Whenever I need a painting that feels both simple and dramatic, I reach for desert landscapes—they’re basically built for bold shapes and glowing color. Here are my favorite desert painting ideas you can riff on, whether you’re craving an easy silhouette or a more experimental vibe.
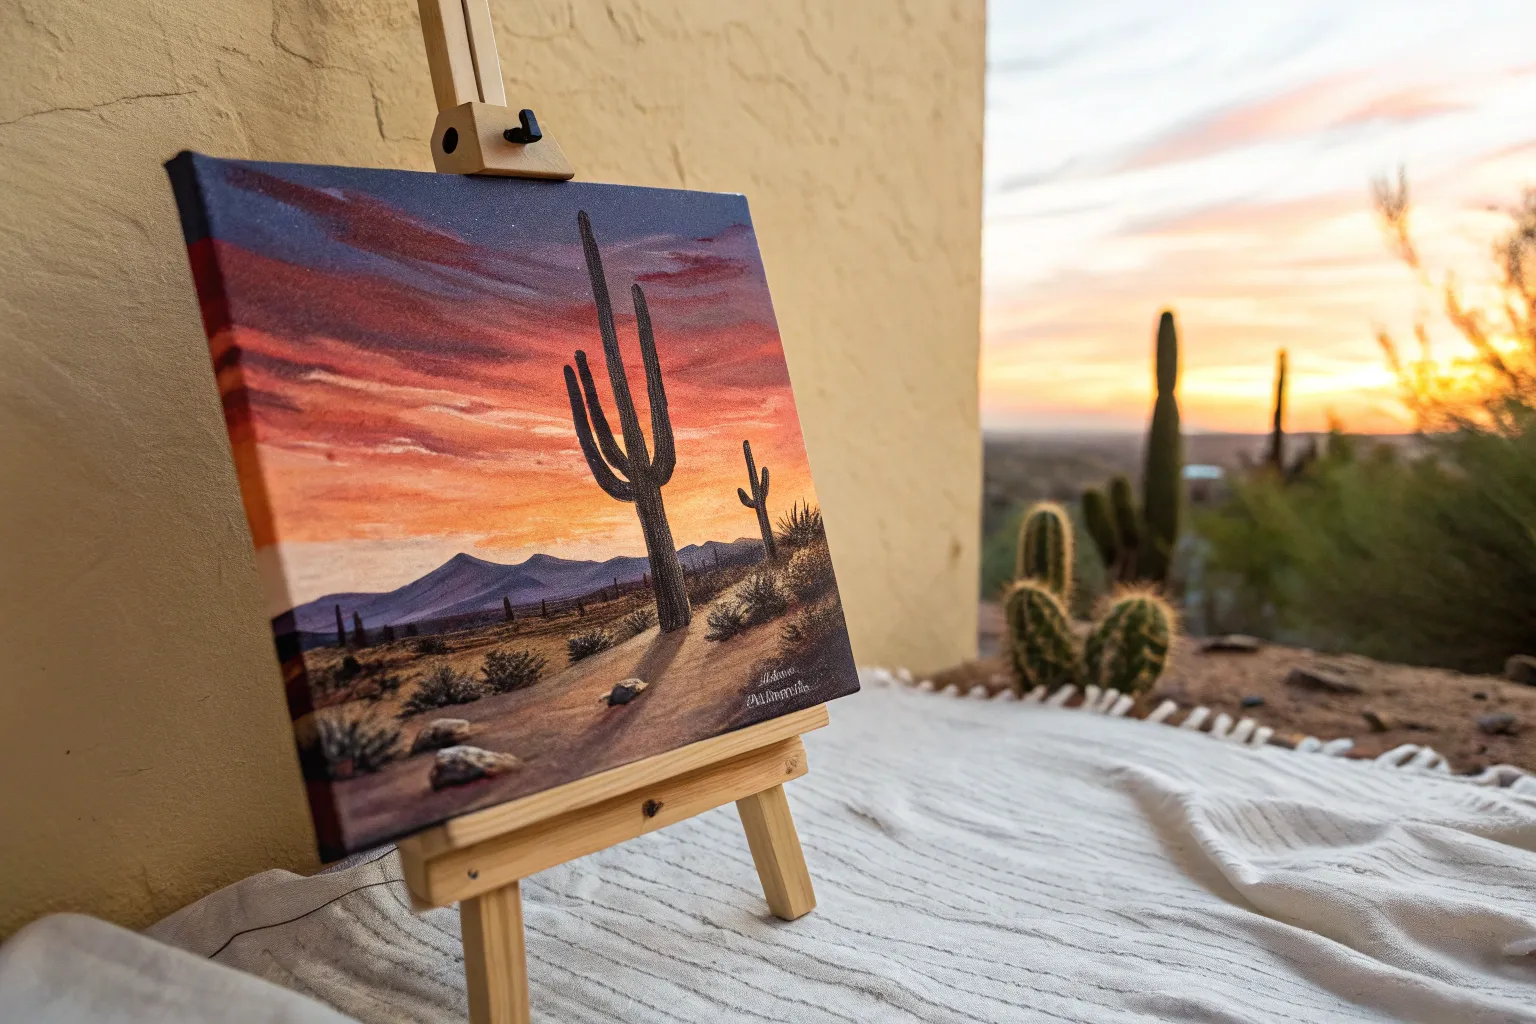
Classic Desert Sunset With Cactus Silhouette
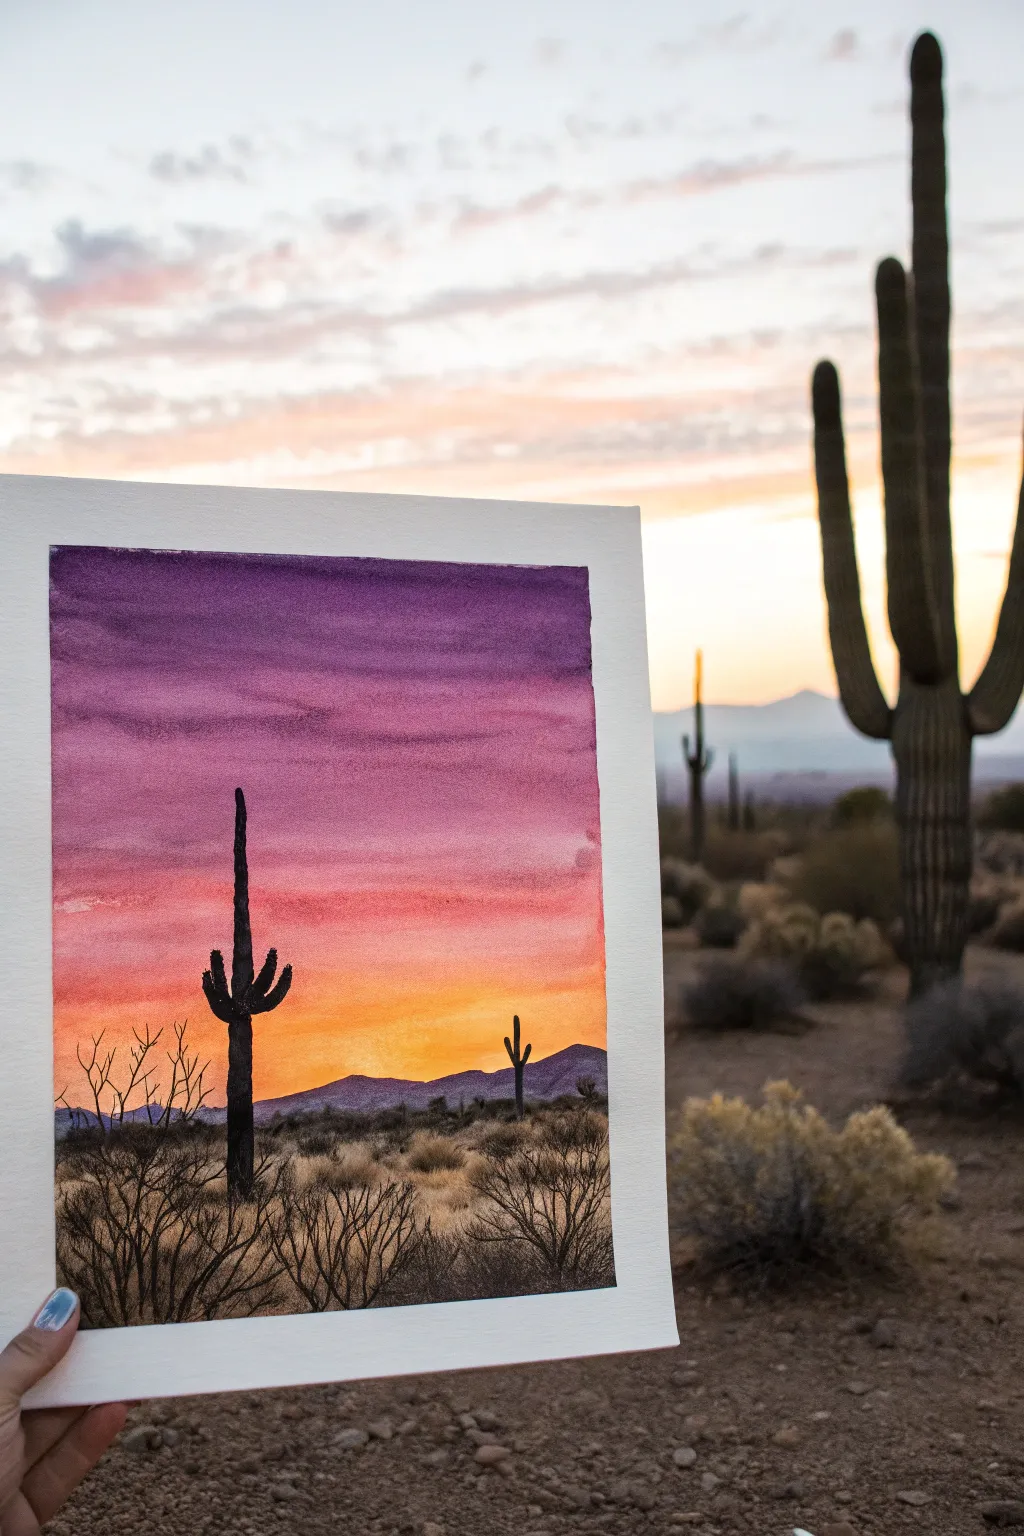
Capture the blazing colors of a desert sunset with this vibrant watercolor project. By blending a rich gradient sky behind precise cactus silhouettes, you’ll create a striking contrast that mimics the beauty of twilight in the Southwest.
Step-by-Step
Materials
- Cold press watercolor paper (140lb/300gsm)
- Watercolor paints (Purple, Alizarin Crimson, Cadmium Yellow, Payne’s Gray, Lamp Black)
- Masking tape
- Large flat wash brush (3/4 inch or 1 inch)
- Small round brush (size 2 or 4)
- Fine liner brush (size 0 or 00)
- Clean water jars
- Paper towels
- Pencil (HB or H for light lines)
Step 1: Setting the Sky Gradient
-
Prepare your canvas:
Begin by taping down all four edges of your watercolor paper to a board or table. This creates a crisp white border and prevents the paper from buckling under heavy washes. -
Sketch the horizon:
Using a pencil, lightly sketch a low horizon line about one-quarter of the way up the page. Add a simple, jagged outline for the distant mountain range just above the horizon. -
Wet the sky area:
Using your large flat brush, apply clean water to the entire sky area above the mountains. The paper should be glisten with moisture but not have puddles. -
Apply the purple:
Load your brush with a deep purple mix. Start at the very top edge and paint horizontally across, allowing the pigment to flow downwards slightly into the wet paper. -
Transition to pink:
Quickly rinse your brush and pick up Alizarin Crimson or a reddish-pink. Blend this into the lower edge of the purple while both are still wet to create a seamless transition. -
Finish with gold:
Rinse again and load Cadmium Yellow. Paint the area just above the mountains, blending it upwards into the pink. This creates the glowing sunset effect near the horizon. -
Add cloud texture:
While the sky is still damp (not soaking), take a slightly drier brush with a bit more purple pigment and create horizontal streaks across the upper section to mimic wispy clouds. -
Let it dry completely:
This is crucial—wait until the paper is bone dry. If the paper feels cool to the touch, it’s still damp. Using a hairdryer on a low, cool setting can speed this up.
Uneven Gradients?
If you get ‘cauliflower’ blooms in the sky, it means you added water to drying paint. Don’t touch it! Let it dry, then gently glaze over it later to smooth it out.
Step 2: Mountains and Mid-ground
-
Paint the distant mountains:
Mix a watery wash of purple with a tiny touch of Payne’s Gray. Paint the distant mountain shapes you sketched earlier. They should remain somewhat transparent to look far away. -
Create the foreground base:
Mix a muted yellow-brown using yellow, a touch of brown, and plenty of water. Paint the foreground ground area below the mountains, letting some texture show through. -
Add dark scrub details:
While the foreground is still slightly damp, drop in small touches of dark green or brown to suggest low-lying bushes and scrub brush texture.
Add Depth
Mix a tiny bit of the sky’s purple into your black silhouette paint. This harmonizes the shadows with the light source and makes the black look less ‘stuck on’.
Step 3: Silhouettes and Fine Details
-
Mix the silhouette color:
Create a very dark, opaque mix for your silhouettes. I prefer mixing Payne’s Gray with a little Lamp Black to get a rich, deep charcoal tone rather than a flat black. -
Draw the main cactus:
Using a size 2 round brush, paint the main vertical trunk of the Saguaro cactus on the left side. Make the edges slightly bumpy to suggest its ribbed texture. -
Add cactus arms:
Extend curved arms upwards from the main trunk. Remember that Saguaro arms usually bend upward like a pitchfork or a waving hand. -
Paint secondary cacti:
Add a smaller, more distant cactus on the right side using the same dark mixture but with a slightly smaller brush to indicate perspective. -
Detail the scrub brush:
Switch to your fine liner brush. Paint intricate, spindly branches rising from the bottom edge of the paper. These represent the creosote bushes and desert broom common in these landscapes. -
Connect the foreground:
Ensure the base of your cactus and the scrub bushes are grounded in dark shadow at the very bottom of the painting to anchor the scene. -
Reveal the border:
Once you are absolutely certain everything is dry, slowly peel away the masking tape at a 45-degree angle to reveal your clean, white edges.
Frame your sunset piece in a simple mat to highlight those dramatic silhouetted forms


Layered Sand Dunes in Soft Neutrals
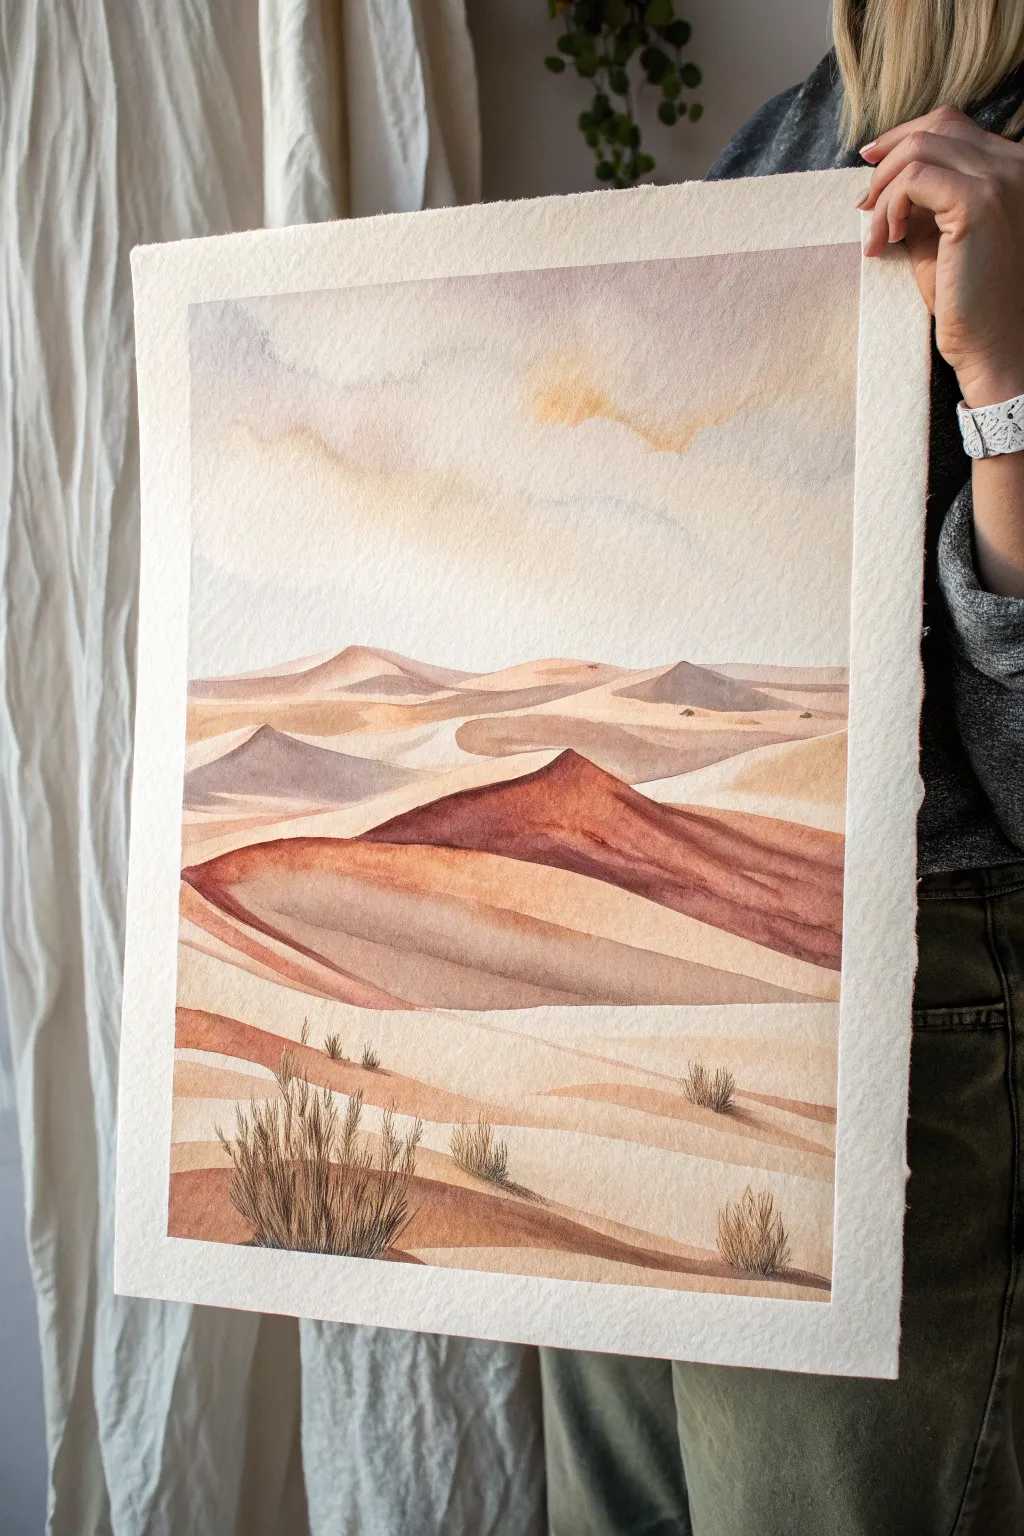
Capture the serene beauty of a vast desert landscape with this layered watercolor study. Using a palette of soft terracottas, dusty pinks, and ochres, you will build up depth through overlapping washes to create gently rolling sand dunes that fade into a hazy sky.
How-To Guide
Materials
- Cold press watercolor paper (minimum 300gsm/140lb)
- Watercolor paints (Burnt Sienna, Yellow Ochre, Alizarin Crimson, Indigo, Sepia, White Gouache – optional)
- Round brushes (sizes 4, 8, and 12)
- Rigger brush (for fine grass details)
- Painter’s tape or Washi tape
- Two jars of water
- Paper towels
- Pencil (HB or lighter) and kneaded eraser
Step 1: Planning and Sky
-
Tape the edges:
Secure your watercolor paper to a board using painter’s tape. Create a clean border by pressing the tape down firmly to prevent paint bleeding underneath. -
Sketch the horizon:
Lightly sketch the outlines of your dunes. Start from the foreground and work your way back, drawing undulating, curvy lines that overlap. Keep the pencil pressure extremely light so it doesn’t show through the transparent paint later. -
Wet the sky area:
Using your largest round brush, apply clean water to the sky area, stopping just above the furthest mountain line. The paper should be glisten, but not hold puddles. -
Paint the first wash:
Drop in a very diluted mix of Yellow Ochre and a tiny touch of Burnt Sienna near the horizon line. As you move upwards, introduce a watery, pale wash of Indigo or purple-grey for clouds. Let the colors bleed softly on the wet paper. -
Add subtle cloud forms:
While the sky is still damp, dab in slightly more concentrated pigment (a grayish-purple mix) to suggest soft cloud formations. Blot with a thirsty brush or paper towel if you need to lift color for highlights.
Mastering the Gradient
Work with two brushes: one loaded with pigment and one clean/damp. Lay down the color on the ridge, then immediately use the damp brush to pull the color down into a fade.
Step 2: Painting the Dunes
-
Mix your palette:
Prepare puddles of your desert colors: a sandy beige (Ochre + plenty of water), a rosy tan (Burnt Sienna + Alizarin Crimson adjusted with water), and a deeper shadow rust (Burnt Sienna + touch of Sepia). -
Start with the furthest dunes:
Begin painting the most distant mountain range. Use a pale, cool violet-brown mix to simulate atmospheric perspective. These shapes should be lighter and less distinct than the foreground. -
Dry completely:
Let that first layer dry completely before moving to the next dune. This is crucial for achieving the hard-edge ‘layered’ look characteristic of sand dunes. -
Paint the middle ground:
Move to the next set of dunes closer to the viewer. Use your warm, rosy tan mix here. Focus on the shadowed side of the dune crests, letting the color fade out into the lighter, sun-hit areas using a clean, damp brush. -
Create the focal dune:
For the prominent, reddish-brown dune in the center, mix a stronger concentration of Burnt Sienna and Alizarin Crimson. Paint the peak boldly, then use water to pull the color down the slope, creating a smooth gradient. -
Define the shadows:
On the darker side of the sharpest dune edges, glaze a deeper purple-brown shadow mix. This sharp contrast defines the ridge and gives the landscape its three-dimensional volume.
Water Control Fix
If you get ‘cauliflower’ back-runs in your smooth sky, it means you added water to drying paint. Don’t touch it! Let it dry completely, then gently scrub with a damp brush to soften.
Step 3: Foreground and Details
-
Layer the foreground sand:
Paint the closest dunes with broader, flatter washes. Leave some areas very pale or even white to represent bright sunlight hitting the sand. -
Add texture to the sand:
While the foreground wash is semi-dry, you can splatter microscopic dots of clean water or darker pigment to give the suggestion of gritty sand texture, but keep it subtle. -
Mix dry brush color:
Prepare a thick, creamy mixture of Sepia or dark brown for the vegetation. It should be opaque enough to sit on top of the dried dune layers. -
Paint the scrub grasses:
Using a rigger brush or the very tip of a small round brush, paint quick, upward flicking strokes to create clumps of dry desert grass. Keep the base of the clumps denser and fan out the tips. -
Vary the grass sizes:
Place larger, more detailed grass clumps in the immediate foreground and smaller, less detailed ones slightly further back to reinforce depth. Don’t overdo it; three or four main clusters are usually enough. -
Final assessment:
Once everything is bone dry, erase any visible pencil lines gently. If you want brighter highlights on the dune ridges, you can add a tiny line of white gouache mixed with a little yellow ochre. -
Reveal the border:
Carefully peel away the masking tape at a 45-degree angle. This crisp white border instantly makes the soft washes of the painting pop.
Now you have a tranquil, warm desert scene ready to bring a sense of calm to any room


Desert Mountains With Atmospheric Perspective
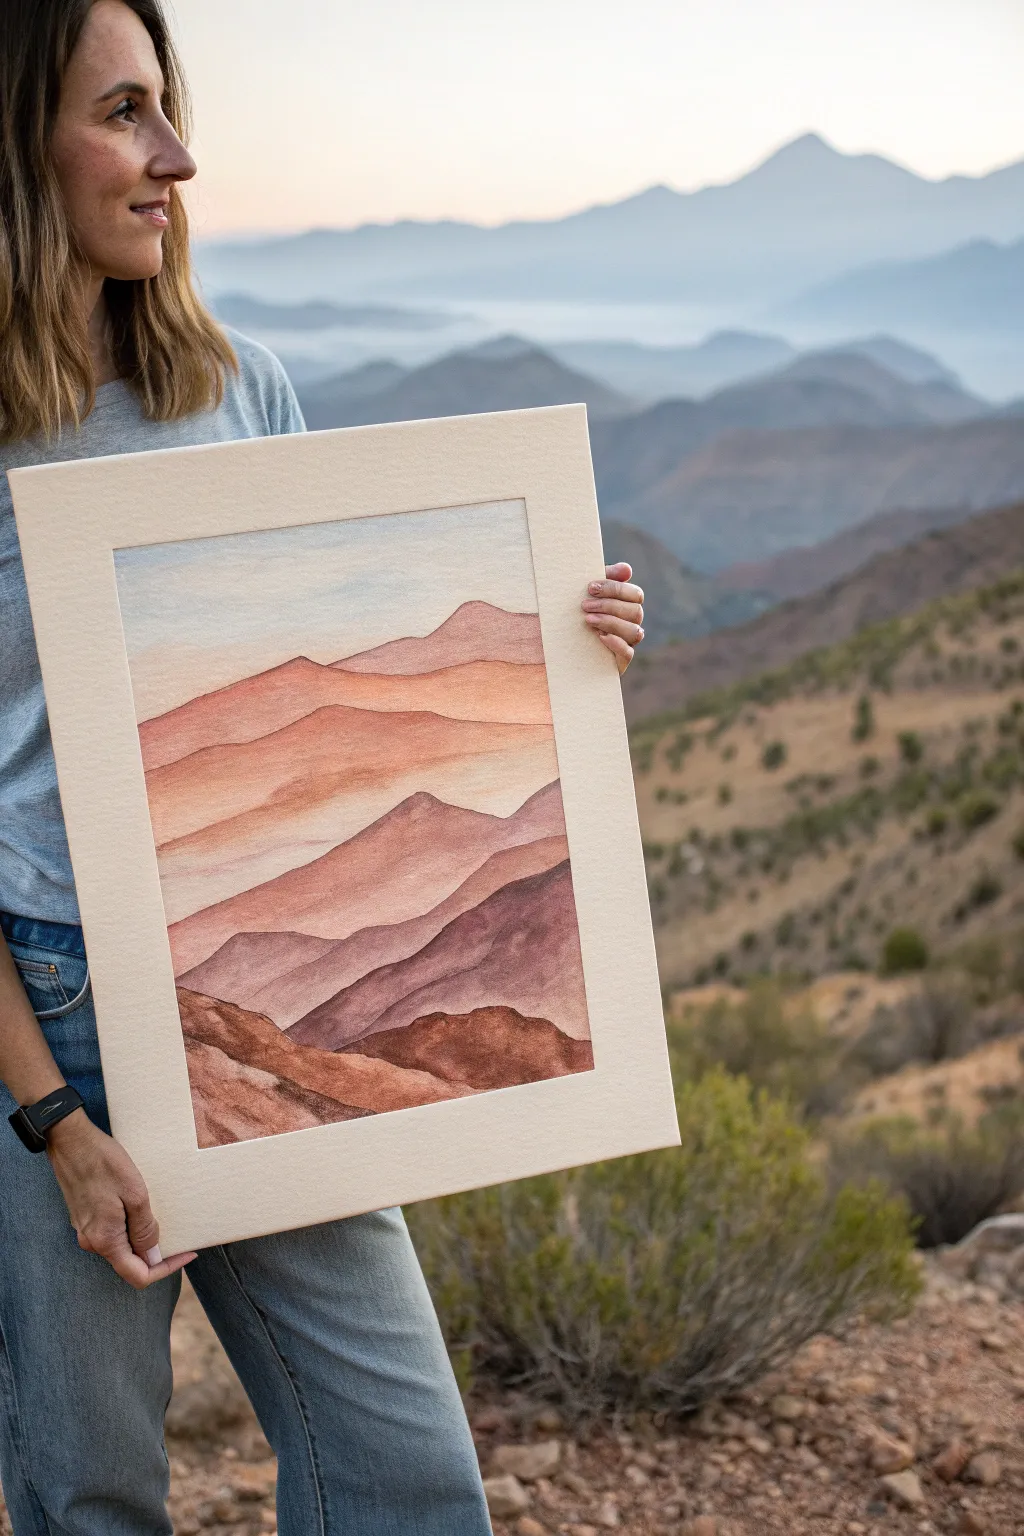
Capture the breathtaking depth of a desert landscape with this layered watercolor study in atmospheric perspective. By gradually lightening your values and cooling your tones as you move up the page, you’ll create serene, receding mountain ranges that seem to fade into the horizon.
Step-by-Step Guide
Materials
- Cold press watercolor paper (140lb/300gsm)
- Watercolor paints (Burnt Sienna, Alizarin Crimson, Ultramarine Blue, Yellow Ochre)
- Round brushes (sizes 6 and 10)
- Flat wash brush (1/2 inch)
- Two jars of water
- Paper towels
- Masking tape
- Pencil (HB or lighter)
- Mat board for framing (optional)
Step 1: Preparation and Sketch
-
Secure the paper:
Tape your watercolor paper down specifically to a hard board on all four sides. This prevents buckling when you apply wet washes. -
Lightly sketch the ridges:
Using an HB pencil, draw horizontal, wavy lines to represent the mountain ridges. Create about 5-6 distinct layers. Make the bottom layers more detailed and jagged, while the upper layers should be smoother and flatter. -
Prepare your palette:
Mix a large puddle of a reddish-brown hue using Burnt Sienna and a touch of Alizarin Crimson. This will be your base color for the entire painting.
Water Control is Key
Work top to bottom. If a previous layer isn’t 100% dry, the new wet paint will bloom upwards, ruining the hard edge of the ridge line.
Step 2: Painting the Sky and Background
-
Wet the sky area:
Use your clean flat brush to wet the paper from the top edge down to the first mountain ridge line. The paper should be glisten, but not hold puddles. -
Apply the sky gradient:
Dilute a tiny amount of Ultramarine Blue with lots of water. Gently brush this into the wet sky area, keeping it very pale. Let it fade to clear water near the horizon line. -
Paint the first distant ridge:
Mix your base reddish-brown with a significant amount of water and a tiny dot of blue to cool it down. Paint the topmost ridge below the sky. It should be barely visible against the white paper—very faint and watery. -
Soften the bottom edge:
Immediately after painting the ridge shape, rinse your brush and run clear water along the bottom edge of that fresh paint. This creates a soft gradient that fades downwards into white. -
Let it dry completely:
Wait until the paper is bone dry before starting the next layer. If it’s damp, your ridges will bleed into each other.
Step 3: Building the Middle Ground
-
Second ridge layer:
Add slightly more pigment to your base mix for the next ridge down. It should be just a shade darker than the previous one. Paint the shape of the mountain, overlapping slightly with the faded bottom of the layer above. -
Create the fade effect:
Just like before, use a clean, damp brush to drag the bottom edge of this paint layer downwards, letting it fade out. This mist effect is crucial for separation. -
Third ridge layer:
Once dry, mix a stronger version of the color, perhaps adding a touch more Alizarin Crimson for warmth. Paint the next ridge down. -
Adding subtle texture:
While this third layer is still wet, you can drop in tiny amounts of concentrated color along the top edge of the ridge to suggest shadows or peaks, but keep it subtle.
Mount it Up
Use a textured mat board in a warm cream or sand tone to complement the desert colors, framing the piece tightly to focus on the layers.
Step 4: Foreground and Details
-
Darkening the mix:
For the lower mountain layers, reduce the amount of water significantly. Add a touch of Burnt Umber or more Burnt Sienna to get a rich, earthy rust color. -
Paint the fourth layer:
Apply this darker mix to the next ridge. The contrast between this layer and the pale ones above creates the illusion of distance. -
The final foreground layer:
For the bottom-most mountains, use your most concentrated pigment. Mix Burnt Sienna with a tiny bit of blue to create a deep brownish-purple shadow color. -
Add foreground texture:
Paint the bottom section with this dark mix. Use the tip of your brush to create rough, jagged edges. You can use ‘dry brush’ technique here—dragging a brush with less water across the paper—to mimic rocky textures. -
Refining shadows:
Once the main washes are dry, I like to glaze a very thin, transparent violet layer over the shadowy sides of the lower mountains to deepen the form. -
Final dry and reveal:
Ensure the artwork is completely dry to the touch. The paper should feel room temperature, not cool. Carefully peel off the tape at a 45-degree angle.
Step back and admire how simple bands of color transform into a vast, layered landscape


Golden Hour Desert Shadows
Capture the breathtaking drama of golden hour in the desert with this realistic acrylic landscape. This project focuses on the interplay between stark, cool shadows and warm, illuminated ridges to create depth and dimension.
How-To Guide
Materials
- Large canvas (e.g., 24×30 inches)
- Acrylic paints (Titanium White, Mars Black, Burnt Umber, Burnt Sienna, Yellow Ochre, Cadmium Orange, Ultramarine Blue, Alizarin Crimson)
- Set of flat brushes (1-inch, 1/2-inch)
- Detail round brushes (size 0, 2)
- Fan brush (optional for textures)
- Slow-drying medium or retarder
- Palette knife
- Water container and rags
- Easel
Step 1: Setting the Scene
-
Prime and tone:
Begin by priming your canvas if it isn’t pre-primed. Once dry, apply a thin wash of Burnt Sienna mixed with plenty of water. This warm undertone will help unify the painting and give the sand a glowing quality later on. -
Sketch the composition:
Using a small round brush and diluted Burnt Umber, lightly sketch the main horizon line. Plot the jagged silhouette of the distant mountains and the sweeping curves of the primary sand dunes in the foreground. -
Block in the sky:
Mix Titanium White with a tiny touch of Yellow Ochre and Cadmium Orange for the horizon glow. Blend upwards into a soft periwinkle blue (White + Ultramarine Blue + a hint of Crimson) for the upper sky. Keep the gradient smooth.
Golden Hour Glow
To make the light feel intense, keep your shadows cool (blue-leaning) and your highlights warm (orange-leaning). Complementary colors vibrate against each other.
Step 2: Distant Mountains
-
Mix mountain colors:
Create a hazy purple-grey using Ultramarine Blue, Alizarin Crimson, White, and a touch of Burnt Umber. Atmospheric perspective means these distant shapes should be lighter and cooler than foreground elements. -
Paint mountain shapes:
Fill in the mountain blocking. Keep the edges slightly soft where they meet the sky to suggest distance. Add slightly darker values on the sides of the mountains facing away from the sun source (the right side in this composition).
Muddy Colors?
If your sand looks dirty, clean your brush thoroughly between the shadow and light phases. Orange and blue neutralize each other into grey instantly.
Step 3: The Dazzling Dunes
-
Identify light source:
Determine exactly where your sunlight is coming from—in this case, low on the right. This is crucial for consistent shadows. -
Paint the deep shadows:
Mix a dark, cool shadow color using Burnt Umber and Ultramarine Blue. Paint the shadowed side of the large foreground dune. The contrast between this dark face and the future lighted edge is what creates the drama. -
Apply the golden light:
Mix Yellow Ochre, Cadmium Orange, and White. Using a flat brush, paint the sunlit face of the dunes. Apply the paint in sweeping strokes that follow the curve of the sand, mimicking the wind-blown texture. -
Refine the ridge line:
This is the most critical step. Use a precise brush to create a razor-sharp edge where the light meets the shadow. This sharp crest defines the dune’s shape. -
Add reflected light:
I like to bounce a little warmth back into the shadows. Mix a duller orange-brown and glaze it slightly into the bottom of the shadowy areas near the ground to simulate light bouncing off the sand.
Step 4: Foreground Textures
-
Texture the sand:
Using a dry flat brush or a fan brush, lightly drag streaks of a lighter sand color across the sunlit areas to create ripples. Keep your hand steady and parallel to the ridge line. -
Block in scrub brush:
Use Burnt Umber and Black to dab in the base of the desert bush in the foreground. Keep it loose and organic. -
Add branches:
With a rigger or size 0 liner brush and chaotic, jerky movements, pull thin branches upward from the dark base. -
Highlight the foliage:
Mix a bright, warm yellow-green or pure Yellow Ochre. Tap the tips of the bushes where the sun catches the needles or leaves. Don’t overdo it; keep the shadows in the plant deep and dark. -
Cast shadows:
Paint long, stretched-out shadows extending from the base of the bushes across the sand to the left, reinforcing the low angle of the sun. -
Final adjustments:
Step back from the easel. Check your values. If the illuminated sand isn’t bright enough, add a final glaze of bright yellow-orange or highlight the very crest with pure white mixed with yellow.
Now step back and admire the stark beauty of your sun-soaked desert landscape
BRUSH GUIDE
The Right Brush for Every Stroke
From clean lines to bold texture — master brush choice, stroke control, and essential techniques.
Explore the Full Guide
Starry Desert Night and Crescent Moon
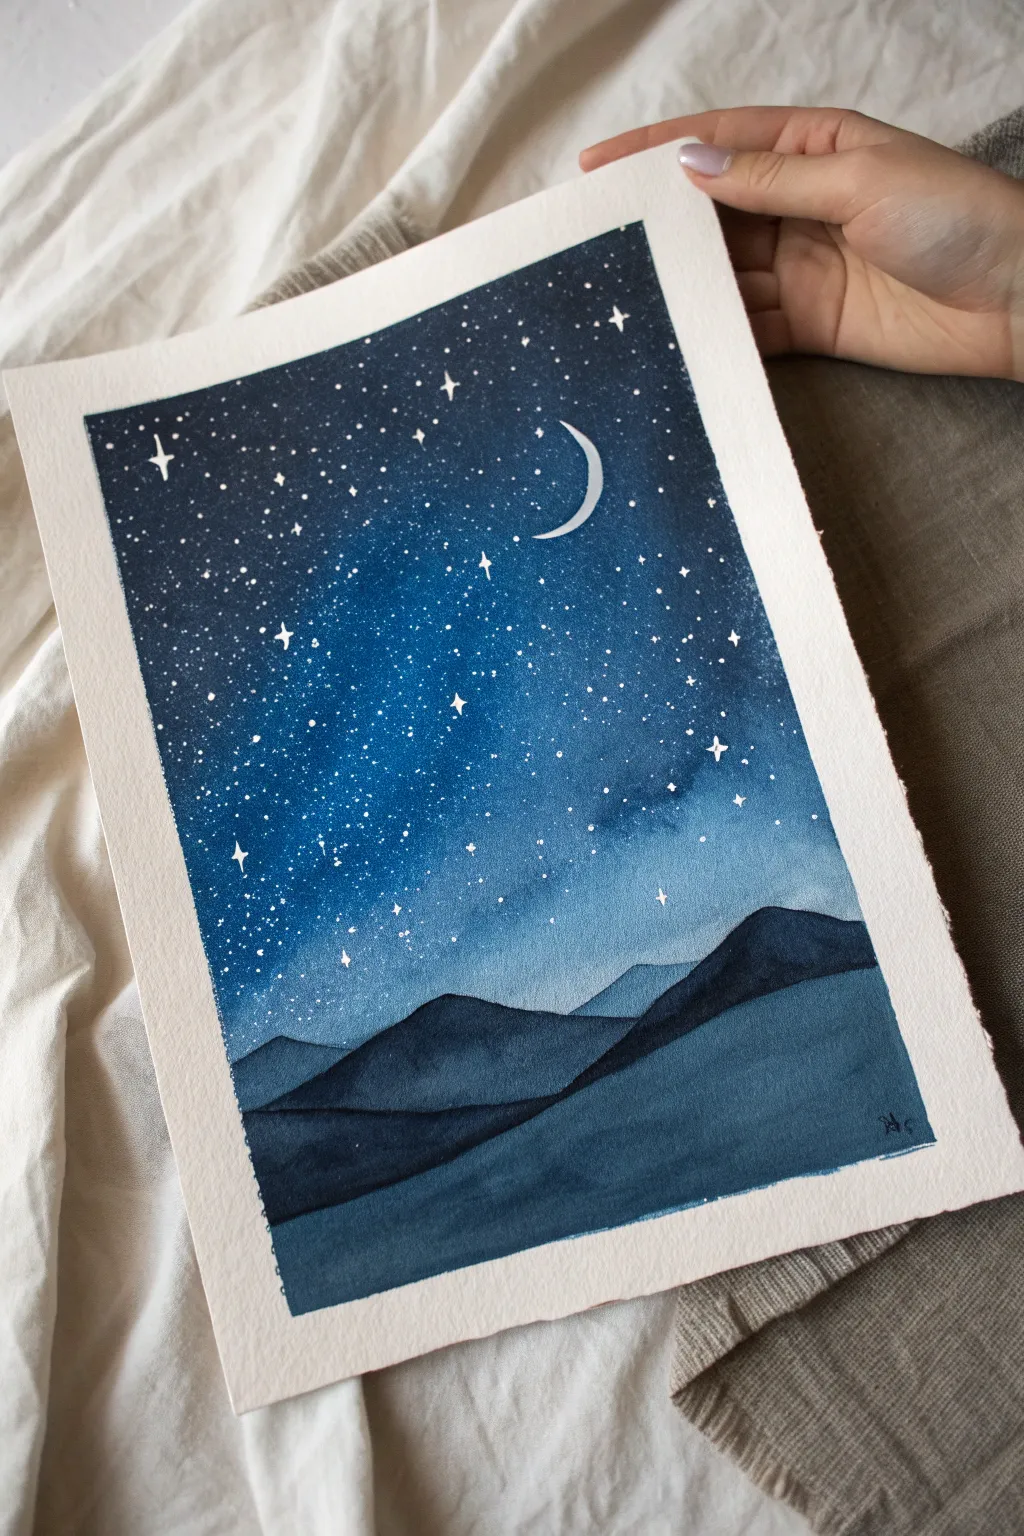
Capture the serene beauty of a limitless night sky over rolling dunes with this atmospheric watercolor tutorial. The project balances deep indigo washes with precise star scatterings for a dreamy, peaceful finish.
Step-by-Step Guide
Materials
- Cold press watercolor paper (300 gsm)
- Masking tape
- Watercolor paints (Indigo, Prussian Blue, Ultramarine, Black)
- White gouache or white gel pen
- Large wash brush (flat or round)
- Medium round brush (size 6 or 8)
- Small detail brush (size 0 or 1)
- Two jars of water
- Paper towels
Step 1: Setting the Sky’s Foundation
-
Secure the paper:
Tape all four edges of your watercolor paper to a board or table to create a clean white border and prevent warping. -
Sketch the crescent:
Lightly sketch a crescent moon shape in the upper right quadrant and a low horizon line with rolling hills at the bottom using a hard pencil. -
Mask the moon:
Fill the moon shape carefully with masking fluid or cover it with a tiny piece of masking tape cut to shape to keep it paper-white. -
Prepare the wash:
Mix a generous amount of dark blue paint, combining Indigo and Prussian Blue. -
Wet-on-wet technique:
Generously wet the entire sky area with clean water, stopping just above your pencil line for the hills. -
Apply the gradient:
Start applying the dark blue mix at the top of the paper, letting it be strongest at the upper corners. -
Blend downwards:
As you move down the page, dilute the paint slightly so the blue becomes lighter and hazier near the horizon line. -
Deepen the night:
While wet, drop in concentrated Black or Indigo into the top corners to create depth and contrast. -
Let it dry completely:
Allow the sky layer to dry thoroughly before proceeding; using a hair dryer on low can speed this up.
Starry Splatter Control
Cover the dark dunes with a piece of scrap paper before splattering white paint so the stars only land in the sky area.
Step 2: Creating the Dunes and Stars
-
First hill layer:
Mix a medium-toned blue-grey. Paint the furthest hill silhouette, ensuring the top edge is crisp against the sky. -
Second hill layer:
Once the first hill is dry, mix a slightly darker, more saturated blue. Paint the middle ground overlap. -
Foreground darkness:
For the closest dune in the foreground, use your darkest Indigo-Black mix to anchor the composition. -
Reveal the moon:
Gently rub off the masking fluid or peel the tape to reveal the crisp white crescent moon. -
Prepare the stars:
Dilute white gouache with a tiny bit of water until it has a milky consistency. -
Splatter technique:
I prefer to tap a loaded brush against another brush handle over the painting to create a random spray of fine stars. -
Detail brighter stars:
Use a fine detail brush or white gel pen to manually add larger, specific stars and cross-shaped twinkles. -
Connect constellations:
Optionally, use faint white lines to connect a few stars if you wish to suggest constellations. -
Remove tape:
Slowly peel away the masking tape at a 45-degree angle to reveal your clean, professional borders.
Fixing “Cauliflowers”
If uneven blooms appear in your sky wash, don’t fuss with them while wet. Wait until dry, then glaze over lightly.
Step back and admire the tranquil midnight atmosphere you have created on paper
Desert Road to the Horizon

Capture the stark beauty of a desert highway stretching into infinity with this atmospheric watercolor painting. You will learn to layer translucent washes for distant mountains and create texture for the arid scrub brush lining the road.
Step-by-Step Guide
Materials
- Cold press watercolor paper (140lb/300gsm)
- Watercolor paints (Ultramarine Blue, Alizarin Crimson, Burnt Sienna, Yellow Ochre, Payne’s Gray, Lamp Black)
- Large flat wash brush (1 inch)
- Round brushes (sizes 4, 8, and 12)
- Fine liner brush or rigger brush
- Masking tape
- Two jars of water
- Paper towels
- Pencil (HB) and eraser
- Ruler
Step 1: Planning and Sky
-
Secure the Paper:
Begin by taping down all four edges of your watercolor paper to a board. This prevents buckling when we apply wet washes and gives you that crisp white border seen in the reference image. -
Draft the Horizon:
Using a ruler, lightly draw the horizon line fairly low on the paper, about one-third of the way up. Mark a vanishing point in the exact center of this line. -
Sketch the Road:
From the bottom corners of the paper (or slightly inward from the corners), draw two lines that converge perfectly at your vanishing point. Sketch the vertical poles on the right side, making them smaller and closer together as they recede. -
Outline the Mountains:
Lightly sketch the jagged outlines of the mountain ranges. Create layers: a distant, flatter range and closer, more detailed foothills on the left. -
Wet the Sky:
With your large flat brush, wet the sky area with clean water. Do not soak it, just ensure an even sheen. -
Paint the Gradient:
Mix a very dilute wash of Alizarin Crimson and a touch of Ultramarine Blue for a soft purple-gray. Apply this to the top of the sky, fading it out into pure water as you move down toward the mountains to keep the horizon bright and hazy.
Atmospheric Depth
Make distant colors cooler (bluer) and lighter than foreground colors. This mimics how air particles scatter light over long distances.
Step 2: Mountains and Background
-
First Mountain Layer:
Mix a cool, light blue using Ultramarine Blue and plenty of water. Paint the most distant mountain range. The color should be very faint to suggest atmospheric perspective. -
Purple Foothills:
While the first layer is drying, mix a slightly stronger purple using Ultramarine and Alizarin Crimson. Paint the middle ground mountains, letting their edges soften slightly if the paper is still damp, or keep them crisp if dry. -
Left Side Terrain:
For the darker hills on the left, mix Payne’s Gray with a bit of Alizarin Crimson. Paint these while adding uneven water marks or lifting pigment with a tissue to create the rugged texture of rocks. -
The Desert Floor Base:
Mix Yellow Ochre with a tiny touch of Burnt Sienna and lots of water. Apply a flat, even wash across the entire ground area on both sides of the road, stopping at the road lines.
Add Life
For a lonely narrative touch, paint a tiny silhouette of a hawk resting on one of the wires or a distant car on the road.
Step 3: The Road and Foreground
-
Asphalt Base Tone:
Mix a watery grey using Payne’s Gray and Lamp Black. Paint the road surface. While wet, dropping in slightly darker pigment near the bottom creates depth. -
Road Markings:
Once the road is bone dry, use a small flat brush or rigid synthetic brush to paint the double yellow line down the center. Use opaque yellow (or mix Yellow Ochre with a tiny bit of white gouache if needed for opacity). -
White Shoulder Lines:
Use a white gel pen or white gouache with a ruler to carefully draw the clean white lines on the outer edges of the asphalt. -
Texture the Scrub:
Using a dry-brush technique with a round brush, stipple mixtures of Burnt Sienna and Payne’s Gray onto the desert floor. Concentrate larger, darker clumps in the foreground and make them tiny dots near the horizon. -
Telephone Poles:
Switch to your rigger or fine liner brush. Mix a dark brown-black. Paint the vertical poles on the right using a confident vertical stroke. Remember, the poles get shorter and thinner as they go back. -
Wiring Details:
With the same fine brush, carefully draw the thin, draping wires connecting the poles. Keep your hand loose to allow for a natural curve. -
Final Shadows:
Add subtle cast shadows at the base of the bushes and poles using a transparent grey wash. This anchors the objects to the ground.
Peel off your tape slowly to reveal those clean edges and admire your peaceful desert landscape

PENCIL GUIDE
Understanding Pencil Grades from H to B
From first sketch to finished drawing — learn pencil grades, line control, and shading techniques.
Explore the Full Guide
Wind-Swept Desert Sky With Thin Clouds
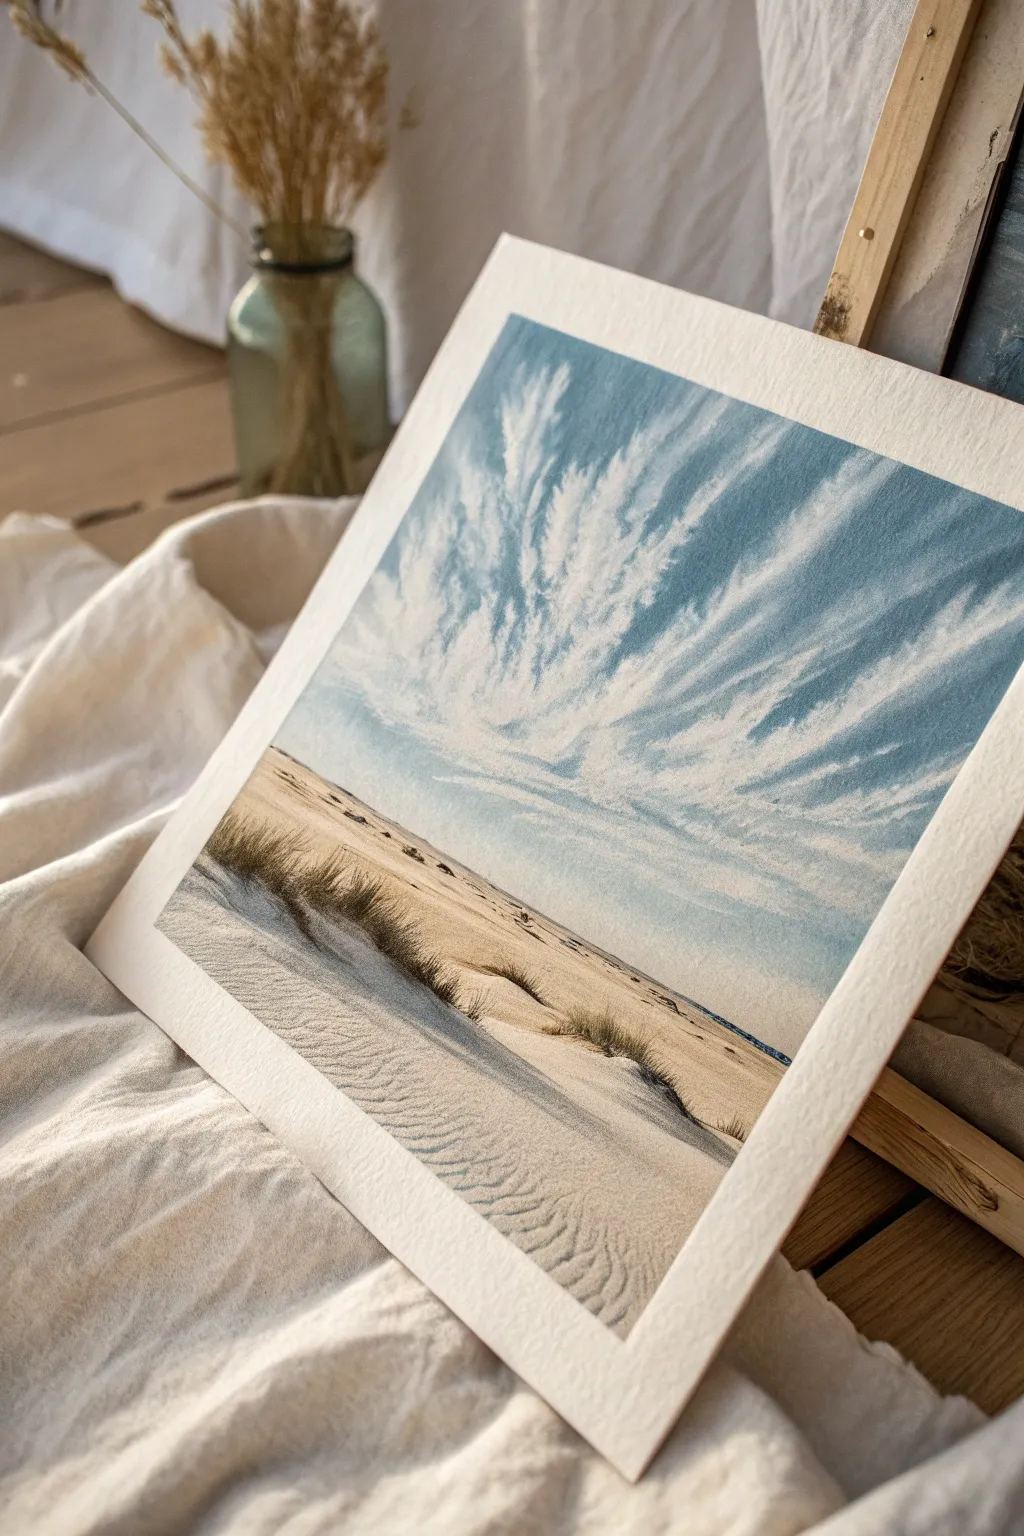
Capture the serene isolation of a windswept coast or desert with this watercolor tutorial, featuring expansive, radiating cirrus clouds above textured sand dunes. The soft, limited color palette creates a calming atmosphere perfect for minimal decor.
How-To Guide
Materials
- Cold Press watercolor paper (300gsm/140lb)
- Masking tape
- Watercolor paints: Cerulean Blue, Ultramarine Blue, Burnt Sienna, Yellow Ochre, Sepia
- Large flat brush (1-inch)
- Round brushes (sizes 4, 8, and 12)
- Detail brush (size 0 or 1)
- Clean water jars
- Paper towels
- White gouache (optional)
Step 1: Setting the Composition
-
Paper preparation:
Begin by taping down all four edges of your watercolor paper to a board. This ensures clean white borders and prevents buckling when we add water. -
Horizon line:
Sketch a very faint horizon line using a pencil, placing it slightly below the center of the paper—about one-third of the way up. This emphasizes the vastness of the sky. -
Dune mapping:
Lightly outline the primary sand dune in the foreground, sweeping it diagonally from the bottom left toward the center right.
Step 2: Painting the Dramatic Sky
-
Wet-on-wet base:
Generously wet the entire sky area with clean water using your large flat brush. The paper should glisten but not have standing puddles. -
Sky gradient:
Mix a diluted wash of Cerulean Blue. Start at the very top edge and pull the color down, fading it out to almost pure water as you approach the horizon. -
Creating cloud streaks:
While the paper is still damp, mix a slightly stronger Ultramarine Blue. Using a size 12 round brush, paint streaky, diagonal lines radiating from a central point low in the sky, lifting the brush quickly at the end of each stroke to create wispy tails. -
Lifting highlights:
Before the paint dries, clean your brush, dry it on a paper towel, and ‘lift’ paint out of the blue areas to create soft white cloud shapes that mirror the radiating pattern. -
Deepening the blue:
Add a touch more pigment to the upper corners of the sky while damp to create a natural vignette effect. -
Drying time:
Let this layer dry completely. The sky must be bone dry before we touch the horizon line.
Cloud Lifting Trick
Use a thirsty, damp brush or a crumbled tissue to lift paint while the sky is wet. This creates softer, more natural cloud edges than painting white clouds on top.
Step 3: Sculpting the Dunes
-
Base sand color:
Mix a very pale wash of Yellow Ochre with a tiny dot of Burnt Sienna. Paint the entire land area with this warm, sandy tone. -
Shadow definition:
While the sand base is slightly damp, mix Burnt Sienna with a touch of Ultramarine to create a cool shadow grey. Paint the shadowed side of the large foreground dune. -
Rippled texture:
Using the side of a size 8 round brush and a ‘dry brush’ technique (very little water), drag the shadow color horizontally across the foreground to mimic rippled sand textures. -
Distant dunes:
Paint the distant flat land with a slightly darker mix of the sand color, keeping the strokes horizontal and smooth to suggest distance.
Texture Boost
Sprinkle a pinch of table salt onto the wet sand area while painting. Once dry, brush it off to create a unique, grainy texture perfect for sand.
Step 4: Details & Contrast
-
Grass clumps:
Mix a dark, earthy green-brown using Sepia and a touch of blue. Switch to your smallest detail brush or a rigger brush. -
Flicking technique:
Paint clumps of dune grass along the ridge of the foreground dune. Use quick, upward flicking motions to create thin, grassy blades. -
Shadowing the grass:
Add a wash of diluted shadow color (grey-brown) extending from the base of the grass clumps down the slope of the dune to anchor them to the ground. -
Distant vegetation:
Add tiny dots and dashes along the horizon line using the same dark mix to suggest far-off bushes or debris. -
Final highlights:
If you lost any brightness in the clouds, dry brush a tiny amount of white gouache over the lightest parts of the sky for extra punch. -
The Reveal:
Wait for the paper to be perfectly dry to the touch, then slowly peel away the masking tape at a 45-degree angle to reveal the crisp edges.
Now stepping back, you can hear the coastal wind whistling through your serene desert landscape.
Mesa and Butte Silhouettes at Dusk
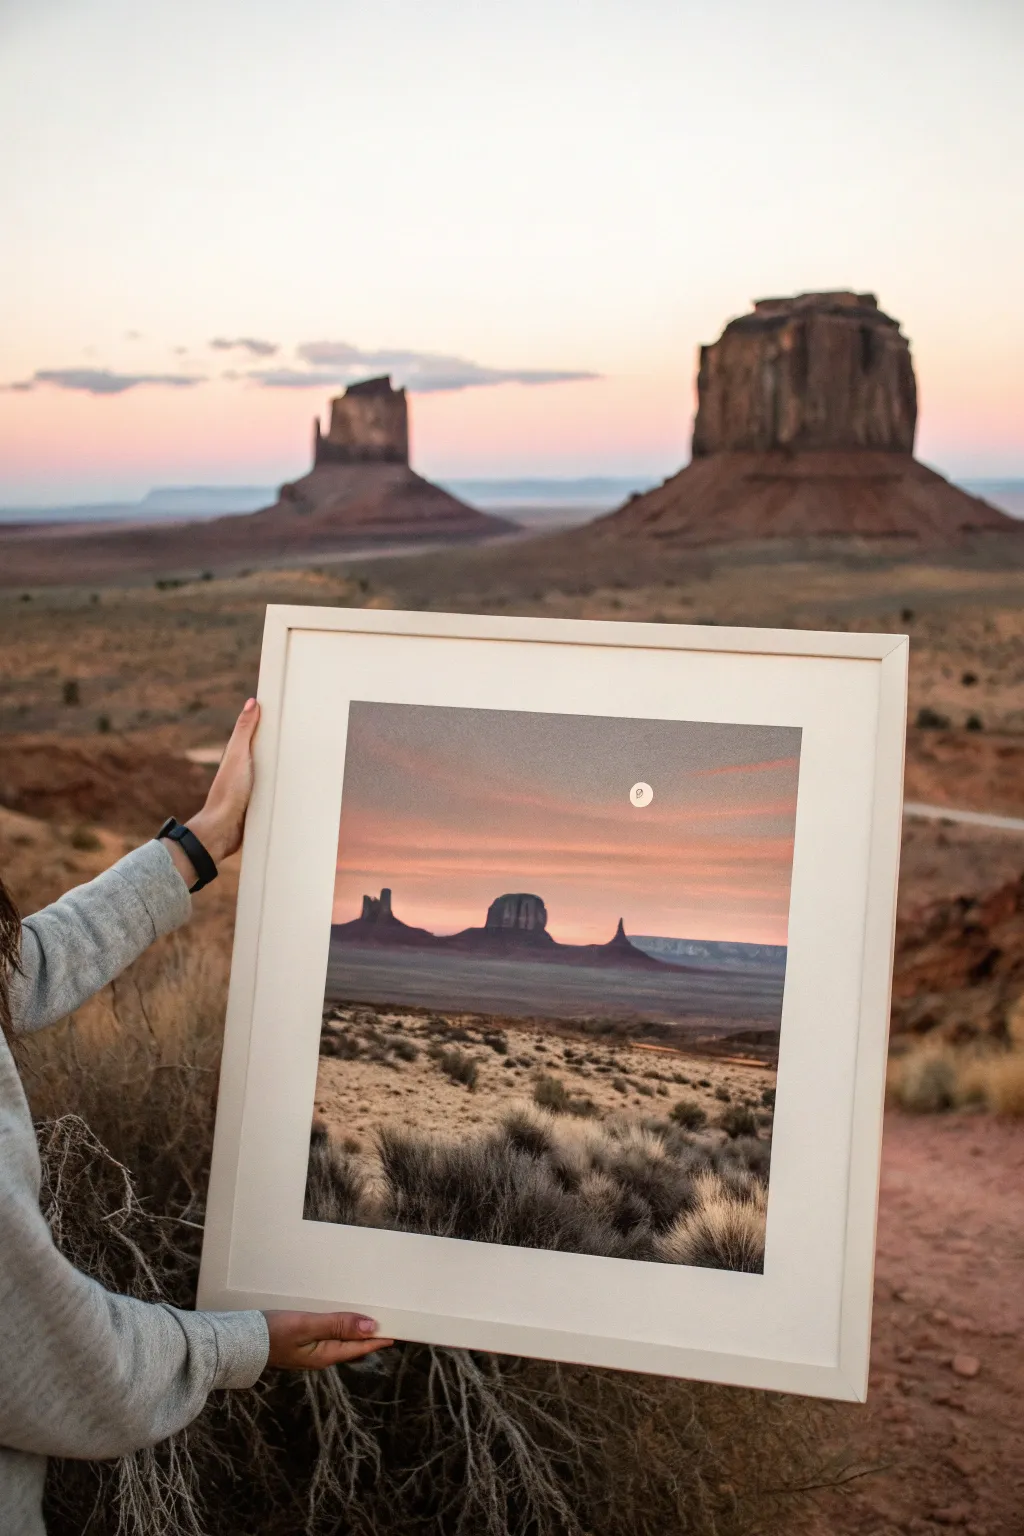
Capture the majestic silence of the desert with this atmospheric painting featuring iconic mesa silhouettes against a soft sunset gradient. The artwork balances the bold, dark shapes of the distant rock formations with the delicate texture of desert scrub brush in the foreground.
Step-by-Step
Materials
- Acrylic paints (Titanium White, Mars Black, Burnt Sienna, Yellow Ochre, Alizarin Crimson, Ultramarine Blue)
- Canvas board or stretched canvas (16×20 inches recommended)
- Set of brushes: 1-inch flat wash, medium filbert, lush fan brush, and fine liner
- Palette knife
- Water cup and paper towels
- White or light gray colored pencil (for sketching)
- Modern white or cream frame (mat optional)
Step 1: Painting the Sky Gradient
-
Establish the horizon:
Lightly sketch a horizon line just below the middle of your canvas using a light gray colored pencil. It doesn’t need to be perfectly straight; a slight undulation adds naturalism. -
Mix the sunset colors:
Prepare three piles of color on your palette for the sky: a purple-gray mix (Ultramarine Blue + Alizarin Crimson + White + a touch of Black), a dusty pink (Alizarin Crimson + White + small dot of Yellow Ochre), and a light peach (Yellow Ochre + White + tiny dab of Alizarin Crimson). -
Apply the top layer:
Using your 1-inch flat wash brush, paint the upper third of the sky with the purple-gray mixture. Use long, horizontal strokes to ensure even coverage. -
Blend the mid-tones:
While the purple layer is still wet, pick up the dusty pink mix and paint the middle section of the sky. Work your brush upward into the wet purple paint to create a seamless transition. -
Finish the horizon glow:
Paint the area closest to the horizon line with the light peach color. Blend upward into the pink. This creates that ‘magic hour’ glow typical of desert sunsets. -
Add floating clouds:
With a mostly dry filbert brush and a tiny amount of the purple-gray mix, scrub in soft, horizontal streaks across the pink and peach sections to suggest distant, wispy clouds. -
Paint the moon:
Using the handle of your brush or a detail tool dipped in pure Titanium White, place a small, perfect circle in the upper middle sky. Let the entire sky dry completely.
Muddy Color Solution
If your sky gradient turns brown or gray while blending, stop! Let the layer dry completely, then re-apply fresh colors over the top. Over-blending wet acrylics often leads to muddiness.
Step 2: Creating the Mesas
-
Sketch the silhouettes:
Lightly outline the iconic Monument Valley shapes (the Mittens and Merrick Butte) along the horizon. Keep the shapes recognizable but simple. -
Mix the distant earth tone:
Create a dark, muted purple-brown by mixing Burnt Sienna, Ultramarine Blue, and a touch of the sky’s purple-gray. The atmospheric perspective means these shouldn’t be jet black yet. -
Fill in the mountains:
Use a medium filbert brush to block in the mesa shapes. Ensure the bottom edge is soft where it meets the ground to imply distance. -
Add the middle ground:
Mix a lighter, dustier brown (Burnt Sienna + White + Yellow Ochre) and paint horizontal bands below the mesas to represent the flat desert floor stretching toward the viewer.
Step 3: Detailing the Foreground
-
Establish the ground texture:
For the immediate foreground, mix Yellow Ochre, White, and a tiny bit of Black for a sandy beige. Apply this with rough, choppy strokes using a scruffy brush. -
Darken the front corners:
Add a bit more Burnt Sienna to your mix and darken the bottom corners of the canvas to create a subtle vignette effect that draws the eye inward. -
Painting scrub brush shadows:
Mix a dark greenish-black (Mars Black + Yellow Ochre). Using the tip of a fan brush held vertically, tap in the dark under-layers of the sagebrush bushes. -
Adding brush highlights:
Clean the fan brush, barely load it with a light tan mix, and lightly tap over the tops of the dark bushes. This simulates the last light hitting the tips of the sage. -
Final dry brushing:
I like to take a dry brush with a tiny bit of white and gently whisk over the very foreground sand to bring out the texture of the dirt.
Pro Tip: Atmospheric Depth
Make the distant mesas slightly lighter and ‘bluer’ than the foreground bushes. This mimics how air density affects color over long distances.
Step 4: Refining and Framing
-
Check values:
Step back and squint at your painting. Ensure the silhouettes stand out clearly against the sky and the foreground feels grounded. -
Varnish:
Once fully cured (wait at least 24 hours), apply a satin varnish to protect the paint and unify the sheen. -
Frame the artwork:
Place the canvas into a simple, creamy white or light wood frame. Using a wide white mat inside the frame can enhance the modern, photographic look shown in the example.
Hang your finished landscape in a well-lit spot to let those warm sunset tones truly glow.


Desert Wash With Pebbles and Dry Brush
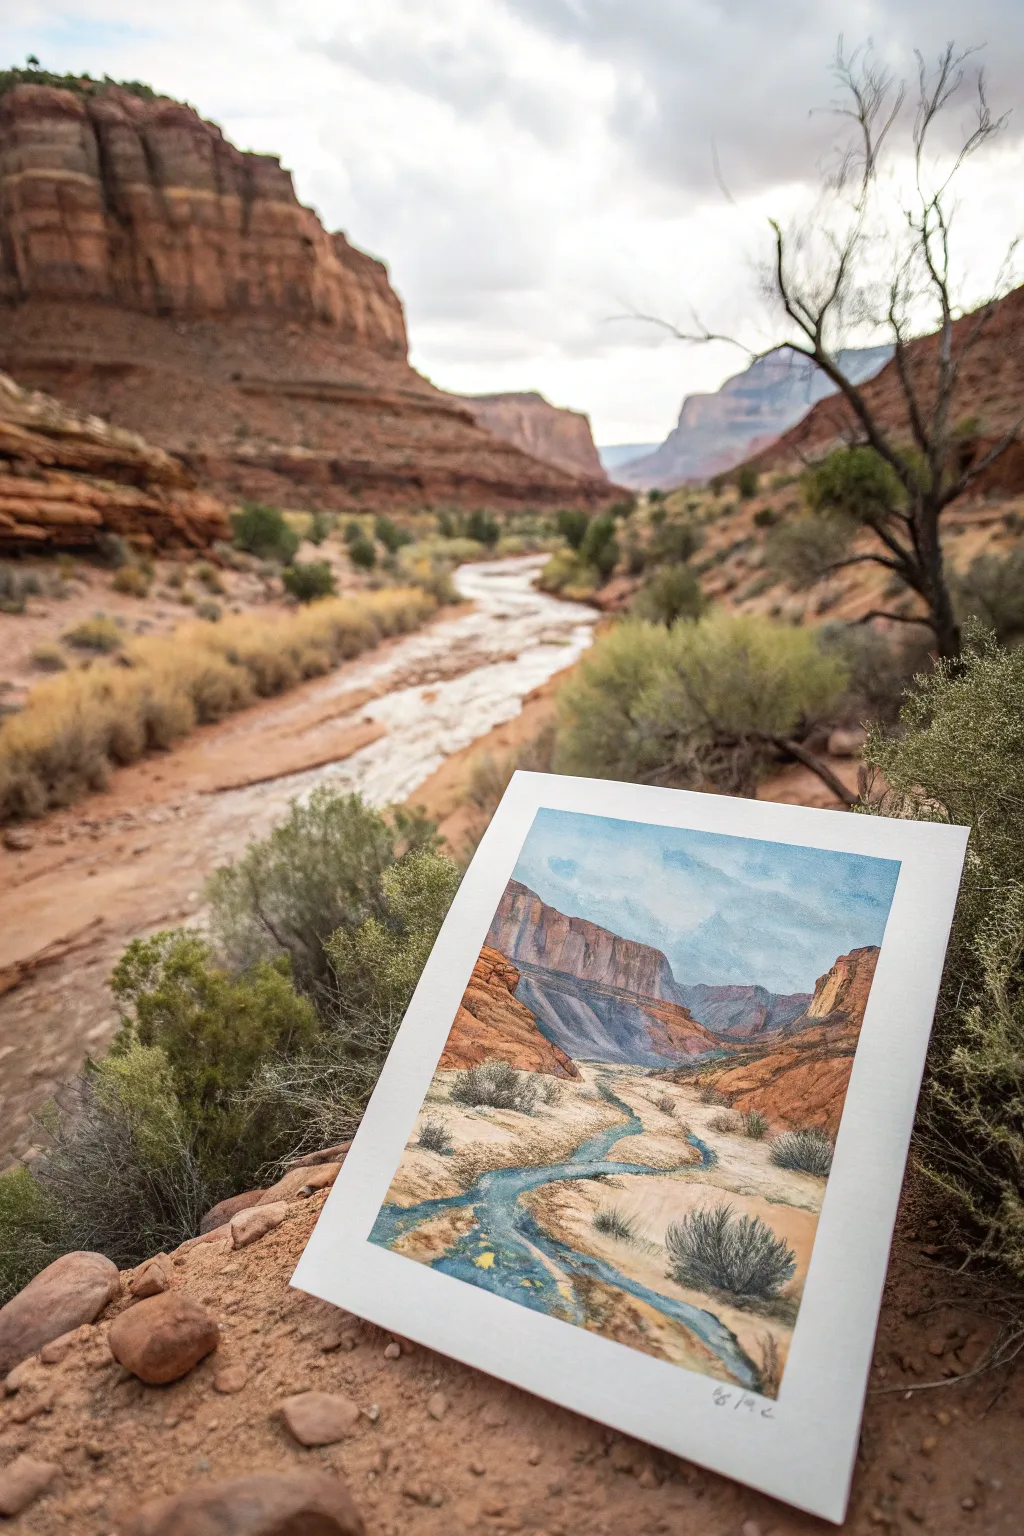
Capture the stark beauty of a desert wash with this vibrant landscape study that emphasizes depth and texture. You will learn to contrast warm, rugged rock formations against a cool, winding stream using dry brush techniques for realistic foliage.
Step-by-Step Guide
Materials
- Cold press watercolor paper (approx. 8×10 or 9×12 inches)
- Watercolor paints (Ultramarine Blue, Burnt Sienna, Yellow Ochre, Alizarin Crimson, Sap Green)
- White Gouache (optional, for highlights)
- Round brushes (sizes 4, 8, and 12)
- Flat shader brush (1/2 inch)
- Old, scruffy brush for dry brushing
- Masking fluid (optional)
- Pencil (HB) and kneaded eraser
- Two cups of water
- Paper towels or rag
- Masking tape
Step 1: Sketch and Sky
-
Preparation:
Begin by taping the edges of your watercolor paper to a board to create a clean white border and prevent buckling. Lightly sketch the horizon line about 2/3rds up the page, the jagged outlines of the canyon walls, and the winding S-curve of the stream bed. -
Sky Wash:
Wet the sky area with clean water using your large round brush. While wet, drop in a diluted wash of Ultramarine Blue, leaving irregular white spaces for wispy clouds. Tilt the board slightly to let the pigment drift naturally. -
Cloud Definition:
Before the sky dries completely, soften the bottom edges of your blue patches with a clean, damp brush. This creates the soft, hazy look of desert clouds drifting over the canyon rim.
Step 2: Canyon Walls and Geography
-
Base Rock Tones:
Mix a light wash of Yellow Ochre and Burnt Sienna. Apply this as a base layer for the canyon walls and the sandy foreground, painting right over the stream area for now (unless using masking fluid) since the water will reflect the sky later. -
Shadow Shapes:
Once the base layer is dry, mix Burnt Sienna with a touch of Ultramarine Blue to create a muted reddish-brown. Block in the shadowed faces of the canyon walls on the left and right, defining the craggy structure. -
Deepening Shadows:
While the shadow shapes are still damp, drop in a stronger mix of Alizarin Crimson and Blue into the deepest crevices and the base of the cliffs to establish serious volume. -
Distant Mountains:
Paint the distant wedge of mountains in the center using a cool, pale violet grey. This atmospheric perspective pushes them into the background.
Pro Tip: Scratch Before You Splash
Before painting foliage, use a dull knife or fingernail to disturb the paper grain. The paint settles darker in these scratches, creating instant branch texture.
Step 3: The Waterway
-
Stream Path:
Identify the winding path of the stream. Using a size 8 round brush, paint the water with a mix of Ultramarine Blue and a tiny hint of Green. Ensure the edges are somewhat irregular to mimic a natural flow. -
Wet-in-Wet Reflections:
While the blue stream is wet, touch in small amounts of the rock color (Burnt Sienna) near the banks to suggest reflections of the reddish earth in the water. -
Sandy Banks:
Enhance the sandy areas on either side of the stream with a more saturated Yellow Ochre wash. Leave some areas of the previous pale wash showing to create a sun-bleached effect.
Level Up: Salt Textures
Change the feel by sprinkling table salt onto the damp sandy wash. When dry, brush it off to reveal a mottled, gritty texture perfect for desert ground.
Step 4: Textures and Foliage
-
Dry Brush Scrub:
This is where I like to switch to an old, scruffy brush. Load it with thick, relatively dry pigment (Sap Green mixed with Burnt Sienna). Drag the brush lightly over the paper’s tooth to create scattered vegetation on the distant slopes. -
Foreground Bushes:
For the distinct bushes in the foreground, use a size 4 brush. Paint the dark underbellies of the sagebrush using a deep green-grey mix. -
Bush Highlights:
Clean your brush and pick up a lighter, yellow-green mix. Dab this on the top of the bushes to indicate sunlight hitting the foliage. -
Pebbles and Debris:
Mix a watery dark grey. Use the very tip of your smallest brush to dot in pebbles and rocky debris near the stream edge and across the sandy foreground. Vary their sizes for realism. -
Defining Edges:
Use a fine liner brush or the tip of a round brush with dark brown paint to add sharp distinct cracks in the canyon walls and define the waterline where the stream meets the bank. -
Final Highlights:
If adjustments are needed, use a small amount of white gouache to bring back sparkles on the water or bright rocks in the foreground that may have gotten too dark. -
Removal:
Allow the painting to dry completely—check by touching the back of the paper to see if it feels cool. Carefully peel off the masking tape at a 45-degree angle to reveal your crisp white border.
This serene desert study captures the quiet drama of the canyon and makes a beautiful addition to your sketchbook collection
Sand Ripples Using Palette-Knife Texture
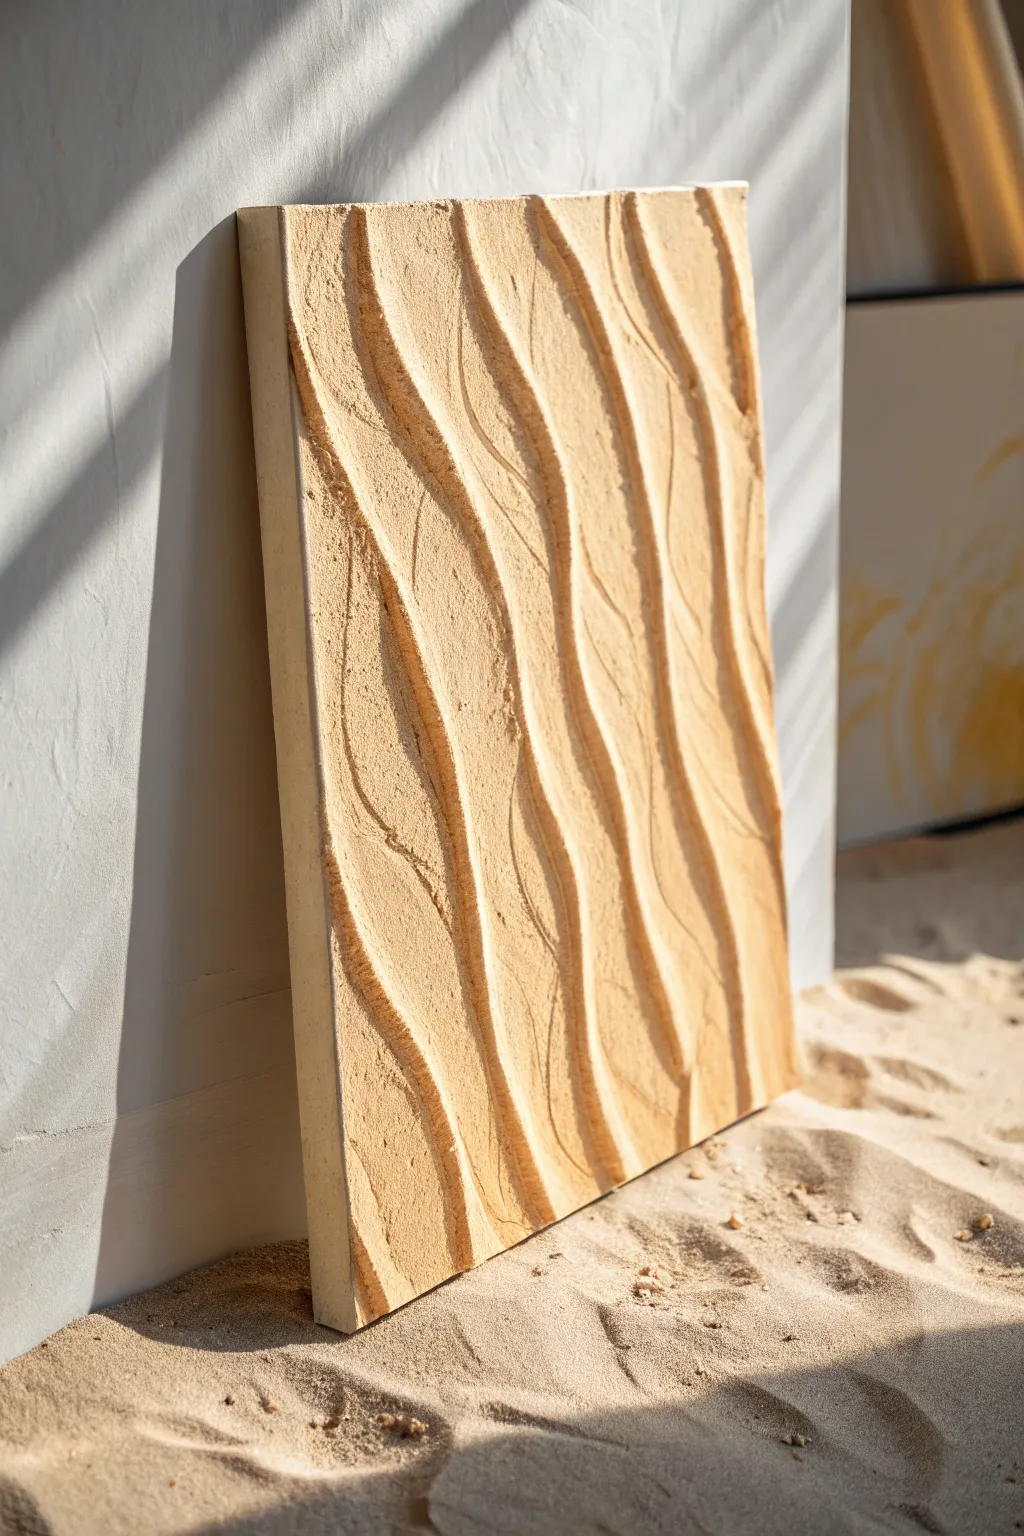
Capture the serene patterns of windblown dunes with this heavily textured desert relief painting. Using modeling paste and sand, you will build raised, undulating ridges that mimic the organic flow of the Sahara.
How-To Guide
Materials
- Canvas or wooden art panel (approx. 16×20 inches for best effect)
- Heavy body acrylic modeling paste or joint compound
- Fine grain craft sand (natural beige color)
- Medium palette knife with a rounded tip
- Acrylic paint (Sandy Beige, Warm Ochre, and Raw Sienna)
- Wide flat paintbrush (2-inch)
- Large mixing bowl or dedicated paint bucket
- Matte spray varnish
Step 1: Preparation & Mixing
-
Prepare your workspace:
Lay down a drop cloth or old newspaper, as this project involves loose sand and can get a bit messy. Ensure your canvas or wood panel is clean and dry. -
Create the texture base:
In your mixing container, combine a generous amount of modeling paste (or joint compound) with your fine craft sand. Aim for a ratio of about 60% paste to 40% sand. -
Tint the mixture:
Squeeze a small amount of Sandy Beige acrylic paint directly into your paste and sand mixture. Stir thoroughly until the color is uniform; this ensures that if the top layer chips later, the underlayer matches. -
Check consistency:
The mixture should feel like thick, gritty frosting. If it’s too runny to hold a peak, add more sand or a pinch of cornstarch to thicken it up.
Step 2: Sculpting the Dunes
-
Apply the base layer:
Using your palette knife, spread a thick, even layer of the mixture across the entire surface of the canvas. It should be roughly 1/4 inch thick to allow for deep carving. -
Plan your flow:
Visualize a diagonal flow for your sand ripples just like in the photo. The lines should generally move from top-left to bottom-right, but with organic curves. -
Carve the first primary ridge:
Turn your palette knife on its edge. Starting from the top, press firmly and drag the knife downward in a waving, S-curve motion to create a deep valley. -
Create parallel peaks:
Repeat this motion alongside your first line. As you drag the knife, allow the displaced paste to build up on one side of the valley, creating a raised ‘peak’ or dune crest. -
Vary the pressure:
To make it look natural, press harder in some areas and lighter in others. This variation creates the illusion of wind intensity changes. -
Refine the ridges:
Use the flat side of the knife to gently smooth the slopes of the dunes, leaving the tops sharp and textured. I find seeing the rough grit on the peaks adds to the realism. -
Add detail texture:
While the paste is still wet, take a pinch of dry sand and sprinkle it lightly over the wet dunes. This adds an extra layer of visual depth and catches the light differently. -
Allow to cure:
This is the patience test. Let the artwork dry completely flat for at least 24-48 hours. The thick paste needs time to harden fully without cracking.
Crack Control
If minor cracks appear while drying, don’t panic. Mix a tiny bit of fresh paste and water, rub it into the cracks with your finger, and let dry again.
Step 3: Painting & Finishing
-
Base coat application:
Once fully hard, mix your Warm Ochre with a lot of water to create a thin wash. Brush this over the entire piece, getting into every crevice. -
Wipe back:
Immediately use a clean rag to gently wipe the surface. This removes paint from the high points but leaves the darker color in the deep valleys, enhancing the 3D effect. -
Dry brushing highlights:
Dip your dry wide brush into the Sandy Beige paint (do not add water). Wipe most of it off on a paper towel, then lightly drag the brush across the tops of the dunes. -
Add warmth:
Repeat the dry brushing step with a tiny amount of Raw Sienna, focusing only on the very highest ridges to mimic sun-kissed sand. -
Final texture check:
Inspect the piece for any overly sharp spikes of dried paste that might be dangerous or fragile. Gently sand them down with fine sandpaper if needed. -
Seal the artwork:
Finish with a coat of matte spray varnish. This holds the loose sand particles in place and protects the textured surface from dust.
Golden Hour Glow
Mix a small amount of metallic gold paint into your final dry-brush layer for a shimmering, sun-drenched desert effect.
Now step back and admire the tranquil, sun-baked landscape you’ve sculpted right in your own home
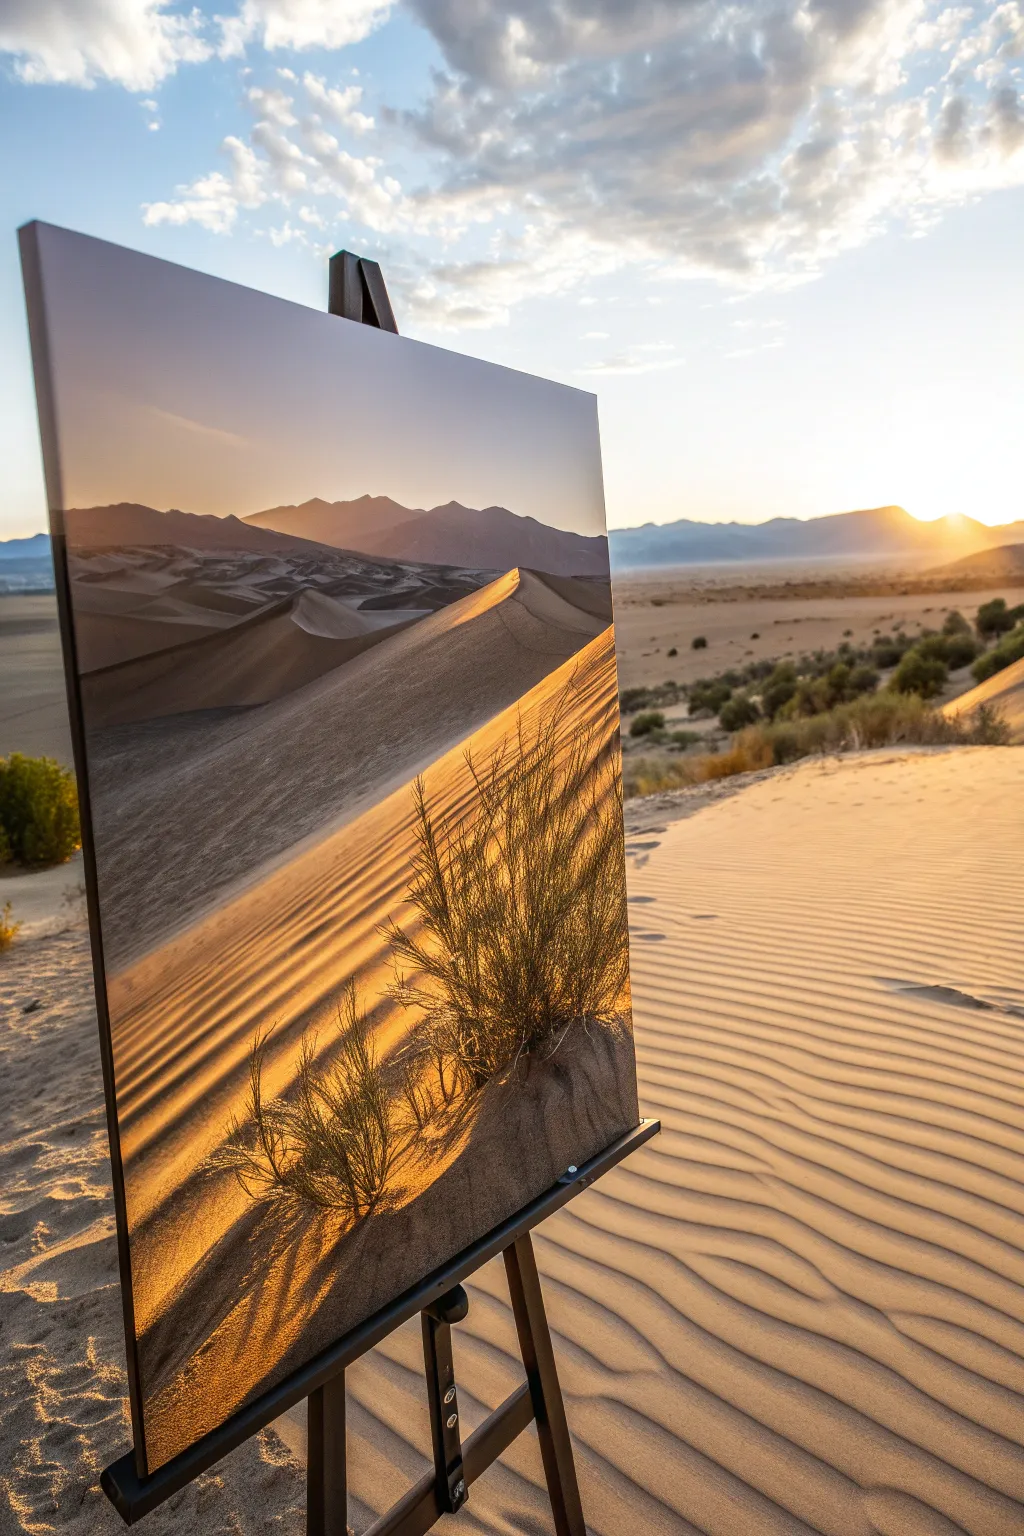
Heat Haze Mirage Effect
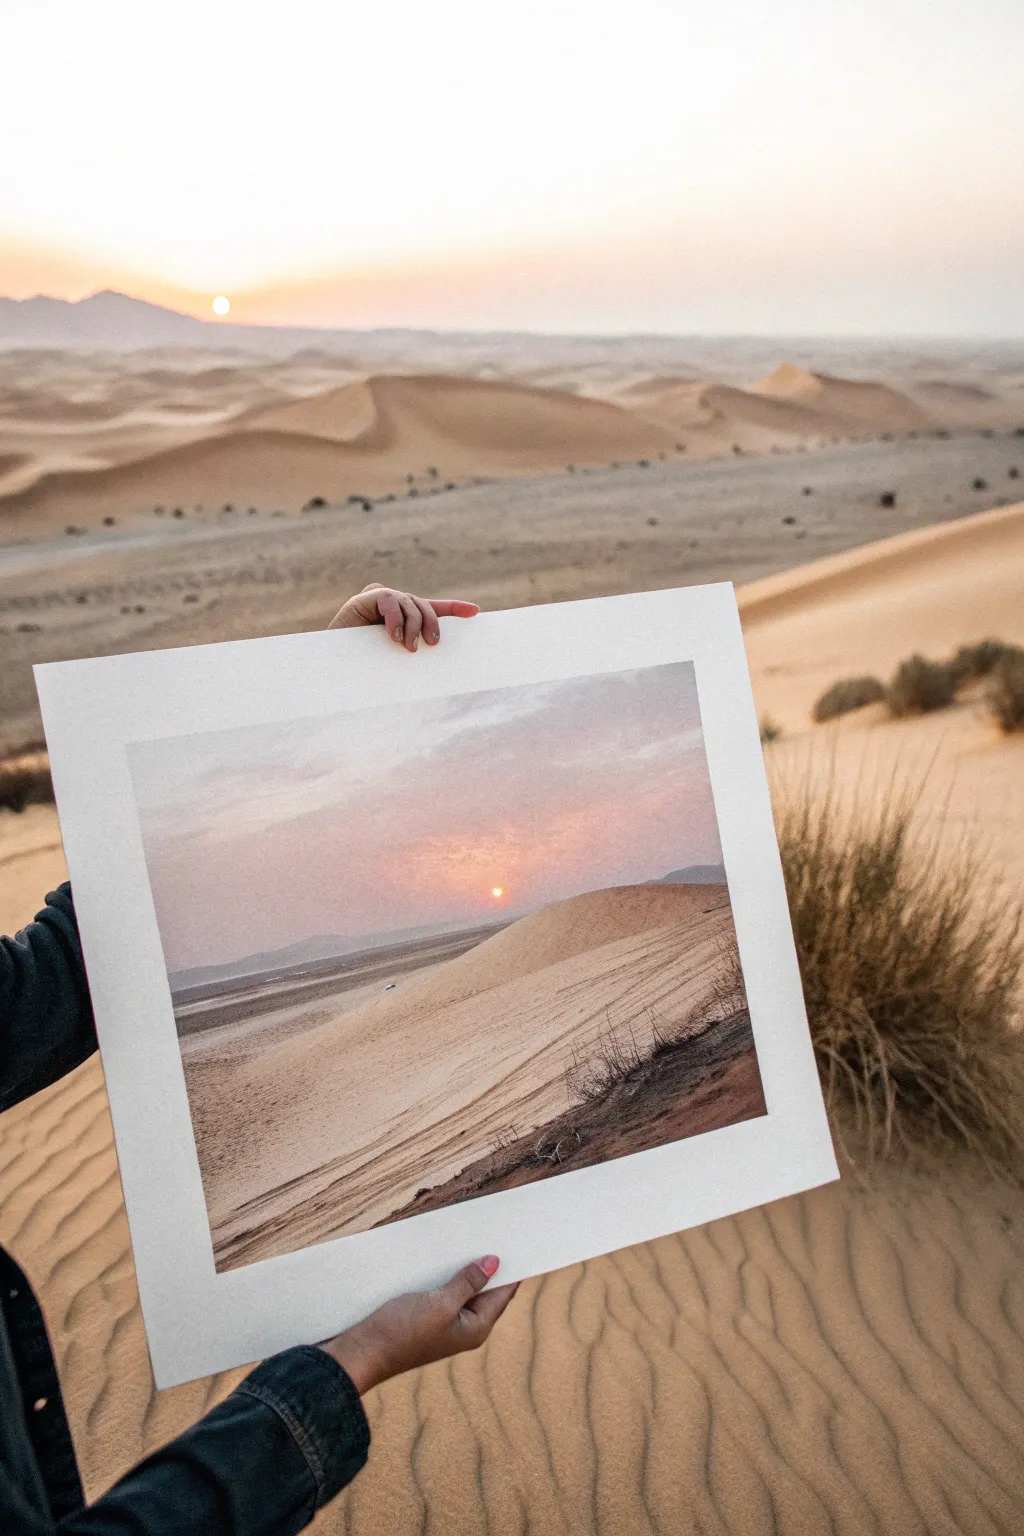
Capture the ethereal beauty of a desert sunset with this soft, matte-finish photographic print. The resulting artwork replicates the dreamy, heat-haze aesthetic of sand dunes under a lowering sun, mounted simply for a clean, modern display.
Step-by-Step
Materials
- High-resolution digital camera or DSLR
- Wide-angle lens (e.g., 24mm or 35mm)
- Tripod
- Adobe Lightroom or similar photo editing software
- High-quality matte photo paper (large format, approx. A2 or 16×20 inches)
- White mat board or foam core backing (sized to print)
- Spray adhesive or archival mounting tape
- Utility knife and metal ruler
Step 1: Planning and Capture
-
Scout the location:
Find a dune location with a clear horizon line. Look for layering in the landscape—foreground textures, mid-ground slopes, and distant mountains to create depth. -
Wait for golden hour:
Arrive roughly an hour before sunset. The goal is to capture the sun just as it dips low, creating that soft, diffused orange glow. -
Compose the shot:
Set up your tripod low to the ground. Frame the shot to include the texture of the sand in the foreground leading the eye toward the sun. -
Adjust settings for softness:
I prefer shooting slightly underexposed to preserve the highlights in the sun. Use a narrower aperture (around f/8 or f/11) to ensure the dunes are sharp from front to back. -
Capture the image:
Take multiple exposures as the sun touches the horizon line. If visible, include a subtle element like a small vehicle or shrub for scale.
Step 2: Digital Processing
-
Import and crop:
Open your image in editing software. Crop slightly if needed to center the sun or balance the horizon line. -
Soften the colors:
Desaturate the blues and greens slightly. Boost the oranges and pinks, but reduce their luminance to create a pastel, hazy look rather than a vibrant, saturated one. -
Lift the blacks:
To achieve that vintage, matte film look seen in the example, lift the black point on your tone curve so the shadows become dark gray instead of pure black. -
Add grain:
Introduce a moderate amount of film grain. This mimics the texture of sand and adds to the ‘heat haze’ atmosphere. -
Reduce clarity:
Slightly lower the clarity or texture slider (negative value). This softens the edges and enhances the dreamlike quality of the light.
Fixing Bubbles
If an air bubble appears during mounting, don’t peel it up. Use a soft cloth to gently push the air toward the nearest edge. If stubborn, prick with a tiny pin and smooth down.
Step 3: Printing and Mounting
-
Select paper type:
Choose a heavy-weight matte or fine art paper. Avoid glossy finishes, as the reflection ruins the soft aesthetic we created digitally. -
Print formatting:
Format the file with a very wide white border. In the example, the border is substantial—about 3-4 inches on all sides—which acts as a built-in mat. -
Do a test strip:
Print a small strip of the image first to check color accuracy, especially the transition from the bright sun to the surrounding sky. -
Final Print:
Print the final image at full size. Allow the ink to dry completely, typically for at least 24 hours, to prevent smudging. -
Prepare the backing:
Cut a piece of foam core or mat board to match the exact outer dimensions of your print. -
Apply adhesive:
In a well-ventilated area, apply a thin, even coat of spray adhesive to the foam core. -
Mount the print:
Carefully align the top edge of your print with the board and smooth it down slowly to avoid air bubbles.
Pro Tip: Virtual Haze
Is your photo too sharp? Add a localized adjustment brush over the horizon line and lower the ‘Dehaze’ slider significantly to artificially create that humid, dusty atmosphere.
Now you have a stunning piece of desert art ready to be framed or displayed on a shelf
Sandstone Arch Framed by Sky
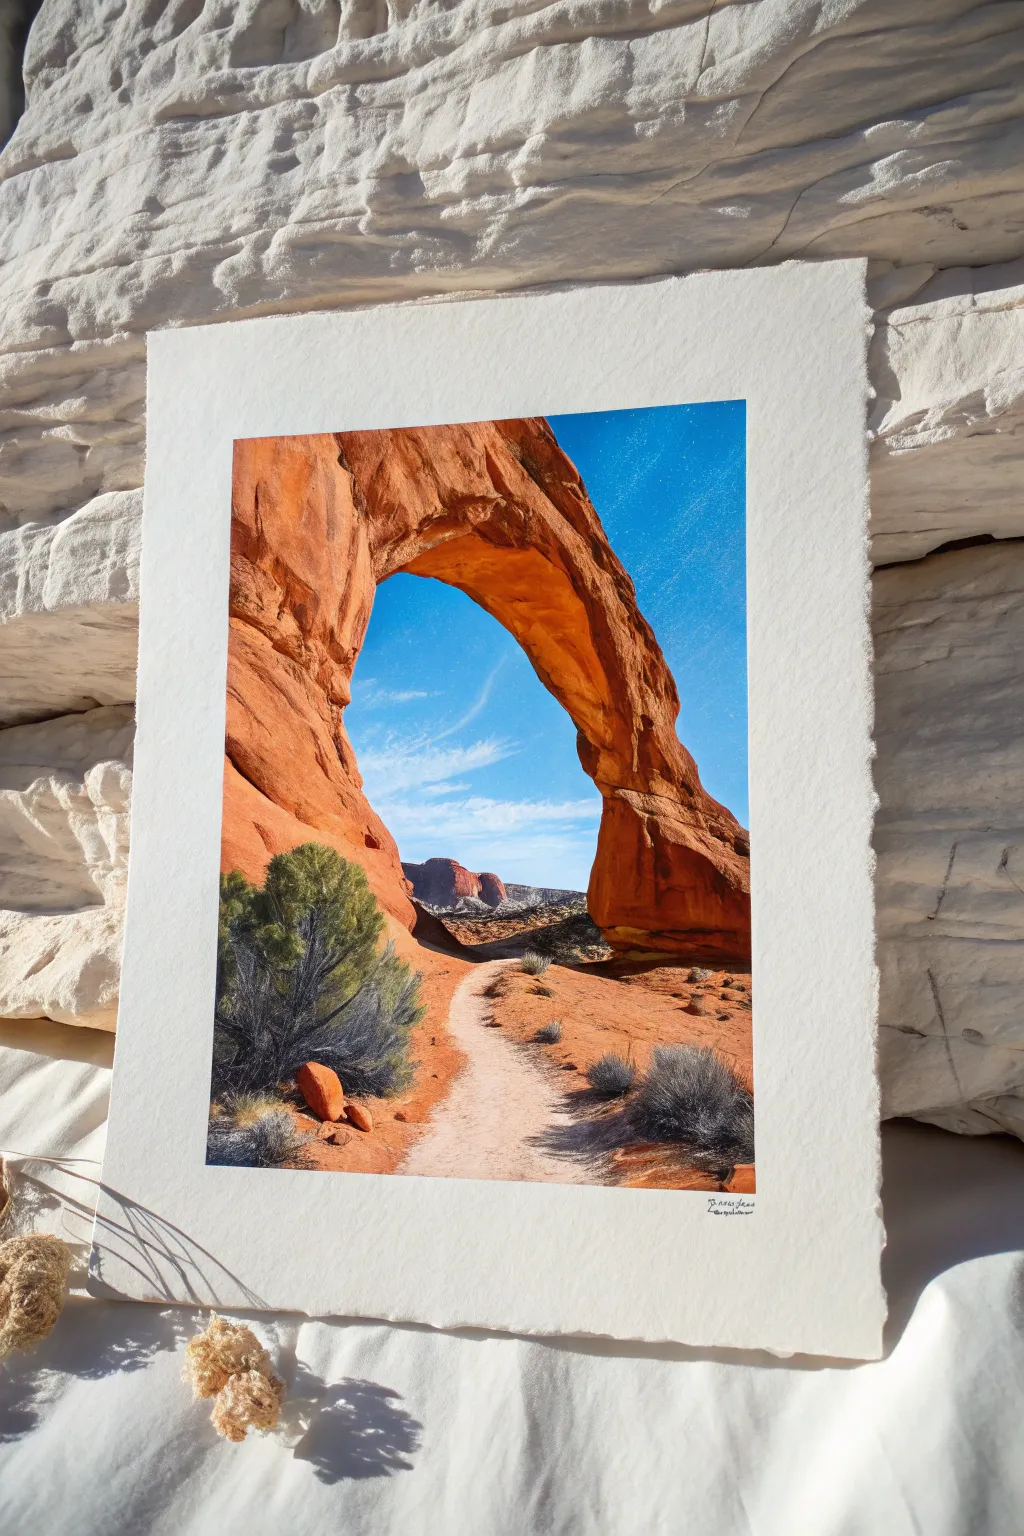
Capture the majestic warmth of the desert with this vibrant landscape painting featuring a glowing red rock archway against a crisp blue sky. The composition draws the viewer in along a dusty path, inviting them to walk right through the towering stone formation.
Detailed Instructions
Materials
- Cold press watercolor paper (300 gsm or heavier)
- Watercolor paints (burnt sienna, yellow ochre, ultramarine blue, alizarin crimson, burnt umber, sap green)
- White gouache (for highlights)
- Masking fluid
- Round brushes (sizes 4, 8, and 12)
- Small rigger brush or liner brush
- Pencil and kneaded eraser
- Board and artist tape
Step 1: Sketch and Sky
-
Rough sketch:
Begin by lightly sketching the outline of the arch. Place the horizon line relatively low to emphasize the height of the rock formation. Sketch the winding path leading from the bottom center toward the opening. -
Masking highlights:
Apply masking fluid to the brightest clouds in the sky and any sharp, sun-hit edges on the rock face. Let this dry completely before touching it with a wet brush. -
Wet-on-wet sky:
Wet the sky area with clean water. Load your large brush with a mix of ultramarine blue and a touch of cerulean. Paint the sky gradient, starting darker at the top and fading to a lighter blue near the horizon line. -
Lift clouds:
While the sky wash is still damp, use a clean, thirsty brush or paper towel to gently lift out soft, wispy cloud shapes to complement your masked areas.
Muddy Shadows?
If your rock shadows look dull, avoid adding black. Instead, mix complementary colors like orange (burnt sienna) and blue (ultramarine) for rich darks.
Step 2: The Majestic Arch
-
Base rock layer:
Mix a warm, light wash using yellow ochre and burnt sienna. Apply this over the entire rock structure and the foreground sand to establish a glowing underpainting. Let this dry thoroughly. -
Defining the form:
Mix a stronger red-orange using burnt sienna and a hint of alizarin crimson. Paint the mid-tones of the arch, leaving the yellow underpainting visible on the left side where the sun hits the stone. -
Deep shadows:
Create a rich shadow color by mixing burnt sienna with ultramarine blue. Apply this to the underside of the arch and the right-side interior wall to create three-dimensional volume. -
Rock texture:
Using a smaller round brush and the dry-brush technique, drag a mix of burnt sienna and burnt umber across the paper’s tooth to simulate the rough, weathered surface of sandstone.
Add Texture
Splatter clean water or salt onto the wet sandy foreground area. As it dries, it creates a blooming, granular texture perfect for desert sand.
Step 3: Foreground and Details
-
Distant mesas:
Paint the small rock formations seen through the arch opening. Use a cooler, violet-tinted mix (ultramarine + alizarin) to push them into the distance. -
The sandy path:
Define the path by painting negative space around it. Use a warm terracotta mix for the ground on either side, leaving the path itself the color of the pale underpainting. -
Sagebrush base:
Mix sap green with a touch of burnt umber and blue. Dab in uneven, organic shapes for the desert bushes in the foreground, specifically the large bush on the left. -
Foliage depth:
Drop darker green-black pigment into the bottom of the wet sagebrush shapes to create weight and shadow. -
Grounding shadows:
Paint cast shadows underneath the bushes and rocks using a diluted purple-grey mix, ensuring they follow the light source direction.
Step 4: Finishing Touches
-
Remove masking:
Once the paper is bone dry, gently rub off the masking fluid to reveal the crisp white highlights on the clouds and rock edges. -
Opaque highlights:
Using a rigger brush and white gouache, add thin, deliberate strokes to the sagebrush to simulate light catching on the twiggy branches. -
Final contrast:
I like to add a few final dark accents in the deepest cracks of the rock using a mix of burnt umber and indigo to really make the form pop. -
Deckled edge tear:
Place a ruler against the edge of the paper. Wet the paper along the ruler’s edge with a brush, wait a moment, and then gently tear away the excess paper to create a rustic, deckled look.
Step back and admire the rugged warmth of your finished desert landscape
Night Desert With Silhouetted Wildlife
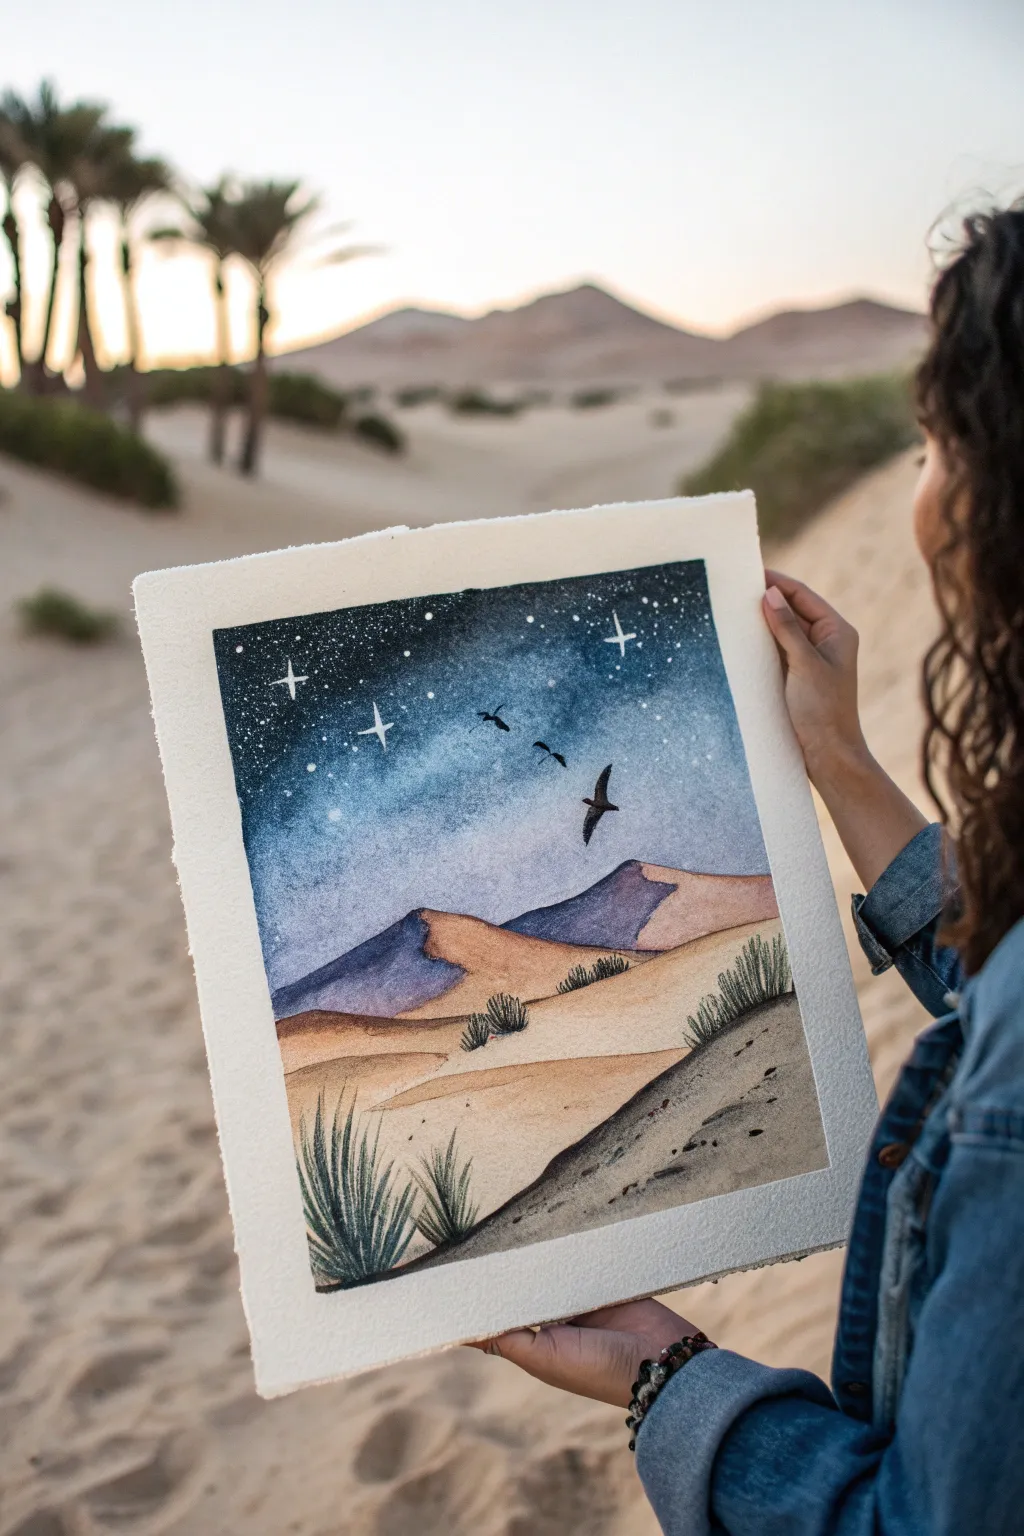
Capture the magic of a desert night with this atmospheric watercolor painting. You will learn to blend a deep, celestial sky into warm, rolling dunes, punctuating the scene with silhouetted birds and textured vegetation.
Step-by-Step
Materials
- Cold press watercolor paper (300 gsm)
- Masking tape
- Watercolor paints (Indigo, Prussian Blue, Burnt Sienna, Yellow Ochre, Paynes Grey, Sap Green)
- White gouache or white gel pen
- Round brushes (sizes 4, 8, and a fine liner)
- Jar of clean water
- Paper towels
- Palette for mixing
Step 1: Planning the Horizon
-
Tape the edges:
Begin by taping down all four edges of your watercolor paper to a board. This creates the crisp white border seen in the original artwork and keeps the paper flat while wet. -
Initial sketch:
Lightly sketch the outlines of the dunes. Draw distinct layers: a foreground dune on the right, a middle ground sweeping across, and distant peaks. Keep your pencil lines very faint so they don’t show through the sky.
Bleeding Colors?
If your dune colors are running into the sky, the sky wasn’t dry enough. Use a hairdryer on low heat between layers to ensure crisp, distinct lines.
Step 2: Painting the Night Sky
-
Wet-on-wet preparation:
Using a clean, large brush, wet the entire sky area above your dune line with clean water. The paper should glisten but not hold puddles. -
Deep blue gradient:
Load your brush with Indigo and Prussian Blue. Start at the very top edge with the darkest pigment and stroke downward. As you move lower toward the horizon, add more water to your brush to fade the color into a soft, hazy light blue. -
Adding stars:
While the sky is completely dry—and I mean completely—use white gouache on a fine brush or a white gel pen to dot in stars. Add a few larger, cross-shaped ‘twinkles’ to make the galaxy pop.
Step 3: Sculpting the Dunes
-
Distant shadows:
For the furthest dunes, mix a watery wash of Indigo and a touch of Purple. Paint the shadowed, steep side of the back dune. Let the top edge remain crisp against the sky. -
Sunlit peaks:
While the shadow is damp, touch the sunlit side of the distant dune with a diluted Burnt Sienna or warm tan. Let the colors bleed slightly where they meet for a natural transition. -
Middle ground wash:
Move to the middle dunes. Use Yellow Ochre mixed with a lot of water for the sun-drenched tops. For the sloping sides, mix Burnt Sienna with a tiny bit of blue to desaturate it, creating a soft shadow. -
Foreground texture:
The closest dune on the bottom right needs more texture. Use a stronger mix of Burnt Sienna and Paynes Grey. Apply the paint, then dab it with a paper towel or a dry brush to create the speckled look of sand and pebbles.
Make It Shimmer
Mix a tiny amount of iridescent medium or metallic watercolor into your night sky blue for a subtle, magical glow when the light hits the paper.
Step 4: Details and Silhouettes
-
Painting the birds:
Mix a concentrated Paynes Grey or black. Using your finest liner brush, paint three birds in flight against the lighter part of the sky. Vary their wing positions to show movement. -
Adding texture spots:
Throughout the middle dunes, use a small round brush to dab tiny, irregular spots of dark green and brown. These represent distant scrub brush scattered across the sand. -
Foreground grasses:
In the bottom left corner, paint spiky desert grass. Use quick, upward flicking motions with your liner brush. Start with the base of the clump using dark green, and add lighter green tips. -
Foreground shrubbery:
On the bottom right slope, add smaller, scrubby bushes using a stippling motion. Ensure the base of these plants is dark to ground them in the sand. -
Final touches:
Add a few tiny dark specks near the foreground textures to suggest rocks or debris. Once everything is bone dry, carefully peel away the masking tape at a 45-degree angle to reveal your clean border.
Now you have a serene desert nightscape ready to frame or gift
Limited-Palette Desert in Warm Monochrome
Capture the serene solitude of the Namib Desert with this warm, layered study in depth and light. Using a restrained palette of sandy beiges and burnt siennas, you will build rolling dunes that recede beautifully into a hazy horizon.
Detailed Instructions
Materials
- Large watercolor paper (hot press for smoothness) or mixed media board
- Acrylic paints: Titanium White, Yellow Ochre, Burnt Sienna, Raw Umber, Unbleached Titanium
- Soft synthetic flat brushes (1 inch and 1/2 inch)
- Small round detail brush (size 2 or 4)
- Slow-drying blending medium or retarder
- Masking tape
- Palette knife for mixing
- Two jars of water
Step 1: Setting the Atmosphere
-
Prepare the canvas:
Tape down all four edges of your paper to a sturdy board. This creates the crisp white border seen in the final framed piece and prevents buckling while you paint. -
Mix the sky gradient:
Create a large pool of very pale, warm off-white. Mix Titanium White with a tiny dot of Burnt Sienna and a touch of mixing medium to keep it workable. -
Paint the sky:
Apply this mixture to the top third of the paper. Use broad, horizontal strokes, ensuring the color is flat and opaque. The goal is a hazy, heat-filled sky with no clouds. -
Fade the horizon:
While the sky is still slightly wet, mix a faint purple-grey using White, a speck of Raw Umber, and Burnt Sienna. Lightly brush this along the bottom edge of the sky area to suggest distant atmospheric haze.
Clean Lines Pro Tip
For the razor-sharp dune ridges, try painting the light side first, letting it dry completely, and then carefully cutting in the shadow side. This yields a crisp line.
Step 2: Building the Distant Dunes
-
Sketch the layout:
Once the sky is dry, use very watered-down Yellow Ochre to lightly sketch the undulating ridge lines of the dunes, starting high in the distance and flowing lower toward the foreground. -
Mix the distant colors:
Create a ‘distance’ color by mixing Unbleached Titanium with a little Burnt Sienna. It should be darker than the sky but lighter than the foreground colors. -
Paint the furthest ridge:
Fill in the most distant mountain-like dunes. Keep the edges soft to imply they are far away. I like to add a tiny bit of white to the top edges to show sunlight hitting the peaks. -
Layer the middle ground:
Mix a slightly stronger, warmer shade using more Yellow Ochre and Burnt Sienna. Paint the next layer of dunes coming forward, ensuring the top edge is sharp against the paler dune behind it.
Muddy Color Issues?
If your shadows look muddy or grey, you’ve likely used too much black. Try deepening your Burnt Sienna with a touch of dark blue or purple instead for richer shadows.
Step 3: Creating Depth and Shadow
-
Define the shadow sides:
Dunes are defined by light and shadow. Identifying your light source (coming from the right), mix a shadow tone using Burnt Sienna and a small touch of black or dark brown. -
Apply the major shadows:
Paint the left-facing slopes of the large central dunes with this shadow mix. Use sweeping, curved strokes to mimic the shape of the sand sliding down the face of the dune. -
Paint the sunlit slopes:
For the right-facing slopes, use a bright mix of Yellow Ochre and White. Paint these areas right up against the shadow shapes to create that signature ‘razor edge’ ridge line. -
Create the S-curve:
Focus on the prominent dune in the center that curves like an ‘S’. Ensure the transition between the light side and shadow side is extremely sharp and clean.
Step 4: Foreground Details
-
Texture the foreground:
The closest sand needs texture. Use a dry brush technique with a mix of Raw Umber and Unbleached Titanium to scumble light ripples across the bottom third of the painting. -
Add ripples:
With a fine round brush, paint delicate, wavy horizontal lines in the foreground sand to suggest wind ripples. Keep these subtle and low-contrast. -
Paint grass clumps:
Switch to your smallest detail brush. Using a dark mix of Raw Umber and Burnt Sienna, paint clumps of dry desert grass in the bottom left and right corners. -
Detail the grass:
flick the brush upward quickly to create thin, tapering blades. Vary the direction slightly so they look windblown and natural. -
Cast grass shadows:
Dilute your dark paint to a glaze consistency. Paint small, elongated shadows stretching to the left of each grass clump to anchor them to the ground.
Peel away the tape to reveal your crisp white border and enjoy your calm, sun-drenched landscape
Mixed-Media Desert Collage With Dusty Neutrals
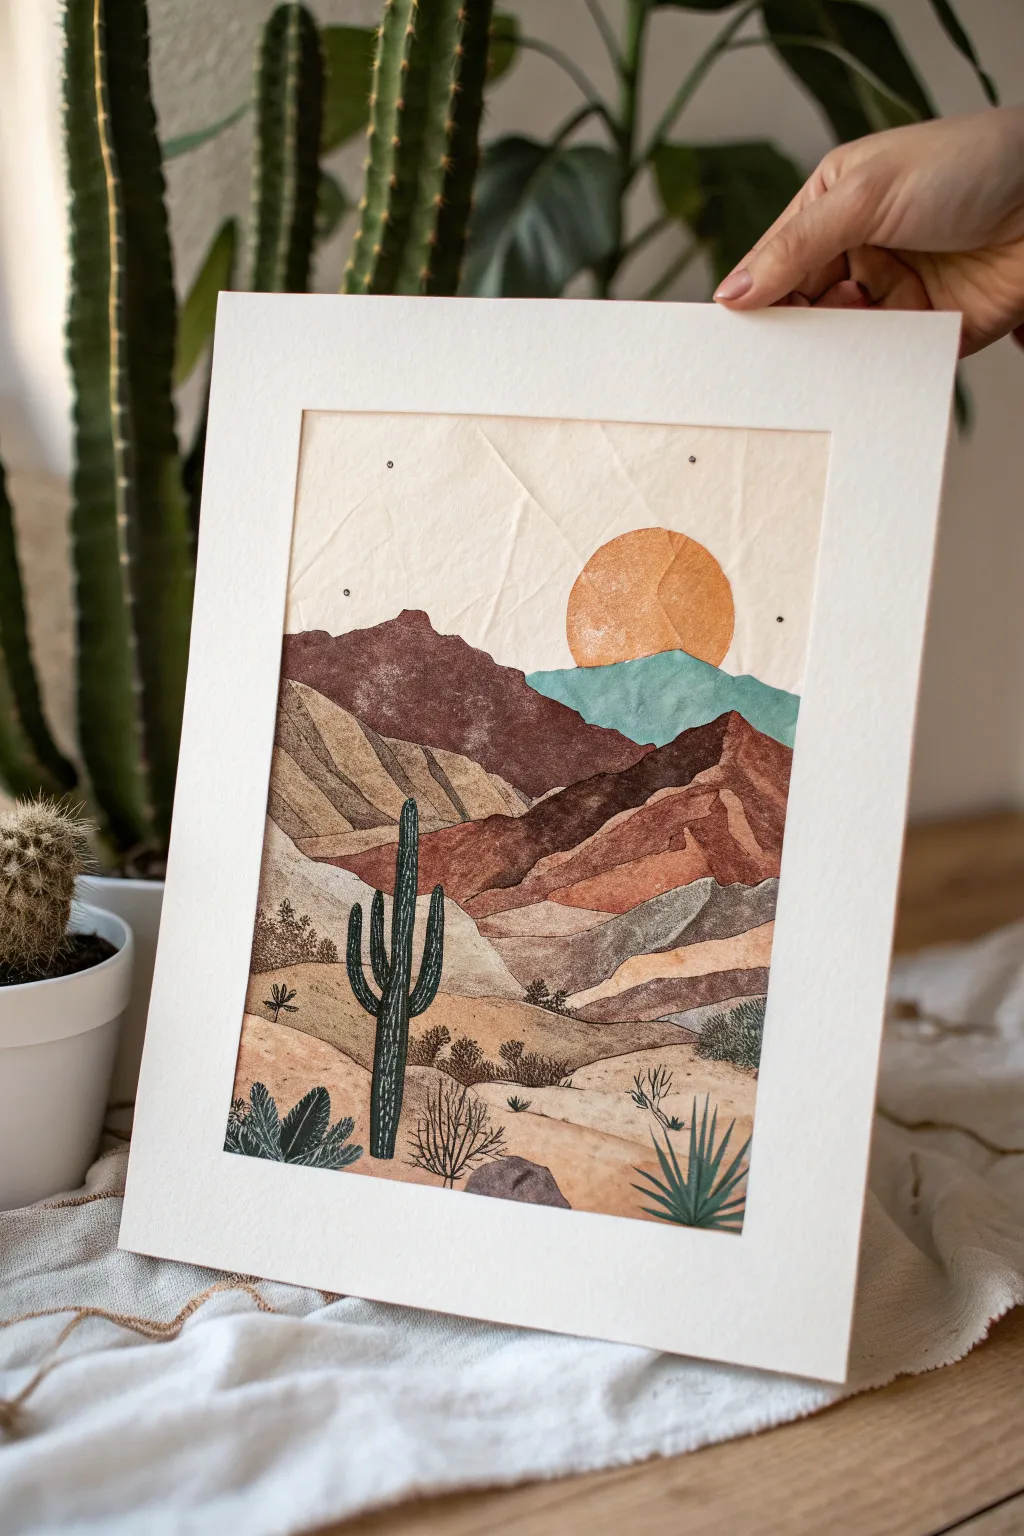
Capture the serene warmth of a desert sunset with this layered mixed-media collage. By combining textured paper, warm neutral tones, and precise botanical details, you’ll build a landscape that feels earthy and distinctively handmade.
How-To Guide
Materials
- Heavyweight watercolor paper or mixed-media board (9×12 inches)
- Assorted textured papers (tissue paper, crepe paper, or handmade mulberry paper)
- Matte gel medium, Mod Podge, or collage glue
- Acrylic gouache or matte acrylic paints (terracotta, burnt sienna, sage green, ochre, soft beige)
- Fine-point black ink pen (0.3mm or 0.5mm)
- Flat shader brushes (sizes 6 and 10)
- Fine detail brush (size 0 or 1)
- Scissors and X-Acto knife
- Tracing paper (optional)
- Masking tape
Step 1: Creating the Textured Base
-
Prepare the substrate:
Begin by taping down the edges of your main heavyweight paper to a flat work surface. This creates a clean white border and prevents buckling when we add wet glue and paint later. -
Layering the sky:
Cut a piece of crumpled thin textured paper (like tissue or mulberry) to fit the top third of your composition. Adhere it using matte gel medium, deliberately allowing some wrinkles to remain for an organic sky texture. -
Painting the sky base:
Once the glue is dry, wash a very watered-down coat of pale cream or unbleached titanium paint over the textured sky area. The wrinkles will catch more pigment, enhancing the paper’s natural grain. -
Adding the sun:
Cut a perfect circle from a separate piece of textured paper. Paint this cutout a warm, dusty orange. Glue it partially overlapping where your horizon line will be, placing it slightly off-center to the right.
Glue Wrinkle Control
If your paper bubbles too much when gluing large sections, smooth it gently with an old credit card from the center outward to push out air pockets.
Step 2: Building the Mountain Layers
-
Sketching the layers:
Lightly use a pencil to map out your mountain ranges. You want at least three distinct planes: a distant range, a middle ground, and a foreground. -
Collaging the distant peaks:
Tear or cut strips of paper for the furthest mountains. Paint these a dusty teal or muted blue-green to simulate atmospheric perspective. Glue this layer down so it slightly overlaps the bottom of your sun. -
Creating the middle ground:
For the prominent middle mountains, use a darker rust or chocolate brown. You can either paint directly onto the base paper here or adhere another layer of torn paper for added dimension. -
Painting geological details:
Using a smaller flat brush, add angular geometric shapes in lighter tan and ochre tones on top of the brown mountains. This mimics the striations and ridges often seen in desert canyons. -
Developing the foreground:
Paint the bottom section of the landscape with sandy beige and warm ochre tones. Use horizontal brushstrokes that adhere to the contours of the land to suggest rolling dunes.
Depth Perception
Make distant mountains lighter and cooler in color (blues/purples) and foreground elements warmer (oranges/browns) to create instant depth.
Step 3: Introducing Botanical Details
-
Drafting the saguaro:
Once the background layers are fully dry, lightly sketch the position of the main saguaro cactus on the left side. It should bridge the foreground and middle ground. -
Painting the cactus body:
Fill in the cactus shape with a deep forest green or slate green acrylic gouache. Keep the color solid and matte. -
Adding smaller flora:
Use your detail brush to paint small clumps of shrubs and grasses in the foreground using muted greens and browns. Vary the height and density to make the terrain look natural. -
Inking the ribs:
I prefer to wait until the green paint is bone dry before switching to the pen. Use the fine-point black pen to draw vertical, slightly curved lines down the length of the cactus arms to represent its ribs. -
Adding spines and texture:
Along the inked rib lines, make tiny tick marks to represent spines. You can also add stippling (dots) to the shadowed side of the cactus for volume. -
Defining the landscape:
Use the ink pen to selectively outline parts of the mountains and add texture to the sandy foreground. Drawn, scribbly textures work well to represent dry desert brush. -
Final touches:
Add a few tiny dots in the sky area with your black pen to suggest distant stars appearing at dusk.
Peeling off the tape reveals a crisp border that makes your desert scene ready for a frame


Have a question or want to share your own experience? I'd love to hear from you in the comments below!