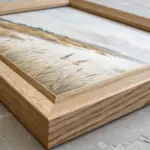
Finishing a diamond painting is such a satisfying moment—until you realize the canvas size is weird and the drills are too chunky for a regular frame. These framing ideas are the ones I reach for when I want maximum sparkle, clean edges, and a display that actually feels “done.”
Glass-Free Frame for Maximum Sparkle
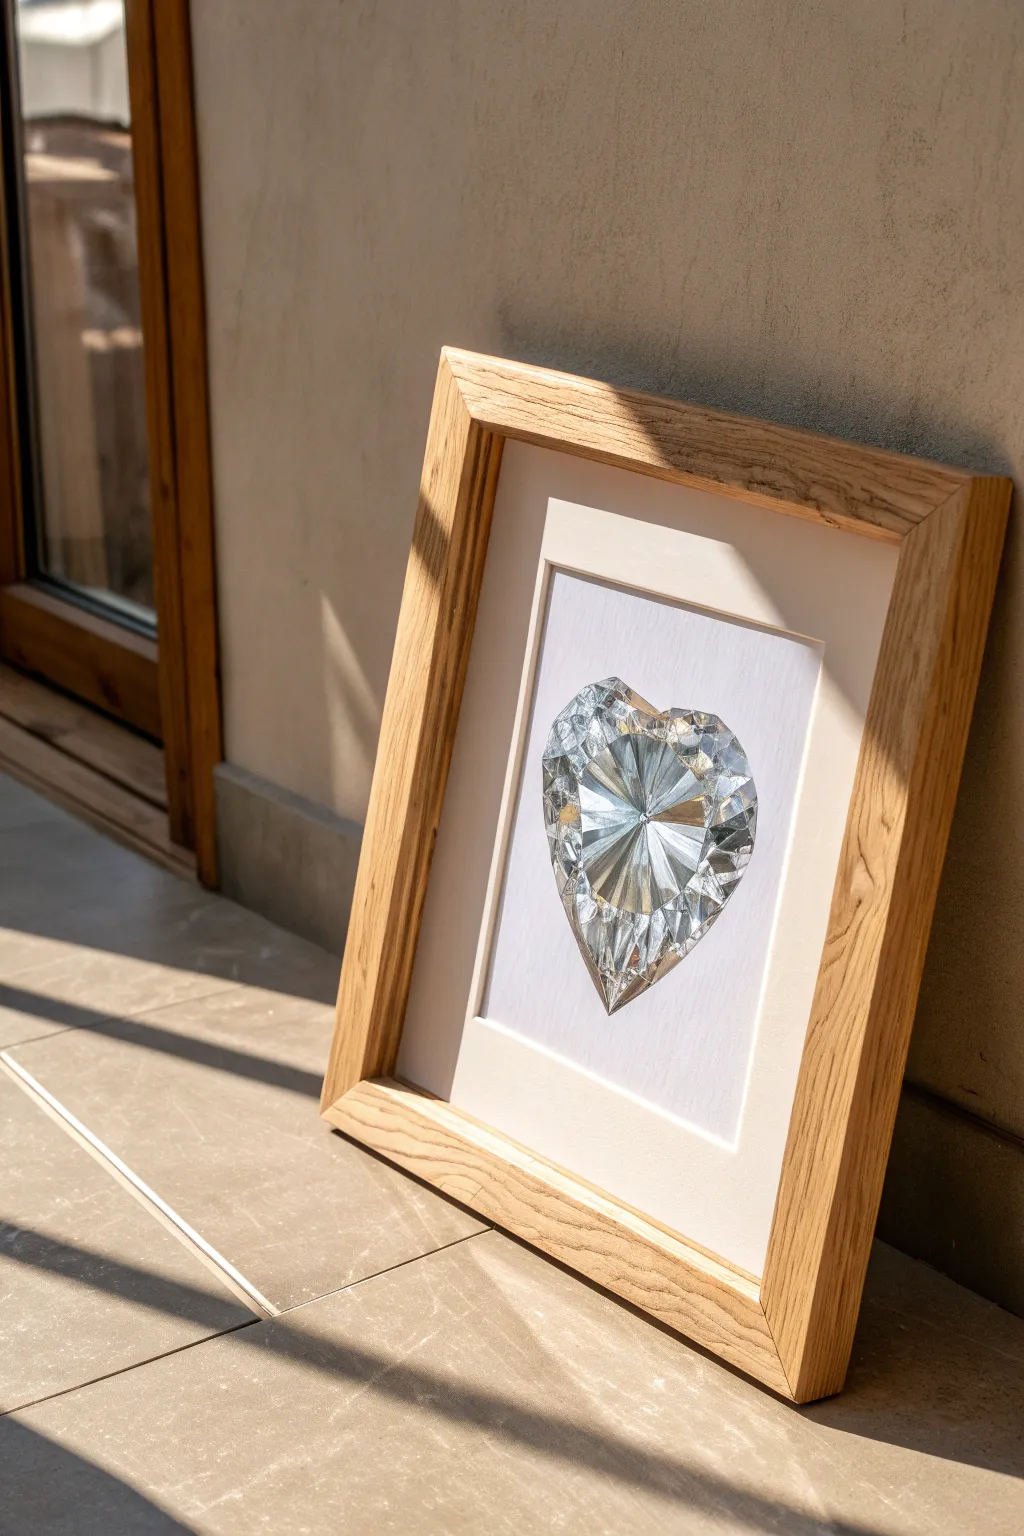
Capture the brilliance of a cut gemstone using nothing but graphite and paper with this stunning heart-shaped diamond drawing. Framed without glass, the texture of the pencil work shines through, creating a raw and elegant focal point for any room.
Step-by-Step
Materials
- High-quality smooth bristol board or heavy drawing paper (A4 or A3)
- Set of graphite pencils (ranging from 4H to 6B)
- Mechanical pencil (0.5mm, HB lead)
- Ruler
- Protractor
- Kneaded eraser
- Precision eraser (stick or mono zero)
- Blending stumps (tortillons) in various sizes
- Tissue or cotton round
- Workable fixative spray
- Light oak or natural wood frame
- White mat (mount board) cut to size
Step 1: Drafting the Structure
-
Draw the center line:
Start by using your ruler to draw a faint vertical line down the center of your paper. This will serve as the axis of symmetry for your heart shape. -
Create the heart outline:
Lightly sketch a symmetrical heart shape around your center line using a 2H pencil. Keep your lines very faint so they can be erased later or blended into the shading. -
Map the central star:
Locate the approximate center point of the heart. From this point, draw radiating lines quickly outwards to the edges of the heart, like spokes on a wheel. These will form the main facets. -
Subdivide the facets:
Connect the ends of your radiating lines to create the geometric shapes of the diamond facets. You are aiming for triangles and kites that fit together like a puzzle. Using a reference image of a brilliant-cut heart is incredibly helpful here to get the geometry right.
Clean Edges Only
Place a piece of clean scrap paper under your drawing hand while shading. This prevents your palm’s natural oils from transferring to the paper and stops you from smearing your crisp pencil lines.
Step 2: Shading and Faceting
-
Establish the darkest darks:
Switch to a 4B or 6B pencil to fill in the deepest shadows. Look closely at your reference; diamonds reflect high contrast. These dark areas usually appear at the bottom points of the triangular facets. -
Create mid-tones:
Using an HB or B pencil, shade the areas adjacent to your darkest spots. I like to apply this layer lightly and then build it up, rather than pressing hard immediately. -
Leave the highlights:
This is crucial: preserve the white of the paper for your brightest highlights. Do not shade over them. These white shapes are what make the diamond look reflective. -
Blend for smoothness:
Take a blending stump and gently smudge your graphite layers. Work from the light areas toward the dark areas to avoid dragging too much pigment into your highlights. -
Sharpen the edges:
Use your mechanical pencil to crisp up the lines between facets. The separation needs to be razor-sharp to convey the hardness of a stone.
Step 3: Refining Details
-
Deepen contrast:
Go back in with your 6B pencil and darken the shadowy crevices again. Blending often creates a grey wash, so re-establishing true black is vital for that sparkling effect. -
Lift reflected light:
Using your precision eraser or a shaped kneaded eraser, lift out tiny slivers of graphite within the grey facets. These subtle light streaks mimic internal reflections. -
Clean the background:
Check the white space around the heart. Use a clean eraser to remove any smudges or fingerprints, ensuring the background is pristine white. -
Seal the drawing:
Take the drawing to a well-ventilated area and spray it with a workable fixative. This prevents the graphite from smudging when you frame it without glass.
Add Metallic Pop
For extra sparkle, trace over the very brightest highlight lines with a silver gel pen or a touch of silver leaf paint. It catches the ambient light beautifully.
Step 4: Framing
-
Prepare the frame:
Disassemble your wooden frame. Since this is a glass-free display to maximize texture, remove the glass pane completely and set it aside for another project. -
Mount the artwork:
Center your drawing behind the mat board using acid-free artist tape. Tape the top edge only (a T-hinge) to allow the paper to expand and contract without buckling. -
Secure the backing:
Place the matted artwork into the frame rebate, followed by the backing board. Secure the flexible tabs or framing points to hold everything tight. -
Final check:
Stand the frame up and let the light hit the graphite. Without glass, you should see the metallic sheen of the pencil strokes changing as you move.
Place your framed diamond near a window to watch the natural light play across the metallic graphite texture


Poster Frame for Oversized Canvases
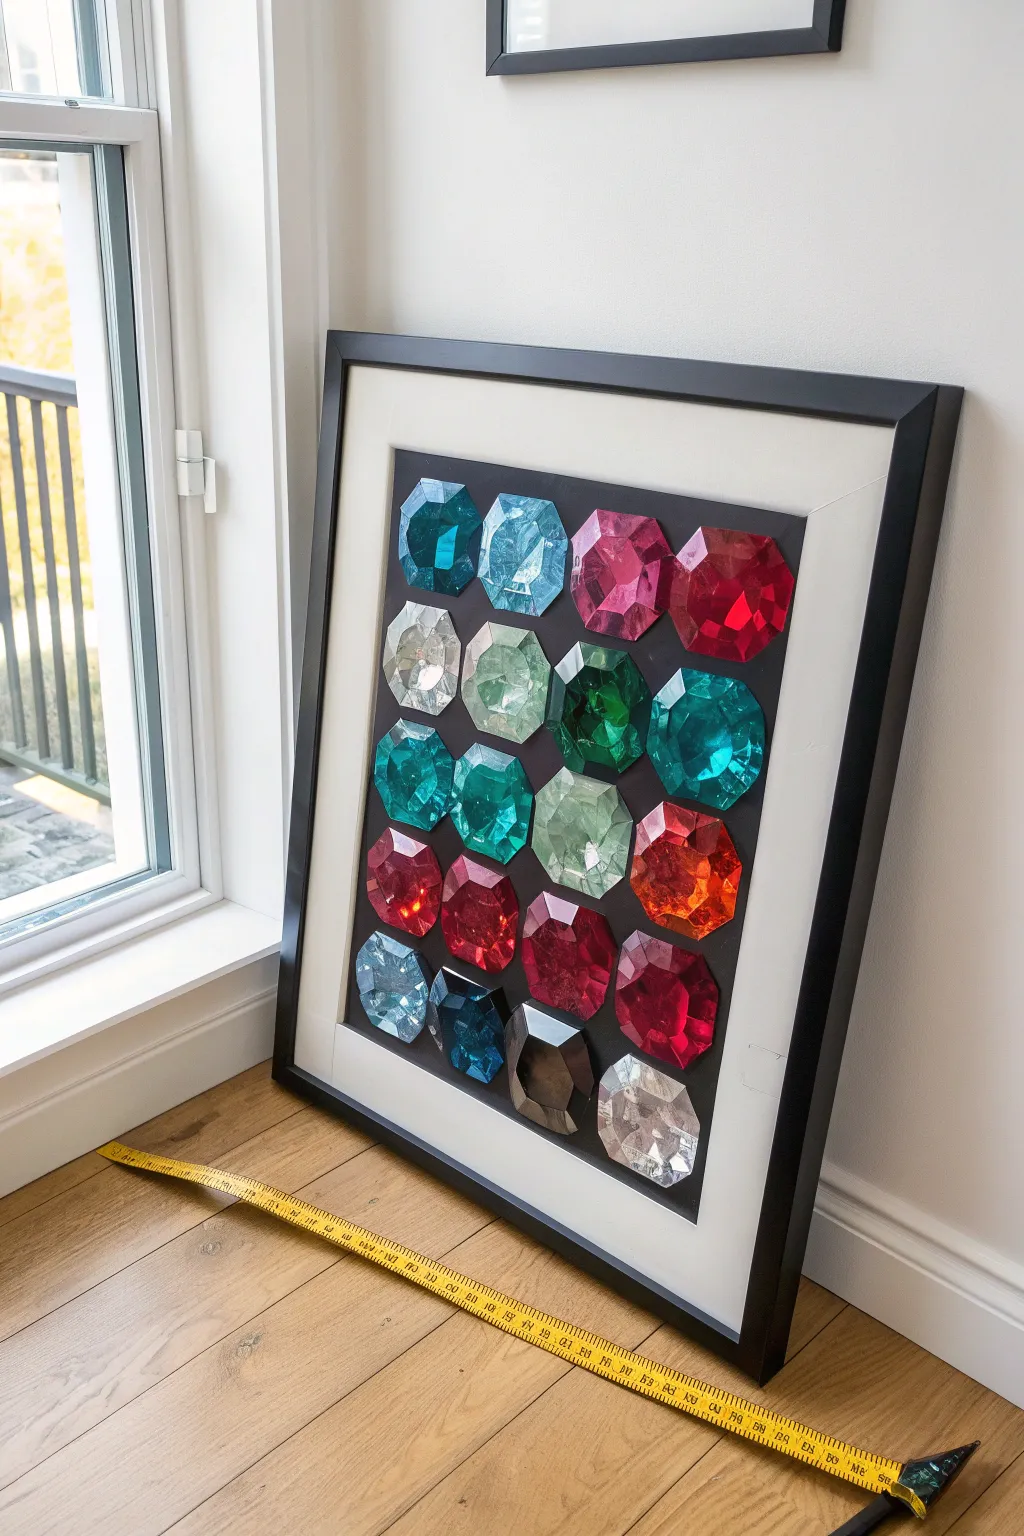
Transform a simple poster frame into a high-end gallery piece by displaying oversized faux gemstones. This project creates a striking, colorful grid that plays with light and geometry, perfect for adding a pop of jewel-toned elegance to any room.
Step-by-Step Tutorial
Materials
- Large poster frame (approx. 24×36 inches) with white mat
- Heavyweight black cardstock or foam board (sized to frame opening)
- Set of large faceted acrylic rhinestones or glass gems (various colors)
- Strong craft adhesive (E6000 or similar)
- Ruler or measuring tape
- White pencil or chalk
- Microfiber cloth
- Glass cleaner
- Painter’s tape or masking tape
Step 1: Preparation and Layout
-
Disassemble the frame:
Carefully remove the backing, the existing print, and the mat from your poster frame. Clean both sides of the glass or acrylic pane thoroughly with glass cleaner and a microfiber cloth to ensure no fingerprints remain inside. -
Prepare the background:
Cut your black cardstock or foam board to fit perfectly inside the frame’s opening. If using the white mat included with the frame, ensure the black background covers the entire visible area behind the mat window. -
Clean your gems:
Wipe down each large acrylic rhinestone or glass gem with a microfiber cloth. Dust or smudges will be very visible once framed, so take a moment to polish them now. -
Dry run arrangement:
Lay your black background flat on a table. Place the white mat over it temporarily to visualize the boundaries. Arrange your gems in a grid pattern (e.g., 4 columns by 5 rows) within the window space. -
Find the spacing:
Adjust the gems until the spacing between them looks even. I like to leave about 1-2 inches between each gem, but this depends on your gem size and frame dimensions.
Step 2: Marking and Mounting
-
Measure the grid:
Once you are happy with the layout, use a ruler to measure the exact distance from the edges and between the gems. Create a small, faint dot with a white pencil or chalk at the center point where each gem will sit. -
Apply adhesive:
Pick up your first gem—starting from a top corner is usually easiest. Apply a generous dab of strong craft adhesive like E6000 to the flat back of the gem. Avoid getting too close to the edge so glue doesn’t seep out. -
Place the first gem:
Press the gem firmly onto your marked center point on the black background. Hold it for 10-15 seconds to ensure the initial tack holds. -
Continue the row:
Repeat the gluing process for the rest of the top row, checking your spacing with a ruler as you go to ensure everything stays straight. -
Complete the grid:
Work your way down, row by row. Gluing sequentially helps prevent your hand from accidentally knocking over already placed gems. -
Cleanup glue spills:
If any adhesive squeezes out, wipe it away immediately with a toothpick or a cotton swab. It’s much harder to remove once cured. -
Let it cure:
Allow the adhesive to dry completely. For heavy gems, leave the artwork flat for at least 24 hours to ensure a permanent bond.
Glue Ghosting?
If you see white fog or ‘ghosting’ around the gems from super glue fumes, use a tiny amount of petroleum jelly on a Q-tip to buff it away gently.
Step 3: Final Assembly
-
Re-clean the gems:
Give the tops of the gems one final polish to remove any dust that settled during the drying process. -
Position the mat:
Place the white mat over your mounted gems. Ensure the grid is centered nicely within the mat’s opening. -
Dust check:
Double-check the inside of your frame glass for any rogue dust specks. A quick blast of compressed air can be very helpful here. -
Assemble the layers:
Carefully lower the glass/frame structure onto your artwork (or place the artwork into the frame face-down, depending on how your frame loads). -
Secure the backing:
Replace the frame backing board and secure the closures. If the gems differ in height significantly, ensure the backing isn’t pressing so hard that it bends.
Add Sparkle
Install a small battery-operated LED light strip inside the frame lip to illuminate the facets of the gems for a stunning evening glow.
Now step back and admire how the light catches every angle of your new modern art piece


Ornate Frame Glow-Up
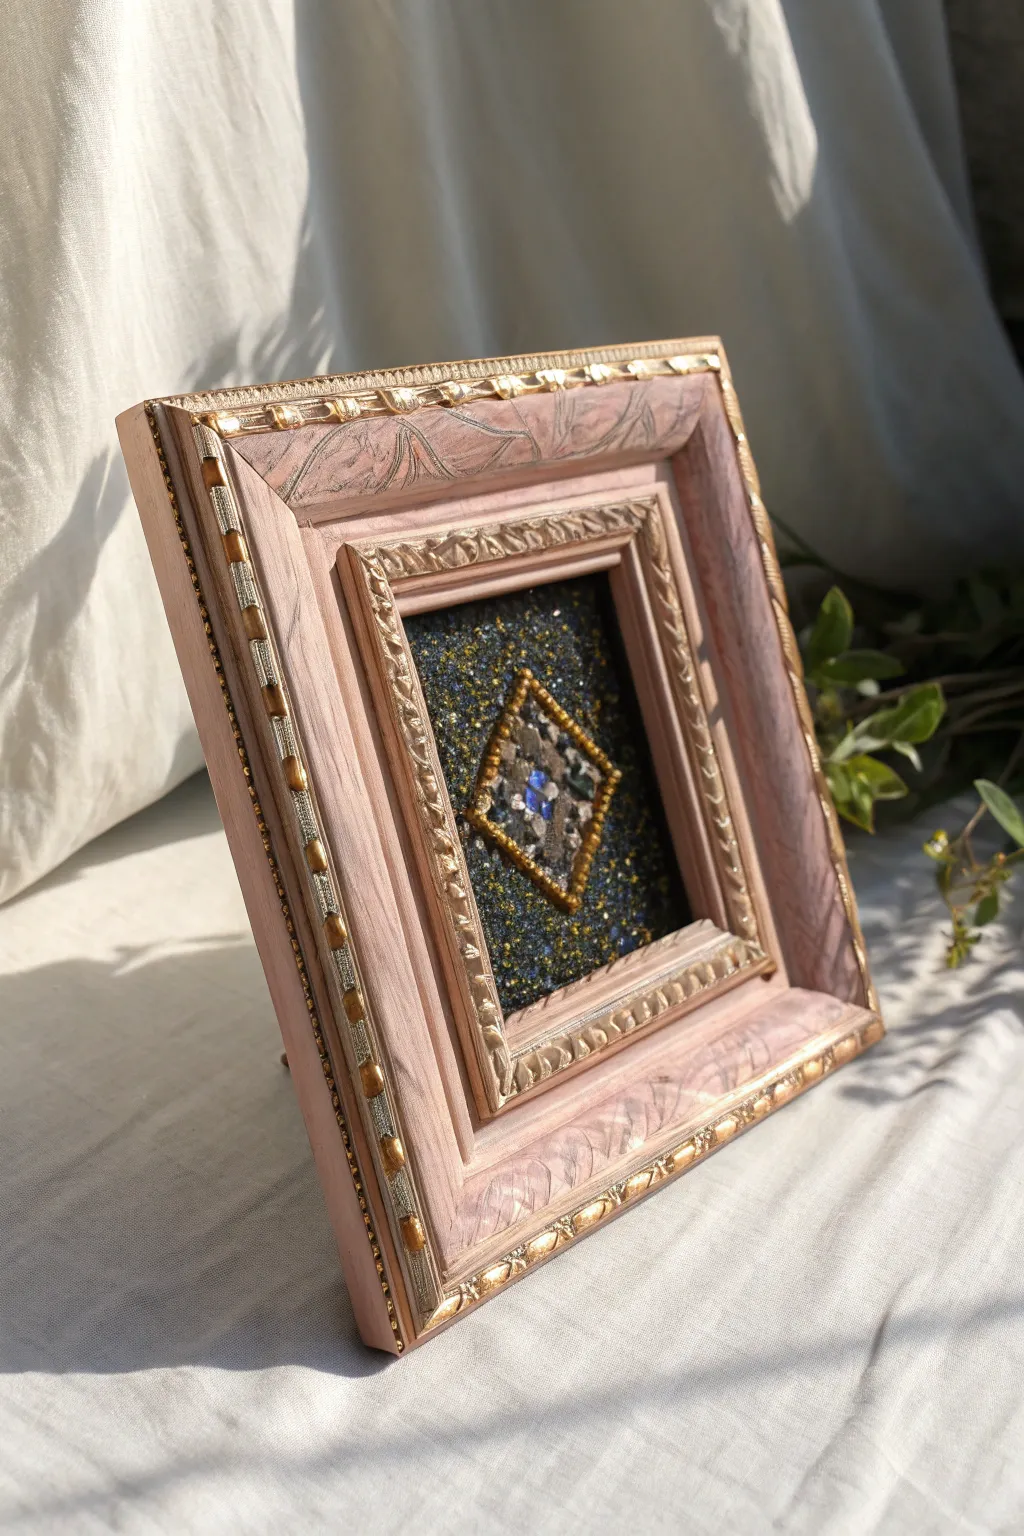
Transform a standard ornate frame into a regal, jewelry-inspired display piece with soft blush tones and rich gold accents. This layered framing technique creates distinct depth, perfectly showcasing a small, detailed diamond painting or mosaic centerpiece.
How-To Guide
Materials
- Ornate wooden photo frame (deep profile wood or resin)
- Acrylic paint (pale blush pink)
- Metallic gold paint or gilding wax
- Small flat paintbrush
- Small detail paintbrush
- Completed miniature diamond painting (diamond shape motif)
- Dark glitter cardstock or velvet paper (for mounting)
- E6000 or strong craft glue
- Gold bead trim or rhinestone chain
- Scissors
- Matte sealant spray
Step 1: Painting the Base Frame
-
Clean surface:
Begin by wiping down your ornate frame with a damp cloth to remove any dust or oils. Let it dry completely. -
Base coat:
Apply a base coat of pale blush pink acrylic paint. Use a flat brush for the broader surfaces. -
Get into crevices:
While the paint is wet, use a smaller dry brush to stipple the paint into the deep carved details of the moulding. -
Second coat:
Allow the first coat to dry for about 20 minutes, then apply a second coat for opaque, even coverage. -
Dry completely:
Let the pink base coat cure fully for at least an hour before moving to metallic accents.
Step 2: Adding Gold Accents
-
Select gold areas:
Identify the raised patterns on your frame—usually the inner rim and any outer scrollwork. -
Apply gilding:
Using your detail brush or a finger (if using gilding wax), carefully apply gold to the highest points of the texture. -
Dry brushing technique:
For the flat pink areas, lightly dry-brush a very small amount of gold over the surface to create a shimmering, textured woodgrain effect. -
Accent the corners:
Add a slightly heavier application of gold to the corners of the frame to emphasize the joinery. -
Seal the frame:
Once the gold is dry, lightly mist the entire frame with a matte sealant to protect the finish.
Gilding Pro-Tip
Don’t aim for perfection with the gold. A ‘skimming’ motion that misses the recessed areas makes the carving pop much more than a solid line.
Step 3: Mounting the Diamond Art
-
Prepare backing:
Cut a piece of dark glitter cardstock or velvet paper to fit exactly inside the frame’s opening. -
Center the art:
Take your small diamond painting motif—trim away any excess canvas right up to the bead line. -
Glue the motif:
Apply a strong craft glue to the back of the diamond painting and press it firmly into the center of your dark backing paper. -
Frame alignment:
Insert the backing board with the mounted art into the frame and secure the back tabs. -
Inner beading (optional):
I like to finish the look by gluing a tiny strand of gold seed beads or chain around the diamond motif itself to define the edge.
Sticky Situations
If the diamond drills start sliding while mounting, the glue is too wet. Let the adhesive tack up for 30 seconds before pressing the artwork down.
Place your shimmering framed artwork near a window to catch the light and enjoy the sparkle


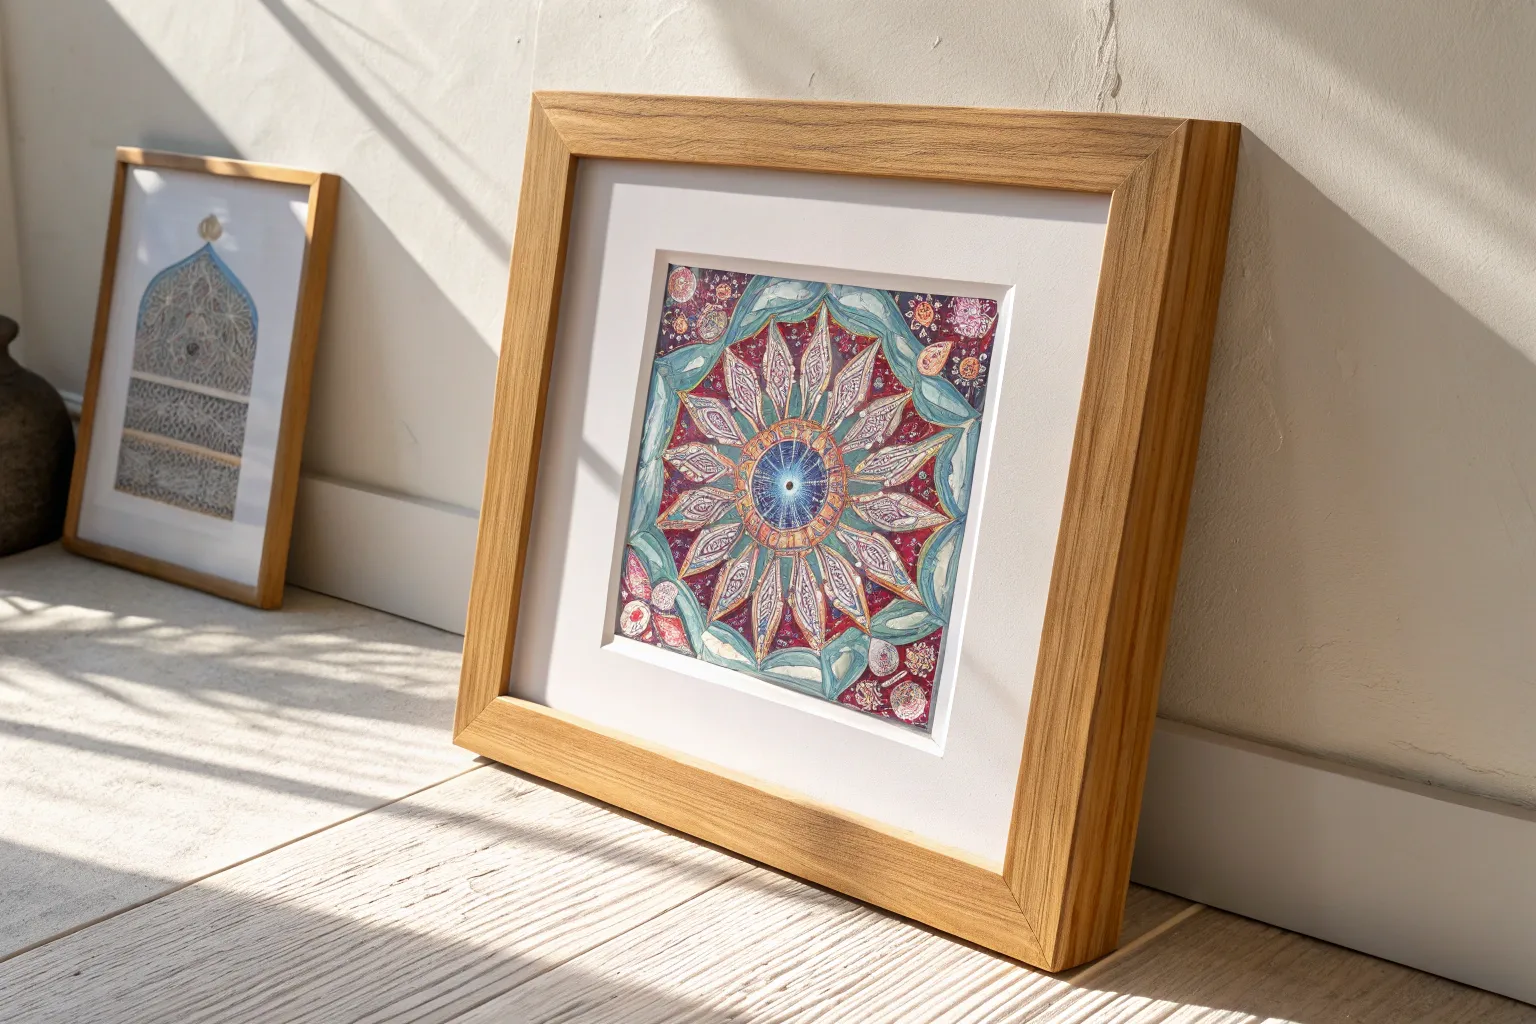
Foam Board Mount Inside a Standard Frame
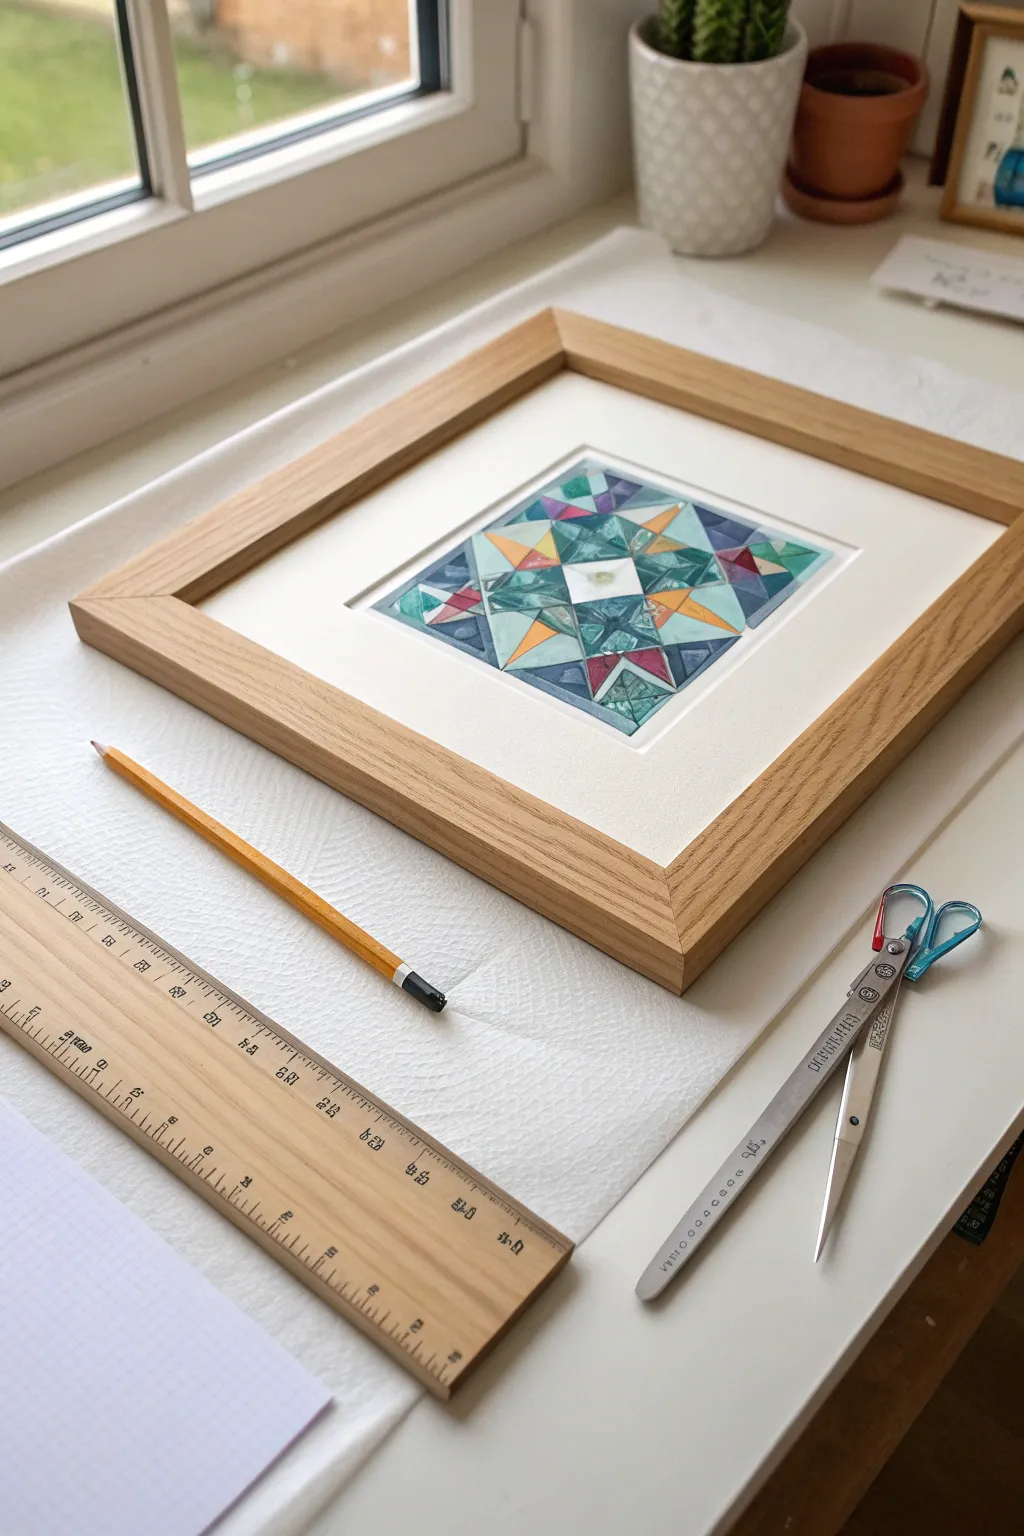
This project transforms simple geometric shapes into a stunning, quilt-inspired artwork that radiates with cool blues, teals, and warm amber tones. Encased in a natural oak frame with a clean white mount, the finished piece brings a sophisticated, modern craft aesthetic to any brighten windowsill or desk.
How-To Guide
Materials
- Square sheet of high-quality watercolor paper (approx. 200gsm+)
- Pencil (HB or 2H for light lines)
- Ruler
- Eraser
- Watercolor paints or watercolor pencils (teal, indigo, mint, amber/orange/gold, muted red)
- Fine detail paintbrush (size 0 or 1)
- Clean water and paper towels
- Square oak finish frame (shadow box style works best)
- White mat board (passe-partout) sized to frame
- Acid-free mounting tape
- Scissors
Step 1: Drafting the Design
-
Establish the boundaries:
Begin by measuring a perfect square in the center of your watercolor paper. Leave at least a 2-inch margin of white space around the outside to accommodate the mat board later. -
Create the grid:
Using your ruler and pencil, lightly divide your main square into a 3×3 or 4×4 grid system, depending on how dense you want the pattern. The artwork in the image uses a centralized design, so mark the exact center point. -
Draw the star points:
Sketch the prominent eight-pointed star shape radiating from the center. Draw four long points extending to the corners and four shorter points extending to the cardinal directions (North, South, East, West). -
Subdivide into triangles:
Inside each large geometric section, use your ruler to create smaller triangles. This ‘shattered glass’ or quilt effect allows you to use different shades within one larger shape. -
Refine the lines:
Go over your necessary lines firmly enough to see them while painting, but gently erase any grid construction lines you don’t need so they don’t show through the paint.
Uneven Watercolors?
If you get ‘blooms’ or watermarks, don’t panic. Wet the area slightly with clean water and lift the excess pigment with a thirsty brush or tissue to smooth it out.
Step 2: Painting the Pattern
-
Prepare your palette:
Mix a range of cool ocean tones: a deep indigo, a medium teal, and a light mint green. Contrast these with a warm amber or golden yellow and a touch of muted berry red. -
Start with the center:
Keep the very center square quite light, perhaps just a wash of very pale green or leaving the white of the paper showing to create a focal point. -
Apply the first color wash:
Choose specific triangles to fill with your lightest teal shade. Paint carefully up to the pencil lines. I prefer to work in non-adjacent sections to prevent wet paint from bleeding into neighbors. -
Deepen the shadows:
Use the indigo paint for the triangles that would naturally be in shadow or to create depth. These dark values act as anchors for the lighter colors. -
Add warm accents:
Fill the star points or specific geometric secondary shapes with the amber/gold color. This complementary color makes the blue tones pop significantly. -
Create texture:
While some paint is still slightly damp, you can drop in a tiny bit of water or darker pigment to create a mottled, textured look similar to stained glass or glazed pottery. -
Let it dry completely:
Allow the paper to sit undisturbed until bone dry. This is crucial before erasing any visible pencil marks.
Step 3: Framing and Mounting
-
Clean up the drawing:
Once the paint is totally dry, gently erase any remaining graphite lines visible between the painted shapes for a clean, professional finish. -
Prepare the backing:
Remove the backboard from your frame. Place your artwork face up on a clean surface. -
Position the mat:
Place the white mat board over your artwork. Adjust the paper until the painted square is perfectly centered within the mat’s window. -
Secure the art:
Holding everything steady, tape the top edge of the watercolor paper to the back of the mat board using acid-free tape. This ‘T-hinge’ method allows the paper to expand and contract with humidity without buckling. -
Final assembly:
Clean the inside of the frame glass to remove dust. Insert the mat and artwork stack, place the backing board on top, and secure the frame clips.
Sharp Edges Trick
For ultra-crisp geometric lines, use thin drafting tape or masking tape over the pencil lines. Paint one section, let it dry, peel, re-tape, and paint the next.
Enjoy the calm satisfaction of seeing your precise geometric work perfectly presented in its new home


Have a question or want to share your own experience? I'd love to hear from you in the comments below!