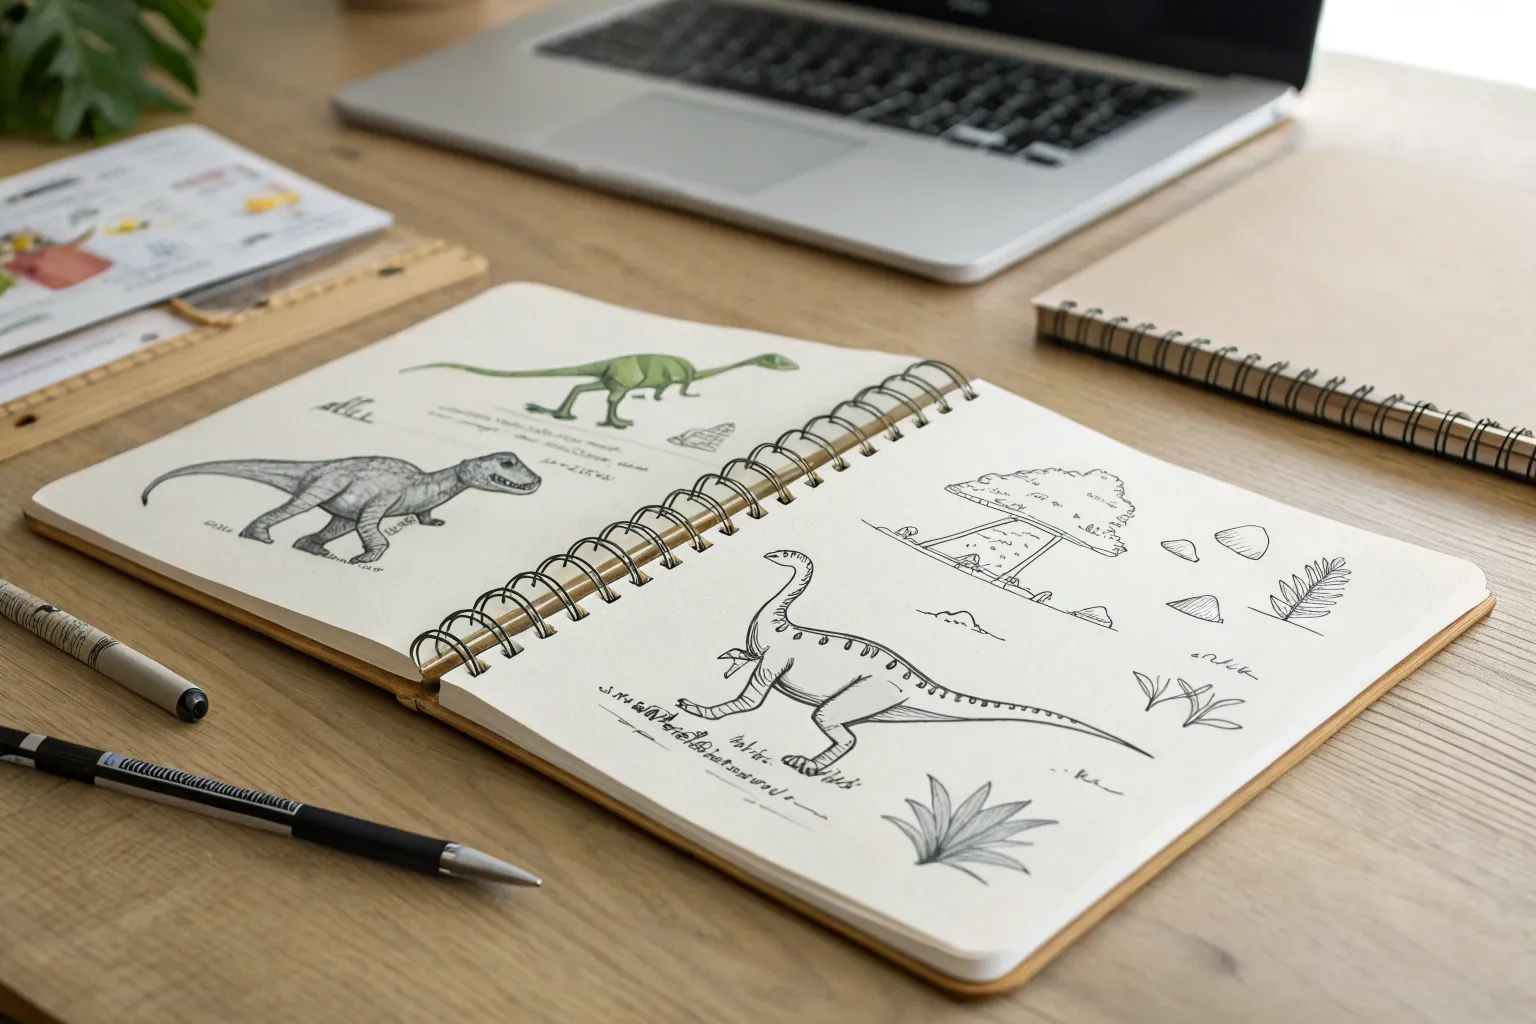
If you’ve been itching to draw dinosaurs, you’re in the right headspace—these prehistoric shapes are perfect for everything from quick doodles to super detailed studies. I pulled together a mix of classic dinos and playful twists so you can find a dinosaur drawing idea that matches your mood (and your skill level) today.
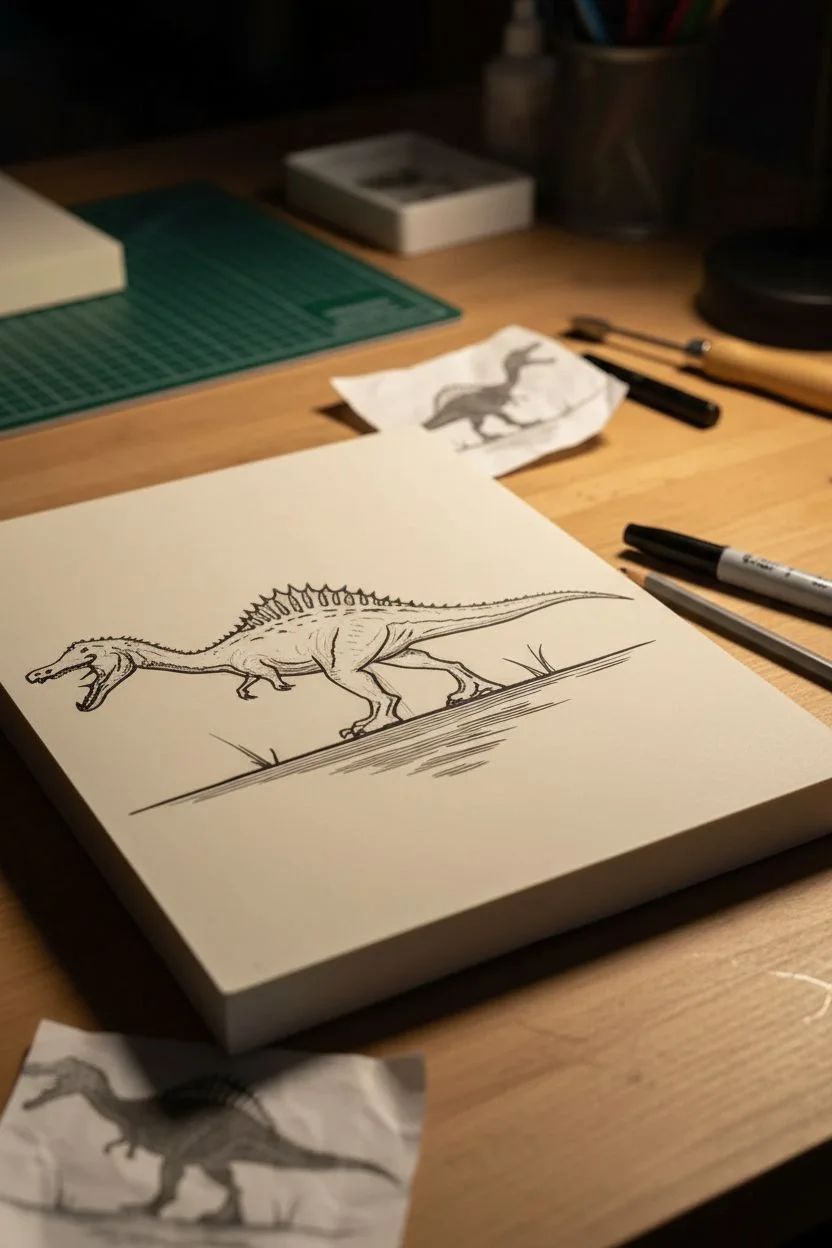
Classic T-Rex Full-Body Pose


Capture the prehistoric power of the king of dinosaurs with this classic pen-and-ink illustration. This project focuses on clean linework and subtle texturing to create a timeless, slightly scientific rendering of a T-Rex in mid-stride.
Step-by-Step
Materials
- High-quality cream or off-white drawing paper (smooth bristol or mixed media)
- HB or 2H graphite pencil for sketching
- Kneaded eraser
- Fine liner pens (sizes 005, 01, 03, and 05)
- Ruler (optional for checking proportions)
Step 1: Setting the Skeleton
-
Establish the main axis:
Begin with your pencil by lightly drawing a diagonal line of action rising from the bottom left to the top right. This will guide the dinosaur’s forward motion from tail to head. -
Block in the masses:
Sketch a large, horizontal oval for the main torso. Connect a smaller, slightly tilted oval to the top right for the head, leaving space for a thick neck. Add a long, tapering curve sweeping down and back for the tail. -
Draft the legs:
Draw the legs using stick figures first, then flesh them out. The left leg (closest to us) should be bent at the knee and ankle, planted firmly. The right leg touches the ground further back, creating a walking stride. -
Define the head shape:
Refine the head oval into a boxier skull shape. Sketch a ‘V’ notch for the open mouth and indicate the ridges above the eye socket and snout. -
Connect and refine:
Connect the head to the body with a thick, muscular neck. Smooth out the transition from the torso to the tail so it feels like one continuous spinal column.
Line Weight Magic
Make the bottom outlines of the belly and tail twice as thick as the top outlines. This simple trick instantly adds weight and gravity to your dino.
Step 2: Inking the Outlines
-
Start the main contour:
Switch to your 03 or 05 pen. Begin tracing your final pencil lines, starting with the top of the head and moving down the spine. Keep your line weight consistent but firm. -
Detail the face:
Use a finer 01 pen for the facial details. Carefully ink the eye, leaving a tiny white highlight if possible. Outline the teeth with jagged, uneven triangles to make them look organic. -
Ink the limbs:
Outline the arms and legs. Pay attention to the small, two-fingered claws on the hands. For the feet, ensure the claws look heavy and sharp, gripping the imagined ground. -
Add skin folds:
Draw small, curved lines where the limbs meet the body—specifically the shoulder, hip, and neck—to suggest wrinkled, thick skin. -
Erase preparatory marks:
Once the ink is completely dry—I usually give it a solid five minutes—gently erase all graphite sketches with your kneaded eraser.
Go Prehistoric
Tea-stain your paper before drawing to give the final piece an authentic ‘found fossil journal’ artifact look.
Step 3: Texturing and Shading
-
Underbelly shading:
Using the 005 or 01 pen, add hatching (parallel lines) along the bottom of the tail and the belly. This grounds the figure and gives it volume. -
Shadowing the legs:
Apply denser hatching or stippling (tiny dots) on the rear leg and the underside of the front thigh. This pushes the back leg into the background visually. -
Adding texture spots:
Draw small clusters of irregular circles or spots along the back and thighs. Don’t cover the whole dinosaur; just suggest a pebbly texture in key areas. -
Defining musculature:
Use short, broken lines to hint at muscle definition in the calf and thigh. These lines shouldn’t be solid outlines, just suggestions of form. -
Enhancing the head:
Add tiny dots around the eye socket and snout to create depth without making the face look too dark. -
Grounding the figure:
Sketch some loose, scribbly horizontal lines under the feet to imply dust or dirt kicking up. This shadow connects the creature to the page. -
Final contrast check:
Step back and look at your drawing. If the legs or belly look too flat, go back in with your 03 pen and thicken the outline on the shadowed side (the bottom edge) only.
You now have a museum-worthy illustration that captures the might of the Cretaceous period right on your desk


Roaring T-Rex Head Study
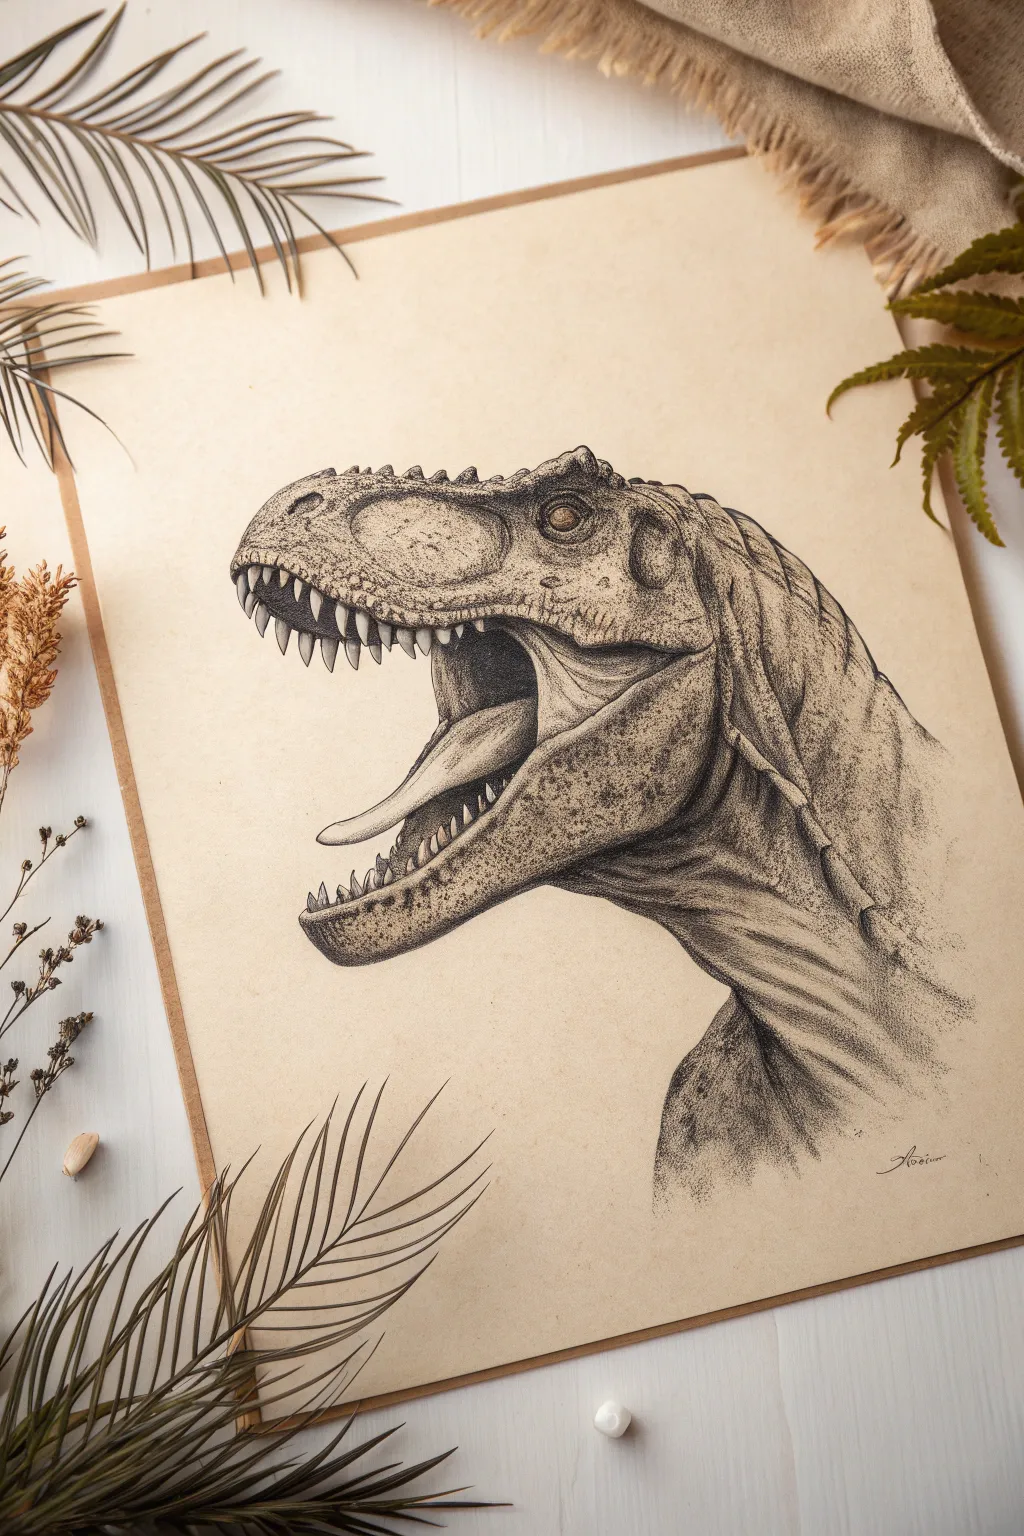
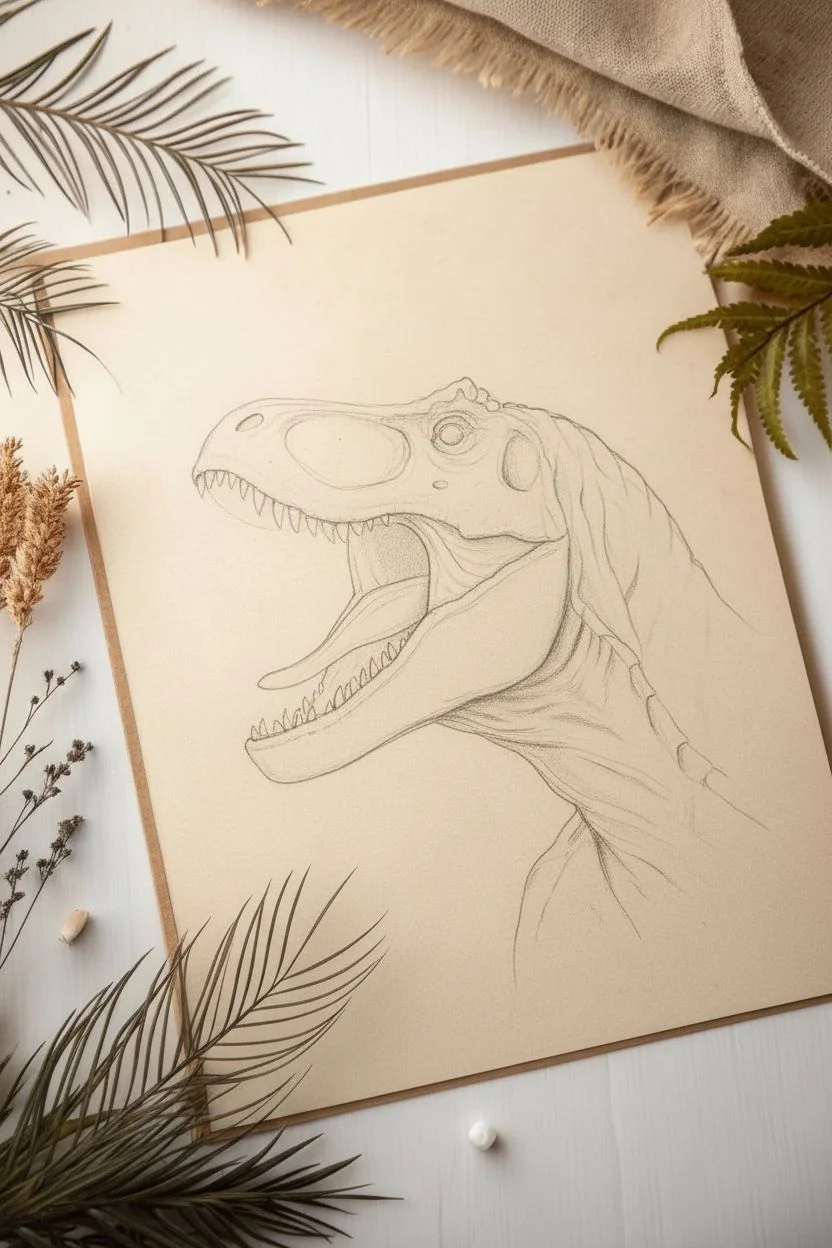
This study captures the raw power of a Tyrannosaurus Rex in profile, focusing on intricate scale textures and dynamic shading. The natural warmth of toned paper brings the prehistoric creature to life, allowing for striking highlights and deep shadows.
Step-by-Step Guide
Materials
- Toned tan or beige drawing paper (smooth or vellum surface)
- Graphite pencils (HB, 2B, 4B, 6B)
- Charcoal pencil (soft) for darkest blacks
- White charcoal or pastel pencil for highlights
- Kneaded eraser
- Fine-point blending stump
- Mechanical pencil (0.5mm HB) for details
Step 1: Structural Framework
-
Establish the Basic Shapes:
Start with a light HB pencil. Draw a large oval for the main skull mass and a smaller, slightly overlapping oval for the snout. Connect them with flowing lines to form the powerful neck. -
Map the Jaw:
Sketch an angled ‘V’ shape opening downwards from the skull to represent the open jaw. Ensure the lower jaw connects behind the skull mass to hinge correctly. -
Refine the Profile:
Trace the outer contour, giving the snout a slight downward curve and adding the prominent brow ridge above where the eye will be. Keep your lines loose and erasable. -
Place Facial Features:
Mark the position of the small, deep-set eye under the brow. Sketch the nostril near the front of the snout and outline the large fenestrae (skull openings) as subtle depressions behind the eye and jaw.
Step 2: Detailing the Mouth
-
Sketch the Teeth:
Draw the iconic serrated teeth. Make the upper teeth significantly larger and slightly curved backward. Vary their sizes to show age and wear; they shouldn’t look like a perfecting uniform row. -
Add the Tongue:
Draw the tongue lifting slightly from the floor of the mouth. Use a curved line to show its thickness and muscle tension as the dinosaur roars. -
Darken the Mouth Cavity:
Using a 4B or 6B pencil, shade the interior of the mouth behind the tongue. This should be one of the darkest areas to create depth, pushing the teeth and tongue forward.
Scale Variation
Don’t make all scales the same size. Reptile scales are small and tight around flexible joints (like eyes/corners of the mouth) and larger/flatter on rigid areas like the snout.
Step 3: Texture and Shading
-
Start the Eye:
Detail the eye with a sharp mechanical pencil. Draw a pupil and iris, leaving a tiny spot of the paper bare for a glint of light. Shade the skin folds around the eye heavily to make it look sunken and protected. -
Create Skin Folds:
Draw deep wrinkles radiating from the corner of the mouth and down the neck. These folds suggest thick, leathery skin stretching as the jaw opens. -
Stipple the Texture:
Instead of drawing individual scales everywhere, use a stippling technique (tiny dots) along the snout and jawline. I find this mimics the pebbled texture of reptile skin effectively without overcrowding the drawing. -
Shade the Neck:
Use a 2B pencil to shade the underside of the neck and throat. Follow the curve of the muscles. Use your blending stump to smooth this shading out, creating a gradient from dark to light. -
Define the Scales:
On the snout and brow, draw small, irregular polygon shapes to represent larger plate-like scales. Vary the pressure; press harder in the crevices between scales.
Muddy Shading?
If your pencil shading looks smeared or gray rather than crisp, you may be over-blending. Re-apply graphite purely with the pencil tip to bring back texture and sharp lines.
Step 4: Refinement and Highlights
-
Deepen the Shadows:
Switch to your soft charcoal pencil for the deepest shadows—specifically under the jaw, inside the nostril, and behind the neck folds. This high contrast makes the form pop. -
Blend Midtones:
Use the blending stump to soften the transition between your stippled texture and the paper tone. This integrates the texture so it looks like part of the skin, not just floating dots. -
Add White Highlights:
Take your white charcoal or pastel pencil and accentuate the lit areas: the top of the brow ridge, the bridge of the nose, and the wet slickness of the tongue and glistening teeth. -
Final Polish:
Clean up the edges of the drawing with an eraser. Reinforce the outer outline with a sharp 4B pencil to ensure the silhouette is crisp against the paper.
This meticulous study rewards patience, resulting in a prehistoric portrait that feels both ancient and alive


Triceratops With Big Shapes First
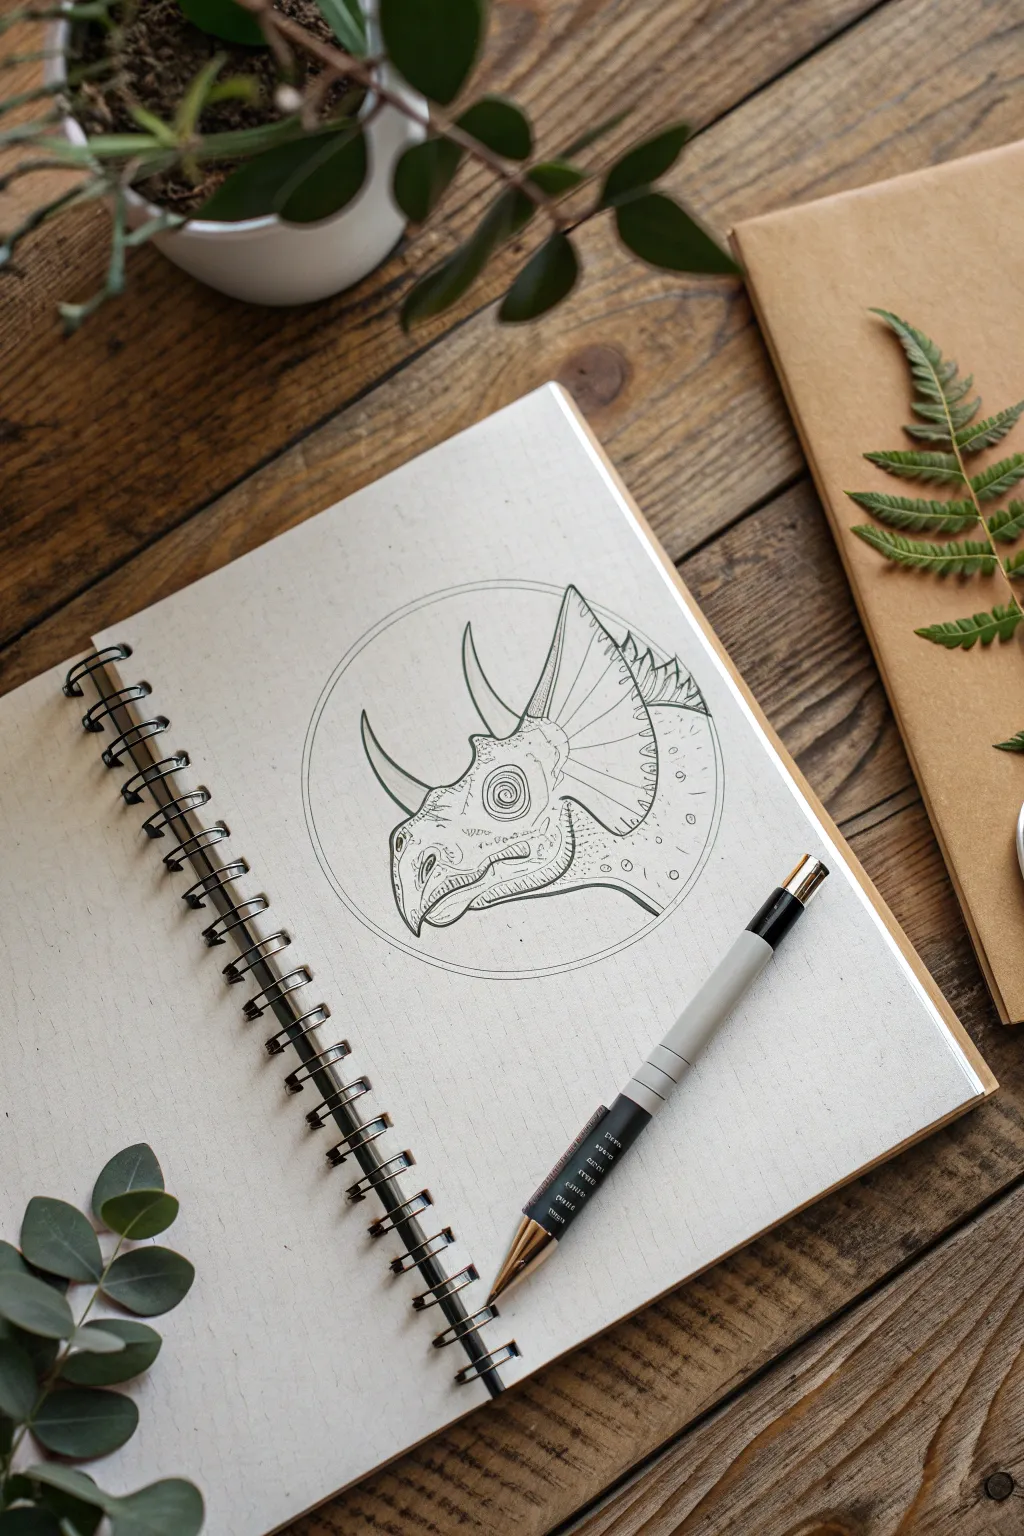
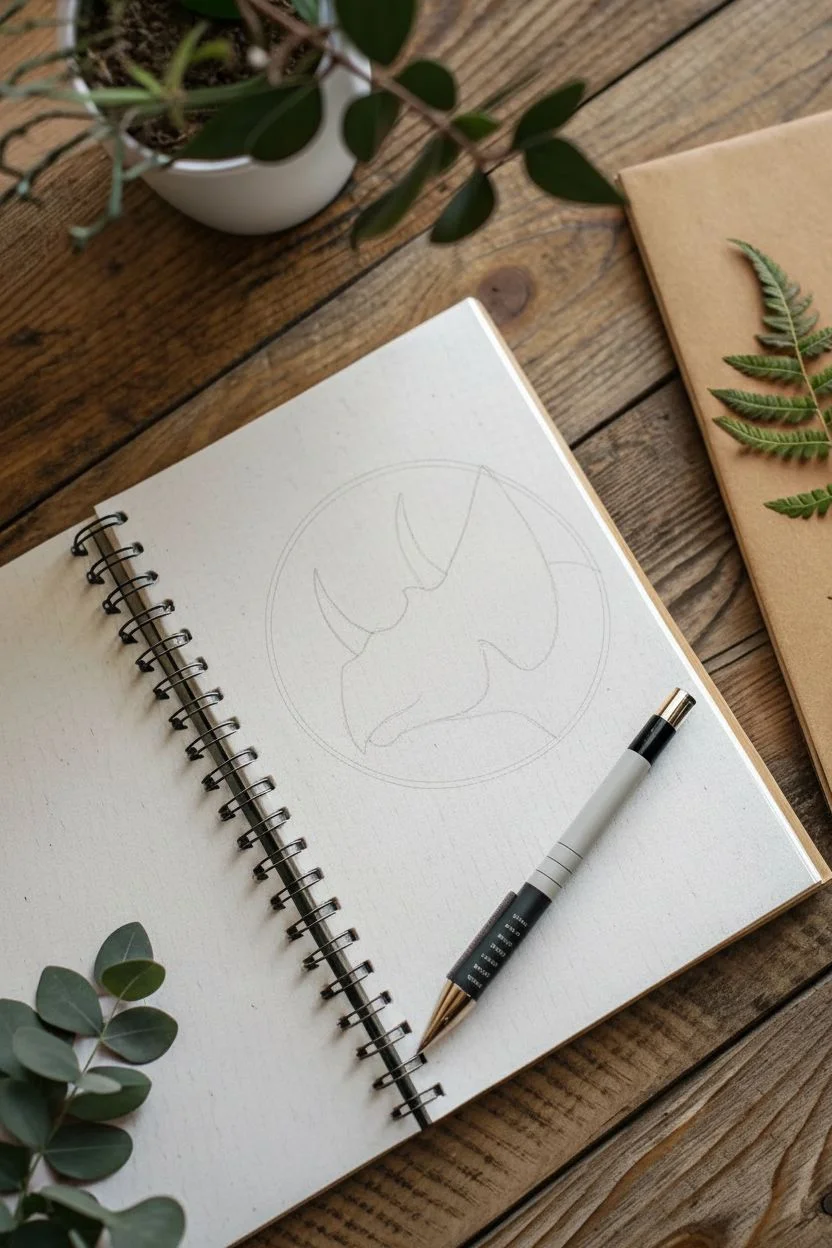
Capture the distinct profile of a Triceratops using clean lines and simple geometric foundations. This guide walks you through building up the head shape, adding the iconic horns and frill, and finishing with fine textural details inside a neat circular frame.
Step-by-Step Tutorial
Materials
- Sketchbook or drawing paper
- HB pencil
- Eraser
- Compass or round object for tracing
- Fine liner pens (0.1mm, 0.3mm, and 0.5mm)
- Ruler (optional)
Step 1: Setting the Stage
-
Draw the frame:
Start by lightly drawing a perfect circle in the center of your page using a compass or by tracing a round object like a bowl. This will serve as a boundary for your composition. -
Map the head shape:
Visualize a rounded triangle pointing towards the left side of the circle. Lightly sketch this shape to represent the main mass of the dinosaur’s skull. -
Add the frill guide:
Draw a large, curved wedge shape extending from the back of the skull triangle towards the right edge of the circle. It should look a bit like a fan.
Step 2: Constructing the Features
-
Position the beak:
At the very tip of your initial triangle, sketch a downward-curving hook shape for the distinct parrot-like beak of the Triceratops. -
Draft the horns:
Pencil in two long, curved spikes. Place the brow horn (the big one) growing upward and forward from above the eye area. Place the smaller nose horn directly above the beak. -
Locate the eye:
Draw a small circle roughly where the skull triangle meets the frill wedge. Add a concentric ring around it to suggest wrinkles or eyelids. -
Refine the jawline:
Sketch a firm jawline connecting the beak to the neck area. Add a subtle curve for the mouth that extends back towards the cheek.
Keep It Smooth
When inking the long curves of the horns, lock your wrist and move your entire arm. This prevents shaky lines.
Step 3: Refining the Sketch
-
Define the frill edge:
Add a scalloped or wavy edge to the top of the frill shape. Draw small triangular spikes along this edge to give it that armored look. -
Add surface details:
Lightly sketch irregular pebbly patterns on the cheek and frill. I find keeping these faint helps prevent the drawing from looking too cluttered later. -
Draw the neck:
Connect the head to the bottom of the circle with a thick, sturdy neck line, implying the body continues outside the frame.
Pop of Color
Use watercolor pencils to lightly shade the frill patterns, then blend with a damp brush for a soft wash effect.
Step 4: Inking the Outline
-
Ink the main contours:
Using a 0.5mm fine liner, go over your main pencil lines for the profile, horns, and frill. Use confident, smooth strokes. -
Detail the eye:
Switch to a 0.3mm pen. Carefully ink the eye, leaving a tiny white dot for a highlight to bring it to life. Define the wrinkles surrounding it. -
Texture the horns:
Add subtle, curved lines running along the length of the horns with the 0.1mm pen to suggest a keratin texture. -
Ink the beak:
Outline the beak with the 0.5mm pen, then add a few vertical hatch marks near the base to show curvature. -
Define the frill spikes:
Ink the small triangular spikes along the frill’s edge. You can make the outline slightly thicker here to emphasizes the bone structure.
Step 5: Final Textures
-
Add skin texture:
With your finest pen (0.1mm), draw small, broken circles and dots across the cheek and neck area. Don’t fill every space; suggest texture rather than drawing every scale. -
Shade the recessed areas:
Use minimal hatching (short parallel lines) under the jaw and beneath the frill to create depth and shadow. -
Ink the circular frame:
Carefully trace over your initial circle with the 0.5mm pen. To make it stand out, draw a second, slightly smaller circle inside the first one for a double-border effect. -
Clean up:
Wait for the ink to dry completely. Gently erase all remaining pencil marks to reveal your crisp, clean line art.
You now have a striking prehistoric portrait ready to be the centerpiece of your sketchbook page


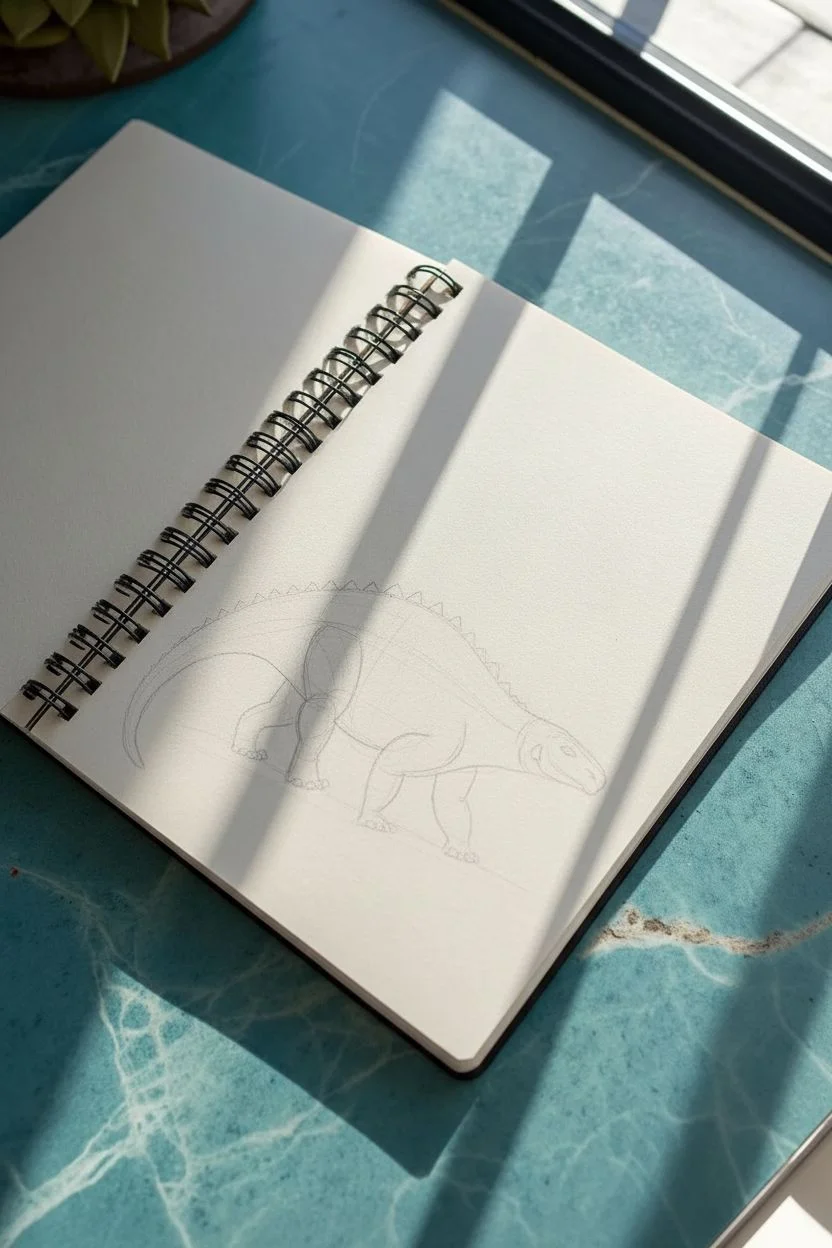
Stegosaurus Plates Pattern Practice

This charming, hand-drawn stegosaurus captures the playful side of prehistoric art with its clean lines and patterned details. Using simple pen techniques like stippling and hatching, youll build a character full of personality right in your sketchbook.
Detailed Instructions
Materials
- Sketchbook (smooth, heavyweight paper preferred)
- Black fineliner pen (0.5mm or 0.8mm)
- Pencil (HB or 2B for sketching)
- Eraser
Step 1: Drafting the Basic Skeleton
-
Outline the head and body:
Start with a light pencil sketch. Draw a small, rounded oval for the head on the left side of your page. Connect this to a much larger, bean-shaped oval for the main body. -
Connect the neck and tail:
Draw two curving lines to connect the head to the body, forming a somewhat thick neck. Extend the back of the body into a long, tapering tail that points downward toward the ground. -
Position the legs:
Sketch four stout legs. The front legs should be slightly shorter and bent at the elbow. The back legs are thick and powerful, grounded firmly.
Step 2: Inking the Outline
-
Trace the main profile:
Grab your black fineliner. Start at the nose, drawing a smooth line over the head, down the neck, and over the arched back all the way to the tail tip. Keep your hand steady for a confident line. -
Define the face:
Add a simple dot for the eye with a small curved eyebrow above it. Draw a short line for the mouth to give him a slight smile. -
Draw the underbelly and legs:
Ink the underside of the neck and belly. When drawing the legs, overlap the front leg slightly over the belly line to show depth. Give the toes distinct rounded shapes. -
Ink the rear leg:
For the large rear thigh, draw a curved line that starts high on the body to show muscle mass. Complete the foot with rounded toes.
Ink Confidence
Don’t connect every single line perfectly. Leaving small gaps in the outlines of the plates or scales adds a looser, more artistic sketchbook feel.
Step 3: Adding the Plates
-
Draw the plate outlines:
Along the spine, draw a series of leaf-shaped plates. Start small near the neck, make them largest at the center of the back, and taper them down again towards the tail. -
Detail the plates:
Inside each plate, draw a central spine line. Then, add diagonal hatching lines fanning out from this center line to simulate texture and ridges. -
Add tail spikes:
At the very end of the tail, add two or three small, triangular spikes for defense.
Smudge Alert
If you are left-handed, place a scrap piece of paper under your hand as you draw to prevent the fineliner ink from smearing across the page.
Step 4: Texturing and Finishing Touches
-
Add spot patterns:
Draw a row of irregular circle spots along the upper back, just below the plates. I like to vary the sizes slightly to make it look more organic. -
Stipple specifically:
Using just the tip of your pen, add small dots (stippling) on the underbelly, the bottom of the tail, and the knees to suggest shadow and rough skin texture. -
Create ground details:
Under the feet, sketch a few jagged lines to represent grass tufts. Add horizontal speed lines below the feet to ground the dinosaur. -
Erase pencil marks:
Wait until the ink is completely dry to avoid smudging. Then, gently erase all your initial pencil guidelines to reveal the crisp black and white drawing.
Now you have a neat prehistoric pal ready to roam across your sketchbook pages
BRUSH GUIDE
The Right Brush for Every Stroke
From clean lines to bold texture — master brush choice, stroke control, and essential techniques.
Explore the Full Guide
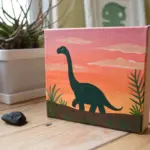
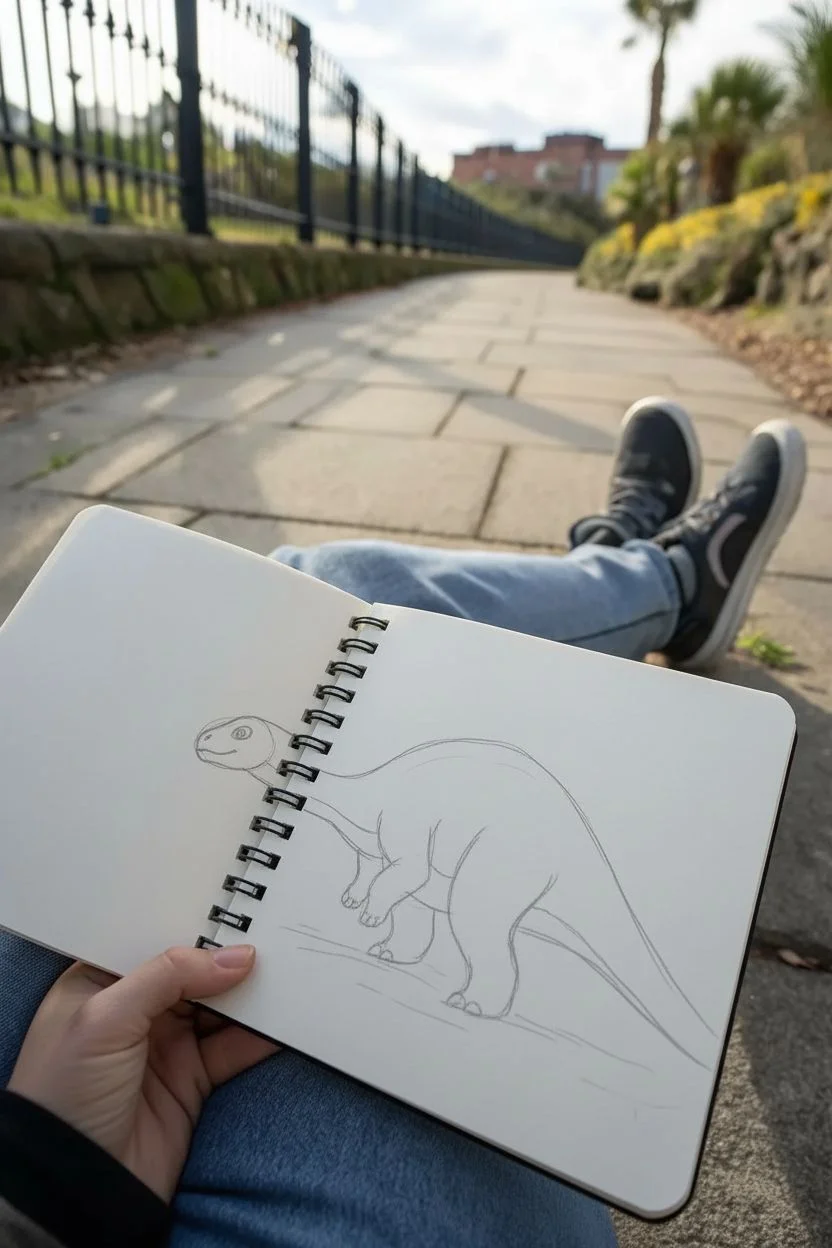
Long-Neck Sauropod in a Simple Landscape
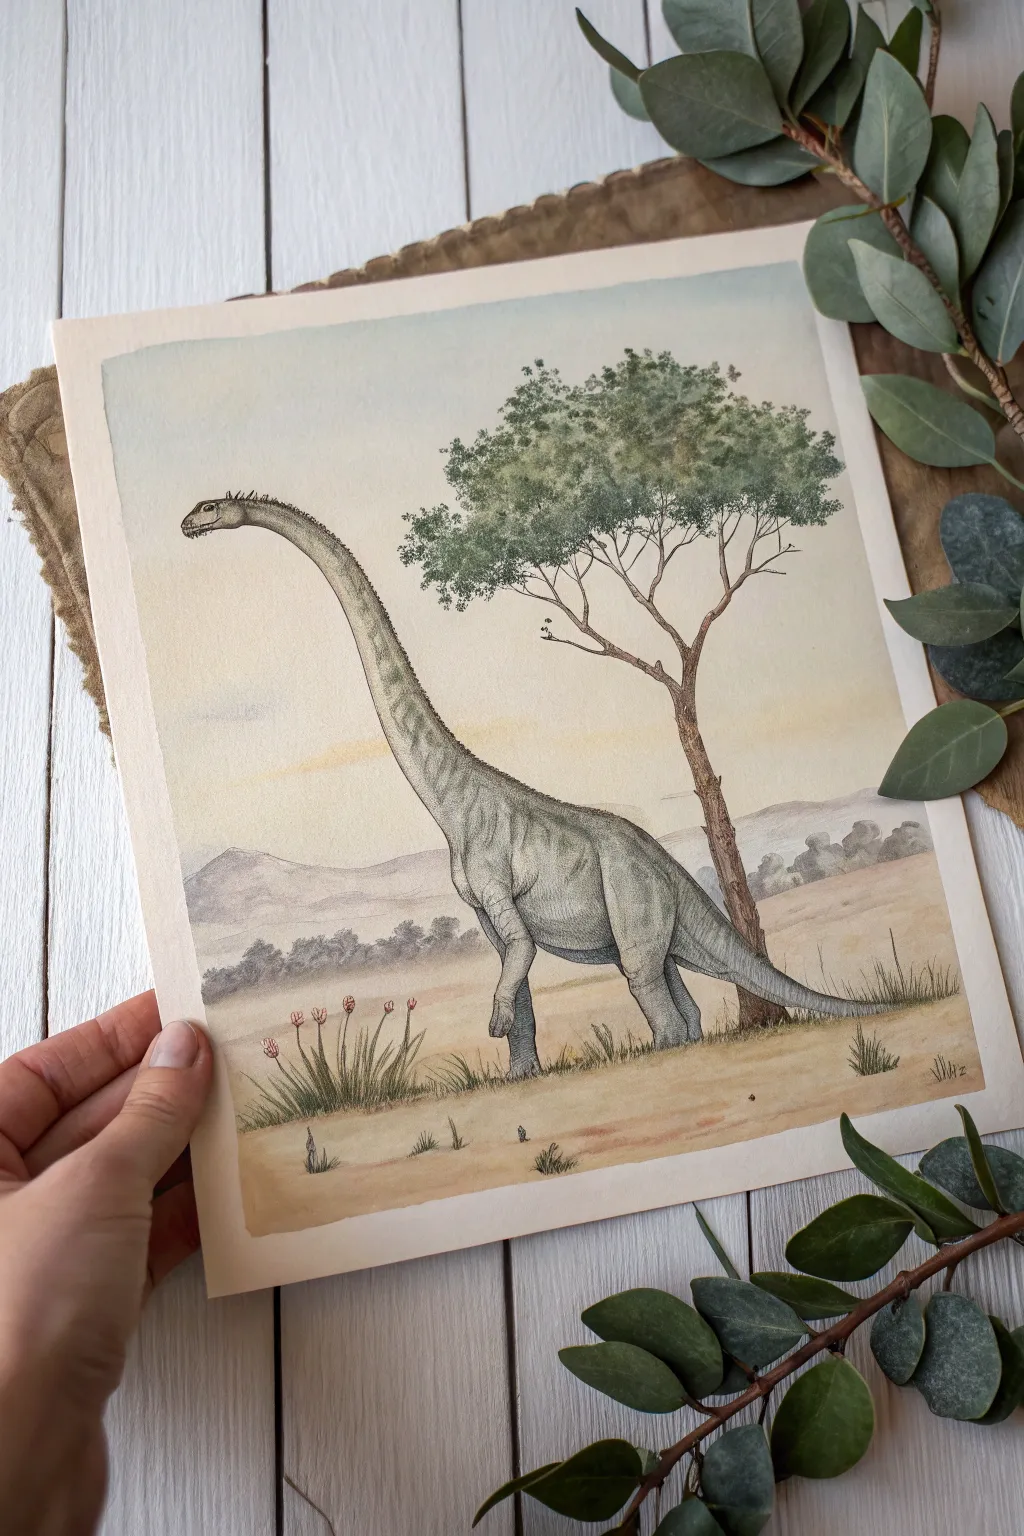
Transport yourself to the Jurassic period with this gentle, illustrative watercolor of a sauropod wandering a sun-bleached landscape. The soft, muted color palette and precise ink details give this piece a vintage scientific illustration feel that effectively captures a peaceful prehistoric moment.
Step-by-Step
Materials
- Cold-press watercolor paper (300gsm)
- HB pencil and eraser
- Waterproof fine liner pens (0.1mm and 0.05mm, dark sepia or black)
- Watercolor paints (Sap Green, Yellow Ochre, Burnt Sienna, Payne’s Grey, Ultramarine Blue, Alizarin Crimson)
- Round brushes (size 4, size 8)
- Mixing palette
- Clean water and paper towels
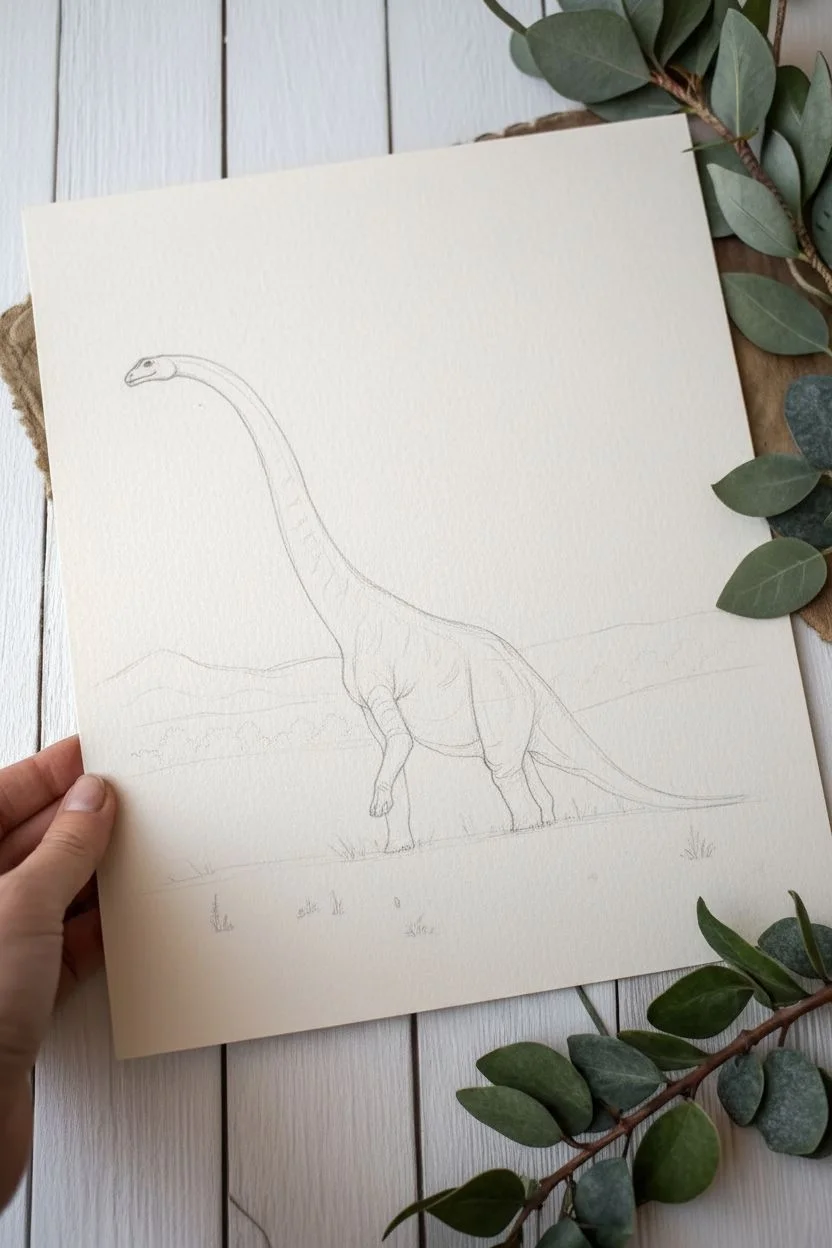
Step 1: Sketching the Giant
-
Establish the horizon:
Begin by lightly drawing a low horizon line about one-third of the way up the paper. Add some gentle, rolling hills in the background to create depth. -
Draft the dinosaur’s body:
Place a large oval shape in the lower middle of the page for the main body. Keep it tilted slightly forward to suggest movement. -
Extend the neck and tail:
Draw a long, sweeping curve extending upwards from the front of the oval for the neck. Counterbalance this with a thick, tapering tail extending downwards and back from the rear. -
Add the legs and head:
Sketch four sturdy, pillar-like legs. The front leg closest to the viewer should be lifted slightly, showing the dinosaur mid-stride. Finish with a small, elongated head at the end of the neck. -
Place the tree:
Behind the dinosaur’s tail area, sketch a tall, spindly tree. It should branch out near the top into a fluffy canopy that balances the composition. -
Add foreground details:
Lightly pencil in some simple grasses and a few small flowering plants in the immediate foreground to anchor the scene.
Step 2: Inking the Details
-
Outline the contours:
Using your 0.1mm fine liner, carefully trace the main outline of the dinosaur. Use broken lines on the underbelly to suggest weight and shadow. -
Texture the skin:
Switch to the 0.05mm pen. Add small, vertical hatch marks along the neck and sides of the body to create the look of wrinkled, leathery skin. -
Ink the landscape:
Outline the tree trunk with jagged lines for bark texture. Use stippling (dots) for the tree canopy leaves to keep it airy. Ink the foreground grasses with quick, upward strokes. -
Erase pencil lines:
Once the ink is completely dry, gently erase all your initial pencil sketches to prepare for painting.
Muddy colors?
If your greens look dull, avoid using black to darken them. Instead, mix a little red into your green paint. It naturally deepens the tone without killing the vibrancy.
Step 3: Applying Watercolor Washes
-
Paint the sky:
Mix a very dilute wash of Ultramarine Blue and a touch of Yellow Ochre. Paint the sky wet-on-dry, fading the blue out as you get closer to the horizon for an atmospheric look. -
Wash the ground:
Creating a mix of Yellow Ochre and Burnt Sienna, paint the ground. I like to keep this wash uneven, allowing some white paper to show through for highlights. -
Define the background hills:
Mix a diluted purple-grey using Payne’s Grey and Alizarin Crimson. Paint the distant hills with a flat wash to push them into the background. -
Base coat for the dinosaur:
Using a pale mix of Payne’s Grey and sap green, paint the entire dinosaur body. While it’s wet, drop in slightly darker pigment on the underside/belly for soft shading. -
Paint the tree:
Use Burnt Sienna for the tree trunk. For the canopy, stipple various shades of Sap Green and darkened green to create leafy texture.
Vintage Look
To enhance the old scientific illustration vibe, try staining the paper with strong tea or coffee before you start drawing. Let it dry flat for an aged, parchment look.
Step 4: Finishing Touches
-
Deepen dinosaur shadows:
Once dry, mix a stronger grey-green. Glaze shadows under the neck, behind the legs, and along the tail to give the creature volume. -
Detail the foreground:
Add small touches of red or pink to the foreground flowers and deepen the green of the grass clumps. -
Final assessment:
Step back and check your contrast. If the dinosaur looks too flat, add one final layer of shadow to the darkest areas under the belly.
Now you have a timeless prehistoric scene ready to be framed or gifted
Velociraptor Action Pose With Claws
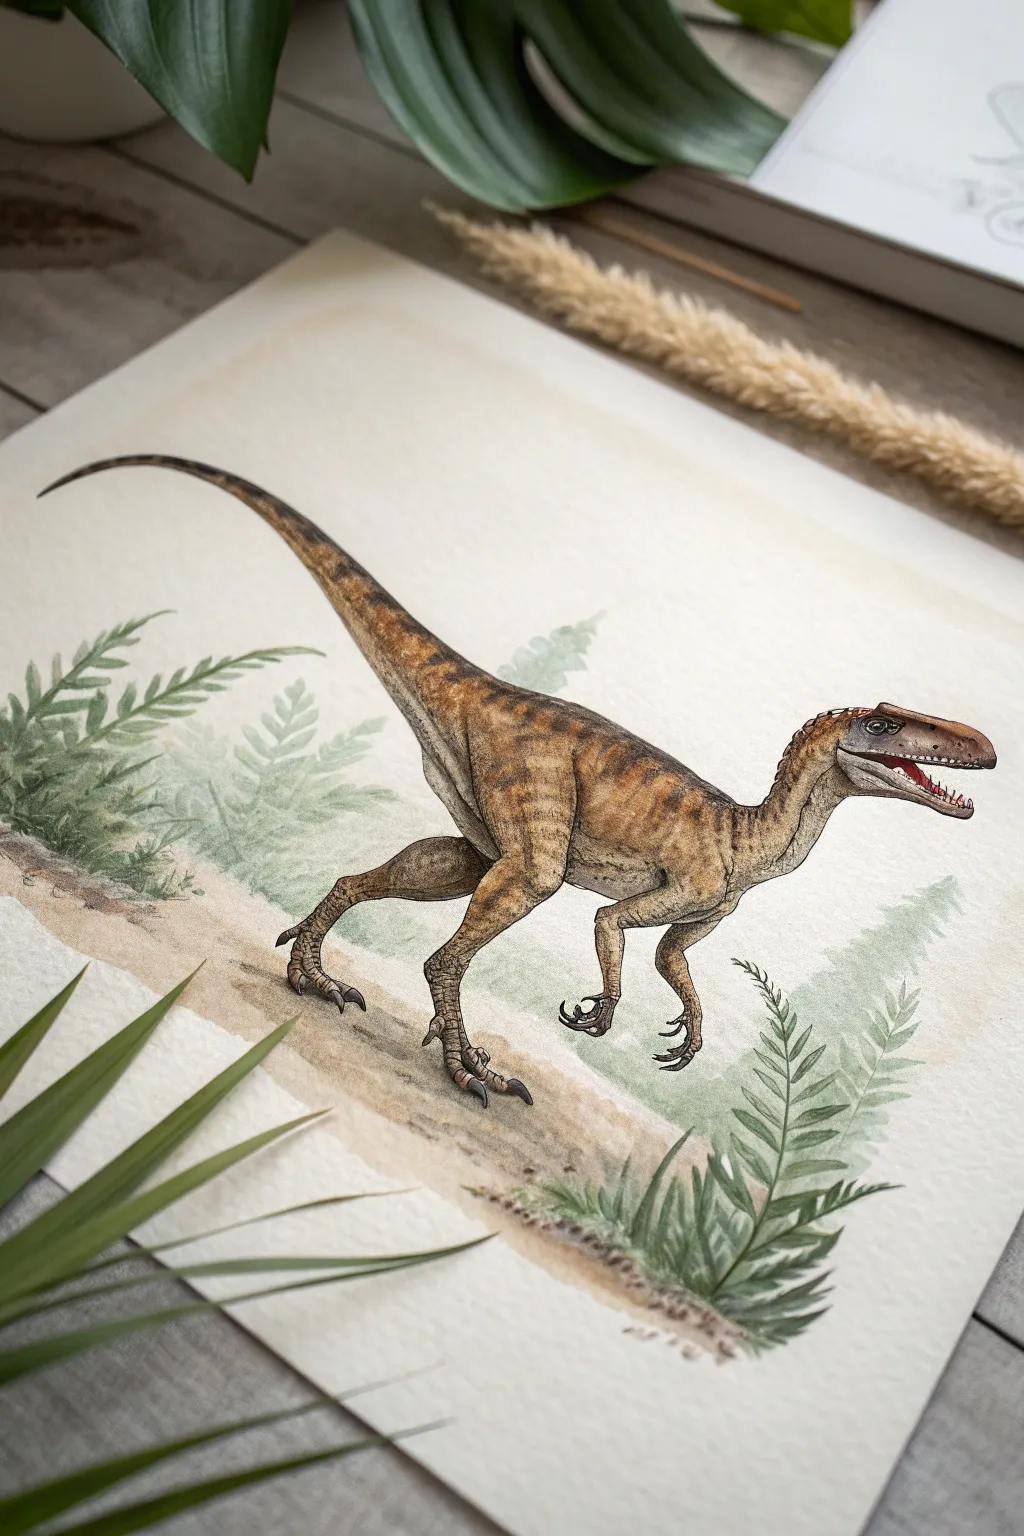
Capture the prehistoric energy of a hunting Velociraptor with this detailed watercolor and ink illustration. This project combines classic scientific illustration techniques with soft botanical elements to create a dynamic scene that feels like a page from an explorer’s sketchbook.
Step-by-Step Guide
Materials
- Hot press watercolor paper (smooth texture is key for details)
- HB graphite pencil for sketching
- Kneaded eraser
- Fine liner pens (0.05, 0.1, and 0.3 sizes, waterproof ink)
- Watercolor paints (Yellow Ochre, Burnt Sienna, Burnt Umber, Sap Green, Paynes Grey)
- Small round brushes (size 0, 2, and 4)
- White gel pen or gouache for highlights
- Paper towel and water cup
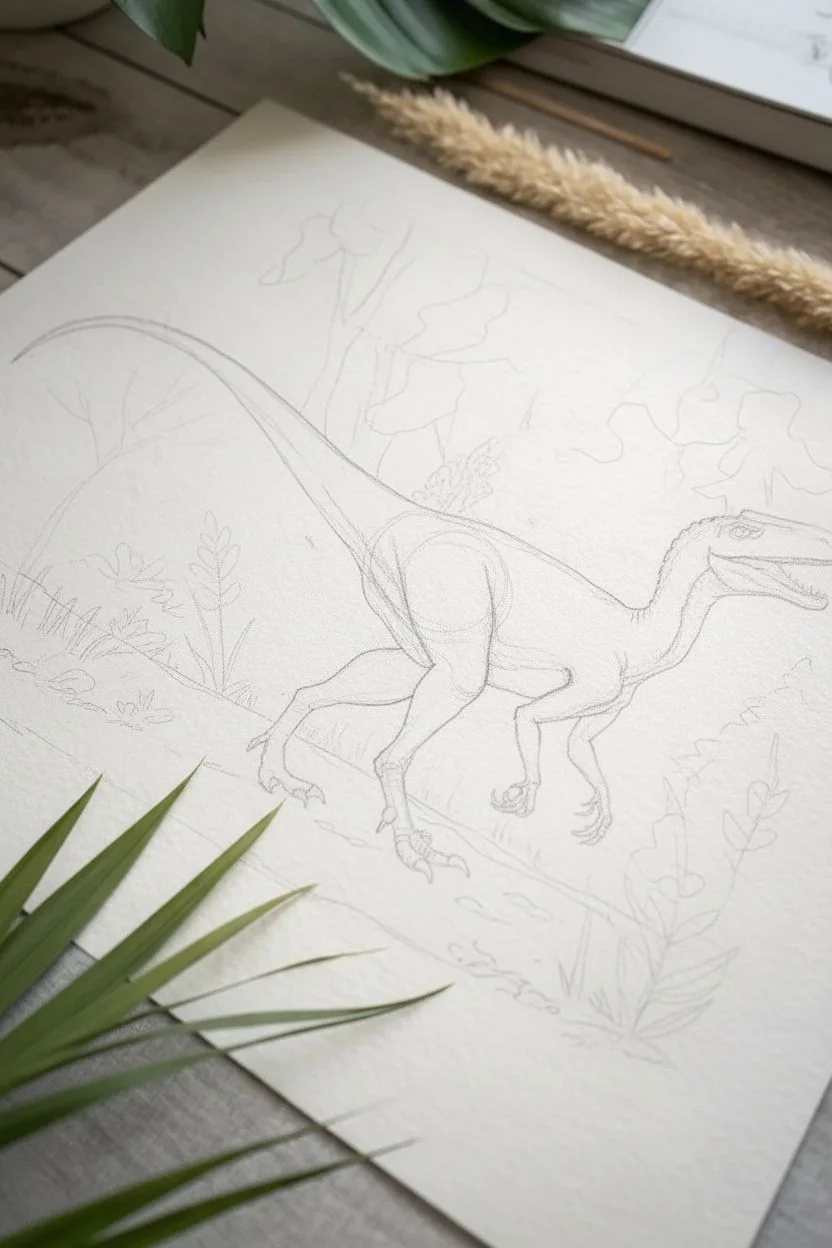
Step 1: Sketching the Skeleton
-
Establish the spine:
Begin with a faint curved line that starts low on the left and arches up towards the right, defining the tail through the neck. This ‘S’ curve gives the dinosaur its forward momentum. -
Block in the masses:
Sketch an oval for the ribcage in the center of your curve and a smaller, elongated triangle shape for the head. Add a small oval for the hip section where the tail connects. -
Define the legs:
Draw the legs using stick figures first to get the joints right. The back leg, closest to us, should be bent in mid-stride, while the far leg is pushing off the ground. Don’t forget the signature sickle claw on the raised foot. -
Outline the body contour:
Connect your shapes with a smooth outline. Keep the neck slender and the tail tapering to a fine point. Refine the snout to look boxy yet aerodynamic. -
Add environmental elements:
Lightly sketch in the placement of the ferns in the foreground and the faint tree shapes in the background. Draw a simple horizon line for the dirt path.
Muddy colors?
If your brown stripes are bleeding too much into the yellow base, your paper is too wet. Ensure the base layer is bone dry before adding the darker patterns.
Step 2: Inking the Details
-
Refine the face:
Using your 0.1 pen, carefully ink the eye, nostril, and mouth. Add small, sharp teeth and use tiny stippling dots around the eye socket to suggest skin texture. -
Texture the skin:
Outline the body with the 0.1 pen. Instead of a solid line, use broken lines and small wrinkles, especially around the neck and leg joints, to suggest loose, leathery skin. -
Define the claws:
Switch to the 0.3 pen for the claws on the hands and feet to give them weight and sharpness. Make the signature toe claw prominent and curved. -
Inking the plants:
Ink the foreground ferns with the 0.1 pen, using jagged lines for the leaves. Leave the background trees and plants strictly as pencil lines or very faint ink; we want them to recede visually. -
Erase pencil marks:
Once the ink is completely dry, gently roll your kneaded eraser over the entire paper to lift the graphite, leaving a clean inked drawing.
Scientific flair
Add ‘specimen notes’ in cursive handwriting near the tail or claws (like ‘Cretaceous Period’ or ‘dromaeosaurid’) to enhance the vintage explorer vibe.
Step 3: Watercolor Application
-
Base wash:
Mix a watery wash of Yellow Ochre. Paint the entire dinosaur body, avoiding the eye and teeth. Keep this layer pale and transparent. -
Building form:
While the base is damp, drop slightly concentrated Burnt Sienna onto the top of the back, tail, and thighs. Let it bleed downward naturally to create roundness. -
Adding stripes:
Once the previous layer is dry to the touch, mix Burnt Umber with a touch of Paynes Grey. Using a size 0 brush, paint vertical, irregular stripes along the back and tail. I like to let the brush skip a bit to make the markings look organic. -
Shadows and depth:
Mix a dilute purple using Paynes Grey and a tiny bit of red. Glaze this into the shadowed areas: under the belly, the underside of the tail, and the back leg. -
Painting the environment:
Paint the path with a wash of watery Brown and Grey. For the foreground ferns, use Sap Green, keeping the edges crisp. For the background foliage, use a very watery, pale green wash to create atmospheric perspective.
Now you have a dynamic, historically-inspired dinosaur illustration ready to be framed or added to your field journal

PENCIL GUIDE
Understanding Pencil Grades from H to B
From first sketch to finished drawing — learn pencil grades, line control, and shading techniques.
Explore the Full Guide
Easy Cute Dinosaur Doodle With Big Eyes
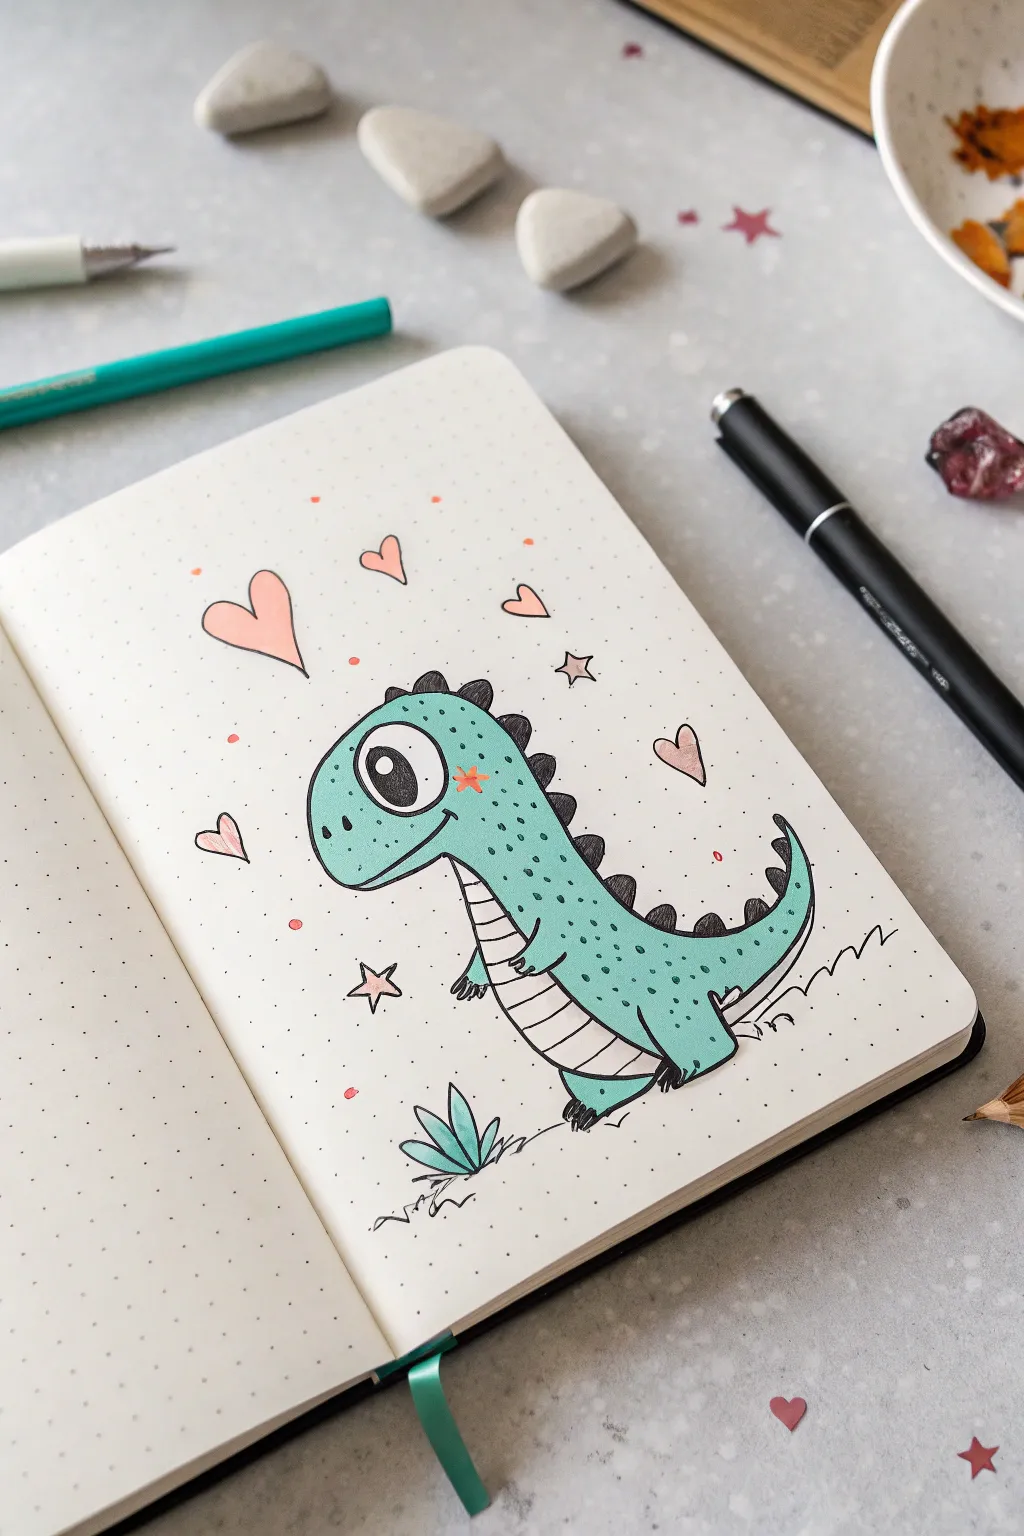
This adorable dinosaur doodle features oversized eyes and soft pastel hearts, perfect for adding a touch of whimsy to your bullet journal or sketchbook. The clean lines and dotted shading give it a professional yet achievable look that’s fun to create.
How-To Guide
Materials
- Dotted Bullet Journal or Sketchbook
- Pencil (HB or lighter)
- Eraser
- Black Fine Liner Pen (0.3mm or 0.5mm)
- Black Felt Tip Pen (thicker, for outlining)
- Teal or Mint Green Marker/Highlighter
- Light Pink Marker or Colored Pencil
- Orange or Coral Marker (for details)
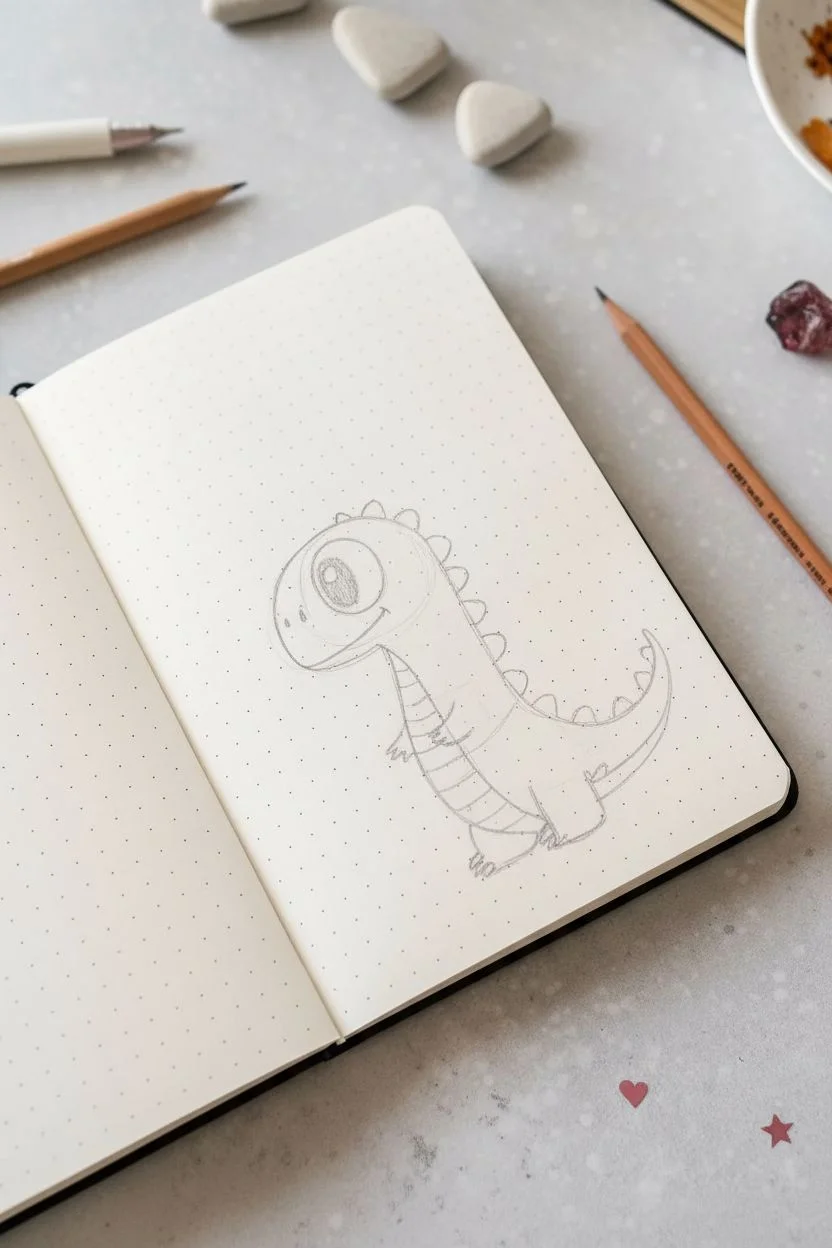
Step 1: Sketching the Outline
-
Head Shape:
Start with a light pencil sketch. Draw a large, rounded kidney-bean shape for the head. The left side should curve inward slightly for the snout. -
Body Curve:
From the bottom back of the head, extend a curved line downward and to the right to form the back. Add a smaller, curved line from the chin area for the chest and belly. -
Tail and Legs:
Extend the back line into a thick, tapered tail that curves upward at the tip. Sketch two short, chunky legs at the bottom of the body, giving them flat feet. -
Tiny Arms:
Draw small, almost comic-like arms coming from the middle of the chest area. They should look a bit vestigial and cute.
Step 2: Adding Details
-
The Big Eye:
Draw a large circle taking up a significant portion of the head. Inside, draw a smaller circle for the pupil, leaving a white spot for a highlight. -
Spikes and Belly:
Sketch a row of rounded triangles running from the top of the head down the spine to the tail tip. Draw horizontal curved lines across the belly area to create the underbelly segments. -
Inking the Lines:
Using your fine liner, carefully trace over your pencil lines. Make the outline of the dinosaur slightly thicker than the internal details like the belly stripes. -
Filling the Eye:
Color in the pupil solid black with your pen, being careful to preserve that crisp white highlight circle. -
Cleanup:
Once the ink is completely dry, gently erase all your underlying pencil sketches.
Smudge Alert
Wait at least 3-5 minutes before erasing pencil lines after inking. Even if it looks dry, thick ink lines can smear easily and ruin your clean page.
Step 3: Coloring and Shading
-
Base Color:
Use a teal or mint green marker to color the entire body of the dinosaur, avoiding the belly area, the eye, and the spikes. -
Spikes and Cheeks:
Color the spikes with a dark grey or black marker. Add a small pink circle or smudge just below the eye for a rosy cheek effect. -
Star Detail:
Draw a small, orange five-pointed star on the cheek area for extra decoration. -
Texture Dots:
With your fine liner, add small clusters of dots on the green skin—mostly on the back and head—to create texture. -
Grounding:
Draw a jagged, uneven line underneath the feet to represent the ground. Add a small tuft of grass with three leaves near the front foot. -
Ground Color:
Lightly color the tuft of grass with your teal marker to match the dino.
Make it Pop
Use a white gel pen to add tiny highlights to the hearts and the dinosaur’s scales after the marker ink has dried completely.
Step 4: Setting the Scene
-
Floating Hearts:
Draw several hearts of varying sizes floating above the dinosaur’s head. Keep the lines loose and casual. -
Coloring Hearts:
Fill these hearts with a soft light pink marker. It’s okay if the color goes slightly outside the lines for a doodle aesthetic. -
Stars and Dots:
Scatter a few small open five-pointed stars around the background. Add tiny orange or pink dots randomly in the empty space to fill the composition.
Now you have a charming prehistoric friend to brighten up your notebook pages
Pterosaur Gliding Across the Sky
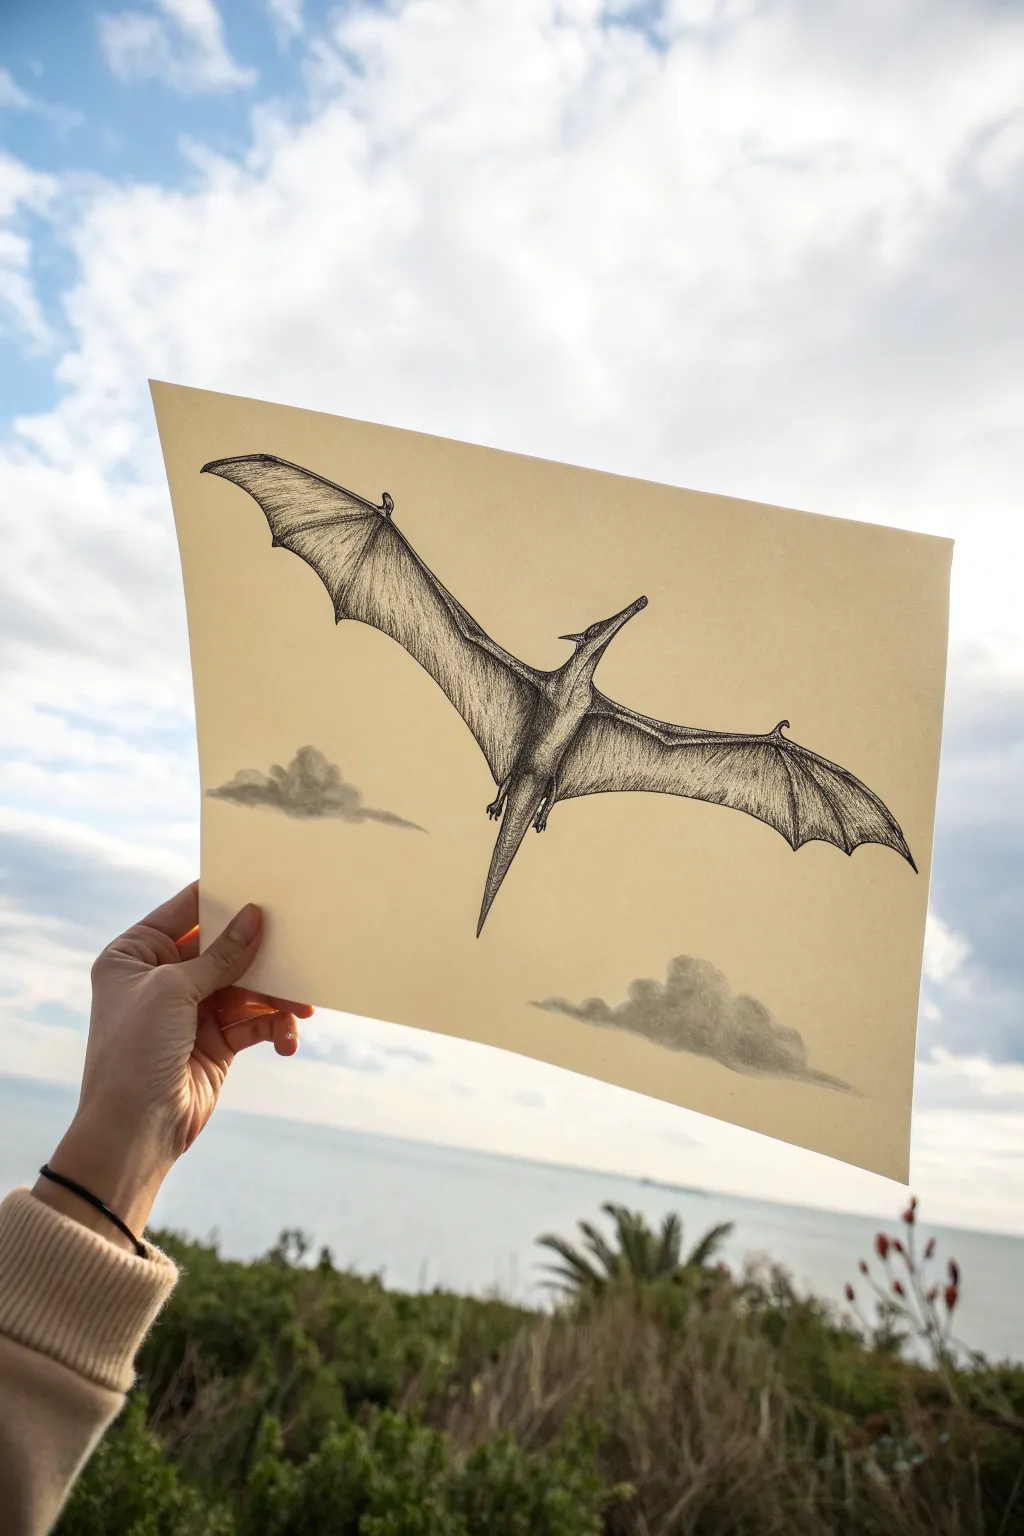
Capture the graceful silhouette of a prehistoric glider with this detailed pen and ink study. By working on toned tan paper, you’ll create an instantly vintage, scientific illustration aesthetic that makes the dinosaur pop against the page.
Step-by-Step
Materials
- Toned tan or cream drawing paper (mixed media or sketch weight)
- HB graphite pencil
- Kneaded eraser
- Fine liner pens (sizes 0.1, 0.3, and 0.5)
- Black ink brush pen (optional for darkest areas)
- Blending stump or tortillon
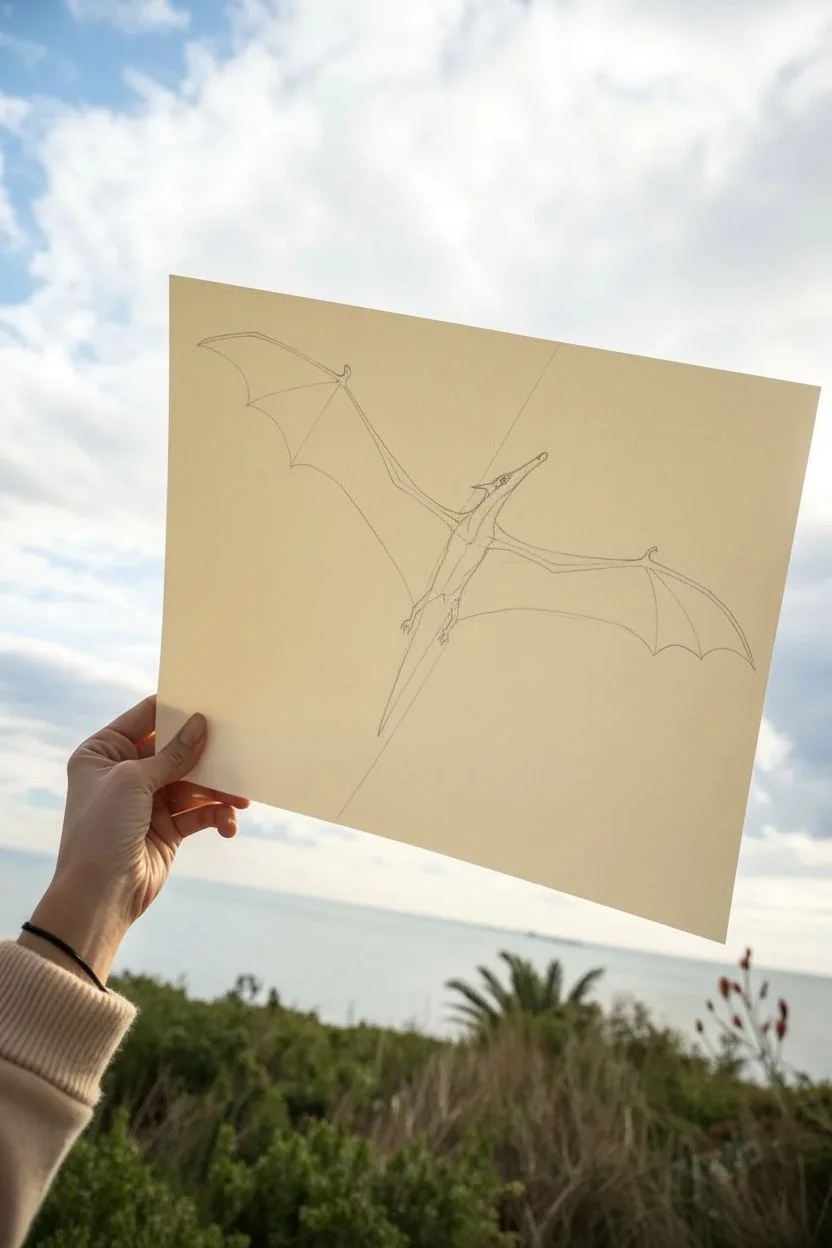
Step 1: Structural Sketching
-
Create the central axis:
Start with your HB pencil. Draw a light, diagonal line through the center of your page to establish the angle of the body and the flight path. -
Block in the body:
Sketch a small oval for the torso along your axis line. Add a long, thin triangle pointing downwards for the tail or rear limbs area. -
Establish the wingspan:
Draw two long, curved lines extending outward from the shoulder area. The left wing should angle slightly up and back, while the right wing stretches forward and down, creating a perspective shift. -
Define the head crest:
At the top of the torso, sketch the distinctive Pteranodon head shape—a long beak pointing forward and a prominent crest extending backward. -
Outline the wing membranes:
Connect the tips of the ‘finger’ bones back to the ankles with scalloped, curved lines. Make sure the membrane looks taut but has slight dips to show flexibility.
Smudge Prevention
Is your hand smearing the ink? Place a scrap piece of paper under your drawing hand while you work to protect the parts you’ve already finished.
Step 2: Inking the Outline
-
Refine the contour:
Switch to your 0.3 fine liner. Carefully go over your pencil lines, correcting the shapes as you go. Make the lines along the bottom of the wings slightly heavier to suggest shadow. -
Add the wing claws:
Draw the small, hook-like claws midway along the top edge of each wing. These are distinct anatomical features that add realism. -
Detail the face:
Use a 0.1 fine liner for the delicate beak and eye area. The eye should be small and positioned roughly where the crest meets the beak. -
Erase pencil guides:
Once the ink is completely dry—give it a full minute—gently erase the graphite understructure with your kneaded eraser.
Step 3: Adding Texture and Volume
-
Hatching the body:
Using the 0.1 pen, add small, curved hatching lines along the rounded sides of the body tones to make it look cylindrical rather than flat. -
Texturing the wings:
This is the most crucial step. Draw long, sweeping lines that radiate from the arm bones toward the trailing edge of the wing. These represent the muscle fibers and skin texture. -
Cross-hatching shadows:
Go back in with a 0.1 or 0.3 pen and add cross-hatching (lines going in the opposite direction) near the arm bones and the body where the shadows would naturally be deepest. -
Stippling for skin:
Add tiny dots (stippling) on the leading edges of the wings and the head crest to suggest a leathery, bumpy skin texture. -
Darkening the underside:
I like to use a 0.5 pen here to really deepen the shadows under the belly and the armpits, anchoring the figure in space.
Level Up: White Highlights
Use a white gel pen to add tiny highlights on the top of the beak and wings. On toned paper, this pop of white creates incredible 3D contrast.
Step 4: Atmospheric Elements
-
Sketch cloud shapes:
Using the side of your HB pencil shading very lightly, create two small cloud formations—one below the right wing and a smaller one to the left. -
Build cloud volume:
Darken the bottom edges of the clouds with graphite to give them weight, keeping the tops fluffy and undefined. -
Blend the clouds:
Use your blending stump to smudge the pencil drawing of the clouds. This creates a soft, misty look that contrasts beautifully with the sharp ink lines of the dinosaur.
Now you have a dynamic prehistoric snapshot ready to frame or display.


Spinosaurus Sail Silhouette Focus

Capture the iconic profile of the Spinosaurus with this bold relief printing project. Using soft linoleum and black ink on natural-toned paper creates a striking silhouette that feels both prehistoric and modern.
How-To Guide
Materials
- Soft-cut linoleum block (approx 8×10 inches)
- Linoleum cutter tool with assorted V and U gouges
- Tracing paper and pencil
- Block printing ink (black, oil-based or water-soluble)
- Soft rubber brayer (roller)
- Baren or a wooden spoon for burnishing
- Tan or beige printing paper (like BFK Rives Tan or Kraft paper)
- Glass or acrylic sheet for rolling ink
- Masking tape
Step 1: Design Transfer
-
Draft the profile:
Begin by sketching your Spinosaurus outline on tracing paper. Focus on the signature sail along the back and the long, crocodile-like snout. The silhouette should be clear and recognizable without internal details. -
Refine the pose:
Ensure the legs are positioned to show movement, with the tail counterbalancing the body. Add a simple ground line below the feet to anchor the dinosaur. -
Transfer to block:
Flip your tracing paper drawing face-down onto the linoleum block. Rub the back of the paper firmly with a spoon or fingernail to transfer the graphite image onto the surface. -
Reinforce lines:
Go over faint transfer lines directly on the block with a permanent marker or dark pencil so you can clearly see what needs to remain raised.
Fixing Chatter
If you see unwanted background lines (chatter) in your test print, carve those areas deeper. You can also wipe ink off accidental high spots with a cloth before printing.
Step 2: Carving the Block
-
Outline the shape:
Using a fine V-gouge tool, carefully carve along the outer edge of your marker line. This creates a ‘trench’ that separates your dinosaur from the background. -
Detail the spine:
Switch to a very small V-gouge for the delicate spikes along the sail. Carve away from the spine tips to keep them sharp. -
Define the ground:
Carve horizontal, slightly jagged lines below the feet to simulate grassy terrain or ripples in water, leaving thin raised ridges. -
Clear the background:
Use a wide U-gouge to clear away the large negative space around the dinosaur. I prefer to carve in directional strokes radiating away from the subject, as these texture marks often show up in the final print and add energy. -
Final clean-up:
Inspect the background area for high spots or ridges that might accidentally catch ink. Shave these down until the background is relatively flat and lower than your image.
Step 3: Inking and Printing
-
Prepare the paper:
Cut your tan paper to size, ensuring there’s a generous border around where the block will sit. -
Charge the ink:
Squeeze a small line of black relief ink onto your glass plate. Roll the brayer back and forth and lift it occasionally to create a uniform, velvety texture on the roller. -
Ink the block:
Roll the brayer over your carved block. Apply ink in multiple thin layers rather than one thick one, rolling in different directions to ensure solid coverage on the dinosaur’s body. -
Position the paper:
Carefully align your paper over the inked block and lower it gently. Once it touches the ink, do not shift it. -
Burnish the print:
Using a baren or the back of a wooden spoon, apply firm, circular pressure over the entire back of the paper. Focus extra pressure on the solid black areas of the body to get a deep, rich tone. -
The reveal:
Slowly peel one corner of the paper up to check coverage. If it looks spotty, lay it back down and burnish more. If solid, peel the paper entirely off the block to reveal your print. -
Drying:
Lay the print flat in a safe, dust-free area. Oil-based inks may take several days to cure fully, while water-based ones will dry much faster.
Gradient Skies
Try a color blend roll! Put orange and yellow ink side-by-side on your glass and roll them together to create a sunset gradient directly on the brayer.
Now you have a striking piece of prehistoric art ready to frame
Ankylosaurus Armor and Tail Club Study

Capture the prehistoric resilience of an armored dinosaur with this detailed pen-and-ink study. Using simple blue fineliner, you will build up texture through cross-hatching to create a surprisingly dimensional creature on the page.
Step-by-Step Guide
Materials
- Sketchbook with smooth, heavy paper (approx. 160gsm)
- HB or 2H graphite pencil for initial sketching
- Soft hi-polymer eraser
- Blue fineliner pen (0.3mm or 0.5mm)
- Ruler (optional for scale or ground line)
Step 1: Structural Sketching
-
Map the body shape:
Begin with your graphite pencil. Draw a large oval for the main body torso. To the right, add a smaller, tapered oval for the head, positioning it low to the ground. On the left, sketch a long, sweeping curve that will become the tail. -
Place the limbs:
Sketch the legs as sturdy columns. The back legs should be slightly thicker and bent at the knee, while the front legs are a bit shorter and more vertical. Think about where the weight falls. -
Define the spine and armor:
Lightly trace a curved line running from the top of the head, along the back, all the way to the tail tip. Along this line, sketch triangular bumps to indicate the primary row of dorsal spikes. -
Refine the silhouette:
Connect your shapes to create a cohesive outline. Smooth out the neck connection and ensure the belly line curves gently between the legs. Once happy with the proportions, lighten your pencil lines with the eraser until they are barely visible.
Clean Lines Pro-Tip
When drawing the grid for the armor, follow the curve of the animal’s belly. If you draw straight lines, the dinosaur will look flat rather than round and heavy.
Step 2: The Ink Outline
-
Start the main ink line:
Switch to your blue fineliner. Begin tracing the top silhouette, carefully outlining the triangular spikes along the back. Keep your hand steady but allow for slight organic wobbles to simulate skin texture. -
Shape the head and jaw:
Outline the head, adding a small circle for the eye and a simple line for the mouth. Define the heavy jawline and the cheek armor plate. -
Complete the body outline:
Ink the legs, underbelly, and tail. Pay attention to the toes—short, stubby claws that grip the ground. Don’t press too hard; let the ink flow naturally.
Step 3: Adding Texture and Armor
-
Draw the armor grid:
The key feature of this dinosaur is its segmented armor. Draw vertical curved lines down the flank of the body, wrapping around the rib cage form. Then, add horizontal lines to create a grid-like pattern of scutes. -
Add secondary spikes:
In the upper rows of your grid, draw smaller triangular spikes pointing backward. These don’t need to be as large as the spine spikes, but they add crucial defensive texture. -
Texture the legs:
On the legs, draw horizontal curved lines to suggest wrinkling skin and heavy scales. This emphasizes the cylindrical volume of the limbs. -
Detail the face:
Add small, stippled dots around the eye ridge and snout to suggest rough skin. Draw a few lines around the neck to show where the skin folds as the head turns.
Ink Smear Fix
Did you smudge the blue ink? Turn it into a texture! Add similar small smudges or extra hatching around it to make it look like dirt on the dinosaur’s skin.
Step 4: Shading and Finishing
-
Establish the light source:
Decide that your light is coming from above. This means the belly and the undersides of the legs will need the darkest shading. -
Cross-hatch the underbelly:
Use fine diagonal lines to shade the bottom of the stomach and the inner legs. Then, cross over them with lines in the opposite direction to deepen the shadow. -
Shade individual plates:
For the armor plates on the side, add tiny hatch marks to the bottom edge of each square. This makes each scute look raised and three-dimensional rather than flat. -
Ground the dinosaur:
Sketch a scribbly, horizontal shadow directly underneath the feet. Keep the lines loose and jagged to suggest dirt or rough terrain. -
Final touches:
Wait about ten minutes for the ink to fully dry. Gently erase any remaining pencil marks to leave a crisp, clean blue drawing.
Now you have a wonderful piece of paleoart ready to be labeled and admired in your sketchbook
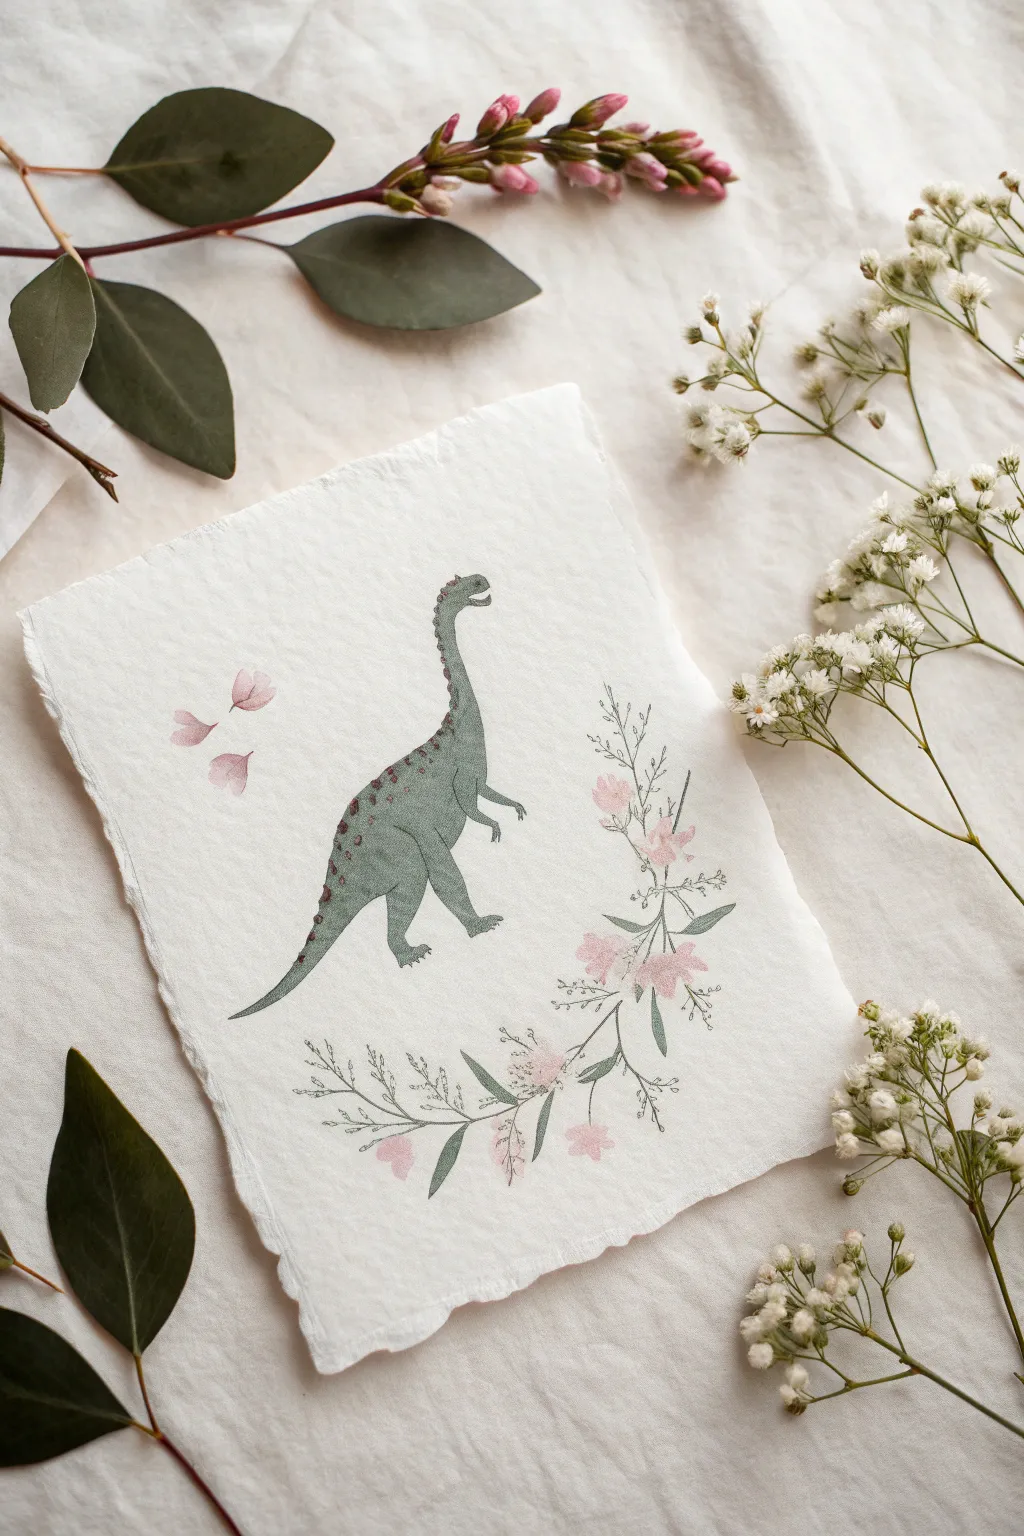
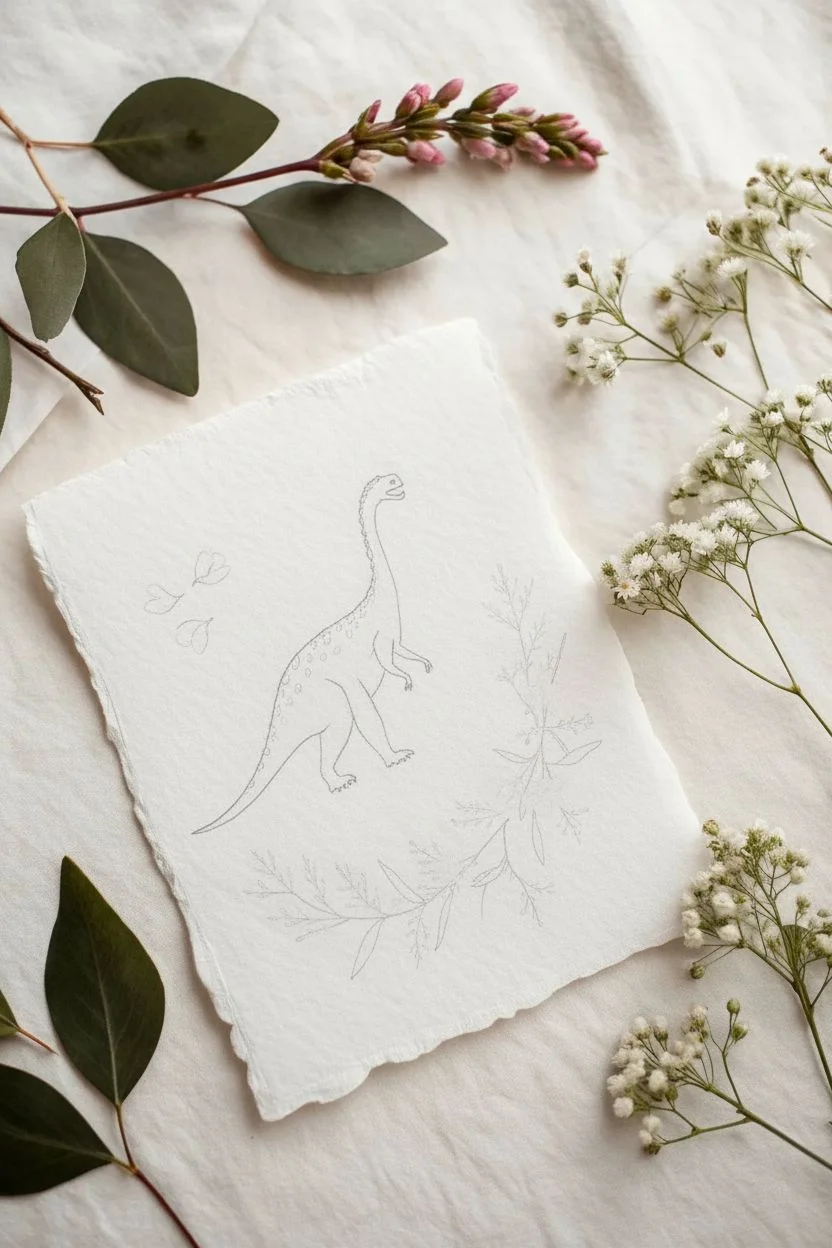
Jurassic Jungle Scene With Overlapping Dino Shapes
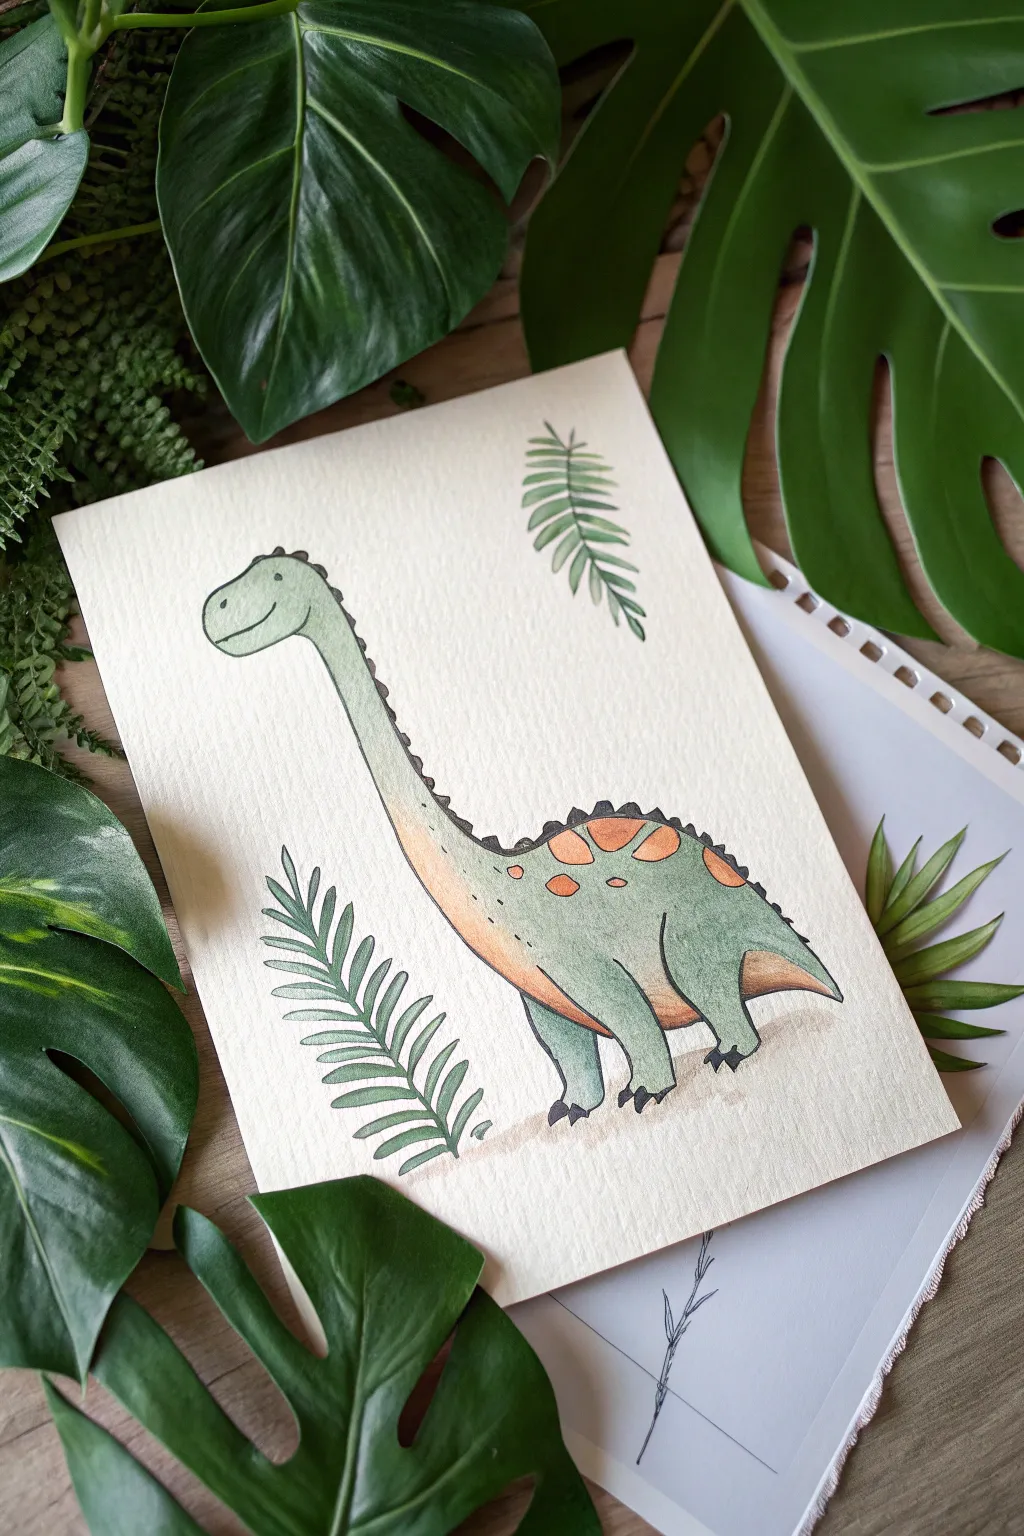
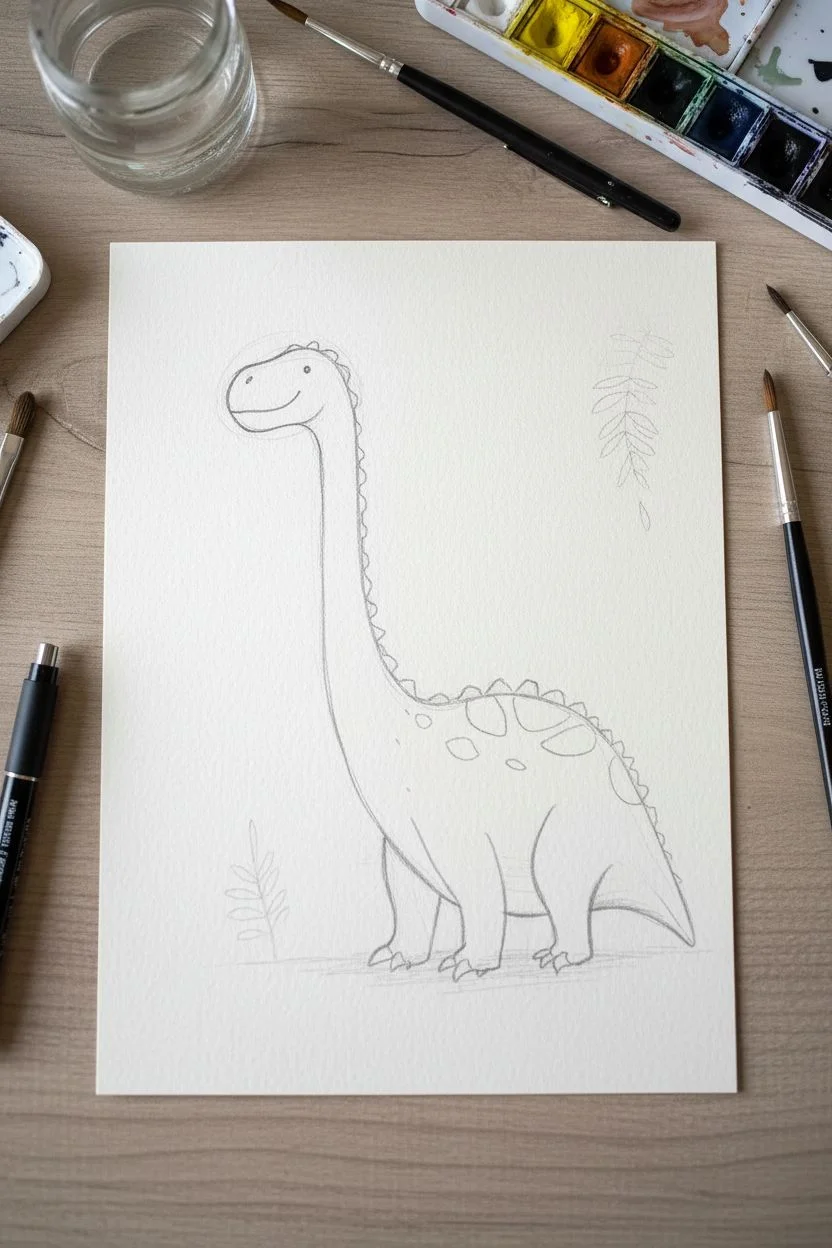
Create a serene prehistoric portrait featuring a friendly long-necked dinosaur surrounded by stylized foliage. This project combines loose watercolor washes with crisp ink linework for a charming, illustrative style.
Step-by-Step
Materials
- Cold-pressed watercolor paper (300gsm/140lb)
- HB pencil and eraser
- Waterproof fine liner pen (0.3mm or 0.5mm, black)
- Watercolor paints (sage green, peach/orange, brown)
- Round watercolor brushes (size 4 and 8)
- Jar of clean water
- Paper towel
Step 1: Sketching the Shape
-
Establish the curve:
Begin with a light pencil sketch. Draw a long, gentle ‘S’ curve that will serve as the spine of your dinosaur, sweeping up for the neck and down for the tail. -
Build the body mass:
Sketch an oval shape near the bottom of your ‘S’ curve to form the main body. Connect this smoothly to the neck line, thickening it as it moves towards the shoulders. -
Add head and legs:
Draw a small, rounded oval for the head at the top of the neck. Add four sturdy, stump-like legs at the base of the body, making sure the feet look grounded. -
Refine the details:
Add a simple curved line for a smile and a dot for the eye. Sketch varying sizes of oval spots along the back and a few triangular spikes running down the spine. -
Sketch the surroundings:
Lightly draw two fern-like fronds floating in the background—one above the tail and one near the ground by the front legs—to frame the composition.
Wobbly Lines?
If your hand shakes while inking, try ‘ghosting’ the line (moving your hand without touching paper) first. Pull the pen toward you rather than pushing it away for steadier strokes.
Step 2: Adding Color
-
Base green wash:
Mix a watery sage green. Using your size 8 brush, fill in the main body of the dinosaur. Keep the wash fairly wet and loose, avoiding the oval spots on the back and the underbelly. -
Painting the belly:
While the green is still slightly damp but not soaking, mix a soft peach or light orange tone. Paint the underside of the neck and belly, letting it gently blend slightly where it meets the green for a soft transition. -
Filling the spots:
Use a slightly more saturated version of your peach/orange mix to fill in the oval spots along the dinosaur’s back. This creates a nice contrast against the cooler green. -
Painting the foliage:
With a smaller brush, paint the fern leaves using your green mix. You can add a tiny touch of brown to the green here to differentiate the plants from the dinosaur. -
Grounding shadow:
Dilute a bit of brown paint with plenty of water. Sweep a very faint shadow underneath the feet to ground the figure so it doesn’t look like it’s floating. -
Let it dry:
Allow the entire painting to dry completely. The paper should be flat and cool to the touch before you proceed to inking.
Watercolor Bloom Magic
Drop clean water or a second color into the green body wash while it’s still wet. This creates ‘blooms’ or cauliflower textures that make dinosaur skin look more organic and interesting.
Step 3: Inking and Definition
-
Outline the body:
Using your waterproof fine liner, carefully trace over your pencil lines. Use a confident, continuous stroke for the long neck and back to keep it smooth. -
Detail the texture:
Add small, bumpy ridges along the spine for the spikes. For the toes, draw small inverted ‘U’ shapes at the bottom of the legs. -
Face and spots:
Ink the eye and the smile. Then, outline the peach spots on the back. I like to keep these lines slightly thinner or broken to maintain a hand-drawn feel. -
Texture lines:
Add a few quick, short scratch marks or dots on the knees and elbows to suggest wrinkled skin texture. -
Leaf details:
Draw the central stem of your fern leaves and add the veins. You don’t need to outline every single leaflet; just the main shapes will do. -
Final erase:
Wait at least 10 minutes to ensure the ink is totally dry, then gently erase any visible pencil marks to clean up the illustration.
Now you have a charming Jurassic friend ready to be framed or gifted to a dino-lover
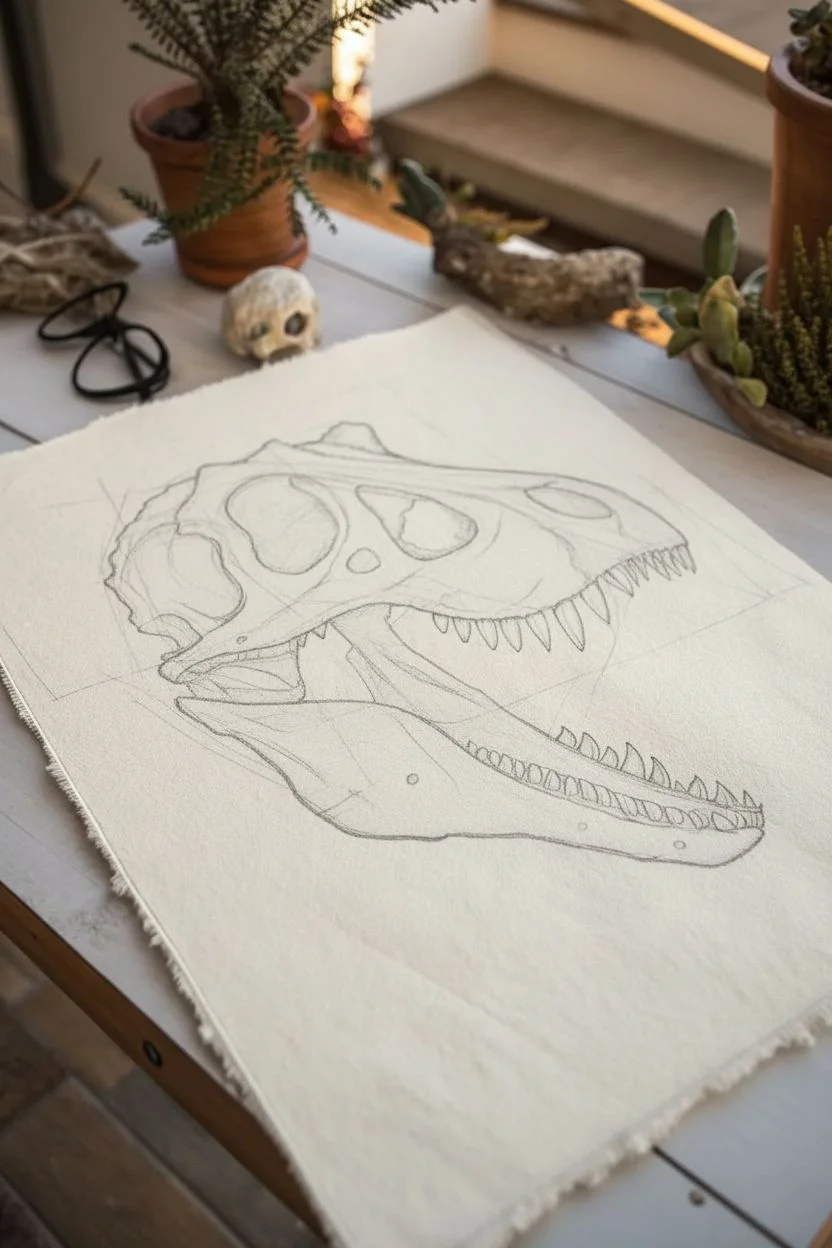
Dinosaur Skeleton or Skull Study
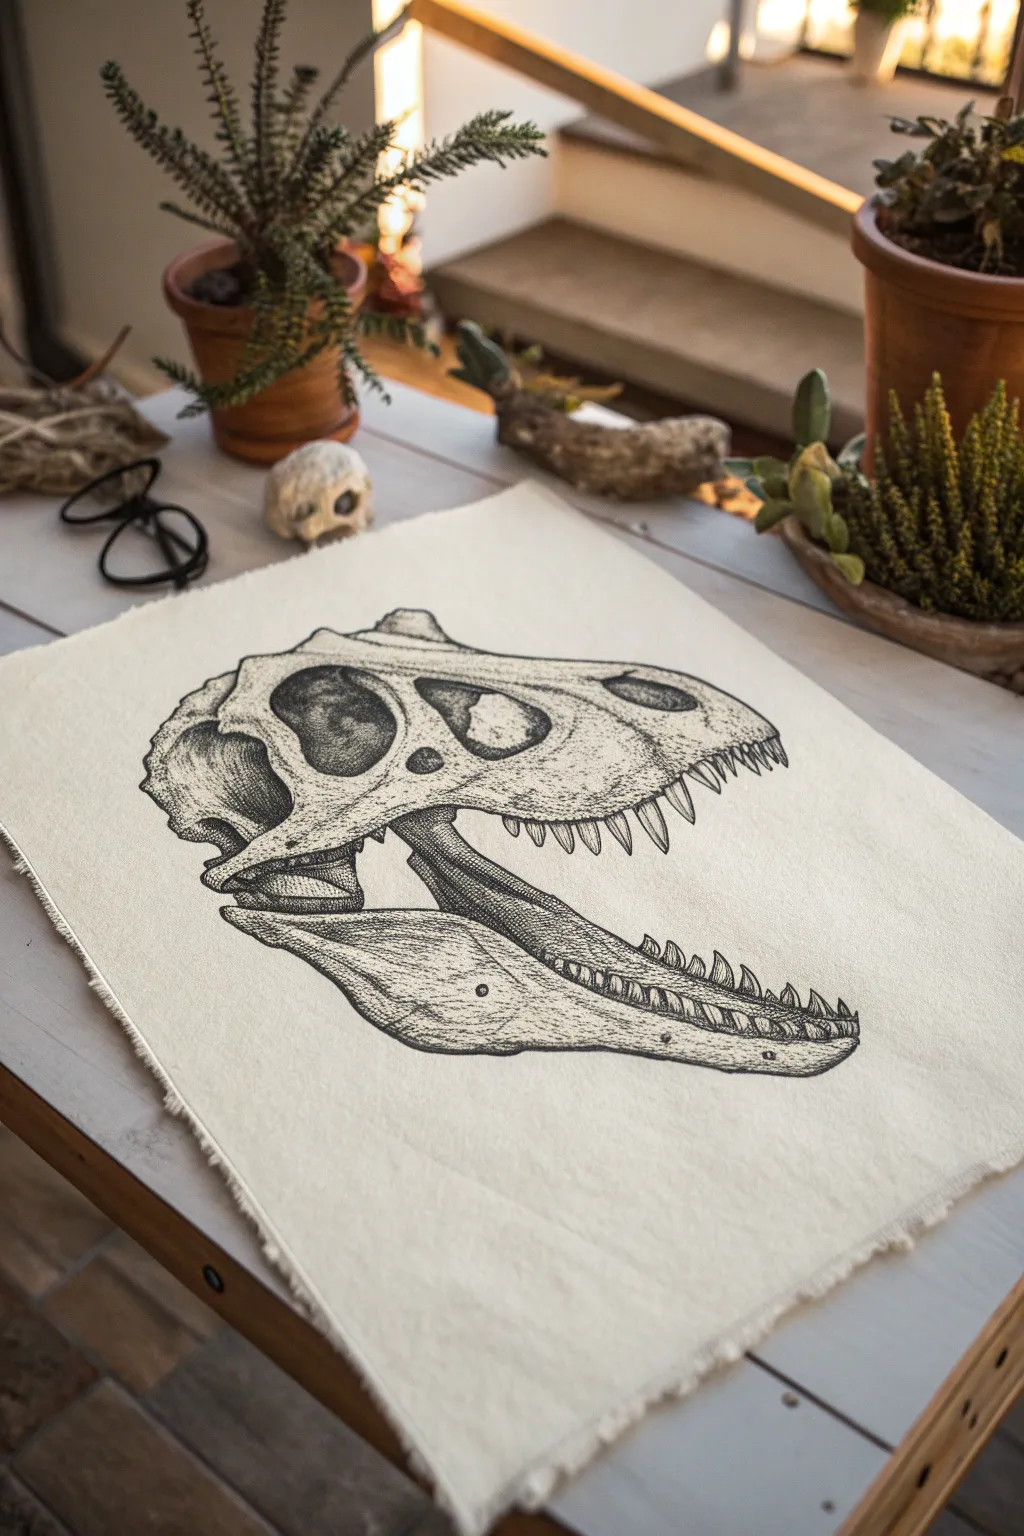
Capture the raw power of prehistory with this scientific illustration-style study of a T-Rex skull. By combining clean line work with meticulous stippling on textured cotton rag paper, you’ll create a piece that feels like a vintage museum discovery.
Step-by-Step Guide
Materials
- Heavyweight off-white cotton rag paper or parchment (raw edges preferred)
- Pencil (HB or 2H)
- Kneaded eraser
- Fine liner pens (sizes 005, 01, 03, and 05 – black pigment ink)
- Ruler (optional for scaling)
- Reference photo of a T-Rex skull profile
Step 1: Structural Sketch
-
Rough dimensions:
Begin by lightly marking the outer limits of the skull on your paper with an HB pencil to ensure the composition fits well within the frayed borders. -
Basic shapes:
Block in the large masses first: a large, roughly rectangular shape for the main cranial area and a long, sweeping curve for the lower jaw. -
Fenestra placement:
Sketch the large openings (fenestrae) in the skull. The eye socket is key; place it slightly behind the midpoint of the upper skull section to anchor the anatomy. -
Jaw mechanics:
Draw the articulation point where the jaw connects. Ensure the mouth is open at a dramatic angle, creating that classic roar silhouette. -
Teeth alignment:
Lightly indicate the gum line and sketch simple triangles for the teeth curves. Remember T-Rex teeth vary in size, with the largest ones near the front of the maxilla.
Ink Smearing?
If you accidentally smudge wet ink, don’t erase! Turn the smudge into a ‘fossil stain’ or extra shadow with more stippling. Organic subjects are forgiving.
Step 2: Inking the Outlines
-
Main contours:
Switch to your 03 pen. Carefully trace the outer perimeter of the bone segments, using a confident but slightly broken line to suggest the texture of aged bone rather than smooth plastic. -
Defining the openings:
Ink the interior shapes of the skull openings (the eye socket and nasal cavities). Use a slightly heavier hand on the bottom edges of these holes to suggest depth and shadow. -
Detailing the teeth:
Use a finer 01 pen for the teeth. Outline them carefully, adding tiny jagged lines near the gum roots to show where they emerge from the jawbone. -
Cracks and fissures:
With the 005 pen, add delicate wandering lines across the flat bone surfaces to represent natural sutures and fossil stress fractures. -
Erase guidelines:
Once the ink is completely dry (give it at least 15 minutes to avoid smearing), gently lift all pencil marks with your kneaded eraser.
Aged Paper Effect
Before drawing, tea-stain your paper. Sponge brewed tea onto the paper and let it air dry for a yellowed, vintage parchment looks that suits fossils perfectly.
Step 3: Shading with Texture
-
Starting the stipple:
This phase requires patience. Using the 01 pen, begin placing dots in the darkest areas—inside the nasal cavity and the back of the throat opening. -
Building density:
Increase the concentration of dots where shadows would naturally fall, such as under the cheekbone ridge and below the upper jaw overhang. I find it helpful to embrace randomness here so no patterns emerge. -
Gradation technique:
Fade your stippling out toward the center of the bone plates. The transition from heavy dots to plain paper creates the illusion of rounded volume. -
Darkest contrasts:
Switch to the 05 pen for the absolute deepest shadows inside the orbital fenestra and the back the mouth. This high contrast makes the white bone pop against the dark voids. -
Texture mapping:
Return to the 005 pen to add very sparse, light stippling across the ‘lit’ areas of the bone, giving it a porous, fossilized surface texture. -
Jaw shading:
Apply shadow to the lower jaw, concentrating on the bottom edge and the inside curve where the tongue would sit, emphasizing the heavy bone structure. -
Final assessment:
Step back and look at the drawing from a distance. If any area looks too flat, go back in with the 01 pen and add another layer of dots to deepen the mid-tones.
Now you have a timeless scientific illustration ready to be framed or displayed as a study piece
Surreal “Dinosaur Made of Flowers” Mashup
This whimsical project combines the prehistoric with the delicate, featuring a soft watercolor sauropod surrounded by a wreath of wispy wildflowers. The textured, deckled-edge paper gives it an heirloom quality, perfect for a nursery or thoughtful greeting card.
Detailed Instructions
Materials
- Heavyweight cold-press watercolor paper with deckled edges (approx. 5×7 inches)
- Watercolor paints (Sage Green, Paynes Grey, Dusty Pink)
- Fine liner pen (Black or Sepia, 0.1mm and 0.05mm)
- Round watercolor brushes (Size 2 and 4)
- Pencil (HB or H)
- Kneaded eraser
- Palette for mixing
- Paper towels and water cup
Step 1: Sketching the Composition
-
Outline the Dinosaur:
Begin lightly in the center of your paper. Draw a long, curving neck leading down to a sloping back and long tail. Keep the body shape rounded and gentle rather than angular. -
Refine the Details:
Sketch the small head at the top of the neck, adding a tiny open mouth as if it’s eating leaves. Add the four sturdy legs, ensuring the back legs look muscular and the front legs slightly slimmer. -
Plan the Flowers:
Lightly trace a curved path starting from below the dinosaur’s tail and sweeping up towards the front. Sketch loose, vine-like structures and small circles where your pink blossoms will go. -
Floating Petals:
Add three small distinct petal shapes floating to the left of the dinosaur’s neck to balance the composition.
Step 2: Watercolor Layers
-
Mix the Dinosaur Green:
Create a muted sage green by mixing a sap green with a tiny touch of Paynes grey or brown to desaturate it. You want a soft, earthy tone. -
Base Wash:
Using your size 4 brush, paint the entire body of the dinosaur with a watery wash of your sage green mix. Keep the edges neat but let the color pool naturally in the center. -
Adding Texture:
While the paint is still damp (not soaking), drop slightly more concentrated pigment along the dinosaur’s back and the bottom of the belly to create shadow and volume. -
Painting the Spots:
Wait for the base layer to dry completely. Mix a reddish-brown tone and carefully dab small, irregular spots along the spine, neck, and tail using the tip of your size 2 brush. -
Floral Pinks:
Mix a very watery dusty pink. Gently dab color into the flower shapes on your wreath and the floating petals. Keep these very loose and undefined; they shouldn’t be perfect circles. -
Vine Base:
Use a pale, watery green (even lighter than the dinosaur) to paint the main stems of the floral wreath. Use a light hand so the lines aren’t too thick.
Bleeding Lines?
If your ink bleeds into the paint, the paper wasn’t dry enough. Wait longer or use a hairdryer on low heat. Ensure your pen is waterproof/archival.
Step 3: Inking and Definition
-
Check Dryness:
Ensure all paint is bone dry. If the paper feels cool to the touch, give it a few more minutes. -
Outline the Dinosaur:
Using your 0.1mm pen, trace the dinosaur’s silhouette. Use a broken, sketchy line rather than a solid heavy one to maintain a delicate look. -
Facial Features:
Draw the tiny eye and define the mouth opening. Add small creases where the legs meet the body and slight lines on the feet to suggest toes. -
Drawing the stems:
With the 0.05mm pen, draw extremely fine lines over your painted green stems. Add little branching twigs that extend beyond the painted areas. -
Flower Details:
Add tiny stamen details or scribbles in the center of the pink flower blobs. Draw little outlines for leaves along the vines, leaving some uncolored for an airy feel. -
Final Touches:
Erase any remaining pencil lines gently with the kneaded eraser. If the dinosaur needs more contrast, add tiny stippling dots with your pen on the shadowed underbelly.
Add Subtle Sparkle
Mix a tiny amount of iridescent medium or metallic watercolor into the pink floral paint for a magical shimmer that catches the light.
This charming little dinosaur is now ready to frame or gift to a prehistoric enthusiast


Have a question or want to share your own experience? I'd love to hear from you in the comments below!