If you’ve got a handful of smooth stones and the urge to paint something playful, dinosaur rock painting is the perfect little project. I love how a rock’s shape can instantly suggest a snout, a frill, or even a dino egg just waiting to crack open.
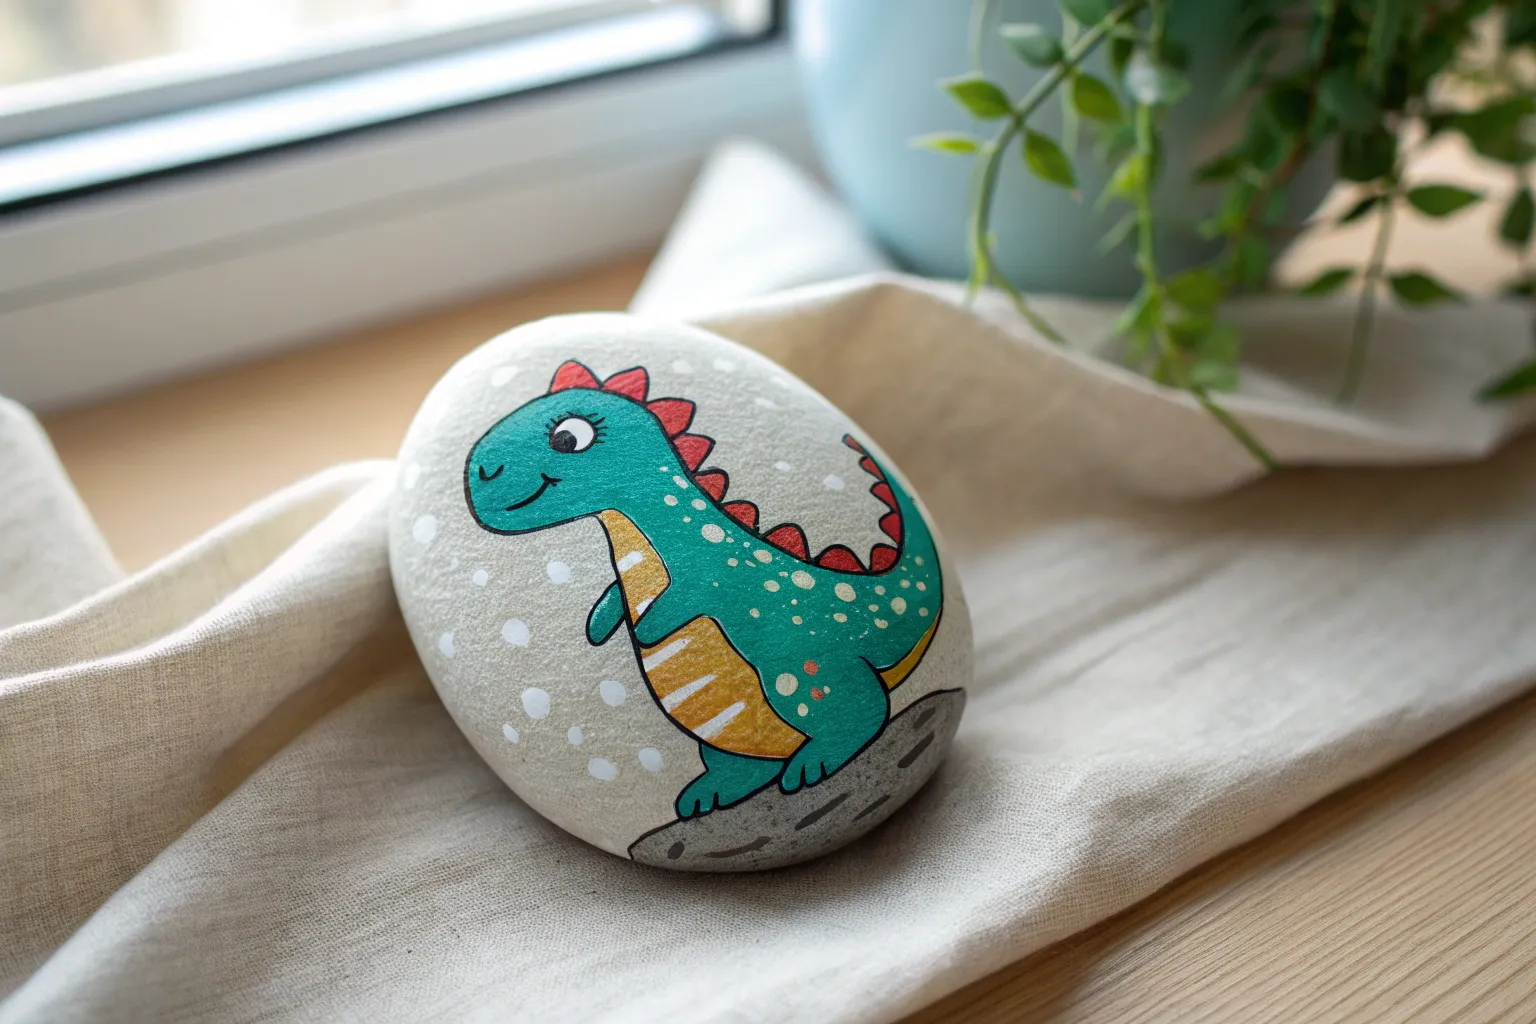
Cute Cartoon Dinosaur Buddy
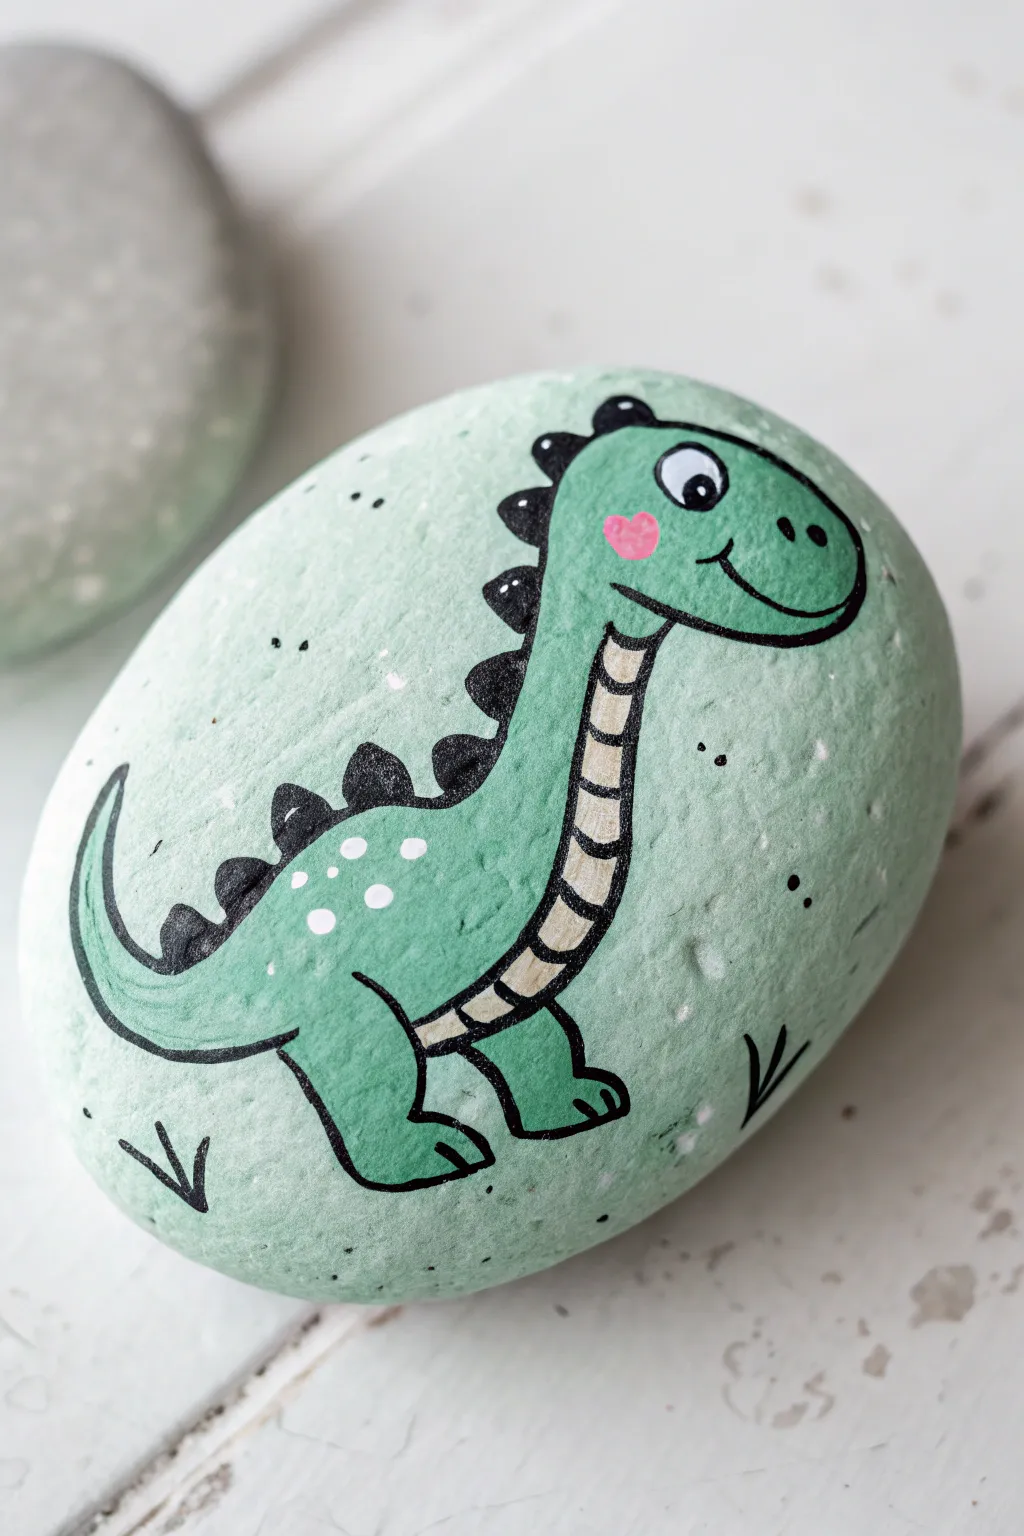
Transform a smooth garden stone into a prehistoric pal that fits right in the palm of your hand. This adorable cartoon dinosaur features bold outlines, soft green hues, and a charming expression, making it a perfect project for beginners and kids alike.
Step-by-Step
Materials
- Smooth, rounded river rock (flat surface preferred)
- Acrylic paints: Light sage green, forest green, white, pale cream/beige, pink
- Posca paint pens or fine-tip acrylic markers: Black (0.7mm or similar), White (extra fine)
- Flat paint brushes (various sizes)
- Detail liner brush (size 0 or 00)
- Pencil and eraser
- Matte spray sealer or Mod Podge
Step 1: Prepping the Canvas
-
Clean the Stone:
Begin by scrubbing your rock with warm, soapy water to remove any dirt or oils that might prevent the paint from sticking, then let it dry completely. -
Base Coat Application:
Mix a very pale sage green using white and a tiny drop of green acrylic paint. -
Layering the Background:
Paint the entire top surface of the stone with this pale sage mixture. You may need two coats for full opacity, ensuring the first coat is dry before adding the second.
Paint Pen Blobs?
If your marker floods, quickly dab the excess ink with a paper towel corner. Let it dry completely, then paint over the mistake with your base color before retrying.
Step 2: Drawing the Dinosaur
-
Sketch the Outline:
Once the background is fully dry, lightly sketch the dinosaur shape with a pencil. Start with a large oval for the body and a smaller circle for the head, connecting them with a long neck. -
Refine the Details:
Add the tail curving upward, stout legs, and the triangular spikes running down the back. -
Paint the Body:
Fill in the main body shape using a brighter, medium green acrylic paint. Be careful to stay inside your pencil lines, leaving space for the underbelly stripe. -
Add the Belly Stripe:
Using a pale cream or beige color, paint the segmented strip that runs from the neck down to the belly. -
Paint the Spikes:
Use a darker forest green or black to fill in the triangular spikes along the spine.
Smoother Outlines
Rest your pinky finger on the dry part of the rock while outlining. This stabilizes your hand and helps you draw confident, steady lines.
Step 3: Adding Personality
-
Outline Work:
Take your fine-tip black paint pen (or a very thin liner brush with black paint) and carefully outline the entire dinosaur body. -
Section the Belly:
Draw horizontal curved lines across the cream belly stripe to create the segmented look. -
Draw the Face:
On the head, draw a large circle for the eye, a small nostril dot, and a wide, curved smile line. -
Fill the Eye:
Color in the pupil with black, leaving the rest of the eye white. I find adding a tiny white dot highlight inside the black pupil really brings the character to life. -
Blushing Cheeks:
Dip the end of a paintbrush or a dotting tool into pink paint and stamp a small heart or oval shape on the cheek area.
Step 4: Finishing Touches
-
Add Texture Spots:
Using a small brush or a white paint pen, add three or four small white dots on the dinosaur’s back for texture. -
Create the Environment:
With your black pen, draw simple tufts of grass (small ‘V’ shapes) near the dinosaur’s feet to ground the character. -
Background Speckling:
Dilute a bit of black or white paint with water and flick it gently with an old toothbrush or stiff brush to create fine speckles across the background stone. -
Seal the Artwork:
Allow the paint to cure for at least 24 hours. Once completely dry, apply a matte spray sealer to protect your artwork from chipping.
Now you have a charming little dinosaur friend to keep you company on your desk or in a planter


Classic T-Rex Side Profile
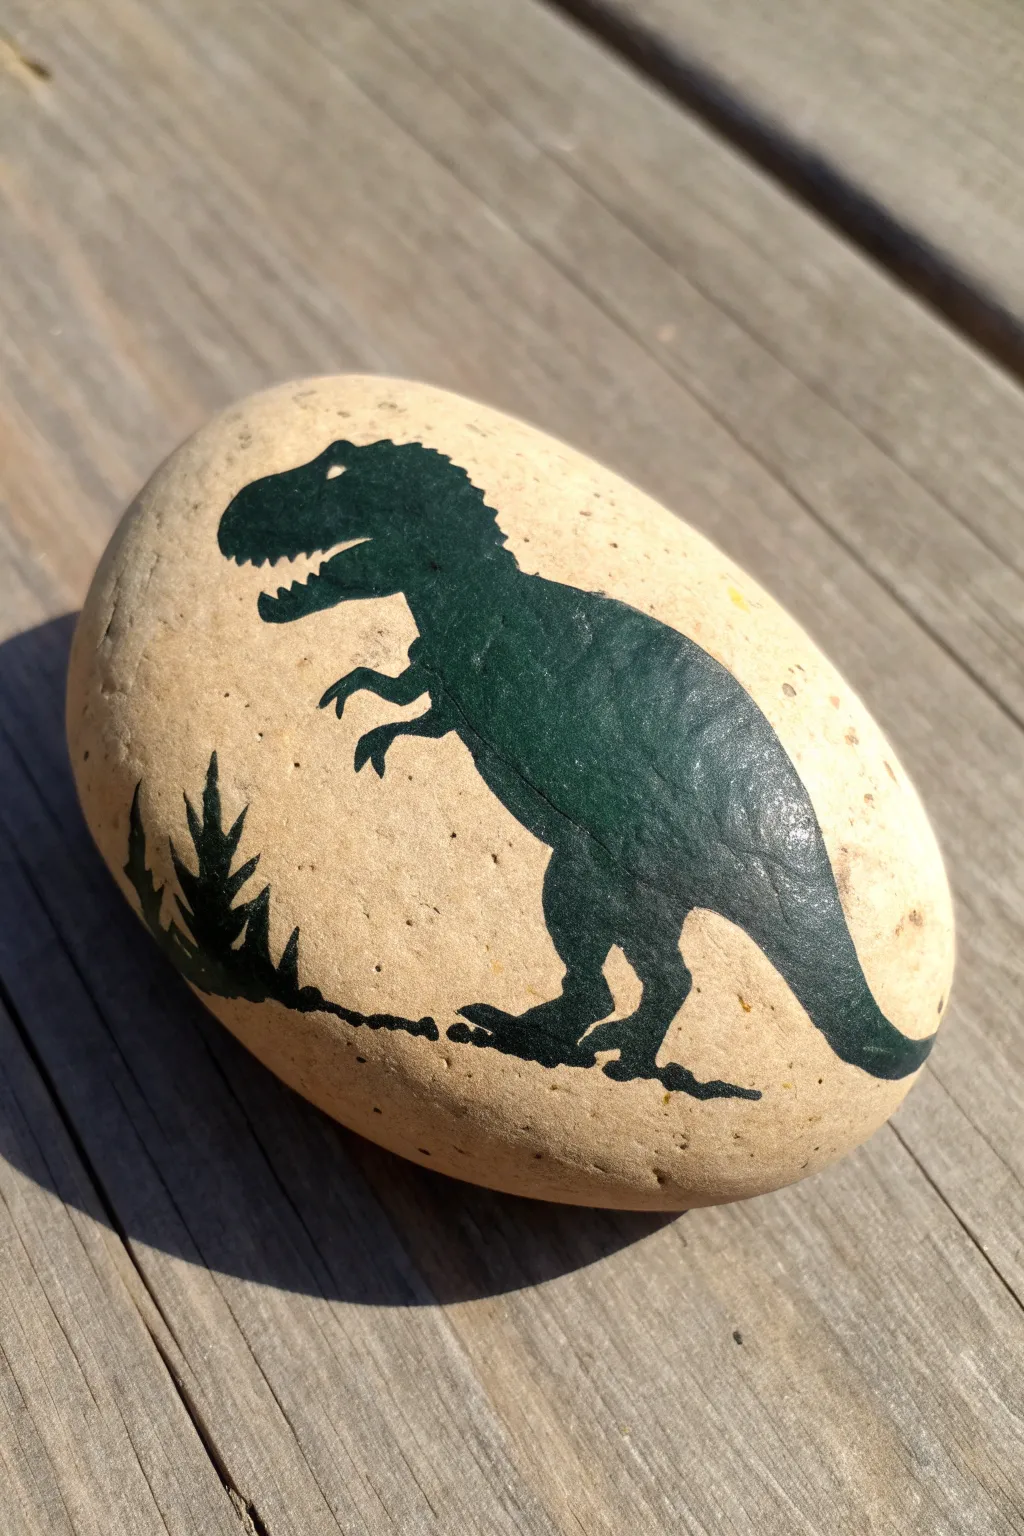
This project captures the mighty Tyrannosaurus Rex in a timeless green silhouette against the natural tan backdrop of a smooth river rock. The sharp profile and jagged teeth create a recognizable and bold design that really stands out on a stone canvas.
How-To Guide
Materials
- Smooth, oval-shaped river rock (cleaned and dried)
- Dark green acrylic paint
- Fine liner paintbrush (size 00 or 000)
- Small round paintbrush (size 1 or 2)
- Pencil (HB or lighter)
- White eraser
- Water cup and paper towels
- Outdoor sealant or varnish (optional)
Step 1: Preparation and Sketching
-
Select your stone:
Choose a rock that is relatively flat and smooth. A lighter color, like beige or tan, works best to make the dark green dinosaur really pop. -
Clean the surface:
Wash your rock with warm soapy water and scrub away any dirt or grit. Let it dry completely before starting, as moisture can ruin the paint adhesion. -
Outline the head:
Using a pencil, lightly sketch the T-Rex’s large, blocky head near the upper left quadrant of the rock. Don’t press too hard, or the graphite will be hard to cover. -
Add the jaw:
Draw the open mouth with a jagged line for the teeth. The lower jaw should jut out slightly less than the upper snout. -
Sketch the body and tail:
Extend a curved line down from the neck to form the back, sloping it all the way down to create a thick, strong tail that tapers off near the right edge of the rock. -
Draw the legs:
Sketch the powerful hind legs. The thigh should be large and muscular, leading down to the thinner shin and finally the clawed feet planted firmly on the ground. -
Position the tiny arms:
Add the iconic small arms just below the neck area. They should look almost comically small compared to the rest of the body, with two little clawed fingers.
Fixing Smudges
If you smudge paint outside the lines, wait for it to dry completely. Then, gently scrape it off with a craft knife or toothpick rather than wiping it while wet.
Step 2: Painting the Silhouette
-
Outline with paint:
Dip your fine liner brush into the dark green acrylic paint. Carefully trace over your pencil lines, starting with the back and tail to establish the main shape. -
Detail the head:
Switching to the very tip of your liner brush, carefully paint the jagged teeth and the profile of the skull. This is the trickiest part, so take your time. -
Define the eye:
Leave a tiny negative space (unpainted area) for the eye. If you accidentally paint over it, don’t worry—you can dot it with white later, but leaving the bare rock looks more natural. -
Fill the body:
Use the slightly larger round brush to fill in the main body. I prefer to work from the center pushing paint outward to avoid messing up the outline. -
Paint the legs:
Carefully fill in the legs and feet. Ensure the connection between the feet and the ‘ground’ looks solid. -
Refine the arms:
Go back to your smallest liner brush to fill in the tiny arms. Ensure the claws look sharp and distinct.
Step 3: Grounding and Finishing
-
Create the ground line:
Paint a thin, uneven line under the feet to represent the ground. It doesn’t need to be straight; a bumpy texture mimics earth better. -
Sketch vegetation:
On the far left, behind the dinosaur, sketch a few jagged, spiky shapes to represent prehistoric ferns or grass. -
Paint the plants:
Using the liner brush, fill in these plant shapes with the same dark green. Use quick, upward flicking motions to keep the tips sharp. -
Clean up edges:
Inspect your silhouette. If any edges look fuzzy, use the fine liner brush to smooth them out for that crisp, sticker-like appearance. -
Let it cure:
Allow the paint to dry completely. This usually takes about 20-30 minutes depending on how thick your paint application was. -
Seal the artwork:
To protect your dino from the elements, apply a coat of clear varnish or sealer once the paint is fully cured. This also deepens the green color slightly.
Pro Tip: Paint Consistency
Add a tiny drop of water to your green acrylic for the fine details like teeth and claws. Ink-like consistency flows better than thick paint for sharp lines.
Now you have a fierce prehistoric creature ready to guard your garden or bookshelf


Triceratops Face With Big Frill
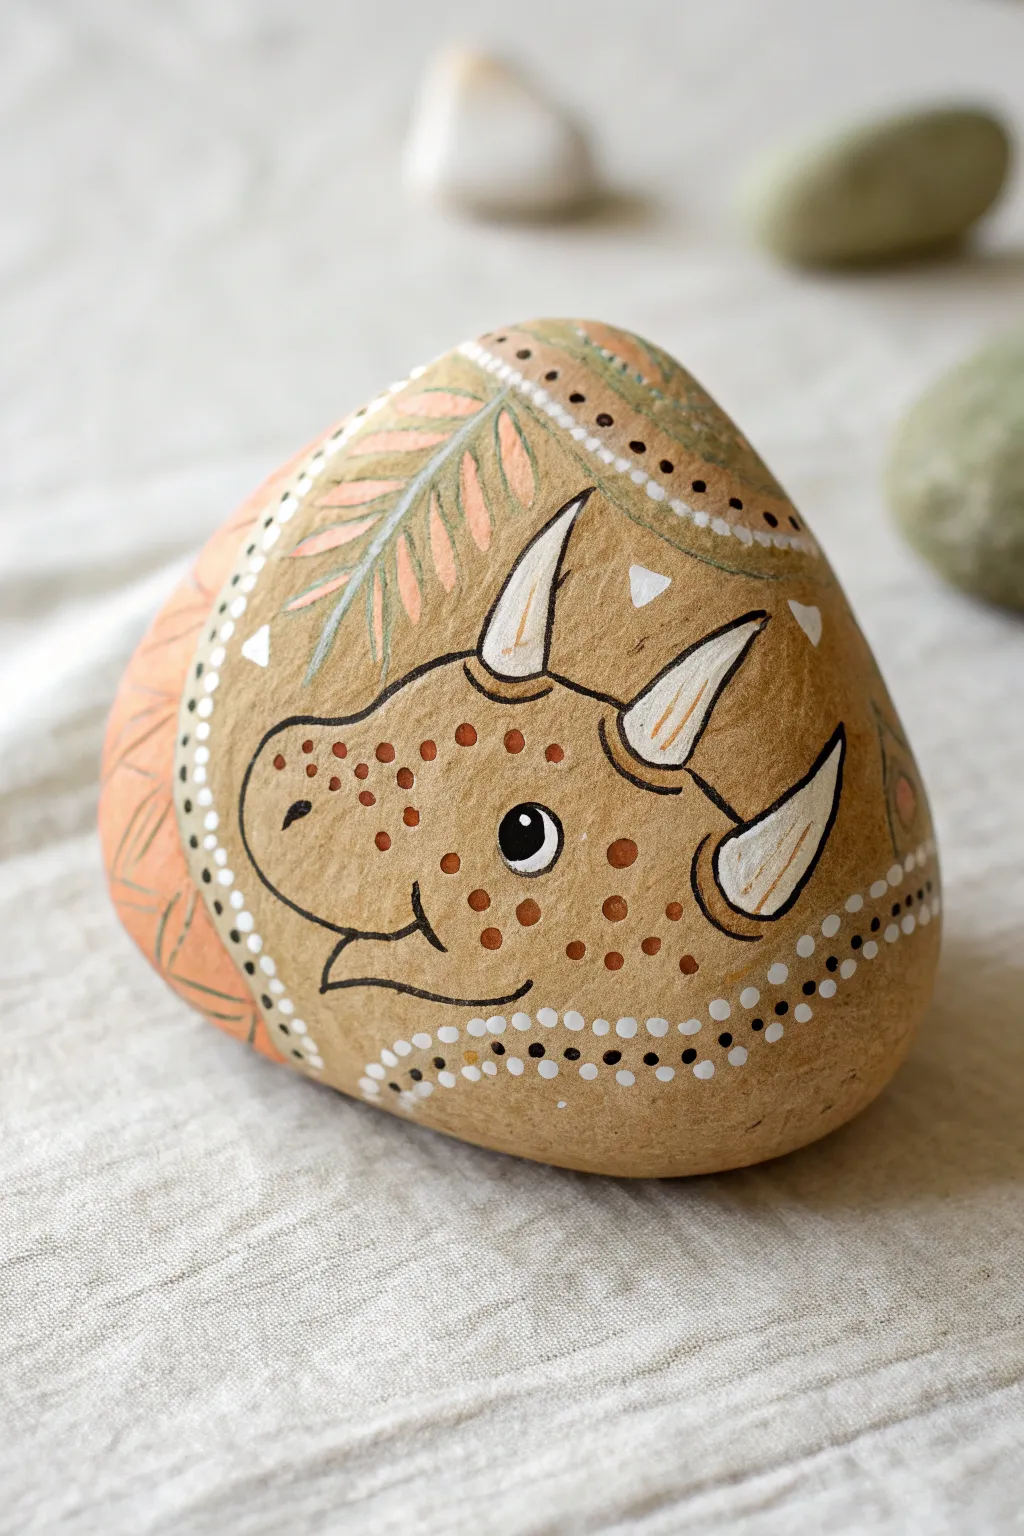
This charming nature-inspired design turns a simple rounded stone into a friendly triceratops with a decorative, boho-style frill. Using warm earth tones and delicate dot work, you’ll create a stylized dinosaur face that feels perfectly at home in a garden or on a cozy bookshelf.
Step-by-Step
Materials
- Smooth, rounded river rock (fist-sized)
- Acrylic paints: khaki/tan, terracotta/pumpkin orange, cream, white, black, moss green
- Fine liner brush (size 0 or 00)
- Small flat brush
- Dotting tools (various sizes) or toothpicks
- Pencil for sketching
- Matte or satin sealant spray
Step 1: Base and Sketch
-
Prepare the surface:
Begin with a clean, dry rock. Since the design relies on a solid background, base coat the entire stone with a warm khaki or tan acrylic paint. You may need two coats for full opacity; let it dry completely. -
Map out the sections:
Using a light pencil, lightly sketch a curved line separating the left third of the rock from the right two-thirds. This left section will be the decorative frill, and the right section will be the face. -
Sketch the dinosaur features:
In the larger right section, lightly draw the outline of the triceratops head. Include the three horns (two on top, one on the nose), the beak-like mouth, and a simple eye shape. Don’t worry about details yet, just the main shapes.
Clean Lines
Is your black outline shaky? Thin your black paint with a drop of water until it has an ink-like consistency, or switch to a fine-tip permanent marker.
Step 2: Color Blocking
-
Paint the frill section:
Fill in the left crescent-shaped section (the frill) with a terracotta or pumpkin orange paint. Keep the edge neat where it meets the tan background. -
Define the head shape:
Since the head is slightly lighter than the base rock in the image, you can mix a little white into your khaki paint to create a subtle contrast, filling in the triceratops head shape. If your base coat is already light enough, you can skip this and just rely on the outlines later. -
Whiten the horns:
Use white paint to fill in the three horns. Apply thin layers so the paint lays flat, as texture can make outlining difficult later. -
Add frill decoration:
On the orange frill section, use a mix of moss green and cream to paint simple, fern-like leaf shapes. I find a liner brush works best here to get those wispy ends.
Symmetry Hack
When dotting the curved border, start with a center dot and work outward to the left and right. This ensures the pattern stays centered and even.
Step 3: Outlining and Patterning
-
Outline the dinosaur:
Using your finest liner brush and black paint thinned slightly with water, carefully outline the triceratops head, the three horns, and the facial features. Add a little curve for the smile and the nostril. -
Detail the horns:
Add a faint line down the center of each horn with a diluted tan paint to give them a bit of dimension without being too harsh. -
Create the eye:
Paint a solid black circle for the eye. Once dry, add a tiny white dot near the top edge for a ‘sparkle’ highlight, and outline the eye with a thin white ring to make it pop. -
Stipple the face:
Dip a small dotting tool or the back of a paintbrush into the terracotta paint. Add varied dots across the forehead and snout to create a speckled, reptile-skin texture.
Step 4: Decorative Borders
-
Primary dot border:
Using white paint and a medium dotting tool, create a line of dots separating the orange frill from the tan face area. These act as the ‘studs’ of the collar. -
Secondary detailing:
Add a second row of smaller dots—alternating black and white—along the outer edge of the white dot border for extra visual interest. -
Upper pattern:
If your rock has space at the top, paint a curved band of moss green and embellish it with tiny black dots to frame the top of the head. -
Final white accents:
Add small white triangles or dots in the empty spaces around the head to fill the composition. -
Seal the artwork:
Allow the rock to dry overnight to ensure deep moisture has evaporated from the thick paint layers. Finish with a matte spray sealant to protect your prehistoric pal.
Now you have a wonderfully earthy dinosaur decoration to brighten up your desk or garden path


Stegosaurus Plates in Bright Colors
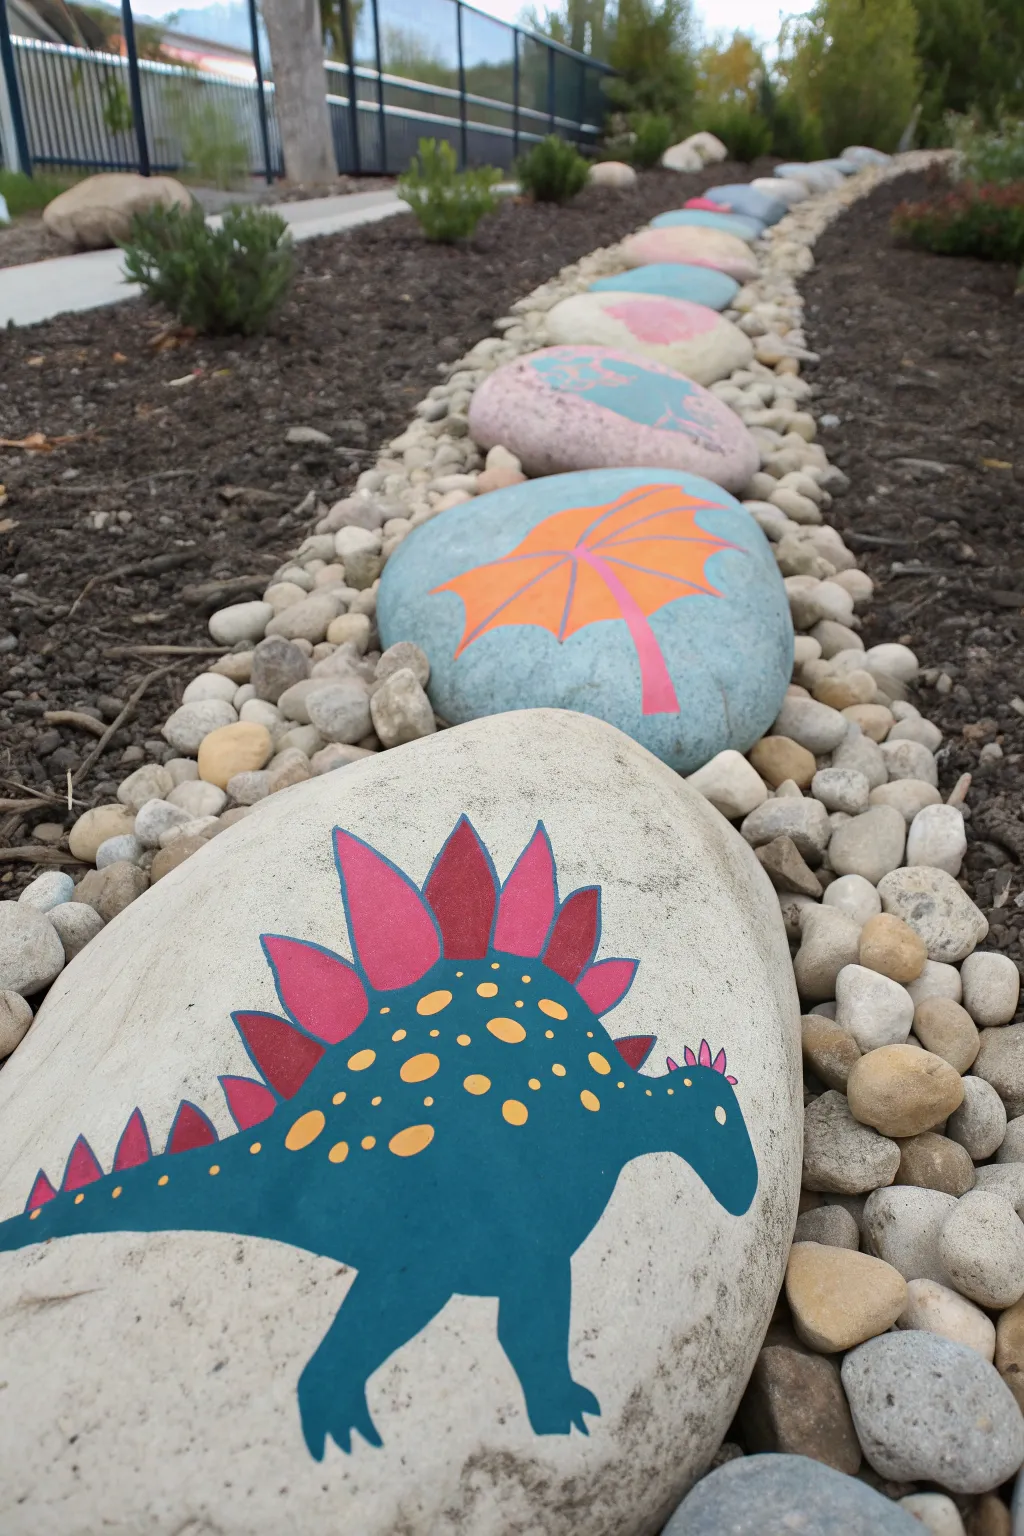
Transform a smooth garden stone into a prehistoric pal with this vibrant stegosaurus design. Featuring bold teal skin and striking pink plates, this project makes a cheerful addition to any rock garden path.
Step-by-Step Guide
Materials
- Large, smooth, flat river rock (light or white color preferred)
- Acrylic paints: Teal/Dark Cyan, Magenta/Hot Pink, Red, Yellow, White (optional primer)
- Flat paintbrush (medium size)
- Small round detail brush
- Pencil useful for sketching
- Clear outdoor sealant spray (matte or glossy)
- Palette for mixing paints
- Water cup and paper towels
Step 1: Preparation and Sketching
-
Clean the surface:
Before starting, scrub your rock with soap and water to remove any dirt or grit. Let it dry completely in the sun or with a rag to ensure the paint adheres properly. -
Optional base coat:
If your rock is dark or uneven in color, paint a layer of white acrylic over the surface to create a blank canvas. Let this dry fully. -
Outline the body:
Using a pencil, lightly sketch the main body shape of the dinosaur. Draw a long, curving oval for the body that tapers into a tail on the left and a neck on the right. -
Add the head and legs:
From the neck area, sketch a small, rounded head pointing downward. Add two sturdy legs beneath the body, keeping the shapes simple and blocky for a cartoonish look. -
Sketch the plates:
Along the curve of the back, draw a series of triangular plates. Make the ones in the center of the back the largest, getting smaller as you move toward the tail and the neck.
Step 2: Painting the Base Colors
-
Fill in the body:
Load your medium flat brush with the teal or dark cyan paint. Carefully fill in the entire body, legs, head, and tail, avoiding the triangular plates on the back. -
Refine the edges:
Use the edge of your brush or switch to a smaller one to tidy up the outline of the teal body, ensuring the curves are smooth. -
Paint the large plates:
Using a clean brush and the magenta or hot pink paint, fill in the largest central plates on the dinosaur’s back. Apply a second coat if the color looks streaky. -
Paint the smaller plates:
Switch to red paint for the smaller plates near the tail and neck. This creates a nice gradient effect along the spine. -
Let it dry:
Allow these base layers to dry completely before moving on to the details. I generally wait about 15 minutes here so the colors don’t bleed into the spots.
Clean Lines
Work steadily from left to right (if you are right-handed) to avoid dragging your hand through wet paint as you fill in the different sections.
Step 3: Adding Details and Finishing
-
Add the large spots:
Dip a small round brush into yellow paint. Dab larger oval-shaped spots along the main body area, spacing them out randomly. -
Add tiny spots:
Using just the tip of the small brush or a toothpick, add smaller yellow dots around the larger ones and down the tail for texture. -
Detail the head:
Dip the very tip of your smallest brush into white paint to create a tiny dot for the eye on the head. -
Add the pupil:
Once the white eye dot is dry, place a minuscule black dot in the center for the pupil using a toothpick or fine brush tip. -
Spikes on the head:
For a fun extra detail, add three tiny pink spikes or tufts on top of the head using the magenta paint. -
Final drying time:
Let the entire rock sit undisturbed until the thickest parts of the paint are fully hardened. -
Seal the artwork:
Take the rock outside and spray it with a clear outdoor sealant. This protects your hard work from rain and sun fading.
Fixing Smudges
If you accidentally paint outside the lines, wait for the mistake to dry completely, then paint over it with the background rock color or scrape it off gently.
Place your colorful dinosaur in the garden path and enjoy your prehistoric art piece
BRUSH GUIDE
The Right Brush for Every Stroke
From clean lines to bold texture — master brush choice, stroke control, and essential techniques.
Explore the Full Guide
Long-Neck Dinosaur Wrapped Around the Rock
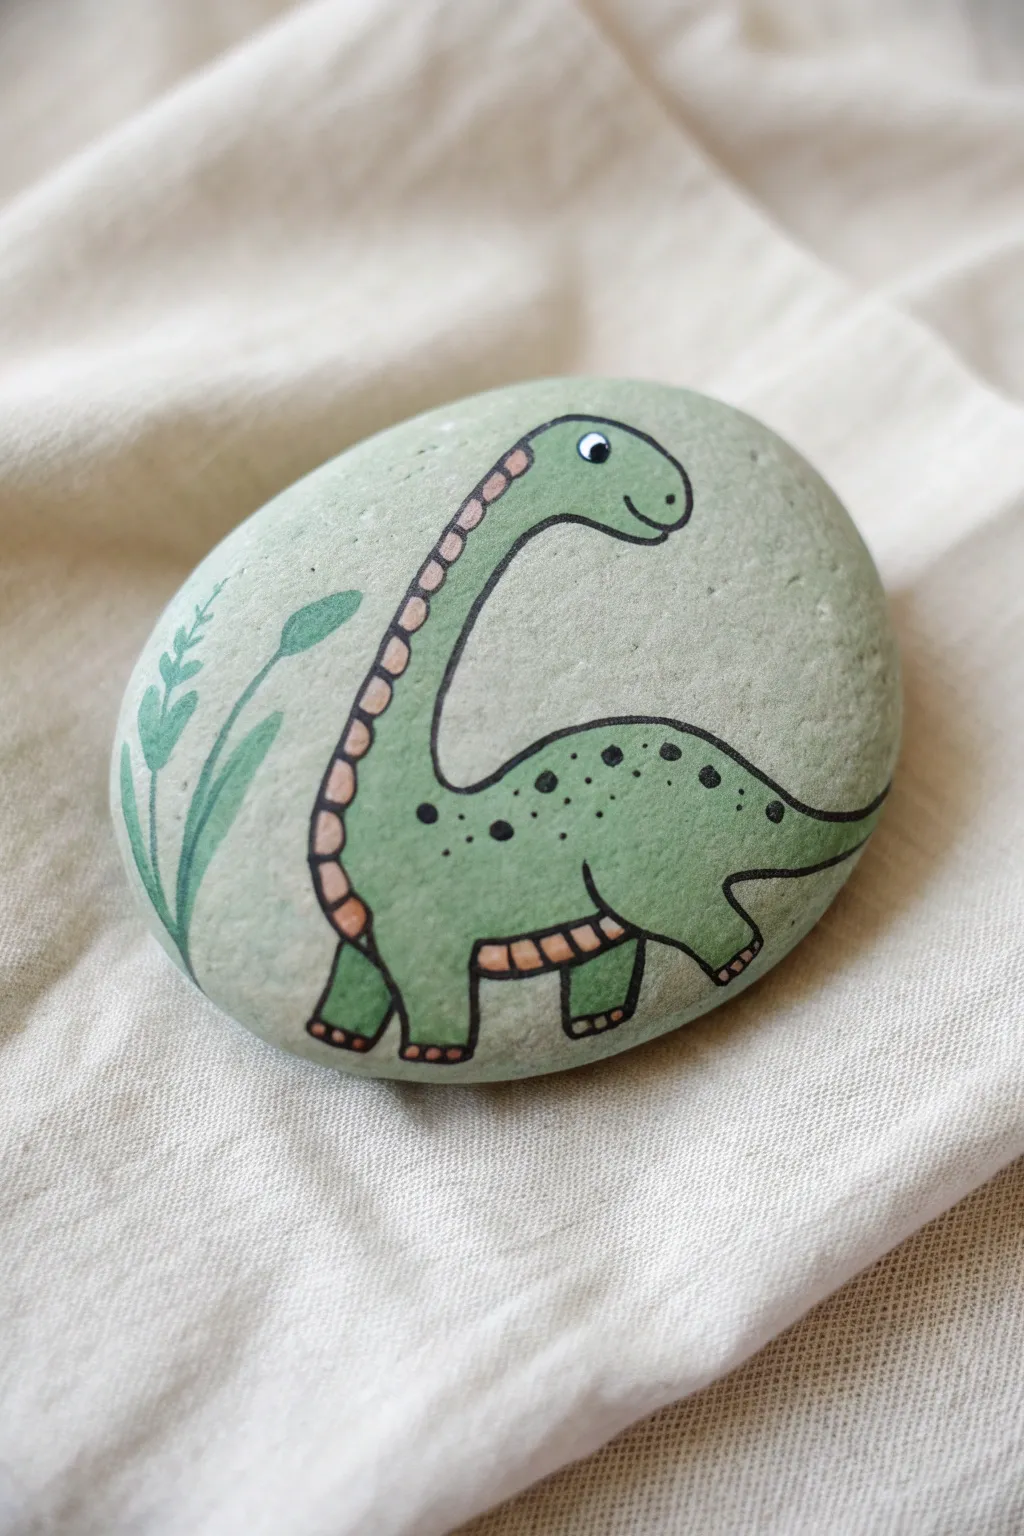
Transform a smooth, rounded stone into a prehistoric friend with this adorable long-neck dinosaur design. The muted green palette and simple outlining make this a charming, nature-inspired piece that looks great in a garden or on a desk.
Step-by-Step Tutorial
Materials
- Smooth, oval river rock (palm-sized)
- Acrylic paints: Sage green, Forest green, Beige/Light tan, White, Black
- Pencil for sketching
- Fine liner brush (size 0 or 00)
- Medium flat brush
- Black fine-tip acrylic paint pen or permanent marker
- Matte or satin sealant spray
Step 1: Base and Sketch
-
Clean the canvas:
Begin by washing your stone with warm soapy water to remove any dirt or oils. Let it dry completely, as moisture will prevent the paint from adhering properly. -
Mix the background color:
Create a pale, dusty green by mixing a small amount of forest green with plenty of white. You want a very soft, stone-like hue that feels organic. -
Paint the background:
Using your medium flat brush, coat the entire top surface of the rock with your pale green mixture. You may need two coats for full opacity, letting the first layer dry before adding the second. -
Sketch the outline:
Once the base coat is bone dry, lightly sketch the dinosaur’s shape with a pencil. Start with a large oval for the body at the bottom and extend a long, curved neck upwards and to the left, ending in a rounded head. -
Shape the legs:
Add four sturdy legs to the bottom of the oval body. They should look like chunky rectangles with rounded bottoms. -
Add the tail:
Draw a pointed tail extending from the right side of the body, curving slightly upward to follow the rock’s natural contour.
Step 2: Painting the Motifs
-
Fill in the dinosaur:
Mix a medium sage green (slightly darker than your background) and fill in the dinosaur’s body shape using a smaller brush. Leave the sketch lines visible if possible, or refine the edges as you paint. -
Paint the belly spots:
While you have your paints out, mix a light beige or tan color. Look at the dinosaur’s belly and under-neck area; paint small, segmented patches here to represent the underbelly scales. -
Add the plant:
To the left of the dinosaur, paint a simple plant with the same medium sage green used for the body. Draw a long stem curving upward with a leaf shape at the top, and a second smaller stem branching off with tiny leaflets. -
Let it cure:
It is crucial to let these colored layers dry completely before moving to the outlining phase to prevent smearing.
Fixing Smudges
If your black outline smudges the green paint, wait for it to dry totally. Then, take a tiny brush with the background color and paint over the mistake like correction fluid.
Step 3: Details and Outlines
-
Outline the body:
Using a black fine-tip paint pen or a very fine liner brush with thinned black paint, carefully trace the entire outline of the dinosaur. -
Define the belly scales:
Outline the beige patches on the belly and neck. Draw small vertical lines within these beige areas to create a segmented, plated look. -
Add the spots:
Using the tip of your brush or a dotting tool dipped in black, add random polka dots across the dinosaur’s back. I like to vary the sizes slightly for a more natural look. -
Create the face:
Paint a small white circle on the head for the eye, adding a black pupil once distinct. Draw a simple curved line for a smiling mouth and two tiny dots for nostrils. -
Detail the feet:
At the bottom of each leg, draw three small curved loops to represent toes. -
Outline the plant:
Gently outline the plant stems and leaves with your black pen. Keep your hand loose here; the lines don’t need to be perfectly rigid. -
Seal the stone:
Once all ink and paint is fully dry, finish with a coat of matte or satin spray sealant to protect your prehistoric pal from the elements.
Level Up: Texture
Mix a pinch of baking soda into your background paint before applying. It creates a gritty, realistic stone texture that feels amazing when held.
Now you have a timeless fossil-inspired creation to hide in a park or keep as a pet rock.
Pterosaur Gliding Across the Sky
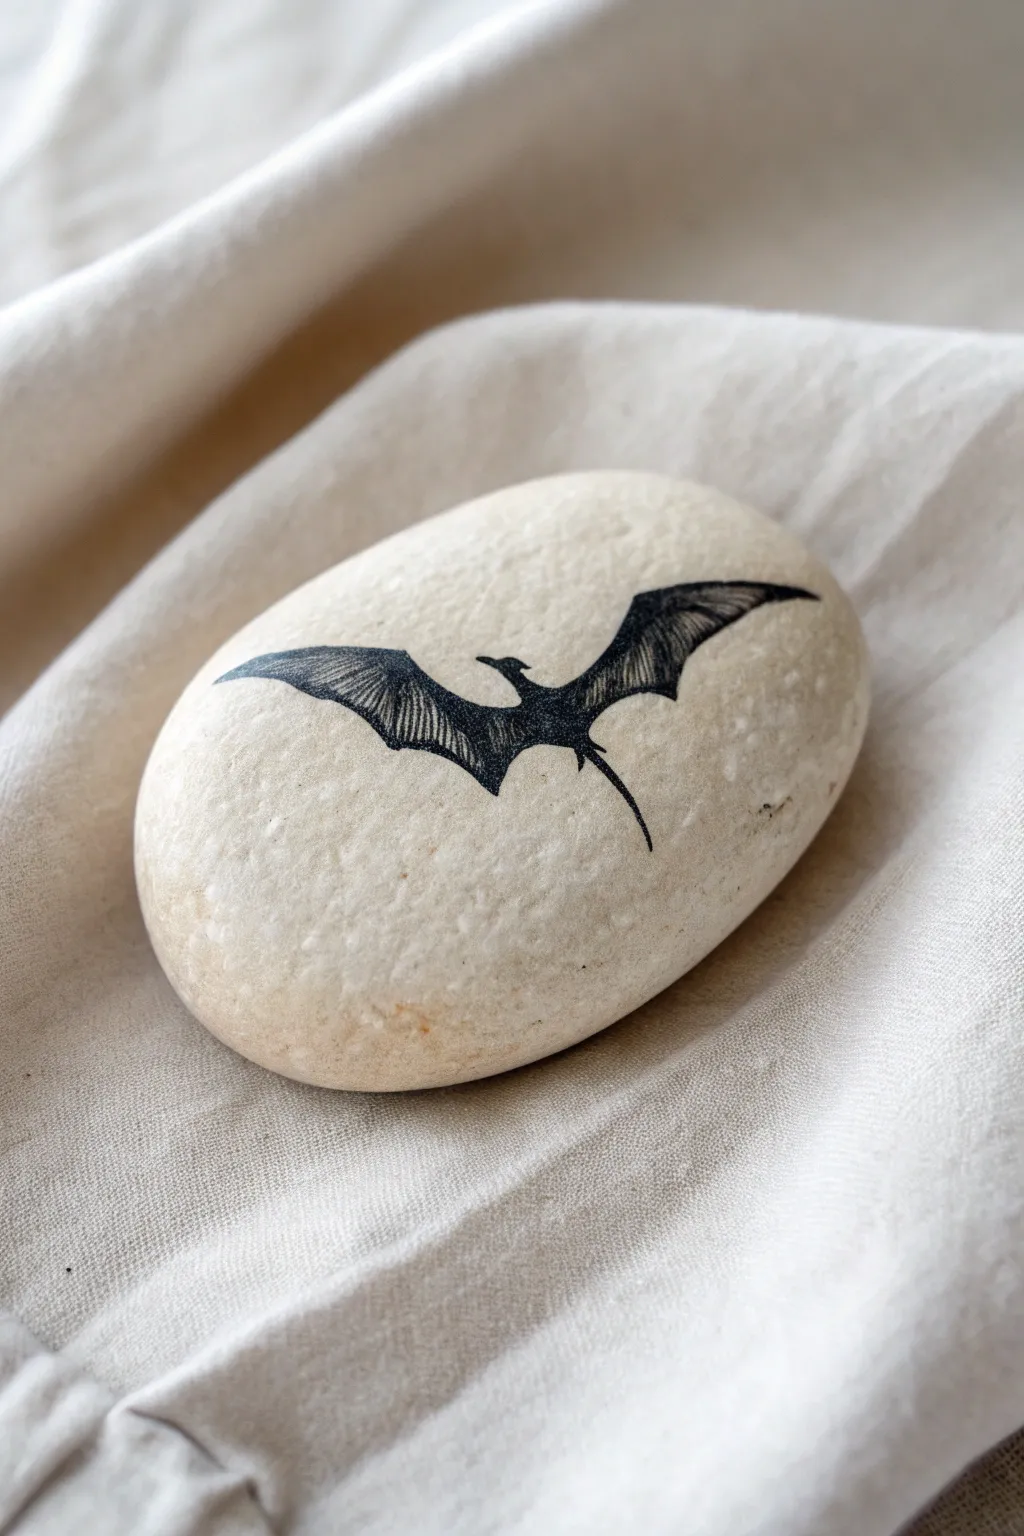
Capture the graceful silhouette of an ancient Pterosaur gliding through prehistoric skies on a smooth river rock. This project uses fine-line ink work to create a classic, etched illustration style that contrasts beautifully with the stone’s natural texture.
How-To Guide
Materials
- Smooth, light-colored river rock (oval shape preferred)
- Fine-grit sandpaper (optional)
- Pencil (HB or 2B)
- Kneaded eraser
- Fine-point permanent black marker (0.3mm or 0.5mm)
- Ultra-fine point permanent black marker (0.1mm or 0.05mm)
- Matte spray varnish or sealant
Step 1: Preparation and Sketching
-
Select your stone:
Look for a smooth, pale river rock with an oval or slightly flattened shape. A lighter background color like cream or light grey ensures the black ink will stand out crisply. -
Clean surface:
Wash the rock thoroughly with soap and water to remove any dirt or oils. Let it dry completely in the sun or with a hairdryer. -
Smooth the texture:
If your rock has minor bumps, lightly buff the center area with fine-grit sandpaper. This creates a smoother canvas for the delicate ink pens. -
Map the body:
Using a pencil with a very light touch, draw a small, elongated curve in the center of the rock. This forms the Pterosaur’s torso. -
Sketch the head:
Extend a line from the top of the torso to create the long neck and the distinct, pointed crest of the head. Add the beak pointing forward. -
Add the wing arches:
Sketch the upper arm bones extending outward from the shoulders. These lines should curve slightly upward before angling back, creating the framework for the wings. -
Outline the wing membranes:
Draw the bottom edge of the wings, swooping down and connecting back to the body. The wings should look bat-like, with a distinct curve on the trailing edge. -
Add the tail:
Sketch a long, thin tail extending from the base of the torso, curving gently downward to suggest movement and balance.
Step 2: Inking and Detailing
-
Outline the silhouette:
Switch to your fine-point (0.3mm) black marker. Carefully trace over your pencil sketch to establish the main outline of the creature. -
Fill the body:
Color in the head, neck, and main torso completely with the black marker. Keep the ink solid here to anchor the figure. -
Define the wing structure:
Draw the ‘fingers’ or structural bones within the wings. These should radiate from the elbow joint toward the wing tips. -
Start the hatching:
Switch to the ultra-fine (0.1mm or 0.05mm) marker. I find this smaller tip essential for the delicate texture work. Begin drawing small, closely spaced lines on the wings. -
Directional shading:
Ensure your hatch lines follow the curve of the wing membrane. They should generally flow from the leading edge of the wing toward the back. -
Darken the edges:
Increase the density of your hatch lines near the body and the upper arm bones. This creates a shadow effect, giving the wings a three-dimensional curvature. -
Feather the tips:
Allow the hatch lines to become lighter and more spaced out as you reach the tips and trailing edges of the wings. -
Refine the tail:
Go over the tail line one more time to ensure it looks sharp and tapered at the end. -
Erase guidelines:
Allow the ink to dry for at least 15 minutes to prevent smearing. Gently use a kneaded eraser to lift away any visible pencil marks. -
Seal the art:
Finish by applying a light coat of matte spray varnish. This protects the ink from fading or rubbing off without adding too much unnatural shine.
Ink Control
If the ink starts bleeding into the stone’s pores, switch to a finer tip pen and use lighter, faster strokes to deposit less ink at once.
Ancient Sky
Add a few tiny, V-shaped birds in the distance or faint cloud lines behind the wings to give the Pterosaur a sense of altitude and scale.
Now you have a piece of prehistoric history preserved perfectly on stone

PENCIL GUIDE
Understanding Pencil Grades from H to B
From first sketch to finished drawing — learn pencil grades, line control, and shading techniques.
Explore the Full Guide
Mini Jurassic Jungle Background Scene

Transform an ordinary stone into a prehistoric masterpiece featuring a friendly green dinosaur wandering through a lush fern forest. This detailed scene layers various shades of green to create depth, making it look like a tiny window into the Jurassic period.
Step-by-Step
Materials
- Large, smooth egg-shaped river rock associated
- Acrylic paints (various greens, pale grey-blue, brown, black, white, red)
- Pencil for sketching
- Assorted synthetic brushes (flat shader, small detail round, liner brush)
- Acrylic paint markers (optional, for fine lines)
- Spray gloss varnish or sealer
Step 1: Creating the Base Landscape
-
Basecoat the sky:
Start by painting the upper two-thirds of the rock with a pale, misty grey-blue mix. I find two thin coats work better than one thick one to get a smooth, non-streaky finish that mimics a humid prehistoric sky. -
Establish the ground:
Paint the bottom third of the rock with a dark, rich brown to serve as the forest floor. Blend the meeting point between the sky and ground slightly if the paint is still wet, or just create a clean horizon line. -
Sketch the layout:
Once the base background is fully dry, lightly sketch the outline of your dinosaur in the center and the large curving fern leaves reaching over from the top using a pencil. -
Paint the background hills:
Mix a muted, dark forest green. Paint the rolling hill shapes behind the dinosaur area, stopping before you reach the foreground grass area. These should serve as the mid-ground foliage.
Brush Control Pro Tip
For the crisp black outlines, thin your black acrylic paint with a few drops of water until it has an ink-like consistency, or use a 0.5mm acrylic paint marker.
Step 2: Adding the Fern Canopy
-
Paint giant ferns:
Using a liner brush and a medium olive green, paint the large fern fronds that arch over the scene from the top. Start with the central vein, then flick small brushstrokes outward for the leaves. -
Outline the foliage:
Carefully outline each leaf of the giant ferns with a very fine black line. This ‘illustrative’ style gives the artwork a crisp, storybook appearance. -
Add palm trees:
On the left side, paint smaller palm tree silhouettes using a lighter green against the dark hill background. Use a thin brush to create the starburst shape of the palm fronds. -
Detail the undergrowth:
Add small, yellowish-green ferns sprouting from the bottom left and right corners. These should look like they are in the immediate foreground.
Level Up: Hatching
Add tiny parallel hatch marks on the darker parts of the dinosaur skin and the shaded sides of the rocks to give the piece a vintage scientific illustration feel.
Step 3: Painting the Dinosaur
-
Fill the body color:
Paint the entire dinosaur shape with a light, muted sage green. You may need two coats to ensure the background dark brown doesn’t show through the legs. -
Add shading:
While the sage green is drying, mix a slightly darker green and apply it to the dinosaur’s back, the top of the head, and the thighs to create roundness and volume. -
Define the belly:
Blend a tiny bit of white into your sage mix and paint the underside of the belly, neck, and tail to highlight these areas. -
Primary outlines:
Use a liner brush with thinned black paint (or a fine tip black paint pen) to outline the entire dinosaur. Keep your hand steady to get a clean, continuous line. -
Add spots and texture:
Dot small dark green spots along the dinosaur’s spine and back. Add tiny lines on the knees and ankles to suggest wrinkles in the skin. -
Facial features:
Paint a small white circle for the eye with a black pupil. Add a small black nostril and a curved line for a smile. A tiny dot of pink on the cheek adds character. -
Claws:
Use white interactively to paint three small claws on the visible hand and the toes.
Step 4: Final Details
-
Grassy foreground:
Using a bright grassy green, paint vertical flicks along the very bottom edge of the rock to simulate tall grass hiding the dinosaur’s feet. -
Outline the grass:
Add thin black lines among the green grass blades to match the outlined style of the rest of the painting. -
Red flower accents:
Paint tiny red flower shapes or berries in the foreground grass and perhaps a tall red tropical flower stalk on the right side for a pop of complementary color. -
Seal the work:
Allow the rock to dry for at least 24 hours before spraying with a glossy varnish to protect the details and make the colors vibrant.
Now you have a charming prehistoric scene that fits in the palm of your hand
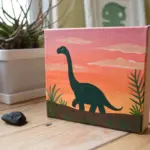
Dinosaur Silhouette at Sunset
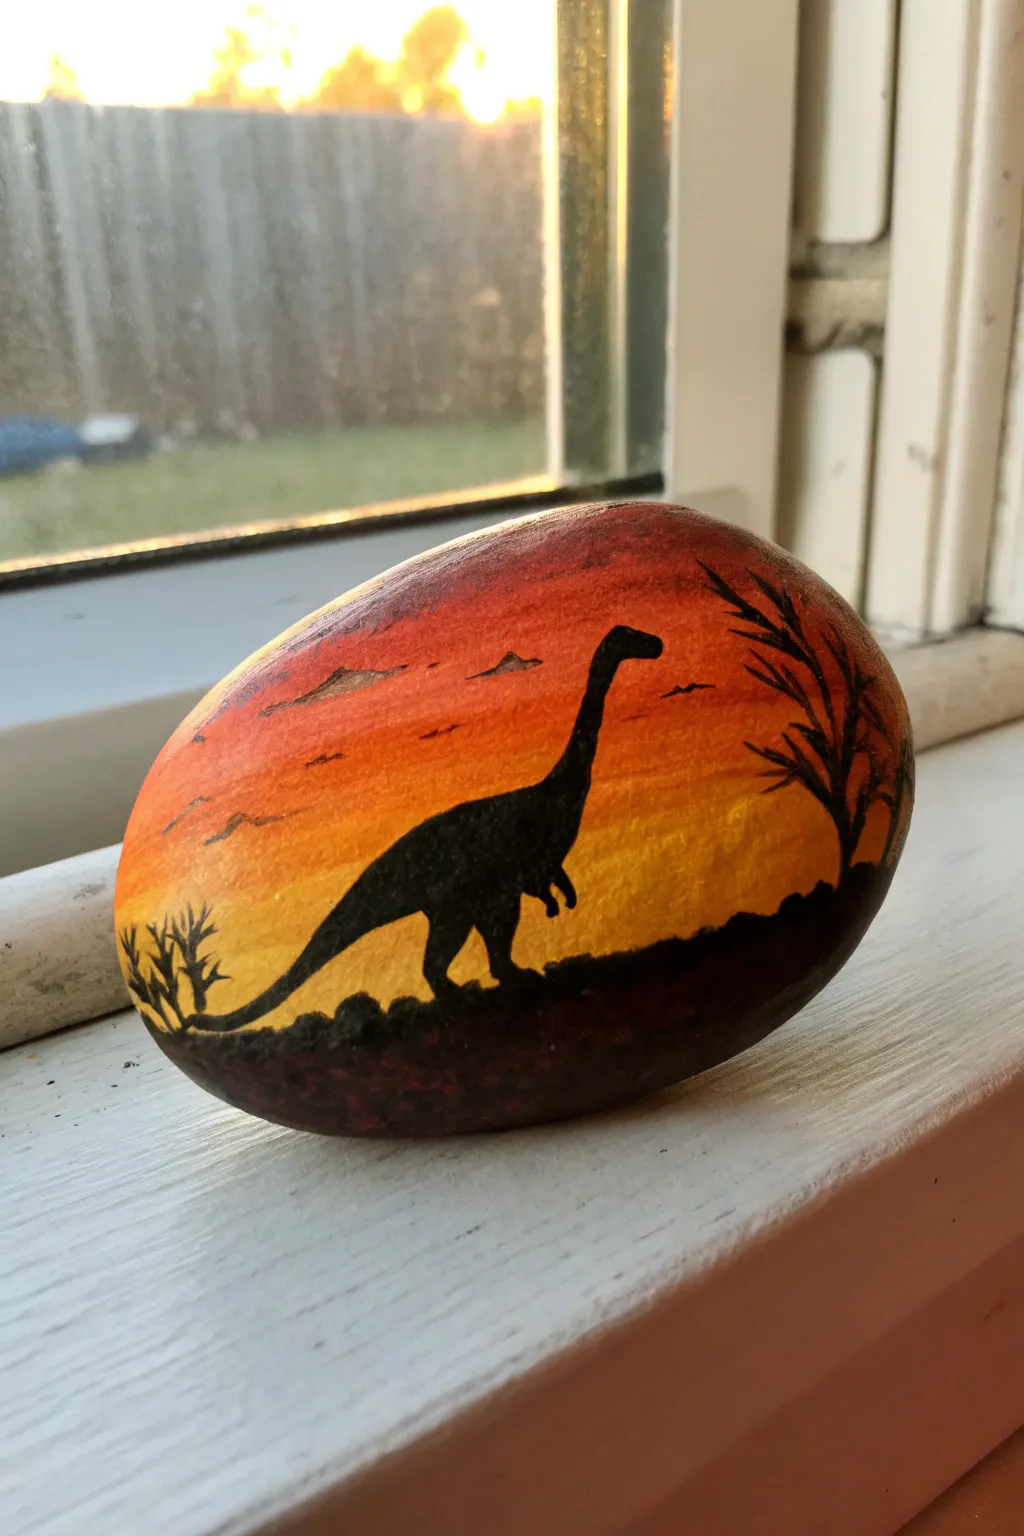
Capture the serene beauty of the Jurassic era with this glowing sunset scene painted on a smooth river rock. The warm gradient background provides the perfect stage for a striking dinosaur silhouette that stands out in bold contrast.
Step-by-Step Guide
Materials
- Smooth, oval river rock (about palm-sized)
- Acrylic paints (Yellow, Orange, Red, Black, Dark Brown)
- Flat paintbrushes (medium and small)
- Fine detail liner brush (size 0 or 00)
- Cup of water
- Paper towels
- Paint palette or paper plate
- Clear acrylic sealer (spray or brush-on, optional)
Step 1: Preparing the Canvas
-
Clean the Stone:
Begin by thoroughly washing your rock with soap and water to remove any dirt or oils. Let it dry completely before starting, as moisture can prevent the paint from adhering properly. -
Base Coat (Optional):
If your rock is very dark, apply a layer of white acrylic paint to the face of the stone. This primes the surface and ensures your sunset colors will pop brilliantly rather than looking muddy.
Blending Blues?
If your gradient gets muddy while blending, let it dry completely. Then repaint the transition areas with thin layers of fresh paint.
Step 2: Creating the Sunset Gradient
-
Apply Yellow:
Start near the bottom third of the rock face. Using a clean flat brush, paint a horizontal band of bright yellow. Don’t worry about perfect edges yet; we are just blocking in color. -
Add Orange:
Paint a band of orange directly above the yellow layer. While the paint is still wet, gently blend the bottom of the orange into the top of the yellow using horizontal brushstrokes to create a soft transition. -
Finish with Red:
Apply red paint to the top third of the rock. Just like before, blend the bottom edge of the red into the wet orange below it. Work somewhat quickly so the acrylics blend smoothly. -
Smooth the Blend:
If the transitions look harsh, clean your brush, dampen it slightly, and run it lightly back and forth over the boundary lines between colors. Let this background layer dry completely.
Step 3: Painting the Silhouette
-
Ground the Scene:
Switch to black paint mixed with a tiny drop of dark brown for warmth. Paint an uneven, hilly horizon line across the very bottom of the rock to serve as the ground. -
Outline the Dinosaur Body:
Using a small round brush, paint an oval shape for the dinosaur’s body in the center, slightly hovering above the ground line. Position it so the neck can extend upwards. -
Add the Neck and Head:
Draw a long, curved line extending up and towards the right for the neck. Top it with a small oval for the head. Sauropods have iconic necks, so I like to make this curve graceful. -
Paint the Tail:
Extend a thick line from the back of the body, tapering it off into a long, thin tail that sweeps down toward the left side of the rock. -
Add Legs:
Paint four legs extending down to the ground. Make the back legs slightly thicker at the top (the thigh area) and ensure they connect solidly with your painted ground. -
Fill in the Form:
Fill in your dinosaur outline with solid black paint. Before it dries, check the proportions—you can thicken the neck or body slightly if needed to make it look sturdy.
Level Up
Mix a tiny bit of gold glitter paint into the yellow section of the sky for a sunset that truly sparkles in the sunlight.
Step 4: Adding Details
-
Paint a Tree:
On the right side of the rock, use your fine liner brush to paint a silhouette of a tree. Start with a thin trunk and branch out into sparse, jagged lines reaching into the orange sky. -
Add Small Shrubs:
On the far left, dab small, spiky shapes near the ground to represent low-lying prehistoric ferns or bushes. Keep these loose and organic. -
Tiny Birds:
For scale, use the very tip of your finest brush to add two or three tiny ‘v’ shapes high in the sky to represent pterodactyls or ancient birds flying in the distance. -
Ground Details:
Dab a little texture along the bottom black strip to make the ground look uneven and rocky rather than perfectly flat.
Step 5: Finishing Touches
-
Final Inspection:
Look over your rock for any pinholes where the stone shows through the black silhouette. touch these up with a tiny bit of paint. -
Seal the Rock:
Once the paint is bone dry (give it at least an hour), apply a coat of clear acrylic sealer to protect your artwork from chipping and fading.
Now you have a piece of prehistory preserved perfectly on stone to display on your shelf or in the garden


Fossil Skeleton on Dark Stone
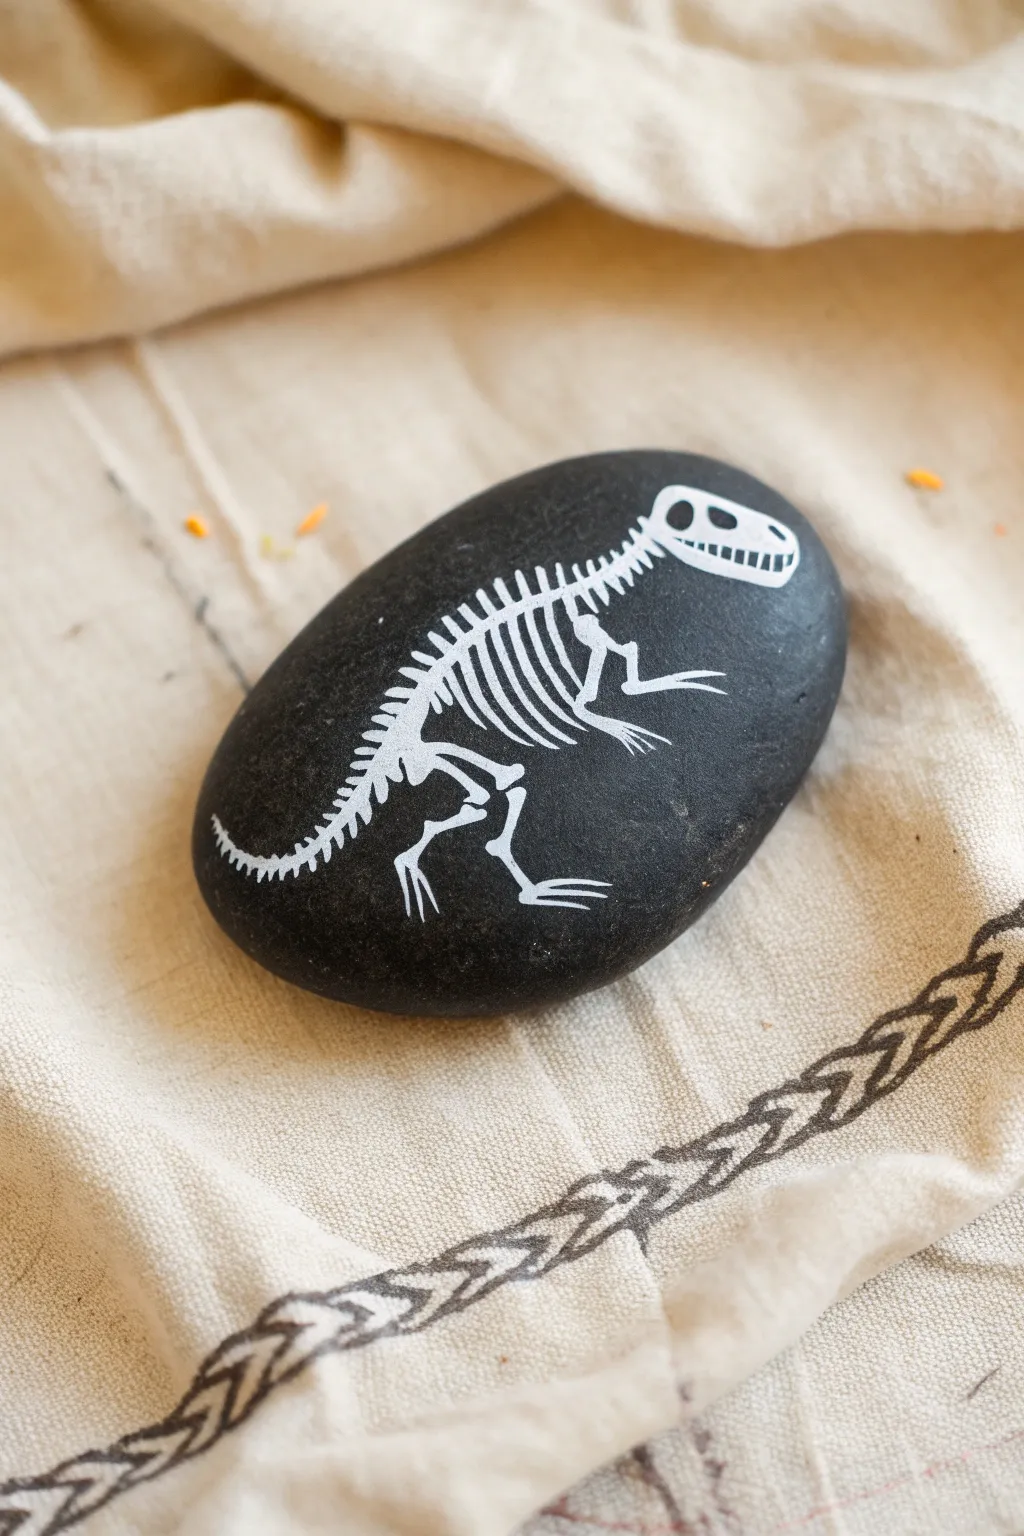
Transform a smooth dark stone into a prehistoric artifact with this striking T-Rex skeleton design. The stark contrast of white paint against black stone creates a clean, museum-quality fossil look that’s surprisingly simple to achieve.
Step-by-Step
Materials
- Smooth, oval river rock (medium to large size)
- Black acrylic paint (matte finish recommended)
- White extra-fine tip paint pen (0.7mm or similar)
- White fine tip paint pen (1-2mm)
- Flat paintbrush (medium size)
- Pencil (HB or lighter)
- Clear spray sealer (matte or satin)
- Paper plate or palette
- Cup of water and paper towels
Step 1: Preparing the Stone Canvas
-
Clean the surface:
Begin by washing your rock thoroughly with soap and water to remove any dirt or oily residue. Let it dry completely naturally or in the sun. -
Apply the base coat:
Squeeze a dollop of black acrylic paint onto your palette. Using your flat brush, coat the entire top surface of the rock in smooth, even strokes. -
Ensure opacity:
Once the first coat is dry to the touch, examine it for streaks. I like to apply a second coat here to ensure a deep, solid black background that will really make the white skeleton pop. -
Allow full curing:
Let the black base coat dry completely. This is crucial—if the paint is even slightly tacky, your pencil sketch or paint pen might dig into it.
Step 2: Sketching the Skeleton
-
Draft the spine:
Using a pencil very lightly, draw a gentle S-curve across the rock. This will act as the backbone guide, starting from the head position on the right down to the tail tip on the left. -
Outline the skull:
Sketch a simplified skull shape at the top right end of your curve. Think of a rounded rectangle with a slight dip for the snout. -
Mark the limbs:
Lightly indicate where the legs will go. Draw two lines for the large hind legs and two smaller lines for the tiny front arms. -
Refine the sketch:
Flesh out the shapes lightly. Don’t worry about individual ribs yet; just ensure the proportions of the head, body, and tail fit nicely on the stone.
Bone Structure Trick
Look at a dinosaur diagram while painting. Not for perfection, but to see how the knees bend backward compared to humans—it makes the skeleton look instantly more realistic.
Step 3: Painting the Bones
-
Fill the skull:
Take your fine tip white paint pen and carefully outline the skull shape. Leave distinct gaps for the eye socket and the nostril hole. -
Add the teeth:
Switch to your extra-fine tip pen. Along the jawline of the skull, draw tiny vertical dashes to create the serrated look of dinosaur teeth. -
Draw the vertebrae:
Starting from the neck and moving down the spine, draw small, connected bony segments along your S-curve. Make them smaller as you reach the tip of the tail. -
Create the ribcage:
From the backbone vertebrae, draw curved white lines extending downward for the ribs. These should be longest in the center of the chest and get shorter toward the hips. -
Paint the pelvic bone:
Isolate the hip area by drawing a small, somewhat triangular shape where the legs meet the spine. -
Detail the hind legs:
Draw the leg bones using thicker lines for the femur and shin. Use the extra-fine pen to add delicate toes and claws at the bottom. -
Add the tiny arms:
Draw the small forearms extending from the upper ribcage area. These are very thin bones, so use a light touch to keep them dainty. -
Connect the tail bones:
Finish the tail by adding small, spiky protrusions on top of the vertebrae towards the end of the tail to give it that ridge-like texture. -
Strengthen the white:
Once the white ink dries, check if any areas look translucent. carefully re-trace the main bones (skull, femur, spine) to make them bright white.
Oops, smudged ink?
If you smudge the white paint pen, don’t wipe it! Let it dry completely, then paint over the mistake with your black base color before redrawing the bone.
Step 4: Finishing Up
-
Clean up sketch lines:
If any pencil marks are still visible, wait until the paint is 100% dry and gently erase them, or carefully touch them up with a tiny bit of black paint. -
Seal the fossil:
Take your rock to a well-ventilated area and spray it with a matte or satin sealer. This protects the paint from chipping and keeps the fossil looking timeless.
Place your finished fossil rock in a planter or on a desk for a prehistoric conversation piece
Night Sky Dinosaur With Stars
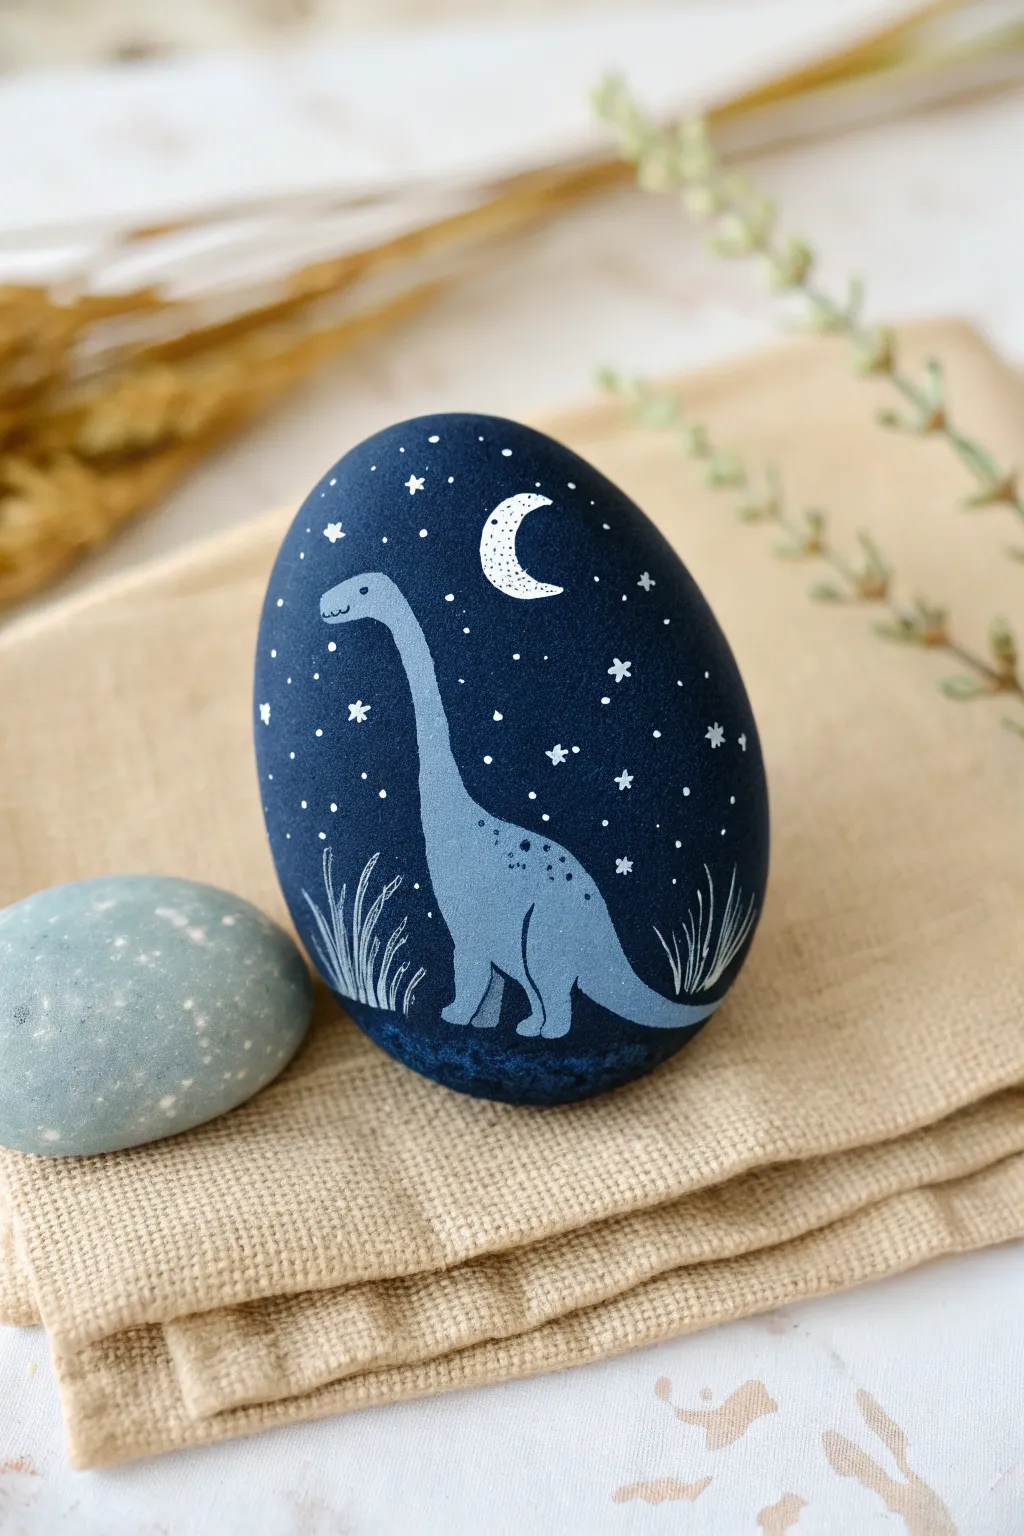
Capture the quiet magic of a prehistoric evening with this serene rock painting project. A gentle long-necked dinosaur gazes at the moon amidst a field of twinkling stars, all set against a deep midnight blue background.
Step-by-Step Guide
Materials
- Smooth, oval-shaped river rock
- Acrylic paints: Deep navy blue, light blue-grey, white, black
- Wide flat brush
- Fine detail brush (liner or size 00)
- Small round brush (size 1 or 2)
- Water cup and palette
- Pencil (optional)
- Matte or satin varnish
Step 1: Setting the Night Scene
-
Clean Your Canvas:
Begin by washing your stone with warm soapy water to remove any dirt or oils. Let it dry completely before you start painting so the base coat adheres properly. -
Apply the Base Coat:
Using your wide flat brush, paint the entire rock with a deep navy blue acrylic paint. You want this color to be rich and opaque, so it looks like the darkest part of the night sky. -
Second Layer:
Allow the first coat to dry fully. If the natural rock color is still showing through, apply a second coat of navy blue for solid, even coverage. -
Darken the Bottom:
While the navy paint is still slightly tacky or just after it dries, mix a tiny drop of black into your navy blue. Paint a subtle, darker curve at the very bottom of the rock to represent the ground.
Uneven Coverage?
If your light blue dinosaur looks streaky over the dark background, don’t overwork wet paint. Let the first layer dry completely, then apply a second thin coat for opacity.
Step 2: Painting the Dinosaur
-
Sketch the Outline:
Once the background is completely bone-dry, lightly sketch the outline of your dinosaur using a pencil. Draw a tall, curving neck that reaches toward the top left, flowing into a rounded body and a long tail that wraps toward the right. -
Fill in the Body:
Load your small round brush with a light blue-grey paint. Carefully fill in the shape you just sketched. The opacity is key here, so don’t be afraid to lay the paint on a little thick to cover the dark background. -
Refine the Edges:
Use your fine detail brush to smooth out the edges of the neck and tail. The silhouette should look crisp against the dark sky. -
Add Texture Spots:
While you have your detail brush out, mix a slightly darker shade of blue-grey. gently stipple small dots along the dinosaur’s back and the base of the neck to add subtle texture. -
Create the Legs:
Paint the legs using the same light blue-grey color. To distinguish the legs that are ‘behind’ the body, you can add a tiny touch of the navy background color to your grey mix, making them appear slightly shadowed. -
The Face Details:
With your finest liner brush and black paint, add a tiny dot for the eye and a small curved line for a smiling mouth near the tip of the snout.
Use a Toothpick
For the tiniest stars or the dinosaur’s eye, dip the tip of a toothpick into your paint instead of a brush. It offers much better control for micro-details.
Step 3: Celestial Details
-
Paint the Moon:
Rinse your brushes well. Using pure white paint and a small brush, paint a clean crescent moon shape in the upper center of the rock, just to the right of the dinosaur’s head. -
Texture the Moon:
I like to take a needle or a very sharp pencil tip and gently tap small dots of black or grey onto the white moon while it’s dry to give it a cratered look. -
Add the Stars:
Using your finest brush or a dotting tool, dip into white paint. Place tiny dots randomly across the night sky. Vary the pressure to create stars of different sizes. -
Draw Starbursts:
Select a few of your larger white dots and carefully drag paint outward in four directions to create twinkling cross-shaped stars. -
Ground the Scene:
At the bottom of the rock, use thin, wispy strokes of white or very light grey to paint small tufts of grass rising up around the dinosaur’s feet. This helps ‘seat’ the figure in the environment. -
Seal Your Work:
Allow the entire painting to dry for at least an hour or overnight. Finish by applying a layer of matte or satin varnish to protect your artwork from scratches.
Now you have a peaceful prehistoric scene perfect for a paperweight or a garden decoration
Geometric Dinosaur Mosaic Style
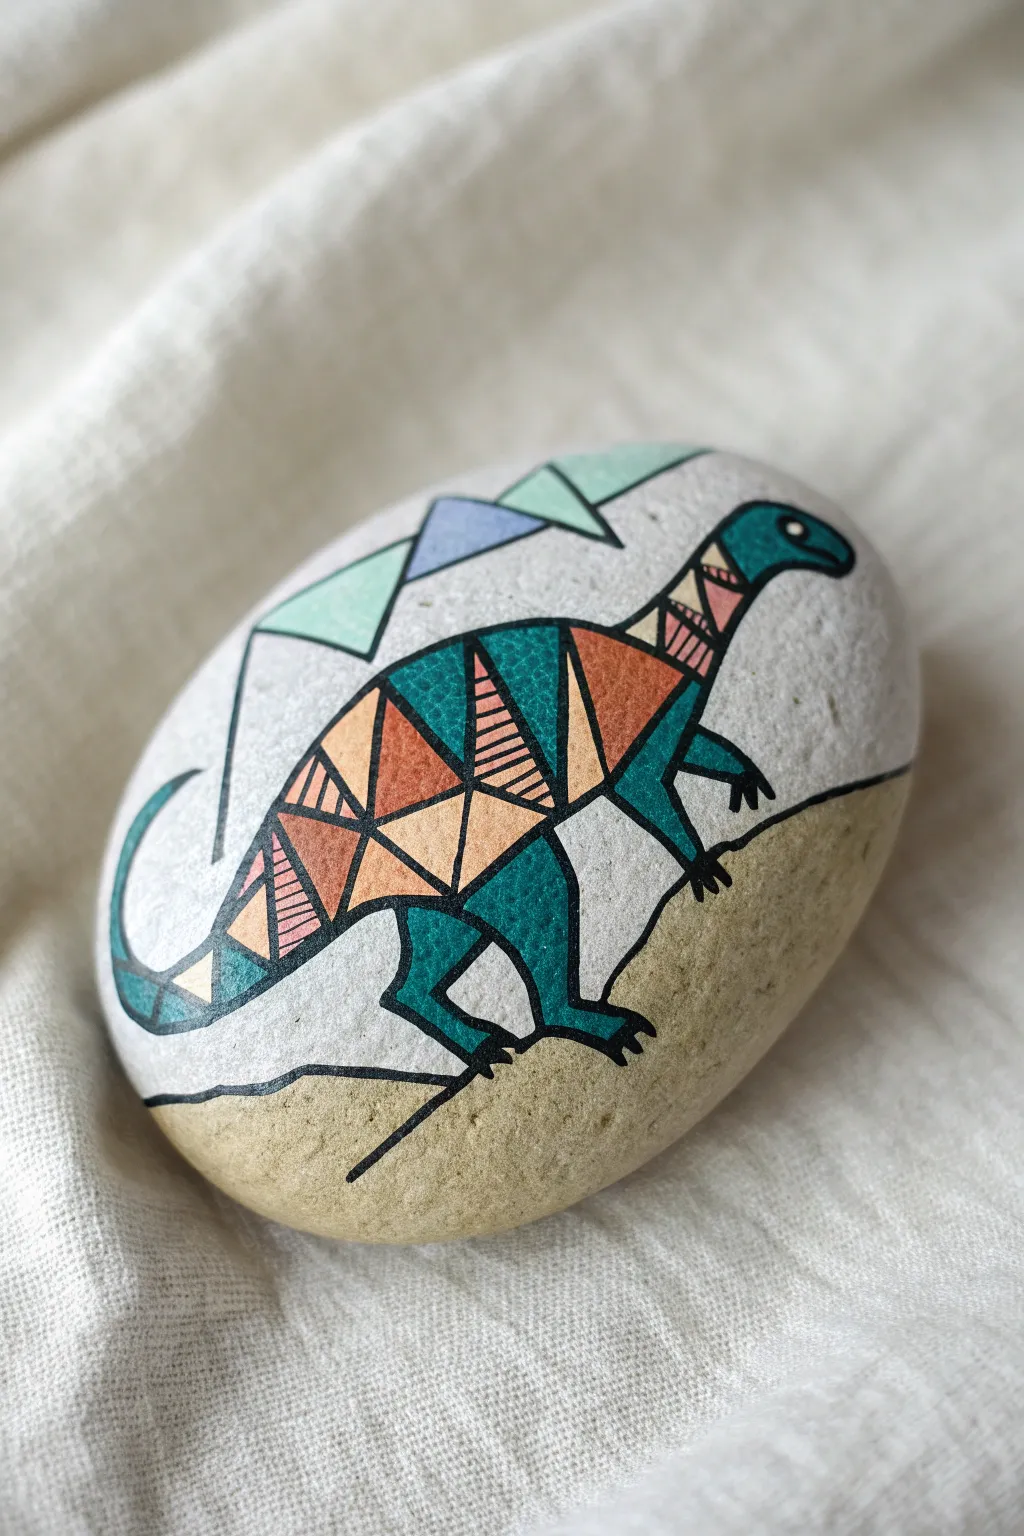
Transform a simple garden stone into a prehistoric piece of art with this mosaic-style dinosaur design. This project combines crisp black lines with vibrant blocks of color to create a modern, stained-glass effect that looks stunning on a smooth white background.
How-To Guide
Materials
- Smooth, oval river rock (approx. 4-5 inches)
- White acrylic paint or gesso (for base)
- Black fine-point paint pen (0.5mm or 0.7mm)
- Acrylic paints: Teal blue, muted orange, light pink, light purple, mint green, and beige/tan
- Small flat brush and fine detail brush
- Pencil and eraser
- Matte or satin varnish sealer
Step 1: Preparation & Base Work
-
Clean the canvas:
Begin by scrubbing your rock thoroughly with soap and water to remove any dirt or oils. Let it dry completely in the sun or use a hairdryer to speed things up. -
Apply the foundation:
Paint the upper two-thirds of the rock with white acrylic paint. You may need two to three thin coats to get a solid, opaque coverage, letting each coat dry fully in between. -
Paint the ground:
For the bottom third of the rock, mix a beige or sandy tan color. Paint a curved horizon line where the white meets the tan, creating a gentle slope for the dinosaur to stand on.
Smudged Lines?
If your black paint pen smears when applying varnish, the ink wasn’t fully dry. Let the black lines cure overnight, or start with a very light mist coat of sealer before a heavy coat.
Step 2: Sketching & Outlining
-
Draft the dinosaur shape:
Use a pencil to lightly sketch the outline of the dinosaur. Focus on the main shapes: a long oval for the body, a sweeping curved tail, a long neck, and simple blocky legs. -
Add geometric divisions:
Inside the dinosaur’s body, draw intersecting straight lines to create the geometric shard pattern. Don’t worry about perfect symmetry; random triangles and trapezoids make the mosaic look more interesting. -
Sketch the background elements:
Above the dinosaur’s back, lightly draw two or three simple floating triangles to represent abstract mountains or spikes. -
Inking the main lines:
Take your black fine-point paint pen and carefully trace over your pencil outlines. I like to start with the outer silhouette first to establish the boundaries before tackling the interior grid. -
Refining the grid:
Continue tracing the interior geometric lines with the black pen. Ensure the lines connect fully to the outer edges so each ‘shard’ is a closed shape ready for color.
Add Metallic Flair
Swap the plain beige ground paint for a metallic gold or bronze. Use a gold paint pen to outline specific triangles in the body for a mosaic that truly shimmers in the light.
Step 3: Color Blocking
-
Painting the primary teal:
Load a fine detail brush with teal blue paint. Fill in the head, the legs, the tip of the tail, and several scattered triangles within the body. This color acts as the anchor for the design. -
Adding warmth:
Switch to your muted orange paint. Fill in larger triangular sections in the center of the body to create a focal point and contrast against the cool teal. -
Softening with pink:
Use a light pink shade for smaller accent shapes, particularly on the neck and lower tail. This softer tone balances the stronger colors. -
Detailing the patterns:
Leave a few specific triangles white for now. Once the adjacent colors are dry, use your black pen to draw fine horizontal stripes inside these white sections for added texture. -
Painting the background shapes:
Fill the floating triangles above the dino with mint green and light purple. These should correspond to the pastel tones used in the main body.
Step 4: Finishing Touches
-
Clean up the lines:
Painting inside small shapes often leads to accidental overlaps. Go back over your black lines with the paint pen to sharpen everything up and cover any messy edges. -
Add the eye:
Place a small white dot on the dinosaur’s head for the eye. Once dry, add a tiny black pupil in the center to bring the creature to life. -
Wait for curing:
Allow the entire rock to sit undisturbed for at least 24 hours (or follow your paint manufacturer’s instructions) to ensure moisture has fully evaporated. -
Seal the artwork:
Apply a coat of satin or matte varnish to protect the paint from chipping. A spray sealer works best here to avoid smearing the black ink lines.
Place your finished geometric dinosaur in a planter or on a bookshelf for a modern touch of prehistoric charm


Have a question or want to share your own experience? I'd love to hear from you in the comments below!