A little paint can completely change the vibe of a bathroom, even when the tile and fixtures stay exactly the same. Here are my favorite DIY bathroom painting ideas—starting with the classics and drifting into the artsy, studio-style upgrades that make a small space feel wildly personal.
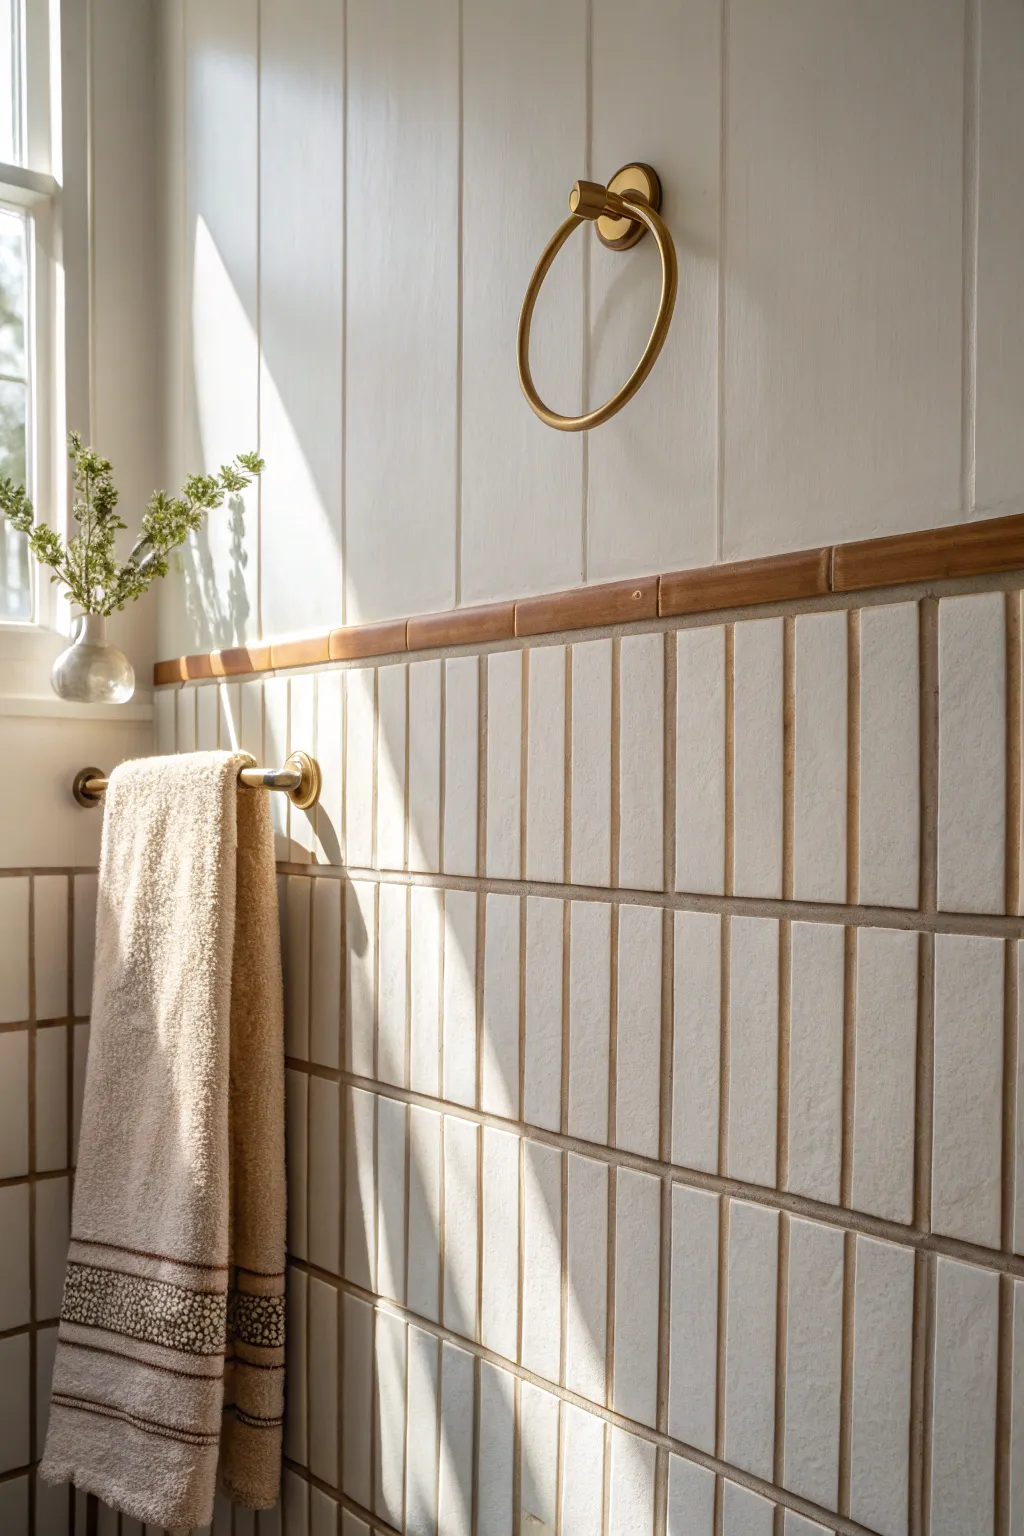
Accent Wall Behind the Vanity
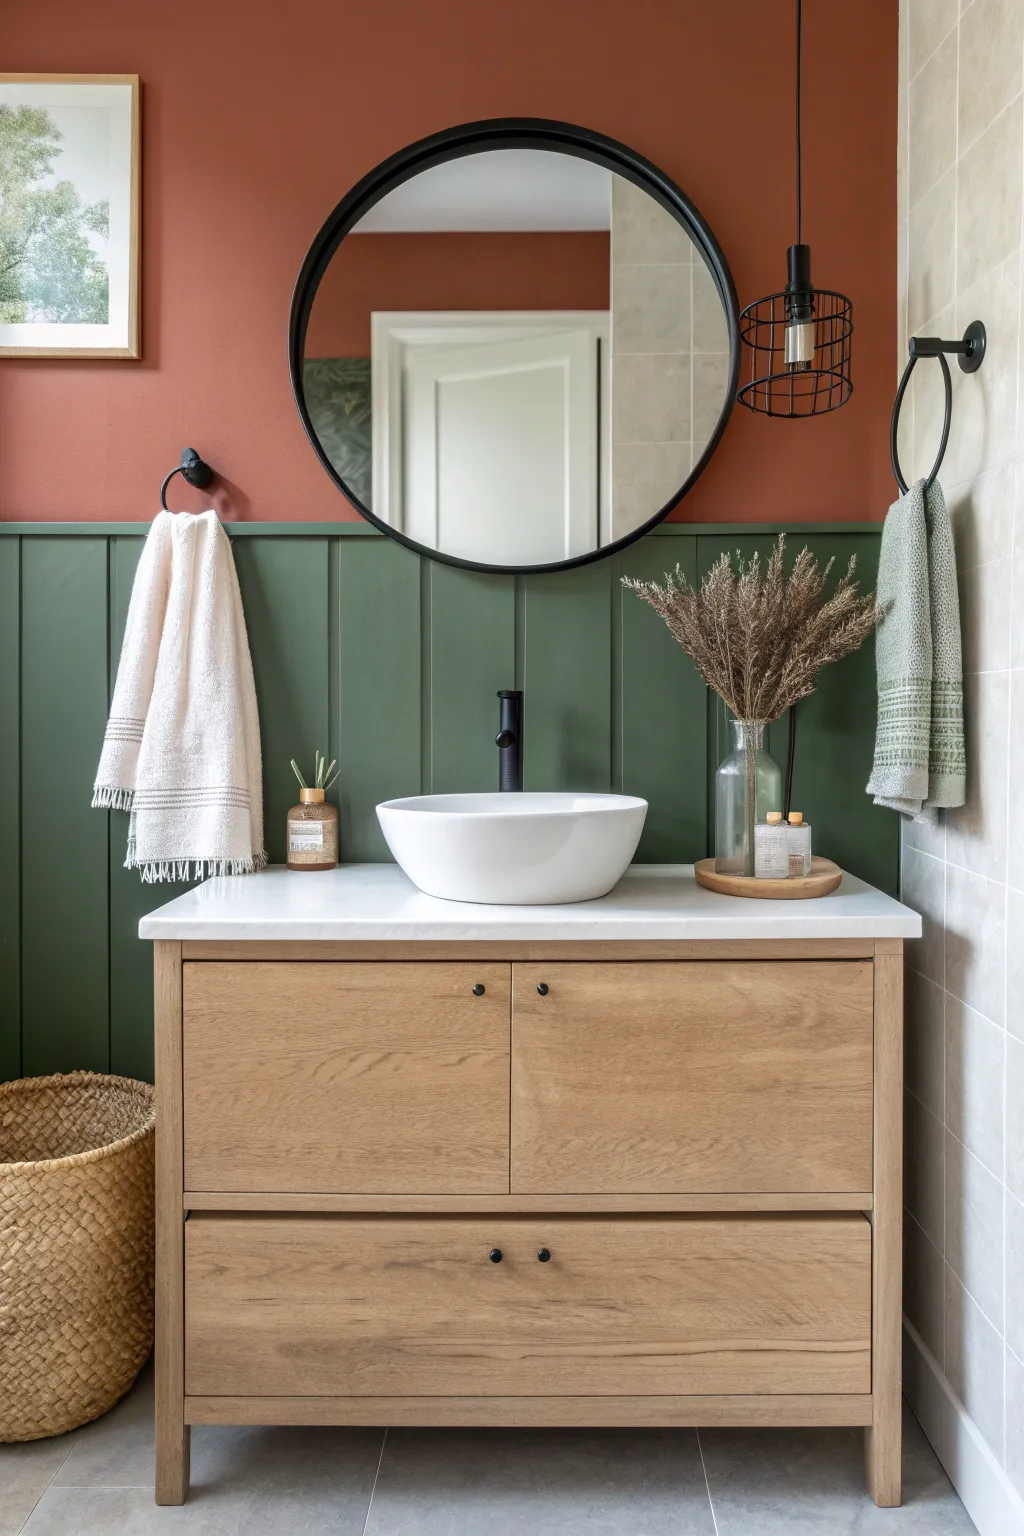
Transform a plain bathroom wall into a character-filled focal point by combining rich, earthy paint tones with classic vertical paneling. This project pairs a warm terracotta upper wall with deep moss green wainscoting to create a cozy, sophisticated backdrop for your vanity.
Detailed Instructions
Materials
- MDF or wood paneling strips (approx. 2-3 inches wide)
- Top rail trim piece
- Construction adhesive (e.g., Liquid Nails)
- Brad nailer and 1.5-inch brad nails
- Wood filler
- Caulk and caulk gun
- Sandpaper (120 and 220 grit)
- Primer (suitable for bathroom/high-humidity)
- Terracotta paint (eggshell or satin finish)
- Moss green paint (satin or semi-gloss finish)
- Paint roller and tray
- Angled sash brush
- Painter’s tape
- Level
- Tape measure
Step 1: Wall Prep & Upper Painting
-
Clear and clean:
Remove the mirror, vanity (if possible, or protect it thoroughly), and any existing fixtures. Clean the wall surfaces with a mild degreaser to ensure good paint adhesion. -
Patch imperfections:
Fill any old nail holes or dents in the drywall with spackle. Once dry, sand these spots smooth so the wall is perfectly flat. -
Mark the wainscoting height:
Decide on the height of your green paneling section; generally, a bit higher than the vanity works well. Use a level and a pencil to draw a straight horizontal line across the entire wall at this mark. -
Paint the upper section:
Before installing any wood, paint the upper portion of the wall with your terracotta color. It’s often easier to cut in the ceiling line and corners now rather than worrying about dripping on new woodwork later. -
Apply a second coat:
Once the first coat of terracotta is dry to the touch, apply a second coat for full, rich coverage. Let this cure fully while you prepare your wood strips.
Fixing Gaps
If your walls aren’t perfectly flat, the wood strips might bow out. Use a little extra construction adhesive and brace the strip with a heavy object until the glue sets firmly.
Step 2: Installing the Paneling
-
Install the top rail:
Cut your top railing trim to the length of the wall. Apply construction adhesive to the back and nail it directly onto your level line using a brad nailer. Check for level one last time before securing. -
Measure vertical spacing:
Determine the spacing between your vertical battens. A gap of 10-12 inches usually looks proportionate. Mark these positions lightly along the wall and the top rail. -
Cut vertical strips:
Measure the distance from the floor (or baseboard) to the bottom of the top rail. Cut your MDF or wood strips to fit vertically in these spaces. -
Attach vertical battens:
Apply adhesive to the back of each strip. Place them on your marks, using a level to ensure each one is perfectly plumb, and secure them with brad nails. -
Fill and sand:
Fill all nail holes with wood filler. Once dry, sand the filler smooth and lightly scuff the face of the wood strips to help the primer stick. -
Caulk the seams:
Run a bead of caulk along every edge where the wood meets the drywall and inside the corners of the paneling. Smooth the caulk with a wet finger or rag for a seamless, built-in look.
Step 3: Painting the Wainscoting
-
Prime the lower section:
Apply a coat of primer to the entire lower wall, covering the new wood strips and the drywall in between. This ensures the green paint will have a uniform sheen. -
Tape the transition:
Once the upper terracotta paint is completely cured (I like to wait at least 24 hours), apply painter’s tape delicately along the top edge of the rail to protect your orange wall. -
Cut in the green:
Use an angled brush to paint the moss green color into the corners, around the battens, and along the floor or baseboard. -
Roll the flat areas:
Use a small foam or microfiber roller to paint the flat designated drywall spaces and the front faces of the wood strips. -
Apply final coat:
Let the first coat dry, then apply a second coat of green. Remove the painter’s tape while the paint is still slightly tacky to prevent peeling. -
Reassemble the room:
Once everything is fully dry, reinstall your vanity, hang the round mirror centered on the vanity, and add your accessories like the towel ring and dried florals.
Pro Tip: Seamless Edges
For a truly professional finish, use ‘paintable’ caulk. Standard silicone caulk repels paint, causing fisheyes, so double-check the label before buying.
Step back and admire how the dual-tone wall instantly adds depth and warmth to your bathroom space


Moody Color Drenching for Drama
Transform a plain bathroom into a moody, sophisticated sanctuary by combining DIY board-and-batten paneling with a rich, forest green paint job. This project focuses on adding architectural interest to your walls before color-drenching them for maximum dramatic effect.
Step-by-Step
Materials
- 1×3 MDF or pine boards
- Construction adhesive
- Brad nailer and nails
- Wood filler
- Paintable caulk and caulk gun
- Fine-grit sandpaper (220-grit)
- High-quality interior paint (Satin or Eggshell finish) in deep forest green
- Angled sash brush (2.5 inch)
- Microfiber roller covers (3/8 inch nap)
- Painter’s tape
- Drop cloths
- Level
- Measuring tape
Step 1: Planning and Paneling
-
Design the Grid:
Measure your wall height and width. Decide on the spacing for your vertical battens—typically 12 to 16 inches apart looks balanced. Sketch the layout on paper to calculate exactly how many vertical and horizontal 1×3 boards you will need. -
Prep the Walls:
Clear the room and remove any existing baseboards if you plan to replace them, or decide to rest your vertical boards on top of the existing baseboard. Lightly sand the drywall where the boards will go to help the adhesive bond. -
Install Horizontal Rails:
Start by installing the top horizontal rail at your desired height (or at the ceiling line). Apply construction adhesive to the back of the board, use a level to ensure it’s perfectly straight, and secure it with a brad nailer into the studs. -
Install Vertical Battens:
Cut your vertical 1×3 boards to fit between the baseboard and your top rail. Using a spacer block cut to your specific gap width can speed this up significantly. Glue and nail these vertically, checking for plumb with your level as you go. -
Add Inner Boxes (Optional):
To mimic the intricate look in the photo, you can add horizontal rails between the verticals to create square or rectangular boxes. Measure each gap individually, as walls are rarely perfectly straight, then glue and nail these cross-pieces.
Pro Tip: Textured Walls
If your drywall has heavy texture, use ‘high-build’ primer before painting, or install thin hardboard panels behind your grid for a perfectly smooth, furniture-grade finish.
Step 2: Seamless Preparation
-
Fill Nail Holes:
Take a small dab of wood filler and press it into every single brad nail hole. I like to overfill them slightly because the filler shrinks as it dries. -
Sand Smooth:
Once the filler is completely dry, sand the spots flush with the wood using 220-grit sandpaper. Run your hand over the join to ensure it feels perfectly smooth. -
Caulk the Seams:
This is the secret to a professional look. Run a thin bead of paintable caulk along every edge where the wood meets the drywall and where boards meet each other. Smooth the bead with a wet finger for a seamless transition. -
Tape and Protect:
Use high-quality painter’s tape to mask off the door casing, ceiling (if painting a different color), and any fixtures you couldn’t remove. Lay down drop cloths to protect the floor tiles.
Troubleshooting: Gaps
If you have large gaps between boards, caulk might crack. Use wood filler for rigid joints on flat surfaces, and flexible caulk only where the wood meets the wall corners.
Step 3: The Color Drench
-
Cut In Edges:
Open your deep green paint (a satin finish resists bathroom moisture well). Use an angled sash brush to ‘cut in’ the corners, along the ceiling line, and crucially, inside all the tight corners of your paneling grid. -
Roll the Panels:
Use a small 4-inch roller to paint the flat faces of the 1×3 boards and the drywall sections inside the boxes. This ensures a consistent texture compared to brushing everything. -
Roll the Main Walls:
Switch to a standard 9-inch roller for any large expanses of wall above or around the paneling. Keep a ‘wet edge’ to avoid lap marks, working in roughly 3×3 foot sections. -
First Coat Dry Time:
Let the first coat dry completely according to the manufacturer’s instructions—usually about 4 hours. Dark colors can look patchy on the first coat, so don’t panic. -
Apply Second Coat:
Repeat the cutting-in and rolling process. Deep greens often require two solid coats, sometimes three, to achieve that rich, velvety depth seen in the photo. -
Remove Tape:
While the final coat is still slightly tacky (not soaking wet, but not fully cured), carefully peel back the painter’s tape at a 45-degree angle to get a crisp, clean line.
Once the paint cures, reinstall your sconces and enjoy the incredible depth this dark paneling adds to your space


Paint the Ceiling a Surprise Color
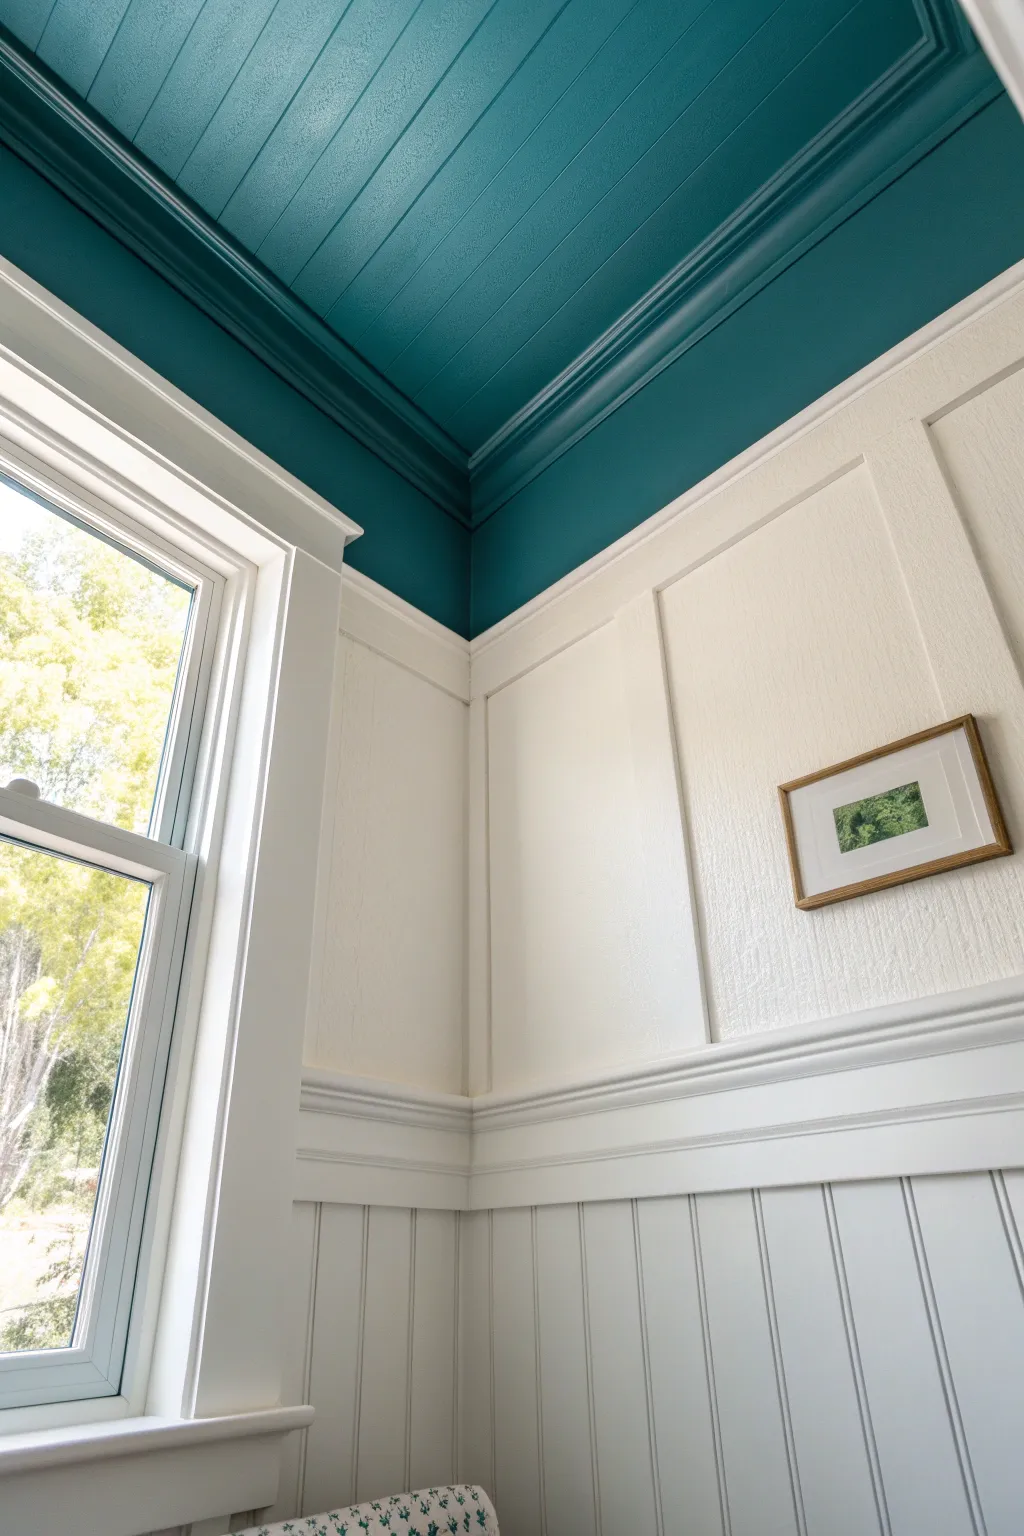
Transform a standard bathroom by treating the ceiling as a fifth wall, drenching it in a rich, peacock-teal hue that contrasts beautifully with crisp white millwork. This project elevates architectural details like crown molding and tongue-and-groove paneling, creating a cozy, jewel-box effect.
Step-by-Step Guide
Materials
- High-quality interior paint (Satin or Semigloss finish, Peacock Teal color)
- White interior trim paint (Semigloss)
- Painter’s tape (specifically for delicate surfaces)
- Angled sash brush (2.5 inch)
- Standard cutting-in brush (2 inch)
- Paint roller frame and extension pole
- Microfiber roller covers (3/8 inch nap for smooth surfaces)
- Drop cloths
- Sanding sponge (fine grit)
- Tack cloth
- Small paint tray and liner
- Ladder
Step 1: Preparation and Protection
-
Clear the Space:
Remove all movable items from the bathroom to give yourself ample room to maneuver the ladder. Cover the floor and any fixtures (like the sink or toilet) completely with drop cloths to protect against splatters. -
Clean Surfaces:
Thoroughly clean the ceiling, molding, and upper walls with a mild degreaser or TSP substitute. Bathrooms often have invisible hairspray or soap residue that can affect paint adhesion, so don’t skip this scrub. -
Sand the Millwork:
Lightly scuff the crown molding and the tongue-and-groove ceiling planks with a fine-grit sanding sponge. You aren’t trying to strip the old paint, just creating a ‘tooth’ for the new teal coat to grab onto. -
Remove Dust:
Wipe down all sanded areas with a tack cloth to remove every speck of dust. Any debris left behind will show up prominently in the final finish. -
Tape the Transition:
Apply painter’s tape along the bottom edge where the crown molding meets the wall. Press the tape edge down firmly with a putty knife or your fingernail to prevent bleed-through.
Paint Sheen Strategy
Use a satin or semi-gloss finish for the colored ceiling. Flat paint hides imperfections, but bathroom ceilings need the moisture resistance and wipe-ability of a higher sheen.
Step 2: Painting the Ceiling and Molding
-
Cut In the Corners:
Using your angled sash brush, dip about an inch into the teal paint. carefuly paint the corners of the ceiling and along the edges where the tongue-and-groove meets the crown molding. -
Paint the Grooves:
Before rolling, use the brush to run paint into the deep V-grooves of the ceiling paneling. A roller often bridges these gaps, leaving white stripes behind, so I always brush them out first. -
Detail the Crown Molding:
While you have the brush out, paint the detailed profile of the crown molding. Use long, smooth strokes to minimize brush marks, working in sections to maintain a wet edge. -
Roll the Flat Areas:
Switch to your roller with the extension pole. Roll the flat faces of the tongue-and-groove planks, rolling in the direction of the wood grain (parallel to the boards). -
Check for Drips:
Immediately inspect the molding and grooves for paint pooling or drips, especially in the corners. Smooth these out instantly with an unloaded brush. -
Apply Second Coat:
Allow the first coat to dry according to the manufacturer’s instructions (usually 4 hours). Repeat the cutting, groove-painting, and rolling process for a rich, opaque color.
Step 3: Refining the Wall Details
-
Remove Tape:
Once the teal paint is dry to the touch but not fully cured, carefully peel away the painter’s tape at a 45-degree angle to reveal a sharp line. -
Prep the White Walls:
Inspect the white board-and-batten walls. If the fresh ceiling makes the white look dingy, give the walls a quick sanding and cleaning. -
Cut In White Paint:
Using a clean angled brush and white trim paint, cut in closely against the window frame and the bottom edge of the crown molding (if touch-ups are needed against the new teal). -
Paint the Paneling:
Paint the recessed flat panels of the wall first using a small roller or brush, then move to the raised stiles and rails. -
Detail the Trim:
Paint the window casing and the chair rail molding with the white semi-gloss. Brush in the direction of the wood grain for a professional finish. -
Final Inspection:
Shine a bright light into the corners and along the ceiling line to check for holidays (missed spots) or uneven coverage. Touch up with a small artist’s brush if necessary.
Add Visual Depth
To make the ceiling look even more custom, mix a glaze into the final coat of teal, or use a slightly darker shade just on the crown molding for a subtle shadow effect.
Step back and admire how this bold splash of color completely redefines the height and atmosphere of your room.


Painted Vanity Refresh
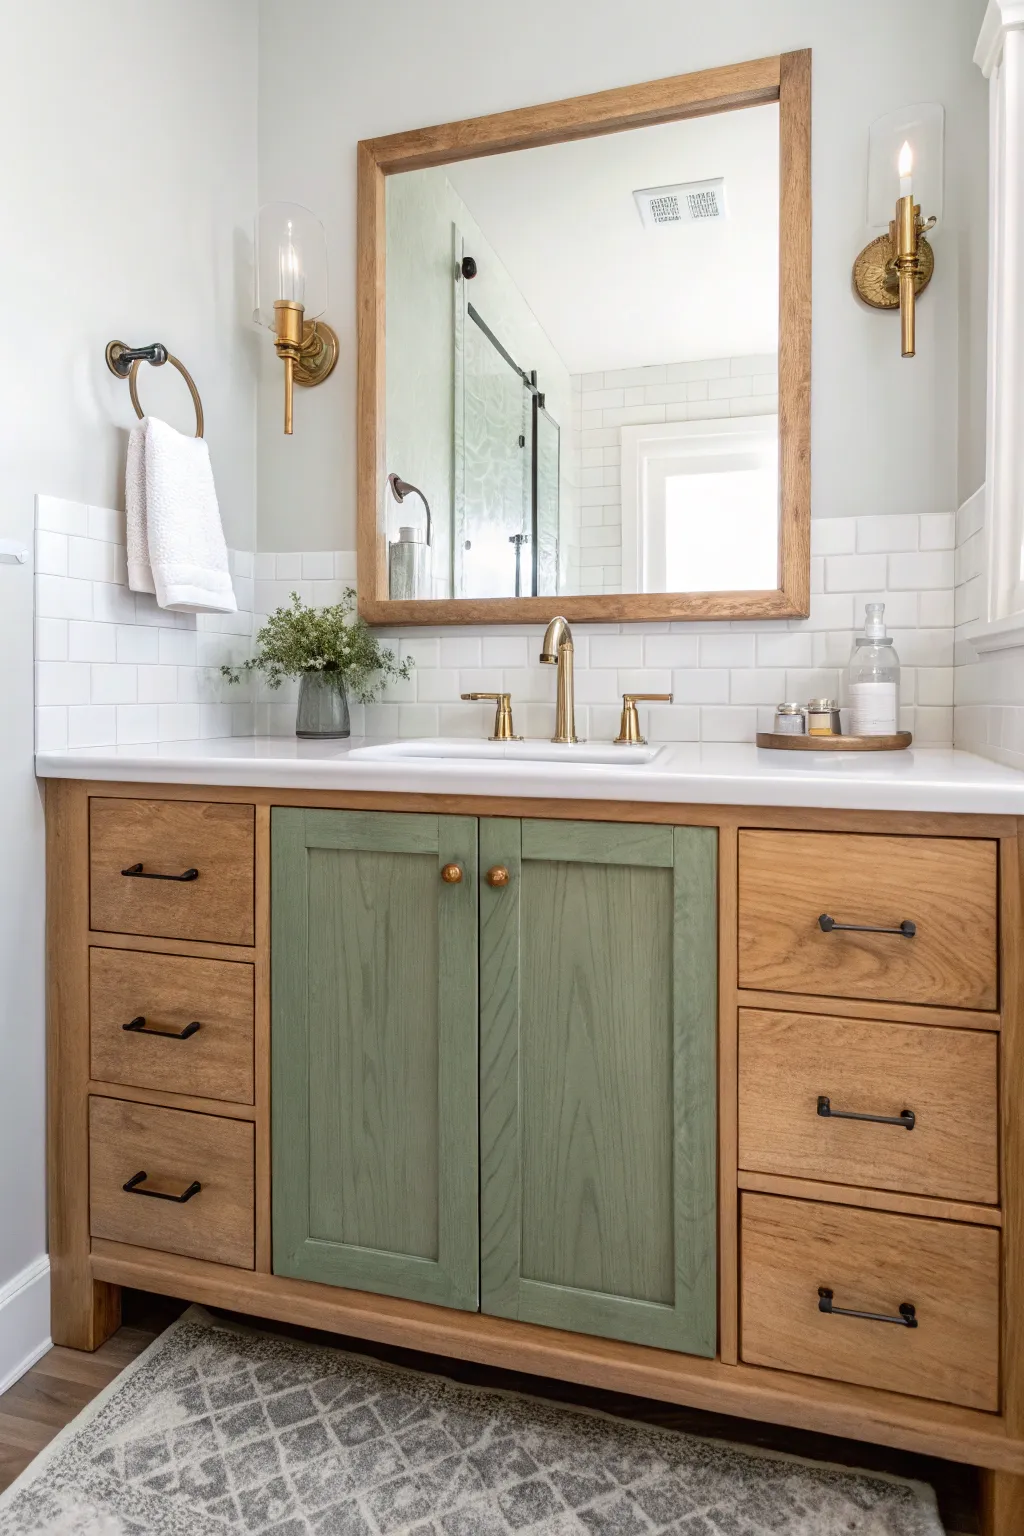
For a custom, high-end look without the designer price tag, try this mixed-finish technique on a standard bathroom vanity. By pairing natural wood drawers with sage green center doors, you create a focal point that feels fresh, organic, and beautifully curated.
Step-by-Step Tutorial
Materials
- Wooden bathroom vanity (unfinished or stripped)
- Sage green cabinet enamel (satin or semi-gloss)
- Pre-stain wood conditioner
- Light oak or natural wood stain
- Matte polyurethane topcoat
- High-quality angled sash brush (2 inch)
- Mini foam roller and tray
- Painter’s tape
- Sandpaper (120 and 220 grit)
- Tack cloth
- Screwdriver or drill
Step 1: Preparation & Disassembly
-
Remove Hardware:
Start by removing all drawers and unhinging the cabinet doors. Take off the handles and knobs, keeping all screws organized in a small bag so nothing gets lost. -
Clean Surfaces:
Wipe down the entire vanity frame, drawers, and doors with a damp cloth to remove dust. If you are working with an existing finish, you will need to strip it down to raw wood first for this specific look. -
Sand Everything:
Using 120-grit sandpaper, lightly sand all wood surfaces to open up the grain. Follow up with 220-grit for a smooth finish, then wipe away all dust with a tack cloth. -
Tape Off:
Since we are doing a two-tone look, careful taping is crucial. If the central door frame is attached to the vanity skeleton, tape off the edge where the frame meets the area intended for staining.
Uneven Stain?
If the wood stain looks blotchy despite conditioning, lightly sand the dark spots with 220-grit paper to lift some pigment, then re-apply a very light layer of stain to blend it back in.
Step 2: Staining the Wood Elements
-
Apply Conditioner:
Brush a coat of pre-stain wood conditioner onto the vanity frame and the drawer fronts. This step prevents blotchiness and mimics that high-end factory finish. -
Stain Application:
Using a rag or brush, apply your light oak stain to the drawer fronts and the main vanity carcass. Work in the direction of the grain. -
Wipe and Dry:
Let the stain sit for about 5-10 minutes (check your can’s instructions), then wipe off the excess with a clean lint-free cloth. Allow this to dry fully, usually overnight. -
First Coat of Sealer:
Once dry, apply a thin layer of matte polyurethane to the stained wood parts to protect them from bathroom humidity.
Step 3: Painting the Accent Doors
-
Prime the Doors:
While the stain dries on the other parts, take your two center cabinet doors and apply a stain-blocking primer. A mini foam roller works best here for a smooth, texture-free base. -
Sand the Primer:
I always give the dried primer a quick scuff with 220-grit paper. This knocks down any little bumps and ensures the green paint glides on perfectly. -
First Coat of Green:
Apply your sage green enamel to the doors. Use an angled brush for the recessed panels and corners first, then immediately roll the flat surfaces with your foam roller to smooth out brush marks. -
Dry and Repeat:
Let the first coat dry completely. Apply a second coat using the same brush-then-roll technique for full, rich coverage.
Change the Vibe
Swap the sage green for a deep navy blue or charcoal gray for a moodier, more masculine look, or try a soft blush pink on the doors for a playful, modern twist.
Step 4: Assembly & Finishing Touches
-
Final Sealing:
Give the stained wood components a second and final coat of matte polyurethane. For extra durability on the painted doors, you can add a clear coat there too, though quality cabinet enamel often doesn’t need it. -
Reinstall Doors:
Once everything is cured (give it 24 hours if possible), reattach the hinges and hang the sage green doors back onto the vanity frame. -
Attach Hardware:
Install the drawer pulls and door knobs. Matte black or brushed gold hardware pairs beautifully with this wood-and-green combination. -
Insert Drawers:
Slide the stained wood drawers back into their slots. -
Final Polish:
Wipe down the countertop and the new hardware to remove any fingerprints from installation.
Enjoy the custom look of your refreshed bathroom vanity knowing you saved a bundle doing it yourself
BRUSH GUIDE
The Right Brush for Every Stroke
From clean lines to bold texture — master brush choice, stroke control, and essential techniques.
Explore the Full Guide
Faux Wainscoting With Painted Panels
Transform a plain bathroom wall into a classic architectural feature with this faux beadboard project. By installing beadboard paneling and finishing it with crisp white paint, you’ll achieve a timeless, cottage-style look that adds instant character and brightness to the space.
How-To Guide
Materials
- 4×8 foot beadboard sheets
- Chair rail molding
- Baseboard molding
- Construction adhesive (e.g., Liquid Nails)
- Circular saw or table saw
- Jigsaw (for cutouts)
- Level
- Stud finder
- Brad nailer and 1.5-inch brad nails
- Caulk gun and paintable caulk
- Wood filler
- Fine-grit sandpaper (220-grit)
- Painter’s tape
- Primer (oil-based recommended for bathrooms)
- Semi-gloss white interior paint
- Paint rollers (foam or short nap)
- Angled sash brush
- Beige wall paint (for upper wall)
- Tape measure
- Pencil
Step 1: Planning and Preparation
-
Measure and Mark:
Decide on the height of your wainscoting. A standard height is often around 32-36 inches, or divide the wall into thirds visually. Measure up from the floor and mark a level line around the entire room to guide the top of your panels. -
Locate Studs:
Use a stud finder to locate the wall studs. Mark their centers lightly with a pencil just above your level line so you’ll know where to nail later. -
Remove Existing Trim:
Carefully pry off any existing baseboards using a pry bar. Save them if you plan to reuse them, though installing new PVC or wood baseboards often yields a cleaner finish with fresh beadboard.
Step 2: Installation
-
Cut Panels to Size:
Measure the horizontal length of your walls. Cut your 4×8 beadboard sheets to the determined height using a circular saw. I find cutting with the finish side down helps reduce splintering. -
Handle Obstacles:
Measure exactly where outlets or plumbing pipes fall. Transfer these measurements to your panel and carefully cut out the openings using a jigsaw. -
Apply Adhesive:
Flip your first panel over and apply a wavy line of construction adhesive on the back. This provides a strong bond in humid bathroom environments where nails alone might shift. -
Mount the Panels:
Press the panel against the wall, aligning the top edge with your level line. Ensure it sits roughly 1/8 inch off the floor to allow for expansion; the baseboard will cover this gap. -
Secure with Nails:
Using a brad nailer, shoot nails into the studs you marked earlier. Also place nails along the top and bottom edges where the molding will cover them. -
Continue Installation:
Repeat the process for the remaining panels. Butt the edges tightly together. If a seam doesn’t land on a stud, use a bit more adhesive to keep the seam flush.
Uneven Walls?
If your corners aren’t perfectly 90 degrees and gaps appear, don’t force the wood. Fill small gaps with paintable caulk before painting; it hides imperfections perfectly.
Step 3: Adding Trim Construction
-
Install Baseboards:
Measure and cut your baseboard molding to fit the length of the walls. Nail these into the studs at the bottom of the beadboard, covering the gap at the floor. -
Add Chair Rail:
Measure and cut the chair rail molding for the top edge. Place it so it caps the top of the beadboard paneling, creating a finished ledge. Nail it securely into the studs. -
Miter Corners:
For inside and outside corners, cut your molding at 45-degree angles for a professional, seamless join.
Seamless Seams
When joining two beadboard sheets, cut the edge at a 45-degree bevel (scarf joint) rather than a butt joint. This overlaps the pieces for a truly invisible seam.
Step 4: Finishing and Painting
-
Fill Holes:
Fill all nail holes and any gaps in the seams with wood filler. Let it dry completely according to the package instructions. -
Sand Smooth:
Sand the wood filler flush with fine-grit sandpaper. Lightly scuff the surface of the beadboard if it’s pre-finished to help the paint adhere better. -
Caulk Seams:
Run a bead of paintable caulk along the top of the chair rail (where it meets the wall), inside corners, and any visible gaps between moldings. Smooth with a wet finger. -
Prime the Surface:
Apply a coat of quality primer to the beadboard and molding. This is crucial for humidity resistance. Allow it to dry fully before painting. -
Paint the Wainscoting:
Apply two coats of semi-gloss white paint. Use a brush for the grooves and corners first, then follow up with a small foam roller for the flat surfaces to avoid brush marks. -
Paint the Upper Wall:
Once the wainscoting is dry, tape off the top edge of the chair rail. Paint the upper wall in your chosen beige or neutral tone to contrast beautifully with the crisp white woodwork.
Step back and admire how this architectural detail completely refreshes the feel of your bathroom
Geometric Color Blocking With Tape

Transform a plain cinder block wall into a mid-century modern statement with this bold geometric mural. By using strategic taping and a warm, retro color palette, you can turn structural texture into part of the art.
Detailed Instructions
Materials
- Painter’s tape (1-inch and 2-inch widths)
- Interior semi-gloss or satin paint (White for base, plus Teal, Burnt Orange, Mustard)
- Small angled sash brush (1.5 to 2 inch)
- Medium sash brush or small roller
- Drop cloths
- Stir sticks
- Paint tray
- Pencil and straightedge or laser level
- Damp rag
Step 1: Preparation and Base Coat
-
Clean the surface:
Since cinder block is textured and porous, scrub the walls thoroughly with a stiff brush and mild detergent to remove dust and grime. Let the walls dry completely before proceeding. -
Protect the area:
Lay down drop cloths on the floor. Use painter’s tape to mask off the ceiling line, the floor trim area, and any fixtures like the window frame or outlets. -
Paint the base color:
Roll on your white base coat over the entire wall. Cinder blocks are thirsty, so you will likely need two coats to get full coverage in the grout lines. Allow this base to cure for at least 24 hours so the tape won’t peel it up later. -
Paint the trim:
While you have your rollers out, paint the door frame, baseboards, and ceiling trim in the teal accent color. Painting the trim first creates a crisp frame for your mural work.
Step 2: Mapping the Design
-
Plan your shapes:
Sketch a rough layout of your triangles on paper first. The design relies on large, intersecting triangles appearing to slide past each other. -
Mark the vertices:
Using a pencil, lightly mark the points on the wall where the corners of your triangles will land. A laser level is helpful here to ensure your geometry feels balanced, even if the lines are diagonal. -
Tape the lines:
Connect your pencil dots with painter’s tape. Press the tape firmly into the textured surface of the cinder block. Run your finger or a plastic putty knife along every edge to seal it tight. -
Seal the tape edges:
Quickly brush a thin layer of your *base white paint* over the edges of the tape. This is my favorite trick—it fills any gaps under the tape with white paint so the colored paint won’t bleed through.
Bleed-Through Blues?
If paint seeps under the tape into the block texture, wait for it to dry. Then, use a tiny artist brush with the background color to paint a straight line over the mistake.
Step 3: Applying Color
-
Start with the darkest color:
Begin with the dark teal sections. Use an angled sash brush to cut in the corners near the tape, working the bristles into the grout lines carefully. -
Fill the shapes:
For the larger flat areas of the blocks, use a small roller or a larger brush to fill in the teal triangles. Apply two coats for a solid, opaque finish. -
Move to the mid-tones:
Once the teal is dry to the touch, move on to the burnt orange shapes. Be mindful of where colors touch; let one section dry completely before moving tape if shapes overlap. -
Apply the lightest accent:
Finally, paint the mustard yellow sections. These lighter colors might need an extra coat to pop against the white background. -
Tackle the grout lines:
Double-check the deep grout lines within your colored shapes. Poke your brush tip gently into any pinholes to ensure no white speckles remain inside the colored zones.
Metallic Pop
Add a thin line of gold or copper metallic tape along the edges where two colors meet to emphasize the geometric separation and add a bit of shine.
Step 4: Finishing Touches
-
Remove the tape:
Peel off the tape while the final coat of paint is still slightly tacky. Pull slowly at a 45-degree angle away from the painted edge for the crispest line. -
Touch up:
Inspect your lines. On rough cinder blocks, a little bleed is normal. Use a small artist’s brush and your white base paint to tidy up any fuzzy edges. -
Clean up:
Remove the floor and fixture masking, pack up your drop cloths, and re-install any outlet covers once the paint is fully cured.
Step back and enjoy the vibrant energy your new geometric wall brings to the room

PENCIL GUIDE
Understanding Pencil Grades from H to B
From first sketch to finished drawing — learn pencil grades, line control, and shading techniques.
Explore the Full Guide
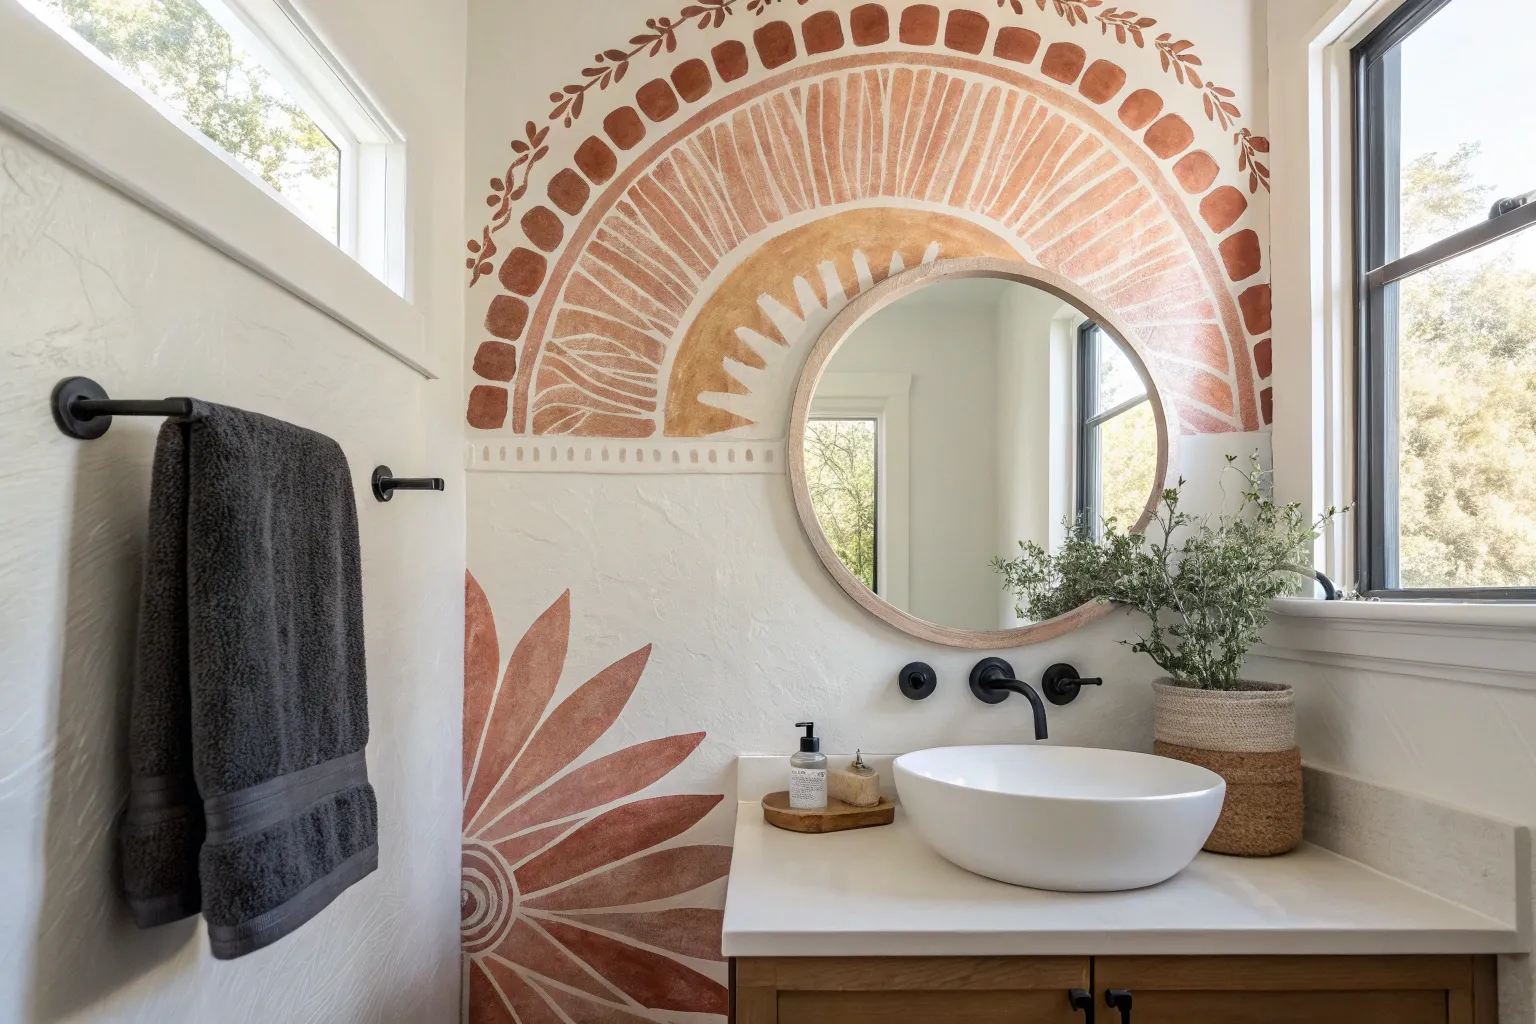
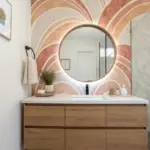
Paint a Soft Arch Around the Mirror
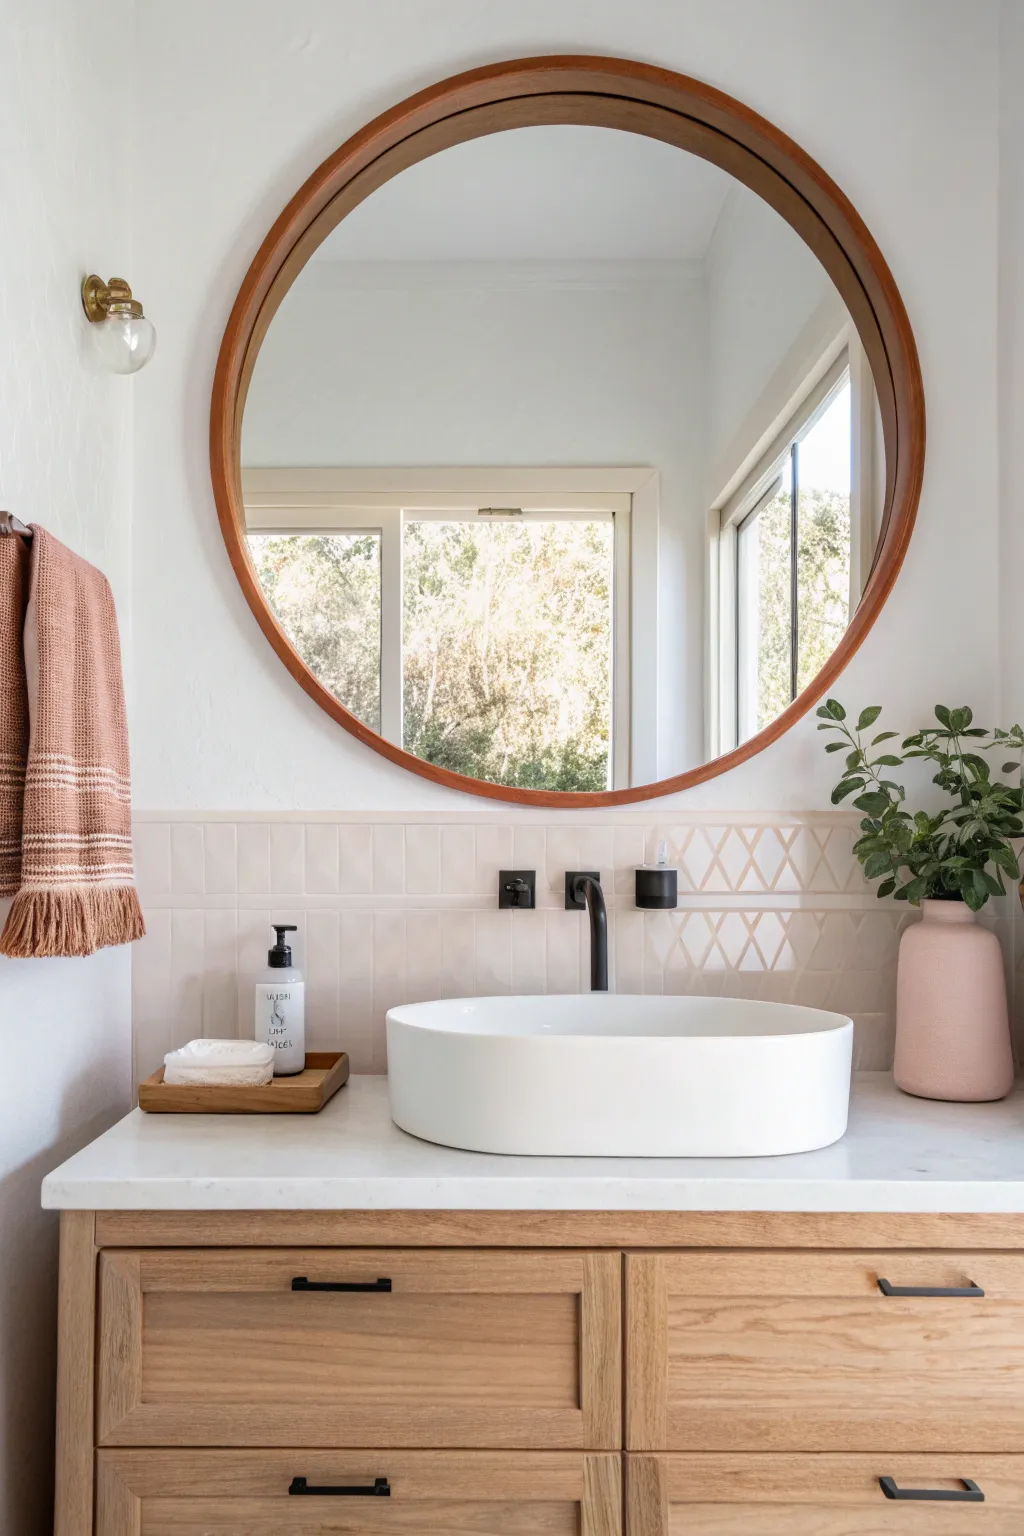
Add an instant focal point to your bathroom vanity by painting a subtle, elegant arch that frames your mirror perfectly. This project softens the hard lines of tiles and cabinetry, creating a custom, designer look with just a splash of paint.
Step-by-Step
Materials
- Interior semi-gloss or satin paint (soft neutral or blush tone)
- Painter’s tape (high quality)
- Pencil
- String
- Measuring tape
- Push pin or small nail
- Small angled sash brush (1.5 – 2 inch)
- Small foam roller and tray
- Level
- Clean damp cloth
Step 1: Preparation and Mapping
-
Clear surface:
Remove the existing mirror and any wall sconces if possible. If the fixtures are hardwired and difficult to move, careful taping will be essential, but removing them yields the cleanest finish. -
Clean the wall:
Wipe down the wall area with a damp cloth to remove any dust or bathroom humidity residue. Let it dry completely so your tape adheres properly. -
Measure the center:
Find the exact center point of your vanity or sink area. Mark this vertical center line lightly with a pencil at the height where the top of your arch will peak. -
Determine width:
Decide how wide you want your arch. Measure out from your center mark to the left and right, ensuring the total width is slightly wider than your mirror to create a framing effect. -
Mark vertical lines:
Use a long level to draw two straight vertical lines upwards from the backsplash or vanity top to the point where the curve of the arch will begin.
Seal for Sharp Lines
Before painting your color, brush a thin layer of the existing wall color over the tape edge. This seals the tape, meaning any bleed is invisible, leaving your arch color with a razor-sharp edge.
Step 2: Creating the Arch Template
-
Prepare the compass string:
Cut a piece of non-stretchy string slightly longer than half the width of your planned arch. Tie one end to a pencil and the other to a push pin. -
Find the pivot point:
Place the push pin on your center vertical line. The distance from the pin to the pencil tip should exactly match the distance from the center line to your side vertical lines. -
Draw the curve:
Holding the string taut, draw a smooth semi-circle connecting the top of your left vertical line to the top of your right vertical line. I like to do a distinct ‘dry run’ without the pencil touching the wall first to ensure the swing feels right. -
Refine the line:
Step back and inspect your pencil outline. Erase and adjust if the transition from the straight line to the curve isn’t perfectly seamless.
Step 3: Painting the Feature
-
Tape the straight edges:
Apply painter’s tape along the outside of the vertical straight lines you drew. Press the tape edge down firmly with your thumbnail or a putty knife to prevent bleed. -
Cut in the curve:
Using your small angled sash brush, carefully hand-paint the curved top edge. Load the brush moderately; too much paint makes it hard to control the line. -
Smooth the edge:
Go slow around the curve. Rotate your wrist to follow the arc naturally. If you have a steady hand, freehand is best here, or you can use flexible painter’s tape for curves. -
Fill the center:
Once the perimeter is cut in, use the small foam roller to fill in the main body of the arch. Roll in a ‘W’ pattern for even coverage. -
Apply second coat:
Allow the first coat to dry according to the can’s instructions (usually 2-4 hours). Apply a second coat to ensure rich opacity and true color. -
Remove tape:
While the second coat is still slightly tacky (not fully dry), gently peel away the painter’s tape at a 45-degree angle. This prevents the paint from chipping. -
Touch up:
inspect the edges for any imperfections. Use a tiny artist’s brush and your wall color to clean up any spots where the arch paint may have strayed. -
Re-hang mirror:
Wait at least 24 hours for the paint to cure fully before hanging your mirror back up centered within your beautiful new painted arch.
Wobbly Curve?
If your hand-painted curve looks shaky, don’t stress. Wait for it to dry, then use an artist’s brush and the original wall color to ‘cut back’ into the arch, refining and smoothing the outer edge.
Now you have a sophisticated architectural detail that elevates your entire bathroom vanity.
Faux Tile Look With Painted Grid Lines
Achieve the sophisticated look of vertical stacked ceramic tiles without laying a single piece of ceramic. This painting technique uses clever taping and shading to create a textured, three-dimensional wainscoting effect that adds architectural interest to any bathroom.
How-To Guide
Materials
- Satin or semi-gloss latex paint (creamy white)
- Small artist brush (angled and fine tip)
- Painter’s tape (various widths, 1/4 inch is ideal for grout lines)
- Laser level or long spirit level
- Measuring tape and pencil
- Paint roller (microfiber nap) and tray
- Acrylic glaze or darker paint shade (beige/tan for grout)
- Wooden trim separation piece (optional)
- Construction adhesive or finish nails (if adding trim)
Step 1: Preparation & Base Coat
-
Clean and prep:
Start by thoroughly cleaning the wall surface to remove any soap scum or dust. Patch any holes and sand smooth. -
Apply base color:
Roll on two coats of your main tile color (a creamy off-white works beautifully for this look) using a satin or semi-gloss finish. Let this dry completely, preferably overnight, as tape can lift fresh paint. -
Establish the height:
Decide how high your faux wainscoting will go. Mark a horizontal line across the wall using a laser level to ensure it is perfectly straight.
Sticky Situation
Use ‘delicate surface’ painter’s tape (often yellow or purple) over your base coat. Standard blue tape might be too aggressive and pull up your fresh base paint upon removal.
Step 2: Creating the Grid
-
Measure vertical columns:
Calculate your tile width. For the vertical stack bond look shown, try 2-3 inches wide. Mark these intervals along your top line and baseboard. -
Tape vertical lines:
Using a laser level as a guide, run strips of painter’s tape vertically from the top line to the floor at your marked intervals. These taped areas will become your ‘grout’ lines. -
Measure horizontal rows:
Now mark your horizontal tile heights. For this elongated look, a height of 6-8 inches works well. Mark these across the vertical tape strips. -
Tape horizontal lines:
Apply horizontal strips of tape. You can either tape right over the vertical ones for a continuous grid or cut small pieces to fit between verticals if you want very specific grout intersection looks. -
Seal the tape edges:
I like to lightly brush a tiny amount of the base wall color over the tape edges first. This seals the tape and prevents the darker ‘grout’ color from bleeding underneath.
Step 3: Painting the Faux Tiles
-
Mix the shadow color:
Create a glaze by mixing a beige or tan paint with a clear glazing medium. It should be translucent, not opaque like regular paint. -
Apply the shadow:
Focusing on the edges of each rectangle (inside the tape lines), brush on your glaze. Keep the center of each ’tile’ lighter to create a convex, 3D appearance. -
Blend the paint:
While the glaze is wet, use a clean, dry brush to soften the transition from the darker edges to the lighter center. This shading is crucial for the trompe l’oeil effect. -
Remove tape carefully:
Once the paint is tacky but not fully dry, slowly peel off the tape at a 45-degree angle to reveal your crisp grid.
Texture Upgrade
Mix a small amount of fine sand or baking soda into your ‘grout’ paint color. This adds physical grit, making the painted lines feel rough and realistic to the touch.
Step 4: Definition & Trim
-
Paint the grout lines:
The white lines left by the tape are your grout. Using a very steady hand and a fine artist brush, paint these lines a sandy beige or light grey to mimic real grout texture. -
Add highlights:
To really sell the 3D effect, paint a razor-thin line of pure white along the top and left edge of each ’tile’, and a slightly darker shadow line on the bottom and right edge. -
Install top trim:
If adding a physical separation, cut a piece of bullnose or flat trim to length. Stain it a warm wood tone to match the aesthetic. -
Secure the trim:
Attach the trim directly over your top horizontal line using construction adhesive and finish nails. -
Final touch-ups:
Check for any paint bleed or uneven lines. Use your small brush to tidy up intersections for a flawless finish.
Step back and admire your incredibly realistic tiled wall that brings warmth and texture to the room


Niche and Shelf Color Pop
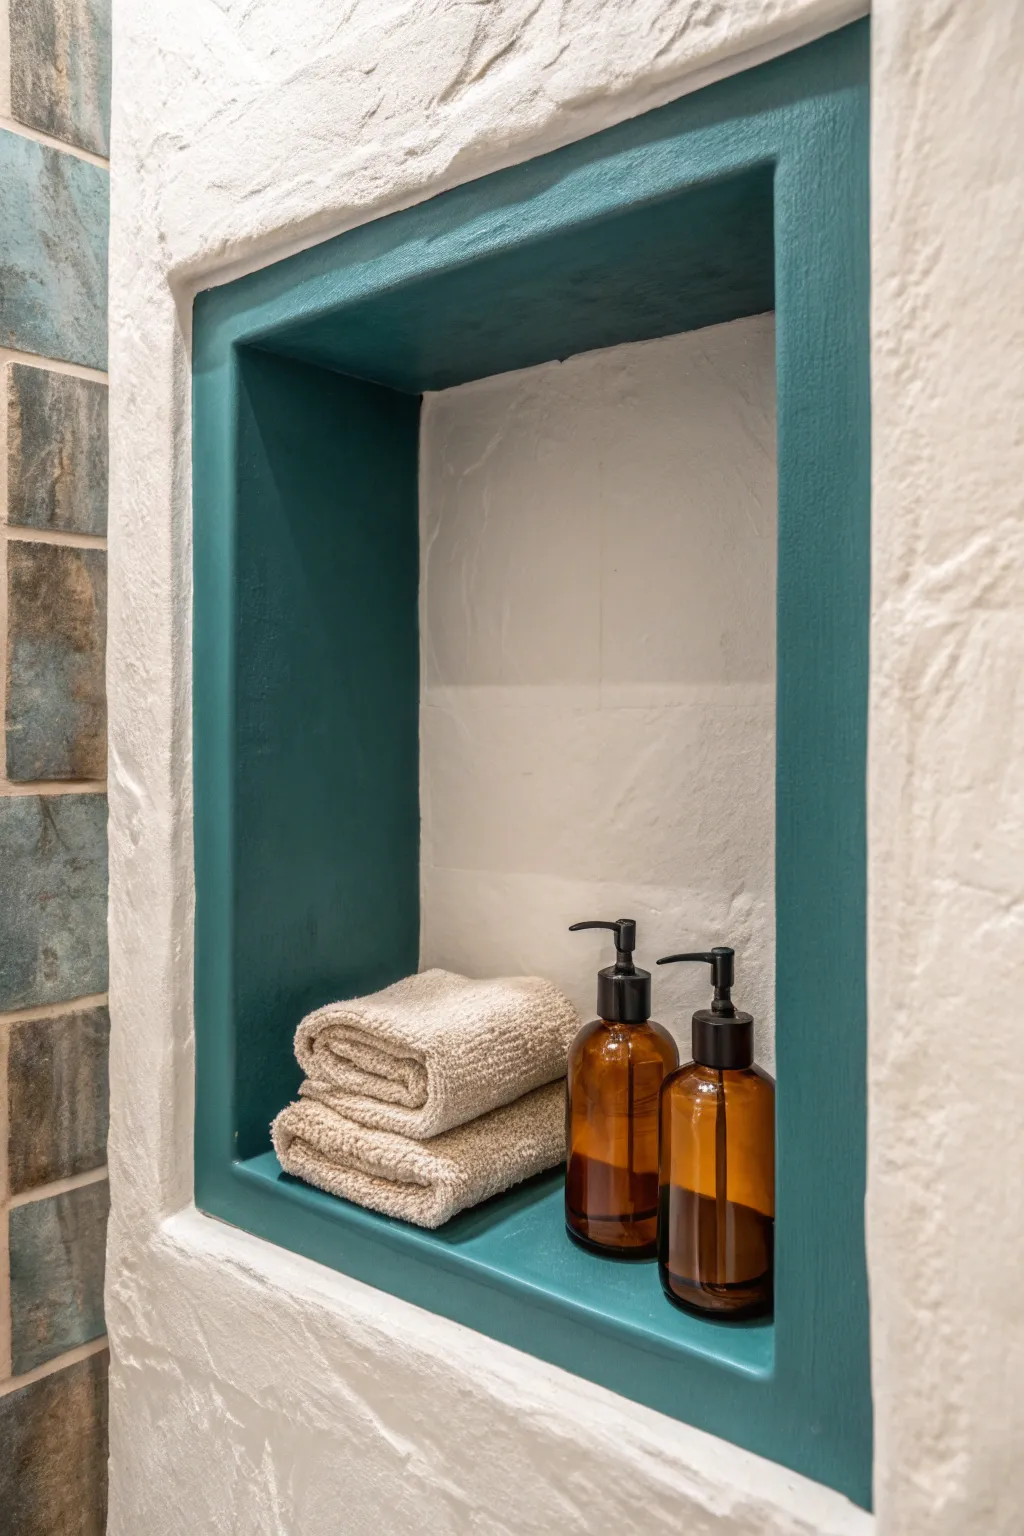
Transform a standard bathroom shelving nook into a stunning focal point with a simple yet bold application of color. This project contrasts textured white stucco walls with a smooth, deep teal frame to create a Mediterranean spa vibe right in your own home.
Step-by-Step Tutorial
Materials
- High-quality painter’s tape (multi-surface)
- Small angled sash brush (1.5 to 2 inch)
- Detail artist brush (small flat or filbert)
- Sanding sponge (fine grit)
- Cleaner/degreaser or TSP substitute
- Primer (high adhesion for bathroom areas)
- Semi-gloss or satin paint in deep teal
- Drop cloth or masking paper
- Clean rag
Step 1: Preparation
-
Clear and clean:
Remove all items from the niche including any shelving hardware or decorative items. Wipe down the entire surface, paying close attention to corners where soap scum or dust accumulates, using a degreaser and a clean rag. -
Scuff the surface:
Lightly sand the interior vertical faces of the niche frame where the teal paint will go. This ‘scuffing’ helps the paint adhere better to the existing finish, especially if the previous paint was glossy. -
Wipe away dust:
Use a damp cloth to remove all sanding dust. Ensure the surface is completely dry before moving to the next step, as moisture will trap bubbles under your paint.
Clean Lines on Texture
For textured walls, seal your tape edge with a thin layer of the *existing* wall color first. This fills the texture gaps so the teal paint can’t bleed under.
Step 2: Taping and Priming
-
Protect the outer wall:
Apply painter’s tape carefully along the outer edge of the niche on the textured white wall side. If the texture is very heavy, press the tape firmly into the crevices to prevent bleed-through. -
Protect the back wall:
Tape off the back wall of the niche (the part that will remain white). Getting a straight line here is crucial for the depth effect, so take your time. -
Burnish the tape:
Run a credit card or your fingernail firmly along the edge of all tape lines to seal them tight against the wall surface. -
Apply primer:
Brush a thin coat of high-adhesion primer onto the four interior faces of the niche frame. I like to use a small sash brush here for better control in the corners. -
Let primer cure:
Allow the primer to dry completely according to the manufacturer’s instructions, usually about an hour or two for water-based formulas.
Add Warmth
Install a small, battery-operated waterproof puck light at the very top of the niche interior to illuminate the amber bottles and create a cozy nightlight.
Step 3: Painting the Teal
-
Cut in the corners first:
Dip your angled brush into the teal paint. Start by painting the very corners where the niche frame meets the back wall. Apply paint sparingly to avoid pooling. -
Paint the flat faces:
Smooth out the paint along the flat, vertical, and horizontal faces of the frame. Use long, even strokes to minimize brush marks. -
Check for drips:
Inspect the bottom horizontal shelf immediately. Gravity often pulls excess paint down here, so smooth out any drips before they can dry. -
Dry first coat:
Let the first coat dry for at least 2-4 hours. Do not rush this step, as tacky paint will pull up if you brush over it too soon. -
Apply second coat:
Apply a second coat of teal paint just as you did the first. This coat will provide the rich, opaque color saturation seen in the photo. -
Remove tape while wet:
Carefully peel off the painter’s tape immediately after the second coat is applied, while the paint is still wet to touch. Pull the tape away at a 45-degree angle.
Step 4: Finishing Touches
-
Touch up edges:
If the textured wall caused any paint bleed, use your small detail artist brush and a bit of the original white wall paint to carefully cover the teal bleeds. -
Clean up lines:
Conversely, if you missed a spot or peeled a tiny chip of teal paint, use the detail brush to dab teal paint back into the imperfection. -
Allow full cure:
Wait at least 24 hours before placing towels or bottles back into the niche to ensure the paint has hardened enough to resist scuffs. -
Style the niche:
Fold two neutral-colored towels neatly and place the folded side facing out. Add glass amber bottles for a warm contrast against the cool teal.
Enjoy the spa-like atmosphere your new color-block accent brings to the space in your daily routine
Hand-Painted Botanical Mini Mural
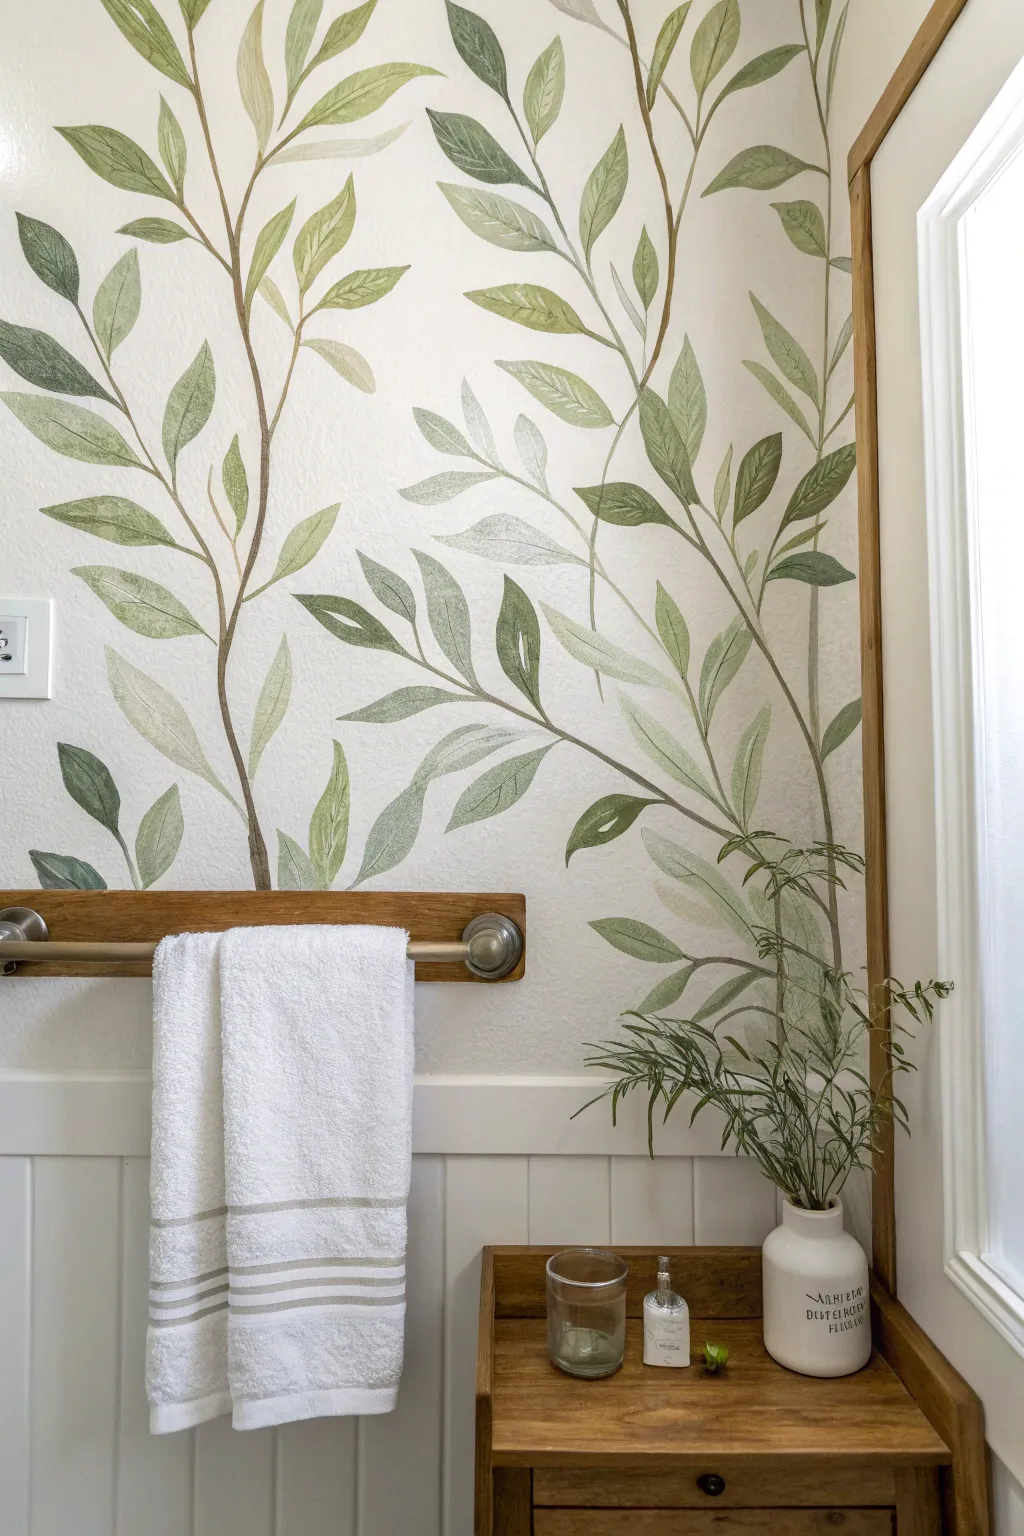
Transform a plain bathroom wall into a serene botanical retreat with this hand-painted mural technique. By using thinned acrylics or latex paints, you can achieve a soft, watercolor effect that mimics the organic flow of nature without needing wallpaper.
Detailed Instructions
Materials
- Interior latex paint (white for base)
- Small sample pots of latex paint (dark olive, sage green, tan/ brown)
- Glazing medium or water (for thinning)
- Pencil
- High-quality eraser
- Assorted round artist brushes (sizes 4, 8, and 10)
- Small mixing cups or palette
- Paper towels
- Drop cloth
- Painter’s tape
Step 1: Preparation & Sketching
-
Prepare the workspace:
Clear the wall of any fixtures like towel bars or shelves. Clean the surface thoroughly with a mild detergent and let it dry completely. Lay down your drop cloth to protect the wainscoting and floor. -
Mask the edges:
Apply painter’s tape along the top edge of the wainscoting and any adjacent trim or molding to ensure you don’t accidentally paint on the woodwork. -
Practice the shapes:
Before touching the wall, grab a piece of scrap paper and practice drawing long, curving stems and simple pointed oval leaf shapes. This helps you figure out the flow you want. -
Sketch the main stems:
Using a pencil very lightly, draw the primary vertical lines for your stems. Start from the bottom (near the wainscoting) and extend them upwards, allowing them to curve gently. Stagger their heights and spacing. -
Add leaf outlines:
Lightly sketch the leaves attaching to the stems. Vary the angles—some pointing up, some drooping slightly. Don’t worry about perfect symmetry; nature is rarely perfect.
Paint Looks Too Solid?
If your leaves look too opaque, keep a damp rag nearby. Immediately after painting a leaf, dab it gently with the rag to lift some pigment and reveal the wall texture.
Step 2: Painting the Stems
-
Mix your brown paint:
In a small cup, mix a brown or tan latex paint with a generous amount of glazing medium or water. You want a consistency that is fluid and semi-transparent, like heavy cream. -
Paint the main lines:
Using a thin round brush (size 4), trace over your pencil lines for the stems. Use long, confident strokes. I find it helpful to pull the brush toward me rather than pushing it away. -
Refine the stems:
Go back over the stems to add slight thickness at the bottom and at the joints where branches split. Keep the tips extremely fine and wispy.
Pro Tip: Custom Colors
Don’t buy new paint if you don’t have to; mix a tiny drop of black or brown craft paint into leftover bright greens to mute them into sophisticated, earthy botanical tones.
Step 3: Painting the Leaves
-
Create a green palette:
Set up three mixing cups for your greens: one light sage, one medium green, and one darker olive. Thin all of them with your glazing medium or water to maintain that watercolor look. -
Start with the light green:
Using a larger round brush (size 8 or 10), fill in about a third of the sketched leaves with your lightest green mixture. Paint loosely, staying mostly within the lines but allowing some natural variation. -
Apply the medium tones:
While the first set is drying, switch to your medium green. Paint another third of the leaves. For some leaves, you can paint one half medium green and leave the other half light for a two-toned effect. -
Add depth with darks:
Fill in the remaining leaves with the dark olive mix. Use this color sparingly on the lower leaves to ground the design. -
Layering for texture:
Once the initial layers are dry to the touch, mix a very watery version of the darkest green. Paint a thin line down the center of select leaves to suggest a central vein. -
Create shadows:
Dip a clean, damp brush into water and then picking up a tiny bit of dark pigment. touch it to the base of a leaf where it meets the stem. The wet surface will help the color bleed slightly, creating a natural shadow.
Step 4: Finishing Touches
-
Check for gaps:
Step back about four feet to view the mural as a whole. Look for awkward empty spaces. If you find one, pencil in a small floating leaf or a new branch shoot and paint it. -
Erase guidelines:
Ensure the paint is 100% dry—usually wait at least 24 hours. Gently erase any visible pencil marks that weren’t covered by paint. -
Reinstall fixtures:
Remove the painter’s tape carefully. Reattach your towel bar or shelving, centering it over the mural as desired.
Enjoy the calming atmosphere of your new, custom-painted botanical sanctuary
Painted Checkerboard Floor Illusion
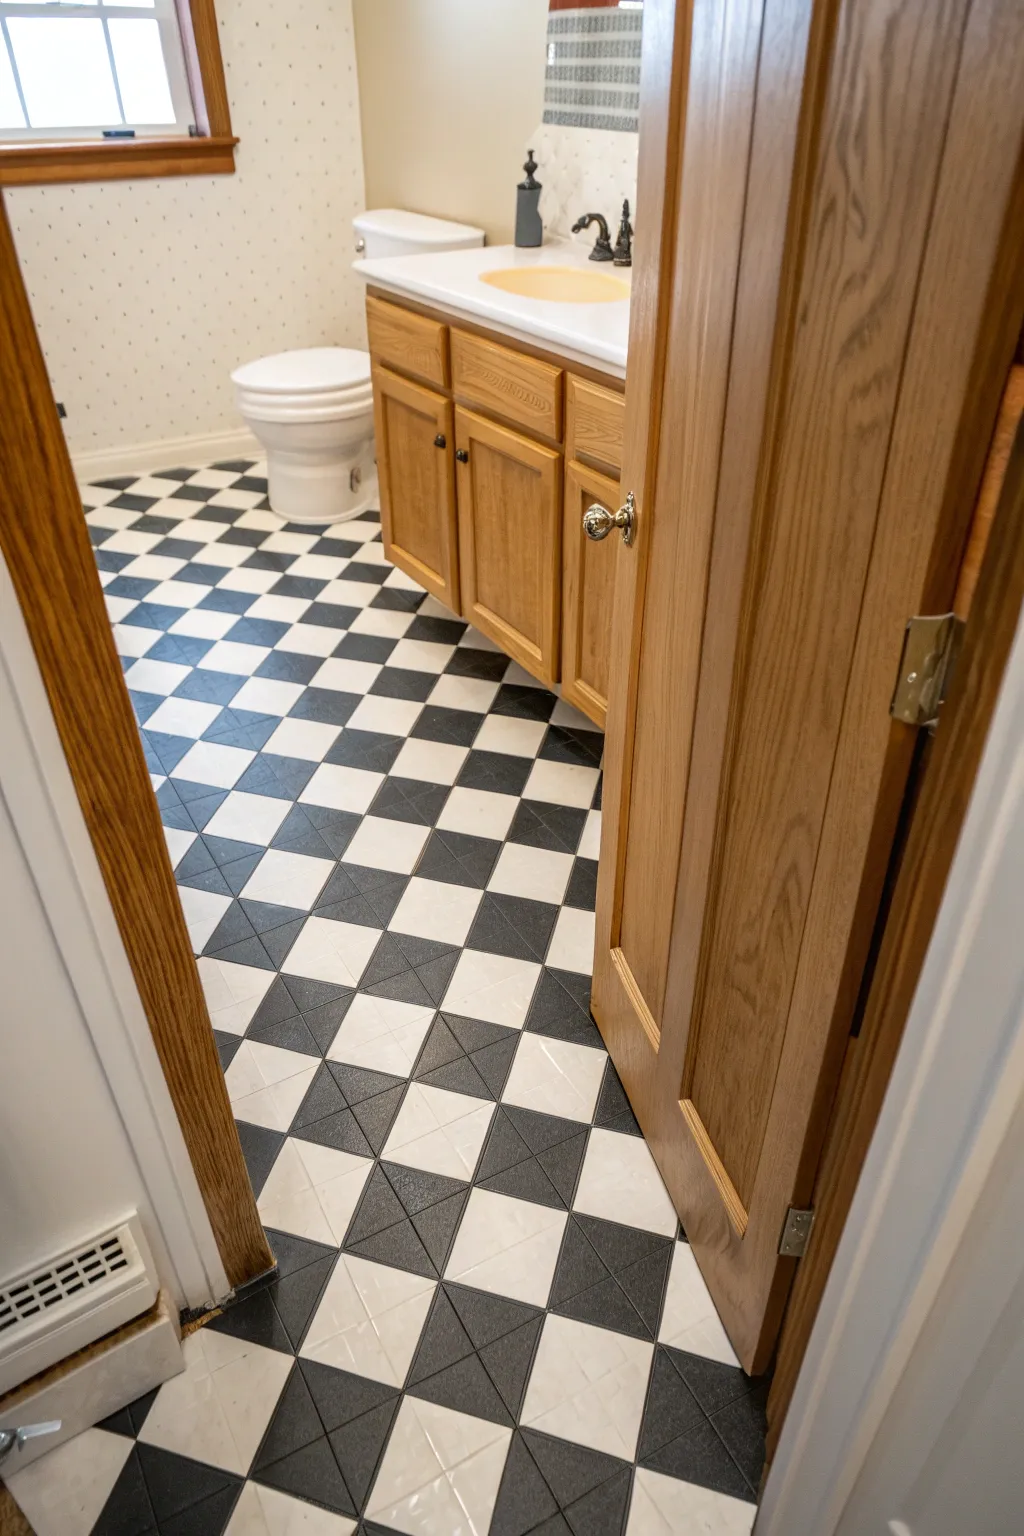
Transform a plain bathroom floor into a stunning classic feature with this painted checkerboard illusion. This project mimics the look of high-end triangular-split tiles using nothing but paint and tape, giving your space a sophisticated, vintage-inspired upgrade.
Step-by-Step
Materials
- High-quality floor primer
- Floor & porch paint (White/Cream base color)
- Floor & porch paint (Black/Charcoal accent color)
- 2-inch painter’s tape (high adhesion)
- 1-inch painter’s tape (delicate surface)
- Measuring tape
- Chalk line or straight edge
- Pencil
- Paint roller with extension pole
- 3/8 inch nap roller covers
- 2-inch angled sash brush
- Sandpaper (120 grit)
- Heavy-duty floor cleaner/degreaser
- Clear polyurethane floor sealer (matte or satin)
Step 1: Prep & Base Coat
-
Clean thoroughly:
Begin by removing all loose debris and scrubbing the floor with a heavy-duty degreaser. It is crucial to remove any soap scum or oils so the paint adheres properly. -
Sand the surface:
Lightly scuff the entire floor with 120-grit sandpaper. You aren’t trying to strip the old floor, just creating a rough texture for the primer to grip. -
Tape off edges:
Apply the 2-inch painter’s tape along the bottom of your baseboards, vanity, and toilet base to protect them from stray roller marks. -
Prime the floor:
Roll on a coat of high-quality bonding primer. Start from the corner furthest from the door and work your way out. Let this dry according to the manufacturer’s instructions, usually overnight. -
Apply base color:
Paint the entire floor with your lighter base color (the white or cream). I prefer to do two thin coats rather than one thick one for better durability. Allow at least 24 hours of drying time before taping.
Step 2: Mapping the Grid
-
Find the center:
Measure the width and length of the room to find the center point. It creates a more balanced look if the full tiles start in the center and get cut off at the edges. -
Mark the grid:
Using a pencil and a long straight edge (or a chalk line for larger rooms), draw a grid of 12-inch by 12-inch squares across the entire floor. -
Add diagonal lines:
To recreate the specific pattern in the photo, draw a diagonal line through every other square, splitting it into two triangles. This alternating pattern is key to the vintage look. -
Tape the pattern:
Apply the 1-inch delicate surface tape along the OUTSIDE of the areas that will remain white. Press, or ‘burnish’, the tape edges firmly with a credit card to prevent bleed-under. -
Seal the tape:
Lightly brush a tiny amount of your base (white) paint over the tape edges. This seals any microscopic gaps, ensuring your black lines will be razor-sharp.
Bleeding Lines?
If paint bleeds under the tape, wait for it to dry fully. Then, re-tape the clean line and gently paint over the bleed with your base color to erase it.
Step 3: Painting the Checks
-
Paint the black squares:
Using a small roller or brush, fill in the designated black squares and triangles. Work carefully to stay within your taped zones. -
Apply second coat:
Once the first coat is dry to the touch (usually 1-2 hours), apply a second coat of black paint for a solid, opaque finish. -
Remove tape:
Carefully peel up the tape while the final coat of paint is still slightly tacky. Pulling at a 45-degree angle helps cut through the paint film cleanly. -
Touch up:
Use a small artist’s brush to fix any minor bleeds or mistakes. A steady hand here makes all the difference.
Level Up: Faux Grout
Leave a tiny 1/8-inch gap between your taped squares. When you peel the tape, the original base color will show through as ‘grout lines’ for extra realism.
Step 4: Sealing & Finish
-
Let cure:
Allow the painted floor to cure for at least 48 hours. The paint needs to harden before you seal it. -
Apply topcoat:
Roll on a coat of clear polyurethane floor sealer. A matte or satin finish looks more like natural stone tile than a high-gloss finish. -
Final dry:
Let the sealer dry completely (often 3-4 days for light foot traffic) before walking on it or replacing rugs.
Enjoy your durable, custom-look floor that mimics classic tile without the heavy construction work
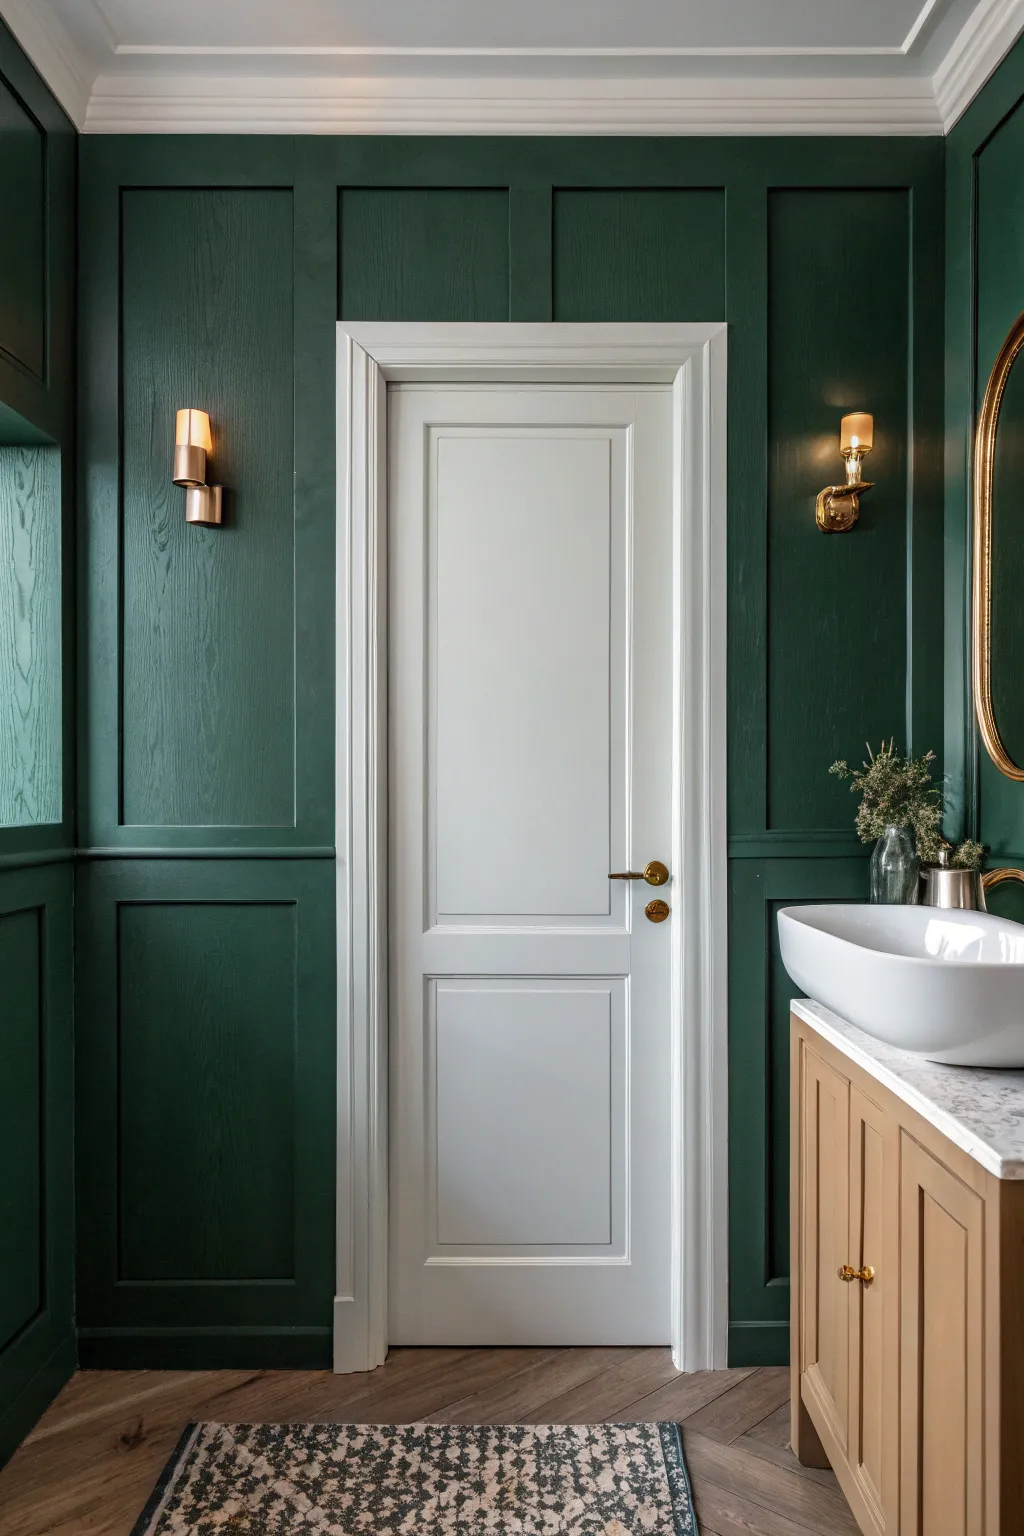
Paint the Door for Instant Impact
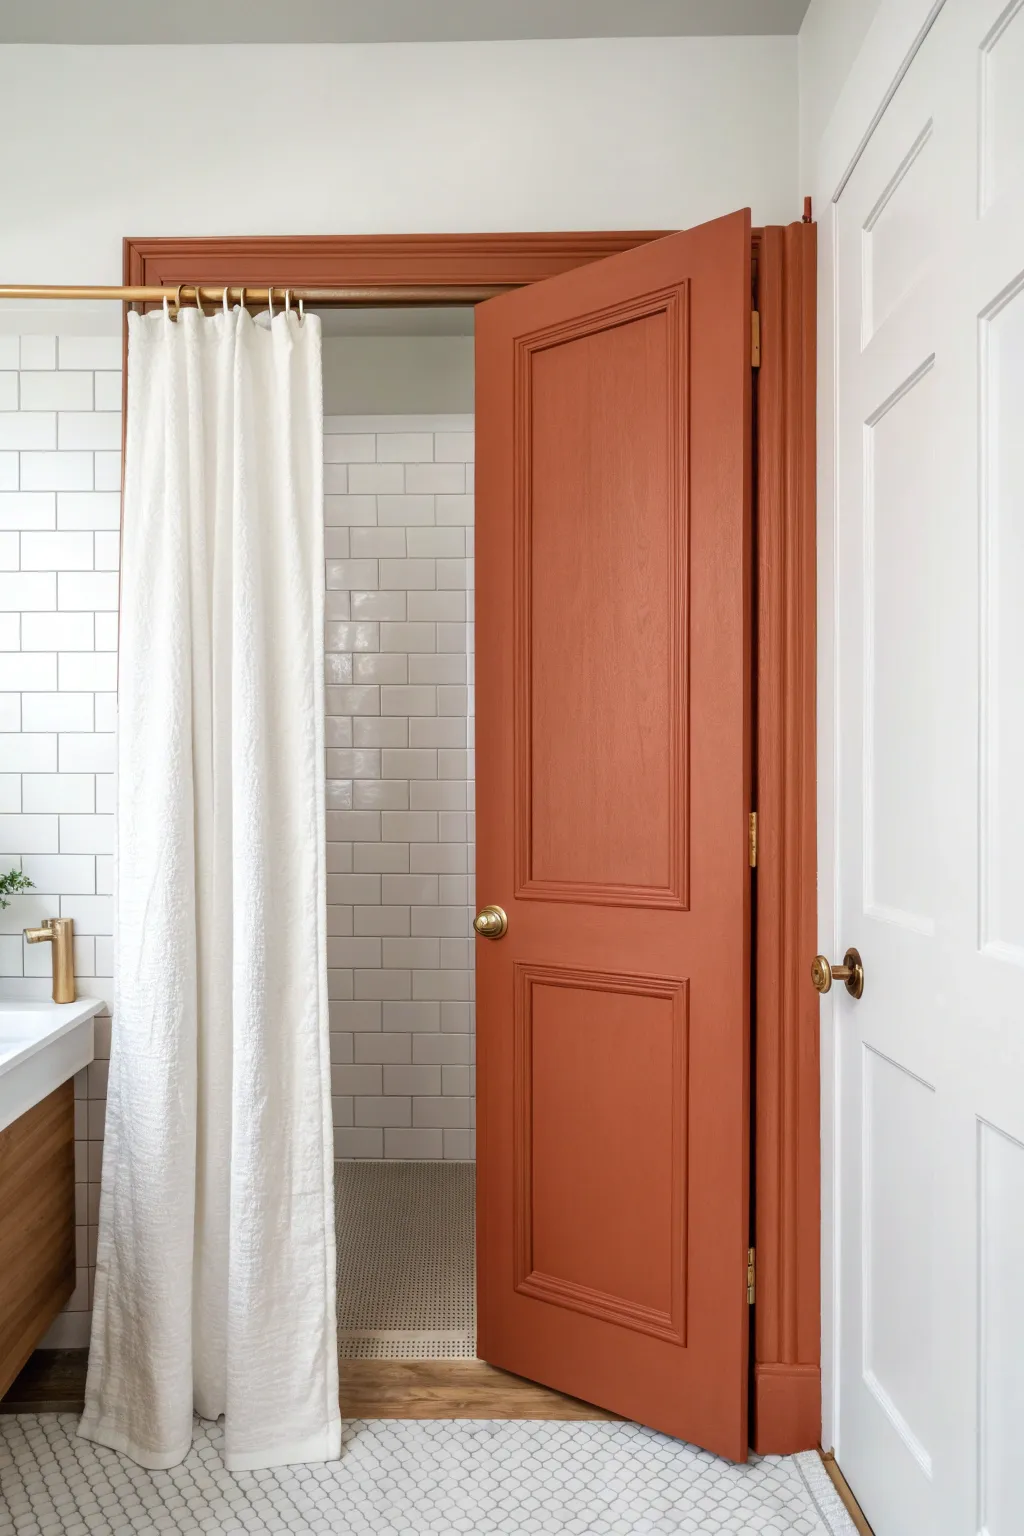
Elevate a standard white bathroom by painting the door and trim a rich, warm terracotta hue that instantly warms up the cool white tiles. This simple yet bold update creates a stunning focal point and adds sophisticated character to any neutral space.
Step-by-Step Guide
Materials
- Interior semi-gloss or satin paint (terracotta/rust color)
- High-quality angled sash brush (1.5 to 2 inch)
- Small foam roller and tray
- Painter’s tape
- Fine-grit sandpaper (220-grit)
- Tack cloth or damp rag
- Screwdriver
- Drop cloth or masking paper
- Liquid deglosser (optional)
- Primer (if painting over dark colors or glossy finish)
Step 1: Preparation
-
Remove Hardware:
Using a screwdriver, carefully remove the doorknobs and latch plates. Place all screws and hardware in a labeled bag so nothing gets lost during the painting process. -
Clean Surfaces:
Thoroughly clean the door and the surrounding trim with a mild degreaser or soapy water to remove dust, oils, and grime. A clean surface is critical for proper paint adhesion. -
Sand Lightly:
Once dry, scuff-sand the entire door and trim using 220-grit sandpaper. You don’t need to strip the paint entirely, just roughen the surface to help the new coat stick better. -
Remove Dust:
Wipe away all sanding dust using a bright tack cloth or a damp rag. Ensure no particles remain, as they will show up in your final finish. -
Protect Surroundings:
Lay down a drop cloth on the floor. Apply painter’s tape to the walls adjacent to the door trim and any hinges if you are painting the door while it’s still hung. I prefer to tape off the floor transition carefully to avoid messy lines.
Sticky Situation?
If the door sticks to the jamb after closing, rub a white candle or some clear wax along the edges. This creates a barrier that prevents fresh paint from bonding and pulling away.
Step 2: Painting the Trim
-
Cut In Edges:
Start with the door casing. Use your angled sash brush to paint the edges where the trim meets the wall. Work carefully to create a straight, clean line. -
Fill the Middle:
Paint the flat faces of the trim using long, smooth strokes. Check for drips, especially in the corners and decorative grooves of the molding, and smooth them out immediately.
Pro Tip: Order Matters
Always paint the door in sections: panels first, then horizontal rails, then vertical stiles. This mimics the wood grain direction of actual joinery for a high-end look.
Step 3: Painting the Door
-
Paint Panels First:
Begin with the recessed panels of the door. Use the angled brush to paint the decorative edges and corners inside the panels. -
Roll Flat Centers:
Switch to a small foam roller to paint the flat center areas of the panels. This ensures a smooth, non-streaky finish that looks professionally sprayed. -
Paint the Stiles:
Paint the vertical center stile (the strip between the panels) using vertical brush strokes. Keep a wet edge to avoid lap marks. -
Paint the Rails:
Paint the horizontal rails (top, middle, and bottom) next. Feather the edges where they meet the vertical stiles so the transition is seamless. -
Paint Outer Stiles:
Finish by painting the long vertical stiles on the outer left and right sides of the door. Again, use long vertical strokes for the best finish. -
Check Edges:
Don’t forget to paint the door edges. For the hinge edge, paint carefully around the hinges or tape them off completely if you left the door on.
Step 4: Finishing Touches
-
Allow to Dry:
Let the first coat dry completely according to the manufacturer’s instructions, usually about 2-4 hours. Do not rush this step. -
Apply Second Coat:
Apply a second coat to both the trim and door following the same order: trim first, then door panels, then rails and stiles. The second coat provides the true richness of the terracotta color. -
Remove Tape:
While the paint is still slightly tacky (not fully cured), carefully peel off the painter’s tape at a 45-degree angle to ensure a crisp line. -
Reinstall Hardware:
Once the door is fully cured—ideally waiting 24 hours to prevent sticking—screw the doorknobs and latch plates back into place.
Enjoy the warmth and distinctive style your new terracotta door brings to the bathroom
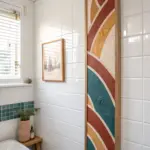
Artful Brushstroke Border Around the Room
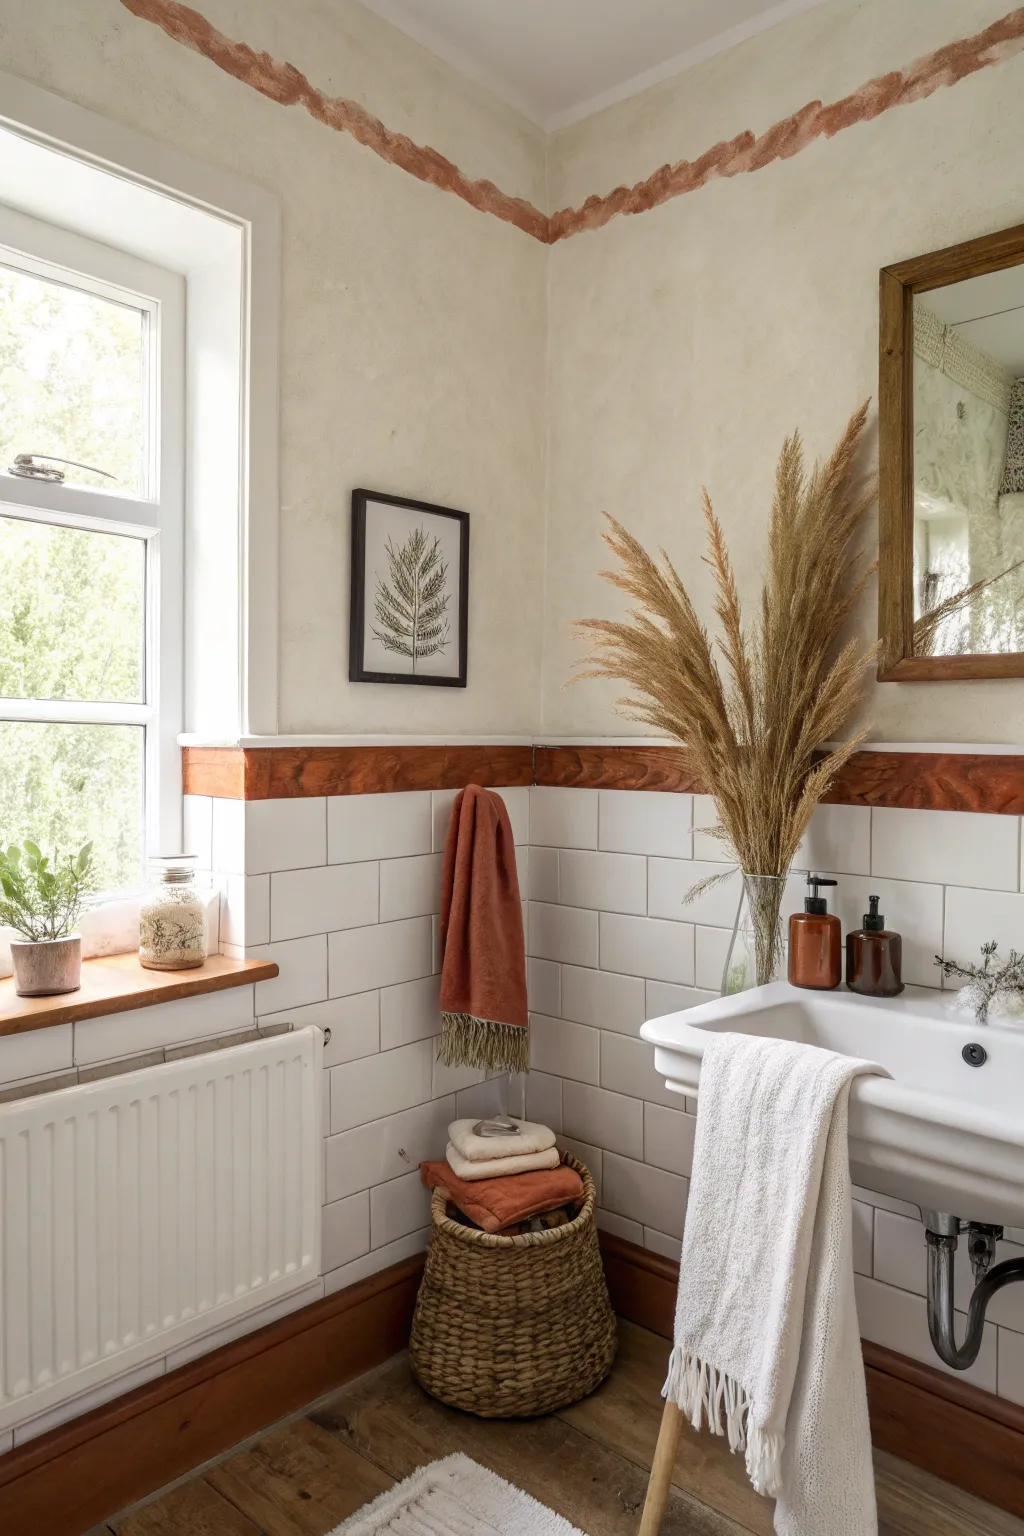
Bring soft movement and organic warmth to your bathroom with this hand-painted, wiggly border detail. This simple yet effective freehand technique creates a charming architectural accent that perfectly mimics the look of exposed terracotta or aged plaster trim.
Step-by-Step
Materials
- Terracotta or rust-colored interior latex paint (matte finish)
- Glaze medium (acrylic or latex compatible)
- 1-inch flat artist brush or sash brush
- Small mixing container
- Painter’s tape (optional)
- Ladder or sturdy step stool
- Damp cloth (for quick corrections)
- Drop cloth
Step 1: Preparation & Mixing
-
Assess the wall surface:
Before you begin, ensure your upper walls are clean and dust-free. If you have glossy paint, give the area where the border will go a quick scuff sand to help the new paint adhere better. -
Mix the glaze:
In your small container, mix your terracotta paint with a clear glaze medium. I like to aim for a ratio of about 2 parts paint to 1 part glaze. This extends the drying time slightly and creates that semi-transparent, watercolor-like effect rather than a solid, heavy line. -
Test opacity:
Find a scrap piece of cardboard or paper to test your mixture. You want the color to be rich but allowing just a hint of the background to influence the tone, mimicking the texture seen in the photo. -
Protect the ceiling:
If you aren’t confident in your cutting-in skills, run a strip of painter’s tape along the ceiling edge where it meets the wall, but keep it a few inches away from your intended border zone to avoid accidents.
Step 2: Painting the Wiggle Border
-
Load the brush:
Dip your 1-inch flat brush into the glaze mixture. Don’t overload it; you want enough paint to flow but not so much that it drips down the wall. -
Establish the height:
Decide on the height of your border. In the inspiration photo, it sits just below the ceiling cove. You can lightly mark a guide line with a pencil if you need to, but the charm comes from the imperfection. -
Begin the stroke:
Starting in a corner, place your brush flat against the wall. Apply moderate pressure so the bristles splay slightly, creating the full width of the ‘stripe’. -
Create the wave:
Drag the brush horizontally while gently undulating your wrist up and down. The goal is a soft, organic wave, not a sharp zigzag. Keep the movement fluid and continuous. -
Manage the paint load:
As the paint runs out on the brush, you’ll see a dry-brush texture appear. This is desirable! Let the stroke fade slightly before reloading to create natural tonal variation. -
Reload and overlap:
When reloading, start the new stroke slightly over the tail end of the previous one. This blends the transition so you don’t have harsh stop-and-start marks. -
Handling corners:
When you reach a corner, let the wave naturally terminate into it, then pick up the rhythm on the adjacent wall at the matching height.
Uneven Wiggles?
Don’t panic if your wave height varies. Step back; if one section dips too low, thicken the line slightly on the top side to balance it visually without erasing.
Step 3: Adding Depth & Texture
-
Review consistency:
Step back and look at the entire border. Some areas might look too thin or pale compared to others. -
Layering color:
Go back over any spot that feels too light with a second, very light pass of the glaze mixture. This builds opacity in random areas, enhancing the hand-painted, rustic aesthetic. -
Softening edges:
If any edges look too sharp or synthetic, you can use a clean, slightly damp brush to feather them out while the paint is still tacky, keeping that soft fresco look. -
Final dry:
Allow the border to dry completely for at least 4 hours. Because of the glaze, it may feel cool to the touch longer than standard latex paint.
Design Pro-Tip
For a truly cohesive look, match your paint color to existing wood elements or textiles in the room, creating a deliberate visual link between the decor and the architecture.
Step back and admire how this simple, fluid line instantly adds character and custom artistry to your bathroom space


Have a question or want to share your own experience? I'd love to hear from you in the comments below!