If your closet feels like a dark little cave, paint is the fastest way to turn it into a space you actually enjoy opening every day. I’m sharing my favorite DIY closet paint ideas—from timeless upgrades to artsy, unexpected finishes that feel like a mini boutique.
Warm White Reset
Transform builder-grade or dated closet doors into a sophisticated feature with this subtle color-blocking technique. The gentle interplay between a creamy yellow-undertone white and a brighter crisp white adds depth without overwhelming the space.
Step-by-Step
Materials
- Interior semi-gloss or satin paint (Warm Cream shade)
- Interior semi-gloss or satin paint (Crisp Warm White shade)
- High-quality synthetic angled sash brush (2-inch)
- Small foam roller and tray
- Painter’s tape (multi-surface)
- Fine-grit sandpaper (220-grit)
- Tack cloth
- Primer (bonding primer highly recommended)
- Measuring tape and pencil
- Screwdriver (to remove hardware)
- Drop cloths
Step 1: Preparation & Priming
-
Clear the area:
Begin by removing all items from the immediate area and laying down drop cloths to protect your beautiful floors from inevitable splatters. -
Remove hardware:
Using a screwdriver, take off the long vertical handles from the sliding doors. Store the screws in a labelled bag so they don’t get lost. -
Key the surface:
Lightly sand the entire surface of the closet doors with 220-grit sandpaper. You aren’t trying to strip the old finish, just creating enough ‘tooth’ for the new paint to grip effectively. -
Clean thoroughly:
Wipe away all sanding dust. I prefer using a tack cloth for the final pass to ensure absolutely no debris remains, as dust creates bumps in your finish. -
Prime the doors:
Apply a coat of bonding primer to the doors using your foam roller for the flat areas and the brush for any edges. Let this cure according to the can’s instructions, usually at least 4 hours.
Tape Trick
For ultra-crisp lines on textured wood, run a damp cloth over the tape edge before painting to activate its adhesive fully.
Step 2: Applying the Base Coat
-
First coat of crisp white:
If your design involves the lighter white on the frame or main panel, apply this color first over the entire door. It acts as a solid base. Use the roller for a smooth, stroke-free finish. -
Sand between coats:
Once dry, very lightly sand with fine paper to knock down any raised grain or bubbles. Wipe clean again. -
Second coat:
Apply the second coat of your crisp warm white paint for full opacity. Allow this to dry completely—ideally overnight—before attempting any taping.
Hardware Swap
Replace standard metal handles with long wooden dowel pulls (like in the photo) to echo the warm tones of the interior shelving.
Step 3: Creating the Color Block
-
Plan your sections:
Measure horizontal lines across the doors where the slight grooves are (or create faux panel lines). In this look, the central panel is the darker cream tone, while the frame remains lighter. -
Apply tape:
Carefully run painter’s tape along the interior edge of the door frame or stiles. Press the edge of the tape down firmly with your fingernail or a credit card to prevent bleed-through. -
Seal the tape edge:
Paint a very thin layer of your *base* color (the crisp white) over the edge of the tape. This seals the gap so that if any paint bleeds under, it matches the bottom layer. -
Paint the accent panels:
Using the roller or brush, apply your darker Warm Cream shade to the inner panels of the door. Be careful not to overload the roller near the taped edges. -
Second accent coat:
Once the first coat is dry to the touch, apply a second coat of the cream paint for rich, true color depth. -
Reveal the lines:
While the final coat is still slightly tacky (not fully dried), slowly peel back the painter’s tape at a 45-degree angle. This ensures a crisp, sharp line.
Step 4: Finishing Touches
-
Check for touch-ups:
Inspect your lines and corners. Use a small artist’s brush to fix any tiny imperfections where the colors meet. -
Reinstall hardware:
Once the paint has cured for at least 24 hours (so it doesn’t stick to the handles), screw the long vertical pulls back into place. -
Final clean:
Remove the drop cloths and re-style the surrounding area to enjoy your refreshed, custom-look wardrobe.
Enjoy the calm, organized feeling your newly refreshed and brightened closet brings to the room


Soft Greige Boutique Neutral

Transform a basic laminate or wood closet system into a high-end, custom-looking wardrobe with this soft greige paint finish. The subtle gray-beige tone creates a warm, sophisticated backdrop that highlights your clothing and accessories without overwhelming the space.
Detailed Instructions
Materials
- High-quality cabinet paint (Satin or Semi-Gloss finish)
- Bonding primer (specifically for laminate/wood)
- Painter’s tape (multi-surface)
- 120-grit and 220-grit sandpaper
- Tack cloth
- High-density foam roller (4-inch) and frame
- Angled sash brush (2-inch)
- Screwdriver or drill
- Paint tray and liners
- Wood filler (optional for old hardware holes)
- Drop cloths
Step 1: Preparation
-
Clear and Clean:
Remove absolutely everything from the closet shelves, rods, and drawers. Wipe down every surface with a degreaser or TSP substitute to remove dust, oils, and residue, ensuring the primer will adhere properly. -
Disassemble Components:
Unscrew the closet rod and remove the mounting brackets. Pull the drawers out completely and remove the drawer fronts if possible; if not, you’ll need to tape off the drawer boxes carefully. -
Remove Hardware:
Take off all knobs, pulls, and hinges. Keep these hardware pieces and their screws organized in labeled zipper bags so reassembly is stress-free later. -
Fill and Sand:
If you are changing hardware sizes or possess visible scratches, fill the holes with wood filler. Once dry, scuff-sand all surfaces with 120-grit sandpaper. You aren’t trying to strip the finish, just creating a ‘tooth’ for the primer. -
Dust Control:
Vacuum up the sanding dust thoroughly. Follow up by wiping everything down with a tack cloth to catch the finest particles.
Sticky Situation
If drawers feel sticky after reassembly, rub a plain candle or beeswax along the wooden runners (not metal glides) to reduce friction without damaging your new paint job.
Step 2: Priming and Painting
-
Masking Off:
Apply painter’s tape to the adjacent walls, ceiling, and floor trim to protect them from stray brush strokes. Lay down your drop cloths to protect the flooring. -
Apply Bonding Primer:
Using your foam roller for flat surfaces and the brush for corners, apply a coat of high-quality bonding primer. This step is non-negotiable for laminate surfaces to prevent peeling. -
Light Sanding:
Once the primer is fully dry (check the can for times), give it a very light pass with 220-grit sandpaper to smooth out any brush marks or raised grain. Wipe clean with a tack cloth again. -
Painting Corners and Edges:
Stir your ‘Soft Greige’ cabinet paint well. Start by ‘cutting in’ the corners, inside edges of the shelves, and tight spots using the angled sash brush. -
Rolling Flat Surfaces:
Immediately follow the brush work with the foam roller on the larger shelf surfaces, vertical dividers, and drawer fronts. Maintain a ‘wet edge’ to ensure a smooth, sprayed-on look. -
First Coat Drying:
Allow the first coat to dry completely. I prefer to let this sit overnight if humidity is high, as cabinet paint needs time to level out and cure slightly between coats. -
Second Coat Application:
Apply the second coat using the same method—brushing corners first, then rolling. This coat creates that rich, opaque color depth and durability. -
Detailing Drawers:
Don’t forget the edges of the drawer fronts. Paint these carefully to ensure a seamless look when the drawers are closed.
Pro Tip: Light it Up
For a true luxury feel, add battery-operated, motion-sensor LED strip lights under the shelves. It illuminates the clothes and makes the paint color glow.
Step 3: Finishing Touches
-
Curing Time:
Let the paint cure for at least 48 to 72 hours before placing heavy items back on the shelves. Cabinet paint remains soft even when dry to the touch, and rushing this can lead to dents. -
Reinstall Hardware:
Reattach your drawer pulls and hinges. For a luxury upgrade, consider swapping old hardware for brushed gold or brass knobs. -
Reassemble Closet:
Slide the drawers back onto their tracks and screw the clothing rod brackets back into place. -
Style the Space:
Arrange your clothes by color and introduce uniform textured baskets (like wicker or fabric) on the upper shelves to complete the boutique aesthetic.
Enjoy the calm and order of your beautifully refreshed dressing space


Moody Charcoal Contrast Closet
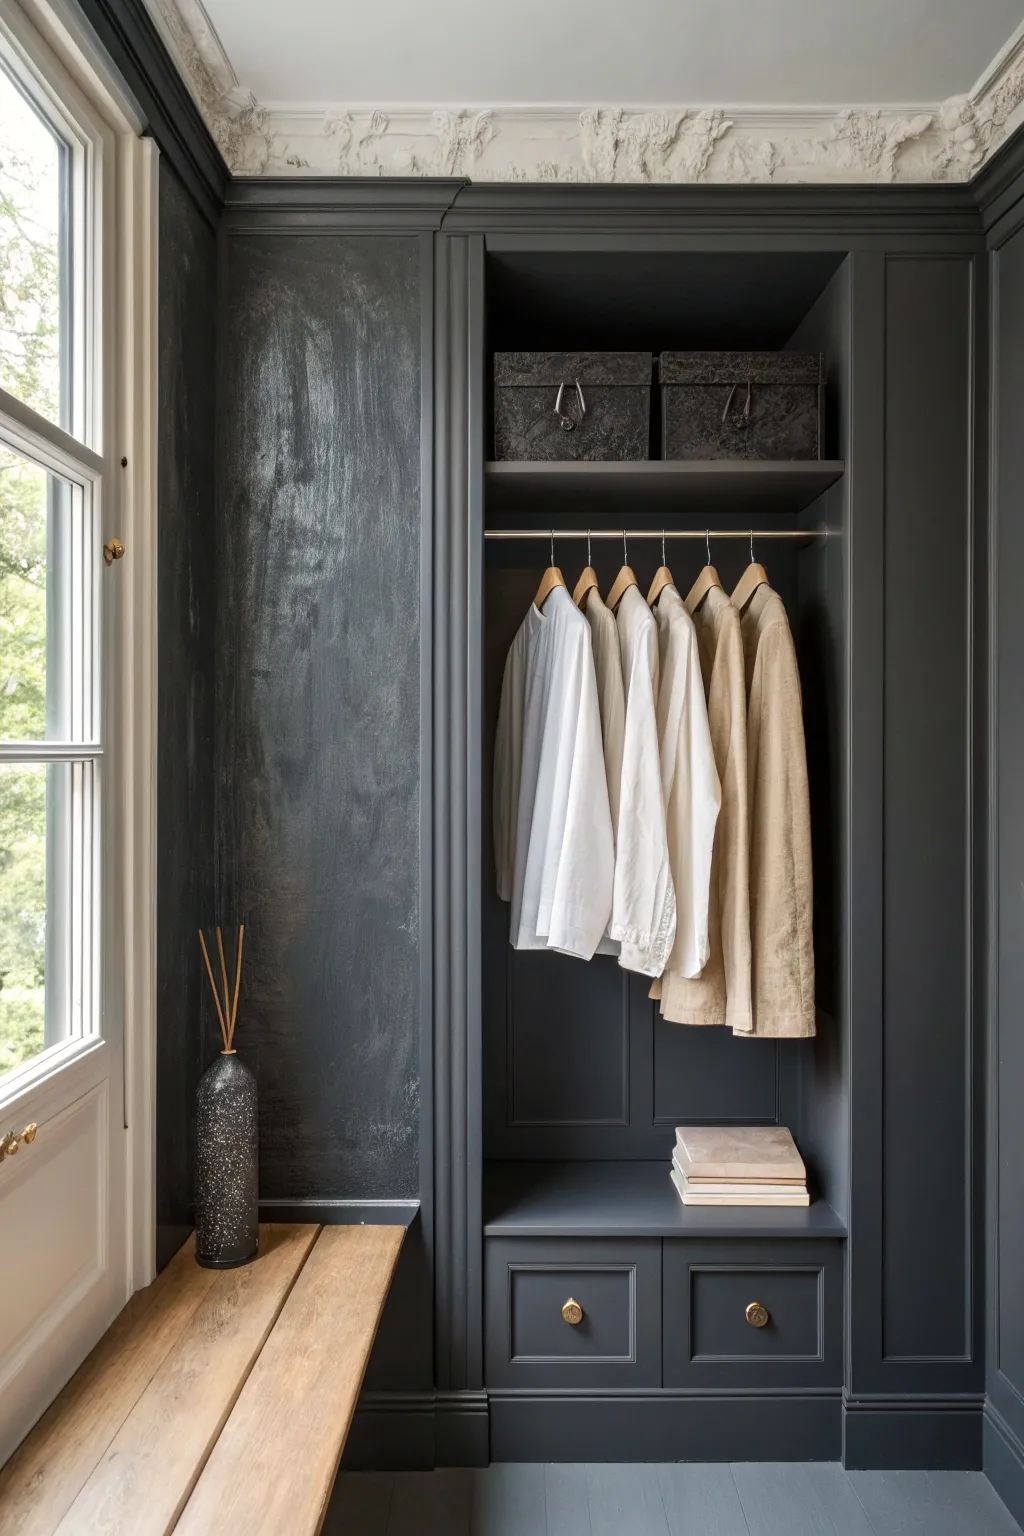
Elevate a standard closet into a boutique-style wardrobe with this moody, sophisticated charcoal finish. The rich, textured dark paint creates a striking contrast against white ceilings and trim, turning storage into a design statement.
Step-by-Step Tutorial
Materials
- High-quality charcoal grey latex paint (satin or eggshell finish)
- Matte clear topcoat (optional, for durability)
- Angled sash brush (2-inch)
- Small foam roller and tray
- Painter’s tape
- Drop cloths
- Fine-grit sandpaper (220-grit)
- Tack cloth
- Screwdriver (for hardware removal)
- Wood filler (if repairing holes)
- Primer (tinted grey strictly recommended)
- Bronze or gold cabinet knobs (optional upgrade)
Step 1: Preparation & Surface Care
-
Clear the space:
Remove all clothing, hangers, and boxes from the closet. You need a completely empty canvas to work effectively without risking paint splatters on your belongings. -
Remove hardware:
Using your screwdriver, take off any existing knobs, pulls, or hinges if possible. Bag these up with their screws so nothing gets lost. -
Clean and sand:
Wipe down all surfaces with a degreaser to remove dust and oils. Once dry, lightly scuff the entire surface with 220-grit sandpaper to give the paint something to grip. -
Fill imperfections:
Inspect the wood for dings or old screw holes. Apply wood filler, let it dry, and sand it smooth. Wipe everything down with a tack cloth to remove every speck of dust. -
Tape carefully:
Apply painter’s tape along the ceiling line, floor trim, and any adjacent walls you want to keep paint-free. Since we are using a dark color, precision here is key.
Uneven Sheen?
If you see shiny spots (flashing), your roller might have been too dry. Apply another thin, consistent coat, keeping a wet edge at all times to blend perfectly.
Step 2: Priming for Depth
-
Tint your primer:
For a deep charcoal color, I always recommend using a grey-tinted primer rather than white. It helps you achieve full coverage with fewer topcoats. -
Cut in corners:
Use your angled sash brush to apply primer into the corners, crevices, and along the taped edges. -
Roll the flat surfaces:
Use the foam roller for the larger flat panels, shelves, and bench seat. This minimizes brush strokes. Let the primer dry completely according to the can’s instructions.
Add Subtle Texture
For that ‘limewash’ look shown on the left wall, mix a small amount of texture additive into the paint or use a cross-hatch brush technique during the final coat.
Step 3: Creating the Moody Finish
-
First coat application:
Stir your charcoal paint thoroughly. Start with the interior back panels, using the brush to get into the deep corners first. -
Work in sections:
Paint the shelving and vertical dividers next. Use long, smooth strokes with the brush for trim and the roller for flat shelves. -
Painting the details:
Tackle the drawer fronts and any decorative molding. If your closet has shaker-style detailing, paint the recessed grooves first before rolling the flat face. -
Dry and assess:
Let the first coat dry for at least 4-6 hours. Don’t panic if it looks patchy; dark colors often look uneven until the second coat. -
Apply the second coat:
Repeat the painting process. The second coat is where the richness happens. Pay special attention to the texture; slightly irregular brush strokes can add that hand-painted, lime-wash effect seen in the inspiration image. -
Bench seat attention:
If you are painting the bench seat, consider a third thin coat for durability, as this area sees the most wear.
Step 4: Finishing Touches
-
Remove tape:
Carefully peel off the painter’s tape while the paint is still slightly tacky to ensure a crisp line without peeling. -
Install hardware:
Once the paint has cured (ideally 24 hours), reinstall your hardware. Swapping old handles for gold or bronze knobs adds a beautiful warm contrast to the cool grey. -
Style the space:
Place textured storage boxes on the top shelf and re-hang your clothes. Simple wooden hangers look particularly good against the dark backdrop.
Enjoy the sophisticated atmosphere of your newly transformed custom closet


Color-Drenched Monochrome Look
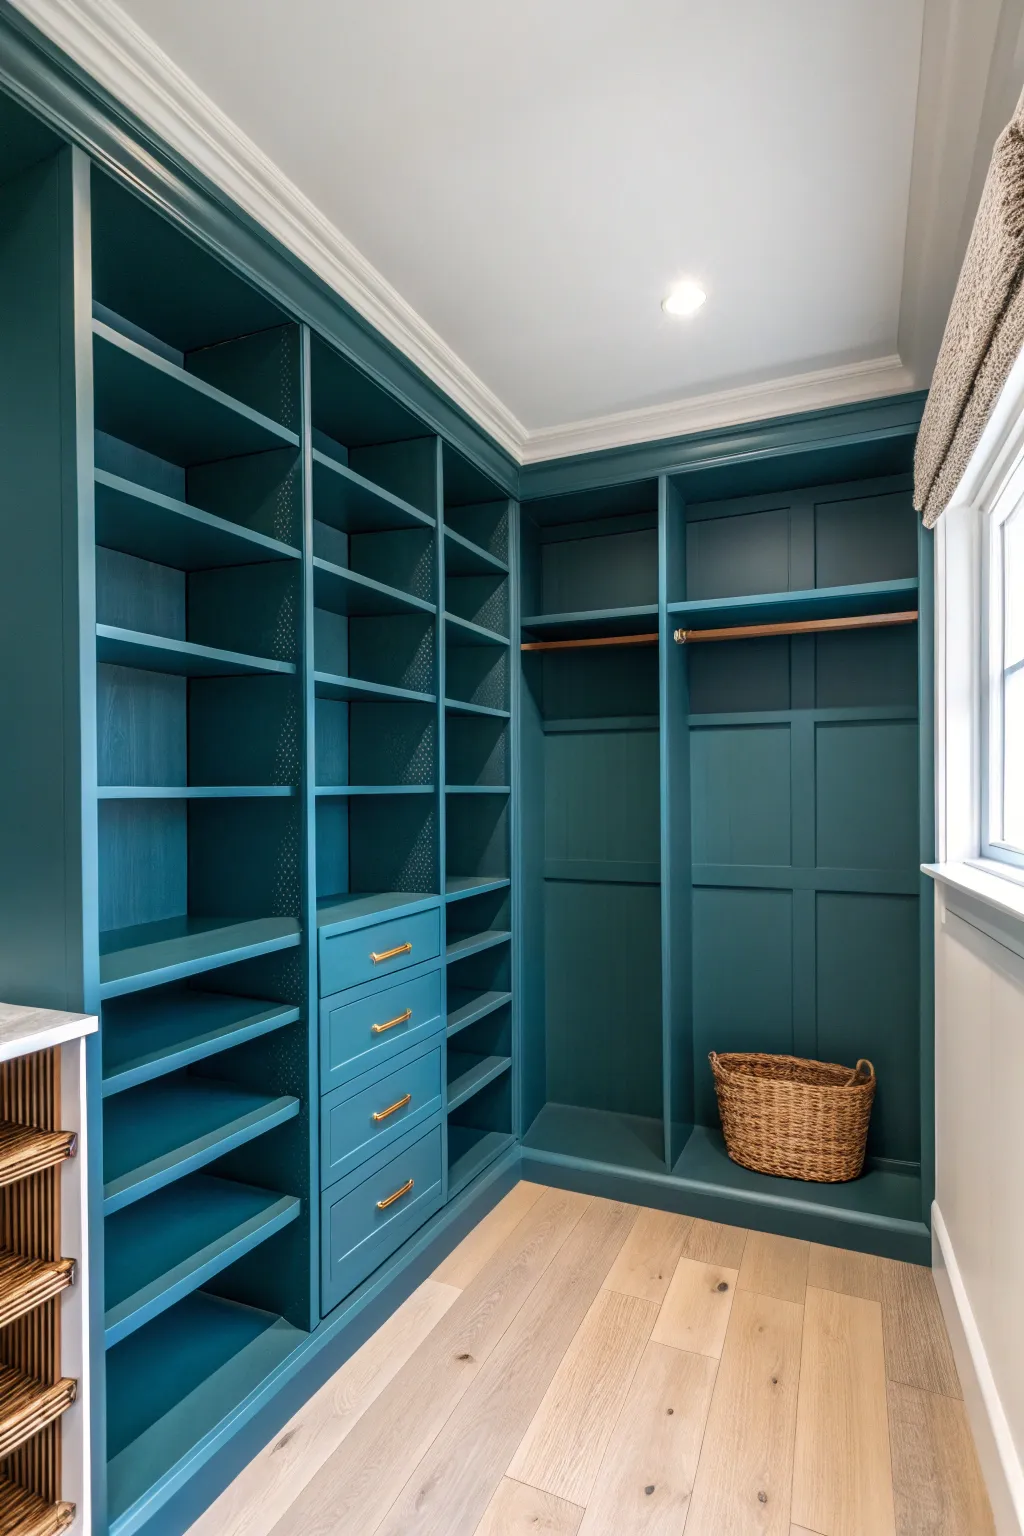
Transform a basic storage space into a boutique-style dressing room with this bold, color-drenched approach. By painting the shelving, walls, and trim in a unified, deep teal hue, you create a sophisticated and seamless built-in look that feels incredibly custom.
How-To Guide
Materials
- High-quality cabinet enamel paint (Satin or Semi-Gloss finish)
- Deep teal color match (e.g., Benjamin Moore vaguely ‘Dark Harbor’ or similar)
- Bonding primer (specifically for glossy surfaces or laminates)
- 220-grit sandpaper and sanding block
- Tack cloth
- Painter’s tape
- High-density foam roller (4-inch width)
- High-quality angled sash brush (1.5 to 2 inch)
- Paint tray and liners
- Screwdriver
- Drop cloths
- Wood filler or spackling paste (if needed)
- Caulk and caulk gun
Step 1: Preparation & Disassembly
-
Clear the space:
Remove absolutely everything from the closet. This includes baskets, clothes, and any loose hardware. Lay down drop cloths to protect your beautiful wood floors. -
Remove hardware:
Using your screwdriver, take off any drawer pulls, handles, and the closet rods if possible. Bag these up with their screws so nothing gets lost. -
Remove drawers and adjustable shelves:
Pull out the drawers completely and remove any adjustable shelves. It is much easier to paint these horizontally on a workbench or sawhorses than while they are installed. -
Clean surfaces thoroughly:
Wipe down every inch of the woodwork with a degreaser or mild soap solution. Dust and oils are the enemies of a smooth finish. -
Sand for adhesion:
Lightly scuff all surfaces with 220-grit sandpaper. You don’t need to strip the old finish, just roughen it enough for the new paint to grab onto. -
Fill imperfections:
Inspect the woodwork for any dings or nail holes. Fill them with wood filler, let dry, and sand flush. If there are gaps between the built-ins and the wall, run a bead of caulk to ensure that seamless look. -
Remove dust:
Vacuum up the sanding dust, then wipe everything with a tack cloth to ensure a pristine surface.
Sticky Drawers?
If drawers stick after painting, rub a plain candle or beeswax along the wood glides or tracks. This creates lubrication without damaging your fresh paint job.
Step 2: Priming
-
Tape off edges:
Apply painter’s tape carefully along the ceiling line, the floor trim, and window edges if you aren’t painting them. -
Apply bonding primer:
Using your foam roller for flat areas and the brush for corners, apply a coat of bonding primer. This is crucial if your closet is made of laminate or pre-finished wood. -
Sand the primer:
Once the primer is fully dry (check the can for times), give it a very light sanding with fine grit paper to knock down any bumps. Wipe away the dust again.
Brass Elegance
Swap standard chrome hardware for brushed brass or unlacquered gold handles. The warm metal tones pop beautifully against the cool, dark teal background.
Step 3: Painting & Finishing
-
Cut in corners:
Start with your angled sash brush. Paint the deep interior corners, the edges around the drawers, and the joints where shelves meet the uprights. I prefer to work in sections so the paint doesn’t dry out before I roll. -
Roll the flattest areas:
Use the high-density foam roller to paint the sides, fixed shelves, and drawer fronts. The foam roller helps achieve that sprayed-on, smooth cabinet finish without brush marks. -
Paint the back wall:
Since this is a color-drenched look, roll the back wall of the closet in the same teal color. This unifies the depth of the cabinet with the structure itself. -
Let it cure:
Allow the first coat to dry completely. Cabinet enamels often require longer drying times between coats than standard wall paint, so patience is key here. -
Apply second coat:
Repeat the cutting and rolling process for a second coat. This deep teal color will likely need two, possibly three coats to achieve full, rich opacity. -
Paint the accessories:
While the main structure dries, paint your removed adjustable shelves and drawer fronts separately. Don’t forget the edges of the shelves. -
Reinstall hardware:
Once the paint has cured for at least 24-48 hours (longer is better for hardness), reinstall your drawer pulls and closet rods. Clean gold hardware looks stunning against this dark teal. -
Reassemble:
carefully slide the drawers back in and place the adjustable shelves. Be gentle to avoid scratching the fresh paint.
Step back and admire how a single bold color choice completely elevates your storage into a design statement
BRUSH GUIDE
The Right Brush for Every Stroke
From clean lines to bold texture — master brush choice, stroke control, and essential techniques.
Explore the Full Guide
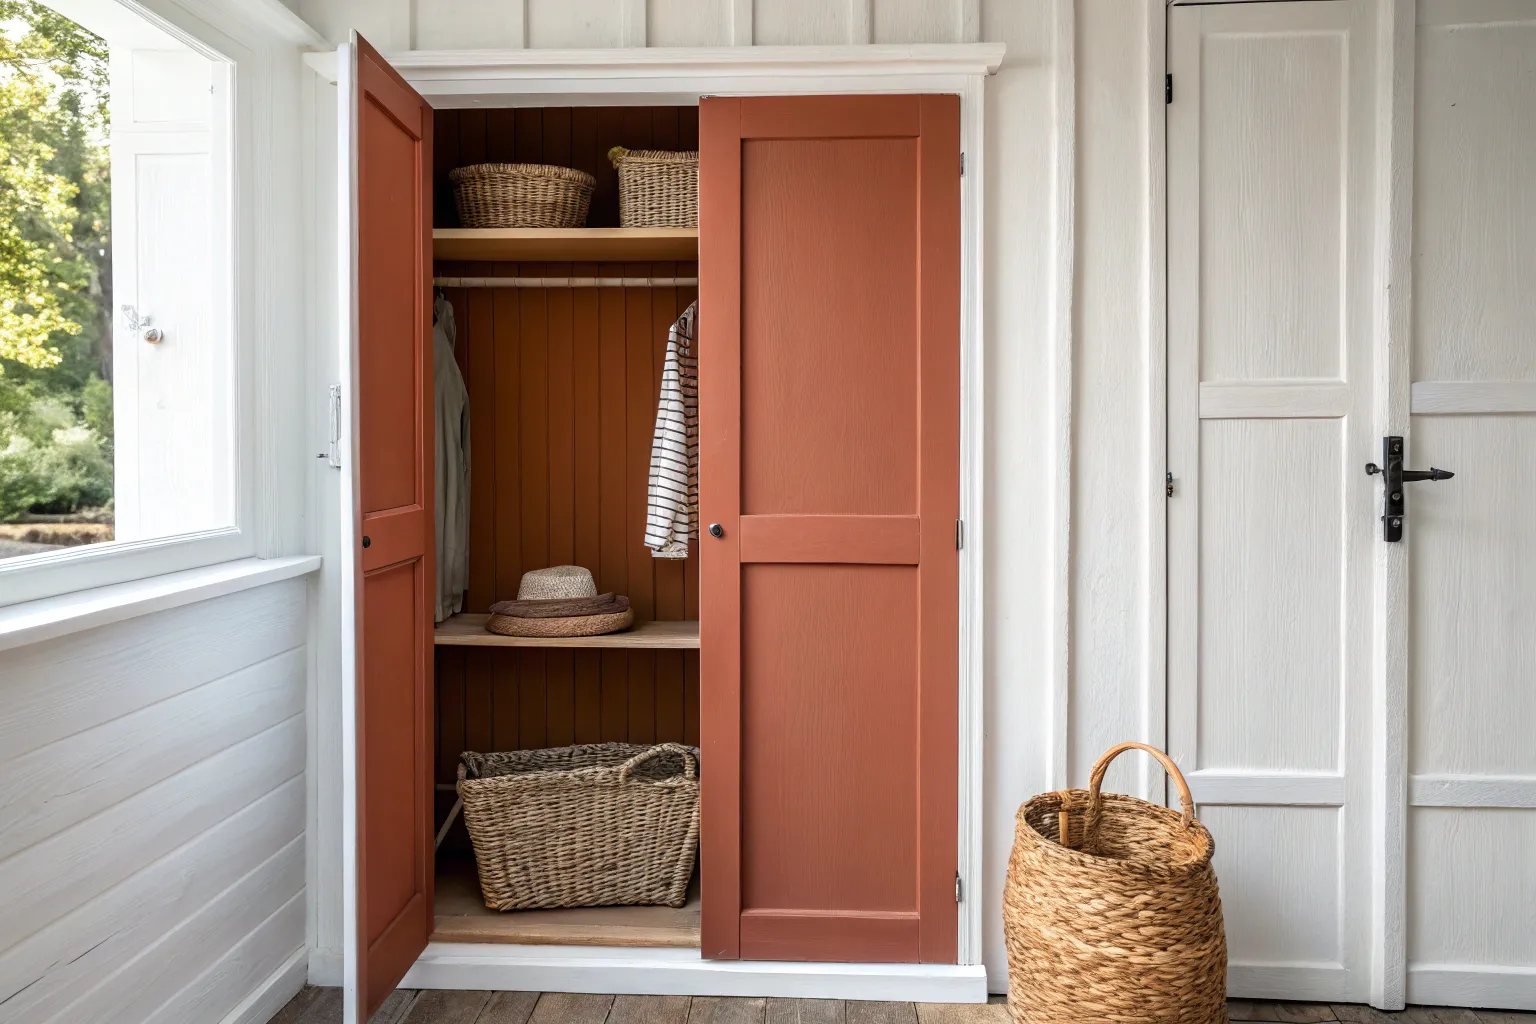
Painted Ceiling for Extra Height
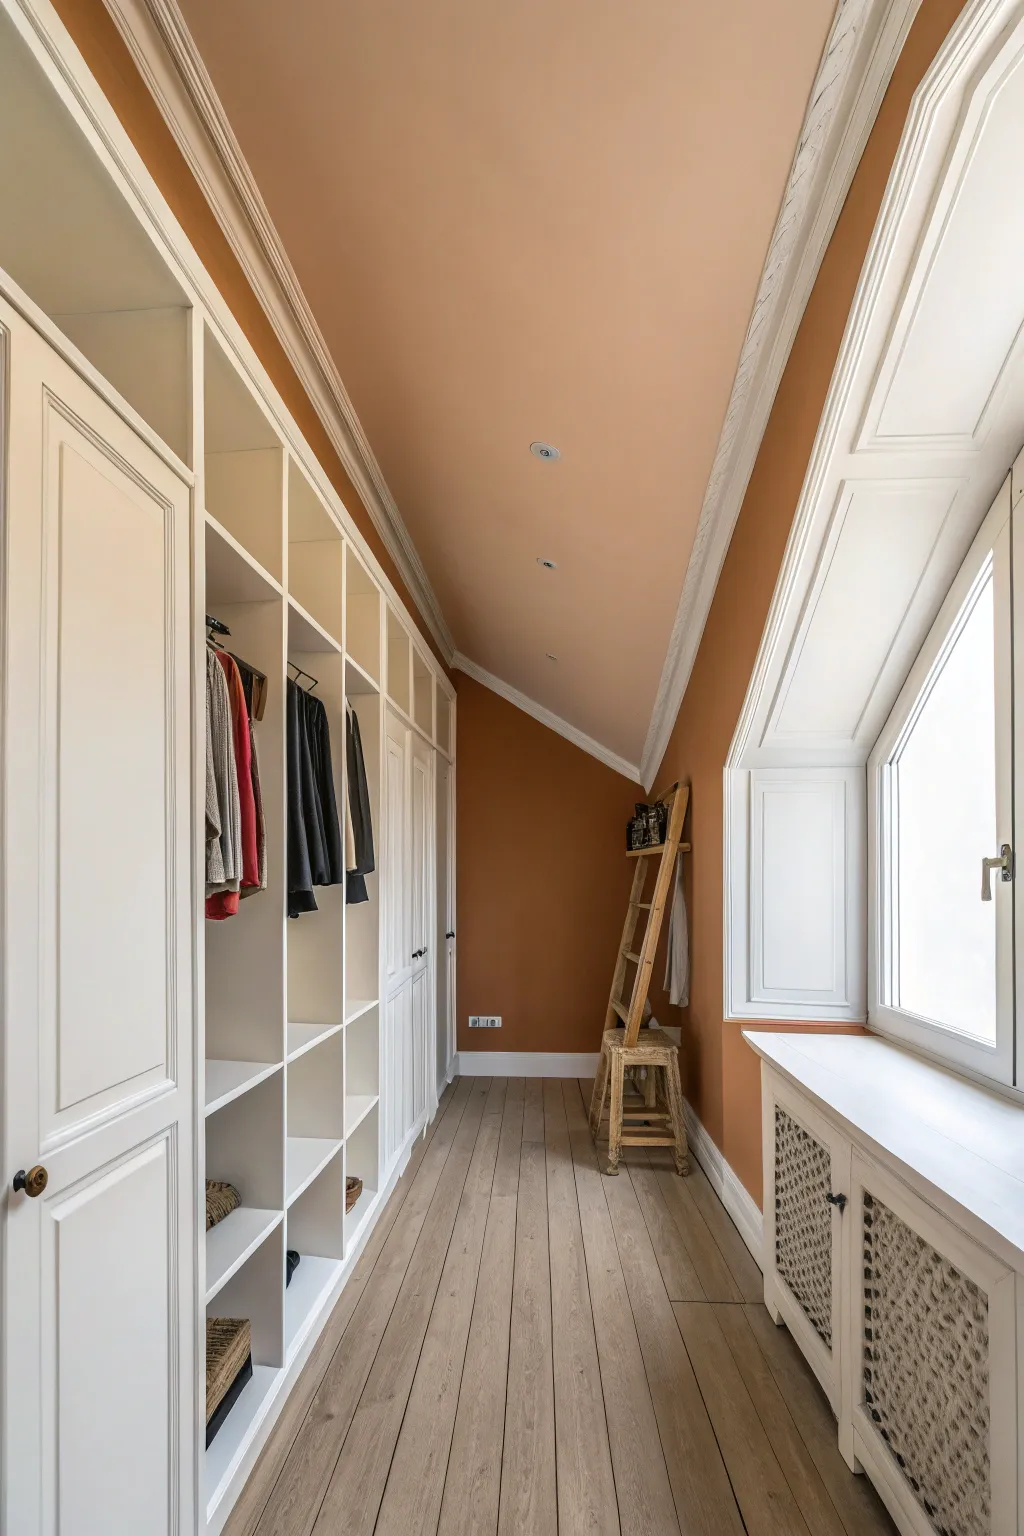
Transform a cramped attic closet into a spacious, boutique-style dressing room by cleverly using paint to trick the eye. This project uses a warm terracotta hue that wraps up the walls and across the ceiling, creating a cozy canopy that unexpectedly makes the room feel taller and more unified.
Step-by-Step Guide
Materials
- High-quality interior latex paint (matte finish, terracotta/burnt orange shade)
- Bright white semi-gloss trim paint
- Angled sash brush (2.5 inch)
- Roller frame and extension pole
- Microfiber roller covers (3/8 inch nap)
- Painter’s tape (delicate surface)
- Drop cloths
- Sanding sponge (fine grit)
- Ladder or sturdy step stool
- Screwdriver (for removing hardware)
- Mild detergent and sponge
Step 1: Preparation & Cleaning
-
Clear the Space:
Remove all clothing, hangers, and movable furniture like ladders or stools from the closet to give yourself ample working room. -
Protect Fixtures:
Take down any light fixtures or cover recessed can lights carefully with painter’s tape and plastic. I personally like to loosen the trim rings on recessed lights just a bit so I can paint underneath them for a cleaner look. -
Clean Surfaces:
Wipe down the walls and ceiling with a mild detergent and water solution to remove any dust or oils, ensuring the paint adheres perfectly. -
Masking Off:
Apply painter’s tape along the edges of the built-in cabinetry, floor trim, and window casings. Press the tape edges down firmly with a putty knife to prevent bleed-through.
Patchy Ceiling?
Ceiling paint often dries faster due to rising heat. If you see lap marks, add a paint extender (like Floetrol) to your mix to slow drying time and smooth out strokes.
Step 2: Painting the Trim & Molding
-
Prime if Necessary:
If your crown molding or trim is raw wood or previously painted with a dark color, apply a coat of primer first. -
Apply White Trim Paint:
Using your angled sash brush, paint the crown molding along the ceiling line and the window trim with bright white semi-gloss paint. This crisp border is crucial for framing the ceiling color. -
Check for Drips:
Keep an eye out for paint pooling in the corners of the molding and brush it out immediately before it begins to set.
Pro Tip: Light Check
Shine a bright work light sideways across the ceiling (raking light) while painting. It highlights missed spots and roller ridges invisible under normal lighting.
Step 3: The Ceiling & Wall Color
-
Cutting In the Ceiling:
Once the trim paint is fully dry, tape off the bottom edge of the crown molding. Use your angled brush to cut in a 3-inch band of the terracotta paint along the ceiling edge where it meets the molding. -
Cutting In Corners:
Continue cutting in the corners of the walls and around any built-in cabinetry edges with the terracotta paint. -
Rolling the Ceiling:
Attach the roller to an extension pole. Load the roller with terracotta paint and apply it to the ceiling in long, overlapping ‘W’ shaped strokes to ensure even coverage without roller marks. -
Rolling the Walls:
Move immediately to painting the walls with the same roller, working from top to bottom. Maintaining a ‘wet edge’ where the wall meets the ceiling helps blend the transition seamlessly. -
First Coat Drying:
Allow the first coat to dry completely according to the paint manufacturer’s instructions, usually about 4 hours. -
Sand Lightly:
Give the walls and ceiling a very light pass with a fine-grit sanding sponge to knock down any bumps, then wipe away the dust with a tack cloth. -
Second Coat Application:
Apply a second coat of terracotta paint to both the ceiling and walls, following the same cutting-in and rolling process to achieve a rich, opaque depth of color.
Step 4: Finishing Touches
-
Remove Tape:
Carefully peel away the painter’s tape while the paint is still slightly tacky to ensure crisp, sharp lines. Pull the tape at a 45-degree angle away from the painted surface. -
Touch Ups:
Inspect your work for any small holidays or bleed-under. Use a small artist’s brush for tiny corrections near the trim or cabinetry. -
Reinstall Fixtures:
Once the paint has cured (ideally 24 hours), push the trim rings of your recessed lights back up or reinstall light fixtures. -
Style the Space:
Reset your closet by bringing back the wooden ladder and organizing clothes to complement your bold new backdrop.
Now step back and enjoy how the continuous color draws the eye upward, making your cozy attic closet feel grand and intentionally designed
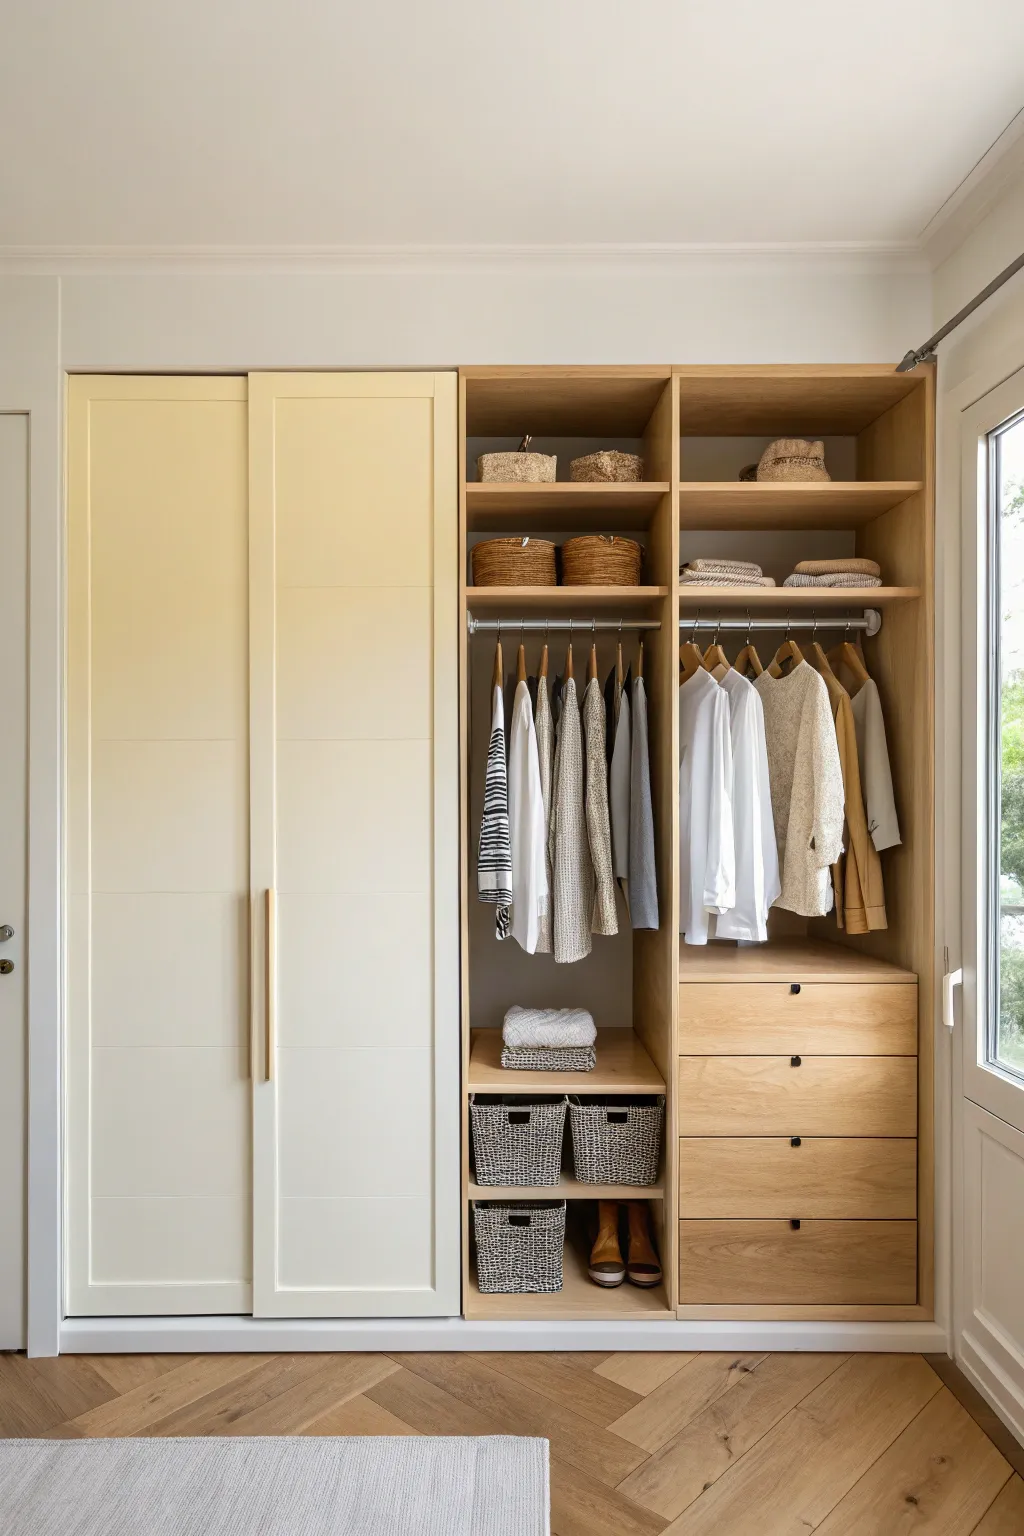
Two-Tone Walls and Built-Ins
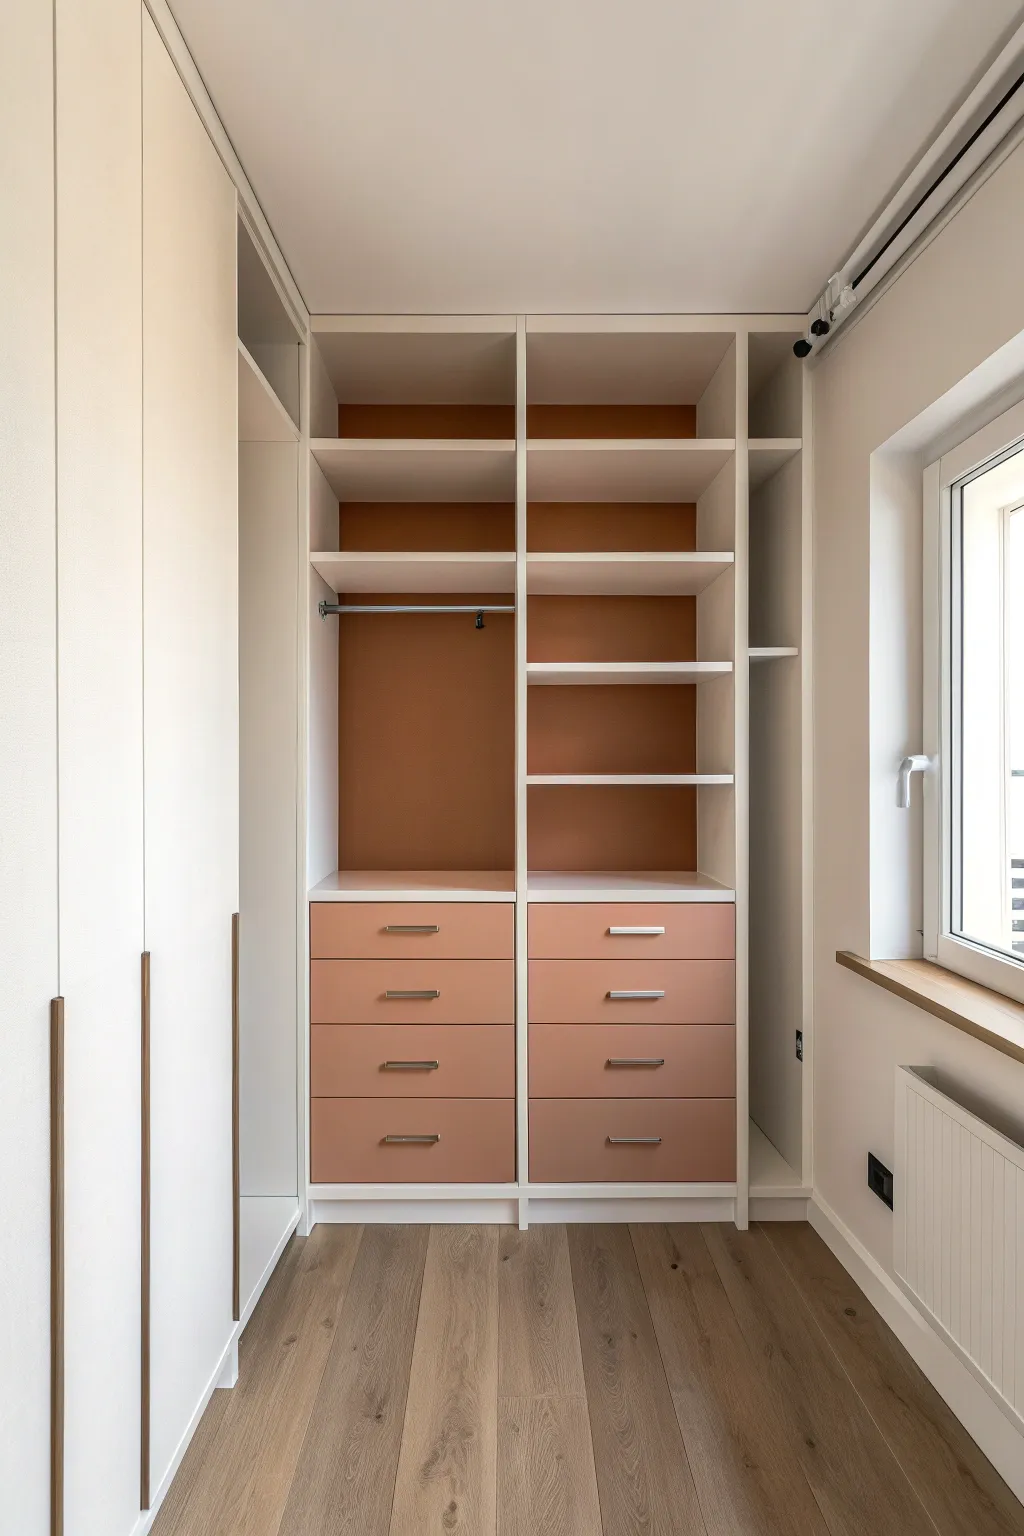
Transform a standard white closet system into a bespoke design feature with this clever two-tone painting technique. By adding a warm terracotta hue to the back panels and drawer fronts while keeping the frame crisp white, you create depth and a high-end custom look without the custom price tag.
Step-by-Step
Materials
- Semi-gloss interior trim paint (Crisp White)
- Satin finish interior paint (warm terracotta/burnt sienna color)
- Small foam roller and tray
- 2-inch angled sash brush
- Fine-grit sandpaper (220-grit)
- Tack cloth
- Painter’s tape (delicate surface)
- Screwdriver or chill driver
- Plastic drop cloths
- Primer (bonding primer highly recommended for laminate)
Step 1: Preparation & Disassembly
-
Empty the space:
Start by completely clearing out the closet. Remove all clothing, hangers, and loose items to ensure you have a clear, unobstructed workspace. -
Remove hardware and drawers:
Using your screwdriver, carefully remove all drawer pulls and the hanging rod. Slide the drawers out of their tracks and set them aside in a separate work area. -
Take out adjustable shelves:
Lift out any removable shelves. It is much easier to paint the back wall without these obstacles in your way, and you can paint the shelves separately if needed. -
Clean surfaces thoroughly:
Wipe down the entire unit—drawer fronts and the back panel—with a degreaser or mild soap solution. Any oils or dust will prevent the paint from bonding properly.
Clean Lines Pro-Tip
For razor-sharp lines in the corners, run a credit card or putty knife firmly over the edge of your painter’s tape before painting to seal it tight.
Step 2: Sanding & Priming
-
Scuff sand surfaces:
Lightly sand the drawer fronts and the back panel of the closet with 220-grit sandpaper. You don’t need to strip the finish, just create enough ‘tooth’ for the primer to stick. -
Remove dust:
Wipe away all sanding residue with a sticky tack cloth. This step is crucial for a smooth final finish. -
Mask the frame:
Apply painter’s tape along the inside edges of the white vertical dividers and stationary shelves. We want to protect the parts that will remain white. -
Prime the accent areas:
Apply a coat of bonding primer to the drawer fronts and the back panel. Let this dry completely according to the manufacturer’s instructions.
Step 3: Painting the Accent Color
-
Cut in the corners:
Using your 2-inch angled brush, carefully paint the terracotta color into the corners and edges of the back panel where the roller can’t reach. -
Roll the back panel:
Use a small foam roller to apply the terracotta paint to the large flat areas of the back panel. Move in smooth, V-shaped strokes for even coverage. -
Paint drawer fronts:
While the back panel dries, paint the drawer faces. I find it best to prop them up on blocks so the edges don’t stick to the drop cloth. -
Apply second coat:
Once the first coat is completely dry to the touch, apply a second coat to both the back panel and drawers to ensure rich, opaque color saturation.
Sticky Drawer Fix
If drawers feel sticky after painting, rub a plain candle or some beeswax along the tracks and the unpainted sides of the drawer box to help them glide.
Step 4: Refining the White Frame
-
Remove tape and inspect:
Carefully peel off the painter’s tape while the second coat is still slightly tacky to prevent peeling. Inspect the white frame for any accidental smudges. -
Touch up the white:
If there are scuffs on the white frame or bleed-through from the accent color, use a small artist’s brush and white trim paint to conceal them. -
Refresh fixed shelves:
If the white shelves look dull next to the fresh paint, give the front edges a quick coat of fresh white semi-gloss for a crisp contrast.
Step 5: Reassembly
-
Allow full cure:
Let all painted surfaces cure for at least 24-48 hours. This prevents the paint from sticking or chipping when you slide components back in. -
Reinstall hardware:
Attach the drawer pulls and the hanging rod back into their original positions. Hand-tighten screws to avoid cracking the fresh paint. -
replace shelves and drawers:
Carefully slide the drawers back onto their tracks and place the adjustable shelves back into position.
Enjoy the satisfying pop of color every time you open your freshly customized wardrobe

PENCIL GUIDE
Understanding Pencil Grades from H to B
From first sketch to finished drawing — learn pencil grades, line control, and shading techniques.
Explore the Full Guide
Painted Closet Doors That Pop
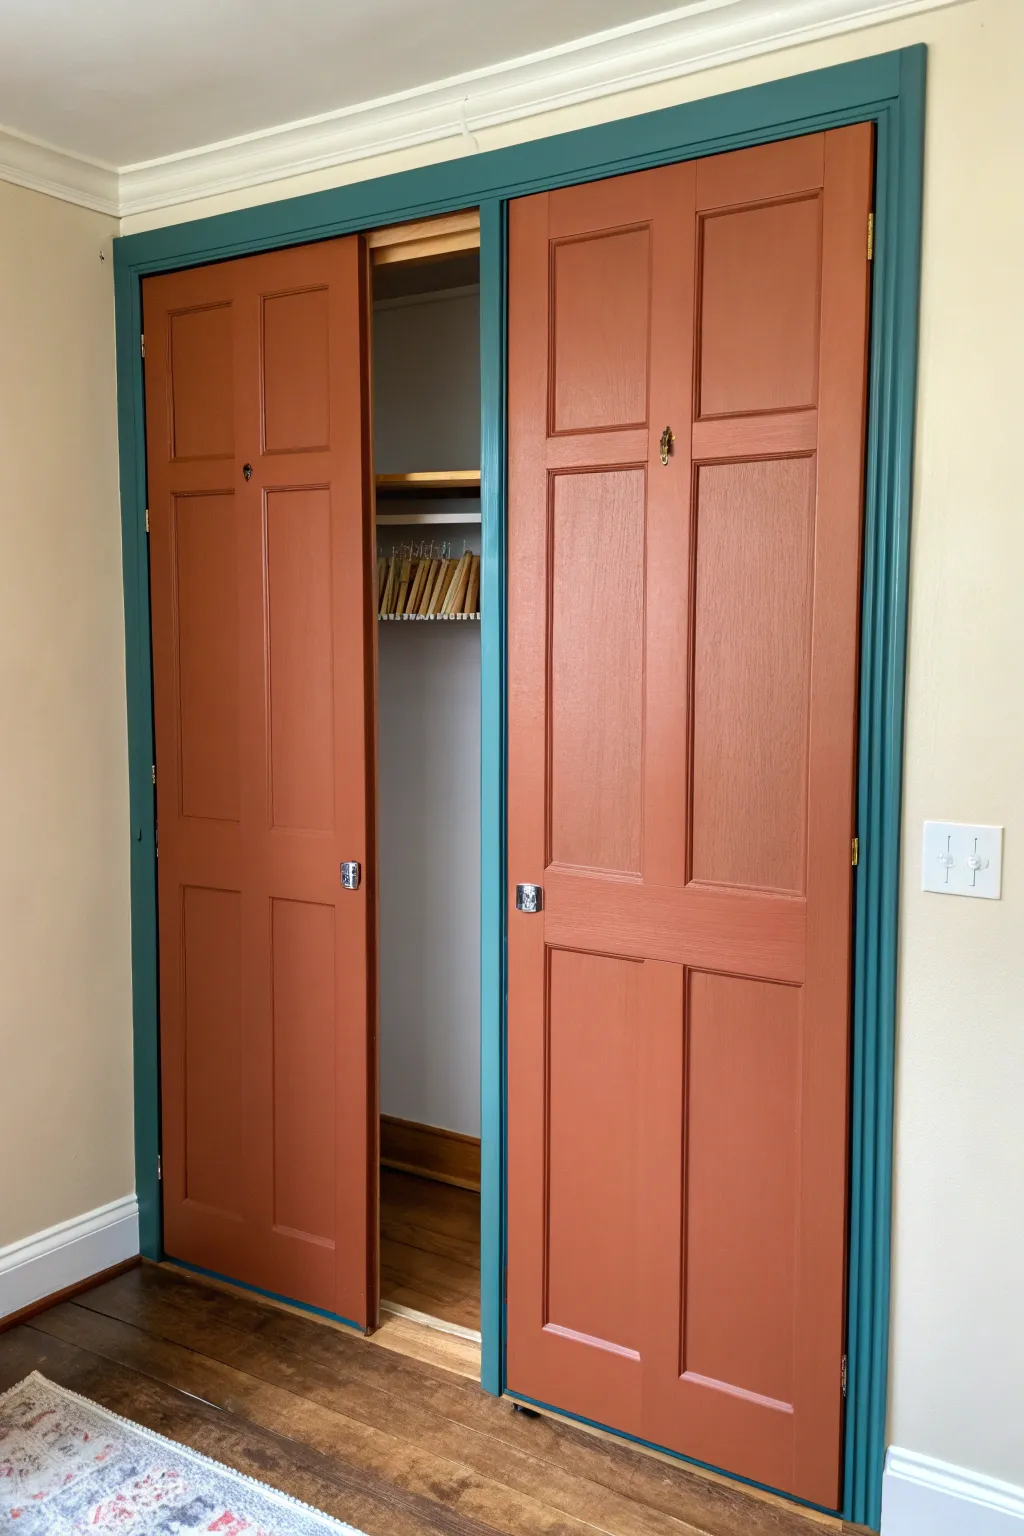
Transform boring bi-fold doors into a stunning focal point with this vibrant two-tone makeover. The warmth of earthy terracotta doors creates a striking, sophisticated contrast against the cool, deep teal trim for a look that feels custom-designed.
How-To Guide
Materials
- Interior semi-gloss paint in Terracotta (e.g., Farrow & Ball Red Earth)
- Interior semi-gloss paint in Deep Teal (e.g., Benjamin Moore Aegean Teal)
- High-quality angled sash brush (1.5 or 2 inch)
- Small foam roller and tray
- Medium-grit sanding sponge (120-150 grit)
- Fine-grit sandpaper (220 grit)
- Painter’s tape (delicate surface)
- Screwdriver or drill
- TSP substitute cleaner or mild degreaser
- Clean rags
- Primer (stain-blocking if painting over raw wood or dark colors)
- Drop cloths
- Sawhorses or work table (optional)
Step 1: Preparation
-
Remove the doors:
Start by taking the bi-fold doors off their tracks. Locate the pivot pin at the top and bottom corners, depress the spring-loaded pins, and carefully lift the doors out. It’s much easier to get a professional finish on a flat surface. -
Dismantle hardware:
Use your screwdriver to remove all knobs, pulls, and hinges connecting the bi-fold panels. Place all screws and hardware in labeled bags so nothing gets lost during the painting process. -
Clean thoroughly:
Wipe down every inch of the doors and the door frame trim with a TSP substitute or degreaser. Closets collect dust and hand oils that can repel paint, so a clean surface is critical for adhesion. -
Sand for grip:
Lightly scuff the existing finish on both the doors and the frame using 120-grit sandpaper. You aren’t trying to strip the paint, just removing the shine to give the new primer and paint something to grab onto. -
Protect the area:
Lay down drop cloths inside the closet and just outside the door frame. Apply painter’s tape along the wall edges where the trim meets the wall to ensure a crisp line for your teal frame.
Sticky Situation?
Doors sticking together? Rub a plain white candle or clear paraffin wax along the edges where the bi-fold panels meet to reduce friction and prevent peeling.
Step 2: Painting the Trim
-
Prime the frame:
Apply a coat of primer to the entire door frame and jamb. Let this dry completely according to the manufacturer’s instructions before moving on. -
Cut in the edges:
Open your deep teal paint. Using an angled sash brush, carefully paint the edges of the trim where it meets the wall and the inner corners of the door jamb. -
Fill in the flat surfaces:
Smooth out the paint on the flat faces of the trim using the brush or a small foam roller for a seamless finish. I find two thin coats usually provide better coverage and durability than one thick one. -
Dry and remove tape:
Allow the final coat of teal to dry until it’s tacky but not fully cured, then carefully peel away the painter’s tape at a 45-degree angle to keep the lines sharp.
Step 3: Painting the Doors
-
Prime the panels:
While the frame dries, move to the doors. Apply a coat of primer to all sides, paying special attention to the recessed panel areas. Let dry and do a quick light sanding with 220-grit paper for smoothness. -
Paint the recessed details:
Dip your angled brush into the terracotta paint and tackle the complex inside edges of the recessed panels first. Work one panel at a time to keep a wet edge. -
Roll the flat surfaces:
Switch to your foam roller for the large flat areas (stiles and rails). Roll with the grain of the wood for the most natural look. This color is bold, so watch out for drips pooling in the corners. -
Apply the second coat:
Once the first coat is dry to the touch, apply a second coat of terracotta paint using the same method—brushing the details and rolling the flats—to achieve that rich, opaque color saturation.
Level Up: Interior Glam
Don’t stop at the outside! Paint the interior back wall of the closet in a softer shade of the teal or terracotta to create a boutique display box effect when open.
Step 4: Reassembly
-
Allow cure time:
This is the hardest part: wait at least 24 to 48 hours for the paint to harden significantly. Rehanging too soon can cause the fresh paint to stick or peel where the bi-folds meet. -
Reattach hinges:
Screw the hinges back onto the door edges. Since the paint adds thickness, be gentle and ensure they sit flush against the wood. -
Install hardware:
Reattach your knobs or pulls. For a look like the photo, ensure your hardware is clean or swap it for polished silver or brass for extra contrast. -
Hang the doors:
Insert the top pivot pins into the track first, then swing the bottom into place. Test the folding mechanism gently to ensure there is clearance and the fresh paint isn’t rubbing.
Enjoy the dramatic flair your new colorful closet brings to the room every time you get dressed
Semi-Gloss Shelves for Light Bounce
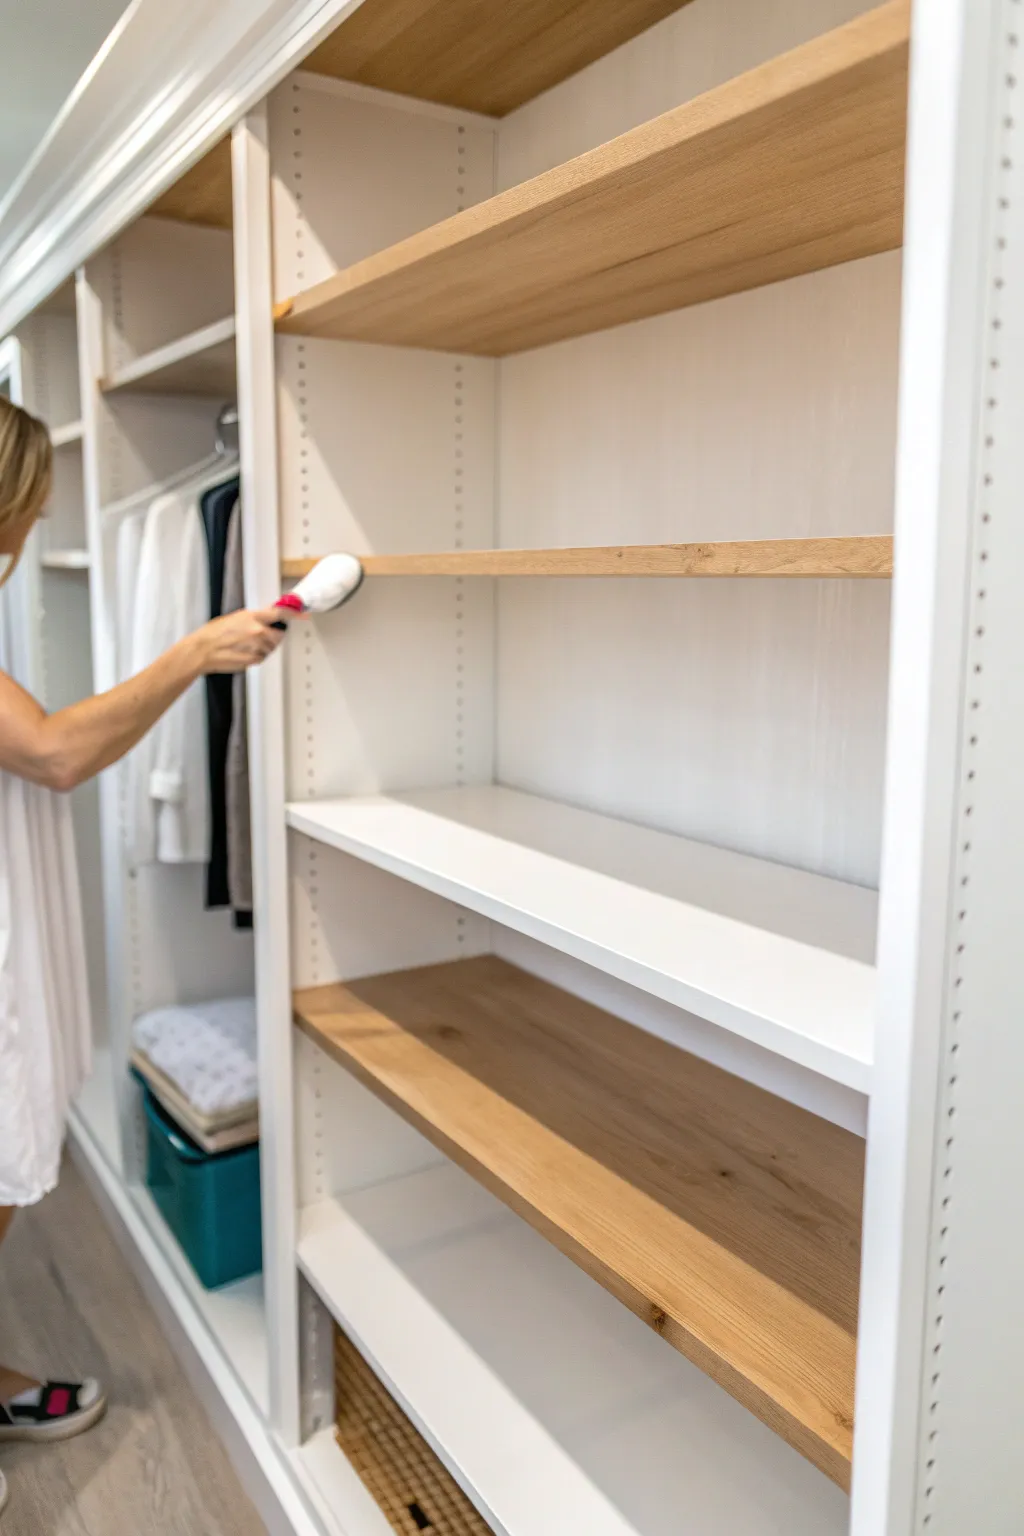
Transform standard closet shelving into a customized boutique display by combining crisp semi-gloss white paint with the organic warmth of natural wood accents. This project maximizes light reflection in dim closets while adding a high-end, two-tone aesthetic.
Detailed Instructions
Materials
- Existing laminate or wood shelving unit
- High-quality semi-gloss white interior paint
- Bonding primer (specifically for laminate if applicable)
- Natural wood veneer sheeting (oak or birch)
- Veneer edge banding (matching wood species)
- Iron-on edge banding trimmer
- Clothes iron
- Foam paint rollers (4-inch size)
- Angled sash brush (2-inch)
- Sandpaper (120 and 220 grit)
- Tack cloth
- Clear matte or satin polyurethane
- Utility knife
Step 1: Preparation & Priming
-
Clean surfaces:
Remove all clothing and shelf pins from the unit. Thoroughly wipe down every surface with a degreaser or TSP substitute to remove dust and oils, ensuring better paint adhesion later. -
Sand for grip:
Lightly scuff-sand all surfaces you intend to paint white using 120-grit sandpaper. If your shelves are laminate, this step is crucial to roughen the slick finish so the primer sticks. -
Clear dust:
Vacuum up the sanding residue and follow up with a tack cloth to ensure the surface is completely pristine before opening any cans. -
Apply bonding primer:
Roll on a coat of high-adhesion bonding primer to the vertical panels and white shelves. Use the angled brush to cut in corners first, then smooth it out with the foam roller. -
Dry and assess:
Let the primer cure according to the manufacturer’s instructions. If the old color or patterned laminate is still bleeding through, apply a second coat.
Step 2: Painting for Maximum Light
-
First semi-gloss coat:
Mix your semi-gloss white paint well. Apply the first coat using a fresh foam roller for a smooth, spray-like finish. The sheen helps bounce light into deep closet corners. -
Sand between coats:
Once dry, very lightly run 220-grit sandpaper over the painted surfaces to knock down any bumps or dust nibs, then wipe clean. -
Final coat application:
Apply the second coat of semi-gloss white. I find that working in long, consistent vertical strokes helps minimize roller marks on the side panels. -
Cure time:
Allow the paint to cure fully for at least 24-48 hours before placing any heavy items back on it, so the finish hardens properly.
Smooth Roller Trick
Wrap your foam roller in painter’s tape and peel it off before painting. This removes loose fuzz that could ruin your glossy finish.
Step 3: Creating Wood Accents
-
Select shelves:
Decide which shelves will remain or become wood-toned. If yours are simple white particle board, you can cover them with wood veneer sheets for that custom look. -
Measure and cut veneer:
Measure the top surface of your selected accent shelves. Cut the wood veneer sheet slightly larger than the shelf dimensions using a straight edge and utility knife. -
Apply veneer:
Adhere the veneer to the shelf top. If using pressure-sensitive veneer, peel and stick carefully; for contact cement types, apply adhesive to both surfaces and wait for it to tack up before joining. -
Trim excess:
Flip the shelf over and use a sharp utility knife to trim the veneer perfectly flush with the shelf edges. -
Apply edge banding:
Heat your clothes iron to the cotton setting. Position the matching wood edge banding along the front face of the shelf and iron it on, melting the glue backing. -
Trim banding:
While the banding is still warm but set, use an edge banding trimmer or a block and blade to shear off the overhanging top and bottom edges for a seamless look. -
Sand wood texture:
Lightly sand the veneer and edge banding with 220-grit paper to smooth out sharp corners and prepare the wood grain for sealing. -
Seal the wood:
Brush on a coat of clear matte polyurethane to protect the wood. This keeps the natural look without adding an artificial plastic shine. -
Final assembly:
Once the wood shelves are dry and the white vertical panels are cured, reinstall the shelves using the adjustable pins. Alternate white and wood shelves to create visual rhythm.
Add Puck Lighting
Install rechargeable LED puck lights directly to the underside of the shelves above the wood accents to make the grain glow warmly.
Step back and admire how much brighter and more custom your closet feels with just a bit of paint and wood texture


Painted Closet Rods and Brackets
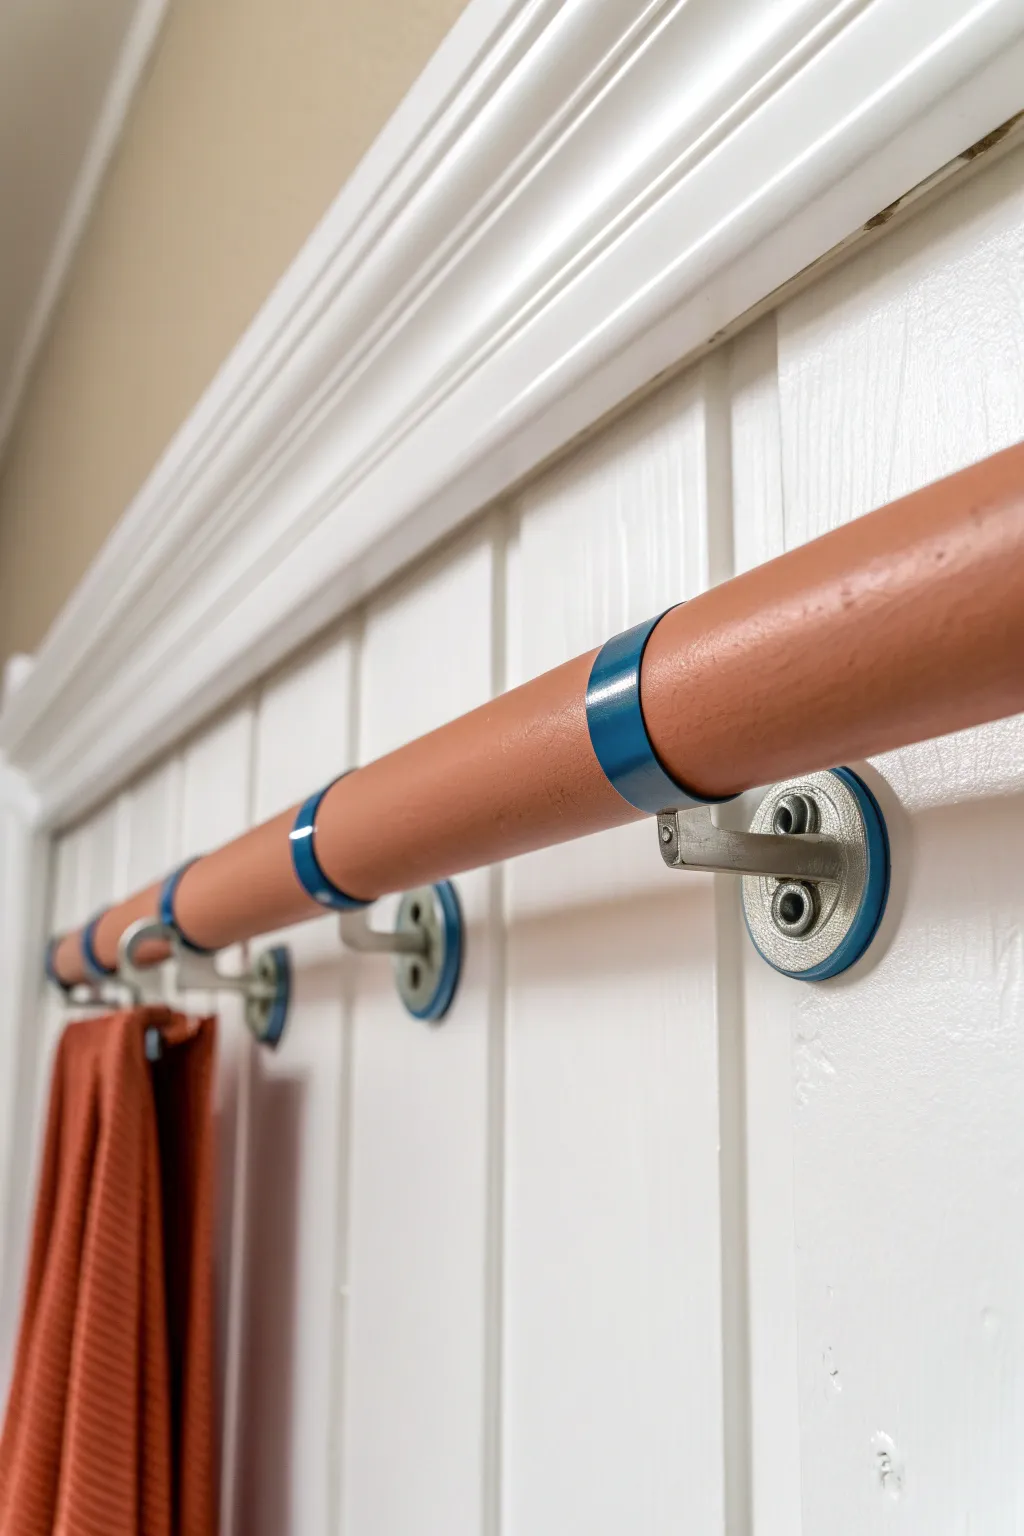
Transform a standard, utilitarian closet rod into a stylish focal point with this easy color-blocking upgrade. By combining earthy terracotta tones with vibrant teal accents and sleek silver hardware, you can turn functional storage into a custom design element.
Step-by-Step Guide
Materials
- Wooden closet rod (dowel)
- Metal closet rod brackets (loop style)
- Sandpaper (150 and 220 grit)
- Spray primer (metal and wood compatible)
- Acrylic latex paint (Terracotta/Rust Orange)
- Spray paint (Metallic Silver/Nickel)
- High-gloss enamel paint (Teal Blue)
- Painter’s tape
- Small artist brushes
- Foam brush or small roller
- Drop cloth
- Screwdriver and mounting hardware
Step 1: Preparing the Rod
-
Measure and cut:
Begin by measuring the width of your closet space or the specific area where you want the rod mounted. Cut your wooden dowel to size, leaving just a tiny bit of wiggle room for the brackets. -
Sand the wood:
Use 150-grit sandpaper to remove any rough patches or splinters from the wooden rod. -
Smooth the finish:
Follow up with 220-grit sandpaper to create a perfectly smooth surface for the paint to adhere to, wiping away all dust with a tack cloth or damp rag. -
Prime the wood:
Apply a coat of primer to the wooden rod. If you are using a raw wood dowel, a stain-blocking primer is a good choice to prevent wood tannins from bleeding through your terracotta color.
Clean Lines Hack
When painting the circular loops, use electrical tape instead of masking tape. It’s stretchier and curves around the metal ring much smoother.
Step 2: Painting the Components
-
Paint the rod base color:
Using a foam brush or small roller, apply the terracotta/rust orange acrylic paint to the entire length of the rod. Apply thin, even coats to avoid drips. -
Apply second coat:
Once the first coat is fully dry to the touch, lightly sand with fine grit paper if needed, and apply a second coat for full opacity. -
Prep the brackets:
Scuff sand the metal brackets lightly to help the paint stick. Clean them thoroughly with a degreaser or rubbing alcohol. -
Spray the bracket base:
Place the brackets on a drop cloth in a well-ventilated area. Apply the metallic silver spray paint to the entire bracket assembly, ensuring you get into the screw holes and crevices. -
Wait for cure time:
Let the spray paint cure completely according to the can’s instructions—usually 24 hours—before attempting to tape over it.
Step 3: Adding the Teal Accents
-
Tape off the base:
Carefully apply painter’s tape around the rectangular mounting plate and the arm of the bracket, leaving only the circular loop (where the rod sits) and the circular back trim exposed. -
Detail base ring:
Depending on your bracket style, you may want to paint the outer rim of the wall-mount circle. Carefully brush the teal enamel paint onto this rim. -
Paint the loop:
Use a small artist brush to apply the high-gloss teal paint to the metal loop that holds the rod. I find a flat-headed shader brush works best for getting clean edges here. -
Add visual stripes:
To mimic the look in the project photo, you can also paint thin teal stripes or bands onto the wooden rod itself where it will sit inside the bracket, creating a continuous band of color. -
Remove tape:
Peel off the painter’s tape while the teal paint is still slightly tacky to ensure a crisp, clean line between the silver and the blue.
Custom End Caps
Add wooden finials or large wooden beads to the ends of the rod, painted in the matching teal color, to give the piece a finished furniture look.
Step 4: Assembly and Installation
-
Mark wall position:
Hold your brackets up to the wall (or the wood paneling as shown) and use a pencil to mark the screw holes. Ensure both sides are perfectly level. -
Install brackets:
Screw the silver and teal brackets securely into the wall or studs. If you aren’t hitting a stud, make sure to use heavy-duty drywall anchors. -
Insert the rod:
Carefully slide your terracotta-painted rod into the teal loops. Take care not to scratch the paint as you position it. -
Secure the rod:
If your brackets have a small set screw underneath, tighten it gently to keep the rod from spinning. -
Final touch-ups:
inspect the installation for any nicks that occurred during assembly. Use a tiny brush to dab paint on any imperfections so everything looks flawless.
Now you have a custom closet feature that brings a pop of personality to your organization space
Stenciled Pattern on Closet Walls
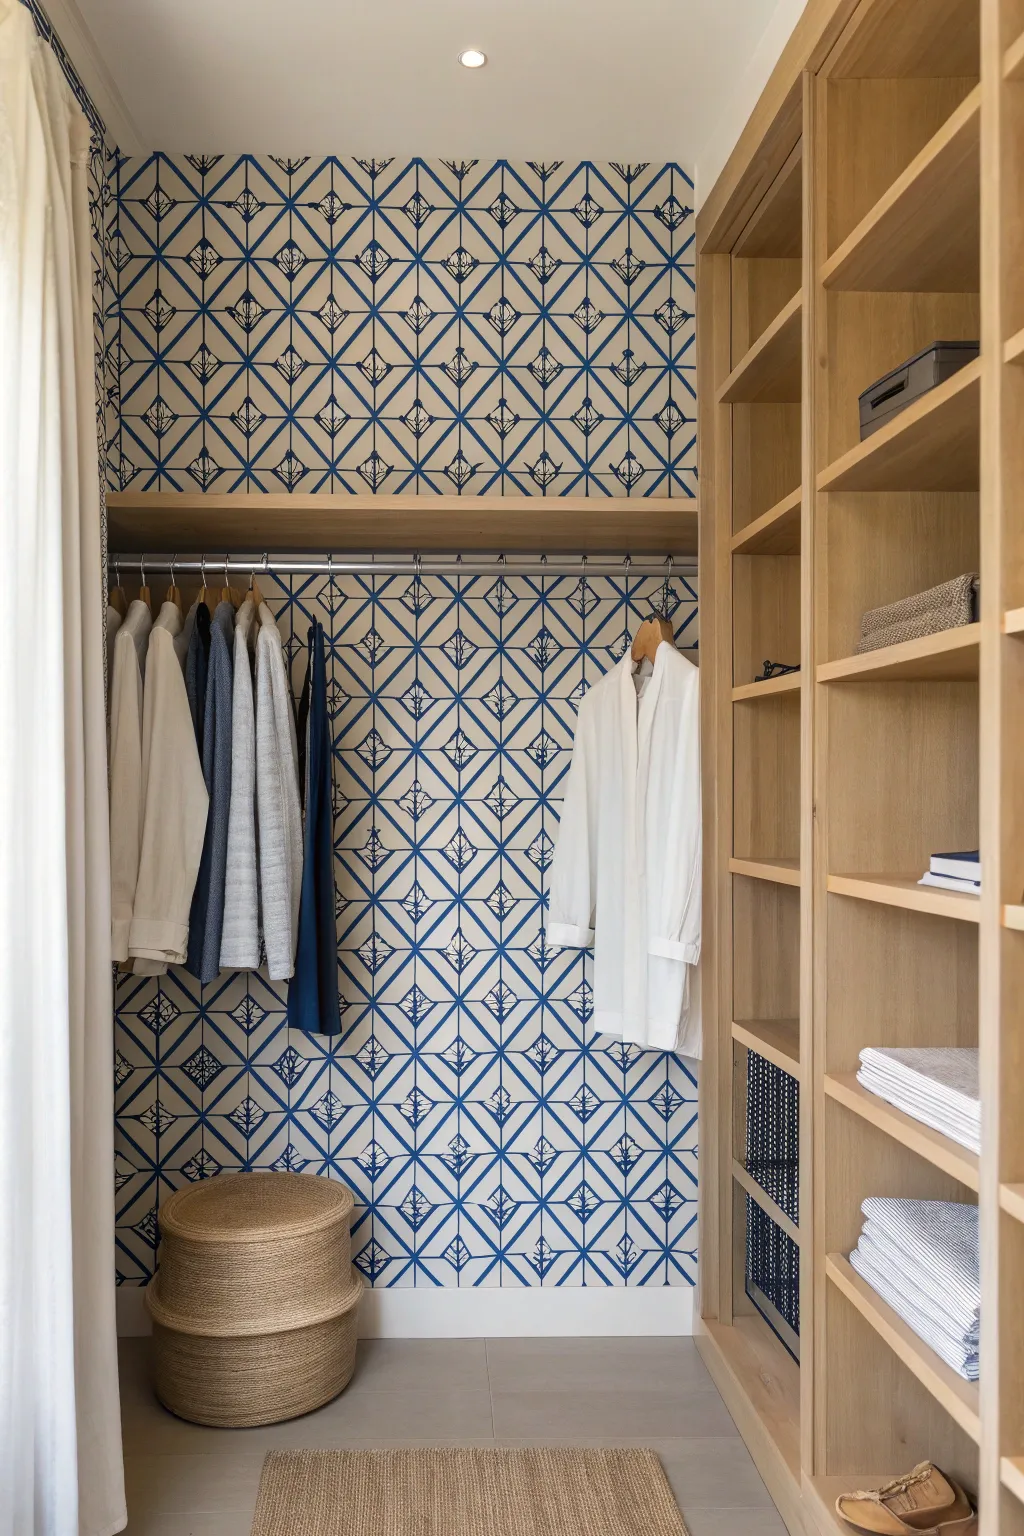
Transform a plain closet interior into a coastal-inspired retreat with this crisp blue-and-white geometric pattern. The repeating diamond and floral motif mimics the look of high-end wallpaper but uses stencils for a budget-friendly custom finish.
Detailed Instructions
Materials
- Semi-gloss or satin interior paint (white for base)
- Semi-gloss or satin interior paint (navy blue for pattern)
- Large geometric wall stencil (diamond/trellis pattern with floral center)
- Repositionable stencil adhesive spray
- Painter’s tape
- High-density foam roller
- Small stencil brush
- Paint tray
- Paper towels
- Drop cloth
- Small artist’s brush (for touch-ups)
- Level
- Measuring tape
Step 1: Preparation & Base Coat
-
Clear and clean:
Remove all clothing, shelving, and rods from the closet completely. Wipe down the walls with a damp cloth and mild detergent to remove dust and oils, which ensures better paint adhesion. -
Protect surfaces:
Lay down a drop cloth on the floor and tape off the ceiling line, baseboards, and any adjoining trim with painter’s tape to keep your lines sharp. -
Apply base color:
Roll on two even costs of your white base paint. Allow the first coat to dry for at least 4 hours before applying the second. Let the final coat cure for a full 24 hours so the tape used in the next steps won’t peel it up.
Bleed Patrol
If paint bleeds under the stencil, your roller is too wet. Offload more paint onto paper towels. The roller should seek ‘dry’ before touching the wall.
Step 2: Stenciling Strategy
-
Plan the layout:
Measure the width of your back wall to find the center point. It is crucial to start the stencil pattern here so the design looks symmetrical on the left and right sides. -
Prepare the stencil:
Spray the back of your stencil lightly with repositionable adhesive. Let it sit for a minute until it feels tacky but not wet; this prevents the glue from leaving residue on the wall. -
Position the first repeat:
Place the stencil at the top center of the wall, right against the ceiling line. Use a small level to ensure the pattern is perfectly straight before pressing it firmly onto the wall.
Metallic Accent
For a luxe upgrade, use a metallic gold paint pen to hand-trace the small floral center details after the blue paint has completely dried.
Step 3: Applying the Pattern
-
Load the roller:
Pour a small amount of navy blue paint into your tray. Load the foam roller and then roll it firmly onto a stack of paper towels to remove almost all the paint. The roller should feel nearly dry to the touch. -
Roll the first section:
Gently roll over the stencil using light to medium pressure. Multiple thin layers are better than one thick layer to prevent paint bleeding under the edges. -
Check coverage:
carefully lift one corner of the stencil to check your color density. If it’s too faint, lay it back down and apply another light pass. -
Move laterally:
Peel the stencil off and reposition it directly next to your first dry impression. Use the registration marks (small cutouts on the edge of the stencil) to align the pattern perfectly with the previous painted section. -
Complete the top row:
Continue moving outward to the corners. When you reach a corner, tape off the adjacent wall and gently bend the stencil into the crease to paint only the current wall surface. -
Continue downwards:
Once the top row is done, move down vertically. Always verify alignment with the painted row above using the registration guides.
Step 4: Finishing Touches
-
Detail tight spots:
For areas near the floor or tight corners where the roller doesn’t fit, use a small stencil brush. Use a dabbing (stippling) motion rather than brushing back and forth. -
Remove tape:
Carefully peel away your painter’s tape from the trim and ceiling while the paint is still slightly tacky to prevent pulling up dried paint chips. -
Touch up imperfections:
I usually find a few spots where paint bled under the plastic. Use a small artist’s brush and your original white base paint to clean up any blurry lines or smudges. -
Reinstall storage components:
Wait at least 48 hours for the patterned paint to fully cure and harden before reinstalling your rods, shelves, or putting clothes back in.
Enjoy the satisfying view every time you open your closet doors to grab an outfit
Vertical Stripes to Stretch the Space
Transform a compact closet into a warm, expansive space using classic vertical stripes. This two-tone beige and golden yellow pattern draws the eye upward, making even small storage nooks feel taller and more inviting.
Step-by-Step
Materials
- Semi-gloss interior paint (creamy beige)
- Semi-gloss interior paint (warm golden yellow)
- Painter’s tape (1.5-inch width)
- Painter’s tape (0.5-inch width)
- Laser level or long spirit level
- Measuring tape
- Pencil
- Paint roller with microfiber nap
- Angled sash brush (2-inch)
- Paint tray and liners
- Putty knife or credit card
- Drop cloths
- Spackle and sandpaper (prep work)
Step 1: Preparation & Base Coat
-
Clear and Clean:
Remove all closet shelving, rods, and hardware. If you can’t remove fixed shelving, you’ll need to carefully mask it off later. Wipe down the walls with a damp cloth to remove dust. -
Patch Imperfections:
Fill any nail holes or dents from the removed hardware with spackle. Once dry, sand these spots smooth so your stripes will have a flawless surface. -
Protect the Floor:
Lay down drop cloths to protect that nice carpet or flooring, taping the edges to the baseboards to ensure no paint sneaks underneath. -
Apply the Base Color:
Using the creamy beige paint, roll two even coats over all the walls. This lighter color will serve as the background for your stripes. -
Dry Time:
Allow the base coat to cure completely—I recommend waiting at least 24 hours. If the paint is even slightly tacky, the tape might pull it off later.
Bleed-Proof Lines
Painting over tape edges with the BASE color first is key. It creates a seal so the stripe color can’t sneak underneath.
Step 2: Measuring & Taping
-
Determine Stripe Width:
Measure the total width of your main wall. To replicate the look in the photo, aim for wide beige stripes (about 6 inches) alternating with slightly narrower yellow stripes (about 4 inches) incorporating thin accent pinned stripes. -
Mark the Vertical Lines:
Starting from the most visible corner, use a tape measure and pencil to make small tick marks along the top of the wall where each stripe transition will be. -
Set the Laser Level:
Turn on your laser level and align the vertical beam with your first tick mark. This ensures your stripes stay perfectly plumb, which is crucial for the ‘stretching’ effect. -
Apply Main Tape Lines:
Apply the 1.5-inch painter’s tape along the laser line. Remember to place the tape on the *outside* of the area you intend to paint yellow, preserving the beige base underneath. -
Creating the Pin Stripes:
To get that complex, high-end look, use the 0.5-inch tape. Place a strip of thin tape inside the wider beige sections, creating a very narrow gap that will be painted yellow. -
Burnish the Edges:
Run a putty knife or a credit card firmly over the edges of all the tape. This seals the tape to the wall and prevents the yellow paint from bleeding under.
Metallic Upgrade
For a glamorous touch, mix a metallic glaze into the yellow paint or use gold leaf for the very thin pin-stripes.
Step 3: Painting the Stripes
-
Seal with Base Coat:
Lightly brush a small amount of the *beige* base color over the tape edges first. This clever trick fills any tiny gaps with the wall color, ensuring crisp lines later. -
Paint the Yellow Sections:
Using a small roller or brush, apply the golden yellow paint to the exposed stripe areas. Be careful not to overload the roller to avoid drips. -
Second Coat:
Once the first coat is dry to the touch, apply a second coat of yellow for rich, opaque coverage. -
The Reveal:
While the final coat is still slightly damp, slowly peel away the painter’s tape at a 45-degree angle. Pulling it while damp helps prevent the paint film from ripping. -
Touch Ups:
Inspect your lines closer. If any bleed occurred, use a tiny artist’s brush and the original beige paint to correct the edges. -
Reinstall Hardware:
Once the walls are fully cured (give it another 24 hours), reinstall your shelves and closet rods to finish the functional space.
Step back and enjoy how your new vertical stripes make the ceiling feel miles high
Color Blocking for Cubby Zones
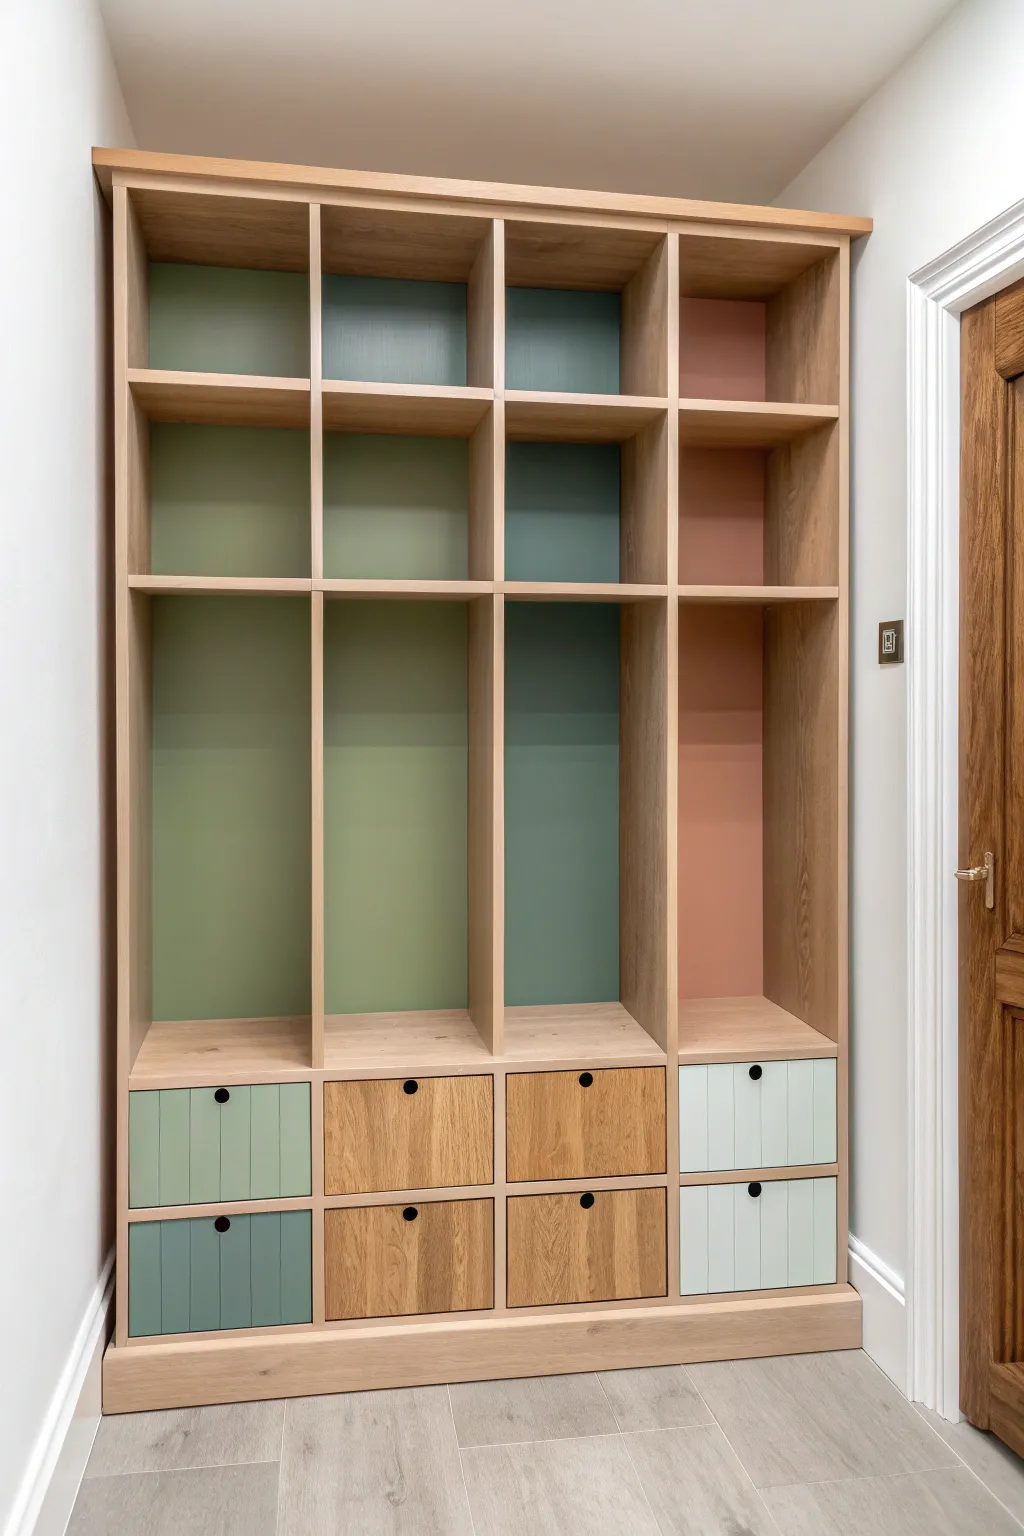
Transform a standard shelving unit into a statement piece by applying soft, distinct paint colors to the back panels and drawer fronts. This project uses a palette of sage, teal, and terracotta to create depth and organize visual zones within a light oak framework.
Detailed Instructions
Materials
- Large wooden shelving unit (oak veneer or solid wood)
- Sandpaper (120 and 220 grit)
- Painter’s tape (high-quality)
- Zinsser BIN or similar shellac-based primer
- Furniture paint (Sage Green, Deep Teal, Terracotta/Dusty Rose, Pale Mint)
- Small foam rollers (4-inch)
- Angled sash brush (1.5-inch)
- Drawer knobs (matte black)
- Drill and bits
- Drop cloths
- Tack cloth
- Screwdriver
Step 1: Prep Work
-
Clear and Clean:
Remove all drawers from the unit and set them aside on a drop cloth. Wipe down the entire shelving unit, including the back panels, with a damp cloth to remove dust and grime. -
Sand Surfaces:
Lightly sand only the areas you intend to paint—specifically the back panels of the cubbies and the front faces of the designated drawers. Use 120-grit sandpaper to scuff the surface for better adhesion. -
Remove Dust:
Vacuum out the cubbies and wipe everything down with a tack cloth to ensure absolutely no dust remains before painting.
Step 2: Painting the Cubby Backs
-
Tape Edges:
Apply painter’s tape precisely along the inner edges where the back panel meets the side walls and shelves. Take your time here; crisp lines are the key to this look. -
Map Your Colors:
Decide which vertical column gets which color. In the reference, the leftmost column is sage, the second is a lighter moss, the third is teal, and the fourth is terracotta. Mark these lightly with pencil. -
Prime Back Panels:
Apply a thin coat of primer to the back panels. Use an angled brush for corners and a mini foam roller for the flat areas to avoid brush marks. -
Apply First Coat:
Once the primer is dry, stir your first paint color (e.g., Sage Green). Work one column at a time, using the sash brush to cut in the corners first. -
Roll the Flat Areas:
While the edges are wet, use the foam roller to paint the rest of the back panel. This blends the brush strokes for a smooth finish. -
Repeat for All Zones:
Move to the next column with a fresh brush and roller cover, applying the Teal, then the Terracotta colors. I find it helpful to wash brushes immediately between color changes if I’m short on tools. -
Second Coat:
Allow the first coat to dry according to the paint manufacturer’s instructions (usually 2-4 hours). Apply a second coat to ensure rich, opaque color coverage. -
Remove Tape:
Carefully peel off the painter’s tape while the second coat is still slightly tacky to prevent peeling the paint film.
Bleeding Edges?
If paint bleeds under tape, wait for it to dry fully. Then, gently scrape the excess off the wood finish with a plastic card or fingernail to correct it.
Step 3: Customizing the Drawers
-
Select Drawers to Paint:
Determine which drawer fronts will be painted. In this design, the far left and far right columns of drawers are painted, while the middle ones stay wood. -
Tape Drawer Sides:
Protect the sides of the drawer boxes with tape so paint doesn’t get on the sliding mechanism or the wood sides. -
Prime Drawer Fronts:
Apply primer to the chosen drawer fronts. If your drawers have vertical groove details like the image, be sure to get primer into those grooves without letting it pool. -
Paint Drawer Fronts:
Paint the drawers to match their corresponding columns above. Use the Pale Mint for the far right drawers and a darker Teal/Sage for the far left. -
Detail Work:
Use a small artist’s brush to ensure full coverage inside any decorative grooves on the drawer faces. -
Install Hardware:
Once the paint has cured for at least 24 hours, measure and mark the center of each drawer top edge. Drill holes and screw in the matte black knobs. -
Final Assembly:
Slide the drawers back into their tracks. Step back and check for any touch-ups needed along the edges.
Groove Detail
To highlight vertical shiplap grooves on drawers, use a darker shade of the same paint color inside just the grooves for subtle, pro-level dimension.
Enjoy the organized, calm aesthetic your new color-blocked storage brings to the room
Ombre Shelves Fade Effect
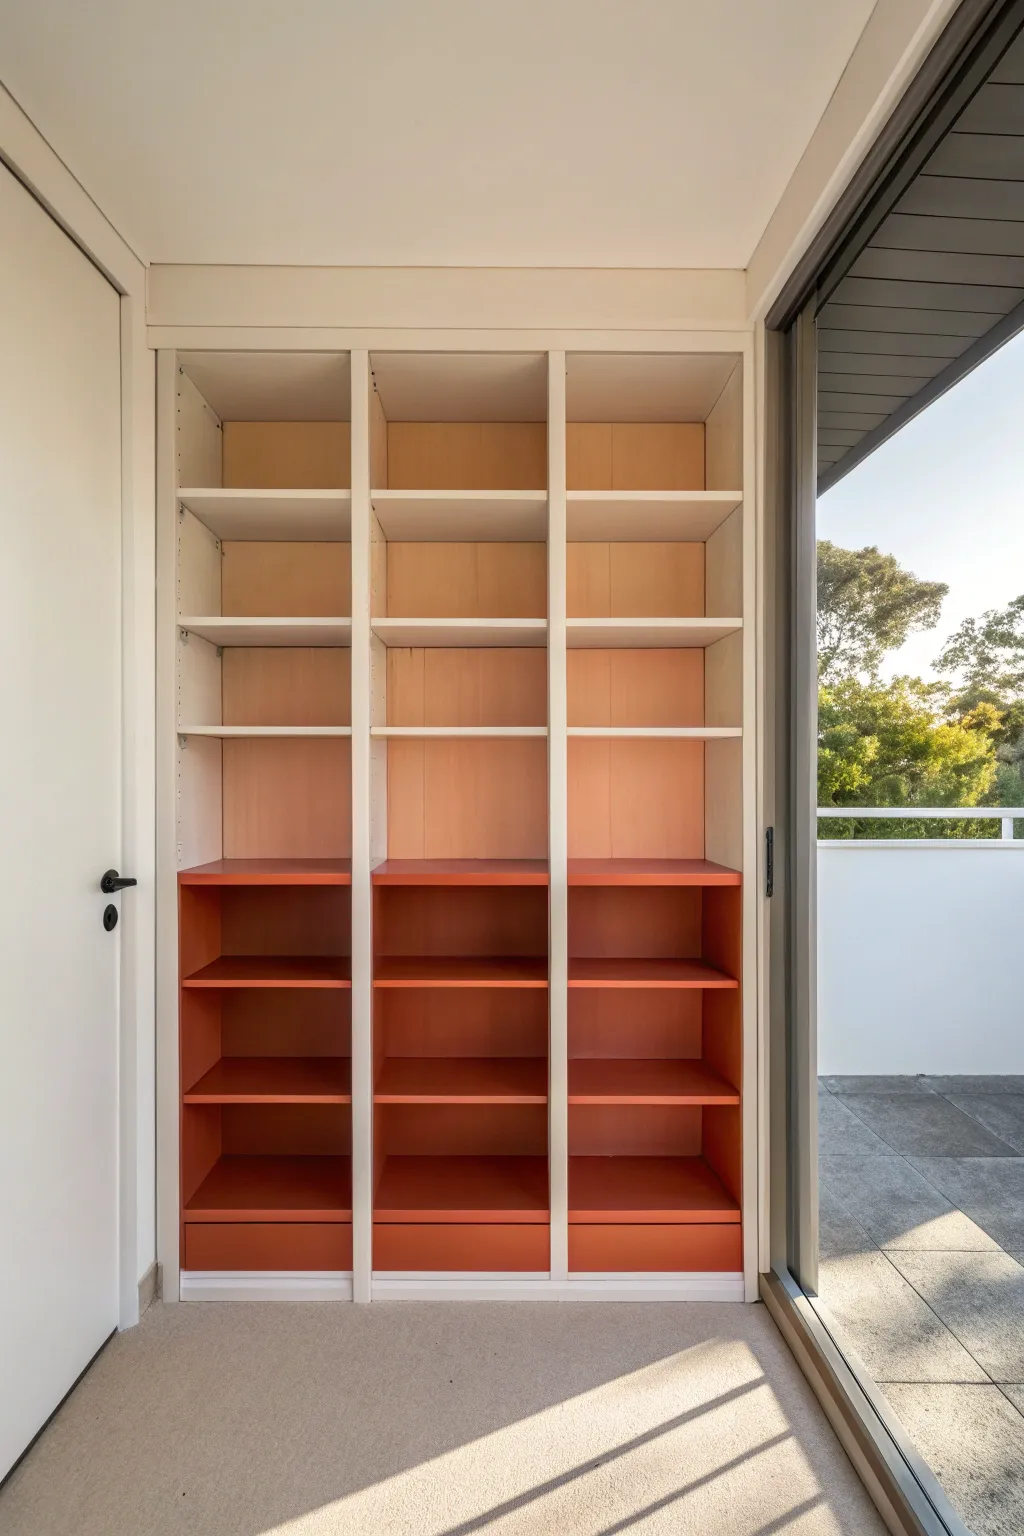
Transform a standard shelving unit into a statement piece with this bold, color-blocked design that grounds the room with warmth. By saturating the lower third in a rich terracotta hue while keeping the upper section airy and light, you create a sophisticated two-tone effect that feels custom-made.
Step-by-Step Guide
Materials
- Existing shelving unit (built-in or freestanding)
- Sandpaper (120 and 220 grit)
- Painter’s tape (high-quality)
- High-bonding primer (suitable for laminate or wood)
- Semigloss or satin enamel paint (Terracotta/Burnt Orange)
- Semigloss or satin enamel paint (White/Off-White)
- Small foam roller
- 2-inch angled sash brush
- Drop cloths
- Screwdriver (to remove shelf supports if adjustable)
- Tack cloth
- Measuring tape
- Level
Step 1: Preparation & Planning
-
Clear and Clean:
Begin by removing all items from your shelves. Wipe down every surface with a damp cloth and mild degreaser to remove dust and oils, which is crucial for paint adhesion. -
Remove Adjustable Elements:
Take out any adjustable shelves. If your unit allows, I like to remove the fixed shelves temporarily too, but if they are built-in, just leave them in place. -
Determine the Horizon Line:
Decide where the color transition will happen. In the reference image, the color block starts just above the third shelf from the bottom. Measure this height on all vertical dividers and mark it lightly with a pencil. -
Sand Surfaces:
Lightly sand all surfaces you intend to paint with 120-grit sandpaper. You don’t need to strip the finish completely, just scuff it enough to give the primer some ‘tooth’ to grab onto. -
Dust Removal:
Vacuum up the sanding dust, then go over the entire unit with a tack cloth to pick up fine particles.
Bleeding Lines?
Paint bleed under tape happens. To fix it, brush a tiny amount of the *base* color (white) over the tape edge first to seal it, then paint the accent color over that.
Step 2: The Upper Section
-
Prime the Top:
Apply a coat of primer to the upper vertical dividers and shelf faces. If you are keeping a natural wood backing like in the photo, be incredibly careful to tape it off perfectly or use a small brush to cut in precision lines. -
Paint the Upper White:
Once the primer is dry, apply your white semigloss paint to the vertical stiles, shelf faces, and any upper shelves. Use a foam roller for flat surfaces to get a smooth finish. -
Second Coat:
Allow the first coat to dry according to the can’s instructions, then apply a second coat of white for full coverage.
Level Up: Texture
For the lower section, consider using a roman clay or limewash paint instead of standard latex. This adds a velvety, plaster-like texture that feels earthy.
Step 3: The Terracotta Dip
-
Tape the Transition:
This is the critical step. Apply your painter’s tape exactly at the horizon line you marked earlier. Press the edge of the tape down firmly with a credit card or putty knife to prevent bleed-through. -
Prime the Bottom:
Prime the entire lower section—walls, backing, shelves, and dividers. Since this area will be a solid color block, you don’t need to worry about preserving a wood grain backing here. -
Cut In Corners:
Using your angled sash brush and the terracotta paint, start by ‘cutting in’ the deep corners, edges, and along the tape line. This ensures the roller can cover the rest without bumping into adjacent walls. -
Roll the Flat Surfaces:
Use the foam roller to apply the terracotta paint to the backing board, sides, and shelf surfaces. Work in small sections to keep a wet edge. -
Paint Removable Shelves:
Lay your removable lower shelves on a drop cloth. Paint the tops, bottoms, and front edges with the terracotta color. I usually do the edges first, then the faces. -
Apply Second Coat:
Once the first coat is dry to the touch, lightly sand with 220-grit paper if there are any bumps, wipe clean, and apply a second rich coat of orange. -
Remove the Tape:
Don’t wait for the paint to fully cure. Peel the tape off slowly at a 45-degree angle while the paint is still slightly tacky to ensure a crisp, sharp line.
Step 4: Finishing Touches
-
Inspect and Touch Up:
Check your horizon line. If any terracotta bled onto the white, use a tiny artist’s brush and white paint to correct it carefully. -
Reinstall Supports:
Once the paint has cured (ideally 24-48 hours so objects don’t stick), put your shelf pins and supports back in. -
Final Assembly:
Slide the shelves back into place, ensuring the colored shelves go into the colored zone and the white ones stay up top.
Step back and admire how this simple color-blocking technique completely changes the architecture of your space without any renovation
Painted Arch or Nook Frame
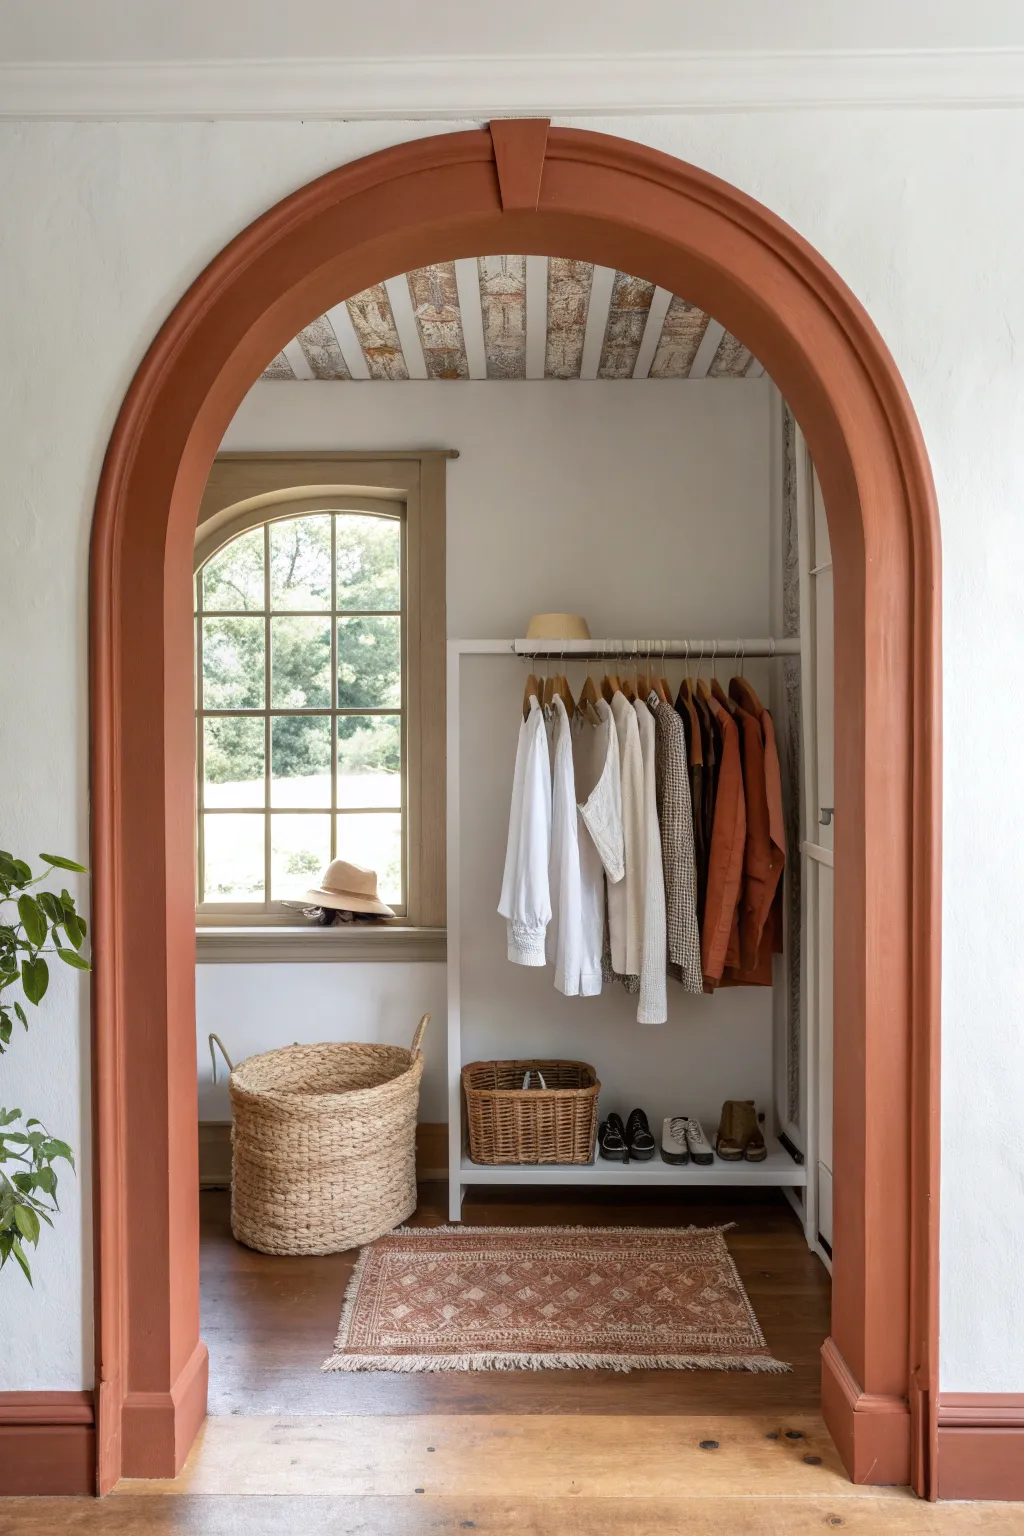
Transform a standard doorway into a stunning architectural feature with this high-impact paint project. By framing an existing closet or nook with a warm, earthy terracotta hue, you create a visual destination that elevates the entire room’s character.
Step-by-Step Tutorial
Materials
- High-quality painter’s tape (multi-surface)
- Small angled sash brush (1.5 or 2 inch)
- 4-inch foam roller and tray
- Terracotta or rust-colored interior paint (satin or eggshell finish)
- Drop cloth or masking paper
- Sanding block (fine grit)
- Tack cloth
- Damp rag
Step 1: Preparation and Masking
-
Clean the surface:
Begin by thoroughly cleaning the archway molding and the surrounding wall area with a damp rag to remove dust and oils. Let it dry completely. -
Light sanding:
Use a fine-grit sanding block to scuff up the existing finish on the molding. This helps the new paint adhere better, especially if the old trim paint is glossy. -
Remove dust:
Wipe away all sanding residue with a tack cloth so your paint surface is perfectly smooth. -
Tape the outer edge:
Carefully apply painter’s tape along the wall where it meets the outside edge of the arch molding. Press the tape edge firmly with your fingernail or a putty knife to prevent bleed-through. -
Tape the inner edge:
Apply a second line of painter’s tape on the inside jamb of the doorway if you want a crisp line where the color stops, or plan to wrap the color all the way through depending on your preference. -
Protect the floor:
Lay down a drop cloth or tape masking paper to the floor right up against the base of the arch molding to catch any drips.
Bleed-Through Blunder
Paint seeped under the tape? Don’t panic. Once dry, re-tape precisely over the colored trim, then seal the edge with a tiny bit of the *wall* color before repainting the correction.
Step 2: Painting the Arch
-
Cut in the edges:
Dip your angled sash brush into the terracotta paint. I like to start by painting the intricate details and the edges right against the tape lines first. -
Paint the keystone:
If your arch has a decorative keystone at the top center like the one shown, use the brush to get into all the crevices and angles of that detail. -
Roll the flat surfaces:
Use the 4-inch foam roller to apply paint to the wider, flat faces of the molding. This helps avoid brush strokes and gives a smoother finish. -
Check for drips:
Immediately scan for any drips pooling in the corners of the molding or near the floor and smooth them out with your brush before they tack up. -
Allow to dry:
Let the first coat dry according to the paint can’s instructions, usually about 2-4 hours. -
Apply second coat:
Repeat the cutting-in and rolling process for a second coat to ensure rich, opaque coverage.
Step 3: Finishing Touches
-
Remove tape while damp:
Carefully peel back the painter’s tape while the second coat is still slightly tacky. Pull the tape away from the painted edge at a 45-degree angle. -
Touch up lines:
Inspect your edges. If any paint bled under the tape, wait for it to dry fully, then use a tiny artist’s brush and your original wall color to correct the line. -
Paint the baseboard connection:
Ensure the transition where the arch molding meets the floor baseboard is clean. You may need to hand-paint the very bottom edge carefully if tape couldn’t reach it. -
Cure time:
Allow the paint to fully cure for at least 24 hours before leaning any objects against the frame or reinstalling any hardware.
Seamless Arch Technique
For curved molding, use short strips of tape slightly overlapping rather than one long piece. This allows the tape to follow the curve without buckling or lifting.
Step back and admire how a simple color change has given your closet a custom, designer feel
Hand-Painted Mini Mural Inside the Closet
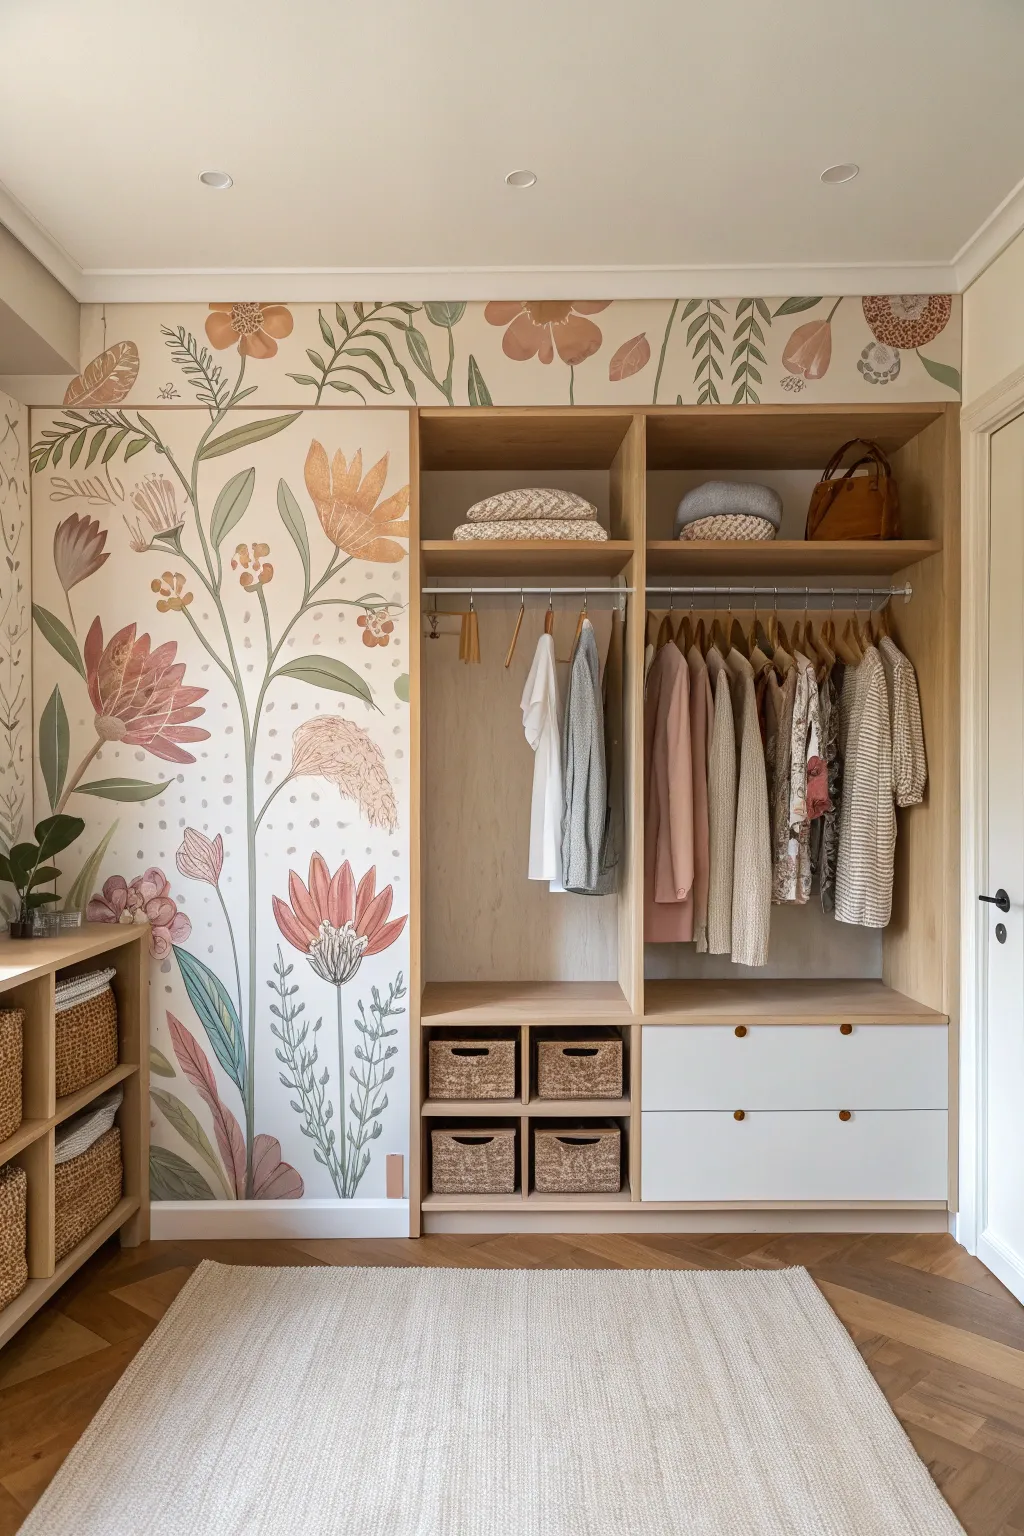
Transform a plain closet wall into an enchanting garden with this large-scale floral mural. Featuring oversized blooms and trailing vines in a soft, earthy palette, this hand-painted design adds a bespoke, artistic touch to your dressing area.
Step-by-Step
Materials
- Interior latex paint (white or cream for base)
- Acrylic paints (terracotta, sage green, forest green, mustard yellow, blush pink, slate blue)
- Pencil and large eraser
- Projector (optional but recommended)
- Angled sash brush (2-inch)
- Assorted round brushes (sizes 4, 8, and 12)
- Small flat brush (size 6)
- Painter’s tape
- Step ladder
- Paper plates or palette
- Water cup and rags
Step 1: Preparation and Sketching
-
Clear and clean:
Remove all items from adjacent shelves and pull furniture away from the wall. Wipe the surface down with a damp cloth to remove dust and oils, ensuring a clean canvas for your paint. -
Tape edges:
Apply painter’s tape along the ceiling line, floor molding, and the edge where the wall meets the wooden closet built-in to create crisp, professional borders. -
Outline the main stems:
Starting from the bottom left corner, lightly sketch long, curving lines reaching upward toward the ceiling. These will be your main flower stems; let them meander naturally like wild vines. -
Place the blooms:
Sketch large circles or oval shapes at the ends of your stems to mark where the major flowers will go. Add a few smaller circles mid-stem for buds or accent foliage. -
Detail the drawing:
Refine your sketch by drawing specific petal shapes inside your guide circles—think tulip shapes, daisy rays, and thistle textures. Add large leaves branching off the main stems. -
Extend to the top:
Don’t forget the space above the closet! Sketch a horizontal vine or series of separate blooms (like the large poppies and ferns seen above) that run parallel to the ceiling line.
Flow & Movement
Keep your wrist loose when painting stems. Locking your elbow and moving your whole arm creates smoother, more organic curves than using just your fingers.
Step 2: Painting the Base Layers
-
Paint the stems:
Mix a muted olive or sage green. Using a size 8 round brush, paint over your stem lines with long, confident strokes. Vary the pressure to make lines thicker at the bottom and thinner at the top. -
Block in green leaves:
Switch to a larger brush if needed and fill in the leaf shapes with your green tones. I like to mix a little white into the green for some leaves to create depth and variety. -
Base coat the flowers:
Using your terracotta, mustard, and blush paints, fill in the main shapes of the flowers. Don’t worry about details yet; just get a solid, opaque layer of color down on the petals. -
Add secondary colors:
For two-tone flowers (like the large pink and red bloom), paint the outer petals one shade and the inner petals a slightly darker or lighter shade while the paint is still wet to blend them softly.
Fixing Wobbly Lines
If a stem line looks shaky, thicken the line slightly on one side to smooth it out, or turn the mistake into a small branching leaf junction.
Step 3: Adding Details and Texture
-
Define the petals:
Once the base coats are dry, use a fine liner brush (size 4) and a darker variation of your flower color to outline individual petals or add separation lines between them. -
Create leaf veins:
Mix a dark forest green. Paint a central vein down the middle of your leaves, and add small, branching veins extending to the edges for a realistic botanical look. -
Add stamina and pollen:
For the centers of open flowers, use a small brush to dab dots of yellow or brown. This stippling technique mimics the texture of pollen. -
Highlight the stems:
Run a very thin line of lighter green or cream along the sun-facing side of your stems to give them a cylindrical, 3D appearance. -
Fill the background details:
Look for empty negative spaces around the main plant. Using a grey-blue or light sage, paint small dots, tiny speckles, or faint background leaves to fill the voids without overpowering the main design. -
Final touch-ups:
Step back and look at the mural as a whole. Use a small angled brush to sharpen any blurry edges and use your wall color (white/cream) to paint over any accidental smudges. -
Remove tape:
Carefully peel off the painter’s tape while the paint is roughly 90% dry to prevent peeling, revealing your crisp, clean edges.
Step back and admire how this blooming garden brings a breath of fresh air to your daily routine.


Have a question or want to share your own experience? I'd love to hear from you in the comments below!