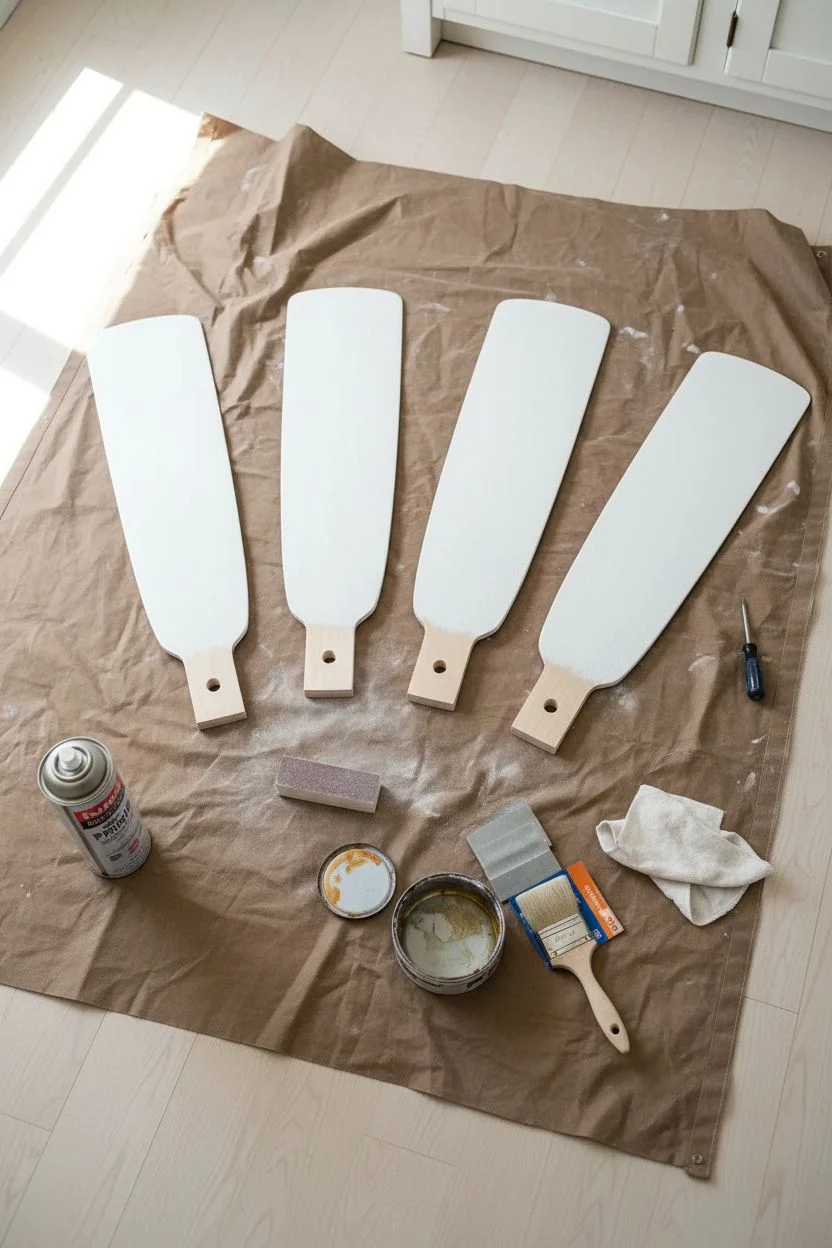
If your fan blades are giving “builder basic,” a little paint can turn that everyday ceiling fan into a real design moment. I love these projects because you can go as simple or as artsy as you want, and the payoff is huge every time the fan spins.
Clean Solid-Color Blade Makeover
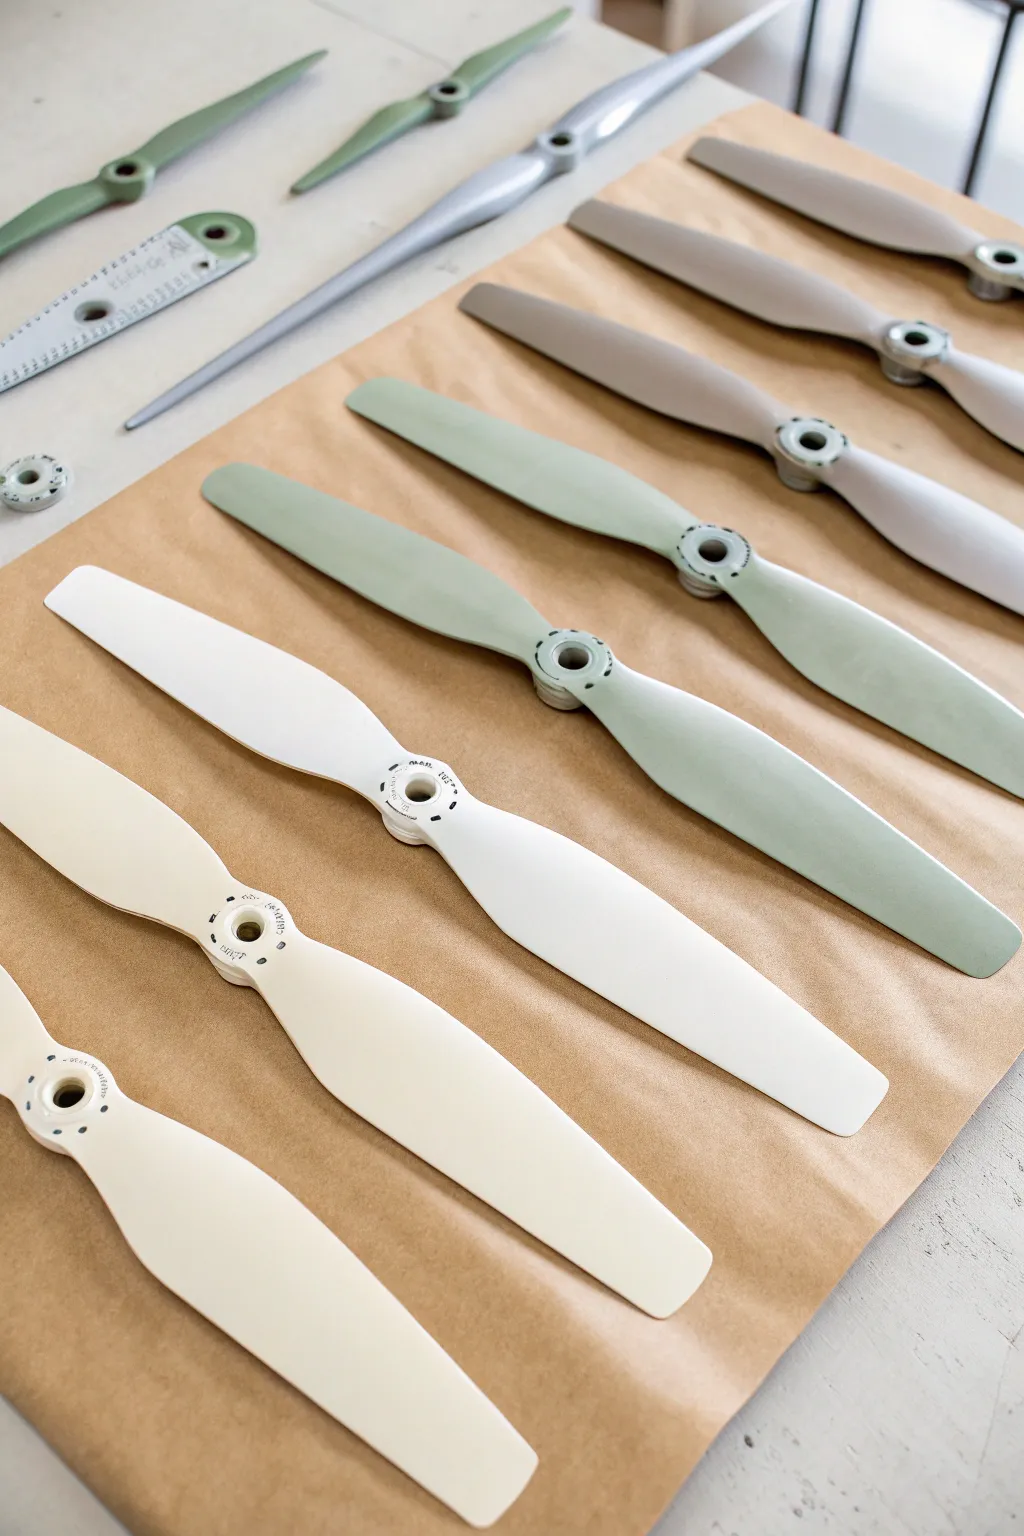
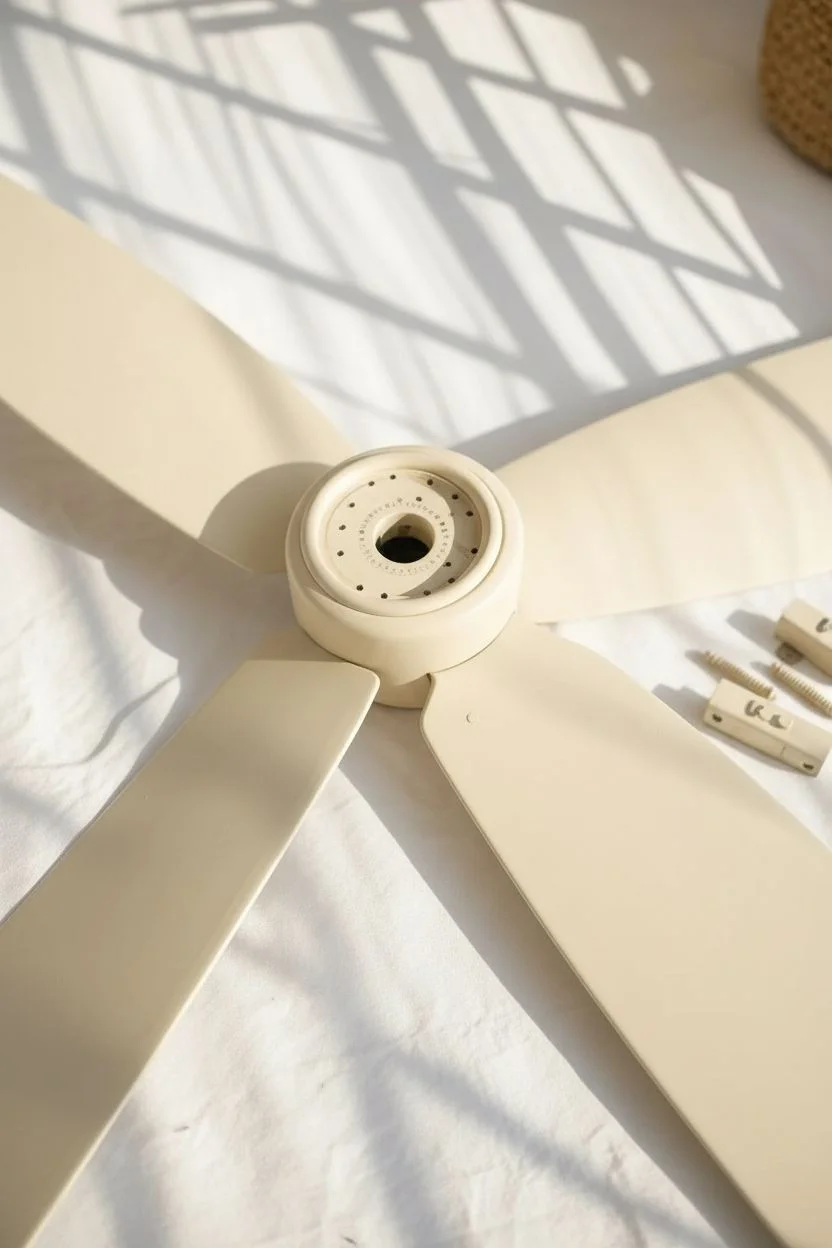
Give worn-out drone or RC plane propellers a sophisticated second life with this sleek, single-color makeover. The palette features calming earth tones like sage, taupe, and cream, creating a unified and modern aesthetic ideal for display or light use.
Step-by-Step
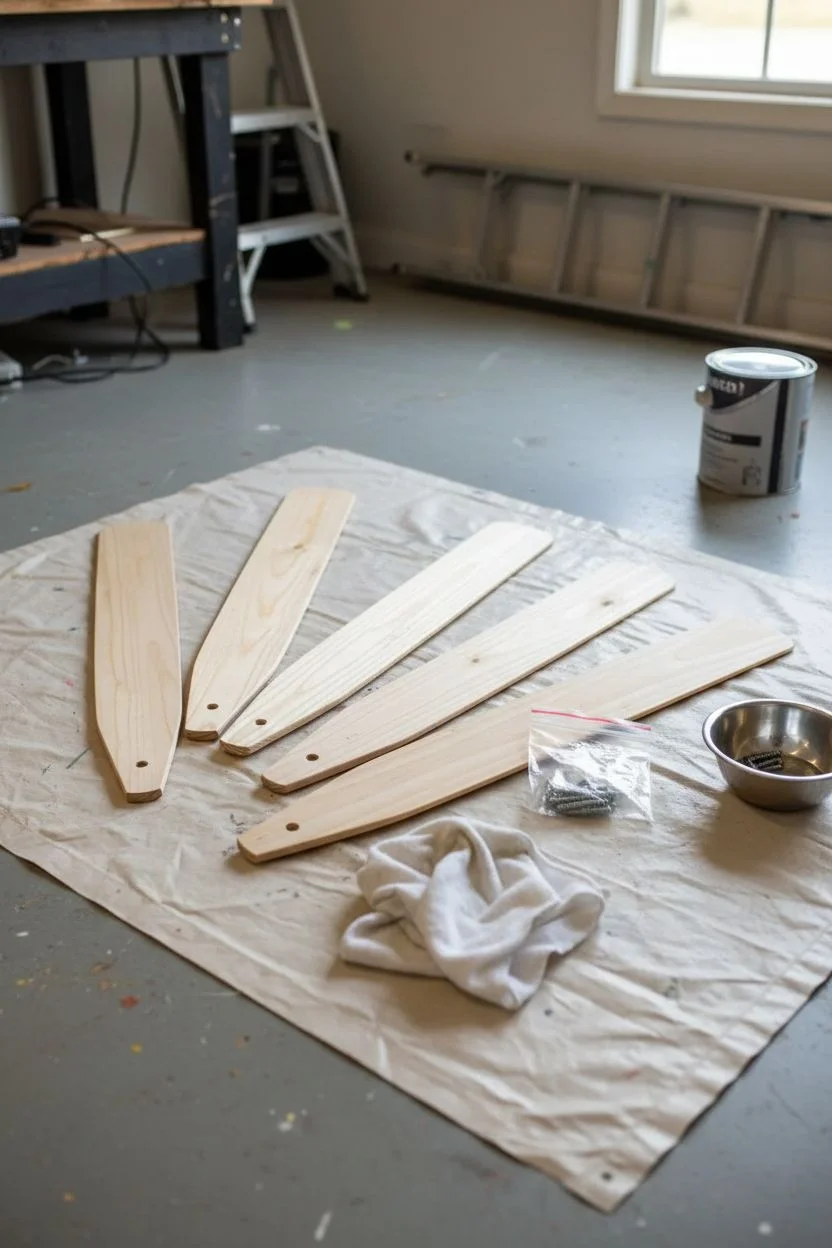
Materials
- Plastic propellers (drone or RC plane style)
- Fine-grit sandpaper (400 to 600 grit)
- Isopropyl alcohol or mild degreaser
- Microfiber cloth
- Plastic primer spray (like Krylon Fusion or Rust-Oleum Plastic)
- Matte spray paints in earth tones (sage green, cream, taupe, warm grey)
- Clear matte topcoat spray
- Brown kraft paper or drop cloth
- Painter’s tape or dowel rods (for holding)
- Cardboard box (optional, for spraying)
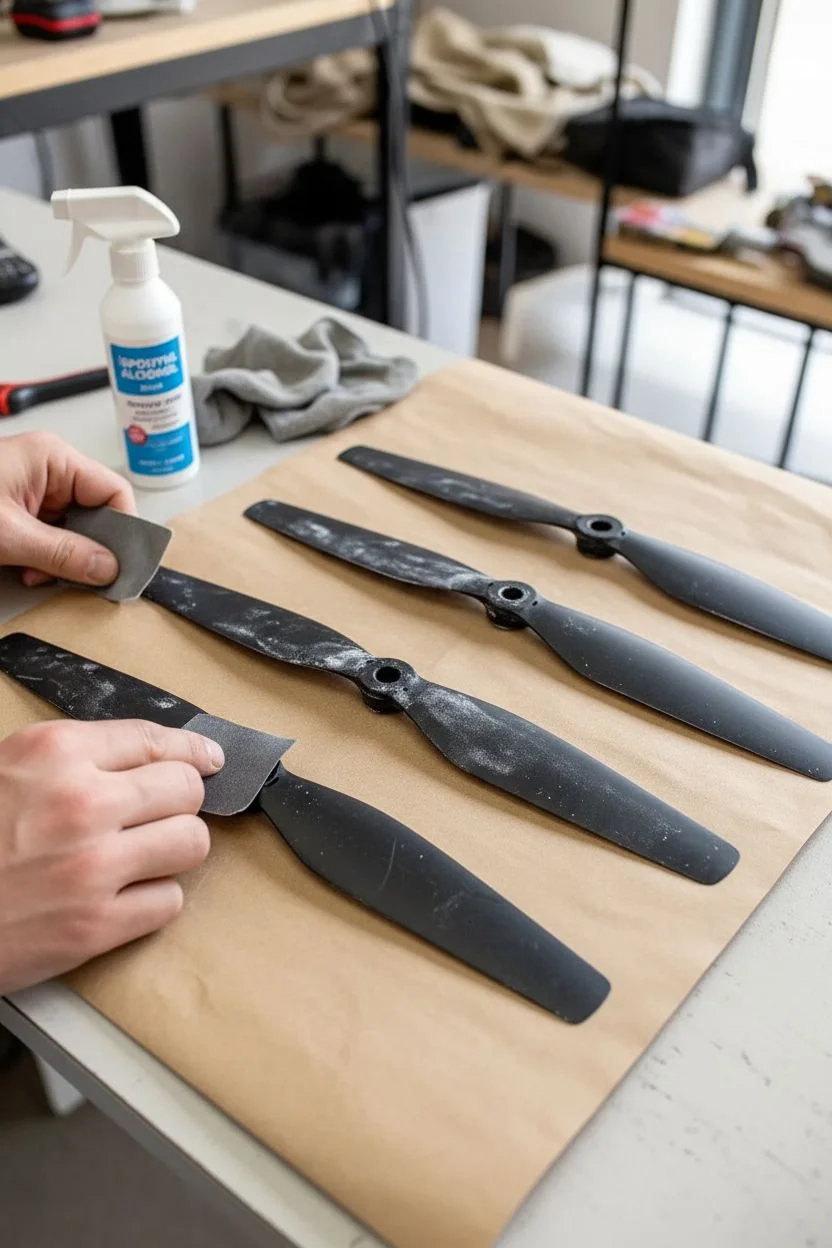
Step 1: Preparation & Cleaning
-
Assess the blades:
Gather your collection of propellers. Inspect them for any deep gouges or cracks; discard any that are structurally compromised if you intend to fly them again, but keep imperfect ones for display-only art. -
Clean thoroughly:
Plastic props often have oily residues from manufacturing or past use. Wipe each blade down aggressively with isopropyl alcohol and a microfiber cloth. -
Scuff the surface:
To ensure the paint adheres to slippery plastic, lightly sand the entire surface of each blade using 400-600 grit sandpaper. You don’t want deep scratches, just a dull, hazy finish. -
Final wipe:
Remove all plastic dust created by sanding with a fresh pass of alcohol or a tack cloth. Any dust left behind will create bumpy textures later. -
Set up the workspace:
Lay out a large sheet of brown kraft paper in a well-ventilated area. If it’s windy, tape the corners of the paper down.
Step 2: Priming & Painting
-
Prop them up:
For easier painting, I like to place the propellers on small dowels or makeshift stands so they aren’t touching the ground, but laying them flat works too if you are careful. -
Apply primer:
Spray a very thin, even coat of plastic-bonding primer over the blades. Hold the can about 8-10 inches away and use sweeping motions. Let this dry for 15 minutes. -
Select your palette:
Choose 3-4 complementary spray paint colors. The image uses a muted palette of sage green, creamy off-white, and warm grey for a cohesive look. -
The first color pass:
Starting with your lightest color (like cream), spray the first batch of blades. Apply a light ‘mist coat’ first—don’t try to get full opacity immediately or it will drip. -
Layering the color:
Wait about 5-10 minutes for the mist coat to twist, then apply a second, slightly heavier wet coat to achieve full coverage. Watch the edges carefully to ensure the color wraps around. -
Switching shades:
Repeat the process with your sage green and grey paints on the remaining propellers. Keep the cans shaken often to maintain a consistent matte finish. -
Check the hubs:
Pay close attention to the central hub area where the mounting holes are. Paint can pool here easily, so use very short bursts of spray in this specific spot. -
Drying time:
Allow the painted blades to dry undisturbed for at least 1 hour. They should look completely matte and dry to the touch before you handle them.
Sticky Situation?
If the paint feels tacky days later, the humidity was likely too high or the coats were too thick. Place them in a warm, dry room or near a dehumidifier to help the chemical curing process speed up.
Step 3: Finishing Touches
-
Flip and repeat:
Once phase one is dry, carefully flip the propellers over to paint the undersides using the same steps: primer, mist coat, and wet coat. -
Inspect for flaws:
Look for any missed spots or uneven texture. If you find a drip, let it dry fully, sand it gently, and spot-spray that area. -
Seal the deal:
For extra durability, especially against scratches, apply a final coat of clear matte sealer over the entire piece. -
Marking detail (optional):
The image shows subtle manufacturing text on the hubs. If you painted over yours, you can use a fine-tip black paint pen to gently re-write technical specs or add decorative dashed lines around the center hole. -
Full cure:
This is crucial: Let the propellers cure for a full 24 to 48 hours before attaching them to anything. The paint needs to harden completely to resist chipping.
Ombré Upgrade
Line up your blades from light to dark. Mix a custom gradient by lightly misting the darker spray paint onto the tips of the lighter blades for a smooth, faded transition effect.
Arranging your newly painted propellers in a gradient creates a satisfying visual flow that turns functional parts into modern art


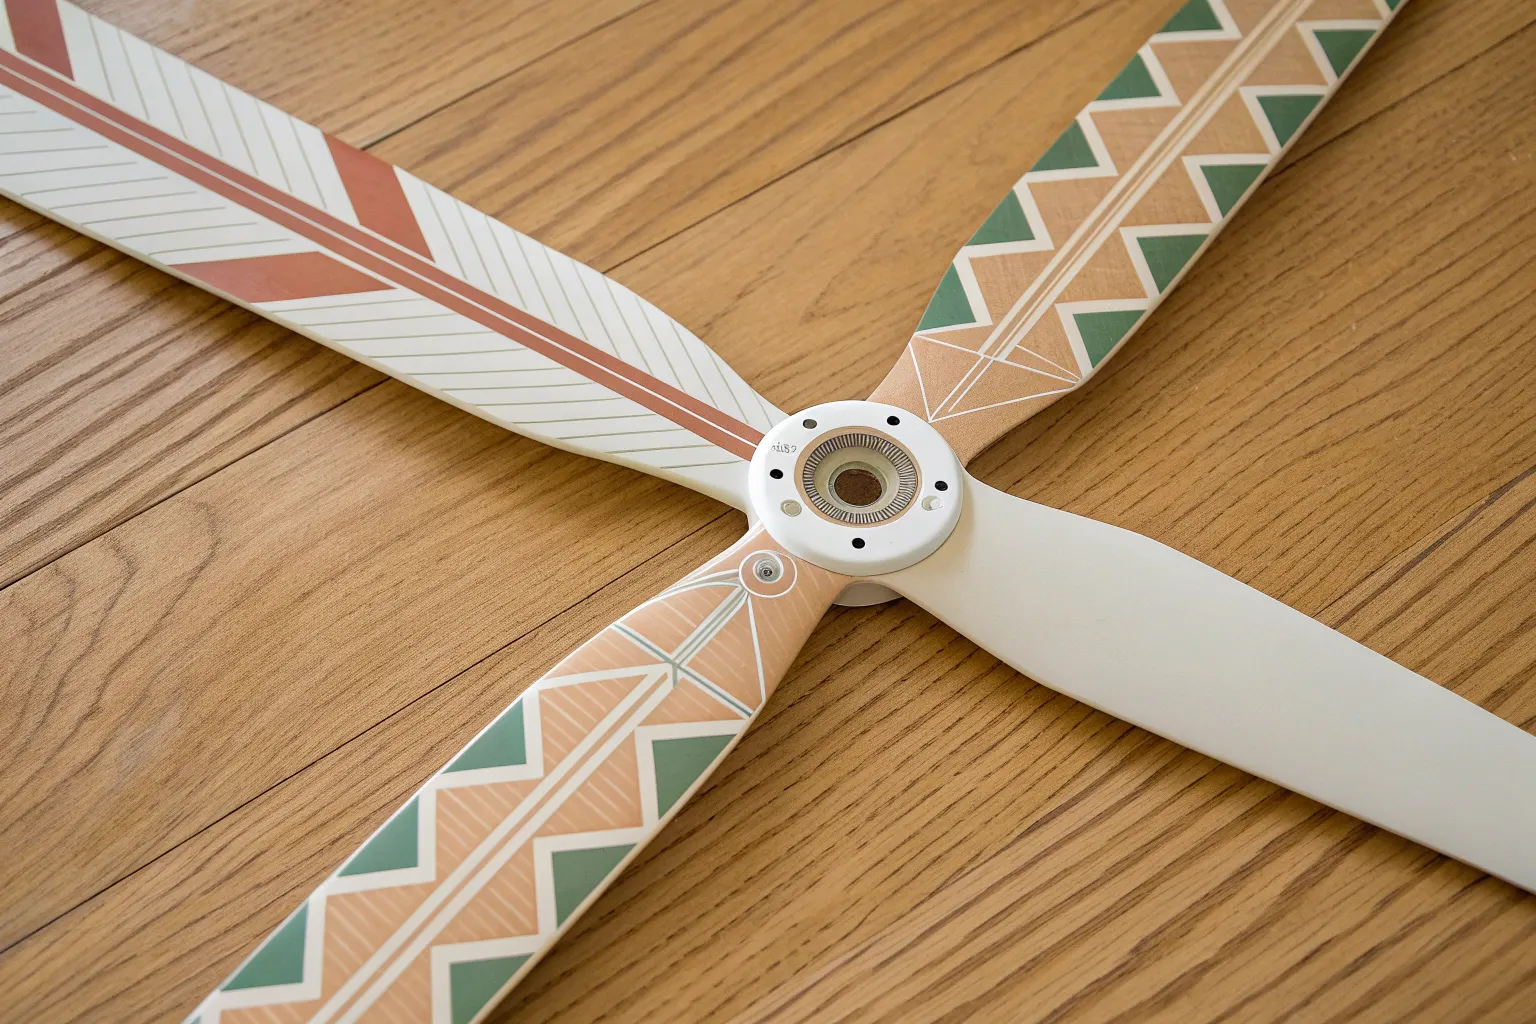
Chevron Arrows for Modern Energy
Transform a standard ceiling fan into a statement piece with this geometric chevron design featuring earthy tones of teal, terracotta, and soft white against natural wood. This project adds a modern, energetic vibe to your ceiling without the need for expensive replacements.
Step-by-Step
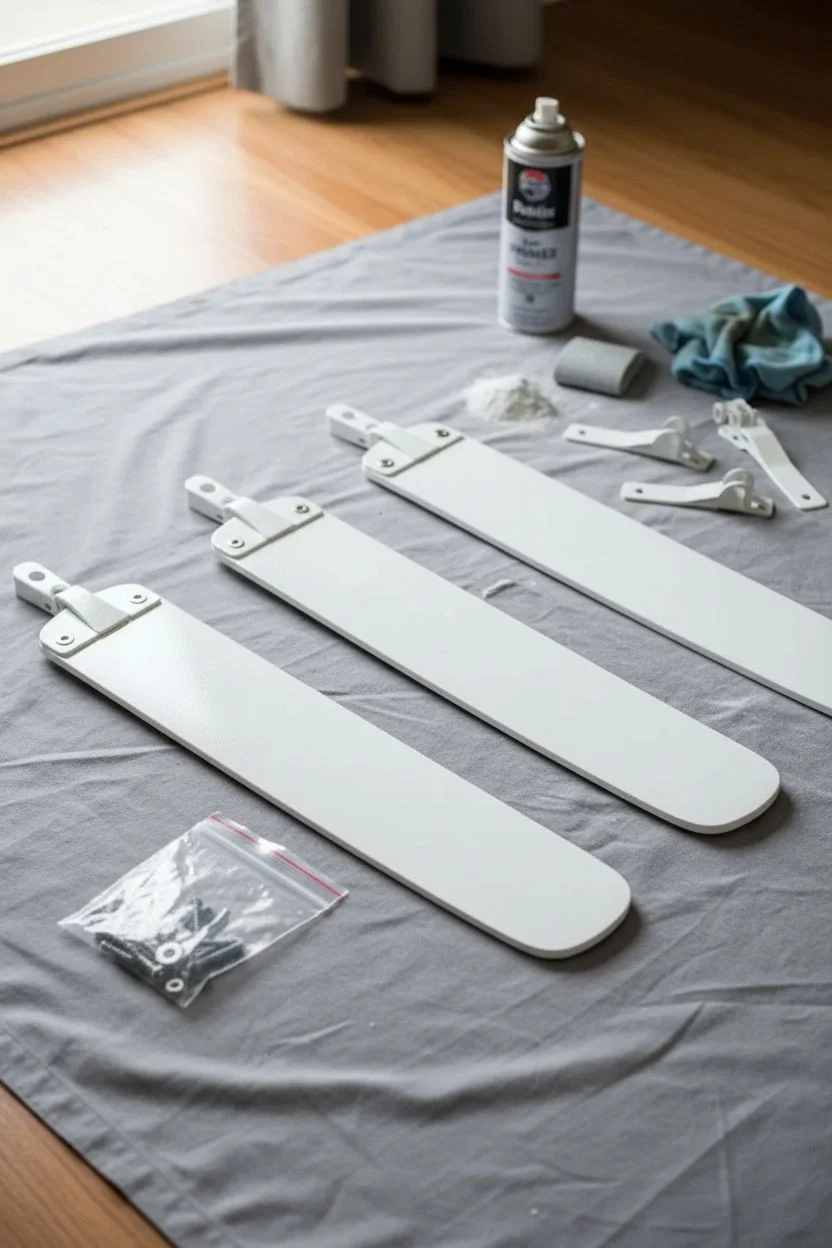
Materials
- Ceiling fan blades (removed from unit)
- Painter’s tape (various widths, 1-inch recommended)
- Acrylic craft paints (Teal, Terracotta/Burnt Orange, White, Dusty Blue)
- Small foam brushes or flat synthetic bristle brushes
- Ruler or measuring tape
- Pencil
- Fine-grit sandpaper (220-grit)
- Clear matte or satin polycrylic sealer
- Screwdriver
- Mild degreaser or soapy water
Step 1: Preparation & Planning
-
Remove and clean:
Turn off the power to the fan. Using your screwdriver, carefully detach each fan blade from the motor housing. Wash both sides of the blades thoroughly with a mild degreaser or soapy water to remove dust and grease buildup, then dry completely. -
Establish the centerline:
Lay a blade flat on your workspace. Use a ruler to find the exact center width of the blade and draw a very light pencil line straight down the middle from the base to the tip. This guide is crucial for perfect chevron points. -
Mark chevron intervals:
Starting from the tip of the blade (the end furthest from the motor), measure and mark intervals along that center line where you want the points of your arrows to land. For the look in the photo, space them about 2 to 3 inches apart. -
Draw the V-shapes:
Using a straight edge, connect your center marks to the edges of the blade to create your ‘V’ shapes. Ensure the angle is consistent for each arrow so they look uniform.
Bleeding Lines?
If paint seeps under the tape, seal the tape edge first with a tiny bit of clear matte medium or base color before applying the main color.
Step 2: Taping & Painting
-
Tape the first color sections:
Apply painter’s tape along the OUTSIDE of the pencil lines for your first color group (e.g., the teal arrows). Press the edges of the tape down firmly with a credit card or fingernail to prevent paint bleed. -
Paint the first coat:
Dip your foam brush into your first color (Teal). Apply thin, even coats moving in the direction of the wood grain if possible. Avoid overloading the brush to keep ridges from forming. -
Second coat and peel:
Once the first coat is dry to the touch, apply a second coat for full opacity. I like to peel the tape off while the paint is still slightly damp to get the crispest lines. Let this color dry completely before moving on. -
Tape for the second color:
Tape off the sections for your next color (Terracotta), making sure the new tape doesn’t pull up the fresh paint you just applied. If you want natural wood gaps between colors like the example, leave a small strip of wood exposed and covered by tape. -
Apply second color:
Paint the Terracotta sections just as you did the first. Use a clean brush for each color to avoid muddying the tones. -
Add white accents:
Repeat the taping process for the thin white chevron stripes. These are narrower in the design, so be precise with your tape placement to keep them delicate. -
Final color application:
Finish with the dusty blue/darker sections. Check your original pencil lines if you get lost, ensuring the V-shape points all align along that center axis.
Custom Pulls
To match the photo perfectly, swap standard pulls for woven tassel pendants or macramé cords to enhance the bohemian aesthetic.
Step 3: Finishing Touches
-
Clean up edges:
Once all paint is dry, inspect your lines. If there was any bleed, use a very small detail brush with the background wood color (or scrape gently with a craft knife) to tidy up. -
Light sanding (optional):
For a distressed or smoother look, you can very lightly pull a sheet of 220-grit sandpaper over the painted surface. Wipe away all dust with a tack cloth. -
Seal the blades:
Apply a clear polycrylic sealer over the entire side of the blade. This protects the paint from dust and makes future cleaning much easier. One or two coats should be sufficient. -
Reattach blades:
Wait for the sealer to cure fully (check the can for cure times, usually 24 hours). Reattach the blades to your fan motor using the original hardware. -
Balance check:
Turn the fan on low to check for wobbling. Painting adds weight, so if it wobbles, use a generic fan balancing kit to adjust the weight distribution.
Enjoy the rhythmic pattern of your new custom fan every time you look up


Speckled Terrazzo Confetti Blades
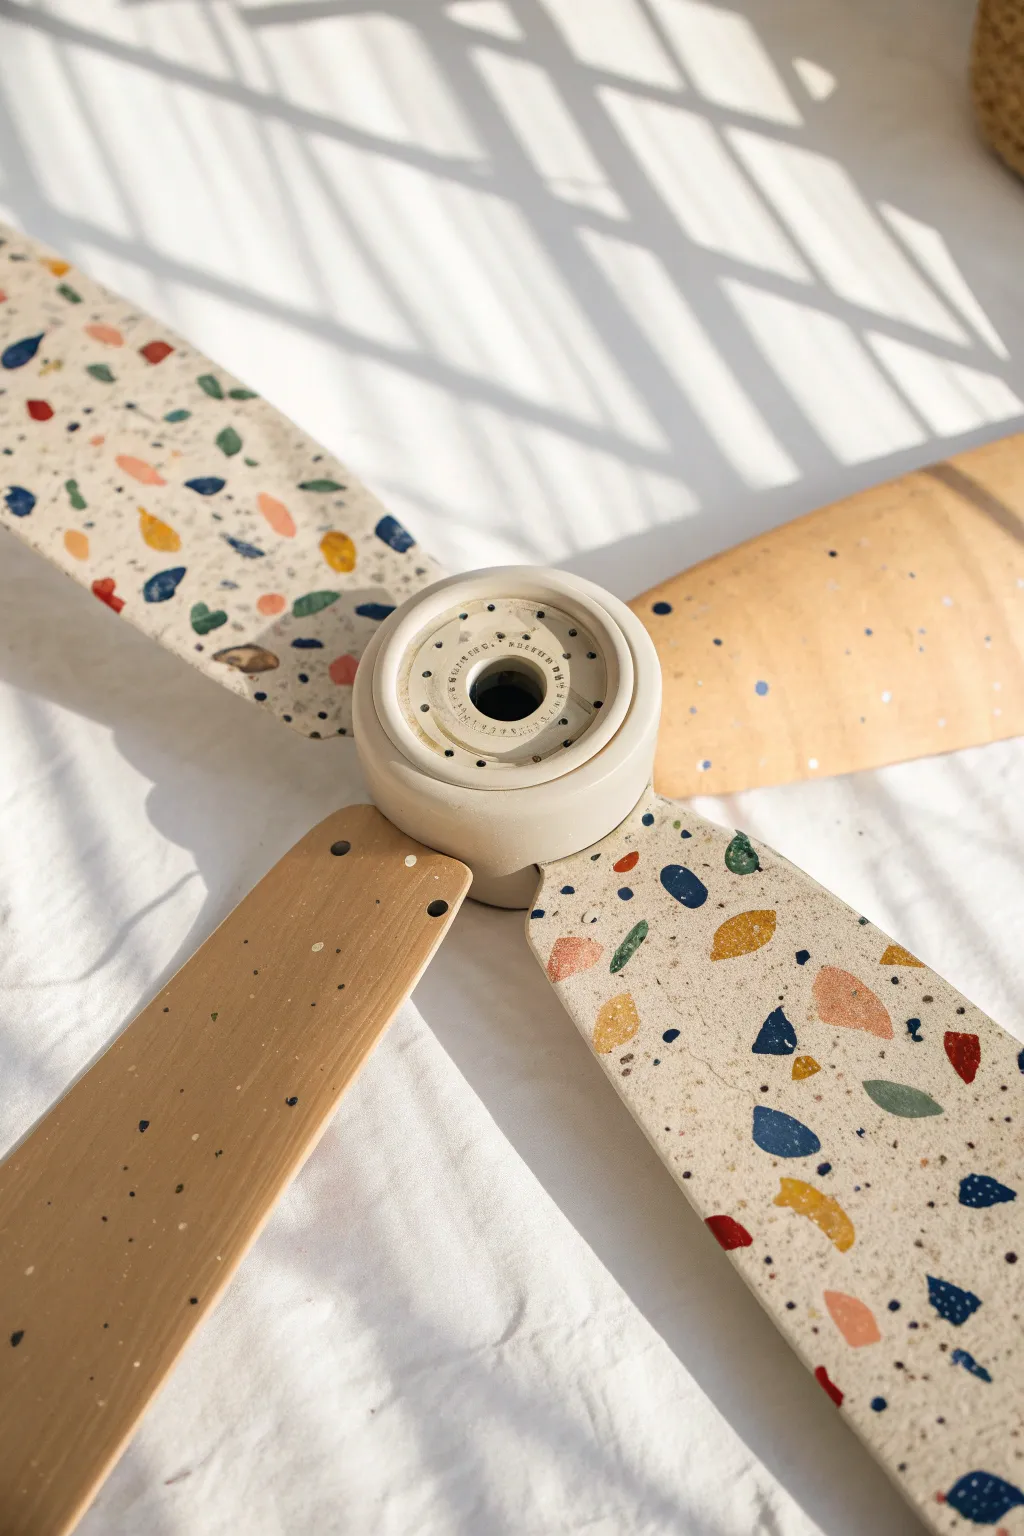
Transform a boring ceiling fan into a playful statement piece with this faux terrazzo finish. Using bold acrylics and a simple cream base, you’ll create a lively confetti pattern that looks like authentic stone composite.
How-To Guide
Materials
- Ceiling fan blades (removed from unit)
- Sandpaper (120 and 220 grit)
- Cream or off-white spray paint (matte finish)
- Acrylic craft paints (navy blue, mustard yellow, coral pink, bright red, emerald green)
- Small fine-tip paint brushes
- Micro-detail brush or toothpick
- Black acrylic paint
- Clear matte polyurethane sealer (spray or brush-on)
- Painter’s tape
- Damp cloth
- Paper plate or palette
Step 1: Preparation & Base Coat
-
Remove hardware:
Before starting, detach the blades from the main fan motor unit. Unscrew any metal brackets or holders attached to the base of the blades so you have a flat, unobstructed surface to work with. -
Clean surface:
Wipe down each blade thoroughly with a damp cloth to remove accumulated dust, grease, or grime. Let them air dry completely. -
Sand for adhesion:
Lightly scuff the factory finish using 120-grit sandpaper. You don’t need to strip it bare, just create a rough surface for the paint to grip. Wipe away the sanding dust with a tack cloth or damp rag. -
Optional: Tape for wood effect:
If you want to keep two blades plain wood like the example, set those aside or tape off the areas you want to preserve. Otherwise, proceed to paint all blades. -
Apply base color:
Using your cream or off-white spray paint, apply a light, even coat to the blades. Hold the can about 8-10 inches away. -
Build opaque coverage:
Once the first coat is dry to the touch, apply a second and possibly third coat until the original blade color is completely hidden and the cream finish is solid and opaque. Let this base cure for at least 24 hours.
Uneven Distribution?
If one area looks too empty, don’t force a large shape. Use a cluster of tiny black or navy dots to fill the void without overwhelming the balance.
Step 2: Creating the Terrazzo Pattern
-
Plan your palette:
Squeeze a nickel-sized amount of your colored acrylics (navy, mustard, coral, red, green) onto a paper plate. Keep a small cup of water handy for rinsing brushes. -
Paint large shapes:
Start with your largest ‘stone’ shapes. Using a small brush, paint random, irregular blobs. Make some look like triangles with soft corners, others like rough trapezoids. Space them widely apart. -
Add secondary colors:
Switch colors and paint medium-sized shapes in the gaps. Vary the orientation—some vertical, some horizontal. I find it helpful to rotate the blade occasionally to ensure the pattern looks random from all angles. -
Layer small chips:
Using a smaller brush, fill in remaining empty spaces with tiny specks and dots in your brighter accent colors like red or green to mimic smaller aggregate stones. -
Create depth with black:
Dip a micro-detail brush or a toothpick into black paint. Add very tiny, irregular flecks and small dots throughout the design. This high-contrast ‘pepper’ look is crucial for a realistic terrazzo effect. -
Repeat for all blades:
Continue this process until all intended blades are covered. Step back frequently to ensure the density of the pattern is consistent across all blades. -
Dry thoroughly:
Allow the acrylic designs to dry completely, preferably overnight, to ensure the thickest paint globs are hard.
Step 3: Finishing Touches
-
Seal the design:
To protect your artwork from dust and centrifugal force, apply a clear matte polyurethane sealer. Spray or brush it on in thin, even layers. -
Reattach hardware:
Once the sealer is fully cured (check the manufacturer’s instructions), screw the metal brackets back onto the blade bases. -
Mount and balance:
Reattach the blades to your fan motor. If the fan wobbles, you may need to use a balancing kit, as the paint adds a tiny amount of weight.
Level Up: Natural Wood
For the unpainted blades, sand them down to raw wood and seal with a matte clear coat to create a beautiful organic contrast against the painted terrazzo ones.
Enjoy the gentle breeze from your newly customized, art-piece ceiling fan


Coastal Wave Gradient in Blues
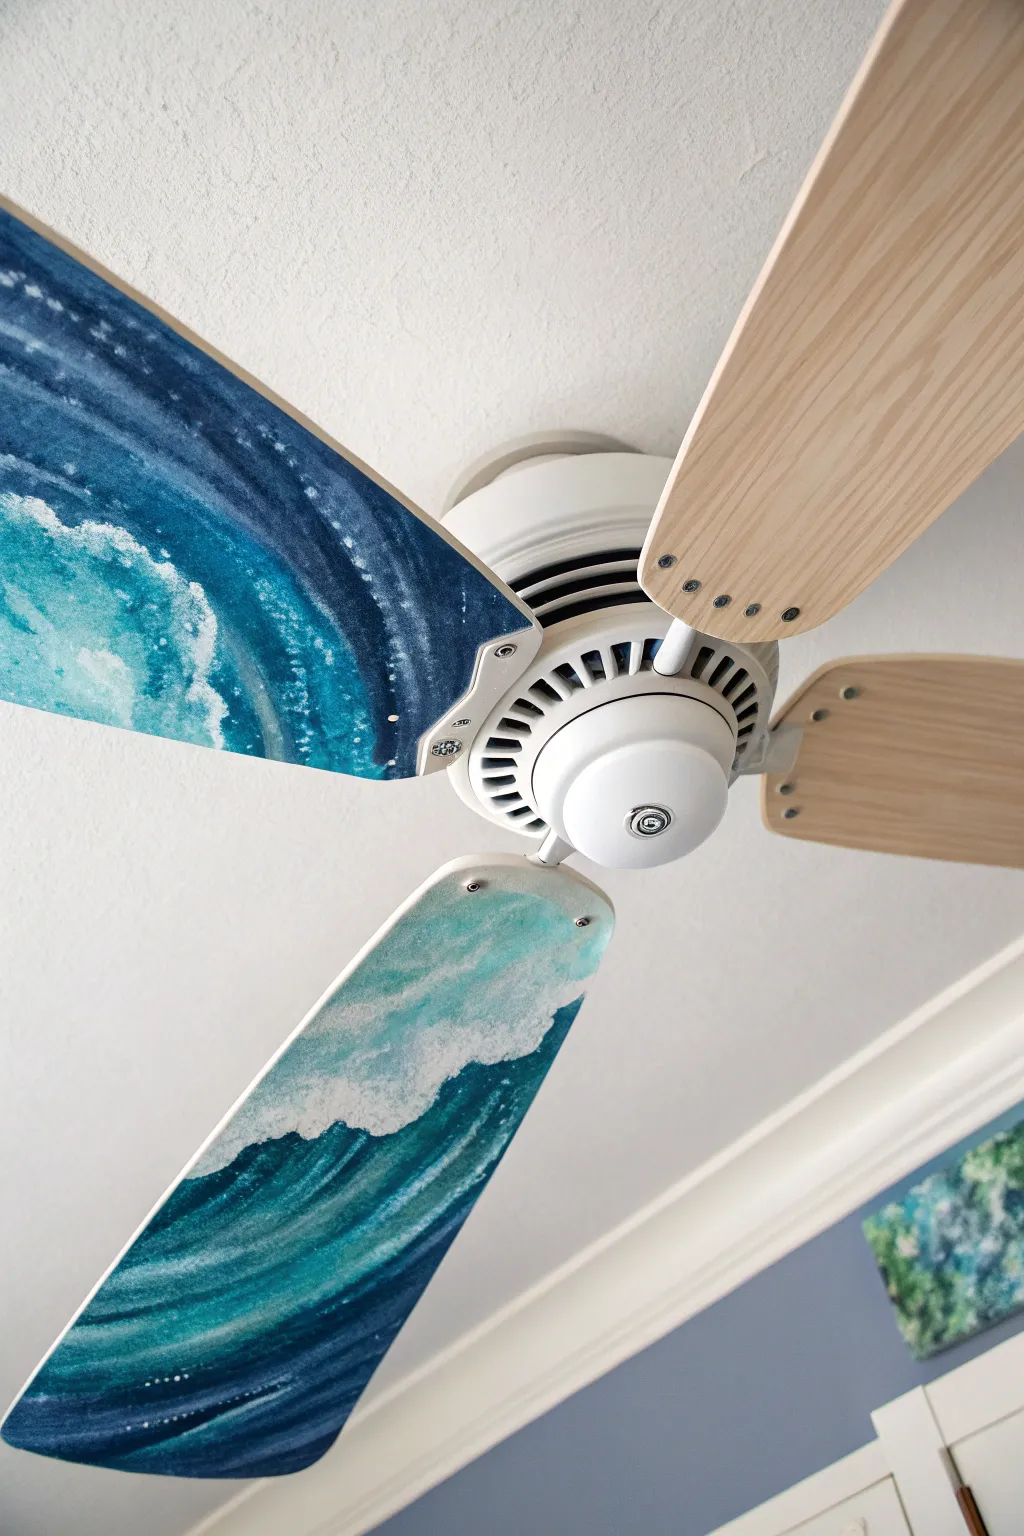
Transform a standard ceiling fan into a moving seascape with this stunning coastal wave design. The rich gradients of deep navy to bright teal create a crashing wave effect that brings a refreshing ocean breeze vibe to any room.
Detailed Instructions
Materials
- Ceiling fan blades (removed from fan)
- Sandpaper (medium grit, around 120-150)
- Primer (spray or brush-on suitable for wood/laminate)
- Acrylic paints (Titanium White, Phthalo Blue, Ultramarine Blue, Teal/Turquoise)
- Flat shader brushes (various sizes)
- Small round detail brush
- Sea sponge or old texture sponge
- Polyurethane sealer (satin or matte finish)
- Screwdriver
- Drop cloth
- Palette for mixing
Step 1: Preparation
-
Remove the Blades:
Turn off the power to your fan and carefully unscrew the blades from the fan brackets. It is crucial to paint on a flat surface rather than overhead. -
Clean and Sand:
Wipe down the blades to remove dust and grease. Lightly sand the side you intend to paint to rough up the existing finish; this helps the primer stick. -
Prime the Surface:
Apply a coat of primer to the blades. If your blades are dark wood, verify the primer provides solid coverage to prevent the dark tone from dulling your ocean blues.
Paint Getting Muddy?
If your blue and white blend into a gray mess, stop blending while wet. Let the blue base dry completely, then add the white foam details on top for crisp contrast.
Step 2: Painting the Ocean Base
-
Mix Your Deep Blues:
On your palette, create a dark midnight blue by mixing Ultramarine with a touch of black or just using pure deep Phthalo Blue. This will be the deepest part of the ocean. -
Apply the Darkest Layer:
Start painting at the motor-end (the narrow end) of the blade. Apply the dark blue generously, covering the bottom third of the blade with long, sweeping strokes. -
Transition to Teal:
Mix your Teal or Turquoise with a little of the dark blue. Blend this color into the dark blue section while the paint is still wet to create a smooth gradient moving toward the middle of the blade. -
Lighten the Waters:
As you move toward the tip of the blade (the wider end), mix more white into your teal. Paint this lighter shade near the top, blending specifically where it meets the darker teal. -
Create the Wave Shape:
Using a clean brush and the lighter teal mix, define the curve of the crashing wave. Instead of a straight line, paint a diagonal, organic curve that sweeps upward, mimicking the natural movement of water.
Make It Sparkle
Mix a tiny pinch of iridescent medium or fine silver glitter into your final clear sealant coat. It will catch the light when the fan spins, mimicking sun on water.
Step 3: Detailing the Crash
-
Sponge the Sea Foam:
Dip a damp sea sponge into Titanium White paint. Dab off the excess, then lightly texture the area just above your teal wave shape to create the frothy, churned-up water look. -
Paint the Crest:
Use a smaller flat brush to paint a solid white edge along the very top of your wave curve. This defines the ‘lip’ of the wave before it crashes. -
Add Droplets and Spray:
Load a small detail brush with watered-down white paint. Flick the bristles or carefully dot tiny specks above the wave crest to mimic flying spray and mist. -
Define Water Movement:
I like to take a fine brush with very light teal and paint thin, swooping lines inside the dark water area. This suggests the undercurrent and movement of the wave rising. -
Check for Consistency:
Line up all your painted blades side-by-side. Ensure the horizon lines and wave curves roughly match up so the visual effect works when the fan is stationary.
Step 4: Sealing and Reassembly
-
Let it Cure:
Allow the acrylic paint to dry completely, preferably overnight, to ensure the thickest parts of the textured foam are solid. -
Apply Sealer:
Apply a clear Polyurethane topcoat. A satin finish works best to give a slight sheen like water without being overly glossy. Apply two thin coats for durability. -
Balance Check:
Painting adds weight. If you painted heavily on one blade and lightly on another, the fan might wobble. Try to keep paint thickness consistent across all blades. -
Reattach:
Once the sealer is fully cured and non-tacky, screw the blades back onto the fan brackets and restore power.
Now you can enjoy a permanent view of the surf from the comfort of your bed
BRUSH GUIDE
The Right Brush for Every Stroke
From clean lines to bold texture — master brush choice, stroke control, and essential techniques.
Explore the Full Guide
Rainbow Ring Spin Effect
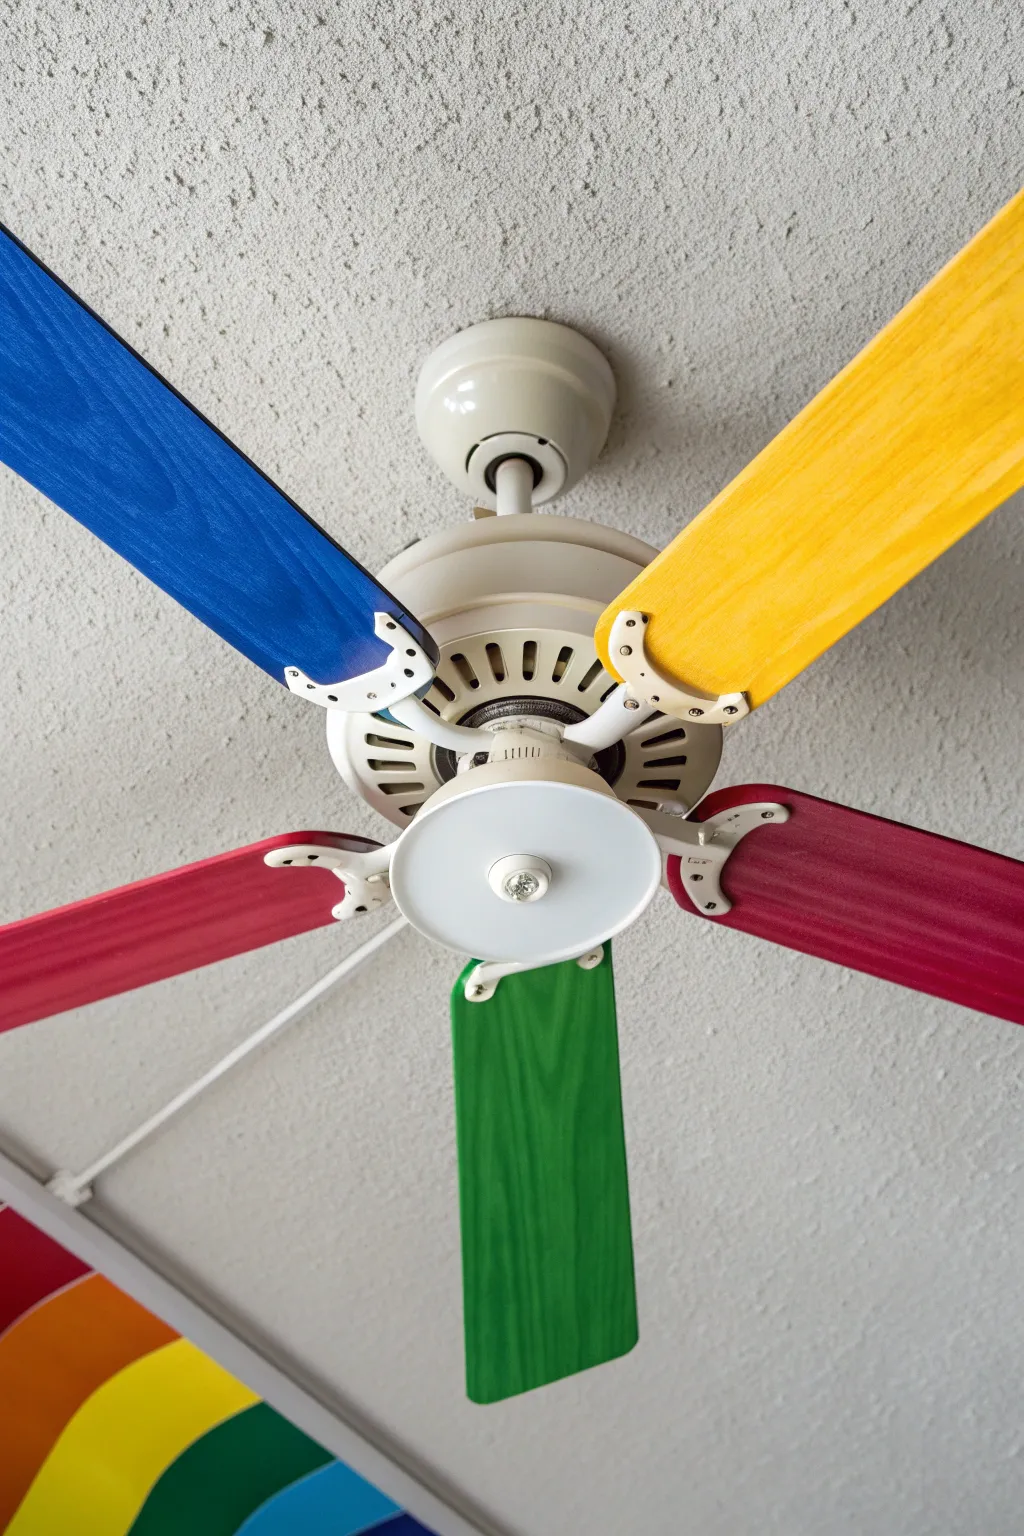
Transform a boring white ceiling fan into a vibrant spectrum of color with this cheerful update. By painting each blade a distinct, bold hue, you create a beautiful blurred ring of color whenever the fan is in motion.
Step-by-Step Guide
Materials
- Ceiling fan blades (removed from unit)
- Screwdriver
- Sandpaper (220-grit)
- Clean rags or tack cloth
- Primer (spray or brush-on)
- Acrylic or enamel craft paints (primary blue, sunshine yellow, crimson red, kelly green, magenta)
- Wide foam brushes or synthetic bristled brushes
- Clear coat sealant (spray)
- Painter’s tape or masking tape
- Drop cloth or newspapers
Step 1: Preparation & Dismantling
-
Safety check:
Ensure the fan is turned off completely at the wall switch or breaker before starting. -
Blade removal:
Climb up a sturdy ladder and carefully unscrew the brackets holding the blades to the fan motor housing. -
Hardware storage:
Place all screws and small hardware pieces immediately into a sandwich bag or small bowl so nothing gets lost during the painting process. -
Bracket separation:
Once down, unscrew the metal brackets from the actual wood or composite blades. You only want to paint the blades, not the mounting hardware. -
Clean surface:
Wipe down each blade thoroughly with a damp cloth to remove years of dust and grease buildup. Let them dry completely.
Smooth Operator
To avoid brush strokes completely, use spray paint instead of brush-on acrylics. Just do light, misty coats to prevent drips.
Step 2: Priming & Base Coat
-
Sanding:
Lightly scuff the surface of each blade with 220-grit sandpaper. This helps the new paint adhere to the factory finish. -
Dust removal:
Wipe away the sanding dust with a tack cloth or a barely damp rag. The surface must be perfectly clean. -
Prime the blades:
Apply a coat of whiter primer to both sides of the blades. Since you’ll be using bright colors, a white base makes them pop much more than painting directly over a dark wood grain. -
Dry time:
Allow the primer to dry fully according to the manufacturer’s instructions before moving on to the color.
Glow Up
Mix a small amount of glow-in-the-dark powder or clear medium into your final topcoat for a fun surprise when the lights go out.
Step 3: Applying the Rainbow
-
Plan your palette:
Lay out your five blades and assign a color to each: blue, yellow, red, green, and magenta (or purple). -
First coat:
Using a wide foam brush for a smooth finish, paint the top side of the first blade in its designated color. Long, even strokes work best to minimize brush marks. -
Continue painting:
Proceed through the rest of the blades, cleaning your brush thoroughly between colors or using a fresh brush for each hue to avoid muddying the pigments. -
Painting the edges:
Don’t forget the sides! Carefully paint the thin vertical edges of the blades so no original color shows when looking up from aside. -
Second coat:
Once the first coat is dry to the touch, apply a second coat to ensure rich, opaque coverage. I find yellow and red often need a third coat for true vibrancy. -
Sealing:
After the paint has cured for 24 hours, take the blades outside and apply a spray clear coat. This protects the finish from dust and makes future cleaning much easier.
Step 4: Reassembly
-
Reattach brackets:
Screw the metal mounting brackets back onto the colorful blades, being careful not to scratch your fresh paint job. -
Color order:
When reattaching the blades to the ceiling motor, think about the order. Arranging them in rainbow order (Red, Yellow, Green, Blue, Magenta) creates the smoothest gradient when it spins. -
Final secure:
Tighten all screws firmly to the motor housing to prevent any wobbling when the fan is turned on.
Now you can flip the switch and enjoy a functional piece of art that brightens the room instantly
Color-Block Geometry for Motion Blur
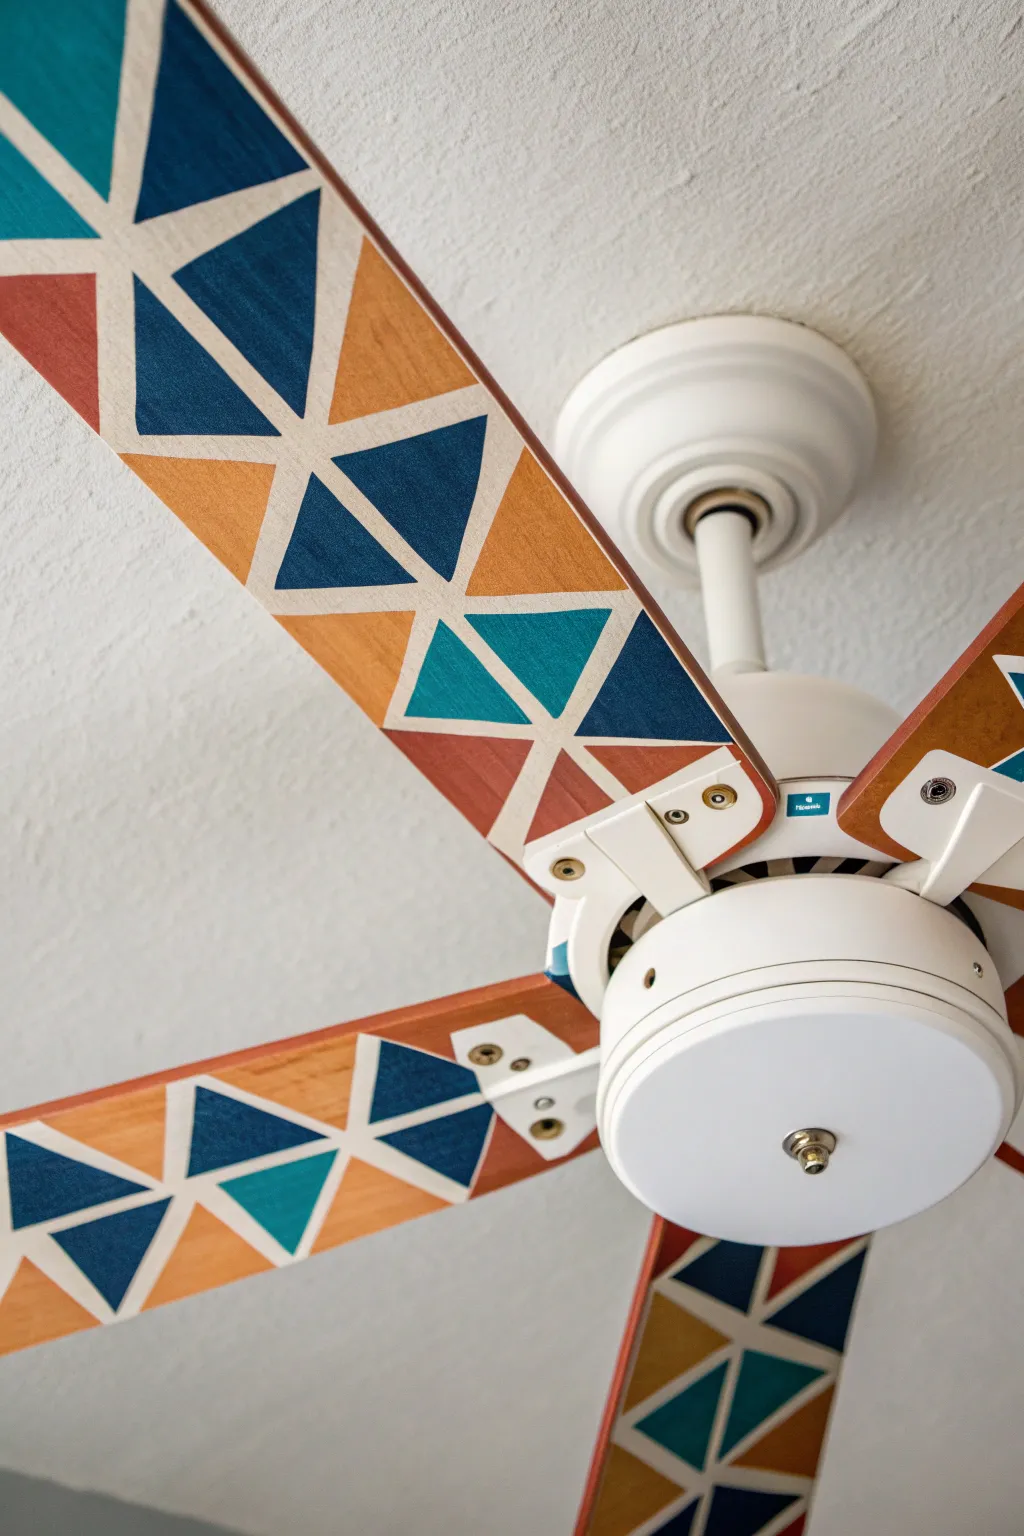
Transform boring ceiling fan blades into a spinning kaleidoscope of color with this vibrant geometric upgrade. The sharp triangular patterns create a mesmerizing effect when the fan is in motion, turning a functional appliance into a true statement piece.
Step-by-Step Tutorial
Materials
- Ceiling fan blades (removed from unit)
- Sandpaper (120 and 220 grit)
- Painter’s tape (various widths, preferably 1/4 inch and 1 inch)
- Acrylic craft paints (navy blue, teal, mustard yellow, terracotta)
- White primer spray paint
- High-quality angled craft brush
- Pencil
- Ruler or straight edge
- Clear polyurethane topcoat (matte or satin finish)
- Screwdriver
- Drop cloth or cardboard
Step 1: Preparation and Base Coat
-
Remove hardware:
Before doing anything else, unscrew the fan blades from the metal brackets. Keep all screws and washers in a labeled baggie so nothing gets lost during the makeover process. -
Clean thoroughly:
Wipe down each blade with a damp cloth and mild soap to remove years of dust and grease buildup. Let them dry completely, as trapped moisture can ruin your paint job. -
Sand the surface:
Scuff the existing finish using 120-grit sandpaper. You don’t need to strip it bare, but you do need to remove the sheen so the primer adheres properly. -
Smooth it out:
Follow up with a quick pass of 220-grit sandpaper for a smooth finish, then wipe away all sanding dust with a tack cloth or slightly damp rag. -
Apply primer:
Lay the blades on a drop cloth in a well-ventilated area. Apply a smooth, even coat of white spray primer. This white base will serve as the bright lines between your colors later, so ensure solid coverage. -
Let it cure:
Allow the primer to dry fully according to the can’s instructions—usually at least an hour or two—before attempting to tape.
Bleeding Lines?
If paint seeps under the tape, wait for it to fully dry. Then, gently scrape the excess away with an X-Acto knife or touch it up with a small brush and your base white color.
Step 2: Taping the Design
-
Create the centerline:
Find the exact center of the blade vertically. Run a strip of thin 1/4-inch painter’s tape straight down the middle from the base to the tip. This creates the central spine of your geometric pattern. -
Mark spacing:
Use a ruler and pencil to mark intervals along the blade edges. Determine how many triangles you want (the example shows about 4-5 sections) and mark even spaces. -
Tape the diagonals:
Using the same 1/4-inch tape, connect your edge marks to the center line to create a series of ‘X’ or ‘V’ shapes. Press the tape edges down firmly with a credit card to prevent paint bleed. -
Seal the edges:
For razor-sharp lines, I like to brush a very light layer of the white primer (or matte medium) over the tape edges. This fills any tiny gaps so the colored paint won’t seep underneath.
Pattern Consistency
Number your blades 1 through 5 on the back before painting. Mirror the color pattern exactly on each blade so the fan creates solid rings of color when spinning at high speed.
Step 3: Painting and Finishing
-
Plan your palette:
Decide on your color order. The example alternates between navy blue, teal, mustard, and terracotta. Using a pattern (like dark-light-dark) helps the motion blur look balanced. -
Paint the first sections:
Start with your darkest color (navy blue). Paint specific triangles according to your pattern, being careful to stay within the taped lines. Two thin coats are better than one thick one. -
Apply remaining colors:
Rinse your brush or switch to a fresh one, then apply the teal, mustard, and terracotta paints to their respective triangles. Ensure the paint is opaque. -
Remove tape promptly:
Peel off the painter’s tape while the final coat of paint is still slightly tacky. Pulling slowly at a 45-degree angle helps ensure you don’t chip the dried paint. -
Touch up:
If any paint bled through, use a tiny detail brush and your white primer paint to tidy up the lines. Let the blades dry for 24 hours. -
Seal the deal:
Apply a clear polyurethane topcoat to protect your artwork from dust and centrifugal force. A spray can version works great here for an even finish without brush strokes. -
Reassemble:
Once the topcoat is fully cured, reattach the blades to the brackets and mount them back onto the fan motor.
Now flip the switch and watch your colorful geometric art blur into beautiful, cohesive rings of color

PENCIL GUIDE
Understanding Pencil Grades from H to B
From first sketch to finished drawing — learn pencil grades, line control, and shading techniques.
Explore the Full Guide
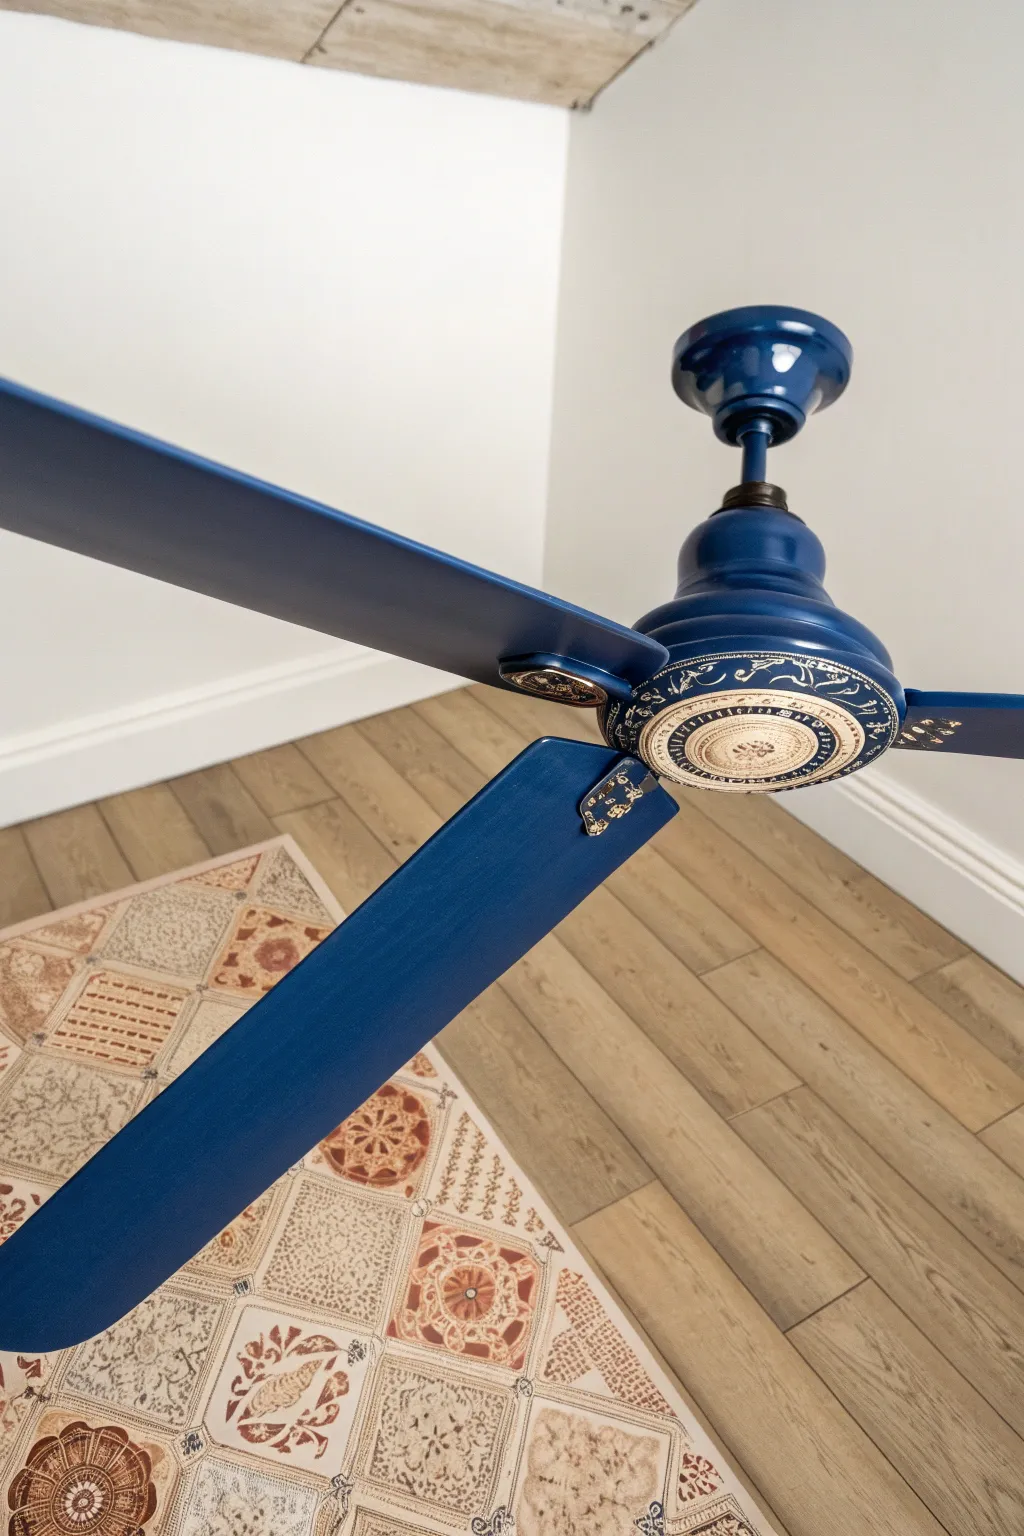
Metallic Edges and Hardware Highlights
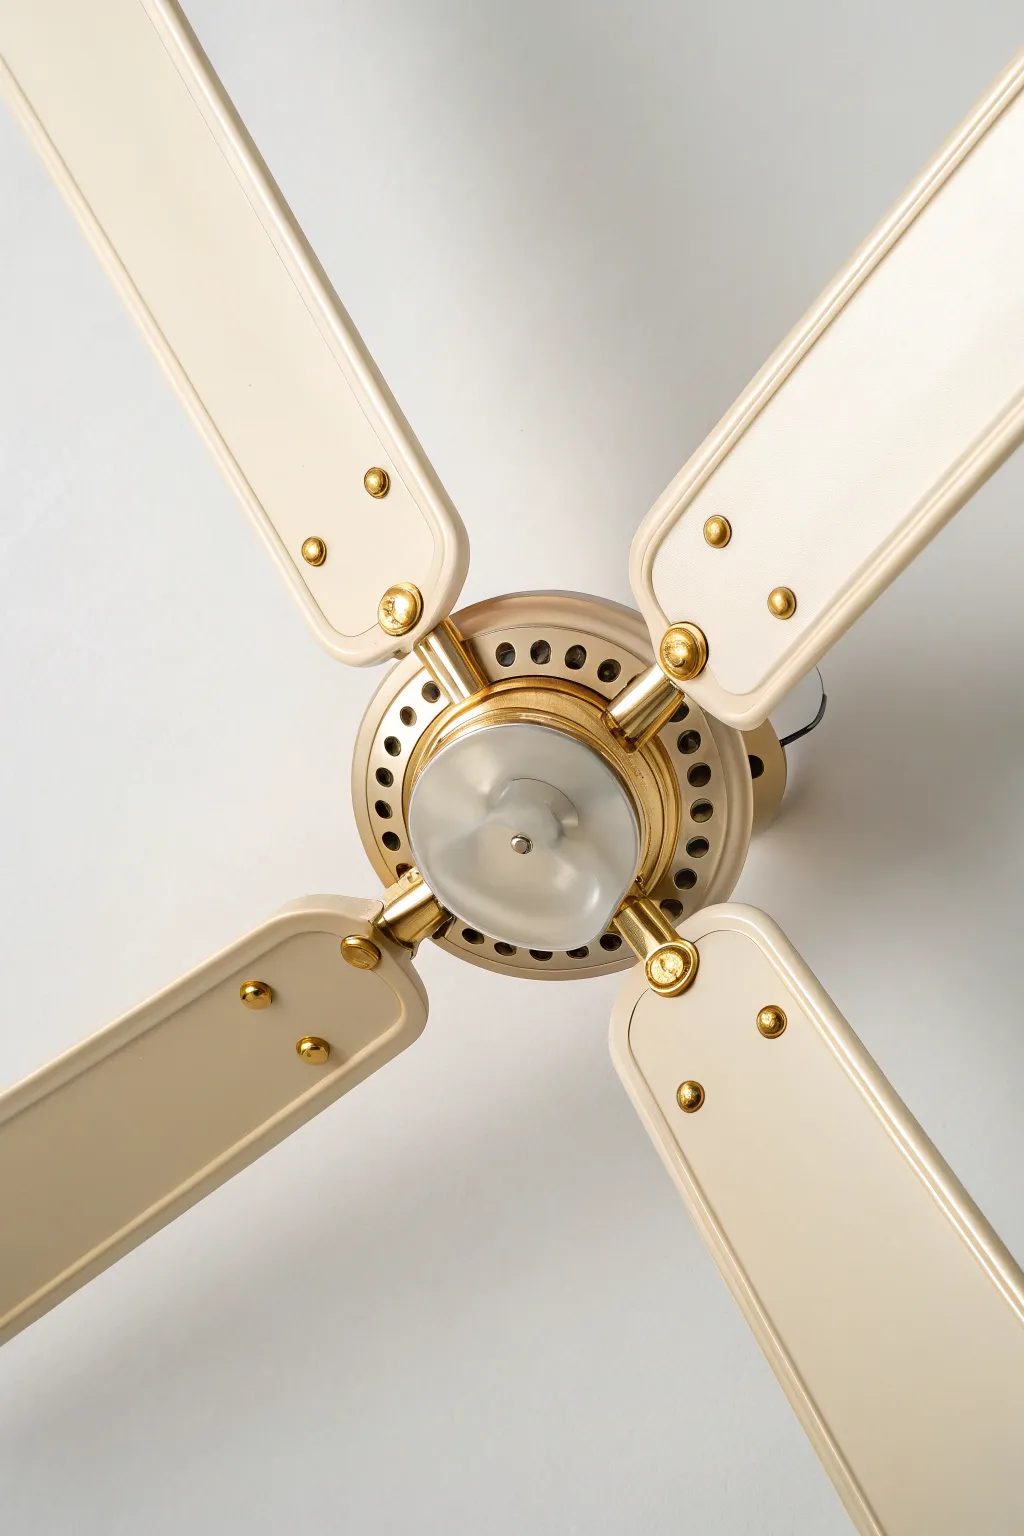
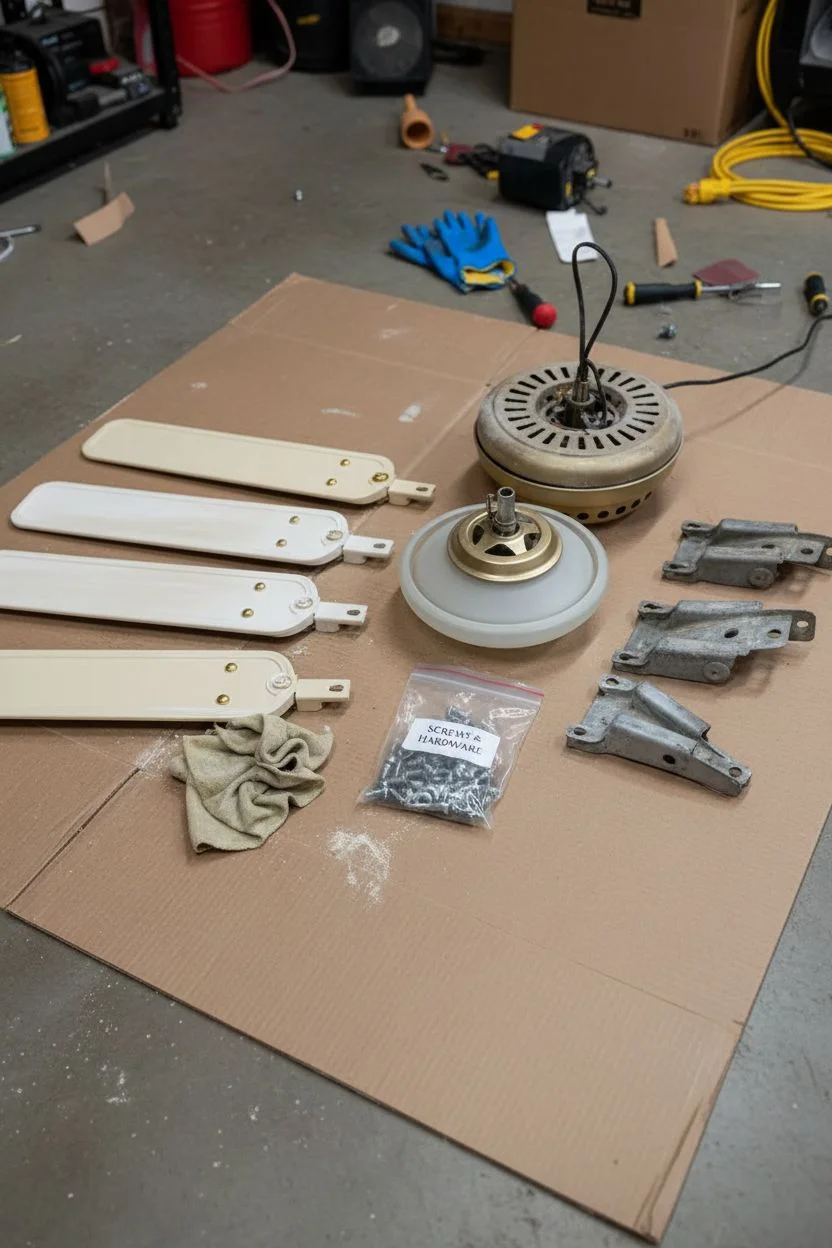
Transform a dated or standard ceiling fan into a chic, modern fixture with a warm beige finish and striking brass accents. This project focuses on meticulous hardware highlighting to create a high-end, custom look that elevates any room.
How-To Guide
Materials
- Ceiling fan (disassembled)
- Screwdriver set
- Sandpaper (220-grit and 400-grit)
- Clean rags or tack cloth
- Degreaser or TSP substitute
- High-quality spray primer (for metal and plastic)
- Enamel spray paint: Creamy Beige or Off-White (Satin finish)
- Metallic spray paint: Bright Brass or Polished Gold
- Metallic spray paint: Champagne Gold (optional, for motor housing nuance)
- Painter’s tape
- Cardboard or drop cloths
- Small artist’s paintbrush (optional for touch-ups)
- Clear spray sealant (Satin or Gloss)
Step 1: Preparation & Disassembly
-
Disconnect and unmount:
Before doing anything else, ensure the power is off at the breaker. Carefully unmount the fan from the ceiling and disconnect the wiring. It is much easier to achieve a professional finish when the fan is down. -
Separate the components:
Using your screwdriver, remove the blades from the blade irons (the metal brackets). Separate the blade irons from the motor housing. Remove the central light kit or cover plate if applicable. Place all screws and small hardware into a labeled bag so pieces don’t get lost. -
Clean thoroughly:
Ceiling fans accumulate a surprising amount of greasy dust. Wipe every surface down with a degreaser or TSP substitute. Scrub the blade irons and motor housing well to ensure no oils remain. -
Sand for adhesion:
Lightly sand the blades and the metal housing with 220-grit sandpaper. You don’t need to strip the old finish completely; just scuff it up to create a ‘tooth’ for the new paint to grab. Wipe away all dust with a tack cloth.
Screw Painting Hack
Push screws into a chunk of Styrofoam or stiff cardboard before painting. This keeps them upright and allows you to spray the heads evenly from all angles without getting paint on the threads.
Step 2: Painting the Blades & Motor Housing
-
Prime the main pieces:
Lay out the fan blades and the main motor housing on cardboard in a well-ventilated area. Apply a thin, even coat of primer. Let this dry completely according to the can’s instructions. -
Apply the base color:
Spray the fan blades with your creamy beige enamel paint. Use long, sweeping motions to avoid drips. I like to do two or three very light coats rather than one heavy one for a smoother finish. -
Paint the motor housing:
For the specific look in the photo, the central motor housing isn’t quite as bright as the hardware. Spray this section with the beige enamel as well, or for a two-tone effect, use a soft Champagne Gold metallic paint. -
Let everything cure:
Allow the blades and housing to dry for at least 24 hours. This curing time helps the paint harden so it won’t scratch during reassembly.
Level Up: Two-Tone Metal
For extra dimension, use a slightly darker ‘Antique Brass’ on the blade irons and a brighter ‘Polished Gold’ on the screws and rivets to create sophisticated depth.
Step 3: Creating the Metallic Highlights
-
Prep the hardware:
Take the blade irons (the arms that hold the blades) and the screws you saved earlier. Poke the screws into a piece of cardboard so they stand upright—this allows you to paint the heads without them rolling away. -
Priming metal parts:
Give the blade irons and the screw heads a quick shot of primer to ensure the metallic paint sticks well to the metal surface. -
Applying the gold finish:
Spray the blade irons and screw heads with the Bright Brass or Polished Gold metallic paint. This requires a steady hand; keep the can moving to prevent pooling in the crevices. -
Detailing the blade connectors:
If your fan has specific decorative nuts or washers (like the ones visible on the blade surface in the photo), ensure these get a solid coat of gold as well. These small details are what make the project pop. -
Clear coat protection:
Once the gold paint is dry, apply a clear sealant over the high-touch metal areas. This prevents the metallic finish from tarnishing or rubbing off over time.
Step 4: Reassembly & Finishing Touches
-
Reattach hardware to blades:
Carefully screw the blade irons back onto the beige blades using your newly gold-painted decorative screws. Be gentle to avoid chipping the fresh paint. -
Install the center cap:
If your fan has a glass or plastic center cap (like the milky translucent one shown), clean it thoroughly. If the cap was originally a different color, you can leave it clear or frost it with a specialized glass spray. -
Final assembly:
Reattach the assembled blade arms to the motor housing. Double-check that all screws are tight to prevent wobbling. -
Remount and test:
Hang the fan back up, reconnect the wiring, and turn the power back on. Run the fan at low speed first to ensure it is balanced and the paint finish looks consistent as it spins.
Enjoy the gentle breeze from your stylishly updated fan that now serves as a custom design element in your home
Glow-in-the-Dark Starry Blade Night Sky
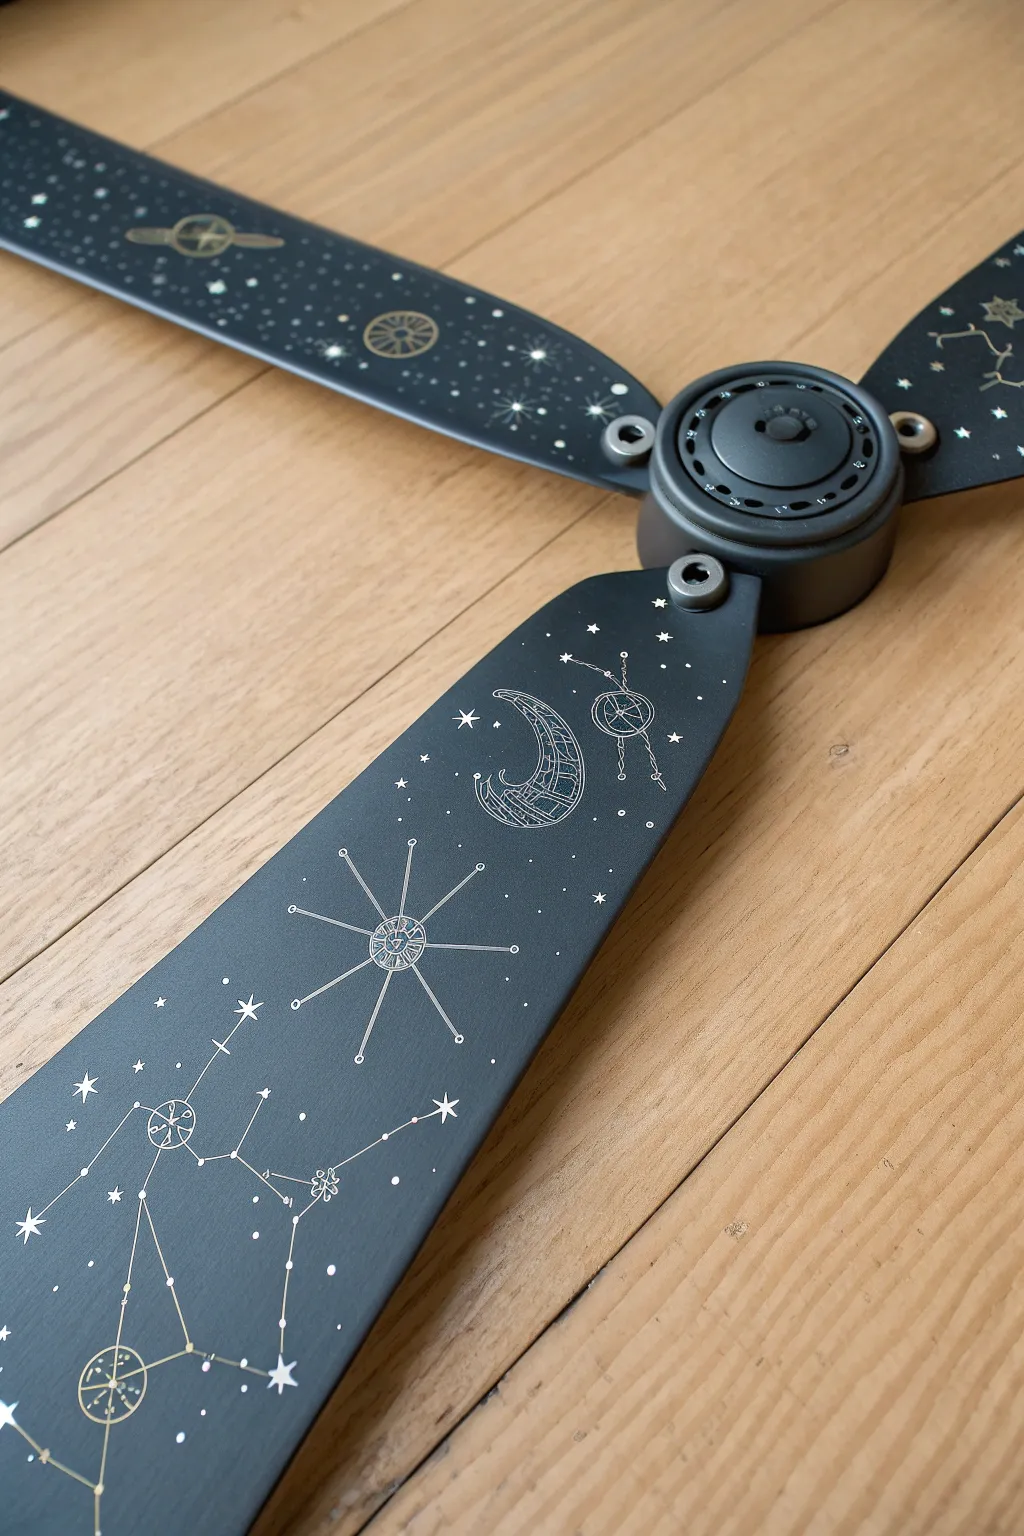

Transform an ordinary ceiling fan into a mesmerizing piece of cosmic art. This project features sleek, matte black blades adorned with delicate, metallic constellations and celestial bodies that turn your ceiling into a personal night sky.
Step-by-Step Tutorial
Materials
- Ceiling fan blades (removed from unit)
- Fine-grit sandpaper (220 grit)
- Matte black spray paint (primer + paint combo is best)
- Metallic silver or gold paint pens (extra fine tip)
- Glow-in-the-dark acrylic paint (optional for night effect)
- White colored pencil or chalk (for sketching)
- Ruler or straight edge
- Small dotting tool or toothpick
- Clear matte acrylic sealer spray
- Clean cloth
- Circular templates (coins or caps)
Step 1: Preparation & Base Coat
-
Clean surface:
Remove the fan blades from the motor housing. Thoroughly clean them with a damp cloth and mild soap to remove any dust or grease build-up. -
Light sanding:
Once dry, lightly scuff the surface of each blade with 220-grit sandpaper. You aren’t trying to strip the finish, just creating a ‘tooth’ for the new paint to adhere to. -
Prime and paint:
In a well-ventilated area, apply a smooth, even coat of matte black spray paint. Hold the can about 8-10 inches away and use sweeping motions to avoid drips. -
Second coat:
Allow the first coat to dry according to the can’s instructions (usually 1 hour). Apply a second coat to ensure solid, opaque coverage. -
Full cure:
Let the blades dry completely for at least 24 hours. This is crucial—if the base is tacky, your paint pens will snag and ruin the finish.
Steady Hands Pro-Tip
To steady your hand for fine lines, rest your pinky finger on a dry part of the blade while you draw. It acts as a pivot point and reduces shakiness.
Step 2: Mapping the Cosmos
-
Plan the layout:
Look at reference images of constellations like Orion, Ursa Major, or Cassiopeia. Decide which blade will feature which design so they feel balanced. -
Draft lightly:
Using a white colored pencil, very lightly sketch the main anchor points (the stars) of your constellations. Don’t press hard; you just want faint guides. -
Sketch curves:
For moons or planets, trace around small household objects like coins or bottle caps to get perfect circles before freehanding the details. -
Add connecting lines:
Use a ruler to lightly draw the lines connecting your star points properly.
Step 3: Inking the Details
-
Draw the stars:
With an extra-fine metallic paint pen, draw small 4-point or 5-point stars over your anchor marks. Vary the sizes to create depth. -
Connect the dots:
Carefully trace over your sketched connection lines with a ruler and the paint pen. I find usually doing the straight lines first anchors the design visually. -
Detail the moon:
Fill in your crescent moon shape with fine hatch marks or geometric patterns rather than solid coloring to mimic the intricate style in the photo. -
Add planet rings:
Draw distinct Saturn-like planets with intersecting rings. Keep the lines crisp and thin. -
Create starbursts:
Add a few larger, stylized starbursts with long, thin radiating lines as focal points on the blade. -
Sprinkle stardust:
Using the tip of the pen or a toothpick dipped in paint, add tiny random dots between the major designs to represent distant background stars.
Level Up: Galaxy Dust
Before sealing, flick a stiff toothbrush dipped in diluted white paint across the blade for a realistic ‘Milky Way’ spray effect.
Step 4: Finishing Touches
-
Remove scan lines:
Once the ink is 100% dry, gently wipe away any visible white pencil marks with a slightly damp cloth. -
Apply glow paint:
If you want the functional night-sky effect, use a dotting tool to dab a tiny amount of glow-in-the-dark paint specifically over the center of the stars. -
Seal the artwork:
Finish by spraying a coat of clear matte acrylic sealer over the blades. This protects your delicate line work from dust and cleaning in the future. -
Reassemble:
Once the sealer is fully cured, reattach the blades to your fan motor and enjoy your custom view.
Now you can look up and get lost in your own private galaxy every time you relax.


Chalkboard-Painted Blades for Doodles
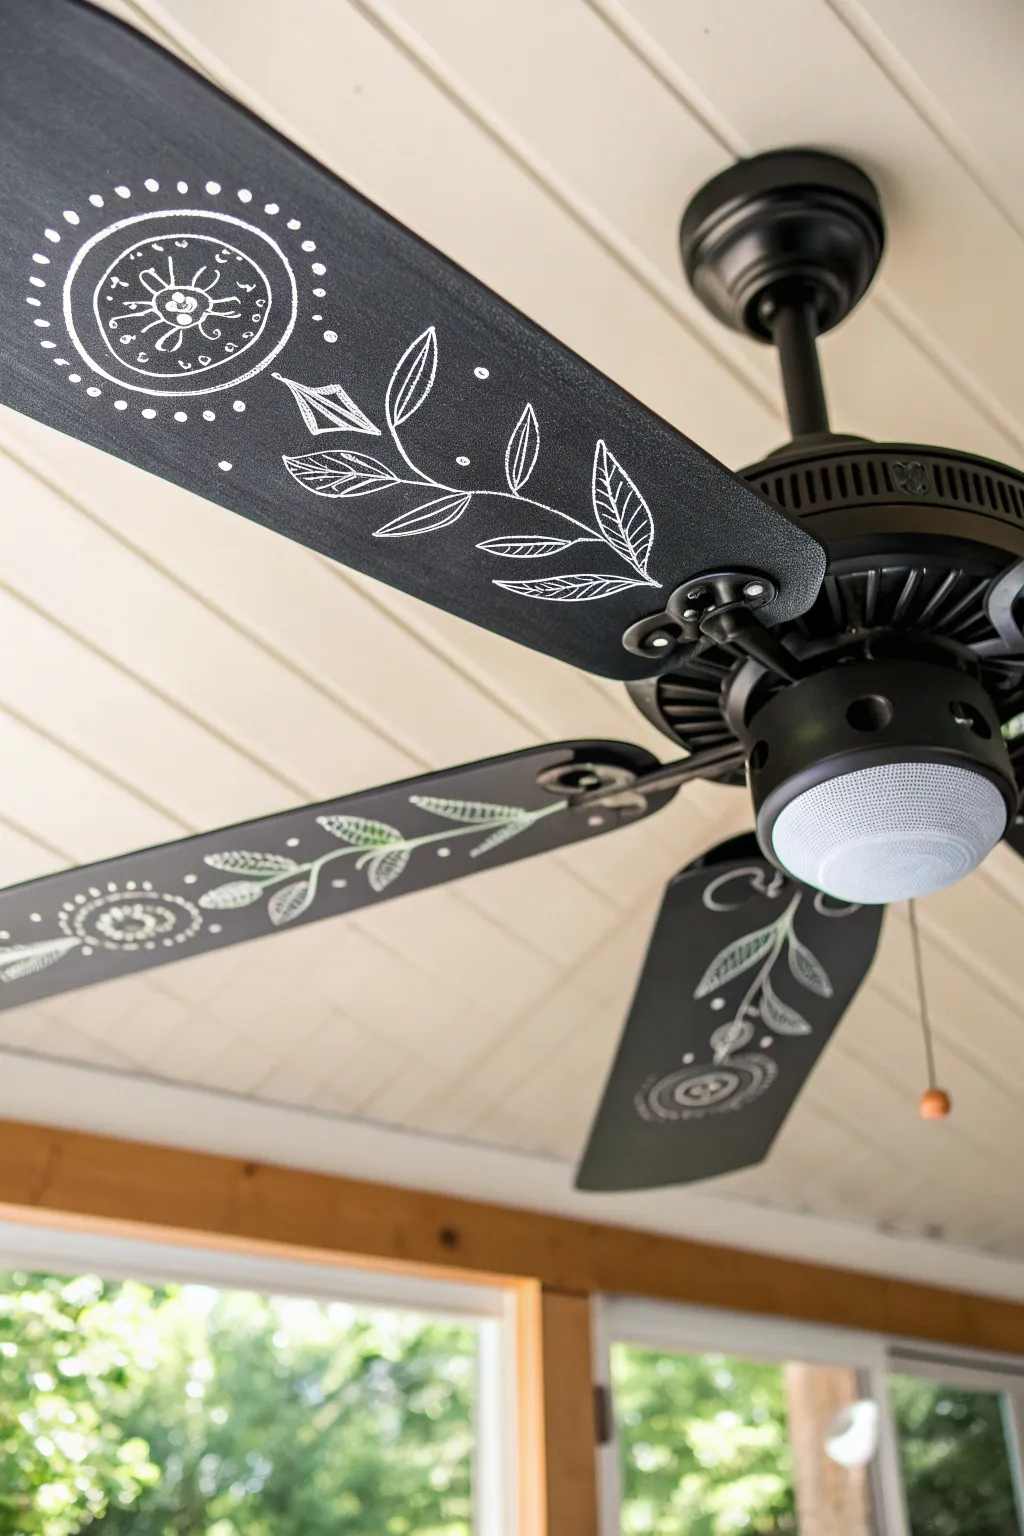
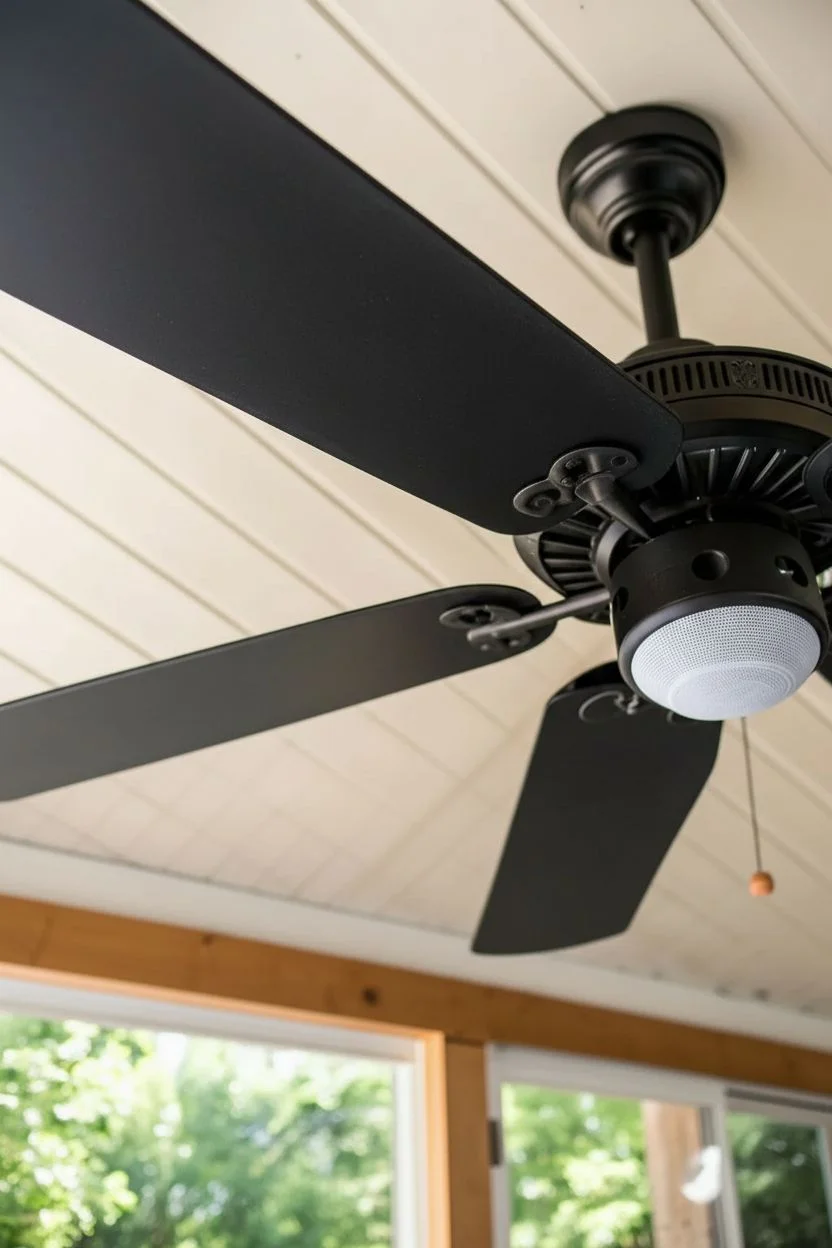
Transform a standard ceiling fan into a charming focal point by turning the blades into a canvas for your creativity. This project features matte chalkboard blades adorned with delicate, hand-drawn floral and geometric doodles that bring a playful touch to any room.
Step-by-Step
Materials
- Ceiling fan blades (removed from unit)
- Sandpaper (medium and fine grit)
- Clean cloth or tact cloth
- Chalkboard spray paint (black)
- Primer spray paint (optional, for dark or slick surfaces)
- Chalk marker (white, fine tip)
- Traditional chalk (for seasoning)
- Pencil and paper (for sketching)
- Damp rag
Step 1: Preparation & Painting
-
Remove blades:
Carefully unscrew the fan blades from the motor housing using a screwdriver. Keep all screws and hardware in a labeled bag so nothing gets lost during the painting process. -
Clean surfaces:
Wipe down each blade thoroughly with a damp cloth to remove decades of dust and grime. If they are greasy, use a mild degreaser or soapy water, then let them dry completely. -
Sand the blades:
Lightly scuff the existing finish on the blades using medium-grit sandpaper. You don’t need to strip the paint entirely, just create enough texture for the new paint to grip. Follow up with fine-grit sandpaper for a smooth finish. -
Remove dust:
Wipe away all sanding dust with a tack cloth or a slightly damp rag. Any leftover dust will create bumps in your chalkboard finish, so be thorough. -
Prime (optional):
If your blades are a very slick laminate or a dark wood that might bleed through, apply a coat of spray primer. Let this dry according to the can’s instructions before moving on. -
Apply chalkboard paint:
Shake your can of chalkboard spray paint vigorously. Apply a thin, even coat to the blades, holding the can about 8-10 inches away. Use sweeping motions to avoid drips. -
Layer up:
Let the first coat dry for about an hour (or as directed). Apply a second coat, and possibly a third, changing the direction of your spray slightly to ensure full coverage. Let the final coat cure for at least 24 hours.
Chalk Marker Tip
Store chalk markers horizontally or tip-down before use. If ink flows too fast, blot the tip on scrap paper before touching the blade to prevent puddles.
Step 2: Seasoning & Designing
-
Season the surface:
Once fully cured, take a piece of traditional stick chalk and rub the side of it over the entire painted surface. This ‘seasons’ the paint preventing permanent ghosting of your first drawing. -
Wipe clean:
Wipe off the excess chalk dust with a dry cloth. The blades should now have a classic, slightly dusty chalkboard look. -
Plan your design:
Sketch your botanical ideas on paper first. Practice drawing the vine shapes and circular mandalas to get a feel for the flow. I like to keep the design simple so it’s readable from the floor. -
Start the vine:
Using a white fine-tip chalk marker, draw a central curved line starting from the wider end of the blade, swooping toward the mounting holes. This serves as the stem for your leaves. -
Add leaves:
Draw simple leaf shapes along the vine. Vary the size slightly and add vein details inside the leaves for extra visual interest. -
Create the focal flower:
Near the tip of the blade, draw a circular mandala or abstract flower. Start with a small circle, add petals or dots around it, and build outward with concentric rings of patterns like dashes or scallops. -
Repeat consistency:
Repeat a similar design on each blade. They don’t have to be identical clones—slight variations add to the hand-drawn charm—but try to keep the visual ‘weight’ similar on each one. -
Let ink dry:
Allow the chalk marker ink to dry completely to avoid smudging during reinstallation. This usually takes just a few minutes. -
Reattach blades:
Carefully screw the blades back onto the fan motor brackets. Double-check that all screws are tight to prevent wobbling when the fan is on.
Make it Permanent
Love the design and never want to change it? Use a white oil-based paint pen instead of chalk marker for a durable finish that won’t wipe away when dusting.
Enjoy the breezy, artistic flair your new custom ceiling fan brings to your space
Painted Base With Collage Overlay Details
Transform a dated ceiling fan into a stunning statement piece using a bold blue base and intricate collage details. This project combines simple spray painting with a touch of decoupage to create a custom look that adds character to any room.
How-To Guide
Materials
- Ceiling fan (disassembled)
- Sandpaper (medium and fine grit)
- Degreaser or TSP substitute
- Painter’s tape
- High-quality spray paint (Navy or Deep Royal Blue) with primer included
- Clear coat sealant (spray or brush-on)
- Decorative paper (maps, vintage book pages, or patterned napkins)
- Mod Podge or decoupage medium
- Small craft scissors
- Foam brushes
- Screwdriver
- Drop cloth
Step 1: Preparation & Base Coat
-
Disassemble the Fan:
Safety first: Turn off the power at the breaker before removing the fan. Carefully take down the fan unit and use a screwdriver to remove the blades from the brackets, and the brackets from the motor housing. Keep all screws in a labeled baggie so you don’t lose them. -
Clean Thoroughly:
Scrub every piece—blades, brackets, motor housing, and downrod—with a degreaser or TSP substitute. Fan blades accumulate a lot of dust and grease over time, and paint won’t stick well to dirty surfaces. -
Sand Surfaces:
Lightly scuff all surfaces with medium-grit sandpaper to remove any glossy finish. This helps the new paint adhere. Wipe away all sanding dust with a damp cloth or tack cloth. -
Protect Key Areas:
Use painter’s tape to completely cover any electrical components, wires, or the inner workings of the motor housing that shouldn’t get painted. You want the paint only on the exterior shell. -
Apply Base Color:
Lay out all parts on a drop cloth in a well-ventilated area. Shake your blue spray paint can vigorously. Apply light, overlapping coats to the blades, brackets, motor housing, and canopy. -
Allow to Dry:
Let the first coat dry for about 20 minutes (or according to can instructions) before applying a second coat to ensure full, opaque coverage. Don’t forget to flip the blades and paint both sides if they will be visible.
Collage Curve Trick
When applying paper to curved surfaces like the motor housing, cut small slits in the paper edges. This allows the paper to overlap slightly and lay flat without wrinkling.
Step 2: Collage Overlay Details
-
Select Collage Material:
Choose your decorative paper. For the circular detail shown in the motor housing, look for paper with interesting borders or text, like old maps or vintage sheet music. -
Measure and Cut:
The tricky part is cutting the paper to fit the curves of the motor housing or blade irons. I find it helpful to make a template using plain scratch paper first, rubbing a pencil over the edge to get the exact shape, then cutting your decorative paper to match. -
Apply Decoupage Medium:
Using a foam brush, apply a thin layer of Mod Podge directly onto the painted surface where the paper will go—specifically focusing on the decorative ring of the motor housing and the blade brackets. -
Position the Paper:
Carefully place your cut paper onto the wet medium. Use your fingers to smooth it out gently, working from the center outward to push out any air bubbles. -
Seal the Design:
Once the paper is positioned correctly, brush another layer of Mod Podge over the top of the paper to seal it. Don’t worry if it looks white; it will dry clear. -
Dry and Repeat:
Let the decoupage layer dry completely. If the surface feels rough, you can very lightly sand it with fine-grit sandpaper and apply a second coat of Mod Podge for extra durability.
Metallic Touch
Before sealing, lightly dry-brush gold or copper metallic paint over the edges of your collage paper or the blade brackets to enhance the vintage, layered look.
Step 3: Reassembly
-
Final Clear Coat:
To protect your work from dust and rotation speed, spray a clear topcoat over the entire fan, including the newly decoupaged areas. A satin or semi-gloss finish works best here. -
Reattach Brackets:
Once everything is fully cured (give it at least 24 hours to prevent tackiness), screw the blade brackets back onto the fan blades. -
Rehang the Fan:
Follow the manufacturer’s instructions to rehang the motor housing and reconnect the wiring. Attach the blades to the motor last to avoid bumping them during installation.
Now you can enjoy a cooling breeze from a custom fixture that perfectly matches your distinctive style


Have a question or want to share your own experience? I'd love to hear from you in the comments below!