If you’ve got a cow skull (real or replica) and a craving to make it art, paint is where the transformation really starts. Here are my favorite DIY painted cow skull ideas—ranging from classic, crowd-pleasing finishes to the kind of bold experiments that make people stop mid-scroll.
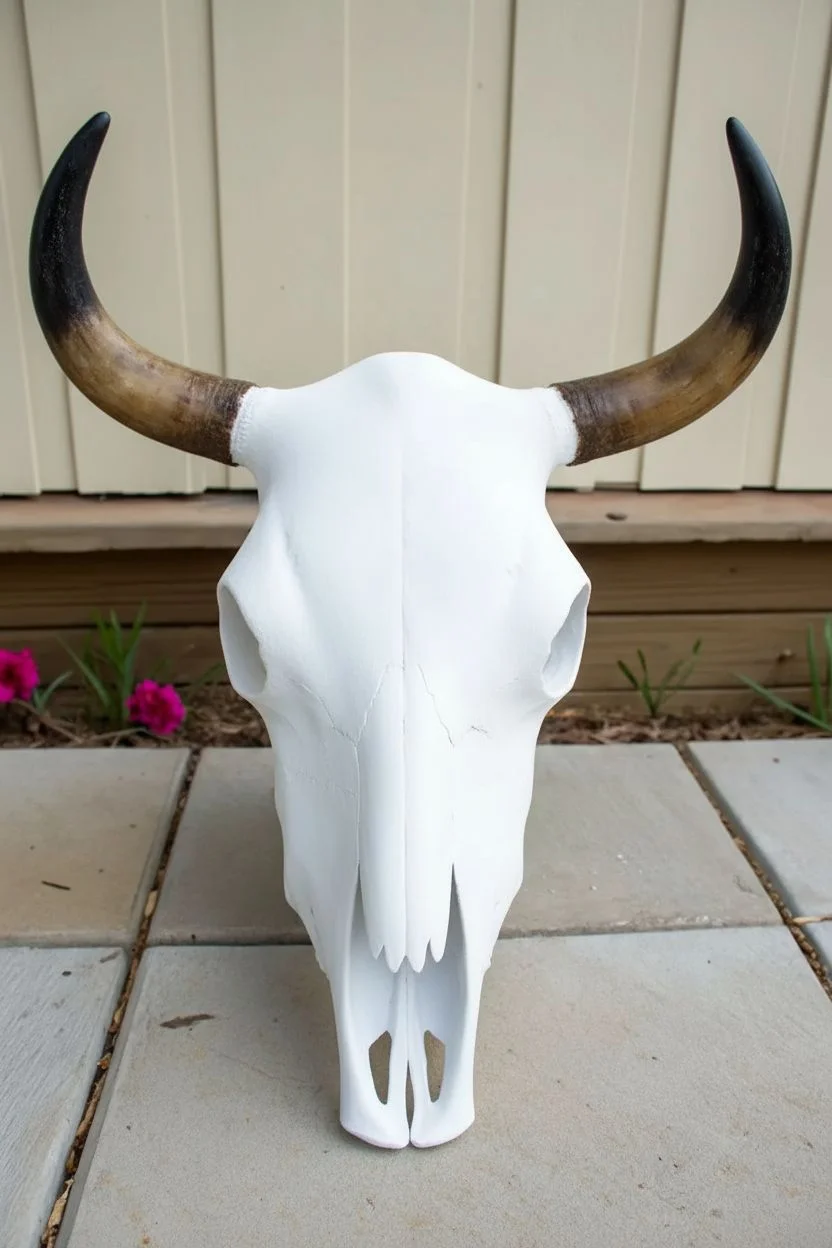
Classic Whitewashed Bone Look
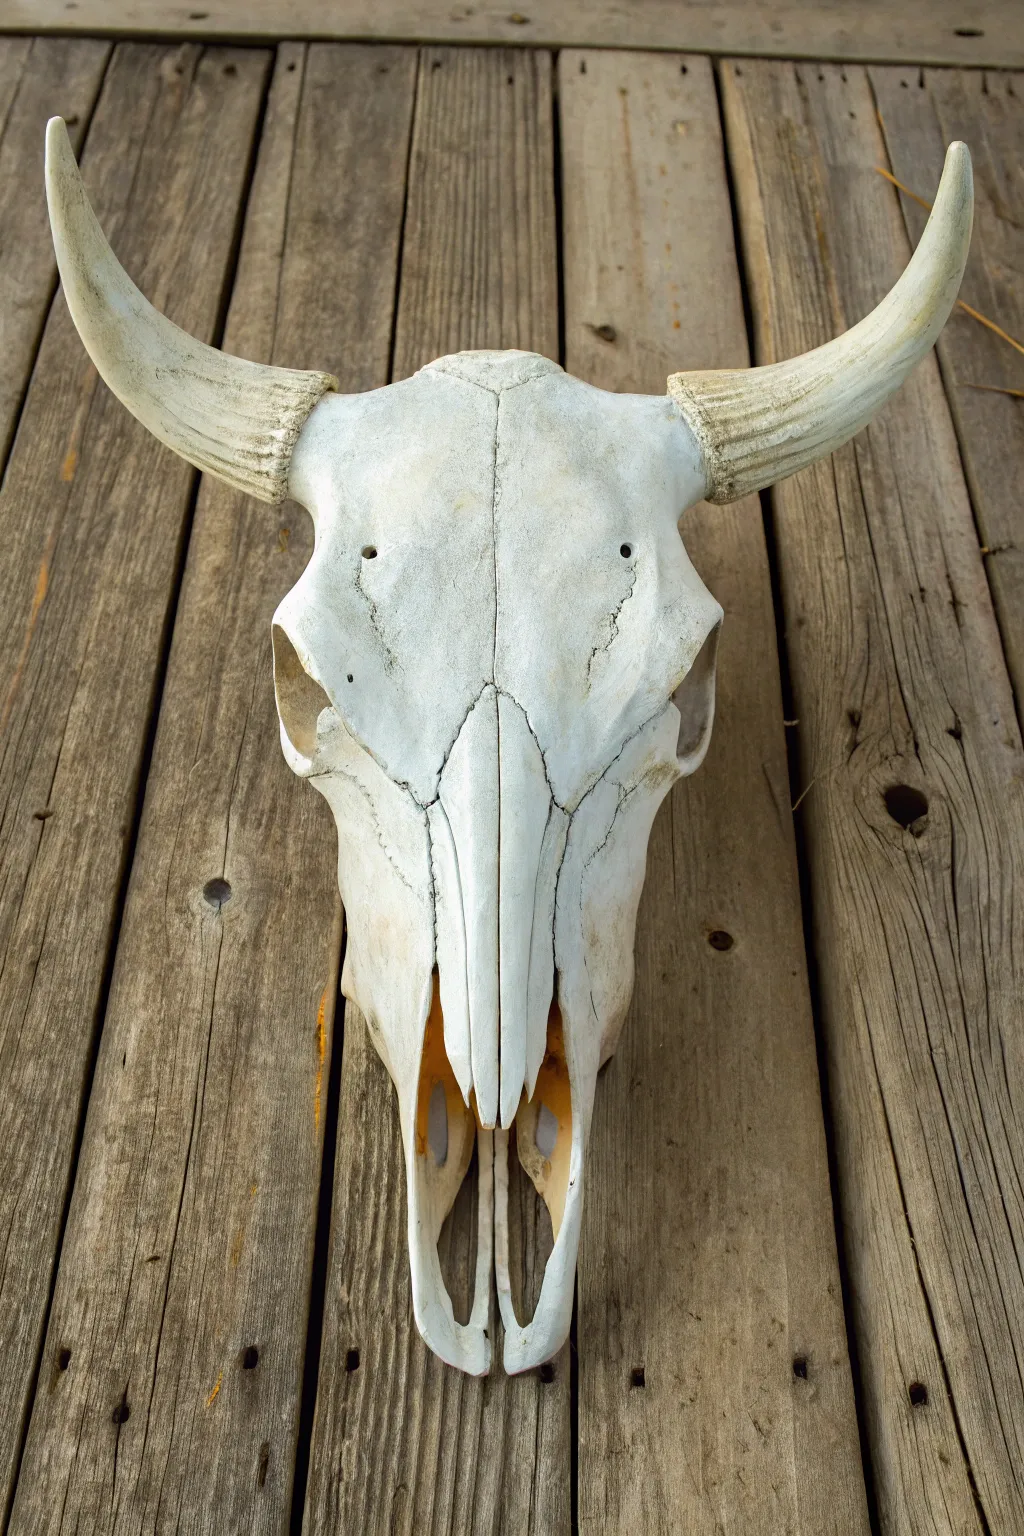
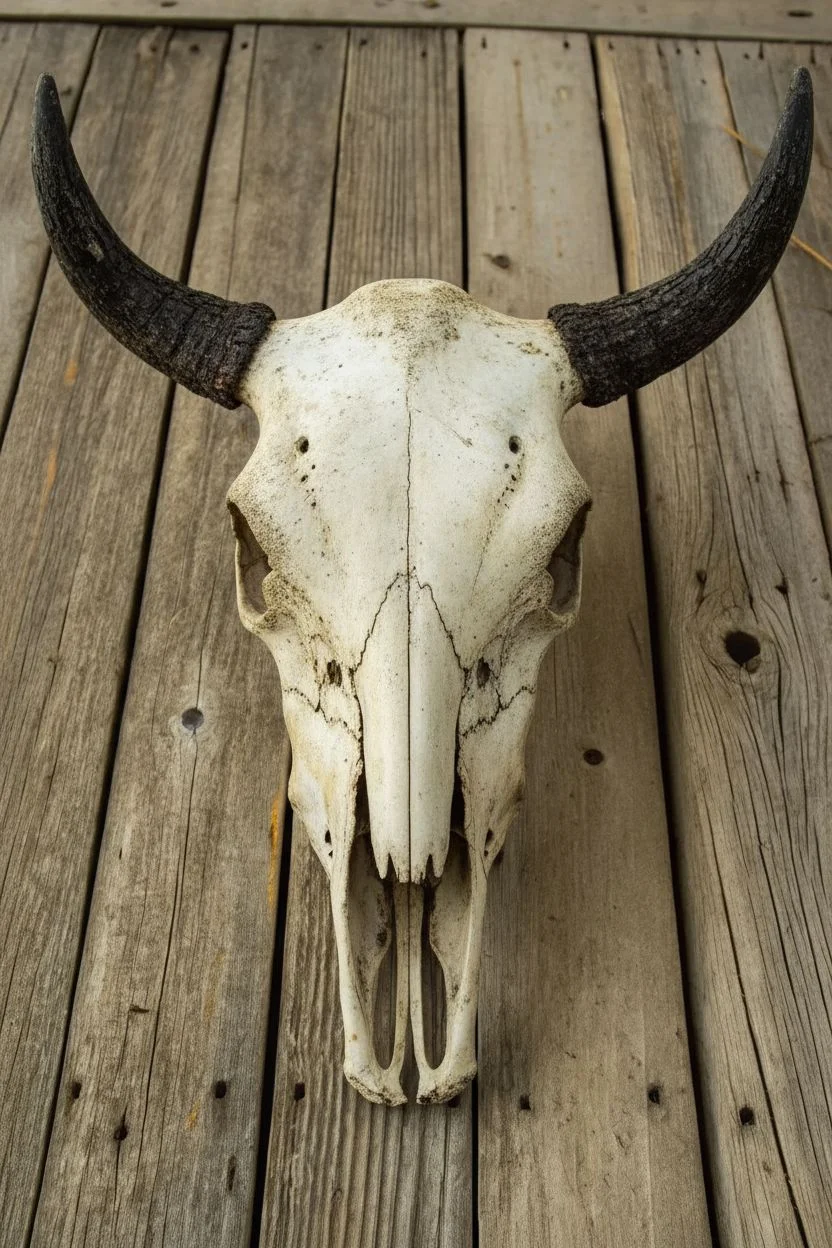
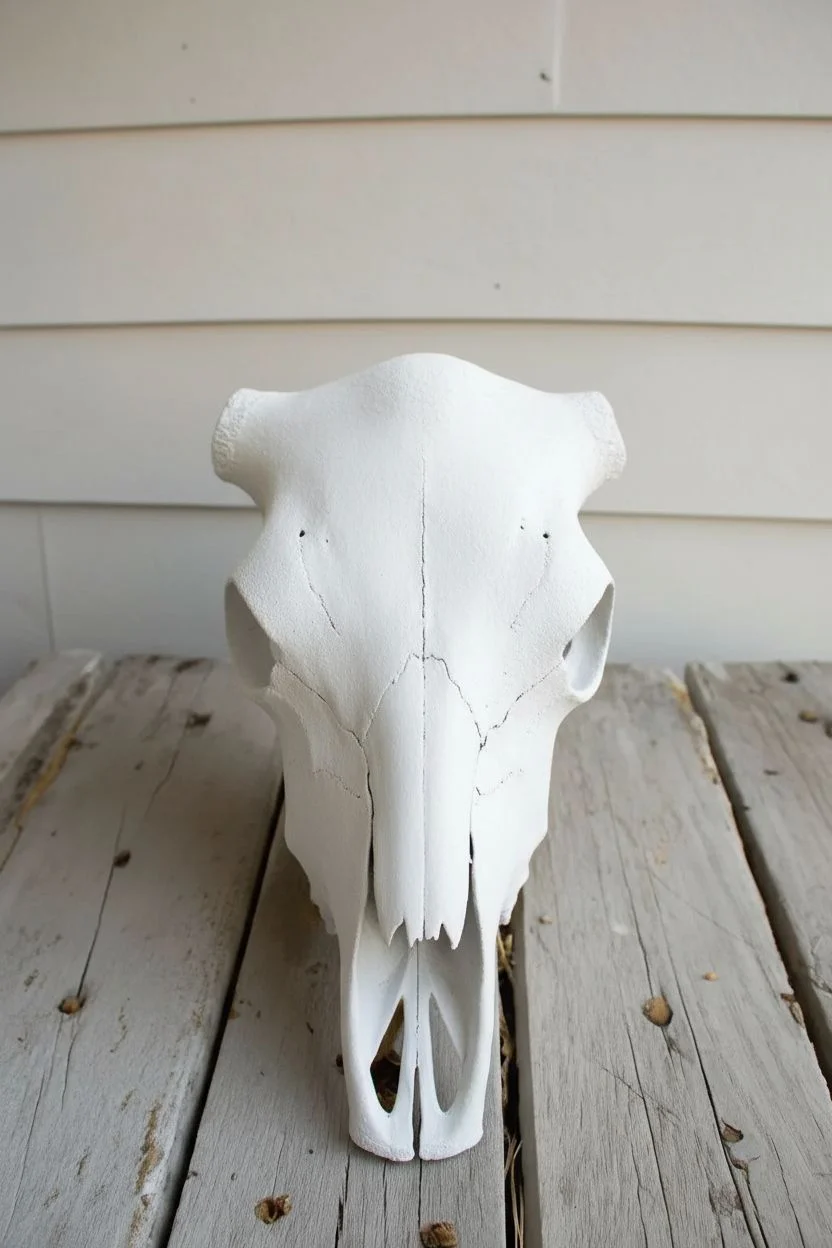
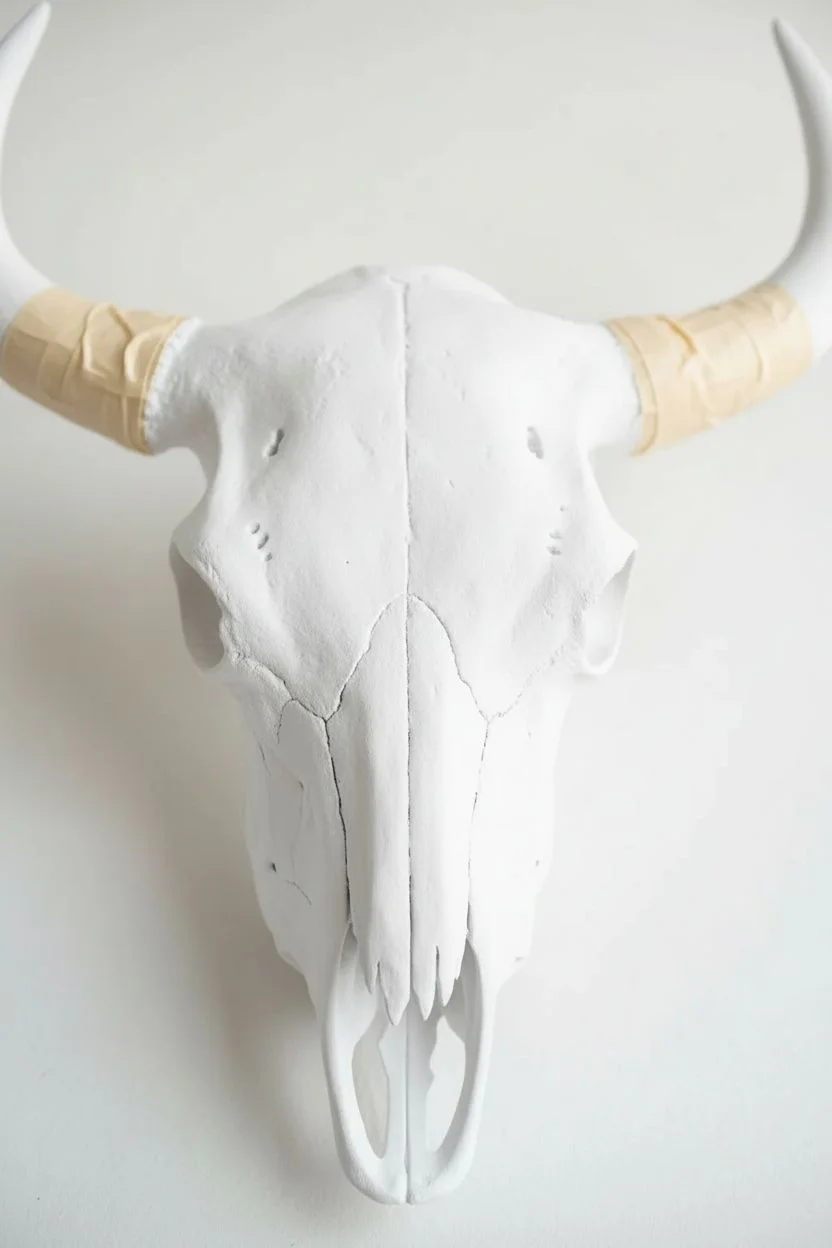
Sometimes the most striking look is simply enhancing nature’s own palette with this classic, ultra-clean whitewashed finish. This tutorial guides you through transforming a raw or discolored skull into a pristine, museum-quality display piece that highlights the natural bone structure.
Detailed Instructions
Materials
- Cow skull (cleaned)
- White acrylic paint or specialized bone whitener
- Matte finish clear coat spray
- Soft bristle brushes (various sizes)
- Stiff scrubbing brush
- Fine-grit sandpaper (220 grit)
- Bowl of water
- Clean rags or paper towels
- Drop cloth
Step 1: Preparation & Cleaning
-
Initial inspection:
Begin by removing any loose dirt or debris from the skull using a stiff scrubbing brush. If the skull has been outside, ensure all crevices are clear. -
Surface smoothing:
Lightly sand rough patches on the bone surface with 220-grit sandpaper. You aren’t trying to remove texture entirely, just knock down any sharp flakes or discoloration spots. -
Dust removal:
Wipe the entire skull down with a damp rag to remove sanding dust. The surface needs to be completely clean for the paint wash to adhere properly.
Step 2: Whitewashing Technique
-
Mixing the wash:
Dilute your white acrylic paint with water in a small bowl. I prefer a ratio of about 60% paint to 40% water to create a milky consistency that stays semi-translucent. -
First application:
Dip a wide, soft brush into the wash and apply it liberally over the main forehead plate. Work quickly to spread it before it begins to tack up. -
Wiping back:
Immediately use a clean rag to gently wipe away roughly half of the paint you just applied. This leaves pigment in the pores and cracks while keeping the high points natural. -
Working the snout:
Move down to the nasal area and snout. The bone here is often more porous, so apply the wash slightly lighter here to prevent it from looking too solid or plastic. -
Detailing the eye sockets:
Use a smaller brush to get the wash inside the rims of the eye sockets, dabbing away excess pooling with a paper towel corner. -
Horn transitions:
Carefully paint up to the base of the horns (the burrs). Do not paint the horns themselves; the contrast between the white bone and the textured horn is crucial for this look. -
Drying time:
Allow this first layer to dry completely for about 30 to 45 minutes.
Natural Texture
For a truly aged look, skip sanding the cracks. Let the dark, natural crevices show through the whitewash to create depth and character.
Step 3: Refining & Sealing
-
Assessment:
Step back and assess the whiteness. If certain areas look too yellow or uneven, apply a second, very thin layer of your wash mixture. -
Spot highlighting:
For a brighter pop, use undiluted white paint on a small dry brush. Lightly hit the most prominent ridges, like the center suture line of the skull. -
Feathering:
Feather this dry brushing out so there are no harsh lines between the bright white highlights and the washed base tone. -
Horn cleaning:
If any white paint accidentally got onto the horns, use a damp Q-tip or a bit of sandpaper to carefully remove it now. -
Final cure:
Let the skull sit for at least 2 hours to ensure all moisture has evaporated from the porous bone. -
Sealing coat:
Take the skull to a well-ventilated area and apply a light, even coat of matte clear spray. Avoid gloss, as it ruins the natural bone aesthetic. -
Final inspection:
Once the sealer is dry, check for any missed spots or uneven sheen and apply a second light coat if necessary.
Gilded Edges
Enhance the rustic look by dry-brushing a tiny amount of liquid gold leaf onto the rough texture at the base of the horns or the nose tip.
Hang your newly restored piece with pride, enjoying the clean, sculptural elegance it brings to the room


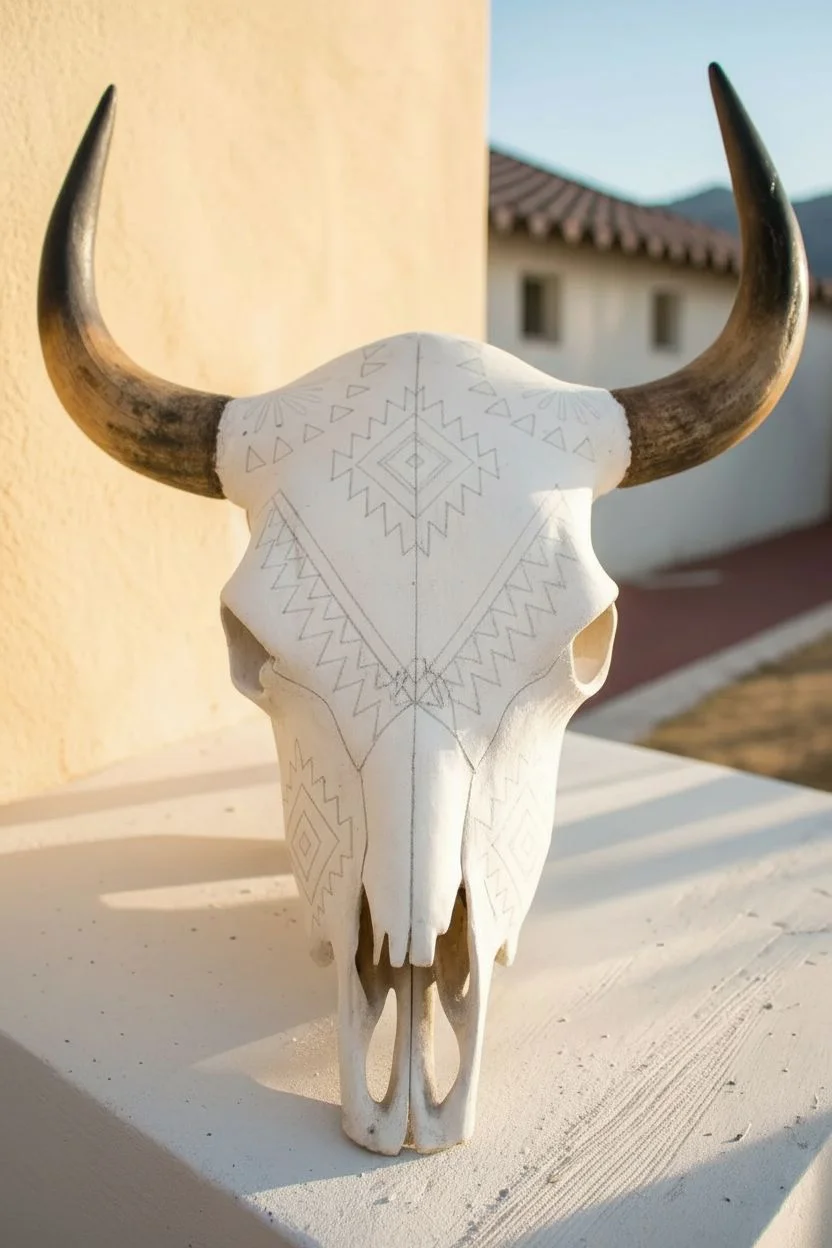
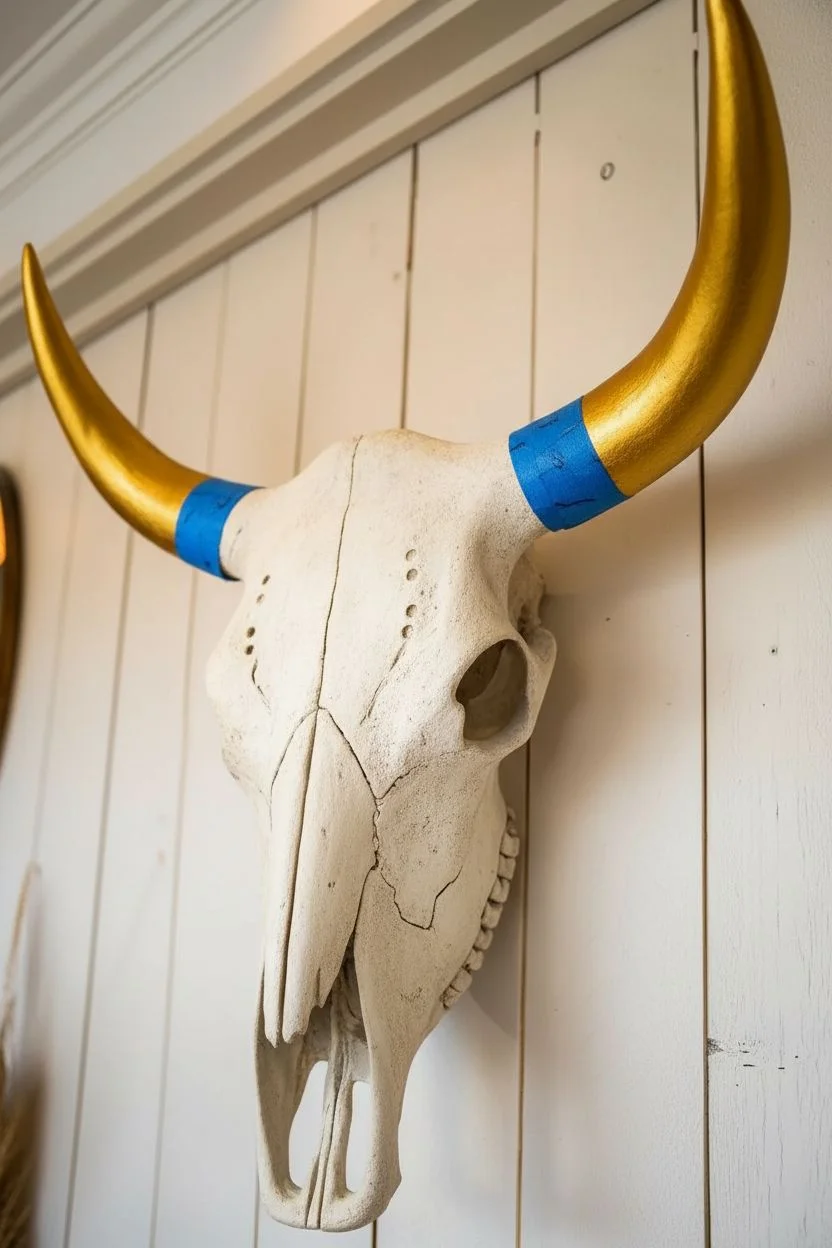
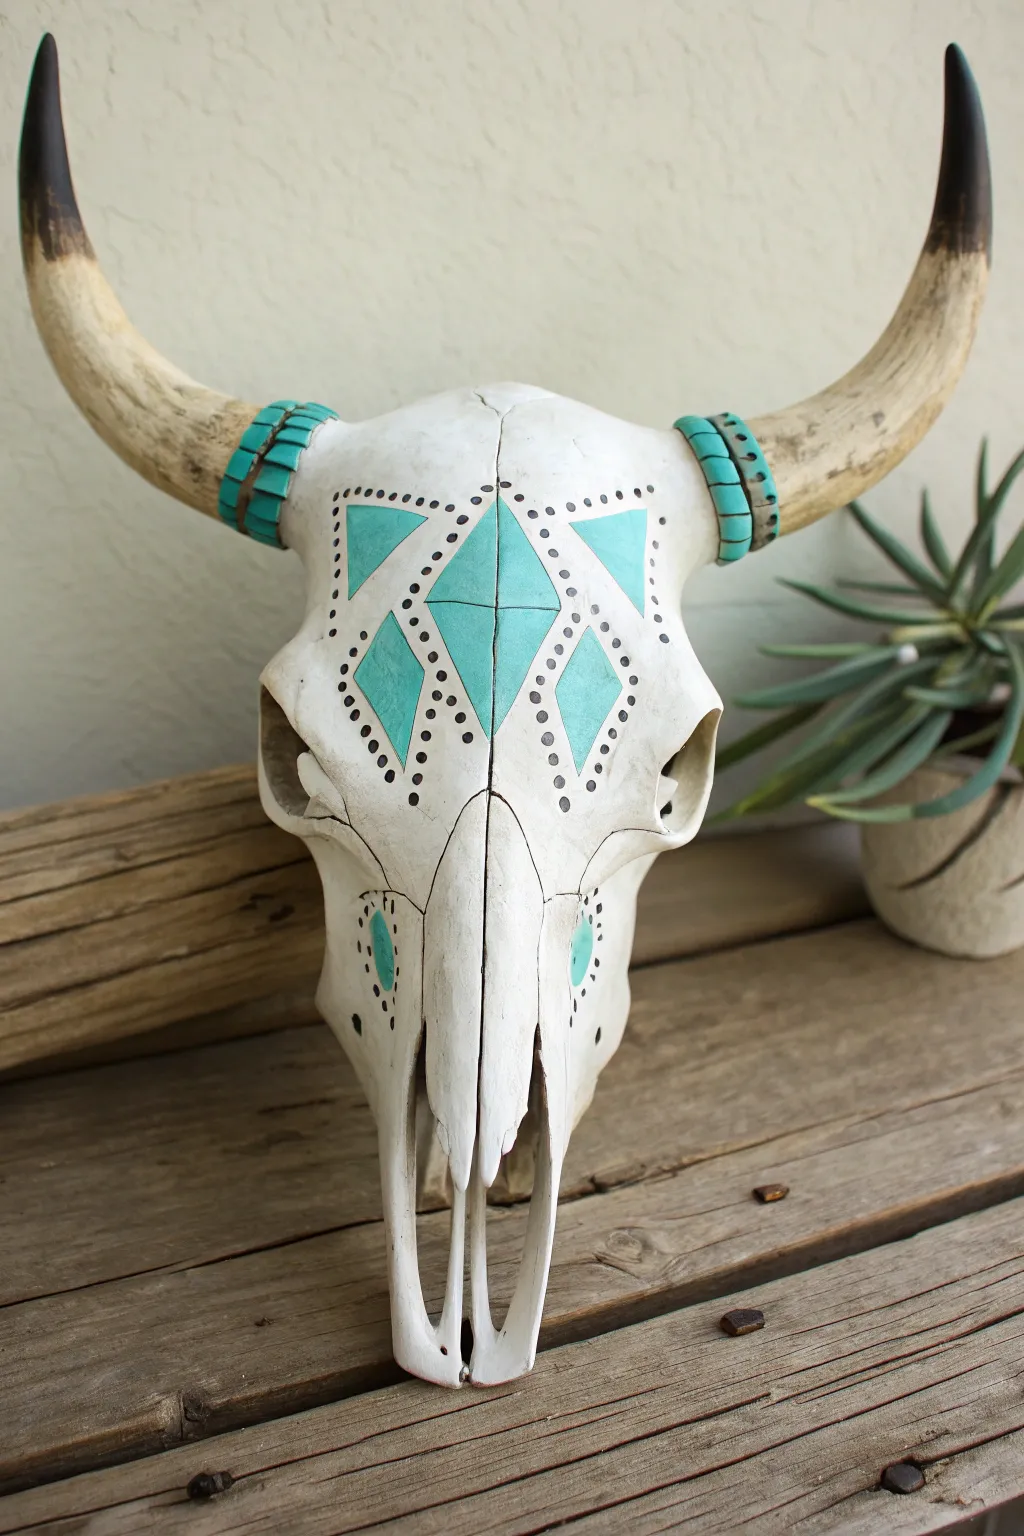
Turquoise and Gold Color Blocking
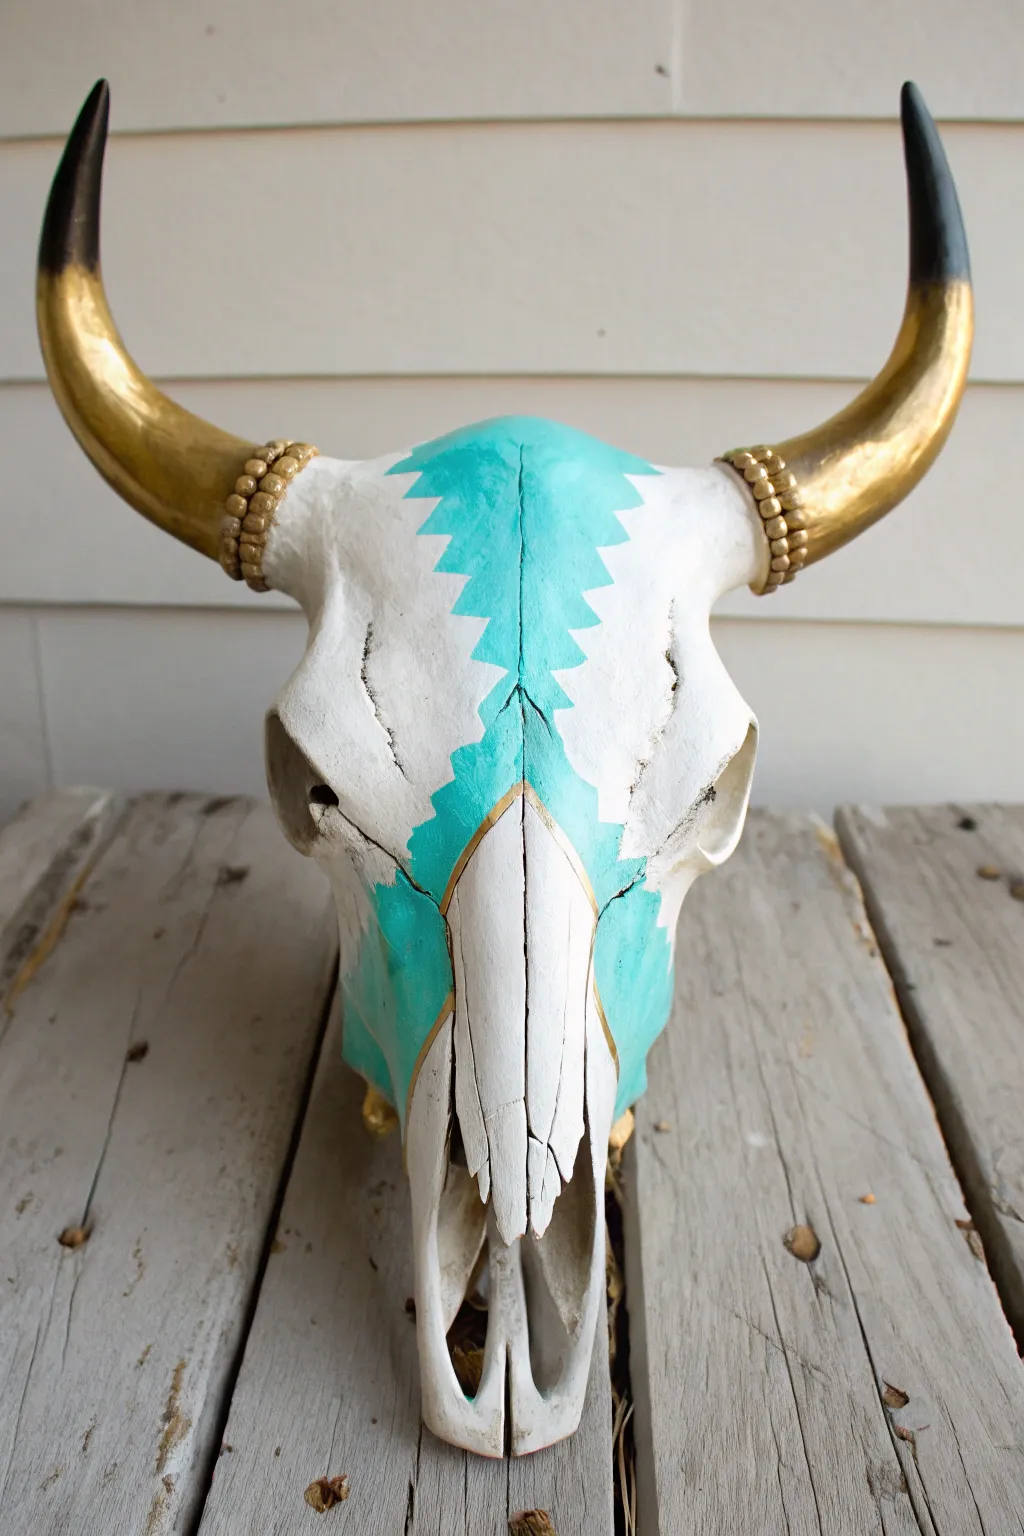
Transform a plain cow skull into a vibrant piece of southwestern decor with striking turquoise geometry and luxe gold accents. This project balances rustic textures with modern color blocking for a statement wall hanging that feels both earthy and elegant.
Step-by-Step Tutorial
Materials
- Cleaned cow skull (real or faux resin)
- White spray paint or acrylic paint (matte finish)
- Turquoise craft acrylic paint
- Liquid gold leaf or metallic gold acrylic paint
- Painter’s tape (blue or green)
- Pencil
- Small flat paintbrush
- Medium round paintbrush
- Gold beads (plastic or wood)
- Hot glue gun and glue sticks
- Clear matte sealant spray
Step 1: Preparation and Base Coat
-
Clean surface:
Ensure your skull is completely clean and dry. If using a real skull, make sure all biological material is removed; for a resin skull, simply wipe away any dust or oils. -
Prime with white:
Apply a base coat of matte white paint to the entire skull. If using spray paint, do this in a well-ventilated area with light, even bursts to avoid drips. -
Check for coverage:
Let the first coat dry completely, usually about an hour. Inspect the skull for any spots where the original bone color shows through and apply a second coat if necessary for a solid, bright white finish.
Don’t Tape? No Problem
If the skull surface is too textured for tape to stick well, skip it. Hand-paint the zigzag outline first with a fine liner brush, then fill it in.
Step 2: Creating the Geometric Design
-
Mark the center:
Using a pencil, very lightly mark the center line down the forehead of the skull. The natural suture lines of the bone often provide a perfect guide for this. -
Draft the zigzag:
Lightly sketch a zigzag or sawtooth pattern on either side of the center line. Aim for symmetry, but remember that the skull’s organic shape allows for some variation. -
Tape the edges:
Carefully apply painter’s tape along the outer edges of your penciled zigzag lines. Press the tape edges down firmly with your fingernail to prevent paint bleed. -
Apply turquoise paint:
Using a flat brush, fill in the taped area with turquoise acrylic paint. Paint away from the tape edge rather than into it to minimize bleeding. -
Second coat:
Allow the turquoise layer to dry to the touch. Apply a second coat to ensure the color is opaque and vibrant against the white background. -
Remove tape:
While the paint is still slightly tacky (not fully cured), gently peel back the painter’s tape at a 45-degree angle to reveal crisp lines.
Step 3: Gold Leaf & Horn Detailing
-
Outline the nose:
Switch to your metallic gold paint or liquid gold leaf. Using a fine detail brush, paint a thin outline around the nasal cavity where the bone naturally curves. -
Paint the horns gold:
Apply gold paint to the horns, starting from the base and working upwards. Stop about two-thirds of the way up the horn. -
Blend the tips:
If your skull has naturally black tips, leave them bare. If not, paint the tips black and use a dry brush to feather the black paint down into the wet gold for a blended, ombre effect. -
Touch up:
Inspect your lines. If any turquoise bled, use a tiny brush with white paint to clean up the edges once everything is dry.
Make it Shine
Swap the matte turquoise paint for a metallic turquoise or teal. The shimmer will catch the light alongside the gold horns for an extra glamorous finish.
Step 4: Embellishing and Sealing
-
Prepare the beads:
Gather enough gold beads to wrap around the base of each horn. I usually dry-fit them first to see how many strands look best. -
Glue the beads:
Apply a small bead of hot glue at the base of the horn where it meets the skull. Press your gold beads into the glue, creating two or three stacked rows to conceal the transition line. -
Final seal:
Once all paint is fully cured (give it overnight if possible), spray the entire skull with a clear matte sealant to protect the paint and prevent chipping.
Hang your finished masterpiece on a rustic wood backdrop or directly on a gallery wall to enjoy your handiwork


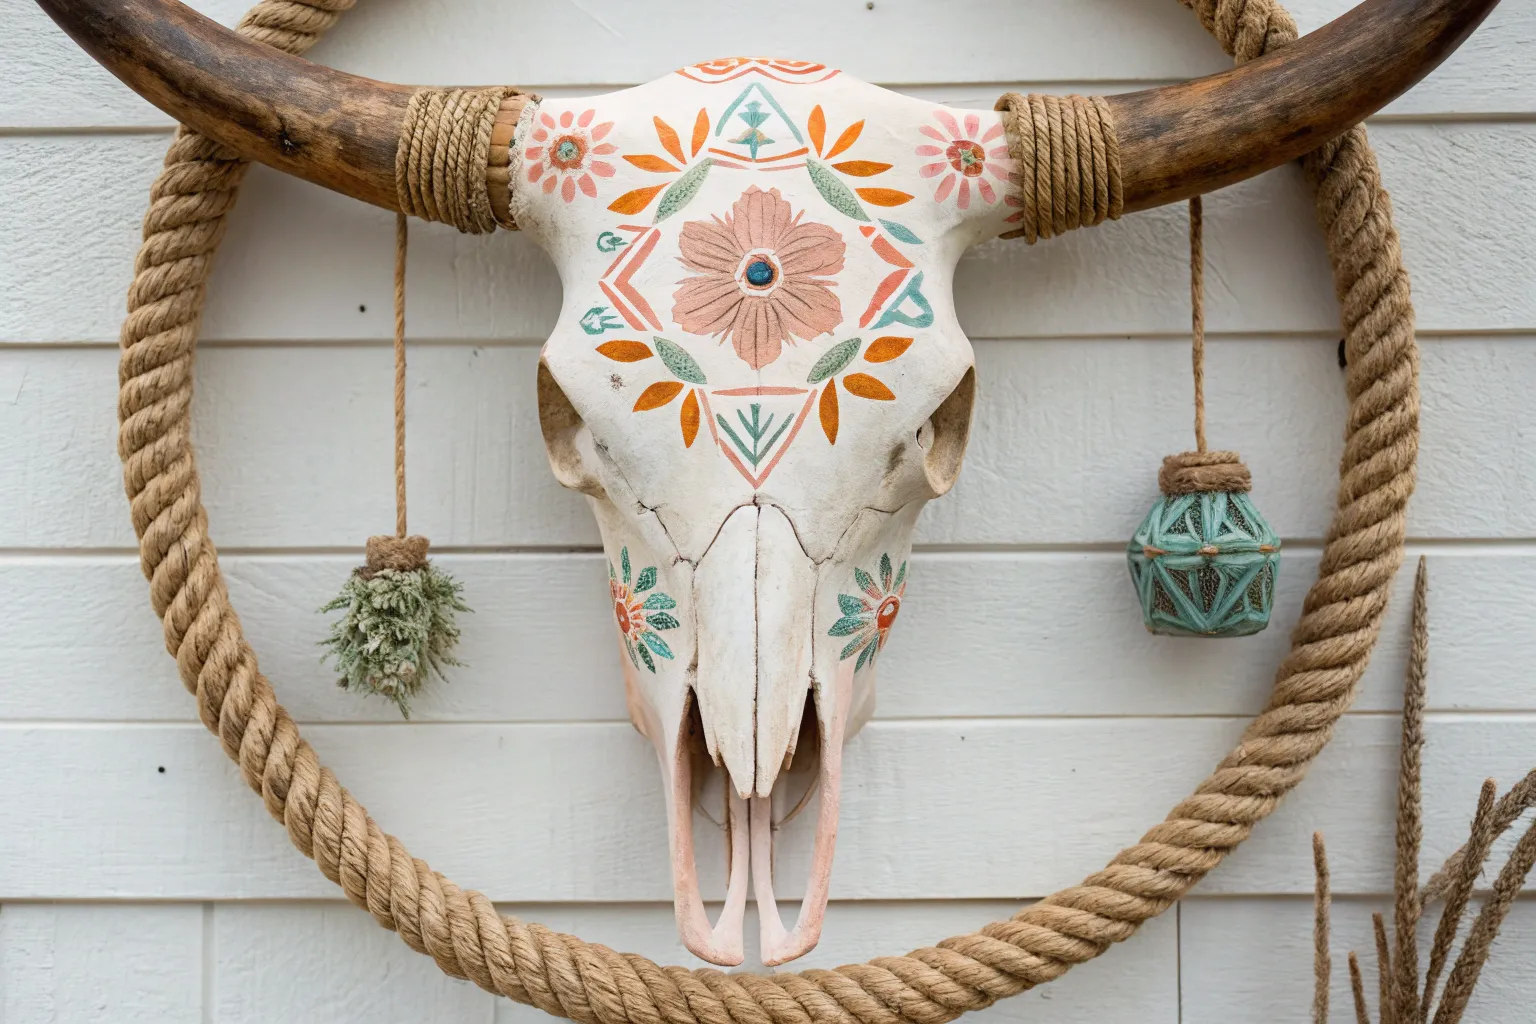
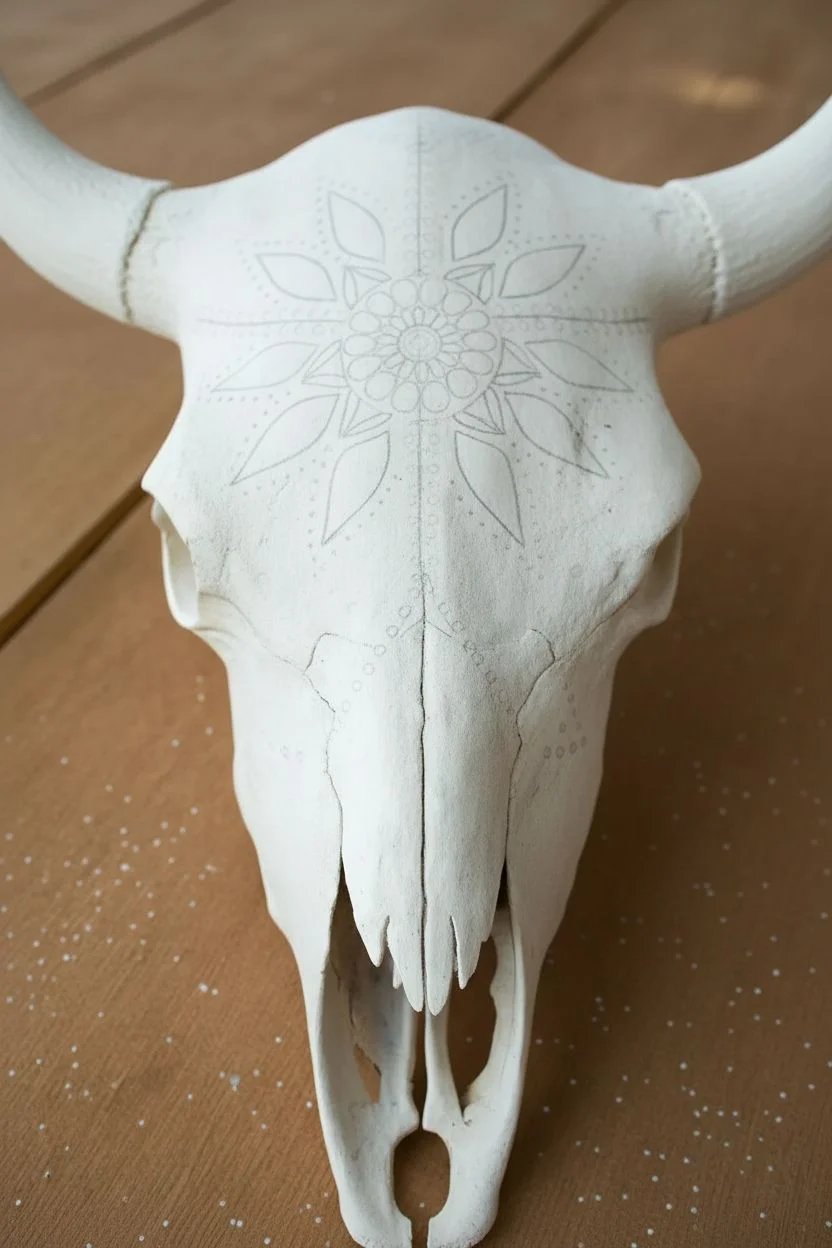
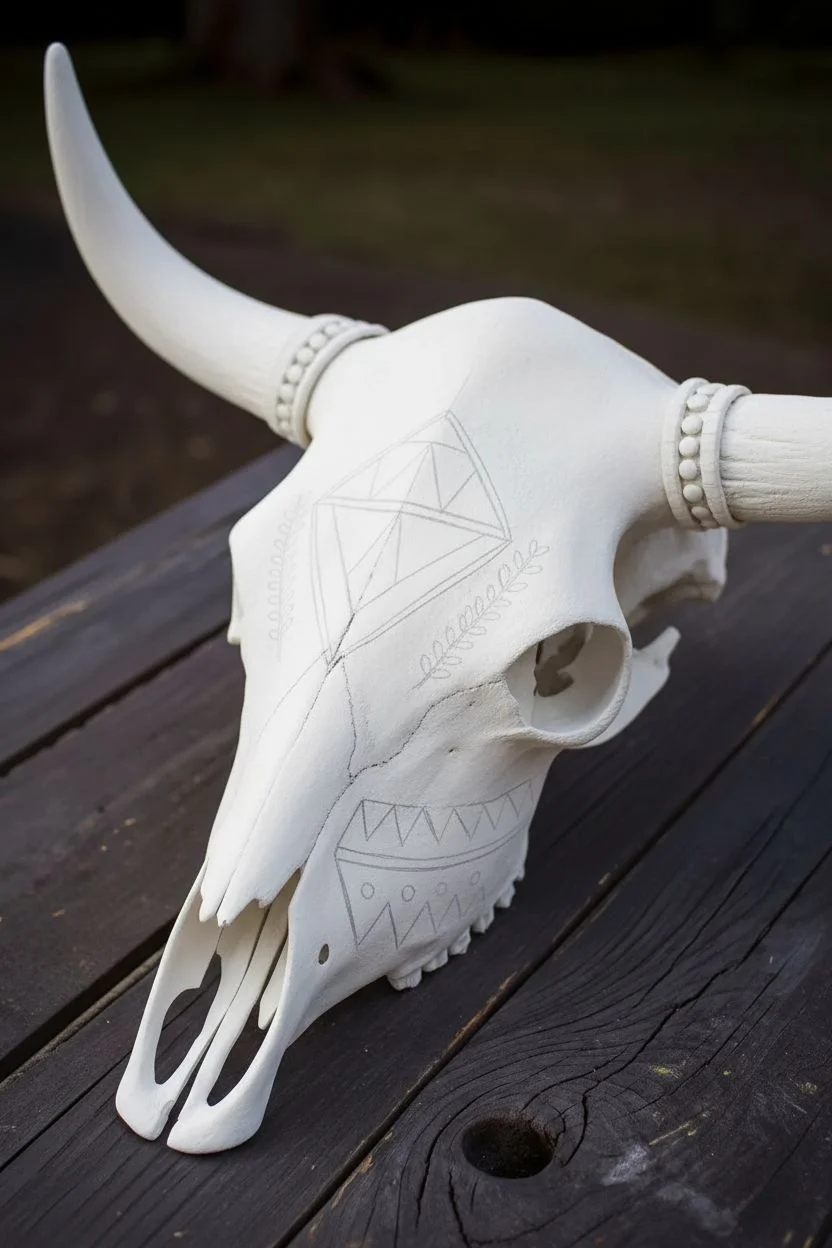
Delicate Floral Forehead Bouquet
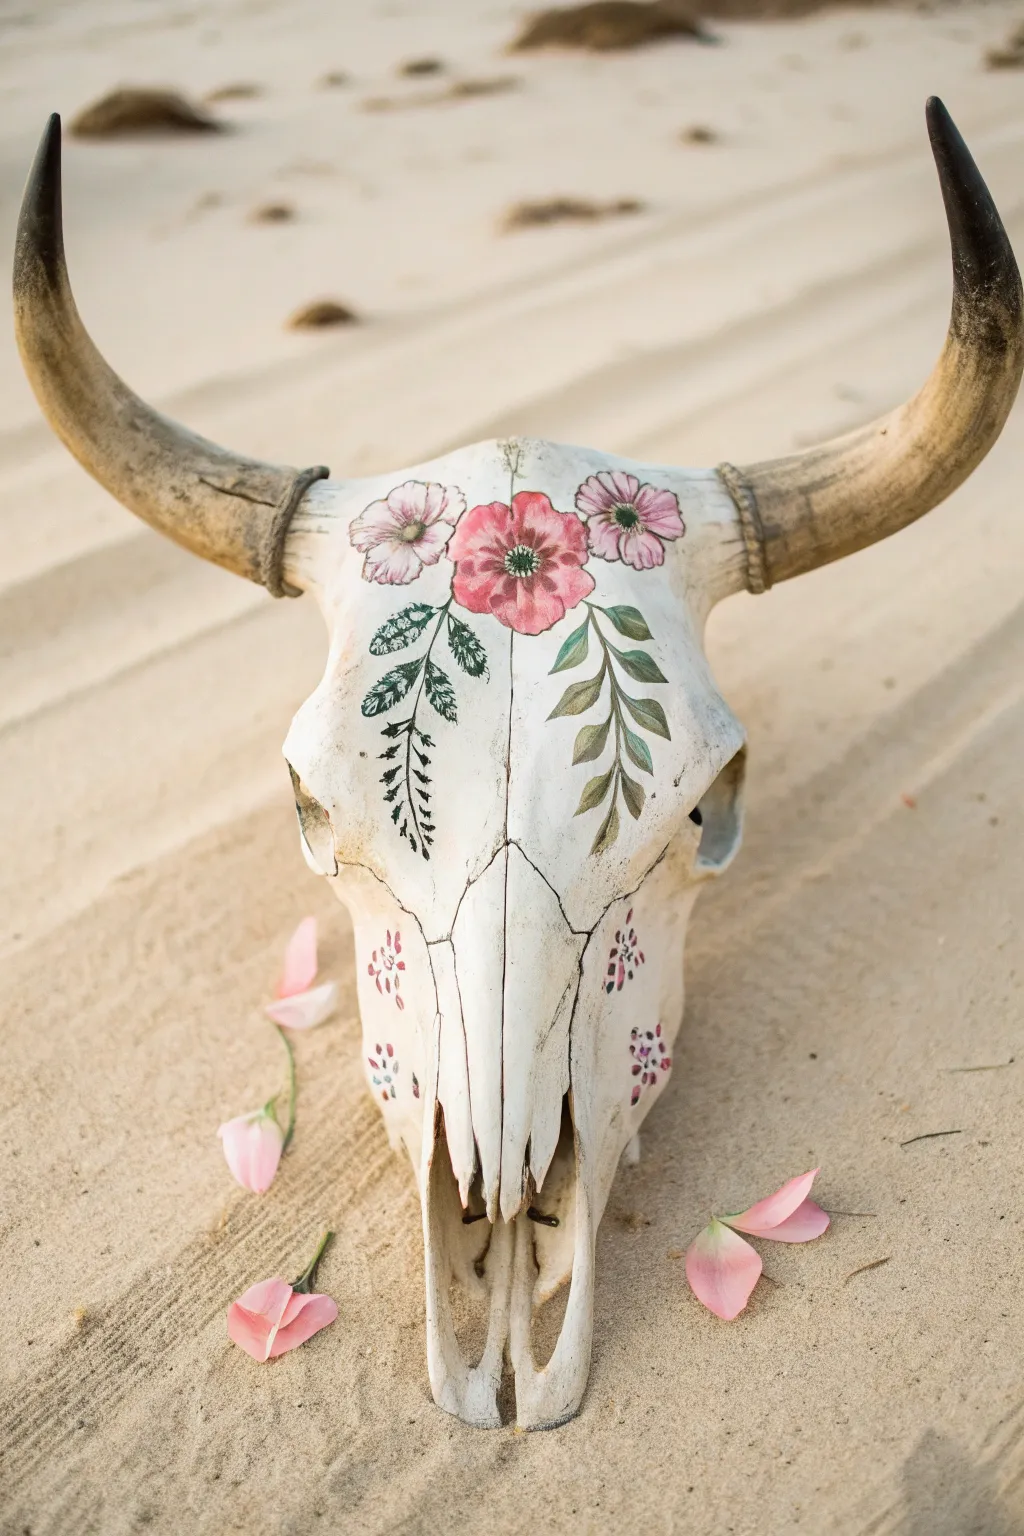
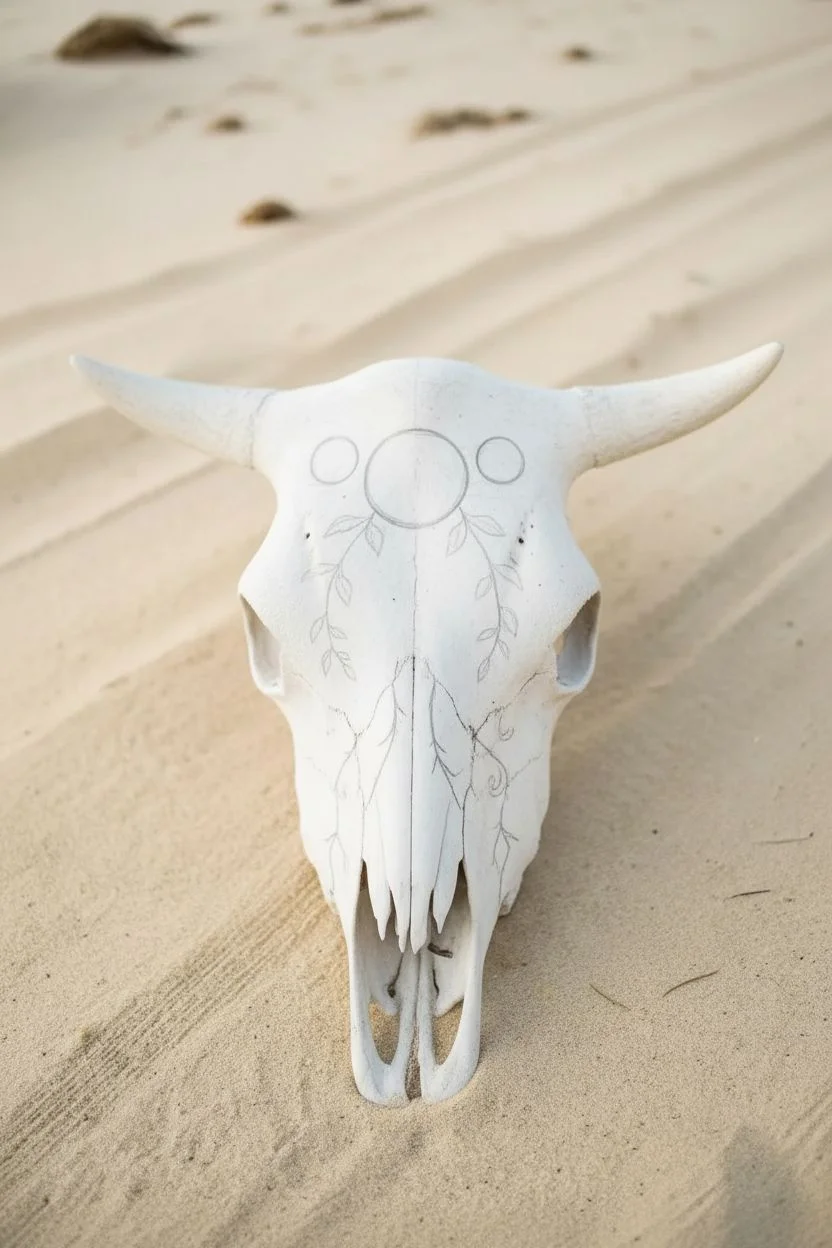
Contrast the rugged texture of bone with soft, painterly florals in this delicate modification of a classic cow skull. By centering a vintage-inspired bouquet on the forehead and trailing vines down the nasal bridge, you create a striking focal point that feels both wild and refined.
How-To Guide
Materials
- Cleaned cow skull (real or high-quality faux resin)
- Acrylic paints: soft pink, muddy rose, olive green, forest green, white, yellow ochre
- Gesso or white acrylic primer
- Fine grit sandpaper (220-grit)
- Paintbrushes: small flat shader (size 4), round detail brush (size 0 or 00), small filbert brush
- Pencil with a very light touch
- Matte clear sealant spray
- Palette or paper plate
- Cup of water and paper towels
Step 1: Preparation & Planning
-
Surface prep:
Begin by ensuring the skull is perfectly clean and dry. If using a real skull, lightly sand the forehead area where you plan to paint to create a slightly smoother surface for the bristles. -
Base coat (optional):
If your skull has dark discoloration on the forehead, apply a very thin, watered-down wash of white acrylic or gesso to the painting area. Let this dry completely to give yourself a bright canvas. -
Sketch the layout:
Using a pencil with a very light hand, sketch the arrangement. Draw a central circle for the main flower right in the middle of the forehead, two slightly smaller circles on either side, and faint lines guiding where the leaves will flow down the nose bridge.
Paint Slipping?
If the acrylic paint beads up on the bone surface, the skull might be too smooth or oily. Lightly sand the area again or dab on a very thin layer of matte medium to give the paint more ‘tooth’ and grip.
Step 2: Painting the Main Blooms
-
Mix your pinks:
Create a gradient of pinks on your palette. You’ll need a pale blush (mix white with a tiny dot of pink) and a deeper rose color for shading. -
Block in petals:
Start with the central flower. Using a small filbert brush, paint rounded petal shapes radiating from the center. Keep the paint somewhat thin so the texture of the bone subtly shows through. -
Add the side blooms:
Repeat the petal blocking for the two flanking flowers. I find that slightly varying the angle of these side flowers makes the bouquet look more organic. -
Layer depth:
Once the base pink is dry, take your deeper rose shade and paint the inner portions of the petals near the flower centers. This creates a dimensional, cup-like effect. -
Highlight edges:
Use your smallest brush with nearly pure white paint to add delicate highlights to the outer tips of the petals, defining their separation. -
Flower centers:
Dab a small circle of yellow ochre mixed with green in the very center of each bloom. Surround this with tiny dots of dark green or brown to mimic stamens.
Step 3: Foliage & Details
-
Mix green shades:
Prepare two shades of green: a lighter, muted olive and a darker forest green. This variation prevents the leaves from looking flat. -
Paint right-side leaves:
On the right side of the skull, paint a vine descending. Use the flat shader brush to create broader, laurel-like leaves. Press the brush down and lift as you pull back to create a tapered leaf shape. -
Paint left-side foliage:
For the left side, change the style slightly to add interest. Use your round detail brush to paint delicate, fern-like fronds with tiny individual leaves branching off a central stem. -
Add veining:
Once the broader leaves are dry, use your finest liner brush and the dark green paint to add a thin central vein to each leaf. -
Lower detailing:
Move further down the nasal bone. Paint small clusters of simple four-dot flowers using your deep rose color. scatter these casually to look like falling petals. -
Connect the design:
Ensure the foliage appears to be tucked behind the main pink flowers by carefully painting green stems that just barely touch the petal edges.
Add Realism
Mix a tiny amount of water into a dark brown paint and flick it off a toothbrush onto the finished flowers. These speckles mimic organic imperfections and make the painting feel vintage.
Step 4: Finishing Touches
-
Assess and refine:
Step back and look at the skull from a distance. If any edges look too sharp, soften them with a slightly damp brush. Add more white highlights if the flowers feel too dark. -
Dry time:
Allow the paint to cure for at least 24 hours. Acrylics dry to the touch quickly but need time to fully harden on a non-porous surface like bone. -
Seal the work:
Spray the painted area with a matte clear coat. Use short, light bursts to avoid drips. This protects your artwork from dust and UV fading.
Place your finished piece in a sunny spot or hang it as a statement wall decoration to bring a touch of southwestern charm to your home


Southwestern Geometric Panels
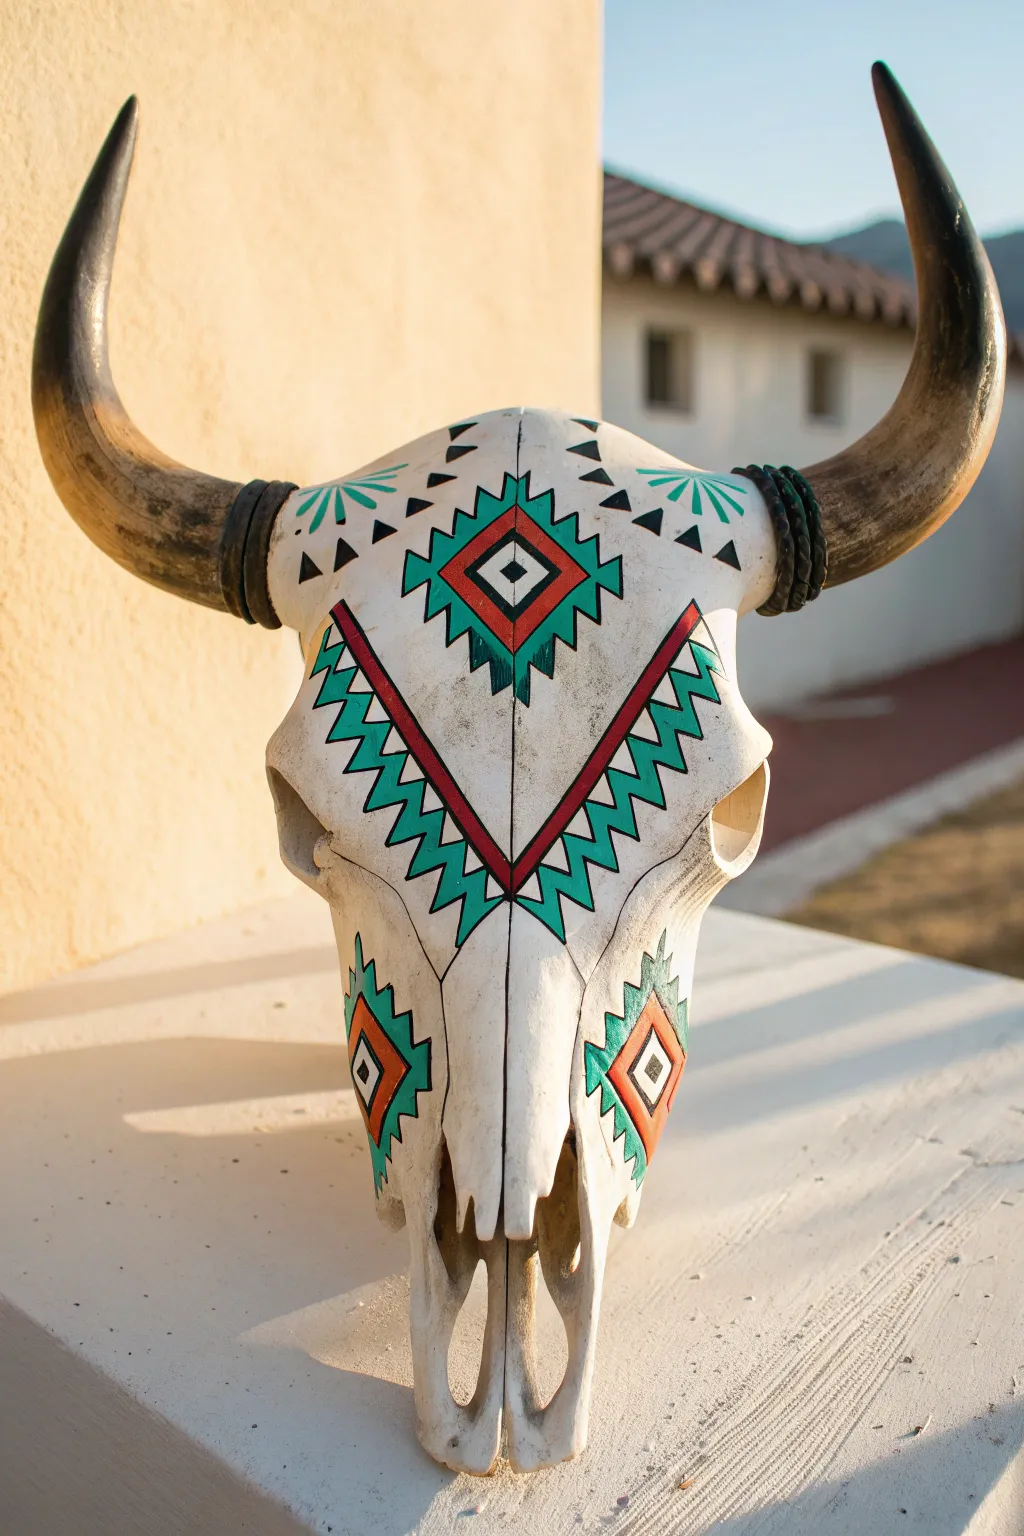
Transform a plain cow skull into a striking piece of Southwestern decor with vibrant teal and rust-orange geometric patterns. This design frames the natural contours of the skull, balancing bold zig-zag lines with delicate accents for a polished, professional look.
Detailed Instructions
Materials
- Cleaned cow skull (real or faux resin replica)
- Acrylic craft paints: Teal/Turquoise, Rust Orange/Terracotta, Black, White
- Pencil and eraser
- Ruler or flexible measuring tape
- Fine-grit sandpaper (optional, for prepping a real skull)
- Set of paintbrushes: Flat shader (size 4), round liner (size 0 or 1), angled brush
- Painters tape (optional)
- Leather cord or twine (black or brown)
- Clear matte sealant spray
Step 1: Preparation and Mapping
-
Clean surface:
Begin by ensuring the skull is clean and dry. If using a real skull, lightly sand any rough patches. For resin skulls, a quick wipe with isopropyl alcohol removes manufacturing oils. -
Mark the center:
Locate the exact center vertical line running down the forehead and nose bridge. Lightly sketch this axis line with your pencil to ensure symmetry throughout the design. -
Outline the central diamond:
Right where the forehead feels broadest (often between the eyes), sketch a large diamond shape. Use your ruler to ensure the points align perfectly with your center axis. -
Sketch the ‘V’ panel:
Draw the large ‘V’ shape that dominates the face. Start the lines near the horns and bring them down to meet at a point on the nose bridge, well below your central diamond. -
Detail the zig-zags:
Inside your large ‘V’ outline, sketch the jagged zig-zag pattern. Drawing these accurately now saves headache later; make sure the teeth of the pattern mirror each other on both sides. -
Add secondary motifs:
Sketch the sunburst patterns near the horns (three lines with small triangles) and the smaller diamond clusters on the lower cheek areas.
Fixing Wobbly Lines
If your geometric lines look shaky, use a white paint pen or a very small brush with the skull’s base color to “erase” and straighten edges. It’s much easier than scraping off paint.
Step 2: Painting the Design
-
Paint the red borders:
Start with your rust orange or terracotta paint. Using a flat brush or the edge of an angled brush, carefully paint the distinct red borders that frame the central diamond, the main ‘V’ panel, and the cheek diamonds. -
Fill the teal shapes:
Switch to your teal paint. Fill in the zig-zag patterns inside the ‘V’ shape and the jagged borders surrounding the central diamond. I find a small flat brush works best for getting crisp edges on these geometric shapes. -
Add black accents:
Using your fine round liner brush and black paint, add the small triangular details. This includes the tiny triangles above the eye sockets, the center of the main diamond, and the sawtooth edges along the teal sections. -
White details and clean up:
If your skull isn’t naturally white, or if you need to correct smudges, use white paint to sharpen the lines between the colored sections. This negative space is crucial for the pattern to pop. -
Sunburst details:
Paint the small fan-like details near the top of the head using teal for the lines and black for the tiny triangle tips. -
Checking symmetry:
Step back and look at the skull from a few feet away. Fix any uneven lines or asymmetry while the paint is still workable.
Add Metallic Flair
Swap the black accent paint for metallic gold or copper. This adds a modern, luxurious shimmer that catches the light beautifully when the skull is hung on the wall.
Step 3: Finishing Touches
-
Apply sealant:
Once the paint is completely dry (give it at least an hour), take the skull to a well-ventilated area and apply a light coat of clear matte sealant. This protects the paint from dust and fading. -
Wrap the horns:
Cut two lengths of leather cord, each about 12-15 inches long. Wrap the base of each horn tightly with the cord to hide the transition point and add texture. -
Secure the cord:
Tuck the ends of the cord underneath the wrapping or secure them with a hidden dot of super glue at the back of the horn base.
Hang your finished masterpiece proudly and enjoy the warm, rustic energy it brings to your space
BRUSH GUIDE
The Right Brush for Every Stroke
From clean lines to bold texture — master brush choice, stroke control, and essential techniques.
Explore the Full Guide
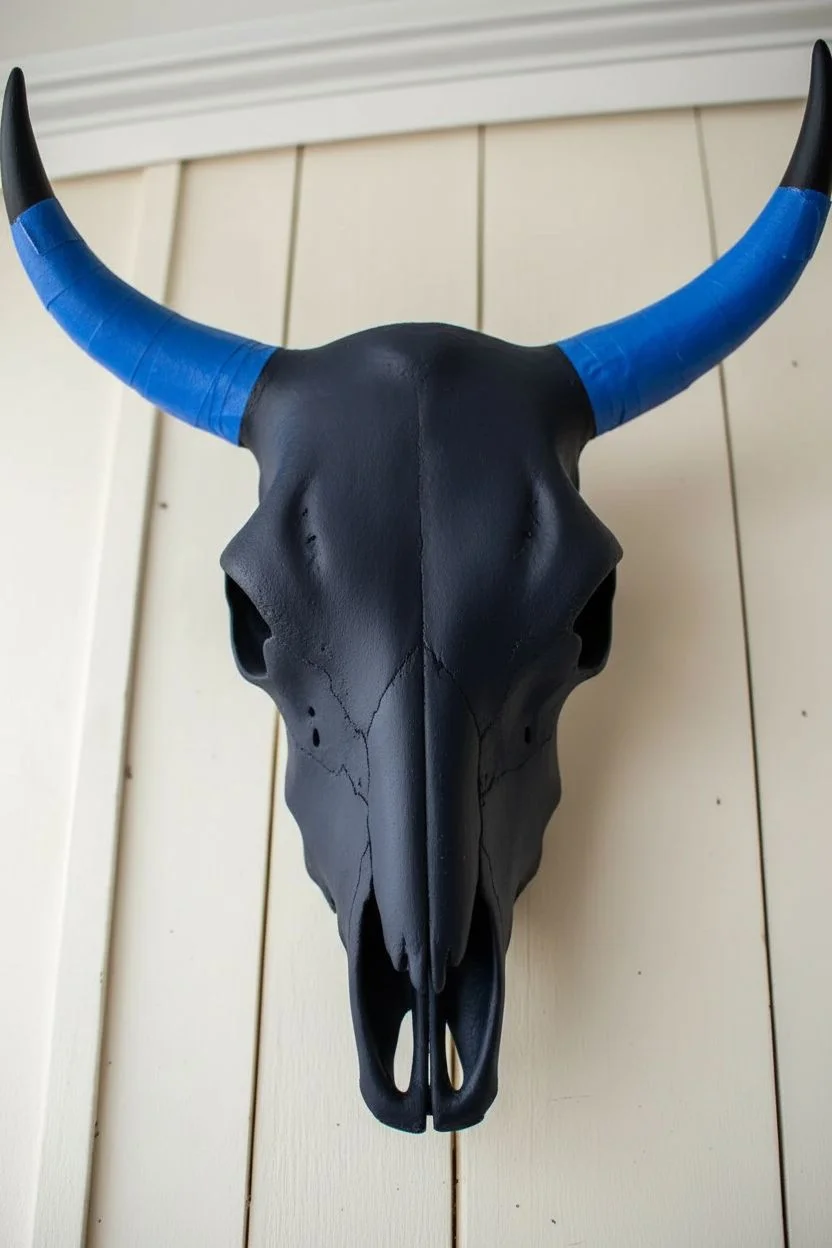
Matte Black With Metallic Dry Brush
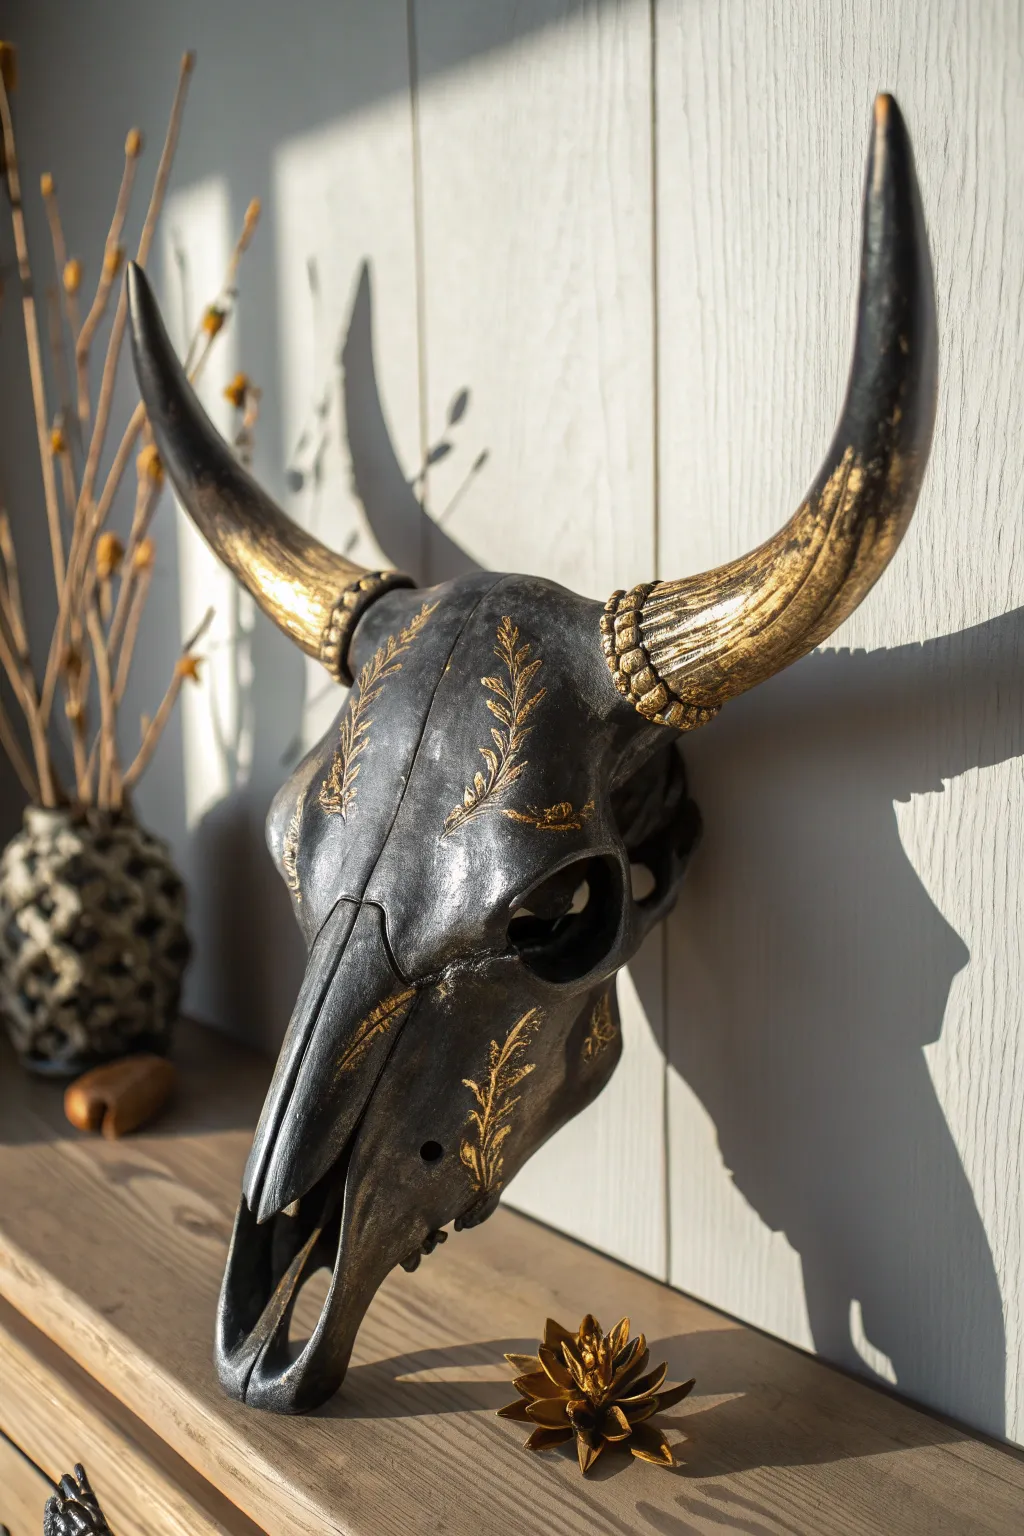
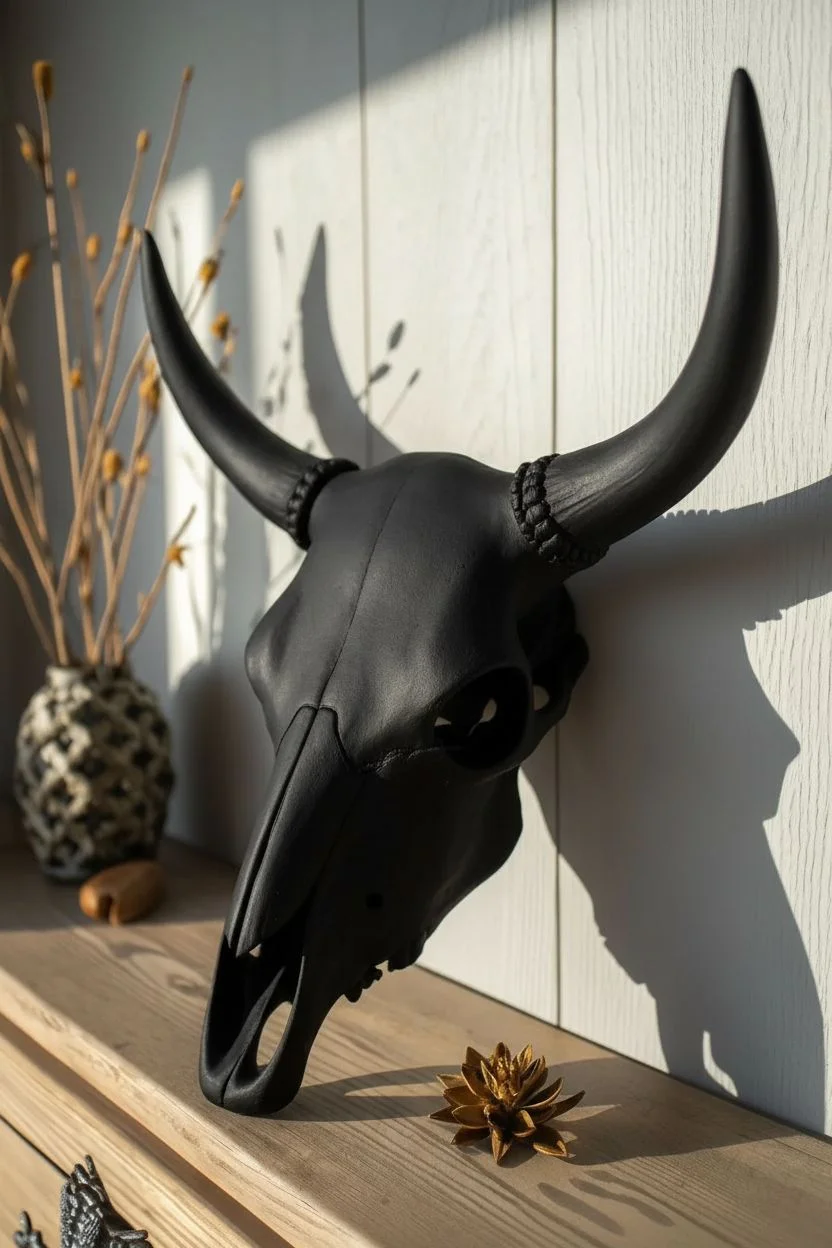
Transform a rustic find into a stunning piece of modern gothic decor with this elegant black and gold design. The combination of a deep matte black base with shimmering metallic accents creates a sophisticated contrast that catches the light beautifully.
Step-by-Step Tutorial
Materials
- Cleaned cow skull (real or faux resin)
- Matte black spray paint or acrylic paint
- Gold metallic paint (liquid, not spray)
- Fine detail paintbrushes (size 0 or 00)
- Medium flat paintbrush
- Painter’s tape
- Paper towels
- Glossy clear coat sealant (optional)
- Sandpaper (fine grit)
Step 1: Preparation and Base Coat
-
Surface Prep:
Begin by ensuring your skull is completely clean and dry. If you are using a real bone skull, make sure it has been properly degreased and whitened. For resin skulls, a quick wipe with soapy water to remove manufacturing oils is sufficient. -
Smooth it Out:
Lightly sand any rough patches or mold seams if you are working with a resin replica. This ensures the paint adheres evenly and looks professional. -
Protect the Horns (Optional):
If you want the base of the horns to remain natural or a different color, wrap them carefully with painter’s tape. For this specific look, we will be painting everything, so taping isn’t strictly necessary unless you want to keep the inner cavities raw. -
Apply the Base:
In a well-ventilated area, apply the matte black paint. Spray paint works best for even coverage. Hold the can 10-12 inches away and apply thin, sweeping coats. -
Build Coverage:
Let the first coat dry for about 15 minutes, then apply a second coat to catch any missed spots, especially inside the eye sockets and nasal cavities. Aim for a solid, opaque black finish. -
Full Cure:
Allow the base coat to dry completely overnight. Painting over semi-wet paint can cause the finish to crackle or peel later.
Brush Control Secret
Rest your pinky finger on a dry part of the skull while painting details. This anchors your hand, reducing shakes and giving you cleaner lines.
Step 2: Adding the Gold Patina
-
Dry Brush Technique:
Dip a dry, medium flat brush into a tiny amount of gold metallic paint. Wipe almost all of the paint off onto a paper towel until the brush leaves only a faint shimmer. -
Highlighting Texture:
Gently whisk the dry brush over the raised bead-like texture at the base of the horns. The goal is to catch just the high points, leaving the recesses black for depth. -
Horn Gradient:
Continue the dry brushing up the horns. Apply a bit more pressure near the base for solid gold coverage, and lighten your touch as you move up towards the tips, letting the black show through to create a faded, weathered look. -
Blackened Tips:
Leave the very tips of the horns largely untouched by the gold, or perhaps just a whisper of sparkle, to maintain that dramatic, sharp silhouette.
Level Up: Antique Effect
Mix a tiny drop of dark brown or copper into your gold paint for the lower layers, then hit the highest points with pure bright gold to create faux oxidation depth.
Step 3: Hand-Painted Details
-
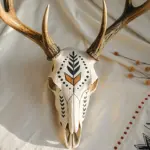
Plan Your Motif:
Visualize where you want your botanical designs. The reference image features symmetrical leafy vines flowing down the bridge of the nose and curving near the eye sockets. -
Load the Liner Brush:
Switch to your fine detail brush (size 0). Thin your gold paint slightly with a drop of water if it feels too thick; it needs to flow smoothly for crisp lines. -
Paint the Stems:
Start by painting thin, curving lines to act as the central stems for your vines. Use a steady hand and pull the brush towards you for better control. -
Add the Leaves:
Along the painted stems, add small leaf shapes. I find it easiest to press the belly of the brush down and lift up quickly to create a teardrop leaf shape instinctively. -
Create Symmetry:
Repeat the design on the opposite side of the skull. Don’t stress closer perfection; slight variations add to the hand-crafted charm. -
Metallic Accents:
Add tiny gold flecks or dots around the larger designs to fill empty space without overcrowding the piece. -
Sealing the Work:
Once the gold paint is fully dry (give it a few hours), you can lightly spray a clear matte sealer over the whole piece if you plan to hang it in a high-traffic area, or leave it unsealed for a rawer finish.
Hang your new masterpiece in a spot where it catches the afternoon sun to really show off that metallic shimmer
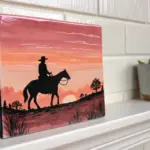
Soft Desert Sunset Ombre
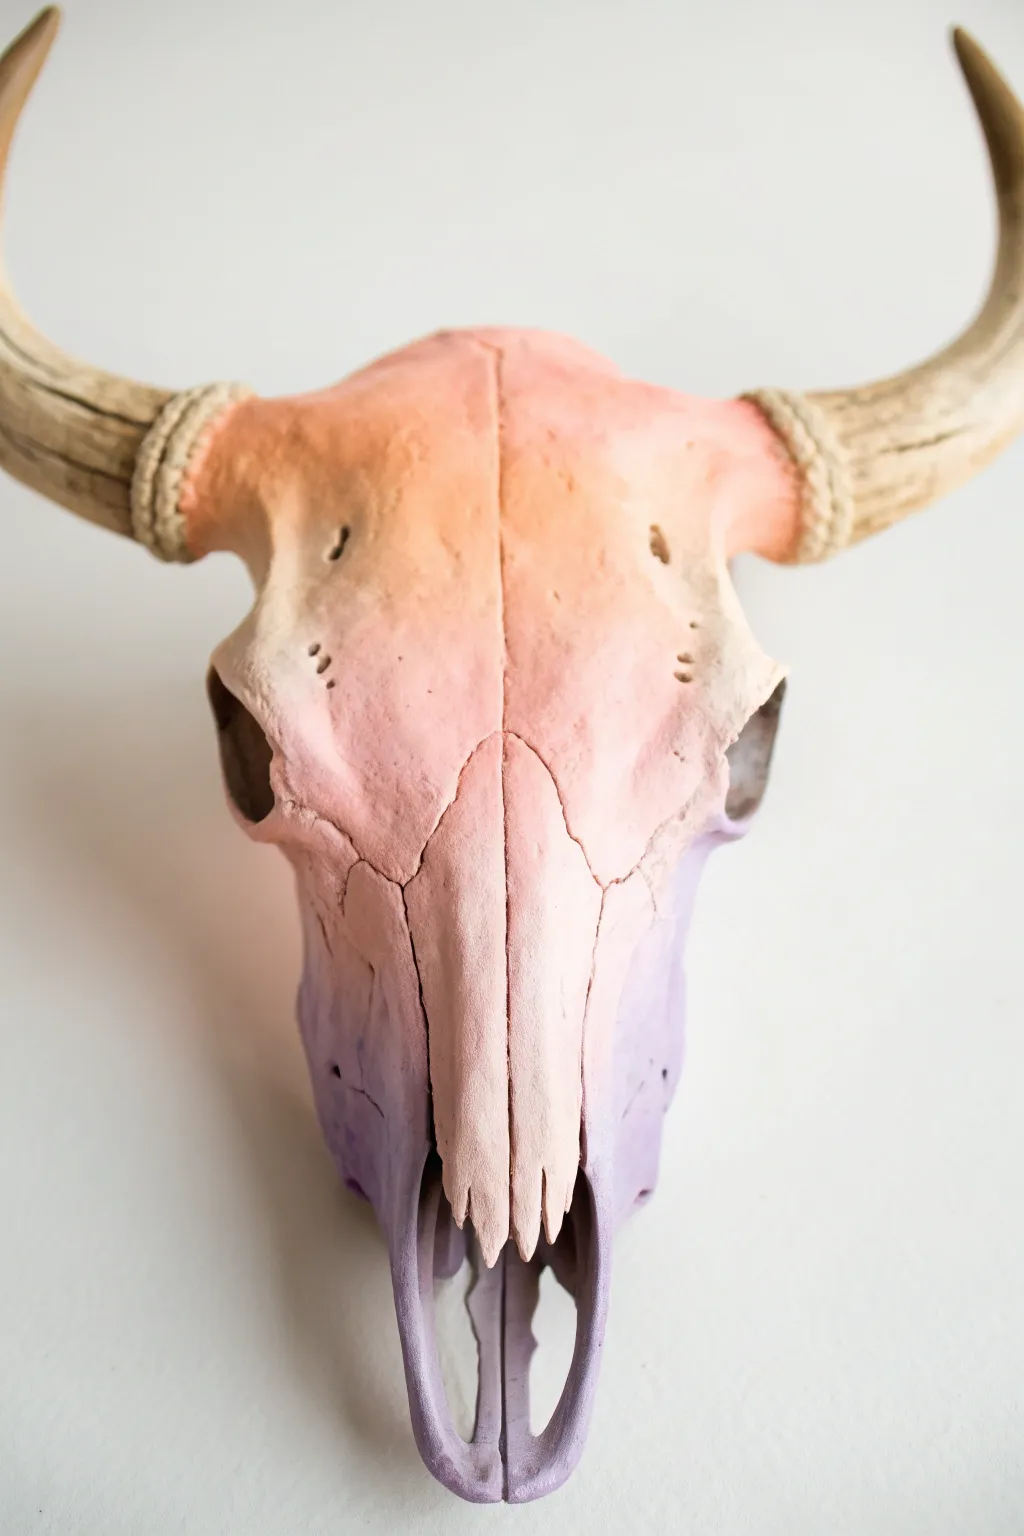
Capture the fleeting beauty of a desert sunset with this dreamy painted cow skull. The soft gradient transitions from a warm peach to a cool lavender, creating a modern Southwestern statement piece that feels both organic and ethereal.
Detailed Instructions
Materials
- Faux or real cow skull (cleaned and prepped)
- Acrylic craft paints (Peach, Soft Pink, Lavender/Lilac)
- White acrylic paint (for mixing)
- Medium flat paintbrush
- Small detail paintbrush
- Makeup sponges or foam pouncers
- Painters tape
- Natural jute twine or hemp cord
- Hot glue gun and glue sticks
- Matte clear sealant spray
- Paper palette or plate
- Cup of water
- Paper towels
Step 1: Preparation & Base Coat
-
Clean surface:
Begin by wiping down your skull with a damp cloth to remove any dust or oils. If you are using a real bone skull, ensure it has been properly whitened and dried. Let it dry completely before painting. -
Mask the horns:
Wrap painter’s tape carefully around the base of the horns where they meet the skull. This ensures you keep the natural horn color clean while you paint the bone section. -
Prime the skull:
If your skull is a dark color or uneven, apply a coat of white acrylic paint over the entire face area. This helps the pastel ombre colors pop and appear true to their hue.
Blending trouble?
If paint dries too fast while blending, lightly mist the skull with water or use a ‘slow-dry medium’ mixed into your acrylics to keep them workable longer.
Step 2: Creating the Ombre Gradient
-
Mix your palette:
Squeeze out your Peach, Soft Pink, and Lavender paints onto your palette. I like to add a dollop of white next to each so I can create lighter transition shades as I go. -
Apply the top color:
Start applying the Peach paint at the very top of the skull, covering the forehead area and around the eye sockets. Paint down to about the top of the eye sockets, keeping the coat solid and opaque. -
Start the mid-tone:
Load your brush with the Soft Pink. Paint the middle section of the skull, starting just below the peach line and extending down towards the start of the nasal cavity. -
Apply the bottom color:
Clean your brush thoroughly and pick up the Lavender paint. Cover the bottom third of the skull, including the entire snout and the delicate nose bones at the tip. -
Blend the first transition:
While the paint is still slightly tacky, use a damp makeup sponge or foam pouncer to blend the line where the Peach meets the Pink. Dab gently up and down to blur the hard edge. -
Refine the blend:
If the blend looks muddy, mix a tiny bit of Peach and Pink together on your palette. Dab this intermediate color directly over the transition line for a smoother fade. -
Blend the lower transition:
Repeat the blending process where the Pink meets the Lavender. Use a fresh side of your sponge to gently stipple the colors together until the gradient looks seamless. -
Detail the cracks:
Use your small detail brush to push color into the deep cracks and fissures of the skull. Ensure the gradient flows naturally even inside these crevices so no white bone shows through. -
Check for consistency:
Step back and look at the skull from a distance. If any area looks patchy, apply a second thin coat of the specific color, re-blending the edges as needed. -
Allow to dry:
Let the paint dry completely for at least an hour. The matte finish usually dries quickly, but you want it fully set before adding embellishments.
Add some sparkle
For a magical touch, lightly brush a sheer gold or iridescent shimmer glaze over the peach section to catch the light like a real sunset.
Step 3: Finishing Touches
-
Seal the paint:
Take the skull to a well-ventilated area and spray it with a matte clear sealant. This protects your paint job from dust and UV fading without adding an unnatural shine. -
Remove tape:
Once the sealer is dry, carefully peel away the painter’s tape from the horn bases. -
Prepare the twine:
Cut a long length of jute twine. Apply a small dot of hot glue to the back of the horn base to anchor the start of your cord. -
Wrap the horns:
Wrap the twine tightly around the base of the horn, covering the transition area where bone meets horn. wrapping 3-4 times creates a nice rustic texture. -
Secure the ends:
Cut the excess twine and secure the end with a final dab of hot glue on the backside of the horn so it isn’t visible from the front.
Now hang your masterpiece and enjoy the warm desert vibes it brings to your space

PENCIL GUIDE
Understanding Pencil Grades from H to B
From first sketch to finished drawing — learn pencil grades, line control, and shading techniques.
Explore the Full Guide
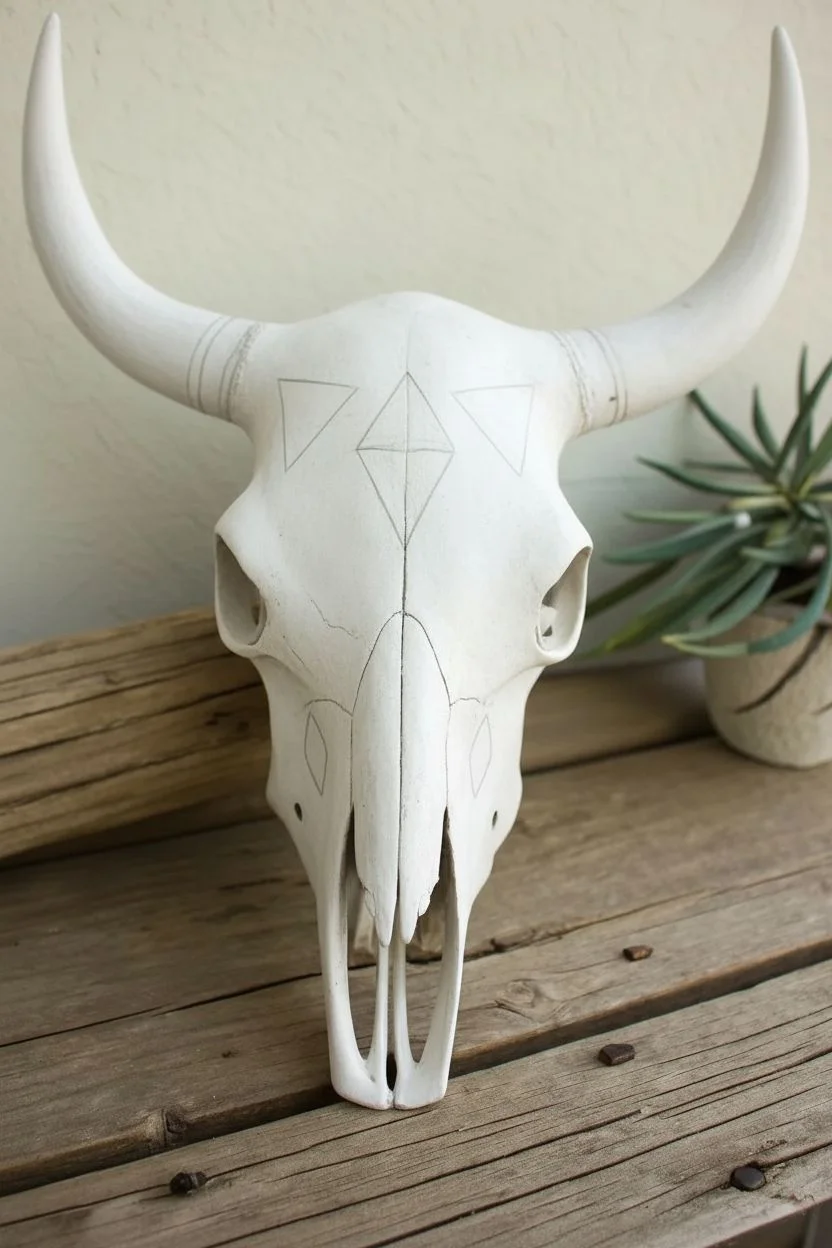
Modern Minimal Line Art
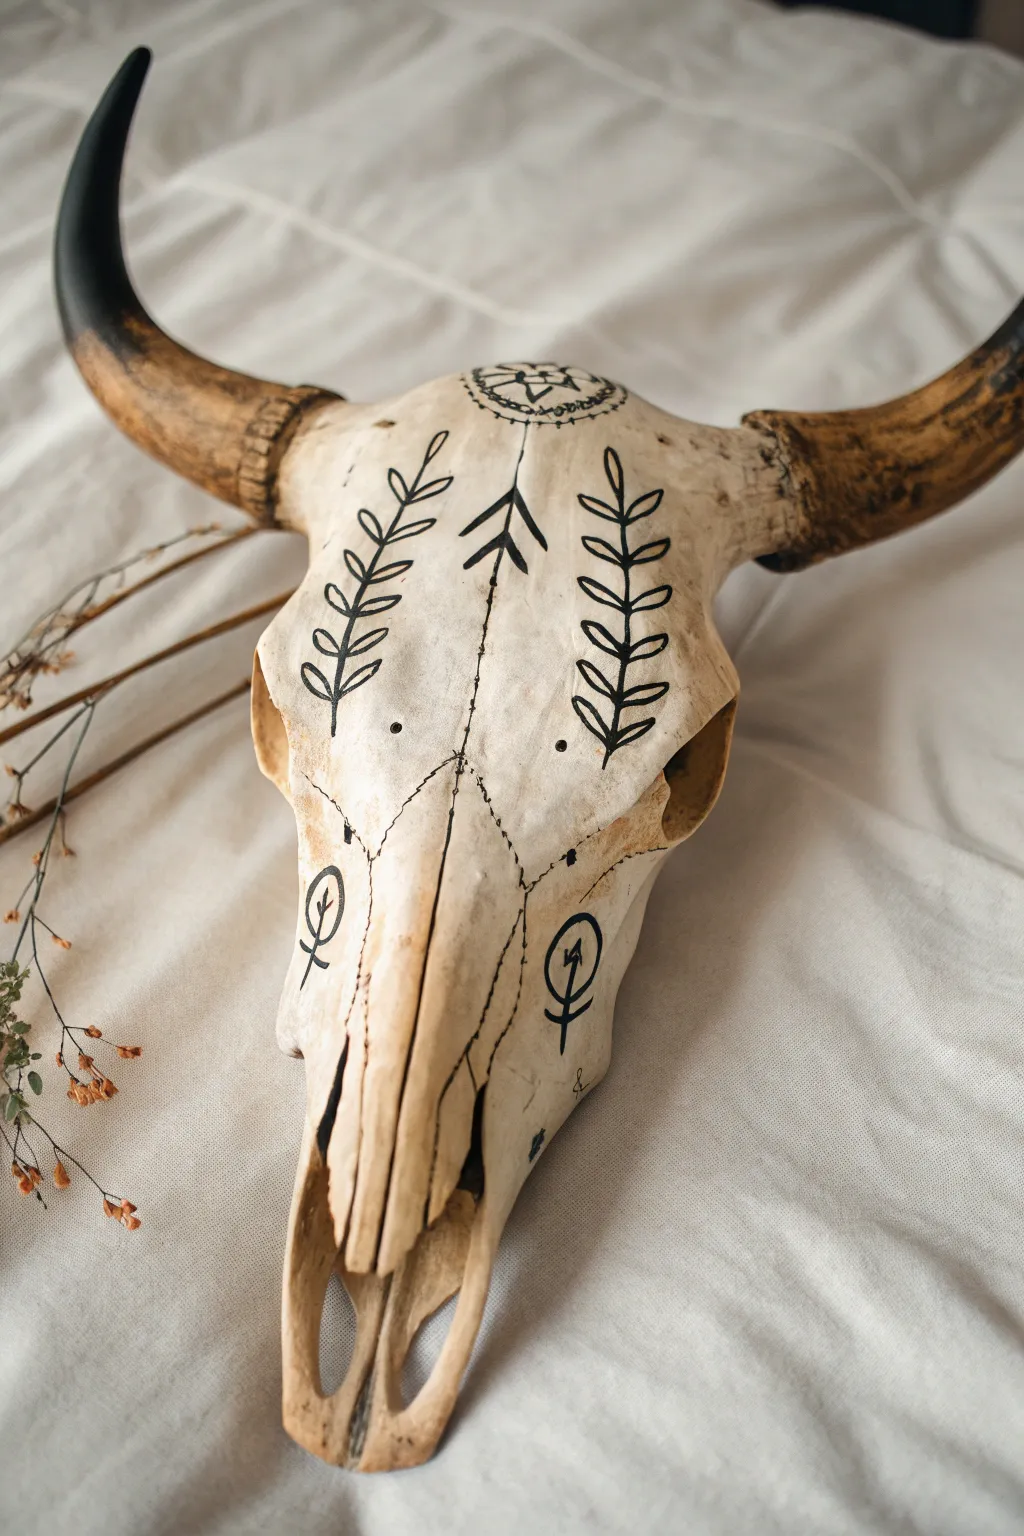
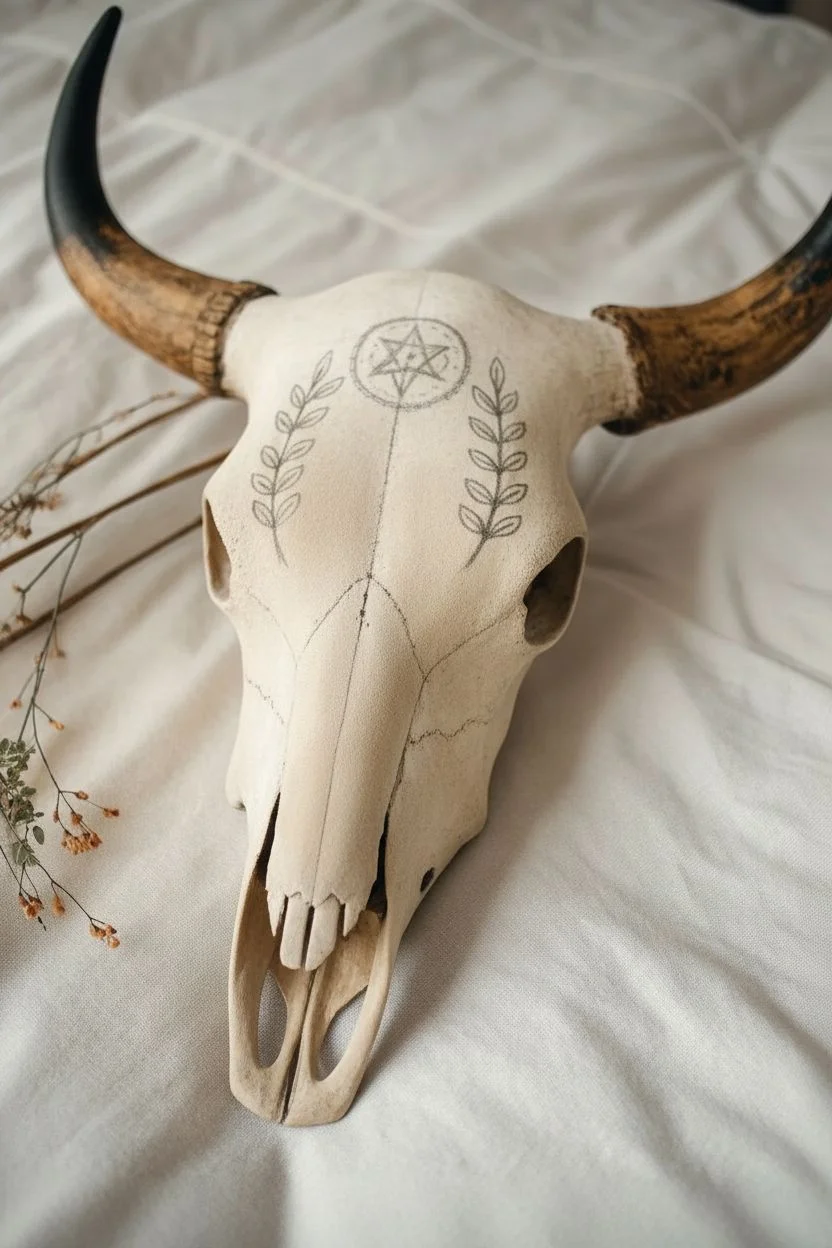
Transform a rustic cow skull into a stunning piece of modern bohemian decor with simple yet striking black line art. This project balances natural textures with clean, geometric botanical motifs for a minimal but impactful statement piece.
Step-by-Step Guide
Materials
- Cleaned cow skull (real or high-quality faux resin)
- Sandpaper (fine grit, 220 or higher)
- Black acrylic paint pen (medium tip)
- Black acrylic paint pen (fine tip)
- Pencil
- Eraser
- Matte clear sealant spray
- Damp cloth
Step 1: Preparation
-
Clean surface:
Begin by ensuring your skull is completely clean and dry. If using a real skull, wipe away any dust or debris with a slightly damp cloth. For resin skulls, a quick wipe down ensures the paint adheres properly. -
Light sanding:
Taking your fine-grit sandpaper, very lightly scuff the forehead and nose area where you plan to draw. This creates a slightly better tooth for the marker to grab onto without damaging the texture. -
Remove dust:
Wipe the skull down one final time to remove any sanding dust. Let it dry completely before starting your sketch.
Step 2: Sketching the Design
-
Center line:
Using a pencil, lightly mark the exact center line running down the forehead. This will serve as your anchor for the symmetrical design. -
Top medallion:
At the very top center of the skull, between the horns, sketch a small semi-circle or medallion shape. Draw a star or geometric flower inside this circle. -
Arrow motif:
Directly below the medallion, sketch a downward-pointing arrow symbol. Create the shaft with a straight line and add angled fletching focused near the top. -
Leaf placement:
On either side of the central arrow, sketch long, curving stems that follow the natural contours of the skull’s forehead. Aim for symmetry, but don’t stress about perfection. -
Adding leaves:
Draw simple, oval-shaped leaves branching off your stems. Keep the leaves spaced evenly to maintain that clean, minimal aesthetic. -
Cheek symbols:
Move down to the narrower nose/cheek area. Sketch a circle on each side. Inside each circle, draw a simple glyph—a vertical line with a small fork or arrow at the top works securely.
Oops! Smudged Ink?
If you smudge wet ink, don’t wipe it! Let it dry completely, then gently sand the smudge away with fine-grit sandpaper or scrape it off with an X-ACTO knife before redrawing.
Step 3: Inking the Design
-
Start the center:
Take your medium-tip black paint pen. I like to shake it well first on a scrap piece of paper. Carefully trace over your central arrow line and the top medallion design. -
Trace stem lines:
Trace the main stems of your botanical branches with smooth, confident strokes. Pull the pen towards you for better control over the curve. -
Fill the leaves:
Outline each leaf shape. You can leave them as outlines for a lighter look, or thicken the lines slightly to make them pop against the white bone. -
Detail work:
Switch to your fine-tip pen for the delicate details inside the cheek circles and the finer hatch marks on the top medallion. -
Dotted accents:
Using the medium tip, add single, deliberate dots around the design to fill negative space. Place a few near the arrow shaft and potentially near the cheek symbols. -
Horn transition (optional):
If your skull’s horns need definition, use the paint pen or black acrylic paint to darken the tips, feathering the color downward so it fades into the natural horn color.
Add Some Glamour
For a luxe touch, trace inside your black leaves with a metallic gold paint pen, or add small gold leaf flakes to the center medallion for a subtle sparkle.
Step 4: Finishing Touches
-
Let it cure:
Allow the paint pen ink to dry completely. This usually takes about 15-20 minutes, but check the manufacturer’s instructions. -
Erase guidelines:
Gently erase any visible pencil marks. Be careful not to scrub too hard over your fresh ink. -
Seal the art:
To protect your work, spray the entire skull with a thin, even coat of matte clear sealant. This prevents the ink from scratching off over time.
Hang your new beautifully patterned skull on a gallery wall or above a mantle for an instant conversation starter
Dot Mandala Centerpiece
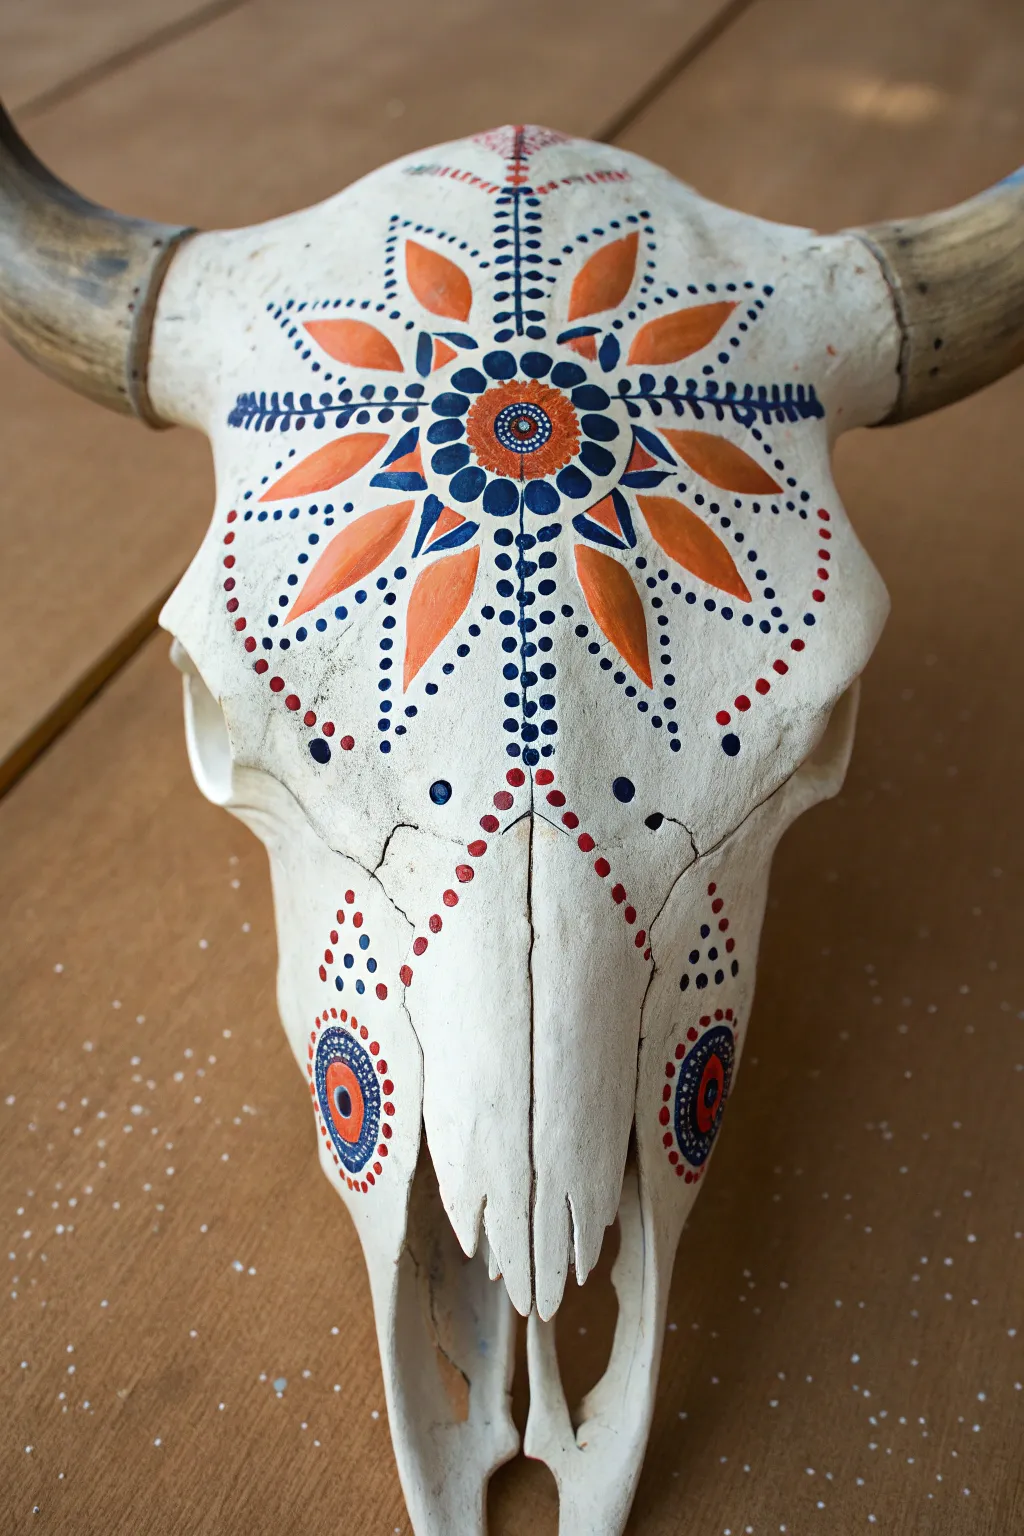
Transform a rustic cow skull into a vibrant piece of bohemian wall art with this detailed dot mandala design. The striking combination of brilliant orange and deep navy blue creates a radiating sunburst pattern that instantly draws the eye.
Step-by-Step Tutorial
Materials
- Cleaned and bleached cow skull
- Acrylic paints: Bright Orange, Navy Blue, White, Dark Red
- Pencil and eraser
- Ruler or flexible measuring tape
- Set of dotting tools (various sizes)
- Small round paintbrushes (sizes 0, 1, and 2)
- Clear matte or satin sealant spray
Step 1: Preparation & Mapping
-
Prep the surface:
Ensure your skull is thoroughly cleaned, bleached, and completely dry. If the bone is too glossy, lightly sand the forehead area with fine-grit sandpaper to give the paint better adhesion. -
Find the centerline:
Using a pencil and a flexible ruler, lightly draw a vertical line straight down the center of the skull, following the natural suture lines of the bone where possible. -
Sketch the central sunburst:
Lightly sketch a small circle in the center of the forehead. Around this, sketch eight petal shapes radiating outward: four hitting the cardinal directions (up, down, left, right) and four diagonally between them. -
Mark the dot paths:
Lightly pencil guidelines for the dot trails that will extend from the petals. This doesn’t need to be perfect, just a roadmap to help keep your symmetry in check later.
Uneven Dots?
If your dots are looking wonky or oval, make sure you are reloading the tool with fresh paint for *every single dot* and holding the tool perfectly vertical when touching the surface.
Step 2: Painting the Forehead Mandala
-
Paint the central flower:
Start by painting the central circle with bright orange. While that dries, paint the eight petals surrounding it in the same orange tone. You may need two coats for full opacity. -
Add the blue center details:
Once the orange center is dry, use a medium dotting tool to place a large navy blue dot in the very middle. Surround this blue dot with a ring of tiny white dots using your smallest tool. -
Outline and accent the petals:
Using a fine liner brush and navy blue paint, carefully outline the orange petals. Add a small navy blue triangle at the outer tip of each petal to sharpen the shape. -
Create the inner dot ring:
Between the petals, near the center, place medium-sized navy blue dots. Then, surround the entire central flower motif with a ring of small navy blue dots. -
Paint the fern details:
Using navy blue and a fine liner brush, paint delicate ‘fern’ or ‘wheat’ stalks extending outward between the orange petals. These are simple lines with tiny leaves branching off. -
Execute the dotted rays:
Switch to your dotting tools. Create lines of blue dots radiating out from the center, following the gaps between the petals. Graduate the size from larger to smaller as you move outward. -
Add the red outer border:
Create the outermost curved border of the design using dark red paint. This consists of a single line of evenly spaced small dots that frame the main sunburst shape.
Use a Lazy Susan
Painting on a 3D organic shape is tricky. Place the skull on a Lazy Susan or turntable so you can rotate the piece to reach awkward angles without smudging wet paint with your hands.
Step 3: Nose & Vertical Details
-
Paint the vertical spine:
Along the central vertical line running down the nose, create a bold line of navy blue dots. I find it helpful to start with the largest dots at the top and decrease size as the bone narrows. -
Add the red draped chains:
Imagine a necklace draping down the nose. Use dark red paint to create two swooping lines of dots that start at the forehead and meet at the center line further down. -
Create the nose medallions:
On the lower section of the nose (the maxilla area), sketch two medium circles on either side. Paint the centers orange. -
Detail the side medallions:
Add a navy blue dot in the center of the orange circles. Surround the orange circle with two rings of dots: the inner ring in red, and the outer ring in navy blue to define the shape. -
Add final side accents:
Finish the nose area by adding a small pyramid or triangle of red dots above the medallions for a festive touch.
Step 4: Finishing Touches
-
Clean up guidelines:
Allow the paint to cure fully—wait at least a few hours. Then, gently erase any visible pencil marks with a white vinyl eraser. -
Apply sealant:
To protect your intricate dot work, spray the entire skull with a clear matte sealant. Use light, misting coats to avoid making the paint run.
Hang your completed skull with pride, enjoying the modern twist on a classic desert aesthetic


Faux Marble Veining Effect
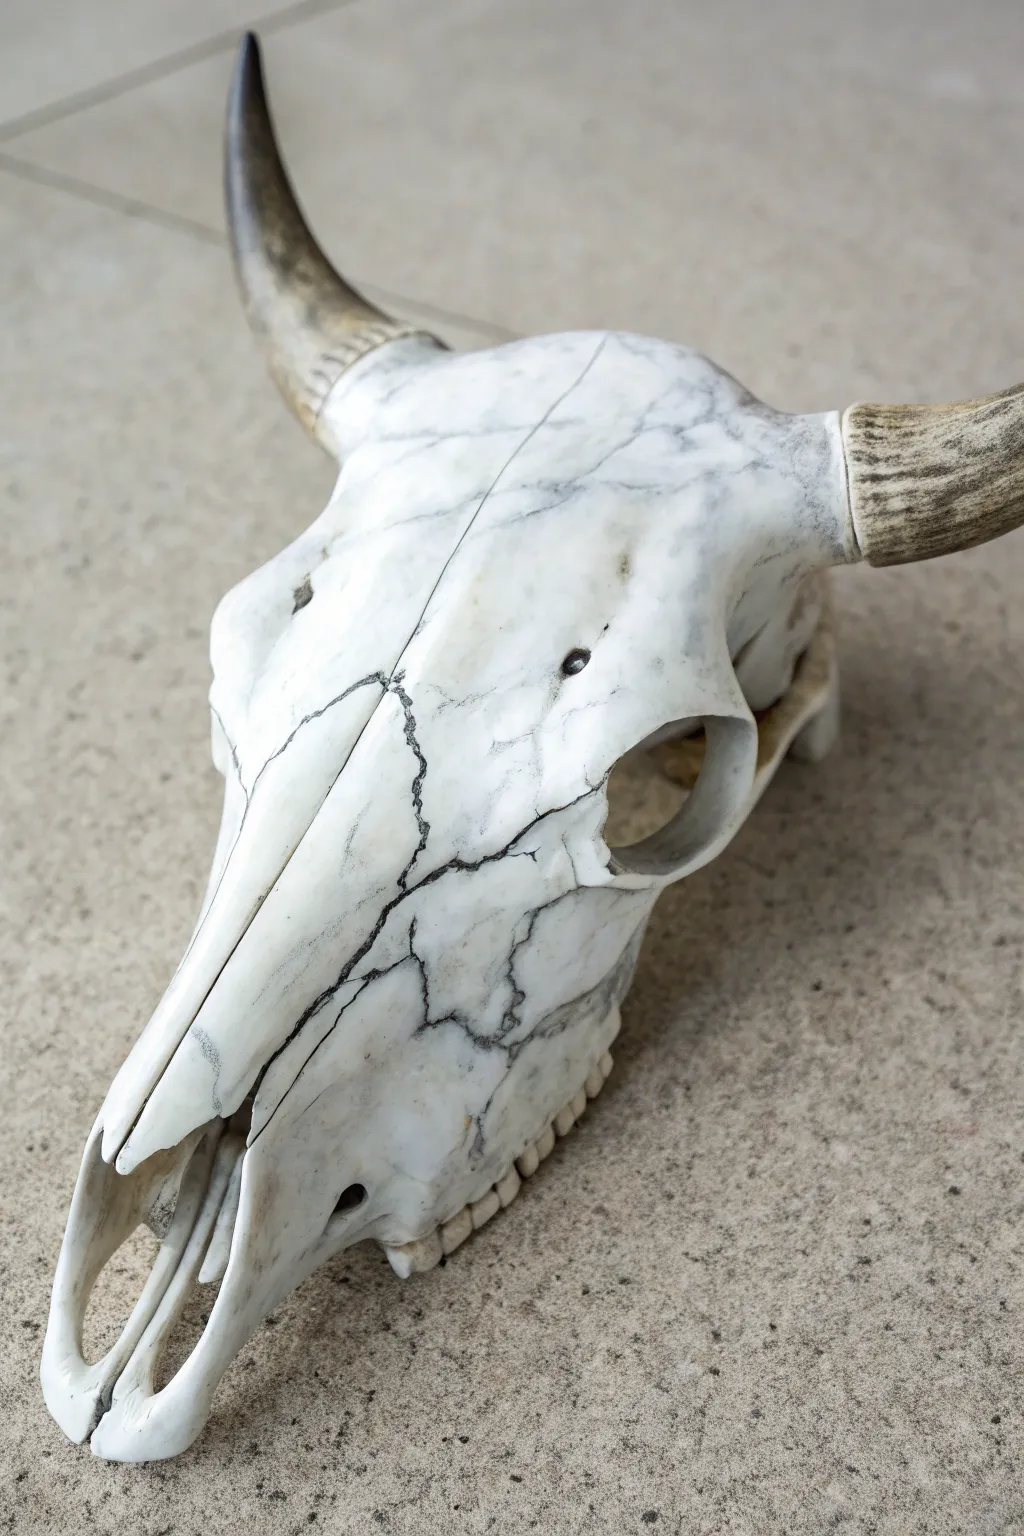

Transform a rustic cow skull into a sophisticated piece of decor by mimicking the timeless elegance of Carrara marble. This technique uses simple acrylics and a feathering method to achieve that realistic, soft, grey-veined stone appearance.
How-To Guide
Materials
- Cleaned cow skull (real or resin replica)
- Sandpaper (medium and fine grit)
- White primer spray paint
- High-gloss white acrylic paint
- Black acrylic paint
- Grey acrylic paint (or mix black and white)
- Glazing medium or water (to thin paint)
- Feather or fine liner brush
- Sea sponge or crumpled plastic bag
- Wide soft bristle brush
- Clear high-gloss spray sealant
- Painters tape (for horns)
Step 1: Preparation & Base Coat
-
Prep the surface:
Before painting, ensure your skull is clean and dry. If using a real bone skull, lightly sand any rough patches to create a smoother surface for the faux finish to adhere to. -
Mask the horns:
Carefully wrap the base of the horns with painter’s tape to protect them from spray paint. You want to preserve their natural texture and color contrast against the white marble. -
Prime the skull:
In a well-ventilated area, apply an even coat of white primer spray paint. Let this dry completely according to the can’s instructions. -
Apply the base color:
Once primed, switch to your high-gloss white acrylic. Apply two to three thin coats using a wide soft brush to minimize brush strokes, letting each layer dry in between. You want a solid, bright white canvas.
Step 2: Creating the Veins
-
Mix the vein color:
Create a dark charcoal grey by mixing black acrylic with a tiny drop of white. Dilute this mixture with glazing medium or water until it has an inky, fluid consistency. -
Map out major veins:
Using a feather or a very fine liner brush, lightly drag the paint across the skull in diagonal, wandering lines. Tremble your hand slightly as you pull the brush to create natural, organic jolts rather than straight lines. -
Soften the lines:
While the paint is still wet, use a damp sea sponge or a dry soft brush to lightly dab or feather the edges of your painted veins. This blurs the stark lines and makes them look embedded in the ‘stone’. -
Add secondary fissures:
Mix a lighter grey shade. Using your fine brush, branch smaller, fainter veins off the main dark arteries. These should be very subtle, resembling hairline cracks in the marble. -
Create depth:
I find that adding a very watered-down grey wash over random patches of the skull helps create that cloudy, translucent depth real marble possesses. Dab it on and immediately blot most of it off with a paper towel. -
Intensify specific cracks:
Go back in with pure black on just the very finest tip of your brush to deepen the center of the largest veins. This high contrast mimics the sharpest fissures in the stone.
Use a Feather
For the most realistic veins, dip the tip of a real bird feather in paint and drag it. It naturally creates the shaky, organic lines that brushes struggle to replicate.
Step 3: Finishing Touches
-
Check your work:
Step back and look at the skull from a distance. The veining should look random and asymmetrical. Add more small connecting lines if any area feels too empty. -
Dry thoroughly:
Allow the painted faux finish to cure for at least 24 hours. The thick layers of glaze and paint need to be perfectly dry before sealing. -
Apply the topcoat:
Spray the entire skull with a clear high-gloss sealant. Real polished marble is reflective, so a glossy finish is crucial for selling the illusion. -
Add a second coat:
For an ultra-smooth finish, lightly sand the first layer of clear coat with very fine grit sandpaper once dry, wipe clean, and apply a second glossy coat. -
Reveal the horns:
Gently peel away the painter’s tape from the horns. If any white paint seeped under, carefully scrape it away with a craft knife or fingernail.
Gold Leaf Accent
After the marble effect dries, trace a few of the deepest veins with liquid gold leaf gilding adhesive and apply gold foil for a luxurious ‘kintsugi’ marble style.
Place your new faux marble skull on a mantel or gallery wall for an instant touch of modern Southwestern elegance
Aged Copper Patina Accents
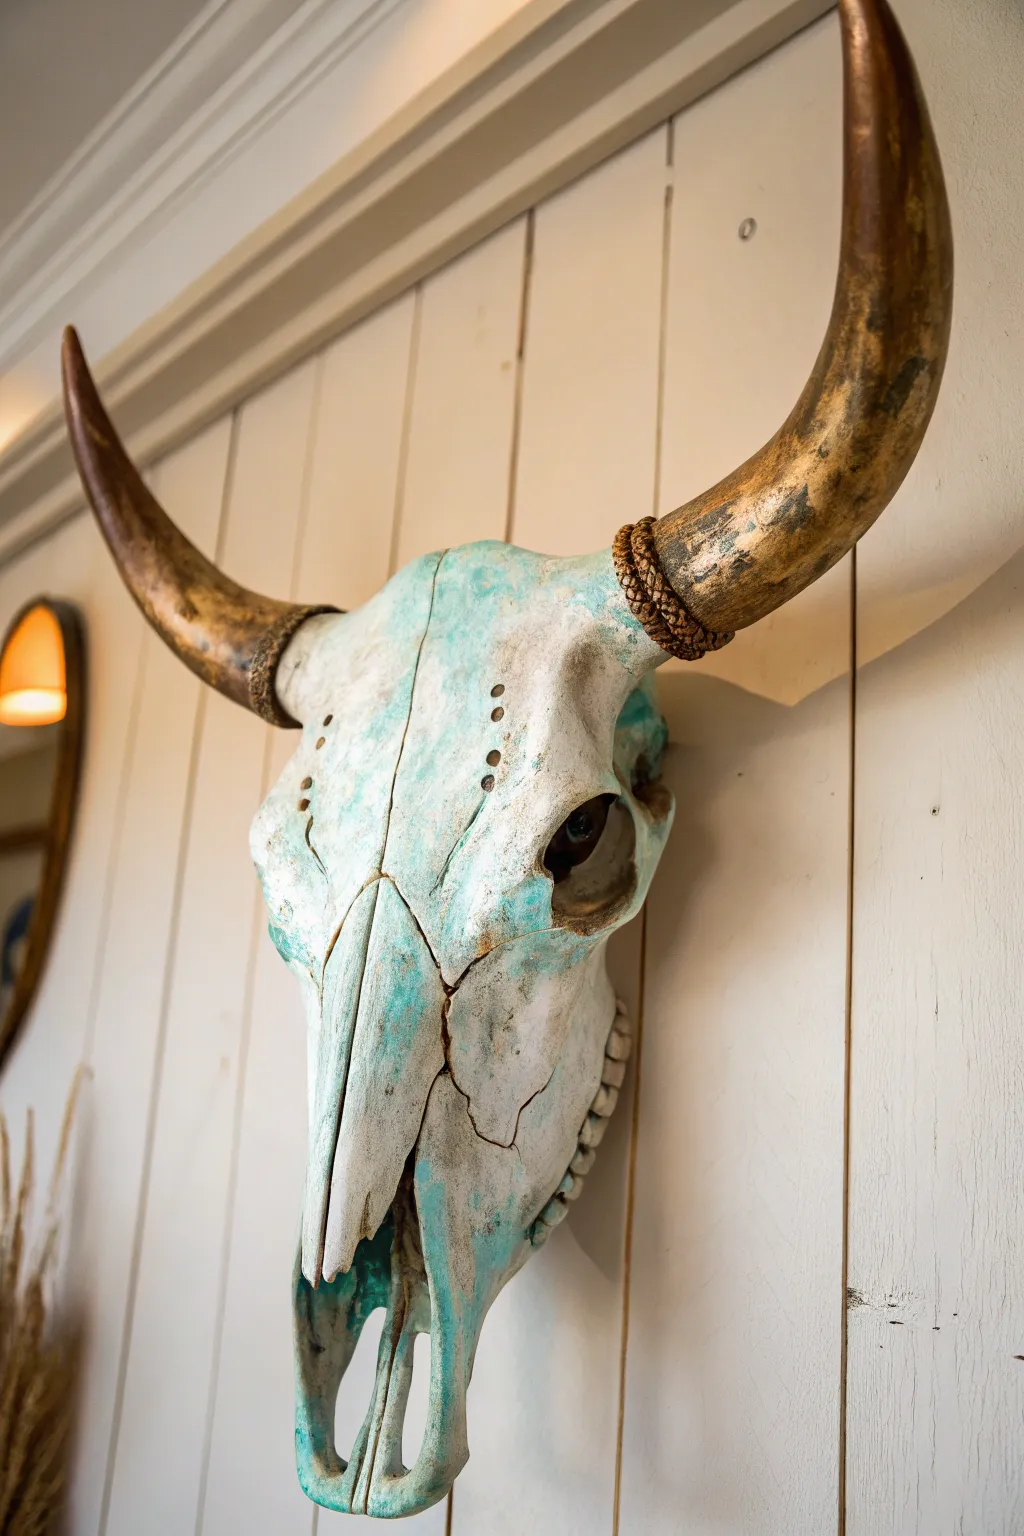
Transform a plain cow skull into a striking piece of Southwestern decor with this sophisticated faux finish. By layering turquoise washes over a bone base and gilding the horns, you’ll achieve an authentic-looking aged copper patina that adds instant character to any wall.
Step-by-Step
Materials
- Cleaned cow skull (real or resin replica)
- White primer spray paint
- Acrylic paints: Cream, Off-White, Turquoise, Teal, Burnt Umber
- Metallic Gold or Bronze paint (liquid or spray)
- Dark brown or black wax (antiquing wax)
- Natural jute or hemp rope (medium thickness)
- Hot glue gun and glue sticks
- Assorted paintbrushes (sponge brush, chip brush, detail brush)
- Paper towels and water cup
- Sandpaper (fine grit)
- Painter’s tape
Step 1: Preparation & Base Coat
-
Clean and Prep:
Ensure your skull is completely clean and dry. If using a real skull, make sure it has been properly bleached and degreased. If it’s a resin replica, give it a light sanding to help the paint adhere. -
Tape Off Horns:
Use painter’s tape to wrap around the base of the horns where they meet the skull. This protects the bone area while we focus on the horns first. -
Paint the Horns:
Apply your metallic gold or bronze paint to the horns. You might need two coats for full opacity. Don’t worry about perfection near the base, as we will cover that transition point later. -
Prime the Bone:
Once the horns are dry, remove the tape and tape over the horn base instead. Apply a coat of white primer to the entire skull surface to create a neutral canvas. -
Apply Base Color:
Paint the skull with a mix of cream and off-white acrylics. I like to use a sponge brush here to create a slightly textured, uneven finish that mimics natural bone rather than a flat plastic look.
Step 2: Creating the Patina
-
Mix the Patina Wash:
Dilute your turquoise and teal paints with water until they are the consistency of ink or thin watercolor. You want it translucent, not opaque. -
Apply First Wash:
Working in sections, brush the watery turquoise mix over the skull. Focus heavily on crevasses, cracks, and eye sockets where natural oxidation would accumulate. -
Wipe Back:
Immediately after applying the wash, use a crumpled paper towel to wipe away the excess paint from the raised high points of the skull. This leaves the blue color in the low spots. -
Layer the Colors:
Repeat the wash and wipe process. Add a few drops of burnt umber to your teal mix for some areas to create a ‘dirty’ aged look. Build up the color intensity slowly. -
Splatter Texture:
Load a stiff-bristled brush or an old toothbrush with slightly thicker turquoise paint. Flick the bristles to create tiny speckles across the skull for an authentic mineral texture.
Too Blue?
If the turquoise looks too bright or cartoonish, apply a wash of watered-down white or cream paint over the top to mute the colors back down.
Step 3: Finishing Touches
-
Aging the Horns:
Remove the tape from the horns. Dry brush a tiny amount of black or dark brown paint sporadically over the gold to dull the shine and make them look weathered. -
Wrap the Base:
Apply a bead of hot glue at the very base of the horn. Press the end of your jute rope into the glue and begin wrapping tightly around the horn where it meets the skull. -
Secure the Rope:
Continue wrapping the rope up the horn for about 1-2 inches, gluing periodically to keep it secure. Cut the rope and tuck the end underneath the coils with a final dab of glue. -
Add Rope Patina:
Lightly dab a little of your dark brown watered-down paint onto the rope wrapping. This makes the new rope look old and integrates it with the rest of the piece. -
Final Seal:
Once everything is perfectly dry, spray the entire piece with a matte clear coat. This protects the paint and unifies the sheen of the different layers.
Pro Tip: Crackle Effect
Apply a layer of white school glue over the base coat and paint the turquoise while the glue is tacky. As it dries, it creates natural cracks.
Hang your finished masterpiece in a well-lit spot to let those metallic horns catch the light beautifully
High-Contrast Folk Pattern Mix
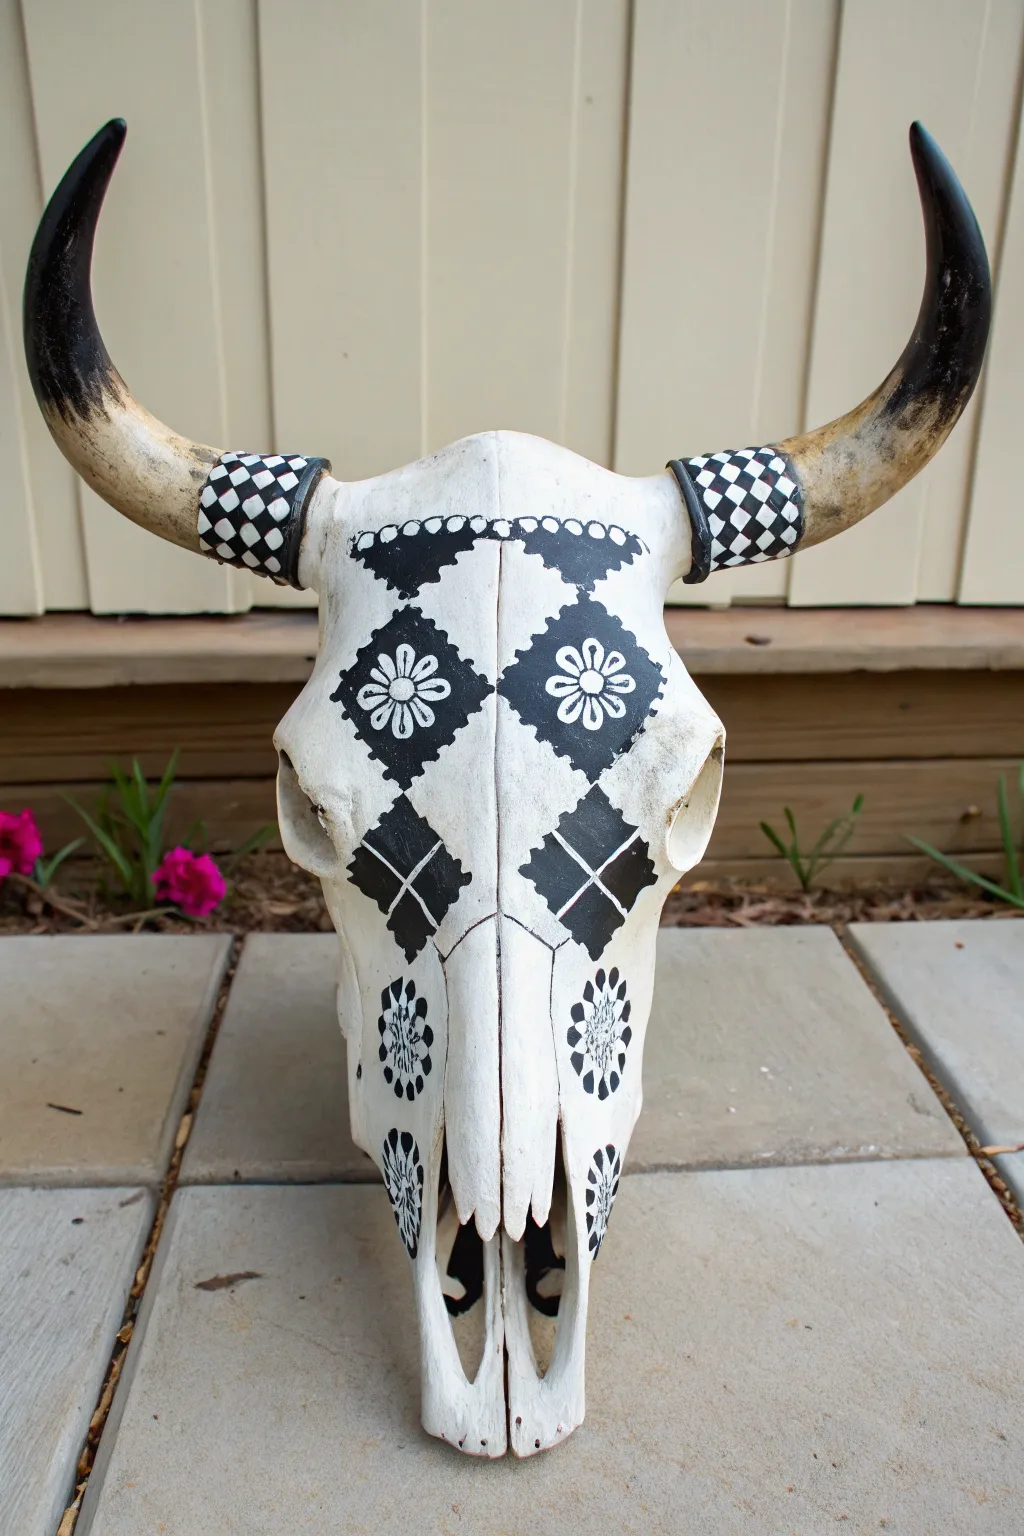
This striking project transforms a rustic cow skull into a piece of modern folk art using high-contrast black and white geometry. The design features bold diamond motifs and intricate floral details that create a captivating focal point for any wall.
Step-by-Step Guide
Materials
- Cleaned cow skull (real or faux resin)
- Matte white acrylic paint or spray paint
- Carbon black acrylic paint
- White paint marker (fine tip)
- Black paint marker (fine and medium tip)
- Pencil
- Eraser
- Painter’s tape
- Small flat synthetic brush
- Detail round brush (size 0 or 1)
- Clear matte sealant spray
Step 1: Base Preparation
-
Clean surface:
Ensure the skull is completely clean and dry. If using a real skull, make sure it has been properly bleached and degreased. If using a faux skull, wipe it down with isopropyl alcohol to remove any manufacturing oils. -
Base coat:
Apply two to three coats of matte white acrylic paint to the entire skull. If the natural bone color is uneven, spray paint provides the most opaque and smooth coverage. Avoid painting the horns for now. -
Dry thoroughly:
Let the white base coat cure completely, ideally overnight. This hard surface is crucial for crisp pencil lines later.
Wobbly Lines?
If your hand shakes while painting straight lines, use the edge of a stiff piece of cardstock as a guide or ruler while using your paint marker.
Step 2: Horn Detailing
-
Tape bindings:
Wrap painter’s tape around the horns about 2 inches from the base. This marks the area for the ‘binding’ design. Wrap another piece of tape about 1.5 inches further up to define the bottom edge of the natural horn color. -
Paint horn tips:
Using black acrylic paint, cover the very tips of the horns. To create the faded ombre effect shown in the image, keep the paint solid at the tip and then dry-brush it downwards into the natural horn color, feathering the edge so it isn’t a harsh line. -
Create the checkerboard:
Paint the section between your tape lines black. Once dry, use your white paint marker to draw a grid, then fill in alternating squares to create the checkerboard band. This mimics a wrapped fabric or beaded look.
Step 3: Geometric Patterning
-
Mark the centerline:
Lightly draw a pencil line down the exact center of the skull’s forehead to ensure symmetry. -
Draft the diamonds:
Sketch two large diamonds on the forehead, spanning across the natural suture lines. Below these, sketch two smaller diamond shapes slightly further apart. -
Add floral centers:
Inside the two large upper diamonds, draw a simple eight-petaled flower shape in the center. Don’t worry about perfection; folk art embraces slight irregularities. -
Block in black:
Using your small flat brush and carbon black paint, carefully fill in the diamond shapes, painting *around* your sketched flower centers. The flower should remain the white of the base coat. -
Refine edges:
Once the blocking is done, use a fine-tip black paint marker to sharpen the edges of the diamonds and the petals of the negative-space flowers.
Add Dimension
Glue small black or metallic beads along the scalloped brow line or in the center of the floral motifs for subtle 3D texture.
Step 4: Fine Details
-
Scalloped brow line:
Across the very top of the forehead, paint a black scalloped or beaded line connecting the two horn bases. Use the round detail brush for this. -
Decorative crosses:
Inside the two lower, smaller black diamonds, use the white paint marker (or a very fine brush with white paint) to draw a simple cross or four-petaled star. -
Nose details:
Moving down the nose bridge, draw small circular flower motifs directly onto the white bone using a black paint marker. These should look like simple rosettes with a center dot and radiating petals. -
Border accents:
Add tiny serrated edges or small dots along the perimeter of the large black diamonds using the black marker to give them a ‘stitched’ appearance. -
Final sealant:
Once all paint is bone-dry (give it at least 24 hours), spray the entire piece with a matte clear coat. This protects the stark black contrast from fading or chipping.
Hang your finished skull in a well-lit spot to let the high-contrast design truly pop
Pastel Boho Rainbow Bands
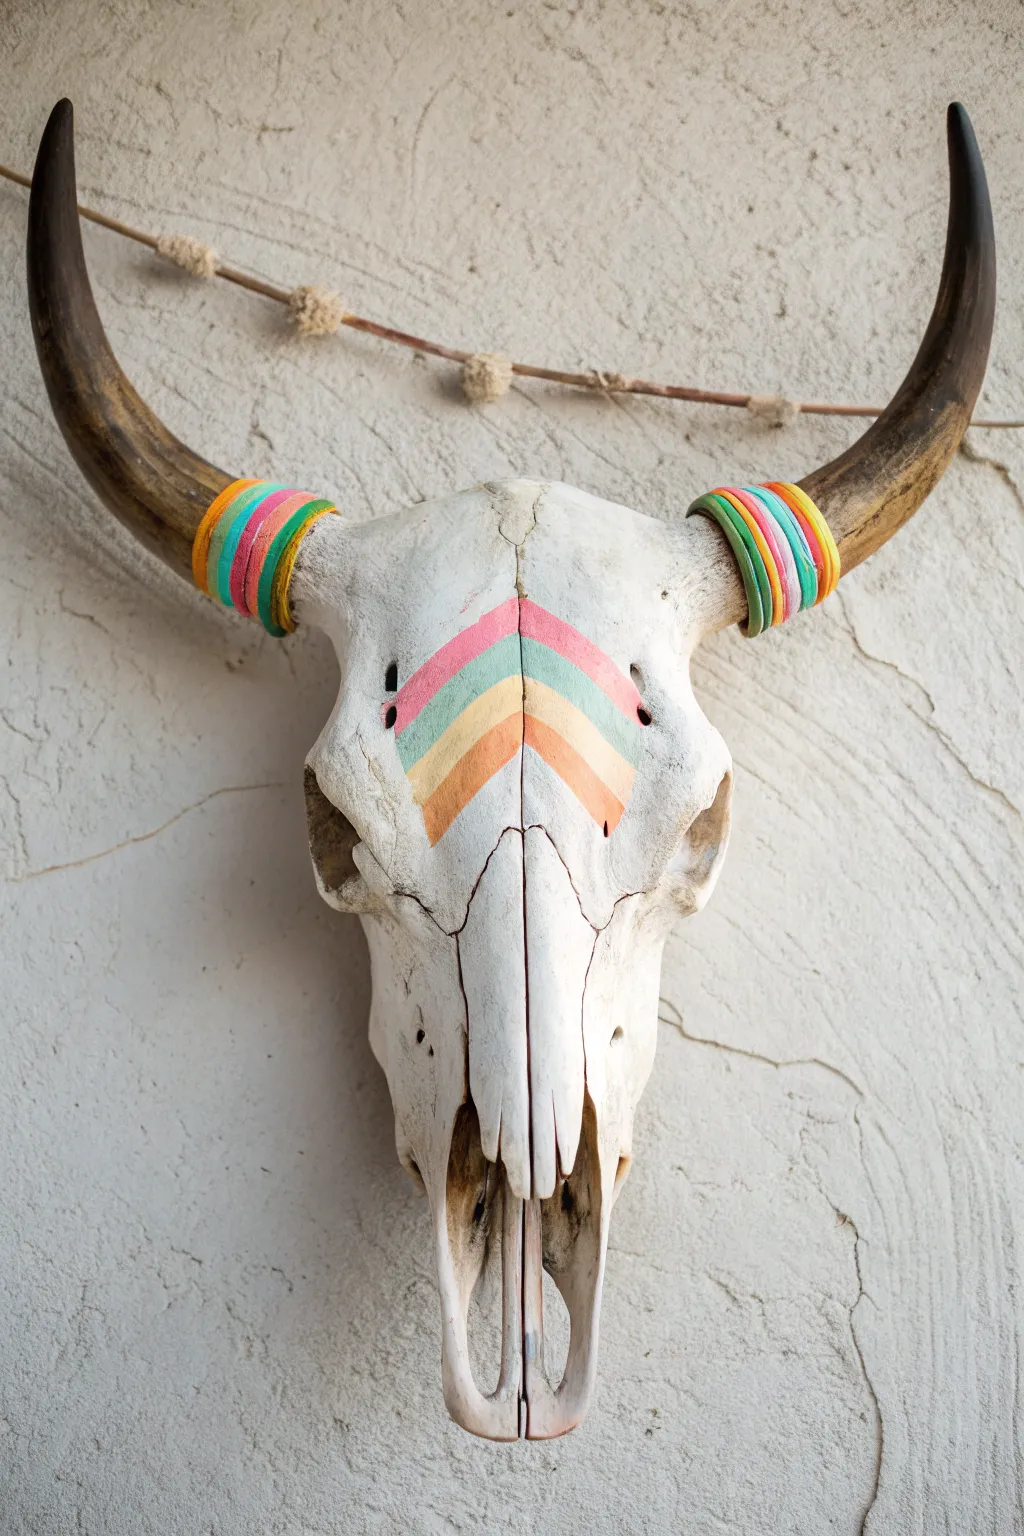
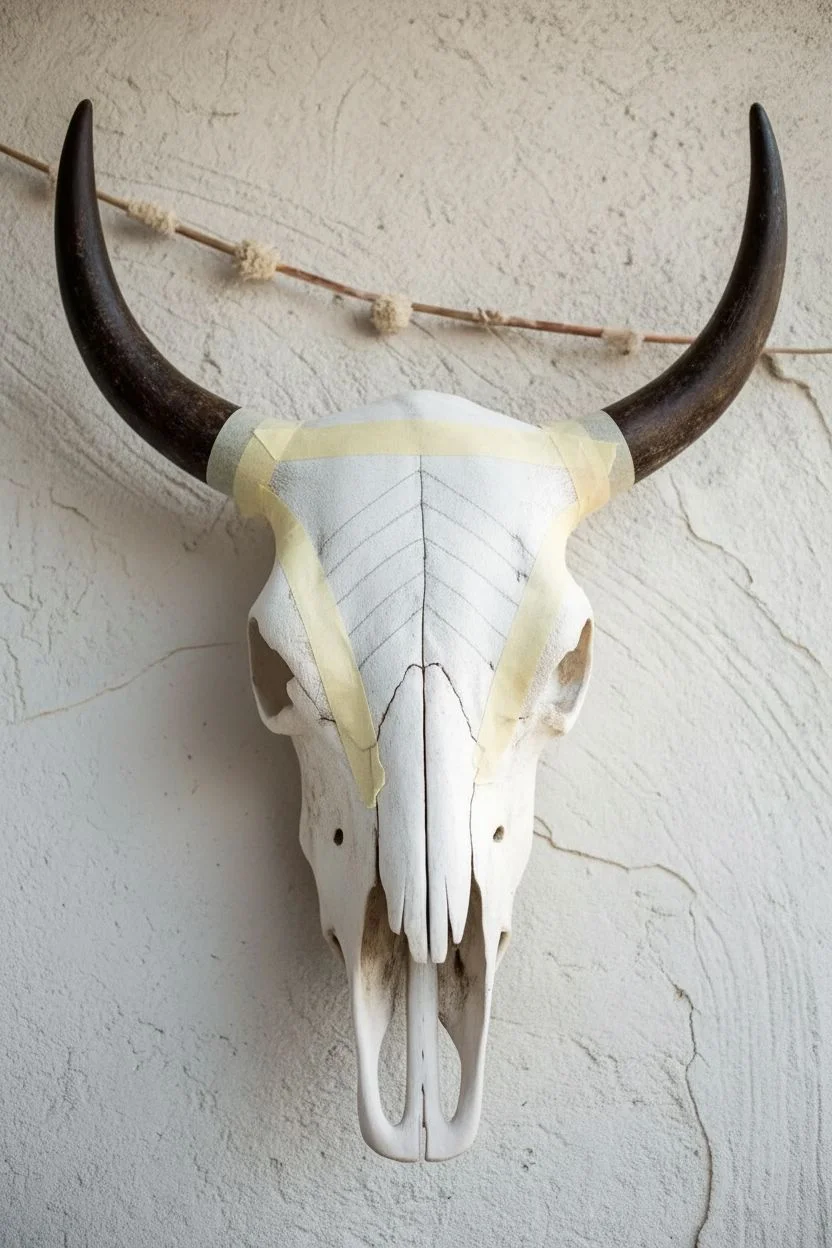
Transform a rustic cow skull into a soft, bohemian centerpiece with this delicate pastel rainbow design. The combination of muted paint stripes in a chevron pattern and matching wrapped horns creates a harmonious, textured look that feels both modern and earthy.
Step-by-Step Tutorial
Materials
- Cleaned and bleached cow skull
- Acrylic paints (pastel pink, mint green, pale yellow, peach/orange)
- Painter’s tape (washi tape works well for curves)
- Small flat paintbrush
- Embroidery floss or thin yarn (matching the paint colors: pink, green, yellow, orange)
- Clear craft glue or hot glue gun with fine tip
- Pencil
- Ruler or flexible measuring tape
- Scissors
Step 1: Preparation & Mapping
-
Clean surface:
Ensure your skull is completely clean, dry, and free of dust. If it’s a natural find, make sure it has been properly bleached and sanitized beforehand. -
Find the center:
Locate the exact vertical center line of the skull’s forehead. The natural suture lines (the cracks where the bone plates meet) usually provide a perfect built-in guide for this. -
Mark the chevron peak:
Decide where the top point of your rainbow will be. Using a pencil, lightly mark a point on that center line, roughly between the eye sockets. -
Sketch the guides:
Use a ruler to lightly sketch the first ‘V’ shape extending downwards from your center mark. Keep the angle somewhat wide to allow space for all four bands. -
Tape the first line:
Apply painter’s tape along the outer edge of your first pencil line to create a crisp boundary for the top stripe.
Tape Trick
Press the edges of your painter’s tape down firmly with a fingernail or credit card. This prevents the liquid acrylic from seeping into the textured bone surface.
Step 2: Painting the Rainbow
-
Paint the top band:
Start with your pastel pink paint. Fill in the top chevron shape. Use a small flat brush to get clean edges, especially near the center seam where the tape might not sit perfectly flat. -
Let it dry:
Allow the pink layer to dry completely to the touch before moving on to avoid smearing. -
Mark the second band:
Measure a consistent width (about 0.5 to 0.75 inches) below the pink line. Tape off the bottom edge for the next stripe. -
Paint the mint green:
Fill in the second space with mint green paint. I find that two thin coats often look smoother than one thick globby one. -
Continue the pattern:
Repeat the taping and painting process for the pale yellow stripe, followed finally by the peach/orange stripe at the bottom. Ensure each layer is dry before taping over it. -
Remove tape:
Once the final stripe is tacky but not fully hardened, carefully peel back all tape at a 45-degree angle to reveal your crisp chevron. -
Touch ups:
If any paint bled under the tape, use a tiny detailed brush with white paint (or the color of the skull) to clean up the edges.
Step 3: Wrapping the Horns
-
Prep the horns:
Wipe down the base of the horns to ensure there are no oils that might prevent the glue from sticking. -
Start the wrap:
Apply a tiny dot of glue on the back side of the horn, right at the base. Secure the end of your first thread color (start with the color matching your top paint stripe). -
Wind tightly:
Wrap the thread around the horn, keeping the coils tight against each other so no horn shows through. Do this for about half an inch. -
Switch colors:
Cut the first thread and glue the end down on the back. Immediately start the next color right where the last one ended, maintaining the tension. -
Completing the sequence:
Continue switching thread colors in the same order as your painted rainbow (Pink, Green, Yellow, Orange). Repeat the sequence if you want a wider wrapped section. -
Secure the end:
When you reach your desired width, secure the final thread end with a strong dot of clear glue on the back of the horn. Repeat the entire wrapping process on the second horn.
Add Metallic Flair
For a bit of glam, add a very thin line of gold leaf or metallic gold paint between each colored stripe to make the pastels pop.
Hang your finished masterpiece on a textured wall and enjoy the calm, colorful vibrancy it brings to your space
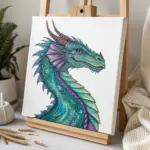
Galaxy Night Sky Finish

Transform a rustic cow skull into a stunning piece of celestial art with this galaxy-inspired finish. The deep indigo and violet hues, highlighted by scattered stars, create a dreamy night sky effect that contrasts beautifully with the natural bone horns.
Detailed Instructions
Materials
- Cleaned cow skull (real or faux resin)
- Painter’s tape
- Acrylic paints (black, dark blue, violet, magenta, teal, white)
- Sponge applicators or sea sponge
- Assorted paintbrushes (medium flat brush, fine detail brush)
- Old toothbrush
- Black twine or leather cord (optional for horn base)
- Clear matte or satin sealant spray
- Water cup and palette
Step 1: Preparation and Base Coat
-
Mask the horns:
Before you open any paint, carefully wrap the base of the horns with painter’s tape. You want a crisp line where the bone meets the painted skull, protecting the natural horn texture from stray splatters. -
Clean surface:
Ensure the skull is free of dust or oils. If it’s a real skull, a quick wipe with a damp cloth prevents paint from peeling later; let it dry completely. -
Apply the dark base:
Mix a small amount of black into your dark blue paint to create a deep midnight navy. Apply this all over the skull using a medium flat brush, ensuring you get into the deep eye sockets, nasal cavities, and cracks. Let it dry fully.
Nebula Nuance
Work in thin translucent layers when sponging. It looks much more like deep space if you build up color slowly rather than applying one heavy coat of purple.
Step 2: Creating the Nebula
-
Start contrasting hues:
Load a sponge with dark violet paint. Dab off the excess on a paper towel until it’s almost dry, then gently press it onto random sections of the skull to create cloud-like shapes. -
Layering lighter purples:
While the violet is still slightly tacky, repeat the sponging process with a brighter purple or magenta. Focus this color in the centers of your violet clouds to create depth. -
Adding teal highlights:
Using a clean section of the sponge, lightly dab small amounts of teal or light blue near the edges of the purple clouds. This mimics the ethereal gas clouds found in deep space photography. -
Blending edges:
If any sponge marks look too harsh, go back with a slightly damp, clean sponge and gently blur the edges of the colors into the dark background. -
Deepening the shadows:
I like to take a little bit of pure black on a brush and darken the deepest crevices again—specifically around the nose bridge and eye sockets—to make the bright nebula colors pop.
Glow Highlighting
Mix a tiny drop of glow-in-the-dark pigment into your white star paint. The skull will look cool during the day, but absolutely magical when the lights go out.
Step 3: The Starry Field
-
Prepare the ‘star’ paint:
Water down a dollop of white acrylic paint until it has an ink-like consistency. It needs to be fluid enough to splatter but opaque enough to show up against dark blue. -
Splatter texture:
Dip an old toothbrush into the watered-down white paint. Hold it near the skull and run your thumb across the bristles to flick a fine mist of white specs across the surface. -
Vary opacity:
Spray heavier concentrations of stars over the lighter nebula sections and keep the darker areas sparser for a realistic sense of depth. -
Hand-painting bright stars:
Use your finest detail brush to dot individually larger stars in random spots. This breaks up the uniform texture of the splatters. -
Adding the cross star:
Choose a focal point on the forehead. Paint a small ‘X’ shape with a vertical line through it using white paint to create a prominent twinkling star flare. -
Let it dry completely:
Allow the paint to cure for several hours. The thickest dots of white paint will take the longest to dry.
Step 4: Finishing Touches
-
Seal the skull:
Take the skull outdoors or into a well-ventilated area and spray it with a clear matte sealant. This protects the paint from chipping and unifies the finish. -
Remove tape:
Once the sealant is dry to the touch, carefully peel away the painter’s tape from the horns. -
Wrap the horn base:
To hide the transition line and add texture, wrap black twine or leather cord tightly around the base of the horns where they meet the skull. Secure the ends with a dab of super glue.
Hang your cosmic masterpiece in a well-lit area to let those nebulas truly shine
Painted Faux Turquoise Inlay Illusion
Transform a plain resin or bone skull into a striking piece of Southwestern decor with this geometric painting technique. Using clever placement of turquoise shapes and dotted borders, you’ll create the convincing illusion of stone inlay and beaded embellishments.
Step-by-Step Tutorial
Materials
- Faux resin cow skull or cleaned natural skull
- Turquoise acrylic paint
- Black acrylic paint or black paint marker (fine tip)
- Small flat shader brush
- Pencil
- Ruler or flexible measuring tape
- Fine grit sandpaper (optional)
- Matte clear sealer spray
Step 1: Preparation and Mapping
-
Clean the surface:
Wipe down your skull with a damp cloth to remove any dust or oils. If you are using a resin skull that feels slick, scuff the forehead area lightly with fine-grit sandpaper to help the paint adhere better. -
Mark the center line:
Identify the natural vertical center crack or line down the forehead of the skull. This will be your anchor for symmetry. If it’s not visible, lightly draw a plumb line down the center with your pencil. -
Sketch the central diamond:
Starting just below the top crown, sketch a tall diamond shape spanning slightly across the center line. This main diamond should act as the focal point between the eyes. -
Draft the side triangles:
Draw two large triangles flanking the top half of your central diamond. The long flat side of these triangles should face outward towards the horns, leaving a small gap between them and the central diamond. -
Add lower diamonds:
Sketch two smaller, elongated diamonds below the triangles. These should sit lower on the forehead, mirroring the angle of the eye sockets. -
Detail the nasal area:
Move down to the nasal bone area. Sketch a small, vertical oval or teardrop shape on each side of the nasal cavity.
Wobbly Lines?
If your hand shakes while painting geometric shapes, use painter’s tape or masking tape to block off the triangles and diamonds. This creates razor-sharp edges without the stress.
Step 2: Painting the “Inlay”
-
Paint the geometric shapes:
Using your flat shader brush and turquoise paint, carefully fill in the pencil shapes you just drew. I prefer to do two thin coats rather than one thick one to avoid brushstrokes. -
Create the horn bands:
Move to the base of the horns. Paint two distinct bands around the circumference of each horn. These should look like thick cuffs. Leave a small gap between the two bands so the horn color shows through. -
Mark the band segments:
Once the turquoise bands are dry, take your black paint or marker. Draw vertical lines spaced evenly around the bands to make them look like individual rectangular beads or stones strung together. -
Refine edges:
Go back and touch up any edges on your forehead shapes with a small brush to ensure the lines are crisp and sharp, reinforcing that stone-cut look.
Add Texture
To make the turquoise look like real stone, lightly sponge a slightly darker teal color or a dark gray wash over the turquoise areas before sealing. This mimics the matrix found in real turquoise.
Step 3: Dot Detail Work
-
Outline the central design:
Dip the handle end of a small brush into black paint, or use a fine-tip paint marker. Place dots entirely around the perimeter of your central diamond, maintaining equal spacing. -
Outline flanking shapes:
Continue dotting around the triangles and the lower diamonds. The dots should act as a frame, leaving about 2-3mm of white space between the turquoise paint and the black dot. -
Connect the design:
Add a line of dots connecting the gaps between the shapes to unify the design into one cohesive geometric pattern. -
Accent the eyes:
Place a row of dots following the curve of the eye socket bone, just above where the eye would be. -
Detail the nose:
Dot around the small turquoise ovals on the nasal bone. Add a few extra decorative dots trailing down towards the tip of the nose for balance. -
Seal the artwork:
Allow all paint to cure fully for at least 24 hours. Spray the entire skull with a matte clear sealer to protect your design and give it a unified finish.
Hang your finished skull as a statement piece that brings a desert spirit to your room
Neon UV-Reactive Party Skull

Transform a rustic cow skull into a vibrant piece of modern art using bright neon hues and bold geometric patterns. This project combines tribal-inspired motifs with an electrifying color palette, making it a perfect statement piece for any eclectic space.
Detailed Instructions
Materials
- Cleaned cow or steer skull (real or faux resin)
- White primer spray paint or gesso
- Neon acrylic paints (Pink, Electric Blue, Lime Green, Yellow)
- Black acrylic paint or black paint marker (fine and medium tip)
- Set of small synthetic brushes (flat and fine round)
- Pencil for sketching
- Eraser
- Painter’s tape (optional)
- Matte or satin clear sealant spray
- Small cup of water and paper towels
Step 1: Preparation & Base Coat
-
Clean and Prep:
Ensure your skull is completely clean, dry, and free of dust or grease. If using a real skull, make sure it has been properly whitened and degreased. Lightly sand any rough patches if you’re working with a resin replica. -
Prime the Surface:
Apply a thin, even coat of white primer or gesso over the entire skull. This provides a uniform surface that makes the neon colors pop. Avoid painting the horns; you want to keep their natural texture for contrast. -
Sketch the Centerpiece:
Once the primer is fully dry, identify the center of the forehead. Using a pencil, lightly sketch a large diamond shape. Divide this diamond horizontally across the middle, and then create smaller interior triangles to form a faceted jewel look. -
Map the Horn Wrappings:
Sketch a band about an inch wide around the base of each horn. Inside these bands, draw small circles to mimic the look of beaded jewelry. -
Draft Additional details:
Sketch the ‘fern’ or ‘feather’ lines extending from the nose bridge toward the eye sockets. Add triangular chevron patterns along the upper jawline and cheekbones.
Neon Brightness Tip
Neon paints can be translucent. I find that painting a layer of solid white acrylic over the specific design area first acts as a ‘backlight’ to make the neon colors truly vibrant.
Step 2: Painting the Colors
-
Fill the Center Diamond:
Start painting the central diamond design. Use neon pink for the bottom triangle and lime green for the top right section. Leave one section blank for now to be filled with black later. -
Paint the Horn Cuffs:
Paint the background of the horn bands with electric blue. Carefully paint the small ‘beads’ inside the band with neon pink. You may need a very fine round brush for this detail. -
Right Eye Designs:
Move to the area above the right eye socket. Paint a large pink chevron shape and accent it with a smaller blue diamond containing yellow circles. Let each color dry before adding neighbors to prevent bleeding. -
Left Eye Designs:
Repeat a symmetrical or complementary pattern above the left eye. Use pink, blue, and touches of white or yellow to create rectangular and triangular motifs. -
Jaw and Cheek Color:
Paint the large chevron area on the cheekbone neon pink. Above this, add a row of jagged blue triangles and lime green accents to create a layered ‘teeth’ or ‘mountain’ effect. -
Adding Contrast:
Now, introduce the black acrylic. Fill the remaining segment of the central diamond with solid black. This dark anchor point instantly adds depth to the neon arrangement. -
Teeth Detail:
Add bright pink paint to the actual teeth area of the skull or the lower jaw ridge to give it an unexpected pop of color.
Step 3: Detailing & Outlining
-
Outline Main Shapes:
Using a fine black paint marker or a liner brush, carefully outline all your geometric shapes. The crisp black lines will clean up any messy edges where colors meet. -
Add Decorative Dots:
Use the back end of a paintbrush dipped in black paint to stamp perfect dots. Add these to the pink cheek chevron and along the pink bands near the horns. -
Line Work:
Draw the ‘fern’ lines on the nose bridge using the black marker. Draw a central stem line first, then add the small leafy dashes extending outward on both sides. -
Hatching Details:
Add small hatch marks or ‘stitches’ inside the pink and blue shapes on the forehead to add texture and complexity to the flat colors. -
Final Cleanup:
Check for any pencil marks still visible and gently erase them. Touch up any white areas of the skull with a bit of fresh white paint if they got smudged. -
Seal the Work:
Once all paint is completely cured (wait at least 24 hours), spray the entire skull with a matte or satin clear coat to protect the design from dust and UV fading.
Glow in the Dark
Swap standard neon paints for UV-reactive or phosphorescent acrylics. Your geometric skull will charge under normal light and glow vividly when the lights go down for a party.
Hang your masterpiece on a contrasting dark wall to really let those neon colors shine


Have a question or want to share your own experience? I'd love to hear from you in the comments below!