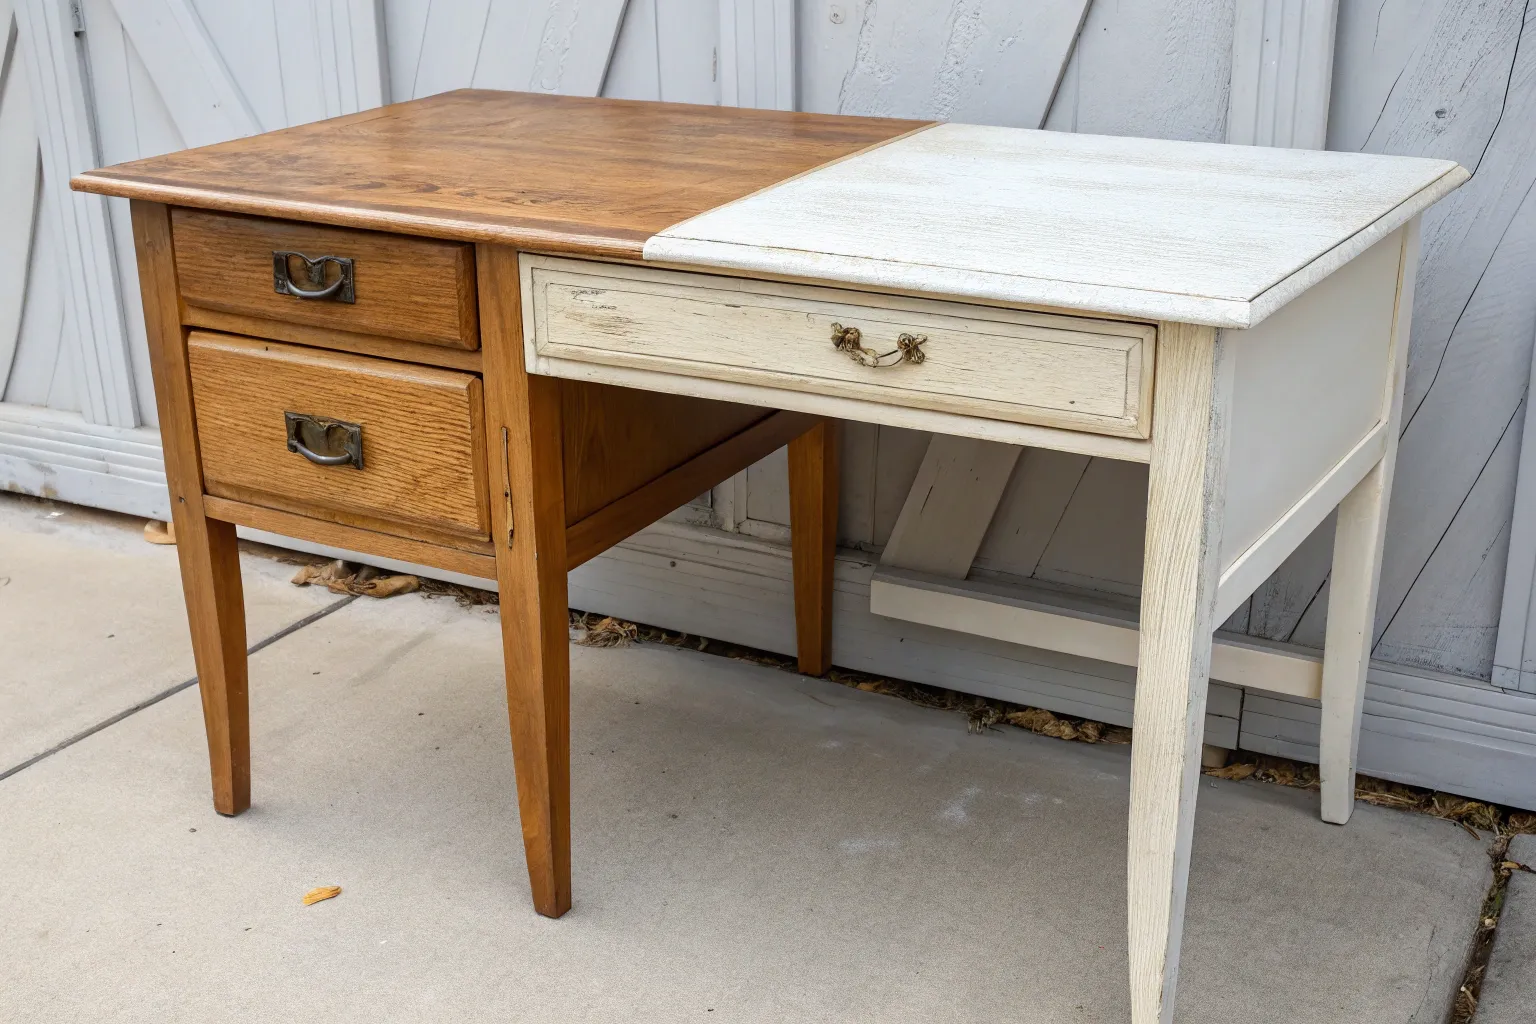
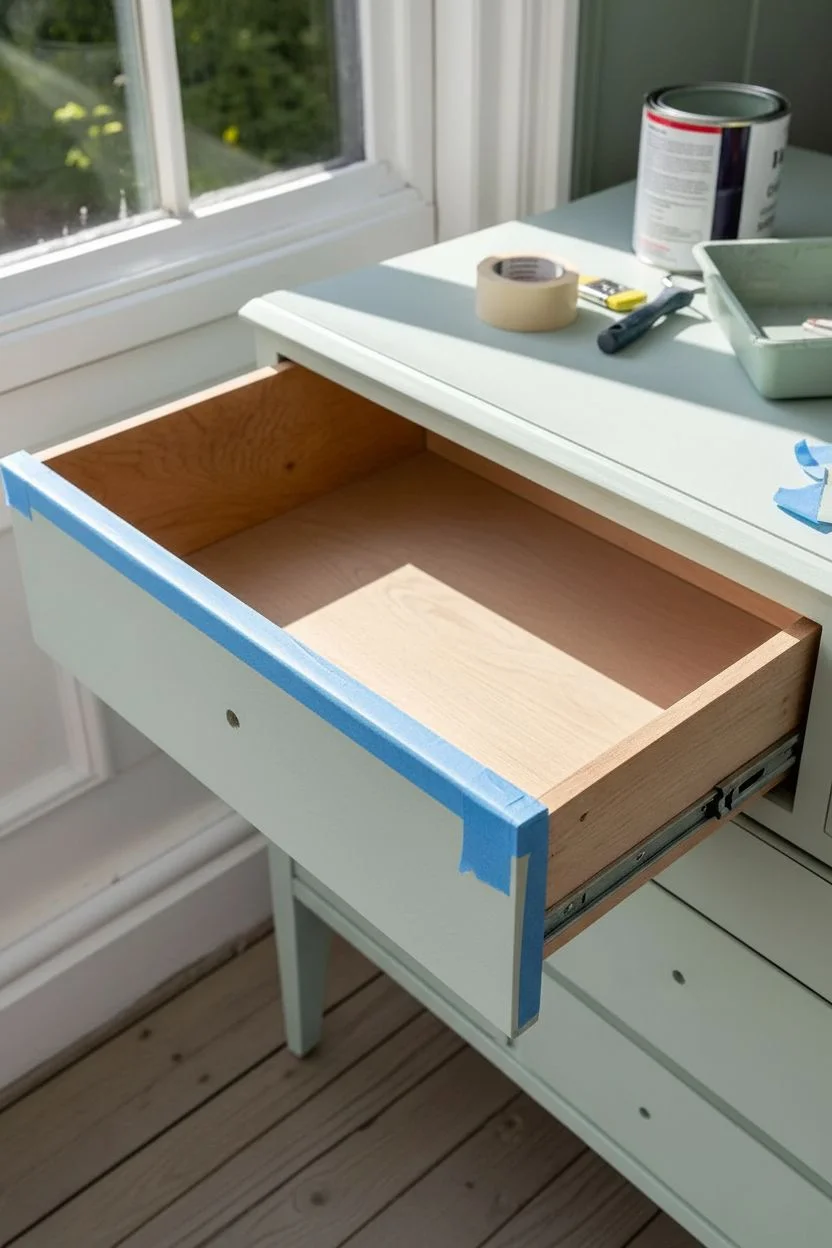
A DIY painted desk is one of my favorite ways to turn a blah workspace into something that feels totally you. Whether you’re craving calm neutrals or a bold art-statement, these ideas are all about big visual payoff and that satisfying before-and-after transformation.
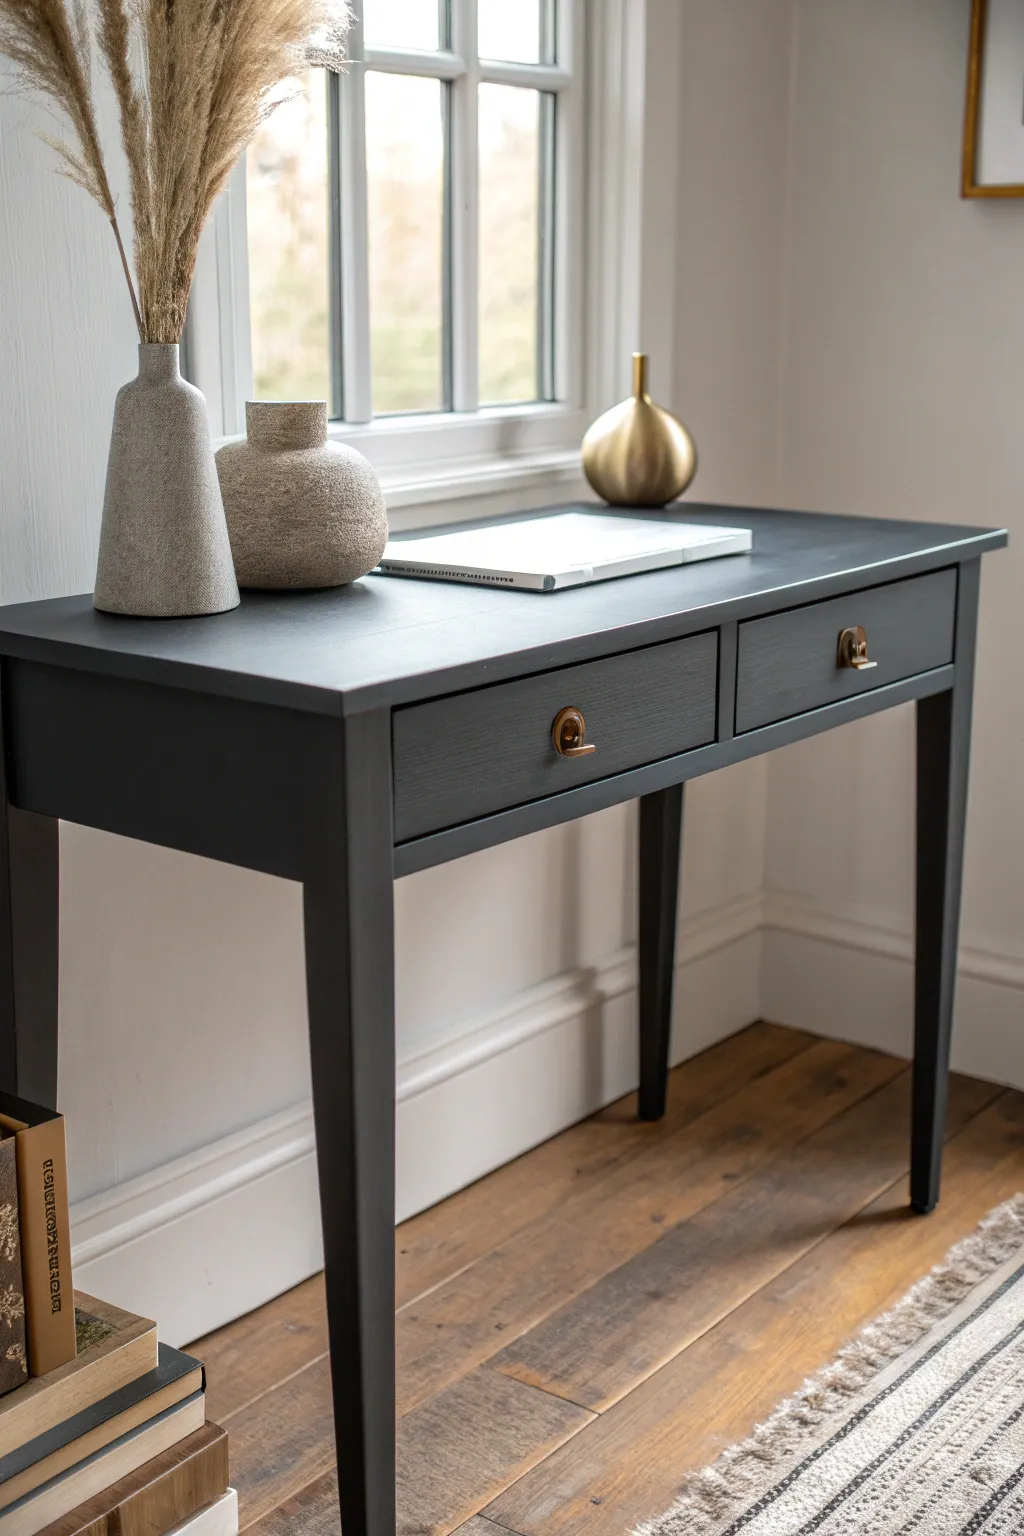
Classic Solid-Color Painted Desk Makeover
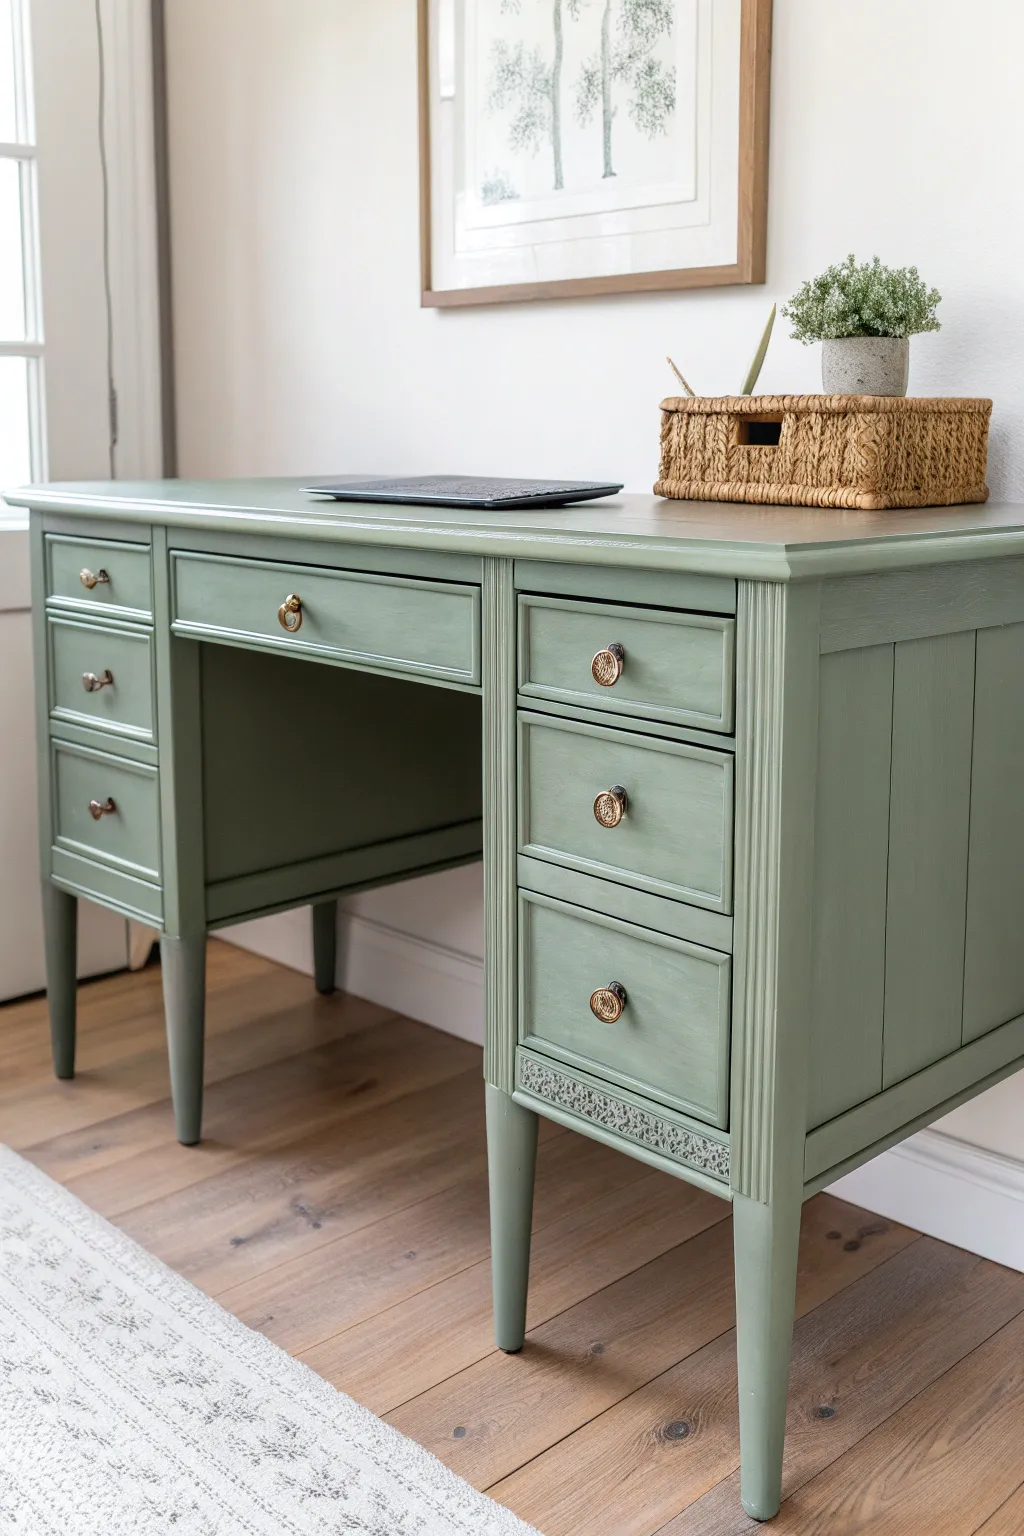
Transform a dated or standard wooden desk into a timeless statement piece with this classic solid-color makeover. The muted sage green paint, paired with fluted detailing and elegant gold hardware, creates a tranquil workspace that balances vintage charm with modern simplicity.
How-To Guide
Materials
- Solid wood desk (vintage or thrifted)
- Medium-grit sandpaper (120-150 grit)
- Fine-grit sandpaper (220 grit)
- Tack cloth or lint-free rags
- Wood filler (if repairing old hardware holes)
- High-quality bonding primer (oil-based or shellac-based recommended for sleek surfaces)
- Sage green satin or semi-gloss furniture paint
- Synthetic bristle angled sash brush (2 inch)
- Small foam roller and tray
- New decorative knobs (gold or antique brass)
- Screwdriver
- Painter’s tape
- Clear matte or satin polycrylic topcoat
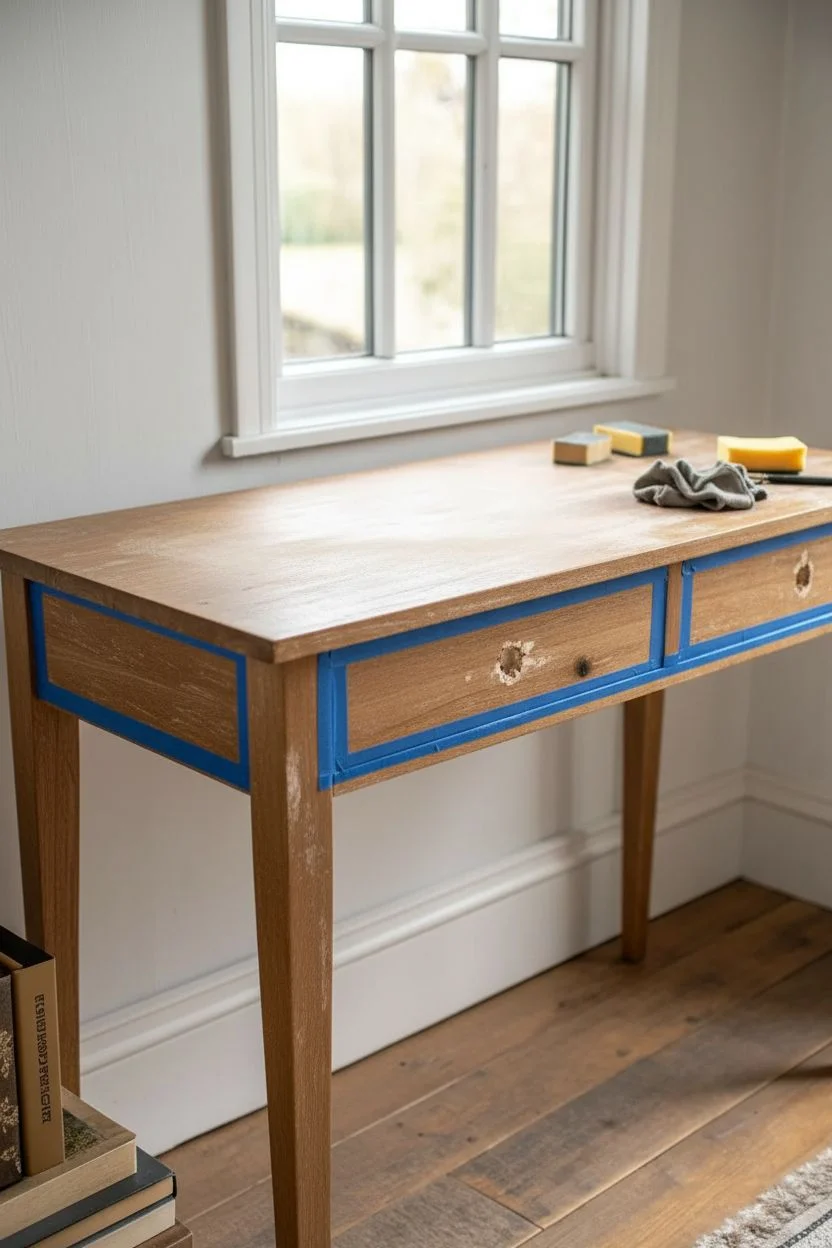
Step 1: Preparation & Repairs
-
Remove Hardware and Drawers:
Begin by pulling all drawers out of the desk body. Use a screwdriver to remove the old knobs or pulls. If you are replacing them with new hardware that has different spacing, fill the old holes with wood filler and let it dry completely. -
Clean Thoroughly:
Wipe down the entire piece with a degreaser or a mixture of warm water and dish soap to remove years of oils and dust. This ensures your primer will stick properly. -
Scuff Sand:
Using medium-grit sandpaper, sanding the entire surface of the desk and drawer fronts. You don’t need to strip it to bare wood; just roughen the existing finish to create ‘teeth’ for the paint. -
Remove Dust:
Vacuum up the sanding dust, then wipe everything down with a tack cloth. Even tiny specks of dust can ruin that smooth professional finish we’re aiming for.
Step 2: Priming the Surface
-
Tape Off Areas:
If you want to keep the inside of the drawers unpainted for a nice contrast, apply painter’s tape along the inner edges now. -
Apply Primer:
Brush or roll on a coat of high-quality bonding primer. Pay special attention to the fluted details on the legs or trim; use your brush to work the primer into these crevices without letting it pool. -
Sand the Primer:
Once the primer is fully dry (check the can for times), lightly sand it with fine-grit sandpaper. It should feel smooth to the touch like an eggshell. Wipe away the dust again.
Pro Brush Tip
Store your wet brush in a sealed plastic bag or wrapped tightly in cling wrap between coats. This keeps the paint fresh so you don’t have to wash it out every single time you take a break.
Step 3: Painting & Sealing
-
Cut In Edges:
Stir your sage green paint well. Use your angled brush to paint the tricky spots first: the fluted trim, corners, and legs. Keep your strokes long and even to minimize brush marks. -
Roll Flat Surfaces:
For the desktop and flat sides, I find using a small foam roller gives the smoothest finish. Apply the paint in thin, even coats rather than one thick gloop. -
Paint Drawer Fronts:
Paint the drawer fronts while they are removed from the desk. Lay them flat on a drop cloth to prevent drips. -
Apply Second Coat:
Let the first coat dry completely (usually 2-4 hours). Lightly sand with very fine grit if you feel any bumps, then apply a second coat for full, rich opacity. -
Protect the Top:
Since a desk sees a lot of wear, apply 2-3 coats of clear polycrylic sealant to the desktop specifically. Let each coat dry before adding the next.
Stuck Drawers?
If drawers stick after painting, sand the edges where they make contact with the frame. Paint adds thickness, so you might need to sand down to bare wood on the hidden sliding tracks.
Step 4: Finishing Touches
-
Install Hardware:
Once the paint has cured for at least 24 hours, install your new gold or brass knobs. If you filled holes earlier, you’ll need to drill new pilot holes first. -
Accentuate Details (Optional):
If your desk has intricate carving like the band above the leg shown here, you can leave it solid green or lightly dry-brush a tiny bit of metallic paint over the texture to make it pop. -
Reassemble:
Slide the drawers back into their tracks. Ensure they glide smoothly; if paint got on the tracks, sand it off or rub a little candle wax on the wood to help them slide.
Enjoy your beautifully refreshed workspace knowing you created a custom piece of furniture


Two-Tone Desk: Painted Base and Wood Top
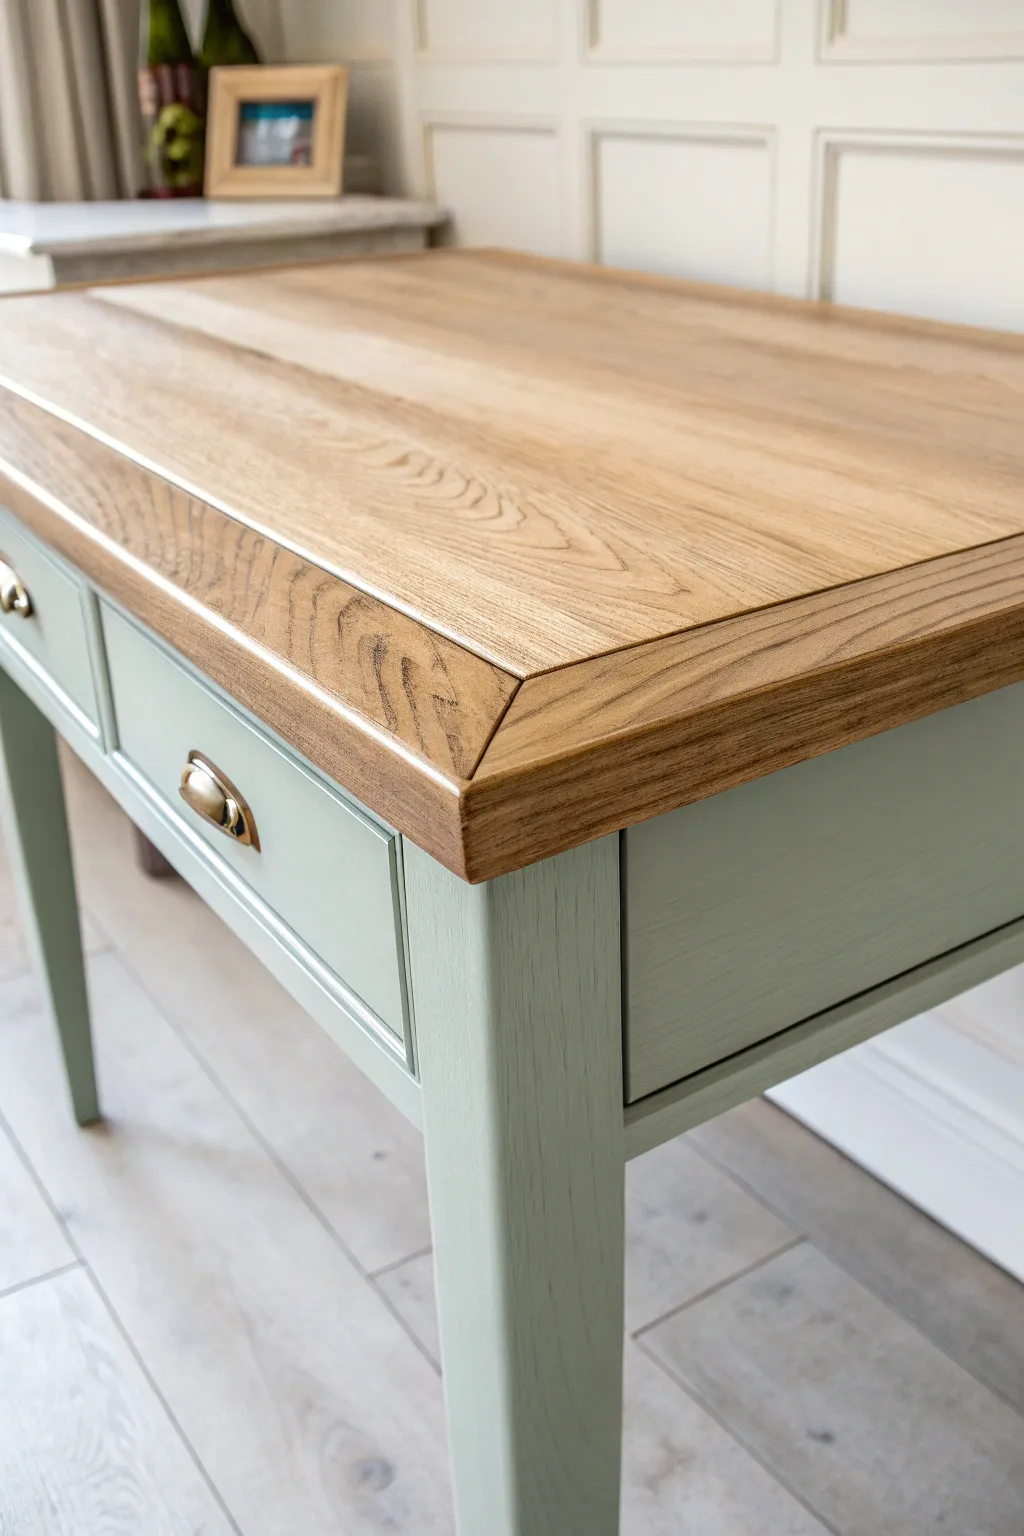
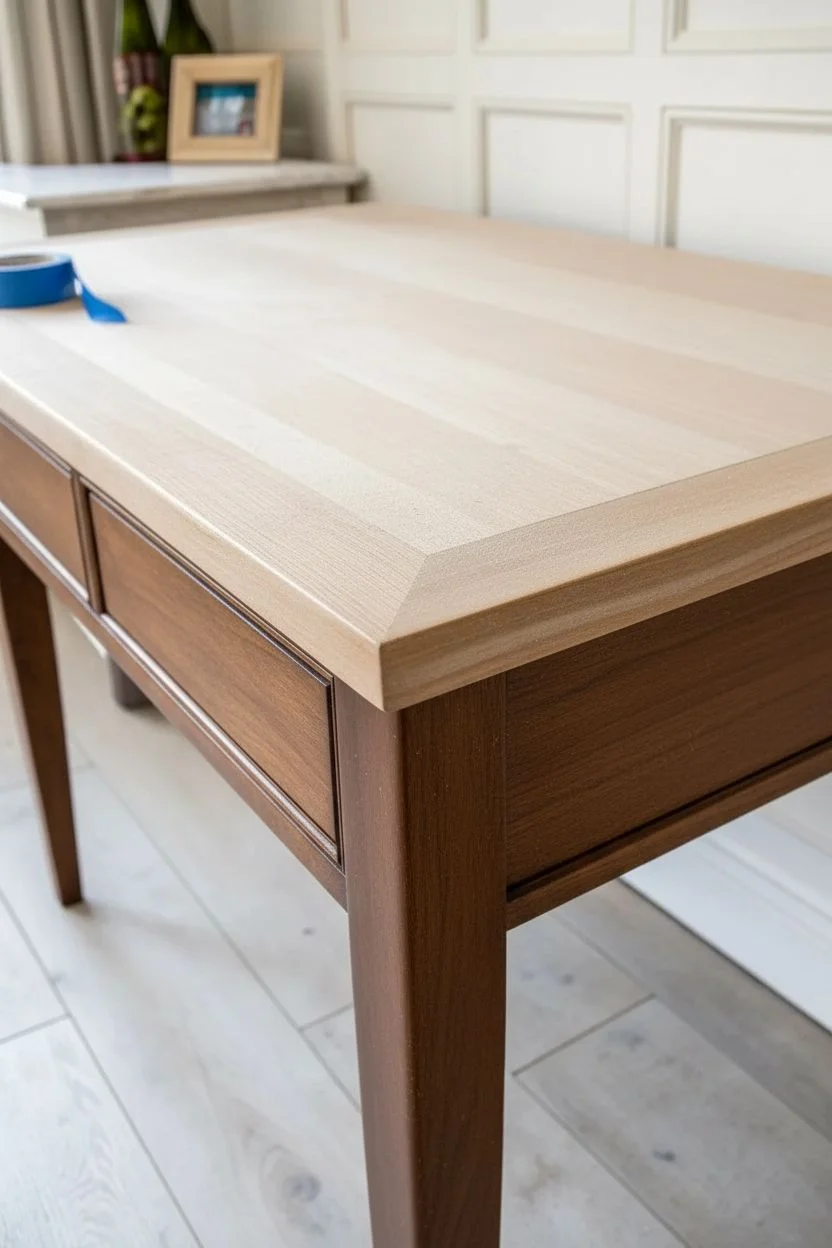
This elegant update combines a buttery-smooth sage green base with a raw, natural oak top for a timeless two-tone look. By contrasting the painted frame with the warmth of exposed wood grain, you create a piece that feels both country-classic and modern.
Step-by-Step Guide
Materials
- Solid wood desk (preferably oak or pine)
- Orbital sander
- Sandpaper (80, 120, 220 grit)
- Chemical paint stripper (optional, for thick varnish)
- High-quality furniture cleaner/degreaser
- Sage green mineral paint (e.g., Fusion Mineral Paint ‘Bellwood’ or similar)
- Bonding primer (if the original finish is glossy)
- Synthetic oval brush (1.5 – 2 inch)
- Clear matte polyurethane or furniture wax
- Lint-free rags
- Antique brass cup handles
- Painter’s tape
- Tack cloth
Step 1: Prepping and Stripping the Top
-
Remove hardware:
Begin by unscrewing all old handles and knobs. Pull the drawers out completely and set them aside to work on separately. -
Assess the top finish:
Examine the desktop. If it has a very thick, shiny varnish, applying a chemical stripper first will save you hours of sanding. -
Strip the top (if needed):
Apply the stripper according to manufacturer instructions, wait for the finish to bubble, and scrape it off with a plastic scraper. -
Rough sand the top:
Using an orbital sander with 80-grit paper, remove the remaining finish from the desktop until you see raw wood. Be mindful of the edges; if they are beveled like the inspiration piece, hand-sand these areas to preserve the sharp angles. -
Refine the wood grain:
Switch to 120-grit sandpaper to smooth out the scratches from the coarse paper. Follow this with a final pass of 220-grit for a baby-smooth surface. -
Clean deeply:
Vacuum up all the sanding dust. Wipe the entire piece—base and top—with a degreasing furniture cleaner to remove oils and residue.
Clean Edges Pro-Tip
When sanding the beveled edge of the tabletop, use a sanding sponge instead of paper. It conforms to the angle without flattening the sharp corner.
Step 2: painting the Base
-
Scuff sand the base:
Since we are painting the legs and frame, you don’t need to strip them to bare wood. Just give them a scuff sand with 120-grit paper to give the paint something to grip. -
Mask the top:
Apply painter’s tape underneath the lip of the wood top to protect your freshly sanded surface from stray paint strokes. -
Apply primer:
If your desk has a shiny or laminate surface, apply one coat of bonding primer. Let it dry completely before moving on. -
First coat of sage:
Dip your synthetic brush into the sage green mineral paint. Apply a thin, even coat, painting in the direction of the wood grain. Don’t worry if coverage isn’t perfect yet. -
Sand between coats:
Once dry, run a piece of superfine sandpaper (400-grit) or a brown paper bag over the painted surface. This knocks down any raised grain or brush marks. -
Second coat:
Apply your second coat of paint. This should provide full opacity. Watch for drips around the corners of the legs. -
Paint the drawers:
While the base dries, paint the drawer fronts. Avoid painting the sides of the drawers, as this can cause them to stick.
Cerused Oak Level-Up
Use a white liming wax on the raw wood top before sealing. It settles into the deep oak grain, highlighting the texture for a more coastal, driftwood effect.
Step 3: Finishing Touches
-
Seal the top:
To keep that natural raw look while adding protection, apply a clear matte polyurethane or a high-quality furniture wax. Rub it in with a lint-free rag. -
Buff the wax:
If using wax, let it haze over for about 15 minutes, then buff it vigorously with a clean cloth to create a soft sheen. -
Protect the paint:
Mineral paint often has a built-in topcoat, but for a high-traffic desk, I usually add a layer of clear wax or matte varnish over the painted areas for extra durability. -
Install hardware:
Once everything is fully cured (give it 24 hours if possible), attach your new antique brass cup pulls to the center of the drawers.
Enjoy your beautifully customized workspace knowing you created it with your own hands


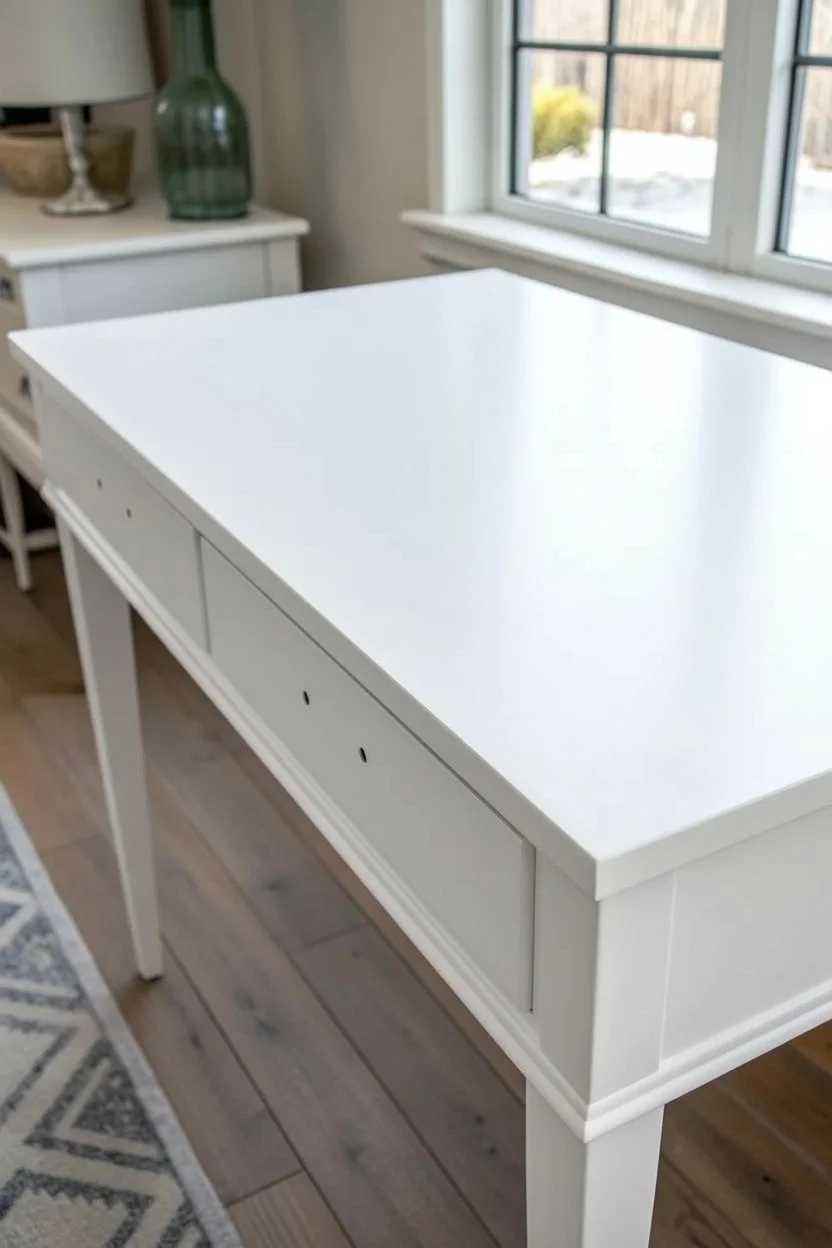
Crisp White Painted Desk for a Bright Studio Feel
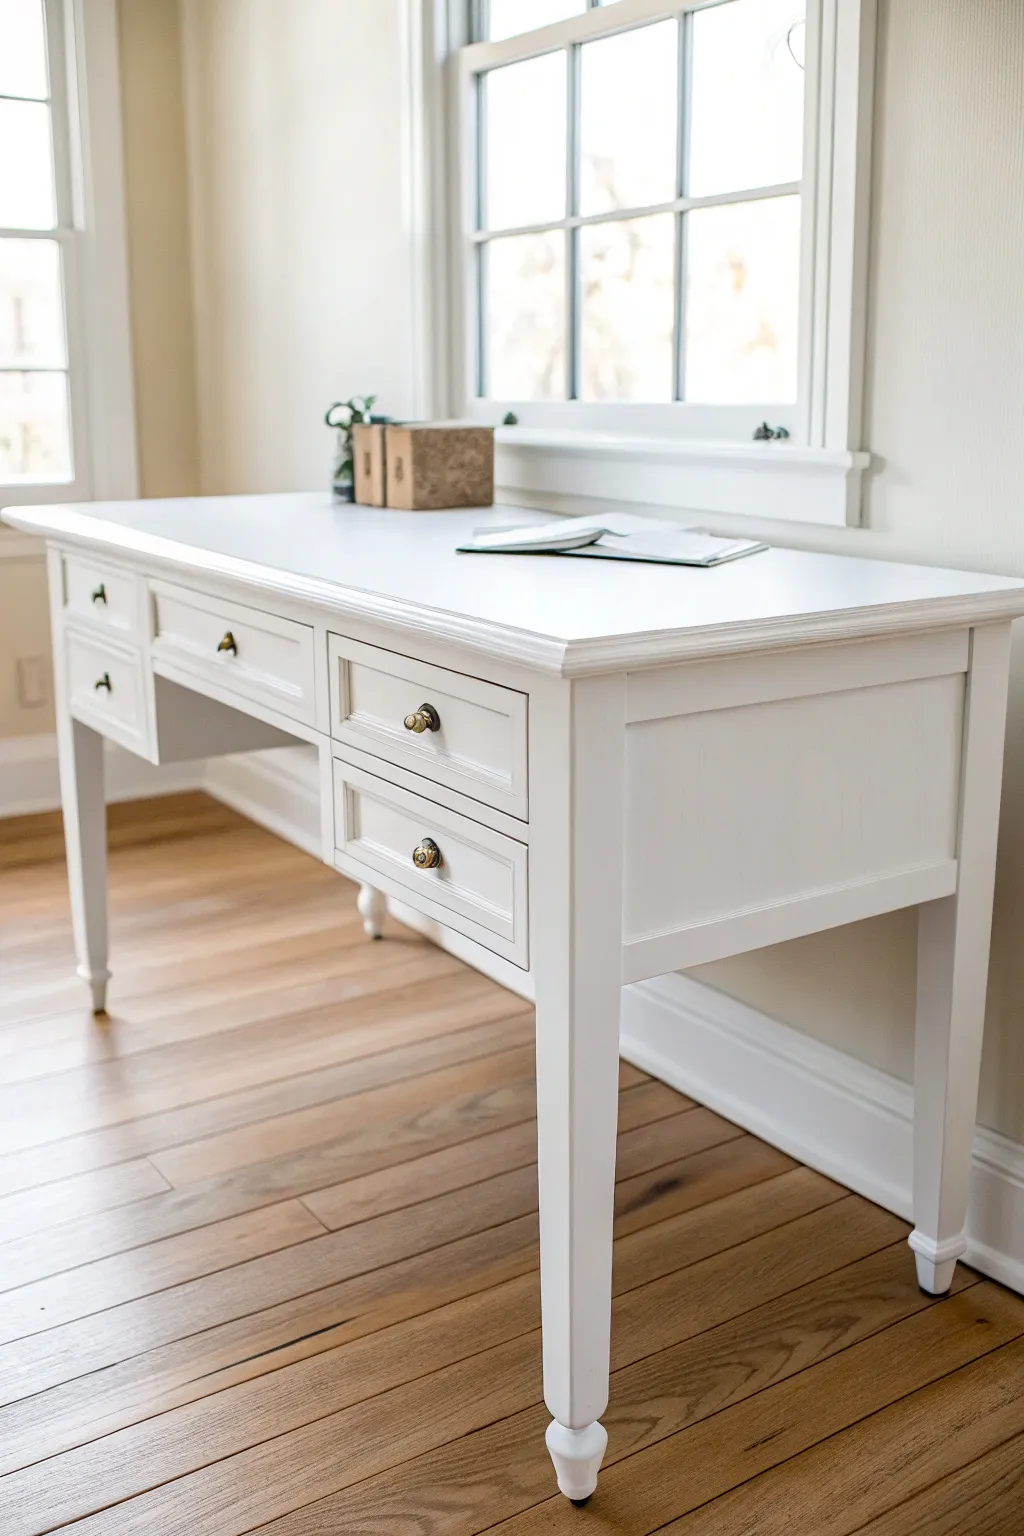

Achieve a sleek, professional look for your home office with this bright white desk makeover. This project transforms a tired wooden piece into a clean, modern focal point using durable enamel paint and classic hardware.
Step-by-Step
Materials
- Old wooden desk (with drawers)
- High-grit sandpaper (220-grit)
- Medium-grit sandpaper (120-grit)
- Clean tack cloths
- Liquid deglosser/sander (optional but recommended)
- Stain-blocking primer (e.g., shellac-based)
- High-quality white enamel paint (satin or semi-gloss finish)
- Gold or brass knob hardware
- Small foam roller
- High-quality angled sash brush
- Screwdriver
- Drop cloths
- Wood filler (if repairing scratches)
Step 1: Preparation
-
Disassemble the desk:
Start by removing all drawers from the desk frame. Use your screwdriver to take off all existing pulls and knobs. Place the hardware in a baggie if you plan to reuse it, though we will likely be replacing them for this updated look. -
Clean thoroughly:
Scrub the entire desk down with a degreasing cleaner to remove years of furniture polish, oil, and dust. This is crucial for paint adhesion. -
Fill imperfections:
Inspect the surface for deep scratches or dents. Apply wood filler to these areas with a putty knife and let it dry completely according to the package instructions. -
Initial scuff sand:
Using 120-grit sandpaper, sanding the entire piece to dull the existing finish. You don’t need to strip it to bare wood, just rough it up enough so the new paint bites. -
Detail sanding:
For the turned legs and grooves, fold your sandpaper or use a sanding sponge to get into the crevices without flattening the details. -
Dust removal:
Vacuum up the bulk of the sawdust, then wipe everything down with a tack cloth to catch the fine particles.
Smooth Operator
Add a paint conditioner like Floetrol to your water-based paint. It slows drying time, allowing brush strokes to level out for a glass-like finish.
Step 2: Priming and Painting
-
Apply primer:
Roll or brush on a coat of stain-blocking primer. I always prefer shellac-based primer for vintage wood to prevent tannins from bleeding through the white paint later. -
Sand the primer:
Once the primer is fully dry (usually about an hour for shellac), lightly sand it with 220-grit paper to knock down any texture. Wipe clean again. -
First coat of paint:
Using a high-quality enamel paint, apply your first coat. Use the foam roller for the large flat top and drawer fronts to get a smooth finish. -
Painting the details:
follow up immediately with the angled sash brush to smooth out the roller texture and paint the legs, corners, and intricate trim. Maintain a ‘wet edge’ to avoid brush marks. -
Dry time:
Allow the first coat to dry undisturbed. Enamels often require longer drying times, potentially 24 hours depending on humidity, so don’t rush this step. -
Light sanding:
Give the first coat a very gentle pass with 220-grit sandpaper. This polishes the surface for a factory-like finish. -
Second coat:
Apply the second coat using the same roller-and-brush technique. This coat should provide full, opaque coverage. -
Curing:
Let the paint cure. While it may feel dry to the touch quickly, enamel takes time to harden completely. Treat it gently for the first few days.
Sticky Drawers?
If painted drawers stick, rub a clear candle or beeswax along the wooden runners and sides to help them slide easily without scraping the paint.
Step 3: Hardware and Assembly
-
Clean hardware holes:
Sometimes paint can clog the holes for the knobs. If necessary, carefully clear them out with a small drill bit or a toothpick. -
Install new knobs:
Attach your gold or brass knobs to the drawers. The metallic contrast against the crisp white is essential for that studio feel. -
Reassemble:
Slide the drawers back into their tracks. Ensure they glide smoothly; if paint dripped onto the tracks, sand it off for smooth operation.
Your workspace now has a fresh, inspiring centerpiece ready for your next big idea


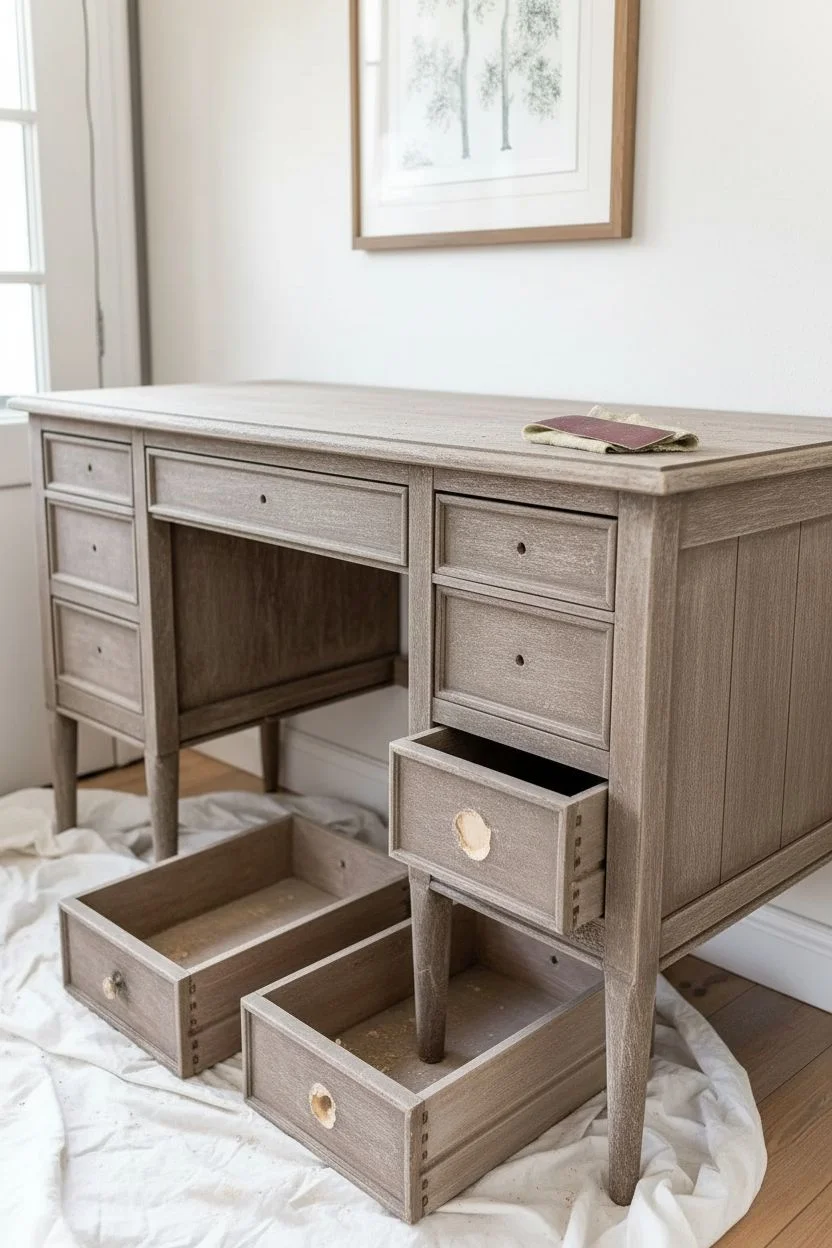
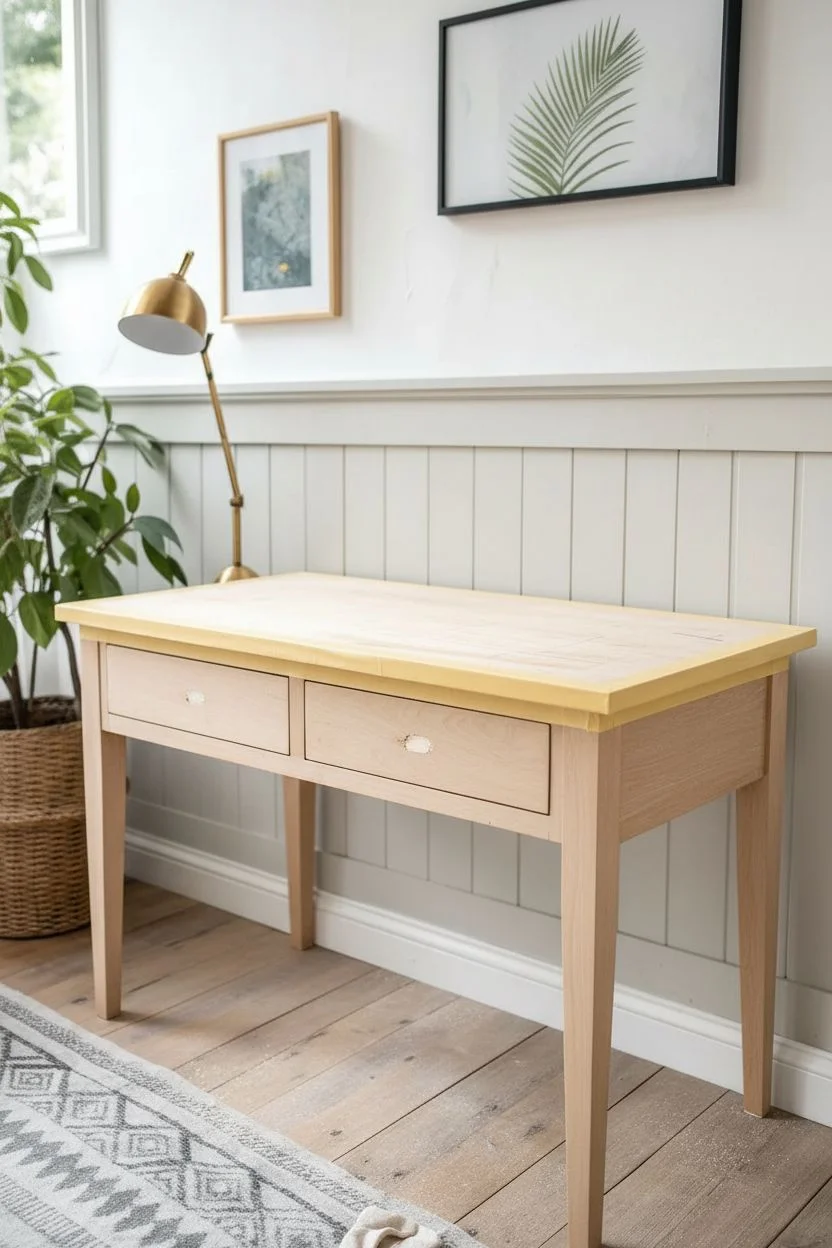
Soft Neutral Painted Desk in Cream, Greige, or Taupe
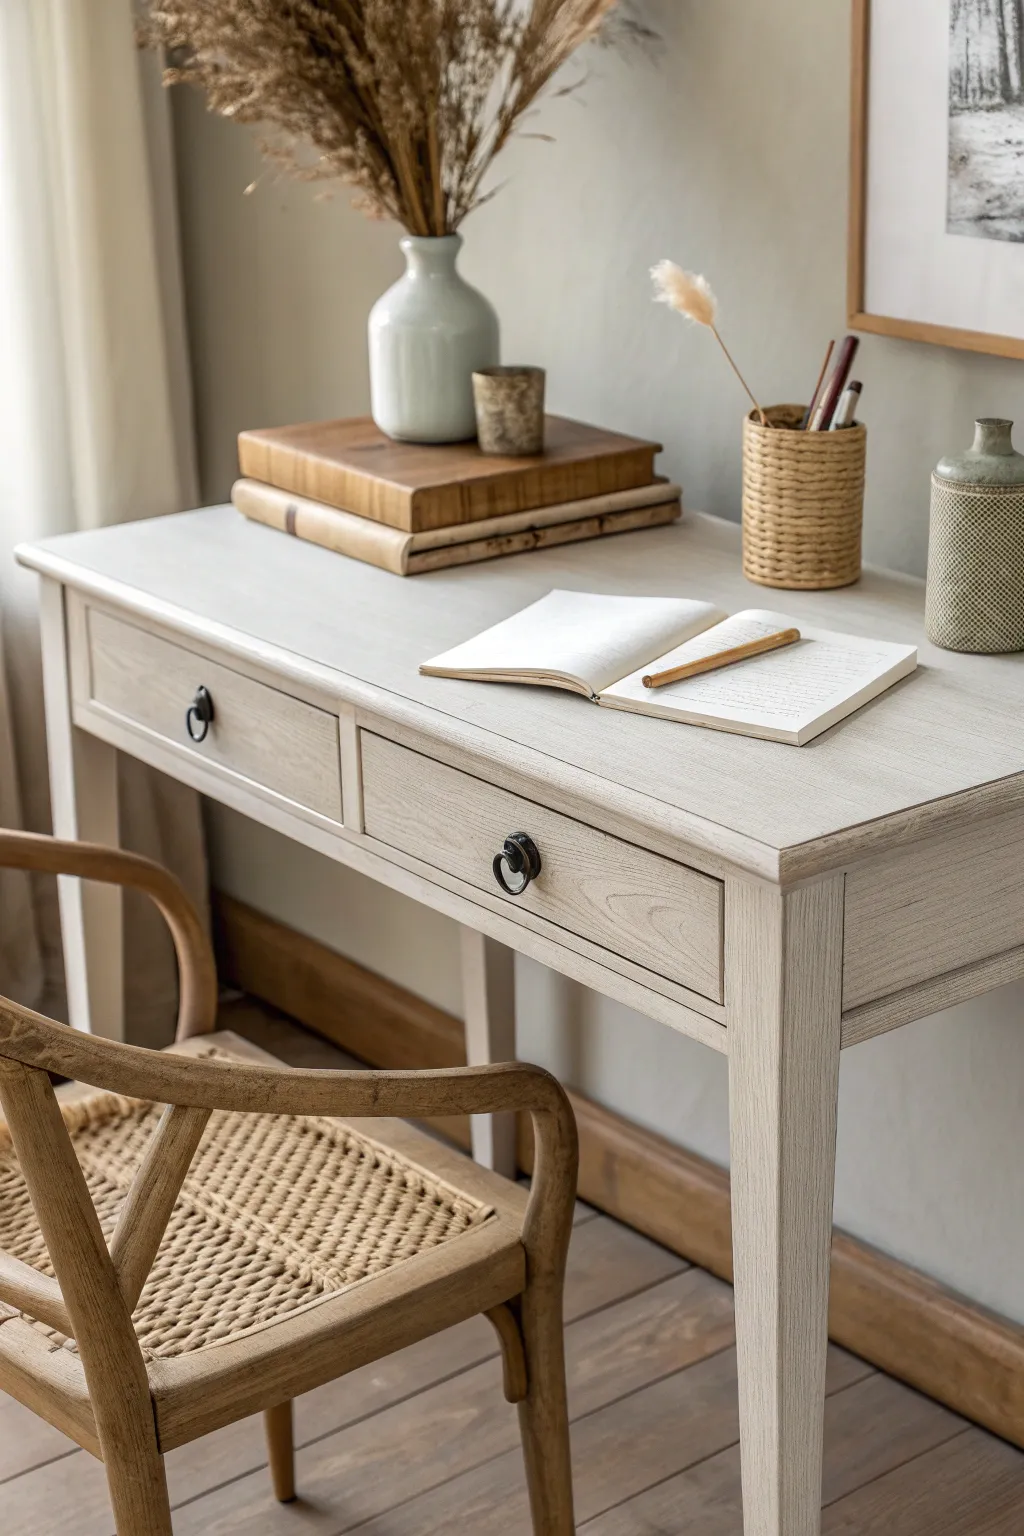
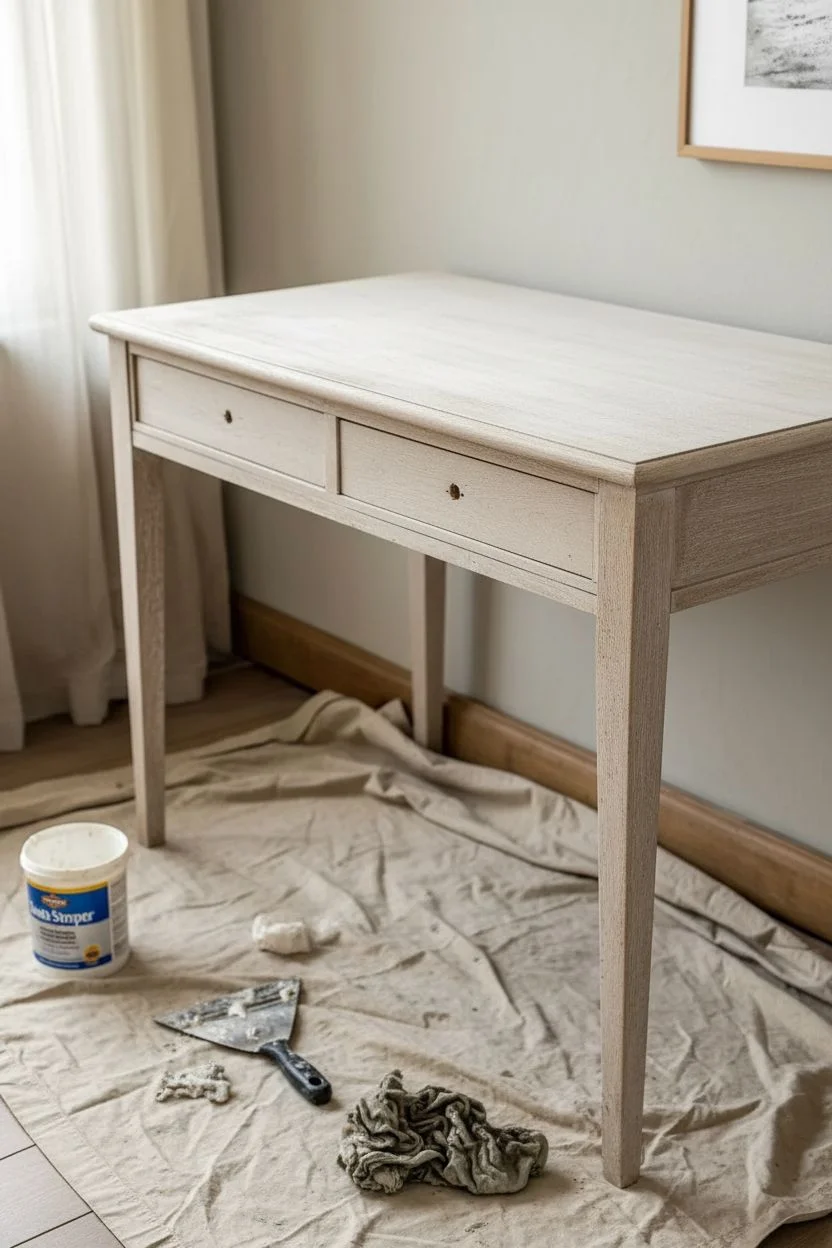
Transform a plain wooden desk into a serene workspace with this soft, neutral finish that sits perfectly between cream and grey. By layering a light wash over raw wood, you’ll achieve a sophisticated, airy look that highlights the natural grain while brightening your room.
Step-by-Step
Materials
- Wooden desk (solid wood or veneer)
- Chemical stripper or heat gun
- Orbital sander with sanding discs (80, 150, 220 grit)
- Tack cloth
- Water-based matte polyurethane
- Cream or off-white chalk paint
- Warm grey or ‘greige’ paint
- Water (for diluting)
- Lint-free rags
- Synthetic bristle brushes
- New drawer pulls (matte black ring pulls)
- Drop cloth
Step 1: Preparation & Stripping
-
Remove hardware:
Begin by removing all existing drawer pulls, knobs, and any metal accents from the desk. Place the hardware and screws in a labeled baggie so they don’t get lost. -
Clean surface:
Wipe down the entire desk with a mild degreaser or soapy water to remove years of built-up oil and grime. Let it dry completely. -
Strip old finish:
Apply a chemical stripper according to the manufacturer’s instructions to remove thick layers of old varnish or paint. Use a plastic scraper to gently lift off the goop once it bubbles.
Grain Enhancement
Use a wire brush lightly on the raw wood before painting to open the grain. This allows the white wash to settle deeper for more texture.
Step 2: Sanding to Bare Wood
-
Coarse sanding:
Using an orbital sander and 80-grit sandpaper, work over the flat surfaces to remove the remaining finish and stains. Keep the sander moving to avoid gouging the wood. -
Medium sanding:
Switch to 150-grit sandpaper to smooth out the scratches from the coarse paper. Sand drawer fronts and legs by hand if the machine won’t fit. -
Final smooth:
Finish with 220-grit sandpaper for a silky smooth surface. Run your hand over the wood to ensure there are no rough patches left. -
Clean dust:
Vacuum up the bulk of the sawdust, then wipe everything down thoroughly with a tack cloth to remove fine particles.
Level Up: Drawer Liners
Line the interior drawers with a soft, patterned wallpaper or cork sheet for a surprise pop of design every time you reach for a pen.
Step 3: Creating the Wash Finish
-
Mix the wash:
In a container, mix your cream chalk paint with water in a 1:1 ratio. You want a consistency similar to skim milk. -
Apply base wash:
Brush the watery paint mixture onto one section of the desk at a time, working in the direction of the wood grain. -
Wipe back:
Immediately wipe the wet paint off with a lint-free rag. The goal is to leave pigment in the grain while tinting the surface without covering the wood texture. -
Add dimension:
Once the cream layer is dry, mix a very small amount of warm grey paint with water (roughly 1 part paint to 4 parts water). Lightly brush this over areas where you want a slightly deeper, shadowed tone. -
Blend the tones:
Use a clean, dry rag to softly blur the grey wash into the cream layer while it’s still damp. I find this creates a nice ‘limed’ oak effect that looks very high-end. -
Dry time:
Allow the desk to dry completely for at least 24 hours. The wood should feel dry to the touch and not tacky.
Step 4: Protection & Assembly
-
First coat of sealer:
Apply a thin layer of water-based matte polyurethane using a high-quality synthetic brush. Long, smooth strokes are best to prevent bubbles. -
Light sand:
Once the first coat is dry (check can for times), very lightly hand-sand with 220-grit paper to knock down any raised grain. -
Final topcoats:
Apply two more thin coats of polyurethane, allowing proper drying time between each. This protects the light finish from coffee rings and ink stains. -
Install hardware:
Attach your new matte black ring pulls or handle hardware to the drawers. The contrast of black metal against the pale wood is stunning.
Enjoy your refreshed, airy workspace that invites creativity and calm
BRUSH GUIDE
The Right Brush for Every Stroke
From clean lines to bold texture — master brush choice, stroke control, and essential techniques.
Explore the Full Guide
Smooth Satin Finish Desk for a Polished Look
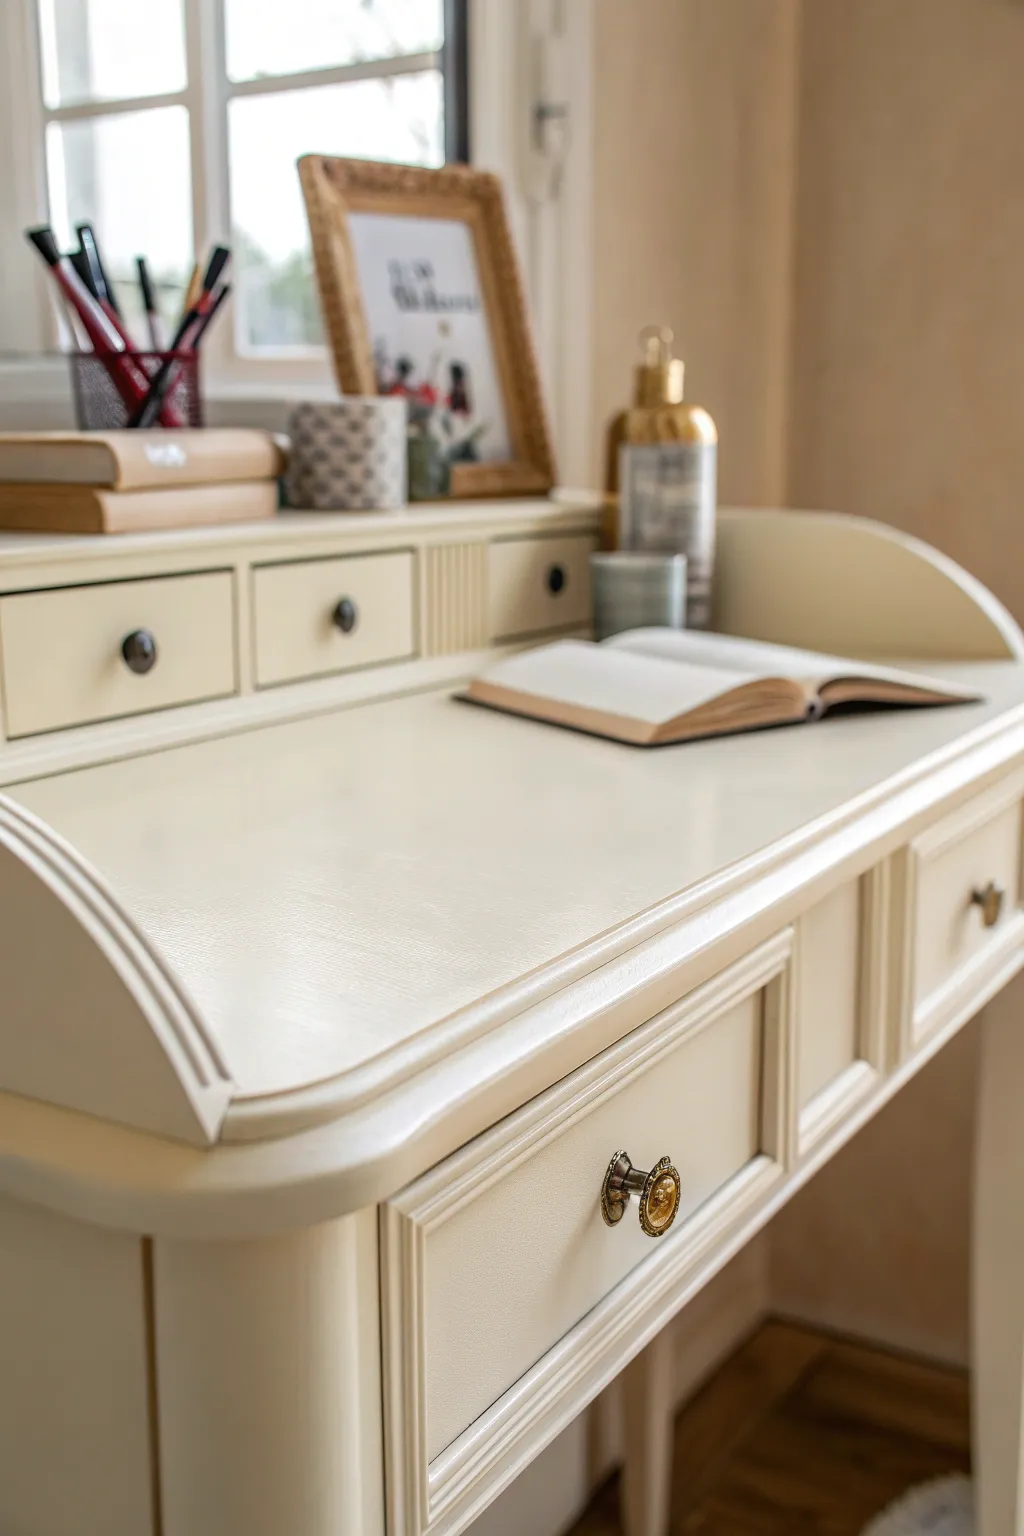
Transform a tired writing bureau into an elegant focal point with a flawless, warm ivory finish that radiates sophistication. This project focuses on achieving that incredibly smooth, factory-like satin sheen using accessible tools and patience.
Step-by-Step Guide
Materials
- Previously owned secretary desk (wood or veneer)
- Degreasing cleaner (like TSP substitute)
- Medium-grit sanding sponge (120-grit)
- Fine-grit sandpaper (220-grit)
- High-quality adhesion primer
- Satin enamel paint (Warm Ivory or Cream color)
- Angled synthetic cut-in brush (2-inch)
- High-density foam roller (4-inch)
- Tack cloths or microfiber rags
- Painter’s tape
- Screwdriver for hardware removal
- Small artist brush for tight corners
- Gold or brass knob hardware (optional upgrade)
Step 1: Preparation & Cleaning
-
Strip the hardware:
Begin by removing all the original knobs, handles, and hinges if possible. Place the screws in labelled zipper bags so nothing gets lost during the renovation process. -
Remove drawers:
Pull out all the small drawers and the main drawer. It is much easier to paint faces when they are lying flat on a work surface rather than vertically installed. -
Deep clean the surface:
Wipe down every inch of the desk with a degreasing cleaner like TSP. Vintage furniture often has oily residue or polish buildup that will repel paint if not removed entirely. -
Scuff sand the gloss:
Using your 120-grit sanding sponge, thoroughly sand the entire piece. You aren’t trying to remove the old finish completely, just dulling the shine to give the primer something to grip. -
Remove sanding dust:
Vacuum up the loose dust, then follow up with a tack cloth or a damp microfiber rag to ensure the surface is perfectly clean.
Sticky Drawer Fix
If paint builds up on drawer edges, they won’t close flush. Scrape excess paint off the sides with a razor blade or sanding block, then wax the tracks generously to restore smooth movement.
Step 2: Priming for Adhesion
-
Tape off edges:
If you aren’t painting the interior of the cubbies or the drawer sides, apply painter’s tape carefully to create sharp lines where the paint should stop. -
Apply the primer coat:
Brush an even coat of high-quality adhesion primer over the desk. Use the brush for corners and detailed moldings, then smooth out larger flat areas with the foam roller to minimize texture. -
Inspect for bleed-through:
Once the primer is dry, check for any pink or yellow stains seeping through. If you spot these tannins, spot-prime those specific areas with a shellac-based primer to seal them in. -
Sand the primer smooth:
This is the secret to a satin finish: lightly sand the dry primer with 220-grit paper. It should feel smooth as glass to the touch before you even open your paint can.
Step 3: The Satin Finish Application
-
Cut in the details:
Dip your angled brush into the warm ivory satin enamel. Start by painting the recessed panels on the drawer fronts and the decorative molding edges. -
Roll the flat surfaces:
Immediately after cutting in, use your high-density foam roller to paint the flat desk surface and drawer fronts. Maintain a ‘wet edge’ to prevent lap marks from forming. -
Address the cubbies:
For the small interior shelves and pigeonholes, use a small artist brush to get deep into the corners without leaving heavy drips of paint. -
Let the first coat cure:
Allow the first coat to dry completely according to the manufacturer’s instructions. Do not rush this step, as tacky paint will drag if recoated too soon. -
Light sanding between coats:
Give the surface a very gentle pass with fine 220-grit paper to knock down any dust nibs or brush ridges. Wipe away the dust with a tack cloth. -
Apply the final coat:
Repeat the painting process for a second coat. I find that applying this layer slightly thinner than the first helps achieve that self-levelling, perfectly smooth look. -
Assess coverage:
Check your finish in good lighting. If the color looks solid and the sheen is even, let it cure. If streakiness remains, a third light coat may be necessary.
Add a Luxe Liner
Line the interior of the drawers or the back panel of the cubbies with a patterned floral wallpaper or velvet contact paper. It adds a hidden pop of joy every time you open the desk.
Step 4: Reassembly & styling
-
Install hardware:
Once the paint has cured for at least 24-48 hours, reattach your hardware. New gold or antique brass knobs look particularly striking against the cream finish. -
Reinsert drawers:
Carefully slide the drawers back into their tracks. If the paint added too much thickness, rub a little candle wax on the runners to help them glide effortlessly.
Now you have a refreshing, smooth workspace that invites creativity and calm
Ultra-Matte Painted Desk for a Velvety Modern Vibe
Achieve a sophisticated, modern look with this ultra-matte desk makeover that feels as luxurious as it looks. This project focuses on creating a smooth, light-absorbing finish that transforms an ordinary piece of furniture into a moody statement piece.
Step-by-Step
Materials
- Wooden desk (with drawers)
- Ultra-matte furniture paint (charcoal or soft black)
- Deglosser or sanding sponges (120 and 220 grit)
- High-quality synthetic brush (2-inch)
- Mini foam roller and tray
- Painter’s tape
- Clear matte wax (optional, if using chalk paint)
- Brass finger pulls or knobs
- Screwdriver
- Clean tack cloths
- Wood filler (if repairing old hardware holes)
Step 1: Preparation
-
Remove Hardware:
Begin by removing all existing knobs, pulls, and any decorative metalwork. Store the screws in a baggie so they don’t get lost. -
Clean Surfaces:
Wipe down the entire desk with a degreasing cleaner to remove oils and dirt. A clean surface is critical for adhesion. -
Fill Imperfections:
If you are changing the hardware style (like switching from two holes to one), fill the old holes with wood filler. Let it dry completely. -
Sand Smooth:
Scuff sand the entire piece with 120-grit sandpaper to give the paint something to grip. If you filled any holes, sand those flush until they are perfectly smooth to the touch. -
Dust Removal:
Vacuum up the dust and follow with a tacky cloth. Any leftover dust will create unwanted bumps in your velvety finish. -
Tape Edges:
Use painter’s tape to protect the inside of the drawers or any areas you want to keep unpainted for a clean line.
Step 2: Painting
-
Cut In Corners:
Dip your synthetic brush into the ultra-matte paint and carefully cut in around intricate corners, legs, and edges where a roller won’t reach. -
Roll the Flat Surfaces:
For the desktop and side panels, use a high-density foam roller. This minimizes brush strokes and is key to achieving that flat, modern look. -
Check for Drips:
Scan the edges immediately after applying paint. Catching drips while they are wet is much easier than sanding them off later. -
Dry Time:
Allow the first coat to dry according to the manufacturer’s instructions. Patience here prevents the paint from peeling up when you apply the next layer. -
Light Sanding:
I always do a very light pass with 220-grit sandpaper between coats. This knocks down any raised wood grain or dust nibs for a professional feel. -
Apply Second Coat:
Repeat the cutting-in and rolling process. A second coat usually provides full opaque coverage for dark colors like charcoal. -
Final Inspection:
Once dry, inspect the finish in good light. If you see any patchiness, a third thin coat might be necessary for that deep, solid color.
Uneven Sheen?
If you see shiny spots in your matte finish, you may have over-brushed the paint as it was drying. Lightly sand the area and apply a final, quick coat without overworking it.
Step 3: Finishing Touches
-
Seal (If Needed):
If your paint requires a topcoat (like traditional chalk paint), apply a clear matte wax. Buff it gently to protect the finish without adding shine. -
Install Hardware:
Attach your new brass finger pulls. The contrast of the warm metal against the dark matte paint is what really elevates the style. -
Drawer check:
Slide the drawers in and out to ensure no paint buildup is causing them to stick. If they stick, sand the runners slightly or apply a little candle wax.
Add Texture
Line the inside of the drawers with a patterned wallpaper or contact paper. A geometric print or a soft linen texture adds a hidden surprise every time you open the desk.
Now step back and admire your incredibly chic and modern workspace upgrade

PENCIL GUIDE
Understanding Pencil Grades from H to B
From first sketch to finished drawing — learn pencil grades, line control, and shading techniques.
Explore the Full Guide
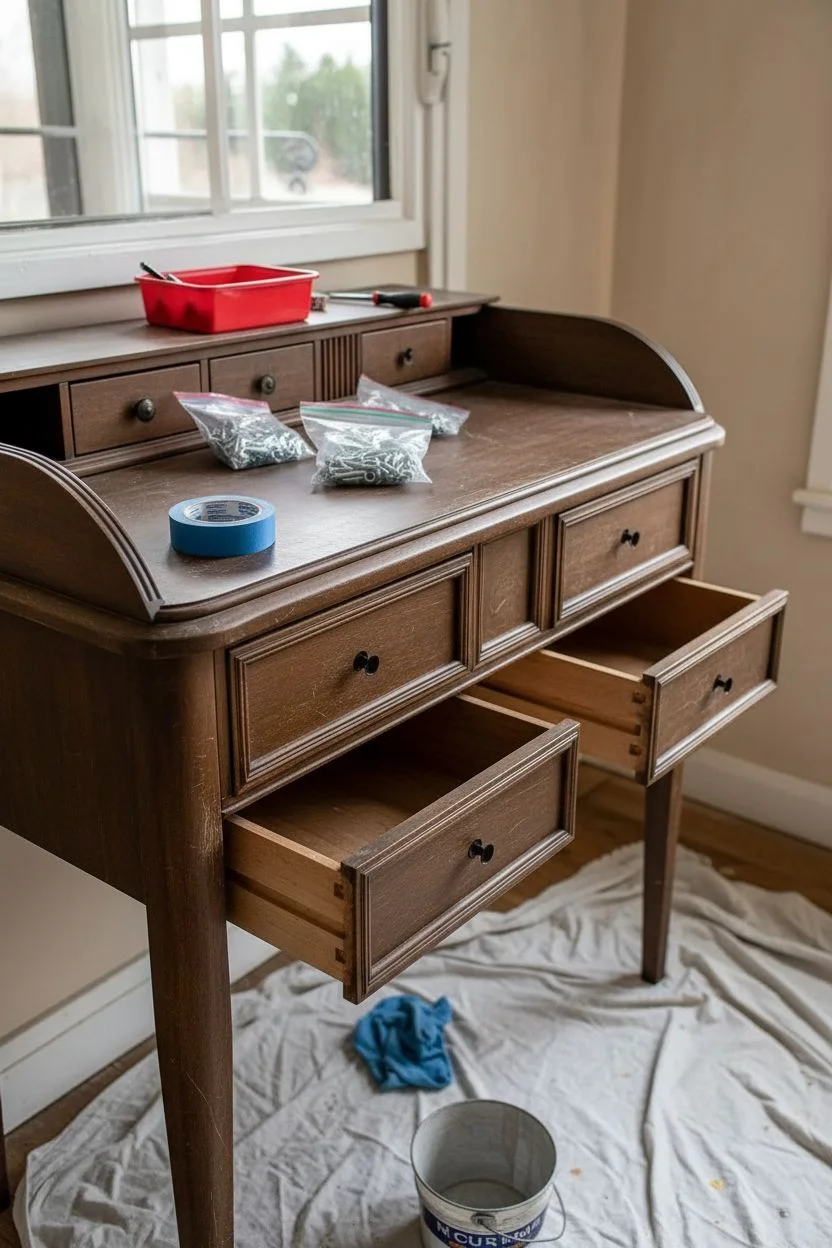
Painted Desk With Freshly Updated Hardware
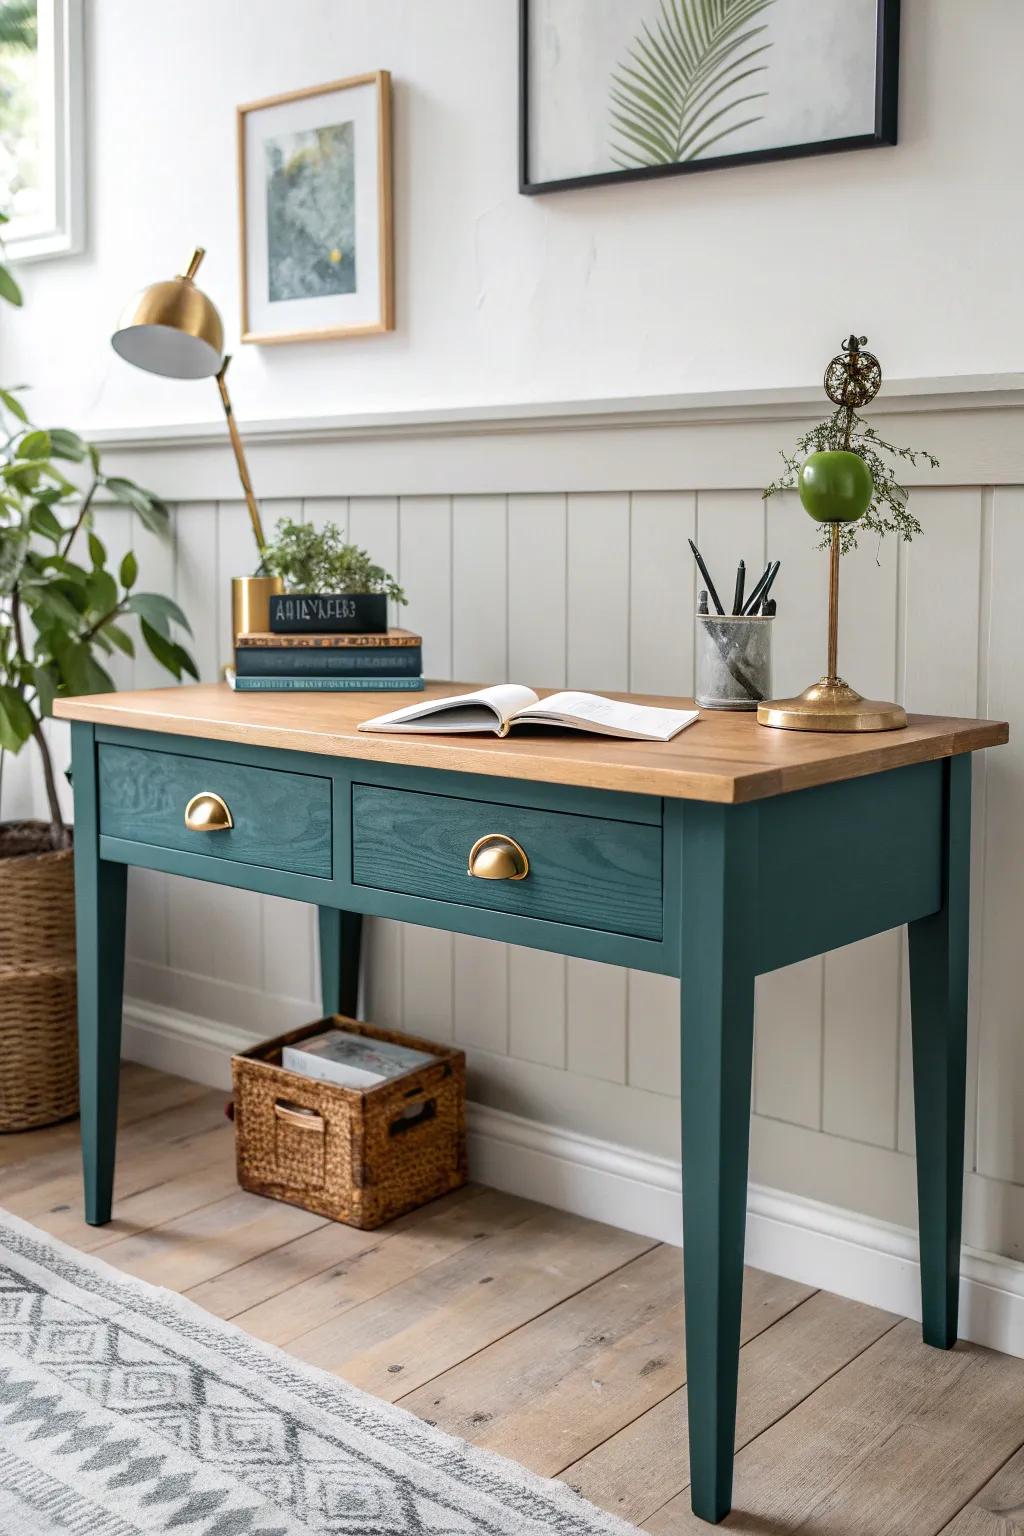
Give any dated or plain wooden desk a sophisticated new life with this two-tone makeover, featuring a rich, deep teal base and beautifully preserved natural wood top. Brass cup pulls add the perfect vintage-inspired finishing touch to complete this elegant home office upgrade.
Detailed Instructions
Materials
- Wooden desk (solid wood top preferred)
- Orbital sander with 80, 120, and 220 grit sandpaper
- Deep teal chalk or mineral paint (e.g., in a Hunter Green or deeply saturated Emerald)
- Small foam roller
- Angled sash brush (2-inch)
- Brass or gold cup bin pulls
- Matte polycrylic sealer or clear furniture wax
- Wood stain (optional, tone depends on your wood species)
- Screwdriver or drill
- Painter’s tape
- Tack cloth
- Wood filler (if filling old hardware holes)
Step 1: Preparation and Top Refinishing
-
Remove hardware:
Begin by removing all drawers from the desk body. Unscrew and remove all old knobs or handles. Keep the screws in a baggie if you plan to reuse them elsewhere. -
Address hardware holes:
If your new brass cup pulls have different hole spacing than the old handles, fill the existing holes with wood filler now. Let it dry completely, then sand flush. -
Sand the desktop:
Using your orbital sander, start with 80-grit sandpaper on the desktop to strip away the old finish. This is the messy part, so I definitely recommend wearing a mask here. Work your way up to 120-grit, and finish with 220-grit for a buttery smooth surface. -
Clean dust:
Wipe down the entire piece, especially the raw wood top, with a tack cloth to remove every speck of sanding dust. -
Protect the top:
If you are satisfied with the natural color of the wood, you can seal it now. If not, apply your stain of choice and let dry. Once dry, tape off the underside edge of the desktop with painter’s tape to protect it from the paint you’ll apply to the base.
Use a Topcoat Trick
When sealing dark paint like this deep teal, mix a tiny drop of your paint color into the clear polycrylic. This prevents the sealer from drying with a cloudy, milky haze on the dark surface.
Step 2: Painting the Base
-
Scuff sand the body:
You don’t need to strip the legs and sides down to bare wood. Just give them a light scuff sand with 120-grit paper to give the paint something to grip. -
Create your workspace:
Ideally, elevate the desk on scrap blocks so you can paint the very bottom of the legs easily without picking up dirt from the floor. -
Cut in edges:
Using your angled sash brush, paint the corners, crevices, and tricky areas around the drawer openings first. This deep teal color is bold, so watch out for drips pooling in the corners. -
Roll the flat surfaces:
For the sides and drawer fronts, use a small high-density foam roller. This prevents brush strokes and gives you that factory-finish look. -
Apply second coat:
Allow the first coat to dry according to the can’s instructions (usually 2-4 hours). Lightly sand with a high-grit sanding sponge if it feels rough, then apply a second coat for full opacity.
Add Drawer Details
Line the inside of the drawers with a patterned contact paper or wallpaper scraps. A yellow vintage floral pattern would look incredible hidden inside these green drawers.
Step 3: Finishing Touches
-
Seal the paint:
Once the paint has cured for at least 24 hours, apply a clear matte protective topcoat or clear furniture wax. Buff the wax gently with a lint-free cloth for a soft sheen. -
Drill new holes:
Measure the center of your drawer fronts carefully. Mark the new holes for your cup pulls, ensuring they are perfectly level. -
Install hardware:
Drill the pilot holes and screw in your new shiny brass cup pulls. The contrast against the deep green paint is really what makes this project shine. -
Reassemble:
Slide your drawers back into the desk. Step back and admire the stark, beautiful contrast between the natural wood grain and the moody paint color.
You now have a custom workspace that looks high-end for a fraction of the furniture store price
Painted Desk Drawers With Decorative Paper Liners
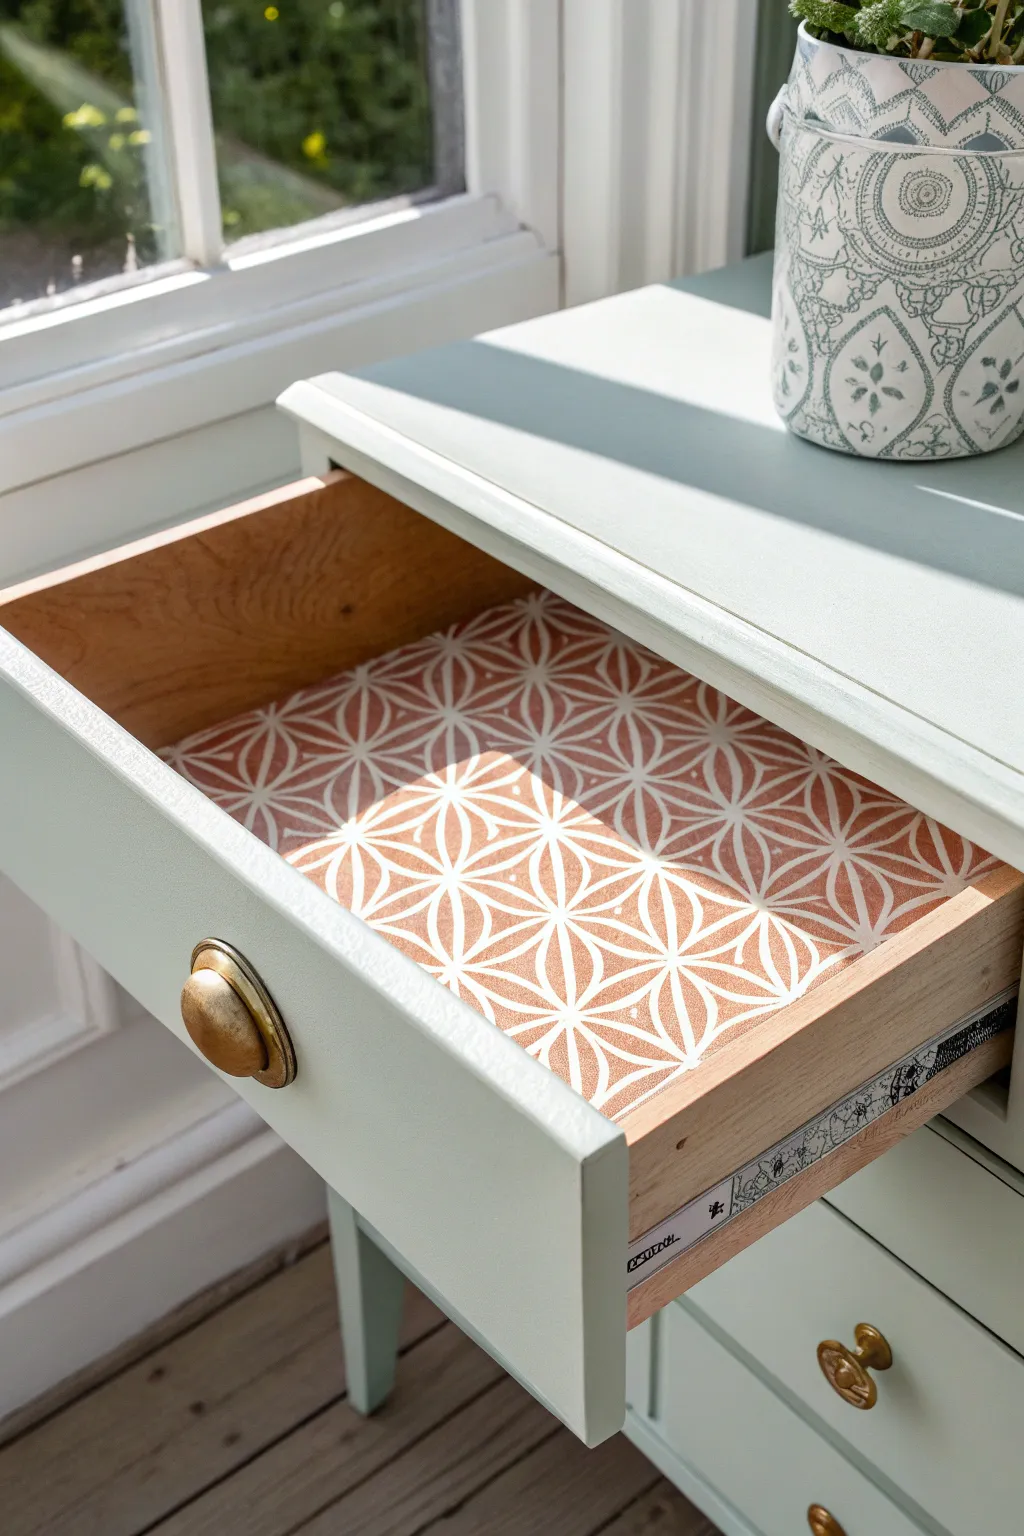
Transform a basic desk into a bespoke beauty by lining the drawers with a geometric, warm-toned paper that contrasts perfectly with sage green paint. This project is all about the little hidden details that bring joy every time you reach for a pen.
Step-by-Step
Materials
- Wooden desk or nightstand
- Sage green furniture paint (satin or eggshell finish)
- Decorative drawer liner paper (geometric terracotta pattern)
- Sandpaper (120 and 220 grit)
- Painter’s tape
- Small foam roller and tray
- Angled sash brush (2-inch)
- Gold drawer knob
- Tape measure or ruler
- Pencil
- Craft knife (X-Acto) with fresh blades
- Cutting mat or straight edge
- Spray adhesive or wallpaper paste (depending on paper type)
- Damp cloth
- Screwdriver
Step 1: Prep and Paint
-
Remove hardware:
Begin by unscrewing the existing knob or handle from the drawer front. Store the screws in a safe place so they aren’t lost during the process. -
Remove the drawer:
Take the drawer completely out of the desk unit. This makes painting the exterior and lining the interior much easier and cleaner. -
Clean surfaces:
Wipe down the entire drawer front and the desk body with a damp cloth to remove any dust, oils, or grime. Allow it to dry completely. -
Light sanding:
Scuff sand the drawer front and the desk exterior with 120-grit sandpaper. You don’t need to strip it bare, just create a rough surface for the paint to grip. -
Protect the sides:
Apply painter’s tape along the wooden sides of the drawer where they meet the drawer front. This ensures you get a crisp paint line and keep the sliding mechanism clean. -
First coat of paint:
Using your angled sash brush for corners and a foam roller for flat areas, apply a thin, even coat of sage green paint to the drawer front and desk body. -
Dry and recoat:
Let the first coat dry according to the manufacturer’s instructions. I usually lightly sand with 220-grit paper between coats for a super smooth finish, then apply a second coat.
Step 2: Lining the Drawer
-
Clean the interior:
Ensure the bottom inside of the drawer is perfectly dust-free. Any debris left behind will show as a bump under your paper liner. -
Measure the space:
Use a tape measure to get the exact length and width of the interior drawer bottom. Measure twice to be sure, as drawer walls aren’t always perfectly square. -
Transfer measurements:
Lay your decorative paper face down on a cutting mat. Mark your measurements on the back of the paper with a pencil. -
Cut the liner:
Using a straight edge and a sharp craft knife, cut the paper along your marked lines. A fresh blade is crucial here to prevent the paper from tearing or snagging. -
Dry fit the paper:
Place the cut paper into the drawer without adhesive first. Check the fit; if it’s too tight and curling up the edges, trim a hairline sliver off the side. -
Apply adhesive:
If using non-adhesive paper, spray a light, even coat of spray adhesive onto the back of the paper. If using peel-and-stick, peel back just the first two inches of the backing. -
Position and smooth:
Align the back edge of the paper with the back of the drawer. Slowly smooth the paper down toward the front, using a clean cloth or smoothing tool to push out air bubbles as you go.
Bubbles Be Gone
If an air bubble is trapped under the liner, poke it gently with the tip of a sewing needle to release the air, then smooth it down flat with your finger.
Step 3: Finishing Touches
-
Reattach hardware:
Once the paint on the drawer front is fully cured, screw the gold knob back into place. -
Check the slide:
Before reinserting the drawer, check the side runners. If any paint dripped there, sand it off gently so the drawer glides smoothly. -
Reassemble:
Slide the finished drawer back into the desk to complete the look.
Scented luxury
Before laying down the paper, place a flat sachet of dried lavender underneath. It adds a subtle scent every time the drawer is opened without being visible.
Enjoy the organized, fresh feeling every time you open your newly styled desk drawer


Laminate Desk Painted for a Real-Furniture Look

Transform a basic laminate desk into a high-end furniture piece that mimics the look of real wood. This technique combines crisp white paint with a faux wood grain finish on the top and drawers for a sophisticated, two-tone farmhouse style.
Step-by-Step Tutorial
Materials
- Sander and sandpaper (120 and 220 grit)
- Adhesion primer (bonding primer)
- White chalk paint or latex enamel
- Beige or tan latex paint (base coat for wood grain)
- Gel stain (dark walnut or antique walnut)
- Topcoat (polyurethane or polycrylic)
- Wood graining tool set
- Chip brushes and high-quality synthetic brushes
- Painter’s tape
- New drawer pulls (optional)
Step 1: Prep and Base Coating
-
Remove hardware:
Begin by taking off all old knobs, handles, and drawer pulls using a screwdriver. Keep the screws safe if you plan to reuse the hardware, or set them aside if upgrading. -
Clean thoroughly:
Wipe down the entire desk with a degreaser or TSP substitute. Laminate surfaces often hold onto oils and polish, which will prevent paint adhesion, so scrubbing is crucial here. -
Scuff sand:
Using 120-grit sandpaper, scuff up the shiny laminate surfaces. You aren’t trying to strip it, just creating ‘tooth’ for the primer to grip. Wipe away all dust with a tack cloth. -
Apply bonding primer:
Paint the entire piece with a high-quality adhesion primer. This is the secret sauce for laminate; without it, your beautiful finish might just peel off later. Let it cure according to the can’s instructions. -
Paint the white sections:
Identify which parts will be white—typically the legs, apron, and side panels. Apply two coats of white chalk paint or enamel, lightly sanding with 220-grit paper between coats for a smooth finish.
Oops! Smudged Grain?
If you mess up a section of graining while the glaze is wet, just brush more stain over it to ‘erase’ the mistake and try the rocking tool again immediately.
Step 2: Faux Wood Graining
-
Tape off boundaries:
Once the white paint is fully dry (I usually wait overnight to be safe), use painter’s tape to protect the white edges where they meet the drawer fronts and the desktop. -
Apply tan base coat:
On the areas destined to look like wood (drawer fronts, top surface), paint a solid coat of beige or tan latex paint. This lighter color will peek through the stain to create the grain effect. -
Mix the glaze:
Mix your dark gel stain with a clear glaze medium if it’s too thick, or use it straight if it’s workable. You want a consistency that stays wet long enough to drag a tool through it. -
Apply stain layer:
Working in small sections (like one drawer front at a time), brush on the dark gel stain over the dry tan base coat. Ensure full coverage but don’t let it dry yet. -
Create the grain:
While the stain is wet, drag a wood graining rocker tool slowly through the stain. Rock the tool up and down gently as you pull to create natural-looking knots and veins. -
Detail the edges:
For the perimeter of the desktop or smaller areas where the rocker won’t fit, use a dry chip brush or a graining comb to drag straight lines, simulating straight grain wood. -
Soften the look:
If the contrast looks too stark, lightly drag a clean, dry paintbrush over the wet grain to soften the lines and blend the colors slightly. This makes it look more organic.
Level Up: Texture
Before painting, use a wire brush to scratch subtle grooves into the laminate. The stain will settle into these scratches for actual physical texture.
Step 3: Finishing Touches
-
Create the whitewashed center:
For the distinctive two-tone top shown, tape off the darker wood border. Apply a very thinned-down white paint or white wax to the center rectangle, wiping it back immediately so the grain still shows but looks bleached. -
Remove tape:
Carefully peel off your painter’s tape while the final layers are still slightly tacky to avoid pulling up any dried paint film. -
Seal the surface:
Because desks see a lot of action, apply at least three coats of polycrylic topcoat. Use a matte or satin finish to keep the ‘real wood’ illusion convincing. -
Install hardware:
Once the topcoat has cured for at least 24 hours, attach your new drawer pulls. Dark metal or bronze handles compliment the stained wood tone beautifully.
Now you have a stunning, custom desk that looks like solid timber for a fraction of the price
Desk Top Pattern Using Painter’s Tape Geometry

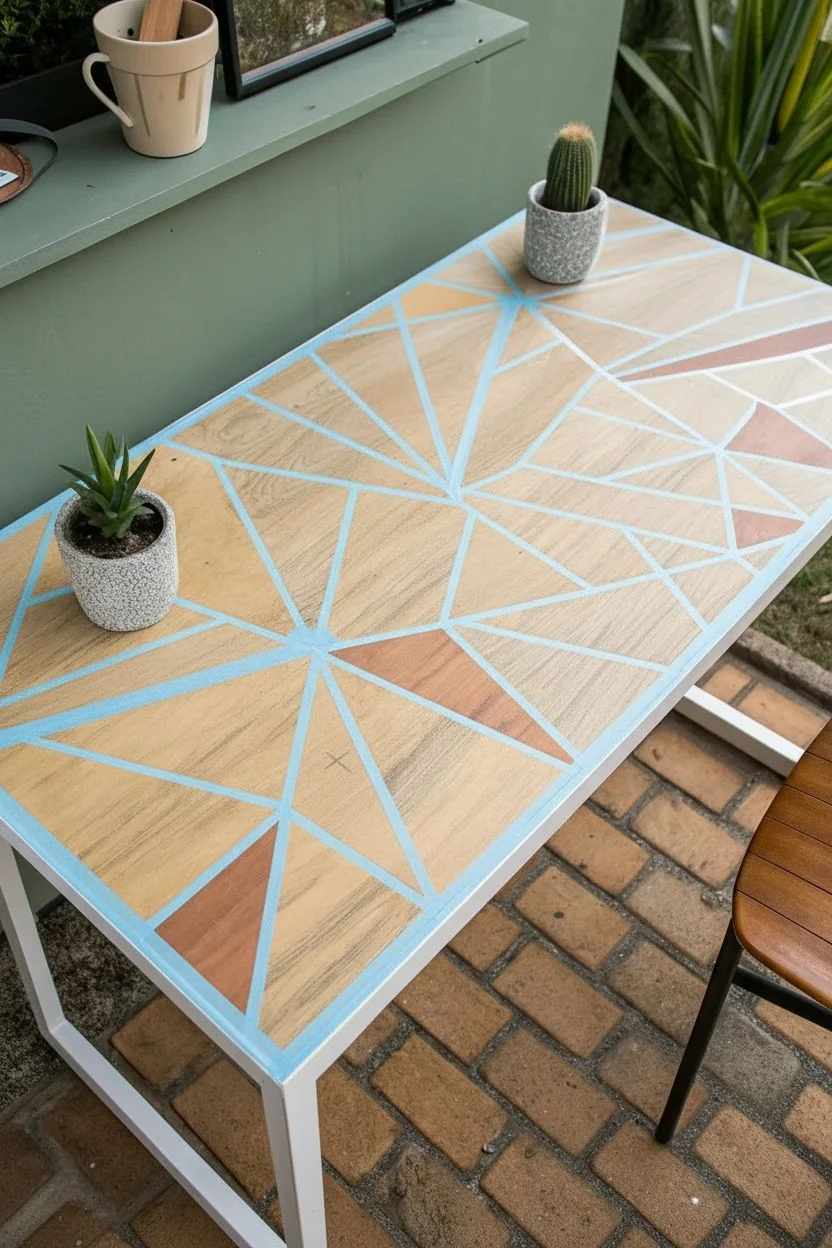
Transform a plain wooden desk into a modern statement piece using crisp geometric lines and speckled paint effects. This project balances natural wood grain with bold pops of color for a workspace that feels fresh and creative.
How-To Guide
Materials
- Wooden desk or tabletop (sanded clean)
- Painter’s tape (0.5 inch width)
- White paint (latex or acrylic)
- Black or dark charcoal acrylic paint
- Terracotta or reddish-brown acrylic paint
- Sage green acrylic paint
- Small stiff-bristle brush (for splashing)
- Medium flat paintbrush
- Paint roller and tray
- Clear polyurethane topcoat (matte or satin)
- Sandpaper (120 and 220 grit)
- Tack cloth
- Drop cloth
Step 1: Preparation & Masking
-
Clean and sand:
Begin by sanding the entire desktop surface to remove any old finish or shine. Start with 120 grit sandpaper to strip the surface, then finish with 220 grit for smoothness. Wipe away all dust with a tack cloth. -
Plan the geometry:
Visualize a ‘sunburst’ or shattered glass pattern. The lines in the image radiate roughly from a central point but intersect randomly. You don’t need to measure perfectly; the charm lies in the irregularity. -
Apply the tape:
Lay down strips of painter’s tape to create your geometric design. Press the tape down firmly, especially at the edges, to prevent paint bleed. These taped lines will become the natural wood boundaries later. -
Seal the edges:
To get razor-sharp lines, I like to lightly brush a tiny amount of clear matte sealer or the base white paint over the tape edges. This fills any microscopic gaps so your colored paint won’t seep under.
Crisp Line Secret
Peel the tape while the paint is still slightly tacky, not bone dry. This prevents the dried paint film from ripping or chipping along the edges.
Step 2: Painting the Design
-
Identify color zones:
Decide which triangles will be painted and which will remain natural wood. In the reference, about 30-40% of the shapes are painted, while the rest show the wood grain. Mark the ‘to-be-painted’ sections lightly with a pencil if it helps. -
Paint the white base:
For the triangles that will be colored (black, green, or terracotta), apply a thin base coat of white paint first. This ensures the colors pop and appear opaque rather than soaking into the wood. -
Apply the dark triangles:
Paint selected triangles with your dark charcoal or black paint. Use a flat brush to get into the corners of the tape. Two thin coats are better than one thick one. -
Add the terracotta tones:
Paint a few scattered triangles with the reddish-brown terracotta color. Keep these spaced out so the color is balanced across the desk surface. -
Paint the sage accents:
Fill in the remaining designated shapes with the sage green paint. Allow all painted sections to dry completely before moving to the speckling step.
Step 3: Special Effects & Finishing
-
Prepare the speckle:
Dilute a small amount of white paint with water until it has a milky, ink-like consistency. -
Protect the wood:
Before splattering, use scrap paper or extra tape to cover the natural wood sections surrounding the dark painted triangles. You only want the white speckles on the colored shapes. -
Flick the paint:
Dip a stiff-bristle brush or an old toothbrush into the diluted white paint. Run your thumb across the bristles to flick tiny droplets onto the dark and colored triangles to create a terrazzo effect. -
Remove the tape:
Once the paint is dry to the touch but not fully cured (usually about an hour), carefully peel back the painter’s tape at a 45-degree angle. This reveals the crisp natural wood lines between your shapes. -
Paint the frame:
If your desk has a metal frame matching the image, paint the legs and edge banding with a solid white enamel paint to unify the look. Let this cure for at least 24 hours. -
Apply topcoat:
Seal the entire desktop with a water-based polyurethane. Apply it in long, even strokes with a clean roller or high-quality brush to protect your work from scratches and spills. -
Light sanding:
Once the first coat of poly is dry, lightly sand with very fine sandpaper (300+ grit) to knock down any raised grain or dust nibs. -
Final seal:
Apply a second and final coat of polyurethane. Let the desk cure for fully 48-72 hours before placing any heavy items like laptops or monitors on top.
Terrazzo Twist
Instead of just white speckles, try flicking gold metallic paint onto the black triangles for a chic, high-end furniture look.
Now you have a stunning, durable workspace that turns every workday into something a little more artistic
Chevron Painted Desk Top for Instant Energy
Transform a plain white desktop into a vibrant statement piece with this bold chevron pattern. The mix of deep teal and warm terracotta creates a striking contrast that instantly energizes any workspace.
Step-by-Step Tutorial
Materials
- Desk top (pre-finished white or primed wood)
- Painter’s tape (high quality, 1-inch width)
- Metal ruler or straight edge (long)
- Pencil
- Deep teal acrylic or chalk paint
- Terracotta or burnt orange acrylic or chalk paint
- Small foam roller or high-quality synthetic angled brush
- Clear matte polyurethane sealer
- Sandpaper (fine grit, optional)
- Tack cloth or damp rag
Step 1: Preparation and Planning
-
Clean the Surface:
Begin by thoroughly wiping down your desk surface to remove any dust, grease, or oils. A clean slate is crucial for crisp paint lines. -
Measure the Width:
Measure the total width of your desk. Decide on the width of your chevron zig-zags; for this look, wider bands around 4-5 inches make a bolder statement than thin stripes. -
Mark Center Points:
Find the exact horizontal center of the desk and mark it lightly with a pencil at the top and bottom edges. This will serve as the anchor for your V-shape. -
Establish the Grid:
To keep the chevron symmetrical, lightly draw parallel vertical lines down the length of the desk, spacing them evenly based on your desired peak width. -
Mark the Peaks and Valleys:
Along your vertical lines, mark uniform intervals (e.g., every 6 inches) to indicate where the chevron pattern will change direction.
Step 2: Taping the Design
-
Connect the Dots:
Using your long metal ruler, connect the marks diagonally to form the zig-zag pattern. Drawing these guidelines lightly in pencil first helps visualize the design before taping. -
Apply the First Tape Lines:
Apply painter’s tape along the outside edges of your pencil lines for the first set of stripes (the teal ones). Remember to tape *outside* the area you want to paint. -
Seal the Tape Edges:
Run a credit card or your fingernail firmly along the edges of the tape to ensure a tight seal. This prevents paint from bleeding underneath. -
Block Off Orange Sections:
Since the colors touch, you will need to tape off the sections designated for the orange paint to protect them while you paint the teal, or vice versa if doing one color at a time.
Tape Sealing Trick
Paint over the tape edge with your base white color first. This seals the tape so any bleed is invisible, leaving perfect colored lines.
Step 3: Painting the Pattern
-
Paint the Teal Stripes:
Using a small foam roller or brush, apply the deep teal paint to the designated chevron rows. Use thin, even coats to avoid ridges. -
Allow to Dry:
Let the teal paint dry completely according to the manufacturer’s instructions. Patience is key here to avoid smudging. -
Paint the Terracotta Stripes:
Apply the warm terracotta paint to the alternate rows. I find that two light coats usually provide better coverage than one thick coat. -
Remove Tape While Slightly damp:
Carefully peel back the painter’s tape at a 45-degree angle. Doing this while the final coat is still slightly tacky can help create a cleaner edge. -
Touch Up Imperfections:
Once the tape is removed, inspect your lines. Use a tiny artist’s brush and the white base color to fix any small bleeds.
Crooked Lines?
If your zig-zags look uneven, use a speed square or a triangle ruler against the desk edge to ensure your 45-degree angles are consistent.
Step 4: Finishing Touches
-
Let the Design Cure:
Allow the entire painted surface to cure for at least 24 hours to ensure the paint has hardened sufficiently before sealing. -
Apply Sealer:
Project the design with a coat of clear matte polyurethane. Use long, smooth strokes to avoid bubbles. -
Light Sanding (Optional):
If the first coat of sealer feels rough, lightly sand with very fine grit paper, wipe clean, and apply a second coat for extra durability. -
Reassemble Desk:
Once the sealer is fully cured (check the can for cure times), attach any legs or hardware to complete your custom desk.
Now you have a dynamic, custom workspace that makes every workday feel a little more creative
Checkerboard Painted Desk Details on Drawer Fronts
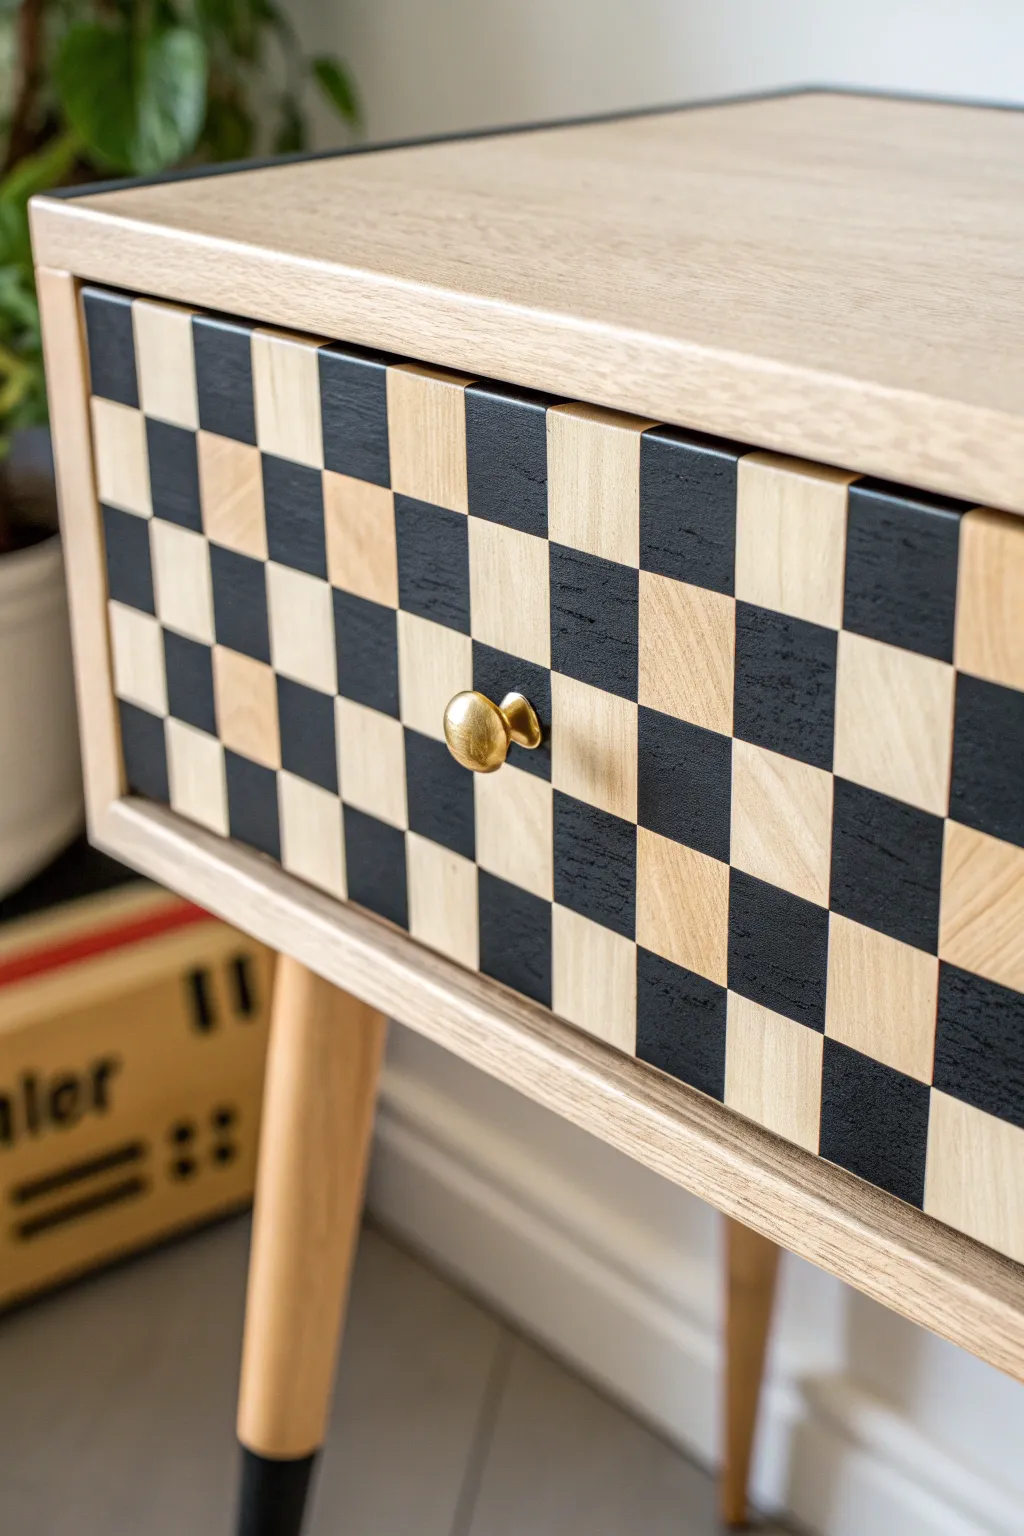
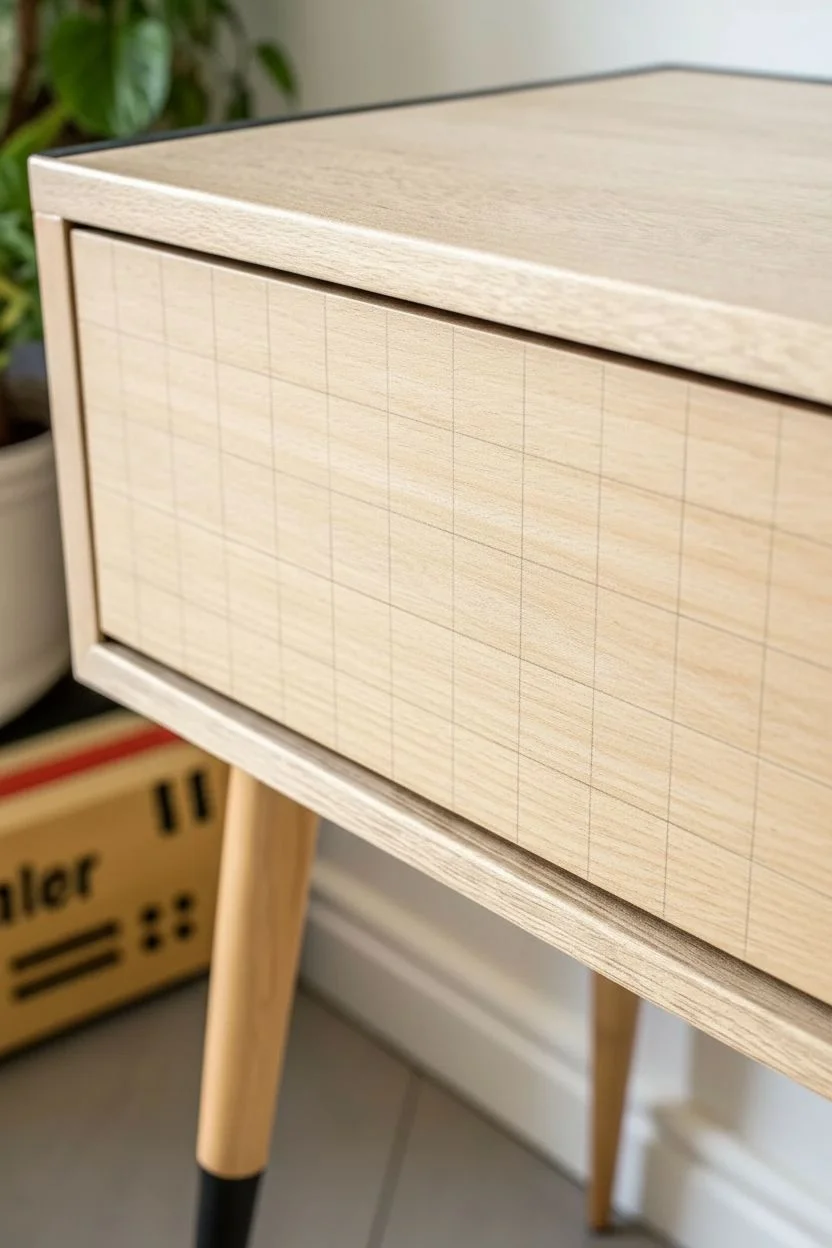
Transform a plain wooden desk drawer into a statement piece with this striking checkerboard pattern. The contrast between the matte black squares and the natural wood grain creates a sophisticated, modern look that feels custom-made.
How-To Guide
Materials
- Unfinished wooden desk (or just the drawer front)
- Ruler or tape measure
- Pencil
- High-quality painter’s tape (frog tape works best)
- X-acto knife or craft blade
- Matte black wood paint or ebony wood stain
- Small flat artist’s paintbrush
- Clear matte varnish or polyurethane
- Sandpaper (220 grit)
- Tack cloth
- Gold drawer knob
Step 1: Preparation & Planning
-
Remove hardware:
Begin by unscrewing and removing the existing drawer knob. Store the screw safely if you plan to reuse it, or prepare your new gold hardware. -
Sand the surface:
Lightly sand the entire drawer front with 220-grit sandpaper. This creates a smooth base for your grid and ensures the tape adheres properly. Wipe away all dust with a tack cloth. -
Calculate your grid:
Measure the height and width of your drawer face. Divide these measurements to determine a square size that fits evenly. For example, if your drawer is 6 inches high, 1.5-inch squares will give you exactly 4 rows. -
Draw the grid:
Using your ruler and pencil, lightly mark out your grid across the entire drawer face. Ensure your horizontal and vertical lines are perfectly straight and perpendicular.
Bleeding Lines?
If paint bleeds under the tape, wait for it to dry fully. Then, gently scrape the excess paint off the natural wood using the tip of your X-acto knife to restore a crisp edge.
Step 2: Taping & Painting
-
Tape horizontal rows:
Instead of taping individual squares, start by applying strips of painter’s tape along the horizontal pencil lines you just drew. -
Cut the vertical lines:
Lay tape across the vertical lines as well, creating a grid of tape. Then, use your X-acto knife to carefully cut away the squares of tape where you want the black paint to go. This ‘weed out’ method is often faster than taping individual squares. -
Seal the edges:
Press down firmly on all tape edges. I like to run a credit card or fingernail over them to ensure a tight seal and prevent paint bleed. -
Apply the first coat:
Using a small flat artist’s brush, apply a thin layer of matte black paint or stain to the exposed wood squares. Paint inward from the tape edges to minimize seepage underneath. -
Let it dry:
Allow the first coat to dry completely according to the manufacturer’s instructions. If using stain, one coat might be enough; paint might require a second light pass for opacity. -
Touch up if needed:
Check for uneven coverage. If the wood grain is showing through more than you’d like, apply a second thin coat and let dry. -
Remove the tape:
Carefully peel off the painter’s tape while the final coat is still slightly tacky (unless using stain). Pull at a 45-degree angle away from the painted area for crisp lines.
Burnish for Sharpness
Before painting black, paint a thin layer of clear matte varnish over the tape edges. This seals the tape, meaning any bleed is clear, keeping your black lines razor sharp.
Step 3: Finishing Touches
-
Clean up lines:
Inspect your checkerboard. If any paint bled, gently scrape it away with your craft knife or use a tiny bit of sandpaper to correct the edges. -
Erase pencil marks:
Gently erase any visible pencil grid lines that remain on the unpainted natural wood squares. -
Seal the surface:
Apply a clear matte varnish or polyurethane over the entire drawer front. This seals the raw wood and protects the black paint from chipping. -
Install the knob:
Once the varnish is fully cured, attach your new gold knob directly in the center. If your checkerboard grid has a center point between squares, align the hardware there for symmetry.
Enjoy the sleek, graphic impact your new desk brings to your workspace
Ombre Painted Desk Fade for a Soft Statement
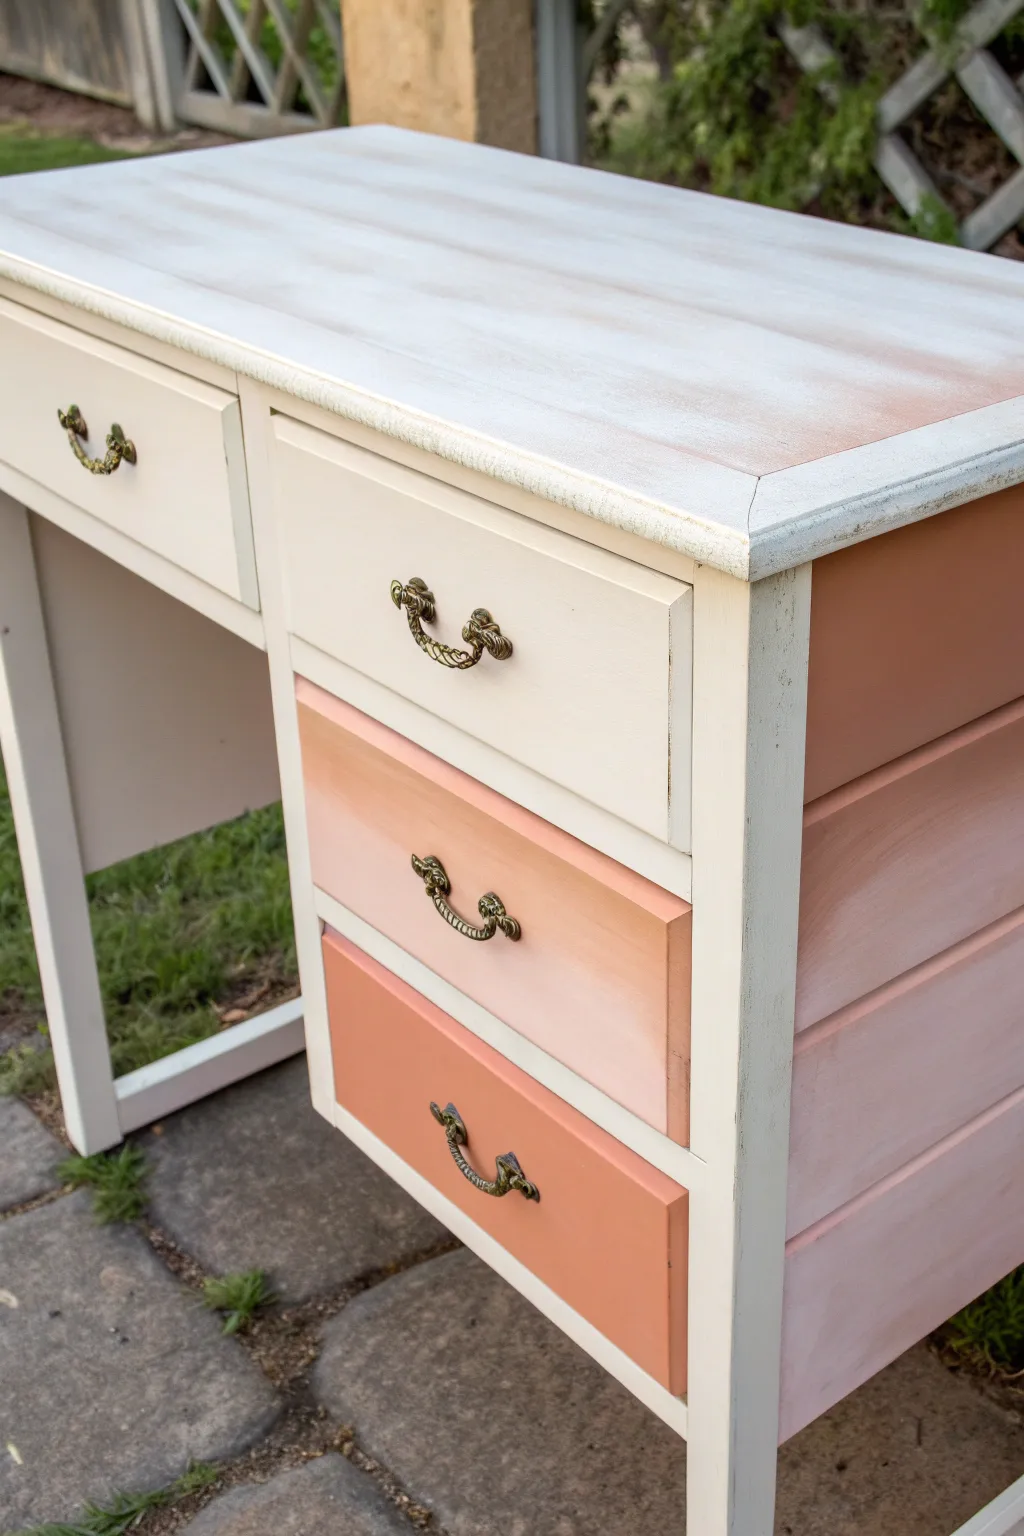
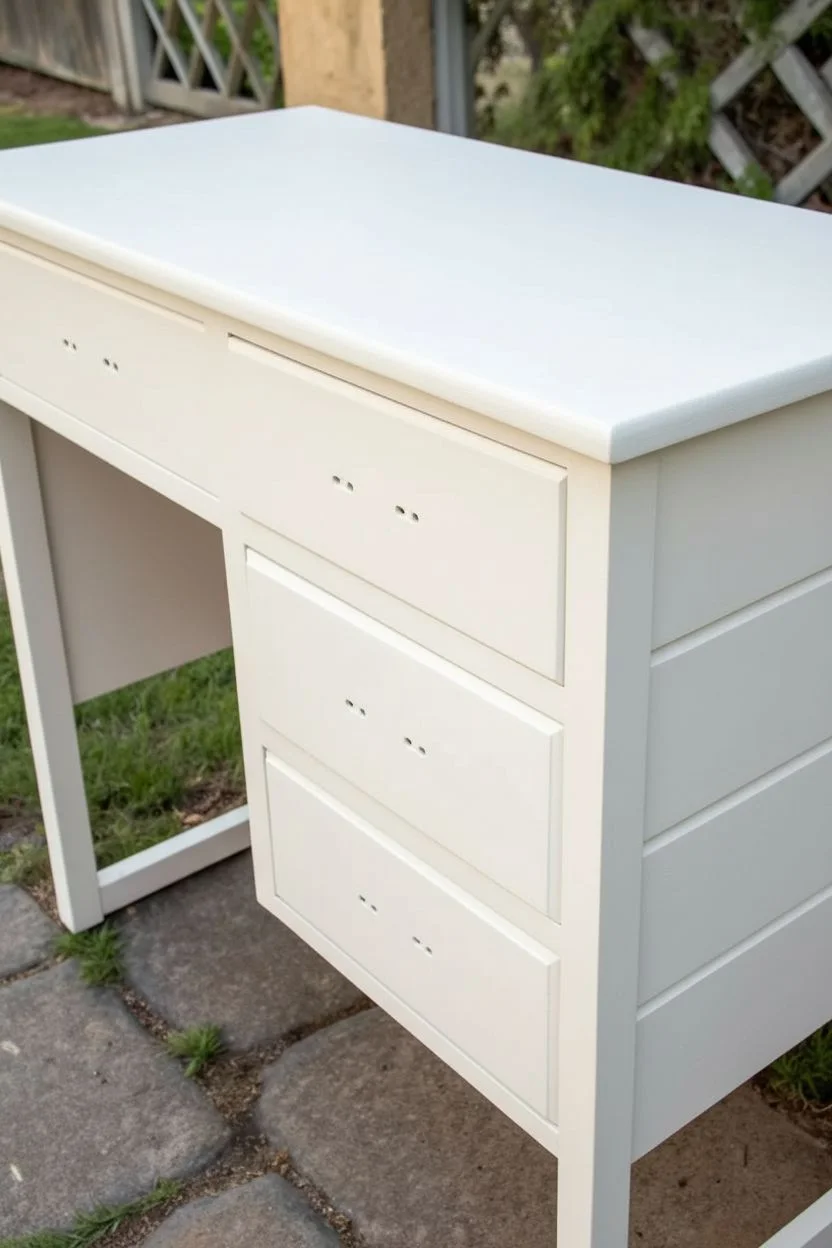
Transform a dated wooden desk into a dreamy statement piece with this soft, blended ombre technique. By layering warm corals into creams, you create a seamless sunset effect that adds subtle color without overwhelming your space.
Step-by-Step
Materials
- Wooden desk (vintage or thrifted)
- Sander and sandpaper (120 and 220 grit)
- Tack cloth
- Primer (stain-blocking)
- Chalk-style paint: Cream/Off-white
- Chalk-style paint: Light Coral/Peach
- Chalk-style paint: Deep Terra Cotta/Warm Orange
- Synthetic oval brush (medium)
- Small artist brush
- Misting water bottle
- Clean blending brush or soft sponge
- Top coat sealant (matte or satin)
- Original or new hardware (handles)
- Gold metallic wax (optional for hardware)
Step 1: Preparation & Base Coat
-
Remove hardware:
Begin by unscrewing all drawer pulls and handles. Label them in ziplock bags if they need to go back into specific holes. -
Clean deeply:
Scrub the entire desk with a degreaser or soapy water to remove years of furniture polish and grime. Let it dry completely. -
Sand the surfaces:
Scuff sand the entire piece with 120-grit sandpaper to give the paint grip. You don’t need to strip it to bare wood, just remove the shine. -
Remove dust:
Wipe away all sanding residue thoroughly using a tack cloth or a slightly damp rag. -
Prime the surface:
Apply a coat of stain-blocking primer. This is crucial for light-colored makeovers to prevent old wood tannins from bleeding through and pinking your cream paint. -
Apply base color:
Paint the entire body of the desk (legs, sides, and top) in your Cream/Off-white shade. You will likely need two coats for solid coverage.
Step 2: Creating the Ombre Drawers
-
Paint the top drawer:
Paint the top drawer front completely in the Cream shade. While it’s still wet, I like to lightly feather the bottom edge to prepare for blending. -
Mix the middle tone:
On a paper plate, mix your Cream paint with a small amount of the Light Coral to create a very pale peach transitional shade. -
Apply the middle drawer base:
Paint the second drawer front with your pre-mixed custom peach tone. Ensure full coverage. -
Paint the bottom drawer:
Apply the Deep Terra Cotta paint to the bottom drawer. This anchors the look with the darkest color. -
Begin the blending process:
Working while the paint is still damp is key. Use your misting bottle to lightly spritz the drawer fronts if they are drying too fast. -
Blend top to middle:
Take a clean, dry blending brush. Feather the Cream from the top drawer slightly downward, and the Peach from the middle drawer slightly upward if they are close, or just focus on creating a visual step-down effect. -
Side shading technique:
For the side panel shown in the image, apply Cream at the top, Peach in the middle, and Terra Cotta at the bottom. -
Wet blend the side:
Mist the side panel with water. Use long, horizontal strokes with a dry brush to drag the colors into each other where they meet, creating a soft, blurry transition rather than hard stripes.
Fixing Muddy Blends
If colors look muddy while blending, stop immediately. Let the paint dry completely, then re-apply fresh colors and try blending again with a lighter hand and a clean, dry brush.
Step 3: Finishing the Top & Details
-
Create the top fade:
Paint the desktop Cream. While wet, brush a small amount of diluted Peach/Coral along the front edge and corner, blending it backward into the white for a sun-bleached look. -
Distress edges:
Once fully dry, use 220-grit sandpaper to gently distress the edges of the drawers and the desktop rim, revealing a bit of wood or white base beneath to define the shape. -
Seal the piece:
Apply 2-3 coats of a matte or satin water-based topcoat. Use long, light strokes to avoid dragging the paint, especially over the blended areas. -
Refresh hardware:
Clean the original hardware. If desired, rub a little gold metallic wax over the metal to brighten the finish. -
Reassemble:
Screw the hardware back onto the drawer fronts once the sealer has cured for at least 24 hours.
Level Up: Hardware Glow
For a luxe touch, rub a tiny bit of Gold Gilding Wax on the distressed edges of the drawers. It catches the light and ties in beautifully with the vintage brass handles.
Enjoy the creative energy this colorful, customized workspace brings to your room
Stenciled Desk Top Motif for an Artsy Finish
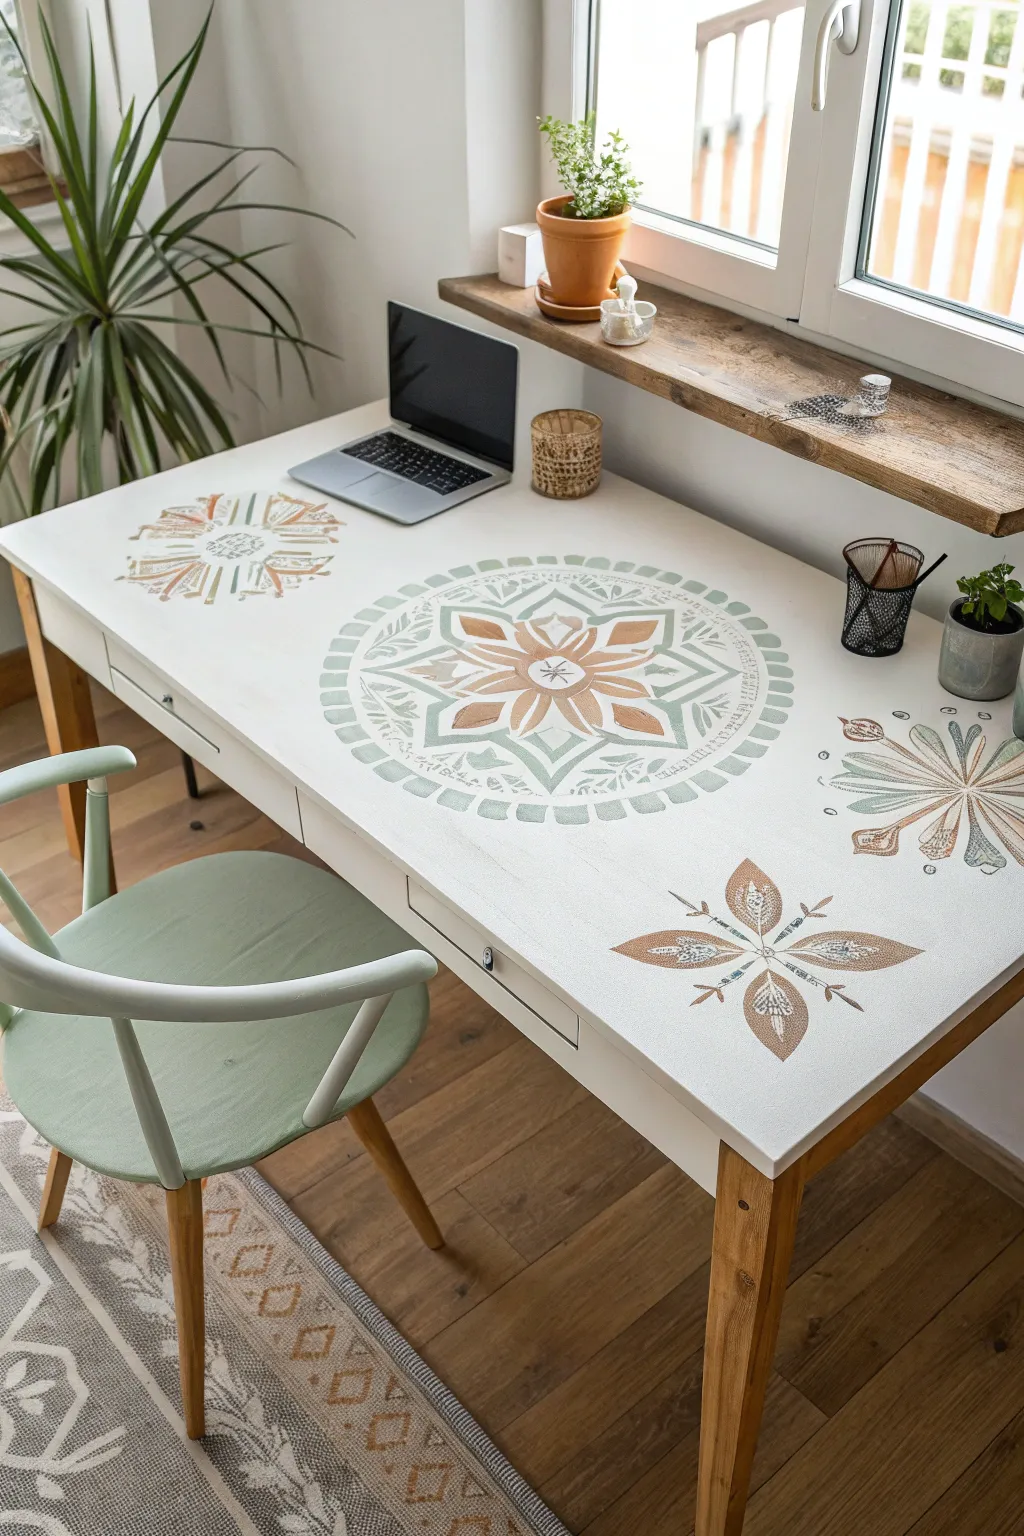
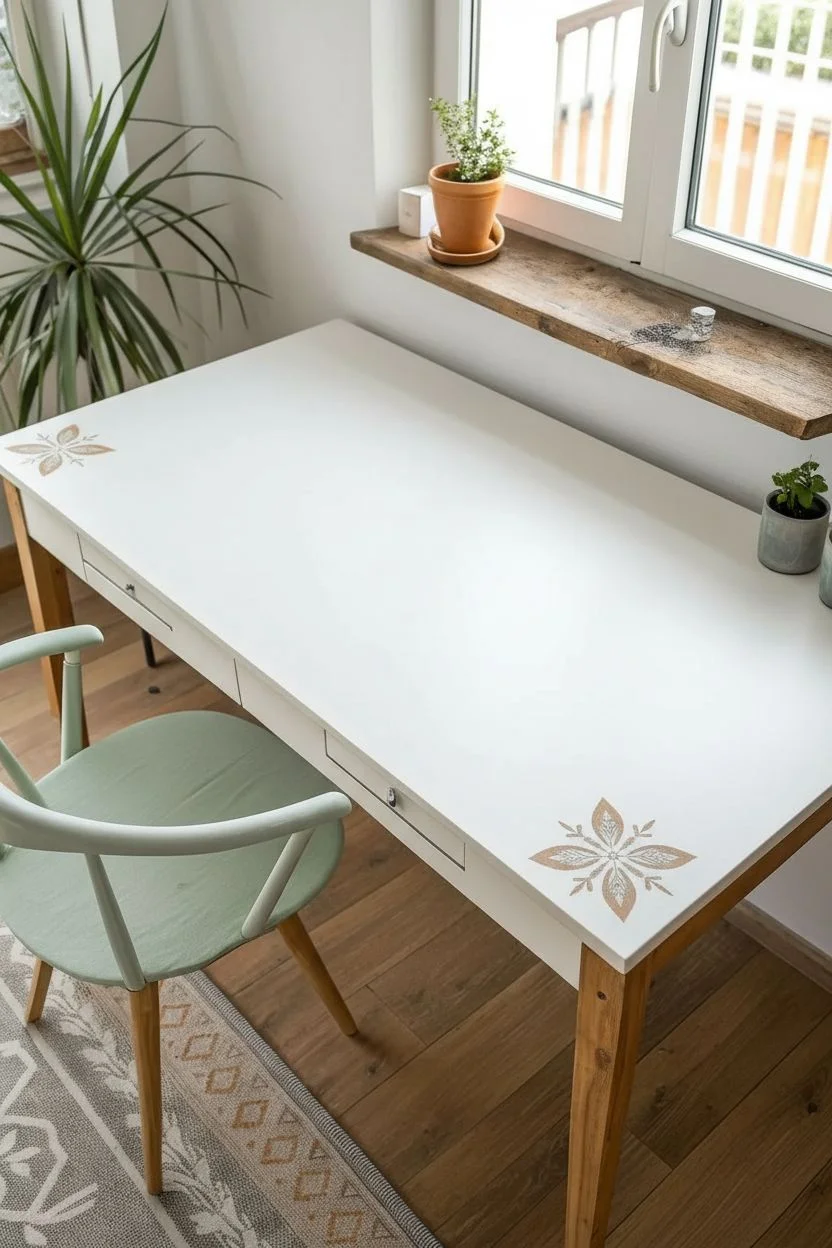
Transform a plain workspace into an inspiring creative haven with this subtle yet striking stenciled desk project. The combination of a crisp white background with earthy sage and terracotta motifs creates a calm, bohemian aesthetic perfect for focusing.
How-To Guide
Materials
- Wooden desk (existing or thrifted)
- Sandpaper (120 and 220 grit)
- Tack cloth
- Primer suitable for wood
- Chalk paint or matte acrylic paint (White base)
- Acrylic craft paints (Sage Green, Terracotta, Light Brown/Tan, Cream)
- Large floral/mandala stencil (12-14 inches)
- Medium geometric floral stencils (4-6 inches)
- Stencil brushes (round, stiff-bristled)
- Painter’s tape
- Small foam roller and tray
- Polycrylic topcoat (matte or satin finish)
- Paper towels
Step 1: Prep and Base Coat
-
Disassemble and clean:
Begin by removing any drawers or hardware from the desk so you have a completely flat surface to work on. Wipe the entire desk down with a degreaser or soapy water to remove oils and dirt. -
Sand the surface:
Scuff sand the desktop using 120-grit sandpaper to remove the old finish’s shine and help the new paint adhere. Follow up with 220-grit for a smooth touch, then wipe away all dust with a tack cloth. -
Apply primer:
Roll on a coat of high-quality wood primer. This step is crucial if you are painting over a dark wood laminate or varnish to prevent bleed-through. -
Paint the base color:
Using a small foam roller, apply your white chalk paint or matte acrylic across the entire desktop. Work in long, even strokes to minimize texture. -
Add a second coat:
Allow the first coat to dry completely (check your paint can for times), then apply a second coat for full, opaque coverage. Let this cure for at least 24 hours before stenciling so the tape doesn’t pull up paint later.
Pro Tip: Crisp Edges
Use stencil adhesive spray on the back of your stencil instead of just tape. It creates a temporary bond across the entire plastic sheet, preventing underspray even on detailed mandala patterns.
Step 2: Stenciling the Design
-
Plan your layout:
Before painting, lay your stencils on the dry desk to visualize the composition. Place the largest mandala slightly off-center or dead center, with smaller motifs scattered near the corners. -
Secure the main stencil:
Tape down your large mandala stencil in the central position using painter’s tape. Ensure it is perfectly flat against the surface to prevent paint bleeding underneath. -
Load the brush correctly:
Dip your stencil brush into the sage green paint, then offload almost all of it onto a paper towel until the brush feels nearly dry. This ‘dry brush’ technique is the secret to crisp lines. -
Stencil the outer ring:
Using a vertical dabbing motion (stippling), apply the sage green to the outer geometric ring of the mandala. Avoid brushing side-to-side, which forces paint under the stencil edges. -
Add inner colors:
Switch to a clean brush and apply the terracotta and light brown tones to the inner floral petals of the mandala. I find it helpful to blend the colors slightly where they meet for a softer, organic look. -
Lift and reveal:
Carefully peel back the tape and lift the stencil straight up. Let this main motif dry to the touch, usually about 15-20 minutes with acrylics. -
Position secondary stencils:
Place your smaller floral or geometric stencils in the empty negative spaces, like the corners or sides. Secure them with tape. -
Paint the accents:
Repeat the stippling process on the smaller designs. Use a mix of the colors—perhaps making one motif predominantly terracotta and another mostly sage—to keep the visual interest balanced. -
Add freehand details:
Once the stencils are removed and dry, use a very fine liner brush to touch up any bridges (the gaps left by the stencil plastic) if you prefer a continuous hand-painted look, or leave them for rustic charm.
Level Up: Distressed Vibe
Once the stencil paint is dry but before sealing, lightly sand heavy-traffic areas with 220-grit paper to reveal bits of the white base or wood underneath for an aged, vintage character.
Step 3: Protection and Finish
-
Light sanding:
If any paint ridges formed during stenciling, very lightly run high-grit sandpaper (400+) over the design to knock them down without removing the color. -
Seal the surface:
Apply a clear polycrylic topcoat using a clean foam roller or synthetic brush. This protects your artwork from scratches and coffee cup rings. -
Final cure:
Apply 2-3 thin coats of sealer, letting each dry fully in between. Wait the full cure time recommended on your sealer can before placing heavy items like monitors back on the desk.
Now you have a stunning, personalized workspace that invites creativity every time you sit down
Hand-Painted Border Lines to Frame the Desk Top
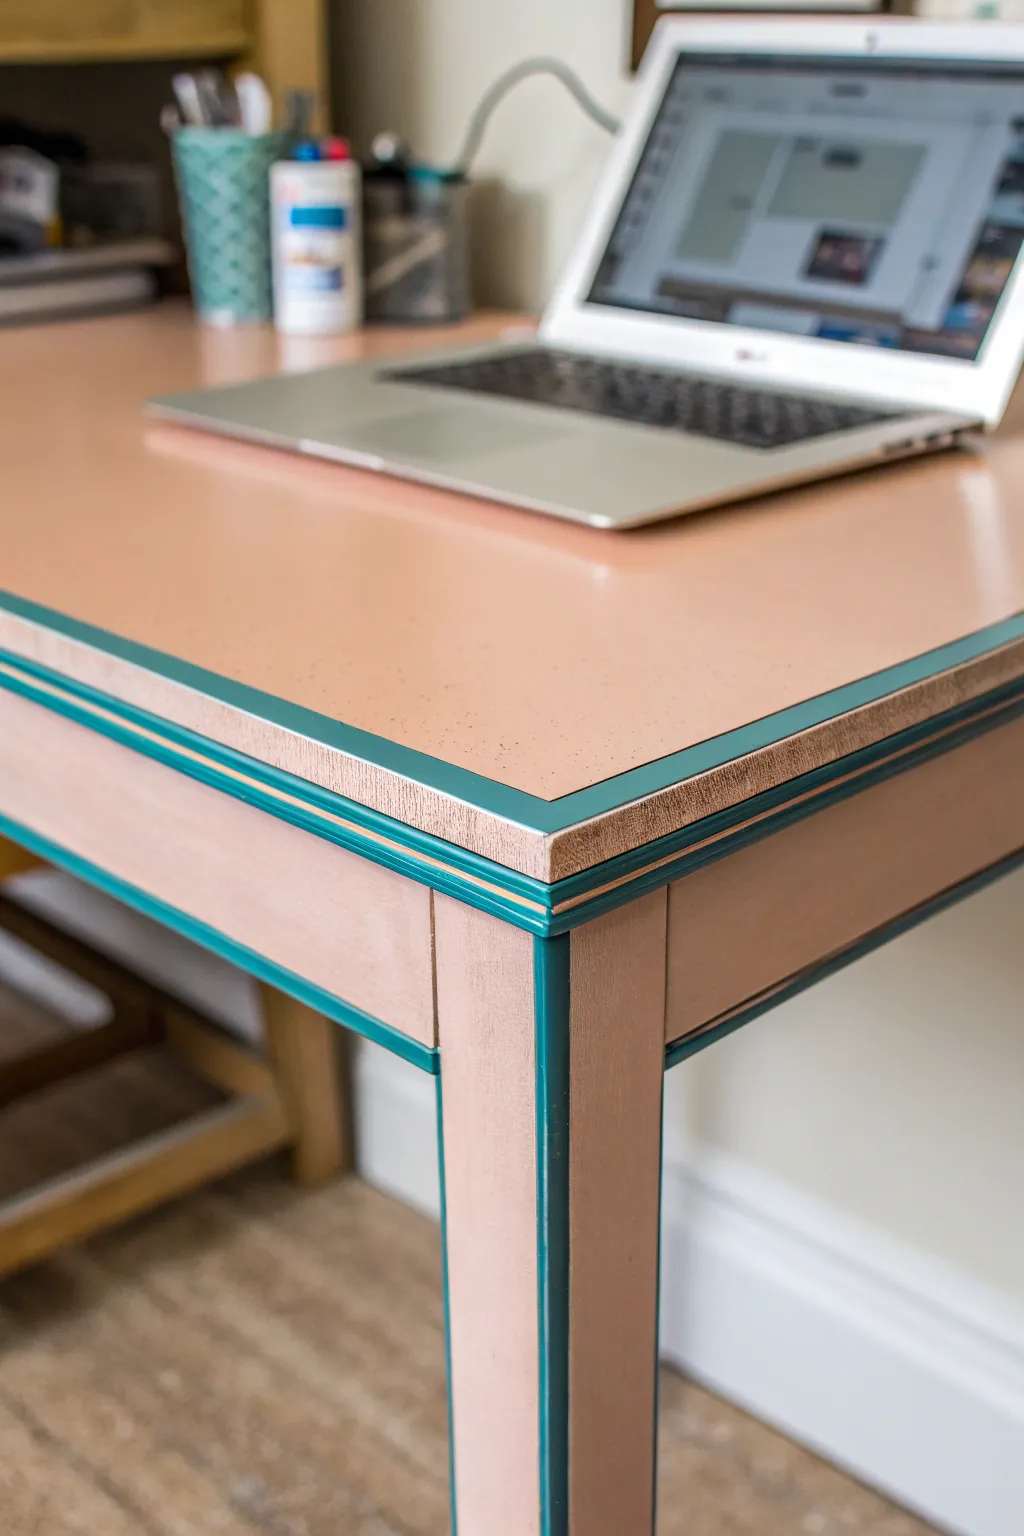
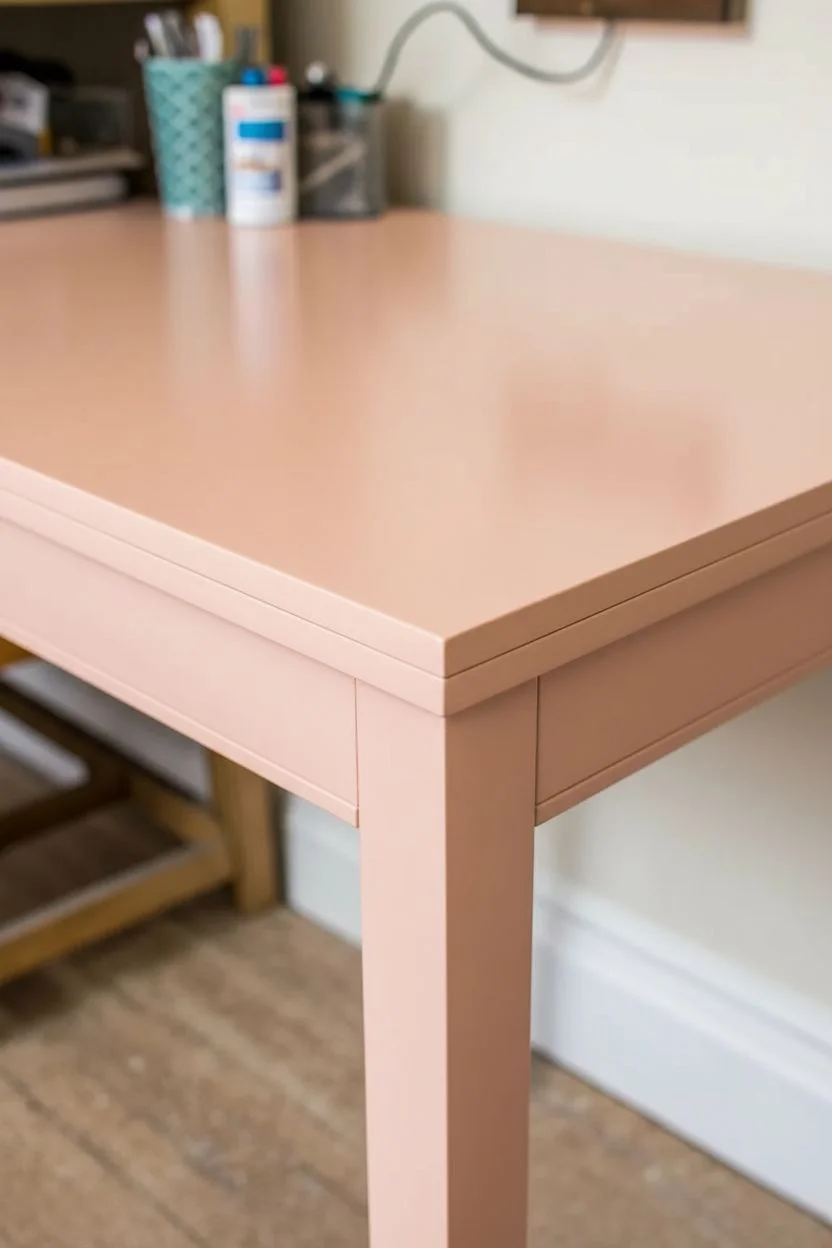
Give a simple desk a striking, architectural update with this high-contrast painted border technique. By framing the soft peach surface with bold teal lines, you create a sophisticated dimensionality that mimics custom joinery.
Detailed Instructions
Materials
- Wooden desk or table (pre-sanded)
- Peachy-pink satin furniture paint
- Deep teal or turquoise satin furniture paint
- High-quality painter’s tape (FrogTape recommended)
- Small foam roller and tray
- Synthetic angled sash brush (1.5 inch)
- Detail artist brush (flat, size 4 or 6)
- Ruler or tape measure
- Pencil
- Clear polychrylic topcoat (optional)
Step 1: Base Coat Application
-
Surface Prep:
Begin by ensuring your desk surface is impeccably clean and free of dust. If working with a previously finished piece, scuff sand it lightly to help the new paint adhere. -
First Coat:
Pour your peach-pink base color into a tray. Using a small foam roller, apply a smooth, even layer of paint across the entire top and legs of the desk. The roller helps avoid brush strokes on the large flat surfaces. -
Edges and Corners:
Use your angled sash brush to catch drips on the edges and paint inside the leg corners where the roller can’t reach. -
Dry Time:
Allow the first coat to dry completely according to the manufacturer’s instructions, usually 2-4 hours. -
Second Coat:
Apply a second coat of the peach paint for full opacity. This layer is crucial because the framing lines will draw the eye, so the background needs to be flawless. -
Cure:
Let the base coat cure overnight. Tape applied too early can peel up fresh paint, ruining your hard work.
Seal Avoids Bleed
Before painting the teal stripe, brush a thin layer of the BASE (pink) color over the tape edge. This fills any tiny gaps so the teal line stays absolutely perfect.
Step 2: Creating the Border
-
Measuring the Border:
Decide on the width of your teal border. For this look, a width of about 3/8 inch works well. Measure in from the edge of the tabletop and mark faint guide points with a pencil every few inches. -
Taping the Perimeter:
Apply a strip of painter’s tape along the inner markings you just made. This tape line will define the *inner* edge of your border. -
Sealing the Tape:
Firmly press down the edge of the tape with your fingernail or a credit card to prevent bleed-through. I like to paint a very thin layer of the *base* peach color over the tape edge first; this seals gaps so the teal line stays crisp. -
Painting the Horizontal Border:
Using a small flat artist brush or the very tip of your sash brush, carefully paint the exposed strip between the tape and the desk’s edge with deep teal paint. -
Painting the Vertical Edge:
Continue painting the teal color down over the edge of the tabletop and onto the vertical lip or apron of the desk as shown in the photo. -
Leg Accents:
To carry the look downward, tape off a matching vertical stripe on the outer corner of each leg. Paint this teal to connect visually with the tabletop border. -
Double Check Coverage:
Apply a second coat of teal if the first looks streaky, but be careful not to build up a thick ridge of paint against the tape. -
The Reveal:
While the final coat of teal is still slightly tacky (not fully dry), slowly peel back the painter’s tape at a 45-degree angle. Pulling while wet helps ensure a razor-sharp line.
Step 3: Finishing Touches
-
Clean Up:
Inspect your lines. If any teal bled under the tape, use a tiny artist brush and a dot of the peach base color to carefully erase the mistake. -
Edge Painting:
Ensure the very outer rim of the desk (the vertical thickness of the wood) is solid teal. You may need to touch this up freehand if the roller missed spots. -
Protective Coat:
Once the border is fully cured (give it at least 24 hours), apply a clear polychrylic topcoat if you plan to use the desk heavily. This seals in your design.
Peeling Paint?
If the base paint lifts when you remove the tape, your base coat likely wasn’t cured enough. Wait 24-48 hours after base coating before applying any tape.
Now you have a custom-looking workspace that adds a pop of graphic color to your room
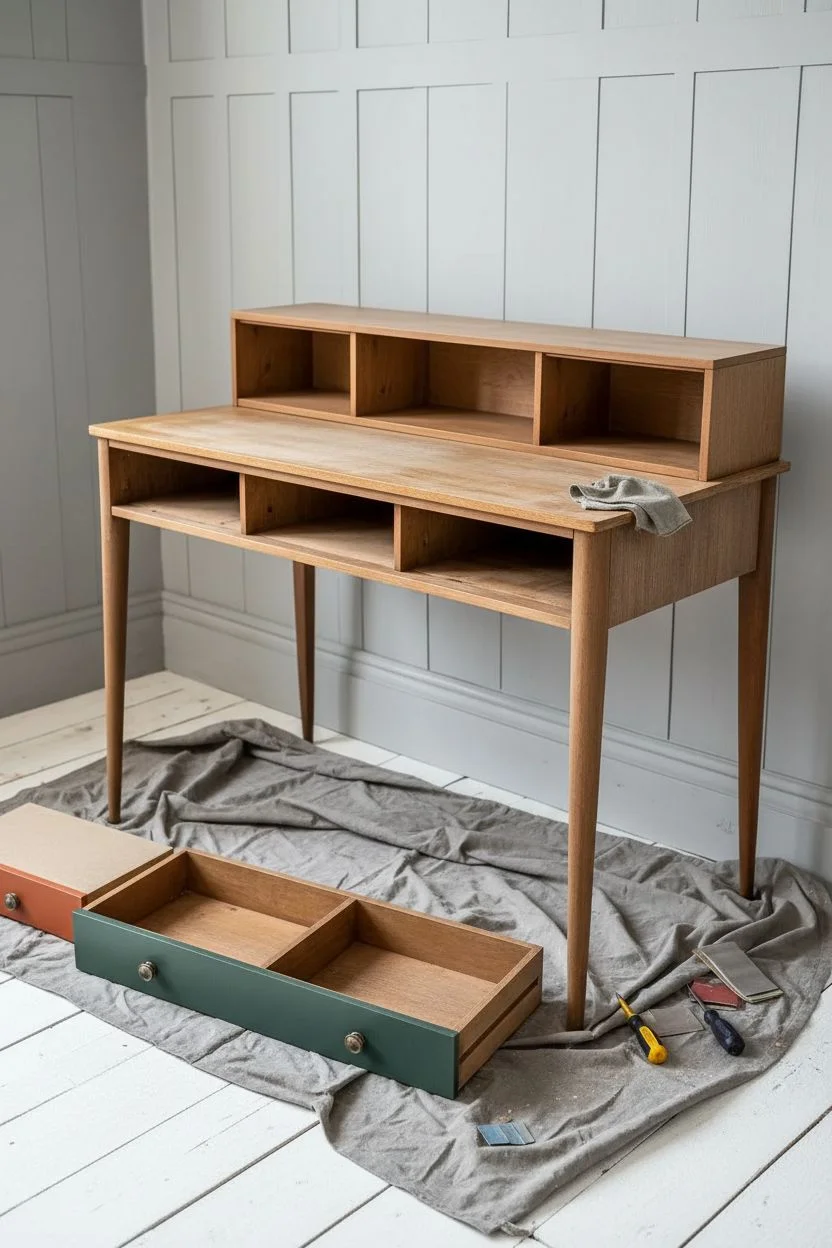
Color-Blocked Painted Desk With Unexpected Panels
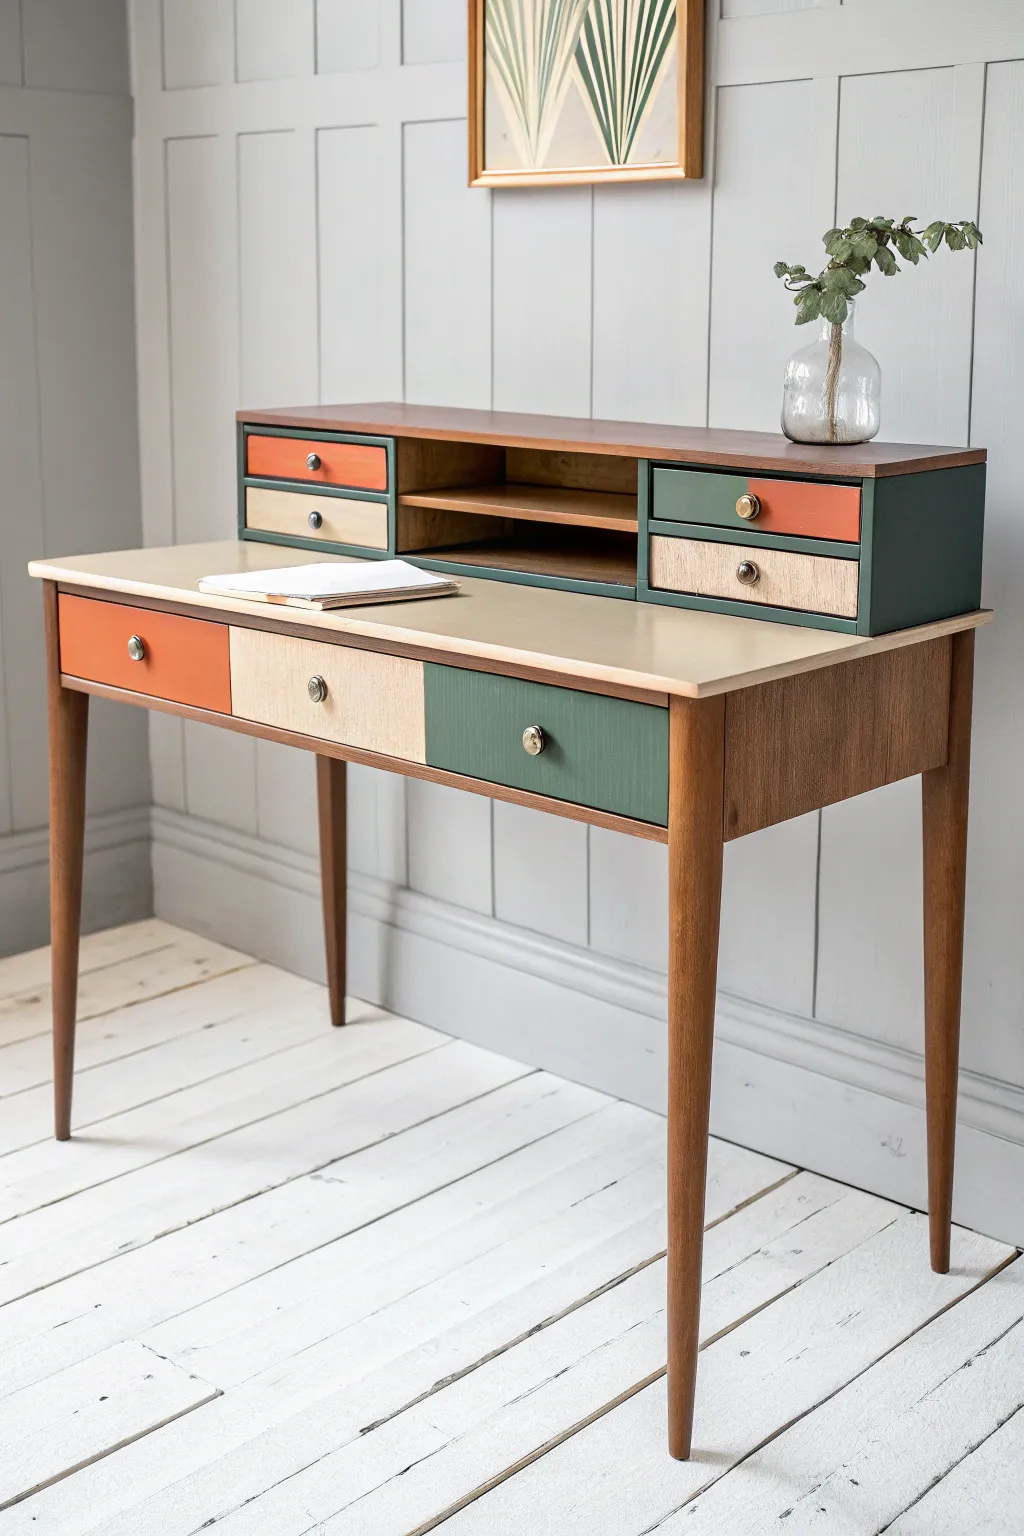
Transform a standard wooden writing desk into a striking mid-century inspired statement piece using a bold color-blocking technique. This project balances rich wood tones with burnt orange, forest green, and textured cream paints for a playful yet sophisticated finish.
Step-by-Step
Materials
- Wooden writing desk (with drawers and shelf hutch)
- Sandpaper (120 and 220 grit)
- Painter’s tape (high-quality edging tape)
- Primer (wood bonding primer)
- Satin finish chalk or mineral paint: Burnt Orange
- Satin finish chalk or mineral paint: Forest Green
- Textured stone-effect spray paint or mineral paint: Cream/Beige
- High-gloss enamel paint: Cream (for desk top)
- Polycrylic topcoat or furniture wax
- Small foam roller
- Angled sash brush (1.5 inch)
- Screwdriver
- Drop cloth
- Tack cloth
- Gold or brass knobs (optional replacement)
Step 1: Preparation & Disassembly
-
Remove hardware:
Start by removing all existing knobs and pulls from the drawers using your screwdriver. Store the screws safely if you plan to reuse the hardware, though swapping them for brass buttons really elevates the look. -
Take out drawers:
Pull out all main drawers and the smaller drawers from the upper hutch. It is much easier to paint faces on a flat surface than while vertical. -
Clean surfaces:
Wipe down the entire desk with a mild degreaser or TSP alternative to remove years of furniture polish, oil, or dust. -
Sand the finish:
Using 120-grit sandpaper, scuff sand all surfaces you intend to paint. You don’t need to strip the wood bare, just de-gloss the old finish so the new paint adheres. -
Remove dust:
Wipe away all sanding residue thoroughly with a tack cloth to ensure a perfectly smooth base.
Sticky Drawer Fix
If drawers stick after painting, rub a plain candle or a bar of beeswax along the wooden runners and the sides of the drawer box for instant lubrication.
Step 2: The Color-Block Strategy
-
Design your layout:
Plan your colors before opening a can. For this look, alternate the drawer fronts: assign the left large drawer orange, the middle cream, and the right green. Mirror or invert this pattern for the smaller hutch drawers. -
Tape boundaries:
If painting the hutch frame around the drawers (like the green sections shown), use painter’s tape to mask off the internal wood grain shelves. Press the tape edges down firmly with a credit card. -
Prime painted areas:
Apply a coat of bonding primer to the drawer fronts and the desktop surface. Let this dry completely according to the can’s instructions.
Step 3: Painting the Elements
-
Apply the orange:
Stir your burnt orange paint well. Using a small brush for edges and a roller for flat areas, paint the designated drawer fronts. Two thin coats are better than one thick one. -
Apply the green:
Repeat the process with the forest green paint on the corresponding drawers and the outer sides of the hutch unit if you are wrapping the color around. -
Create the textured cream:
For the middle drawers, use a textured stone-effect spray or a mineral paint with a stipple brush to create that unique, tactile beige finish. I find light, misting passes work best to avoid drips with texture sprays. -
Refinish the desktop:
Paint the main writing surface with the high-gloss cream enamel. Use a high-density foam roller to get a self-leveling, smooth finish that is durable for writing. -
Sand between coats:
Once the first coats are dry, very lightly sand with 220-grit paper to knock down any nibs, then wipe clean and apply the second coats for full opacity.
Geometric Reveal
Add a hidden pop of joy by lining the interior drawer bottoms with a patterned wallpaper or contact paper that matches your color palette.
Step 4: Assembly & Finishing
-
Deep clean the wood legs:
While paint dries, use wood oil or a restorative finish on the unpainted wood legs and sides to make the natural grain pop against the new colors. -
Seal the paint:
Once all paint has cured for at least 24 hours, apply two coats of polycrylic sealer to the drawer fronts and desktop to protect against scratches and chips. -
Reinstall hardware:
Attach your knobs back onto the drawers. If using new hardware, you might need to fill old holes and drill new ones during the prep phase, so ensure they fit now. -
Reassemble the desk:
Slide the drawers back into their tracks. Ensure they glide smoothly; if paint buildup causes sticking, sand the edges slightly.
Now you have a custom workspace that perfectly blends vintage charm with modern color trends
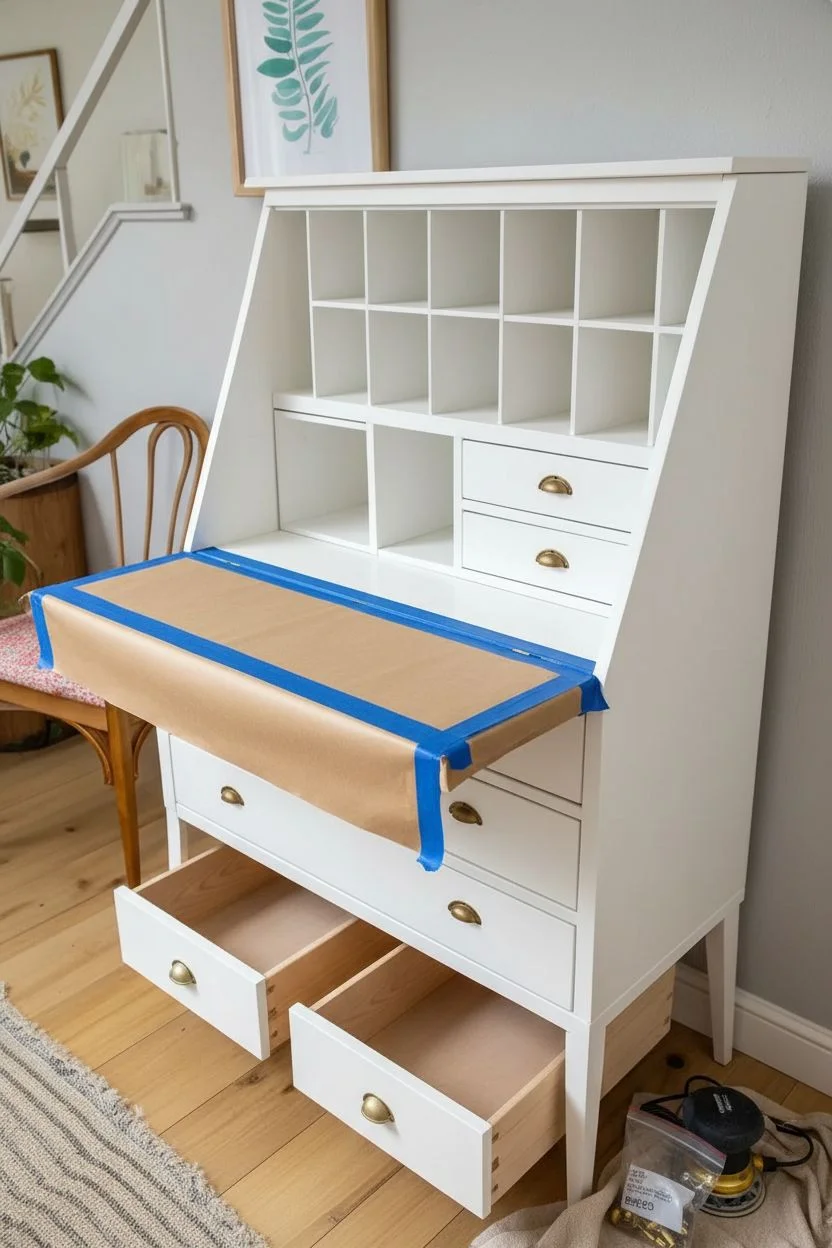
Painted Desk Interior Surprise: Bright Cubby or Pigeonholes
Transform a dated secretary desk into a modern statement piece with a crisp white exterior and a delightful surprise inside. This project balances neutral elegance with vibrant splashes of teal and coral grid work, showcasing nearly hidden pops of color that are revealed only when you’re ready to work.
Step-by-Step Tutorial
Materials
- Secretary desk (vintage or thrifted)
- Sander (orbital) and sandpaper (120, 220 grit)
- Primer (stain-blocking, shellac-based recommended)
- White furniture paint (satin or semi-gloss)
- Teal acrylic or latex paint (sample pot size)
- Coral/Salmon acrylic or latex paint (sample pot size)
- Painter’s tape (high quality)
- Small foam rollers and tray
- Angled sash brush (2-inch)
- Small artist brushes (flat and round)
- Clear matte polycrylic topcoat
- Brass cup pulls and knobs
- Wood stain (optional, if refinishing the desktop)
- Screwdriver and hardware tools
Step 1: Prep & Prime
-
Clear Out:
Remove all drawers, shelves (if removable), and existing hardware from the desk. Place hardware in a labeled bag so you don’t lose screws. -
Clean Thoroughly:
Scrub the entire piece with a degreaser or TSP alternative to remove years of furniture wax, oils, and dirt. Let it dry completely. -
Sand Surfaces:
Scuff sand the entire exterior and the interior cubby area with 120-grit sandpaper to give the paint grip. If the fold-down desktop is wood, sand it down to raw wood using the orbital sander to remove old varnish. -
Protect the Wood:
Tape off the newly sanded raw wood desktop completely to protect it from primer and paint. I like to use paper and tape to cover the large flat area. -
Prime Everything:
Apply a coat of stain-blocking primer to the entire body, drawer fronts, and interior cubbies. This is crucial for stopping old wood tannins from bleeding through your white paint.
Sloppy Corners?
If paint bridges the corners inside the small cubbies, wrap a putty knife in a damp rag and run it along the crease immediately to wipe away excess build-up.
Step 2: The Colorful Interior
-
Divide and Conquer:
Visually divide your cubby section. In this design, the left bank of cubbies is teal, and the right bank is coral. Use painter’s tape to mask off the center divider line perfectly. -
Paint the Deep Corners:
Using a small artist brush, paint the difficult back corners and edges of the left-hand cubbies with your teal paint first. -
Fill the Teal Side:
Apply the teal paint to the flat surfaces of the left cubbies using a small foam roller for a smooth finish, blending into the corners you just brushed. -
Paint the Coral Side:
Once the teal side is dry, carefully move your tape if necessary to protect the teal edge, then repeat the process on the right side with the coral paint. -
Second Coats:
Apply a second coat to both colored sections to ensure opaque, vibrant coverage. Remove the tape while the paint is still slightly tacky to keep lines sharp.
Add Some pattern
Instead of solid colors, use removable wallpaper or patterned contact paper on the back panel of the cubbies for a funky, graphic look behind the shelves.
Step 3: Exterior & Assembly
-
Paint the Body:
Apply your white furniture paint to the exterior frame, legs, and drawer fronts. Use a high-quality sash brush for the legs and detailed trim. -
Roll the Flats:
Use a foam roller on the large flat sides and top for a brush-stroke-free finish. Apply 2-3 coats as needed, lightly sanding with 220-grit paper between coats for smoothness. -
Paint Interior Drawers:
Don’t forget the small interior drawers! Paint their fronts white to match the exterior, creating a clean contrast against the colorful cubbies. -
Seal the Wood:
Remove the tape from the desktop. Apply a wood stain if desired, or simply seal the raw wood with 3 coats of clear polycrylic for a durable writing surface. -
Install Hardware:
Once all paint has cured (at least 24 hours), attach the new brass cup pulls on the drawers and knobs on the fold-down lid. -
Reassemble:
Slide the small drawers back into their slots and move the large drawers into place. Step back and admire the pop of color.
Enjoy your renewed workspace that hides a cheerful burst of color whenever you close up shop for the day


Have a question or want to share your own experience? I'd love to hear from you in the comments below!