A plain lampshade is basically a blank canvas that can turn a whole corner of your room into something intentional and artsy with just a little acrylic paint. Here are my favorite DIY painted lampshade ideas—starting with the classics you’ll actually use, then sliding into the fun, weirder techniques once you’re warmed up.
Classic Solid-Color Refresh
Transform a plain or dated drum shade into a sophisticated statement piece with this warm, earthy makeover. By using diluted fabric paint or chalk paint, you can achieve a soft, dyed look that retains the natural texture of the linen for a high-end finish.
Step-by-Step Guide
Materials
- Fabric drum lampshade (white or cream)
- Fabric medium
- Acrylic paint (Terra Cotta or burnt orange)
- Chalk paint (optional alternative)
- Wide flat synthetic brush (2-3 inch)
- Spray bottle with water
- Painter’s tape
- Drop cloth or newspapers
- Plastic cup or mixing jar
- Lint roller
Step 1: Preparation
-
Clean surface:
Begin by thoroughly cleaning your lampshade using a lint roller to remove any dust, pet hair, or loose fibers that might get trapped in the paint. -
Protect hardware:
Use painter’s tape to carefully mask off the metal spider fitting inside the shade and any trim edges if you want them to remain the original color. -
Set up workspace:
Lay down your drop cloth or old newspapers on a flat surface, ensuring you have enough room to rotate the shade freely as you work.
Patchy results?
If the light shines through unevenly, don’t panic. Gently sand the dry surface with high-grit sandpaper, wipe clean, and apply a third, very thin coat of paint.
Step 2: Mixing the Color
-
Combine medium and paint:
In your mixing cup, combine one part fabric medium with two parts acrylic paint; the medium ensures the paint remains flexible and doesn’t crack once dry. -
Dilute mixture:
Add water slowly to your paint mixture until it reaches a consistency similar to heavy cream or a thin milkshake. -
Test opacity:
I usually test a tiny swatch on the inside seam of the lampshade to ensure the color depth is correct before committing to the exterior. -
Adjust hue:
If the orange feels too bright, add a tiny drop of brown to deepen it into that rich terra cotta tone shown in the example.
Level Up: Linen Look
For a woven linen texture, wait until the paint is tacky, then gently drag a dry, stiff-bristled brush vertically and then horizontally across the surface.
Step 3: Painting Process
-
Dampen the fabric:
Lightly mist the entire lampshade with your water spray bottle; this helps the paint absorb evenly rather than sitting on top of the fibers. -
Apply first coat:
Dip your wide brush into the mixture and apply the paint in long, horizontal strokes, working your way around the cylinder. -
Work quickly:
Keep a ‘wet edge’ by moving steadily around the shade so you don’t get harsh overlap lines where dry paint meets wet paint. -
Smooth the texture:
Once the first coat is on, run your brush lightly over the surface again without adding more paint to smooth out any heavy brushstrokes. -
Let it dry:
Allow the lampshade to dry completely for about 2 to 4 hours; it will likely look patchy at this stage, which is normal. -
Check transparency:
Turn on the lamp briefly to see how the light filters through; this reveals uneven spots that need more attention in the next layer.
Step 4: Refining and Finishing
-
Apply second coat:
Repeat the painting process with a second layer, focusing on any areas that looked translucent during your light test. -
Address seams:
Use the tip of your brush to carefully dab paint into the vertical seam of the shade to ensure no white backing shows through. -
Clean edges:
While the paint is still slightly damp, carefully peel away the painter’s tape to ensure a crisp, clean line along the metal fittings. -
Final cure:
Let the lampshade cure for at least 24 hours before using it with a bulb, as heat can affect uncured paint.
Now you have a custom-colored accent piece that adds warmth to your room without the high designer price tag


Modern Color-Block Panels
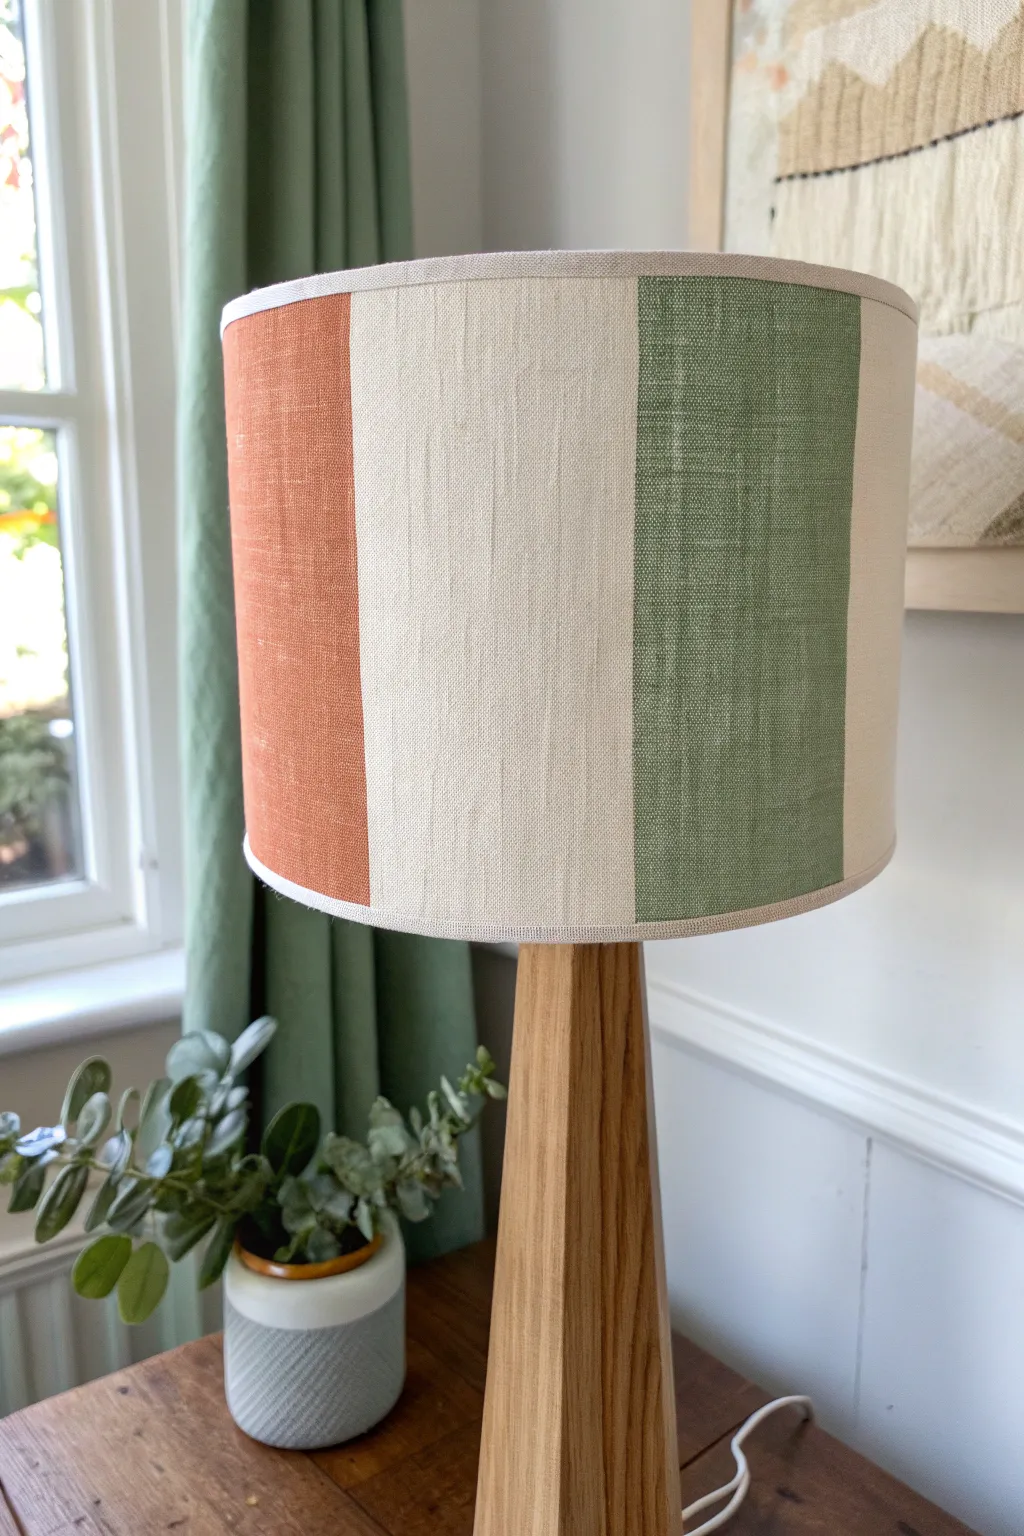
Transform a plain drum shade into a statement piece with bold, architectural stripes of color. This modern color-blocking technique uses fabric medium to keep the linen texture soft while adding earthy tones of terracotta and sage.
Detailed Instructions
Materials
- Plain linen or cotton drum lampshade (light color)
- Acrylic craft paint (burnt orange/terracotta)
- Acrylic craft paint (sage/olive green)
- Textile medium (fabric medium)
- Painter’s tape (1-inch width works best)
- Measuring tape
- Pencil
- Flat synthetic paintbrush (1-inch width)
- Palette or paper plate
- Mixing stick
- Drop cloth or waste paper
Step 1: Planning and Taping
-
Measure the circumference:
Start by measuring the total circumference of your lampshade with a flexible measuring tape. -
Calculate panel sizes:
Divide the total circumference by an even number to determine your panel width. For the look in the photo, aim for 3-4 distinct panels, so divide by 3 or 4 depending on the shade’s size. -
Mark the verticals:
Using your pencil, make faint tick marks on the top and bottom rims of the shade to indicate where each vertical line should fall. -
Apply the divider tape:
Run strips of painter’s tape vertically connecting your top and bottom marks. Ensure the tape is perfectly straight and press the edges down firmly to prevent bleed. -
Protect the trim:
Apply a strip of painter’s tape horizontally along the very top and bottom rim of the shade to protect the finished edge binding from stray paint strokes.
Bleeding Lines?
If paint bleeds under the tape, it’s usually because the paint was too thin or the tape wasn’t sealed. For crisp lines, paint a thin layer of clear matte medium over the tape edge first.
Step 2: Painting the Panels
-
Prepare the paint mix:
Mix your acrylic paint with textile medium according to the bottle instructions (usually a 1:1 or 2:1 ratio). This is crucial for keeping the fabric flexible rather than stiff and crunchy. -
Conquer the first color:
Dip your flat brush into the terracotta mixture. Start in the center of the panel and work outward toward the tape. -
Work the edges:
When painting near the tape, brush *away* from the tape edge or parallel to it, rather than pushing paint underneath it. -
Ensure even coverage:
Apply the paint in smooth, vertical strokes to mimic the weave of the fabric. I like to check the shade against a light source to spot any thin patches. -
Skip a section:
Leave the next panel unpainted to reveal the natural cream linen color, creating that negative space effect shown in the image. -
Paint the second color:
Move to the third panel and apply your sage green mixture using a clean brush, following the same technique of brushing vertically and away from tape edges. -
Double check opacity:
Linen absorbs paint quickly. if the color looks streaky, wait about 20 minutes for the first coat to be touch-dry, then apply a second thin coat.
Step 3: Finishing Touches
-
Peel while damp:
Carefully peel off the vertical painter’s tape while the paint is still slightly tacky. This helps prevent the dried acrylic film from cracking at the edge. -
Remove rim tape:
Slowly remove the horizontal tape protecting the top and bottom rims. -
Inspect the lines:
Check your crisp lines. If a tiny bit of paint bled under the tape, use a damp Q-tip or a small stiff brush with water to gently scrub it away before it cures. -
Let it cure:
Allow the lampshade to dry completely for 24 hours before attaching it to a lamp base. Heat setting with a hairdryer isn’t strictly necessary for a lamp, but can help durability.
Pro Tip: Light Check
Before drying completely, put the shade on a lamp and turn it on. Paint looks different when backlit! Fill in any patchy areas that become visible only when the light shines through.
Enjoy the warm, custom glow of your new modern accent piece


Soft Ombre Fade
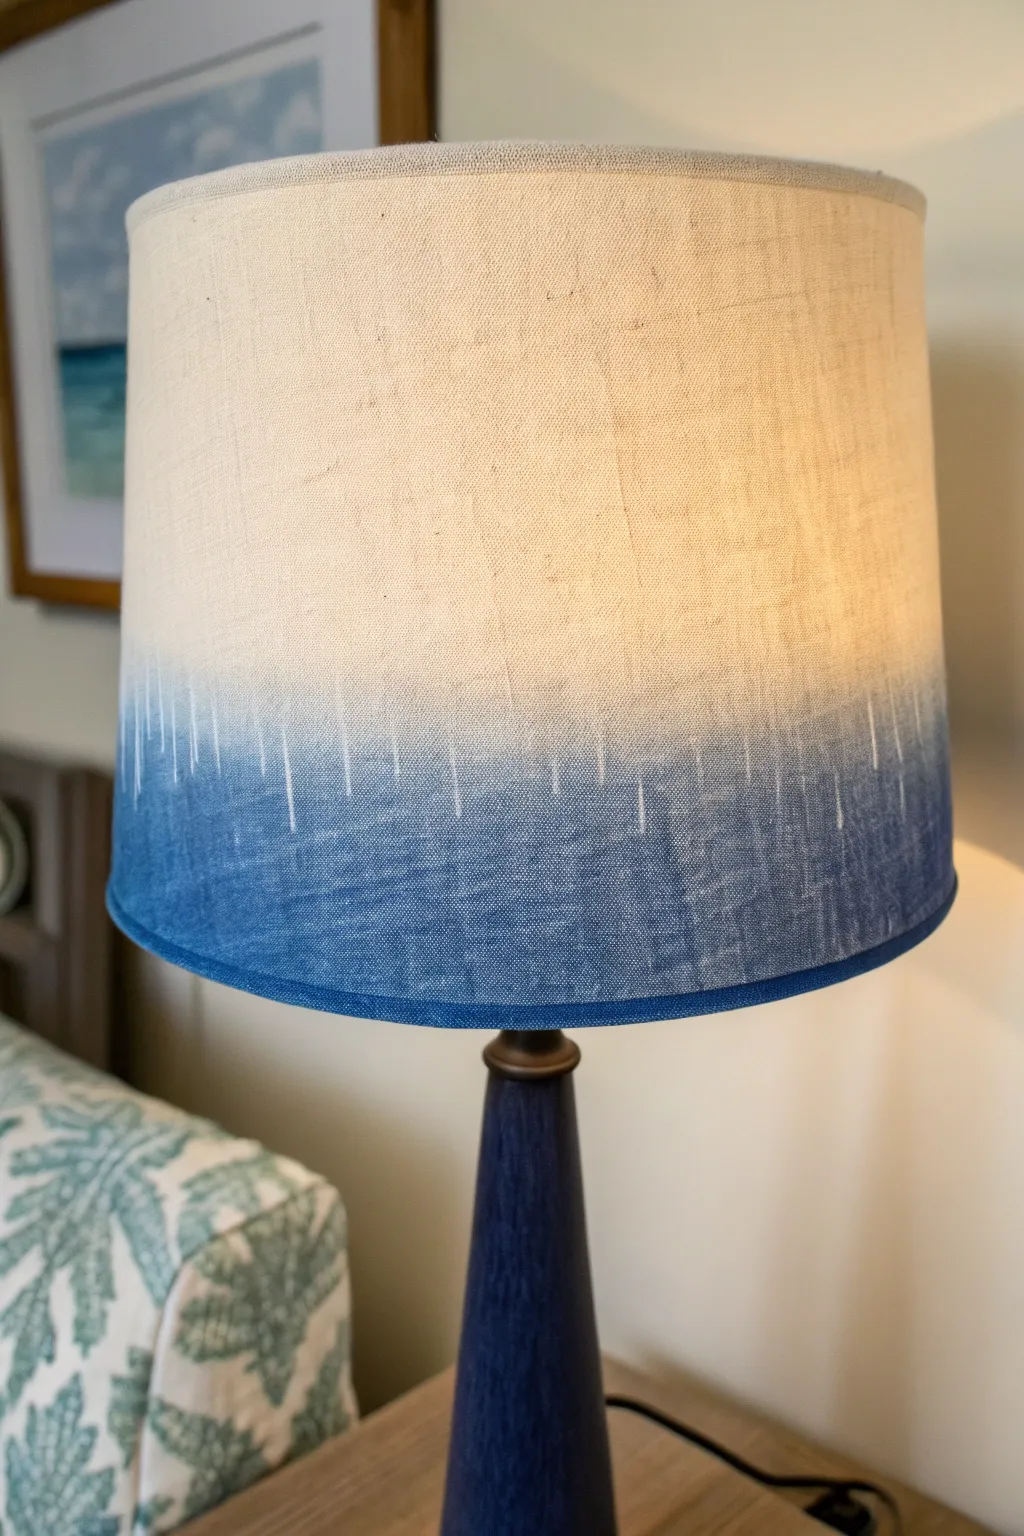
Bring the calming vibes of the ocean into your bedroom with this faux dip-dye lampshade makeover. By carefully controlling fabric paint and water, you can achieve that sought-after soft, bleeding watercolor transition without actually dipping the entire shade.
Step-by-Step Tutorial
Materials
- Light-colored fabric lampshade (linen or cotton works best)
- Fabric paint (indigo or navy blue)
- Fabric medium (optional, for softer texture)
- Wide foam craft brush (2-3 inches)
- Small round bristle brush (for details)
- Spray bottle filled with water
- Plastic drop cloth or garbage bag
- Painter’s tape
- Paper plate or painting palette
- Clean rag or paper towels
Step 1: Preparation
-
Clean the Shade:
Before starting, ensure your lampshade is free of dust and lint. Use a lint roller or a piece of masking tape to lift away any debris that might interfere with the paint absorption. -
Protect Your Workspace:
Lay down your plastic drop cloth on a flat table. Since this project involves a fair amount of water, things can get drippy, so protect any nearby furniture or rugs as well. -
Mix the Paint:
Squeeze a generous amount of indigo fabric paint onto your palette. If you are using a fabric medium, mix it in now according to the bottle’s instructions—usually a 1:1 ratio. This helps the paint move more fluidly on the fabric. -
Dilute the Paint:
Create a secondary pool of paint on your palette and mix in a little water. You want a consistency that is thinner than the tube paint but not quite watery ink. We will use the full-strength paint for the bottom edge later.
Step 2: Creating the Ombre Effect
-
Wet the Bottom Edge:
Using your spray bottle, lightly mist the bottom third of the lampshade. You don’t want it soaking wet, just damp enough to encourage the paint to travel. -
Apply the Base Layer:
Take your wide foam brush and load it with the diluted paint mixture. Start painting from the very bottom rim, moving upwards in vertical strokes. -
Work in Sections:
Paint around the circumference of the shade, covering about 2-3 inches of height from the bottom rim. Don’t worry about the top edge of the paint line yet; just get solid coverage at the base. -
Feather the Edge:
Re-wet the foam brush with just water (no paint). Drag the clean, wet brush along the top edge of your blue line, pulling the pigment upward slightly. This begins the fading process. -
Introduce the ‘Bleed’:
For that organic, uneven look seen in the photo, spray the transition line with water again. Watch as the blue pigment climbs up into the dry fabric. Gravity is your friend here, but capillarity does the work. -
Enhance the Streaks:
Switch to your small round bristle brush. Dip it in water and drag it vertically from the painted blue section up into the clean linen area. This creates those distinct, whispy vertical lines. -
Deepen the Bottom:
While the fabric is still damp, go back to your undiluted, darker paint. Apply this heavily along the very bottom rim and the bottom inch of the shade to create a rich, saturated foundation. -
Blend the Layers:
Use the foam brush to gently blend this dark bottom section upwards into the misty mid-section, ensuring there are no harsh horizontal bands of color.
Fixing heavy blotches
If a spot gets too dark or blotchy, immediately dab it with a clean, damp paper towel to lift the pigment. Don’t rub, or you’ll pill the fabric.
Step 3: Refinement and Drying
-
Check for Consistency:
Step back and rotate the lamp. Look for any areas where the ‘fade’ is too low or too high and adjust by adding little touches of water or diluted paint. -
Create Negative Space:
If your blue section looks too solid, dip a clean brush in water and ‘paint’ clear water lines starting from the unpainted section down into the blue. This pushes pigment away, creating lighter streaks. -
Paint the Trim:
Most lampshades have a fabric binding tape on the bottom edge. Paint this carefully with undiluted paint so it frames the design solidly. -
Let it Dry:
Allow the shade to dry completely. This usually takes overnight. The colors may lighten slightly as they dry. -
Heat Set:
Once dry, verify your fabric paint instructions. Many require heat setting. You can do this by blowing hot air from a hairdryer over the painted area for several minutes.
Add a crisp finish
Glue a matching navy ribbon or grosgrain trim along the very bottom edge of the shade for a polished, professional look that hides any rim imperfections.
Place your newly painted shade on its base and enjoy the soft, artistic glow it adds to your room


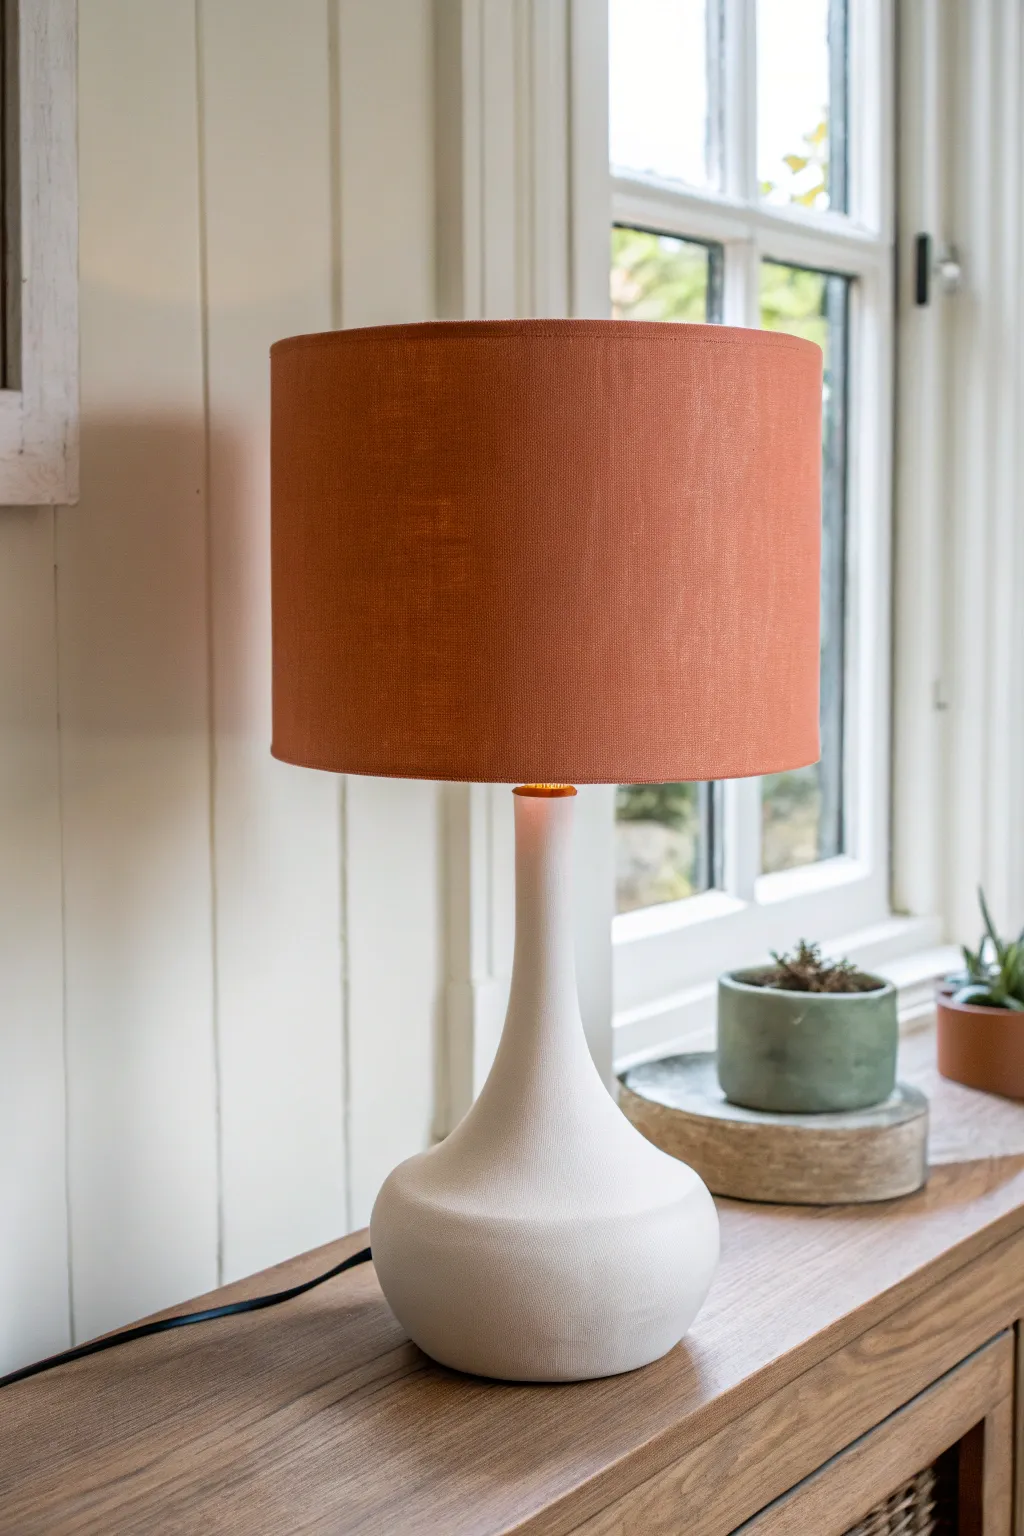
Two-Tone Dipped Bottom Edge
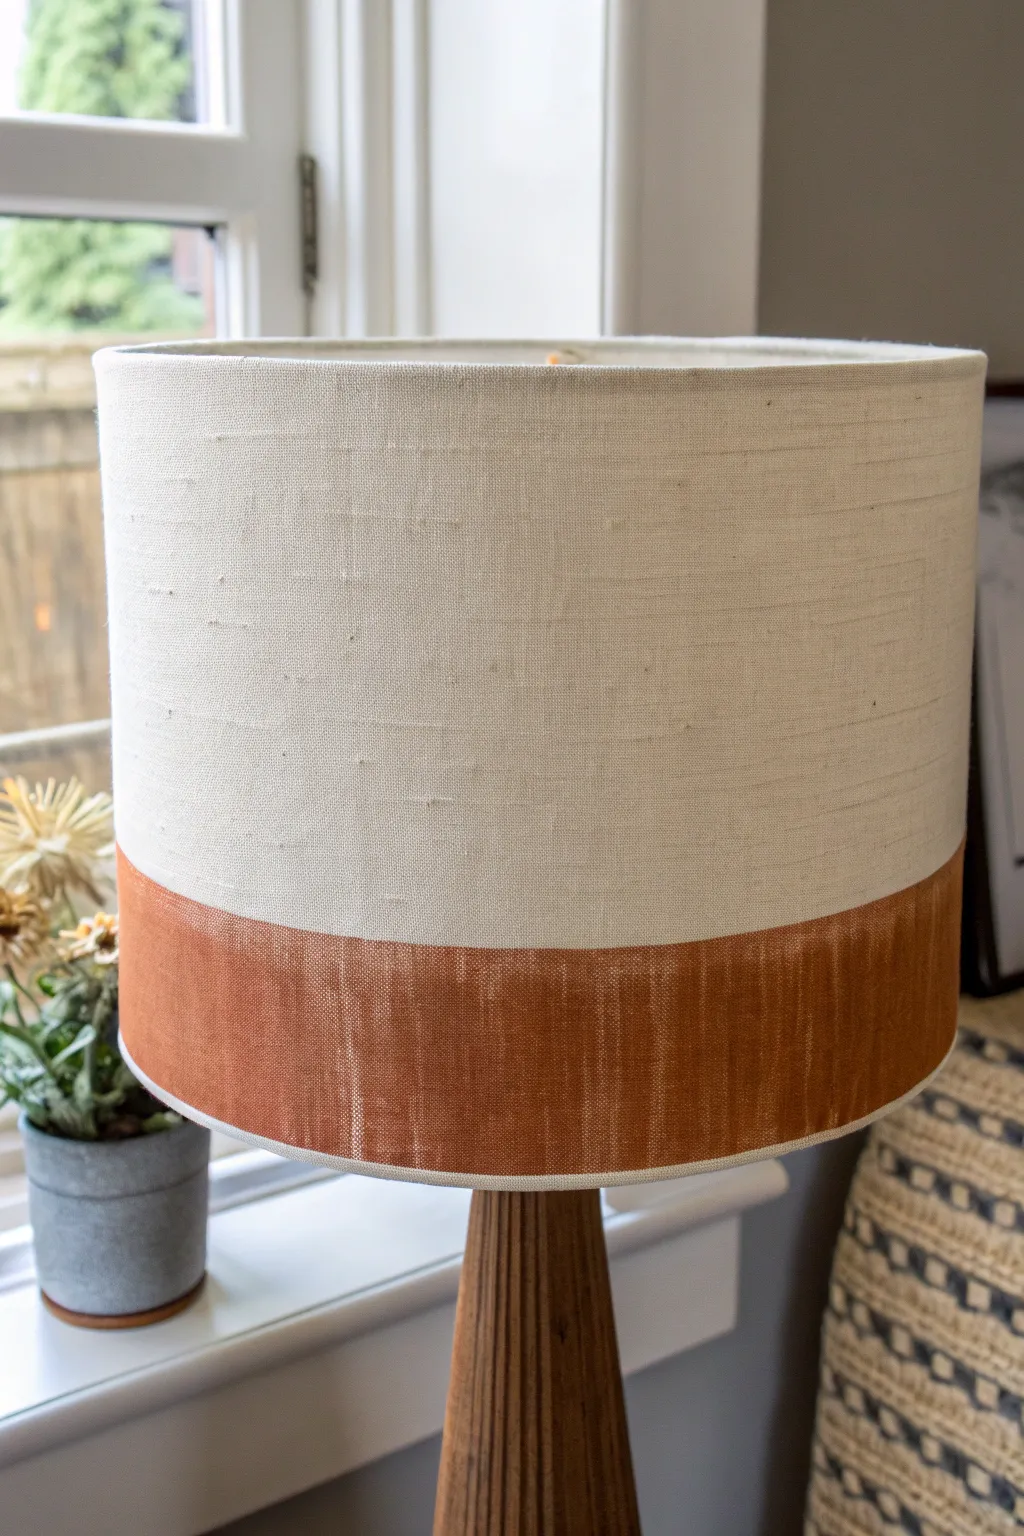
Give a simple drum shade a modern, earthy update with this easy two-tone painting technique. The result resembles a high-end dipped fabric look, adding a warm pop of color that perfectly complements wooden lamp bases.
Step-by-Step
Materials
- Fabric drum lampshade (light beige or cream)
- Painter’s tape (1.5 or 2 inch width)
- Fabric paint or acrylic paint (burnt orange/terracotta)
- Textile medium (if using acrylic paint)
- Flat paintbrush (2-inch)
- Small foam roller (optional for smoother finish)
- Measuring tape or ruler
- Pencil
- Drop cloth or old newspaper
Step 1: Prep and Measure
-
Clean surface:
Before starting, ensure your lampshade is free of dust and lint. A quick pass with a lint roller does the trick perfectly. -
Determine height:
Decide how high you want the colored band to go. In the photo, the band covers approximately the bottom quarter of the shade. -
Mark the line:
Use your ruler to measure reaching up from the bottom rim. Make small, faint pencil marks every 2 inches around the circumference of the shade at your desired height. -
Apply tape:
Carefully run a strip of painter’s tape around the shade, connecting your pencil marks. The bottom edge of the tape should align with your marks. -
Secure the seal:
Run your fingernail or a credit card firmly along the bottom edge of the tape. This is crucial to prevent paint from bleeding under the line.
Bleeding Lines?
If paint bled under the tape, dip a stiff, angled brush in rubbing alcohol and gently scrub the mistake. The alcohol helps lift the paint from fabric fibers better than water.
Step 2: Painting the Texture
-
Mix your medium:
If you are using standard acrylic paint, mix it with a textile medium according to the bottle’s instructions. This keeps the painted fabric flexible rather than stiff and plasticky. -
Dilute slightly:
Add a very small amount of water to your paint mixture. We want the linen texture to show through, rather than coating it in a thick plastic shell. -
First pass:
Using your flat brush, apply the paint starting from the tape line and pulling downward toward the bottom rim. Avoid pushing paint *up* against the tape edge to minimize bleeding. -
Cover the rim:
Don’t forget the very bottom edge and the inside lip of the shade. Paint carefully around the bottom wire rim for a professional, finished look. -
Check consistency:
Look for heavy brush strokes. If you want a smoother look, lightly go over the wet paint with a foam roller. For a more organic linen look, leave the brush strokes visible. -
Let it dry:
Allow the first coat to dry almost completely, which usually takes about 20-30 minutes. -
Assess coverage:
Turn on a light near the shade (or hold it up to a window). If the coverage is too streaky or thin, apply a second thin coat using the same downward motion.
Step 3: Finishing Touches
-
Remove tape:
This is the most satisfying part. While the final coat is still ever-so-slightly separate, carefully peel back the painter’s tape at a 45-degree angle. -
Inspect the edge:
Check the line for any small bleeds. If you find any minor imperfections, you can carefully scrape them away with a craft knife while the paint is fresh, or touch up with a tiny bit of white paint later. -
Full cure:
Let the lampshade dry fully for at least 24 hours before reattaching it to your lamp base to ensure the paint doesn’t transfer or smudge.
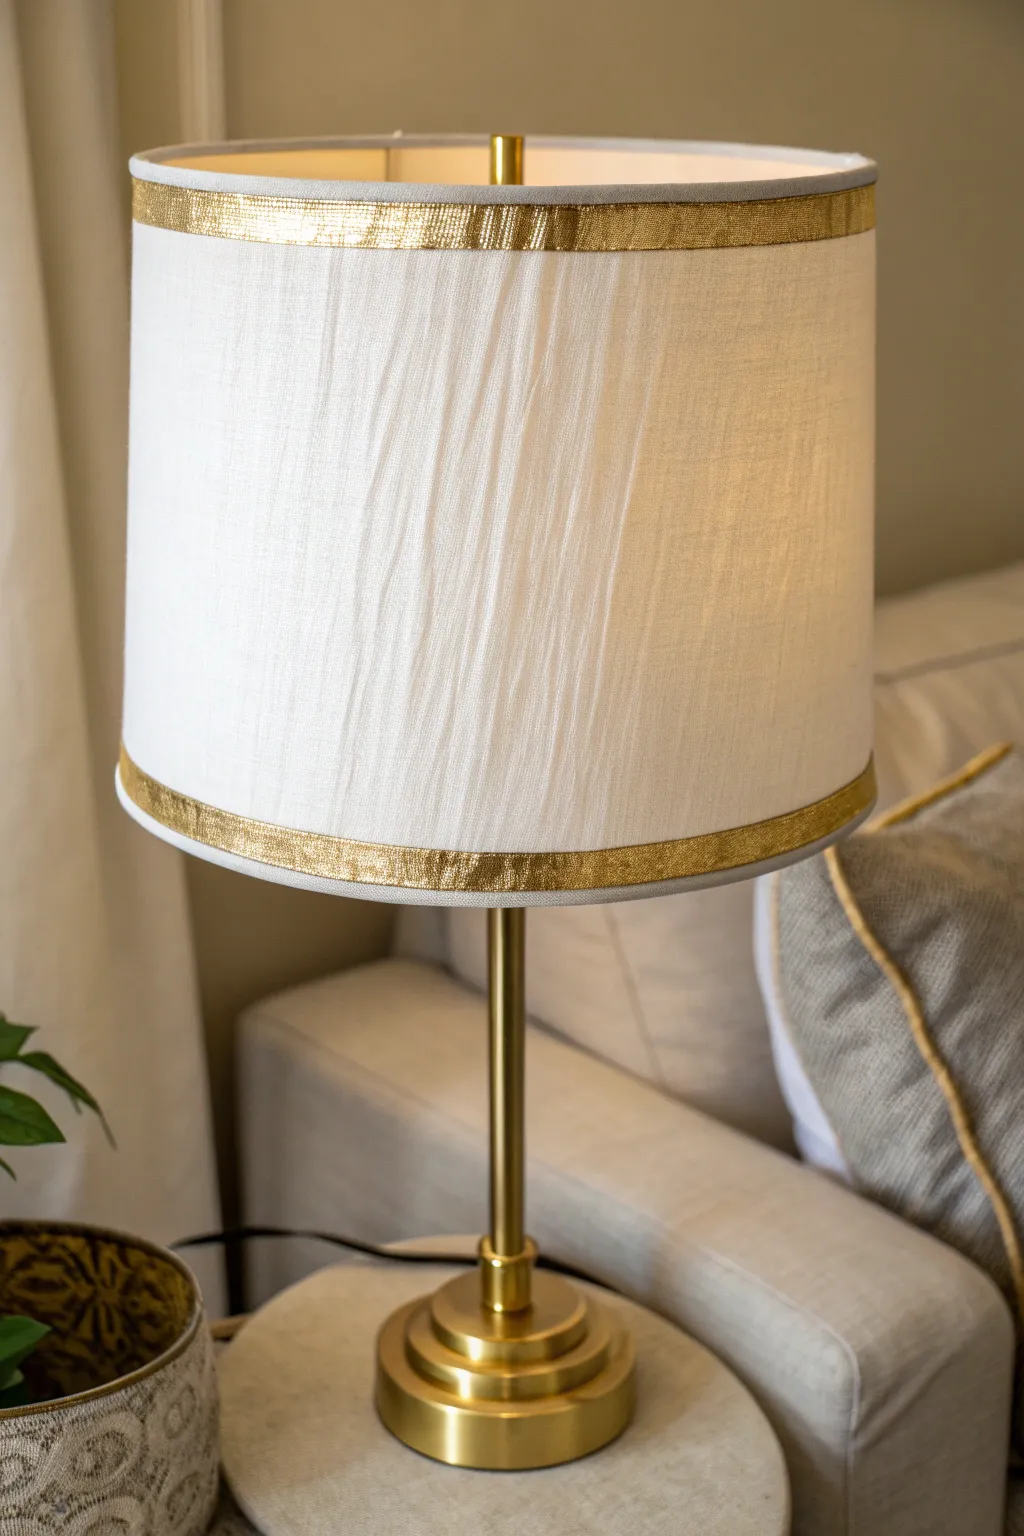
Metallic Edge
Add a thin pinstripe of gold leaf or metallic gold paint right along the transition line between the beige and terracotta parts for a touch of luxe glamour.
Enjoy the warm glow your newly customized lamp brings to the room
BRUSH GUIDE
The Right Brush for Every Stroke
From clean lines to bold texture — master brush choice, stroke control, and essential techniques.
Explore the Full Guide
Allover Stencil Pattern
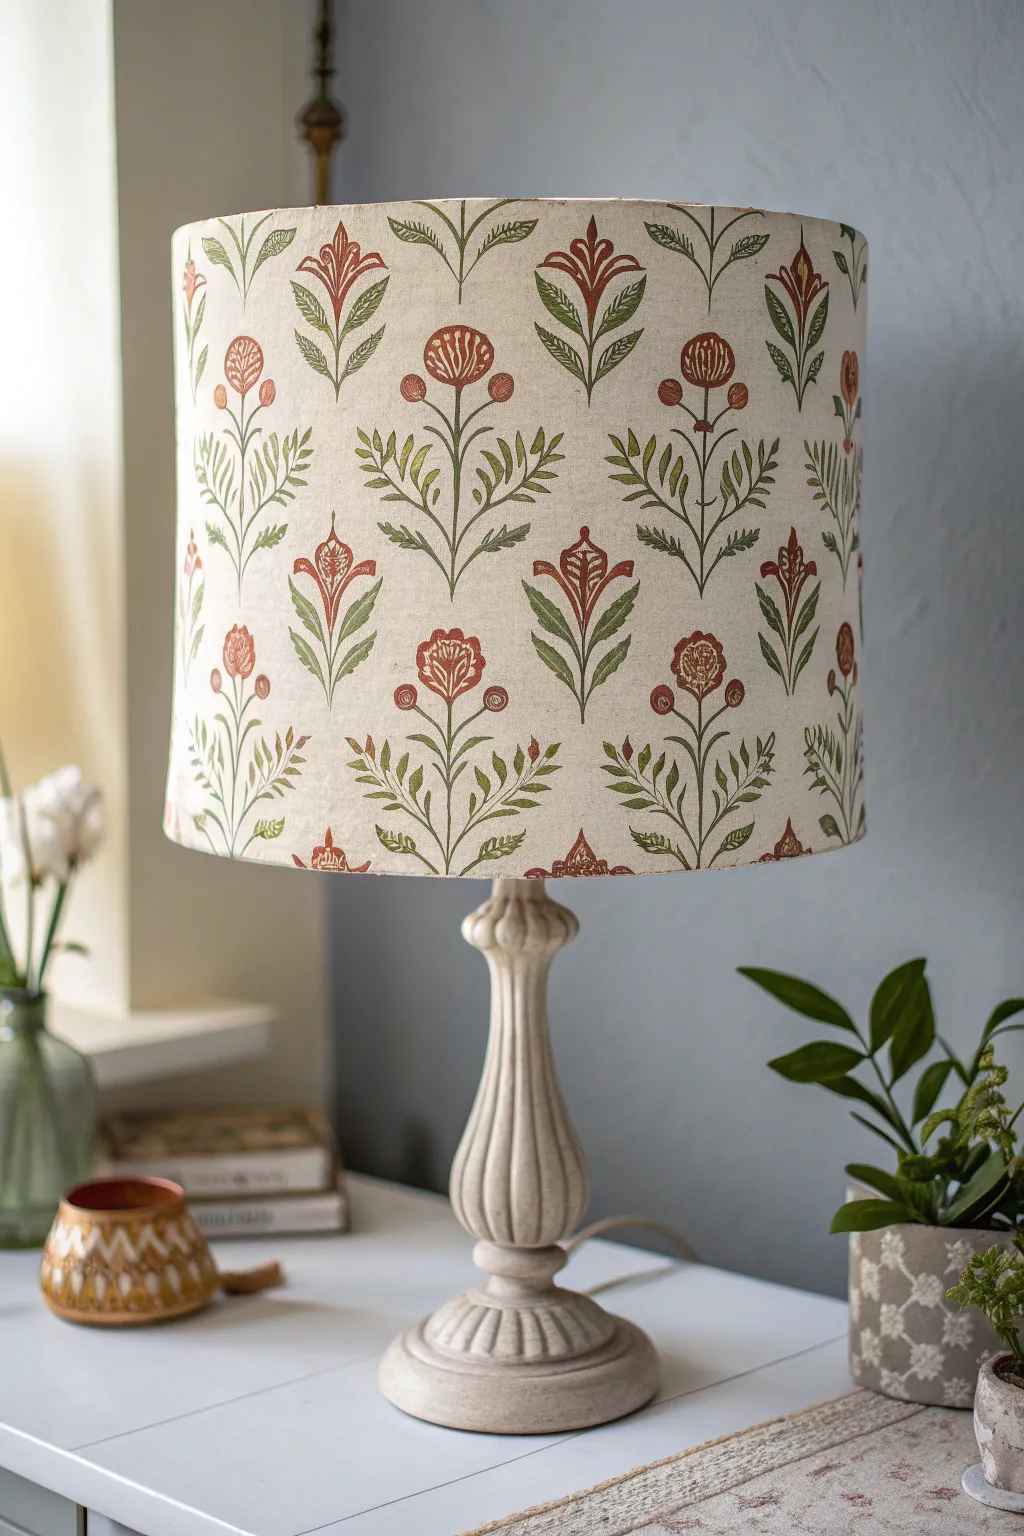
Transform a plain fabric lampshade into a piece of artisanal decor with this faux block-print technique. Using stencils and matte fabric paints creates a lovely, hand-stamped effect that mimics expensive imported textiles.
Step-by-Step Tutorial
Materials
- Plain drum lampshade (cotton or linen blend works best)
- Botanical stencil sheet (vine or floral motif)
- Stencil adhesive spray
- Fabric medium
- Acrylic craft paints (muted red/terracotta, olive green, deep sage)
- Stencil brushes (flat-bottomed)
- Small round detail brush (size 1 or 2)
- Paper towels
- Painter’s tape
- Palette or paper plate
Step 1: Preparation & Planning
-
Clean the Surface:
Before beginning, use a lint roller over the entire lampshade to remove any dust, pet hair, or fuzzy fibers. This ensures your stencil sits perfectly flat against the fabric. -
Mix Your Medium:
Prepare your paint mixture by combining one part fabric medium with two parts acrylic paint. This ensures the paint remains flexible on the lampshade rather than cracking when the light heats up. Do this for each of your three colors: terracotta, olive, and sage. -
Plan the Repeats:
Measure the circumference of your shade and the width of your stencil pattern to calculate spacing. Lightly mark vertical guidelines with a pencil around the top and bottom rims to ensure your pattern stays straight. -
Prepare the Stencil:
Lightly mist the back of your stencil with repositionable spray adhesive. Let it get tacky for about 30 seconds before applying it to the lampshade; this prevents the glue from leaving a gummy residue on your fabric.
Bleeding Edges?
If paint seeps under the stencil, your brush is too wet. Use a stiff, clean brush dampened with water to gently scrub out the mistake while it’s still wet, or cover it later with a tiny dot of opaque paint.
Step 2: Stenciling the Pattern
-
Position the First Motif:
Place your stencil vertically on the shade, aligning it with your first set of pencil marks. Press down firmly, especially around the intricate internal cutouts of the leaves and flowers. -
Load the Brush:
Dip your stencil brush into the olive green paint, then offload almost all of it onto a paper towel. The brush should feel almost dry to the touch to prevent paint bleed. -
Apply the Base Greenery:
Using a pouncing motion (straight up and down), apply the olive green to the lower leaf sections of the stencil. Don’t worry about perfect coverage; a slightly uneven texture adds to the hand-stamped block print look. -
Add Depth:
Switch to a clean brush and use the deeper sage green for the stems and veins within the leaves, blending slightly into the olive areas for a natural transition. -
Stencil the Blooms:
Using the terracotta paint and a fresh brush, stipple the color into the flower head or bud sections of the stencil. Be careful not to cross-contaminate with the wet green paint nearby. -
Lift and Repeat:
Carefully peel back the stencil. Reposition it at the next interval mark you made earlier, ensuring the spacing remains consistent, and repeat the painting process until you’ve circled the entire shade.
Add Vintage Character
Mix a tiny drop of brown paint into a cup of water to create a ‘tea stain’ wash. Lightly brush this over the entire finished shade for an aged, antique parchment look.
Step 3: Hand-Painted Details
-
Fill the Gaps:
Stencils naturally leave small ‘bridges’—blank spaces that hold the plastic together. To make this look like a continuous block print, use your small round detail brush to paint over these bridges, connecting the stems to the leaves. -
Add Organic Texture:
Dip your detail brush into the terracotta paint and add tiny, imperfect dots or lines inside the flower petals. This mimics the carving marks found in traditional Indian block printing. -
Create Veins:
With the dark sage paint, lightly drag thin lines through the center of the larger leaves to create definition that the stencil couldn’t provide. -
The Second Row:
If your shade is tall enough for a second row of patterns (like the image), shift your stencil so the new flowers sit in the spaces between the first row’s flowers (a drop-match pattern). -
Paint the Second Row:
Repeat the stenciling process for this offset row. If you reach the seam of the lampshade, simply paint right over it to disguise the join. -
Final Cleanup:
Once the paint is fully dry (usually 24 hours), gently erase any visible pencil guidelines from the rims. -
Heat Set:
To permanently set the design, use a hair dryer on high heat for a few minutes over each section, keeping the nozzle moving to avoid scorching the fabric.
Enjoy the cozy, custom glow your new patterned shade brings to the room
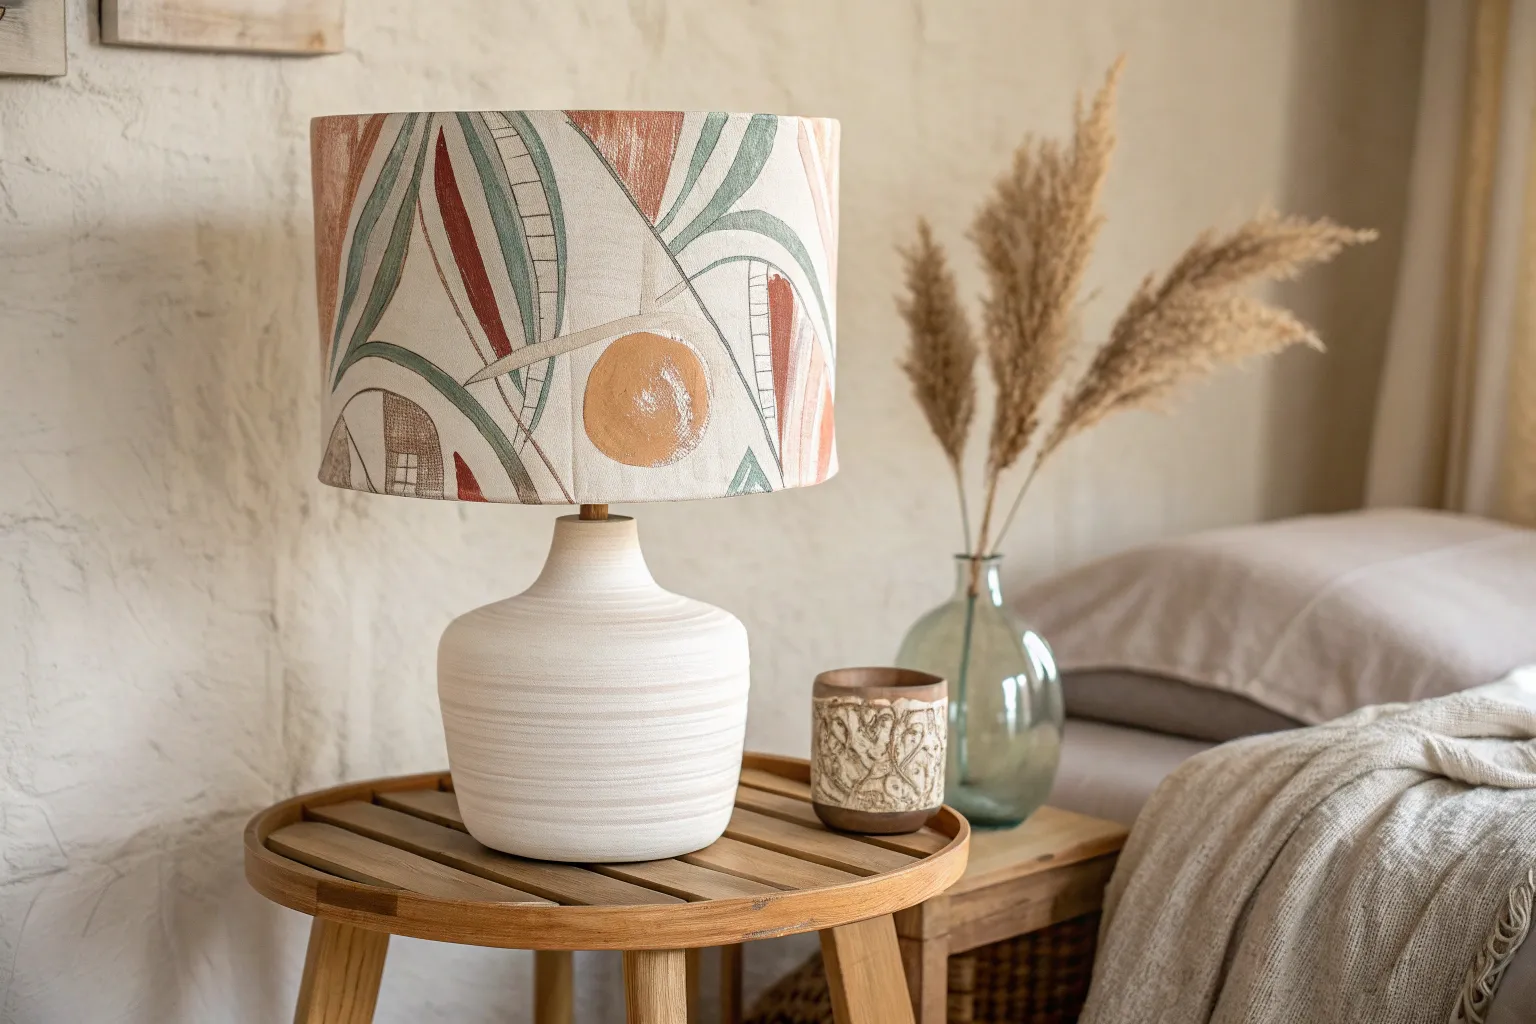
Hand-Painted Floral Clusters
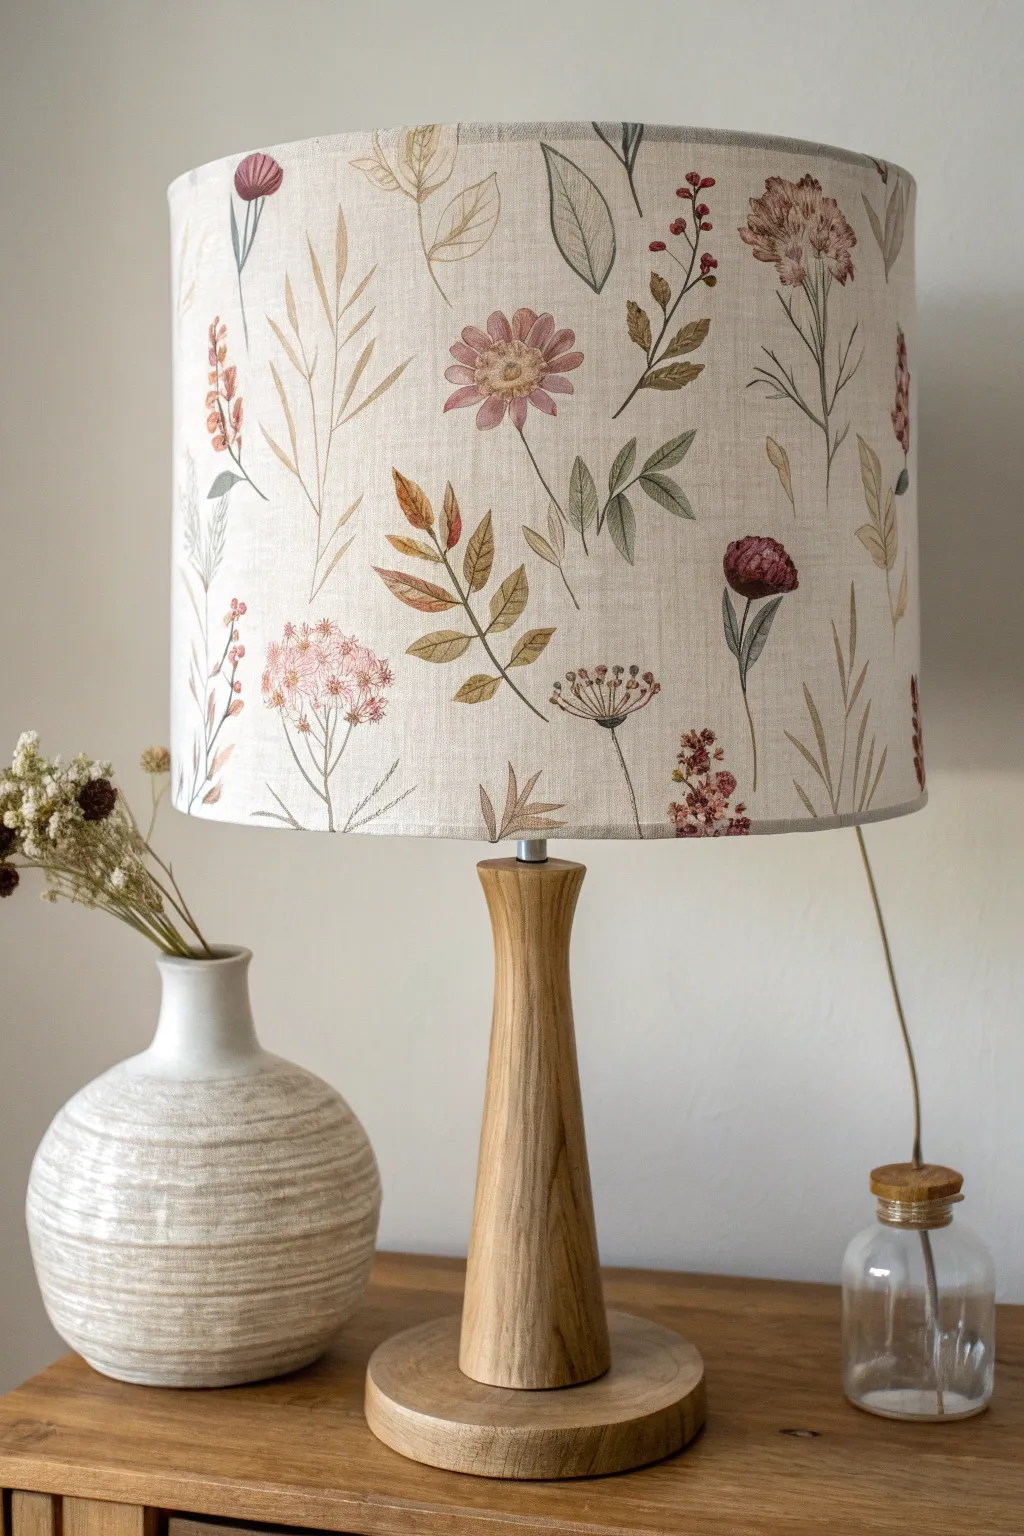
Transform a plain fabric lampshade into a whimsical meadow of wildflowers using fabric paints and a delicate touch. This project achieves a vintage, watercolor-illustration look by layering thin washes of muted earthy tones.
Detailed Instructions
Materials
- Plain fabric drum lampshade (linen or cotton blend works best)
- Fabric painting medium
- Acrylic paints (muted pink, sage green, olive, burgundy, mustard yellow, brown)
- Set of fine brushes (sizes 0, 2, and 4 round brushes)
- Water container and mixing palette
- Pencil (light H or HB)
- Paper towels
- Scrap fabric for testing
Step 1: Planning and Sketching
-
Prepare the Surface:
Ensure your lampshade is clean and free of dust. If it’s a new shade, use a lint roller to remove any loose fibers that might catch on your brush. -
Plan the Composition:
Visualize a random, scattering pattern. You don’t want the flowers to look too regimented. Aim for a mix of heights and stem directions, as if they are growing naturally in a field. -
Lightly Sketch Stems:
Using your pencil very lightly, draw thin, wandering lines for the main stems. Vary the curvature so some lean left and some lean right. Keep these lines faint as they will guide you but shouldn’t be visible later. -
Mark Flower Heads:
Sketch small circles or ovals where the flower heads will go. Add simple leaf outlines along the stems, alternating their placement.
Paint Bleeding?
If paint bleeds into the fabric grain, your mix is too watery. Use less water and rely more on the fabric medium to thin the acrylics.
Step 2: Painting the Foliage
-
Mix Your Greens:
Combine acrylic paint with the fabric medium according to the bottle instructions. Create two shades of green: a pale sage for lighter leaves and a deeper olive for shadows. -
Paint Main Stems:
Soak your size 0 brush in the diluted olive mix. With a steady hand, trace over your pencil stems. Keep the paint thin to mimic a watercolor ink wash. -
Fill Larger Leaves:
Switch to a size 2 or 4 brush. Using the sage green, fill in the larger, broad leaves. I like to leave tiny gaps of unpainted fabric within the leaf shape to add texture and light. -
Add Leaf Veins:
Once the sage green is dry to the touch, use your finest brush with the darker olive paint to draw a central vein down the middle of the leaves for definition. -
Paint Grassy Sprigs:
Using a brownish-mustard tone, paint thin, wispy grass blades between the main flower stems to fill empty spaces without overcrowding the design.
Vintage Patina
Mix a tiny drop of brown into all your colors. This desaturates bright acrylics, giving that ‘antiqued’ botanical illustration look.
Step 3: Adding Floral Details
-
Create the Pink Daisies:
Mix a muted dusty pink. Paint the petals of the daisy-like flowers, stroking from the outside in towards the center. Let the paint be slightly translucent. -
Paint Berry Clusters:
Dip a small round brush into burgundy paint. Dot small clusters at the ends of delicate stems to create berries or buds. Vary the pressure to make some dots larger than others. -
Detail the Thistles:
For the darker, bulbous flowers (like the one on the right), use a deep plum or burgundy. Paint a round base, then use quick, upward flicks to create the textured top. -
Add Yellow Accents:
Use a warm mustard yellow for the centers of the daisies. Stipple the paint (tap straight down) to give the center a pollen-like texture. -
Paint Umbellifer Heads:
For flowers resembling Queen Anne’s lace (the pinkish clusters), dab tiny, diluted pink spots in a loose umbrella shape. Connect them to the main stem with hair-thin lines. -
Create Depth with Layering:
Go back over a few leaves and petals with a slightly darker version of their base color. Add shadows only at the bottom of petals or where a leaf attaches to a stem.
Step 4: Finishing Touches
-
Check for Balance:
Step back and look at the lampshade from a distance. If there are large empty gaps, add a simple floating leaf or a tiny sprig of buds to balance the composition. -
Heat Set the Paint:
Allow the paint to dry completely (usually 24 hours). Once dry, use a hair dryer on high heat or an iron (on the non-painted side, if possible to detach) to set the fabric medium.
Now you have a custom piece of functional art that brings the garden indoors

PENCIL GUIDE
Understanding Pencil Grades from H to B
From first sketch to finished drawing — learn pencil grades, line control, and shading techniques.
Explore the Full Guide
Botanical Silhouette Border
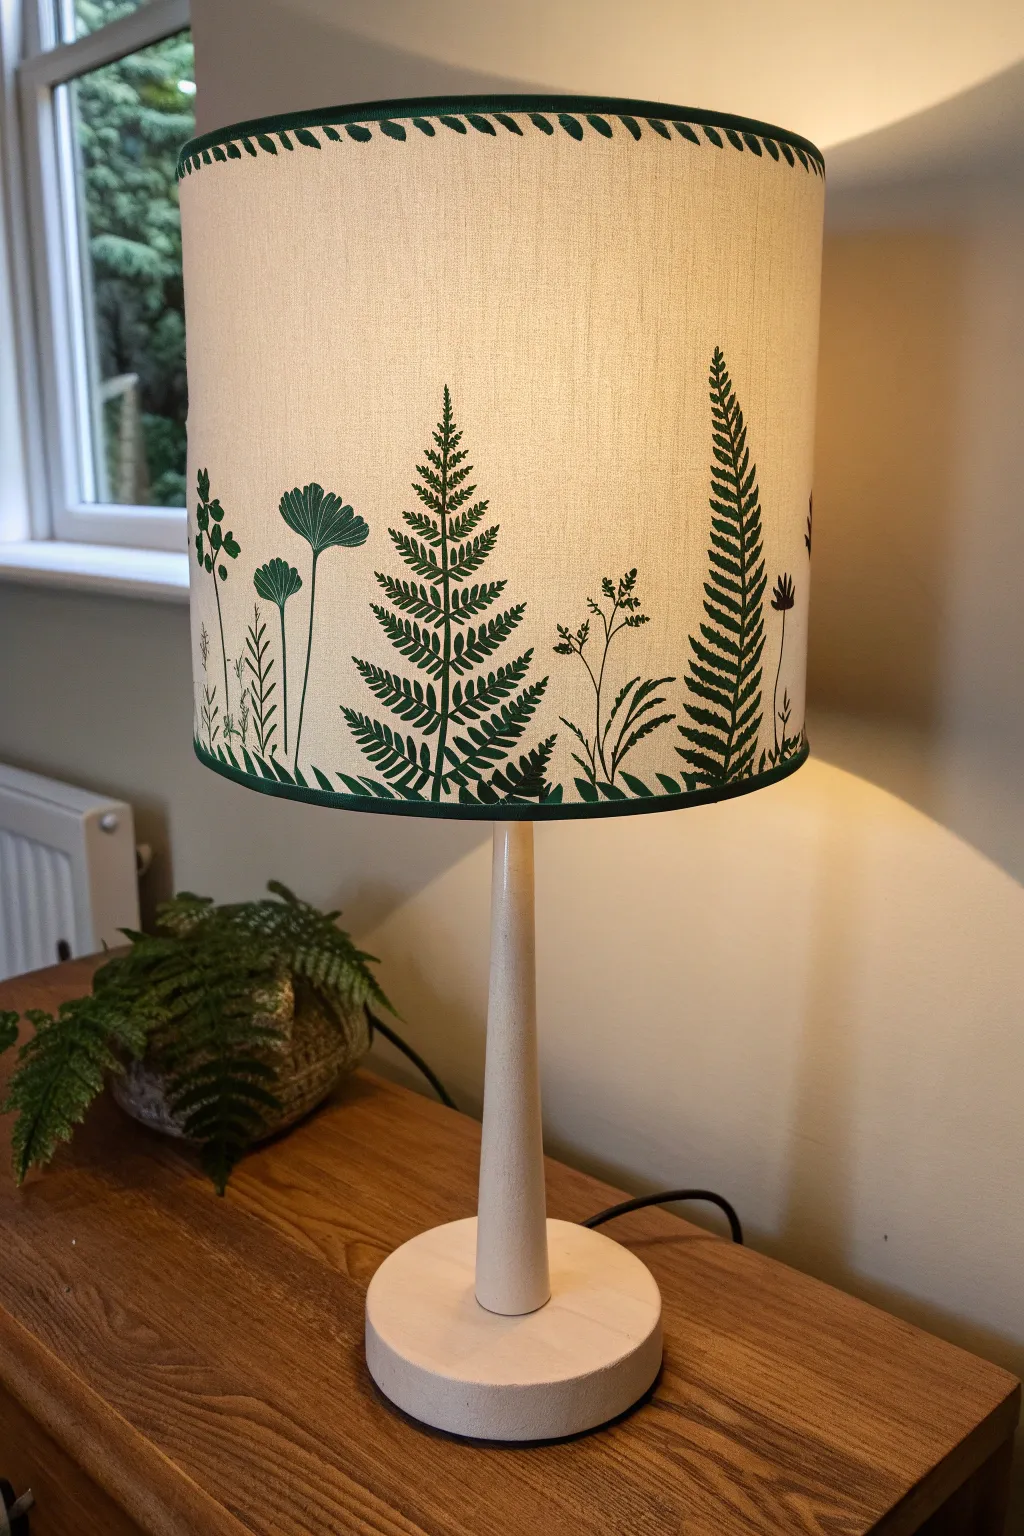
Transform a plain fabric lampshade into a lush indoor garden with this delicate botanical painting project. Using simple silhouette techniques and a deep forest green, you’ll create a sophisticated border of ferns, grasses, and leaves that glows beautifully when illuminated.
Step-by-Step Tutorial
Materials
- Plain fabric drum lampshade (light cream or linen color)
- Fabric paint (Deep Forest Green or Emerald Green)
- Fine liner paintbrush (size 0 or 00)
- Small round paintbrush (size 2)
- Fabric medium (optional, if using acrylic paint)
- Disappearing ink fabric marker or soft pencil
- Reference images of ferns, ginkgo leaves, and meadow grasses
- Cardboard or paper scraps (for practice)
- Palette or small dish
- Masking tape (optional)
Step 1: Preparation and Planning
-
Clean surface:
Ensure your lampshade is completely free of dust and lint; use a lint roller if necessary to create a perfect canvas. -
Sketch the border lines:
Using a ruler or measuring tape, lightly mark a consistent border line about 1 cm from the bottom edge and 1 cm from the top edge with your disappearing ink marker. This will guide your decorative trim painting later. -
Draft the botanical layout:
Before committing to paint, lightly sketch the skeleton of your plants directly onto the shade. Start with the vertical stems of the tallest ferns to establish height, then space out the shorter ginkgo leaves and grasses in between. Vary heights to keep the composition organic and interesting. -
Practice your strokes:
I always recommend doing a few test leaves on a scrap of paper or cardboard first to get a feel for how the paint flows.
Step 2: Painting the Botanicals
-
Mix your paint:
If you are using acrylics, mix them with fabric medium according to the bottle instructions to prevent cracking. Aim for a consistency like heavy cream—fluid enough to flow off the brush but thick enough to be opaque. -
Paint the main stems:
Using your fine liner brush, carefully trace over your vertical stem lines. Keep these lines thin and delicate; heavy stems can make the design look clunky. -
Create fern fronds:
For the ferns, start at the bottom of a stem and work upward. Use the tip of the size 2 brush to dab small, angled strokes outward from the stem, getting smaller as you reach the tip. -
Paint ginkgo leaves:
For the fan-shaped ginkgo leaves, outline the semi-circle shape first with the fine liner, then fill in the silhouette solid with the round brush. Add faint vertical lines inside the silhouette if you want extra texture. -
Add meadow grasses:
Fill the gaps between the feature plants with simple grasses. Use quick, flicking motions with the fine liner to create grass blades that curve naturally. -
Detail work:
Go back in with your tiniest brush to add tiny buds or seeds to the tops of the grass stems for variety. -
Solidify the ground:
Paint the very bottom edge of your design where the stems meet, creating a slightly thicker, grounded line of vegetation so the plants aren’t floating.
Use a Bridge
Rest your hand on a book or a dedicated artist’s mahl stick while painting. This stabilizes your wrist and prevents smudging wet paint on the curved surface.
Step 3: Finishing Touches
-
Paint the bottom trim:
Along the bottom edge of the shade, paint a solid band or a simple recurring pattern (like the small diagonal dashes seen here) to frame the artwork. -
Paint a matching top border:
Repeat the same decorative pattern along the very top rim of the lampshade to balance the design. This creates a cohesive, professional look. -
Check opacity:
Turn on the lamp briefly to see how the light shines through the paint. If the silhouettes look patchy or streaky, apply a careful second coat to the solid areas once the first layer is dry. -
Remove guidemarks:
Once the paint is fully dry (wait at least 24 hours), follow the instructions for your marker to remove any visible sketch lines—usually a dab of water or air drying does the trick. -
Heat set (optional):
If your fabric paint requires heat setting, use a hairdryer on high heat or carefully hover a warm iron (no steam) near the surface to cure the design permanently.
Bleeding Paint?
If paint bleeds into the fabric grain, your brush is too wet. Use less water and drier paint. You can clean up fuzzy edges with a white gel pen once dry.
Place your newly painted shade on a simple wooden base to let the natural theme really shine
Watercolor Wash Effect
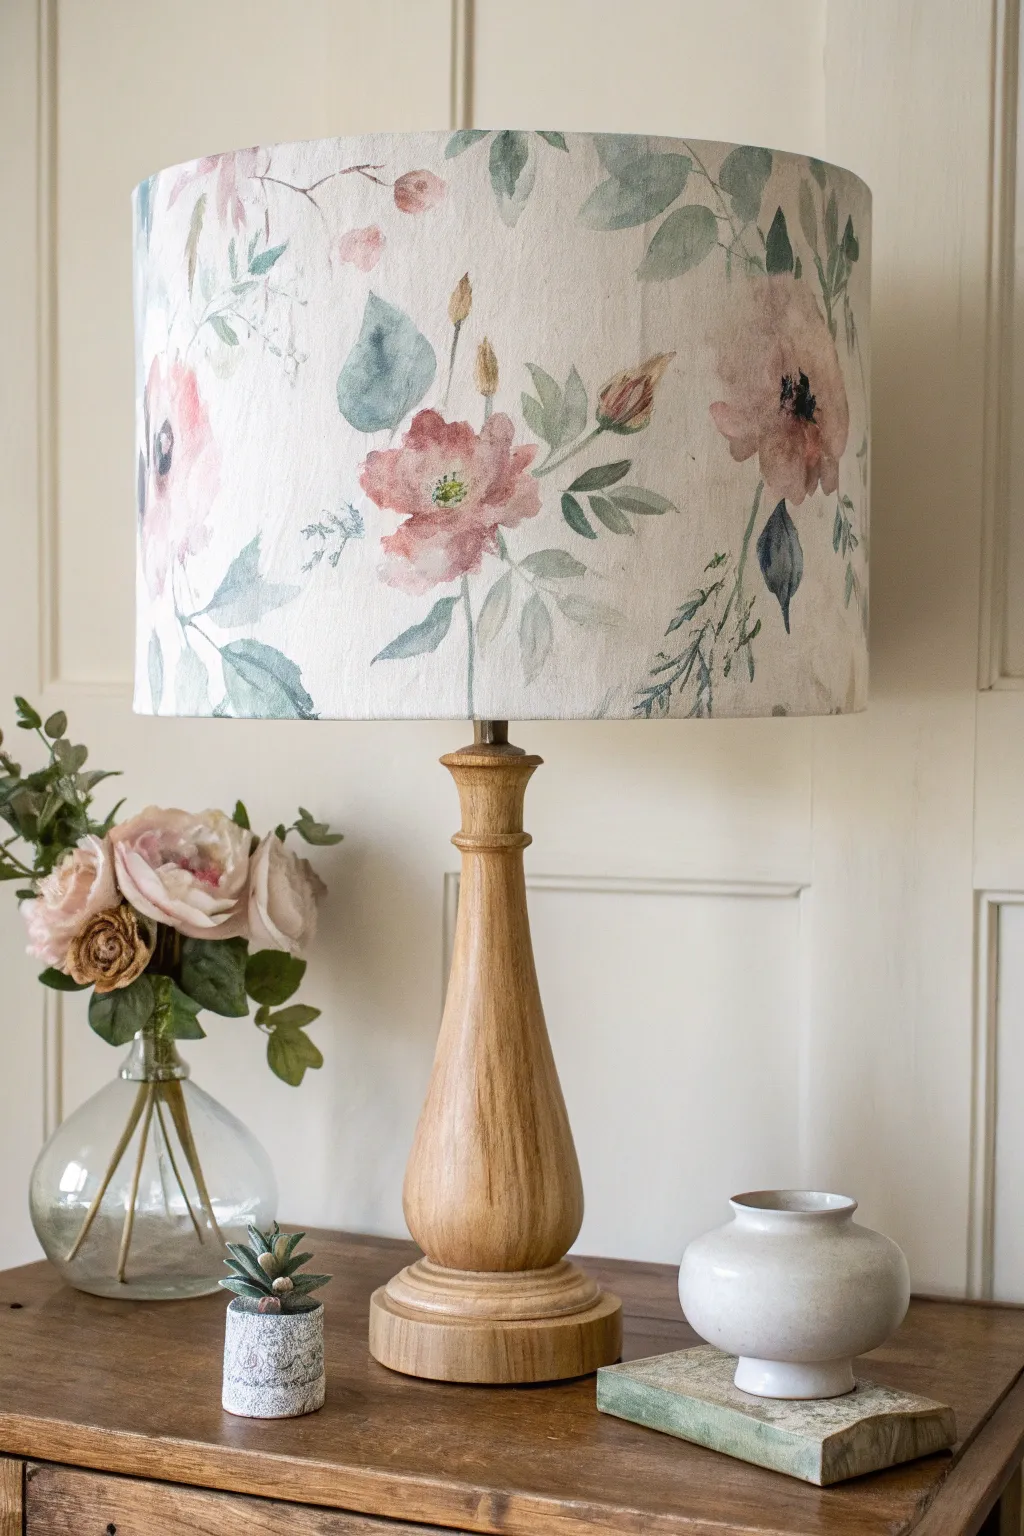
Transform a plain fabric lampshade into a piece of art with this delicate watercolor-inspired project. By using fabric medium and thinned acrylics, you can create soft, bleeding blooms and gentle foliage that look like they were painted by a professional botanical artist.
Detailed Instructions
Materials
- Plain white or cream fabric drum lampshade (cotton or linen blend works best)
- Soft-body acrylic paints (Dusty Rose, Alizarin Crimson, Sap Green, Olive Green, Burnt Umber, White)
- Fabric painting medium (essential for the watercolor effect)
- Set of watercolor brushes (Round #4, Round #8, and a fine liner brush)
- Plastic palette or white ceramic plate
- Jar of clean water
- Paper towels
- Pencil (H or HB for light lines)
- Spray bottle with water (optional)
Step 1: Preparation and Sketching
-
Prepare your workspace:
Set up in a well-lit area. Remove the lampshade from the base to make painting easier. If you are worried about drips, you can stuff the inside of the shade with clean rags or paper towels, though the paint shouldn’t be wet enough to soak through completely. -
Mix your base:
On your palette, mix your acrylic craft paints with the fabric medium. Aim for a 1:1 ratio to start. This ensures the paint stays flexible and bonds to the fibers without cracking. -
Plan the composition:
Look at the lampshade and decide where your main focal flowers will go. The reference image uses an asymmetrical pattern with large blooms spaced out by trailing vines. You don’t need to fill every inch. -
Lightly sketch outlines:
Using your pencil, very faintly sketch the rough circles for your main flowers and the directional lines for the stems. Keep these marks incredibly light so they don’t show through the translucent paint later.
Bleed Control
To stop paint from spreading too fast on fabric, dampen the area slightly with a sponge first. However, if the fabric is too wet, the paint will spiderweb uncontrollably.
Step 2: Painting the Blooms
-
Creates the washes:
Dilute your paint/medium mixture further with a little water until it has the consistency of heavy cream or diverse milk. You want it fluid but not dripping. -
Start the main flower:
For the large pink rose shapes, load your #8 round brush with the watered-down Dusty Rose. Apply jagged, uneven strokes in a circular pattern, leaving significant white space between strokes. This mimics the light hitting petals. -
Add wet-on-wet depth:
While the first layer is still damp, touch a tiny amount of undiluted Alizarin Crimson into the center of the flower shape and the bottom edges. Let it bleed naturally into the wet petals. -
Create soft edges:
Dip a clean, damp brush into water and run it along the outer edges of some petals. This feathers the paint out, creating that signature hazy watercolor look. -
Paint secondary buds:
Using a smaller brush, paint tight tear-drop shapes for the buds in a mix of soft pink and white. These should be more opaque than the large blooms. -
Add flower centers:
Once the pinks are semi-dry, mix a tiny dot of yellow or pale green for the flower centers. Stipple this on gently. You can add tiny dots of dark brown for pollen centers once slightly drier.
Metallic Accent
After the florals are dry, use a fine liner brush and metallic gold leafing paint to add extremely thin outlines or dots to the flower centers for a touch of elegance.
Step 3: Adding Foliage and vines
-
Mix shadow greens:
Combine your Sap Green with a touch of Burnt Umber or blue to create a cool, shadowy green. Water this down heavily for the large, ghostly background leaves. -
Paint background leaves:
Paint large, loose leaf shapes near your flowers using the watery shadow green mixture. I like to keep the edges very uneven here. -
Paint foreground stems:
Using the #4 brush and a more saturated Olive Green mix, paint main stems connecting your buds and flowers. Use a light hand; vary the pressure to make the line thick and thin. -
Detail the sharp leaves:
Paint crisp, smaller leaves attached to the darker stems. For the serrated leaves, press the brush down to widen the stroke and lift up quickly to create a point. -
Add delicate vines:
Use your fine liner brush with a very watery, dark green mix to add wispy vines and fern-like sprigs that extend away from the floral groupings. These should look almost like pencil sketches. -
Blend colors on leaves:
While some green leaves are wet, drop in a tiny bit of red or brown at the base of the leaf. This creates an organic, earthy feel. -
Final assessment:
Step back and look at the shade from a distance. If it feels too sparse, add faint ghost leaves (very watery grey-green) to fill gaps without adding visual weight. -
Dry and heat set:
Allow the lampshade to dry completely, preferably overnight. Most fabric mediums require heat setting to become permanent; you can use a hairdryer on high heat for several minutes over each painted section.
Place your newly painted shade on its base and switch on the light to see your watercolor garden glow beautifully


Loose Abstract Brush Shapes
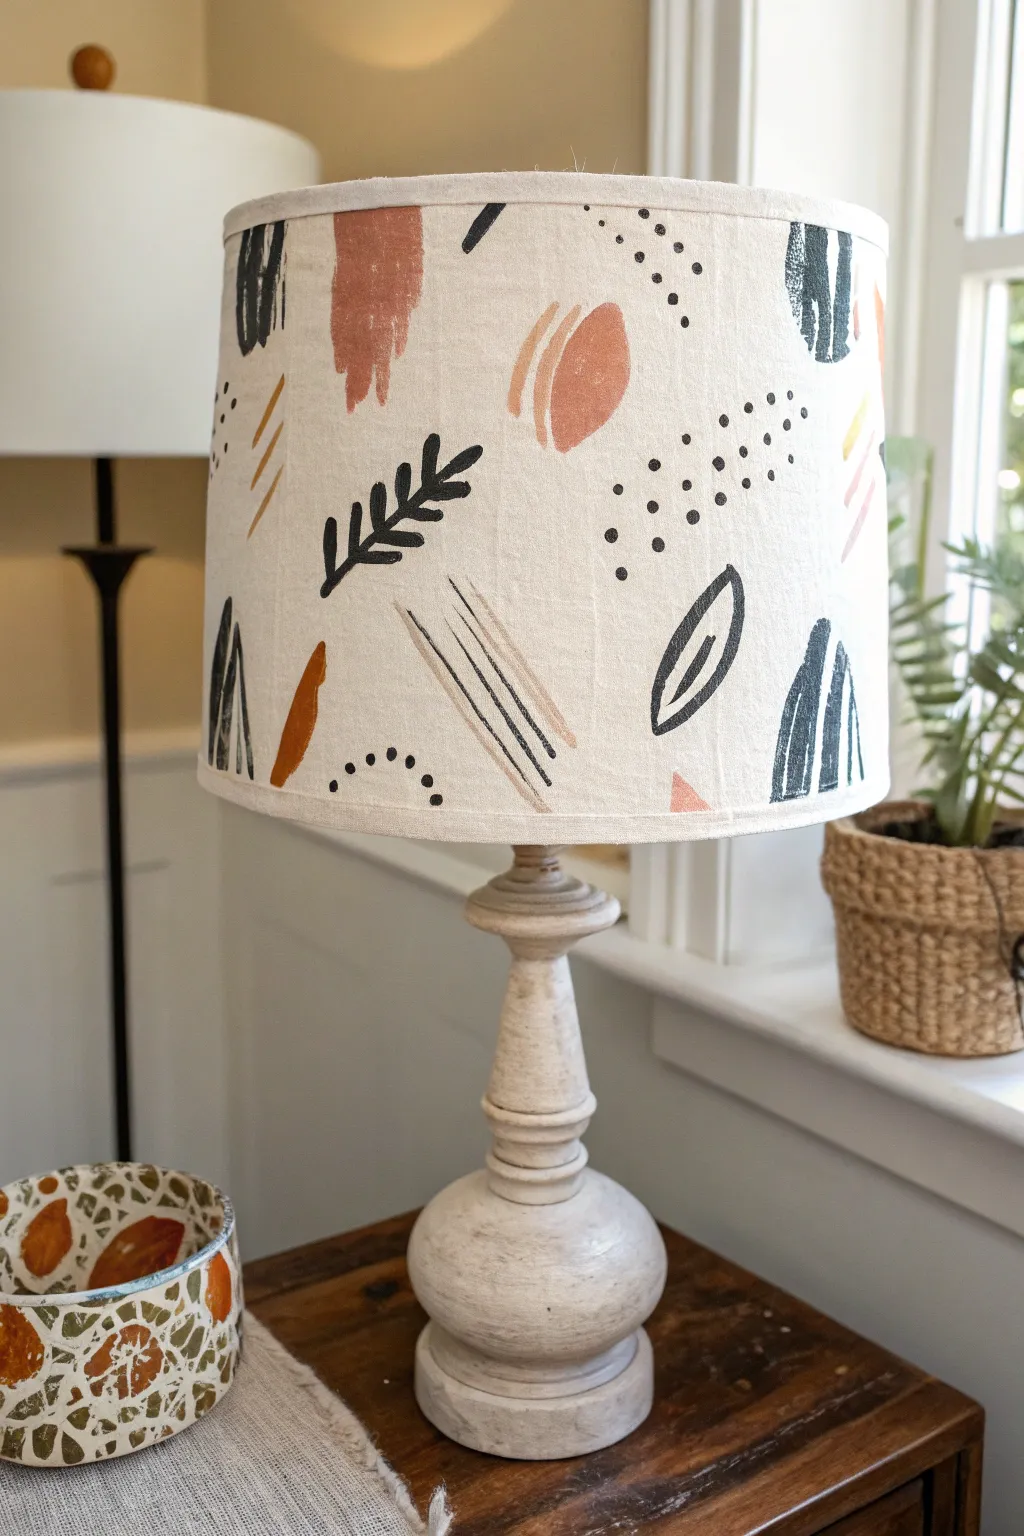
Transform a plain lampshade into a piece of modern art with simple, organic brushstrokes and earthy tones. This project embraces imperfection, using loose shapes and patterns to create a relaxed, bohemian vibe perfect for any cozy corner.
Step-by-Step Guide
Materials
- Plain drum lampshade (light beige or cream fabric)
- Acrylic fabric medium
- Acrylic craft paints (black, terracotta/rust, mustard yellow, beige/taupe)
- Assorted paintbrushes (medium flat brush, small round brush, fine liner brush)
- Palette or paper plate
- Pencil or disappearing fabric marker
- Cardboard or paper scraps (for practice)
Step 1: Preparation and Planning
-
Mix your medium:
Before you start painting, mix your acrylic paints with the fabric medium according to the bottle instructions (usually a 2:1 or 1:1 ratio). This ensures the paint moves smoothly on the fabric without cracking later. -
Test your colors:
Swatch your mixed colors on a piece of scrap paper or cardboard. You want a palette that feels cohesive—aim for a sharp black alongside soft terracotta, muted mustard, and a sandy beige. -
Practice the motifs:
Take a few minutes to practice the key shapes on paper: loose fern leaves, solid oval blossoms, clusters of dots, and messy striped bundles. Getting the muscle memory down now will make painting the actual shade much less stressful.
Dry Brush It
For a textured, vintage look, wipe most of the paint off your brush before painting the solid color shapes. This ‘dry brush’ looks softer on fabric.
Step 2: Painting the Organic Shapes
-
Start with the large color blocks:
Using a medium flat brush, paint a few large, organic oval or kidney-bean shapes scattered randomly around the shade. I used the terracotta color for these, keeping the edges soft and slightly uneven. -
Add vertical dashes:
Switch to the beige or taupe color. Paint clusters of vertical, slightly diagonal dashes. Think of these as abstract rain or grass textures. Keep them loose and vary their lengths. -
Incorporate the black leaves:
Load a small round brush with black paint. Paint a central stem line, then add small, simple leaves branching off either side. Don’t worry about symmetry; natural variation looks better here. -
Create the enclosed leaf shapes:
Still using black, paint outlined leaf shapes—like a simple almond or eye shape. Inside some of them, add a single floating line or a smaller solid shape for visual interest. -
Add solid black arches:
paint a few solid, arch-like shapes that resemble stylized stones or tumuli. Alternatively, paint outlines of these arches and fill them with vertical stripes instead of solid color.
Step 3: Detailing and Filling Gaps
-
Sprinkle in dot clusters:
Dip the non-brush end of a paintbrush handle into black paint to create perfect, uniform dots. Group them in flowing lines or scattered clusters to fill empty white space between larger motifs. -
Balance with mustard accents:
Take your mustard yellow paint and add small, spontaneous marks—short dashes or mini half-circles—where the design feels a bit empty. These pops of color brighten the whole composition. -
Layering lines:
If any of your colored patches look too flat, use a fine liner brush with black paint to add sketchy lines or patterns over the dried colored areas, adding depth and definition. -
Check for spacing:
Step back and rotate the lamp. Look for any large gaps that feel unintentional. Fill them with small black semi-circles or tiny rust-colored dashes to maintain a consistent rhythm around the drum. -
Let it cure:
Allow the lampshade to dry completely for at least 24 hours. If your fabric medium requires heat setting, use a hair dryer or an iron on a low setting (with a cloth barrier) once fully dry.
Stitch It Up
Add real texture by embroidering over some painted lines with embroidery floss. A few satin stitches over the ‘dashes’ creates an amazing mixed-media effect.
Place your newly painted shade on its base and enjoy the warm, artistic glow it adds to your room
Polka Dots With Painted Depth
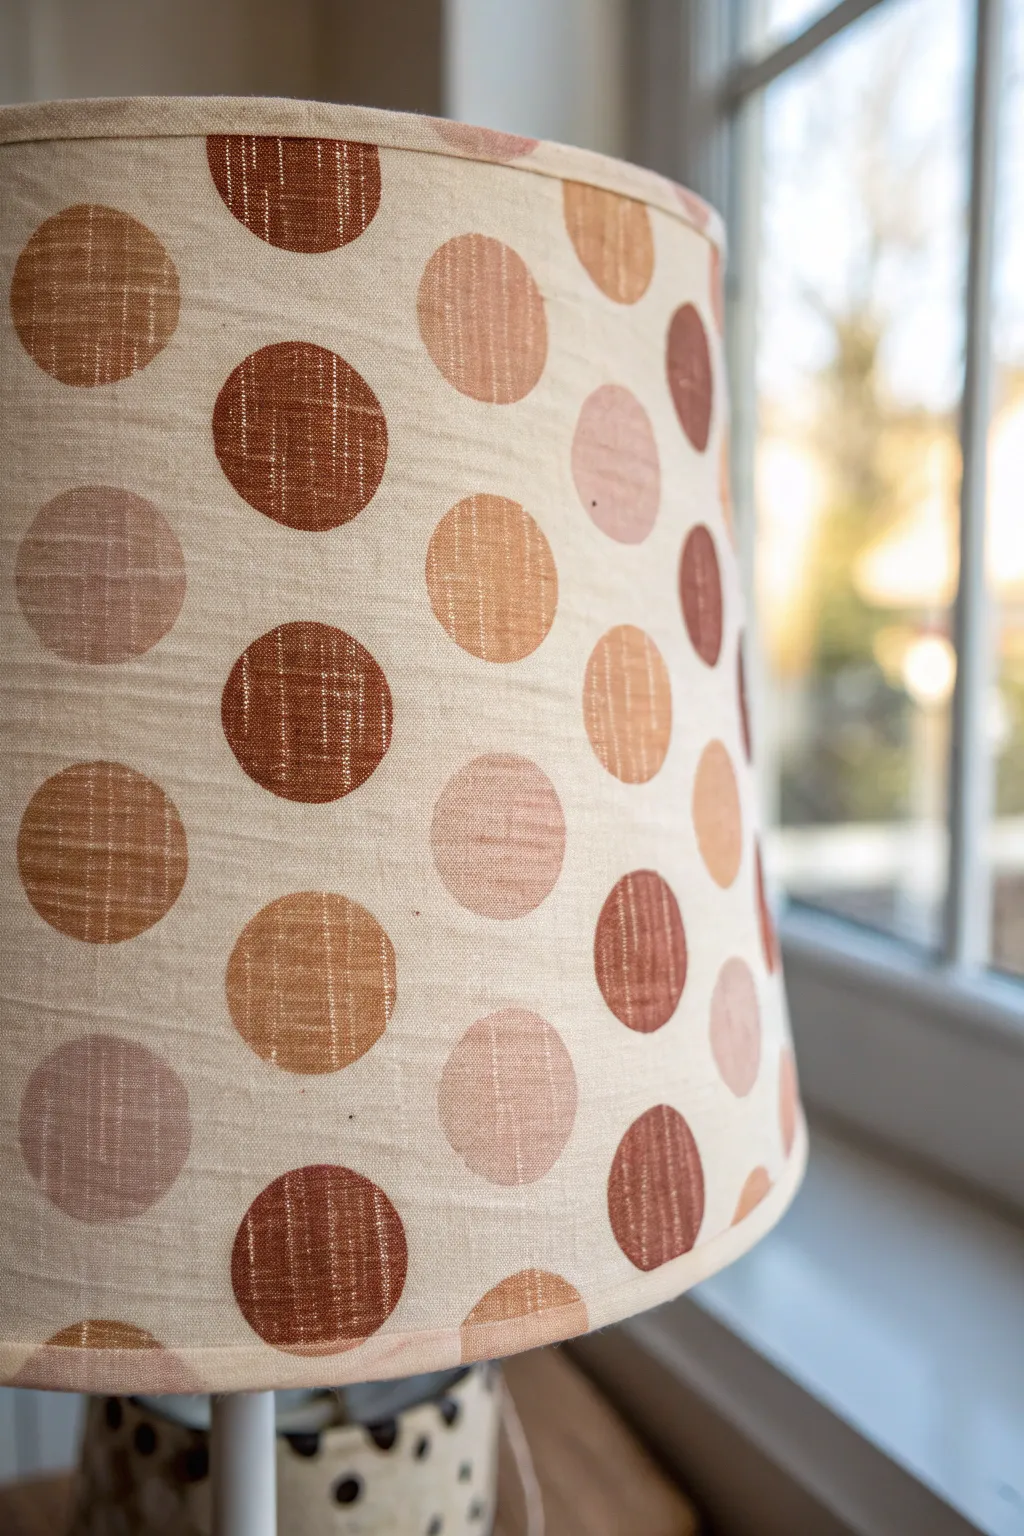
Transform a plain fabric shade into a cozy statement piece using warm, earthy tones and a clever stenciling technique. The beauty of this project lies in the soft, fabric-like texture of the paint, which mocks a printed textile rather than a stiff painted surface.
Step-by-Step
Materials
- Light-colored fabric drum lampshade (linen or cotton)
- Fabric paint or acrylic paint mixed with textile medium
- Palette: Burnt sienna, terracotta, blush pink, beige, and warm brown
- Round foam pouncer brushes (1.5 to 2-inch diameter)
- Painter’s tape or stencil adhesive
- Cardstock or stencil plastic
- Paper plate or palette
- Measuring tape
- Pencil (light hand)
- Paper towels
Step 1: Planning and Prep
-
Clean the Shade:
Before you begin, use a lint roller over the entire lampshade to remove any dust or stray fibers. This ensures your paint adheres smoothly to the fabric weave. -
Design Your Stencil:
If you don’t have a foam pouncer in the exact size you want, create a stencil. Cut a perfect circle out of cardstock or stencil plastic. The dots in the example look to be about 2 inches in diameter. -
Map the Grid:
To achieve the even, staggered look shown in the photo, you’ll need a grid. Lightly measure the circumference of your shade and divide it by the number of dots you want per row to find your horizontal spacing. -
Mark Positions:
Using a pencil very lightly, mark small ‘plus’ signs where the center of each dot should go. Alternate the rows so the dots sit in the windows of the row above, creating a brick-lay pattern.
Bleeding Edges?
If paint bleeds under your stencil, your brush is too wet. Blot almost all paint onto a paper towel first. The brush should feel ‘dry’ before touching the shade for crisp edges.
Step 2: Mixing Colors
-
Prepare the Palette:
Squeeze out your various paint distinct colors onto a paper plate. If using standard acrylics, mix them with a textile medium according to the bottle instructions (usually 2:1 ratio) to keep flex in the fabric. -
Create Depth:
Don’t just use flat colors. For that textured, organic look seen in the reference, I like to mix a tiny bit of water or extra medium into the paint so it’s slightly translucent. -
Testing Opacity:
Test your consistency on a scrap piece of fabric or paper towel first. You want the weave of the lampshade designed to show through slightly, rather than a thick, plastic-looking globs of paint.
Metallic Pop
Mix a small drop of gold fabric paint into your terracotta or brown shades. It won’t look glittery, but adds a subtle, high-end shimmer when the lamp is turned on.
Step 3: Painting the Dots
-
Load the Brush:
Dip your foam pouncer or stencil brush into your first color (e.g., the darkest terracotta). Blot excess paint off onto a paper towel until the sponge looks almost dry. -
Apply the First Color:
Press the foam pouncer firmly onto your first marked spot. Twist it slightly back and forth without lifting it to work the pigment into the fabric fibers. -
Repeat Randomly:
Continue apply this first color to random spots around the shade. Avoid placing two of the same color right next to each other to maintain visual balance. -
Switching Tones:
Clean your pouncer or switch to a fresh one for the next color, perhaps the blush pink. Repeat the stamping process, filling in empty spaces in your grid. -
Layering Beige:
Add your neutral beige tones. These lighter dots help break up the darker colors and keep the overall look airy and light. -
Checking Edges:
Inspect the edges of your dots. If using a stencil, ensure you dab straight down to avoid bleed. If using a pouncer, check that the circle edges are crisp; use a small liner brush to tidy them if needed.
Step 4: Finishing Touches
-
Review Spacing:
Step back and look at the shade from a distance. If any gaps feel too large, you can add partial dots at the top and bottom rims, wrapping the design visually off the edge. -
Clean Up:
If you accidentally got a stray mark, use a damp Q-tip immediately to gently lift the paint before it sets into the fabric fibers. -
Dry Time:
Allow the lampshade to dry completely for at least 24 hours. Keep it away from dust sources while the paint is tacky. -
Heat Set (Optional):
If your textile medium requires heat setting, use a hair dryer on high heat or an iron on a low setting (with a cloth barrier) once the paint is fully dry.
Now you have a custom, boutique-style lampshade that brings warmth to any corner of your room
Speckled Terrazzo Look
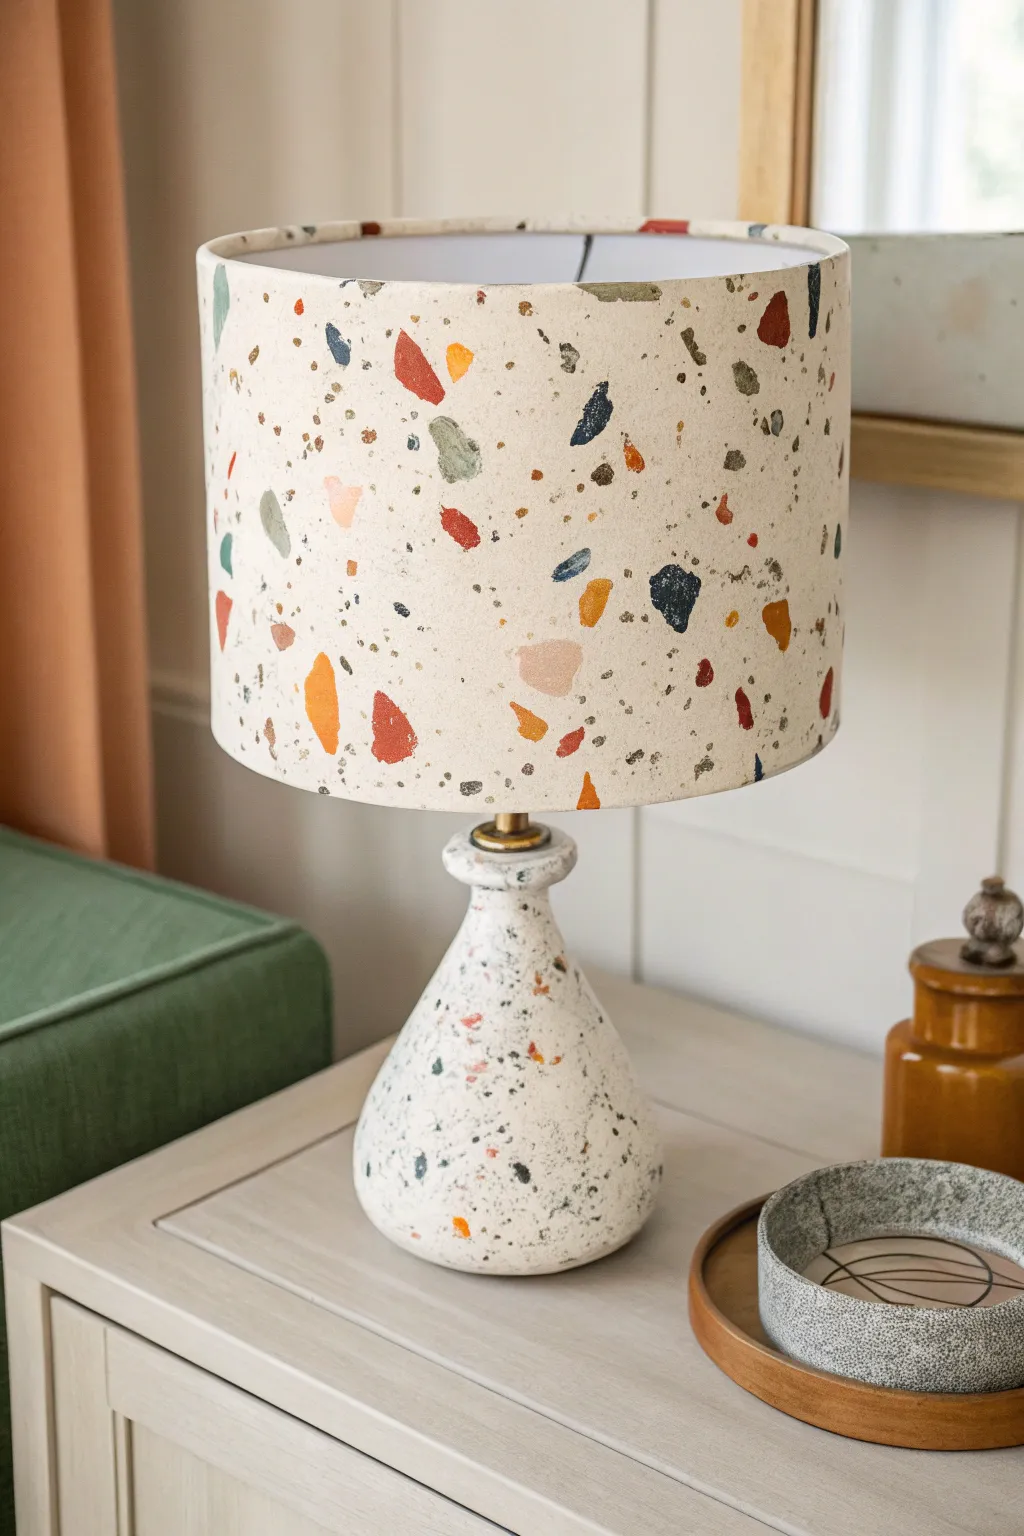
Transform a plain fabric lampshade into a trendy statement piece with this easy faux terrazzo technique. By layering irregular painted shapes with fine speckles, you can mimic the high-end look of composite stone without the heavy price tag.
Step-by-Step Guide
Materials
- Plain fabric lampshade (white or cream)
- Acrylic craft paints (in 5-6 complementary colors like terracotta, navy, sage, mustard, blush, and charcoal)
- Fabric painting medium
- Small flat paintbrushes (various sizes)
- Stiff bristle brush (like a toothbrush or fan brush)
- Paper plate or palette
- Drop cloth or old newspapers
- Painter’s tape
Step 1: Preparation & Planning
-
Prepare your workspace:
Since this project involves splattering paint, cover your table surface thoroughly with drop cloths or newspapers to protect it from stray specks. -
Mix your medium:
Combine your acrylic paints with fabric medium according to the package instructions (usually a 1:1 or 2:1 ratio). This prevents the paint from cracking when the lamp is turned on and the shade expands slightly. -
Test your color palette:
Dab small swatches of your chosen colors onto a scrap piece of paper or fabric. Make sure you like how the terracotta, sage, and navy tones play off one another before committing to the shade. -
Protect the hardware:
Use painter’s tape to cover the metal spider fitting inside the shade and any trim edges you want to keep pristine.
Step 2: Painting the Terrazzo Stones
-
Start with the largest shapes:
Dip a small flat brush into your first color. Paint random, irregular geometric shapes scattered across the shade surface. Think jagged triangles, trapezoids, and uneven ovals. -
Rotate and repeat:
Turn the lampshade frequently as you work to ensure the spacing remains random but balanced. Avoid clustering too many large shapes in one area. -
Add the second color:
Clean your brush and switch to your second color. Paint shapes similar in size to the first batch, filling in some of the larger gaps. -
Vary the sizes:
For the third and fourth colors, try painting slightly smaller, more angular ‘chips’ of color. This size variation is key to achieving a realistic stone aggregate look. -
Incorporate dark accents:
Use your darkest color (like charcoal or navy) sparingly. These shapes act as anchors for the eye and add depth to the design. -
Dry the base layer:
Let these painted ‘stones’ dry completely for about 30 minutes. If the fabric absorbs too much paint, you may need a second coat on the lighter colors for full opacity.
Paint Bleeding?
If paint is bleeding into the fabric weave, your mix is too watery. Use less water or let the paint sit for a moment to thicken slightly before applying.
Step 3: Adding the Speckles
-
Prepare the splatter paint:
Dilute a small amount of dark grey or black paint with a few drops of water until it has an inky consistency suitable for flicking. -
Practice your splatter technique:
Dip a stiff bristle brush or toothbrush into the thinned paint. Holding it over a piece of scrap paper, run your thumb across the bristles to flick tiny droplets. -
Splatter the shade:
Hold the brush about 6-10 inches away from the lampshade. Gently flick the bristles to create a fine mist of speckles over the painted shapes and the white background. -
Rotate for even coverage:
I find it helpful to walk around the table while splattering to hit the shade from different angles, ensuring the texture looks uniform. -
Add secondary speckles:
If desired, repeat the splatter process with a second color, perhaps a metallic gold or a lighter grey, to add even more dimension to the faux stone texture. -
Clean up stray drops:
Inspect the shade for any accidental large globs. If you spot one while wet, dab it gently with a dry corner of a paper towel to lift it. -
Final cure:
Remove the painter’s tape and let the lampshade dry undisturbed for at least 24 hours before attaching it to your lamp base.
Natural Variety
Don’t make your terrazzo shapes perfect circles or squares. Truly random, jagged edges look more like real crushed stone aggregate.
Once the paint has fully cured, light up your room and enjoy the warm glow through your custom stone-effect shade
Dry-Brush Weathered Lines
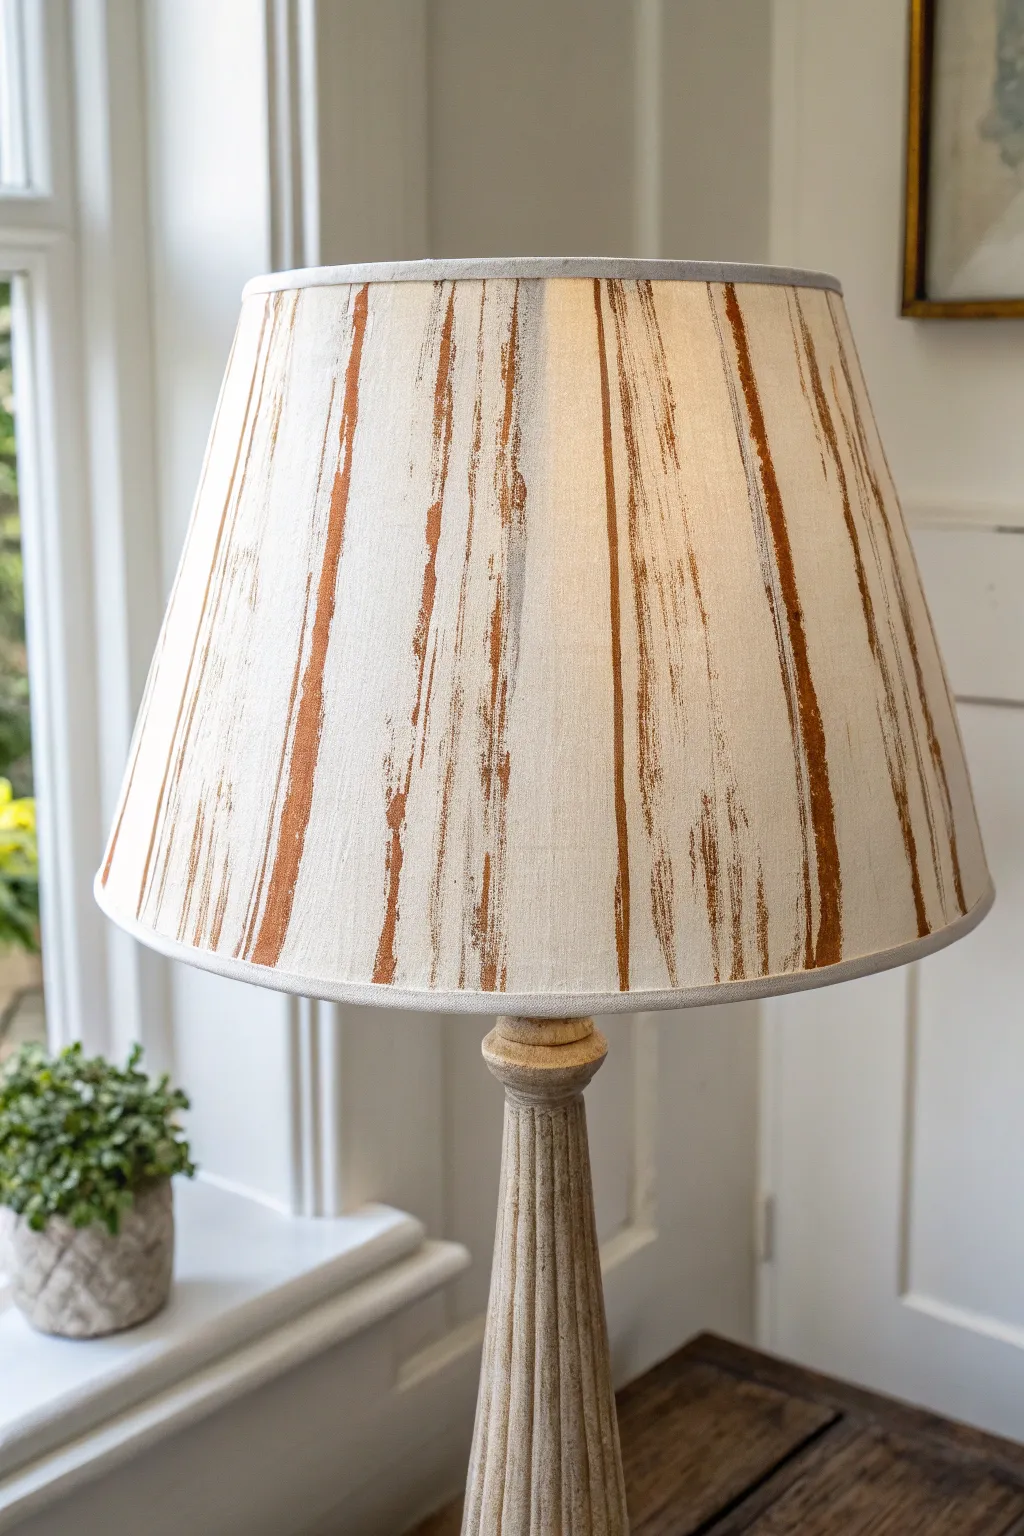
Transform a plain lampshade into a piece of rustic charm with this simple dry-brushing technique. The effect creates soft, imperfect vertical stripes that mimic the look of aged wood or weathered fabric, adding instant warmth to any room.
How-To Guide
Materials
- Plain drum or tapered lampshade (cream or white fabric)
- Acrylic craft paint (warm rust or burnt sienna)
- Acrylic craft paint (metallic bronze or gold – optional)
- Textile medium (optional, for softer feel)
- Wide flat bristle brush (2-inch)
- Paper plate or palette
- Paper towels or scrap cardboard
- Painter’s tape (optional)
- Ruler or straight edge
- Pencil
Step 1: Preparation
-
Clean surface:
Ensure your lampshade is free of dust and lint. A quick pass with a lint roller does wonders for a smooth application surface. -
Plan your spacing:
Decide on the width and spacing of your stripes. For the organic look in the photo, irregular spacing often looks better than perfect measurements. -
Mark guidelines:
Using a pencil and ruler, lightly mark the top and bottom of the shade where you want your main stripe centers to be. Don’t draw full heavy lines across the fabric. -
Mix your medium:
Squeeze a dollop of burnt sienna acrylic paint onto your palette. If you want the finish to remain soft to the touch, mix in textile medium according to the bottle’s instructions. -
Prepare the brush:
Dip just the tips of your dry, wide bristle brush into the paint. You want very little pigment on the bristles—less is definitely more here.
Don’t Wet the Brush
Never use water to clean your brush between strokes. Water will cause the paint to bleed into the fabric, ruining the crisp, scratchy ‘dry brush’ texture you are aiming for.
Step 2: Painting the Stripes
-
Offload excess paint:
Rub the brush vigorously onto a paper towel or scrap cardboard. This is crucial: the brush should look almost out of paint before it touches the shade. -
First stroke test:
Test your stroke on a piece of scrap paper first to ensure you are getting a scratchy, streaky texture rather than a solid block of color. -
Start the main stripe:
Starting from the top rim, pull the brush straight down to the bottom rim in one continuous motion. Use light pressure. -
Build the texture:
Go over the same line again, perhaps pressing slightly harder in random spots to deposit more pigment, creating that weathered variation. -
Feather the edges:
Using the very edge of the brush, add thinner, fainter lines parallel to your main stripe. This softens the look so it feels worn rather than painted. -
Repeat the process:
move to your next pencil mark and repeat. Don’t worry if the brush runs dry halfway down; just reload, offload, and pick up where the stroke faded. -
Vary the intensity:
Intentionally make some stripes darker and others ghost-like. I find this variation gives the piece genuine vintage character.
Step 3: Finishing Touches
-
Add metallic depth:
For a bit of dimension, mix a tiny amount of metallic bronze into your leftover rust paint. It shouldn’t be glittery, just slightly luminous. -
Highlighting:
Dry-brush this slightly lighter mix over just the center of your thickest stripes. This creates a subtle highlight that mimics light hitting worn wood. -
Clean up rims:
Check the fabric bias tape at the top and bottom rims. If paint got on them and looks messy, use a small angled brush to paint the rims a solid matching rust color for a framed look. -
Final cure:
Let the lampshade dry completely for at least 24 hours. If you used textile medium, you may need to heat set it with a hair dryer depending on the product directions.
Add a Faux-Linen Weave
After vertically striping, use a clean dry brush with very faint beige paint and drag it horizontally across the shade. This creates a cross-hatched, woven linen appearance.
Place your newly patterned shade on a base to enjoy the cozy, rustic filter it casts on your light
Checkerboard Statement
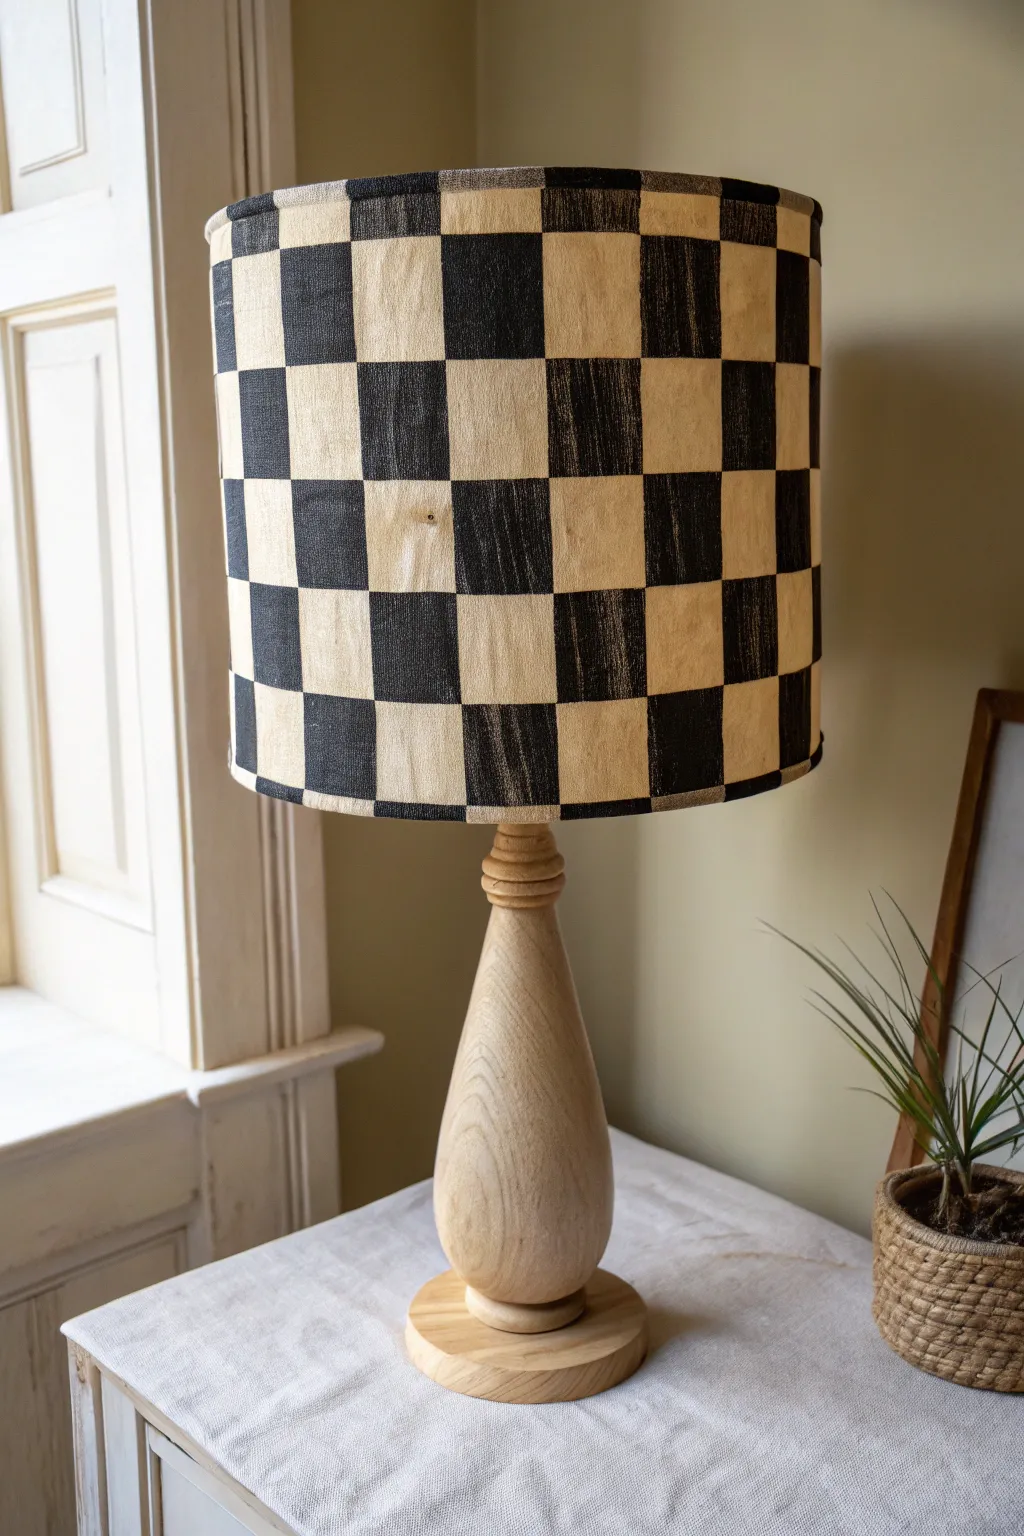
Transform a plain drum shade into a strikingly modern statement piece with this high-contrast checkerboard design. The textured, slightly imperfect lines give it a sought-after artisanal feel that pairs beautifully with natural wood bases.
Step-by-Step
Materials
- Plain fabric drum lampshade (light beige or cream)
- Black fabric paint (matte finish)
- Flat shader brush (1-inch width)
- Painter’s tape or masking tape (1-inch width)
- Ruler or measuring tape
- Pencil
- Cardstock or scrap paper
- Palette or paper plate
Step 1: Planning and Preparation
-
Measure the circumference:
Begin by measuring the total circumference of your lampshade’s bottom rim with a flexible measuring tape. Divide this number by an even integer to determine the width of your squares (e.g., if the circumference is 30 inches, 2-inch squares are ideal). -
Establish vertical guides:
Using your calculated measurement, make small tick marks with a pencil along the top and bottom rims to mark where your vertical columns will go. -
Connect the vertical lines:
Lightly draw connecting vertical lines from the top tick mark to the bottom tick mark. Use a flexible ruler or just the edge of your measuring tape to keep them relatively straight, though a little hand-drawn character is fine. -
Create a square template:
Cut a piece of cardstock into a square that matches the width you calculated earlier. This will serve as your height guide. -
Mark horizontal rows:
Starting from the top rim, trace your cardstock template down the length of the shade within one column to create your horizontal rows. Repeat this around the shade so you have a full grid of squares drawn in pencil.
Textile Trick
For the textured look seen in the photo, don’t saturate the fabric completely. Use a ‘dry brush’ technique to let some of the original fabric weave show through the black paint.
Step 2: Creating the Grid
-
Mark the ‘fill’ squares:
To avoid confusion once you start painting, lightly mark a small ‘X’ in every other square. This creates the checkerboard pattern and ensures you don’t accidentally paint two adjacent blocks. -
Tape vertical columns first:
Apply painter’s tape vertically along the outside edges of your first column of squares. Press the edges down firmly with your fingernail or a credit card to prevent paint bleed. -
Tape horizontal boundaries:
Apply short pieces of tape horizontally to block off the top and bottom of the specific squares you intend to paint within that column. This isolates the squares perfectly.
Step 3: Painting the Pattern
-
Load your brush:
Squeeze black fabric paint onto your palette. Load your 1-inch flat brush, ensuring it’s not dripping wet; a slightly drier brush helps maintain that woven fabric texture visible in the reference. -
Paint the first column:
Fill in the squares marked with an ‘X’ inside your taped area. Use consistent vertical strokes for a uniform look, or cross-hatch slightly if you want more texture. -
Remove tape immediately:
I usually prefer to peel the tape off while the paint is still wet. This prevents the paint from drying to the tape and peeling up chunks of your hard work later. -
Skip and repeat:
Move to the next column that needs painting. Since the adjacent column shares a border, you might need to let the first column dry or carefully reuse the tape line if you have a steady hand. -
Dry completely:
Once all squares are painted, let the lampshade sit undisturbed for at least 24 hours to ensure the fabric paint cures completely. -
Touch up edges:
Inspect your corners. If any lines look too messy, use a very small detail brush with a tiny amount of paint to sharpen the corners of your black squares. -
Erase pencil marks:
Check the unpainted beige squares for any visible pencil guidelines. A gentle white eraser should lift these marks without damaging the fabric. -
Final assembly:
Attach the shade back onto your lamp base and switch on the light. The illumination will highlight the texture of the fabric paint beautifully.
Bleed Control
If your paint bleeds under the tape, wait for it to dry fully. Then, adhere a clean piece of tape over the black error and carefully paint over it with a beige that matches the shade.
Now you have a bold, graphic focal point that adds instant architectural interest to your room
Scalloped Edge Trim Illusion

Transform a plain linen lampshade into a bespoke statement piece with this clever trompe-l’œil technique. By painting delicate, scalloped loops in a warm terracotta tone, you can mimic the rich texture of heavy embroidery thread without sewing a single stitch.
Step-by-Step Tutorial
Materials
- Plain linen or cotton drum lampshade (light beige or cream)
- Fabric paint or high-quality acrylic paint mixed with fabric medium
- Color: Terracotta, rust, or burnt orange
- Fine liner paintbrush (size 0 or 00)
- Flat shader brush (small, for mixing)
- Pencil (HB or lighter)
- Cardstock or thin cardboard (for template)
- Scissors
- Masking tape or painter’s tape
- Palette or small dish
- Ruler or measuring tape
- Eraser
Step 1: Planning the Pattern
-
Create the scallop template:
Cut a small rectangle of cardstock roughly 2 inches wide. Draw a single scallop shape (a semi-circle or slightly elongated arch) that is about 1 to 1.5 inches wide. -
Cut out the shape:
Carefully cut out your scallop shape to use as a stencil. Ensure the bottom edge is perfectly flat so it can align with the shade’s rim. -
Mark the spacing:
Measure the circumference of your lampshade’s bottom edge. Divide this number by the width of your scallop to ensure you’ll have evenly spaced arches. Adjust your template size slightly if the math doesn’t result in a whole number. -
Trace the bottom scallops:
Place the template against the bottom edge of the shade, about 0.5 inches up from the actual rim. Lightly trace the arch with a pencil. Repeat this all the way around the circumference. -
Trace the top scallops:
Repeat the tracing process for the top of the lampshade. Inverted scallops (hanging down) often look best here, so align the straight edge of your template parallel to the top rim.
Bleeding Lines?
If paint bleeds into the linen weave, your mix is too watery. Let it dry, then gently scrape the bleed with a craft knife. Thicken your next batch with less water.
Step 2: Painting the Design
-
Prepare the paint:
Mix your terracotta acrylic paint with a fabric medium according to the bottle instructions. This ensures the paint flexes with the fabric and doesn’t crack. -
Test the consistency:
The paint should be fluid enough to flow off a liner brush but not so runny that it bleeds into the linen fibers. Test a few strokes on a scrap piece of fabric or paper towel first. -
Paint the outline:
Using the fine liner brush, paint over your pencil lines to create the primary arch shape. Keep your hand steady and apply even pressure for a consistent line width. -
Add inner loops:
Inside each painted arch, paint 3-4 smaller concentric arches. Leave a tiny sliver of the lampshade fabric visible between each line to create the illusion of separate stitched rows. -
Connect the scallops:
Where the arches meet, paint a small vertical teardrop or dot shape to join them, mimicking the knot of a thread join. -
Add the ‘thread’ texture:
This is the secret sauce: Instead of solid lines, you can use very small, short, diagonal dashes for the outermost arches. This mimics the look of a satin stitch or chain stitch embroidery. -
Detail the points:
At the peak of each scallop and the lowest point where they join, add a tiny solid dot of paint. This acts as an anchor point visually.
Two-Tone Effect
Mix a slightly lighter shade of terracotta for the inner arches and a darker shade for the outer outline to create subtle 3D depth and shadow.
Step 3: Finishing Touches
-
Review and refine:
Stand back and look at the shade from a distance. If any lines look too faint, carefully go over them with a second coat of paint once the first is dry to the touch. -
Erase guidelines:
Once the paint is completely bone dry (wait at least 4-6 hours), gently erase any visible pencil marks. Be extremely gentle to avoid smudging the paint or fraying the linen. -
Heat set (optional):
If your fabric medium requires heat setting, use a hair dryer on a high heat setting, holding it a few inches away from the surface for several minutes.
Place your newly decorated shade onto the lamp base and enjoy the cozy, handcrafted charm it brings to your room
Reverse Stencil Negative Space
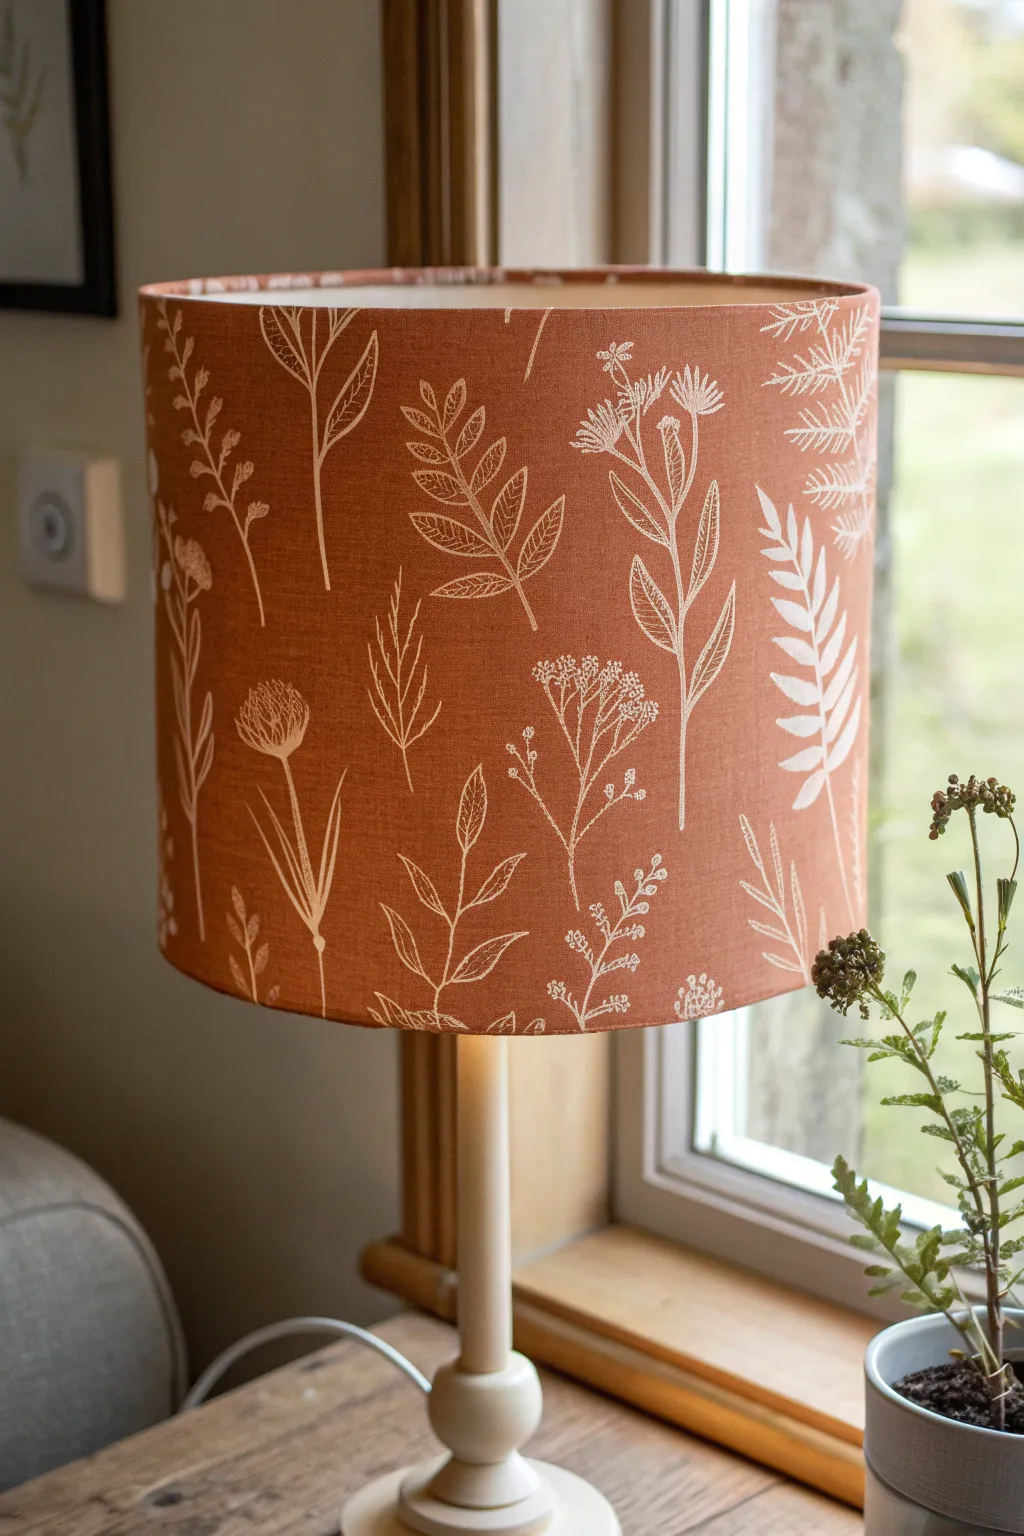
This project creates a stunning, custom lampshade by using a reverse stencil technique to reveal the original fabric color through layers of rich paint, or conversely, using a fine line masking fluid to preserve white space against a painted background. For the look shown here, we’re actually going to mimic the negative space effect by hand-painting delicate white botanical illustrations directly onto a rust-colored fabric shade.
Detailed Instructions
Materials
- Fabric lampshade (rust/terracotta color)
- White fabric paint or acrylic paint mixed with textile medium
- Fine liner brushes (size 00 or 000)
- Chalk or a heavy pencil for sketching
- Paper towels
- Small palette or dish
- Reference images of wildflowers and ferns
- Optional: White gel pen for sketching
Step 1: Preparation & Planning
-
Clean the shade:
Before you begin, ensure your lampshade is free of dust. Use a lint-roller over the entire surface to capture any stray fibers or pet hair that might interfere with your painting. -
Gather botanical references:
Look for images of wildflowers, ferns, dill, stalks of wheat, and simple leaves. You want a variety of shapes—some tall and spindly, some leafy and full—to create a balanced pattern. -
Sketch the layout:
Using a piece of chalk or a very light pencil, lightly sketch the main stems of your plants directly onto the lampshade. Spacing is key here; leave enough breathing room between each plant so the design doesn’t feel cluttered. -
Vary the heights:
Make sure your plants start at slightly different heights from the bottom edge or have stems of varying lengths to avoid a rigid, unnatural look.
Step 2: Painting the Botanicals
-
Prepare the paint:
Mix your white fabric paint or acrylic. If using acrylic, mix it with a fabric medium according to the bottle instructions to ensure it doesn’t crack. You want a consistency similar to heavy cream—flowy enough to draw thin lines, but opaque enough to show up against the dark fabric. -
Start with main stems:
Load your fine liner brush with paint. Starting from the bottom of a sketched plant, paint the main vertical stem using a smooth, upward stroke. Lift the brush pressure as you reach the tip for a tapered end. -
Add simple leaves:
For leafy plants, paint small leaf shapes branching off the main stem. Use a ‘press and lift’ motion: touch the tip to the fabric, press down slightly to widen the line for the leaf body, and lift up to create a point. -
Create fern fronds:
When painting the fern structures shown in the image, paint a long, curved central spine first. Then, add tiny, rapid dashed lines or small V-shapes down the length of the spine to represent the leaflets. -
Paint flower heads:
For the dill or wildflower shapes, paint a cluster of tiny dots or short dashes at the top of a stem. I like to keep these loose and not too perfectly circular. -
Detailing:
Go back in with your smallest brush (size 000) to add very fine details, like the veins inside larger leaves or extra wispy stems branching off. -
Work in sections:
Rotate the lampshade as you work, completing one botanical element at a time. Be mindful of your hand placement so you don’t smudge wet paint.
Fixing Wobbly Lines
Line too thick or shaky? Don’t panic. Dip a clean brush in water (or rubbing alcohol for acrylics) and gently ‘erase’ the wet paint. Or, wait for it to dry and broaden the leaf shape to cover the mistake.
Step 3: Refining & Finishing
-
Check for opacity:
Once the first layer is dry to the touch (usually 15-20 minutes), inspect your white lines. Since the fabric is dark, you might need to re-trace some lines to make the white pop more vividly. -
Fill empty spaces:
Look at the overall composition. If there are large awkward gaps, add small sprigs of grass or tiny floating seeds to balance the negative space without overcrowding it. -
Clean up sketches:
If any chalk or pencil marks preserve are still visible after the paint is fully dry, gently brush them away with a clean, dry paintbrush or a soft cloth. -
Heat set the paint:
Follow the instructions on your fabric paint bottle. Most require heat setting with a hairdryer or an iron (using a pressing cloth) to make the design permanent. -
Final inspection:
Place the shade back on the lamp base and turn it on. The light shining through will highlight your brushwork and might reveal spots that need a tiny touch-up of paint.
Level Up: Texture
For a raised, embroidered look, try using puffy fabric paint instead of standard flat paint. Apply it straight from the fine-tip applicator bottle for a tactile, 3D botanical effect.
Now you have a custom, nature-inspired accent piece that glows beautifully in the evening light
Metallic Accent Rim
Transform a plain, inexpensive lampshade into a high-end designer piece by simply adding a touch of metallic shine. This project uses gold paint to create defined, shimmering borders that frame the light beautifully and add warmth to any room.
How-To Guide
Materials
- Plain fabric drum lampshade (light color works best)
- Painter’s tape (1-inch width)
- Metallic gold acrylic craft paint or metallic fabric paint
- Small flat synthetic paintbrush (approx. 1/2 inch)
- Ruler or measuring tape
- Bone folder or credit card (for sealing tape)
- Small mixing tray or paper plate
- Newspaper or drop cloth
Step 1: Preparation
-
Clean surface:
Before starting, ensure your lampshade is free of dust or lint. A quick pass with a lint roller is usually sufficient to prep the fabric surface. -
Set up workspace:
Cover your table with newspaper or a drop cloth. Place your lampshade on the surface, ensuring you have clear access to both the top and bottom rims. -
Measure the border:
Decide how thick you want your gold band to be. In the example, the band is approximately 3/4 inch to 1 inch wide. Measure this distance from the top edge down and make very faint pencil marks every few inches around the circumference.
Step 2: Taping
-
Apply top tape:
Using your pencil marks as a guide, apply painter’s tape around the top of the lampshade. The tape should sit just below the area you intend to paint, exposing the top rim. -
Check alignment:
Stand back and look at the tape line from a distance. Spin the shade slowly to ensure the line is perfectly horizontal and connects seamlessly where the tape ends meet. -
Seal the edge:
firmly press down the edge of the tape that faces the area to be painted. I find using a bone folder or the edge of a credit card really helps prevent paint from bleeding under the tape. -
Repeat for bottom:
Flip the lampshade over or access the bottom rim. Measure, mark, and apply a second strip of painter’s tape near the bottom edge, creating a border of equal width to the top. -
Verify symmetry:
Check that your bottom border looks visually consistent with the top one before moving on to the painting phase.
Bleeding Lines?
If paint bled under the tape, wait for it to dry fully. Then, gently scrape the excess paint away with a craft knife or cover the mistake with a thin ribbon trim.
Step 3: Painting
-
Load the brush:
Squeeze a small amount of metallic gold paint onto your tray. Dip your flat brush in, but don’t overload it; too much paint can cause drips or bleed-through. -
First coat application:
Paint the exposed fabric strip between the tape and the rim edge. Use horizontal strokes that run parallel to the rim for a smooth finish. Be sure to paint the very edge of the fabric binding as well. -
Work in sections:
Rotate the lampshade gradually as you paint, maintaining a wet edge to avoid streak marks. Ensure complete coverage of the fabric weave. -
Dry time:
Let the first coat dry for about 20-30 minutes. Metallic paints are often sheer, so don’t worry if it looks a bit patchy at this stage. -
Second coat:
Apply a second layer of gold paint. This coat will deepen the metallic luster and ensure the underlying fabric color is fully completely concealed. -
Inspect edges:
Check closely near the tape line. Ensure you have solid coverage right up to the tape without pushing paint aggressively underneath it.
Add Texture
For a vintage look, try “dry brushing” a little antique bronze paint over the gold once it’s dry. It creates depth and an aged, sophisticated patina.
Step 4: Finishing
-
Remove tape:
While the second coat is still slightly tacky (not fully cured), carefully peel away the painter’s tape. Pull the tape away from the painted edge at a 45-degree angle to get the crispest line. -
Touch ups:
If any tiny seepages occurred, use a very small detail brush with a tiny bit of white paint (or your shade’s base color) to correct the line manually. -
Final cure:
Allow the lampshade to dry completely, preferably overnight, before reattaching it to your lamp base.
Enjoy the sophisticated glow your newly gilded lampshade brings to your space
Glow-in-the-Dark Constellations
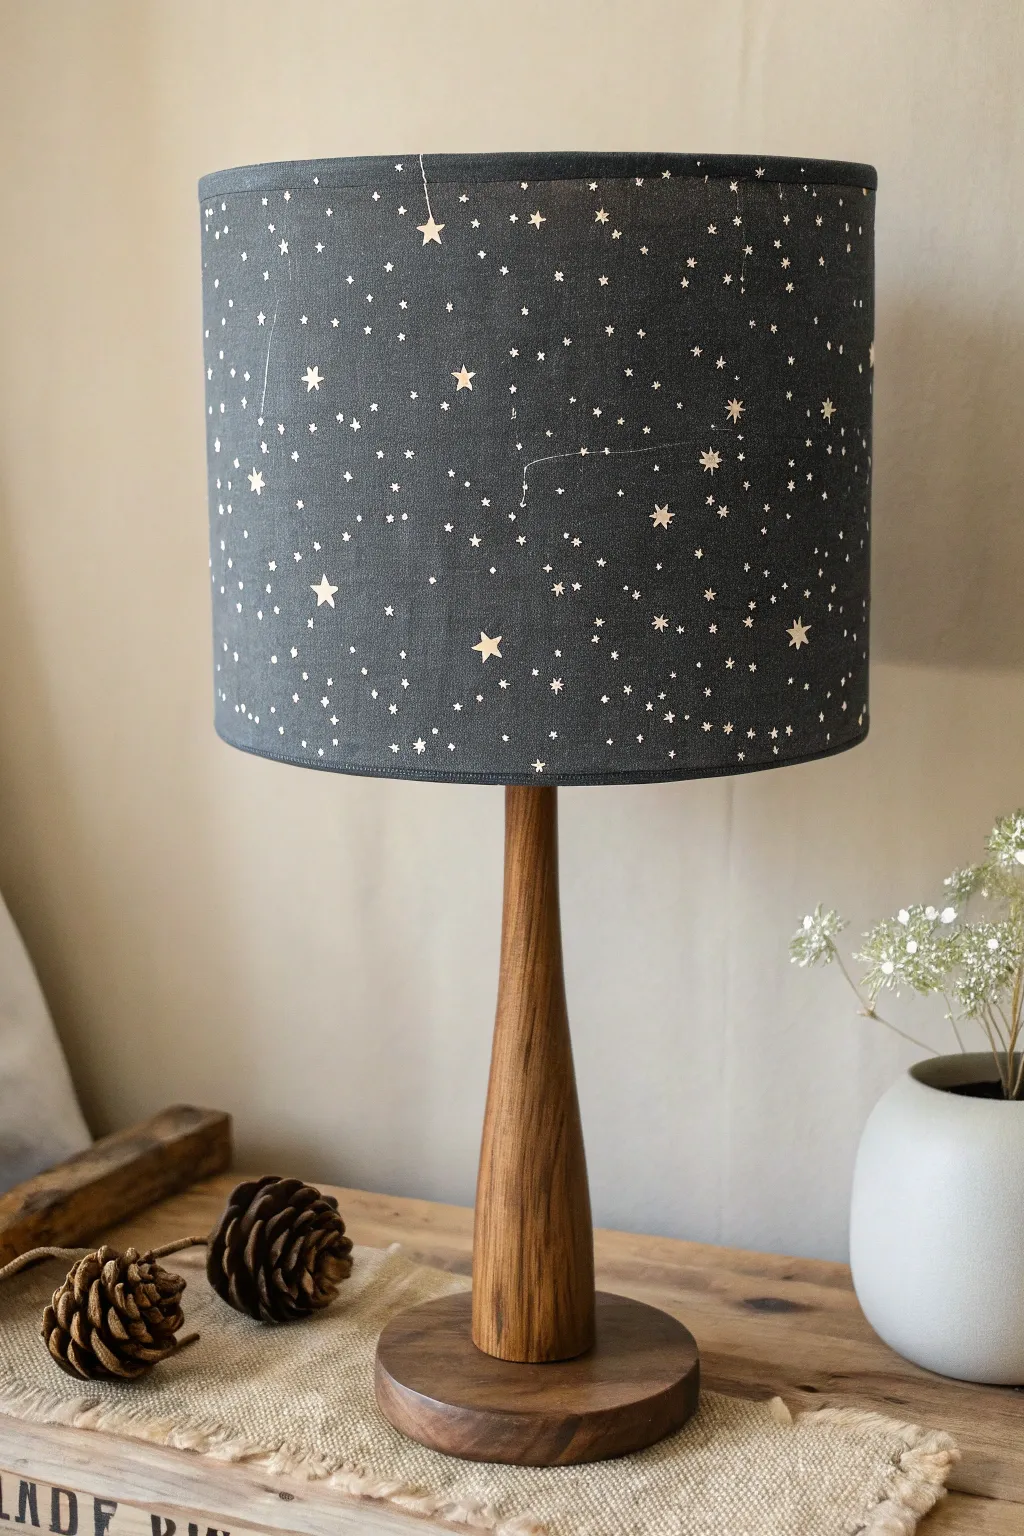
Transform a plain drum shade into a dreamy window to the cosmos with this simple yet stunning upgrade. By combining a rich charcoal base with metallic accents and glow-in-the-dark paint, you’ll create a piece that looks elegant by day and magically luminous when the lights go out.
Step-by-Step
Materials
- Plain drum lampshade (light fabric works best)
- Dark charcoal grey or navy blue fabric paint
- Wide flat paintbrush or foam brush
- Glow-in-the-dark acrylic paint (neutral/white drying)
- Metallic gold or silver paint pen (fine tip)
- Metallic gold or silver paint pen (medium tip)
- Pencil
- Ruler
- Printed constellation guide (optional)
- Small round detail brush (size 0 or 1)
Step 1: Preparing the Canvas
-
Clean the shade:
Before you begin, wipe down your lampshade with a lint roller or a dry cloth to remove any dust or stray fibers that might get caught in the paint. -
Apply the base coat:
Using a wide flat brush or foam brush, apply your dark charcoal grey fabric paint to the entire exterior of the shade. This creates the ‘night sky’ background. -
Even out streaks:
Work in horizontal strokes around the drum to ensure the texture looks intentional. If the fabric is absorbing too much paint, you might need a second coat after the first one is touch-dry. -
Let it dry completely:
Wait for the base coat to fully cure. This is crucial—if the base is damp, your stars will bleed. I usually let this sit overnight just to be safe.
Step 2: Mapping the Cosmos
-
Plan major stars:
Lightly mark the positions of your main shimmering stars with a pencil. You can freestyle this for a random starry look or use a printed guide to map out real constellations. -
Draw the larger stars:
Take the medium-tip metallic paint pen and draw five-pointed stars over your pencil marks. Don’t worry about perfection; a little hand-drawn charm adds character. -
Add connecting lines:
Switch to your fine-tip metallic pen. If you are making constellations, draw very thin, delicate lines connecting the stars you just created.
Uneven Coverage?
If the dark paint looks patchy when the lamp is ON, paint the inside of the shade with a lighter coat of the same dark color. This blocks light unevenly and hides brushstrokes.
Step 3: Layering the Light
-
Create medium stars:
Using the fine-tip metallic pen, scatter smaller four-pointed stars or tiny cross-hatch stars in the empty spaces between your main constellations. -
Add the stardust:
For the distant background stars, use the fine-tip pen to dot thousands of tiny specks. Vary the pressure to create different sizes of dots, making the galaxy feel deep and layered. -
Concentrate the clusters:
Try grouping some dots closer together in ‘bands’ to mimic the Milky Way, rather than spacing them all perfectly evenly.
Use a Template
Poke holes through a printed constellation map. Tape the paper to the dry shade and use a white chalk pencil to mark dots through the holes for perfect placement.
Step 4: Adding the Glow
-
Highlight the major stars:
Dip your small detail brush into the glow-in-the-dark paint. Carefully paint a tiny dot right in the center of your largest gold stars. -
Add invisible stars:
Here is the secret trick: dot the glow paint onto the dark grey background in empty areas where there are no gold stars. These will be invisible during the day but appear when the light goes off. -
Trace the lines:
If you want the constellations to be recognizable in the dark, very faintly trace over your metallic connecting lines with a thin wash of the glow paint. -
Final charge:
Let all paint dry completely. Once dry, turn on the lamp for a few minutes to ‘charge’ the glow paint, then switch it off to test your galaxy’s luminescence.
Now you have a cozy reading light that turns into a personal planetarium the moment you go to sleep


Have a question or want to share your own experience? I'd love to hear from you in the comments below!