Painting a ceramic dog bowl is one of those projects that’s equal parts practical and ridiculously charming. Here are my favorite dog bowl pottery painting ideas—from classic paw prints to artsy designs that feel like a little gallery piece for your pup’s everyday routine.
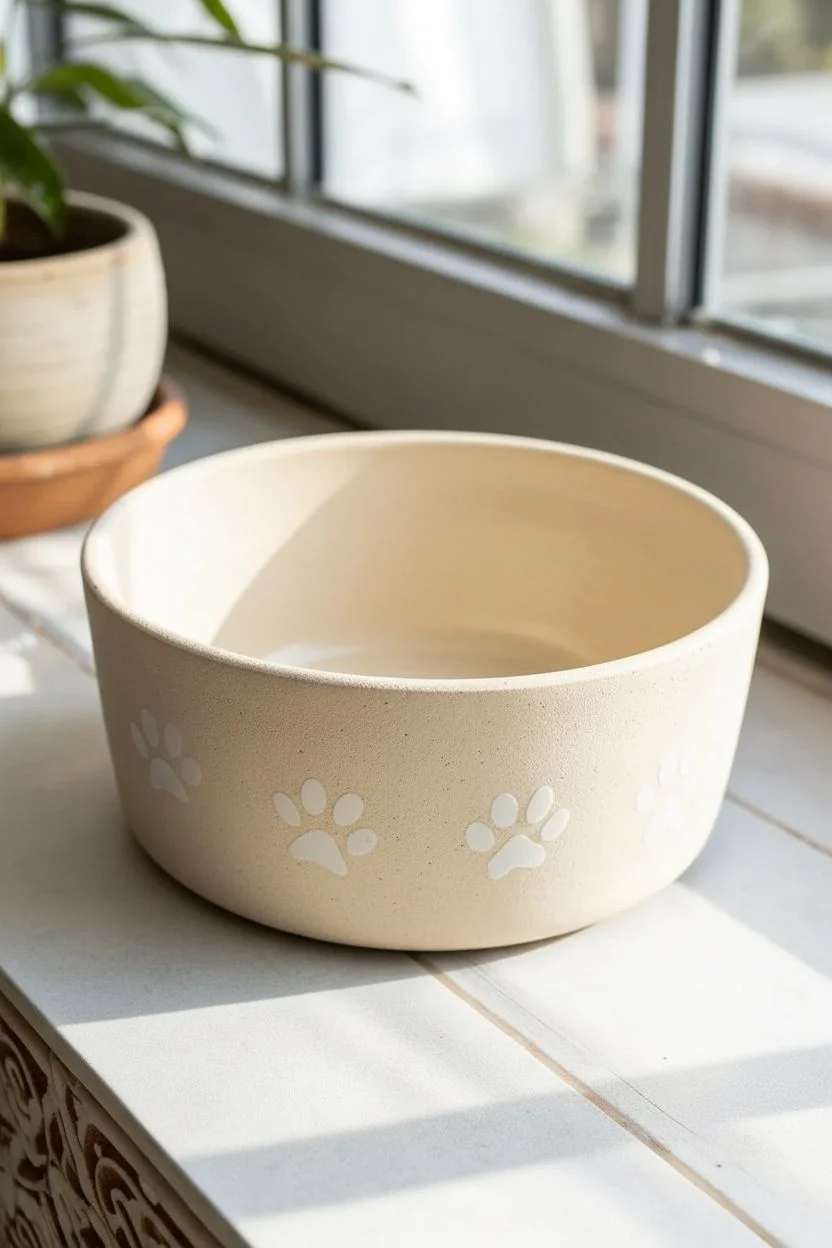
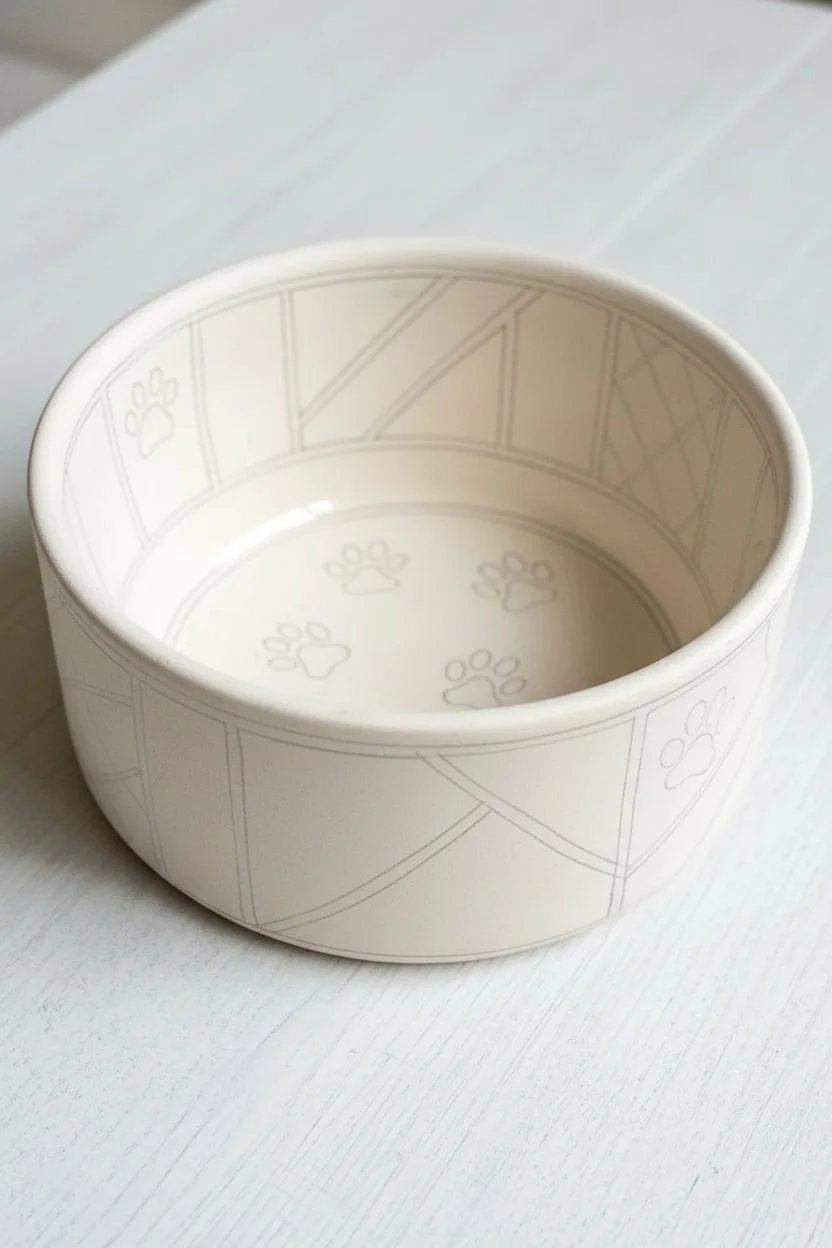
Classic Paw Print Border

This charming ceramic project features a classic paw print motif on a creamy, speckled background that mimics traditional stoneware. The exposed raw clay base and rim detail give it a warm, handmade feel that’s perfect for your furry friend.
Detailed Instructions
Materials
- Bisque ceramic dog bowl (straight-sided style)
- Creamy white speckled glaze (e.g., Mayco Specu-Clear or a speckled oatmeal glaze)
- Dark brown underglaze (e.g., Chocolate or Mocha)
- Small round sponge applicator or pouncer (approx. 1/2 inch size)
- Small liner brush (size 0 or 00)
- Medium flat brush
- Water bowl and sponge for wiping
- Wax resist (optional)
Step 1: Preparation and Base Coat
-
Clean the Bisque:
Start by wiping down your bisque bowl with a damp sponge. This removes any dust that could prevent the glaze from adhering properly. -
Mark the Unpainted Base:
Decide how far up the side you want the raw clay base to show (about 1/2 to 3/4 inch). You can apply wax resist to this bottom band and the very bottom of the bowl to keep your lines crisp, or simply be careful when painting. -
Apply the Base Glaze:
Using a medium flat brush, apply three even coats of your creamy white speckled glaze to the interior of the bowl. Allow each coat to dry until it loses its sheen before applying the next. -
Glaze the Exterior:
Apply three coats of the same speckled glaze to the exterior walls, stopping exactly at the line you established for the exposed clay base. This creates that lovely two-tone dipped look.
Stamp Smartly
Can’t find a round sponge? Use the eraser end of a pencil for the toes and your thumbprint for the main pad for a truly personal touch.
Step 2: Creating the Paw Prints
-
Plan Your Placement:
Visualize where your paw prints will go. You’ll want a repeating pattern around the exterior wall and a corresponding row on the upper interior wall. -
Load the Sponge:
Pour a small amount of dark brown underglaze onto a palette. Dip your small round sponge pouncer into the paint, blotting off any excess to prevent dripping. -
Stamp the Main Pads:
Press the sponge gently against the bowl to create the large main pad of the paw. Space these evenly around the outside of the bowl first. -
Add Interior Pads:
Repeat the stamping process on the inside rim of the bowl. Make sure these interior paws are positioned high enough to be seen even when the bowl is full. -
Paint the Toes:
Switch to your small liner brush. Dip it into the dark brown underglaze and carefully paint three or four small oval toes above each large sponge-stamped pad. -
Refine the Shapes:
Since the sponge circle is perfectly round, you might want to use your brush to slightly flatten the top edge or pull bottom corners to make it look more like a natural paw pad shape.
Oops, Smudged It?
If you smudge a paw print, don’t wipe it! Let it dry completely, then gently scrape the mistake off with a toothpick before re-glazing.
Step 3: Finishing Touches
-
Rim Detail:
To mimic the exposed clay look on the rim, use your liner brush to paint a very thin, possibly broken line of the dark brown underglaze along the very top edge of the rim. -
Clean Up:
Check the unglazed band at the bottom. If any white glaze dripped down, scrape it away gently with a clean craft knife or wipe it with a damp sponge. -
Final Inspection:
Look over the paw prints. If the glaze is too thin in spots (looking transparent), dab a little more brown on top to ensure a solid, rich color after firing. -
Drying:
Let the piece dry completely overnight. The glaze should be chalky and dry to the touch before it goes into the kiln. -
Firing:
Fire the piece according to the instructions on your specific glaze bottle, usually to Cone 06 or Cone 6 depending on whether you used low-fire or stoneware glaze.
Once fired, this durable and adorable bowl will be ready for your pup’s next meal


Paw Prints on the Inside Surprise
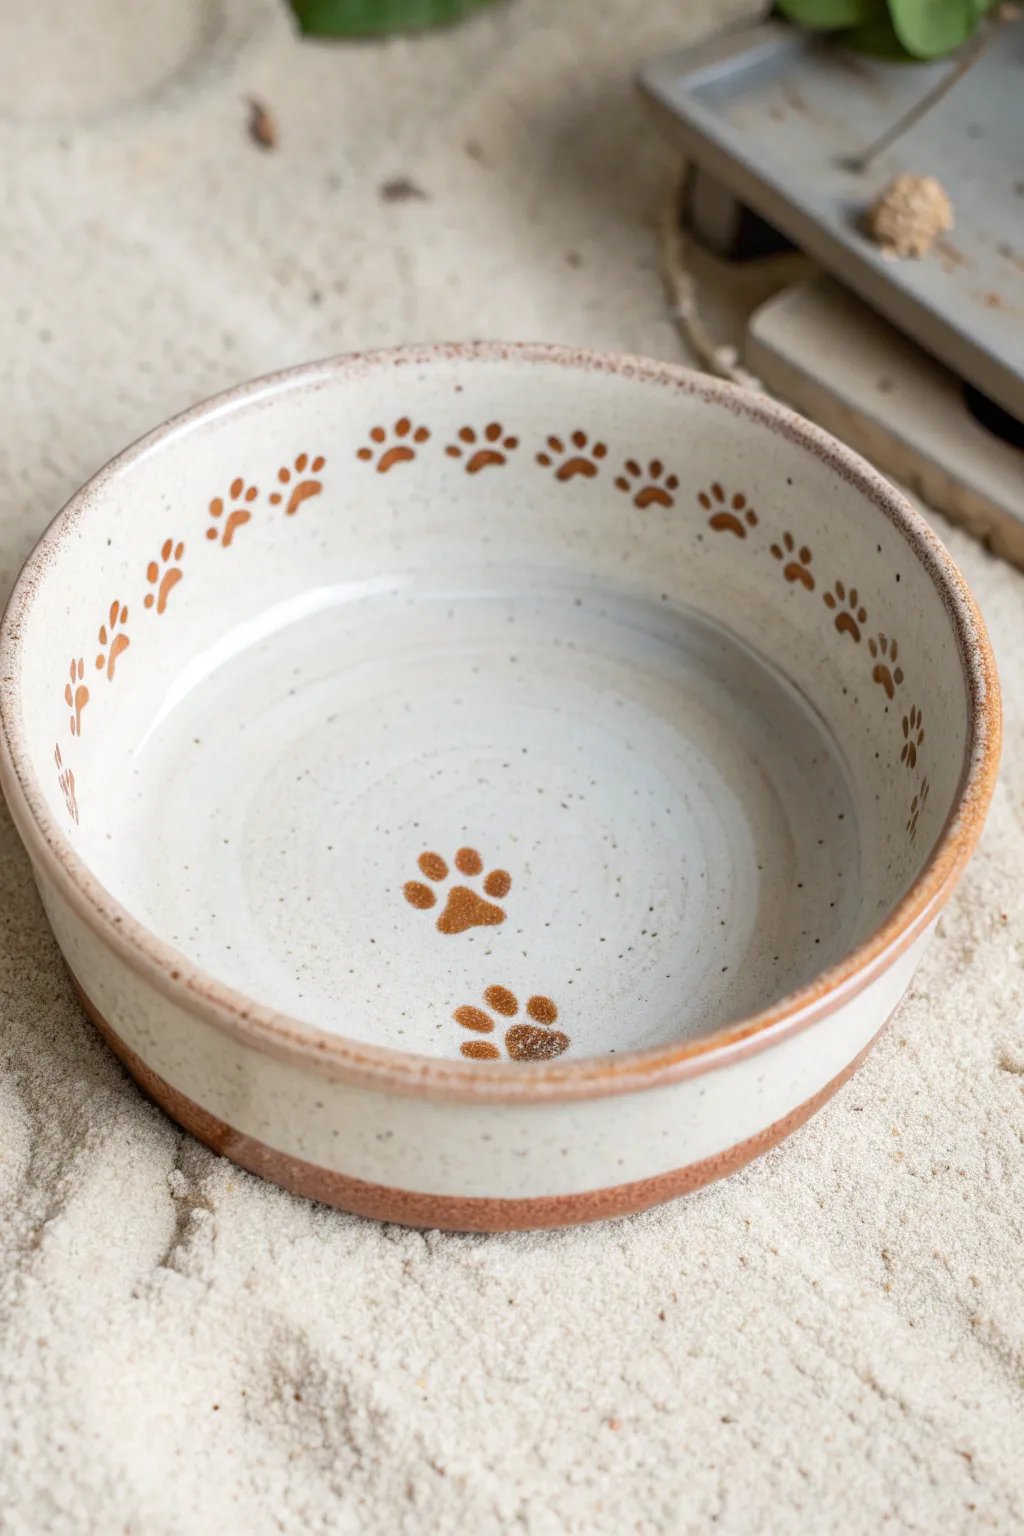
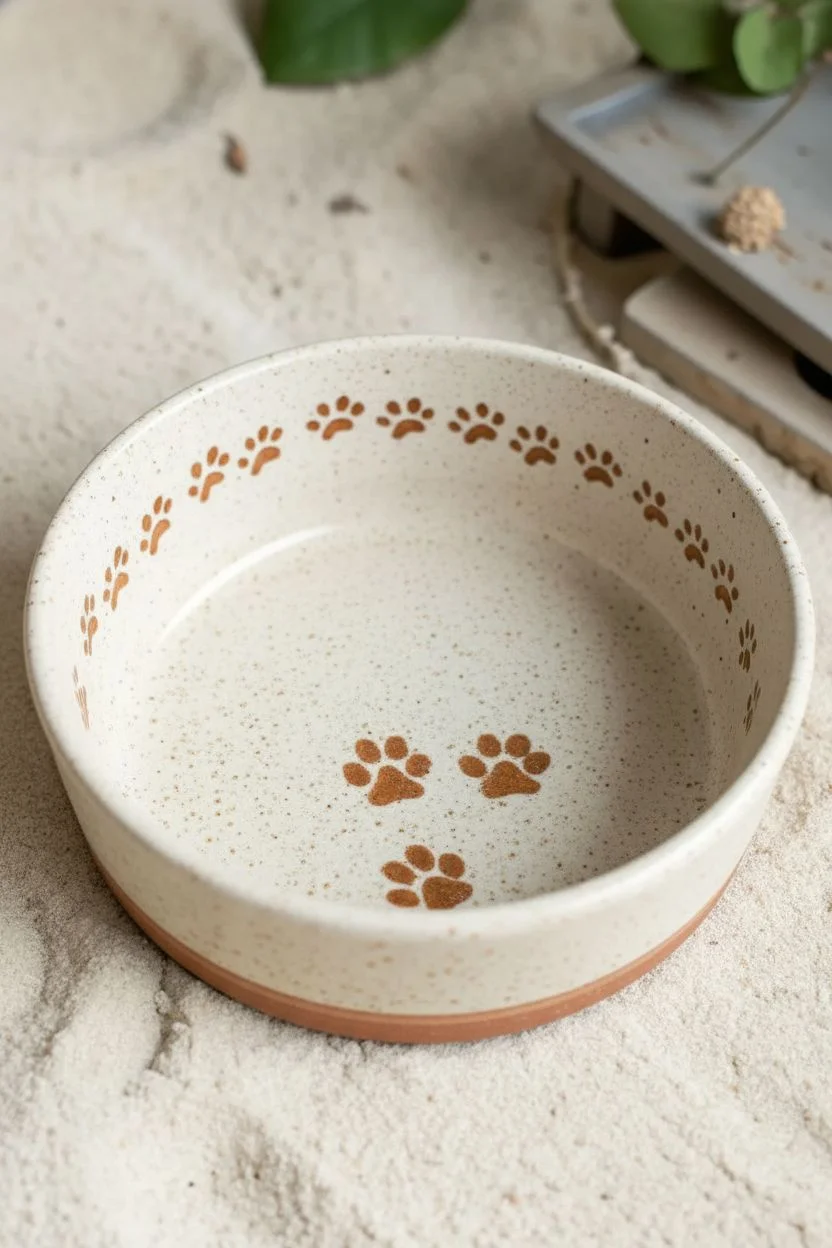
Create a delightful surprise for your furry friend with this hand-thrown style ceramic bowl, featuring a whimsical trail of paw prints along the inner rim. The speckled clay body and warm brown glaze create a cozy, rustic feel that reveals two larger paw prints at the bottom once dinner is done.
Step-by-Step Tutorial
Materials
- Bisque-fired ceramic dog bowl (speckled clay body preferred)
- Underglaze pencil or soft lead pencil
- Warm brown underglaze (e.g., Duncan Concepts or similar potters choice)
- Clear dipping or brushing glaze (transparent)
- Small round detail brush (size 1 or 2)
- Medium round brush (size 4 or 6)
- Potter’s sponge
- Water container
Step 1: Painting the Paw Prints
-
Clean the bisque:
Start by wiping down your bisque-fired bowl with a damp potter’s sponge. This removes any dust or oils from handling and ensures your underglaze adheres properly to the surface. -
Mark the rim spacing:
Using a soft pencil, lightly mark small dots around the inner wall of the bowl, about an inch below the rim. Space them evenly to guide where your paw print trail will go. Don’t worry, the pencil marks will burn off in the kiln. -
Paint the first pad:
Dip your small detail brush into the warm brown underglaze. For each paw print along the wall, paint the main triangular pad first. Use a simple ‘press and lift’ motion to create a soft, rounded triangle shape. -
Add the toes:
above the main pad, dab four small dots using the tip of your brush to create the toes. Keep them close to the main pad but distinct. -
Complete the trail:
Continue this process around the entire inner circumference of the bowl. Try to keep them at a consistent height, but allow for slight variations in the ‘walking’ angle to make it look like a natural path. -
Plan the center surprise:
Look into the bottom of the bowl and visualize where you want the two larger surprise prints. I like to offset them slightly from the center rather than placing them dead center. -
Paint the larger pads:
Switch to your medium round brush for these bottom prints. Load it well with the brown underglaze and paint two larger, heart-shaped main pads in the bottom of the bowl. -
Detail the center toes:
Go back to your smaller brush to add the four toes above each large pad. Since these are the focal point once the food is gone, take extra care to make them round and plump. -
Check for opacity:
If your brown underglaze looks thin or streaky, apply a second coat to the prints once the first layer is dry to the touch. You want a solid, rich color.
Stamp Master
Make a simple stamp eraser! Carve a small paw shape into a rubber eraser and use it to stamp the pattern for perfect consistency.
Step 2: Glazing and Finishing
-
Sponge the rim:
Take your detail brush or a small sponge and lightly run a band of the brown underglaze along the very top rim of the bowl. This frames the design and ties the color scheme together. -
Let underglaze dry:
Allow all your painted designs to dry completely. The surface should be matte and chalky before you move to the clear glaze. -
Apply clear glaze:
Dip the entire bowl into a clear, transparent glaze. If you are brushing, apply two to three even coats, letting each dry in between. This is crucial for making the bowl food-safe. -
Wipe the foot:
Turn the bowl over and carefully wipe any glaze off the bottom foot ring with a damp sponge. Any glaze left here will fuse the bowl to the kiln shelf. -
Final inspection:
Check the rim and the inside for any pinholes or thick drips of glaze. Smooth them out gently with your finger if the glaze is still slightly damp. -
Fire the piece:
Load the bowl into the kiln and fire it to the temperature recommended for your specific clay and glaze combination (usually Cone 5 or 6 for stoneware).
Personal Touch
Paint your pup’s name on the outside of the bowl using the same brown underglaze for a fully custom set.
Now you have a charming, personalized bowl that rewards your pet with a cute surprise after every meal


Single Center Paw Medallion
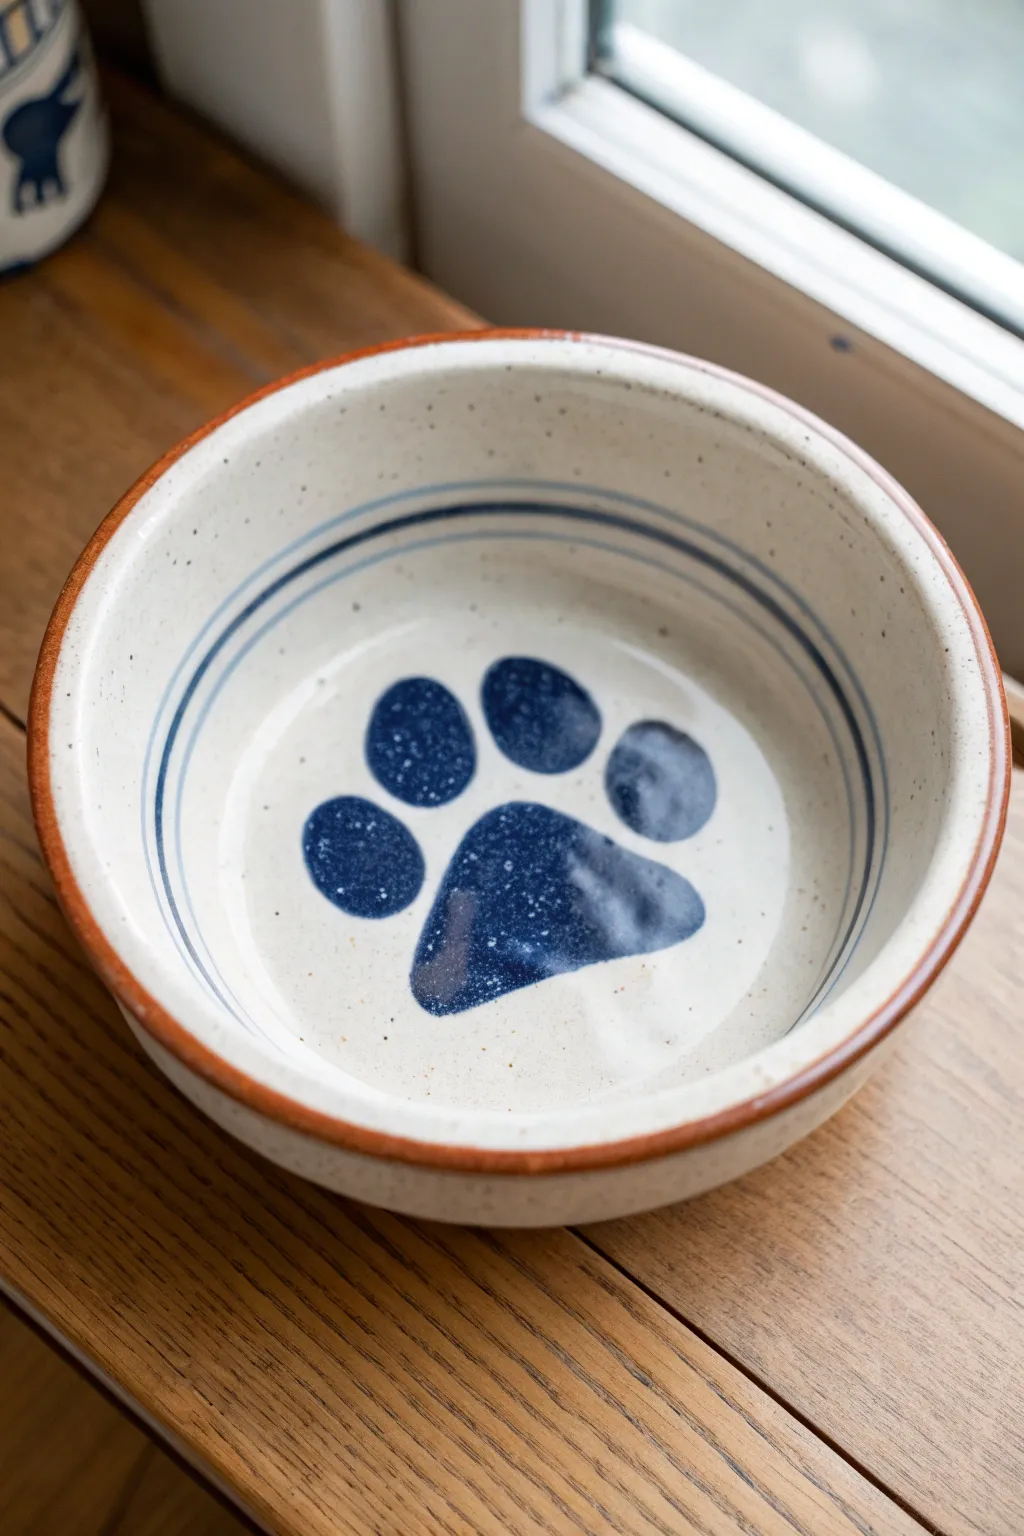
This timeless design features a bold, deep blue paw print centered perfectly at the bottom of a speckled cream bowl, framed by elegant concentric rings. It balances rustic charm with a clean, graphic focal point that looks professionally glazed.
How-To Guide
Materials
- Bisque ceramic bowl (medium size)
- Speckled cream or ‘oatmeal’ underglaze
- Deep glossy blue underglaze (like cobalt or navy)
- Terracotta or rust-colored underglaze
- Stiff fan brush
- Medium round brush (size 6 or 8)
- Fine liner brush
- Pottery wheel or banding wheel
- Pencil
- Paper paw print stencil (optional)
- Clear dipping glaze
- Sponge and water
Step 1: Base Preparation
-
Clean the Bisque:
Wipe down your entire bisque bowl with a slightly damp sponge to remove any dust or oils that might prevent glaze adhesion. -
Apply the Base Coat:
Using a stiff fan brush, apply three even coats of the speckled cream underglaze to the inside and outside of the bowl. Allow each coat to dry until it loses its sheen before adding the next. -
Inspect the Coverage:
Check for any thin spots. The speckled effect relies on good coverage, so a fourth thin coat might be necessary on the smoother areas.
Uneven Circle Lines?
If your hand shakes while painting rings, anchor your painting arm against your torso and use your other hand to steady your wrist while the wheel spins.
Step 2: Applying the Rim & Rings
-
Set Up the Wheel:
Place your bowl exactly in the center of your banding wheel or pottery wheel. Give it a spin to ensure it isn’t wobbling. -
Paint the Rim:
Load a medium round brush with the terracotta/rust underglaze. While spinning the wheel at a steady, slow pace, hold the brush gently against the top rim to create a solid, earthy band. -
Clean the Edge:
If any rust paint dripped down the sides, use a clean, damp sponge to tidy up the line immediately. -
Paint the Inner Rings:
Switch to your deep blue underglaze and a fine liner brush. Spin the wheel again and gently touch the brush to the inner wall, about an inch below the rim, to create the thin top line. -
Add the Thicker Band:
Reload the blue paint and press slightly harder with the brush just below your first line to create the thicker, secondary blue ring. The variation in line weight adds visual interest.
Pro Tip: Depth Effect
Add a tiny drop of water to the center of the wet blue paw print. As it dries, the pigment will pool at the edges, creating a natural watercolor-like shading.
Step 3: Creating the Paw Medallion
-
Find the Center:
Look straight down into the bowl to locate the absolute center. You can mark this lightly with a pencil; the graphite will burn away in the kiln. -
Draft the Shape:
Lightly sketch the large main pad and four toe pads with your pencil. If you aren’t confident freehanding, cut a paper stencil and trace around it. -
Fill the Main Pad:
Using the medium round brush loaded with deep blue underglaze, fill in the large bottom pad. I usually start in the middle and push the paint outward toward the sketched lines for a smooth edge. -
Paint the Toe Pads:
Carefully fill in the four smaller toe pads. Try to keep the spacing between them and the main pad consistent. -
Second Coat:
Once the blue paint is dry to the touch, apply a second coat to the entire paw print to ensure a rich, opaque color after firing. -
Add Texture (Optional):
To mimic the speckled look inside the paw print shown in the image, you can lightly flick a toothbrush with the cream base color over the dried blue paw, or simply let the translucency of the blue glaze allow the base speckles to show through.
Step 4: Finishing Touches
-
Final Inspection:
Check the interior for any stray blue smudges. Scrape them away gently with a craft knife or clean them with a damp brush. -
Dry Completely:
Let the piece dry for at least 24 hours to ensure all moisture has evaporated from the clay body. -
Clear Glaze Application:
Dip the entire bowl into a clear dipping glaze. Shake off the excess gently and let it dry. -
Stilting and Firing:
Wipe the foot of the bowl clean so it doesn’t stick to the kiln shelf, then shorter fire according to the specifications of your clay and glaze (usually Cone 06 or Cone 6).
Once fired, you will have a sturdy, personalized bowl that makes every meal special for your furry friend


Bone Pattern Around the Rim
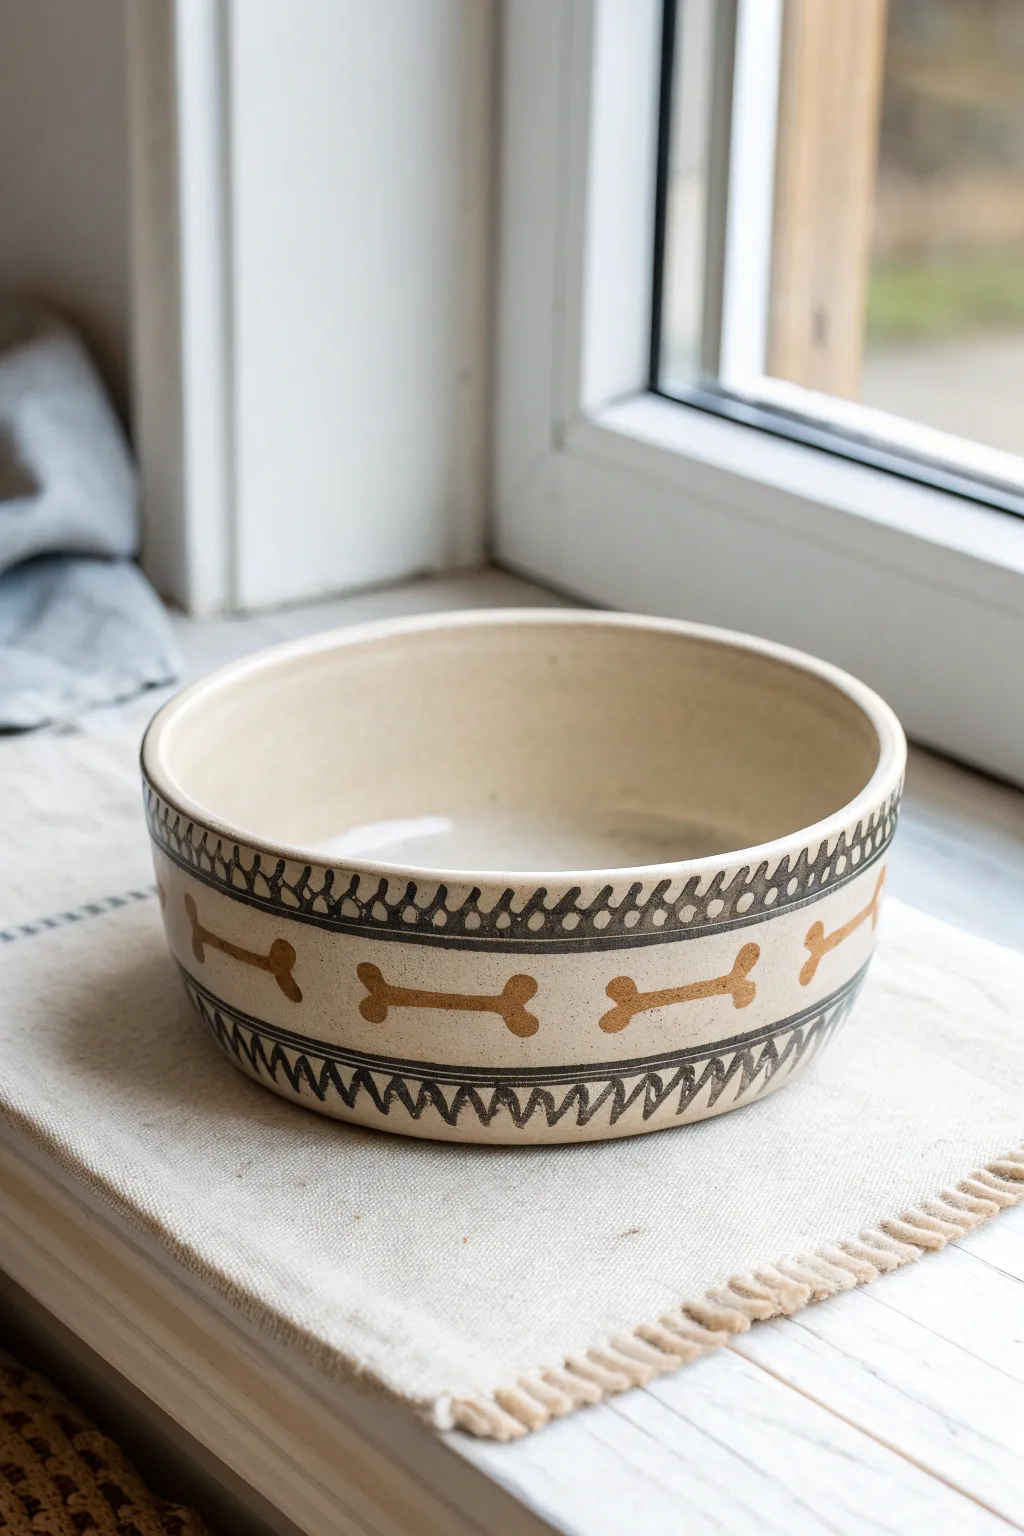
Give your furry friend a stylish dining experience with this earthy, bohemian-inspired dog bowl design. By combining simple bone motifs with structured geometric borders, you’ll create a piece that feels both playful and sophisticated enough for any modern home.
Detailed Instructions
Materials
- Bisque ceramic dog bowl (smooth rim)
- Underglaze pencil (light graphite or dedicated ceramic pencil)
- Small flat shader brush (size 4 or 6)
- Fine liner brush (size 0 or 00)
- Golden-brown underglaze (e.g., camel or honey toast)
- Charcoal or slate grey underglaze (dark but not pure black)
- Clear dipping or brushing glaze
- Sponge and water
- Soft measuring tape (optional)
Step 1: Preparing the Canvas
-
Wipe It Down:
Begin by taking a clean, slightly damp sponge and wiping down your entire bisque bowl. This removes any ceramic dust that could prevent the glaze from adhering properly. -
Mark the Bands:
Using a soft measuring tape (or a steady hand), lightly mark horizontal guidelines around the exterior of the bowl with your pencil. You need a wide central band for the bones and two narrower bands above and below for the geometric borders.
Use a Banding Wheel
Place the bowl on a rotating banding wheel. Hold your brush steady in one spot while slowly spinning the wheel to get perfectly straight horizontal lines effortlessly.
Step 2: The Central Bone Motif
-
Sketch the Bones:
In the wide middle section, lightly sketch evenly spaced dog bone shapes. They don’t need to be perfect; a little organic variation adds charm. Aim for about 2 inches of length per bone. -
Fill the Bones:
Load your flat shader brush with the golden-brown underglaze. Carefully fill in the bone shapes. Use smooth, horizontal strokes to ensure even coverage. -
Apply Second Coat:
Once the first layer is touch-dry (it should look chalky), apply a second coat to the bones. This ensures the color remains rich and opaque after firing. -
Clean Edges:
If you went outside the lines, use a stiff brush dampened with water to gently scrub away the excess paint, keeping the edges crisp.
Step 3: The Geometric Borders
-
Define the Upper Lines:
Switch to your fine liner brush and the charcoal grey underglaze. Paint a thin, solid horizontal line just above the bone section. -
Define the Lower Lines:
Repeat this process below the bones, painting another horizontal line to frame the central motif. Then, paint a second parallel line about half an inch below that one to create the bottom border area. -
The Bottom Zig-Zag:
In the bottom border area you just created, paint a continuous zig-zag pattern. Ensure the points touch the top and bottom lines of this section. -
Filling the Triangles:
I like to add visual weight here by using your charcoal gray to fill in the upper triangles formed by the zig-zag, leaving the bottom triangles the natural cream color of the clay. -
The Top Loops:
For the upper border (near the rim), paint a series of small, connected loops or scallops along the guide line you drew earlier. -
Adding Texture Details:
Inside each loop on the top border, place a small dot. Then, paint vertical dashes or ‘fringe’ lines descending from the main horizontal line between each loop. -
Rim Emphasis:
Paint a final thin gray line right along the lip of the bowl to frame the entire piece.
Personalize It
Swap one of the bone shapes for a painted dog tag silhouette and write your pet’s name inside it using the fine liner brush for a custom touch.
Step 4: Finishing Touches
-
Cleanup:
Check the interior of the bowl for any stray paint drips and wipe them away with your clean sponge. -
Drying:
Allow the underglaze to dry completely, preferably overnight, to prevent smudging during generated glazing. -
Clear Glaze Application:
Apply clear glaze over the entire piece. If brushing, use a fan brush and apply 2-3 coats in alternating directions. If dipping, dip once quickly. -
Fire It:
Fire the piece in the kiln according to the clay and glaze specifications (usually Cone 06 or Cone 6 depending on your materials).
Once fired, this custom bowl will be ready to serve up dinner in style
BRUSH GUIDE
The Right Brush for Every Stroke
From clean lines to bold texture — master brush choice, stroke control, and essential techniques.
Explore the Full Guide
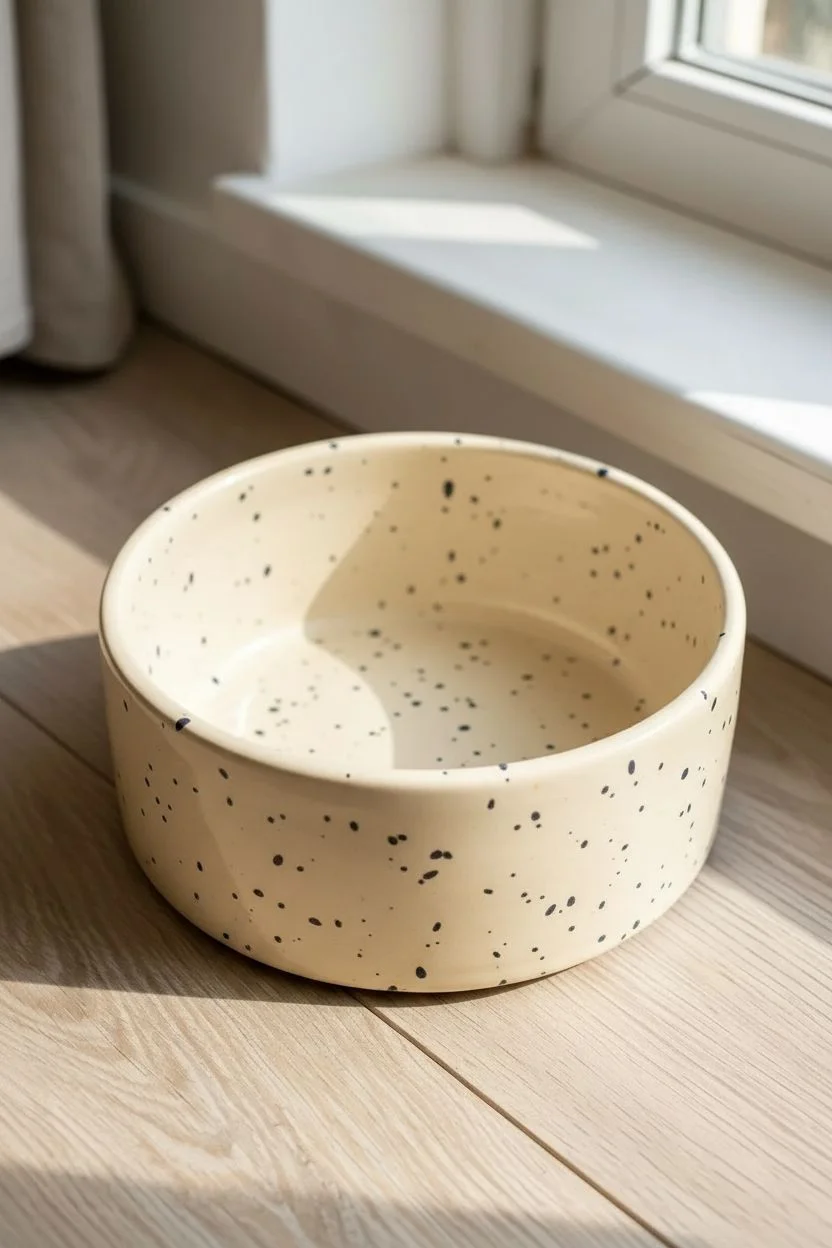
Polka Dots and Tiny Paws Mix
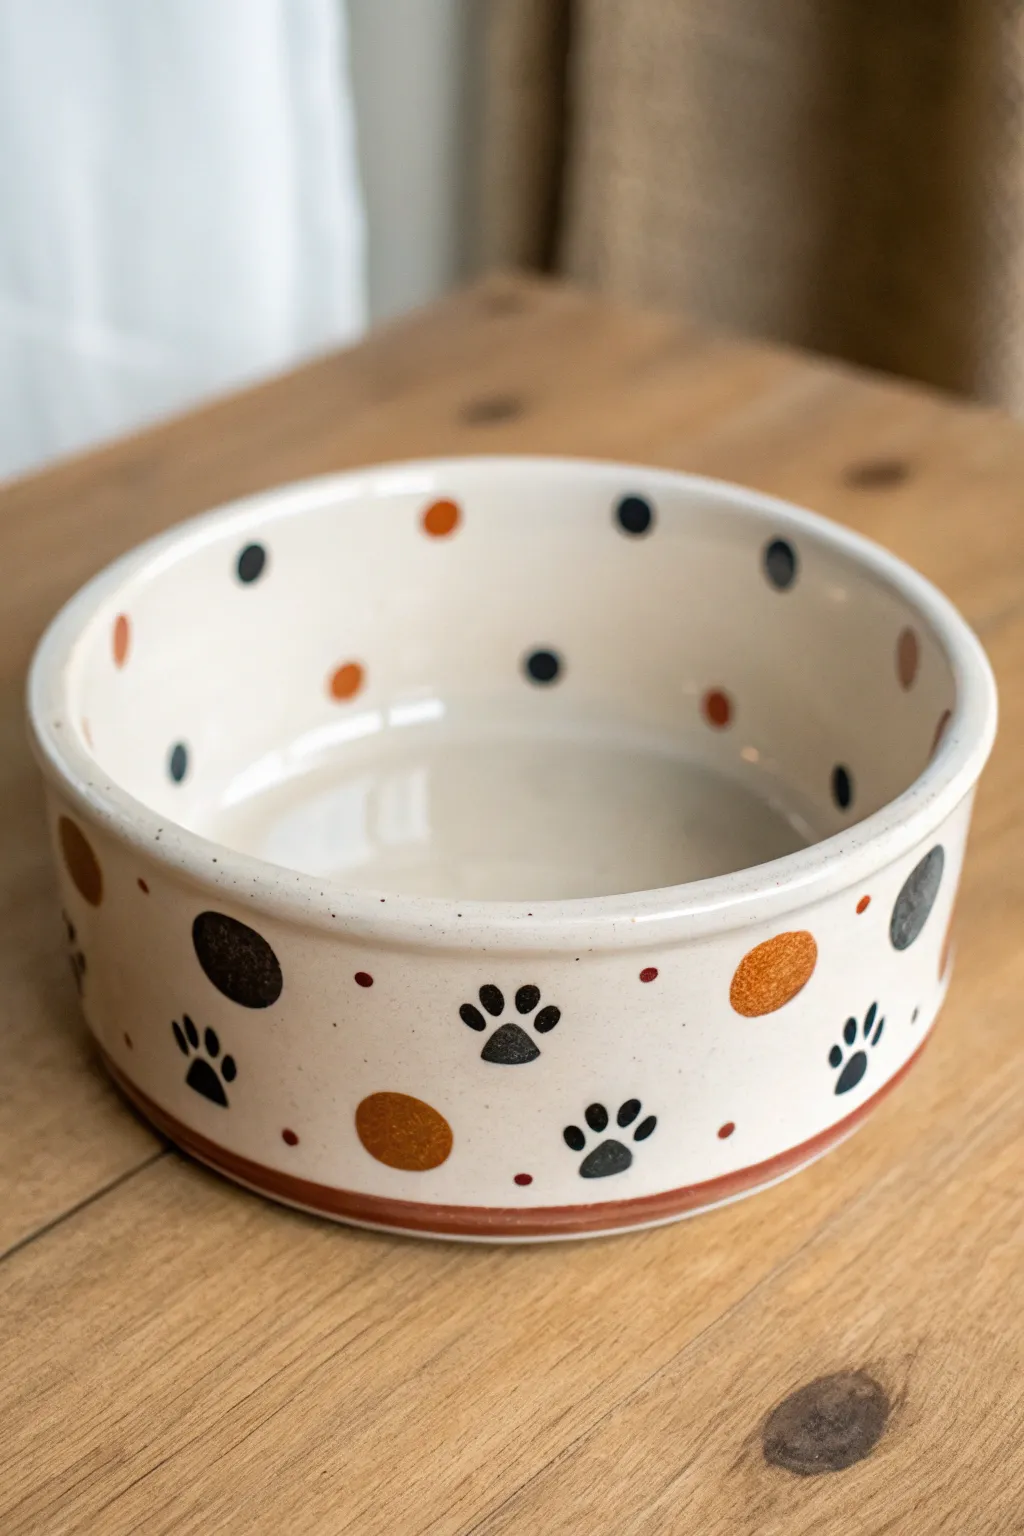
This charming ceramic bowl design combines playful paw prints with organic polka dots in warm earth tones for a cozy, handcrafted feel. By balancing randomly placed shapes with carefully stamped paws, you get a delightful pattern that looks great from every angle.
Step-by-Step
Materials
- Bisque ceramic dog bowl (medium size)
- Underglazes: Creamy White, Jet Black, Burnt Orange/Rust, Warm Brown
- Clear dipping glaze
- Soft fan brush (for base coat)
- Round synthetic brushes (sizes 4 and 6)
- Detail liner brush (size 0 or 00)
- Sponges (for cleaning bisque)
- Small round sponge dauber (optional)
- Pencil (for sketching spacing)
Step 1: Base Preparation
-
Clean the Bisque:
Wipe down your entire bisque bowl with a slightly damp sponge to remove any kiln dust, which helps the glaze adhere properly. -
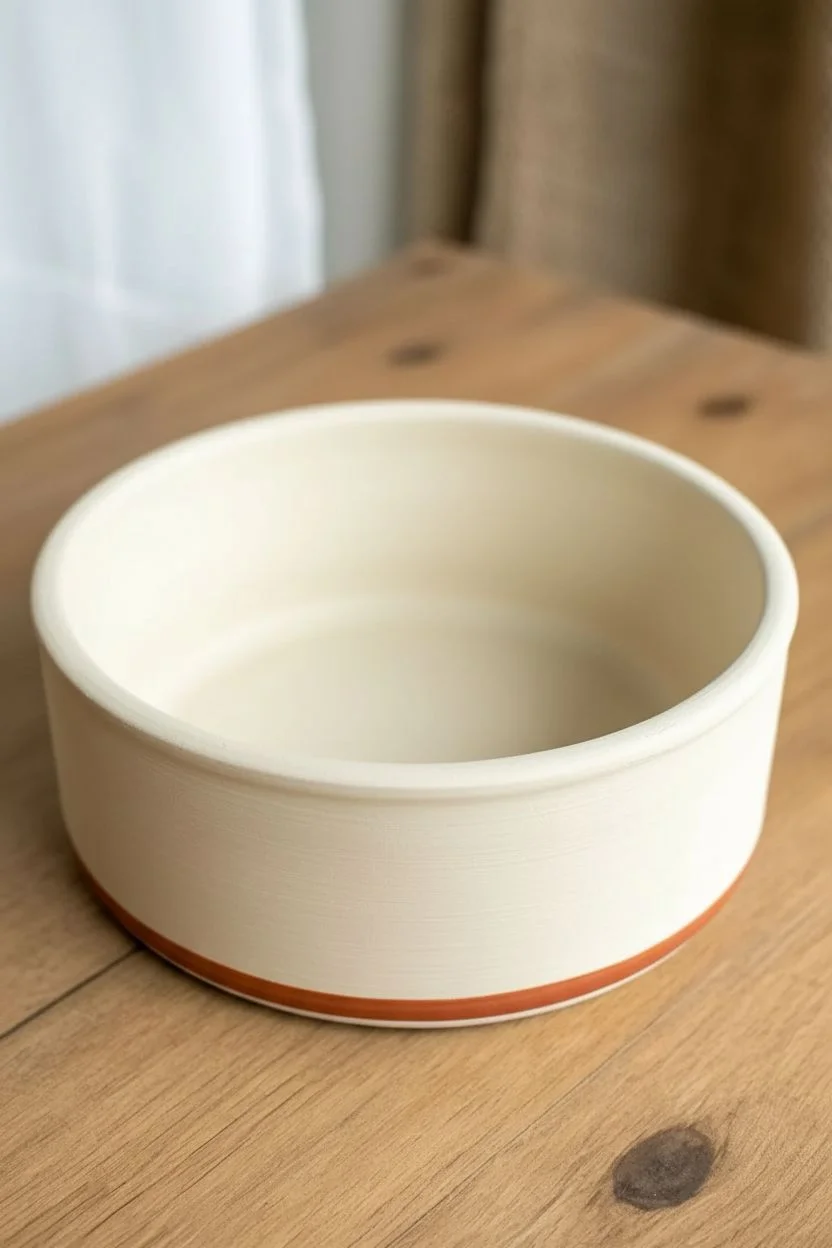
Apply the Cream Base:
Using a soft fan brush, apply three even coats of Creamy White underglaze to both the inside and outside of the bowl. -
Dry Between Layers:
Allow each creamy layer to dry until it loses its sheen before applying the next coat to ensure a smooth, opaque background. -
Rim Detail:
Paint a thin, steady band of Burnt Orange/Rust around the very bottom edge of the bowl’s exterior to ground the design.
Smudged Paw Fix
If a paw print smears, let it dry completely. Then, gently scratch off the mistake with a toothpick or cleaning tool and re-dab the base cream color over the spot.
Step 2: Exterior Pattern
-
Plan Your Spacing:
Lightly visualize or mark a triangular grid pattern around the outside of the bowl so your elements don’t get too clumped together. -
Paint Large Circles:
With a size 6 round brush, paint large, varied circles in Warm Brown, Burnt Orange, and Black randomly around the lower half of the bowl. -
Create Paw Pads:
For the paw prints, start by painting an upside-down, soft-cornered triangular shape using Black underglaze. -
Add Paw Toes:
Above the main pad, add three or four small oval shapes for toes. Using a slightly heavier pressure at the start of the stroke creates a natural toe shape. -
Intersperse Small Dots:
Dip the handle end of a paintbrush into your Rust or Brown paint and dot it onto the surface to create tiny filler accents between the larger shapes.
Personalize It!
Paint your dog’s name in a fun, bubbly font on the inside bottom of the bowl. It will be a cute surprise revealed every time they finish their dinner.
Step 3: Interior Design
-
Switch Perspective:
Move to the inside of the bowl. The goal here is a lighter, airier pattern compared to the outside. -
Inner Rim Dots:
Paint medium-sized dots around the inner rim, alternating between Black and Rust colors. Keep them spaced about two inches apart. -
Add Inner Accents:
Scatter a few smaller dots further down the inside walls, but leave the very bottom center largely plain so food is easily visible. -
Refine Edges:
If any of your circles look too rough, use a damp liner brush to gently tidy up the edges before the paint fully sets.
Step 4: Finishing Touches
-
Final Cleanup:
Check the bottom foot of the bowl. If any glaze has dripped there, sponge it off completely so it doesn’t stick to the kiln shelf. -
Clear Glaze Application:
Once the underglaze is bone dry, carefully dip the bowl into a clear glaze. Shake off excess glaze gently. -
Let it Dry:
Allow the clear glaze to dry completely before firing. It will look powdery and opaque now but will turn glossy and revealing in the kiln. -
Fire the Piece:
Fire the bowl in the kiln according to the clay and glaze specifications (usually cone 06 for low-fire earthenware).
Now your furry friend can dine in style with a custom bowl made just for them
Cartoon Pup Portrait in a Circle
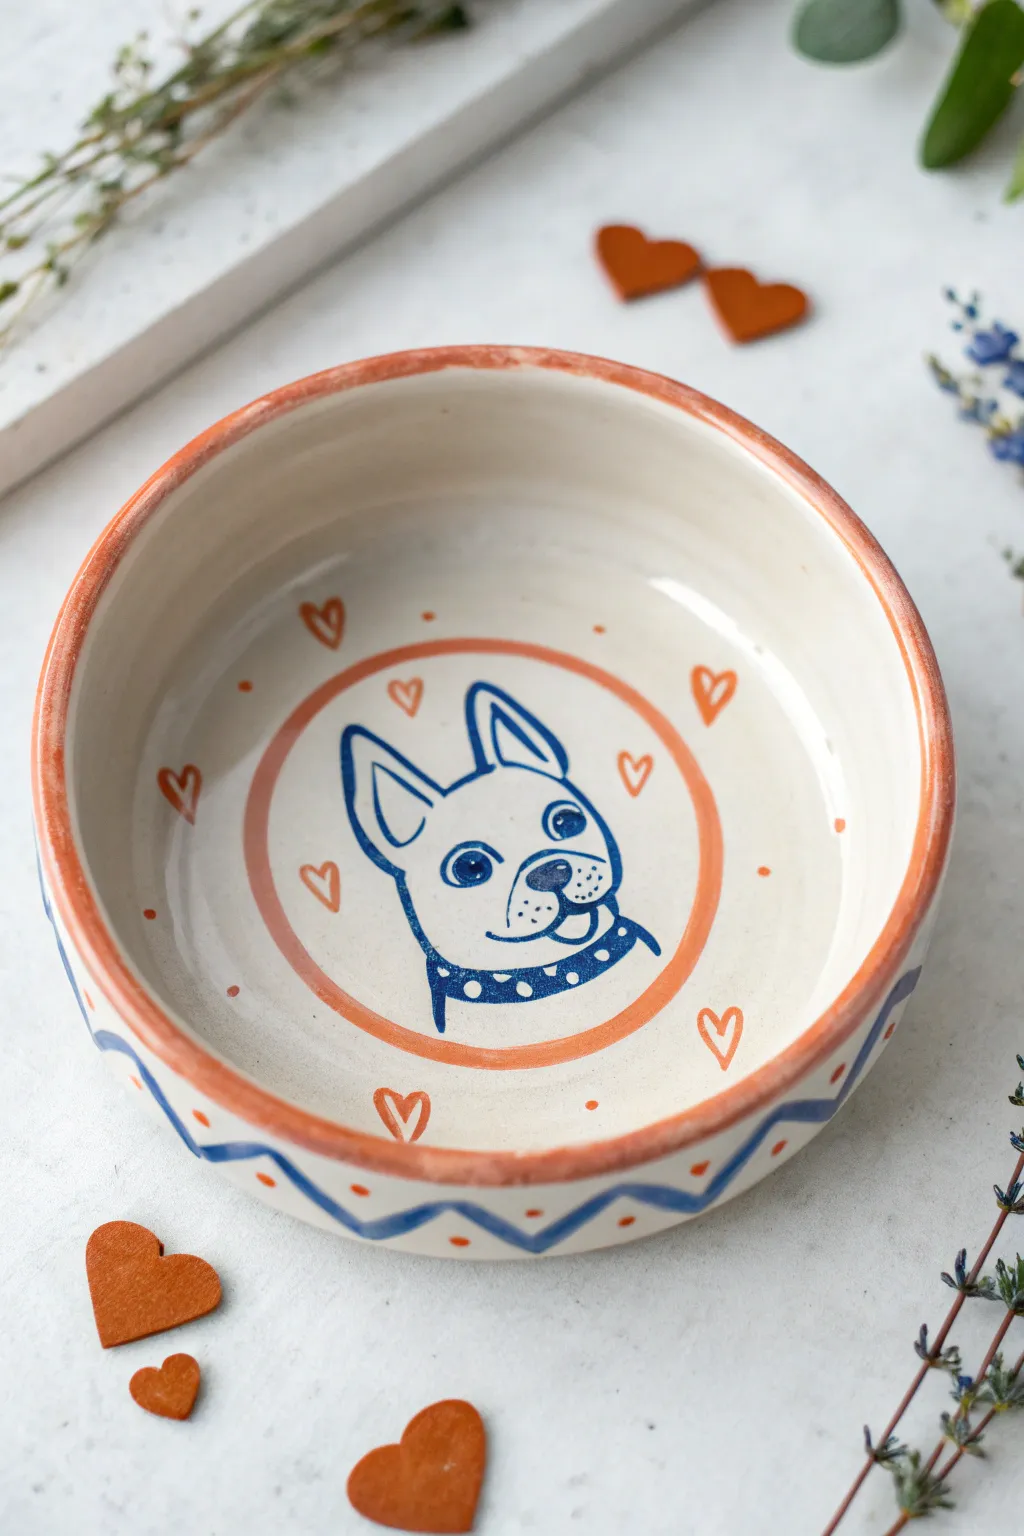
This adorable ceramic bowl design frames a simple line-drawn pup within a warm terracotta circle, scattered with little hearts for extra sweetness. The combination of navy blue outlines and rustic orange accents creates a classic, cozy look perfect for your furry friend’s mealtime.
How-To Guide
Materials
- Bisque ceramic dog bowl
- Underglaze paints: Navy Blue, Terracotta/Rust Orange
- Fine liner brush (size 0 or 00)
- Small round brush (size 2 or 4)
- Pencil (light graphite)
- Damp sponge
- Tracing paper (optional)
- Clear dipping glaze
Step 1: Preparation & Sketching
-
Clean the bisque:
Start by wiping down your ceramic bowl with a damp sponge. This removes any dust from the shelf that could prevent the glaze from sticking properly. -
Mark the center:
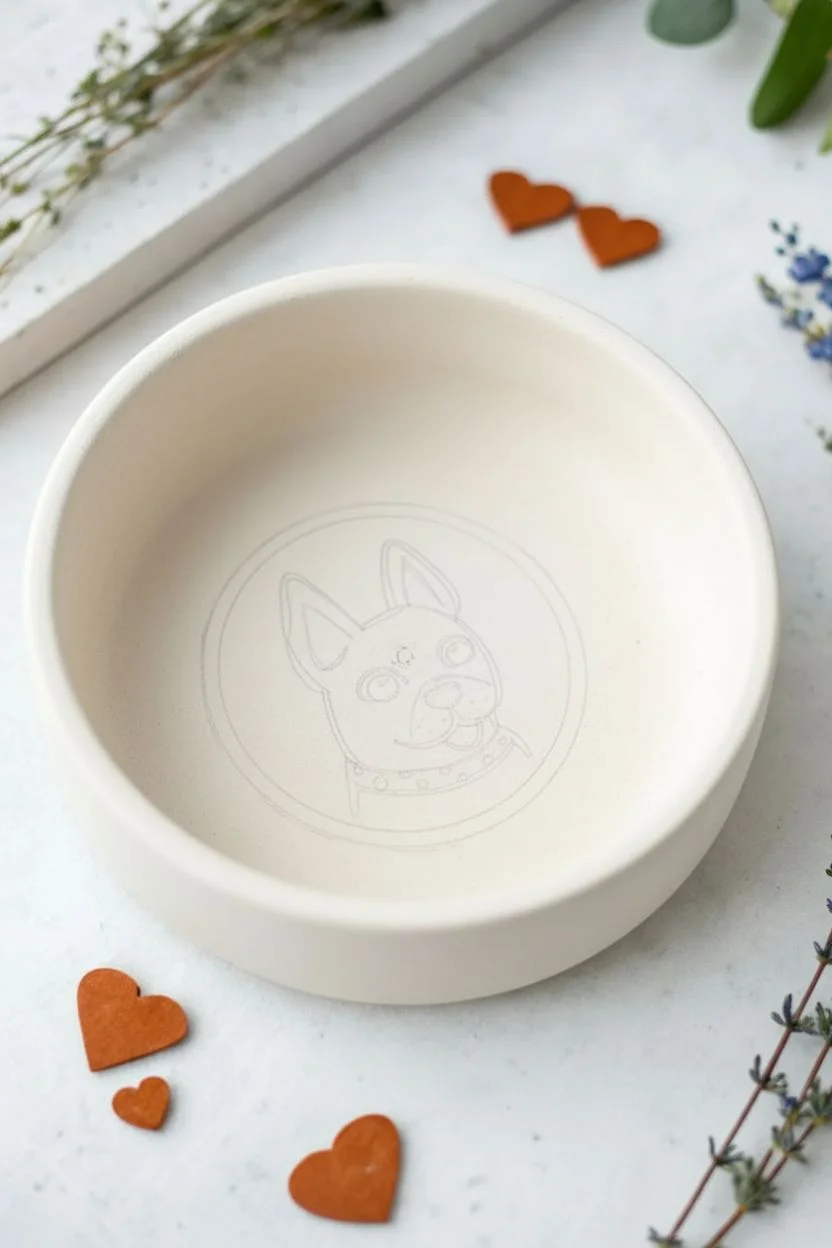
Look straight down into the bowl and lightly mark the center point with your pencil. Since pencil burns off in the kiln, don’t worry about making mistakes. -
Draw the inner circle:
Sketch a large circle in the center of the bowl’s basin. It doesn’t need to be mathematically perfect; a slightly organic hand-drawn circle adds charm. -
Sketch the portrait:
Inside that circle, lightly sketch the dog’s head. Focus on the large pointed ears, the rounded face shape, and the collar. If drawing isn’t your strong suit, you can transfer a printed image using tracing paper.
Step 2: Painting the Centerpiece
-
Outline the circle:
Load your round brush with the Terracotta underglaze. Carefully paint over your pencil line for the main circle, keeping the line thickness consistent. -
Outline the dog:
Switch to your fine liner brush and the Navy Blue underglaze. With a steady hand, trace over your dog sketch. I like to start with the ears and work my way down to avoid smudging the wet paint. -
Add facial details:
Use the very tip of the liner brush to add the eyes, nose, and mouth details. Leave a tiny speck of unpainted white in the eyes to create a highlight. -
Fill the collar:
Paint the dog’s collar solid blue, but leave small circles unpainted to create the polka-dot pattern shown in the image.
Oops! Shaky lines?
If your blue lines look jittery, wait for them to dry completely. Then, use a toothpick to gently scratch away the wobbly edges and straighten them up before firing.
Step 3: Adding Decorative Accents
-
Paint the floating hearts:
Using the terracotta color and the fine liner brush, paint small outlines of hearts scattered in the empty space between the dog portrait and the bowl’s walls. -
Vary the heart orientation:
Tilt the hearts in different directions to give the design a playful, floating feeling. -
Paint the rim:
Using the round brush and terracotta paint, carefully paint the top rim of the bowl. You can let the brush naturally create a slightly uneven, rustic edge.
Make it yours
Personalize the portrait by swapping the Frenchie for your own breed’s silhouette, or write your pet’s name in the banner style inside the collar area.
Step 4: Exterior Pattern & Finish
-
Sketch the zigzag:
Moving to the outside of the bowl, lightly pencil a zigzag pattern that goes all the way around the circumference. -
Paint the blue wave:
Trace over your zigzag sketch with the Navy Blue underglaze using a medium round brush. Aim for a fluid, continuous line. -
Add the dots:
Dip the handle end of a paintbrush into the Terracotta paint. Dot the paint into the ‘V’ spaces created by the blue zigzag line, both top and bottom. -
Final check:
Inspect your work for any accidental smudges. You can gently scratch them off with a toothpick or a clean, damp brush. -
Glazing:
Once the underglaze is bone dry, the piece is ready to be dipped in clear glaze and fired in the kiln according to the clay specifications.
Once fired, this custom bowl will make every meal feel special for your beloved pup

PENCIL GUIDE
Understanding Pencil Grades from H to B
From first sketch to finished drawing — learn pencil grades, line control, and shading techniques.
Explore the Full Guide
Breed-Inspired Color Spots
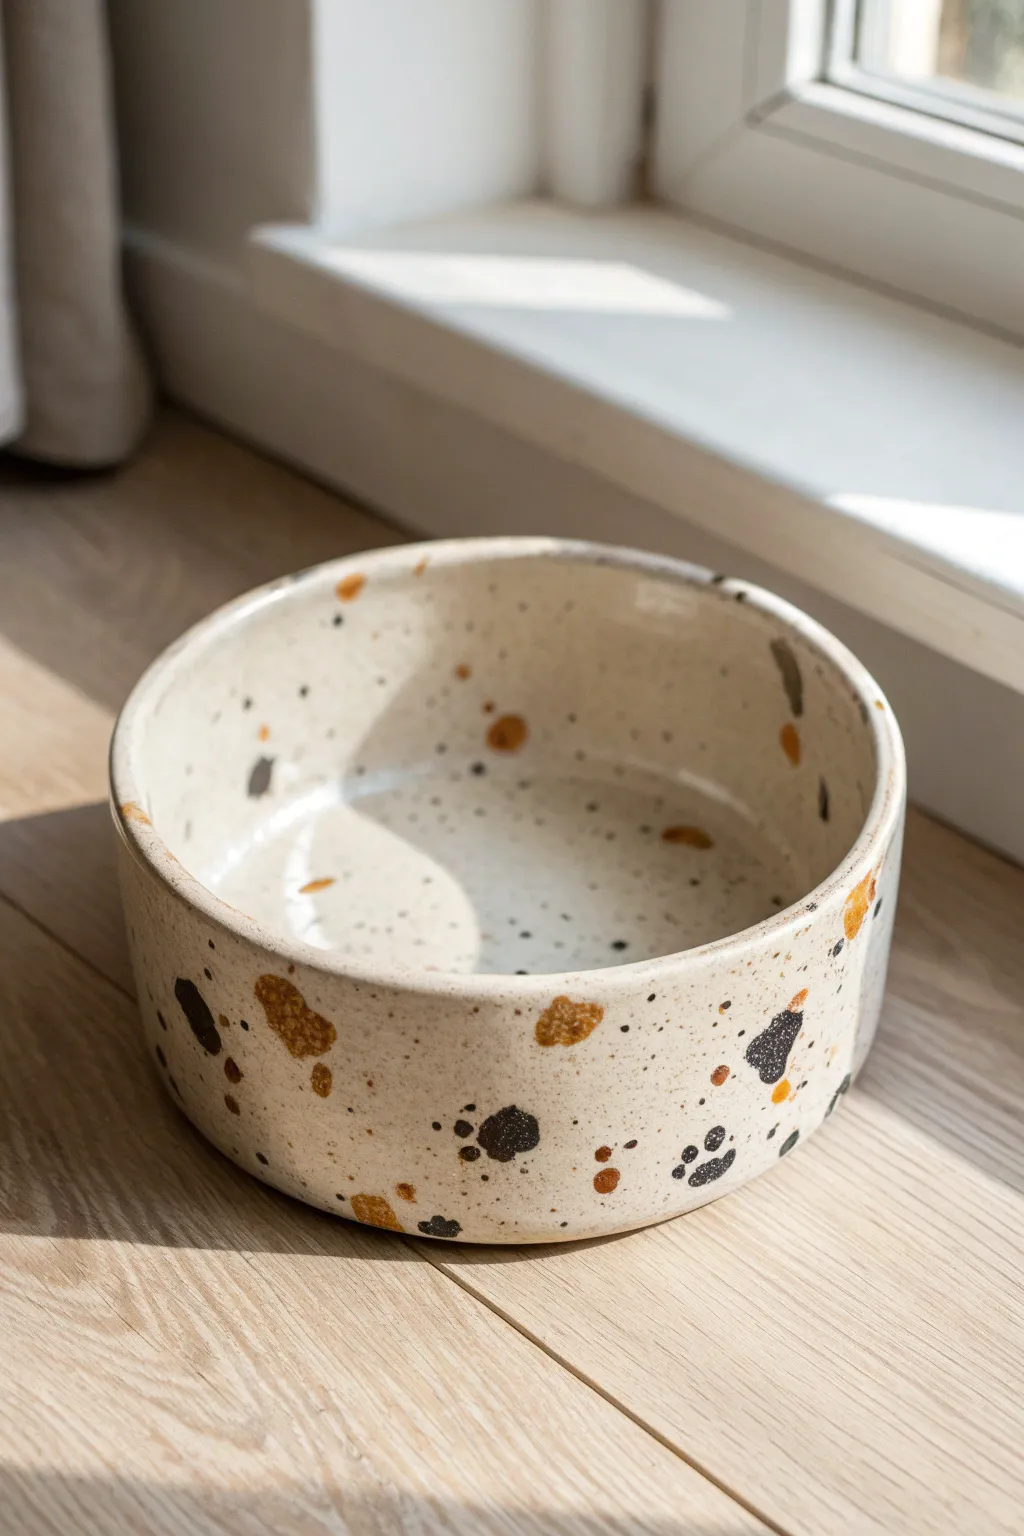
Celebrate your furry friend’s unique coat with this stylish, terrazzo-inspired pottery project. The final look features a creamy speckled base adorned with organic, painterly spots in warm ochre and deep espresso tones.
Detailed Instructions
Materials
- Bisque ceramic dog bowl (smooth surface)
- Cream or off-white underglaze
- Dark charcoal or black underglaze
- Warm ochre, mustard, or rust-orange underglaze
- Large fan brush or soft flat brush
- Small round detail brush (size 2 or 4)
- Old toothbrush or stiff bristle brush
- Palette or small dishes for paint
- Clear dipping glaze
- Sponge and water bowl
- Lazy Susan (optional)
Step 1: Base Preparation
-
Clean the Bisque:
Start by wiping down your entire ceramic bowl with a slightly damp sponge. This removes any kiln dust or oils from handling that might resist the glaze. -
Apply the Base Coat:
Pour a generous amount of your cream or off-white underglaze onto your palette. Using the large fan brush, apple a smooth, even coat over the entire bowl, inside and out. Don’t forget the rim. -
Layer for Opacity:
Let the first coat dry until it’s chalky to the touch. Apply a second and third coat to ensure a solid, opaque background. I find that cross-hatching your brush strokes helps eliminate streakiness. -
Create the Speckled Texture:
Dilute a tiny amount of your dark charcoal underglaze with a drop of water. Dip an old toothbrush into this mixture. -
Splatter Technique:
Hold the toothbrush about 6 inches from the bowl and run your thumb across the bristles to flick tiny specks onto the surface. Rotate the bowl to get even coverage inside and out. These tiny dots create that authentic ceramic clay look.
Natural Variation
To make the spots look more like real stone or fur, dab the wet underglaze gently with a dry sponge before it dries to add subtle texture.
Step 2: Adding the Spots
-
Prepare Accent Colors:
Pour small puddles of your ochre and dark charcoal underglazes. You want them at full strength, not diluted, for solid coverage. -
Paint the Ochre Shapes:
Using your small round brush, paint irregular, organic shapes with the ochre glaze. Think about kidney bean shapes, ovals, or soft triangles. Avoid perfect circles to keep the look natural. -
Placement Strategy:
Space these orange-brown spots randomly around the exterior wall and scatter a few on the inside floor of the bowl. Leave plenty of breathing room between them. -
Paint the Dark Shapes:
Clean your brush thoroughly. Now, add similar organic shapes using the dark charcoal glaze. These should act as a high-contrast anchor to the design. -
Layering Textures:
For a true terrazzo feel, try painting a few dark spots slightly overlapping the ochre ones, or place them very close together. Vary the sizes significantly—some should be thumb-sized, others just tiny dots. -
Rim Details:
Don’t ignore the top rim. Paint a few spots that ‘fold’ over the edge from the outside to the inside, connecting the two surfaces visually. -
Refine the Edges:
Go back over your larger spots with a second coat if the color looks thin. The edges should be relatively crisp, but not mechanical. -
Dry Completely:
Allow the bowl to dry completely. The underglaze should look matte and chalky, with no wet sheen remaining.
Splatter Control
If you get a giant blob of splatter where you didn’t want it, let it dry completely and gently scratch it off with a toothpick rather than wiping it wet.
Step 3: Finishing
-
Sponge the Foot:
Flip the bowl over and use a clean, damp sponge to wipe any stray glaze off the uttermost bottom ring (the foot) of the bowl. This prevents it from sticking to the kiln shelf. -
Clear Glaze Application:
Dip the entire bowl into a clear dipping glaze using tongs, or brush on a clear brushing glaze according to the manufacturer’s instructions. -
Final Fire:
Fire the piece in the kiln to the appropriate cone temperature for your specific clay and glaze usually Cone 06 or Cone 6.
Once fired, you’ll have a durable, modern bowl that perfectly matches your home decor and your pet’s personality
Ombré Glaze-Look Background With Paws

Give your furry friend a dining upgrade with this stunning hand-painted ceramic bowl featuring a warm, sunset-like ombré effect. The playful negative-space paw prints add a charming personal touch that reveals the creamy ceramic base beneath.
How-To Guide
Materials
- Unfinished ceramic dog bowl (bisque)
- Adhesive vinyl or paw print stickers (for stencils)
- Sponges (clean kitchen sponge or round painting sponge)
- Ceramic glaze (warm terracotta or reddish-brown)
- Clear dipping glaze (or brush-on clear glaze)
- Warm water
- Paper towels
- Soft fan brush
- Craft knife or tweezers
Step 1: Preparation & Masking
-
Clean the Bisque:
Start by wiping down your entire ceramic bowl with a slightly damp sponge. This removes any dust from the shelf which can prevent the glaze from adhering properly. -
Prepare the Paw Masks:
If you are using a vinyl cutter, cut out several paw prints sized appropriately for your bowl’s height. Alternatively, use pre-made paw print stickers. You’ll need enough to go all the way around the circumference. -
Apply the Stickers:
Position your paw stickers along the lower half of the bowl’s exterior. Press them down firmly, paying special attention to the edges of the toes and pads to ensure no paint bleeds underneath. -
Check Alignment:
Step back and rotate the bowl to ensure your spacing looks even. It doesn’t have to be mathematically perfect, but a balanced distribution looks best.
Step 2: Creating the Ombré Effect
-
Prepare the Sponge:
Dampen your painting sponge and squeeze out almost all the water. Pour a small amount of your terracotta-colored glaze onto a palette or plate. -
Start at the Base:
Dip the sponge into the glaze and dab off the excess on a paper towel. Begin sponging the very bottom edge of the bowl with a heavy application of color. -
Work Upwards:
Slowly move the sponge upward, covering the paw stickers. As you move higher up the bowl, lighten your pressure to deposit less paint. -
Feather the Edge:
For that soft, speckled fade seen in the photo, use a mostly dry sponge for the transition area where the color meets the white ceramic. Dab lightly so the natural ceramic color shows through the texture. -
Add a Second Coat:
Once the first layer is dry to the touch (it will turn chalky), add a second layer of sponging focused mainly at the bottom inch of the bowl to deepen that color intensity. -
Inspect the Fade:
Look closely at the gradient. If there are harsh lines, lightly dab over them with a clean, slightly damp sponge to soften the transition.
Bleeding Edges?
If glaze bleeds under the sticker, scratch it off gently with a wooden skewer. The wood is hard enough to remove dusty glaze but soft enough not to damage the ceramic bisque underneath.
Step 3: Revealing the Design
-
Dry Completely:
Allow the glaze to dry fully. This usually takes about 10–15 minutes depending on the humidity. -
Remove the Stickers:
Carefully use tweezers or a craft knife to lift the edge of the paw print stickers. Peel them off slowly to reveal the clean white bisque underneath. -
Clean the Edges:
If any glaze seeped under the stickers, use a toothpick or a clean, damp brush to gently scrape or wipe away the stray marks.
Textured Gradient
Use a natural sea sponge instead of a synthetic kitchen sponge. The irregular holes in a sea sponge create a much more organic, speckled transition for the ombré fade.
Step 4: Finishing Touches
-
Interior Glazing:
For the inside of the bowl, you can leave it white or apply a coat of clear glaze. If you want the creamy look from the photo, painting a layer of ‘Clear’ or ‘White’ glaze on the interior is best. -
Final Clear Coat:
Apply a clear dipping glaze over the entire piece (or brush on clear glaze) to seal the raw bisque areas and make the bowl food-safe and shiny. -
Fire the Piece:
Place your bowl in the kiln and fire it according to the glaze manufacturer’s instructions (usually cone 06 or cone 6).
Once fired, you’ll have a durable, custom piece that makes mealtime special for your pet


Night Sky With Constellation Pup
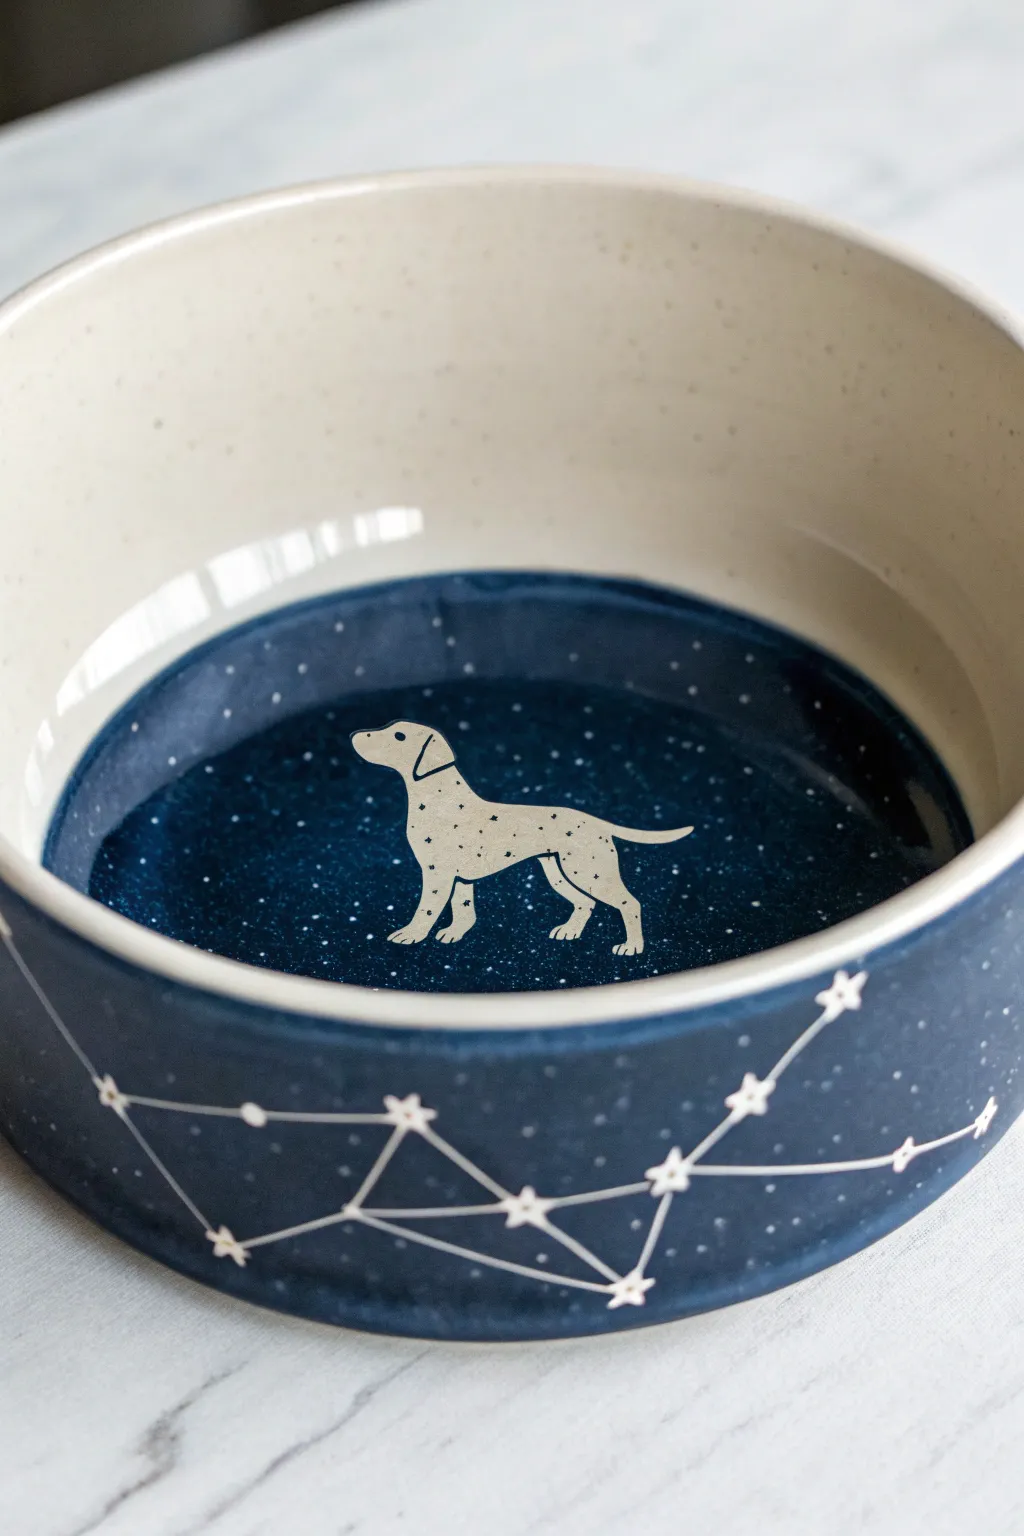
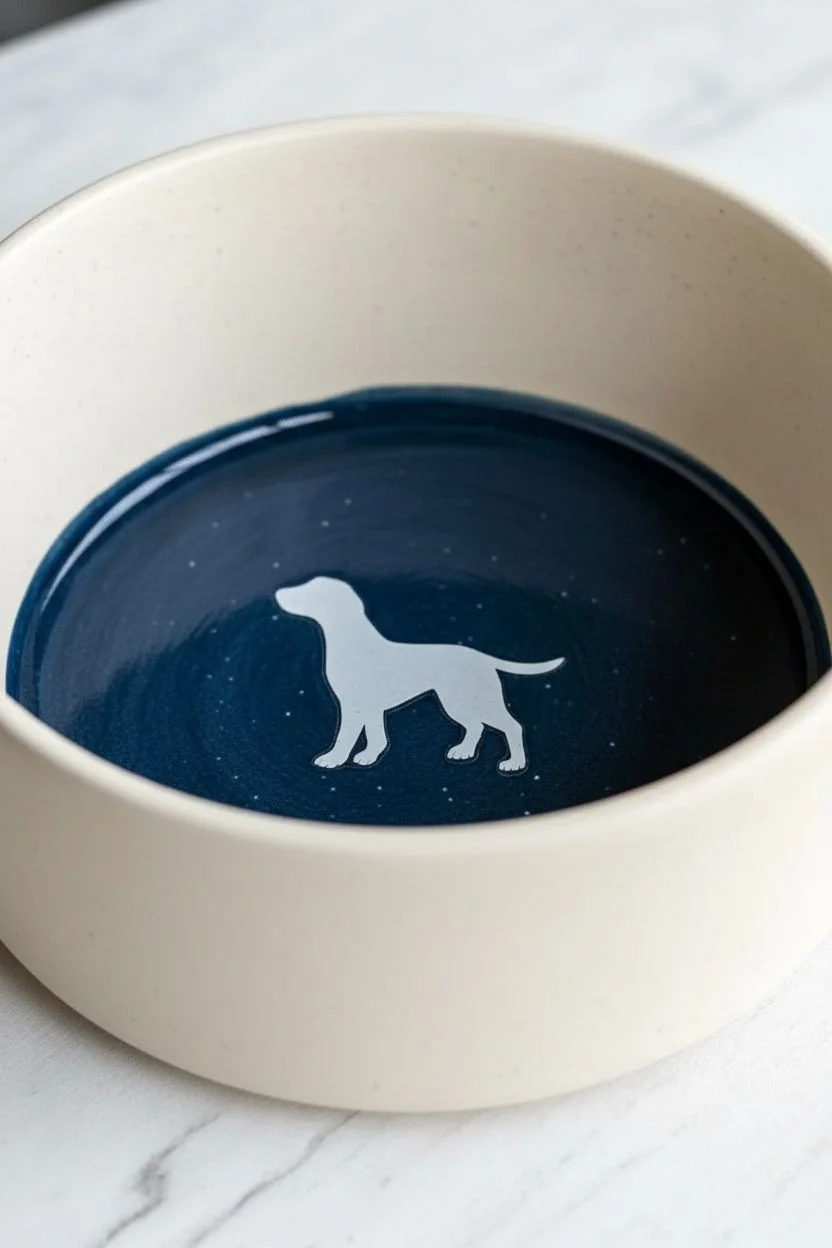
Turn mealtime into a starry spectacle with this constellation-themed ceramic dog bowl. Featuring a deep midnight blue interior and a charming dog silhouette amongst the stars, this piece is as functional as it is beautiful.
Detailed Instructions
Materials
- Bisque ceramic dog bowl
- Underglaze (Dark Navy Blue)
- Underglaze (Cream or White)
- Pencil
- Adhesive stencil vinyl or contact paper
- Craft knife or stencil cutter
- Fluffy fan brush
- Small round detail brush (size 1 or 2)
- Old toothbrush
- Sponge
- Clear dipping glaze
Step 1: Prepping the Canvas
-
Clean the bisque:
Wipe down your entire bisque bowl with a damp sponge to remove any dust or kiln debris, ensuring a clean surface for your glaze application. -
Create the dog stencil:
Draw a simple silhouette of your dog on adhesive vinyl or contact paper. It can be a generic breed or specific to your pup. -
Cut the stencil:
Carefully cut out the dog shape using a craft knife. You want the solid dog shape to act as a mask, so peel off the backing and set the positive shape aside. -
Apply the mask:
Place the vinyl dog sticker firmly in the very center of the inside of the bowl. Rub the edges down well so no paint can seep underneath.
Step 2: Painting the Midnight Sky
-
Paint the interior base:
Using a soft brush, apply three even coats of Dark Navy Blue underglaze to the bottom inside of the bowl, painting right over your vinyl stencil. Allow each coat to dry until it loses its sheen before applying the next. -
Glaze the exterior:
Extend the Dark Navy Blue to the exterior sides of the bowl. Apply three coats here as well to get that deep, rich opaque color. -
Leave the upper rim:
Stop the blue glaze about two inches from the top rim on the inside, leaving the upper band of the bowl as bare bisque for now. -
Speckle the rim:
Dip an old toothbrush into thinned Cream underglaze. Hold it near the unpainted upper rim and run your thumb across the bristles to flick tiny specks onto the bare bisque.
Bleeding Edges?
If paint bleeds under your stencil, wait for it to dry completely. Then, gently scratch the excess paint away with a wooden toothpick or a clay scratch tool.
Step 3: Revealing the Pup
-
Remove the stencil:
Once the blue paint is dry to the touch, use a pin or the tip of your craft knife to carefully lift the edge of the vinyl dog sticker and peel it away. -
Clean the edges:
If any blue paint bled under the sticker, gently scrape it away with a cleanup tool or a damp stiff brush to sharpen the dog’s outline. -
Add dog details:
Using a fine detail brush and the Cream underglaze, paint small spots, an ear outline, and an eye onto the bare bisque dog shape. I find keeping these simple works best.
Personalize It
Look up the star chart for your dog’s birthday (or adoption day) and paint that specific constellation pattern on the side of the bowl.
Step 4: Creating Constellations
-
Plan the stars:
Lightly sketch your constellation design onto the dried blue exterior using a pencil. The graphite will burn off in the kiln. -
Paint the stars:
Use your detail brush and Cream underglaze to paint small 5-point stars or simple dots at the main points of your constellation lines. -
Connect the dots:
Draw thin lines connecting your stars using the very tip of your brush or a slip trailer bottle for precision. -
Add background stars:
Dip the toothbrush in Cream underglaze again and gently splatter the dark blue areas (inside and out) to create a distant galaxy effect.
Step 5: Finishing Touches
-
Glaze the interior rim:
Apply a clear or transparent cream glaze to the upper inside rim if you want it to have a different finish, or leave it speckled bisque if dipping the whole piece later. -
Clear coat:
Once all underglaze is bone dry, dip the entire bowl into a clear glazing bath or brush on two coats of clear brushing glaze. -
Fire:
Fire the piece in a kiln according to the clay and glaze specifications (usually cone 06 or cone 6).
Your furry friend now has a dining vessel worthy of the stars
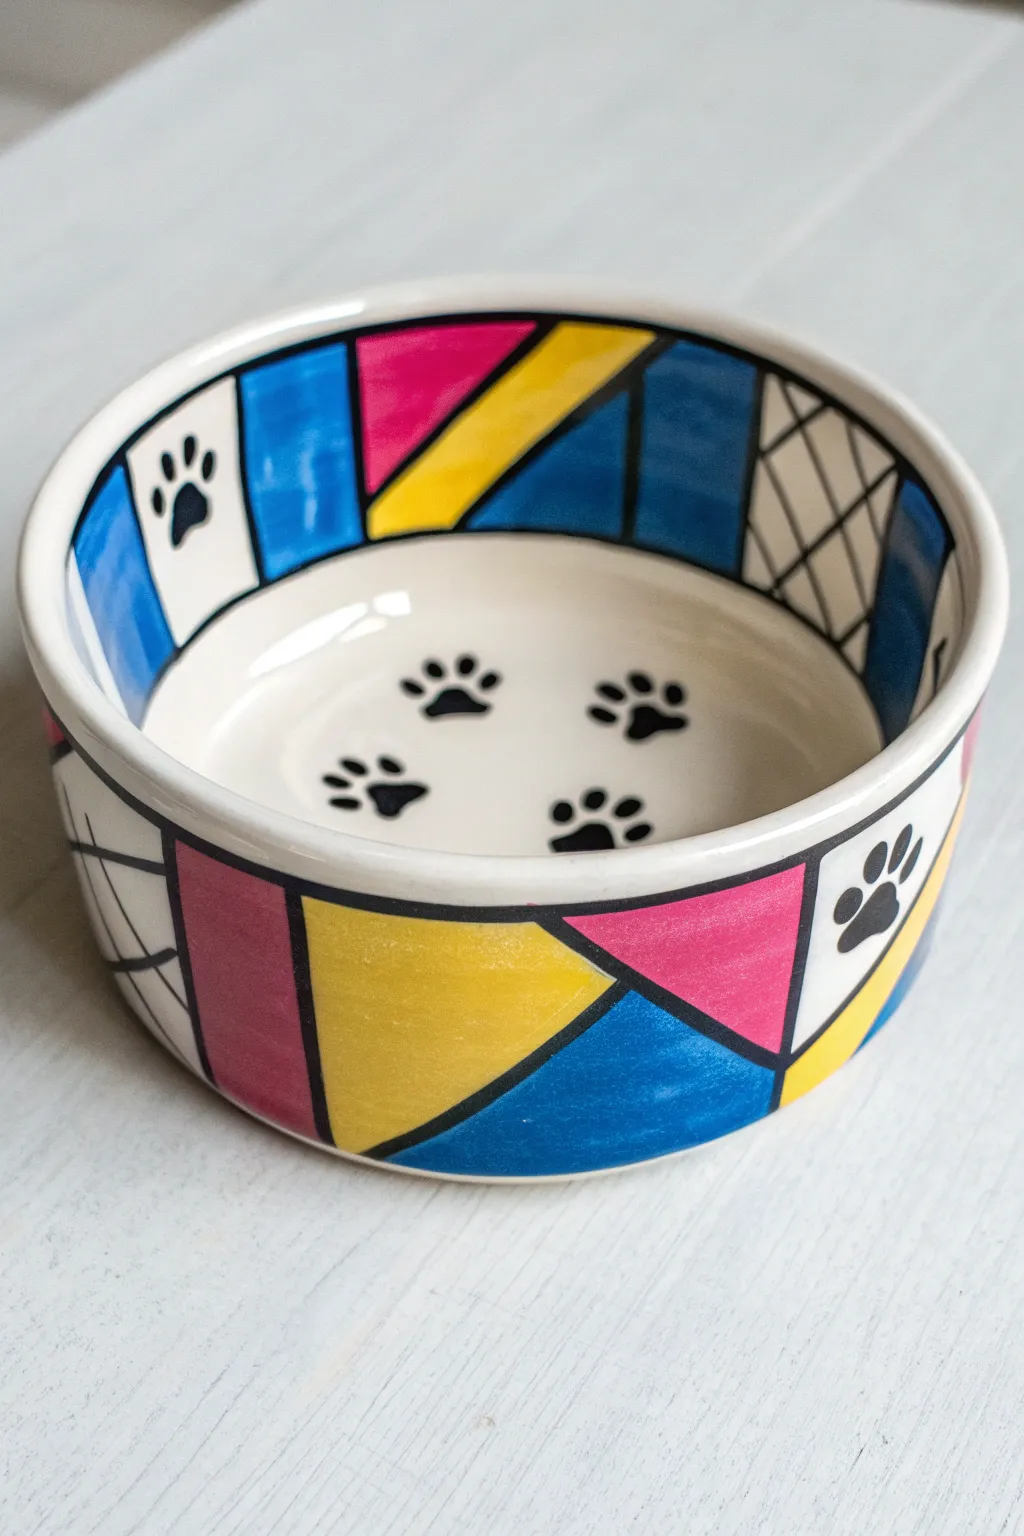
Pop-Art Blocks With Comic Paws

Bring a splash of comic book vibrancy to feeding time with this geometric, Mondrian-inspired pottery project. The combination of bold black outlines, primary colors, and cute paw prints creates a playful yet modern aesthetic that really pops on white ceramic.
Step-by-Step Tutorial
Materials
- Bisque ceramic dog bowl
- Pencil
- Measuring tape (flexible) or paper strip
- Ceramic underglazes (Bright Blue, Sunshine Yellow, Magenta/Red, Black)
- Small flat brush (size 4 or 6)
- Fine liner brush (size 0 or 00) or underglaze applicator bottle with fine tip
- Round brush (size 4)
- Clear dipping glaze
- Sponge and water bowl
Step 1: Geometric Layout
-
Clean surface:
Before starting, wipe down the entire bisque bowl with a damp sponge. This removes ceramic dust that could repel the glaze and gives you a clean slate. -
Initial vertical lines:
Using a flexible tape measure or a strip of paper, mark even intervals around the outside rim of the bowl. Lightly sketch vertical lines down the side to create rectangular panels. They don’t have to be perfectly identical, but aim for symmetry. -
Diagonal divisions:
Within selected rectangular panels, draw diagonal lines connecting opposite corners. Create variety by alternating the direction of the diagonals or leaving some panels fully rectangular. -
Map the interior:
Carry your vertical lines over the rim and down the inside wall of the bowl. The interior pattern should generally mirror or complement the exterior geometry for a cohesive look.
Clean Lines Hack
Smudged a black line? Don’t panic. Wait for the mistake to dry completely, then use a stiff, slightly damp brush or a wooden skewer to gently scrape the stray paint off the bisque.
Step 2: Applying Color
-
Start with yellow:
Begin painting your color blocks. I usually start with the lightest color, yellow, to prevent darker colors from muddying it. Fill in triangles or rectangles, applying 3 solid coats for opacity, letting each coat dry until matte. -
Add magenta sections:
Move on to the magenta or bright red glaze. Select geometric sections adjacent to the yellow or white spaces. Apply 3 even coats. -
Paint the blue:
Fill remaining color blocks with bright blue. Be careful to paint right up to your pencil lines without going too far over, though the black outline later will cover minor messy edges. -
Leave white space:
Crucially, leave several panels unpainted (raw bisque). These white spaces are essential for the ‘pop art’ high-contrast look and serve as the background for the paw prints. -
Cross-hatch pattern:
Pick one or two panels on the interior and exterior to feature a cross-hatch grid. Leave the background white and use your fine liner brush to paint a thin black diamond grid pattern.
Step 3: Detailing & Outlining
-
Outline the geometry:
Using a fine liner brush or a glaze applicator bottle filled with black underglaze, trace over all your pencil lines. These lines should be thick enough to resemble the lead coming in stained glass or comic book borders. -
Rim definition:
Paint a consistent black line along the top rim of the bowl to frame the entire piece. -
Exterior paw prints:
In the center of the large white exterior panels, paint a solid black paw print. Use a round brush to dab the main pad and three or four smaller toe beans above it. -
Interior paw prints:
Moving to the bottom inside of the bowl, paint four to five paw prints scattered across the white ceramic floor. Vary their rotation slightly to make it look like a dog walked through the bowl. -
Final inspection:
Check your black lines for any gaps or thin spots. Rework them if necessary to ensure they are solid and opaque.
Make It Personal
Is this a gift? Instead of generic paw prints on the exterior white panels, paint the pet’s name in a bold, comic-book style font or paint a small bone silhouette.
Step 4: Finishing
-
Clear glaze application:
Once the underglaze is bone dry, the bowl needs to be dipped in clear glaze. If you represent doing this at home, carefully brush on a clear brushing glaze; otherwise, handle this step with your studio. -
Stilt and fire:
Wipe the very bottom foot of the bowl clean with a sponge so it doesn’t stick to the kiln shelf. Fire according to your clay body’s instructions (usually cone 06 or cone 6).
Your furry friend now has a dining vessel that is a true work of modern art


Have a question or want to share your own experience? I'd love to hear from you in the comments below!