I love treating a door like a blank canvas—one weekend of door paint can completely shift the mood of your space. These door painting ideas range from classic color upgrades to artsy techniques that turn an everyday door into a real focal point.
Classic Bold Front Door Color Pop
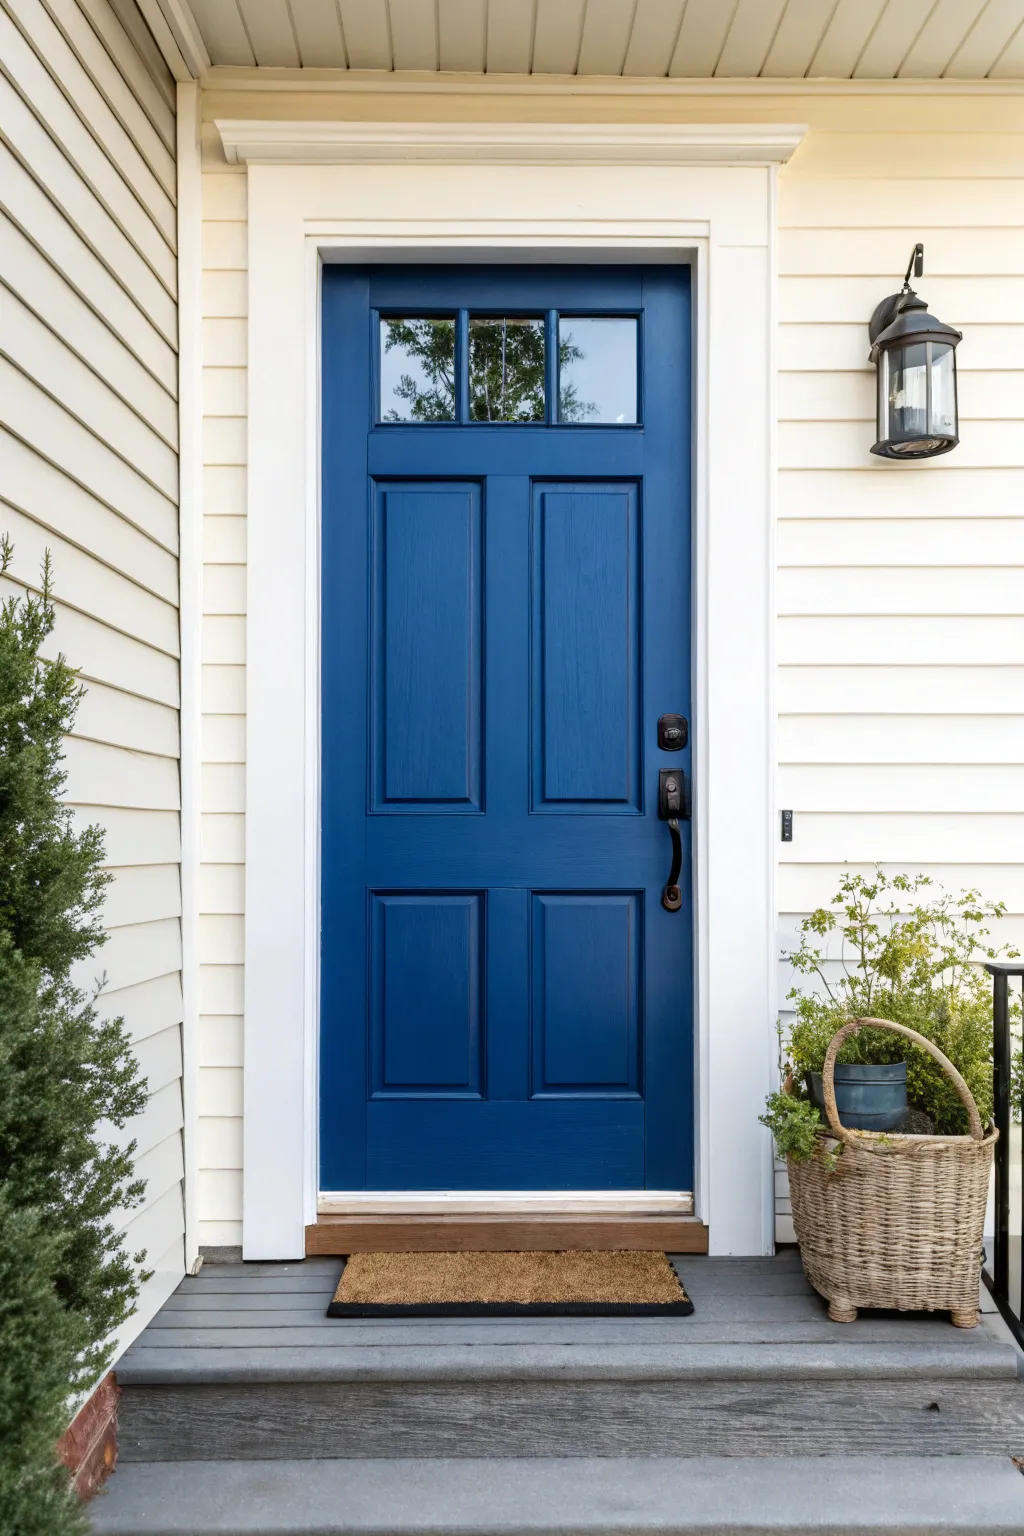

Transform your entryway with a timeless pop of color that instantly boosts curb appeal and welcomes guests with sophistication. This project guides you through achieving that perfectly smooth, deep navy finish that contrasts beautifully against white trim.
Detailed Instructions
Materials
- Exterior semi-gloss paint (Navy/Classic Blue)
- High-quality angled sash brush (2-2.5 inch)
- Mini foam roller and tray
- Painter’s tape
- Sandpaper (120 and 220 grit)
- Tack cloth or microfiber rags
- Mild degreaser or TSP
- Exterior primer (if changing color drastically)
- Drop cloth
- Screwdriver
Step 1: Preparation
-
Check the conditions:
Before starting, check your weather forecast. You want a window of 2-3 days with temperatures between 50°F and 90°F and low humidity to ensure proper drying and curing. -
Remove hardware:
Use a screwdriver to remove the handle, deadbolt, and knocker. While taping around them is possible, I find removing them guarantees a much more professional, seamless finish. -
Clean thoroughly:
Wipe down the entire door with a mild degreaser or TSP solution to remove dirt, grime, and oils from hands. Let the door dry completely. -
Protect the area:
Lay down a drop cloth to protect your porch floor. Apply painter’s tape carefully over any glass panes (like the top window section) and hinges if you haven’t removed the door from its frame. -
Sand the surface:
Lightly scuff the old gathered paint with 120-grit sandpaper to help the new coat adhere. If there is peeling paint, sand it smooth so no ridges remain. -
Remove dust:
Vacuum up the sanding dust, then wipe the door with a tack cloth to ensure the surface is perfectly clean.
Step 2: Painting
-
Prime if necessary:
If you are painting over a dark color or raw wood, apply a coat of high-quality exterior primer. Let it dry according to the can’s instructions. -
Paint the panels first:
Dip your angled sash brush and start with the recessed panels. Paint the inside edges first, then brush out the flat center of the panel to smooth it. -
Feather the edges:
Keep a wet edge and watch for paint pooling in the corners of the panels. Gently brush away any drips immediately. -
Paint the vertical mullions:
Move to the vertical center strip (the mullion) between the panels. Use your brush or the mini roller here, stroking vertically from top to bottom. -
Paint the horizontal rails:
Next, paint the horizontal sections (rails) starting at the top and working your way down. Ensure your brush strokes follow the wood grain direction (horizontal). -
Paint the outer stiles:
Finish by painting the long vertical side strips (stiles) that run the full height of the door on the left and right. This frames in your work neatly. -
Allow to dry:
Let this first coat dry completely. Depending on your paint and humidity, this could take 4 to 24 hours. Don’t rush this step or the paint may drag. -
Light send between coats:
Once fully dry, very lightly run 220-grit sandpaper over the surface to knock down any bumps. Wipe away the dust with a tack cloth. -
Apply the second coat:
Repeat the painting order: panels, center vertical strip, horizontal rails, and finally the outer vertical stiles. Two coats provide that rich, deep color saturation.
Sticky Situation?
If the door feels sticky after drying (blocking), dust the weatherstripping with a little talcum powder before closing it to prevent the paint from bonding to the seal.
Step 3: Finishing Up
-
Remove tape:
Carefully peel away the painter’s tape while the final coat is still slightly tacky to prevent peeling dry paint off the glass. -
Reinstall hardware:
Once the door is fully cured (give it at least 24 hours if possible), screw your lockset and handle back into place. -
Final wipe down:
Clean any stray smudges on the glass with glass cleaner and a paper towel for a sparkling finish.
Make It Shine
Swap out old hardware for a contrasting metal finish, like the matte black handle shown here, to instantly modernize the classic blue look.
Step back and admire how a simple color change has completely revitalized the character of your home entrance


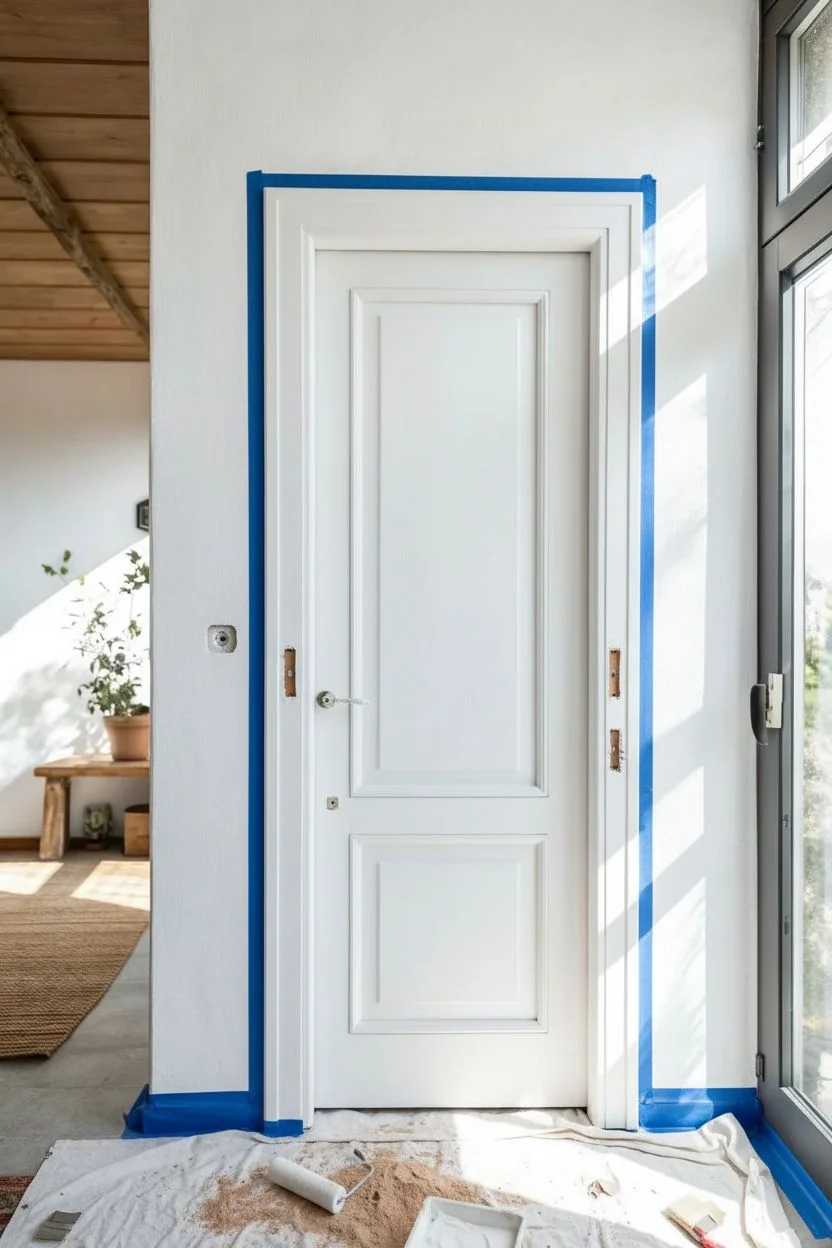
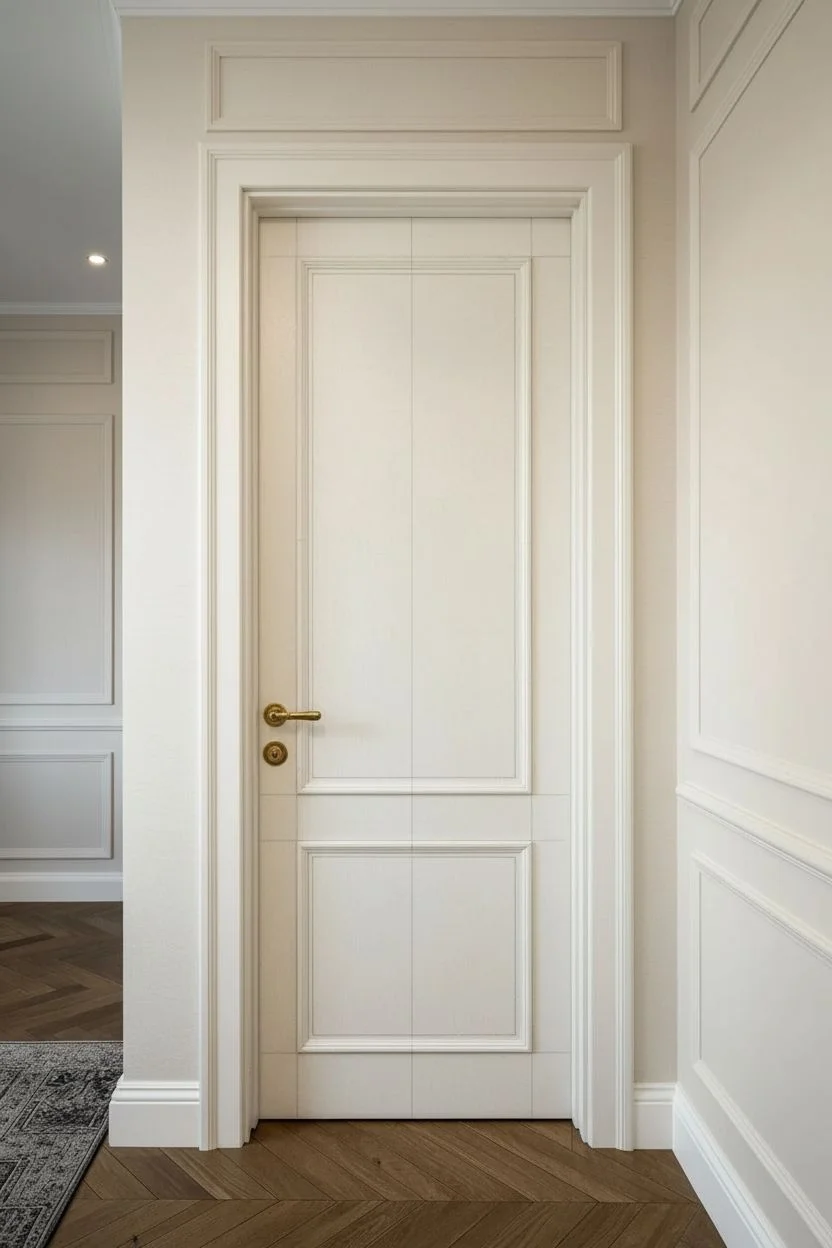
Crisp White Door With a Freshly Painted Frame
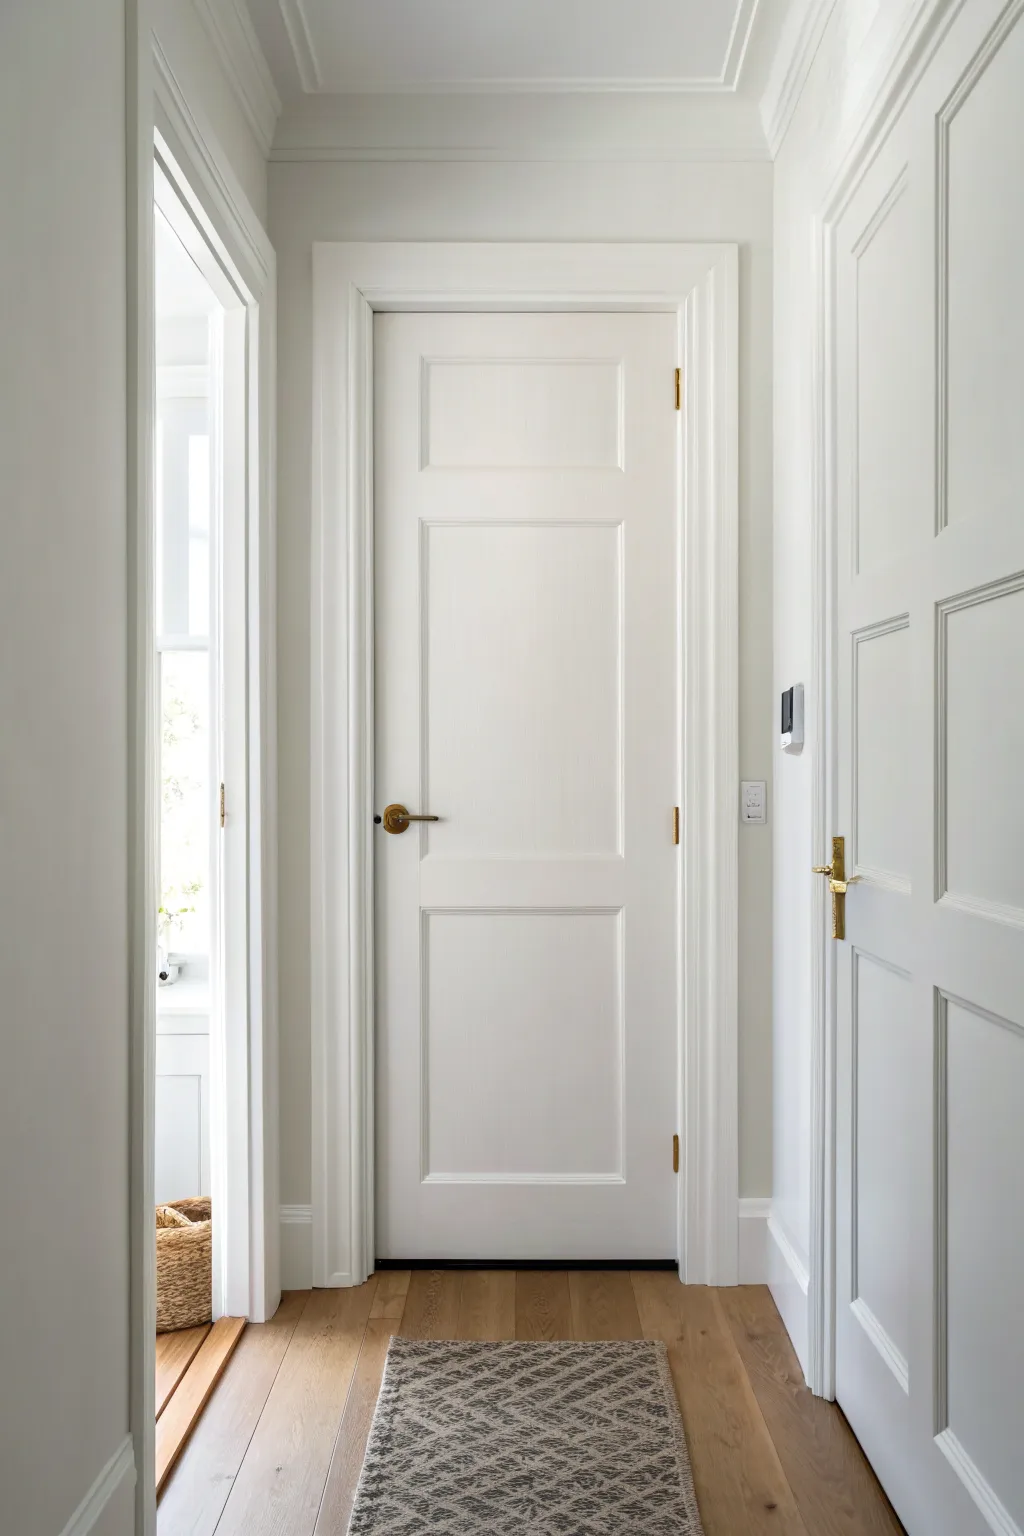
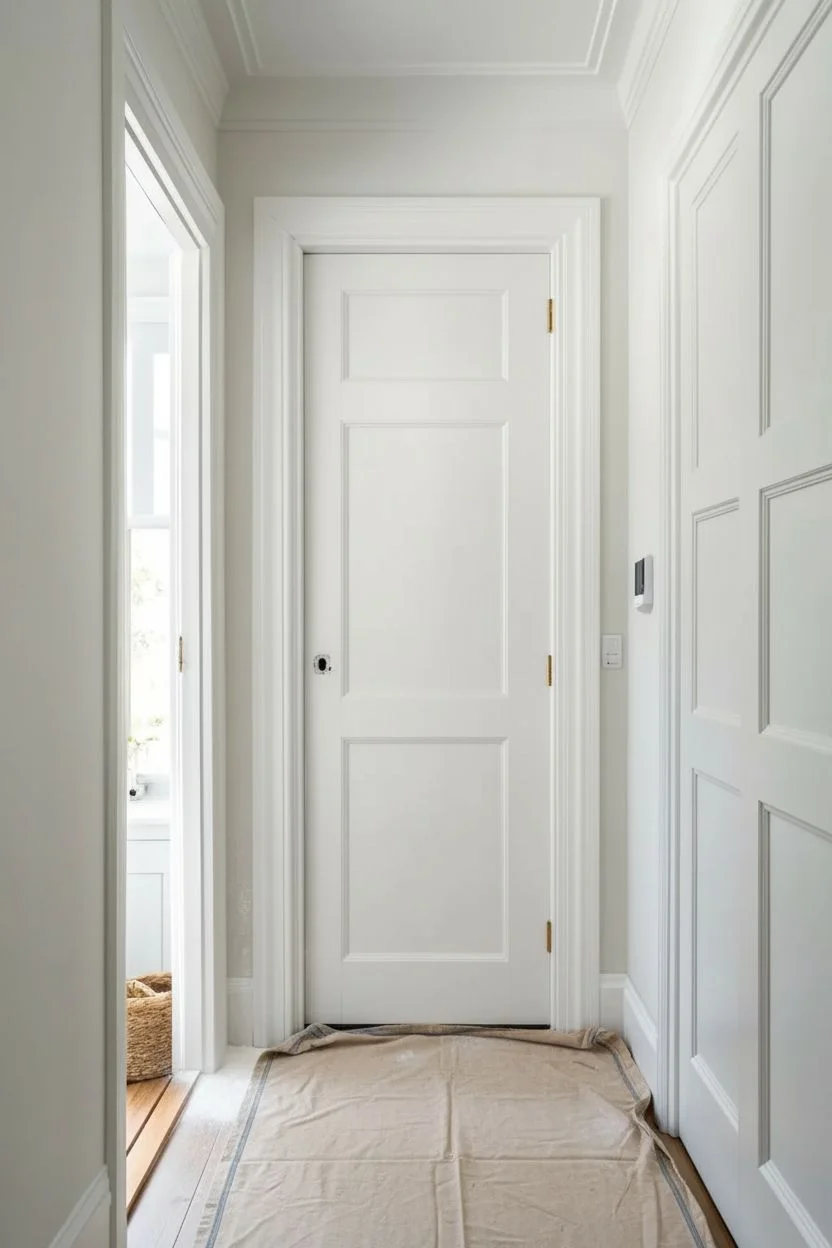
Reinvigorate a hallway space by mastering the subtle art of painting a crisp, clean white door against matching white trim. This project creates a seamless, airy aesthetic that visually expands small corridors while highlighting architectural details through finish and sheen.
Step-by-Step Tutorial
Materials
- High-quality interior satin or semi-gloss paint (bright white)
- Interior semi-gloss or high-gloss paint (for trim, same white shade)
- Medium-grit sanding sponge (120-150 grit)
- Fine-grit sandpaper (220 grit)
- Tack cloth
- Painter’s tape (1.5 – 2 inch width)
- Canvas drop cloth
- Degreasing cleaner (like TSP or a TSP substitute)
- Screwdriver (for hardware removal)
- 2-inch angled sash brush (synthetic bristles)
- 4-inch foam roller or short-nap microfiber roller
- Wood filler (if repairs are needed)
- Putty knife
- Primer (stain-blocking)
Step 1: Preparation & Hardware Removal
-
Clear and Protect:
Begin by removing any rugs, like the woven runner shown, and clearing the hallway. Lay down a canvas drop cloth to protect your hardwood floors from drips and splatters. -
Remove Hardware:
Using a screwdriver, carefully remove the door handle, latch plate, and any other hardware. It is much easier to get a professional finish by removing these rather than taping around them. -
Clean Thoroughly:
Wipe down the entire door and frame with a degreasing cleaner. Doors accumulate a surprising amount of finger oils and dust in the crevices, which can prevent paint adhesion. -
Fill Imperfections:
Inspect the woodwork for dings or scratches. Apply a small amount of wood filler with a putty knife, let it dry completely, and sand it flush.
Wet Edge Wonder
Add a conditioner like Floetrol to water-based paint. It slows drying time, reducing brush marks and helping the paint self-level for a glass-like finish.
Step 2: Sanding & Priming
-
Sand the Surfaces:
Use a medium-grit sanding sponge to scuff the existing finish on both the door and the frame. You don’t need to remove all the old paint, just take the shine off to help the new coat stick. -
Dust Removal:
Vacuum up the sanding dust, then wipe the surface with a tack cloth to pick up every last micro-particle. -
Tape the Edges:
Apply painter’s tape to the floor where the door jamb meets the hardwood, and along the wall where the casing meets the drywall if you aren’t painting the walls simultaneously. -
Prime the Surface:
Apply a coat of stain-blocking primer. I find this step crucial even when painting white over white, as it ensures a consistent base sheen and hides any old yellowing. -
Light Sanding:
Once the primer is fully dry, give it a very light pass with fine-grit (220) sandpaper to smooth out any brush marks or raised grain.
Step 3: Painting the Door & Trim
-
Start with the Panels:
Begin painting the door itself. Use an angled sash brush to paint the recessed molding around the three panels first. -
Fill the Centers:
Use a small roller to paint the flat center panels. Roll in the direction of the wood grain (vertical for the vertical panels). -
Paint the Vertical Stiles:
Paint the vertical center stile (the strip between the panels) next, feathering the edges so they blend well. -
Paint the Horizontals:
Brush or roll the horizontal rails of the door. Be careful at the intersections to keep the brush strokes following the construction of the door. -
Finish the Door Edges:
Paint the two vertical outer stiles of the door last, running the full length from top to bottom. -
Paint the Frame:
Move to the door casing and jambs. Use the angled brush to cut in sharp lines against the wall, then fill in the face of the trim with long, smooth strokes. -
Check for Drips:
While the paint is wet, inspect corners and detail work for pooling paint or drips and smooth them out immediately. -
Apply Second Coat:
Allow the first coat to dry according to the manufacturer’s instructions. Apply a second coat following the exact same order (panels, rails, stiles, then trim) for full opacity. -
Reinstall Hardware:
Wait at least 24 hours—or longer if possible—for the paint to cure slightly before reinstalling the brass handle and latch to avoid denting the soft fresh paint.
Sheen Contrast
For a subtle designer touch, paint the walls in a flat/matte finish and the door/trim in semi-gloss using the exact same white color to add depth.
Step back and appreciate how this clean, unified look brightens your hallway and makes the space feel instantly more open


Moody Dark Door for Instant Drama
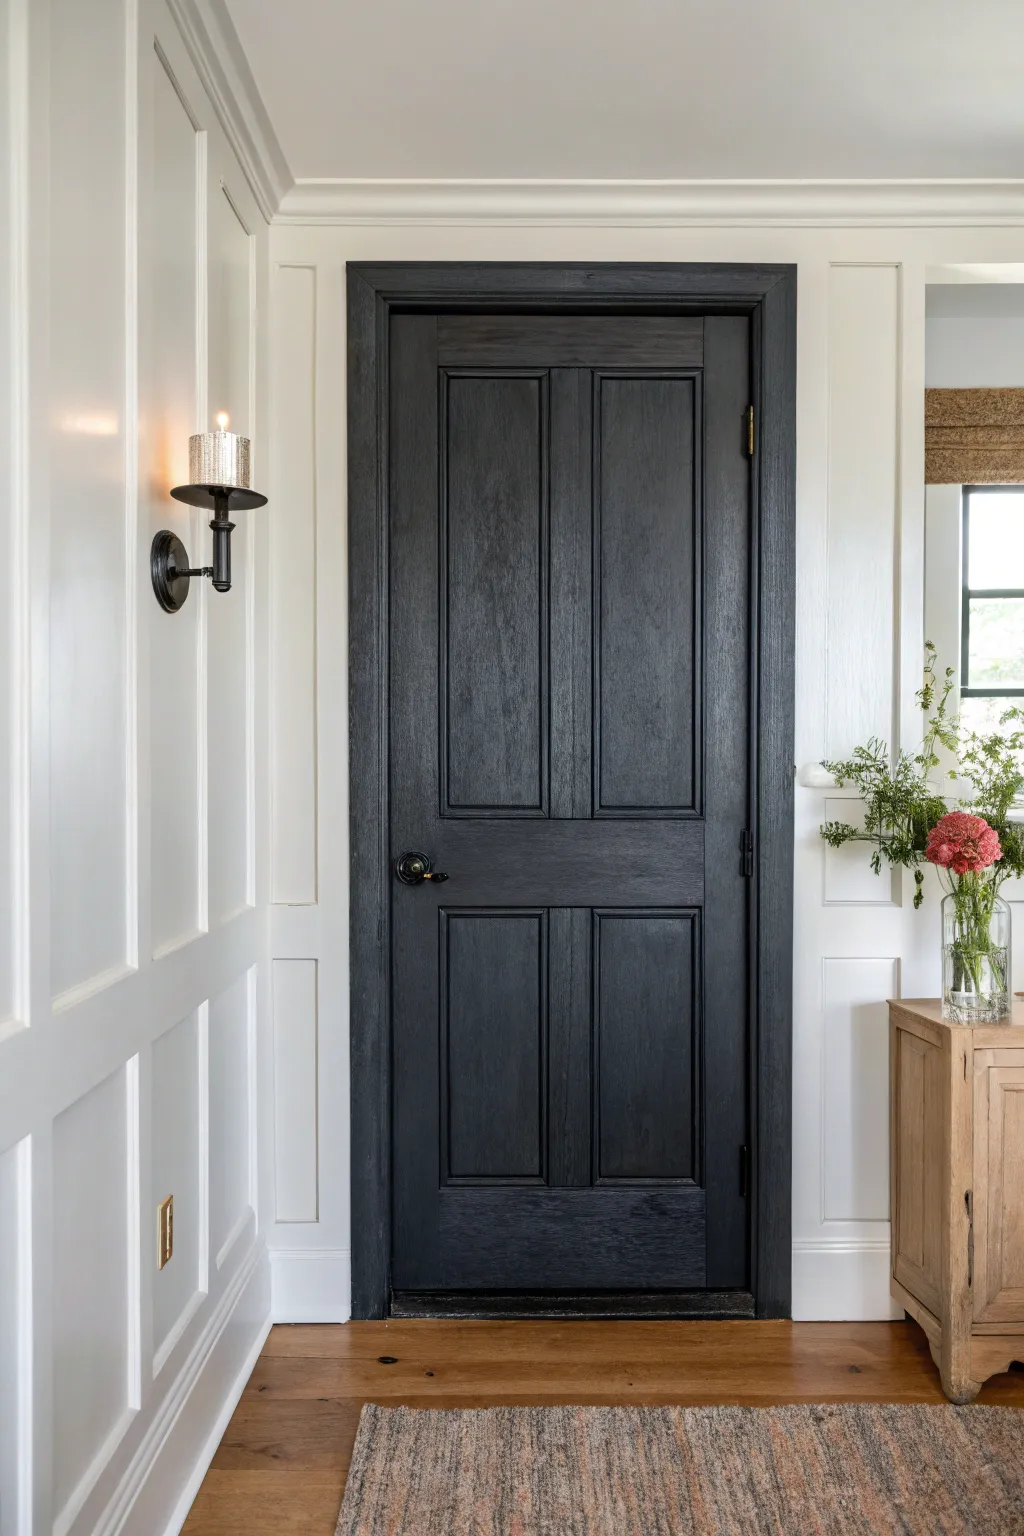
Transform a standard interior door into a striking focal point with a matte charcoal finish. This moody upgrade adds instant depth and modern elegance to any hallway, creating a stunning contrast against white trim.
Step-by-Step
Materials
- Sanding block (120-grit)
- Sandpaper (220-grit)
- Painter’s tape (blue or green)
- Drop cloth
- Degreaser or Trisodium Phosphate (TSP)
- High-quality primer (tinted gray)
- High-quality interior paint (Charcoal or pure black, satin or semi-gloss)
- 2-inch angled sash brush
- 4-inch foam roller
- Screwdriver
- Clean tack cloths
Step 1: Preparation Essentials
-
Remove Hardware:
Use your screwdriver to carefully remove the doorknob, locking mechanisms, and any strike plates. Store the screws and pieces in a small bag so they don’t get lost. -
Clean Thoroughly:
Wipe down the entire door with a degreaser or TSP solution. Doors collect oils from hands, which can prevent paint from adhering properly. -
Sand the Surface:
Using a 120-grit sanding block, sand the entire door to scuff up the existing finish. You aren’t trying to remove all the old paint, just creating a ‘tooth’ for the new coat to grip. -
Dust Removal:
Vacuum up the dust, then wipe the door down with a tacky cloth to remove every last speck of debris. -
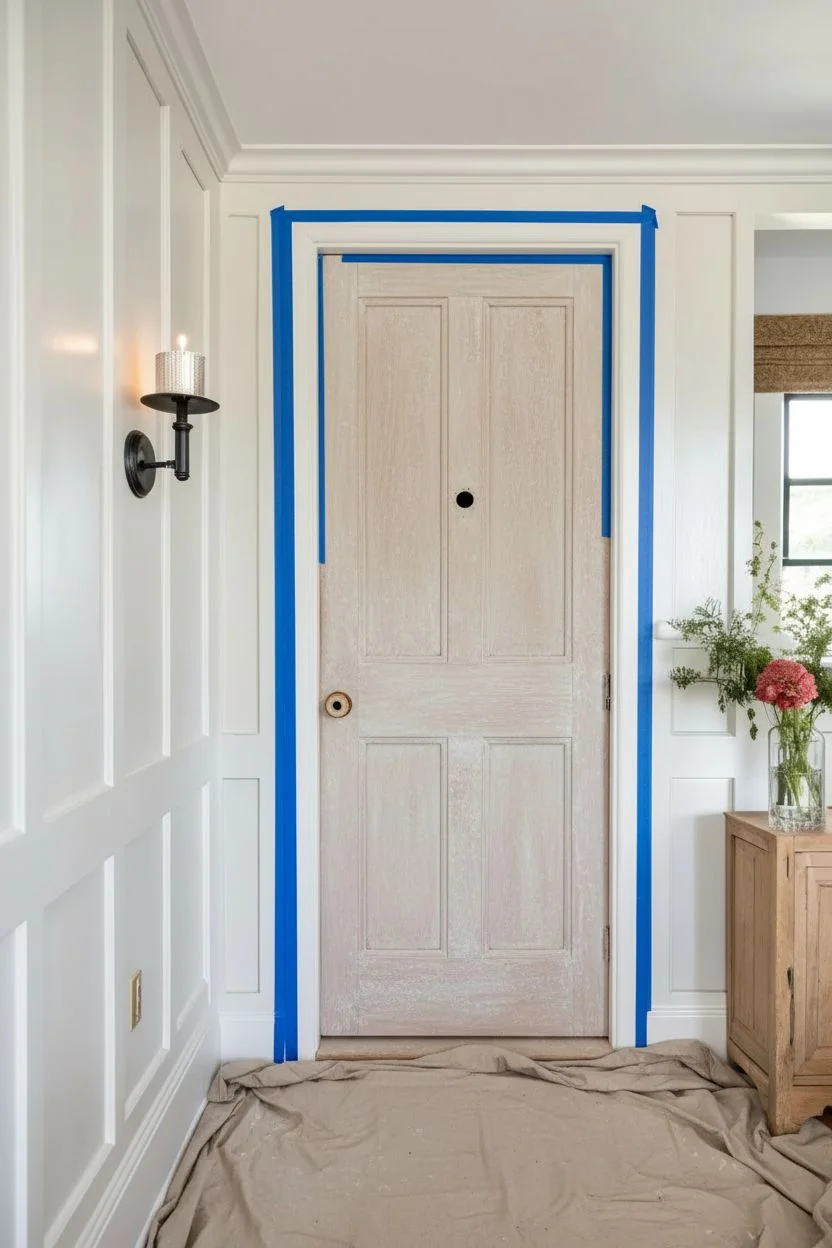
Protect Surroundings:
Lay down a drop cloth underneath the door. Apply painter’s tape carefully over the hinges (unless you removed the door entirely) and along the edges of the door frame or trim if you plan to keep those white.
Sticky Situation
If the door feels sticky after painting (blocking), rub a plain white candle or swipe clear wax along the edges where the door creates friction with the frame.
Step 2: Prime for Success
-
Choose Tinted Primer:
Since you are going from light to very dark, ask the paint store to tint your primer gray. This helps achieve true black coverage with fewer topcoats. -
Cutting In:
Use the angled sash brush to apply primer into the recessed panels and corners first. Work the brush into the grooves to ensure full coverage. -
Roll Flat Areas:
Use the foam roller for the flat stiles and rails. This minimizes brush strokes and speeds up the process. -
Light Sanding:
Once the primer is fully dry (check the can for times), lightly sand with fine 220-grit sandpaper for a buttery smooth base.
Hardware Swap
Take the drama further by swapping old brass knobs for matte black or oil-rubbed bronze hardware to create a monochromatic, high-end look.
Step 3: The Dark Transformation
-
Panel Work First:
Dip your angled brush into your dark charcoal paint. Start by painting the recessed moldings of the panels first. -
Inner Panels:
Immediately after the molding, paint the flat center of the panels. Use smooth, vertical strokes to mimic the wood grain direction. -
Vertical Stiles:
Move to the vertical center stile (the strip between panels). Paint vertically with your brush or roller. -
Horizontal Rails:
Paint the horizontal rails next. Be careful where these meet the vertical sections; try to keep a wet edge to avoid lap marks. -
Outer Edges:
Finally, paint the long vertical stiles on the far left and right of the door. -
Watch for Drips:
After completing a section, I like to do a quick visual check for paint pooling in the corners and smooth it out before it tacks up. -
Dry and Repeat:
Let the first coat dry completely—usually 4 to 6 hours. Do not rush this step, or the paint may stay tacky. -
Second Coat:
Apply a second coat following the exact same order (panels, center, rails, edges). This coat will deepen the color and fix any streakiness.
Step 4: Finishing Touches
-
Remove Tape:
Carefully peel off the painter’s tape while the paint is still slightly damp to get a crisp line without peeling up dried paint chunks. -
Reinstall Hardware:
Once the door has cured for at least 24 hours (fully hard to the touch), screw your hardware back into place. -
Touch Ups:
Use a tiny artist’s brush to fix any small spots you might have missed near the hardware installation points.
Enjoy the sophisticated, gallery-like entrance you have created for your room


Soft Muted Door Color for Calm Rooms
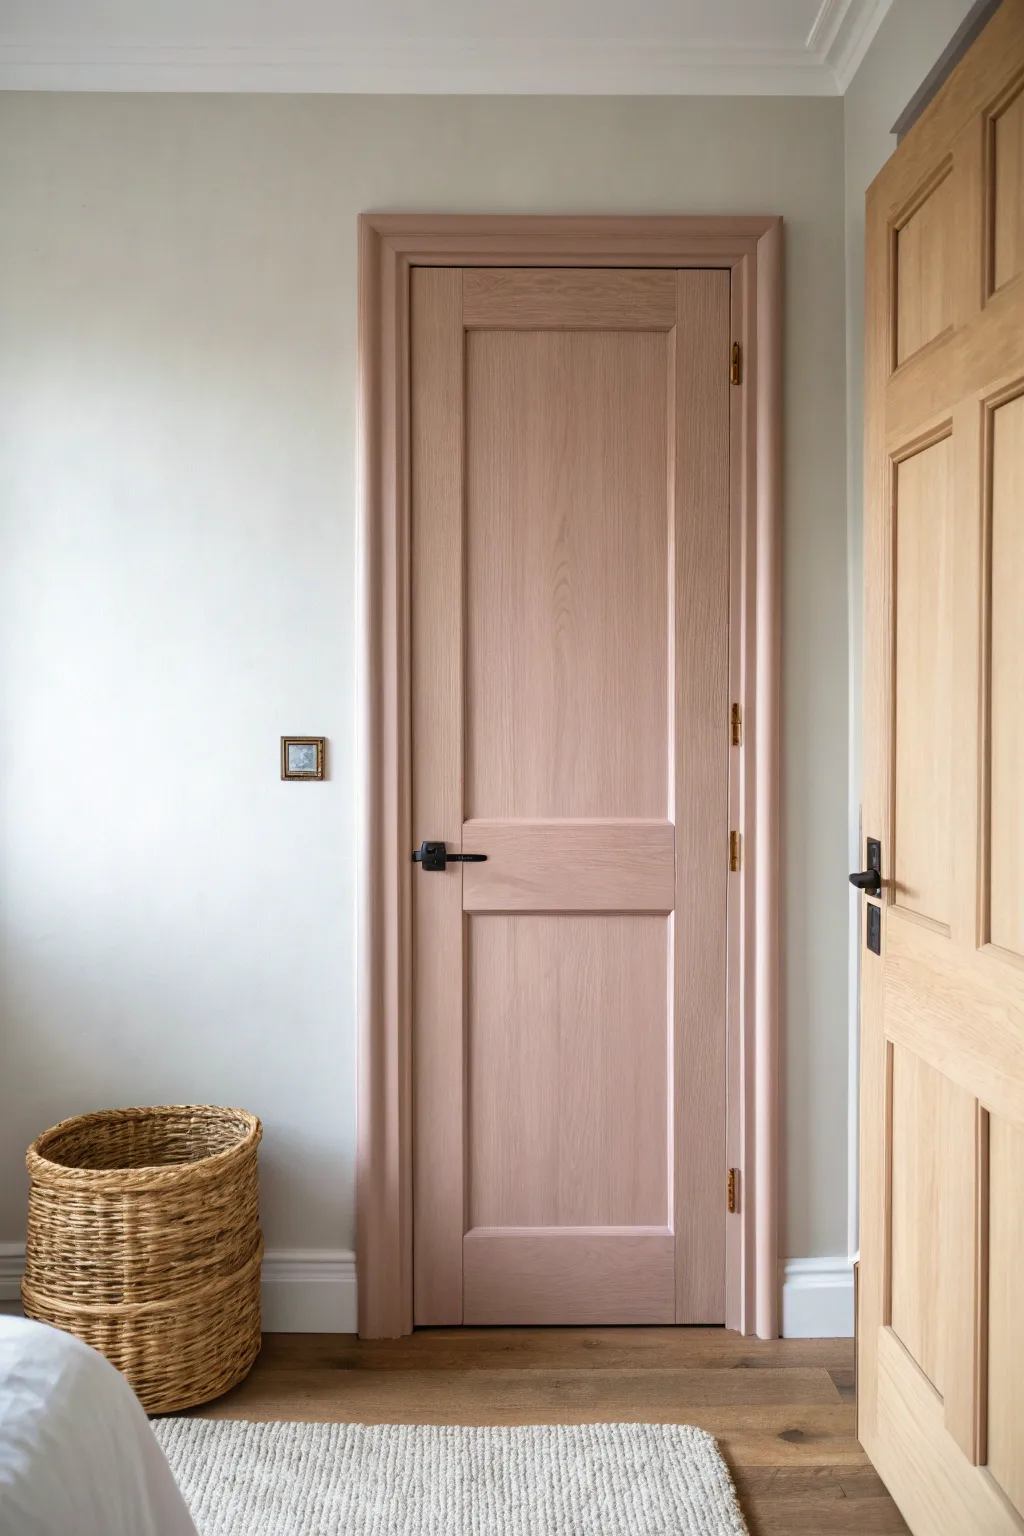
Transform a standard interior door into a statement of tranquility with this soft, muted pink finish. By wrapping the color onto the trim and architraves, you create a cohesive, custom look that elevates the entire room’s atmosphere without overwhelming it.
Step-by-Step Guide
Materials
- Interior wood primer (high adhesion)
- Satin or eggshell interior wood paint (muted pink/blush tone)
- 2-inch synthetic angled sash brush
- 4-inch foam or microfiber mini roller
- Paint tray and liners
- Medium-grit sandpaper (120-grit)
- Fine-grit sandpaper (220-grit)
- Painter’s tape
- Tack cloth or lint-free rags
- Screwdriver (for hardware removal)
- Drop cloth
- Mild degreaser or sugar soap
Step 1: Preparation
-
Clear the area:
Begin by removing any nearby furniture or decor items, like the woven basket shown in the inspiration photo, to give yourself ample working room. Lay down a drop cloth to protect the flooring. -
Remove hardware:
Take a screwdriver and carefully remove the door handle, latch plate, and any other hardware. Store these screws and pieces in a sealed bag so nothing gets lost. -
Clean deeply:
Wipe down the entire door and the surrounding trim with a mild degreaser or sugar soap. This removes hand oils and dust that could prevent the paint from sticking properly. -
Sand for adhesion:
Using 120-grit sandpaper, thoroughly sand the door and the trim. You aren’t trying to strip the old finish completely, but rather scuffing the surface to create a ‘key’ for the new paint to grip. Don’t forget the crevices in the paneling. -
Dust off:
Vacuum up the sanding dust, then wipe the surface with a tack cloth to ensure it is perfectly clean. -
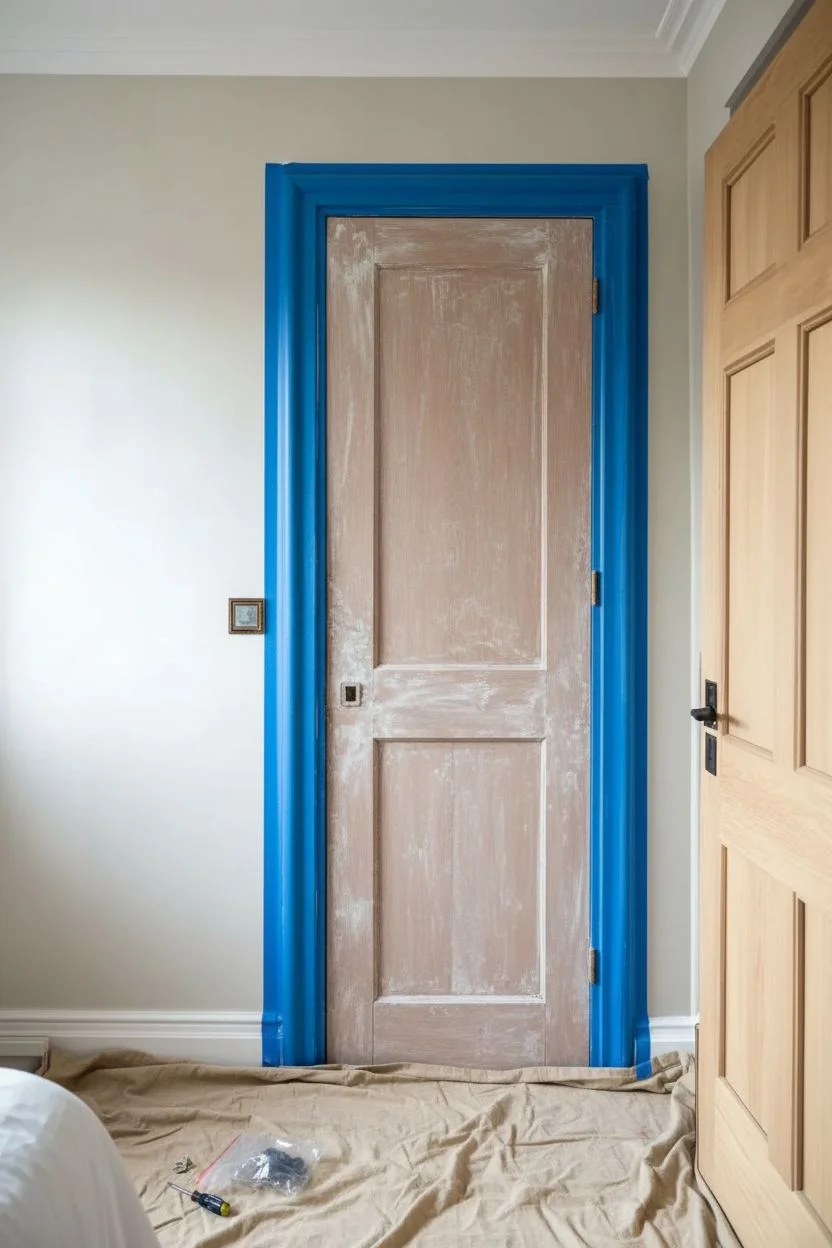
Protect the walls:
Apply painter’s tape along the wall edge where it meets the door trim. Press the tape edge down firmly with your fingertip to prevent paint bleed.
Sticky Door?
If the door sticks after painting, rub a clear candle or a little beeswax along the edge that touches the frame. This lubricates the surface and prevents paint from peeling.
Step 2: Priming
-
Cut in the primer:
Use your 2-inch angled brush to apply primer to the recessed corners of the panels and the edges of the trim first. -
Roll the flats:
With the mini roller, apply primer to the flat vertical and horizontal surfaces. Roll in the direction of the wood grain for the smoothest finish. -
Let it cure:
Allow the primer to dry completely according to the manufacturer’s instructions. This is usually around 2-4 hours. -
Light sanding:
Once dry, give the primed surface a very light rub with 220-grit sandpaper to smooth out any brush marks or raised grain, then wipe away the dust.
Step 3: Painting
-
Paint the panels first:
Dip your sash brush into the muted pink paint. Start by painting the recessed moldings inside the door panels. Feather out any pools of paint in the corners immediately. -
Paint the center stiles:
Switch to your mini roller or stay with the brush to paint the vertical center strip of the door. -
Paint the rails:
Next, paint the horizontal rails (the top, middle, and bottom sections) crossing the door. Keep a wet edge to avoid lap marks. -
Paint the outer stiles:
Finish the door face by painting the long vertical strips on the far left and right. I like to double-check for drips along the edges here. -
Address the trim:
Paint the door frame and architraves carefully. Painting the trim the same color as the door creates the sophisticated, monolithic look seen in the example. -
Dry and recoat:
Let the first coat dry for at least 4-6 hours. Apply a second coat using the exact same order (panels, center, rails, sides, trim) for full opacity and depth. -
Reassemble:
Once the final coat has cured for at least 24 hours (so it’s not tacky), carefully remove the painter’s tape and screw the hardware back into place.
Grain Direction
Always paint following the direction the wood grain would naturally run. For vertical stiles, brush up and down; for horizontal rails, brush side to side.
Enjoy the calm atmosphere your newly painted door brings to the space
BRUSH GUIDE
The Right Brush for Every Stroke
From clean lines to bold texture — master brush choice, stroke control, and essential techniques.
Explore the Full Guide
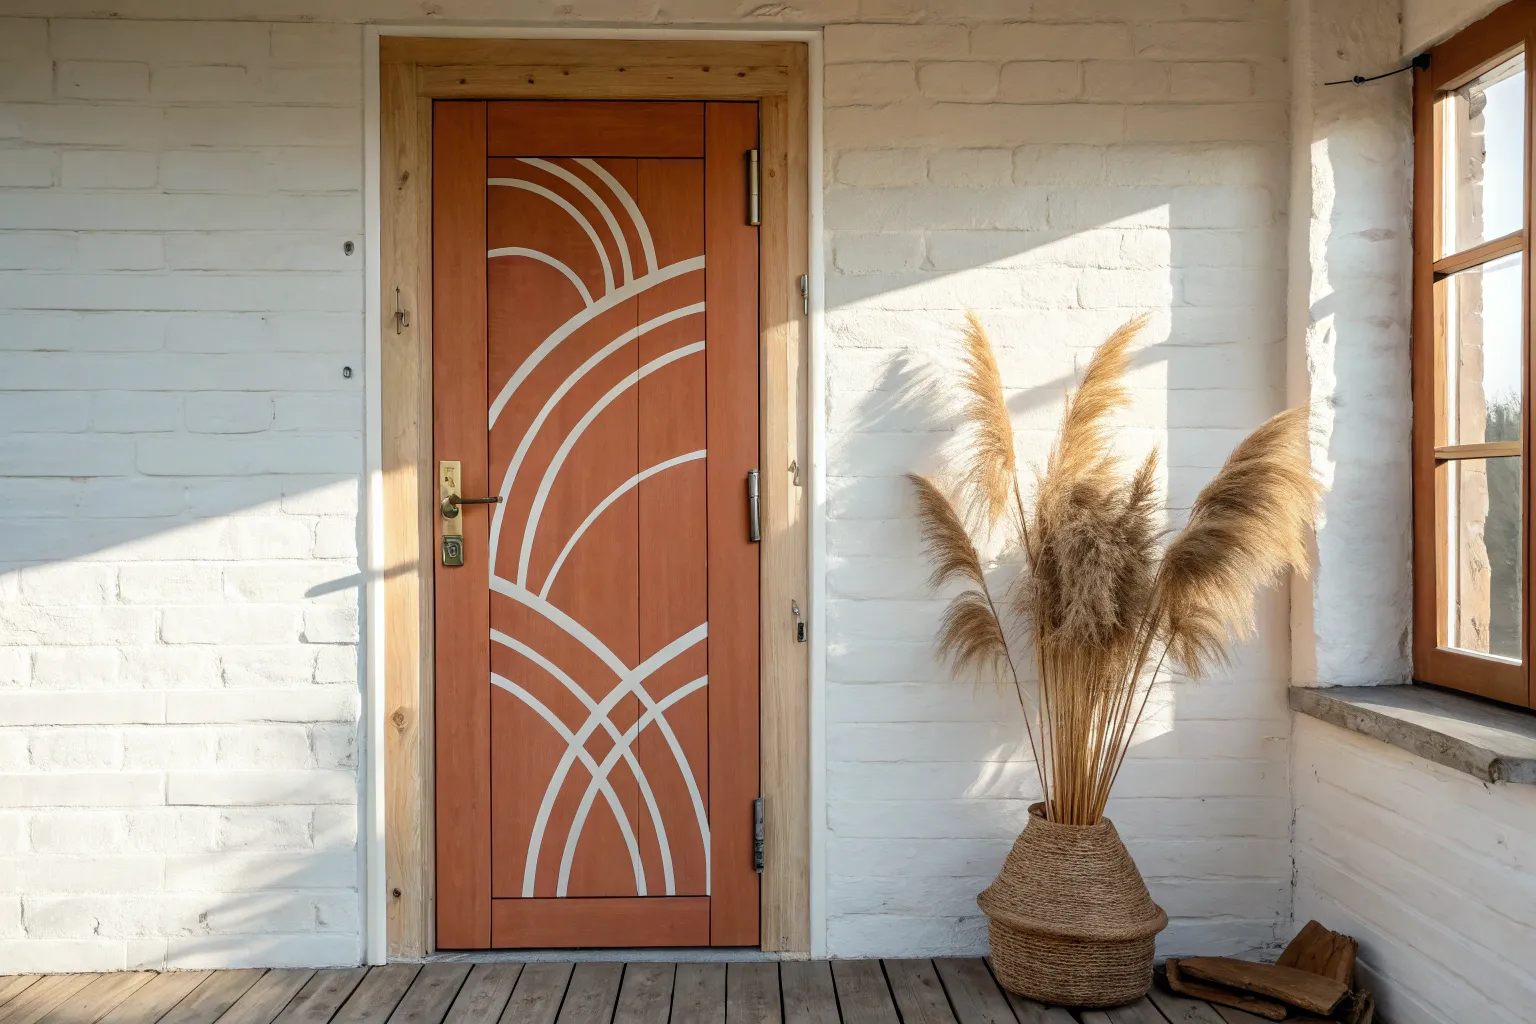
Color-Drenched Door, Trim, and Frame in One Shade

Transform a standard interior door into a warm architectural statement by painting the door, trim, and frame in a single, cohesive shade of earthy terracotta. This “color-drenching” technique draws the eye and adds a sophisticated, custom-finish look to any hallway or room entrance.
Step-by-Step
Materials
- Interior wood paint (Satin or Semi-Gloss finish)
- Color match: Earthy terracotta or muted clay red
- High-quality synthetic angled sash brush (2 inch)
- Small foam roller and tray
- Medium-grit sandpaper (120-150 grit)
- Fine-grit sandpaper (220 grit)
- Painter’s tape (delicate surface)
- Tack cloth or microfiber rags
- Wood filler (if repairing old holes)
- Primer (stain-blocking)
- Screwdriver (for hardware removal)
- Drop cloth
Step 1: Preparation
-
Remove Hardware:
Use a screwdriver to carefully remove the door handle, lock mechanism, and strike plates. If possible, take the door off its hinges and lay it on sawhorses for the easiest painting experience, though painting it vertically in place is perfectly fine too. -
Clean Surfaces:
Wipe down the entire door, the door frame, and the surrounding architrave trim with a mild degreaser or soapy water to remove oils and dust. -
Fill Imperfections:
Inspect the wood for deep scratches or dents. Apply a small amount of wood filler to these areas, smoothing it over with a putty knife, and let it dry completely. -
Sand for Adhesion:
Using the medium-grit sandpaper, scuff sand every surface you intend to paint. You aren’t trying to strip the old paint entirely; you just need to create a dull, grippy surface for the new primer. -
Clean Dust:
Vacuum up the sanding dust, then wipe everything down thoroughly with a tack cloth to ensure a debris-free surface. -
Masking:
Apply painter’s tape to the wall immediately surrounding the door trim. Press the edges of the tape down firmly with a credit card or putty knife to prevent paint bleed onto your white walls.
Paint Conditioner Secret
Add a splash of paint conditioner (like Floetrol) to your acrylic paint. It extends drying time and levels out brushstrokes, giving you a sprayed-on factory finish without the equipment.
Step 2: Priming
-
Apply Primer:
Brush a coat of stain-blocking primer onto the recessed panels first, then roll the flat surfaces. Don’t forget the door frame and the casing trim. This step is crucial if you are making a drastic color change like this deep terracotta. -
Light Sand:
Once the primer is fully dry, very lightly sand the surface with fine-grit (220) sandpaper to knock down any brush ridges or bumps.
Step 3: Painting the Color
-
Start with Panels:
Dip your angled sash brush into the terracotta paint and begin with the recessed molding of the door panels. Work the paint into the corners but watch for drips pooling at the bottom edges. -
Paint the Inner Styles:
Use your roller or brush to paint the vertical center stile (the strip between the panels) and the horizontal center rails. -
Paint Outer Areas:
Move to the outer vertical stiles of the door. Use long, smooth strokes to minimize start and stop marks. -
Coat the Frame and Trim:
While the door dries, paint the door jamb (the inside frame) and the architrave trim. I find that painting the trim in the same continuous session helps visualize the full color-drench effect immediately. -
Dry and Assess:
Allow this first coat to dry for the manufacturer’s recommended time (usually 4-6 hours). It may look streaky initially, but don’t panic. -
Second Coat:
Apply a second coat following the exact same order: panels, center rails, outer stiles, then frame and trim. This coat will provide the rich, opaque color saturation seen in the photo. -
Final Inspection:
Check for any light spots or drips while the paint is still wet. If you need a third coat for depth, let it dry and repeat, but usually, two coats of quality paint suffice.
Hardware Upgrade
To truly elevate the look, swap standard chrome handles for matte black or brushed antique brass hardware. The contrast against the warm terracotta creates a high-end designer feel.
Step 4: Finishing Touches
-
Remove Tape:
Remove the painter’s tape while the final coat is slightly tacky (not soaking wet, but not rock hard). Pull the tape away from the paint line at a 45-degree angle for a crisp edge. -
Reinstall Hardware:
Once the door is fully cured (give it at least 24 hours to avoid scratching the fresh paint), screw the handle and lock mechanism back into place.
Step back and enjoy the warmth your new monochromatic entrance brings to the space
Contrasting Trim That Outlines the Door Like Art


Transform a standard interior door into a subtle architectural statement by pairing a calming sage green with crisp, bright white trim. This project highlights the door’s panel detailing while creating a sophisticated frame effect that draws the eye without overwhelming the room.
Step-by-Step Guide
Materials
- Interior wood paint (Satin or Eggshell finish)
- Color: Sage or Olive Green (e.g., Farrow & Ball ‘Lichen’ or similar)
- Interior trim paint (Semi-gloss or Gloss)
- Color: Pure White
- Sandpaper (120 and 220 grit)
- Painter’s tape (high quality)
- Sugar soap or degreaser
- Wood filler (if repairs are needed)
- Caulk and caulk gun
- 2-inch angled sash brush
- 4-inch foam roller or short-nap microfiber roller
- Paint tray and liners
- Drop cloths
- Screwdriver (for hardware removal)
- Tack cloth
Step 1: Preparation
-
Clear the area:
Start by laying down drop cloths to protect that lovely wooden flooring. Ensure you have good ventilation in the room by opening windows if possible. -
Remove hardware:
Using your screwdriver, carefully remove the door handle, lock mechanisms, and hinges if you plan to paint the door off the frame. If leaving it on the hinges, cover them completely with painter’s tape. -
Clean surfaces:
Wash the entire door and the surrounding trim thoroughly with sugar soap or a degreaser. This step is crucial to remove invisible oils from hands that can prevent paint adhesion. -
Fill imperfections:
Inspect the door for any dents or scratches. Apply wood filler to these areas, let it dry completely, and sand smooth. -
Sand for adhesion:
Lightly sand all surfaces—both the door and the trim—with 120-grit sandpaper. You just want to scuff the existing finish to give the new paint ‘teeth’ to grab onto. Wipe away all dust with a tack cloth.
Sticky Situation?
If the door sticks after painting, rub a clear candle or paraffin wax along the edges where it meets the frame. This lubricates the contact points without damaging your new finish.
Step 2: The Trim (The Frame)
-
Tape the walls:
Apply painter’s tape to the wall immediately surrounding the door casing to protect your wall paint. Press the edges down firmly. -
Paint the trim:
Stir your bright white trim paint well. Using the 2-inch angled brush, paint the door casing, frame, and stops. Use long, smooth strokes. -
Check for drips:
Keep an eye on the corners and edges for pooling paint. Catching drips early makes sanding easier later. -
Apply second coat:
Allow the first coat to dry according to the manufacturer’s instructions. A light sanding with 220-grit paper between coats can ensure a glass-smooth finish. Apply a second coat of white for full opacity.
Luxe Upgrade
Swap standard hinges for brass ones that match your handle. The coordination between the hardware and the sage green elevates the look from DIY project to custom design.
Step 3: The Door (The Artwork)
-
Tape the hinges:
If you haven’t removed the door, ensure the hinges are perfectly taped off now. Also, tape the very edge of the white trim if you are worried about a steady hand. -
Paint the panels:
Start with the indented panels of the door. Use your brush to paint the recessed moulding edges first, then fill in the flat center of the panel. I like to do all four panels before moving on. -
Mix brush and roller:
For the flat stiles (verticals) and rails (horizontals) between the panels, you can use a small foam roller for a factory-smooth finish, or continue with a brush for a traditional hand-painted look. -
Paint the center rail:
Paint the vertical strip running down the center of the door, avoiding the horizontal rails for a moment. -
Paint horizontal rails:
Next, paint the horizontal rails (top, middle, and bottom). Feather the edges where they meet the vertical sections to avoid hard lines. -
Paint outer verticals:
Finish by painting the two long vertical stiles on the far left and right edges of the door. Always paint with the grain of the wood. -
Second coat:
Let the sage green paint dry completely. Lightly scuff with fine sandpaper if needed, wipe dust, and apply your final coat following the same panel-first order. -
Reassemble:
Once the paint has cured (give it at least 24 hours to avoid tackiness), remove all tape and reinstall your gold hardware.
Step back and admire how your new sage door stands out like a framed masterpiece against the crisp white trim

PENCIL GUIDE
Understanding Pencil Grades from H to B
From first sketch to finished drawing — learn pencil grades, line control, and shading techniques.
Explore the Full Guide
Painted Door Panels to Highlight Architecture
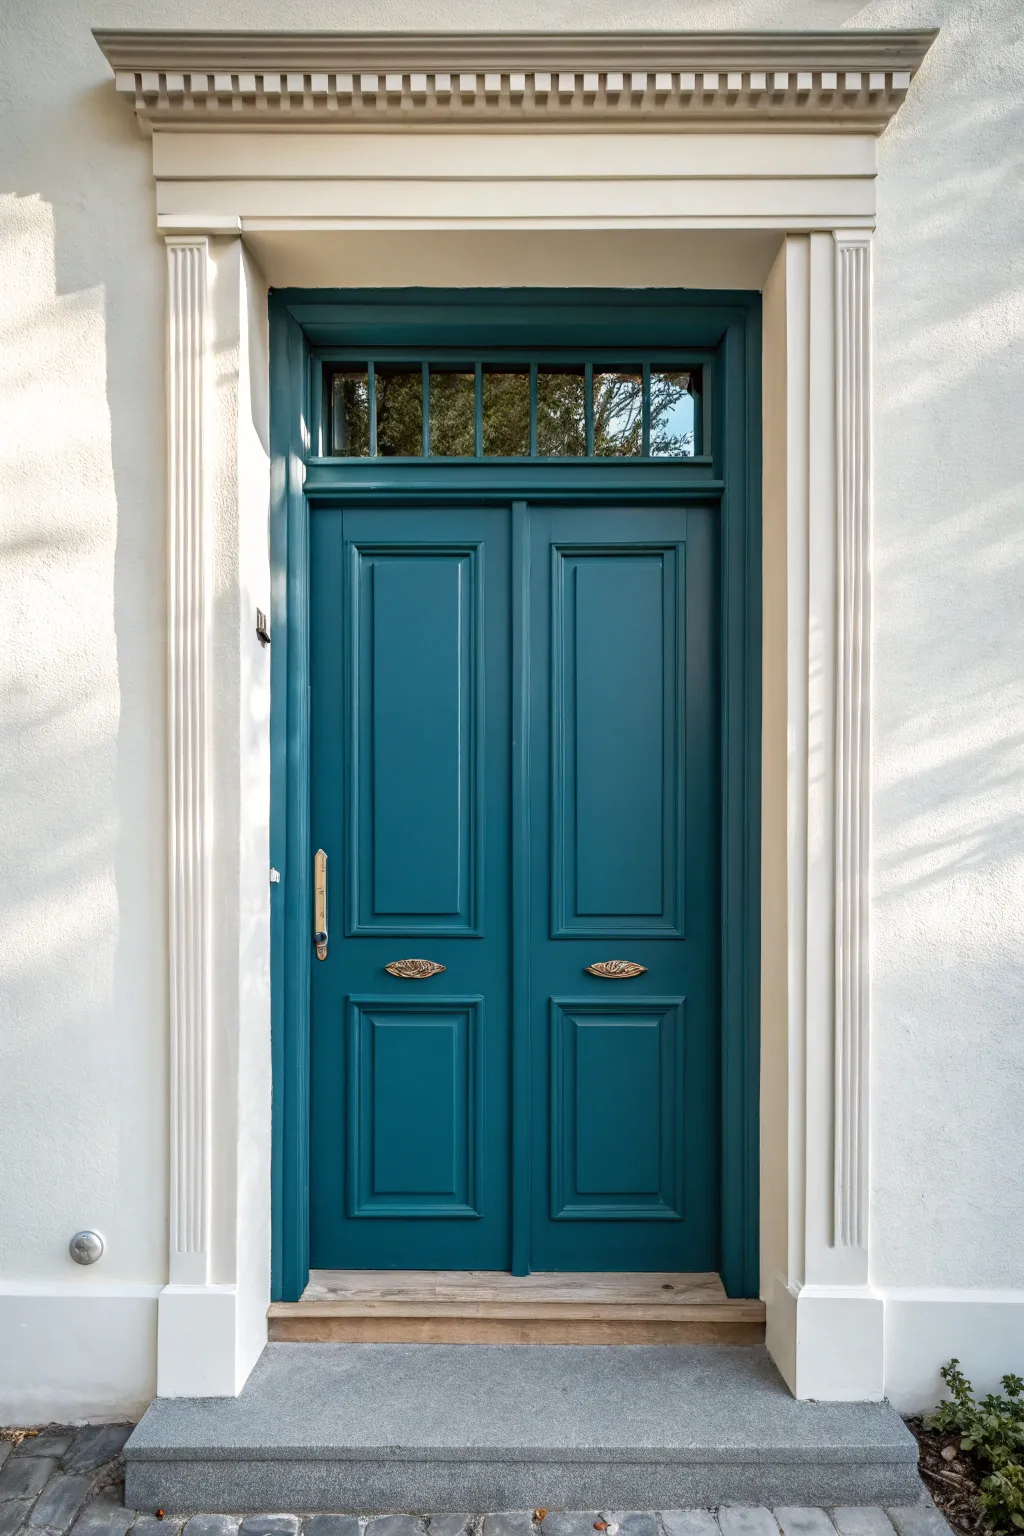
Update your entryway with a sophisticated touch by painting your paneled door in a deep, rich teal while keeping the trim crisp in classic white. This project emphasizes the existing architecture of recessed panels and fluted molding to create a grand, welcoming focal point.
How-To Guide
Materials
- High-quality exterior paint (rich teal/blue-green shade)
- High-quality exterior paint (crisp white)
- Exterior primer (if needed)
- 2-inch angled sash brush
- 4-inch foam roller or mini roller
- Paint tray and liners
- Painter’s tape (exterior grade)
- Sandpaper (120 and 220 grit)
- Tack cloth
- Drop cloth
- Screwdriver (for hardware removal)
- Cleaning solution (TSP or degreaser)
Step 1: Preparation
-
Clear the area:
Start by laying down a drop cloth to protect your porch or stoop surface from potential drips. -
Hardware removal:
Using a screwdriver, carefully remove all door hardware, including handles, locks, and mail slots. This ensures a clean finish without paint buildup around the edges. -
Surface cleaning:
Scrub the entire door and trim thoroughly with a TSP solution or degreaser to remove dirt, grime, and oils. Let it dry completely. -
Sanding:
Lightly sand all surfaces with 120-grit sandpaper to scuff the old finish, which helps the new paint adhere. Ensure you get into the fluted grooves of the trim. -
Dust removal:
Wipe down the entire door and frame with a tack cloth to remove every speck of sanding dust. I find this step crucial for that professional smooth finish. -
Masking:
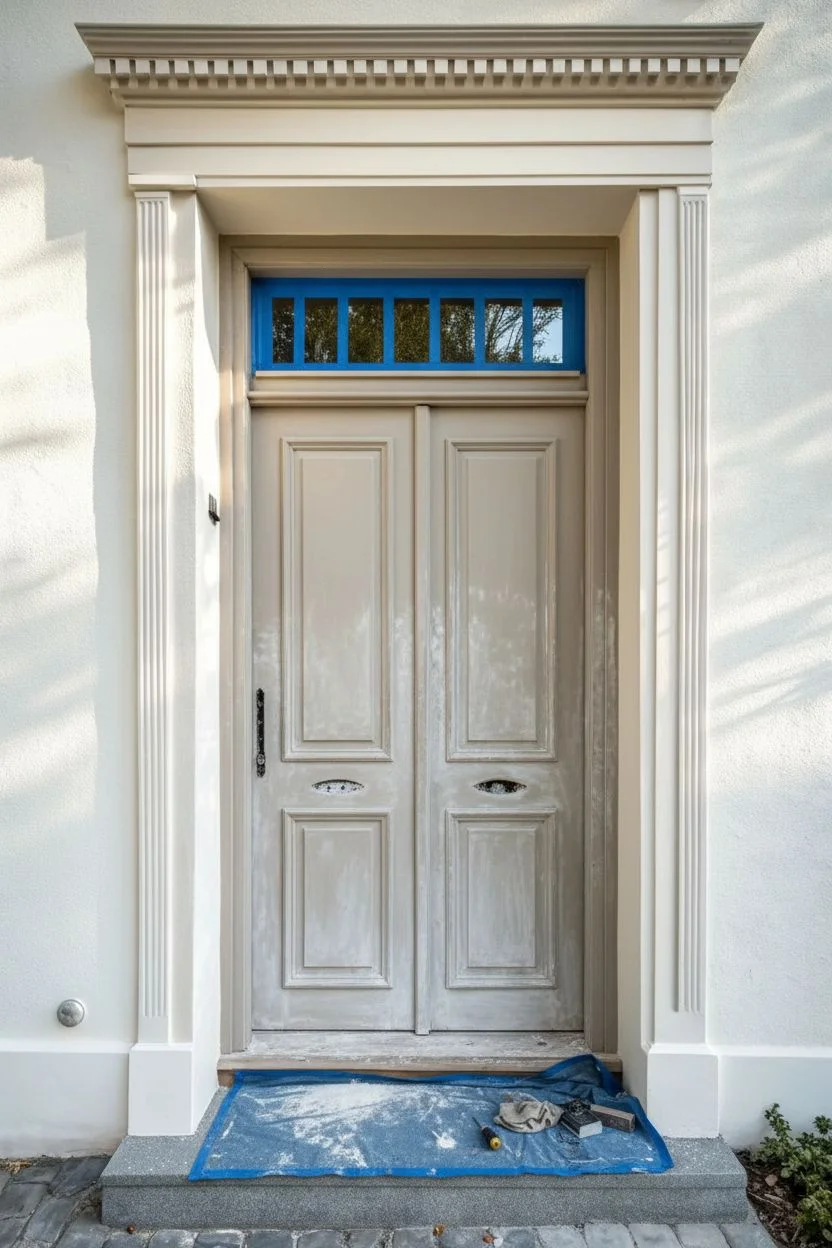
Apply painter’s tape carefully around the glass panes of the transom window above the door to protect them from stray brushstrokes.
Step 2: Painting the Trim
-
Trim first:
Begin by painting the surrounding door frame, pilasters, and the dentil molding at the top with your crisp white exterior paint. -
Detail work:
Use the angled sash brush to get paint into the flutes of the side columns and the small squares of the dentil cornice. -
Drying and recoating:
Allow the first coat of white to dry according to the can’s instructions, then apply a second coat for full opacity and brightness.
Sticky Situation?
If the door feels sticky after drying, dust the edges lightly with talcum powder. This prevents weatherstripping from bonding to the fresh paint.
Step 3: Painting the Door
-
Protect the trim:
Once the white trim is fully dry (wait at least 24 hours), tape off the edges where the door frame meets the door to prevent teal paint from transferring. -
Recessed panels:
Start painting the door with the recessed panels first. Use your brush to paint the molded edges inside the rectangles. -
Panel centers:
Fill in the flat centers of the panels using a small roller or brush, smoothing out any texture. -
Vertical/Horizontal structure:
Next, paint the vertical center stile (the strip between the panels) and then the horizontal rails. -
Outer edges:
Finish by painting the outer vertical stiles of the door. Keep a wet edge to avoid lap marks. -
Transom muntins:
Carefully paint the wooden muntins (grids) in the transom window above to match the door color, using a small artist’s brush if needed for precision. -
Second coat:
Let the first coat dry completely. Lightly sand with 220-grit paper if there are rough spots, clean, and apply a second coat of teal for a deep, saturated color.
Go For Gold
Use a metallic gold paint pen to highlight the thin inner bevel of the recessed panels for a subtle, luxurious gilded detail.
Step 4: Finishing Touches
-
Tape removal:
Remove the painter’s tape while the final coat is still slightly tacky to prevent peeling the paint film. -
Hardware reinstallation:
Once the paint has cured (ideally 24-48 hours so it doesn’t stick), reinstall your hardware. Consider polishing brass fixtures first for extra shine. -
Final clean:
Clean the glass in the transom window to remove any smudges or accidental paint spots using a razor blade if necessary.
Step back and admire how a simple color change has completely revitalized the character of your entrance
Half-Painted Door Color Block for a Modern Twist

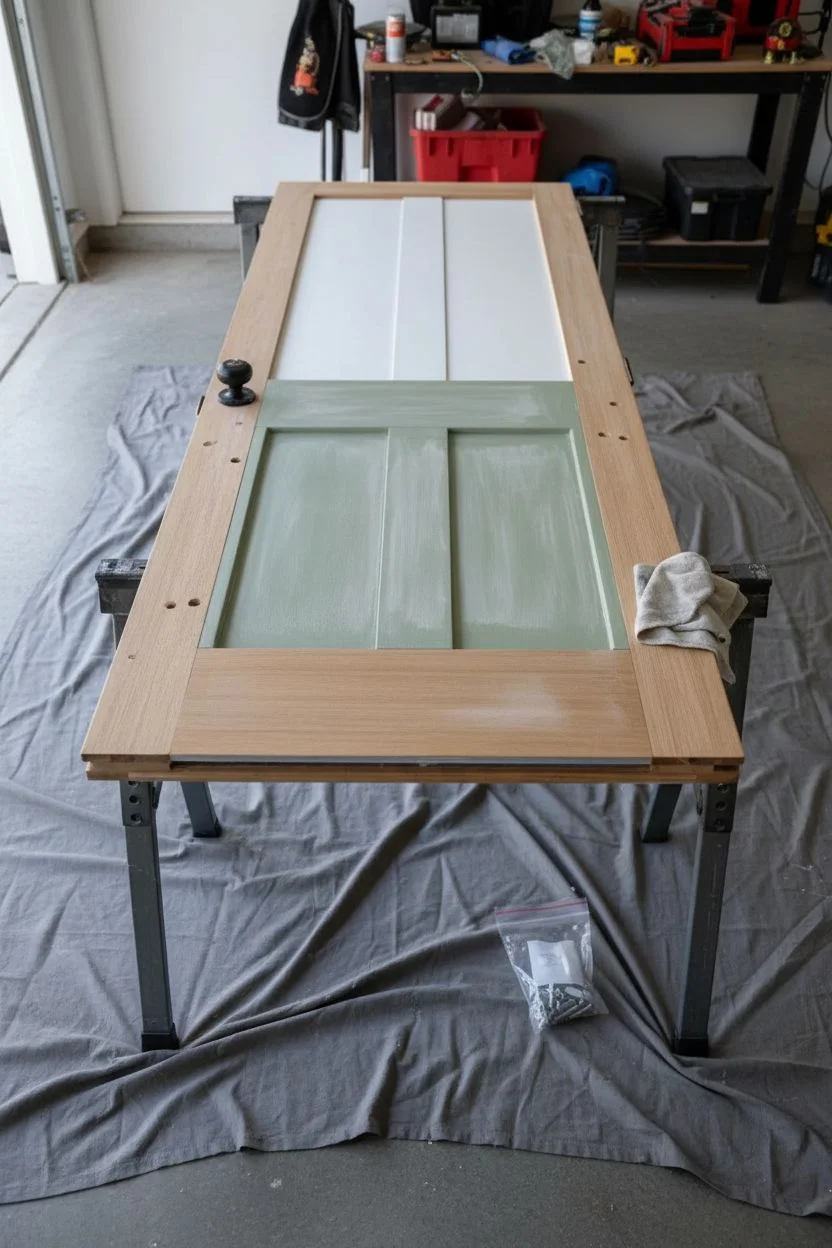
Transform a standard wood-framed door into a contemporary statement piece by combining color blocking with natural textures. This project balances the warmth of exposed oak with crisp white and calming sage green for a look that feels both fresh and grounded.
Step-by-Step Guide
Materials
- Interior wood door (solid or detailed veneer)
- Painter’s tape (high quality)
- Sandpaper (120 and 220 grit)
- Tack cloth
- Primer (bonding primer recommended)
- Interior paint (Sage Green)
- Interior paint (Crisp White)
- Small foam roller
- Angled sash brush (1.5 to 2 inch)
- Drop cloth
- Screwdriver (for hardware removal)
- Clear matte polyurethane (optional)
Step 1: Preparation
-
Remove the door:
Begin by removing the hinge pins to take the door off its frame. Lay it flat on sawhorses or a stable work surface covered with a drop cloth. This prevents drips and saves your back. -
Hardware removal:
Unscrew and remove the doorknob, lock mechanism, and hinges. Label the screws in small bags so reassembly is easy later. -
Clean surface:
Wipe down the entire door with a mild degreaser or soapy water to remove oils and dirt. Let it dry completely. -
Sand the panels:
Using 120-grit sandpaper, scuff sand the central recessed panels where you intend to paint. You don’t need to strip it bare, just create a ‘tooth’ for the primer to grab. -
Sand the frame:
Lightly sand the outer wood stiles and rails (the frame part) with 220-grit paper just to smooth out any imperfections, being careful not to sand through if it’s a veneer. -
Clean dust:
Remove all sanding dust thoroughly using a tack cloth or a vacuum with a brush attachment.
Step 2: Taping and Priming
-
Tape the wood frame:
Apply painter’s tape meticulously along the inner edges of the wood stiles and rails. Press the tape edge down firmly with your fingernail or a putty knife to prevent bleed-through. -
Measure the color block:
Determine where your color split will be. In this look, the split aligns with the horizontal rail separating the top and bottom panels. If your door is a single flat panel, measure and mark a horizontal line at doorknob height. -
Prime the panels:
Apply a coat of bonding primer to the inner panel areas. Use a brush to get into the corners and edges near the tape, and a small foam roller for the flat surfaces to ensure a smooth finish. -
Sand primer:
Once the primer is fully dry, give it a very light pass with 220-grit sandpaper to knock down any raised grain or fuzz. Wipe away the dust.
Bleeding Lines?
If paint bled onto the wood grain, don’t wipe it while wet as it will smear into the pores. Let it dry slightly, then gently scrape with a plastic razor blade.
Step 3: Painting
-
Paint the top section:
Stir your crisp white paint well. Using a clean angled brush, cut in around the edges of the top panel section. Follow immediately with the foam roller for the main area. -
Paint the bottom section:
Repeat the process for the bottom section using your sage green paint. Be careful not to let the green paint drip onto the white section if they share a border, or tape off the dried white section first if needed. -
Second coats:
Allow the first coats to dry according to the can’s instructions. Apply a second coat to both sections for full, rich coverage. I find two thin coats are always better than one thick one. -
Remove tape:
While the final coat of paint is still slightly tacky (not wet, but not fully cured), carefully peel back the painter’s tape at a 45-degree angle. This ensures a crisp line without peeling up dried paint chips. -
Touch ups:
Inspect the wood frame. If any paint bled under the tape, carefully scrape it away with a fingernail or use a damp cloth wrapped around a putty knife while the paint is fresh.
Seal the Tape Edge
For ultra-crisp lines, brush a tiny amount of clear matte medium or the base primer over the tape edge first. This seals the gap so your colored paint can’t sneak under.
Step 4: Refining the Wood
-
Seal the wood frame:
If the natural wood frame looks dry or dull, apply a clear matte polyurethane or a wood wax to protect it and bring out the grain warmth. -
Reinstall hardware:
Once the paint has cured for at least 24 hours to avoid tackiness, screw the hinges and doorknob back into place. -
Hang the door:
Place the door back on the hinges and tap the pins back in. Check that it swings freely and admire your work.
Enjoy the custom look of your new color-blocked door every time you walk through the hallway


Geometric Tape Pattern Door for Easy Wow Factor
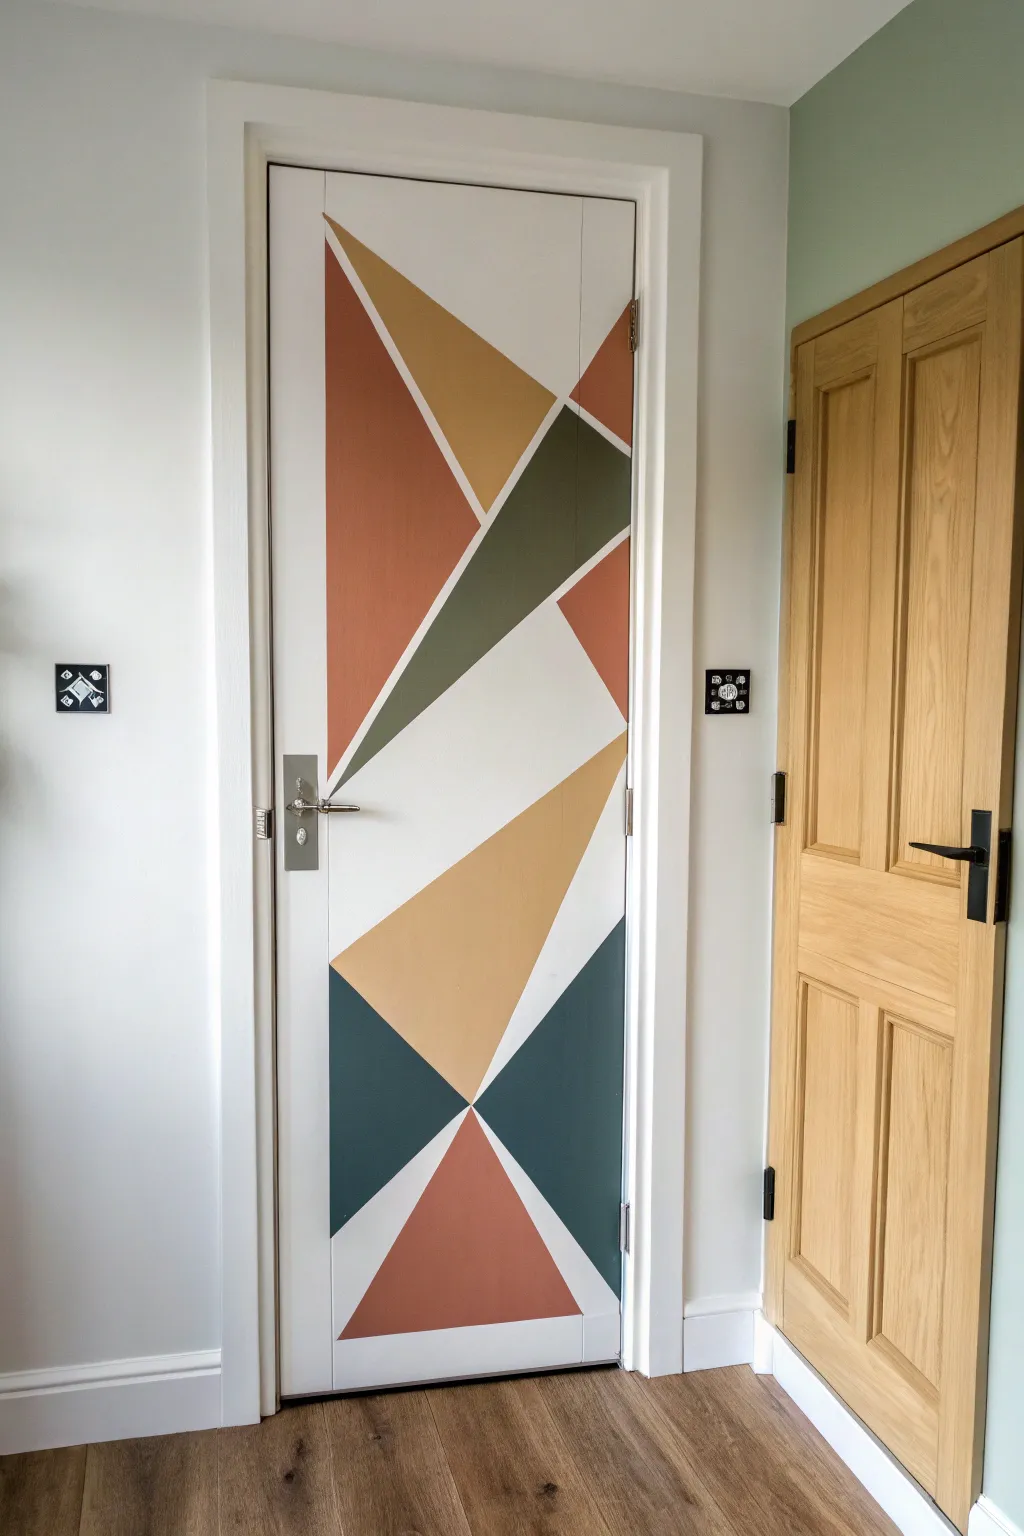
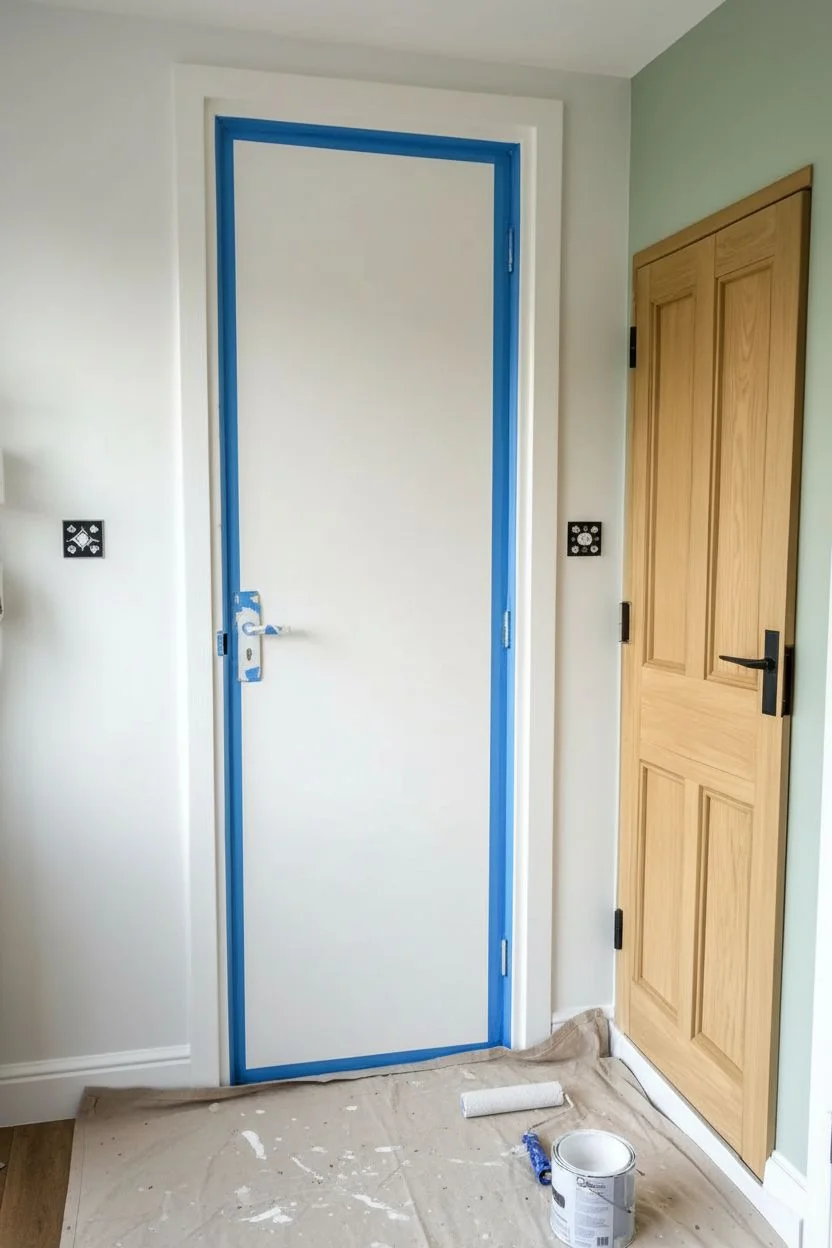
Transform a plain flat-panel door into a piece of modern art with crisp lines and earthy tones. This project uses a simple painter’s tape technique to create sharp geometric triangles in a warm, muted palette that instantly updates any hallway.
How-To Guide
Materials
- Flat-panel interior door (cleaned and prepped)
- White primer (if painting over a dark color)
- Painter’s tape (high-quality, preferably low-tack for delicate surfaces)
- Credit card or putty knife (for sealing tape)
- Interior wood/satin paint in White (base)
- Interior satin/eggshell paint in Terracotta/Rust
- Interior satin/eggshell paint in Mustard Yellow
- Interior satin/eggshell paint in Sage Green
- Interior satin/eggshell paint in Dark Teal/Navy
- Small foam rollers (one for each color)
- Small angled paintbrush (for touch-ups)
- Drop cloth
- Utility knife
Step 1: Preparation and Base Coat
-
Clean the surface:
Thoroughly clean the entire door surface with a degreaser or sugar soap solution to remove any oils, fingerprints, or dust, ensuring the tape will stick properly. -
Protect the area:
Lay down a drop cloth underneath the door and use painter’s tape to mask off the door handle, hinges, and the surrounding door frame to protect them from stray roller marks. -
Isolate the panel:
If your door has a border detail like the one in the photo, run a straight line of tape around the inner perimeter of the door face. This creates a neat white border that frames your artwork. -
Apply the base color:
Roll on two coats of your white base paint across the entire section you plan to design. Let it dry completely—I usually wait overnight here to ensure the tape won’t peel the fresh base coat later.
Bleed-Through Blues?
If paint bleeds under the tape, wait for it to dry fully. Then, place a fresh piece regarding tape over the color, and touch up the white line carefully with a small craft brush.
Step 2: Creating the Design
-
Map out the first line:
Start with your longest line. Apply a strip of painters tape diagonally from the top left quadrant down toward the center right to establish the main visual anchor. -
Create main triangles:
Add intersecting lines of tape to form large triangles. Focus on creating a balanced composition by varying the sizes; you want a mix of large statement shapes and smaller accent triangles. -
Seal the edges:
Once your pattern is taped, run a credit card or putty knife firmly along every edge of the tape. This is crucial for preventing paint bleed and achieving those razor-sharp lines. -
The lock-in trick:
Lightly brush a tiny amount of your *white base paint* over the edges of the tape strips. This seals any microscopic gaps with white paint, so if any bleeding happens, it matches the background and remains invisible.
Step 3: Painting the Colors
-
Plan your palette:
Before dipping your roller, assign a color to each triangle mentally or with a small sticky note. Ensure that no two shapes of the same color touch each other directly. -
Paint the Terracotta sections:
Using a small foam roller, fill in the designated triangles with your Terracotta/Rust shade. Use light, even pressure to avoid pushing paint under the tape. -
Apply the Mustard Yellow:
Switch to a fresh roller and fill in the yellow sections. These lighter colors might need a second coat sooner than the darker ones, so keep an eye on coverage. -
Add the Sage Green:
Fill in the green triangles next. Be careful when rolling near the edges where colors meet; simple vertical strokes work best to keep the texture uniform. -
Finish with Dark Teal:
Roll the final dark teal sections. This deep color anchors the design, usually at the bottom or corners, providing visual weight to the pattern. -
Apply second coats:
Allow the first layer of colors to dry to the touch (usually about 2-4 hours), then apply a second coat to every shape for a rich, opaque finish.
Level Up: Metallic Pop
For a luxe finish, use metallic gold or copper masking tape instead of removing regular tape. Leave the metallic tape on permanently for shimmering dividing lines.
Step 4: The Reveal
-
Peel while slightly tacky:
Don’t wait for the paint to cure fully. Gently peel the tape off slowly at a 45-degree angle while the paint is still slightly tacky to prevent it from chipping. -
Remove the border tape:
Carefully remove the perimeter tape protecting the door frame and the handle hardware. -
Touch up imperfections:
Inspect your lines. If any paint managed to sneak under the tape, use a very small artist’s brush and a bit of white paint to erase the bleed. -
Let it cure:
Leave the door open and untouched for at least 24 hours to let the paint harden completely before regular use.
Enjoy the striking new focal point that brings personality to your hallway
Ombre Gradient Door That Fades Like a Sky Wash
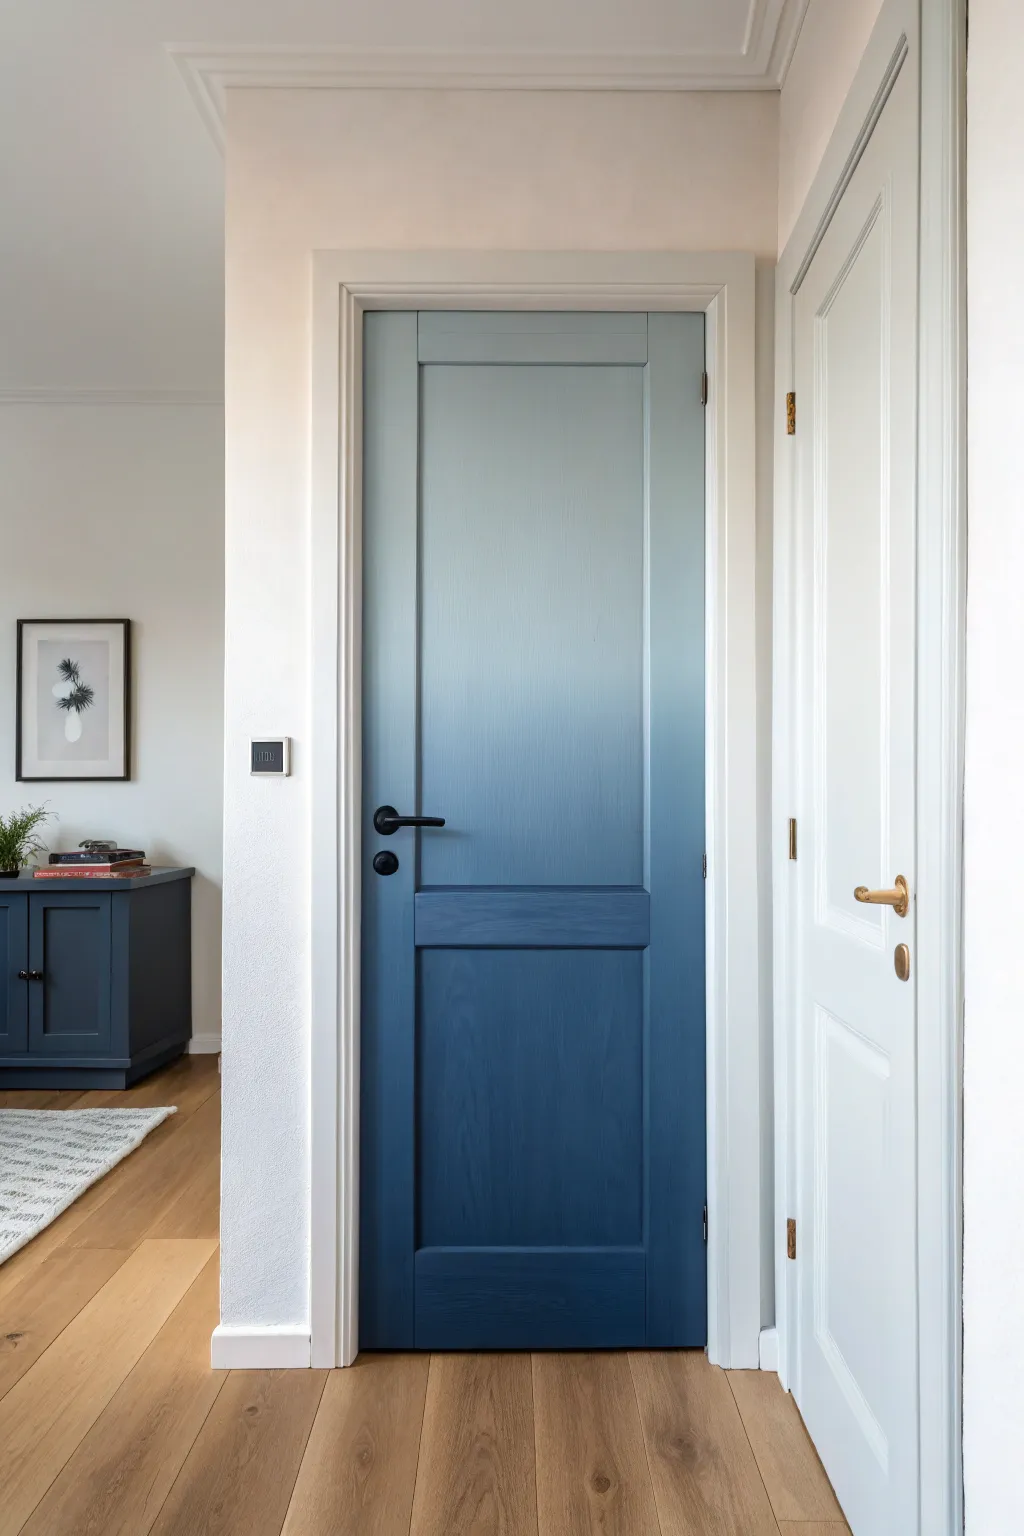
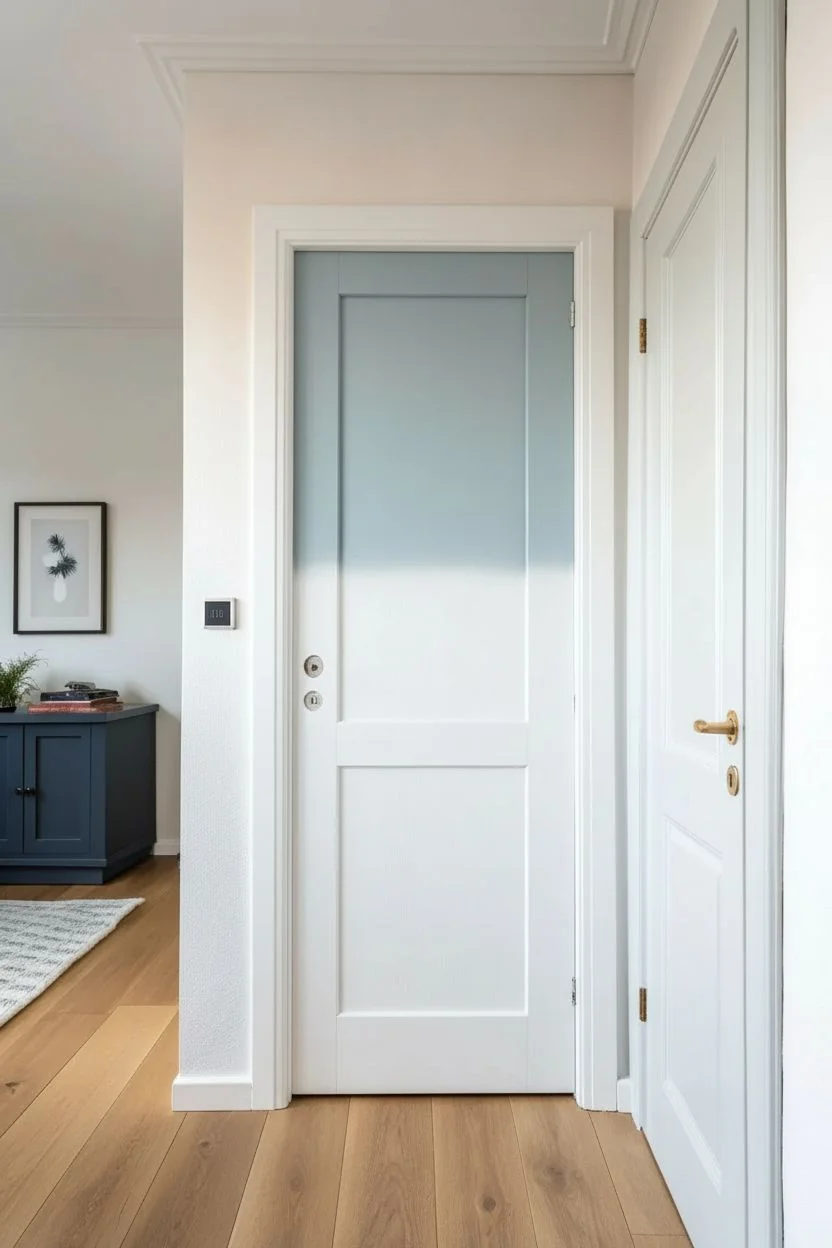
Transform a standard interior door into a modern art feature with this stunning gradient effect. By blending shades from ethereal sky blue down to a deep, grounding navy, you add depth and a touch of dreaminess to any hallway.
Detailed Instructions
Materials
- Interior wood door (prepped)
- Sandpaper (120 and 220 grit)
- Painter’s tape
- Primer (high-quality bonding primer)
- Latex paint: Light Blue-Grey (Top Color)
- Latex paint: Medium Steel Blue (Middle Color)
- Latex paint: Deep Navy Blue (Bottom Color)
- 3 Small paint trays
- 3 Synthetic bristle brushes (2-inch)
- 3 Small blending brushes or sponges
- Spray bottle with water (misting setting)
- Drop cloth
- Screwdriver (for hardware removal)
Step 1: Preparation & Base Coat
-
Clear the hardware:
Begin by removing the door handle, lock mechanism, and hinges if you prefer painting the door flat (which makes blending easier). If leaving it on the hinges, tape them off meticulously. -
Prep the surface:
Lightly sand the entire door using 120-grit sandpaper to remove the old glossy finish. Wipe away all dust with a tack cloth or damp rag. -
Apply the primer:
Roll or brush on a solid coat of high-quality bonding primer. This ensures your gradient colors adhere evenly and true to tone. -
Establish the lightest tone:
Once the primer is dry, paint the entire top third of the door with your lightest Blue-Grey color. You can bring this color down a bit further than you think you need as a base.
Wet Edge Wonder
Work fast! Latex paint dries quickly. Keep a ‘wet edge’ at all times during blending. If you stop, you’ll get a hard line instead of a soft fade.
Step 2: Creating the Gradient
-
Map out your sections:
Mentally divide the door into three sections: Top (Light), Middle (Medium), and Bottom (Dark). Don’t use tape for these lines; they need to remain fluid. -
Apply the bottom section:
Paint the solid Deep Navy Blue on the bottom third of the door. Ensure full coverage on the bottom rail and lower panels. -
Apply the middle section:
Brush the Medium Steel Blue onto the middle third of the door, leaving a gap of about 4-6 inches between it and the wet Navy paint below. -
The first blend: Dark to Mid:
While both paints are still wet, mix a small amount of the Navy and Medium Blue on a separate plate. Apply this mixture in the gap between the two colors. -
Softening the transition:
Use a clean, dry brush to stroke horizontally across the transition line where the Navy meets the Middle Blue. Use a very light hand to feather the colors together. -
Feather vertical strokes:
Once the horizontal blend looks good, do long, gentle vertical strokes up and down through the transition area to smooth out brush marks. -
Applying the top transition:
Move to the upper section. Apply fresh Light Blue-Grey to the top third if the base coat has dried too much. -
The second blend: Mid to Light:
Repeat the blending process where the Medium Blue meets the Light Blue-Grey. Mix the two colors on your tray for the transition zone. -
Use the misting trick:
I find that if the paint starts to drag or dry too fast, a single, very fine mist of water from your spray bottle helps the latex paint glide and blend smoothly again.
Step 3: Finishing Details
-
Address the panels:
For doors with recessed panels like this one, use a smaller brush to ensure the gradient flows naturally into the corners and grooves. Don’t let paint pool in the crevices. -
Let it cure:
Allow the first full layer of gradient to dry completely. It might look a bit streaky; this is normal. -
Second pass for depth:
Repeat the color application and blending process a second time. The second coat creates the rich, seamless opacity seen in the photos. -
Final smooth out:
Do a final check for drips, especially on the panel edges, and smooth them out immediatey with a dry brush. -
Reinstall hardware:
Wait at least 24 hours for the paint to cure fully before screwing the black handle back into place. The matte black hardware contrasts beautifully with the blue tones.
Metallic Pop
Swap standard black hardware for brushed gold or brass handles. The warm metal tones look incredible against the cool blue gradient background.
Step back and admire how a simple paint job has turned your functional door into a serene visual anchor for the room
Painted “Faux Panels” on a Flat Door
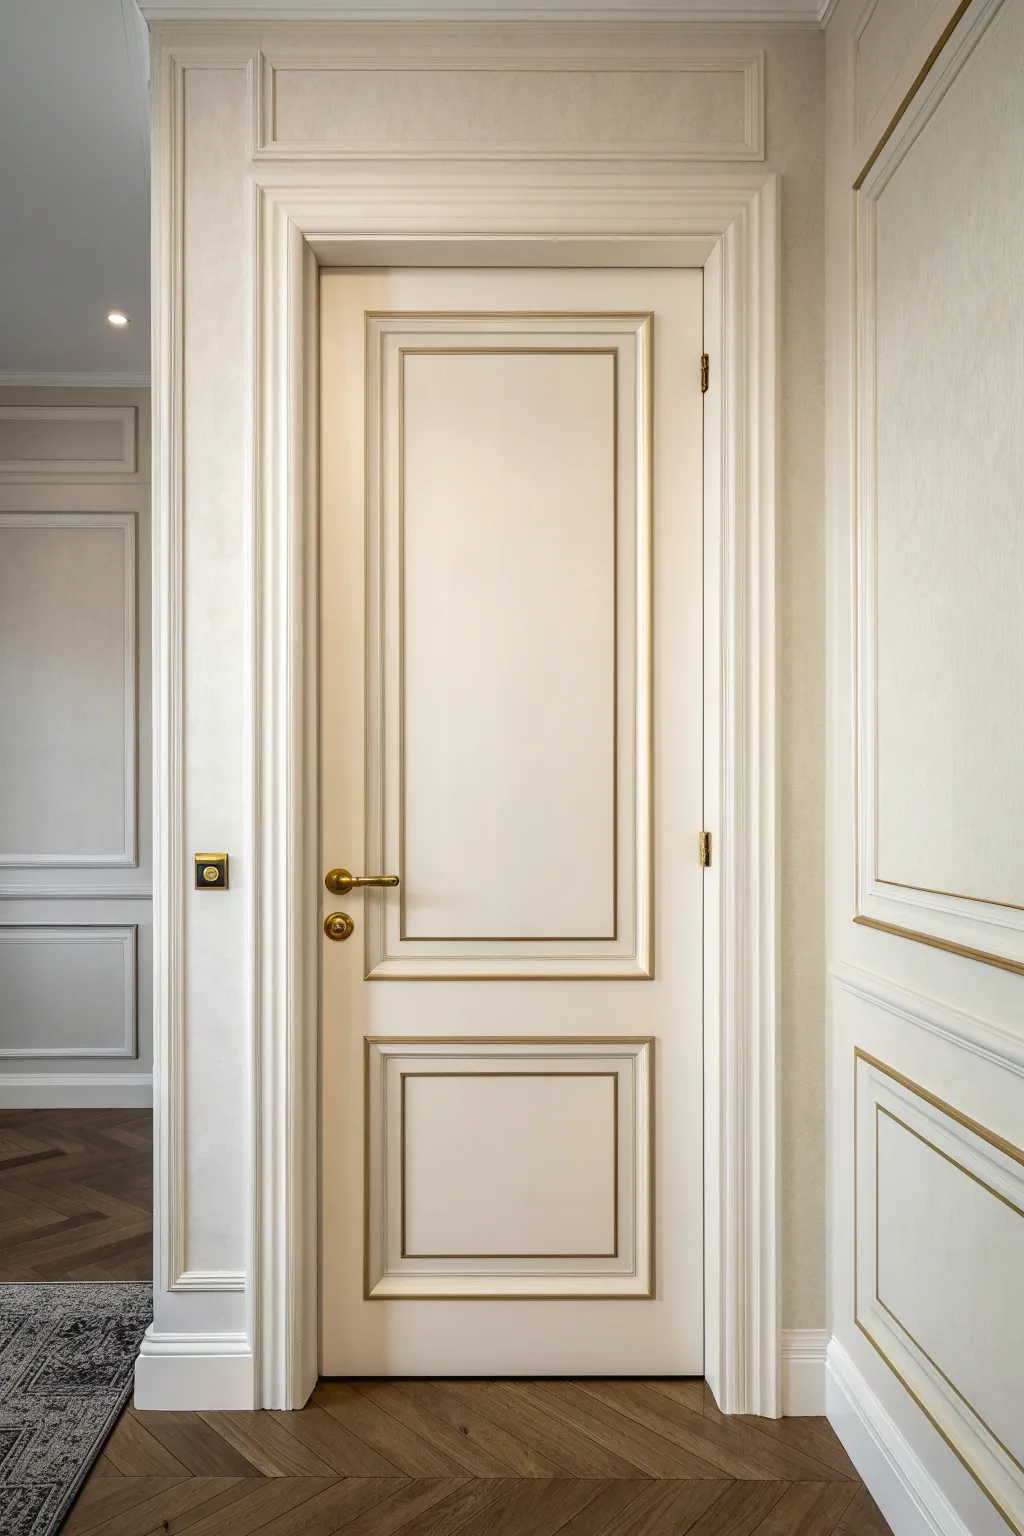
Transform a plain, flat slab door into a high-end architectural feature using added molding and gold leaf accents. This project creates the convincing illusion of expensive joinery through the clever application of applied trim and a sophisticated two-tone finish.
How-To Guide
Materials
- Flat interior door (cleaned and sanded)
- Small panel molding (primed wood or PVC)
- Chair rail or dado molding (for outer frames)
- Miter box and saw
- Construction adhesive (e.g., Liquid Nails)
- Painter’s tape
- Wood filler or caulk
- Fine-grit sandpaper (220 grit)
- Primer (high adhesion)
- Soft white satin or semi-gloss paint
- Gold leaf paint or metallic gilding wax
- Fine detail artist brush
- Level and measuring tape
- Pencil
Step 1: Planning and Layout
-
Clean surface:
Begin by thoroughly cleaning the flat door surface to remove any grease or oils, then scuff-sand lightly to ensure adhesion. -
Design the grid:
Decide on your panel layout. The classic look involves one large rectangular panel on the top half and a smaller square panel on the bottom half. Use a pencil to mark the center vertical line of the door. -
Mark measurements:
Measure about 4-5 inches inward from the door edges to establish the outer boundary of your panels. Ensure the distance between the top and bottom panels is substantial, roughly 6-8 inches, to accommodate the handle mechanism. -
Draw the guides:
Using a level and straightedge, draw the full rectangles for where your molding will sit directly onto the door surface. This visual guide effectively prevents crooked application later.
Wobbly Gold Lines?
If painting straight lines by hand is difficult, define the gold area with two strips of painter’s tape, leaving a tiny gap. Paint the gap, let dry, and peel.
Step 2: Cutting and Installing Molding
-
Miter the outer frames:
Cut your heavier chair rail molding to length using a miter box, creating 45-degree angles for the corners. These pieces will form the outermost frame of each panel section. -
Attach outer frames:
Apply a bead of construction adhesive to the back of the molding pieces. Press them onto your pencil lines, securing them temporarily with painter’s tape while the glue sets. -
Cut the inner detail:
Cut the thinner, delicate panel molding to fit inside the frames you just created. Leave a consistent gap—about 1.5 to 2 inches—between the outer frame and this inner rectangle for a double-panel look. -
Install inner frames:
Adhere these inner molding rectangles in the same manner. Double-check everything with your level before the adhesive cures completely. -
Fill the gaps:
Once the glue is dry, use wood filler or caulk to fill the mitered corners and any gaps between the molding and the door surface. I find using a damp finger to smooth the caulk creates the most seamless transition.
Step 3: Painting and Gilding
-
Prime the door:
Apply a high-quality primer over the entire door, focusing heavily on the new wood or PVC trim to ensure the texture matches the rest of the door. -
Sand for smoothness:
After the primer dries, lightly sand the raised areas with 220-grit sandpaper to remove any brush strokes or raised grain. -
Apply base color:
Paint the entire door with your chosen soft white paint. Use a small roller for the flat sections and a brush for the molding profiles. Apply two coats for full opacity. -
Prepare for gold:
Allow the white paint to cure for at least 24 hours. The surface must be hard and dry so the metallic detailing sits on top rather than blending in. -
Stripe the detail:
Dip a fine artist’s brush into your gold leaf paint or gilding liquid. Carefully trace the highest ridge or the central groove of your inner molding. -
Steady hand technique:
Work in short sections. If using a brush feels too shaky, you can use a gold paint marker, though liquid paint generally offers a richer sheen. -
Clean up edges:
If any gold paint strays onto the white flat panel, immediately wipe it away with a damp cloth or touch it up with a tiny bit of white paint after it dries. -
Seal the finish:
If the door is in a high-traffic area, apply a clear, non-yellowing polycrilic sealer over the gold detail to prevent tarnishing or rubbing off.
Pro Tip: Handle Clearance
Before gluing any molding, hold your door handle against the door. Ensure your molding layout leaves at least 2 inches of clearance around the rosette so your knuckles don’t hit the trim.
Now you have a door that looks like it belongs in a Parisian apartment, adding instant value and character to your room
Hand-Painted Botanical Vine Mural Climbing the Door

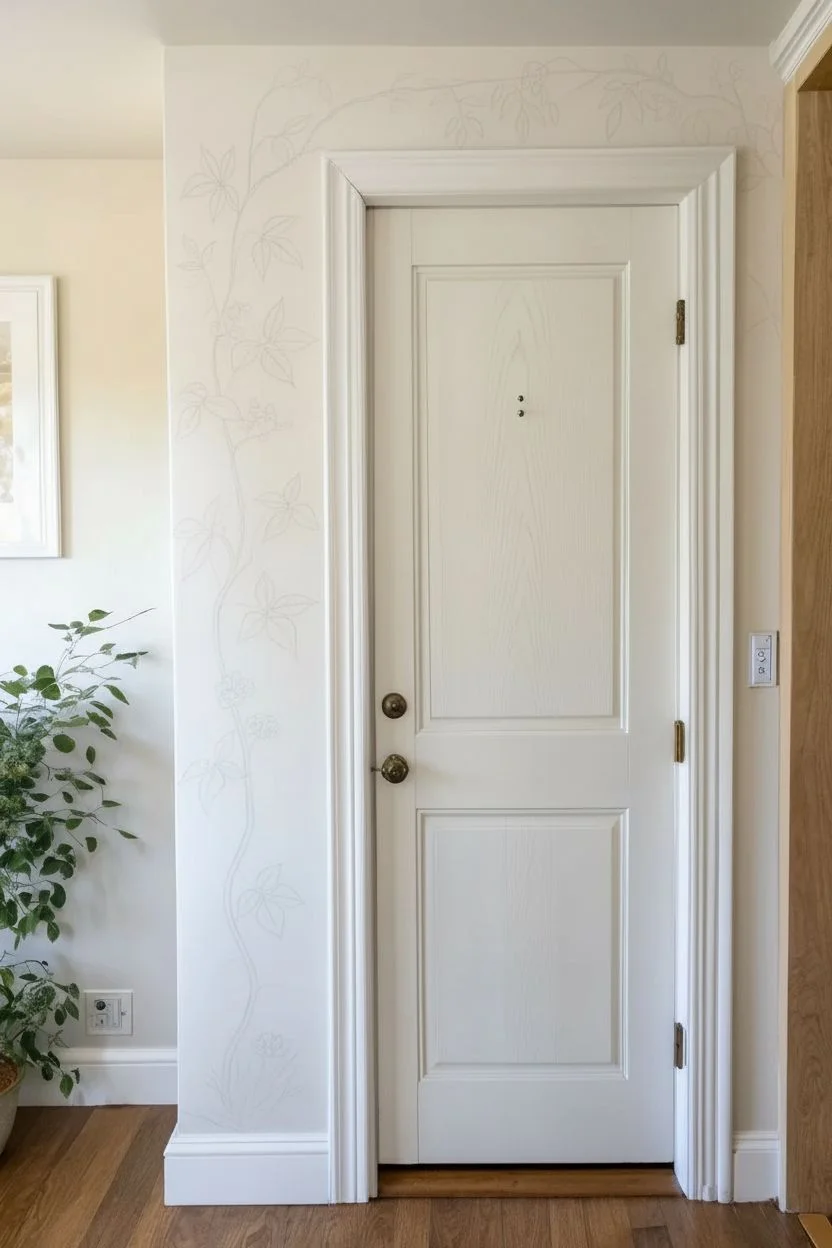
Bring the charm of an English garden indoors with this delicate, hand-painted botanical mural that frames your doorway. The design features trailing vines, realistic leaves, and soft peach blossoms rising from a grassy base to create an elegant, nature-inspired functional art piece.
Step-by-Step Tutorial
Materials
- High-quality interior acrylic latex paint (white base for wall)
- Acrylic craft paints (olive green, forest green, sap green, brown/umber, peach/dusty pink, cream, white)
- Pencil and eraser
- Reference images of botanical illustrations
- Assorted synthetic paintbrushes (liner brush for stems, rounds #2 and #4 for leaves, small flat brush for grass)
- Palette or paper plate
- Clean rag and water cup
- Painter’s tape (optional, to protect the door trim)
Step 1: Preparation and Planning
-
Prepare the surface:
Ensure the wall sections surrounding the door frame are clean, dry, and free of dust. If the current paint has a high sheen, lightly sand it to help the acrylics adhere better. If you are painting on a fresh white background like the photo, apply your base coat now and let it cure fully. -
Map the main vine structure:
Using a light pencil, sketch the primary S-curve of the main thick vine. Start from the floor on the left side, winding upward in gentle undulations parallel to the door frame, and arching over the lintel. Keep the line fluid and organic rather than rigid. -
Sketch the foliage placement:
Lightly draw the secondary branches and groupings of leaves. Observe how the leaves in the image fan out in groups of three or five (palmate style). Vary the angles so some point up and some droop down for naturalism. -
Add floral details:
Sketch small circles or clusters where the peach-colored flowers will sit. Place them strategically at the junction of leaves and stems to balance the greenery. Don’t forget to sketch distinct tall grasses at the very base to ‘ground’ the plant.
Step 2: Painting the Structure
-
Mix the stem color:
On your palette, mix brown/umber with a touch of olive green and a drop of white to create a realistic woody vine color. It shouldn’t be stark chocolate brown; aim for a grayish-brown bark tone. -
Paint the main vine:
Using a liner brush or small round brush, carefully paint the main stem following your pencil guide. Vary the pressure on your brush—press harder for thicker sections near the bottom and lift comfortably for wispy tips near the top. -
Add secondary branches:
Paint the thinner offshoot branches connecting the main vine to where your leaf clusters will go. These should be significantly thinner than the main trunk. I like to keep the paint consistency slightly fluid here for smoother lines.
Clean Edges
If you struggle with shaky hands on stems, use a ‘mahl stick’ (or a yardstick) to rest your hand against the wall while painting without smudging wet areas.
Step 3: Layering the Foliage
-
Base coat the leaves:
Mix a mid-tone olive green. Using a #4 round brush, paint the basic shape of the serrated leaves. Don’t worry about shading yet; just get the solid silhouette down, covering your pencil marks. -
Add leaf shadows:
While the green is still slightly tacky or just dry, mix a darker forest green. Paint along one side of the central leaf vein and at the base of the leaves where they meet the stem to create depth. -
Paint leaf highlights:
Mix a lighter sap green or add a touch of cream to your base green. Apply this to the tips of the leaves and the upper edges that would catch the light. This three-tone approach gives that dimensional, textbook-botanical look. -
Detail the veins:
With your thinnest liner brush and a diluted dark green or brown, paint the delicate central veins and tiny side veins on each leaf. Keep these lines whisper-thin.
Add Wildlife
Personalize the mural by hiding tiny details among the leaves, like a small ladybug, a resting butterfly, or a bumblebee on one of the peach flowers.
Step 4: Flowers and Finishing Touches
-
Paint the flower base:
Mix a dusty pink or peach tone. Dab this color onto your flower sketches using a small round brush. Keep the edges somewhat irregular to mimic petals. -
Detail the blossoms:
Add a darker rose color to the center of the flower clusters for depth, and highlight the petal tips with a pale creamy pink. If visible, add tiny yellow or brown dots in the centers for pollen/stamen details. -
Anchor with grass:
At the floor level, use a flat brush turned sideways or a liner brush to flick upward strokes of various greens. Intersect these blades of grass with the base of the vine to make it look like it’s growing from the earth. -
Refine the top arch:
Check the vines going over the door frame. Ensure they taper off naturally into thin tendrils rather than stopping abruptly. Add a few small, lonely leaves or buds at the very ends for a delicate finish. -
Final inspection:
Step back and look for any pencil marks that are still visible; gently erase them once the paint is 100% cure-dry. If any edges look too rough, tidy them up with your wall’s white background paint.
Enjoy the timeless beauty of this botanical feature every time you walk through the door


Have a question or want to share your own experience? I'd love to hear from you in the comments below!