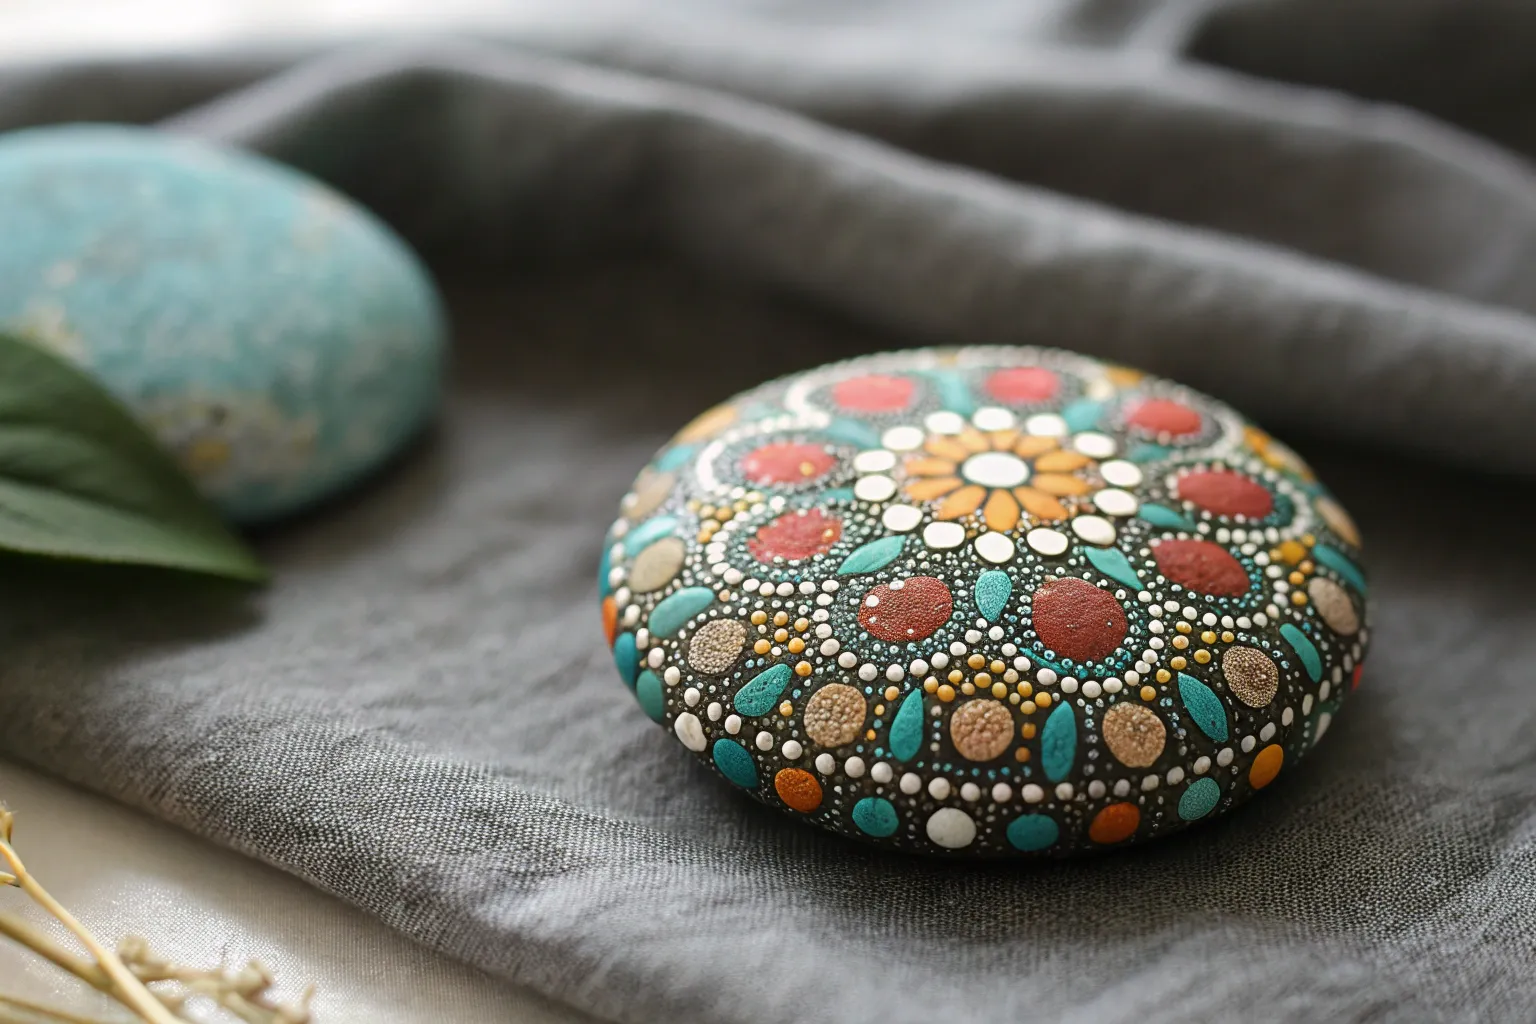
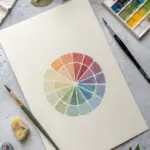
If you’ve ever gotten lost in the calm, clicky rhythm of making one perfect dot after another, you already know why dot painting is so addictive. I pulled together my favorite dot painting ideas—starting with the classics and moving into the fun, unexpected twists you can try once you’re feeling brave.
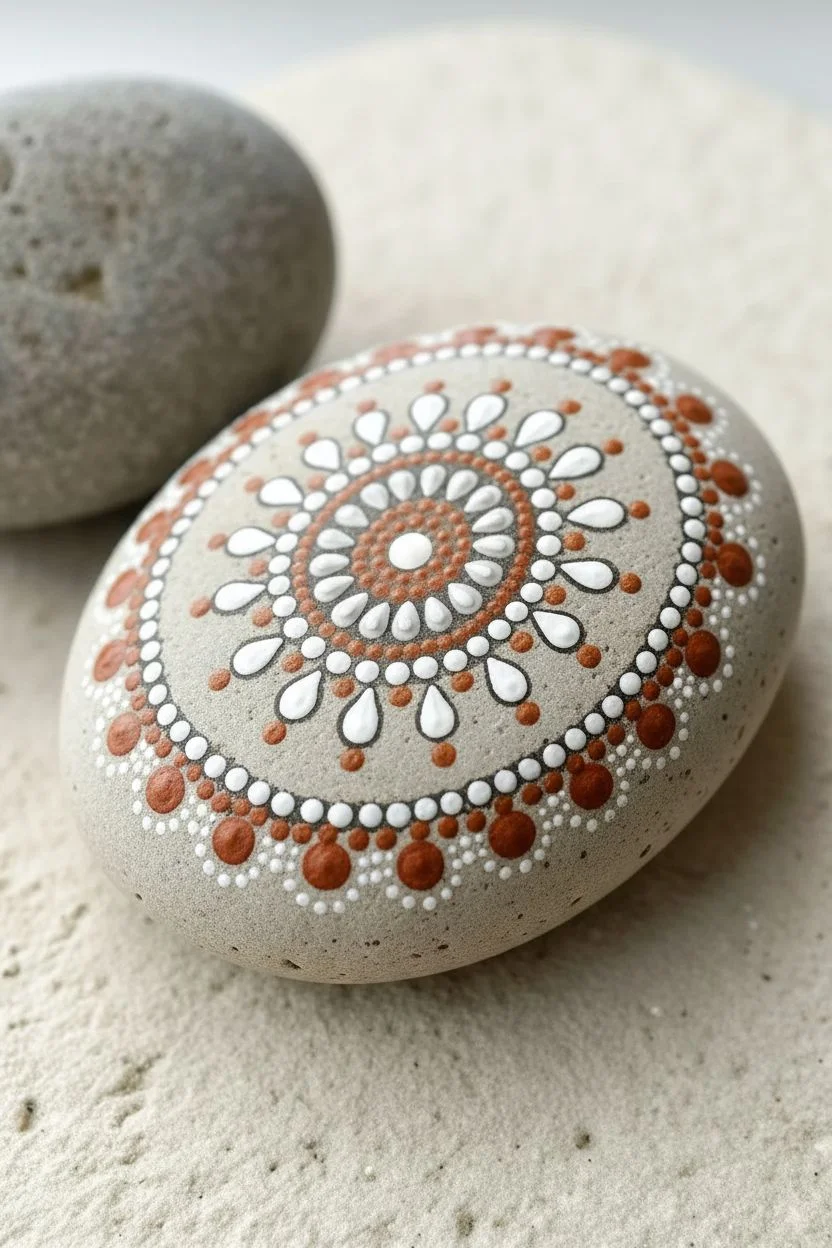
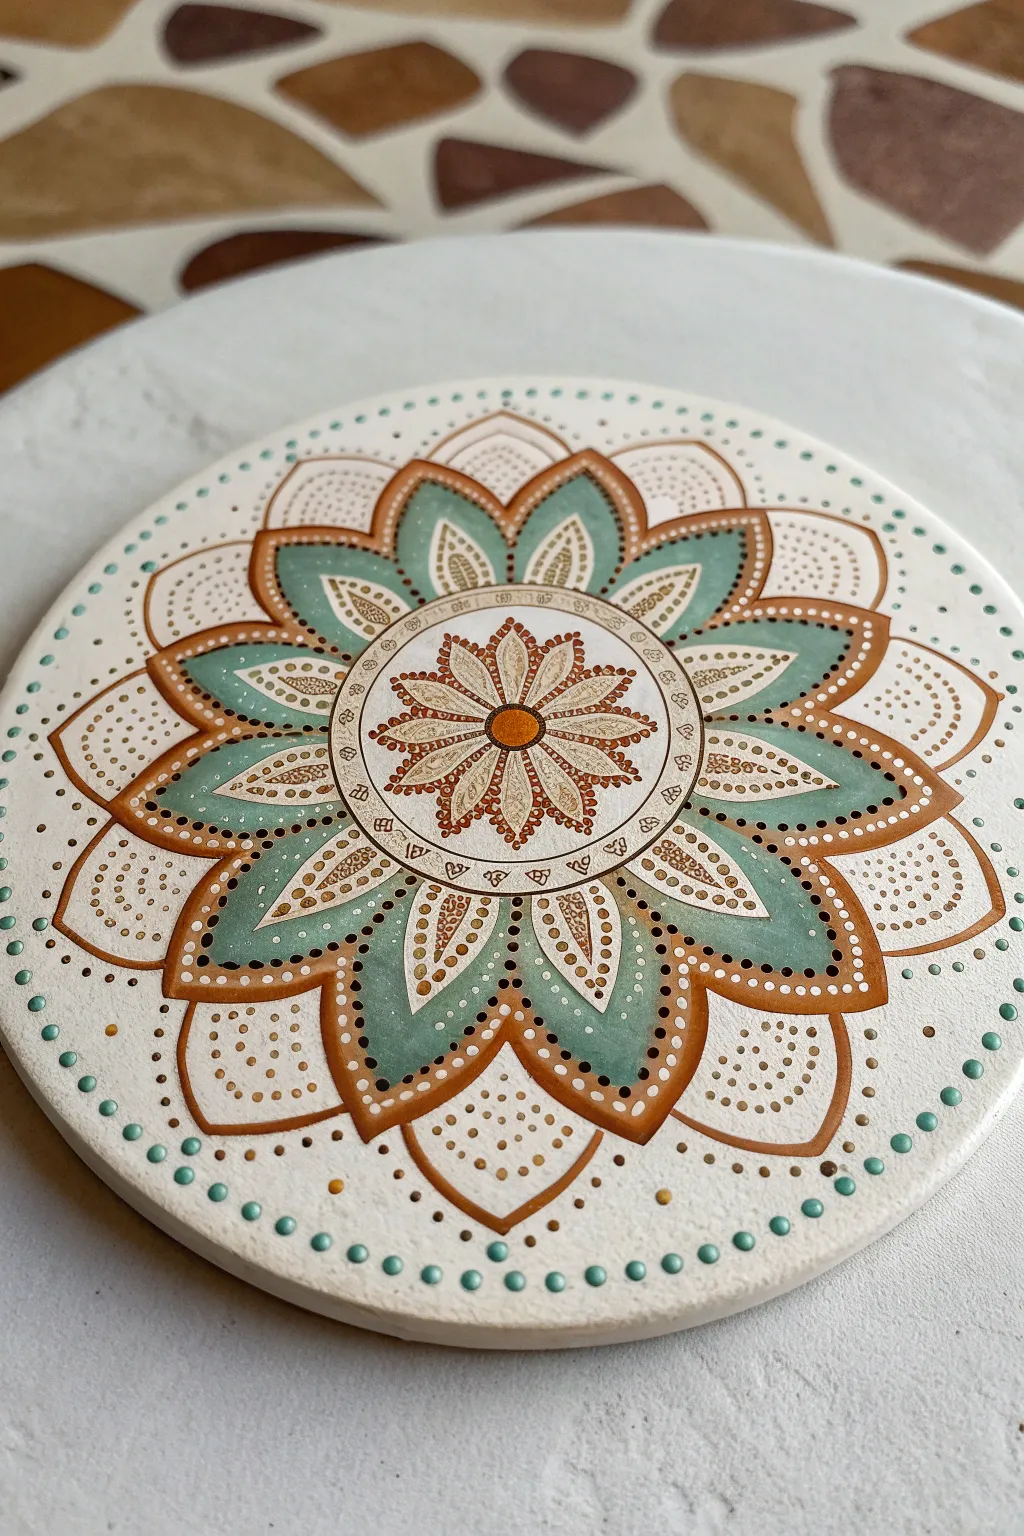
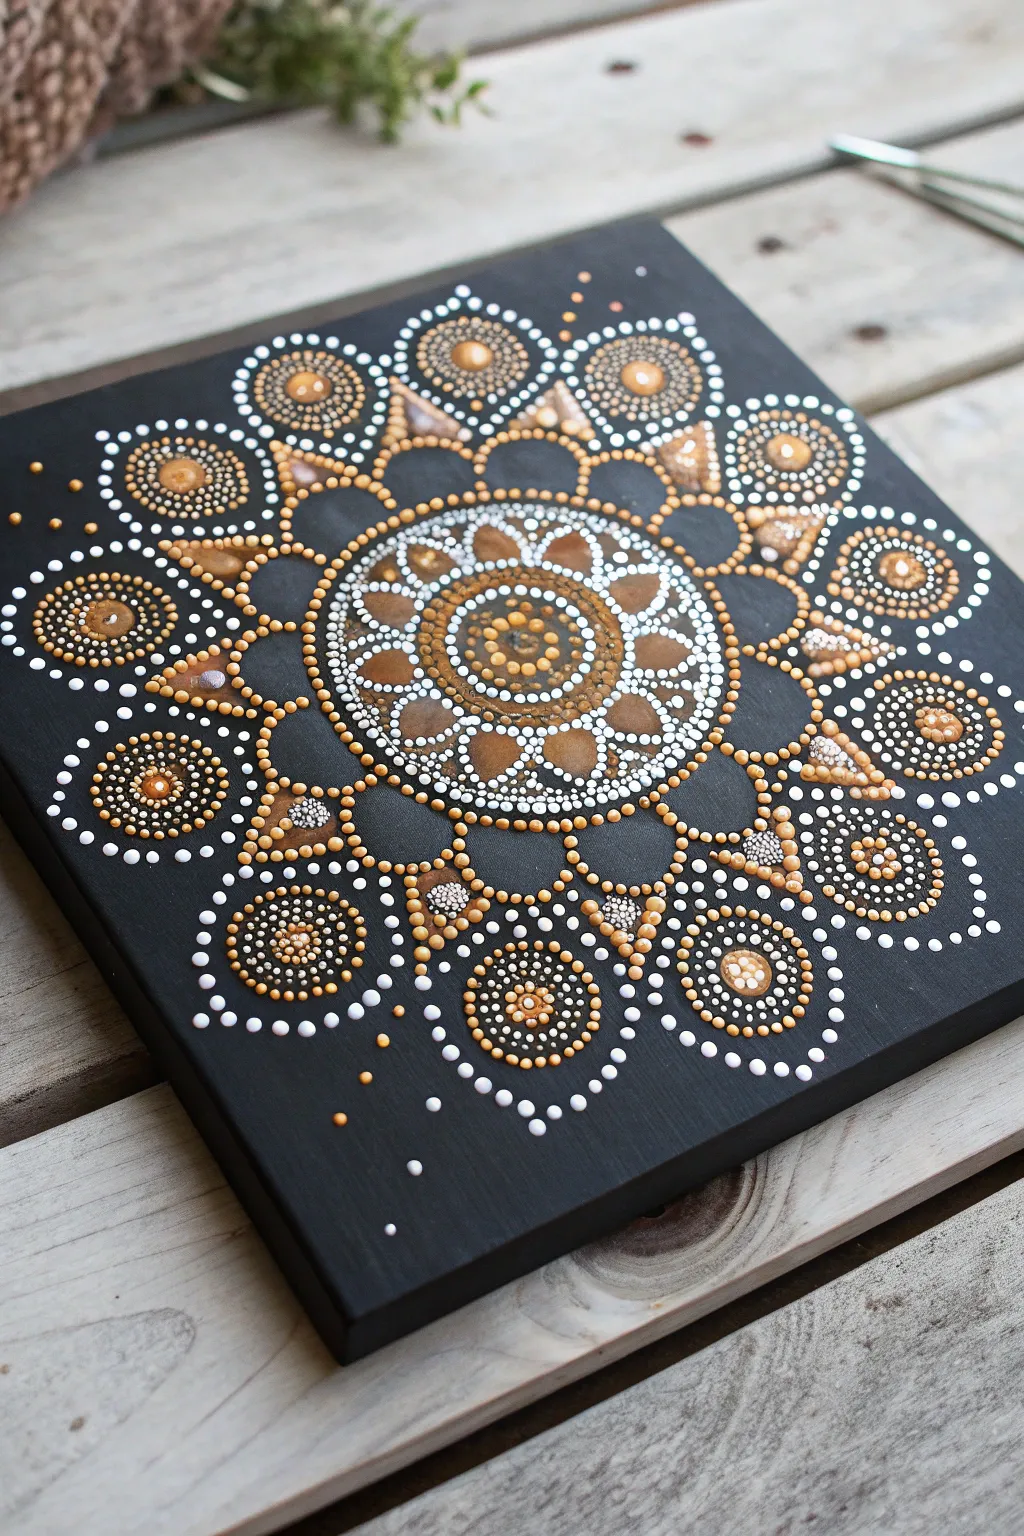
Classic Mandala Rock
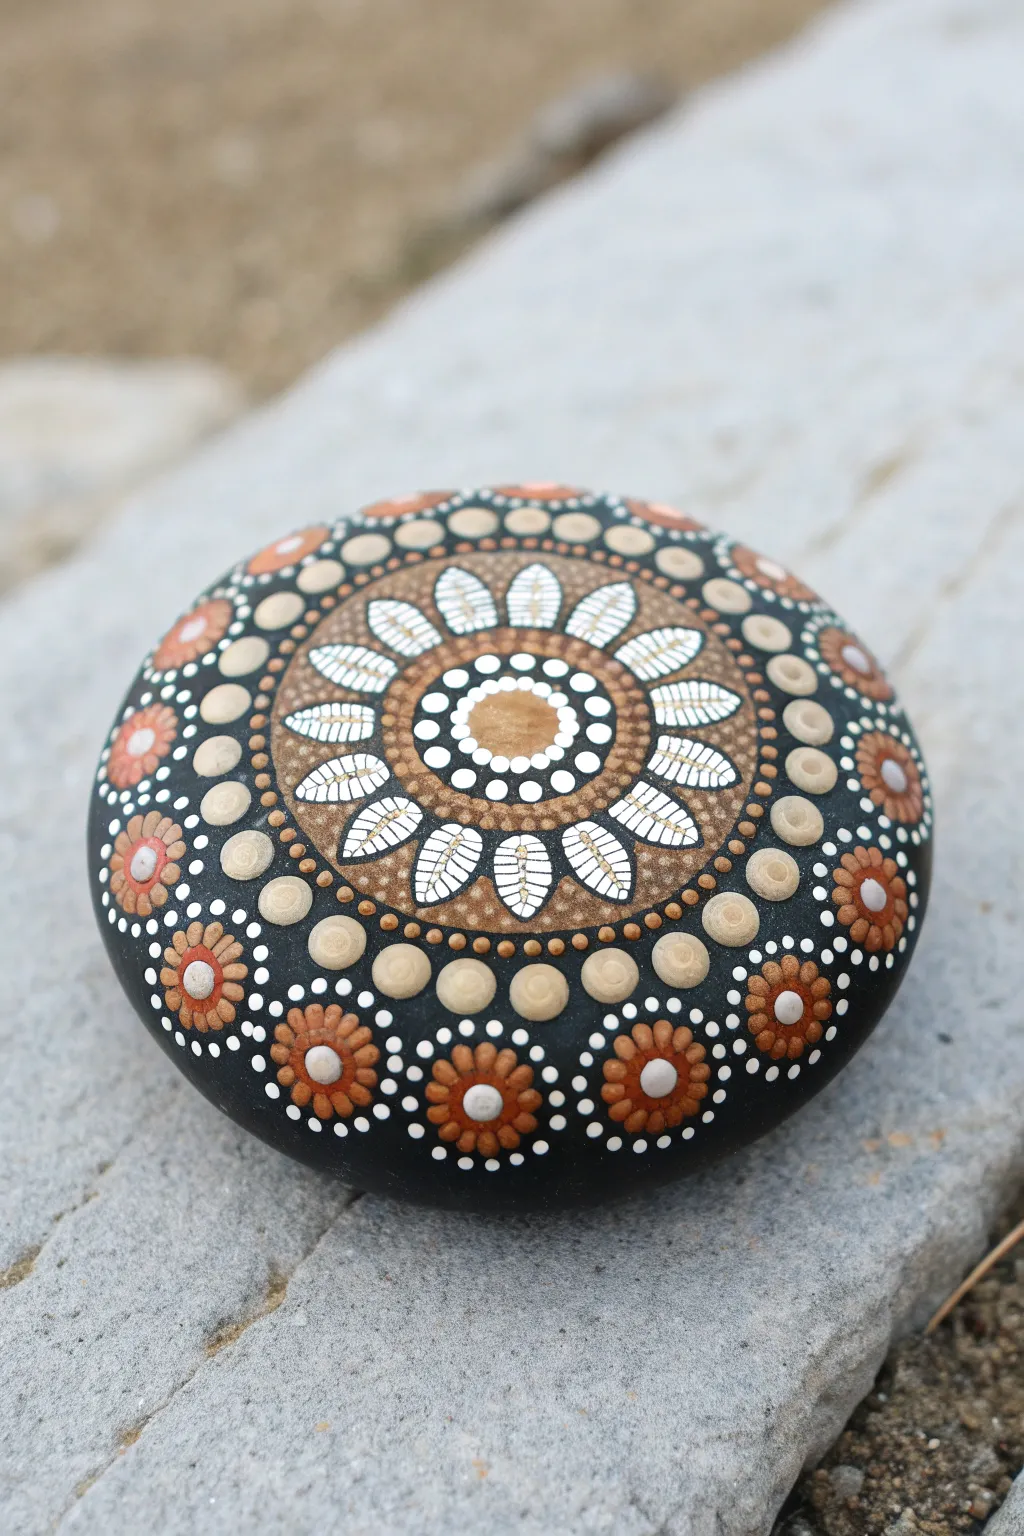
Embrace the soothing rhythm of dot art with this stunning mandala stone featuring earthy tones of copper, cream, and coffee against a stark black background. The intricate floral center and surrounding geometric borders create a mesmerizing piece perfect for meditation or decor.
Step-by-Step Tutorial
Materials
- Smooth, round river rock (approx. 3-4 inch diameter)
- Black acrylic paint or gesso for the base coat
- Acrylic paints: White, Cream/Off-White, Light Tan/Beige, Metallic Copper or Burnt Sienna
- Set of dotting tools (styluses and acrylic rods of various diameters)
- Fine detail paintbrush (size 0 or 00)
- Gloss varnish (spray or brush-on)
- Piece of chalk or white charcoal pencil
- Compass or circle template (optional)
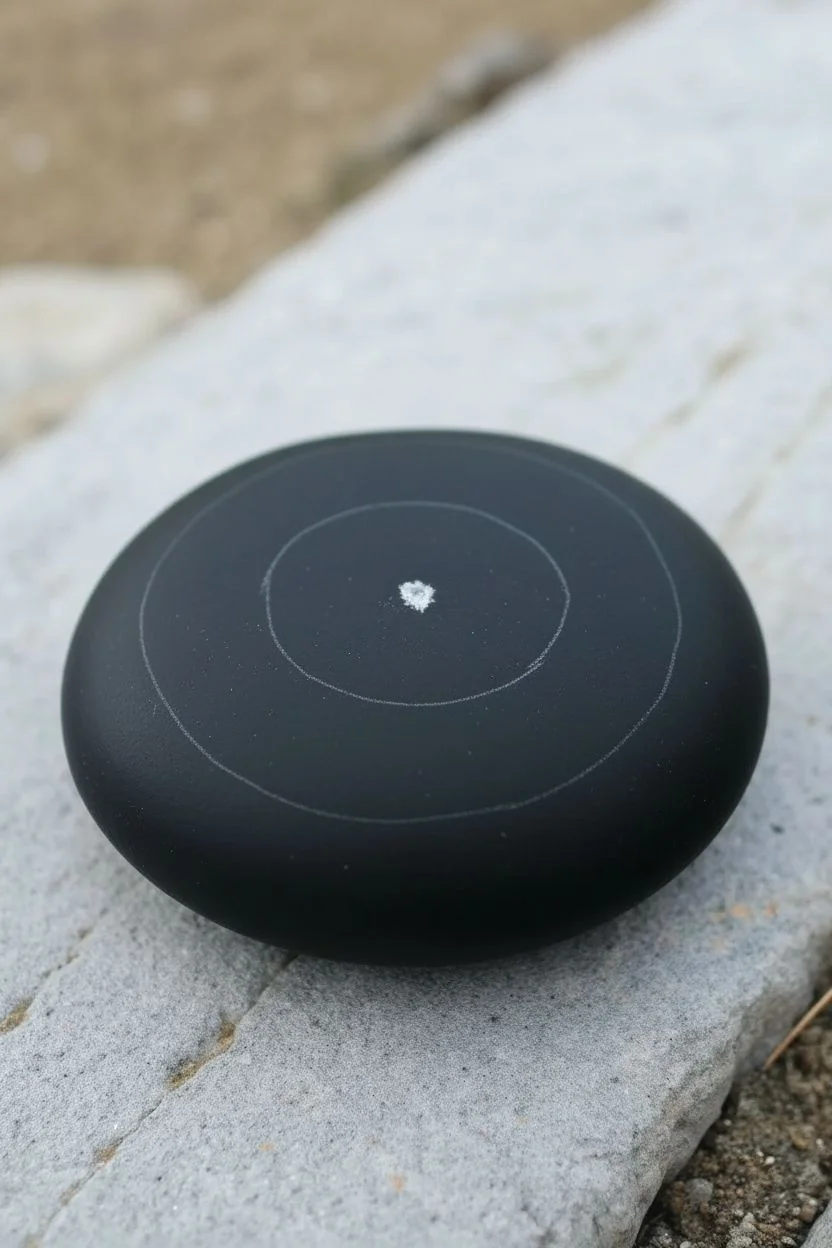
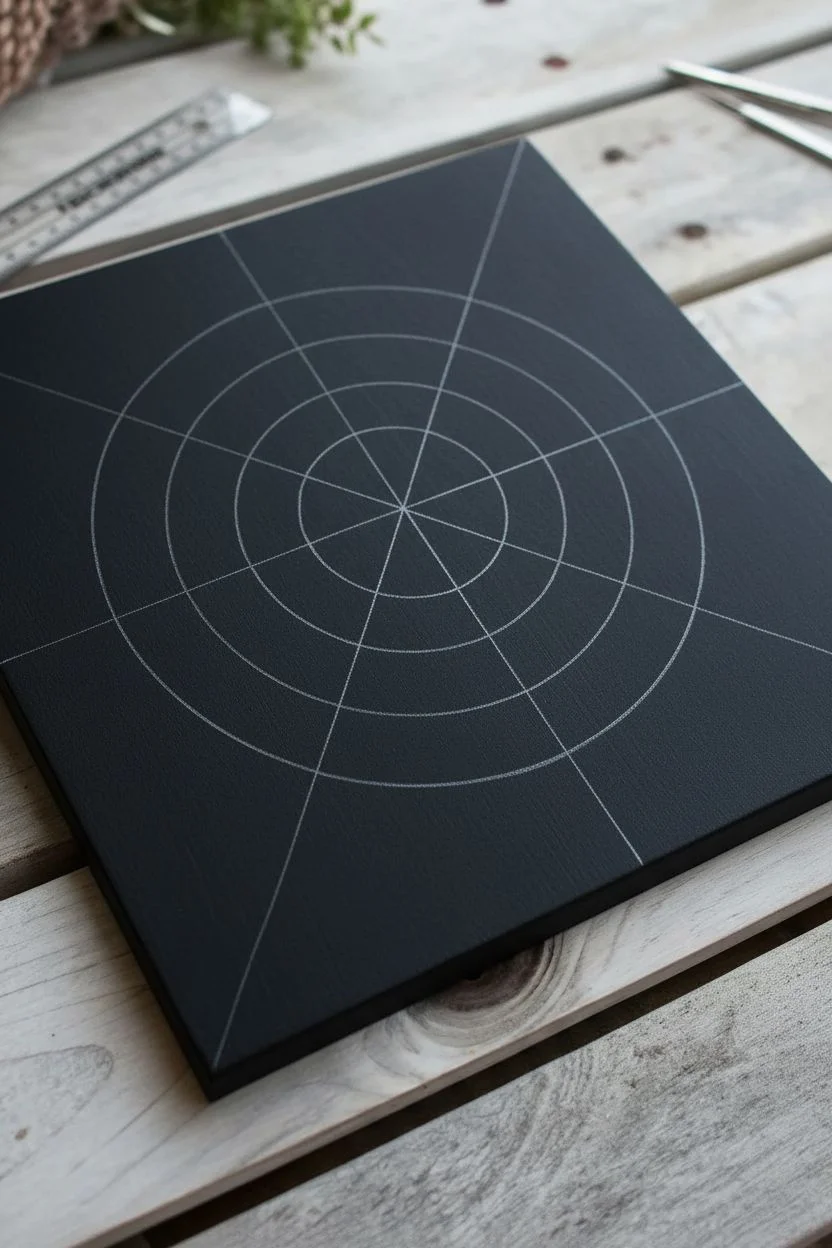
Step 1: Preparation and Base
-
Prime the Surface:
Begin by washing and drying your stone thoroughly. Apply one or two coats of black acrylic paint or black gesso to the entire surface, ensuring it is completely opaque and smooth. Let this dry fully. -
Find the Center:
Using a white chalk pencil or charcoal pencil, lightly mark the absolute center of your stone. If you want precision, use a compass to faint draw guide circles expanding outward, though freehanding adds organic charm.
Step 2: The Central Garden
-
First Ring:
Start with a large central dot of metallic copper or light brown. Around this, place a ring of small white dots using a small stylus tool. These should hug the central dot closely. -
Second Ring:
Move outward slightly and dot a circle of medium-sized white dots. Keep the spacing consistent. -
Creating the Brown Band:
Using your metallic copper or light brown paint, create a solid band around the white dots. I find it easiest to paint this as a thick ring first, rather than individual dots. -
Adding Petals:
Around the brown band, paint classic leaf or petal shapes using white paint and a fine liner brush. Aim for about 12-14 petals total around the circle. -
Detailing the Petals:
Once the white petals are dry, use a very fine tool to add tiny copper cross-hatches or veins inside each petal for texture. -
Texturing the Brown Band:
Go back to that solid brown band behind the petals. Add tiny white micro-dots all over it to give it a pollen-like, textured appearance.
Paint Consistency
For perfectly round dots that don’t peak in the center, mix a tiny drop of pouring medium or water into your heavy body acrylics until they have the consistency of melted ice cream.
Step 3: Expanding the Pattern
-
Bordering:
Outline the entire central flower motif with a ring of small copper dots. -
Large Cream Dots:
Select a larger acrylic rod tool. Dip it in cream or beige paint and place large dots around the perimeter of your central motif. Space them out so they touch slightly. -
Walking the Dots:
Using a much smaller tool and the same cream paint, ‘walk the dots’ around each large cream circle. This means placing tiny dots that decrease in size around the larger one to frame it. -
Filling the Voids:
In the triangular gaps between the top edges of the cream circles, drop a single medium-sized copper dot to bridge the pattern.
Try a Gradient
Make the design pop by using a gradient for the petal shapes—start with dark brown at the base and fade into pure white at the tips for a glowing effect.
Step 4: The Outer Rim
-
Large Outer Dots:
Switch to your largest flat-head dotting tool. Mix a light tan shade and place substantial dots around the outer edge of the stone, aligned with the gaps of the previous row. -
Adding Flower Motifs:
In the wide black spaces between these large outer dots, use your copper paint to create small 5 or 6-petal flowers. Start with a central dot and surround it with petal dots. -
Highlighting Flowers:
Once the copper flowers are dry, add a small white ‘top dot’ to the center of each one to make it pop. -
Lace Work:
Using your smallest stylus and white paint, create delicate dotted sweeping lines or swooshes connecting the outer elements, filling any remaining negative space with ‘starry night’ dust.
Step 5: Finishing Touches
-
Top Dots:
Revisit your large cream circles from the middle section. Add a smaller, lighter colored dot on top of each dried dot to create a 3D effect. -
Clean Up:
Once all paint is perfectly dry (wait at least 24 hours), use a damp cloth or cotton swab to gently wipe away any visible chalk guidelines. -
Seal and Protect:
Finish by applying a coat of high-gloss varnish. This will protect your art and make the stone colors look wet and vibrant permanently.
Place your finished mandala stone in a garden or on your desk as a reminder of the patience used to create it


Simple Concentric Circles Sampler
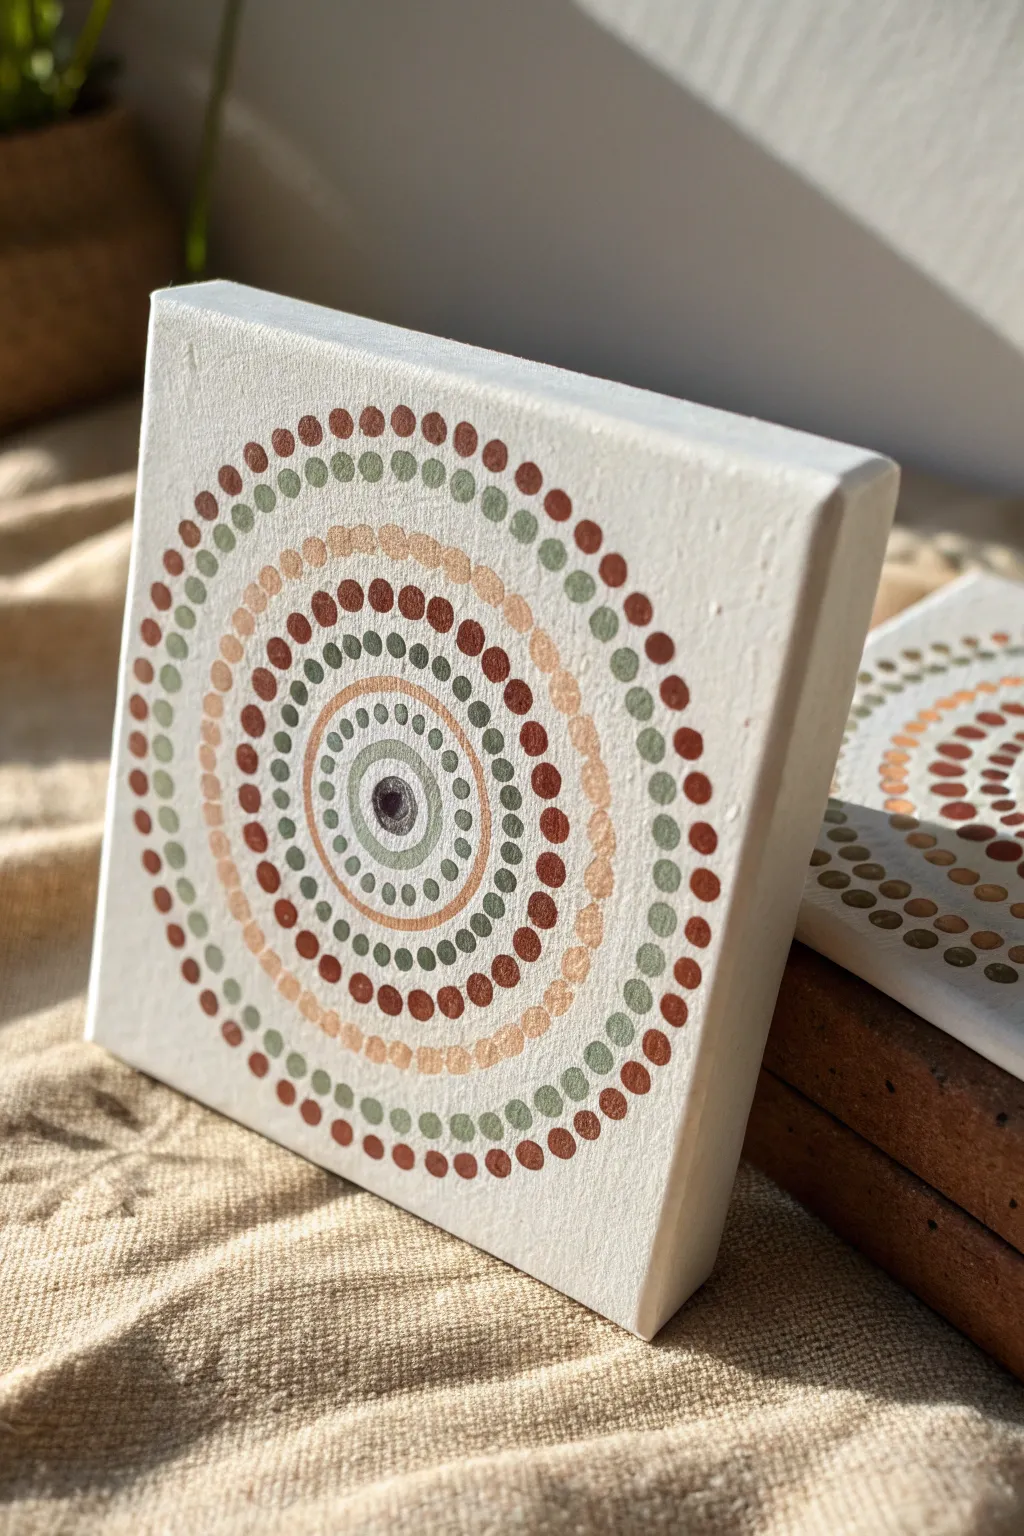
This soothing concentric circle pattern uses a palette of muted earth tones to create a modern bohemian vibe. The design is perfect for beginners because it relies on simple, radiating rings rather than complex geometric divisions.
Step-by-Step Guide
Materials
- Small square stretched canvas (approx. 4×4 or 6×6 inches)
- Acrylic paints: Dark brown, terracotta/rust, soft peach
- Acrylic paints: Sage green, cream/off-white
- Dotting tools (various sizes) or household alternatives (pencil erasers, brush ends, toothpicks)
- Palette or small plate
- Damp paper towel for cleaning tools
- Ruler and pencil (optional for finding center)
- Gesso (optional primer)
Step 1: Preparation & Center
-
Prime the Surface:
Since the canvas texture can be rough, start by applying a coat of cream or white gesso if you want a smoother surface. Alternatively, leave the raw canvas texture visible as seen in the photo for a rustic look. -
Base Coat:
Paint the entire canvas with two coats of a creamy white or very pale beige. Let it dry completely between coats to ensure no canvas weave shows through too aggressively. -
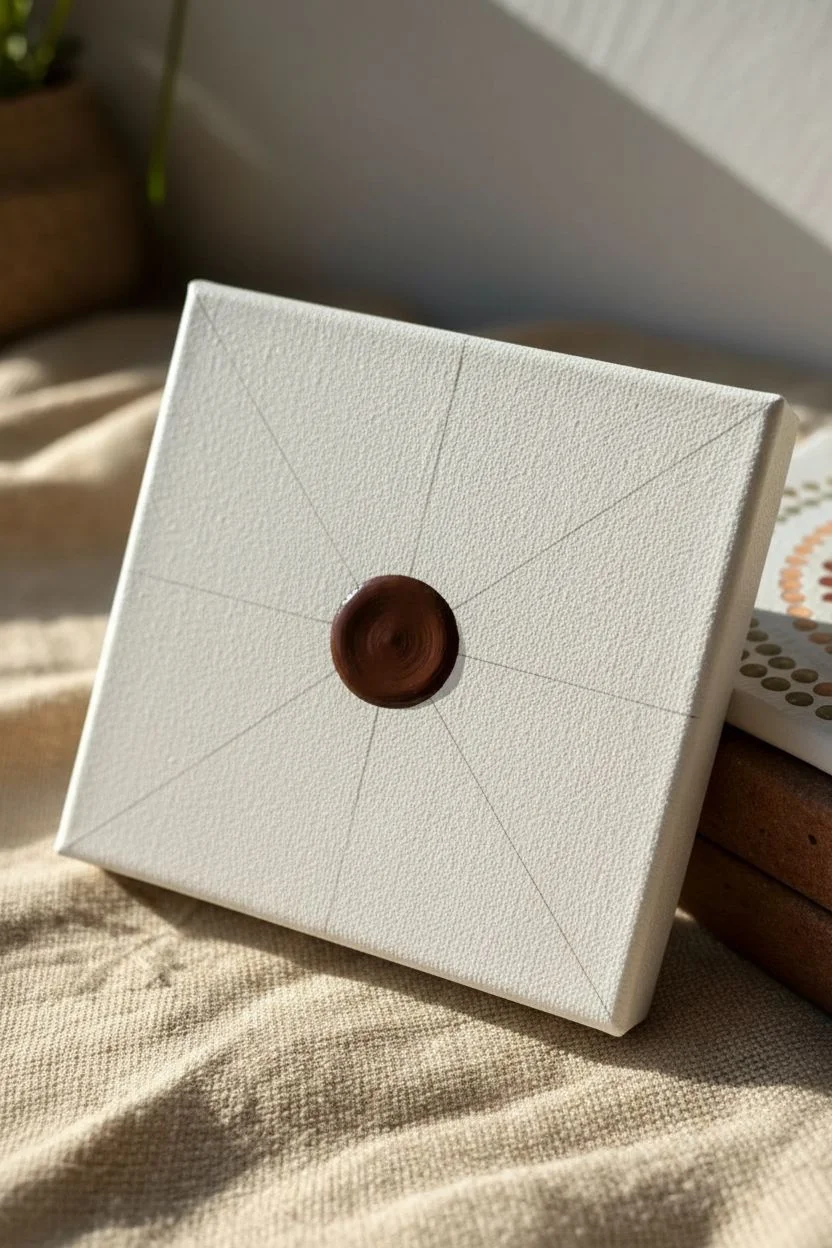
Find Center:
To keep your circles even, lightly mark the center point with a pencil. You can find this by measuring corner to corner with a ruler; x marks the spot. -
The Focal Point:
Using your largest dotting tool or the flat end of a pencil, place a single, large dark brown dot directly on your center mark. This anchors the whole design.
Fixing Wonky Circles
If a ring starts losing its circular shape, lightly draw a guide circle with a compass before dotting. If a wet dot is misplaced, wipe it immediately with a damp Q-tip.
Step 2: Inner Core
-
First Ring:
Mix a small amount of sage green with white to create a pale tint. Using a small tool, place tiny dots closely around the center brown dot. Try to keep the spacing consistent between each dot. -
A Solid Ring:
Instead of individual dots, paint a thin, solid ring of pale sage green around the previous row. This acts as a spacer and adds visual variety to the texture. -
Adding Contrast:
On top of the solid sage ring you just painted, apply small dots of cream or white. Space them evenly so they sit like pearls on a string. -
Defining the Core:
Outline this central cluster with a thin, solid line of peach or light terracotta paint. This creates a clear boundary before the larger pattern begins.
Pro Tip: Consistency
For perfectly uniform dots, dip your tool into the paint for every single dot. The ‘walking the dots’ technique (dipping once, dotting multiple times) creates shrinking dots, which we don’t want here.
Step 3: Radiating Layers
-
Sage Green Layer:
Load a medium-sized tool with sage green paint. Create a ring of dots just outside the peach line. Remember to reload your tool every 1-2 dots to keep them plump and round. -
Terracotta Expansion:
Switch to a terracotta or rust color. Using a sliighly larger tool than the previous row, place dots in the spaces between the green dots of the prior ring (a brick-laying pattern). -
Deepening the Contrast:
Using the dark brown paint again, add a row of dots outside the terracotta ring. I find that placing these dots directly aligned with the green dots (skipping the terracotta alignment) helps keep the circle expanding evenly. -
The Peach Band:
Create a wider band of the soft peach color next. Use a medium tool and place these dots quite close together to create a light, airy break in the darker colors. -
Second Peach Row:
Add a second row of peach dots immediately outside the first peach row. Stacking two rows of the same color makes this band look thicker and more prominent.
Step 4: Finishing the Pattern
-
Green and Brown Return:
Return to your sage green for the next ring using a medium-large tool. Follow this immediately with another ring of dark brown dots. -
Terracotta Accent:
Add a ring of terracotta dots. As you move outward, the circumference grows, so ensure you are spacing the dots so they don’t look crowded or too sparse. -
Final Green Ring:
Finish the main circular pattern with a final ring of sage green dots. These should be near the edges of your canvas but not falling off. -
Corner Fillers:
To square off the design, add partial arcs of dots in the four corners. Use the dark brown, followed by terracotta, mimicking the curve of the main circle until the corner is filled. -
Protect the Art:
Allow the paint to dry for at least 24 hours. Because the dots are thick patches of paint, they take longer to cure. Finish with a matte spray varnish to protect the surface.
Once dry, display your canvas on a small easel or mount it on the wall for a touch of geometric calm


Easy Half-Mandala Border
Capture the warmth of the sun on a naturally smooth stone with this intricate dot painting design. The pattern combines fiery rust-orange petals with crisp white accents for a striking radial display that feels both earthy and elegant.
How-To Guide
Materials
- Smooth, light-colored river rock (approximately palm-sized)
- Acrylic paints: Rust orange/terracotta, bright white, black
- Dotting tools (various sizes)
- Fine detail paintbrush (for petal shapes)
- Acrylic gloss varnish or sealant
- Damp cloth for mistakes
- Palette or small plate
Step 1: Center Burst
-
Central anchor:
Begin by finding the most pleasing spot on your stone’s surface to be the center. Using a medium-sized dotting tool, place a single, solid white dot right in the middle. -
First ring:
Switch to a very small dotting tool. Dip it into the rust orange paint and create a tight ring of tiny micro-dots immediately surrounding the central white dot. -
Inner petals:
Using white paint and a small brush or a tool dragged to a point, create a ring of small teardrop shapes pointing outward from the orange ring. These should look like small seeds or short petals. -
Orange outline:
Once the white teardrops are dry, use your smallest dotting tool with rust orange paint to place a single tiny dot between the tips of each white teardrop. -
Second ring:
surround the entire center assembly with a new ring of small orange dots. Keep these evenly spaced and close to the white teardrops.
Step 2: Radiating Petals
-
Drafting the petals:
Load a fine detail brush with your rust orange paint. Paint a ring of long, pointed petal shapes radiating outward. Aim for about 12-14 petals depending on your stone’s size. -
Petal detailing:
While the orange petals are drying, you might notice the paint sinks in a bit; apply a second coat if needed for opacity. Then, use a fine liner brush and black paint to carefully outline each orange petal. -
Inner stripe:
Add a very thin line of lighter orange or simply leave the center of the petal slightly translucent to create a veined look, though the example relies mostly on the bold solid color. -
Petal spacing dots:
In the V-shaped gaps between the tips of the petals, place a medium-sized white dot using a dotting tool. -
Connecting dots:
From that medium white dot, walk smaller white dots down the sides of the petals toward the center. This fills the negative space between petals with tapering white lines.
Perfect Petals
If you struggle painting petals freehand, draw a faint pencil guide first. A distinct centerline helps keep them symmetrical.
Step 3: The Outer Border
-
Base circles:
Create a wide border ring by painting large rust-orange circles around the entire flower design. Leave a small gap between this new ring and the petal tips. -
Border definition:
Once the large orange circles are dry, use your smallest tool to dot a ring of tiny black dots around the perimeter of each orange circle. -
Inner detail:
Inside every large orange circle, create a cluster of tiny white dots. I usually place one in the center and 5-6 around it to look like a mini-flower. -
Connecting the border:
To tie the border to the main flower, place a medium-sized white dot in the space between each large orange border circle. -
Final framing:
Using white paint, create a scalloped edge by walking dots around the outer edge of the border circles. Start with a larger dot at the intersection and decrease dot size as you curve around the orange circle. -
Sealing:
Allow the stone to cure for at least 24 hours before applying a coat of gloss varnish to protect your work and make the colors pop.
Go Metallic
Swap the rust orange for copper or bronze metallic paint. The shimmer against the matte stone creates a stunning, jewelry-like effect.
Enjoy displaying your beautiful mandala stone in a garden pot or on a sunny windowsill where the light can catch the details


Dot Gradient Ombre Fade
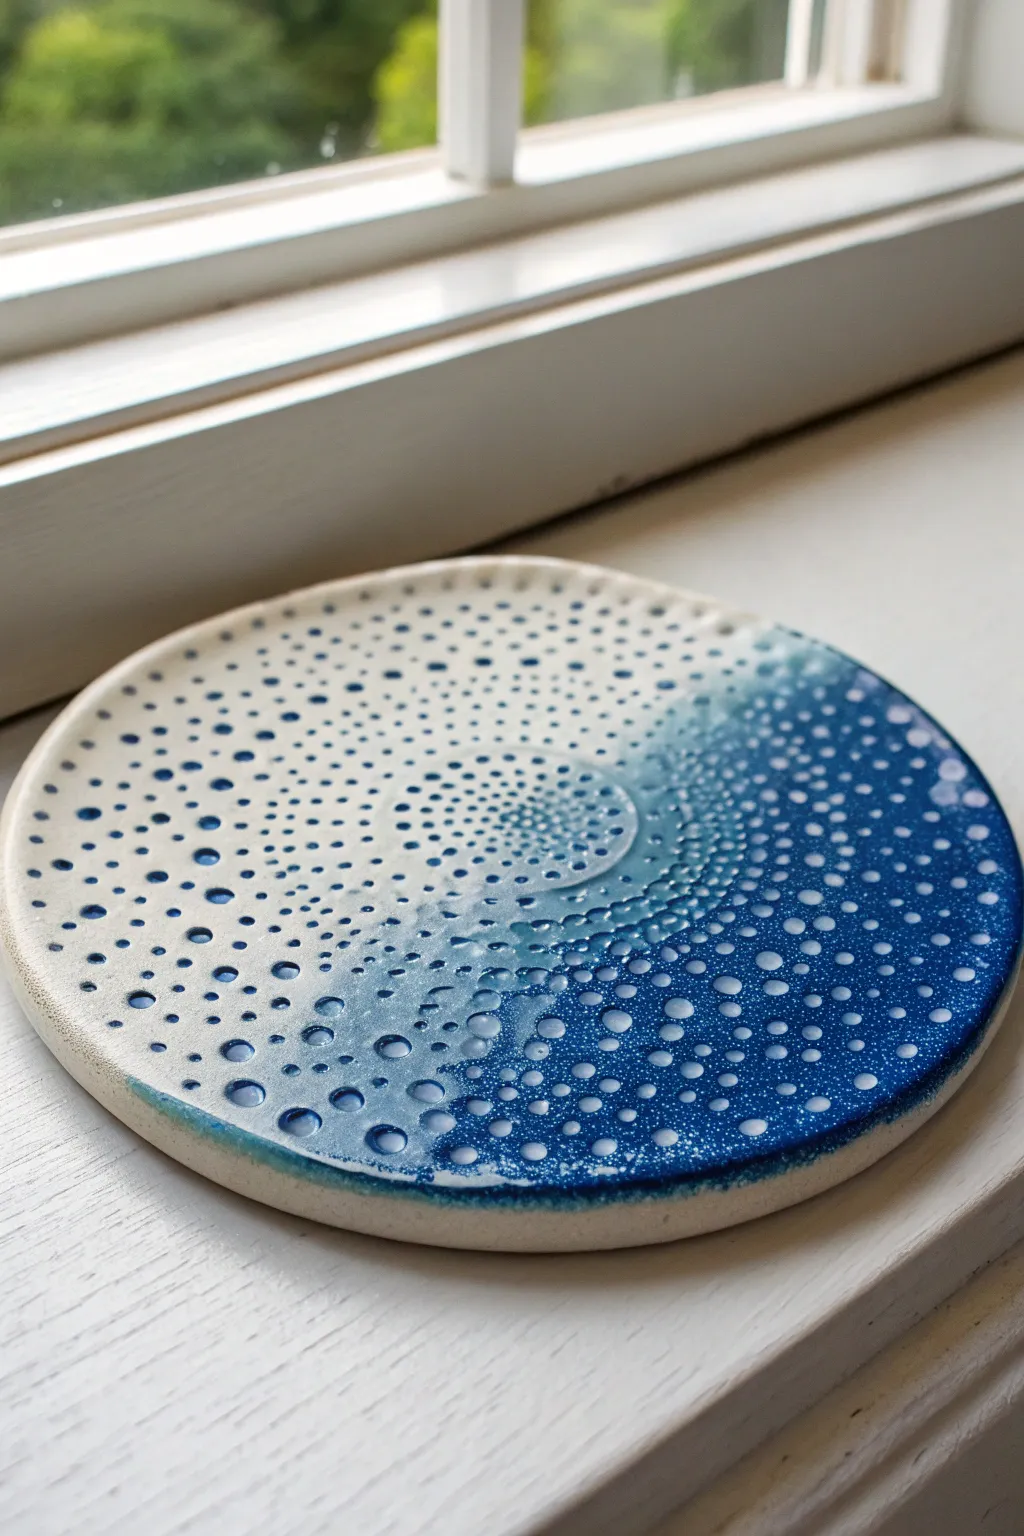
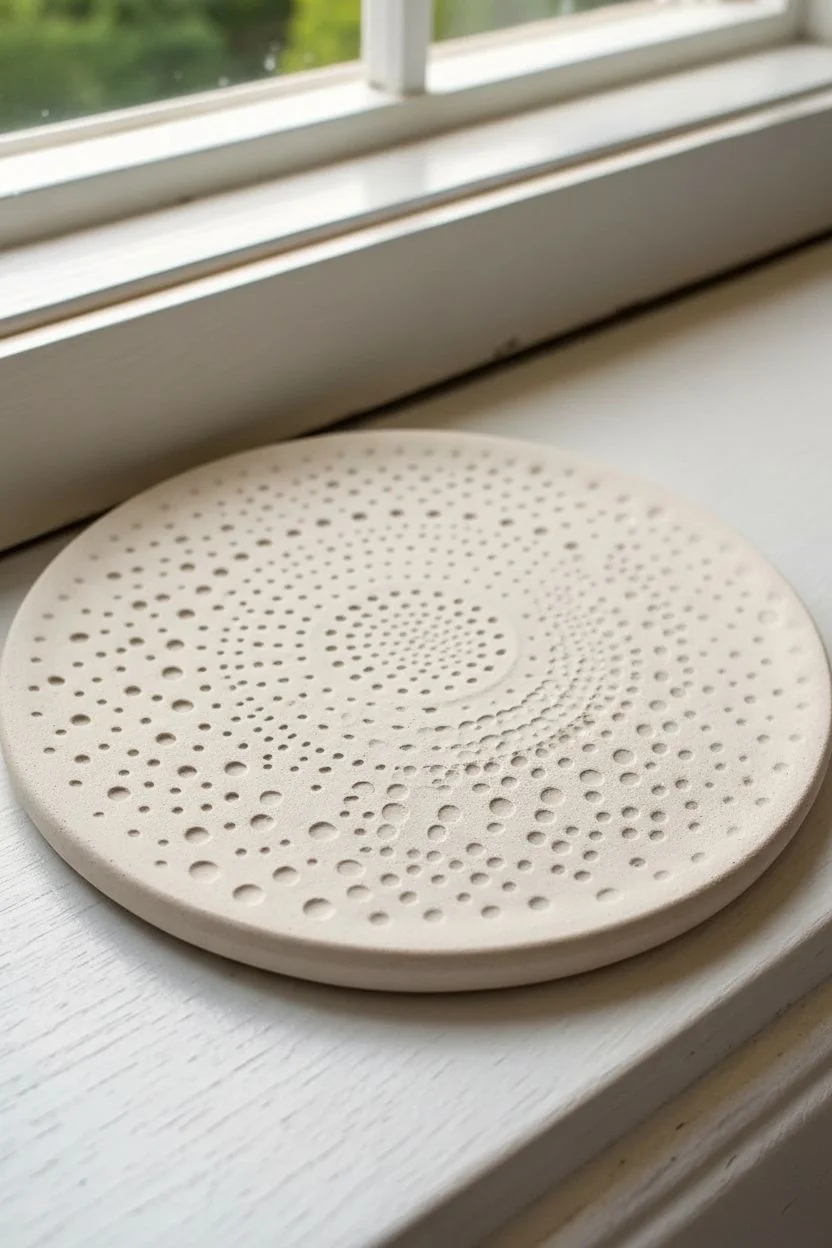
Capture the mesmerizing depth of rolling waves with this textured ceramic coaster project. By combining precise impressing tools with a clever glaze-resist technique, you can create a stunning ombre effect where deep blue fades effortlessly into raw white clay.
Step-by-Step Tutorial
Materials
- White stoneware clay (rolled into a slab)
- Circle cutter or template (approx. 4-5 inches)
- Set of dotting tools or drill bits (various sizes)
- Small sponge
- Wax resist (liquid)
- Deep cobalt blue ceramic glaze (glossy)
- Clear transparent glaze (optional)
- Kiln access (for bisque and glaze firing)
- Soft fan brush
- Potter’s needle tool
Step 1: Forming and Texturing
-
Prepare the Canvas:
Begin by rolling out your white stoneware clay to a consistent thickness of about 1/4 inch. Use a rib tool to smooth the surface perfectly, removing any canvas texture or imperfections. -
Cut the Shape:
Using your circle cutter or a needle tool tracing a template, cut out a perfect circle. Smooth the edges with a slightly damp sponge to round them off so they aren’t sharp after firing. -
Plan the Spiral:
Lightly mark the center of your circle. Visualize a swirling galaxy or a nautilus shell shape that starts tight in the center and fans out towards one side. -
Begin the Center Impression:
Take your smallest dotting tool. Press gently into the clay at the center to create a tight cluster of small divots. Don’t press all the way through; you just want a clean indentation. -
Expand the Pattern:
Move outward from the center in a spiral motion. Switch to slightly larger tools as the spiral expands. The key is to keep the dots dense in the ‘blue’ zones and more sparse as they fade into the white zones. -
Create the Gradient Texture:
On the side of the coaster intended to be white, press fewer dots and use smaller tools. On the side intended to be dark blue, pack the impressions closely together, using larger tools to create deep reservoirs for the glaze. -
Refine the Edges:
Add a few scattered dots near the very rim of the circle to make the pattern feel like it continues off the edge. Let the clay dry slowly to the leather-hard stage, then bisque fire it according to your clay’s specifications.
Uneven Glaze?
If the gradient looks streaky, use a spray bottle to apply the glaze instead of a brush. Layering mist allows for a much softer transition than brushing.
Step 2: Glazing and Finishing
-
Clean the Bisque:
Once your piece is out of the bisque firing, wipe it down with a damp sponge to remove any kiln dust. This ensures the glaze adheres properly. -
Apply Wax Resist:
This is the secret to the crisp white dots. Carefully paint liquid wax resist onto the surface of the clay where you want the white clay to show through—specifically into the smaller dots on the ‘light’ side of the gradient. -
Wiping Technique:
Alternatively, if you want the dots to be filled with glaze (as seen in the deep blue section), do not wax them. Instead, you’ll rely on the depth of the impression to hold more pigment. -
Applying the Gradient:
Dip your fan brush into the deep cobalt blue glaze. Apply a heavy coat to the side of the coaster with the large, deep impressions. Let the glaze pool into those divots. -
Creating the Fade:
Without reloading your brush, drag the glaze across towards the lighter side. The glaze should get thinner. I like to dip my brush in a tiny bit of water to thin the glaze further as I reach the far edge, creating a wash rather than a solid coat. -
Wipe Back Surface Glaze:
Take a clean, damp sponge and very gently wipe the surface of the clay on the lighter side. This removes glaze from the high points but leaves it trapped inside the impressions, accentuating the texture. -
Check the Reservoirs:
Inspect the deep blue side. Ensure the large indented dots possess a nice pool of glaze. If they look dry, dab a little extra droplet of blue into each indentation. -
Clean the Foot:
Wipe the bottom of the coaster completely clean of any glaze to prevent it from sticking to the kiln shelf. -
The Final Fire:
Load the kiln and fire to the maturity temperature of your glaze (typically Cone 5 or 6 for stoneware). The glaze will melt, pool in the dots, and flow slightly to create that beautiful organic interaction.
Add Sparkle
Crush a small amount of clear glass frit and sprinkle it into the largest indentations before firing for pools that look like actual water droplets.
Once cooled, you will have a durable piece of art that mimics the mesmerizing patterns of sea foam
BRUSH GUIDE
The Right Brush for Every Stroke
From clean lines to bold texture — master brush choice, stroke control, and essential techniques.
Explore the Full Guide
Rainbow Spiral Swirl
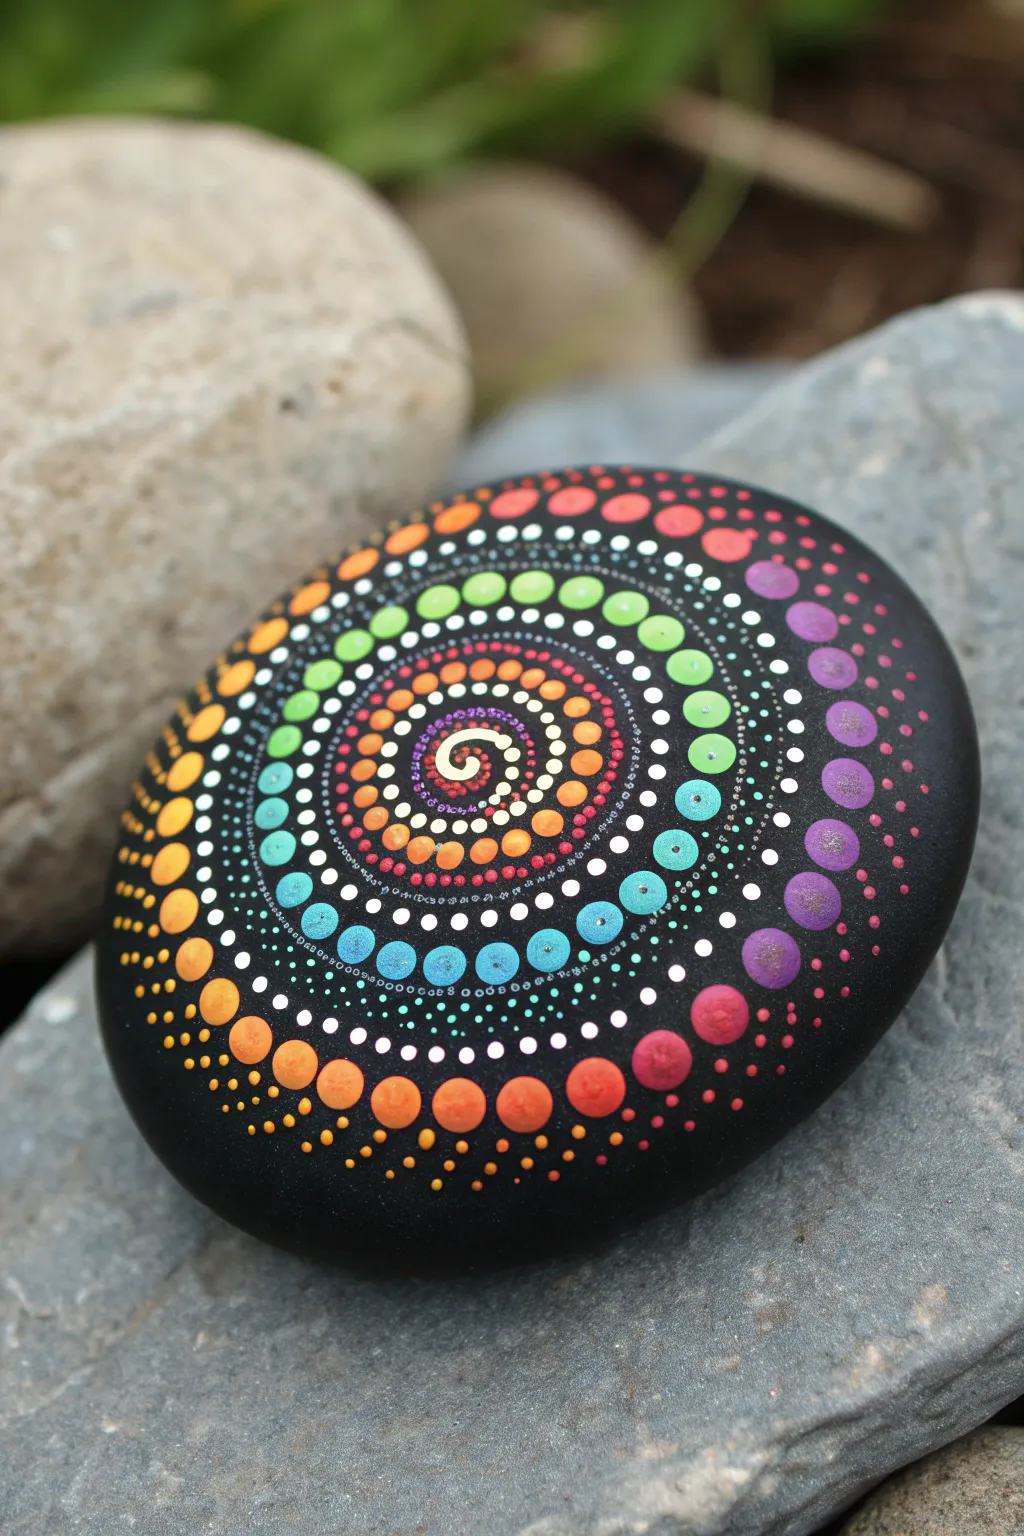
Transform a simple dark stone into a mesmerizing burst of color with this vibrant spiral dot mandala. The hypnotic pattern radiates outward in a rainbow gradient, creating a stunning piece of pocket-sized art that looks far more complex than it actually is.
Step-by-Step Guide
Materials
- Smooth, round river rock (approx. 3-4 inches wide)
- Black acrylic paint (base coat)
- Acrylic paints in rainbow colors: Red, Orange, Yellow, Green, Blue, Purple, Magenta
- Metallic Gold acrylic paint
- White acrylic paint
- Dotting tools (various sizes from small to large)
- Small twist cap or palette for mixing
- Clear spray sealer (glossy or matte)
Step 1: Preparation & Base
-
Prepare the canvas:
Begin by washing your stone with warm soapy water to remove any dirt or oils. Let it dry completely before starting. -
Apply the base coat:
Paint the entire top surface of the stone with black acrylic paint. You may need two thin coats for full opacity. Allow the black paint to dry thoroughly so your colorful dots will pop against the dark background. -
Establish the center:
Locate the approximate center of your stone. Using a very fine dotting tool or a toothpick, paint a small, tight ‘S’ curve or spiral shape in metallic gold. This tiny swirl acts as the anchor for your entire design.
Step 2: Creating the Spiral Core
-
Start the first row:
Dip a small dotting tool into orange paint. Place a series of small viewing dots originating from the tail of your gold center swirl, creating a curved line that begins to wrap around the center. -
Transitioning colors:
Without breaking the line, switch to red paint. Continue the spiral path outward, placing dots that are slightly larger than the previous orange ones. The key to the spiral effect is maintaining a consistent gap between your current row and the previous inner row. -
Adding the purple section:
Move to a slightly larger tool and switch to purple paint. Continue the spiral arm, wrapping it further around the stone. Remember to dot intentionally—press down, lift straight up to keep rounds crisp. -
Blue and teal tones:
Transition into blue, then teal or light blue paint. As you move outward, gradually increase the size of your dotting tool. By now, your line of dots should be noticeably larger than the tiny center ones.
Smooth Operator
If your paint leaves peaks on the dots, thin it slightly with pouring medium or water. You want the paint to settle into a smooth dome, not a Hershey’s Kiss shape.
Step 3: Expanding the Rainbow
-
Green growth:
Switch to green paint and a medium-sized tool. Continue the spiral path. I find it helpful to rotate the stone constantly as I work to keep my hand angle comfortable. -
Yellow brightness:
Clean your tool and switch to bright yellow. Place these dots along the spiral path. Ensure they don’t touch the green row inside them; leave a thin black gap to define the spiral. -
Orange and red return:
Cycle back to orange and red as you reach the outer edges of the stone. Your dots should be at their largest size now, acting as the bold border of the design. -
Completing the main spiral:
Finish the main spiral tail with your largest dots (likely magenta or red) near the edge of the rock. Taper the size down slightly at the very end to tuck the tail neatly against the previous row.
Glow in the Dark
Swap the white highlight dots for phosphorescent or UV-reactive paint. Under a blacklight, your spiral will look like a glowing galaxy.
Step 4: Details & Decoration
-
Walking the dots:
Now for the intricate detail: choosing a very small tool and white paint, you will ‘walk the dots’ around the larger colored circles. Start with a central white dot at the top of a large colored dot, then curve tiny white dots down around its sides. -
Applying divider dots:
Instead of full surrounding dots, you can simply place small white divider dots in the black spaces between the large colored spiral rows. This fills the negative space and adds brightness. -
Top dots:
Using a smaller tool size than the original colored dots, add a ‘top dot’ of a lighter shade onto the larger dots. For example, add a light green dot on top of the dark green ones, or yellow on top of orange. This creates a 3D layered effect. -
Tiny accents:
Use a needle tool or toothpick to add the tiniest specks of contrasting colors in any remaining large gaps. In the image, note the tiny orange specks near the outer edge. -
Final drying:
Allow the stone to dry for at least 24 hours. The thick layers of paint in the larger dots take longer to cure than the base coat. -
Sealing:
Once fully cured, spray with a clear acrylic sealer. This protects the paint from chipping and gives the stone a beautiful, finished sheen.
Place your finished stone in a sunny garden spot or on your desk as a cheerful, colorful reminder of your creativity
Sunset Sky With Dot Clouds
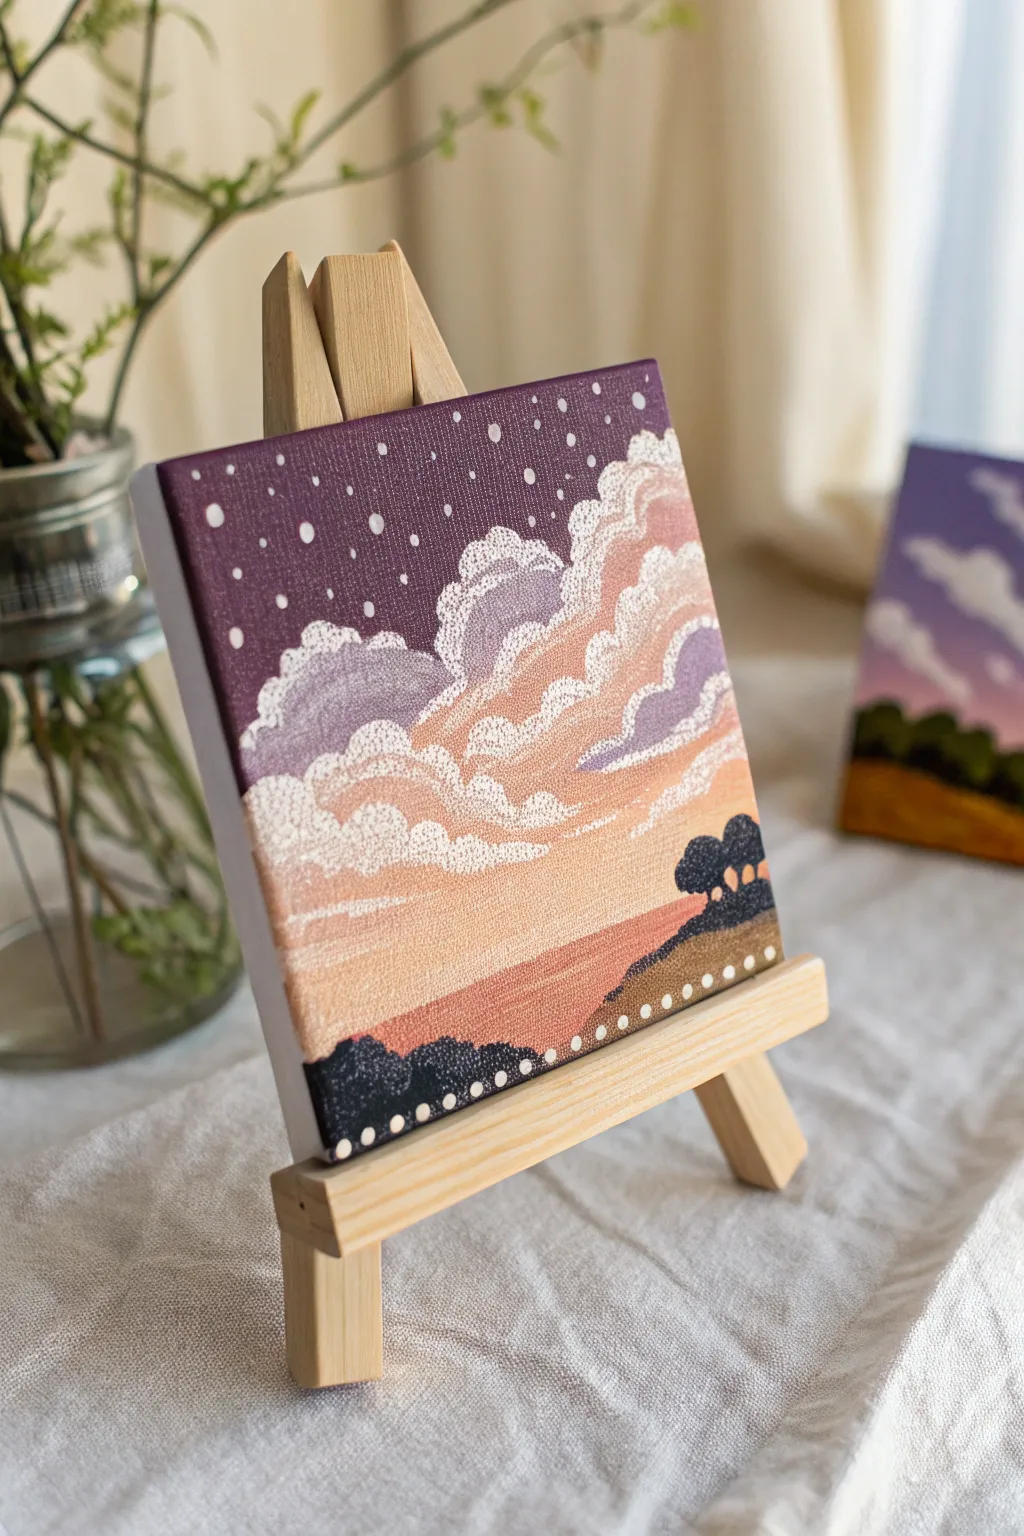
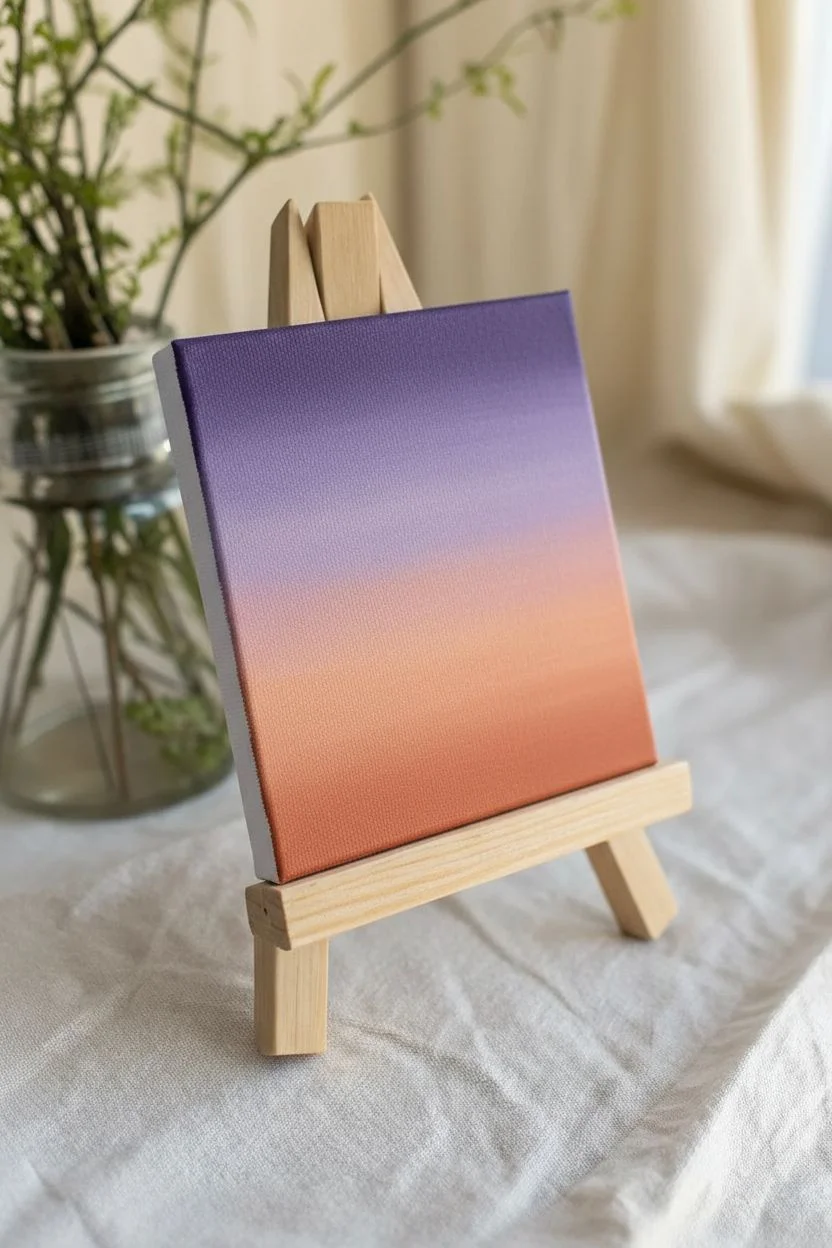
Capture the magic of twilight with this charming mini canvas project, blending soft gradients with precise dot work. The fluffy, stippled clouds and starry purple sky create a dreamy, textured landscape that fits perfectly on a desk or shelf.
Detailed Instructions
Materials
- Small square canvas (e.g., 4×4 or 6×6 inch)
- Acrylic paints (Dark Purple, Lavender, Peach, Orange, White, Black)
- Dotting tools (various sizes) or toothpicks/brush ends
- Flat shader brush (small)
- Small round detail brush
- Paint palette
- Water cup and paper towels
- Mini wooden easel (optional, for display)
Step 1: Setting the Sky Gradation
-
Prime the background:
Start by painting the top third of your canvas with a solid coat of dark purple. Ensure full coverage, bringing the color down slightly past where you want your clouds to begin. -
Blend the sunset hues:
Below the purple, paint a strip of lavender, blending it slightly while wet into the purple edge. Underneath that, add a peach tone, followed by soft orange at the horizon line. -
Create the land base:
Paint the bottom section of the canvas with a terra cotta or darkened orange shade to represent the distant ground. Don’t worry about perfect lines yet; the foreground will cover the bottom edge. -
Dry completely:
Allow these background layers to dry thoroughly before starting the dot work. If the paint is wet, your dots will bleed and lose their crisp shape.
Clean Tools Matter
Wipe your dotting tool tip on a paper towel after every 3-4 dots. Paint buildup on the tool changes the dot size and shape, leading to inconsistent textures in your clouds.
Step 2: Building the Fluffy Clouds
-
Outline cloud shapes:
Using a very light lavender or white paint, lightly sketch the billowing shapes of the cumulus clouds. They should rise diagonally from the left side towards the top right. -
Base dot layer:
Dip a medium-sized dotting tool into white paint. Begin stippling along the top curvy edges of your cloud shapes. Keep the dots relatively close together but not touching. -
Add lavender shadows:
Switch to a pale lavender paint. Apply dots inside the white outline, filling the main body of the clouds. I like to let the dots become slightly more spaced out as I move away from the bright edges to create depth. -
Highlight with peach:
Where the clouds are nearest the setting sun (the bottom of the cloud formation), use peach-colored dots. Overlap these slightly with the lavender dots to create a soft transition. -
Refine the edges:
Go back with your smallest tool and bright white paint to add tiny dots along the very crests of the cloud curves. This emphasizes the fluffiness and highlights.
Make It 3D
Instead of leaving the canvas sides white, wrap the painting around the edges. Continue the purple sky and the ground lines onto the sides for a finished, gallery-style look.
Step 3: Foreground and Details
-
Paint silhouettes:
Mix a dark grey or soft black paint. Use your flat brush to paint undulating hill shapes along the very bottom edge of the canvas. -
Add distant trees:
On the right side, sticking up from the dark hills, paint small, round tree shapes. These don’t need much detail, just solid dark silhouettes against the orange sky. -
Dot the treeline:
To mimic the style of the clouds, use a small tool to add tiny dark dots along the upper edge of your tree and hill silhouettes. This integrates the foreground with the rest of the painting’s style. -
Create the decorative border:
Dip a medium tool into white or light cream paint. Carefully place a row of evenly spaced dots along the dark hill line at the bottom. This acts as a stylized border for the ground. -
Paint the stars:
Finally, turn your attention to the dark purple sky. Use your smallest tool or a toothpick to place random white dots for stars. -
Vary star sizes:
Make some stars slightly larger than others for a natural night-sky look, and consider grouping a few closer together.
Place your mini masterpiece on its easel and enjoy the peaceful view you’ve created

PENCIL GUIDE
Understanding Pencil Grades from H to B
From first sketch to finished drawing — learn pencil grades, line control, and shading techniques.
Explore the Full Guide
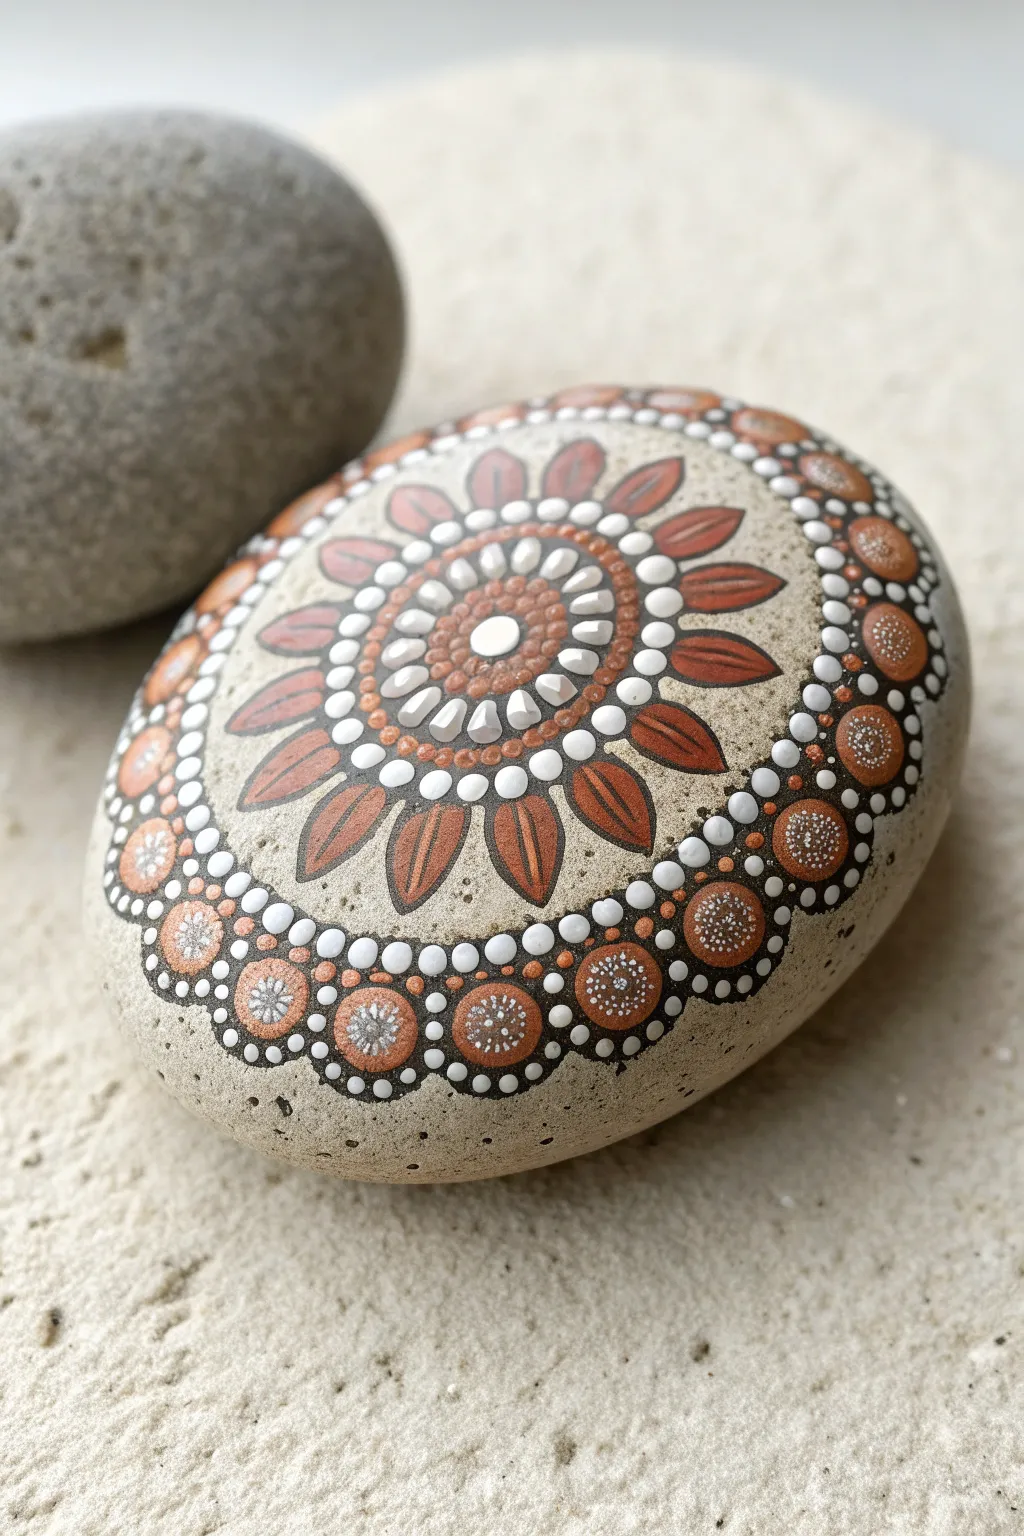
Ocean Waves in Dot Lines
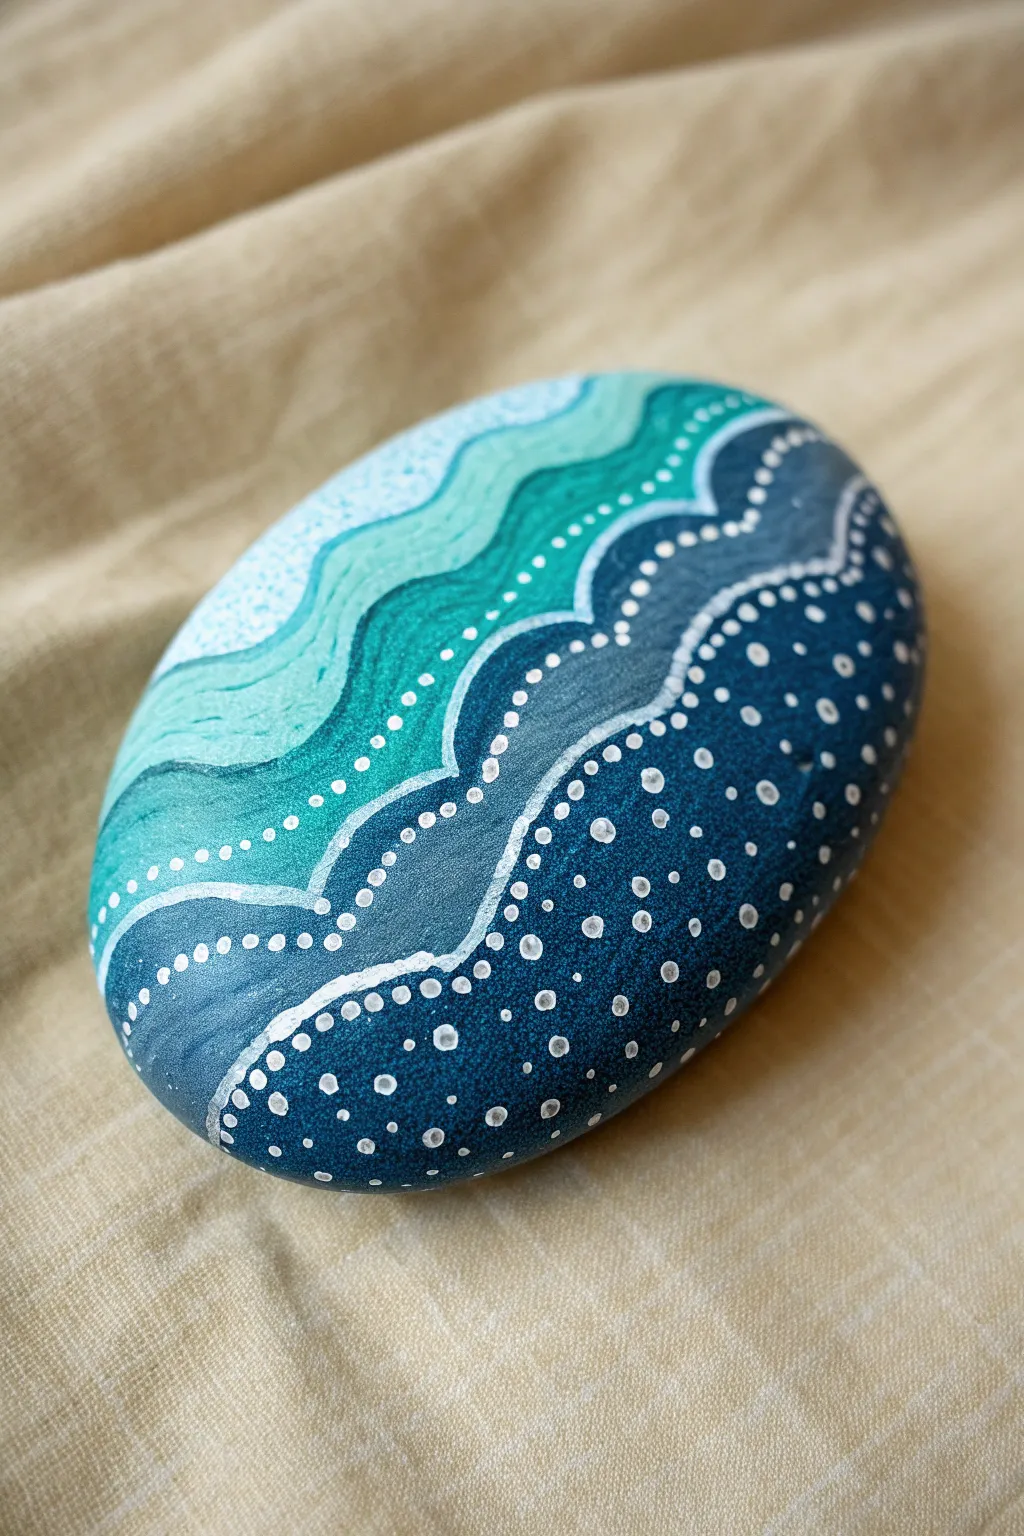
Capture the rhythm of the ocean on a simple stone with this serene wave design. By blending solid bands of color with delicate dot work, you’ll create a soothing gradient from deep sea navy to foamy coastal teal.
Step-by-Step Guide
Materials
- Smooth oval river rock (approx. 3-4 inches wide)
- Acrylic paints: Navy blue, dark teal, turquoise, light aqua, and titanium white
- Paint brushes: Medium flat brush for bands, fine liner brush for details
- Dotting tools (or the ends of paintbrush handles) in varying sizes
- Acrylic matte or gloss sealer (optional)
- Palette for mixing
- Pencil (optional)
Step 1: Preparation & Base Layers
-
Clean the surface:
Begin by washing your stone with warm soapy water to remove any dirt or oils. Let it dry completely before starting to ensure the paint adheres properly. -
Map out the waves:
Using a pencil, lightly sketch 4-5 wavy lines across the stone. Start from the bottom right and curve upwards toward the top left to create a flowing, organic movement. -
Mix your palette:
Prepare your gradient colors. You will need a deep navy for the bottom, followed by a dark teal, a medium turquoise, a light aqua, and finally a very pale blue or white for the top corner. -
Paint the deep sea:
Using your flat brush, fill in the largest bottom-right section with the navy blue paint. Apply two thin coats for opaque coverage, letting the first coat dry before adding the second. -
Apply the mid-tones:
Move to the next wavy section and fill it with the dark teal paint. Carefully paint along the pencil line so it bumps right up against the navy section without blending. -
Continue the gradient:
Paint the subsequent wave bands with turquoise and then light aqua. I find it helpful to slightly wet the brush to get smooth, sharp edges on these curves. -
Finish the crest:
Fill the final small section at the top left with your palest blue or white paint. Allow the entire base coat to dry completely, about 15-20 minutes.
Uneven Dots?
If your dots have pointy peaks, your paint is too thick. Mix in a single drop of water or pouring medium to the white paint for smoother, flatter circles.
Step 2: Detailing & Dots
-
Outline the waves:
With a fine liner brush and titanium white paint, carefully trace the boundary lines between each color section. These lines should mimic the wobbly, organic feel of sea foam. -
Start the primary dots:
Dip a medium-sized dotting tool into white paint. Place a row of dots along the inside edge of the bottom navy section, following the curve of the white line you just painted. -
Vary dot sizes:
Switch to a smaller dotting tool. Add a second row of smaller dots next to the first row within the navy section, filling the gap towards the bottom edge. -
Add scattered foam:
Randomly disperse tiny white dots throughout the remaining navy and dark teal areas. These represent sea spray and add texture to the darker zones. -
Detail the lighter waves:
For the lighter aqua sections, use a very fine tool to add subtle, tiny dots along the wave lines. Keep these minimal to let the lighter paint colors shine through. -
Enhance the white lines:
If any of your original white contour lines look thin, go back over them gently to ensure they are crisp and bold against the blue background. -
Check for consistency:
Look over your dot work. If any dots look translucent, carefully dab a second layer of white paint on top of them once they are dry to make them pop.
Add shimmer
For a magical touch, use a metallic silver or pearl paint instead of plain white for the smallest scattered dots to mimic sunlight hitting the water.
Step 3: Finishing Touches
-
Dry completely:
Allow the stone to sit undisturbed for at least an hour. The thick dots will take longer to dry than the flat paint. -
Seal the artwork:
Once fully dry, apply a coat of spray varnish or a brush-on sealer. A satin or matte finish looks natural, while gloss mimics the look of a wet stone.
Now you have a piece of the ocean to hold in the palm of your hand
Floral Dot Bouquet
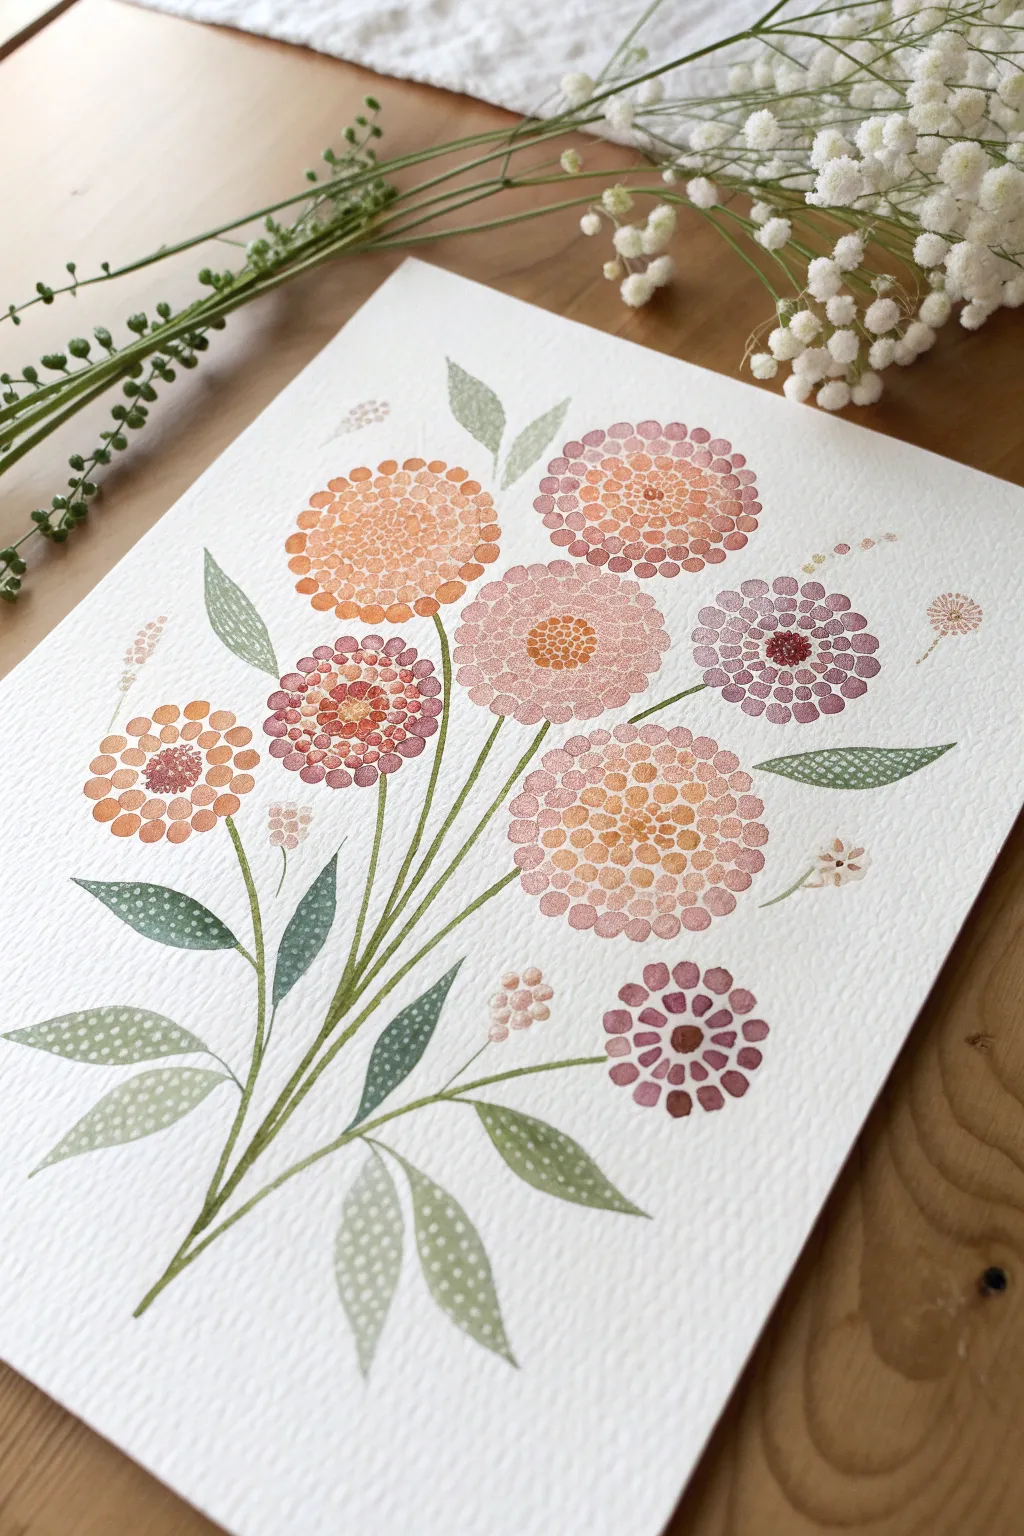
Capture the delicate beauty of a summer garden with this pointillism-inspired watercolor project. Using only small dots of varying saturation, you’ll build up soft, textured blooms and leafy stems that feel both modern and timeless.
How-To Guide
Materials
- Cold press watercolor paper (300 gsm)
- Watercolor paints (shades of ochre, burnt sienna, dusty rose, mauve, and sap green)
- Small round brushes (size 0, size 2, and size 4)
- Pencil (HB or H for light lines)
- Kneaded eraser
- Clean water jar
- Paper towel or rag
- Palette for mixing
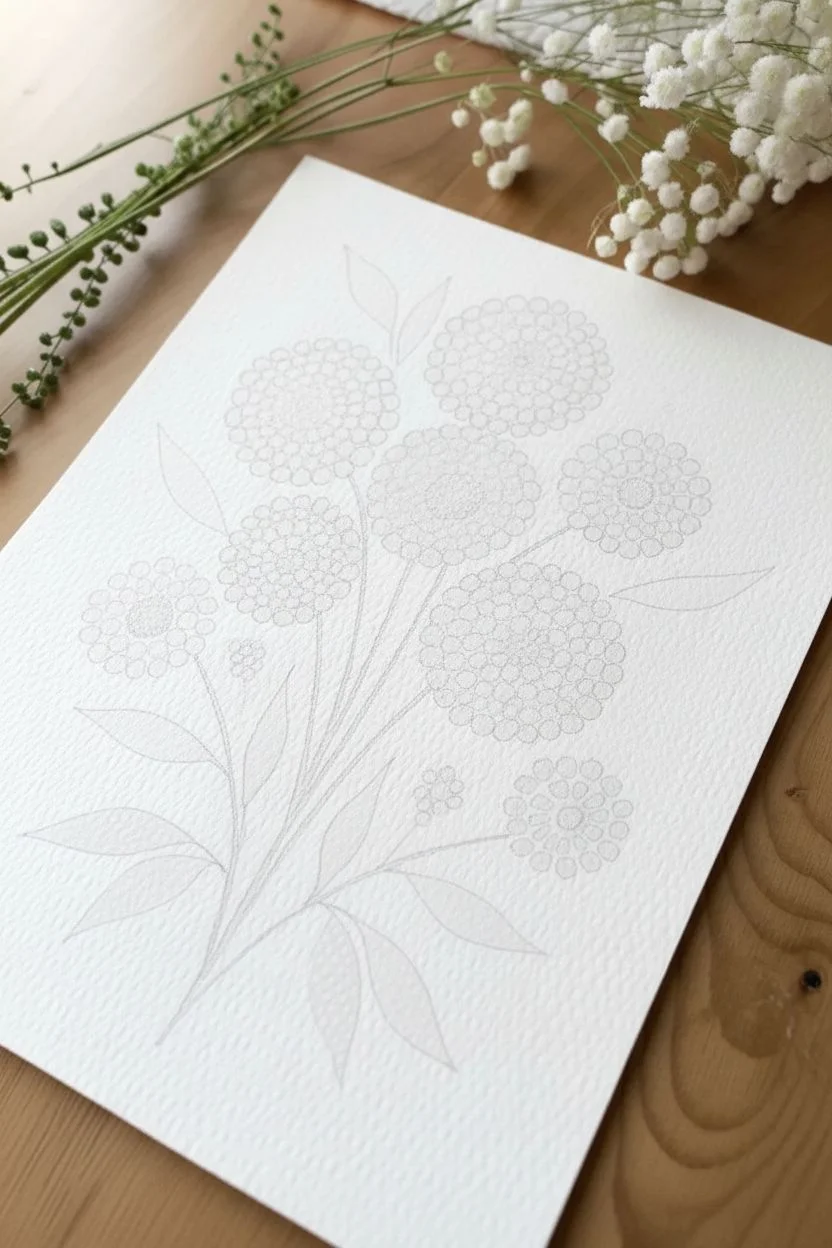
Step 1: Planning the Composition
-
Sketch the framework:
Begin by lightly sketching the stems of your bouquet. Start from a central point at the bottom and fan them out gently towards the top, creating a natural, loose arrangement. -
Outline the shapes:
Draw faint circles where you want your flower heads to sit. Vary the sizes, placing larger blooms near the center and smaller buds or seed pods towards the edges. Add simple leaf shapes attached to the lower stems. -
Soften your guides:
Take your kneaded eraser and gently dab (don’t rub) over the pencil lines. You want the guides to be barely visible so the graphite doesn’t show through the transparent watercolor dots later.
Uneven Dots?
If your dots are bleeding into puddles, your brush is too wet. Blot the bristles on a paper towel after loading paint to ensure you only deposit a precise bead of color.
Step 2: Creating the Dotted Blooms
-
Mix your first palette:
Prepare a watery mix of warm ochre and a soft dusty rose. You want these mixtures to be quite diluted for the initial layers. -
Start the center bloom:
On your largest central flower circle, begin placing small dots with your size 2 brush. Start from the very center and work outward in concentric rings. Keep the dots tight but not touching. -
Introduce gradients:
As you move toward the outer edge of the flower, switch to a slightly more saturated dusty rose paint. The subtle shift from a yellow center to pink petals creates volume. -
Paint the mauve accents:
Move to a neighboring flower circle. Mix a muted purple or mauve. Use the same circular dotting technique, keeping the center dots darker and more concentrated than the outer ones. -
Create a ring pattern:
For the ‘dahlia’ style flowers (like the orange/pink ones), try dotting a distinct dark center circle, leaving a tiny gap of white paper, and then starting a new ring of dots in a lighter shade. -
Vary dot density:
To give the petals a sense of roundness, place your dots closer together near the imagined ‘shadow’ areas of the flower, and space them further apart where the light would hit. -
Add tiny filler flowers:
Using the size 0 brush, add clusters of very tiny dots on the smaller outer stems. These mimic baby’s breath or seed pods. Use a warm beige or faint brown for a delicate look.
Pro Tip: Volume Trick
Make dots smaller and lighter at the petal edges, and larger/darker near the center. This size variation tricks the eye into seeing a 3D dome shape.
Step 3: Painting Stems and Leaves
-
Paint the stems:
Switch to your sap green paint. Using a steady hand and your size 2 brush, paint the stems with a continuous, smooth line. I like to keep the paint fairly watery so it looks translucent. -
Fill the leaf base:
Fill in your leaf outlines with a flat wash of pale green. This base layer needs to be very light and must dry completely before the next step. -
Layer dots on leaves:
Once the green wash is bone-dry, mix a slightly darker, more opaque green. Using the size 0 brush, apply tiny white or pale green dots over the wash to create a textured pattern. -
Alternative leaf texture:
For some leaves, reverse the technique: Paint the leaf shape purely with small green dots, leaving the paper white in between, rather than using a base wash.
Step 4: Final Details
-
Deepen the centers:
Look at your flower centers. If they feel flat, add a few tiny dots of concentrated burnt sienna or deep purple right in the middle to anchor the bloom. -
Check balance:
Step back and assess your bouquet. If an area feels too empty, add a small floating stem or a few stray dots to suggest pollen or falling petals. -
Dry and flatten:
Let the paper air dry completely for at least an hour. If the paper has buckled from the water, place it under a heavy book overnight to smooth it out.
Now step back and admire how hundreds of tiny, imperfect marks have come together to form a coherent and beautiful garden scene


Single Lotus Mandala Centerpiece
This elegant coaster project features a soothing single lotus design that radiates from a warm central sunburst. By combining soft sage greens with metallic earthy tones and precise dot work, you’ll create a functional piece of art that feels both modern and timeless.
Step-by-Step Tutorial
Materials
- Round ceramic bisque coaster or stone art stone (approx. 4-inch diameter)
- Acrylic paints: Cream/Off-White, Sage Green/Light Teal, Copper/Bronze Metallic, Dark Brown
- Fine liner brush (size 0 or 00)
- Full set of dotting tools (stylus and rod types)
- Compass and pencil for guidelines
- Eraser
- Gloss varnish or clear sealant
Step 1: Preparation & Central Flower
-
Surface Prep:
Ensure your ceramic coaster is clean and dry. If the surface is rough, give it a very light sanding. Paint the entire surface with two coats of Cream/Off-White acrylic paint, allowing it to dry fully between coats to create a smooth base. -
Drafting Guidelines:
Using a compass, lightly draw a small center circle (approx. 0.5 inch), a middle ring for the petal tips (approx. 2 inches), and a larger ring for the outer petals. Use a pencil to mark 8 or 12 evenly spaced points around the circle to help align your petals symmetrically. -
The Center Sunburst:
Load a medium dotting tool with Bronze/Copper paint and place a bold dot in the absolute center. Using a fine liner brush and Dark Brown paint, draw a small circle around this central dot. -
Inner Petal Outline:
With your fine liner brush and Bronze paint, carefully paint 12 small, pointed petal shapes radiating from the center ring. They should look like a small daisy. Fill distinct lines inside each petal to create a veined texture. -
Inner Ring Border:
Enclose the central flower with a thin circular outline using the liner brush and Dark Brown paint. Inside this band, use a very small stylus to add tiny distinct symbols or dots for a decorative border effect.
Step 2: Painting the Main Lotus
-
Drafting Main Petals:
Pencil in the main layer of large lotus petals. You want about 8-10 large, pointed petals that extend from the center ring outward. Curves should be graceful and meet at sharp points. -
Filling with Sage:
Using a small flat brush or the liner brush, fill the inside of these main petals with the Sage Green paint. You may need two thin layers to get an opaque, smooth finish without brushstrokes. -
Petal Outline:
Once the green is dry, outline each petal firmly with the Bronze/Copper paint using your liner brush. The line should be consistent in thickness. Add a second, thinner line of Dark Brown just inside the copper border for depth. -
Internal Stippling:
Inside each green petal, create a smaller petal shape using tiny Cream dots. Use a small stylus tool to stipple these dots densely, leaving the green background visible around the edges. -
Central Vein Detail:
Draw a thin, dashed line or a series of tiny graduating dots down the center of each green petal using the Cream paint. This highlights the spine of the lotus leaf.
Uneven Petals?
If your hand-painted petals look wonky, widen the outlines. A thicker outline can hide wobbly edges and correct asymmetry without repainting the whole shape.
Step 3: Outer Border & Finishing
-
Outer Petal Curves:
Between the peaks of the green petals, penci in shallower, wider curved petals that reach near the edge of the coaster. Outline these shapes with the Bronze/Copper paint. -
Outer Dot Fill:
Fill these outer shapes with ordered rows of dots. Start with slightly larger Bronze dots near the base and transition to tiny dots as you move outward. I find walking the dots (dotting repeatedly without reloading paint) works perfectly here for a fading effect. -
Rim Dotting:
Around the very edge of the white ceramic space (outside the main design), place a ring of Teal/Sage Green dots. Use a medium-sized tool and space them evenly. -
Micro-Detailing:
Go back with your smallest stylus and add tiny white ‘highlight’ dots on top of the largest Bronze dots and on the central flower center to make them pop. -
Clean Up:
Once the paint is completely cured (wait at least 24 hours), verify no pencil marks are visible. Gently erase any remaining guidelines. -
Sealing:
Apply a coat of gloss varnish or clear resin to protect your work, especially if this will be used as a functional coaster. This also enhances the shine of the metallic copper paint.
Level Up: Resin Top Coat
Pour a layer of art resin over the finished, dry piece. It creates a glass-like, heat-resistant surface that makes the dot texture look magnifying and 3D.
Enjoy using your new handcrafted coaster or gift it to someone special who loves unique decor.
Snowflake Dot Symmetry
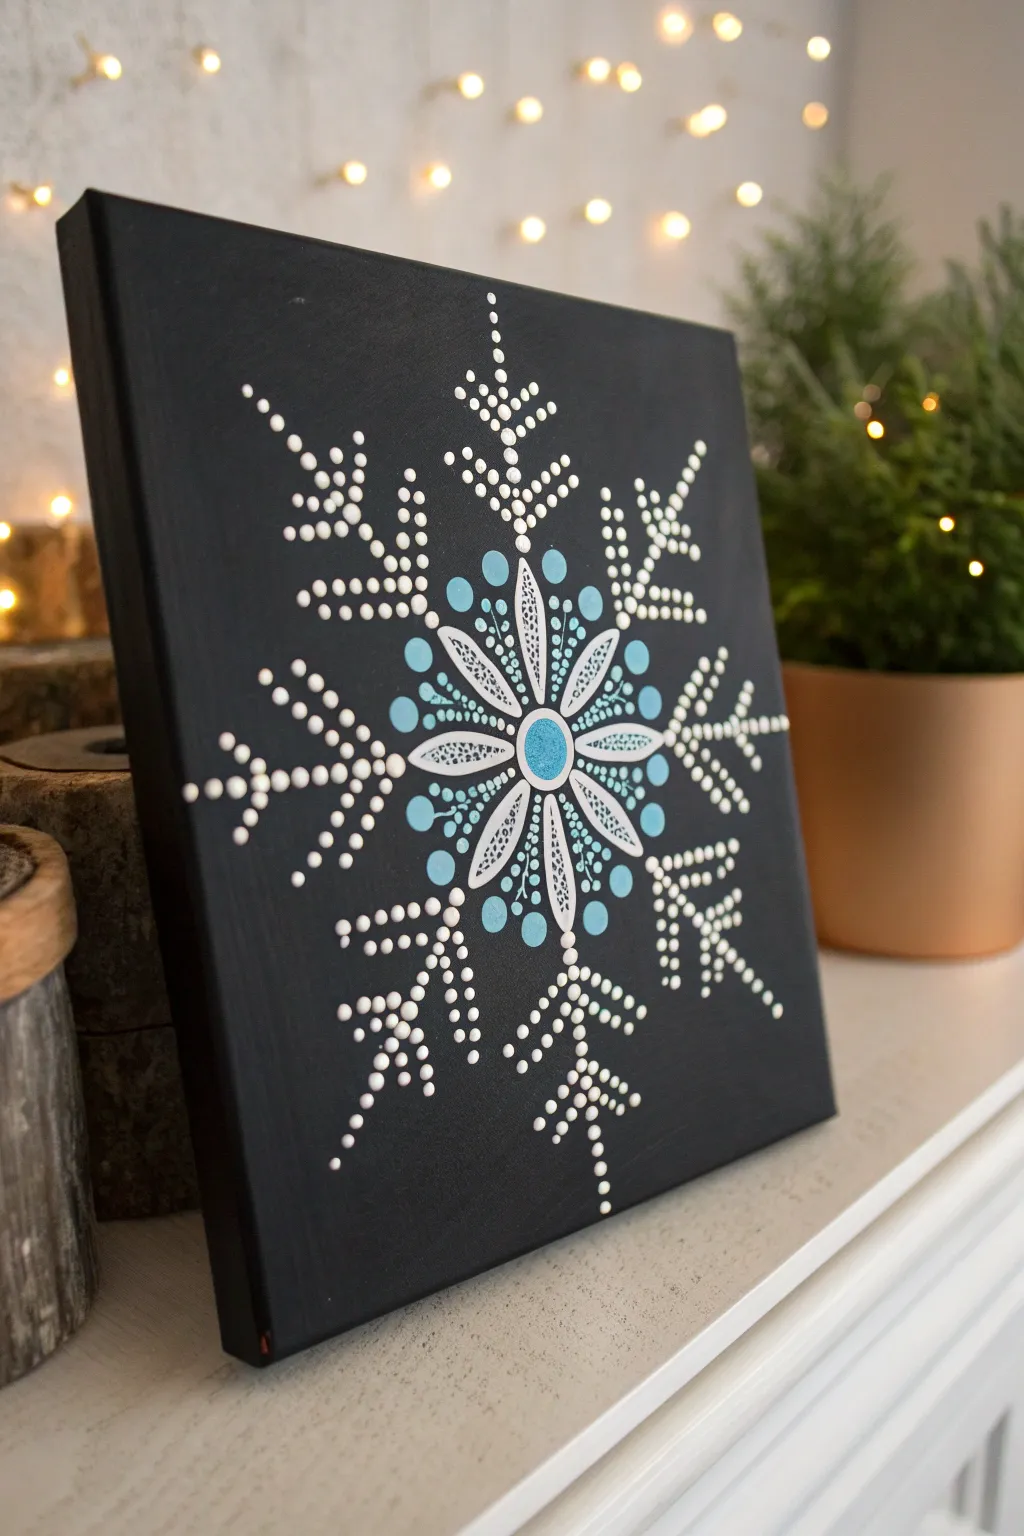
Capture the delicate geometry of winter with this striking mandala-style snowflake. By painting bright white and icy blue dots against a stark black background, you’ll create a piece that pops with crisp contrast and elegant symmetry.
Step-by-Step
Materials
- Square stretched canvas (8×8 or 10×10 inches)
- Black acrylic paint (matte base)
- White acrylic paint
- Light blue/turquoise acrylic paint
- Set of dotting tools (various sizes)
- White charcoal pencil or chalk
- Ruler
- Compass or round object for tracing
- Damp paper towel
- Palette or small plate
- Clear varnish (optional)
- Fine detail brush
Step 1: Preparation and Mapping
-
Prepare the Canvas:
Begin by painting your entire canvas with two coats of black acrylic paint, ensuring full coverage on the sides as well. Allow the paint to dry completely between coats for a solid, matte finish. -
Find the Center:
Use a ruler to lightly mark an ‘X’ from corner to corner with a white charcoal pencil to find exact center. This tiny point will anchor your entire symmetric design. -
Draft Guidelines:
Draw a vertical line and a horizontal line through the center point, creating a cross. Then, draw diagonal lines to divide the canvas into eight equal pie-shaped sections. These lines are crucial for keeping your snowflake arms straight. -
Mark Ring Distances:
Using a compass or a steady hand, lightly sketch two or three concentric circles outward from the center. These don’t need to be perfect, but they help you keep the layers of the snowflake equidistant from the middle.
Step 2: Painting the Core
-
The Center Dot:
Load a medium-sized dotting tool with turquoise paint mixed with a tiny bit of white for a frosty look. Place a single, perfect dot directly over your center mark. -
First White Ring:
Using a smaller dotting tool and pure white paint, place a ring of small dots immediately surrounding the central blue dot. Keep spacing tight so they frame it like a classic mandala start. -
Create the Flower Petals:
Along each of the eight guide lines, paint a long, teardrop petal shape using white paint. You can do this by dragging a larger dot inward or using a fine liner brush. I find dragging the paint while wet gives the smoothest taper. -
Internal Petal Details:
Once the white petals are dry, use a very fine tool to add tiny black dots (or leave negative space) inside the petals for texture, effectively ‘erasing’ parts of the white to create a lacy effect. -
Inner Blue Accents:
Place a medium-sized light blue dot between each of the white petals. This establishes the secondary color rhythm of the piece. -
Outer Blue Highlights:
Add a slightly smaller blue dot further out, resting just beyond the tip of each white petal. This bridges the gap between the floral center and the icy branches.
Paint Consistency
For perfectly round dots that don’t peak, mix a drop of pouring medium or water into your heavy body acrylics. You want a sour cream consistency.
Step 3: Extending the Branches
-
The Main Spines:
Using white paint and a medium dotting tool, begin walking dots outward along the eight main guide lines. Start with larger dots near the center and gradually decrease the tool size as you move toward the canvas edge. -
First Branch Pair:
About halfway down each main spine, add a V-shape of smaller white dots branching off to the left and right. Aim for 3-4 dots per branch, tapering in size. -
Second Branch Pair:
Move further out along the spine and add a second, larger pair of branches. These should angle backward slightly more than the first set, mimicking the crystalline structure of real ice. -
Tips and Terminals:
Finish the main spines with tiny micro-dots that trail off into nothingness. This gives the snowflake a delicate, floating appearance rather than a heavy, abrupt stop.
Oops! A Smear?
Don’t wipe wet paint! Let the mistake dry completely, then paint over it with your black base color. It acts like an eraser for the canvas.
Step 4: Finishing Touches
-
Clean Up Guidelines:
Wait until the paint is extremely dry—give it a few hours just to be safe. Then, gently erase the visible charcoal lines with a damp Q-tip or a soft eraser, being careful not to rub the paint. -
Final Inspection:
Step back and look for any gaps. If a specific area looks empty, add a very tiny white ‘dust’ dot to balance the composition without overcrowding it. -
Seal the Work:
Once the charcoal is gone and paint is cured (usually 24 hours), apply a coat of clear gloss or satin varnish to protect the dots and deepen the black background.
Hang your finished snowflake on a wall or prop it on a mantel to bring a permanent, un-melting winter wonder into your home
Heart-Shaped Dot Fill
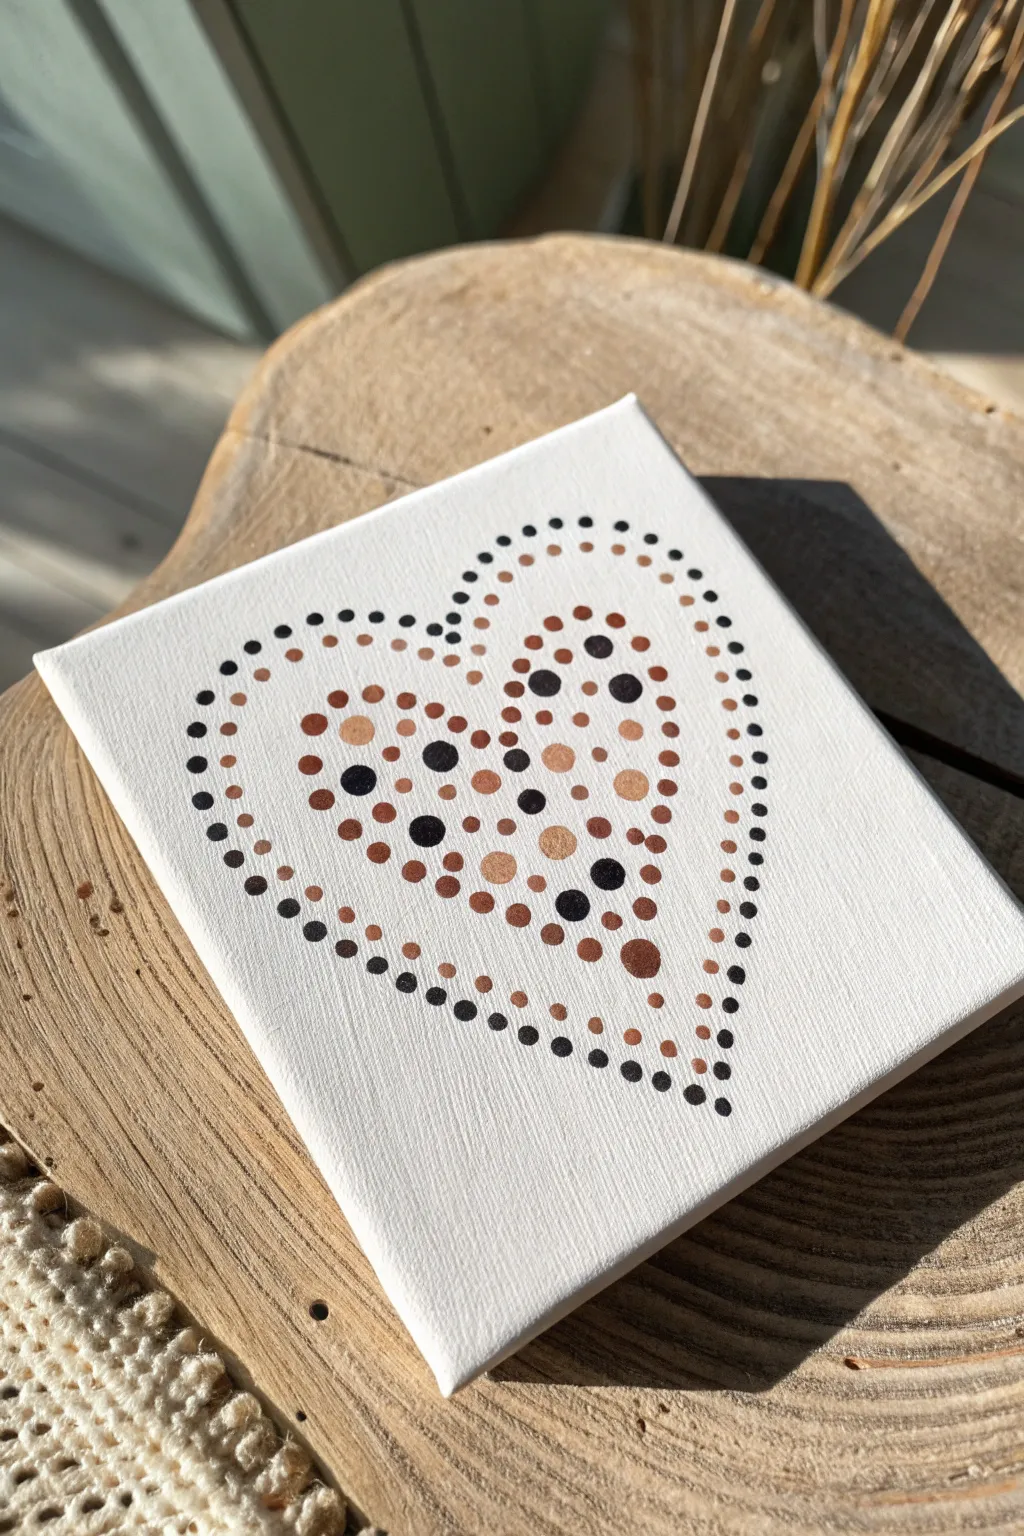
This minimalist canvas project utilizes warm earth tones and precise dotting to create a charming heart shape. The technique combines an outlined border with a scattered, confetti-like fill for a textured and modern look.
Step-by-Step Tutorial
Materials
- Small square canvas (stretched or canvas board)
- Acrylic paints: black, dark brown, bronze/copper metallic, beige/sand
- Dotting tools (flat-headed stylus set) in varying sizes
- Pencil and eraser
- Paper template of a heart (optional)
- Palette or paper plate
- Damp cloth for cleaning tools
Step 1: Preparation & Outlining
-
Prepare the Canvas:
Ensure your small canvas is clean and dust-free so the paint adheres properly. -
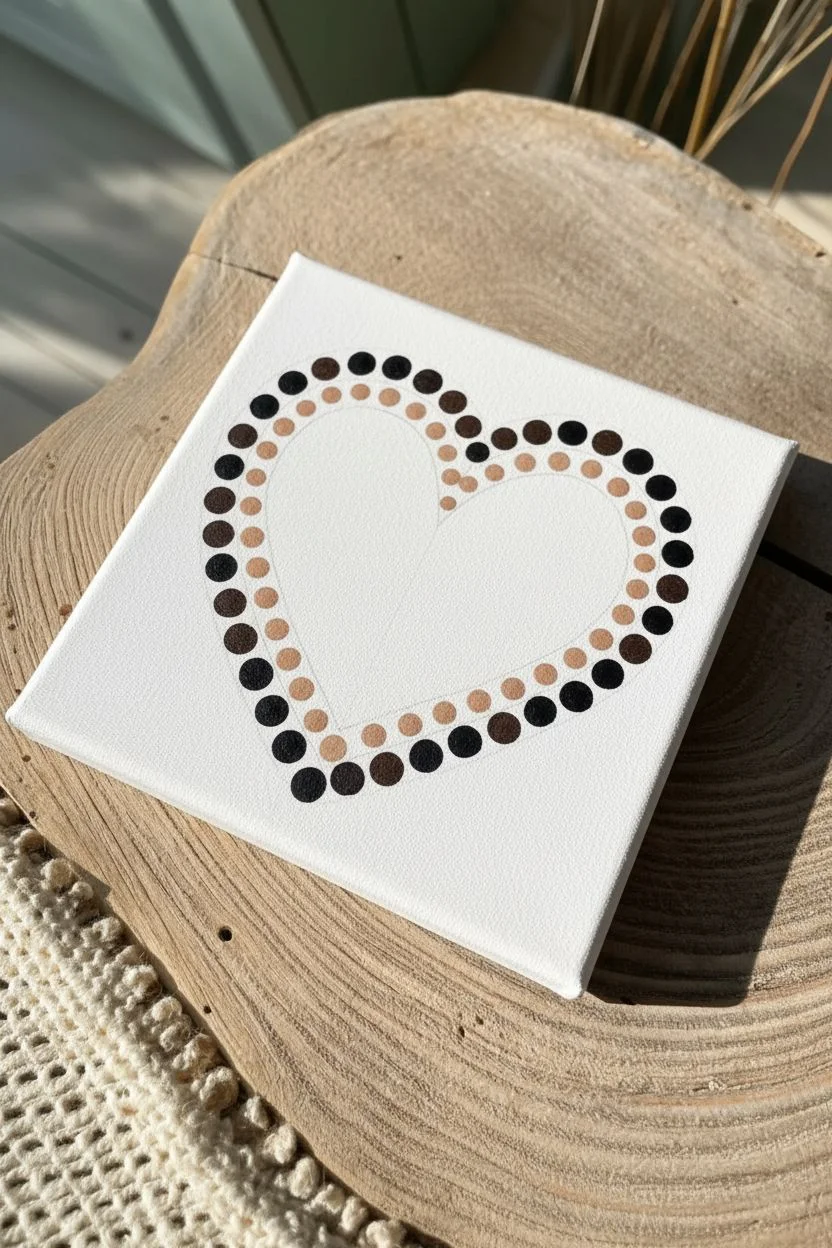
Create a Guide:
Lightly sketch a large heart shape onto the center of the canvas using a pencil. If you want perfect symmetry, cut a paper heart template, place it on the canvas, and trace around it lightly. -
Load Your Palette:
Squeeze small amounts of black, dark brown, bronze, and beige paint onto your palette. Keep them separate to avoid muddying the colors. -
Start the Outer Border:
Select a small-to-medium sized dotting tool. Dip it into the black paint and begin placing dots along your pencil line. -
Spacing the Border:
Space the black dots evenly, leaving a tiny gap between each one. Follow the curve of the heart carefully, ensuring the point at the bottom and the dip at the top are clearly defined. -
Inner Border Layer:
Switch to a slightly smaller tool. Using the dark brown paint, create a second line of dots just inside the black border dots. -
Staggering the Dots:
Try to place these brown dots in the ‘windows’ or spaces between the black outer dots for a nested effect. -
Third Border Ring:
Using the beige or sand color and the same small tool, add a third concentric row of dots inside the brown line. This creates a clear, structured frame before we start the random fill.
Paint Consistency
If dots have pointy peaks (Hershey’s Kisses shape), your paint is too thick. Thin it with a drop of flow medium or water to get flat, smooth domes.
Step 2: Filling the Center
-
Place Anchor Dots:
Switch to your largest dotting tool. Dip it into the black paint and place 3-5 large, random dots inside the heart shape to act as focal points. -
Add Metallic Accents:
Using a medium-sized tool, add several bronze or copper dots scattered around the interior. The metallic sheen adds a lovely depth when the light hits it. -
Fill with Brown:
With a medium tool, disperse dark brown dots throughout the remaining empty spaces. Keep the spacing somewhat random but balanced. -
Layer in Beige:
Use the beige paint to fill in gaps. I like to vary the tool size here, using both medium and small dots to create visual interest. -
Addressing the Gaps:
Look for any large white spaces between your colored dots. Use your smallest tool to place tiny ‘filler’ dots in these areas. -
Gradient Effect (Optional):
You can cluster darker colors near the bottom and lighter colors near the top if you want a slight ombre feel, though a random mix works beautifully too. -
Erase Guidelines:
Once the paint is completely dry (give it at least an hour), use a clean eraser to gently remove any visible pencil marks from your initial sketch.
Clean Edges
Wipe your dotting tool on a damp cloth after every few dots. Dried paint buildup on the tool distorts the dot shape and size.
Display your charming dotted heart on a mini easel or hang it as part of a gallery wall for a touch of handmade warmth
Geometric Dot Grid Pattern
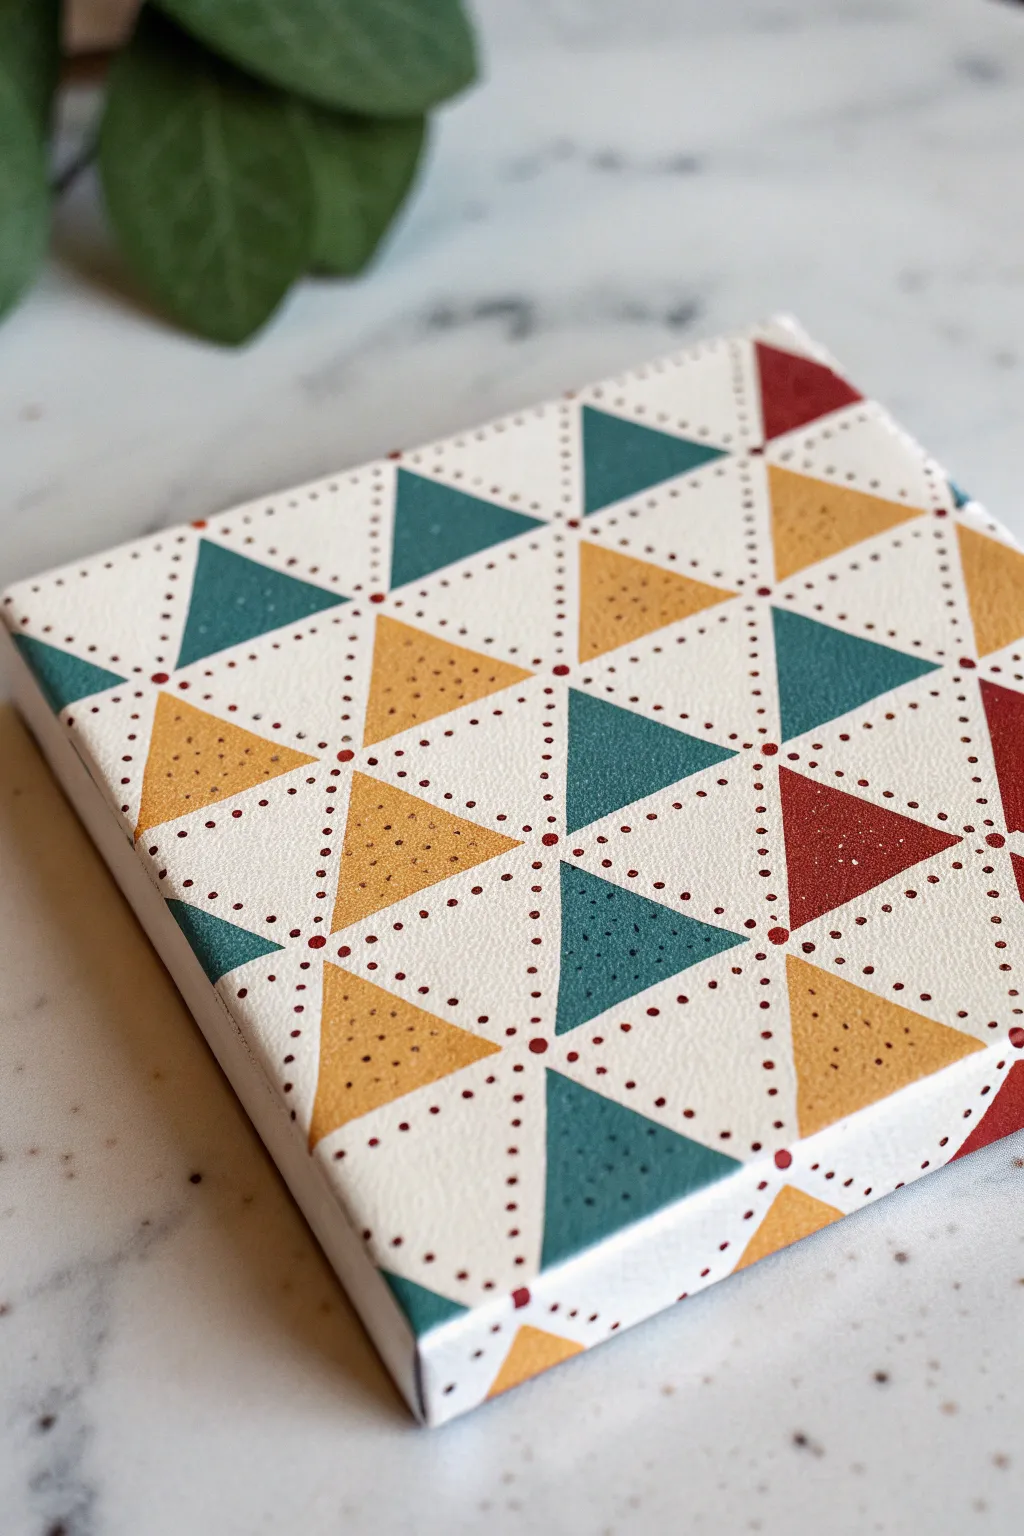
This project combines crisp geometric shapes with the delicate texture of dot painting for a modern, architectural look. The result is a striking pattern of teal, mustard, and deep red triangles anchored by precise dotted borders.
How-To Guide
Materials
- Small square canvas (e.g., 6×6 or 8×8 inch)
- Acrylic paints (Teal/Dark Turquoise, Mustard/Ochre Yellow, Deep Red/Burgundy, White)
- Small flat paintbrush (size 4 or 6)
- Small round paintbrush (size 0 or 1)
- Dotting tool or toothpick
- Pencil
- Ruler
- Eraser
- Palette or paper plate
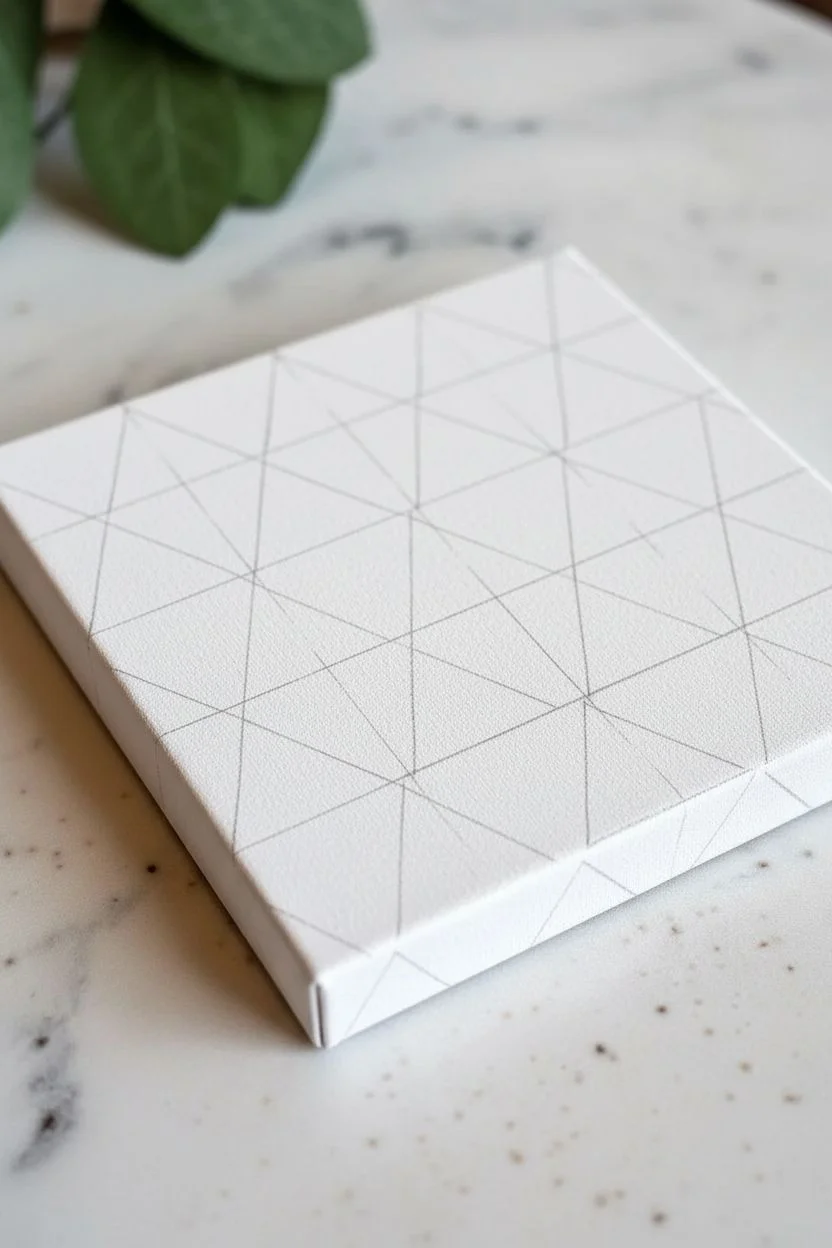
Step 1: Preparation & Layout
-
Base coat:
Start by painting the entire canvas with a solid coat of white acrylic paint. This ensures a clean background and covers the canvas texture slightly. Let it dry completely. -
Measure the grid:
Using your ruler and a pencil, lightly mark horizontal and vertical lines to create a grid of squares. For a 6-inch canvas, 1.5-inch squares work well. -
Draw diagonals:
Draw diagonal lines through your squares to create the triangular sections. Alternate the direction of the diagonals in adjacent rows to create the dynamic, scattered triangle effect seen in the photo. -
Identify color zones:
Lightly mark which triangles will be painted with color. The pattern relies on ‘negative space,’ so you need to leave white borders between the colored triangles. Mark a smaller triangle inside your grid lines to guide your painting.
Clean Lines Secret
Use low-tack painter’s tape to mask off the triangles before painting. This guarantees crisp, sharp edges without needing a perfectly steady hand.
Step 2: Painting the Triangles
-
Mix the teal:
On your palette, prepare your teal paint. If it’s too bright, add a tiny touch of black or grey to mute it slightly for that sophisticated look. -
Paint teal sections:
Using the small flat brush, fill in the designated teal triangles. Keep your edges as straight as possible, but don’t worry too much about perfection as the dots will help define the borders later. -
Apply mustard yellow:
Rinse your brush thoroughly and switch to the mustard yellow. Paint the yellow triangles scattered throughout the pattern. -
Add red accents:
Finally, paint the deep red triangles. These serve as strong anchor points in the design, so place them strategically to balance the lighter colors. -
Wrap the edges:
Don’t forget to continue the pattern over the sides of the canvas. This gives the piece a professional, finished look when hung on a wall. -
Let it cure:
Allow all the colored triangles to dry completely before moving on to the dot work to prevent smudging.
Step 3: Dotting the Framework
-
Select dot color:
Choose a color for your dots. In the example, a reddish-brown or burgundy (matching the red triangles) creates a cohesive look. -
Test your tool:
Dip your dotting tool or a toothpick into the paint and test a few dots on a scrap of paper to ensure the size is consistent and small. -
Start the lines:
Begin dotting along the pencil grid lines that separate the triangles. Place the dots evenly spaced, leaving a tiny gap between each one. -
Corner technique:
When you reach a corner where triangle points meet, place a single dot right at the intersection to anchor the lines. -
Defining the white space:
Ensure you are dotting along the invisible grid lines within the white channels, not directly touching the colored triangles. The dots should float in the white space. -
Speckle the triangles:
For added texture, use an old toothbrush or a stiff brush to gently flick very fine speckles of the dark paint onto the colored triangles. I find this gives it a lovely ‘stone’ or terrazzo effect. -
Clean up:
Once the paint is fully dry, gently erase any visible pencil lines that weren’t covered by the paint or dots.
Metallic Upgrade
Swap out the mustard yellow paint for a metallic gold. The shimmer will catch the light and make the geometric pattern pop against the matte teal.
Hang your finished geometric masterpiece on a gallery wall or use it as a modern coaster for your coffee table
Metallic Dots on Black Background
This striking mandala features a mesmerizing constellation of metallic gold, copper, bronze, and crisp white dots against a deep matte black background. The interplay of radiating circles and pointed petals creates a sophisticated, jewelry-like effect that looks stunning on any wall.
How-To Guide
Materials
- Square wood panel or stretched canvas (approx. 8×8 or 10×10 inches)
- Black acrylic paint (matte finish is best)
- Metallic acrylic paints (Gold, Bronze, Copper, Champagne)
- White acrylic paint
- Pearl or iridescent medium (optional)
- Dotting tools (various sizes from large ball stylus to fine needle tool)
- White charcoal pencil or chalk pencil
- Ruler
- Compass
- Damp paper towel
- Gloss varnish or resin (optional for finish)
- Wide flat brush
Step 1: Preparation & Grid
-
Base Coat Application:
Begin by painting your entire canvas black using a wide flat brush. Apply two to three coats to ensure a solid, opaque coverage without streaks. Let it dry completely between layers. -
Finding the Center:
Using a ruler, lightly draw corner-to-corner diagonal lines with a white charcoal pencil to find exact center of the square. This central point is crucial for symmetry. -
Drawing Guidelines:
Use your compass to draw a series of concentric circles radiating from the center. Space them about 0.5 to 1 inch apart depending on how dense you want the pattern. These lines will guide the major rings of the mandala. -
Radial Lines:
Use a protractor or simple geometry to mark 8 or 16 equal pie-slice sections on the canvas. These radial lines help keep your petals and dot spacing consistent as you work outward.
Paint Consistency Pro-Tip
Metallics can be thick. Mix a tiny drop of pouring medium into your gold and copper paints. This helps them form perfectly round, self-leveling domes rather than pointy Hershey’s Kisses.
Step 2: The Central Core
-
Center Dot:
Place a large gold dot precisely in the center using your largest dotting tool. Gently tap the canvas from underneath to flatten the paint peak if necessary. -
First Ring:
Using a smaller tool, place a ring of tiny white dots immediately surrounding the central gold dot. Keep them tight and uniform. -
Bronze Circle:
Load a medium-sized tool with bronze paint. Create a ring of evenly spaced dots around the white ones on your first pencil guideline. -
Petal Formation:
Between the bronze dots, create small swoops or ‘petals’ by walking the dots. Place a larger gold dot, then use progressively smaller dots of lighter gold or white to curve down towards the center ring.
Step 3: Expanding the Pattern
-
White Ring Definition:
Create a distinct ring of larger white dots outside your initial petal flower. This high-contrast ring separates the center from the outer layers. -
Triangular Spikes:
On the next guideline, paint eight large bronze triangles. Fill the interior of these triangles with smaller dots, perhaps using a mix of copper and white to add depth. -
Walking the Dots:
Outline each large triangle with tiny white dots. Start at the tip of the triangle and ‘walk’ the dots down the sides, letting the paint run out naturally so the dots get smaller. -
Web Connections:
Connect the peaks of your triangles with swooping chains of gold dots. This creates a scalloped edge effect that bridges the inner star to the outer circles.
Troubleshooting: Uneven Spacing
If you notice a gap in your ring isn’t big enough for a full dot, don’t squeeze one in. Instead, slightly increase the space between the last 3-4 dots to disguise the error invisible.
Step 4: Outer Rings & Details
-
Large Outer Circles:
In the spaces created by the scallop shapes, place your largest dotting tool to deposit big, bold circles of metallic paint—alternate between copper and gold for visual interest. -
Concentric Fill:
Inside these large outer circles, place a smaller dot of a contrasting color (like white on gold) once the base layer is dry. This ‘top dot’ technique adds instantly dimension. -
Surrounding Halos:
Surround each of these large outer circles with two rows of tiny dots. Use white for the inner row and a metallic shade for the outer row to make them pop against the black. -
Final Flourishes:
Inspect the negative space. Add tiny ‘filler dots’ or ‘dust’ in white or pearl in the empty black areas between the main patterns to make the design feel dense and complete. -
Cleanup:
Once the paint is 100% dry (give it at least 24 hours), gently wipe away the visible white charcoal guidelines with a damp paper towel or a Q-tip.
Allow the piece to cure fully before displaying, enjoying how the light catches the different metallic textures
Dot Painting on a Terracotta Pot Rim
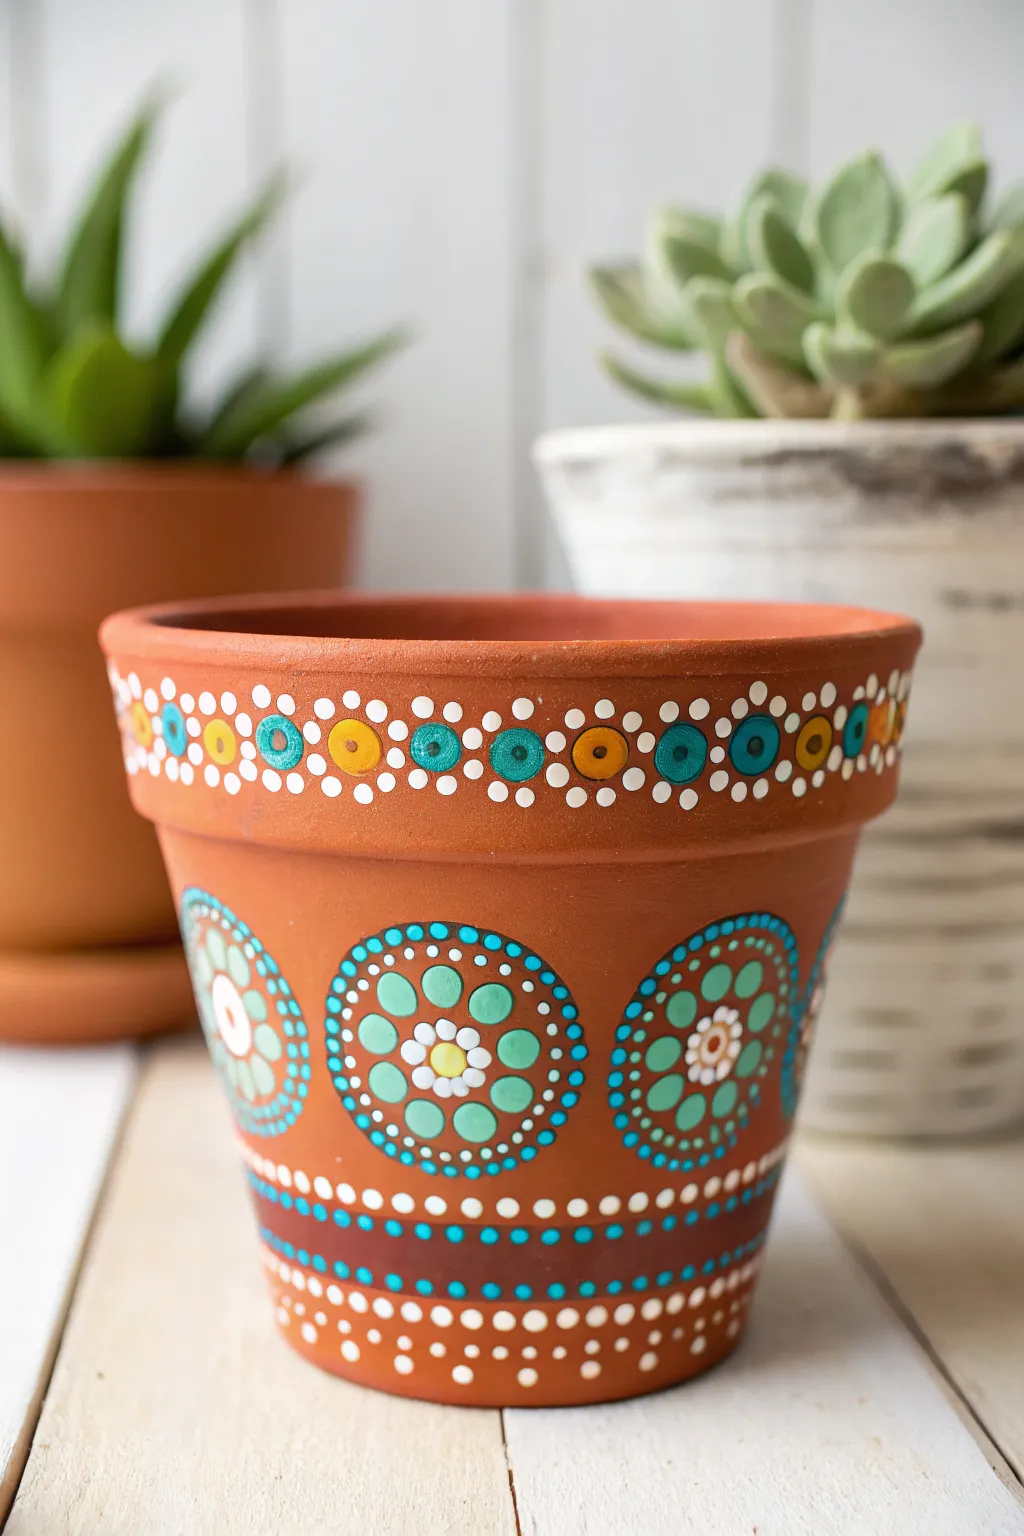
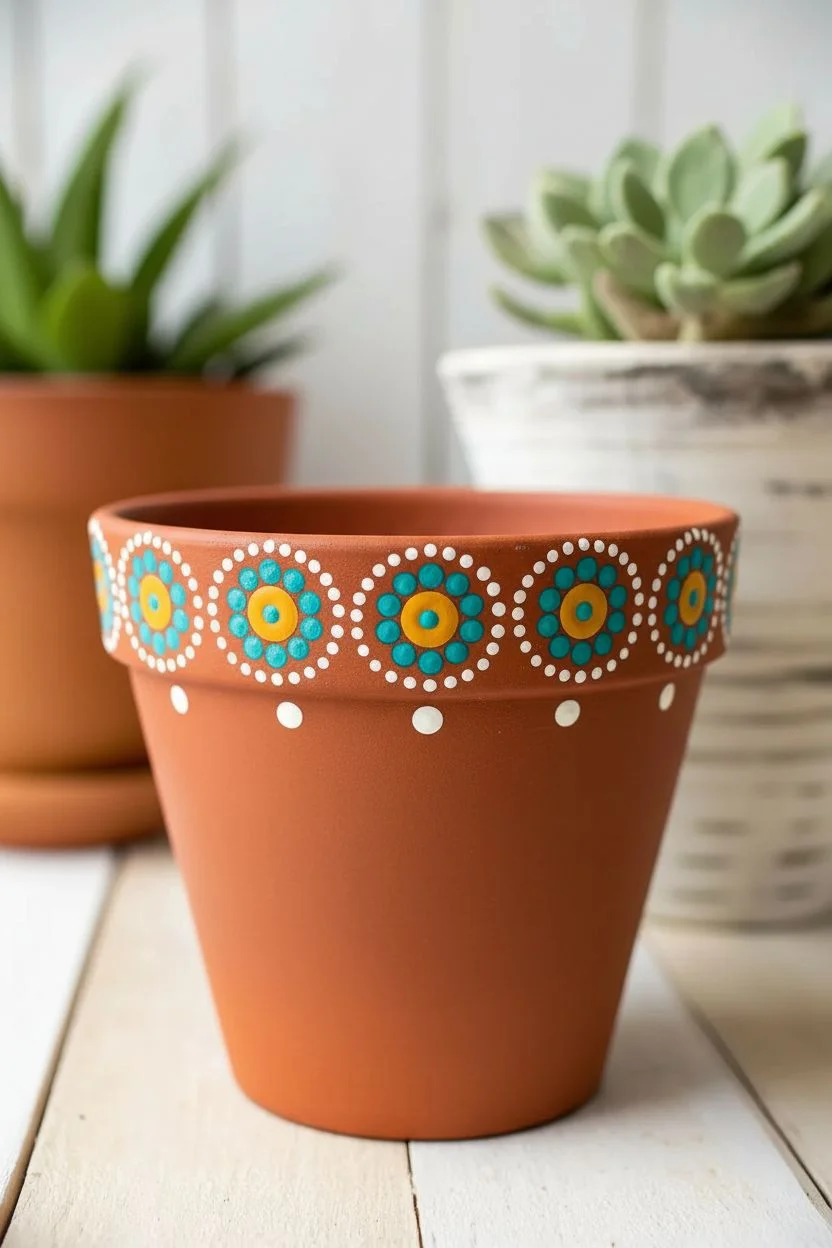
Transform a plain terracotta pot into a vibrant piece of home decor using simple dotting techniques. This design features a striking turquoise and yellow mandala pattern, bordered by delicate white dotted lacework along the rim and base.
Step-by-Step
Materials
- Terracotta pot (standard size)
- Acrylic craft paints (White, Turquoise/Teal, Light Blue, Mustard Yellow, Brown)
- Set of dotting tools (various sizes)
- Small paintbrush
- Damp cloth or paper towel
- Palette or paper plate
- Sealant spray (matte or gloss)
Step 1: Preparing the Rim
-
Clean surface:
Before you begin painting, ensure your terracotta pot is clean, dry, and free of dust. A quick wipe with a damp cloth usually does the trick. -
Plan the rim spacing:
Visualize the rim divided into equal sections. You will be placing large dots at regular intervals around the entire circumference. -
Place base rim dots:
Using a medium-large dotting tool, alternate placing dots of Mustard Yellow and Teal around the center of the rim. Try to keep the spacing consistent between them. -
Add inner details:
Once the main rim dots are dry, use a smaller tool to place a contrasting dot inside each one—put a tiny Teal dot inside the Yellow ones, and a tiny Yellow dot inside the Teal ones. -
Create the white border:
Switch to white paint and a small tool. Carefully dot a flowing, curved line of small white dots that goes over each large colored dot and dips down between them, creating a scalloped lace effect. -
Accentuate the spaces:
Place a single, medium-sized white dot in the empty space below the scalloped line, directly between each of the larger colored dots.
Oops! Smudged Dot?
Don’t panic if you smudge a wet dot. wait for it to dry completely, paint over it with a bit of terracotta-colored paint (or scrape it off gently), and re-dot.
Step 2: Designing the Mandala Center
-
Mark the centers:
Move down to the main body of the pot. Identify spots that align vertically with the patterns on the rim to ensure symmetry. I find it helpful to visually align these with the ‘dips’ in the rim pattern. -
Start the mandala core:
Place a medium White dot to serve as the absolute center of your mandala flower. -
First ring:
Using a small tool and Mustard Yellow paint, place a ring of small dots tightly around the center white dot. -
Second ring:
Switch to White paint again. Place slightly larger dots around the yellow ring, spacing them so they touch the previous ring. -
Third ring (petals):
Using a medium-large tool and Light Green or Mint paint, place a ring of substantial dots around the white layer to form the main ‘petals’ of the mandala. -
Walking the dots:
Using Teal paint and a tiny tool, perform ‘walking the dots’ around each large green petal. Place a central teal dot at the top of the petal, then walk smaller dots down both sides to frame it. -
Outer framing:
Complete the mandala by adding a ring of medium Teal dots between the peaks of the previous layer to round out the circular shape.
Step 3: Finishing the Base
-
Paint the brown band:
Near the bottom of the pot, use a paintbrush to create a solid, thick band of Dark Brown paint. This acts as a grounding stripe for the lower pattern. -
Upper stripe decoration:
Just above the brown band, add a horizontal row of alternating Teal and White dots. -
Decorate the brown band:
On the brown band itself, add a simple row of small Teal dots running through the center. -
Lower scallop pattern:
Below the brown band, create a scalloped design using White dots similar to the rim pattern, draping the lines to create swags. -
Final accents:
Fill the spaces inside the lower white swags with small patterns of White and Brown dots to balance the visual weight. -
Seal the work:
Once all paint is completely cured (wait at least 24 hours), spray the entire pot with a clear sealant to protect your artwork from moisture and soil.
Pro Tip: Consistency
If your paint leaves peaks or ‘Hershey’s Kisses’ shapes, it’s too thick. Mix in a drop or two of pouring medium or water to get smoother, flatter domes.
With your mandala design complete, this pot is ready to showcase your favorite succulent or small houseplant


Have a question or want to share your own experience? I'd love to hear from you in the comments below!