Dragons are my favorite excuse to mix fantasy creature vibes with real-deal painting practice, from big simple shapes to tiny scale textures. Here are dragon painting ideas that start super approachable and gradually get a little weirder—in the best way.
Moonlit Dragon Silhouette in a Giant Full Moon
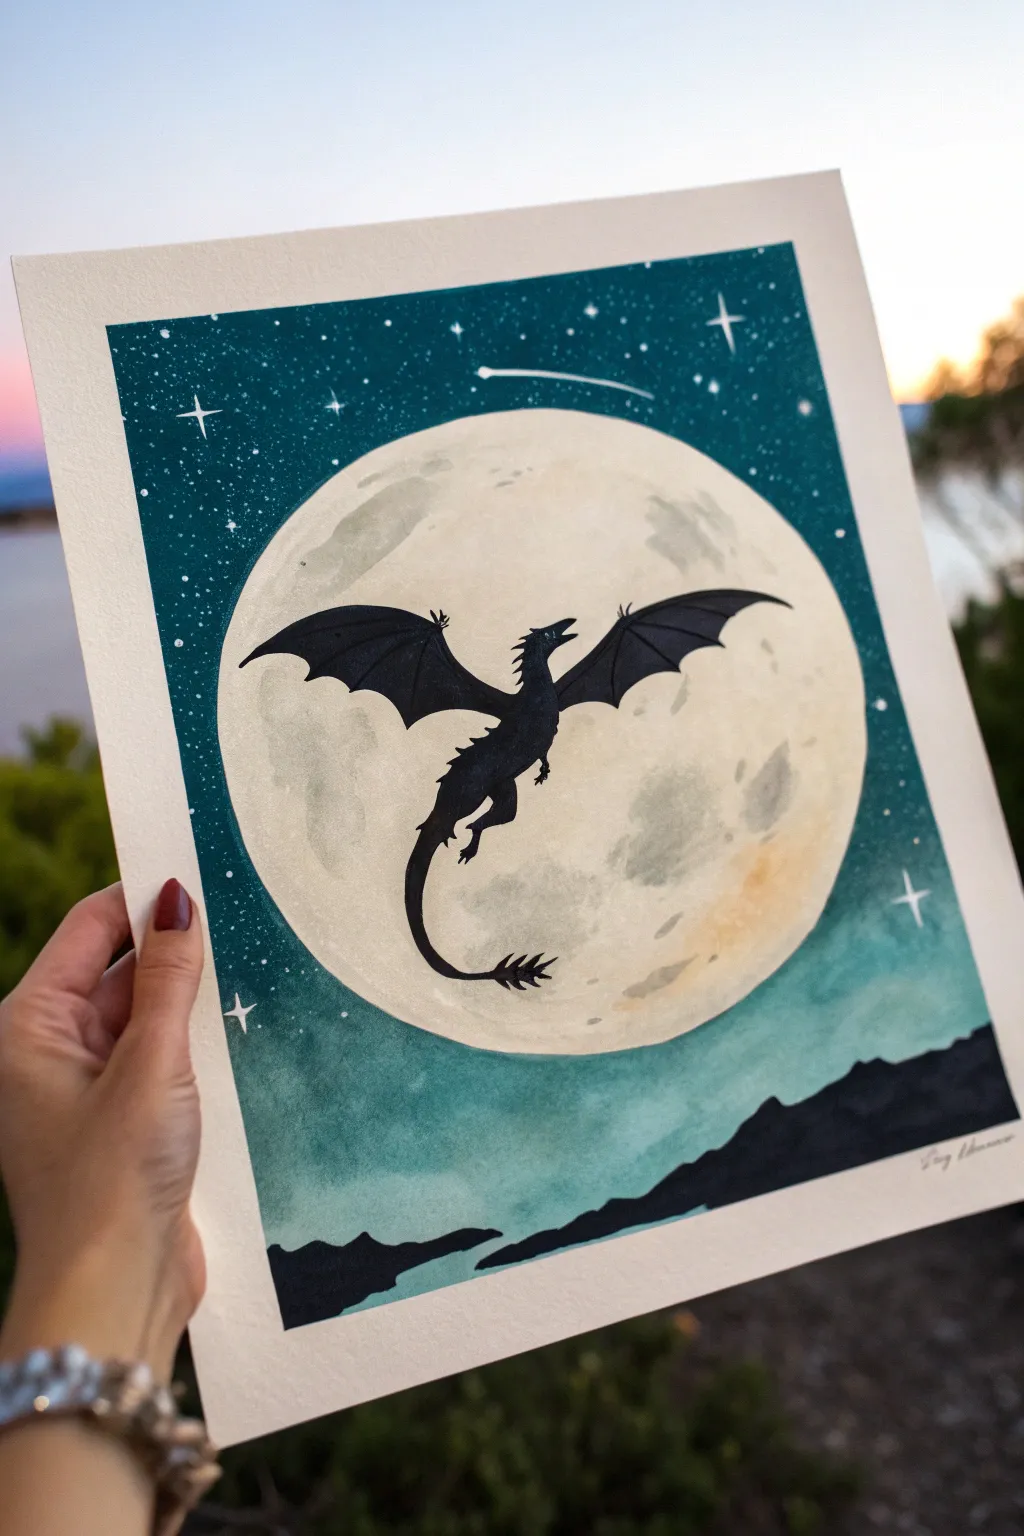
Capture the magic of a fantasy night with this striking watercolor painting featuring a dark dragon silhouette soaring against a luminous, oversized full moon. The contrast between the deep teal sky and the pale lunar glow creates a dramatic focal point that brings the mythical creature to life.
Step-by-Step Guide
Materials
- Cold Press Watercolor Paper (140lb/300gsm)
- Masking tape
- Pencil and eraser
- Circular object or compass
- Watercolor paints (Indigo/Prussian Blue, Teal, Black, Yellow Ochre/Raw Sienna)
- Gouache paint (White, Black)
- Round watercolor brushes (Size 8 or 10 for washes)
- Fine detail brush (Size 0 or 1)
- Mixing palette
- Two jars of water
- Paper towels
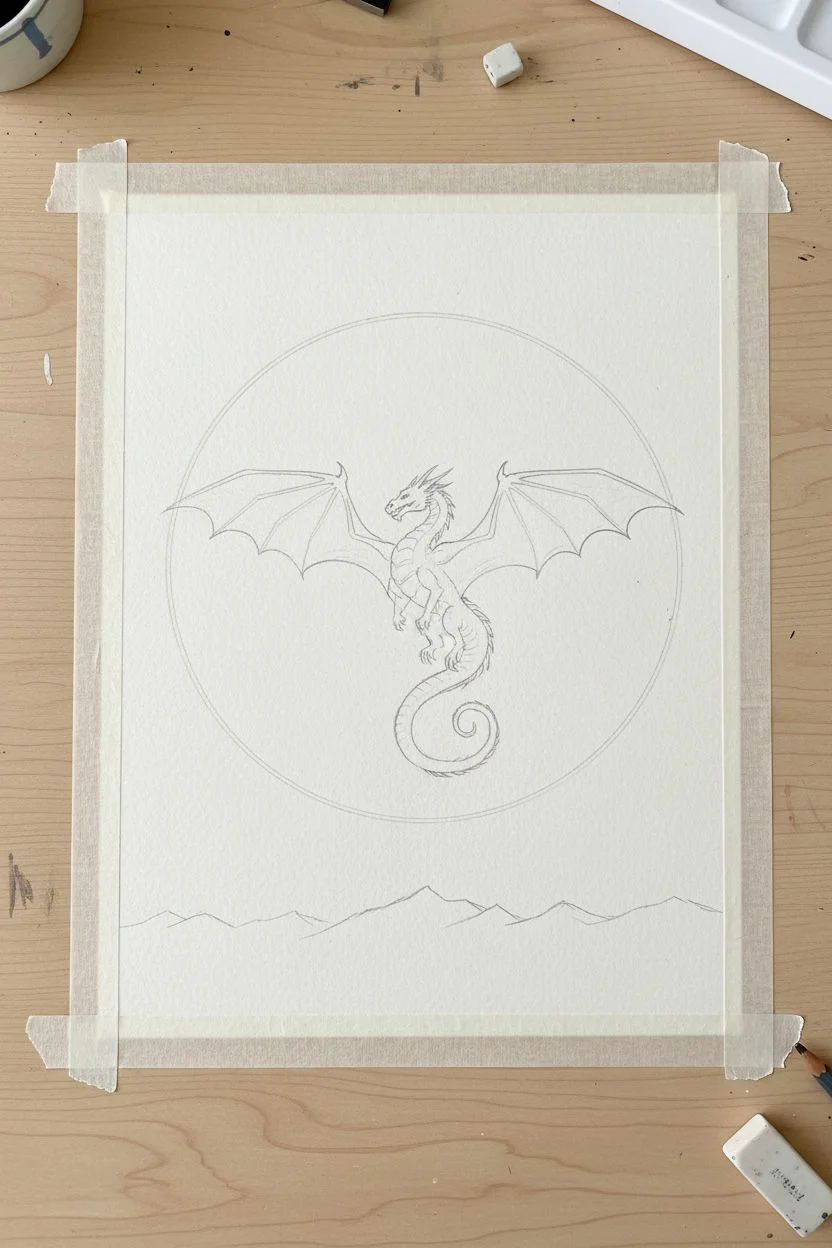
Step 1: A Perfect Circle
-
Prep the paper:
Begin by taping down all four edges of your watercolor paper to a hard board or table. This prevents buckling when we add the wet washes later. -
Trace the moon:
Normally I just grab a bowl from the kitchen for this, but use a compass if you want precision. Lightly trace a large circle in the center of your paper, leaving enough space around the edges for the sky. -
Sketch the silhouette:
Inside the circle, sketch the outline of your dragon. Focus on the pose—wings spread wide, tail curling underneath. Don’t worry about internal details like scales; we only need the outer shape. -
Add landscape details:
Sketch a low, jagged horizon line at the very bottom to represent distant mountains or hills. This grounds the composition.
Step 2: Painting the Luminescent Moon
-
Wet-on-wet base:
Clean your large brush thoroughly. Apply a layer of clean water strictly inside the moon circle. The paper should glisten but not have puddles. -
Initial lunar glow:
Dilute a tiny amount of Yellow Ochre or Raw Sienna until it is very pale. Drop this color randomly onto the wet circle, letting it bloom softly to create warm undertones. -
Adding texture:
Mix a very watery grey using a touch of Indigo and water. While the moon is still damp, dab this grey into patches to create the ‘cratering’ effect. Keep the edges soft. -
Let it dry completely:
This is crucial. The moon area must be bone dry before you paint the sky, or the dark teal will bleed into your perfect circle.
Clean Lines Pro-Tip
For a perfect moon edge, apply liquid frisket (masking fluid) over the circle area before painting the dark sky. Rub it off once the sky is 100% dry to reveal clean paper.
Step 3: The Deep Night Sky
-
Mixing the sky color:
Create a rich, dark teal by mixing Indigo (or Prussian Blue) with a bit of Emerald Green or Viridian. You want a deep value, so use less water and more pigment. -
Painting the background:
Carefully paint around the outside of your moon circle. Use the tip of your brush to get a crisp edge, then fill the rest of the sky area out to the tape. -
Creating a gradient:
As you move toward the bottom of the paper beneath the moon, dilute your paint slightly with water so the lower sky (above the mountains) is a lighter, hazier teal. -
Second layer:
Once the first sky layer is dry, you might need a second coat near the top of the paper to get that deep, starry night intensity.
Level Up: Metallic Touch
Mix a small amount of metallic silver or gold watercolor into your white star mixture. It adds a subtle shimmer that changes as you move the artwork in the light.
Step 4: Stars and Shadows
-
Splatter stars:
Cover your painted moon with a scrap piece of paper to protect it. Load a brush with white gouache (or opaque white watercolor) and tap the handle to splatter tiny stars across the teal sky. -
Detailing the cosmos:
Use your finest brush and white gouache to paint a few specific larger stars with cross-shapes and a faint shooting star near the top. -
Blocking in the dragon:
Switch to black gouache or very concentrated black watercolor. Carefully fill in your dragon sketch. Use the fine brush for sharp wing tips and claw details. -
Refining the dragon:
Add tiny details to the silhouette, such as small spikes along the spine or the texture of the tail tuft. -
Painting the terrain:
Fill in the bottom mountain shapes with solid black. This anchors the floating dragon and balances the dark values. -
The Reveal:
Wait until the entire painting is perfectly dry. Slowly peel off the masking tape at a 45-degree angle to reveal your crisp white borders.
Now you have a mythical scene ready to frame and display on your wall


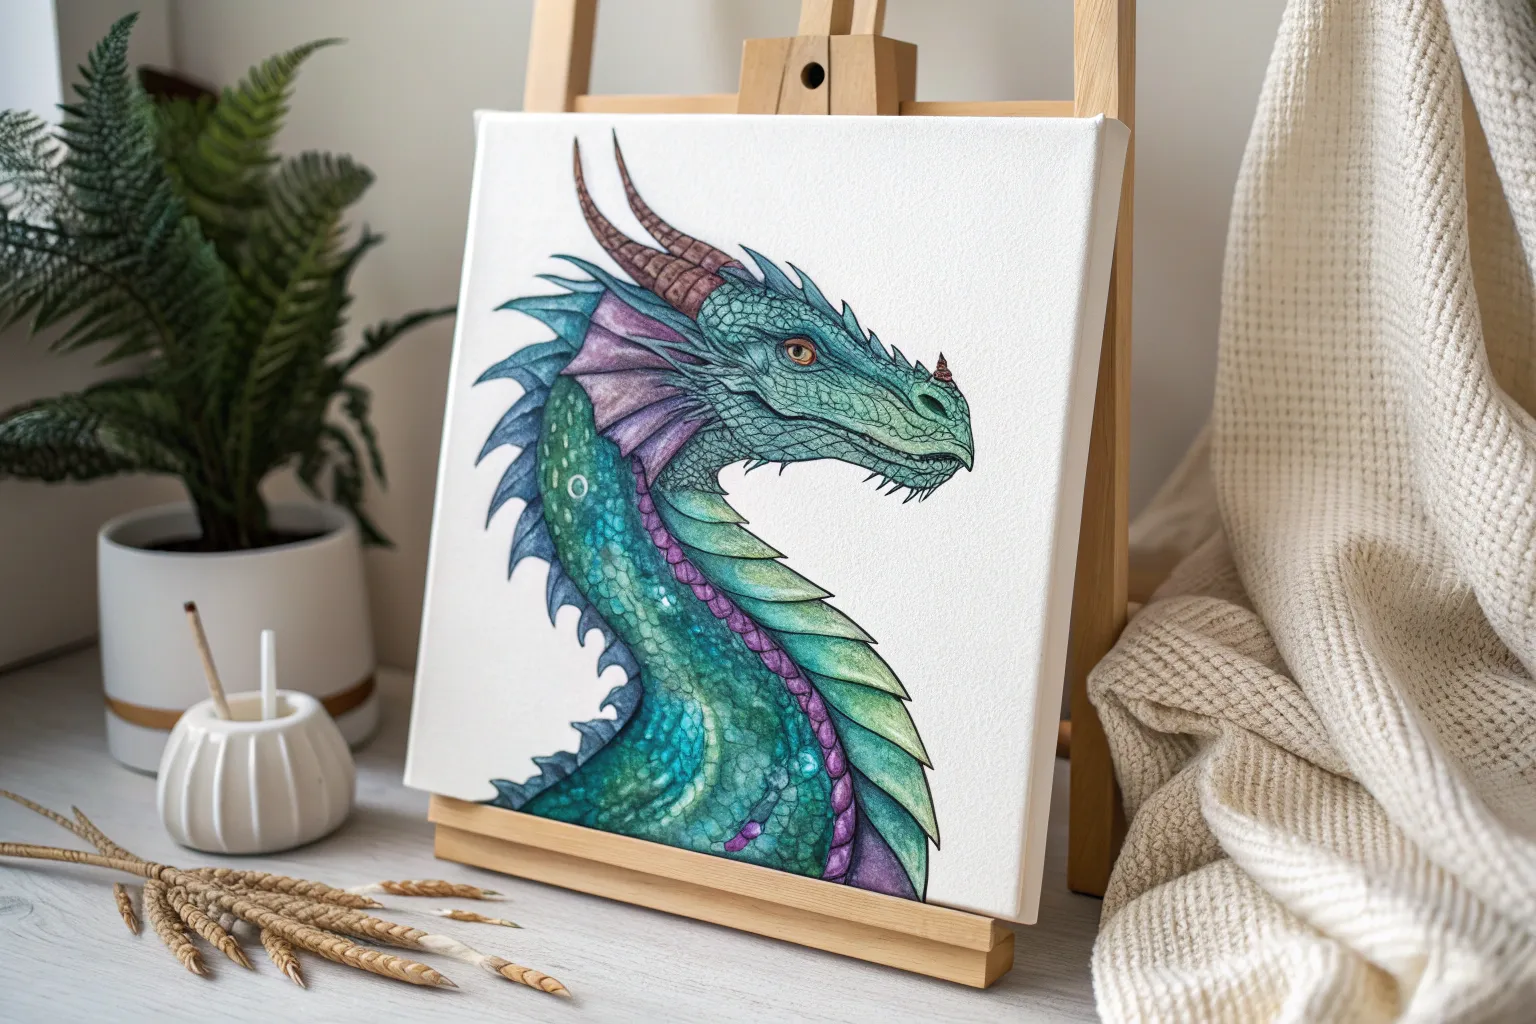
Classic Dragon Head Portrait With Glowing Eyes
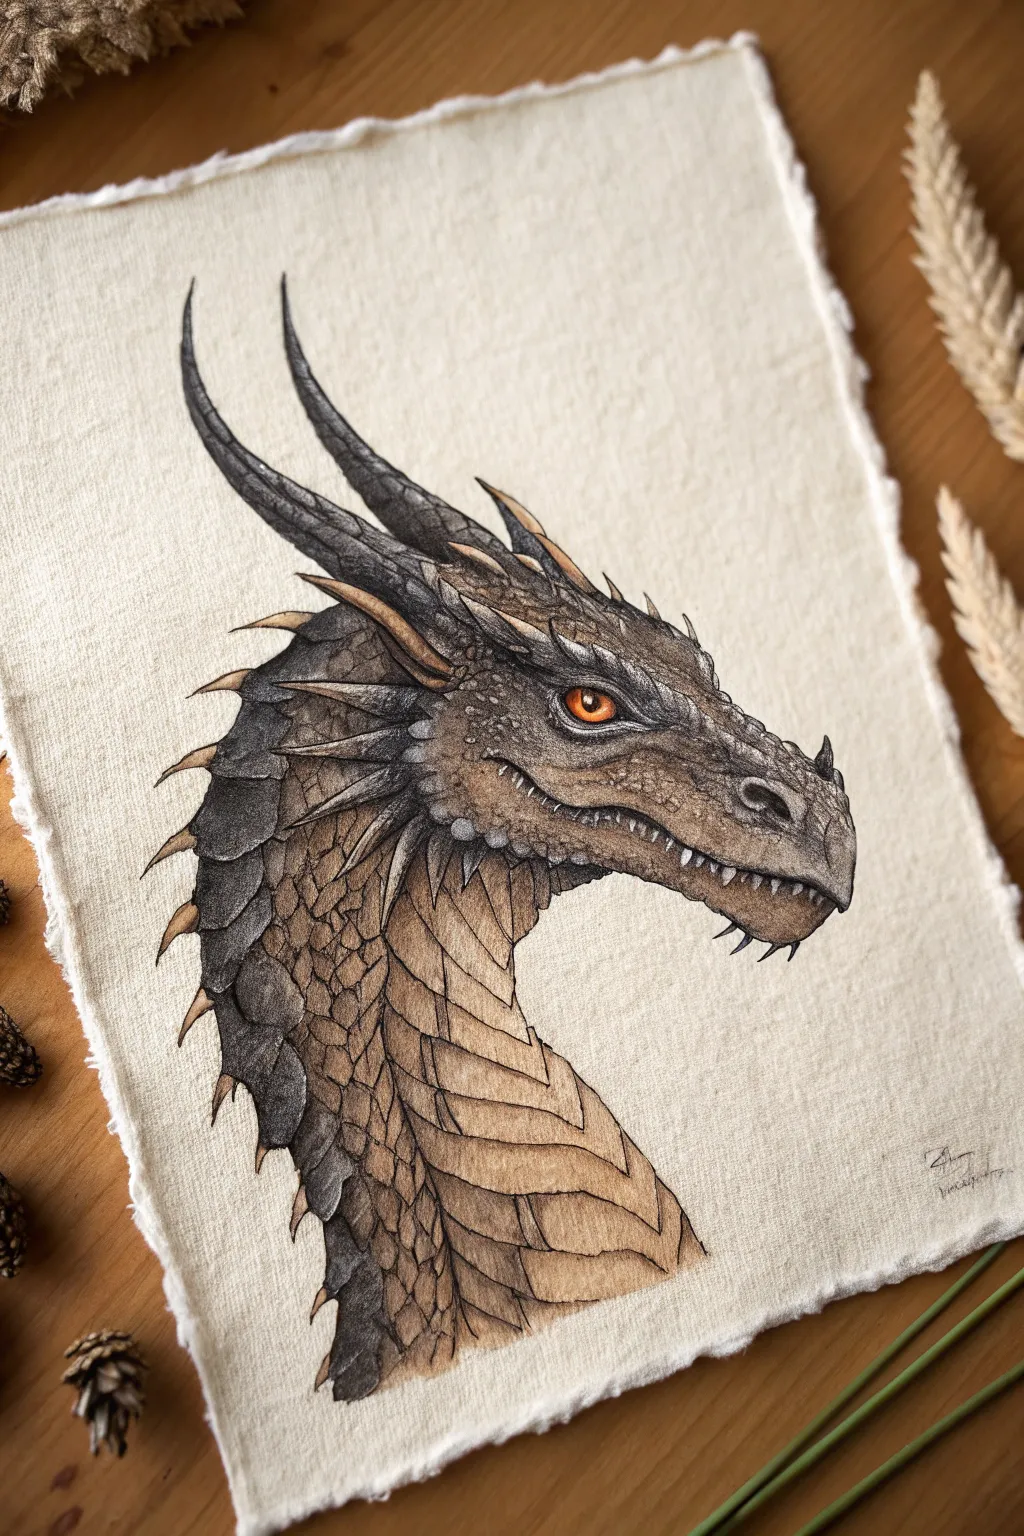

Capture the stoic elegance of fantasy’s most legendary creature with this detailed mixed-media portrait. Using a combination of ink liners and watercolors on textured deckle-edged paper creates a timeless, manuscript-like artifact.
Step-by-Step Tutorial
Materials
- Heavyweight cold-press watercolor paper with deckle edge (approx. 300gsm)
- H or HB graphite pencil for sketching
- Kneaded eraser
- Fine liner pens (black and dark sepia, sizes 0.05, 0.1, 0.3)
- Watercolor paints (Burnt Umber, Sepia, Payne’s Gray, Yellow Ochre, Cadmium Orange)
- Small round watercolor brushes (sizes 2 and 4)
- White gel pen or white gouache for highlights
Step 1: Planning and Sketching
-
Establish the curve:
Begin lightly with your pencil, drawing a sweeping ‘S’ curve to define the dragon’s neck and head posture. This central line ensures the creature looks noble and upright rather than stiff. -
Block in the shapes:
Draw an oval for the main skull and a boxy rectangle for the snout. Sketch the large, triangular horns sweeping backward from the top of the skull to balance the composition. -
Refine the silhouette:
Carve out the details of the mouth line, giving it a slight downward curve for a serious expression. Outline the spikes running down the back of the neck, making them vary slightly in size for realism. -
Map the scales:
Lightly sketch the scale patterns. Use large, plate-like shapes for the neck belly, smaller diamond shapes for the jaw, and tiny pebbles around the eye socket.
Scale Variation
Avoid the “pinecone effect.” Vary the size of your scales—tiny around the eyes, medium on the cheek, and large plates on the neck—to make the anatomy believeable.
Step 2: Inking the Details
-
Outline primary features:
Switch to your 0.3 pen to ink the main outlines of the head, horns, and neck. Keep your hand loose; broken or slightly jittery lines add organic texture to the skin. -
Detail the eye:
Use a 0.05 pen for the eye area. Draw the pupil as a sharp vertical slit and carefully ink the wrinkled lids surrounding it. This focal point needs the most precision. -
Define the scales:
Ink the individual scales on the neck. Don’t close every shape completely; leaving small gaps makes the texture look like weathered skin rather than chainmail armor. -
Add texture to the horns:
Use the 0.1 pen to draw longitudinal cracks and striations along the length of the horns. These lines should follow the curve of the horn to emphasize its roundness. -
Erase pencil guides:
Wait for the ink to dry completely—give it an extra minute just to be safe—then gently remove your graphite sketch with the kneaded eraser.
Step 3: Applying Color
-
Base wash for the skin:
Mix a very watery wash of Yellow Ochre and a touch of Burnt Umber. Apply this pale tan color across the entire dragon, avoiding the eye and the darkest horns. -
Deepen the dorsal scales:
While the base is dry, mix Payne’s Gray with Sepia. Paint the spiky scales along the back of the neck, letting the color pool slightly at the base of each spike for natural shading. -
Shade the underbelly:
Using a diluted Burnt Umber, glaze the large overlapping plates on the front of the neck. Add a second layer of paint just under the ridge of each plate to create dimension. -
Color the horns:
Paint the horns with a gradient, starting with dark Sepia at the tips and fading into the lighter gray-brown mix near the skull. This gradient implies age and hardness. -
Ignite the eye:
Load your smallest brush with intense Cadmium Orange. Paint the iris carefully, keeping the color brightest near the bottom and slightly darker near the top eyelid. -
Enhance shadows:
Mix a dark purple-gray shadow tone. Apply this carefully into the crevices between scales, under the jawline, and beneath the heavy brow ridge to make the features pop.
Muddy Colors?
If your browns and grays look muddy, let each layer dry completely before adding the next. Wet-on-wet mixes colors; wet-on-dry layers them cleanly.
Step 4: Final Touches
-
Strengthen outlines:
I rarely skip this step: go back over key areas like the jawline and horn tips with your 0.3 pen to re-define edges that may have been softened by the watercolor. -
Add scale details:
Use your finest pen to add tiny stippling dots or scratches onto the larger scales. This micro-texture mimics rough, lizard-like skin. -
Highlighting:
Using a white gel pen or a tiny dot of white gouache, add a single specular reflection to the eye. You can also add thin white highlights to the wettest-looking scales on the snout.
Now step back and admire the fierce intelligence in the eye of your creation.


Flying Dragon With a Big Wing Spread
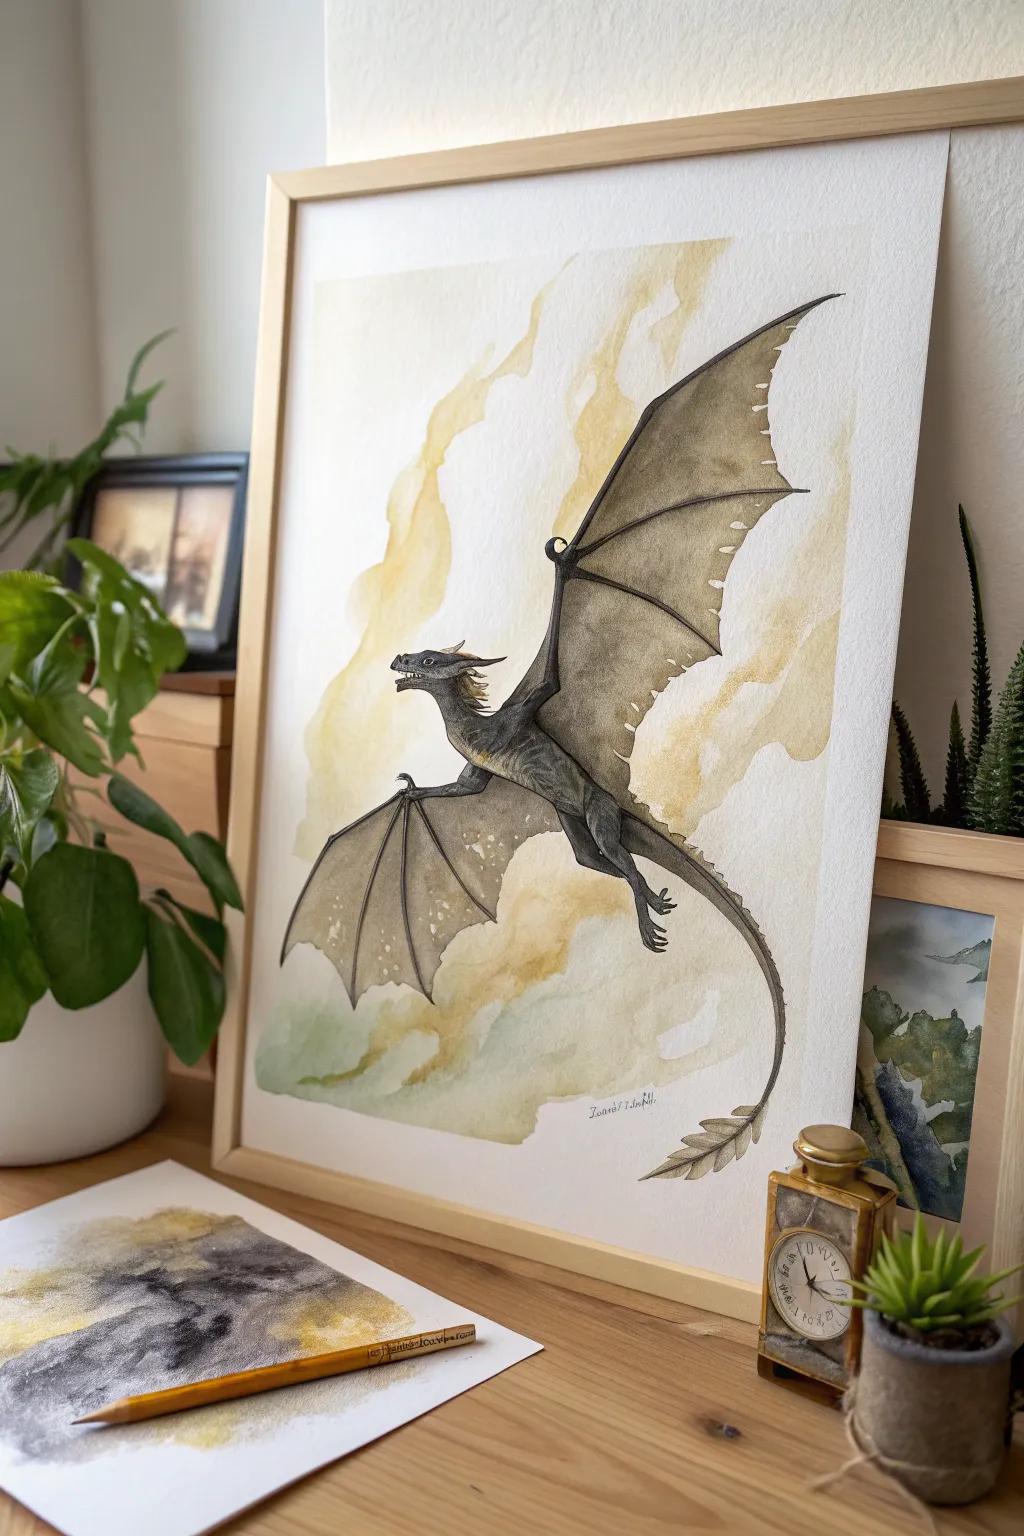
Capture the graceful power of a dragon mid-flight with this elegant watercolor project. You’ll create a striking contrast between the detailed, shadowy creature and a loose, ethereal golden background.
Step-by-Step Guide
Materials
- Cold press watercolor paper (300gsm)
- Pencil (HB or H)
- Kneaded eraser
- Watercolor paints (Payne’s Grey, Yellow Ochre, Burnt Umber, Olive Green)
- Round brushes (sizes 2, 6, and 10)
- Fine liner brush or 00 round brush
- Clean water jars
- Paper towels
- Masking tape
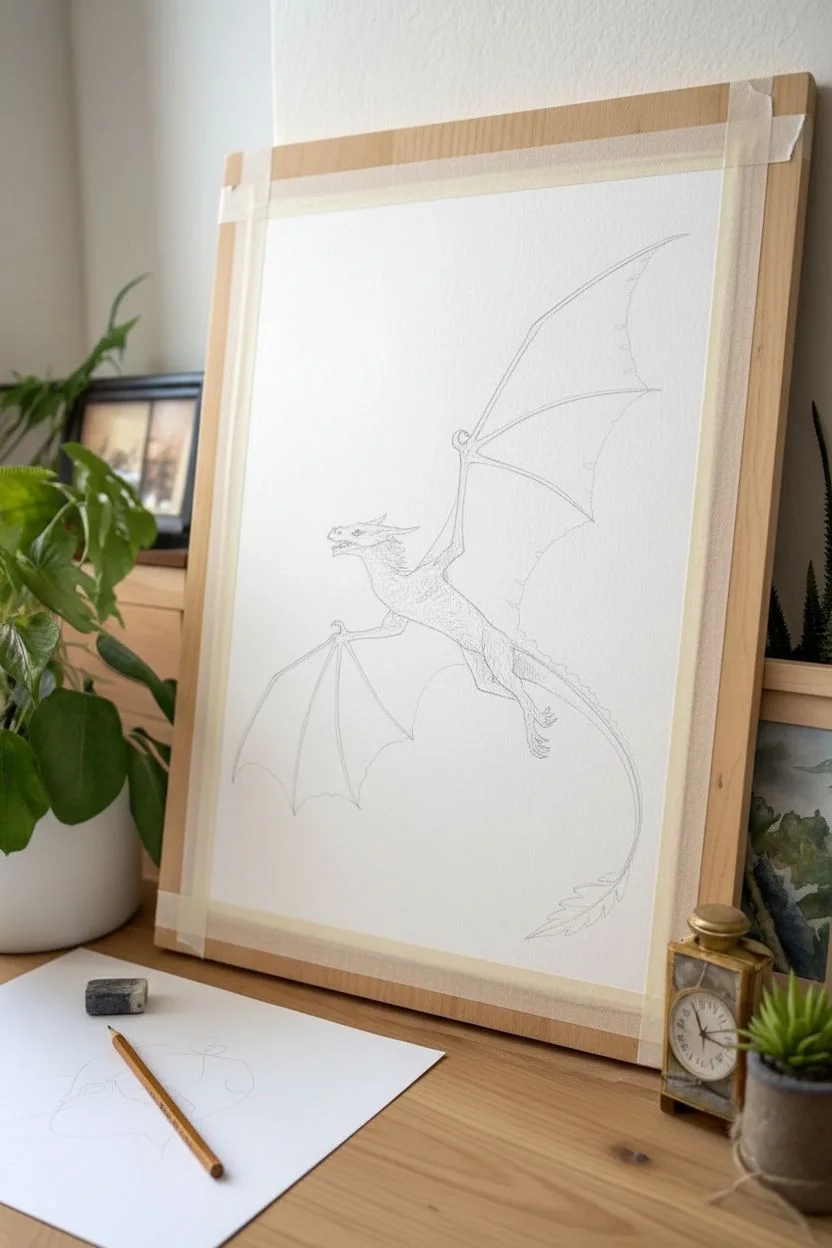
Step 1: Sketching the Form
-
Paper Preparation:
Tape your watercolor paper down to a board on all four sides. This prevents buckling when we add the wet washes later. -
Basic Shapes:
Visualize the dragon’s body as a long, curved S-shape moving diagonally from lower left to upper right. Lightly sketch an oval for the chest and a smaller circle for the head. -
Wing Structure:
Draw the skeletal lines of the wings first. Imagine them like long arms with extended fingers. The upper wing reaches high, almost touching the corner, while the lower wing sweeps downward. -
Refining the Silhouette:
Connect your guide lines with the ‘skin’ of the wings, adding jagged scallops along the bottom edges. Refine the head shape with a snout and horns, and sketch the long, whip-like tail ending in a fin. -
Clean Up:
Gently roll your kneaded eraser over the sketch to lift excess graphite. You want the lines barely visible so they don’t show through the paint.
Muddy colors?
If your grey looks flat, you likely overmixed it on the paper. Let layers dry fully before glazing a new color on top to keep the transparency.
Step 2: The Atmospheric Background
-
Golden Wash:
Mix a watery puddle of Yellow Ochre. Using your size 10 brush, paint loose, wavy cloud-like shapes behind where the dragon will be. Keep the edges soft and organic. -
Lower Atmosphere:
While the ochre is still slightly damp near the bottom, introduce a very faint mix of Olive Green and Payne’s Grey. Let these colors bleed slightly into the yellow for a misty effect. -
Drying Time:
Let this background layer dry completely. If you paint the dragon while the paper is wet, your sharp lines will fuzzy out.
Scale Shimmer
Once dry, use a metallic gold watercolor or gel pen to add tiny highlights on the scales and wing tips for a magical effect.
Step 3: Painting the Dragon
-
Base Body Tone:
Mix a light wash of Payne’s Grey with a touch of Olive Green. Fill in the entire dragon body and wings, avoiding the tiny eye area. -
Shadow Mapping:
While the base is moist, drop in a more saturated Payne’s Grey along the underside of the belly, the bottom of the tail, and the finger bones of the wings to create volume. -
Wing Membranes:
For the skin between the wing bones, use a varied wash. I like to keep the center of each membrane slightly lighter to make it look translucent and stretched. -
Texture Building:
Once the main washes are dry, use a size 2 brush and a dark mix of Payne’s Grey and Burnt Umber to paint small scales on the neck and chest. -
Defining the Bones:
Strengthen the lines of the wing ‘fingers’ with dark pigment. Add sharp little claws at the wing joints and feet. -
Head Detail:
Switch to your finest brush. Carefully paint the horns, the ridge of the eye, and the jawline. Leave a tiny white speck for the highlight in the eye.
Step 4: Final Touches
-
Tail and Spines:
Paint the fin at the end of the tail with delicate strokes. Add small, darker spikes running down the spine of the dragon. -
Splatter Effect:
To give the wings texture, load a small brush with clean water and tap it gently over the drying wing paint. This pushes pigment away, creating ‘blooms’ that look like mottled skin. -
Deepest Darks:
Assess your contrast. Add pure, concentrated Payne’s Grey to the deepest crevices—under the armpit, the groin, and the wing folds—to pop the figure forward.
Remove the tape carefully to reveal your crisp, mythical masterpiece ready for framing


Fire-Breathing Dragon With Dramatic Backlight
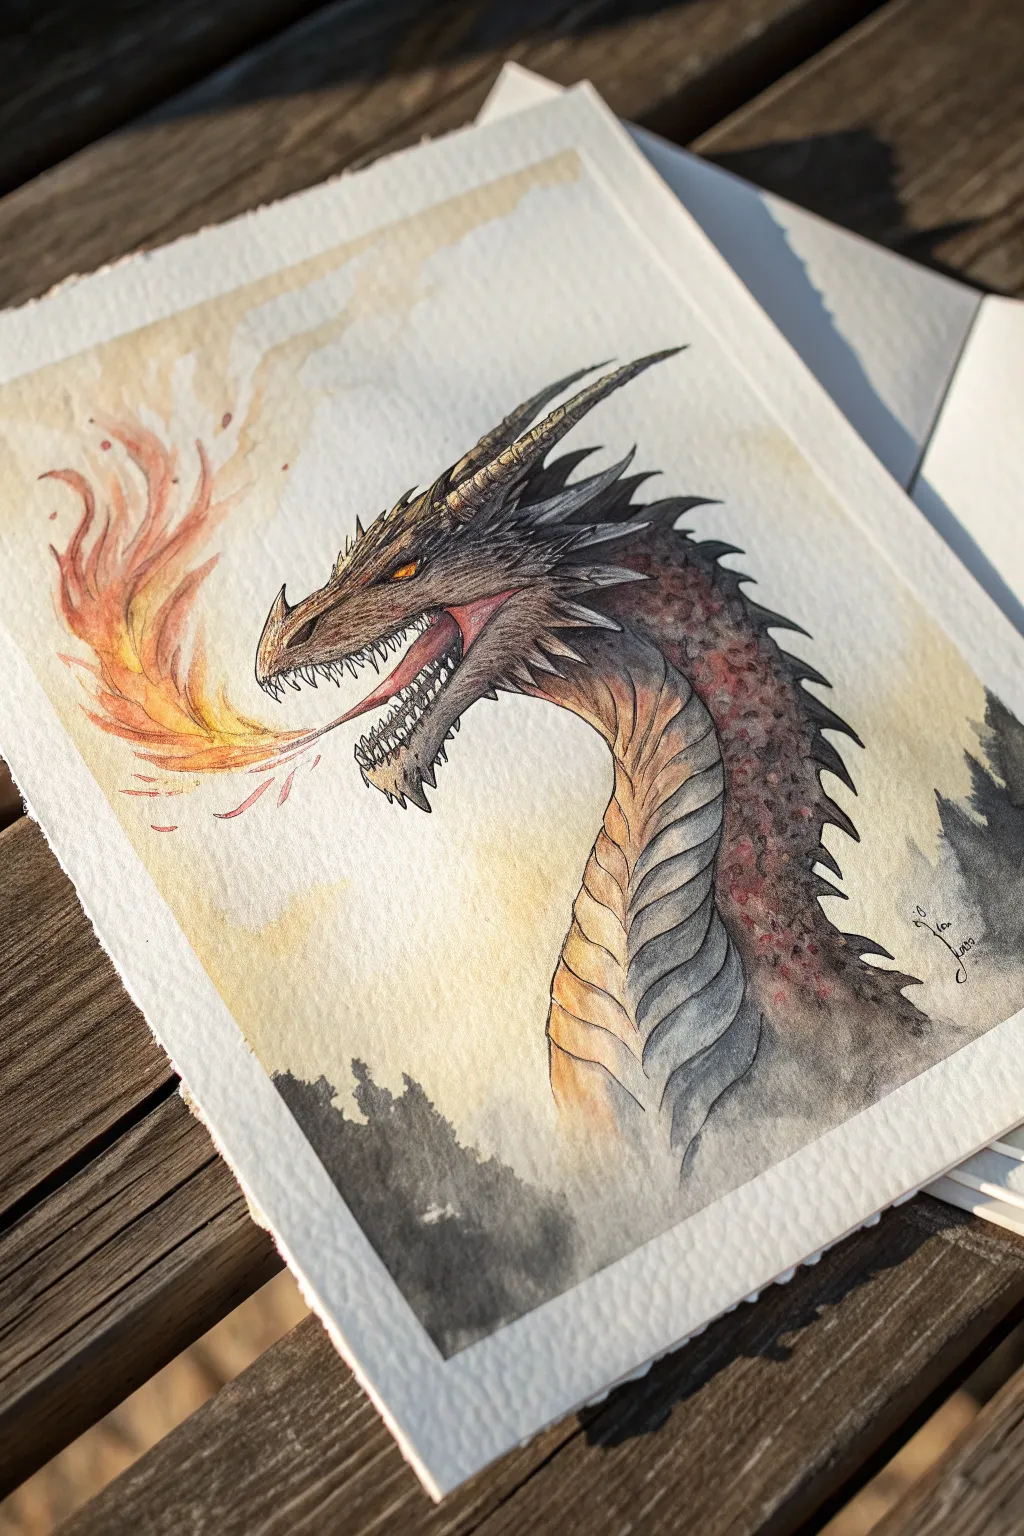
This striking dragon portrait combines the fluid softness of watercolor with the crisp definition of ink hatching. The composition focuses on a detailed profile view, contrasting the creature’s stony scales against the vibrant burst of its fiery breath.
Detailed Instructions
Materials
- Cold press watercolor paper (300 gsm)
- Pencil (HB) and eraser
- Waterproof fineliner pens (0.3mm and 0.5mm, black)
- Watercolor paint set
- Round watercolor brushes (sizes 4 and 8)
- Small flat brush for background washes
- Mixing palette
- Jar of clean water
- Paper towels
Step 1: Drawing the Beast
-
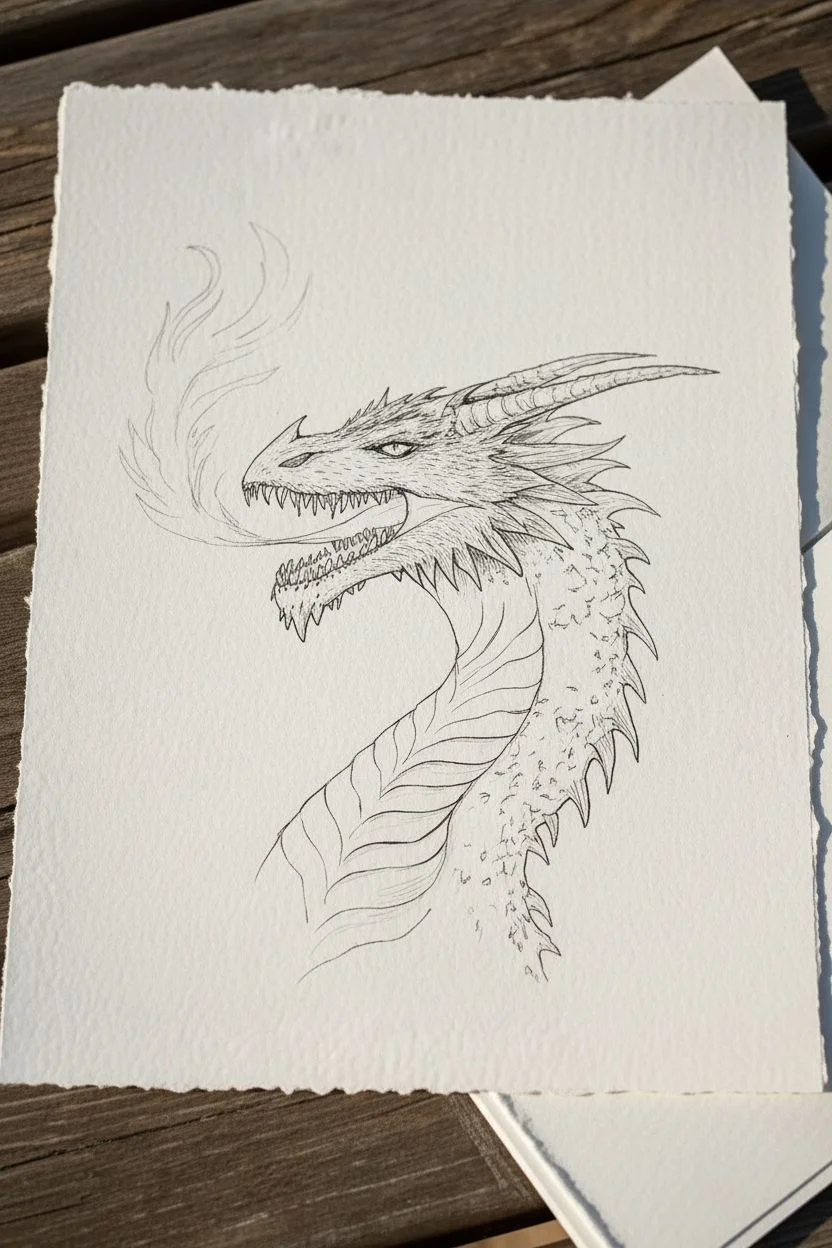
Light Sketching:
Begin with a very light pencil sketch to establish the dragon’s proportions. Start with a large oval for the head and a sweeping S-curve for the neck. Position the open jaw so there is enough negative space on the left side of the paper for the flames. -
Refining Features:
Flesh out the details of the face. Add the sharp ridges of the brow, the spiky horns sweeping backward from the skull, and the triangular teeth lining the open jaw. Sketch jagged, overlapping scales running down the back of the neck. -
Adding Texture:
Lightly indicate the direction of the scales on the neck. The throat area should have larger, plate-like segments, while the upper neck has smaller, denser scales. -
Initial Inking:
Using your 0.5mm waterproof fineliner, carefully go over your pencil lines. Focus on the main silhouette first—the horns, the jawline, and the spine. Keep your hand steady but allow for slight unevenness to mimic organic texture. -
Detailed Hatching:
Switch to the finer 0.3mm pen for shading. Use hatching (parallel lines) and cross-hatching to create depth under the jaw, around the eye socket, and between the neck plates. This ink shading provides the foundation for the darker values later. -
Drawing the Flames:
Sketch the fire stream coming from the mouth lightly with pencil first, keeping the shapes fluid and organic. Then, ink these lines very brokenly or not at all—sometimes it’s better to let the paint define the fire’s edge without a harsh black outline.
Ink Patience
Wait at least 15 minutes for the fineliner ink to cure before erasing pencil lines. Even waterproof ink can smudge if erased while fresh.
Step 2: Dynamic Watercolor Application
-
Base Tone:
Once the ink is totally dry, erase visible pencil marks. Mix a watery wash of yellow ochre and apply it loosely over the dragon’s face and upper neck to create a warm undertone. -
Scale Variation:
While the base is damp, drop in touches of burnt sienna and a muted purple-grey onto the neck scales. Let the colors bleed slightly into each other to create that mottled, stony appearance. -
Shadows and Depth:
Mix a darker grey using ultramarine blue and burnt umber. Paint this into the shadowed areas you previously cross-hatched, particularly under the chin and the overlapping segments of the throat armor. -
The Eye:
Carefully paint the eye with a bright, pure orange or yellow. Leave a tiny speck of white paper for the highlight, or add it back later with gouache, to make the dragon look alive. -
Painting the Flames:
Wet the paper area where the fire is. Load your brush with intense lemon yellow and touch it to the wet paper near the mouth. While wet, drop in cadmium orange and a hint of red at the very tips, letting the water blend them naturally. -
Surrounding Glow:
I like to take a very diluted wash of that same yellow-orange and sweep it lightly around the flames into the background, suggesting heat radiating into the air. -
Atmospheric Background:
For the bottom corners, wet the paper and drop in a loose, watery grey-black mix to suggest distant silhouetted trees or smoke. Keep this abstract so it doesn’t distract from the focal point. -
Final Contrast:
Once the first layers are dry, mix a concentrated dark brown-black. Glaze this over the darkest recesses of the scales and the horns to pump up the contrast. -
Highlighting:
If your fire or teeth lost clarity, use a tiny bit of white gouache or a gel pen to reclaim the brightest whites, specifically on the teeth tips and the center of the flame burst.
Smoke Signals
While the background grey wash is still wet, lift out pigment with a twisted tissue to create soft, white smoky wisps rising from the bottom.
Now step back and admire the fierce mythical beast you have brought to life
BRUSH GUIDE
The Right Brush for Every Stroke
From clean lines to bold texture — master brush choice, stroke control, and essential techniques.
Explore the Full Guide
Ink-and-Wash Serpentine Dragon With Calligraphic Lines
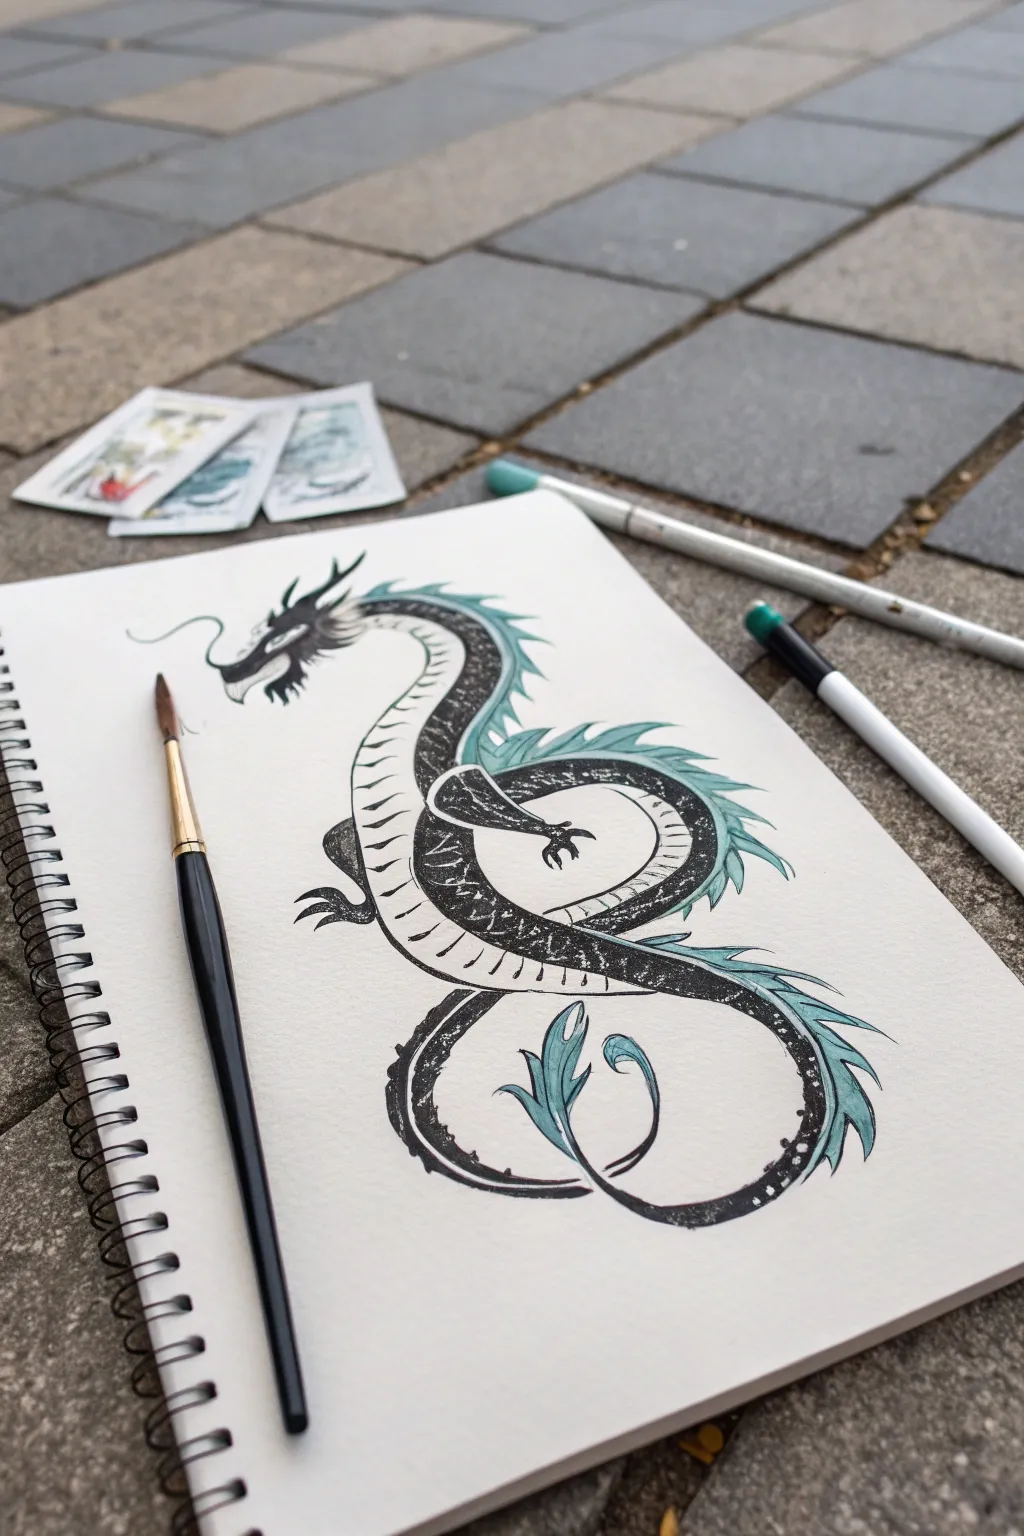
Capture the fluid elegance of a classic eastern dragon with this striking ink-and-wash project. Using bold black strokes contrasted against soft teal accents, you’ll create a creature that feels both ancient and refreshingly modern on the page.
How-To Guide
Materials
- Heavyweight mixed-media sketchbook or watercolor paper
- Pencil (HB or 2B) for sketching
- Kneaded eraser
- Black India ink or black gouache paint
- Teal or turquoise watercolor paint (or diluted gouache)
- Round watercolor brush (size 6 or 8)
- Fine liner brush or rigger brush for details
- Clean water and mixing palette
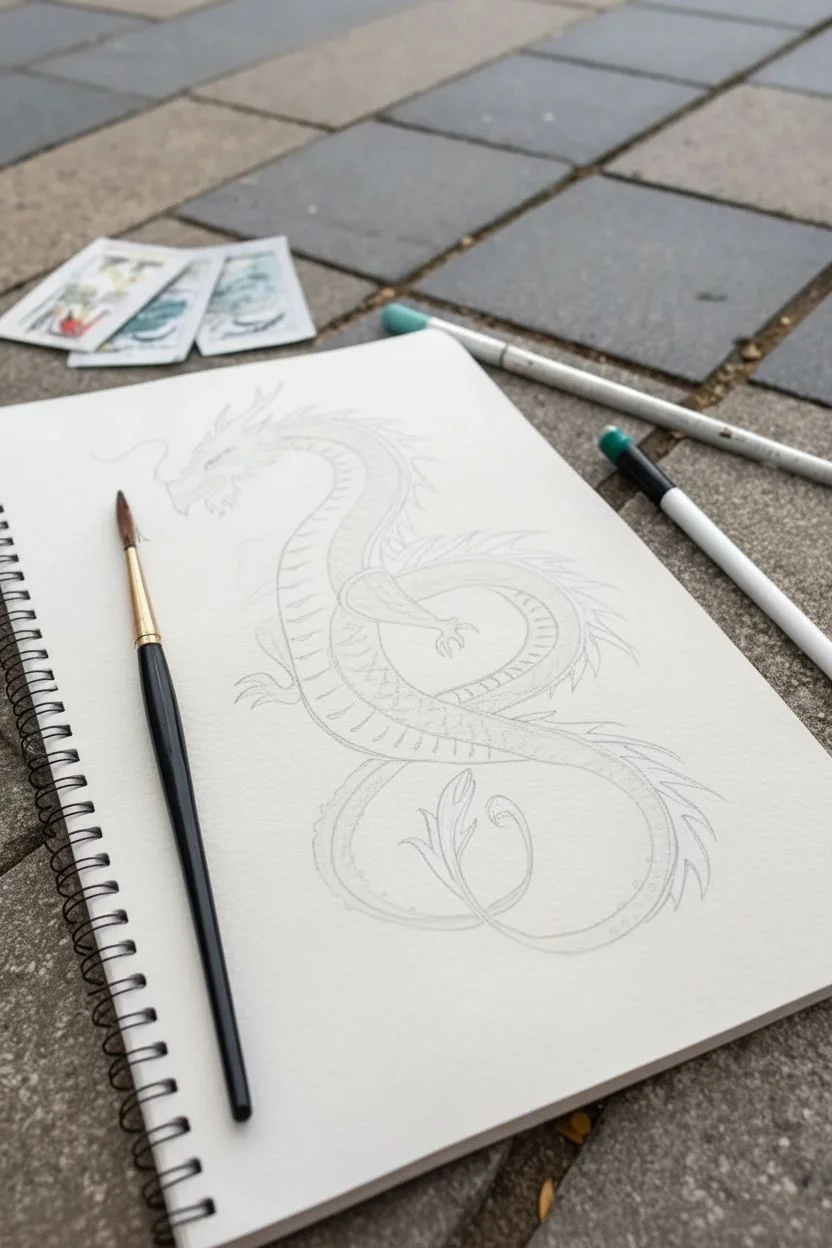
Step 1: Drafting the Serpent
-
Map the Curve:
Start by lightly sketching a single, flowing ‘S’ curve in the center of your page. This will be the spine of your dragon. Let the tail loop back around underneath the body to create a balanced composition. -
Flesh Out the Body:
Draw parallel lines on either side of your guide curve to give the dragon thickness. Taper the body gradually as you move towards the tail tip, keeping the neck area slightly thicker than the tail. -
Sketch the Head:
At the top of the curve, sketch the head profile. Think of a camel or horse shape, with an open mouth. Add two long, flowing whiskers extending from the snout and flowing backward. -
Define the Limbs:
Add two small arms. Place one near the upper curve of the body, reaching forward, and another lower down, appearing to grip the air. Keep the claws sharp and bird-like. -
Marking Flowing Hair:
Lightly outline jagged, flame-like shapes along the spine to represent the mane or dorsal fur. Let these spikes follow the direction of movement.
Dry Brush Technique
Don’t wet your paper first. Use a brush with sticky, undiluted ink and drag it quickly. The ‘skips’ where the white paper shows through create instant scale texture without drawing every single scale.
Step 2: Inking the Form
-
Prepare Your Black:
Load your round brush with black ink or slightly diluted black gouache. You want a consistency that flows but remains opaque. -
Outline the Dorsal Side:
Paint the upper edge of the dragon’s body with a confident, slightly broken line. I like to use a dry-brush technique here—moving the brush quickly so the paper texture shows through—to suggest scales. -
Fill the Dark Scales:
Paint the upper half of the body solid black, leaving the belly area white. Allow the ink to skip over the paper grain occasionally for that weathered, ancient look. -
Detail the Head:
Switch to your finer brush to ink the head. Carefully define the eye, the nostrils, and the sharp teeth. Use varied line weights: thicker for the jaw, thinner for the whiskers. -
Paint the Limbs:
Fill in the arms and claws with solid black. Ensure the connection points to the body feel organic, merging into the dark back scales. -
Create the Belly Segments:
Using a thinner brush with slightly less ink, draw curved lines across the white belly area to create segmented plates. These line should curve with the body’s form.
Ink Bleeding?
If your black ink bleeds into the teal, ensure the black is 100% dry before adding color. If using waterproof ink, you can paint over it safely; if using water-soluble ink, paint the teal carefully around it.
Step 3: Adding Color and Detail
-
Mix the Teal Wash:
Dilute your teal or turquoise watercolor significantly. You want a transparent, watery consistency that contrasts with the heavy black ink. -
Paint the Mane:
Apply the teal wash to the jagged mane shapes you sketched earlier along the spine. Let the color fade out slightly at the tips for a soft effect. -
Accent the Tail:
Add touches of teal to the tuft of hair at the very end of the tail. Use loose, flicking strokes to mimic the texture of hair. -
Enhance the Whiskers:
Carefully trace a thin line of teal alongside or over the black whiskers to give them dimension and a magical glow. -
White Highlights:
If your black ink has covered too much texture, you can use a white gel pen or opaque white gouache to add tiny scratches or highlights on the black scales to simulate light reflecting. -
Final Cleanup:
Once everything is completely dry, gently erase any visible pencil lines, particularly around the light belly area and the teal mane.
Now you have a dynamic, mythical creature spiraling across your sketchbook page, ready to guard your other drawings
Limited-Palette Dragon Painting for Instant Cohesion
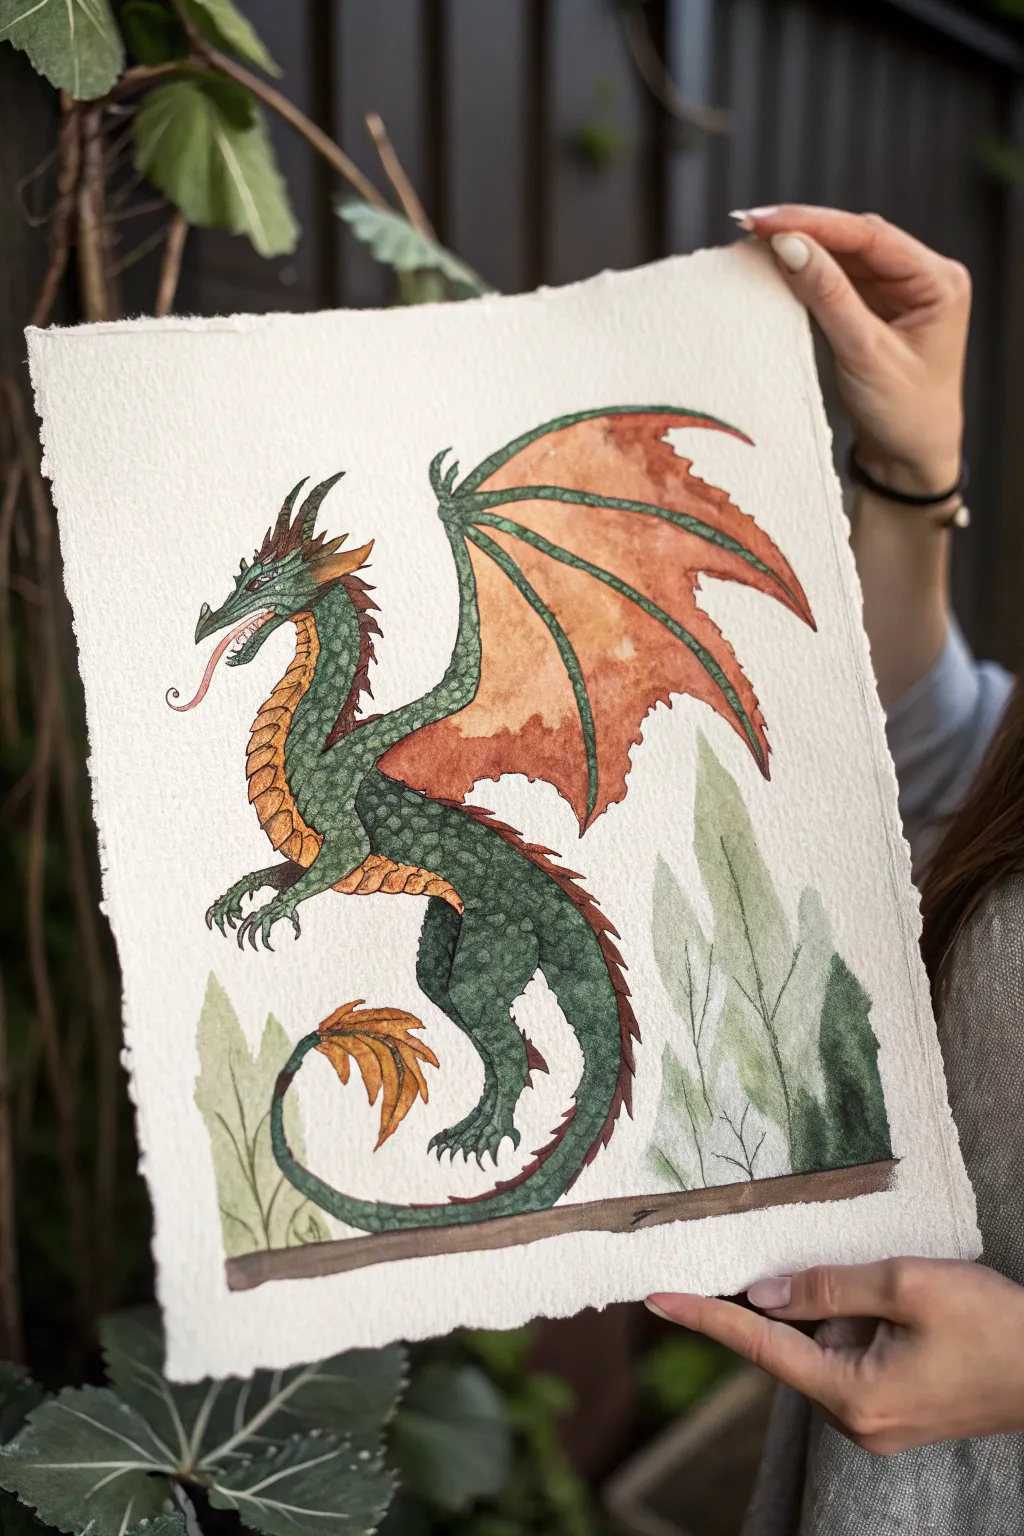
This project features a charming, slightly stylized dragon painted in a limited palette of earth tones on textured paper. The result feels like an illustration ripped from a classic fantasy storybook or a medieval bestiary.
Step-by-Step
Materials
- Cold press watercolor paper (300 gsm or heavier, preferably with deckled edges)
- Watercolor paints (Sap Green, Hooker’s Green Dark, Burnt Sienna, Yellow Ochre, Alizarin Crimson)
- Pencil (HB or H for light lines)
- Kneaded eraser
- Round synthetic brushes (Size 2 and 4 for details, Size 6 for washing)
- Fine liner brush or 00 round brush for scales
- Palette
- Two jars of water
- Paper towels
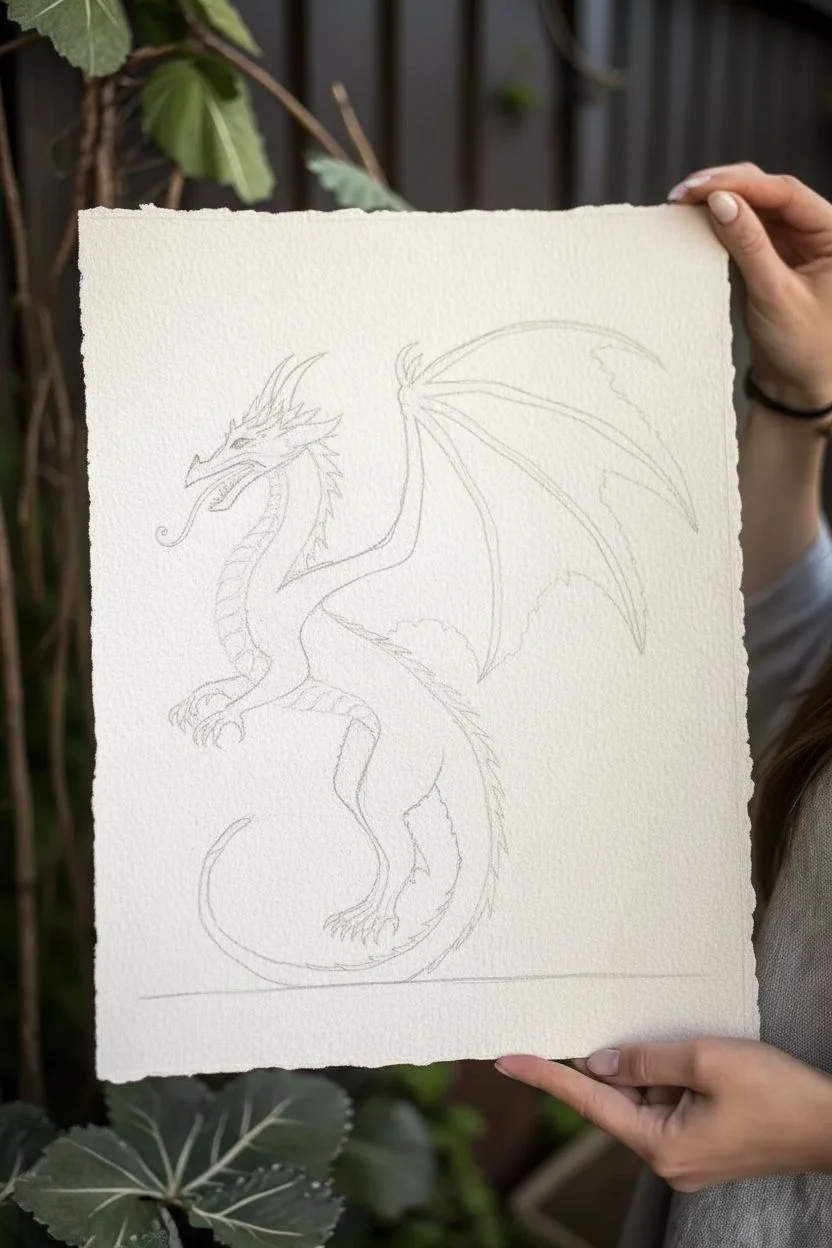
Step 1: Sketching the Beast
-
Establish the curve:
Begin by lightly drawing an ‘S’ curve to define the dragon’s posture. This line will guide the flow from the head, down the spine, and curling into the tail which rests near the ground. -
Block in shapes:
Sketch a small oval for the head and a larger, elongated bean shape for the torso. Connect the neck to the body with two elegant, curving lines that widen slightly as they reach the chest. -
Add limbs and wings:
Draw the bent leg in the foreground, focusing on the muscular thigh and the clawed foot grasping the air. Add the large wing extending from the shoulder blade; use a bat-wing structure with elongated ‘fingers’ stretching the membrane. -
Refine details:
Sketch the dragon’s features: the snout, the curling tongue, the segmented underbelly scales, and the leaf-like tuft at the end of the tail. Mark the horizon line lightly near the bottom.
Step 2: Base Layers
-
Paint the underbelly:
Mix Yellow Ochre with a tiny touch of Burnt Sienna. Paint the segmented scales running down the neck and belly. Keep the wash fairly light to allow for darker detailing later. -
Green skin tones:
Create a mix of Sap Green and a little Hooker’s Green. Paint the main body, legs, and tail. I like to keep this wash uneven, allowing some pigment to pool, which creates a natural, scaly texture as it dries. -
Wing membranes:
Mix a watery wash of Burnt Sienna with a hint of Alizarin Crimson for a rusty orange tone. Fill in the wing membranes, letting the color be more saturated near the ‘fingers’ and fading slightly toward the edges. -
Background foliage:
Using a very diluted, watery green-grey mix, paint loose, jagged shapes at the bottom for the grass and rocks. This should look like a faint background, not a focal point.
Wet-on-Dry for Control
Work wet-on-dry for the scales. If the base layer is even slightly damp, your fine scale details will bleed and turn fuzzy instead of crisp.
Step 3: Defining Texture
-
Scale pattern:
Once the green base layer is completely dry, mix a darker, more concentrated green. Using your smallest brush, paint small ‘U’ shapes or dots across the body to simulate rough scales. -
Underbelly shadows:
Take a slightly darker orange-brown mix and paint thin lines between the belly segments. Add a little shadow to the underside of the belly scales to give them dimension. -
Wing structure:
Paint the bony ‘fingers’ of the wings with the dark green mix. Ensure these lines are crisp and clean against the rusty orange membrane. -
Spines and claws:
Use a deep brownish-red to paint the spikes running down the dragon’s spine and the claws on the feet. Careful brush control is key here.
Make it Antique
Before painting, apply a light wash of tea or coffee to the paper and let it dry. This gives an instant aged, parchment look perfect for dragons.
Step 4: Finishing Touches
-
Facial details:
With your finest brush, paint the eye, the nostril, and the sharp teeth. Add the long, thin, pinkish tongue curling out of the mouth. -
Grounding shadow:
Paint a solid, dark brown line beneath the dragon to represent the ground or a branch it’s hovering over. This grounds the composition. -
Highlighting:
If any areas got too dark, you can lift a tiny bit of color with a damp, clean brush on the upper thigh or shoulder to suggest a light source. -
Final assessment:
Step back and check the balance. If the background foliage is too light, add a second transparent layer of grey-green to give it more presence without overpowering the dragon.
Once dry, this piece makes a wonderful addition to a playroom or a thoughtful gift for any fantasy lover

PENCIL GUIDE
Understanding Pencil Grades from H to B
From first sketch to finished drawing — learn pencil grades, line control, and shading techniques.
Explore the Full Guide
Playful Cartoon Dragon With Exaggerated Expressions
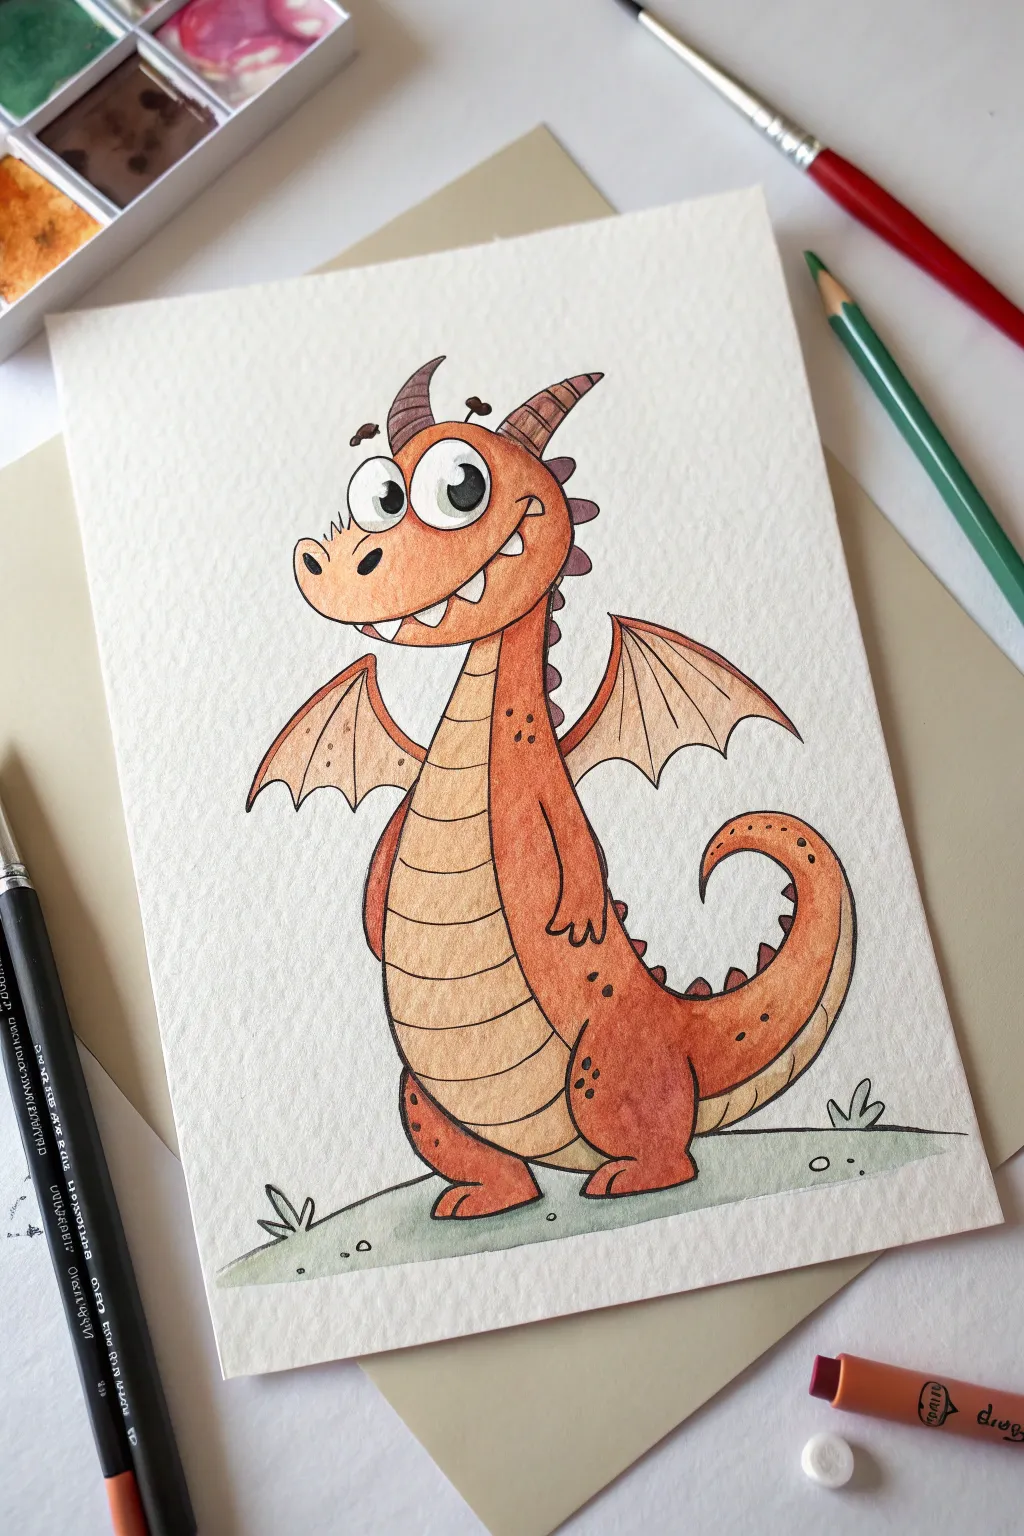
Capture the charm of fantasy with this adorable, wide-eyed cartoon dragon illustration. Using a mix of watercolor washes and crisp ink outlines, you’ll bring this friendly, orange-scaled character to life on textured paper.
Detailed Instructions
Materials
- Cold press watercolor paper (A5 size recommended)
- HB pencil for sketching
- Waterproof fine liner pen (black, 0.3mm or 0.5mm)
- Watercolor paints (Orange, Red-Orange, Yellow-Ochre, Purple, Green)
- Round watercolor brushes (size 2 and 6)
- Water cup and paper towel
- White eraser
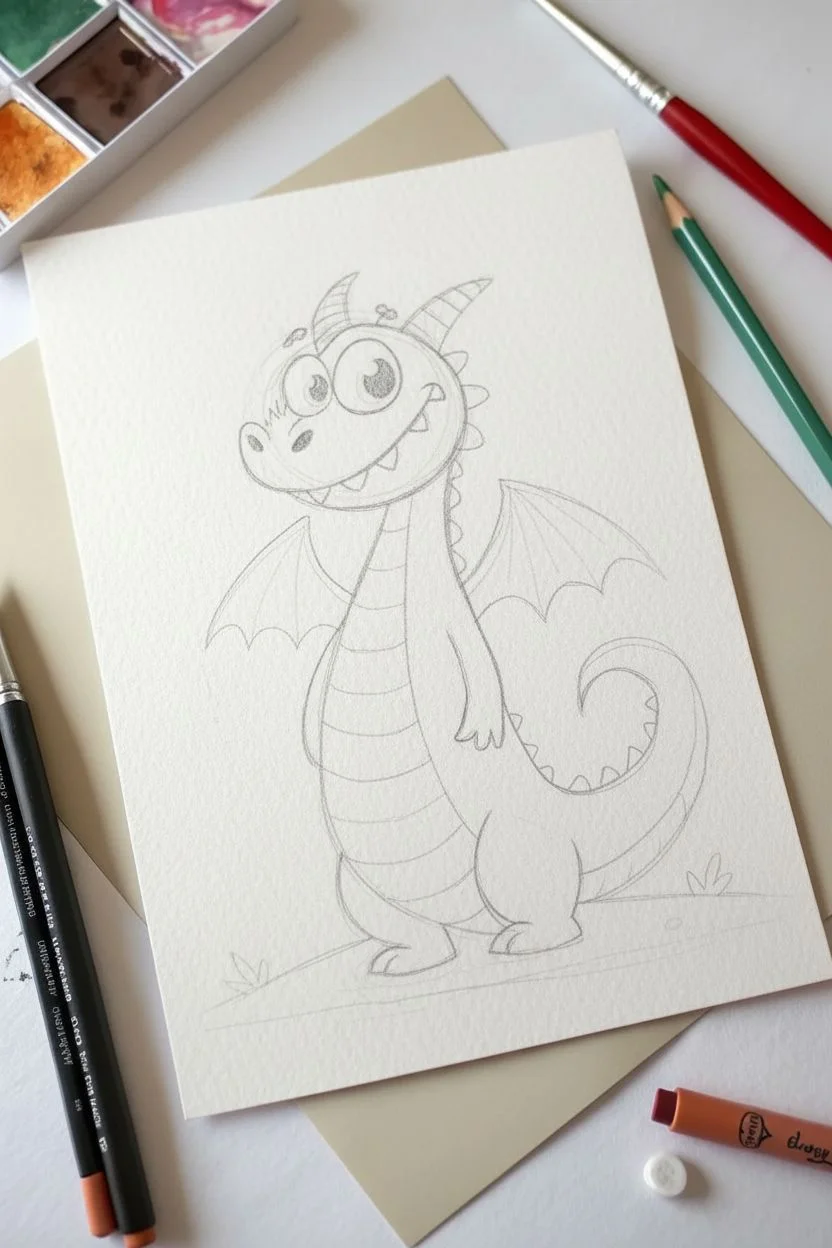
Step 1: Sketching the Silly Shape
-
Map out the head and body:
Begin by lightly sketching a large circle for the head and a pear-shaped oval connecting directly beneath it for the body. Keep your pencil pressure very light so the lines don’t show through the paint later. -
Position the eyes and snout:
Draw two large, touching circles for the eyes on the left side of the head circle. Add a rounded protrusion below them for the snout, curving it upwards into a cheeky smile. -
Add expressive details:
Draw the pupils looking backwards for a goofy expression. Sketch the small, triangular teeth peeking out from the smile and add two curved horns on top of the head. -
Draft the wings and limbs:
Sketch small, bat-like wings extending from the upper back. Draw simple arms resting against the belly and two chunky legs at the base. Add the thick tail curving upwards behind the body. -
Detail the belly and spikes:
Draw a curved line down the center of the body to separate the belly plates. Sketch small triangular spikes running from the back of the head all the way down to the tail’s tip.
Step 2: Inking the Outline
-
Trace the main lines:
Using your waterproof fine liner, carefully trace over your pencil sketch. Use confident, continuous strokes for the long curves of the belly and tail. -
Add texture marks:
Add small details like the nostrils, eyebrows, and tiny scratches or freckles on the snout to give the skin character. Don’t forget the horizontal lines across the underbelly. -
Erase the graphite:
Wait until the ink is completely dry to prevent smudging. This usually takes just a minute or two. Gently erase all visible pencil lines to leave a clean black-and-white drawing.
Eye Sparkle Tip
Leave a tiny circle of white paper unpainted inside the black pupil. This ‘catchlight’ makes the character look alive and glossy.
Step 3: Painting with Watercolors
-
Paint the main body color:
Mix a vibrant orange watercolor. Using the size 6 brush, fill in the head, outer body, legs, and tail. I like to keep the wash uneven, allowing some paint to pool near the edges for natural shading. -
Color the belly and wings:
Dilute a yellow-ochre or pale tan color with plenty of water. Paint the segmented belly area and the inner membranes of the wings, ensuring you stay within the lines. -
Add the purple accents:
Mix a muted purple tone. Using the smaller size 2 brush, carefully paint the spikes along the back and the striped horns on the head. This cool tone contrasts nicely with the warm orange body. -
Deepen the shadows:
Once the first orange layer is dry, mix a slightly reddish-orange. Glaze this darker color along the bottom of the belly, under the chin, and on the lower parts of the legs to create volume. -
Paint spots and details:
Use the tip of your small brush with concentrated reddish-brown paint to dab small spots on the knees and cheeks. This adds texture to the dragon’s skin. -
Ground the figure:
Mix a very watery grey-green wash. Paint a simple, abstract patch of grass beneath the dragon’s feet to make sure it isn’t floating in space.
Level Up: Smoke Effects
Use a dry brush with faint grey paint to create little puffs of smoke coming from the nostrils for extra personality.
Let your playful masterpiece dry completely before signing your name in the corner
Botanical Dragon With Leafy Frills and Vine Details
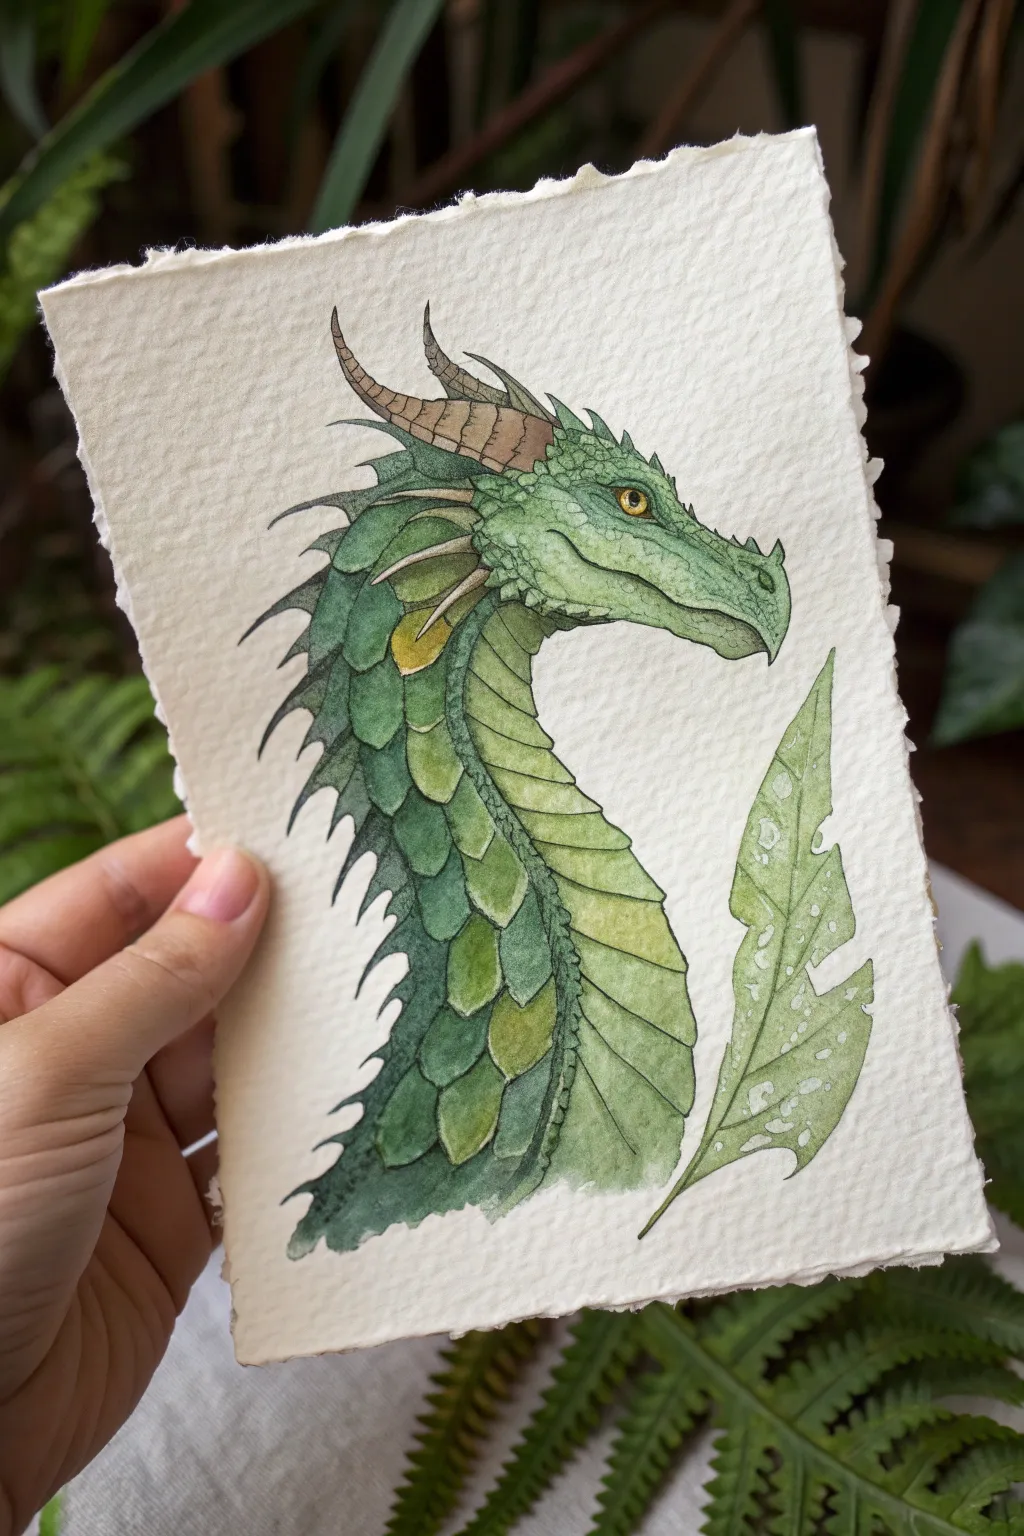
Blend the mythical with the natural world in this delicate watercolor piece, featuring a serene green dragon alongside a matching botanical element. The textured, deckled-edge paper enhances the organic feel, making the artwork look like a field study from a fantasy realm.
Detailed Instructions
Materials
- Cold press watercolor paper (deckle edge preferred)
- Watercolor paints (Sap Green, Olive Green, Hooker’s Green, Burnt Umber, Yellow Ochre, Payne’s Grey)
- Micron fineliners (0.1, 0.3, and 0.5 sizes, waterproof ink)
- Round watercolor brushes (Size 2 and 6)
- Pencil (HB) and kneaded eraser
- Clean water jar
- Paper towels
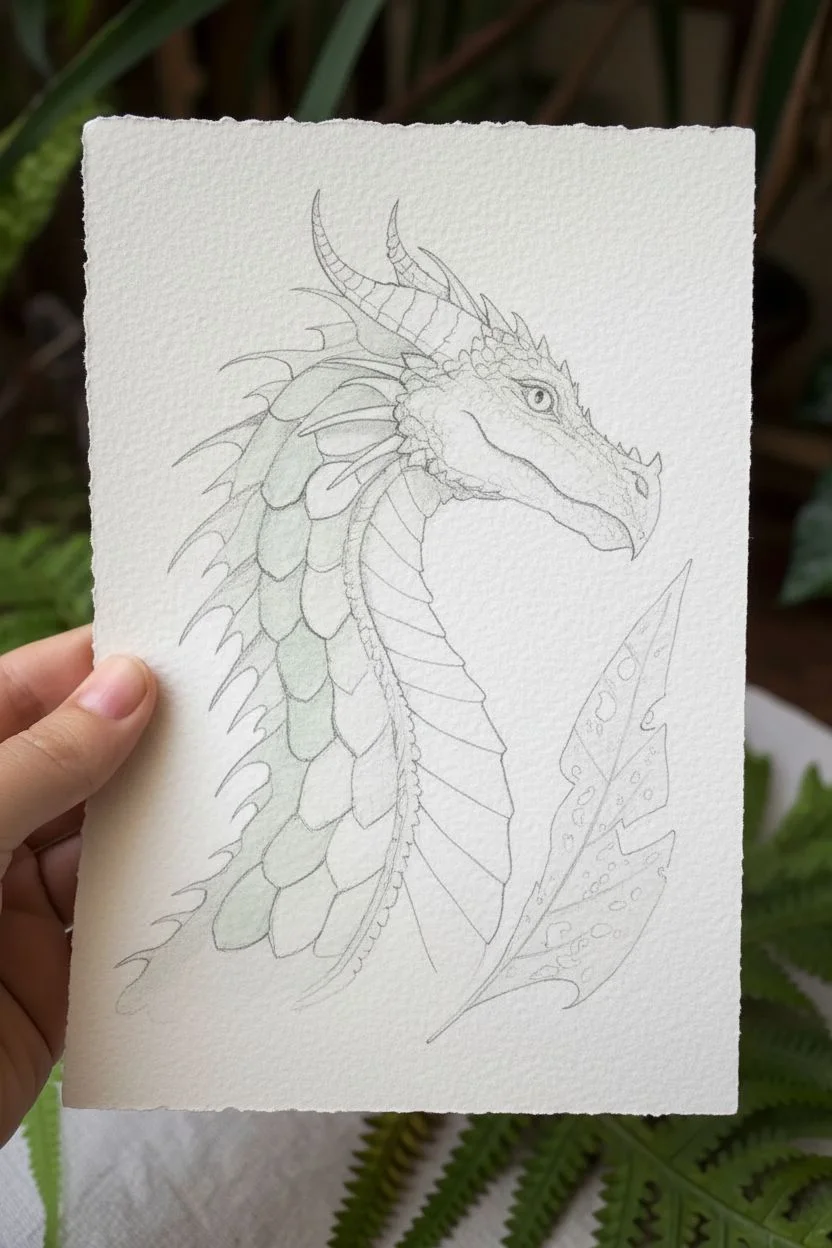
Step 1: Planning and Sketching
-
Map the composition:
Begin with a light pencil sketch on your watercolor paper. Place the dragon’s head in the upper left-center, curving the neck down towards the bottom left. Leave space on the right side for the large, upright fern leaf. -
Refine the dragon’s profile:
Detail the dragon’s face. Sketch a calm eye, a snout that squares off slightly at the nose, and a gentle jawline. Add two backward-curving horns on top of the head. -
Draft the scales and frills:
Instead of typical spikes, draw the spine frills to look tough but organic, almost like thorned leaves. Sketch large, plate-like scales down the back of the neck and smaller, softer banding on the throat. -
Draw the companion leaf:
To the right of the dragon, sketch a large, singular pinnate leaf (like a fern frond) standing upright. Include notches and small circular details to mimic variegation or water droplets.
Step 2: Inking the Outline
-
Outline the main shapes:
Using a 0.3 or 0.5 waterproof fineliner, go over your pencil lines. Use confident, slightly broken strokes for the scales to suggest texture rather than rigid armor. -
Add texture details:
Switch to a 0.1 pen for finer details. Add tiny scratches on the horns, small lines near the eye, and the central veins on the throat scales. Erase all pencil marks once the ink is totally dry.
Muddy colors?
If your greens look dull, wait for layers to completely dry before adding new ones. Wet-on-wet mixing can sometimes create mud if you overwork it.
Step 3: Layering Watercolors
-
Base wash for the dragon:
Mix a watery Sap Green. Apply a light wash over the dragon’s face and leafy frills. While wet, drop in a tiny touch of Yellow Ochre on the cheek and upper neck scales for warmth. -
Base wash for the throat:
Mix a very pale Olive Green or yellow-green. Paint the underside of the neck (the banded scales), keeping this area significantly lighter than the back scales to create dimension. -
Painting the horns:
Use a diluted Burnt Umber to paint the horns. I like to keep the paint slightly darker at the base of the horns and fade it out toward the tips for a weathered look. -
Painting the fern leaf:
Paint the leaf on the right with a mix of Sap Green and a touch of gray. Leave small irregular circles unpainted (paper white) to represent the variegated spots seen in the reference. -
Deepening the greens:
Once the first layer is dry, mix Hooker’s Green with a bit of Payne’s Grey for a shadow color. Paint the scales along the spine, blending the color downward so the top of each scale is darker than the bottom. -
Adding gradients to the scales:
Working scale by scale on the neck, apply a medium green at the top of the scale and use a damp brush to pull the color down, creating a gradient. Vary the greens slightly—some more yellow, some more blueish—to keep it organic. -
Shading the throat:
Add subtle shadows to the throat plates using a diluted green-grey mix. Paint thin lines where the segments overlap to show the ridges. -
Eye details:
Paint the iris with a bright Yellow Ochre or Gold. Once dry, carefully dot the pupil with your finest black pen or dark paint. -
Final shadows and contrast:
Mix your darkest green. Add crisp shadows under the jawline, behind the ear frills, and under the horns to make the head pop forward. -
Refining the leaf:
Add a second layer of green to the right-hand leaf, darkening the area around the white spots to make them stand out. Paint the stem a brownish-green.
Level Up: Deckled Edges
To mimic the paper shown, fold your watercolor paper sharply, run a wet brush along the crease, and carefully tear it to create a soft, feathery deckle edge.
Step back and admire your serene, nature-inspired dragon portrait


Cosmic Dragon Made of Nebula Clouds and Stars
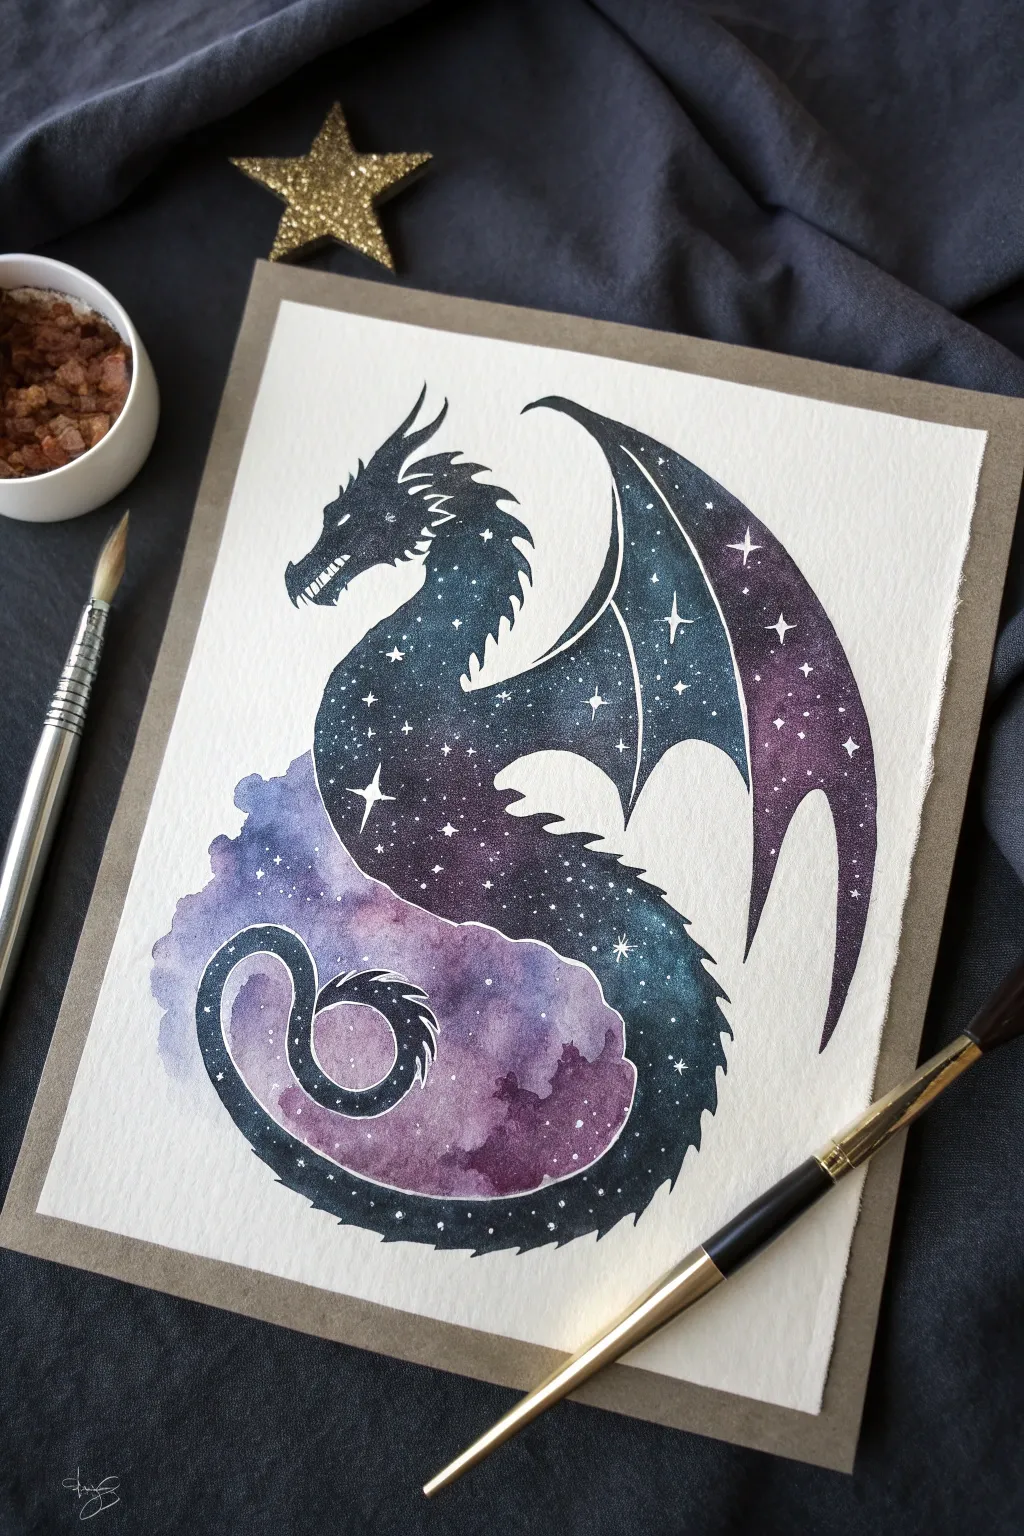
Capture the magic of the cosmos within the silhouette of a mythical beast with this mesmerizing watercolor project. By blending deep indigos, purples, and teals, you’ll create a nebula effect that makes this dragon look like it was forged from stardust.
Step-by-Step Tutorial
Materials
- Cold press watercolor paper (300 gsm)
- Watercolor paints (Indigo, turquoise/teal, violet/purple, black)
- White gouache or white gel pen
- Round watercolor brushes (sizes 2 and 6)
- Pencil (HB or H)
- Eraser
- Masking fluid (optional but helpful)
- Washi tape or masking tape
- Two jars of water
- Paper towels
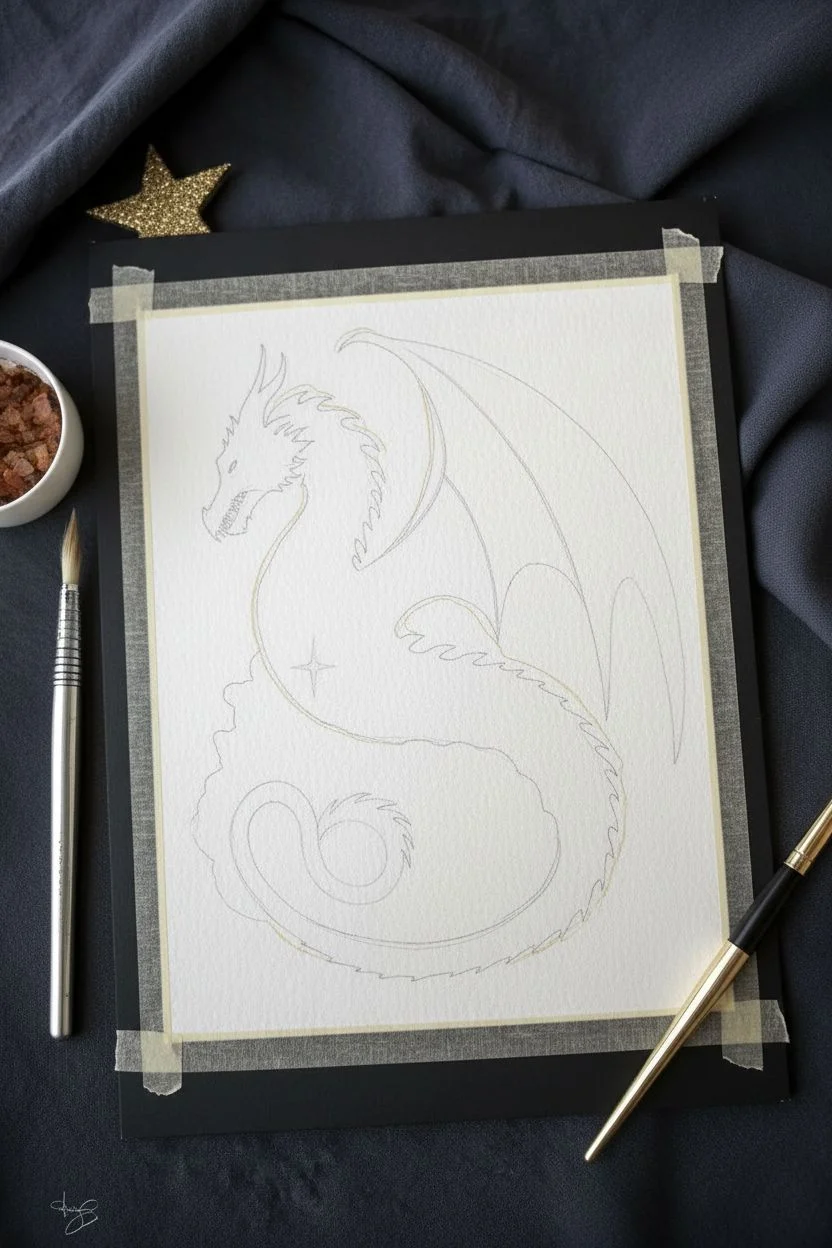
Step 1: Preparation and Sketching
-
Secure the Paper:
Begin by taping down all four edges of your watercolor paper to a board or table. This prevents buckling when we add wet washes later. -
Outline the Dragon:
Lightly sketch the dragon’s silhouette. Focus on the main shapes: a curving neck, a jagged spine, curled tail, and large, bat-like wings. Don’t worry about internal details yet; just get the outer boundary right. -
Refine the Silhouette:
Darken your lines slightly to define the jagged edges of the scales and the sharp points in the wings. Keep the pencil lines light enough so they won’t show through lighter paint areas. -
Masking (Optional):
If you are using liquid masking fluid, apply it carefully along the very outer edge of your pencil line. This acts as a barrier so you can paint freely inside the shape without worry. Let it dry completely.
Pro Tip: Clean Lines
Painting a complex silhouette is hard! If your edges get messy, you can ‘cut in’ with white gouache around the outside to tidy up the dragon’s shape.
Step 2: Creating the Galaxy Base
-
Wet-on-Wet Technique:
Use your larger clean brush to wet the inside of the dragon shape with clear water. The paper should be glistering but not holding a puddle. -
Drop in Colors:
Load your brush with turquoise or teal and drop it onto the wet paper in random patches. I like to place lighter colors near the center of the body and wings. -
Add Depth:
While the first layer is still wet, introduce violet and purple paint. Let them bleed naturally into the teal, creating soft, cloud-like transitions. -
Darken the Edges:
Now, take your indigo or a mix of black and blue. Carefully paint along the edges of the silhouette, allowing the dark pigment to flow inward but stopping before it covers the lighter center spots. This creates the illusion of a glowing nebula. -
Create the Nebula Cloud:
For the bottom section where the tail rests, paint a soft, uneven wash of purple and indigo that extends outside the dragon’s body slightly, mimicking a gas cloud the dragon is emerging from. -
Salt Texture (Optional):
If you want extra texture in your galaxy, sprinkle a tiny pinch of table salt onto the wet paint. It will push the pigment away, creating little star-burst textures. -
Let it Dry:
Allow this base layer to dry completely. The paper must be bone dry before the next step to keep lines crisp.
Level Up: Metallic Magic
Mix metallic gold watercolor or ink into your star splatter. When the light hits the painting, your cosmic dragon will literally sparkle.
Step 3: Defining the Shape
-
Strengthen Shadows:
Once dry, look at your painting. If the galaxy looks too pale, create a second layer (glaze) of dark indigo or black, specifically focusing on the wing tips, the spine, and the face to sharpen the silhouette. -
Detail the Face:
Switch to your size 2 brush. Carefully paint the sharp edges of the snout and jagged horns with highly pigmented dark paint to ensure the dragon looks fierce and defined. -
Remove Masking:
If you used masking fluid earlier, gently rub it away with your finger or an eraser now.
Step 4: Adding the Stars
-
Prepping White Gouache:
Squeeze a tiny bit of white gouache onto your palette and dilute it slightly with water until it has a creamy consistency. -
Splatter Stars:
Cover the background area (outside the dragon) with scrap paper. Load a stiff brush with the white paint and tap the handle against another brush over the artwork to create a spray of tiny white dots. -
Draw Large Stars:
Using your smallest brush or a white gel pen, manually draw a few larger, four-pointed stars. Place these strategically—one on the wing, one on the chest, and a few near the tail curve. -
Outline Clean Up:
Use the white gel pen or gouache to outline specific parts of the silhouette if they got lost in the background, like the curl of the tail or the gaps in the wings. -
Final Touches:
Evaluate your galaxy. If you need more ‘glow,’ add tiny dots of white in the center of your lightest teal patches.
Peel off your tape carefully to reveal the crisp border around your mythical beast.
Geometric Dragon Using Facets and Sharp Planes
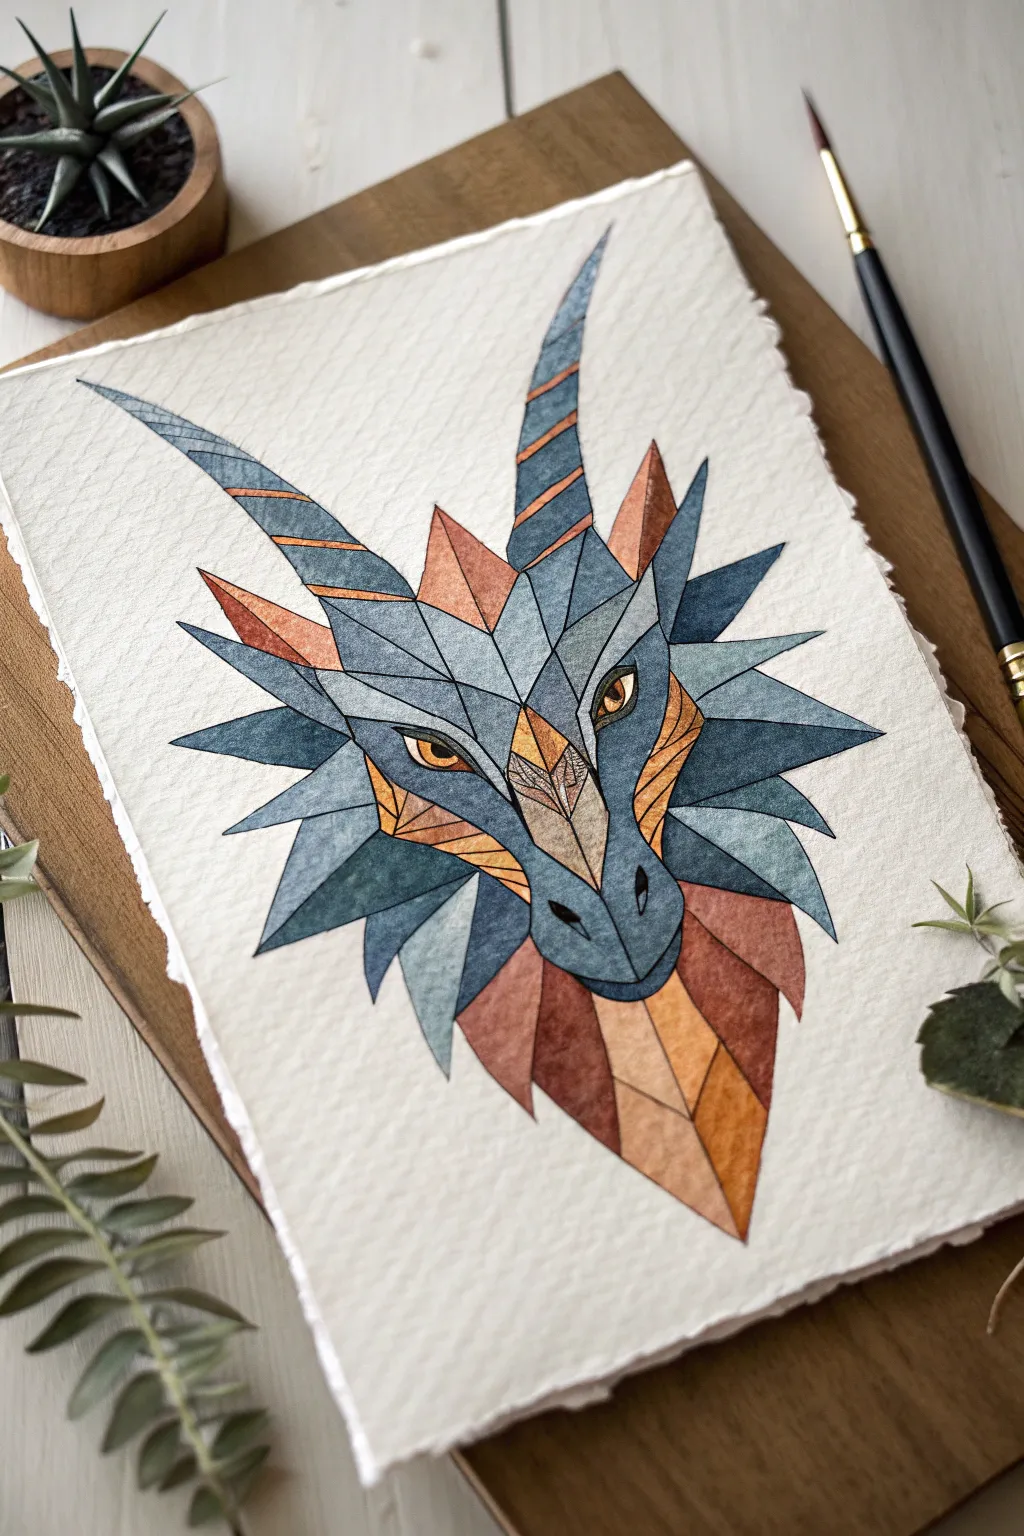
Capture the mythical elegance of a dragon using a geometric, low-poly style that breaks the form down into sharp planes and facets. This watercolor project relies on a cool teal and warm rust color palette to create a striking contrast on textured paper.
Step-by-Step Guide
Materials
- Cold press watercolor paper (deckled edge preferred)
- Watercolor paints (Payne’s Grey, Indigo, Teal, Burnt Sienna, Yellow Ochre, Rust/Red Oxide)
- Fine liner pen (black, waterproof, size 0.1 or 0.3)
- Synthetic round brushes (size 2 and 4)
- HB Pencil and eraser
- Ruler (optional but helpful)
- Masking tape
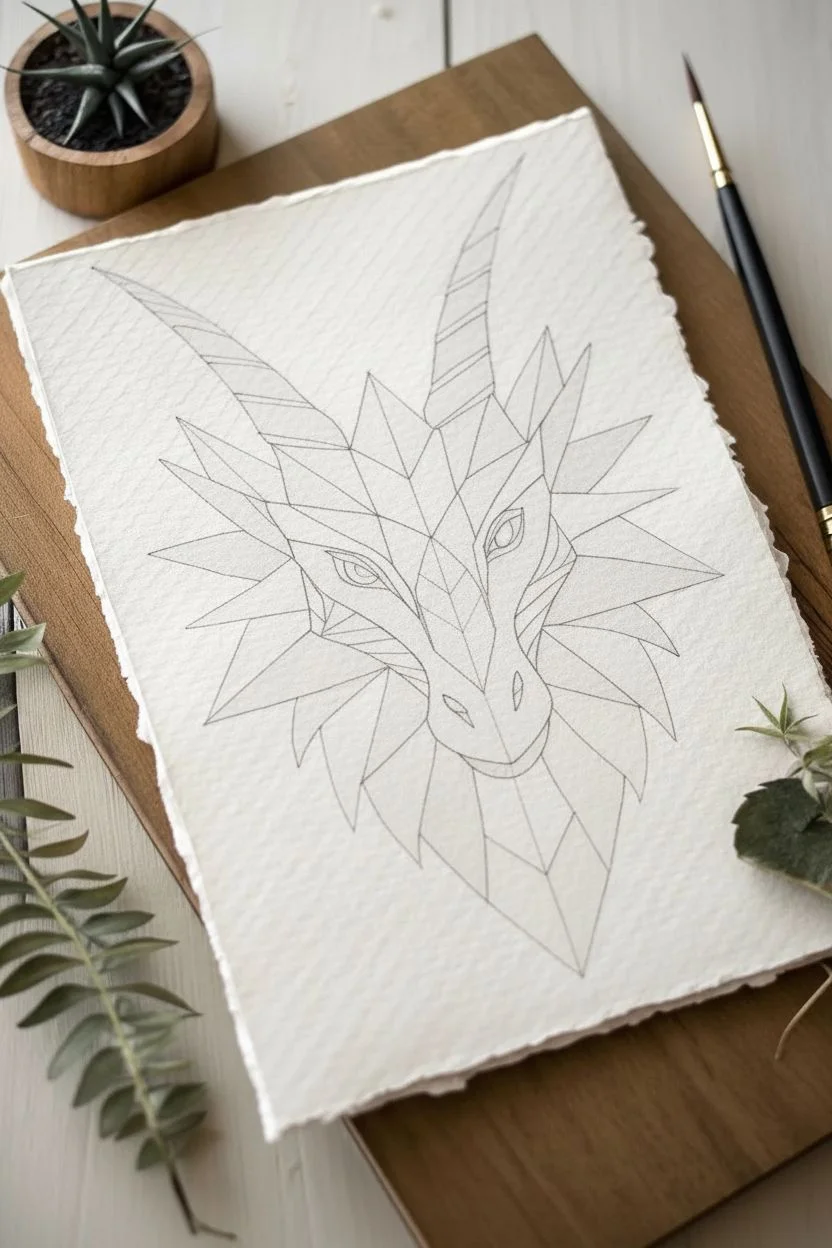
Step 1: Drafting the Geometry
-
Establish the centerline:
Begin by lightly drawing a vertical centerline on your paper. This dragon is symmetrical, so having a central guide is crucial for keeping the proportions balanced. -
Block in main shapes:
Sketch a downward-pointing triangle for the snout and a wider diamond shape for the head. Add two long, curbing triangles sweeping upwards for the horns. -
Map the facets:
Instead of drawing curves, use straight lines to break the face into shards. Draw angular cheekbones, a hexagonal nose bridge, and sharp, triangular spikes radiating from the jawline. -
Detail the eyes and nostrils:
Place two almond-shaped eyes within the geometric sockets. Keep the lines sharp. Add two small teardrop shapes for the nostrils at the bottom of the snout. -
Refine the lines:
Go over your sketch, ensuring every shape is a closed polygon (triangle, quadrilateral, etc.). Use a ruler if you want machine-perfect lines, though hand-drawn lines add organic character.
Don’t Rush the Bleed
To keep edges crisp, only paint shapes that don’t touch each other. Let them dry completely before painting their neighbors.
Step 2: Inking the Structure
-
Outline the design:
Using your waterproof fine liner, carefully trace over your pencil lines. The key to the geometric look is crisp intersections where the lines meet. -
Thicken key areas:
Consider slightly thickening the outer silhouette lines to make the dragon pop from the page. Leave the internal facet lines delicate. -
Clean up:
Once the ink is completely verified dry (wait at least 15 minutes), gently erase all underlying pencil marks to keep the watercolor washes clean.
Add Metallic Flair
Swap the yellow ochre paint for metallic gold watercolor. Painting the eyes or horn ridges with gold adds a magical shimmer.
Step 3: Watercolor Application
-
Mix your cool tones:
Prepare a palette of blues and teals. Mix Indigo with a touch of Payne’s Grey for the deepest shadows, and water down a Teal for the highlights. -
Paint the blue facets:
Fill in the scales on the forehead, cheeks, and horns. I like to paint non-adjacent facets first to prevent colors from bleeding into each other. -
Add dimension with value:
Vary the saturation in the blue sections. Use darker, more concentrated paint on the ‘underside’ of facets to suggest shadow, and very watery paint for top-facing planes. -
Mix warm tones:
Create a gradient of earthy colors: Burnt Sienna, Rust, and Yellow Ochre. These will act as a fiery counterpoint to the cool scales. -
Fill the accent facets:
Apply the warm colors to the spikes around the jaw, the inner ear areas, and the chest scales. Use the Yellow Ochre for the brightest spots, like the eye ridges. -
Detail the eyes:
Carefully paint the iris with a bright Yellow Ochre or Gold. leave a tiny speck of white paper for the highlight, or add it later with white gouache. -
Stripe the horns:
If your design included spiral ridges on the horns, alternate between your dark blue mix and a rusty orange to create a striped torsion effect. -
Layering for depth:
Once the first layer is dry, glaze a second sheer layer of Indigo over the recessed areas (like under the cheekbones) to deepen the 3D effect.
Let the piece dry fully to enjoy the sharp contrast between your precise linework and the fluid watercolor textures


Have a question or want to share your own experience? I'd love to hear from you in the comments below!