Whenever I need a project that’s equal parts drawing, painting, and pure play, I reach for dragon puppet designs. Here are my favorite dragon puppet ideas—starting with the classic builds and moving into the delightfully weird, character-heavy stuff.
Classic Hinged Jaw Paper Dragon Puppet
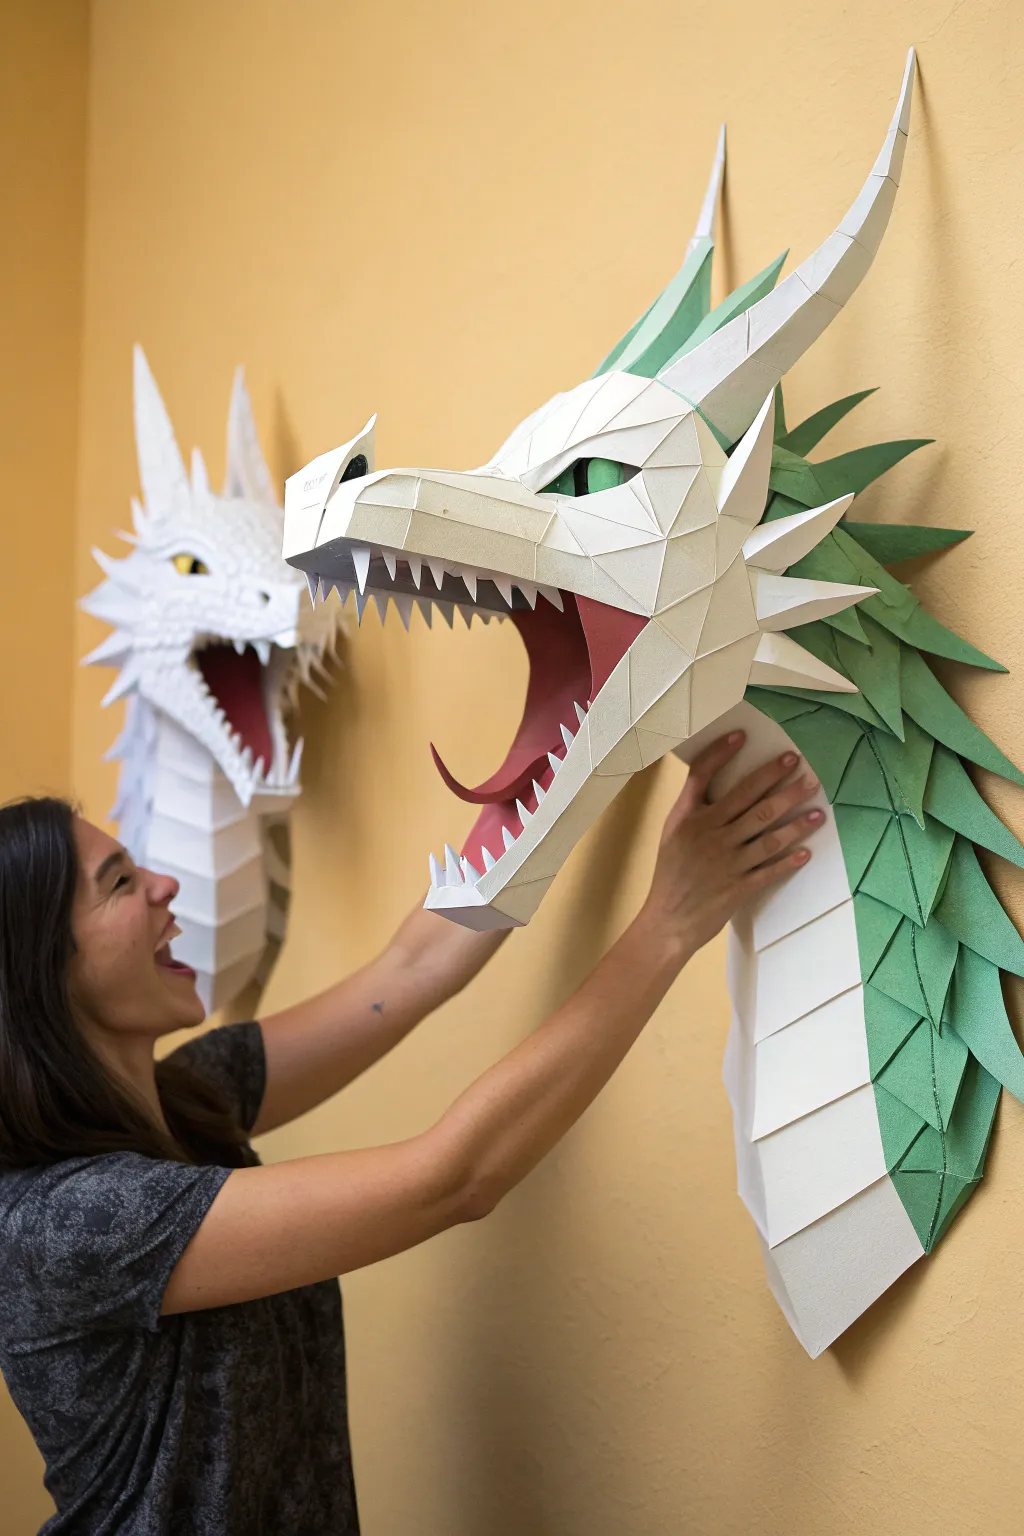
Bring the fantasy world into your living room with these striking, geometric dragon trophies that look like they’re bursting through the wall. Features a distinct low-poly design composed of faceted triangles, complete with fearsome teeth and jagged green spines.
Step-by-Step
Materials
- Heavyweight cardstock (160-200 GSM) in white, forest green, red, and black
- Digital cutting machine (Cricut/Silhouette) or X-Acto knife
- Metal ruler
- Self-healing cutting mat
- Quick-drying tacky glue or PVA glue
- Fine-point scoring tool or dried ballpoint pen
- Tweezers
- Small paintbrush (for glue application)
- Downloadable low-poly dragon template (PDF/SVG)
Step 1: Preparation & Cutting
-
Source the Template:
Find a low-poly dragon head digital pattern. Look specifically for ‘paper trophy’ or ‘cosplay mask’ styles that feature an Eastern dragon aesthetic with facial whiskers and spines. -
Cut the Segments:
If using a cutting machine, load your cardstock and let the machine do the work. If cutting by hand, tape the printed template over your cardstock and cut firmly along the solid lines with your X-Acto knife. -
Score the Fold Lines:
This is the most critical step for sharp geometry. Use a ruler and your scoring tool to trace every dashed line. Press firmly enough to dent the paper fibers but not cut through them. -
Organize by Color:
Separate your cut pieces into piles: white for the face and neck underbelly, green for the mane and spines, red for the mouth interior, and black for the eyes.
Step 2: Assembling the Features
-
Pre-fold the Pieces:
Go through every piece and fold along your scored lines. Most patterns use ‘mountain’ folds (pointed up) for the main structure and ‘valley’ folds (pointed down) for tucked areas. -
Construct the Snout:
Locate the nose and upper jaw pieces. Apply a thin layer of glue to the tabs and press them to the corresponding numbered edges. Hold each bond for 10-15 seconds until the tacky glue grabs. -
Build the Mouth Interior:
Assemble the red cardstock components to form the inner throat and tongue. I find it easier to attach the white teeth strips to the red gums *before* installing the whole mouth assembly into the snout. -
Form the Eyes:
Fold the intricate eye sockets carefully. Glue the black pupil inserts behind the eye openings before you close up the head structure, as it’s nearly impossible to reach later.
Glue stains?
If you smudge glue on the visible side of the paper, don’t wipe it wet! Let it dry completely until clear, then gently rub it off with a crepe rubber cement pickup tool.
Step 3: Building the Head Structure
-
Connect Face to Jaw:
Join the upper snout assembly to the lower jaw. This creates the main ‘skull’ of the dragon. Check for symmetry constantly; if one side looks twisted, gently re-adjust the glue tabs before they dry fully. -
Attach the Horns and Ears:
Assemble the sharp white horns and ear spikes separately. Once formed into rigid cones, glue them onto the designated spots on the skull. -
Start the Mane:
Begin assembling the green spiked segments. These often work like a ‘hood’ that fits over the back of the white skull. Work from the forehead backward. -
Layer the Spines:
Continue adding the green spine sections down the back of the neck. Ensure the points are sharp and the valleys are deep to maintain that prickly, aggressive look. -
Close the Neck:
Construct the white ventral scales (the throat plates) and attach them to the bottom of the green mane sections to create a closed tube for the neck.
Level Up: Scale Texture
Before folding, run the green paper through a texture embosser or lightly spray it with stone-texture spray paint for a realistic, scaly reptile skin effect.
Step 4: Final Mounting
-
Reinforce the Back:
If this is a wall trophy, cut a piece of thick cardboard or foam core matching the shape of the neck opening. Glue this inside the base to provide structural rigidity where it meets the wall. -
Add Hanging Hardware:
Punch a hole in your reinforcement backing or glue a small plastic hook to the internal cardboard support so it can hang flush. -
Final smooth check:
Inspect all seams. If any white paper edges are showing on the green or red parts, touch them up carefully with a matching marker.
Now mount your majestic beast on the wall and enjoy the mythical atmosphere it adds to the room


Concertina Body Chinese-Style Dragon Puppet
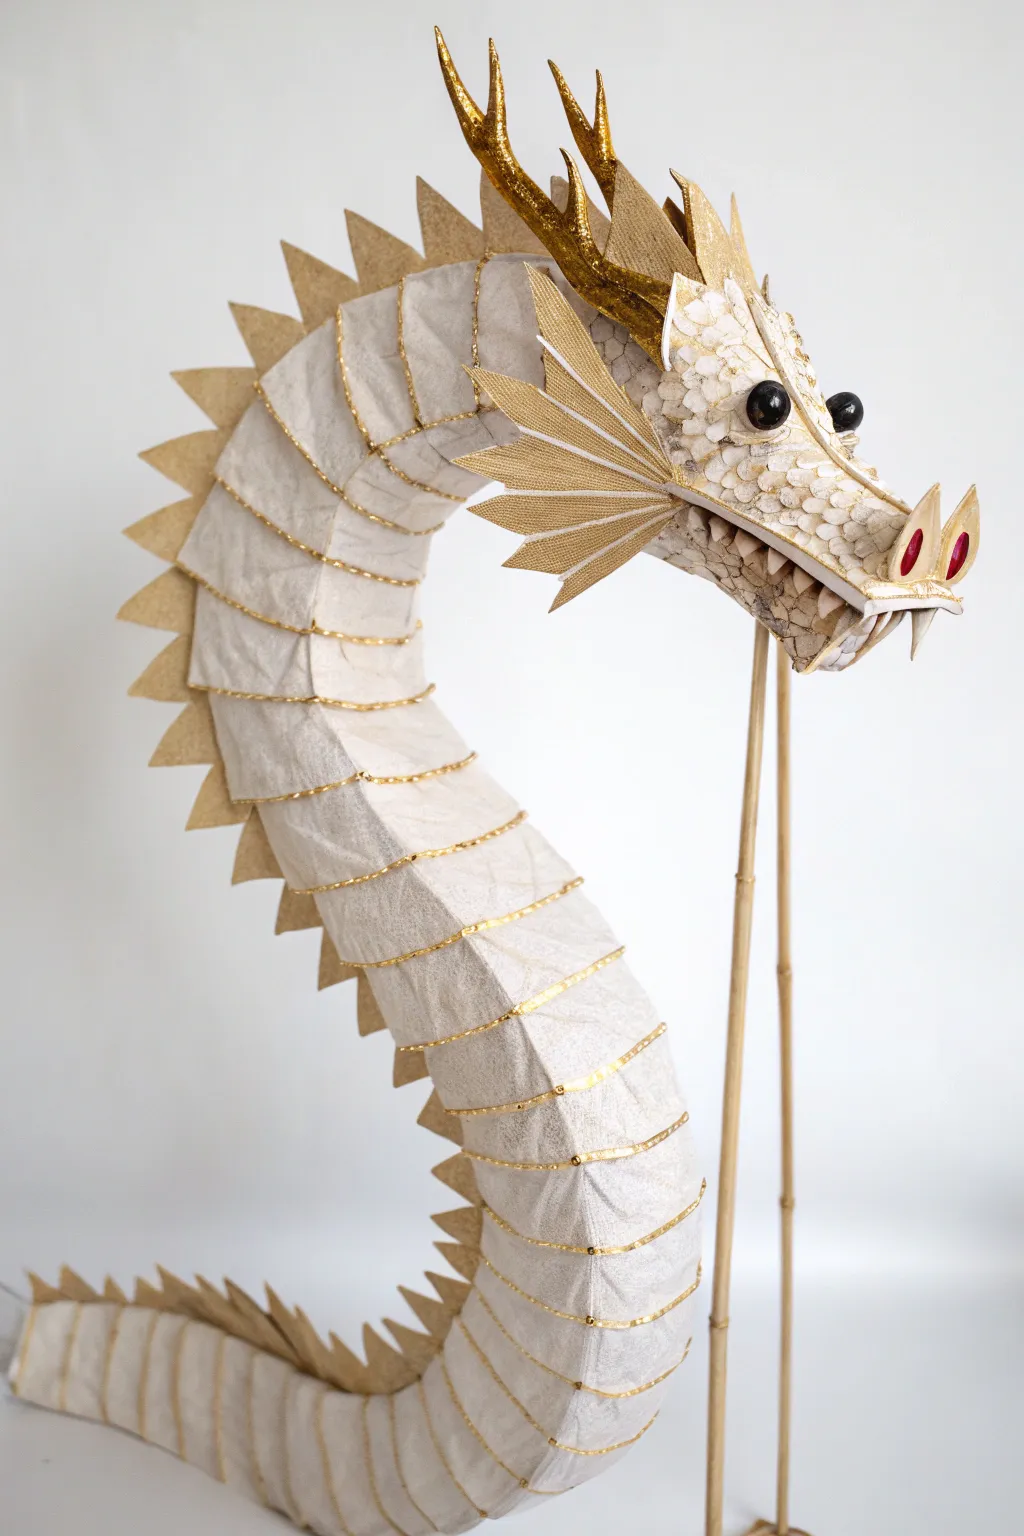
Bring myth to life with this elegant, segmented dragon puppet that mimics the sinuous movement of traditional Chinese dragons. Featuring shimmering gold accents, a textured scale head, and a flexible body supported by bamboo rods, this project is a showstopper for parades or playroom adventures.
Step-by-Step Tutorial
Materials
- Flexible wire or thick coat hanger wire
- Cream or off-white crepe paper or tissue paper
- Gold ribbon or gold washi tape (thin)
- Gold metallic cardstock
- White cardstock or heavy paper
- Stiff gold glitter cardstock (for horns)
- Two large black beads or black polished stones (for eyes)
- Red gem stickers or markers (for nostrils)
- Bamboo garden stakes or wooden dowels (2)
- Hot glue gun and glue sticks
- White craft glue (PVA)
- Scissors and wire cutters
- Pencil
Step 1: Body Construction
-
Form the spine:
Cut a long piece of flexible wire to your desired dragon length. This will act as the central spine to hold the shape while allowing movement. -
Create the segments:
Cut the cream crepe paper into long strips, roughly 4-5 inches wide. Accordion-fold these strips or gently pleat them as you glue them continuously over the wire spine to create a tube-like, segmented body structure. -
Define the segments:
Wrap a piece of thin gold ribbon or gold washi tape around the body at regular intervals (every 2-3 inches). Pull it slightly taut to compress the paper, creating the distinct ‘sausage’ links of the dragon’s body. -
Add dorsal spines:
Cut many triangles from the gold metallic cardstock. These should be roughly uniform in size. -
Attach the spines:
Glue the gold triangles in a single row along the entire top ridge of the dragon’s body. Ensure the points are facing backward or straight up.
Sagging Body?
If the body segment is drooping too much between the rods, run a fishing line along the top spine connecting the head to the tail to act as a tension string.
Step 2: Sculpting the Head
-
Build the armature:
Create a basic boxy snout and head shape using heavy white cardstock. It should be hollow and lightweight. I find keeping the jaw slightly open adds more character. -
Prepare the scales:
Cut dozens of small scallop shapes (U-shapes) from the white cardstock. These will be the individual scales for the face. -
Apply the scales:
Starting from the nose and working backward, glue the scales in overlapping rows. Stagger them like bricks so they cover the underlying structure completely. -
Add the frills:
Cut two large, fan-like shapes from gold cardstock for the side fins. Score lines radiating from the center to give them texture, then glue one to each side of the head behind the jaw. -
Shape the horns:
Cut two antler shapes from the stiff gold glitter cardstock. Attach these firmly to the top of the head, angling them slightly backward. -
Detail the face:
Glue the large black beads in place for eyes. Add the red gems to the tip of the snout for nostrils and cut small white triangles for teeth, gluing them inside the upper jaw.
Level Up: Flowing Beard
Add wisps of white wool roving or shredded chiffon fabric under the chin to give your dragon a wise, ancient aesthetic.
Step 3: Assembly and Mounting
-
Connect head to body:
Insert the front wire of the body into the back of the cardboard head structure. Secure it heavily with hot glue to ensure it doesn’t wobble loose. -
Attach the main rod:
Secure the first bamboo stake to the underside of the dragon’s head. Use ample hot glue or even wire it through the cardstock for extra stability. -
Attach the body rod:
Secure the second bamboo stake to the middle section of the body (about halfway down). This allows you to manipulate the dragon’s curve while performing. -
Final touches:
Check all seams and glued parts. If any wire is exposed at the tail end, cover it with a final cone of crepe paper and a few extra gold spines.
Now your dragon is ready to dance through the air with every twist of the bamboo rods


Cardstock Dragon Head With Finger Tabs
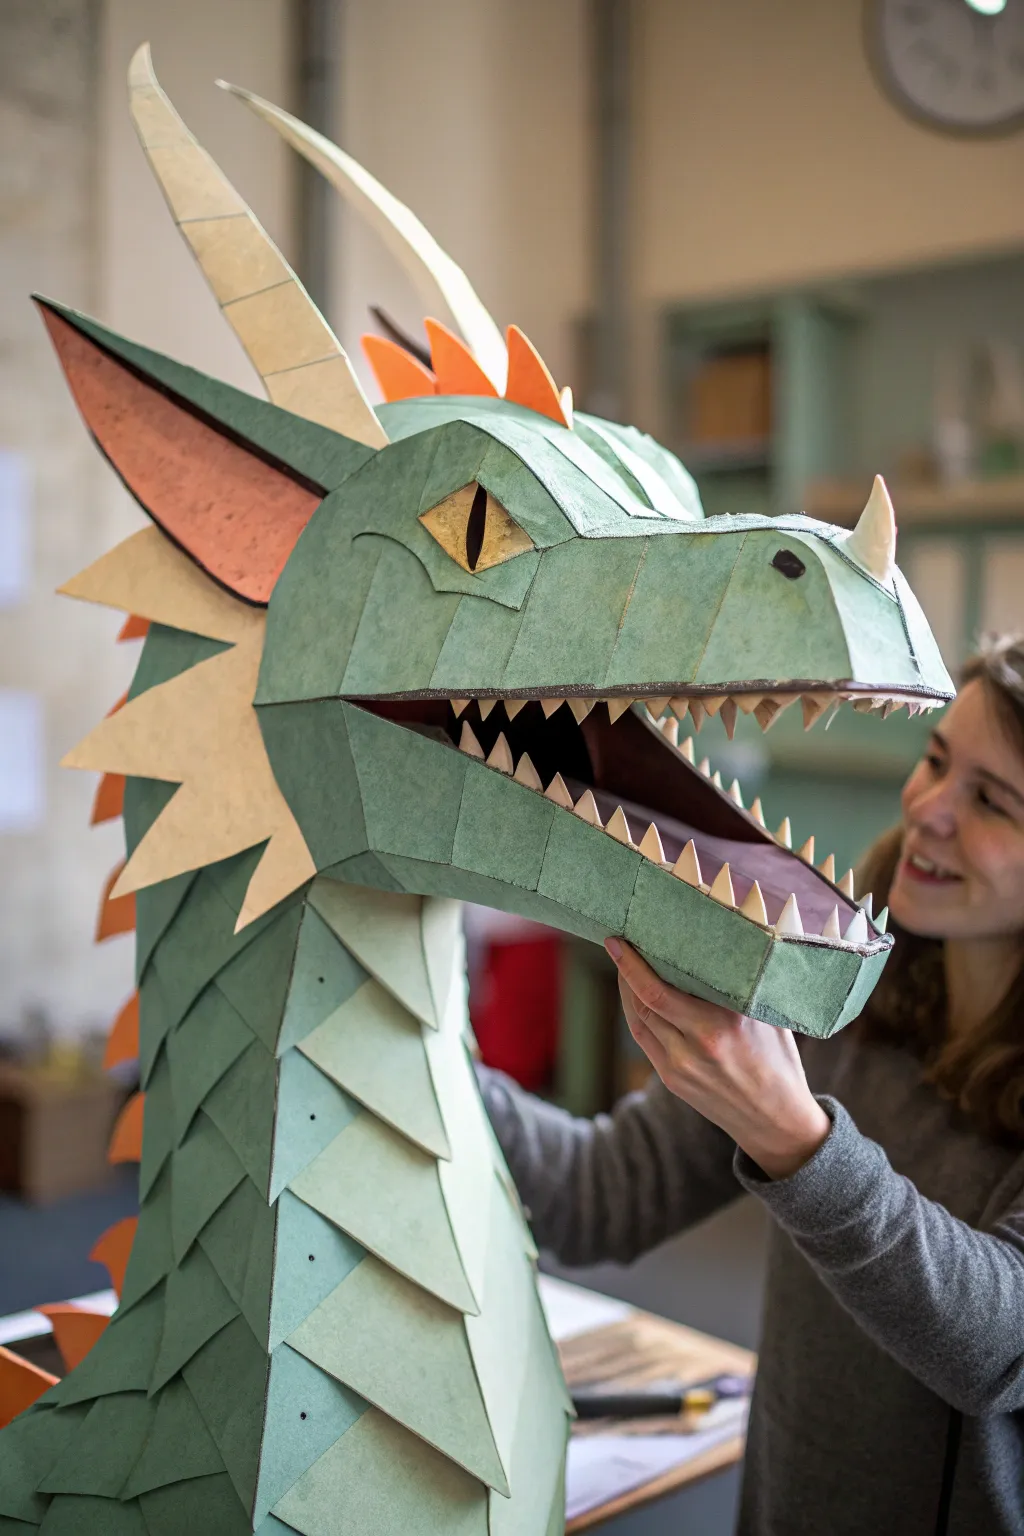
This impressive dragon head is a triumph of papercraft engineering, featuring a striking low-poly aesthetic that mimics the scales and sharp angles of a fantasy beast. The project uses layers of sturdy cardstock to build a lightweight but voluminous puppet detailed with fearsome teeth and distinct horns.
Step-by-Step
Materials
- Heavyweight green cardstock (two varying shades)
- Cream or off-white cardstock (for horns and jaw contrast)
- Bright orange cardstock (for fins and spikes)
- Black cardstock (for mouth interior and pupil)
- Metallic gold paper or paint (for the eyes)
- Craft knife and fresh blades
- Self-healing cutting mat
- Bone folder
- PVA glue or high-tack craft glue
- Metal ruler
- Low-tack masking tape
Step 1: Designing and Cutting the Templates
-
Prepare the polygonal blueprint:
Begin by sketching or printing a low-poly dragon pattern; you need a design that breaks the dragon’s curves into flat triangles and quadrilaterals. -
Transfer to cardstock:
Trace your pattern pieces onto the green cardstock. Use the slightly darker green for the back of the neck and the lighter green for the face to create depth. -
Precision cutting:
Using your craft knife and ruler, cut out each geometric shape with extreme care, ensuring straight, crisp edges are maintained. -
Score the fold lines:
Before assembling anything, use the bone folder and ruler to score every single internal line where the paper needs to bend; this is crucial for that sharp, angular look. -
Create the mounting tabs:
Ensure every piece has small trapezoidal tabs extended from the edges, which will be the glue points for connecting the 3D form.
Sticky Situation?
If glue oozes out, adapt immediately! Wipe it away instantly with a barely damp cloth. Dried glue spots can ruin the texture and prevent paint or finish from adhering later.
Step 2: Assembling the Facial Structure
-
Form the snout:
Start at the nose tip, gluing the snout panels together first. Apply a thin layer of glue to the tabs and hold them firmly for 10-15 seconds until the bond sets. -
Build the eye sockets:
Construct the angular brow ridges separately, creating a deep recess where the eyes will eventually sit. -
Connect the jaw:
Assemble the lower jaw separately from the upper skull. I find it easier to work on these two halves independently before joining them at the jaw hinge. -
Line the mouth:
Before closing up the head, glue the black cardstock into the interior of the mouth cavity to give it depth and darkness. -
Attach the teeth:
Cut small, sharp triangles from cream cardstock and glue them in a row along the upper and lower gum lines.
Smoke and Fire
Install a small, battery-operated LED light or a tiny fog machine inside the snout. This illuminates the mouth interior for a magical, breathing-fire effect.
Step 3: Neck and Detail Work
-
Construct the neck scales:
Build the neck by layering large, shield-shaped panels of green cardstock, overlapping them slightly like reptilian armor plates. -
Add the neck underbelly:
Use the cream cardstock to create the contrasting lighter scales that run down the front of the throat. -
Assemble the horns:
Roll and glue the cream cardstock into long, tapering polygonal cones for the main horns and smaller cones for the nose horn. -
Install the fins:
Cut jagged fin shapes from the orange cardstock and glue them perpendicular to the spine, placing them between the neck scale segments. -
Create the eyes:
Cut a diamond shape from metallic gold paper and slit a vertical pupil from black cardstock. Assemble these and glue them deep into the eye sockets. -
Final assembly:
Connect the finished head to the neck assembly, ensuring the balance allows you to hold it comfortably from underneath.
Now you have a mythical beast ready to roar at your command


Paper Bag Dragon Puppet With Painted Scales
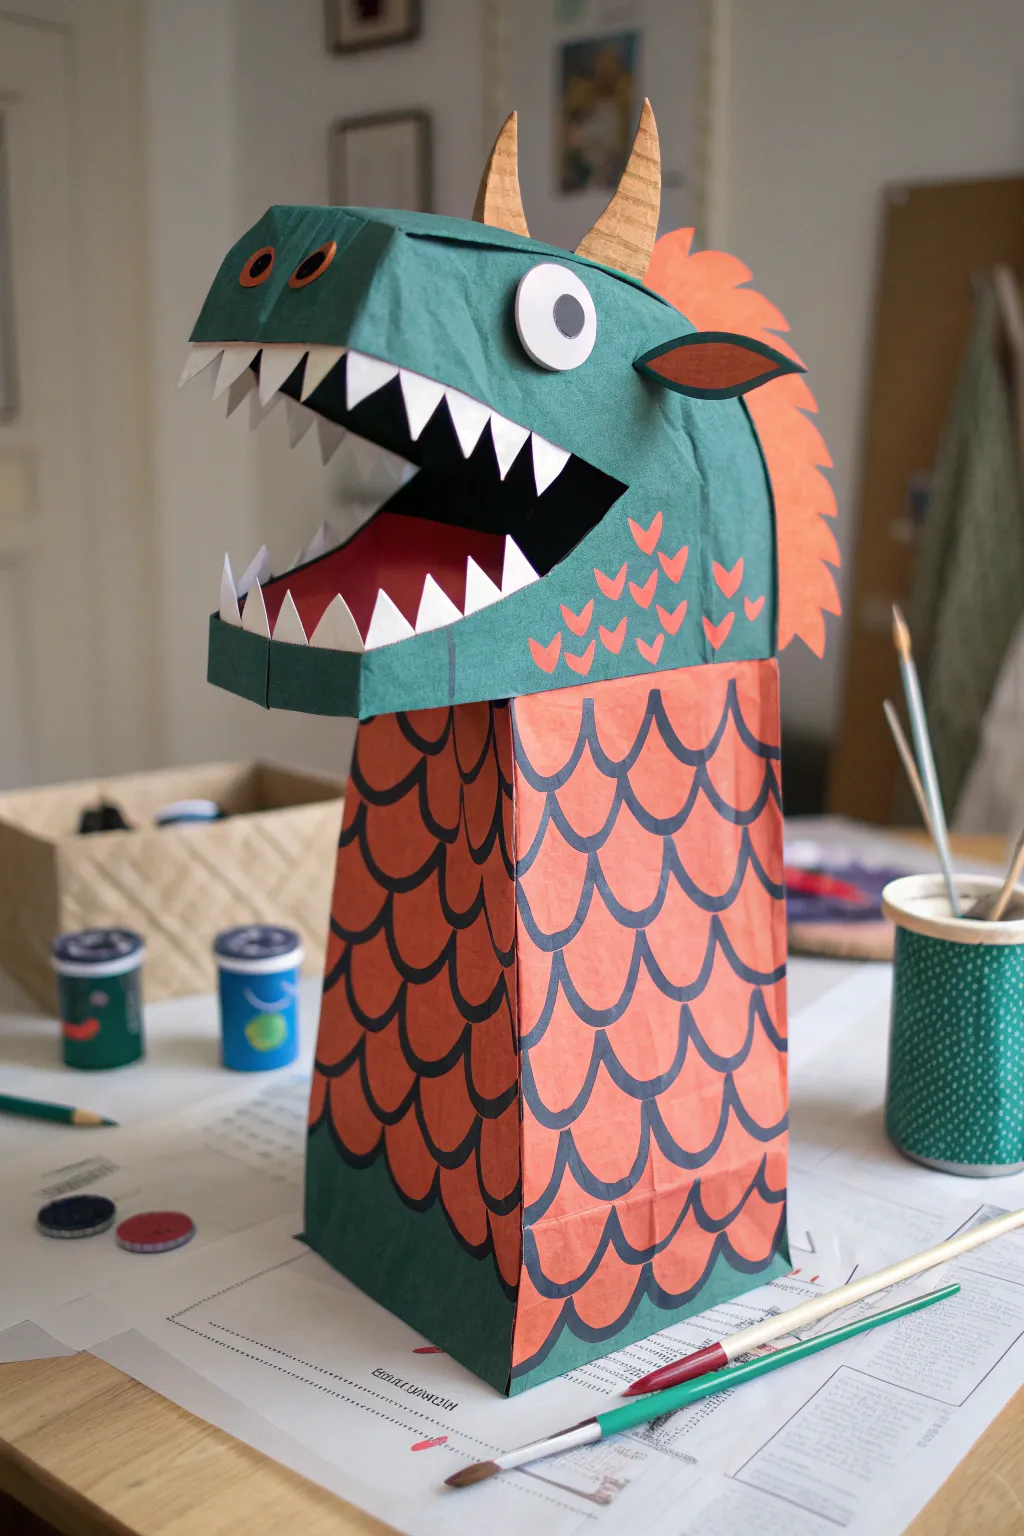
Transform a simple paper grocery bag into a fierce and colorful dragon friend with this detailed puppet project. Featuring vibrant orange scales and a dimensional head structure, this craft combines painting and paper folding for a sturdy, playable result.
How-To Guide
Materials
- Large rectangular paper grocery bag (brown or white)
- Green construction paper or cardstock
- Orange acrylic paint
- Black acrylic paint or Posca marker
- White cardstock
- Cardboard scraps
- Scissors and X-ACTO knife
- PVA glue or hot glue gun
- Paintbrushes (flat brush and fine liner brush)
- Pencil
- Ruler
Step 1: Creating the Dragon’s Head
-
Prepare the bag base:
Start with a standard paper grocery bag. Keep the bottom flap folded flat against the bag; this flap will become the moving mouth of your puppet. Ensure the bag is free of wrinkles. -
Construct the upper jaw:
Cut a sheet of green construction paper to cover the entire rectangular bottom flap of the bag (the part that faces you). Glue it down securely, wrapping the edges slightly around the sides for a clean finish. -
Add structure to the snout:
To give the head that boxy, angular look shown in the photo, cut wider strips of green paper. Fold them to create a ‘bridge’ over the nose area, gluing the tabs to the sides of the flap rather than flat against the face. This creates a 3D snout. -
Form the lower jaw:
Cut a matching piece of green paper for the area directly below the flap (the body of the bag where the mouth meets). Glue this in place so the upper and lower jaws align perfectly when the mouth is closed. -
Create the inner mouth:
Cut a piece of dark red or black paper to fit inside the mouth opening. Glue this to the underside of the flap and the corresponding spot on the bag body so the inside looks dark and mysterious when opened.
Wrinkled Paint?
If your paper bag starts to warp or wrinkle from the wet paint, stuff the inside of the bag with newspaper while you work. This holds the shape until the acrylics are fully dry.
Step 2: Teeth, Horns, and Eyes
-
Cut the serrated teeth:
Using stiff white cardstock, cut two long strips. On one edge of each strip, cut a sharp zigzag pattern to create jagged teeth. Make the teeth fairly large so they stand out. -
Attach the teeth:
Glue one strip of teeth to the underside of the top jaw (the flap), pointing down. Glue the second strip to the top edge of the lower jaw, pointing up. Offset them slightly if you want a more menacing look. -
Craft the horns:
Cut two curved horn shapes from cardboard scraps. Peel away the top layer of paper on the cardboard to reveal the corrugated texture underneath, which adds great rustic detail. -
Mount the horns:
Glue the horns to the top of the dragon’s head, positioning them just behind where the forehead begins to slope. -
Assemble the eyes:
Cut two large circles from white cardstock. Draw solid black pupils in the center using a marker. Glue these to the sides of the 3D green snout structure you built earlier. -
Add nostrils:
Cut two small ovals from orange or dark paper and glue them near the front of the snout for nostrils. I like to angle them slightly to give the dragon expression.
Pro Tip: Better Grip
Glue a small cardboard loops inside the upper and lower flap where your hand goes. Sliding your fingers into these loops gives you much better control over the snapping mouth.
Step 3: Painting the Scales and Details
-
Base coat the body:
Paint the main body of the paper bag (below the head) with a solid coat of orange acrylic paint. Let this dry completely before moving to the next step. -
Outline the scales:
Using a thin brush with black paint or a thick black marker, draw a pattern of connecting ‘U’ shapes starting from the top of the orange section. Stagger the rows like bricks to create a classic scale pattern. -
Detail the head scales:
On the green paper of the lower jaw and neck area, paint small orange ‘V’ or heart-like shapes. These represent smaller scales transitioning into the larger body scales. -
Add the spine ridge:
Cut a long strip of orange paper and cut a jagged, sawtooth pattern along one edge. Glue this strip down the center of the back of the dragon’s head and neck for a spiky spine. -
Attach the ears:
Cut two leaf-shaped ears from green paper. Add an inner ear detail with brown or orange paper, then glue them behind the eyes, angling them backward. -
Final drying time:
Allow all glue and paint to dry fully for at least an hour. This ensures the heavy cardstock teeth and horns stay secure during play.
Now slide your hand inside and get ready to roar with your vibrant new creation.
BRUSH GUIDE
The Right Brush for Every Stroke
From clean lines to bold texture — master brush choice, stroke control, and essential techniques.
Explore the Full Guide
Sock Dragon Puppet With Fabric Horns
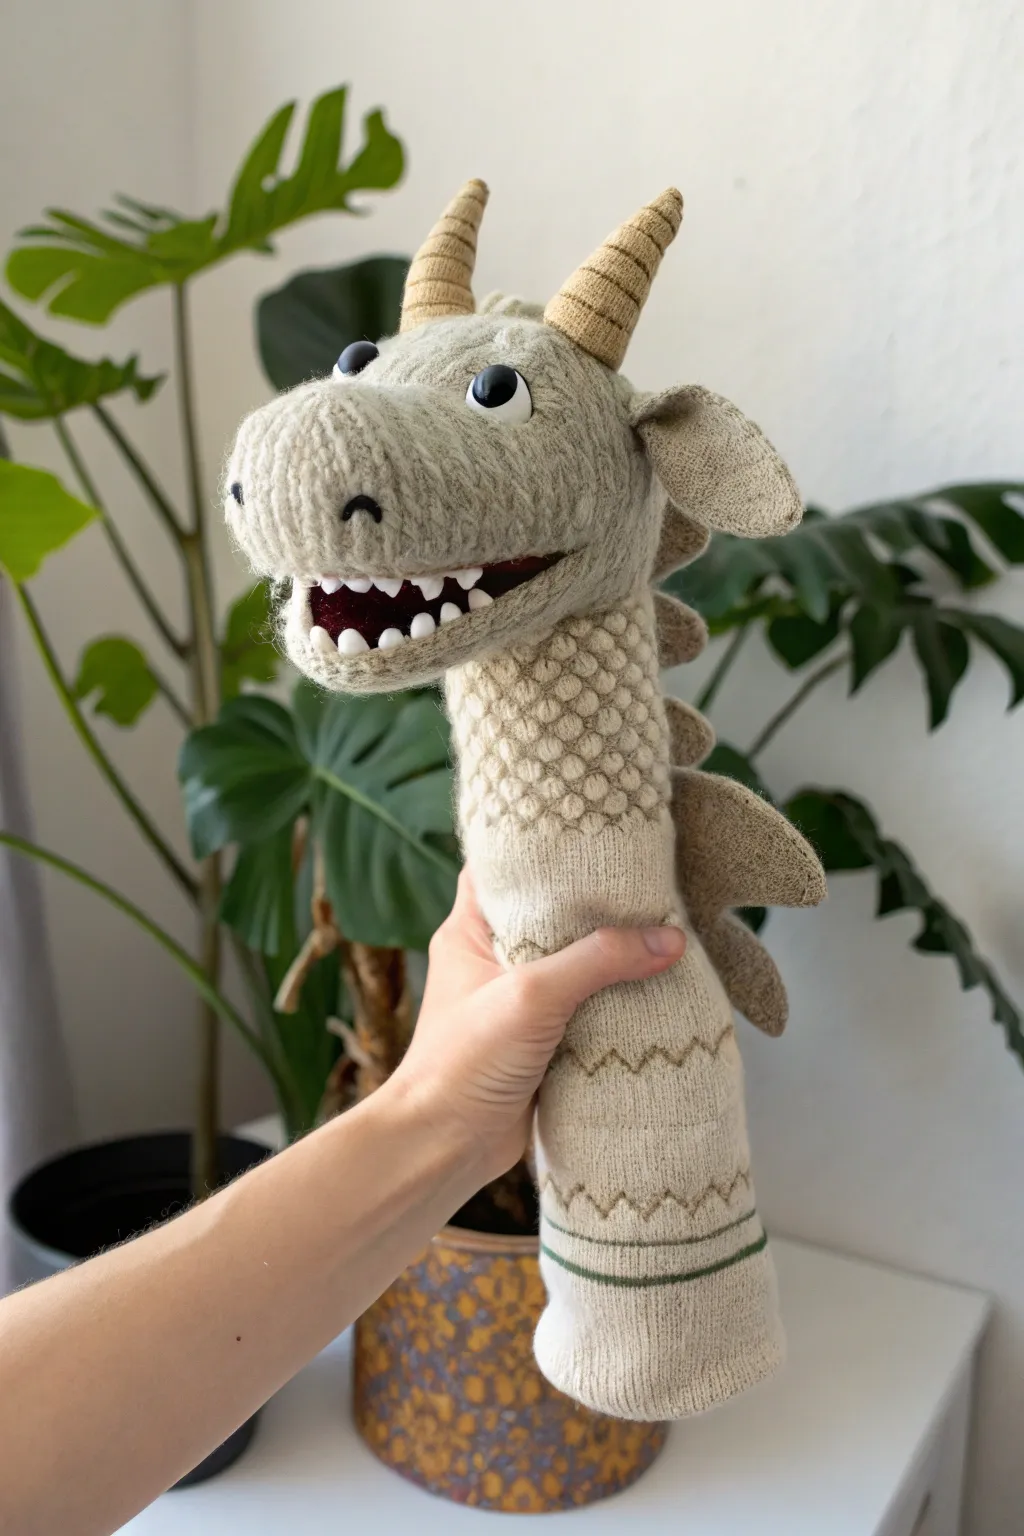
Transform a cozy woolen sock into a whimsical dragon companion with textured scales and expressive features. This project combines simple sewing techniques with clever material choices to create a puppet that feels like a treasured heirloom.
Step-by-Step
Materials
- One thick, beige woolen sock (preferably with a textured knit pattern)
- Beige felt or boiled wool scraps (for ears and spines)
- Dark grey or brown yarn (for horns)
- White felt (for teeth)
- Red or dark maroon felt (for the mouth interior)
- Two large plastic safety eyes (black and white)
- Fiberfill stuffing
- Cardboard or stiff interfacing
- Needle and matching beige thread
- Embroidery floss (black for nostrils)
- Fabric glue or hot glue gun
- Scissors
Step 1: Preparing the Base
-
Map out the puppet:
Put the sock on your arm to gauge where your thumb and fingers sit. The heel of the sock should naturally form the top of the dragon’s snout. Mark the position for the mouth slit between your thumb and fingers. -
Create the mouth foundation:
Cut a piece of cardboard into an oval shape folded in half; this will act as the mouth plate structure. It should be roughly the width of the sock’s toe area. -
Shape the mouth interior:
Cut your red or maroon felt into a slightly larger oval than your cardboard. Glue or sew this felt onto the cardboard plate to create the dragon’s palate and tongue area. -
Insert the mouth:
Cut the slit in the sock you marked earlier. Invert the sock carefully. Position your mouth plate into the opening and sew the raw edges of the sock knit to the felt/cardboard assembly securely. Turn the sock right-side out.
Floppy Snout?
If the snout droops, the cardboard mouth plate might be too heavy or the stuffing too loose. Add more batting above the mouth and ensure the cardboard fold is stiff.
Step 2: Building the Head Structure
-
Form the snout:
Stuff the toe area of the sock (above the mouth plate) with fiberfill. I like to pack this quite firmly to give the dragon a prominent, rounded snout shape. -
Add the eyes:
Before closing up any stuffing, position the safety eyes. Poke them through the knit fabric on the top of the head, ensuring they are symmetrical. Secure them with their washers from the inside. -
Sculpt the eye ridges:
To give the dragon character, take a needle and thread and create small tucks or stitches just above the eyes. This pulls the fabric slightly to form ‘brow’ ridges. -
Add head definition:
Stuff the area behind the eyes lightly, but leave the neck column (where your arm goes) mostly unstuffed so your hand fits comfortably.
Scale Texture Trick
Instead of embroidering individual scales, you can sew on a patch of ‘popcorn stitch’ crochet fabric or a piece of textured thermal knit fabric for the neck area.
Step 3: Creating Details & Textures
-
Craft the horns:
Using the dark grey or brown yarn, knit or crochet two small cones. Alternatively, you can sew cone shapes from stiff felt. Stuff them firmly with a pinch of fiberfill. -
Attach the horns:
Sew the horns to the top of the head, just behind the eyes. Angle them slightly backward for a classic dragon silhouette. -
Make the ears:
Cut two leaf-shaped pieces from your beige felt or boiled wool. Pinch the base of each ear and stitch it together to create a curve, then sew them onto the sides of the head. -
Create the scale texture:
This is the most time-consuming but rewarding part. Using a thick beige yarn or embroidery floss, stitch ‘scales’ onto the neck area. Create small U-shaped loops or French knots in rows, mimicking the honeycomb texture seen in the photo. -
Add the dorsal spines:
Cut several triangular shapes from your beige felt. Sew them in a line running down the back of the dragon’s neck, starting from behind the horns. Spacing them evenly makes the puppet look professional.
Step 4: Finishing Touches
-
Install the teeth:
Cut a strip of zigzag ‘teeth’ from white stiff felt. Glue or hand-sew this strip along the upper and lower ridges of the mouth interior. -
Embroider the nostrils:
Using black embroidery floss, satin stitch two teardrop shapes on the front of the snout. You can add a subtle embroidered curve above each nostril for extra definition. -
Final grooming:
Trim any loose threads. If your sock has a pattern near the cuff (like the zigzags in the image), ensure it aligns nicely at the base of the puppet’s neck.
Slip your hand inside your new creation and bring your charming dragon to life with a roar
Glove-Style Dragon Puppet With Long Neck
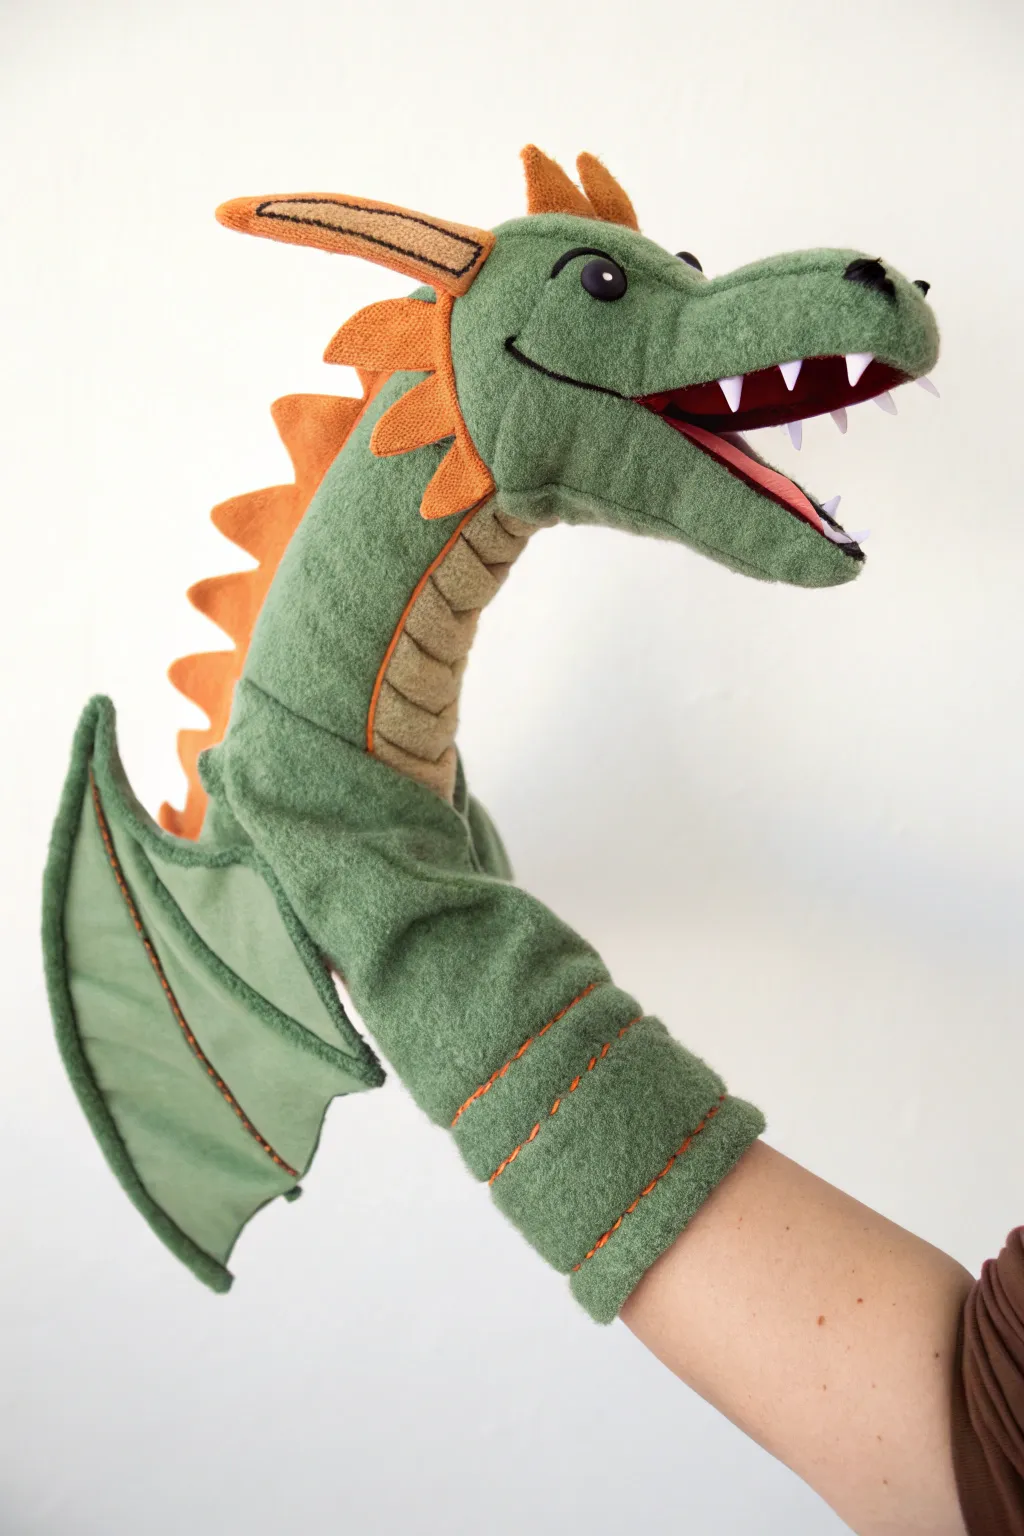
Bring stories to life with this expressive glove-style dragon puppet, featuring a long neck perfect for peeking around corners. The design combines soft green fleece with striking orange accents, creating a durable and huggable character that’s ready for adventure.
How-To Guide
Materials
- Green fleece fabric (body, head, wings)
- Light tan or cream fleece (belly scales)
- Orange felt (spines, ears)
- Red felt (mouth interior)
- White stiff craft felt (teeth)
- Two black safety eyes (approx 12mm)
- Poly-fil stuffing
- Matching thread (green, orange, red)
- Sewing machine
- Fabric scissors and pins
- Hand sewing needle
- Cardboard or stiff interfacing (for mouth structure)
Step 1: Pattern and Cutting
-
Draft the body pattern:
Create a pattern that resembles a long sleeve or sock, extending from your elbow to past your fingertips. The hand section should split into a thumb (lower jaw) and fingers (upper head) shape. -
Draft the details:
Design triangular shapes for the spine spikes, a teardrop shape for the wings, and a long rectangular strip with curved edges for the belly scales. -
Cut the main fabric:
Cut two mirror images of the main body/head profile from the green fleece, adding a 1/2 inch seam allowance around the edges. -
Cut the accents:
From orange felt, cut multiple jagged spine pieces and the ear shapes. Cut the belly strip from the tan fleece.
Stiffening the Snout
If the snout feels too floppy, glue a layer of quilt batting to the wrong side of the green fleece head pieces before sewing to add structure without weight.
Step 2: Assembling the Details
-
Prepare the belly:
Pin the tan belly strip to the front of the neck area on one of the green body pieces. Topstitch horizontal lines across it every inch to create a ribbed, scale-like texture. -
Sew the spines:
Sandwich the orange spine pieces between the two green body layers along the back seam line, making sure the points face inward for now. -
Stitch the ears:
Sew the orange ear accents to the top of the head area before assembling the main body, ensuring they are symmetrical. -
Construct the wings:
Cut four wing pieces from green fleece. Sew two together for each wing, turn them right side out, and topstitch vein details with contrasting orange thread. -
Attach the wings:
Pin the raw edge of the finished wings into the side seams of the body, positioning them near the base where your wrist would be.
Smoke Breath Effect
Sew a small patch of velcro to the roof of the mouth. Attach strips of red and orange tulle to a matching velcro dot so you can add or remove ‘fire’ breath.
Step 3: Constructing the Head
-
Create the mouthboard:
Cut a piece of cardboard or stiff interfacing folded in half to fit inside the mouth. Cover the inside face with red felt to act as the mouth’s interior. -
Add the teeth:
Cut small triangles from white stiff felt. Sew or glue them along the edges of the red mouth lining so they protrude slightly. -
Install the eyes:
Insert the safety eyes into the upper head section of the green fleece before closing the head seams. Secure the washers firmly on the back. -
Sew the head shape:
With right sides together, sew the top curve of the head and the bottom curve of the jaw, leaving the mouth opening unstitched for now.
Step 4: Final Assembly
-
Sew the body seams:
Stitch the long back seam (catching the spines) and the front seam (catching the belly panel), leaving the bottom opening for your arm. -
Insert the mouth:
Turn the body right side out. Carefully hand-stitch the red mouthplate into the opening between the upper and lower jaw sections. -
Stuff the head:
Lightly stuff the top of the head around the mouthplate with poly-fil. I find using a chopstick helps push the stuffing into the snout without overfilling. -
Hem the bottom:
Fold up the bottom edge of the puppet (the arm opening) about an inch and topstitch it with orange thread for a decorative, finished cuff. -
Sculpt the face:
Use a needle and thread to create a small tack stitch at the corner of the mouth to give the dragon a permanent smile.
Now slide your hand in and give your friendly new dragon a voice to start your puppetry performance

PENCIL GUIDE
Understanding Pencil Grades from H to B
From first sketch to finished drawing — learn pencil grades, line control, and shading techniques.
Explore the Full Guide
Dragon Shadow Puppet With Cutout Details
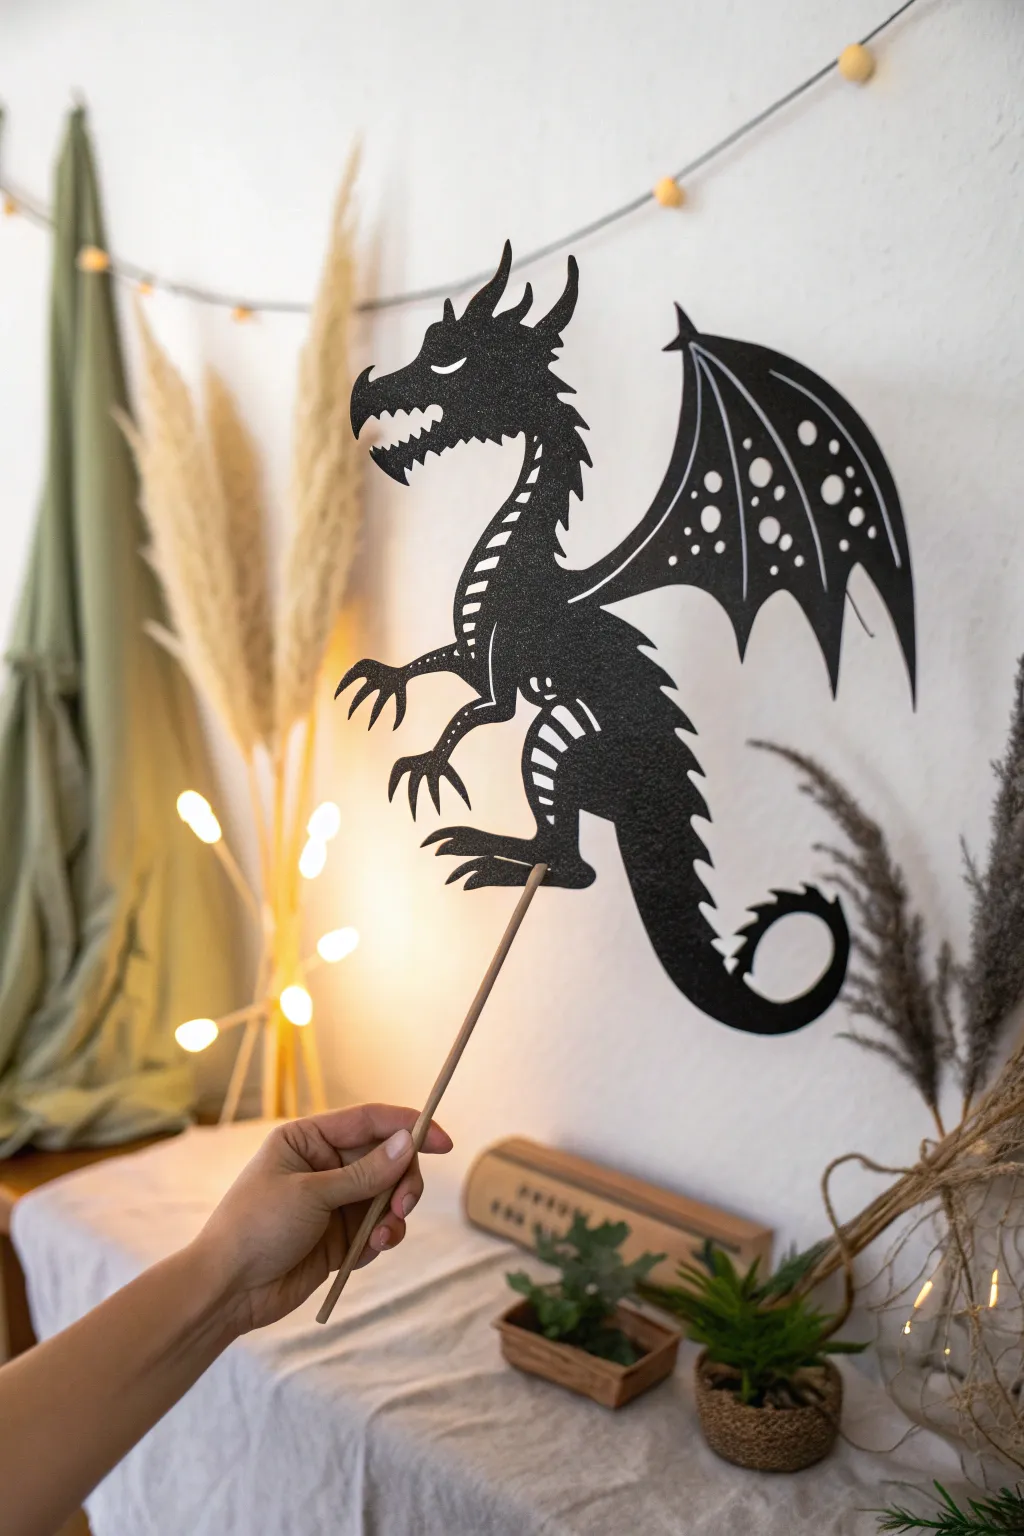
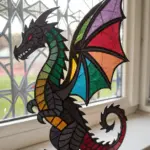
This majestic dragon shadow puppet combines a classic silhouette shape with intricate internal cutouts, allowing light to shine through its wings and belly stripes. The finished piece creates a striking contrast with its dark, glittering cardstock, perfect for storytelling against a backlit sheet or wall.
Step-by-Step Guide
Materials
- Black glitter cardstock (heavyweight)
- Small wooden dowel or bamboo skewer
- Precision craft knife (X-Acto)
- Cutting mat
- Pencil or white gel pen
- Strong craft glue or hot glue gun
- Tracing paper (optional)
- Dragon template or sketch
Step 1: Designing and Outlining
-
Choose your template:
Start by finding a dragon silhouette you love or sketching one freehand on scratch paper. Look for a design with distinct features like spikes, claws, and large wings. -
Transfer the design:
Place your black glitter cardstock face down on your workspace so you are working on the plain back side. Trace your dragon shape onto the back using a pencil. -
Sketch the internal details:
Draw the internal cutouts directly onto the back of the cardstock. Focus on three main areas: stripes along the belly, slots along the neck, and decorative circles or teardrops within the wing membranes. -
Refine the facial features:
Pay special attention to the head. Sketch a sharp, jagged mouth with teeth, a slitted eye, and perhaps a small nostril detail to give the dragon character.
Clean Cuts Only
If your edges look ragged, your blade is dull. Snap off the tip or replace the blade immediately. Glitter paper dulls blades faster than regular paper.
Step 2: Cutting the Puppet
-
Prepare your cutting surface:
Ensure you have a self-healing cutting mat underneath your cardstock to protect your table and keep your blade sharp. -
Start with the small details:
Using a fresh, sharp blade in your craft knife, begin cutting out the internal intricate pieces first. It is much easier to cut the tiny wing holes and belly stripes while the full sheet of paper provides stability. -
Cut the wing patterns:
carefully remove the sections inside the wings. Leave thin ‘veins’ of cardstock between the cutouts to maintain the wing’s structure without making it too flimsy. -
Check your progress:
Periodically flip the paper over to see how the glitter side looks. If any corners are stuck, flip it back and gently re-cut rather than pulling, which can tear the paper. -
Cut the outer silhouette:
Once all internal details are removed, begin cutting the perimeter of the dragon. Move the paper, not your hand, to achieve smooth curves around the tail and claws. -
Handle the spikes carefully:
I find it helpful to cut away from the tip of the spikes inward toward the body to prevent bending the delicate points.
Colored Light Effects
Glue small scraps of colored cellophane or tissue paper over the wing cutouts on the back. When light shines through, the wings will glow in color.
Step 3: Assembly and Finishing
-
Inspect the edges:
Clean up any fuzzy paper fibers or rough edges with your craft knife or small scissors for a crisp silhouette. -
Position the dowel:
Flip the dragon to the non-glitter side. Place the wooden dowel or skewer vertically so it crosses the main body and part of the leg for maximum stability. -
Secure the stick:
Apply a generous line of strong craft glue or a bead of hot glue along the section of the dowel that touches the paper. -
Press and hold:
Press the dowel firmly onto the back of the cardstock. If using liquid glue, you might want to weigh it down with a book for a few minutes while it sets. -
Test the balance:
Pick up the puppet by the stick. If the head or tail flops too much, you can glue a small reinforcing strip of cardstock across the dowel on the back for extra rigidity.
Now you are ready to dim the lights and let your mythical creature take flight across the wall
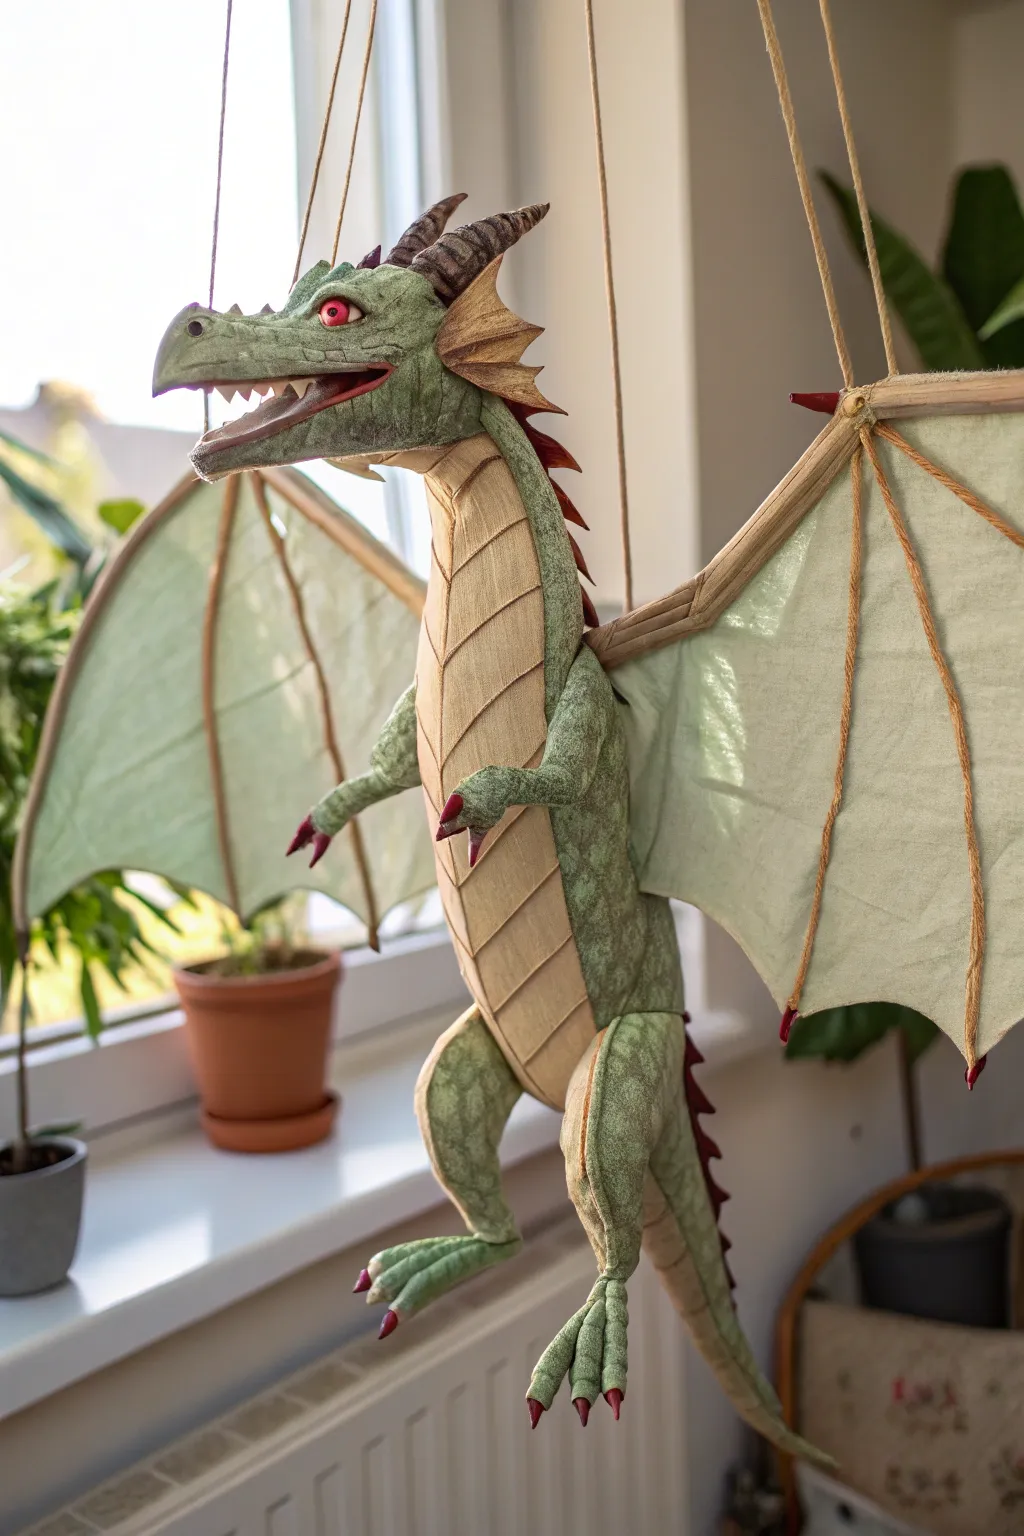
Simple String-Jointed Dragon Marionette
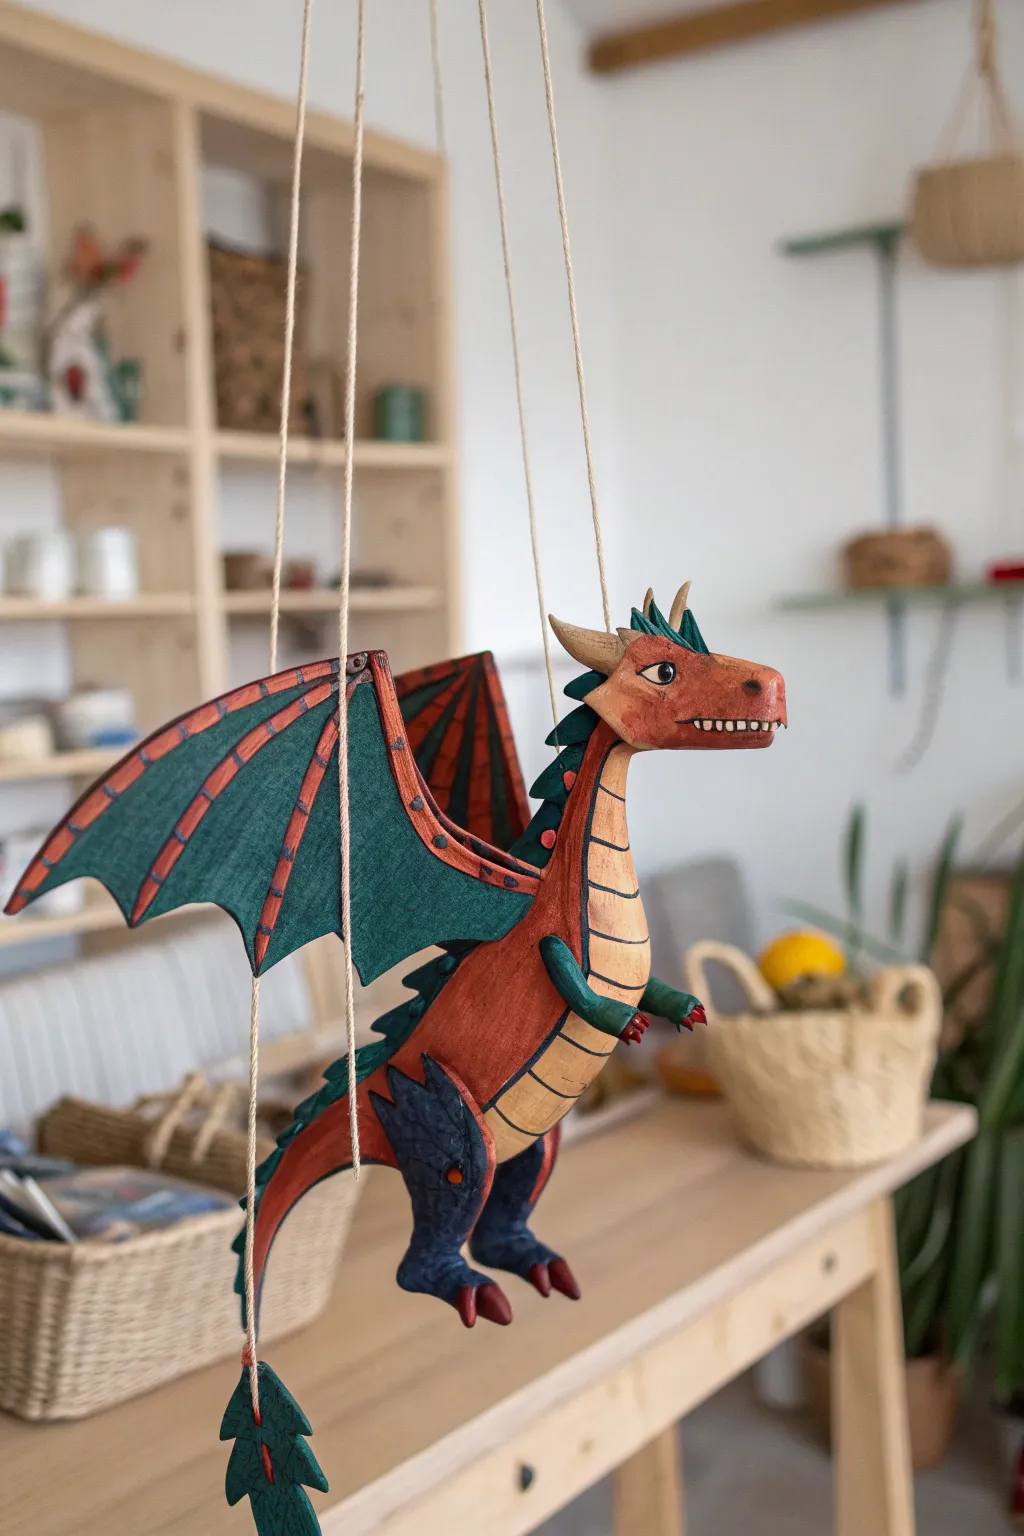
Bring a fantastical creature to life with this charming dragon marionette project, featuring articulated wings and legs for realistic flight movement. The finished piece showcases a beautiful folk-art aesthetic with its visible wood grain texture and vibrant contrasting colors of rusty orange and teal green.
Detailed Instructions
Materials
- Basswood or balsa wood blocks (various sizes for body parts)
- Coping saw or scroll saw
- Carving knife or detail wood carving tools
- Sandpaper (medium and fine grit)
- Acrylic paints (rust red, teal green, cream/beige, black, bright orange)
- Small eye hooks (screw eyes) – approx. 10-12 pieces
- Strong puppet string or waxed linen thread
- Small craft drill with fine bits
- Wooden dowel cross-brace (control bar)
- Small paintbrushes (flat and detail)
- Matte or satin clear varnish
Step 1: Shaping the Body Parts
-
Draft your design:
Sketch the dragon’s profile onto paper first to get the proportions right, then cut out separate templates for the head, main body, two upper wings, two lower wings, two legs, and the tail tip. -
Cut the rough shapes:
Transfer your patterns onto the basswood blocks. Using a coping saw, carefully cut out each individual component. For the wings, you’ll want thinner wood stock than for the chunky body. -
Carve the contours:
Use a carving knife to round over the sharp edges of the body and head. Carve a distinct snout area and add little notches for the dragon’s spine ridges along the back of the neck and body. -
Detail the wings:
Carve shallow grooves into the wing pieces to simulate the ‘fingers’ or bones of the dragon wing. This adds depth and makes painting much easier later on. -
Refine the surface:
Sand all pieces thoroughly. Start with medium grit to remove saw marks, then finish with fine grit for a smooth surface that still retains a bit of hand-carved character.
Sticky Joints?
If the legs stick and don’t swing freely, slight sand the wood around the eye hooks to create more clearance, or rub a little candle wax on touching surfaces.
Step 2: Painting and Assembly
-
Base coat the belly:
Paint the underside of the neck and belly with a cream or light beige acrylic. I find adding horizontal lines in a slightly darker brown helps create the segmented ‘scute’ look. -
Apply the main colors:
Paint the upper body, head, and outer wing bones in a rusty red-orange. Use a deep teal green for the wing membranes and the leg feathers or scales. -
Add facial details:
Once the base coats are dry, use a fine tip brush to add the eye (white with a black pupil) and small white triangles for the teeth along the jawline. Add black outlines to define the mouth. -
Drill pilot holes:
Carefully drill tiny pilot holes where the limbs will connect to the body, and where the strings will attach (head, back, wings, tail). -
Attach hardware:
Screw the small eye hooks into the pilot holes. You need them at the shoulder joints, the wing pivots, and the top of the head and back for suspension. -
Connect the joints:
Link the legs and tail tip to the body. You can use interlocking eye hooks (opened with pliers and then closed) or small wire loops to ensure they dangle freely.
Step 3: Stringing the Marionette
-
Prepare the control bar:
Create a simple wooden cross using two dowels or strips of wood. Drill holes at the four ends of the cross. -
Attach the main support strings:
Tie a string from the head eye-hook to the front of your control bar, and another from the lower back (base of tail) to the back of the control bar. Adjust length until the dragon hangs level. -
String the wings:
Tie strings to the outer tips of the wings. Attach these to the left and right sides of your control bar. This allows you to ‘flap’ the dragon by rocking the bar. -
String the tail tip:
Attach a final string to the separated tail tip piece (the evergreen tree shape at the bottom). This can attach to the back of the control bar or be left as a separate pull-string for specific tail movements. -
Final heavy varnish:
Coat the entire puppet in a matte or satin varnish to protect the paint and give it that finished, professional toy look.
Add Sparkle
Mix a tiny amount of metallic gold or copper powder into your varnish for the red scales to give the dragon a subtle, magical shimmer when it moves.
Hang your new mythical friend in a sunny spot or practice your puppetry skills to make him fly


Rod Puppet Dragon With Moveable Wings
Bring fantasy to life with this intricate rod and string puppet, featuring textured green scales and impressive moveable wings. The combination of rigid structural elements and soft, segmented fabric creates a creature that looks ready to take flight right from your window sill.
Step-by-Step
Materials
- Textured green fabric (felt or heavy cotton)
- Beige fabric for belly segments
- Wooden dowels (various thicknesses for structure and rods)
- Strong puppet string or fishing line
- Red polymer clay or heavy felt (for claws/spines)
- Wire armature
- Polyester fiberfill stuffing
- Fabric glue and sewing machine
- Acrylic paints (dark green shading)
- Glass or plastic dragon eyes
Step 1: Sculpting the Body Structure
-
Build the armature:
Create a simple wire skeleton for the dragon’s spine, head, and limbs. This allows for posing later. Focus on a strong central curve for the S-shaped body posture. -
Pattern the head:
Cut four pieces of green fabric for the head profile. Sew the top and bottom seams, insert the wire skull frame, and stuff firmly to define the snout and jawline. -
Create the belly segments:
Cut a long strip of beige fabric. Stitch horizontal pleats every inch to create the segmented underbelly look, then sew this strip to the front of your green body panels. -
Assemble the torso:
Sew the green body panels around the belly strip, leaving openings for the limbs. Insert the wire spine and stuff the body, making sure the neck remains flexible but sturdy.
Wing Movement Secret
Add small metal washers to the wing tips. The slight extra weight helps the wings drop back down quickly after you pull the string.
Step 2: Wings and Appendages
-
Construct the wing frame:
Using thin wooden dowels, form the skeletal structure of the wings. Glue a main spar and three finger-spars for each wing to create a bat-like framework. -
Attach the wing membrane:
Cut lighter green fabric to span the wing frame. Glue or stitch the fabric directly to the dowels, letting it drape slightly loose between the bones for a realistic, wind-caught look. -
Form the limbs:
Sew tubular shapes for the arms and legs using the textured green fabric. Insert wire for the joints, stuff lightly, and attach them securely to the main body. -
Attach the wings:
Connect the main wing spar to the dragon’s shoulder area. I find that using a strong pivot joint or heavy-duty thread here is crucial so the wings can flap freely.
Droopy Neck?
If the head won’t stay up, stiffen the neck wire by twisting two strands together or add a small dowel section just behind the skull base.
Step 3: Details and Rigging
-
Craft the claws and spines:
Shape small cones from red polymer clay for the claws and back spines. Once baked and cooled, glue them to the fingertips, toes, and along the dorsal ridge of the neck. -
Add facial features:
Install the red glass eyes and build up fabric ridges around them for an intense glare. You can add a darker wash of acrylic paint locally to increase the shadow depth. -
Rig the suspension strings:
Attach heavy-duty strings to the head, the base of the tail, and the tips of both wings. Ensure the balance is centered so the dragon hangs horizontally or slightly upright. -
Connect to the control bar:
Tie the strings to a wooden cross-brace control bar. Test the tension; pulling the wing strings should cause the fabric wings to flap dramatically. -
Final shading:
Dry brush a little dark green or brown paint into the crevices of the belly segments and around the scales. This weathering makes the dragon look ancient and real.
Hang your dragon near a window to let the sunlight illuminate the wing membranes as it guards your crafting space
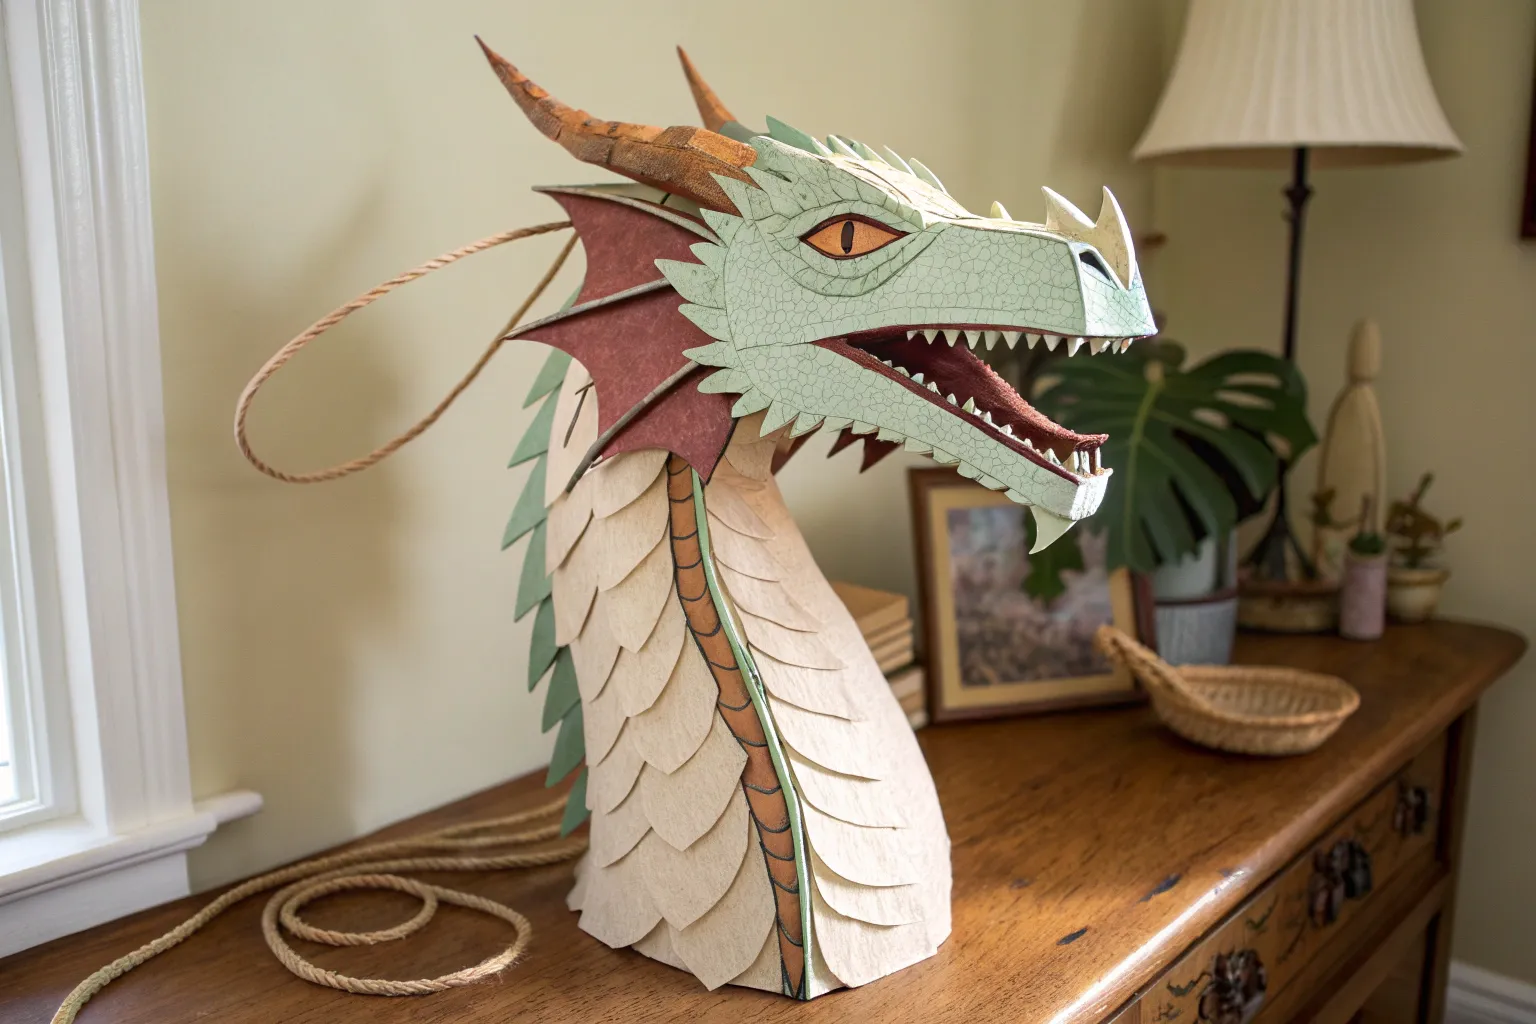
Pop-Up Mouth Dragon With Accordion Tongue
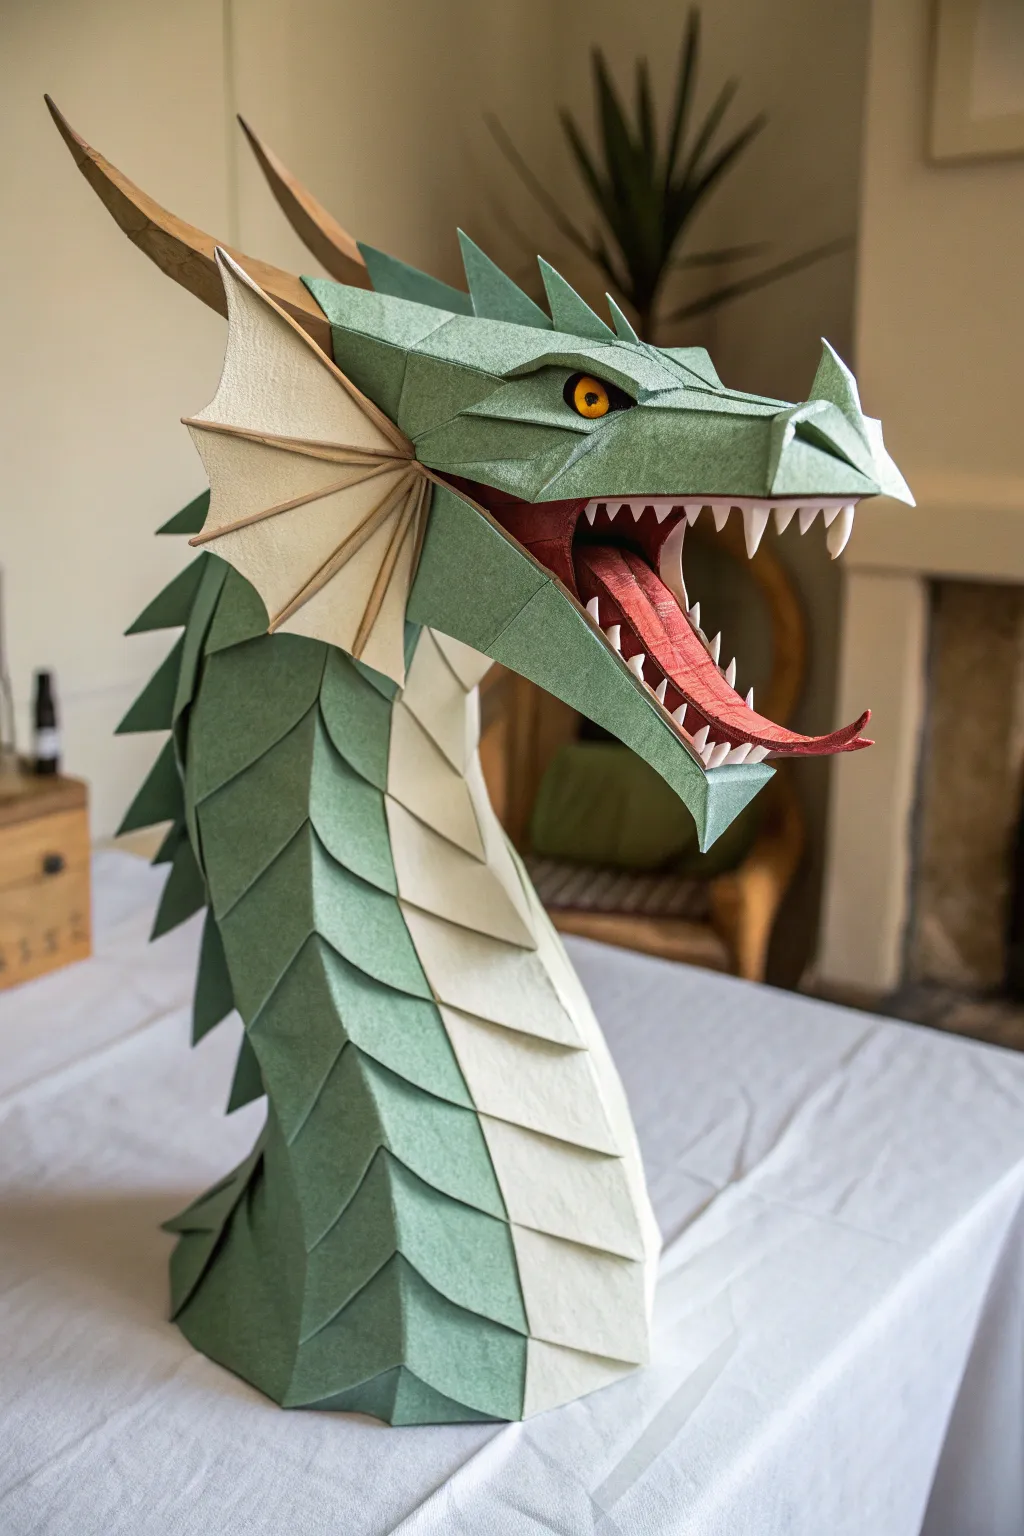
This majestic dragon head is a stunning example of low-poly papercraft, featuring sharp geometric folds and striking textured cardstock. With its fierce expression, layered scales, and pop-up style jaw, this project transforms flat sheets of paper into a mythical creature that looks ready to roar.
How-To Guide
Materials
- Heavyweight textured cardstock (sage green, cream, dark red)
- Lightweight wood veneer or brown cardstock (for horns/spines)
- Craft knife or scalpel (e.g., X-Acto)
- Metal ruler
- Self-healing cutting mat
- Bone folder
- Quick-drying tacky glue or strong PVA glue
- Double-sided tape (optional)
- Yellow glass cabochon or plastic animal eye (approx. 20mm)
- White cardstock strips (for teeth)
- Digital template/pattern (low-poly dragon style)
Step 1: Preparing the Pattern
-
Print the templates:
Begin by printing your low-poly dragon pattern directly onto the colored cardstock. Use the green cardstock for the head and neck scales, and the cream cardstock for the underbelly. -
Score the fold lines:
Before cutting anything out, use the back of your craft knife or a bone folder along your metal ruler to score every fold line. This is crucial for achieving those crisp, sharp geometric angles that define the low-poly look. -
Cut out the pieces:
Carefully cut out each shape along the solid exterior lines. Take your time around the jagged scale edges on the neck pieces to ensure they look sharp and distinct.
Step 2: Assembling the Head Structure
-
Fold the crease lines:
Identify ‘mountain’ folds (pointed up) and ‘valley’ folds (pointed down) based on your pattern’s guide. Pre-fold all these lines firmly to create the structural tension needed. -
Construct the snout:
Start gluing the smaller tabs around the dragon’s nose and upper jaw. Apply a thin layer of tacky glue to a tab, hold it in place for 10-15 seconds until it grabs, and then move to the next adjacent tab. -
Form the eye sockets:
Build the geometry around the eyes carefully. Before closing the head cavity completely, glue the yellow glass eye inside the socket from the back so it peers out naturally. -
Build the lower jaw:
Assemble the lower jaw separately. Ensure the hinge area where it meets the upper head is reinforced with extra glue, as this will support the mouth opening.
Sticky Situation?
If tabs won’t stay glued, use small magnets or paperclips to clamp them. Over-gluing warps paper; use a toothpick to apply glue.
Step 3: Creating the Mouth and Details
-
Add the gums and tongue:
Cut the inner mouth parts from dark red cardstock. Assemble the tongue so it has a slight curve or curl at the tip, then glue it securely into the center of the lower jaw. -
Install the teeth:
Cut small, sharp triangles from white cardstock. Glue these individually along the inner rim of the upper jaw and lower jaw, spacing them slightly unevenly for a more organic, monstrous look. -
Connect jaws and head:
Attach the lower jaw to the main head unit. I find it helpful to use small clamps or clothespins here to hold the pieces together while the glue sets fully.
Make It Mythical
Dry brush gold acrylic paint lightly over the edges of the green scales to give them a weathered, shimmering metallic finish.
Step 4: Neck and Finishing Touches
-
Assemble the neck column:
Construct the neck sections, alternating between the green scale pieces for the back and sides, and the smooth cream plates for the throat. Glue them in overlapping rings, working from the head downwards. -
Shape the horns:
Using the wood veneer or brown cardstock, fold and glue the long, curved horns. Attach them firmly to the top of the skull, ensuring they angle backward symmetrically. -
Create the side fins:
For the fan-like ears or fins, cut fan shapes from cream paper. Glue thin strips of wood veneer or stiff brown cardstock across them to act as structural ribs. -
Attach fins to head:
Glue these finished fins behind the jawline. You may need to hold them in place manually for a minute until the glue bonds, as gravity will try to pull them down. -
Add dorsal spines:
Cut triangular spines from green cardstock. Glue them strictly down the center ridge of the neck, starting from the back of the skull and running down to the base. -
Curving the neck:
To give the dragon a lifelike posture, gently bend the assembled neck column so it curves slightly forward. The segmented scale construction should allow for a little flexibility.
Place your finished dragon on a sturdy base or mount it on a wall to guard your room
Double-Sided Dragon Puppet for All-Angle Play
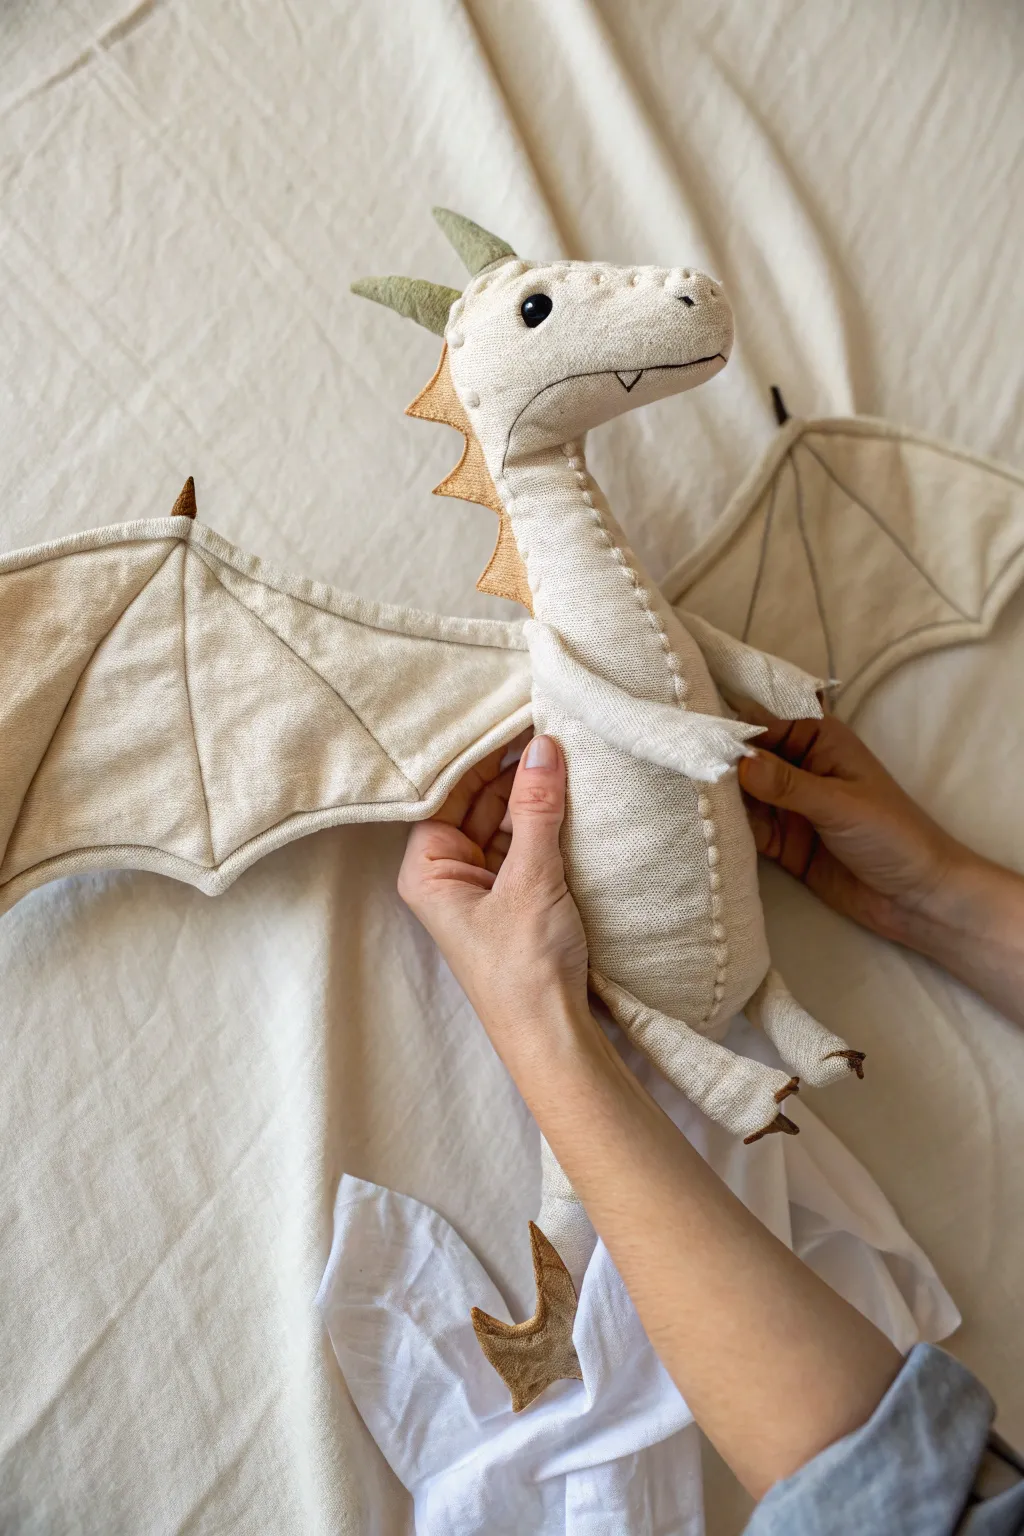
This charming, heirloom-quality dragon puppet features a natural linen body, impressive quilted wings, and hand-embroidered details for a timeless look. Perfect for imaginative play from any angle, its soft structure and jointed feel make it a delightful companion for storytelling.
Detailed Instructions
Materials
- Natural linen or cotton canvas fabric (off-white for body)
- Contrasting linen fabric (mustard or earthy tone for spine/claws)
- Fiberfill stuffing
- Matching heavyweight thread (topstitching)
- Black embroidery floss (eyes/mouth)
- Green felt or fabric scraps (horns)
- Sewing machine
- Hand sewing needles
- Fabric scissors & pins
- Chopstick or turning tool
Step 1: Designing the Body
-
Draft the template:
Begin by sketching a side-profile silhouette of a dragon on paper. This should include the head, a long neck, a rounded tummy, and a tail, all as one continuous piece. You will also need separate shapes for the arms, legs, wings, and triangular spine spikes. -
Cut the main pieces:
Fold your off-white linen fabric in half so you can cut two mirror-image body pieces at once. Leave a generous 1/2-inch seam allowance around your tracing. -
Prepare the limbs:
Cut four pieces for the arms and four for the legs. For the feet, add tiny triangular tips of darker fabric for claws, sandwiching them inside the foot seams before sewing the limb halves together.
Fabric Choice Matters
Use a heavy-weight linen or canvas drop cloth. The coarser weave holds the shape better than quilting cotton and gives the dragon that rustic, old-world texture.
Step 2: Spine & Head Assembly
-
Create the spikes:
Cut a long strip of mustard-colored fabric into a sawtooth pattern to create a continuous line of triangles. Fold it in half lengthwise if delicate, or layer two strips and sew the zig-zag edge, turning it right side out for sturdier spikes. -
Insert the spine:
Pin the spine strip between the two main body fabric layers, facing inward (sandwiched). Ensure the spikes run from the back of the head down to the start of the tail. -
Sew the body contour:
Sew along the back curve first to secure the spine. Then, sew the front of the neck and tummy, leaving an opening at the bottom of the belly for stuffing and turning. -
Add the face:
Once the body is turned right side out, use black embroidery floss to stitch a solid round eye on each side of the head. I like to add a small backstitched line for the mouth and a tiny snaggletooth for character.
Step 3: Constructing the Wings
-
Layer the wings:
Cut four large wing shapes (two pairs). Place two pieces right sides together, sew the perimeter leaving a small gap, turn right side out, and press flat. -
Quilt the structure:
Using a straight stitch, sew lines radiating from the top corner of the wing down to the scalloped edges. This ‘bat wing’ quilting adds necessary stiffness without using wire. -
Add wing details:
Sew a small, dark fabric triangle to the top turning point of each wing to act as a claw or joint accent.
Internal Skeleton
Bend floral wire into a loop and insert it into the wings before sewing the quilting lines. This makes the wings fully poseable for dramatic flight scenes.
Step 4: Final Assembly
-
Stuff the creates:
Firmly pack fiberfill into the head, neck, and body. Use a chopstick to push stuffing deep into the tail tip. Stuff the arms and legs separately, leaving the top half-inch of the limbs empty to allow for movement. -
Close the seams:
Ladder stitch the turning opening on the belly closed. Then, attach the arms and legs to the body using strong thread. Sewing straight through the body from one limb to the other creates simple thread joints that allow posing. -
Attach the horns:
Roll small scraps of green felt or fabric into cone shapes. Hand sew these securely to the top of the head just behind the eyes. -
Secure the wings:
Pin the wings to the dragon’s back, right along the spine seam. Hand stitch them firmly in place using a whip stitch or strong backstitch so they can flap during play. -
Decorative stitching:
For that handmade charm seen in the photo, add a visible running stitch or blanket stitch along the belly seam and neck using thick, contrasting thread.
Now your textile dragon is ready to take flight in its first story
Mix-and-Match Dragon Accessories Pack
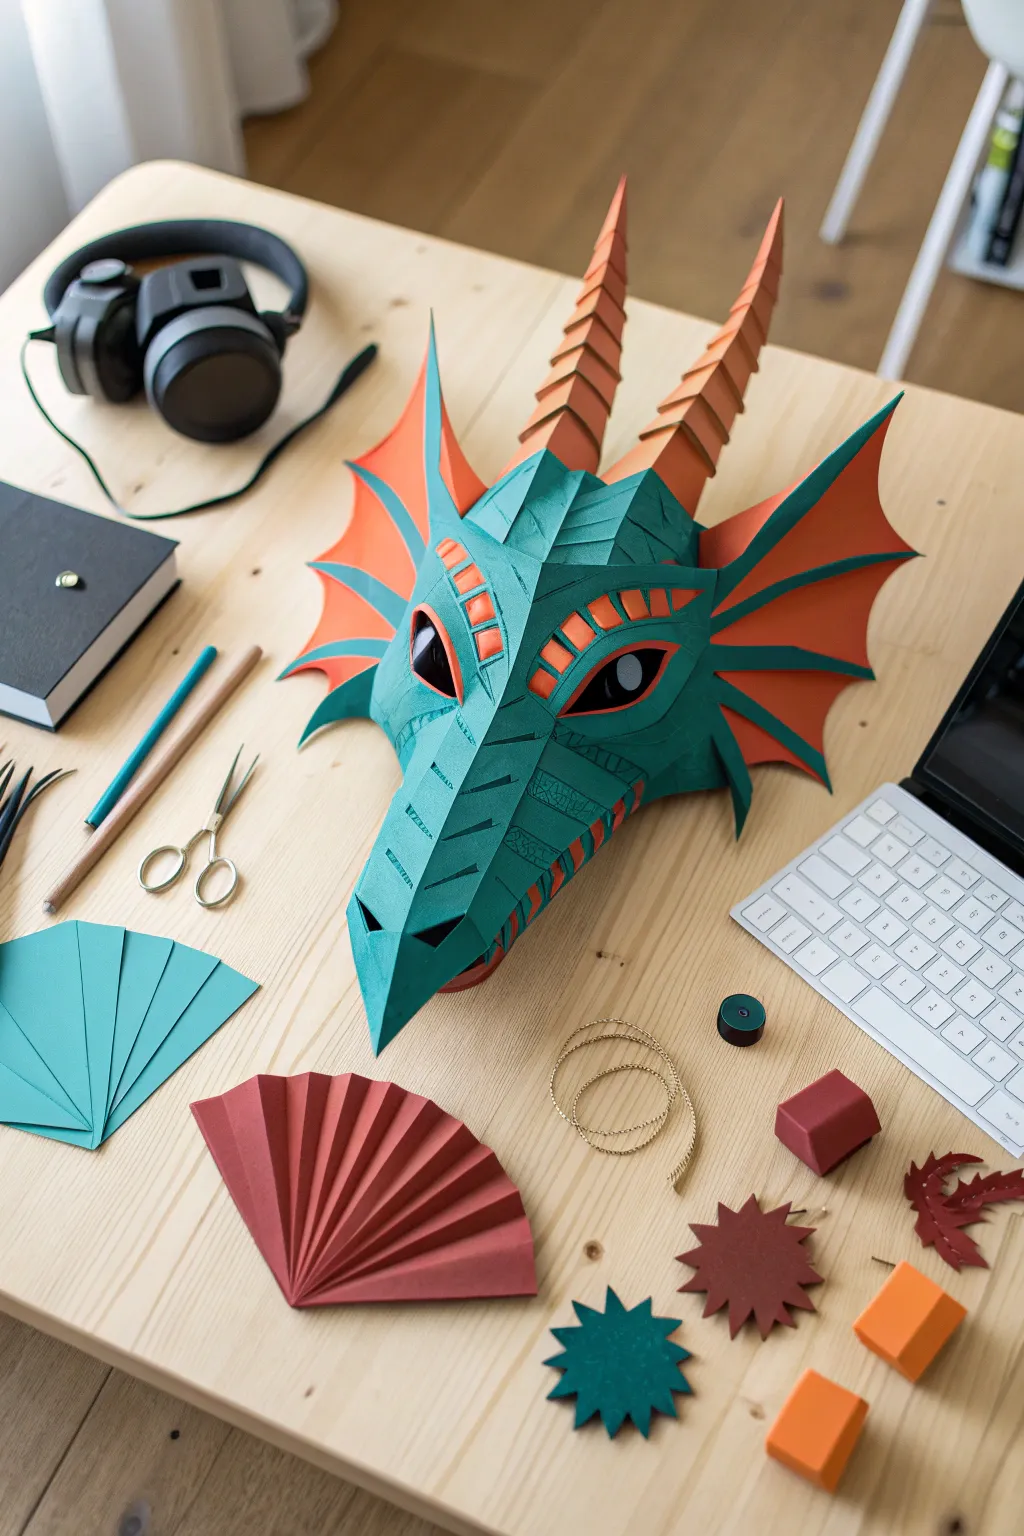
Transform flat sheets of paper into a striking 3D dragon head featuring bold angles and a vibrant green-and-orange color palette. This low-poly style mask combines sharp creases with layered details to create a fierce, mythical accessory perfect for display or costume play.
Step-by-Step Tutorial
Materials
- Heavy cardstock (Jade Green and Bright Orange)
- Black cardstock (for eyes and details)
- Craft knife or precision scissors
- Cutting mat
- Metal ruler
- Bone folder or dried-out ballpoint pen
- Quick-drying tacky glue or double-sided craft tape
- Dragon mask template (printable)
Step 1: Preparation and Cutting
-
Select your paper:
Choose a cardstock between 180-220gsm. This weight is crucial because it needs to hold the dramatic geometric structure without sagging, yet still fold crisply. -
Score the fold lines:
Before cutting anything out, use your ruler and a bone folder (or the back of a craft knife) to score every dotted fold line on your printed template. This ensures sharp, professional-looking edges later. -
Cut out the components:
Carefully cut along the solid exterior lines of each piece. You will have separate sections for the snout, the cranium, the side frills, and the horns. Keep the orange and green pieces organized in separate piles.
Clean Edges Pro-Tip
For invisible seams, use a marker matching your cardstock color to color the white edges of the paper after cutting but before gluing.
Step 2: Assembling the Base Structure
-
Pre-fold all creases:
Go through every piece and fold along your scored lines. Identify ‘mountain’ folds (pointed up) versus ‘valley’ folds (pointed down) according to your template’s key to establish the low-poly form. -
Build the snout:
Locate the long, central green nose piece. Apply a thin line of glue to the tabs and connect the side panels to the central ridge, holding each bond for about 10 seconds until set. -
Form the eye sockets:
Detailed folding is needed here. Assemble the angular brow ridges separately, then attach them to the upper part of the snout section. This creates the mask’s intense expression. -
Insert the eyes:
Cut slitted pupil shapes from black cardstock and glue them behind the eye cutouts before you fully close up the head structure. I find placing them slightly off-center gives the dragon more character. -
Construct the cranium:
Join the large top head plates together. Work symmetrically, attaching the left and right sides to the central seam, moving from the forehead back toward the neck. -
Attach the snout:
Connect the fully formed snout assembly to the cranium. Match the tabs carefully around the cheekbones to ensure there are no gaps in the face.
Step 3: Adding the Flair
-
Assemble the horns:
Roll and glue the orange cardstock strips into segmented cone shapes. These are often made of stacked rings or spiral-folded polygons depending on your specific template pattern. -
Mount the horns:
Glue the finished horns firmly to the marked spots on the top of the head. Press down from the inside of the mask to get a secure bond without denting the shape. -
Create the side frills:
Construct the large, fin-like ears using orange cardstock for the webbing and green for the structural spines. Layer the green strips over the orange base to create a raised, skeletal look. -
Attach the frills:
Secure these large fins to the sides of the dragon’s head. You may need to prop them up with a small object while the glue dries to keep them at the correct aggressive angle. -
Detailing the scales:
Cut small trapezoids or diamonds from orange paper. Glue these onto the brow ridges and under the eyes to simulate armored scales or decorative markings. -
Final reinforcement:
Check the interior of the mask. If any seams feel weak, reinforce them with an extra strip of paper or tape on the inside where it won’t be seen.
Level Up: Metallic Finish
Brush clear drying glue over the ‘scale’ details and dust with fine gold glitter or mica powder for a magical, shimmering beast.
Once the final glue tab is dry, your geometric dragon is ready to guard your desk or become the star of your next costume
Palette-Driven Dragon Puppet Color Series
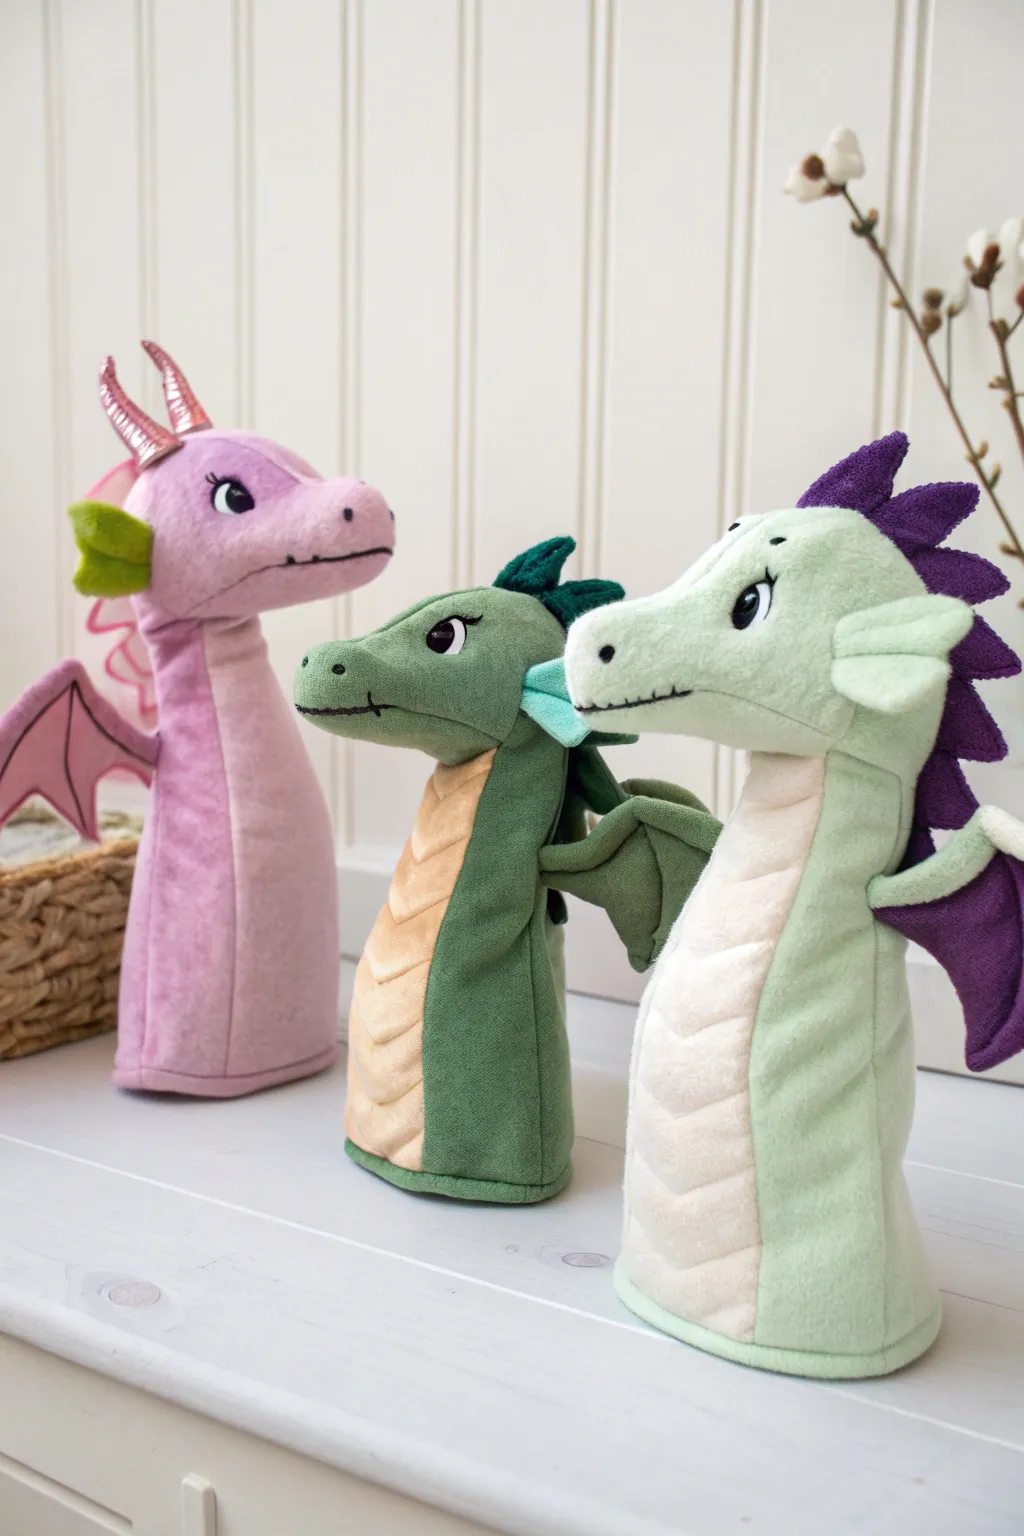
Bring storytelling to life with this charming set of plush dragon puppets, featuring a soft, minky texture and distinctive color palettes. These puppets are designed with an upright, standing posture that looks great on a shelf when not in use, making them perfect for both play and display.
How-To Guide
Materials
- Minky or velour fabric in three main colors (dusty pink, forest green, mint green)
- Contrasting fabric for belly scales (cream, tan, light pink)
- Felt scraps for ears and spines (dark purple, teal, lime green)
- Metallic faux leather or stiff felt for horns
- Safety eyes (black) or black embroidery thread
- Polyester fiberfill stuffing
- Matching thread
- Sewing machine
- Hand sewing needle
- Fabric scissors
- Pins or sewing clips
Step 1: Preparing the Pattern Pieces
-
Draft the main body:
Create a pattern resembling a tall, elongated ‘sock’ shape with a slight curve for the neck and a distinct snout profile. The base should be wide enough for a hand to enter comfortably. -
Design the details:
Draft a smaller, scalloped strip for the belly scales that runs from the neck to the bottom hem. Draw wing shapes (bat-like triangles), small triangular ears, and a jagged spine strip for the back. -
Cut the fabric:
Cut two mirrored main body pieces for each dragon. Cut one belly strip per dragon from contrasting fabric. Cut double layers for wings and spines to ensure they stand up.
Step 2: Assembling the Features
-
Sew the belly scales:
Pin the scalloped belly strip to the ‘front’ side of one main body piece. Topstitch horizontally across the strip at each scallop point to create a quilted, scale-like effect. -
Prepare the wings and spines:
Place wing pieces right sides together, sew the perimeter leaving the straight edge open, then turn right side out. Topstitch vein lines for detail. For the back spines, I like to stitch two layers of felt together for stability. -
Create the face:
If using safety eyes, install them now on the side head pieces before sewing the puppet shut. Alternatively, embroider eyes with black thread after assembly for a softer look. Embroider a simple mouth line and small nostrils on the snout.
Droopy Spines?
If felt spines flop over, stiffen them slightly with a diluted white glue wash or use double-layered felt with a fusible interfacing hidden in the middle.
Step 3: Constructing the Puppet
-
Insert spines and ears:
Sandwich the spine strip and ears between the two main body pieces along the top and back seam allowance. Make sure they are facing inward (towards the body) so they deploy correctly when turned. -
Sew the main body:
Sew along the top of the head, down the back, and around the snout, catching the spines and ears in the seam. Leave the bottom opening and the arm/wing slots unsewn for now. -
Attach the wings:
Position the raw edges of the wings into the side seams or dedicated arm slots. Stitch deeply to secure them, ensuring they flap outwards. -
Finish the side seams:
Complete sewing the side seams down to the hem, ensuring the wings are caught securely but not puckered. -
Turn and stuff:
Turn the puppet right side out. Use a chopstick to poke out the snout and horns gently.
Wing Pro Tip
Add a layer of crinkle material (like clean food packaging) inside the wings before sewing them shut to add a fun sound effect for storytelling.
Step 4: Final Touches
-
Stuff the head:
Lightly stuff piece polyester fiberfill into the head area only. This helps the dragon maintain its shape and expression while the hand operates the neck. -
Hem the bottom:
Fold the bottom raw edge up by half an inch and hem it with a zigzag or stretch stitch to prevent fraying and provide a finished cuff. -
Add metallic horns:
If adding metallic horns like the pink dragon, construct small cones from metallic fabric, stuff them tightly, and hand-stitch them securely to the top of the head using a ladder stitch.
Enjoy creating your own cast of magical characters for your next puppet show
Galaxy Dragon Puppet With Starry Markings
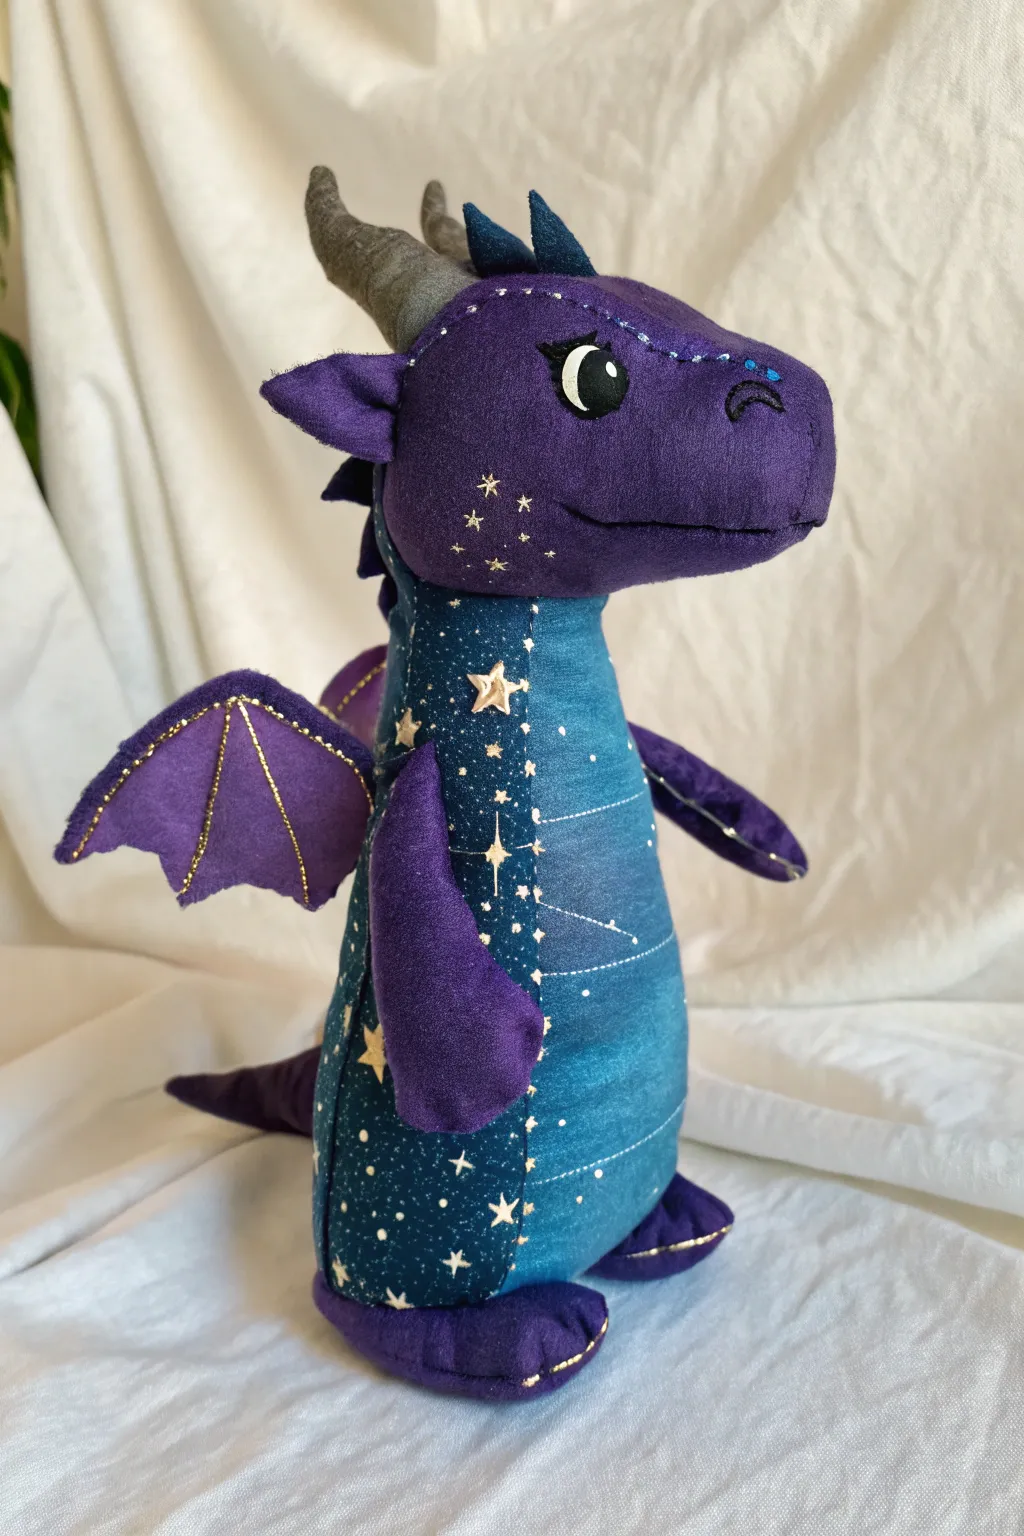
Bring the night sky to life with this enchanting plush dragon, featuring a body made from celestial-print fabric and deep purple accents. With its gentle embroidered expression and golden details, this huggable friend looks like it flew straight out of a galaxy far away.
Step-by-Step Tutorial
Materials
- Deep purple fleece or minky fabric (for head, limbs, wings)
- Blue galaxy/constellation cotton print fabric (for body belly)
- Grey felt (for horns)
- Dark blue felt (for spine spikes)
- Gold embroidery floss or metallic thread
- White and black felt scraps (for eyes)
- Polyester stuffing
- Sewing machine and thread
- Hand sewing needles
- Fabric glue or fusible web
- Pattern paper and pencil
Step 1: Planning and Cutting
-
Draft the Pattern:
Sketch a side profile for the dragon’s head and a pear-shaped body. Draw simple shapes for the arms, legs, wings (bat-style), and curved horns. Remember to add a 1/4 inch seam allowance to all your pieces. -
Cut the Fabrics:
Cut two mirrored head pieces, four arm pieces, four leg pieces, large foot pads, and four wing pieces from the purple fabric. Cut the main body panels from the galaxy print fabric, ensuring the star pattern runs vertically. -
Prepare the Horns and Spikes:
Cut four horn shapes from the grey felt and a long strip of triangle spikes from the dark blue felt. I like to cut the spikes as one continuous strip to make sewing easier later.
Uneven Seams?
If the curves of the head look bumpy after turning, use a chopstick or knitting needle to gently push out the seams from the inside before stuffing. This smooths out the fabric effectively.
Step 2: Assembling the Head and Face
-
Create the Eyes:
Cut white circles and slightly smaller black circles for the pupils from felt. Glue or fuse them onto the side of the head pieces. Add a tiny white highlight dot for extra sparkle. -
Embroider the Features:
Using black thread, satin stitch a thick lash line above the eye and a small curved nostril near the snout. Switch to gold metallic thread to embroider small twinkle stars on the dragon’s cheek. -
Sew and Stuff Horns:
Stitch the grey horn pairs together, leaving the bottom open. Turn them right side out, stuff firmly with polyester fiberfill, and set aside. -
Construct the Head:
Pin the two purple head pieces right sides together. Insert the stuffed horns and the first few blue felt spikes into the top seam, sandwiching them inside. Sew around the perimeter, leaving the neck opening unsewn. Turn right side out and stuff the head firmly.
Make it Shine
Sew tiny glass seed beads or sequins onto the galaxy fabric body where the printed stars are. This adds real texture and makes your dragon sparkle when it catches the light.
Step 3: Body and Limbs
-
Sew the Limbs:
Pair up your arm and leg pieces right sides together. Sew around the edges, leaving the straight edge open for turning. For the feet, stitch the purple ovals to the bottom of the legs to create a flat standing base. -
Add Gold Accents:
Once the limbs are turned right side out and lightly stuffed, use gold floss to stitch decorative lines around the toes of the feet. -
Assemble the Wings:
Sew the wing pairs together, turn them right side out, and press flat. Topstitch ‘veins’ into the wings using the gold thread to give them structure and a magical look. -
Construct the Body:
Pin the galaxy body panels right sides together. Sandwich the remaining blue felt spikes along the back seam. Pin the wings into the back seam as well, angled slightly upward. Sew the side seams and the back seam, leaving the neck and bottom open. -
Attach Limbs to Body:
Insert the arms into the side seams of the body before sewing up the sides entirely, or hand-sew them securely onto the finished body later using a ladder stitch.
Step 4: Final Assembly
-
Join Head to Body:
Align the neck opening of the head with the neck opening of the body. Hand sew them together securely using a ladder stitch, adding more stuffing to the neck area to prevent wobbling. -
Attaching the Legs:
Position the stuffed legs at the bottom of the body so the dragon sits upright. Ladder stitch them firmly in place around the top of the thigh. -
Adding the Tail:
If you created a tail piece, attach it to the lower back seam now, ensuring the blue spikes continue seamlessly from the back down to the tail tip. -
Final Touches:
Check for any loose threads and give the dragon a gentle squish to distribute the stuffing evenly. Add a tiny dot of blue fabric paint near the snout for extra celestial detailing.
Your celestial guardian is now ready to perch on a cozy shelf or join you for stargazing adventures
Forest Sprite Dragon Puppet With Leaf Frills
Bring a touch of woodland magic to your craft table with this intricate felt dragon, complete with overlapping scales and leaf-inspired armor. The blend of earthy browns and vibrant greens creates a natural, forest-guardian aesthetic that feels both whimsical and grounded.
Detailed Instructions
Materials
- High-quality wool or acrylic felt sheets (dark green, lime green, olive green, medium brown, dark brown)
- Polyester fiberfill stuffing
- Matching embroidery floss (greens and browns)
- Glass cabochon eyes or large safety eyes (amber/orange iris)
- Fabric glue or felt glue
- Embroidery needles
- Sharp fabric scissors
- Pinking shears (optional)
- Cardstock for pattern making
- Pins or sewing clips
- Disappearing ink fabric marker
Step 1: Designing and Cutting the Shapes
-
Draft the body pattern:
Sketch a side profile of the dragon’s head, neck, and body on cardstock to create your main template. Create separate templates for the wings, tail, horns, and distinctive leaf-shaped leg guards. -
Cut the main body pieces:
Trace your pattern onto the medium brown felt for the main body and cut out two mirror-image pieces. Remember to leave a small seam allowance around the edges. -
Prepare the scales:
Cut numerous small scalloped shapes from the medium brown felt for the back scales. For the belly scales, cut crescent or curved rectangular strips from the lime green felt. -
Cut decorative accents:
Using the dark green felt, cut out the leaf shapes for the leg armor and the darker frills for the spine. Cut the wing membranes from the olive green felt and the wing bones/fingers from the dark green.
Step 2: Assembling the Head and Body
-
Attach the eyes:
Position the safety eyes on the head section of your felt pieces before sewing the body together. If using glass cabochons, you can glue these in place later, but I find securing safety eyes early is much easier. -
Create the eye sockets:
To give the dragon expressive brows, layer small pieces of dark green and brown felt over the eye area to create eyelids and deep sockets, stitching them down with small whip stitches. -
Sew the belly scales:
Starting from the neck and working down to the tail, stitch the lime green belly plates onto the front of the body pieces. Overlap them slightly like shingles so the upper layer covers the top edge of the one below it. -
Layer the back scales:
Simulate the dragon’s armored back by glueing or stitching the brown scalloped scales in overlapping rows along the sides of the body pattern, ensuring the rounded edges point toward the tail. -
Stitch the body halves:
Pin the two body halves together, right sides out. Begin blanket stitching along the top spine ridge, inserting the dark green spinal frills (triangle shapes) in between the layers as you sew. -
Stuff the form:
Pause your perimeter stitching occasionally to firmly stuff the head, neck, and upper body with fiberfill. Use a chopstick or dowel to push stuffing into the snout and horns to ensure they keep their shape. -
Close the seam:
Continue stitching down the tail and underbelly, stuffing firmly as you go before sealing the final gap at the bottom.
Sturdy Horns Tip
For horns that stand tall without flopping, insert a small pipe cleaner or piece of floral wire inside the felt horn shape before stuffing it tightly with fiberfill.
Step 3: Adding Wings and Limbs
-
Assemble the wings:
Glue or stitch the dark green wing ‘fingers’ onto the olive green wing membrane. Add texture by embroidering a central vein line down each finger using a darker green thread. -
Attach wings to body:
Sew the finished wings firmly to the upper back of the dragon using a strong ladder stitch so the thread remains hidden. -
Construct the legs:
Sew the brown leg pieces together, stuff them, and attach the dark green leaf-shaped guards to the outer thighs. Embroider vein details on these leaves for extra realism. -
Create claws:
Cut small triangular claws from dark brown felt and stitch them to the tips of the toes on each foot. -
Attach the limbs:
Position the legs at the base of the body so the dragon sits stably. Use heavy-duty thread to sew the hips to the body, passing the needle all the way through the torso if you want jointed, movable legs. -
Final leaf details:
Add the smaller leaf frills behind the ears/horns using a dab of fabric glue or tiny tacking stitches to frame the face.
Watercolor Shading
Use diluted fabric paint or even eyeshadow to lightly brush the edges of the felt scales and leaves. This adds depth and makes the dragon look surprisingly realistic.
Place your finished forest guardian on a shelf or desk to watch over your workspace with its gentle, bright eyes
Dessert-Themed Dragon Puppet With Sprinkle Texture
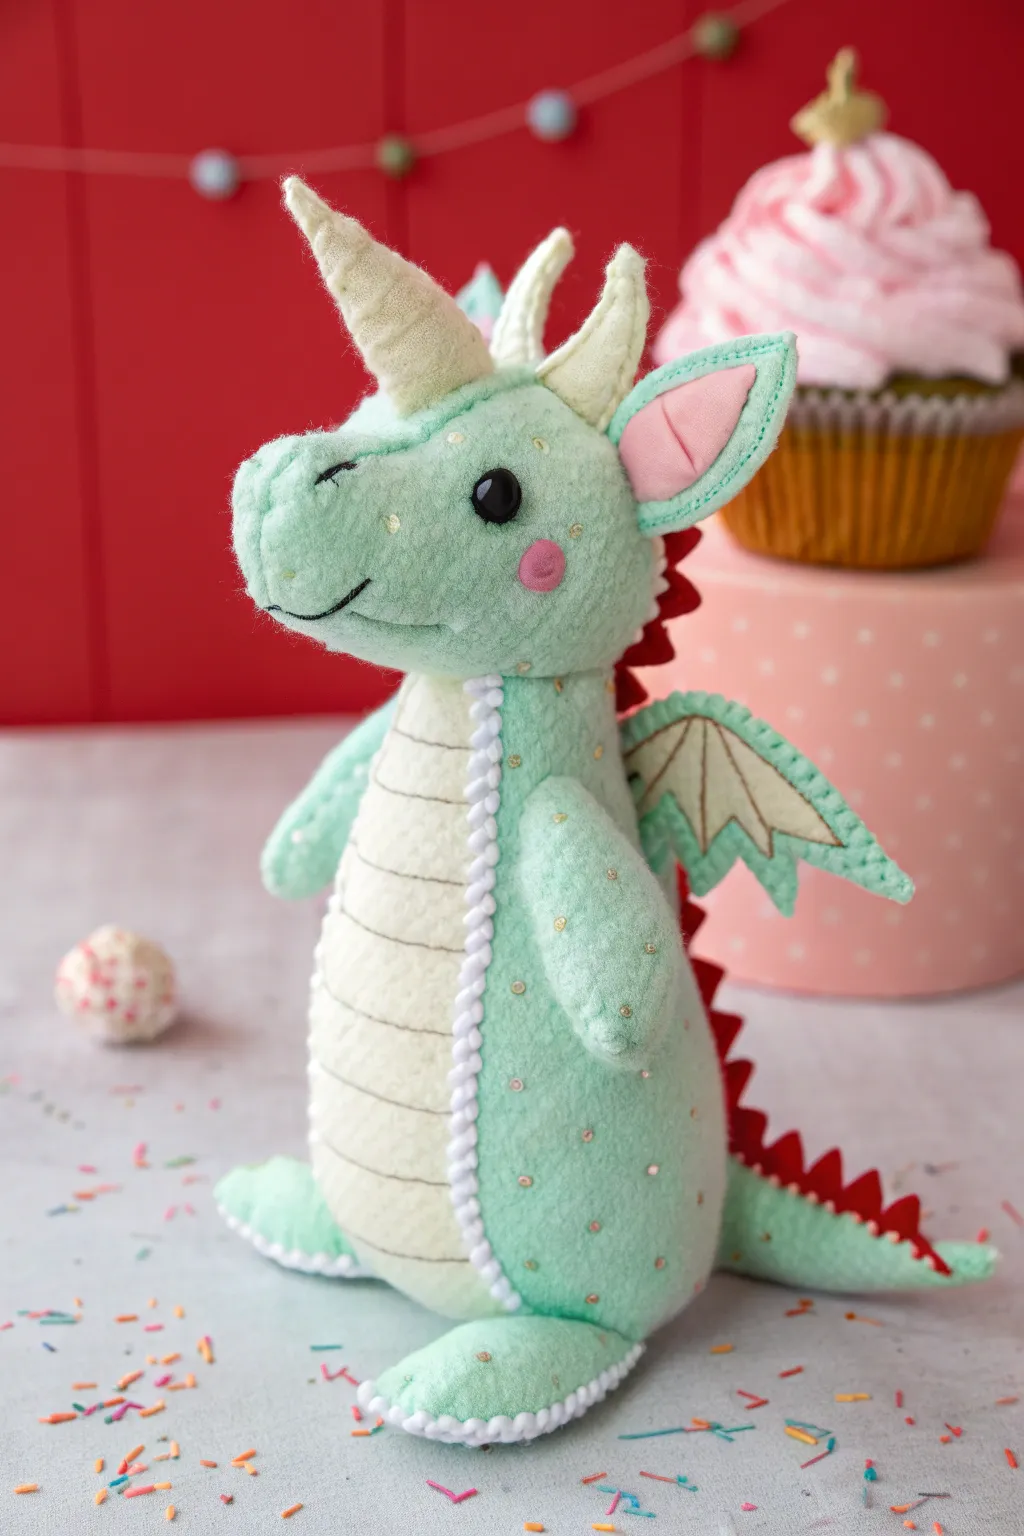
Sew a fantastical friend inspired by sweet treats, featuring a mint-green body dotted with glittery sprinkles. This intermediate felt project combines simple stitching with dimensional details like a stuffed horn and scalloped spine.
How-To Guide
Materials
- Mint green wool blend felt (2 sheets)
- Cream wool blend felt (1 sheet)
- Red wool blend felt (scrap piece)
- Gold glitter cardstock or metallic felt (for wings/horn)
- Polyester fiberfill stuffing
- Embroidery floss in mint, cream, black, and hot pink
- Black safety eyes (6mm) or black beads
- Gold glitter glue or fabric paint
- Pinking shears (optional)
- Basic sewing kit (needles, pins, sharp scissors)
- Air-soluble fabric marker
Step 1: Body Construction
-
Pattern Cutting:
Begin by sketching your dragon shape onto cardstock to create a template. You’ll need two side profiles (head to tail), one cream belly panel, two wings, four leg pieces, a horn triangle, and a long scalloped strip for the spine. -
Applying Sprinkles:
Before sewing, lay out your mint green felt body pieces flat. Using gold glitter glue or careful dabs of fabric paint, dot the ‘scales’ onto the body, legs, and head area. Let this dry completely—usually at least an hour—before handling. -
Attaching the Belly:
Pin the cream belly panel to the front edge of one green body piece. Using a blanket stitch and white embroidery floss, sew them together. Repeat with the other green body piece on the opposite side of the belly panel. -
Adding Details:
Stitch horizontal lines across the cream belly using a backstitch in darker taupe thread to create a ribbed texture. While the body is still flat, sew a small pink felt circle for the cheek using a whipstitch. -
Facial Features:
Insert the safety eye through the marked position on the head; secure the washer on the back. If using beads, sew them on securely now. Use black floss to embroider a small, curved smile and a nose slit.
Sticky Situation
If using glitter glue for the specks, don’t sew over wet glue! If you must sew near a wet spot, cover it with a piece of parchment paper to protect your needle and hands.
Step 2: Horns and Spines
-
Making the Horn:
Cut a triangle shape from cream felt. Roll it into a cone, stitch the side seam closed, and stuff it firmly with fiberfill. Use a metallic thread to wrap a spiral pattern from base to tip. -
Sewing the Horn:
Position the stuffed horn on the forehead area between the two body panels. Pin extensively to keep it upright. -
Spine Assembly:
Cut a long strip of red felt and use pinking shears or small scissors to cut a zigzag ‘dino spike’ pattern along one edge. Sandwich this red strip between the two green back pieces, aligning the straight edge with the seam allowance.
Step 3: Assembly and Finishing
-
Closing the Seams:
Using a blanket stitch and mint floss, sew the two body halves together starting from the nose, going over the head (catching the horn and red spikes), and down the tail. -
Stuffing:
Pause sewing at the bottom of the tail. Stuff the head firmly first, using a chopstick to push stuffing into the snout, then fill the body. I find that overstuffing slightly helps the felt stretch just enough to look plump. -
Bottom Closure:
Finish sewing the bottom seam closed. Ensure the base is somewhat flat so the dragon can stand on its own. -
Arm Assembly:
Sew two arm pieces together with a blanket stitch, stuff lightly, and close. Repeat for the second arm. Attach them to the sides of the body using a ladder stitch so they are movable. -
Wing Creation:
Cut wing shapes from stiffened felt or layer felt over cardstock to hold shape. Embroider ‘bones’ onto the wings using darker thread. -
Attaching Wings:
Sew the wings firmly to the back of the dragon, positioning them just behind the arm location. Angle them slightly upward for a perky look. -
Final Flair:
Double-check your glitter sprinkles. If any rubbed off during assembly, add a few fresh dots now and let dry vertically.
Make it Magical
Use variegated embroidery floss for the blanket stitching on the edges. A thread that shifts from mint to white adds a lovely, subtle candy-cane effect to the seams.
Now your adorable dessert dragon is ready to guard your sweets or sit elegantly on a shelf
Mask-to-Puppet Hybrid Dragon With Hidden Jaw Grip
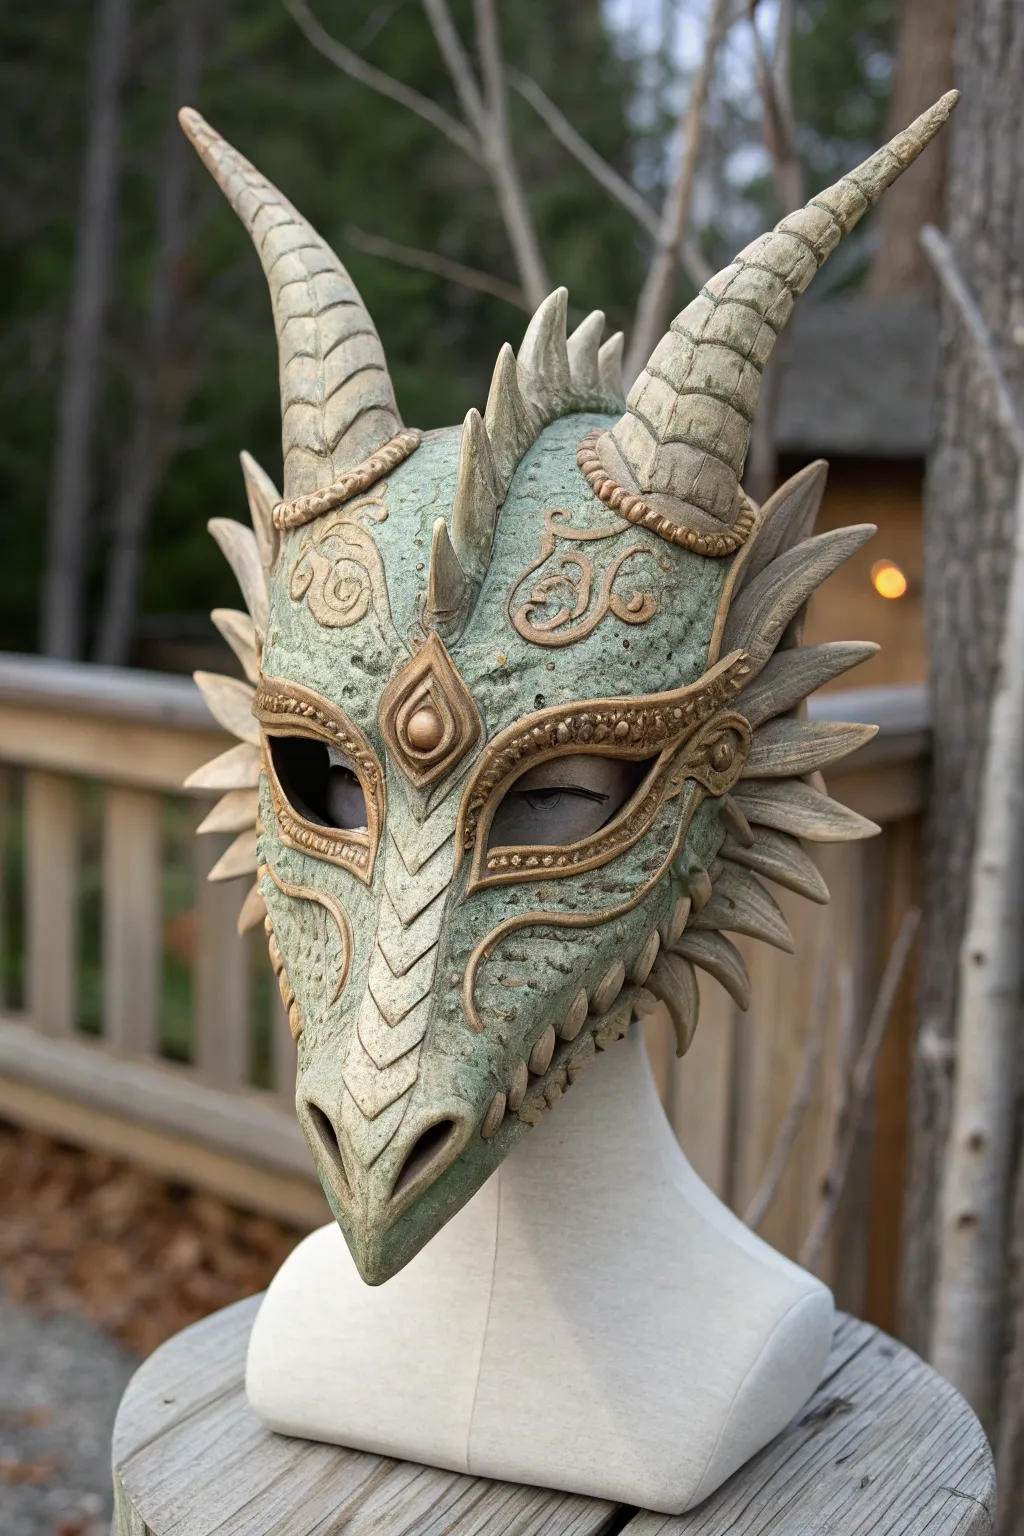
This tutorial guides you through crafting a stunningly realistic dragon mask that doubles as a hand puppet, featuring an articulated jaw for expressive movement. With a weathered stone finish and intricate golden filigree, the final piece looks less like a costume prop and more like an artifact excavated from a fantasy ruin.
Step-by-Step
Materials
- High-density EVA foam (4mm, 6mm and 2mm sheets)
- Worbla or other thermoplastic (optional for rigid details)
- Contact cement
- Heat gun
- Foam clay
- Dremel rotary tool with sanding drums and grinding bits
- Wood burning tool
- Heavy-duty elastic bands (for jaw mechanism)
- Plasti Dip or flexible primer
- Acrylic paints (Mint green, moss green, bone white, antique gold, black)
- Clear matte sealer spray
- Mannequin head or duct tape bust
Step 1: Constructing the Base Structure
-
Patterning the foundation:
Start by masking a mannequin head with foil and tape to create your pattern. Draw the elongated snout, brow ridge, and jawline directly onto the tape. Cut these shapes off carefully to serve as your templates. -
Cutting the foam:
Transfer your patterns onto 6mm EVA foam. Cut the pieces out with a sharp craft knife, ensuring your blade stays perpendicular to the foam for clean edges. -
Assembling the snout:
Glue the forehead and snout pieces together using contact cement. Heat form the foam curves with your heat gun to create the organic, domed shape of the dragon’s nose bridge. -
Lower jaw mechanism:
Construct the lower jaw separately from 6mm foam. Attach it to the upper mask using a hidden simple hinge or loose fabric connection, adding internal elastic bands that keep the mouth closed until your hand (inside the puppet) pushes it open.
Fixing Gaps
If you have visible seams where foam pieces join, intricate sanding is hard. Instead, fill the gap with Kwik Seal or flexible caulk, smooth with a wet finger, and paint over it once dry.
Step 2: Sculpting the Details
-
Adding the horns:
Carve the two main horns from insulation foam or stack layers of 6mm EVA foam. Sand them into tapered points using your Dremel, then glue them securely to the brow ridge. -
Creating the frills:
Cut leaf-shaped spikes from 4mm foam for the side frills. Before attaching them, heat the edges and pinch them to create a sharp, organic ridge down the center of each spike. -
Applying the filigree:
Roll thin snakes of foam clay or use 2mm foam strips to create the swirling filigree patterns on the forehead and cheeks. Apply these wet (if using clay) or glue them down to mimic raised relief carvings. -
Texturing the ‘stone’:
Press a crumpled ball of aluminum foil firmly into the foam surface while applying heat. This imitates a pitted, weathered stone texture across the green skin areas. -
Engraving scale lines:
Use a wood burning tool (in a well-ventilated area) to burn shallow lines along the snout bridge, creating the segmented armoured plating effect. -
Horn detailing:
Score horizontal rings around the horns with your Dremel or knife to create growth ridges, making them look like natural bone.
Level Up: Glowing Eyes
Install small amber LEDs behind a sheer black fabric in the eye sockets. The fabric hides your face, while the LEDs create a menacing, magical glow from within the deep sockets.
Step 3: Painting and Weathering
-
Priming the surface:
Seal the entire mask with three coats of Plasti Dip. This provides a flexible skin that prevents the paint from cracking when the jaw moves. -
Base coating:
Paint the entire mask in a dark mossy green mixed with a little black. This dark base is crucial for the shadows in the recesses. -
Stippling the stone effect:
Sponge on a lighter mint green, followed by a very distinctive dry-brushing of bone white. Focus the white on the high points of the texture to make the ‘stone’ pop. -
Painting the horns:
Paint the horns and side spikes in a beige bone color. Wash them with watered-down brown acrylic, then wipe away the excess so the brown stays only in the carved cracks. -
Gilding the details:
Carefully paint the raised filigree swirls, the eye rims, and the forehead gem setting with antique gold acrylic. I find using a small angle brush helps keep these lines crisp. -
Final shading:
Use an airbrush or a soft brush with diluted black paint to deepen the eye sockets and the nostrils, adding depth to the dragon’s expression. -
Sealing the work:
Spray the entire piece with a clear matte sealer to unify the finish and protect your paint job from handling during performance.
Once the sealer is dry, your ancient dragon is ready to be worn or displayed as a stunning piece of fantasy art


Have a question or want to share your own experience? I'd love to hear from you in the comments below!