
If you’re 12, you’re in that sweet spot where your drawings can look seriously impressive—without needing to be “perfect.” Here are my favorite drawing ideas for kids age 12 that feel fun, a little more grown-up, and totally doable in your sketchbook.
Favorite Animal in a Cool Pose
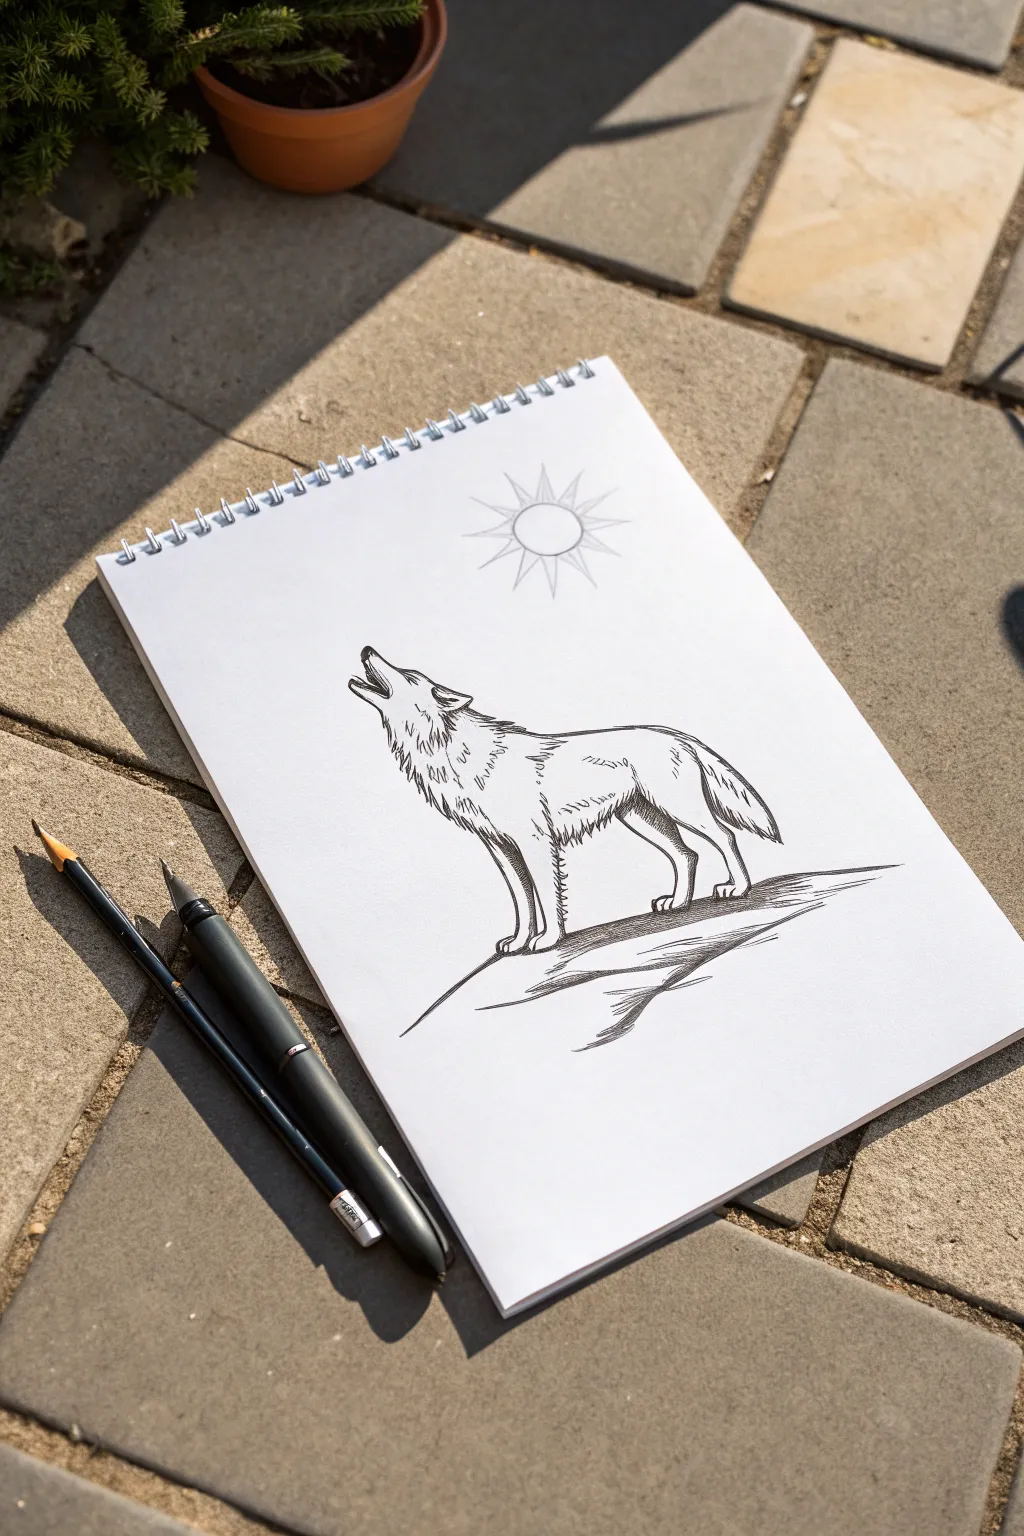
Capture the wild spirit of nature with this striking black-and-white sketch of a wolf howling at the sky. This project focuses on drawing clean lines and creating texture with simple ink strokes to bring the animal’s fur to life.
Step-by-Step
Materials
- Sketchbook with white paper
- HB Graphite pencil
- Eraser
- Fine-tip black drawing pen (size 0.3 or 0.5)
- Black brush pen or thicker marker
Step 1: Planning the Structure
-
Basic Shapes:
Start lightly with your pencil. Draw a small circle for the head and a larger oval for the chest area, slightly lower and to the right. -
Connecting the Body:
Connect these shapes with a curved line for the neck. Add a longer oval behind the chest for the hindquarters. -
Leg Framework:
Sketch simple stick lines to map out where the legs will go. Notice how the back legs have a distinct bend at the hock joint. -
Snout and Tail:
Add a triangular shape pointing upward from the head circle for the open snout. Draw a sweeping, curved line off the back for the tail. -
Refining the Contour:
Go over your stick figure to thicken the legs and neck. Create the final outline of the wolf’s silhouette, keeping your pencil pressure light so it’s easy to erase later.
Fur Direction
Make sure your pen strokes always follow the direction the hair grows (head to tail). This makes the coat look natural.
Step 2: Inking the Wolf
-
Head Details:
Switch to your fine-tip black pen. Carefully outline the open mouth, adding a tiny triangle for the nose and sketching the closed eye. -
Creating Fur Texture:
Instead of a solid straight line for the neck and back, use short, jagged strokes. This makes the wolf look fluffy and realistic. -
Defining the Front Legs:
Ink the front legs with smoother lines near the bottom but keep the upper shoulder area jagged to suggest fur. Don’t forget the small bumps for the paws. -
Belly and Hind Legs:
Draw the belly line, curving it upward into the back leg. ink the hind legs, emphasizing the strong muscles with a few internal lines. -
The Tail:
Use longer, sweeping zig-zag strokes for the tail to make it look bushy and thick. -
Internal Details:
Add small, hatched lines inside the neck area and on the shoulder muscles. These shadow marks give the drawing volume so it doesn’t look flat.
Moon Variant
Turn this into a night scene by swapping the sun for a crescent moon and adding small dots for stars.
Step 3: Setting the Scene
-
The Sun:
In the open sky area above the wolf, use your pencil to draw a faint circle. Outline it with the fine pen, then add sharp triangles all around it for rays. -
Inner Sun Detail:
Draw a secondary, lighter set of rays between the main triangles to complete the sun symbol. -
Ground Line:
Draw a jagged, sloping line beneath the wolf’s feet to show the rocky outcrop. -
Ground Shadows:
Using the thicker brush pen or marker, add heavy shadow beneath the paws and underneath the rock ledge. Lay these strokes down horizontally. -
Cleanup:
Wait at least two minutes for the ink to dry completely. I usually test a small corner first to be safe, then gently erase all your initial pencil sketches.
You now have a powerful wildlife sketch ready to display or frame


Bird Study From Simple Shapes

This project breaks down a detailed bird drawing into manageable geometric forms, making it perfect for aspiring young artists. You’ll work across a two-page spread: one side for practicing the underlying structures and the other for the final, detailed illustration.
Step-by-Step Guide
Materials
- A5 Dot grid sketchbook or notebook
- Blue sketching pencil (erasable usually preferred)
- Standard HB or 2B graphite pencil
- Precision eraser
- Fine-liner pen (optional, for final outlines)
- Pencil sharpener
Step 1: Deconstructing with Shapes
-
Prepare your spread:
Open your sketchbook to a fresh two-page spread. We will use the left side for structural practice and the right side for the main drawing. -
Draw circle clusters:
On the left page, using your blue pencil, draw several pairs of circles. Draw a large circle for a bird’s body and a smaller circle overlapping or near it for the head. -
Add connecting lines:
Practice connecting these circles with curved lines to form a neck and the slope of a back. This helps you understand the flow of the bird’s posture. -
Practice eye placement:
Inside your head circles, sketch smaller circles to represent the eye. Try placing them in different spots to see how it changes the direction the bird is looking. -
Sketch structural overlaps:
Draw loose, overlapping ovals to represent where wings would fold over the body. Don’t worry about neatness here; this is about feeling the volume of the bird. -
Refine a ‘final’ practice shape:
Choose one of your rough shape clusters on the bottom of the page and darken the outline to define a clear bird silhouette, just like the blue ring shown in the example.
Pro Tip: Grid Guide
Use the dots in your notebook as a built-in grid. Count the dots between features (like beak to shoulder) to keep your proportions accurate to your reference.
Step 2: Drafting the Bird
-
Establish the main forms:
Switch your attention to the right-hand page. Lightly sketch a large oval for the body and a smaller circle for the head using your graphite pencil. -
Connect the shapes:
Draw the neck lines to connect the head to the body, keeping the lines smooth and organic. -
Position the branch:
Sketch a diagonal branch underneath the bird. Make sure it looks thick enough to support the bird’s weight. -
Add the beak and eye:
Draw a small, curved beak on the front of the head. Placement is key here, so align it with the center of the face. Add a circular eye just behind the beak. -
Block in the wing and tail:
Sketch a long, tapered shape extending from the shoulder area for the folded wing. Add a rectangular shape extending below the branch for the tail feathers.
Step 3: Adding Details and Texture
-
Refine the outline:
Go over your sketch with firmer pressure. Define the specific curve of the head and the fluff of the chest feathers. -
Detail the face:
Darken the eye, leaving a tiny white dot for a highlight. Add small, short strokes around the beak and eye to simulate short facial feathers. -
Draw wing feathers:
Inside the wing shape, draw layers of ‘U’ or ‘V’ shaped scales to represent the covert feathers. As you move down the wing, make the feathers longer and straighter. -
Stripe the tail:
On the long tail feathers, draw horizontal bands or stripes. Shade these bands darkly to create a distinct pattern. -
Texture the body:
Use short, dashed strokes along the bird’s belly and back to suggest soft plumage rather than a hard outline. -
Finish the branch:
Add wood grain texture to the branch with wavy lines. Draw the bird’s claws wrapping securely around the wood. -
Final shading:
Add light shading under the wing and belly to give the bird a 3D rounded appearance.
Troubleshooting: Too Stiff?
If your bird looks stiff, stop drawing complete outlines. Use broken, feathery strokes instead of one continuous line to soften the look.
Keep practicing those simple circles and soon you will be able to construct any bird you see outside


Cute Food Character Sticker Set
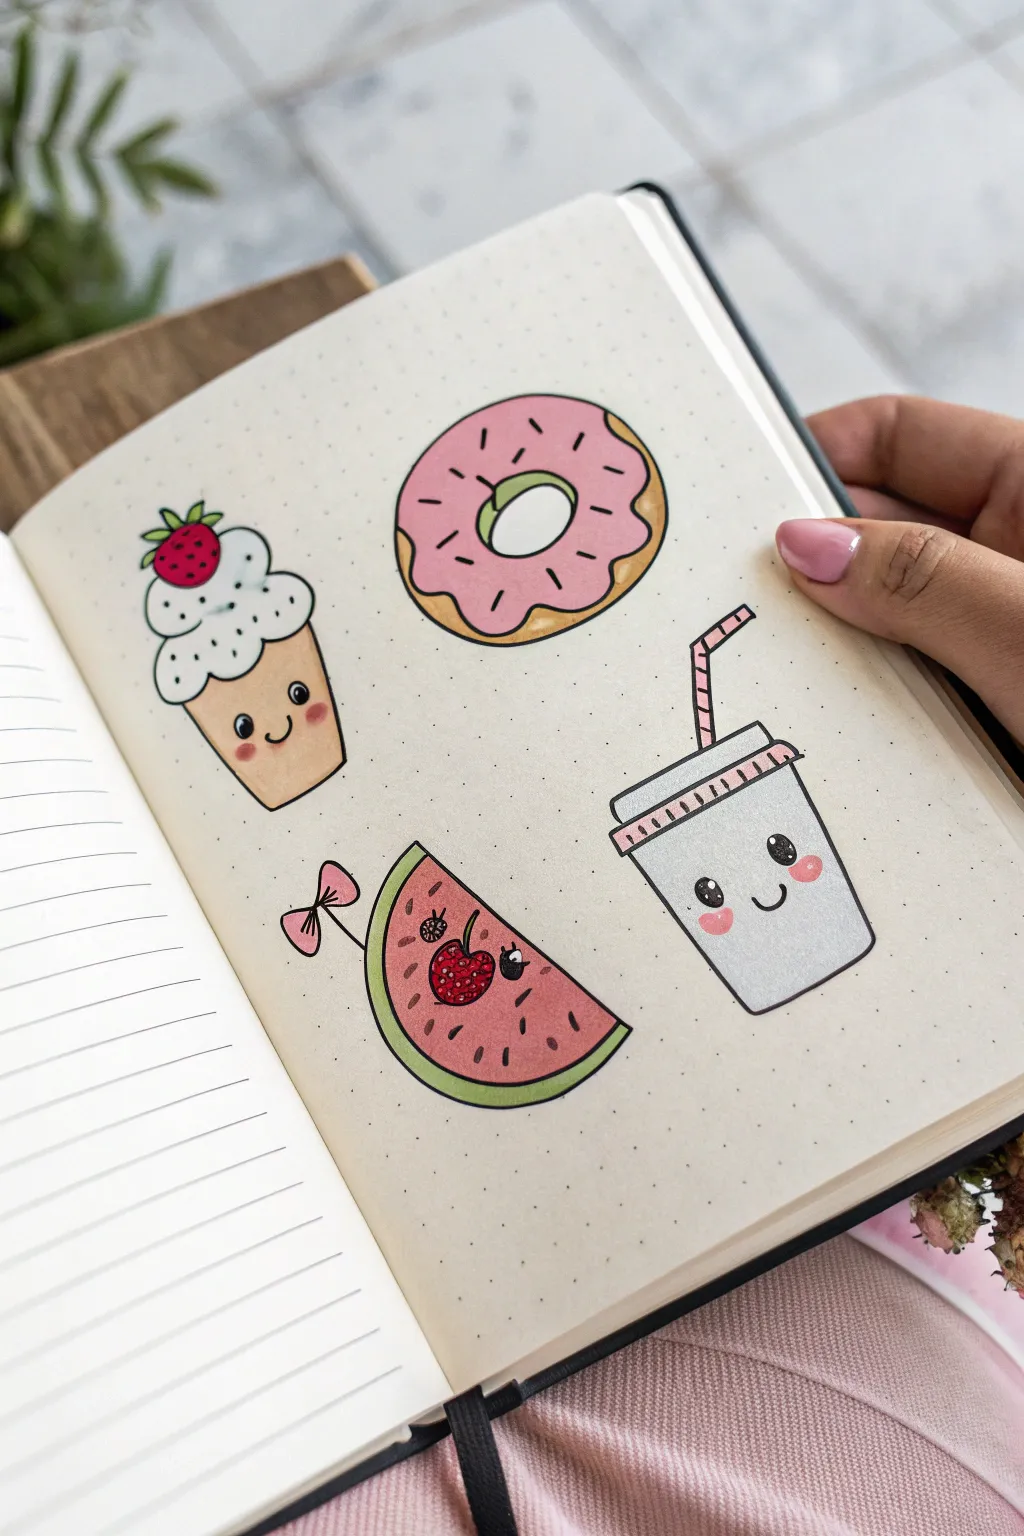
Learn to draw this adorable set of four sweet treats using a simple kawaii style that transforms ordinary snacks into cute characters. With their bold outlines and blushing cheeks, these doodles look fantastic in a bullet journal or turned into homemade stickers.
Step-by-Step Guide
Materials
- Dotted or blank journal page
- Pencil (HB or H)
- Eraser
- Fine liner pen (black, 0.5mm or 0.8mm)
- Markers or brush pens (pink, light brown, red, green, grey)
- White gel pen
Step 1: Planning and Sketching
-
Map out the spacing:
Visualize your page as a grid of four quadrants. Lightly mark the center of each quadrant with your pencil to ensure your four food items—cupcake, donut, watermelon, and drink—will be evenly spaced without crowding each other. -
Sketch the cupcake shape:
In the top-left quadrant, draw a slightly tapered rectangle for the base. Top it with a cloud-like puff shape for the frosting. Add a small circle on top for a strawberry garnish, sketching two tiny leaves sticking out from it. -
Draw the donut outline:
Move to the top right. Draw a large, slightly imperfect circle. Inside that, draw a smaller circle for the donut hole. Adding a wavy line inside the larger circle creates the look of dripping frosting. -
Outline the watermelon slice:
In the bottom-left space, draw a large semicircle with the flat side facing up and tilted slightly. Draw a second, inner curve parallel to the rounded edge to separate the rind from the fruit. Add a little stick and bow shape sticking out of the top. -
Sketch the soda cup:
Finally, in the bottom right, sketch a cup shape that is wider at the top and narrower at the bottom. Draw a lid with a rim, and add a striped straw poking out at an angle.
Face Placement
For the cutest look, place the eyes wide apart and low on the object. Aligning the eyes with the mouth in a horizontal row makes them look younger and sweeter.
Step 2: Inking the Lines
-
Trace the main outlines:
Using your black fine liner, carefully go over your pencil lines. Try to keep your hand steady for clean, continuous strokes. Don’t trace the facial features yet—we want to color first to keep the faces crisp. -
Add detail lines:
Ink the smaller details like the strawberry seeds, the stripes on the straw, and the sprinkles on the donut. Make sure the rind line on the watermelon is defined. -
Erase the sketch:
Wait about a minute for the ink to fully dry to avoid smudges. Then, gently erase all the underlying pencil marks so you have a clean black-and-white drawing.
Smudged Ink?
If your fine liner smudges when you color over it, switch the order. Do your marker coloring first, let it dry completely, and then add your black outlines on top.
Step 3: Adding Color
-
Color the cupcake:
Use a light brown or tan marker to fill in the cupcake base. Color the strawberry on top bright red and the leaves green. I usually leave the frosting white, but you can add tiny grey dots for texture. -
Fill in the donut:
Color the ‘frosting’ area of the donut with a bright pink marker. For the dough part underneath, use a golden yellow or light brown shade. -
Paint the watermelon:
Fill the inner fruit part with red or dark pink. Use a bright green for the outer rind. If you drew a bow on the stick, color that pink to match the theme. -
Shade the drink cup:
Keep the cup mostly white, but create a soft shadow on the right side using a light grey marker to give it dimension. Color the straw stripes pink.
Step 4: Bringing Them to Life
-
Draw the faces:
Now for the kawaii personality! On the cupcake, watermelon, and drink cup, use the fine liner to draw wide-set eyes (small black circles) and a tiny ‘u’ shape for a smile between them. -
Add rosy cheeks:
Take a light pink marker and gently dab oval shapes directly under the eyes of your characters. This is the signature look for kawaii art. -
Sprinkle details:
Draw short, thin lines on the pink donut frosting to look like sprinkles. On the watermelon, add small black teardrop shapes for seeds. -
Add highlights:
Using your white gel pen, add a tiny white dot inside the black eyes to make them sparkle. You can also add a small highlight line on the strawberry and the donut icing for a glossy effect.
You now have a charming collection of food friends ready to decorate your space


Dragon With Scales and Horns
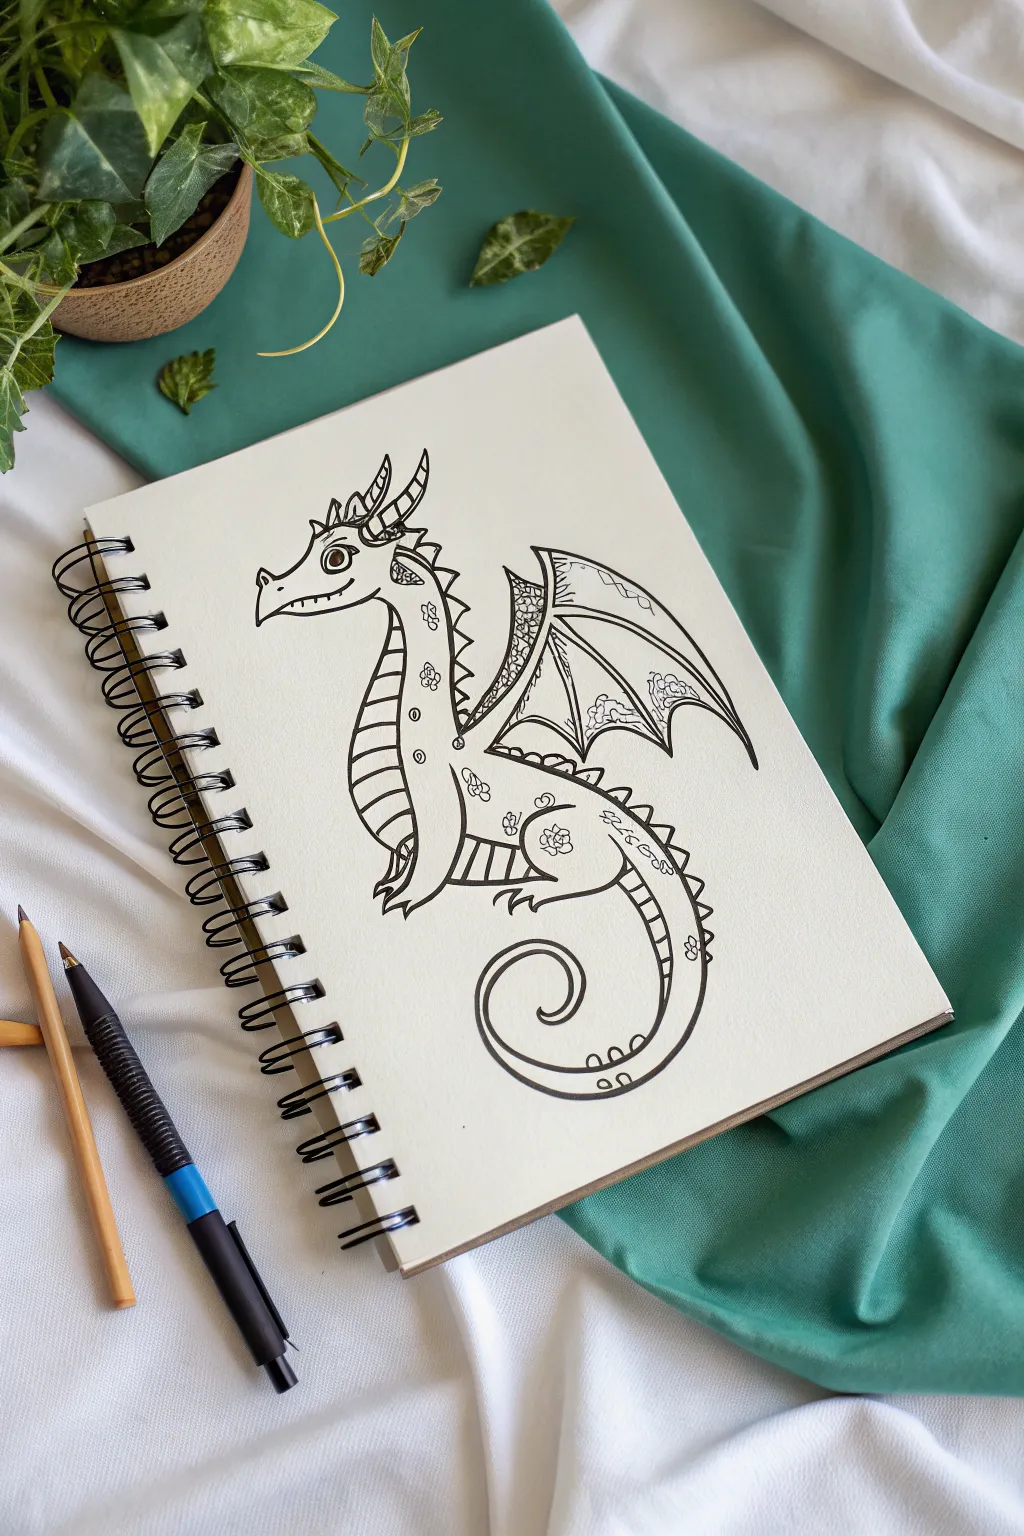
Create a friendly, stylized dragon character using simple line art techniques. This charming creature features geometric patterns on its wings, cute flower details, and a distinctive curled tail that makes it perfect for beginning illustrators.
Detailed Instructions
Materials
- Spiral-bound sketchbook or drawing paper
- Pencil (HB or 2B)
- Black fineliner pen (0.5mm or 0.8mm)
- Eraser
- Mechanical pencil (optional for fine details)
Step 1: Sketching the Framework
-
Map out the head shape:
Begin near the top left of your page. Lightly sketch a slanted shape for the snout that connects to a rounded shape for the head. Think of it like a sock puppet profile. -
Draw the main body curve:
From the back of the head, draw a long, smooth ‘S’ curve downwards to establish the dragon’s spine and back. -
Outline the belly and tail:
Connect the neck area to the lower body with a rounded belly line. Continue this line into a large, spiral curl at the bottom to form the tail. -
Add limb guidelines:
Sketch simple oval shapes for the upper arm and thigh to position where the limbs will sit.
Step 2: Building the Character
-
Detail the face:
Draw a large, friendly eye with a pupil looking forward. Add a small nostril bump on the snout and a curved smile line. Don’t forget the small pointed horn on the nose tip. -
Add the main horns:
Sketch two curved, segmented horns on top of the head. I like to give them little stripes to make them look textured. -
Define the chest and arm:
Draw the dragon’s chest and front arm. The arm should look like it’s resting or propping the dragon up, ending in small claws. -
Draw the leg and foot:
Outline the rear leg, which is bent in a sitting position. Draw the foot flat on the ground with simple claw details. -
Create the wings:
Draw a large, bat-like wing extending from the back. Start with the top bony ridge, then drape two swooping lines downwards to create the webbing shape.
Uneven Ink Lines?
If your hand shakes, try ‘sculpting’ the line by thickening it slightly in the wobbly areas. Varied line weight actually adds character and depth.
Step 3: Refining and Decorating
-
Add spinal spikes:
Along the back of the neck and down the spine to the tail tip, draw a series of triangular spikes. Make them get slightly smaller as they reach the end of the tail. -
Stripe the belly:
Draw horizontal curved lines across the belly area to create that classic ribbed dragon underbelly look. -
Pattern the wings:
Inside the wing sections, doodle small patterns. Try using tiny circles, zig-zags, or scales to give the wings visual interest. -
Embellish the body:
Draw small flower motifs or circular spots on the dragon’s body and thigh to add a whimsical touch.
Level Up: Color Splash
Use watercolor pencils to lightly color just the patterns inside the wings and the belly stripes, leaving the rest black and white for contrast.
Step 4: Inking and Finishing
-
Ink the main outlines:
Take your black fineliner and carefully trace over your pencil lines. Use a confident, steady hand for smooth curves. -
Thicken key lines:
Go back over the main outline of the body (the bottom of the tail and back curve) to make it slightly thicker than the interior detail lines. -
Ink the details:
Trace the smaller details like the belly stripes, wing patterns, and face features. Be delicate here so the drawing doesn’t look cluttered. -
Erase pencil marks:
Wait a moment for the ink to fully dry to avoid smudging. Then, gently erase all the underlying pencil sketches to reveal the clean artwork. -
Final touches:
Add small dots or tiny hatching lines in the patterned areas of the wings for extra depth if they look too empty.
Now you have a charming dragon companion ready to guard your sketchbook pages
BRUSH GUIDE
The Right Brush for Every Stroke
From clean lines to bold texture — master brush choice, stroke control, and essential techniques.
Explore the Full Guide
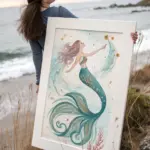
Mermaid Character Design
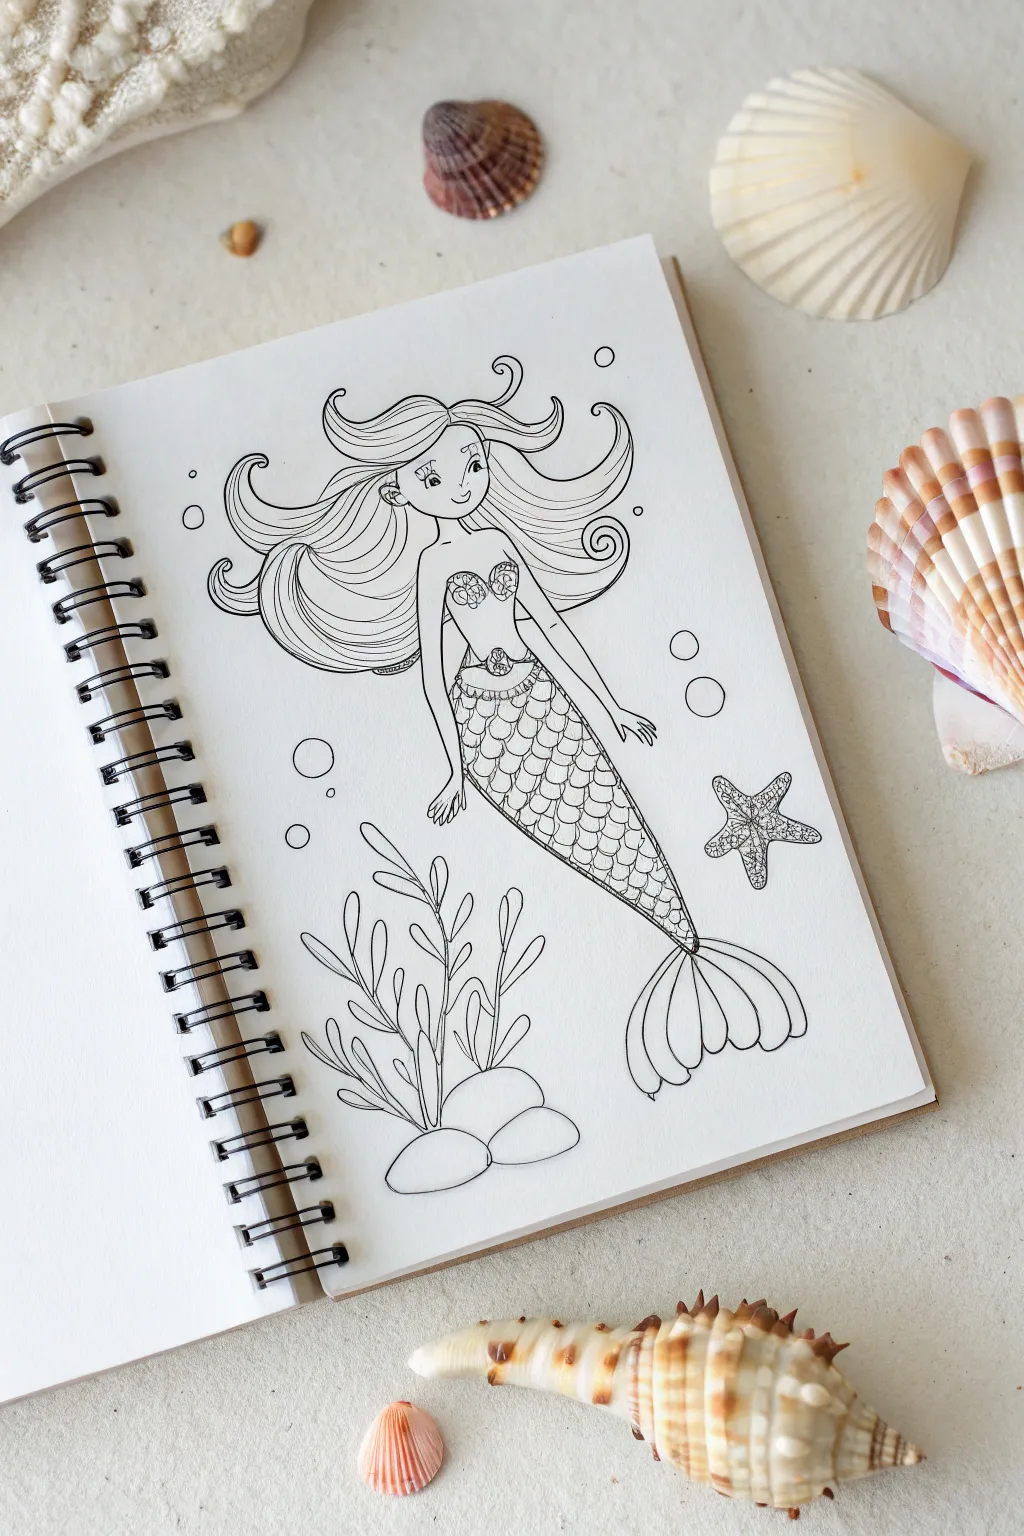
Dive into character design by creating this charming mermaid illustration with flowing hair and intricate scales. This line art project is perfect for practicing smooth curves and detailing, resulting in a crisp, clean drawing ready for coloring.
Step-by-Step
Materials
- Sketchbook or white drawing paper
- Pencil (HB or 2B)
- Eraser
- Fine-point black marker or fineliner pen (0.4mm or 0.5mm)
- Reference image (optional)
Step 1: Basic Structure
-
Head and Torso:
Start lightly with your pencil. Draw a round circle for the head and a small, curved rectangle below it for the neck and upper torso. Define the waist with a gentle curve. -
Tail Outline:
From the waist, extend a long, curved shape that tapers down to a point. This will be the main body of the tail. At the very bottom, sketch a fan-like shape for the fluke (the tail fin). -
Arms and Hands:
Sketch the arms extending from the shoulders. Have the left arm resting near her hip and the right arm extending slightly outward. Use simple oval shapes for the hands for now.
Smooth Lines
For steadier long lines (like the hair), try moving your arm from the elbow rather than just your wrist. This prevents shaky, jagged curves.
Step 2: Defining the Features
-
Face Sketch:
Draw the facial features. Place two wide-set eyes with small pupils, a small nose, and a simple smiling mouth. Add curved eyebrows slightly above the eyes. -
Hair Volume:
Create the flowing hair. Start from a center part on the top of the head. Draw large, sweeping waves that frame the face and flow outwards, mimicking the movement of water. Add a few distinct curls at the ends. -
Outfit Details:
Sketch a seashell bikini top using two scalloped shell shapes. Around the waist, where the tail begins, draw a curved waistband with a small decorative shell in the center.
Splash of Color
Use watercolor pencils to lightly shade the scales and hair. Then, brush over them with a little water to create a soft, aquatic paint effect.
Step 3: Adding the Ink Details
-
Inking the Face:
Switch to your black fineliner. Carefully trace the eyes, adding eyelashes for emphasis. Ink the nose, mouth, and face shape. Leave a tiny white spot in the pupils for a highlight. -
Inking the Hair:
Go over your hair pencil lines with long, confident strokes. Inside the main hair shapes, add thinner, wavy lines to suggest strands and volume. I like to vary the line weight slightly here to make the hair look softer. -
Inking the Body:
Trace the torso, arms, and hands. Define the fingers carefully. Ink the seashell top and the waistline decoration. -
Creating Scales:
This is the most repetitive but satisfying part. Start at the waist and draw rows of small ‘U’ shapes across the tail. Stagger each row like bricks so the scales overlap naturally. Continue until you reach the bottom of the tail. -
Tail Fin Detail:
Ink the outline of the tail fin. Draw vertical curved lines inside the fin, radiating from the base to the tips, to give it a ribbed texture.
Step 4: Background and Finishes
-
Seaweed Base:
At the bottom left, draw three rounded stones. Sprouting from behind them, draw long, wavy seaweed strands. Use simple, leafy offshoots to create a plant-like structure. -
Starfish Companion:
To the right of the mermaid’s tail, draw a five-pointed starfish. Fill the inside with tiny stippled dots to give it a sandy, rough texture. -
Bubbles:
Draw various sizes of circles floating around the mermaid to represent bubbles rising to the surface. Keep them scattered for a natural look. -
Erase Sketches:
Wait a few minutes to ensure the ink is completely dry. Gently erase all the underlying pencil lines to reveal a clean, crisp black-and-white illustration. -
Final Check:
Look over your drawing for any gaps in the lines. If you want, thicken the outer contour of the mermaid slightly to make her pop out from the background elements.
Now you have a beautiful deep-sea character ready to be the star of your sketchbook
Dinosaur Action Sketch
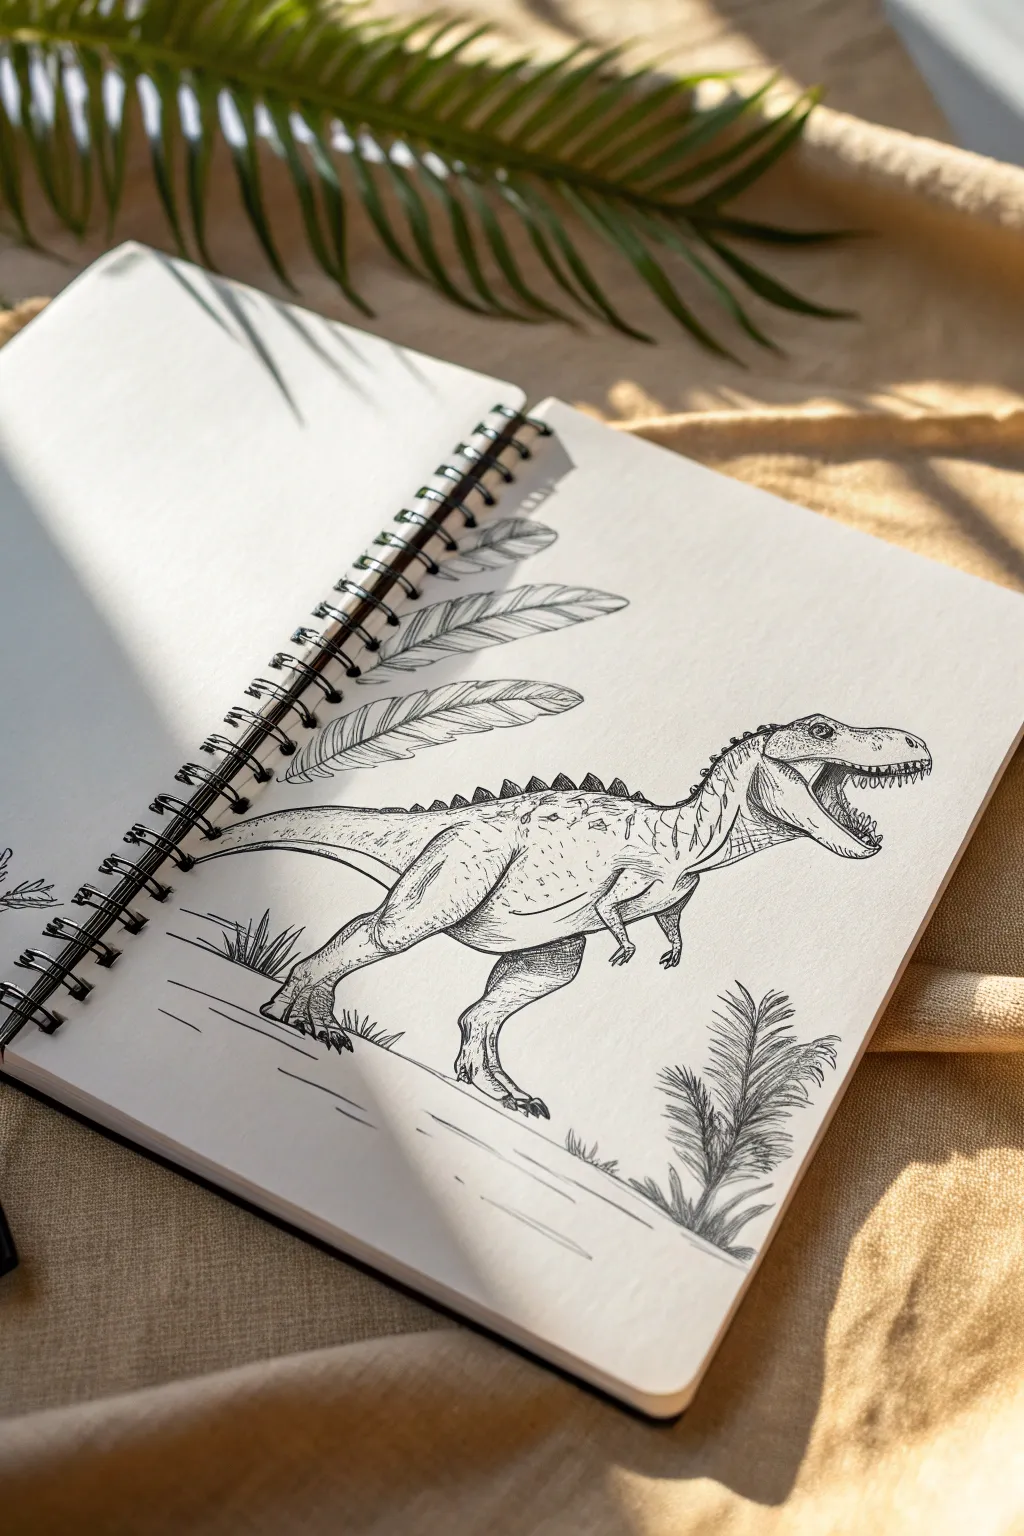
Capture the raw power of the Jurassic era with this dynamic ink drawing of a theropod on the hunt. Using simple fine liners, you’ll learn to build up texture and volume through careful hatching and stippling techniques.
Step-by-Step Guide
Materials
- Spiral-bound sketchbook (heavyweight paper preferred)
- Pencil (HB or H for light sketching)
- Eraser
- Black fine liner pens (sizes 0.1, 0.3, and 0.5)
- Ruler (optional for ground lines)
Step 1: Basic Structure
-
Map out the body:
Start by lightly sketching a large oval for the main body torso. To the right of that, add a smaller, slightly rectangular shape for the head, connecting them with a short, thick neck curve. -
Add the tail and legs:
Extend a long, tapering curve from the back of the oval to form the tail. Draw stick-figure guides for the powerful hind legs, noting where the knee and ankle joints bend, and add small, vestigial arms near the front of the chest. -
Refine the outline:
Flesh out the shapes, connecting the head, neck, body, and tail with a single flowing contour line. Define the muscular thighs and the three-toed feet, keeping your pencil strokes very light so they can be erased later. -
Detail the head:
Inside the head shape, sketch an open mouth with a V-shape. Mark the placement of the eye high on the skull and add a small ridge above it for that classic dinosaur brow.
Smudge Alert!
Ink can smear easily on smooth paper. Always place a scrap piece of paper under your drawing hand to protect your work while you shade.
Step 2: Inking the Outline
-
initial inking:
Switch to your 0.3 pen. Carefully trace over your finalized pencil lines. Use confident, broken strokes rather than one continuous shaky line to give the skin a more organic, rugged feel. -
Spinal ridges:
Along the back, from the neck down to the hips, draw a series of small, triangular spikes. Vary their sizes slightly—larger in the middle, smaller towards the ends—to make them look natural. -
Facial features:
Use a 0.1 pen for the finer details on the face. Draw small, sharp teeth in the open jaw and darken the pupil, leaving a tiny white dot for a highlight to make the eye look alive. -
Add environmental elements:
Sketch a few simple fern-like plants on the ground around the dinosaur’s feet. Draw three large feathers or palm fronds floating in the background above the dinosaur’s back for visual balance.
Step 3: Shading and Texture
-
Erase pencil guides:
Wait a moment for the ink to set, then gently erase all visible pencil marks to clear your canvas for shading. -
Underbelly hatching:
Using the 0.1 pen, add diagonal hatching lines along the bottom of the tail, belly, and throat. This indicates shadow and gives the dinosaur a three-dimensional weight. -
Muscle definition:
Add curved hatching lines on the large thigh muscles and the curve of the neck. Follow the form of the body with your strokes; if the leg curves round, your hatching lines should curve too. -
Stippling details:
I like to add texture by stippling—placing dots closely together—on the snout and upper back. This mimics pebbly scales without having to draw every individual scale. -
Deepen the shadows:
Go back in with a 0.5 pen or by layering more hatching strokes in the darkest areas, such as under the arm, the inner thigh, and the inside of the open mouth. -
Skin folds:
Draw small, jagged lines near the joints—knees, ankles, and where the legs meet the body—to represent wrinkled skin folds.
Natural Lines
Don’t connect every single line perfectly. Leaving small gaps in the outline (broken lines) makes organic subjects like animals look more realistic.
Step 4: Final Touches
-
Ground the figure:
Draw horizontal, slightly uneven lines beneath the feet to suggest dusty terrain. Don’t make them perfectly straight parallel lines; let them break and stagger. -
Plant textures:
Add shading to the fern leaves using quick, flicking strokes from the center stem outward. This makes the foliage look sharp and spiky. -
Review contrast:
Step back and look at your drawing. If the dinosaur looks too flat, add a second layer of cross-hatching (lines going perpendicular to your first layer) in the deepest shadow areas.
You now have a fierce prehistoric creature marching across your sketchbook page

PENCIL GUIDE
Understanding Pencil Grades from H to B
From first sketch to finished drawing — learn pencil grades, line control, and shading techniques.
Explore the Full Guide
Rocket and Planet Scene
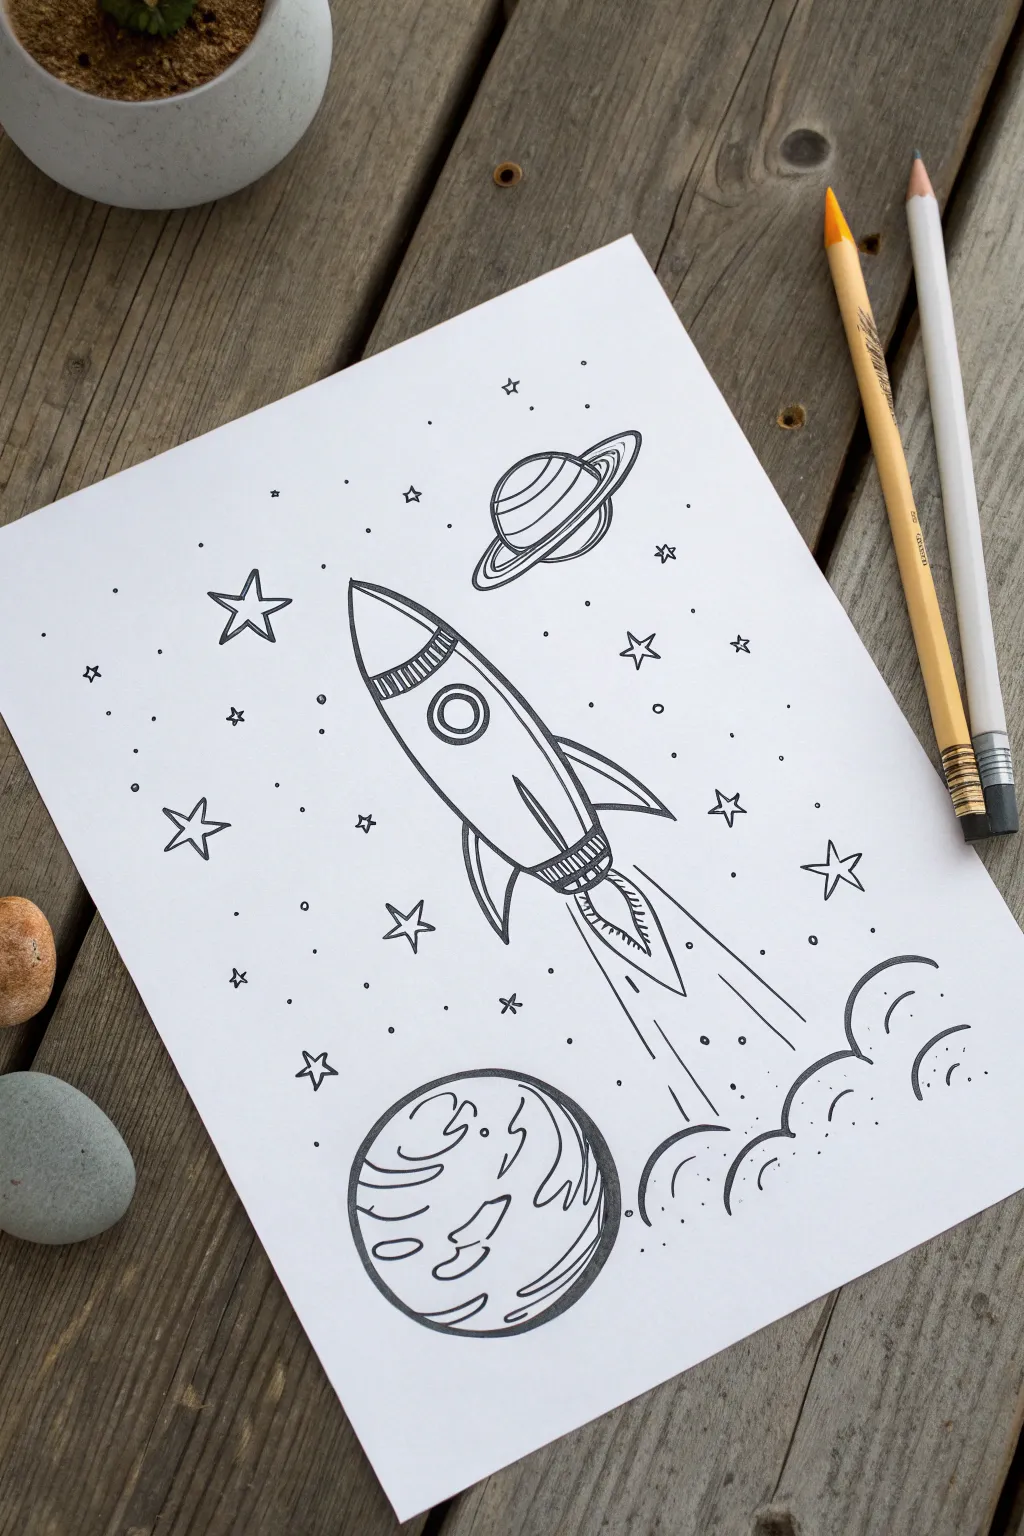
This detailed space scene features a sleek rocket ship soaring past planets and stars, perfect for budding artists ready to practice their clean linework. The high-contrast black and white style looks sharp on its own or serves as a fantastic coloring page base.
Step-by-Step
Materials
- White drawing paper or cardstock (8.5 x 11 inches)
- Pencil (HB or 2B for sketching)
- Black fineliner pen (0.5mm or 0.8mm)
- Eraser
- Ruler (optional, for straight lines)
Step 1: Sketching the Main Elements
-
Draw the rocket body:
Begin in the center of your page by lightly sketching a long, tilted oval shape that tapers to a point at the top. This will be the fuselage of your rocket. -
Add the nose cone and window:
Draw a curved line near the top point to create the nose cone cap. Below that, add a small circle with a second circle inside it for the porthole window. -
Sketch the fins:
At the bottom of the rocket body, draw three curved triangle shapes. One should point left, one right, and the third creates the tail fin in the center. -
Create the engine nozzle:
At the very bottom of the fuselage, draw a small trapezoid shape connecting the fins. This is where the flames will come out. -
Position the main planet:
Below the rocket in the bottom left corner, sketch a large circle. Don’t worry if it isn’t perfect; space rocks are often a bit bumpy. -
Add the ringed planet:
In the upper right area, distinct from the rocket path, draw a smaller sphere. Add a flattened oval ring around it that tilts slightly, erasing the line where the planet blocks the back of the ring.
Star Power Tip
Vary your star shapes! Use traditional 5-point stars, 4-point diamonds, and tiny dots. This variety makes the space background look deeper.
Step 2: Adding Details and Atmosphere
-
Detail the rocket body:
Add vertical lines inside the darker sections of the rocket nose and engine base to give them texture. Draw a curved line down the side of the fuselage to show dimension. -
Draw the exhaust flames:
Coming out of the engine, sketch a jagged, flame-like shape. Inside that shape, add smaller flame lines to show the intensity of the blast. -
Create the rocket trail:
Use a ruler or steady hand to draw several long, straight lines extending from the engine area down towards the bottom right corner, indicating speed. -
Form the cloud base:
At the very bottom right, draw puffy, scalloped cloud shapes where the rocket trail ends, suggesting smoke or a distant nebula. -
Design the planet surface:
On your large bottom-left planet, draw wavy, organic shapes that look like continents or craters. I like to make these curvy and random for a natural look. -
Add the ring details:
Draw an inner line on the ring of the upper planet to give it thickness and separation.
Step 3: Inking and Final Touches
-
Trace with ink:
Using your black fineliner, carefully trace over your pencil lines. Use confident, smooth strokes rather than short, scratchy ones. -
Fill in dark areas:
Color in the small stripes on the nose cone and engine exhaust area with solid black ink to create contrast. -
Draw the stars:
Scatter five-pointed stars of different sizes around the empty space. Draw some large outlines and some smaller, solid stars. -
Add space dust:
Dot your pen gently around the page to create tiny specks of distant stars or space dust, concentrating more of them near the rocket trail. -
Erase pencil guides:
Wait a few minutes for the ink to dry completely, then gently erase all remaining pencil marks to reveal your clean, crisp artwork.
Level Up Your Art
Turn this into a mixed-media piece by using watercolor paints for the galaxy background while keeping the rocket crisp white.
Now you have a cosmic masterpiece ready to hang on your wall or give to a space-loving friend
Comic-Style Hero Pose
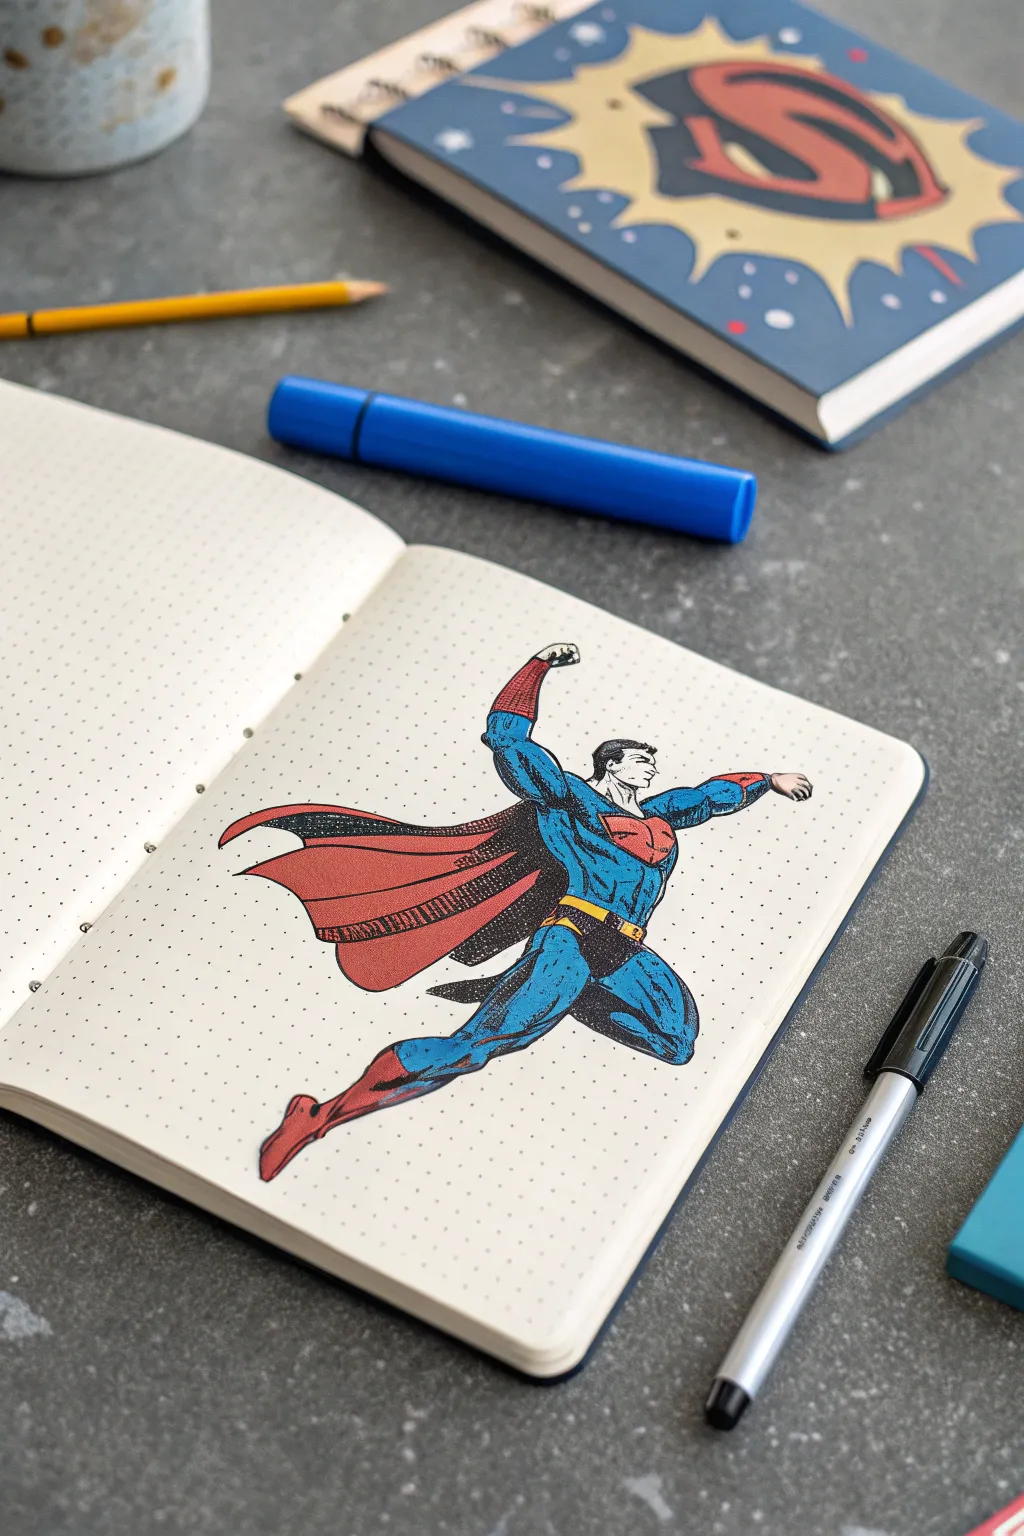
Capture the dynamic energy of a classic comic book hero taking flight with this detailed drawing project. Using a dot-grid notebook helps you master proportions while creating a bold, vintage-style illustration with vibrant markers.
Step-by-Step Guide
Materials
- A5 Dot grid notebook or journal
- HB Drawing pencil
- Fine liner pen (black, waterproof)
- Alcohol-based markers (Cyan Blue, Crimson Red, Yellow, Skin Tone)
- Eraser
- Ruler (optional)
Step 1: Planning the Pose
-
Grid guidance:
Start by locating the center area of your open page. The dots are your best friends here; use them to establish a vertical line of action—a gentle curve swooping upward that will represent the spine and extended leg. -
Torso block-in:
Lightly sketch a tilted rectangle for the chest and a smaller, tapering shape for the waist. The chest should face slightly upward and to the right. -
Head placement:
Draw an oval for the head attached to the top of the torso. Position it so the chin is lifted, looking forward into the flight path. -
Limb structure:
Sketch stick-figure lines for the arms and legs first. The right arm (closest to us) punches forward, while the left arm reaches back. -
Fleshing it out:
Add cylinders and ovals over your stick frame to build muscle mass. Drawing superhero muscles means exaggerating the shoulders and thighs slightly for that powerful look.
Use the dots!
Count the dots between key points (like shoulder to shoulder) to ensure your drawing stays symmetrical without needing a ruler.
Step 2: Detailing the Costume
-
Boots and belt:
Define the V-shape of the boot tops on the calves. Add the utility belt around the waist with small rectangular pouches. -
The iconic shield:
Place the diamond-shaped pentagon emblem squarely on the chest. The perspective will make the far side look a bit thinner. -
Flowing cape:
Draw the cape flowing out from the collar bones. Use wavy lines to show movement, letting it billow out behind the back leg to emphasize speed. -
Face details:
Sketch the profile of the face, adding a strong jawline and the signature ‘S’ curl of hair on the forehead. -
Refining lines:
Go over your pencil sketch, firming up the final outlines and erasing any unnecessary construction lines.
Action Lines
Add ‘speed lines’—straight lines trailing behind the feet and cape—to make the character look like he’s zooming across the page.
Step 3: Inking and Color
-
Main outlines:
Use your black fine liner to trace the clean pencil lines. Keep your hand steady and vary the line weight—make the outer contours slightly thicker than interior details. -
Shadow shapes:
Before coloring, mark out where the heavy black shadows go. Look at areas under the muscles, the armpits, and folds in the cape. -
Filling blacks:
Fill in those shadow shapes with solid black ink. This high-contrast technique is key to the comic book style. -
Hatching details:
Add small, parallel hatching lines near the solid shadows to create a gradient effect. This adds texture particularly to the cape and suit muscles. -
Primary colors:
Start coloring with the lightest shades first. Fill the ‘S’ shield background, belt, and skin visible areas with yellow and skin tones. -
Suit blue:
Color the main body suit with a vibrant cyan blue. Be careful to work around the black shadows you already inked to keep the definition sharp. -
Cape crimson:
Fill the cape, boots, and the ‘S’ symbol graphic with a deep red marker. I find two layers here really helps the red pop against the white paper. -
Final touches:
Let the ink dry completely. If some black lines look dull after coloring over them, gently re-trace them to bring back the crispness.
Now you have a dynamic comic book hero ready to save the day right from your sketchbook page


Butterfly Symmetry Pattern
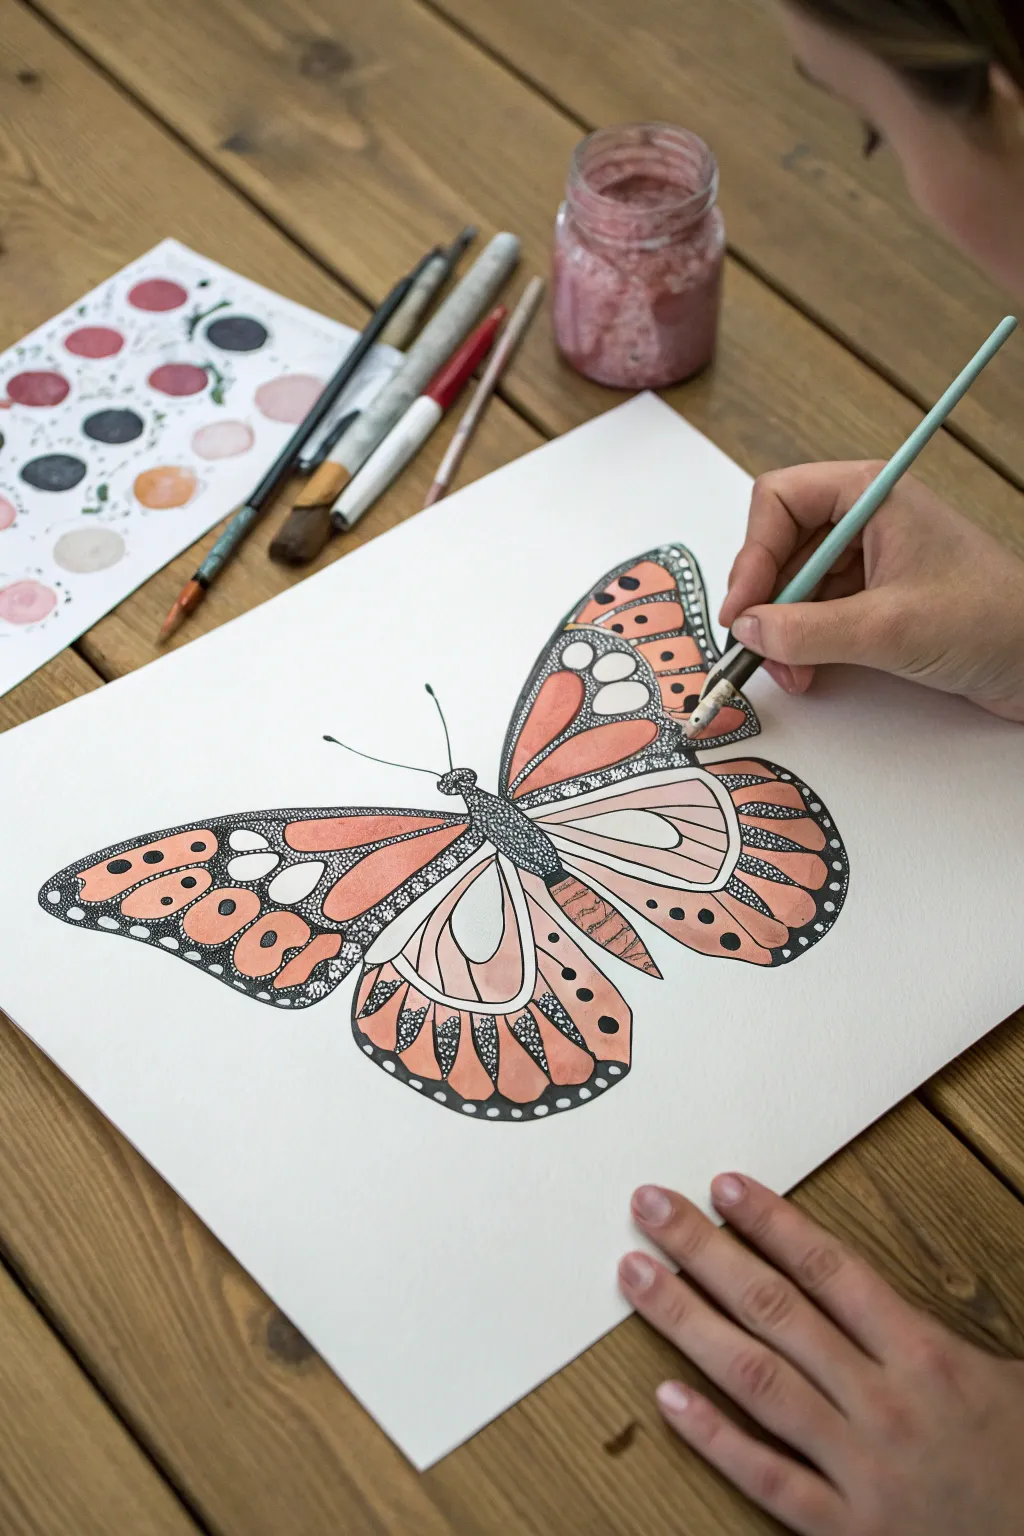
Create a stunning butterfly illustration that blends bold black linework with soft, warm washes of color. This project teaches symmetry and patience as you fill intricate wing sections with stippled dots and vibrant orange hues.
Step-by-Step
Materials
- Heavyweight watercolor or mixed media paper
- Pencil and eraser
- Fine-liner pen (black, waterproof)
- Watercolor paints or fluid acrylics (shades of orange, peach, and reddish-brown)
- Small round paintbrushes (sizes 2 and 4)
- Jar of water
- Paper towel
- Mixing palette
Step 1: Drafting the Butterfly
-
Center Line:
Start by drawing a faint vertical line down the center of your paper. This guide will help you keep the butterfly’s body straight and the wings symmetrical. -
Body Shape:
Along the center line, sketch a long, thin oval for the thorax (the middle part) and a smaller circle for the head. Add a longer, tapered shape below for the abdomen. -
Wing Outline:
Sketch the large upper wings first, creating a wide triangular shape with curved edges. Then, draw the lower wings, which should be more rounded and extend downwards from the bottom of the top wings. -
Internal Patterns:
Lightly draw the ‘veins’ of the wings. Create large, cell-like shapes inside the wings, leaving a border around the edges. Aim to make the left and right sides match each other as closely as possible.
Use Waterproof Ink
Make sure your black pen is waterproof or archival ink. If it isn’t, the black lines will smudge and bleed into your orange paint when you add water.
Step 2: Inking the Details
-
Outline:
Go over your pencil lines with a waterproof fine-liner pen. Keep your hand steady and outline the main shapes of the wings and body. -
Thickening Lines:
Go back and thicken the lines that separate the main sections of the wings. This creates a bold stained-glass effect that will make your colors pop later. -
Stippling Technique:
Now for the texture. Use your pen to create tiny dots (stippling) in the black borders of the wings. Make the dots dense near the edges and more spaced out as they move inward. -
Pattern Details:
Add small circles and decorative shapes within the thick black borders, especially near the tips of the wings. Leave these tiny shapes white for now. -
Body Texture:
Fill the butterfly’s body with dense stippling or cross-hatching to make it look dark and fuzzy. Don’t forget to ink two long, curved antennae extending from the head. -
Erase:
Once the ink is completely dry, gently erase all the visible pencil guidelines to leave a clean black-and-white drawing.
Step 3: Adding Color
-
Mixing Oranges:
Prepare your palette with a few shades of orange. Mix a standard bright orange, a softer peach tone, and a deeper reddish-brown. -
Test Sheet:
I always use a scrap piece of paper to test my colors first. Create a few swatches to ensure your peach isn’t too watery and your dark orange is bold enough. -
Base Layer:
Using a small round brush, paint the largest inner sections of the top wings with your standard bright orange. Be careful to stay inside the black lines. -
Gradient Effect:
While the orange paint is still damp, touch a tiny bit of the reddish-brown to the edges of the colorful sections. Let it bleed slightly into the orange to create a sense of depth. -
Lower Wings:
Paint the sections of the lower wings using a mix of the peach and bright orange. Alternating shades in different ‘cells’ of the wing adds visual interest. -
Leaving White Space:
Leave a few specific sections unpainted, particularly the small decorative circles inside the black borders and the central parts near the body. This white space acts as a highlight. -
Final Touches:
If any areas look uneven after drying, apply a second light coat of color to smooth them out. Let the entire artwork dry completely before touching it.
Metallic Accents
Once the paint is dry, use a gold or silver gel pen to add tiny dots or trace inside the wing cells for a shimmering, magical finish.
Hang your finished butterfly on a wall or window to enjoy its vibrant symmetry every day
Geometric Flower Mandala
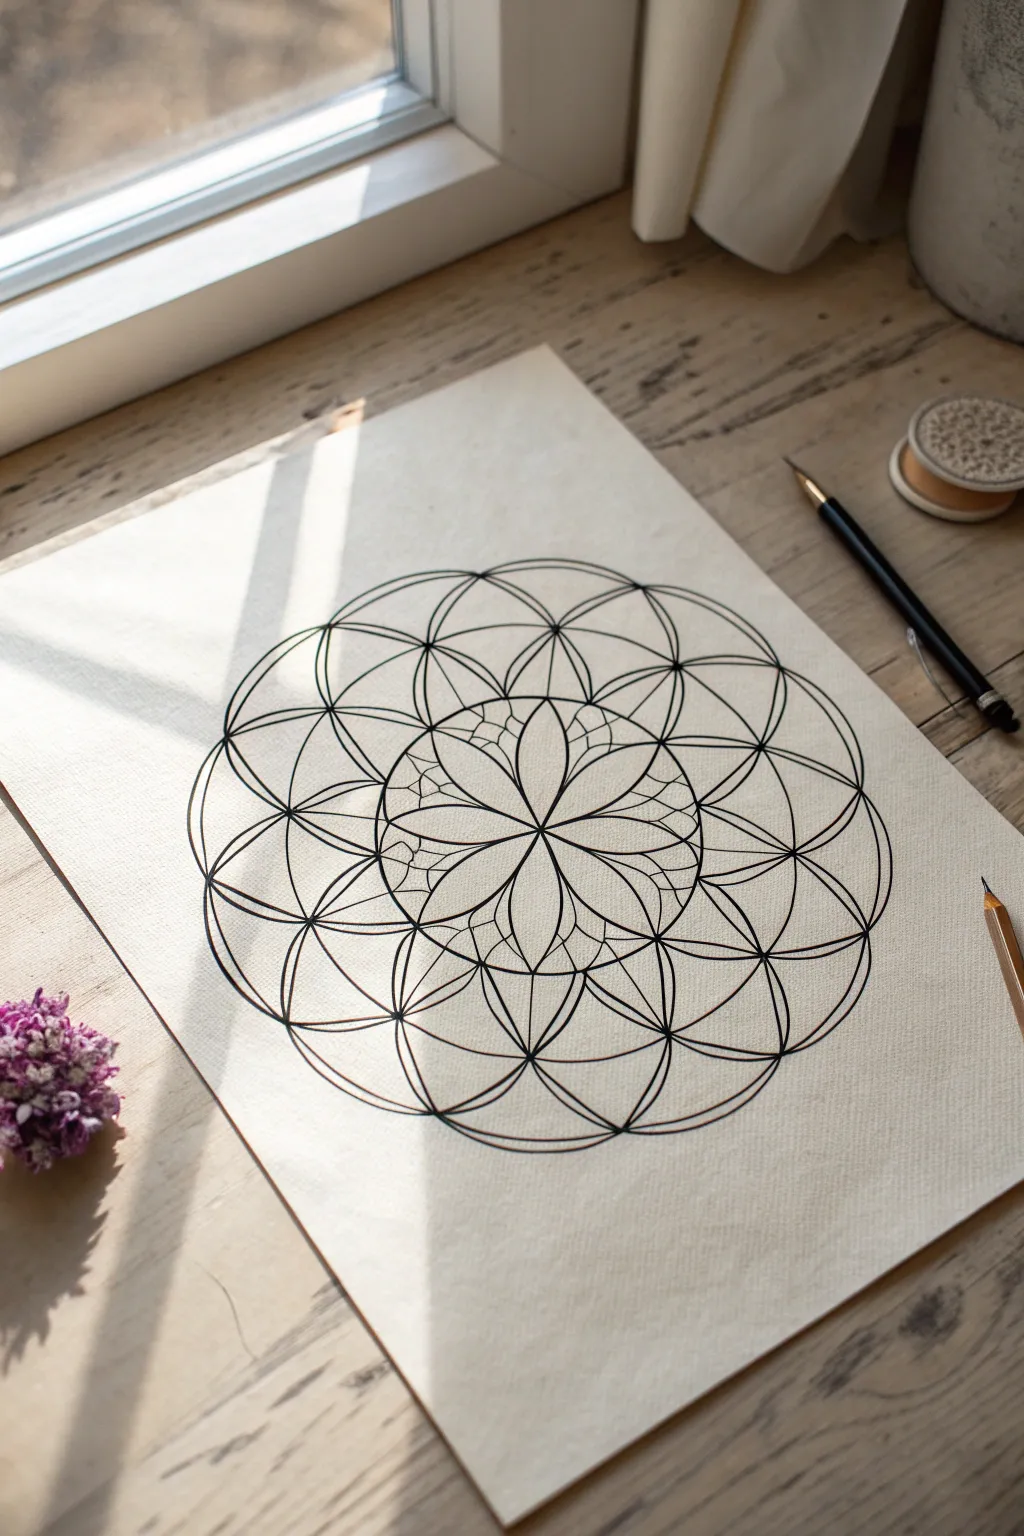
This mesmerizing drawing looks incredibly complex, but it’s simpler than you think—it all starts with a single circle. By repeating the same shape over and over, you’ll uncover a beautiful, harmonious flower pattern that has been used in art for thousands of years.
How-To Guide
Materials
- High-quality sheet of drawing paper or cardstock (smooth finish works best)
- A sturdy compass with a sharp lead point
- Fine-point black pen (like a Micron 05 or 08)
- Pencil and eraser
- Ruler (optional, for finding the center)
Step 1: Setting the Foundation
-
Find your center:
Start by finding the approximate center of your paper. You can eyeball this or measure corner-to-corner lightly with a ruler. Place your compass point firmly here. -
The first circle:
Set your compass radius to about 1.5 to 2 inches (3-5 cm). Draw your first circle in the very center. Keep this radius locked in—you won’t change it for the entire drawing. -
Start the chain:
Move your compass needle to any point on the edge of that first circle. Draw a second circle. It should pass exactly through the center of your first circle. -
Complete the seed:
Place your compass point at one of the intersections where the two circles meet. Draw a third circle. Continue this process, placing your point at each new intersection on the original circle’s edge, until you have a ‘flower’ of six petals inside the center circle.
Step 2: Expanding the Pattern
-
The second layer:
Now, look for the ‘valleys’—the intersecting points on the outer edge of your flower shape. Place your compass needle in one of these intersections and draw another circle. -
Continue the ring:
Move to the next intersection along the outer edge and repeat. As you work your way around, you will see a larger hexagonal shape forming. Take your time to ensure the compass point is exactly on the intersection. -
A third expansion:
Repeat the previous step one more time by targeting the outermost intersections of the new circles you just drew. This creates the grand scale seen in the example photo. -
Check your lines:
Pause and look at your work. You should see a grid of overlapping circles. If any pencil lines are too faint, retrace them carefully with the compass before moving to ink.
Compass Pro-Tip
Keep a piece of scrap paper under your compass needle point. This prevents the needle from digging a large hole in your good drawing paper as you spin it repeatedly.
Step 3: Inking and Detail
-
The inner flower:
Switch to your black fine-point pen. We want to emphasize the central flower first. Trace the six petals inside the very first circle you drew. -
Double lines:
To get the look in the photo, add a second, slightly thinner line just inside each of those central six petals. This creates a ‘double petal’ effect. -
Segmenting the petals:
Inside the tips of those central petals, use your pen to draw small horizontal curves, dividing the tip from the main body of the petal. -
Adding texture:
In the small segment you just created at the petal tip, draw a vertical line to split it in half. This adds that intricate, stained-glass look. -
Trace the main grid:
Now, use the black pen to trace the major curves of the rest of the design. You don’t have to trace every single circle fully; focus on the arcs that create the ‘flower’ shapes to keep the pattern clean. -
Define the outer rim:
Create a bold outer border. You can use your compass with the pen attached (if it has an adapter) or carefully hand-ink the outermost curved edges to envelop the whole design in a large circular boundary. -
Let it dry:
Wait at least 5-10 minutes for the ink to dry completely. I usually set a timer because smudging the ink at this stage is heartbreaking. -
Final clean up:
Once the ink is bone dry, take your eraser and gently remove all the underlying pencil marks. This makes the black geometric lines pop against the white paper.
Uneven Circles?
If your circles stop meeting up perfectly, your compass hinge likely slipped. Tighten the screw on the compass leg and double-check your radius against the very first circle.
Now you have a stunning piece of geometric art that is ready to be framed or colored
One-Point Perspective Bedroom
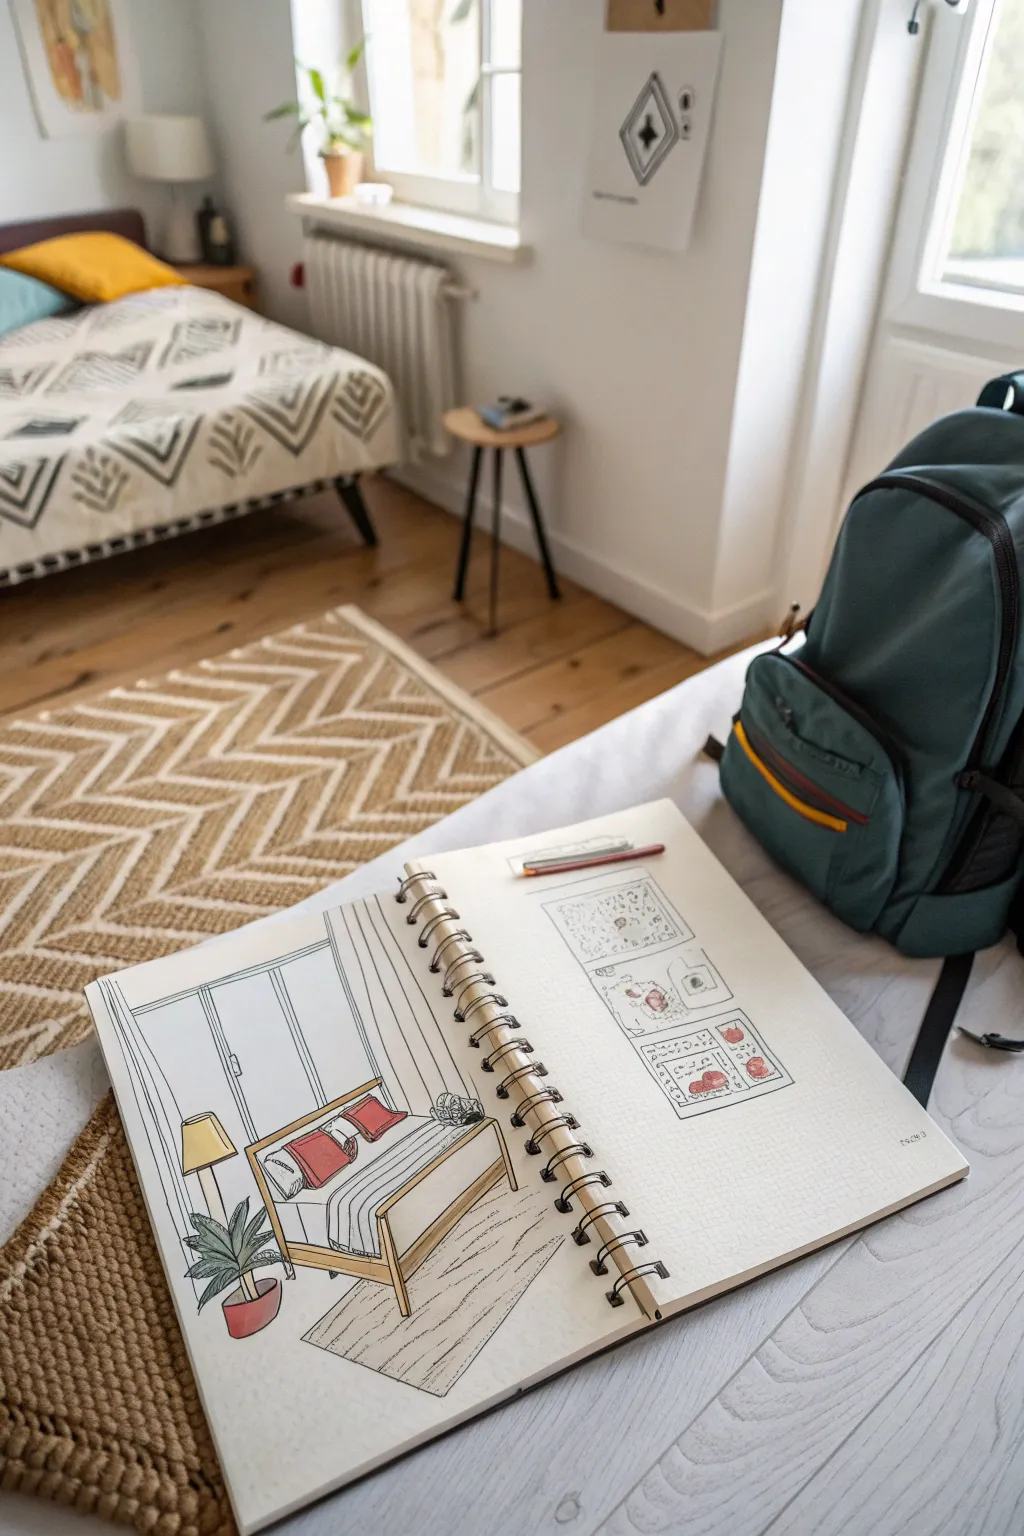
Learn the basics of one-point perspective with this clean, architectural-style drawing featuring a cozy bed and a leafy plant. Using simple lines and a single vanishing point, you’ll create a sense of depth that makes the room pop right off the page.
How-To Guide
Materials
- Spiral-bound sketchbook (heavyweight paper)
- Ruler or straightedge
- Fine-liner pen (black, approx. 0.3mm or 0.5mm)
- Pencil (HB or 2B)
- Eraser
- Colored pencils or markers (red, yellow, brown, green)
Step 1: Setting the Perspective
-
Establish the horizon line:
Start by drawing a light horizontal line across the middle of your page using your pencil and ruler. This is your eye level. -
Mark the vanishing point:
Place a small dot right in the center of your horizon line. Every diagonal line in this drawing will connect back to this single point. -
Create the back wall:
Draw a rectangle around the vanishing point. Keep the horizontal lines parallel to your horizon line and the vertical lines straight up and down. -
Draw the room lines:
From each corner of that central rectangle, draw diagonal lines extending outward toward the edges of the paper. These lines create your ceiling, floor, and side walls.
Angle Check
Confused about angles? If a line is vertical in real life, draw it vertical. If it’s horizontal, draw it horizontal. Only lines moving *away* from you are diagonal.
Step 2: Building the Furniture
-
Block in the bed frame:
Draw a rectangular box shape for the bed. The front face of the bed frame should be a regular rectangle, while the sides angle back toward your vanishing point. -
Add the headboard:
Sketch a smaller rectangle behind the bed against the back wall, ensuring the top edge aligns with your perspective guidelines. -
Detail the pillows:
Draw three soft rectangular shapes on the bed: two large back pillows leaning on the headboard and a smaller decorative pillow in front. -
Sketch the rug:
Beneath the bed, draw a large rectangle for the area rug. Remember that the side edges of the rug must angle toward that center vanishing point to look flat on the floor. -
Add a floor lamp:
To the left of the bed, draw a tall, thin pole with a trapezoid shape on top for the lampshade. -
Place the houseplant:
In the bottom left corner, sketch a simple pot shape. Then, add several long, pointy leaves bursting outwards to give the room some life.
Add a Window
Draw a square on the side wall. The top and bottom of the window frame should angle directly towards your vanishing point to look realistic.
Step 3: Inking and Coloring
-
Ink the main lines:
Take your black fine-liner and trace over your pencil lines. Use a ruler for the furniture and walls, but feel free to freehand the plant and pillows for a softer look. -
Add vertical wall details:
Use your ruler to draw vertical stripes on the back wall, creating a paneling effect. Stop these lines where they meet the bed or furniture. -
Erase pencil guides:
Once the ink is totally dry—I usually wait a full minute to avoid smudges—gently erase all your pencil marks and the vanishing point. -
Color the pillows:
Use a red marker or colored pencil to fill in the front decorative pillow and the two back pillows, leaving the pillowcases white for contrast. -
Color the lamp and plant:
Fill in the lampshade with a bright yellow. Use a mix of green shades for the plant leaves to give them dimension, and color the pot a terracotta red. -
Add wood tones:
Lightly color the bed frame with a tan or light brown pencil to suggest wood. -
Detail the rug texture:
Using your fine-liner, draw short, dashed lines completely covering the rug area to mimic a woven texture.
Now you have a stylish, dimensional room sketch that shows off your perspective skills
Mash-Up Creature Challenge
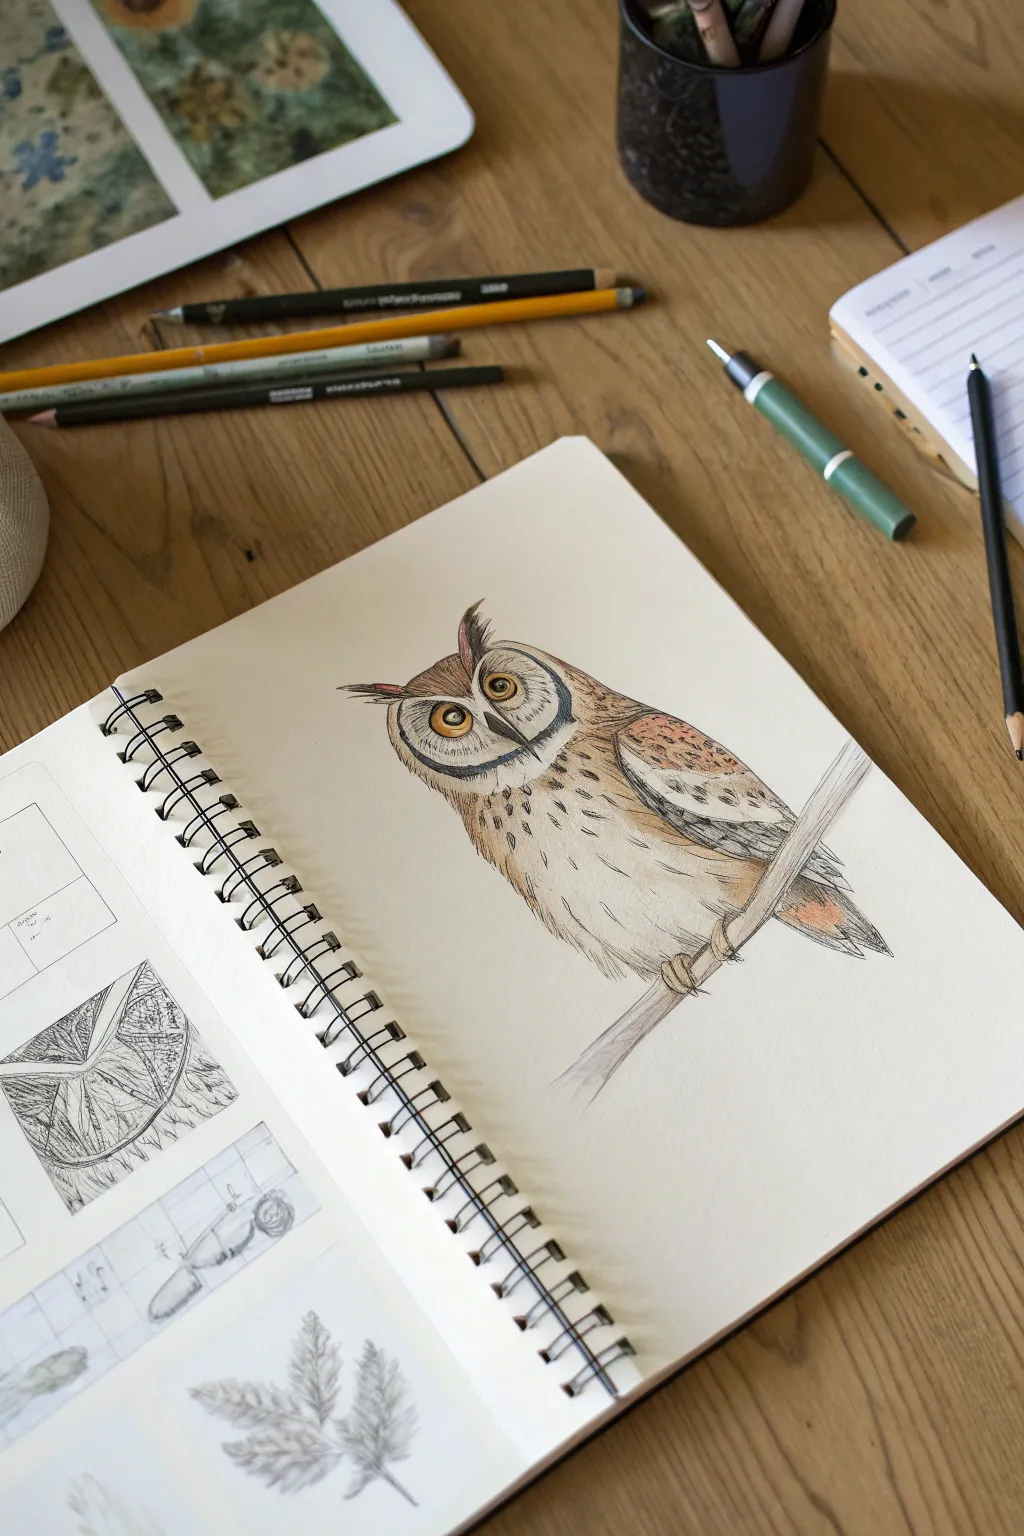
Create a stunning, character-filled owl illustration using subtle shading and delicate linework to capture its personality. This project emphasizes texture and expression, making it perfect for budding artists ready to refine their colored pencil skills.
Step-by-Step
Materials
- A4 Spiral-bound sketchbook (heavyweight paper)
- Graphite pencil (HB or 2B)
- Fine liner pen (black, 0.3mm or 0.5mm)
- Colored pencils (brown, tan, orange, grey, and cream)
- Kneaded eraser
Step 1: Sketching the Framework
-
Head and Body Shapes:
Begin lightly with your HB pencil. Draw a wide, slanted oval for the head and a larger, longer oval underneath for the body, connected by a short neck area. The posture should lean slightly to the right. -
Define the Face:
Inside the head oval, lightly sketch a heart-shaped facial disc. Place two large circles for the eyes, ensuring they are symmetrical, and a small, sharp triangular beak right between them. -
Wing and Tail:
Sketch the folded wing shape along the right side of the body, extending it down towards the tail feathers. Add a simple diagonal line where the branch will go.
Step 2: Refining Features
-
Ear Tuft Details:
At the top of the head, sketch the distinct ear tufts. Make the left one stick out slightly and the right one tuck back to give the owl a curious expression. -
Eye Shapes:
Draw the pupils inside your eye circles. Keep them focused forward. Add the detailed rings around the eyes that are characteristic of owls. -
Feet Placement:
Draw the talons gripping the branch. Focus on the visible claws wrapping over the wood shape.
Feathery Textures
Don’t color solid blocks for feathers! Use short, directional strokes with your pencil that follow the way the feathers grow on the bird’s body.
Step 3: Inking the Outline
-
Main Lines:
Using your fine liner, go over your pencil lines. Use short, broken strokes for the feathers on the chest and belly to suggest fluffiness rather than a hard outline. -
Facial Definition:
Darken the eyes, leaving a tiny white spot in each pupil for a highlight. This spark of life is crucial. Carefully ink the beak and the prominent ridge above the eyes. -
Erase Pencils:
Once the ink is completely dry—give it a minute or two to be safe—gently erase all underlying graphite marks with your kneaded eraser.
Eyes Looking Flat?
If the eyes look dull, you likely forgot the highlight. Use a white gel pen to add a tiny dot to the pupil if you accidentally colored over the white paper.
Step 4: Adding Color and Texture
-
Base Tone:
Start with a cream or very light tan pencil. Lightly shade the chest, belly, and parts of the face. Keep your pressure light to build layers slowly. -
Eye Color:
Use a bright yellow-orange pencil for the irises. Press firmly to make the eyes pop against the neutral feathers. -
Wing Patterns:
With a medium brown pencil, add the darker patches on the wings. Create small, U-shaped marks to simulate layers of feathers. -
Facial Markings:
Introduce a dark grey or black pencil to emphasize the facial disc border and the tufts. I find that deepening the contrast around the face really brings the character forward. -
Chest Feathers:
Using a sharp brown pencil, draw small, vertical dash marks down the chest. Vary the length and spacing so it doesn’t look too uniform. -
Warm Highlights:
Add touches of orange or reddish-brown to the wing shoulder and the tips of the ear tufts for warmth. -
Grounding the Bird:
Color the branch with a mix of grey and light brown. Add a slight shadow under the claws and where the tail overlaps the branch to establish weight.
You now have a charming owl sketch ready to watch over your sketchbook pages


Have a question or want to share your own experience? I'd love to hear from you in the comments below!