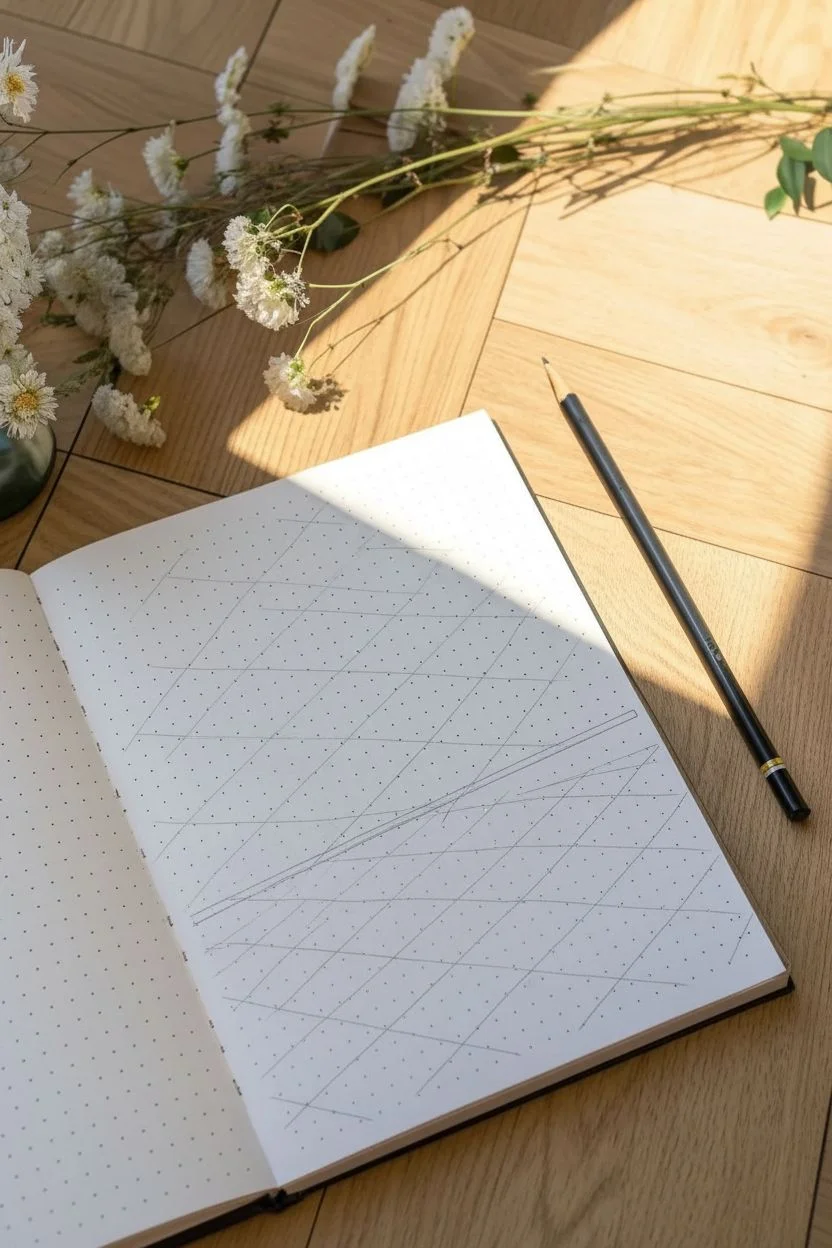
There is something incredibly freeing about engaging with a blank page when you have the right structural foundations to guide your pencil. I want to share the techniques found in my own studio practice that transformed my sketchbook from stiff scribbles into dynamic, living characters.
Rediscover the power of the basic stick figure
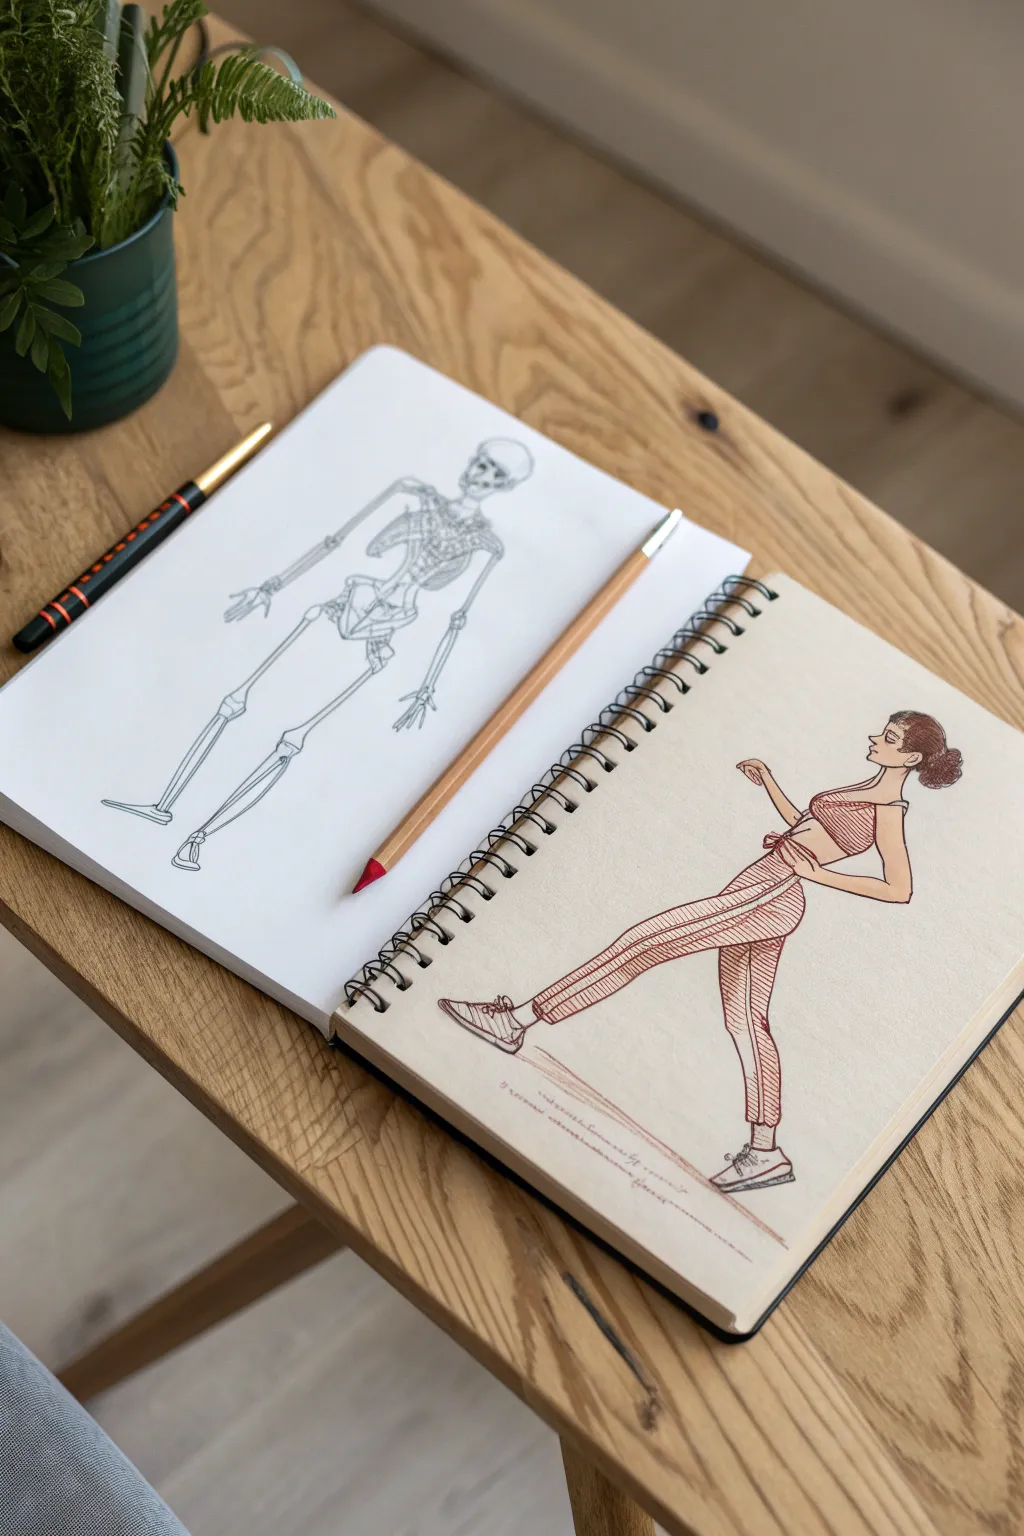
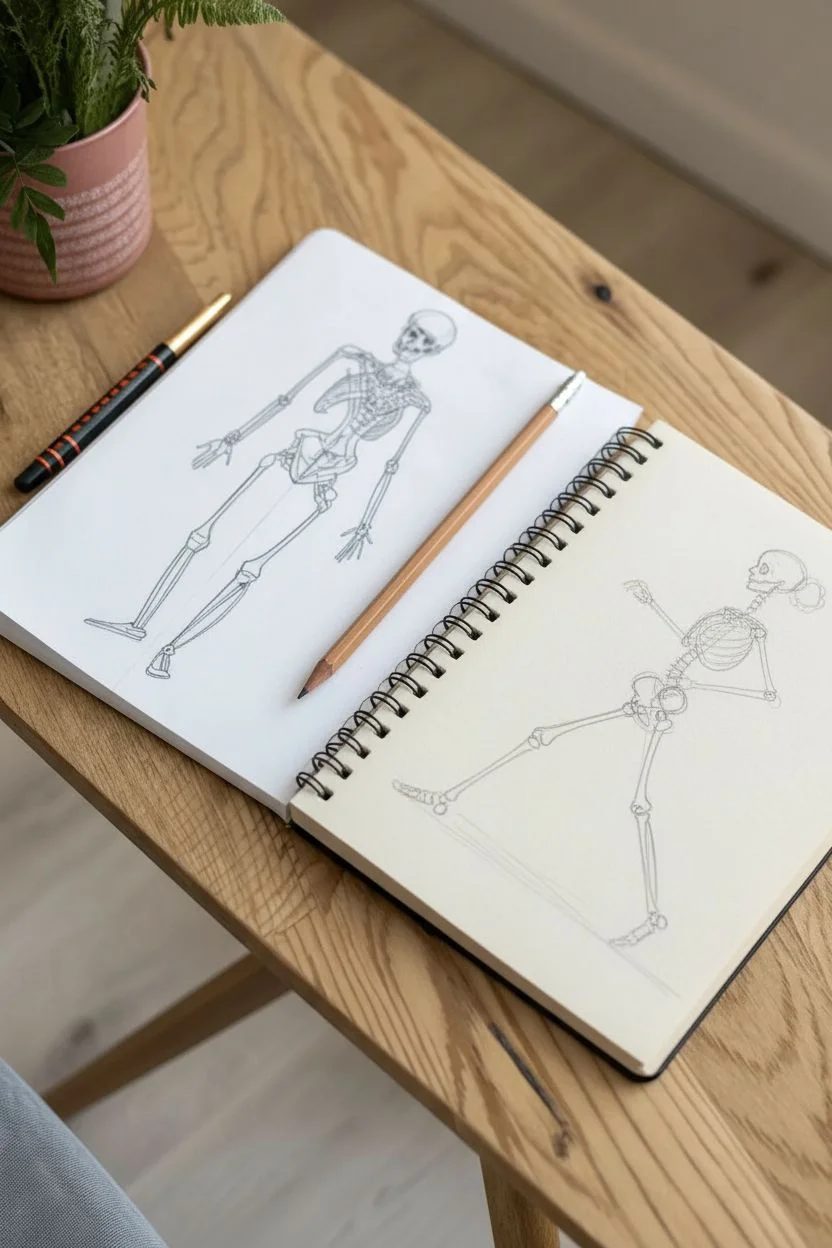
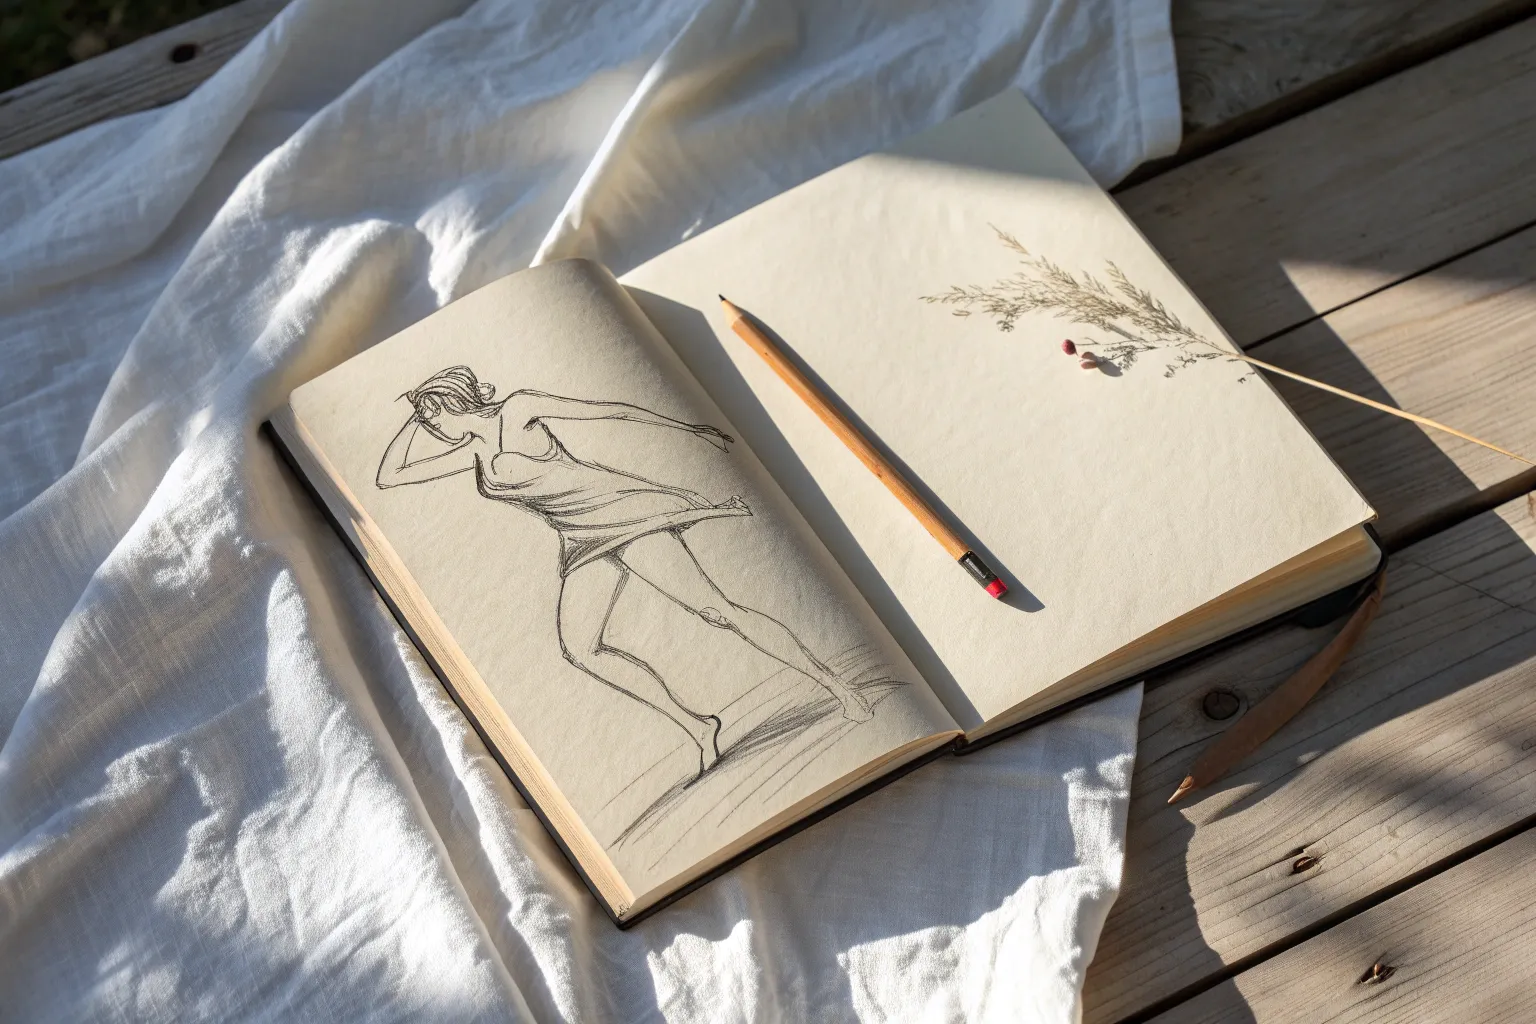
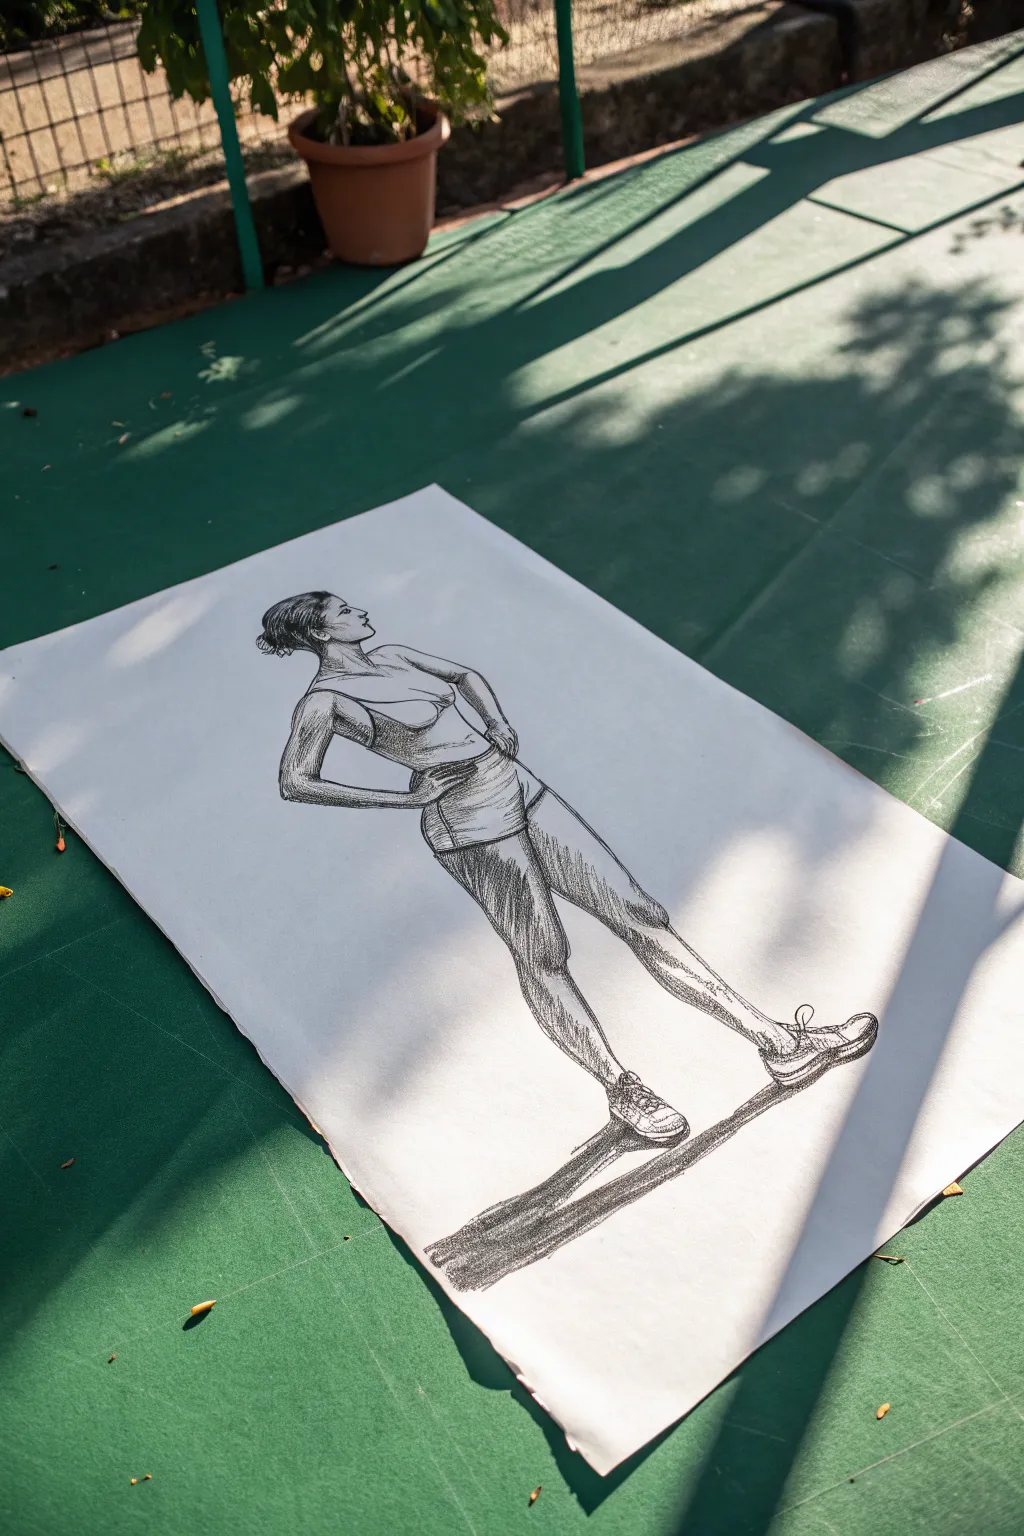
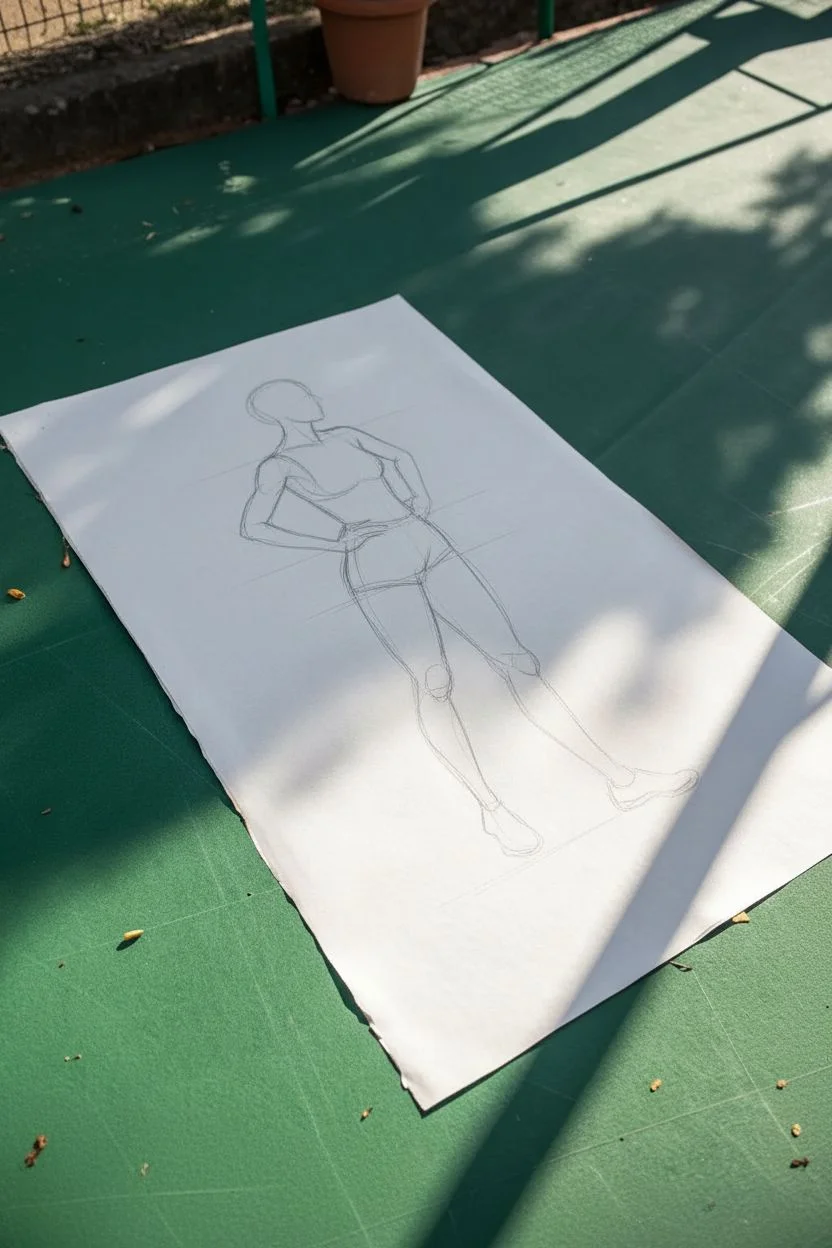
This project bridges the gap between technical anatomy and character illustration by placing the underlying structure side-by-side with the finished look. You will create a comparative study featuring a skeletal breakdown on one sheet and a fully dressed character in the same dynamic walking stride on another.
Step-by-Step Tutorial
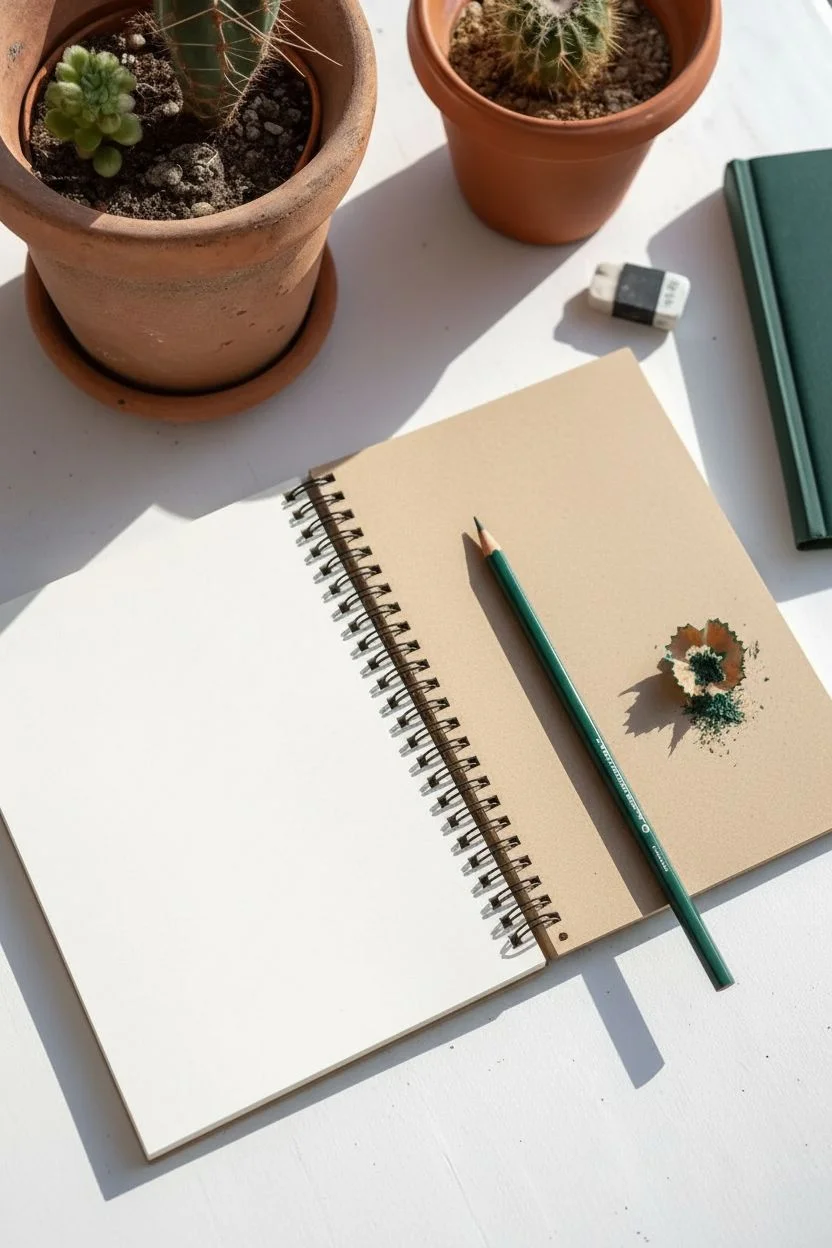
Materials
- Spiral-bound sketchbook (cream paper)
- Separate sheet of white drawing paper
- Graphite pencil (HB or 2B)
- Fine black pigment liner (0.1mm – 0.3mm)
- Terracotta or rust-red colored pencil
- Eraser
Step 1: Constructing the Stick Figure Frame
-
Establish the spine:
On your separate white sheet, begin by drawing a vertical line with a slight S-curve to represent the spine. Top it with a simple oval for the skull. -
Add ribcage and pelvis:
Sketch a rounded, egg-shaped form for the ribcage along the upper spine, and a triangular blocks shape below it for the pelvis. -
Position the legs:
Draw the leg bones using simple straight lines. Extend the front leg straight forward (heel strike) and bend the back leg at the knee to show a mid-stride walk. -
Mark the joints:
Draw small circles where the knees, ankles, shoulders, and elbows go. This visual shorthand helps ensure your limbs bend in realistic places. -
Refine the anatomy:
Thicken your stick lines into bone shapes. Focus on sketching the femur and tibia details, as well as the separate forearm bones, to mimic an anatomical study. -
Ink the skeleton:
Go over your structural sketch with a fine black liner to finalize the ‘reference’ half of your project.
Stiff Pose Syndrome?
If the walk looks robotic, check the angle of the pelvis. Tilting the hip line slightly (one hip higher than the other) instantly adds natural weight and movement to a stride.
Step 2: Sketching the Character
-
Transfer the pose:
Open your spiral sketchbook. Using your graphite pencil, lightly replicate the exact same ‘stick figure’ structure you just drew, ensuring the walking stride matches. -
Flesh out the body:
Draw the body’s volume over your stick frame. Add curves for the calves, thighs, and arms, keeping the figure slender and athletic. -
Profile details:
Sketch the face in profile, adding a nose, eye, and chin. Draw the hair pulled back into a messy high bun at the crown of the head. -
Dress the figure:
Outline the clothing over the body form. Draw a cropped tank top with thin straps and high-waisted, loose pajama-style trousers. -
Refine accessories:
Add sneakers to the feet and detail the hands. Position the front hand resting on the hip and the back hand swung slightly behind.
Step 3: Inking and Patterning
-
Define the outlines:
Take your black fine liner and carefully trace the permanent lines of your character. Use a steady hand for the face profile and hair contours. -
Clean up:
Once the ink is completely dry to the touch, gently erase all the underlying graphite guide lines to leave a crisp illustration. -
stripe the outfit:
Using the terracotta colored pencil, carefully draw thin, horizontal stripes across the entire outfit. Follow the curve of the body with your lines to suggest volume. -
Shadow with pattern:
I prefer to press just a little harder with the pencil in shadowed areas—like under the knee or waist—making the stripes darker to create depth without adding black shading. -
Color accents:
Use the same colored pencil to lightly fill in the hair bun and add small details to the sneakers. -
Ground the figure:
Add a quick, scribbled shadow line under the feet with the colored pencil to stick the character to the ground. -
Add handwritten notes:
To finish the ‘artist’s study’ vibe, scribble some illegible or loose text lines beneath the drawing using your colored pencil.
Pattern Pro-Tip
Don’t draw straight stripes! Curve your stripe lines slightly downward on the legs and torso. This wraps the pattern around the cylindrical forms, making the figure look 3D.
Layout your skeletal study next to your finished character for a satisfying look at your artistic process.


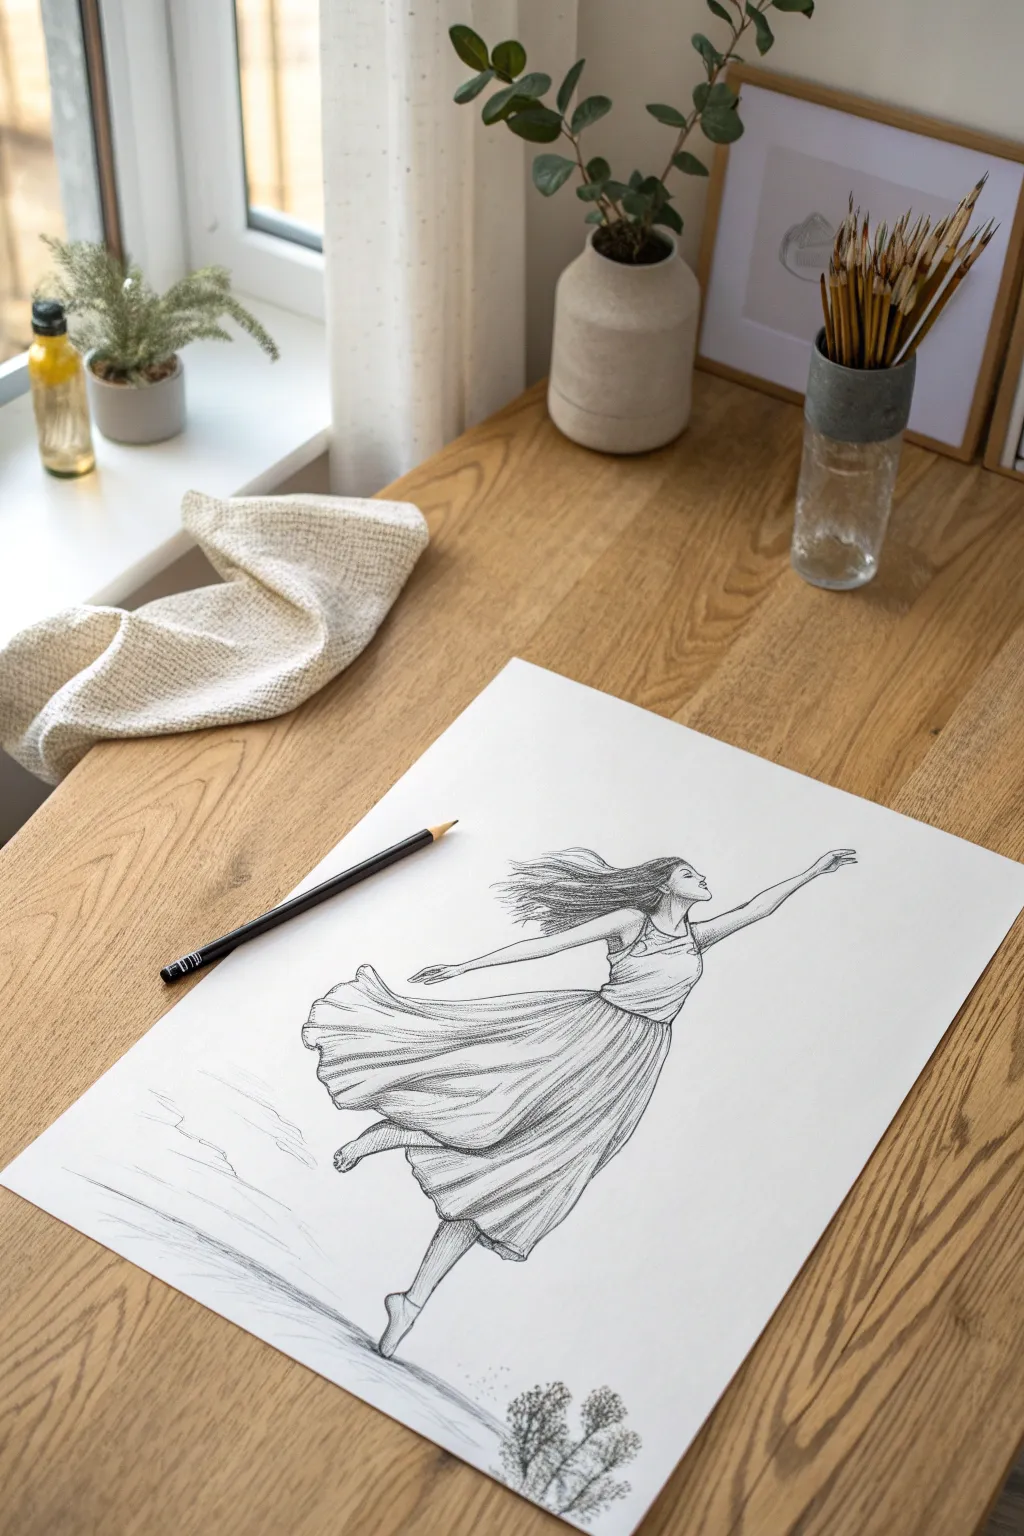
Find the natural line of action
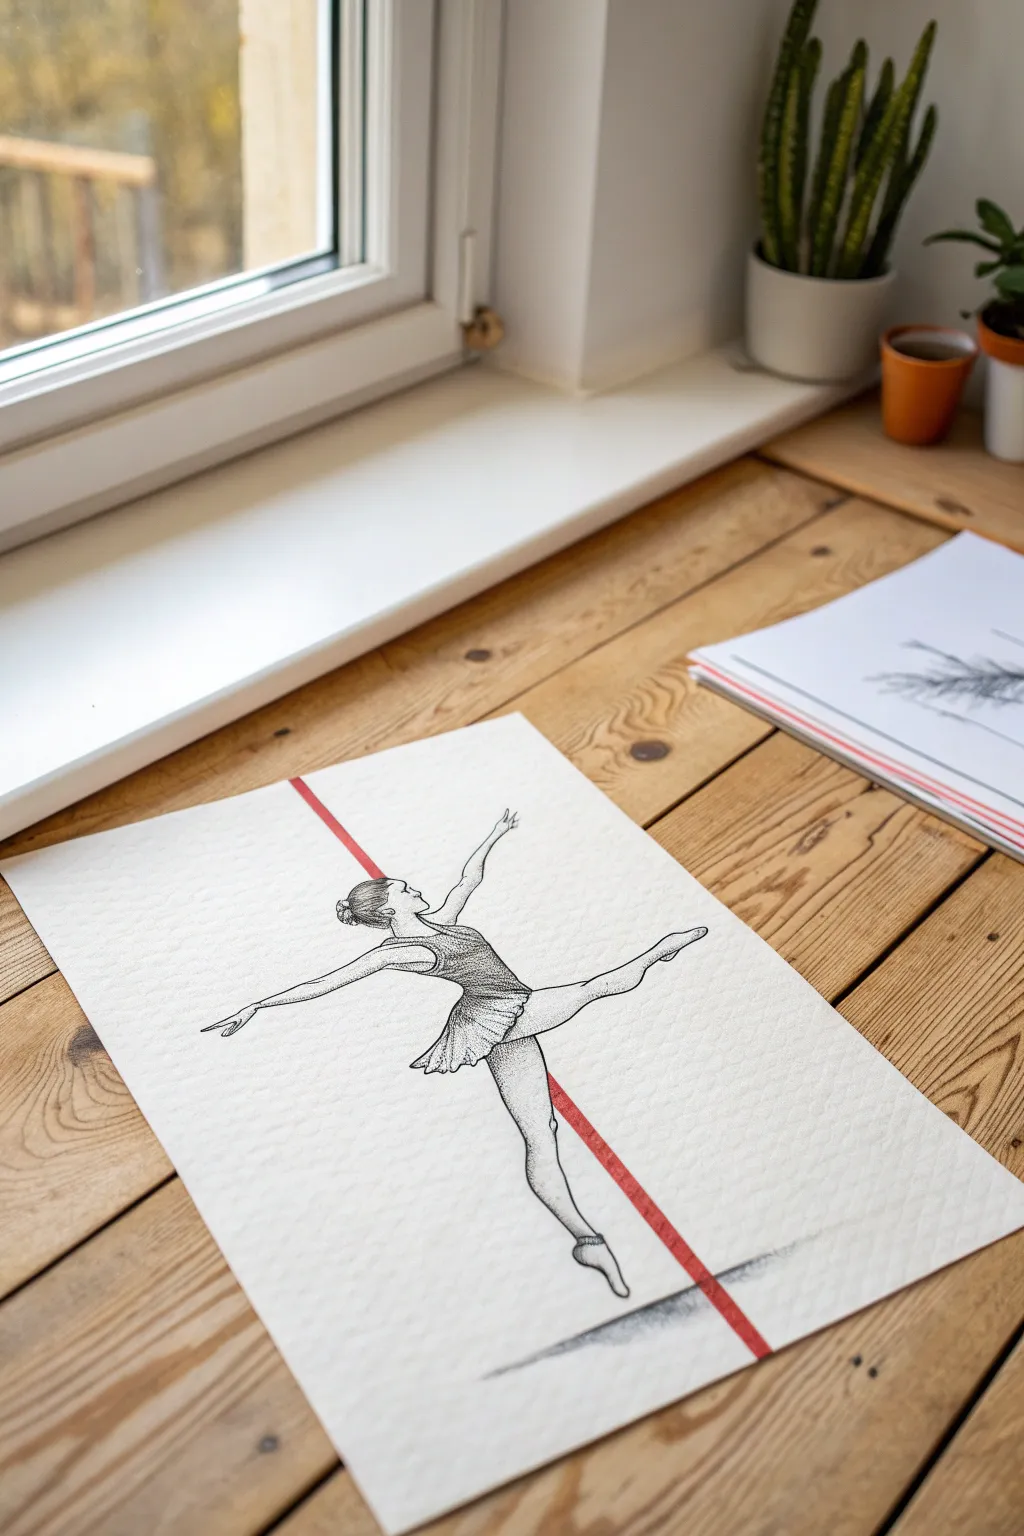
Master the art of dynamic movement by sketching a ballerina in a classic arabesque pose. This project emphasizes the primary gesture using a bold red graphical element to visualize the backbone of the motion.
Step-by-Step Guide
Materials
- Cold-press watercolor paper or textured sketch paper (A4)
- HB and 2B graphite pencils
- Kneaded eraser
- Fine liner pens (Black, sizes 0.1 and 0.5)
- Red marker or felt-tip pen
- Ruler
Step 1: Constructing the Skeleton
-
Visualize the axis:
Before making a mark, visualize a diagonal line running from the bottom left to the top right of your paper. This is your line of action. -
Sketch the head:
Using your HB pencil, lightly draw a small oval for the head near the upper third of that imagined diagonal line. -
Draw the spine curve:
Sketch a sweeping curve representing the spine. It should flow from the head, arching slightly downwards. -
Extend the main leg:
Continue that spine line directly into the back leg to create one long, seamless curve ending in a point for the foot. -
Add the supporting leg:
Draw a vertical line descending from the hip area, curving slightly at the bottom to indicate the pointed foot bearing the weight.
Fixing Stiffness
If the pose feels stiff, your line of action might be too straight. Ensure the spine has a slight ‘S’ curve rather than being a rigid stick.
Step 2: Fleshing out the Form
-
Add volume to the torso:
Lightly sketch shapes around the spine to define the ribcage and waist. Keep the waist narrow and the chest lifted. -
Define the limbs:
Draw cylindrical shapes over your stick-figure legs to build muscle volume, tapering gracefully toward the ankles. -
Position the arms:
Sketch the prominent arm reaching backward, almost parallel to the extended leg, and the other reaching forward and up. -
Outline the tutu:
Draw a jagged, skirt-like shape around the hips. Keep the lines loose to suggest ruffle texture later. -
Refine features:
Detail the profile of the face, the ear, and the bun on the back of the head.
Make it Pop
For a mixed-media look, use a piece of red geometric tape or a glued strip of red paper instead of marker for the line of action.
Step 3: Ink and Texture
-
Outline the body:
Switch to your 0.5 black fine liner. Carefully go over the pencil lines of the body, creating a smooth, confident contour. -
Detail the face:
I prefer using the thinner 0.1 pen here for the delicate facial features and the strands of hair in the bun. -
Texture the bodice:
Use a stippling technique (tiny dots) on the ballerina’s bodice to create a fabric texture that differs from the skin. -
Shade the tutu:
Use quick, short vertical strokes with the 0.1 pen to create shadows and folds in the tutu. -
Add muscle definition:
Add very light stippling or hatching on the underside of the legs and arms to give them cylindrical form. -
Ground the figure:
Use the side of your pencil or some light ink hatching to create a soft cast shadow beneath the supporting foot. -
Clean up:
Once the ink is completely dry, gently erase all underlying graphite pencil lines with your kneaded eraser.
Step 4: The Graphical Accent
-
Position the ruler:
Place your ruler diagonally across the drawing. It should align with the angle of the torso and the extended back leg. -
Draw the red line:
Using the red marker, draw a bold, continuous line along the ruler’s edge, passing ‘behind’ the figure (stop drawing where the body overlaps). -
Connect the line:
Continue the red line below the body if necessary, ensuring visually it looks like one single axis cutting through space.
Now stepping back, you can clearly see how the red line defines the energy and balance of your finished drawing


Build mass with cylinders and cubes
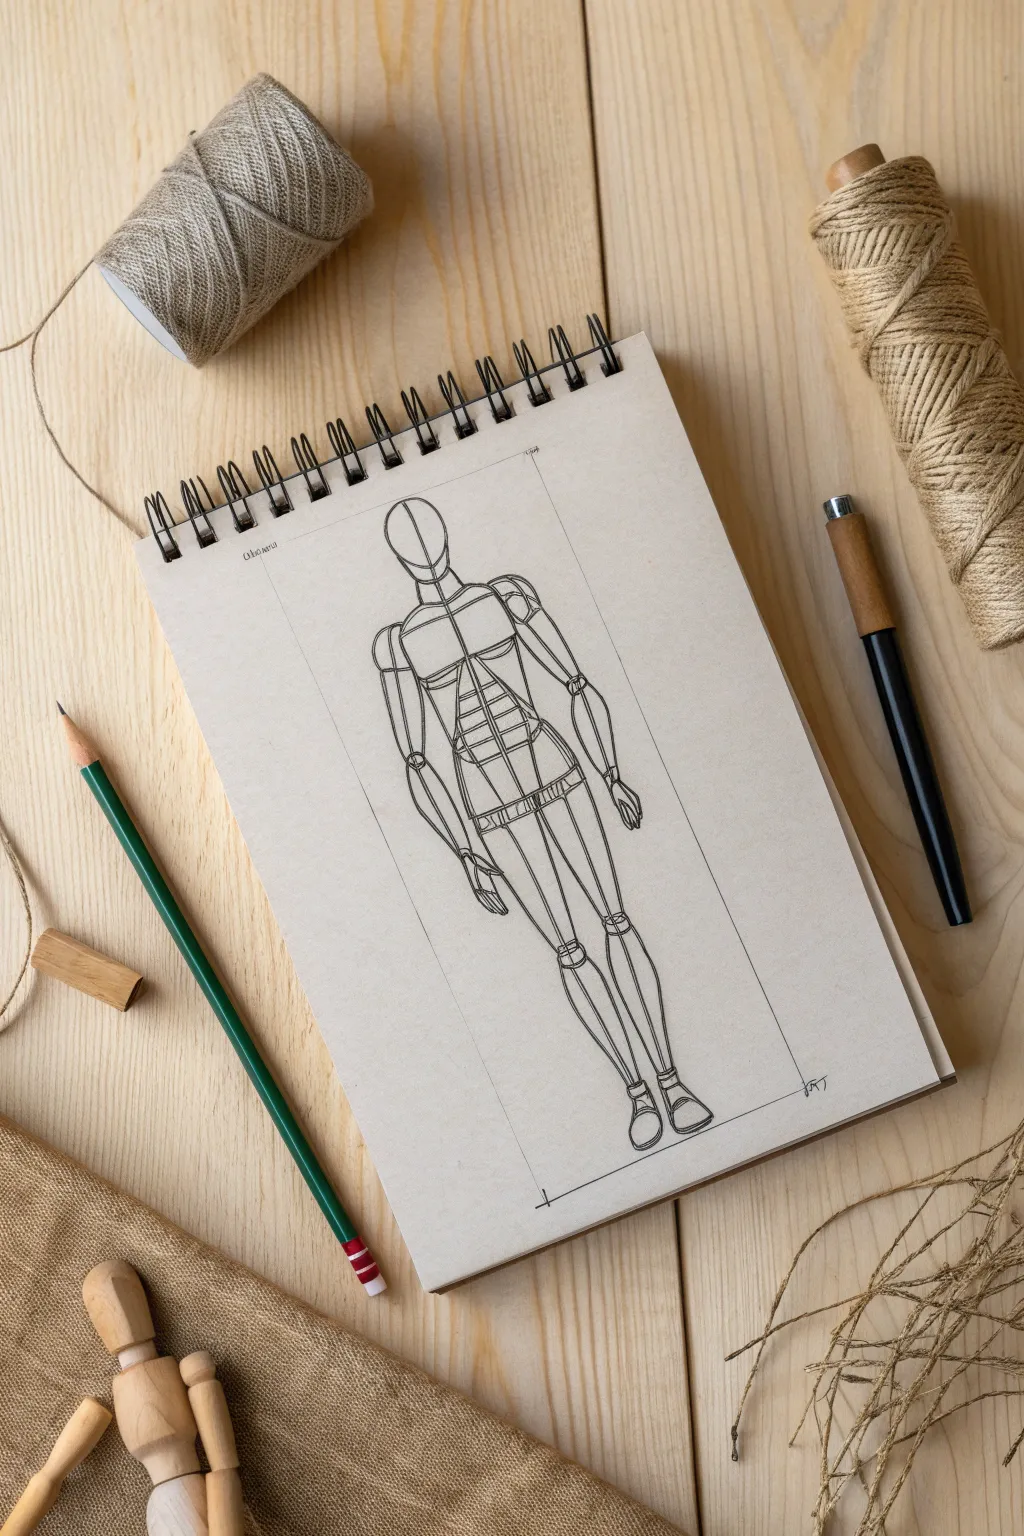
Master the art of structural anatomy by breaking the human form down into simple geometric solids. This exercise focuses on mannequinization, using cylinders, spheres, and cubes to create a convincing three-dimensional figure.
Step-by-Step
Materials
- Sketchbook with smooth paper
- HB or 2B Graphite pencil
- Fine-point black pen or darker lead (4B)
- Ruler
- Kneaded eraser
Step 1: Establishing the Framework
-
Draw the bounding box:
Begin by lightly drawing a tall, vertical rectangle using your ruler. This box defines the total height and width limits of your figure to keep proportions in check. -
Mark the center axis:
Sketch a vertical line straight down the middle of your box. This axis represents the spine and center of gravity that will align the head, torso, and legs. -
The head form:
At the top of the axis, draw an oval or egg shape for the head. Add a vertical and horizontal cross-contour line on the face to indicate the direction the head is looking.
Flatness Fix
If your limbs look like flat stickers, trace elliptical loops around the cylinder forms. Seeing the ‘back’ of the curve helps your brain process the volume.
Step 2: Constructing the Torso
-
The neck cylinder:
Draw a short, sturdy cylinder extending downward from the base of the head oval. -
Ribcage orientation:
Sketch a large, rounded block or barrel shape for the chest. Ensure the top line of this shape curves over the form to show perspective, rather than drawing a flat square. -
The pelvis block:
Leave a gap for the waist, then draw a bucket-shaped block for the pelvis. It should be slightly narrower than the ribcage. -
Connecting the core:
Connect the ribcage to the pelvis with two vertical lines representing the abdominal muscles. I like to draw a grid over this area to emphasize the front plane of the stomach. -
Shoulder joints:
Place a sphere on the upper outer corners of the ribcage block. These ball joints act as the anchor points for the arms.
Step 3: Building Limbs with Cylinders
-
Upper arm tubes:
Extend cylinders down from the shoulder spheres. Taper them slightly toward the bottom where the elbow will be. -
Elbows and forearms:
Draw a small sphere or hinge shape for the elbow, followed by a tapered cylinder for the forearm. Keep the wrist end narrower than the elbow end. -
Simplified hands:
At the end of the forearms, attach simple, mitten-like block shapes to represent relaxed hands. -
Hip joints and thighs:
Visualize spheres embedded in the bottom corners of the pelvis block. Extend long, thick cylinders downward for the thighs, angling them slightly inward. -
Knee connections:
Draw boxy shapes or spheres for the kneecaps. This separates the upper leg mass from the lower leg. -
Calves and ankles:
Draw the lower legs as cylinders that bulge slightly near the top (the calf muscle) and taper significantly toward the ankle. -
Blocking the feet:
Construct the feet using triangular wedges. The wide part should sit at the toes and the narrow part at the heel.
Through the Looking Glass
Draw as if the figure is transparent. Sketching the hidden side of the pelvis or the back of the knee joint ensures everything connects correctly in 3D space.
Step 4: Refining Volume
-
Contour lines:
Draw faint elliptical lines wrapping around the limbs (like rubber bands). These cross-contours are crucial for showing the viewer that the forms are round, not flat. -
Muscle definition:
Sketch geometric plates on the chest and abs (pecs and rectus abdominis). Treat them as raised surfaces on top of the ribcage block. -
Final outlines:
Using a darker pencil or pen, go over the main structural lines. Darken the overlapping areas (where an arm passes in front of the body) to enhance the 3D effect.
Now you have a solid geometric foundation ready for muscle details or clothing overlays


Shift the weight for a classic contrapposto stance
Capture the classic elegance of a weight-shifted stance with this expressive sketched study. Using rough charcoal or soft graphite, you will build a figure that feels grounded yet relaxed, focusing on the opposing angles of the shoulders and hips.
Step-by-Step Guide
Materials
- Large drawing paper (A2 or 18×24 inches)
- Soft charcoal pencils or graphite (4B, 6B)
- Harder pencil for initial lines (HB)
- Kneaded eraser
- Fixative spray (optional)
Step 1: Structural Framework
-
Establish the line of action:
Start with a sweeping, vertical ‘S’ curve down the center of your page to represent the spine’s movement. -
Mark the head and torso:
Lightly sketch an oval for the head at the top, and indicate the ribcage mass just below it, aligning with your action line. -
Set the shoulder angle:
Draw a horizontal line for the shoulders. Since the model is looking up and to the right, keep this line relatively straight or slightly dipped on the right. -
Define the hip tilt:
This is crucial for contrapposto: draw the hip axis tilting sharply opposite to the shoulders. Cultural note: the high hip is always on the side of the straight, weight-bearing leg. -
Map the legs:
Sketch the stick-figure geometry of the legs. The weight-bearing leg should be a straight vertical column; the relaxed leg should bend at the knee and trail slightly.
Check Your Balance
To prevent the figure from looking like it’s falling, drop a vertical line from the pit of the neck. It should land directly over the heel of the straight, weight-bearing leg.
Step 2: Anatomical Volume
-
Flesh out the torso:
Connect the ribcage and pelvis, observing how the skin stretches on the high-hip side and bunches on the relaxed side. -
Build the legs:
Add cylinders to form the thighs and calves. I find it helpful to exaggerate the curve of the quadriceps on the weight-bearing leg to show tension. -
Position the arms:
Sketch triangles for the arms, placing the hands firmly on the hips to emphasize the stance’s confidence. -
Refine the head and neck:
Draw the neck stretching upwards. Sketch the profile of the face looking upward and outline the hair drawn back into a bun. -
Add feet and shoes:
Block in the shape of the sneakers. The weight-bearing foot should be planted flat, while the relaxed foot rests lightly on the toe.
Try Toned Paper
Level up by drawing on grey or tan paper. Use black charcoal for the shadows as described, but use a white charcoal pencil for the highlights to make the figure pop.
Step 3: Detailed Definition
-
Outline clothing:
Draw the tank top and shorts over the body form. Add the hemlines and the curve of the neckline. -
Refine hands:
Detail the fingers resting on the waist. This interaction creates negative space between the arms and the body. -
Clean up contours:
Switch to your softer pencil or charcoal. Go over your main contour lines, varying the pressure—press harder on the shadowed side (the figure’s right) to create visual weight.
Step 4: Shading and Texture
-
Identify light source:
Assume the light comes from the upper left. This means the right side of the figure will be in shadow. -
Hatching the legs:
Use directional hatching marks to shade the legs. Follow the curvature of the muscles with your strokes to create roundness. -
Darken the clothing:
Fill in the shorts and top with dense, darker shading, leaving the paper white where the light hits the chest and thigh. -
Add core shadows:
Deepen the shadows specifically under the bust, inside the arm, and along the inner thigh to separate the forms. -
Cast the ground shadow:
Draw a long, dark diagonal shadow stretching out from the feet. This anchors the figure to the ground so she doesn’t look like she’s floating.
Now stepping back, you should see a figure with genuine weight and presence.

PENCIL GUIDE
Understanding Pencil Grades from H to B
From first sketch to finished drawing — learn pencil grades, line control, and shading techniques.
Explore the Full Guide
Check your pose readability with silhouettes
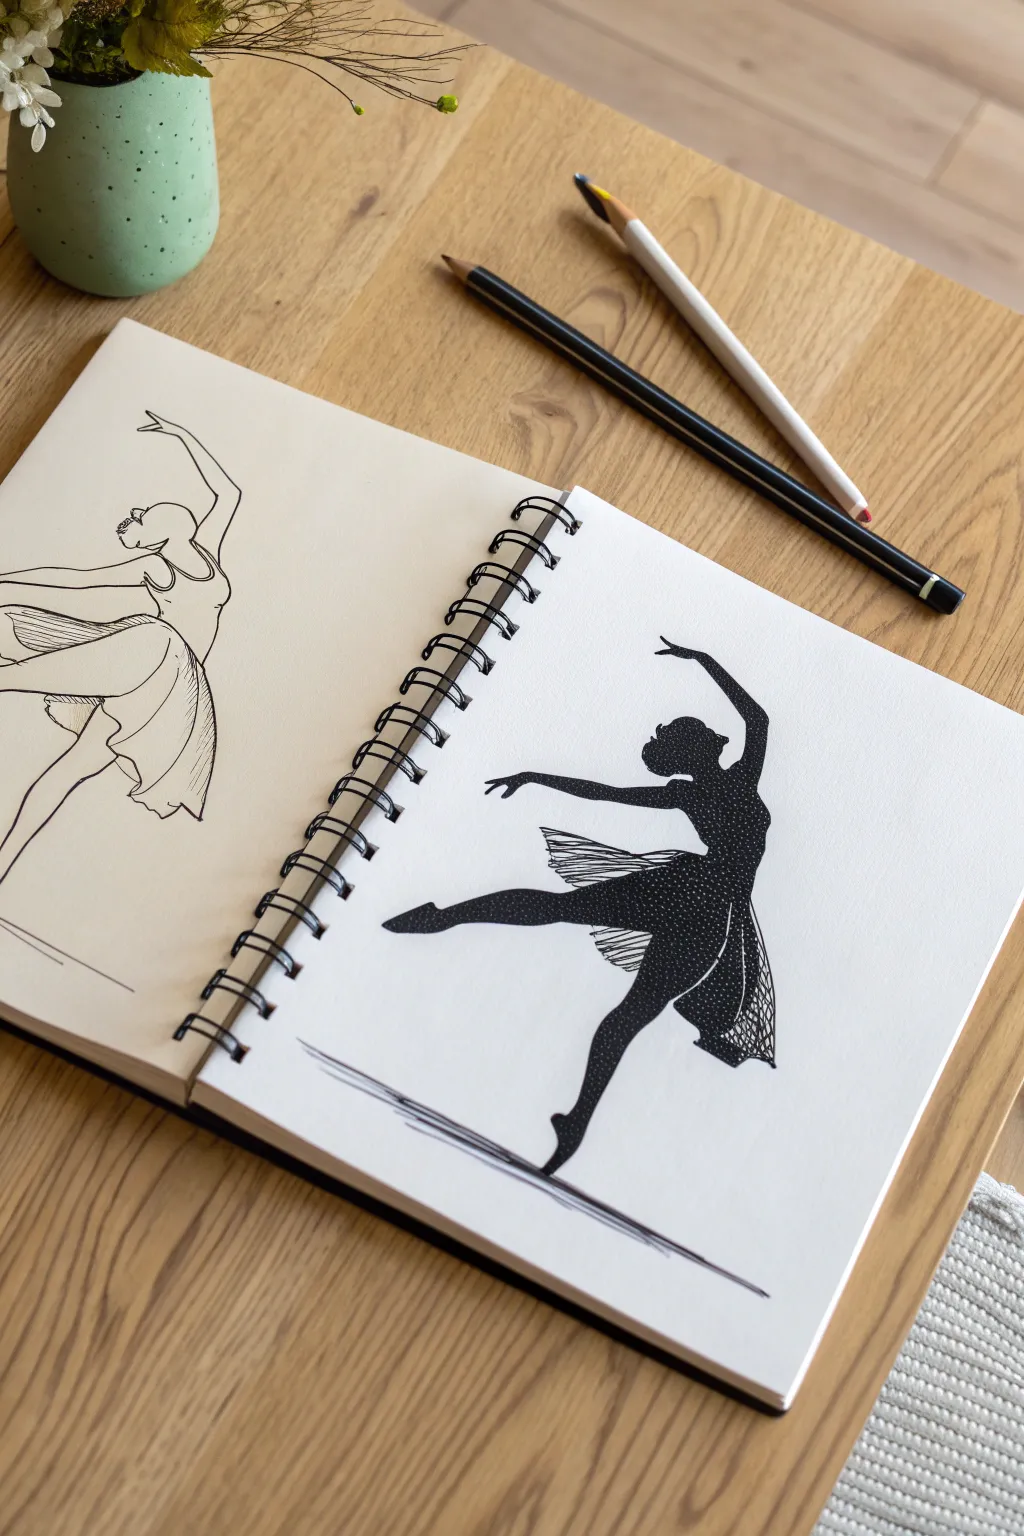
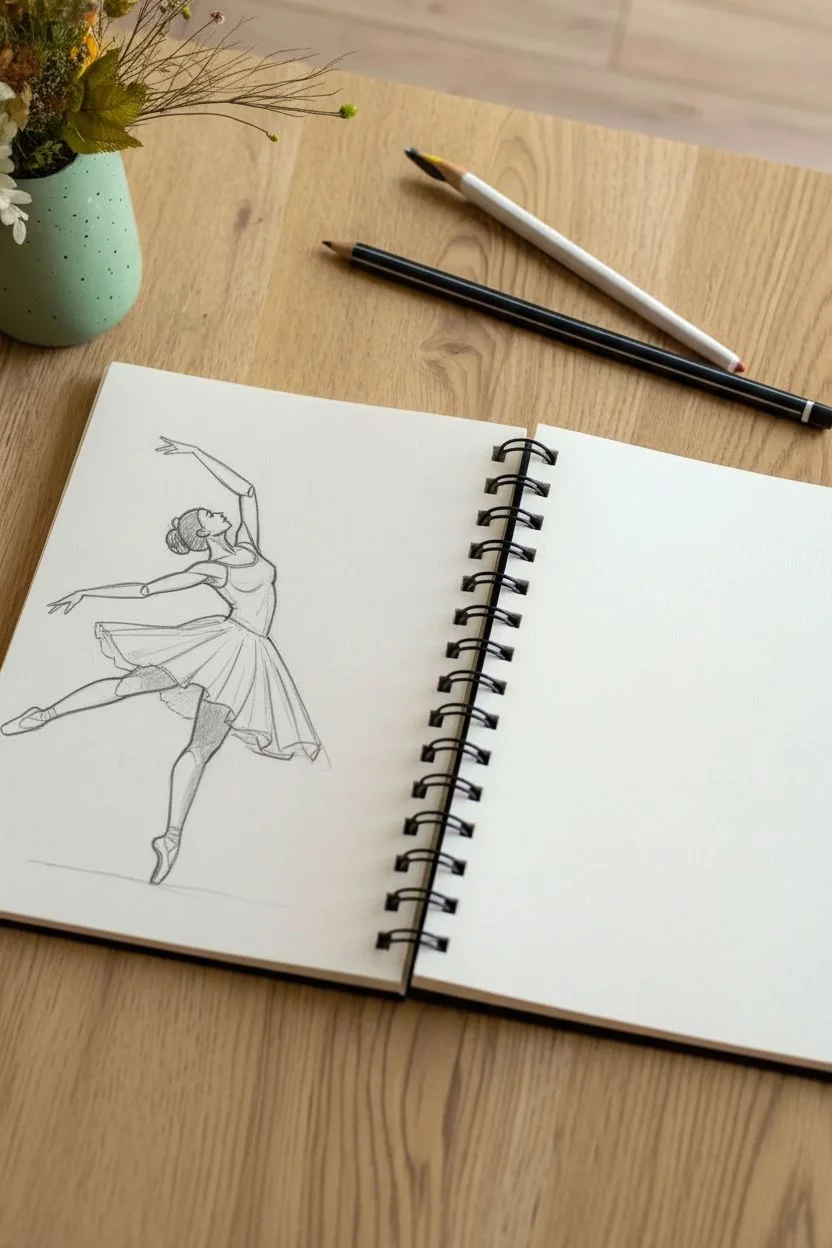
Compare the delicate details of a pencil sketch with the bold impact of a graphic silhouette in this two-page spread. This exercise is fantastic for testing if your pose reads clearly without relying on internal details.
Step-by-Step
Materials
- Spiral-bound sketchbook (heavyweight paper)
- HB and 2B graphite pencils
- Black brush pen or broad marker
- Fine tip black drawing pen (0.5mm)
- White gel pen (opaque)
- Kneaded eraser
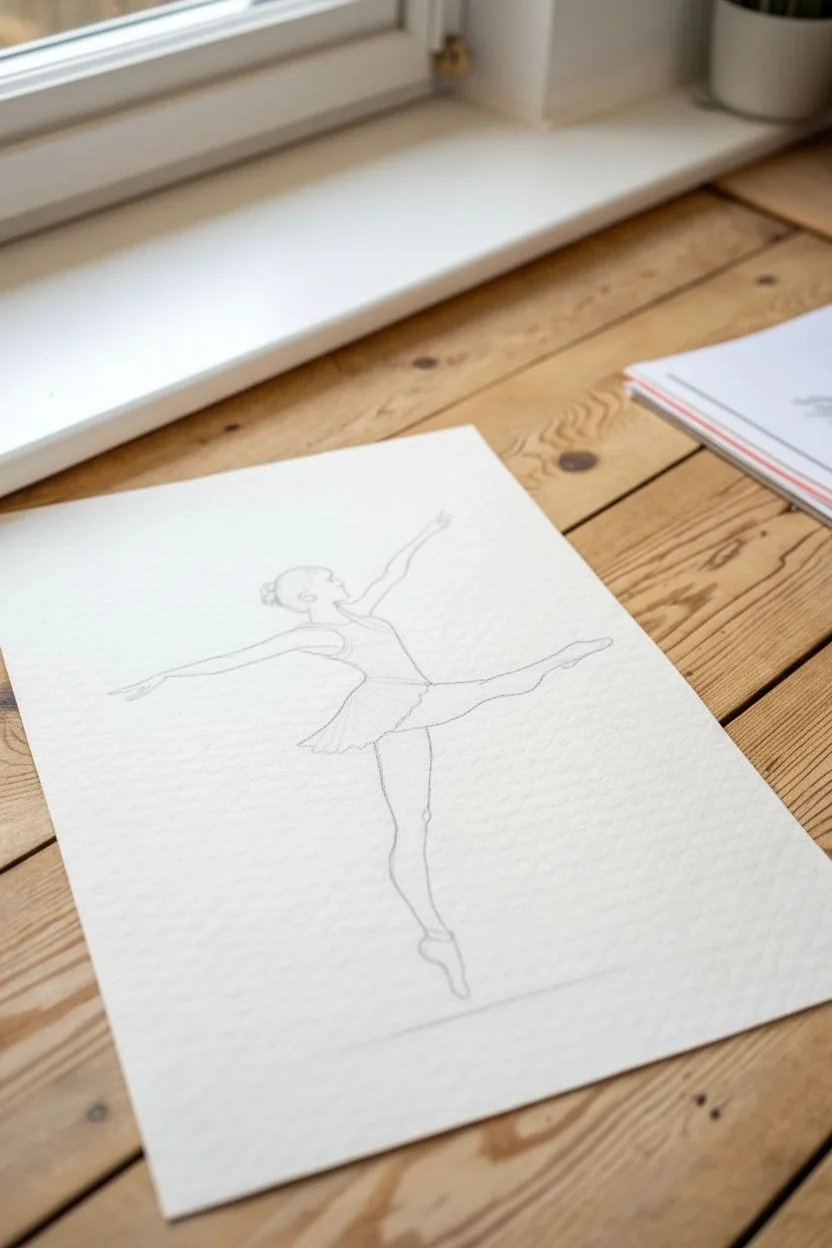
Step 1: Pencil Study (Left Page)
-
Establish the gesture:
On the left page, lightly sketch a sweeping curve using an HB pencil to define the spine and limiting leg. This sets the flow of the arabesque pose. -
Block in shapes:
Draw an oval for the ribcage and a tilted shape for the hips. Connect them with a curved waistline to show the arch of the back. -
Position the limbs:
Sketch the legs first—one planted firmly, the other extended straight back. Then, position the arms: one reaching forward and up, the other gracefully extended backward. -
Refine the anatomy:
Flesh out the stick figure lines with cylindrical shapes to form the muscles of the legs and arms. Keep the ankles and wrists slender for elegance. -
Add the head and bun:
Sketch the profile of the head looking forward, adding a small round shape at the back for the hair bun. -
Draft the tutu:
Draw the skirt using loose, triangular shapes projecting from the waist. Don’t worry about detailed fabric folds yet; just get the volume right. -
Finalize pencil lines:
Switch to a 2B pencil to darken your final contour lines. I like to add light hatching on the skirt and simple facial features to finish clearly.
Silhouette Blob?
If the silhouette looks undefined, your limbs might be overlapping the body too much due to the angle. Increase the ‘negative space’ between arms and torso to improve readability.
Step 2: The Silhouette (Right Page)
-
Duplicate the outline:
On the right page, lightly sketch the outline of your ballerina again. Focus strictly on the outer edge—internal muscles don’t matter here. -
Define boundaries:
Use your fine tip black pen to create a crisp outline around the entire figure. Ensure the fingers and pointed toes are sharp and distinct. -
Fill the core:
Using a black brush pen or marker, fill in the head, torso, and limbs. Work carefully near the edges to keep the silhouette sharp. -
Fill the tutu:
Color the skirt area solid black as well. Make the bottom edge jagged or feathery to mimic the texture of tulle fabric. -
Ground the figure:
Add a few quick, horizontal strokes of black ink under the standing foot to create a ground shadow, anchoring the dancer.
Step 3: Detailing & Contrast
-
Dry completely:
Wait for the black ink to dry fully to prevent the white pen from turning gray or smudging. -
Stipple the body:
With an opaque white gel pen, tap tiny dots (stippling) inside the dancer’s body. Gather more dots in the center and fewer near the edges for a dimensional look. -
Highlight the skirt:
Use quick, wispy strokes with the white pen over the black tutu area to suggest layers of fabric and movement. -
Final touches:
Check the ground shadow again; I sometimes add a second, thinner line underneath with the fine pen to emphasize the floor plane.
Level Up: Galaxy Effect
Instead of uniform stippling, vary the white dot sizes and add tiny four-point stars inside the silhouette. This turns the figure into a celestial body or a ‘galaxy’ dancer.
Now you have a striking spread that shows how much information a simple outline can convey.
Incorporate expressive hand gestures near the face
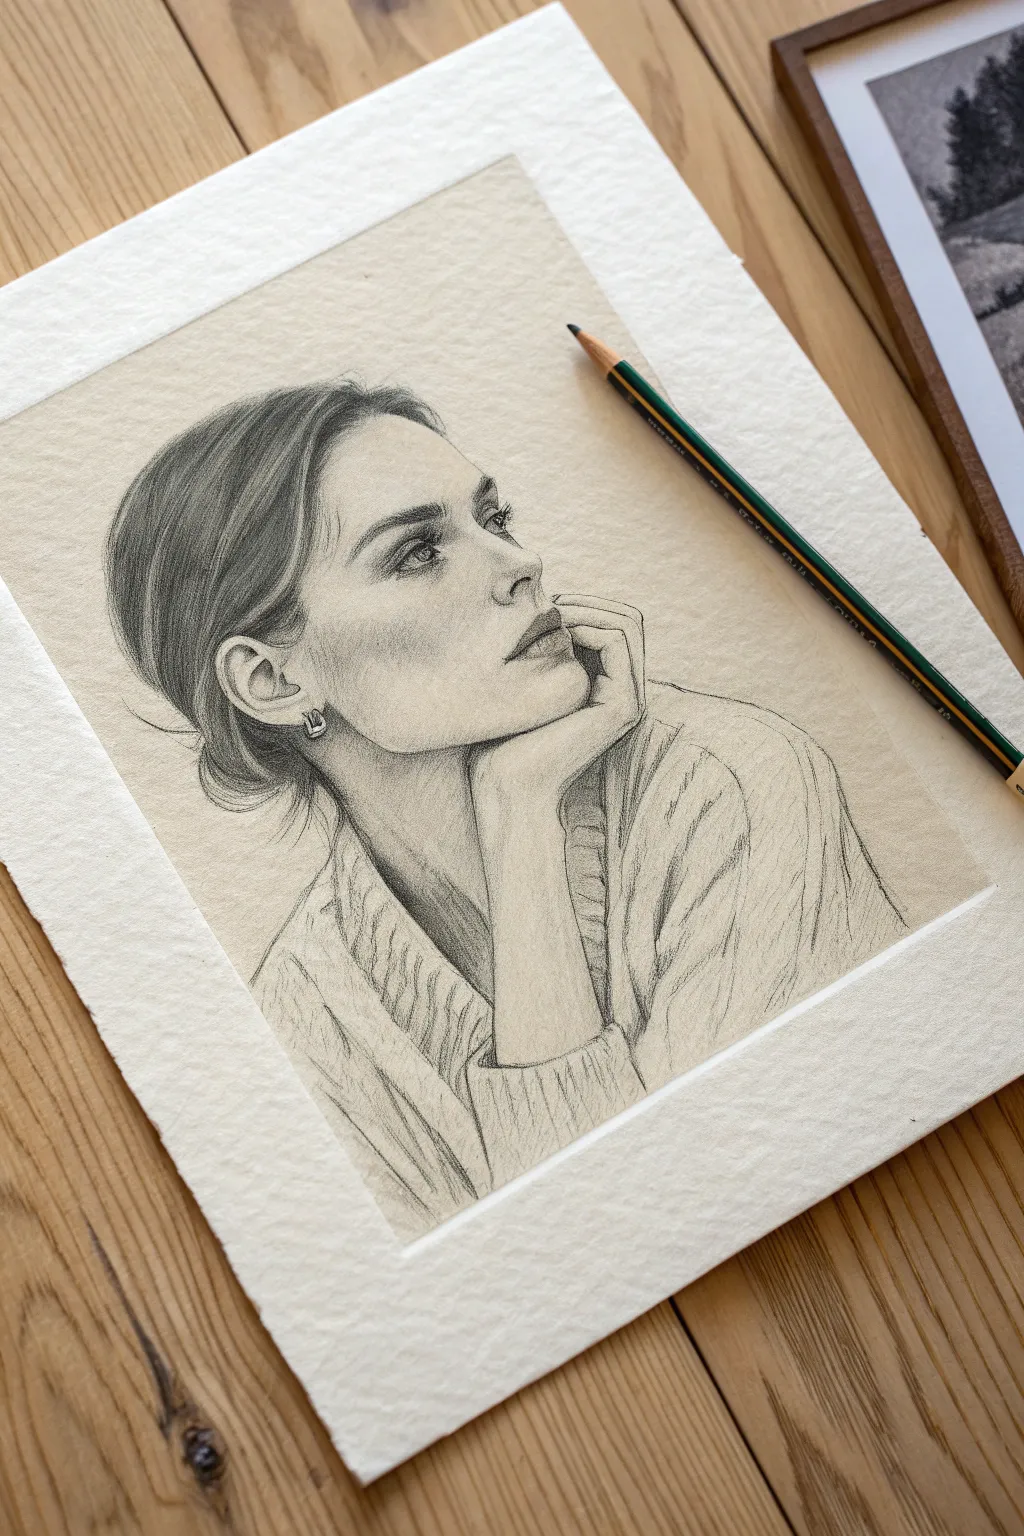
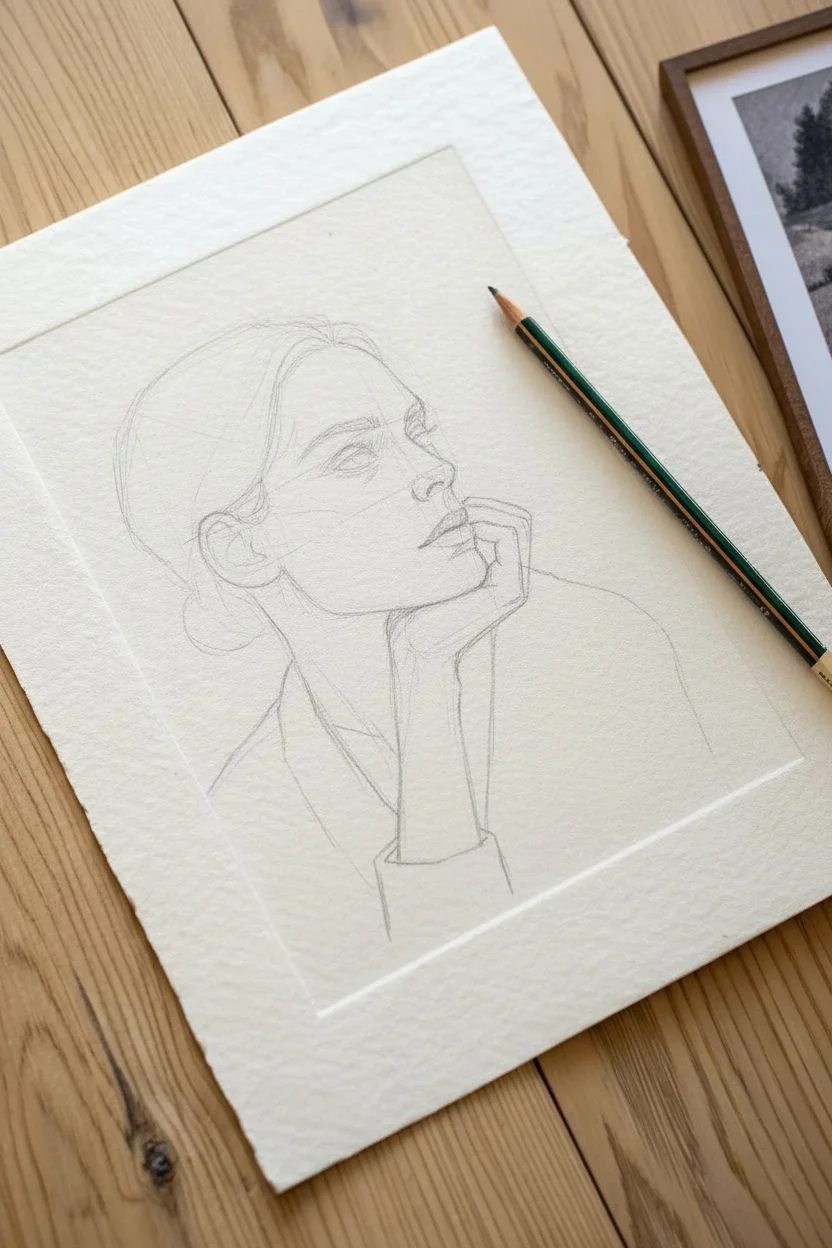
Capture a moment of quiet thought with this realistic graphite portrait featuring an expressive hand-to-face gesture. This project focuses on rendering delicate skin tones, textured hair, and the gentle interaction between the hand and jawline on heavyweight textured paper.
Step-by-Step Guide
Materials
- High-quality graphite pencils (grades HB, 2B, 4B, 6B)
- Heavyweight textured drawing paper or hot-press watercolor paper
- Kneaded eraser
- Precision eraser (stick or mono zero)
- Blending stump (tortillon)
- Sharpener
- Protective sketch paper
Step 1: Structural Sketching
-
Map the proportions:
Begin with an HB pencil, sketching a loose oval for the head and a slightly angled block shape beneath the chin representing the hand support. Keep these lines very faint. -
Placement guidelines:
Draw light horizontal lines to mark the position of the eyes, the base of the nose, and the center of the lips. Note the three-quarter tilt of the head. -
Define the silhouette:
Refine the outline of the face, paying close attention to the curve of the jaw where it presses against the heel of the hand. -
Block in the gesture:
Sketch the fingers curled under the chin and the wrist extending down. Ensure the hand looks like it is bearing the weight of the head, not just floating near it.
Step 2: Facial Features
-
Render the eyes:
Using a freshly sharpened 2B pencil, draw the eye shape, iris, and pupil. Leave a tiny white spot in the pupil for the catchlight to bring the subject to life. -
Shape the brows:
Sketch the eyebrows using short, flicking strokes that follow the direction of hair growth, thickening the texture slightly at the arch. -
Nose and lips:
Lightly define the nostril and the bridge of the nose. Move to the lips, shading the upper lip darker than the bottom one to create volume. -
Ear detail:
Outline the visible ear and the small hoop earring. I find it helpful to draw the earring shape first so I don’t accidentally shade through it.
Keep it clean
Place a scrap piece of paper under your drawing hand while you work. This prevents the natural oils in your skin from smudging your shading or transferring graphite to clean areas.
Step 3: Shading & Tone
-
Base skin values:
Switch to a 2B pencil and lay down soft hatching on the shadowed side of the face, particularly under the cheekbone and along the temple. -
Deepen the shadows:
Use a 4B pencil to darken the area under the jawline and where the fingers touch the face. This contact shadow is crucial for anchoring the hand gesture. -
Model the hand:
Shade the fingers and back of the hand. Keep the values slightly lighter on the top planes of the knuckles to show bone structure. -
Textured shading:
Allow the grain of the paper to show through your shading strokes. This adds the artistic, traditional look seen in the reference image.
Level Up: Deckled Edges
To mimic the artisan paper look in the photo, tear the edges of your heavy paper against a ruler instead of cutting them. This creating a soft, ‘deckled’ edge perfect for framing.
Step 4: Hair & Clothing
-
Hair direction:
Map out the flow of the hair pulled back into a bun. Use long, sweeping strokes starting from the hairline. -
Darken hair values:
With a 6B pencil, fill in the darkest parts of the hair (behind the ear and at the nape/bun) to create depth and contrast. -
Individual strands:
Use a sharp HB pencil to draw fine, loose strands escaping the bun and framing the neck and ear for a realistic, messy-bun effect. -
Sweater outline:
Loosely sketch the collar and shoulders of the sweater. The clothing should be less detailed than the face to keep the focus on the portrait. -
Fabric texture:
Apply loose, diagonal cross-hatching to the sweater area to suggest a knit texture without drawing every stitch.
Step 5: Refinement
-
Enhance contrast:
Review the drawing and deepen the darkest blacks—pupils, nostrils, and deepest hair shadows—using your 6B pencil. -
Lift highlights:
Use the kneaded eraser to gently lift graphite from the cheekbone, the bridge of the nose, and the tip of the chin to emphasize the light source. -
Final clean up:
Erase any stray construction lines around the outer edges to leave a clean, professional finish on your textured paper.
Now that your portrait is complete, frame it simply to let the subtle textures and emotion shine.
BRUSH GUIDE
The Right Brush for Every Stroke
From clean lines to bold texture — master brush choice, stroke control, and essential techniques.
Explore the Full Guide
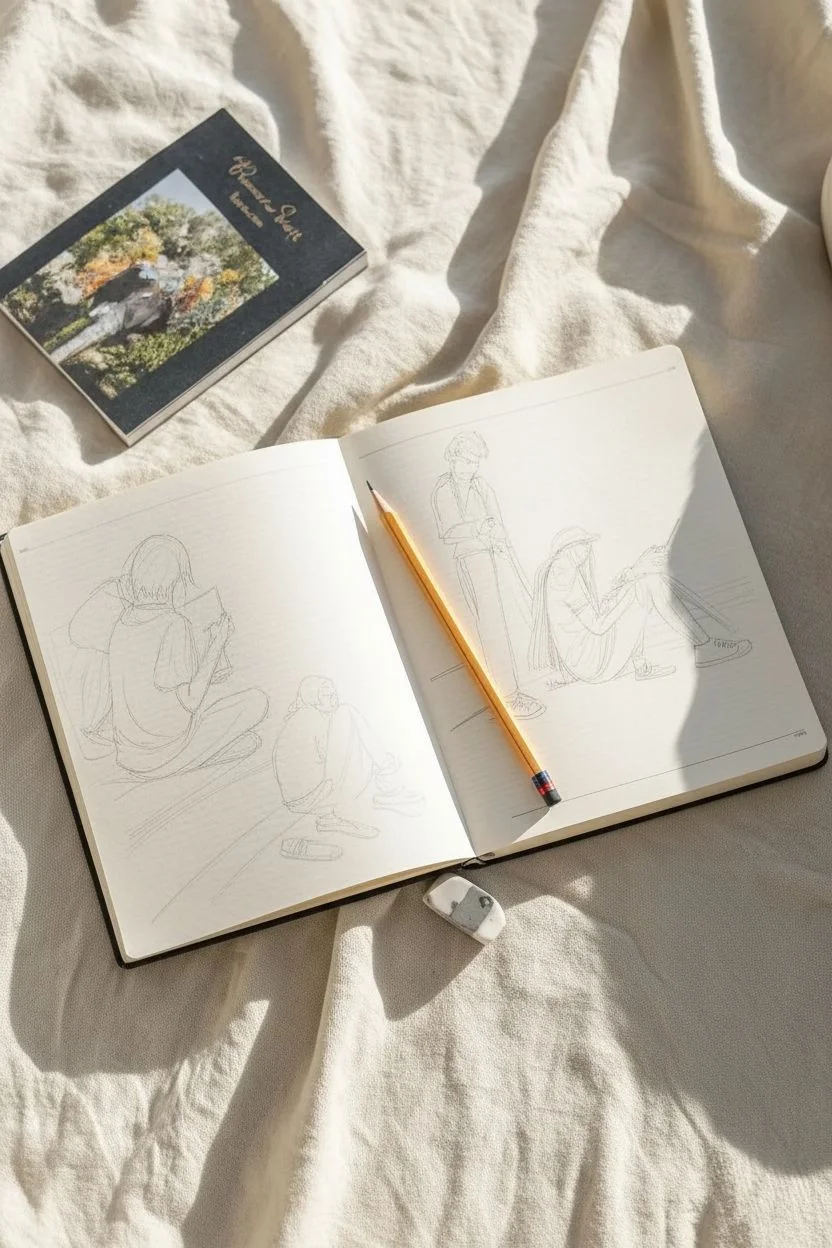
Capture candid everyday maneuvers
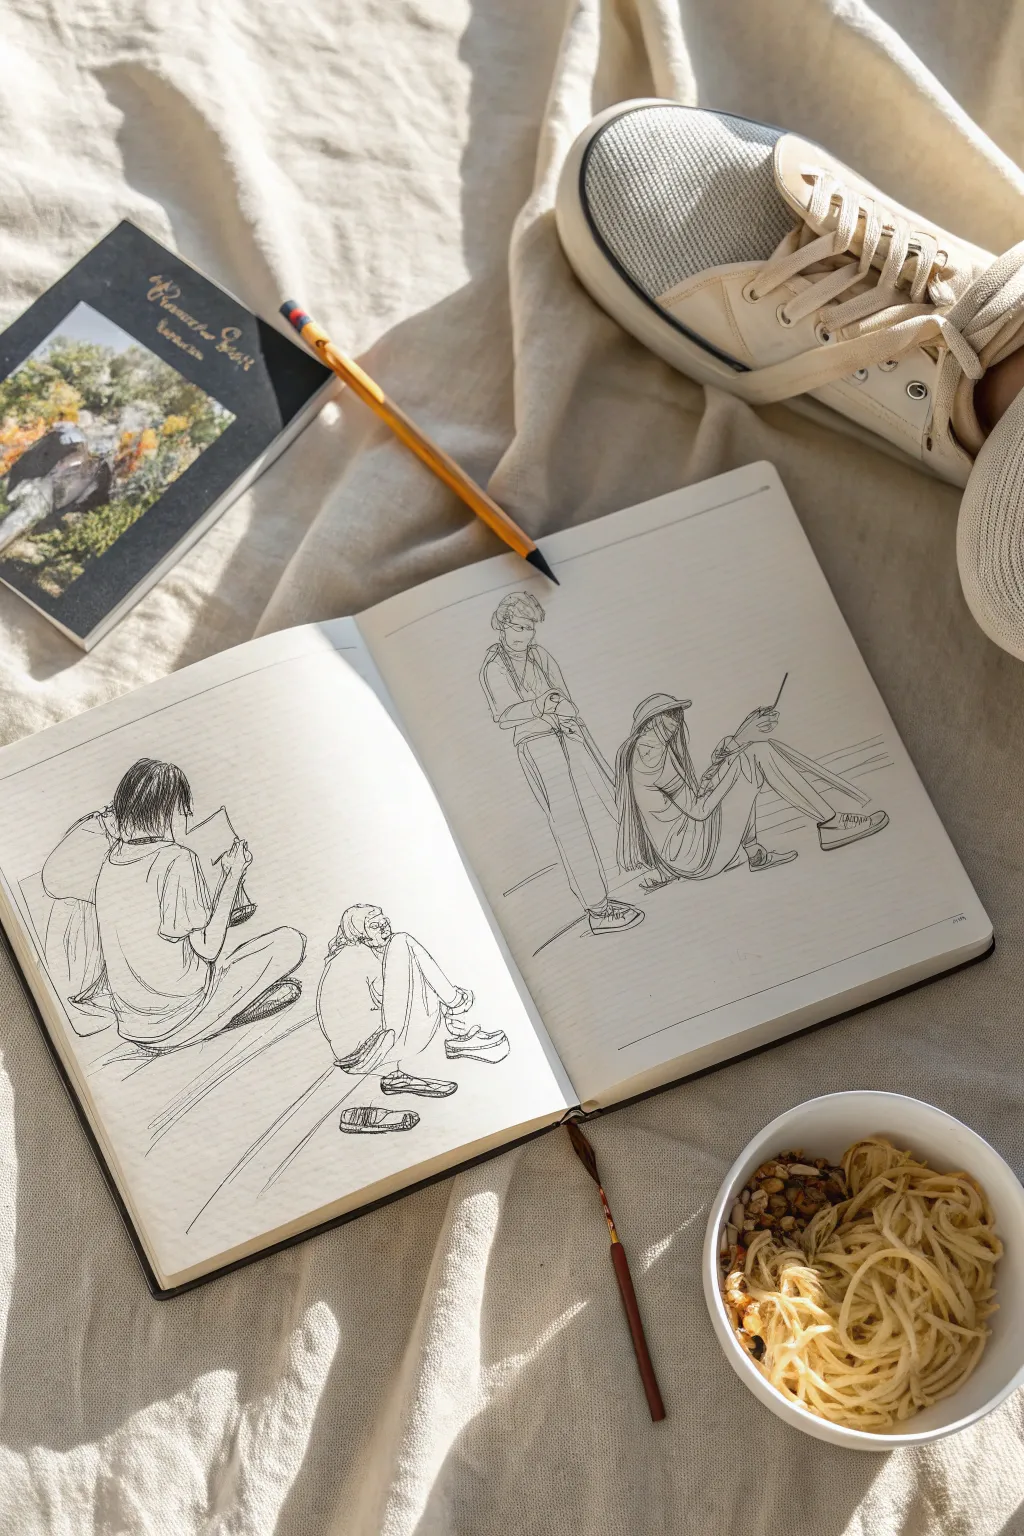
This project focuses on the beauty of mundane body language through minimalist line art. You will fill a sketchbook spread with candid figures, emphasizing clothing folds and posture rather than complex facial features.
How-To Guide
Materials
- Sketchbook with smooth paper
- HB or 2B Graphite pencil
- fKneaded eraser
- Black fine liner pen (0.1mm or 0.3mm)
- Reference photos of people waiting or reading
Step 1: Structural Sketching
-
Establish the ground plane:
Using your pencil, lightly draw a faint horizontal line across both pages to establish where your figures will sit or stand, ensuring they don’t look like they constitute floating in space. -
Block in the left figure:
On the left page, start with a large oval for the torso of the main figure, oriented with their back to you. -
Add gesture lines for limbs:
Sketch the legs in a cross-legged position. Focus on the triangular shape created by the knees and the base of the spine. -
Position the arms:
Draw the elbows tucked in close to the body, with forearms raised as if holding a book or phone. -
Add the smaller figure:
Near the bottom right of the left page, sketch a smaller, crouching figure. Use simple circles for the head and knees to get the huddled proportion right.
Uneven Lines?
If your long ink lines feel shaky, try moving your arm from the shoulder rather than just your wrist. Faster strokes often result in smoother lines than slow, hesitant ones.
Step 2: Right Page composition
-
Standing figure gesture:
On the left side of the right page, draw a vertical line for a standing figure. Mark the hips and shoulders at a slight angle to show a relaxed stance. -
Clothing volume:
Instead of drawing muscles, sketch the loose outline of a baggy jacket and trousers over the standing frame. -
Seated figure foundation:
To the right, sketch a figure sitting with legs extended. Start with the head and angle the torso slightly backward, as if leaning against a wall. -
Leg extension:
Draw long, angular lines for the legs stretching out towards the page edge, indicating bent knees and shoes. -
Accessories:
Lightly sketch the wide-brimmed hat on the seated figure and the phone in their hands.
Step 3: Inking and Refining
-
Begin inking the left page:
Switch to your fine liner. Start with the hair of the main seated figure, using short strokes to suggest texture. -
Define the clothing folds:
Trace the outer contours of the t-shirt. I like to add specific wrinkle lines where the fabric bunches at the waist and under the arms to show weight. -
Detail the crouching figure:
Ink the profile of the smaller figure, paying attention to the definition of the shoes and the curve of the spine. -
Ink the standing figure:
Move to the right page. Use confident, continuous lines for the long trousers of the standing figure. -
Add the strap details:
Draw the strap of the bag crossing the standing figure’s chest, noting how it presses into the clothing fabric. -
Finalize the hat figure:
Ink the hat and let the hair drape down over the shoulders. Use fluid lines for the long skirt or pants to emphasize the relaxed pose. -
Clean up:
Wait at least five minutes for the ink to dry completely to prevent smudging. -
Erase guidelines:
Gently rub your kneaded eraser over the entire spread to lift the graphite, leaving only the crisp ink lines.
Add Depth
Use a grey brush pen or a dilute ink wash to add simple cast shadows on the floor and folds. This quickly gives the flat line art volume without overworking the sketch.
Now you have a lively sketchbook spread that captures the quiet rhythm of daily life.
Let fabric folds reveal the form underneath
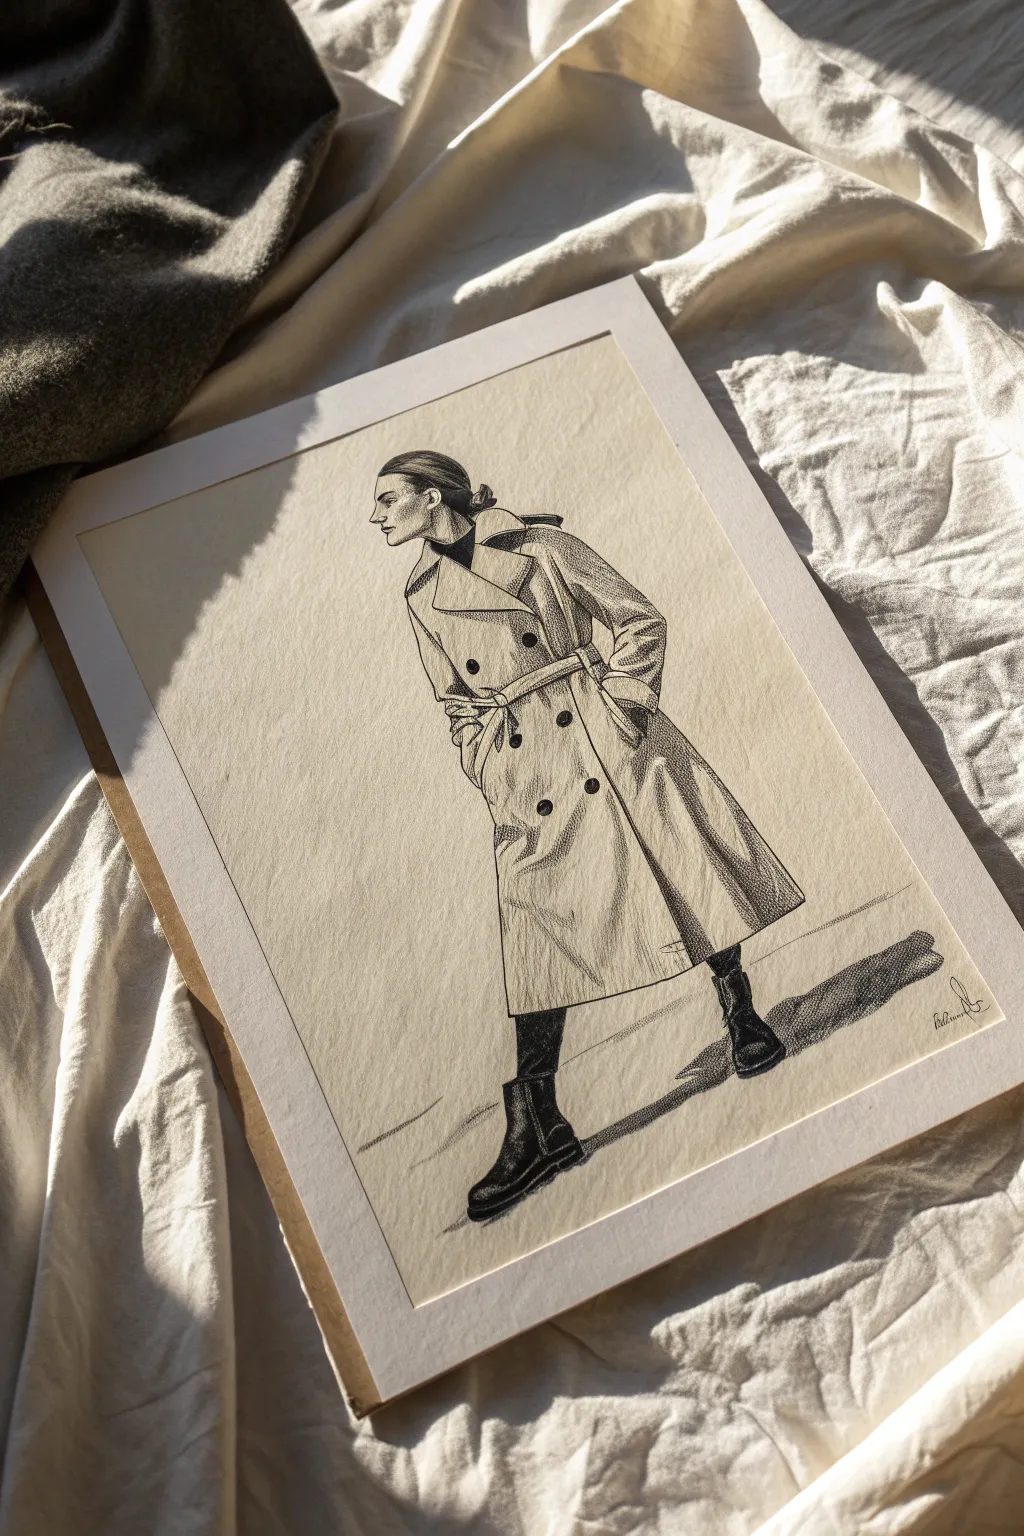
Capture the elegance of motion with this detailed ink drawing that uses texture to define volume. This project focuses on high-contrast shading and delicate stippling to render the weight of a trench coat on a walking figure.
Step-by-Step Guide
Materials
- Heavyweight cream or off-white drawing paper
- HB graphite pencil
- Kneaded eraser
- Fine liner pens (sizes 005, 01, and 05)
- Ruler
- Backing board or cardstock (for mounting)
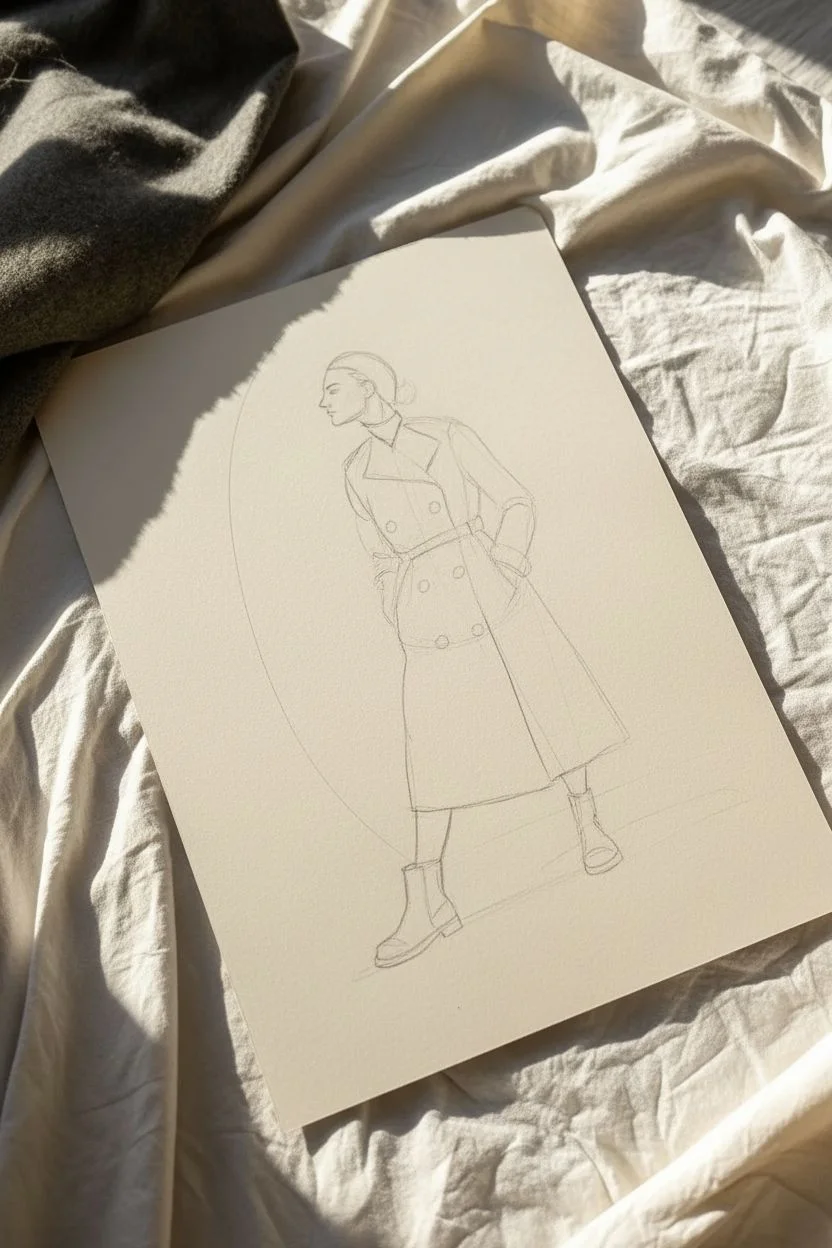
Step 1: Constructing the Pose
-
Establish the line of action:
Lightly sketch a curved vertical line with your HB pencil to represent the spine and the forward motion of the figure. -
Block in the body masses:
Draw simple ovals for the head, ribcage, and hips along your action line. Keep the head profile turned to the left. -
Define the legs:
Sketch the legs in a walking stride. The front leg should be straight and bearing weight, while the back leg bends at the knee to propel the figure forward. -
Sketch the boots:
Outline the shape of chunky Chelsea boots. Keep the shapes blocky and grounded, ensuring they align with the perspective of the floor.
Pro Tip: Tension Points
Fabric always pulls from “anchor points” like shoulders, belts, or buttons. Draw your fold lines radiating outward from these specific points to make the clothing look realistic.
Step 2: Draping the Fabric
-
Outline the collar and lapels:
Sketch a large, wide collar that sits high on the neck. Add a darker turtleneck shape underneath for contrast. -
Cinch the waist:
Draw the belt tightly around the waistline. I like to make the belt slightly angled to emphasize the forward movement of the hips. -
Draw the coat skirt:
Extend the coat down to the shins. Let the fabric flare out slightly behind the figure to simulate movement. -
Add key folds:
Sketch drag lines radiating from the belt and buttons. This is crucial—let the lines curve around the thigh to show the leg underneath the heavy fabric. -
Place the details:
Mark the positions for the double-breasted buttons, the cuff straps, and the pocket flaps.
Step 3: Inking and Defining
-
Ink the main outlines:
Using an 01 fine liner, trace your pencil lines with confident, smooth strokes. Don’t worry if lines aren’t perfectly continuous; slight breaks add character. -
Erase guidelines:
Once the ink is completely dry, gently remove all graphite sketch lines with a kneaded eraser to keep the paper texture intact. -
Fill the heavy blacks:
Switch to an 05 pen to color the boots, the turtleneck, and the leggings. Leave small slivers of white on the boots to represent highlights on the leather. -
Detail the hair:
Use the 005 pen to draw fine, sweeping lines for the hair, pulling it back into a low bun.
Troubleshooting: Flat Shading
If the coat looks flat, increase the density of your stippling dots near the outline edges. This creates a gradient that mimics the roundness of the body beneath the cloth.
Step 4: Shading with Texture
-
Start stippling:
Using the 005 pen, apply tiny dots (stippling) to the shadowed areas of the coat: under the collar, beneath the belt, and along the side seam. -
Add hatched shading:
Layer diagonal hatching lines over the stippled areas to deepen the shadows, particularly in the deep folds of the fabric. -
Create the cast shadow:
Draw a long, horizontal shadow stretching to the right of the feet using parallel hatching lines. This grounds the figure. -
Mount the drawing:
Trim your drawing paper to a rectangle. Center it on a slightly larger piece of backing board or cardstock to create a framed, finished look.
Display your chic illustration in a simple frame or on a mood board to inspire your next fashion sketch.


Push the limits with gesture exaggeration
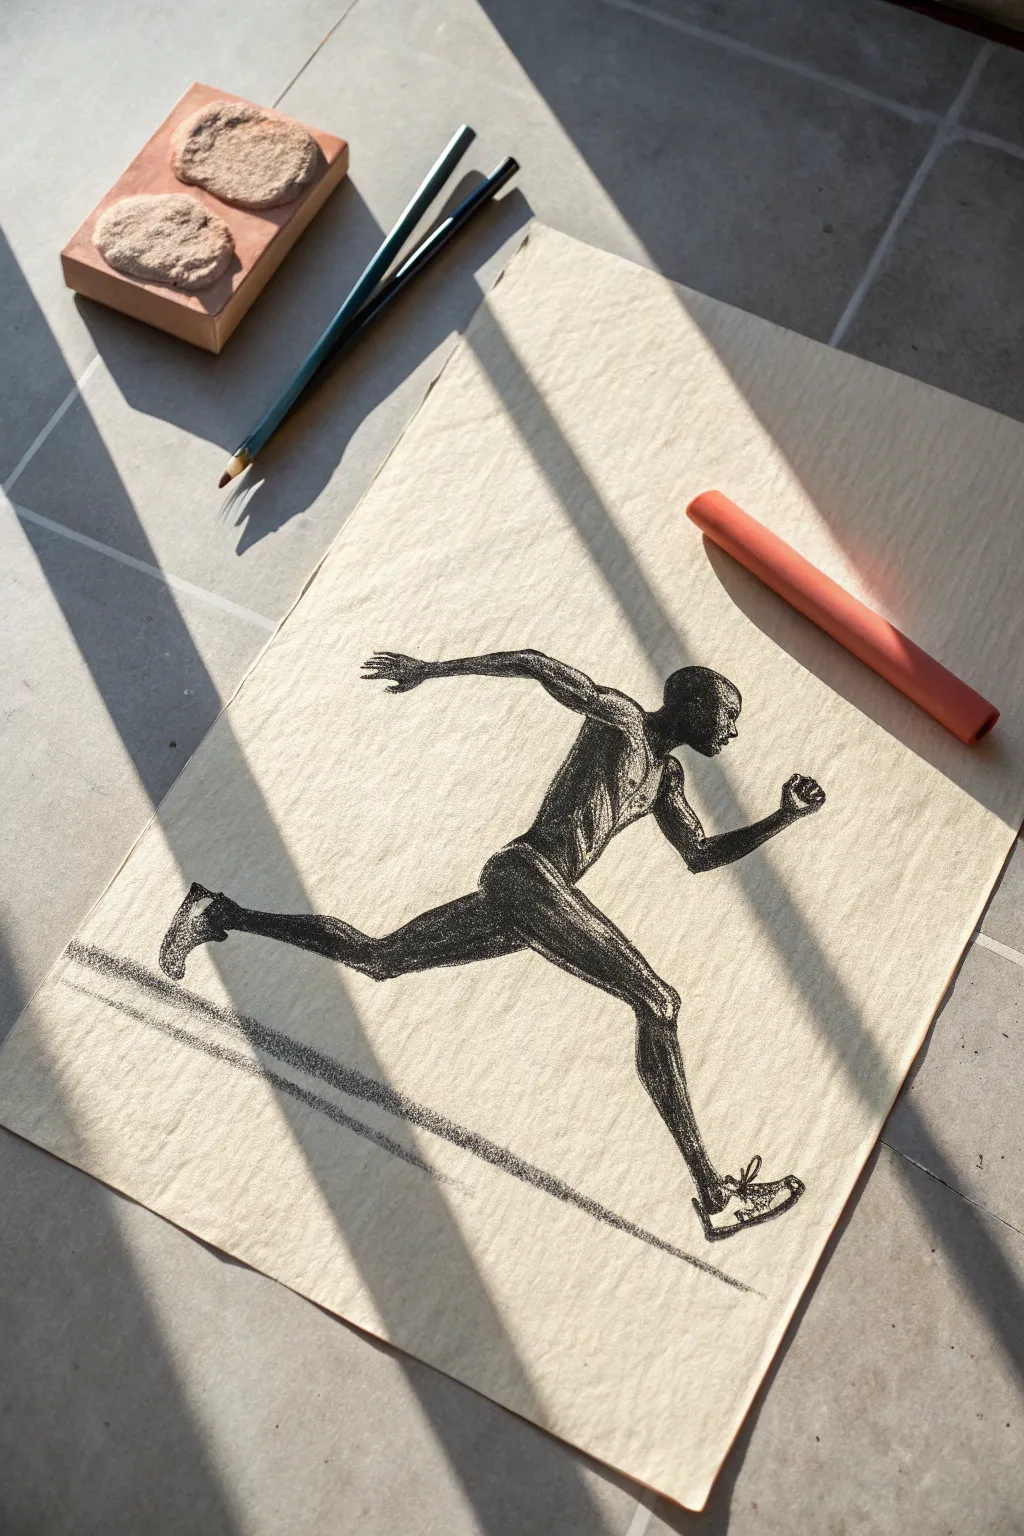
Capture the raw energy of an athlete in mid-stride using high-contrast shading and gestural lines. This project focuses on exaggerating the human form to convey speed, utilizing textured paper to add grit and movement to the final piece.
Step-by-Step Guide
Materials
- Textured sketch paper (cream or oatmeal tone)
- Black charcoal stick or compressed charcoal
- Black Conté crayon (optional for finer lines)
- Graphite pencil (HB or B)
- Kneaded eraser
- Fixative spray
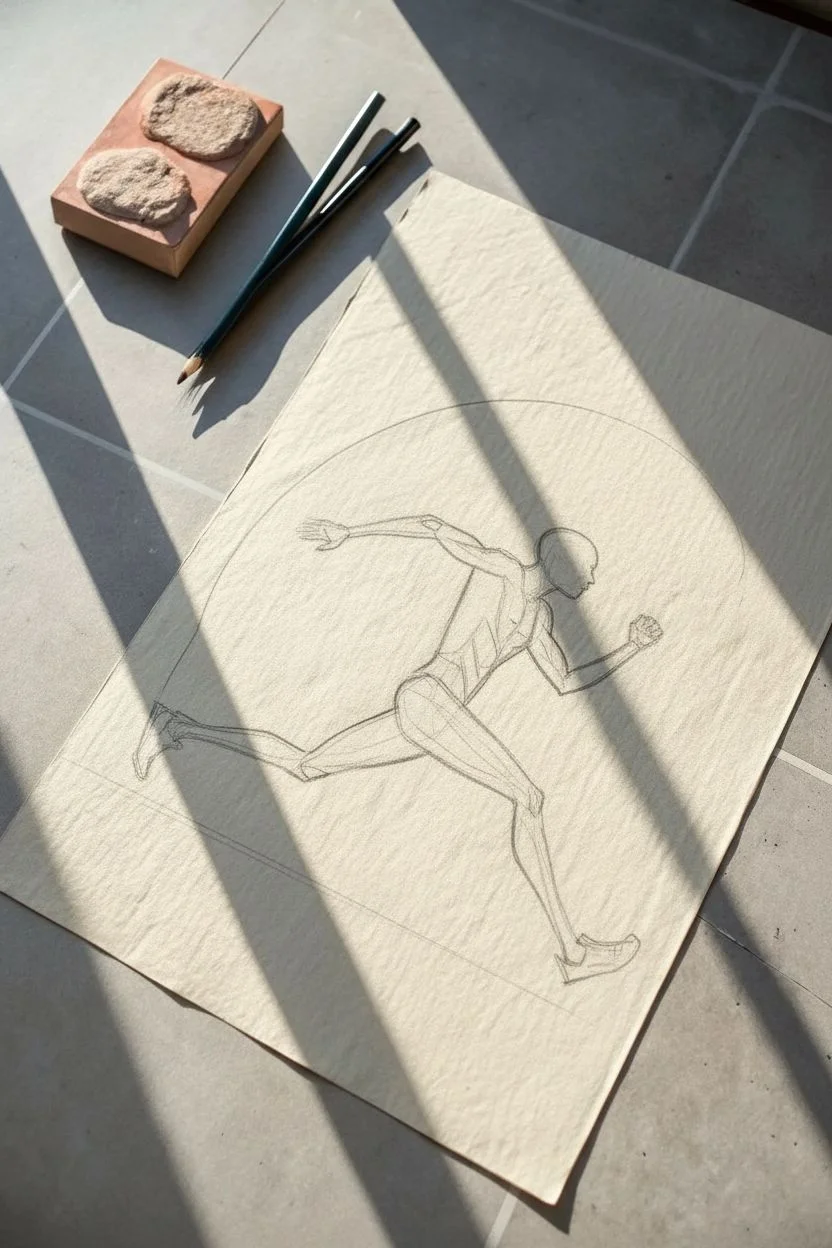
Step 1: Constructing the Gesture
-
Establish the line of action:
Begin with a faint graphite pencil line that sweeps from the head, down the spine, and extends straight out through the rear leg. This curve defines the forward momentum. -
Block in the masses:
Sketch an oval for the head, a tilted rectangular block for the ribcage, and a smaller block for the pelvis. The torso should lean heavily forward. -
Map the limbs:
Draw lines for the arms and legs. To achieve the ‘gesture exaggeration,’ extend the stride significantly wider than a normal running pose, pushing the rear leg far back and the front knee high. -
Refine the contour:
Lightly outline the muscles around your stick figure framework, focusing on the powerful shapes of the thighs and calves.
Use the Tooth
Let the paper’s texture do the work. Don’t press so hard that you flatten the paper grain; allowing white specks to show through the black charcoal adds natural vibration and energy.
Step 2: Applying Charcoal
-
Start with the darkest values:
Switch to your charcoal stick. Identify the core shadow areas—usually the underside of the limbs, the chest, and the shorts—and fill them in with firm pressure. -
Define the torso:
Use the edge of the charcoal to carve out the ribcage and abdominal muscles. Leave small gaps of paper showing through to suggest skin texture/sweat. -
Render the legs:
Shade the legs, keeping the strokes following the direction of the muscles. I like to keep the pressure varied here so the paper’s grain breaks up the solid black lines. -
Add anatomic details:
sharpen the charcoal or use a Conté crayon to define the ankle bones, knee caps, and the definition of the shoulder blade. -
Sketch the hands and feet:
Keep the hands and feet somewhat loose and impressionistic. For the running shoes, use quick, jagged lines to suggest laces and tread without drawing every detail.
Step 3: Highlights and Atmosphere
-
Lift out highlights:
Take your kneaded eraser and pinch it into a wedge. Dab away charcoal on the top of the shoulder, the thigh, and the brow to create striking highlights. -
Refine edges:
Check the silhouette. If any edges look too fuzzy, crisp them up with the charcoal, especially around the face and the leading knee. -
Ground the figure:
Draw a thick, straight line of shadow beneath the feet. This ground line emphasizes the height of the jump and anchors the composition. -
Smudge for speed:
Lightly drag a finger or blending stump specifically on the rear foot or back elbow to blur the edges slightly, creating a subtle motion blur effect. -
Final assessment:
Step back and look at the contrast. Deepen the darkest blacks one last time to ensure the figure pops against the cream paper.
Level Up: Color Pop
Introduce a single accent color. Use a sanguine or terracotta Conté crayon for the shoes or the track line to create a dynamic visual interest that contrasts with the heavy black.
Spray your finished drawing with fixative to preserve those deep blacks and keep your dynamic runner in motion
Create narratives with group interaction templates
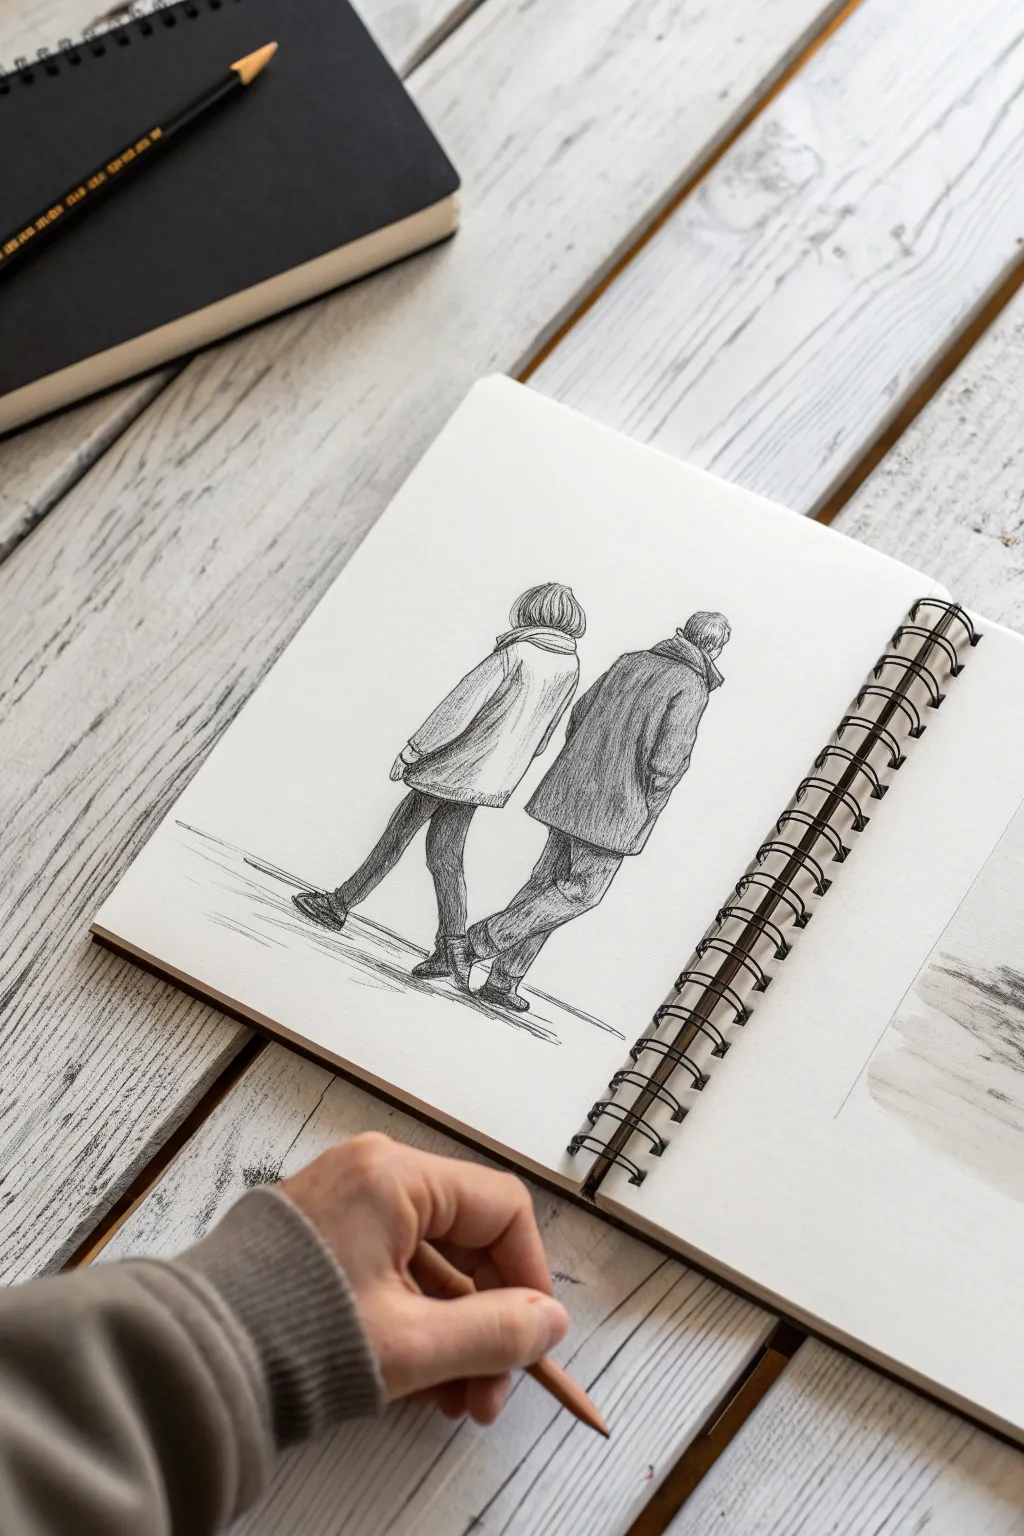
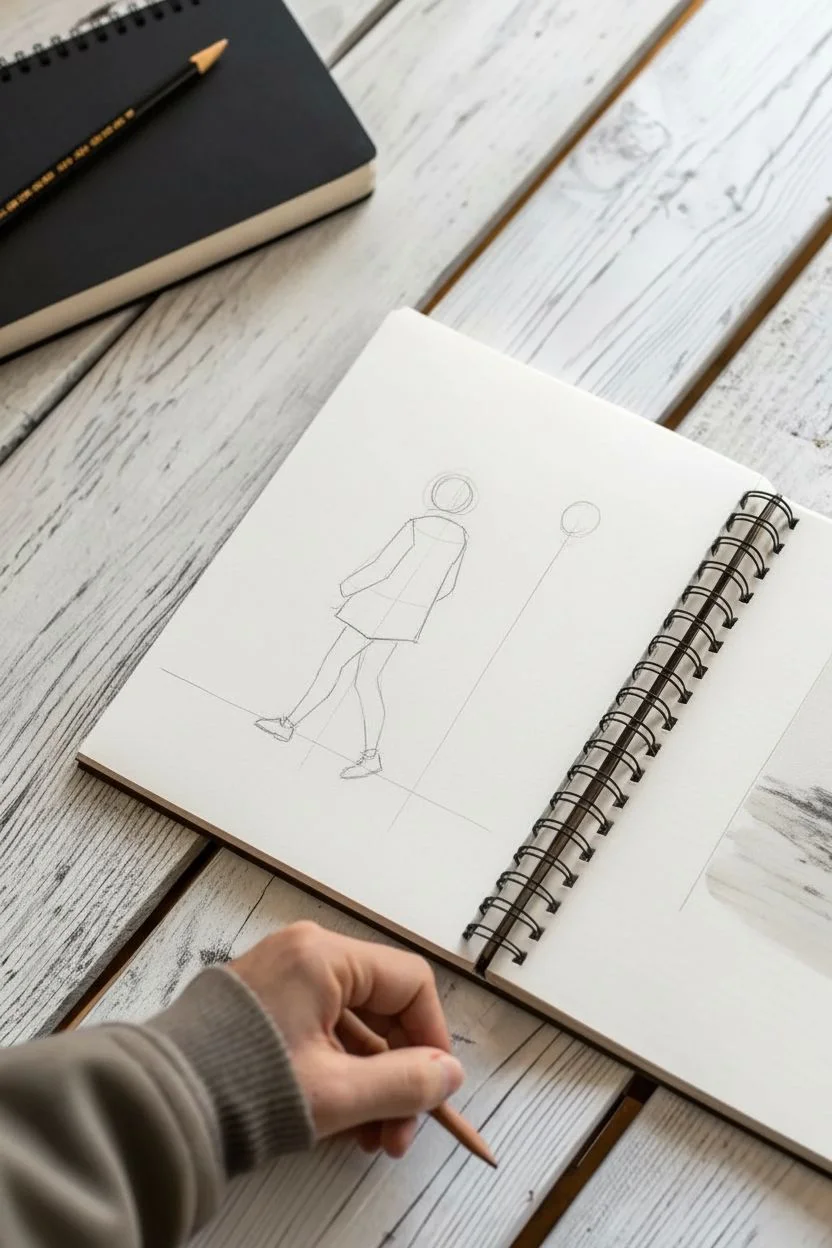
Capture the quiet camaraderie of two figures walking away in this expressive pencil sketch. You will learn to build character silhouettes and use directional hatching to suggest heavy winter fabrics and movement.
Step-by-Step Tutorial
Materials
- Sketchbook with smooth paper
- HB graphite pencil (for initial structural lines)
- 2B or 4B graphite pencil (for shading and depth)
- Kneaded eraser
- Pencil sharpener
Step 1: Structural blocking
-
Establish the ground plane:
Begin by drawing a faint horizontal line near the bottom third of your page to represent the ground level where the feet will land. -
Draw the center of gravity:
Sketch two light, vertical lines side-by-side to determine the placement and height of your two figures. -
Head positioning:
At the top of your vertical lines, draw two oval shapes for the heads. The figure on the right should be slightly taller. -
Shoulder and torso block-in:
Draw sloping lines for the shoulders. Below this, sketch a trapezoid shape for the left figure’s coat and a slightly more rectangular block for the right figure’s jacket. -
Leg wireframe:
Use simple stick lines to map out the legs. I find it helpful to angle the legs to show a mid-stride motion—one leg slightly back, the other forward.
Step 2: Fleshing out the forms
-
Define the left coat:
Outline the left figure’s coat using loose, confident strokes. Give it an A-line shape that flares slightly at the hips, adding a thick collar around the neck. -
Shape the left figure’s legs:
Thicken the stick lines into legs. Taper them toward the ankles to suggest fitted trousers or leggings. -
Define the right coat:
Draw the right figure’s coat with straighter, heavier lines. Include the collar turned up against the neck and marks for the arm placement at the side. -
Shape the right figure’s trousers:
Draw the trousers for the right figure, making them looser than the left figure’s. Add subtle wrinkles around the knees where the fabric bunches. -
Add footwear:
Sketch the shoes on both figures. Ensure the back heel comes up slightly on the legs that are pushing off the ground to emphasize the walking motion. -
Hairstyles:
Add the hair details. Use short vertical strokes for a bob cut on the left figure and shorter, texturized strokes for the figure on the right.
Un-stiffen the walk
If the figures look like they are standing still, angle the torso slightly forward and ensure the back heel is lifted off the ground to imply forward momentum.
Step 3: Shading and texture
-
Clean up the sketch:
Take your kneaded eraser and gently list the initial construction lines so only your defined outlines remain visible. -
Hatch the left coat:
Switch to your 2B pencil. Use light, vertical hatching strokes on the left coat, concentrating on the sides to create volume while keeping the center lighter. -
Darken the leggings:
Fill in the left figure’s legs with dense, dark shading to contrast with the lighter coat. -
Texture the right coat:
Use a cross-hatching technique on the right figure’s jacket to make it appear darker and heavier than the left coat. Darken the area under the arm/elbow. -
Right trouser shading:
Add shading to the right trousers, focusing on the folds behind the knees and the hem of the pants. -
Ground shadows:
Draw quick horizontal scribbles under the feet. Extend these lines slightly to the left to cast a shadow on the pavement. -
Final contrast check:
Review your drawing and darken the deepest crevices—like between the figures and under the shoe soles—to make the sketch pop.
Pro Tip: Line weight
Use heavier, darker pencil pressure on the underside of the clothes and shoes. This ‘anchors’ the figures so they don’t look like they are floating.
Now you have a charming narrative sketch ready to be part of a larger story or stand on its own.
Ground the figure using environmental props
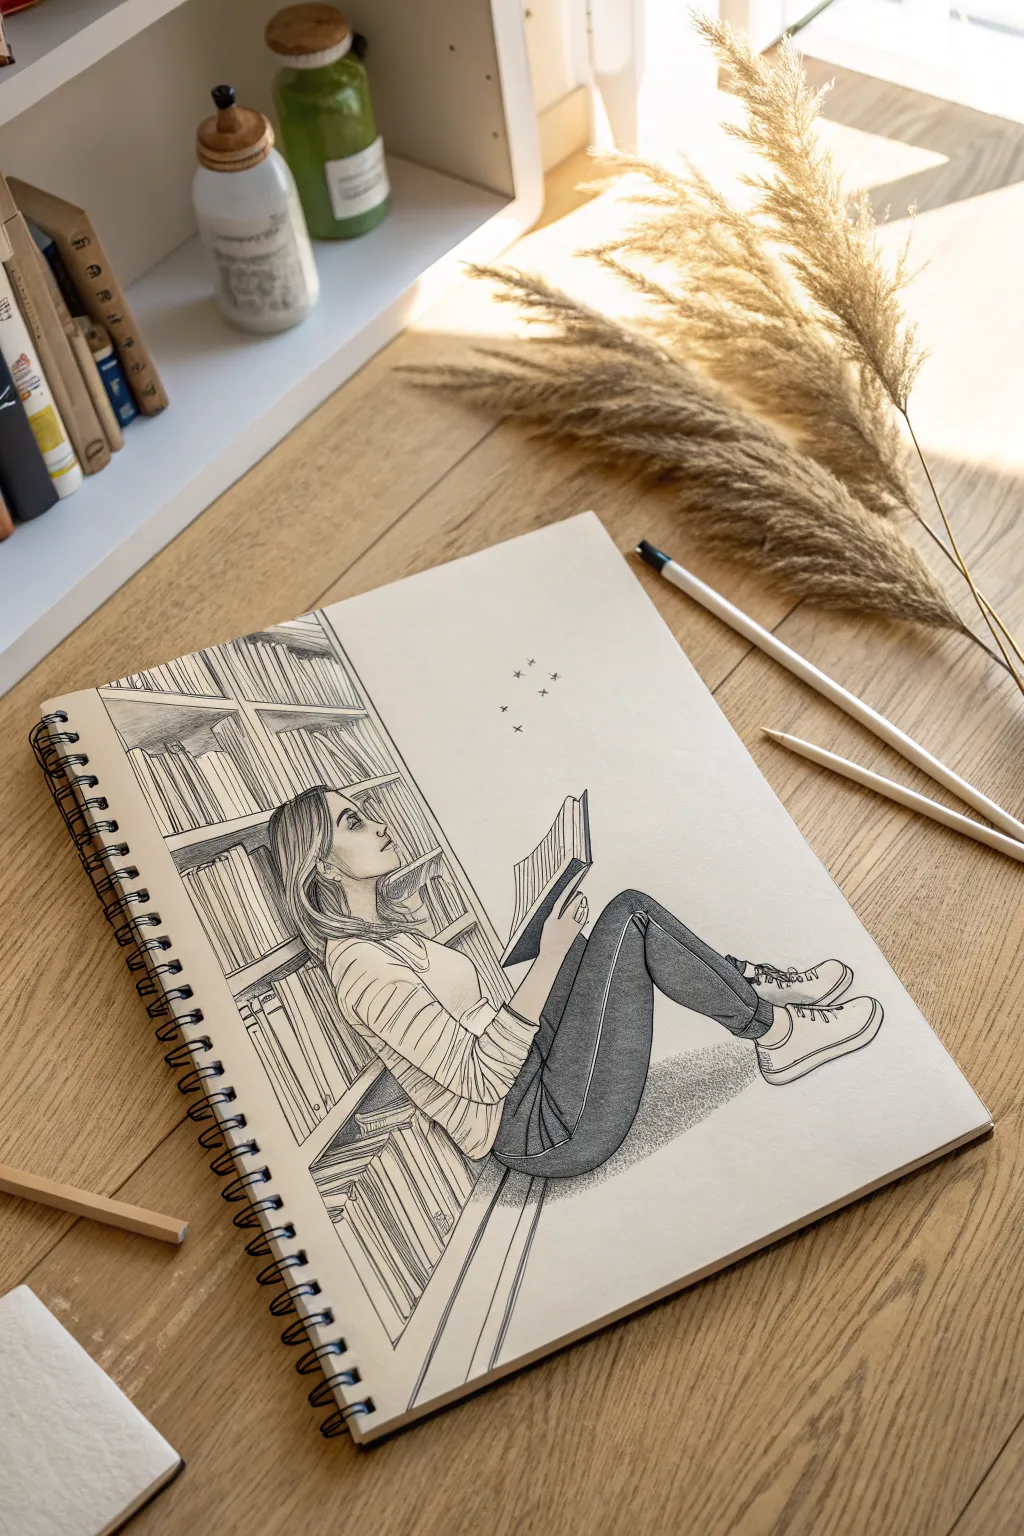
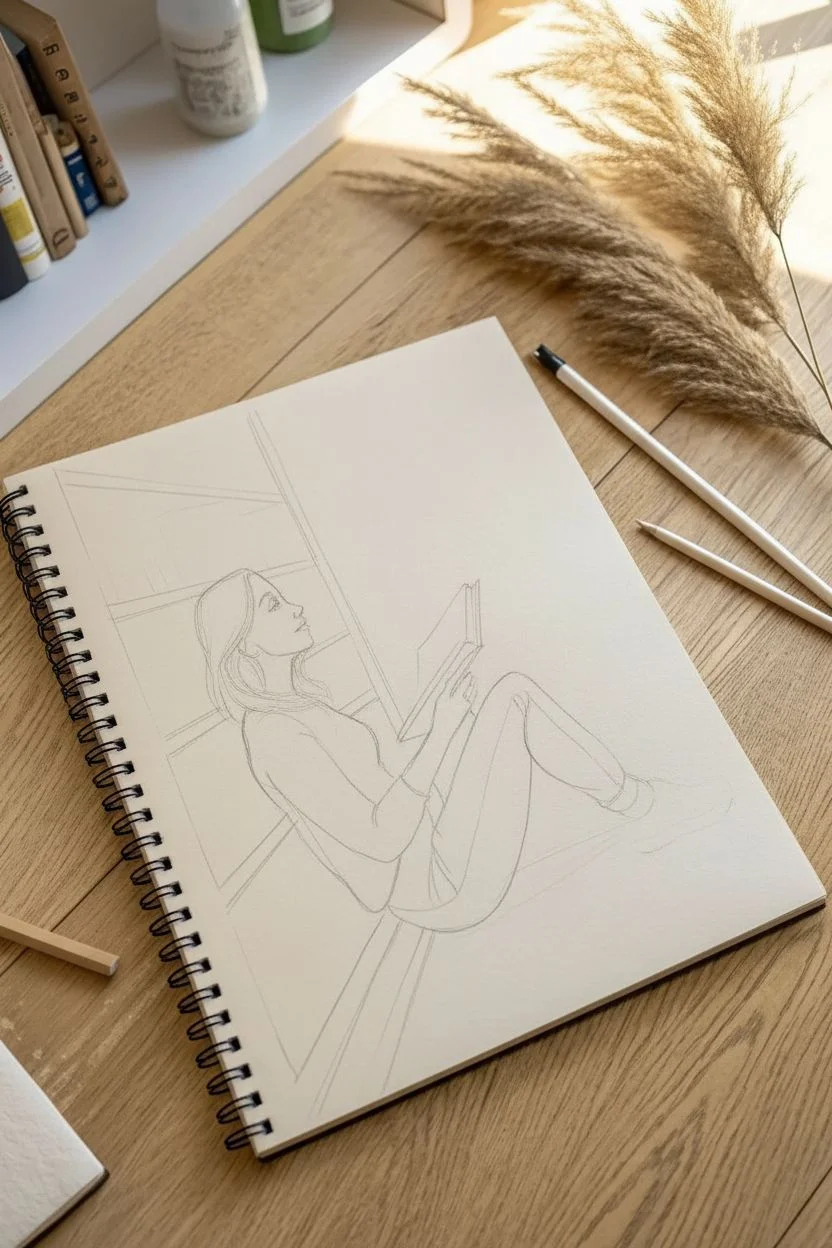
Capture the peaceful feeling of getting lost in a story with this intricate ink illustration. You will learn how to ground your character against a detailed bookshelf backdrop using fine liner pens and careful shading.
Step-by-Step Guide
Materials
- Sketchbook or drawing paper
- HB Drawing pencil
- Kneaded eraser
- Fine liner pens (sizes 0.1, 0.3, and 0.5)
- Ruler (optional)
Step 1: Structuring the Scene
-
Layout lines:
Start with your pencil to lightly sketch the vertical lines of the bookshelf on the left side of the page. Angle them slightly to create a subtle perspective. -
Figure placement:
Lightly block in the shape of the figure sitting on the floor. Draw a triangular shape for the bent legs and a vertical oval for the torso resting against your sketched shelves. -
Limb structure:
Sketch the legs bent at the knees, with feet extending forward. Position the arms so they bend at the elbow to hold an open book. -
Profile sketch:
Outline the profile of the face looking slightly upward, and sketch the basic shape of the hair falling over the shoulders.
Weight & Gravity
To really ‘ground’ the figure, slightly flatten the curves of the back where it touches the bookshelf and the bottom where it touches the floor. This visually sells the weight of the pose.
Step 2: Refining the Drawing
-
Clothing details:
Refine the clothing folds. Draw the hem of the sweater bunching at the waist and soft wrinkles at the elbows. Sketch the outline of the sneakers. -
Book details:
Draw the open book in her hands. Angle the cover and pages to show weight, making sure her fingers wrap naturally around the binding. -
Bookshelf contents:
Fill the shelves behind her with books. Draw various vertical spines, lean some books diagonally, and leave a few horizontal gaps to make the shelf look used and realistic.
Level Up: Personal Library
Customize the spines of the larger books on the shelf by writing in the actual titles of your favorite novels in tiny print, making the artwork autobiographical.
Step 3: Inking the Lines
-
Main outlines:
Switch to a 0.5 fine liner pen. Carefully go over the main outline of the girl’s body, her shoes, and the book she is holding. -
Shelf borders:
Ink the structural lines of the wooden bookshelf. You can use a ruler here if you want it distinct, but a steady freehand line adds more character. -
Book spines:
Use a thinner 0.3 pen to ink the individual books on the shelf. Adds small lines on the spines to suggest titles or binding details. -
Clean up:
Once the ink is completely dry, gently erase the underlying pencil structure lines to reveal the clean line art.
Step 4: Shading and Texture
-
Hair texture:
Using the 0.1 pen, draw long, sweeping strokes following the curve of the hair to create volume and shine distinct from the clothing. -
Sweater pattern:
Draw thin, widely spaced horizontal lines across the sweater to mimic a striped pattern. Curve them slightly around the arm and chest volume. -
Pants shading:
I like to take my time here to build up value. Use dense cross-hatching or tight stippling with the 0.3 pen to turn the pants a dark grey. Leave a strip of white along the top of the thigh for a highlight. -
Shoe details:
Add laces and sole details to the sneakers. Keep the lines clean to distinguish them from the dark pants. -
Depth shadows:
Add hatching to the darker corners inside the bookshelf cubbies, behind the books. This pushes the background back and makes the figure pop forward. -
Grounding shadow:
Create a cast shadow on the floor beneath her legs and bottom. Use a pointillism (dot) technique or soft hatching that fades out as it moves away from the body. -
Magical touch:
Finish by drawing a few tiny stars or ‘plus’ signs floating above the open book to represent the magic of reading.
Now you have a serene illustration that perfectly captures the joy of a quiet afternoon reading.
Convey mood through slumped or rigid posture

Explore how posture defines mood by creating two contrasting figure studies on a mixed-media sketchbook spread. You’ll use a single dark green colored pencil to sketch a tightly coiled, contemplative seated figure on white paper and a slumped, weary form on toned paper.
Detailed Instructions
Materials
- Mixed-media sketchbook (containing both white and kraft/toned paper)
- Dark green colored pencil (e.g., Faber-Castell Polychromos or Prismacolor Verithin)
- Pencil sharpener
- Kneaded eraser
Step 1: Setting the Composition
-
Prepare your workspace:
Open your sketchbook to a spread where the left page is white and the right page is toned or kraft paper to match the reference style. -
Sharpen your tool:
Sharpen your green pencil to a fine point. Using a colored pencil instead of graphite prevents smudging and adds a unique character to the sketches.
Keep it Sharp
Rotate your pencil in your hand every few strokes. This keeps the tip conical and sharp, allowing for crisp details like the facial profile without constant sharpening.
Step 2: The Contained Figure (Left Page)
-
Gesture the spine:
On the white page, lightly sketch a curved line representing the spine of a seated figure leaning slightly forward. -
Block the body shape:
Draw a large triangular shape to represent legs pulled up tightly against the chest, creating a closed-off, self-protective posture. -
Position the head:
Sketch an oval for the head, tilting it downward and turning it slightly to the left so the face is in profile. -
Define the arms:
Draw the arms wrapping around the legs, resting the forearms across the knees to emphasize the ‘held’ feeling of the pose. -
Detail the profile:
Refine the facial profile with a sharp nose and chin. Add the hair pulled back into a loose, low bun, using quick, sweeping strokes for texture. -
Clothing contours:
Outline a simple tank top and shorts. Notice how the fabric pulls tight across the back and bunches slightly at the waist. -
Add weight:
Press harder with the pencil to darken the contour lines where the body touches the ground and where limbs overlap, grounding the figure.
Postures feel stiff?
Focus on the spine first. If the spine line is stiff, the whole drawing will be rigid. Exaggerate the curve of the back more than you think you need to.
Step 3: The Slumped Figure (Right Page)
-
Establish the curve:
On the toned paper page, start with an exaggerated, drooping curve for the spine to immediately convey exhaustion or surrender. -
Hang the head:
Draw the head lower than the shoulders, letting it hang forward. Keep the facial features minimal or obscured by hair. -
Shoulder placement:
Sketch the shoulders rolled forward. This creates a rounded upper back that is essential for the ‘slumped’ look. -
Draw the arm:
Let the visible arm dangle or rest heavily against the body, avoiding any tension in the lines. -
Abstract background elements:
Behind this figure, lightly sketch organic, leaf-like shapes rising upward. These can represent a metaphorical weight or simply a design element framing the posture.
Step 4: Refining and Shading
-
Cross-hatching hair:
Return to the green hair on the left figure. Use varying pressure to fill in the hair mass, leaving small white highlights to suggest volume. -
Emphasize clothing folds:
Add small, jagged lines at the waist of the shorts and the armpit of the tank top to show how the fabric wrinkles. -
Line variation:
Go over your main contours again. I like to thicken the lines on the shadow side (the back and bottom) to give the drawing dimension without full shading. -
Clean up:
Use a kneaded eraser to lightly lift any construction lines that distract from the flow, but leave some loose sketch marks for energy.
Now you have a dynamic spread that captures two distinct emotional states through simple body language.
Defy gravity with floating poses
Capture the sensation of weightlessness with this dynamic pencil drawing of a figure suspended in mid-air. You will practice mastering the flow of fabric and directional line work to create an ethereal, wind-swept effect.
Step-by-Step Tutorial
Materials
- Smooth heavyweight drawing paper
- Graphite pencils (HB, 2B, and 4B)
- Kneaded eraser
- Pencil sharpener
- Blending stump (optional)
Step 1: Gesture and Construction
-
Establish the line of action:
Using an HB pencil with a very light hand, draw a long, sweeping diagonal curve from the bottom left to the top right of your paper. This curve represents the spine and the path of movement. -
Block in major masses:
Sketch a small oval for the head at the top of your curve, followed by a tilted oval for the ribcage and a shape for the hips. Keep these shapes loose -
Map the limbs:
Draw single lines to indicate the arms and legs. The right arm should extend upward following the line of action, while the left arm reaches back slightly. Position the legs so the feet are pointed downward, reinforcing the floating illusion.
Airflow Dynamics
To make the floating convincing, ensure the hair and dress flow in the exact same direction. This unifies the composition and implies a specific wind source.
Step 2: Defining the Anatomy
-
Refine the profile:
Sketch the profile of the face, tilting the chin upward. Add the delicate curve of the neck flowing into the shoulders. -
Detail the arms:
Flesh out the arms around your initial guidelines. Pay attention to the reaching hand; the fingers should be graceful and slightly separated. -
Sketch the legs:
Define the visible parts of the legs and feet. The toes should be pointed sharply, like a dancer mid-leap.
Dreamscape Update
Add a surreal touch by drawing small birds, floating petals, or geometric shapes swirling around the figure’s reaching hand.
Step 3: Draping the Dress
-
Outline the bodice:
Draw the top of the dress, adding straps that curve over the shoulders and a fitted waistline that sits high on the torso. -
Create the skirt form:
Sketch the large, billowing shape of the skirt. The fabric should flare out to the left, mimicking the resistance of air as the figure rises. -
Add fold guidelines:
Draw long, sweeping lines within the skirt shape to map out where the deep folds and ridges of the fabric will go. These lines should radiate from the waist and sweep backward. -
Flowing hair:
Sketch the mass of the hair flowing horizontally behind the head. Use quick, loose strokes to imply wind blowing through it.
Step 4: Shading and Texture
-
clean up lines:
Use your kneaded eraser to lift away your initial construction lines, leaving only the refined outline of the figure and dress. -
Shade the skin:
Switch to a 2B pencil. Lightly shade the underside of the arms, neck, and legs to give the limbs volume. -
Detail the bodice folds:
Add small, tight shading lines to the bodice to show the tension of the fabric pulling across the chest. -
Render the skirt shadows:
Using a 4B pencil, darken the ‘valleys’ between the folds of the skirt. I like to keep my pencil strokes directional here, following the curve of the fabric to enhance the sense of movement. -
Add texture to the fabric:
Use lighter hatching marks on the raised parts of the folds (the ridges) to create a woven texture, leaving the very highest points white for highlights. -
Contrast the hair:
Darken the hair with the 4B pencil, focusing on the area near the neck and fading out toward the tips to keep it looking soft and airy. -
Ground elements:
Sketch some very loose, scribbly textures at the very bottom of the page to suggest bushes or clouds, giving a reference point for how high the figure has floated.
Step back and admire how your use of shadow and line has lifted the figure right off the page.
Map out the scene with perspective grids
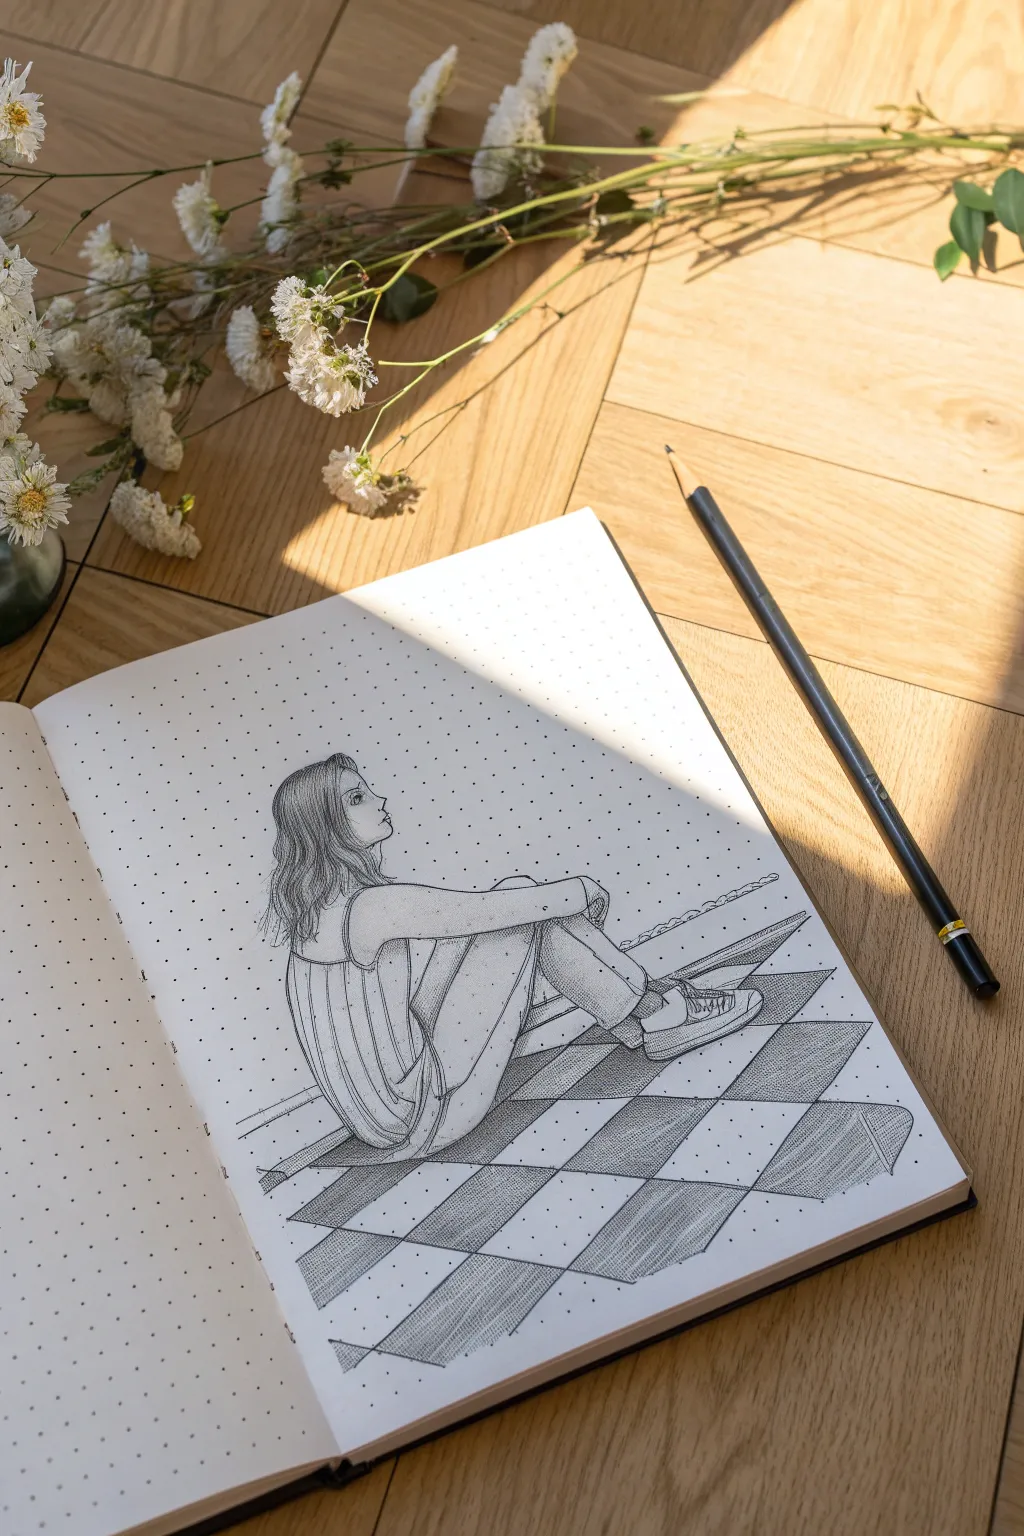
This project combines figure drawing with environmental perspective to create a grounded, dimensional scene. Using dot-grid paper helps immensely in plotting out the checkered floor pattern that gives the drawing its depth.
Detailed Instructions
Materials
- Dot-grid notebook or paper
- Mechanical pencil (HB or 2B)
- Black fineliner pen (0.1mm)
- Black fineliner pen (0.3mm)
- Ruler
- Eraser
Step 1: Constructing the Perspective Grid
-
Establish the floor plane:
Using a ruler and pencil, lightly map out the floor area. Since we are using dot-grid paper, select specific dots to serve as anchors for your diagonal lines to ensure they remain parallel. -
Draw the diagonals:
Draw a series of evenly spaced diagonal lines slanting to the right. Then, draw intersecting diagonal lines slanting to the left to create a diamond checkerboard pattern. -
Determine the horizon:
Even though the horizon line is off-page, keep your diagonal angles consistent so the floor looks flat rather than tilted.
Grid Master Tip
Use the dot grid to cheat perspective! Count 3 dots over and 2 dots up for every line segment to create perfect, identical diagonal angles without measuring.
Step 2: Sketching the Figure
-
block out the body:
Lightly sketch the figure’s geometric shapes sitting on the grid. Draw an oval for the torso, leaning slightly forward, and locate the hips firmly on the floor. -
Position the limbs:
Sketch the legs in a bent position with knees pulled up. Position the arms wrapping around the knees or resting near the ankles. -
Refine the profile:
Outline the side profile of the face, looking upward and away. Sketch the hair falling loosely over the shoulders to frame the neck. -
Add clothing details:
Draw the outline of a sleeveless top and loose trousers. Sketch rough outlines for the sneakers on the feet.
Step 3: Inking the Outlines
-
Ink the figure:
Using the 0.3mm fineliner, go over the pencil outlines of the girl. Use smooth, continuous confidence lines for the limbs and clothing folds. -
Define the hair:
Switch to a finer 0.1mm pen to draw the individual strands of hair. Add more density near the roots and behind the ears for depth. -
Ink the floor structure:
Use the ruler and the thicker pen to crisply ink the diamond grid of the floor. You don’t need to fill the whole page; an irregular patch of tiles creates a nice vignette effect.
Level Up: Environment
Expand the scene by drawing a window frame behind the figure using the same perspective lines, adding a light source direction to your shading.
Step 4: Shading and Texture
-
Hatch the floor tiles:
Identify the alternating ‘black’ tiles on your checkerboard. Fill these in using closely spaced, parallel hatching lines. Keep the angle of the hatch consistent across all dark tiles. -
Add cast shadows:
Draw horizontal hatching lines directly underneath the figure’s legs and bottom to create a cast shadow. This grounds the figure so she doesn’t look like she’s floating. -
Texture the shirt:
I like to use stippling here for a softer look. Add small dots to the shirt, concentrating them in shadow areas like the side of the torso and under the arm. -
Detail the pants:
Add minimal vertical hatching or stippling on the trousers to suggest a denim or linen texture, focusing on the creases near the hip and knee. -
Define the shoes:
Add small details to the sneakers, outlining the laces and the rubber sole.
Step 5: Refining and Finishing
-
Deepen the contrast:
Go back with your pen and darken the deepest shadows—specifically where the body meets the floor and where the hair tucks behind the neck. -
Let it set:
Allow the ink to dry completely to prevent smudging. -
Clean up:
Gently erase all the remaining graphite pencil marks to reveal clean, sharp line art.
Now you have a beautifully composed illustration that uses simple geometry to create a convincing sense of space.
Loosen up with 30-second gesture sprints
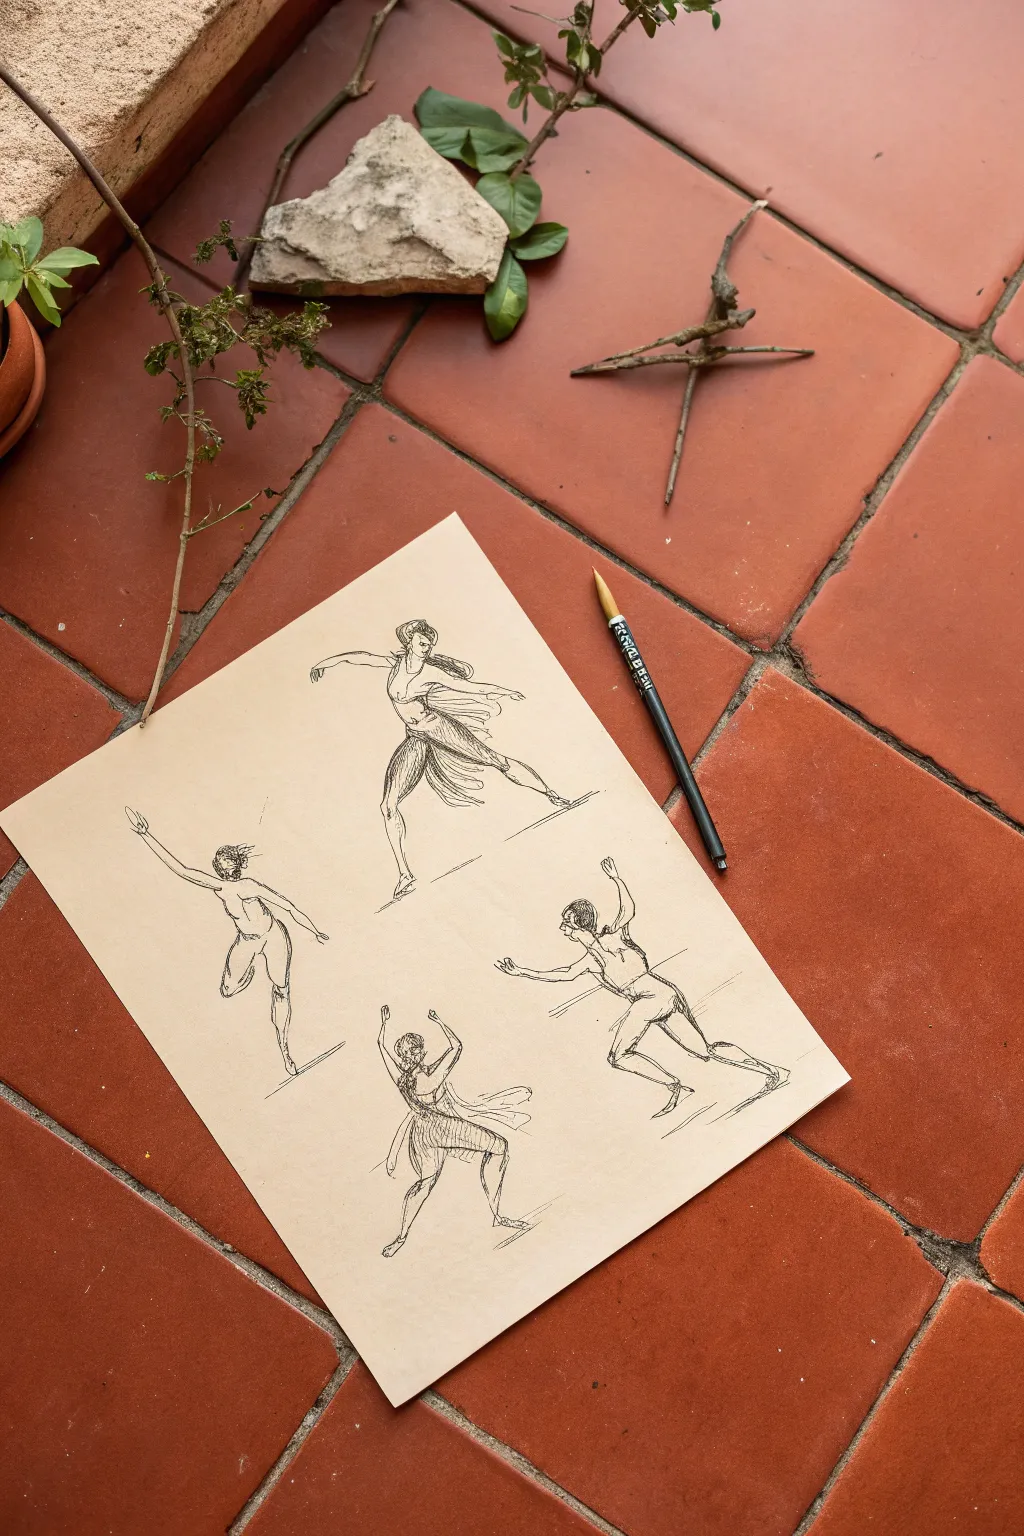
Capture the raw energy of human movement using broad, fluid strokes on warm-toned paper. This project focuses on the ‘line of action’ to create four expressive dancer sketches that emphasize motion over anatomical perfection.
How-To Guide
Materials
- Toned sketch paper (tan or gray)
- Black brush pen (e.g., Pentel Pocket or similar)
- Reference photos of dancers in motion
- Masking tape (optional, to secure paper)
Step 1: Setting the Stage
-
Prepare your surface:
Place your sheet of toned paper on a hard, flat surface. If the paper comes from a roll and curls, tape the corners down lightly to keep it flat. -
Test the tool:
On a scrap piece of paper, practice making strokes with your brush pen. Experiment with pressing hard for thick lines and lifting gently for hairline strokes. -
Visualize the layout:
Mentally map out where your four figures will go to ensure they fit. We will place a large standing figure in the center-top, a leaping one to the left, and two grounded poses at the bottom.
Step 2: The Central Dancer
-
Find the line of action:
Start with the central figure. Draw a swift, curved line representing the spine, starting from the head and swooping down through the torso. -
Block in masses:
Quickly sketch an oval for the ribcage and a shape for the pelvis along that spinal curve. Keep the ink flowing; don’t lift the pen too often. -
Extend the limbs:
Draw the legs extended in a wide stance and the arms outstretched. Use single, confident strokes rather than short, scratchy lines to define the muscles. -
Add flowing fabric:
Sketch the skirt or fabric wrapping around the hips using swift, horizontal S-curves to suggest rapid spinning motion.
Don’t Hesitate
The key to gesture drawing is speed. If you think too much, the line stiffens. Hold the pen further back on the handle to force your arm to make larger, more fluid movements.
Step 3: Capturing Leaps and Twists
-
Sketch the leaping figure:
Move to the top left area. Draw a figure leaping upward, focusing on a high reaching arm and an arched back. Capture the upward momentum with upward-flicking strokes. -
Draw the twisting pose:
In the bottom left, sketch a figure twisting away. Focus on the torsion between the shoulders and hips. I find that accentuating the spinal twist here makes the pose look more dynamic. -
Create the low crouch:
For the bottom right figure, draw a dancer in a deep lunge or crouch. Emphasize the sharp angles of the bent knees and elbows to show tension. -
Ground the figures:
Add quick, horizontal scratch lines underneath the feet of each figure. This simple addition gives them weight and prevents them from looking like they are floating in space.
Ink Pooling?
If the brush pen leaves blotchy puddles, you are moving too slowly. Increase your stroke speed so the ink deposits evenly. Let the artwork dry for 5 minutes before touching.
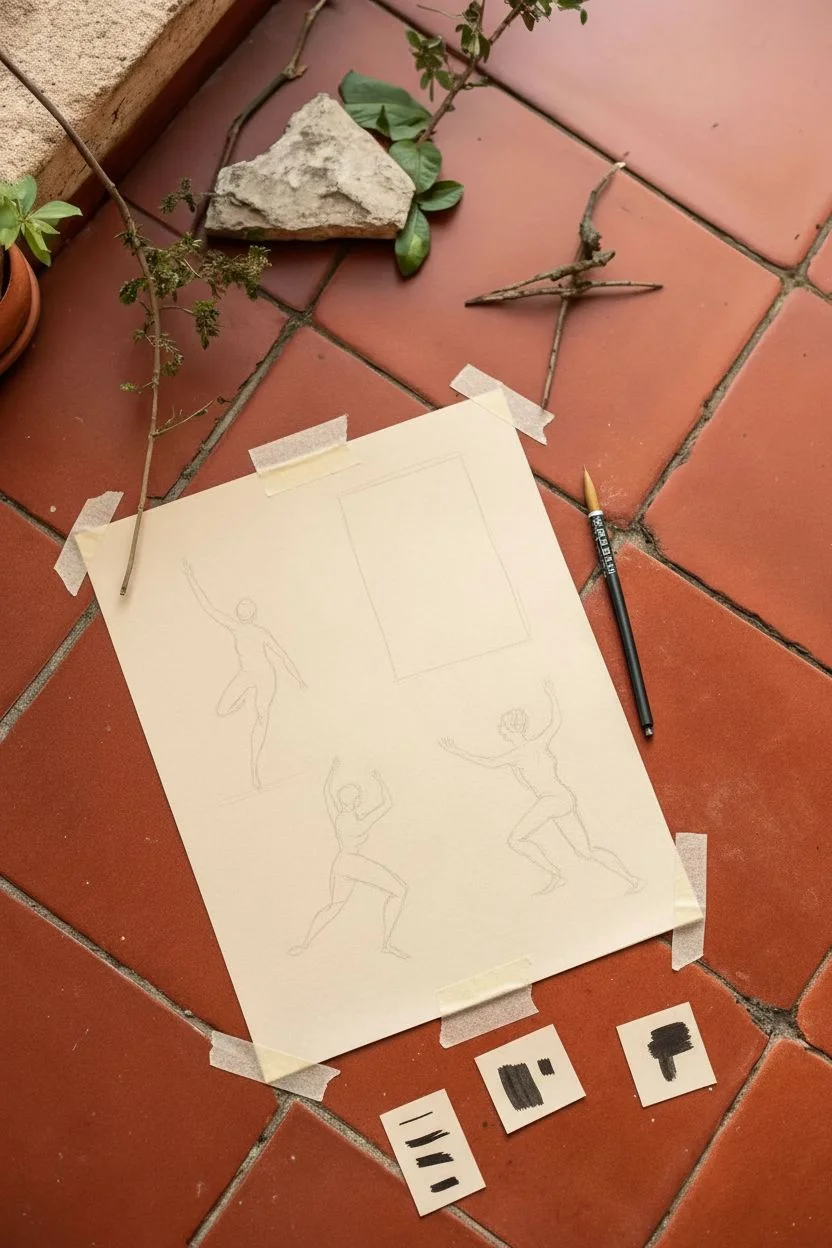
Step 4: Refining with Ink
-
Thicken the shadow side:
Go back over your initial lines. Apply more pressure to the brush pen on the ‘shadow’ side of the limbs (usually the underside) to create line weight variation. -
Hatch natural shadows:
Use thin, rapid parallel lines (hatching) to shadow the torso, inner legs, and folds of the clothes. Keep these lines diagonal and consistent in direction. -
Define the hair:
Darken the hair on each figure. Leave small slivers of the tan paper showing through the black ink to represent highlights or shine. -
Final contrast check:
Look at the composition as a whole. If any figure feels too light, add a few bold, dark strokes to the clothing or deepest shadows to anchor the page.
Now you have a lively study of motion that captures the essence of the dance.


Have a question or want to share your own experience? I'd love to hear from you in the comments below!