Whenever I need a quick creative reset, I grab sidewalk chalk and let the ground turn into my sketchbook. These chalk art ideas are made for big, bold drawings that invite you (and maybe a few kids nearby) to jump right into the scene.
Classic Rainbow Arc With Cloud Puffs
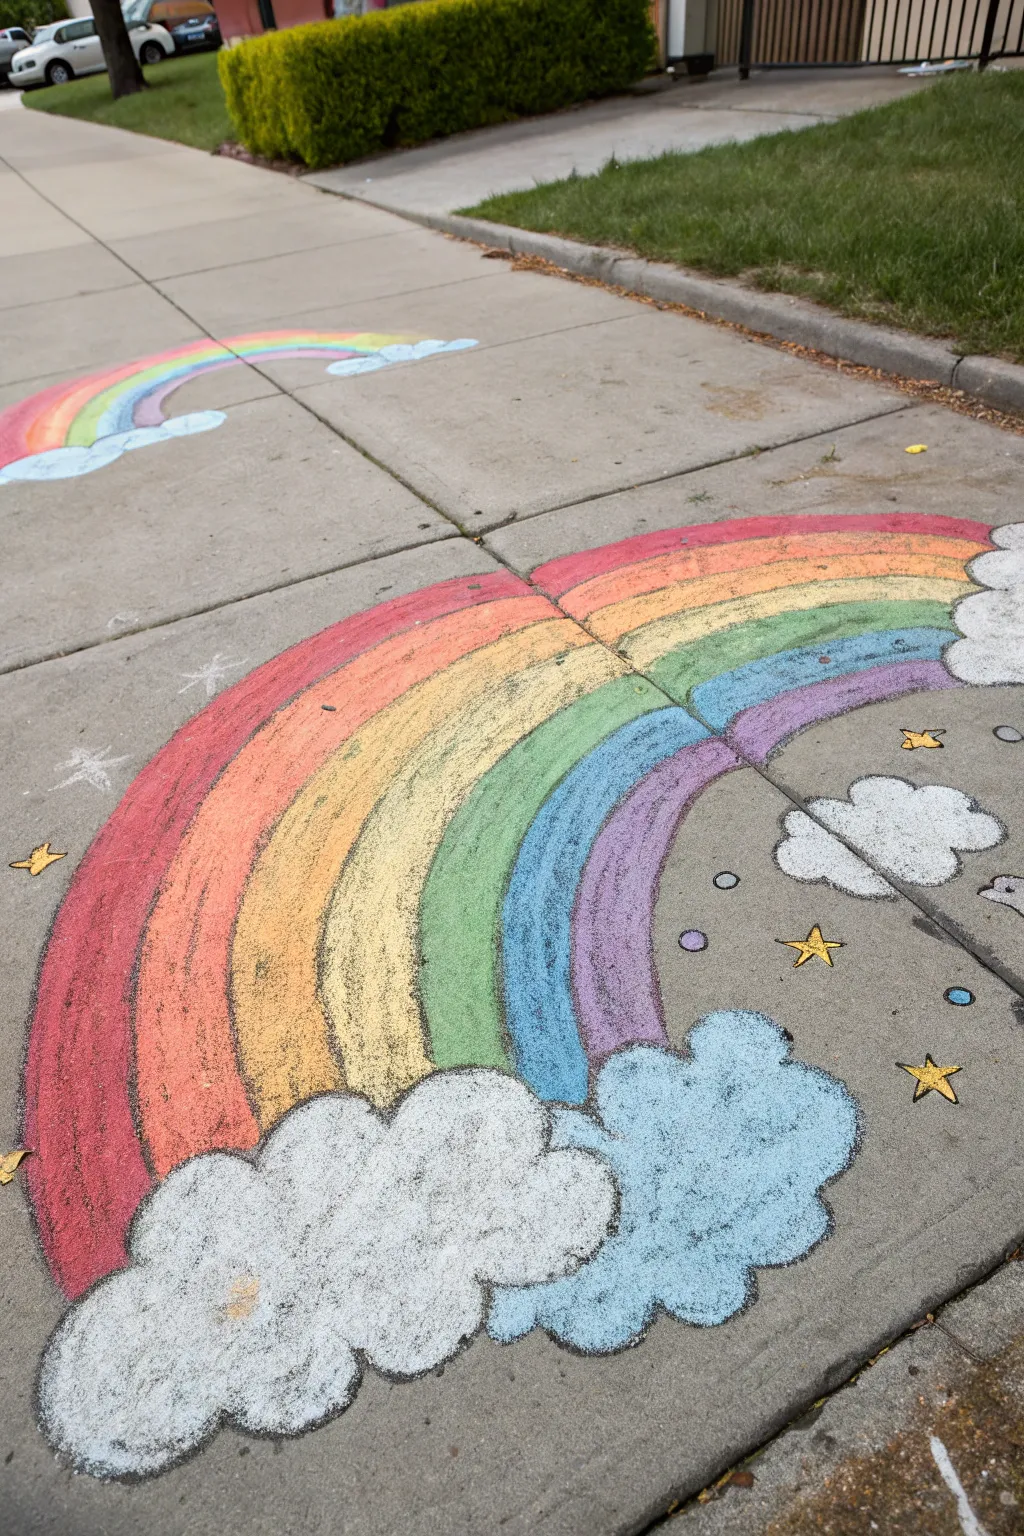
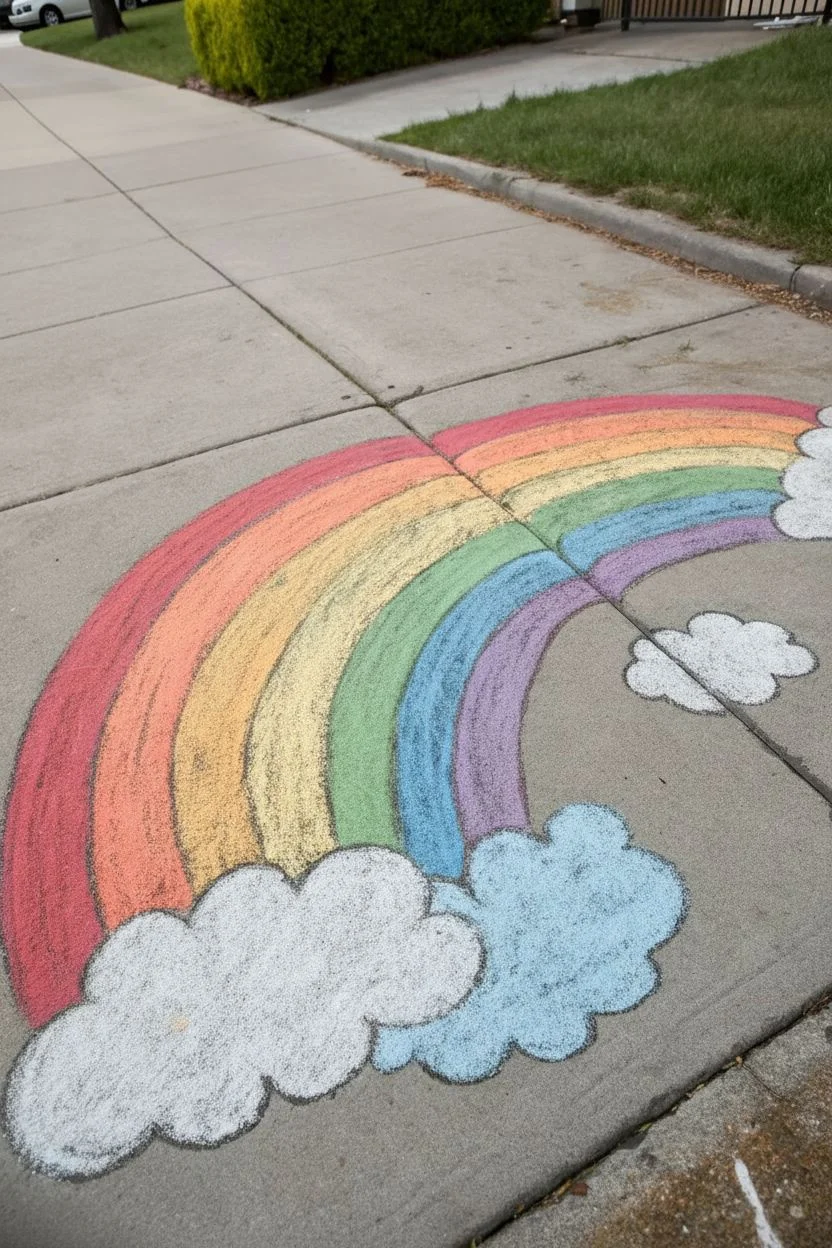
Brighten up the neighborhood with this large-scale, cheerful rainbow that spans two sidewalk squares. Featuring soft, billowy clouds and charming star accents, this chalk art project uses vibrant arching bands to create a joyful path for anyone walking by.
Step-by-Step Guide
Materials
- Jumbo sidewalk chalk (Red, Orange, Yellow, Green, Blue, Indigo/Purple)
- White sidewalk chalk (lots of it!)
- Yellow chalk for stars
- Black or dark charcoal chalk for outlines
- Blending sponge or old rag (optional)
- Broom or brush for sweeping the sidewalk
Step 1: Preparation and Outlining
-
Prep the canvas:
Start by sweeping your chosen sidewalk squares thoroughly. Dirt and pebbles can interrupt your smooth lines, so sweeping creates a much cleaner base for the chalk to adhere to. -
Sketch the cloud bases:
Decide where your rainbow will begin and end. Using white chalk, lightly sketch the outline of a large, bubbly cloud on the bottom left corner and a similar one on the bottom right side. I find keeping them slightly asymmetrical makes it look more organic. -
Draw the main arch:
Starting from the top of your left cloud, draw a large, sweeping curve over to the right cloud using your red chalk. This will be the top band of your rainbow and sets the shape for all the others. -
Create the bands:
Working inward from the red line, sketch the dividing lines for the remaining five colors. Try to keep the spacing even between each line so your color bands will be roughly the same width.
Step 2: Coloring the Rainbow
-
Fill the red band:
Take your red chalk and fill in the top arch completely. Use broad, firm strokes to get a saturated color. -
Add orange and yellow:
Moving inward, color the next band with orange, followed by the yellow band. Don’t worry if you go slightly over the lines; we can clean that up later. -
Complete the cool colors:
Continue filling in the bands with green, then blue, and finally finish the smallest inner arch with purple or indigo. -
Blend the transitions:
For a smoother look, gently rub the chalk with your hand, a sponge, or a rag. You can either blend each color individually for a solid look or slightly smudge the lines where colors meet for a softer gradient.
Chalk Too Dusty?
If the clouds aren’t looking solid enough, dip the tip of your white chalk in water for 2 seconds before drawing. It creates a paint-like paste.
Step 3: Clouds and Details
-
Fill the white cloud:
Return to the large cloud on the left. Using the side of your white chalk stick, color the interior heavily to make it bright and opaque. -
Create the blue cloud:
For the right-side cloud, lightly fill it with blue chalk first, then layer white chalk heavily over the top. Use your fingers to swirl them together creates a lovely sky-blue perfection. -
Add extra puffs:
Draw a few smaller, detached clouds floating near the rainbow’s base for extra atmosphere. Fill these in with solid white. -
Outline everything:
Take a black piece of chalk or charcoal to outline every element. Trace the outer edges of the rainbow, the dividing lines between colors, and the bubbly edges of every cloud. This crucial step makes the artwork pop against the gray concrete.
Smoother Blending
Instead of using your fingers on rough concrete (ouch!), use an old chalkboard eraser or a carpet scrap to blend large areas quickly.
Step 4: Final Flourishes
-
Draw large stars:
scattered around the rainbow, draw five-pointed star shapes using yellow chalk. Outline them in black to match the rest of the style. -
Add twinkle details:
Draw smaller, simple asterisks or crosses with white chalk in the empty spaces to look like distant twinkling stars. -
Include decorative circles:
Draw tiny circles or bubbles in various colors (like purple or blue) floating near the clouds to fill negative space. -
Clean up edges:
Check the perimeter of your drawing. If you have any smudges on the untouched concrete, use a little water or a rag to wipe them away for a crisp presentation.
Step back and enjoy how this colorful addition transforms the walking path into something magical


Hopscotch With Patterned Squares
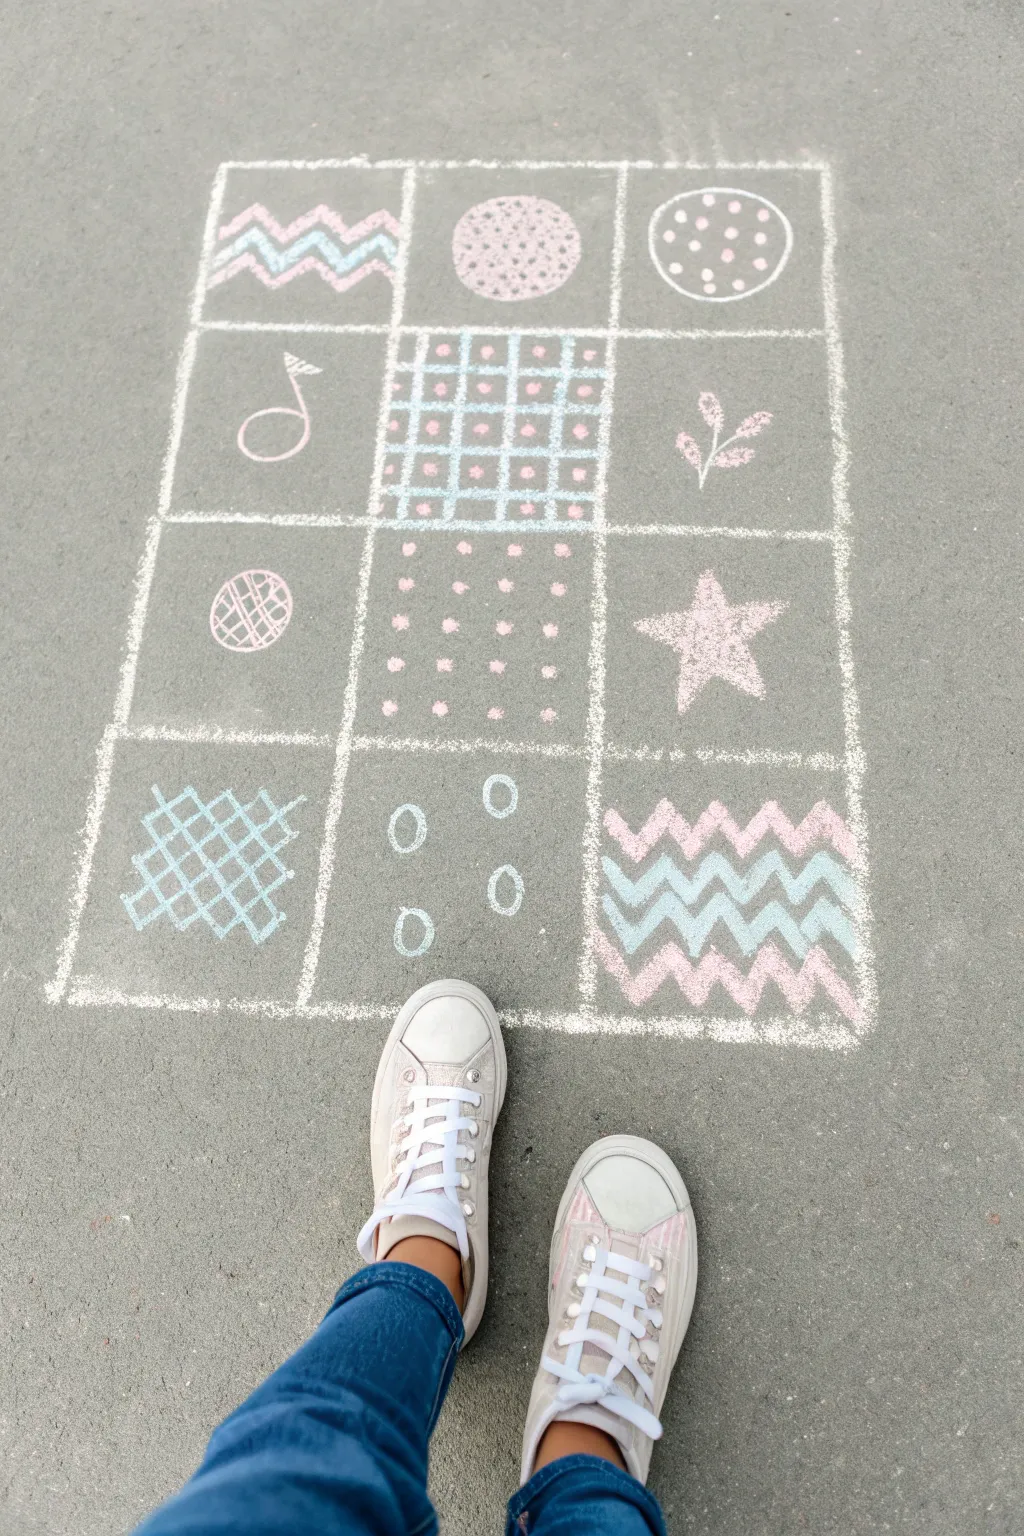
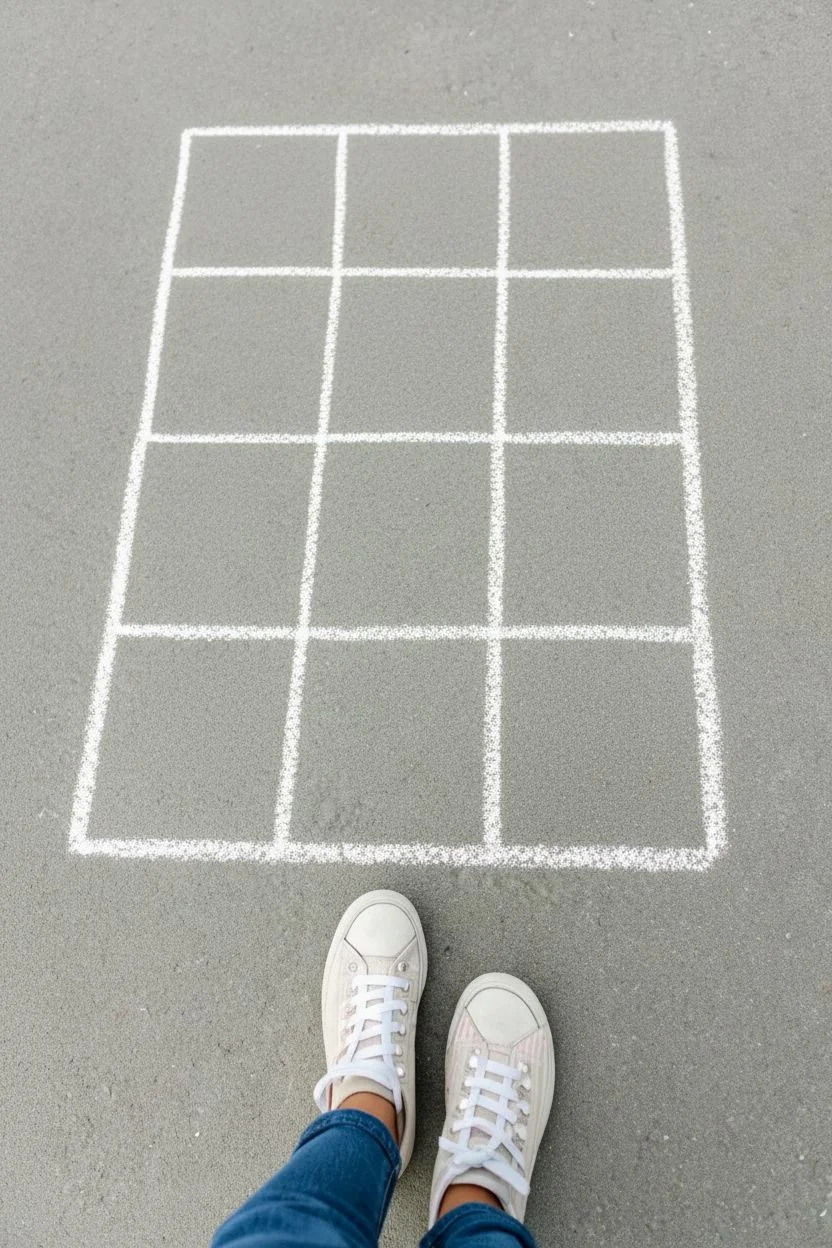
Transform a simple patch of pavement into an artistic game board with this charming patterned hopscotch grid. Featuring twelve distinct designs in a soft pastel palette, this chalk art project combines creative doodling with outdoor play.
Step-by-Step
Materials
- White sidewalk chalk
- Pastel pink sidewalk chalk
- Pastel blue (or teal) sidewalk chalk
- Painter’s tape (optional, for straight lines)
- Yardstick or tape measure
- Knee pads or a gardening kneeling pad (recommended)
Step 1: Setting the Grid
-
Create the perimeter:
Begin by drawing a large rectangle on the pavement using white chalk. For a standard size, aim for about 3 feet wide by 4 feet tall, but adjust based on your available space. -
Divide into squares:
Using a yardstick for accuracy, divide your large rectangle into a grid. Draw two vertical lines to split the width into three columns, and three horizontal lines to create four rows. You should end up with a 3×4 grid containing twelve equal squares. -
Thicken the lines:
Go over your initial white grid lines a second or third time to make them bold and bright. This high-contrast frame helps the interior patterns pop.
Step 2: Top Row Patterns
-
Left square: Zigzags:
In the top-left square, draw three parallel zigzag lines. Alternate colors: start with pink on top, blue in the middle, and pink on the bottom. -
Center square: Polka dot circle:
Draw a large circle in the middle top square using pink chalk. Instead of coloring it in solid, fill the inside of the circle with small, tight pink stippled dots. -
Right square: Floating dots:
For the top-right square, outline a white circle. Fill the circle’s interior with evenly spaced, solid white dots to create a polka-dot cookie effect.
Clean Lines Hack
If your grid lines look wobbly, lay down masking tape or painter’s tape on the pavement first. Chalk over the tape edges, then peel it up for perfectly straight, crisp borders.
Step 3: Middle Rows Designs
-
Second row left: The cherry:
Draw a simple cherry shape in pink with a white stem and leaf in the left square of the second row. Keep the lines thin and delicate. -
Second row center: The plaid grid:
This is likely the most detailed square. Draw a tight grid of blue lines. Inside every square created by the grid, place a small pink dot. -
Second row right: Floral sprig:
Sketch a simple stem with leaves using pink chalk. I find it easiest to draw the central curved line first, then add the small leaf loops on alternating sides. -
Third row left: Crosshatched ball:
Draw a pink circle outline. Fill it with a simple crosshatch pattern (lines going vertically and horizontally) in pink. -
Third row center: Spotted square:
Fill this entire square with an organized layout of pink dots. Try to align them in straight rows and columns for a tidy look. -
Third row right: The star:
Draw a five-pointed star shape in pink. Lightly scribble the inside with pink chalk to give it texture without making it perfectly solid.
Glow Effect
To make the pastel colors pop even more on gray asphalt, dampen the chalk stick tip slightly in water before drawing. The colors will dry much brighter and more opaque.
Step 4: Bottom Row Patterns
-
Bottom left: Crosshatch mesh:
Using blue chalk, draw diagonal lines going one way, then cross them with diagonal lines going the opposite way to create a diamond mesh pattern filling the square. -
Bottom center: Scattered rings:
Draw five or six small, open circles using blue chalk. Scatter them randomly within the square like bubbles. -
Bottom right: Bold chevrons:
Mirroring the top-left square but bolder, fill this final square with stacked zigzag lines. Alternate pink and blue lines until the entire box is filled from top to bottom. -
Final touch-ups:
Stand back and look for any smudges. Use a little water on a rag to clean up stray marks outside the main rectangle to make the artwork look crisp.
Enjoy jumping through your custom-designed gallery of patterns


Balloon Bouquet Photo Illusion
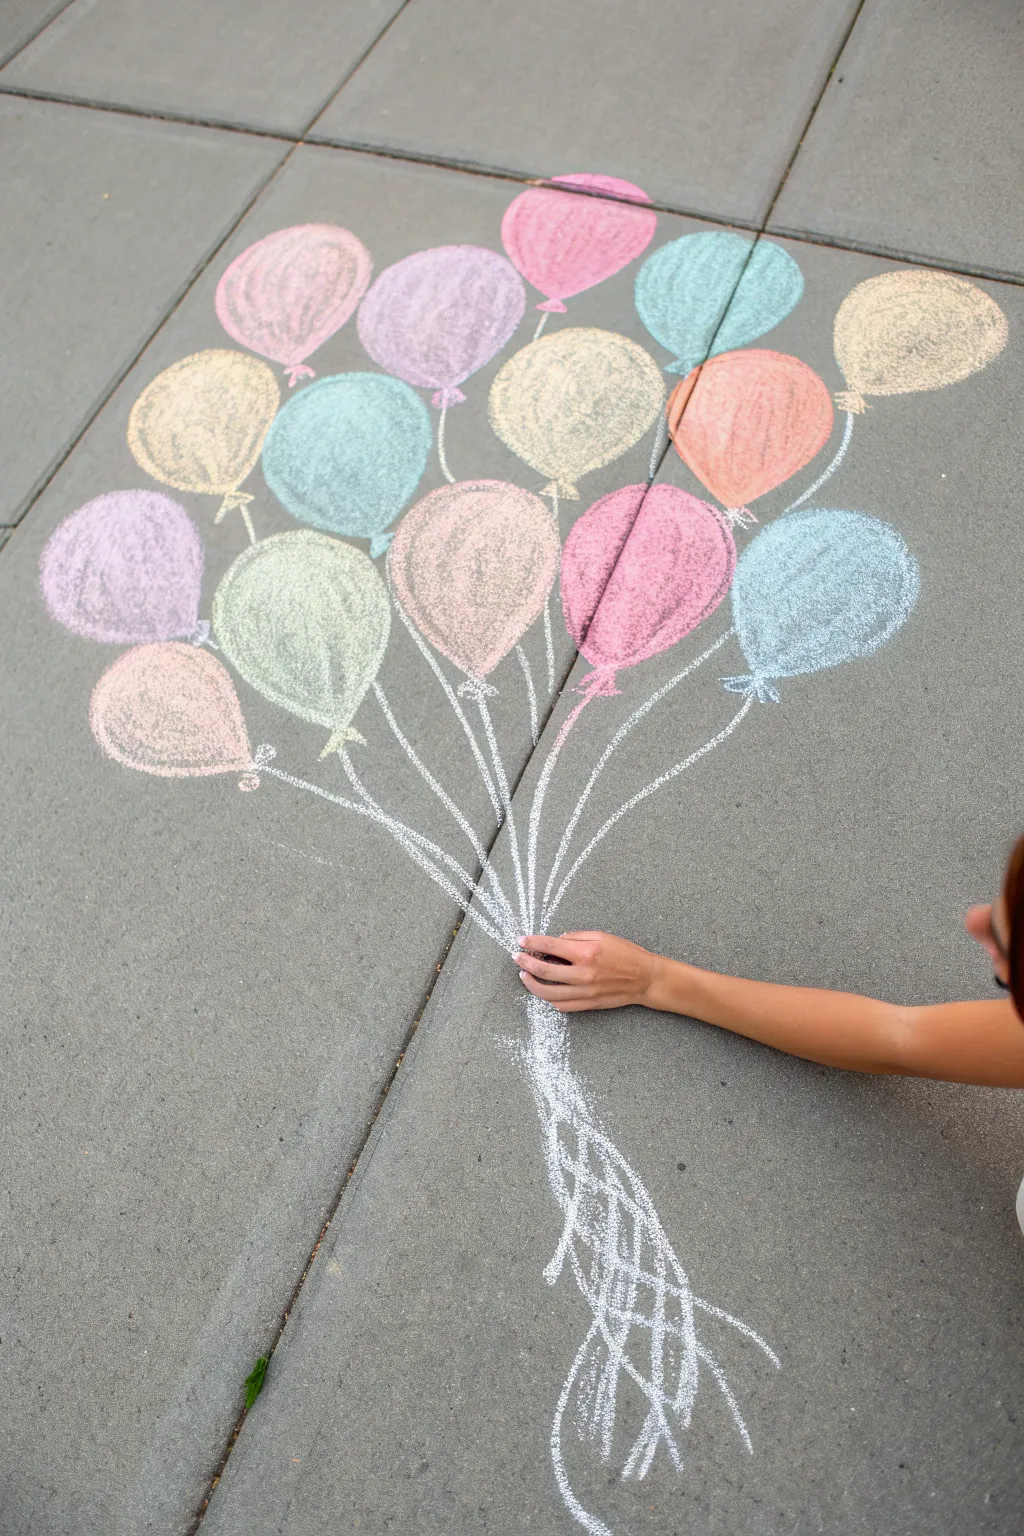
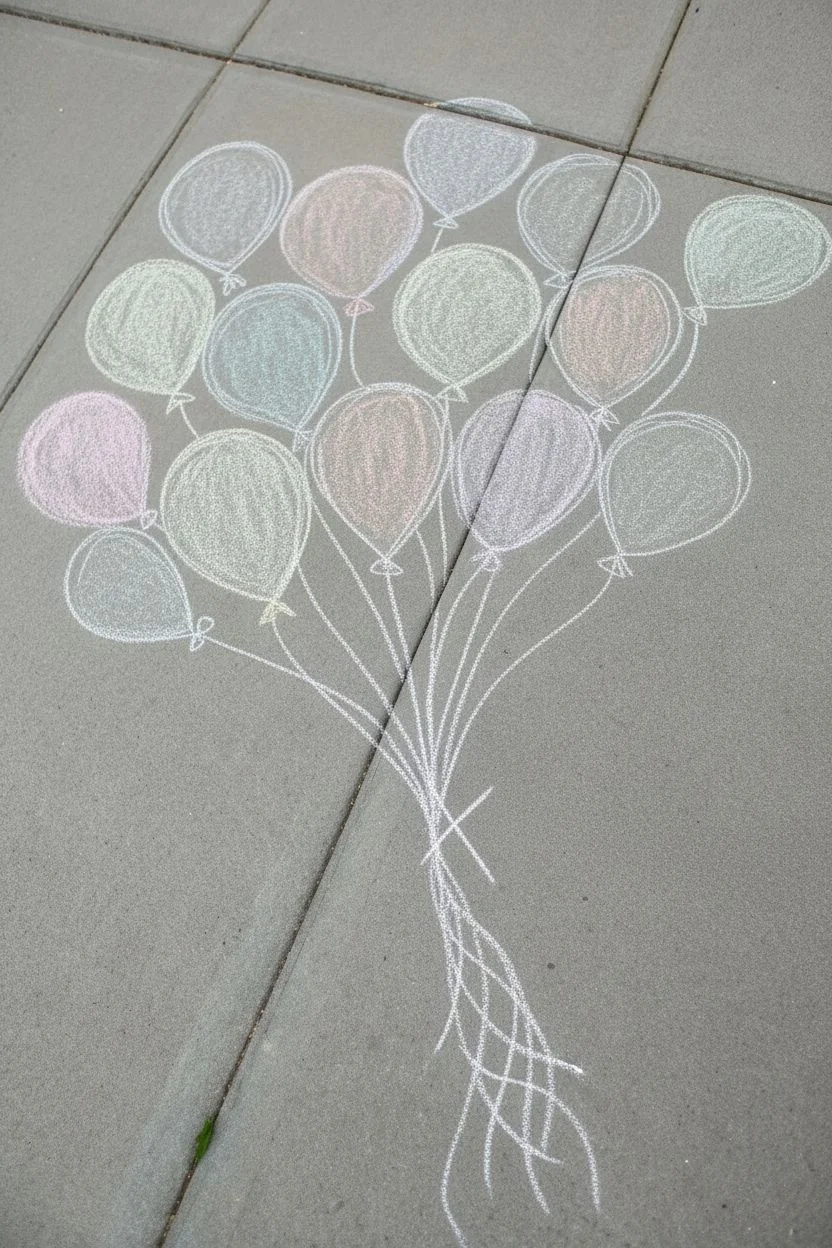
Transform an ordinary patch of pavement into an interactive art piece with this colorful chalk balloon bouquet. This forced perspective drawing invites passersby to ‘hold’ the strings, making for a delightful photo opportunity that looks almost three-dimensional.
How-To Guide
Materials
- Sidewalk chalk (pastel colors like pink, blue, purple, yellow, orange)
- White sidewalk chalk (for strings and highlights)
- A clean, dry section of sidewalk or driveway
- A blending tool (optional: foam brush, old rag, or fingers)
- Knee pads or a gardening mat (optional for comfort)
- Water (for washing hands)
Step 1: Drafting the Shapes
-
Scout your location:
Find a sidewalk square that has a central crack or seam running vertically if possible, though a flat surface works just as well. The seam can act as natural centering guide. -
Visualize the layout:
Imagine where the ‘hand’ will interact with the drawing. Mark a small ‘X’ or distinct point near the bottom center where all the balloon strings will eventually converge. -
Lightly sketch the outlines:
Using a light color or white chalk, sketch roughly 12 to 15 ovals of various sizes in a fan shape above your convergence point. Keep the pressure very light so you can erase or adjust easily. -
Vary the angles:
Don’t line the balloons up perfectly straight. Tilt some left, some right, and overlap a few in the middle to create a sense of natural movement and fullness.
Smudgy Colors?
If colors look muddy after blending, you might be over-rubbing. Clean your hands or blending tool between different colors to keep pastels bright and distinct.
Step 2: Coloring the Balloons
-
Fill the base layers:
Start with the top-most balloons. Select your pastel chalks—think mint green, soft pink, lavender, and sky blue—and fill in the ovals. Use the side of the chalk stick for broader, smoother coverage. -
Blend the pigment through rubbing:
Once a balloon is filled, use your fingers or a dense foam piece to rub the chalk into the concrete texture. This pushes the pigment into the pores and makes the color look solid and opaque rather than scratchy. -
Layer overlapping balloons:
When coloring balloons that sit ‘behind’ others, be careful not to smudge into the front ones. I like to finish the front-most balloons last to keep their edges crisp. -
Add dimension with shadows:
Pick a slightly darker shade of the same color (or press harder with the same chalk) along the bottom curve of each balloon to create a subtle shadow effect. -
Create highlights:
Take your stark white chalk and draw a small curved line or a ‘comma’ shape on the upper right or left side of every balloon. Ensure the light source is consistent for all of them. -
Refine the edges:
Go back around the perimeter of each balloon with your main color to sharpen any fuzzy outlines caused during the blending process.
Step 3: Drawing the Strings
-
Draw the knots:
At the bottom center of each balloon, draw a tiny triangle or small bead shape in the same color as the balloon to represent the tied knot. -
Begin the string lines:
Switch to a sharp piece of white chalk. Place the tip at the knot of the highest balloon and draw a straight, confident line down toward your convergence point. -
Connect the remaining strings:
Repeat this for every balloon. The lines should all angle inward, meeting at that single spot you marked earlier. Think of it like the spokes of a bicycle wheel coming to the hub. -
Add string detail:
Near the knots, draw small, tight squiggles or crinkled lines to represent the loose end of the balloon tie. -
Bundle the base:
Where the lines meet at the bottom, draw a dense cluster of white strokes. It should look crowded, simulating a handful of strings being gripped together. -
Extend the tail:
Below the convergence point (where the hand will go), draw flowy, wavy white lines extending downward. These represent the loose ends of the ribbons trailing beneath the hand.
Level Up: Realism
Add a faint gray shadow on the pavement to the side of the balloons (opposite the white highlights). This ‘cast shadow’ makes the balloons look like they are floating above the ground.
Step 4: The Final Illusion
-
Clean the negative space:
Use a damp rag to carefully wipe away any unintentional smudges on the gray concrete around the balloons. Clean edges are crucial for the 3D pop. -
Test the position:
Have a friend lie down or place their hand on the convergence point to ensure the proportions look right. -
Capture the photo:
Stand directly over the artwork or get high up on a ladder. Take the photo from a top-down angle while someone poses with their hand ‘holding’ the chalk bouquet.
Now you have a permanent celebration on your driveway ready for the perfect summer snapshot


Big Bloom Sidewalk Garden
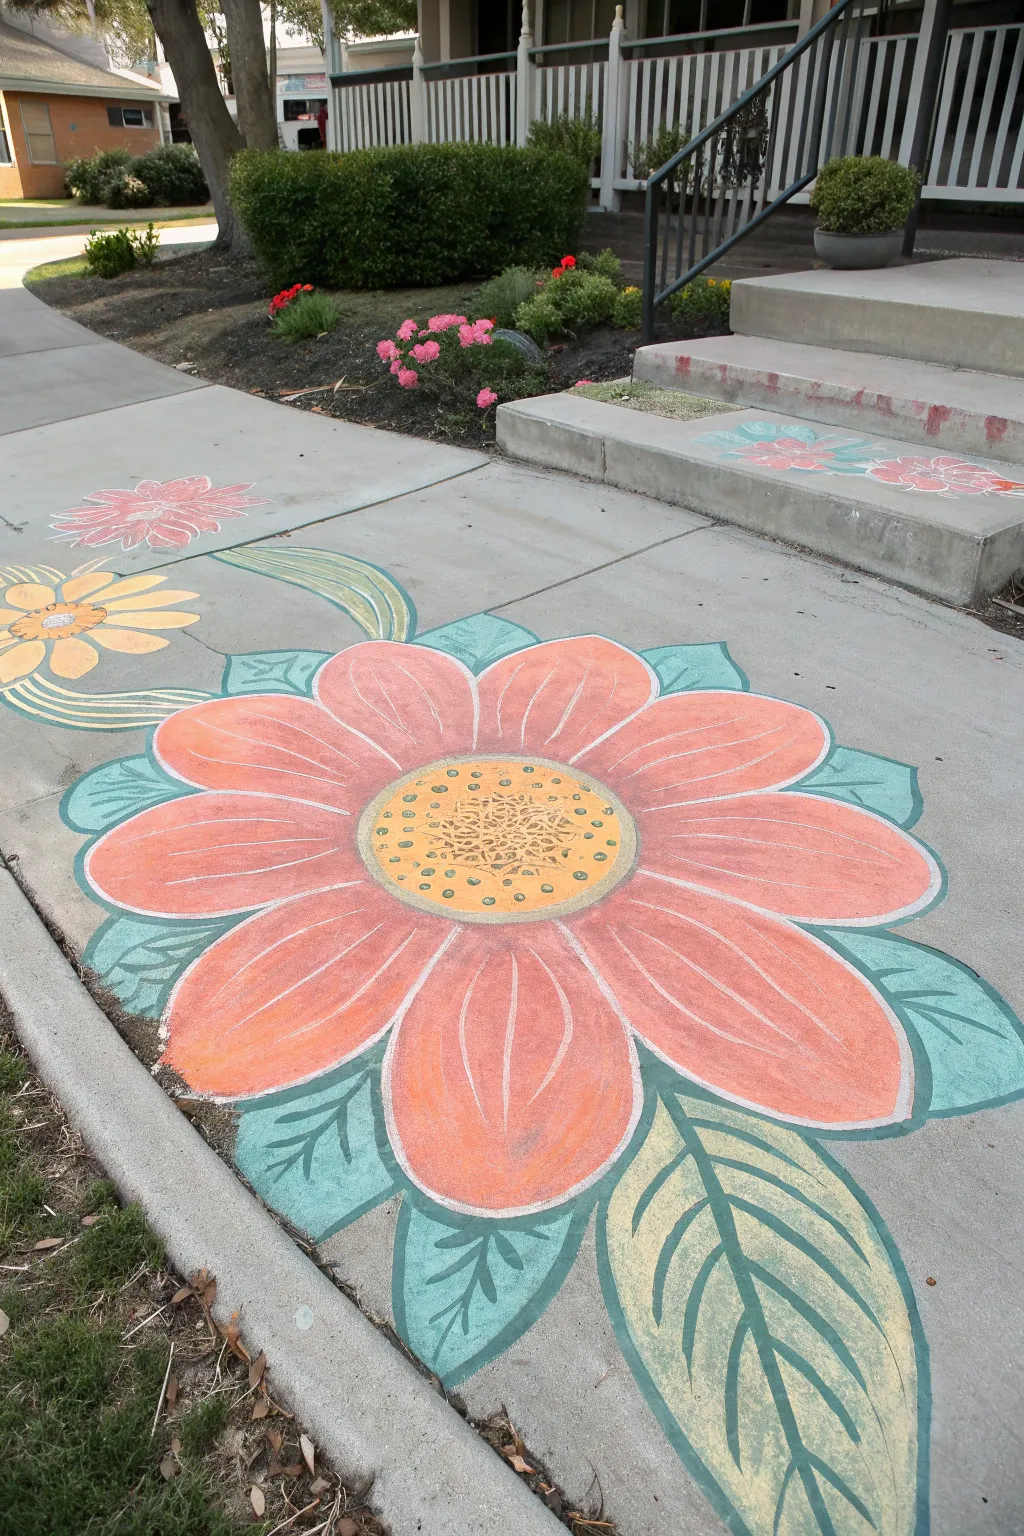
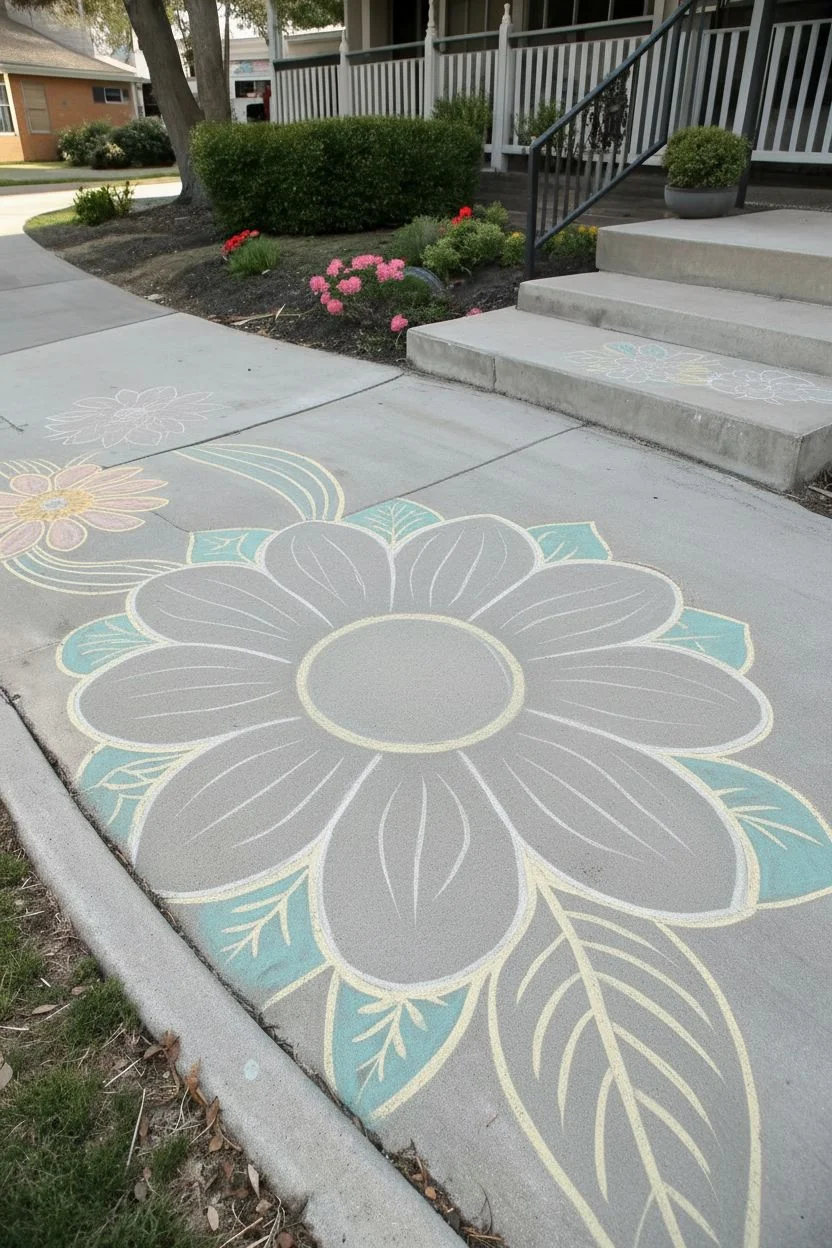
Transform a plain concrete walkway into a vibrant, oversized garden path with this large-scale chalk mural. Featuring massive petals and sweeping leaves, this project uses bold outlining and layering techniques to create depth and cheer right at your doorstep.
Detailed Instructions
Materials
- Sidewalk chalk (assorted colors including orange, red, yellow, pink, green, light blue, teal, and white)
- Wide paintbrush or foam sponge (for blending)
- Cup of water
- Knee pads or a gardening kneeling mat
- Broom (for prep)
Step 1: Preparation & Layout
-
Clean the canvas:
Begin by thoroughly sweeping the sidewalk area to remove loose dirt, leaves, and pebbles. A clean surface ensures the chalk adheres well and blending is smooth. -
Map the main flower:
Choose a large central spot for the main bloom. Using a light colored chalk (like white or pale yellow), lightly sketch a large circle for the center of the flower. -
Outline the petals:
Around the center circle, sketch long, rounded petal shapes radiating outward. Make sure they are roughly equal in size, but don’t worry about perfection; organic shapes look more natural. -
Add background elements:
Sketch the outlines for the smaller yellow flower to the left and the pink flower further back. Add flowing lines connecting them to suggest stems or vines.
Smoother Blending
Make blending easier by wrapping a piece of carpet remnant or a thick rag around a sanding block. This saves your fingers while smoothing large areas.
Step 2: The Big Bloom
-
Fill the center:
Color in the center circle with a dense layer of yellow chalk. While the chalk is fresh, use your finger or a dry brush to smooth the dust into the concrete pores. -
Texture the center:
Create the seed head detail by drawing a smaller, intricate starburst pattern in orange right in the middle of the yellow. Dot the outer yellow ring with small green or teal circles for extra detail. -
Base coat the petals:
Fill each large petal with a vibrant orange chalk. Apply heavy pressure to get rich coverage. -
Create gradients:
To give the petals dimension, add red chalk near the center of the flower and blend it outward into the orange. Add a touch of pink or white at the very tips of the petals. -
Blend the petals:
Using your hand or a foam sponge, rub the colors together on each petal to create a smooth, seamless transition from the dark center to the lighter tips. -
Detail the petals:
Take a sharp piece of white or pale pink chalk and draw thin, curved lines down the center of each petal to represent veins.
Chalk Too Dusty?
If the chalk isn’t sticking and just blowing away, the concrete might be too dry. Mist the sidewalk very lightly with a spray bottle before drawing.
Step 3: Leaves & Background
-
Draw the leaves:
Sketch large, pointed leaves tucked between the petals. Use a teal or light blue color for these to create a nice contrast against the warm flower tones. -
Fill and vein:
Color the leaves solidly. Once filled, use a darker green or blue chalk to draw a central vein and branching veins on each leaf. -
Add the yellow flower:
Move to the side and fill in the smaller yellow flower using the same technique: a solid center, yellow petals, and a soft blend. -
Create the pink flower:
Further down the path, color the pink flower. Try mixing red and white directly on the pavement to get varied shades of pink. -
Decorate the stairs:
If you have steps nearby, add smaller versions of the flowers on the treads. Simple five-petal shapes work best for these narrow spaces.
Step 4: Final Touches
-
Deepen the outlines:
Go back over the entire artwork with a thick white outline. This ‘sticker style’ border makes the drawing pop against the grey concrete. -
Clean up edges:
Blow away any excess chalk dust that has settled where it shouldn’t be to crisp up the final look. -
Seal (Optional):
If you want the art to last a bit longer, you can lightly mist it with water, which sets the chalk slightly as it dries.
Step back and admire how your colorful path brightens the whole neighborhood walk
BRUSH GUIDE
The Right Brush for Every Stroke
From clean lines to bold texture — master brush choice, stroke control, and essential techniques.
Explore the Full Guide
Shooting Stars and Moon Glow
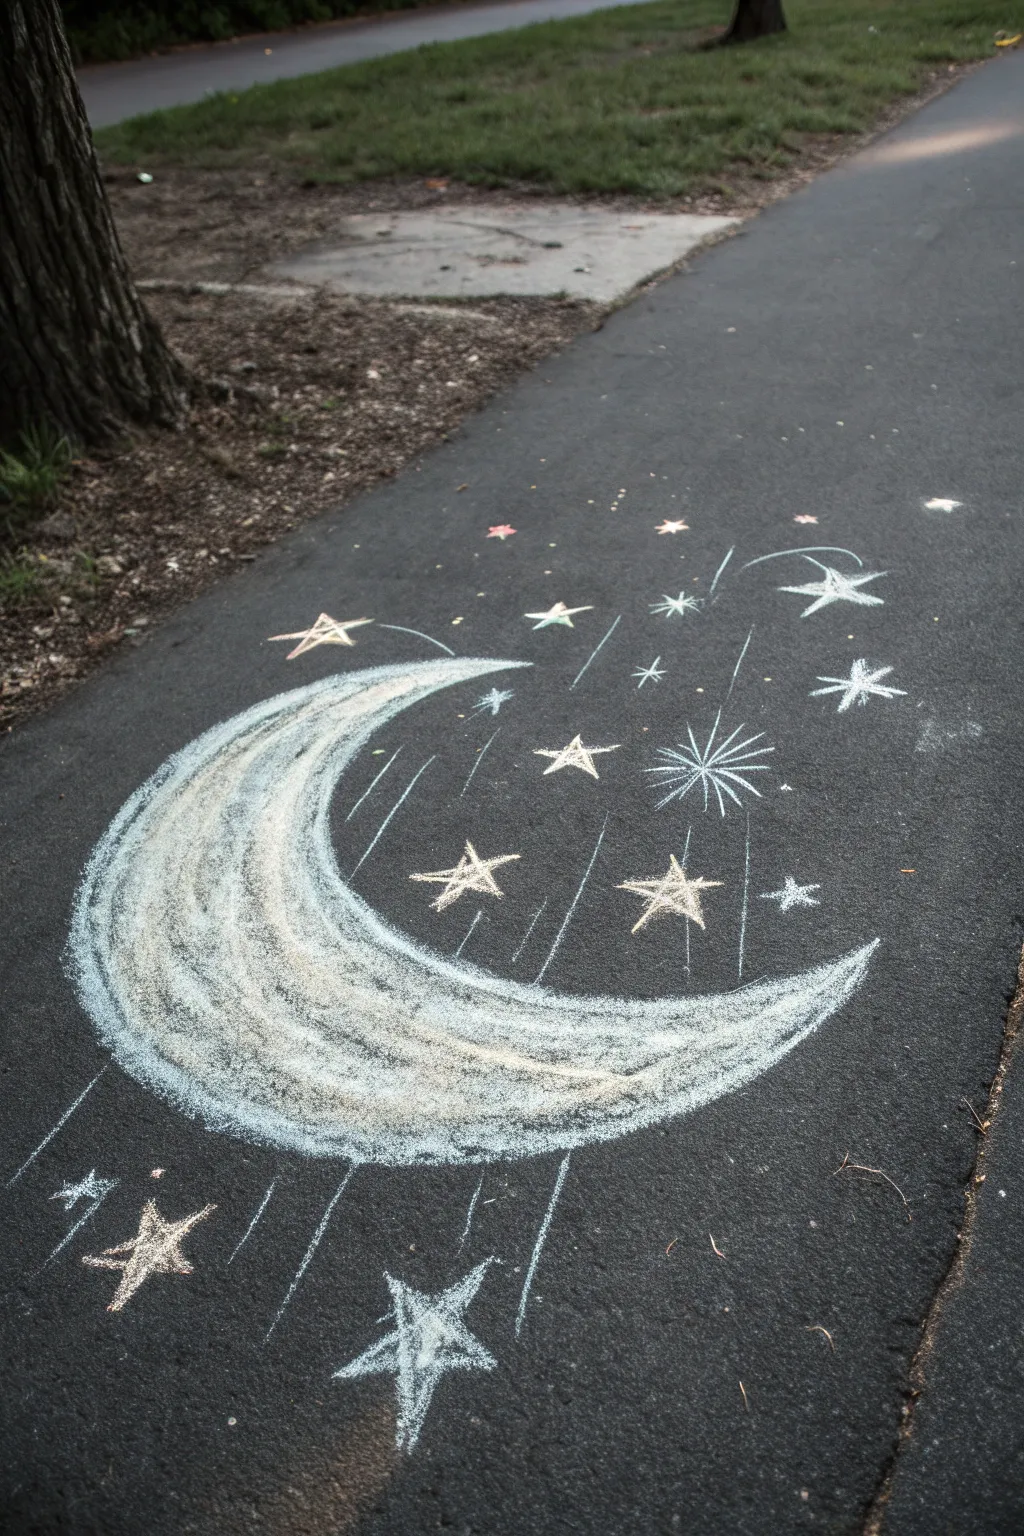
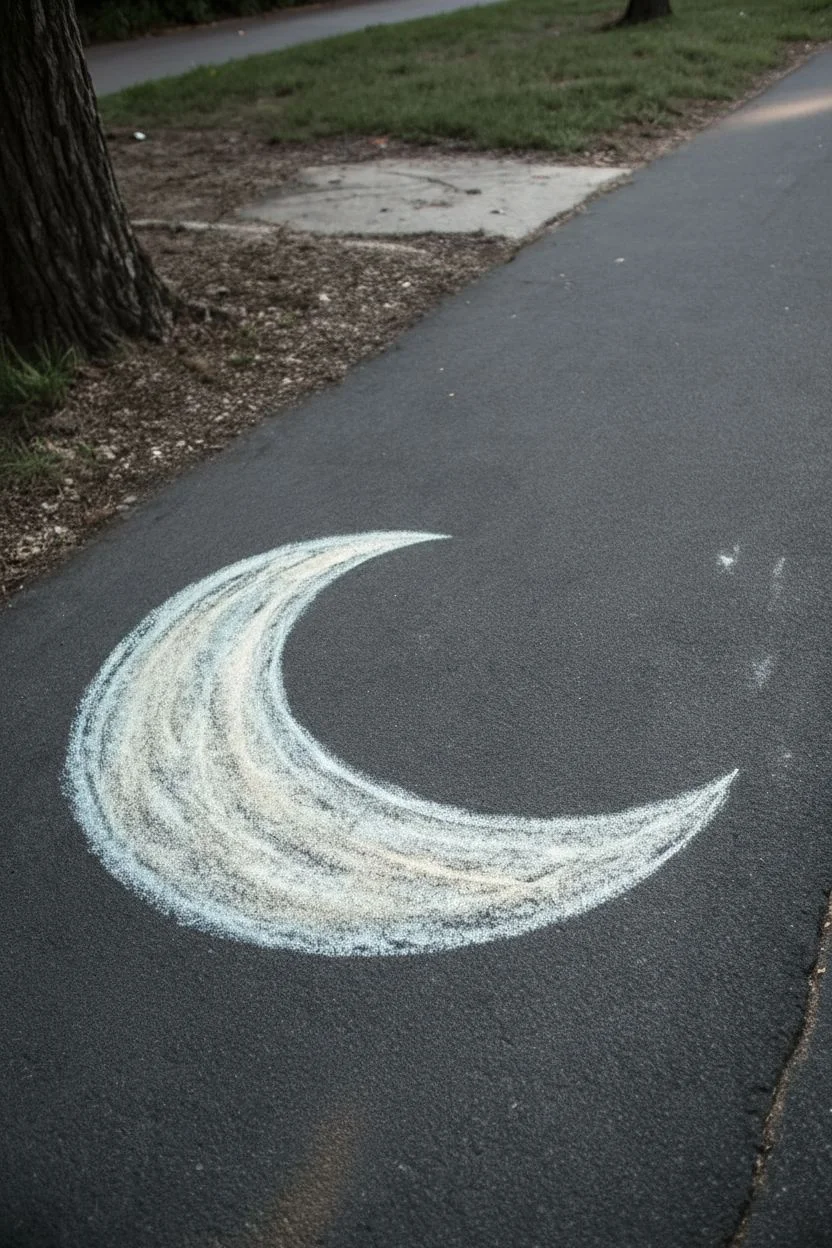
Transform a patch of ordinary walkway into a mesmerizing night sky with this chalk art project. Featuring a large, textured crescent moon surrounded by a shower of twinkling stars and comets, this design relies on simple lines and blending to create a glowing effect against the dark asphalt.
Step-by-Step Guide
Materials
- Jumbo sidewalk chalk (white, light blue, pale yellow)
- Standard stick chalk (white for fine details)
- A clean, dry blending tool (old sock, rag, or chalkboard eraser)
- Kneeling pad or cushion (optional, for comfort)
- Small cup of water (for wetting chalk, optional)
Step 1: Drafting the Moon
-
Outline the crescent:
Begin by drawing a large ‘C’ shape on the pavement using your white jumbo chalk. Create the inner curve next to define the thickness of your crescent moon, tapering the ends to sharp points. -
Fill the base layer:
Color in the entire crescent shape heavily with white chalk. Don’t worry about texture yet; just get a solid layer of pigment down on the asphalt. -
Add dimension with color:
Take your light blue chalk and lightly scumble (add texture) along the outer curve of the moon. This adds a cool shadow tone. -
Introduce warmth:
Using the pale yellow chalk, add patches of color towards the center and inner curve of the crescent to create a glowing warmth. -
Blend for smoothness:
Using your rag or blending tool, gently rub the chalk in a circular motion. I like to blend the white and colors together just enough to soften the grain of the asphalt while keeping some texture visible.
Smudgy Lines?
If your star points look blurry, sharpen your chalk by rubbing the side on concrete until you have a crisp edge, or use artist pastels for fine details.
Step 2: Creating the Starfield
-
Draw primary stars:
Select 3-4 spots around the moon for your largest stars. Draw these as five-pointed stars using the sharp edge of a yellow or white chalk stick. -
Add starbursts:
Create several ‘starburst’ shapes by drawing a central point and radiating 8-10 thin lines outward. Make the vertical and horizontal lines slightly longer than the diagonal ones. -
Scatter smaller stars:
Fill in the empty spaces with smaller five-pointed stars. Vary the sizes to create a sense of depth and distance in your sky. -
Add distant glimmer:
Dot the pavement with tiny specks or small ‘x’ shapes to represent the furthest stars in the galaxy.
Step 3: Adding Motion and Magic
-
Draw shooting star trails:
Choose a few of your starbursts or larger stars to turn into shooting stars. Draw three parallel, straight lines trailing behind them, fading out as they get further from the star. -
Create curved comets:
For a different look, add curved tails to a few stars near the top, making them look like they are swooping around the moon. -
Highlight the moon:
Go back to your moon and use a fresh stick of white chalk to add a crisp, clean line along the very outer edge. -
Add moon texture:
Lightly drag the side of a white chalk stick over the blended moon surface to bring back some crater-like texture on top of the smooth base. -
Detailing the rays:
Use a sharp corner of your chalk to sharpen the points of your stars, ensuring they look distinct against the dark background. -
Final dusting:
Blow away any loose chalk dust that has settled on the blacktop outside your design to keep the negative space dark and clean.
Glow Up
Make the moon pop by wetting the white chalk tip before drawing the final outline. Wet chalk applies like paint and dries intensely bright.
Step back and enjoy the view of your personal galaxy right beneath your feet
Cute Animal Faces in Sidewalk Squares
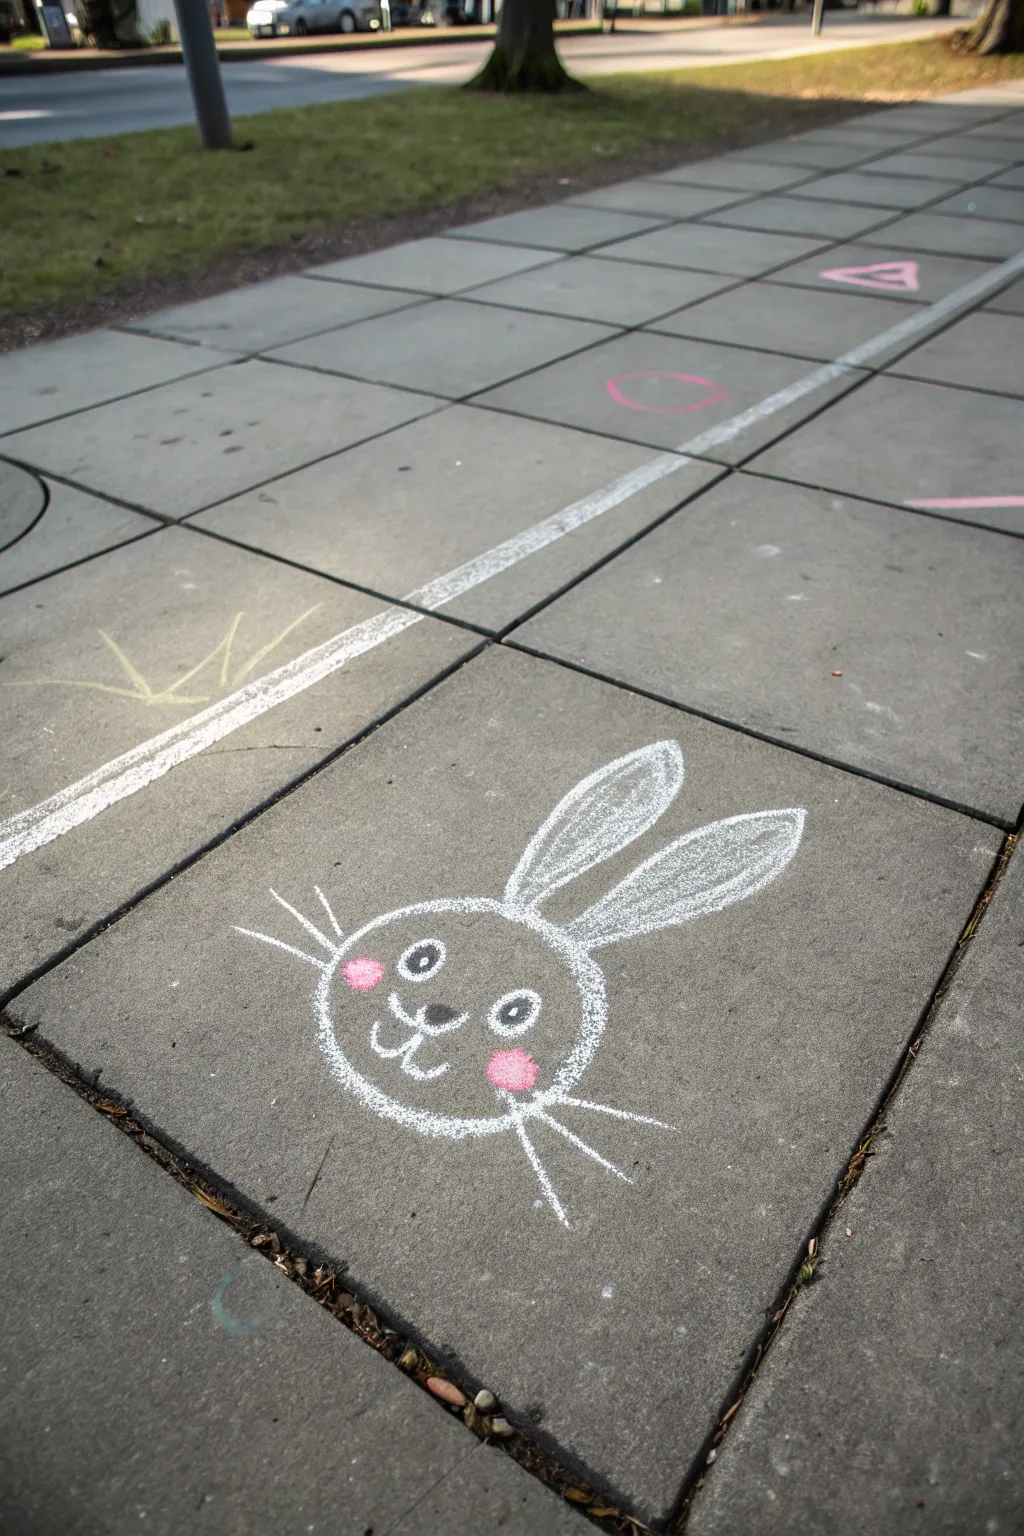
Transform a simple square of pavement into a cheerful character with this adorable bunny face design. Minimal lines and a touch of color make this a perfect beginner-friendly project that pops against grey concrete.
Step-by-Step Tutorial
Materials
- White sidewalk chalk (thick stick)
- Pink sidewalk chalk (thick stick)
- Wet wipe or damp cloth (for clean up)
- Pavement or sidewalk square
Step 1: Drawing the Head Shape
-
Choose your canvas:
Find a clean, dry square of pavement. Sweeping away loose dirt or pebbles first will help your chalk glide smoothly. -
Start the circle:
Draw a large circle for the bunny’s head. It doesn’t need to be geometrically perfect; a slightly oval shape works great too. -
Close the loop:
Ensure the circle is fully closed with a solid white line. Go over the line a second time to make the white really stand out against the grey stone.
Step 2: Adding the Ears
-
Draw the first ear:
Starting from the top right of the head circle, draw a long, looped oval shape extending upwards and slightly to the right. -
Draw the second ear:
Draw a matching ear right next to the first one, angling it similarly. Keeping them close together at the base looks cutest. -
Color the ears:
Lightly shade the inside of both ear loops with your white chalk. I find using the side of the chalk stick makes this filling process much faster. -
Refine the outline:
Trace over the outer edges of the ears again with the tip of the chalk to give them a crisp border.
Chalk Too Faint?
If the white isn’t showing up well, dip the tip of your chalk in water for 5 seconds. Wet chalk draws much more vividly and dries opaque.
Step 3: Creating the Face
-
Position the eyes:
Draw two small circles in the upper half of the main face circle. Space them widely apart for that playful look. -
Add pupils:
Inside each eye circle, draw a solid dot. You can make them look slightly toward one direction to give the bunny some personality. -
Draw the nose:
Place a small, rounded triangle or oval between the eyes, but slightly lower down. -
Create the mouth:
Draw a small vertical line down from the nose, then curve it outward to the left and right like a ‘w’ shape to form the smile.
Make It A Family
Draw different animal faces in adjacent sidewalk squares to create a whole zoo. Try a cat with triangle ears or a bear with round ones.
Step 4: Adding Charming Details
-
Add the cheeks:
Take your pink chalk and draw two solid circular spots on either side of the mouth. Press firm to get vibrant color. -
Draw the whiskers:
Switch back to white chalk. Draw three straight lines extending outward from each cheek area. -
Vary whisker length:
Make the middle whisker slightly longer than the top and bottom ones for a balanced look. -
Clean up edges:
Use a damp cloth or your finger to smudge away any stray chalk dust or mistakes around the outside lines. -
Final brightness check:
Step back and see if any lines need brightening. A final pass over the main outlines ensures your bunny is visible from a distance.
Enjoy your cheerful new sidewalk companion as you complete your walk

PENCIL GUIDE
Understanding Pencil Grades from H to B
From first sketch to finished drawing — learn pencil grades, line control, and shading techniques.
Explore the Full Guide
Mermaid Tail Pose-In Drawing

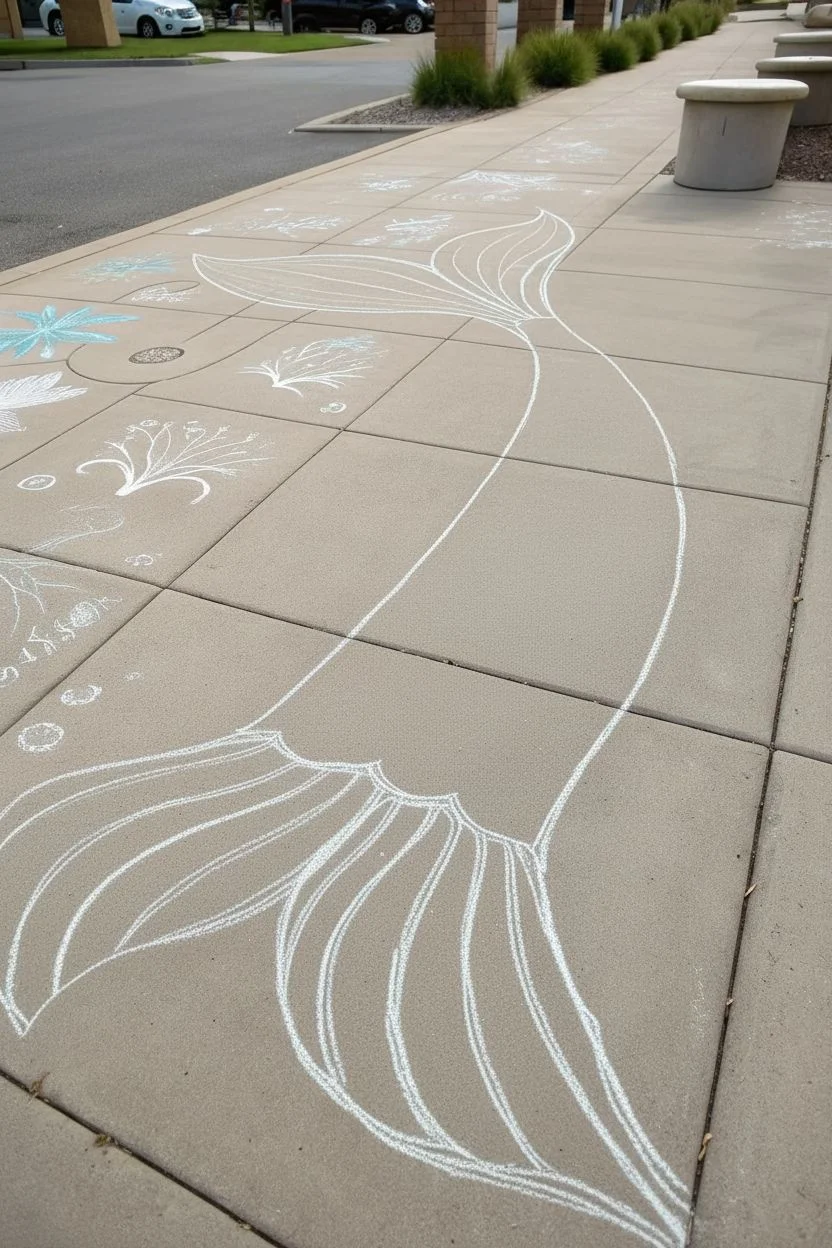
Transform your sidewalk into an underwater fantasy with this interactive mermaid tail mural designed for posing. The vibrant teal scales and sweeping magenta fins create a magical photo opportunity for kids and adults alike.
Detailed Instructions
Materials
- Sidewalk chalk (jumbo sticks)
- Chalk pastels (for vibrant details)
- Blending sponge or soft cloth
- Measuring tape or yardstick
- Painter’s tape or string (optional guide)
- Water spray bottle
- Knee pads (highly recommended)
Step 1: Planning the S-Curve
-
Map out the space:
Choose a smooth section of pavement free from large cracks. Visualize a human-sized figure lying down to ensure you leave enough space for the tail to extend naturally from where a person’s waist would be. -
Draw the spine line:
Using a light colored chalk, sketch a long, flowing ‘S’ curve. This will serve as the central spine of the tail to keep the flow organic and natural. -
Outline the tail shape:
Draw the outer edges of the tail, following your S-curve. Start wider at the top (the waist area) and taper it gradually until it gets very narrow just before the fin starts. -
Sketch the fluke outline:
At the narrowest bottom point, flare out two large, wing-like shapes for the tail fin (fluke). Make them asymmetrical for a more dynamic look, with one side sweeping slightly higher. -
Sketch the waist fins:
Add a smaller, secondary fin structure at the very top (waist) end and potentially two smaller side fins near the main fluke if you want extra detail, though the main image focuses on a large split tail.
Step 2: Adding the Scales
-
Create the scale grid:
Starting from the bottom of the main tail body (not the fin), draw U-shaped curves in rows. I find it easiest to work row by row upward so my hand doesn’t smudge the work below. -
Stagger the pattern:
Ensure each new row of scales sits in the valleys of the row below it, like a brick pattern. This creates the classic fish-scale look. -
Fill the base color:
Color in every scale heavily with your teal or turquoise chalk. Press hard to get good coverage, or wet the chalk slightly for a paint-like opacity. -
Blend the pigment:
Use a sponge or a piece of foam to rub the teal chalk into the pores of the concrete. This creates a solid, vibrant base layer. -
Add scale highlights:
Take a lighter blue or white chalk and draw a smaller ‘U’ inside the top curve of each scale. This creates a 3D domed effect. -
Define the edges:
Use a darker blue or even a thin black chalk pastel to outline the bottom edge of each individual scale to update the contrast and make them pop.
Vibrant Color Hack
Soak your chalk sticks in a cup of water for 5-10 minutes before drawing. The wet chalk goes on like creamy paint and dries incredibly bright!
Step 3: Coloring the Fins
-
Block in the fin colors:
For the large tail fluke, draw long, sweeping lines of teal and magenta (or purple). Alternate the stripes to simulate the ribbing of a fish fin. -
Blend for texture:
Gently blend these stripes lengthwise (following the direction of the fin) so the colors meet but don’t turn muddy. -
Add the ribbing:
Using your darkest purple or blue, draw firm lines radiating from the center of the tail out to the edges of the fin. These lines separate the sections of the fin. -
Highlight the fin tips:
Add streaks of white or pale pink near the outer edges of the fin to make it look shimmering and translucent.
Add Some Sparkle
Once your drawing is complete but before you take the photo, sprinkle biodegradable glitter over the wet scales for a magical shimmering effect in the sunlight.
Step 4: Final Flourishes
-
Add bubbles:
Draw circles of varying sizes floating around the tail. Outline them in white and add a tiny ‘reflection’ dot to make them look wet. -
Draw sea flora:
Sketch simple seaweed shapes or coral outlines in pinks and whites nearby to frame the composition without cluttering it. -
Clean the edges:
Take a clean, damp cloth and carefully wipe the pavement right next to your outline to sharpen up the silhouette of the tail. -
Set the scene:
Mark an ‘X’ or draw a small towel outline where the subject should sit or lie down to align perfectly with the tail.
Now lie down, strike a pose, and enjoy your transformation into a mythical sea creature
Outer Space Planets With Kid Astronaut
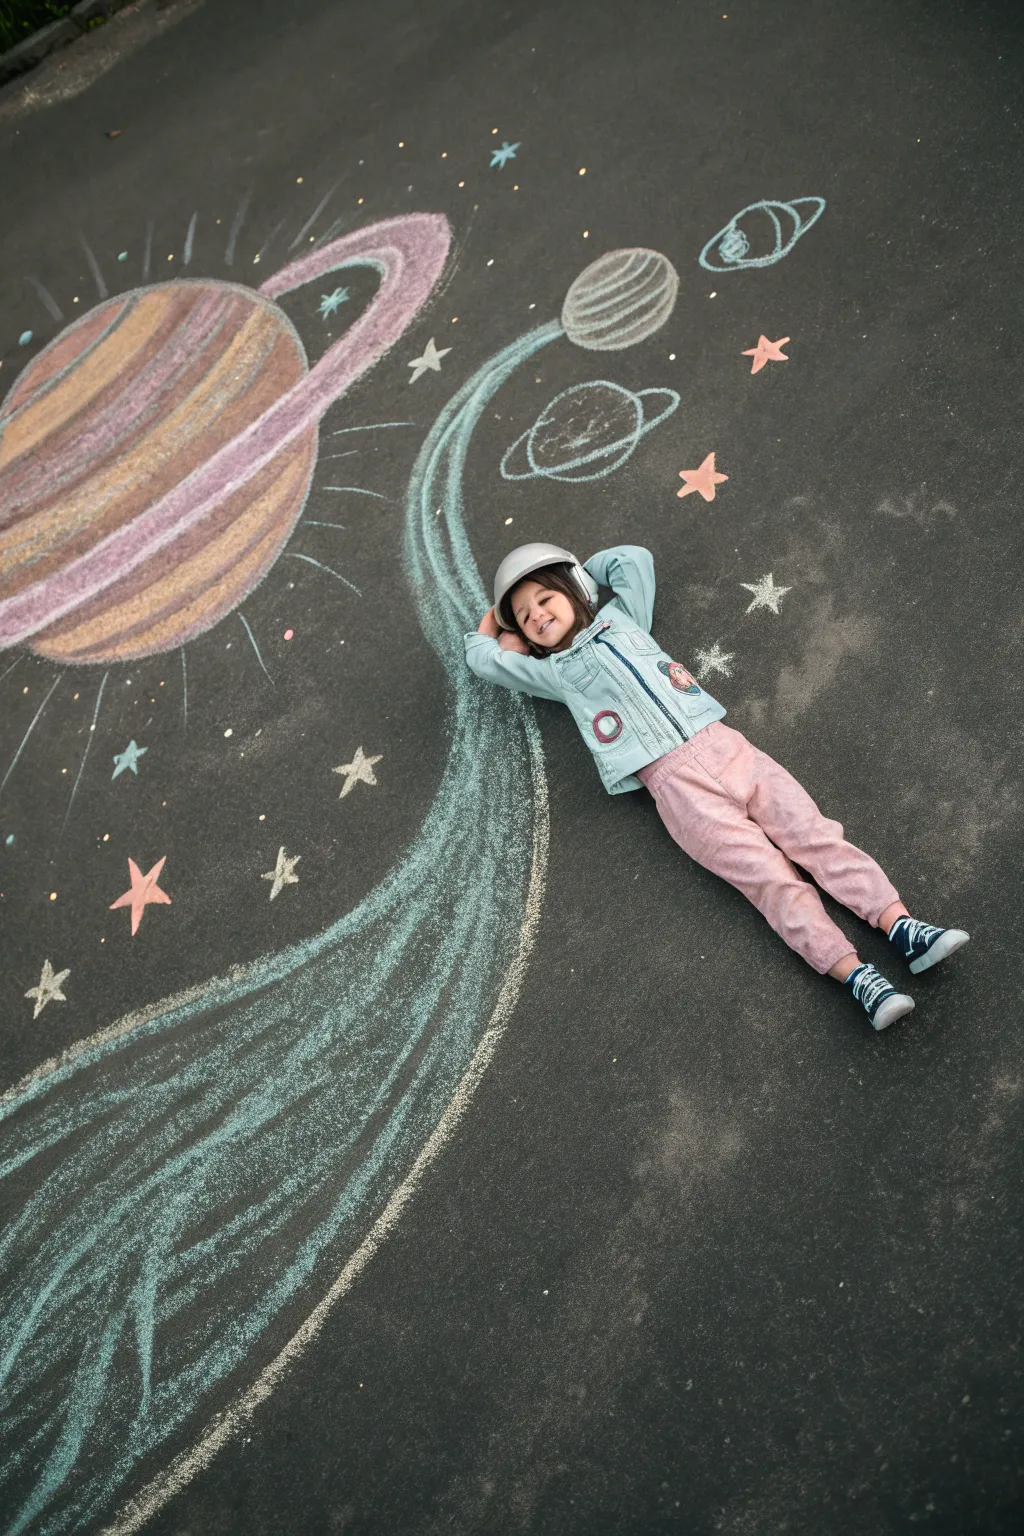
Transform your driveway into a cosmic playground with this immersive chalk art scene featuring a giant ringed planet and a soaring comet trail. This project uses the pavement as a canvas to turn your little one into an astronaut floating through the galaxy.
Step-by-Step Tutorial
Materials
- Sidewalk chalk (assorted colors including pink, orange, yellow, blue, and white)
- Black asphalt driveway or pavement
- A child (your astronaut model)
- A bike helmet or costume helmet
- Denim jacket and comfortable pants (for the astronaut suit look)
- Smartphone or camera
- Optional: A rag or blending sponge
Step 1: Planning composition
-
Position your astronaut:
Begin by having your child lie down on the pavement to gauge spacing. Have them place their hands behind their head in a relaxed ‘floating’ pose. -
Mark the spots:
Lightly mark with white chalk where their head and feet are positioned, then have them stand up so you can draw freely without them getting dusty just yet.
Step 2: Drawing the Giant Planet
-
Outline the sphere:
In the upper left quadrant of your space, draw a large circle using white chalk. This will be the base for your main gas giant planet. -
Add the base colors:
Fill the circle with diagonal stripes of color. Use warm tones like orange, peach, and light brown to mimic Jupiter or Saturn’s bands. -
Blend the surface:
Use your fingers or a sponge to smudge the colorful stripes together slightly, softening the lines to give the planet a gaseous, spherical appearance. -
Draw the rings:
Draw large, elliptical rings circling the planet using pink and white chalk. Make the back part of the ring disappear ‘behind’ the planet to create depth. -
Highlight the rings:
Thicken the front arc of the rings with extra white chalk to make them pop against the dark asphalt. -
Add radiant lines:
Draw short, thin white lines radiating outward from the planet’s edge to symbolize its glowing atmosphere.
Chalk breaking?
If your chalk keeps snapping on rough asphalt, try soaking the sticks in water for 5 minutes before drawing. This makes them softer and creates smoother, paint-like lines.
Step 3: Creating the Comet Trail
-
Outline the plume:
Starting from where the child’s head will be, draw two long, curving lines that sweep downward and to the left, getting wider as they go. This creates the ‘blast off’ or comet tail effect. -
Fill with blue:
Color inside these lines using a light blue or teal chalk. Apply more pressure near the top (the head area) for intensity and press lighter as the tail fades out at the bottom. -
Add texture:
Draw squiggly white lines over the blue fill to suggest billowing smoke or energy streams within the trail. -
Define the edges:
Go over the outer edges of the plume with a sharp white piece of chalk to clearly separate the trail from the dark pavement.
Pro Tip: Glowing effect
To make the stars really shine, dampen the pavement slightly with a mist bottle before drawing the white centers. The wet connection creates a much brighter, solid white.
Step 4: Adding Space Details
-
Draw smaller planets:
To the right of the comet trail, sketch a few smaller planets. Try a striped sphere or a simple ringed planet outline in white or light grey. -
Create stars:
Scatter five-pointed stars around the scene. Use pink, yellow, and white chalk to add variety. -
Add distant starlight:
Tap the tip of your chalk on the ground to create small dots or ‘distant stars’ filling the empty negative space.
Step 5: The Photo Finish
-
Suit up:
Have your child put on their helmet and lie back down in the designated spot at the top of the comet trail. -
Pose:
Ask them to cross their legs at the ankles and rest their hands behind their head, looking up at the sky. -
Capture the shot:
Stand on a ladder or a sturdy chair to get a high angle directly above the art. This perspective flattens the ground and makes the illusion convincing.
Enjoy your trip to the stars and the wonderful photos you’ll have to remember the journey


Flying Over a Chalk City Skyline
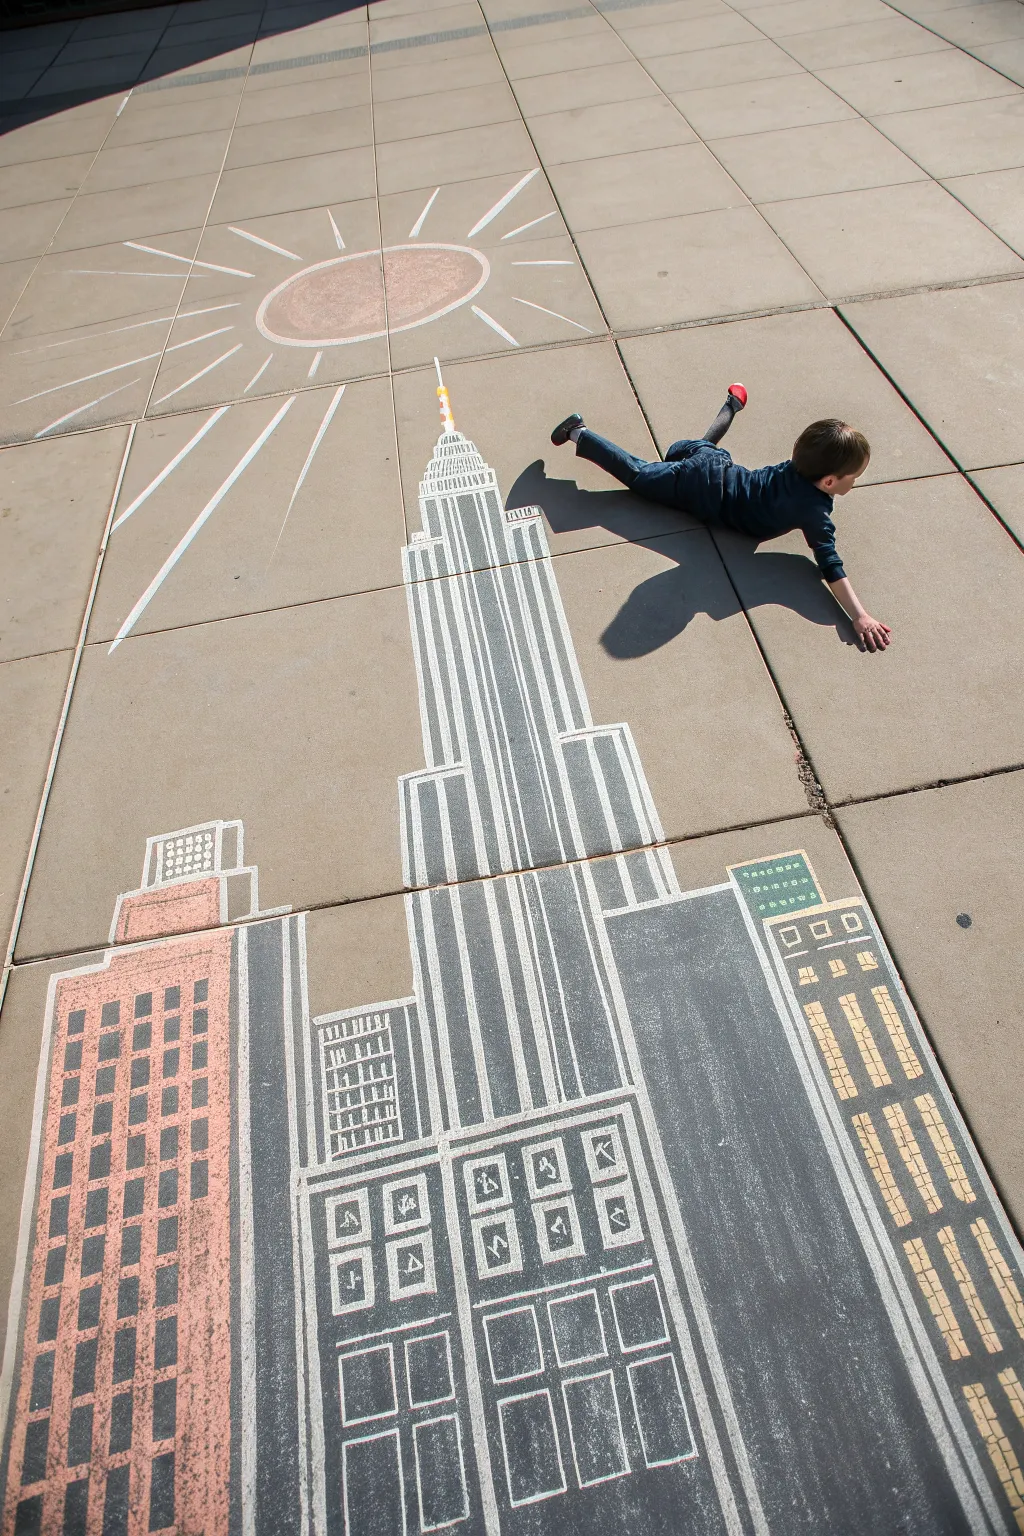
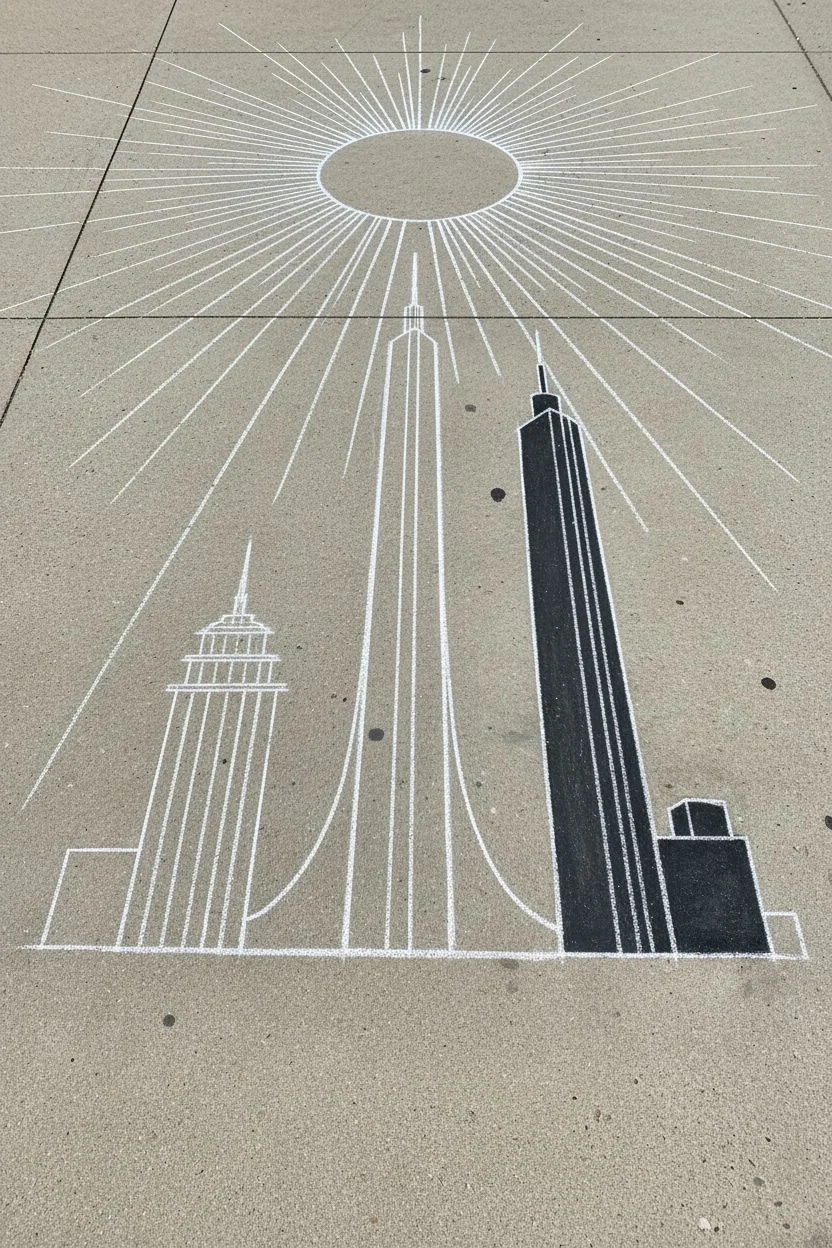
Transform your driveway into a towering metropolis with this clever forced perspective chalk art. By drawing elongated skyscrapers and posing horizontally, you can create the magical illusion that you or your child is flying superhero-style over the city.
Step-by-Step Tutorial
Materials
- Sidewalk chalk (white, black, gray, brick red, yellow, green)
- Wide painter’s tape or masking tape (optional, for crisp lines)
- A broom or large brush (for blending)
- Knee pads or a gardening kneeling mat
- A clean, dry section of pavement or concrete
Step 1: Setting the Scene
-
Outline the central skyscraper:
Begin by drawing the Empire State Building-style tower in the center. Use white chalk to sketch a very long, narrow rectangle that widens slightly at the base. Remember, for forced perspective to work, the buildings need to be much longer than you think—stretch it out. -
Add side buildings:
Draw the outlines of flanking buildings. On the left, sketch a tiered, shorter building. On the right, add a taller, darker skyscraper and a smaller adjacent structure. Keep all vertical lines parallel to your central tower. -
Sketch the sun:
Position yourself at the ‘top’ of the drawing (where the spire points). Draw a large oval for the sun and sketch long, dynamic rays bursting outward to fill the upper concrete space.
Smudge Savvy
Use a chalkboard eraser or a carpet remnant to blend larger areas of color. This pushes the chalk dust into the concrete’s pores for a smoother, more painted look.
Step 2: Filing in the Colors
-
Color the central tower:
Fill the central skyscraper with grey chalk, leaving strong white vertical stripes to represent the Art Deco ribs of the building. Use the side of your chalk stick to cover large areas quickly. -
Detail the spire:
At the very top of the central building, switch to yellow and orange chalk to color the antenna spire, making it a focal point. -
Color the left building:
Fill the tiered building on the left with a brick-red or salmon color. Leave a grid of dark squares empty to represent windows, or draw them in with black charcoal later. -
Create the dark skyscraper:
For the large building on the right, use heavy black or dark grey chalk. This contrast is crucial. I find that rubbing the chalk into the pavement with a brush or dedicated blending sponge helps get a solid, opaque look here. -
Add the right-side details:
On the far right edge, outline a smaller adjacent building in white and fill its top with green, adding small white dashes for windows.
Step 3: Defining Details
-
Draw the windows:
Go back over your buildings and crisply defining the windows. For the central tower, use long vertical white lines. For the surrounding buildings, draw grids of squares or rectangles using white or yellow chalk. -
Add architectural accents:
Use white chalk to add specific details like the triangular chevron patterns near the base of the central building and the distinct tiers near the top. -
Create shadows (optional):
If you want extra depth, smudge a little black chalk along one consistent side of the buildings to suggest a shadow falling away from the sun. -
Reinforce outlines:
Take a sharp piece of white chalk and re-trace all the major exterior outlines. This ‘comic book style’ outlining makes the drawing pop clearly in photographs.
Add Clouds
Draw fluffy white clouds scattered around the spire and the ‘flyer.’ This adds depth and creates a sense of high altitude for the photo.
Step 4: The Final Illusion
-
Refine the sun:
Fill in the sun’s center with a soft pink or orange, then re-trace the white rays to ensure they stand out against the grey pavement. -
Pose the flyer:
Have your subject lie down on their stomach just above the central skyscraper. They should lift their feet and extend one arm forward as if they are Superman flying through the air. -
Direct the shadow:
Try to take the photo when the sun casts the subject’s shadow onto the building drawing. This interaction between the real shadow and the chalk drawing is what sells the 3D effect effectively. -
Photograph from above:
Stand on a ladder or a chair at the bottom of the buildings (the ‘street level’) and take the photo looking down the length of the drawing toward the child.
Once you snap that perfect high-angle photo, you’ll have a permanent memory of high-flying adventure that washes away with the next rain
Life-Size Silhouette Portraits With Costume Details
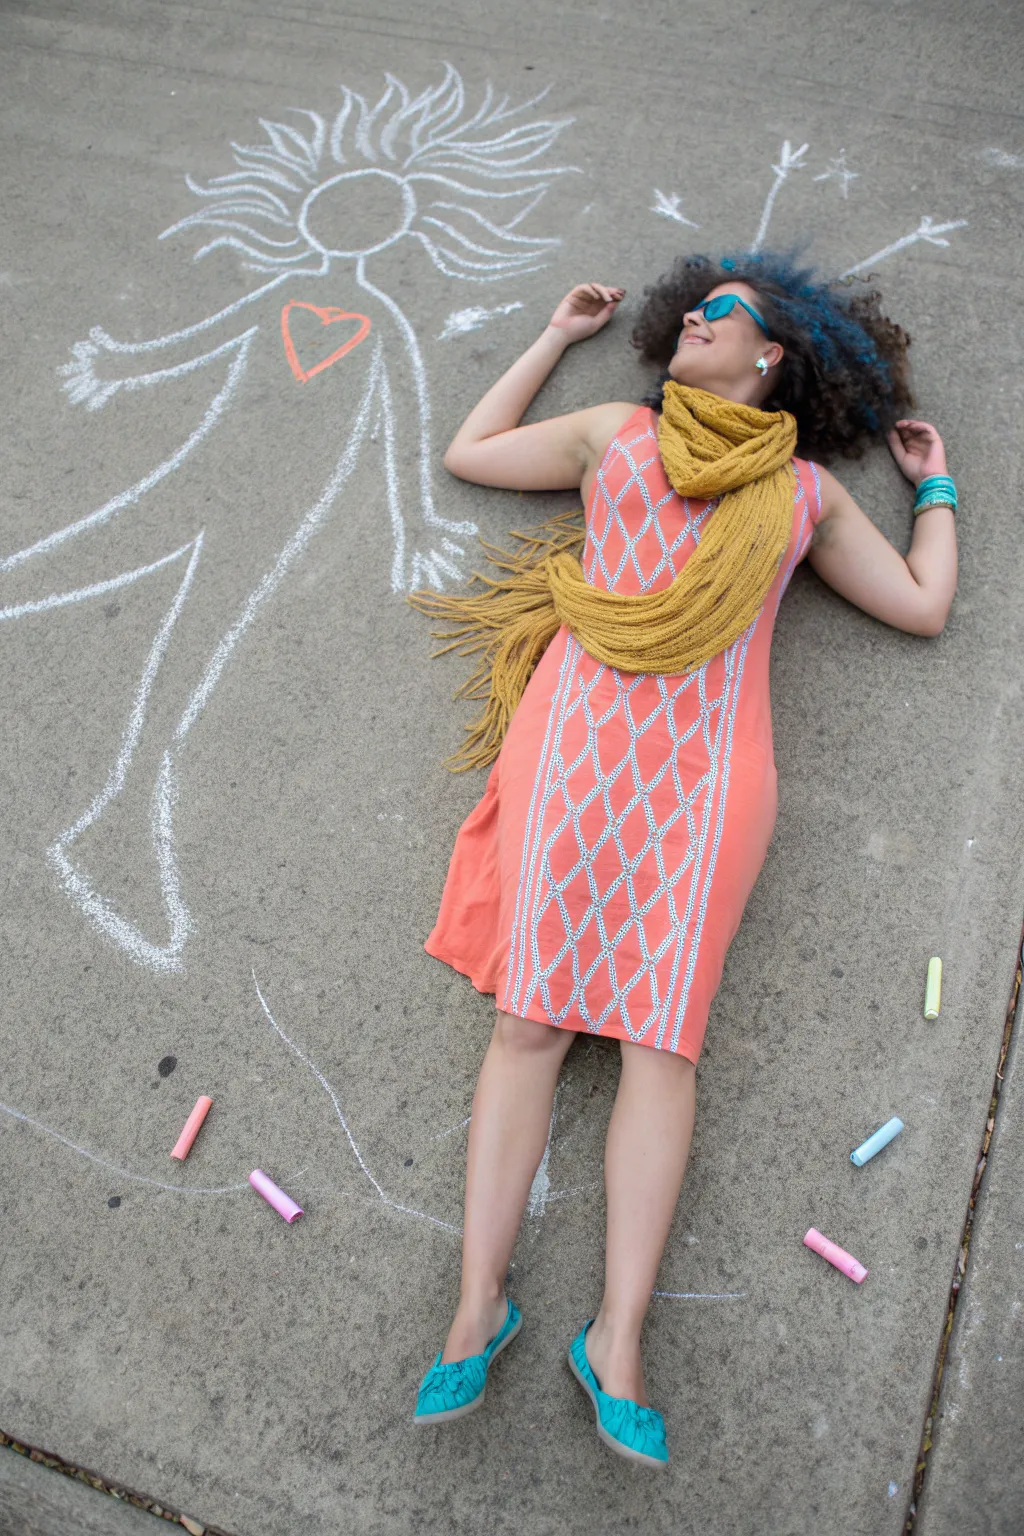
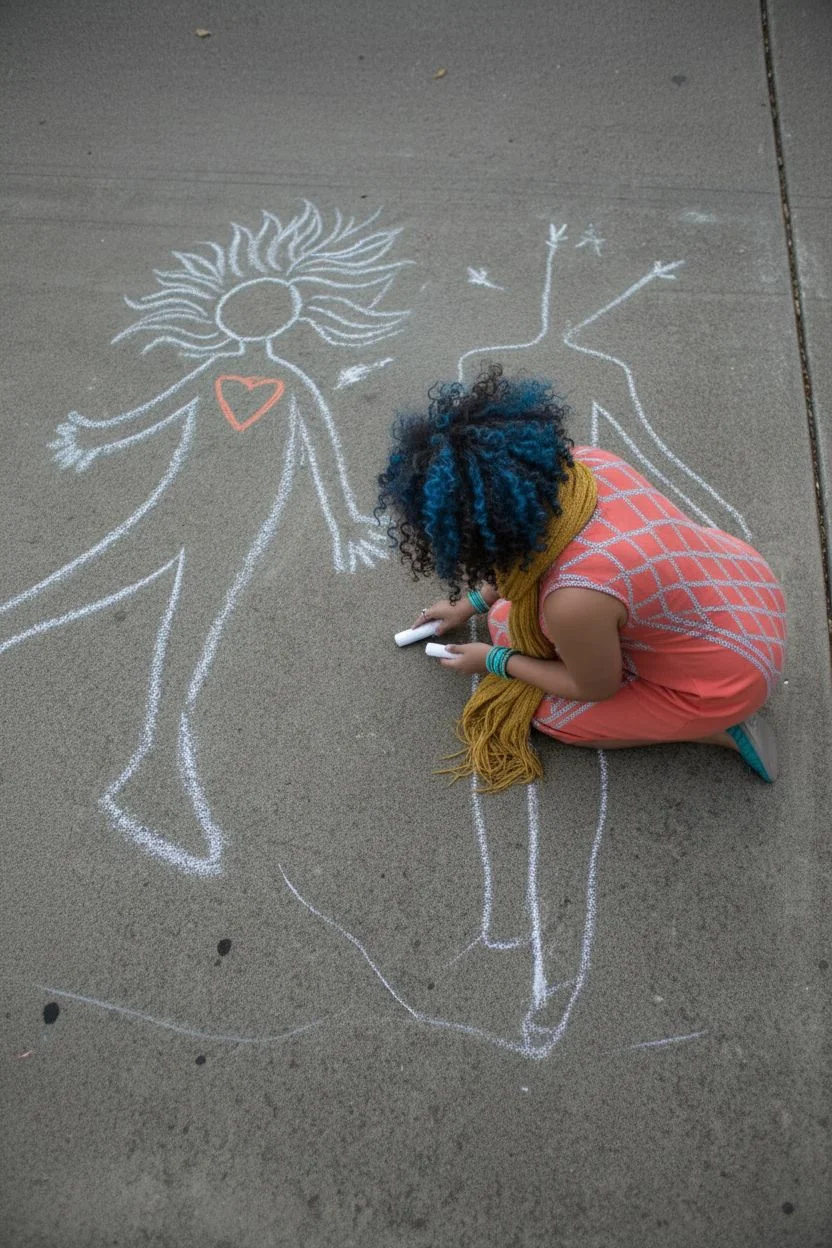
Capture the magic of simple street art with this playful project that pairs a real-life subject with their chalk-outline twin. This life-size silhouette portrait creates a striking visual contrast between vibrant clothing and classic white lines, perfect for whimsical photos.
Detailed Instructions
Materials
- White sidewalk chalk (thick sticks are best)
- Colored sidewalk chalk (specifically red/pink for the heart)
- Paved surface (driveway, sidewalk, or patio)
- A model (friend or family member)
- Camera or smartphone
- Ladder or step stool (optional, for the final photo)
Step 1: Setting the Scene & Silhouette
-
Choose your canvas:
Find a clean, dry stretch of concrete or asphalt. Sweep away any loose pebbles or dirt so the chalk adheres smoothly and comfortable for your model to lie on. -
Position the model:
Ask your model to lie down on the pavement. Have them adopt a relaxed, open pose—arms slightly out, legs comfortably apart. This ‘imperfect’ pose makes the final drawing look more dynamic than a stiff straight line. -
Trace the outline:
Using a thick stick of white chalk, trace the entire perimeter of your model’s body. Keep the chalk perpendicular to the ground to get a clean, distinct line roughly an inch away from their actual body to allow for easier movement later. -
The mirror pose:
Once the first outline is done, ask the model to stand up carefully. Now, have them lie down again, but parallel to the first outline, mimicking the exact same pose. This helps you visualize where the second ‘twin’ figure should go. -
Mark the second figure:
While the model is in position, lightly mark the key points (head, hands, feet) for the second figure to ensure the scale matches perfectly. I find it easiest to just trace them a second time right next to the first outline, creating two side-by-side silhouettes.
Step 2: Adding Artistic Details
-
Refine the lines:
With the model out of the frame, go over your chalk lines again. Thicken them up and smooth out any bumpy areas where the chalk might have skipped over the pavement texture. -
Draw the heart:
In the center of the chest area of your chalk figure, draw a simple, bold heart using red or pink chalk. Fill it in slightly or leave it as an outline depending on your preference. -
Add the wild hair:
Instead of realistic hair, give the chalk figure a burst of energy. Draw long, wavy lines radiating outward from the head circle. Make them erratic and expressive, like electricity or sun rays. -
Create hand details:
Refine the hands. Since tracing fingers can look blobby, you might need to artificially sharpen the fingers into distinct shapes with your chalk to make them look like open palms. -
Add playful extras:
Draw a few stray marks or ‘sparkles’ (little stars or lines) around the head area to suggest thoughts or energy.
Uneven Pavement?
If the concrete is too rough, wet the chalk slightly before drawing. This creates a paint-like paste that fills crevices better for smoother, brighter white lines.
Step 3: Styling & Photography
-
Dress the model:
Style your model in bright, solid colors that will pop against the grey concrete. The image uses a coral dress and a chunky mustard scarf, which adds great texture. -
Accessorize:
Add fun accessories like teal sunglasses or bright shoes. If the model has curly hair, fluff it out to mimic the ‘wild hair’ drawn on the chalk figure. -
Final positioning:
Have the model lie back down in the ’empty’ spot next to the chalk drawing. They should attempt to match the angle of limbs exactly to the drawing. -
Scatter the tools:
Artfully scatter a few pieces of colored chalk around the scene. This adds a nice ‘behind the scenes’ feel to the final photo and balances the composition. -
Get the high angle:
To capture the full effect, you need height. Stand on a sturdy chair or ladder to take the photo directly from above to avoid perspective distortion.
Level Up: Costume Swap
Draw specific costume details (like a mermaid tail or superhero cape) on the chalk side, then have the model wear the real-life equivalent for a true mirror image.
Enjoy your fun new piece of interactive pavement art and the great photos that come with it
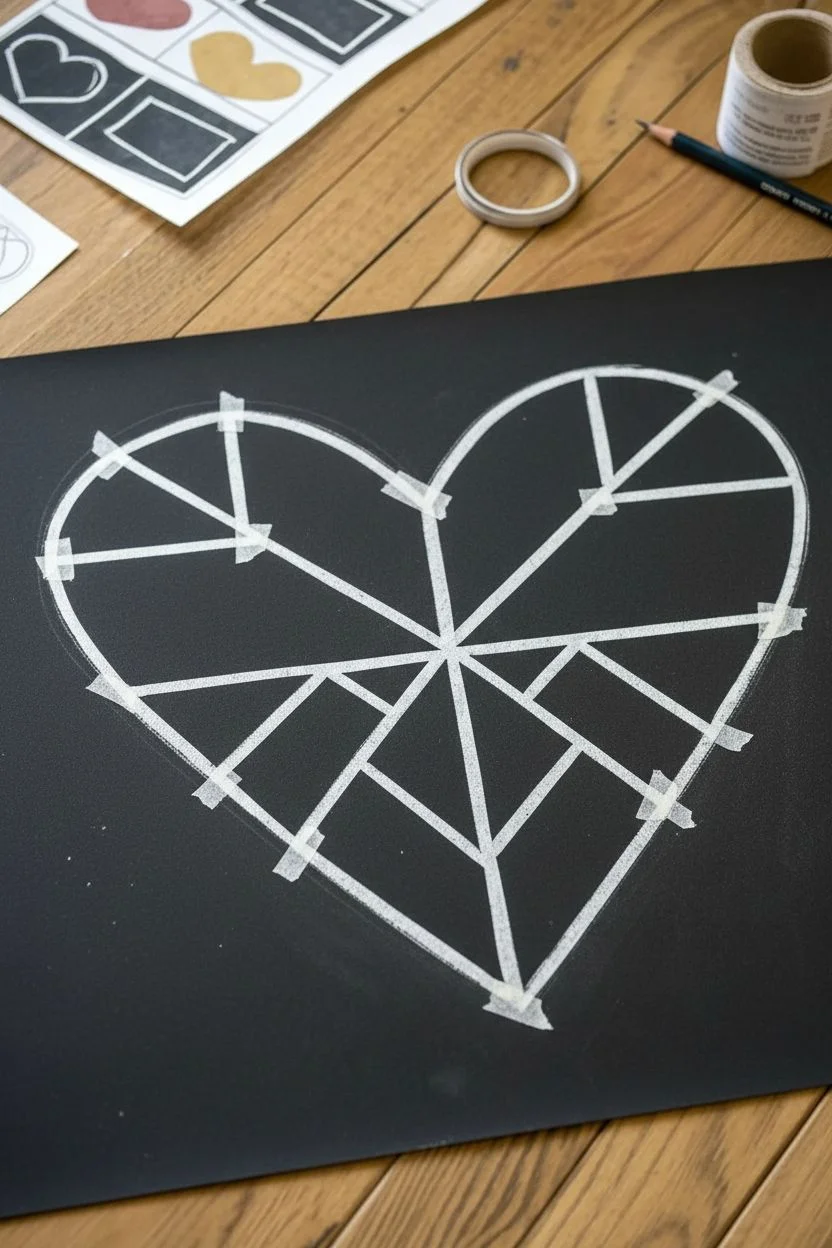
Stained-Glass Heart Mosaic With Tape Lines
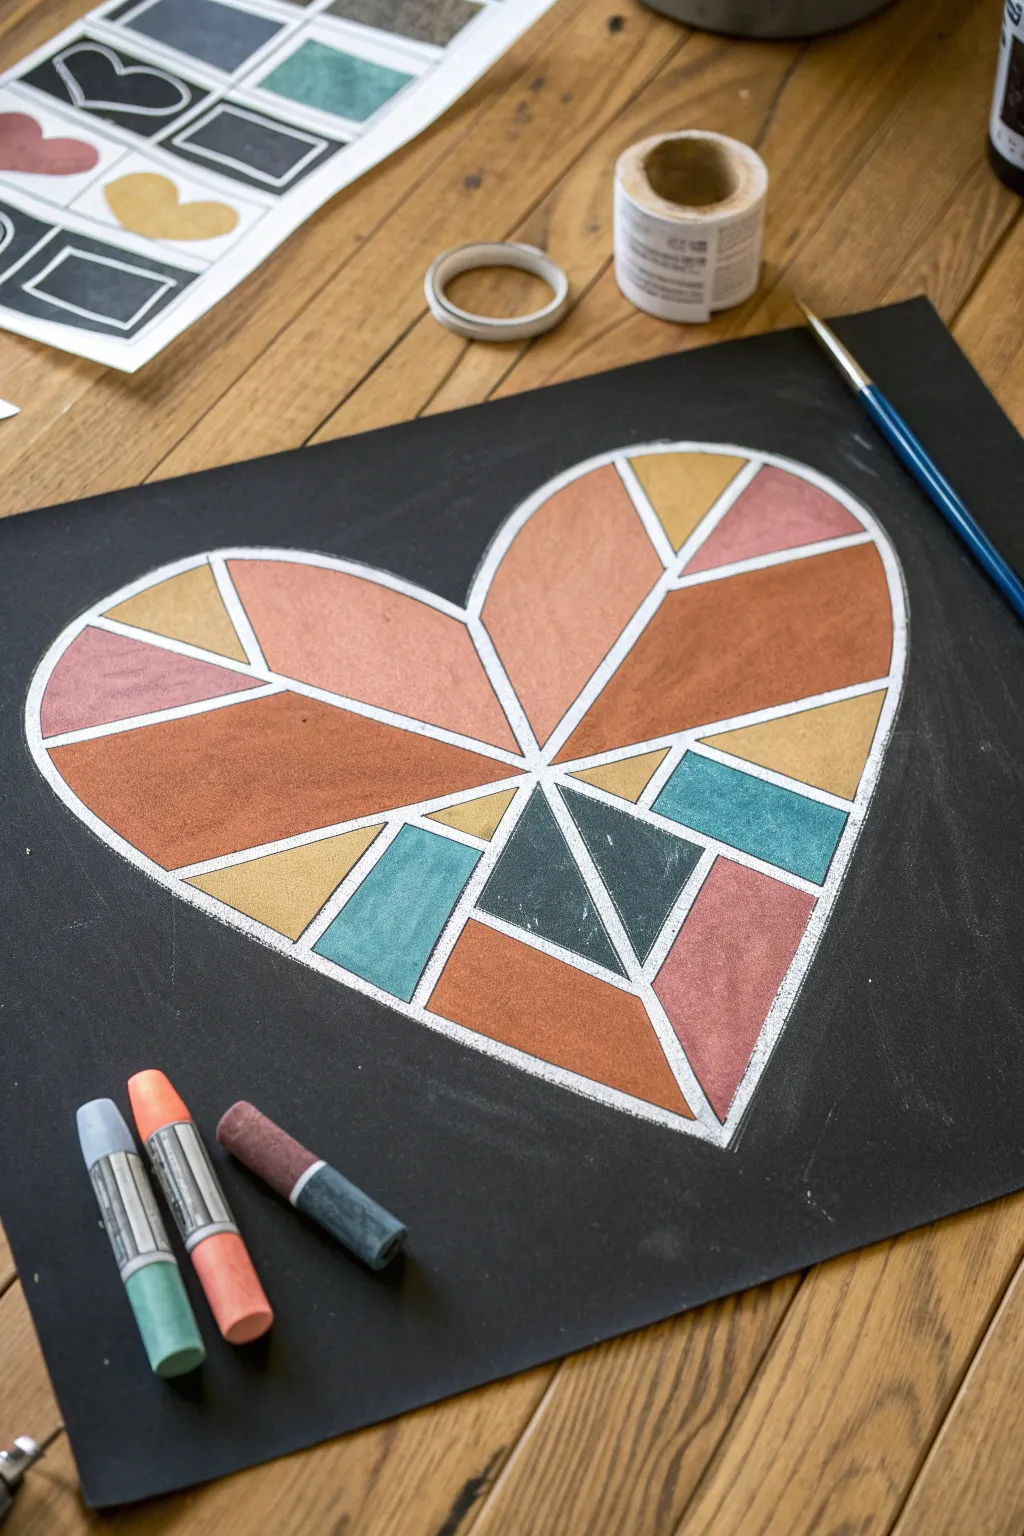
Transform simple black paper into a vibrant faux stained-glass masterpiece using the magic of tape resist art. This project creates a striking geometric heart with crisp white lines separating soft, blended fields of pastel color.
Step-by-Step
Materials
- Black construction paper or cardstock (heavyweight is best)
- Painter’s tape or masking tape (narrow width works well)
- White artist tape or thin washi tape (optional, for finer lines)
- Chalk pastels or soft pastels in various warm and cool tones
- Cotton swabs or blending stumps
- Pencil
- Scissors (to trim tape ends)
- Paintbrush (soft bristle, for sweeping away dust)
- Fixative spray (optional)
Step 1: Setting the Framework
-
Prepare your canvas:
Start with a clean sheet of heavy black paper. I find cardstock holds up better to the pressure of blending pastels without buckling. -
Draft the heart shape:
Using a pencil, lightly sketch a large heart in the center of your paper. Draw just hard enough so you can see the graphite shine against the black background. -
Outline with tape:
Tear off small pieces of your masking tape to cover your pencil outline. You’ll need to use several shorter strips to navigate the curves of the heart, overlapping them slightly to create a continuous border. -
Create the geometric interior:
Now for the fun part: dividing the space. Place a long strip of tape vertically down the center of the heart, or slightly off-center for a dynamic look. -
Add radiating lines:
Add diagonal strips of tape radiating outward from your center line to the edges of the heart. Think of sunbeams or shattered glass to guide your placement. -
Subdivide the sections:
Look for larger empty spaces within your design and break them up with smaller, intersecting pieces of tape. Aim for a mix of triangles and quadrilaterals to keep the mosaic interesting. -
Secure the edges:
Rub your finger firmly over all the tape lines, especially the edges. This seal is crucial to prevent the fine chalk dust from sneaking underneath and ruining your crisp lines.
Step 2: Adding Color
-
Select your palette:
Choose 4-6 colors of chalk pastels. The example uses warm tones like peach, rust, and mustard yellow, contrasted with cool teal and dark slate blue. -
Fill the first shape:
Pick a shape near the center and color it in heavily with your first pastel stick. Don’t worry about being too neat near the tape lines yet. -
Smudge and blend:
Use your finger or a cotton swab to rub the pastel into the paper. Push the pigment right up to the edges of the tape to ensure full coverage without any black peeking through. -
Vary color placement:
Move to a non-adjacent section and apply the same color. Distributing the colors randomly across the heart creates a balanced, cohesive look. -
Introduce contrast:
Switch to a contrasting color—like the teal blue—and fill in a few scattered shapes. This pop of cool color makes the warm tones stand out more vibrantly. -
Complete the coloring:
Continue filling each empty geometric shape until the entire heart is colored. If you notice any colors looking thin, layer more pastel on top and blend again for opacity. -
Clean up stray dust:
Take your soft paintbrush and very gently sweep inward from the black background toward the heart to remove any loose chalk dust that settled outside your design.
Chalk dust everywhere?
Keep a damp paper towel nearby to wipe your fingers between color switches. This prevents muddy colors and unintentional fingerprints on the black background.
Step 3: The Reveal
-
Begin the peel:
Start peeling the tape off slowly. Pull the tape back upon itself at a 45-degree angle rather than pulling straight up, which helps keep the paper fibers intact. -
Remove interior strips:
Carefully remove the inner geometric strips first. Revealing those crisp black lines between the colors is always the most satisfying part of the process. -
Remove the outline:
Finally, peel away the tape that formed the outer heart shape. Watch as your colorful mosaic emerges sharply against the dark background. -
Touch up edges:
If a little chalk dusted onto the black lines, use a clean polymer eraser or the edge of a dry sponge to gently lift it off. -
Set the work:
If you want to handle the art without smudging, take it outside and give it a light coat of fixative spray or even hairspray.
Pro Tip: Brighter Colors
For ultra-vibrant pastels on black paper, color a layer of white chalk first as a base, then apply your colored pastel on top. It makes the pop!
Now you have a stunning piece of geometric art that looks complex but was surprisingly simple to build.
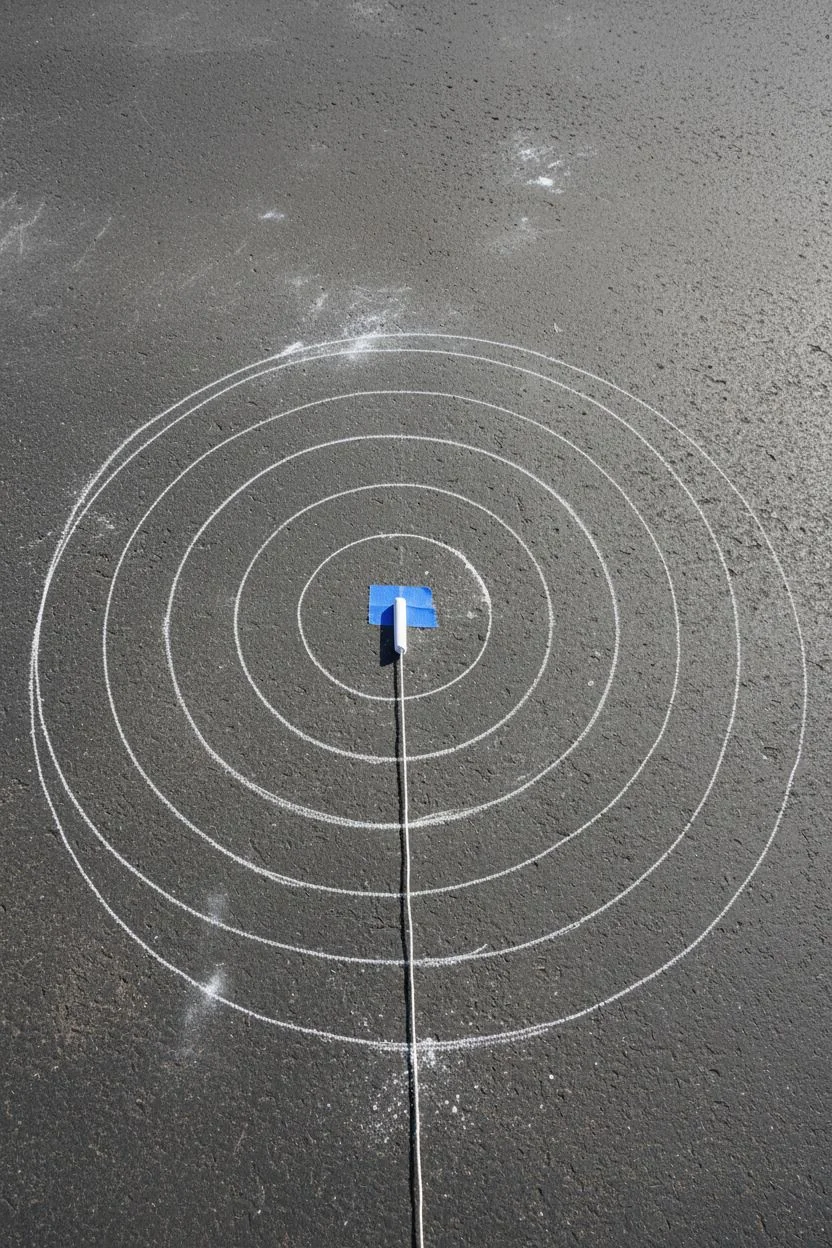
Geometric Mandala Color-In Circle
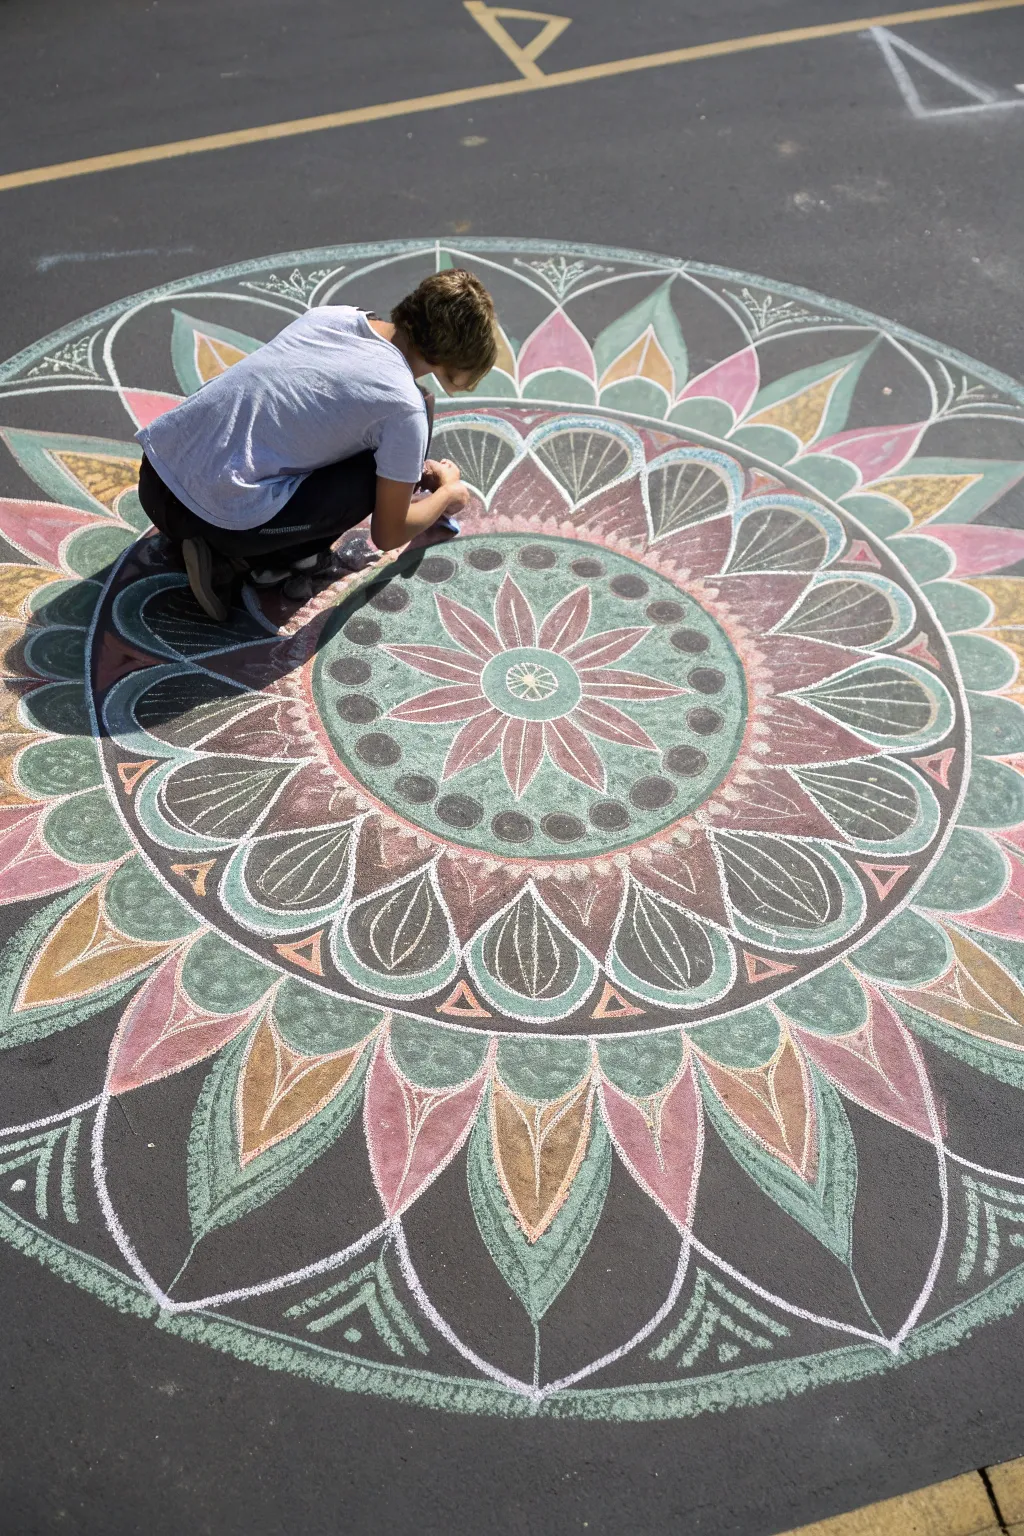
Transform a dull patch of asphalt into a vibrant explosion of symmetry and color with this large-scale geometric mandala. Layers of lotus petals, teardrops, and intricate circles radiate outward, creating a mesmerizing pattern that is as relaxing to draw as it is beautiful to look at.
Detailed Instructions
Materials
- Jumbo sidewalk chalk (assorted colors)
- White sidewalk chalk (plenty of sticks)
- String (approx. 4-5 feet)
- Duct tape or painters tape
- Measuring tape (optional)
- Knee pads (highly recommended for comfort)
- Blending foam or rags
Step 1: Setting the Foundation
-
Find your canvas:
Locate a large, flat, and dry area of asphalt or concrete sweep away any loose pebbles, dirt, or debris to ensure smooth lines. -
Create a compass tool:
Tie a piece of white chalk securely to one end of your string. This makeshift compass is essential for keeping your circles perfectly round as you expand outward. -
Mark the center:
Choose the center point of your mandala. Ask a friend to hold the free end of the string down firmly at this center spot, or tape it down securely with duct tape. -
Draft the concentric circles:
Using your string compass, lightly draw a series of concentric circles in white. Start small (about 1 foot diameter) and work your way out, adding rings every 6–10 inches until you have about 5 or 6 main guideline rings.
Uneven Symmetry?
If your petals look uneven, use a yardstick to lightly mark ‘spokes’ like a wheel from the center out before drawing the petals. This creates guide slots.
Step 2: Core Design
-
Draw the central flower:
In the very center circle, draw a small wheel with spokes. Around this, sketch a ring of eight pointed flower petals extending to the next guideline circle. Fill these petals with a dusty pink chalk. -
Add the green halo:
Color the background space between the central flower and the next ring boundaries with a soothing seafoam or mint green. This pushes the pink flower forward visually. -
Create the polka-dot ring:
In the green band surrounding the flower, add a circle of evenly spaced dark grey or black dots. I find twisting the chalk stick in place creates the most uniform circles.
Step 3: Middle Layers
-
Draft the teardrop layer:
Moving to the next band, execute a row of large, wide teardrop shapes pointed outward. Use bold white lines to define them. -
Detail the teardrops:
Inside each large teardrop, draw a simple vertical line vein. Color the background of this band with a brownish-burgundy tone to create deep contrast against the white lines. -
Fill the teardrops:
Color half of the teardrop interiors with a dark slate grey, leaving the outline crisp white so the pattern pops. -
Add triangular spacers:
In the negative spaces between the tips of the teardrops, draw small, inverted triangles. Color these with light orange or peach.
Vibrant Colors
To make colors pop on dark asphalt, dip your chalk in water for 10 seconds before drawing. It applies like paint and dries intensely bright.
Step 4: Outer Expansion
-
Draw the large lotus petals:
For the largest ring, draw massive, sweeping petal shapes that extend to your outermost guideline. These should align with the layers below to maintain symmetry. -
Color the outer petals:
Alternate colors for these large petals to create rhythm. Use dusty pink for one set and a soft yellow-orange for the next. This alternating pattern adds visual interest. -
Layer the green leaves:
Between the large colorful petals, add pointed green leaf shapes. Use a hatching motion with your green chalk to get good coverage on the rough asphalt. -
Define the borders:
Go back over the main outlines of your outer petals with fresh white chalk to clean up any messy edges where colors might have blurred.
Step 5: Final Flourishes
-
Add the final decorative rim:
Draw the final, largest circle guideline. Inside this rim, sketch a decorative pattern of zig-zags or small leaf visuals using white chalk on the dark pavement background. -
Blend for smoothness:
Using a blending foam or a dry rag, gently rub the larger colored areas (like the pink and green sections) to push the chalk dust into the pavement pores for a smoother, painted look. -
Reinforce the white lines:
Blending often dulls your crisp lines, so do one final pass with your white chalk over all the major structural lines to make the design truly sing.
Step back and admire your massive, meditative creation before the rain washes it away for a fresh start
Roadway Town for Toy Cars

Transform a simple black surface into a bustling metropolis for toy cars with this engaging chalkboard art project. Using crisp white lines and touches of color, you’ll create a durable and endlessly customizable roadway system that sparks imaginative play.
Step-by-Step Tutorial
Materials
- Large black chalkboard surface (painted table, large board, or chalkboard floor mat)
- White stick chalk (standard)
- White chalk marker (optional, for finer details)
- Colored artist pastels or colored chalk (peach/beige, light blue, soft green, orange)
- Ruler or straight edge
- Damp cloth (for corrections)
- Toy car (for scale reference)
Step 1: Planning the Layout
-
Establish the main artery:
Begin by drawing two parallel white lines diagonally across your surface to create the main highway. Keep the width consistent—I usually use the toy car itself as a spacer to ensure the lanes are wide enough for play. -
Define the curves:
Branch off from your main highway with large, sweeping curves. Create a smooth U-turn loop on one side and a gentle S-curve on the other to maximize driving fun. -
Add lane markings:
Down the center of your roads, draw dashed lines to separate traffic lanes. Keep the dashes short and evenly spaced. For the road edges, go over your initial lines to make them bold and solid.
Smudge Control
Work from the top left to bottom right (if right-handed) to avoid smearing your work. Use hairspray as a fixative if you want the drawing to last longer.
Step 2: Building the Neighborhood
-
Outline the houses:
In the empty spaces between roads, sketch simple geometric house shapes. Try a tall rectangular apartment building on the left and smaller, cozy cottages with pitched roofs on the other side. -
Color the walls:
Using the broad side of a peach or beige piece of chalk, gently fill in the walls of the buildings. Don’t press too hard; a soft, dusty texture looks charming here. -
Add windows:
Take a piece of white chalk or a chalk marker and draw grids of squares over the colored walls to represent windows. Clean lines help these pop against the colored background. -
Detail the roofs:
Sketch roofs using simple triangles. Fill them with a hatch pattern or a scalloped design to mimic shingles.
Interactive Upgrade
Draw distinct destinations like a gas station, school, or store. Label them with simple icons so kids can create specific delivery missions.
Step 3: Adding Nature & Details
-
Plant the forest:
Draw stylized evergreen trees in clusters. Start with a vertical line for the trunk, then add downward-sweeping branches on either side. Use a soft green chalk for these to add a subtle pop of color. -
Create special zones:
Designate specific areas like a parking lot or a bus stop with simple rectangular outlines. You can fill one rectangle with a peachy-orange tone to suggest a specific building or zone. -
Draw secondary paths:
Add smaller dashed trails or pedestrian paths that wind through the empty spaces, connecting the houses to the main roads. -
Final clean-up:
Use a slightly damp cloth to wipe away any smudge marks or chalk dust that strayed outside your intended lines, keeping the black ‘asphalt’ looking clean.
Now your little drivers have a custom world to explore, ready for gridlock and adventures alike
“The Ground Is Lava” Rock-Hop Course
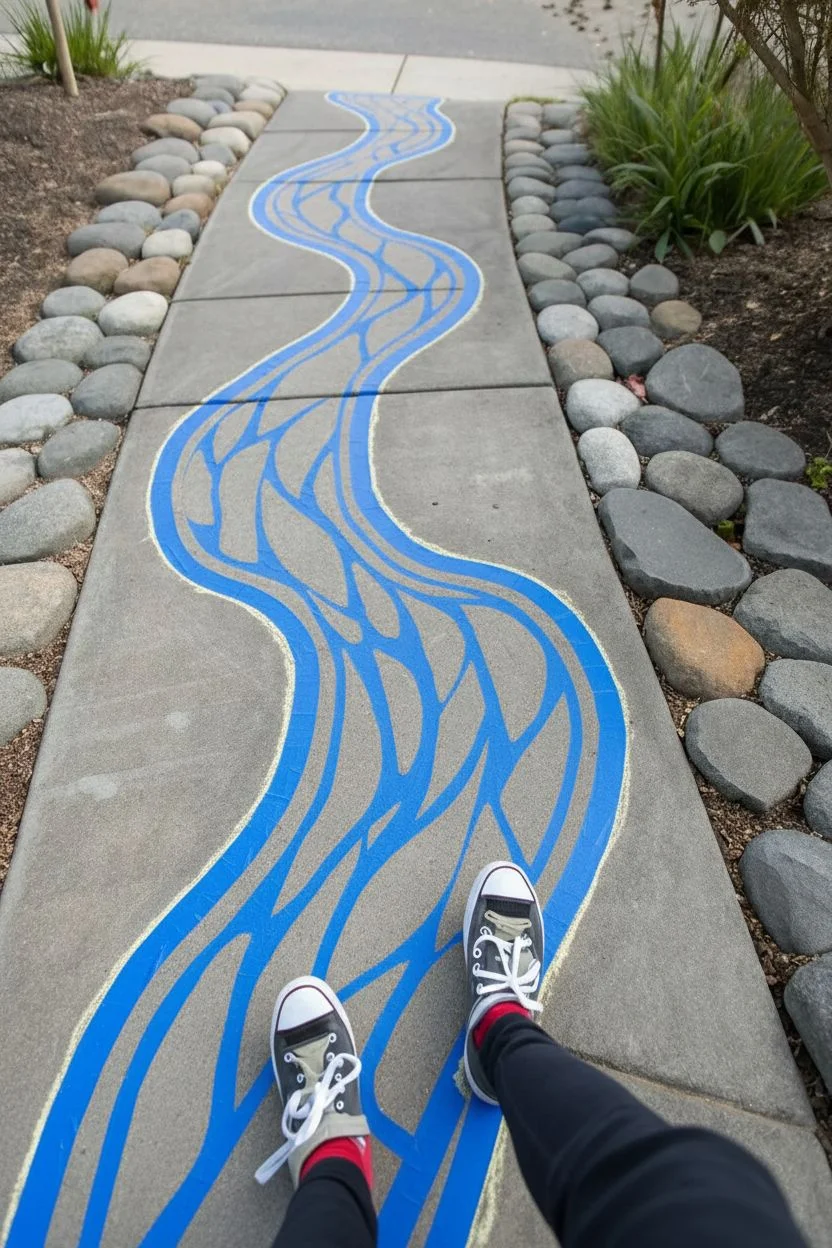
Transform a plain concrete walkway into a thrilling molten river that winds its way to the front door. This design uses vibrant reds and oranges separated by clever negative space to create a visually striking flow that looks hot to the touch.
Step-by-Step Guide
Materials
- Thick sidewalk chalk (Red, Orange, Yellow)
- Painter’s tape or masking tape (approx 1 inch width)
- Broom or leaf blower
- Water spray bottle (optional)
- Blending sponge or old rag (optional)
Step 1: Preparation & Outline
-
Clean the canvas:
Start by thoroughly sweeping the concrete walkway. Dirt and pebbles will ruin your clean lines, so I like to give it a really good sweep or even use a leaf blower to get the surface as dust-free as possible. -
Establish the flow:
Visualize a winding ‘S’ curve that snakes up the path. Using a stick of light-colored chalk (like yellow), lightly sketch the outer boundaries of your lava river. Keep the curves sweeping and organic rather than sharp. -
Tape the separation lines:
This is the secret to the professional look. Instead of drawing lines, you’ll block them out. lay down strips of painter’s tape to act as the ‘veins’ of the lava. -
Create the current:
Place long strips of tape running lengthwise down the middle of your river, following the curve. Don’t make them perfectly straight or parallel; let them branch off and rejoin like flowing liquid. -
Press it down:
Walk over your tape lines or press them firmly with your specific shoe to ensure the edges seal against the concrete texture. This prevents chalk dust from sneaking underneath.
Chalk Not Sticking?
If the concrete is too smooth, dip the tip of your chalk in water for 15 seconds before drawing. This creates a creamy paste that adheres better to slick surfaces.
Step 2: Color Application
-
Start with the edges:
Begin coloring the outermost sections of the river design with your deepest red chalk. Apply heavy pressure to get maximum pigment saturation right up against the tape and the walkway edges. -
Move to the middle:
Switch to bright orange for the mid-sections of the flow. Color in the areas between your tape lines, leaving the very center of the river empty for now. -
Highlight the core:
Fill the innermost sections or ‘hottest’ parts of the lava stream with bright yellow chalk. This gradient from red to yellow mimics the intense heat of molten rock. -
Blend the transitions:
Where the red meets orange, or orange meets yellow, smudge the colors together slightly with your fingers or a sponge to create a natural gradient rather than harsh stripes.
Make it Sparkle
While the chalk is still fresh (especially if you used the wet technique), sprinkle biodegradable glitter over the yellow sections to make the ‘heat’ shimmer in the sun.
Step 3: Texture & Finish
-
Add surface texture:
To get that gritty, rushing lava look, scumble a perpendicular layer of chalk over your base colors. For example, add light dashes of red over the orange areas. -
Intensify the pigment:
If the colors look too dusty or pale, lightly mist the chalk with water and go over it again. Wet chalk creates a paint-like slurry that dries incredibly bright. -
The reveal:
Once you are happy with the color saturation, carefully peel up your painter’s tape. Pull slowly at a 45-degree angle to keep the concrete lines crisp and clean. -
Clean up the edges:
If any chalk dusted over into the negative space lines where the tape was, use a damp cloth or Q-tip to wipe the gray concrete clean again. -
Final dust off:
Gently blow away any loose chalk dust sitting on top of the design so it doesn’t track everywhere immediately.
Step back and enjoy challenging your friends to hop across the stones without touching the lava
Obstacle Course Path With Mini Challenges
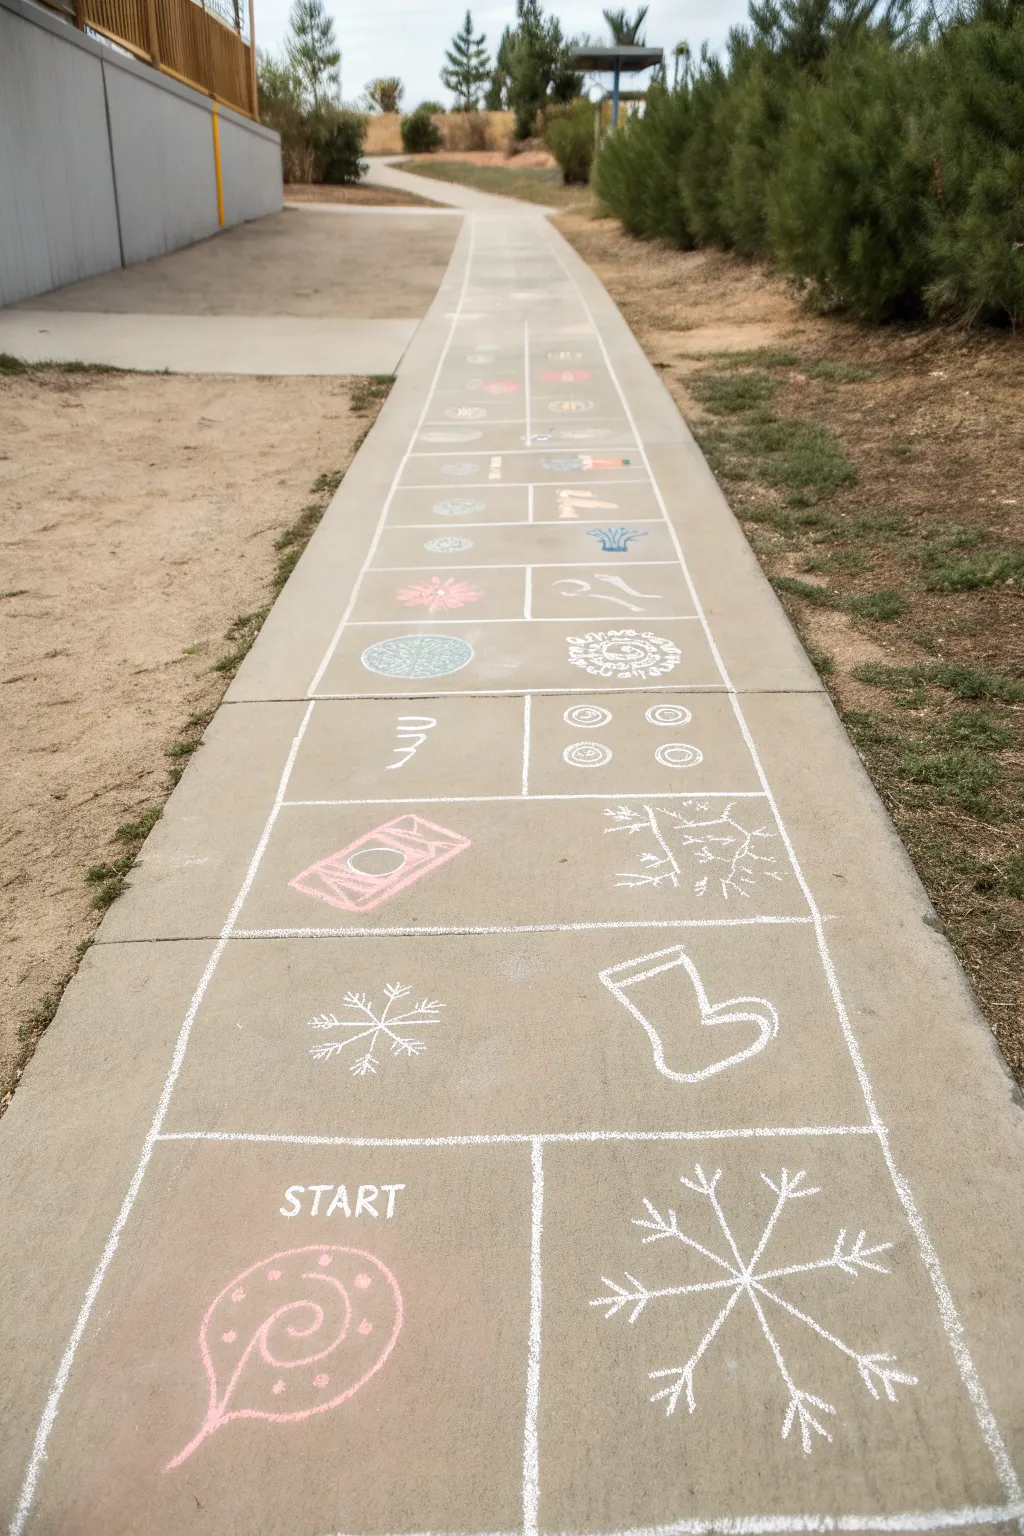
Transform a long stretch of sidewalk into an engaging winter-themed journey with this expansive chalk obstacle course. Featuring seasonal motifs like snowflakes, stockings, and swirls, this playful path encourages kids to jump, hop, and interact with the art.
Step-by-Step
Materials
- Sidewalk chalk (white and assorted pastel colors)
- Painter’s tape or masking tape (optional, for straight lines)
- Measuring tape (optional)
- A broom or leaf blower (to clear the surface)
- Knee pads (highly recommended for comfort)
Step 1: Preparation & Grid Layout
-
Clear your canvas:
Before you begin, use a broom or leaf blower to sweep away any dirt, pebbles, or leaves from your chosen sidewalk path. A clean surface ensures your chalk lines stick better and last longer. -
Establish the centerline:
Draw a long, continuous white vertical line down the center of your sidewalk path to split it into two lanes. If you want perfectly straight lines, you can snap a chalk line or lay down painter’s tape first, but freehand adds a charming, handmade feel. -
Create the exterior borders:
Draw two long vertical lines running parallel to your center line on the outer edges of the path to define the play area boundaries. -
Mark horizontal dividers:
Starting at the bottom (closest to you), draw horizontal lines across the width of the path every 2 to 3 feet. This creates a grid of large rectangular boxes for your obstacles.
Chalk Brightness Trick
Dip your chalk stick into water for just a moment before drawing. Wet chalk goes on much smoother and dries significantly brighter and more opaque than dry chalk.
Step 2: Drawing the Start Zone
-
Label the beginning:
In the bottom-left square, write the word ‘START’ clearly in capital letters using white chalk. -
Draw the lollipop swirl:
Below the ‘START’ text, draw a large pink spiral. Start from the center and spiral outward. Close the shape into a blob and add a small stick at the bottom to create a candy or lollipop shape. -
Decorate the lollipop:
Add small white dots or embellishments inside the pink shape for texture. -
Add a giant snowflake:
In the bottom-right square (opposite the Start), begin a large white snowflake. Draw a vertical line, a horizontal line, and two diagonal lines intersecting at the center. -
Detail the snowflake fins:
On each arm of the snowflake star, draw small ‘V’ shapes facing outward to create the feathery ice crystal look.
Action Prompts
Add text instructions next to shapes to guide the play! Write ‘Spin’ near spirals, ‘Balance’ on straight lines, or ‘Frog Hop’ near the lilypad-style circles.
Step 3: Filling the Middle Obstacles
-
Draw the snowflake hop:
In the next square up on the left, draw a medium-sized white snowflake. Keep this one simpler than the giant one—just intersecting lines with small tips. -
Sketch the holiday stocking:
In the square to the right of the medium snowflake, outline a large stocking shape using thick white lines. Make sure the opening at the top is wide and the toe is rounded. -
Add the present box:
Moving up to the next left square, draw a pink rectangle tilted diagonally. Draw a circle in the center to represent a simplified bow or ornament. -
Create tree branches:
In the square to the right of the present, draw abstract white lines resembling pine branches or frost patterns. Use jagged strokes to mimic needles. -
Draw the squiggle jump:
In the next left square up, draw a vertical white wiggly line or a spiral spring shape. This indicates a turning jump motion. -
Map out the target circles:
In the adjacent right square, draw four small circles arranged in a square formation. Draw concentric circles inside them to make them look like targets for precision hopping.
Step 4: Completing the Path
-
Design the textured circles:
Continue up the path. In the next left box, draw a large blue circle and fill it with a crosshatch pattern. In the right box, draw a white circle filled with a swirling spiral pattern. -
Fill the remaining upper grid:
Fill the distant squares with simpler shapes as the perspective narrows. Use quick motifs like small flowers, simple squiggles for ‘balance beams’, or small triangles. -
Thicken the main grid lines:
Go back over your main vertical and horizontal grid lines with a heavy layer of white chalk. This high contrast makes the course easy to see while running. -
Clean up edges:
If any chalk dust has smudged outside your boxes, use a little water or a damp rag to wipe the edges clean for a sharp finish.
Step back and admire your lengthy masterpiece before inviting the neighborhood kids to test their agility
Nature Scavenger Hunt Checklist in Chalk
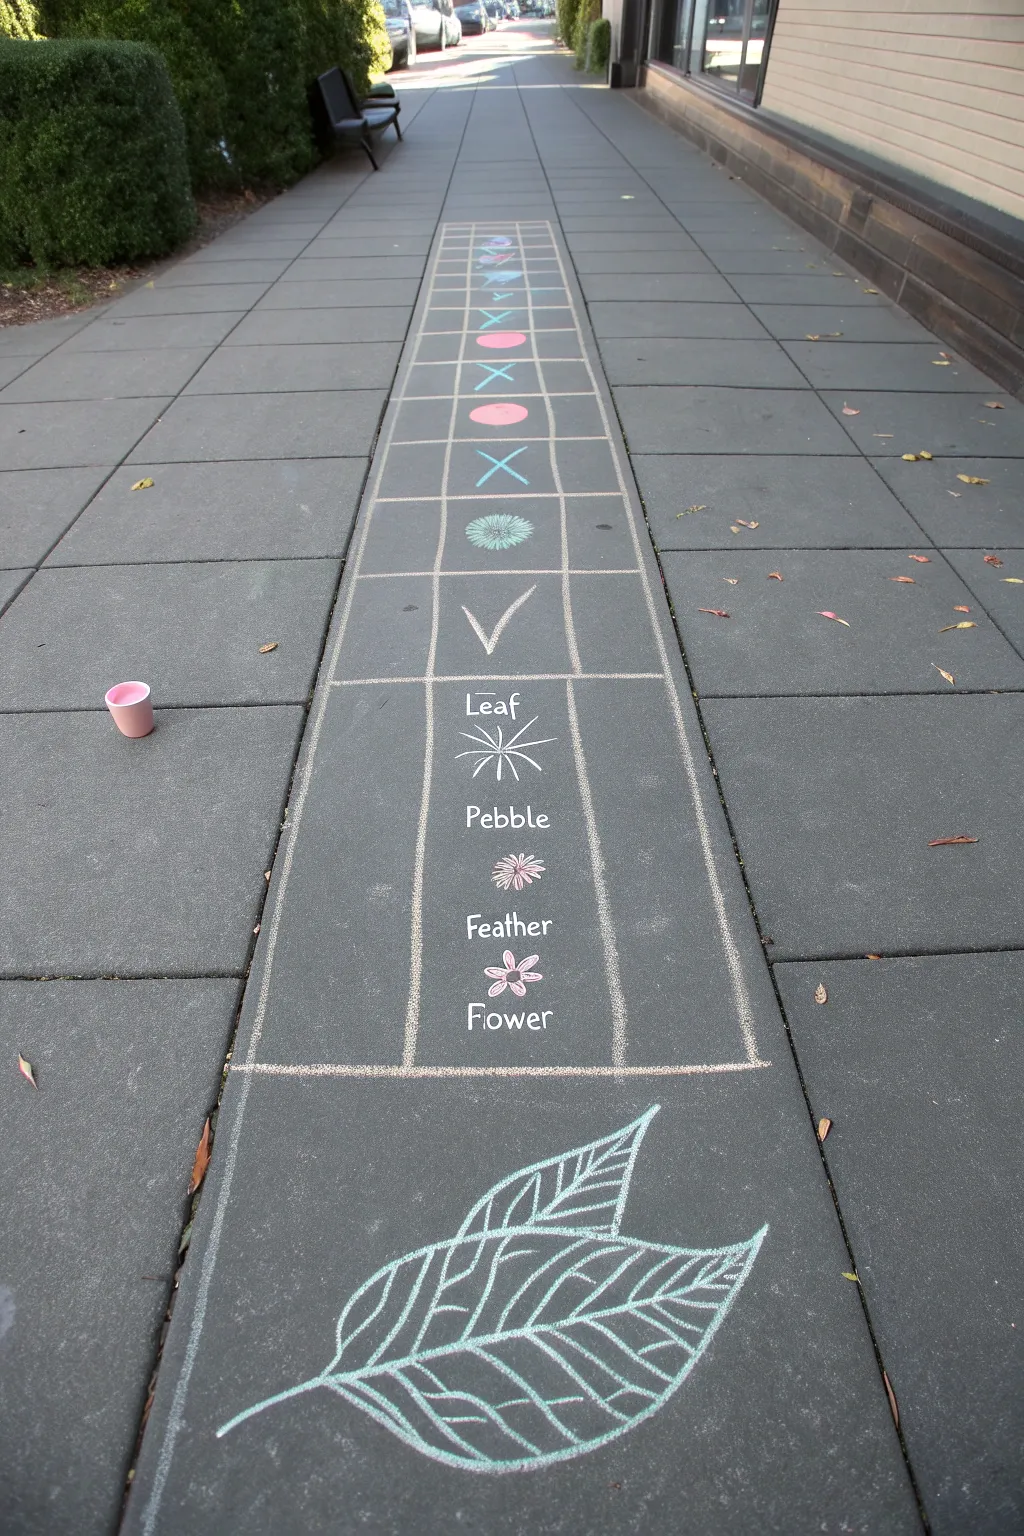
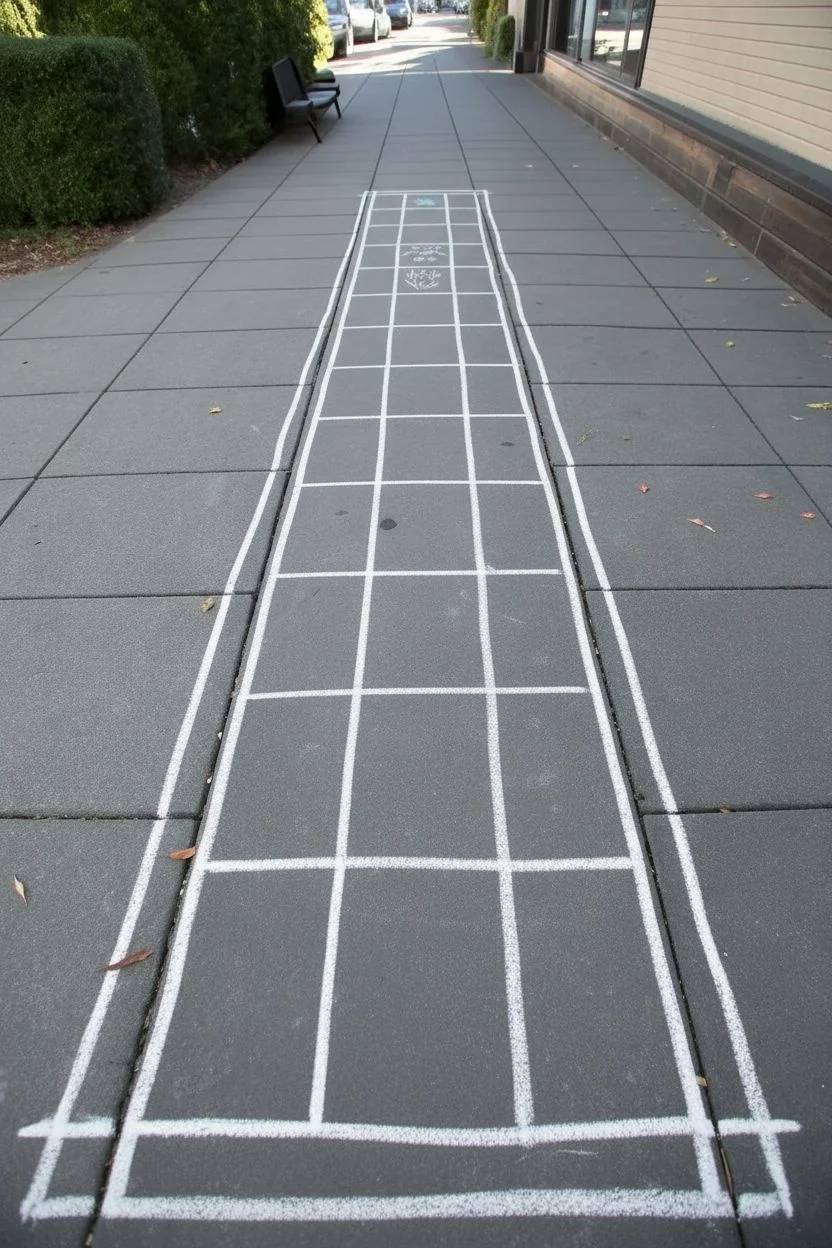
Transform a boring stretch of pavement into an interactive nature walk with this structured scavenger hunt grid. Featuring clear checkboxes and delightful illustrations, this layout encourages little explorers to find specific natural treasures like leaves, pebbles, and feathers along their path.
Step-by-Step Guide
Materials
- White sidewalk chalk (jumbo stick)
- Colored sidewalk chalk (pastels: pink, blue, green)
- Long straight edge (yardstick, board, or tape measure)
- Knee pads or gardening mat (optional for comfort)
- Pavement or driveway surface
Step 1: Setting the Grid
-
Scout the location:
Find a long, straight section of sidewalk or driveway. You’ll need about 10-15 feet of length to comfortably fit the entire trail without cramping the squares. -
Draw the main vertical lines:
Using your white chalk and a straight edge (or just a steady hand following the pavement seam), draw two long parallel lines approximately 2.5 feet apart. This forms the outer boundary of your game board. -
Create the center divider:
Draw a third vertical line right down the center of your path, splitting the long column into two equal lanes. -
Mark the horizontal rows:
Starting from the top, draw horizontal lines across the entire width every 12-18 inches. This creates the individual grid boxes for each item on the list. -
Cap the ends:
Draw firm horizontal lines at the very top and bottom to close off your grid. I like to double-stroke these lines to give the game a definitive start and finish point.
Uneven Pavement?
If your sidewalk is rough, wrap masking tape around your chalk stick, leaving only the tip exposed. This prevents the chalk from snapping when it hits bumps.
Step 2: Adding the Checklist Text
-
Write the first item:
Move to the bottom section of your grid (closest to where the child will start). In the center of the lane, write ‘Flower’ clearly in white block letters. -
Add the second item:
Move up one box and write ‘Feather’ in the same clear, readable style. -
Continue the list:
In the next box up, write ‘Pebble’. Keep your lettering size consistent so it’s easy for kids to read fro a standing position. -
Finish the text items:
In the fourth box up, write ‘Leaf’. You can continue adding items if you made your grid longer, or leave blank spaces for generic finds.
Grid Symmetry
Use a broom to mark your center line before drawing. Lay the broom handle flat and trace along it, moving it up to create a perfectly straight guide.
Step 3: Drawing the Illustrations
-
Draw the flower icon:
Directly above the word ‘Flower’, draw a simple five-petal daisy shape using pink chalk for the petals and a yellow or white center. -
Illustrate the feather:
Above the word ‘Feather’, sketch a simple pink quill shape. Draw a central spine and add short, angled strokes outward to mimic the texture of a feather. -
Sketch the pebble:
For the ‘Pebble’ square, use white chalk to draw a starburst or ‘sparkle’ shape. Since pebbles vary so much, an abstract shiny shape works well here to represent a special stone. -
Draw the leaf icon:
Above the word ‘Leaf’, draw a simple white checkmark or a basic leaf outline. -
Add a large decorative leaf:
Below the very start of your grid, draw a large, artistic leaf in green or blue chalk. Start with a curved central vein, then add the outline and detailed smaller veins branching out.
Step 4: Marking the Trail
-
Fill the upper squares:
Moving up the grid past your text, start alternating symbols in the blank squares. Draw a light blue ‘X’ in one square. -
Add solid circles:
In the square above the X, draw a solid pink circle. Fill it in completely for a pop of color. -
Continue the pattern:
Keep moving up the grid, alternating between blue X marks and pink circles until you reach the very top. This creates a playful path leading to the checklist. -
Review and refine:
Stand up and walk the length of your drawing. Retrace any lines that look faint and brush away distinct chalk dust piles so they don’t smear when stepped on. -
Set out the chalk cup:
Place a small cup of colored chalk near the start. This allows the scavenger hunt participants to tick off the items or color in the squares as they find their treasures.
Now you have a colorful, interactive path ready for neighborhood explorers to enjoy
Target Rings for Toss-and-Score Fun
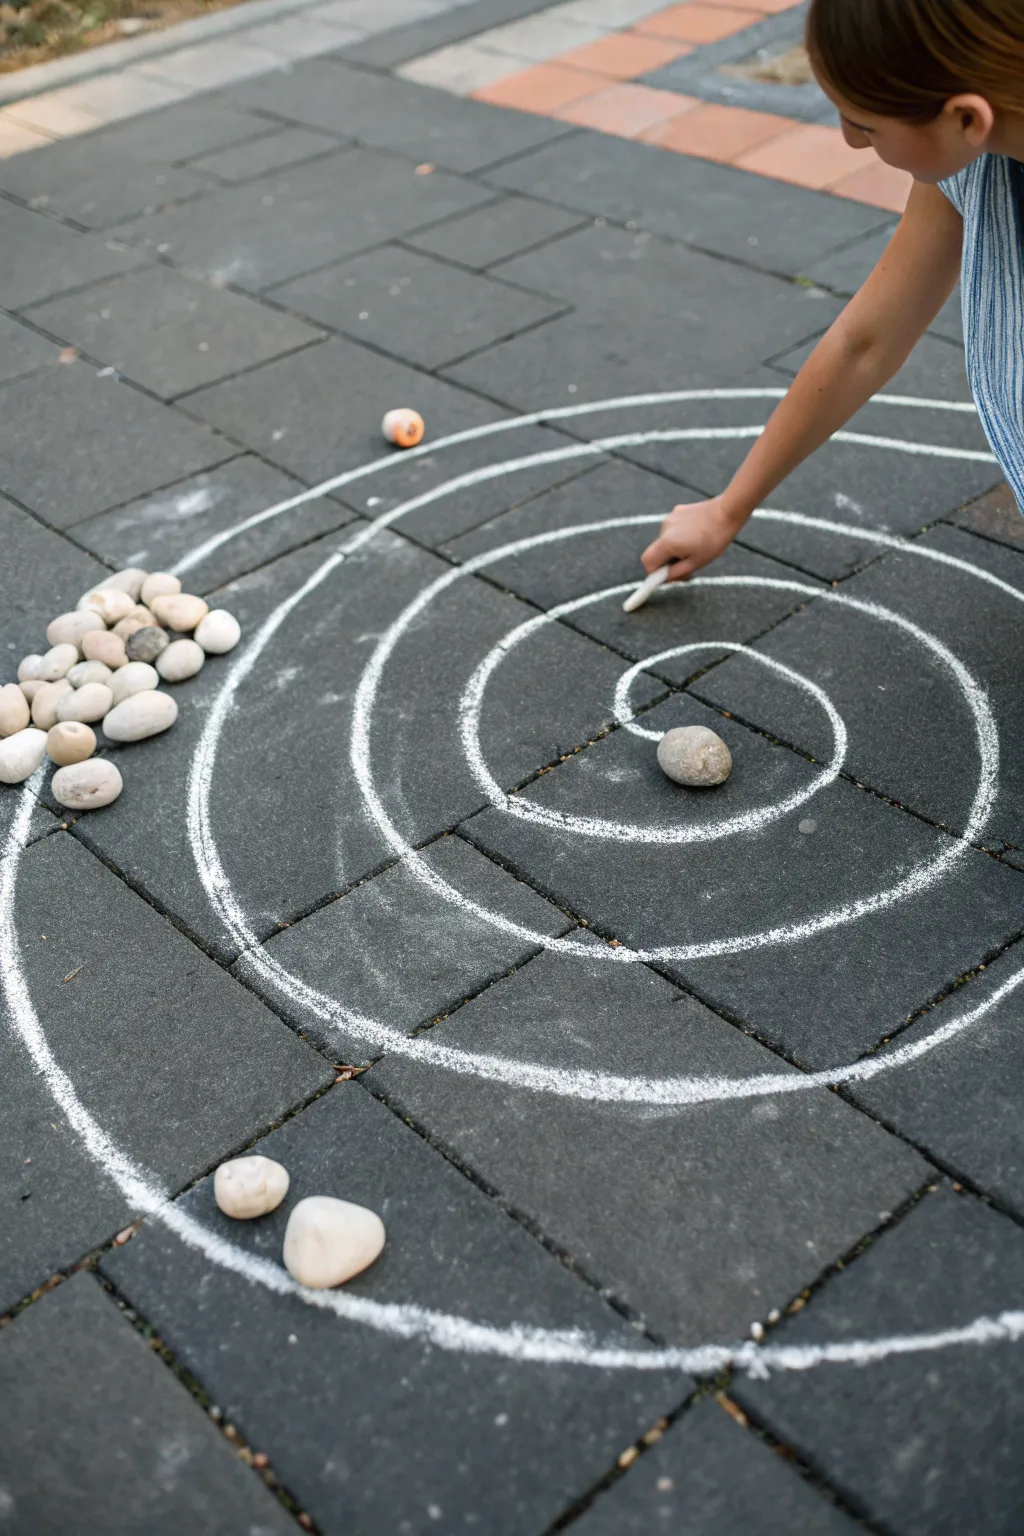
Turn your patio into an instant game zone with this classic spiral target board. Using simple chalk lines and smooth river stones, create a naturally inspired toss game that blends beautifully with outdoor pavers.
Detailed Instructions
Materials
- Jumbo white sidewalk chalk
- Paved surface (concrete, brick, or stone)
- Small pile of smooth river stones or pebbles (15-20)
- One distinct ‘marker’ stone (optional)
- Access to water (for cleanup)
Step 1: Setting up the Canvas
-
Choose your space:
Find a flat area of pavement that is at least 4 feet by 4 feet. Darker pavers work wonderfully for contrast, but standard concrete is fine too. -
Surface prep:
Quickly sweep away any loose dirt, leaves, or twigs so your chalk lines will be smooth and unbroken. -
Gather your pieces:
Collect a handful of smooth, palm-sized stones. Having them nearby helps you gauge the scale of the rings you are about to draw.
Chalk Grip Tip
Hold the chalk like a crayon but closer to the tip. This gives you better control over curves than holding it loosely at the end.
Step 2: Drawing the Spiral
-
Mark the center:
Identify the exact center point where you want your target to be. You can place a small dot tailored to be the ‘bullseye’ here. -
Start the inner curve:
Place your chalk tip on the center mark and begin drawing a tight, curved line moving outward. -
Check the spacing:
As you complete the first small loop, check the width. The lane should be just wide enough for one of your stones to sit comfortably inside without touching the lines. -
Continue the motion:
Keep the chalk moving in a continuous circular motion, gradually widening the spiral as you go. -
Maintain consistency:
Try to keep the distance between the lines relatively even. I find that moving your whole body around the circle, rather than just your arm, helps keep the curves smooth. -
Manage the chalk pressure:
Press down firmly. You want a thick, opaque white line that stands out clearly against the grey stone. -
Rotate the chalk:
If the tip gets flat, rotate the chalk stick slightly to use a sharper edge for crisp lines. -
Expand outward:
Continue spiraling outward until you have about 4 or 5 complete rings. The game becomes more challenging with more rings. -
Finish the edge:
Once the spiral is large enough (usually about 3-4 feet in diameter), let the outside line fade out naturally or connect it to the outer circle boundary.
Step 3: Final Touches & Play Setup
-
Review the lines:
Stand back and look for any faint spots. Go over them a second time to ensure high visibility. -
Place the bullseye:
Take one special rock or object and place it dead center in the smallest inner coil to mark the high-score zone. -
Create a throw line:
Draw a straight horizontal line about 4-6 feet away from the spiral. This will be where players stand to toss. -
Stock the arsenal:
Pile up your throwing stones near the standing line, ready for the first player.
Score Values
Make it competitive: Label each ring with a point value! Write ’10’ in the center, ‘5’ in the middle rings, and ‘1’ on the outer edge.
Now you are ready to test your aim and enjoy a simple game in the fresh air


Have a question or want to share your own experience? I'd love to hear from you in the comments below!