If you’re itching to paint something sweet and seasonal, an Easter Bunny is basically the perfect excuse to play with soft color, fluffy textures, and a little whimsy. I pulled together a mix of classic favorites and fresh twists so you can find an idea that matches your style (and your current energy level).
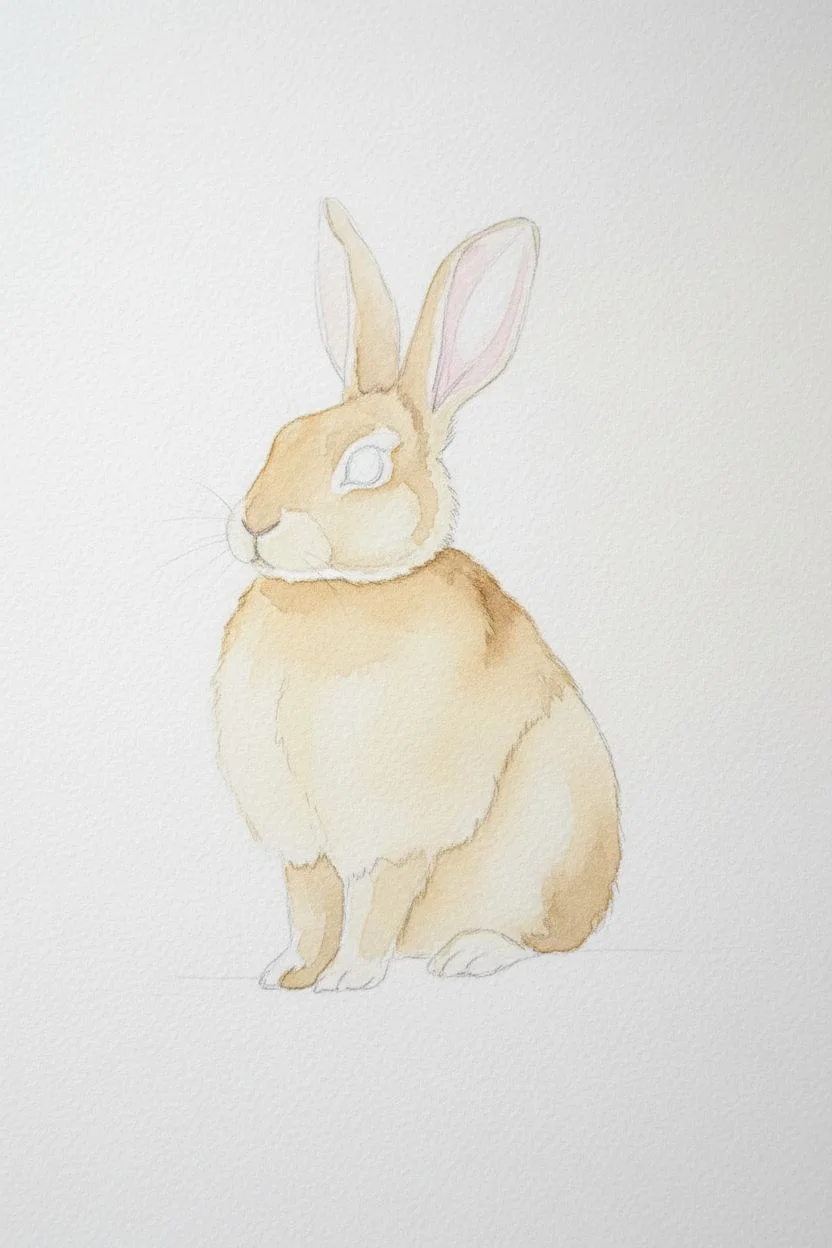
Easter Bunny From Behind With a Fluffy Cottontail
Capture the stillness of spring with this delicate watercolor painting of a rabbit gazing upward. The soft, textured fur and fluffy white tail make this piece a charming addition to your seasonal decor or a lovely handmade Easter card.
Detailed Instructions
Materials
- Cold press watercolor paper (300 gsm)
- Watercolor paints (Burnt Umber, Yellow Ochre, Lamp Black, Sap Green, Alizarin Crimson)
- Small round detail brush (size 0 or 1)
- Medium round brush (size 4 or 6)
- Pencil (HB or H) for sketching
- Kneaded eraser
- White gouache or white gel pen
- Jar of water
- Paper towels
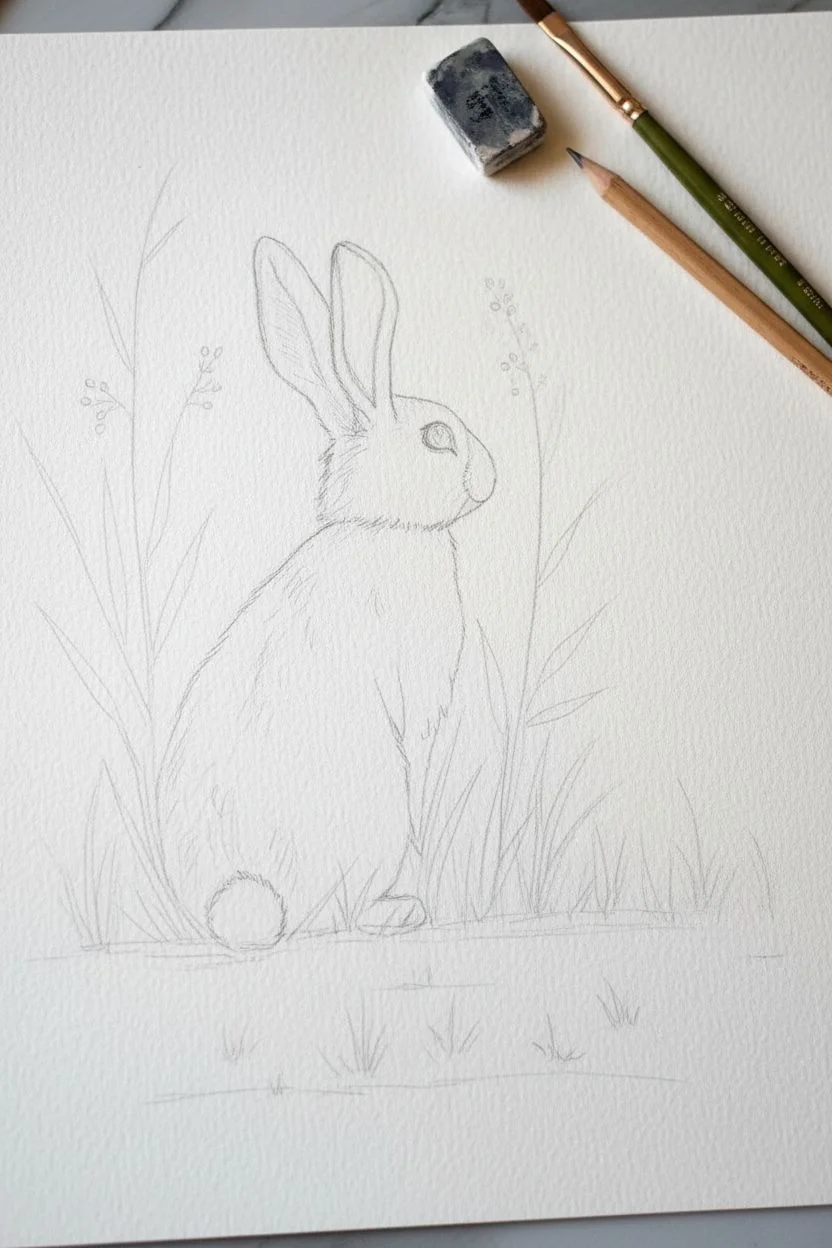
Step 1: Sketching the Composition
-
Outline the rabbit:
Start with a light pencil sketch. Draw a large oval for the body and a smaller circle for the head, connecting them with a sloping neck line. Position the rabbit slightly to the left to leave negative space. -
Add key features:
Sketch the long ears pointing backward and upward. Mark the position of the large eye, the nose, and the small, round tail at the base of the body. -
Draw the environment:
Lightly sketch tall, sweeping blades of grass surrounding the rabbit. Add a few seed heads or wheat-like stalks rising above the bunny’s head to frame the subject. -
Clean up lines:
Use your kneaded eraser to gently lift the darkest graphite marks. You want a faint ghost image that won’t show through the transparent watercolor layers.
Step 2: Painting the Rabbit
-
Base wash:
Mix a very dilute wash of Yellow Ochre and a touch of Burnt Umber. Apply this wet-on-dry to the rabbit’s body, avoiding the tail and the white chest area to keep them bright. -
Pink inner ear:
While the body dries, mix a watery Alizarin Crimson with a tiny bit of brown. Paint the inside of the ear, letting the color fade as it reaches the outer fur edge. -
Adding fur texture:
Switch to your small detail brush. Using a mix of Burnt Umber and Lamp Black, start painting short, directional strokes that follow the curve of the body. Keep the strokes separate to mimic individual hairs. -
Darkening the coat:
Layer darker brown strokes on the rabbit’s back and the back of the ears. Leave the belly and chest area lighter to give the rabbit roundness and dimension. -
The eye details:
Carefully paint the eye with Lamp Black, leaving a tiny spot of white paper for the highlight. Add a thin ring of lighter brown around the eye for realism. -
Whisker details:
With the very tip of your smallest brush and a dark grey mix, pull quick, confident lines outward from the nose to create fine whiskers. -
The fluffy tail:
Using a nearly dry brush with faint grey paint, dab specifically around the edges of the tail to suggest fluffiness without filling in the bright white center.
Fur Texture Tip
Don’t overwork the fur. Let the first layers dry completely before adding darker hairs on top. This prevents the colors from muddying and keeps the texture crisp.
Step 3: Creating the Meadow
-
Base grass layer:
Mix Sap Green with a little Yellow Ochre. Paint the ground beneath the rabbit with loose, horizontal strokes to establish the earth. -
Painting tall blades:
Load your medium brush with watery green. Paint long, sweeping upward strokes for the tall grass blades. Allow some to cross over each other for a natural look. -
Adding seed heads:
Dip into a reddish-brown mix. Dot small clusters at the tips of the tallest grass stems to create the delicate seed heads shown in the reference. -
Deepening the foreground:
Mix a darker green using Sap Green and a touch of Burnt Umber or Black. Paint shorter, sharper blades of grass directly around the rabbit’s paws and base to ground the figure. -
Final highlights:
Once completely dry, use white gouache or a white gel pen to add tiny bright hairs on the tail and chest, or to reclaim a lost highlight in the eye.
Decorated Eggs
Use your extra paper to paint matching egg cutouts. Paint patterns with geometry or leaves, cut them out, and glue them onto the main piece for a 3D effect.
Now you have a serene little bunny to celebrate the season on your wall or mantle


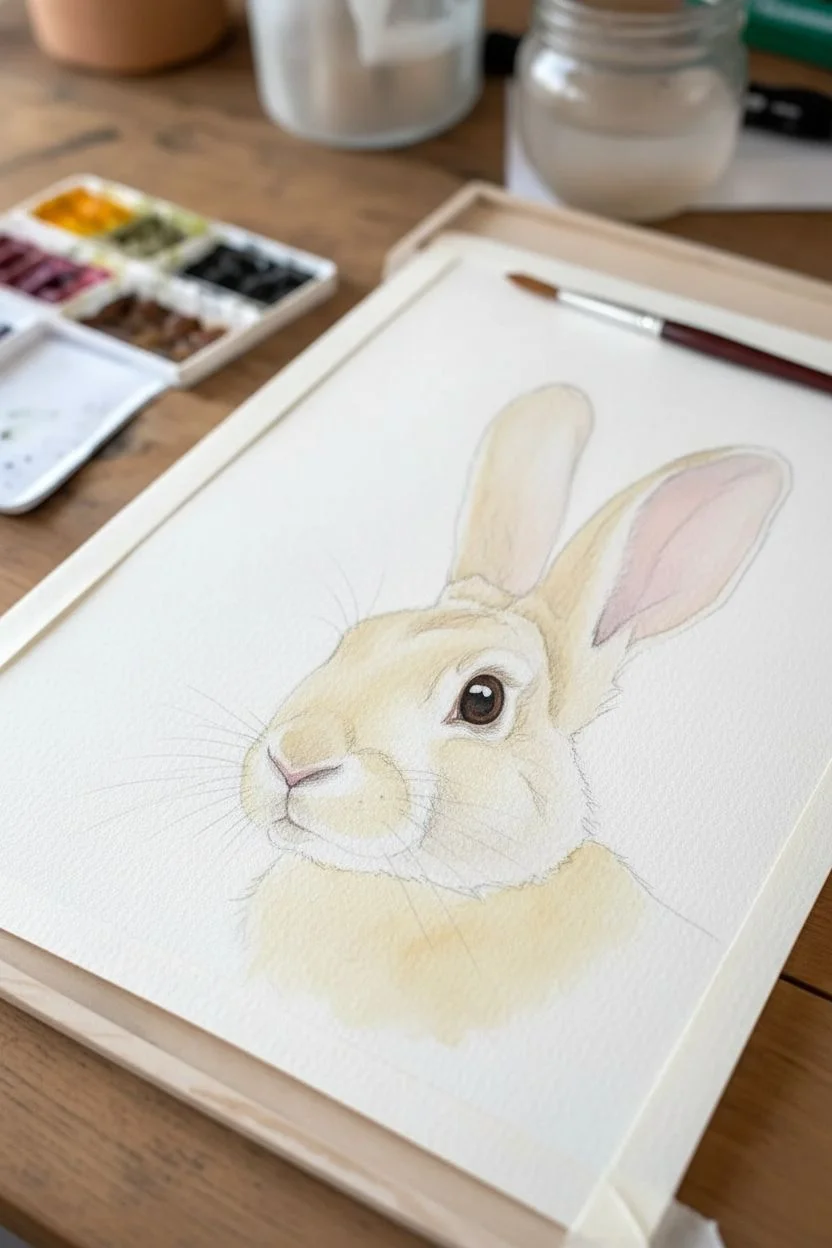
Peeking Easter Bunny Over the Canvas Edge
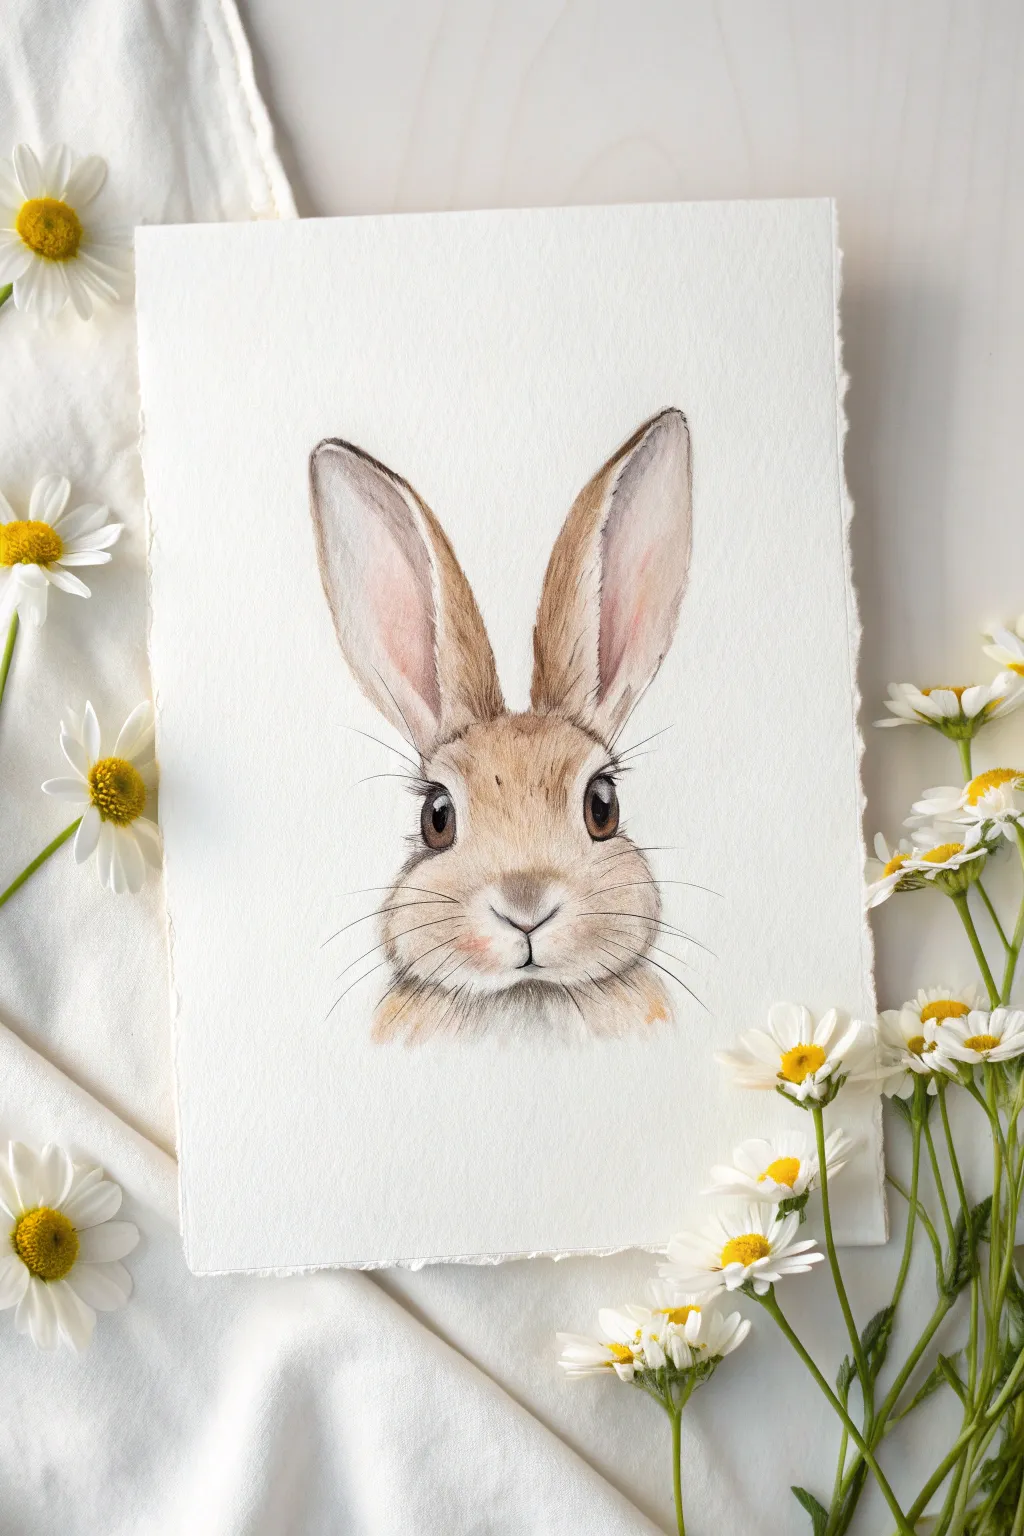
Capture the soft, innocent gaze of an Easter bunny with this delicate watercolor and pencil portrait. The artwork features warm brown tones and fine details on high-quality deckled edge paper, creating a timeless and elegant piece perfect for spring decor.
Step-by-Step Guide
Materials
- Heavyweight watercolor paper (300gsm, cold press with deckled edges)
- Watercolor paints (Burnt Sienna, Yellow Ochre, Burnt Umber, Alizarin Crimson, Lamp Black)
- Round watercolor brushes (sizes 2, 4, and 00 for details)
- Graphite pencil (HB or H) for sketching
- Kneaded eraser
- Fine liner pen (brown or sepia, 0.1mm)
- White gouache or white gel pen
- Paper towel and water cup
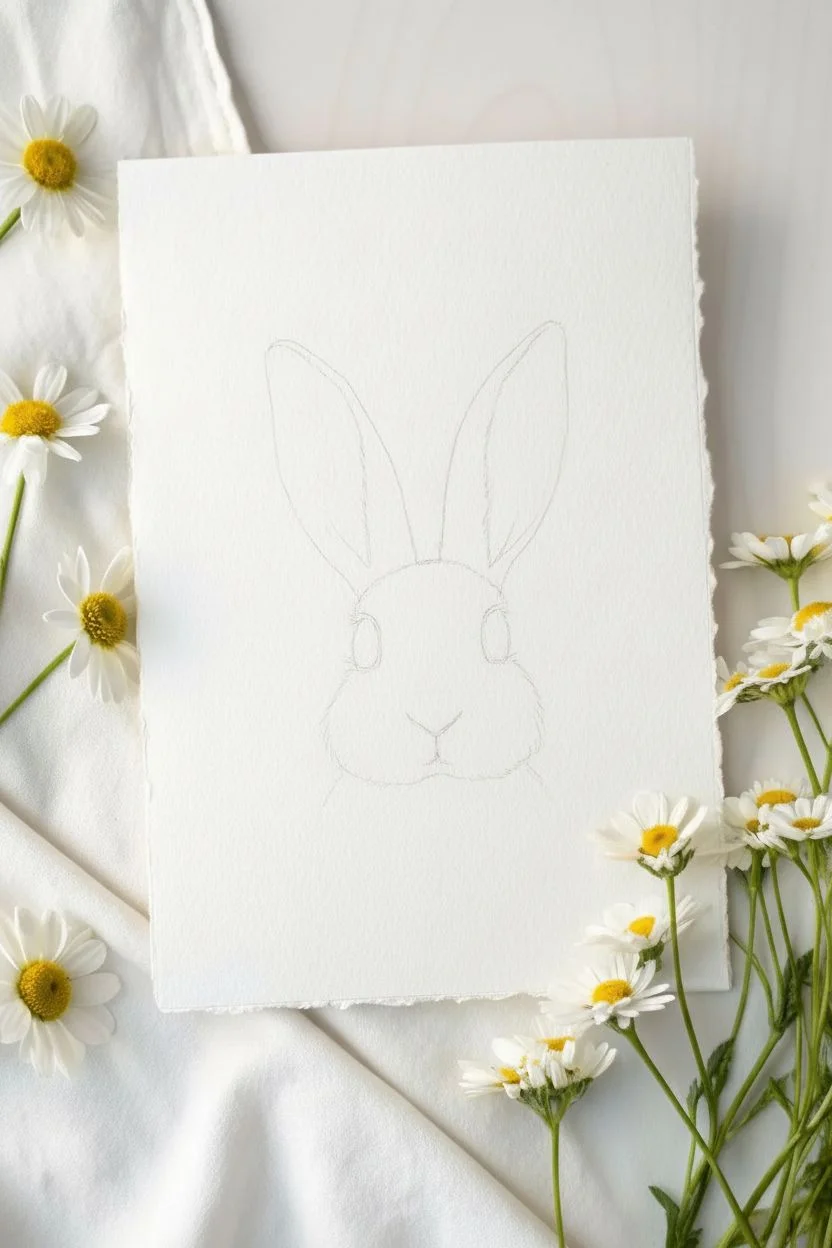
Step 1: Sketching the Outline
-
Map basic shapes:
Start by lightly sketching a rounded oval for the bunny’s head. Add two tall, elongated almond shapes extending upward for the ears, keeping them slightly closer together at the base. -
Refine features:
Position the eyes halfway down the head oval, spacing them widely. Sketch the Y-shape of the nose and mouth area just below the center line. Mark the fluffy cheek areas extending slightly outward from the oval. -
Clean the lines:
Use a kneaded eraser to roll over your sketch, lifting the graphite until the lines are barely visible. This ensures the pencil marks won’t dirty your watercolor washes later.
Troubleshooting: Muddy Fur?
If fur looks muddy, you likely didn’t let layers dry fully. Let the paper dry completely, then add crisp, dark detail lines on top to regain definition.
Step 2: Layering the Base Colors
-
First wash:
Mix a very dilute wash of Yellow Ochre and a touch of Burnt Sienna. Apply this loosely to the ears and face, leaving the area around the eyes and the tip of the muzzle white for highlights. -
Pink tones:
While the first layer is still slightly damp, drop a very watery mix of Alizarin Crimson into the inner ears and a tiny dab on the nose area to create a soft, natural blush. -
Shadow mapping:
Once the first layer is dry, mix Burnt Umber with a little Burnt Sienna. Paint the darker areas: the tips of the ears, strictly along the outer edges of the face, and under the chin. -
Softening edges:
Immediately after applying the shadow paint, use a clean, damp brush to gently feather the edges of the paint inward, creating a gradient from dark fur to light fur.
Level Up: Floral Crown
Paint a simple crown of tiny daisies or forget-me-nots resting between the ears. Use masking fluid to protect the flower shapes before painting the fur.
Step 3: Building Detail and Texture
-
Fur texture:
Switch to your size 2 brush. Using a mix of Burnt Umber and Sepia, make short, flicking strokes in the direction of hair growth. Focus these strokes on the forehead, cheeks, and ear ridges. -
Deepening the ears:
Add another layer of pinkish-brown to the inner ears to create depth, leaving the very center pale. -
Painting the eyes:
Fill the almond-shaped eyes with a rich, dark brown (Burnt Umber mixed with a tiny dot of Black). Leave a small circle of white paper unpainted in each eye for the reflection, or paint it solid and add white later. -
Defining the features:
Use the size 00 brush or a fine liner pen to darken the nostrils and the split of the mouth. Add tiny dots on the muzzle where whiskers will originate.
Step 4: Final Touches
-
Adding whiskers:
With a fine liner pen or a rigger brush loaded with diluted black ink, confidently flick long, thin lines outward from the muzzle. Vary the lengths and angles for a realistic look. -
Eyelash details:
Carefully paint three or four long lashes extending from the outer corner of each eye using your finest brush or pen. -
Highlight popping:
Use white gouache or a gel pen to add the final bright glint in the eyes if you painted over them. I also like to add tiny white whisker hairs on the chin for extra dimension. -
Fur blending:
Take a clean, slightly damp brush and gently soften the bottom edge of the neck so the portrait fades elegantly into the white paper rather than ending abruptly.
Now you have a charming bunny portrait ready to frame or gift for the spring season


Simple Easter Bunny Silhouette With Pastel Gradient Sky
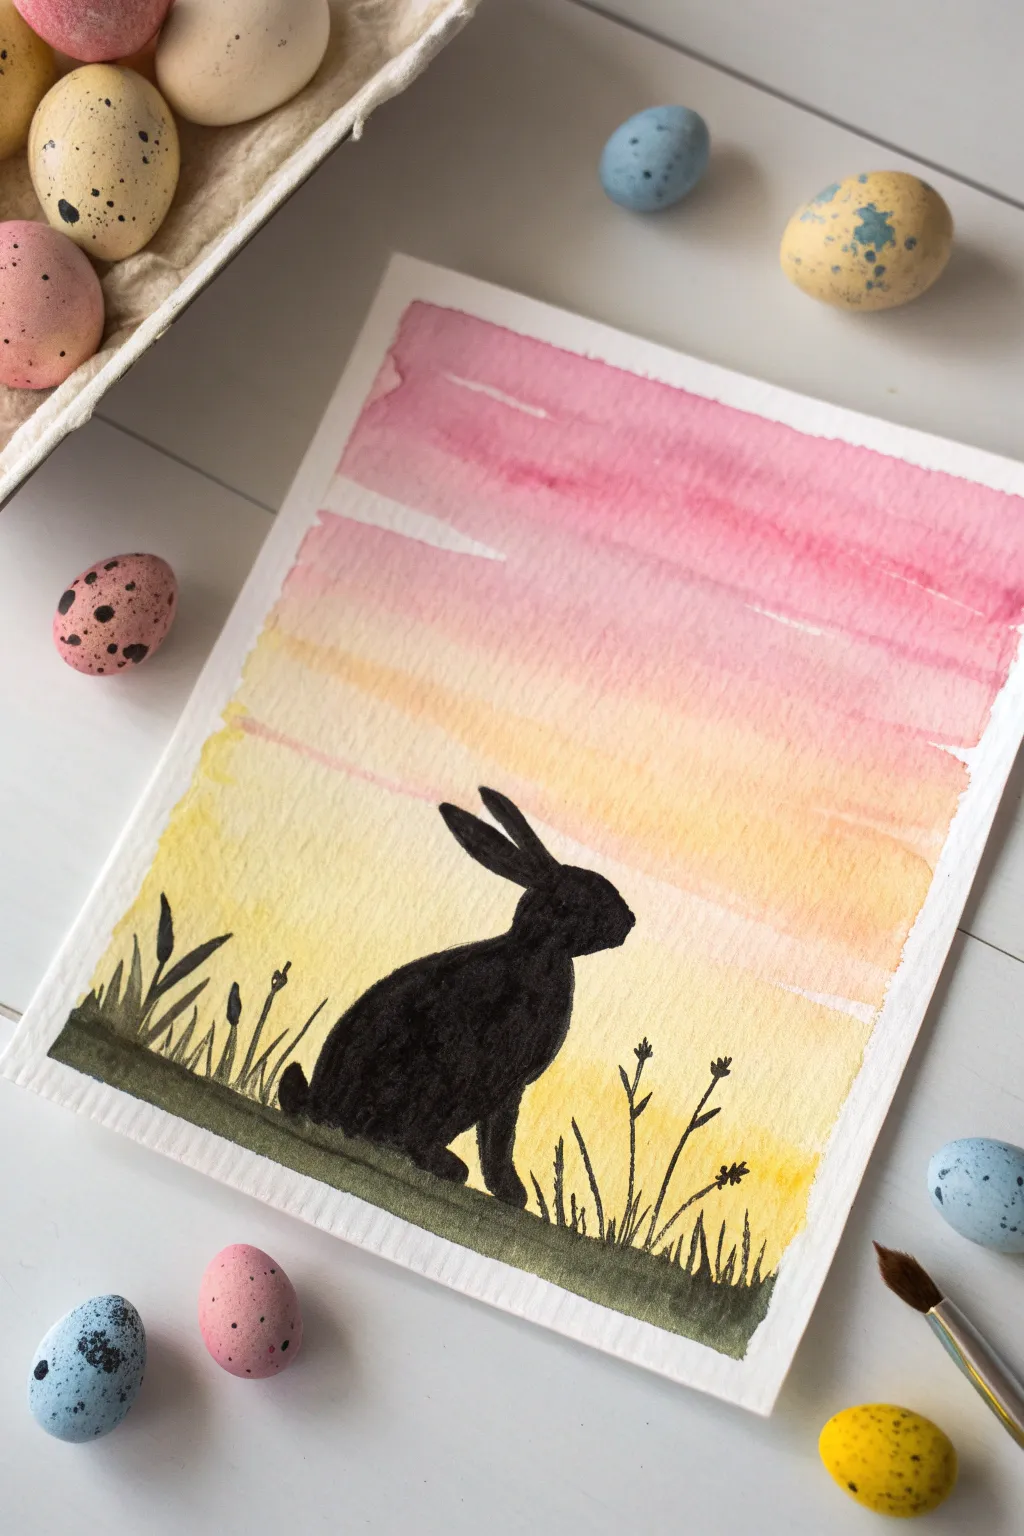
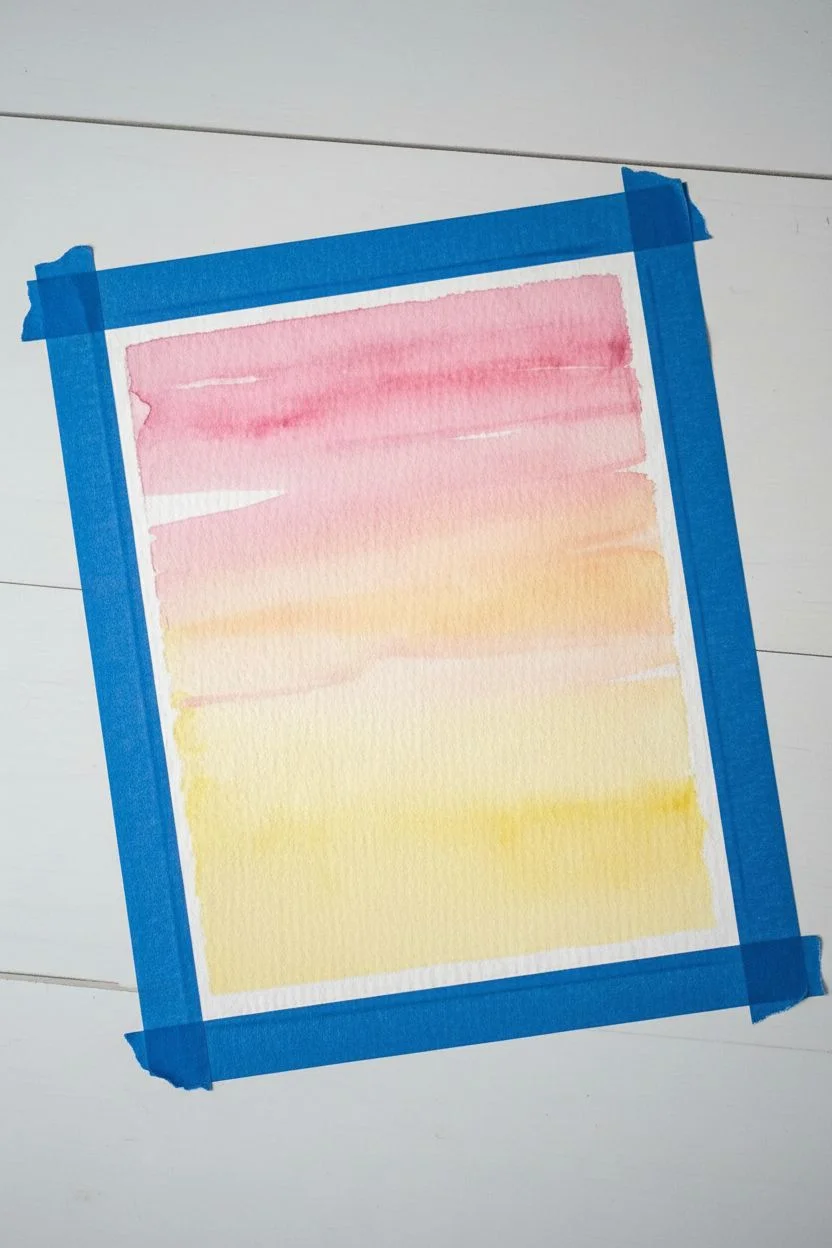
Capture the serenity of an Easter evening with this lovely watercolor project featuring a stark black bunny against a soft wash of pinks and yellows. This beginner-friendly painting relies on a wet-on-dry gradient technique to create a dreamy sky that perfectly highlights the crisp silhouette.
Step-by-Step
Materials
- Watercolor paper (cold press creates nice texture)
- Masking tape or painter’s tape
- Watercolor paints (pink, pastel orange/yellow, black, dark green)
- Flat wash brush (approx. 1/2 inch or 3/4 inch)
- Round detail brush (size 2 or 4)
- Pencil and eraser
- Clean water jar
- Paper towels
Step 1: Preparing the Sky
-
Secure the paper:
Tape down all four edges of your watercolor paper to a board or table. This creates that crisp white border seen in the final piece and keeps the paper from buckling when wet. -
Mix your pink:
Prepare a watery mix of rose or light pink on your palette. You want enough liquid to cover the top third of the paper without running out. -
Mix your yellow:
Prepare a second puddle of warm, pastel yellow. If it feels too bright, add a tiny touch of the pink to soften it into a peachier tone. -
Apply the top layer:
Using your flat wash brush, load it with the pink mixture. Paint broad horizontal strokes across the top third of your paper. -
Fade the pink:
Dip your brush in clean water to dilute the remaining paint on the bristles slightly, then continue painting down, letting the pink fade as you reach the middle. -
Introduce yellow:
Rinse your brush thoroughly. Load it with the yellow paint and start painting from just below the pink area, brushing upwards slightly to blend the two colors where they meet. -
Paint the bottom section:
Continuing with the yellow, fill the rest of the paper down to where the grass will eventually be. Keep the wash loose and don’t worry about perfect smoothness; the texture adds character. -
Let it dry completely:
This is crucial: allow the sky to dry 100% before moving on. I check by touching the paper with the back of my hand—if it feels cool, it’s still wet.
Uneven Sky?
If your gradient looks streaky instead of smooth, re-wet the entire sky area with a clean, damp brush (lightly!) to reactivate the paint and smooth out harsh lines.
Step 2: Painting the Silhouette
-
Sketch the bunny:
Lightly sketch the outline of the sitting bunny using a pencil. Focus on the oval shape of the body and the long, alert ears. Keep lines faint so they won’t show through the yellow paint. -
Mix the black paint:
You need a very opaque black for the silhouette. Mix your black watercolor with less water than usual, creating a creamy, ink-like consistency. -
Outline the bunny:
Switch to your small round detail brush. Carefully paint over your pencil outline with the black paint. -
Fill in the shape:
Fill the interior of the bunny’s body with solid black. If the paint looks streaky, let the first layer dry and apply a second coat for solid coverage. -
Refine the edges:
Use the tip of your brush to sharpen the tips of the ears and the curve of the chest to ensure the silhouette looks crisp against the sunset.
Step 3: Adding Ground and Details
-
Paint the ground base:
Mix a dark, earthy green. Draw a horizontal line underneath the bunny for the ground, slightly uneven to look natural, and fill the area down to the bottom tape line. -
Add grass blades:
Using the very tip of your round brush (or a rigger brush if you have one), flick upward strokes from the ground line to create grass blades relative to the bunny’s size. -
Vary the grass:
Make some grass blades short and straight, while others should curve or bend slightly. Include a few taller stalks to frame the bunny. -
Add tiny flowers:
On the taller grass stalks, dab tiny specks or small ‘V’ shapes near the tips to suggest wild seed pods or silhouette flowers. -
Final connection:
Ensure the bunny’s paws look firmly planted in the grass by painting a few small blades slightly overlapping the bottom of the black silhouette. -
Peel the tape:
Once the painting is bone dry, slowly peel the tape away at a 45-degree angle to reveal your clean white borders.
Golden Hour Glow
Add a few tiny dots of white gouache or gel pen amongst the grass blades to mimic fireflies or sparkling dew in the evening light.
Now you have a serene little piece of art ready to display for the holiday


Stencil-Sponged Easter Bunny With Crisp Edges
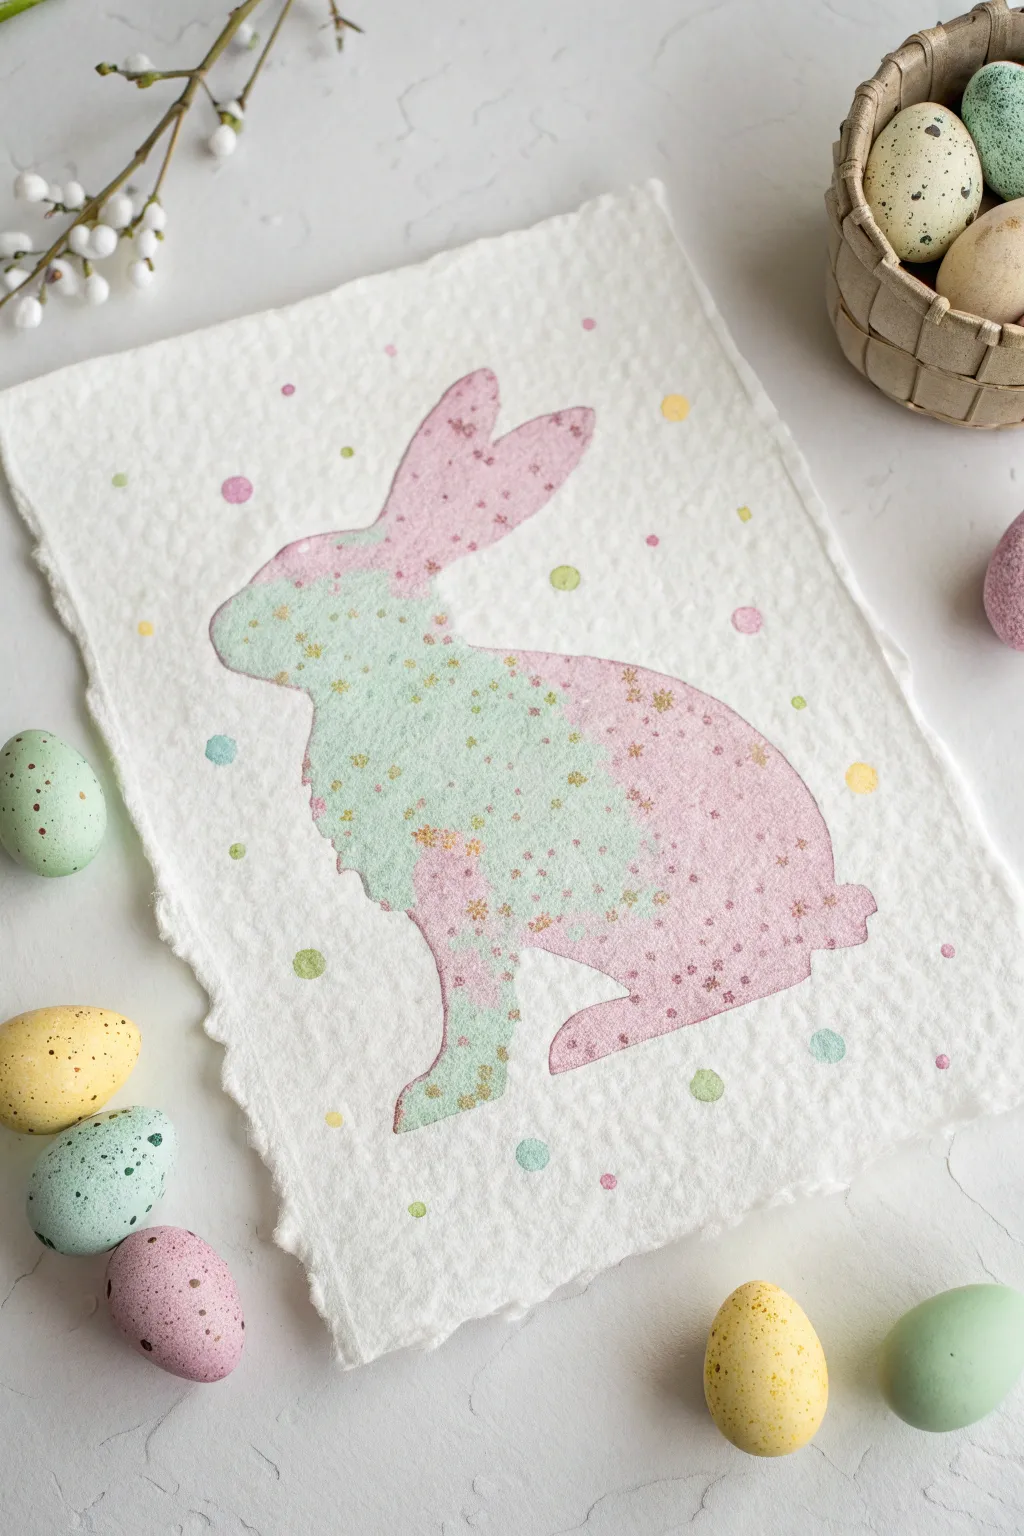
Capture the soft, pastel charm of spring with this elegant silhouette project that combines crisp edges with a dreamy, speckled texture. The handmade paper adds a rustic touch that perfectly complements the delicate pink and mint green palette.
Step-by-Step Tutorial
Materials
- Heavyweight cold press watercolor paper (with deckled edges preferred)
- Adhesive stencil film or masking fluid
- Rabbit silhouette template
- Craft knife and cutting mat
- Watercolor paints (Mint Green, Soft Pink)
- Small natural sea sponge
- Old toothbrush or stiff bristle brush
- Masking tape
- Paper towels
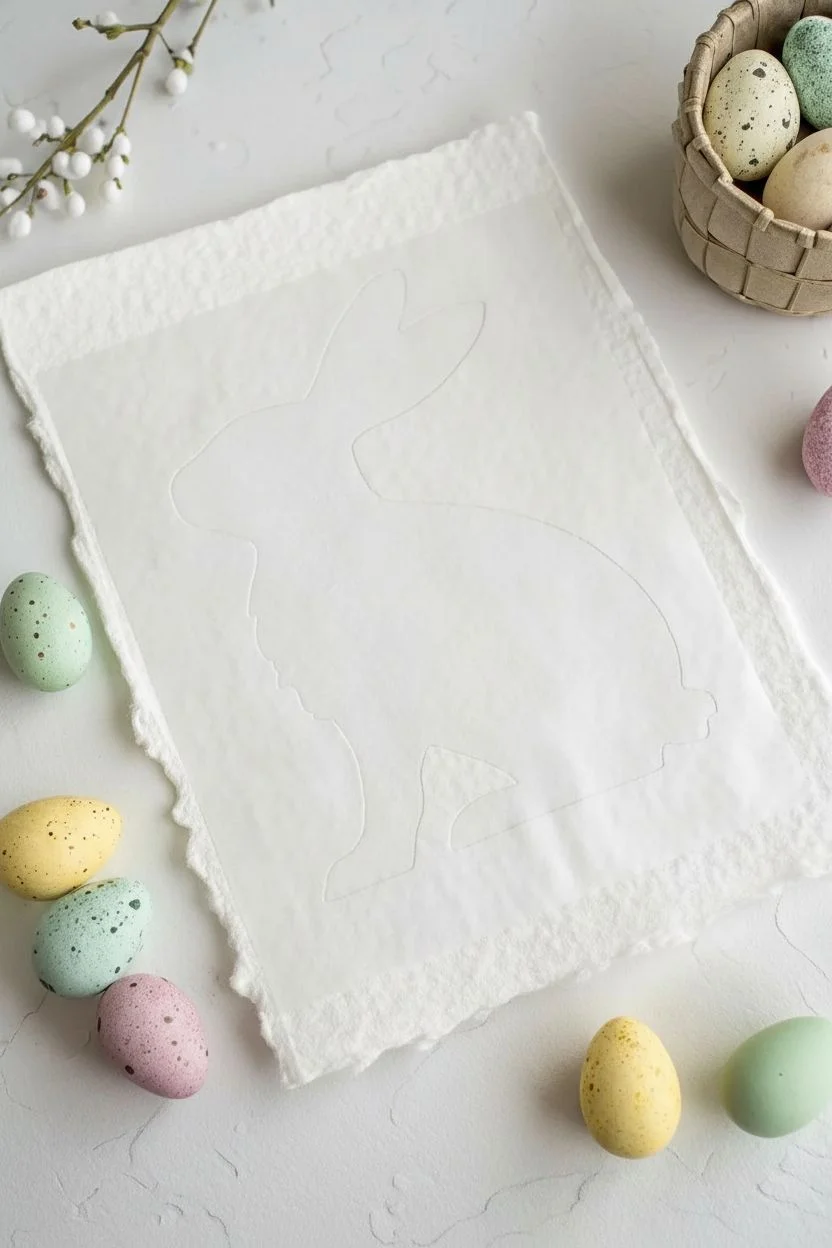
Step 1: Preparation
-
Prepare your paper:
Begin by selecting a high-quality, textured watercolor paper. If your paper doesn’t have deckled edges, you can gently tear the edges against a ruler to create that beautiful, raw finish seen in the example. -
Trace the silhouette:
Print out a simple rabbit silhouette sized to fit your paper. Place your adhesive stencil film over the printout and carefully trace the outline with a pencil. -
Cut the stencil:
Using a sharp craft knife on a cutting mat, cut out the rabbit shape from the adhesive film. You want to keep the negative space (the outer part), not the rabbit itself. -
Apply the stencil:
Peel the backing off your adhesive film and carefully position it centrally on your watercolor paper. Press down firmly along all the edges of the rabbit shape to ensure a tight seal—this prevents paint from bleeding underneath.
Fuzzy Edges?
If paint bleeds under the stencil, your paint was too watery or the seal wasn’t tight. Use drier paint (more pigment, less water) near edges.
Step 2: Painting the Base
-
Mix your colors:
Prepare two small puddles of watercolor paint: a soft mint green and a muted rose pink. Dilute them slightly with water so they are fluid but still vibrant. -
Sponge application:
Dampen your natural sea sponge and squeeze out excess water. Dip it lightly into the mint green paint first. -
Dab the first layer:
Gently dab the sponge inside the stencil area. Focus the green on the head, chest, and front paws of the bunny. Don’t aim for solid coverage; a mottled, airy look is better. -
Transition to pink:
Rinse your sponge or switch to a clean area. Pick up the pink paint and sponge the ears and the rear half of the bunny body. Let the pink and green overlap slightly in the middle to blend them softly. -
Dry partially:
Allow this base layer to dry for about 10-15 minutes. It doesn’t need to be bone dry, but it shouldn’t be soaking wet.
Add Some Sparkle
Mix a tiny bit of metallic gold watercolor into your splatter step for subtle shimmer that catches the light beautifully.
Step 3: Adding Texture & Dots
-
Create speckles:
Dip an old toothbrush or a stiff brush into slightly thicker paint (less water). Run your thumb across the bristles to flick tiny splatters of green and pink paint over the stenciled area. -
Add detail spots:
For the defined polka dots inside the rabbit, use the tip of a small round brush or a cotton swab. Dip it in saturated paint and randomly place dots within the silhouette. -
Background confetti:
While the stencil is still in place, you can also flick a very small amount of paint onto the white paper surrounding the bunny if you want the speckles to carry over to the background, though the example keeps the background mostly clean with just large distinct dots. -
Refine the background:
To match the image perfectly, create distinct, larger pastel dots (pink, yellow, green) scattered around the outside of the rabbit shape on the white background.
Step 4: Finishing Touches
-
Let it dry completely:
Wait until the paint is completely dry to the touch. Patience here ensures you don’t smudge your crisp lines. -
Remove the stencil:
Slowly peel back the adhesive stencil film at a sharp angle. Reveal the crisp edge of your bunny silhouette. -
Touch ups:
If any paint bled under the edge, you can carefully scrape it away with a clean craft knife or cover it with a tiny dab of white gouache. -
Flattening:
If the watercolor paper buckled slightly from the moisture, place the dry artwork under a heavy book overnight to flatten it out.
Display your charming bunny art in a floating frame to show off those lovely deckled edges
BRUSH GUIDE
The Right Brush for Every Stroke
From clean lines to bold texture — master brush choice, stroke control, and essential techniques.
Explore the Full Guide
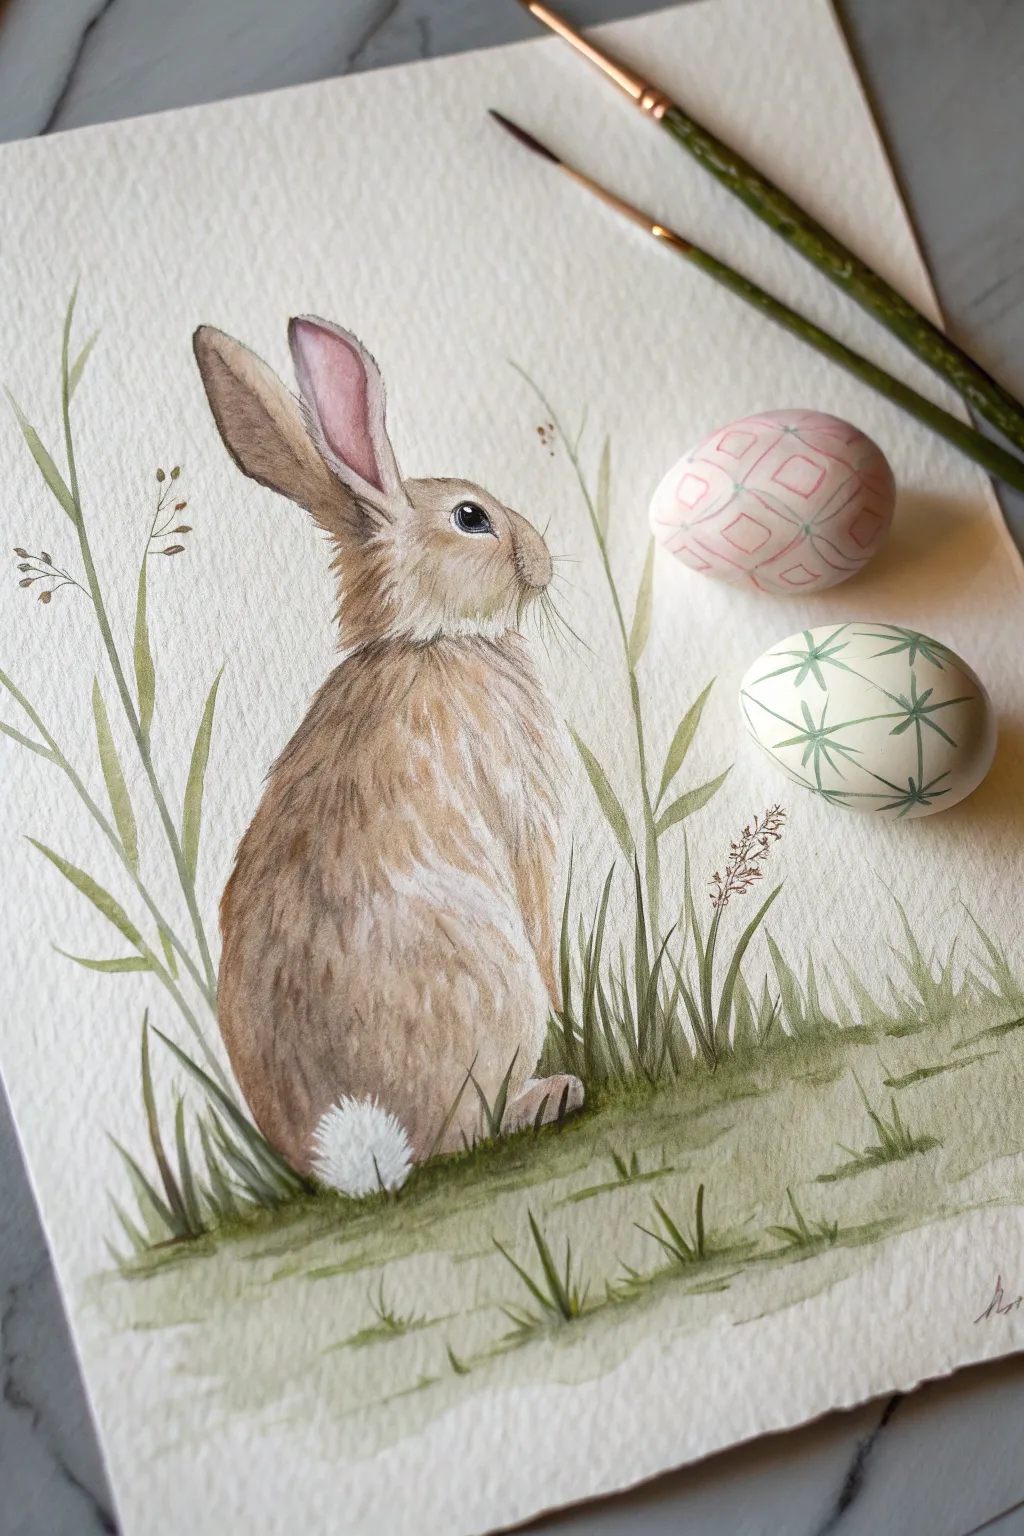
Watercolor Easter Bunny With Soft Wet-on-Wet Fur
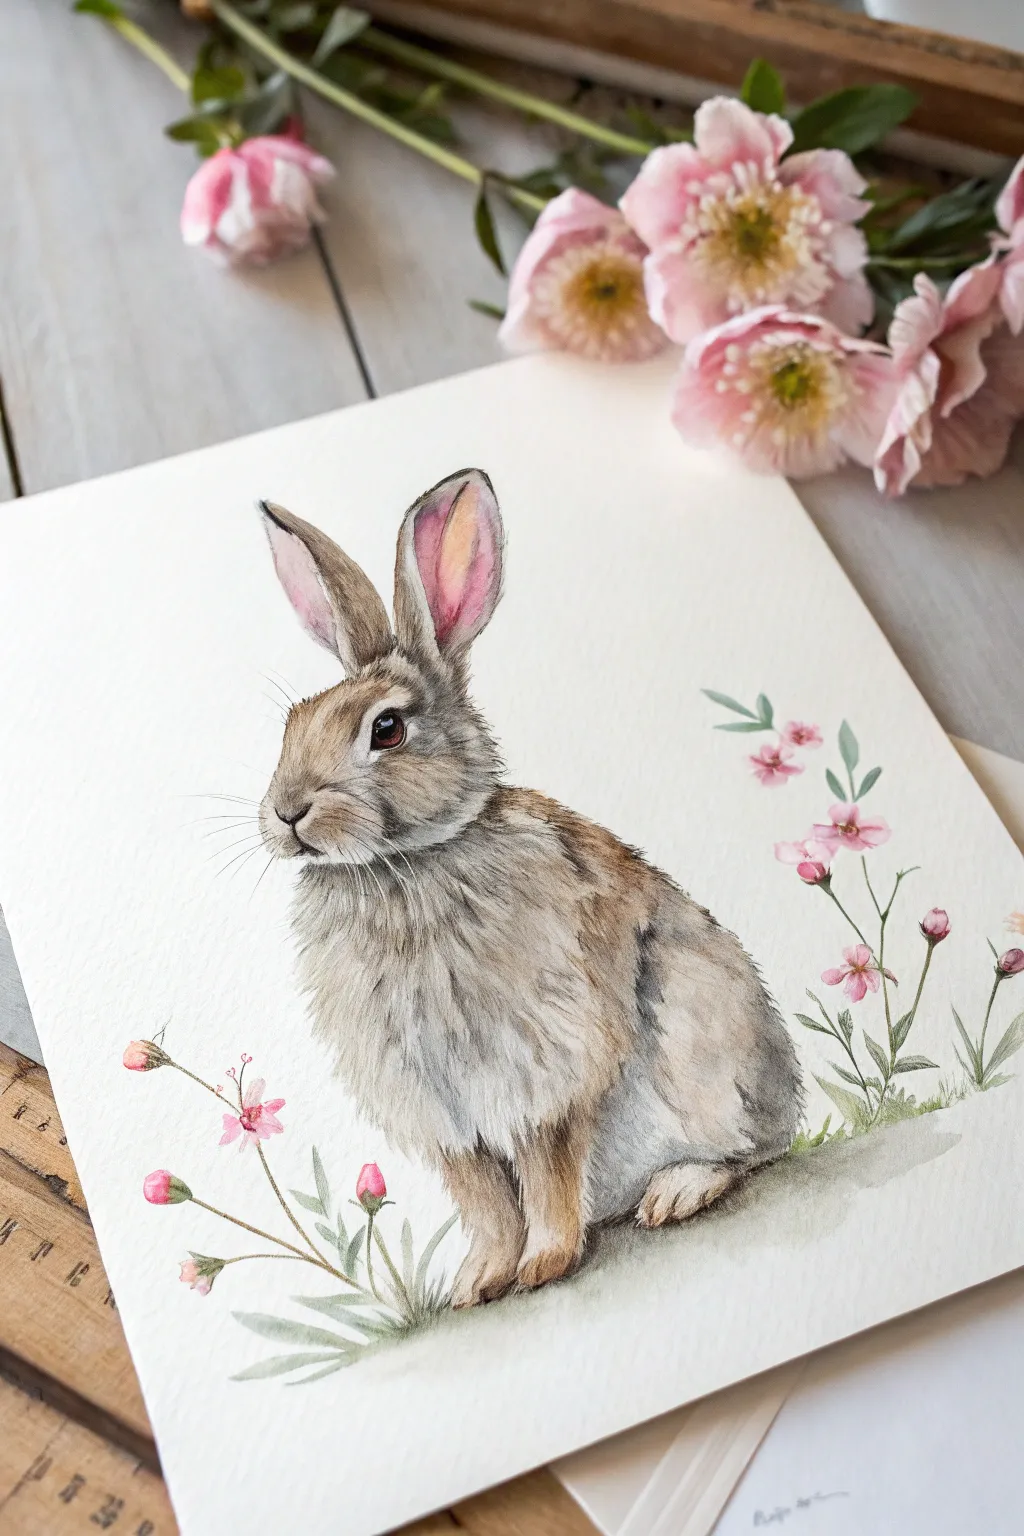
Capture the gentle spirit of spring with this detailed watercolor study of a rabbit featuring incredibly lifelike fur texture. By combining wet-on-wet washes for softness with fine dry-brush detailing, you’ll create a piece that feels both artistic and distinct.
Detailed Instructions
Materials
- Cold press watercolor paper (300 gsm)
- Watercolor paints (Burnt Umber, Yellow Ochre, Paynes Grey, Alizarin Crimson, Sap Green)
- Round brushes (sizes 2, 4, and 8)
- Fine liner brush (size 0 or 00)
- HB Pencil and kneaded eraser
- Two jars of water
- Paper towels
- Masking fluid (optional)
Step 1: Sketch and Base Layer
-
Light Outline:
Begin with a very faint HB pencil sketch. Focus on the oval shape of the body and the distinct curve of the rabbit’s spine. Sketch the large ears standing upright and indicate the position of the eye and nose, keeping lines light so they won’t show through the paint. -
Initial Wash:
Load a size 8 brush with clear water and wet the entire body of the rabbit, avoiding the eye area. Drop in a very dilute mix of Yellow Ochre and clear water to create a warm, creamy underpainting for the light fur areas on the chest and belly. -
Adding Warmth:
While the paper is still damp, touch in small amounts of diluted Burnt Umber along the back and ears. Let the paint bloom naturally to create soft transitions, then allow this layer to dry completely.
Muddy Fur Fix
If fur colors merge into a blob, stop immediately. Let the paper dry 100%. Once dry, use a stiff, damp brush to lift out highlights, then re-apply crisp dark hairs on top.
Step 2: Building Fur Texture
-
Mid-Tones:
Switch to a size 4 brush. Mix Burnt Umber with a touch of Paynes Grey for a neutral brown. Apply short, directional strokes along the rabbit’s back and head, following the direction the fur grows. -
Deepening Shadows:
Darken your brown mix with more Paynes Grey. Apply this shadow color under the chin, behind the front leg, and where the haunch meets the belly to create dimension and weight. -
Ear Detail:
Paint the inner ear with a watery wash of Alizarin Crimson mixed with a tiny bit of brown. While wet, drop deeper brown along the outer edges to create a shadowed rim. -
Chest Fur Texture:
For the fluffy white chest, use a damp, clean brush to soften the edges of your previous washes. I like to use very diluted grey to paint loose, wispy strokes here, implying fur without overworking it. -
The Eye:
Carefully paint the eye using a strong mix of Burnt Umber and black. Leave a tiny speck of white paper unpainted for the highlight to bring life to the face.
Step 3: Fine Details and Flowers
-
Detailed Fur:
Using your smallest liner brush (size 0) and a darker, less watery brown mix, paint individual hairs. Focus these detailed strokes on the face, muzzle, and the top of the back where the texture is most visible. -
Whiskers:
With a steady hand and the liner brush, use a very light grey or white gouache to flick on long, thin whiskers extending from the muzzle. -
Flower Stems:
Mix Sap Green with a touch of brown for an earthy stem color. Paint thin, swaying stems rising from the bottom on both sides of the bunny. -
Blossoms:
Mix a watery pink using Alizarin Crimson. Paint small, five-petaled flowers at the ends of the stems. vary the intensity of the pink to give the flowers depth. -
Grounding Shadow:
Paint a subtle wash of grey-green horizontally under the rabbit’s paws and tail to ground the figure so it doesn’t look like it’s floating. -
Grass Blades:
Be careful not to overdo the grass; just add a few short, upward green strokes near the paws and flower bases to integrate the rabbit into the scene. -
Final Contrast Check:
Step back and assess your values. If the rabbit looks flat, add a few more dark strokes of Paynes Grey in the deepest crevices of the fur.
Soft Speckling
Load a toothbrush with diluted brown paint and gently flick it over the rabbit’s back while masking the face. It adds instant organic texture to the coat.
Frame your delicate watercolor bunny to bring a touch of graceful nature into your home for the holiday
Dry-Brush Fur Study on a Realistic Easter Bunny Face
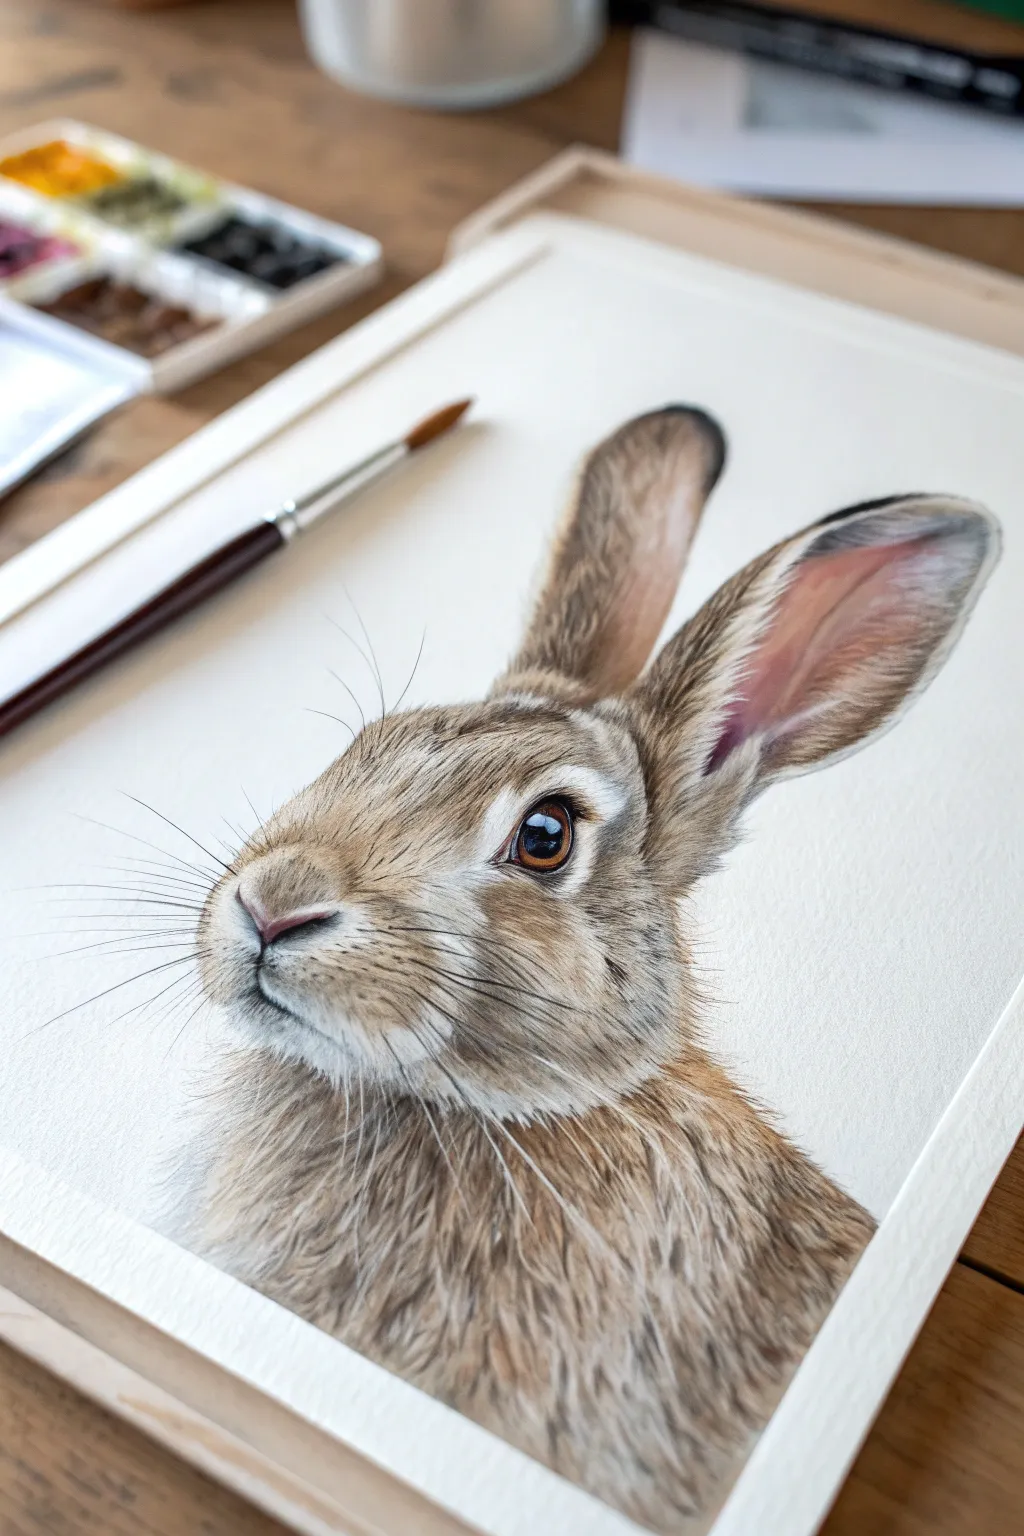
Capture the soft, tactile essence of fur with this detailed bunny study, perfect for refining your texture techniques. By layering subtle washes and precise dry-brush strokes, you will build a lifelike rabbit portrait full of depth and character.
Step-by-Step
Materials
- Hot press watercolor paper (block or taped to board)
- Watercolor paints (Burnt Umber, Yellow Ochre, Ultramarine Blue, Alizarin Crimson, Lamp Black, Chinese White)
- Round synthetic brushes (sizes 2, 4, 6)
- Fine liner brush (size 00 or 000)
- Mixing palette
- Two jars of water
- Paper towels
- Graphite pencil (HB) and kneadable eraser
Step 1: Sketching and Base Layers
-
Light Outline:
Begin with a very faint pencil sketch of the rabbit’s head, ears, and chest. Focus on capturing the correct proportions of the ears relative to the head. Keep your lines light so they don’t show through the final fur. -
Eye Foundation:
Paint the eye first using a mix of Burnt Umber and a touch of Lamp Black. Leave a crisp, white unpainted circle for the highlight reflection. Let this dry completely before adding a second, darker glaze to the pupil area for depth. -
Initial Wash:
Mix a watery, pale wash of Yellow Ochre and a tiny bit of Burnt Umber. Apply this loosely over the fur areas—the cheeks, forehead, and chest—avoiding the white areas around the eye and under the chin. Keep edges soft. -
Ear Pinkness:
Mix a very dilute Alizarin Crimson with water. Gently wash this into the inner ear area. While still damp, touch a little gray (Ultramarine + Burnt Umber) near the outer edges to create a soft transition.
Step 2: Building Fur Texture
-
Mapping Shadows:
Using a size 4 brush and a light brown mix, block in the shadow shapes under the chin, inside the ears, and around the nose. This establishes the form before you start the detail work. -
Forehead Fur Directions:
Switch to a size 2 brush. Mix a medium brown using Burnt Umber. Start creating short, directional strokes on the forehead. Pay close attention to how the fur grows outward from the center; this ‘mapping’ is crucial for realism. -
Cheek Texture:
Move to the cheeks. The fur here is slightly longer and softer. Use a ‘flicking’ motion with your brush, lifting it at the end of each stroke to taper the hair. Layer lighter browns over slightly darker areas. -
Inner Ear Details:
The inside of the ear has sparse, fine hairs. Use your finest brush to paint delicate, widely spaced strokes over the pink wash, using a grey-brown mix. Don’t overdo this area; let the pink glow through. -
Darkening the Eye Rim:
Carefully outline the eye with a dark, almost black mixture. Widen the line slightly at the top to simulate an eyelid shadow. This immediately makes the rabbit look alert and alive. -
Nose Definition:
Paint the nose using a mix of Alizarin Crimson and Burnt Umber. Keep the top edge soft where it meets the fur, and define the nostrils with a darker concentration of the same color.
Muddy Fur?
If your fur looks like a blob, you likely didn’t let layers dry. Watercolor fur requires patience; each layer must be bone-dry before adding the next set of hairs to keep lines crisp.
Step 3: Fine Details and Dry Brushing
-
Dry-Brush Technique:
Load a size 2 brush with thick, pigment-rich dark brown paint, then wipe most of it off on a paper towel. Drag the nearly dry brush over the textured paper on the darker fur areas to create a jagged, realistic hair texture. -
Chest Fluff:
The chest fur is thick and messy. Use longer, looser strokes here. I like to mix cooler greys into the brown for the chest shadows to differentiate it from the warmer head tones. -
White Fur Highlights:
Using Chinese White or white gouache, paint fine, opaque hairs over the dried dark patches, especially around the eye ring and the muzzle. This opacity creates incredible depth against the watercolor layers. -
Whisker Spots:
Add tiny, faint dots on the muzzle capability where whiskers will emerge. Use a mid-grey tone rather than black to keep it soft. -
Adding Whiskers:
With your finest liner brush or even a white gel pen, draw the long whiskers with quick, confident strokes. Painting them slowly will make them look shaky. Some should be dark (against light background) and some white (against dark fur). -
Final Contrast Check:
Step back and squint at your painting. Deepen the darkest shadows—usually right under the chin and inside the ear fold—to ensure the bunny pops off the page.
Pro Tip: Observation
Don’t just paint ‘fur’; paint ‘clumps.’ Fur tends to group together. Painting slight shadows between these small clumps creates far more realism than painting thousands of individual lines.
Once the final whisker is placed, you will have a stunningly detailed study that captures the gentle spirit of the season

PENCIL GUIDE
Understanding Pencil Grades from H to B
From first sketch to finished drawing — learn pencil grades, line control, and shading techniques.
Explore the Full Guide
Easter Bunny With a Basket of Easter Eggs

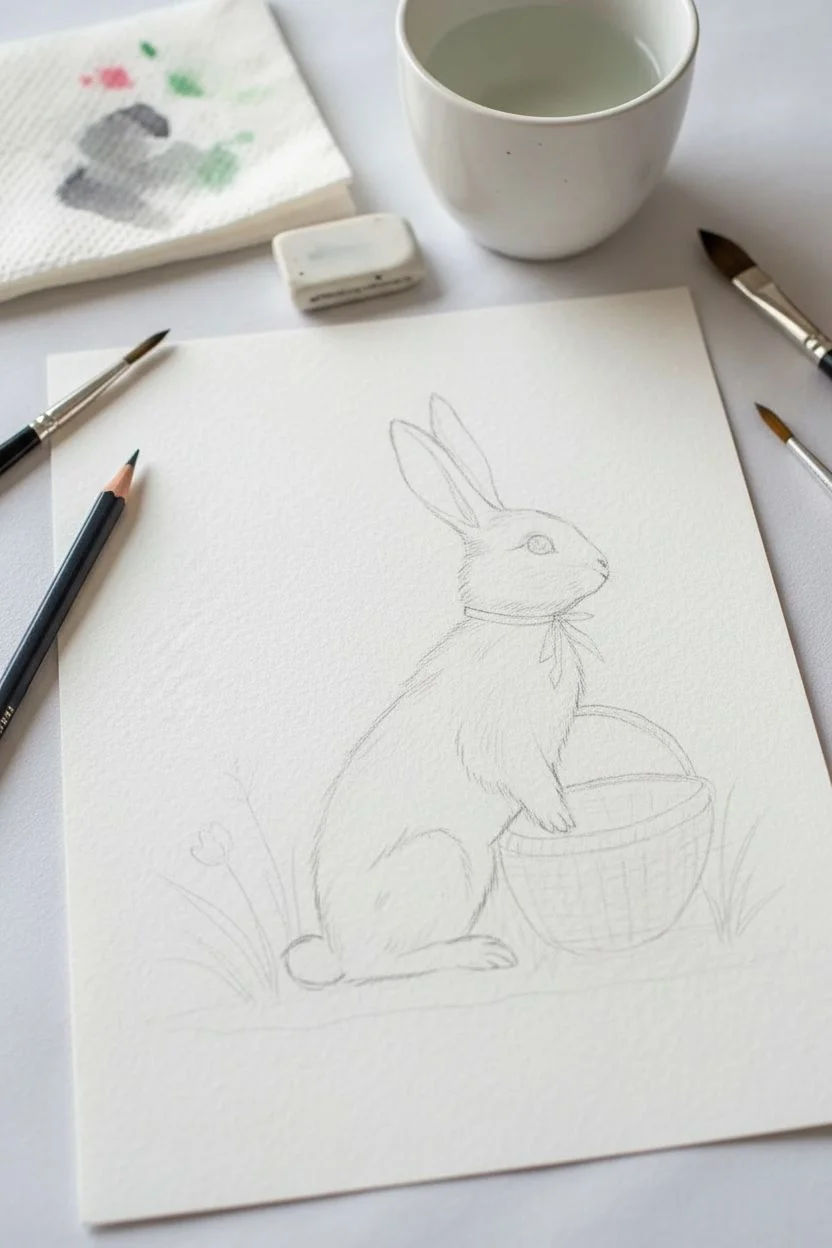
Capture the gentle spirit of spring with this delicate watercolor illustration of an Easter bunny holding a woven basket. The soft fur textures and light floral accents make this a perfect handmade card or seasonal decoration.
How-To Guide
Materials
- Cold press watercolor paper (300gsm)
- Pencil (HB or 2H)
- Kneadable eraser
- Watercolor paints (neutrals: sepia, burnt umber, black; accents: red, sap green, blue)
- Fine round brushes (size 0, 2, and 4)
- Cup of water
- Paper towels
- Optional: White gouache or gel pen for highlights
Step 1: Sketching the Outline
-
Light Construction:
Begin with a very light hand, sketching a gentle oval for the bunny’s body and a smaller circle for the head. Add the long ears extending backwards, keeping the lines fluid. -
Adding Details:
Refine the face shape, marking the position of the eye, nose, and the ribbon around the neck. Sketch the paws reaching forward to hold the basket. -
The Basket:
Draw the basket shape tucked under the front paws. It should look like a half-sphere with a handle arching over the arm. Keep your pencil marks faint so they won’t show through the paint later. -
Floral Placement:
Lightly indicate where the grass and wildflowers will go at the base and behind the bunny, creating a natural setting.
Fixing Muddy Fur
If your fur texture looks like a blob, you likely used too much water or worked too fast. Let it dry 100%, then add crisp, dark strokes with a mostly dry brush to redefine the hairs.
Step 2: Painting the Bunny
-
First Wash:
Mix a very watery wash of grey using a touch of black and plenty of water. Apply this to the shadowed areas of the bunny—under the chin, the belly, and the back of the ears—leaving the main body white for now. -
Creating Fur Texture:
Using your smallest brush and a slightly darker grey-brown mix, start painting short, fine strokes in the direction of hair growth. I find it helpful to start at the ears and work downwards. -
Deepening Shadows:
Layer more of these fine strokes in areas where shadows would naturally fall, like where the leg meets the belly and under the folded ear. This builds volume without losing the fluffiness. -
Facial Features:
Use a dark sepia or black for the eye, leaving a tiny white speck of unpainted paper for the catchlight. Paint the nose with a very dilute pink-grey. -
The Red Ribbon:
Paint the ribbon with a bright red. Use the tip of your brush to keep the edges crisp and the bow loops distinct.
Level Up: 3D Whiskers
Once the painting is totally dry, use a white gel pen or thin white gouache to add long, sweeping whiskers and extra bright highlights on the eye for a pro finish.
Step 3: Basket and Environment
-
Basket Weave Base:
Fill the basket shape with a light wash of burnt umber or raw sienna. Let this layer dry completely before moving on. -
Weaving Details:
With a darker brown and a fine brush, paint horizontal curved lines across the basket, then add short vertical hatch marks to simulate the wicker texture. -
Background Flora:
Mix a soft sage green for the leaves and stems. Paint them loosely, allowing the watercolor to be slightly transparent. -
Floral Accents:
Add small touches of red or pink for the flower buds. Keep these loose and suggestive rather than hyper-detailed. -
Grounding the Scene:
Add a wash of pale green mixed with plenty of water underneath the bunny and basket to ground the figure so it doesn’t look like it’s floating.
Allow your beautiful artwork to rest flat until completely dry, then frame it or gift it to someone special for the holiday
Finger-Painted Easter Bunny for Playful Texture
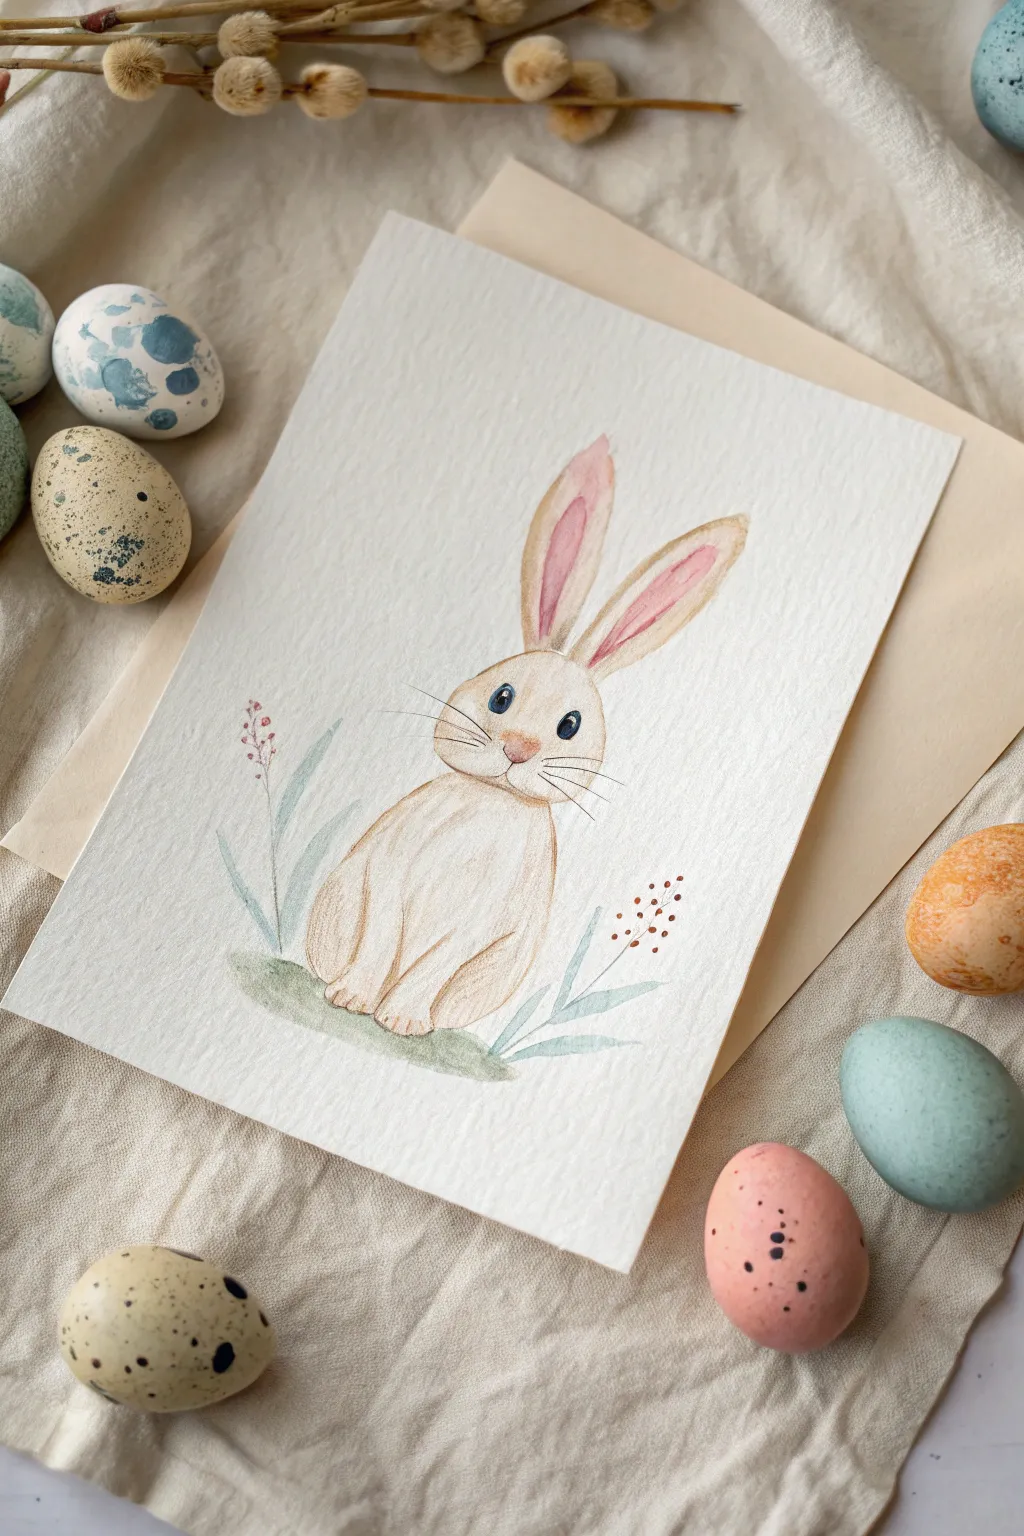
This charming project captures the softness of spring with a delicate, textured bunny illustration surrounded by subtle botanical elements. By combining light washes with fine details, you’ll create a greeting card-worthy piece of art that feels both rustic and refined.
Detailed Instructions
Materials
- Cold press watercolor paper (textured, 140lb/300gsm)
- Watercolor paints (Light Brown, Pink, Green, Dark Blue, Dark Brown)
- Small round brushes (size 2 and size 4)
- Fine liner brush or brown micron pen (optional for details)
- Pencil (HB or H)
- Kneadable eraser
- Paper towels
- Clean water jar
- Mixing palette
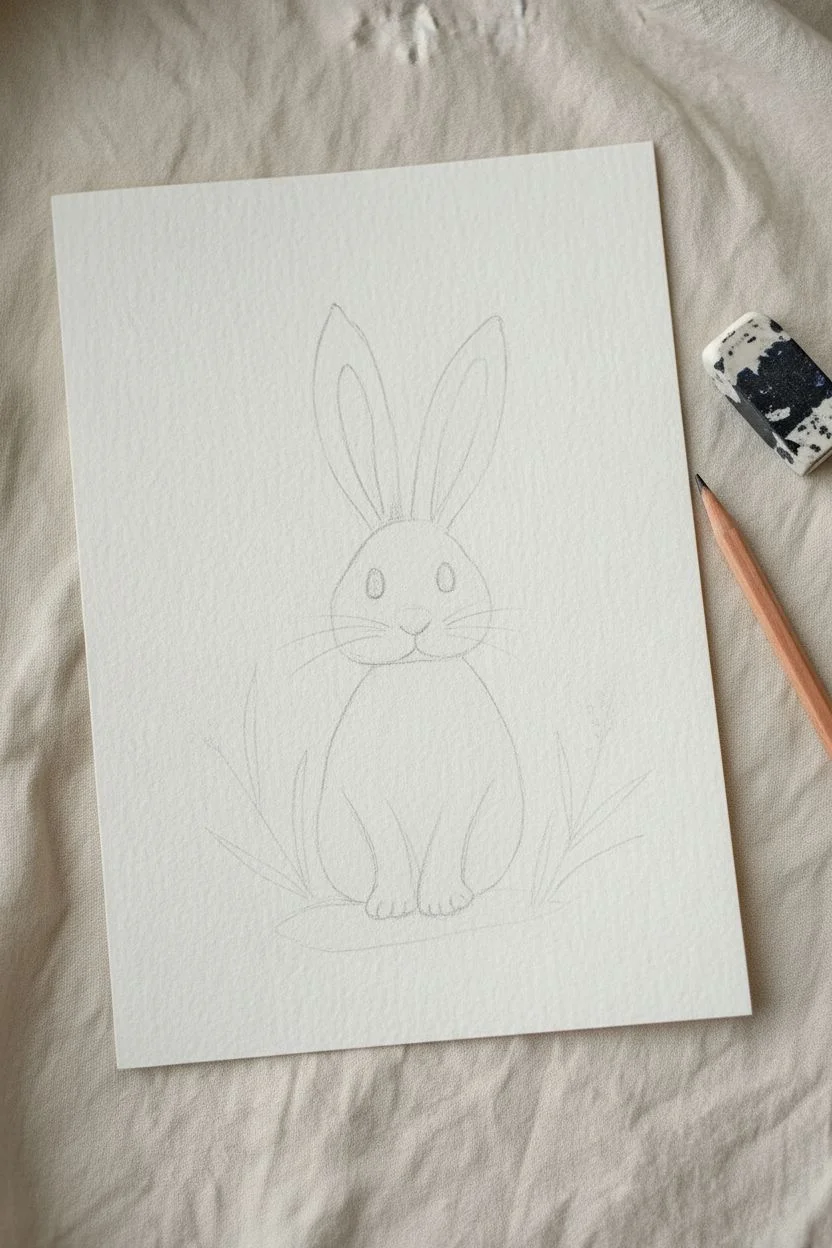
Step 1: Sketching the Outline
-
Draft basic shapes:
Begin lightly with your pencil. Roughly in the center of your paper, draw a slightly flattened oval for the bunny’s head. Below that, attach a larger, pear-shaped oval for the body, making sure the bottom is wider to give the bunny a seated posture. -
Add the ears:
Draw two long, slender ears extending from the top of the head. Curve them slightly to the right to give the bunny an alert, listening expression. -
Details and refinement:
Sketch in the facial features: two oval eyes spaced wide apart, a small triangle nose, and the muzzle area. Add simple lines for the front paws tucked into the body and indicating the hind leg. Sketch faint guidelines for the plants on either side. -
Lighten the lines:
Before painting, take your kneadable eraser and gently roll it over the sketch. You want the graphite to be barely visible so it doesn’t show through the final watercolor layers.
Step 2: Painting the Bunny
-
Base wash:
Mix a very watery, pale brown or diluted ochre. Using a size 4 brush, wet the bunny’s body and head (avoiding the eyes) with clean water first, then drop in the pigment. This wet-on-wet technique creates that soft, fuzzy texture. -
Add warmth:
While the paper is still damp, touch a slightly darker brown to the bottom edges of the body, under the chin, and the paws to create shadow and volume. Let this dry completely. -
Painting the ears:
Mix a soft rose pink. Carefully paint the inner shape of the ears, leaving a thin border of the pale brown skin around the edges. Feather the pink downwards so it blends naturally near the head. -
Fur texture:
Once the base layer is totally dry, switch to a size 2 brush with a slightly thicker mix of light brown paint. Use tiny, flicking strokes to suggest fur direction, focusing on the chest and the contour of the back.
Use Textured Paper
For that authentic ‘fuzzy’ look, use cold press paper. The rough grain naturally breaks up the paint pigment, mimicking fur texture without extra effort.
Step 3: Facial Features & Details
-
The eyes:
Use a dark blue or deep charcoal color for the eyes. Paint the oval shape carefully, leaving a tiny speck of white unpainted for the ‘catchlight’ or highlight, which brings the bunny to life. -
Nose and mouth:
Paint the nose with a slightly more concentrated pink than used for the ears. Use a very fine line of dark brown to draw the mouth beneath the nose. -
Whiskers:
With your finest brush (or a liner brush), mix a dark brown-black. With quick, confident strokes, flick out three or four long whiskers from each cheek. Quick movement prevents shaky lines.
Muddy Colors?
If your browns look muddy, ensure your first layer is 100% dry before adding fur details. Painting wet-on-wet too long blends everything into a single blob.
Step 4: Botanical Accents
-
Stems and leaves:
Mix a muted, sage green. Paint simple, sweeping stems rising from the ground on either side of the bunny. Add elongated leaves using a single stroke for each, pressing down and lifting up to create the leaf shape. -
Adding ground:
Use a diluted wash of that same sage green to create a small patch of ground directly beneath the bunny so it isn’t floating in space. -
Floral buds:
For the left plant, dab tiny dots of pink at the tips. For the right plant, use a burnt sienna or reddish-brown to dot small berries or seeds along the stem tips. -
Final check:
Step back and assess your work. If the fur looks too flat, I sometimes add a few very light pencil strokes over the dry paint to enhance the texture without adding more water.
Once dry, this adorable piece is ready to be framed or turned into a custom Easter card for someone special


Mixed-Media Easter Bunny With Real Dried Flowers
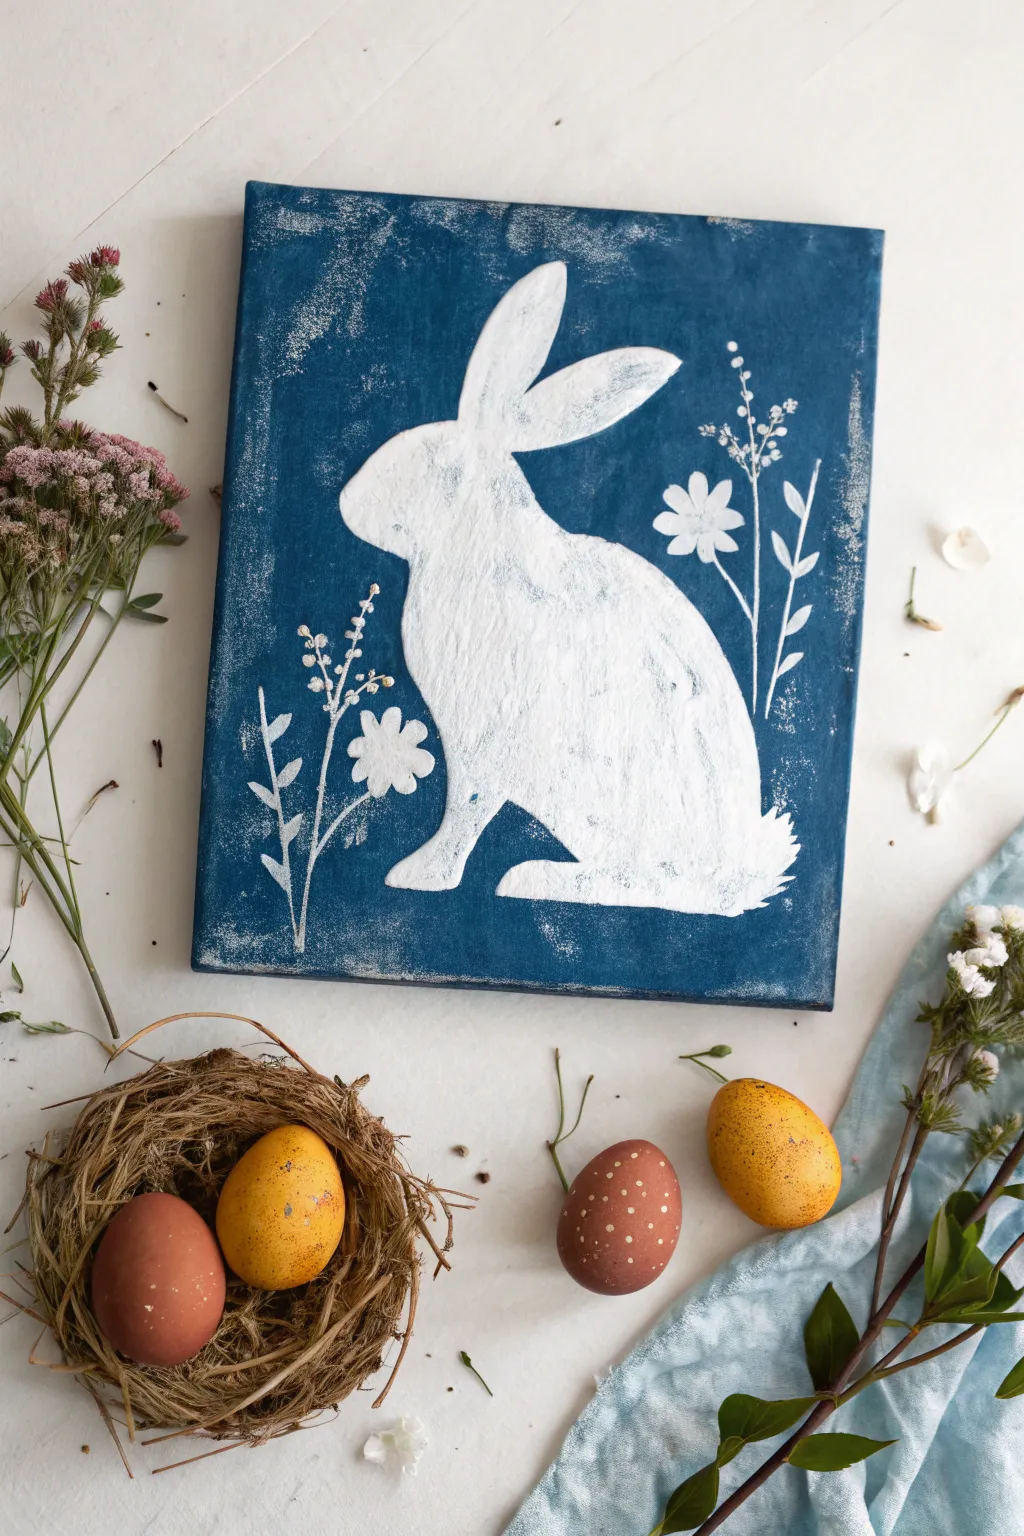

Capture the charm of a sun-printed cyanotype with this elegantly simple acrylic painting. The texture of the white silhouette pops beautifully against the denim-blue background, creating a rustic yet refined piece of spring decor.
Detailed Instructions
Materials
- Square canvas (approx. 8×8 or 10×10 inches)
- Deep Prussian blue or denim blue acrylic paint
- White acrylic paint
- Thick white texture paste or heavy body acrylic gel
- Palette knife
- Fine liner brush
- Medium flat brush
- Bunny silhouette template (printed paper)
- Pencil or white charcoal pencil
- Scissors or craft knife
- Masking tape
- Optional: Metallic gold paint for accents
Step 1: Preparing the Background
-
Base Coat:
Begin by covering your entire canvas with the deep blue acrylic paint. Use your medium flat brush to get solid coverage, ensuring you paint the edges of the canvas as well for a finished look. -
Create Texture:
While the first layer is still slightly tacky, dab a very small amount of white paint onto a dry brush or sponge. Lightly pounce or dry-brush this around the random spots of the canvas, especially near the edges, to create a weathered, chalky effect. -
Dry Time:
Let this background layer dry completely. This is crucial so your bunny stencil doesn’t lift up the blue paint later.
Fixing Smudges
If you accidentally paint outside the lines, don’t wipe it while wet. Let the mistake dry completely, then paint over it with your background blue color.
Step 2: Creating the Bunny
-
Prepare the Stencil:
Print out a simple bunny silhouette on standard printer paper. Carefully cut out the bunny shape using scissors or a craft knife, keeping the outer paper intact to use as a negative stencil. -
Positioning:
Place the paper stencil onto the dry canvas. Center the bunny or offset it slightly for a more artistic composition. Secure the edges of the paper with masking tape so it doesn’t shift. -
Tracing the Shape:
Lightly trace the interior outline of the bunny using a pencil or white charcoal pencil. Once traced, you can remove the paper stencil entirely. -
Applying Texture:
Mix a dollop of white acrylic paint with texture paste or heavy body gel. Using a palette knife or a stiff brush, fill in your traced bunny outline. Don’t smooth it out too much; I find drawn-out strokes mimic the look of fur. -
Refining Edges:
Use a smaller brush to tidy up the edges of the ears and paws, ensuring the shape remains distinct against the dark background. -
Create the Tail:
Add a slightly thicker dollop of the paste mixture at the base of the bunny to form a fluffy tail, stippling it with the tip of your brush for extra volume.
Make It 3D
Glue actual pressed dried flowers onto the canvas instead of painting them for a stunning, tactile mixed-media effect.
Step 3: Adding Floral Details
-
Planning the Flora:
visualize where your plants will grow. Sketch faint lines with your pencil flanking the bunny, imagining tall grasses or wildflowers reaching upward. -
Painting Stems:
Load a fine liner brush with thinned white paint. Using a light hand, drag the brush upward to create thin, delicate stems on both sides of the bunny. -
Adding Leaves:
Press down gently with the body of the brush along the stems to create simple leaf shapes. Lift the brush quickly at the end of the stroke to create a sharp point. -
Flower Heads:
Paint small, simple daisy shapes or clusters of dots at the tops of the stems. Keep these loose and stylized rather than hyper-realistic. -
Metallic Touches:
If you want a bit of shimmer, dip the very tip of your liner brush into gold paint and add tiny dots to the centers of the flowers or the tips of the grass blades. -
Weathering the Scene:
To integrate the bunny with the background, verify the white paint is fully dry, then lightly dry-brush a tiny bit of the original blue paint over the bottom of the bunny’s feet, grounding it in the scene.
Display your new artwork on a mantelpiece alongside a nest of speckled eggs for a complete seasonal vignette
Negative-Space Easter Bunny With Masked Easter Eggs
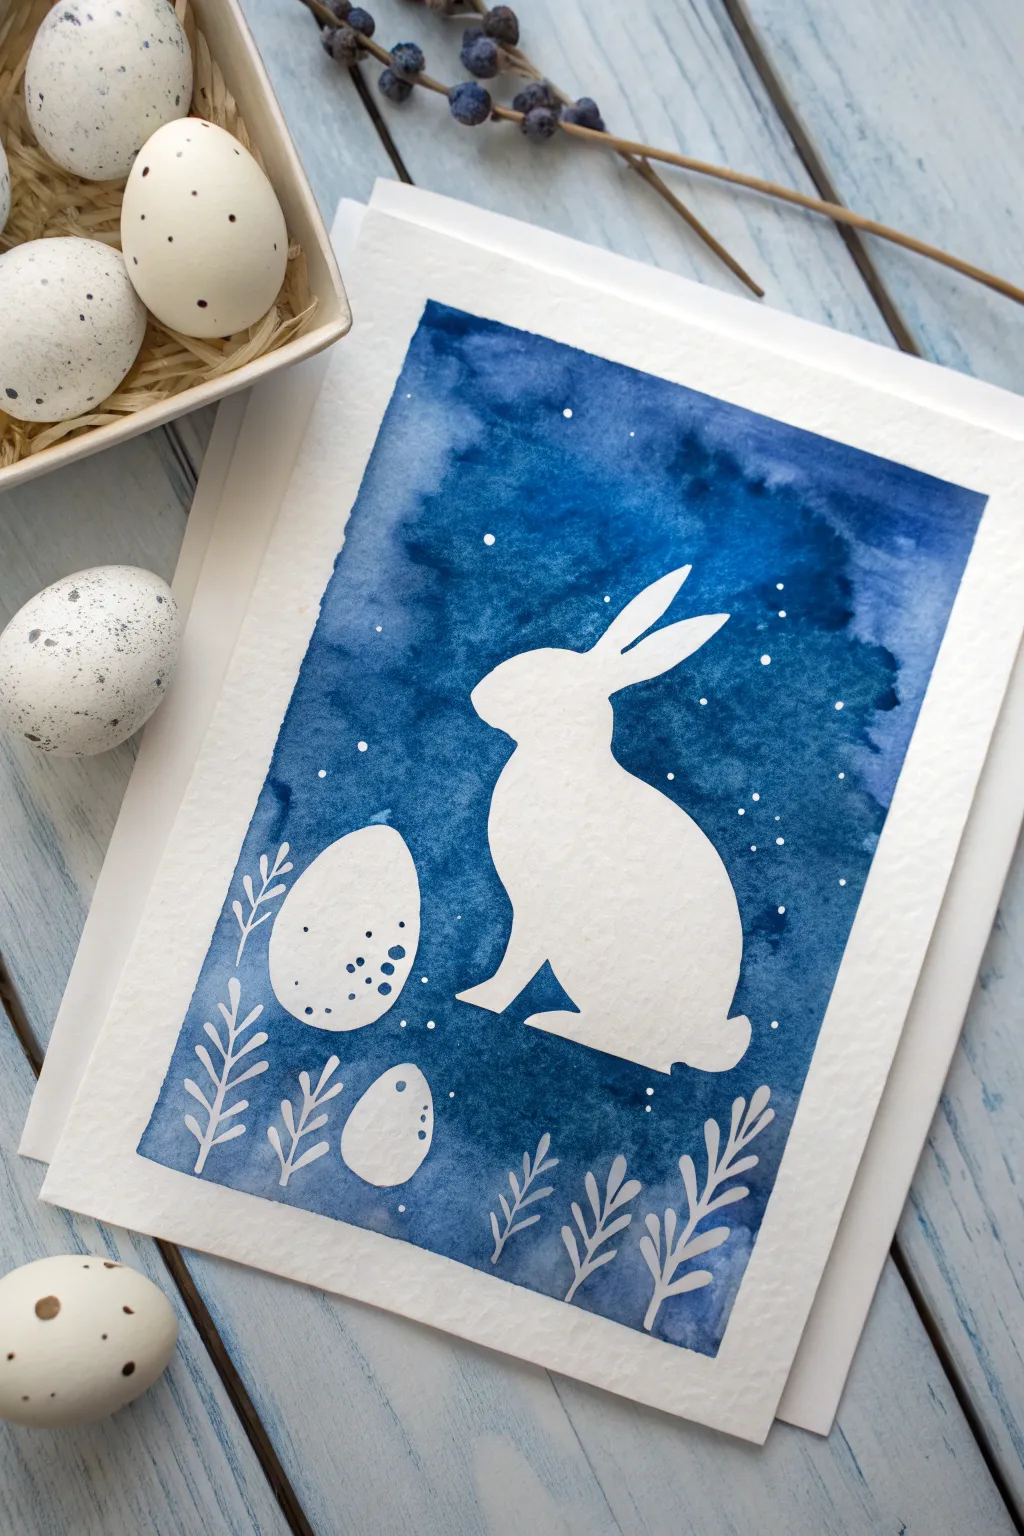
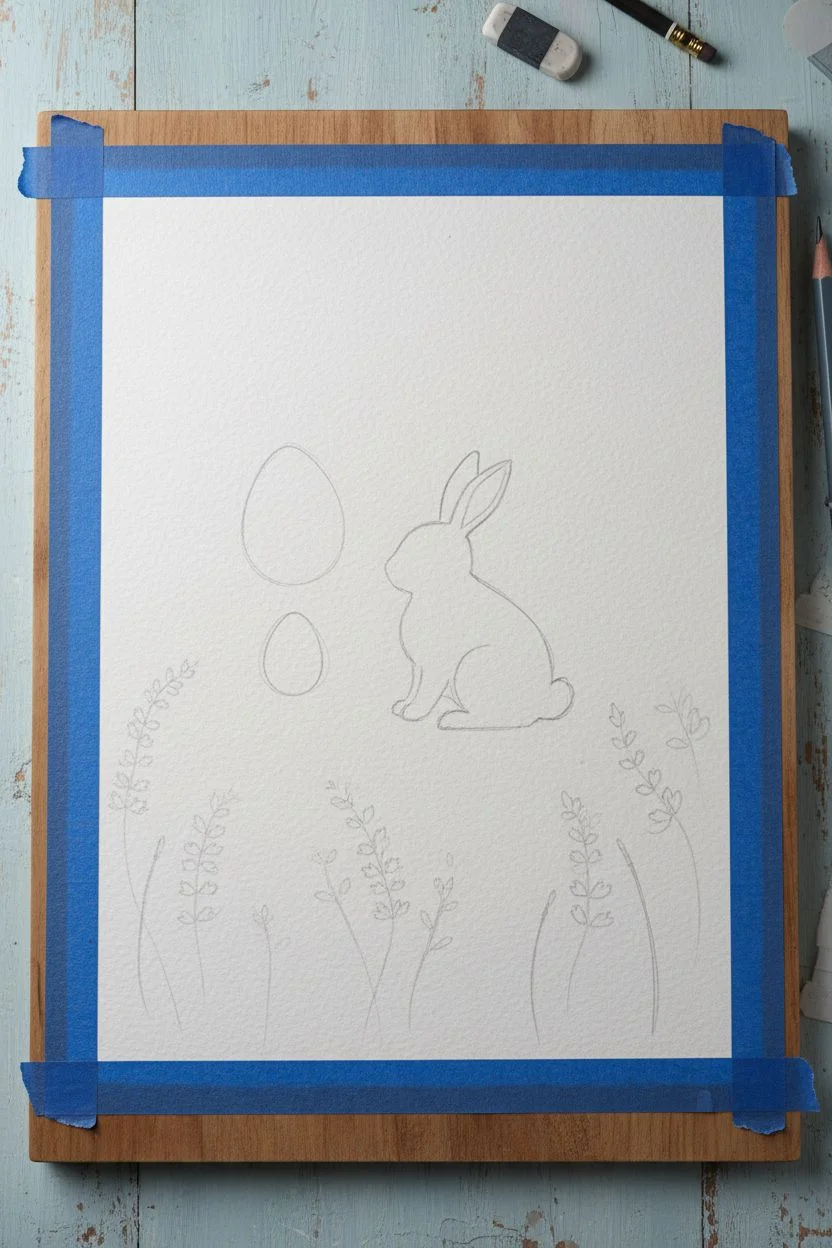
Capture the stillness of a moonlit Easter evening with this striking negative space watercolor project. By masking off your main shapes before painting, you create a crisp, stark contrast against a moody, textured indigo sky.
Step-by-Step
Materials
- Cold press watercolor paper (gives that nice texture)
- Masking fluid (drawing gum) or masking tape/frisket film
- Watercolor paints (Indigo, Prussian Blue, Payne’s Gray)
- Large round watercolor brush (size 10 or 12)
- Small detail brush or an old brush for masking fluid
- Pencil and eraser
- Painter’s tape
- Board for taping down paper
- White gouache or white ink for speckles
- Jar of water and paper towels
- Rubber cement pickup tool (optional)
Step 1: Preparation and Sketching
-
Secure the paper:
Start by taping your watercolor paper down to a sturdy board on all four sides. This ensures your paper stays flat when it gets wet and creates that beautiful clean white border you see in the final piece. -
Sketch the bunny:
Lightly sketch the outline of a sitting bunny in the center-right of your paper. Focus on the simple silhouette shape—ears upright, round body, and a small tail. -
Add scenic elements:
To the left of the bunny, sketch two egg shapes, one larger and one smaller. Then, draw simple, fern-like botanical stems rising from the bottom edge to frame the scene.
Paper Tearing?
If removing masking fluid tears your paper, the fluid may have been on too long or the paper wasn’t 100% dry. Use a heat tool to soften the gum slightly before peeling.
Step 2: Masking
-
Apply masking fluid:
Using an old brush or a silicone applicator, carefully fill in your pencil sketches with masking fluid. You want to cover the bunny, the eggs, and the fern leaves completely. -
Protect the details:
If you want the tiny speckles on the eggs to remain pure white like the paper, dot small amounts of masking fluid inside the egg shapes now. Be sure to let all the masking fluid dry completely before moving on—it should feel tacky but hard. -
Brush care tip:
I always rub a little bar soap on my brush bristles before dipping into masking fluid; it makes cleaning the sticky rubber out much easier later.
Add Dimension
Once the mask is removed, paint a very faint, watery shadow of pale blue-grey along the bottom of the bunny and eggs to ground them so they don’t look like they are floating.
Step 3: The Blue Wash
-
Mix your colors:
Create a deep, watery pool of paint. Mix Indigo with a touch of Payne’s Gray or Prussian Blue to get that rich, stormy night sky color. -
Wet-on-wet technique:
Brush clean water over the entire paper, going right over your dried masking fluid. You want the paper glistening but not swimming in puddles. -
Drop in color:
Load your large brush with the blue mix and start dropping it onto the wet paper. Start from the top and let the color bloom and spread naturally. -
Vary the saturation:
Add more concentrated pigment in some areas and leave others slightly lighter to create a mottled, cloudy texture. The paint will flow around your masked shapes. -
Optional salt texture:
If you want extra texture in the sky, sprinkle a few grains of table salt into the wet paint while it’s still shiny. This pulls the pigment away and creates starry bursts.
Step 4: Finishing Touches
-
Dry thoroughly:
This is crucial: wait until the paper is bone dry. If it’s cold to the touch, it’s still wet. Patience prevents the paper from tearing. -
Remove the mask:
Gently rub away the masking fluid using your finger or a rubber cement pickup tool. Reveal the crisp white paper underneath your blue wash. -
Add speckles:
Dip a stencil brush or stiff toothbrush into white gouache or ink. Flick the bristles to spray tiny white dots across the blue background, mimicking snow or stars. -
Detail the eggs:
If you didn’t mask the dots inside the eggs earlier, used a fine-point pen or a tiny brush with diluted blue paint to add speckles to the white eggs now for that realistic shell look. -
Reveal the border:
Slowly peel off the painter’s tape from the edges, pulling away from the painting at a 45-degree angle to keep the paper intact.
Now you have a serene, frosty bunny scene that perfectly balances simple shapes with rich watercolor texture
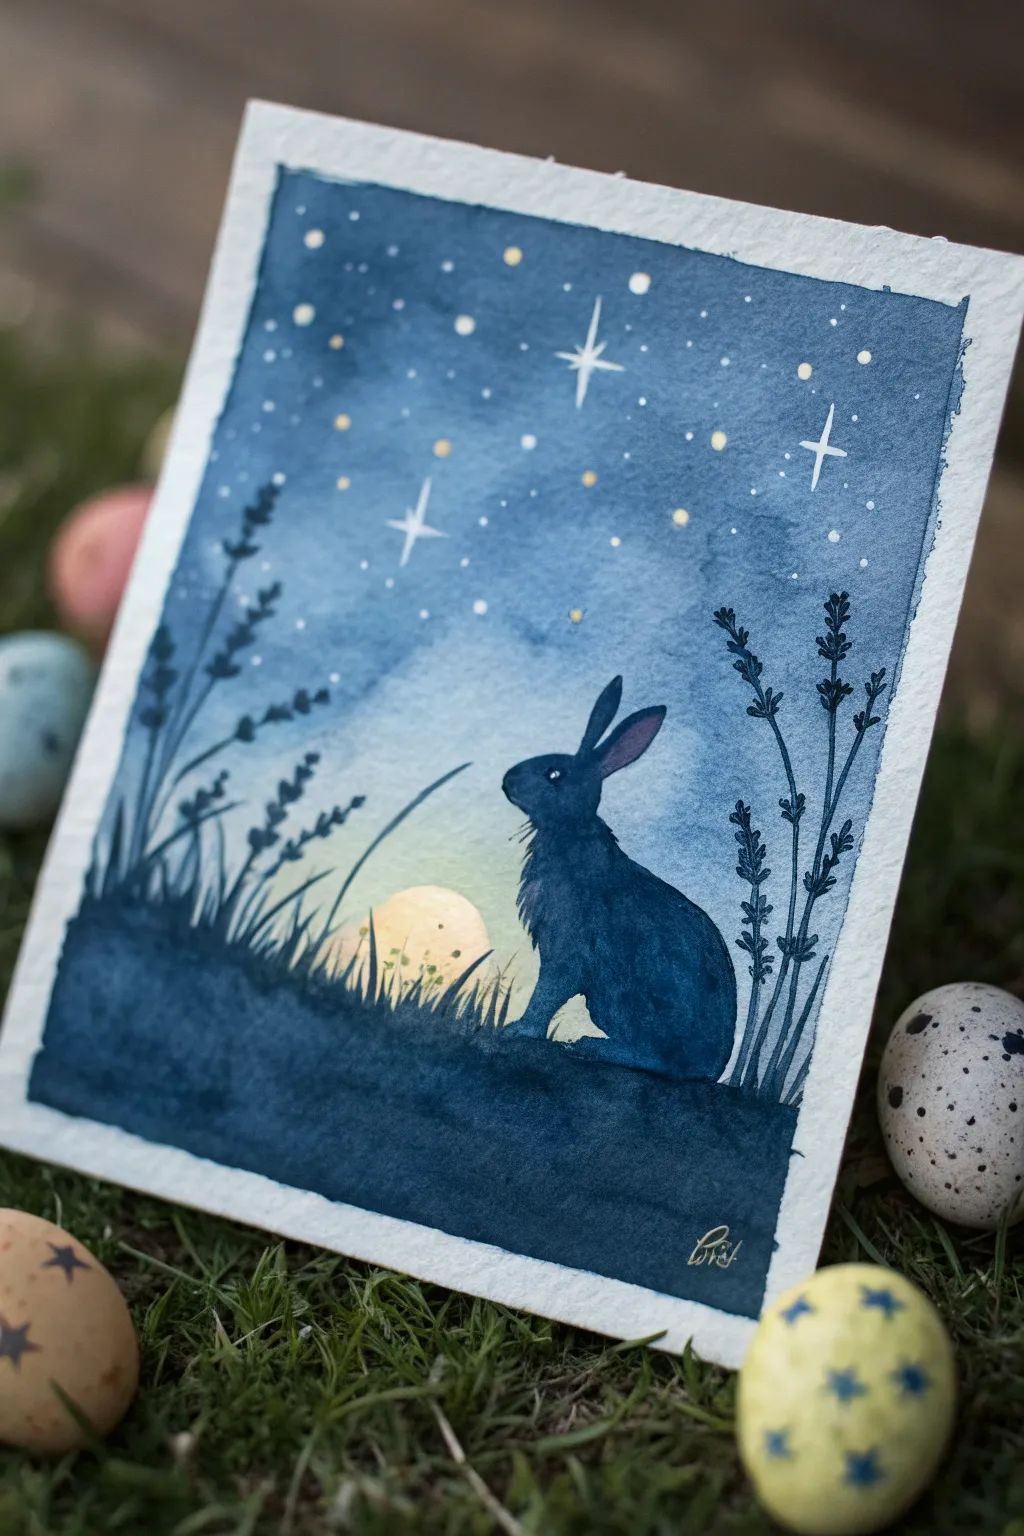
Night-Sky Easter Bunny With a Hidden Egg Hunt Glow

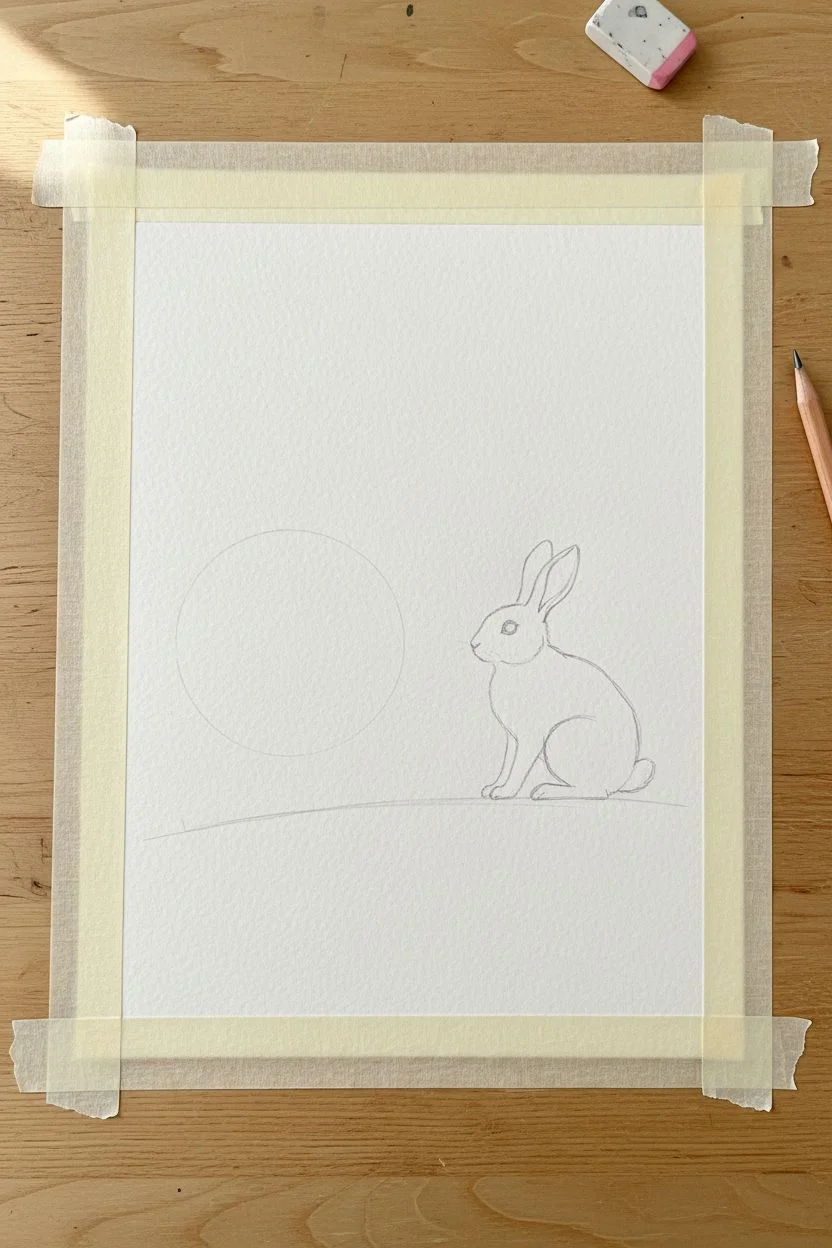
Capture the quiet magic of a spring evening with this celestial watercolor project. By blending deep indigos with a soft horizon glow, you’ll create a mystical backdrop for a simple bunny silhouette that evokes the mystery of a hidden egg hunt.
Step-by-Step Tutorial
Materials
- Cold press watercolor paper (approx. 5×7 inches)
- Watercolor paints (Indigo, Prussian Blue, Black, Lemon Yellow, White Gouache)
- Masking tape or painter’s tape
- Pencil and eraser
- Round watercolor brushes (size 4 and 8)
- Fine liner brush (size 0 or 00)
- Gold or metallic yellow paint (optional for stars)
- Jar of clean water
- Paper towels
Step 1: Setting the Scene
-
Prep the borders:
Begin by taping down all four edges of your watercolor paper to a board or table. This creates that crisp white border seen in the final piece and prevents the paper from buckling when wet. -
Sketch the silhouette:
Lightly sketch the outline of the bunny sitting in profile on the right side. Add a curved horizon line near the bottom third of the paper. Keep your pencil pressure very light so the graphite doesn’t show through later. -
Define the moon glow:
Draw a large semi-circle rising from the horizon line on the left side, representing a rising moon or a giant glowing egg.
Clean Edges Trick
To stop paint bleeding under your tape, quickly run a burnishing tool or the back of your fingernail firmly over the tape edge before you start painting.
Step 2: Painting the Sky
-
Wet the paper:
Using a clean brush, wet the entire sky area with water, stopping carefully at the edges of your bunny sketch and the moon shape. The paper should be glisten, but not hold puddles. -
Apply the glow:
Drop a very watered-down Lemon Yellow or pale cream color right around the top curve of your moon shape, letting it bleed softly outward into the damp paper to create a hazy aura. -
Start with light blue:
While the paper is still wet, introduce a medium blue (like Prussian Blue) starting from the top and working down, fading it out as it approaches the yellow glow to create a soft teal transition. -
Deepen the night:
Mix a strong Indigo or dark blue. Apply this to the top corners and edges of the sky, letting the wet-on-wet technique blend the colors naturally. Keep the area immediately around the bunny and the horizon slightly lighter. -
Let it dry completely:
This is crucial. Wait until the paper is bone dry and cool to the touch before moving on, otherwise your crisp details will bleed.
Step 3: The Silhouette and Details
-
Paint the bunny:
Mix a saturated Indigo with a touch of Black to get a deep, near-black navy. Carefully fill in your bunny sketch. I prefer to paint the edges first with a smaller brush for precision, then fill the center. -
Ground the scene:
Using the same dark navy mix, paint the ground area below the horizon line. You can dab the brush tip along the horizon to suggest the texture of grass rather than a straight line. -
Paint the moon:
Fill in the moon/egg shape with a pale yellow-cream. It should look like a light source, so keep it much lighter than the surrounding grass. -
Add tall grasses:
Switch to your fine liner brush. With the dark navy mix, paint thin, vertical stalks rising from the ground on both sides of the bunny. -
Create foliage texture:
Add small, rhythmic dabbing strokes along the upper parts of the stalks to resemble lavender or wheat. Keep these loose and organic. -
Highlight the bunny:
If your bunny silhouette feels too flat, mix a slightly lighter blue and add a few strokes near the chest or ears to suggest fur texture, or just leave it solid for high contrast.
Moon Magic
Mix a tiny pinch of salt into the wet yellow paint of the moon before it dries. The salt pushes pigment away, creating a textured, crater-like surface.
Step 4: Celestial Final Touches
-
Add major stars:
Using white gouache or undiluted white watercolor on a fine brush, paint a few four-pointed stars. Focus on the upper third of the painting. -
Sprinkle the stardust:
Load a brush with white paint (or gold if you want warmth), hold it over the paper, and tap the handle against another brush to splatter tiny speckles across the sky. -
Add specific star dots:
Dip the back end of your paintbrush into yellow or gold paint and dot specific spots in the sky for larger, round stars. -
The bunny’s eye:
Add a tiny white dot for the bunny’s eye to bring it to life. -
The Reveal:
Once absolutely everything is dry, slowly peel away the masking tape at a 45-degree angle to reveal your crisp white border.
Sign your name in metallic ink at the bottom corner and display your artwork alongside some speckled eggs for a beautiful seasonal vignette


Have a question or want to share your own experience? I'd love to hear from you in the comments below!