Three-piece paintings are one of my favorite ways to make a big statement without needing advanced skills. With the right triptych layout and a simple plan, you can create a single image that flows cleanly across three canvases and looks way more impressive than it was to paint.
Sunset Ombre With Tree Silhouette
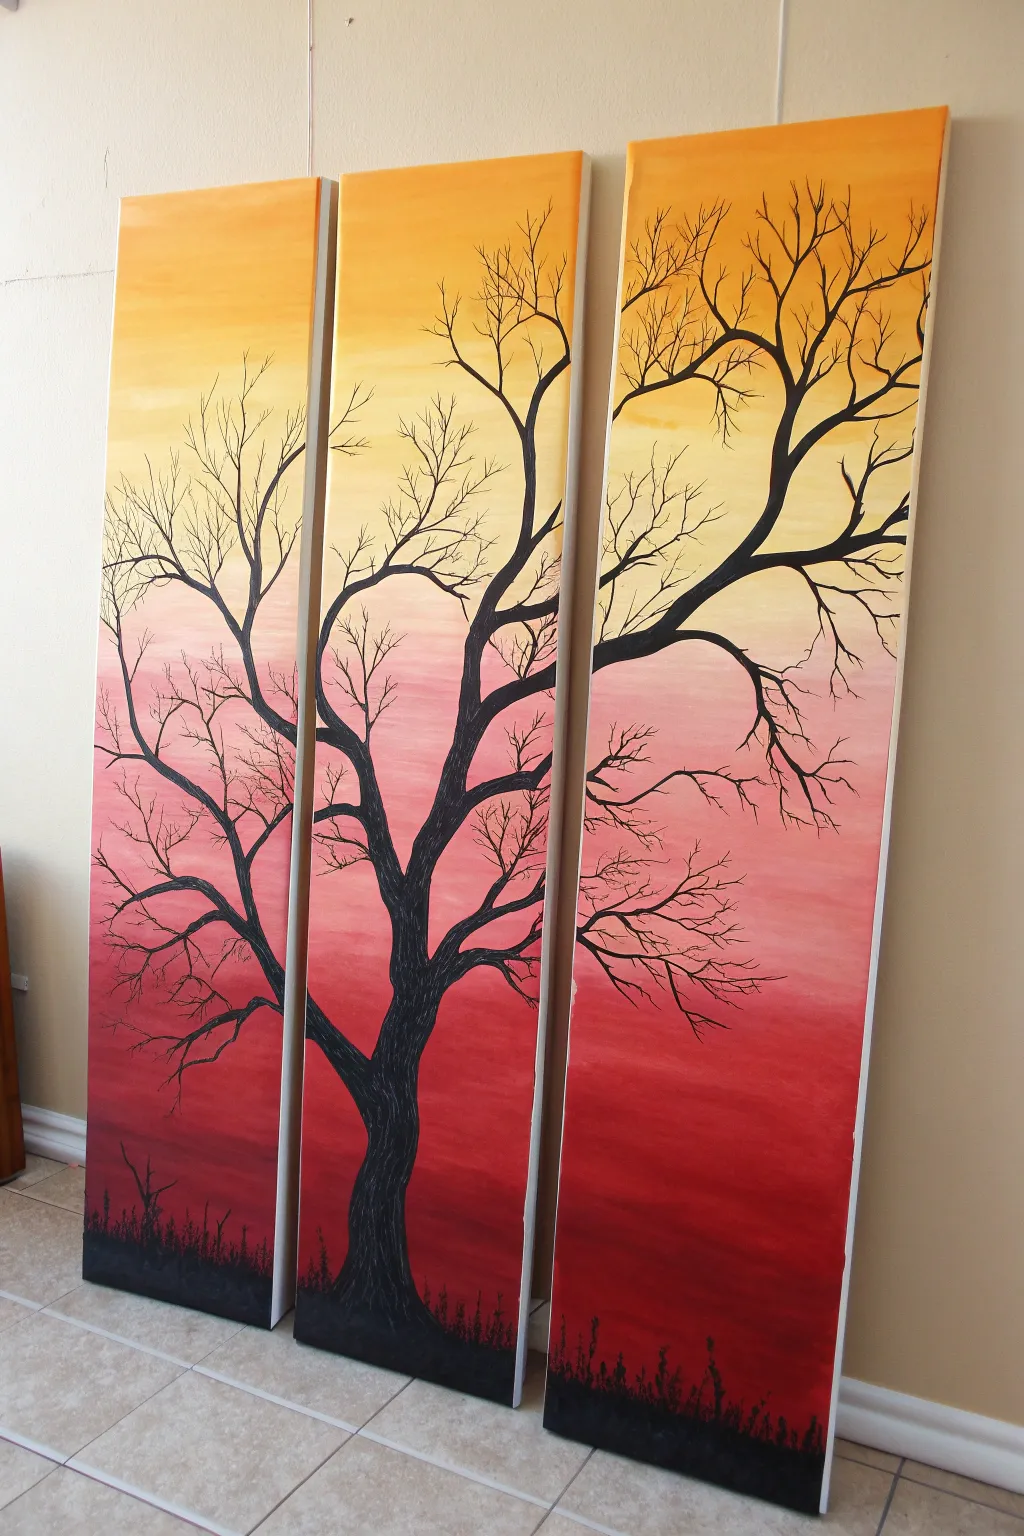
Capture the warmth of a setting sun with this stunning three-piece canvas project featuring a dramatic black tree silhouette. The seamless ombre background transitions from bright yellow to deep crimson, creating a bold statement piece for any room.
How-To Guide
Materials
- 3 tall rectangular stretched canvases (artist quality)
- Acrylic paints: Titanium white, lemon yellow, orange, red, crimson, and black
- Large flat paintbrush (2-3 inch width)
- Medium round brush
- Small liner brush (for fine branches)
- Water cup and paper towels
- Pencil and eraser
- Easel or drop cloth
Step 1: Creating the Ombre Background
-
Prepare the Canvases:
Line up your three canvases side-by-side on your workspace or eased. It is crucial they are touching or very close together so you can paint across all three continuously to ensure the gradient matches perfectly. -
Start with Yellow:
Load your large flat brush with lemon yellow mixed with a touch of white. Paint the top 20-25% of all three canvases with horizontal strokes, ensuring solid coverage. -
Introduce Orange:
Without cleaning your brush thoroughly, pick up some orange paint. Begin painting below the yellow section, blending upwards into the wet yellow paint to create a soft transition. -
Deepen the Gradient:
As you move down toward the middle of the canvases, gradually add more pure orange and then red to your brush. Work in horizontal bands, constantly blending the line where the new color meets the previous one. -
Add the Crimson Layer:
For the lower portion, switch to a deep crimson or dark red. Blend this into the lighter red above it. Keep your brush strokes long and horizontal to mimic the calm look of a sky. -
Paint the Deepest Base:
At the very bottom (the last 10%), mix a tiny bit of black into your crimson to create a very dark, shadowed red horizon line. Paint this strip across the bottom of all three panels. -
Paint the Edges:
Don’t forget to paint the sides of your canvases! Wrap the corresponding color around the edges so the painting looks finished from all angles. Let the background dry completely before moving on.
Step 2: Sketching and Painting the Tree
-
Draft the Trunk:
Once the sky is dry, arrange the canvases with small gaps between them (how they will hang). Lightly sketch the main trunk of the tree with a pencil, placing the base primarily on the center canvas but allowing roots or lower trunk sections to spill onto adjacent panels if desired. -
Map Out Main Branches:
Sketch large, reaching branches that extend from the center canvas onto the left and right panels. Think of a ‘Y’ shape spreading out, ensuring the lines connect visually across the gaps between canvases. -
Paint the Trunk:
Using your medium round brush and black acrylic paint, fill in the trunk. I like to add a tiny drop of water to the black paint to make it flow smoother. Create a solid, opaque silhouette. -
Build the Branch Structure:
Follow your pencil lines to paint the thickest main branches. Keep the pressure firm at the base of the branch and lift off gently as you extend outward to taper the ends. -
Add Secondary Branches:
Switch to a smaller brush. Paint smaller branches shooting off the main ones. Remember that branches naturally grow slightly upward and outward reaching for sunlight. -
Detail the Twigs:
Using your finest liner brush and thinned black paint (almost ink consistency), add delicate twigs to the ends of the branches. These should be very fine lines that fill the negative space in the upper yellow and orange sections. -
Connect the Panels:
Check the visual flow. Ensure that where a branch leaves one canvas and enters the next, the alignment height is accurate so the eye follows the line naturally across the gap. -
Create the Ground:
At the very bottom of the canvases, stipple pure black paint over the dark red base using an old or rough brush. This creates the texture of grass and uneven ground in silhouette. -
Add Ground Textures:
Use the liner brush to flick tiny upward strokes along the black bottom edge to suggest blades of grass or weeds sticking up against the sunset.
Blending Blues?
If acrylics dry too fast while blending the sky, mix in a slow-drying medium or lightly mist the canvas with water to keep the paint workable longer.
Make it Pop
Paint the tree trunk with a very dark grey first, then add pure black on the shadow side to give the silhouette just a hint of 3D dimension.
Hang your masterpieces with about an inch of space between them to complete the visual effect


Birds on a Wire Across Three Panels
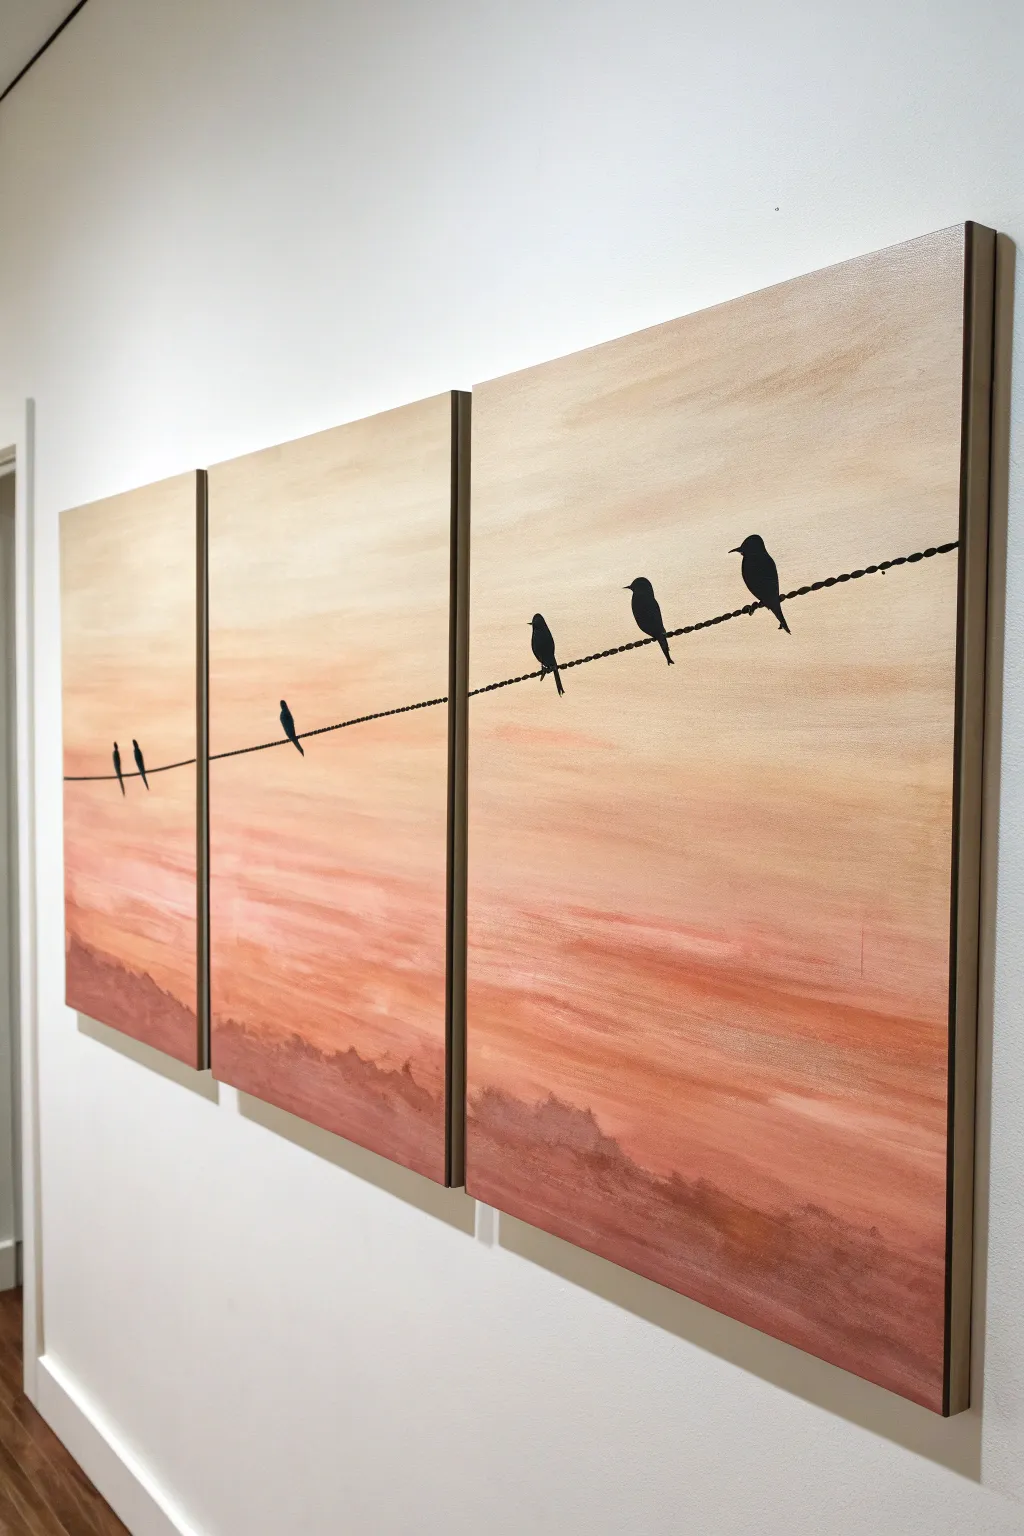
Create a unified scene across three separate canvases with this serene sunset design. The warm gradient background flows seamlessly from one panel to the next, while the crisp silhouettes of birds add a charming focal point.
How-To Guide
Materials
- 3 stretched canvases (same size, e.g., 12×16 or 16×20 inches)
- Acrylic paints (Titanium White, Yellow Ochre, Cadmium Orange, Burnt Sienna, Carbon Black)
- Large flat wash brush (2-3 inch)
- Medium flat brush
- Small round detail brush (size 0 or 1)
- Ruler or straight edge
- Pencil
- Painter’s tape or masking tape
- Palette and water cup
Step 1: Preparation and Sky Gradient
-
Set up the workspace:
Lay your three canvases side-by-side on a flat surface, leaving a very small gap (about half an inch) between them. This gap mimics how they will hang on the wall, ensuring your continuous lines match up perfectly. -
Mix the top sky color:
On your palette, mix a large amount of Titanium White with just a touch of Yellow Ochre. You want a very pale, creamy off-white color for the highest part of the sky. -
Paint the upper section:
Using your large wash brush, paint the top third of all three canvases with your pale mixture. Use long, horizontal strokes that span across the panels to create a smooth, continuous look. -
Prepare the transition color:
Into your existing white mixture, add a small amount of Cadmium Orange. Do not mix it fully; leave it slightly streaky to create natural cloud-like variations. -
Blend the middle section:
Apply this warmer peach tone to the middle third of the canvases. While the paint is still wet, gently brush upward into the pale top section to create a soft, seamless gradient where the colors meet. -
Mix the horizon color:
Clean your brush. Mix Cadmium Orange with a little Burnt Sienna and a touch of white to create a rusty, sunset pink color. -
Paint the lower sky:
Fill the bottom third of the canvases with this darker rusty blend. Again, work quickly while the paint is wet to blend it upward into the middle peach section. -
Add cloud details:
Reload your brush with straight Titanium White and wipe most of it off on a paper towel. Lightly dry-brush horizontal streaks across the transition zones to suggest wispy clouds. -
Create the heavy clouds at the bottom:
Mix Burnt Sienna with a tiny dot of Black to create a dark brownish-red. Use a medium flat brush to dab irregular, heavy cloud shapes right along the very bottom edge of the canvases. I find a messy, tapping motion works best here. -
Let it dry completely:
Allow the background to dry fully before moving on to the wire, otherwise your black paint might bleed into the sky.
Sticky Situation
Use a strip of painter’s tape across the backs of the canvases to hold them temporarily together while you draw the pencil line for the wire. This guarantees perfect alignment.
Step 2: The Wire and Birds
-
Draft the wire placement:
Place the canvases back in their side-by-side arrangement. Use a ruler and pencil to lightly draw a straight diagonal line that starts lower on the left canvas and ends higher on the right canvas. -
Paint the main wire:
Load a small round brush with Carbon Black paint thinned slightly with water. Carefully paint over your pencil line. A fluid, ink-like consistency helps create a smooth, unbroken line. -
Add wire texture:
To make the wire look twisted or braided, add tiny, evenly spaced bumps or dots along the top edge of the black line once the first layer is dry. -
Outline the bird shapes:
Using the pencil, lightly sketch simple bird silhouettes sitting on the wire. Vary their sizes and spacing—perhaps two on one canvas, one on another, to keep the composition interesting. -
Fill in the silhouettes:
Use your smallest detail brush and pure Carbon Black to fill in the bird shapes. Start with the bodies, then add the heads. -
Refine the tails and beaks:
Add the delicate details last. Use the very tip of your brush to pull paint downward for the tail feathers and create tiny triangles for the beaks. -
Clean up edges:
Check the sides of your canvases. If you want a gallery-wrapped look, paint the edges to match the sky gradient, or paint them solid black for a framed appearance.
Metallic Touch
For a subtle magic-hour glow, mix a tiny drop of gold metallic paint into your orange sky color, or glaze the clouds with iridescent medium after the paint dries.
Hang your new triptych with a small gap between panels to enjoy the satisfying effect of the continuous line
Moonlit Night Gradient With Pine Trees
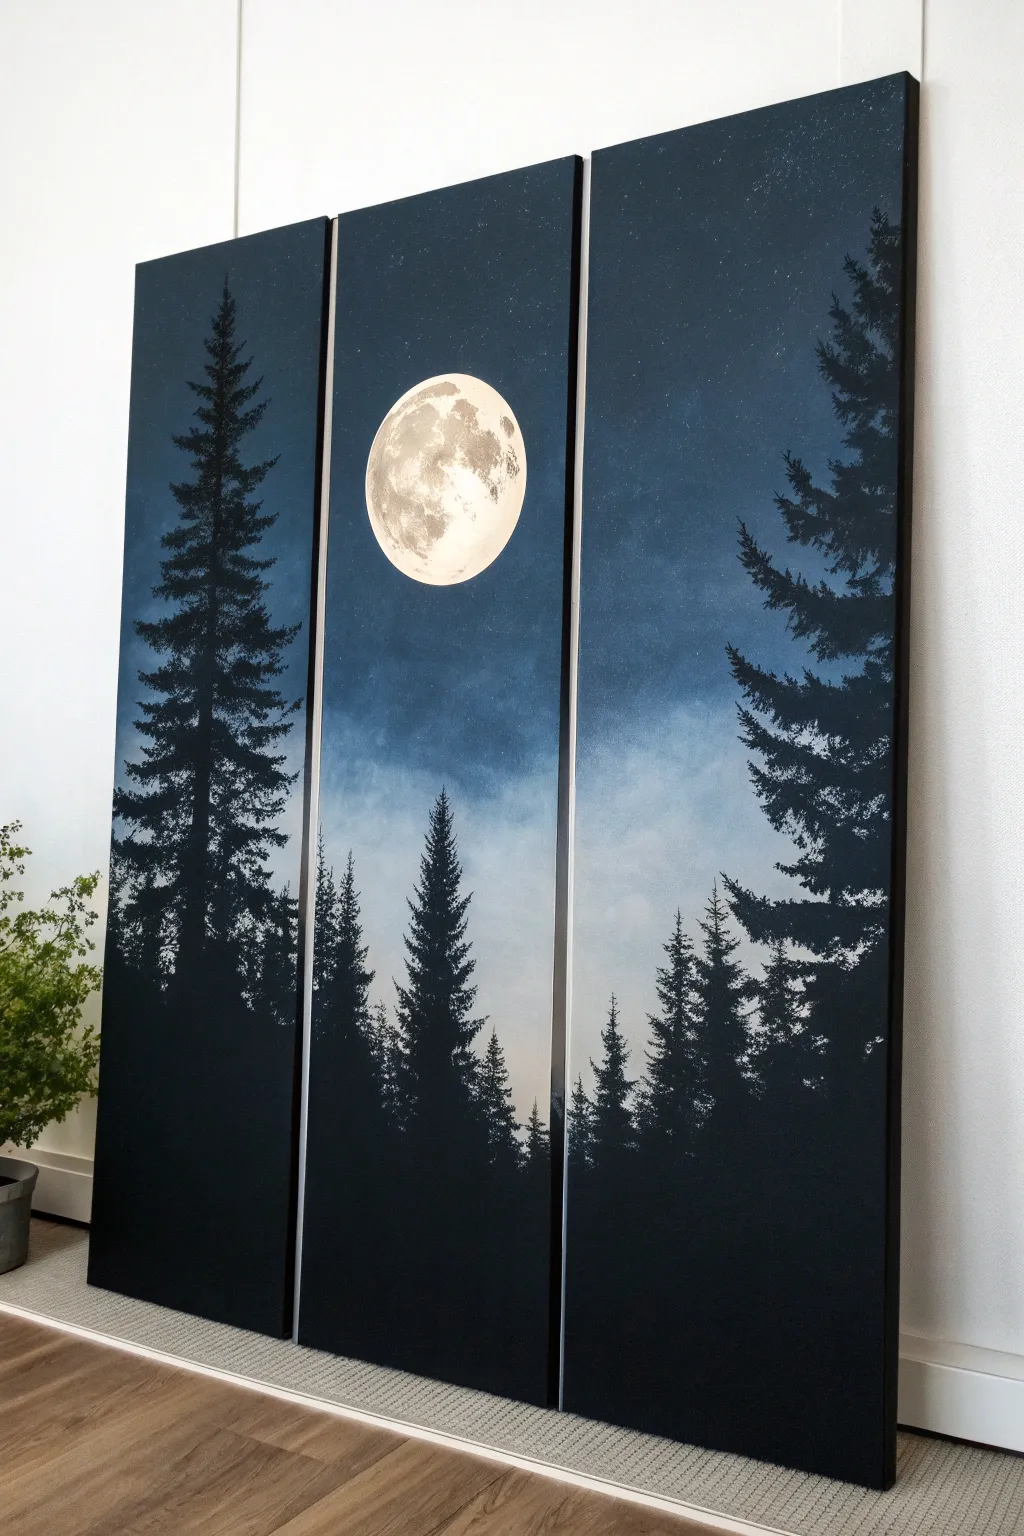
Transform three blank canvases into a stunning nocturnal window with this shadowy pine forest scene. The high contrast between the luminous full moon and the pitch-black silhouettes creates a dramatic, peaceful atmosphere perfect for any room.
Step-by-Step Tutorial
Materials
- 3 Tall vertical canvases (equal size, e.g., 12×36 inches)
- Acrylic paints: Mars Black, Titanium White, Phthalo Blue (or Prussian Blue), Ultramarine Blue
- Large flat brush or sponge brush
- Medium round brush
- Small fine liner brush
- Old toothbrush (for stars)
- Palette or paper plate
- Water cup and paper towels
- Masking tape (optional)
Step 1: Preparation and Sky Gradient
-
Set up the triptych:
Lay your three canvases side-by-side on a flat surface or easel. Push them close together so they are touching; this allows you to paint the sky as one continuous image across all three panels. -
Mix the darkest blue:
On your palette, mix a large amount of Phthalo Blue with a touch of Mars Black to create a deep, midnight blue. You want this to look almost black but still retain a rich blue hue. -
Paint a dark vignette:
Using your large flat brush, paint the top corners and edges of the canvas assembly with the dark midnight blue mixture, leaving the center area somewhat open. -
Create the mid-tone blue:
Add a little Titanium White to your blue mixture to create a medium steel blue shade. Blend this into the dark edges, working your way slightly inward. -
Add the misty horizon:
Mix a light, misty blue using mostly Titanium White with just a hint of Ultramarine Blue. Paint this in the lower-middle section where the tree tops will eventually be, blending it upward into the darker blues to create a soft, glowing atmosphere. -
Smooth the transition:
While the paint is still wet, use a clean, slightly damp brush to feather the edges where the different blue tones meet, ensuring a smooth, seamless gradient from the dark corners to the light center. -
Dry thoroughly:
Allow the background gradient to dry completely before maximizing the contrast in the next steps.
Step 2: The Moon and Stars
-
Position the moon:
In the upper center of the middle canvas, use a small round brush and pure Titanium White to paint a solid circle. I prefer to not make it perfectly round to keep it looking natural. -
Add lunar texture:
Mix a tiny drop of black or grey into your white. Use a mostly dry brush to dab small, irregular splotches onto the white moon circle to simulate craters and shadows. -
Create the stars:
Dilute a small amount of white paint with water until it is runny. Dip an old toothbrush into it, point the bristles toward the canvas, and run your thumb over them to flick tiny specks of ‘stars’ across the upper dark sections of the sky. -
Protect the moon:
Be careful not to spray stars directly over your moon; you can hold a piece of paper over the moon circle while flicking paint if you’re worried about overspray.
Star Splatter Mess?
If you flicked too many stars or made a blob, quickly wipe it with a damp paper towel. If it dried, just dab a little of your dark blue background color over the mistake to hide it.
Step 3: Silhouetted Trees
-
Outline the main trees:
Switch to pure Mars Black. Identify where you want your tallest trees—usually one dominant tree on each outer panel. Paint a vertical line for the trunk of each main tree. -
Stipple the foliage:
Using a medium round brush or a fan brush, tap black paint onto the canvas starting from the top of the trunk and working down. Use a jagged, side-to-side motion to mimic pine branches getting wider near the base. -
Fill the dense forest:
Paint the bottom third of the canvases almost solid black to represent the dense forest floor and undergrowth, creating a solid base for your trees. -
Add background trees:
For the trees in the distance (especially in the center panel), mix a tiny bit of the background blue into your black to make a dark charcoal grey. Paint smaller, thinner trees between the large black ones to create depth. -
Refine the edges:
Use your fine liner brush to add tiny, sharp details like the very tips of the pine trees or stray branches sticking out from the main silhouette. -
Paint the canvas sides:
Don’t forget the edges! Since this is a triptych, painting the sides of the canvas black ensures the image looks finished when viewed from an angle.
Level Up: Glow Effect
Glaze a very thin layer of watered-down white paint around the moon’s edge before painting the trees. This creates a hazy ‘halo’ effect that makes the moon look like it’s glowing.
Hang your panels with about an inch of space between them to complete this serene midnight window effect


Cherry Blossom Branch With Finger-Painted Blooms
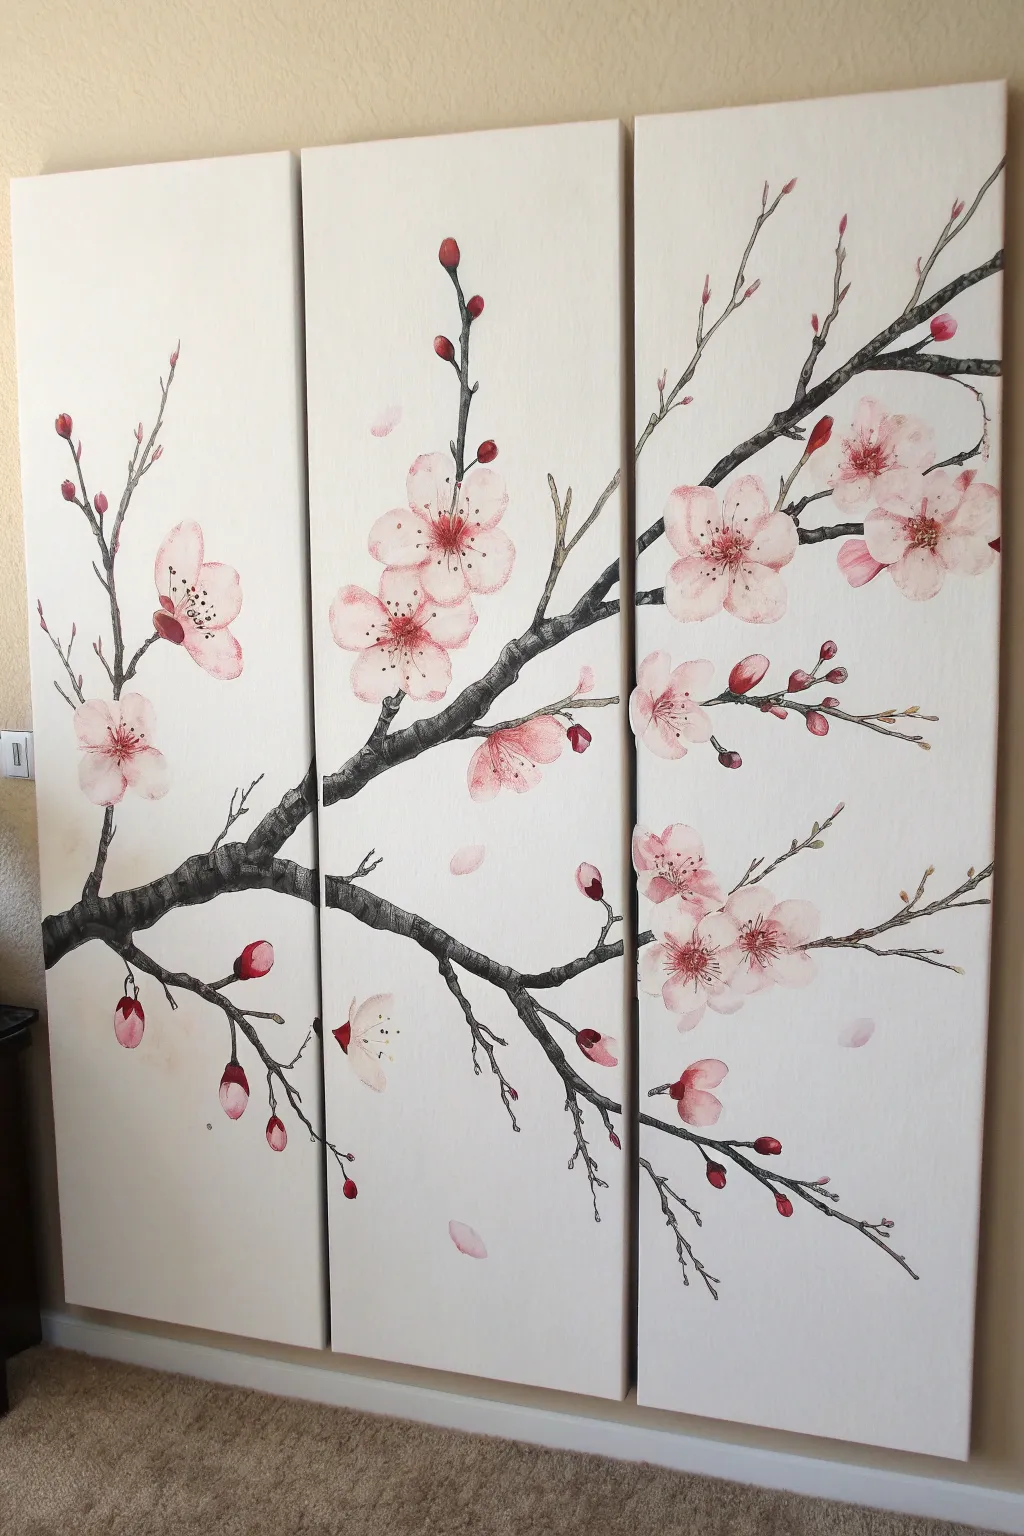
Bring the delicate beauty of spring indoors with this elegant three-piece canvas set featuring a sprawling cherry blossom branch. The split-panel composition adds a modern, sophisticated touch while the soft pink blooms create a calming atmosphere for any room.
Step-by-Step Guide
Materials
- 3 tall rectangular canvases (e.g., 12×24 or 12×36 inches)
- Acrylic paints: Mars Black, Titanium White, Alizarin Crimson, Burnt Umber
- Assorted brushes: 1-inch flat brush, #4 round brush, fine liner brush
- Small sea sponge or round foam pouncer
- Palette or paper plate
- Water cup and paper towels
- Pencil and eraser
- Ruler or straight edge
Step 1: Preparation and Sketching
-
Arrange your canvas:
Lay your three canvases side-by-side on a flat surface or easel, leaving a small gap (about 1 inch) between them to simulate how they will hang on the wall. This ensures your branch flows naturally across the gaps. -
Plan the main branch:
Using a pencil, lightly sketch the main thick branch starting from the bottom left of the first canvas. Let it curve upward across the middle panel and extend into the top right of the third panel. -
Add secondary twigs:
Sketch smaller offshoot branches and twigs reaching outward. Vary their lengths and angles to creating a natural, organic look rather than perfect symmetry. -
Mark flower placements:
Lightly draw small circles or clusters where you want your main cherry blossom flowers to sit. Place some directly on the branch and some floating near the ends as buds.
Too Heavy-Handed?
If your petals look too solid or opaque, dip your brush in water before picking up paint. Acrylics can be used like watercolors to get that ethereal, soft look.
Step 2: Painting the Branch Structure
-
Mix your branch color:
On your palette, mix Mars Black with a touch of Titanium White and Burnt Umber to create a dark, charcoal grey. It shouldn’t be pitch black, but rather a deep, woody tone. -
Base coat the branches:
Use a round brush to paint the main branch structure, following your sketch. Apply the paint slightly unevenly to suggest the rough texture of tree bark. -
Add fine details:
Switch to a liner brush for the very thin twigs at the ends of the branches. Use a light touch, lifting the brush as you reach the tip to create a tapered point. -
Create bark texture:
Mix a lighter grey by adding more white to your black mix. Using a “dry brush” technique (wipe most paint off on a towel), lightly drag the brush horizontally across the dried main branch to highlight the ridges of the bark. -
Add shadows:
Take pure black or a very dark grey and paint along the bottom edge of the branches to give them weight and roundness.
Add Metallic Shimmer
Once the painting is dry, lightly glaze the flower centers with a transparent gold metallic paint. It catches the light beautifully when hung.
Step 3: Blooming the Flowers
-
Mix the petal pinks:
Create a gradient of pinks on your palette. Start with pure Titanium White, then mix a separate pile of very pale pink (white + tiny dot of red), and a medium pink. -
Paint the first petal layer:
For the open flowers, use a small round brush to paint five petal shapes using the palest pink. Keep the paint slightly watery for a translucent, watercolor-like effect. -
Layering color:
While the first layer is still slightly damp, dab a touch of medium pink into the center of the flower and let it bleed outward slightly into the pale petals. -
Painting the buds:
For the closed buds, use a slightly darker, more saturated pink. Paint small tear-drop shapes at the tips of the thin twigs. -
Add falling petals:
Paint single, small petal shapes floating in the empty white space of the canvas. This creates movement and makes the composition feel dynamic.
Step 4: Final Details
-
Detail the flower centers:
Once the pink petals are fully dry, mix a deep reddish-brown. Use your finest liner brush to paint tiny, radiating lines from the center of each open flower. -
Add stamen dots:
Dip the very tip of your liner brush or a toothpick into white or dark yellow paint. Place tiny dots at the ends of the radiating center lines you just painted. -
Connect the buds:
Use your dark grey branch color to paint the tiny “cups” (sepals) at the base of the flower buds, connecting them firmly to the twigs. -
Review and refine:
Step back and look at the three canvases as a whole. If a section looks too empty, add a small falling petal or extend a twig to balance the image.
Hang your masterpieces with equal spacing between them to complete this serene nature display
BRUSH GUIDE
The Right Brush for Every Stroke
From clean lines to bold texture — master brush choice, stroke control, and essential techniques.
Explore the Full Guide
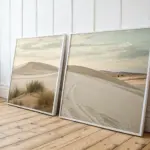
Big Wildflower Stems in a Breezy Field
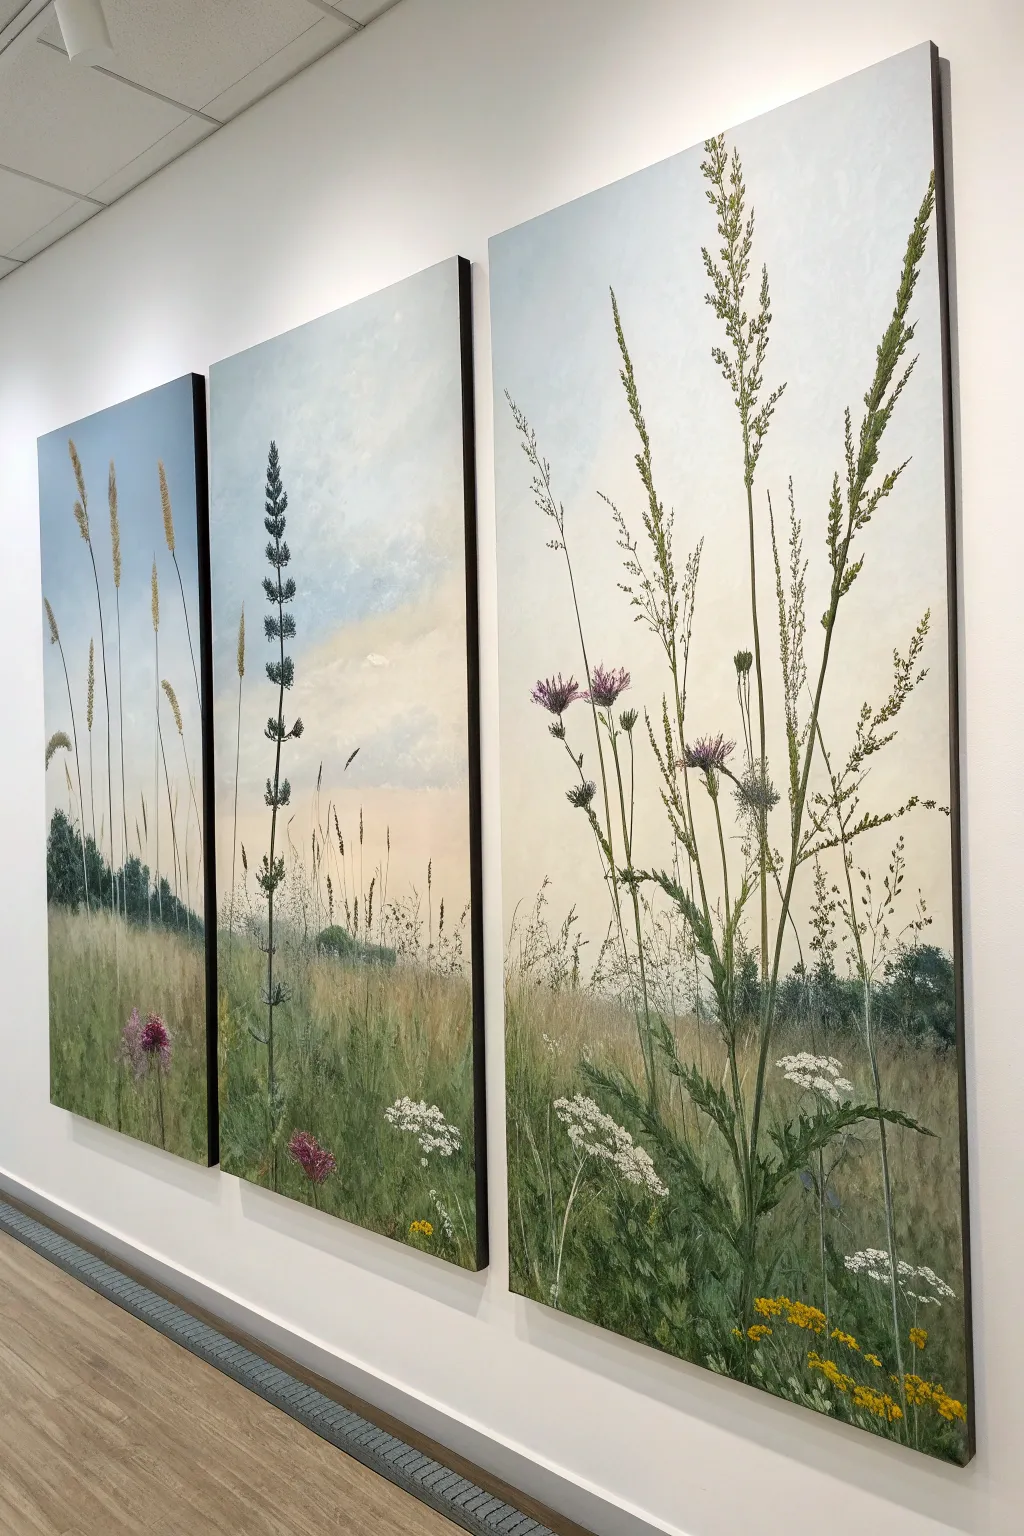
Capture the delicate beauty of a summer meadow with this three-panel painting featuring tall grasses and wildflowers against a soft sky. This project uses a continuous landscape technique to create a seamless, panoramic view that brings the outdoors inside.
Step-by-Step
Materials
- 3 large vertical canvases (e.g., 24×48 inches)
- Acrylic paints (Titanium White, Cerulean Blue, Sap Green, Yellow Ochre, Burnt Umber, Alizarin Crimson, Purple)
- Large flat brushes (2-inch)
- Medium filbert brushes
- Fine liner brushes or rigger brushes
- Palette knife
- Easels (or a large wall space to hang canvases together)
- Water container and paper towels
- Chalk or pastel pencil for sketching
Step 1: Setting the Sky and Horizon
-
Prepare the workspace:
Arrange all three canvases side-by-side on your easel or wall with a small gap (about 1-2 inches) between them. This is crucial because you want the horizon line and cloud patterns to flow naturally across the gap. -
Mix the sky gradient:
On your palette, create a large pool of sky blue using Cerulean Blue and Titanium White. Creating three distinct shades—a darker blue for the top, a medium blue, and a very pale, almost white blue for the horizon—helps add depth. -
Paint the upper sky:
Using a large 2-inch flat brush, apply the darkest blue mix to the top third of all three canvases. Use long, horizontal strokes to blend the paint smoothly across the panels. -
Blend downward:
While the paint is still wet, transition to your medium blue and finally the palest blue as you move down the canvas. I like to work quickly here to ensure a soft, seamless gradient without hard lines. -
Add soft clouds:
With a clean brush and pure Titanium White, scumble in soft, indistinct cloud shapes near the middle section where the blue fades. Keep these very subtle and hazy, avoiding sharp edges. -
Establish the background trees:
Mix a dark, desaturated green using Sap Green and a touch of Purple. Paint a low, uneven tree line along the bottom third of the canvases, keeping the shapes blurry to suggest distance.
Uneven Horizon?
If your horizon line doesn’t match up across canvases, use a yardstick or painter’s tape across all three panels at once to mark the line before you start painting details.
Step 2: The Grassy Foundation
-
Base coat the field:
Mix Yellow Ochre, Sap Green, and White to create a muted, warm meadow color. Fill the bottom section of the canvases below your tree line, bringing the color right down to the bottom edge. -
Build grass texture:
Using a medium filbert brush and varying shades of green (some mixed with Burnt Umber for shadows, some with Yellow for highlights), add vertical strokes to the field area. Keep layers thin and varying in height. -
Define the mid-ground:
Paint slightly taller, more distinct clumps of grass in the middle ground using a darker green. These strokes should be sharper than the base layer but not as detailed as the foreground will be.
Add Dimension
Mix a clear glazing medium with a tiny drop of gold paint and glaze over the sunlit areas of the grass field. This adds a subtle, warm shimmer that catches the light.
Step 3: Details and Foreground Flora
-
Sketch main stems:
Once the background is dry, use a piece of chalk to lightly map out where your main tall stems will go. Position the tallest ones in the foreground of the right and left panels to frame the composition. -
Paint structural stems:
Switch to a fine liner brush or rigger brush. Mix a dark green-brown and paint the long, thin stems of the foreground weeds. Use a confident, quick upward motion to get a natural taper at the top. -
Create seed heads:
For the golden grasses, mix Yellow Ochre and White. Use a fan brush or a frayed old brush to dab texture at the tops of the stems on the left panel, creating fluffy seed heads. -
Add thistle details:
On the right panel, paint the spiky thistle leaves using a mix of Green and Blue. Add the flower heads with small dabs of Purple and Alizarin Crimson, topped with tiny flicks of White for fluff. -
Queen Anne’s Lace:
For the white flower clusters (Queen Anne’s Lace) in the lower right, use a small round brush to dot thick Titanium White in umbrella shapes. Keep the dots distinct rather than painting a solid white blob. -
Connect the panels:
Stand back and look at the triptych as a whole. Ensure that any sweeping lines of grass or cloud formations visually ‘jump’ the gap between canvases effectively. -
Final highlights:
Mix a very pale yellow-green. Add final highlights to the sun-facing sides of the tallest stems and the tips of the nearest leaves to make them pop against the background.
Hang your masterpieces with equal spacing between them to enjoy your calm meadow view
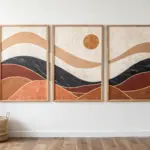
Simple Desert Sunset With Cactus Silhouettes
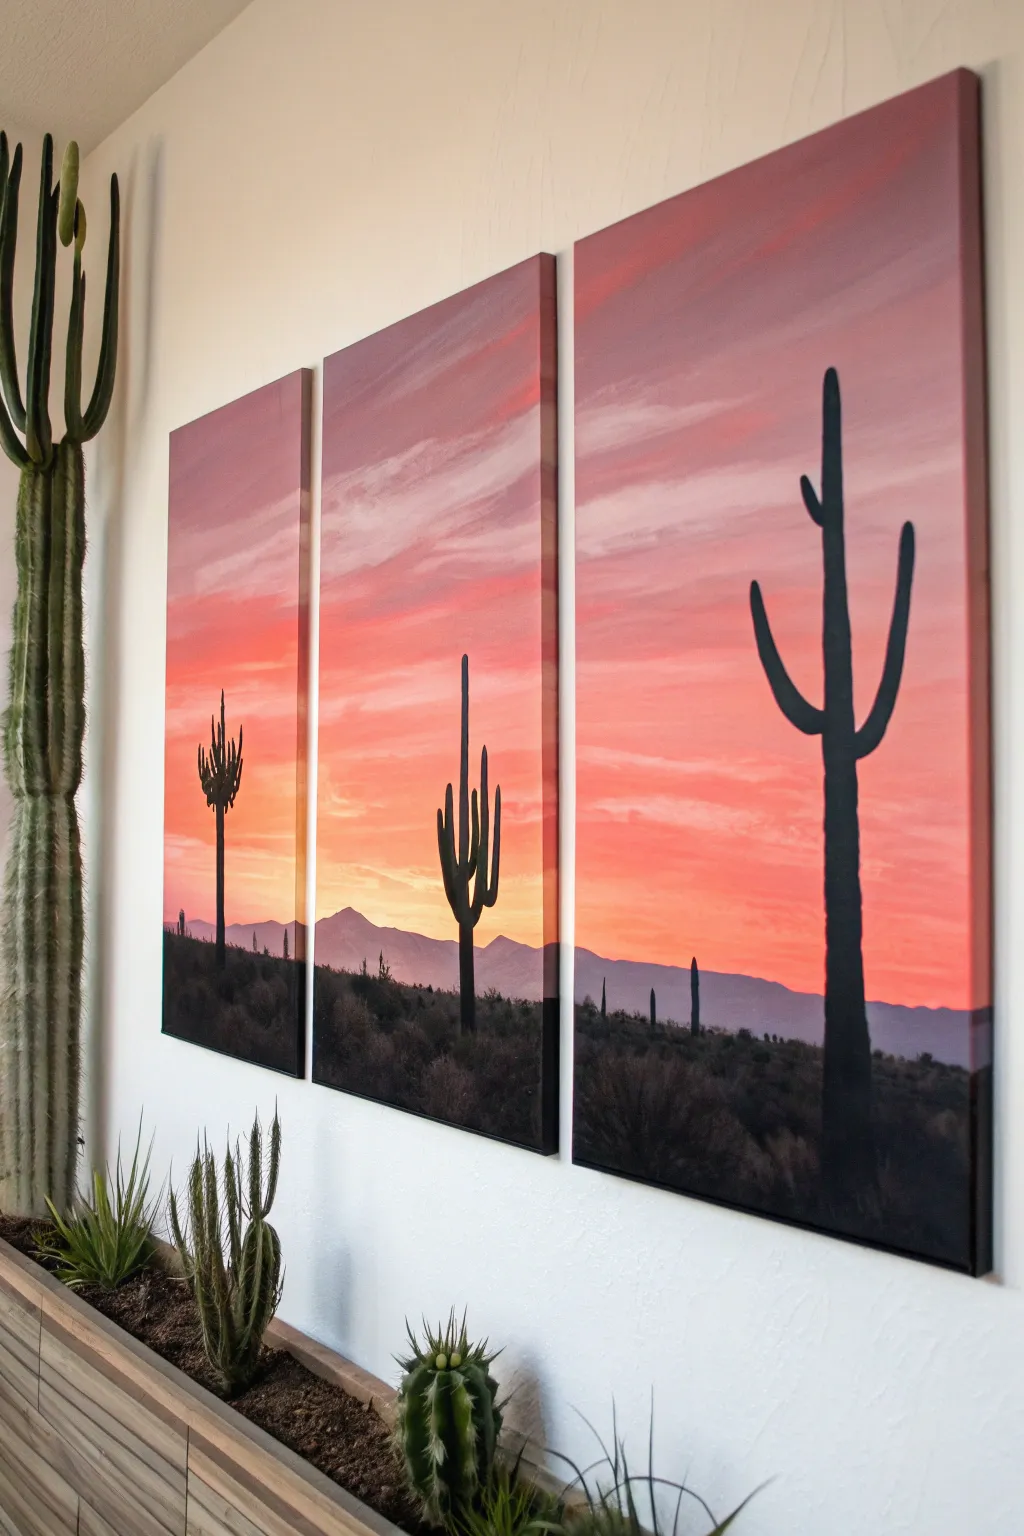
Capture the warmth of a southwestern evening with this striking three-panel canvas set. Using a simple gradient blending technique and bold silhouettes, you will create a unified landscape that flows seamlessly across separate pieces.
Step-by-Step Guide
Materials
- 3 Stretched canvases (same size, rectangular)
- Acrylic paints (Titanium White, Cadmium Yellow, Orange, Alizarin Crimson, Burnt Umber, Mars Black)
- Wide flat brush (2-3 inch)
- Medium flat brush
- Small round detail brush
- Palette for mixing
- Cup of water
- Paper towels
- Chalk or pastel pencil (white or light gray)
- Painter’s tape or masking tape
Step 1: Setting the Stage
-
Arrange the workspace:
Lay your three canvases side-by-side on a flat surface or easel. Push them close together until they are touching; this is crucial because you will be painting the sky as one continuous image across all three surfaces. -
Prepare the gradient palette:
Squeeze out generous amounts of white, yellow, orange, crimson, and a touch of purple (or mix crimson with blue) onto your palette. You want your colors ready to go because acrylics dry fast, and blending requires wet paint.
Step 2: Painting the Sky
-
Start the top section:
Using your wide flat brush, mix a dusty purple-pink using crimson, a tiny bit of blue or black, and white. Apply this horizontal stroke across the very top of all three canvases. -
Transition to pinks:
Wipe your brush slightly (don’t rinse fully) and pick up the crimson and orange mix. Paint a band directly below the purple, blending the wet edges where they meet to create a soft transition. -
Add warmth:
Moving downward, introduce pure orange and mix it with a little cadmium yellow on your brush. Apply this to the middle section of the canvases, using long, confident horizontal strokes that span across the gaps between the canvases. -
Paint the horizon glow:
For the lowest sky section, mix a bright, pale yellow using plenty of white. Blend this from the bottom up into the orange layer, creating the appearance of the sun just having set. -
Create cloud textures:
While the sky is still slightly tacky, take a cleaner, dry brush with a very small amount of white and pale pink paint. Gently streak in wispy, horizontal clouds across the upper sections to break up the solid colors. -
Let it cure:
Allow the background gradient to dry completely before moving on. This usually takes about 20-30 minutes depending on humidity.
Streak Fixer
If your sky blending looks streaky, use a dry, soft mop brush to gently sweep over the wet paint. This softens harsh lines and creates an airbrushed effect.
Step 3: Adding the Landscape
-
Sketch the horizon:
Using a piece of chalk, lightly sketch a low, uneven mountain range across the bottom third of the canvases. Make sure the line connects visually from one canvas to the next. -
Mix the mountain color:
Create a hazy purple-gray color by mixing purple, white, and a touch of gray. It should be darker than the sky but lighter than pure black to create atmospheric perspective. -
Paint the distant mountains:
Fill in the mountain shapes with your medium flat brush. The top edge should be crisp against the sunset sky. -
Add the foreground ground:
Mix Mars Black with a little Burnt Umber to create a very dark, warm black. Paint the immediate foreground at the very bottom, making it slightly uneven to represent desert scrub. -
Texture the scrub brush:
Using an old or stiff brush, tap the top edge of the black foreground to create the look of small bushes and desert textures against the lighter mountain background.
Placement Pro Tip
Keep a 1-inch gap between canvases while painting if you plan to hang them spaced apart. This accounts for the visual break in the image.
Step 4: The Silhouettes
-
Plan the cacti placement:
Decide where your main cacti will go. In the referenced style, place a large Saguaro on the right panel, a medium one in the center, and perhaps a smaller one on the left. -
Paint the main trunks:
Using the dark black-brown mix and a medium flat brush turned sideways (or a round brush), paint vertical lines for the main trunks of the cacti. Ensure the lines are straight but have slightly organic, bumpy edges. -
Add the arms:
Switch to a smaller round brush to paint the arms of the cacti. Curve them upwards in that classic ‘U’ shape. Vary the height and number of arms for visual interest. -
Refine the edges:
I like to go back with my smallest detail brush to sharpen the tips of the cactus arms and smooth out any awkward connections where the arms meet the trunk. -
Add distant details:
Paint tiny, thin vertical lines in the background mountains or mid-ground to suggest far-off cacti. These should be very small compared to your foreground giants. -
Paint the canvas sides:
Don’t forget the edges! Continue your sky, mountains, and ground colors onto the sides (depth) of the canvases for a professional, gallery-wrapped look.
Once dry, hang your masterpiece with slight spacing between panels to let that beautiful horizon line stretch across your wall.

PENCIL GUIDE
Understanding Pencil Grades from H to B
From first sketch to finished drawing — learn pencil grades, line control, and shading techniques.
Explore the Full Guide
Rainy Day Drips as the Design
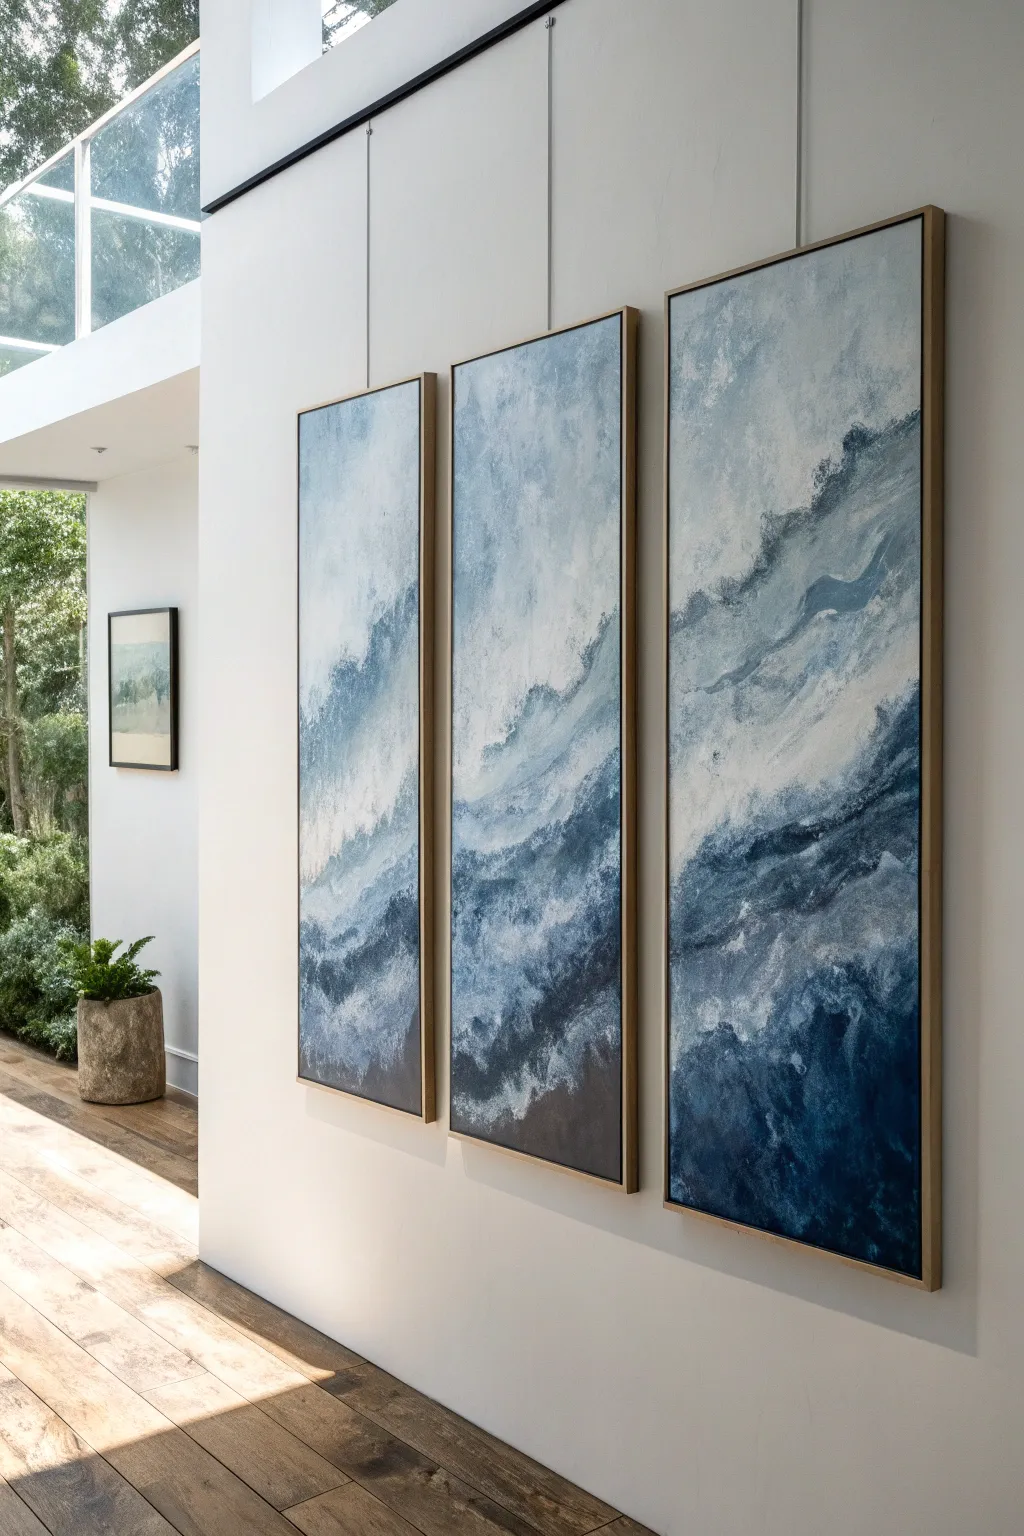
Capture the moody elegance of a rain-swept horizon with this striking abstract triptych. Using vertical motion and a limited palette of blues and greys, you will create a seamless, flowing atmosphere that evokes the feeling of a storm passing over the sea.
Step-by-Step
Materials
- 3 tall rectangular canvases (same size, e.g., 20×40 inches)
- Acrylic paints: Prussian Blue, Phthalo Blue, Payne’s Grey, Titanium White, Raw Umber
- Acrylic glazing medium or flow aid
- Large flat paintbrush (2-3 inch)
- Medium round brush
- Spray bottle with water
- Clean rags or paper towels
- Easel or large vertical work surface
- Drop cloth
Step 1: Preparation and Base Layer
-
Prepare the workflow:
Set up your three canvases side-by-side on your easel or wall. It is crucial to work on all three simultaneously to ensure the horizon lines and color gradients flow continuously across the gaps. -
Mix your base tone:
Create a wash by mixing Titanium White with a generous amount of water or flow aid. You want a milky consistency that is semi-transparent. -
Apply the background:
Cover all three canvases with this white wash using your large flat brush. Keep the strokes rough and random to build texture for the later layers.
Gravity Assistance
Work vertically! Gravity is your best tool here. Let the paint do the work rather than forcing brushstrokes.
Step 2: Creating the Stormy Atmosphere
-
Mix the mid-tones:
Combine Phthalo Blue with Titanium White to create a stormy sky blue. Add a touch of glazing medium to extend the drying time. -
Establish the sky:
Start painting at the top third of the canvases. Use crisscross strokes to apply the blue, leaving some of the white background peeking through for an airy feel. -
Add the deep blues:
While the sky is still damp, mix Prussian Blue and Payne’s Grey. Apply this darker mixture starting from the bottom third, blending upwards. This grounds the artwork. -
Blend the transitions:
Use a clean, damp large brush to soften the area where the sky blue meets the dark bottom section. Use horizontal sweeping motions to suggest a horizon or rolling clouds.
Step 3: The Rainy Drip Technique
-
Prepare the fluid paint:
Mix Titanium White with flow aid and water until it has the consistency of heavy cream. It needs to run easily but hold its opacity. -
Apply the upper drips:
Load a round brush heavily with the fluid white. Press it against the top of the canvas in random intervals and let the paint naturally run down the surface. -
Mist and manipulate:
Immediately mist the wet drips with your spray bottle. This encourages the paint to bleed, streak, and feather out, mimicking rain on a windowpane. -
Layering darker drips:
Repeat this drip process using a thinned Payne’s Grey mix, focusing more on the middle and lower sections to add depth and shadow to the storm. -
Diagonal flow:
Tilt your canvases slightly or use your brush to guide some drips diagonally. This breaks up the vertical lines and creates the illusion of wind-blown rain.
Metallic Accent
Mix silver leaf or metallic iridescent medium into the white drip layer for a shimmering, wet-look finish.
Step 4: Texturing and Refinement
-
Cloud formation:
Dip a crumpled rag into thick Titanium White paint. Dab and twist it onto the canvas where the light blue meets the dark blue to create frothy, textured cloud banks. -
Add warmth:
Mix a very small amount of Raw Umber with white. Glaze this lightly into the bottom corner of the darkest section to add an earthy richness that contrasts with the cool blues. -
Enhance the flow:
Step back and check the continuity. If a wave or cloud structure ends abruptly at the edge of one canvas, paint it over the gap onto the next canvas so they look connected. -
Final highlights:
Using a smaller brush, add distinct, sharp lines of pure white along the ridges of your ‘clouds’ or waves to simulate light catching the water. -
Let it cure:
Allow the painting to dry flat if possible, or vertically if the drips have stopped moving. Wait at least 24 hours before framing or hanging.
Hang your new masterpiece with small gaps between the frames to let the continuous horizon line work its magic
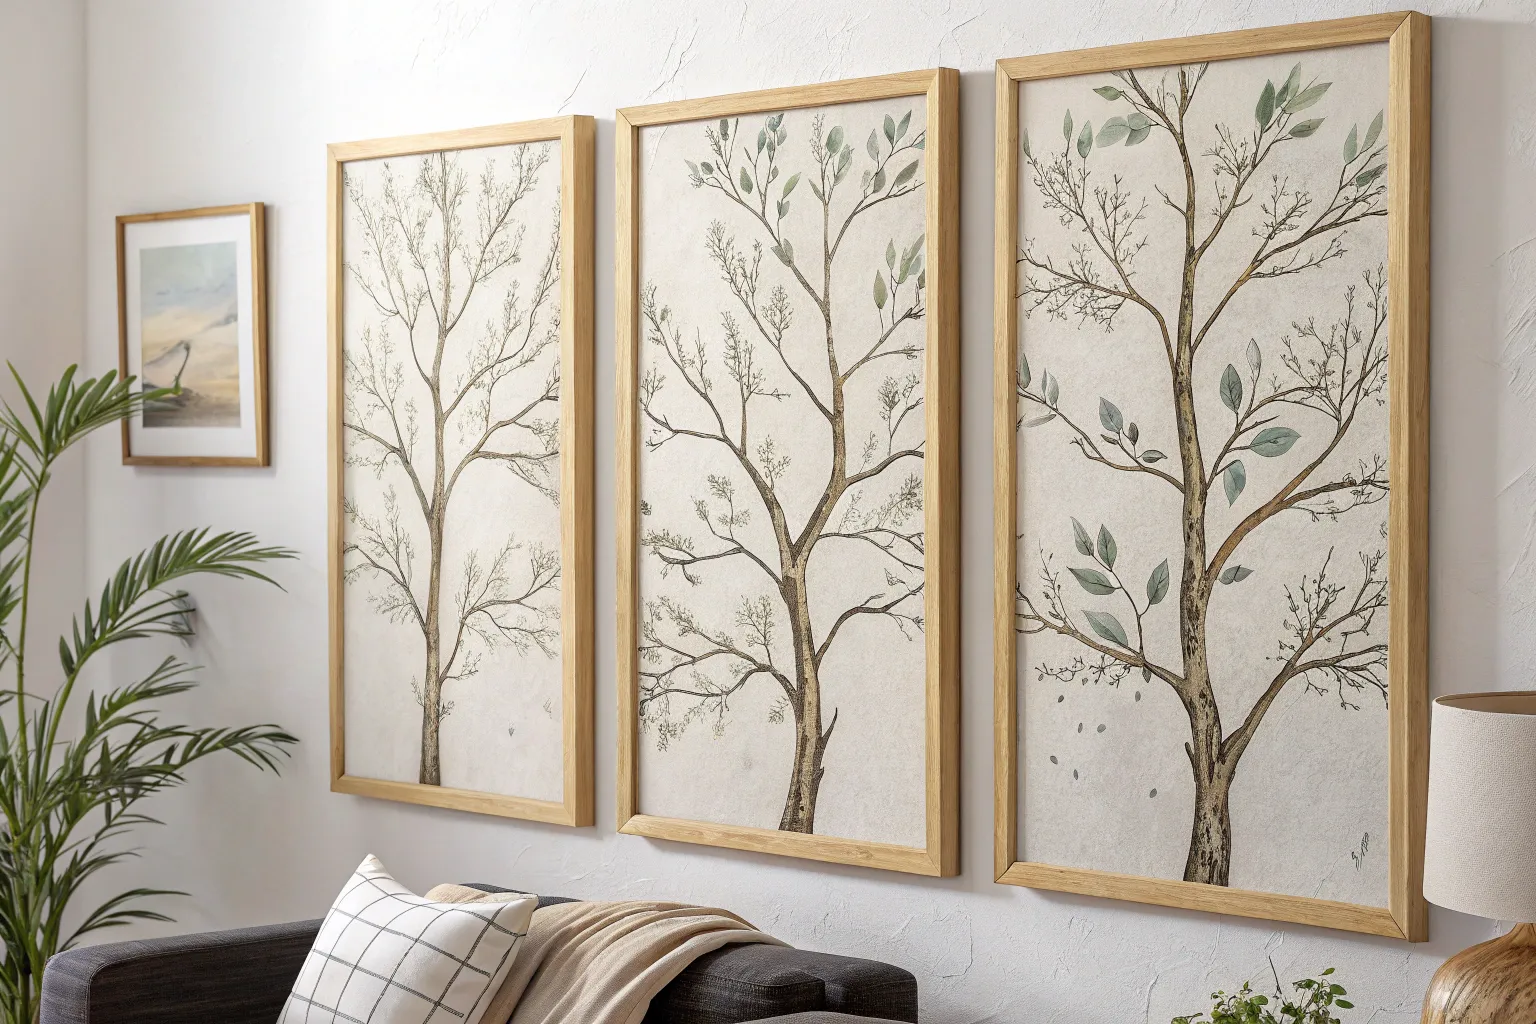
Negative Space Leaves With a Minimal Branch Line
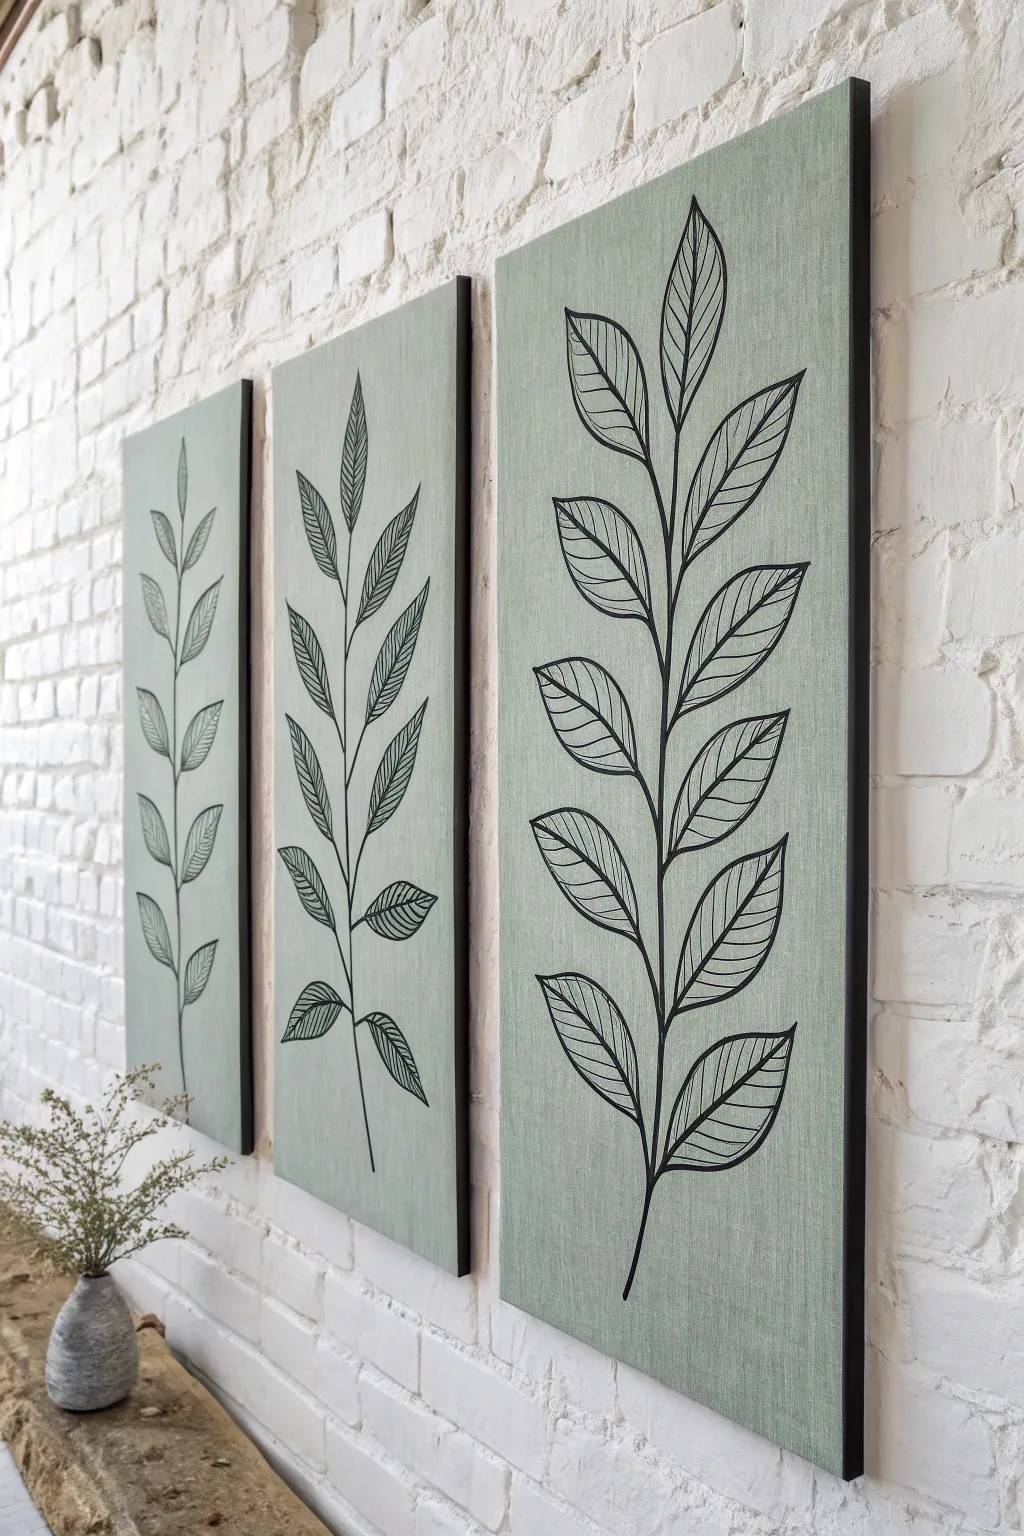
This elegant three-piece wall art relies on the beauty of simplicity, pairing textured sage green fabric with crisp black line work. The minimalist vine design flows naturally across separate vertical panels, creating a modern botanical focal point for any room.
Step-by-Step Guide
Materials
- 3 tall artist canvases (approx 12×24 inches or similar ratio)
- Sage green linen or cotton fabric (enough to cover all canvases with wrap-around)
- Heavy-duty staple gun
- Staples
- Fabric scissors
- Iron and ironing board
- Black acrylic paint or fabric paint
- Fine liner brush (size 0 or 1)
- Black paint marker (medium tip, optional for steadier lines)
- Chalk or a disappearing fabric ink pen
- Ruler or straight edge
- Matte spray varnish (optional)
Step 1: Preparing the Fabric Base
-
Measure and cut:
Lay your fabric out on a clean, flat surface. Place your three canvases on top, leaving at least 3 inches of extra fabric on all four sides of each canvas. -
Iron smooth:
Before attaching anything, iron your cut fabric pieces thoroughly. Any creases now will be permanent later, so aim for a perfectly smooth surface. -
Position the fabric:
Place one fabric piece face down, then center a canvas face down on top of it. Ensure the weave of the fabric is straight relative to the canvas frame. -
Staple the long sides:
Starting in the middle of one long side, pull the fabric taut and staple it to the back of the wooden frame. Move to the opposite side, pull tight, and staple. Work your way out toward the corners. -
Hospital corners:
Fold the fabric at the corners neatly, just like making a bed with hospital corners. Keep the fold crisp so the canvas lays flat against the wall later. -
Secure the short sides:
Pull the top and bottom fabric sections tight and staple them securely. Repeat this process for all three canvases.
Step 2: Sketching the Design
-
Arrange the triptych:
Lay the three wrapped canvases on the floor side-by-side with a small gap between them, just as they will hang on the wall. This ensures your design flows continuously. -
Mark the central stems:
Using a light piece of chalk or a disappearing fabric pen, lightly sketch a central wavy line going up each panel. These will be the main stems for your vines. -
Outline leaf shapes:
Draw the almond-shaped outlines of the leaves attached to the stem. Vary the angles slightly to make them look organic. -
Add vein details:
Lightly sketch the internal structure of the leaves. Draw a center line through each leaf and add simple curved veins branching out.
Bleeding Lines?
If paint bleeds into the fabric weave, switch to a fabric marker or mix clear acrylic medium into your black paint to thicken it slightly.
Step 3: Painting the Vines
-
Mix your paint:
If using acrylics, mix a small amount of water into your black paint to improve its flow. It should be inky but opaque. -
Trace the main stem:
Using your mix or a black paint marker, carefully trace over the main stem line first. A marker often gives better control on woven fabric than a brush. -
Outline the leaves:
Go over the outer perimeter of each leaf shape. Keep your pressure consistent to maintain a uniform line thickness. -
Refining the points:
Pay distinct attention to the tips of the leaves and where the stem meets the leaf base; sharp, clean intersections make the art look professional. -
Paint interior veins:
Using a very fine liner brush or the very tip of your marker, draw the internal veins. I personally prefer these lines to be slightly thinner than the outline for visual depth. -
Clean up edges:
Check for any skipped stitches in the fabric texture where the paint didn’t take. Dab a tiny bit of paint into these spots to make the lines solid black. -
Erase guidelines:
Once the paint is completely dry, gently brush away any remaining chalk marks or wait for the disappearing ink to fade. -
Seal the work:
Ideally, finish with a light mist of matte spray varnish to protect the fabric from dust and seal the paint.
Add Dimension
Use dark green embroidery thread to go over just the central leaf veins for a subtle mixed-media texture effect.
Hang your panels with even spacing to let the design breathe across the wall


Have a question or want to share your own experience? I'd love to hear from you in the comments below!