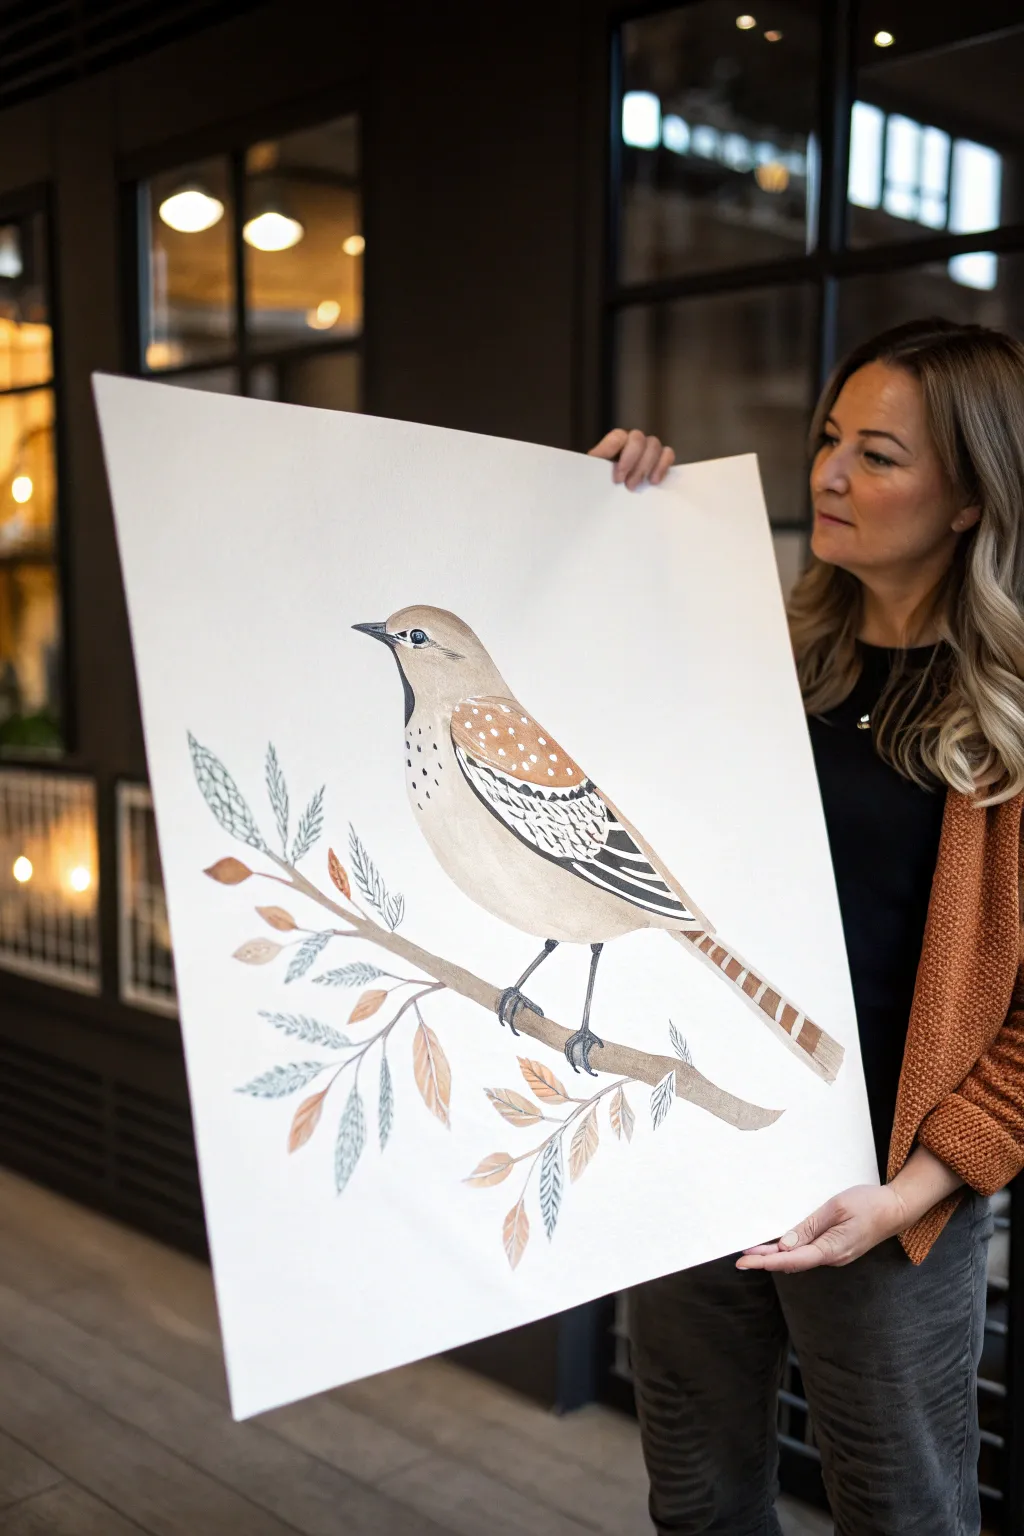
Birds are the perfect painting subject when you want something cute, recognizable, and totally doable in one sitting. Here are my favorite easy bird painting ideas that keep shapes simple, colors fun, and the “I can’t mess this up” energy high.
Bird Silhouette on a Sunset Wash

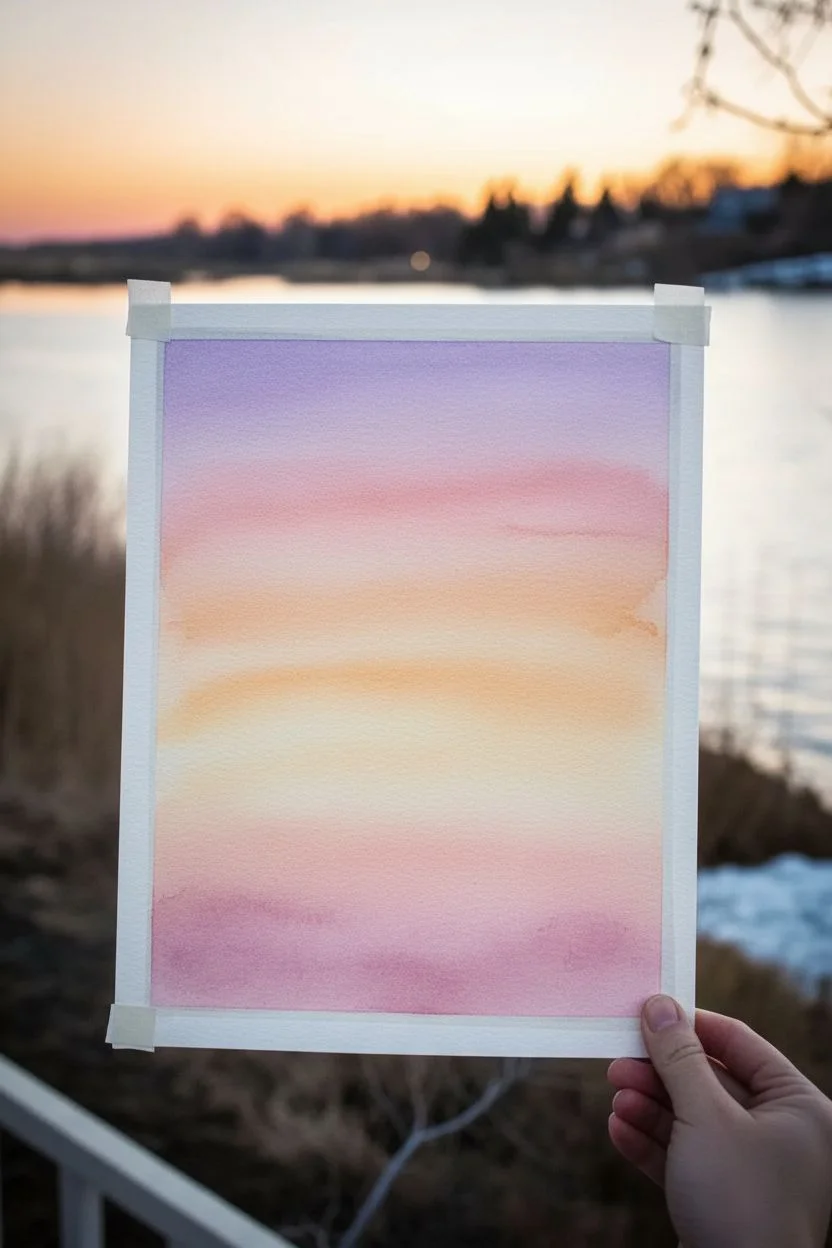
Capture the serene beauty of twilight with this striking watercolor silhouette. By combining a wet-on-wet gradient background with crisp black details, you’ll create a piece that feels both atmospheric and bold.
Detailed Instructions
Materials
- Cold press watercolor paper (approx. 9×12 inches)
- Painter’s tape or masking tape
- Watercolor paints (Purple, Pink, Orange, Yellow, Black)
- Large flat wash brush
- Small round detail brush (size 0 or 1)
- Jar of clean water
- Paper towels
- Hairdryer (optional, for faster drying)
- Pencil (optional)
Step 1: Painting the Sunset Sky
-
Prepare the paper:
Begin by taping down all four edges of your watercolor paper to a rigid board or table. This creates a clean white border and prevents the paper from buckling when wet. -
Wet the surface:
Using your large wash brush and clean water, apply a generous, even layer of water across the entire area inside the tape. The paper should glisten but not have puddles. -
Apply the purple:
Load your brush with a soft purple watercolor. Paint a horizontal band across the top third of the paper, letting the color flow and soften into the wet paper. -
Transition to pink:
Rinse your brush slightly and pick up a pink hue. Paint a band directly below the purple, allowing the edges to touch and bleed together naturally for a soft gradient. -
Add warmth with orange:
Mix a light orange and apply it below the pink section. Keep your strokes horizontal and fluid to mimic the banding of a sunset sky. -
Finish with yellow:
For the bottom section, use a pale yellow wash. Blend it upwards into the orange. If you want the bottom to feel hazy like distant ground fog, you can add touches of pink or diluted purple near the very bottom edge. -
Dry completely:
This is crucial: allow the background wash to dry 100%. If the paper is cool to the touch, it’s still damp. If you paint the silhouette too soon, the black ink will bleed into the sky.
Clean Lines Secret
For the sharpest silhouette, use black gouache or India ink instead of watercolor. These are more opaque and less likely to lift the background color when applied over top.
Step 2: Adding the Silhouette
-
Sketch the composition:
Lightly sketch the main branch line and the position of the bird using a pencil. Keep the lines very faint so they don’t show through later. -
Paint the main branch:
Switch to your small round detail brush and load it with opaque black watercolor or black gouache. Paint the main diagonal branch, making it slightly thicker at the bottom left and tapering as it moves up and right. -
Outline the bird:
Carefully outline the shape of the bird perched on the branch. Focus on the beak, the curve of the head, and the angle of the tail feathers to get that classic crow or blackbird profile. -
Fill the silhouette:
Fill in the bird’s body with solid black paint. Ensure the coverage is opaque; you may need a second coat once the first dries if it looks streaky. -
Add branch details:
Extend smaller twigs and branches outward from the main line. Use the very tip of your brush and a quick, confident flicking motion to keep these lines thin and natural-looking. -
Create lower brush:
Paint a network of fine, tangled branches rising from the bottom left corner. These should look like scrubby bushes in the foreground, overlapping the bottom of the sky wash. -
Refine the feet:
Add tiny strokes where the bird meets the branch to indicate claws gripping the wood. -
Add final textures:
Identify any small gaps in your branch network that feel empty and add tiny twigs. Review the bird’s silhouette to smooth out any shaky edges.
Level Up: Salt Texture
While the background sky wash is still wet, sprinkle a few grains of table salt into the purple or pink sections. It creates distinct ‘stars’ or snowflake textures once dry.
Step 3: Final Touches
-
Reveal the border:
Once the black paint is completely dry, slowly peel off the masking tape. Pull the tape away from the center of the painting at a 45-degree angle to keep the paper from tearing. -
Sign it:
Sign your name in the bottom corner, perhaps in the white border or discreetly among the lower branches.
Enjoy the peaceful contrast of your new sunset masterpiece


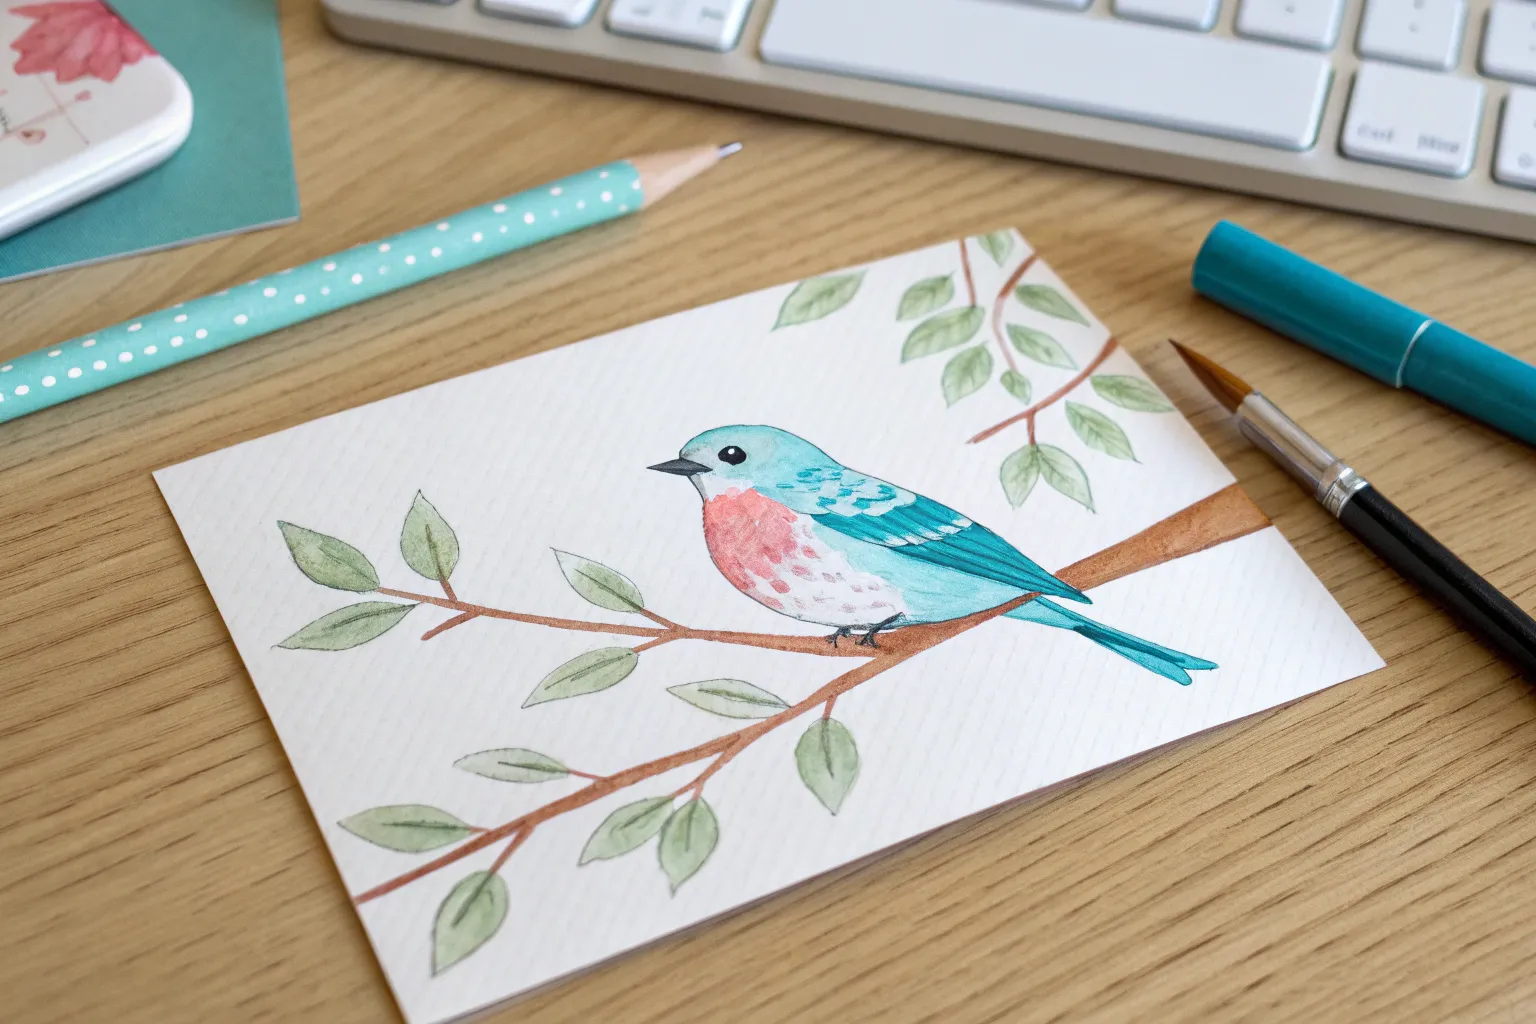
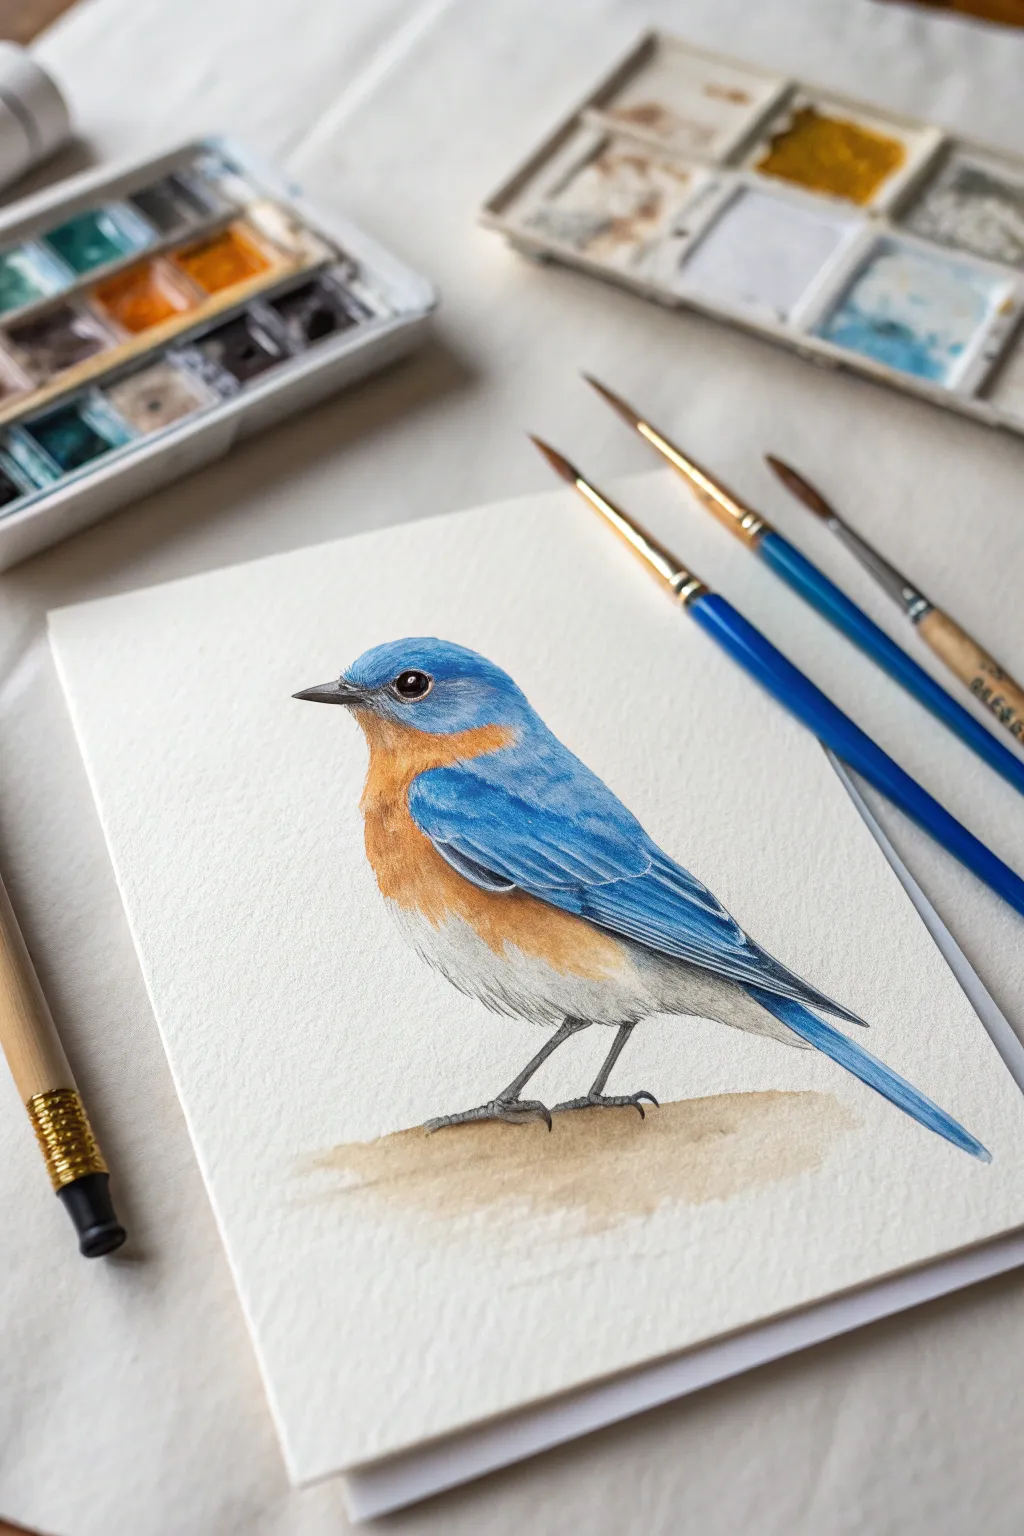
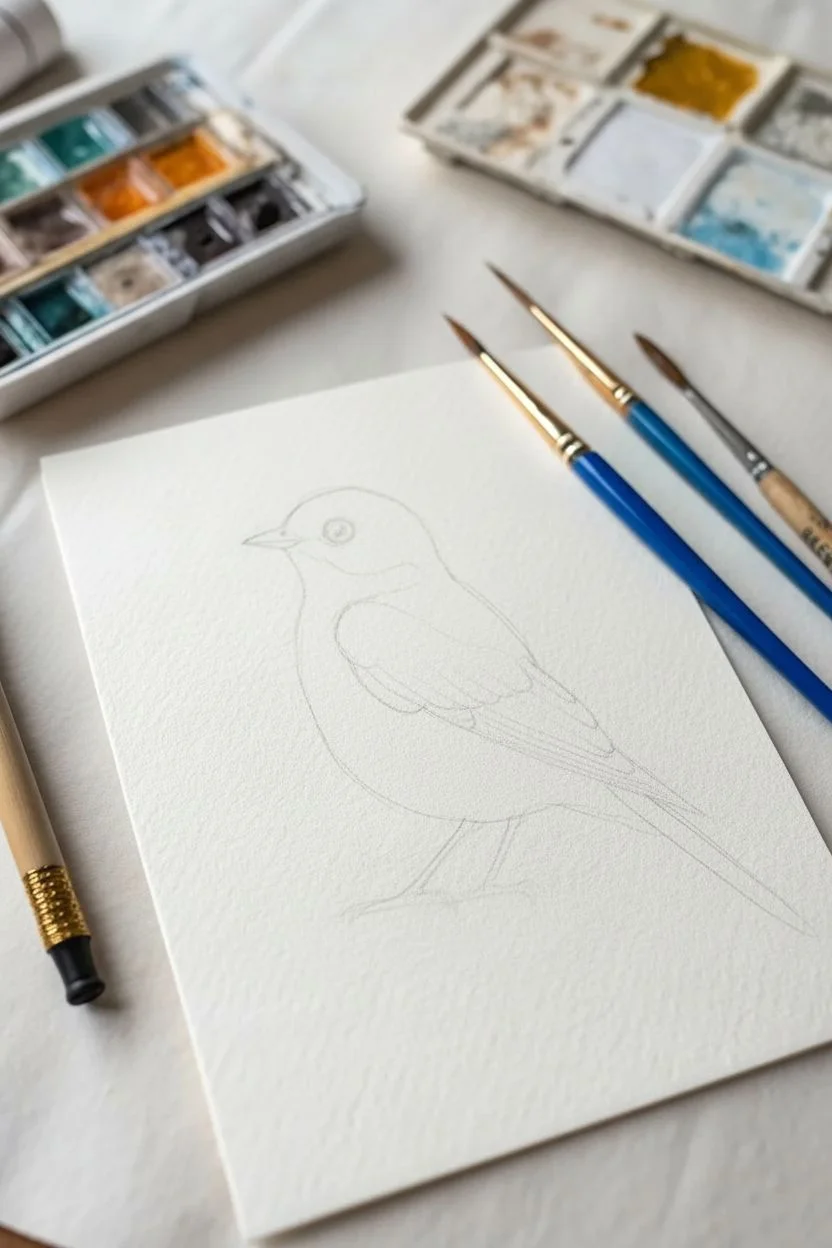
Easy Bird on a Branch With Two Color Blocks
Capture the delicate beauty of a songbird with this detailed watercolor project. By breaking the bird’s form into distinct blocks of azure blue and rusty orange, you creates a striking, realistic portrait that pops against the crisp white paper.
How-To Guide
Materials
- Cold press watercolor paper (300 gsm)
- H or HB pencil for sketching
- Kneaded eraser
- Watercolor paints (Cerulean Blue, Ultramarine, Burnt Sienna, Yellow Ochre, Burnt Umber)
- Round brushes (size 2, 4, and 0 for details)
- Clean water jar
- Paper towels
- Palette for mixing
- Fine liner brush (optional for feet)
Step 1: Sketching the Composition
-
Outline the Branch:
Start by lightly sketching a diagonal line rising from the bottom right to the middle left of your paper. Thicken this line to create a sturdy branch, adding a smaller offshoot or two branching upward to the left for balance. -
Map the Bird’s Shape:
Visualize an oval shape resting on the branch for the bird’s body. Add a smaller circle on top for the head. -
Refine the Anatomy:
Connect the head and body with a gentle slope for the neck. Sketch the wing folded against the side, extending into tail feathers that dip below the branch. -
Add Details:
Draw the small, sharp beak and place the eye just behind it. Sketch the thin legs gripping the branch. Once happy, gently roll a kneaded eraser over the sketch to lift excess graphite so lines won’t show through the paint.
Wet-on-Dry vs. Wet-on-Wet
For the crisp edges on the wings, ensure the paper is bone dry before adding new strokes. Use wet-on-wet only for the soft belly gradient.
Step 2: Painting the Bird
-
First Head Layer:
Mix a light wash of Cerulean Blue. Apply this to the top of the head and the back of the neck, leaving a tiny white sliver around the eye for a highlight. -
Wing Base Coat:
Using the same blue mix, paint the folded wing. While it’s still damp, drop in a tiny touch of Ultramarine near the shoulder area to suggest shadow. -
Breast Color:
Mix Burnt Sienna with a touch of Yellow Ochre to get a warm, rusty orange. careful not to touch the wet blue paint, apply this to the bird’s chest and flank. -
Belly Fade:
Clean your brush and use plain water to soften the bottom edge of the orange paint, letting it fade gently into the white of the belly area. -
Deepening the Blues:
Once the first layer is fully dry, mix a stronger, more saturated blue. Paint distinct feather shapes on the wing and add depth to the back of the head. I find short, directional strokes work best here to mimic feather texture. -
Warm Shadows:
Add a second, thinner layer of the rust color to the side of the breast to create roundness and volume. -
The Tail Feathers:
Paint the long tail feathers with a mix of blue and a tiny dot of grey or brown to make them look distinct from the bright back feathers.
Step 3: Branch and Final Details
-
Base Branch Wash:
Mix a watery pale brown using Yellow Ochre and Burnt Umber. Paint the entire branch shape. -
Bark Texture:
While the branch is damp, drop in darker brown (Burnt Umber) along the bottom edge for shadow. Let this bleed slightly upward. -
Defining Bark:
Once dry, use a size 0 brush with dark brown to add squiggly horizontal lines and knots to mimic rough bark texture. -
The Eye and Beak:
Using a very dark grey (mix brown and blue), carefully paint the beak and the eye pupil, preserving that tiny white highlight you left earlier. Outline the eye with a thin dark ring. -
Feet and Claws:
Paint the legs and feet using a dark charcoal grey. Ensure the claws look like they are wrapping *around* the wood, not just sitting on top of it. -
Final Feathers:
Use your smallest brush to add tiny, precise dark lines on the wing to separate individual flight feathers. -
Clean Up:
Check your edges. If the white belly looks too stark against the paper, add the faintest shadow commonly grey along the very bottom curve.
Muddy Colors?
If the orange breast bleeds into the blue wing and turns brown, let the layers dry completely between applications. Patience is key.
Now step back and admire how a few simple colors have brought your bluebird to life


Two Lovebirds on One Branch
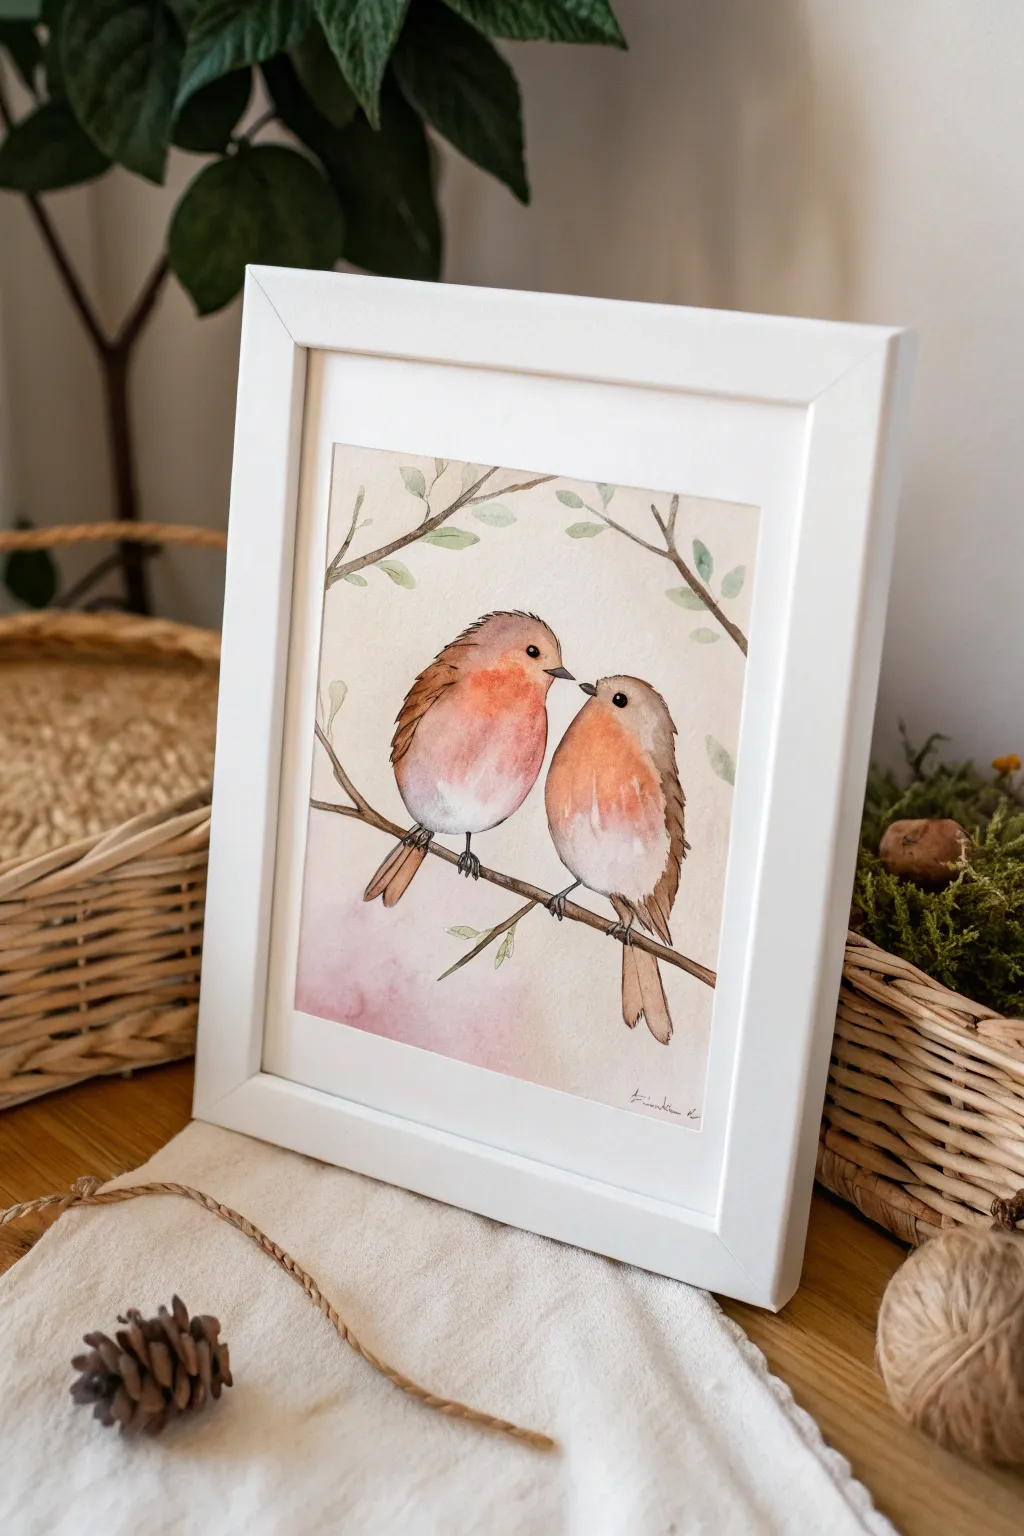
Capture the tender connection between two perched robins with this gentle watercolor project. The soft washes of peach and brown create a warm, inviting atmosphere perfect for framing or gifting.
Step-by-Step Tutorial
Materials
- Cold press watercolor paper (300 gsm)
- Watercolor paints (Burnt Sienna, Cadmium Red/Light Red, Yellow Ochre, Burnt Umber, Sepia, Payne’s Grey, Sap Green)
- Round brushes (sz 2, sz 4, sz 6)
- Fine liner brush or black waterproof fineliner pen
- Pencil (HB or lighter) and eraser
- Clean water and paper towels
- Masking tape
- Optional: White gouache or gel pen for highlights
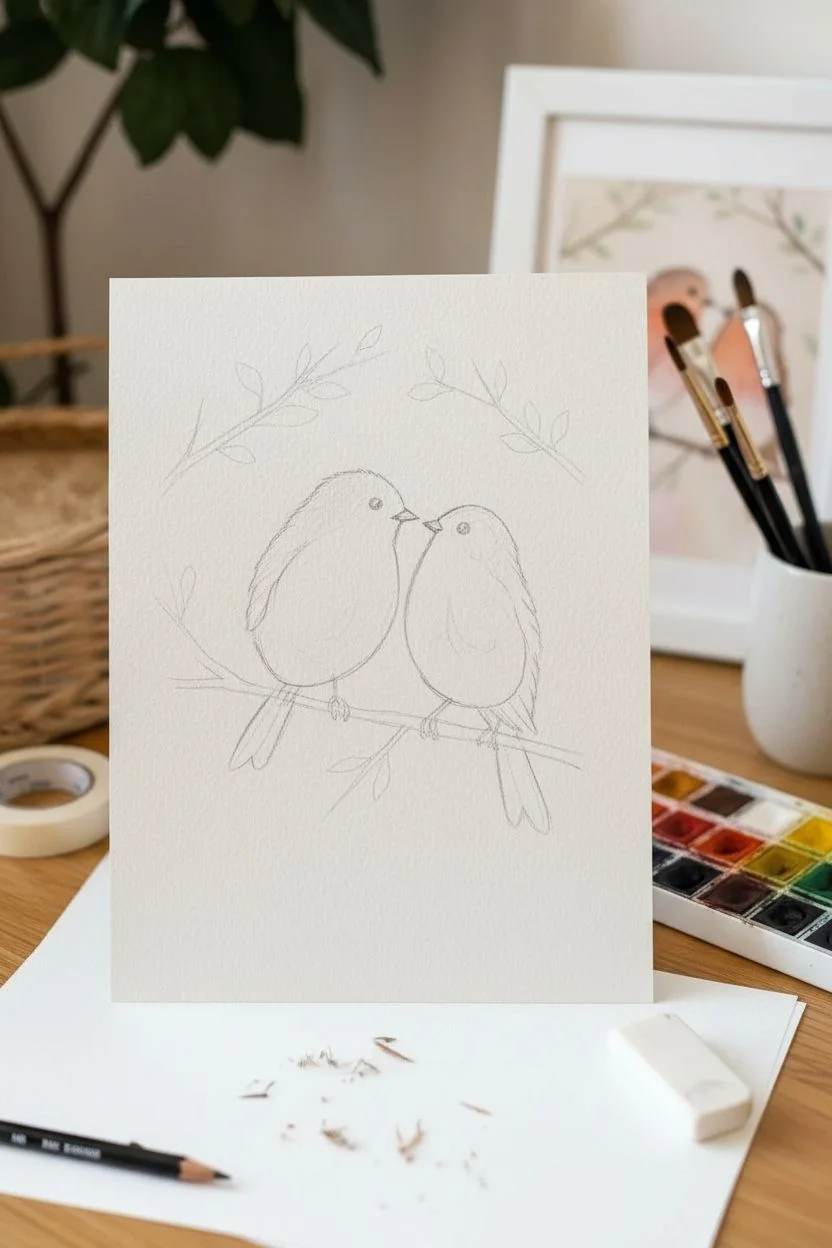
Step 1: Sketching the Composition
-
Draft the bodies based on shapes:
Begin by lightly drawing two overlapping oval shapes slightly off-center. The left bird should be slightly larger and rounder, while the right bird is a bit leaner, but both should lean toward each other. -
Add the heads and beaks:
Sketch smaller circles on top of the ovals for heads. Draw tiny triangular beaks; the left bird’s beak should be just above the right one, creating the illusion of a sweet interaction. -
Draw the branch:
Sketch a diagonal line passing beneath both birds. Add thickness to create a convincing branch, ensuring their feet will have a solid place to grip. -
Refine the details:
Lightly sketch the wing positions tucked against their sides and the long tail feathers pointing downward. Add a few simple leaves and twigs arching overhead to frame the scene. -
Clean up the sketch:
Gently erase any harsh guidelines or construction circles until you are left with a faint, clean outline that won’t show through the paint.
Muddy colors?
If the orange breast bleeds into the brown wings and turns grey, ensure the first section is 100% dry before painting the adjacent color.
Step 2: Painting the Birds
-
First wash for the breasts:
Mix a diluted wash of Cadmium Red with a touch of Yellow Ochre to get that soft peach-orange. Wet the chest area of the left bird and drop in the color, letting it bloom naturally toward the white belly. -
Repeat for the second bird:
While the first dries, apply the same peach-orange mix to the chest of the right bird, keeping the color strongest near the throat and fading out near the bottom. -
Adding the brown feathers:
Mix Burnt Sienna with a little Burnt Umber. Using a size 4 brush, paint the top of the heads and the wings, using short, dashed strokes to simulate feather texture rather than a solid block of color. -
Deepening the shadows:
While the brown is still slightly damp, drop a stronger mix of Burnt Umber or Sepia into the heavy shadow areas—under the wings and where the overlapping feathers meet. -
Painting the tails:
Use the brown mixture to paint the long tail feathers. Add distinct vertical lines with a smaller brush to suggest individual feathers. -
Detailing the beaks and eyes:
Using a very fine brush with Sepia or Payne’s Grey (or a fineliner pen), carefully paint the small beaks and the round eyes. Leave a tiny white spec in the eyes for a life-like glint.
Winter Edition
Transform this into a holiday card by keeping the leaves off the branches and adding tiny dots of white gouache for falling snow.
Step 3: Atmosphere and Surroundings
-
Painting the main branch:
Mix Sepia and Burnt Umber for a dark, woody tone. Paint the branch beneath them with a steady hand, varying the pressure to make it look organic and knotty. -
Adding the feet:
With your smallest brush and dark grey paint, draw thin, grippy toes wrapping around the branch. Make sure the legs connect convincingly to the fluffy underbellies. -
Creating the background ambience:
I like to dampen the paper around the birds slightly and drop in very faint washes of diluted pink and ochre. This creates a soft, dreamy glow without distracting from the subjects. -
Painting the leaves:
Using a muted Sap Green, paint the small leaves on the upper twigs. Keep these loose and slightly transparent to maintain the delicate watercolor feel. -
Adding definition with ink (optional):
If you want a more illustrative look like the reference, use a fine liner pen to loosely outline the wings, beaks, and branches. Keep the lines broken and sketchy rather than solid.
Once dry, frame this darling pair in a simple white frame to let the soft colors truly shine


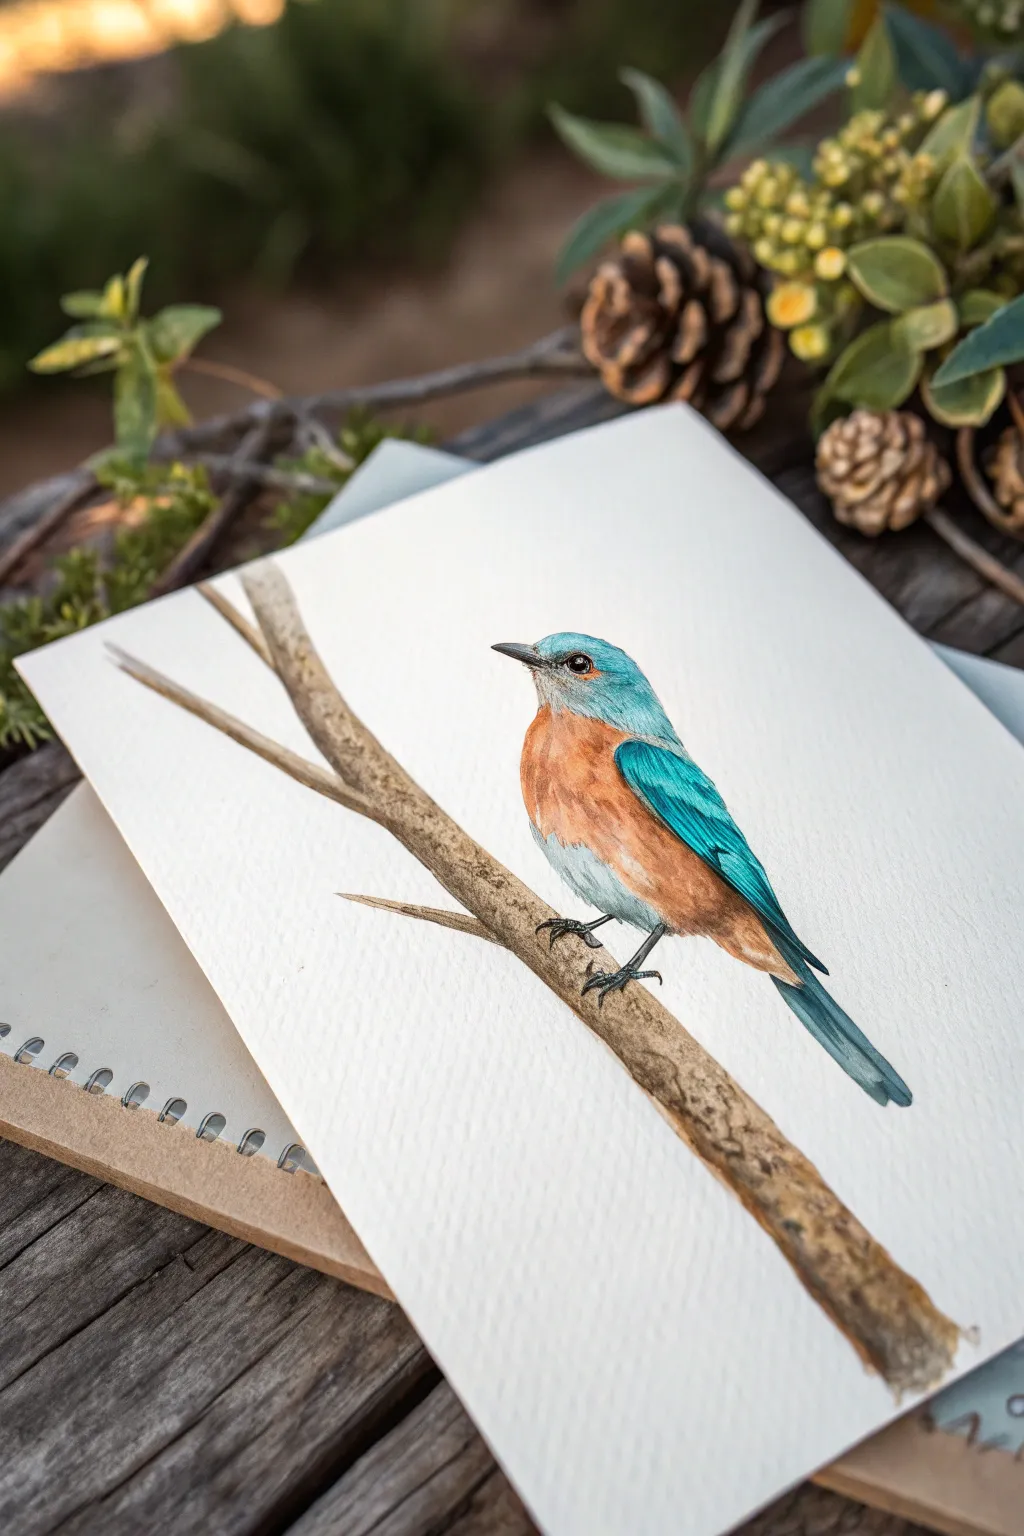
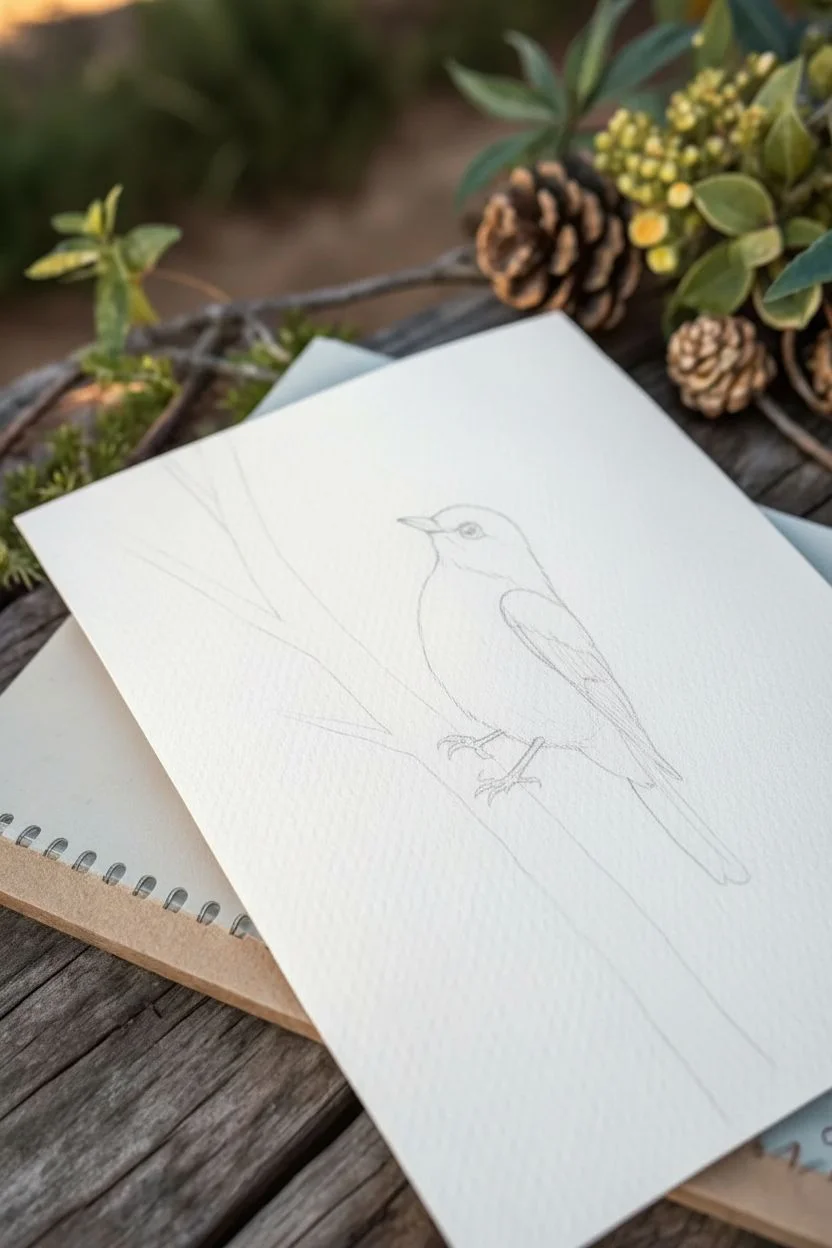
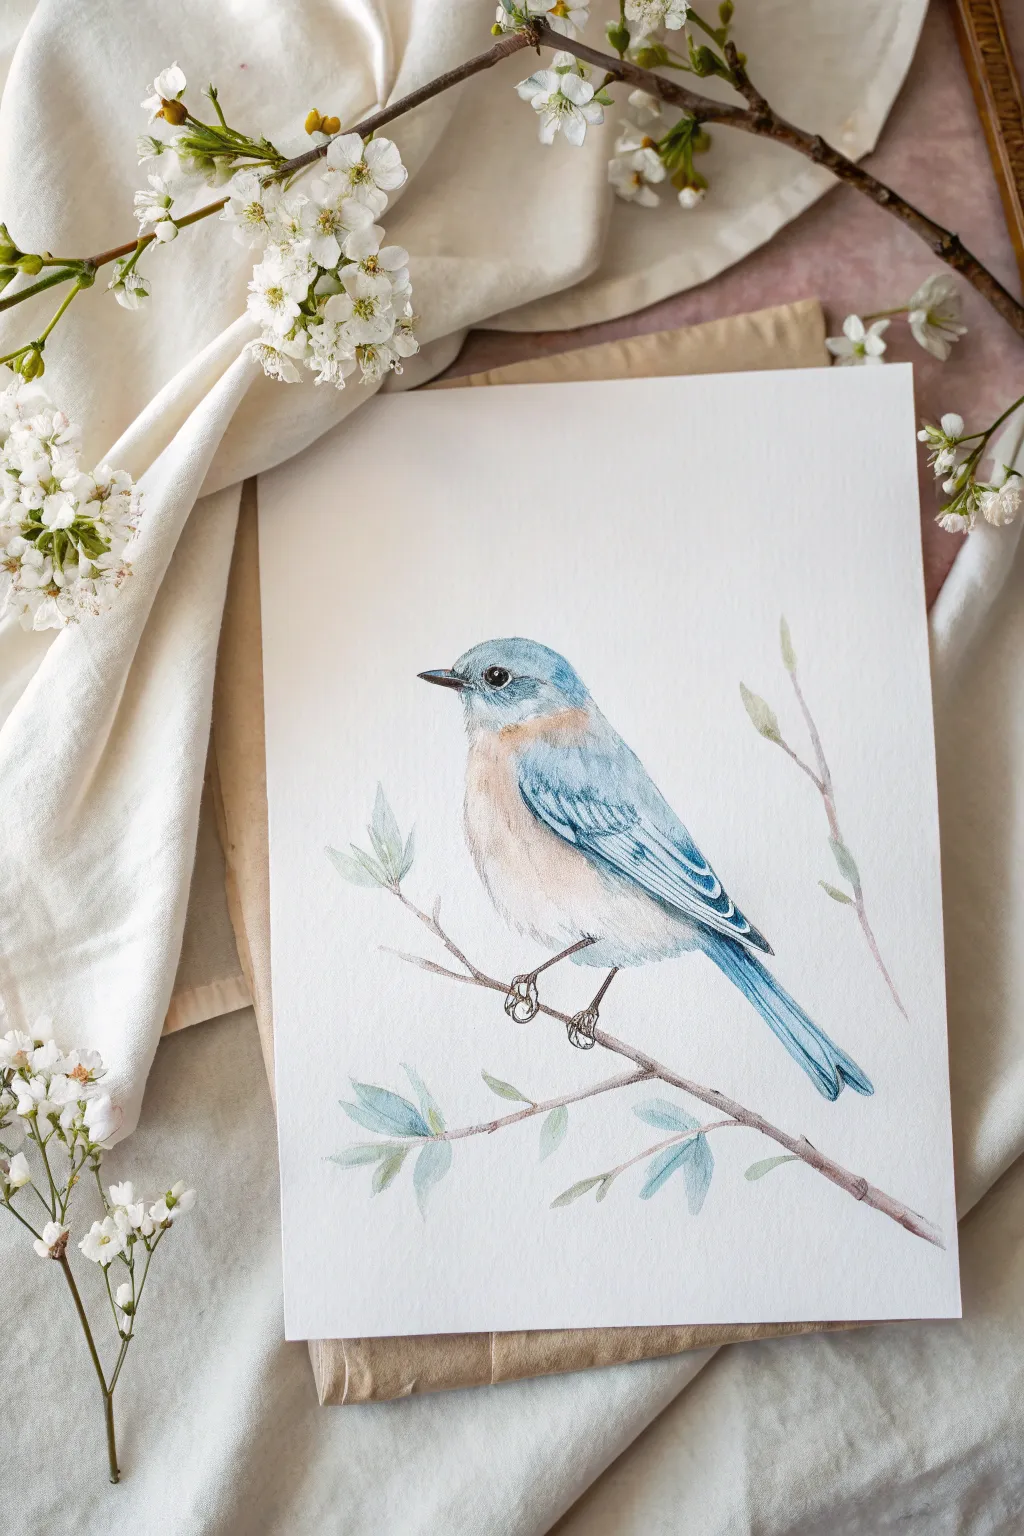
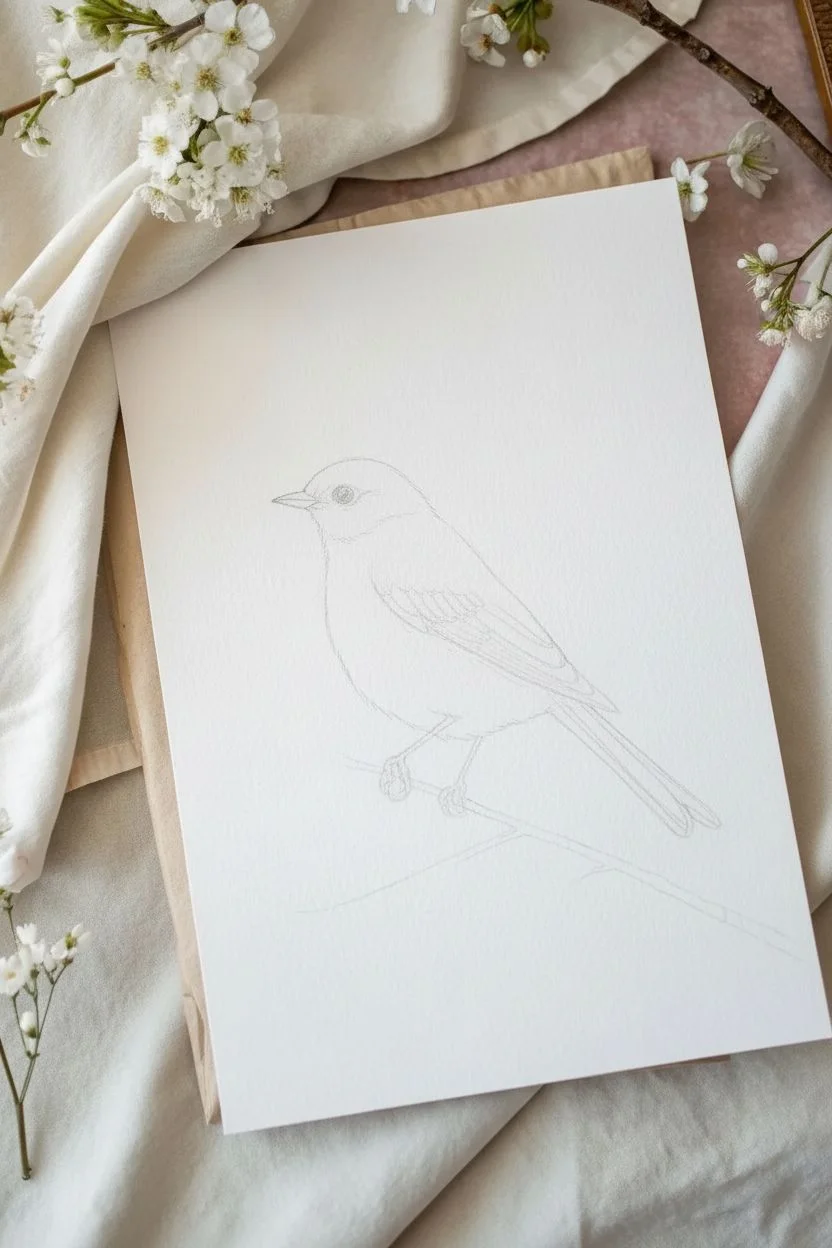
Bluebird Basics With a Simple Oval Body
Capture the delicate beauty of a bluebird with this approachable watercolor tutorial, focusing on layering vibrant blues and warm oranges. The result is a crisp, detailed illustration that pops against the white paper, perfect for greeting cards or framing.
Detailed Instructions
Materials
- Cold press watercolor paper (300 gsm)
- Pencil (HB or 2H for light sketching)
- Kneaded eraser
- Watercolor paints (Cerulean Blue, Ultramarine Blue, Burnt Sienna, Yellow Ochre, Paynes Grey, Sepia)
- Round watercolor brushes (sizes 2, 4, and 6)
- Fine detail brush (size 0 or 00)
- Two jars of water
- Paper towels
Step 1: Sketching the Framework
-
Draw the basic shapes:
Start by lightly sketching a tilted oval for the body and a smaller circle for the head on your watercolor paper. Keep your pencil pressure extremely light so the graphite doesn’t show through the transparent paint later. -
Connect the forms:
Connect the head to the body with sloping lines to form the neck. Refine the back curve, extending it downwards to indicate where the tail feathers will begin. -
Add key details:
Sketch a small, triangular beak on the left side of the head. Draw a small circle for the eye, placing it centrally but slightly forward in the head circle. Add the wings folded against the side of the body. -
Refine the outline:
Go over your sketch to finalize the bird’s silhouette. Erase any internal construction lines (the initial oval and circle overlaps) using a kneaded eraser, leaving only a faint guide for your painting.
Highlight Pro-Tip
Lost your eye highlight? Don’t panic. Use a white gel pen or a dot of opaque white gouache at the very end to bring the life back into the bird’s expression.
Step 2: Laying the Base Colors
-
First wash of blue:
Mix a watery wash of Cerulean Blue. Using a size 6 brush, apply this light blue to the top of the head, the back, and the wings. Leave the chest and belly completely white for now and avoid the eye area. -
Adding the warmth:
While the blue is drying (or carefully working around it if you have good brush control), mix a blend of Burnt Sienna and a touch of Yellow Ochre. Apply this warm rust color to the chest area, letting it fade out softly as it reaches the white underbelly. -
Softening the transition:
If the orange and blue touch while wet, that’s okay—let them bleed slightly for a natural look. However, try to keep the throat area distinct where the rust meets the blue head. -
The white belly:
For the lower belly, use clean water to soften the bottom edge of the rust color, dragging a tiny amount of pigment down to create a blurry, soft white transition at the legs.
Trouble with Mud?
If the orange chest and blue wing look muddy where they meet, let the first color dry completely before painting the neighbor. Patience prevents unwanted mixing.
Step 3: Building Depth and Texture
-
Deepening the blues:
Once the first layer is fully dry, mix a stronger Ultramarine Blue. Using a size 4 brush, paint the primary feathers on the wing and add depth to the top of the head. Use short, dashed strokes to suggest feather texture. -
Layering the chest:
glaze a second layer of Burnt Sienna over the chest to increase vibrancy. Use a slightly drier brush here to create a fur-like texture on the chest feathers, rather than a flat wash. -
Wing details:
Switch to your size 2 brush. Mix Ultramarine with a tiny bit of Payne’s Grey for a darker blue. Define the individual long flight feathers on the wing and the tail, leaving thin slivers of the lighter blue showing between them for separation. -
Painting the eye:
Using a size 0 detail brush and concentrated Sepia or black, carefully paint the eye. Leave a tiny speck of white unpainted for the highlight, or add it back later with white gouache. Paint the beak using a grey wash, darkening the tip.
Step 4: Final Details
-
Legs and feet:
Mix a dark grey using Sepia and Payne’s Grey. With your finest brush, paint the thin legs and claws. Notice how the toes curl; ensure they look like they are gripping a surface. -
Grounding the bird:
Mix a very watery wash of Burnt Sienna and Sepia. Paint a loose, abstract swift patch of ground beneath the feet. Do not overwork this; it should look like a simple suggestion of earth or wood. -
Feather texture:
I like to take a nearly dry brush with dark blue and add very fine, short tick marks on the back and head to simulate individualized feathers. Do the same with a diluted grey on the white belly to give it volume. -
Final check:
Assess the contrast. If the wing shadow needs to be darker, add a final glaze of dark blue-grey right under the wing’s edge to make it pop against the body.
Once specific details are dry, you can erase any remaining pencil lines to reveal your crisp, colorful bluebird illustration
BRUSH GUIDE
The Right Brush for Every Stroke
From clean lines to bold texture — master brush choice, stroke control, and essential techniques.
Explore the Full Guide
Robin-Inspired Bird With a Bright Belly Patch
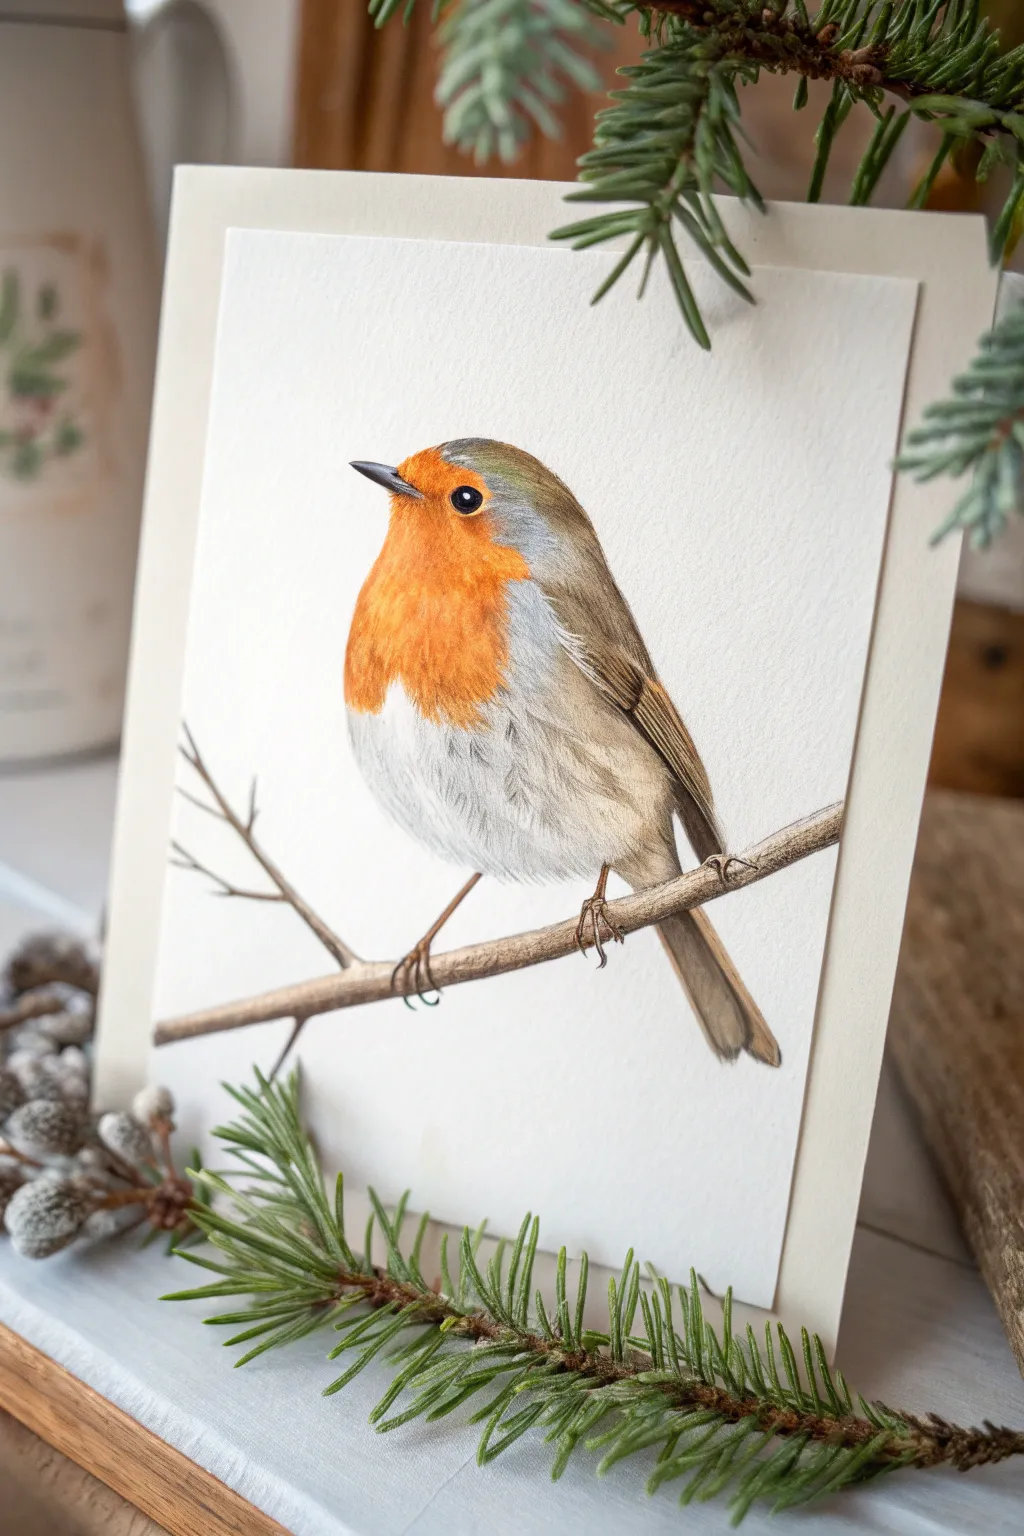
Capture the classic charm of a European robin with this detailed, mixed-media illustration project. By combining the fluidity of watercolors for the base with the precision of colored pencils for texture, you’ll create a lifelike bird with a glowing orange breast.
Step-by-Step Tutorial
Materials
- Hot press watercolor paper (smooth texture)
- Watercolor paints (Cadmium Orange, Burnt Sienna, Payne’s Grey, Yellow Ochre)
- Small round watercolor brushes (sizes 2 and 4)
- Colored pencils (sharpened to a fine point: orange, several browns, warm grey, black, white)
- HB graphite pencil for sketching
- Kneaded eraser
- White gel pen or gouache (for the eye highlight)
- Two water cups and paper towels
Step 1: Sketching and Base Washes
-
Light Outline:
Begin by lightly sketching the robin’s oval body shape and round head on your hot press paper. Add the simple diagonal line for the branch and position the beak and eye carefully. Use your kneaded eraser to lift almost all the graphite until only a faint ghost image remains. -
Orange Wet-on-Wet:
Wet the chest area with clean water, staying strictly within your sketch lines. Drop in a mix of Cadmium Orange and a touch of Yellow Ochre, letting the pigment bloom naturally to create that signature soft, glowing breast. -
Wing and Back Base:
While the chest dries, apply a diluted wash of light brown and warm grey to the wing and back area. Keep this layer very pale; it is just a map for your colored pencils later. -
Underbelly Shadow:
Mix a very watery, pale grey wash. Apply this to the lower white belly area to give the bird form and roundness, keeping the center of the belly the white of the paper.
Feather Direction Tip
Always stroke your pencil in the direction the feathers grow—from the head toward the tail. This creates a natural ‘flow’ even if individual strokes are visible.
Step 2: Building Texture with Pencils
-
Defining the Eye:
Once the paint is bone dry, switch to pencils. Use a black colored pencil to fill in the eye, pressing firmly for a deep, solid dark. Leave a tiny speck of white paper for the catchlight, or add it later with a gel pen. -
Face Details:
Use a dark grey or soft black pencil to outline the beak and add the characteristic grey feathers that frame the orange face patch. Use short, light strokes to mimic tiny feathers. -
Enhancing the Orange:
Layer orange and burnt sienna pencils over your dried watercolor wash on the chest. Use directional strokes that follow the curve of the bird’s body to suggest feather growth direction. -
Wing Textures:
With a medium brown pencil, start defining the separate wing feathers. Draw the primary feathers as long, sleek shapes, and use shorter, hatched markings for the upper wing coverts. -
Deepening Shadows:
Add depth where the wing meets the body using a dark brown pencil. I find this contrast is crucial for making the wing look like it’s tucked against the bird rather than flat. -
Fluffy Belly Feathers:
Switch to a warm grey pencil. Make very light, wispy strokes on the white underbelly to create the look of soft down feathers, blending gently into the painted shadow area.
Step 3: Branch and Finishing Touches
-
Painting the Branch:
Paint the branch with a mix of Burnt Sienna and Payne’s Grey. While it’s still damp, drop in a slightly darker value on the bottom edge to create cylindrical volume. -
Branch Texture:
Once the branch paint is dry, use a dark brown pencil to add cracks, knots, and bark texture. Keep these lines organic and jagged. -
Adding the Feet:
Draw the thin legs and feet clasping the branch using a sharp brown pencil. Ensure the toes wrap convincingly around the wood form. -
Final Highlights:
Use a white colored pencil to burnish (press hard) over the lightest parts of the wing and the edge of the orange chest to smooth out the texture. Add a tiny dot of white gel pen to the eye if you didn’t leave the paper white. -
Card Assembly:
Carefully trim your finished painting. Mount it onto a folded cream cardstock base using double-sided tape or photo corners for a clean, professional presentation.
Snowy Scene Upgrade
splatter white gouache or acrylic paint lightly over the background and on top of the branch to create a gentle winter snow effect for a holiday card.
Now you have a charming, detailed robin illustration ready to be displayed or sent as a thoughtful greeting card
Cherry Blossom Branch With a Tiny Perched Bird

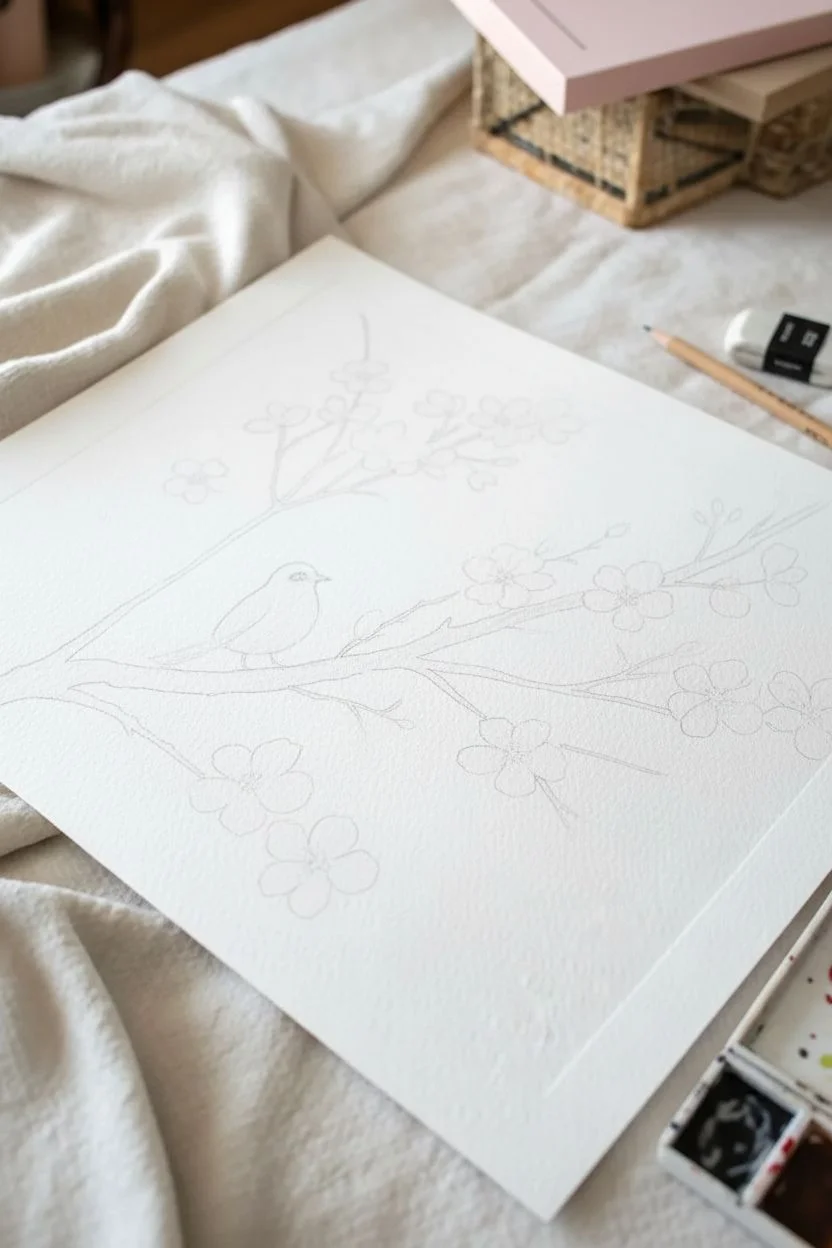
Capture the delicate beauty of spring with this soft watercolor scene featuring a tiny brown bird perched amongst blooming cherry blossoms. The composition balances the rugged texture of the branches with the ethereal translucency of the pink flowers.
How-To Guide
Materials
- Cold press watercolor paper (300 gsm)
- Round watercolor brushes (sizes 2, 4, and 6)
- Detail brush (size 0 or 00)
- Watercolor paints (Burnt Umber, Sepia, Quinacridone Rose or Alizarin Crimson, Sap Green, Payne’s Grey, and a touch of Yellow Ochre)
- Jar of clean water
- Paper towels
- Pencil (HB) and kneaded eraser
- Palette for mixing
Step 1: Sketching the Composition
-
Outline the Main Branch:
Start by lightly sketching the main branch extending from the left side of the paper. Draw it thicker at the base and let it taper as it splits into smaller forks diagonally across the page. Keep your pencil lines very faint so they won’t show through the transparent paint later. -
Position the Bird and Blossoms:
Draw a simple oval shape for the bird’s body resting on the main branch, adding a smaller circle for the head and a triangular beak. Scatter various sizes of circles around the smaller twigs to mark where your cherry blossoms will go, keeping the arrangement loose and organic.
Step 2: Painting the Branch
-
Apply the Base Brown:
Mix a watery wash of Burnt Umber. Using your size 4 or 6 brush, paint the main branch. While the paint is still wet, drop in tiny touches of Sepia on the underside of the branch to create immediate shadow and volume. -
Extend the Twigs:
Switch to a smaller size 2 brush to pull the color out into the thinner twigs. Let your hand shake slightly as you paint these lines; -
Add Texture Details:
Once the first layer is damp but not soaking, use a thicker mix of Sepia and a size 2 brush to add small knots, bumps, and bark lines. These darker accents give the wood its rough, natural character.
Bleeding Colors?
If pink petals are bleeding into the brown branch, ensure the branch is 100% dry before painting flowers that touch it. Use a hairdryer to speed this up.
Step 3: Painting the Bird
-
Base Coat for the Bird:
For the bird’s chest and belly, mix a very pale wash of Burnt Umber with a hint of Yellow Ochre. Paint the body area, leaving the belly slightly lighter or even white to suggest roundness. -
Wing and Back Feathers:
While the chest is drying, mix a darker brown using Burnt Umber and Sepia. Paint the wing shape, using short, directional strokes to mimic layered feathers. Leave a thin gap between the wing feathers to show separation. -
The Distinctive Eye Mask:
This bird has a charming dark mask. Use a mix of Payne’s Grey and Sepia with your smallest detail brush to carefully paint the area around the eye and the beak. Leave a tiny white speck inside the black eye for a lifelike catchlight. -
Tail Feathers:
Use the same dark grey-brown mix to paint the tail feathers extending below the wing. Keep the lines crisp and straight to show the stiffness of the tail. -
Tiny Claws:
With the detail brush and dark paint, add tiny, curved strokes hooking over the branch to ground the bird.
Pro Tip: Soft Edges
For fluffier-looking bird feathers, soften the edge of your paint stroke with a clean, damp brush before the paint dries completely.
Step 4: Creating the Cherry Blossoms
-
First Layer of Petals:
Dilute your pink paint (Quinacridone Rose) with plenty of water until it’s a soft, pale blush. Using the size 4 brush, paint loose, five-petal flower shapes. Don’t worry about perfection; let the petals touch and bleed slightly. -
Varying the blooms:
Paint some flowers fully open and others as small, tight buds. For the buds, use slightly more pigment to make them darker than the open flowers. -
Adding Depth to Centers:
While the pink petals are still slightly damp, dab a more concentrated pink or red into the very center of each flower. The color will softly bloom outward, creating a natural gradient. -
Painting the Stamens:
Once the flowers are completely dry, use your smallest brush or a fine liner to paint tiny, radiating lines from the flower centers in a dark pink or brown. Add tiny dots of Yellow Ochre or gold at the tips for pollen.
Step 5: Final Details
-
Connecting the Flowers:
Use a light brown or green mix to paint tiny stems connecting your floating flowers back to the main branches. -
Green accents:
Mix a fresh Sap Green and add tiny, budding leaves near the flower clusters. Keep these sparse to maintain the focus on the pink blooms. -
Review and Refine:
Step back and look at the whole piece. If the branch looks too flat, add a glaze of dark brown to the shadowed side. Strengthen the bird’s eye if needed.
Now you have a serene piece of nature art ready to frame.

PENCIL GUIDE
Understanding Pencil Grades from H to B
From first sketch to finished drawing — learn pencil grades, line control, and shading techniques.
Explore the Full Guide
Loose Watercolor Bird With Just Three Brushstrokes
Capture the gentle spirit of spring with this detailed yet approachable watercolor painting of a bluebird. The soft washes of blue and peach combined with fine ink-like details create a beautiful balance between realism and illustrative charm.
Step-by-Step Guide
Materials
- Cold press watercolor paper (300 gsm)
- Watercolor paints (Cerulean Blue, Burnt Sienna, Payne’s Grey, Sap Green)
- Round brushes (sizes 2, 4, and 0 for details)
- Pencil (HB or 2H)
- Kneadable eraser
- Clean water jar
- Paper towels
Step 1: Sketching the Form
-
Basic Shapes:
Start lightly with your pencil. Draw a slanted oval for the bird’s body and a smaller circle for the head, connecting them with a gentle curve for the neck. -
Adding Features:
Refine the outline. Place a small triangle for the beak and a small circle for the eye. Sketch the long, slender shape of the folded wing stretching down the back. -
Branch Placement:
Draw diagonal lines for the branch the bird is perched on. Add a few small, budding leaves sprouting from the main twig to frame the composition. -
Refining Lines:
Use your kneadable eraser to gently lift the heaviest pencil lines. You want a faint guide that will disappear under the paint, but is still visible enough to follow.
Preserve the Highlights
The tiny white dot in the eye brings the bird to life. If you accidentally paint over it, use a tiny dot of white gouache or a gel pen at the very end to restore the sparkle.
Step 2: First Washes
-
Blue Plumage:
Mix a watery wash of Cerulean Blue. Using a size 4 brush, apply this light layer to the head, back, and wing area. Leave the chest and belly white for now. -
Adding Warmth:
While the blue is still slightly damp (but not swimming), mix a very pale Burnt Sienna. Touch this to the chest area, allowing it to bleed ever so slightly into the blue neck for a soft transition. -
Branch Base:
Using a mix of Burnt Sienna and a touch of Payne’s Grey, paint the branch with a size 2 brush. Keep the stroke somewhat loose, varying the pressure to suggest bark texture. -
Leaf Greenery:
Mix a light Sap Green wash. Paint the tiny leaves on the branch with a quick, single stroke for each leaf to keep them looking fresh and spontaneous.
Step 3: Building Depth and Detail
-
Wing Feathers:
Once the first layer is completely dry, switch to a size 2 brush with a more concentrated blue mix. Paint individual feather shapes on the wing, leaving tiny slivers of the lighter wash showing between them. -
Tail Definition:
Extend the dark blue down to the tail feathers. Use long strokes that follow the direction of the tail, darkening the edges to show separation. -
Chest Shadows:
Add a second, slightly darker layer of diluted Burnt Sienna to the lower curve of the chest to create roundness and volume. -
The Face:
Carefully paint the beak using dark grey or black. Use your smallest brush (size 0) to paint the eye, leaving a tiny pinprick of white paper unpainted for the highlight.
Bleeding Colors?
If the orange chest bleeds too much into the blue back, your paper was too wet. Let the blue layer dry completely next time before adding the chest color to keep them distinct.
Step 4: Final Touches
-
Fine Texture:
With the size 0 brush and a fairly dry mix of Payne’s Grey, add tiny, hairline strokes around the beak and wing bars to suggest fine plumage texture. -
Feet and Claws:
Paint the feet gripping the branch using a dark brown mix. Use very fine lines to articulate the claws wrapping around the wood. -
Branch Detail:
Before finishing, add a few darker brown lines to the underside of the branch to ground the bird and give the wood dimension. -
Leaf Accents:
Add a tiny touch of darker green to the base of the leaves where they meet the stem to improve contrast.
Now you have a serene little bluebird to brighten up your sketchbook or frame for a wall
Minimal Line-and-Wash Bird Sketch
Capture the delicate beauty of a bird study with this elegant line-and-wash technique. By combining precise ink detailing with loose, expressive watercolor splashes, you creates a sketchbook page that feels both vintage and fresh.
Step-by-Step
Materials
- Mixed media sketchbook (smooth or vellum finish)
- Fine liner pen (01 or 03 size, black, waterproof ink)
- Dip pen and India ink (optional, for variation)
- Watercolor paints (Teal, Sap Green, Payne’s Grey)
- Small round watercolor brush (size 2 or 4)
- Pencil (HB) and eraser
- Paper towel
Step 1: Drawing the Base
-
Initial outline:
Begin with a very light pencil sketch on your page. Start with an oval for the body and a smaller circle for the head, connecting them with gentle curves. -
Adding features:
Sketch a short, sharp beak pointing slightly upward. Mark the position of the eye, keeping it relatively large to give the bird character. -
Wing placement:
Draw the folded wing shape along the bird’s back. Don’t worry about individual feathers yet; just capture the main triangular shape of the wing as it rests against the body. -
Branch and leaves:
Sketch a simple branch extending from the right side for the bird to perch on. Add two main stems branching downward with paired, oval-shaped leaves. -
Refining the sketch:
Gently erase any construction lines that you won’t need, leaving only the faintest guide for your ink work. This keeps the final page looking clean.
Loose is Best
Don’t connect every single ink line. Leaving small gaps in the outline of the bird helps the eye ‘fill in’ the form and makes the drawing look more dynamic.
Step 2: Inking the Details
-
Inking the eye and beak:
Using your waterproof fine liner or dip pen, carefully outline the eye and beak. Fill in the pupil, leaving a tiny white highlight to bring the bird to life. -
Feather textures:
Start inking the head and chest using short, directional strokes to mimic feathers. I prefer to keep these strokes loose and separate rather than drawing a solid outline. -
Wing definition:
Draw long, parallel lines for the wing feathers. Use thicker lines for the primary flight feathers at the bottom and finer, shorter marks for the upper wing coverts. -
Drawing the branch:
Ink the branch with shaky, uneven lines to suggest rough bark textures. Add a few small knots or cracks for realism. -
Leaf details:
Outline the leaves using a jagged, sketchy line style. Draw a central vein down each leaf and add delicate hatching marks on one side of the leaves to imply shading.
Coffee Stain Effect
For a vintage naturalist look, stain your paper beforehand with diluted teas or coffee, or splatter a little gold watercolor over the finished bird for a magical touch.
Step 3: Adding Color
-
Prepare the teal wash:
Mix a watery puddle of teal watercolor. You want this first layer to be very transparent, almost like stained glass. -
Body color wash:
Loosely paint the bird’s body with the teal mix. Don’t try to stay perfectly inside the lines; letting the paint bleed slightly outside gives it that artistic, ‘sketchbook’ feel. -
Deepening the shadows:
While the first layer is still slightly damp, drop a more concentrated teal or a touch of Payne’s Grey into the lower belly and under the wing to create instant volume. -
Painting the leaves:
Switch to your Sap Green. Apply a quick, light wash over the leaves, again keeping it loose. Leave some white space on the highlighted side of the leaves. -
Background splash:
Mix a very faint, watery grey or diluted blue. Paint a rough, organic shape behind the bird’s head and back to ground the subject, ensuring the edges fade out softly.
Step 4: Final Touches
-
Adding texture:
Once the paint is fully drawn, use your pen to add more hatching over the darker painted areas to deepen the contrast. -
Splatter effect:
Load your brush with a small amount of dark paint and tap it against your finger to create tiny speckles around the bird, adding energy to the composition. -
Final dry:
Let the entire page dry completely before erasing any remaining pencil marks to avoid smudging your fresh artwork.
Now you have a charming nature study preserved in your sketchbook.


Cartoon-Cute Bird With Oversized Eye
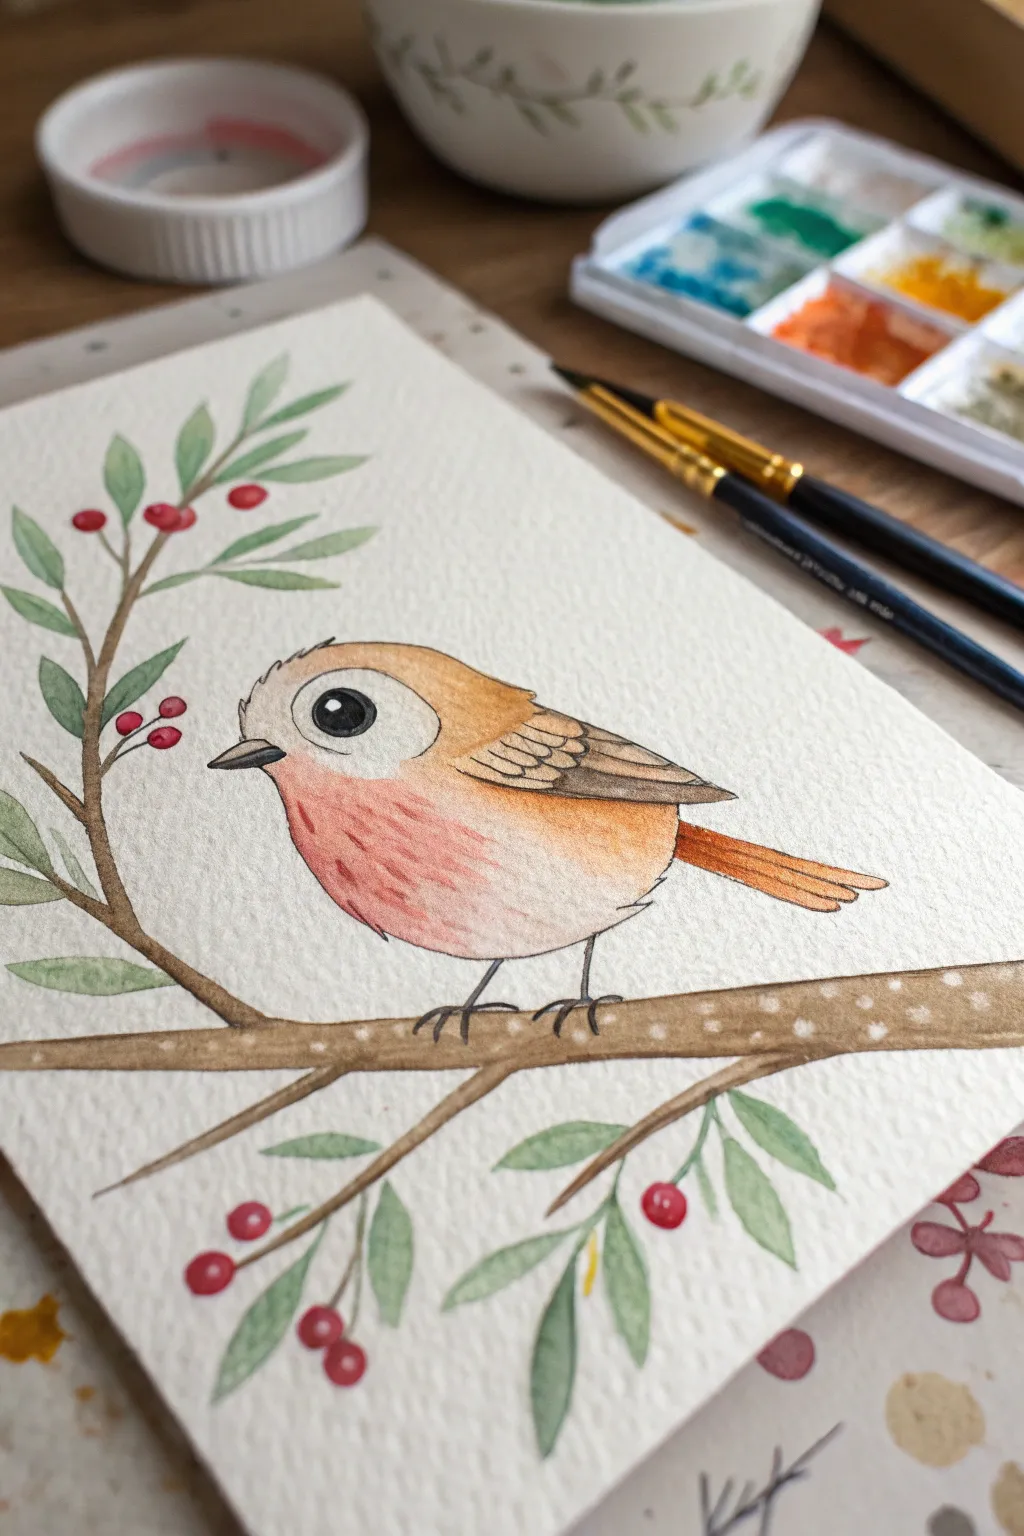
This charming project captures a sweet, cartoon-style bird resting on a berry-laden branch, perfect for beginners looking to practice their watercolor control. The oversized eye gives the character an endearing, innocent expression that leaps off the textured paper.
How-To Guide
Materials
- Cold press watercolor paper (300 gsm recommended)
- Watercolor paints (Vermilion, Burnt Sienna, Yellow Ochre, Sap Green, Payne’s Grey/Black, White Gouache or Acrylic)
- Round brushes (sizes 2 and 6)
- Fine liner brush (size 0 or 00) or archival ink pen
- Pencil (HB) and kneaded eraser
- Two jars of water
- Paper towels
Step 1: Sketching the Composition
-
Establish the curve:
Begin by lightly drawing a gentle, upward-curving line across the bottom third of your paper to serve as the main branch. -
Outline the body:
Draw the bird’s shape sitting atop the branch. Start with a rounded oval for the body and a slightly flattened circle for the head, merging them into one continuous, chubby form. -
Add the focal point:
Sketch a very large circle for the eye near the front of the face. Inside, draw a smaller circle for the pupil and a tiny circle for the highlight. This oversized feature is key to the cute aesthetic. -
Finish the details:
Add a small, triangular beak, the wing shape resting on the back, and the tail feathers extending behind. Sketch thin, wiry legs gripping the branch. -
Add foliage:
Sketch thinner twigs branching off the main stem. Draw simple almond-shaped leaves and small circle clusters for berries along these twigs.
Clean Edges Pro Tip
For the crispest eye outline, switch to a waterproof archival ink pen instead of paint. The steady ink flow makes circles much easier than a brush.
Step 2: Applying the Base Colors
-
Paint the chest:
Mix a watery wash of Vermilion red. Using your size 6 brush, apply this to the breast area of the bird, feathering the edges outward with clean water so it fades softly into the rest of the body. -
Color the body:
While the red is still slightly damp but not soaking, paint the head and back with a light wash of Yellow Ochre. Allow the colors to bleed slightly where they meet for a natural transition. -
Define the wing:
Mix Burnt Sienna with a touch of brown. Paint the wing shape, keeping the color solid for now. Add this same color to the tail feathers. -
Paint the eye:
Using a very small brush and concentrated Payne’s Grey or Black, carefully fill in the pupil, leaving the tiny highlight circle pure white. Paint the iris area a lighter grey or brown if desired, though a solid black eye emphasizes the cartoon look. -
Branch basics:
Paint the entire branch system with a mix of Burnt Sienna and a touch of grey to desaturate it. Let the paint pool slightly at the underside of the branch for natural shading.
Step 3: Foliage and Finishing Touches
-
Greenery:
Using Sap Green, fill in the leaves. Vary the intensity by adding more water to some leaves for a translucent look, and more pigment to others for depth. -
Berry accents:
Dot in the berries with concentrated Vermilion red. Try to leave a tiny speck of white paper showing on each berry to act as a highlight, or add it later with white gouache. -
Dry time:
Allow the entire painting to dry completely. If the paper feels cool to the touch, it is still wet. -
Outline work:
Using a size 0 brush with dark brown paint (or a fine liner pen), outline the bird’s body, wing, and eye. Keep the lines thin and slightly broken in areas so it doesn’t look like a coloring book. -
Wing texture:
Add scalloped lines inside the wing area to suggest feathers. I like to keep these lines fairly loose to maintain the whimsical feel. -
Legs and feet:
Paint the thin legs using a dark grey-brown mix, ensuring the toes look like they wrap around the branch. -
Branch texture:
Mix a little white gouache with water and tap small dots onto the branch to create a bark-like texture. -
Final highlights:
Add tiny touches of white gouache to the eye catch-light if the paper white got covered, and perhaps a small glint on the beak.
Level Up: Seasonal Vibes
Change the feel by swirling a very faint blue wash around the background for a winter sky, or add tiny white snowflakes to the branch.
Once dry, you can frame your cheerful little bird to brighten up any small corner of your home
Fingerprint Birds on a Wire
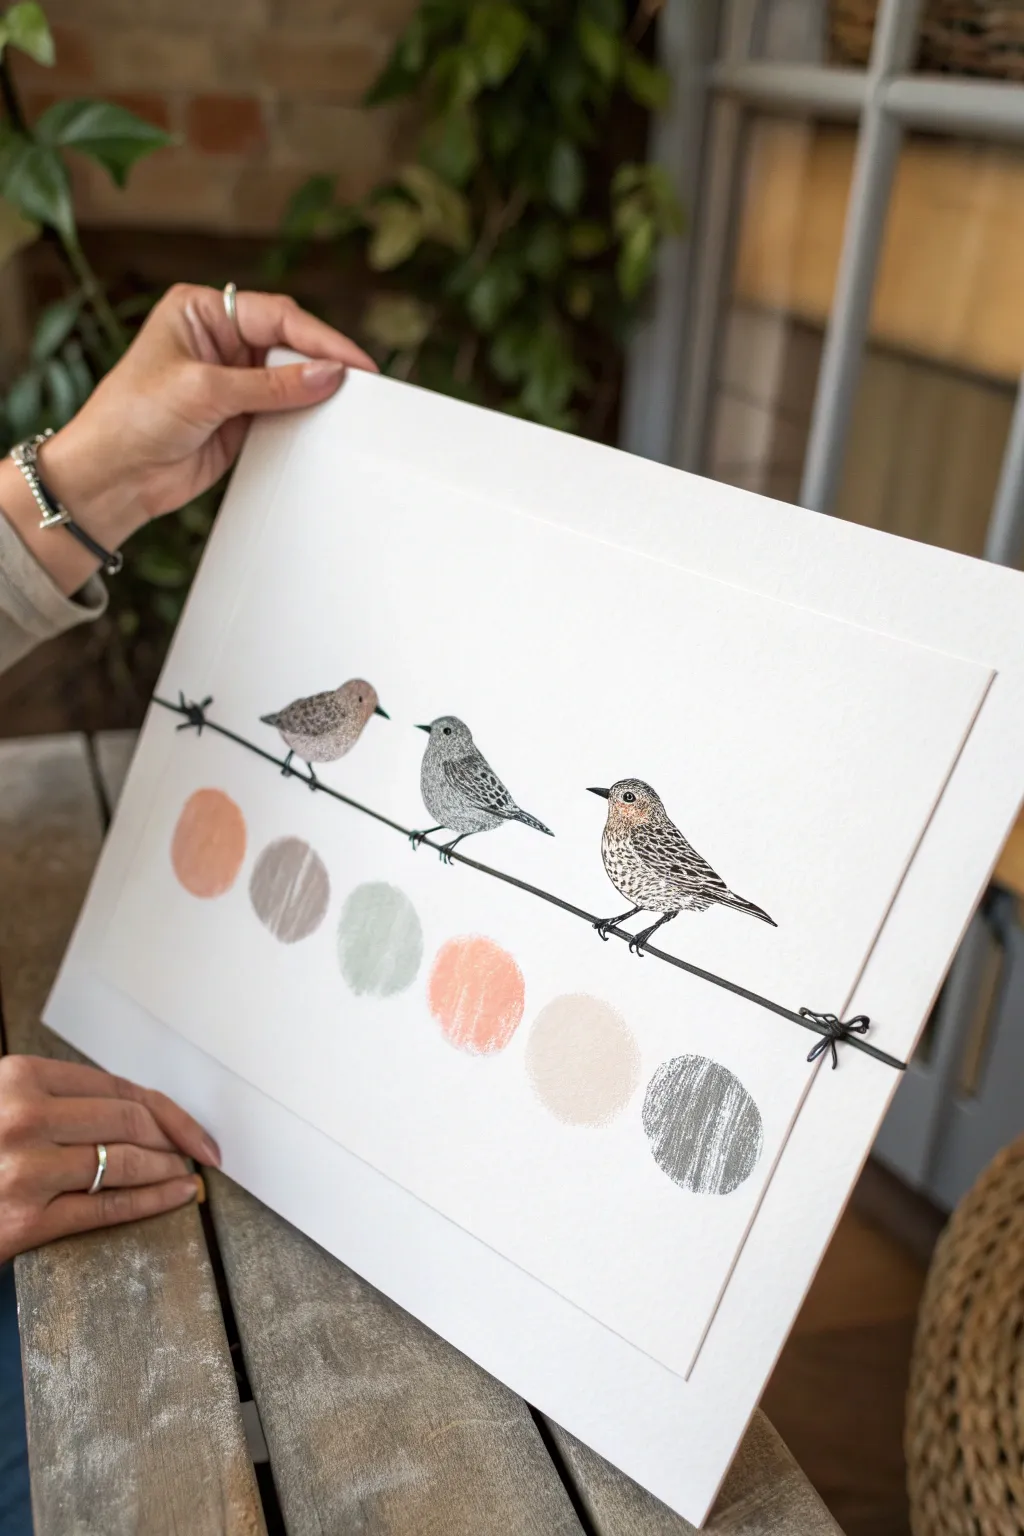
This charming mixed-media piece combines delicate pen illustrations with bold, abstract color swatches for a modern avian aesthetic. It’s a wonderful way to practice detailed texture drawing while playing with a muted, earthy color palette.
Step-by-Step
Materials
- High-quality watercolor paper or heavy cardstock (two sheets)
- Fine-liner pens (black, 0.1mm and 0.3mm)
- Watercolor paints or gouache (earth tones: rust, sage, grey, beige)
- Round paintbrush (size 6 or 8)
- Black embroidery floss or waxed cotton cord
- Pencil and eraser
- Ruler
- Scissors or craft knife
- Double-sided foam tape or glue dots
- Mounting board or backing card
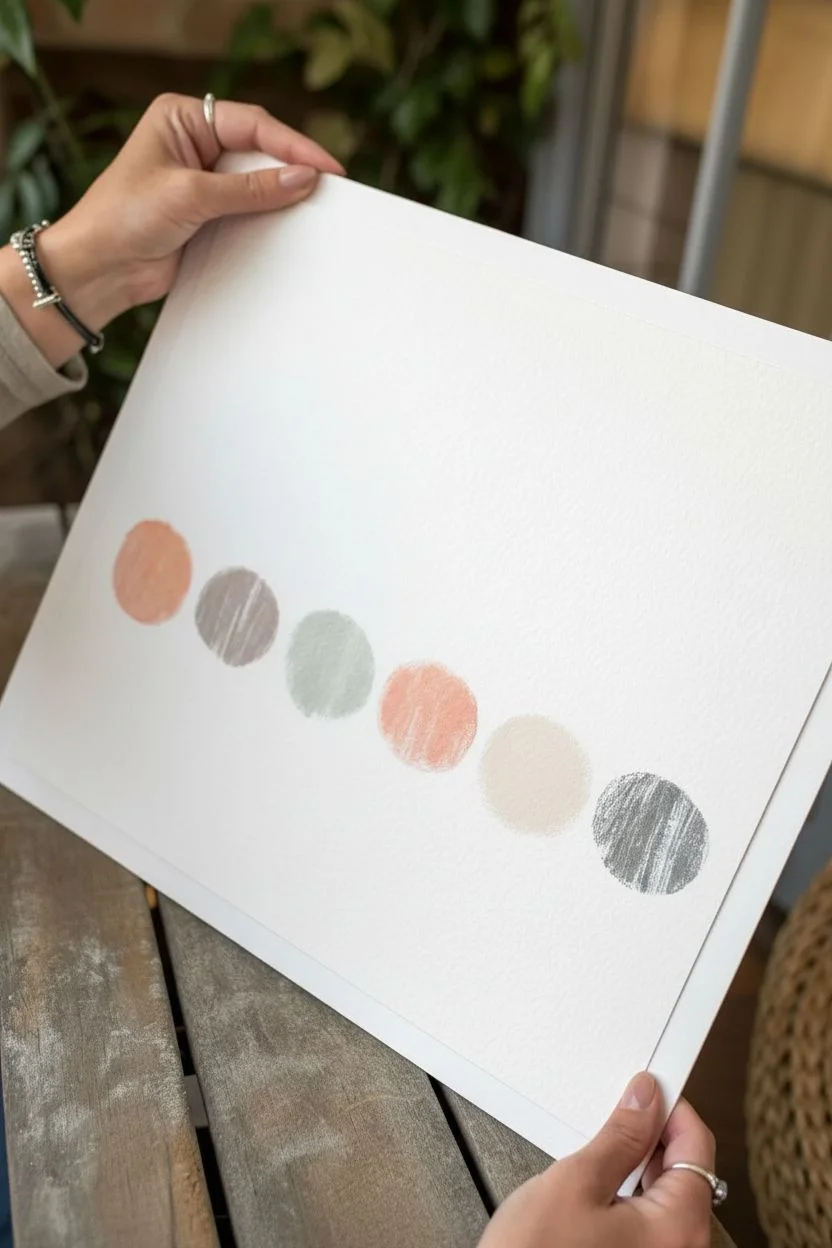
Step 1: Painting the Color Palette
-
Prepare your colors:
Mix six distinct colors on your palette. Aim for a cohesive, earthy scheme: a warm terracotta, a cool grey-brown, a soft sage green, a coral pink, a creamy beige, and a dark slate grey. -
Mark positions:
On your main sheet of watercolor paper, lightly mark a horizontal line about one-third of the way up from the bottom. Arrange six evenly spaced points along this line where your circles will go. -
Paint the swatches:
Using a relatively dry brush technique (scumbling), paint a circle at each mark. You want the texture of the paper to show through, so don’t overload your brush with water. -
Create texture:
While painting, intentionally leave some white space within the circles or use vertical brush strokes to give them a sketched, imperfect look rather than a solid flat fill. -
Let it dry:
Allow the paint to dry completely. Since we used less water, this should only take about 10-15 minutes.
Step 2: Drawing the Birds
-
Sketch the outlines:
Above the color swatches, roughly aligned with the first, third, and fifth dots, lightly sketch the outlines of three small birds sitting on an imaginary diagonal line. -
Ink the outlines:
Use your 0.1mm fine-liner to trace the bird outlines. Keep the lines somewhat broken or dotted in places to suggest soft feathers rather than a rigid cartoon outline. -
Add facial details:
Draw the beaks and eyes. Leave a tiny white highlight in the eye to bring the birds to life, then fill the rest of the eye in solid black. -
Stipple the textures:
Using the fine-liner, use stippling (lots of tiny dots) and short hatch marks to create the texture of wings and bellies. Concentrate the dots on the wings and under the belly for shadow. -
Variation in tone:
For the middle bird, you might want to switch to a darker ink or denser stippling to make it appear grey, creating contrast with the lighter birds on either side. -
Optional color accents:
If you like, wash a very faint glaze of watercolor over the bird bodies—perhaps a touch of terracotta on the chest or grey on the wings—but keep it subtle to let the ink work stand out.
Dry Brush Secret
To get that scratchy, textured look on the circles, wipe your brush on a paper towel before painting. It removes excess water.
Step 3: Assembly and Finishing
-
Cut the mount:
Cut a smaller rectangle of paper that contains just your artwork. Cut a second, larger piece of backing card or heavy paper to serve as the mount. -
Install the wire:
Place the artwork on top of the mount. Take a length of black embroidery floss and stretch it across the artwork, angling it slightly downwards from left to right, exactly where the birds’ feet are. -
Secure the wire:
Wrap the ends of the thread around the back of the artwork sheet and tape them securely. Tie a small bow with a separate piece of thread on the right side of the ‘wire’ for a decorative knot effect. -
Add dimension:
Apply foam tape or foam squares to the back of your artwork sheet. -
Final mount:
Center the artwork on your larger backing board and press down firmly. The foam tape creates a nice shadow drop, giving the piece a gallery-quality feel. -
Check the feet:
Finally, use your pen to draw the birds’ tiny feet gripping the thread wire, ensuring they look firmly perched.
Uneven Spacing?
If your circles are crooked, don’t restart. Add a few smaller ‘pebble’ dots between them to turn the mistake into an intentional pattern.
Hang your new textured masterpiece in a well-lit spot to enjoy the depth of the floating mount
Stencil-Style Bird Shapes With Clean Edges

Capture the stark beauty of a lone bird against a soft, sun-drenched sky with this beginner-friendly watercolor project. Using a simple silhouette technique creates a striking contrast between the crisp black subject and the dreamy, washed background.
Detailed Instructions
Materials
- Cold-pressed watercolor paper (300 gsm)
- Watercolor paints (Yellow Ochre, Burnt Sienna, Lamp Black)
- Round watercolor brushes (size 8 for wash, size 2 or 0 for details)
- Masking fluid (optional, but helpful for crisp edges)
- Pencil (HB or H)
- Paper towels
- Two jars of water
- Painter’s tape or washi tape
Step 1: Setting the Scene
-
Tape the paper:
Secure your watercolor paper to a board or table using painter’s tape on all four sides. This prevents the paper from buckling when we add the water for the background wash. -
Establish the horizon:
Lightly sketch the bird’s silhouette, the branch it rests on, and the grassy clumps at the bottom. Keep your pencil lines extremely faint so they won’t show through the final paint.
Keep Edges Sharp
For the crispest silhouette, ensure your background is 100% dry. Even slight dampness will cause the black bird to fuzz out.
Step 2: Creating the Atmosophere
-
Prepare the wash:
On your palette, mix a watery puddle of Yellow Ochre with a tiny touch of Burnt Sienna to warm it up. You want a color that resembles weak tea or morning sunlight. -
Wet the sky area:
Using your larger round brush and clean water, dampen the paper in the sky area. Be careful to avoid the shape of the bird if you are good at cutting in, though painting over it is fine since the black will cover it later. -
Drop in color:
While the paper is still glistening, load your brush with the yellow mix and touch it to the paper. Let the paint bloom and spread naturally. -
Create cloud textures:
To get that mottled, cloudy look seen in the example, gently dab different concentrations of the yellow mix onto the wet paper. Leave some areas nearly white to suggest bright light breaking through. -
Soften the edges:
If hard lines form where you don’t want them, rinse your brush, dry it slightly on a towel, and gently sweep along the edge to diffuse the pigment. -
Dry partially:
Let this first layer dry until it loses its sheen but feels cool to the touch. This semi-damp state is perfect for adding slightly darker clouds if you wish. -
Deepen the background tones:
Add a second, slightly more concentrated layer of the yellow-orange mix near the bottom horizon area to suggest the density of the lower atmosphere. -
Complete drying:
Allow the background to dry completely. The paper must be bone dry before we add the black silhouette to prevent bleeding.
Metallic Magic
Mix a tiny bit of gold metallic watercolor into your yellow sky wash. It creates a subtle shimmer that mimics sunlight hitting the clouds.
Step 3: The Silhouette
-
Mix the black:
Prepare a rich, creamy consistency of Lamp Black. You want it dark and opaque, not watery like the background wash. -
Outline the bird:
Switch to your smaller detail brush. Carefully outline the shape of the bird’s head and beak first, ensuring a sharp, clean edge. -
Fill the body:
Working quickly while the outline is wet, fill in the body of the bird. This prevents streak marks. I find working from the head down to the tail helps maintain the flow. -
Paint the tail feathers:
Extend the tail downwards with a confident stroke. The tail should be sleek and taper to a point. -
Add the eye detail:
While masking fluid is best, you can also just carefully leave a tiny pinprick of white paper unpainted for the eye. If you paint over it, just add a dot of white gouache later. -
Create the branch:
Using the tip of your brush, paint the branch the bird is perched on. Vary the pressure to make the branch look natural—thicker near the bird’s feet and tapering out. -
Detail the feet:
Paint the small claws wrapping around the perch. These are tiny details, so steady your hand against the table if needed.
Step 4: Grounding the Image
-
Start the grass:
At the very bottom of the page, use a diluted black wash (grey) to paint the base of the grass clumps. -
Add grassy spikes:
Flick your brush upward from the grey base to create blades of grass. Use quick, upward strokes to get sharp, tapered points. -
Vary the values:
Drop more concentrated black into the bottom of the wet grass area. This adds weight to the bottom of the composition and grounds the floating branch visually.
Peel off your tape carefully to reveal a clean border and frame your high-contrast masterpiece
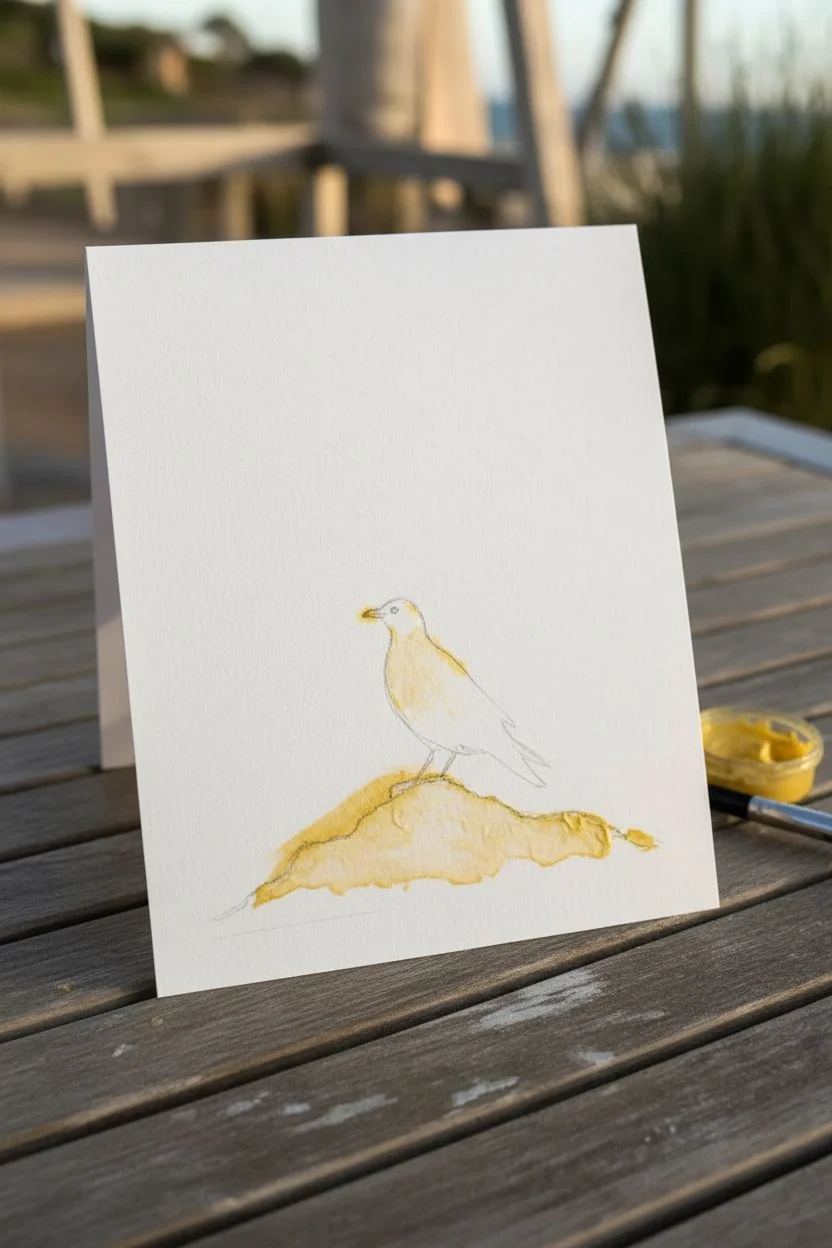
Negative-Space Bird in a Simple Sky Background
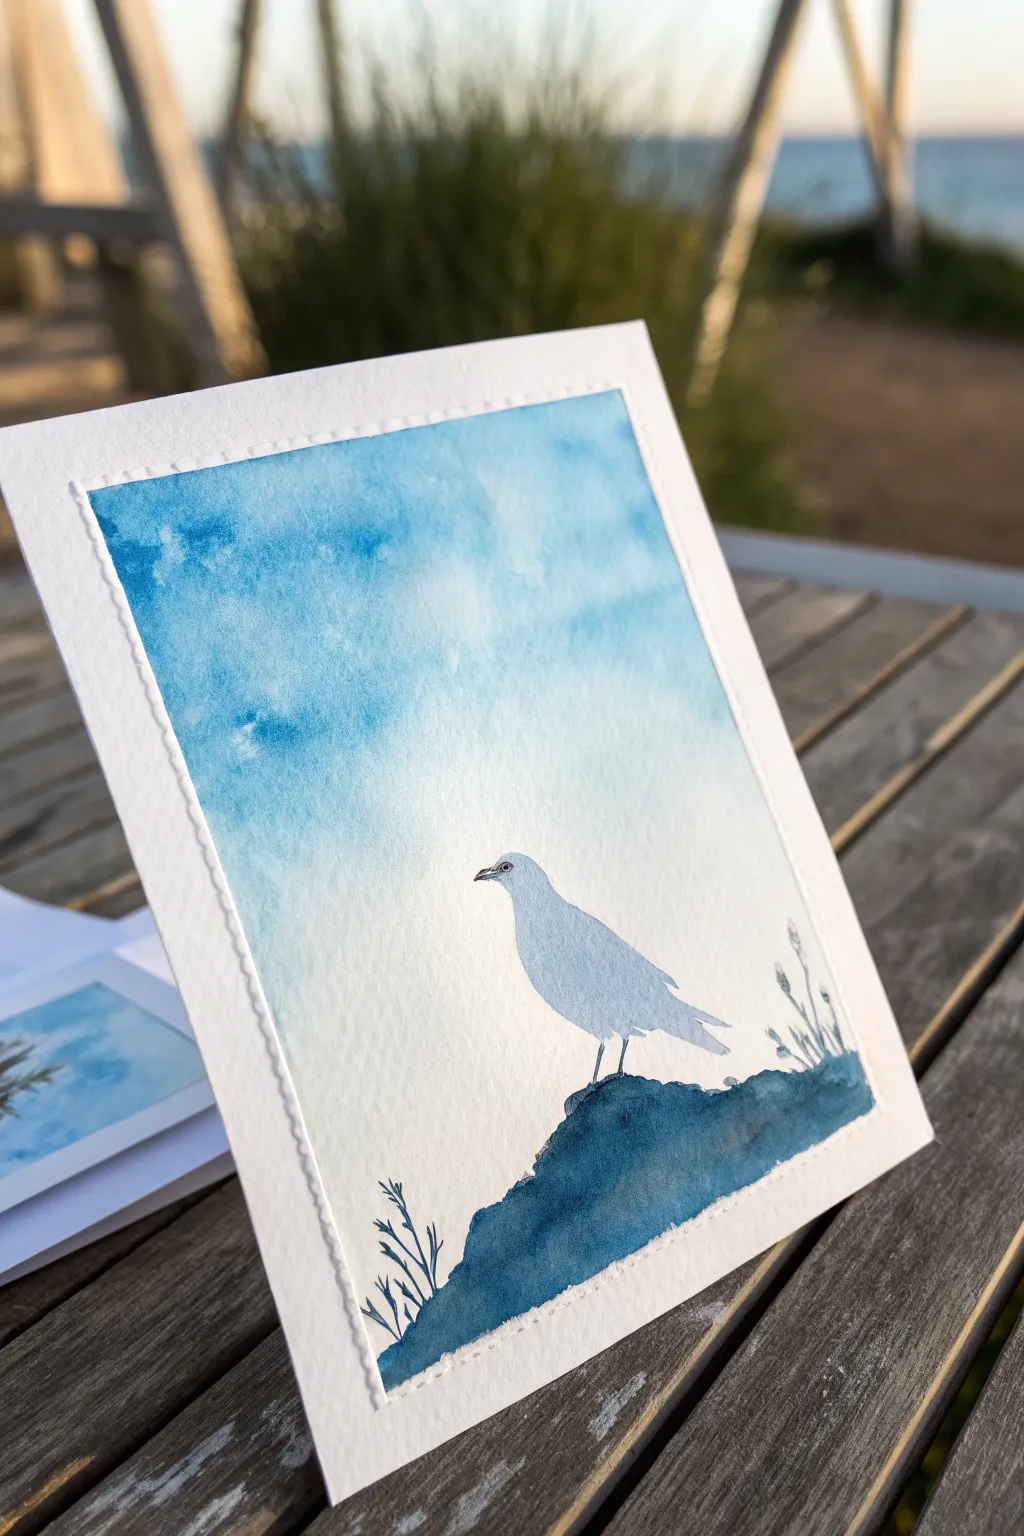
This peaceful project uses the beautiful technique of negative space painting to reveal a soft, white bird against a vibrant sky. By painting around your subject rather than filling it in, you create a luminous effect perfect for handmade greeting cards or framed minis.
How-To Guide
Materials
- Cold press watercolor paper (cut to card size)
- Watercolor paints (Cerulean Blue, Prussian Blue or Indigo)
- Masking fluid (drawing gum) and old brush
- Round watercolor brushes (size 4 and size 8)
- Jar of clean water
- Paper towels
- Pencil and kneaded eraser
- Hair dryer (optional for faster drying)
Step 1: Preparation and Masking
-
Sketch the outline:
Begin by lightly sketching the outline of a simple bird shape and the rocky mound beneath it. Keep your pencil lines very faint so they don’t show through the final paint. -
Establish the mound:
Draw a gently sloping hill or rock formation at the bottom third of the paper. Add a few small sprigs of grass or reeds poking out from the sides for interest. -
Apply masking fluid:
Using an old brush or a silicone applicator, carefully fill in the entire shape of the bird with masking fluid. This will protect the white paper underneath. -
Protect the details:
Don’t forget to add tiny dots of masking fluid for any glint in the eye, and if you want white highlights on the grass, mask those thin lines now too. -
Let it dry completey:
Wait until the masking fluid is perfectly dry and rubbery to the touch. If you paint too soon, you risk tearing the paper later.
Protect Your Brushes
Masking fluid ruins bristles instantly! Coat your brush in soapy water before dipping into the fluid, or use a dedicated ‘junk’ brush or silicone sculpting tool.
Step 2: Painting the Sky
-
Wet the sky area:
With a clean brush and clear water, wet the entire sky area around your masked bird, stopping just above the hill line. -
Drop in color:
Load your larger brush with a watery mix of Cerulean Blue. Lightly touch the wet paper, letting the color bloom and spread naturally. -
Create gradients:
Concentrate more pigment at the top corners and let it fade to a lighter, almost white wash near the horizon line behind the bird. -
Lift clouds (optional):
If the sky looks too uniform, dab a crumpled tissue gently onto the damp paint to lift out soft, cloudy textures. -
Dry the background:
Allow the sky layer to dry completely before moving on to the foreground. This prevents the dark hill color from bleeding upward.
Step 3: Foreground and Details
-
Paint the rock mound:
Mix a saturated, darker blue like Indigo or Prussian Blue. Paint the hill shape wet-on-dry for a crisp edge that contrasts against the sky. -
Add texture to the hill:
While the hill paint is still damp, drop in pure pigment or a tiny bit of salt to create a rough, rocky texture. -
Paint the foliage silhouettes:
Using the tip of your smallest brush, paint thin, delicate lines for the grass sprigs extending from the rock using the same dark blue mixture. -
Dry everything thoroughly:
Ensure the entire painting is bone dry. If the paper is cool to the touch, it still holds moisture. -
Remove the mask:
Gently rub the masking fluid away with your finger or a rubber cement pickup tool to reveal the pristine white bird underneath. -
Shadow the bird:
Mix an extremely watery, pale blue-grey wash. Paint the underside of the bird’s belly and tail to give it dimension so it doesn’t look flat. -
Add facial details:
Using a fine point brush (or a fine liner pen if you prefer), carefully paint the beak and the eye. -
Define the legs:
Paint two thin legs connecting the bird to the rock, ensuring it looks grounded rather than floating.
Add Subtle Texture
While the sky wash is still wet, sprinkle a tiny pinch of table salt on the blue paint. Let it dry completely, then brush it off for a frosty, crystallized sky effect.
Now you have a serene little artwork ready to be gifted or displayed
Easy Hummingbird With a Teardrop Body
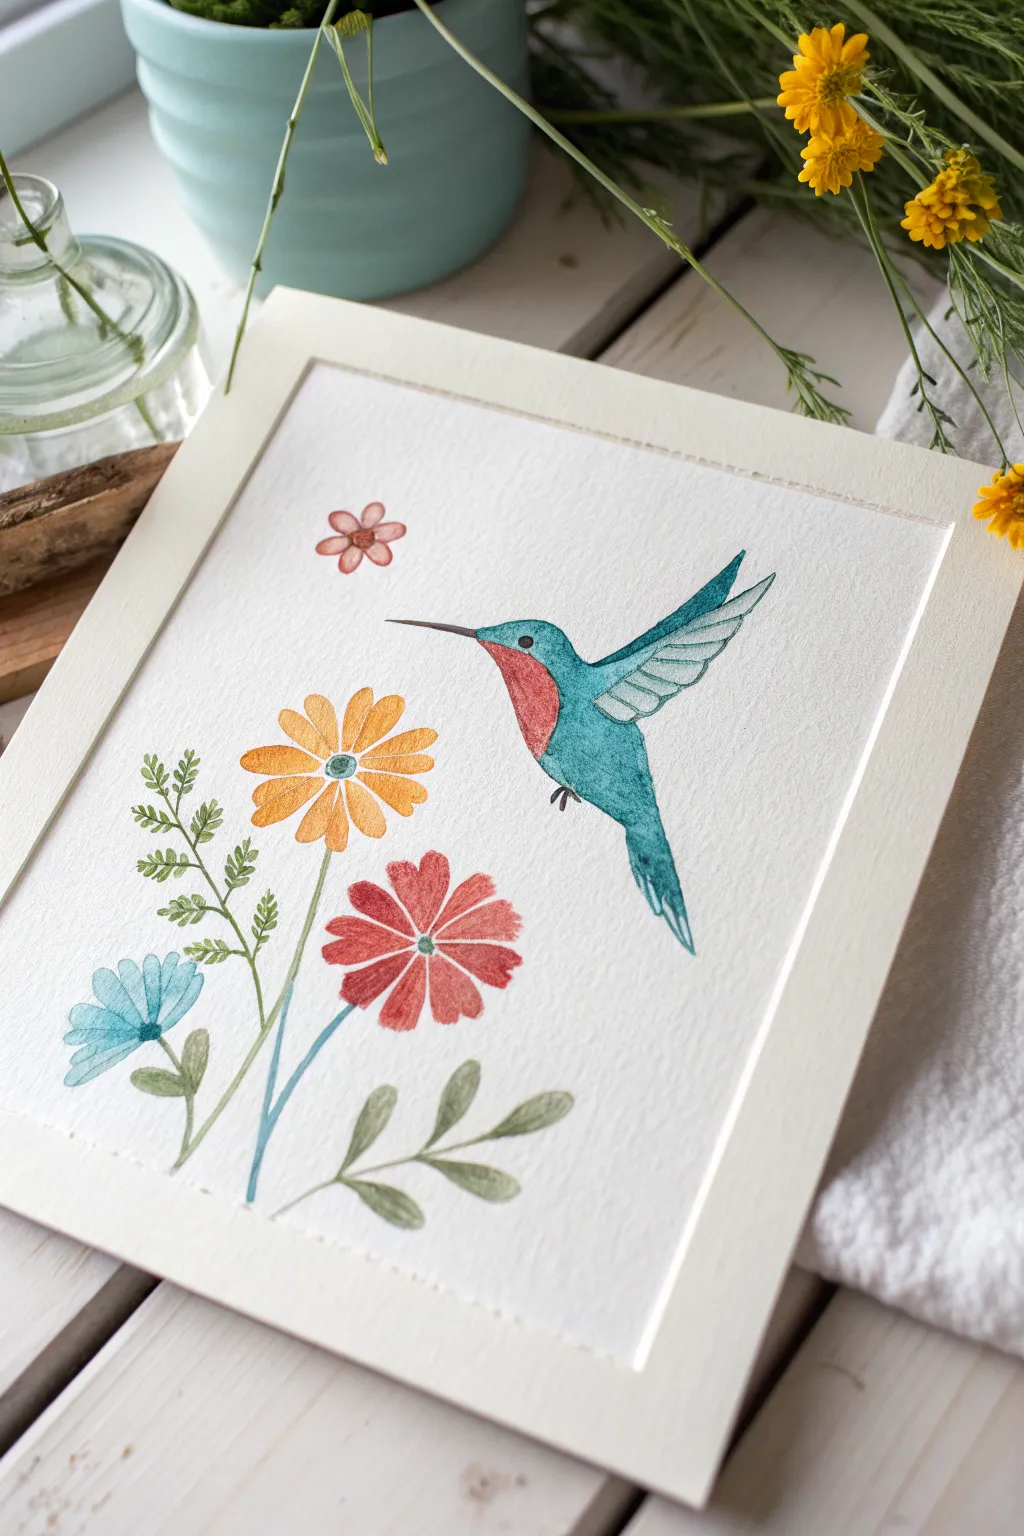
Capture the delicate flutter of a hummingbird with this charming watercolor project. By using simple geometric foundation shapes, you’ll create a vibrant scene featuring a jewel-toned bird visiting a trio of colorful wildflowers.
Step-by-Step Guide
Materials
- Cold press watercolor paper (approx. 8×10 inches)
- Watercolor paints (teal/turquoise, warm red, golden yellow, light blue, sap green, indigo)
- Round brushes (sizes 2, 4, and 6)
- Pencil (HB or H for light lines)
- Kneaded eraser
- Fine liner or very small detail brush for the eye
- Clean water and paper towels
- Masking tape (optional, to create clean edges)
Step 1: Sketching the Scene
-
Define the bird’s body:
Start by lightly drawing a tilted teardrop shape in the upper right quadrant of your paper. The pointed end will become the tail, and the rounded end is the head. -
Add wings and beak:
Sketch a long, thin triangle extending upward from the back for the top wing, and a smaller partial triangle below it for the far wing. Draw a long, needle-thin line for the beak pointing toward the left. -
Outline the flowers:
To the left of the bird, sketch circles to mark the positions of your flowers: one low on the left (blue), a larger central one (orange), and one slightly lower right (red). Add a tiny floating flower above the bird’s path. -
Connect stems and leaves:
Draw thin, curving lines connecting the flowers to the bottom edge of the paper. Add simple leaf shapes: fern-like fronds on the far left and rounded oval leaves near the bottom.
Step 2: Painting the Hummingbird
-
Base coat for the body:
Using a size 4 brush, mix a vibrant turquoise or teal. Paint the head, back, and tail area, leaving the throat area unpainted for now. Keep the paint wet enough to flow smoothly. -
Create the ruby throat:
While the blue is still slightly damp (but not puddling), carefully paint the throat area with a warm red. If the colors touch slightly, let them bleed for a soft transition, but try to keep the shapes distinct. -
Wing transparency:
Dilute your teal paint significantly with water to create a very pale wash. Paint the wings with this sheer color to suggest movement and translucency. -
Wing details:
Once the pale wing wash is dry, use a size 2 brush and thicker teal paint to add lines indicating the feathers. -
Face details:
With a very fine brush or dark indigo paint, add a small dot for the eye within the teal head area. Carefully paint the long beak in a dark brown or black.
Wet-on-Dry Precision
For this illustrative style, use the ‘wet-on-dry’ technique. Let each shape dry fully before painting a neighbor to keep edges crisp and prevent unwanted bleeding.
Step 3: Painting the Flora
-
The blue daisy:
Mix a light sky blue. Paint simple, elongated oval petals for the bottom-left flower. Leave a tiny white gap in the center or paint around the center circle. -
The orange bloom:
For the large central flower, use a golden yellow or orange. Paint distinct petals radiating from the center. I like to leave tiny slivers of white paper between petals to keep them from merging into a blob. -
The red cosmos:
Use a diluted red (similar to the hummingbird’s throat) for the third flower. Create wider, slightly squared-off petals. -
Flower centers:
Once the petals are dry, add the centers. Use a darker teal for the orange flower’s center to tie the color scheme together, and simple dots for the others. -
Stems and foliage:
Load a size 4 brush with sap green. Paint the stems with confident, sweeping strokes. For the fern-like leaves, use the tip of the brush to make small dashed marks along the stem. -
Final leaf details:
Paint the rounded leaves at the bottom with a slightly more diluted green for variety. Let everything dry completely before erasing any visible pencil marks.
Metallic Magic
Once dry, add a tiny touch of gold watercolor or metallic pen to the hummingbird’s throat or the flower centers for a subtle shimmer that catches the light.
Frame your delicate artwork with a wide white mat to emphasize the airy feel of the composition
Abstract Bird With Patterned Wing Shapes
This charming, stylized bird painting stands out with its decorative wing details and soft, muted color palette. The combination of clean lines, geometric patterns like polka dots and stripes, and organic leaf shapes creates a modern illustration style that looks professional yet is surprisingly approachable for beginners.
Detailed Instructions
Materials
- Large sheet of hot press watercolor paper or illustration board
- Gouache or acrylic paints (matte finish recommended)
- Pencil and eraser
- Synthetic round brushes (sizes 2, 6, and 10)
- Fine liner brush (size 0 or 00)
- Mixing palette
- Jar of water
- Paper towels
Step 1: Drafting the Shapes
-
Map out the composition:
Begin by lightly sketching the main branch extending diagonally from the bottom left corner upward toward the right. Add smaller offshoot twigs to create a balanced structure for your leaves. -
Outline the bird body:
Sketch a smooth, teardrop-like shape for the bird’s body, resting it gently on the main branch. Ensure the head is rounded and transitions smoothly into the back. -
Define the wing sections:
Inside the body shape, draw the wing structure. Unlike a realistic bird, break the wing into distinct, blocked-out sections—a shoulder patch, a middle bar, and the long flight feathers—which we will later fill with patterns. -
Add nature details:
Sketch varying leaf shapes along the branch. I find that mixing simple oval leaves with slightly more jagged, fern-like fronds adds nice visual interest to the composition.
Step 2: Blocking in Color
-
Paint the body base:
Mix a warm beige or light taupe color. Using your size 10 brush, fill in the main body of the bird, carefully painting around the eye area and the wing sections you sketched earlier. -
Fill the branch:
Using a darker taupe or soft brown, paint the branch structure. Keep your strokes confident to mimic the sturdiness of wood, tapering the thinner twigs at their ends. -
Color the upper wing:
Mix a rusty terracotta orange. Apply this to the uppermost section of the wing (the shoulder) and a few select leaves to tie the color palette together. -
Paint the leaves:
For the remaining leaves, mix a muted sage green and a pale blue-grey. Alternate these colors on your branch to create a soft, varied foliage effect. -
Undercoat the patterned areas:
Paint the middle wing section white or very pale cream. Paint the lower flight feathers and the tail feathers in the same base beige used for the body, or slightly darker for contrast.
Clean Lines Pro Tip
For the crispest patterns on the wings, let the base layer of paint dry fully (at least 20 minutes) before adding stripes or dots on top. Wet-on-wet will smudge.
Step 3: Adding Patterns & Details
-
Detail the eye and beak:
Switch to your size 2 brush and black paint. Carefully fill in the beak and the eye, leaving a tiny speck of white paper (or adding a white dot later) for the highlight. -
Add the black accents:
Paint the signature black markings: a swoop from the beak down the neck, and bold black stripes on the white middle wing section. -
Create the polka dots:
Using the tip of a small round brush or a dotting tool, apply white dots over the rusty orange shoulder patch. Keep them relatively uniform in size. -
Texturize the chest:
Mix a diluted dark grey or brown. Add tiny, scattered flecks or dots on the bird’s chest to suggest speckled plumage without drawing individual feathers. -
Define flight feathers:
Use your fine liner brush to paint thin, dark lines differentiating the long flight feathers on the lower wing. -
Stripe the tail:
Add horizontal reddish-brown stripes across the long tail feathers, mimicking the pattern of a hawk or kestrel. -
Outline the leaves:
To give the leaves a graphic, illustrative look, add very fine veins or outlines using a thinned-down version of your branch color. -
Final touches:
Paint the legs and feet using a dark charcoal grey, ensuring the claws wrap convincingly around the branch. Let the entire piece dry completely before erasing any visible pencil marks.
Level Up: Gold Leaf
Make the artwork pop by swapping the white polka dots on the wing for real gold leaf or metallic gold paint. It catches the light beautifully.
Hang this serene piece in a hallway or study where its earthy tones can bring a sense of nature indoors without overwhelming the space
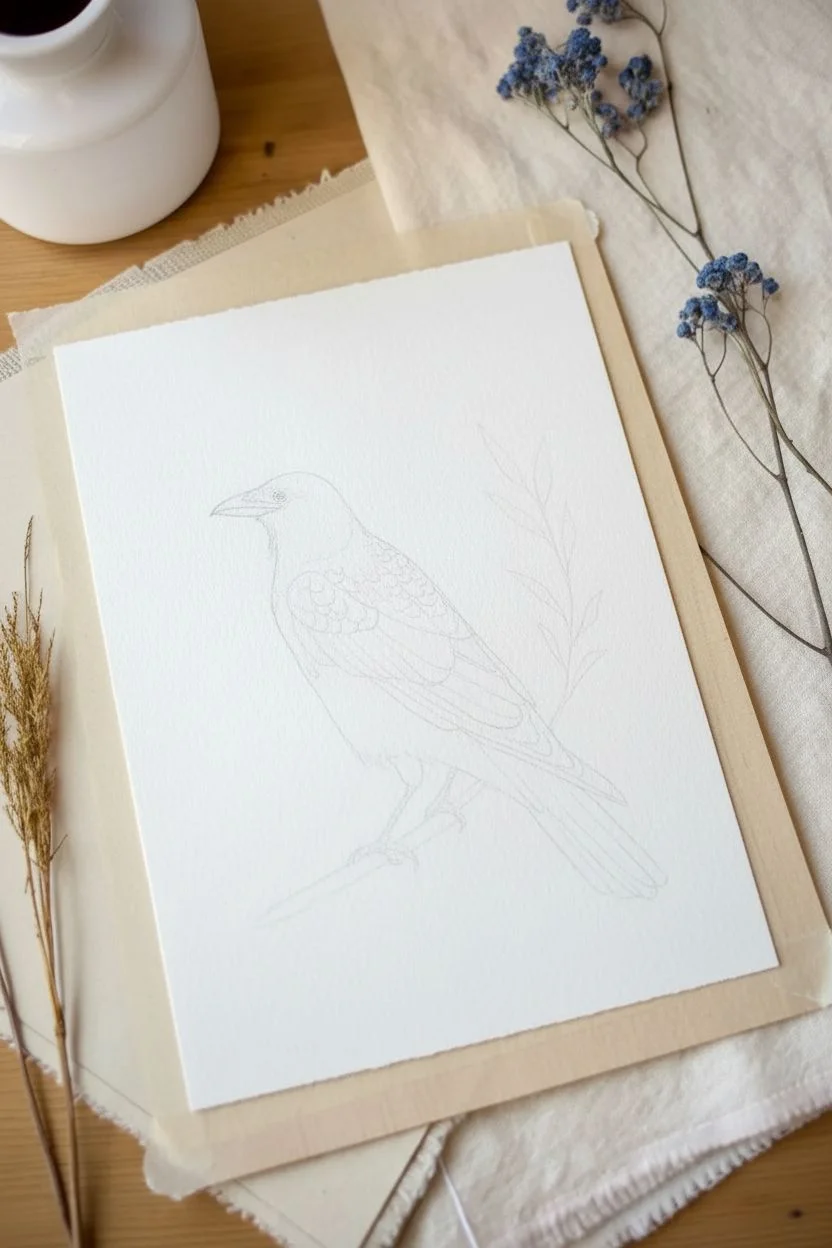
Galaxy Background With a Black Bird Silhouette
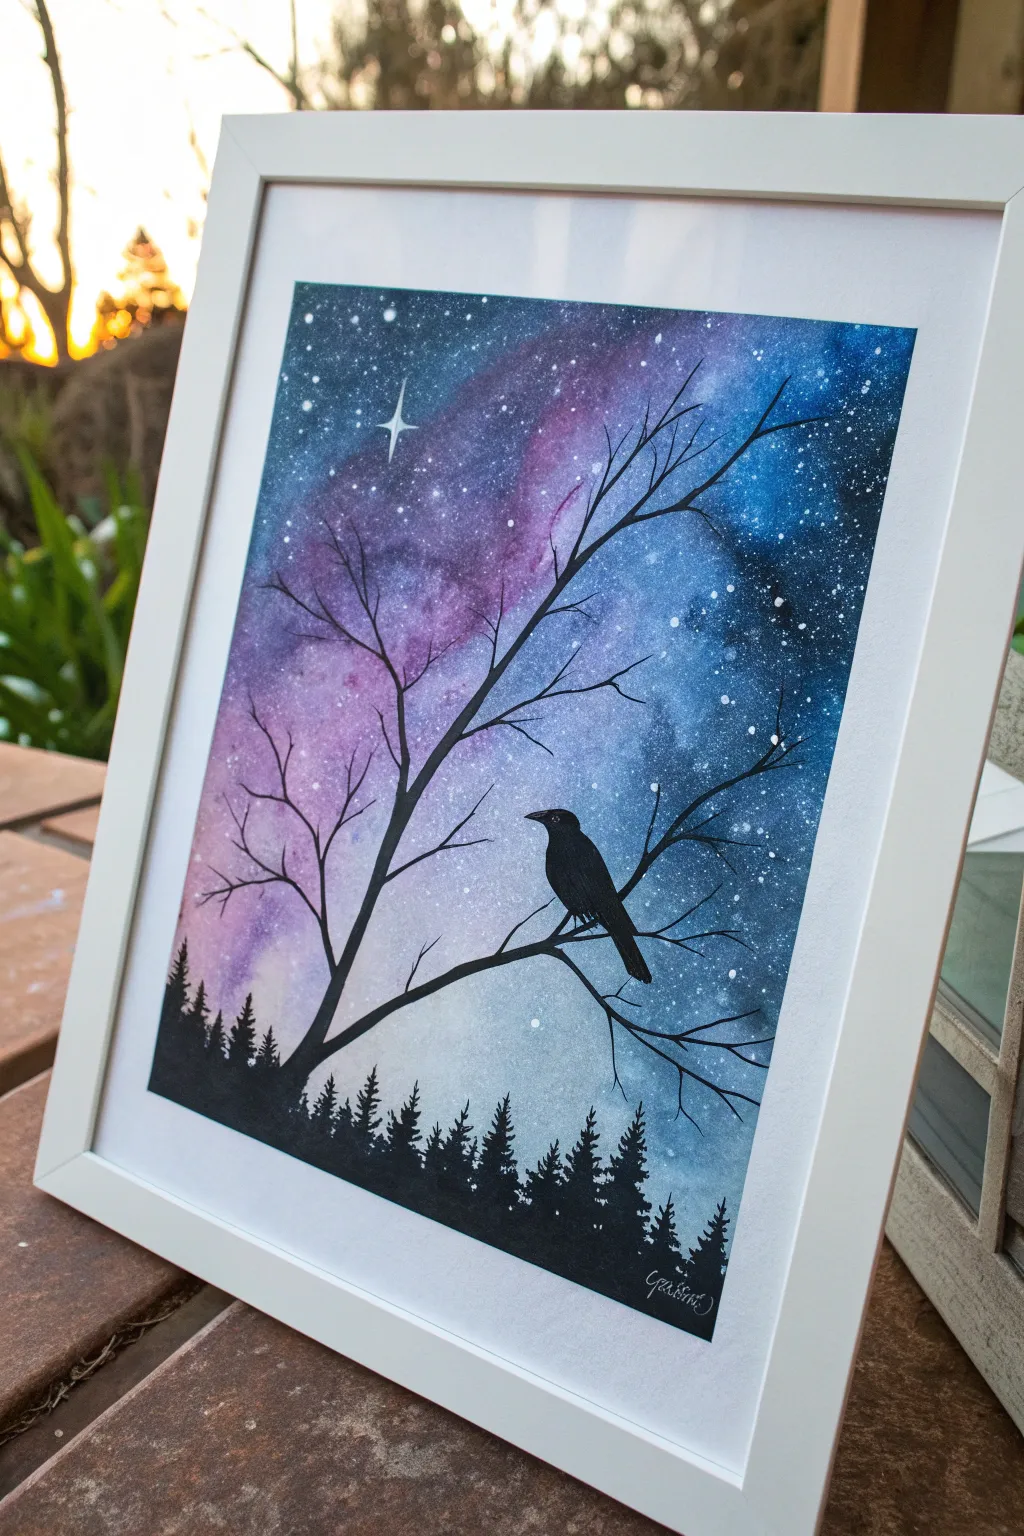

Capture the magic of a winter evening with this stunning galaxy watercolor painting featuring a lonely crow silhouette. The vibrant blend of deep blues, purples, and pinks creates a dramatic backdrop for the stark black trees and bird.
Step-by-Step Tutorial
Materials
- Cold press watercolor paper (300gsm)
- Painter’s tape or masking tape
- Watercolor paints (Indigo, Phthalo Blue, Purple, Magenta)
- Black acrylic paint or black gouache
- White acrylic paint, gouache, or white gel pen
- Large flat wash brush
- Medium round brush (size 6 or 8)
- Small detail brush (size 0 or 1)
- Cup of water and paper towels
- Old toothbrush (optional for stars)
Step 1: Setting the Scene
-
Tape the edges:
Before you begin, secure your watercolor paper to a board or table using painter’s tape. This not only keeps the paper flat when wet but also creates that crisp, clean white border visible in the final framed piece. -
Wet the paper:
Using your large flat brush, apply a generous wash of clean water across the entire surface of the paper. You want the paper to be shiny and damp, but not dripping with puddles.
Wet-on-Wet Magic
For better galaxy blends, tilt your paper while the paint is wet. Gravity helps the colors swirl together naturally without over-brushing.
Step 2: Painting the Galaxy Sky
-
Start with the light colors:
While the paper is wet, drop in patches of magenta and light purple. Start near the bottom left and streak upwards diagonally towards the center. Allow the wet paper to soften the edges naturally. -
Add the mid-tones:
Introduce phthalo blue or a bright sky blue around the pink areas. Let the blue touch the edges of the pink paint so they blend slightly into a soft violet, but try not to overwork it into mud. -
Deepen the night sky:
Load your brush with concentrated indigo or dark navy blue. Apply this to the top corners and the far right edge of the paper to create the depth of space. Leave the area near the horizon slightly lighter. -
Blend and smooth:
If you see hard lines forming, rinse your brush, dampen it slightly, and gently feather the edges where colors meet. The goal is a seamless transition between the dark cosmos and the colorful nebula. -
Let it dry completely:
This is crucial—wait for the background to be bone dry. If it’s still cool to the touch, it’s wet. You can use a hairdryer on a low setting to speed this up.
Step 3: Creating the Stars
-
Flick the stars:
Mix a small amount of white gouache or acrylic with a tiny drop of water to make it fluid. Dip an old toothbrush or a stiff bristled brush into the paint and flick the bristles to spray tiny white specks across the sky. -
Paint larger stars:
Use your smallest detail brush or a white gel pen to dot a few deliberate, larger stars. Add a ‘lens flare’ or cross shape to the brightest star in the upper left corner to make it twinkle.
Make it Sparkle
Mix a tiny bit of iridescent or metallic watercolor into your night sky. It won’t show much in the dark, but it will shimmer beautifully in the light.
Step 4: Adding the Silhouettes
-
Paint the tree line:
Switch to black acrylic or gouache for opacity. With a medium brush, dab a jagged, uneven line along the bottom edge to form the ground. Use vertical dabbing motions to suggest the pointed tops of a distant pine forest. -
Draft the main branch:
Using your detail brush and black paint, draw a long, sweeping branch starting from the lower left forest and reaching diagonally up toward the top right corner. Keep the line slightly shaky to look organic. -
Add twigs and offshoots:
From the main trunk, pull out smaller branches. Remember that branches get thinner as they move away from the tree. Vary the angles so they look like a natural winter tree. -
Outline the bird:
About halfway up the main branch, paint a small silhouette of a bird. Start with an oval for the body and a smaller circle for the head, making sure the feet connect firmly to the branch. -
Detail the bird:
Use the very tip of your detail brush to sharpen the bird’s beak and add a long tail feather pointing downward. This creates the distinct profile of a raven or crow. -
Paint a white eye:
Once the black bird silhouette is fully dry, take a tiny dot of white paint or your gel pen and add a small eye to bring the bird to life. -
Peel the tape:
Wait until every layer is completely dry. Slowly peel the painter’s tape away at a 45-degree angle to reveal your clean edges and frame your masterpiece.
Now you have a moody, atmospheric piece of art ready to be framed
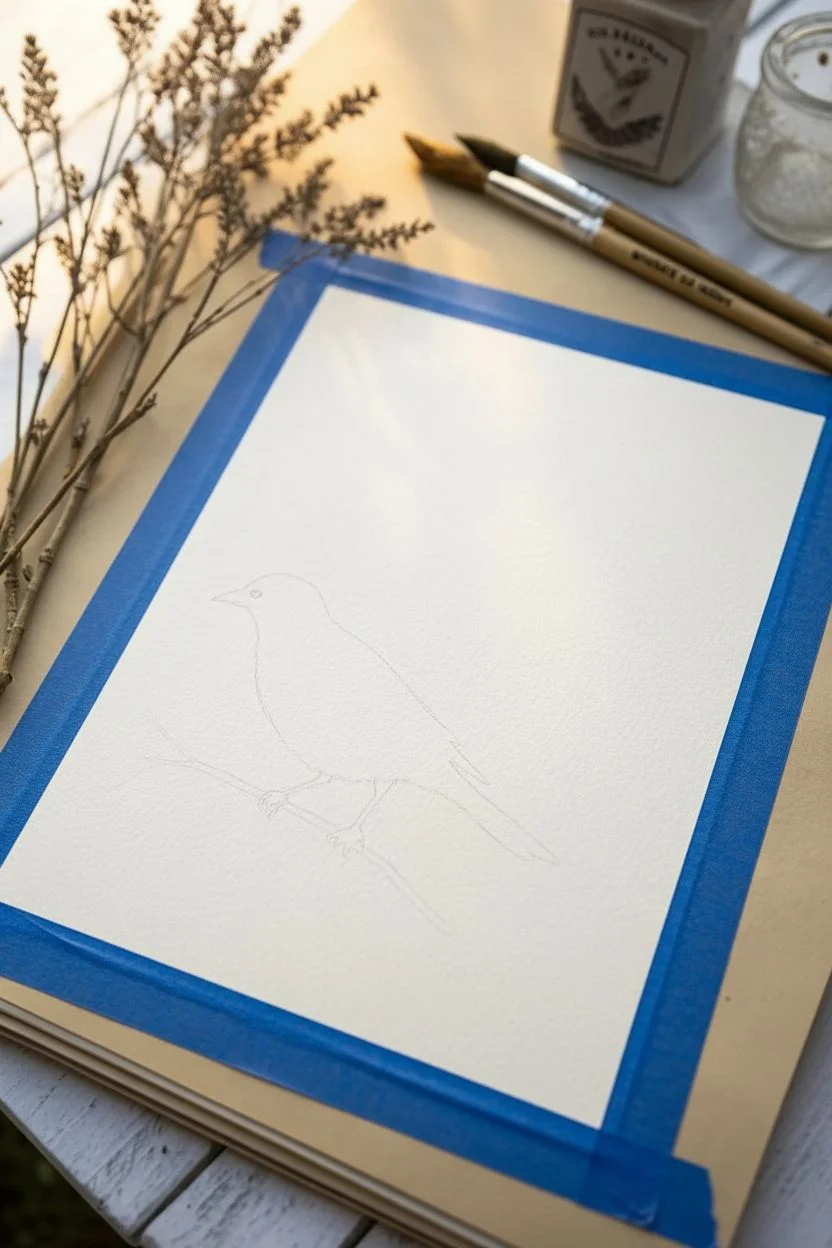
One-Color Bird Study in Monochrome
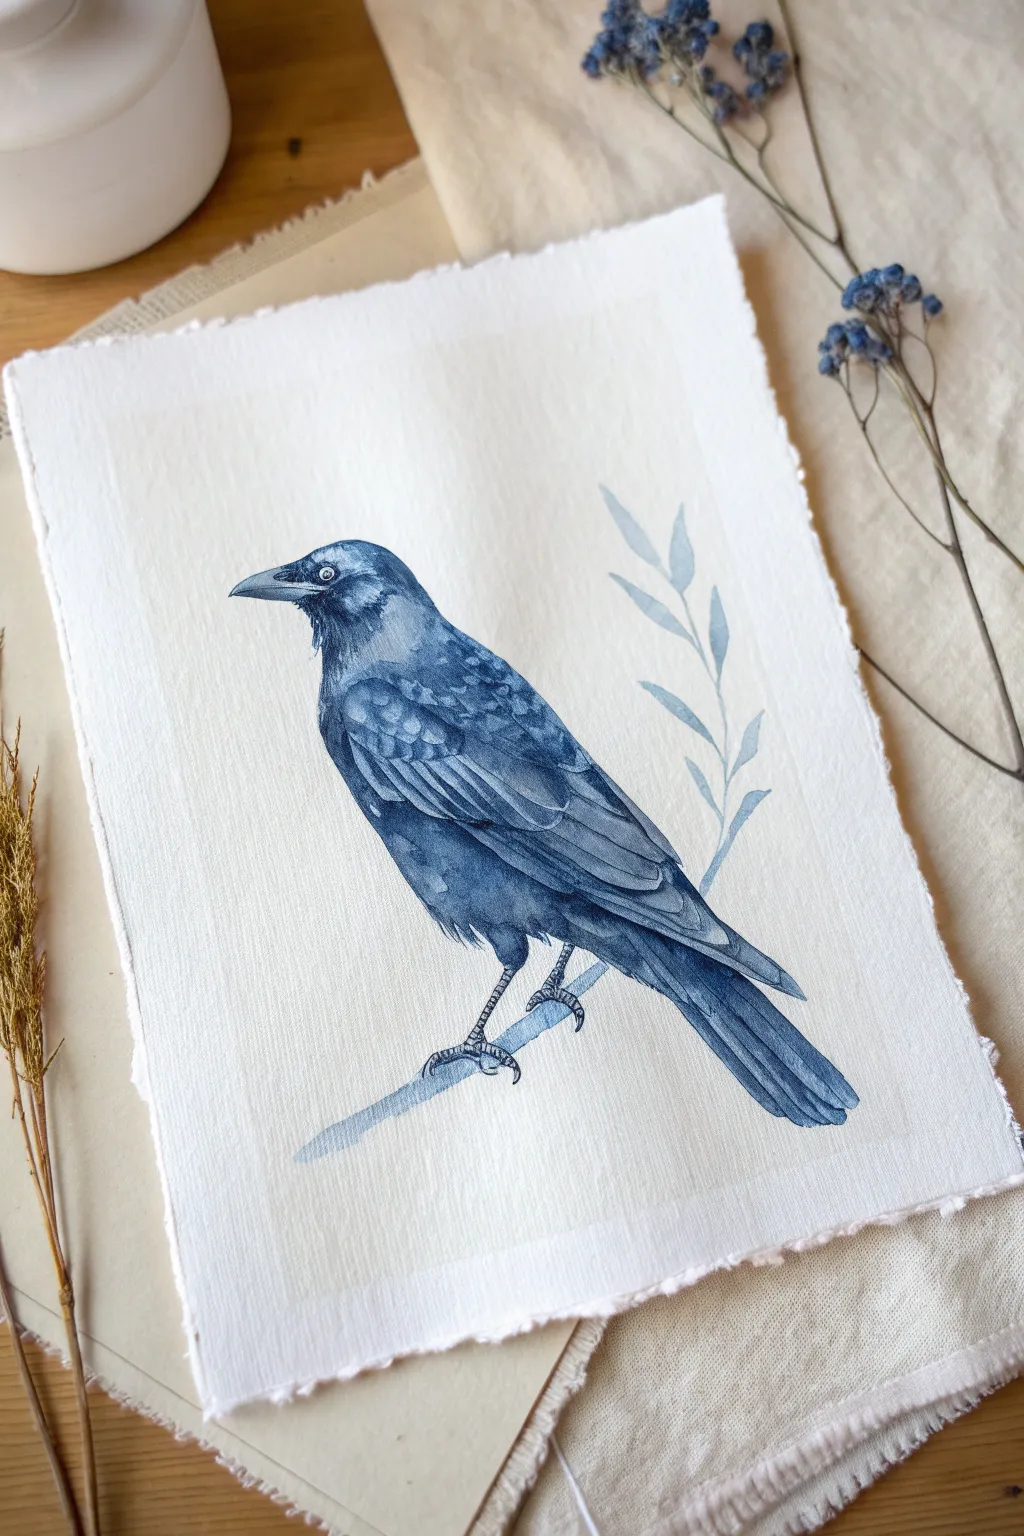
Master the art of tonal values with this striking single-color study of a raven. Using just one shade of paint allows you to focus entirely on light, shadow, and texture without the complexity of color mixing, resulting in a sophisticated and moody illustration.
Step-by-Step Guide
Materials
- Cold press watercolor paper (300 gsm/140 lb)
- Indigo or Payne’s Gray watercolor paint
- Round watercolor brushes (sizes 2, 6, and 8)
- Pencil (HB or 2H)
- Kneaded eraser
- Two jars of water
- Paper towels
- Masking tape or painter’s tape
Step 1: Preparation and Sketching
-
Prepare the paper:
Begin by tearing the edges of your watercolor paper to create a deckled edge look, or cut it to your desired size (A5 works well for this). Tape the paper down to a board to prevent buckling. -
Outline the basic shape:
Using a light hand and an HB pencil, sketch the oval shape of the bird’s body and a smaller circle for the head. Connect them with a curved neck line to establish the posture. -
Refine the details:
Draw the beak, ensuring it has a slight curve, and mark the position of the eye. Sketch the wing feathers, tail feathers, and the legs gripping a simple diagonal branch. Lightly sketch a few floating leaves to the right for balance. -
Lighten the guides:
Roll your kneaded eraser gently over the entire sketch. You want the graphite lines to be barely visible so they don’t show through the transparent watercolor layers later.
Mastering Monochrome
Test your three paint consistencies on a scrap paper first. The difference between the light and dark mix is key to creating that 3D effect.
Step 2: Layering the Values
-
Mix your washes:
Create three puddles of your chosen color (Indigo) on your palette: a very watery ‘tea’ consistency (light), a ‘milk’ consistency (medium), and a thick ‘cream’ consistency (dark). -
First light wash:
Using the size 6 brush and the light wash, paint the entire body of the bird, carefully avoiding the beak, the eye, and the legs. This establishes the base tone. -
Defining the beak and eye:
While the body dries, switch to a size 2 brush. Paint the beak with the medium wash, leaving a tiny sliver of white paper on top for a highlight. Carefully outline the eye and paint the pupil dark, leaving a white reflection dot. -
Shadows on the head:
Once the base layer is dry, apply the medium wash to the head and neck area. Use short, small strokes to mimic the texture of small feathers, concentrating darker pigment under the beak and behind the eye. -
Wing structure:
With the medium wash, paint the individual wing feathers. Leave narrow gaps between some feathers to let the lighter underlayer show through, which separates the shapes. -
Deepening the shadows:
Now reach for your darkest ‘cream’ mixture and the size 6 brush. Add deep shadows under the wing, at the base of the tail, and on the underside of the belly to give the bird volume.
Water Control Fix
If a “cauliflower” bloom appears in your wash, wait for it to execute completely dry, then gently scrub it with a damp stiff brush to soften the edge.
Step 3: Texturing and Final Details
-
Feather detailing:
Switch to your smallest brush (size 2) and the dark paint. Add fine lines and delicate scalloped shapes onto the wing feathers to suggest texture and barbs. -
Painting the legs:
Paint the legs using the dark mixture. Use the very tip of the brush to create the scale-like texture on the feet and claws, ensuring they look like they are gripping the branch strongly. -
The branch and leaves:
Paint the branch with a very diluted, watery wash of your Indigo. While it is still wet, drop a tiny bit of darker pigment along the bottom edge for a soft shadow effect. -
Adding botanical elements:
Paint the floating leaves using the lightest wash. Keep these very faint and ghostly compared to the bird; they should look like a subtle background element. -
Final assessment:
Step back and look at your contrast. If the bird looks too flat, add one final layer of the darkest pigment to the deepest shadow areas, typically under the wing and tail. -
Finishing touches:
If you accidentally painted over the eye highlight, you can use a tiny dot of white gouache or a white gel pen to bring the spark back. Let the artwork dry completely before removing the tape.
Once dry, your monochromatic bird study is ready to be framed or gifted as a sophisticated piece of nature art
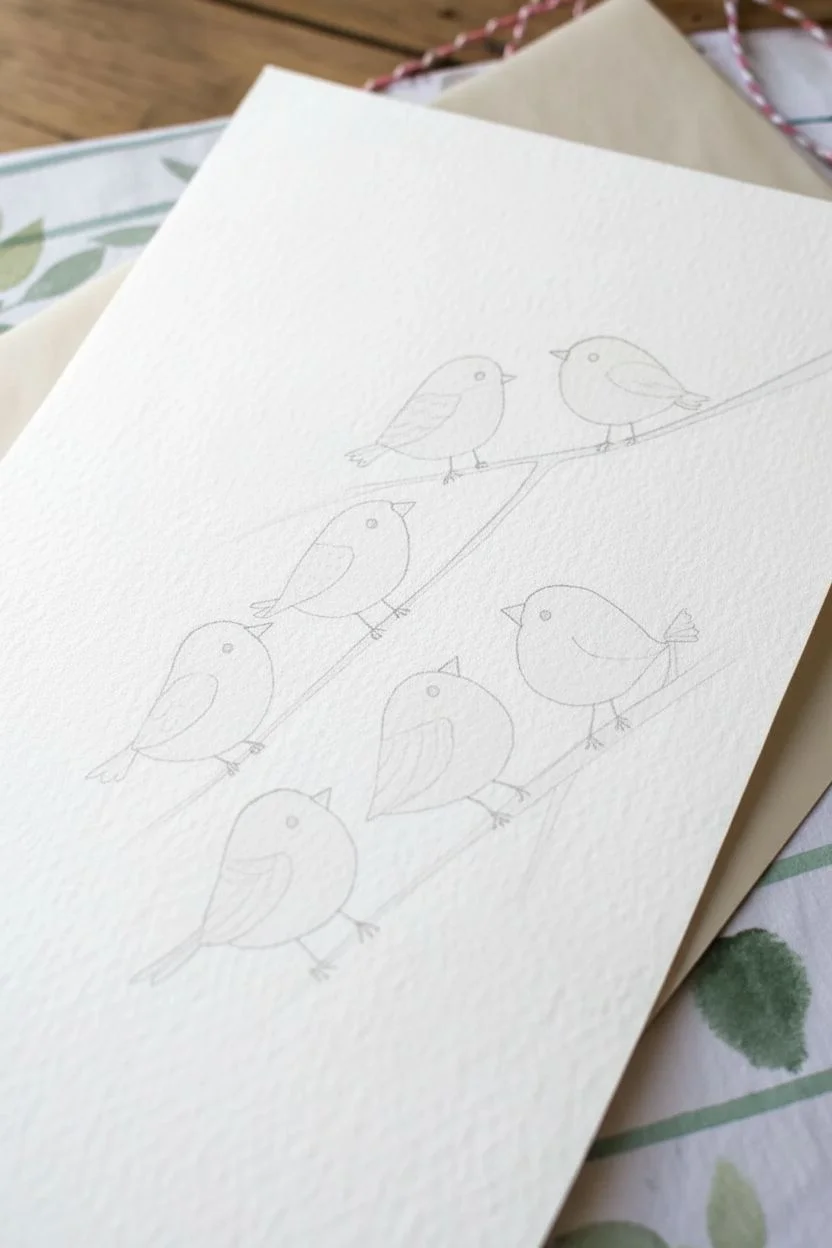
Whimsical Birds With Mixed Sizes and Simple Shapes
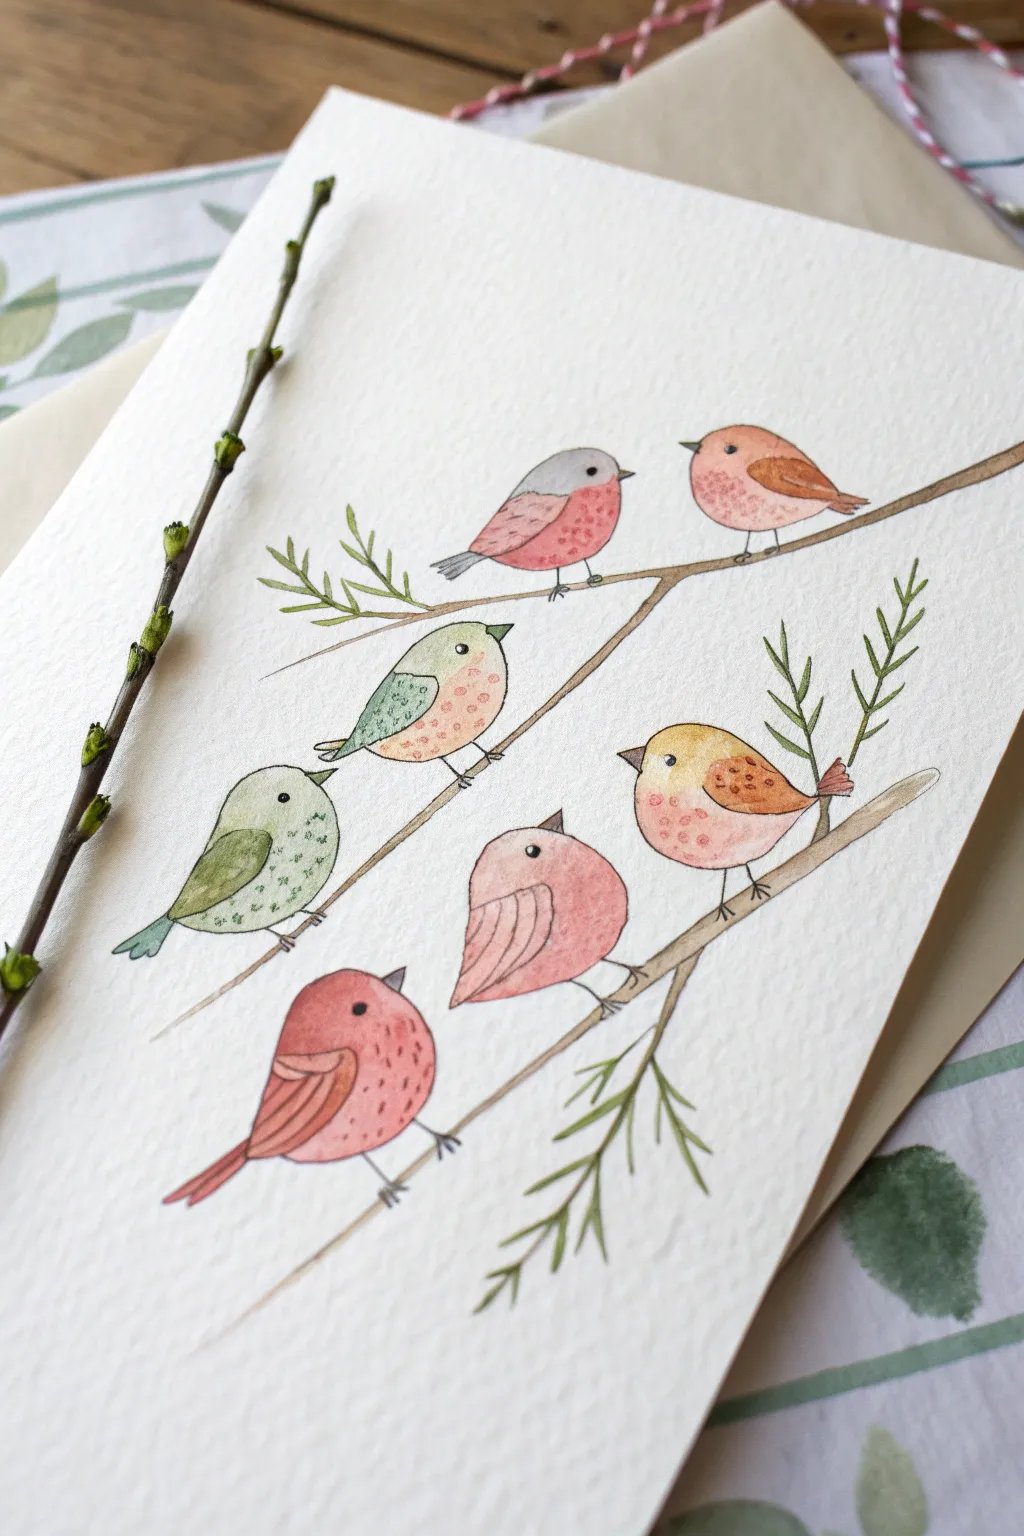
Learn to paint this charming flock of seven stylized birds, each boasting its own unique personality and soft color palette. This project combines simple geometric shapes with delicate watercolor washes and fine pen details to create a heartwarming illustration.
Step-by-Step
Materials
- Cold press watercolor paper (textured)
- Watercolor paint set (pinks, reds, greens, ochre yellow, grey)
- Round watercolor brushes (size 2 and 4)
- Fine-point black waterproof pigment liner (0.1 or 0.3mm)
- Pencil and eraser
- Clean water and mixing palette
- Paper towels
Step 1: Sketching the Layout
-
Plan the composition:
Visualize three diagonal branch lines. The top one will hold two birds, the middle one three birds (staggered), and the bottom one two birds. -
Draw the bird shapes:
Using very light pencil strokes, sketch seven round, plump teardrop or oval shapes for the bird bodies. Keep them simple—essentially just eggs sitting on invisible lines. -
Add basic details:
Sketch small triangles for beaks and simple curved lines for the wings. Don’t add legs yet; just focus on the main body masses. -
Outline the branches:
Draw the three branches passing under the birds. They should be thin and slightly uneven to look natural, branching off occasionally.
Step 2: Painting the Bodies
-
Mix your first colors:
Prepare a watery mix of soft pink for the top right bird and a muted greyish-red for the top left bird. -
Paint the top birds:
Fill in the body shapes with your wash. For variety, you can drop a slightly darker pigment into the bottom curve of the wet body to create roundness. -
Working on the middle row:
For the left bird, use a pale sap green. The middle bird is a mix of ochre and orange, and the right bird is a soft rose pink. Paint these bodies, letting the water do the work of spreading the pigment. -
The bottom pair:
Paint the bottom left bird in a deeper, warm red. The final bird on the right gets a simple pink wash. I like to leave tiny specs of white paper dry for highlights if possible, but it’s not strictly necessary. -
Adding wing contrast:
While the bodies are drying, you can paint the wings if they aren’t touching wet paint. Use slightly contrasting colors—grey for the pink bird, green for the light green bird, etc.
Smudged Ink?
If your pen line bleeds, the paper was still damp. Stop immediately and let it dry. You can carefully dab the smudge with a damp tissue to lift some ink.
Step 3: Details & Line Work
-
Paint the branches:
Mix a light brown or sepia color. With a small brush (size 2), carefully paint the thin branch lines. Keep the pressure light to maintain a delicate look. -
Add leaf accents:
Using a fresh green mix, paint small, simple leaves. Notice how the middle branch has leaves pointing up (like rosemary sprigs), while others are simpler almond shapes. -
Dry completely:
Wait until the paper is bone dry. If it’s even slightly damp, your ink pen will bleed. -
Inking the bodies:
Take your waterproof pen and trace the bird outlines loosely. The lines don’t need to be perfect; a few breaks in the line add character. -
Drawing faces:
Add a small black dot for the eye on each bird. Leave a tiny white spec in the center of the dot for a ‘glint’ of life. Outline the triangular beaks. -
Legs and feet:
Draw simple stick legs extending to the branches. Just two or three tiny lines for toes wrapping around the wood work perfectly. -
Texture and pattern:
This is the fun part: add textures to the bellies. Use stippling (dots) for the orange bird, tiny dashes for the green bird, and curved lines on the wings for feather detail.
Loose & Lively Lines
Don’t try to trace your pencil lines exactly. Let the ink pen deviate slightly from the paint edge; that ‘imperfect’ registration creates the charming illustrative style.
Once the ink is set, simply erase any remaining pencil marks to reveal your cheerful flock suitable for framing or greeting cards


Have a question or want to share your own experience? I'd love to hear from you in the comments below!