Blue is my favorite shortcut to making a painting feel instantly calm, moody, and finished. These easy blue painting ideas lean on simple shapes, soft blending, and high-contrast silhouettes so you can get a gorgeous result without overthinking it.
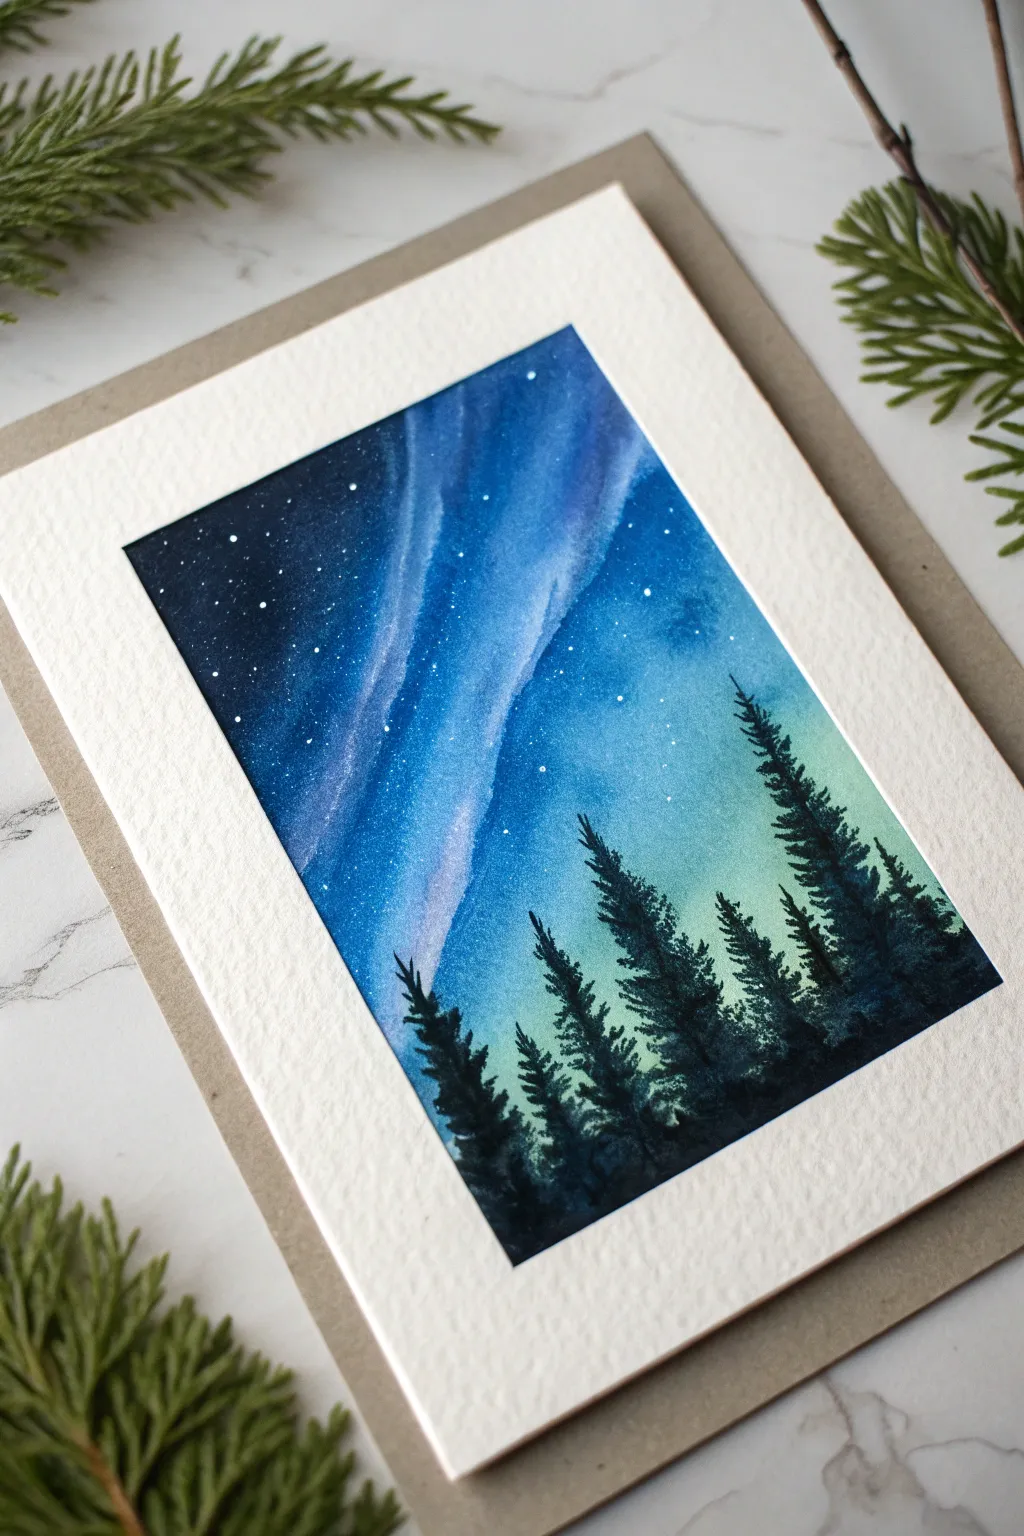
Ombre Blue Night Sky
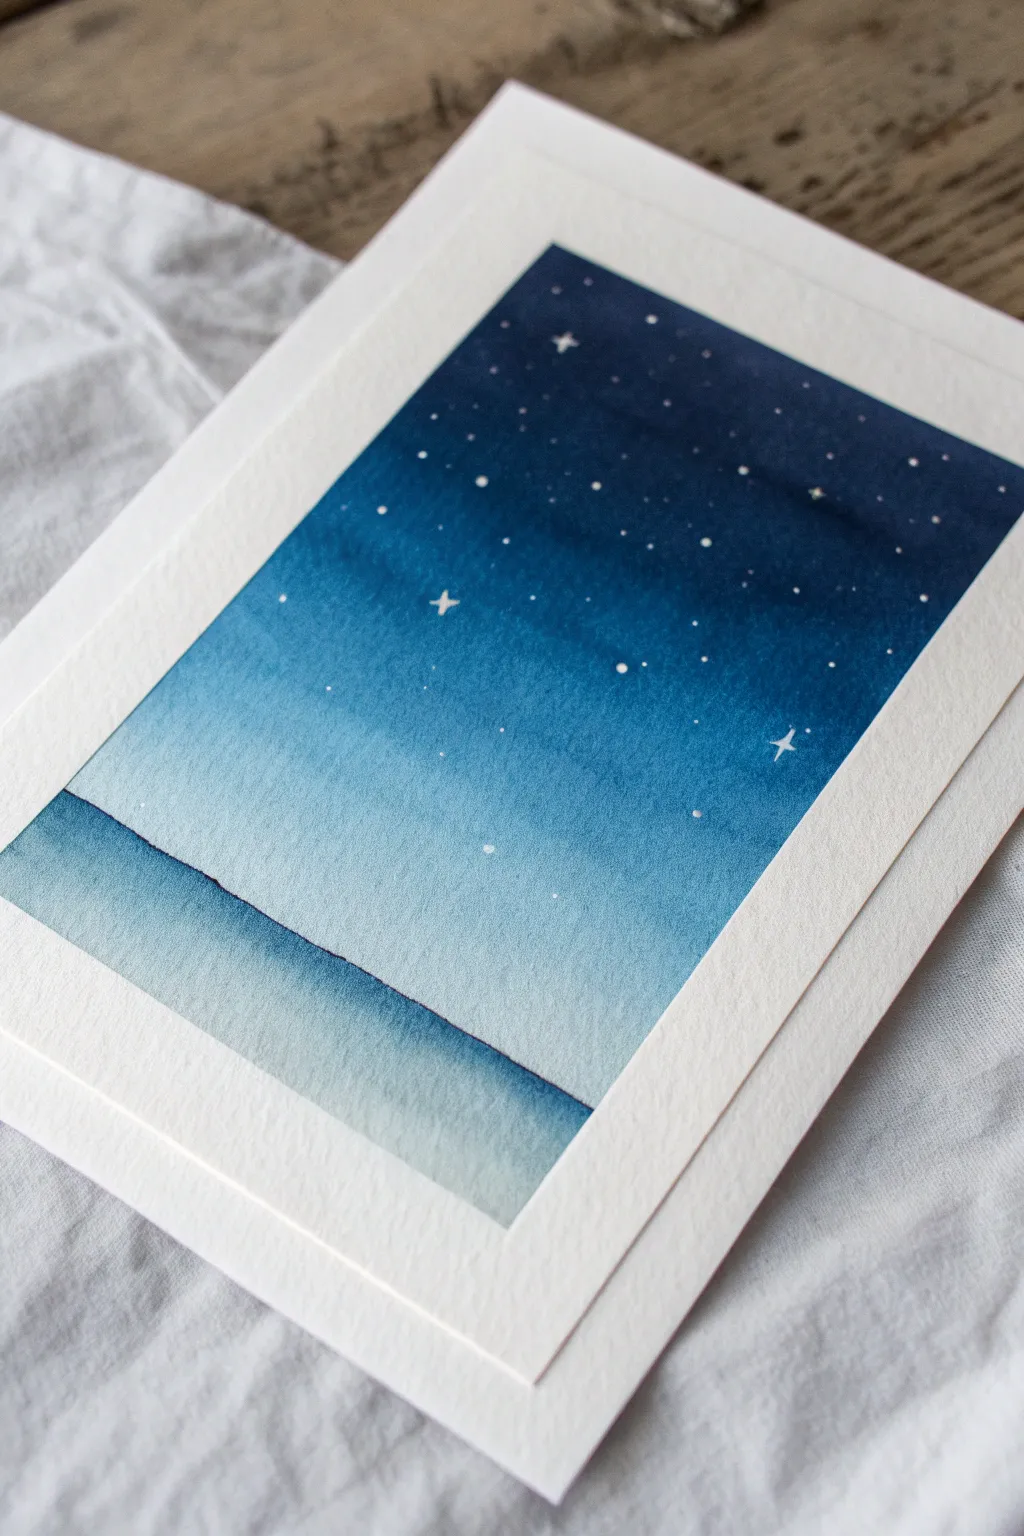
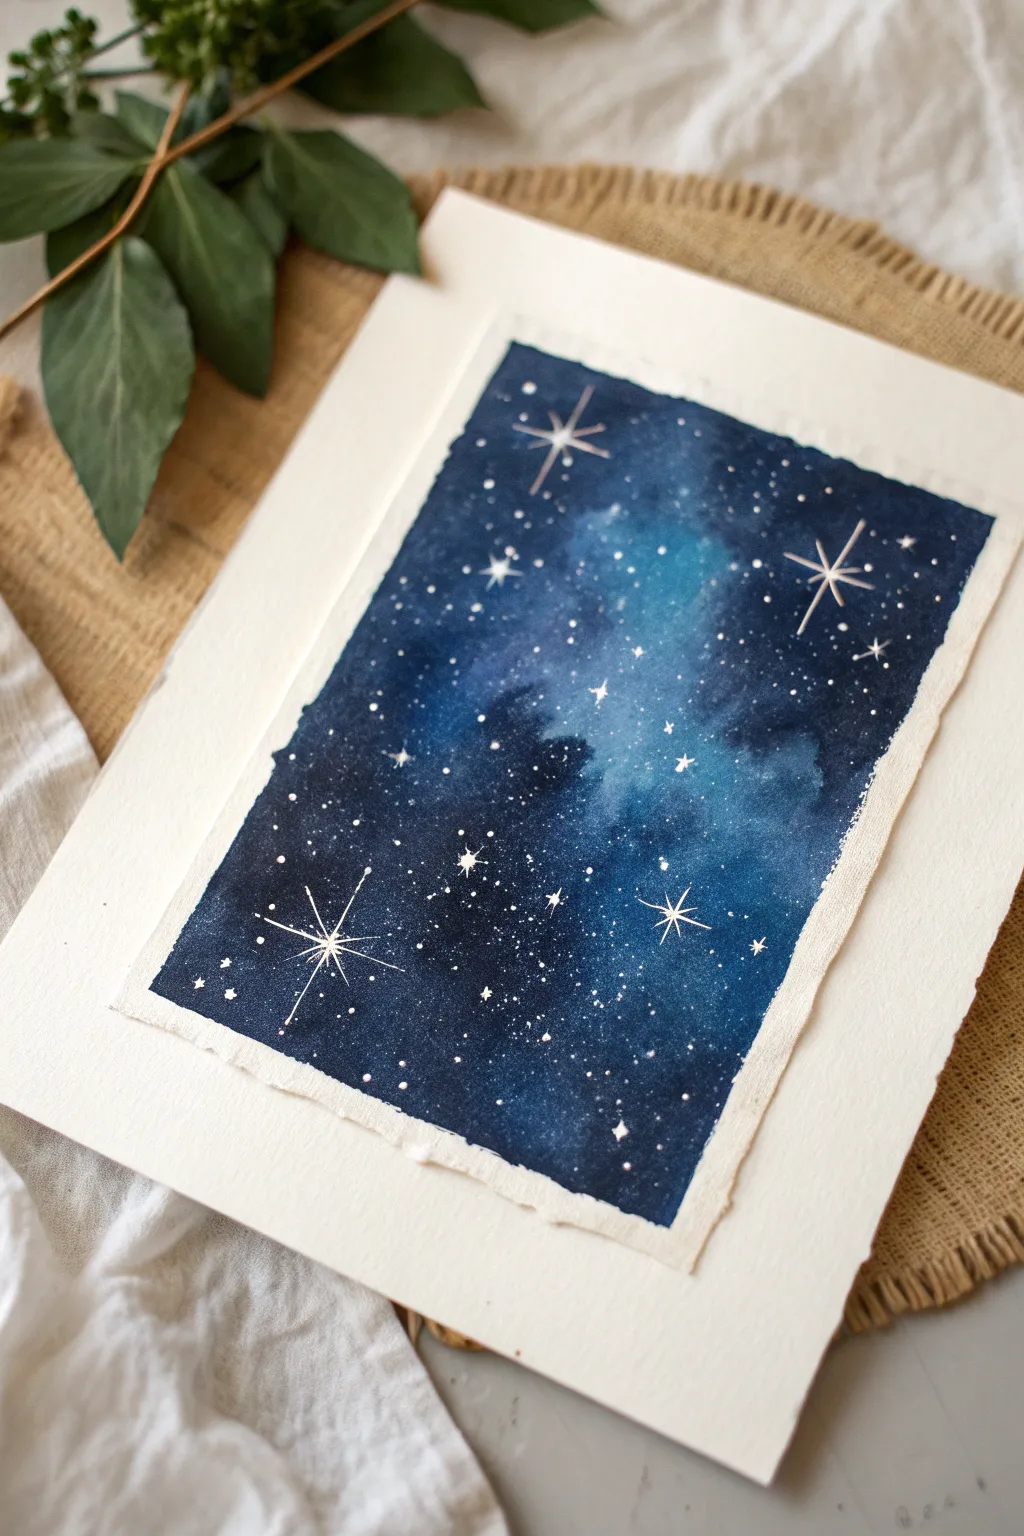
This serene project captures the stillness of a night sky using a simple yet effective ombré wash technique. You’ll create a seamless gradient from deep indigo to pale blue, finishing with sparkling stars to bring the scene to life.
Step-by-Step Tutorial
Materials
- Cold press watercolor paper (approx. 5×7 inches)
- Watercolor paints (Indigo, Prussian Blue, Titanium White/White Gouache)
- Painter’s tape or masking tape
- Flat wash brush (3/4 inch or 1 inch)
- Small round brush (size 0 or 1)
- Jar of clean water
- Paper towels
- White gel pen (optional alternative for stars)
- Mixing palette
Step 1: Setting the Stage
-
Tape your borders:
Begin by taping the edges of your watercolor paper down to a hard board or table. This creates a crisp white border and prevents the paper from buckling when wet. -
Prepare your colors:
Squeeze out a generous amount of Indigo and Prussian Blue onto your palette. You’ll need enough pigment pre-mixed to complete the gradient without stopping. -
Mix the darkest shade:
Create a concentrated puddle of Indigo with just a touch of water. This will be the very top of your night sky and needs to be rich and dark.
Pro Tip: Seamless Blending
Work quickly while the paper shines with moisture. If the paper starts to dry matte during the gradient phase, stop blending or you’ll get harsh ‘cauliflower’ blooms.
Step 2: Creating the Sky Gradient
-
Wet the paper:
Use your large flat brush to apply a thin, even coat of clean water over the upper two-thirds of the paper, stopping where you want the horizon line to be. -
Apply the first dark stroke:
Load your flat brush with the concentrated Indigo mix. Paint a horizontal stripe across the very top of the wet area. -
Introduce the mid-tone:
Without cleaning the brush completely, dip slightly into the Prussian Blue and mix it with the remaining Indigo on your brush. Paint the next stripe slightly overlapping the first. -
Blend downward:
Dip your brush in clean water to dilute the pigment slightly. Paint the next horizontal stroke, allowing the wet edge to pull the color down. -
Fade to light:
Continue adding more water to your brush with each downward stroke. The blue should become progressively paler as you near the horizon line. -
Soft finish:
For the final stroke just above the horizon, use almost pure water to create a misty, barely-there blue tint. -
Let the sky dry completely:
This is crucial. The paper must be bone-dry before moving to the next step to prevent colors from bleeding into the foreground.
Level Up: Splatter Stars
Instead of painting every dot, load a stiff brush with white gouache and tap the handle against a pencil over the paper for a natural, random spray of tiny stars.
Step 3: Ground and Details
-
Paint the first hill layer:
Mix a watery, pale wash of Indigo. Using a clean brush, paint a soft, rolling hill shape horizontally across the bottom third of the paper. -
Add the ridge definition:
While the hill wash is still wet, drop a slightly more concentrated line of blue pigment along the top edge of the hill to define the ridge. -
Paint the bottom foreground:
Wash a very pale blue glaze over the remaining white space at the bottom to ground the image, letting it fade out to white at the very bottom edge. -
Wait for total dryness:
I like to use a hairdryer on a low setting here to speed things up, as the paper needs to be completely dry for the stars to look sharp.
Step 4: Adding the Starlight
-
Mix opaque white:
Prepare your white gouache or undiluted white watercolor. It needs to be the consistency of heavy cream to show up against the dark blue. -
Paint tiny specks:
Using your smallest round brush (or a white gel pen), gently dab tiny dots randomly across the darkest part of the upper sky. -
Create distinct stars:
Select 3 or 4 spots to feature larger stars. Paint a small cross shape, then curve the inner corners slightly to create a twinkling four-point star. -
Scatter the cluster:
Add a few clusters of smaller dots near the main stars to simulate distant galaxies or constellations. -
Reveal the border:
Once the white paint is fully dry, slowly peel away the masking tape at a 45-degree angle to reveal your crisp, clean edges.
Frame your mini-masterpiece in a simple white mat to highlight the beautiful depth of the blue tones


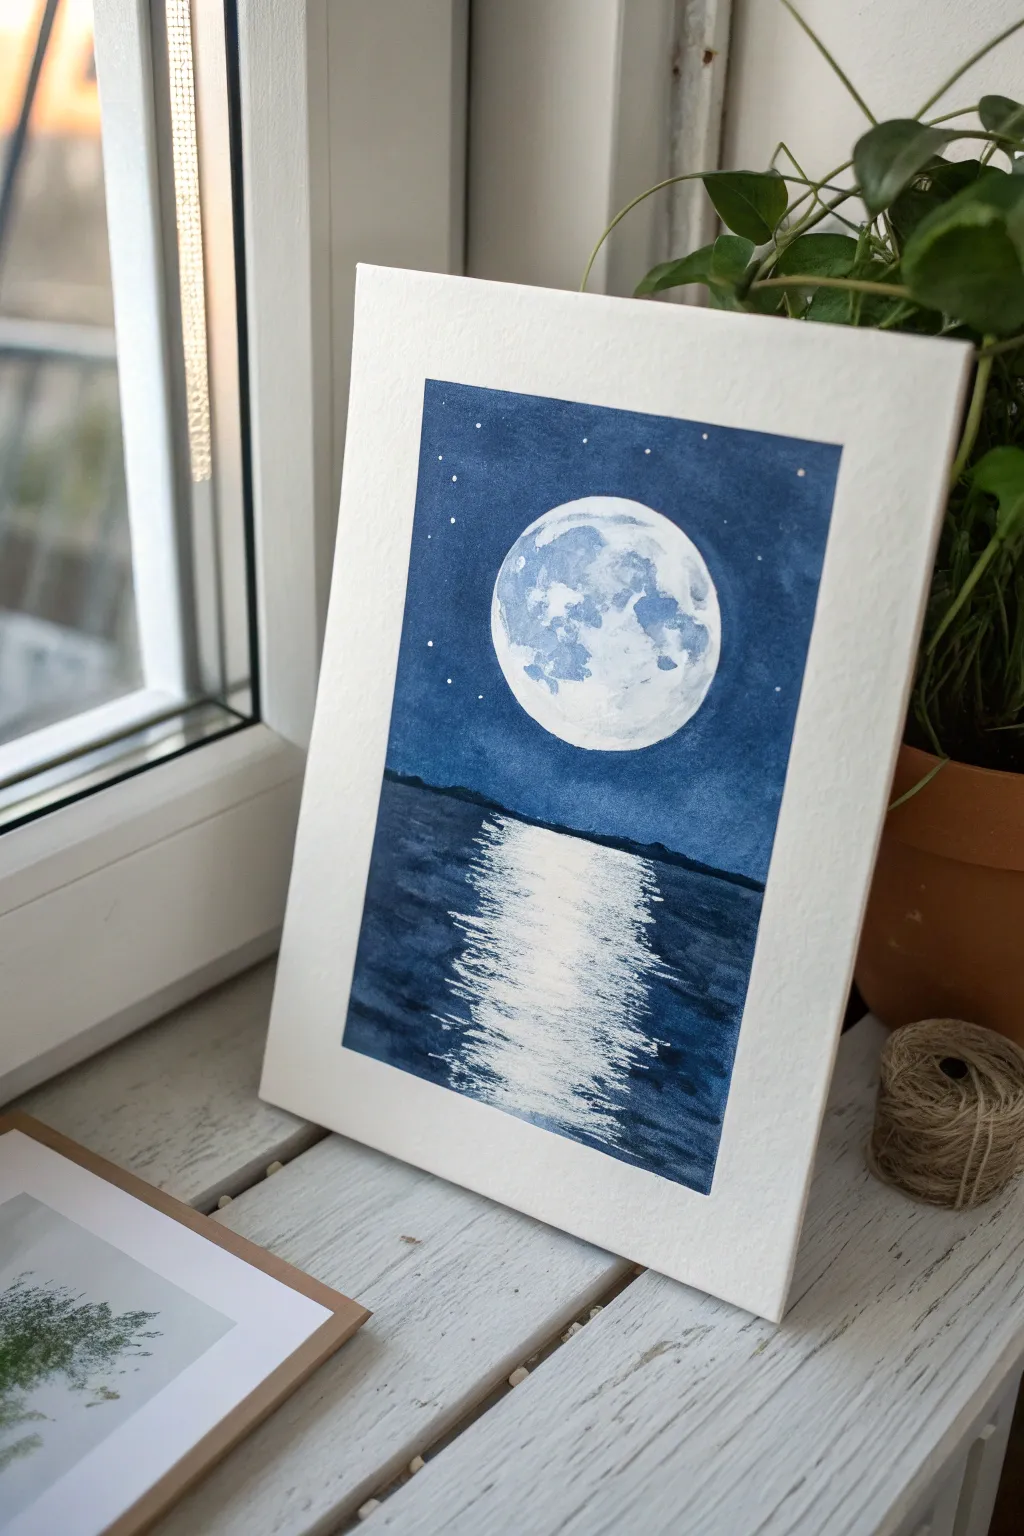
Full Moon Over Blue Clouds
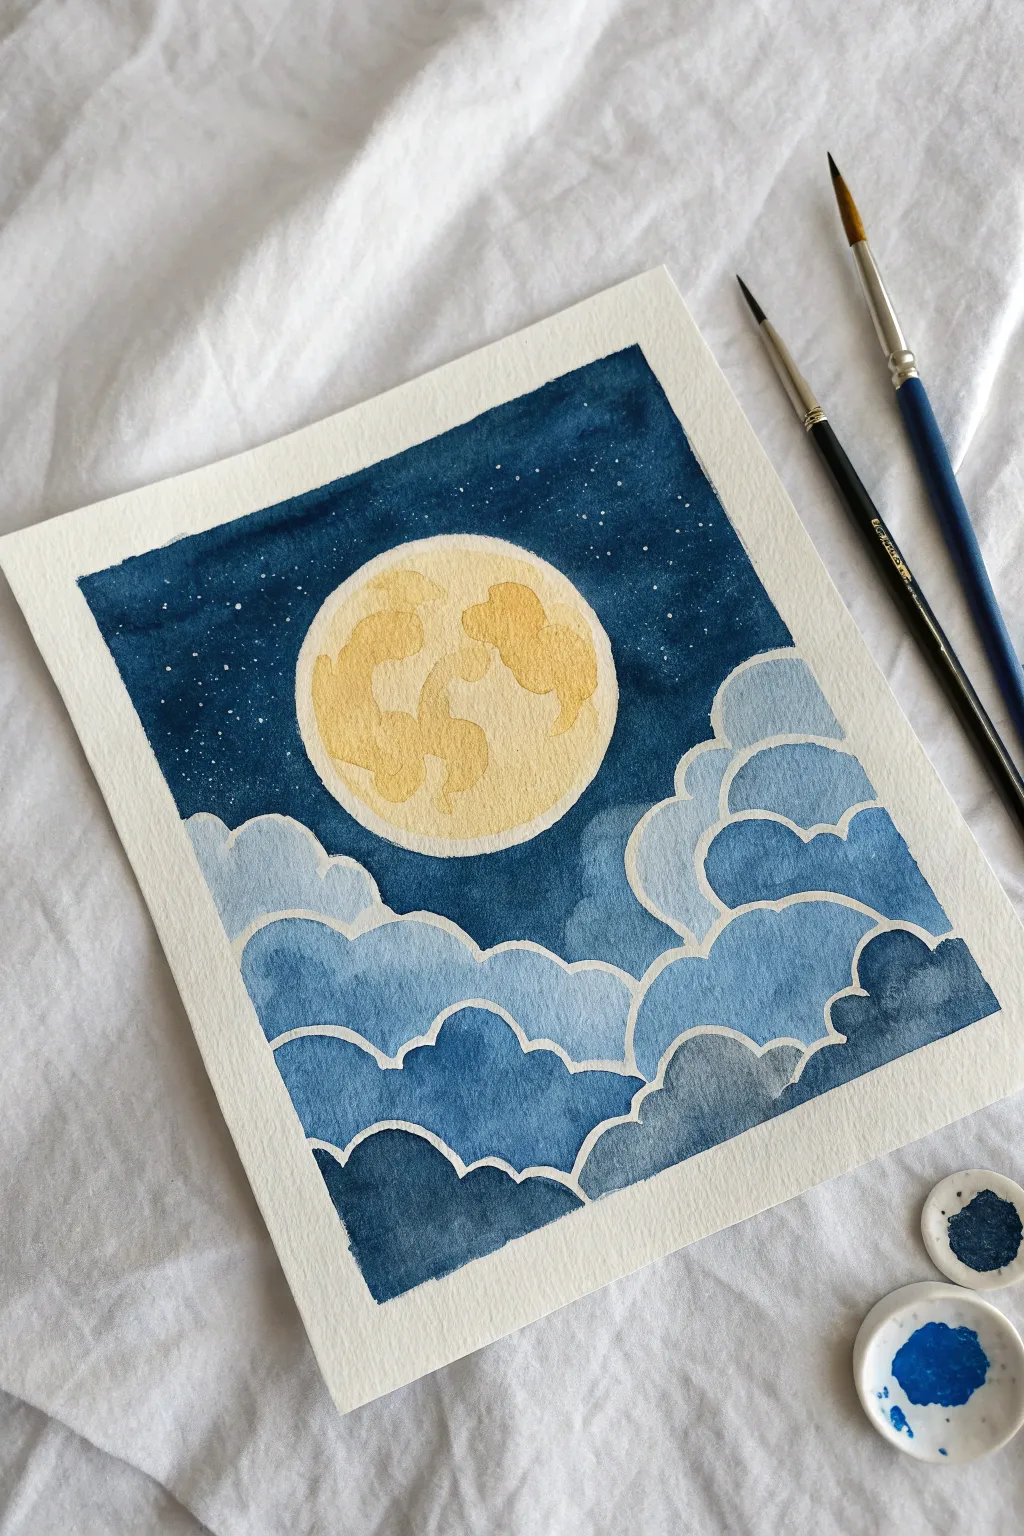
Capture the magic of a clear night sky with this layered watercolor painting. By playing with shades of Prussian blue and negative space, you’ll build stunning depth between the glowing moon and the rolling cloud banks.
How-To Guide
Materials
- Cold press watercolor paper (approx. 300 gsm)
- Watercolor paints (Indanthrone blue or Prussian blue, yellow ochre)
- Paintbrushes (medium round #6, small detail brush #2)
- White gel pen or white gouache
- Masking tape or washi tape
- Pencil and eraser
- Circular object for tracing (like a jar lid)
- Palette for mixing
- Water cups and paper towels
Step 1: Preparation and Sketching
-
Tape the edges:
Begin by securing your paper to a flat surface using masking tape on all four sides. This creates that crisp, professional white border and prevents buckling when the paper gets wet. -
Trace the moon:
Place your circular object near the center of the upper half of the paper. Lightly trace around it with a pencil to define your moon. -
Sketch cloud layers:
Starting from the bottom, sketch wavy, bubbly lines to create the cloud formations. Make three or four distinct tiers of clouds, letting them overlap and build upwards toward the moon.
Smooth Gradients
Work quickly on the cloud layers. If the edge of the paint dries before you finish filling the shape, you’ll get hard lines. Keep a wet edge for smooth fills.
Step 2: Painting the Sky and Moon
-
Paint the background sky:
Mix a deep, saturated blue using very little water. Paint the entire sky area around the moon, carefully edging up to the pencil line but not crossing it. Bring this dark blue wash down to the top edge of your highest cloud layer. -
Add the stars:
While the sky is drying, use a white gel pen or small dots of white gouache to sprinkle tiny stars across the dark blue area. Vary the sizes slightly for a natural effect. -
Base layer for the moon:
Wet your brush and pick up a pale, watery yellow ochre. Fill in the moon circle completely with this light wash. -
Moon craters:
While the moon is still slightly damp, drop in stronger pigment of yellow ochre or a touch of browner yellow to create irregular splotches. These suggest craters and texture on the moon’s surface.
Step 3: Layering the Clouds
-
Technique for white outlines:
The key to this style is leaving a thin sliver of white paper unpainted between every section. Keep this in mind as you start painting the clouds. -
Paint the top cloud tier:
Mix a medium-strength blue wash (lighter than the sky). Paint the highest group of clouds, carefully leaving a small white gap between the dark sky and this new blue layer. -
Create variation:
I like to vary the blue intensity within the same cloud layer. Add a drop of water to your brush to lighten some bubbles, or more paint to darken the corners. -
Middle cloud layers:
Move to the next tier down. Mix a slightly different shade of blue—perhaps adding a tiny bit of black or purple to cool it down. Paint this section, remembering to leave that white ‘halo’ gap between this layer and the one above it. -
Bottom cloud layer:
For the lowest clouds, use your darkest blue mix again, similar to the sky color. This grounds the painting and creates a nice sense of framing. -
Refining edges:
Use your smallest detail brush to tidy up any curves. The white gaps act as highlights, making the clouds look like they are glowing in the moonlight.
Add Magic
Once fully dry, use metallic gold watercolor or a gold pen to outline just the moon’s edge or add a few gold stars for an extra celestial shimmer.
Step 4: Finishing Touches
-
Dry completely:
Let the entire piece dry completely. If the paper feels cool to the touch, it’s still wet deep down. -
Check for contrast:
If the clouds look too flat, you can glaze a very thin, watery layer of blue over the bottom of individual cloud bumps to make them look more round. -
Reveal the border:
Slowly peel away the masking tape at a 45-degree angle, pulling away from the center of the art to avoid tearing the paper.
Enjoy the peaceful atmosphere your new night sky painting brings to the room


Starry Blue Galaxy Splatter
This ethereal watercolor project captures the depth of space with just a few shades of blue and simple layering techniques. The jagged, ripped edges of the paper add a rustic charm that frames the celestial scene beautifully.
Step-by-Step Tutorial
Materials
- Cold press watercolor paper (300 gsm)
- Painter’s tape or masking tape
- Watercolor paints: Indigo, Prussian Blue, Cerulean Blue
- Flat wash brush (1-inch)
- Round brush (size 6 or 8)
- Fine liner brush (size 0 or 00)
- White gouache or opaque white ink
- Clean water jar
- Paper towels
- Ruler
Step 1: Preparing the Surface
-
Size the paper:
Start with a piece of watercolor paper slightly larger than your desired final size. If you want the specific look from the photo, don’t worry about cutting it perfectly straight yet. -
Create the mask:
Using painter’s tape, tape down a rectangle in the center of your paper. This defines the painted area. Press the edges of the tape down firmly to prevent paint from sneaking underneath. -
Wet the paper:
Dip your large flat brush in clean water and apply a generous, even coat of water inside the taped rectangle. The paper should be glistening but not forming puddles.
Star-Maker Tip
Cover the unpainted white border with scrap paper before splattering. This keeps your ‘stars’ strictly inside the galaxy and keeps the crisp white frame clean.
Step 2: Painting the Galaxy
-
Apply the light base:
Load your round brush with watery Cerulean Blue. Drop this color into the center of the wet paper in cloud-like shapes, leaving some white space showing for brightness. -
Mid-tone depth:
While the paper is still wet, mix Prussian Blue. Dab it around the edges of the Cerulean clouds, letting the colors bleed together naturally. -
Deepen the cosmos:
Switch to Indigo or your darkest blue. Apply this heavily around the edges of the tape and fill in the corners to create a vignette effect. This contrast makes the lighter center glow. -
Blend softly:
If the transitions look too harsh, clean your brush, dampen it slightly, and gently tickle the edges where the dark and light blues meet to smooth them out. -
Partial dry:
Let this first layer dry until the shine disappears from the paper but it still feels cool to the touch. -
Second layer clouds:
For more texture, you can dab a little more saturated dark blue into the semi-dry areas. This creates the ‘cauliflower’ blooms that look like nebula gas. -
Complete drying:
Allow the painting to dry completely. This is crucial before moving to the stars phase to keep them crisp.
Step 3: Stars and Details
-
Mix the stars:
Squeeze a pea-sized amount of white gouache onto your palette and mix with a tiny drop of water. You want a consistency like heavy cream. -
Splatter stars:
Load a round brush with the white mix. Hold it over the painting and tap the handle against a second brush or your finger to spray fine mist dots onto the dark background. -
Adjust density:
Focus the splatter more heavily in the ‘cloud’ areas of the galaxy for a Milky Way effect. -
Paint major stars:
Using your fine liner brush and the white gouache, paint a few specific stars. Start with a tiny dot. -
Add flair:
For the largest stars, paint a cross shape with long, thin tapered lines extending from the center dot. Add a smaller ‘X’ shape diagonally over the cross if you want extra sparkle. -
Reveal the edge:
Once the white paint is totally dry, slowly peel off the masking tape at a 45-degree angle away from the painting.
Level Up: Color Shift
While painting the nebula clouds, drop in tiny hints of Magenta or Purple alongside the Cerulean Blue. This creates a more complex, deep-space color palette.
Step 4: Finishing Touches
-
Prepare the tear:
Place a ruler on top of the paper, aligning it about a quarter-inch outside of your painted rectangle. -
Create the deckle:
Firmly hold the ruler down. Tear the unpainted white border upward against the ruler’s edge to create that rough, fibrous ‘deckled’ look seen in the example. -
Repeat perimeter:
Repeat the tearing process on all four sides so you have an even white border with rough edges framing your galaxy.
Using the ripped edge technique is a wonderful way to make a simple study feel like a vintage artifact found in an astronomer’s journal

Moon Reflection on Blue Water
Capture the serene beauty of a moonlit night with this monochromatic watercolor project. Using shades of deep indigo and leaving the bright white paper untouched creates a striking contrast that feels both peaceful and dramatic.
Step-by-Step Tutorial
Materials
- Cold press watercolor paper (300 gsm recommended)
- Watercolor paints (Indigo, Payne’s Grey, or Phthalo Blue)
- White opacity gouache or white gel pen (optional)
- Masking tape
- Round brushes (sizes 6 and 2)
- Flat brush (size 1 inch)
- Clean water and blending palette
- Pencil and circular object for tracing
Step 1: Preparation & Sketching
-
Secure the borders:
Begin by taping down all four edges of your watercolor paper to a hard board. This creates the crisp white border seen in the final piece and prevents the paper from buckling when wet. -
Outline the moon:
Place a circular object, like a small jar lid or tape roll, in the upper center of the paper. Lightly trace around it with a pencil to define your moon. -
Mark the horizon:
Lightly sketch a horizontal line about two-thirds of the way down the paper to separate the sky from the water. It doesn’t need to be perfectly straight; a slight ruggedness adds natural character.
Step 2: Painting the Sky
-
Mix your night sky color:
Prepare a generous amount of deep indigo or dark blue paint. You want this mixture to be quite concentrated to achieve that deep, midnight look. -
Careful outlining:
Using a smaller round brush, carefully paint around the pencil outline of the moon. This reserves the crisp white shape without needing masking fluid. -
Fill the background:
Switch to a larger brush and fill in the rest of the sky area, working from the moon outwards to the taped edges and down to the horizon line. Keep the paint wet to avoid hard drying lines. -
Create a gradient:
While the sky wash is still damp, you can drop in darker pigment near the edges and corners to create a vignette effect, making the moon glow brighter by comparison. -
Add distant land:
Once the sky is semi-dry, paint a very thin, dark strip along the horizon line to suggest distant hills or land. Let the top half of the painting dry completely.
Bleeding Lines?
If paint bleeds into the moon or reflection, lift it immediately with a clean, thirsty brush or paper towel corner. Wait for it to dry before fixing the edge.
Step 3: Painting the Water
-
Plan the reflection:
Visualize a column of light directly beneath the moon. This central vertical area needs to remain mostly white paper to represent the strong reflection. -
Paint the water sides:
Using your dark blue mix, paint the water on the far left and right sides of the paper, keeping the strokes horizontal. -
Feather the edges:
As you approach the center reflection area, break up your brushstrokes. Make flicking, horizontal motions that taper off, simulating ripples cutting into the light. -
Refine the ripples:
Switch to a smaller brush to add thin, dark lines crossing into the white reflection column. I usually vary the length of these lines to make the water look organic. -
Deepen the contrast:
Go back over the outer edges of the water with highly concentrated paint. The darker the water surrounding the reflection, the brighter the light will appear.
Add a Glow
Before the blue sky dries completely, lift a little pigment around the moon with a damp brush to create a soft, hazy atmospheric glow.
Step 4: The Moon Detail
-
Dilute for craters:
Take extremely watered-down blue or grey paint. The consistency should be like tea. -
Dab in texture:
Gently dab this pale wash onto the white moon circle to form craters. Leave random patches purely white for the moon’s highlights. -
Soften edges:
If the crater edges look too sharp, use a clean, slightly damp brush to soften them while the paint is still wet.
Step 5: Final Touches
-
Add stars:
Once the sky is bone dry, use white gouache or a white gel pen to dot tiny stars into the dark blue sky. Vary the pressure for different star sizes. -
Peel the tape:
Wait until the entire painting is completely dry—patience is key here! Gently peel the masking tape away at a 45-degree angle to reveal your clean, professional borders.
Now you have a tranquil night scene ready to frame or gift
BRUSH GUIDE
The Right Brush for Every Stroke
From clean lines to bold texture — master brush choice, stroke control, and essential techniques.
Explore the Full Guide
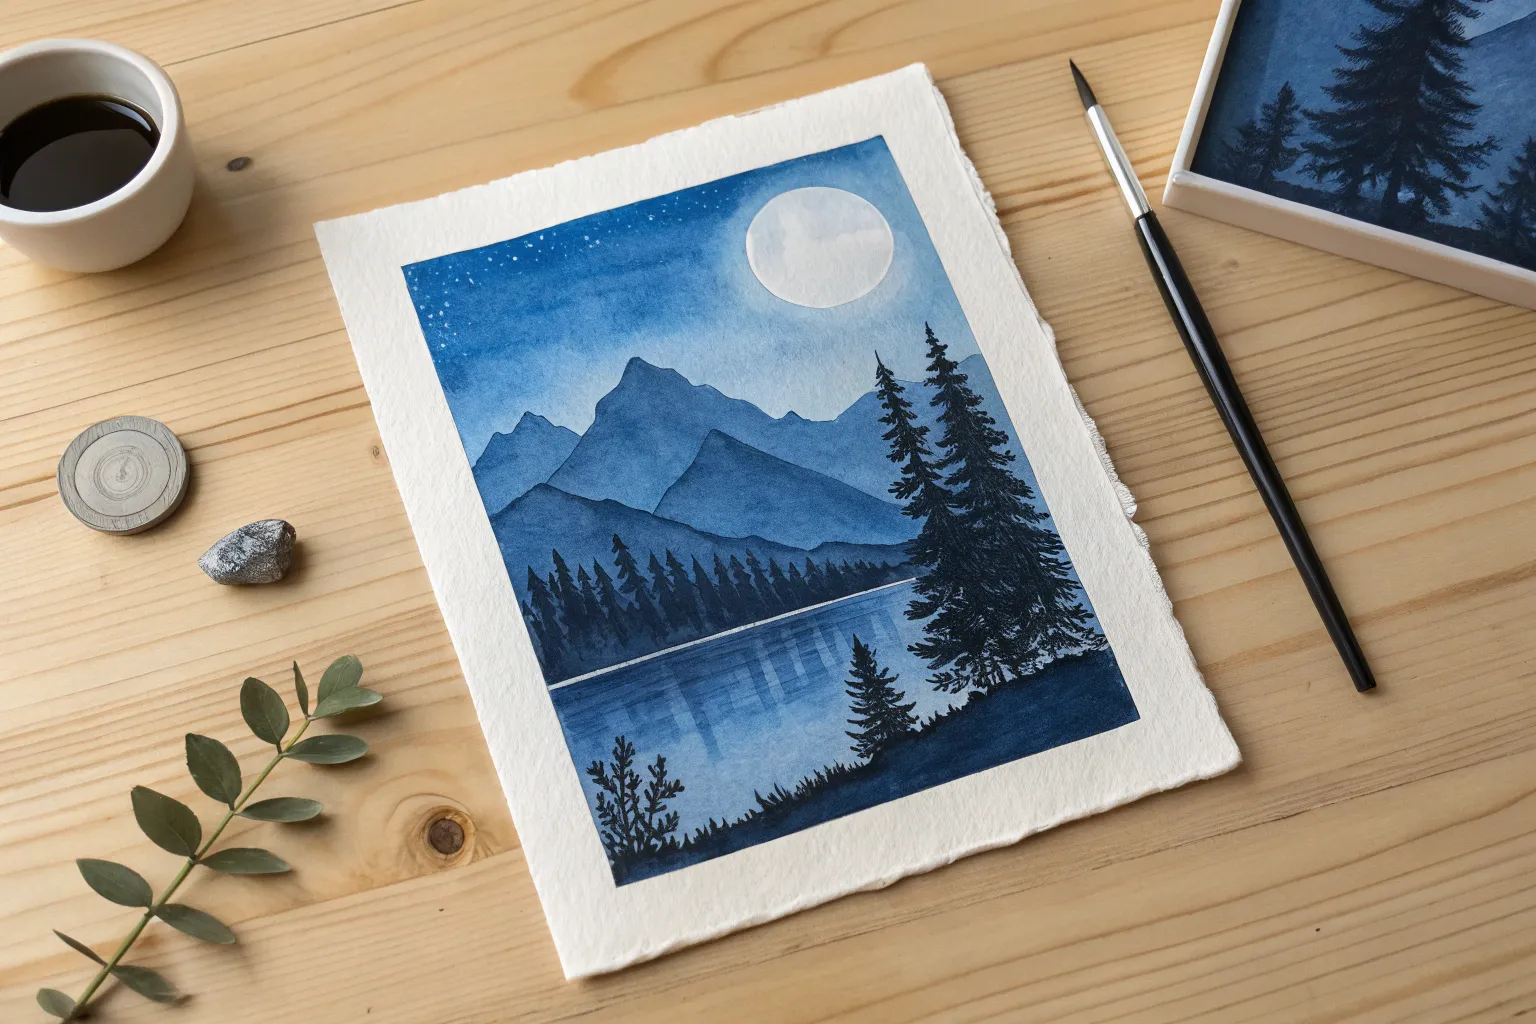
Black Pine Silhouettes on Blue
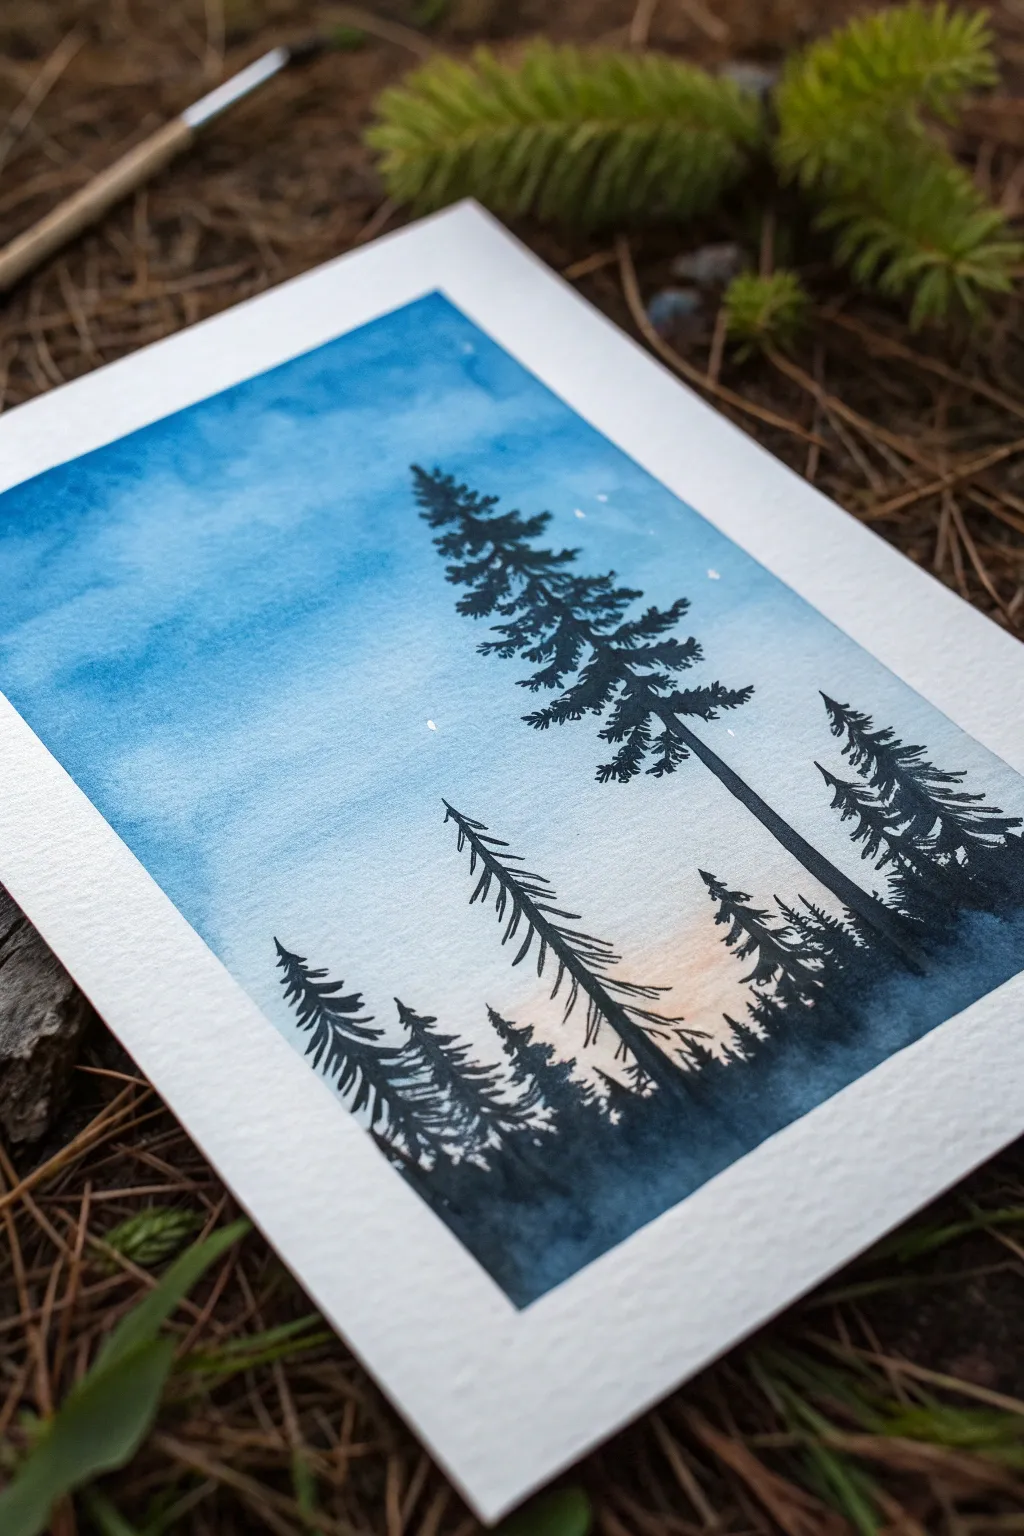
This serene watercolor project captures the tranquil beauty of towering pines against a soft, gradient sky. By blending a simple blue wash with a touch of warmth and layering stark black silhouettes, you’ll create a moody and atmospheric piece perfect for beginners.
Detailed Instructions
Materials
- Cold press watercolor paper (300gsm/140lb)
- Masking tape or painter’s tape
- Watercolor paints: Cerulean Blue, Prussian Blue, and a hint of Burnt Sienna or Pale Pink
- Black ink, gouache, or very concentrated watercolor
- Flat wash brush (1-inch or 3/4-inch)
- Fine liner brush (size 0 or 00) or a fine-tip black pen
- Small round brush (size 2 or 4)
- Jar of clean water
- Paper towels
- White gel pen (optional for stars)
Step 1: Preparing the Canvas
-
Secure the Paper:
Begin by taping down all four edges of your watercolor paper to a hard board or table. This creates that crisp white border and prevents the paper from buckling when wet. -
Pre-wet the Paper:
Using your large flat brush and clean water, apply a gentle, even coat of water over the entire paper surface. You want it damp and glistening, but not forming puddles.
Dry Brush Trick
When painting pine branches, use a brush that is fairly dry and rough. A split or old brush works perfectly to create the scratchy, realistic texture of pine needles in one stroke.
Step 2: Creating the Sky Gradient
-
Apply the Main Blue:
Load your flat brush with a diluted mix of Cerulean Blue. Start at the top left corner and sweep across, letting the color naturally diffuse into the wet paper. -
Deepen the Tone:
While the paper is still wet, drop in some deeper Prussian Blue near the top right, allowing it to blend softly into the lighter blue for a clouded effect. -
Create the Horizon Glow:
Clean your brush thoroughly. Near the bottom third of the paper, gently brush in a very faint wash of Pale Pink or highly diluted Burnt Sienna to suggest a fading sunset glow. -
Blend the Transition:
Use a clean, damp brush to smooth the area where the blue sky meets the warm glow, ensuring there are no hard lines. -
Add Texture:
I like to dab a clean paper towel lightly in a few spots on the blue sky while it’s still damp to lift pigment and create subtle cloud shapes. -
Darken the Bottom:
At the very bottom edge, apply a concentrated strip of Prussian Blue mixed with a tiny drop of black. This will serve as the misty base for your forest. -
Thorough Drying Phase:
Let this background layer dry completely. The paper must be bone dry before adding trees, or the ink will bleed into the sky.
Step 3: Painting the Foreground Pines
-
Mix the Black:
Prepare your black silhouette medium. You can use black gouache for a matte finish, waterproof ink for sharpness, or very concentrated watercolor for a softer look. -
Draft the Large Tree:
Using a fine liner brush, draw a thin, slightly wavering vertical line starting from the bottom right-third and extending high into the sky. -
Add Top Branches:
Start near the top of your line with tiny, horizontal scribbles. Pine branches typically point slightly upward at the very top and droop as they go down. -
Developing the Shape:
Working your way down the trunk, make the branches progressively wider and more jagged. Use quick, flicking motions to mimic needles. -
Create Irregularities:
Don’t make the tree perfectly symmetrical. Leave some gaps between branch clusters to let the sky show through, making it look natural and weathered. -
Secondary Trees:
Paint two smaller, shorter trees to the left of the main pine using the same technique. Vary their heights to create visual interest. -
Foreground Base:
Switch to a small round brush and stipple (dot) black paint along the very bottom edge to create the illusion of bushes and undergrowth connecting the tree bases. -
Add Far Trees:
For depth, paint a few very small, faint trees in the background on the left side. You can dilute your black slightly with water to make these appear further away. -
Refining Details:
Go back with your finest brush and add tiny stray twigs protruding from the main branches or the tops of the trees.
Starry Night Effect
Transform the scene: instead of one star, use an old toothbrush dipped in white gouache to flick a galaxy of stars across the darker blue sections of the sky.
Step 4: Finishing Touches
-
Add Stars:
Once the paint is dry, use a white gel pen to place a tiny dot or two in the blue area for an early evening star. -
The Reveal:
Carefully peel away the masking tape at a 45-degree angle, revealing the clean white frame around your woodland scene.
Enjoy the peaceful atmosphere your new silhouette painting brings to the room
Bare Branch Silhouette in Blue Fog

Capture the stillness of a misty morning with this monochromatic watercolor landscape. Using only shades of indigo and Prussian blue, you will learn to create depth through layering and atmospheric perspective, featuring a striking leafless tree reaching into a fog-filled sky.
How-To Guide
Materials
- Cold Press watercolor paper (300 gsm recommended)
- Watercolor paints (Indigo, Prussian Blue, or Payne’s Gray)
- Painter’s tape or washi tape (optional, for clean edges)
- Large flat wash brush or mop brush
- Medium round brush (size 6 or 8)
- Fine liner or rigger brush (size 0 or 1)
- Two jars of water (one clean, one for rinsing)
- Paper towels
- Mixing palette
Step 1: Setting the Atmosphere
-
Prepare your paper:
Start by taping down your watercolor paper to a board or table to prevent buckling. If you want the rough, organic edges seen in the reference photo, simply sketch lightly within a centralized rectangle area without taping the borders. -
Mix your base wash:
Prepare a very watery, pale puddle of your chosen blue pigment. It should look like weak tea. I like to test the pale wash on a scrap piece of paper first to ensure it isn’t too dark. -
Wet the sky area:
Using your large wash brush, wet the entire rectangular area of the paper with clean water. The paper should have a gentle sheen but no standing puddles. -
Create the first gradient:
Dip your large brush into the pale blue mix and sweep it across the top of the wet paper. Let the color flow naturally downwards, fading out as it reaches the bottom third of the page to mimic fog. -
Add texture to the sky:
While the sky is still damp, carefully drop just a hint more pigment into the upper corners and let it bleed. This subtle variation keeps the sky from looking flat.
Step 2: Building the Middle Ground
-
Dry the initial layer:
Wait until the paper is completely bone dry. If it feels cool to the touch, it’s still wet. You can use a hairdryer on a low setting to speed this up. -
Mix a mid-tone blue:
Create a slightly stronger mix of your blue paint. This should be noticeably darker than your sky but still transparent enough to look distant. -
Paint the distant pine line:
Using a medium round brush, paint a jagged tree line on the left side, about a third of the way up the paper. Use vertical dabbing motions to suggest the tops of pine trees. -
Create the misty fade:
Immediately rinse your brush, dry it slightly on a paper towel so it’s damp, and drag the bottom edge of your painted pine trees downward. This softens the pigment into the white of the paper, creating that ‘rising mist’ effect. -
Add the right-side forest:
Repeat the previous step on the right side of the paper, perhaps placing these trees slightly lower or higher to create an interesting, asymmetrical composition. Soften the bottom edges into nothingness just like the left side. -
Let it settle:
Allow this middle layer to dry completely. The misty effect relies on these soft washes being fixed before we add the sharp foreground.
Problem Solver: Bloomed Background
If your sky dries with weird ‘cauliflower’ watermarks, you likely added water to a section that was already half-dry. Embrace it! In a misty scene, these marks look like natural clouds.
Step 3: The Foreground and Silhouette
-
Mix your darkest value:
Get your deepest, most concentrated paint ready. This should be nearly opaque, with very little water added. -
Paint the foreground slope:
Using the medium round brush and dark paint, create the uneven, grassy ground at the very bottom of the page. Use rough, upward flicks to suggest tufts of grass and weeds. -
Start the main trunk:
Plant the base of your tree on the foreground slope, slightly off-center. Paint the trunk extending upwards, tapering gradually as it goes halfway up the sky. -
Branch structure:
Switch to your finer brush. Draw the main primary branches splitting off from the trunk. Remember that trees generally form ‘V’ or ‘Y’ shapes as they split. -
Adding fine twigs:
Using the rigger or liner brush, add the delicate secondary branches and tiny twigs. Use a very light hand—barely touching the paper—to get thready lines. A shaky hand actually helps here to make the twigs look natural and organic. -
Connect the scene:
Return to the foreground grass with your dark paint. Add a few taller, thin weeds or dead stalks poking up around the base of the tree to integrate the trunk into the ground.
Winter Texture
Before the dark foreground paint dries completely, sprinkle a tiny pinch of table salt onto the wet pigment. This creates crystal-like textures that mimic frost on the ground.
Step back and admire your moody, atmospheric landscape, perfectly capturing the quiet chill of dawn.

PENCIL GUIDE
Understanding Pencil Grades from H to B
From first sketch to finished drawing — learn pencil grades, line control, and shading techniques.
Explore the Full Guide
Misty Blue Forest Layers
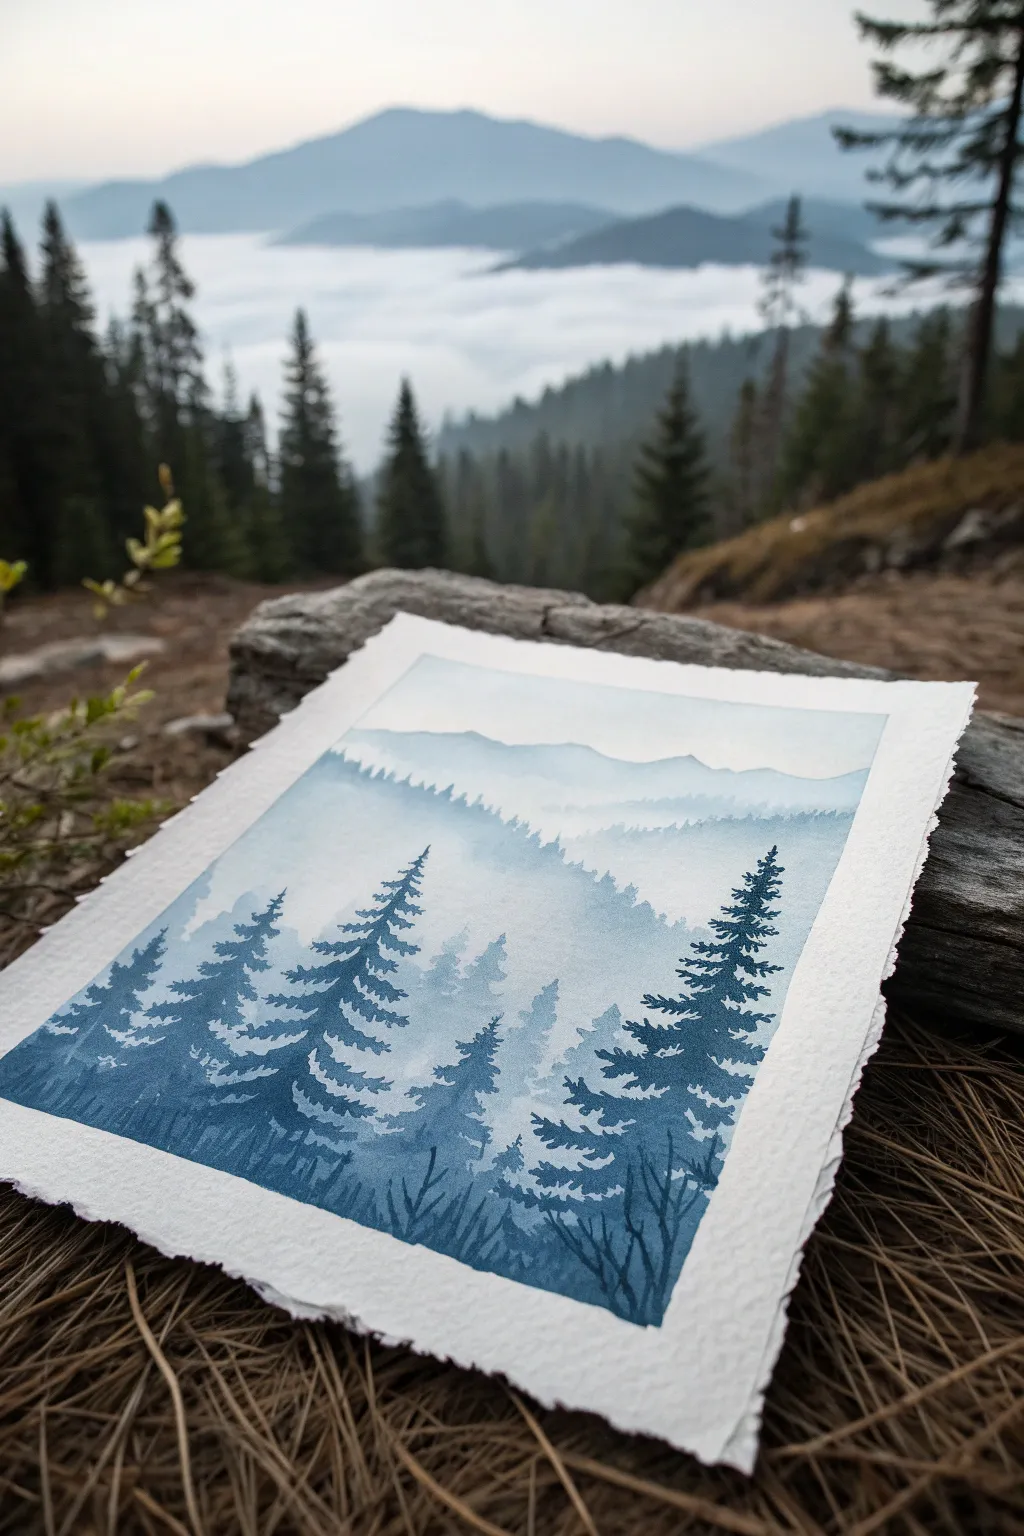
Capture the serene silence of a mountain morning with this monochromatic watercolor study. Using just one or two shades of blue, you’ll learn to build depth through layers, creating a misty atmospheric effect where distant peaks fade into the fog while foreground pines stand crisp and dark.
Step-by-Step Tutorial
Materials
- Cold Press Watercolor Paper (300gsm/140lb)
- Watercolor Paint: Indigo or Prussian Blue
- Watercolor Paint: Payne’s Grey (optional for deepening)
- Flat Wash Brush (3/4 inch or 1 inch)
- Round Brush (Size 6 or 8)
- Detail Round Brush (Size 2 or 4)
- Two jars of water (clean and dirty)
- Paper towels
- Masking tape or painter’s tape
Step 1: Setting the Atmosphere
-
Prepare the paper:
Begin by taping down all four edges of your watercolor paper to a board. This prevents buckling and leaves you with that crisp, clean white border shown in the example. -
Mix your lightest wash:
Dilute a very small amount of blue paint with plenty of water. You want a color that is barely visible—think of the palest sky blue imaginable. -
Paint the sky:
Using your large flat brush, apply this pale wash across the top third of the paper. You can use a ‘wet-on-wet’ technique here by wetting the paper with clean water first, then dropping in the color for a soft, clouded gradient. -
Create the furthest mountain:
While the sky is still slightly damp but not soaking, mix a slightly stronger version of your blue wash. Paint the silhouette of the most distant mountain range. The edge should be soft, blending slightly into the sky to imply distance. -
Dry completely:
Wait for this first layer to be bone dry. If the paper feels cool to the touch, it’s still wet.
Uneven Watermarks?
If you see ‘cauliflower’ blooms where water pushed pigment away, don’t panic. These accidental textures actually look like rising mist and add to the mood.
Step 2: Building the Middle Ground
-
Mix a mid-tone blue:
Add a bit more pigment to your puddle. This layer needs to be visibly darker than the sky but still transparent and misty. -
Paint the second ridge:
Paint a new mountain ridge starting just below the previous one. Use a slightly jagged motion with your brush to suggest distant treetops along the ridge line. -
Fade it out:
Immediately after painting the top edge of this ridge, rinse your brush and drag clean water along the bottom edge of the paint line. This fades the color into white paper at the bottom, creating the illusion of mist settling in the valley. -
The third layer:
Once dry, repeat the process for a third layer of mountains. Use a darker mix this time. I like to make the treeline silhoutte a bit more distinct here, showing tiny vertical strokes for tree spikes. -
Creating the mist effect:
Again, fade the bottom of this layer out with clean water. The contrast between the darker top edge and the faded bottom is the secret to the foggy look.
Add Winter Snow
For a snowy variation, use white gouache or a white gel pen to splatter falling snow or add highlights to the tops of the darkest pine branches.
Step 3: The Foreground Pines
-
Mix your darkest value:
Now, create a thick, creamy mixture of your Indigo or Prussian Blue. You want very little water here to achieve a deep, rich navy color. -
Outline the main trees:
Switch to your medium round brush. Paint the central vertical trunks of the foreground pine trees. Vary their heights, placing the tallest ones on the left and right sides to frame the composition. -
Add pine branches:
Using the tip of the brush, start at the top of a trunk and tap downwards in a zigzag motion. Keep the branches narrow at the top and let them flare out wider as you move down the tree. -
Detail the needles:
Switch to your smallest brush for the finer branches. Use quick, upward flicking motions to mimic the texture of pine needles on the outer edges of the branches. -
Fill the bottom:
Connect the bases of the trees with a dark wash of blue to ground them. Add some simple, grassy strokes or scrubby bushes at the very bottom edge using dark pigment. -
Final dry and reveal:
Let the painting dry completely—ideally overnight or with a hairdryer on low heat. Carefully peel off the tape at a 45-degree angle to reveal your clean edges.
Step back and admire how a single color can create such a deep, immersive landscape
Blue Mountains in Three Values
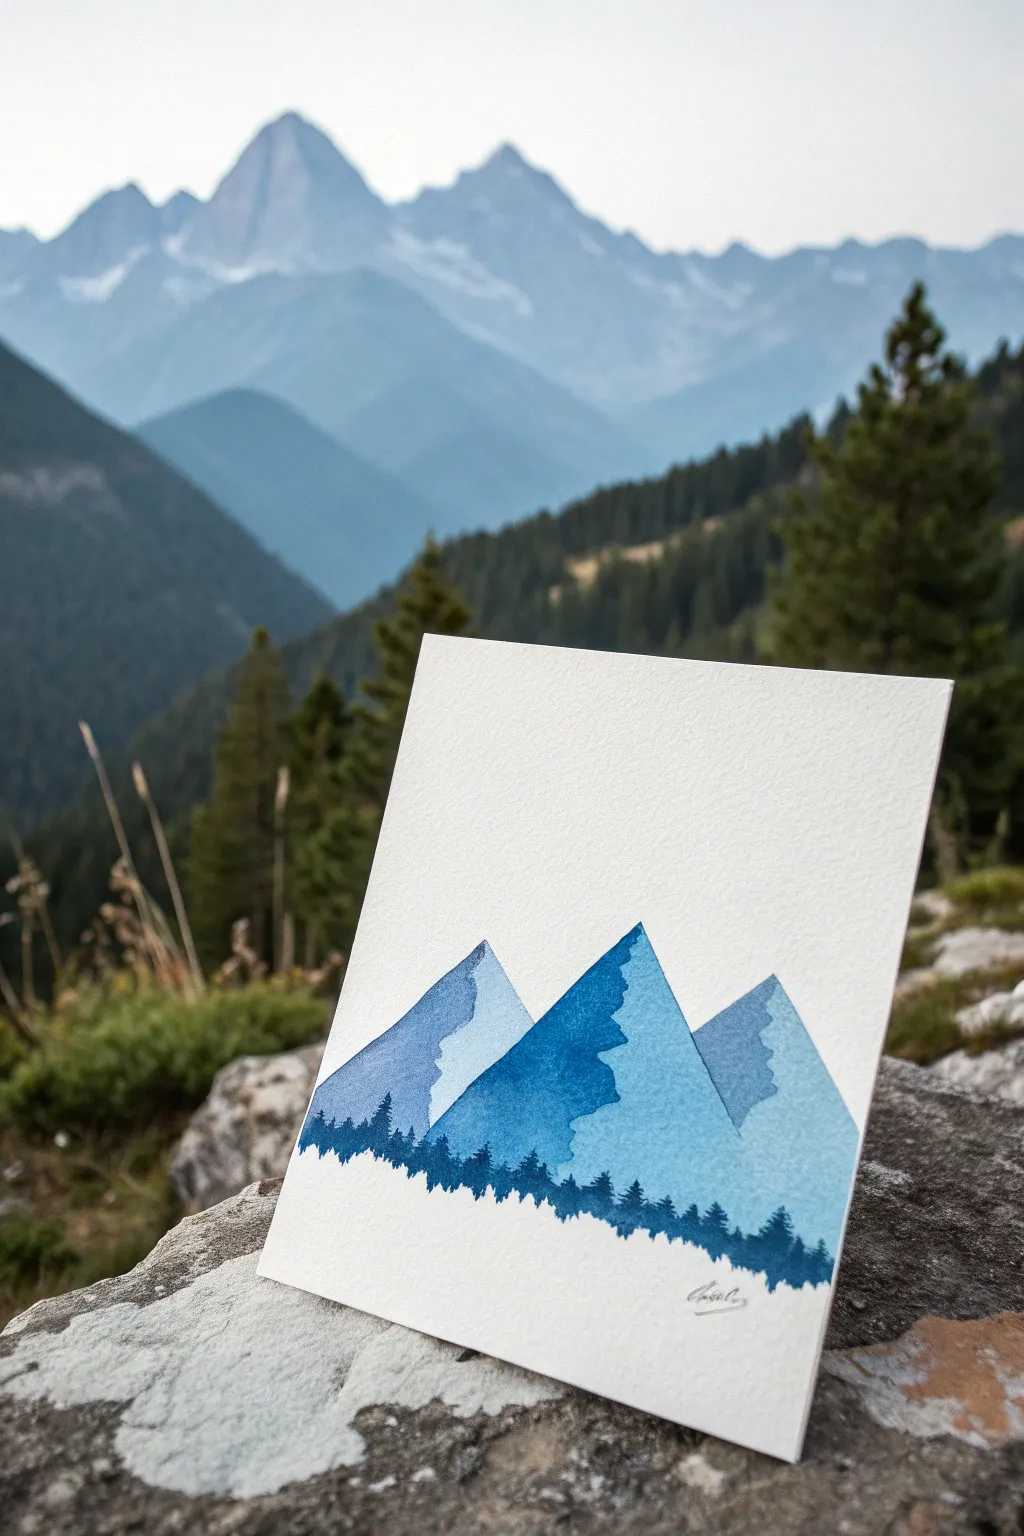
Capture the serenity of high-altitude vistas with this crisp, stylized watercolor painting. By playing with three distinct values of blue, you’ll create instant depth and dimension in a simple yet striking mountain composition.
How-To Guide
Materials
- Cold press watercolor paper (cut to 5×7 or postcard size)
- Pencil (HB or lighter)
- Masking tape or painter’s tape
- Watercolor paints (Prussian Blue or Phthalo Blue)
- Small round brush (size 2 or 4)
- Detail brush (size 0 or 00)
- Jar of clean water
- Paper towel
- Ruler (optional)
Step 1: Planning the Peaks
-
Tape the edges:
Begin by taping your watercolor paper down to a sturdy board or table. This prevents buckling and keeps your paper stationary while you work. -
Draft the outlines:
Lightly sketch three overlapping triangles to represent your mountains. Draw the central peak the highest, slightly offset from the center, with two smaller peaks flanking it on either side. -
Add jagged details:
Refine your triangle sketches by adding jagged, uneven lines down the center of each peak. These lines will separate the light side from the shadowed side of each mountain. -
Lighten the lines:
Before painting, take a kneaded eraser or your regular eraser and gently lift up most of the graphite. You want the lines to be barely visible guides so the pencil doesn’t show through the final paint.
Step 2: Painting the Values
-
Mix the lightest wash:
On your palette, create a very watery, pale blue mix. Use lots of water and just a tiny touch of pigment. -
Paint the right-hand slopes:
Using your round brush, fill in the right side of each mountain triangle with this pale wash. Ensure the paint extends all the way to your vertical jagged dividing line. -
Let it dry completely:
It is crucial that this first layer is bone dry before proceeding, otherwise the colors will bleed into each other. -
Mix the medium value:
Add more pigment to your puddle to create a medium-tone blue. It should be significantly darker than your first wash but still transparent. -
Paint the left-hand slopes:
Carefully paint the left side of the middle and right-hand mountains. The hard edge created against the dry pale wash will effectively simulate a sharp mountain ridge. -
Adjust the left mountain:
For the mountain on the far left, you might want to use a slightly lighter version of this medium mix to suggest it is further away or catching different light. -
Dry again:
Wait for this second phase to be completely dry to the touch.
Bleeding Edges?
If paint bleeds across the jagged ridge line, your first layer wasn’t dry enough. Let it dry fully, then use a damp, clean brush to gently ‘lift’ the error away.
Step 3: Adding Depth and Trees
-
Mix the darkest value:
Create your darkest blue yet. The consistency should be like milk—rich with pigment and less water. -
Detail the mountain shadows:
If you want extra contrast, you can glaze a second layer of this dark blue over the shadow side of the central peak to make it pop forward. -
Start the forest line:
Switch to your smallest detail brush. Load it with the darkest, most saturated blue paint you have mixed. -
Paint tiny tree shapes:
Along the very bottom edge of your mountains, paint a continuous row of tiny vertical lines. Use the tip of the brush to create jagged, triangular tops that mimic pine trees. -
Vary the heights:
Make sure your trees aren’t all the same height. I like to make unpredictable ups and downs to keep the forest looking organic and natural. -
Fill the bottom edge:
Fill in the space below the tree tops solid blue, creating a silhouette that grounds the entire composition. -
Final dry and reveal:
Allow the forest line to dry completely. Once dry, carefully peel away your masking tape at a 45-degree angle to reveal the crisp white border.
Pro Tip: Sharp Peaks
For ultra-crisp mountain peaks, rotate your paper upside down. It’s often easier to pull the brush stroke ‘down’ towards the tip of the mountain than pushing it up.
Display your miniature mountain range on a small easel or frame it to bring a breath of fresh air to your desk space


Blue Winter Landscape With Shadows
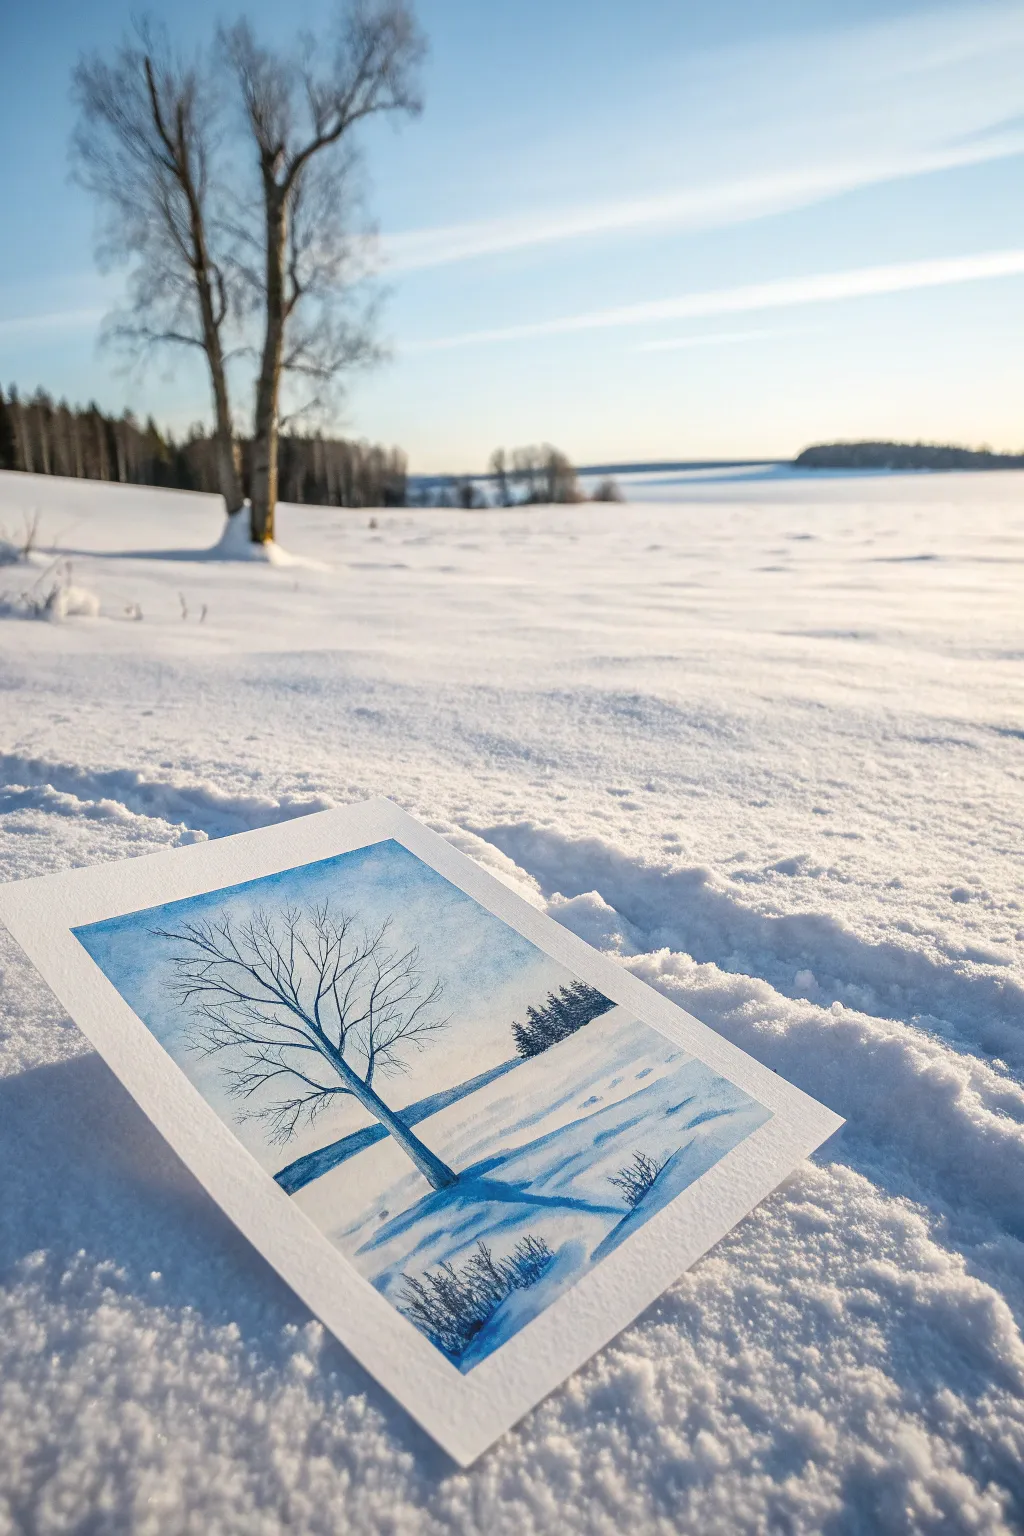
Capture the stark beauty of a snowy field with this simple yet evocative watercolor study. By limiting your palette primarily to blues, you will practice creating depth through tonal values and learn to paint realistic cast shadows on snow.
Detailed Instructions
Materials
- Cold pressed watercolor paper (ideally 140lb/300gsm)
- Painter’s tape or masking tape
- Pencil (HB or lighter) and kneaded eraser
- Watercolor paints: Ultramarine Blue, Prussian Blue (or Phthalo Blue), Burnt Umber
- Round brushes: Size 8 for washes, Size 2 or rigger brush for details
- Clean water and paper towels
- Mixing palette
Step 1: Preparation and Sketching
-
Secure the paper:
Tape down all four edges of your watercolor paper to a sturdy board. This prevents buckling and creates a crisp white border around your finished piece. -
Establish the horizon:
Lightly sketch a horizon line just below the halfway point of the paper. It shouldn’t be perfectly straight; give it a slight, gentle undulation to mimic a snowy hill. -
Sketch the main tree:
Draw the main bare tree in the left foreground. Start with the trunk leaning slightly, then branch out into finer limbs. Don’t worry about every twig yet; just get the main structure down. -
Indicate shadow paths:
Lightly mark diagonal lines extending from the tree base towards the bottom right. These will guide your shadow painting later. Add a small cluster of trees on the distant horizon line.
Shadow Warmth
Snow shadows reflect the sky, so they are blue! For realism, drop tiny hints of purple into the wet shadow wash to contrast the yellowish winter sun.
Step 2: Sky and Distance
-
Mix the sky wash:
Dilute a cool blue, like Prussian Blue or Phthalo Blue, with plenty of water. You want a pale, airy tone. -
Paint the sky gradient:
Using your large round brush, apply the blue wash starting at the top edge. As you move down towards the horizon, add more water to fade the color out, leaving the area just above the horizon almost white. -
Paint the distant tree line:
While the sky is drying, mix a darker blue-grey by adding a touch of Burnt Umber to Ultramarine Blue. Paint the small cluster of distant evergreens on the right horizon, keeping the edges slightly soft to suggest distance. -
Add a horizontal shadow:
Paint a faint, soft horizontal strip of blue just below the horizon line to separate the sky from the snow plane.
Sparkle Effect
Sprinkle a tiny pinch of salt onto the wet shadow areas. As it dries, it pushes pigment away, creating a texture that looks like crystallized ice.
Step 3: The Main Subject
-
Mix the trunk color:
Create a cooler, darker grey-blue. I like using Prussian Blue mixed with a little more brown to get a cold, woody tone. -
Paint the trunk:
Using a smaller brush, paint the main trunk. Let the paint be slightly uneven—darker on the shadowed side (right) and lighter on the left. -
Extend the branches:
Switch to your rigger brush or the very tip of your small round brush. Pull paint outward from the main branches to create fine twigs. Keep your hand loose and shaky to make them look organic. -
Build branch density:
Add more fine branches crossing over each other. The tree should look like a skeletal network against the sky.
Step 4: Shadows and Textures
-
Mix the shadow blue:
Prepare a clean, transparent wash of Ultramarine Blue. It should be distinct but not too dark. -
Cast the main shadow:
Paint broad, diagonal strokes extending from the base of the tree towards the bottom right. The shadow should follow the undulation of the ground, perhaps dipping slightly where the snow is uneven. -
Softening edges:
While the shadow paint is still wet, you can slightly soften the edges further away from the tree with a damp clean brush to simulate diffusion. -
Foreground grasses:
Using a fairly dry brush with dark blue-grey paint, flick upward strokes at the very bottom of the page to create dead grasses poking through the snow. -
Add shadow to grasses:
Just like the tree, give these small grass clumps their own tiny cast shadows falling to the right. -
Final touches:
Look for any areas that need contrast. You might deepen the side of the tree trunk or add a few darker twigs. -
Reveal the border:
Once the paper is completely bone-dry, carefully peel away the tape at a 45-degree angle to reveal your clean edges.
Enjoy the calm feeling of your finished winter scene as you sign your name in the corner
Blue Rainy Window Abstract
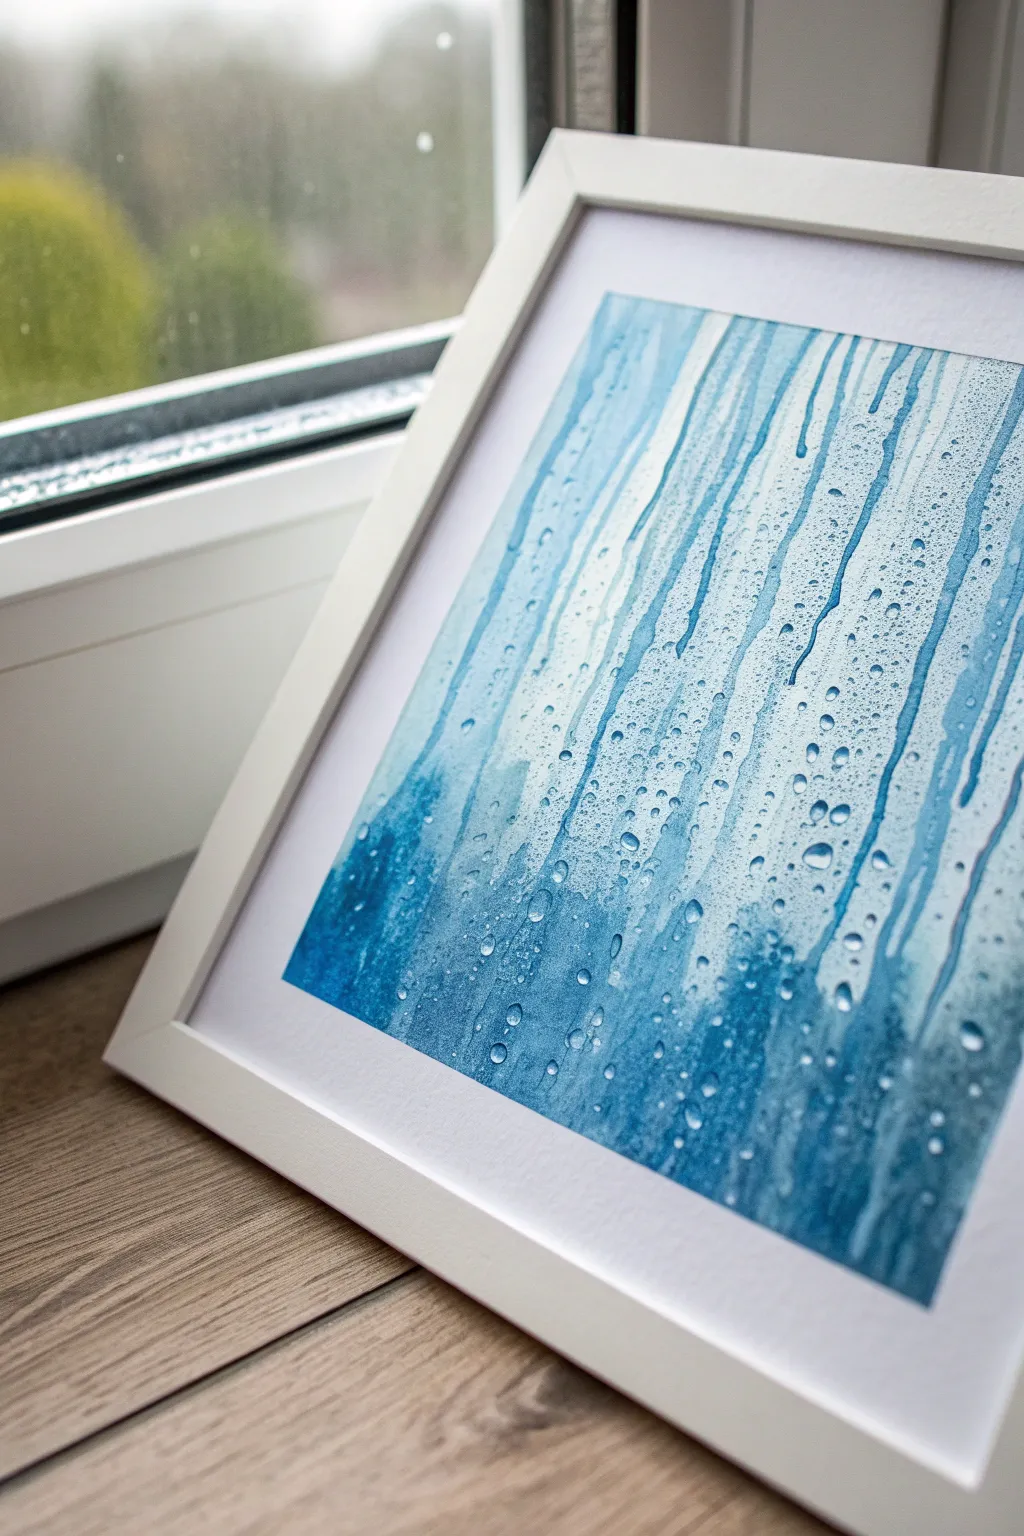
Capture the cozy, melancholy beauty of a rainy day without getting wet. This watercolor project uses wet-on-wet techniques and masking fluid to create a hyper-realistic illusion of water droplets sliding down cool blue glass.
Step-by-Step Tutorial
Materials
- Cold Press Watercolor Paper (140lb/300gsm)
- Masking Fluid (drawing gum)
- Fine liner brush or silicone masking fluid applicator
- Watercolor paints: Prussian Blue, Indigo, Phthalo Blue
- Large wash brush (flat)
- Medium round brush (size 6 or 8)
- Small detail brush (size 0 or 1)
- Paper towels
- White gel pen (optional)
- Clean water
Step 1: Setting the Scene
-
Sketch the major streaks:
Begin by lightly sketching vertical, wavy lines where your main water streaks will flow. These don’t need to be perfect; gravity pulls water down, but it meanders. -
Map out the droplets:
Draw small circles and ovals scattered across the paper. Place them randomly, with some clustering near the streaks. Vary the sizes significantly for realism. -
Apply masking fluid to streaks:
Using an old liner brush or a silicone tool, carefully fill in your penciled rain streaks with masking fluid. The fluid reserves the white of the paper. -
Mask the droplets:
Dot the masking fluid onto your drawn circles. For tiny mist-like droplets, you can flick the applicator to spatter small specks of fluid. -
Let it cure completely:
Wait until the masking fluid is entirely dry and rubbery to the touch. Painting over wet fluid will ruin your brush and the paper.
Sticky Situation
If masking fluid tears your paper upon removal, it was likely too hot or left on too long. Peel slowly at a 45-degree angle to save the surface.
Step 2: Creating the Blue Atmosphere
-
Wet the paper:
Use your large flat brush to apply a generous coat of clean water over the entire paper, painting right over the dried masking fluid. -
Drop in the base color:
While the glistening paper is wet, load your brush with a watery mix of Phthalo Blue. Touch it to the paper and let it bloom, keeping the top half lighter. -
Deepen the bottom gradient:
Mix a stronger concentration of Prussian Blue and Indigo. Apply this to the bottom third of the painting, encouraging it to bleed upward. -
Create blurred shapes:
While the wash is still damp, dab in darker patches of Indigo to suggest out-of-focus trees or buildings in the distance behind the ‘glass’. -
Dry thoroughly:
Allow the background wash to dry completely. The paper should be flat and warm to the touch before proceeding.
Step 3: Revealing the Rain
-
Remove the mask:
Gently rub your finger or a rubber cement pickup tool over the masking fluid to peel it away, revealing stark white shapes. -
Soften the streak edges:
Use a damp, clean brush to gently scrub and soften one side of the vertical streaks. This gives them volume rather than looking like flat white stripes. -
Shadowing the droplets:
Mix a very pale, watered-down indigo. Paint a tiny crescent shape on the *inside* bottom of each water droplet. This creates the lens effect. -
Adding cast shadows:
Paint a thin, dark line underneath each droplet and streak on the *outside*. I find this step instantly makes the water pop off the page. -
Highlighting:
If your white paper isn’t bright enough, use a white gel pen to add a tiny specular highlight dot to the top of the largest droplets.
Pro Tip: Gravity’s Help
Tilt your board slightly while the background wash is wet. This encourages the blue pigment to settle naturally at the bottom, creating a perfect gradient.
Frame your piece in white to enhance that clean, window-like aesthetic and enjoy your rainy view
Blue Ink Wash City Skyline
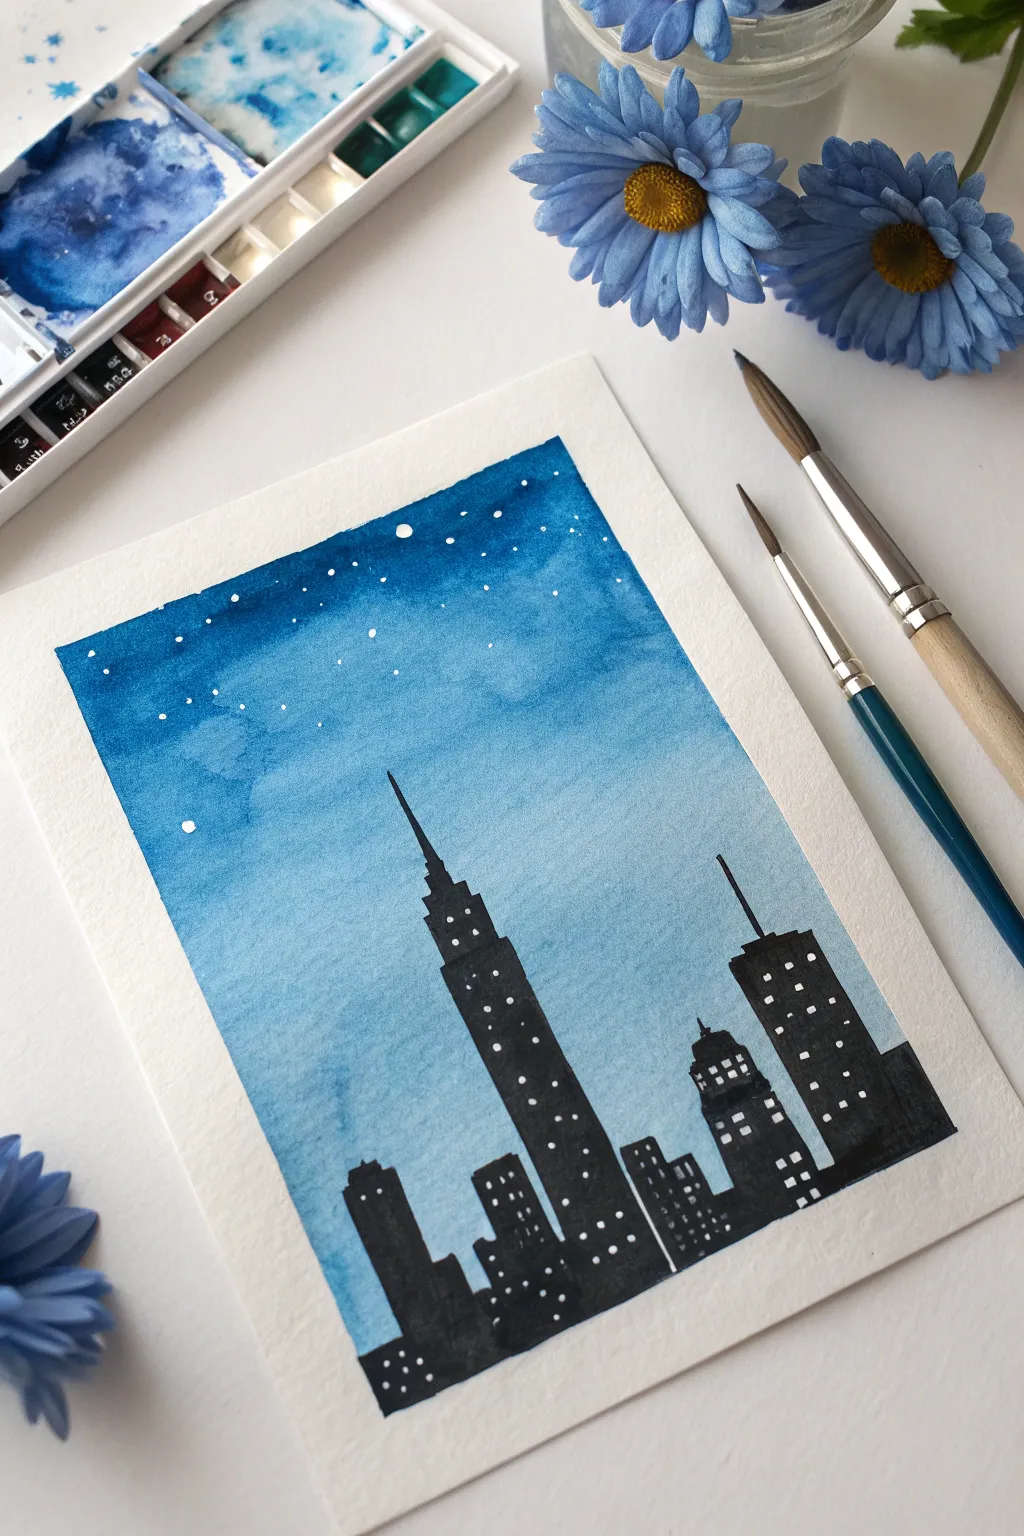
Capture the magic of an urban night with this moody and atmospheric watercolor skyline. By blending deep indigo into a soft sky blue and adding crisp black silhouettes, you’ll create a striking city scene perfect for beginners.
Step-by-Step
Materials
- Watercolor paper (cold press recommended)
- Masking tape or painter’s tape
- Watercolors (Indigo, Prussian Blue, or Phthalo Blue)
- Black watercolor, gouache, or black ink
- White gel pen or white gouache
- Flat wash brush (large)
- Small round brush (size 2 or 4)
- Two jars of water
- Paper towels
Step 1: Creating the Night Sky
-
Tape the Edges:
Begin by securely taping down all four edges of your watercolor paper to a board or table. This creates that crisp, professional white border seen in the final piece and prevents the paper from buckling. -
Prepare the Colors:
Mix a generous amount of your blue paint. You’ll need a gradient, so prepare a small puddle of concentrated dark blue (Indigo or Prussian Blue) and have plenty of clean water ready to dilute it. -
Start at the Top:
Load your large flat brush with the most concentrated dark blue paint. Apply a bold stroke horizontally across the very top of the paper. -
Begin the Gradient:
Dip your brush into clean water once to dilute the pigment slightly. Paint the next horizontal section immediately below the first, overlapping slightly so the colors blend. -
Fade to Light:
Continue working your way down the paper, dipping your brush into water before each new stroke. By the time you reach the bottom third of the paper, the color should be a very pale, watery blue. -
Smooth the Blend:
If you see harsh lines between your bands of color, gently run a clean, damp brush back and forth over the transition areas while the paint is still wet to smooth them out. -
Let it Dry:
Allow the background wash to dry completely. This is crucial; if the paper is damp, your black city silhouette will bleed into the sky.
Uneven Sky Gradient?
If your sky dries with ‘blooms’ or cauliflower marks, it usually means you added water to drying paint. Next time, work faster while the paper is consistently wet from top to bottom.
Step 2: Painting the Skyline
-
Outline the Main Building:
Switch to your small round brush and load it with opaque black paint or ink. Just left of center, draw a vertical line closest to the bottom for the tallest skyscraper’s antenna. -
Shape the Spire:
Thicken the line to create the stepped spire of the main building, mimicking the Empire State Building shape. The top should be pointy, widening as it goes down. -
Fill the Main Silhouette:
Continue painting the body of this central building all the way to the bottom edge. Ensure the black is solid and opaque. -
Add Secondary Buildings:
To the right, paint another tall building with a flat top and a thin antenna. Make it shorter than your central spire to create depth. -
Fill the Horizon:
Paint smaller, blocky rectangular buildings of varying heights between and around the two main skyscrapers. Vary the roof shapes—some flat, some slanted—to make the skyline interesting. -
Connect the Shapes:
Fill in the entire bottom area with black so all buildings connect into a solid ground mass. Let this black layer dry fully.
Level Up: Reflection
Make it a waterfront scene! Leave a gap of white paper below the buildings, then mirror the black shapes downward into the water with wavy, distorted lines.
Step 3: Adding the Details
-
Dot the Stars:
Using a white gel pen or a fine brush with white gouache, gently tap small dots into the upper, darker portion of the blue sky. Vary the spacing to avoid a uniform grid look. -
Add City Lights:
With the same white tool, carefully draw tiny squares or dots on individual buildings to represent lit windows. Cluster them randomly; you don’t need a light on every floor. -
Cluster the Windows:
I like to leave some buildings completely dark to create contrast, while making others look busy and illuminated. -
Final Reveal:
Once everything is perfectly dry, slowly peel away the masking tape at a 45-degree angle to reveal your crisp white border.
Now you have a stunning, high-contrast cityscape that brings a touch of urban elegance to your space
Blue Mountains in a Circle Frame
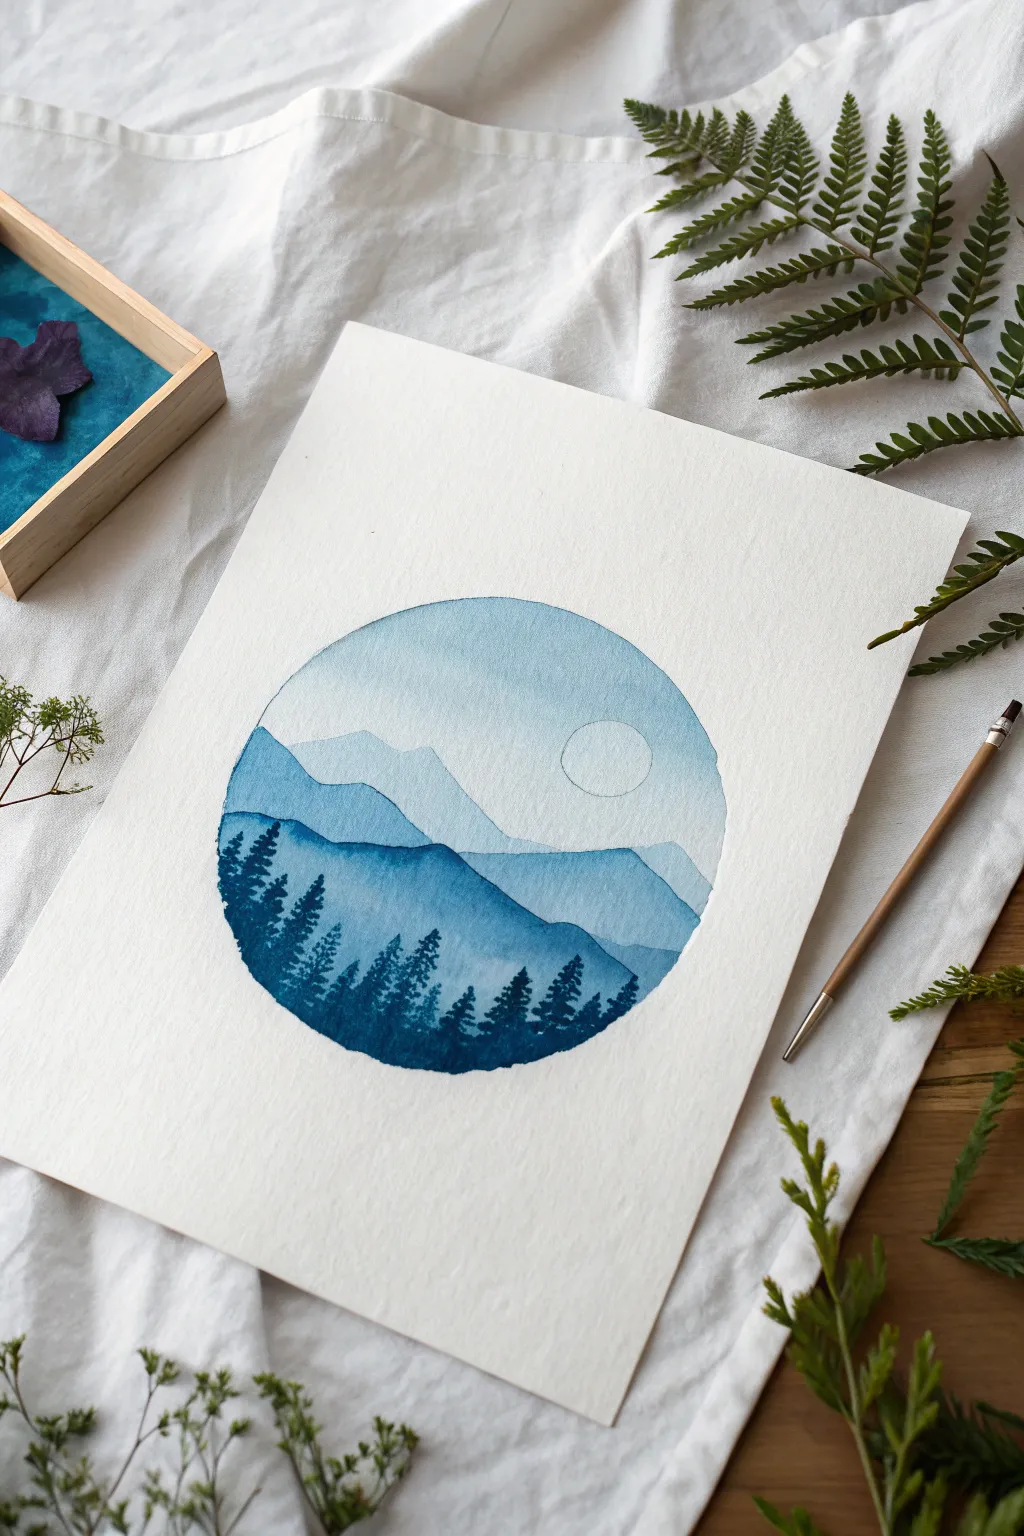
This serene watercolor project captures the misty beauty of a mountain range using only a single color palette. By layering varied concentrations of blue within a crisp circular frame, you’ll create a striking sense of depth and atmosphere.
Detailed Instructions
Materials
- Cold press watercolor paper (300 gsm)
- Masking tape or large painter’s tape
- Compass or a circular object to trace (approx. 4-5 inches)
- Pencil (HB or lighter)
- Kneaded eraser
- Watercolor paints (Indigo, Prussian Blue, or Payne’s Gray)
- Round watercolor brushes (sizes 2, 6, and 8)
- Palette for mixing measurements
- Two cups of water
- Paper towels
Step 1: Setting the Stage
-
Paper Preparation:
Begin by taping down all four sides of your watercolor paper to a hard board or table. This prevents buckling when the paper gets wet. -
Drafting the Frame:
Use a compass or trace a circular bowl to draw a perfect circle in the center of your page. Keep the pencil touch very light so graphite doesn’t smudge into the paint later. -
Sketching Layers:
Lightly sketch three or four rolling mountain lines across the circle. Start high in the middle for the distant peaks and slope downwards. Don’t worry about details; you just need guides for the ridges. -
The Moon:
Near the upper right quadrant within the sky area, trace a small circle for the moon. You can use a coin or a button for this.
Clean Moon Tip
If painting around the small moon feels difficult, use a drop of liquid masking fluid on the moon area before you start painting. Rub it off at the very end to reveal perfect white paper.
Step 2: Painting the Sky and Distance
-
Sky Wash:
Mix a very watery, pale wash of blue. Using your largest brush, wet the sky area inside the circle, carefully painting around the moon to keep it white. Drop in your pale blue paint while the paper is wet for a soft, gradient look. -
First Drying Phase:
Let the sky layer dry completely. If the paper is cool to the touch, it’s still damp. Wait until it is room temperature. -
Farthest Mountains:
Mix a slightly more saturated blue—still transparent, but darker than the sky. Paint the silhouette of the furthest mountain range. Keep the bottom edge of this layer soft by fading it out with clear water as you move down the circle. -
Creating Distance:
Let that layer dry. Mix a medium-tone blue for the next mountain range. I like to make the top edge crisp and distinct against the previous layer, which creates that classic atmospheric perspective effect.
Starry Night Upgrade
Once the painting is 100% dry, load an old toothbrush with opaque white gouache or white ink. Use your thumb to flick tiny speckles over the sky area to create a field of distant stars.
Step 3: Foreground and Details
-
Mid-Ground Peaks:
Once the previous layer is dry, mix a fairly dark blue. Paint the third layer of mountains, bringing the color about halfway down the remaining space. Ensure the ‘valleys’ overlap interestingly with the peaks behind them. -
Deepest Blue Mix:
While waiting for the paint to dry, prepare your darkest value. Establish a concentrated mix of Indigo or Prussian Blue with very little water; it should be opaque and inky. -
Foreground Silhouette:
Using the dark mix, paint the final, bottom-most landmass. Cover the entire bottom section of the circle up to the edge. -
Tree placement:
Switch to your smallest brush (size 2). While the bottom layer is still damp (or after it dries for sharper lines), start pulling pigment upward to form tree trunks. -
Adding Foliage:
Using just the tip of the small brush, dab horizontally along the trunks to create pine branches. Make the trees vary in height, with some breaking the line of the mountain behind them. -
Final Polish:
Review the edges of your main circle. If any paint went outside the line, you can gently lift it with a clean, damp brush or cover it later with a mat board.
Peel off your tape to reveal a crisp, monochromatic landscape ready for framing
Blue Geometric Color Blocks
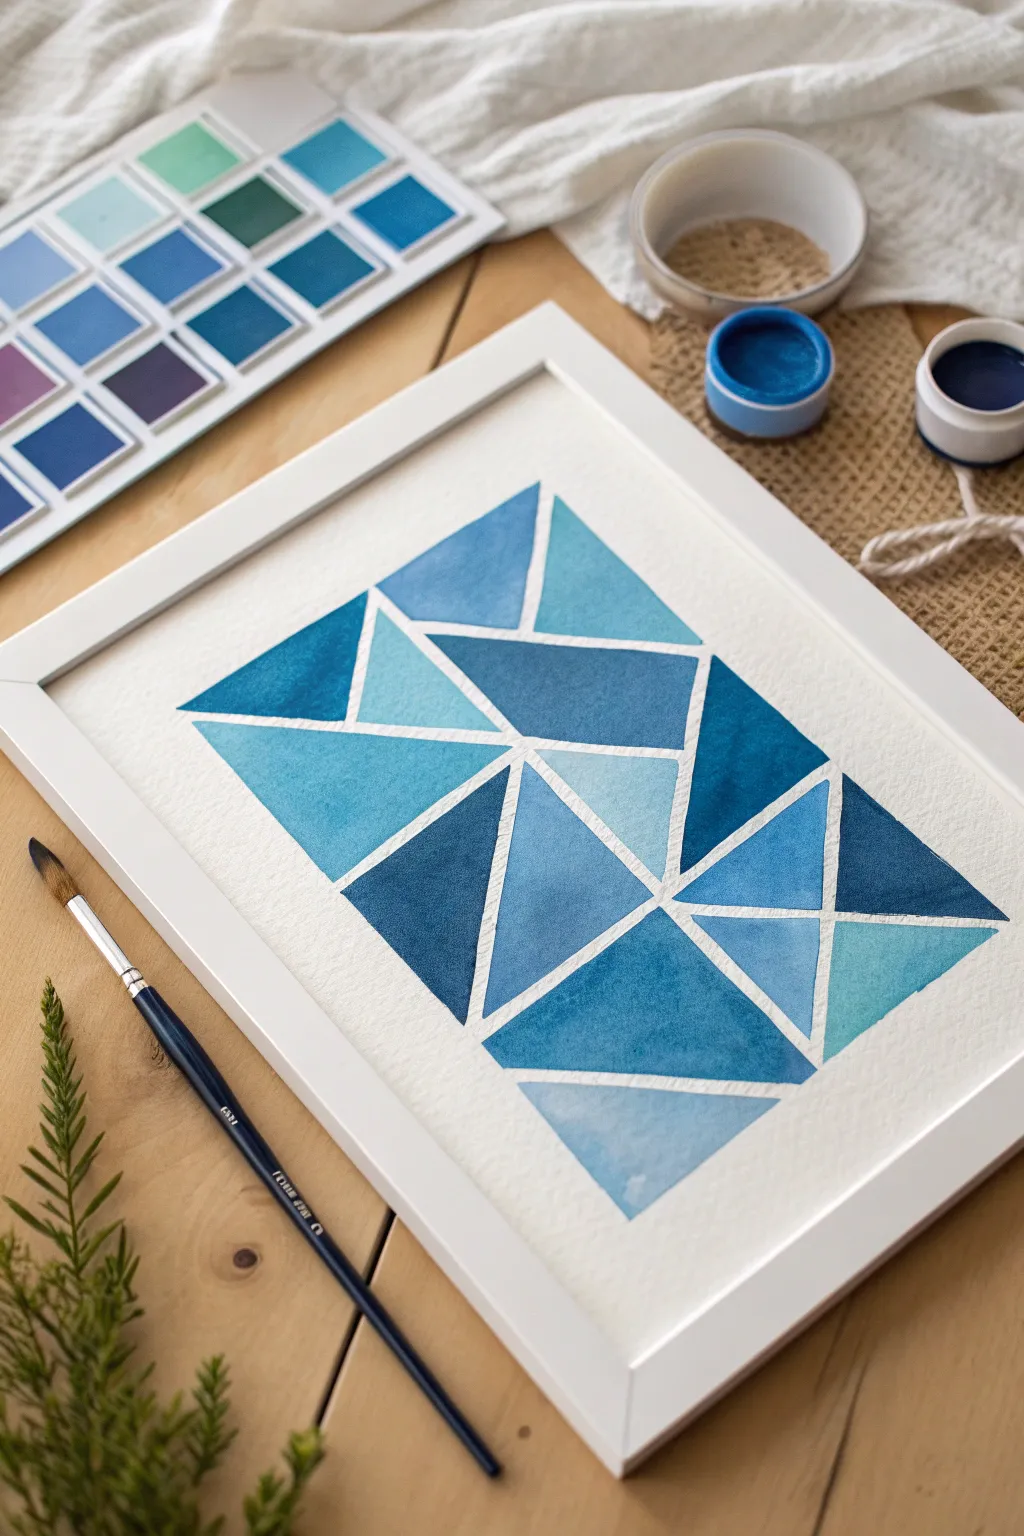
This modern geometric watercolor piece relies on clean lines and a soothing gradients of blue to create a stained-glass effect. Through simple masking techniques and color layering, you’ll build a structured yet fluid composition that looks professionally designed.
Step-by-Step
Materials
- Cold press watercolor paper (approx. 9×12 inches)
- White artist’s tape or masking tape (1/4 inch width is ideal)
- Watercolor paints (Indigo, Phthalo Blue, Cerulean Blue)
- Palette for mixing
- Flat shader brush (size 6 or 8)
- Round brush (size 4) for details
- Clean water and paper towels
- Ruler
- Pencil (HB or H)
- White or light wood frame (optional)
Step 1: Preparation and Masking
-
Tape your borders:
Begin by taping down all four edges of your watercolor paper to your work surface. This creates a crisp white border and prevents the paper from buckling while wet. -
Establish the main lines:
Rip or cut long strips of your masking tape. Place two or three long diagonal lines across the paper, intersecting each other to break the large space into smaller, manageble sections. -
Create the subdivisions:
Cut shorter pieces of tape and place them within the larger sections you just created. Aim to create a mix of triangles and irregular quadrilaterals. -
Check the balance:
Step back and look at your composition. If one area has huge shapes and another has tiny ones, add a few more tape lines to even out the visual weight. -
Seal the edges:
Run a bone folder or the back of your fingernail firmly over the edges of every piece of tape. This is crucial to prevent paint from bleeding underneath and spoiling your crisp white lines.
Bleeding Lines?
If paint sneaks under the tape, cover the mistake with opaque white gouache or a white gel pen once the blue paint is bone dry to restore the line.
Step 2: Mixing and Painting
-
Prepare your palette:
Squeeze out your blue paints. Create four distinct puddles: a deep, saturated indigo; a medium true blue; a light, watery sky blue; and a slightly greenish-teal mix. -
Start with the darkest tones:
Select three or four non-adjacent shapes spread across the page. Fill these in with your darkest indigo mix, keeping the paint application fairly even. -
Apply the medium wash:
Move to your true blue tone. Paint shapes that are adjacent to the dark ones, ensuring a nice contrast. I find that lifting the brush at the end of a stroke creates a nice texture here. -
Fill the lightest sections:
Use your most watered-down sky blue for several remaining shapes. These light areas act as ‘breathing room’ in the composition. -
Add variety with gradients:
For the few remaining empty shapes, try a wet-on-wet technique. Wet the paper inside the shape with clean water first, then drop darker pigment into one corner and let it naturally fade to white. -
Review contrast:
Check that no two shapes of the exact same value are touching. If they are, add a quick glaze of a darker blue over one of them to separate them visualy. -
Dry completely:
Allow the painting to dry fully. The paper should feel room temperature to the touch, not cool. Use a hairdryer on a low setting if you are impatient.
Add Metallic Flair
Once the blue paint is dry, paint a thin layer of gold or silver watercolor over just one or two triangles for a pop of elegance.
Step 3: Refining and Framing
-
The reveal:
Gently peel away the tape. Pull the tape slowly at a 45-degree angle away from the painted area to minimize the risk of tearing the paper. -
Clean up edges:
If any paint bled under the tape, use a slightly damp, stiff brush to gently scrub the pigment away, blotting with a paper towel. -
Flatten the artwork:
If the paper has warped slightly, place it face down on a clean surface and weigh it down with heavy books overnight. -
Mount and frame:
Place your finished geometric piece into a simple white frame to echo the white lines within the artwork.
Hang this cool-toned mosaic in a sunny spot to let the geometric patterns really shine
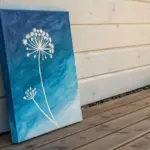
Blue Monochrome Floral Silhouette
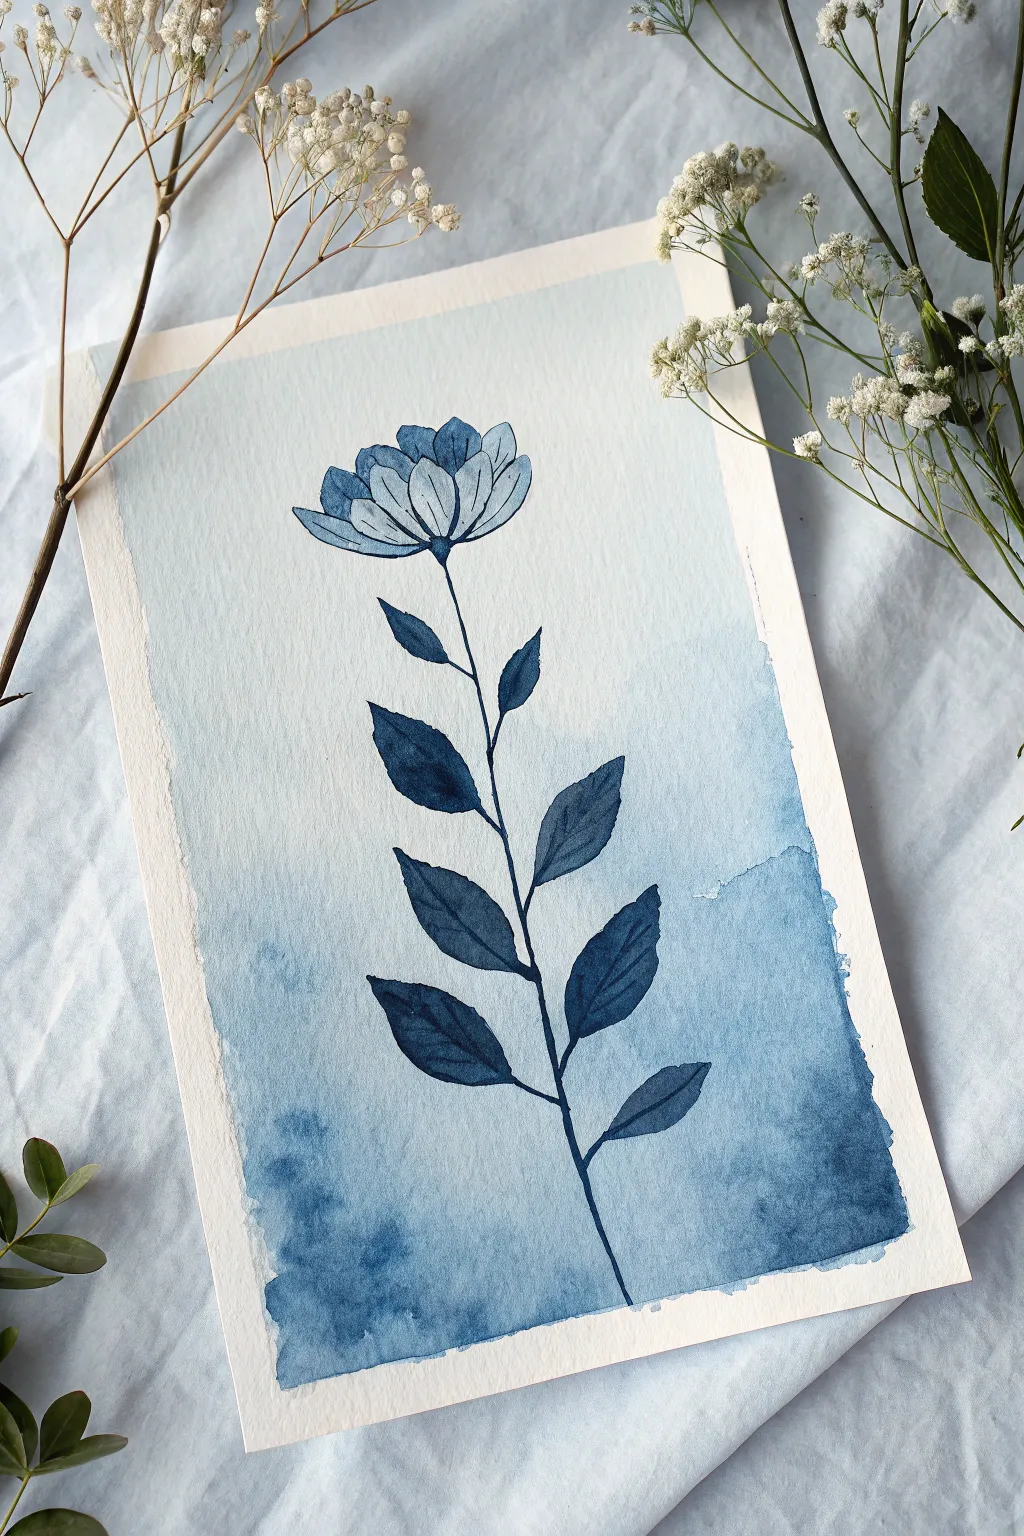
This elegant project combines the loose, organic flow of watercolor with precise linework to create a striking monochrome botanical. You’ll master a simple gradient wash technique that adds haunting depth behind a crisp, illustrated silhouette.
Step-by-Step Tutorial
Materials
- Cold press watercolor paper (A5 or similar size)
- Watercolor paints (Indigo or Prussian Blue)
- Masking tape or painter’s tape
- Flat wash brush (approx. 1 inch)
- Round watercolor brush (size 4 or 6)
- Fine liner pen (black, 0.3mm or 0.5mm, waterproof)
- Jar of clean water
- Paper towels
- Pencil and eraser
Step 1: Preparation and Sketching
-
Secure the Paper:
Begin by taping down all four edges of your watercolor paper onto a hard board or table. This creates that crisp white border seen in the image and prevents the paper from buckling when wet. -
Draft the Stem:
Using a pencil very lightly, draw a long, slightly curved center line for the flower stem. It doesn’t need to be perfectly straight; a slight curve feels more organic. -
Add Leaf Placement:
Mark positions for the leaves along the stem, alternating sides as you move up. Draw simple almond shapes, making the lower leaves slightly larger than the upper ones. -
Sketch the Flower Head:
At the top of the stem, sketch a simple cup-shaped bloom. Draw several overlapping petals, keeping the overall shape rounded but slightly flattened at the top.
Step 2: Painting the Gradient Background
-
Mix Your Wash:
Prepare a puddle of watery blue paint on your palette. Indigo or Prussian Blue works beautifully here. You want a decent amount of liquid so you don’t run out mid-wash. -
Wet the Paper:
With your clean flat brush, apply a glaze of plain water over the entire rectangular area inside the tape. The paper should be glisten, but not hold puddles. -
Begin the Gradient:
Load your flat brush with the pigment. Start applying paint at the bottom of the paper. This should be the darkest area, so deposit plenty of color here. -
Fade Upwards:
Gradually work your brush upwards. As you move up, dip your brush into water (without adding more paint) to dilute the color on the paper. -
Create the Fade:
Continue brushing upward until the color fades into a very pale, barely-there blue at the top. The goal is a seamless transition from the deep indigo bottom to the airy top. -
Create Texture:
While the bottom section is still damp, dab a little extra concentrated pigment into the lower corners. This creates those lovely ‘blooms’ and texture seen in the reference. -
Dry Completely:
This is crucial: let the background dry 100%. If you touch the paper and it feels cool, it’s not dry yet. Waiting prevents the next layers from bleeding.
Wet-on-Wet Magic
For more organic texture in the bottom wash, sprinkle a few grains of coarse salt onto the wet paint. Brush it off once dry for a starry effect.
Step 3: Painting the Floral Silhouette
-
Mix a Concentrated Blue:
Create a mixture of the same blue paint, but with much less water. It should be creamy and bold, significantly darker than your background. -
Paint the Leaves:
Using your round brush, fill in the leaf shapes you sketched earlier. Start from the stem and pull outward to the tip of the leaf to get a sharp point. -
Paint the Flower Petals:
Fill in the flower head at the top. You can paint the petals as a somewhat solid shape for now, as the pen work will define them later. -
Add the Stem:
Carefully connect the flower and leaves with a thin line for the stem using the very tip of your round brush. I find holding my breath for a moment helps steady my hand for this long stroke. -
Second Drying Phase:
Allow the painted floral elements to dry completely before reaching for your pen.
Go Metallic
Swap the black pen for a metallic gold or silver gel pen. The shimmer against the deep indigo blue creates a stunning, luxurious contrast.
Step 4: Adding the Details
-
Outline the Petals:
Take your waterproof fine liner and trace the outline of your flower petals. Add a few extra lines inside the petals to suggest texture and folding. -
Define the Leaves:
Outline darker painted leaves with ink. Draw a center vein down the middle of each leaf for added realism. -
Trace the Stem:
Go over your painted stem line with the ink pen to sharpen the silhouette and connect all the elements cleanly. -
The Final Reveal:
Once you are absolutely certain the ink is dry, gently peel away the masking tape at a 45-degree angle to reveal your crisp white border.
Frame your botanical study or gift it as a serene greeting card to a friend
Blue Koi Fish With Simple Highlights
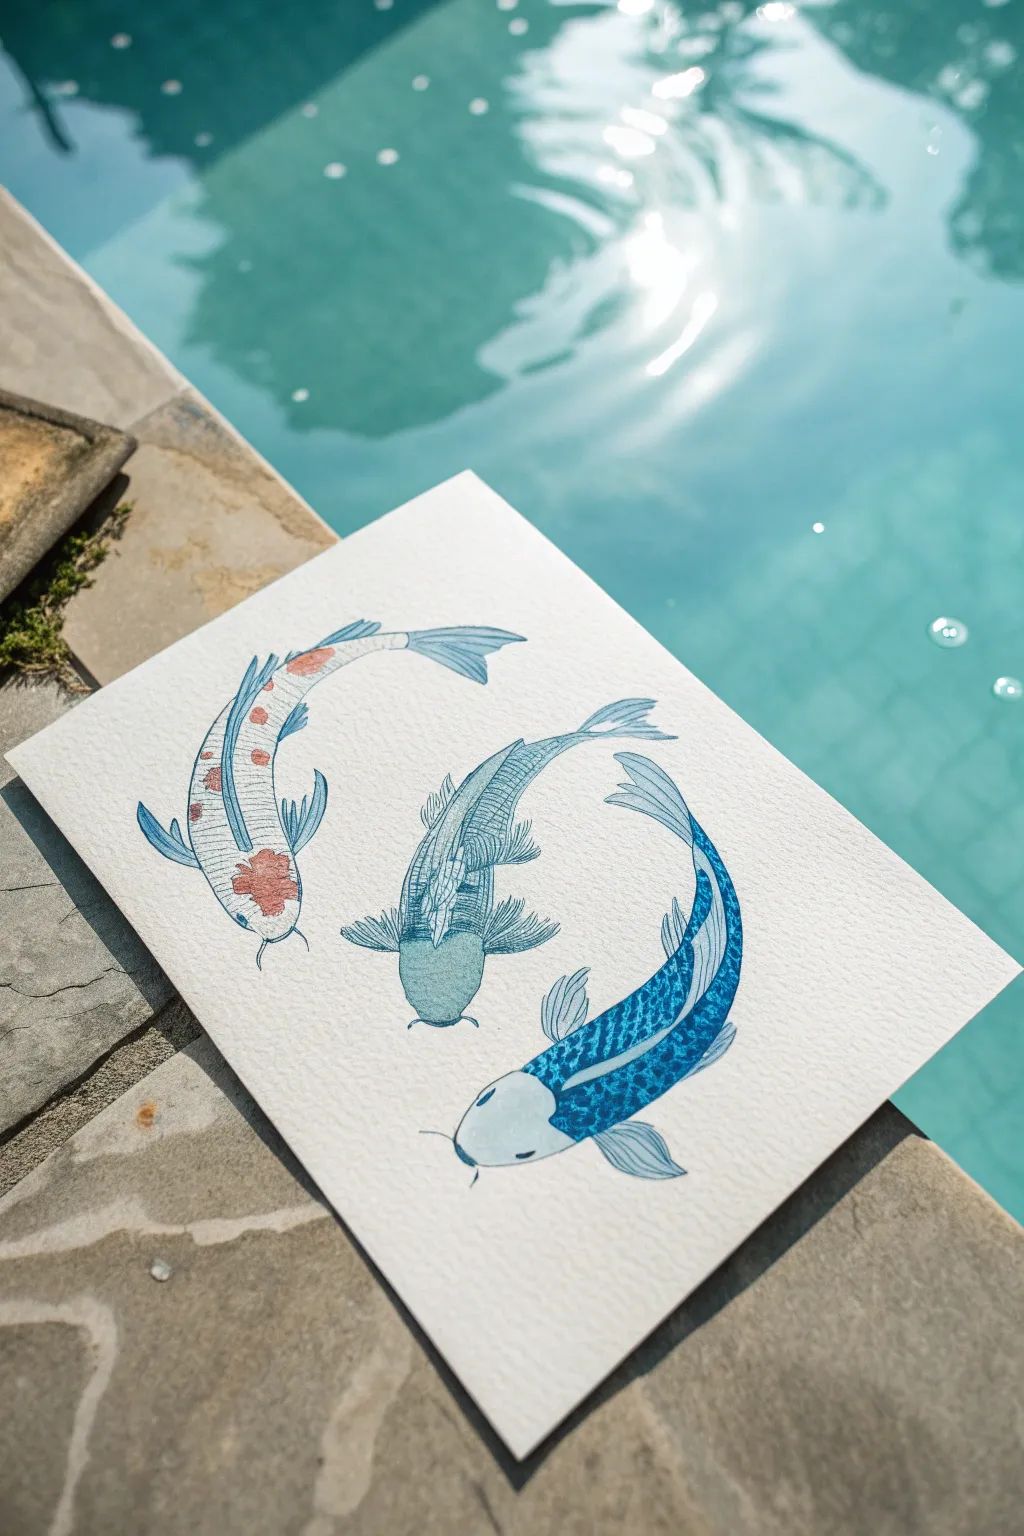
Capture the graceful movement of koi with this elegant watercolor and ink illustration. Using a limited palette of calming blues and a touch of terracotta, you’ll create three distinct fish circling in a harmonious composition.
Step-by-Step Guide
Materials
- Cold press watercolor paper (300 gsm)
- Watercolor paints (Indigo, Prussian Blue, Cerulean Blue, Burnt Sienna/Rust)
- Fine liner pens (Black, waterproof, sizes 01 and 03)
- White gel pen or white gouache
- Round watercolor brushes (Size 4 and 8)
- Pencil (HB)
- Eraser
- Clean water and paper towels
Step 1: Sketching the Composition
-
Establish the flow:
Begin by lightly drawing a large circle in the center of your paper using a pencil. This won’t be part of the final image, but it acts as a guide to ensure your fish flow around a central point. -
Outline the first fish:
Sketch the top-left fish first. Draw a curved body shape following the circular guide, adding a fan-shaped tail and side fins. This fish will be the spotted one. -
Add the second fish:
Draw the middle fish, slightly smaller and positioned centrally. Its head should point downwards, creating a sense of depth as if it’s swimming below the others. -
Complete the trio:
Sketch the third fish on the bottom right, curving upwards to complete the circle. Make this one slightly bolder in shape, as it will be the darkest fish. -
Refine the details:
Go back over your fish shapes, refining the fins and adding faint lines for where the heads meet the bodies. Keep these pencil marks very light so they don’t show through the paint later.
Bleeding Lines?
If your ink lines are feathering or spreading, your paper isn’t dry enough. Wait another 10-15 minutes or use a hair dryer on a low, cool setting before inking.
Step 2: Watercolor Washes
-
The spotted koi:
Mix a very watery, pale blue wash. Apply this loosely to the body of the top-left fish, leaving random white patches where you want highlights or spots. While still damp, drop in concentrated rusty orange paint into a few specific areas to create the classic koi markings. -
The central shadow fish:
For the middle fish, mix a teal or greenish-blue shade. Paint the entire body with an even, semi-transparent wash. This lighter, cooler tone helps push this fish visually into the background. -
The dark blue koi:
Load your brush with a saturated Indigo or Prussian Blue. Paint the body of the bottom-right fish, but leave the head area completely white for now. -
Painting the dark head:
Clean your brush and use a very pale grey-blue wash to paint the head of the dark fish. This creates a striking contrast with the deep blue body. -
Adding texture:
While the dark blue body is drying but no longer soaking wet, you can dap a clean, damp brush or paper towel onto the spine area to lift a tiny bit of pigment, suggesting the curve of the back. -
Let it dry completely:
Step away and let the painting dry fully. This is crucial—if the paper is damp, your ink lines in the next phase will bleed.
Step 3: Inking and Detailing
-
Outline the spotted fish:
Using the 01 fine liner, trace the outline of the first fish. Instead of a solid line, use broken, sketchy strokes to suggest scales along the spine. -
Detailing the middle fish:
On the teal central fish, use the pen to draw intricate cross-hatching or scale patterns. Since this fish is ‘deeper’ in the water, sketching finer, denser lines helps create a textured, shadowed look. -
Patterning the dark fish:
For the dark blue fish, use a white gel pen or white gouache. Draw a diamond or net pattern over the dark blue paint to represent scales shimmering in the light. -
Fin details:
On all three fish, use your black pen (or blue if you have one) to draw fine lines radiating from the base of the fins and tails to the tips. This gives them a delicate, translucent appearance. -
Eye contact:
Carefully draw small black dots for the eyes on the sides of the heads. add small whiskers (barbels) near the mouth area for that characteristic koi look. -
Final touches:
Erase any remaining pencil marks gently. If the orange spots look too flat, I sometimes add a tiny dot of red ink to the center of them for depth.
Scale Texture Trick
Sprinkle coarse salt on the wet paint of the dark blue fish. When dry, brush it off to create a natural, mottled scale texture without drawing every line.
Frame your aquatic trio and enjoy the sense of movement they bring to your space
Blue Aurora Bands With Silhouette Trees
Capture the ethereal beauty of an arctic night with this mesmerizing watercolor project. Swirls of indigo and cerulean dance across the paper, grounded by sharp, pitch-black tree silhouettes, making for a stunning piece of wall art or a heartfelt handmade card.
Step-by-Step
Materials
- Cold-pressed watercolor paper (300 gsm)
- Watercolor paints (Indigo, Prussian Blue, Phthalo Blue, Turquoise, Violet)
- Black gouache or waterproof black ink
- White gouache or white gel pen
- Painter’s tape
- Flat wash brush (3/4 inch)
- Round brush (size 6)
- Detail round brush (size 0 or 1)
- Cup of water and paper towels
- Old toothbrush (optional)
Step 1: Setting the Sky Stage
-
Secure your canvas:
Begin by taping down the edges of your watercolor paper to a hard board using painter’s tape. This creates that crisp, clean white border effectively seen in the final piece and prevents the paper from buckling under heavy washes. -
Wet-on-wet preparation:
Using your large flat brush and clean water, thoroughly wet the entire area inside the tape. The paper should be glisten with a sheen but not have puddles of water sitting on top. -
Initial wash:
Load your brush with a watery mix of Turquoise or a light Aqua color. Apply this broadly across the paper, leaving irregular, sweeping diagonal streaks of white paper untouched to represent the brightest parts of the aurora. -
Deepening the blue:
While the paper is still wet, switch to Phthalo Blue or Prussian Blue. Paint around the lighter turquoise areas, blending the edges softly so there are no harsh lines.
Clean Edges Pro-Tip
Before painting, run a bone folder or the back of a spoon firmly over the edge of your painter’s tape. This seals the gap and prevents liquid paint from seeping underneath.
Step 2: Creating the Aurora
-
Adding the night depth:
Mix a concentrated dark Indigo or dark blue. Apply this to the top corners and the upper edges of the painting to suggest the vastness of the space above the lights. -
The violet transition:
To add that magical chromatic shift, introduce a small amount of diluted Violet along the edges where the dark blue meets the lighter aurora bands. Let the colors bleed naturally into one another. -
Lifting color:
If your aurora bands got too dark, dampen a clean brush, blot it on a towel, and gently lift some pigment off the paper in diagonal sweeping motions to reclaim the light. -
Essential drying time:
This is crucial: Let the sky layer dry completely. The paper must be bone dry before moving to the next steps to prevent the stars and trees from blossoming into blurry blobs.
Step 3: Stars and Silhouettes
-
Flicking the stars:
Dilute a small dab of white gouache with water until it has a creamy consistency. Load an old toothbrush or a stiff brush with the mixture. -
Create the galaxy:
Using your thumb, flick the bristles over the top of the painting to spray fine white specks. Focus the density at the top darker areas and go lighter near the horizon. -
Highlighting major stars:
Take your detail brush or a white gel pen and manually add a few larger, brighter stars in the dark blue sections to create variety in your constellation. -
Mixing the blackest black:
Prepare your black gouache or ink. I prefer gouache here because it dries matte and extremely opaque, which contrasts beautifully with the transparent watercolor sky. -
Painting the tree line:
Start at the very bottom edge with your size 6 round brush and paint a solid black uneven strip. This grounds the forest. -
Drafting the tree trunks:
Switch to your medium or detail brush. Draw thin vertical lines extending upward from your black base. Vary the heights—some should be tall and majestic, others short and hidden. -
Adding texture to the pines:
Using the very tip of your brush, use a stippling or dab-and-pull motion to create pine branches. Start narrow at the top of the trunk and widen the branches as you move down. -
Refining the silhouette:
Ensure the bottom area where the trees merge becomes a solid mass of shadow. You can add tiny vertical spikes in the gaps to suggest distant, smaller trees in the background. -
The reveal:
Once the black paint is fully dry, slowly and carefully peel away the painter’s tape at a 45-degree angle to reveal your clean, professional borders.
Level Up: Metallic Magic
Mix a tiny amount of iridescent or pearl watercolor medium into your turquoise paint. The aurora bands will have a subtle, magical shimmer when the light hits the card.
Step back and admire your personal window into a peaceful winter night
Tape-Edge Blue Mini Paintings Grid
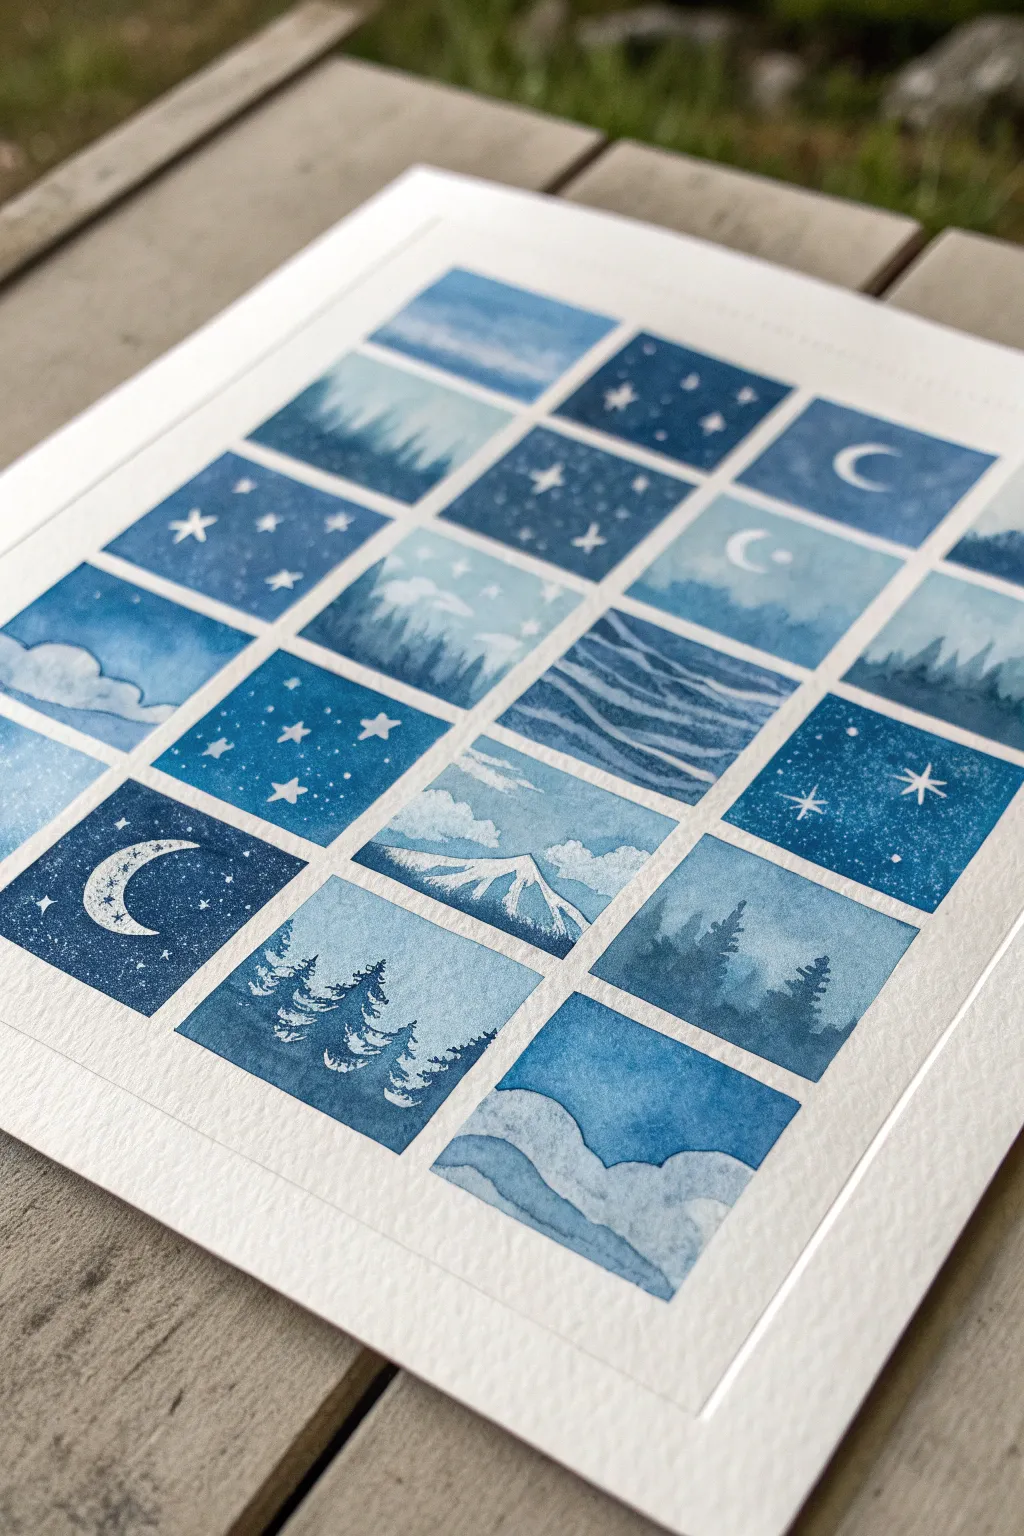
This stunning grid of sixteen miniature paintings captures the serene beauty of the night sky and winter landscapes using only shades of blue. By using artist tape to mask off clean borders, you’ll create a crisp, professional-looking collection of celestial scenes, mountains, and forests all on a single sheet.
How-To Guide
Materials
- Cold press watercolor paper (square format, at least 140lb/300gsm)
- Painter’s tape or artist masking tape (1/4 inch width is ideal)
- Watercolor paints (Indigo, Prussian Blue, Payne’s Gray)
- White gouache or white gel pen
- Synthetic round brushes (sizes 2 and 4)
- Clean water jar
- Paper towels
- Ruler and pencil
Step 1: Preparation and Masking
-
Prep your paper:
Start with a square piece of watercolor paper. Using your ruler and pencil, lightly mark a 4×4 grid. The exact dimensions depend on your paper size, but aim for equal-sized squares. -
Tape the borders:
Apply masking tape firmly over your pencil lines to create the grid structure. Run distinct lines of tape horizontally and vertically to separate the sixteen small painting areas. -
Seal the edges:
Run a bone folder or the back of your fingernail along all the tape edges. This crucial step prevents the blue paint from bleeding under the tape and keeps your white lines crisp. -
Mix your palette:
Pre-mix a strong, dark indigo and a medium blue on your palette. Having these ready allows you to work quickly while the paper is wet.
Tape Peeling Trick
If your tape feels too sticky, press it against your clothes a few times before applying it to the paper. This reduces tackiness and saves your paper from tearing.
Step 2: Painting the Scenes (Top Half)
-
Create gradients:
For squares involving just sky (like the top left or third one down), wet the paper first with clean water. Drop in dark blue at the top and let it fade to white or light blue at the bottom. -
Starry nights:
In several random squares (like the second one in the top row), paint the entire square a deep, saturated indigo. Let this dry completely before adding details later. -
Misty forests:
For the tree scenes, start with a pale wash for the sky. While the paper is still slightly damp, use a more concentrated blue to dab in the shapes of distant treelines, letting the pigment bloom slightly for a foggy effect. -
Paint a crescent moon:
In the moon squares, use the ‘negative painting’ technique. carefully paint the dark blue sky *around* the crescent shape, leaving the white paper exposed for the moon itself. -
Detailed trees:
Once your misty backgrounds are dry, use your size 2 brush with concentrated indigo to paint sharp, detailed silhouettes of pine trees in the foreground.
Bleeding Lines?
If paint bled under the tape, wait for it to dry completely. Then, use a small amount of concentrated white gouache to paint over the mistake and restore the grid line.
Step 3: Painting the Scenes (Bottom Half)
-
Mountain peaks:
For the mountain square, paint the sky first. Once dry, outline a jagged peak. Fill the mountain with a medium blue wash, but leave patches of white paper to represent snow caps. -
Ocean waves:
Dedicate one square to abstract waves. Use horizontal, slightly wavy brushstrokes with varying concentrations of blue, leaving thin slivers of white paper between the strokes for foam. -
Rolling clouds:
For the bottom-right squares, outline puffy cloud shapes with a very pale blue wash. Add shading only to the bottom of the clouds to give them volume, keeping the tops white. -
Layering depth:
Go back to your landscape squares. If they look too flat, add a second layer of darker trees or hills in the immediate foreground to push the lighter elements into the distance.
Step 4: Details and Finishing
-
Add the stars:
Return to your fully dried dark sky squares. Use white gouache or a gel pen to dot in stars. I like to add a few larger ‘sparkles’ using a cross shape for variety. -
Highlight the moon:
If your negative-space moon has uneven edges, refine it now with white gouache to make it perfectly crisp. -
Snowy textures:
Use a nearly dry brush with white gouache to lightly drag over the dark mountain peaks or pine trees, simulating a dusting of snow. -
The reveal:
Ensure the painting is 100% bone dry. Slowly peel the tape away at a 45-degree angle, pulling away from the painted areas to avoid ripping the paper.
Step back and admire how the grid structure unifies your distinct little worlds into one cohesive piece of art


Have a question or want to share your own experience? I'd love to hear from you in the comments below!