
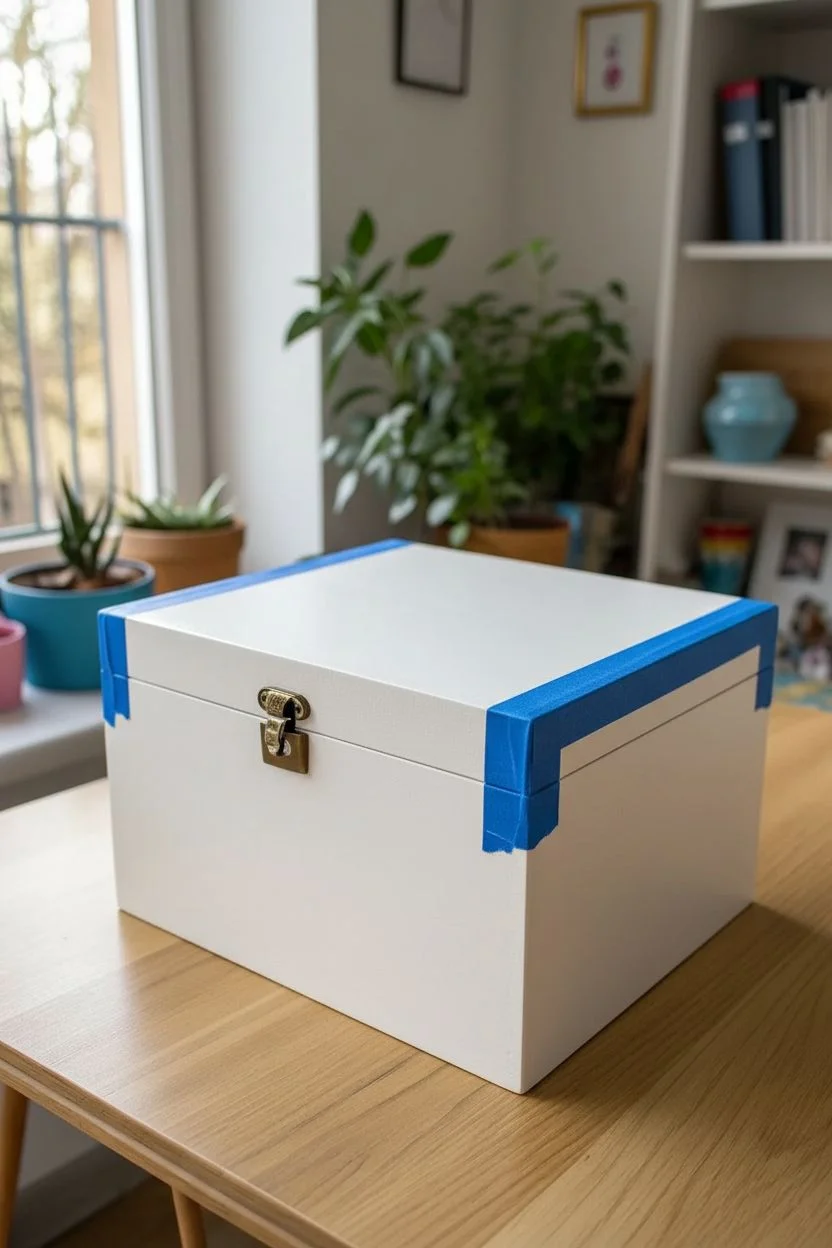
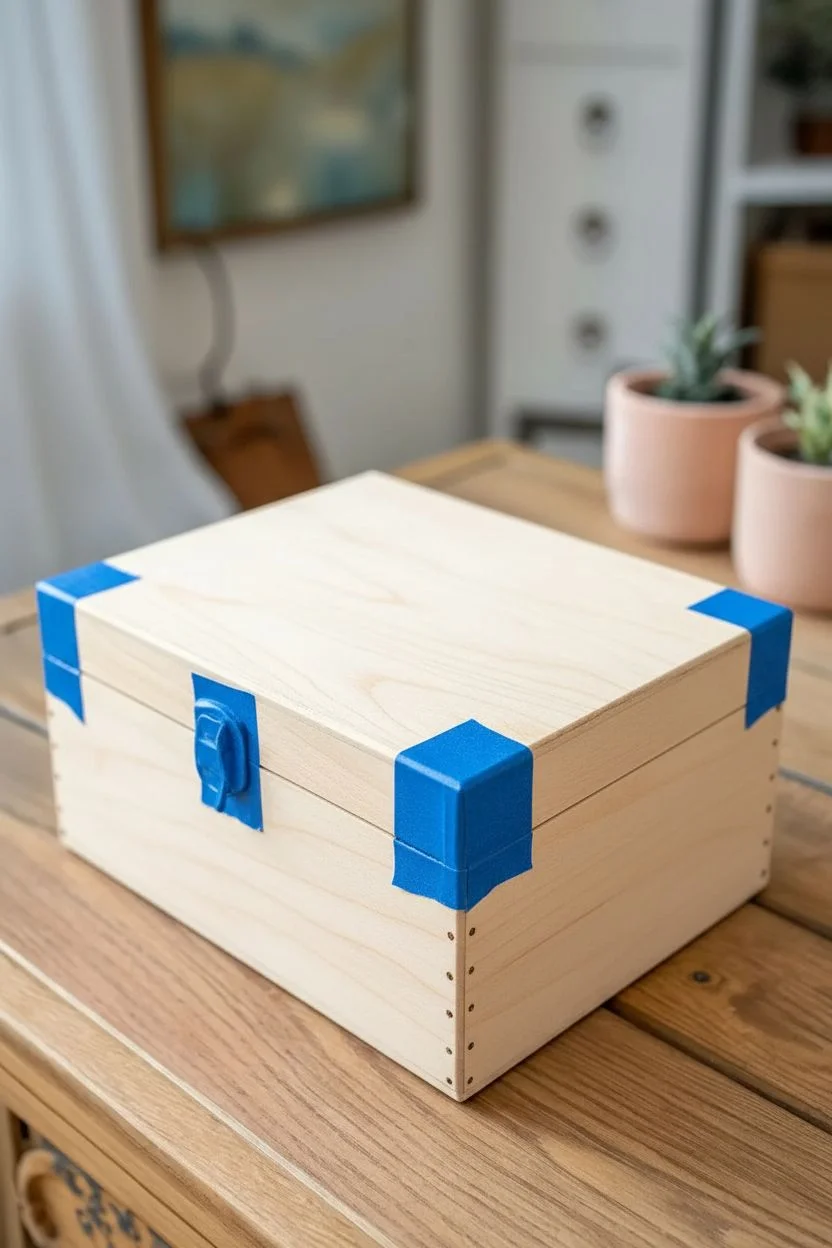
Transforming a plain wooden container into a personalized treasure chest is one of the most satisfying projects you can tackle, regardless of your skill level. These simple yet effective techniques will show you how to turn inexpensive craft store finds into stylish decor pieces using tools you likely already have.
White Paint Pens on Dark Wood
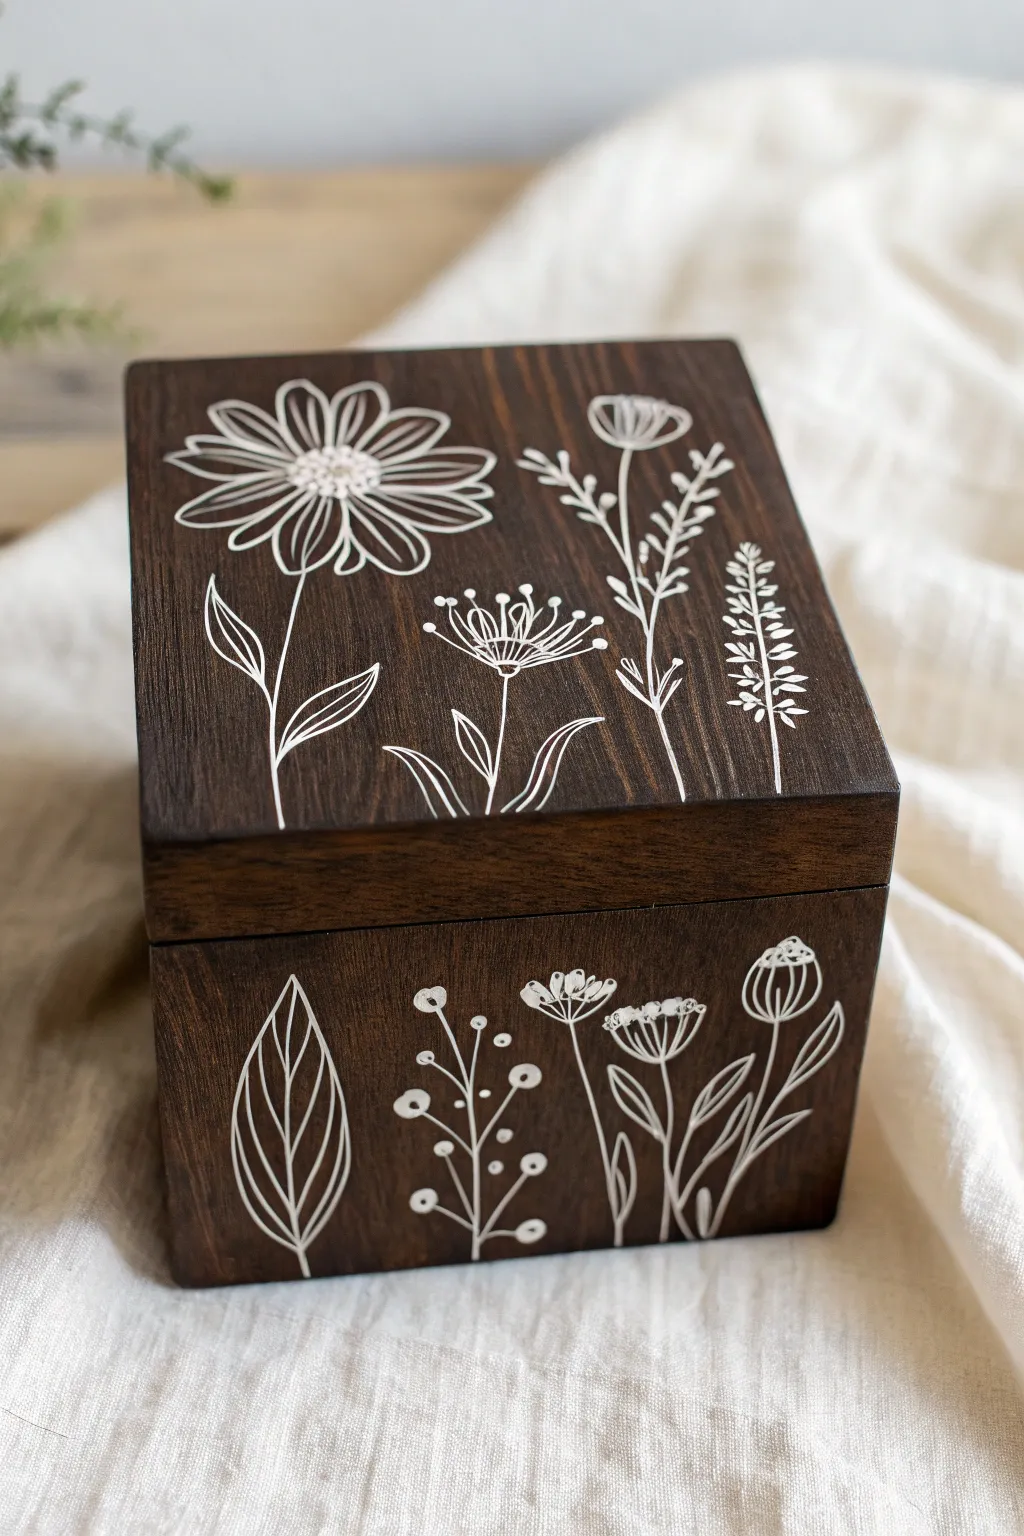
Transform a plain wooden keepsake box into a piece of modern botanical art using high-contrast techniques. The stark white lines against a deep, rich stain create an elegant look that is surprisingly simple to achieve with the right marker.
How-To Guide
Materials
- Unfinished wooden box with lid
- Dark wood stain (Espresso or Dark Walnut)
- Fine-grit sandpaper (220 grit)
- Clean rags or foam brush
- White acrylic paint pen (Fine tip)
- White acrylic paint pen (Extra-fine tip)
- Pencil and eraser
- Matte spray sealer
Step 1: Staining the Surface
-
Smooth the wood:
Lightly sand the entire box with 220-grit sandpaper, paying special attention to the edges and corners to remove any rough splinters. -
Clean the surface:
Wipe the box down thoroughly with a tack cloth or a slightly damp rag to remove all sawdust, as dust can clog paint pens later. -
Apply the stain:
Using a foam brush or rag, apply a dark wood stain like Espresso generally over the wood, following the direction of the grain. -
Wipe excess:
Immediately wipe away unabsorbed stain with a clean rag to prevent blotching and allow the natural grain pattern to show through. -
Cure time:
Allow the box to dry completely, preferably overnight; if the wood is damp or oily from the stain, the paint pens will not adhere crisp white lines.
Step 2: Drawing the Lid Design
-
Prime the pen:
Shake your fine-tip white acrylic paint pen well and pump the nib on a piece of scrap paper until the ink flows opaque and smooth. -
Sketch the layout:
Very lightly sketch your floral placement with a pencil, just marking the center of flowers and the general curve of the stems. -
Draw the main daisy:
Start on the lid’s left side by drawing a cluster of small dots for the center, then pull long, looped petals radiating outward. -
Detail the petals:
Add a single thin line down the center of each daisy petal to give the flower dimension and a more illustrative style. -
Add right-side foliage:
On the opposite side of the lid, draw tall, thin vertical stems and add pairs of small V-shaped leaves climbing up the stalks. -
Fill the center gap:
Between the daisy and the foliage, draw a smaller dandelion-style bloom using short, straight lines radiating from a central point. -
Connect the stems:
Draw the stems for all flowers curving gently downward, aiming for them to disappear off the bottom edge of the lid.
Ink Absorption Fix
If the white ink looks transparent or soaks into the wood, let the first layer dry completely for ten minutes. Then, retrace the lines; a second coat usually creates that crisp, bright opacity.
Step 3: Detailing the Sides
-
Rotate to the front:
Turn the box to face the front panel; here you will create a taller, more vertical composition to match the box’s shape. -
Draw the geometric leaf:
On the left, outline a large, pointed oval leaf shape, then draw a central spine from bottom to tip. -
Add leaf veins:
Fill the leaf with curved lines stretching from the spine to the outer edges, keeping the spacing generous and consistent. -
Create the berry sprig:
In the middle section, draw a branching stem and place small, solid white circles at the tips to represent berries. -
Sketch seed pods:
On the right, draw two stems topped with cup-shaped semi-circles to create poppy-style seed pods. -
Texturize the pods:
Switch to an extra-fine tip pen if you have one to draw vertical hatching lines inside the seed pod cups for delicate shading. -
Double the opacity:
I like to go back over the thickest outlines a second time once the first layer is dry to make the white pop against the dark background. -
Clean up:
Allow the paint to dry for at least an hour, then gently erase any visible pencil marks that weren’t covered by ink. -
Protect the art:
Finish by spraying the box with a matte clear sealer to prevent the white lines from scratching off over time.
Steady Hands
To keep your hand steady on the uneven wood grain, anchor your pinky finger on a dry section of the box while drawing. This acts as a pivot point and prevents shaky lines on the textured surface.
Now you have a stunning, personalized keepsake box with a hand-drawn touch that looks professionally crafted


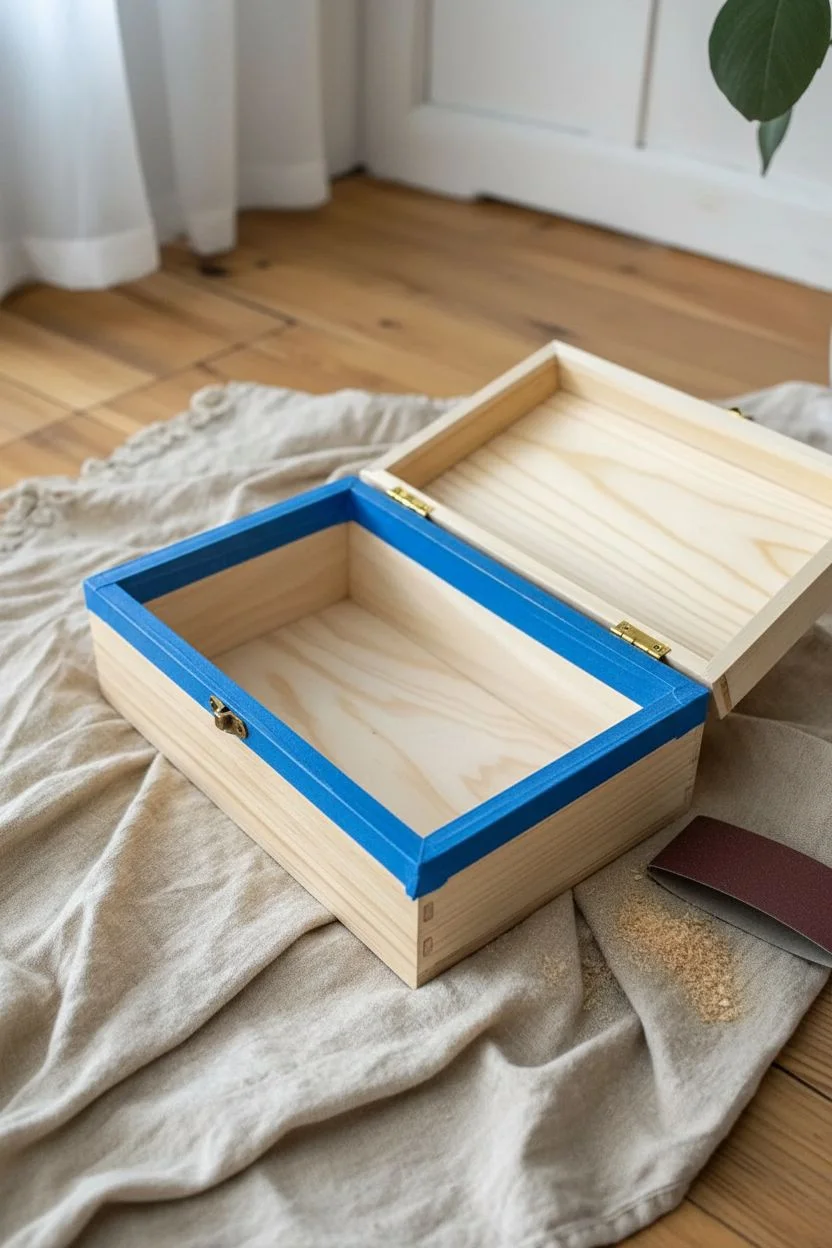
Classic Geometric Stripes
Transform a plain wooden box into a chic storage piece with this crisp, high-contrast design. Using simple masking techniques, you can achieve professional-looking geometric stripes that wrap seamlessly around the corners.
Detailed Instructions
Materials
- Unfinished wooden box
- Fine-grit sandpaper (220 grit)
- White or cream acrylic paint
- Navy blue acrylic paint
- Painter’s tape (0.75 or 1 inch width)
- Wide flat synthetic paintbrush
- Small detail brush
- Clear matte varnish
Step 1: Preparation & Base Coat
-
Smooth the surface:
Lightly sand all exterior surfaces of your wooden box to remove rough fibers, then wipe away the dust with a damp cloth. -
Apply the primer coat:
Paint the entire exterior of the box with your white or cream acrylic paint. Don’t worry about perfect coverage yet. -
Sand between coats:
Once dry, do a very light sanding pass to knock down any grain that raised up during painting, ensuring a super smooth finish. -
Perfect the opacity:
Apply a second (and third, if necessary) coat of white paint until you have a solid, opaque background color. -
Allow to cure:
Let the white base coat dry completely. I prefer leaving it for at least an hour or two, as applied tape can pull up paint that isn’t fully cured.
Fuzzy Lines?
If paint bled under the tape, don’t panic. Wait for the paint to dry completely, then use a ruler and a white paint pen or fine brush to trace over and crisp up the edges.
Step 2: Masking the Pattern
-
Place the anchor stripe:
Apply your first strip of painter’s tape diagonally across the top of the box. This establishes the angle for all subsequent stripes. -
Wrap the corners:
Smoothe the tape ends down the front and back sides of the box so the pattern continues seamlessly over the edges. -
Create spacing:
Place parallel strips of tape across the rest of the box. Use a loose piece of tape as a spacer between strips to keep the gap width consistent. -
Press the edges:
Runs your fingernail or a credit card firmly along the edges of every tape strip. This ‘burnishing’ prevents the dark paint from bleeding under. -
Seal the tape:
For razor-sharp lines, lightly brush a tiny amount of your *white* base color over the tape edges to fill any microscopic gaps.
Step 3: Painting & Reveal
-
Apply the navy:
Using the flat brush, paint the navy blue color into the exposed spaces between the tape strips. -
Watch the direction:
Try to brush away from the tape edges or parallel to them rather than pushing paint underneath the tape. -
Add a second layer:
Let the blue paint dry to the touch, then add a second coat to ensure the dark color is rich and even. -
The peel reveal:
While the final coat is still slightly tacky (not fully hard), slowly peel off the painter’s tape at a 45-degree angle. -
Tidy up:
If any paint bled through, use a small detail brush with white paint to carefully correct the lines once the blue is dry. -
Protect the work:
Finish by applying a coat of clear matte varnish over the entire box to protect your new design from scuffs.
Level Up
Add a luxe touch by painting the interior of the box a contrasting bright color, like coral or sunshine yellow, for a happy surprise when opened.
Fill your freshly painted box with trinkets or gift it to a friend for a stylish handmade present.


Perfect Pencil Eraser Polka Dots
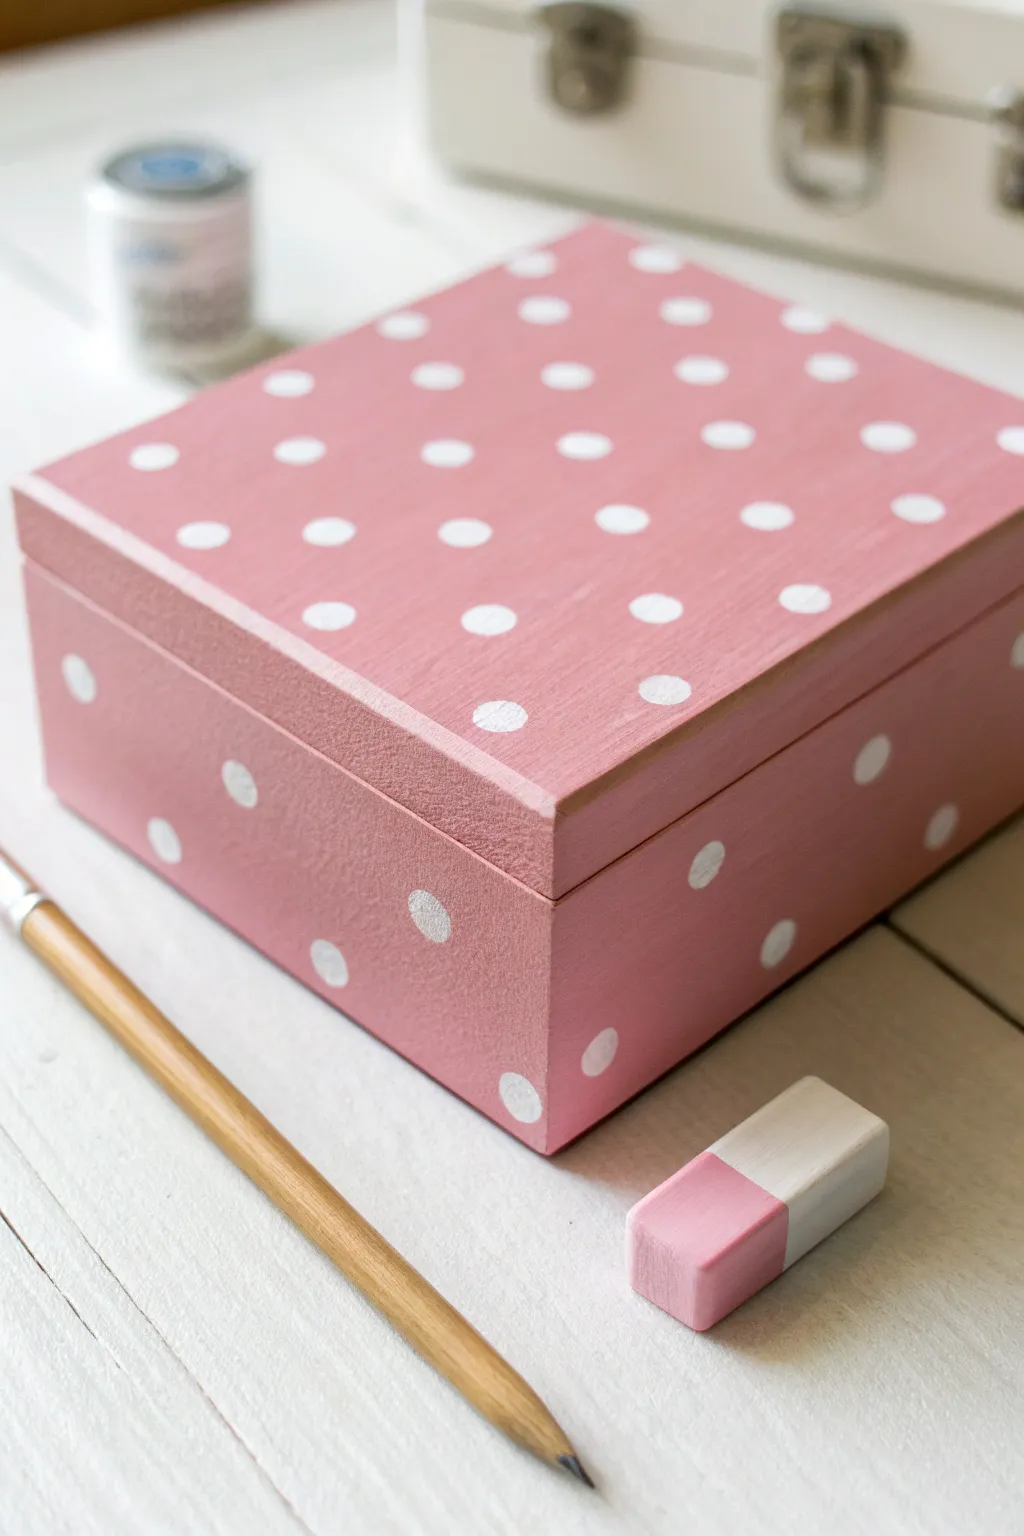
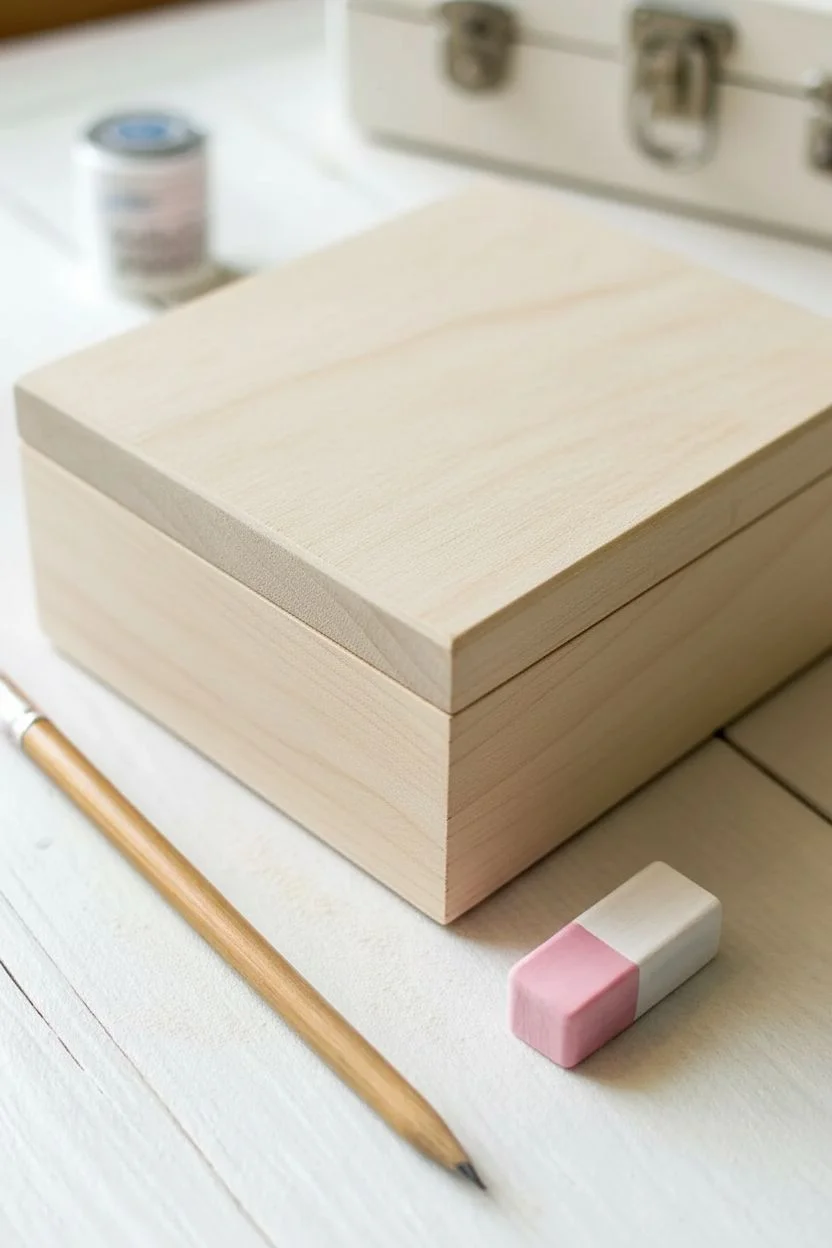
Transform a plain wooden box into a charming keepsake with nothing more than paint and a pencil. This technique creates perfectly uniform polka dots for a playful, professional-looking finish.
Step-by-Step Tutorial
Materials
- Unfinished wooden box
- Dusty rose acrylic craft paint
- White acrylic craft paint
- Flat synthetic paintbrush (1-inch width)
- New pencil with a clean, flat eraser
- Fine-grit sandpaper (220 grit)
- Paper plate or palette
- Paper towels
Step 1: Prepping the Surface
-
Prepare the wood:
Before painting, take a moment to lightly sand the entire wooden box with fine-grit sandpaper to remove any splinters or rough patches. -
Clean the dust:
Wipe the box down thoroughly with a slightly damp paper towel or tack cloth to ensure the surface is completely dust-free. -
Protect hardware:
If your box has hinges or a clasp that you don’t want painted, cover them carefully with painter’s tape or remove them temporarily if possible.
Step 2: Applying the Base Color
-
load the brush:
Squeeze a generous amount of the dusty rose acrylic paint onto your palette and load your flat paintbrush. -
First coat:
Apply the paint methodically with the grain of the wood, covering the lid and all sides. Don’t worry if it looks a bit streaky initially. -
Let it dry:
Allow the first layer to dry completely to the touch, which usually takes about 20 minutes depending on your paint brand. -
Apply second coat:
Paint a second layer of pink to achieve an opaque, solid color. Smooth out any heavy brushstrokes as you go. -
Check the hidden spots:
Open the lid slightly to paint the rim and the visible inside edges so no raw wood peeks through when the box is closed. -
Dry thoroughly:
Let the base coat cure fully for at least an hour. The surface must be hard and dry before we start stamping.
Pro Tip: Perfect Circles
Avoid ‘donut’ dots (empty centers) by pressing gently. If you press too hard, the eraser squishes and pushes paint to the outer rim. A light touch works best.
Step 3: Stamping the Polka Dots
-
Prepare the stamp:
Pour a small puddle of white acrylic paint onto your plate. Use the eraser end of a brand new pencil as your stamp tool. -
Load the eraser:
Dip the eraser straight down into the white paint, ensuring the entire circular face is coated evenly but not dripping. -
Practice first:
I recommend doing a few test stamps on a scrap piece of paper to get a feel for how much pressure creates the perfect circle. -
Start the center row:
Begin on the center of the lid. Press the eraser straight down and lift it straight up to create your first dot. -
Create a line:
Continue stamping a straight row across the lid, respacing them evenly. Reload the eraser with paint after every singe dot for consistency. -
Offset the pattern:
Start the next row so that the new dots land in the spaces between the dots of the previous row (a diamond or ‘brick’ pattern). -
Handle the edges:
Where the pattern meets the edge of the box, allow the stamp to go off the side, creating a partial dot for a continuous fabric-like look. -
Sides and drying:
Repeat the process on the sides of the box. Be careful not to touch the wet dots on the lid while rotating the box.
Troubleshooting: Smudges
If you accidentally smudge a wet dot, wait for it to dry completely, then paint over it with a tiny bit of the pink base color before restamping the white dot.
Allow your beautiful new storage box to dry overnight before filling it with your favorite trinkets.


Modern Tri-Tone Color Blocking
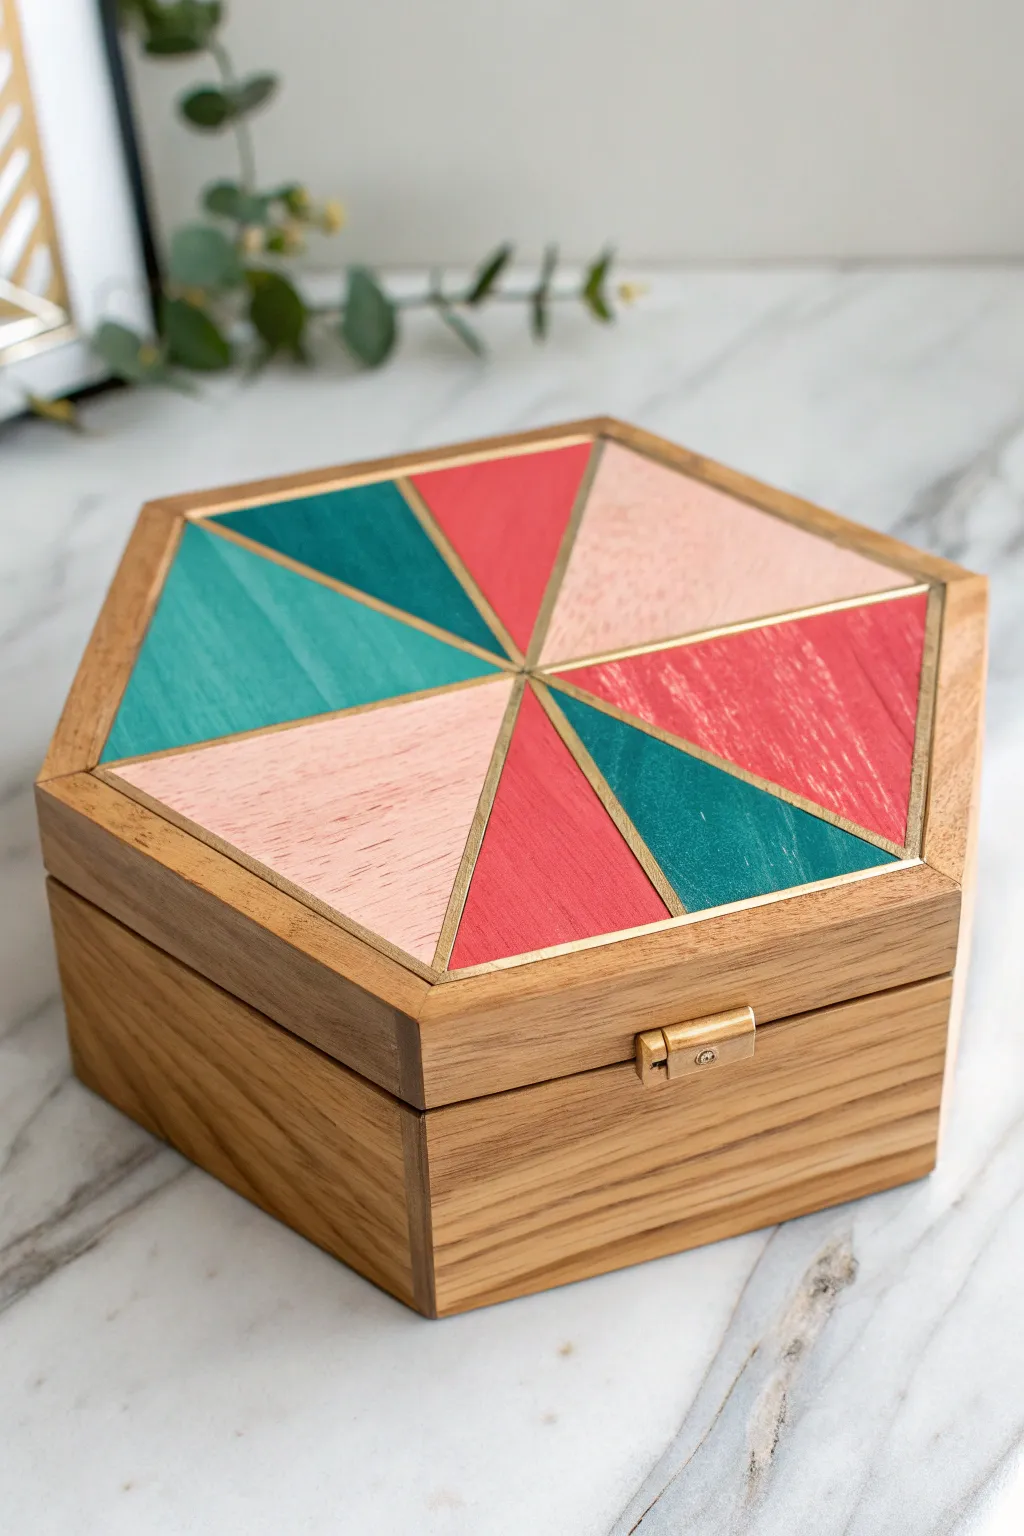
Transform a plain wooden container into a modern statement piece with this clever crisp-line painting technique. By layering gold underneath your colors, you will achieve professional, sharp geometric divisions that look high-end and chic.
Step-by-Step
Materials
- Unfinished wooden hexagon box
- Gold metallic acrylic paint
- Acrylic paints (Teal, Coral Red, Blush Pink)
- Painter’s tape or 1/4 inch masking tape
- Small flat synthetic brushes
- Fine grit sandpaper (220 grit)
- Ruler and pencil
- Small screwdriver
- Clear matte varnish or sealer
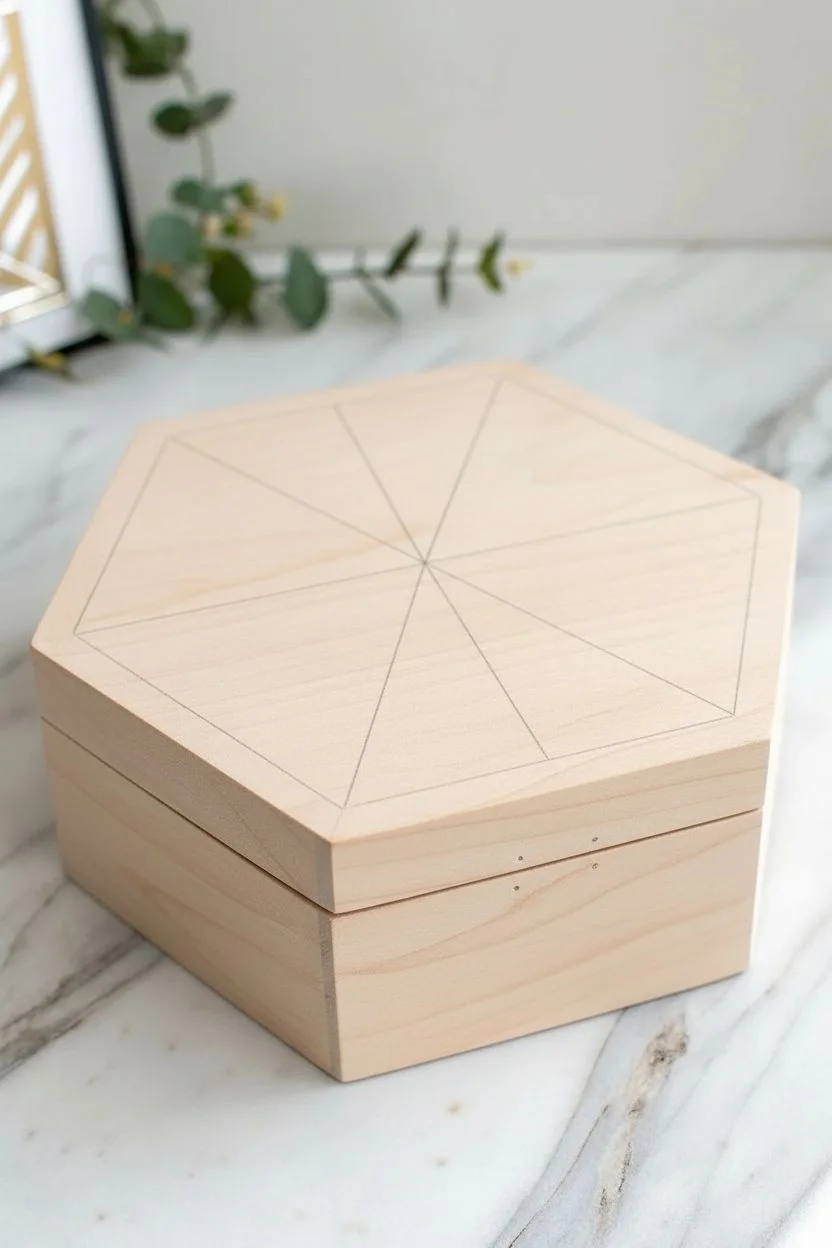
Step 1: Preparation and Layout
-
Remove hardware:
Using a small screwdriver, carefully remove the front latch and rear hinges. Place these small screws in a bowl so you don’t lose them. -
Smooth the surface:
Lightly sand the entire box, focusing on the lid to ensure a perfectly smooth canvas for your paint. Wipe away all dust with a tack cloth or slightly damp paper towel. -
Find the center:
Use your ruler to draw faint diagonal lines connecting opposite corners of the hexagonal lid. Where they intersect is your exact center. -
Draw the segments:
Draw straight lines from the center point to each of the six outer corners of the hexagon, creating six equal triangles.
Bleeding Edges?
If your lines aren’t sharp, don’t panic. Use a gold paint pen to trace over the lines. The pen’s nib gives you control to cover jagged edges and makes the dividers pop.
Step 2: The Gold Framework
-
Paint the grid:
Paint along all your penciled lines with the gold metallic paint. Make your strokes about half an inch wide so the gold extends well beyond where the tape will go. -
Dry thoroughly:
Allow the gold paint to dry completely. If it feels cool to the touch, it needs more time; don’t rush this or the tape might lift the paint later. -
Mask the lines:
Cut strips of painter’s tape and place them precisely over your pencil lines, covering the gold paint. Press exactly down the center to create the masked gold dividers. -
Seal the tape edges:
Run your fingernail or a credit card edge firmly along the tape strips to ensure a tight seal against the wood. -
Protect the rim:
Apply tape around the outer edge of the lid to keep the slanted rim natural wood, as seen in the finished project.
Level Up: Velvet Lining
Cut a piece of adhesive velvet or thick felt in a matching hexagon shape. Press it into the bottom interior of the box for a luxurious finish that protects delicate jewelry.
Step 3: Applying Color
-
Plan the palette:
Assign your colors to the six triangles. For the best look, place colors so that identical shades are on opposite sides, or randomize them for a playful look. -
Paint the Teal:
Fill in your chosen teal triangles using a flat brush. Brush from the center tape outward to avoid pushing paint under the tape seams. -
Paint the Coral:
Clean your brush and apply the coral red paint to its designated sections. I find applying thin layers helps keep the texture smooth. -
Paint the Blush:
Fill in the remaining triangles with the blush pink paint. Ensure you cover the wood completely up to the tape edges. -
Apply second coat:
Once the first layer is dry, add a second coat to all colors to make them opaque and vibrant.
Step 4: Reveal and Finish
-
The peel reveal:
While the final coat is still slightly tacky but not wet, slowly peel off the tape strips at a 45-degree angle to reveal the crisp gold lines underneath. -
Clean up:
If any paint bled through, use a very fine brush or a toothpick to gently scrape it away or touch it up with a tiny dab of gold. -
Seal the work:
Apply a coat of clear matte varnish over the entire lid to protect your artwork from scratches. -
Reassemble:
Once the varnish is fully cured, screw the hinges and latch back into place.
Fill your beautiful new geometric box with your favorite trinkets and enjoy the pop of color it adds to your room.
BRUSH GUIDE
The Right Brush for Every Stroke
From clean lines to bold texture — master brush choice, stroke control, and essential techniques.
Explore the Full Guide
Sponge Painted Galaxy Night Sky
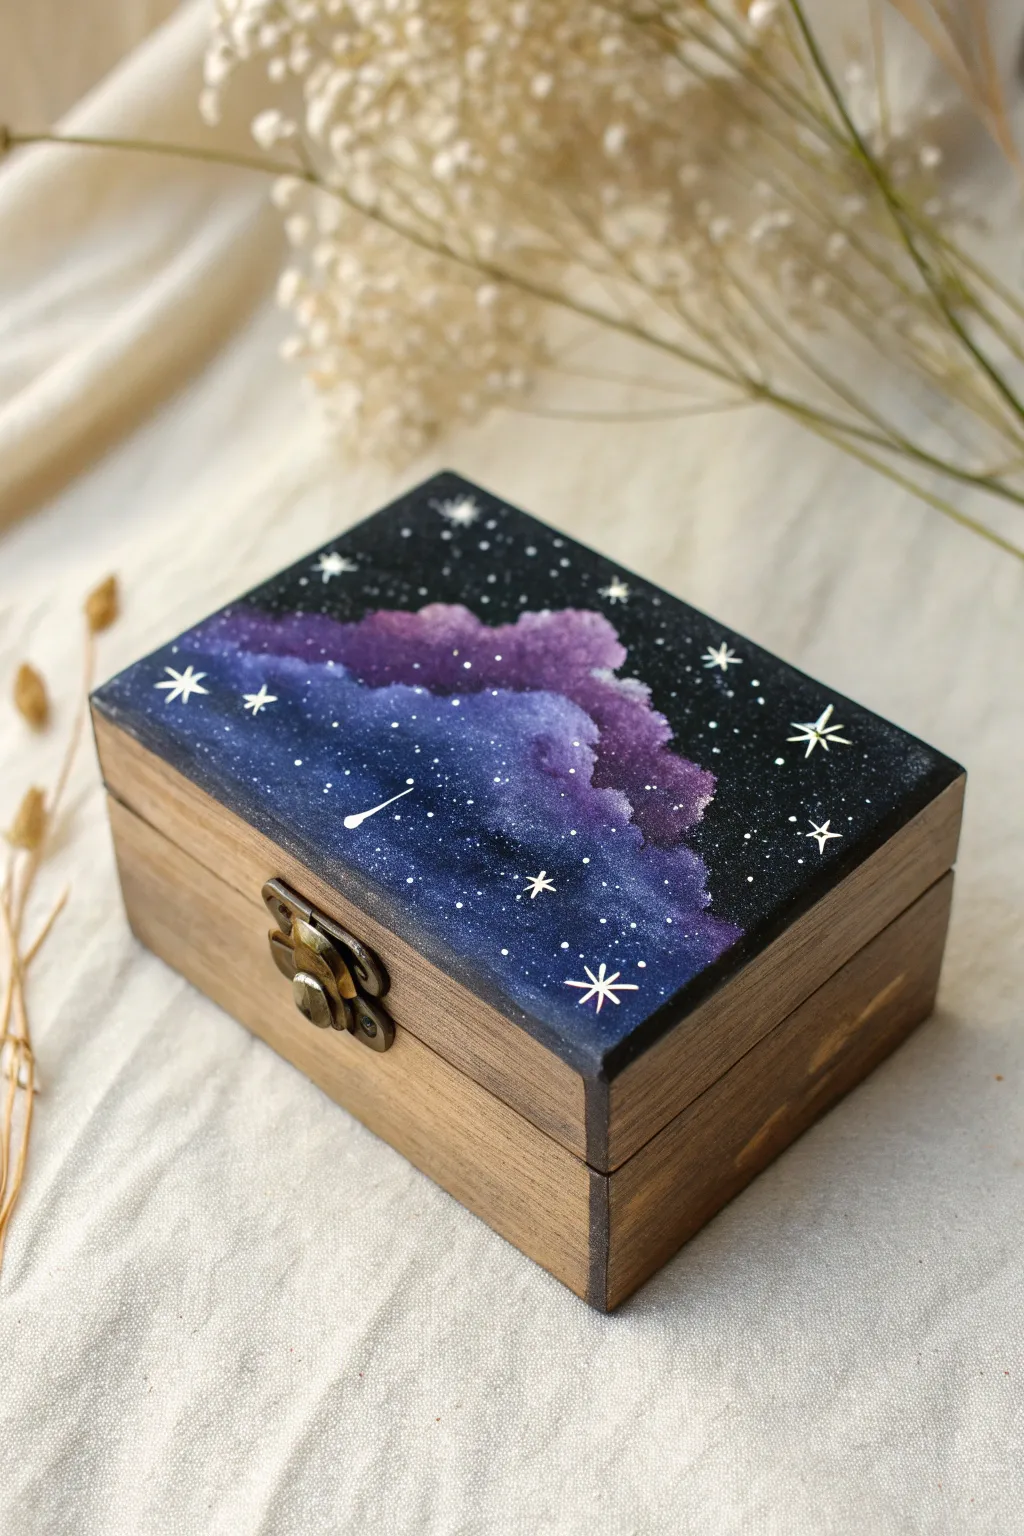
Transform a plain wooden container into a portal to the universe with this dreamy galaxy painting project. Using simple sponging techniques, you will create a rich nebula effect topped with silver stars, perfect for storing jewelry or crystals.
Step-by-Step Tutorial
Materials
- Unfinished wooden box with clasp
- Sandpaper (fine grit)
- Masking tape or painter’s tape
- Wood stain (dark walnut or oak)
- Acrylic paints (black, navy blue, deep purple, magenta, white)
- Cosmetic sponge wedges
- Old toothbrush
- Fine detail brush (size 0 or 00) or white paint pen
- Matte or satin varnish
Step 1: Preparation & Staining
-
Smooth the surface:
Lightly sand the entire wooden box to remove any rough splinters or uneven patches, focusing on the edges and corners. -
Protect the hardware:
Carefully cover the metal clasp and hinges with small pieces of masking tape to keep them paint-free. -
Mask the lid:
Apply a strip of tape around the side of the lid, right where it meets the bottom half, if you want a clean separation between the galaxy top and stained bottom. -
Stain the base:
Apply a coat of dark wood stain to the bottom half of the box using a rag or brush. Wipe away excess and let it dry according to the bottle instructions.
Step 2: Creating the Nebula
-
Base coat:
Paint the entire top lid and the side rims of the lid with opaque black acrylic paint. I usually do two thin coats to ensure solid coverage. -
Sponge the first layer:
Tear off a small piece of a cosmetic sponge. Dip it into navy blue paint and dab off the excess on a paper towel until it’s almost dry. -
Create the cloud shape:
Gently dab the navy blue diagonally across the center of the black lid, leaving the corners pitch black. Keep the texture uneven and cloud-like. -
Add purple depth:
Using a fresh piece of sponge, dab deep purple paint over the center of the blue area, blending it slightly outward but keeping it smaller than the blue patch. -
Brighten the core:
Mix a little magenta with the purple. Sponge this lighter berry shade into the very center of the galaxy cloud to create a glowing effect. -
Highlighting:
Finally, dab a tiny amount of white mixed with magenta into the “hottest” parts of the nebula for contrast. Be very sparing here.
Cloudy Colors?
If your galaxy looks muddy, you likely didn’t let the layers dry enough. Wait for the black and blue base to fully set before sponging on the lighter purples so the colors sit on top rather than mixing.
Step 3: Stars & Sealing
-
Splatter the background stars:
Dilute a small drop of white paint with water. Dip an old toothbrush in it, point it at the box, and flick the bristles with your thumb to spray tiny white specks. -
Paint larger stars:
Using your finest detail brush or a white paint pen, add a few distinct dots slightly larger than the splatter for nearby stars. -
Detail starbursts:
Select 3 or 4 spots to paint large ‘cross’ shaped stars. Draw a thin vertical line crossed by a horizontal one, then add tiny diagonals for a sparkle effect. -
Add a shooting star:
Create a sense of movement by painting a small comet—a white dot with a fine tail trailing off into the dark background. -
Remove tape:
Once the paint is fully dry, carefully peel off the masking tape from the hardware and the lid separation line. -
Seal the artwork:
Apply a coat of matte or satin varnish over the painted lid and the stained wood to protect the finish and unify the sheen.
Starlight Pro Tip
For the crispest stars, use a white gel pen or an ultra-fine acrylic paint marker instead of a brush. This gives you way more control over the tiny starburst lines and prevents globs of paint.
Fill your new cosmic box with treasures and enjoy having a piece of the night sky on your dresser
High-Contrast Silhouette Accents
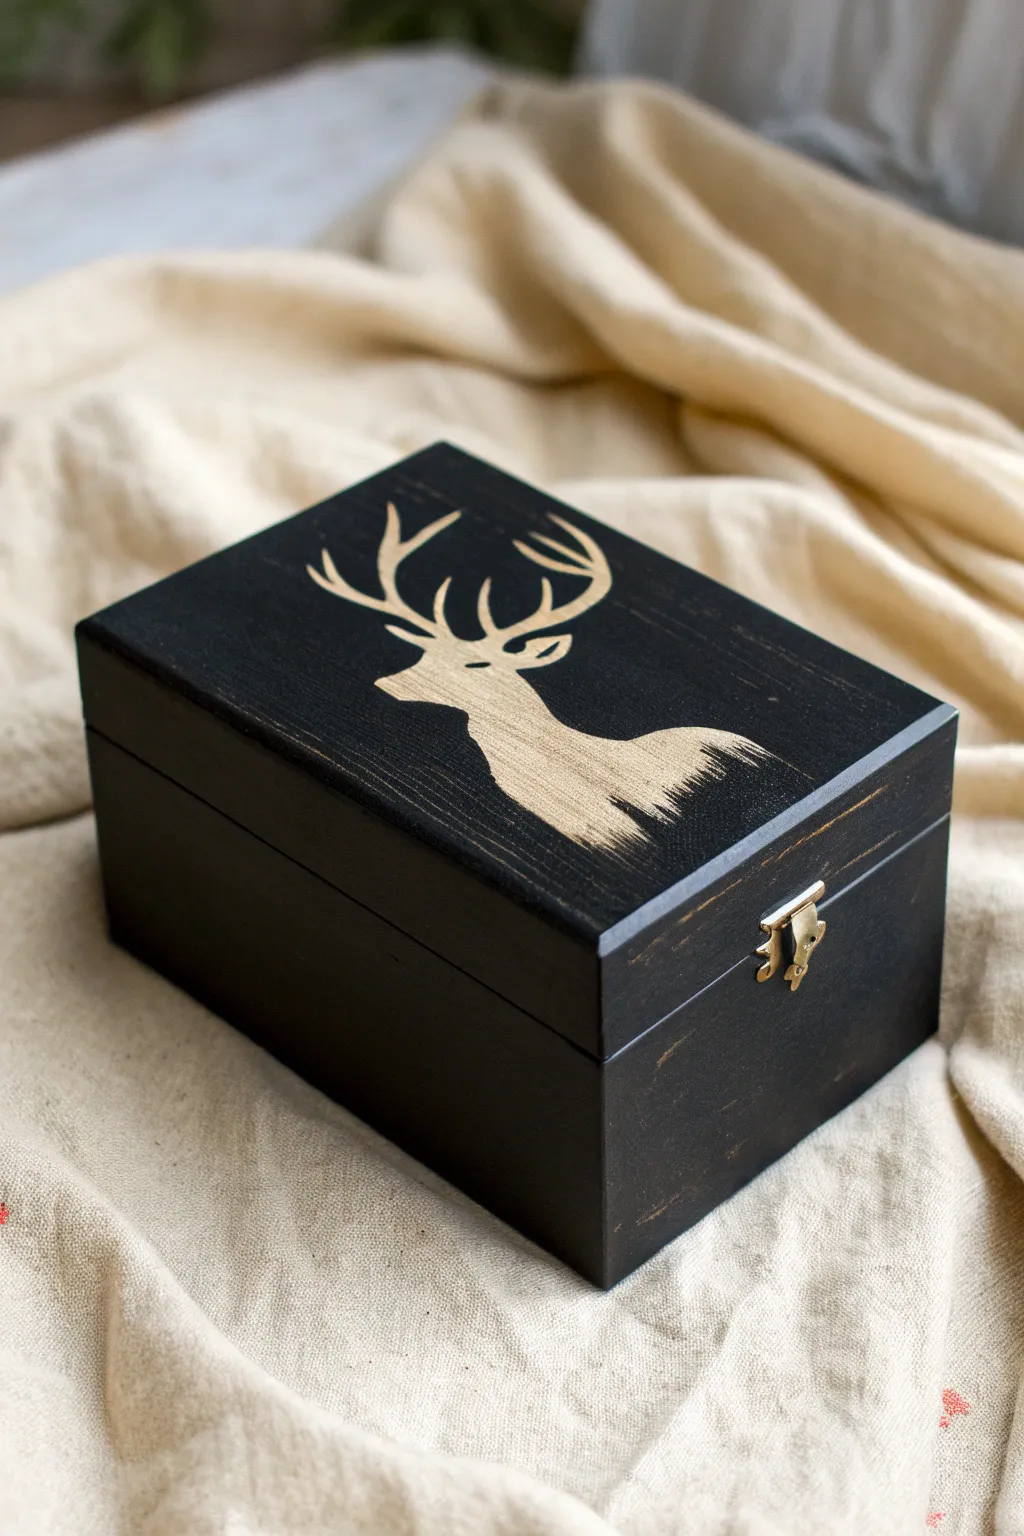
Transform a plain wooden container into a moody, rustic keepsake box that balances elegance with a touch of wilderness. The high contrast between the matte black base and the shimmering metallic gold stag creates a striking focal point.
Step-by-Step
Materials
- Unfinished wooden box with latch
- Matte black acrylic paint
- Metallic gold or champagne acrylic paint
- Stag head stencil
- Stencil brush or cosmetic sponge wedge
- Fine-grit sandpaper (220 grit)
- Painter’s tape
- Small screwdriver
- Matte clear finishing spray
Step 1: Preparation and Base Coat
-
Remove hardware:
If your box has a screwed-on latch like the one visible in the photo, use a small screwdriver to carefully remove it. This ensures a clean paint job without getting black streaks on the metal. -
Smooth the surface:
Lightly sand the entire exterior of the wooden box with 220-grit sandpaper to remove any rough splinters or factory varnish. -
Clean the dust:
Wipe the box down thoroughly with a tack cloth or a slightly damp rag to remove all woodworking dust before painting. -
Apply the first layer:
Using a flat synthetic brush, apply a coat of matte black acrylic paint to the exterior surfaces. Brush in the direction of the wood grain for the smoothest finish. -
Dry and assess:
Allow the first coat to dry completely for about 20 minutes. If the wood grain is still showing through too much, apply a second thin coat for solid opaque coverage. -
Paint the rim:
Carefully paint the rim where the lid meets the box, ensuring you don’t glob paint which might make the box stick shut later.
Step 2: Stenciling the Design
-
Position the stencil:
Once the black base is bone dry, place your stag stencil on the center of the lid. Measure from the edges if necessary to ensure it is perfectly centered. -
Secure the template:
Tape down the edges of the stencil with painter’s tape so it doesn’t shift while you work. -
Load the paint:
Dip your stencil brush or sponge into the metallic gold paint, then dab almost all of it off onto a paper towel. The brush should feel almost dry. -
Apply the gold:
Use a vertical pouncing or dabbing motion to apply the gold paint over the stencil. Do not brush back and forth, as this pushes paint under the edges. -
Build intensity:
Apply the gold in light layers. The antlers should be crisp and solid, but you can go slightly lighter near the bottom of the bust for a feathered effect. -
Remove the stencil:
I prefer to lift the stencil straight up while the gold paint is still slightly tacky to prevent it from bonding to the plastic and pulling up chunks of paint.
Clean Lines Pro Tip
To prevent the gold paint from bleeding, dab a very thin layer of the base color (black) over the stencil first to seal the edges, then apply the gold.
Step 3: Finishing and Distressing
-
Dry the accent:
Let the gold stag design dry completely, which usually takes about 30 to 45 minutes depending on humidity. -
Distress the edges:
Take your fine-grit sandpaper and gently sand the sharp corners and edges of the box. Remove a little black paint to reveal the raw wood underneath, mimicking the worn look in the photo. -
Add surface scuffs:
You can also lightly drag the sandpaper across flat black areas to add subtle scratches or ‘weathering’ if you want a more rustic appearance. -
Clean up:
Wipe away any sanding dust created during the distressing process with a dry cloth. -
Seal the work:
Spray the entire box with a matte clear sealer to protect the finish and keep the gold from tarnishing over time. -
Reattach hardware:
Once the sealer is dry, screw the metal latch back into place to complete the project.
Level Up
Line the interior bottom of the box with adhesive felt or velvet in a deep forest green to add a luxurious texture when the box is opened.
This sophisticated yet rugged box is now ready to hold your treasures or serve as a stunning handmade gift.

PENCIL GUIDE
Understanding Pencil Grades from H to B
From first sketch to finished drawing — learn pencil grades, line control, and shading techniques.
Explore the Full Guide
Abstract Squeegee Drag Art
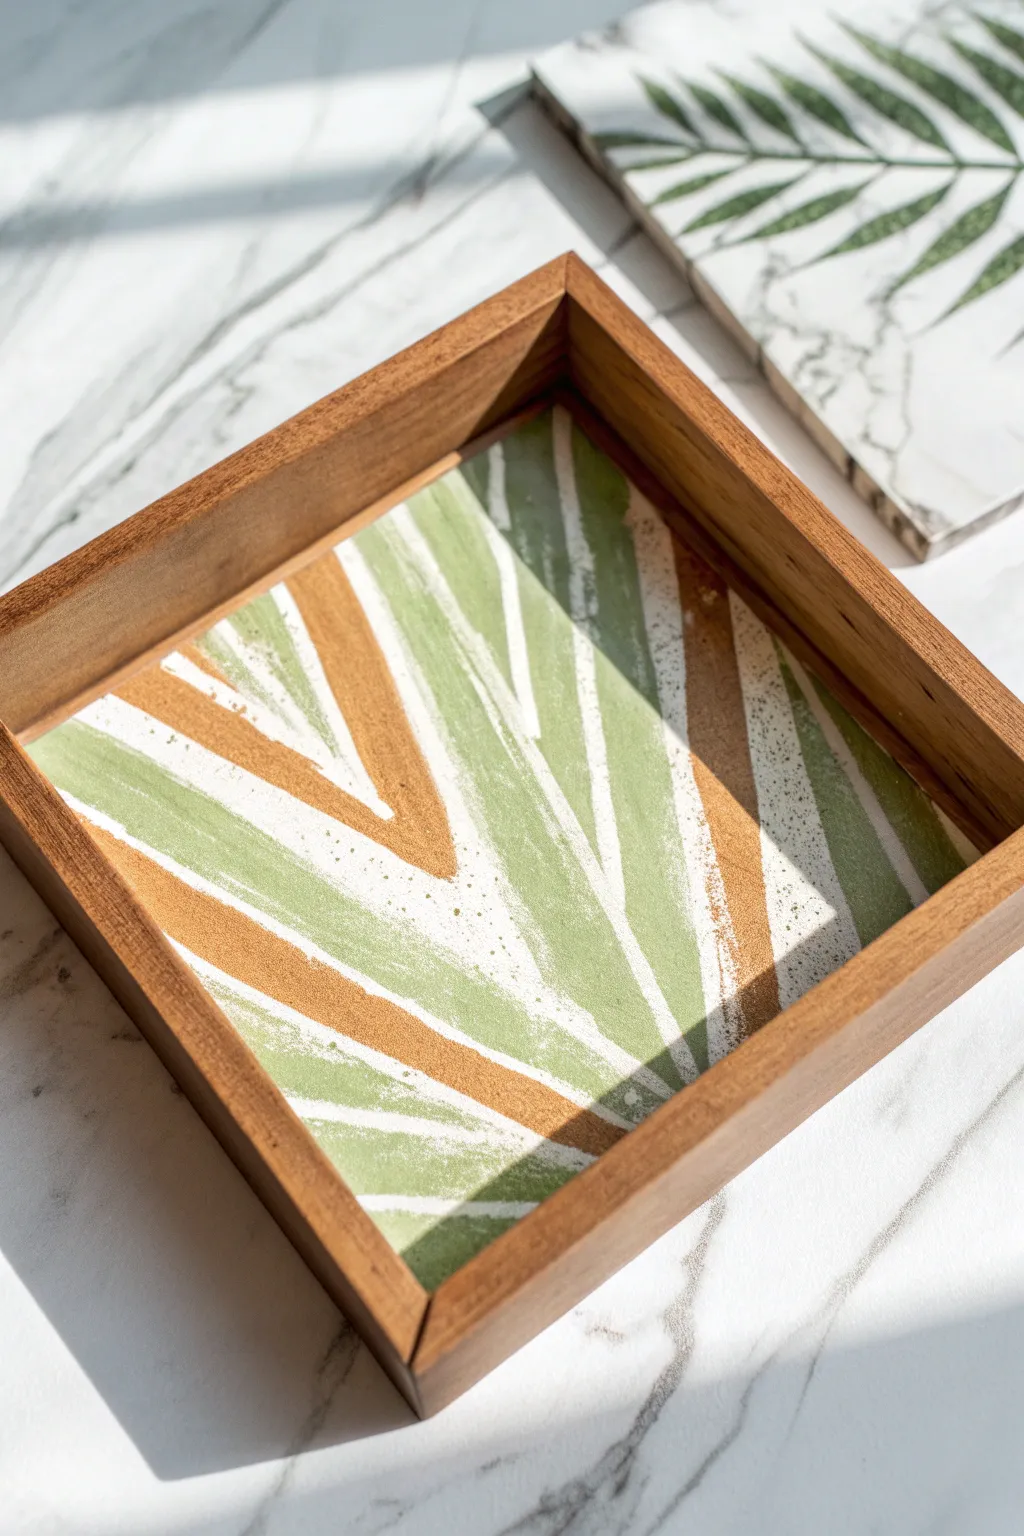

Transform a plain wooden catch-all into a piece of modern art using a simple scraping technique. This project combines exposed natural wood with radiating bands of sage and ochre for an organic, stunning look.
Detailed Instructions
Materials
- Square wooden tray (unfinished)
- Painter’s tape (high quality)
- White acrylic paint (matte)
- Sage green acrylic paint
- Gold or ochre heavy-body acrylic paint
- Old credit card or flexible plastic squeegee
- Flat paintbrushes
- Sandpaper (fine grit)
- Clear protective sealer (polycrylic)
Step 1: Preparation & Masking
-
Sand the surface:
Begin by lightly sanding the entire wooden tray to ensure a smooth starting point, wiping away any dust with a tack cloth. -
Protect the frame:
Apply painter’s tape along the inner vertical walls of the tray. -
Secure the edges:
Press the tape down firmly along the bottom edge where the wall meets the floor of the tray. This is crucial to keep the wood grain clean. -
Prime the base:
Apply a coat of white acrylic paint to the bottom panel of the tray. -
Establish the background:
Once the first coat is dry, add a second coat of white to ensure a solid, opaque background, and let it cure completely.
Step 2: Creating the Design
-
Plan the direction:
Visualize a V-shape or radiating sunburst pattern starting from the bottom center of the tray. -
Apply the fist color:
Squeeze a few small dots of sage green paint directly onto the white background in the lower central area. -
The first drag:
Place the edge of your credit card or squeegee just below the paint dots. -
Create the streak:
In one smooth motion, drag the tool upward and outward toward the top corners. -
Vary the texture:
I like to fluctuate the pressure slightly as I pull; this creates the distressed, skipped-paint look seen in the photo. -
Add the contrast color:
Apply dots of the gold or ochre paint near the base of your green strokes. -
Drag the second color:
Use a clean edge of your card to drag the gold paint outward, filling in the gaps between the green sections. -
Layering:
If the design feels too sparse, add small drops of paint on top of previous layers and drag again to build depth. -
Let it settle:
Allow the thick drag lines to dry undisturbed; this may take longer than standard brushing due to the paint volume.
Pro Tip: The Skipped Effect
To get that gritty, textured look where the white shows through, don’t overload your squeegee with paint. A ‘dry drag’ works best for the outer edges of the pattern.
Step 3: Finishing Touches
-
Remove the masking:
Carefully peel back the painter’s tape while the paint is fully dry to reveal the crisp line between the artwork and the wood. -
Clean up errors:
If any paint seeped under the tape, gently scrape it away from the wood grain using a craft knife or fingernail. -
Seal the work:
Apply a clear polycrylic sealer over the painted bottom to protect your art from scratches and items you place in the tray. -
Final cure:
Let the sealer cure according to the bottle instructions before using the tray.
Troubleshooting: Muddy Colors
Wipe your credit card or squeegee tool clean with a paper towel between every single swipe. This prevents the green and gold from mixing into a muddy brown mess.
Now you have a chic, custom-designed tray ready to hold your keys or jewelry in style
Natural Coffee Staining
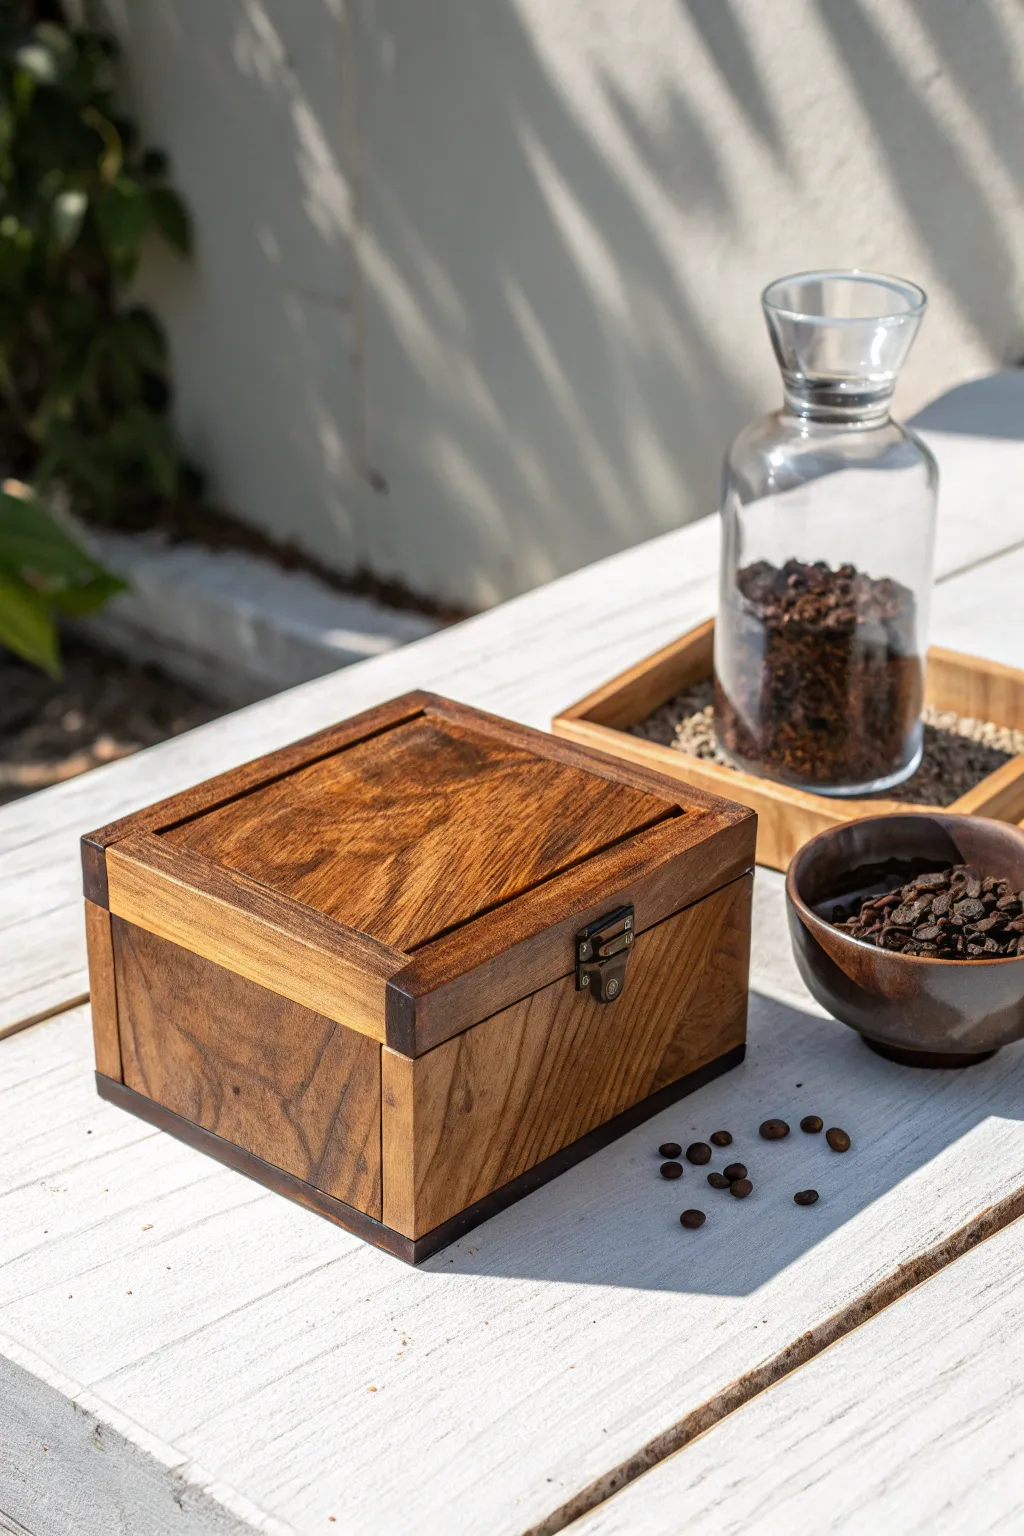
Transform a plain wooden box into a rich, rustic treasure using a staple from your kitchen pantry. This natural staining method brings out the intricate wood grain with a warm, earthy tone that chemical stains just can’t replicate.
Step-by-Step Tutorial
Materials
- Unfinished wooden box
- Instant coffee granules
- Boiling water
- Small glass jar or bowl
- Foam brush
- Clean cotton rags
- Sandpaper (150 and 220 grit)
- Screwdriver
- Clear matte acrylic sealer or furniture wax
Step 1: Prepping the Wood
-
Remove hardware:
Using a small screwdriver, carefully take off the latch and hinges so you don’t stain the metal or let coffee pool around the screws. -
Initial sanding:
Sand the entire exterior and interior with 150-grit sandpaper to remove any rough splinters or factory coatings. -
Refine the surface:
Switch to 220-grit sandpaper and go over the wood again until it feels buttery smooth to the touch. -
Clean up:
Wipe away all sawdust with a tac cloth or slightly damp rag to ensure a clean surface for staining.
Step 2: Brewing the Stain
-
Boil water:
Heat a small amount of water; you won’t need much, just enough to dissolve the granules. -
Mix the concentrate:
In your jar, combine the hot water and instant coffee. I prefer a 1:1 ratio for a deep espresso color, but you can add more water for a lighter roast. -
Stir thoroughly:
Mix until every granule is completely dissolved so you don’t get grainy streaks on the wood. -
Cool down:
Let the mixture sit for a few minutes until it is warm but safe to handle.
Pro Tip: The Midnight Brew
For the intensely dark color shown in the photo, use cheap instant coffee rather than brewed grounds. It is much more concentrated and creates a thicker, syrup-like stain that clings better.
Step 3: Applying the Roast
-
Perform a test:
Dab a little of your coffee mixture on the bottom of the box to ensure you are happy with the color depth. -
Apply the first coat:
Dip your foam brush into the coffee and apply it generously to the wood, moving in the direction of the grain. -
Wipe the excess:
After about a minute, wipe the surface gently with a paper towel to remove pooling liquid while leaving the color behind. -
Let it dry:
Allow the box to dry completely; the color will look much lighter once the water evaporates. -
Build the color:
Apply a second or even third coat to deepen the tone, focusing a bit more on the edges to create a gentle vignette effect.
Level Up: Wax On
Instead of a spray varnish, finish your box with clear beeswax paste. Buffing it vigorously with a soft lint-free cloth gives it that soft, professional satin sheen seen in the image.
Step 4: Sealing and Finish
-
Dry overnight:
Ensure the wood is bone dry before sealing, as trapped moisture can ruin the finish. -
Knock down the grain:
Because water raises wood grain, the surface might feel fuzzy. Very lightly rub it with 220-grit paper to smooth it back out without sanding off the color. -
Seal the deal:
Apply a clear matte sealer or furniture wax to lock in the coffee stain and protect the wood from humidity. -
Reassemble:
Once the sealer is cured, screw the hardware back into place.
Place your newly stained box on a side table to add a touch of organic warmth to your decor.


Minimalist Mountain Landscape
Transform a simple wooden crate into a modern decorative piece with this crisp, Nordic-inspired mountain landscape. Using a smart taping technique, you will build colorful geometric layers to create a stylized range of peaks.
Step-by-Step
Materials
- Unfinished wooden box with sliding lid
- 220-grit sandpaper
- Painter’s tape (0.5 to 1 inch width)
- Acrylic paints (charcoal, teal, light grey, white, navy)
- Flat paintbrushes
- Fine liner brush
- Pencil and ruler
- Matte varnish
- Tack cloth
Step 1: Preparation & Layout
-
Smooth the Canvas:
Begin by sanding the front panel of your wood box with 220-grit sandpaper to remove any rough fibers. This ensures your paint lines will be sharp and clean. -
Clean Dust:
Wipe the surface thoroughly with a tack cloth or slightly damp rag to remove all sawdust. -
Draft the Peaks:
Using a pencil and ruler, lightly sketch a series of overlapping triangles across the width of the box. Vary the heights and widths, allowing some designs to run off the edges for a dynamic look. -
Plan Your Palette:
Mark each triangle lightly with a letter representing the color (e.g., ‘T’ for Teal, ‘G’ for Grey) to keep track of your design during the painting process.
Fixing Bleeds
If paint seeps under the tape, don’t panic. Let it dry fully, then gently scrape the excess away with an X-Acto knife or carefully paint over the error with the neighboring color.
Step 2: Painting the Base Layer
-
Tape Non-Adjacent Shapes:
Apply painter’s tape along the outlines of the triangles that do not touch each other. Press the edges of the tape down firmly with your fingernail. -
Seal the Tape:
I like to paint a very thin layer of matte medium or the clear varnish over the tape edge first. This blocks paint from bleeding underneath. -
Apply First Colors:
Fill in these masked sections with your chosen colors—try the lighter grey and the teal first. Use a flat brush and paint away from the tape edge. -
Immediate Reveal:
Peel off the tape carefully while the paint is still wet or slightly tacky. Pulling at a 45-degree angle helps prevent the paint from lifting. -
Thorough Drying:
Allow these first shapes to dry completely. Since acrylics dry fast, wait about 20-30 minutes before taping over them.
Add Snowcaps
Give your landscape a wintry feel by taping off the top inch of the highest peaks and painting them white. This small “snowcap” detail adds a charming focal point to the design.
Step 3: Layering & Details
-
Tape Overlapping Peaks:
Once the base is dry, tape off the remaining triangles. Your tape will cross over the previously painted sections, intersecting them to create the layered effect. -
Paint Darker Tones:
Fill in these new shapes with your darker colors, like charcoal or navy. Darker colors often require two thin coats for full opacity. -
Create Depth:
To mimic the two-toned mountain in the image, tape a vertical line down the center of a large triangle and paint one half a shade darker than the other. -
Add Line Texture:
For the striped peak shown in the design, paint a base triangle in a light wood tone or beige. Once dry, use a fine liner brush and a ruler to paint thin, vertical charcoal lines. -
Reveal Final Shapes:
Remove the remaining tape gently to reveal your complete mountain range.
Step 4: Finishing Touches
-
Touch Ups:
Check for any uneven edges. Use a small detail brush to tidy up lines or cover any small gaps where the tape might have slipped. -
Erase Guidelines:
Once the paint is bonedry, gently erase any visible pencil marks from the unpainted wood sections. -
Seal the Work:
Apply a coat of matte varnish over the entire front face. This unifies the sheen of the paint and protects the raw wood. -
Final Cure:
Let the box sit for a few hours to fully cure before sliding the lid back on.
Enjoy organized living with your stylish new piece of functional art
Cheerful 80s Style Splatter
Bring the energetic vibe of 80s Memphis design to your desk with this playful painted box project. Dynamic geometric shards and a subtle splatter effect transform a plain wooden container into a cheerful statement piece.
Step-by-Step Guide
Materials
- Unfinished wooden box with latch
- Fine-grit sandpaper (220 grit)
- Painter’s tape
- White acrylic paint (matte finish)
- Acrylic paints: Cyan, Hot Pink, Bright Yellow
- Navy blue or Purple acrylic paint (for splatter)
- Flat synthetic brush (1-inch)
- Round detail brush (size 2-4)
- Old toothbrush or stiff bristle brush
- Matte clear varnish or sealer
- Palette or paper plate
Step 1: Preparation & Base
-
Smooth the surface:
Start by sanding the entire wooden box with 220-grit sandpaper to remove any rough texture or splinters. -
Clean up dust:
Wipe the wood thoroughly with a slightly damp cloth or tack cloth to remove all sanding dust. -
Protect hardware:
Carefully apply painter’s tape over the metal latch, hinges, and any other hardware you want to keep paint-free. -
Apply base coat:
Paint the entire exterior with white acrylic paint using your flat synthetic brush. -
Sand and recoat:
Once the first coat is dry, lightly sand it to smooth down any raised grain, then apply a second full coat of white for opaque coverage. -
Dry completely:
Allow the white base to dry fully before moving on to the colorful details to prevent colors from muddying.
Blob Rescue
Accidentally made a giant paint blob? Don’t wipe it while wet, as it will smear. Let it dry completely, then carefully dab a tiny bit of your white base paint over it to make it vanish.
Step 2: Geometric Shapes
-
Practice the stroke:
On a piece of scrap paper, practice making tapered lines by pressing the brush down firmly at the start and lifting it while pulling away to create a sharp point. -
Paint Cyan shards:
Using your round detail brush, paint elongated cyan triangles scattered across the lid and sides. -
Vary direction:
Orient these blue shapes in different directions, aiming for a radiating effect that looks like an explosion of confetti. -
Add Pink accents:
Clean your brush and switch to hot pink paint, adding similar tapered shards in the spaces between the blue shapes. -
Fill with Yellow:
I like to add the yellow shards last, using them to fill smaller gaps and balance the overall color composition. -
Refine edges:
Go back over any shapes that look transparent with a second layer of paint to make the colors pop.
Inside Surprise
For an extra pop, paint the interior of the box in a solid contrasting color like bright cyan or neon pink. It adds a delightful visual surprise every time you lift the lid.
Step 3: Splatter & Finish
-
Prepare splatter mix:
Dilute a small amount of navy blue or purple paint with water until it reaches the consistency of thin ink. -
Test the spray:
Dip an old toothbrush into the watery paint and run your thumb across the bristles to test the spray pattern on paper first. -
Apply the effect:
Gently flick the bristles to mist fine speckles over the box, keeping the dots small and subtle. -
Clean edges:
If any splatter lands where you don’t want it, quickly dab it away with a damp paper towel or cotton swab. -
Cure time:
Let the artwork dry completely for a few hours so the splatter dots harden. -
Seal the work:
Apply a coat of matte clear varnish to protect your design from scratches and dust. -
Reveal hardware:
Once the varnish is dry to the touch, carefully peel away the painter’s tape to reveal the clean metal hardware.
Enjoy filling your vibrant new box with keepsakes and brighten up your shelf.
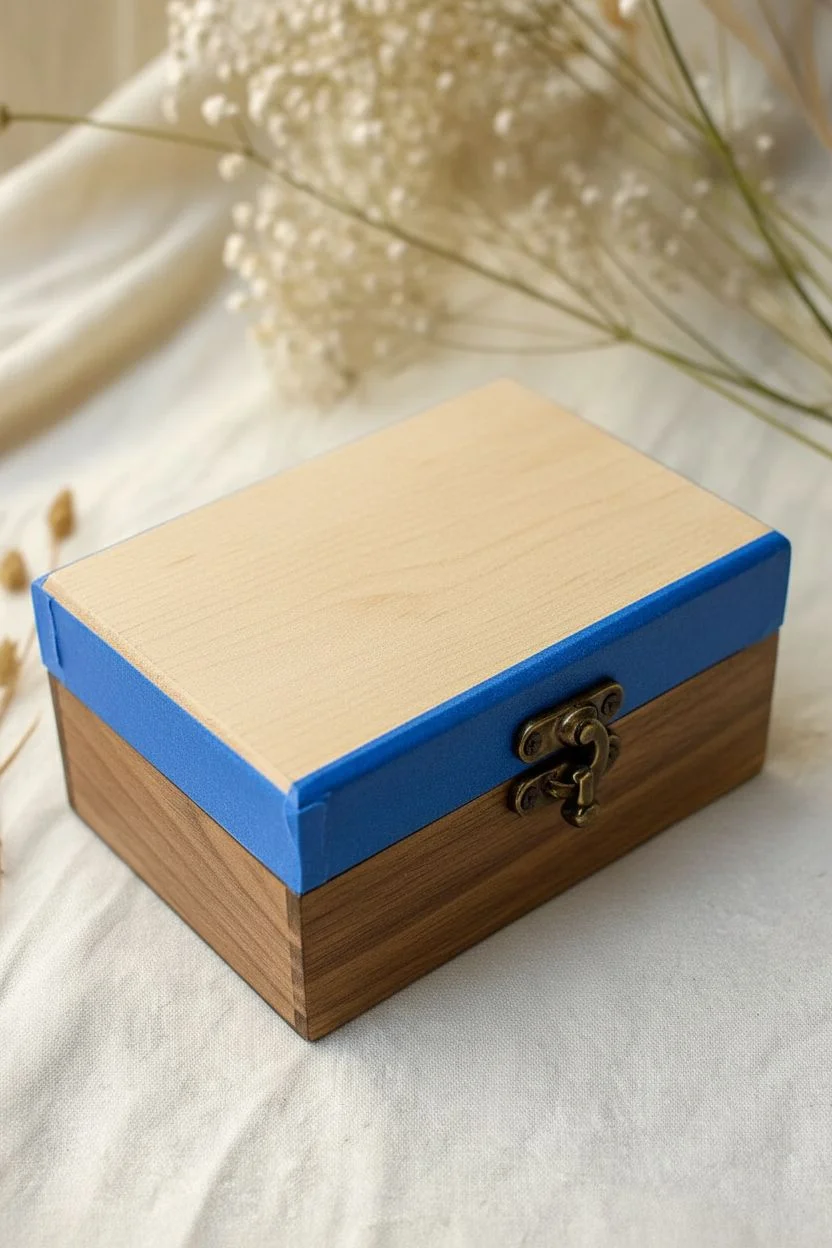
Distressed Farmhouse Finish
This project transforms a simple pine box into a vintage-style storage piece using a classic distressing technique. The bright white finish contrasts beautifully with revealed wood grain to capture that popular, time-worn rustic farmhouse aesthetic.
Step-by-Step Tutorial
Materials
- Unfinished pine crate
- White or cream chalk-finish paint
- 2-inch chip brush (bristle brush)
- 80-grit sandpaper (coarse)
- 150-grit sandpaper (medium)
- Tack cloth or damp rag
- Clear furniture wax
- Lint-free cotton cloth
- Drop cloth
Step 1: Preparation and Base
-
Prepare the surface:
Begin by giving the entire crate a quick sanding with the 150-grit sandpaper to remove any sharp splinters from the manufacturing process. -
Clean the wood:
Wipe the crate down thoroughly with a tack cloth or a slightly damp rag to remove all sawdust, ensuring a clean surface for the paint to grip. -
Stir the paint:
Open your white chalk-finish paint and stir it well to ensure the pigments are evenly distributed. -
Apply the first bold strokes:
Dip your chip brush into the paint and apply a generous coat to the exterior slats, brushing in the same direction as the wood grain. -
Cover the details:
ensure you paint the top rim of the crate and the inside edges of the handle cutouts, but leave the interior of the box unpainted for that natural contrast seen in the photo. -
Feather the edges:
Don’t worry about getting absolutely perfect coverage; the slightly streaky texture of a chip brush actually helps with the final distressed look. -
Allow to dry:
Let the first coat dry to the touch, which typically takes about 30 to 60 minutes depending on your workspace humidity. -
Add a second coat:
If the wood grain is showing through more than you like, apply a second coat of paint to specific areas, though I usually find one heavy coat works best for heavy distressing. -
Full cure time:
Allow the paint to dry completely, preferably overnight or at least for 2-3 hours; if the paint is even slightly wet, it will peel rather than sand away cleanly.
Paint gumming up?
If the paint balls up on your sandpaper instead of creating dust, it isn’t dry enough. Stop immediately and let the crate cure for another hour before continuing.
Step 2: Distressing and Finishing
-
Start coarse sanding:
Take a piece of 80-grit coarse sandpaper and fold it to get a firm grip. -
Target the structural edges:
Vigorously sand the four outer vertical corners of the crate until the raw wood completely breaks through the white paint. -
Distress the handles:
Run the sandpaper along the sharp edges of the handle cutouts to simulate years of being lifted and carried. -
Scuff the slat faces:
Sand horizontally along the flat surfaces of the slats, applying uneven pressure to create random patches where the wood peeks through. -
Detail the uneven spots:
Focus extra sanding attention on any knots or raised grain areas, as these high points would naturally lose paint first over time. -
Clean up the dust:
Once you are satisfied with the level of distressing, use a clean tack cloth to remove all the fine white paint dust generated by sanding. -
Apply sealing wax:
Scoop a small amount of clear furniture wax onto a lint-free cloth and unable it over the painted surfaces. -
Buff to finish:
Let the wax sit for a few minutes, then buff it briskly with a clean portion of the cloth to create a smooth, subtle sheen that protects the finish.
Pro Tip: Custom Aging
For a grungier, dirtier antique look, swap the clear wax for a dark antique wax. Apply it sparingly into the sanded grooves to highlight the texture.
Now you have a charming, rugged storage crate that looks like it came straight from an old farmhouse barn
Soft Gradient Sunset Wash
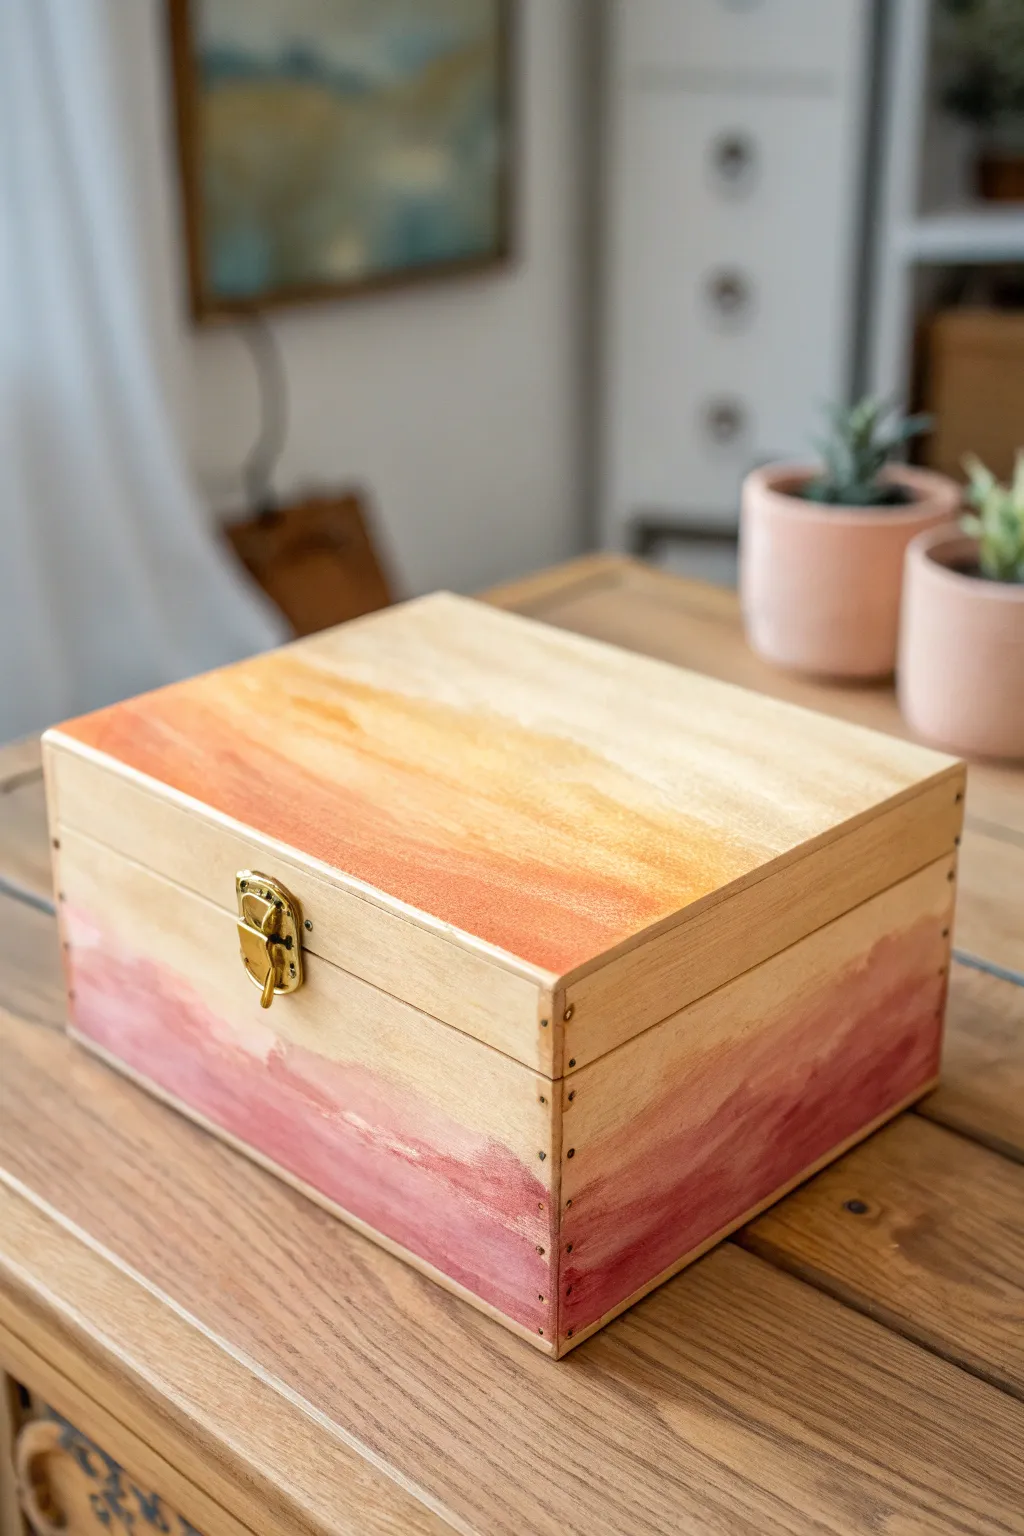
Capture the warmth of a setting sun with this dreamy gradient box project. By using diluted acrylics as a wood stain, you create a soft, translucent finish that highlights the natural grain while adding a romantic wash of color.
Step-by-Step Tutorial
Materials
- Unfinished wooden box with latch
- Acrylic paints (warm orange, berry pink)
- Water container
- Mixing palette or small cups
- Flat synthetic paintbrush (1-inch width)
- Fine-grit sandpaper (220 grit)
- Painter’s tape
- Paper towels
- Clear matte varnish spray
Step 1: Preparation
-
Smooth the surface:
Lightly sand the entire wooden box with fine-grit sandpaper, focusing on any rough edges or splinters to ensure a smooth canvas. -
Clean the dust:
Wipe the box down thoroughly with a dry paper towel or tack cloth to remove all sanding residue. -
Protect the hardware:
Apply small pieces of painter’s tape over the metal latch and hinges to keep them free of paint splatters.
Wet Wood Tip
Before applying paint, lightly wipe the raw wood with a damp sponge. This opens the grain and helps the color wash spread more evenly without blotching.
Step 2: Mixing the Washes
-
Create the orange wash:
Squeeze a dime-sized amount of orange paint into a palette cup and mix in water until it reaches the consistency of skim milk. -
Create the pink wash:
Repeat the process in a separate cup with the berry pink paint, ensuring the pigment is fully dissolved so there are no lumps. -
Test the opacity:
Brush a tiny stroke of the wash on the bottom of the box; it should stain the wood while letting the grain show through clearly.
Level Up: Golden Hour
Once the paint is dry, use a fine detail brush to apply a thin, jagged line of liquid gold leaf right where the color fades into the wood.
Step 3: Painting the Sunset Lid
-
Apply the main color:
Load your flat brush with the orange wash and paint a bold horizontal strip across the back half of the lid’s surface. -
Prepare the fade:
Quickly rinse your brush in clean water and dab it on a paper towel so it is damp but not dripping. -
Blend the gradient:
Drag the clean, damp brush along the edge of the wet orange paint, pulling the color toward the front of the lid to create a fade. -
Soften the transition:
Continue feathering the paint outward until the orange color dissolves seamlessly into the natural wood tone. -
Deepen the hue:
If you want a bolder look, I like to add a second layer of wash just to the darkest back edge once the first coat is tacky.
Step 4: Painting the Berry Base
-
Start at the bottom:
Dip your clean brush into the pink wash and paint a continuous strip along the very bottom perimeter of the box. -
Work upwards:
Paint vertically up the sides and front about one inch, ensuring the coverage is solid at the base. -
Create the washout:
Using the damp-brush technique from before, pull the pink paint upward so it fades out around the middle of the box. -
Refine the edges:
Use light, irregular brush strokes for the fade line to give it an organic, watercolor-style appearance rather than a straight line. -
Check the corners:
Dab a little extra wash into the corner joints where the wood grain might absorb more liquid, ensuring even color.
Step 5: Sealing and Finishing
-
Let it dry:
Allow the box to sit undisturbed for at least 30 minutes until the wood feels completely dry to the touch. -
Reveal the hardware:
Gently peel off the painter’s tape from the latch and hinges. -
Seal the project:
Spray the entire box with a light coat of clear matte varnish to protect the wash without adding unwanted shine.
Fill your new keepsake box with treasures and enjoy the warm splash of color on your shelf
Freehand Botanical Vines
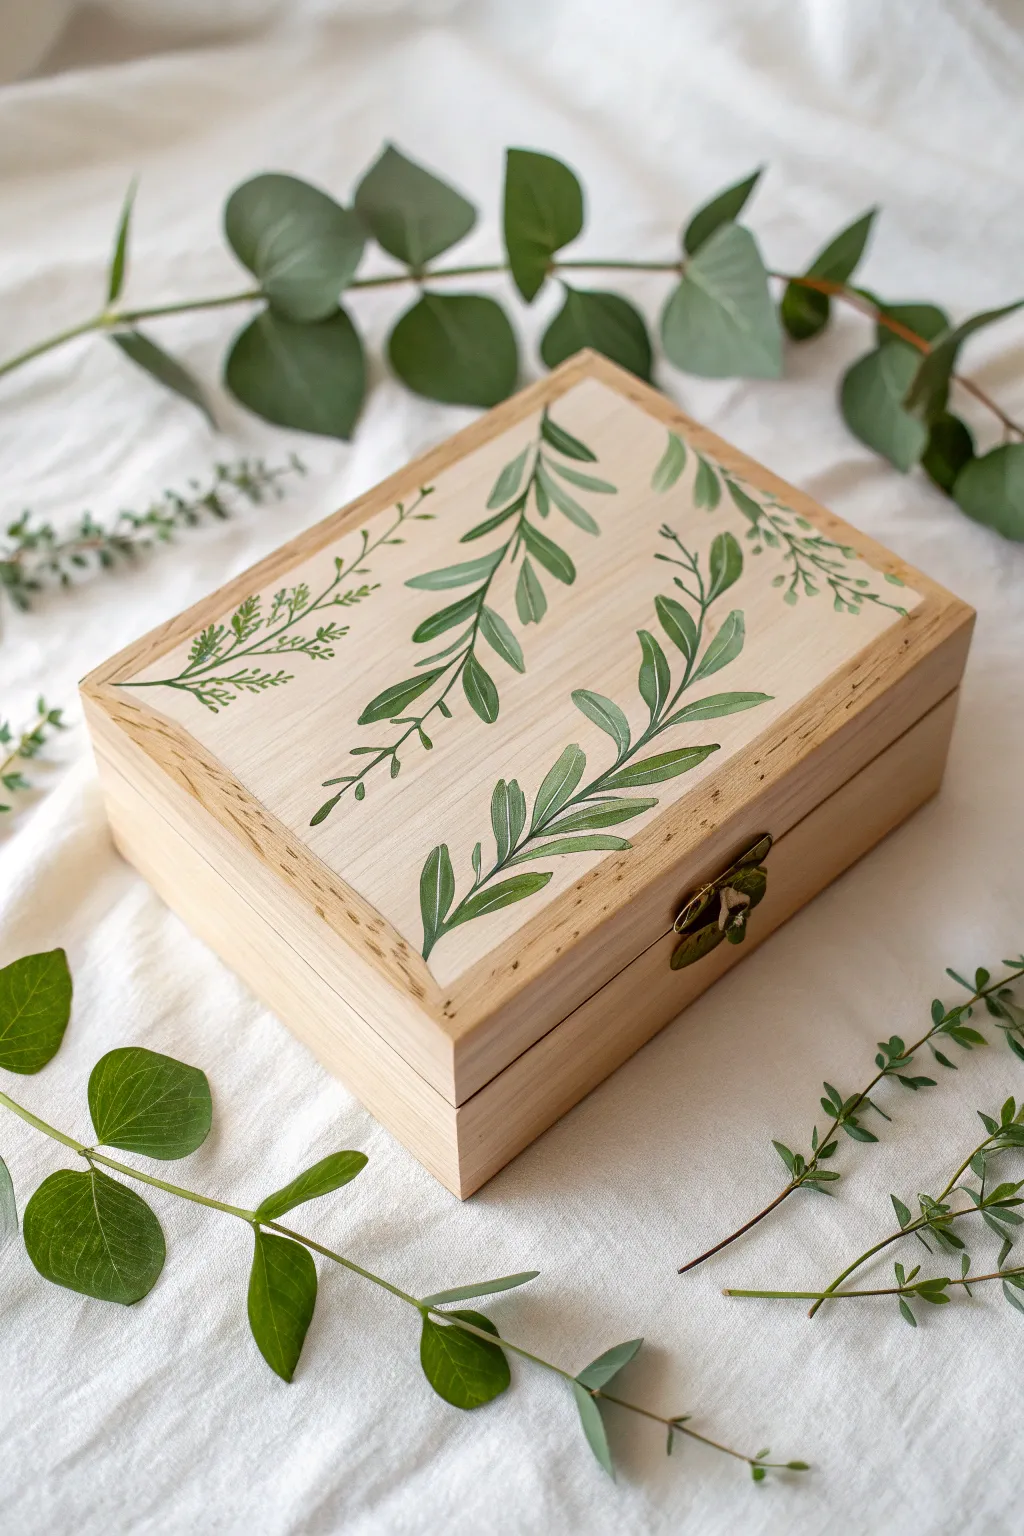
Transform a plain wooden keepsake box into a woodland treasure with simple freehand vines. This project uses basic brush strokes to create lively, organic greenery that complements the natural wood grain beautifully.
Step-by-Step Guide
Materials
- Unfinished wooden box with metal latch
- Fine-grit sandpaper (220 grit)
- Acrylic paints (Sap Green, Dark Green, Titanium White, Yellow Ochre)
- Synthetic round brush (size 4)
- Detail or liner brush (size 0)
- Palette and water cup
- Pencil and kneaded eraser
- Matte clear varnish or soft wax
Step 1: Preparing the Canvas
-
Smooth the Surface:
Before painting, lightly sand the entire wooden box with 220-grit sandpaper. Focus on the lid where your design will go to ensure the wood fibers don’t snag your brush. -
Clean the Dust:
Wipe the box down with a tack cloth or a slightly damp paper towel to remove all sanding dust. -
Plan the Flow:
Visualize how you want the vines to grow. A diagonal composition, moving from corner to center, creates a dynamic, natural look. -
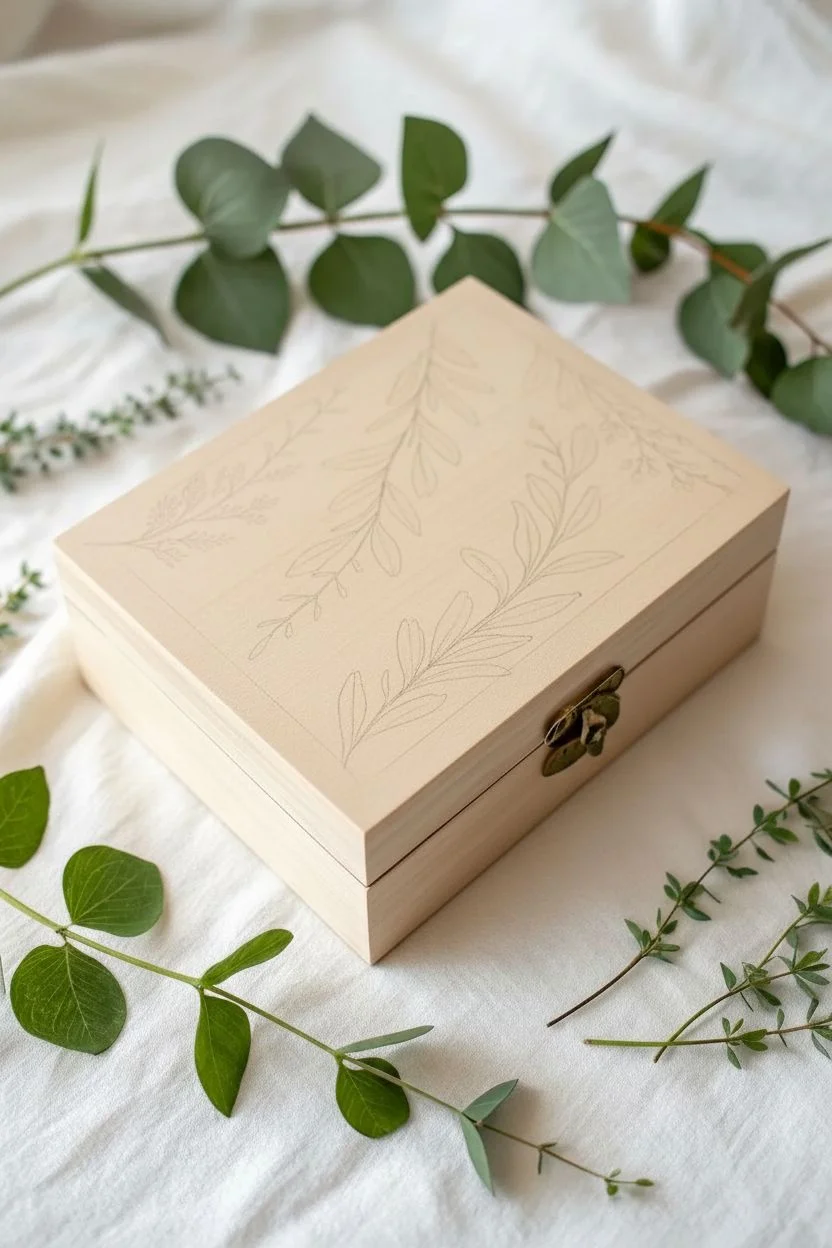
Sketch the Stems:
Using a pencil very lightly, draw thin, curved lines to map out the main stems of your vines. Don’t worry about drawing individual leaves yet; just establish the direction.
Step 2: Painting the Foliage
-
Mix Your Base Greens:
On your palette, squeeze out your greens, yellow, and white. Create a few custom shades: a dark ‘shadow’ green, a mid-tone grassy green, and a pale yellow-green for highlights. -
Practice the Leaf Stroke:
Using your size 4 round brush, practice the ‘press and lift’ motion on scrap paper. Touch the tip to the surface, press down to widen the bristles for the leaf belly, and lift up while dragging to create a sharp point. -
Paint the Main Stems:
Load your liner brush with the darker green mixture. Trace over your pencil stem lines with confident, fluid strokes. It helps to add a drop of water to the paint for smoother detailed lines. -
Add Large Leaves:
Starting at the base of the stems, paint your larger leaves using the round brush and the mid-tone green. Attach them to the stem at an upward angle. -
Vary the Angles:
As you move up the stem, make the leaves slightly smaller. I like to paint some leaves overlapping the stem slightly to make the vine look more three-dimensional. -
Create Depth:
While the green is still tacky, mix a tiny bit of dark green on your brush and touch the base of the leaves closer to the stem to add instant shading. -
Add Highlights:
Clean your brush and pick up the pale yellow-green. Add a swipe of this color to the tips of the leaves or the upper edges where the light would hit.
Pro Tip
Keep a wet edge! If you blend your highlight colors into the leaves while the base green is still damp, you get a beautiful, soft gradient without harsh lines.
Step 3: Fine Details and Finish
-
Sketch Fern Accents:
Identify empty spaces between your main vines where you want lighter, airier textures. -
Paint Fine Sprigs:
Switch to your liner brush. Using a thinned-down lighter green heavily mixed with white or ochre, paint delicate, fern-like sprigs. -
Detail the Sprigs:
Use tiny, short dashing motions to create the small leaves of these finer plants, mimicking thyme or ferns. Keep these strokes very loose and organic. -
Check Balance:
Step back and look at the lid. If a spot looks too empty, add a small floating leaf or a curling tendril to fill the gap without overcrowding. -
Erase Guidelines:
Once the paint is 100% dry (give it at least an hour), gently use a kneaded eraser to lift any visible pencil lines from the unpainted wood areas. -
Seal the Wood:
Apply a thin coat of matte varnish over the entire lid. This protects the raw wood from oils and keeps the paint from chipping. -
Final Buff:
After the varnish cures, you can lightly buff it with a crumpled bare paper bag to make the finish feel ultra-smooth.
Level Up
Personalize the box by painting small initials in gold metallic paint nestled among the vines, or line the interior bottom with adhesive velvet felt.
Now you have a charming, nature-inspired box perfect for storing jewelry or gifting to a plant lover.
Faux Terrazzo Chip Pattern
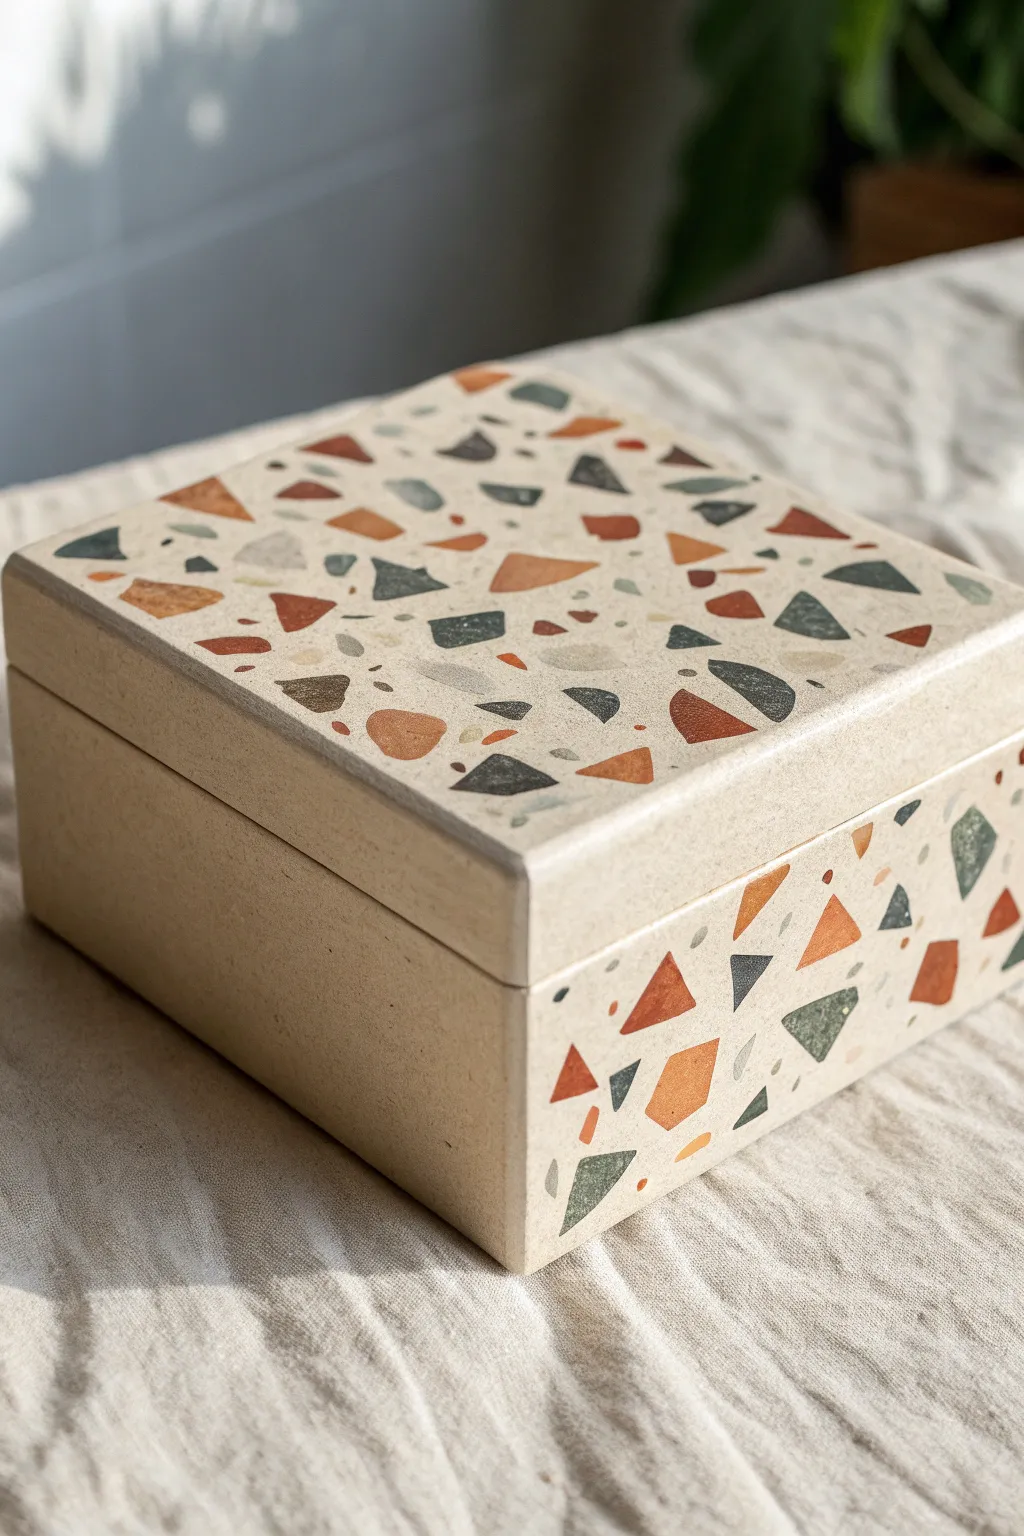
Transform a plain utility item into a high-end decor piece with this surprisingly simple painting technique. This project mimics the sophisticated look of real terrazzo stone using scattered geometric shards in a warm, earthy color palette.
Step-by-Step
Materials
- Unfinished wooden or paper mache box
- Fine-grit sandpaper
- Acrylic paint (Cream/Off-white base)
- Acrylic paints (Terracotta, Sage Green, Charcoal, Warm Grey)
- Small flat shader brush (square tip)
- Small round detail brush
- Paint palette
- Matte clear varnish
Step 1: Preparation & Base
-
Smooth the surface:
Remove any hardware or sticker residue from your box and give the entire surface a light sanding with fine-grit sandpaper to ensure a smooth finish. -
Clean up dust:
Wipe the box down with a slightly damp cloth or a tack cloth to remove all sanding dust before you start painting. -
Apply the first base coat:
Using a larger brush, cover the entire exterior of the box and lid with your cream or off-white acrylic paint. -
Let it dry:
Allow the paint to dry completely to the touch; this prevents the wood grain from raising or the paint from dragging. -
Add a second coat:
Apply a second layer of the base color to ensure solid, opaque coverage where the underlying material doesn’t show through. -
Inspect the rim:
Make sure to paint the vertical rim of the lid cleanly, as we will be leaving this area solid to frame the pattern later.
Angle Hack
Don’t paint outlines! Instead, press the flat edge of your square brush down and pivot it to create sharp corners instantly.
Step 2: Creating the Chips
-
Prepare your palette:
Squeeze out dime-sized amounts of your contrast colors: Terracotta, Sage Green, Charcoal, and Warm Grey. -
Select the right tool:
Pick up a small flat shader brush. The straight metal ferrule helps create the sharp, angular corners characteristic of terrazzo chips. -
Start with the dominant color:
Dip your brush into the Terracotta paint. I like to start with the largest shapes first to anchor the design. -
Paint geometric shapes:
Press the flat brush down to create random triangles, trapezoids, and shard-like shapes on the lid’s top surface. -
Space them out:
Leave generous gaps between your first set of shapes for the other colors, keeping the arrangement loose and random. -
Add the second color:
Clean your brush and switch to Sage Green. Paint similar angular shapes in the empty spaces, varying the size slightly. -
Incorporate dark accents:
Using the Charcoal paint, add smaller, distinct shards. These dark spots provide necessary contrast and depth to the pattern. -
Fill the gaps:
Use the Warm Grey to add tiny chips or “broken” specks in any large open areas to mimic the aggregate look of stone. -
Continue to the sides:
Carry the pattern down the sides of the bottom half of the box, ensuring the shapes wrap around the corners naturally. -
Mind the borders:
Intentionally leave the vertical rim of the lid plain cream. This negative space keeps the design from looking too busy.
Step 3: Finishing Touches
-
Review the balance:
Step back and look at the box from a distance. If an area looks too empty, add a tiny speck of grey or charcoal to balance it. -
Dry completely:
Allow the decorative paint chips to dry fully. Thick dabs of paint may take a bit longer than the base coat. -
Seal the work:
Apply a thin layer of matte varnish over the entire box to protect the design and give it a unified, stone-like finish.
Level Up
Mix a tiny amount of baking soda into your colored paints before applying to give the chips a raised, realistic stone texture.
Now you have a chic storage solution that looks like heavy stone but weighs nearly nothing
Elegant Monogram Personalization
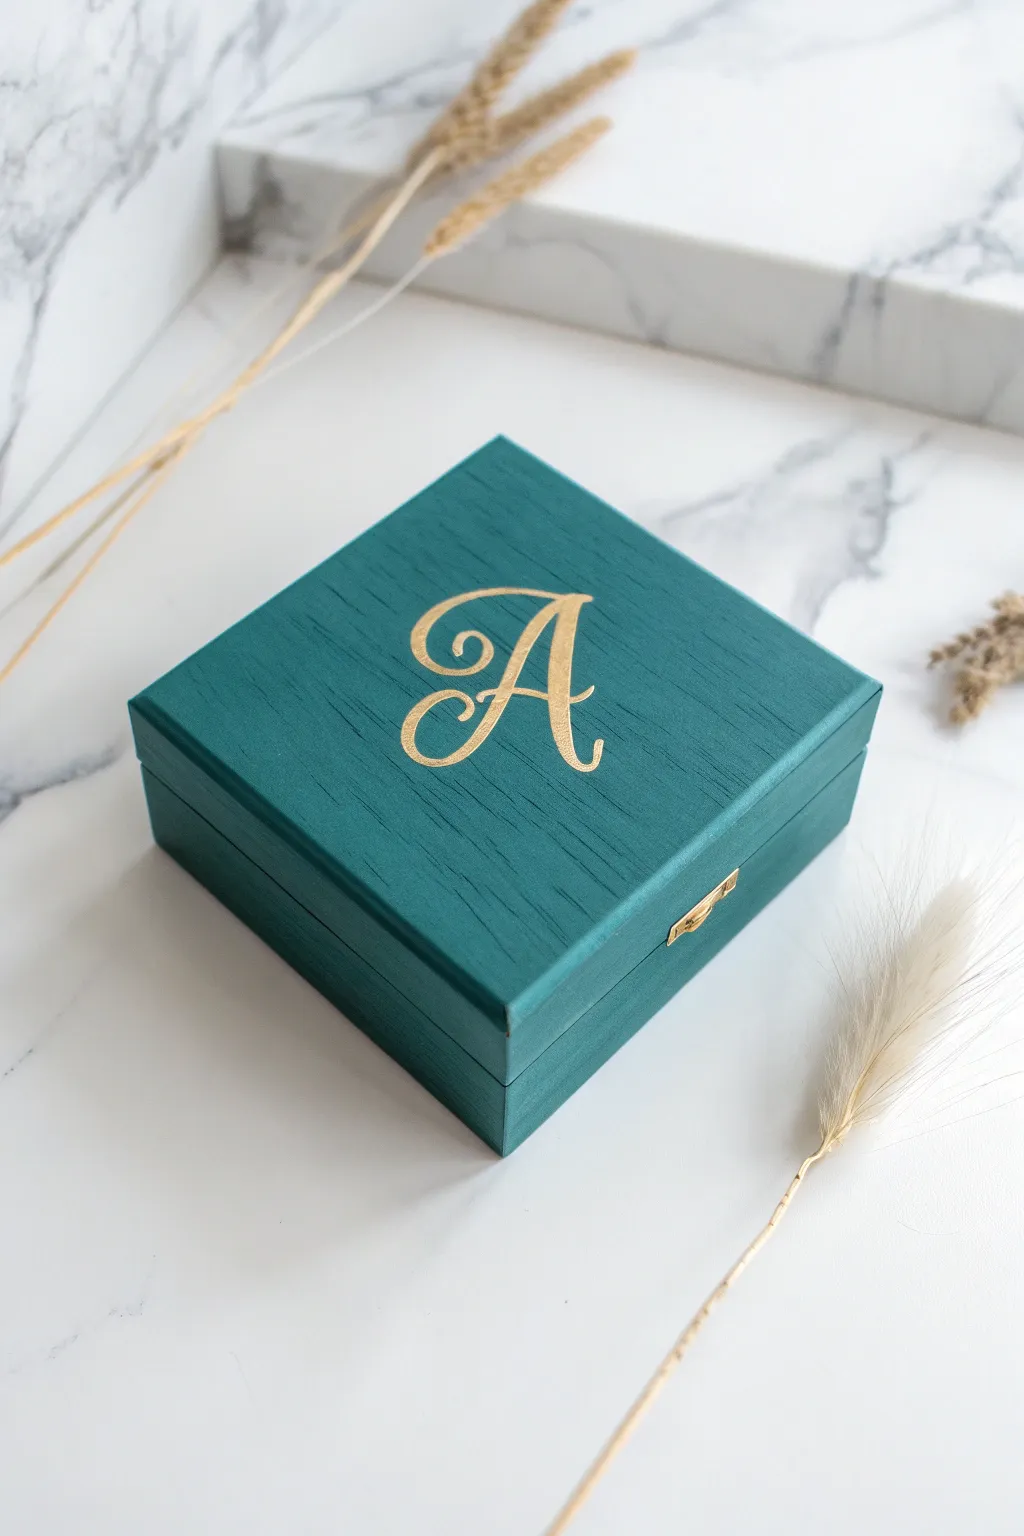
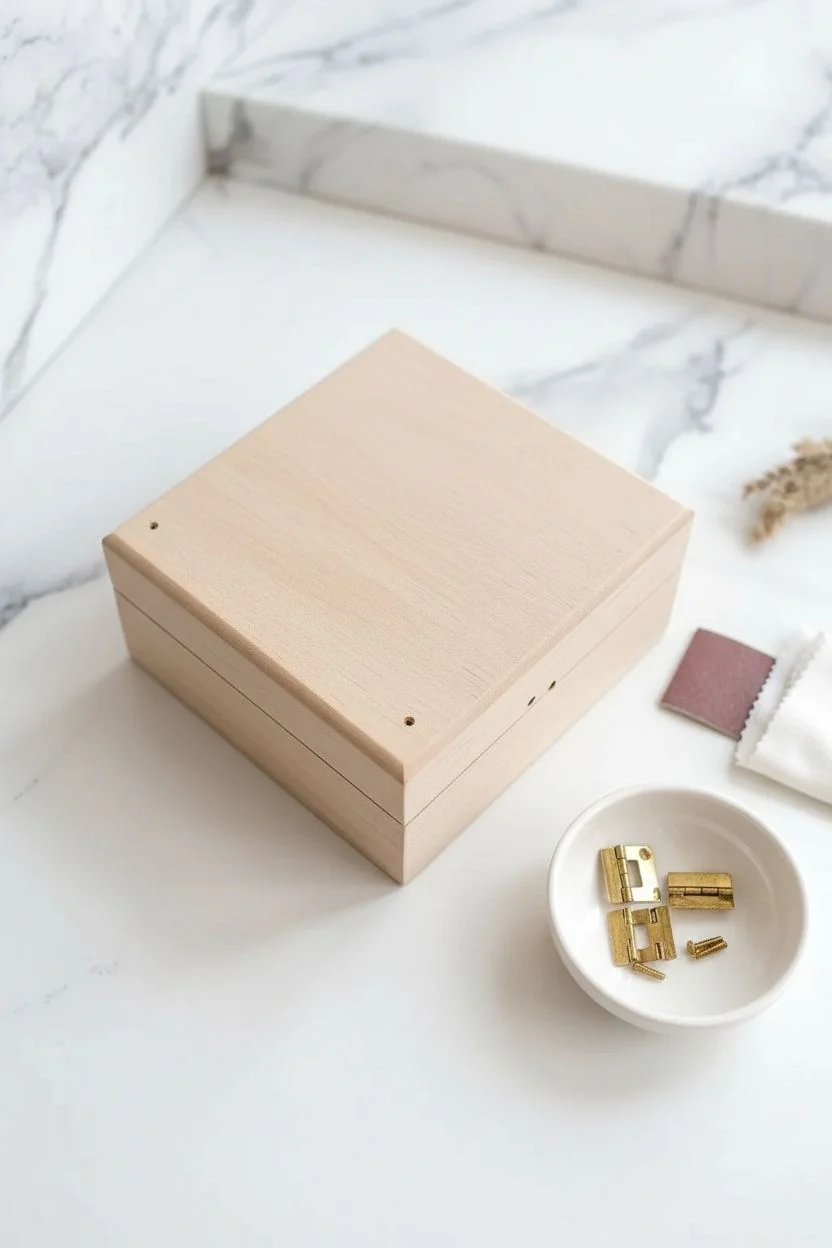
Transform a plain wooden box into a sophisticated keepsake with this rich, classic styling. The combination of deep teal visible wood grain and metallic gold calligraphy creates a high-end look perfect for gifting or vanity storage.
How-To Guide
Materials
- Unfinished wooden box with latch
- Deep teal chalk-style or acrylic paint
- Liquid gold leaf or high-pigment metallic gold acrylic
- Printed letter template (paper)
- Pencil and painter’s tape
- Fine grit sandpaper (220 grit)
- Small screwdriver
- Flat synthetic brush (1 inch)
- Fine liner brush (size 00 or 0)
- Matte clear spray sealer
Step 1: Preparation
-
Remove hardware:
Using a small screwdriver, carefully remove the latch and hinges from the box. Place these small pieces in a bowl so they don’t get lost. -
Initial sand:
Lightly sand the entire exterior of the box with 220-grit sandpaper to remove any rough splinters while keeping the wood grain texture intact. -
Clean surface:
Wipe the wood down with a tack cloth or slightly damp paper towel to ensure all sawdust is removed before painting.
Crisp Edges
If gold paint bleeds into the wood grain, let it dry fully. Then, use a tiny detail brush with your base teal color to touch up and erase any mistakes.
Step 2: Applying Base Color
-
First coat:
Dip your flat brush into the teal paint and apply a thin, even layer to the box, always brushing in the direction of the wood grain. -
Watch the edges:
Be careful not to let paint pool in the screw holes where the hardware will go back in later. -
Allow to dry:
Let the first coat dry for about 20-30 minutes until it is dry to the touch. -
Smooth it out:
Once dry, very lightly run your sandpaper over the painted surface to knock down any raised grain fibers. -
Second coat:
Apply a second coat of teal paint for richer color saturation, ensuring you don’t paint so thickly that you lose the beautiful texture of the wood. -
Full cure:
Allow the base coat to dry completely, preferably for at least an hour, to provide a stable surface for the detail work.
Step 3: Gilding the Monogram
-
Prepare template:
Print out your chosen initial in a font you love, sized to fit the center of the lid. -
Create transfer:
Flip the paper over and scribble heavily over the back of the letter using a graphite pencil. -
Position design:
Flip the paper right-side up, center it on the box lid, and secure it with two small pieces of painter’s tape. -
Trace outline:
Using a sharp pencil or ballpoint pen, trace firmly around the outline of the letter to transfer the graphite onto the painted teal wood. -
Reveal guide:
Remove the paper to reveal a faint pencil outline of your monogram on the lid. -
Outline in gold:
Dip your fine liner brush into the gold paint. I like to rest my pinky finger on the box surface to stabilize my hand while outlining the letter. -
Fill the shape:
Carefully fill in the rest of the letter with the gold paint, aiming for a smooth, solid coverage. -
Dry gold:
Let the gold detail dry undisturbed. If using liquid leaf, this happens quickly; acrylics may take longer.
Velvet Interior
Elevate the luxury feel by lining the bottom interior with adhesive velvet or felt in a contrasting cream or champagne color to protect delicate jewelry.
Step 4: Assembly & Finish
-
Seal result:
Take the box to a ventilated area and apply a light coat of matte spray sealer to protect the paint without making it too shiny. -
Reattach hardware:
Once the sealer is dry, screw the hinges and latch back into their original holes to complete the project.
Place your finished box on a vanity or dresser to add an instant touch of personalized elegance to your space.
The Interior Color Pop
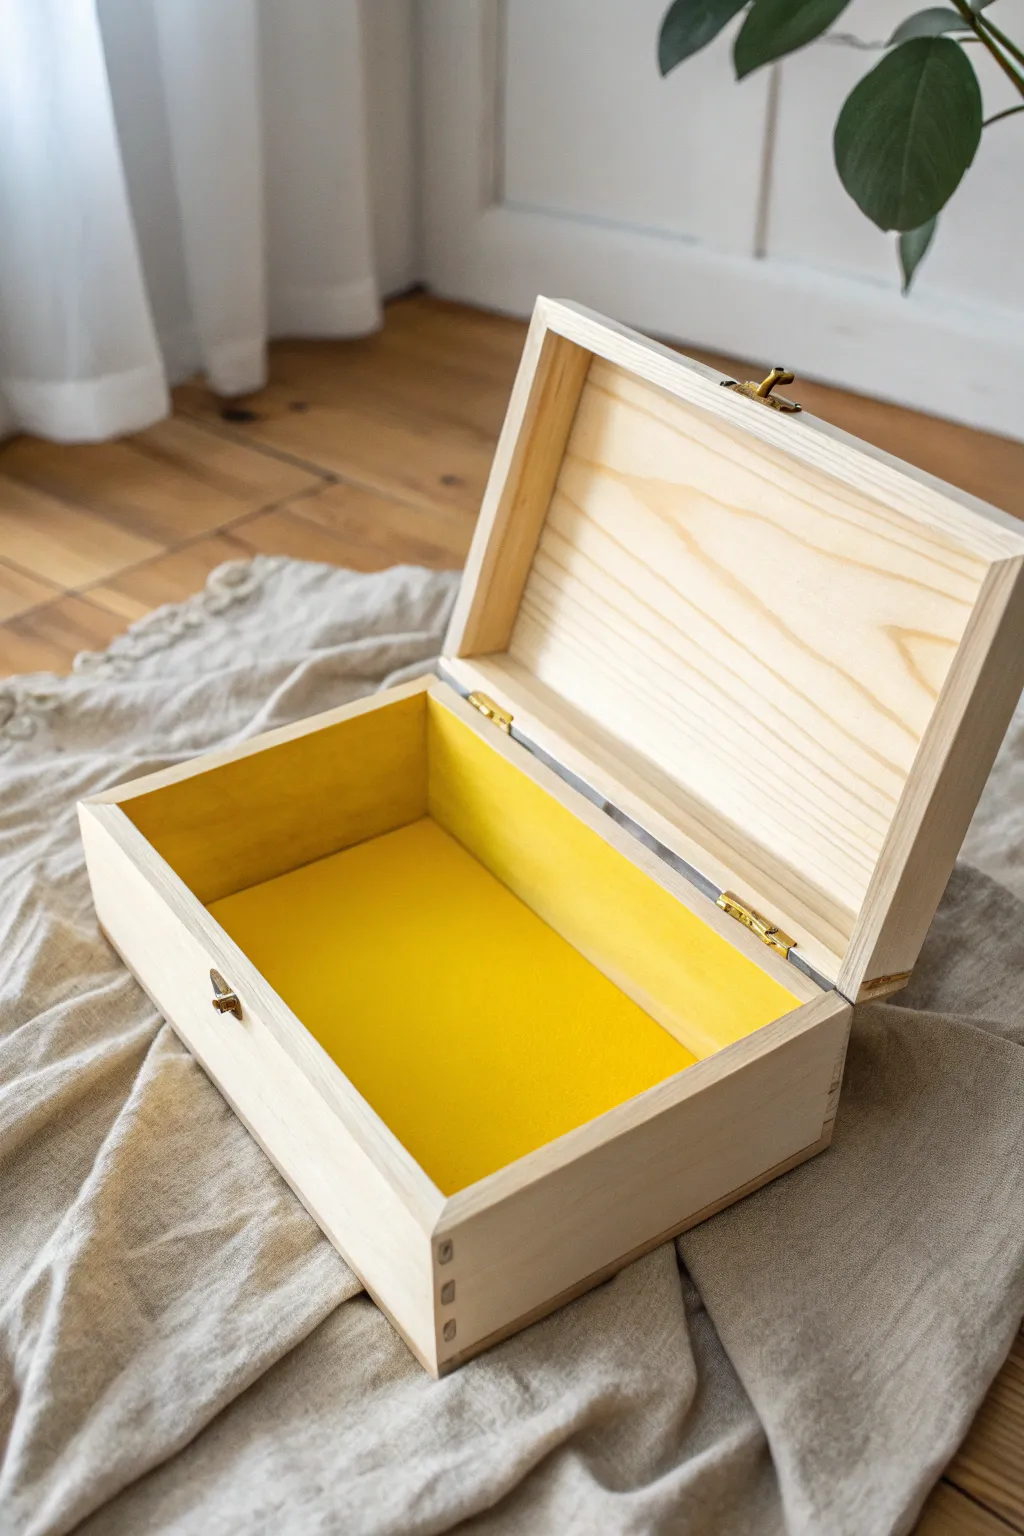
Transform a plain wooden craft box into a delightful surprise by keeping the exterior minimalist and natural while flooding the interior with a vibrant burst of yellow. This high-contrast look is modern, clean, and surprisingly simple to achieve.
Step-by-Step Tutorial
Materials
- Unfinished wooden craft box with hinged lid
- Acrylic paint (bright lemon yellow)
- Painter’s tape or masking tape
- Fine-grit sandpaper (220 grit)
- Flat synthetic paintbrush (approx. 1 inch)
- Small angled detail brush
- Tack cloth or lint-free rag
- Small screwdriver
- Matte spray sealer (optional)
Step 1: Preparation
-
Remove hardware:
Use a small screwdriver to carefully remove the latch and hinges. This ensures the neatest finish, though you can tape over them if the screws are stripped. -
Initial specific sanding:
Lightly sand only the interior of the box where you plan to paint, focusing on smoothing out any rough grain that might snag your brush. -
Exterior smoothing:
Give the exterior a quick pass with the sandpaper as well to ensure the natural wood feels soft to the touch. -
Dust removal:
Wipe the entire box down thoroughly with a tack cloth to remove every speck of sawdust. -
Tape the rim:
Apply painter’s tape to the top rim of the bottom half of the box. This creates the crisp separation between the painted interior and the natural closure. -
Seal the tape:
Run your fingernail or a credit card firmly along the edge of the tape to prevent paint from bleeding underneath.
Step 2: Painting the Interior
-
Load the brush:
Dip your flat brush into the bright yellow acrylic paint. You want a moderate amount—too much will create globs in the corners. -
Paint the floor:
Start by painting the bottom surface of the box interior. Use long, smooth strokes going in the direction of the wood grain. -
Paint the walls:
Move to the interior side walls. Paint horizontally, working your way up to the taped rim line. -
Corner detailing:
Switch to your small angled brush to get sharp coverage in the deep corners where the walls meet the floor. -
Check for drips:
I always take a moment here to inspect the corners for pooled paint, smoothing them out before they start to dry. -
First drying period:
Allow the first coat to dry for about 20 minutes. The wood will absorb a lot of the pigment, so it may look streaky initially. -
Apply second coat:
Apply a second layer of yellow. This coat will sit on top of the first and provide that opaque, saturated ‘pop’ seen in the photo. -
Tape removal:
Carefully peel back the painter’s tape while the second coat is still slightly damp to ensure a clean, sharp edge.
Bleed Blues?
If paint seeped under your tape onto the natural rim, don’t worry. Once dry, use an X-Acto knife to gently scrape the yellow pigment off the raw wood, or sand it specifically with a folded sanding block.
Step 3: Finishing and Reassembly
-
Full cure:
Let the box sit open in a well-ventilated area for at least an hour until the paint is completely dry to the touch. -
Clean up edges:
If any yellow paint bled onto the rim, gently sand it away with a small piece of folded sandpaper. -
Protective seal:
Optional: Spray a light coat of matte clear sealer over the yellow paint to prevent scratching if you plan to store keys or coins. -
Reattach hardware:
Screw the hinges and latch back into their original pilot holes, ensuring everything is aligned correctly. -
Final polish:
Give the unpainted exterior one last wipe with a clean cloth to remove any oils from your hands.
Secret Message
Since the interior lid is left natural, use this blank space to add a personal touch. Use a rubber stamp with permanent black ink to place a date, monogram, or small fern leaf in the center of the lid.
Now you have a sleek, modern storage box that keeps its sunny disposition hidden until the very moment you open it.


Have a question or want to share your own experience? I'd love to hear from you in the comments below!