If you can paint a few simple shapes, you can paint a cactus—promise. These easy cactus painting ideas are all about bold color, simple texture tricks, and quick wins that still look super polished.
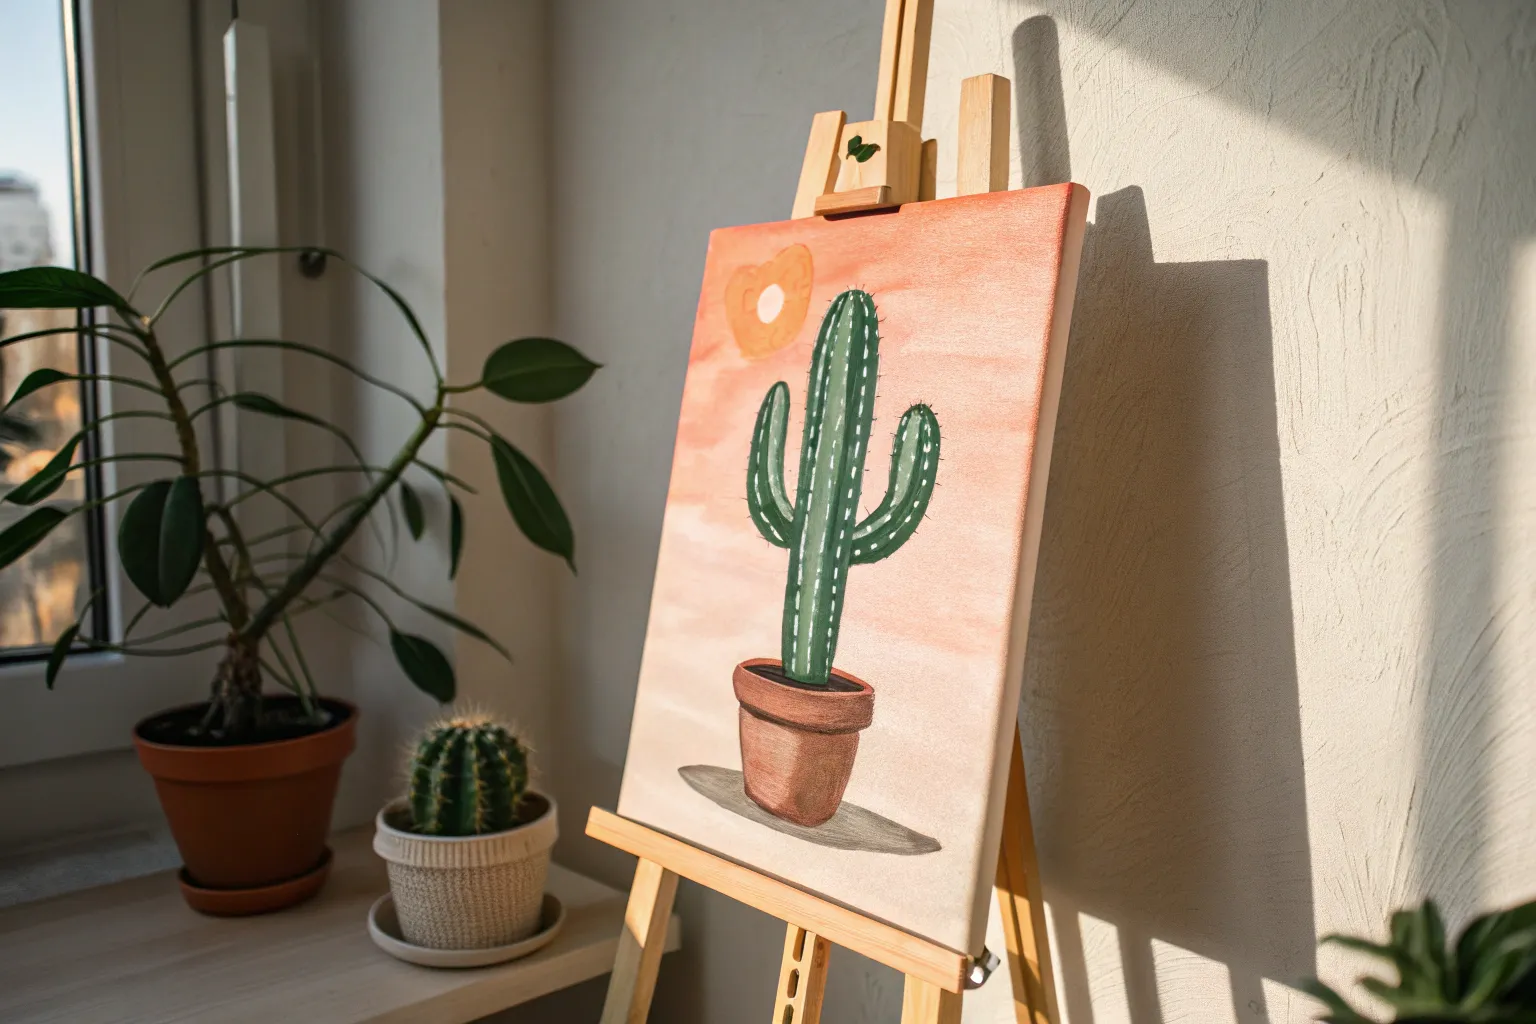
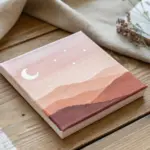
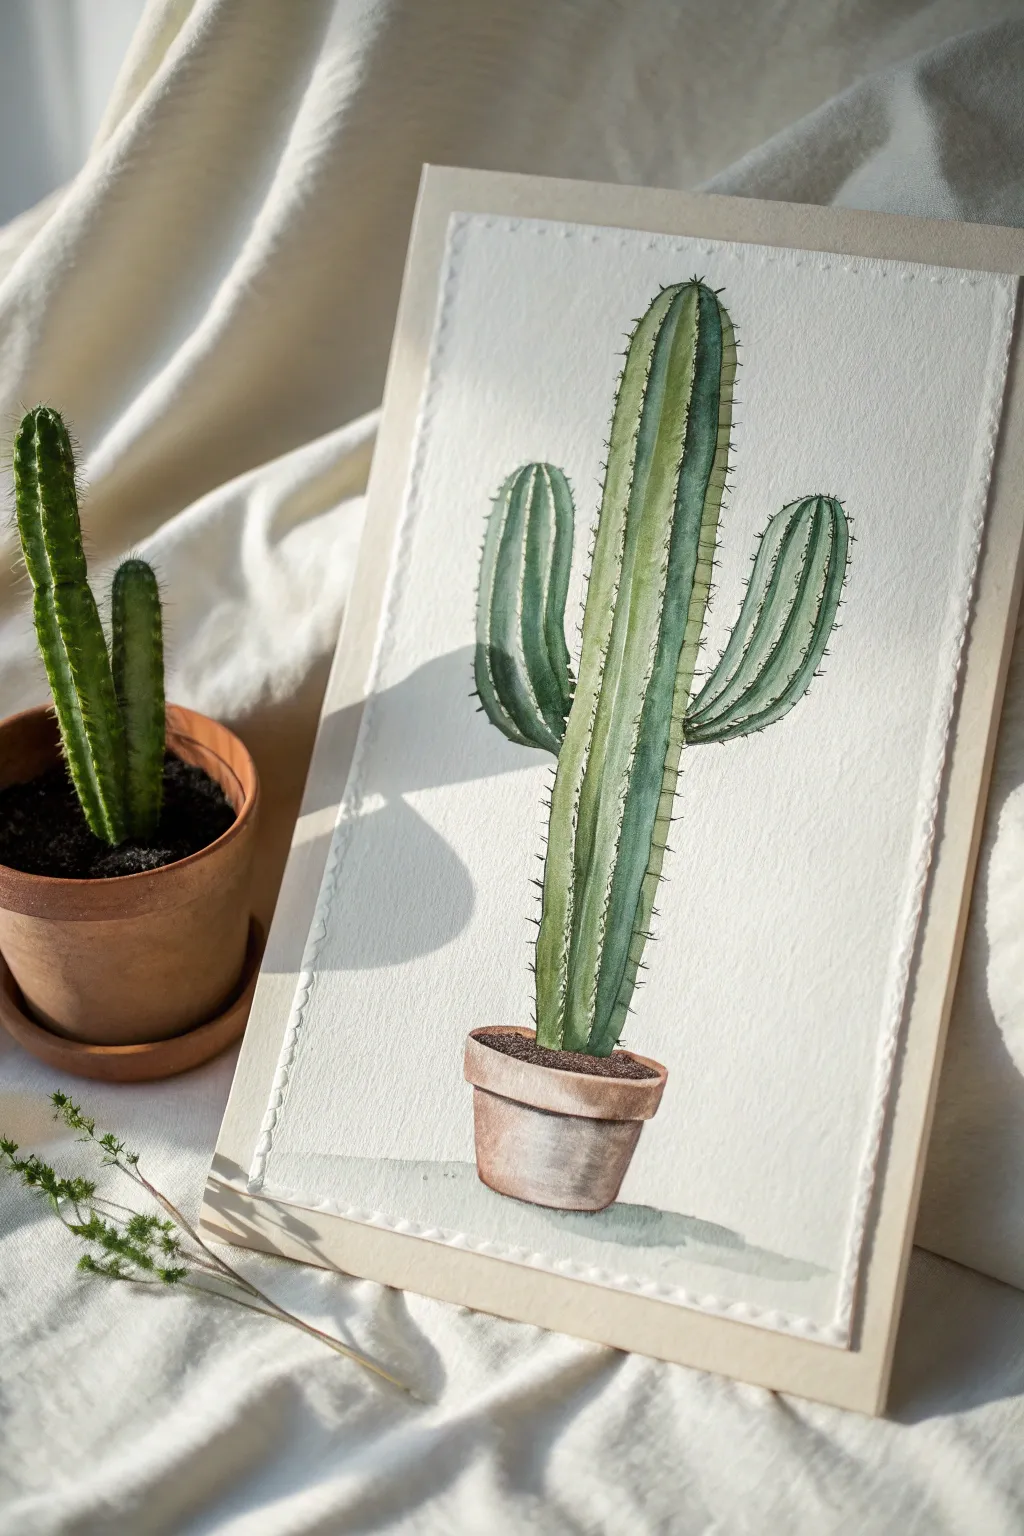
Classic Saguaro Silhouette at Sunset

Capture the magic of the Southwest with this stunning watercolor Saguaro silhouette project. By layering warm sunset gradients behind a stark, dark cactus, you’ll create a striking sense of depth and atmosphere that looks professional but is surprisingly beginner-friendly.
How-To Guide
Materials
- Cold-press watercolor paper (140lb/300gsm suggested)
- Watercolor paints (Yellow Ochre, Cadmium Orange, Alizarin Crimson, Burnt Sienna, Payne’s Gray)
- Flat wash brush (3/4 inch)
- Round brushes (sizes 6 and 2)
- Masking fluid (optional, but helpful)
- Jar of clean water
- Paper towels
- Pencil and eraser
- Painter’s tape
Step 1: Planning and Sky Wash
-
Tape it down:
Start by taping all four edges of your watercolor paper to a board or table. This creates that crisp white border seen in the example and prevents the paper from buckling when wet. -
Light sketch:
Using a pencil, lightly sketch the horizon line about a quarter of the way up from the bottom. Outline the mountains slightly above that, and draw the main Saguaro cactus silhouette prominently in the foreground. -
Wet the sky:
With clean water and your large flat brush, wet the entire sky area above the mountains. Don’t worry about painting over your pencil sketch of the cactus; the dark paint later will cover it. -
Yellow horizon:
Load your brush with watery Yellow Ochre. Paint horizontal strokes starting just above the mountain line, letting the color bleed upwards into the wet paper. -
Orange transition:
While the yellow is still damp, mix some Cadmium Orange. Apply this in horizontal bands above the yellow, allowing the colors to soften into each other naturally. -
Purple sky hues:
Mix a muted purple using Alizarin Crimson and a touch of Payne’s Gray. Apply this to the top third of the paper, pulling it down to meet the orange. -
Creating clouds:
While the sky is drying but still slightly damp, use a smaller round brush with a thicker mix of purple-grey to streak in horizontal clouds. The damp paper will soften the edges automatically. -
Full dry:
Let the sky layer dry completely. This is crucial—if the paper is cool to the touch, it’s still wet.
Wet-on-Wet Pro Tip
For the softest clouds, tilt your paper board slightly. Gravity pulls the pigment down, creating seamless gradients without harsh brushstrokes ruining the sunset effect.
Step 2: Mountains and Foreground
-
Distant mountains:
Mix a very watery grey-purple. Paint the distant mountain range silhouette right over your dried sky wash. Keep the bottom edge soft by adding water as you move toward the foreground. -
Foreground base:
For the desert floor, use Burnt Sienna and a little Yellow Ochre. Paint the ground area loosely, leaving some lighter patches for highlights on the sand. -
Ground texture:
While the ground is wet, drop in jagged touches of darker brown near the bottom corners to imply shadows and scrubby terrain. -
Dry again:
Wait for these landscape layers to dry completely before starting the main subject.
Step 3: The Saguaro and Details
-
Main cactus silhouette:
Mix a dark, dense green-black using Payne’s Gray and a green pigment (or mix yellow and blue). With your size 6 round brush, carefully fill in the main Saguaro shape. -
Ribbing texture:
I prefer to lift out tiny vertical lines on the cactus while the paint is damp using a clean, thirsty brush, or wait until it’s dry and use a fine liner with white gouache to suggest the ribs catching the light. -
Distant cacti:
Using a slightly lighter grey mix, paint the smaller, distant cacti on the horizon line. They should look faded to create atmospheric perspective. -
Scrub bushes:
Use a dry-brush technique with dark olive green and brown to stipple little bushes at the base of the Saguaro and in the foreground corners. -
Bush highlights:
Add tiny dabs of Yellow Ochre on the tops of the foreground bushes to show where the sunset light hits them. -
Final touches:
Use your smallest brush (size 2) to add tiny twigs or dried flowers poking out from the bushes. -
The reveal:
Once absolutely dry, carefully peel away the painter’s tape at a 45-degree angle to reveal your clean edges.
Level Up: Salt Texture
While the paint for the sandy ground is still wet, sprinkle a pinch of table salt on it. Brush it off once dry to create amazing, sandy speckles and texture.
Frame this piece behind glass to protect the delicate watercolor surface and enjoy your personal desert oasis


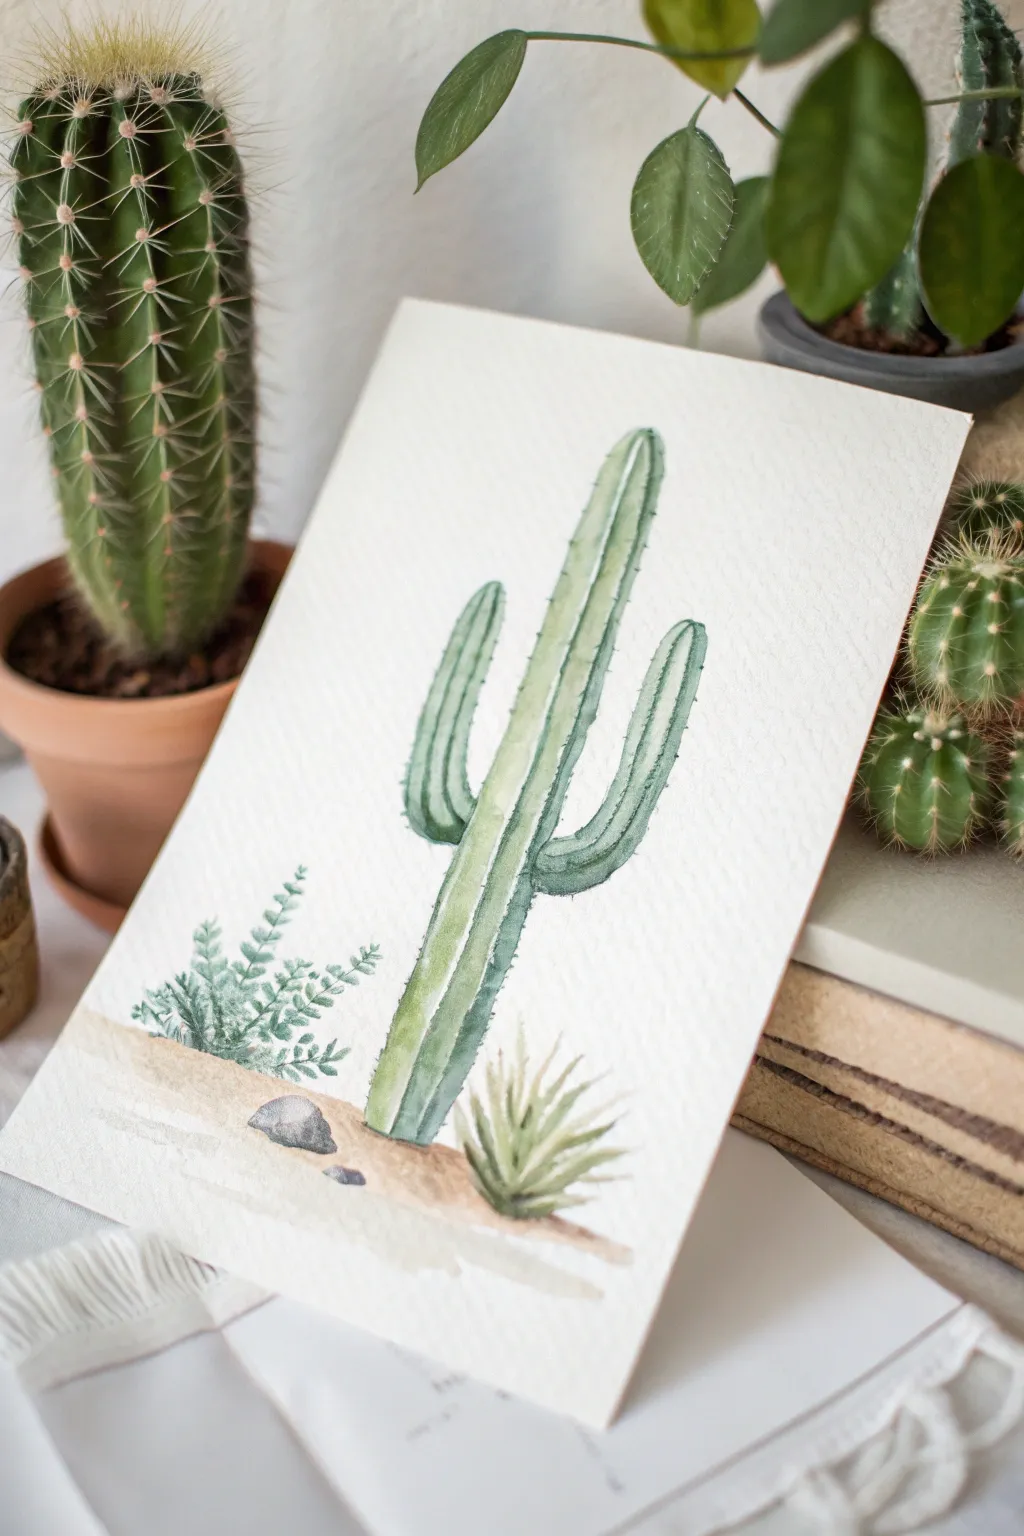
Cute Potted Cactus Trio
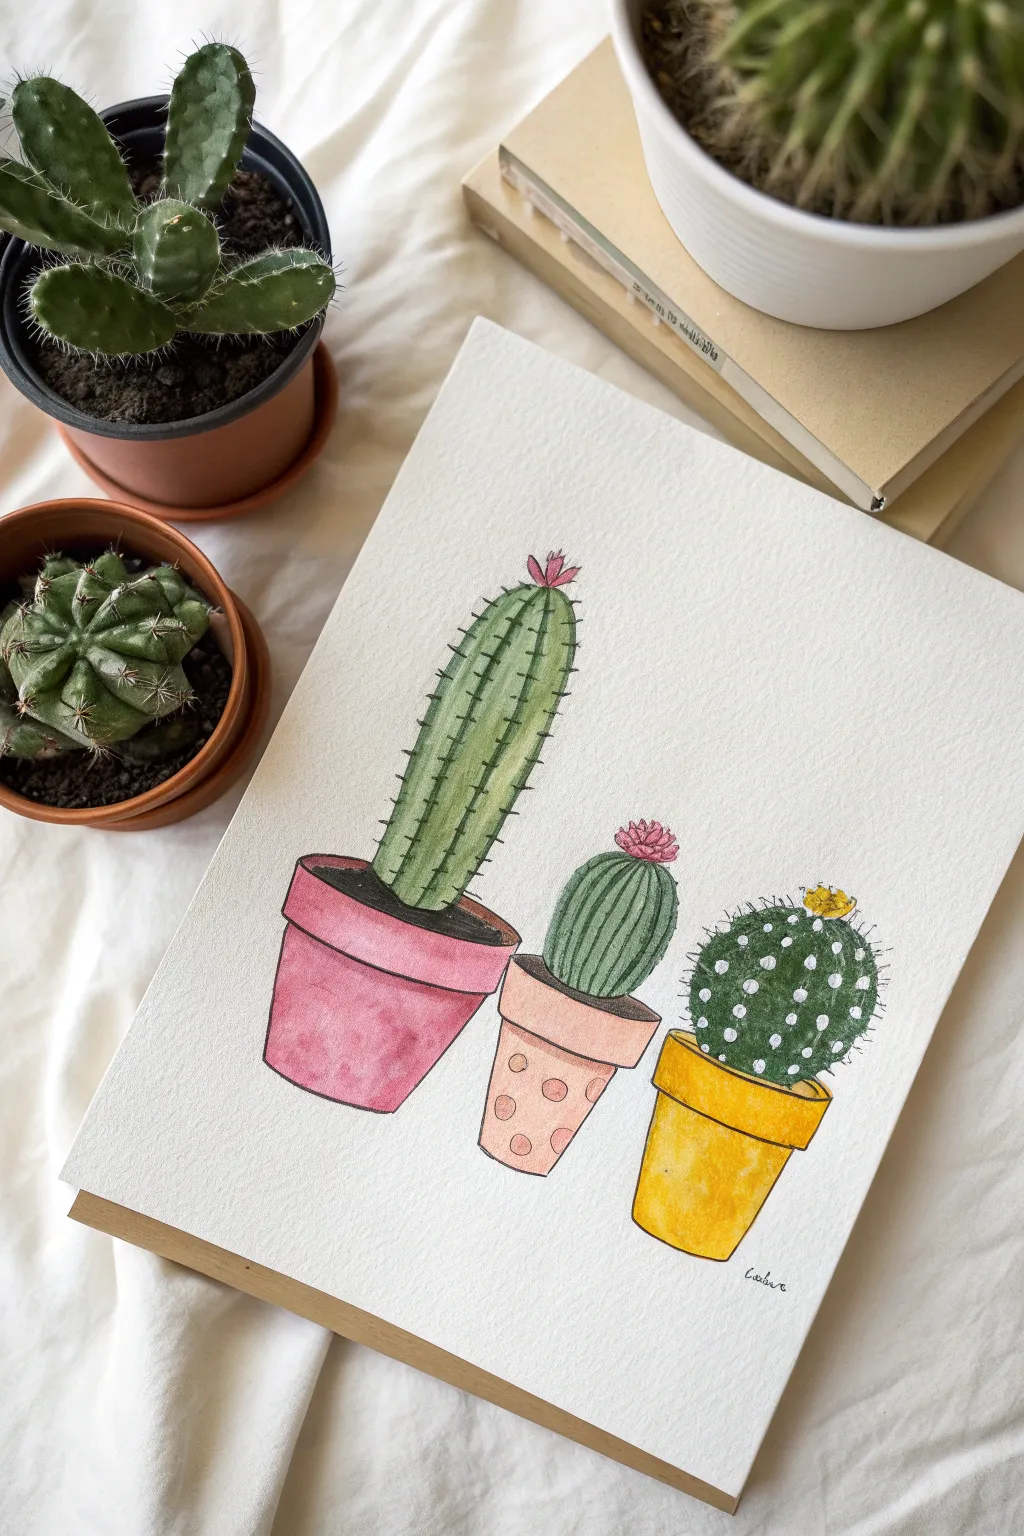
This charming illustration features three distinct cacti in playful, colorful pots, perfect for brightening up a sketchbook page or creating a greeting card. The style combines loose watercolor washes with crisp pen detailing for a delightful mixed-media look.
Detailed Instructions
Materials
- Cold press watercolor paper (A4 or similar size)
- Watercolor paint set
- Fine liner pens (black, sizes 0.1 and 0.5)
- Small round brush (size 2-4)
- Pencil (HB)
- Eraser
- Jar of clean water
- Paper towel
Step 1: Sketching the Composition
-
Outline the pots:
Start by lightly sketching three flower pots in a row at the bottom center of your page. Draw the left one slightly larger and tilted, the middle one smallest, and the right one sturdy and upright. Give them distinct rims and slightly tapered bases. -
Draw the cactus shapes:
For the left pot, draw a tall, columnar cactus shape. For the middle, sketch a short, round barrel shape. For the right pot, draw a perfectly round, spherical cactus body. -
Add detail lines:
Lightly sketch vertical ribs on the tall left cactus and the middle barrel cactus. These guide lines will help you place the spines later. Keep your pencil marks very faint so they don’t show through the paint.
Don’t Rush the Ink
Make absolutely sure your paper is cool to the touch (meaning dry) before inking. Even slightly damp paper will cause your fine liner ink to bleed and feather.
Step 2: Painting the Pots
-
Paint the pink pot:
Mix a watery raspberry red or pink shade. Paint the leftmost pot, letting the color pool slightly at the bottom for a natural gradient. Leave the rim distinct from the base. -
Paint the peach pot:
For the middle pot, mix a soft peach or terracotta color. Paint the base and rim. While the paint is still wet, you can lift out small circles with a thirsty brush to create the polka dots, or wait for it to dry and paint darker circles on top. -
Paint the yellow pot:
Use a bright, sunny yellow for the rightmost pot. Apply the paint evenly, perhaps adding a touch of orange to the right side for shadow. -
Fill the soil:
Using a dark brown or sepia tone, carefully fill in the oval openings of the pots beneath the cacti to represent the soil. Ensure the neighboring pot colors are dry first so they don’t bleed.
Step 3: Painting the Greenery
-
Base layer for tall cactus:
Mix a sap green with a touch of olive. Paint the tall cactus on the left. To give it dimension, paint vertical stripes following your pencil lines, leaving very thin white gaps or lighter green spaces between the ribs. -
Base layer for middle cactus:
Use a slightly cooler, blue-green shade for the middle cactus. Paint slightly curved vertical strokes to emphasize its round form. -
Base layer for round cactus:
For the rightmost cactus, use a deep forest green. Fill the circle completely. I find it helpful to leave tiny unpainted white spots if I want highlights, but a solid wash works too. -
Add the flowers:
Once the green paint is dry, add a tiny dab of bright pink to the top of the left and middle cacti. Add a splash of yellow on top of the round cactus on the right.
Pattern Play
Customize the pots with your own patterns! Try painting blue zig-zags, green stripes, or tiny triangles on the pots instead of the solid colors shown here.
Step 4: Inking and Details
-
Outline the pots:
Once the paint is completely bone-dry, use your 0.5 fine liner to trace the outlines of the pots. Keep the lines slightly loose and sketchy rather than ruler-straight. -
Define the cactus ribs:
On the left and middle cacti, draw vertical lines down the center of your painted green ribs. Add small horizontal dashes or ‘v’ shapes along these lines to represent spines. -
Detail the round cactus:
For the dark green cactus on the right, use a white gel pen or opaque white gouache to add small dots in a grid pattern. Then, draw tiny black spines radiating from these white dots. -
Final flower touches:
Outline the flower petals loosely with your fine liner to give them structure. Add a few stamen details to the yellow flower. -
Sign your work:
Add your small signature or initials near the bottom right pot to complete the composition.
You now have a delightful trio of potted plants that never need watering


Dot-and-Dash Spines Shortcut
Capture the charm of the desert with this minimalist watercolor saguaro that focuses on clean lines and simple textures. By using a clever dot-and-dash technique for the spines, you can create impressive detail without getting bogged down in complexity.
Step-by-Step
Materials
- Cold press watercolor paper (A4 or similar size)
- Watercolor paints (Sage Green, Sap Green, Burnt Sienna, Yellow Ochre, tiny touch of Coral)
- Round brushes (size 6 for filling, size 0 or 1 for details)
- Pencil (HB) and eraser
- Jar of clean water
- Paper towels
- Fine liner or very dark green paint for outlines
Step 1: Sketching the Bones
-
Outline the main trunk:
Begin by lightly sketching a tall, slightly pill-shaped cylinder in the center of your page. Keep the top rounded and the bottom flat where it meets the ground. -
Add the arms:
Draw two arms extending from the trunk. Place the left arm lower, curving upward in a classic ‘L’ shape. Place the right arm slightly higher, also curving upward but perhaps a bit shorter. -
Create the ridges:
Sketch light vertical lines running down the length of the trunk and the arms to represent the cactus ribs. These stripes give the cactus its three-dimensional form. -
Sketch the extras:
Add a small, spiky agave plant near the bottom right base. Then, draw a loose, elongated oval shape at the bottom to define the sandy patch.
Step 2: Washing with Color
-
Mix your base green:
Prepare a watery mix of Sage Green. It should be pale and translucent. Using your larger round brush, fill in the entire cactus body. -
Define the ribs:
While the base layer is still slightly damp (but not swimming), drop a slightly more saturated green along the pencil lines of the ridges. This creates soft shadowing. -
Paint the agave:
Use a cooler, blue-green mix for the small agave plant at the bottom. Paint short, sharp triangular strokes radiating from a center point. -
Lay the sandy foundation:
Mix Yellow Ochre with a tiny drop of Burnt Sienna and plenty of water. Paint the ground patch in horizontal strokes, letting the edges fade out naturally. -
Let it dry completely:
Step away and wait. The paper must be bone dry before adding the sharp details in the next phase, or lines will bleed.
Steady Hand Trick
Rest your pinky finger on a dry part of the paper while painting the fine spine details. It anchors your hand and prevents the brush from shaking.
Step 3: The Detail Work
-
Reinforce the ridges:
Using a size 1 brush and a darker Sap Green, carefully paint over your vertical ridge lines. Keep these lines steady but not perfectly uniform; natural wobbles look best. -
Apply the dot spines:
Along the vertical ridge lines you just painted, add tiny dots or extremely short dashes at regular intervals. This represents the areoles where spines grow. -
Add the dash spines:
From each dot, flick a tiny, thin line outward on the left and right sides of the ridges. This is the ‘dash’ part of the shortcut technique that implies prickliness. -
Outline the perimeter:
Using the very tip of your small brush or a fine liner pen, trace the outer edge of the cactus to verify the shape. -
Add the flower:
Mix a soft coral or salmon color. At the very top of the main trunk, paint tiny, bursting strokes to suggest a small bloom opening up. -
Detail the sand:
Take your Burnt Sienna mix and dab small, irregular spots onto the dried sand area to create the look of pebbles and texture.
Desert Sunset
Instead of white paper, try painting a very pale pink and orange gradient wash across the background first for a ‘golden hour’ atmosphere.
Once the final details are dry, you can frame your minimalist desert study or scan it to make charming greeting cards


Single White Highlight Line Trick
This simple yet striking project captures the essence of a classic saguaro cactus against a warm, sandy background. The defining feature is a clever single white highlight line that instantly adds dimension and a cartoon-like charm to the finished piece.
Detailed Instructions
Materials
- Cold press watercolor paper (cut to 5×7 inches)
- Masking tape or painter’s tape
- Watercolor paints (Sap Green, Yellow Ochre, Burnt Umber)
- Round brush (size 6 or 8)
- Fine liner brush (size 0 or 1)
- White gel pen or fine white paint marker
- Pency
- Eraser
- Jar of water
- Paper towel
Step 1: Preparation and Sketching
-
Secure the borders:
Begin by taping down all four edges of your watercolor paper to a hard surface. Create a border about a half-inch wide; this will give you that crisp, professional white frame once the painting is done. -
Sketch the outline:
Lightly draw the shape of a saguaro cactus in the center of the paper. Focus on a tall main column with two arms—one curving upward on the left and a slightly smaller one on the right. -
Define the ground:
Draw a slightly wavy horizontal line near the bottom of the cactus to mark where the desert floor meets the sky. The cactus base should sit slightly below this line.
Step 2: Painting the Background
-
Mix the sky color:
Dilute a Yellow Ochre paint with plenty of water to create a pale, sandy wash. You want this to look like a hazy, hot desert sky. -
Apply the wash:
Paint the entire sky area around the cactus using the Yellow Ochre wash. It’s okay if the color is slightly uneven; that adds texture. Careful not to paint inside the cactus outline. -
Paint the ground:
Mix Burnt Umber with a touch of black or dark blue to get a deep brown shade. Paint the ground area below your horizon line, covering the very bottom of the cactus trunk so it looks planted. -
Let it dry completely:
Wait for both the sky and ground sections to be fully dry to the touch before moving on. This prevents the green paint from bleeding into the background.
Highlight Hack
Don’t make the white line solid! Breaking it up into dashes or segments makes the reflection look more natural and organic.
Step 3: Painting the Cactus
-
Base green layer:
Fill in the cactus shape with a medium Sap Green. Apply it evenly, but let the watercolor pool slightly in areas to create natural variation. -
Add vertical ribs:
While the base green is still slightly damp (or after drying if you prefer more control), take a more concentrated, darker green mix. Paint vertical stripes down the length of the main column and following the curves of the arms. -
Deepen the shadows:
Add extra dark green pigment to the left side of the main column and the underside of the cactus arms to suggest a light source coming from the right. -
Dry thoroughly:
This is crucial: allow the green paint to dry completley. If the paper is even slightly cool to the touch, it’s still wet.
Warped Paper?
If your paper buckles, you likely used too much water. tape it down tighter next time, or place the finished (dry) art under heavy books overnight.
Step 4: The Highlight Trick
-
Prepare the highlighter:
Grab your white gel pen or fine white paint marker. Test it on a scrap piece of paper to ensure the ink is flowing smoothly. -
Add the single line:
Draw a single, broken white line down the right side of the main cactus column. I like to keep this line slightly inside the edge, not directly on the outline. -
Highlight the arms:
Add similar broken white lines to the top/right edges of the cactus arms. This simple trick immediately makes the cactus look round and dimensional. -
Add prickles (optional):
If you wish, add tiny white dots or short dashes along the darker green vertical stripes to represent the cactus spines. -
The reveal:
Once everything is dry, slowly peel away the masking tape at a 45-degree angle to reveal your crisp, white borders.
Frame your mini masterpiece or gift it to a plant-loving friend to brighten their day
BRUSH GUIDE
The Right Brush for Every Stroke
From clean lines to bold texture — master brush choice, stroke control, and essential techniques.
Explore the Full Guide
Tiny Bloom Accents on Top
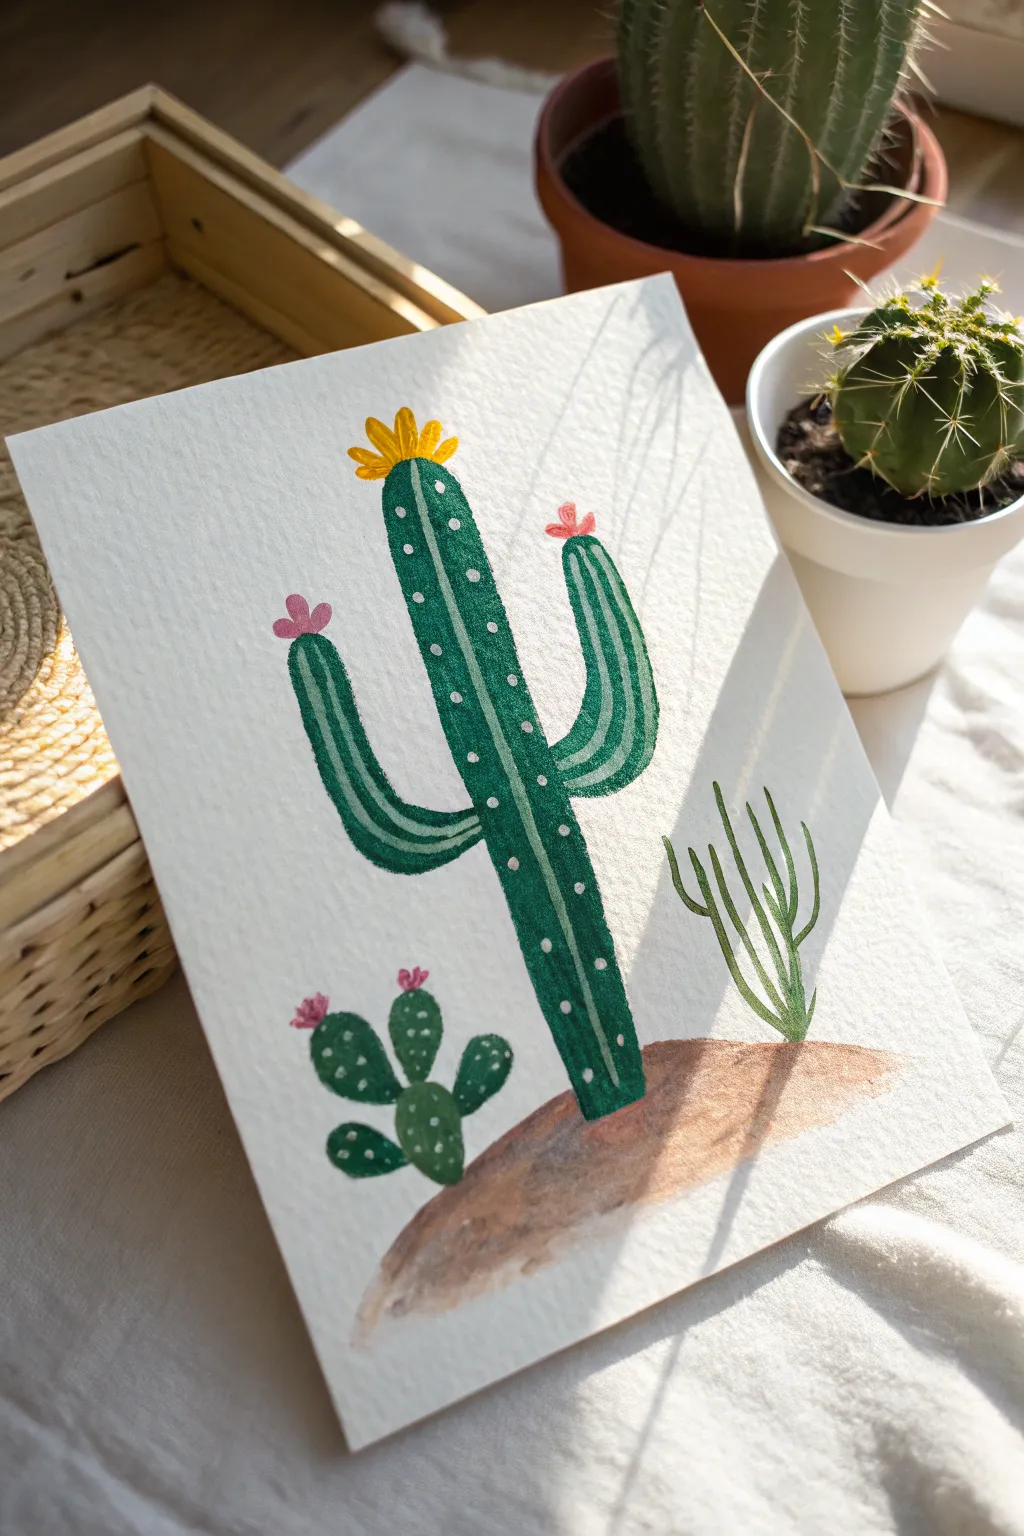
Capture the warmth of the desert with this charming watercolor illustration featuring three distinct cactus styles. The textured paper and gentle layering create a lovely, organic feel that brings the prickly subjects to life without the need for complex shading.
How-To Guide
Materials
- Cold press watercolor paper (A5 or 5×7 size)
- Watercolor paints (Dark Green, Sap Green, Light Green, Yellow, Pink/Coral, Brown/Burnt Sienna)
- Round brushes (sizes 2, 4, and 6)
- White gel pen or fine white gouache
- pencil and eraser
- Jar of water
- Paper towel
Step 1: Sketching the Shapes
-
Draw the main saguaro:
Start by lightly sketching the large central cactus using a pencil. Draw a tall, straight column first, then add two curved arms: one on the left sweeping upwards, and a slightly higher one on the right curving up. -
Add the companions:
To the bottom left, sketch a small prickly pear shape made of stacked oval pads. On the right side, draw a few thin, vertical grassy spikes or a spindly succulent to balance the composition. -
Ground the scene:
Draw a gentle, curved mound at the bottom of the cacti to represent the sandy ground. Keep your pencil lines very faint so they don’t show through the watercolor later.
Bleeding Colors?
If your brown earth color is bleeding into the green cactus base, you didn’t wait long enough! Let the green dry completely, or leave a tiny visible sliver of white paper between the two shapes.
Step 2: Painting the Greenery
-
Base layer for the Saguaro:
Load a size 6 brush with a rich, dark green paint. Fill in the main body and arms of the central cactus. Try to achieve a steady, solid color, but don’t worry if there are slight variations in the wash—it adds character. -
Paint the small prickly pear:
Switch to a slightly deeper or bluer shade of green for the small cactus on the left. Paint the individual oval pads, connecting them carefully. -
Add the spindly plant:
Using a thinner brush (size 2 or 4) and a lighter olive or sap green, paint the thin, vertical stems on the right side. Paint form the bottom up to get a tapered, grassy look. -
Let it dry completely:
This is crucial! Wait until the green paint is bone dry before moving on. If you paint adjacent colors while it’s wet, they will bleed into each other.
Pro Tip: Texture Trick
For the sandy ground, sprinkle a tiny pinch of salt onto the brown paint while it is still very wet. Let it dry, then brush the salt off to create an amazing grainy sand texture.
Step 3: Adding the Earth and Texture
-
Paint the sandy mound:
Mix a watery brown or burnt sienna color. Paint the ground shape you sketched earlier. I like to let the edges remain slightly loose and watery for that classic watercolor look. -
Detail the tall cactus:
Once the green is dry, take a slightly lighter green or dilute your original mix and paint vertical stripes down the length of the main cactus and its arms. This mimics the ribs of the plant. -
Create the Prickly Pear spines:
Using your white gel pen or a very fine brush with white gouache, add tiny clusters of dots to the dark green oval pads on the left. -
Add the Saguaro spines:
With the white pen, add columns of simple dots running vertically down the dark green body, following the ‘ribs’ you imagined earlier.
Step 4: Blooming Accents
-
Paint the yellow crown:
Use a bright yellow paint to create a bloom on the very top of the main cactus. Paint small, petal-like strokes faning outward. -
Add pink buds:
Mix a soft pink or coral color. Add small, rounded flower shapes to the tips of the Saguaro’s arms and tiny buds on the prickly pear pads. -
Final touches:
Erase any visible pencil lines around the base or edges if they are distracting, being careful not to rub the paint.
Now you have a refreshing desert scene ready to brighten up your wall or desk
Color-Blocked Background Behind a Cactus
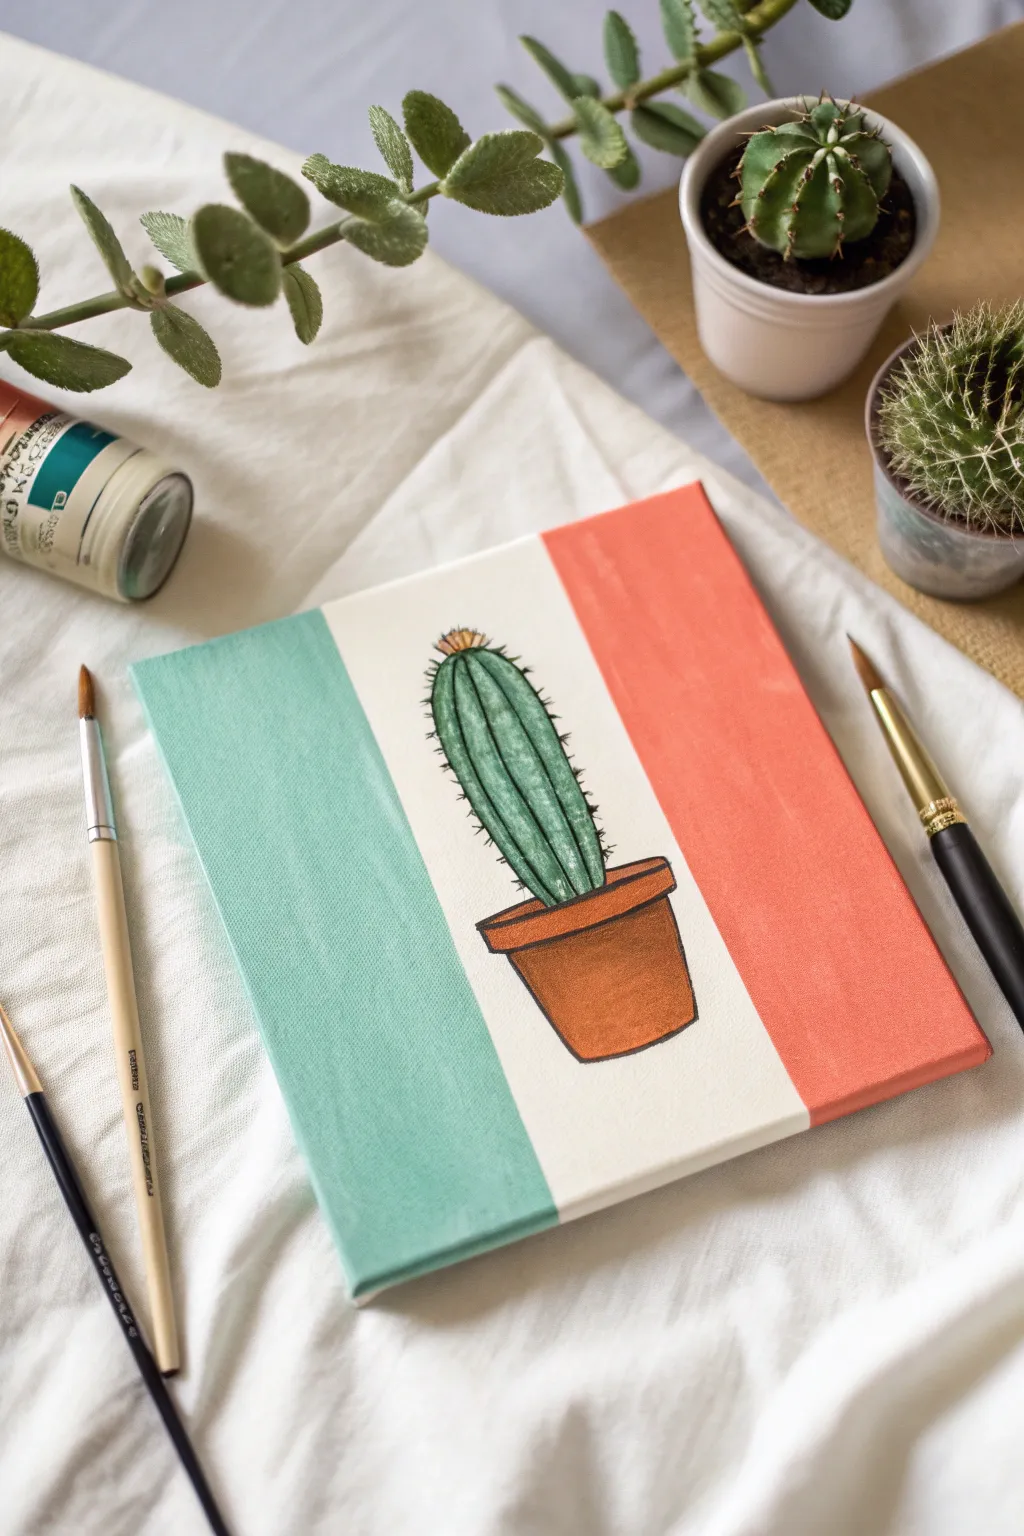
This charming project combines a crisp, color-blocked geometric background with a whimsical illustrative cactus in the center. The teal and coral stripes frame the subject perfectly, creating a modern, graphic look that brightens any shelf.
Step-by-Step Tutorial
Materials
- Small square canvas (e.g., 8×8 or 10×10 inches)
- Acrylic paints: Mint green/Teal, Coral/Salmon pink, White, Dark green, Light green, Terracotta orange, Brown, Black
- Painter’s tape or masking tape
- Flat shader brush (medium size)
- Round detail brush (small size)
- Fine liner brush (very thin)
- Pencil and eraser
- Ruler
- Water cup and paper towels
Step 1: Creating the Background
-
Measure and mark:
Begin by using a ruler to divide your canvas vertically into three equal sections. Make very light pencil marks at the top and bottom edges to guide your taping. -
Tape the center:
Apply two strips of painter’s tape vertically. You want to cover the outer edges of the center section so you can paint the side panels cleanly without worrying about straight lines. -
Paint the left panel:
Load your flat shader brush with the mint green or teal paint. Apply an even coat to the left-hand section of the canvas, brushing vertically from top to bottom for a smooth finish. -
Paint the right panel:
Rinse your brush thoroughly and switch to the coral or salmon pink paint. Fill in the right-hand section of the canvas, ensuring opaque coverage. -
Remove tape:
While the paint is still slightly tacky (but not wet), carefully peel off the painter’s tape to reveal crisp edges. Let the side panels dry completely before proceeding. -
Paint the center:
If your canvas isn’t already primed white, or if some paint bled through, carefully paint the middle strip with white acrylic paint. You typically don’t need tape for this if you use a steady hand, but you can re-tape over the dry colored sections if you prefer.
Bleeding paint lines?
If paint bleeds under your tape, wait for it to dry completely. Then, use a small brush with the background color (white) to touch up and straighten the edge.
Step 2: Painting the Cactus
-
Sketch the outline:
Once the background is totally dry, lightly sketch a simple terracotta pot shape in the bottom third of the white center stripe. Then, draw a tall, rounded cactus column rising from the pot. -
Base coat the pot:
Mix a terracotta orange with a tiny dot of brown to get a warm clay color. Fill in the pot shape using a small round brush. -
Base coat the cactus:
Paint the cactus body with a medium-dark green. Don’t worry about shading yet; just get a solid, opaque layer down within your pencil lines. -
Add cactus ribs:
Using a lighter green shade (mix your base green with a little white or yellow), paint thin vertical lines curving slightly with the shape of the cactus to suggest ribs. -
Shadow the pot:
Add a slightly darker brown tone to the right side of the pot and just under the rim to give it dimension. -
Outline the pot:
Switch to your fine liner brush and black paint. Carefully outline the entire pot, including the rim, to give it that illustrative, cartoon-like style shown in the image. -
Outline the cactus:
Continue with the liner brush to outline the main body of the cactus. Keep your hand loose; a slightly wavering line adds character here. -
Add the spines:
Using very short, quick strokes with the black liner brush, tap small ‘stars’ or crosses along the outer edges of the cactus and down the vertical ribs to create the look of prickly needles. -
Flower detail:
Paint a very small, messy cluster of yellow or orange at the very top of the cactus head for a blooming flower. -
Final touches:
Add a few tiny white highlights on the pot or the cactus ribs if you want extra shine, then let the entire piece dry overnight.
Pro Tip: Tape Seal
To get razor-sharp lines, paint a thin layer of the *base* color (white) over the tape edge first to seal it. Then paint your color on top.
This cute trio of colors creates a modern decoration that is ready to hang or lean

PENCIL GUIDE
Understanding Pencil Grades from H to B
From first sketch to finished drawing — learn pencil grades, line control, and shading techniques.
Explore the Full Guide
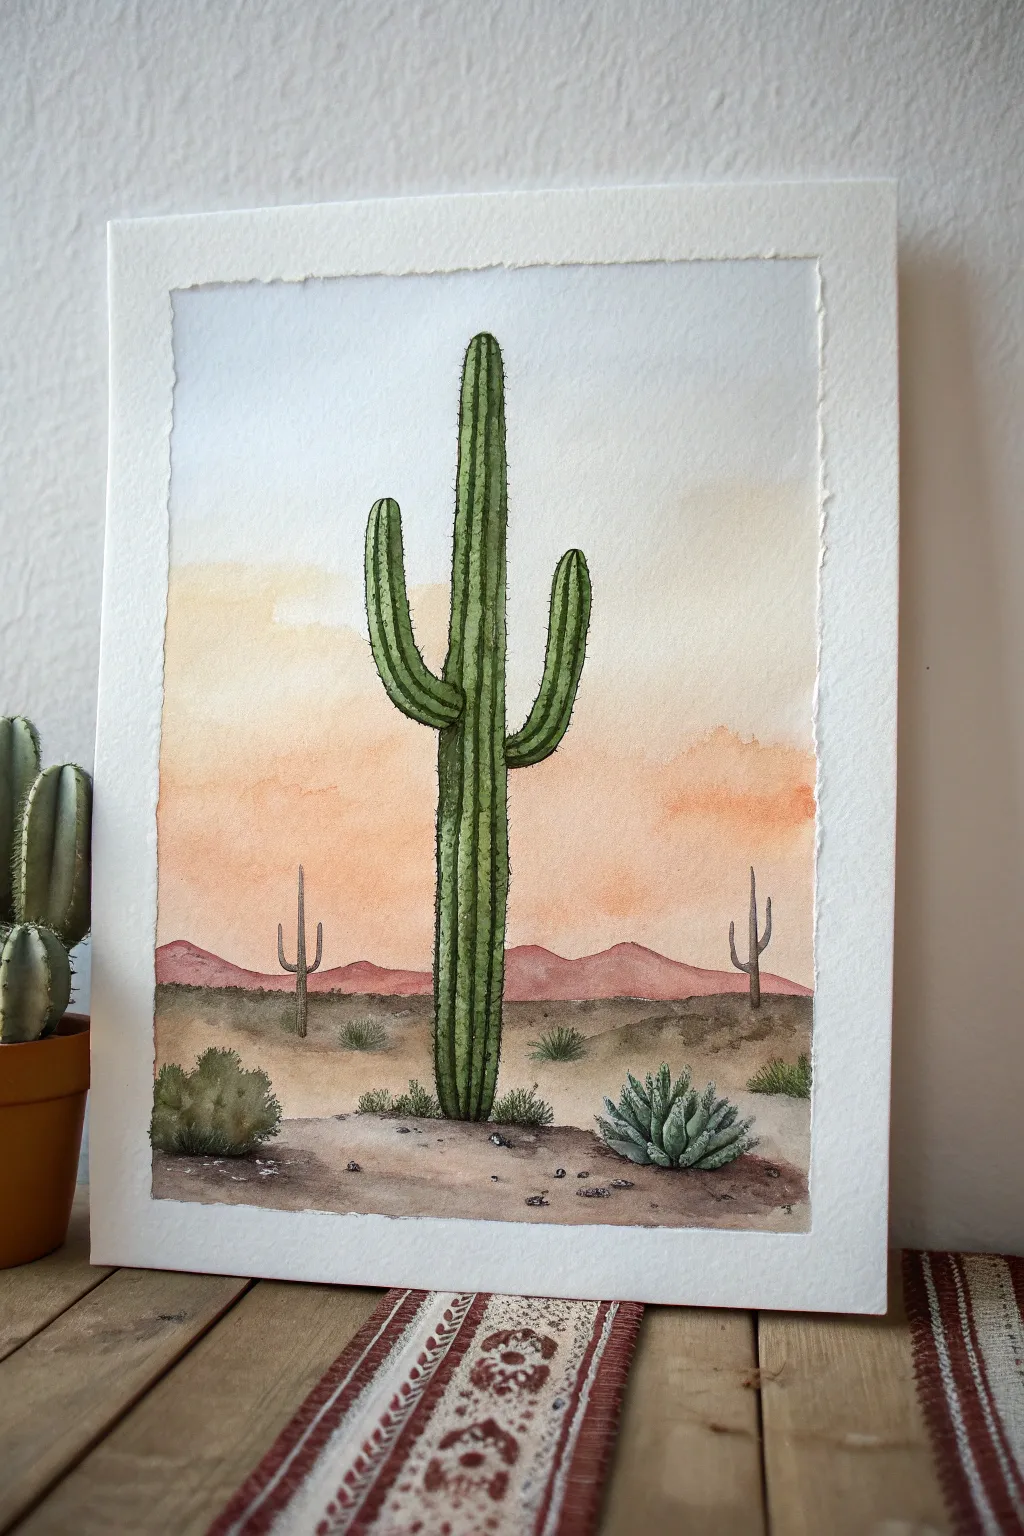
Monochrome Green Cactus Study
Capture the elegant verticality of a desert giant with this watercolor study. Using graduated washes of green and simple linework, you will build a dimensional cactus that looks striking against the crisp white paper.
Detailed Instructions
Materials
- Cold press watercolor paper (approx. 300gsm)
- Watercolor paints: Sap Green, Hooker’s Green, Burnt Sienna, Burnt Umber, Payne’s Grey
- Round brushes: sizes 6 and 2
- Pencil (HB or 2H)
- Kneaded eraser
- Two jars of water
- Paper towels
- Palette or white plate
Step 1: Sketching the Structure
-
Outline the pot:
Begin near the bottom third of your paper. Sketch a simple terracotta pot shape: a wide rectangular rim and a slightly tapered body beneath it. Keep your pencil lines very faint so they don’t show through the final paint. -
Draw the central column:
From the center of the pot, draw a tall, slender column rising upward. Round off the top gently. This is the main body of your cactus. -
Add the arms:
Sketch two arms branching off the main column. Place one lower on the left side, curving upward, and another slightly higher on the right side, also curving upward. Aim for a balanced, but not perfectly symmetrical, look. -
Mark the ribs:
Lightly draw vertical lines down the length of the main column and the arms. These lines represent the ribs of the cactus. They should curve slightly to follow the cylindrical form of the plant.
Step 2: Painting the Cactus
-
Mix your greens:
Prepare two puddles of green on your palette. One should be a lighter, watery Sap Green, and the other a darker mix using Hooker’s Green with a touch of Payne’s Grey for shadows. -
First wash:
Using your size 6 brush, paint the ‘ribs’ or stripes of the cactus. Fill alternating vertical sections with the lighter green mix. Leave a tiny sliver of dry white paper between some sections to act as a highlight. -
Add dimension:
While the first wash is still damp but not swiming, drop the darker green mix along the edges of the painted stripes, particularly on the shadowed side (usually the right side) of each rib. This wet-in-wet technique creates a natural rounded volume. -
Paint the arms:
Repeat the previous step for the arms. Careful brush control is key here; use the tip of the brush to guide the paint into the curves where the arms meet the main body. -
Define the remaining ribs:
Once the first set of stripes is dry, paint the remaining vertical sections with a slightly different shade of green—perhaps adding a little more water to vary the tone. This separation prevents the colors from bleeding into one huge blob.
Stippled Paper Effect
To mimic the textured border seen in the photo, pierce the paper edge with a dry needle every 5mm before painting for a faux-stitched look.
Step 3: Pot and Details
-
Base coat for the pot:
Mix a watery wash of Burnt Sienna. Paint the entire pot shape. While wet, lift a small horizontal line of paint from the front center using a clean, thirsty brush to create a highlight. -
Shadowing the pot:
Mix Burnt Sienna with a tiny bit of Burnt Umber or a purple tone. Apply this to the right side of the pot and just under the rim to create a cast shadow. -
Soil texture:
Use a thick mixture of Burnt Umber and Payne’s Grey. Stipple this dark color into the oval opening of the pot around the base of the cactus to simulate potting soil. -
Cast shadow:
Mix a very diluted grey-green wash. Paint a soft, diffuse shadow extending to the right of the pot on the ‘ground’ to anchor your subject. -
Adding spines:
Switch to your size 2 brush or a fine liner. Using a dark, concentrated green-black mix, paint tiny, short ticks along the vertical ridge lines. I find it helps to group them in clusters of two or three rather than spacing them perfectly evenly.
Bleeding Lines?
If your vertical cactus stripes are merging together, you’re painting adjacent sections too soon. Let every other stripe dry completely before filling the gaps.
Once the paint is fully dry, you can erase any visible pencil marks to leave your crisp cactus standing tall
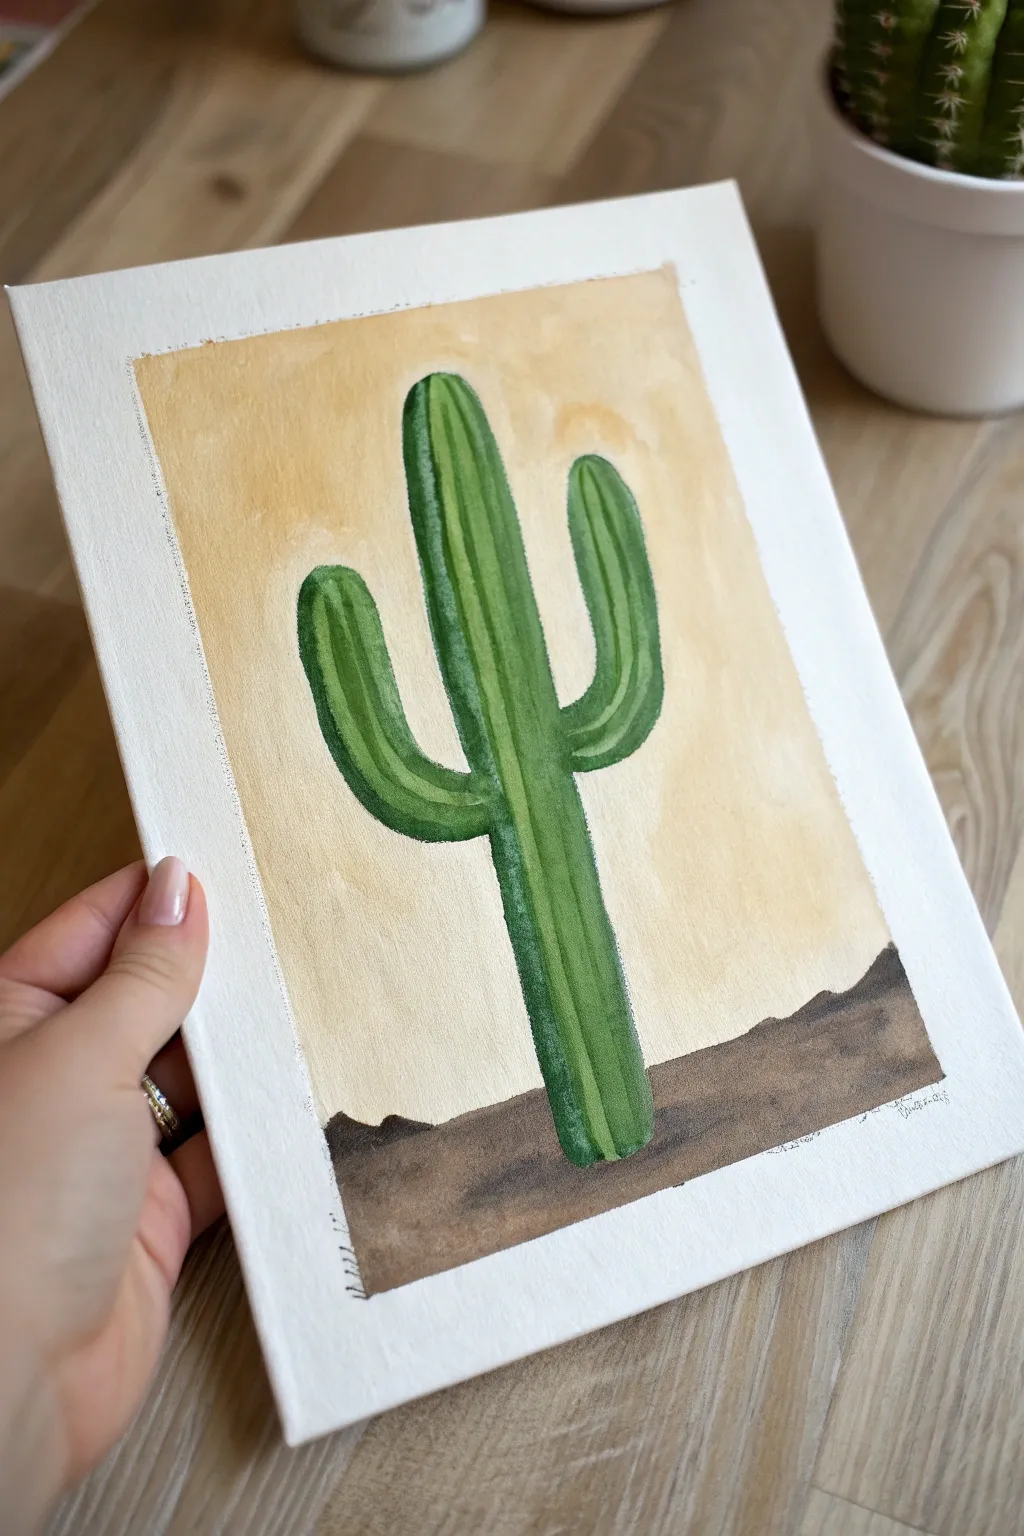
Minimal Line Cactus Over Watercolor Wash
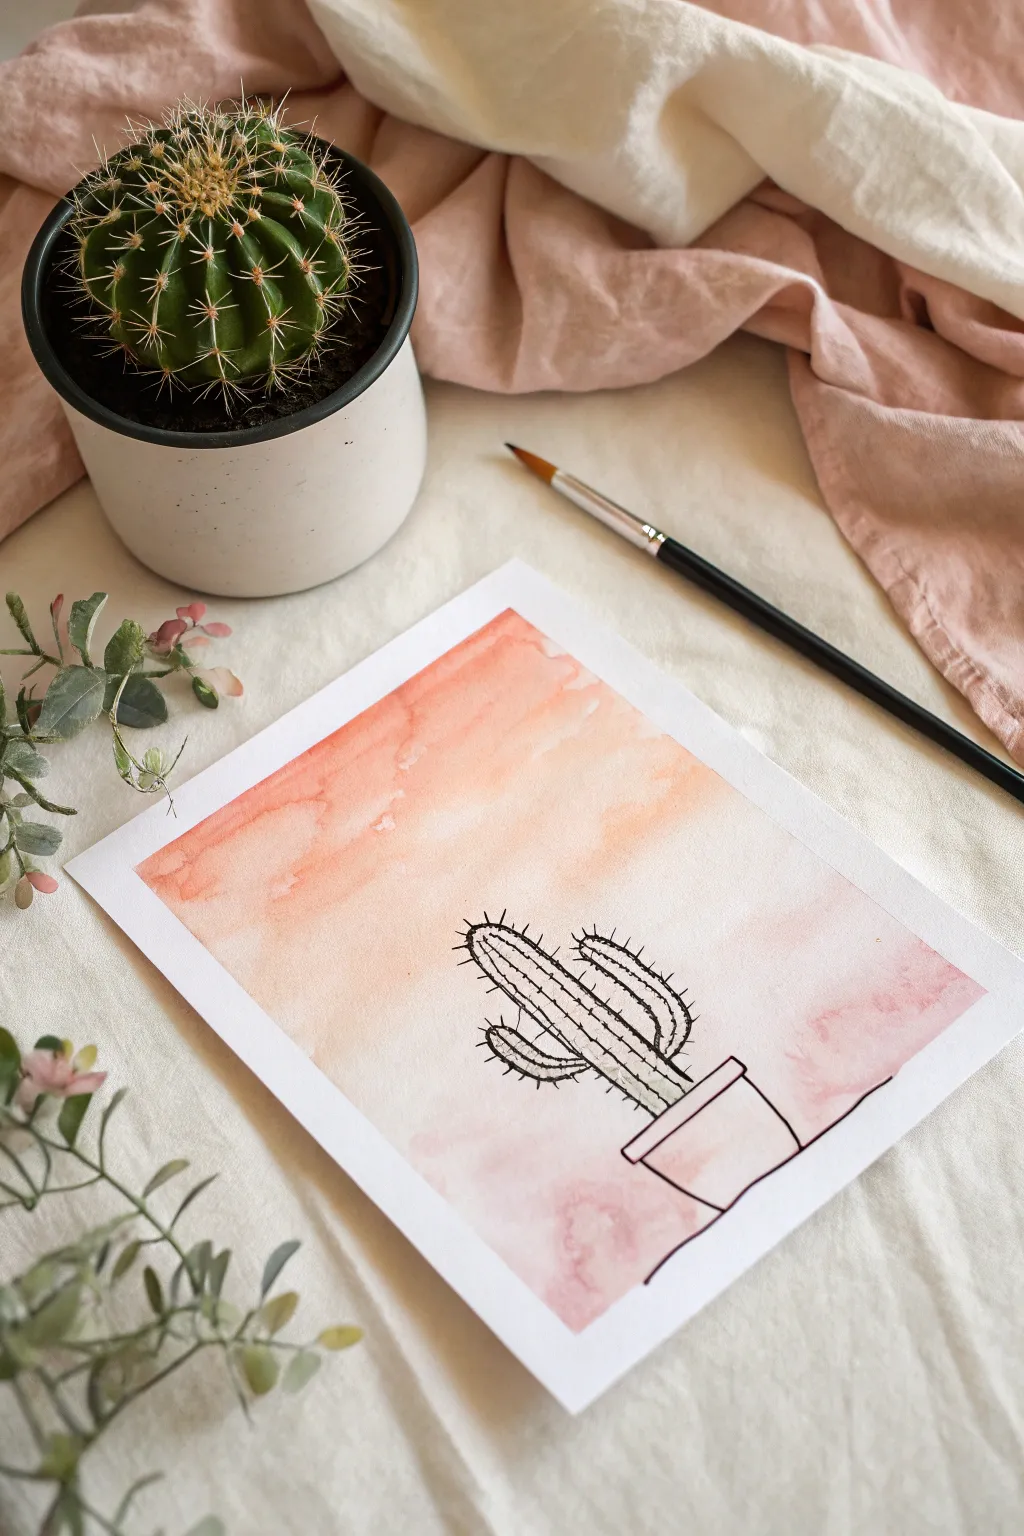
This project combines the loose, organic nature of watercolor washes with the crisp precision of ink illustration. You’ll create a dreamy, sunset-hued background that perfectly frames a simple, minimal cactus drawing.
Step-by-Step Guide
Materials
- Cold press watercolor paper (approx. 5×7 inches)
- Watercolor paints (Peach, Coral, or Salmon shades)
- Round watercolor brush (size 6 or 8)
- Water cups
- Paper towels
- Painter’s tape or Washi tape
- Drawing board or hard surface
- Black waterproof fineliner pen (0.5mm or 0.8mm)
- Pencil and eraser (optional)
Step 1: Preparing the Canvas
-
Tape it down:
Secure your watercolor paper to your drawing board using painter’s tape or washi tape along all four edges. This creates a clean white border and prevents the paper from buckling when wet. -
Mix your colors:
Prepare a watery mix of peach or coral paint on your palette. You want a nice puddle of color that is fluid but still pigmented. I like to have a slightly darker, more saturated version of the same color ready nearby.
Ink Bleeding?
If your waterproof pen smears, the paper wasn’t dry enough! Use a hairdryer on a low, cool setting to ensure the fibers are bone dry before inking.
Step 2: Painting the Wash
-
Wet the paper:
Using your clean brush and water, lightly wet the upper two-thirds of the paper where you want the sky to be. It should be damp, not soaking wet. -
Apply the first wash:
Load your brush with the lighter peach mix and sweep it across the top of the wet area. Let the paint flow naturally into the damp paper. -
Add depth:
While the paper is still wet, drop in some of the darker coral mix near the top or in random patches to create a cloud-like texture. -
Fade it out:
Rinse your brush and use just clean water to drag the bottom edge of the peach color downwards, letting it fade into white. You want an organic, uneven bottom edge rather than a straight line. -
Create blooms:
If you want more texture, dip your brush in water and tap a few drops onto the drying wash. This pushes pigment away and creates soft ‘blooms’ or cauliflower shapes. -
Wait for complete drying:
This is crucial: Let the paper dry completely. If it’s cold to the touch, it’s still wet. Patience here prevents your ink from bleeding later.
Step 3: Drawing the Cactus
-
Sketch the pot:
Using your black fineliner (or a light pencil first if you’re nervous), focus on the bottom center of the paper. Draw a simple trapezoid shape for the pot, wider at the top and narrower at the bottom. -
Add the rim:
Draw a thin rectangle on top of the trapezoid to create the rim of the pot. -
Outline the main stem:
Starting from the center of the pot’s rim, draw the main body of the cactus upwards. It should be a tall, rounded cylinder shape. -
Add the arms:
Draw two arms branching off the main stem. Draw one lower down on the left, curving upward, and one slightly higher on the right, also curving upward. -
Draw the ribs:
Sketch vertical lines inside the cactus body and arms to represent the ribs. These don’t need to be perfectly straight; a little wobble adds character. -
Add the needles:
Along the outer edges and the internal rib lines, draw tiny, short dashes or ‘v’ shapes to represent the cactus spines. Vary their direction slightly for a natural look. -
Ground the pot:
Draw a simple horizontal line extending from either side of the pot to represent the table or ground surface.
Level Up: Salt Texture
While the watercolor wash is still wet, sprinkle a tiny pinch of table salt on it. Brush it off once dry for a sparkling, crystal-like texture.
Step 4: Finishing Touches
-
Erase pencil marks:
If you sketched with pencil first, wait until the ink is totally dry, then gently erase the graphite lines. -
Peel the tape:
Slowly peel off the painter’s tape at a 45-degree angle away from the paper to reveal your crisp white border.
Frame your new desert-inspired artwork and enjoy the warm vibes


Geometric Cactus in a Triangle Frame
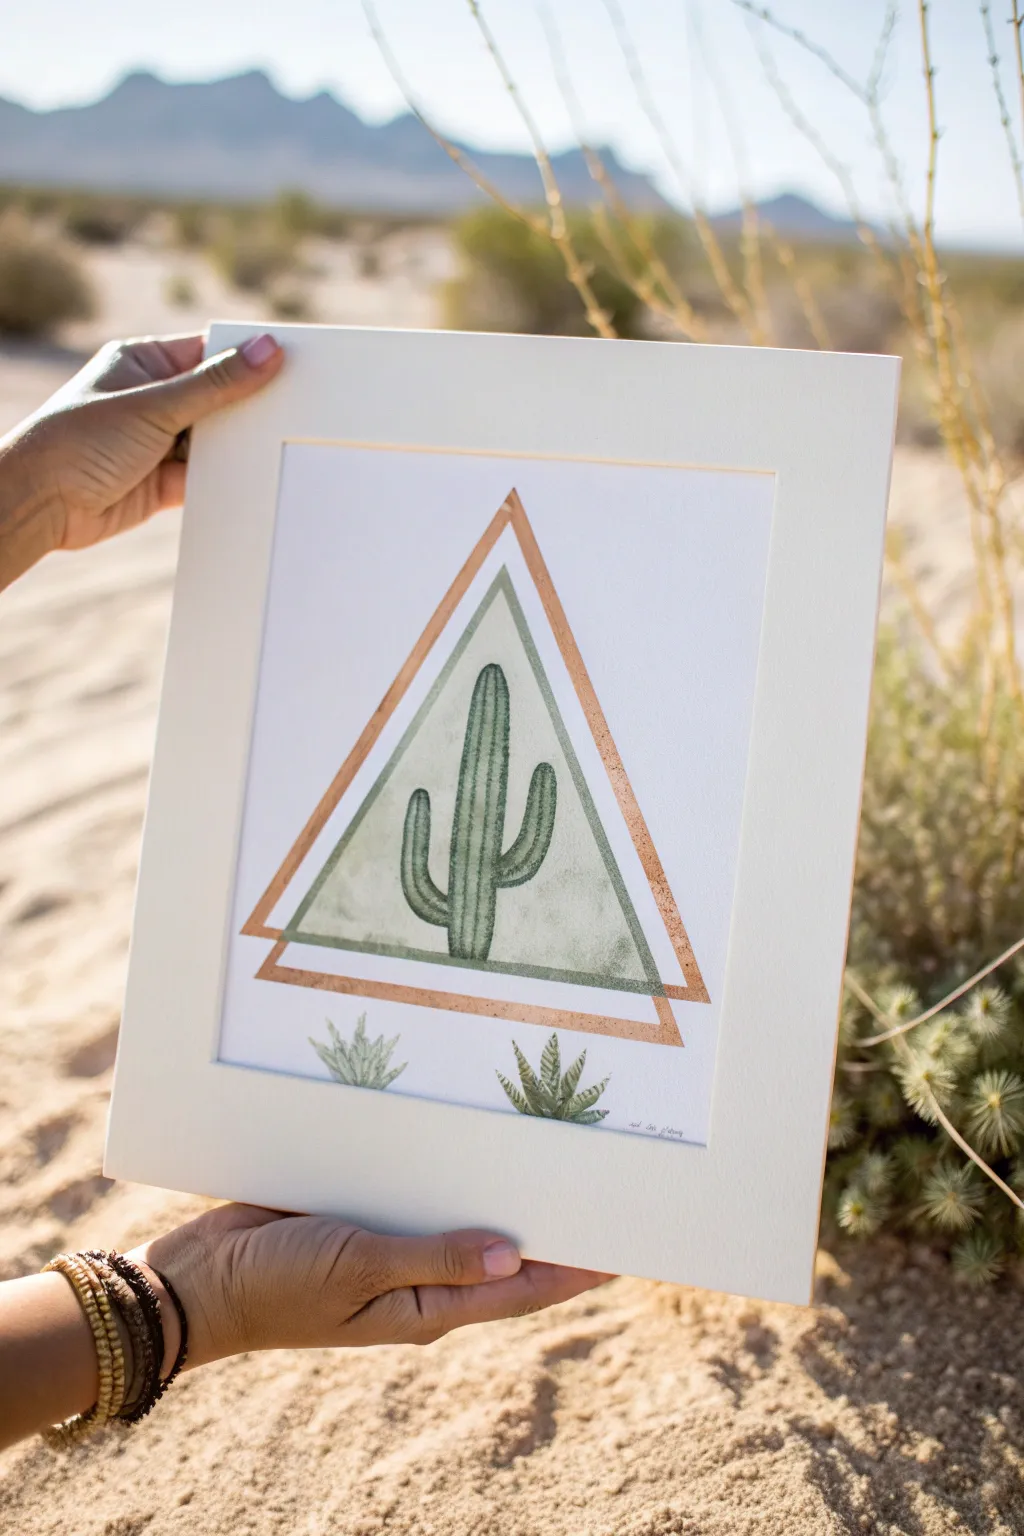
Blend the structured elegance of geometry with the organic flow of nature in this contemporary watercolor piece. A stylized saguaro cactus sits against a soft green backdrop, enclosed by a shimmering metallic copper triangle that adds a sophisticated finish.
Step-by-Step
Materials
- Hot press watercolor paper (smooth texture)
- Watercolor paints (Sage Green, Dark Hooker’s Green, Sap Green)
- Metallic copper or rose gold paint (acrylic or gouache)
- Painters tape or masking tape (low tack)
- Small flat brush (size 4 or 6)
- Fine detail brush (size 0 or 00)
- Ruler
- Pencil
- Eraser
- Palette
Step 1: Drafting the Geometry
-
Establish the center:
Begin by finding the visual center of your watercolor paper. Use a ruler to make a very faint mark where your main triangle will sit, ensuring there is plenty of white space around the edges for a clean, mat-ready look. -
Draw the main triangle:
Lightly sketch an equilateral triangle using your ruler. The base should be wide enough to support the cactus, roughly 6-8 inches depending on your paper size. Keep your pencil pressure extremely light so lines can be erased later. -
Add the offset triangle:
Sketch a second triangle slightly offset from the first to create that overlapping geometric effect. This second triangle will serve as the metallic border guideline. It should be slightly larger and shifted just a fraction of an inch to the side or vertically. -
Define the borders:
Using your ruler, measure a consistent width (about 1/4 inch) for the frame of the second triangle and draw the inner lines, creating a thick band that you will fill with metallic paint later.
Uneven Metallic Lines?
If your hand isn’t steady enough for the framing, re-apply painter’s tape *over* your dried green painting to mask the metallic area perfectly.
Step 2: Painting the Cactus
-
Mask the background area:
Apply painters tape carefully along the outside edges of your inner triangle shape—the one that will hold the cactus background. This ensures crisp, straight lines for the green geometric fill. -
Wash the background:
Mix a very watery wash of Sage Green. Paint the entire interior of the masked triangle. I like to keep this layer slightly uneven and translucent to give it that authentic watercolor texture. Let this layer dry completely. -
Sketch the cactus:
Once dry, lightly pencil in your saguaro shape on top of the sage background. Draw a central column with two arms curving upward—one slightly lower than the other for natural asymmetry. -
Paint the cactus base:
Using a stronger mix of Sap Green and the fine brush, fill in the cactus shape. Work carefully up the trunk and around the curves of the arms. The previous background layer will show through faintly, adding depth. -
Add vertical ribs:
Mix Dark Hooker’s Green with a tiny bit of blue for a shadow tone. With your smallest detail brush, paint thin vertical stripes running up the length covering the cactus. These mimic the ribs and texture of the plant. -
Add tiny details:
While you have the detail brush out, create tiny dots along the ribs to represent spines. You can also paint two small agave-style succulents at the very bottom of the paper, outside the main triangle, as a cute accent.
Level Up: Gold Leaf
Swap the metallic paint for adhesive size and real copper leaf sheets. The texture will catch the light much more dramatically than paint.
Step 3: Gilded Geometric Finish
-
Remove tape:
Very gently peel back the painter’s tape at a 45-degree angle. If the paper feels warm or the paint is tacky, wait longer. This reveal is the most satisfying part! -
Prepare the metallic paint:
Squeeze out a small amount of metallic copper or rose gold paint. If it’s heavy body acrylic, thin it with just a drop of water so it flows smoothly but remains opaque. -
Fill the frame:
Using a flat brush, carefully fill in the ‘frame’ triangle you drew in the drafting phase. Use the flat edge of the brush to keep your lines straight against your pencil guides. This metallic border should overlap parts of your green background triangle. -
Sharpen edges:
Go back with your finest brush to touch up any corners of the metallic triangle where the paint didn’t quite reach the point. Crisp corners are essential for the geometric look. -
Final erase:
Wait at least an hour for all paint, especially the metallic acrylic, to cure fully. Gently erase any visible pencil guidelines that weren’t covered by paint.
Place your finished artwork in a bright white mat to verify how professional and gallery-ready your desert geometry looks
Cactus With Bold Outline and Flat Fill
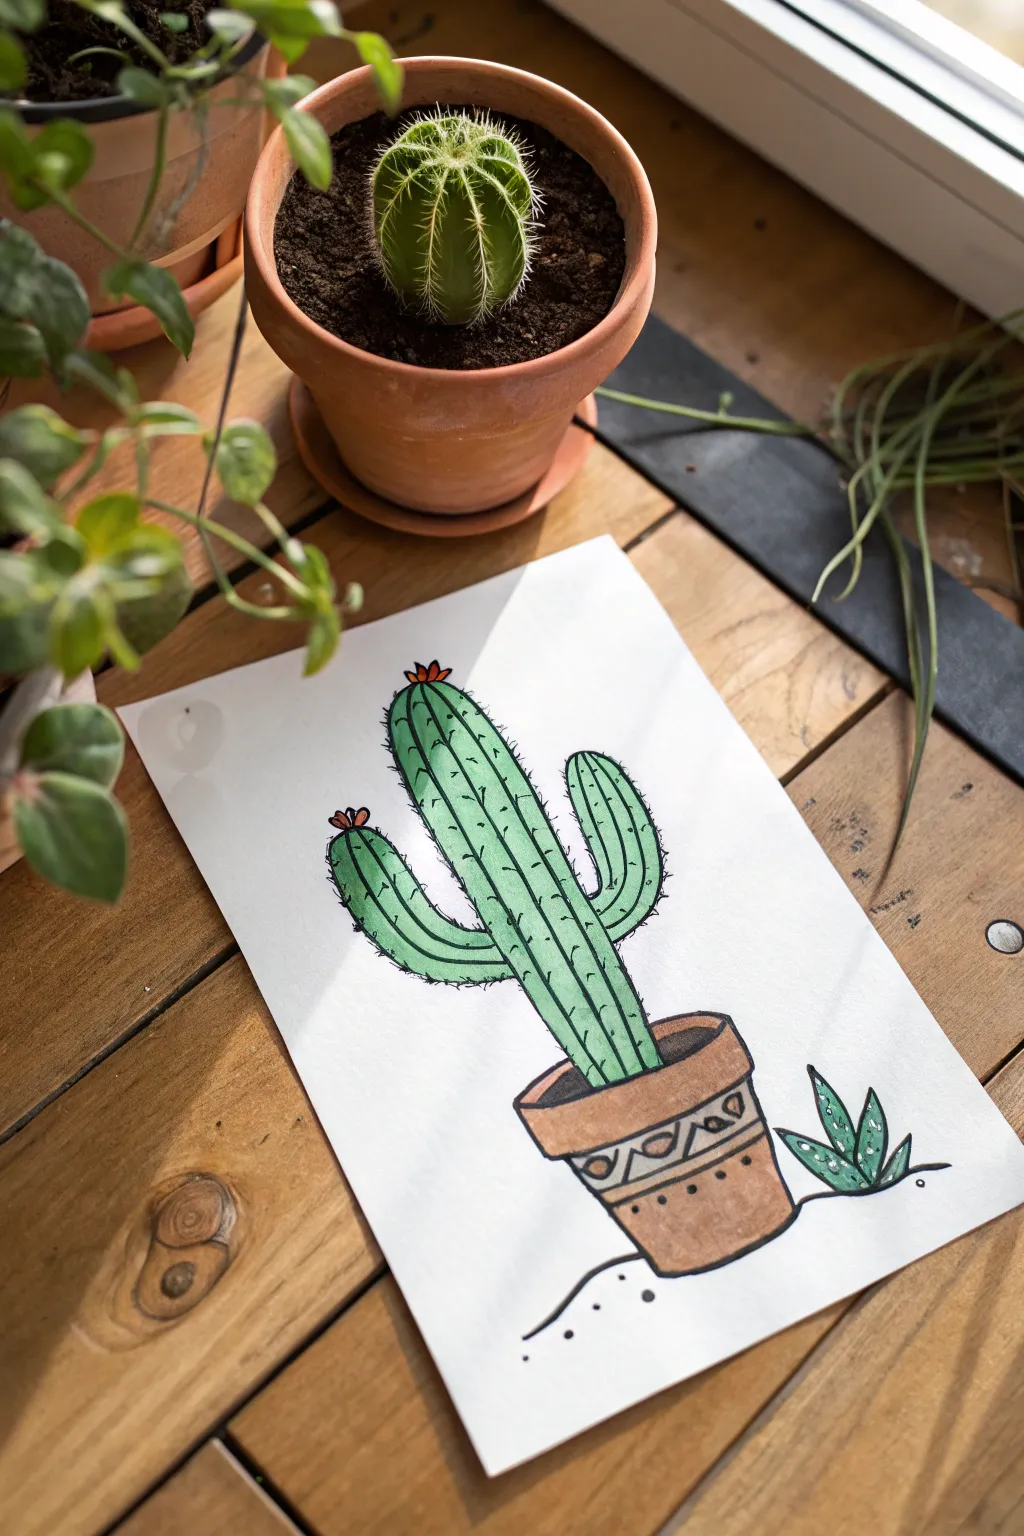
This project combines the clean look of graphic illustration with simple coloring techniques for a striking result. By using strong black outlines and flat, consistent coloring, you can create a charming desert scene that pops right off the page.
How-To Guide
Materials
- Heavyweight white drawing paper or mixed media paper
- HB Pencil
- Eraser
- Black fine liner pen (0.5mm or 0.8mm)
- Green markers (light and medium tones)
- Brown markers (tan and terracotta tones)
- Small touch of reddish-orange marker
- Ruler (optional)
Step 1: Sketching the Structure
-
Position the Pot:
Start near the bottom third of your paper. Draw a slightly flattened oval for the rim of the pot. Just below the rim, draw two lines tapering inward to form the main body of the pot, closing it off with a curved line at the bottom. -
Draft the Main Stem:
From the center of the pot’s oval, draw a tall, elongated oval shape extending upward. This will be the main body of your cactus. Keep the top rounded rather than pointy. -
Add the Arms:
On the left side of the main stem, roughly halfway up, sketch a curved arm that bends upward like a ‘U’ shape. Repeat this on the right side, perhaps placing it slightly higher or lower to keep it looking organic. -
Detail the Pot:
Draw a horizontal band across the pot’s body, just below the rim. Inside this band, sketch a simple zigzag or triangle pattern. Below the band, add a few small circles for texture. -
Add a Side Plant:
To balance the composition, sketch three small, pointy leaves emerging from the ground on the right side of the pot. These look like mini aloe vera leaves.
Step 2: Coloring
-
Fill the Cactus Body:
Using a light green marker, fill in the entire cactus shape. Use long, vertical strokes to mimic the direction of growth and keep the color distinctively flat and even. -
Color the Soil:
Inside the rim of the pot, color the small visible oval area with a dark brown or black to represent the soil. -
Color the Pot:
Switch to a terracotta or light brown marker. Color the main body and the rim of the pot. Leave the decorative zigzag band uncolored for now if you want it to be lighter, or fill it in with a contrasting tan shade. -
Add Blooms:
At the very tip of the main stem and the left arm, add tiny bursts of reddish-orange to represent small cactus flowers. -
Color the Side Plant:
Use a slightly darker green for the small leafy plant on the right side to distinguish it from the main cactus.
Clean Lines
Pull the pen toward you rather than pushing it away when drawing long outlines. This gives you more control and helps keep the line weight consistent.
Step 3: Inking and Details
-
Outline the Pot:
Once the marker ink is dry, take your black fine liner. Trace over your pencil lines for the pot, making the lines deliberate and continuous. -
Outline the Cactus:
Trace the outline of the cactus body and arms. I personally like to make these outer lines slightly thicker than the interior details for a bolder look. -
Draw the Ribs:
Draw vertical lines running down the length of the main stem and the arms. These represent the ribs of the cactus. Curve them slightly with the shape of the plant. -
Add Spines:
Along the vertical rib lines and the outer edges, make small, quick tick marks or dashes. These are the spines. Don’t overdo it; just a few spaced out evenly works best. -
Refine the Pot Decor:
Ink the zigzag pattern on the pot. Add small dots or circles in the space below the band for extra earthenware texture. -
Ground the Subject:
Draw a simple, wavy horizontal line extending from the base of the pot and under the side plant. Add a few loose dots below this line to suggest sand or pebbles. -
Erase Sketches:
Wait at least 5 minutes to ensure the black ink is totally set. Then, gently erase any visible pencil sketch lines to clean up the artwork.
Uneven Marker Ink
If your marker strokes look streaky, try coloring in small circular motions rather than long lines. This saturates the paper better for a solid, flat fill.
Step back and admire your crisp, modern desert illustration, ready to be framed
Ombre Cactus: Light-to-Dark Blend
Capture the serene beauty of the desert with this elegant watercolor cactus tutorial that focuses on blending soft greens. The gentle ombré effect on the main saguaro creates a lovely sense of dimension without needing complicated shading techniques.
Detailed Instructions
Materials
- Cold press watercolor paper (300 gsm)
- Watercolor paints (Sap Green, darker Hooker’s Green, Yellow Ochre, Burnt Sienna)
- Round watercolor brushes (size 4 and 8)
- Fine liner brush (size 0 or 00) for details
- Pencil (HB or H for light lines)
- Eraser
- Jar of clean water
- Paper towel
Step 1: Sketching the Composition
-
Outline the cactus:
Begin by lightly sketching the main cactus shape in the center of your paper. Draw a tall, vertical column with a rounded top, keeping the lines very faint. -
Add the arms:
Sketch two arms curving upward from the main column. Place one arm slightly lower on the left side and the other slightly higher on the right for a natural, asymmetrical look. -
Sketch the ground plants:
At the base of the cactus, lightly draw a simple, spiky agave shape on the right side and a small cluster of leafy branches on the left. -
Define the ridges:
Finally, sketch vertical lines running up the length of the cactus and its arms to represent the ribs. These will guide your painting later.
Bleeding Lines?
If your vertical stripes are merging together, you are painting adjacent sections too quickly. Wait for each stripe to dry completely, or use a hair dryer on low heat between sections.
Step 2: Painting the Main Cactus
-
Mix your greens:
Prepare two puddles of paint: a watery, light yellow-green for the highlights and a richer, darker sap green for the shadows. -
Starting the gradient:
Using your size 4 round brush, wet the first vertical rib section with clean water. Drop in your light green at the top of the shape. -
Deepening the color:
While the paper is still damp, touch the darker green to the bottom of that same section. Tilt the paper slightly or use a clean, damp brush to encourage the colors to meet and blend in the middle. -
Repeat the process:
Move to the next vertical strip. I find it helpful to skip every other strip and let them dry before painting the adjacent ones; this prevents the wet paint from bleeding across the lines and ruining the ribbed effect. -
Fill in the gaps:
Once the first set of strips is dry, paint the remaining strips using the same ombré technique—light green at the top, fading to dark green at the bottom. -
Paint the arms:
Use the same method for the cactus arms, keeping the tops lighter and the areas where the arms join the main body slightly darker to simulate shadow.
Step 3: Adding Details and Grounds
-
Paint the leafy bush:
For the plant on the left, use a blue-green mix. Paint a central stem and dab on tiny leaves using the tip of your brush. -
Paint the agave:
For the spiky plant on the right, use an olive green tone. Start your stroke at the base and flick upward to create sharp, tapered points. -
Create the sandy ground:
Dilute Yellow Ochre and a touch of Burnt Sienna with lots of water. Paint a horizontal wash across the bottom, carefully going around the base of the plants. -
Add rocks:
Drop in a few small, greyish shapes near the cactus base while the ground wash is still slightly wet to let them settle into the sand. -
Add spines:
Once the main cactus is completely bone-dry, use your fine liner brush and a dark green mix to paint tiny, short perpendicular dashes along the vertical ridges. -
Final touches:
Erase any visible pencil lines gently, but make sure the paint is totally dry first to avoid smudging.
Frame It Up
Leave a 1-inch border of white paper around your painting. When finished, tape off the edges and paint a soft wash rectangle in the background for a modern ‘postcard’ look.
Now you have a tranquil desert scene perfect for framing or gifting to a plant-loving friend
Night Desert Cactus With Simple Stars
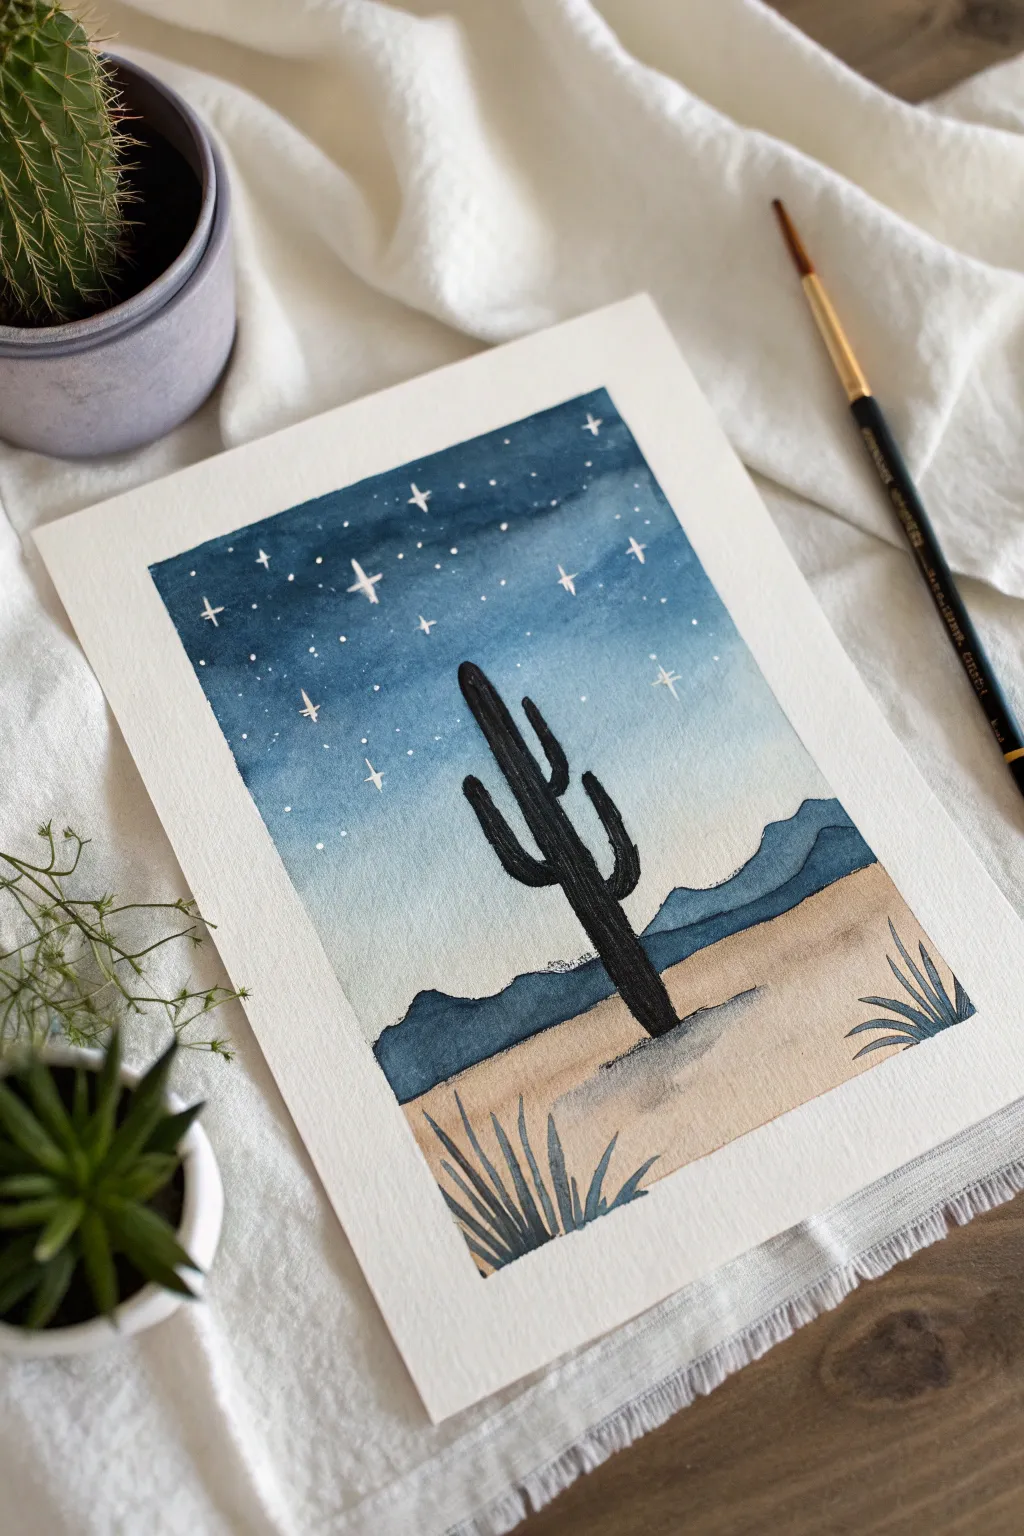
Capture the serene beauty of the desert at dusk with this atmospheric watercolor piece. The gradient sky transitions from a deep indigo to a soft horizon, creating the perfect backdrop for a bold cactus silhouette.
Step-by-Step Tutorial
Materials
- Cold press watercolor paper (approx. 5×7 inches)
- Watercolor paints (Indigo, Prussian Blue, Burnt Sienna, Yellow Ochre, Black/Payne’s Gray)
- Masking tape
- Flat wash brush (3/4 inch)
- Round brush (size 4 or 6)
- Fine detail brush (size 0 or 1)
- White gel pen or white gouache
- Cup of water and paper towels
Step 1: Setting the Scene
-
Prepare the canvas:
Tape down all four edges of your watercolor paper to a board or table. This creates that crisp white border seen in the example and prevents the paper from buckling when wet. -
Sketch the horizon:
Lightly sketch a horizontal line about a third of the way up from the bottom for the ground. Add a subtle, uneven line just above it to mark where the distant mountains will sit.
Bleeding Lines?
If your mountains are bleeding into the sky, your paper wasn’t dry enough. Use a hairdryer on the low heat setting to speed up drying between adjacent layers.
Step 2: Painting the Sky Gradient
-
Wet the sky area:
Using your flat wash brush and clean water, gently wet the entire sky area above your mountain line. The paper should be glisten, but not form puddles. -
Apply the darkest blue:
Load your brush with a concentrated Indigo or deep blue. Paint a horizontal stripe across the very top of the paper, letting the color bleed downwards into the wet paper. -
Blend the mid-tones:
Rinse your brush slightly and pick up a lighter blue (like diluted Prussian Blue). Apply this below the dark stripe, blending the edges where they meet to create a soft transition. -
Fade to the horizon:
With a damp, clean brush, pull the blue color down toward the mountain line. As you get closer to the horizon, let the blue fade almost to white or a very pale wash, creating a glowing effect. -
Let it dry:
Allow the sky layer to dry completely. If the paper is cold to the touch, it’s still wet. This step is crucial so the mountains don’t bleed into the sky.
Add Texture
While the sandy ground layer is still wet, sprinkle a tiny pinch of table salt on it. Let it dry completely, then brush it off for a cool, speckled sand texture.
Step 3: Ground and Mountains
-
Paint the desert floor:
Mix a watery wash of Yellow Ochre with a tiny touch of Burnt Sienna to get a sandy beige. Paint the bottom section of the paper, keeping the wash even and light. -
Add the mountains:
Once the sky and ground are dry, mix a medium-tone blue-grey using your blue and a touch of black. Paint the mountain range shape, overlapping the bottom edge of the sky slightly.
Step 4: The Silhouette
-
Outline the cactus:
Using your round brush and concentrated black paint (or a very thick mix of Indigo/Payne’s Gray), carefully paint the main trunk of the cactus in the center. -
Add the arms:
Paint the curved arms of the cactus. Notice in the example how one arm curves up on the left and two relate on the right. Vary the thickness slightly to make it look organic. -
Refine the shape:
Go back while the paint is wet to smooth out any edges. Ensure the base of the cactus covers the transition between the mountains and the sand. -
Paint the shadow:
With a diluted grey mix, paint a soft, elongated shadow distinctively stretching to the right from the base of the cactus to ground it in the landscape.
Step 5: Final Details
-
Add foreground plants:
Switch to your fine detail brush. Using a mix of the mountain blue and some black, paint small, spiky agave-like plants in the bottom corners. -
Create the stars:
Once everything is bone dry, use a white gel pen or a fine brush with white gouache to dot small stars in the dark blue section of the sky. -
Add sparkle:
Draw a few larger four-pointed stars (cross shapes) scattered among the dots to make the sky twinkle. -
Remove the tape:
Slowly and carefully peel away the masking tape at a 45-degree angle to reveal your clean, crisp edges.
Frame this mini masterpiece or turn it into a beautiful handmade greeting card for a friend
Tape-Resist Cactus Shapes
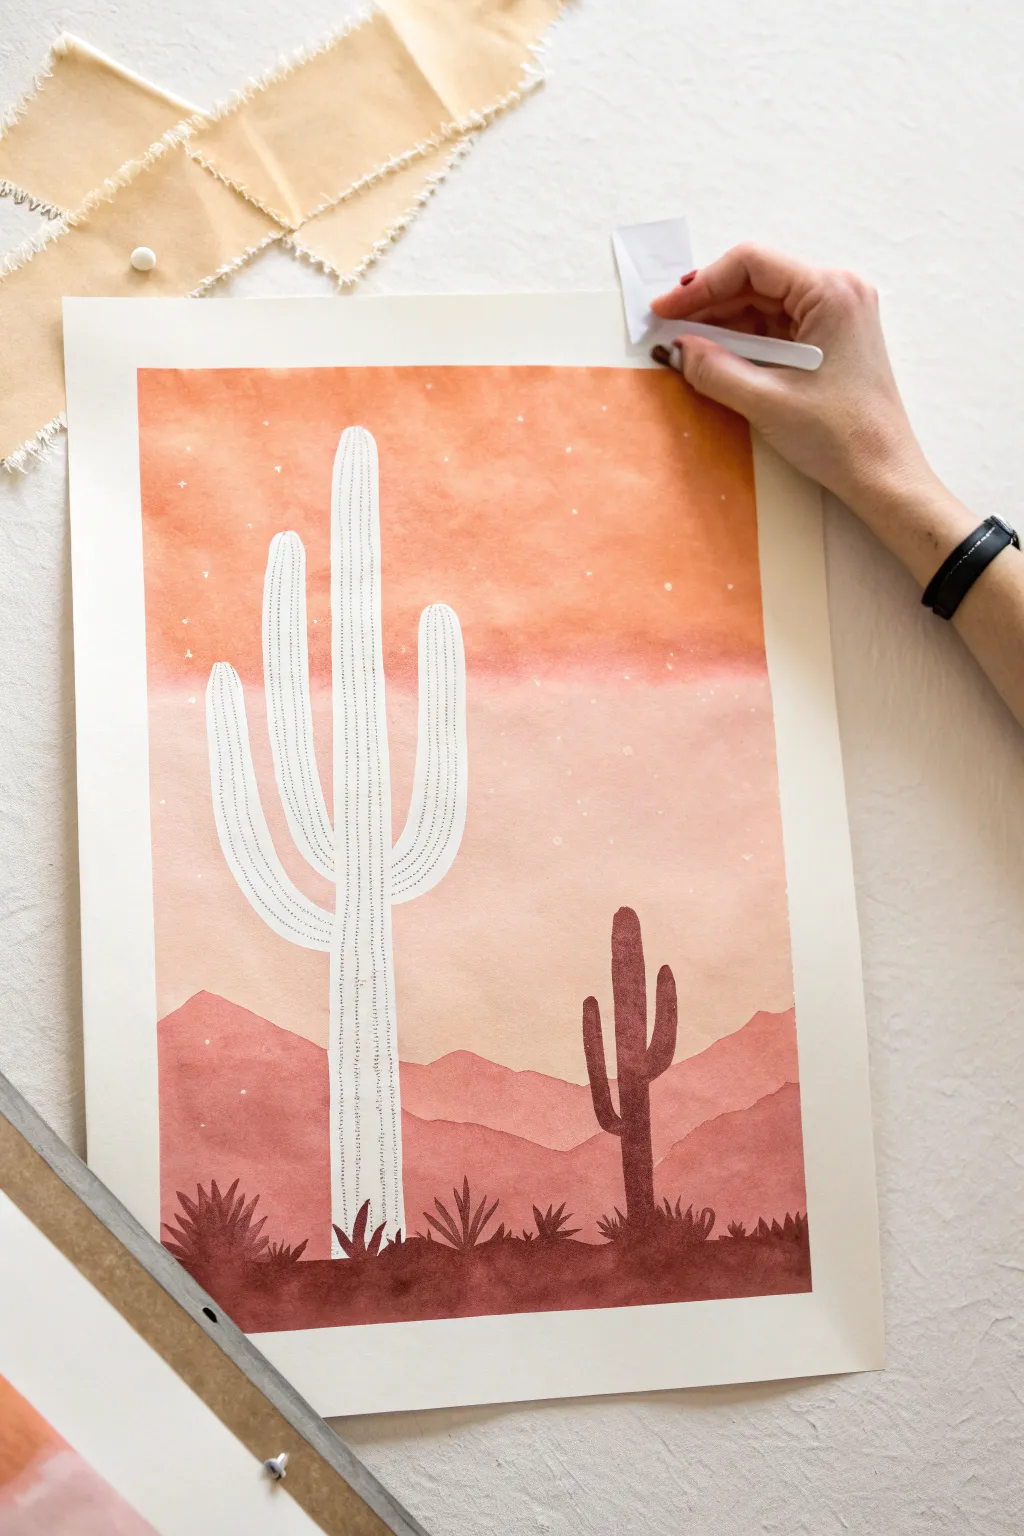
Capture the magic of a fading desert sunset with this clever tape-resist watercolor technique. By masking off the main subject first, you create a crisp, white cactus that pops dramatically against a warm, blended gradient sky.
Detailed Instructions
Materials
- Watercolor paper (cold press recommended)
- Painter’s tape or masking fluid
- Watercolor paints (shades of ochre, burnt sienna, rust, and orange)
- Flat wash brush (large)
- Round detail brushes (small and medium)
- X-Acto knife or craft knife
- Cutting mat
- Pencil
- White gel pen or gouache (for stars)
Step 1: Masking the Giant
-
Sketch the outline:
Begin by lightly sketching your large saguaro cactus shape on the left side of your paper. Keep the lines faint since they will be erased later. -
Apply the tape base:
Cover the entire sketched cactus area with strips of painter’s tape. Overlap the edges slightly to ensure no paint seeps through the gaps. -
Cut the shape:
Carefully run your craft knife along your pencil lines to cut the tape into the cactus shape. Use a gentle touch to cut through the tape without slicing deeply into the paper underneath. -
Peel away excess:
Peel up the tape from the outside of the cactus shape, leaving only your perfectly masked cactus firmly adhered to the paper. Press down the edges one last time to seal them.
Step 2: The Sunset Sky
-
Mix your gradient colors:
Prepare three washes on your palette: a deep burnt orange, a softer peachy-pink, and a very pale warm ochre. -
The initial wash:
Using your large flat brush, apply clean water to the entire paper (wet-on-wet technique) to help the colors blend smoothly. -
Paint the top sky:
Load your brush with the deep burnt orange and paint the top third of the paper, brushing horizontally right over the taped cactus. -
Blend downward:
Switch to the peachy-pink tone for the middle section, overlapping slightly with the orange to create a seamless transition. -
Finish the horizon:
Use the pale ochre wash for the bottom section of the sky. Let the colors bleed naturally into one another, but keep the horizon line relatively light. -
Dry completely:
This is crucial—let the background layer dry 100% before moving on. The paper should feel uniform in temperature and not cool to the touch.
Tape Tearing Paper?
Before applying tape to your art, stick it to your clothing once or twice. The lint reduces the tackiness just enough to make it peel away safely later.
Step 3: Mountains and Silhouettes
-
Paint distant mountains:
Mix a diluted reddish-brown color. Paint rolling mountain shapes near the bottom third of the paper. This layer should be translucent to look far away. -
Add closer hills:
Once the first range is damp-dry, mix a slightly more saturated rust color and paint a second, lower mountain range in front of the first. -
Paint the foreground:
Taking your darkest pigment—a thick consistency of burnt umber mixed with a touch of red or purple—paint the ground along the very bottom edge. -
Add silhouette details:
Using a small round brush and that same dark mixture, paint the smaller cactus on the right side and add spiky agave plants along the bottom. -
Let it set:
Allow these dark foreground elements to dry completely to prevent smudging.
Level Up: Salt Texture
While the sky wash is still wet, sprinkle a pinch of table salt on the orange section. When dry and brushed off, it creates a starry, speckled galaxy texture.
Step 4: The Reveal
-
Remove the tape:
Slowly peel the tape off your main cactus. Pull it away at a 45-degree angle to keep the paper fibers intact. You should be left with a stark white shape. -
Add texture lines:
The white space can look a bit flat, so I use a fine-tip black pen or very thin brush to draw vertical dotted lines down the length of the cactus arms to simulate ridges. -
Add stars:
Finally, dip a small brush or toothpick into white gouache (or use a gel pen) to dot tiny stars into the darker orange section of the sky.
Frame your piece to highlight the beautiful contrast between the crisp white cactus and the soft, dreamy sky
Splatter-Paint Desert Cactus Texture
Capture the serene beauty of the American Southwest with this vibrant watercolor project that balances warm, glowing skies with detailed botanical illustration. You’ll layer washes to create a stunning sunset gradient before adding a majestic Saguaro cactus as your bold focal point.
How-To Guide
Materials
- Cold press watercolor paper (300 gsm or heavier)
- Watercolor paints (Sap Green, Hooker’s Green, Burnt Sienna, Yellow Ochre, Cadmium Orange, Alizarin Crimson, Burnt Umber)
- Masking tape
- Pencil (HB or H) and kneaded eraser
- Round brushes (sizes 2, 6, and 10)
- Fine liner brush or rigger brush
- Two jars of water
- Paper towels
- White gel pen (optional for highlights)
Step 1: Setting the Scene
-
Outline the Composition:
Lightly sketch a large Saguaro cactus in the center of your paper. Make the main trunk tall and add two curved arms. Sketch a low horizon line behind it, and outline distant, undulating hills in the background. Keep your pencil pressure very light so graphite doesn’t smudge later. -
Tape the Edges:
Ideally, leave natural deckled edges if your paper has them, but secure the paper to your board with masking tape along the very outer rim to prevent buckling during the wash stages. If you want a sharp border within the paper, tape that off now. -
Prepare the Sky Wash:
Mix a watery puddle of Yellow Ochre and another of Cadmium Orange. Wet the sleek sky area with clean water using your largest brush, being careful to paint *around* the main cactus shape, keeping the cactus dry white paper. -
Paint the Sunset Gradient:
While the paper is wet, drop Yellow Ochre near the horizon line. As you move upward, blend in the Cadmium Orange. Allow the colors to diffuse naturally. Add a tiny touch of diluted Alizarin Crimson mixed with orange for some cloud-like variation near the mountains.
Step 2: Landscapes and Layers
-
Background Mountains:
Once the sky serves as a dry backdrop, mix Alizarin Crimson with a touch of Burnt Sienna for a dusty rose color. Paint the distant mountain range with a flat wash. This layer should be sheer to suggest atmospheric distance. -
Middle Ground Texture:
Mix Burnt Umber with a little Sap Green. Paint the ground layer below the mountains. Use horizontal strokes, leaving some lighter gaps to suggest uneven, dry terrain. While this is damp, dab in darker brown spots to create the look of roughness and rocks. -
Add Distant Silhouettes:
Using a small size 2 brush and a watery grey-brown mix, paint two tiny, simple cactus silhouettes in the distance on either side of the main subject. These help create a sense of scale and vastness.
Uneven Wash?
If your sunset sky dries with hard lines (flower shapes), clean them up by gently scrubbing the edge with a damp stiff brush, or embrace them as wispy clouds.
Step 3: The Main Attraction
-
Base Green Layer:
Now for the star of the show. Mix sap Green with a little Yellow Ochre for a warm, light green. Paint the entire body of the main cactus. Let the watercolor pool slightly at the bottom of the arms for natural shading. -
Define the Ribs:
Wait for the base layer to dry completely. Mix a darker green using Hooker’s Green and a touch of Burnt Umber. With a steady hand and a size 2 brush, paint vertical lines down the length of the cactus to represent its ribbed structure. -
Creating dimension:
Soften one side of each dark vertical stripe with a clean, slightly damp brush. This blends the hard line into a shadow, making the ribs look rounded rather than flat. -
Adding Spines:
Using your finest liner brush and a very dark brown-black mix, create tiny ticking marks along the vertical ribs. These are the spines. Group them in small clusters of 3 or 4 for realism.
Go 3D
Once the paint is fully dry, use a white gel pen to add tiny highlights to the very tips of the cactus spines or the sunny side of the agave leaves.
Step 4: Foreground Details
-
Adding Shrubbery:
Mix a dusty olive green. Using a scumbling motion (scrubbing lightly) with an older or dry brush, stipple in a bushy shrub on the left side of the foreground. The dry brush technique creates a perfect leafy texture. -
Painting the Agave:
On the right foreground, use a cool blue-green mix to paint an agave plant. Use overlapping, pointed strokes that radiate outward from a central point on the ground. -
Ground Shadows:
Mix a watery dark brown and glaze it under the base of the main cactus and the smaller shrubs to anchor them to the ground. This prevents them from looking like they are floating. -
Splatter Texture:
Dip an old toothbrush or stiff brush into diluted brown paint. Tap it over the bottom foreground area to create flecks of sand and grit. Cover the main cactus with a scrap of paper while doing this to keep it clean.
Peel off your tape carefully to reveal those crisp edges and enjoy your serene desert landscape
Mini Cactus Polaroid-Style Series
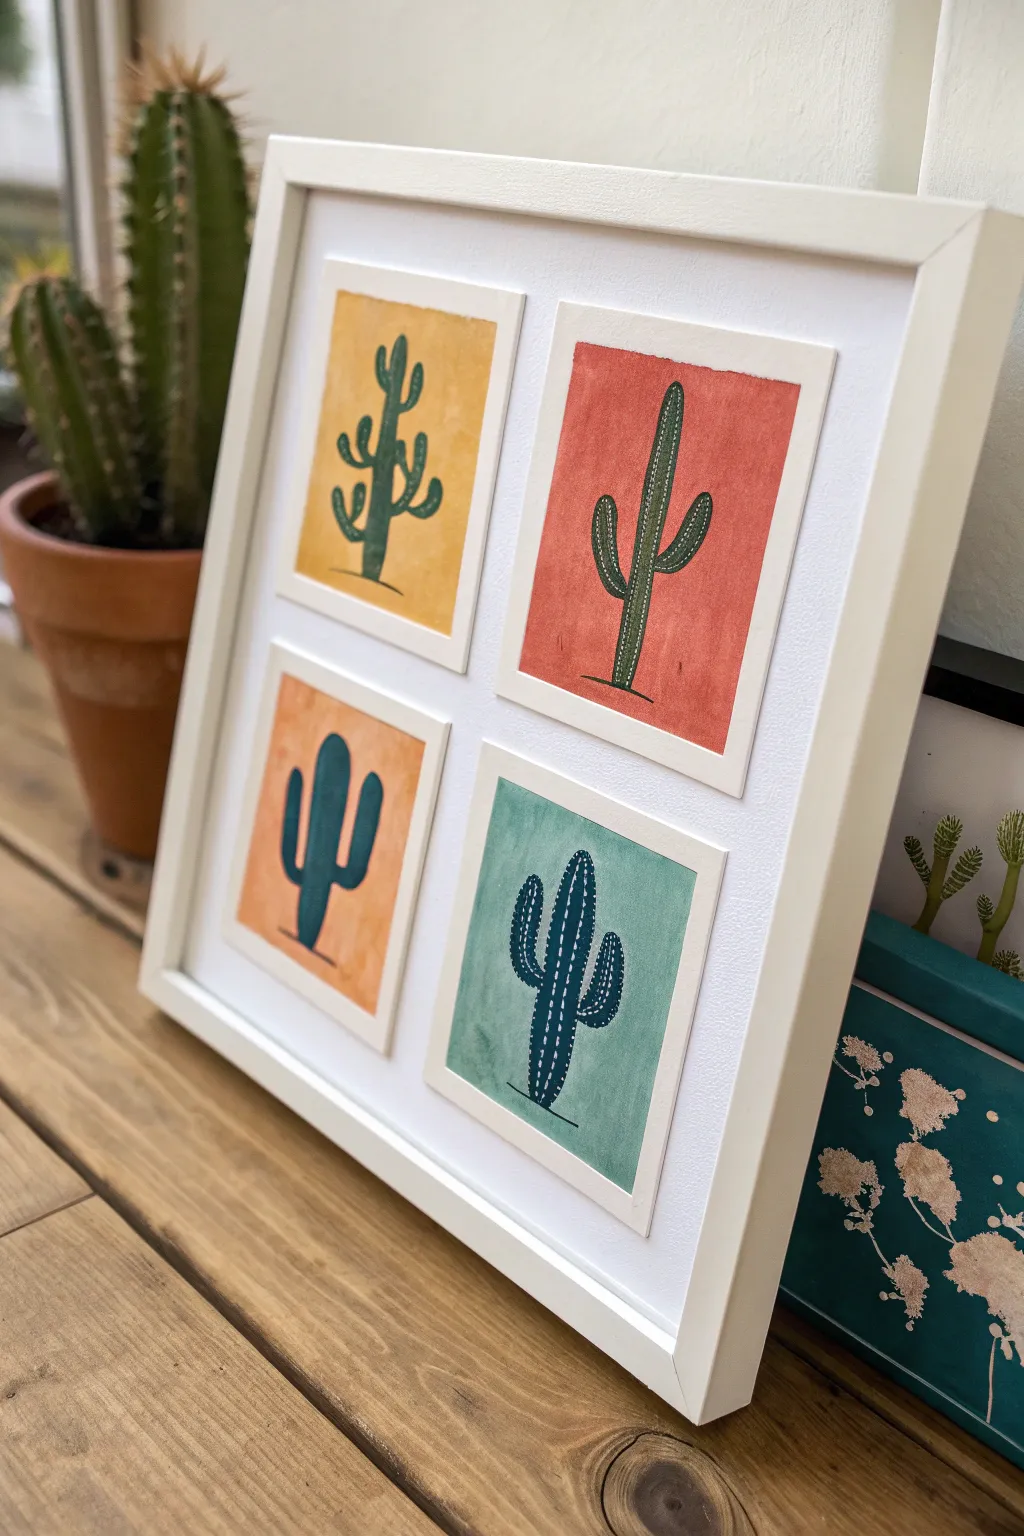
Create a gallery-worthy statement piece by combining four miniature cactus portraits into one cohesive frame. This project mimics the charm of vintage Polaroids with colorful, blocked backgrounds and crisp, illustrative botanicals.
Detailed Instructions
Materials
- Heavyweight watercolor paper (300gsm cold press is best)
- Watercolor paints (mustard, terracotta, peach, teal)
- Dark green acrylic paint or gouache
- Fine liner brushes (size 0 and 2)
- White gel pen
- Ruler
- Pencil and eraser
- Masking tape or painter’s tape
- Scissors or a paper trimmer
- White square frame (approx. 10×10 or 12×12 inches)
- Double-sided tape or adhesive foam pads
Step 1: Preparing the Mini Canvases
-
Measure and mark:
Start by measuring four equal rectangles on your watercolor paper. These should be slightly smaller than standard Polaroids, perhaps 3×4 inches each, leaving white space around them if you plan to cut them out later. -
Define the painting area:
Within each rectangle, lightly draw a square at the top, leaving a larger white border at the bottom to mimic that classic instant film look. About 2.5 x 2.5 inches for the painted area works well. -
Tape the borders:
Use masking tape to block off the outside edges of your inner squares. Press the tape down firmly to prevent paint from bleeding underneath, ensuring you get those crisp, clean lines later.
Bleeding Edges?
If paint bleeds under the tape, wait for it to dry completely. Then, use a small flat brush with a tiny amount of white gouache or acrylic to paint over the mistake and crisp up the line.
Step 2: Painting the Backgrounds
-
Mix your palette:
Prepare four distinct, earthy colors: a warm mustard yellow, a deep terracotta red, a soft peach, and a muted teal or sage green. These will serve as your backdrop blocks. -
Apply the first wash:
Paint the first square entirely with the mustard yellow. Aim for a flat, even wash, but don’t worry if there’s a little texture—watercolor paper adds nice character. -
Complete the set:
Continue painting the remaining three squares with the terracotta, peach, and teal mixes respectively. Wash your brush thoroughly between colors. -
Let it dry completely:
Wait for the paint to be bone dry. If the paper feels cool to the touch, it’s still damp. I usually give this step at least 30 minutes or use a hair dryer on a low setting. -
Peel the tape:
Check that the paint is dry, then carefully peel away the masking tape at a 45-degree angle. This reveals your four perfect blocks of color.
Step 3: Illustrating the Cacti
-
Sketch the shapes:
Lightly sketch a different cactus shape in the center of each colored block. Try a tall Saguaro, a round barrel cactus, or a branching variety for visual interest. -
Fill in the silhouettes:
Using dark green gouache or acrylic paint and a size 2 brush, carefully fill in your cactus sketches. The opacity of gouache works perfectly here to stand out against the colored backgrounds. -
Refine the edges:
Switch to a size 0 liner brush to clean up any edges or add tiny protruding arms to your cacti. -
Add the ground connection:
Paint a very thin, simple horizontal line or a tiny shadow at the base of each cactus so they don’t look like they are floating in mid-air.
Level Up
Use adhesive foam squares instead of flat tape to mount the paper cards inside the frame. This creates a shadow box effect, adding depth and making them look like real mounted photos.
Step 4: Final Details and Assembly
-
Wait for the green to dry:
Ensure the dark green cactus shapes are completely dry before moving to the detail phase to prevent smearing. -
Add spines and texture:
Take your white gel pen and draw the details. Add lines of dots for spines, stripes, or small ‘v’ shapes to give the cacti dimension and personality. -
Cut out the cards:
Using scissors or a paper trimmer, cut out the four rectangles you marked in the beginning. Leave that signature wider white margin at the bottom of each one. -
Arrange placement:
Open your frame and arrange the four paintings on the backing board or mat. Experiment with the spacing until the gap between them is equal. -
Secure and frame:
Attach the paintings to the backing using double-sided tape or foam pads for a slight 3D effect. Reassemble the frame and clean the glass.
Hang your new desert-inspired quartet in a sunny spot to enjoy those vibrant colors all year round
Abstract Cactus Mosaic With Color Tiles
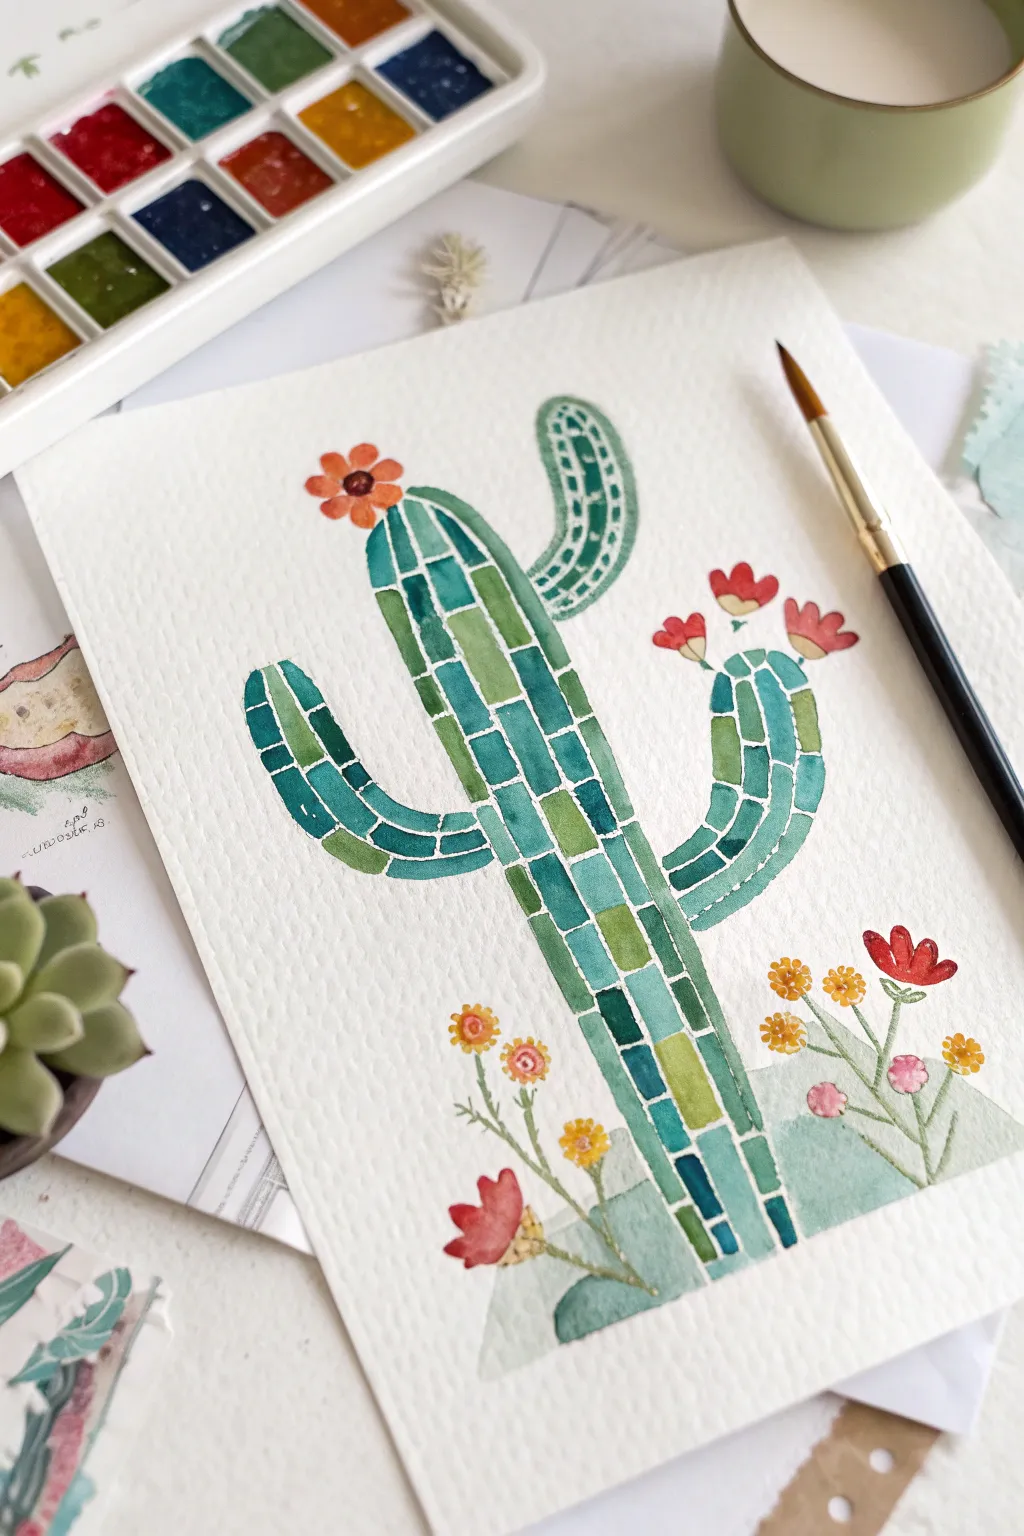
Transform a classic desert icon into a modern mosaic masterpiece using a simple grid-like painting technique. This project plays with geometry and negative space, creating a beautiful stained-glass effect where the white of the paper acts as your grout lines.
Step-by-Step Tutorial
Materials
- Cold press watercolor paper (300 gsm)
- Watercolor paint set
- Round watercolor brush (size 4 or 6)
- Small detail brush (size 0 or 2)
- Pencil (HB or H)
- Eraser
- Jar of clean water
- Paper towels
- Palette for mixing
Step 1: Sketching the Framework
-
Outline the main body:
Start by lightly sketching a tall, thick vertical column in the center of your paper. This will be the main trunk of the cactus. Keep the top slightly rounded rather than flat. -
Add the arms:
Draw three distinct arms branching off the main trunk. Place one curving upwards on the lower left, another curving up on the middle right, and a smaller, thinner one near the top right. -
Grid the interior:
Inside your cactus outline, sketch a grid of rectangular ’tiles.’ Draw vertical lines following the curve of the cactus, then cross them with horizontal lines. Don’t make them perfect squares; slight irregularity adds charm. -
Sketch the flowers:
Draw small circles or tulip shapes at the tips of the arms and the top of the trunk. At the base, sketch simple stems and small circular blooms rising from the ground. -
Create the ground:
Lightly pencil in a few low, rolling triangular hills at the very bottom to ground your composition.
Step 2: Painting the Mosaic Tiles
-
Prepare your greens:
Mix three or four variations of green on your palette. I like to have a deep hooked green, a bright sap green, a blue-green teal, and a lighter yellow-green ready to go. -
Start filling tiles:
Begin painting the individual rectangular sections inside your pencil grid. The most crucial part is leaving a tiny gap of white paper between every single block of color. -
Vary the hues:
As you move from tile to tile, switch up your green shades. Place a dark teal neighbor next to a bright lime green to create contrast and the look of varied ceramic tiles. -
Control the water:
Keep your paint consistency relatively rich. If the paint is too watery, it might run across your ‘grout lines.’ If a puddle forms, tap it gently with a dry paper towel. -
Complete the cactus body:
Continue until all the plotted rectangles in the trunk and arms are filled. It requires a bit of patience, but the rhythm becomes quite relaxing. -
Paint the top arm:
For the small upper-right arm, use smaller dots or dashes instead of full rectangles to show texture variation.
Clean Lines Trick
If you struggle with steady hands for the white gaps, draw your grid with white masking fluid or a white wax crayon first. The paint will resist these lines automatically.
Step 3: Adding Blooms and Details
-
Paint the cactus flowers:
Using a bright orange or coral color, fill in the flower shapes on the cactus tips. Keep these simple—just a wash of color with maybe a darker center dot while wet. -
Color the ground flowers:
Switch to your detail brush. Paint small yellow and pink circles for the wildflowers growing at the base. Add tiny red centers to the yellow flowers for depth. -
Add stems and leaves:
Using a steady hand and a light green mix, paint thin, single-stroke lines for the stems of the ground flowers. Add tiny leaf shapes attached to these stems. -
Fill the ground hills:
Wash in the ground triangles with a very pale, watery green-grey. This should be much lighter than the cactus itself so it doesn’t compete for attention. -
Erase pencil lines:
Once the painting is 100% bone dry—seriously, give it extra time—gently erase any visible pencil marks from the white gaps to make the mosaic pop.
Golden Hour Glow
Once the green tiles are dry, glaze a very watery, transparent yellow wash over just the left side of the cactus to make it look like it’s catching the morning sun.
Now you have a refreshing piece of desert art that looks intricate but is surprisingly meditative to create


Have a question or want to share your own experience? I'd love to hear from you in the comments below!