If you’ve got a handful of smooth stones and a little paint, you’re already halfway to the cutest pack of dog rocks. I love these easy dog rock painting ideas because you can keep them super simple and still end up with tons of personality.
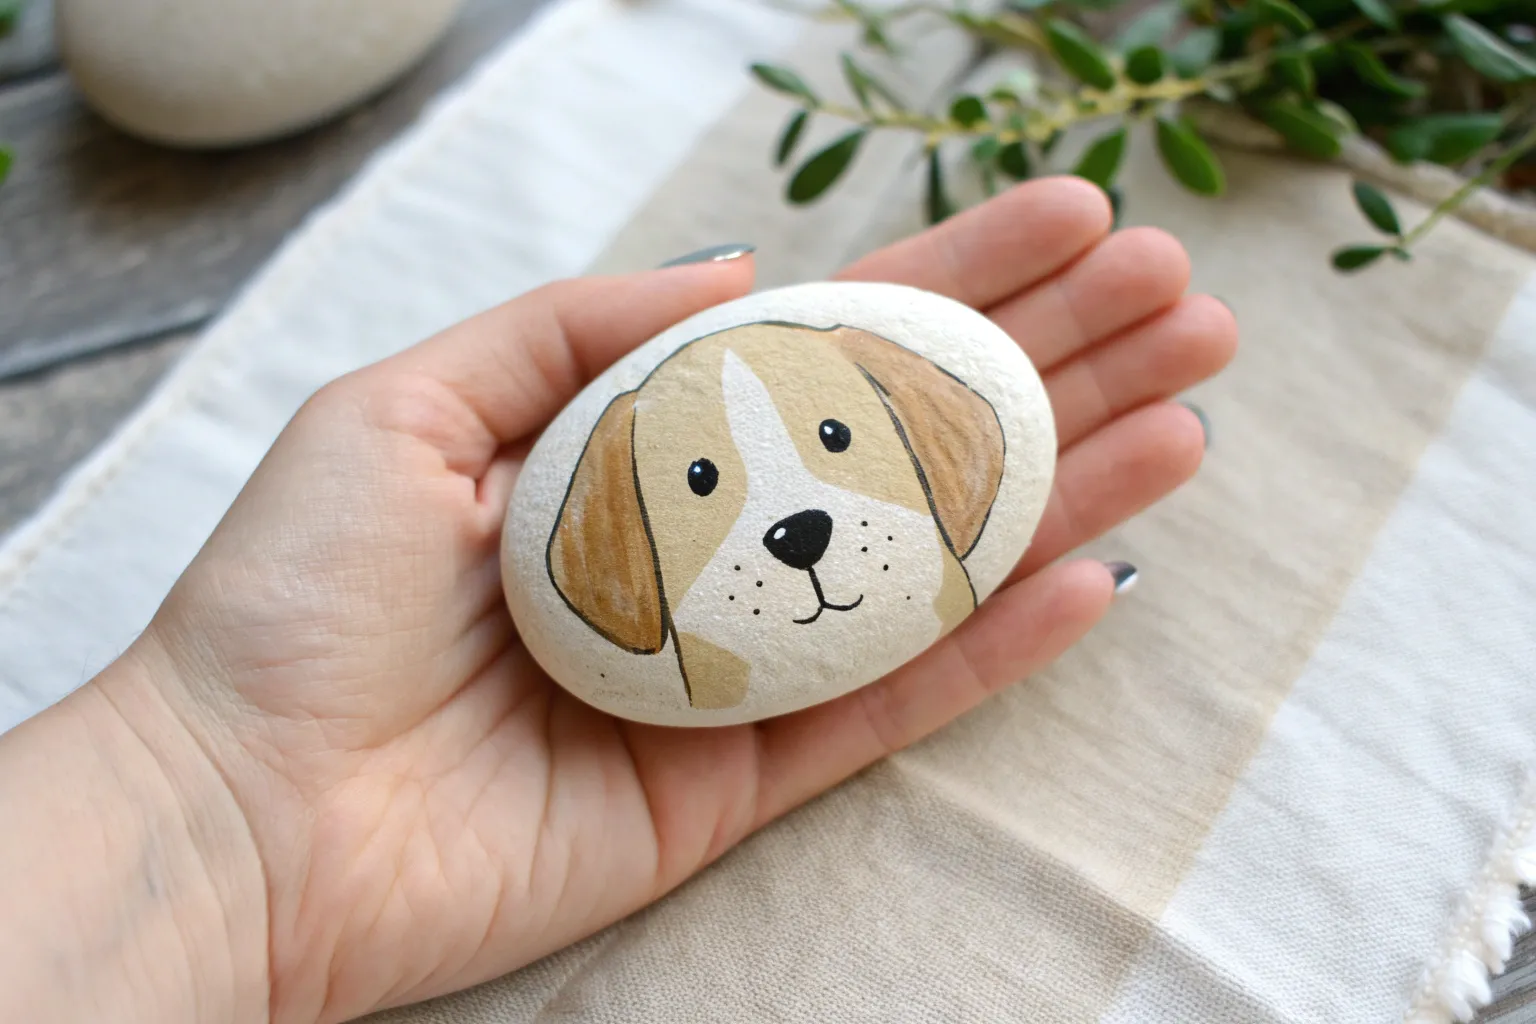
Simple Puppy Face With Big Eyes
Turn a smooth, rounded stone into an adorable puppy face with this simple tutorial. Using oversized, shiny eyes and floppy ears, this design captures an irresistibly cute expression that is perfect for hiding in your garden.
How-To Guide
Materials
- Smooth, oval-shaped river rock (palm-sized)
- Acrylic paint: beige/tan, dark brown, black, white, and blushing pink
- Paintbrushes: medium flat brush and fine detail liner brush
- Pencil for sketching
- Dotting tool or toothpick
- Clear spray sealer (gloss or matte)
Step 1: Preparing the Base
-
Clean the stone:
Begin by scrubbing your rock with warm, soapy water to remove any dirt or grit. Let it dry completely in the sun or use a hairdryer to speed things up. -
Paint the base coat:
Mix a warm beige or light tan color that mimics a golden retriever’s fur. Apply this over the top surface of the rock using a flat brush. Depending on your paint’s opacity, you might need two coats for solid coverage. -
Sketch the features:
Once the base is dry to the touch, lightly sketch the puppy’s face with a pencil. Draw two large circles for eyes in the middle, a small oval nose below them, and two large, drooping ears on the sides.
Shaky Hands?
If painting fine black outlines with a brush is difficult, use an ultra-fine tip black Posca pen or permanent marker after the base paint is 100% dry.
Step 2: Painting the Features
-
Fill in the ears:
Using a slightly darker beige or light brown, paint inside the ear outlines you sketched. This subtle color difference helps separate the ears from the face. -
Paint the eyes:
Take your dark brown paint and fill in the two large eye circles. I find that making them slightly oval rather than perfectly round adds to the innocent look. -
Outline the ears:
Switch to your fine liner brush and black paint. Carefully outline the floppy ears. Keep your hand steady and try to make the line thickness consistent. -
Define the head shape:
While you have the black paint, you can add a small curved line at the top of the left ear to suggest the curve of the head, though this is optional depending on your rock’s shape.
Step 3: Adding the Details
-
Create the nose:
Paint a small, inverted triangle with rounded corners for the nose using solid black paint. Place it centered below the eyes. -
Paint the mouth:
From the bottom point of the nose, draw a small vertical line down. From there, curve two lines outward to the left and right to create the classic ‘w’ mouth shape. -
Add shine to the nose:
Dip the very tip of a small brush or toothpick into white paint and add a tiny horizontal dash on the upper part of the black nose to make it look wet. -
Sparkle the eyes:
This step brings the puppy to life. Use the handle end of a paintbrush or a dotting tool dipped in white paint. Add a large white dot near the top of each eye, and a slightly smaller dot below it. -
Add rosy cheeks:
Dilute a bit of pink or light orange paint with water so it’s translucent. Dab two small oval spots below the eyes on the outer edges to give the puppy a blushing look. -
Paint the whiskers:
Using the very tip of your finest brush or a toothpick, tap three tiny black dots on each side of the muzzle area, between the nose and the cheeks. -
Let it cure:
Allow the paint to dry completely, ideally overnight. This ensures the thick layers of the eyes have hardened fully. -
Seal the rock:
Finish by spraying the rock with a clear acrylic sealer. This protects your artwork from weather if you plan to leave this little guy outdoors.
Pro Tip: Eye Placement
Place the eyes lower on the rock face than you think you should. A larger forehead creates a ‘baby animal’ proportion that instantly looks cuter.
Now you have a loyal little rock friend to keep you company on your desk or patio


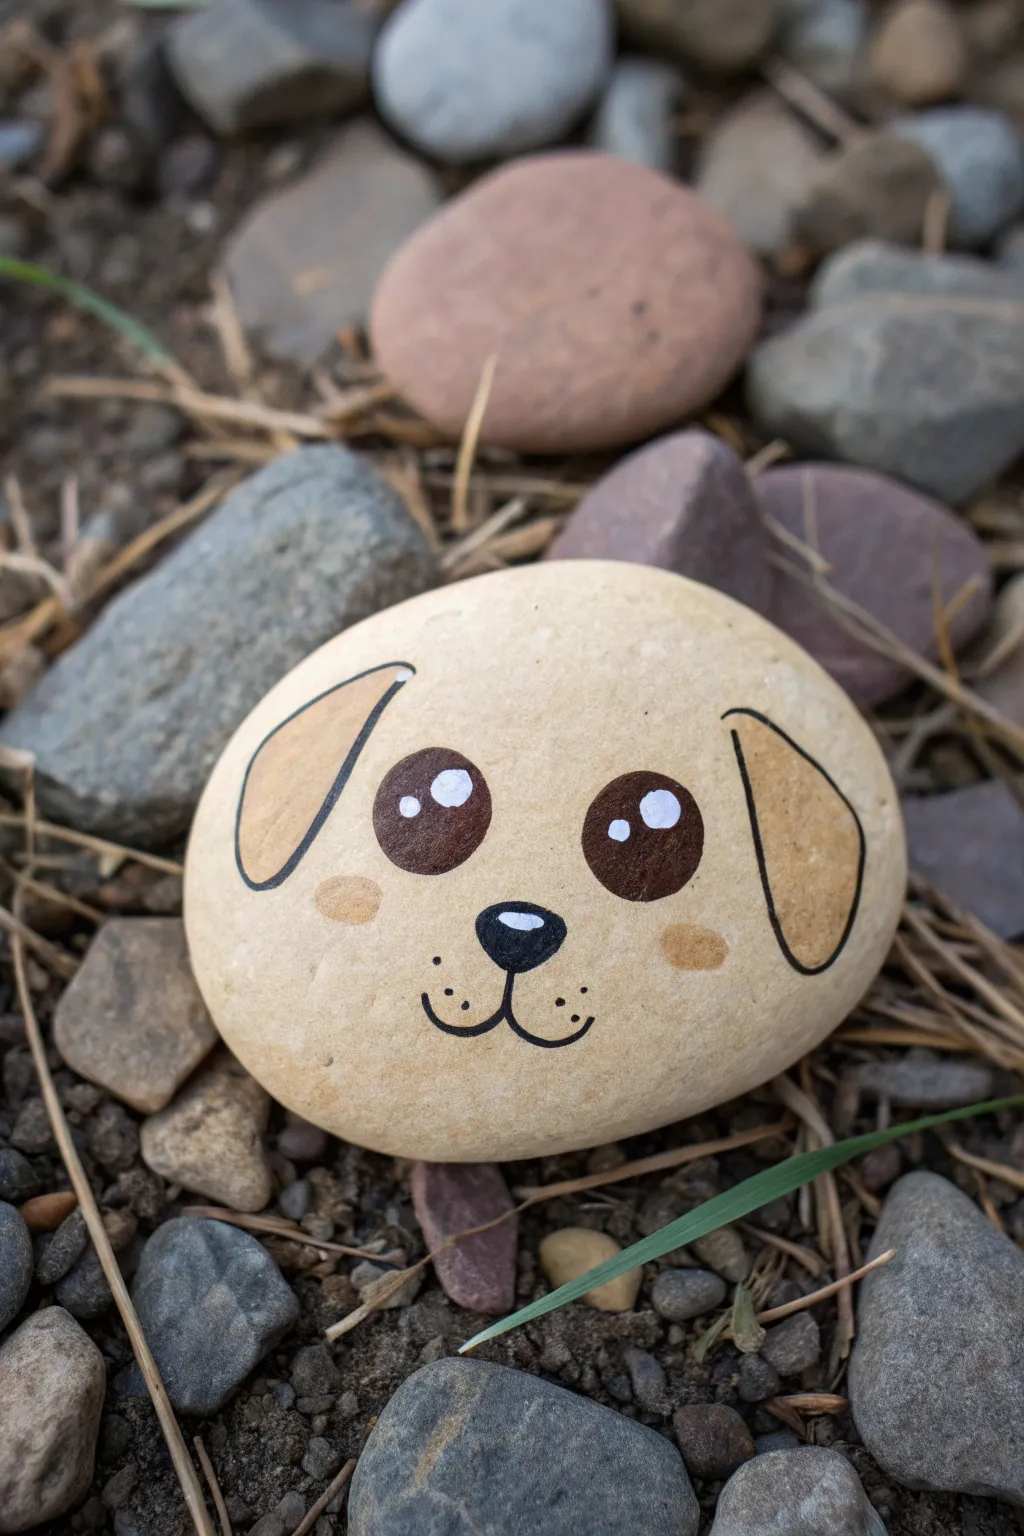
Spotted Pup With Quick Dot Markings
Transform a smooth, pale stone into a lovable puppy companion with just a few simple strokes of black paint. This minimalist design relies on the natural texture of the rock to serve as the dog’s fur, making it a quick and satisfying project for artists of all ages. The uneven speckling adds a whimsical, hand-drawn charm that feels perfectly imperfect.
Detailed Instructions
Materials
- Smooth, egg-shaped rock (white or cream colored)
- Black acrylic paint or a black paint pen (medium tip)
- Small round paintbrush (if using bottle paint)
- Mild soap and water
- Pencil (optional)
- Clear sealant spray or varnish (matte finish)
Step 1: Preparation & Planning
-
Select the perfect canvas:
Hunt for a rock that is relatively smooth and egg-shaped. A stone with a slightly flattened bottom works best so your puppy can ‘sit’ without rolling away. -
Clean the surface:
Wash your stone thoroughly with mild soap and warm water to remove any dirt or oils. Let it dry completely, ideally in the sun, to ensure the paint adheres properly. -
Position the stone:
Hold the rock in your hand to find the best orientation. The wider end should generally be at the bottom to form the puppy’s cheeks. -
Sketch the outline (optional):
If you’re nervous about freehand painting, lightly sketch the placement of the ears and nose with a pencil. Keep the lines very faint so they don’t show through the light-colored stone later.
Step 2: Painting the Features
-
Start with the nose:
Using your black paint pen or brush, draw an inverted, rounded triangle right in the center of the rock face. -
Fill the nose:
Color in the nose shape completely. I like to round off the top corners slightly to give it a softer, friendlier look. -
Create the mussel anchor line:
Draw a short, straight vertical line extending downward from the bottom point of the nose. -
Draw the mouth curves:
From the bottom of that anchor line, draw two curved lines branching out to the left and right, creating a classic ‘w’ shape for the mouth. -
Add the eyes:
Place two solid black circles above the nose. Space them slightly wider than the nose itself to create an open, curious expression. -
Paint the left ear:
Near the top left curve of the rock, paint a rounded triangle shape that mimics a floppy ear folding down. -
Paint the right ear:
Repeat this on the right side. Don’t worry about making them perfectly symmetrical; slightly mismatched ears add character to your pup. -
Fill in the ears:
Color inside your ear outlines until they are solid black. Let these larger areas dry for a minute before moving on so you don’t smudge them with your hand.
Pen vs. Paint
For this design, a black acrylic paint pen (like Posca) offers much better control for the dots and sharp lines than a traditional brush.
Step 3: Adding the Details
-
Add freckles:
Dot three small spots on the left cheek area, roughly between the mouth curve and the eye. -
Mirror the freckles:
Add three corresponding dots on the right cheek. Varying the size of these dots slightly makes it look more natural. -
Decorate the forehead:
Add a few random, tiny dots near the top of the head or between the ears to suggest fur texture. -
detail the chin:
Place two small dots near the bottom edge of the rock to imply a chin. -
Final inspection:
Look over your rock. If any black areas look thin or transparent, add a second coat of paint for a bold, opaque finish. -
Let it dry completely:
Allow the paint to cure for at least 30 minutes to an hour. -
Seal the deal:
Spray the rock with a clear matte sealant. This protects your artwork from chipping and weather if you plan to hide it outdoors.
Adding Personality
Give your pup a unique accessory by painting a simple red collar or a little bowtie at the bottom of the rock.
Now you have a durable little pet that won’t ever need walking or feeding


Floppy-Eared Hound Head
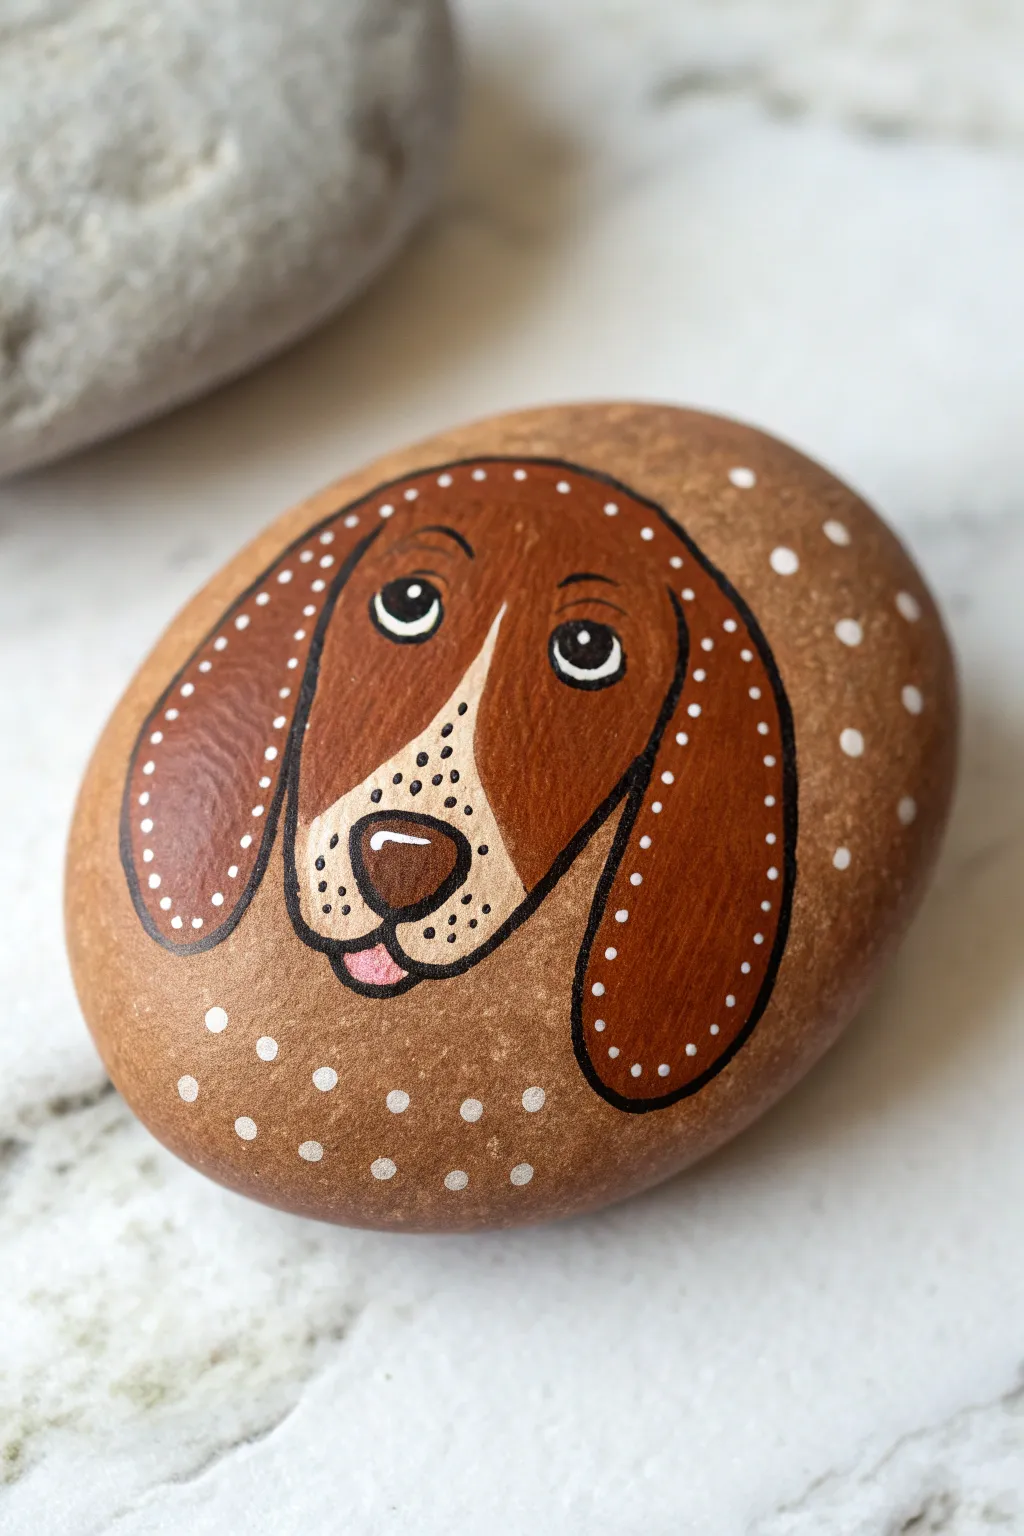
Transform a simple river stone into a soulful hound with this charming, folk-art inspired design. The natural brown tone of the rock serves as the perfect mid-tone background, letting the white dots and deep brown ears really pop.
How-To Guide
Materials
- Smooth, oval river rock (tan or light brown)
- Acrylic paints: Burnt Sienna, Cream/Off-White, Black, Bubblegum Pink
- Fine liner brush (size 0 or 00)
- Small round brush (size 2)
- Dotting tools (or toothpicks/paintbrush ends)
- Pencil for sketching
- Matte or glossy sealer (optional)
Step 1: Planning the Face
-
Clean your canvas:
Before starting, ensure your rock is scrubbed clean of any dirt or dust and completely dry. This helps the paint adhere properly. -
Sketch the outline:
Lightly sketch the dog’s head using a pencil. Draw a central U-shape for the muzzle area, then add two long, teardrop shapes hanging down from the top of the head for the floppy ears. -
Refine the features:
Within the muzzle area, sketch a triangular nose and a small tongue peeking out below. Mark the positions for the almond-shaped eyes just above the muzzle line.
Wobbly Lines?
If your black outlines look shaky, try thinning the paint with a drop of water until it has an ink-like consistency. It will flow much smoother from the brush.
Step 2: Painting the Base Colors
-
Fill the ears:
Using your small round brush and Burnt Sienna paint, fill in the long ear shapes. You may need two thin coats to get a solid, opaque brown. -
Create the mask:
Use the same Burnt Sienna to paint the upper forehead area between the ears, leaving a strip down the center of the face unpainted. -
Paint the muzzle:
Mix a tiny bit of Burnt Sienna with White (or use a dedicated Cream color) to paint the central strip of the face and the muzzle area. This lighter color creates the classic beagle marking. -
Add the nose accent:
Paint the nose shape with Burnt Sienna. Let this dry completely before adding outlines later. -
Pink tongue details:
Fill in the small tongue shape with Bubblegum Pink paint. It’s a tiny detail, so a fine liner brush works best here.
Make It Personal
Change the ear color to black for a different breed look, or add a painted collar at the bottom with the name of your own pet written in tiny letters.
Step 3: Defining Features
-
Outline the shapes:
Using black paint thinned slightly with water and your finest liner brush, carefully outline the ears, the head shape, and the muzzle. Keep your hand steady and rest your wrist on the table for stability. -
Paint the eyes:
Paint two black almond shapes for the eyes. When dry, add a tiny white dot near the top of each pupil to bring the dog to life. -
Detail the nose:
Outline the nose in black. I usually add a small white curved line on the upper left of the nose to simulate a wet, shiny texture. -
Add whisker spots:
Using the very tip of your liner brush or a toothpick, dab tiny black dots onto the cream-colored muzzle area to create whisker follicles.
Step 4: Decorative Accents
-
Outline dots on ears:
Dip a small dotting tool or toothpick into white paint. Create a line of small, evenly spaced dots following the inner curves of the brown ears. -
Add larger background dots:
Using a slightly larger dotting tool (or the back of a paintbrush handle), stamp white dots around the outer perimeter of the dog’s head on the bare rock. -
Vary the dot sizes:
To keep the design dynamic, mix larger dots with a few smaller ones near the bottom of the rock, framing the face nicely. -
Final dry and seal:
Allow the paint to cure for at least 24 hours. Once fully dry, apply a layer of clear sealer to protect your artwork from chipping.
Place this adorable hound on your desk or in a planter for a loyal little companion that never needs walking


Pointy-Eared Terrier Look
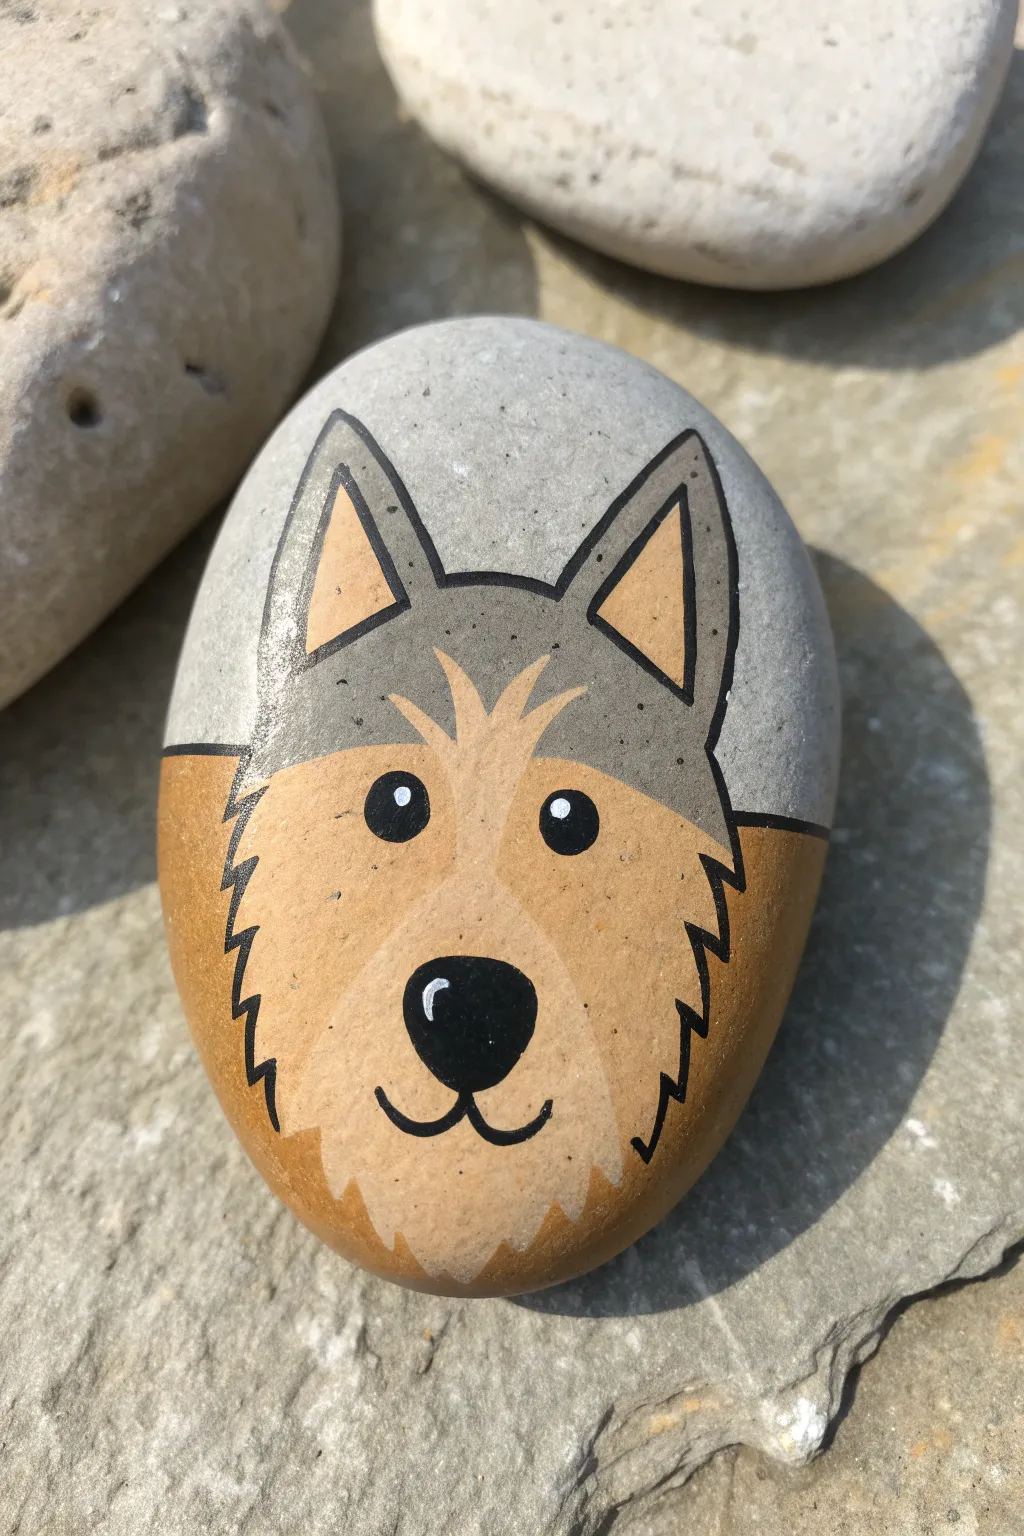
Capture the spirit of a scruffy terrier with this charming rock painting project. With its pointed ears and soulful eyes, this design uses simple overlapping shapes to create a stylized yet recognizable pup that fits perfectly in the palm of your hand.
Step-by-Step Tutorial
Materials
- Smooth, oval river rock (approx. 3-4 inches)
- Acrylic paints: medium grey, warm tan/ochre, black, and white
- Pencil for sketching
- Fine liner brush (size 0 or 00)
- Small flat brush (size 4 or 6)
- Black paint pen (extra fine tip) or black acrylic paint
- Clear sealant (matte or glossy)
Step 1: Base Sketching
-
Prepare the surface:
Ensure your rock is clean and dry. If the natural color of the stone is dark, you may want to prime the painting area with a thin layer of white first to help the colors pop, though this design works well directly on light grey stones. -
Draft the ears:
Using a pencil, lightly sketch two large triangles at the top of the rock for the ears. They should be tall and close together at the base to get that alert terrier expression. -
Outline the head:
Draw the main shape of the head below the ears. It should fill the bottom two-thirds of the rock, widening slightly towards the bottom to create chubby cheeks. -
Mark the color zones:
Lightly sketch a curved line separating the top grey forehead area from the bottom tan snout area, including a jagged ‘hair’ line in the center where the colors will meet.
Steady Hand Trick
Rest your pinky finger on a dry part of the rock while painting the black outlines. This creates an anchor point and keeps your hand much steadier for crisp lines.
Step 2: Blocking Colors
-
Paint the grey upper:
Use your flat brush to fill in the forehead and the outer triangular shape of the ears with a medium grey paint. Apply two thin coats for solid coverage. -
Fill the tan snout:
Paint the entire lower section of the face with a warm tan or ochre color. Let the paint brush glide smoothly around the bottom curve of the rock. -
Add the inner ears:
Using the same tan color, carefully fill inside the triangles of the ears, leaving a grey border around the edges. -
Layer the fur details:
While you have the tan paint out, create wispy brush strokes moving upward into the grey forehead area to mimic scruffy fur texture. I find a slightly drier brush helps blend these transitions naturally. -
Lighten the snout:
Mix a tiny bit of white into your tan paint. Paint a subtle, lighter patch in the very center of the snout where the nose will go, fading it outwards. -
Let it dry complete:
Pause here and allow all base layers to dry completely before moving to the detail work. This prevents the black lines from dragging through wet paint.
Step 3: Defining Features
-
Outline the ears:
Using your fine liner brush or a black paint pen, draw crisp outlines around the ears and the inner tan triangles. -
Create the scruffy cheeks:
Draw the outline for the sides of the head using jagged, zigzag lines to represent fur texture, rather than a smooth straight line. -
Paint the eyes:
Place two medium-sized black circles in the middle of the face, spacing them wide apart. They should sit right near the transition line between the grey and tan. -
Add the nose:
Paint a rounded triangular nose in solid black in the center of the lighter tan area. Make it fairly large for a cute, cartoonish look. -
Draw the mouth:
Extend a small vertical line down from the bottom of the nose, then curve outward to the left and right to create a happy anchor-shaped smile. -
Add highlights:
Dip the back end of a brush or a toothpick into white paint. Add a small white dot to the upper right area of each eye and a tiny curved highlight on the nose to bring the face to life. -
Final fur details:
Add a few small, faint white strokes at the very bottom of the chin to suggest a little beard, common in terrier breeds. -
Seal the rock:
Once the paint is fully cured (usually after 24 hours), apply a clear sealant to protect your hard work from weather and scratches.
Make It 3D
After sealing, glue small folded triangles of felt onto the painted ears. The mixed media texture makes the terrier look extra scruffy and touchable.
Now you have a loyal little companion that sits perfectly still and never barks
BRUSH GUIDE
The Right Brush for Every Stroke
From clean lines to bold texture — master brush choice, stroke control, and essential techniques.
Explore the Full Guide
Curly-Coated Pup With Loop Curls
Capture the sweetness of a curly-coated pup with this minimalist rock painting design. Using simple loop curls and subtle shading, you can transform a plain river stone into an adorable, textured dog portrait.
How-To Guide
Materials
- Smooth, round river rock (light beige or white)
- Black geometric fine-point pigment pens or ultra-fine paint pens (0.3mm or 0.5mm)
- Light tan or beige watercolor paint (or highly diluted acrylic)
- Small round paintbrush (size 1 or 2)
- Graphite pencil (H or HB)
- Eraser
- Matte spray sealant
Step 1: Sketching the Outline
-
Prepare the surface:
Ensure your rock is clean and completely dry. If the natural stone isn’t light enough, apply a base coat of white or cream acrylic paint and let it dry fully before starting. -
Map the face shape:
Using a light pencil, sketch a large, rounded shape that dominates the front of the rock. This will be the main head outline. Keep the lines faint so they are easy to remove later. -
Define the ears:
On either side of the head shape, draw two large, elongated ovals for the ears. They should droop down, framing the face. -
Add facial features:
Sketch a triangular nose in the center, slightly lower than the midline. Below the nose, draw a simple ‘W’ shape for the mouth. Place two small circles for eyes above the nose.
Ink Smearing?
If your black ink bleeds when dragging the paintbrush over it, switch the order: paint the tan wash areas first, let them dry completely, and then draw the black lines on top.
Step 2: Inking the Details
-
Outline the head:
With your black fine-point pen, trace the top arc of the head. Instead of a solid line, use a slightly broken or dotted line occasionally to suggest softness. -
Draw the loopy ears:
For the ears, the goal is texture. Draw the outer edge as a solid curve, but for the inner edge closest to the face, draw a series of connected scallops or ‘u’ shapes. These loops mimic curly fur texture. -
Connect the neck:
Create the ruffled neck fur. Draw a wobbly, scalloped line connecting the bottom of the left ear to the bottom of the right ear, creating a bib-like shape under the chin. -
Ink the face:
Carefully ink the nose, filling it in solid black but leaving a tiny uncolored speck for a highlight if you wish. Draw the mouth lines and fill in the small round eye pupils. -
Add whisker spots:
Dot three to four small freckles on each side of the muzzle area between the nose and the cheeks. -
Create the forehead texture:
Stipple tiny dots on the forehead area to suggest fur density without drawing individual hairs. Keep these sparse.
Curly Texture
Vary the size of your looped scallops on the ears. Making some loops tighter and others looser creates a more natural, organic curly coat look.
Step 3: Adding Color & Final Touches
-
Mix a subtle wash:
Dilute a tiny amount of tan or beige paint with water. I prefer this mixture to be very watery, almost like tea, so the natural rock texture still shows through. -
Apply the shadow:
Gently paint this wash along the bottom edge of the ruffled ‘bib’ neck line and slightly up the sides of the cheeks. This adds dimension and separates the chin from the body. -
Add body texture:
Once the wash is dry, switch back to your black pen. Add stippling (small dots) below the neck ruffle to suggest the body’s continuation. -
Refine the contour lines:
Go over the scallop lines on the ears and neck one more time if needed to ensure the line weight is consistent and bold enough to stand out. -
Erase pencil marks:
Wait until the ink is completely set and dry. Gently erase any visible pencil guidelines. -
Seal the artwork:
Finish by spraying a light coat of matte sealant over the rock to protect the ink from smudging and fading over time.
Now you have a charming little stone companion that brings a smile to anyone who spots it
Happy Tongue-Out Puppy
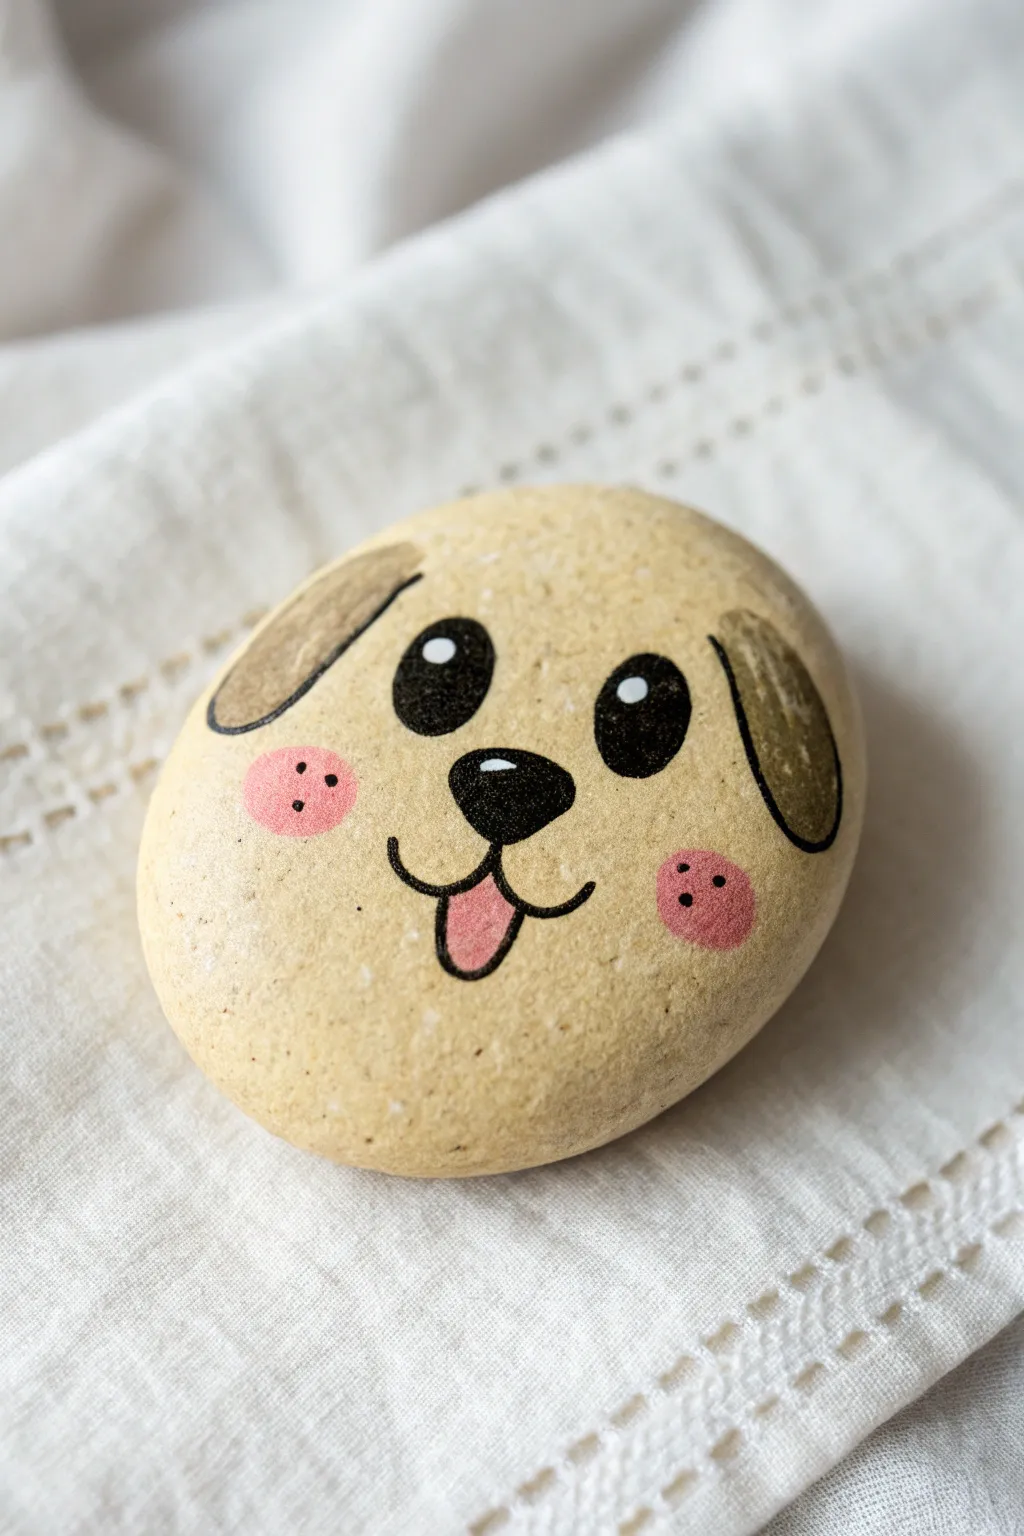
This adorable rock painting features a cheerful puppy with floppy ears and a playful tongue sticking out. It uses simple shapes and clean lines on a natural stone background, making it perfect for beginners who want a quick win.
Step-by-Step Tutorial
Materials
- Smooth, round river rock (light beige/tan color preferred)
- Black acrylic paint or fine-tip paint pen (Posca)
- White acrylic paint or paint pen
- Light brown/tan acrylic paint
- Pink acrylic paint
- Small round paintbrush (sz 0 or 1)
- Detail brush or toothpick
- Matte or satin sealant spray
Step 1: Preparation & Base
-
Select your stone:
Choose a smooth, rounded rock that is naturally light beige or cream-colored. If you can’t find one, paint a base coat of cream acrylic over any rock and let it dry completely. -
Clean surface:
Ensure the rock is free of dust and dirt by wiping it down with a damp cloth or washing it with mild soap and water. Let it dry fully before painting.
Steady Hands
For the cleanest black outlines, use a fine-tip acrylic paint marker (0.7mm) instead of a brush. It gives you much more control over the curves.
Step 2: Sketching the Features
-
Pencil outline:
Lightly sketch the dog’s face using a pencil. Draw two large ovals for eyes, a rounded triangle for the nose, and large floppy ears on the sides. -
Mouth placement:
Sketch a simple ‘3’ shape sideways under the nose for the muzzle, and add a U-shape below the center for the tongue.
Make it a Dalmation
Change the base coat to white and add irregular black spots all over the rock’s surface before painting the face for a spotted puppy version.
Step 3: Painting the Ears
-
Fill the ears:
Using your light brown or tan paint, fill in the floppy ear shapes on the left and right sides of the upper face. -
Outline the ears:
Once the brown paint is dry, use a black paint pen or fine brush to carefully outline the ear shapes. I find that bracing my hand against the table helps keep the lines steady.
Step 4: Face Details
-
Paint the eyes:
Fill in the large eye ovals with solid black paint. Make them slightly tall and oval-shaped for a cartoonish look. -
Nose and muzzle:
Paint the rounded triangle nose black. Then, trace the mouth lines (the sideways ‘3’ shape) connecting from the bottom of the nose. -
Add the tongue:
Fill the U-shaped tongue area with a bright pink paint. Let it dry, then outline the tongue with your fine black liner. -
Rosy cheeks:
Paint two small circles of pink on either side of the muzzle for the cheeks. They should be placed slightly lower than the eyes.
Step 5: Finishing Touches
-
Eye highlights:
Dip the handle end of a paintbrush or a toothpick into white paint. Add a small white dot near the top of each black eye oval to bring the puppy to life. -
Nose highlight:
Add a tiny horizontal dash or dot of white on the upper part of the black nose to make it look wet and shiny. -
Freckles:
Using a very fine point or toothpick, add three tiny black dots onto each pink cheek area. -
Seal the rock:
Once all paint is completely dry (give it at least an hour), spray the entire rock with a matte or satin sealant to protect your artwork from chipping.
Your cheerful puppy rock is now ready to be used as a cute paperweight or a garden surprise

PENCIL GUIDE
Understanding Pencil Grades from H to B
From first sketch to finished drawing — learn pencil grades, line control, and shading techniques.
Explore the Full Guide
Pup With a Simple Collar and Tag
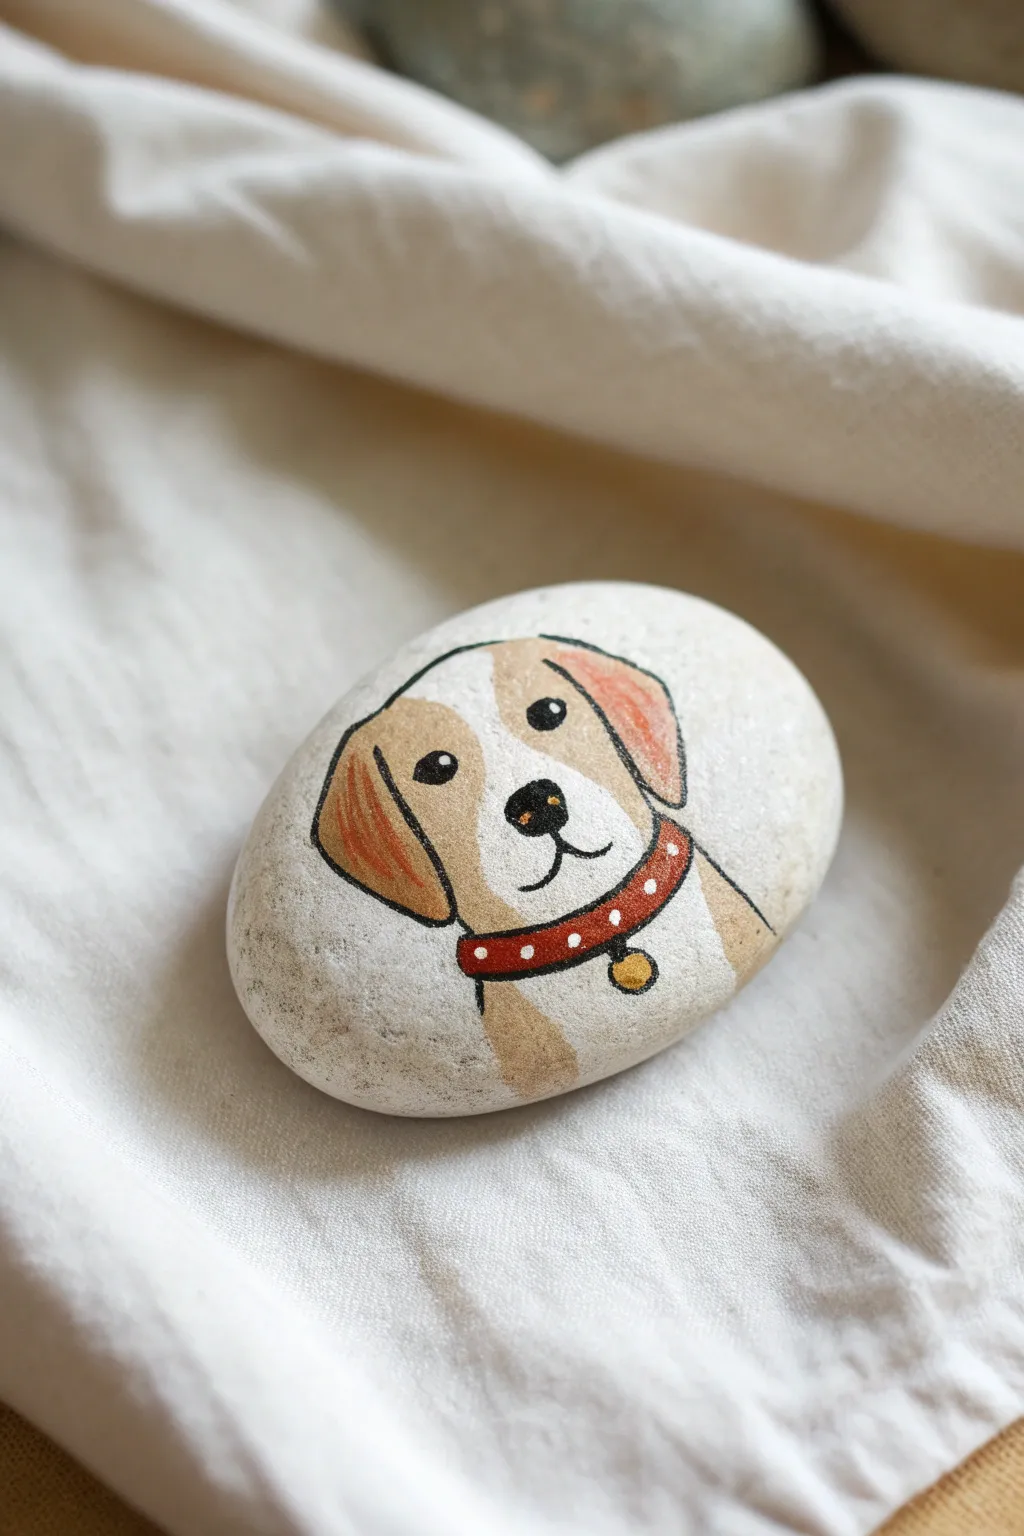
This friendly pup portrait captures the sweetness of our four-legged friends with a simple yet expressive design. Using basic shapes and warm colors, you’ll transform an ordinary garden stone into a charming keepsake featuring a classic floppy-eared dog with a cheerful collar.
Step-by-Step Guide
Materials
- Smooth, oval-shaped river rock (cleaned and dried)
- White or cream acrylic paint (for base coat)
- Tan or light brown acrylic paint
- Burnt orange or terracotta acrylic paint
- Red acrylic paint
- Mustard yellow or gold acrylic paint
- Black fine-point paint pen or liner brush
- Fine detail paintbrush (size 0 or 00)
- Small flat paintbrush
- Matte or satin varnish sealer
Step 1: Base and Sketch
-
Prep the surface:
Start by washing your rock thoroughly with soap and water to remove any dirt or oils. Once completely dry, paint the top surface with a coat of white or cream acrylic paint to create a clean canvas for your colors. -
Outline the head shape:
Using a pencil, lightly sketch a rounded dome shape in the center of the rock for the top of the dog’s head. Extend lines downward that flare out slightly to form the cheeks and neck area. -
Mark the ears:
Sketch two large, floppy teardrop shapes on either side of the head. Position them so they start high on the head and droop down past the cheek line, giving him that classic hound dog look. -
Define the muzzle:
Draw a curved line connecting the bottom edges of the ears to define the jawline. Inside the face, lightly sketch a ‘U’ shape or a rounded rectangle in the center to mark off the white muzzle area. -
Add the collar:
At the bottom of the neck, sketch a curved band for the collar that follows the contour of the neck. Add a small circle hanging from the center bottom for the dog tag.
Step 2: Blocking in Color
-
Paint the face:
Use your tan or light brown paint to fill in the main part of the face around the eyes and top of the head. Leave the muzzle area and the space between the eyes white. -
Fill the ears:
Mix a little burnt orange with your tan paint to create a deeper, reddish-brown hue. Use this to fill in both floppy ears, giving them a distinct color from the face. -
Paint the body:
Extend the tan color down below the collar on the left and right sides to suggest the dog’s shoulders. Keep the center chest area white. -
Color the collar:
Fill in the collar band carefully with bright red paint. I find a small flat brush helps keep the edges straight here. Let this dry completely before moving on. -
Add the gold tag:
Paint the small circle tag with mustard yellow or gold paint. You may need two coats here to cover the white background fully.
Keep It Smooth
If your rock is pitted, apply a layer of gesso or wood filler first. Sand it down once dry to create a perfectly smooth surface for painting fine details.
Step 3: Details and Outline
-
Outline the main features:
Once the paint is bone dry, use a black fine-point paint pen to trace over your pencil outlines. Outline the head, ears, neck, shoulders, and the collar. -
Draw the nose:
In the center of the white muzzle area, draw a rounded triangular nose with black paint or your pen. Leave a tiny speck of white unfinished at the top for a highlight. -
Create the mouth:
Draw a vertical line down from the nose, then curve it outward to the left and right to create a happy smile. -
Add the eyes:
Place two solid black oval eyes in the tan area of the face. Position them fairly wide apart. Add a tiny white dot in the upper corner of each eye to bring them to life. -
Decorate the collar:
Using the very tip of a brush or a toothpick dipped in white paint, add a row of small polka dots along the red collar. -
Seal the artwork:
Allow the rock to dry overnight to ensure no moisture is trapped. Finish with a layer of spray varnish or brush-on sealer to protect your new pet from scratching.
Personalize It
Instead of a generic tag, paint the tag slightly larger and use a super-fine pen to write your own pet’s name or initial in the center of the gold circle.
Enjoy your adorable hand-painted pup, a perfect desk companion that never needs walking
Bandana-Wearing Buddy
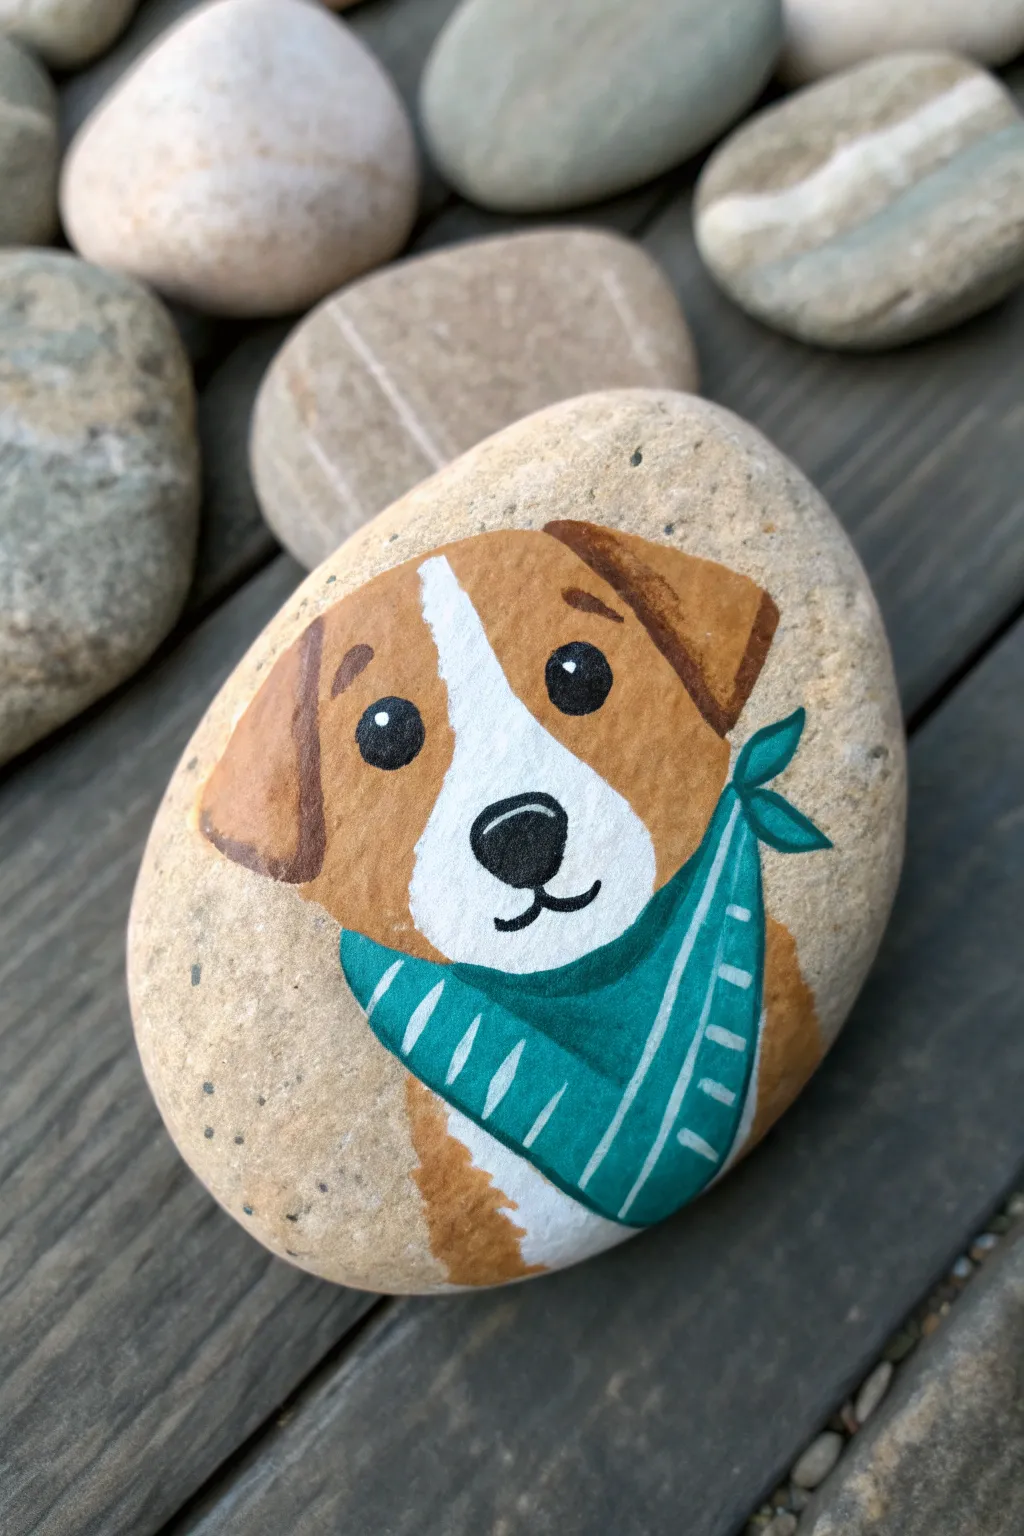
Turn a simple garden stone into a charming portrait of a lovable pup sporting a stylish teal bandana. This project uses basic shapes and bold colors to create a friendly face that’s perfect for beginners or seasoned rock painters.
Detailed Instructions
Materials
- Smooth, oval-shaped river rock (approximately palm-sized)
- Acrylic paints: warm brown, white, teal/turquoise, black
- Pencil for sketching
- Fine liner or detail brush (size 0 or 00)
- Small flat brush (size 2 or 4)
- Dotting tool or toothpick
- Clear acrylic sealer (spray or brush-on)
- Palette or paper plate
- Cup of water and paper towels
Step 1: Planning the Face
-
Clean and prep:
Begin by washing your stone with warm soapy water to remove any dirt or oils. Let it dry completely before starting; painting on a damp rock can cause the acrylics to lift later. -
Light sketch:
Using a pencil, lightly sketch the outline of the dog’s head. Imagine an upside-down tear-drop shape for the white muzzle area centered on the rock. -
Define the ears:
Sketch two floppy triangle shapes on either side of the head for the ears. One can be slightly perkier than the other to give your pup some personality. -
Map the bandana:
Draw a curved line below the chin area for the top of the bandana, and a V-shape extending down towards the bottom of the rock to form the fabric point.
Paint Consistency Tip
If your detailed lines feel clumpy, thin your black paint with a single drop of water. Ink-like consistency flows much smoother.
Step 2: Adding the Base Colors
-
Paint the muzzle:
Load your small flat brush with white acrylic paint. Fill in the center muzzle area, extending a strip up the forehead between the eyes. You may need two thin coats for solid coverage. -
Fill the fur:
Using the warm brown paint, color in the face area around the white stripe and the ears. Be careful to keep the edges crisp where the brown meets the white. -
Add the bandana base:
fill in the bandana shape with your teal or turquoise paint. extend the color slightly around the neck area to suggest the knot. -
Paint the chest:
If there is space left at the very bottom of the rock beneath the bandana, add a little patch of brown and white to represent the dog’s chest fur. -
Key drying time:
Wait for all these base layers to feel completely try to the touch. If the paint is wet, your detail lines will bleed.
Step 3: Detailing the Face
-
Outline the features:
Switch to your finest detail brush. Use dark brown or black to outline the ears, giving them definition against the head color. -
Add the eyes:
Paint two solid black circles for eyes on the brown part of the face. Make them relatively large to keep the expression cute and cartoony. -
Paint the nose:
In the white muzzle area, paint a rounded triangle shape for the nose using black paint. It should sit just slightly lower than the eyes. -
Draw the mouth:
From the bottom point of the nose, draw a small vertical line down, then curve two lines outward (like a sideways ‘3’) to create the smiling mouth. -
Eye sparkles:
Once the black eye paint is dry, dip a dotting tool or toothpick into white paint and add a tiny dot to the top right of each eye. This brings the character to life instantly. -
Eyebrows:
Add two small, floating curved lines above the eyes using a darker brown shade to give the pup a sweet expression.
Customize Your Breed
Change the ear shape to pointed triangles for a husky or make them long and droopy for a hound dog look.
Step 4: Accessorizing
-
Bandana knot:
Paint the knot of the bandana on the right side of the neck. Use two small leaf shapes pointing outward to look like the tied fabric ends. -
Bandana shadows:
Mix a tiny bit of black into your teal paint to make a shadow color. Paint a thin line under the chin folds and where the bandana overlaps itself to create depth. -
Pattern work:
Using your fine liner brush and white paint, carefully add stripes to the bandana. Follow the curve of the fabric to make it look like it’s wrapping around the neck. -
Cleaning edges:
Check the perimeter of your painting. I like to do a quick pass with the background rock color or clean up any smudges with a damp brush. -
Seal it up:
Once the entire rock is bone dry (give it a few hours), apply a clear acrylic sealer to protect your artwork from chipping or fading, especially if it will live outdoors.
Place your adorable new rock puppy in a potted plant or on your desk for a loyal companion that never needs walking


Dog Face With a Little Bone
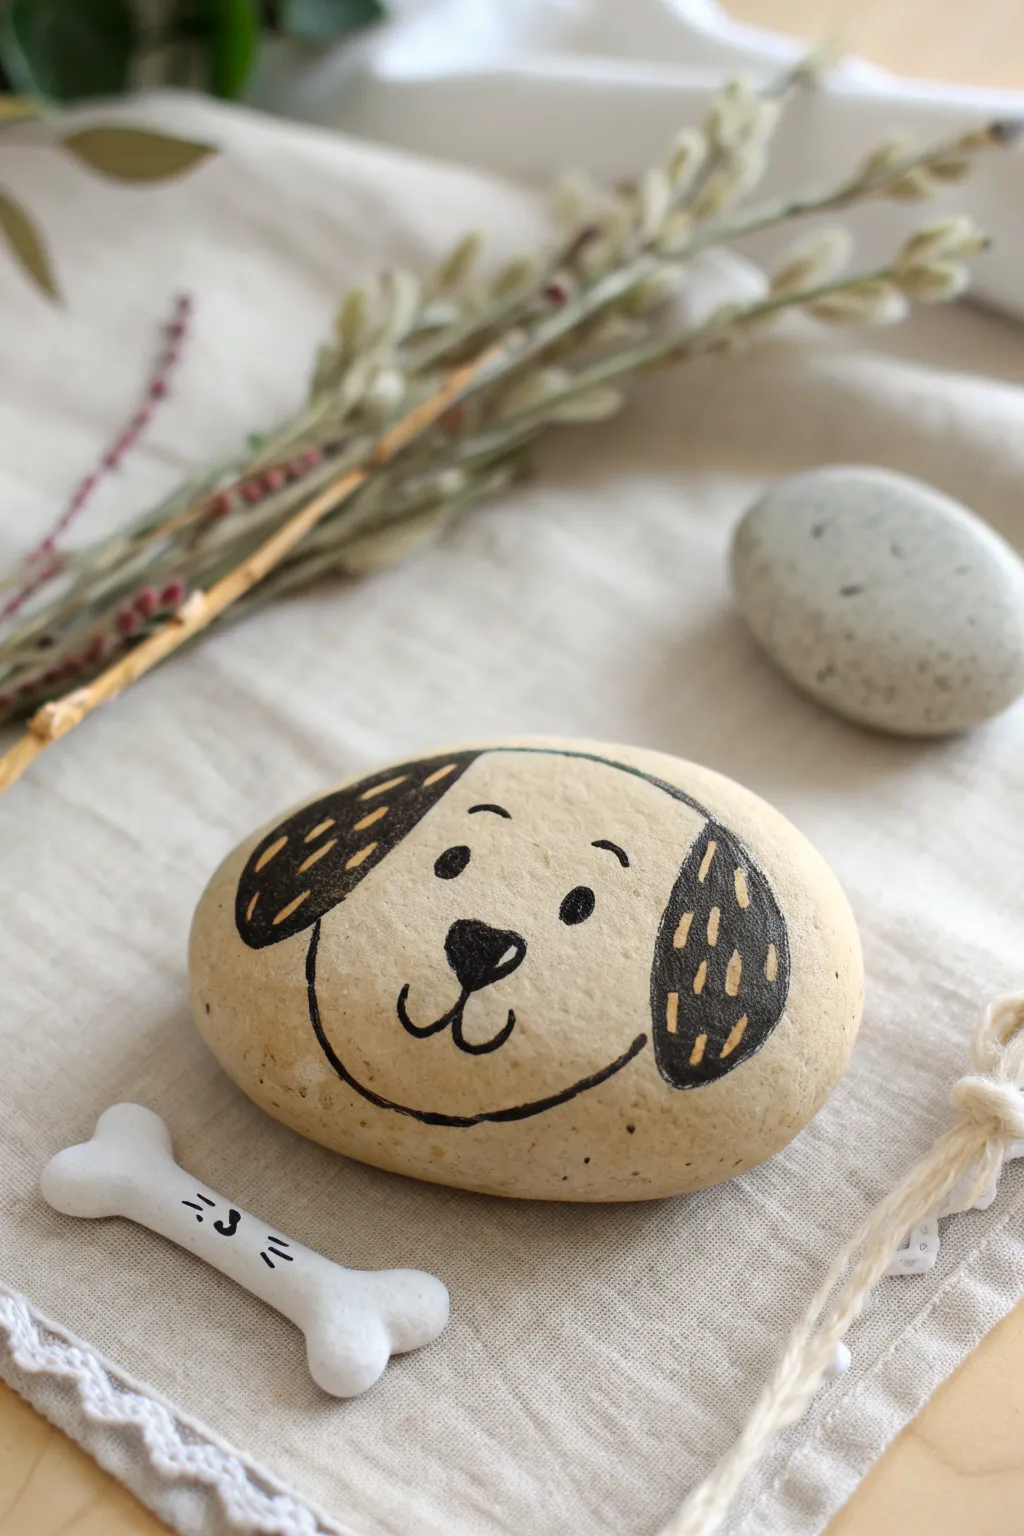
Capture the sweetness of a loyal friend with this wonderfully simple rock painting project. Using the stone’s natural color as a base, you’ll create a charming dog face accompanied by a tiny clay bone accessory.
Step-by-Step Tutorial
Materials
- Smooth, oval-shaped river rock (beige or tan)
- Black acrylic paint pen (fine tip)
- Black acrylic paint pen (medium tip)
- White acrylic paint pen (fine tip)
- Pencil and eraser
- Air-dry clay (white)
- Matte spray varnish or sealant
Step 1: Painting the Dog Face
-
Clean your canvas:
Begin by washing your rock thoroughly with soap and water to remove any dirt or oils. Let it dry completely before starting; any moisture generally prevents the pens from adhering properly. -
Draft the outline:
Using a pencil, lightly sketch the dog’s features onto the smoothest side of the rock. Draw a wide U-shape for the jawline, two large floppy ear shapes on the sides, and place the eyes and nose in the center. -
Outline the ears:
Take your medium-tip black paint pen and trace over the pencil lines for the ears. Make the lines bold and confident, ensuring they curve nicely around the top corners of the rock. -
Fill the ears:
Color in the ear shapes completely with the black pen. You might need two coats here to get a solid, opaque black; just let the first layer dry for a few minutes before applying the second. -
Draw the jawline:
Switch to a slightly finer black pen if you have one, or use a light touch with the medium tip. Trace the large U-curve that forms the bottom of the dog’s face. Connect it to the bottom of the ears. -
Add the nose:
In the center of the face, draw an inverted triangle with rounded corners for the nose. Fill it in solid black, leaving a tiny speck uncolored if you want a highlight, or add a white dot later. -
Create the mouth:
Draw a small vertical line coming down from the bottom point of the nose. From the bottom of that line, curve outwards to the left and right to create a happy anchor shape for the mouth. -
Place the eyes:
Above the nose, draw two small ovals for eyes. Position them slightly wide apart for a cute, innocent look. Fill them in black. -
Add eyebrows:
Floating above the eyes, draw two small, curved dashes for eyebrows. These add a lot of expression, so you can slant them slightly to change the dog’s mood. -
Detail the ears:
Once the black paint on the ears is absolutely dry, take your white fine-tip paint pen. Draw small, dashed lines or little strokes inside the black ear area to simulate texture or a pattern. -
Final touches:
Check your lines. If any pencil marks are still visible, wait until the ink is fully cured (give it an hour to be safe) and gently erase them.
Natural Texture
Don’t paint a base coat! Choosing a rock that is already a nice warm beige or tan allows the natural stone to serve as the dog’s fur color.
Step 2: Crafting the Bone Accessory
-
Shape the clay:
Take a small balls of white air-dry clay, about the size of a marble. Roll it into a short log shape between your palms. -
Form the ends:
Use a sculpting tool or just your fingertips to press an indentation into each end of the log, creating the classic heart-shape ends of a cartoon bone. -
Smooth it out:
I find that dipping a finger in a tiny bit of water helps smooth out any cracks in the clay before setting it aside to dry according to the package instructions. -
Decorate the bone:
Once the clay bone is hard and dry, use your fine-tip black pen to draw a tiny face on it—two dots for eyes and a small mouth—to match the whimsy of the rock. -
Seal everything:
Finish both the rock and the clay bone with a light coat of matte spray varnish. This protects the paint from scratching and keeps your artwork looking fresh.
Make It 3D
Glue a small, strong magnet to the back of the clay bone and another to the rock’s ‘mouth’ area so the dog can actually hold his treat.
Now you have an adorable, maintenance-free pet that will perfectly decorate your desk or garden area
Classic Paw Print Icon
This project captures the simple elegance of a classic paw print on a smooth, natural canvas. The stark contrast between the matte black paint and the pale stone creates a striking commemorative piece or garden decoration.
Step-by-Step Guide
Materials
- Smooth, light-colored river rock (approximately palm-sized)
- Black acrylic paint (outdoor rated if for garden use)
- Small round paintbrush (size 2 or 3)
- Very fine detail brush (size 0 or 00)
- Pencil for sketching
- Eraser
- Clear matte sealant spray (optional)
- Paper towel
- Water cup
Step 1: Preparation & Sketching
-
Clean surface:
Begin by washing your stone thoroughly with warm soapy water to remove any dirt or oils. Scrub it gently and let it dry completely before starting. -
Position the stone:
Find the smoothest, flattest side of the rock. Orient it so it sits stable on your table, ensuring your painted design won’t face downward or tip over easily. -
Mark the center:
Using a pencil, lightly mark the center point of the rock face. This will help you center the main pad of the paw print. -
Outline the main pad:
Sketch a softly rounded, upside-down heart shape or a triangular shape with rounded corners for the main paw pad. Keep the lines very light so they don’t show through effectively. -
Place the toe guides:
Lightly sketch four small circles in an arc above the main pad. I find it helpful to start with the two outer toes to establish the width, then fill in the middle two. -
Refine the toe shapes:
Transform your circle guides into oval shapes that tilt slightly inward toward the center, mimicking the natural anatomy of a dog’s paw.
Step 2: Painting the Design
-
Load the brush:
Dip your small round brush into the black acrylic paint. You want creamy consistency—not too watery, but wet enough to flow smoothly. -
Fill the large pad:
Start by painting the outline of the main pad first to get a crisp edge. Then, fill in the center of the pad with smooth, even strokes. -
Smooth the texture:
While the paint is wet, look for any ridges left by the brush. Gently sweep over them to flatten the paint for a solid, opaque look. -
Paint the middle toes:
Move to the two middle toes. Carefully outline the oval shapes and fill them in. Painting the middle ones first helps keep the symmetry balanced. -
Paint the outer toes:
Complete the design by painting the two outer toes. Ensure they are sized similarly to the middle ones but positioned slightly lower on the arc. -
Check for gaps:
Inspect the stone closely. If the rock’s natural texture is showing through as little white specks, dab a tiny bit more paint into those crevices. -
Clean the edges:
Switch to your very fine detail brush. Go around the perimeter of each shape to sharpen any fuzzy edges or correct small bumps in your outline.
Symmetry Hack
Use a paper stencil! Fold a small piece of paper, cut half a heart shape for the main pad, and use it to trace a perfectly symmetrical base.
Step 3: Finishing Touches
-
Dry completely:
Let the black paint dry fully. This usually takes about 15-20 minutes depending on how thick the layer is. -
Erase guidelines:
Once the paint is bone-dry, gently erase any visible pencil marks that are still showing around the edges of the design. -
Second coat (optional):
If the black looks a bit streaky or gray, apply a second thin coat of paint for a truly deep, solid black finish. -
Seal the artwork:
To protect your rock from chipping or weather, spray a light coat of clear matte sealant over the entire surface in a well-ventilated area.
Add Personality
Once the black paint is dry, paint a tiny white heart inside the main pad, or write your pet’s name in small white letters curving under the print.
Place your finished stone in a garden bed or on a shelf as a sweet reminder of your furry friend
Heart Nose Puppy Close-Up
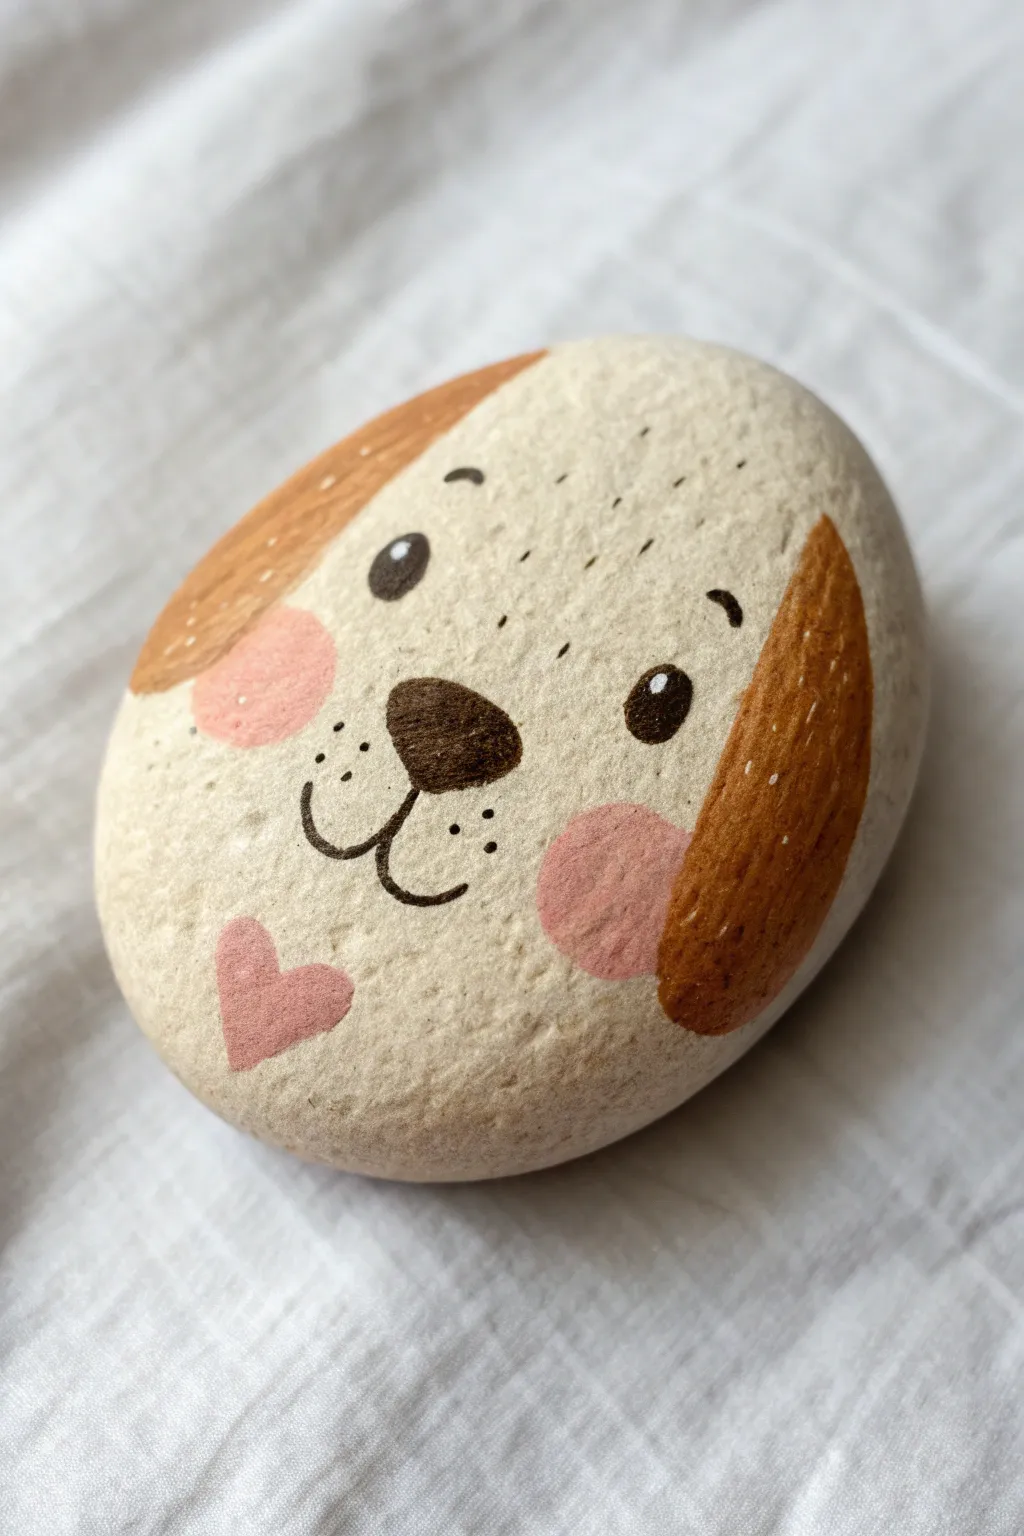
This adorable painted rock captures the loving gaze of a loyal pup with its warm brown ears and a charming pink heart on its chin. The natural stone texture works perfectly with the soft cream base to create a fuzzy, organic feel.
Detailed Instructions
Materials
- Smooth, oval-shaped river rock (palm-sized)
- Acrylic paints (cream/off-white, caramel brown, soft pink, dark brown, white)
- Wide flat paintbrush
- Small round paintbrush (size 2 or 4)
- Fine liner brush or extra-fine paint pen (black or dark brown)
- Pencil for sketching
- Matte paint sealer/varnish
- Water cup and paper towels
Step 1: Base and Sketching
-
Clean surface:
Begin by thoroughly washing your rock with soap and water to remove any dirt or oils. Let it dry completely before starting. -
Base coat application:
Using your wide flat brush, paint the entire front surface of the rock with a cream or off-white acrylic paint. This creates a soft, consistent background for the puppy’s face. -
Layering the base:
If the rock’s natural color shows through, apply a second coat of cream paint after the first one is touch-dry. Aim for an opaque, even finish. -
Sketch the features:
Once the base paint is bone dry, lightly sketch the puppy’s face with a pencil. Draw curved lines for the ears on the sides, two oval eyes, a rounded triangle nose, and the muzzle shape.
Uneven Coverage?
If your cream base coat looks streaky, sponge the paint on instead of brushing. A makeup sponge creates a smooth, stone-like texture without brushstrokes.
Step 2: Painting the Main Features
-
Paint the ears:
Using a small round brush and caramel brown paint, fill in the ear shapes. Follow the curve of the rock on the sides to make them look like they are flopping down. -
Add ear texture:
While the brown paint is drying, you can gently feather the inner edges slightly to create a hint of fur texture rather than a harsh straight line. -
Rosy cheeks:
Mix a soft pink shade and paint two circular cheeks on either side of the muzzle area. I find that watering down the paint just a tiny bit helps these blend softer into the background. -
The heart detail:
Using the same soft pink, paint a small, tilted heart on the lower left side of the chin area. -
Paint the nose:
Use dark brown paint to fill in the rounded triangle nose in the center of the face. Make the top edge slightly curved for a cute button-nose look. -
Fill the eyes:
With the same dark brown (or black if you prefer deeper contrast), paint two solid oval shapes for the eyes.
Step 3: Details and Fine Lines
-
Draw the mouth:
Using your fine liner brush or a paint pen, draw the mouth lines coming down from the nose. Create a ‘J’ shape on the left and a backward ‘J’ on the right to form the smile. -
Add eyebrows:
Paint two small, floating curved lines above the eyes to give the puppy an expressive, sweet look. -
Create freckles:
Dot tiny specks of dark brown paint on the forehead and around the muzzle area to mimic whisker spots and texture. -
Eye highlights:
Dip the very tip of a brush handle or a toothpick into white paint. Add a small white dot to the upper right corner of each eye to bring the puppy to life. -
Fur accents:
Use a very fine brush with white paint to add tiny dashes on the brown ears and the heart nose, suggesting light reflection and fur texture. -
Seal the rock:
Once all paint is perfectly dry, finish with a coat of matte spray varnish to protect your artwork from chipping and weather.
Make it a Set
Paint different dog breeds on various sized rocks to create a whole puppy family. You can glue felt ears on top for a 3D mixed-media effect.
This charming puppy rock makes a perfect paperweight or a sweet surprise to hide in a neighborhood garden
Sleepy Curled-Up Dog on an Oval Rock
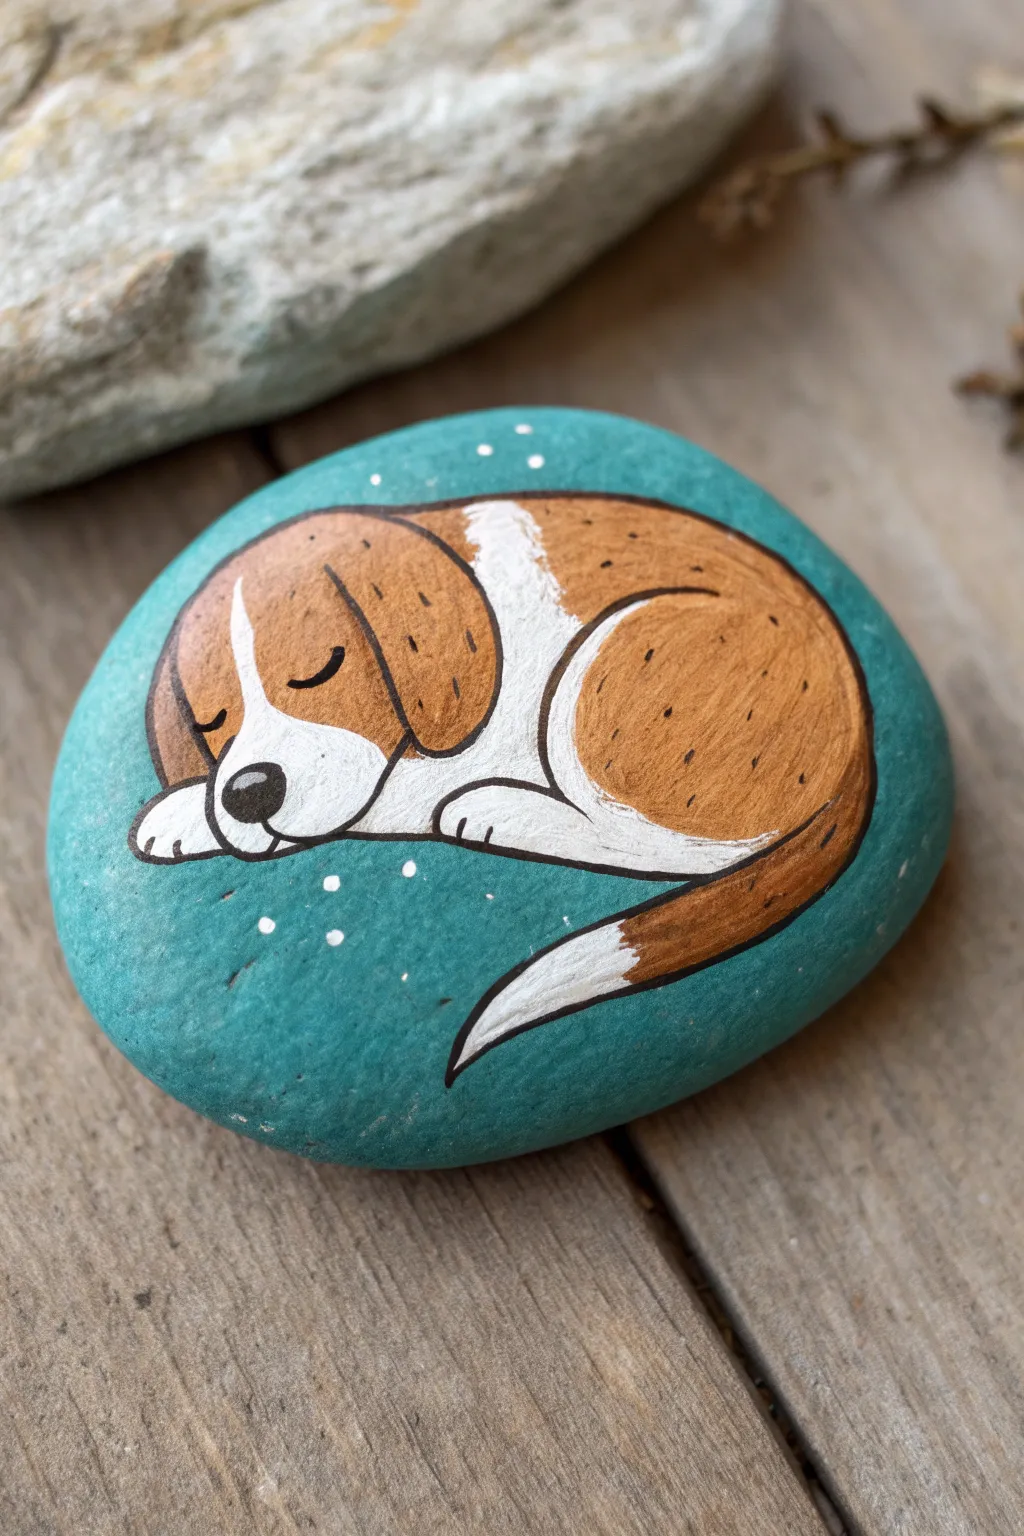
Capture the peaceful sweetness of a sleeping puppy with this adorable rock painting project. The vibrant teal background makes the warm brown and white tones of the beagle pop, creating a cozy little keepsake perfect for garden decor or a paperweight.
How-To Guide
Materials
- Smooth, oval-shaped river rock (approximately palm-sized)
- Acrylic paints: Teal/Turquoise, Warm Brown (Sienna), White, Black
- Paint brushes: Flat brush (for base coat), small liner brush (0 or 00 size)
- Pencil (HB or lighter)
- Sealer (spray or brush-on varnish)
- Palette or paper plate
- Water cup and paper towels
Step 1: Base Coat & Sketching
-
Prep the canvas:
Start by washing and drying your rock thoroughly to remove any dirt or oils. Use your flat brush to paint the entire top surface with a vibrant teal or turquoise acrylic paint. -
Apply a second coat:
Allow the first layer to dry completely to the touch. Apply a second coat of teal to ensure the color is solid and opaque, hiding the natural stone color beneath. -
Outline the shape:
Once the base paint is bone dry, lightly sketch the oval shape of the curled-up dog using a pencil. Start with a kidney-bean shape for the body and a rounded shape for the head tucked near the paws.
Clean Lines
To get steady outlines, rest your pinky finger on the dry part of the rock to stabilize your hand while using the liner brush.
Step 2: Color Blocking
-
Paint the white areas:
Using a small round brush and white paint, fill in the muzzle, the stripe running up the forehead, the tucked paws, the underbelly area, and the tip of the tail. You may need two coats for bright white. -
Fill the brown fur:
Switch to your warm brown paint. Fill in the ears, the top of the head around the white stripe, the main body curve, and the base of the tail. -
Refine the edges:
While painting the brown, carefully meet the edges of the white sections. It’s okay if they touch; we will add a separating line later, but try to keep the blocks distinct. -
Let it cure:
I like to take a short break here to ensure the color blocks are essentially completely dry before moving to the detail work, otherwise the black liner paint might muddy the colors.
Make it yours
Change the fur colors to match your own pet! Use grey and white for a schnauzer or all golden-yellow for a retriever puppy.
Step 3: Line Work & Details
-
Outline the perimeter:
Mix a tiny drop of water into your black paint to make it flow like ink. Using your finest liner brush, carefully trace the entire outer perimeter of the dog. -
Define the features:
Paint the curved lines that separate the head from the body, and the legs from the tummy. Add the floppy ear shape and the definition for the paws. -
Add the face:
Paint a small, rounded triangular nose in black on the white muzzle. Add two simple, small curved ‘U’ shapes for the closed sleeping eyes. -
Texture the fur:
Using extremely light pressure with your liner brush or a fine-tip paint pen, add tiny tick marks and dots in black on the brown sections to suggest fur texture. -
Add background magic:
Dip the tip of a toothpick or the handle end of a paintbrush into white paint. Dot small ‘stars’ or ‘snow’ scattered across the teal background around the dog.
Step 4: Finishing Touches
-
Check for gaps:
Look closer at your lines. If the black looks shaky or thin in spots, carefully go over them one last time to thicken the outline slightly, giving it that illustrative sticker look. -
Dry completely:
Allow the rock to sit undisturbed for at least 24 hours to ensure all layers of paint are cured. -
Seal the artwork:
Apply a clear coat of varnish or spray sealer. This protects the paint from chipping and makes the teal color look even richer.
Place your sleeping pup on a desk or shelf to add a moment of calm to your day
Two-Tone Split-Face Puppy
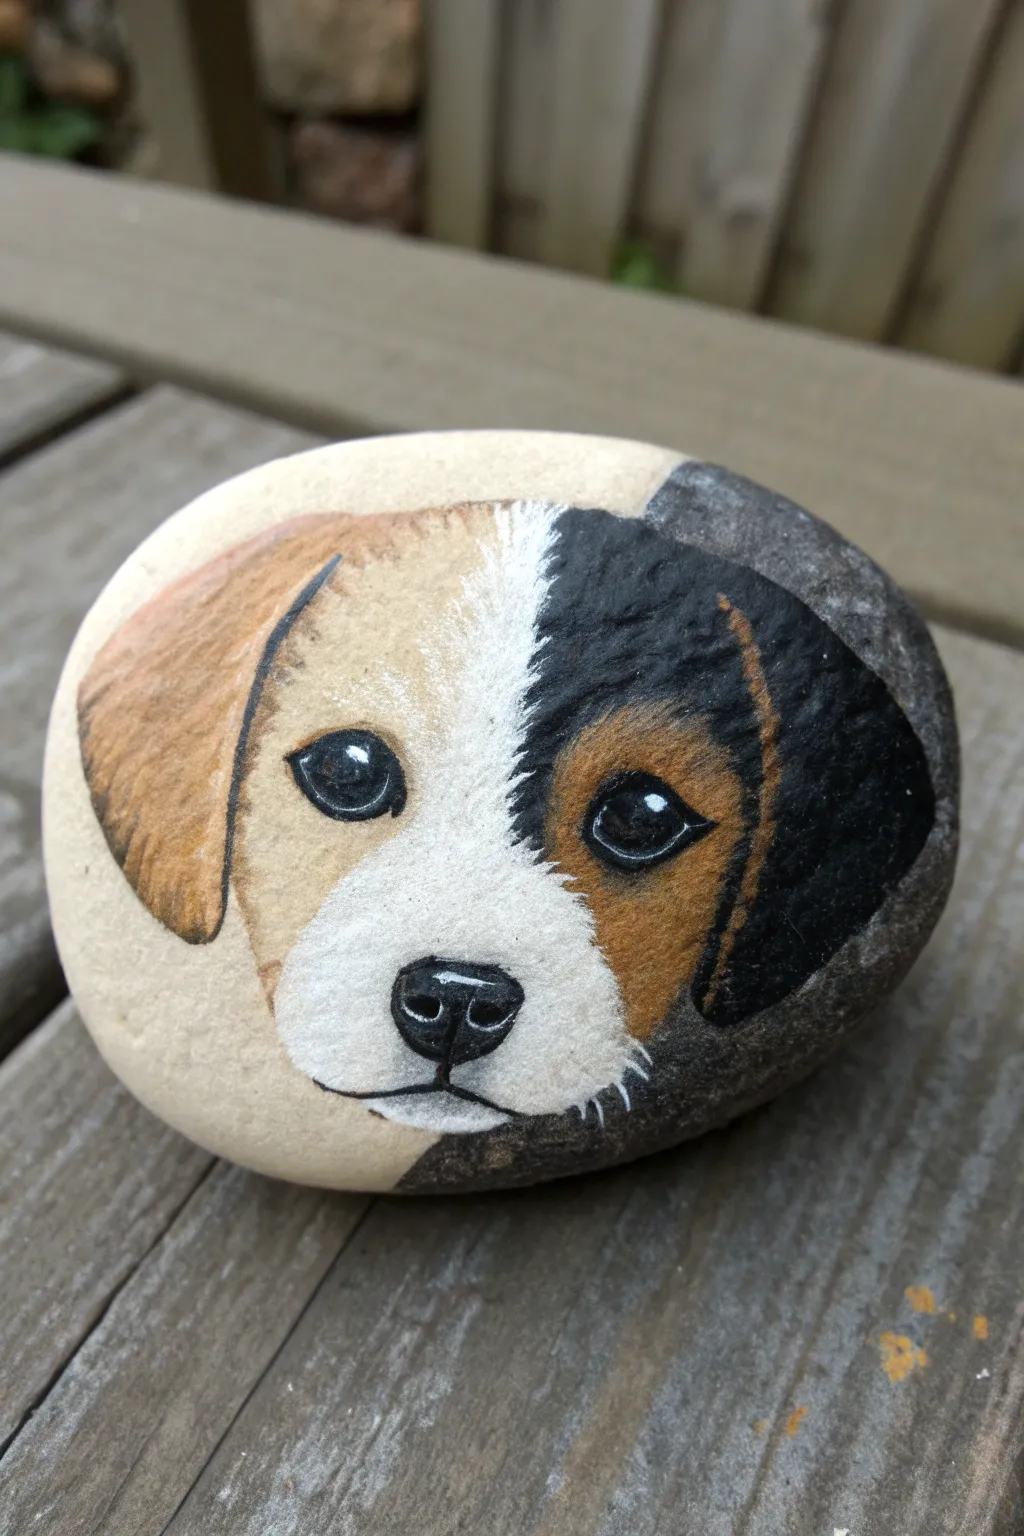
This clever design uses the natural contrast of a two-colored stone to frame a sweet puppy face, blending the rock’s raw texture with detailed painting. By aligning the painted features with the stone’s color split, you create a striking illusion that brings the rock to life.
Step-by-Step
Materials
- Smooth, rounded river rock (ideally two-toned, or paint a base coat to mimic it)
- Acrylic paints: white, black, burnt sienna (brown), raw sienna (tan/gold)
- Fine detail brushes (sizes 00 and 1)
- Flat shader brush (size 4 or 6)
- Pencil or white charcoal pencil
- Matte or satin clear sealant spray
Step 1: Preparation and Mapping
-
Stone Selection:
Find a smooth, oval rock. If you are lucky enough to find one with a natural diagonal color split like the reference, clean it well. If not, use a plain stone and paint a diagonal line, coloring the top right section dark grey and leaving the rest light cream. -
Outline the Head:
Using a pencil, lightly sketch a large oval shape that sits centrally on the rock. The top right portion of the head should sit within the darker area of the stone. -
Mark the Features:
Sketch the floppy ears on either side. Draw two almond shapes for eyes, positioning the right eye so it sits inside the darker zone. Add a rounded triangle for the nose and a simple curve for the mouth.
Use Feathery Strokes
For realistic fur, never paint straight lines. Always use short, quick flicks of the wrist. Start the stroke inside the color block and flick outward.
Step 2: Blocking the Colors
-
Paint the White Blaze:
Mix a tiny bit of water with your white acrylic paint to improve flow. Paint a central stripe down the forehead, widening it significantly around the muzzle area. Use feathery strokes at the edges to mimic fur texture. -
Left Ear and Eye Patch:
Using raw sienna or a golden tan color, fill in the left ear (the one on the light side of the rock). Extend this color slightly under the left eye area. -
Right Eye Patch:
For the dark side of the face, mix burnt sienna with a touch of black to create a deep brown. Paint a patch around the right eye area, but leave the very outer edge of the ear unpainted if you want the natural rock color to show through as the dark fur. -
Define the Dark Fur:
Paint the right ear and the right side of the head with black paint. I like to drag the brush slightly into the white muzzle area to create a jagged, furry transition line rather than a straight edge.
Step 3: Detailed Features
-
Paint the Eyes Base:
Using your smallest brush and black paint, carefully fill in the almond shapes for the eyes. Make them relatively large to give that cute puppy look. -
Nose and Mouth:
Fill in the nose with solid black. Paint a very thin vertical line dragging down from the nose center, splitting into a gentle ‘W’ shape for the mouth. -
Nose Highlights:
Once the black nose is dry, mix a dark grey. Paint a tiny curved line along the top of the nose to show dimension. Add two comma-shaped nostrils in pure black over this grey if needed. -
Eye Reflections:
This is the most crucial step for realism. Dip the tip of a toothpick or a size 000 brush in pure white paint. Place a small dot in the upper right quadrant of both pupils. Add a faint curved grey line at the bottom of the iris for depth. -
Whiskers and Fur Details:
Thin down your white paint. Using the very tip of your detail brush, flick tiny hairs overlapping the black patch on the right side. Add a few small dots on the muzzle where whiskers would originate.
Eyes Looking Flat?
If the eyes look dead, you likely missed the lower reflection. Add a very faint, curved line of light grey or blue-grey along the bottom rim of the iris.
Step 4: Refining and Sealing
-
Outline Adjustment:
If any edges look too smooth, go back with the adjacent color and paint tiny flicks to simulate hair texture. Specifically, ensure the white blaze has a ragged edge where it meets the brown patches. -
Ear Definition:
On the tan left ear, use a slightly darker brown to paint a thin line defining the bottom edge and the fold where the ear attaches to the head. -
Final Cleanup:
Check the background stone. If you got any paint on the unpainted areas of the rock, scratch it off gently with a damp toothpick or cotton swab. -
Seal the Rock:
Allow the paint to cure for at least 24 hours. Spray with a matte or satin outdoor sealer to protect the paint without making the natural stone look artificial and plastic-like.
Place your finished split-face puppy in a garden bed or on a shelf where its sweet gaze can greet you daily
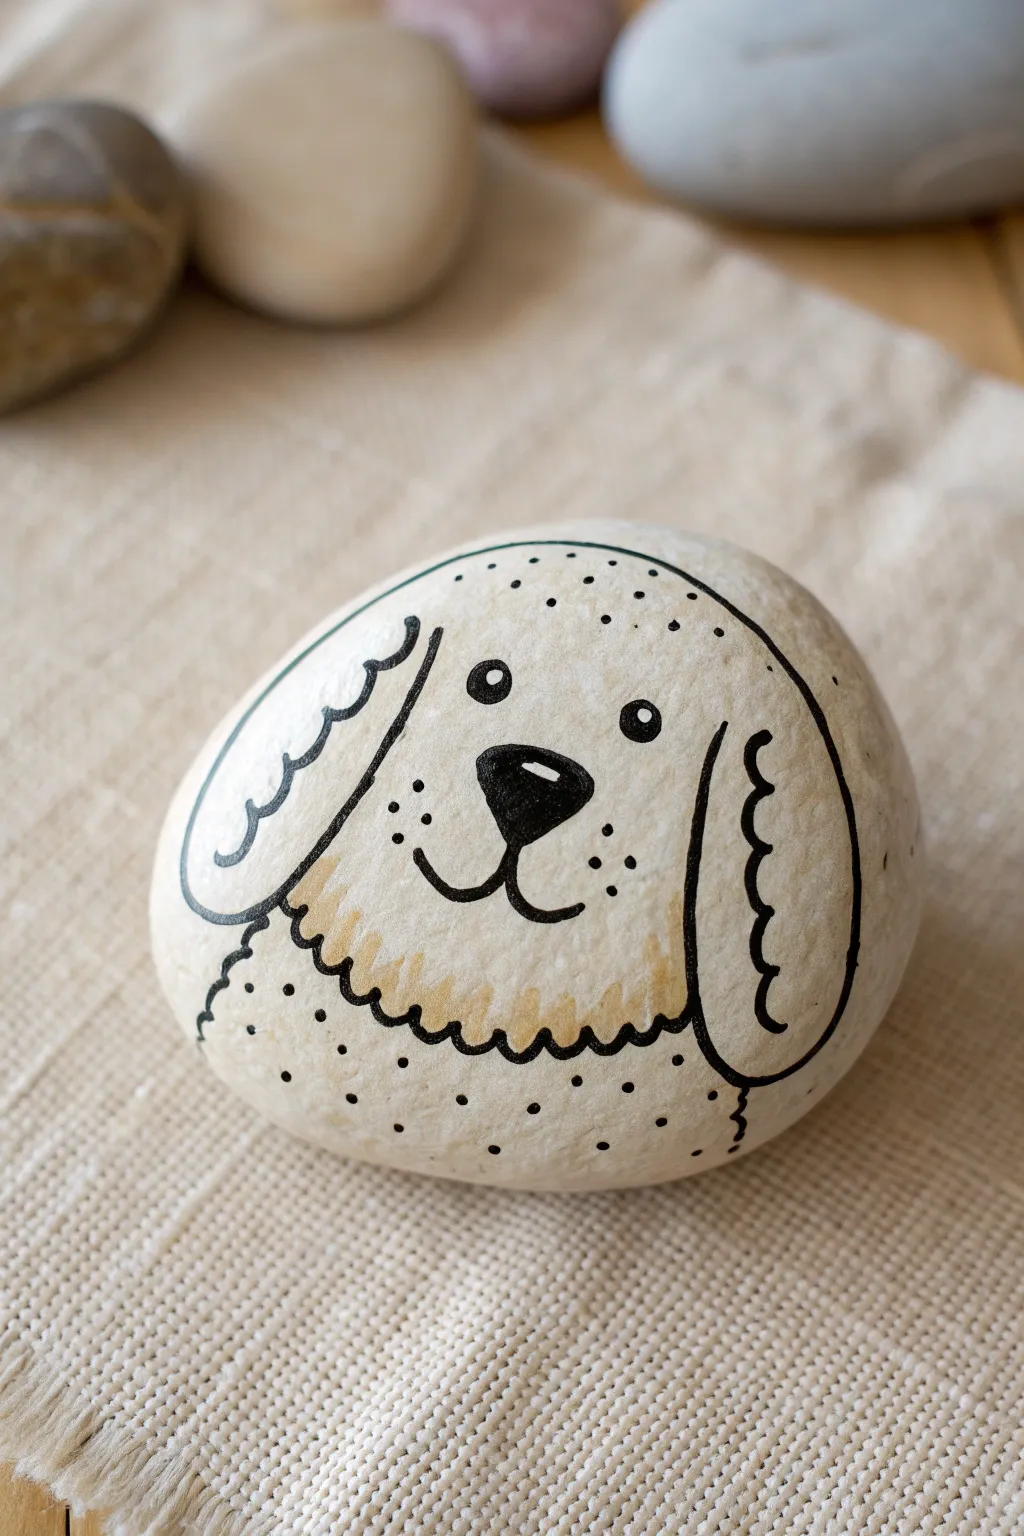
Minimal Line-Art Dog Profile
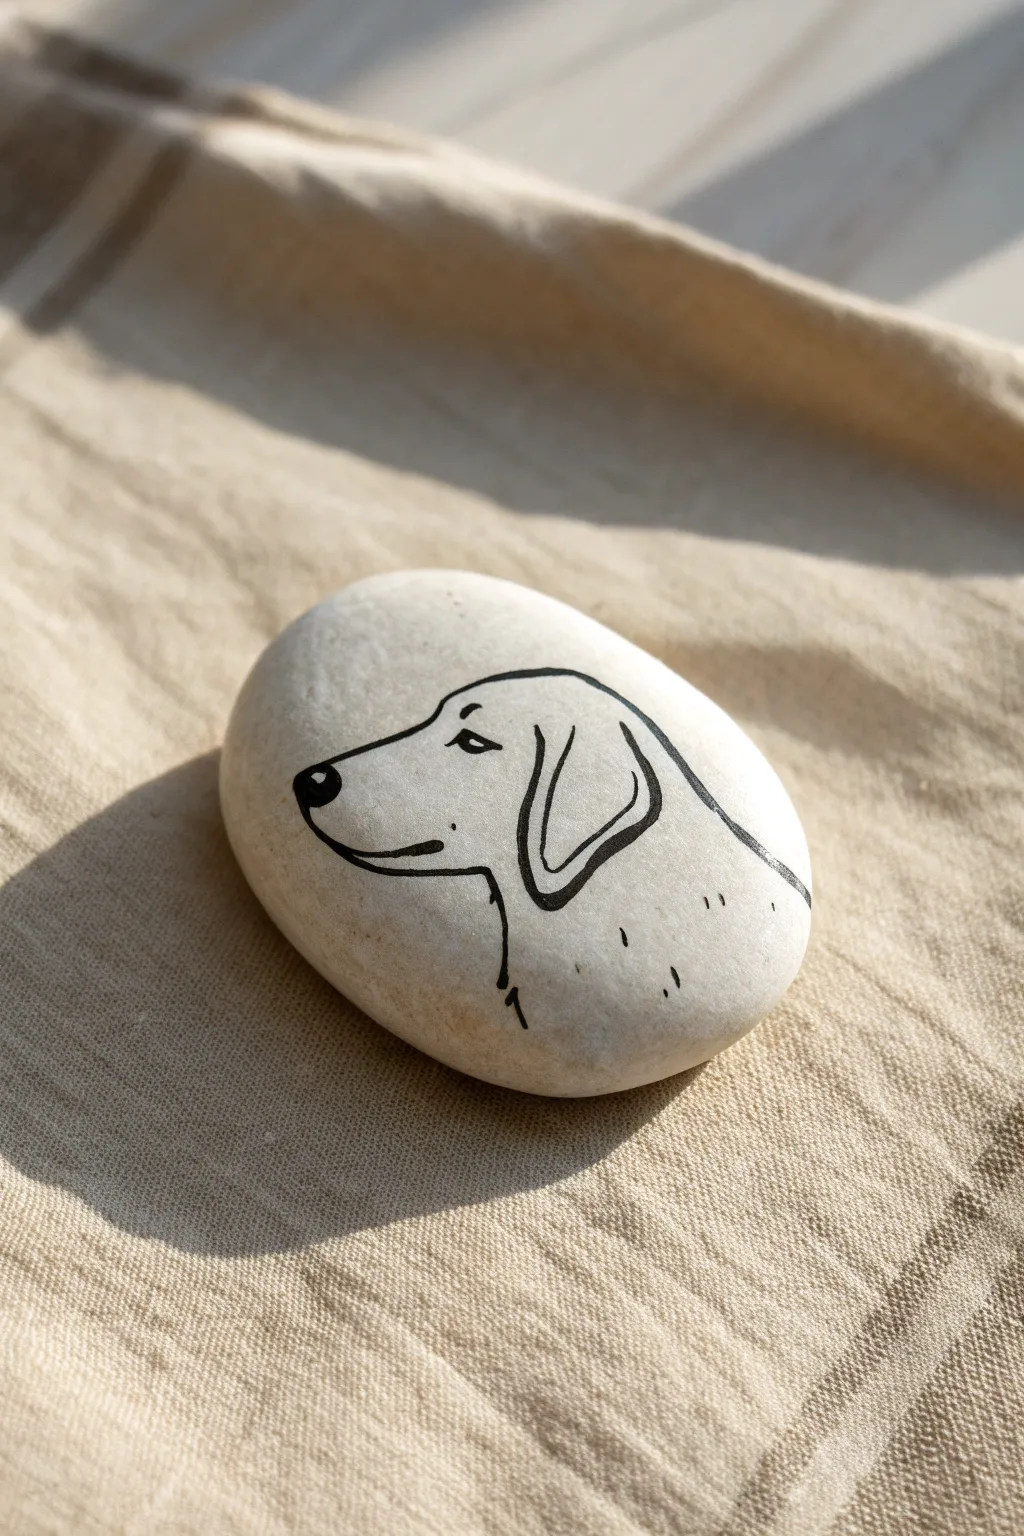
Capture the gentle spirit of a loyal companion with just a few confident strokes in this elegant line-art project. The stark contrast of black ink against a smooth white stone creates a modern, sophisticated look that is deceptively simple to achieve.
Step-by-Step Tutorial
Materials
- Smooth, oval river rock (white or light beige)
- Fine-grit sandpaper (optional)
- Pencil (HB or H)
- White eraser
- Black acrylic paint pen (fine tip/0.7mm)
- Black acrylic paint pen (medium tip/3mm)
- Clear spray sealant (matte or satin finish)
Step 1: Preparation and Sketching
-
Surface Prep:
Begin by washing your stone thoroughly with soap and water to remove any dirt or oils. Let it dry completely in the sun. -
Smoothing:
Run your fingers over the surface; if there are any rough patches where you plan to draw, gently buff them with fine-grit sandpaper to ensure your pen glides smoothly. -
Mapping the Head:
Using a pencil with a very light touch, sketch a simple oval shape slightly off-center to the left to represent the dog’s main head mass. -
Adding the Snout:
Extend a rounded rectangular shape from the left side of your oval to form the snout. Keep the top line relatively flat and the bottom line curving gently upward. -
Placing the Ear:
Draw the ear shape, reminiscent of a folded triangle with rounded corners. The top of the ear should start near the top of the head curve, dropping down past the jawline. -
Defining the Neck:
Sketch a swooping line extending from the back of the head down towards the right edge of the rock to suggest the dog’s back. -
Front Neck Detail:
Add a shorter, curved line coming down from under the jaw to indicate the throat and chest area. -
Facial Features:
Lightly mark the position for the nose at the tip of the snout and a small, almond-shaped eye just above the corner of the mouth line.
Shaky Lines?
If your hand shakes while tracing, rest your pinky finger on the dry part of the rock as an anchor. Draw lines by moving your whole arm, not just your wrist.
Step 2: Inking and Details
-
Outline the Snout:
Switch to your medium-tip black paint pen. carefully trace the top of the snout, moving back towards the forehead in one fluid motion if possible. -
Draw the Nose:
Fill in the nose shape completely with the medium pen, leaving a tiny pinprick of white space on the top curve to simulate a highlight. -
The Jawline:
Trace the bottom jaw line, curving it slightly upward into a gentle smile, ending just before the neck starts. -
Inking the Ear:
Outline the main shape of the ear. For the inner ear fold, switch to the fine-tip pen to create a delicate line that runs parallel to the front edge of the ear flap. -
The Eye:
Using the fine-tip pen, carefully draw the eye. A small triangular eyebrow mark above the eye adds expressive character. -
Neck Lines:
Trace the back and throat lines. Allow the lines to taper off at the ends rather than stopping abruptly. -
Adding Texture:
With the fine-tip pen, add three or four tiny, dashed marks on the lower neck area to suggest fur texture without overcrowding the design. -
Line Weight Variation:
I like to go back over the outer edge of the ear and the top of the head with the medium pen once more to thicken those lines, creating visual depth. -
Cleanup:
Allow the paint to dry for at least 15 minutes. Once fully set, gently erase any visible pencil sketch lines. -
Sealing:
Finish by applying a light coat of clear matte spray sealant to protect the ink from chipping or fading.
Add a Pop
Give the dog a personalized collar! Use a bright red or blue paint pen to draw a simple band across the neck area for a tiny splash of vibrant color.
Now you have a sleek, modern piece of stone art that captures puppy love in its simplest form
Bold Dog Silhouette on a Bright Base
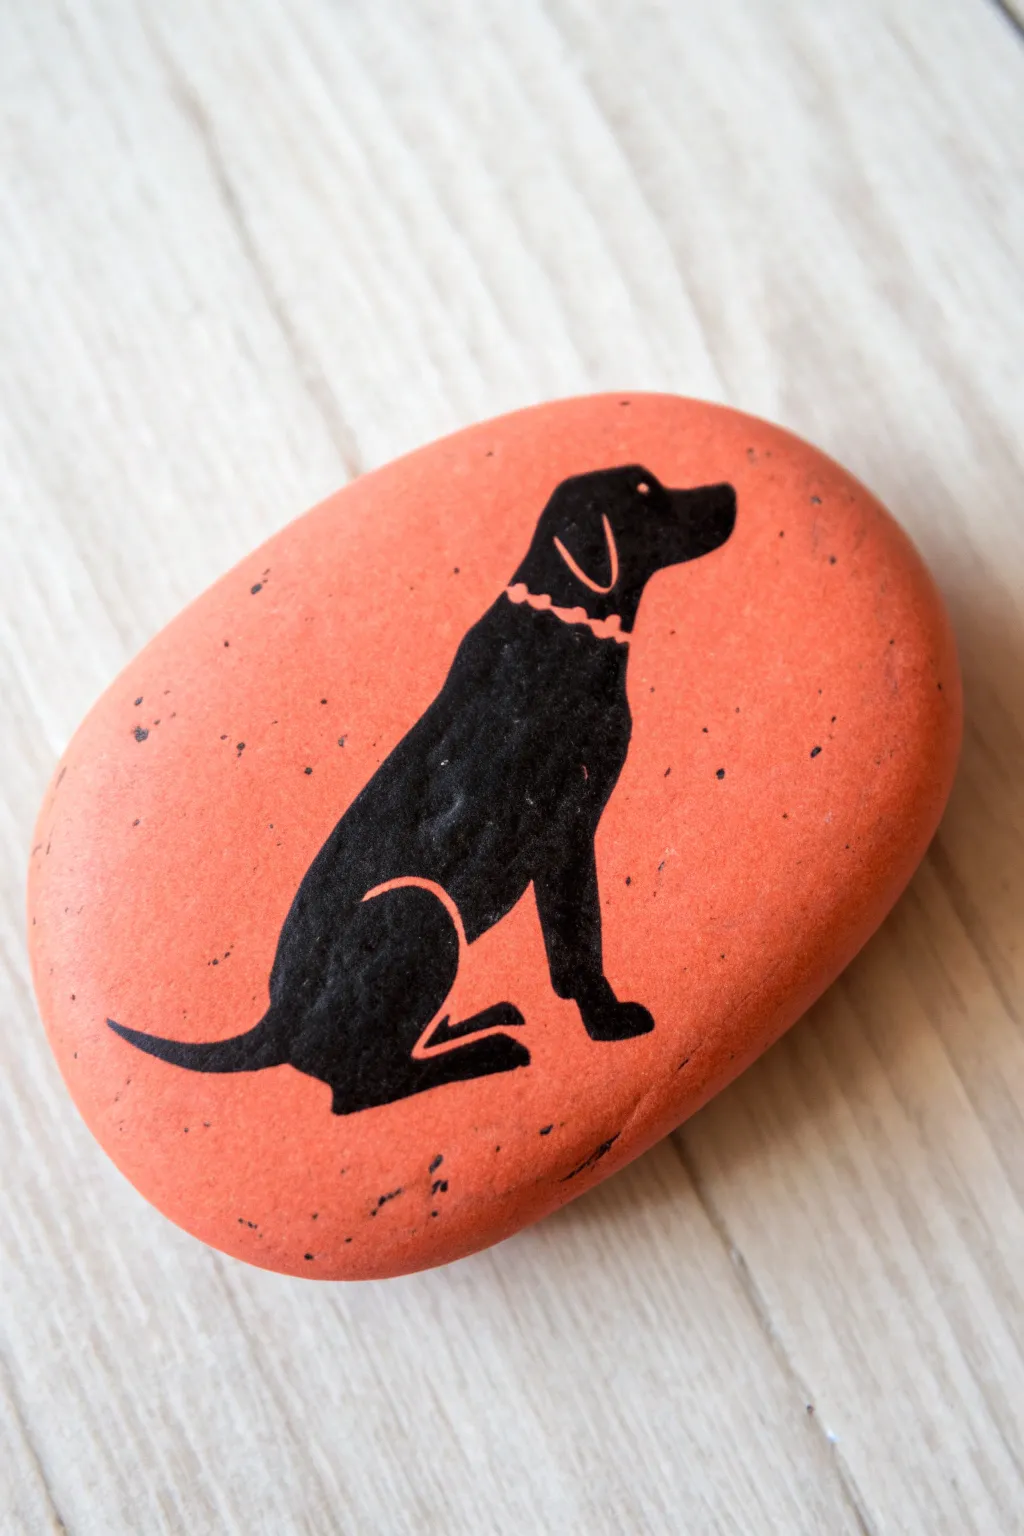
This striking project features a classic black dog silhouette against a vibrant coral-orange background. The high contrast creates a clean, modern look that makes the simple shape really pop off the stone.
Step-by-Step
Materials
- Smooth oval river rock (medium size)
- Acrylic paint: Coral or salmon orange
- Acrylic paint: Black
- Soft flat paintbrush (medium)
- Fine detail paintbrush (0 or 00 size)
- Pencil
- White or grey transfer paper (optional)
- Dog silhouette template (printed)
- Sealant (spray or brush-on)
- Water cup and paper towels
Step 1: Preparing the Canvas
-
Clean the Stone:
Begin by washing your rock thoroughly with warm, soapy water to remove any dirt or oils. Use an old toothbrush if needed to get into the texture. Dry it completely with a towel before starting. -
Base Coat Application:
Squeeze out your coral or salmon-colored acrylic paint. Using the soft flat brush, apply a smooth, even layer over the top surface of the rock. Don’t worry if it looks streaky on the first pass. -
Second Layer:
Once the first coat is dry to the touch, apply a second coat of the coral paint. This ensures a rich, opaque background color. Let this dry completely—ideally for at least 30 minutes—so your pencil marks won’t gouge the paint later.
Step 2: Drafting the Design
-
Choose Your Shape:
You can either sketch the dog freehand or use a transfer method. The shape is a simple sitting dog profile: a rounded head, a straight back sloping down, and paws tucked underneath. -
Using Transfer Paper:
If you are using a printed template, place a piece of white or grey transfer paper between your template and the painted rock. Trace the outline firmly with a pencil to leave a faint guide on the coral background. -
Freehand Sketching:
If drawing directly, lightly sketch the outline with a pencil. Start with the curve of the head and snout, move down the neck to the back, and curve around the haunches. Keep the lines very light so they are easy to cover.
Uneven Coverage?
If the black paint looks streaky or grey, don’t overwork wet paint. Let it fully dry and add a second thin layer for a solid, sticker-like finish.
Step 3: Painting the Silhouette
-
Outline the Shape:
Load your fine detail brush with black acrylic paint. Carefully paint over your pencil lines to create a crisp outline. Work slowly, particularly around the snout and ears, as these define the character of the dog. -
Fill the Body:
Switch to a slightly larger brush or continue with the detail brush to fill in the main body area. Ensure the black is solid and opaque; you may need a second coat of black once the first dries to prevent the orange showing through. -
Refining the Edges:
Go back over the edges with your smallest brush to smooth out any bumps. Make sure the tail has a nice tapered point and the paws look like they are resting flat on the ground.
Texture Twist
Before sealing, use a stiff brush to flicker tiny black spots around the dog for a splattered, modern art texture effect.
Step 4: Adding Details
-
The Collar Gap:
The charm of this design is the ‘negative space’ collar. You can achieve this by leaving a tiny unpainted gap in the neck area when filling the black, or by engaging in the next step. -
Painting the Collar:
If you filled the whole shape black, wait for it to dry completely. Then, mix a tiny amount of the original coral background color and use your smallest brush to paint a thin, dotted, or zig-zag line across the neck to simulate a collar. -
Ear Definition:
Similar to the collar, add a very fine line of coral paint (or leave a gap) to define the floppy ear against the head. This small detail adds dimension to the silhouette. -
Leg Definition:
Add a thin curved line of the coral color to separate the rear haunch from the main body. I find this really helps clarify the sitting posture. -
Clean Up:
If you made any mistakes with the black paint, wait for it to dry and touch it up with the coral background color. It serves as a perfect eraser.
Step 5: Finishing Up
-
Final Drying:
Let the entire rock dry for several hours or overnight. The black paint is thicker and takes longer to cure fully than the base coat. -
Sealing:
Apply a clear sealant to protect your artwork. A spray sealer works best to prevent smearing the black paint, but a brush-on varnish works if you are very gentle.
Now you have a loyal companion that sits perfectly still on your desk or in your garden
Dot Mandala Paw Print Pattern
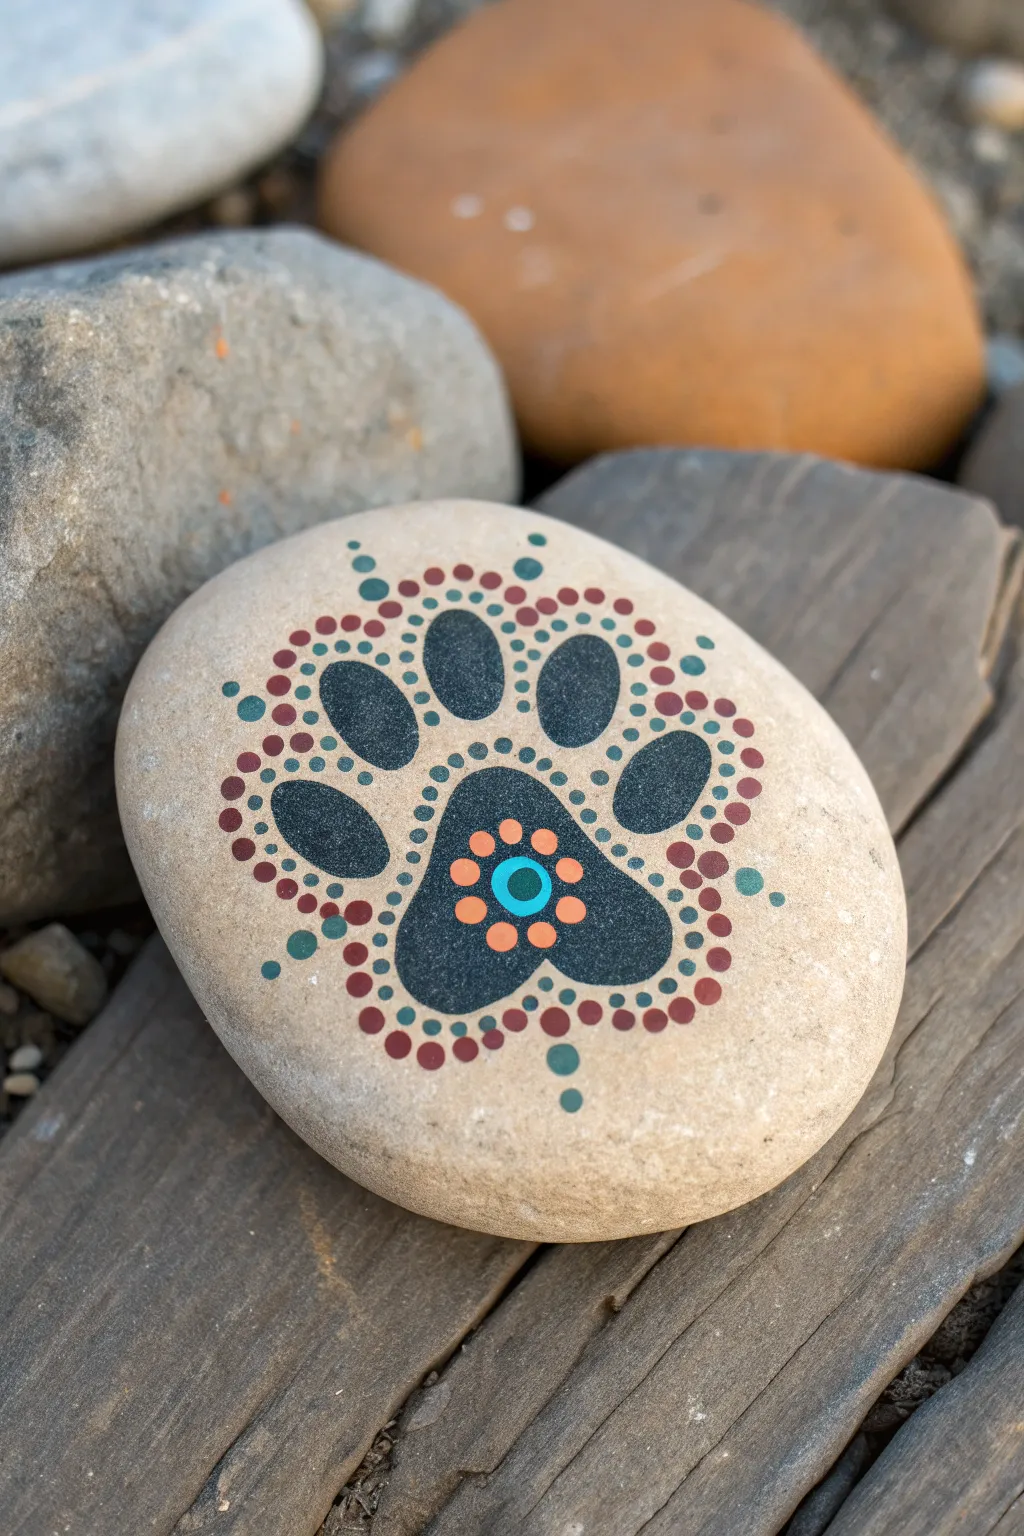
This project combines the classic symbol of a beloved pet with the soothing, intricate patterns of dot art. The result is a smooth, balanced stone featuring a stylized paw print blooming with colorful dotted accents.
Step-by-Step Tutorial
Materials
- Smooth, round river rock (beige/light tan)
- Black acrylic paint
- Deep red/maroon acrylic paint
- Teal/blue-green acrylic paint
- Bright orange acrylic paint
- Dotting tools (various sizes)
- Small flat brush or detail brush
- Pencil for sketching (optional)
- Clear sealant (spray or brush-on)
Step 1: Painting the Base Paw
-
Clean surface:
Begin by washing your stone with soap and water to remove any dirt or oils, then let it dry thoroughly. -
Sketch the outline:
Lightly sketch the main pad (a heart-like shape with a rounded bottom) and four oval toe pads above it using a pencil. Keep the arrangement centered. -
Fill the pads:
Using black acrylic paint and a small flat brush, fill in the sketched shapes. Aim for solid, opaque coverage. -
Smoothing edges:
Carefully refine the edges of your paw pads to ensure they are crisp and clean curves. -
Dry completely:
Allow the black paint to dry completely. This is crucial before starting the dot work to prevent smudging.
Step 2: Adding the Central Floral Motif
-
Center dot:
Inside the large main pad, use a medium dotting tool to place a single teal dot right in the center. -
Orange ring:
Using a smaller tool, place a ring of small orange dots directly surrounding the teal center dot. -
Outer flower petals:
Switch to a slightly larger tool and place orange dots around the previous ring to create a flower shape inside the black pad. -
Teal center accent:
Once the very first teal dot is dry, you can add a tiny black dot in its center for extra depth, though I often skip this if the teal is vibrant enough.
Paint Consistency Pro-Tip
For perfect round dots, ensure your paint is the consistency of heavy cream. If it forms peaks when dipped, add a tiny drop of water.
Step 3: Creating the Outer Mandala Border
-
Primary red halo:
Dip a medium dotting tool into the deep red paint. Place a row of dots following the outer contour of the entire paw print, leaving a small gap between the paint and the black shape. -
Spacing the first row:
Try to keep the spacing between these red dots consistent as you curve around the toes and the main pad. -
Inner details:
Using a very small tool and teal paint, add tiny dots in the gaps between the paw pads and the red border dots where space allows. -
Second layer accents:
Add a second scattered row of teal dots outside the red ring, focusing on the crevices between the toes to fan the design outward. -
Top spikes:
At the very top of the center two toes, extend the design upward with a vertical line of three dots decreasing in size (teal, red, teal). -
Bottom anchor:
Mirror this effect at the very bottom center of the main pad with a few trailing teal and red dots to balance the composition. -
Final touches:
Look for any uneven gaps and fill them with tiny ‘micro-dots’ in teal or orange to make the mandala feel dense and complete. -
Seal the stone:
Once all paint is perfectly dry (give it a few hours), apply a clear sealant to protect your design from weather and wear.
Level Up: Metallic Finish
Swap the teal paint for a metallic gold or copper. The shimmer against the matte black paw print adds an elegant, high-end look.
Place this beautiful stone in your garden as a colorful tribute to your furry friend
Pup in a Simple Patterned Sweater
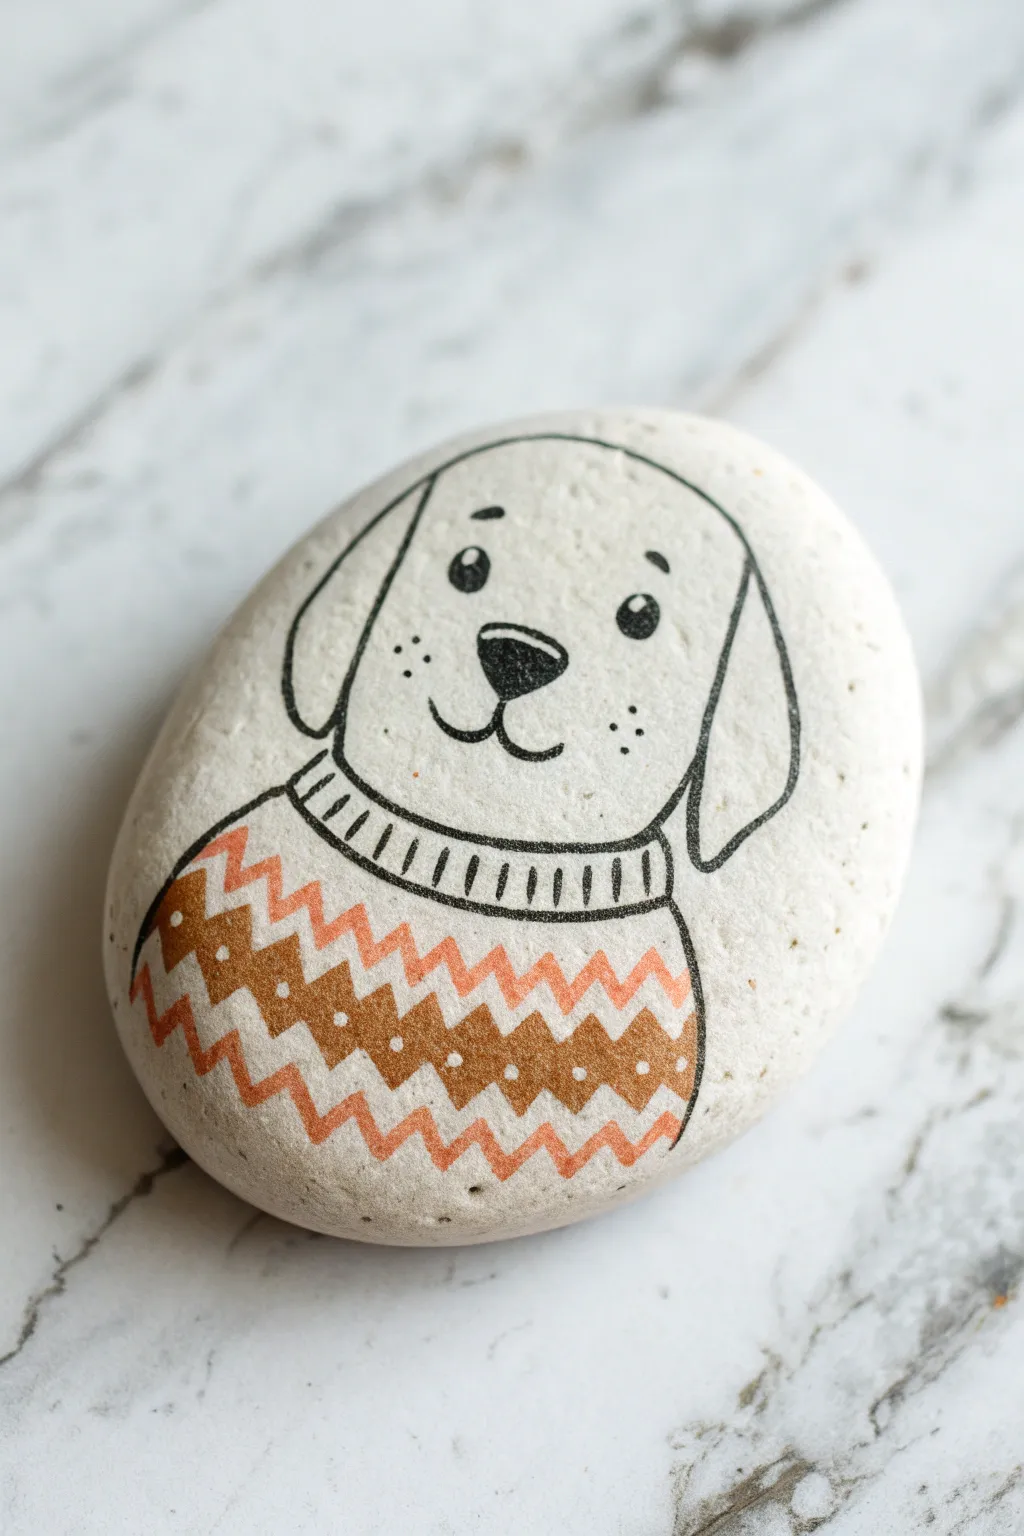
This adorable rock painting features a minimalist dog character cozying up in a zig-zag patterned sweater. The clean black lines against the smooth white stone create a modern, stamped look that is perfect for beginners.
How-To Guide
Materials
- Smooth, white flat river rock (sanitized and dry)
- Fine-point black permanent marker or waterproof liner pen (0.5mm or 0.8mm)
- Paint pens or acrylic paint (Soft Orange, Metallic Bronze/Gold)
- Fine detail brush (if using bottled paint)
- Pencil and eraser
- Spray sealant (matte or gloss)
- White acrylic paint (optional, for base coating)
Step 1: Preparation and Sketching
-
Prep the Surface:
Before anything else, ensure your rock is clean and dry. If your stone isn’t naturally white, apply a layer of white acrylic paint to create a blank canvas and let it dry completely. -
Map Out the Head:
Using a light pencil touch, draw a large inverted ‘U’ shape in the upper center of the rock. This will be the top of the dog’s head and ears. -
Draw the Ears:
Sketch two floppy oval shapes connecting to the sides of that initial arch. Let them droop down slightly past the imaginary jawline for that cute, relaxed look. -
Connect the Jaw:
Close the head shape by drawing a gentle curve connecting the bottom of the ears, forming the dog’s chin and cheeks. -
Add the Sweater Outline:
Directly below the head, draw a curved line for the sweater collar. Extend curved lines downward to the bottom edge of the rock to form the shoulders and chest.
Ink Smearing?
If your black marker bleeds when painting near it, switch to an archival waterproof ink pen, or seal the black lines with spray varnish before painting colors.
Step 2: Inking the Lines
-
Trace the Main Features:
Take your fine-point black marker and carefully trace over your pencil lines for the head, ears, and sweater body. Use a steady hand to keep lines crisp. -
Define the Collar:
Draw the ribbed collar by adding a second curved line parallel to the neckline. Fill the space between them with small vertical hash marks. -
Add Facial Features:
Draw two small ovals for eyes, leaving tiny white dots inside for highlights. Fill the rest in black. Add a rounded triangular nose and a ‘W’ shape for the mouth. -
Detail the Face:
I like to add character here by drawing small eyebrows floating above the eyes and adding three tiny freckle dots on each cheek. -
Erase Pencil Marks:
Wait at least 10 minutes for the ink to fully set, then gently erase any visible pencil guidelines.
Make It 3D
Use ‘puffy paint’ or dimensional fabric paint for the sweater stripes to give the artwork actual texture that feels like knitting.
Step 3: Painting the Pattern
-
Start the Geometric Pattern:
For the sweater, we will create a chevron (zig-zag) design. Start by drawing a continuous zig-zag line across the chest with your orange paint pen. -
Add the Bronze Layer:
Below the orange line, add a thicker zig-zag band using the metallic bronze or gold color. Follow the same peaks and valleys as the first line. -
Continue the Pattern:
Repeat the pattern with another orange zig-zag line below the bronze one, filling the space down to the bottom of the rock. -
Add Decorative Dots:
Once the bronze paint is dry, use a fine tip or toothpick to add tiny white or light-colored dots along the center of the metallic band. -
Refine the Edges:
Check the edges where the sweater meets the background. If your paint went outside the lines, touch up the black outline with your marker once the paint is fully dry. -
Seal the Rock:
Finish the project by spraying a thin coat of sealant over the entire surface to protect the ink and paint from scratching or fading.
Now you have a charming canine companion that makes for a perfect desk accessory or garden surprise
Starry Galaxy Dog Face
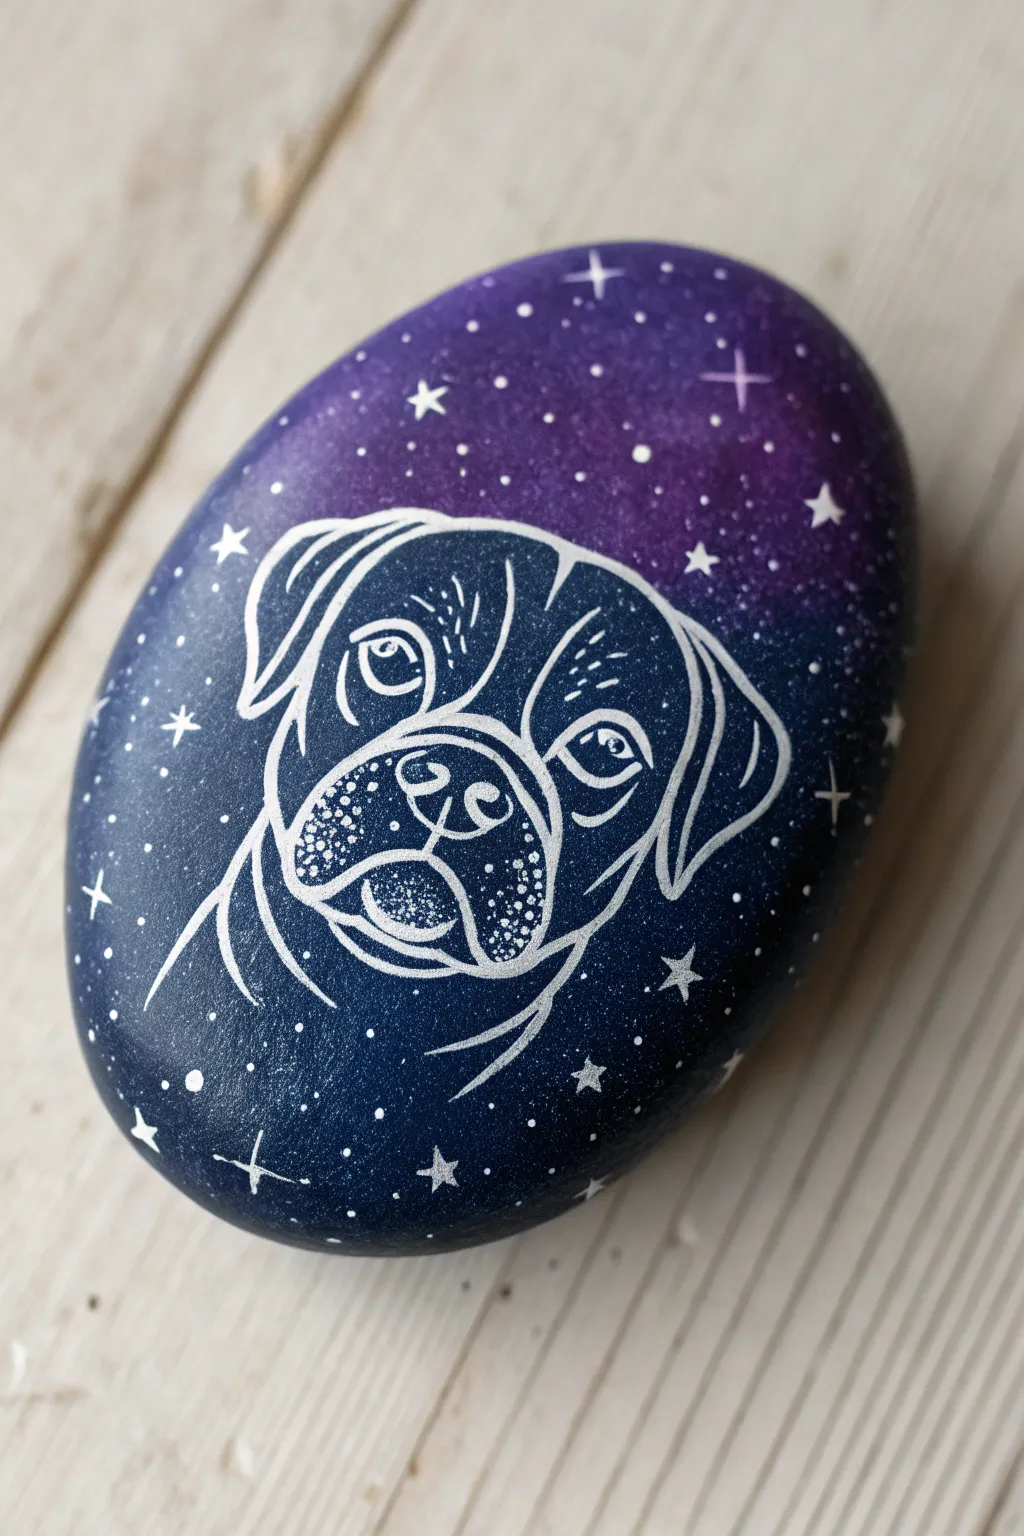
Transform a simple stone into a celestial masterpiece with this striking galaxy dog portrait. The contrast between the deep, starry background and the crisp white line art creates a truly magical effect that really pops.
Step-by-Step Tutorial
Materials
- Smooth, oval-shaped river rock
- Gesso or white acrylic primer
- Acrylic paints: Navy blue, black, purple, magenta, and titanium white
- Makeup sponge or small sponge pouncer
- Fine liner brush (size 00 or 000)
- White paint pen (extra fine tip) or white gel pen
- Old toothbrush (optional for stars)
- Clear spray sealer (matte or gloss)
- Pencil and eraser
- Palette or paper plate
Step 1: Preparing the Galaxy Base
-
Clean and Prime:
Wash your rock thoroughly with soap and water to remove any dirt or oils. Once completely dry, apply a coat of white gesso or primer to the top surface. This step is crucial because it ensures your dark colors will look vibrant rather than muddy. -
Dark Base Layer:
Start by painting the bottom third of the rock with a deep navy blue mixed with a tiny drop of black. This creates the darkest part of our night sky. -
Mid-Tone Transition:
While the navy is still slightly wet, use your sponge to dab pure navy blue into the middle section, blending it gently into the darker bottom edge. -
Purple Nebula:
On your palette, mix purple with a touch of magenta. Sponge this lighter, vibrant color onto the top third of the rock. Use a clean part of your sponge to tap over the line where the blue and purple meet to create a seamless, soft gradient. -
Adding Depth:
Lightly sponge pure black around the very outer edges of the rock, framing the colored center. This vignette effect draws the eye inward. -
Starry Splatters:
Dilute a small amount of white acrylic paint with water until it’s inky. Dip an old toothbrush into it and flick the bristles with your thumb to spray tiny white specks across the ‘sky’. Let this layer dry completely before moving on. -
Hand-Painted Stars:
Using your fine liner brush or a white paint pen, add larger, specific stars. Draw small crosses or four-pointed shapes to represent twinkling stars, placing them randomly but looking for empty spots that need brightness.
Step 2: Drawing the Dog Portrait
-
Sketching the Outline:
Once the background is 100% dry, lightly sketch the dog’s face using a standard pencil. Don’t press too hard, or you might scratch the paint. Focus on the big shapes: the rounded head, the floppy ears, and the muzzle area. -
Starting the Ink Work:
Shake your white paint pen well to get the ink flowing. Begin tracing your pencil lines, starting with the outer contour of the head and ears to establish the frame. -
Defining the Eyes:
Carefully draw the eyes. Add a small white highlight dot inside each pupil to give the dog expression and life. This is the focal point, so take your time here. -
Muzzle Details:
Outline the nose and mouth area. Add the nose nostrils and the distinct line separating the jowls. I find that breaking the lines slightly instead of drawing one continuous stroke can make the fur look more natural. -
Adding Texture:
Use stippling (tiny dots) on the muzzle area to mimic the texture of short whiskers and pores. This creates shading without using grey paint. -
Fur Lines:
Add short, curved strokes above the eyes and on the forehead to suggest wrinkles and fur direction. Keep these lines thinner than the main outline. -
Ear Details:
Draw the inner folds of the ears with simple, sweeping curves. These lines give the drawing dimension so the ears don’t look flat. -
Refining the Contrast:
Step back and look at your rock. If any white lines look too thin against the dark galaxy background, go over them a second time to thicken and brighten them. -
Clean Up:
Once the ink is fully dry, gently erase any visible pencil marks. Be very gentle to avoid rubbing off the acrylic background. -
Sealing:
Finish by applying a clear spray sealer. A gloss finish looks amazing on galaxy rocks as it makes the dark colors look wet and deep.
Stars Disappearing?
If your white stars fade as they dry, your white paint was likely too thin or transparent. Go back over the largest stars with a white paint pen or a second dot of undiluted heavy body acrylic.
Glow Up
Use glow-in-the-dark acrylic paint for the stars and the dog outline. By day it looks white, but at night your celestial pup will magically illuminate.
Place your finished galaxy rock in a sunny spot or hide it in a park for someone lucky to find
Textured Fur With Quick Stippling
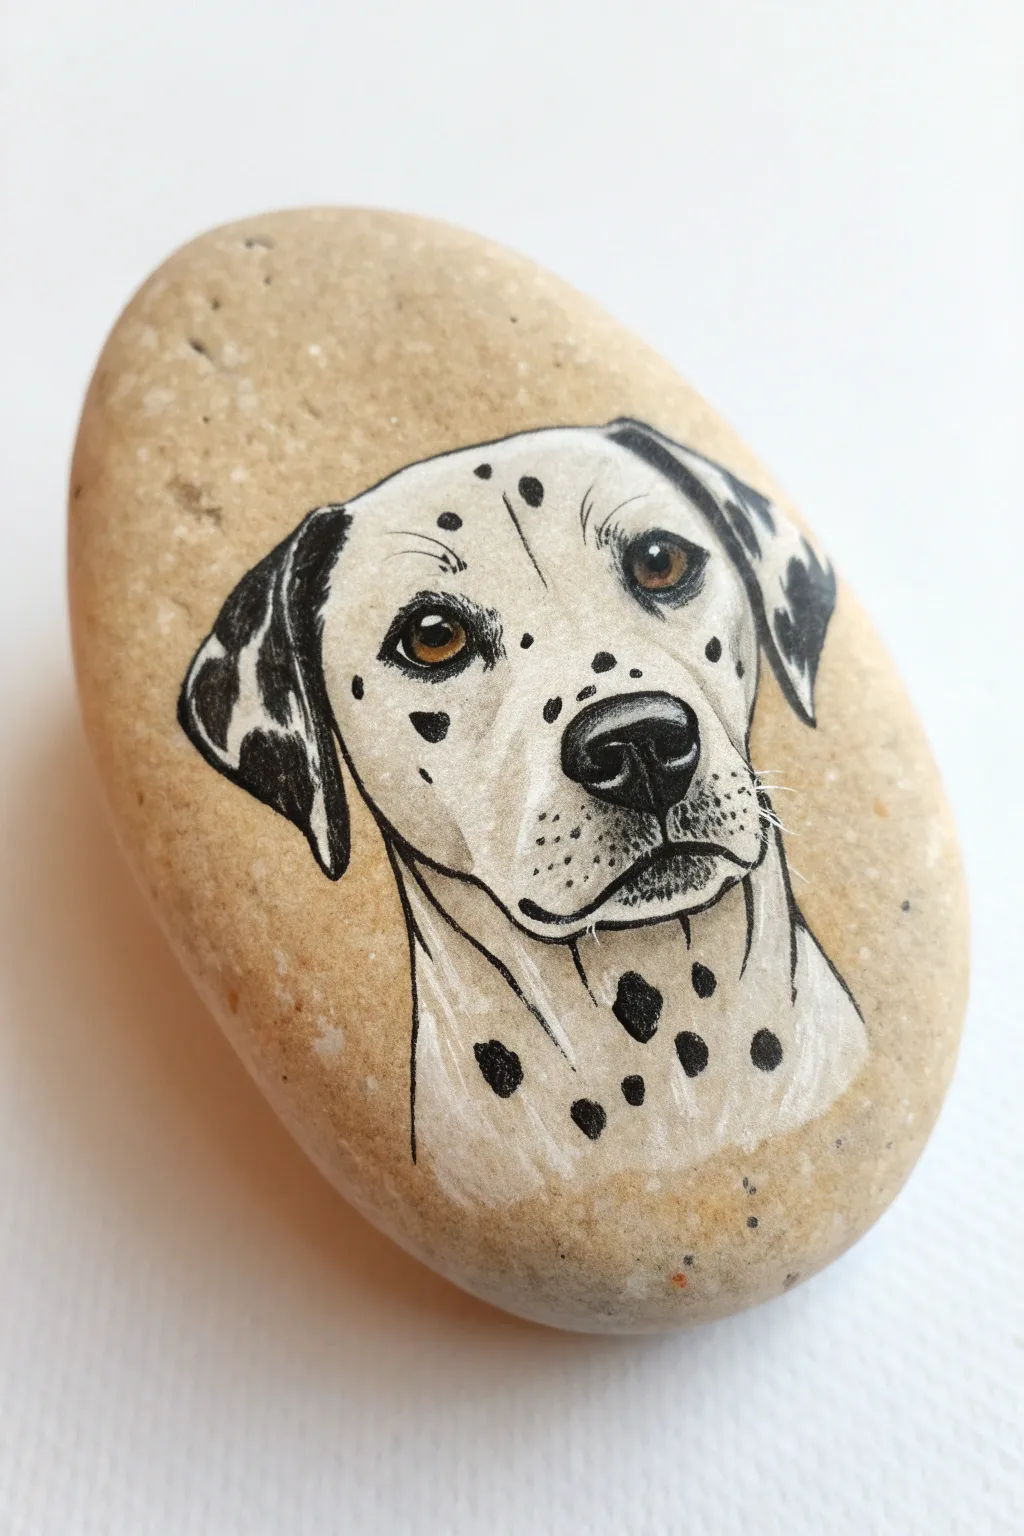
Capture the loyal expression of a Dalmatian on a smooth river stone using precision pens and layering techniques. This project focuses on building depth through delicate stippling and careful shading to create realistic fur texture.
Step-by-Step
Materials
- Smooth, oval-shaped river rock (tan or beige base)
- Pencil (HB or 2H)
- Black archival ink fine liners (0.05, 0.1, and 0.5 sizes)
- White gel pen (Signo or Gelly Roll)
- White acrylic paint (fine detail brush optional)
- Colored pencils (brown, amber, black)
- Matte spray varnish
Step 1: Sketching the Outline
-
Prepare the surface:
Ensure your rock is clean and dry. Since we are using the natural stone color as the mid-tone, choose a stone with a nice, even beige or light tan complexion. -
Map the proportions:
Using a light pencil grip, sketch a vertical centerline to help with symmetry. Mark the eye level about halfway down the intended head shape. -
Draft the basic shapes:
Draw the muzzle as a boxy shape and add drooping triangular shapes for the ears. Dalmatians have a distinctive sleek skull, so keep the lines clean. -
Refine the features:
Sketch the almond-shaped eyes, the triangular nose, and the jowls. Don’t press too hard with the pencil, as you want these lines to be barely visible later.
Ink Control
If using fine liners over acrylic paint, ensure the paint is 100% dry. Wet acrylic ruins felt-tip pens instantly. Wait at least 20 minutes between mediums.
Step 2: Inking the Features
-
Outline the main lines:
Trace your pencil lines with a 0.1 black fine liner. Use broken, short strokes for the neck and cheek areas to suggest fur rather than a solid hard line. -
Fill the dark spots:
Using a thicker 0.5 pen, fill in the ears and the characteristic Dalmatian spots on the neck and forehead. Leave tiny slivers of negative space within the black ears to suggest hair sheen. -
Detail the nose:
Color the nose black, but leave a small highlight area uncolored on the top curve to make it look wet and three-dimensional. Add dots (stippling) on the muzzle where whiskers would grow. -
Draw the eyes:
Outline the eyes carefully. Fill the pupil with solid black, leaving a tiny white dot for the reflection. This ‘spark of life’ is crucial for realism.
Step 3: Adding Color and Depth
-
Color the iris:
Use a sharp amber or light brown colored pencil to fill in the iris around the pupil. Layer a darker brown near the top of the iris to create a shadow from the eyelid. -
Shadow the face:
Use a light grey marker or a very light wash of black colored pencil to add shadows under the chin, around the eyes, and alongside the muzzle. -
Create fur texture:
This is where the stippling comes in. Use your 0.05 pen to make tiny dots on the muzzle and bridge of the nose. I find clustering dots closer together creates shadow, while spacing them out creates highlights.
Uneven Texture?
If the rock surface is too bumpy for clean lines, lightly sand the area where the face will go with fine-grit sandpaper before starting your sketch.
Step 4: Highlights and Finishing
-
Apply white base fur:
Use a white gel pen or fine brush with white acrylic to color the chest and the main part of the face. The ink might be semi-transparent, allowing the rock color to warm it up. -
Build white opacity:
Once the first white layer is dry, add a second layer of white strokes on the brightest areas: the forehead, the bridge of the nose, and the chest. Use directional strokes that follow the hair growth. -
Refine the whiskers:
Use your white gel pen to draw fine, sweeping whiskers over the black muzzle area. They should originate from the stippled dots you made earlier. -
Enhance contrast:
Go back with your black pen and re-darken any spots or outlines that got clouded by the white pencil or paint. High contrast is key to this graphic look. -
Seal the artwork:
Finish with a matte spray varnish to protect the ink without making the rock too glossy, which usually distracts from the detailed linework.
Now you have a striking black and white portrait that celebrates the unique beauty of spots and stone


Have a question or want to share your own experience? I'd love to hear from you in the comments below!