When I’m painting faces for kids, boys usually want something that looks bold and awesome but doesn’t take forever to sit through. These easy face paint ideas for boys are quick, playful, and built around the themes they ask for again and again.
Classic Tiger Stripes
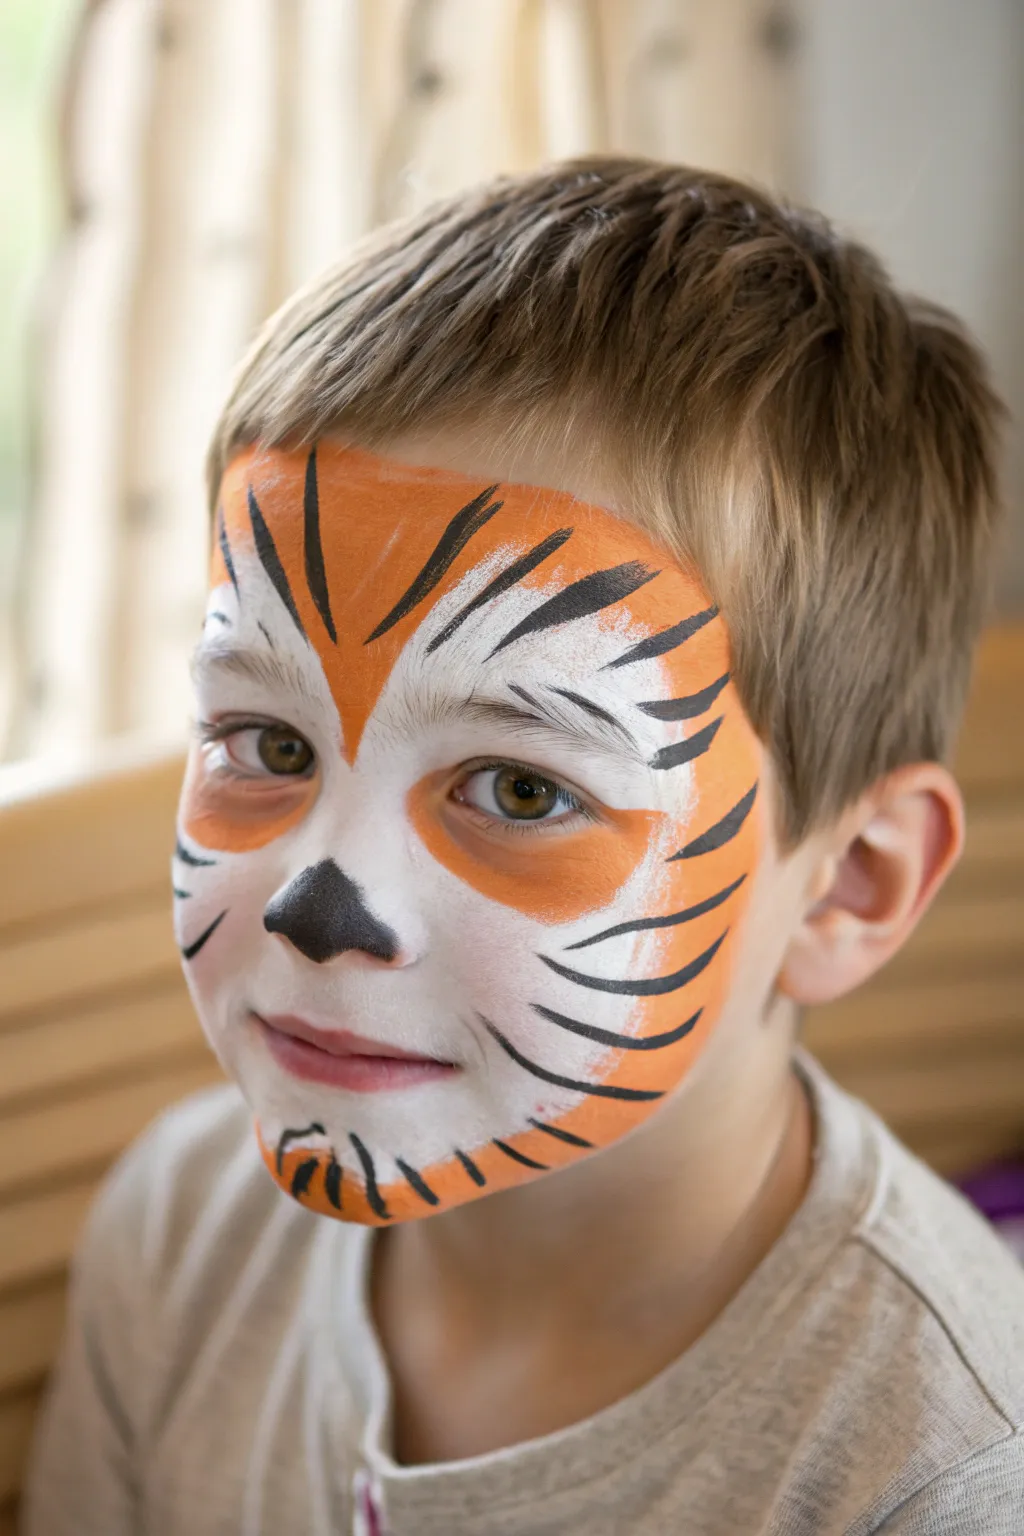
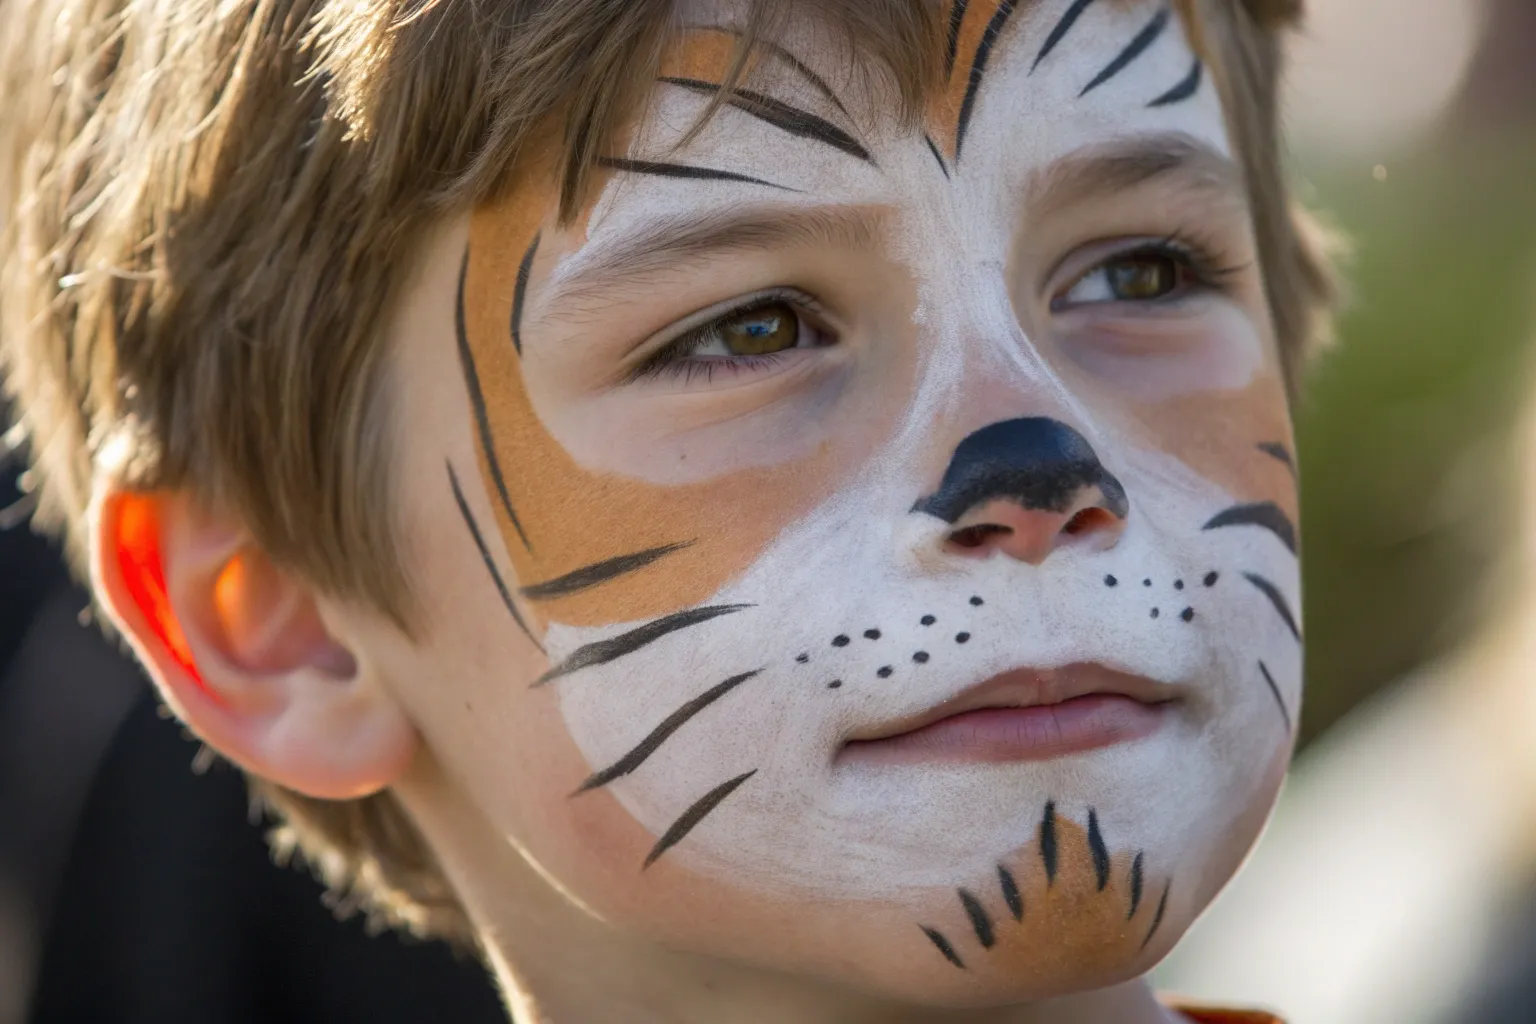
Transform little cubs into wild tigers with this classic, bold design that balances bright orange with stark black and white. It features sharp, graphic stripes and a cute black nose, perfect for a jungle-themed party or pretend play.
Step-by-Step Guide
Materials
- High-quality face paint palette (orange, white, black)
- Flat brush (medium size)
- Fine round brush (for detail work)
- Face painting sponges (high-density)
- Cup of water
- Paper towels or wipes
Step 1: Base Colors
-
Orange Base:
Load a slightly damp sponge with bright orange face paint. Dab it around the outer edges of the face, focusing on the forehead, the temples, and sweeping down onto the cheeks. -
Chin Coverage:
Continue dabbing orange onto the chin area. You want to leave the center of the face (around the eyes, nose, and mouth) clean for now. -
White Highlights:
Using a clean sponge or a clean corner of your existing sponge, pick up some white paint. Fill in the center of the forehead above the nose, blending it slightly outward into the orange. -
Eye Mask:
Sponge white paint over the eyelids and under the eyes, extending down towards the top lip. This creates the tiger’s lighter muzzle area. -
Muzzle Blend:
Gently blend the white paint on the upper lip and around the mouth into the surrounding orange on the cheeks so there isn’t a harsh line.
Step 2: Key Features
-
Nose Tip:
Switch to a medium round brush loaded with black paint. carefully paint the tip of the nose black. -
Nose Shape:
Extend the black paint slightly up the nostrils and refine the shape into a soft, inverted triangle or rounded mushroom shape. -
Upper Lip Line:
Using a fine liner brush, draw a very thin vertical line from the bottom of the black nose to the center of the top lip. -
Under-Eye Detail:
With the orange paint and a small flat brush, add a swoop of orange directly under the eye, right in the middle of the white area, to add depth to the tiger’s gaze.
Tiger Talk
For sharp points on your tiger stripes, remember the mantra ‘press and flick.’ Start with heavy pressure for the base, then lift seamlessly as you pull away.
Step 3: Defining Stripes
-
Center Forehead:
Load a round brush with black paint. Start in the center of the forehead and paint two lines curving outward and upward, resembling tall grass blades. -
Forehead Sides:
Add smaller, curved triangular stripes on either side of the central ones, angling them towards the center of the face. -
Temple Stripes:
On the temples, paint three distinct stripes. Press down firmly to start the line thick, then lift the brush as you flick inward to create a sharp, thin point. -
Cheek Definition:
Move lower to the cheekbones. Paint two to three stripes curving inward from the hairline toward the nose. -
Jawline Whiskers:
Add a few swooping lines along the jawline. These should look like they are framing the face. -
Chin Stripes:
Paint small, short stripes on the chin over the orange paint, curving them upward toward the mouth.
Wild Style
Add some cosmetic glitter gel over the orange areas while they are still slightly tacky for a sparkly, magical tiger effect.
Step 4: Final Touches
-
Muzzle Whiskers:
On the white muzzle area (the upper lip), use your finest brush to paint three small dots on each side. -
Whisker Lines:
Flick very thin, short lines outward from the white muzzle area into the cheek stripes. -
White Accents:
Clean your fine brush thoroughly and load it with white. Add tiny highlights in the center of the black nose. -
Stripe Highlights:
Trace thin white lines right next to a few of the black forehead stripes to make them pop and look more three-dimensional.
Now step back and practice your best roar with this ferocious fresh look


Spider Web Corner Mask
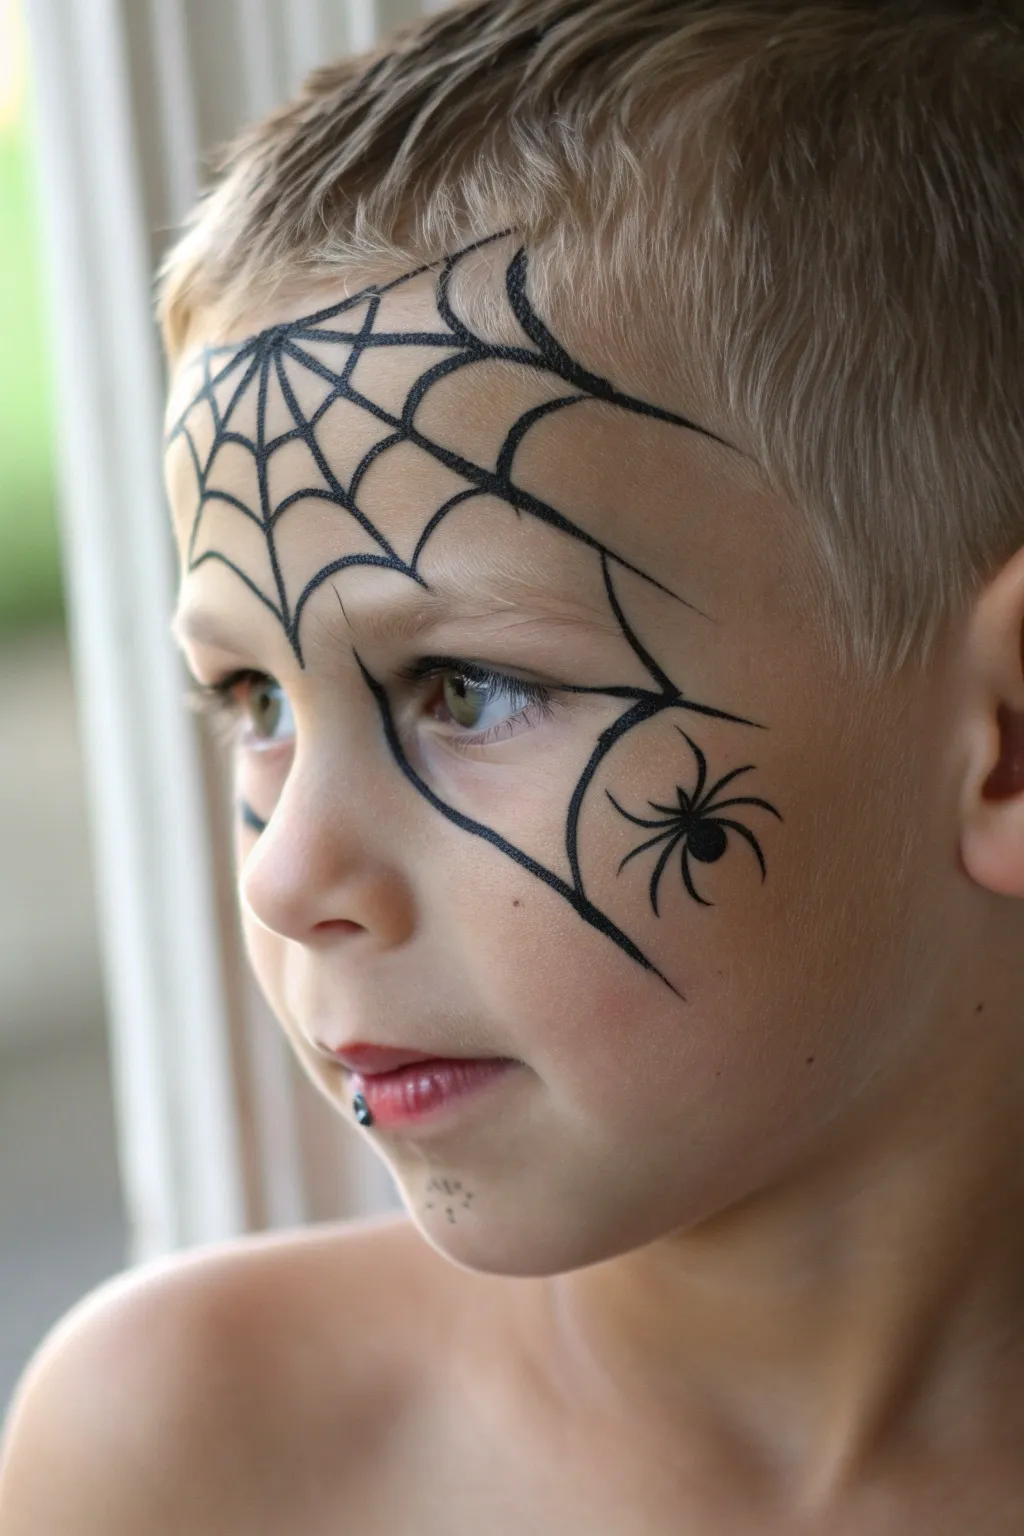
Transform a simple face paint session into a superhero moment with this sleek spider web design that sweeps across just one side of the face. It is a fantastic choice for kids who want something cool but don’t like the feeling of full-face coverage, leaving plenty of skin clean and breathable.
Detailed Instructions
Materials
- Black face paint (water-activated cake or liquid)
- Round brush (size 2 or 3 for main lines)
- Fine liner brush (size 0 or 1 for details)
- Cup of clean water
- Paper towel or sponge (for blotting)
Step 1: Painting the Web Framework
-
Load the brush:
Dip your size 2 or 3 round brush into water and tackle the black face paint cake. You want a creamy, ink-like consistency that flows smoothly but doesn’t drip. Test it on your hand first to ensure the opacity is solid. -
Create the focal point:
Identify a focal point from where the web will originate. For this design, imagine a spot just above the eyebrow, slightly towards the center of the forehead. All your main ‘spoke’ lines will radiate from this imaginary point. -
Draw the main spokes:
Start painting the long, radiating lines. Draw the first line curving up towards the hairline. Draw a second line curving down towards the outer corner of the eye. Add 3-4 more lines in between these two to create the skeleton of the web. -
Extend the lower line:
Take that lowest line (the one near the eye) and extend it downwards along the cheekbone, ending roughly in line with the bottom of the nose. This creates a nice frame for the face.
Fixing Shaky Lines
If a line goes wobbly, don’t wipe it! Wait for it to dry completely, then use a damp Q-tip to basically erase the mistake like an eraser before repainting.
Step 2: Connecting the Web
-
Start the inner arches:
Switch to your finer brush if you feel less confident with the thicker one. Starting close to the center ‘focal point’, draw small, curved lines connecting the spokes. These curves should dip inward towards the center, like tiny hammocks. -
Build the middle section:
Move outward about an inch and paint a second row of connecting arches. Ideally, make these slightly wider than the first row to simulate the web expanding as it moves away from the center. -
Complete the outer web:
Add the final row of connecting curves on the outer edges of the spokes. Keep your hand steady but don’t worry about perfection; natural spider webs are rarely perfectly symmetrical. -
Refine the line weights:
I prefer to go back over any intersections that look too thin. Adding a tiny bit of extra thickness where the lines cross gives the web more dimension.
Pro Tip: Line Variation
Vary your pressure while painting the web lines. Press down at the start and lift up at the end of each stroke to create tapered, sharp points rather than blunt ends.
Step 3: Adding the Spider Details
-
Position the spider:
Locate an open space on the cheek, just below the outer corner of the eye, nestled within the bottom section of your web framework. -
Paint the body:
Using the round brush, paint a small oval for the spider’s abdomen and a slightly smaller circle attached to the top for the head. Fill them in completely with black. -
Add the legs:
Switch to your finest liner brush. Paint four legs coming out of each side of the body. The front two should curve forward, and the back two should curve backward for a realistic crawling look. -
Add floating accent spots:
To balance the design, add three small dots in a triangular formation near the chin, just below the corner of the lip. This subtle detail brings the whole look together. -
Optional lip accent:
If the child is comfortable with it, add a tiny black dot or ring on the bottom lip, mimicking a piercing or just an extra bit of edge. -
Final check:
Look over the design for any patchy areas in the black lines and touch them up carefully. Ensure the lines around the eye area are dry before the child blinks too much.
Now you have a striking, classic design that looks complex but comes together in just a few minutes


Dinosaur Scales Around One Eye
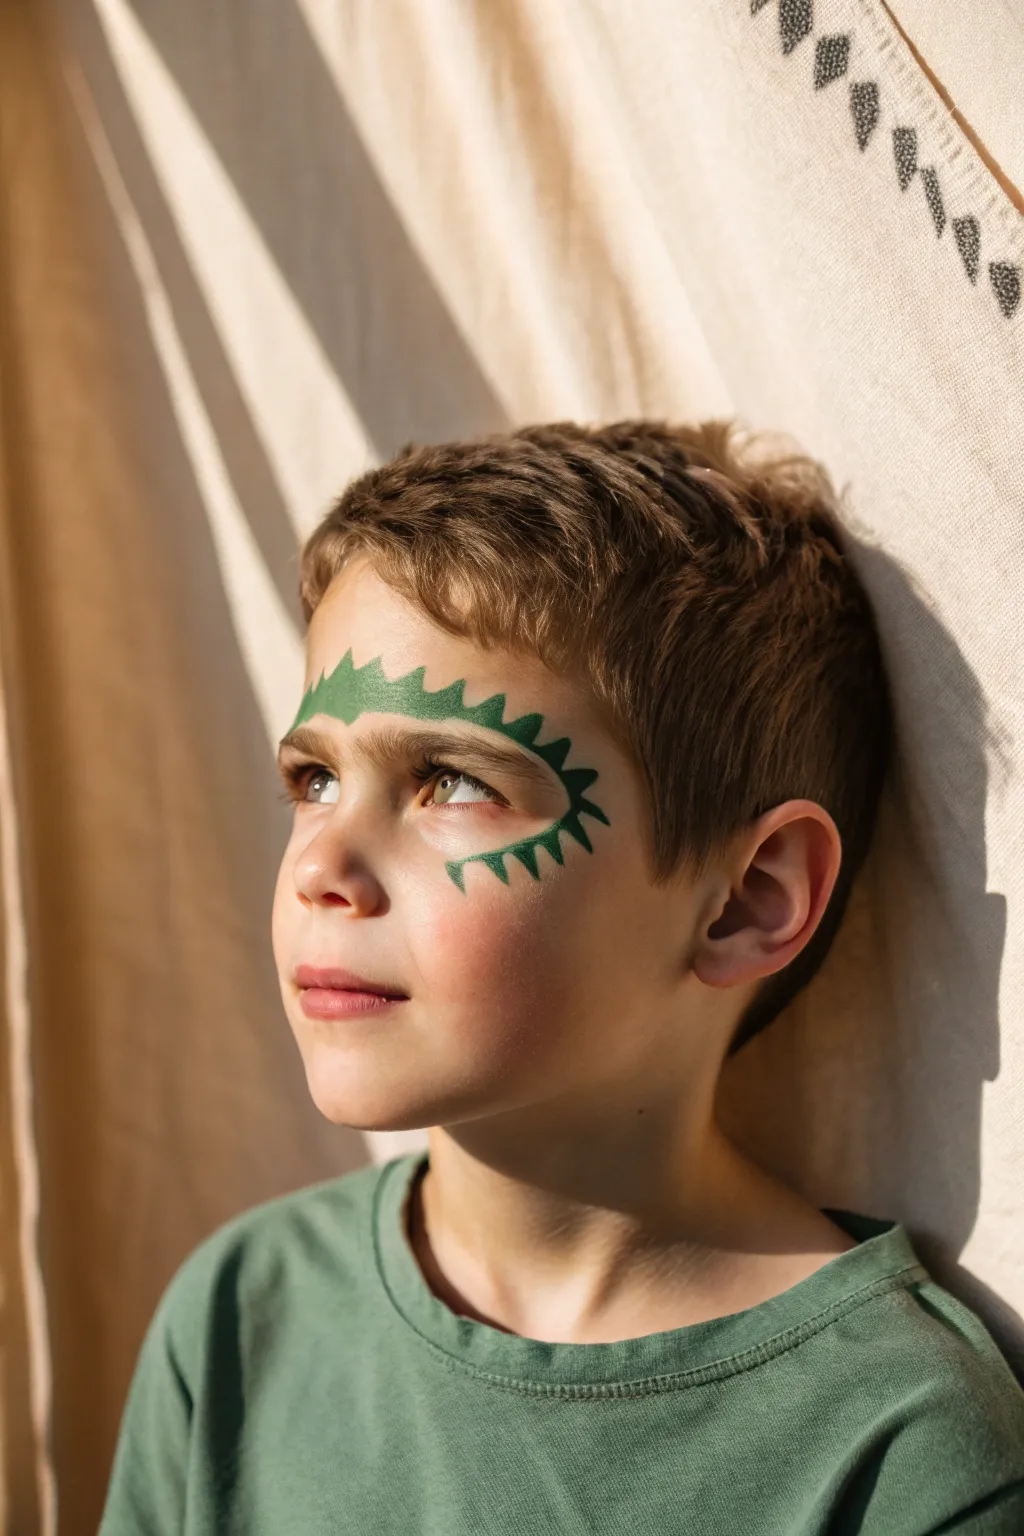
Transform your little adventurer into a prehistoric creature with this simple yet striking dinosaur design. It focuses on a bold, jagged shape around just one eye, making it quick to apply and comfortable for kids who might shy away from full-face paint.
Step-by-Step Guide
Materials
- Green face paint (water-activated cake or cream based)
- Medium round brush (size 4 or 6)
- Small round brush (size 1 or 2)
- Cup of water
- Paper towels or sponge
Step 1: Preparation & Base Shape
-
Clean the canvas:
Start with a clean, dry face. Use a gentle wipe to remove any oils or dirt from the eye area to ensure the paint adheres smoothly. -
Load your brush:
Dip your medium round brush into water and swirl it into your green face paint until you have a creamy consistency. You don’t want it too watery, or it will drip. -
Mark the start and end:
Visualize an arc that starts just above the inner eyebrow and curves around to the cheekbone. You can place tiny dots as guide markers if it helps you plan the spacing. -
Paint the upper curve:
Starting near the nose bridge above the eyebrow, paint a smooth, curved line that arches up over the eyebrow and curves down towards the temple. Keep this line relatively thick. -
Paint the lower curve:
Continue that line from the temple, curving it underneath the eye (on the upper cheekbone) and bringing it back towards the nose, creating a ‘C’ shape that frames the eye.
Step 2: Adding the Spikes
-
Create the first spike:
Starting on the upper line near the nose, press your brush down to establish width, then drag it upwards and lift off quickly to create a sharp triangular point. -
Continue the ridge:
move outwards along the eyebrow line, painting a series of triangular spikes. I like to make the ones directly over the eyebrow slightly larger for a bold crest effect. -
Angle the spikes:
As you move down the temple area, angle your spikes so they point outward towards the ear, following the natural curve of the face. -
Switch to the lower line:
Now, add downward-pointing spikes along the cheekbone line. These can be slightly smaller and sharper than the top ones to look like serrated scales. -
Detail the inner corner:
If there is space near the inner eye corner, add one or two tiny spikes pointing inward toward the nose to close the loop slightly.
Oops! Paint too runny?
If paint drips, it’s too wet. Blot the brush on a paper towel and swirl it in the cake again to get a creamier texture. Let drips dry before wiping away.
Step 3: Refining & Finishing
-
Check for gaps:
Look closely at the main curved line connecting the spikes. Fill in any patches where skin shows through to make the line solid and bold. -
Sharpen the tips:
Switch to your small round brush (size 1 or 2). Load it with a little fresh green paint and carefully touch up the very tips of the triangles to make them extra sharp. -
Clean up edges:
If any paint smudged or a line went wide, wrap a damp wipe around your finger or use a clean, damp Q-tip to tidy up the edges. -
Optional highlight:
For extra dimension, you could add a tiny dot of white or lighter green to the center of the largest spikes, though the solid green looks classic on its own. -
Let it set:
Keep the child still for about 60 seconds to let the water-based paint dry completely so it won’t smudge when they smile.
Dino Texture
Use a sponge with darker green paint to lightly dab texture over the dry green spikes. This creates a cool, bumpy reptile skin effect.
Now your little one is ready to roar with a fierce and fun dinosaur design


Shark Teeth Mouth Trick
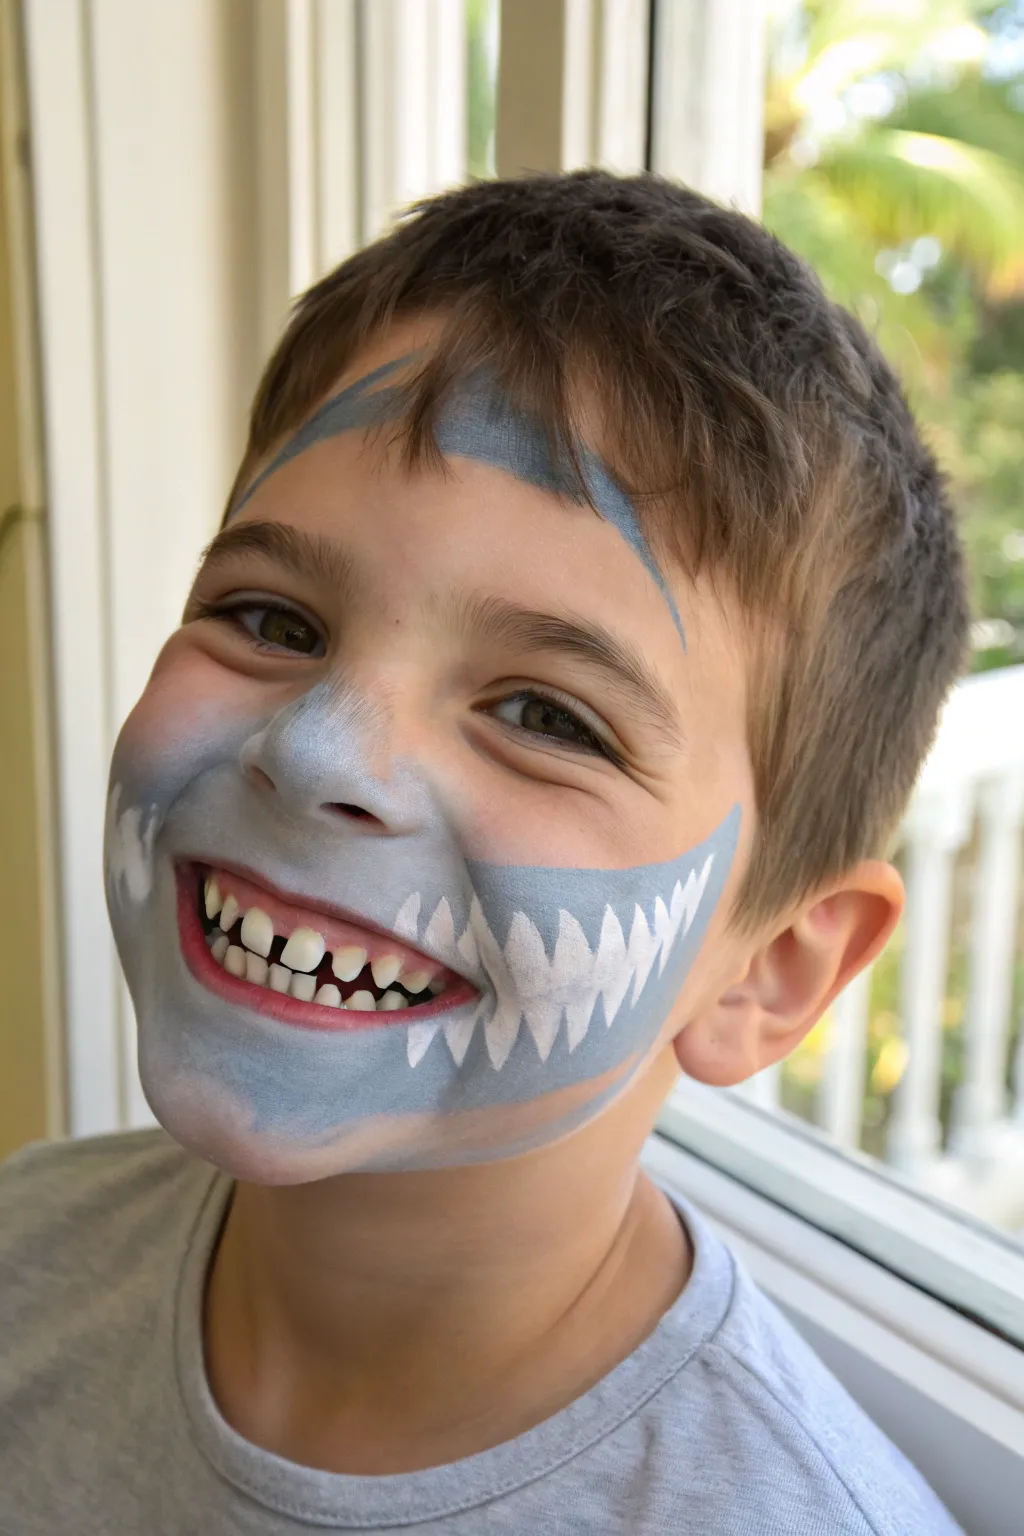
Turn a smiling face into a fierce ocean predator with this clever mouth-centric design. By using the natural movement of the mouth to animate the sharp teeth, this look is as fun to wear as it is to paint.
Step-by-Step Tutorial
Materials
- Light blue-grey face paint
- White face paint
- High-density face painting sponge
- Medium round brush
- Fine liner brush
- Cup of water
- Paper towels
Step 1: Setting the Scene
-
Sponge Loading:
Begin by dampening your sponge slightly and loading it thoroughly with the light blue-grey paint. You want a creamy consistency that isn’t too drippy so it provides solid coverage. -
Base Application:
Dab the sponge around the chin, cheeks, and upper lip area. Create a wide U-shape that extends from under the nose out towards the ears, covering the entire lower jaw area. -
Creating the Snout:
Continuing with the sponge, gently press paint over the nose to form the shark’s snout. Blend this area seamlessly into the cheek sections you just painted so there are no harsh lines. -
Forehead Fin:
Reload your sponge or switch to a large brush. On the forehead, sweep a curved shape starting from the center and arching slightly outward to one side to mimic a dorsal fin cutting through water.
Step 2: Teeth & Details
-
Switching to White:
Rinse your brush or grab a fresh medium round brush. Load it up with bright white face paint. Make sure the blue base is mostly dry so the white stands out crisply without blending into grey. -
Lower Teeth Outline:
Start painting triangles pointing upward along the lower lip line. I find it easiest to start from the center and work outward to ensure symmetry. -
Expanding the Jaw:
Continue these white triangles past the corners of the mouth and up onto the blue painted area on the cheeks. These should get slightly larger as you move away from the lips. -
Upper Teeth:
Paint downward-pointing triangles along the upper lip, interlocking them slightly with the bottom gaps if the mouth is closed. Extend these up the cheek curves as well. -
Filling In:
Use the brush to fully fill in all your triangle outlines with solid white paint.
Muddy Colors?
If the white teeth turn grey, the base layer was too wet. Let the blue dry completely before applying white, or use a highly pigmented waxy white paint.
Step 3: Finishing Touches
-
Adding Highlights:
Using a fine liner brush and a tiny bit of white, add a small swoosh or highlight to the top edge of the forehead fin to give it dimension. -
Nose Definition:
If the nose area got too messy, use a clean damp cloth or q-tip to tidy up the nostrils—sharks don’t need human nostrils, but comfort is key. -
Clean Up Edges:
Check the outer edges of the blue base. If they look too ragged, use a baby wipe wrapped around your finger to smooth the curve for a more polished look. -
Final Check:
Ask the model to smile and bare their real teeth. This “double row” effect completes the illusion.
Level Up: Gill Slits
Add three small, curved black lines on the neck or outer cheek area to create gill slits, enhancing the realistic shark anatomy.
Now watch them chomp their way through the rest of the party with their new predator smile
BRUSH GUIDE
The Right Brush for Every Stroke
From clean lines to bold texture — master brush choice, stroke control, and essential techniques.
Explore the Full Guide
Camo Face Paint Smudge Trio
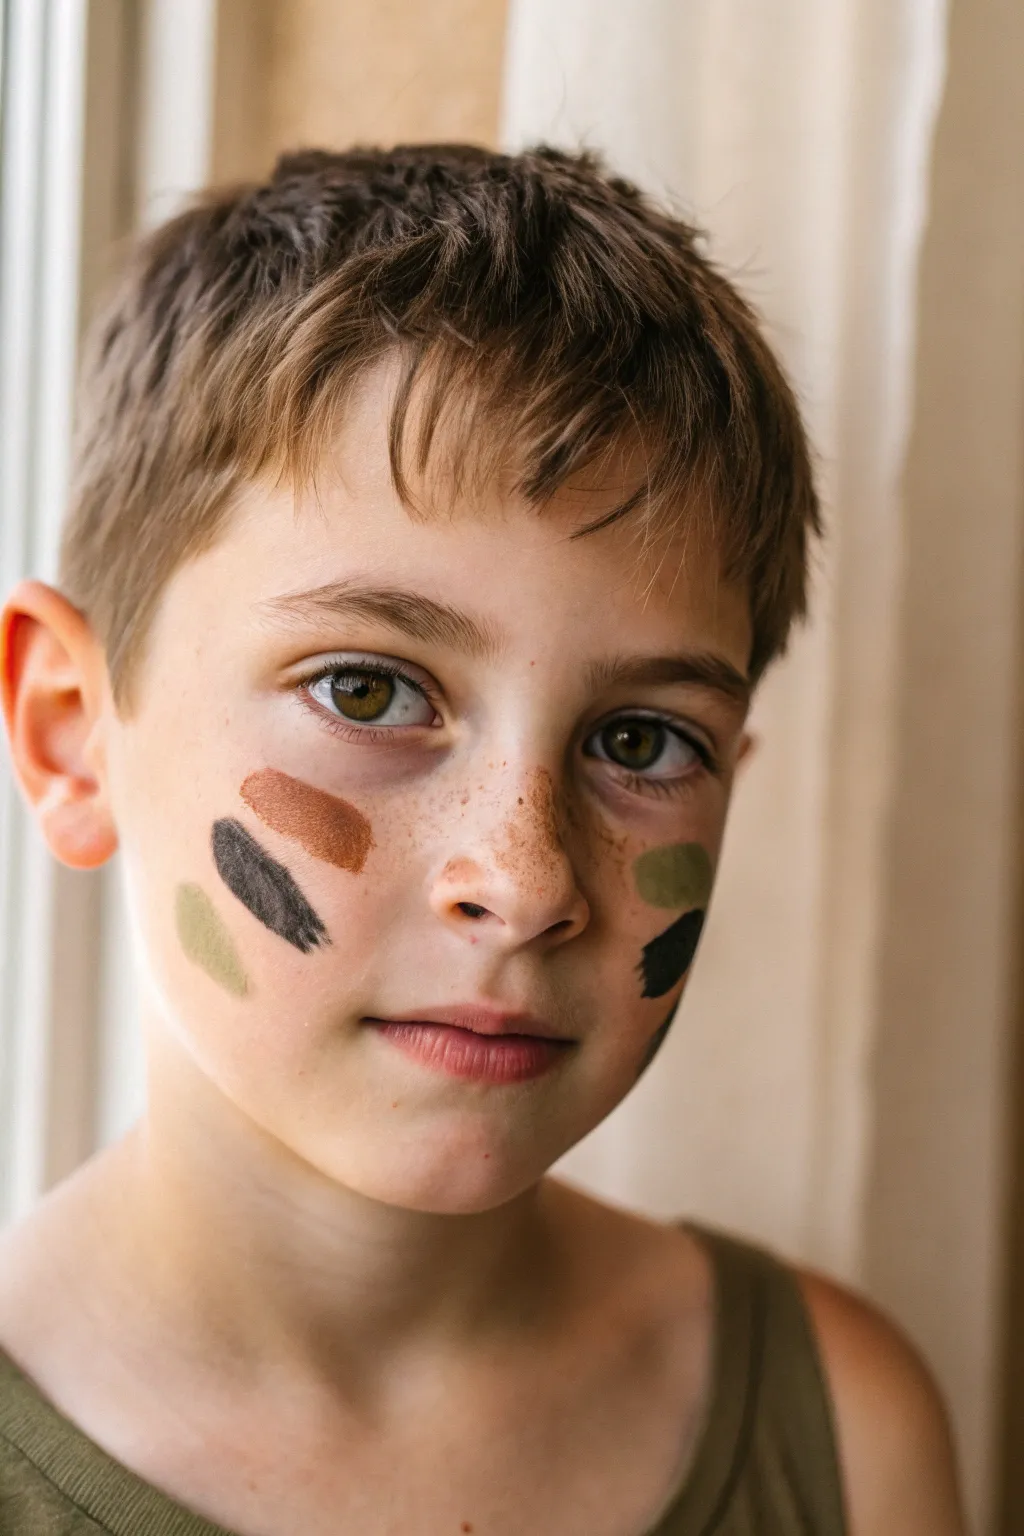
This minimalist camo design uses just three distinct color swipes to create a rugged, adventurous look without needing to cover the entire face. It is perfect for quick application and features earthy tones that mimic the shadows and foliage of the deep woods.
Step-by-Step
Materials
- Face paint palette (must verify skin safety)
- Medium flat brush (synthetic bristles work best)
- Small round brush
- Olive green face paint
- Deep charcoal or black face paint
- Warm brown or terracotta face paint
- Cup of water
- Paper towels or soft cloth
- Makeup setting spray (optional)
Step 1: Preparation
-
Clean and Dry:
Start with a clean face. Use a gentle wipe to remove any oils or dirt from the cheek area, which helps the paint adhere better and last longer. -
Brush Check:
Ensure your brushes are clean and slightly dampened. You don’t want them dripping wet, just moist enough to activate the paint to a creamy consistency.
Uneven Coverage?
If the paint looks streaky, your brush is likely too wet. Blot the bristles on a paper towel, pick up more pigment, and simply pat over the streak rather than dragging again
Step 2: Right Cheek Design
-
The Foundation Stripe:
Load your medium flat brush with the warm brown paint. I like to get a good amount of pigment so it’s opaque in one go. -
Applying the Brown:
Starting high on the cheekbone under the outer corner of the eye, press the brush down and swipe inward toward the nose, lifting off at the end to create a tapered edge. -
Adding Contrast:
Rinse your brush thoroughly and load it with the deep charcoal or black paint. -
The Dark Slash:
Position this stroke slightly below the brown one, starting further back near the ear. Swipe parallel to the first mark, angling it downward toward the corner of the mouth, ending about mid-cheek. -
Green Accent:
Clean the brush again and switch to olive green. Place a shorter, softer stroke below the black one, almost near the jawline, keeping it lighter and slightly more rounded.
Step 3: Left Cheek Design
-
Mirror Image Setup:
Move to the other side of the face. While you want balance, camo shouldn’t be perfectly symmetrical. -
Olive Placement:
Start with the olive green this time. Paint a thick, horizontal smudge high on the cheekbone, roughly level with the brown stripe on the opposite side. -
Deepening the Shadow:
Reload with the black paint. Place a short, definitive stroke right below the green one, keeping it closer to the outer edge of the face.
Dirt & Grime Effect
Use a porous sponge with thin brown paint. Lightly stipple random spots on the forehead and chin to create a ‘mud splatter’ effect that complements the stripes
Step 4: Finishing Touches
-
Soften Edges:
If any lines look too sharp or like perfect rectangles, use a clean, slightly damp finger to gently pat the starting edge of the strokes to make them look more natural and rugged. -
Freckle Adjustment:
If the model has natural freckles like in the photo, try to let some show through the thinner parts of the paint for an authentic look. -
Set the Look:
Asking the child to close their eyes, give a very light mist of setting spray from a distance to keep the design smudge-proof during play.
Now they have a tough, outdoorsy disguise ready for backyard adventures
Soccer Stripes And Cheek Ball
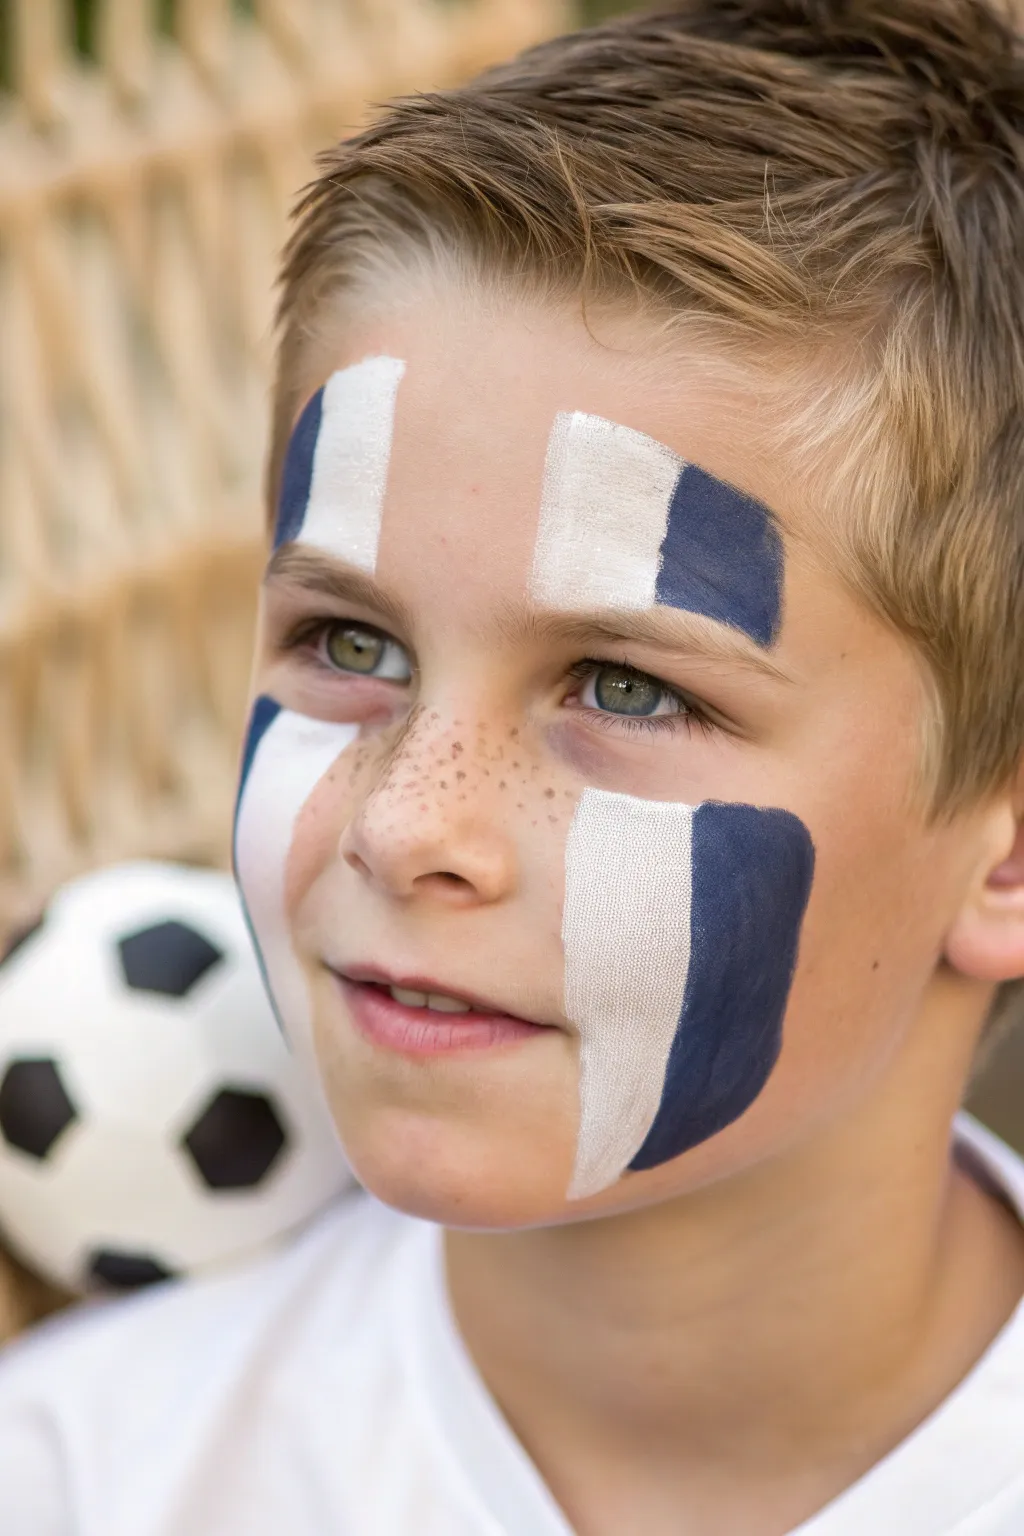
Get into the team spirit with this bold and graphic face paint design that mimics the look of a waving flag. Using blocks of white and navy blue, you’ll create vertical stripes that contour the face for a sporty, professional finish.
Detailed Instructions
Materials
- White face paint (water-activated or cream)
- Navy blue face paint
- Flat brush (medium width, approx 3/4 inch)
- Flat brush (small width, approx 1/2 inch)
- Cup of water
- Paper towels or sponge for cleanup
Step 1: Forehead Foundation
-
Load the White:
Begin by wetting your medium flat brush and creating a creamy consistency with the white face paint. Ensure the bristles are fully saturated but not dripping. -
First White Block:
On the left side of the forehead (the model’s right), paint a vertical rectangular block. Start from just above the eyebrow and pull upward toward the hairline. -
Second White Block:
Repeat this process on the other side of the forehead, creating a second white vertical block leaving space on the outer edge for the blue stripe. -
Saturate the Color:
Go over the white blocks a second time if needed to make them opaque and bright against the skin.
Step 2: Cheek Stripes
-
Load White Again:
Refresh your white paint if it has started to dry on the brush. -
Left Cheek Stripe:
Starting below the eye area on the left cheek, paint a wide vertical stripe downward toward the jawline. Try to align it somewhat with the forehead block above, though a slight offset looks dynamic. -
Right Cheek Stripe:
Paint a matching wide white stripe on the right cheek, extending from the cheekbone down to the jawline. -
Angle Check:
I find it helpful to look at the model straight on here to ensure the stripes frame the nose symmetrically.
Crisp Lines
For sharper edges between colors, let the white paint dry completely before applying the blue right next to it.
Step 3: Applying the Blue
-
Switch Brushes:
Rinse your brush thoroughly or switch to a fresh flat brush for the dark color. -
Load Navy Blue:
Activate the navy blue paint until it is smooth and ink-like. -
Forehead Accents:
Paint a vertical blue stripe directly next to the outer edge of each white forehead block. These should be roughly the same height as the white blocks. -
Clean Edges:
Use the sharp edge of the flat brush to make the line where the blue meets the white as crisp as possible. -
Cheek Definition:
Paint a blue vertical stripe on the outer edge of the white stripe on the right cheek. Follow the same downward angle. -
Left Cheek Detail:
On the left cheek, apply the blue stripe on the outer edge of the white section as well, ensuring it curves naturally with the face.
Flag Variations
Add a third red stripe next to the blue to turn this generic design into a specific country flag like France or USA.
Step 4: Finishing Touches
-
Square the Ends:
Go back with your brush and flatten the tops and bottoms of the stripes to give them a blocky, flag-like appearance rather than wispy ends. -
Opacity Check:
Dab a little extra blue paint over any patchy areas, particularly near the jawline where movement might thin the paint.
Your little fan is now ready to cheer from the sidelines with their team colors proudly displayed

PENCIL GUIDE
Understanding Pencil Grades from H to B
From first sketch to finished drawing — learn pencil grades, line control, and shading techniques.
Explore the Full Guide
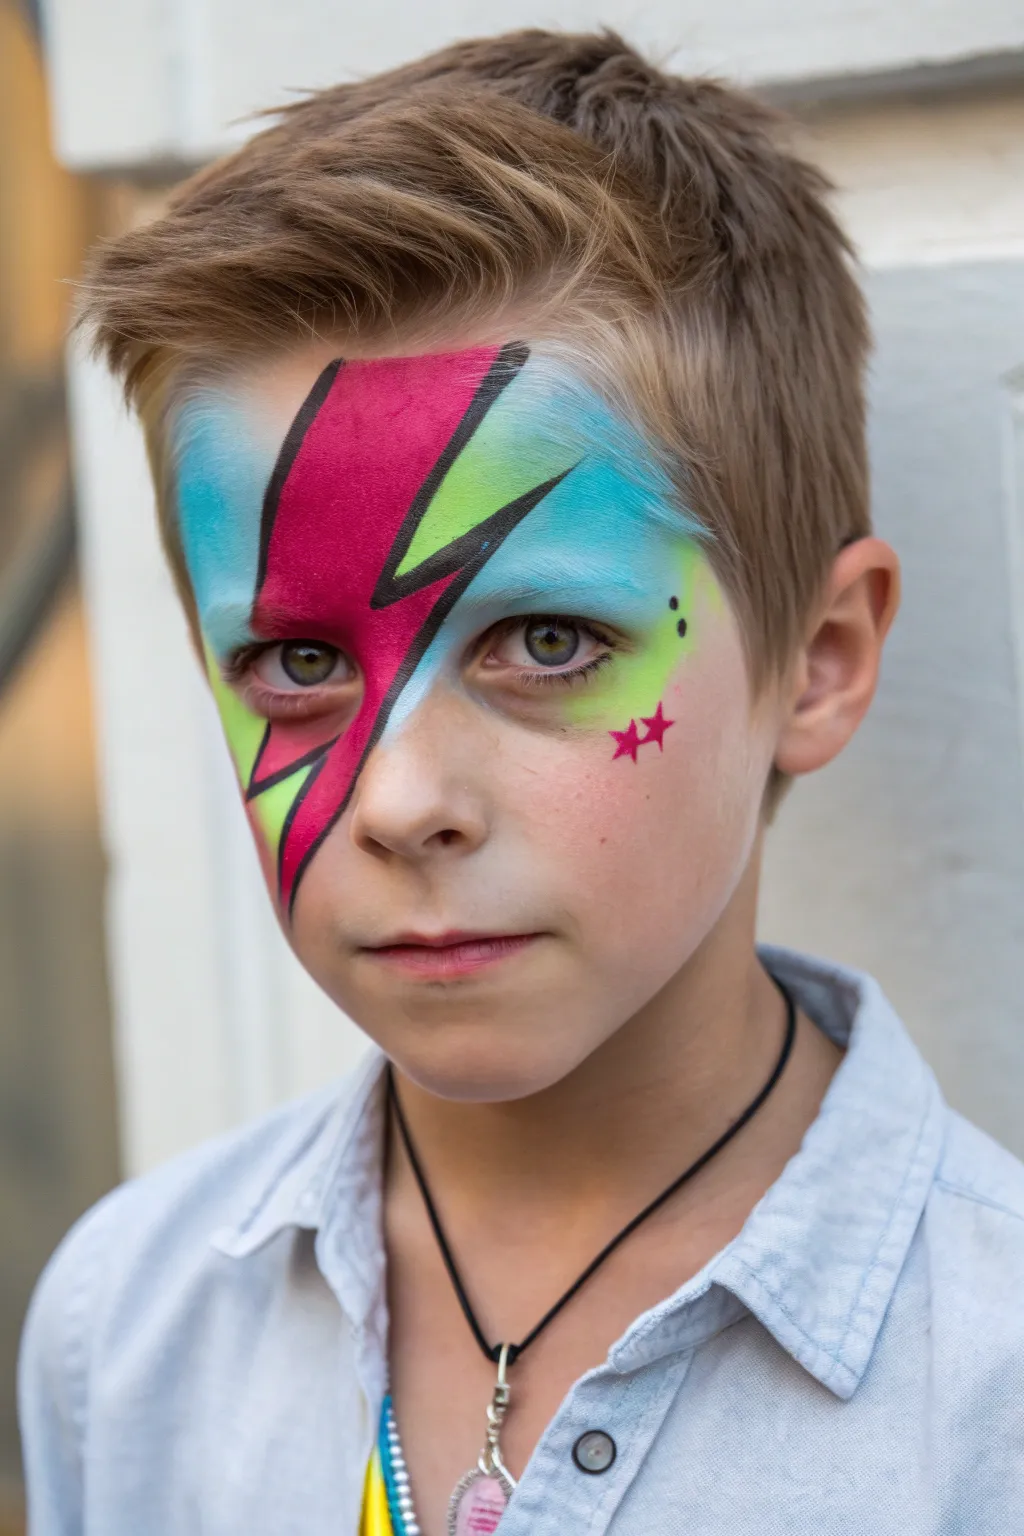
Flame Streaks On The Temples
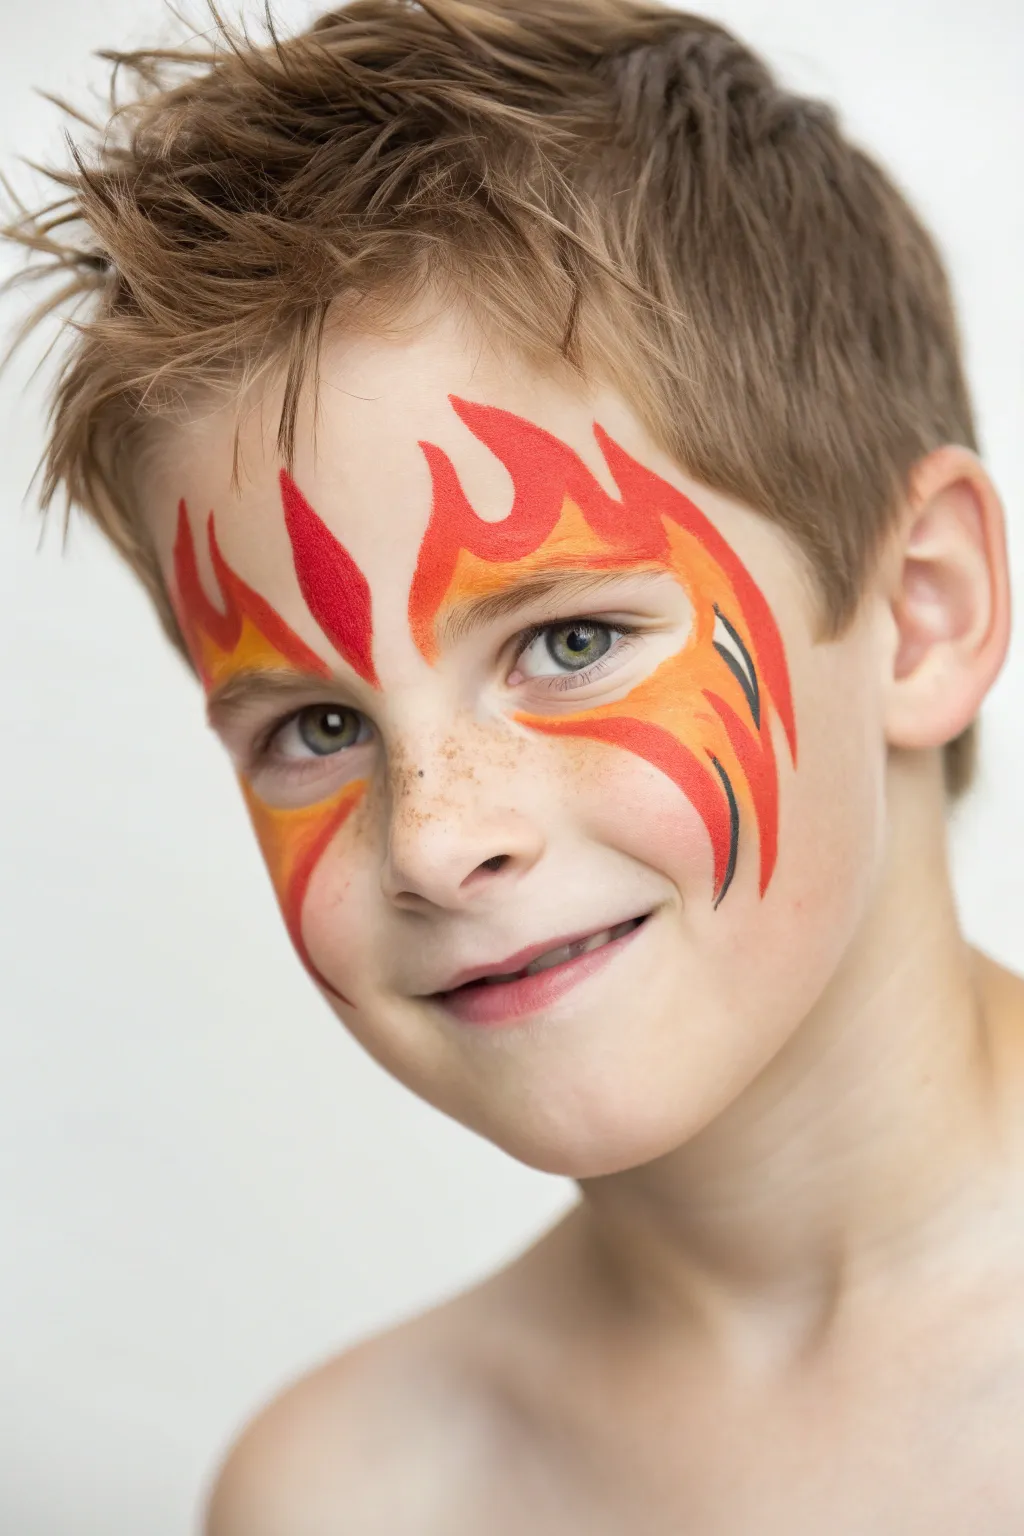
Transform an ordinary afternoon into an adventure with this dynamic flame design that frames the eyes without overwhelming the face. Using vibrant reds and gradient oranges, you’ll create a superhero-ready look that feels energetic and fast.
How-To Guide
Materials
- High-density face paint (Red)
- High-density face paint (Bright Orange)
- High-density face paint (Yellow or Gold)
- Face paint (Black) for detailing
- Medium round brush (size 4 or 6)
- Small round brush (size 2 or 3)
- Cup of water
- Spray bottle (optional, for wetting paints)
- Face painting sponge (optional, for skin prep)
Step 1: Setting the Fiery Foundation
-
Prepare the paint:
Activate your bright orange face paint with a little water until it reaches a creamy consistency. You want it fluid enough to glide but thick enough to be opaque. -
Start the left temple:
Load your medium round brush with the orange. Starting at the outer corner of the left eye, paint a sweeping curve that flicks upward toward the hairline. -
Create the lower flame:
Add a second, slightly shorter stroke starting from the cheekbone area, curving up to meet the first flame’s general direction. -
Mirror the design:
Repeat these initial orange strokes on the right temple. Try to keep the symmetry somewhat balanced, though flames are naturally organic, so perfect precision isn’t necessary. -
Add the central accents:
Using the same orange, paint smaller flicker shapes near the inner corner of the eyebrows, just above the nose bridge, pointing slightly upward.
Clean Lines Only
If your flame tips look blunt, your paint is likely too dry. Add a tiny drop of water to the brush tip and twist it on the palette to re-form a needle-sharp point before painting.
Step 2: Adding Heat with Red
-
Activate the red:
Clean your brush thoroughly and load it with the vibrant red paint. Make sure it’s nice and creamy. -
Outline and define:
On the top edge of your existing orange shapes, paint bold red strokes that taper into sharp points. This creates the ‘core’ of the flame look. -
Create the central flame:
In the middle of the forehead, paint a distinct standalone red flame shape. It should look like a leaf or a teardrop with a sharp, curved tip pointing towards the hair. -
Add depth to the sides:
Run a line of red along the bottom edge of the orange temple strokes. I find this helps separate the design from the skin tone and adds dimension. -
Blend lightly:
While the paint is still slightly damp, gently sweep your brush where the red and orange meet to create a soft transition, rather than a hard stripe.
Add Some Sparkle
While the paint is still slightly tacky/wet, dab chunky cosmetic gold glitter onto the yellow sections. It catches the light beautifully and makes the ‘fire’ look like it’s glowing.
Step 3: Highlights and Details
-
Prepare the yellow:
Load a clean medium brush with bright yellow or gold paint. -
Fill the gaps:
Fill in any remaining skin space between the red and orange strokes with the yellow. This acts as the hottest part of the fire. -
Add inner highlights:
Paint thin yellow streaks inside the widest parts of the red flames to make them pop. -
Switch to the small brush:
Pick up your small round brush (size 2 or 3) and load it with black paint. Keep the consistency slightly thinner, distinct like ink. -
Paint jagged accents:
On the outer cheek area, paint two or three sharp, jagged black lines overlapping the colored flames. These shouldn’t outline the whole shape, just accent the movement. -
Refine the points:
Use the very tip of your small brush with a tiny bit of red to sharpen the ends of any flames that look too blunt. -
Add freckles (optional):
If the model has natural freckles, let them show through. If not, you can lightly tap a few brown specks across the nose bridge for a rugged look. -
Final check:
Step back and look at the overall balance. If one side looks ‘heavier,’ add a small extra lick of yellow flame to balance it out.
Now you have a fierce, fiery design that is ready for playtime action
Dragon Eye Wing Sweep

Transform a simple profile into a mythical creature with this sleek dragon wing design. It curves elegantly around the eye, using a vibrant metallic green base and sharp black outlines for a bold, adventurous look.
Step-by-Step
Materials
- Metallic or pearl green face paint
- Black face paint (strong pigment)
- White face paint
- Medium round brush (size 4 or 6)
- Fine liner brush (size 1 or 2)
- Spray bottle with water
- Small sponge (optional for base blending)
Step 1: Painting the Green Wing Base
-
Activate the green paint:
Mist your metallic green paint with a little water until it reaches a creamy consistency. Load your medium round brush thoroughly. -
Start the main arch:
Beginning just above the eyebrow near the center of the forehead, sweep a curved line outwards and downwards, following the natural curve of the eye socket toward the temple. -
Define the wing tips:
From the bottom edge of your arch, pull three distinct points downwards. The first point should sit near the corner of the eye, while the second and third extend further towards the cheekbone. -
Fill in the shape:
Use the belly of your brush to fill the entire wing shape with the metallic green. Ensure the coverage is solid and opaque. -
Create the inner structure:
While the paint is still slightly damp, ensure your edges are relatively clean, though we will outline them later. Let the green base dry completely before moving to black.
Clean Lines?
If your black lines are blobbing, your brush is likely overloaded with too much water. Blot the bristles on a paper towel to sharpen the tip before painting.
Step 2: Outlining and Detailing
-
Prepare the black paint:
Load a fine liner brush with black face paint. You want an inky, fluid consistency that flows easily off the tip for sharp lines. -
Outline the top arch:
Start from the inner point above the brow and trace a smooth, thin line along the top edge of the green wing, extending it all the way to the outer tip. -
Trace the bottom curves:
Outline the scalloped bottom edge of the wing. When you reach the points of the scallops, flick your brush slightly to make the tips sharp and pointy. -
Add the wing spines:
Paint curved vertical lines inside the green shape. These should start from the top arch and curve down to meet each sharp point at the bottom, mimicking the bat-like structure of a dragon wing. -
Refine the tail:
Extend the very last black line at the outer corner into a long, tapered curve that sweeps down towards the ear.
Scale Effect
Before the green base dries, press a weirdly textured sponge or a piece of netting onto the paint to create a scaly dragon skin texture instantly.
Step 3: Highlights and Embellishments
-
Add white dots:
Clean your fine brush or use a dotting tool. Load it with creamy white paint. -
Decorate the upper arch:
Place a series of small, evenly spaced white dots just above the black outline of the top arch. I like to graduate the size, making them slightly smaller as the line curves down. -
Add the chin detail:
Reload your fine brush with black paint. On the chin, just below the corner of the mouth, paint a small cluster of dots in a diamond or scatter pattern. -
Check for symmetry:
Step back and look at the design. If any black lines look shaky, you can carefully thicken them slightly to smooth out the wobbly bits. -
Final touches:
Ensure all lines are crisp. If the green looks a bit flat, you can add a tiny white highlight line inside the green sections to make them look shiny.
With the paint dry, he is ready to take flight with his new mythical look


Snake Wrap Over The Brow
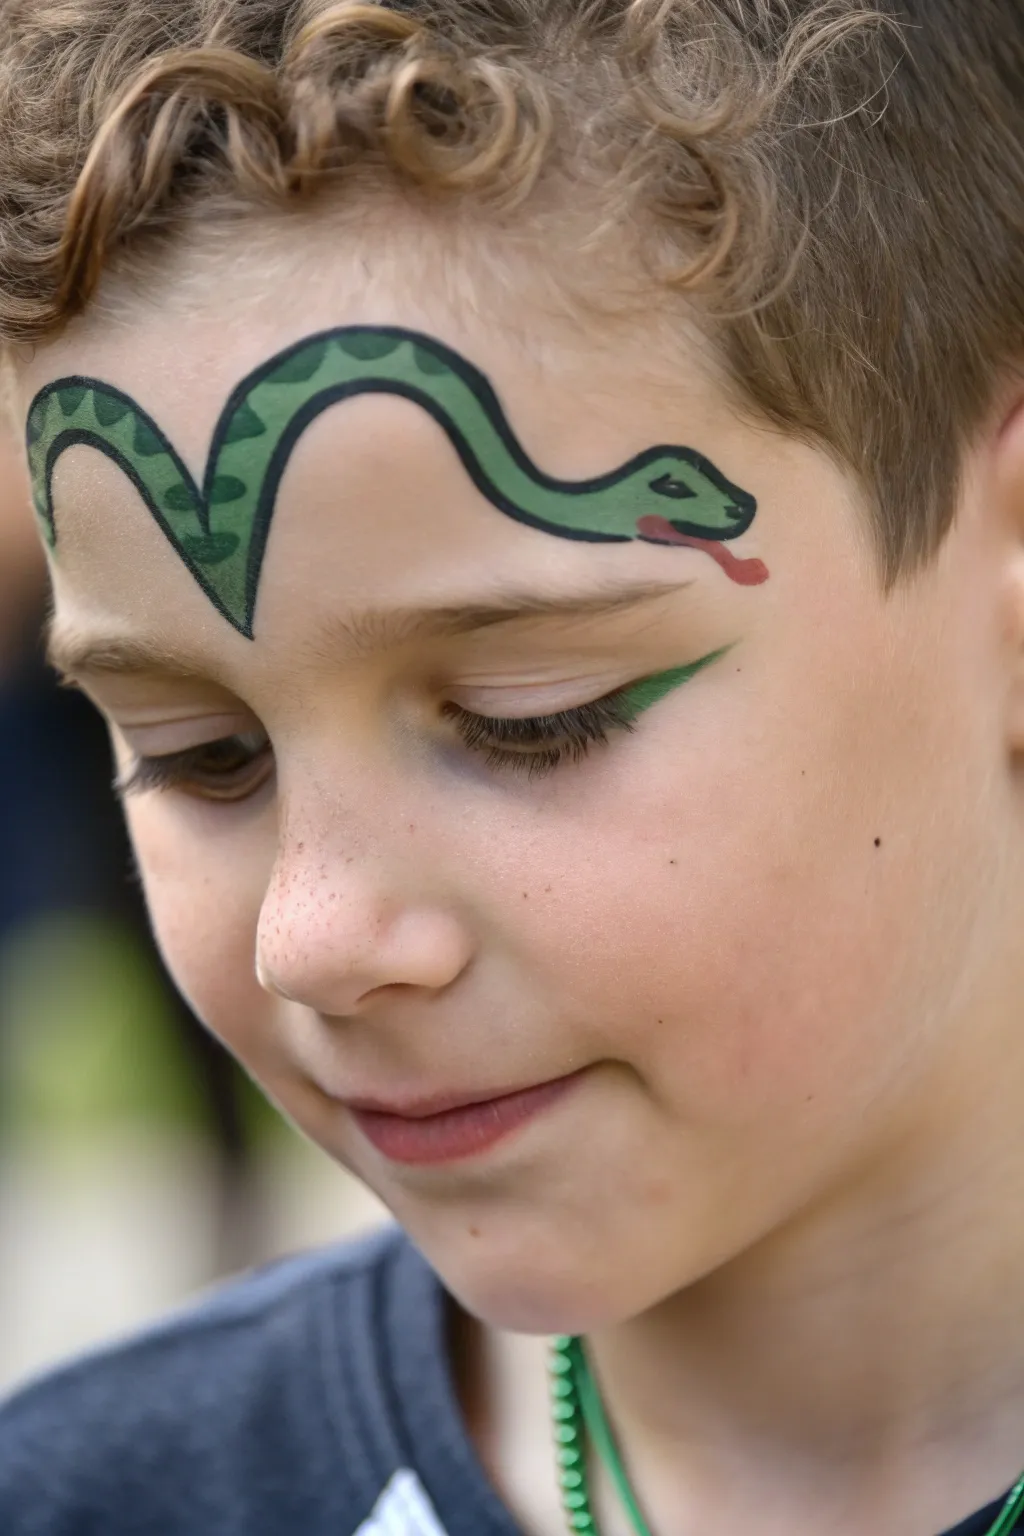
Turn a simple forehead design into a cool creature feature with this wriggling green snake. It curves perfectly over the eyebrow for a fun, adventurous look that isn’t too scary for younger kids.
Detailed Instructions
Materials
- Green face paint cake (medium shade)
- Black face paint cake
- Red face paint cake
- Small round brush (size 2 or 3)
- Fine liner brush or detail brush (size 0 or 1)
- Cup of water
- Paper towels
Step 1: Painting the Body
-
Load the brush:
Start by activating your medium green face paint with a little water on your small round brush until it has a creamy consistency. -
Start the tail:
Begin on the far right side of the forehead (the child’s left), just above the outer edge of the eyebrow. -
Create the first curve:
Draw a thick line that swoops down towards the top of the eyebrow, starting thin and gradually getting thicker as you move inward. -
Form the middle arch:
Continue that line by swooping it upward into a large arch that reaches the middle of the forehead. -
Finish the snake body:
Bring the line back down slightly and extend it horizontally towards the opposite temple to create the head area. -
Round out the head:
At the end of your line, press the brush down slightly to form a rounded, bulbous shape for the snake’s head. -
Thicken the shape:
Go back over your green line to ensure it has a consistent thickness, tapering off into a sharp point at the tail end. -
Let it dry:
Pause for just a moment to let the green base dry completely so the next colors don’t smear into it.
Step 2: Outlining and Detailing
-
Prepare the black paint:
Switch to your fine liner brush and load it with black paint. You want ink-like consistency for sharp lines. -
Outline the top:
Carefully trace the upper edge of the entire green shape with a continuous, thin black line. -
Outline the bottom:
Repeat the outlining process on the bottom edge, connecting it to the top line at the tail tip. -
Draw the eye:
On the head area, paint a small, slanted black dash or tiny oval for the snake’s eye. -
Add the nostril:
Place a tiny dot near the very front tip of the nose for a nostril detail. -
Paint the pattern:
Using the very tip of your brush, add small, curved triangle shapes along the back of the snake to suggest scales or markings. -
Add the tongue:
Clean your fine brush and pick up some bright red paint. -
Shape the fork:
Paint a small, wavy ‘Y’ shape coming out of the snake’s mouth area to create a forked tongue. -
Create the brow accent:
I like to add a little flair by painting a green swoosh extending from the outer corner of the child’s actual eye, sweeping upward towards the hairline. -
Outline the accent:
Finally, add a thin black line along the top edge of that eye accent to tie the whole look together.
Trembling Hands?
If you struggle with shaky lines, rest your pinky finger on the child’s forehead or cheek to stabilize your hand while painting the fine details.
Pro Tip: Eye Shape
Make the snake look fiercer by angling the eye dash downward toward the nose. A simple dot looks cute, but a slanted line adds attitude.
Now you have a slithery friend ready for any jungle adventure
Robot Panels And Bolts
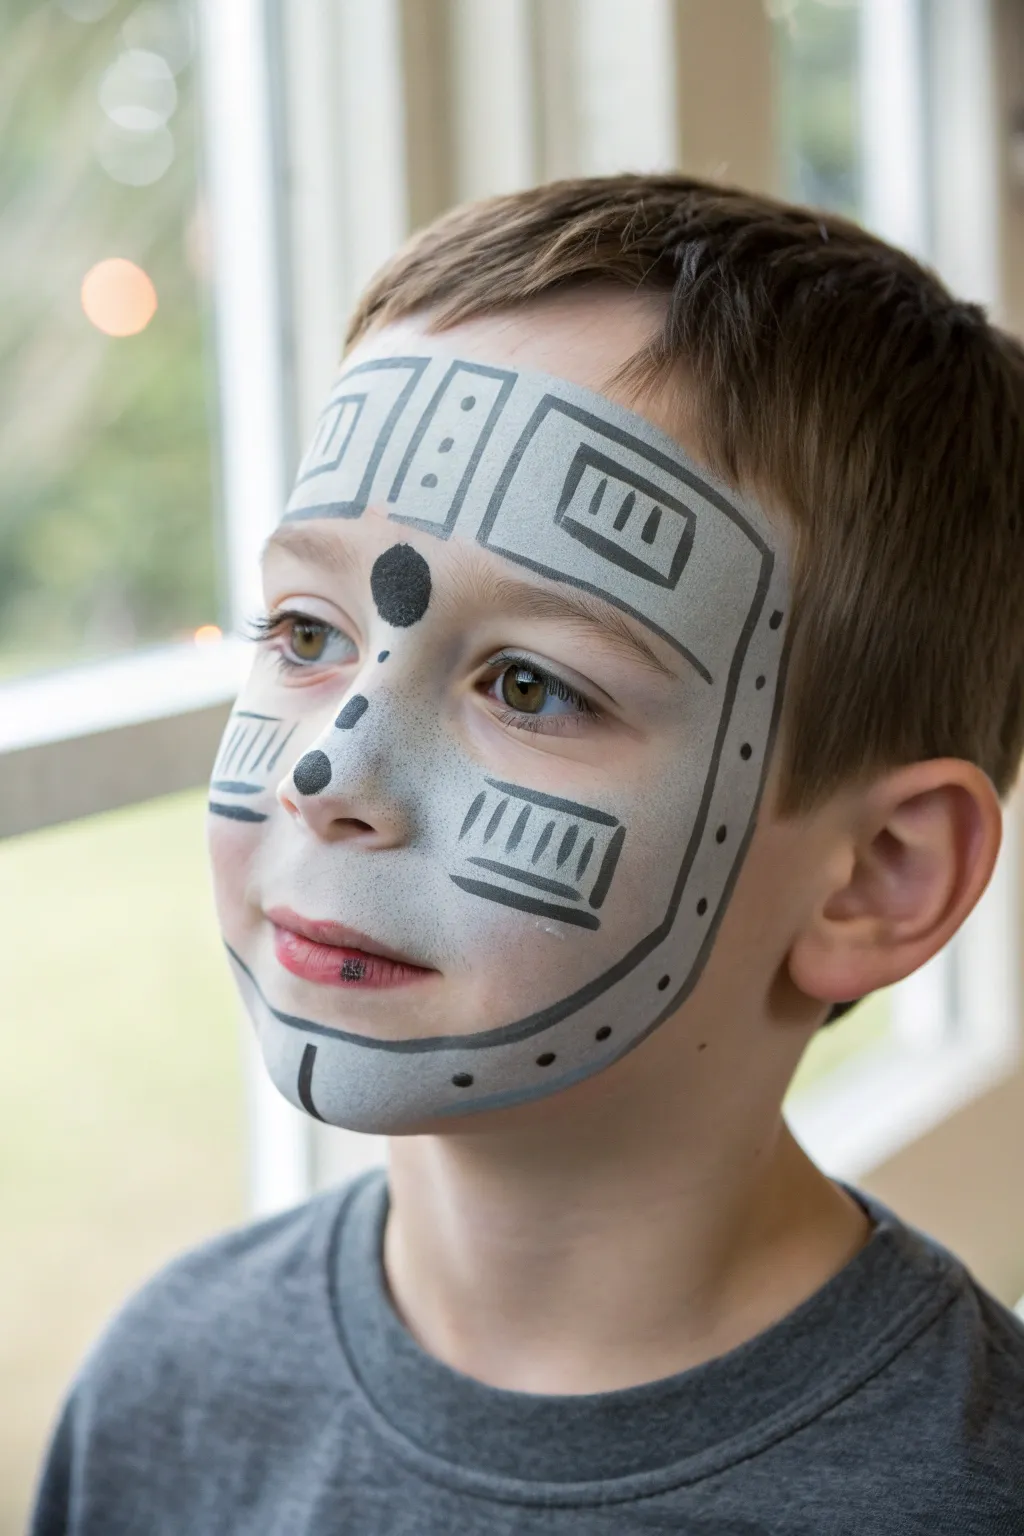
Transform a human face into a sleek machine with this geometric robot design. Using a base of metallic silver and crisp black linework, you’ll build panels and rivets that look like they’ve been bolted right on.
Step-by-Step
Materials
- Metallic silver face paint
- Black face paint
- Face painting sponge (high-density)
- Medium round brush (size 4 or 6)
- Fine liner brush (size 1 or 2)
- Small cup of water
- Paper towel
Step 1: Base Layer
-
Load the sponge:
Dampen your high-density sponge slightly and load it generously with metallic silver face paint. You want a creamy consistency that isn’t too drippy. -
Create the main shape:
Dab the sponge onto the forehead, creating a large rectangular block that spans nearly the entire width of the forehead. -
Extend down one side:
Continue dabbing the silver paint down the left side of the face (the child’s left), covering the temple, cheekbone, and ending at the jawline. -
Define the nose area:
Sponge silver over the nose, blending it seamlessly into the forehead block and the cheek section. -
Cover the chin:
Extend the silver coverage down to the chin, ensuring the entire left side of the face creates a continuous ‘C’ shape of robotic plating. -
Smooth the coverage:
Go back over any patchy areas with the sponge to ensure an opaque, metallic finish. Let this base dry completely for a minute so the next lines stay crisp.
Smudge Alert
If the black lines are bleeding into the silver, your base layer was too wet. Wait a full 60 seconds before applying detail lines.
Step 2: Structural Outlines
-
Outline the perimeter:
Using a medium round brush loaded with black paint, draw a thick, consistent line around the entire outer edge of the silver shape. -
Add inner border:
Draw a second, thinner black line hugging the inner edge of the mask, running from the inner eyebrow down past the nose to the chin. -
Segment the forehead:
On the forehead, paint two vertical lines to divide the silver space into three distinct rectangular panels. -
Create the cheek panel:
Draw rectangular box outlines on the cheek and temple areas to suggest separate metal plates screwed into place. -
Detail the nose bridge:
Place a solid black circle right in the center of the forehead, just above the eyebrows, acting as a central sensor. -
Add connecting dots:
Paint a line of three descending black dots starting from the inner eye corner and running down the side of the nose.
Pro Tip
Add a tiny dot of white paint inside the black ‘sensor’ circles to make them look like glowing LED lights or shiny glass lenses.
Step 3: Mechanical Details
-
Draw vents:
Switch to your fine liner brush. Inside the cheek rectangle and one of the forehead panels, paint short, parallel vertical hatch marks to look like air vents. -
Add the rivets:
Using the tip of the round brush, press small, firm dots along the outer edge of the jawline and temple line. These are the ‘bolts’ holding the mask on. -
Highlight the nose:
Paint a small, solid black circle on the tip of the nose to mimic a mechanical joint or breathing port. -
Create wiring accents:
Draw a few thin, short lines radiating from the outer cheek panel towards the ear to suggest internal wiring. -
Clean up edges:
If any silver paint has strayed outside the black outline, use a clean, damp brush or Q-tip to wipe it away for a sharp, manufactured look.
Now step back and admire the industrial precision of your new robotic creation
Monster Claw Cheek Scratch
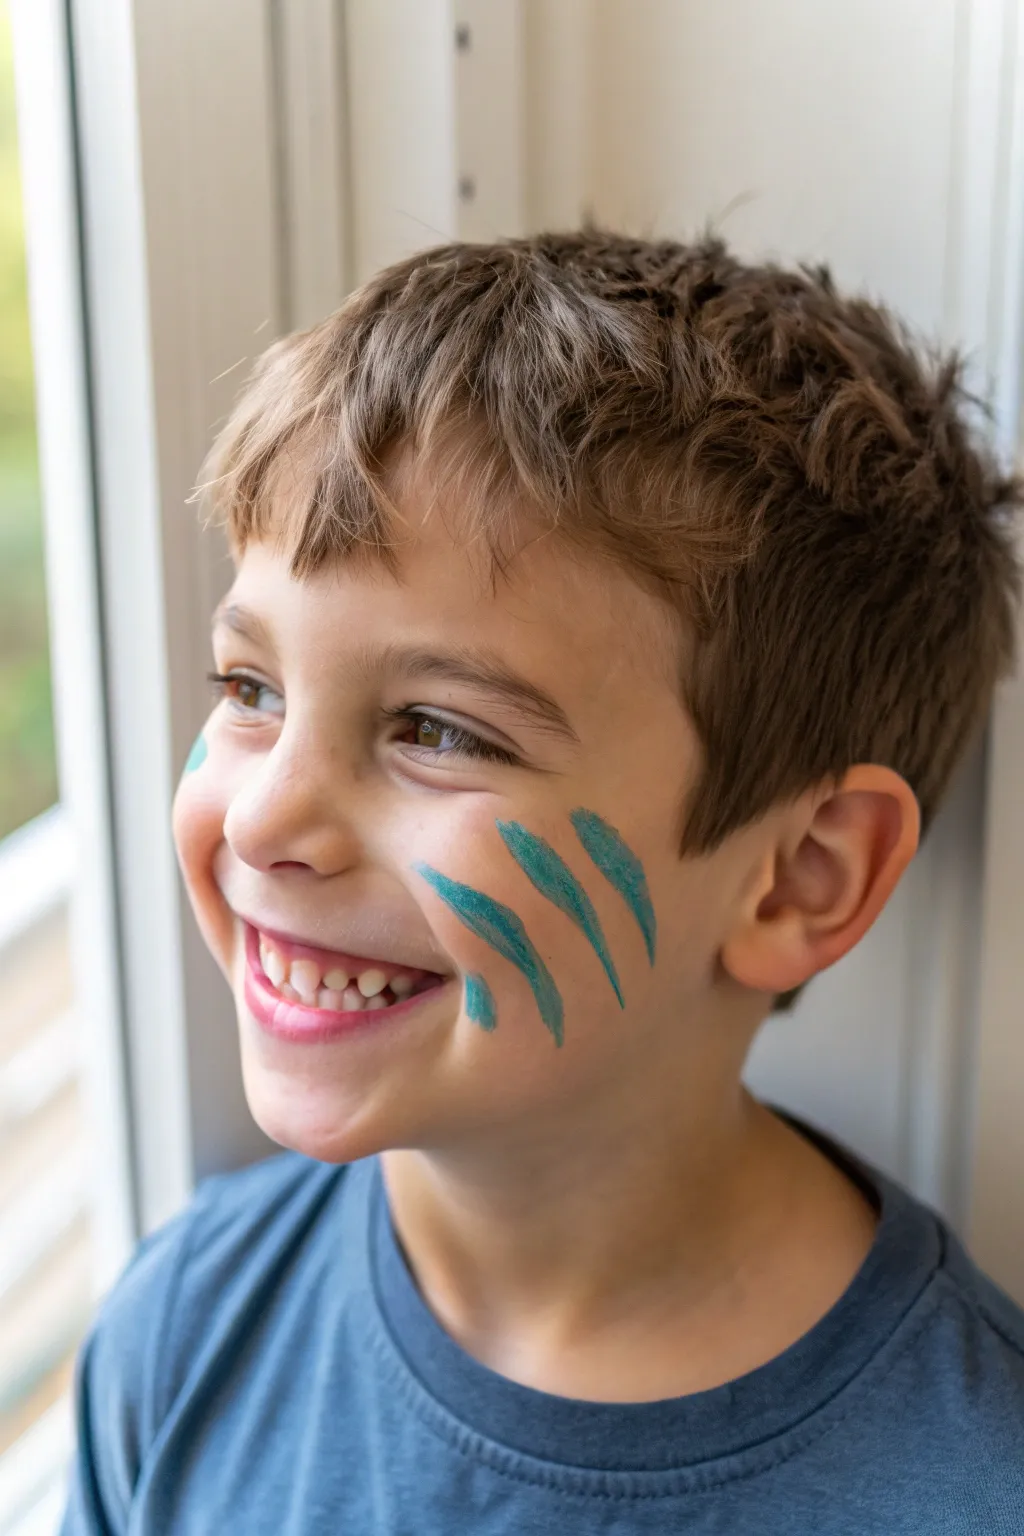
Transform a simple smile into a ferocious beast with just a few strokes of teal face paint. This minimalist monster claw design is perfect for kids who want a touch of wild style without sitting still for a full-face mask.
How-To Guide
Materials
- Teal or turquoise face paint (water-activated cake or cream)
- Medium round brush (size 4 or 6)
- Small cup of water
- Baby wipes or damp paper towel (for cleanup)
- Setting spray (optional)
Step 1: Preparation
-
Clean the canvas:
Before starting, ensure the child’s cheek is clean and dry. Use a baby wipe to remove any oils or food residue, which helps the paint stick better. -
Load the brush:
Dip your medium round brush into the water, but don’t soak it. You want the bristles damp, not dripping. -
Activate the paint:
Swirl the damp brush into your teal face paint cake. Aim for a creamy consistency similar to melted ice cream rather than watery ink.
Flick of the Wrist
The key to a sharp point at the end of the claw mark is speed. Flick your wrist quickly at the end of the stroke rather than dragging slowly.
Step 2: The First Mark
-
Positioning:
Locate the starting point high on the cheekbone, slightly towards the outer corner of the eye but below the temple. -
Start the stroke:
Place the tip of the brush against the skin with light pressure to begin the top of the claw mark. -
Press down:
As you drag the brush diagonally downward towards the mouth, press the bristles down firmly to widen the stroke. This creates the thick middle part of the scar. -
Taper off:
As you near the end of the stroke, gradually lift the brush while continuing the motion to create a sharp, tapered point. -
Review shape:
The first mark should look like a elongated teardrop or a comet tail, curving slightly towards the nose.
Step 3: Adding the Claws
-
Second stripe:
Reload your brush slightly if it feels dry. Position your brush about half an inch apart from the first mark, moving closer to the ear. -
Mirror the motion:
Repeat the press-and-lift technique. Start thin, press for thickness, and lift for a sharp point. Make this middle mark slightly longer than the first one if possible. -
Third stripe:
Place your brush for the final claw mark, another half-inch back towards the ear. -
Create the final curve:
Execute the third stroke. I usually like to curve this one slightly more inward at the bottom to follow the natural contour of the cheek. -
Check consistency:
Look at the three lines together. They represent a single swipe from a monster paw, so they should generally follow the same diagonal angle.
Paint Too Translucent?
If the teal looks watery or streaky, your brush has too much water. Dry the brush on a paper towel and work it into the paint cake until it feels creamy again.
Step 4: Finishing Touches
-
Smooth the edges:
If any of the starting points look too blunt, use the very tip of your brush with leftover paint to gently round them off or sharpen them. -
Fill gaps:
Inspect the thickest parts of your stripes. If the skin shows through, carefully dab a little more paint on top to make the teal color opaque and bold. -
Clean spills:
If you accidentally dripped or made a line too wide, use a damp Q-tip or the corner of a wipe to clean up the edges. -
Small extra mark:
For added detail, you can add a tiny, shorter fourth mark or a small dot near the bottom of the cheek, like a stray scratch. -
Let it dry:
Ask the child to keep their cheeks relatively still for about 60 seconds to ensure the paint sets completely.
Now your little monster is ready to roar with a quick and cool design
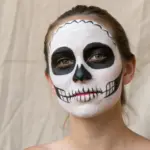
Skeleton Bones Half Mask
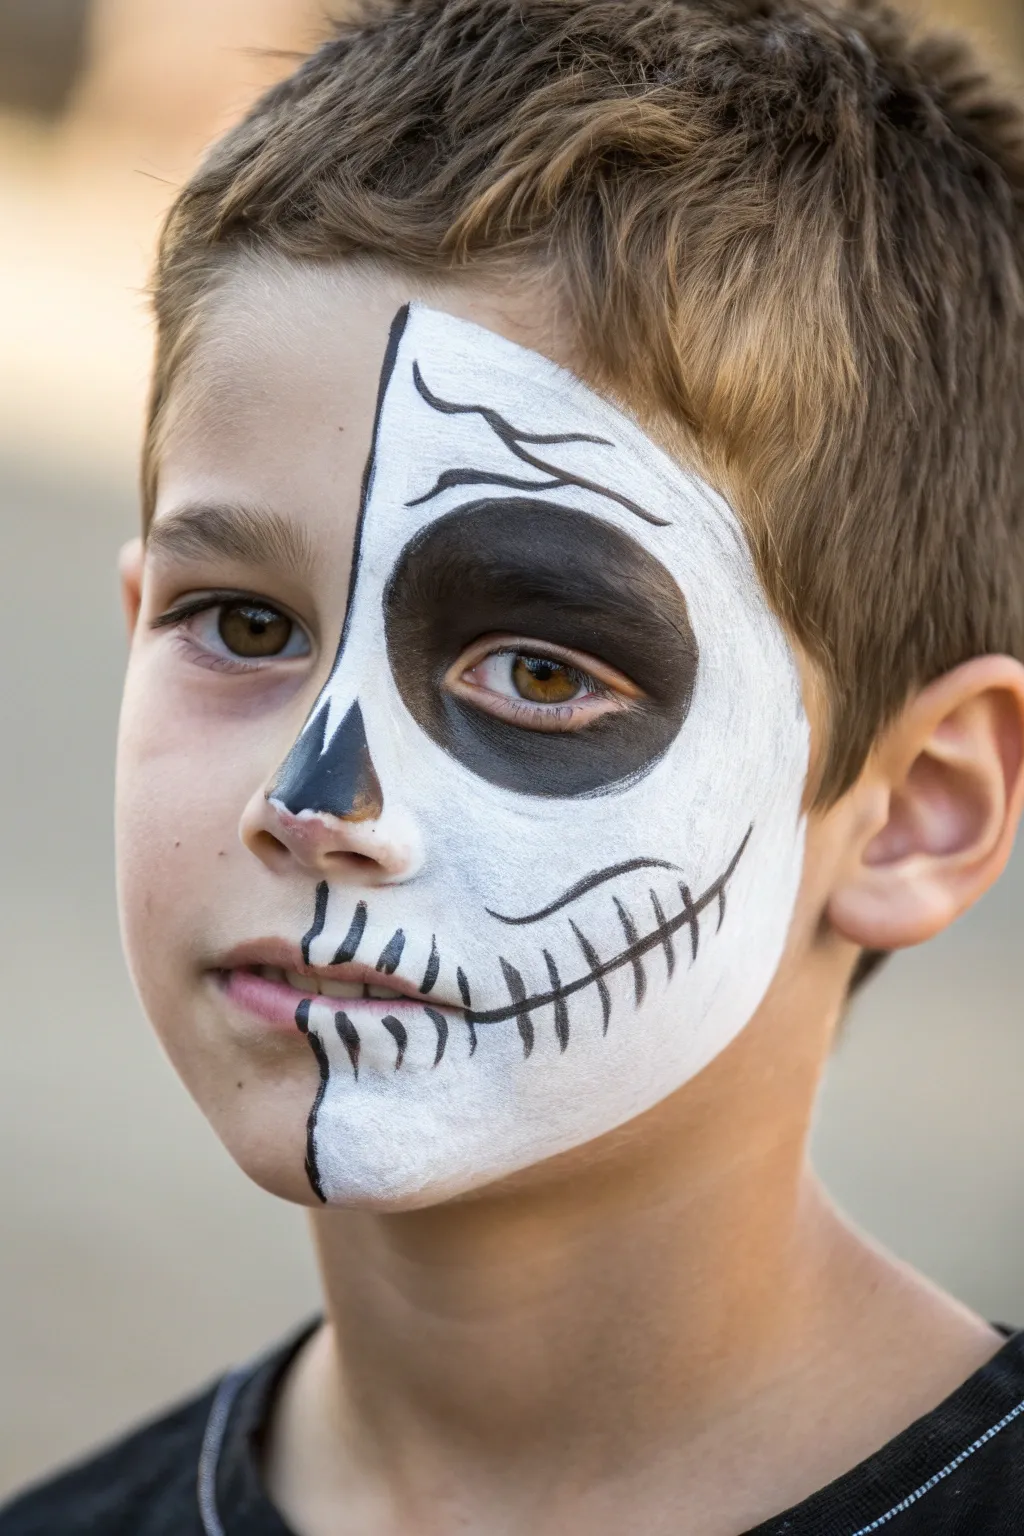
This striking design creates a dramatic half-skeleton effect that looks much more complex than it actually is. By dividing the face down the middle, you get the spooky impact of a skull while keeping one side clean for a cool asymmetrical look.
Step-by-Step Guide
Materials
- White face paint (water-activated cake or cream)
- Black face paint (water-activated cake or cream)
- High-density face painting sponge
- Medium round brush (size 4 or 6)
- Fine detail brush (size 1 or 2)
- Cup of water
- Paper towels
Step 1: The White Base
-
Outline the divider:
Begin by dampening your medium round brush and picking up a small amount of black paint. Draw a thin, vertical guide line straight down the center of the face, starting from the hairline, going over the nose, and ending at the chin. -
Load the sponge:
Wet your high-density sponge and swirl it thoroughly in your white face paint until you have a creamy, opaque consistency. It shouldn’t be drippy. -
Apply the white base:
Dab the sponge on the left side of the face (the subject’s left), filling in the entire area up to your center line. Be sure to cover the eyebrow and lips completely. -
Smooth the edges:
While the paint is still slightly damp, gently pat around the eye socket area to ensure even coverage, but leave the immediate eye area slightly less opaque as we will cover it with black later. -
Let it set:
Give the white base a minute or two to dry completely. If you paint over it while wet, the black lines will turn grey and muddy.
Step 2: The Dark Socket & Nose
-
Outline the eye socket:
Using the medium round brush loaded with black paint, draw a large circle around the left eye. Following the natural bone structure usually works best, bringing the circle up to the eyebrow and down to the cheekbone. -
Fill the eye:
Fill in the entire circle with black paint. I find it helpful to ask the child to close their eyes gently while painting the eyelid to prevent smudging. -
Create the nose cavity:
On the left side of the nose tip, paint a triangular shape that hugs the nostril. Use two brushstrokes that meet at a point near the bridge of the nose to mimic a nasal cavity.
Fixing Grey Smudges
If the black paint is turning grey against the white, stop immediately. The white layer isn’t dry enough. Wait 2 minutes, then apply black again with a drier brush.
Step 3: Cracks and Details
-
Define the center edge:
Switch to your fine detail brush with black paint. Carefully trace over your initial center guide line to make it crisp and distinct, creating a sharp boundary between skin and skull. -
Paint the mouth line:
From the center of the lips, draw a black line extending outward horizontally toward the cheek. Extend this line further than the actual mouth to create a skeletal jaw look. -
Add teeth markings:
Along this horizontal mouth line, paint short vertical dashes crossing it. Make the dashes in the center (over the lips) slightly longer and thicker, getting smaller as they move out toward the cheek. -
Create forehead cracks:
Using the very tip of your fine brush, paint wiggle lines on the forehead. Start thick near the center line and taper them to a fine point as they extend outward. -
Add temple details:
Paint a few jagged, irregular lines near the temple or eye socket edge to simulate bone fissures. -
Refine the edges:
Check the perimeter of the white paint. If the hairline looks messy, use a clean, damp baby wipe to tidy up the edge or paint a clean black line to border it.
Shade for Depth
Dab a dry brush into grey eyeshadow and lightly trace under the cheekbone and around the temple cracks. This subtle shadow makes the ‘skull’ pop out in 3D.
Now step back and admire this spooktacular transformation that is perfect for trick-or-treating or a costume party
Race Car Number And Speed Lines
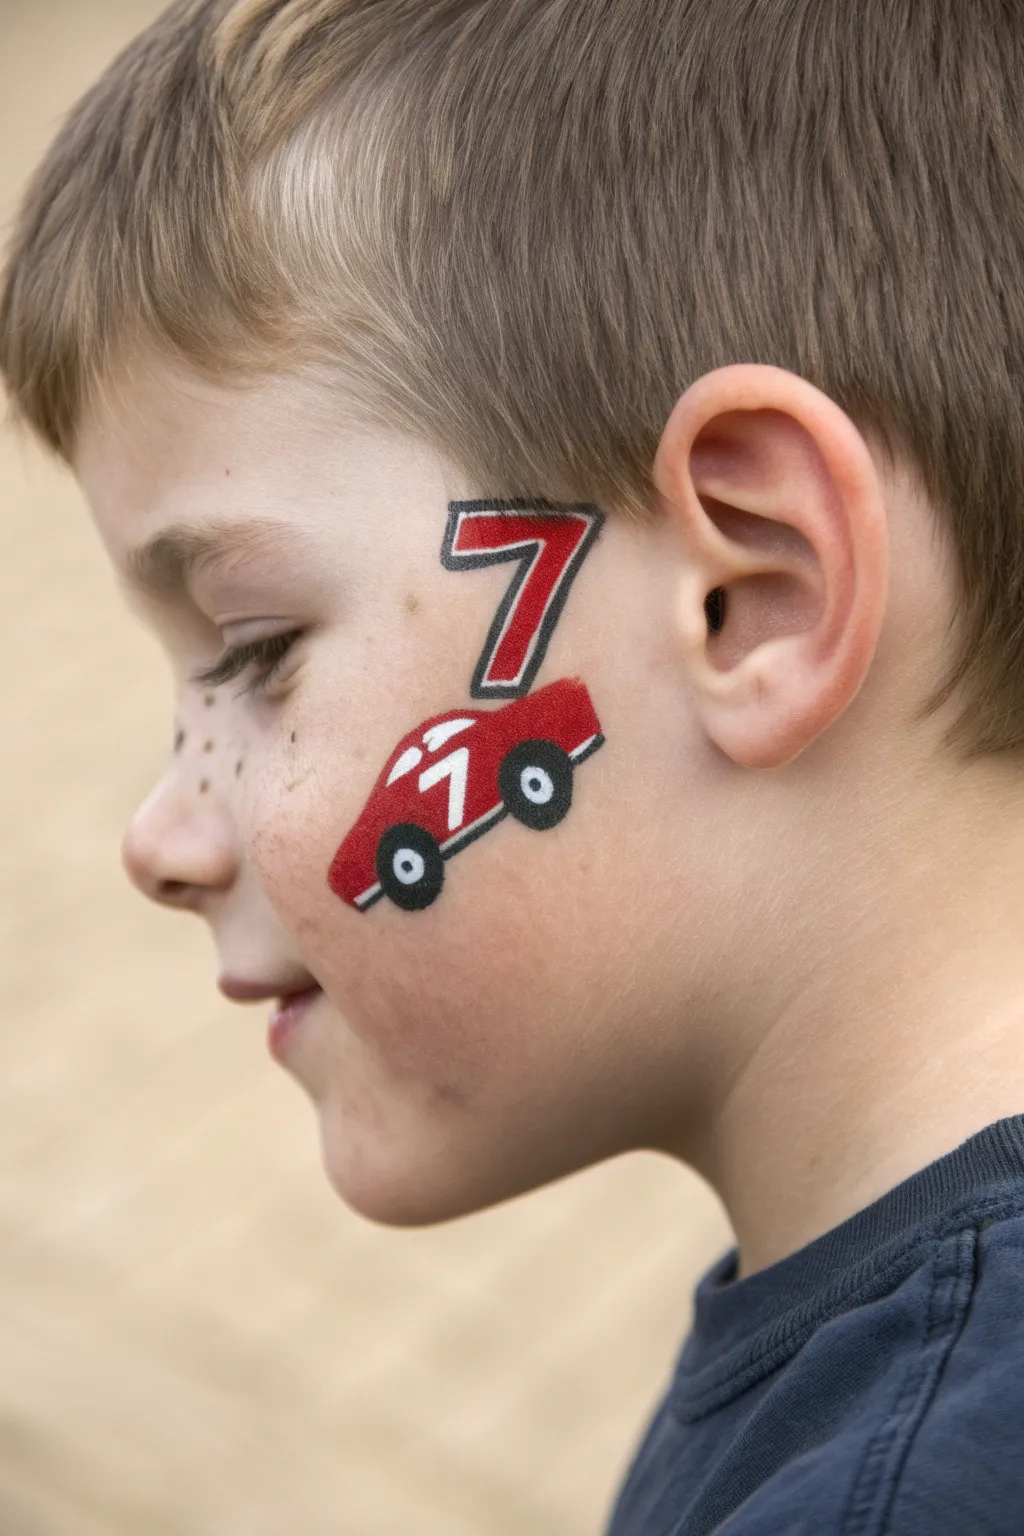
Rev up the fun with this dynamic race car cheek art that pairs a speedy red vehicle with a bold lucky number. It is a perfect quick design for little racing fans who want to sport their favorite number or age right on their face.
Detailed Instructions
Materials
- Red face paint (high density)
- White face paint
- Black face paint
- Small flat brush (approx. size 4)
- Fine round detail brush (size 1 or 2)
- Cup of water
- Paper towels or sponge
Step 1: Painting the Car Body
-
Outline the chassis shape:
Start with your small flat brush loaded with bright red paint. On the apple of the cheek, paint a slanted rectangular shape that angles downward slightly, representing the main body of the race car. -
Add the roof slope:
From the top left of your rectangle, pull the red paint upwards and backwards to create the sloped roof and rear spoiler area of the car. -
Fill it in:
Ensure the entire red shape is solid and opaque. Start with a thin layer, let it dry for a few seconds, and add a second coat if the skin is showing through too much. -
Let the red base set:
Give the red paint a moment to become touch-dry before moving on. This prevents the next colors from blending into pink or muddy tones.
Step 2: Adding the Big Number
-
Draft the number:
While the car dries, rinse your flat brush thoroughly and load it with red paint again. Position the brush above the car on the temple area. -
Paint the top bar:
Draw the horizontal top bar of the number ‘7’ (or whichever age number you are doing) with a confident stroke. -
Paint the diagonal stem:
Connect your stroke and pull the brush diagonally downward towards the car’s roof, creating the main leg of the ‘7’. Keep the corners relatively sharp. -
Solidify the color:
Just like the car body, ensure the coverage is even. Smooth out any streaks with a slightly damp brush tip.
Smudged Lines?
If black smears into red, wait for it to fully dry. Then, use a damp Q-tip to lift the mistake before reapplying the correct color over the clean patch.
Step 3: Wheels and Details
-
Place the tires:
Switch to a fine round brush with black paint. Paint two solid black circles along the bottom edge of the red car body—one near the front and one near the back. -
Create the windows:
Rinse your brush well and switch to white paint. Carefully paint a small, angled wedge shape on the upper front part of the red car body to act as the windshield and side window. -
Add the racing number:
Using the very tip of your round brush with white paint, draw a tiny matching number ‘7’ on the side door area of the red car. -
Dot the hubcaps:
Place a small white dot in the exact center of each black tire to create the hubcaps.
Make it Faster
Add ‘speed lines’—three quick horizontal strokes behind the car with white or black paint to make it look like it’s zooming forward.
Step 4: Outlining and Definition
-
Outline the master number:
Load your fine round brush with inky black paint. Outline the large red ‘7’ on the temple, varying your pressure slightly to give the line some character. -
Outline the car body:
Carefully trace around the perimeter of the red car shape with thin black lines. It helps to anchor your pinky finger on the chin for stability. -
Define the windows:
Add a very thin black line separating the white window area from the red car body for crisp separation. -
Add motion lines:
Add a small black accent line under the front bumper and rear bumper to suggest the chassis and bumpers. -
Freckle touch-up:
If you painted over any natural freckles or spots that look distracting, you can gently tap a tiny bit of diluted brown paint to blend them, though usually, the clean car design is enough.
Now you have a custom race car design ready for the checkered flag
Rocket Ship Temple Mini Art
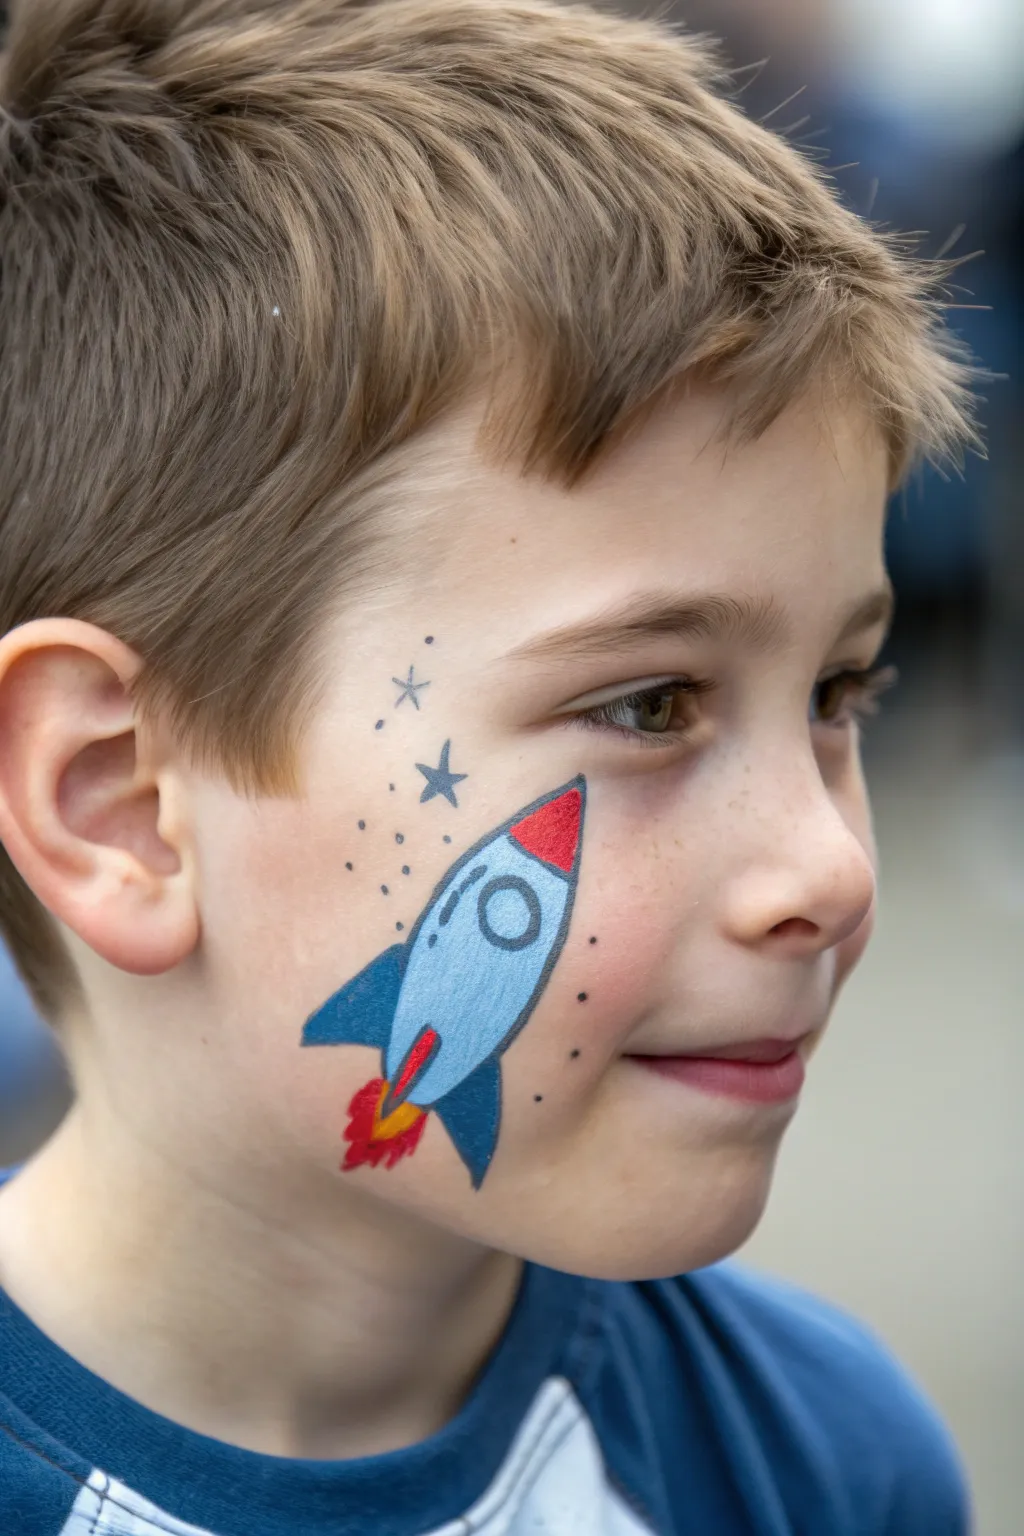
Launch into creativity with this simple yet striking rocket ship design that fits perfectly on a child’s cheek. The bold blues and bright red accents create a fun, cartoon-style look that is quick to apply but looks professionally done.
Step-by-Step Guide
Materials
- Face paint (light blue, royal blue, bright red, yellow, white, black)
- Small round brush (size 1 or 2)
- Medium round brush (size 4)
- Fine detail brush (size 0 or liner brush)
- Water cup
- Sponge (optional, for cleanup)
Step 1: Painting the Rocket Body
-
Outline the shape:
Using a wet medium round brush loaded with light blue paint, draw a tilted, elongated oval shape on the cheek, angling it towards the nose. -
Fill in the base:
Fill in the entire oval shape with the same light blue paint, ensuring smooth, solid coverage without streaks. -
Add the nose cone:
Switch to bright red paint on a small round brush. Paint a distinct triangular tip at the top (front) of your light blue oval for the nose cone. -
Create the fins:
Using royal blue paint and a small round brush, paint a triangular fin on the bottom edge of the rocket body, sweeping it backwards. -
Paint the second fin:
Add a second matching royal blue fin on the top edge of the rocket, balancing the design. -
Paint the tail fin:
Add a third, slightly smaller royal blue fin at the very back of the rocket body.
Wobbly Lines?
If your black outlines get shaky, rest your pinky finger gently on the child’s chin or forehead to stabilize your hand while painting detailed lines.
Step 2: Details and Flames
-
Add the window:
Rinse your medium brush and pick up some white paint (or re-use light blue mixed with white). Paint a small circle in the upper middle section of the rocket body for a porthole window. -
Ignite the engines:
Load a small round brush with yellow paint. Paint a small, jagged burst coming directly out of the back of the rocket, between the fins. -
Add red fire:
While the yellow is still slightly damp, add dabs of red paint to the outer edges of the yellow flame to create a two-tone fire effect. -
Outline the body:
This is the crucial step for that cartoon look. Using a fine detail brush and black paint, carefully outline the entire light blue body of the rocket. -
Outline the fins:
Continue with the black liner brush to outline the three royal blue fins, making the lines crisp and defined. -
Define the window:
Draw a black circle around the white porthole window you painted earlier. -
Separate the nose cone:
Draw a curved black line separating the red nose cone from the blue body, and outline the red tip itself. -
Add motion lines:
Paint two or three very small, curved black lines inside the light blue body to suggest rounded volume.
Star Power
For sharper stars, use a ‘starburst’ technique: paint a cross first (+), then add a smaller X over it. Start from the center and flick outward for thin points.
Step 3: Space Atmosphere
-
Paint a large star:
Using your fine brush and dark grey or diluted black paint, draw a simple five-point star or a cross-star shape slightly above and behind the rocket. -
Add distant stars:
Draw two or three smaller cross-shapes nearby to look like twinkling stars in the distance. -
Create stardust:
Dip the very tip of your fine brush into black or dark grey paint and add tiny dots scattered around the tail of the rocket to simulate space dust. -
Highlight the glass:
Finally, add a tiny dot of pure white paint inside the window outline and a small streak on the nose cone to make them look shiny.
Now you have a space explorer ready for an intergalactic adventure right in your living room
Ninja Mask Shadow Shape
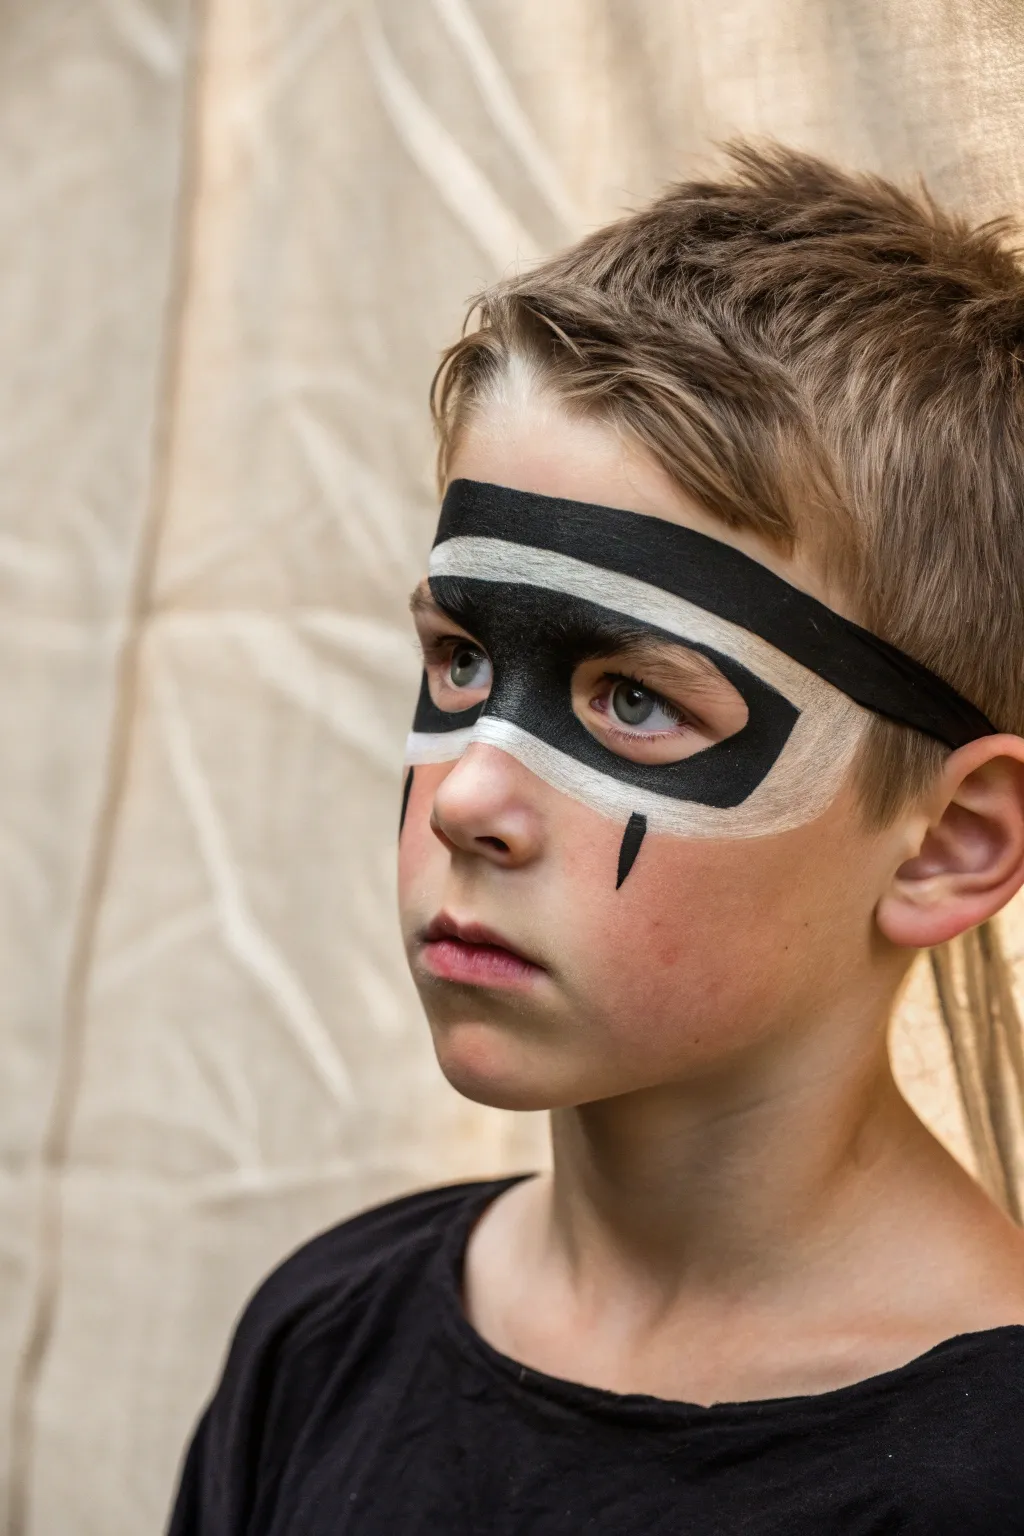
Transform an ordinary afternoon into an action-packed adventure with this striking high-contrast ninja mask design. By combining sharp black geometry with soft white highlights, you’ll create a dramatic 3D effect that looks both tough and professional.
Detailed Instructions
Materials
- High-quality face paint (Black)
- High-quality face paint (White)
- Medium flat brush (approx. 1/2 inch)
- Small round detail brush (size 2 or 3)
- Cup of clean water
- Makeup sponge (optional, for blending)
- Paper towels
Step 1: Laying the White Warning Stripe
-
Load the brush:
Start by wetting your medium flat brush and loading it with white face paint. You want a creamy consistency, not too watery, to ensure the white pops against the skin. -
Map the forehead line:
Paint a straight, horizontal white line across the forehead, positioning it just above the eyebrows. This will act as the top border for the eye mask area. -
Create the lower border:
Using the same flat brush, paint a second white line that runs across the bridge of the nose and extends underneath both eyes, curving slightly upwards towards the temples. -
Soften the edges:
While the paint is still slightly damp, you can gently feather the outer edges of these white lines with your finger or a sponge to make them look less like stickers and more like a painted accent. -
Double check symmetry:
Step back for a moment to ensure your white lines are roughly even on both sides. Don’t worry about perfection; ninja masks move with the face.
Fixing Smudges
If black paint bleeds into the white, wait for it to dry completely. Then, use a damp cotton swab to lift the mistake before re-applying fresh white paint.
Step 2: Constructing the Black Mask
-
Switch to black:
Rinse your flat brush thoroughly or grab a fresh one. Load it heavily with black face paint. I prefer a very opaque load here so the black covers the skin completely in one stroke. -
Paint the top band:
Paint a thick black band directly above the white forehead line. This band should be wider than the white line, creating a strong, solid forehead piece. -
Form the eye mask:
Using the flat brush, fill in the area around the eyes. Start from the bridge of the nose and sweep outwards over the eyelids towards the temples. -
Connect the shapes:
Carefully paint up the sides of the face to connect the eye mask section to the forehead band, creating a unified mask shape that encircles the eyes. -
Define the eye sockets:
Be careful around the immediate eye area. Leave the actual eyelids comfortable, but bring the black paint in close enough to create that hollow, shadowed look. -
The nose bridge:
Bring the black paint down the center of the nose bridge, stopping right where your lower white line crosses. This connects the two sides of the mask.
Pro Tip: Sharp Edges
For the crispest lines, use the chisel edge of your flat brush. Hold it perpendicular to the skin and drag it sideways to create razor-sharp boundaries.
Step 3: Adding the Fierce Details
-
Detail brush swap:
Switch to your small round detail brush and load it with black paint. We need precision now for the sharp definition. -
Outline the eye holes:
Carefully trace the inner edge of the black mask around the eyes to make the lines crisp. This cleans up any fuzzy edges from the flat brush. -
Refine the border:
Use the detail brush to separate the black and white sections. Run a clean, sharp black line right where the black mask meets the white stripe to maximize contrast. -
The vertical accents:
Paint two small, sharp triangular spikes dropping down from the cheek area. Place one on each cheek, pointing downward like fangs or mask folds. -
Add the strap:
From the outer temples, paint a black line extending towards the ears. This simulates the strap ties of the mask going around the back of the head. -
Final white touch-ups:
Clean your small brush and reload with white. If the black has overshadowed the white lines, add a thin, bright highlight layer on top of the original white stripes to make them gleam.
Now he is ready to sneak through the shadows with his new warrior disguise
Pixel Art Game Face
Bring the blocky world of Minecraft to life with this iconic Creeper face paint design. This simple yet striking pixel art look uses geometric shapes to create a recognizable gamer favorite right on the cheek.
Step-by-Step Guide
Materials
- Green face paint (medium shade)
- Black face paint
- Flat square brush (medium width, approx 1/2 inch)
- Fine detail brush or small square brush
- Cup of water
- Paper towel or sponge
- Misting spray bottle (optional)
Step 1: Preparation and Base Shape
-
Prepare your green:
Start by activating your medium green face paint with a little water until it reaches a creamy consistency. You want it smooth enough to glide but thick enough to be opaque. -
Create the central block:
Load your flat square brush fully with green paint. Place the brush flat against the apple of the cheek to stamp a central square shape. -
Build the pixel structure:
Using the width of your brush as a guide, stamp additional square shapes around your central block. Create a rough ‘H’ or staggered grid shape. -
Refine the edges:
Look closely at the design. The pixelated look relies on sharp corners, so use the edge of your flat brush to square off any rounded sections. -
Fill in the gaps:
Ensure all the green blocks connect seamlessly to form a single, solid green background shape that resembles a pixelated creature’s head. -
Let it set:
Allow the green layer to dry completely for a minute or two. If you paint over it while wet, the black will muddy into a dark green mess.
Step 2: Adding the Pixel Details
-
Load the black paint:
Clean your brush thoroughly or switch to a smaller flat brush. Load it with black face paint, keeping the consistency fairly dry to prevent dripping. -
Paint the left eye:
Visualize the face within the green shape. Paint a small black square in the upper left quadrant of the green area for the first eye. -
Paint the right eye:
Place a second black square to the right, leaving a gap of green between them. This gap represents the nose bridge area of the character. -
Start the mouth:
Below the eyes, paint a small central black square. This acts as the center of the Creeper’s frown. -
Extend the frown down:
Paint two vertical rectangular shapes extending downward from the sides of that central mouth square, looking like little legs. -
Connect the sides:
Add two small black blocks on the outer edges of the mouth structure, connecting them upwards slightly toward the eyes. -
Clean up edges:
Use a damp Q-tip or a clean, wet brush to wipe away any black paint that may have strayed outside the sharp pixel lines. -
Enhance the green:
If I notice the green looks a bit transparent after drying, I carefully dab a second layer of green around the black features to make the color pop.
Smudgy Edges?
If your straight lines are wobbly, use the edge of a credit card or a piece of stiff paper as a stencil guide while painting the outer squares.
Explosive Effect
Add white highlights to the corners of the green blocks or small ‘cracks’ around the design to make it look like the Creeper is about to explode.
Now you have a perfect gamer-ready look that is sure to be a hit at any party
Neon Lightning Pop Mask
Channel inner rock star vibes with this striking lightning bolt design that pops against neon hues. This look combines the classic lightning motif with a modern, glowing gradient for a truly electric effect.
Step-by-Step Tutorial
Materials
- High-density face paint sponge (cut in half)
- Round brush (size 2 or 3 for outlining)
- Flat brush (small, for clean edges)
- Water-activated face paints: Neon Green, Light Blue, Deep Pink/Magenta, Black, White
- Cup of water
- Spray bottle (optional, for wetting paints)
- Cotton swabs (for cleanup)
Step 1: Setting the Neon Base
-
Prepare the Sponge:
Start by dampening your half-sponge and loading it with the light blue face paint. Make sure the paint is creamy but not dripping. -
Apply Blue Background:
Sponge the blue paint over the forehead area above the left eye (the model’s left) and blend it down slightly onto the temple. -
Add Green Glow:
Flip the sponge or use a fresh one to load up the neon green. Apply this color around the blue, blending them where they meet to create a soft teal transition. -
Extend the Colors:
Continue sponging the neon green down onto the cheekbone area and slightly under the eye, creating a soft, asymmetrical mask shape that fades out towards the ear. -
Create the Second Base:
On the other side of the face (the model’s right), apply a smaller patch of neon green near the temple where the top of the bolt will eventually sit, ensuring the skin is prepped for the design.
Uneven Edges?
If your lightning bolt edges look wobbly, use a baby wipe wrapped tightly around your finger or a clean, damp flat brush to ‘erase’ and sharpen the line before the paint fully dries.
Step 2: The Lightning Bolt
-
Outline the Shape:
Using a wet flat brush loaded with deep pink or magenta, map out the lightning bolt shape. Start high on the forehead on the right side, cutting diagonally across the eyebrow and down the cheek. -
Fill in the Color:
Fill the entire lightning bolt shape with the deep pink paint. Use smooth, downward strokes for an even finish. You might need a second coat for full opacity. -
Sharpen the Edges:
While the pink is still slightly damp, go back with the edge of your flat brush to neaten any jagged lines, ensuring the geometric angles of the bolt are sharp. -
Add the Shadow:
To give the bolt dimension, pick up your round brush and load it with black paint. Carefully paint a thin line along the right-hand side of the lightning bolt to create a drop-shadow effect. -
Define the Left Side:
Continue the black outline on the left side of the bolt, but keep this line slightly thinner than the shadow side to maintain that 3D perspective. -
Add White Highlights:
Rinse your round brush thoroughly and load it with white. Add a thin, crisp line along the inner left edge of the pink bolt (next to the black outline) to make it look shiny.
Step 3: Final Details
-
Paint cheek stars:
Using a small round brush and the magenta paint, draw two small, five-pointed stars on the left cheekbone (the blue/green side). I usually put one slightly lower than the other. -
Add Star Dots:
Dip the tip of your round brush or the handle end into black paint and place two tiny dots near the stars for extra texture. -
Clean Up:
Use a damp cotton swab to clean up any paint that may have strayed onto the eyelids or lips to ensure the design looks crisp and professional.
Pro Tip: Pop Factor
For maximum brightness, lay down a thin layer of white paint exactly where the neon colors will go first. It acts as a primer and makes the fluorescents stand out much more vividly.
Now you have a bold, electrifying look ready for any costume party or event


Have a question or want to share your own experience? I'd love to hear from you in the comments below!