When kids ask for face paint, they want something they can recognize in the mirror right away—and you want something you can finish before they wiggle away. These easy face paint ideas for kids are my go-to designs: quick shapes, simple lines, and lots of room for happy little imperfections.
Classic Cat Whiskers and Nose

Transform your little one into an adorable feline in just minutes with this timeless and minimal design. Featuring a distinct black nose and sweeping whiskers, this look is a classic crowd-pleaser that’s easy to execute.
Step-by-Step Guide
Materials
- Black face paint (water-activated cake or cream)
- Pink face paint
- Small round brush (size 2 or 3)
- Fine liner brush (size 0 or 1)
- Cup of water
- Paper towels or sponge
Step 1: Creating the Kitty Nose
-
Load your brush:
Dip your small round brush into clean water and swirl it into your black face paint cake until it reaches a smooth, creamy consistency. -
Outline the shape:
Starting at the very bottom tip of the child’s nose, draw a small inverted triangle shape. Keep the lines neat and the shape centered. -
Fill it in:
Carefully fill in the triangle with the black paint using small strokes. Ensure the paint is opaque. -
Add the center line:
Using the very tip of your brush, draw a thin vertical line extending from the bottom point of the triangle down towards the cupid’s bow of the lip. This connects the nose to the mouth area.
Uneven Whiskers?
If whisker lines look shaky, try moving your whole arm instead of just your wrist. Fast, confident flicking motions usually create smoother, straighter lines than slow dragging.
Step 2: Drawing the Whiskers
-
Switch brushes:
Swap to your fine liner brush for better control over thin lines. Reload with black paint, ensuring the consistency is inkl-like for smooth gliding. -
Determine placement:
Visualize three points on the cheek: one near the nose, one in the middle, and one slightly lower to create a fanned-out effect. -
Draw the top whisker:
Start the first line on the high cheek area, pressing down lightly and flicking outward towards the ear. Lift the brush at the end to taper the line into a point. -
Draw the middle whisker:
Place the second line just below the first, slightly longer than the top one. I find it helps to anchor my pinky on their chin for stability. -
Draw the bottom whisker:
Add the third whisker below the middle one, slightly angled downward to complete the fan shape. -
Repeat on the other side:
Create three matching whiskers on the opposite cheek, trying to keep them symmetrical in length and angle.
Pro Tip: Long-Lasting Nose
The nose area tends to get oily or rubbed. Lightly dust translucent setting powder over the black nose paint once it’s fully dry to prevent smudging.
Step 3: Adding the Final Details
-
Prepare the pink paint:
Clean your fine liner brush thoroughly or grab a clean one. Load it with pink face paint. -
Add nose freckles:
Just above the black nose and between the eyes, gently tap the tip of the brush to create a small cluster of tiny pink dots. Group them loosely for a natural look. -
Add cheek freckles:
Lightly dab a few tiny pink dots near the inner starting points of the whiskers on both cheeks to add a cute, rosy detail. -
Check for gaps:
Look over the black areas again. If the nose paint has dried unevenly, dab a tiny bit more black to ensure full coverage. -
Clean up edges:
If any lines are wobbly, use a damp cotton swab or the corner of a folded wet wipe to gently correct the edges.
Now your little kitten is ready to prowl around with their cute new look


Puppy Face With Floppy Spots
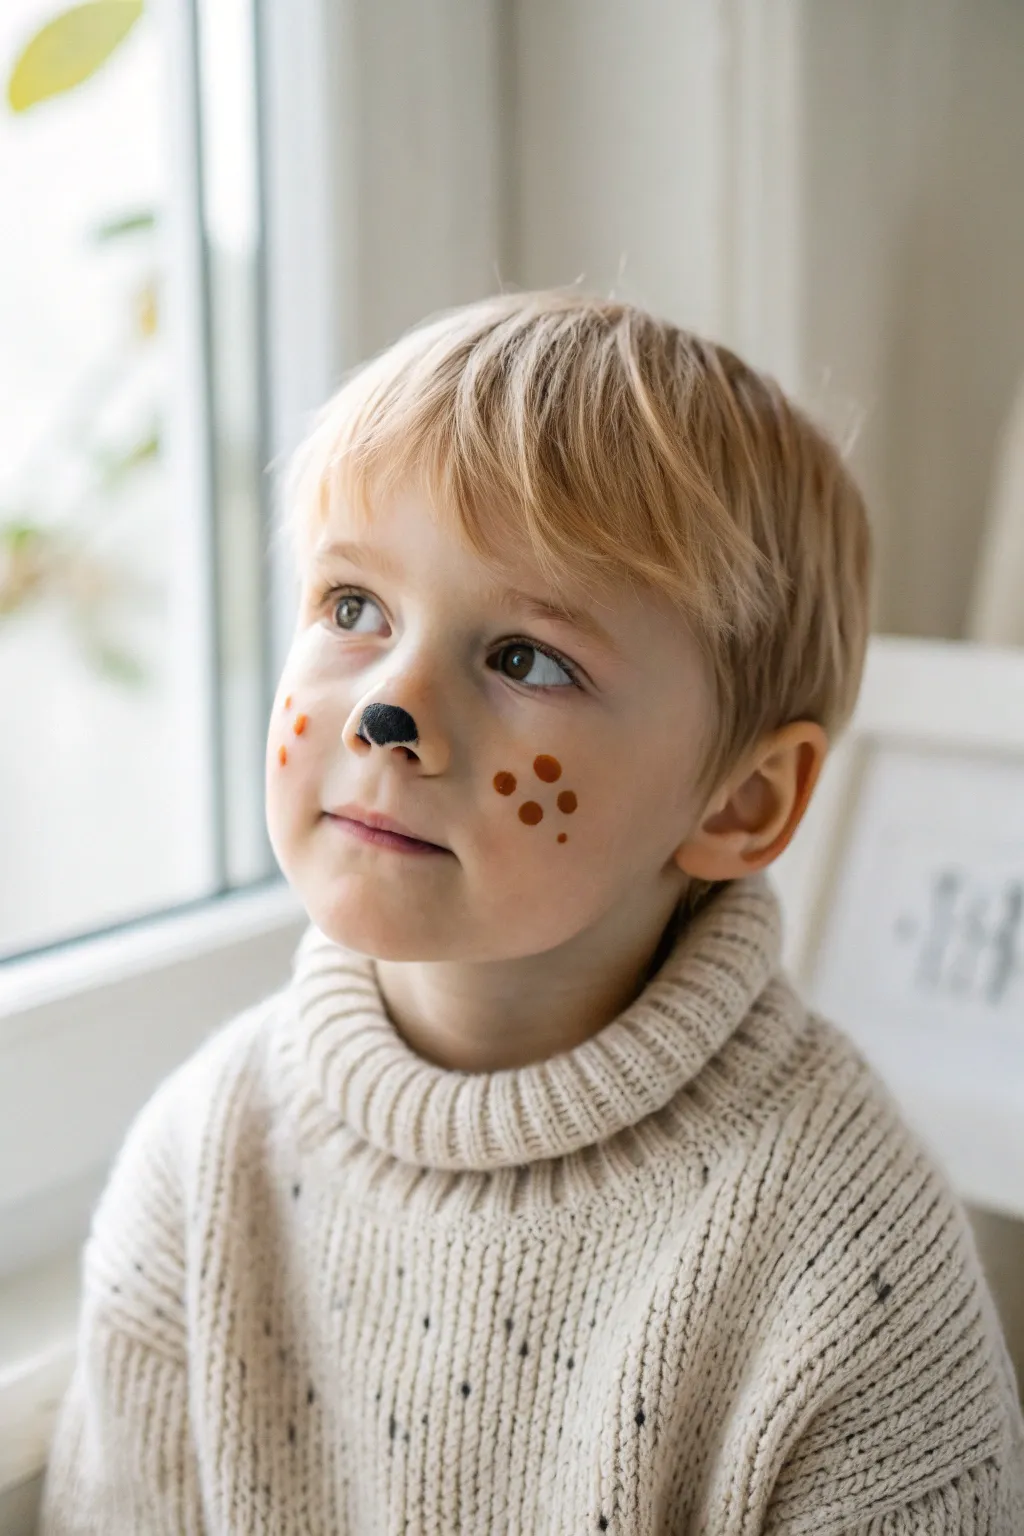
Transform your little one into an adorable puppy with this incredibly simple yet sweet face paint design. Focused on a cute button nose and playful freckle spots, this look is perfect for beginners who want a quick, clean result.
Step-by-Step Tutorial
Materials
- High-quality black face paint (water-activated or cream)
- Warm brown or burnt orange face paint
- Small round brush (size 2 or 4)
- Medium round brush (size 6)
- Cup of clean water
- Paper towels or soft cloth
- Baby wipes (for cleanup)
Step 1: Painting the Puppy Nose
-
Clean and Prep:
Start with a clean, dry face. Use a gentle wipe to remove any oils from the nose and cheek area to ensure the paint adheres smoothly. -
Load the Black Paint:
Dip your small round brush into the water and mix it into your black face paint until you have a creamy consistency, similar to melted chocolate. -
Outline the Nose Shape:
On the very tip of the child’s nose, paint a soft, rounded triangle or oval shape. I like to keep the bottom edge slightly curved to hug the nostril line. -
Fill in the Nose:
Gently fill inside your outline with the black paint using smooth strokes. Avoid going too far up the bridge of the nose; keep it concentrated on the button tip for the cutest effect. -
Refine the Edges:
Use the very tip of your brush to smooth out any bumpy edges on the nose shape. A clean, defined edge makes the design look much more professional. -
Dry the Nose:
Ask the child to sit still for a moment to let the black paint dry completely. This prevents smudging while you work on the cheeks.
Stay Round!
To get perfect circular spots, load your brush well, hold it perpendicular to the face (straight out), press down, and twist slightly as you lift off.
Step 2: Adding the Playful Spots
-
Prepare the Brown Color:
Rinse your brush thoroughly or switch to a medium round brush. Load it with a warm brown or burnt orange face paint. The color should be distinctly lighter than the black nose. -
Test Consistency:
Test the paint on your hand first. You want it fluid enough to make round dots, but not so watery that it drips. -
First Cheek Cluster:
Choose one cheek to start. Gently press the tip of the brush down to create a small dot. Lift straight up to keep it round. -
Varying Dot Sizes:
Create a cluster of 3-5 dots on that cheek. By pressing slightly harder or lighter, you can vary the size of the spots, making them look more natural and playful. -
Second Cheek Cluster:
Move to the other cheek and repeat the process. Aim for asymmetry here; don’t try to mirror the first side perfectly. -
Checking Balance:
Step back and look at the face. Add one or two tiny ‘freckle’ dots near the nose if the cheeks look too empty. -
Optional Forehead Spot:
If you want a little more detail, add a single larger spot or a small cluster near the temple, but keeping it minimal is key to this specific look. -
Final Clean Up:
Dip a cotton swab in makeup remover or water to tidy up any stray marks or smudges around the edges of your dots.
Furry Texture
Use a dry brush technique with white paint to add tiny, wispy hair strokes around the outer edges of the face for a fuzzy puppy effect.
Now you have a sweet little puppy ready for playtime, achieved in just a few minutes


Easy Butterfly Eye Wing
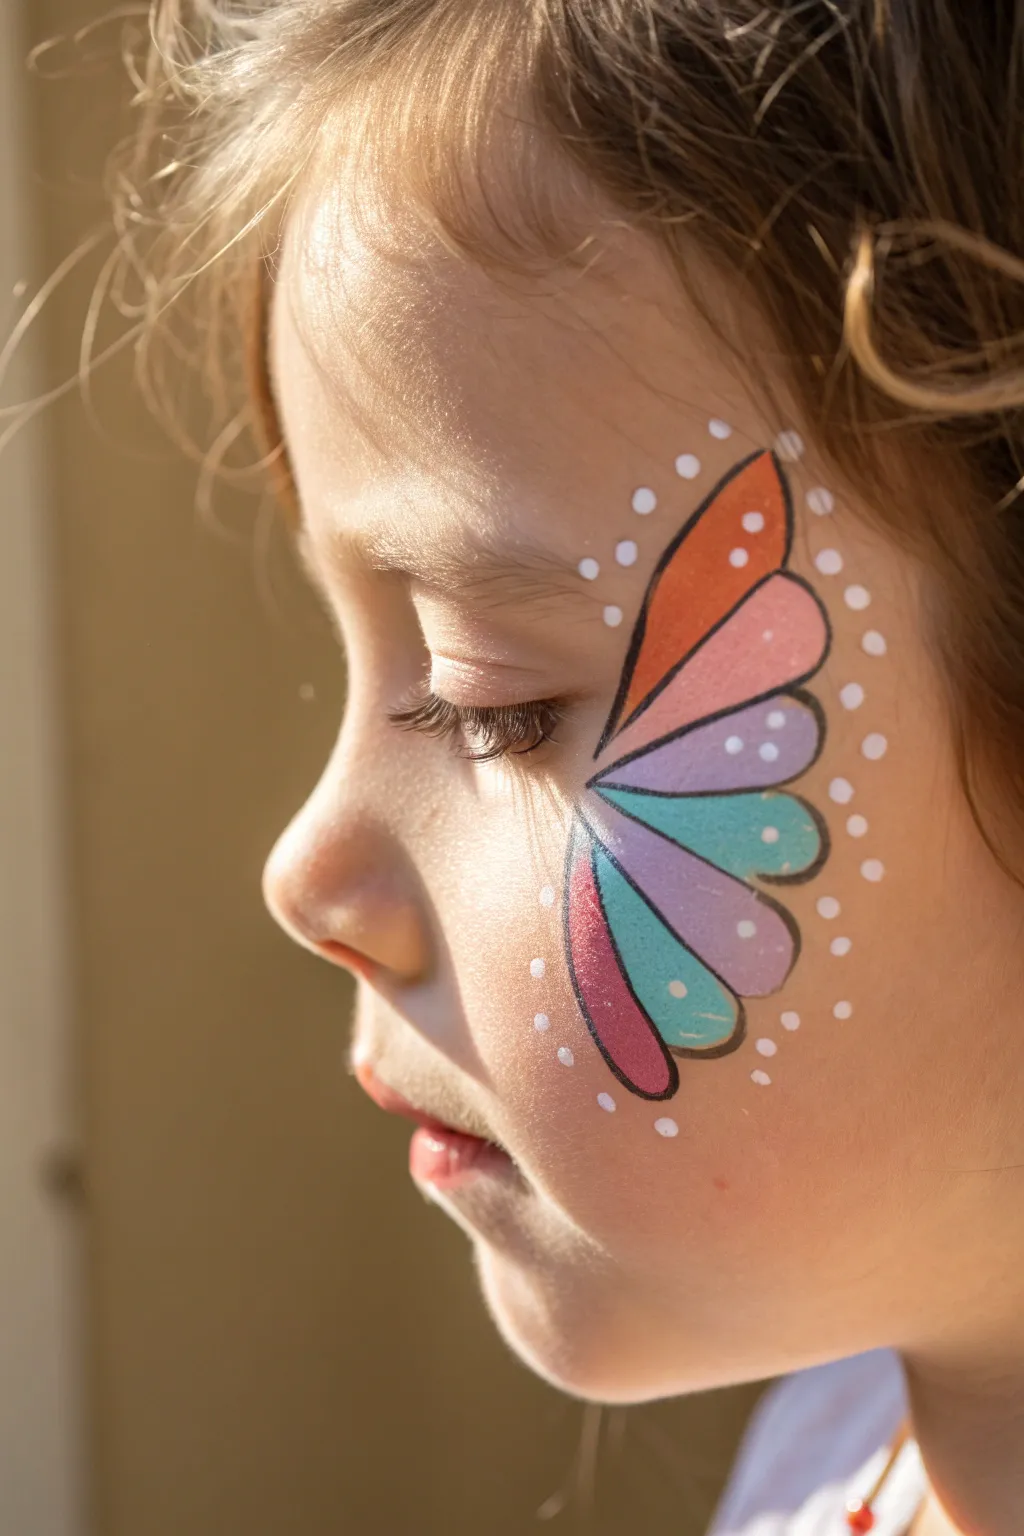
This charming half-butterfly design sweeps elegantly from the corner of the eye, fanning out onto the cheek in a gentle rainbow gradient. It is a perfect, quick option for little ones who might not sit still for a full-face mask but still want something magical.
Detailed Instructions
Materials
- Water-activated face paints (orange, pink, purple, teal/light blue, maroon/dark pink)
- White face paint for detailing
- Round brush (size 2 or 3) for outlining
- Small filbert brush or petal sponge for filling
- Fine liner brush (size 0 or 1) for dots
- Cup of water
- Paper towels
Step 1: Painting the Wing Segments
-
Load the first color:
Begin by dampening your small filbert brush or sponge and loading it with bright orange face paint. Ensure the consistency is creamy, not too watery, to prevent drips near the eye. -
Create the top petal:
Starting just beside the outer corner of the eye, press and sweep the brush upwards and outwards towards the temple to create a long, teardrop shape. This forms the uppermost part of the wing. -
Add the pink segment:
Rinse your brush thoroughly and load it with a soft pastel pink. Paint a second petal shape directly underneath the orange one, making it slightly shorter so the wing begins to curve downward. -
Continue with purple:
Switch to a lavender or light purple shade. Place this third petal below the pink one, following the natural curve of the child’s cheekbone. -
Paint the teal petal:
Load up a bright teal or aqua blue. Paint the fourth segment, angling it slightly more downwards than the previous ones. -
The lower purple layer:
Return to your purple paint (or use a slightly darker purple for depth) and add the fifth petal shape, continuing the fan-like arrangement. -
Finish the bottom loop:
Complete the wing shape with a maroon or dark pink petal at the very bottom, creating a rounded end to the design on the lower cheek.
Wobbly Lines?
If your black outlines look shaky, try resting your pinky finger gently on the child’s chin or cheek (use a dry sponge as a barrier) to stabilize your hand while painting.
Step 2: Outlining and Details
-
Prepare the outline brush:
Switch to a size 2 or 3 round brush. Load it with black face paint, rolling the bristles to a sharp point on your palette. -
Outline the top edge:
Carefully trace the upper edge of the orange shape. Use thin pressure at the start near the eye, pressing down slightly as you go up, then lifting off for a tapered end. -
Outline the segments:
Draw black lines between each colored segment to separate them. I find it easiest to start from the center point near the eye and pull the lines outward. -
Define the outer edge:
Connect the outer tips of the petals with curved black strokes, giving the wing a scalloped, organic butterfly edge. -
Enclose the bottom:
Finish the black outlining around the bottom maroon shape, bringing the line back towards the starting point near the nose/cheek area.
Sparkle Upgrade
While the paint is still slightly damp, gently poof cosmetic-grade glitter over the design. Focus on the tips of the wings for a magical, shimmering fairy effect.
Step 3: Magical White Accents
-
Load white paint:
Clean your brush or switch to a fine liner brush for the final details. Load it with opaque white face paint. -
Add inner highlights:
Inside each colored segment, add a tiny white dot or short dash near the outer curve. This mimics the patterns found on real butterfly wings. -
Create the dot border:
Dip the handle end of a brush into the white paint for perfect circles, or use your liner brush. Stamp a series of dots around the entire outer perimeter of the butterfly wing. -
Connect the dots:
Continue the line of white dots down the curve of the cheek, following the contour of the wing but floating slightly away from the black outline. -
Final check:
Step back and check for any smudges. If you see any, a slightly damp q-tip works wonders for quick cleanups without ruining the base.
You now have a beautiful, fluttery design ready for a sunny afternoon of play


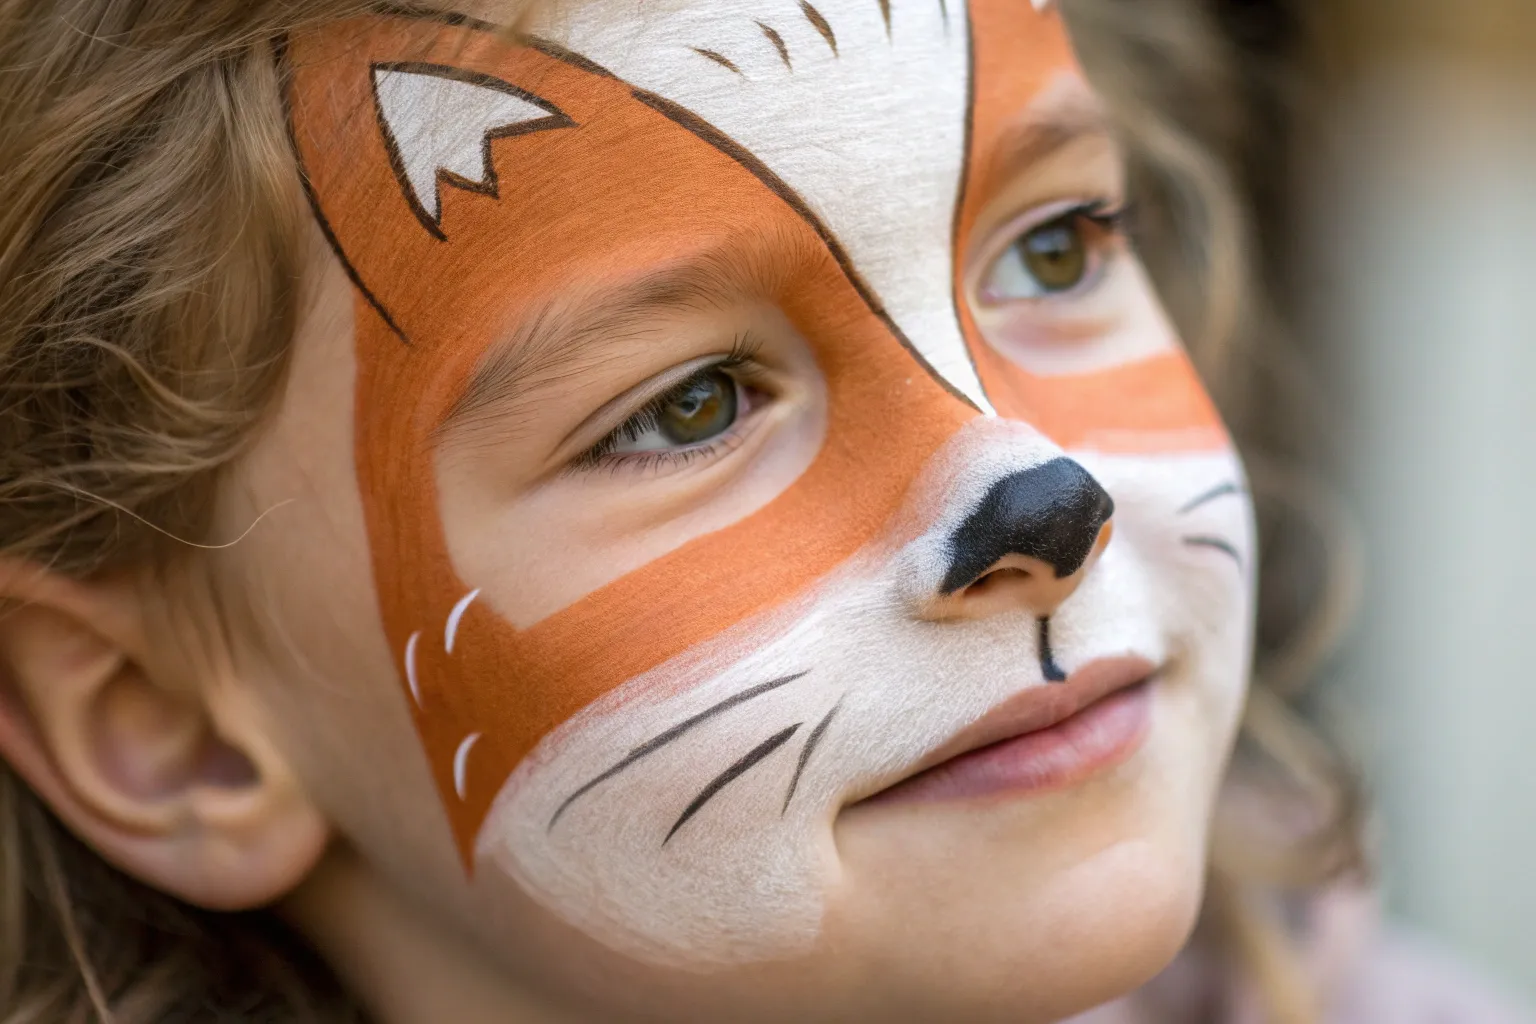
Tiger Stripes With a Roar Nose
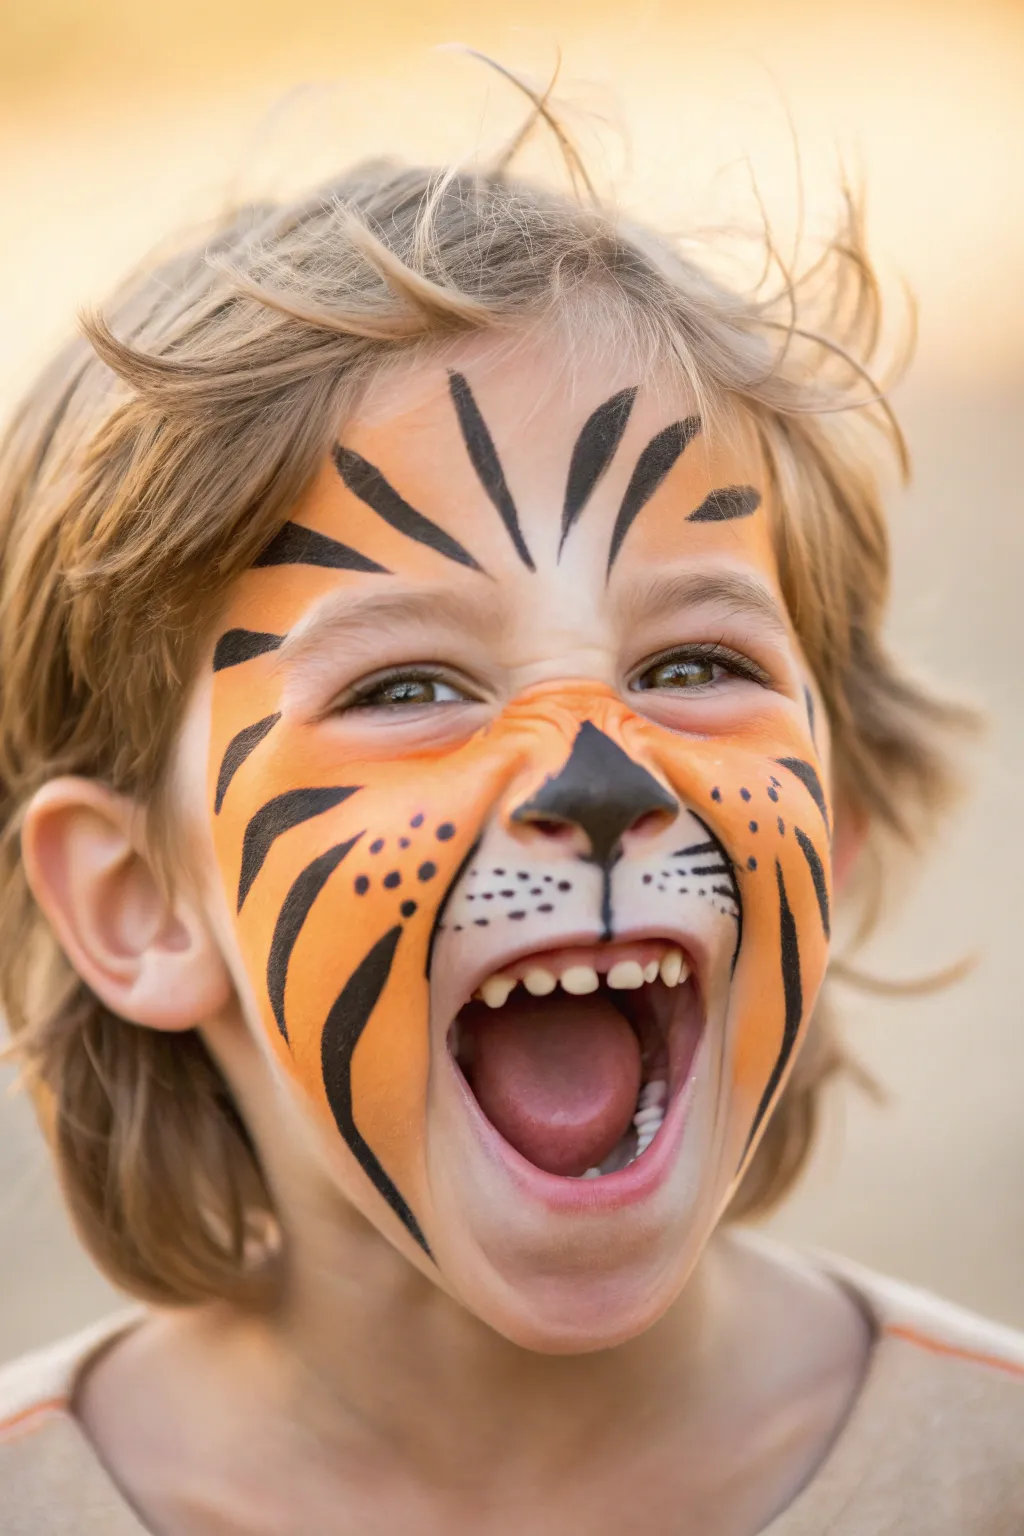
Transform your little one into a fierce jungle cat with this striking tiger design. By focusing on bold stripes and a prominent black nose, you can achieve a professional look that still leaves plenty of room for roars and smiles.
Step-by-Step Guide
Materials
- Orange face paint (snazaroo or similar water-based)
- White face paint
- Black face paint
- High-density face painting sponge
- Medium round brush (size 4 or 6)
- Fine detail brush (size 1 or 2)
- Cup of clean water
- Paper towels or a washcloth
Step 1: Creating the Base
-
Sponge loading:
Begin by dampening your sponge slightly and loading it generously with bright orange face paint. You want a creamy consistency, not too watery, to ensure solid coverage. -
Forehead application:
Starting at the center of the forehead just above the eyebrows, dab the orange paint upwards and outwards towards the hairline. -
Cheek color:
Move down to the cheeks, tapping the sponge across the cheekbones and nose bridge. Leave the area directly under the eyes and the upper lip clear for now. -
Adding highlights:
I usually rinse the sponge or use a fresh corner to pick up some white paint. Dab this gently onto the upper lip area (the muzzle) and blend it slightly into the surrounding orange on the cheeks for a soft transition. -
Optional eye highlights:
If your child is comfortable, add a tiny dab of white just under the arch of the eyebrow to brighten the expression, though this is optional for wiggly kids.
Step 2: The Nose and Muzzle
-
Painting the nose:
Load your medium round brush with black paint. Paint the entire tip of the nose black, creating an inverted triangle shape that extends slightly down the center strip of the nose. -
Connecting the philtrum:
Draw a straight, thin black line vertically down from the center of the nose tip to the top lip. -
Defining the muzzle:
Switch to your finer detail brush. From the base of that vertical line, draw a curve outwards along the top lip line on both sides, creating a defined muzzle shape. -
Adding whisker spots:
Using the very tip of your fine brush, add three levels of small black dots on the white muzzle area on both sides. I like to vary the size slightly for a more organic look. -
Inner whiskers:
Paint two or three very short, thin lines coming out from the inner cheeks towards the nose to suggest fine whiskers.
Flick of the Wrist
To get sharp, tiger-like points on your stripes, press the brush down firmly at the start of the stroke, then lift it gradually as you flick your wrist pulling away.
Step 3: Stripes and Details
-
Center forehead stripes:
Reload your medium brush with black. Starting from between the eyebrows, paint two lines that curve outward and upward toward the hairline, getting thinner at the ends. -
Side forehead stripes:
Add two more triangular stripes on the outer sides of the forehead, angling them inward toward the center. -
Cheek stripes:
On the cheeks, paint three bold stripes on each side. Start thick near the outside edge of the face and flick the brush inward so the line tapers to a sharp point. -
Eye definition:
Carefully paint a small triangular accent at the outer corner of each eye, pointing toward the ear. -
Crinkle nose details:
Ask the child to scrunch their nose like a tiger. Paint two small curved lines on the bridge of the nose to emphasize the snarl. -
Chin accents:
Add a final stripe or two along the jawline on each side to frame the face completely.
Glitter Roar
While the paint is still slightly damp, poof a small amount of cosmetic-grade gold glitter over the orange sections for a magical, shimmering jungle cat effect.
Now your little tiger is ready to prowl the party with their bold new look
BRUSH GUIDE
The Right Brush for Every Stroke
From clean lines to bold texture — master brush choice, stroke control, and essential techniques.
Explore the Full Guide
Sweet Bunny Nose and Teeth
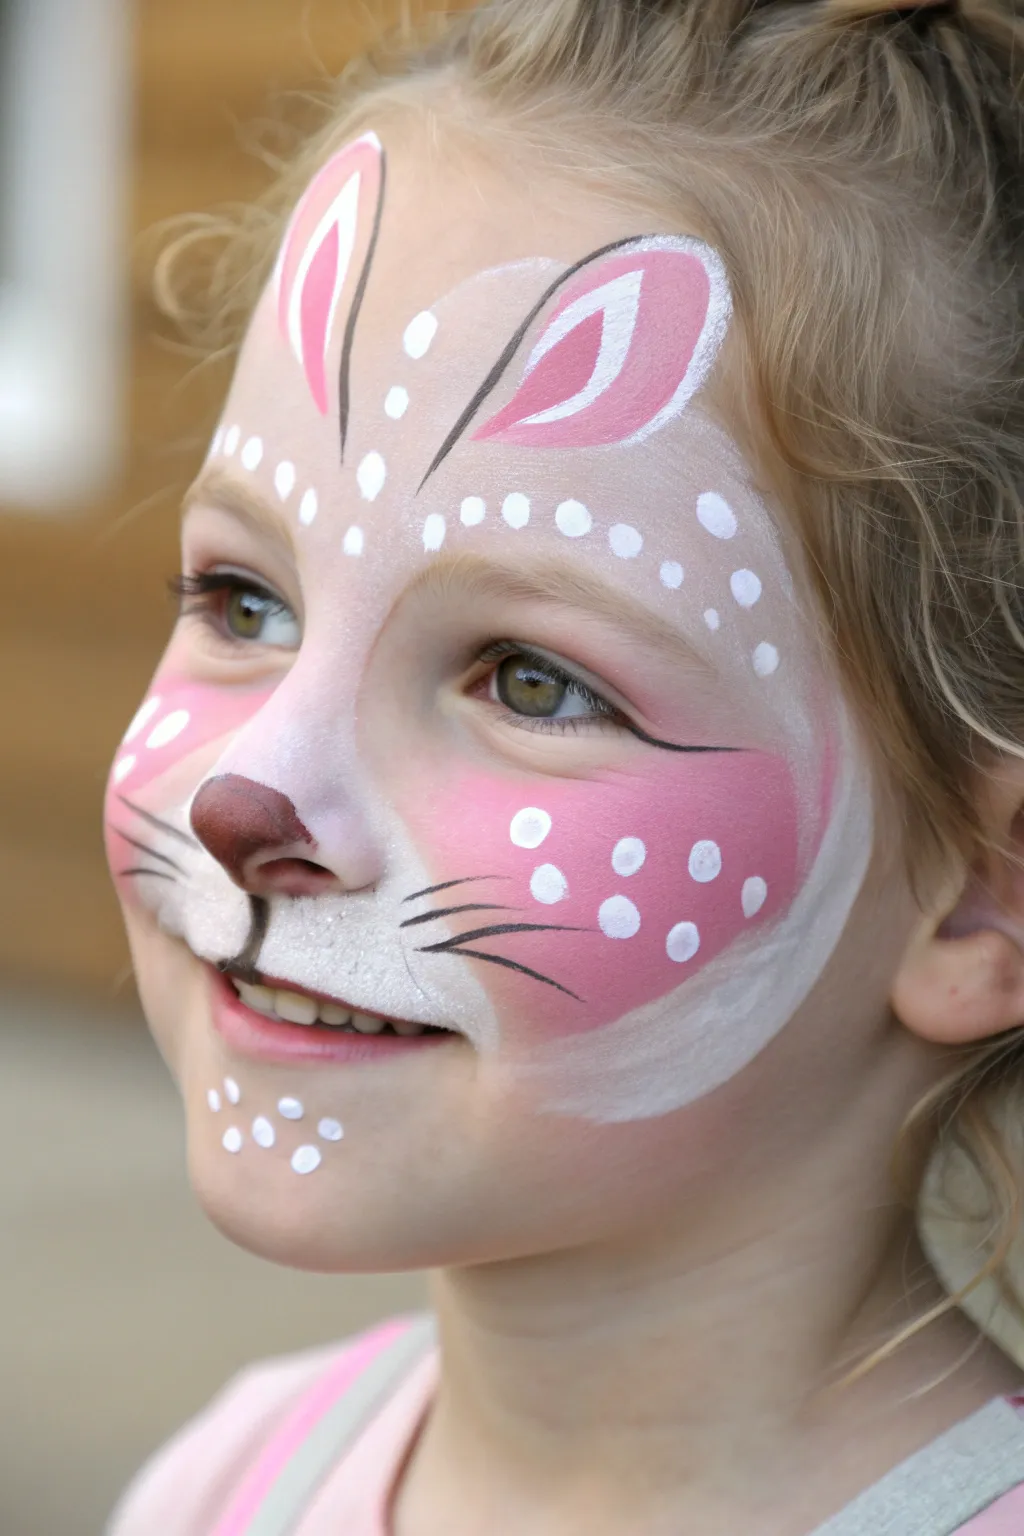
Transform your little one into an adorable rabbit with this sweet and simple face paint design. Featuring soft pink cheeks, delicate whiskers, and cute bunny ears painted right on the forehead, this look is perfect for Easter celebrations or just an afternoon of dress-up fun.
Step-by-Step Tutorial
Materials
- High-quality face paint palette (white, light pink, dark brown/black)
- Medium round brush
- Fine detail brush
- High-density face painting sponge
- Cup of water
- Spray bottle (optional, for wetting paints)
- Baby wipes or damp cloth for cleanup
Step 1: Creating the Soft Base
-
Sponge the cheeks:
Start by dampening your sponge and loading it with a vibrant pink face paint. Gently dab rosy circles onto both cheeks, keeping the color concentrated on the apples of the cheeks and fading slightly outward. -
Highlight the eyes:
Using the corner of your sponge or a clean section, pick up some white paint. Softly dab this over the eyelids and extend it slightly up towards the brow bone to brighten the eye area. -
Form the muzzle:
Reload your sponge with white paint, making sure it’s creamy but not dripping. Pat a wide, rounded shape across the upper lip area, extending out towards the cheeks to create the bunny’s muzzle.
Stay Symmetrical
To keep the ears even, mark the top tip of each ear with a tiny dot of paint first. This guides your brush strokes so one ear doesn’t end up taller than the other.
Step 2: Painting the Bunny Ears
-
Outline the ears:
Load a medium round brush with white paint. Starting just above the eyebrows, paint two large, curved tear-drop shapes that extend up onto the forehead. These will be the fluffy outer parts of the bunny ears. -
Fill the inner ears:
Rinse your brush and load it with pink paint. Paint a smaller tear-drop shape inside each white ear outline, leaving a clear white border around the pink center. -
Add ear details:
Take your fine detail brush and load it with black or dark brown paint. Carefully outline the pink inner ear shape to give it definition. Add a few quick, thin strokes at the top of the white ear tips to simulate fur texture.
Smudgy Cheeks?
If the pink on the cheeks smears into the white muzzle, wait for it to fully dry. Then, sponge fresh white paint directly over the smudge to cover it cleanly.
Step 3: Defining the Face Features
-
Paint the nose:
Using a small round brush and brown paint, fill in the tip of the nose. I like to keep the shape slightly rounded at the top and flatter at the bottom for a cute button-nose look. -
Draw the muzzle line:
With a fine liner brush and black/brown paint, draw a small vertical line straight down from the center of the nose to the top lip. -
Add the whiskers:
Using your thinnest brush loaded with black or dark brown paint, flick three light, sweeping lines outward from the white muzzle area on each cheek. Keep your hand loose so the lines taper off nicely at the ends. -
Create the spots:
Clean your medium round brush and load it with thick white paint. Press the tip gently onto the pink cheek areas to create three distinct white polka dots on each side. -
Add forehead dots:
Continuing with the white paint, create a decorative arch of dots. Start from the inner corner of one eye, go up between the eyebrows, and arch over the eye towards the temple. Repeat on the other side. -
Chin details:
Add a tiny cluster of three or four small white dots on the chin to balance the design.
Step 4: Finishing Touches
-
Highlight the nose:
Take a tiny amount of white paint on a detail brush and add a small ‘comma’ or dot highlight to the brown nose to make it look shiny. -
Final fur texture:
Use a nearly dry brush with a tiny bit of white paint to feather the edges of the muzzle slightly, making it look soft and furry rather than a solid block of color. -
Enhance the eyes:
If your model is sitting still, you can add a very thin black eyeliner flick at the outer corner of the eyes to emphasize the bunny shape, though this is totally optional.
Your little bunny is now ready to hop away and show off their cute new look
Rainbow Cheek Sweep With Cloud

Brighten up any day with this simple yet striking rainbow face paint design that arcs beautifully across the cheek. It finishes with a fluffy white cloud and magical sparkles, making it a perfect quick-design for busy parties or impatient little ones.
Step-by-Step
Materials
- Face paint pallet (Red, Orange, Yellow, Green, Purple, White)
- Flat brush (approx. 3/4 inch or 1 inch wide)
- Small round brush (size 2 or 3)
- Fine liner brush (optional)
- Face painting sponge (optional)
- Cup of water
- Paper towels or cloth
Step 1: Painting the Rainbow Arc
-
Load the flat brush:
Begin by dampening your wide flat brush slightly. Rub it back and forth over a split-cake rainbow palette if you have one, or load singular colors side-by-side if you are mixing manually. -
Position the brush:
Start at the top of the cheekbone, slightly under the outer corner of the eye. Hold the brush so the red edge is facing upwards and the purple edge is facing downwards. -
Create the sweep:
With a steady hand, pull the brush in a gentle curve downwards towards the jawline, stopping just parallel to the corner of the mouth. I like to keep the pressure even so all bands of color show up equally. -
Check the shape:
Review the arc. It should look like a partial rainbow sliding down the cheek. If the edges are a bit ragged, you can carefully re-stroke the same path once more while the paint is still damp.
One-Stroke Magic
Use a ‘split cake’ or ‘rainbow cake’ paint block. This lets you load all rainbow colors onto a wide flat brush at once for a perfect single-stroke gradient.
Step 2: Adding the Cloud
-
Load white paint:
Clean your brush or switch to a small round brush. Load it thoroughly with creamy white face paint. Make sure the consistency is thick enough to be opaque. -
Outline the cloud:
At the bottom end of the rainbow arc, paint a series of bubbly, curved humps to form the top outline of a cloud. Connect the bottom with a flatter, slightly wavy line. -
Fill it in:
Fill the inside of your cloud shape with the white paint. Stipple or dab the paint gently to give it a fluffy texture rather than a smooth, flat look. -
Outline in green (Optional):
For a stylized pop that matches the rainbow, clean your small round brush and load it with a dark green or teal. Carefully outline the entire cloud shape to make it stand out against the skin.
Star Power
Swap the white dots for tiny adhesive crafting gems or biodegradable glitter gel to make the design truly sparkle in the sunlight.
Step 3: Magical Details
-
Paint dots:
Using the handle end of a brush or a very small round brush loaded with white, add three small dots ascending from the top of the rainbow curve near the eye. -
Add lower dots:
Place two or three more small white dots near the cloud, following the curve of the rainbow slightly, to suggest magical sparkles. -
Dry time:
Wait a moment for the paint to dry completely. This usually takes about 30-60 seconds, preventing smudges if the child touches their face.
Now you have a cheerful splash of color ready for playtime or a party

PENCIL GUIDE
Understanding Pencil Grades from H to B
From first sketch to finished drawing — learn pencil grades, line control, and shading techniques.
Explore the Full Guide
Superhero-Style Eye Mask
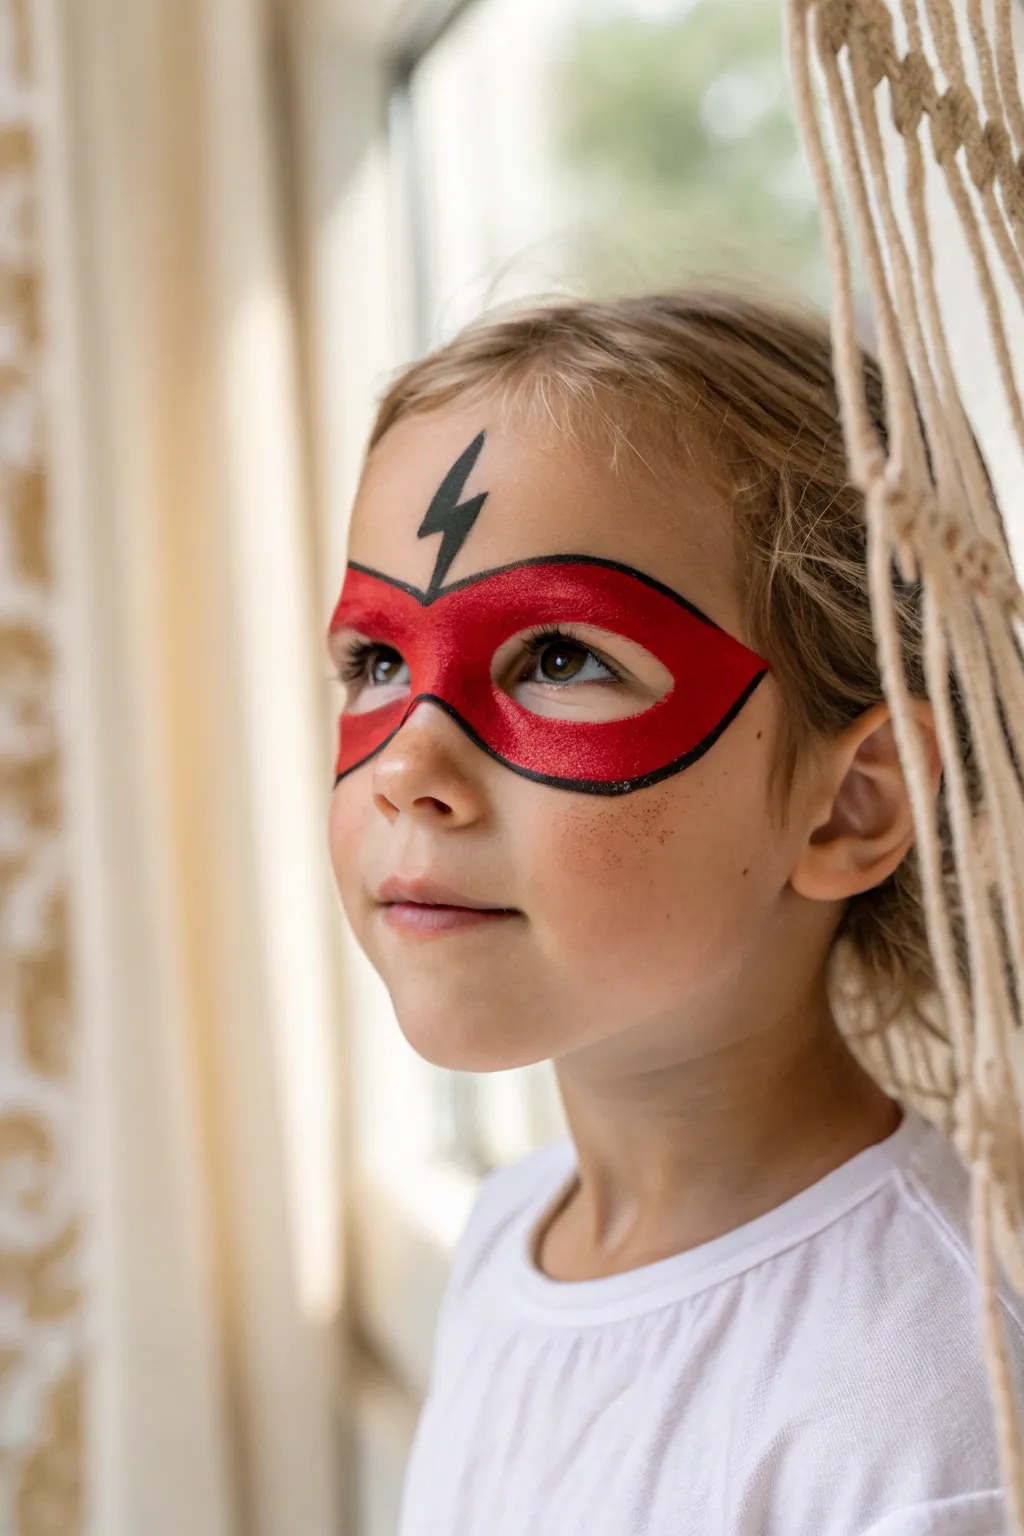
Every aspiring superhero needs a secret identity, and this classic red eye mask featuring a striking lightning bolt symbol is quick to paint and instantly recognizable. The clean black outline gives it a bold, comic-book style pop that looks fantastic in photos.
How-To Guide
Materials
- Red face paint (water-activated cake works best for coverage)
- Black face paint (for outlining)
- Medium round brush (size 4 or 6)
- Fine liner brush (size 1 or 2)
- Cup of clean water
- Paper towels or a sponge for blotting
- Baby wipes (for quick cleanups)
Step 1: Painting the Base Mask
-
Map out the shape:
Visualize a rounded ‘domino’ mask shape that covers the eyes and meets at the nose bridge. You don’t need to draw an outline first; just imagine the endpoints on the temples and cheeks. -
Load the red paint:
Wet your medium round brush and swirl it into the red cake paint until you have a creamy consistency, like melted ice cream. If it’s too watery, the coverage won’t be opaque. -
Outline the top curve:
Start just above the eyebrow. Use a confident, sweeping motion to paint a curved line that goes from the inner eyebrow out toward the temple. -
Mirror the top line:
Repeat this curve on the other eye, trying to keep the height symmetrical so the mask looks balanced. -
Define the bottom edge:
Paint a similar curve underneath the eye, running across the top of the cheekbone. Connect this line to the top curve at the outer corner of the eye near the temple. -
Connect the center:
Bring the lines together over the bridge of the nose. Dip the shape down slightly in the very center between the eyes to create that classic superhero V-shape. -
Fill in the mask:
Using the same medium brush, fill in the entire outline with solid red paint. Use smooth, horizontal strokes to minimize streakiness. -
Refine the edges:
Go back while the paint is still damp and smooth out any rough edges on the perimeter of your red shape. -
Let it dry:
Pause for a moment to let the red base dry completely. This is crucial before adding black, or the colors will mix and turn muddy.
Step 2: Adding the Emblem and Outline
-
Load the black paint:
Switch to your fine liner brush. Wet it and load it with black paint until it has an inky consistency that flows easily off the tip. -
Paint the lightning bolt:
Position your brush in the center of the forehead, just above the mask’s midpoint. Paint a sharp, zigzagging lightning bolt shape. -
Sharpen the bolt:
I find it helpful to thicken the top part of the bolt slightly and let it taper to a sharp point at the bottom for a more dynamic look. -
Start the outline:
Begin outlining the red mask at the center of the nose bridge. Use the very tip of your liner brush for a thin, consistent line. -
Outline the top edge:
Trace the upper curve of the red mask, moving slowly towards the temple. Try to do this in one or two long strokes rather than sketched dashes. -
Connect to the bolt:
Where the mask dips in the center of the forehead, extend a tiny black line upward to connect the mask directly to the bottom of the lightning bolt. -
Outline the bottom edge:
Continue the black outline along the bottom curve on the cheekbones, wrapping around to meet the top line at the temple points. -
Check for gaps:
Look closely at the perimeter. If there are any spots where the red paint spilled over your black line, or where the line is too thin, gently touch them up now. -
Clean up:
If any paint got onto the eyelids or too close to the waterline, use a clean, damp cotton swab to gently wipe it away for comfort.
Steady Hands
Rest your pinky finger gently on the child’s cheek or forehead while painting. This anchors your hand and gives you much better control for crisp outlines.
Power Upgrade
Add a touch of cosmetic glitter gel over the wet red paint or highlight the lightning bolt with a thin line of metallic gold for extra sparkle.
Now your little hero is ready to save the day with their super speed and dashing new look
Pirate Patch and Curly Mustache
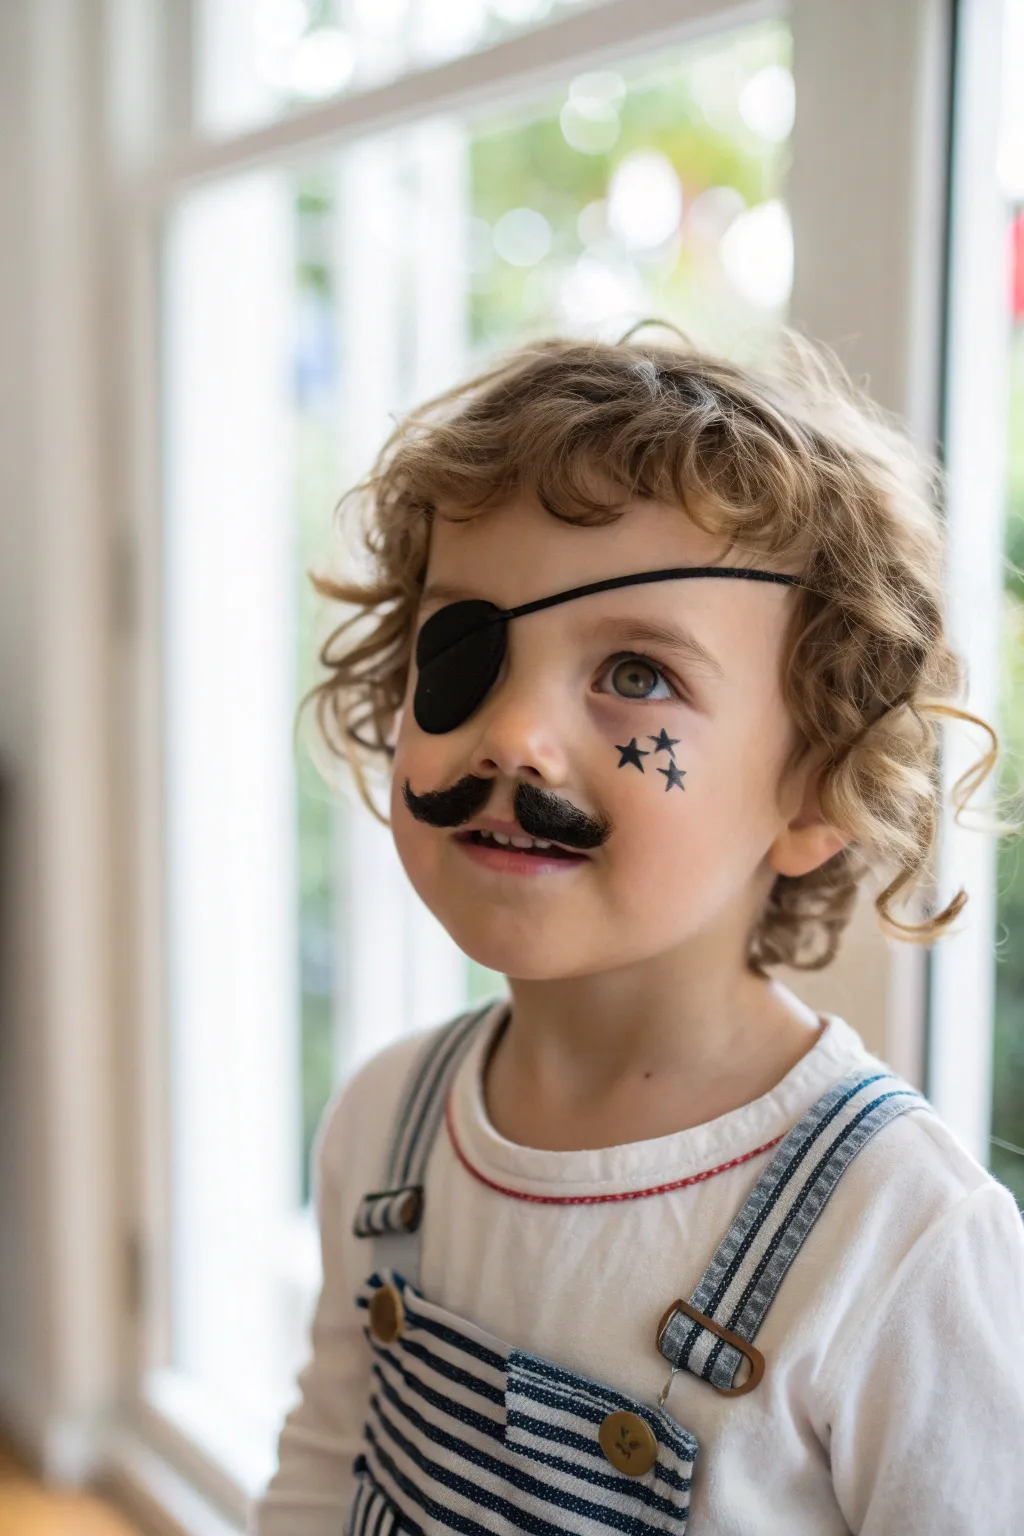
Transform your little one into a swashbuckling adventurer with this incredibly simple pirate look that combines a classic costume piece with a touch of face paint flair. This design features a bold adhesive mustache, a comfortable fabric eye patch, and a trio of charming stars on the cheek for a playful twist.
Detailed Instructions
Materials
- Black fabric eye patch with elastic band
- Self-adhesive novelty mustache (black, handlebar style)
- Black face paint or cosmetic eyeliner pencil
- Small round brush (size 2 or 4)
- Makeup remover wipes
- Mirror
Step 1: Setting the Scene
-
Clean the canvas:
Start with a clean, dry face. Use a gentle wipe to remove any oils or food residue from the upper lip and cheek area to ensure the adhesive and paint stick properly. -
Position the eye patch:
Place the black fabric eye patch over the child’s right eye (or their preferred eye). Adjust the elastic band so it sits comfortably around the head without being too tight against the hair. -
Secure the strap:
Ensure the strap runs just above the ears to keep it from slipping down. If the patch feels scratchy, you can place a small cotton round underneath it for comfort.
Sticky Situation
If the mustache keeps falling off due to sweat or movement, skip the adhesive and paint a matching curly mustache right onto the skin using your black face paint.
Step 2: The Handlebar Mustache
-
Prepare the mustache:
Peel the backing off your self-adhesive handlebar mustache carefully. Try not to touch the sticky side too much with your fingers to preserve the tackiness. -
Center the placement:
Ask your child to relax their mouth. Align the center of the mustache with the philtrum (the little groove under the nose) to ensure it sits straight. -
Apply pressure:
Press the mustache firmly onto the skin, starting from the center and smoothing outwards toward the curled tips. Hold it in place for about 10 seconds to set the adhesive. -
Check adhesion:
Gently tap the ends to make sure they aren’t lifting. If the adhesive isn’t strong enough, a tiny dot of eyelash glue can be a lifesaver here.
Step 3: Starry Details
-
Load your brush:
Activate your black face paint with a little water until it has an inky consistency, or sharpen your cosmetic eyeliner pencil for a precise point. -
Locate the star zone:
Identify the spot on the left cheekbone (the side without the eye patch), just below the outer corner of the eye. -
paint the first star:
Draw the largest star first. Start with an upside-down ‘V’, then draw a line across from left to right, and connect the points. Fill in the center if you prefer a solid look. -
Add the second star:
Position a slightly smaller star just below and to the right of the first one. I find that staggering them slightly creates a more dynamic look than a straight line. -
Finish the trio:
Paint the third and smallest star below the second one, creating a gentle curve following the contour of the cheek. -
Refine the edges:
Use the very tip of your brush or pencil to sharpen the points of the stars. Clean, crisp points make the design look much more professional. -
Let it dry:
Allow the paint to set for about 30 seconds before letting your little pirate touch their face or run off to play.
Treasure Hunter
Add a small dab of cosmetic glitter gel to the center of each black star to make them sparkle like buried treasure.
Now your little captain is ready to set sail and command the seven seas


Happy Clown Cheeks and Dots
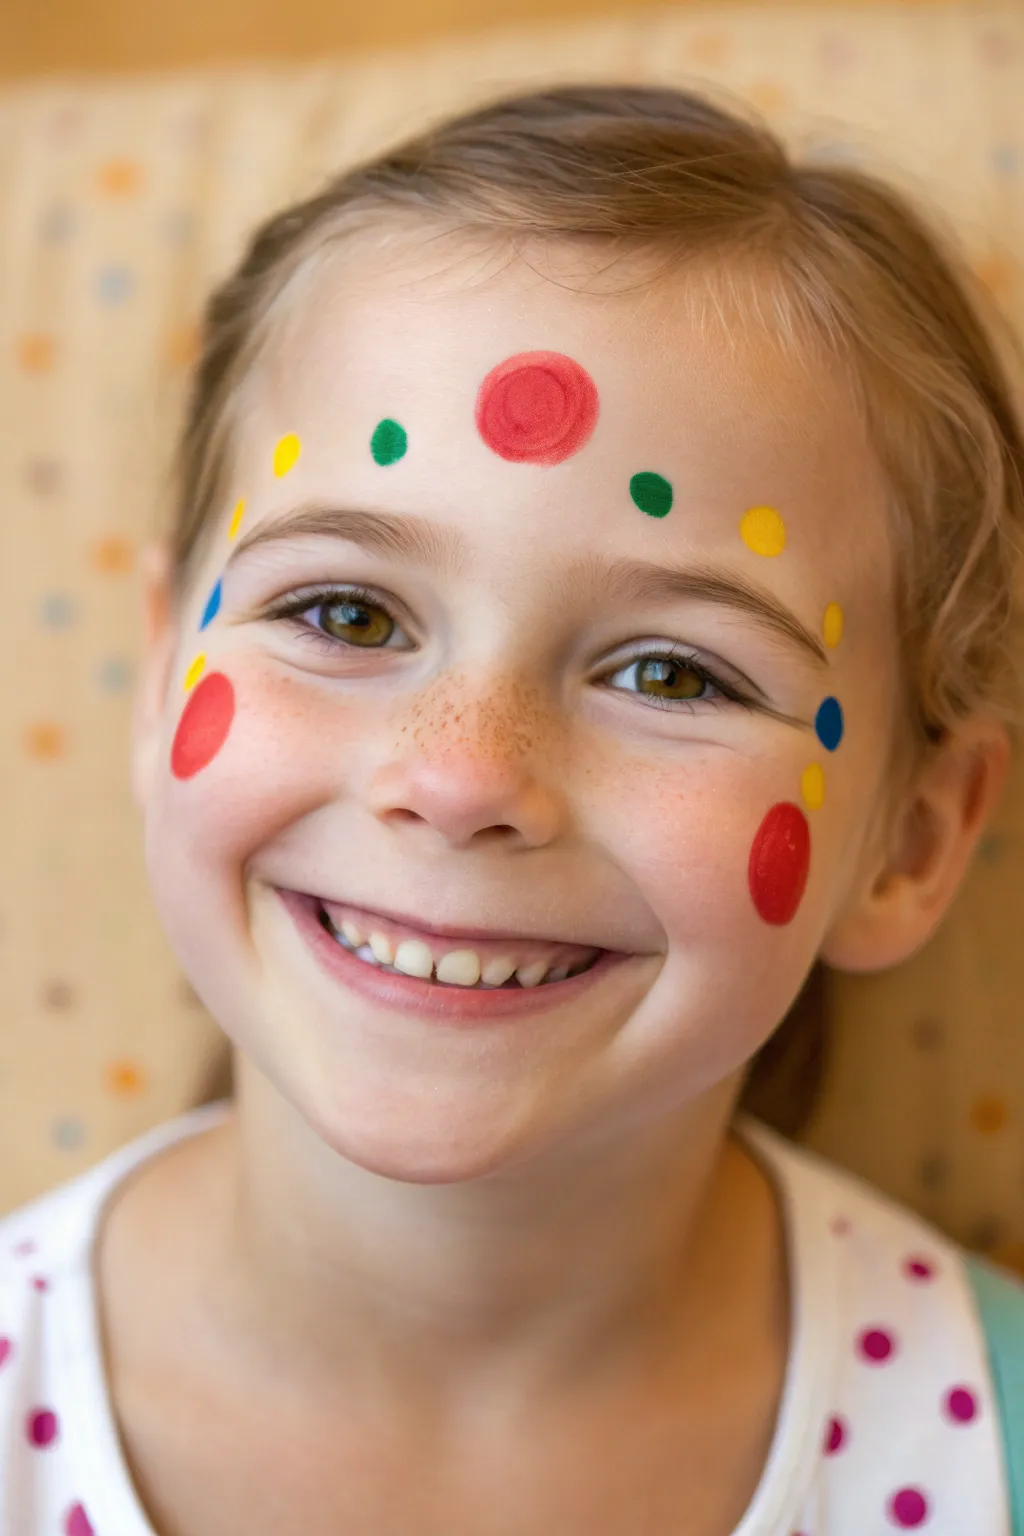
This bright and joyful design transforms a face using nothing but simple circles and dots, making it perfect for beginners or wiggly kids. With its primary color palette and clean shapes, it creates a classic, cheerful clown look without the need for a full-face white base.
Step-by-Step Tutorial
Materials
- Red face paint (water-activated)
- Yellow face paint (water-activated)
- Green face paint (water-activated)
- Blue face paint (water-activated)
- Medium round brush (size 4 or 6)
- Small round brush (size 1 or 2)
- Cup of clean water
- Paper towels or sponge
Step 1: Painting the Main Circles
-
Load the red paint:
Dip your medium round brush into the water, then swirl it into your red face paint cake until you have a creamy consistency that isn’t too drippy. -
Paint the forehead circle:
Find the center of the forehead, just slightly above the eyebrows. Press the brush down gently and spin it slightly to create a medium-sized red circle. -
Fill the forehead circle:
If the spinning motion didn’t fill the center completely, gently dab more red paint inside to create a solid, bold dot. -
Locate cheek placement:
Visualize the ‘apples’ of the cheeks. You want the cheek spots to sit high enough that they don’t disappear when the child smiles. -
Paint the left cheek:
Using the same red loaded brush, paint a circle on the left cheek apple. I like to make these slightly larger than the forehead dot for a blushing effect. -
Paint the right cheek:
Repeat the process on the right cheek, trying to keep it symmetrical in size and placement with the left side. -
Clean your brush:
Thoroughly rinse the red paint off your medium brush in the water cup and wipe it on a paper towel to ensure no pigment remains.
Step 2: Adding the Arch Details
-
Load the green paint:
Load your medium brush with green face paint. Ensure the consistency is creamy so the dots will be opaque. -
Paint inner green dots:
Place a small green dot on either side of the central red forehead dot. Leave about a finger-width of space between colors. -
Clean and switch to yellow:
Rinse the green off completely. Load the same brush with bright yellow paint. -
Add first yellow dots:
Paint a yellow dot next to each green dot on the forehead, continuing the outward curve above the eyebrows. -
Add outer eyebrow dots:
Place one more yellow dot just past the end of the eyebrow on each side. This starts framing the eye area. -
Switch to the small brush:
Put down the medium brush and pick up your small round brush (size 1 or 2) for finer control on the side details. -
Start the temple design:
Reload with yellow paint on the small brush. Place a tiny yellow dot just below the outer yellow brow dot you painted previously. -
Add cheek accents:
Place a small yellow dot directly above the large red cheek circle on each side.
Paint Hygiene
Face paint is skin-safe, but always ensure your brushes are clean between color changes. If wet colors mix on the face, let them dry fully before touching up.
Step 3: Finishing with Blue Accents
-
Load the blue paint:
Rinse your small brush well and load it with blue face paint. -
Paint the temple dots:
On the outer edge of the eye area, place a blue dot between the upper and lower yellow dots to create a vertical line of color. -
Add final sparkle dots:
Add a tiny blue dot near the outer corner of the eye on the left side to balance the look. -
Add right eye accent:
Repeat the tiny blue dot on the outer corner of the right eye. -
Check for symmetry:
Step back and look at the face. If any dots look too faint, carefully dab a second layer of paint over them once the first layer is dry.
Perfect Circles
Use a foam dauber sponge instead of a brush for the large red cheek circles. Press, twist once, and lift for a perfectly round shape every time.
Now you have a cheerful, colorful face paint design ready for any party or playtime
Mini Pumpkin Cheek Patch
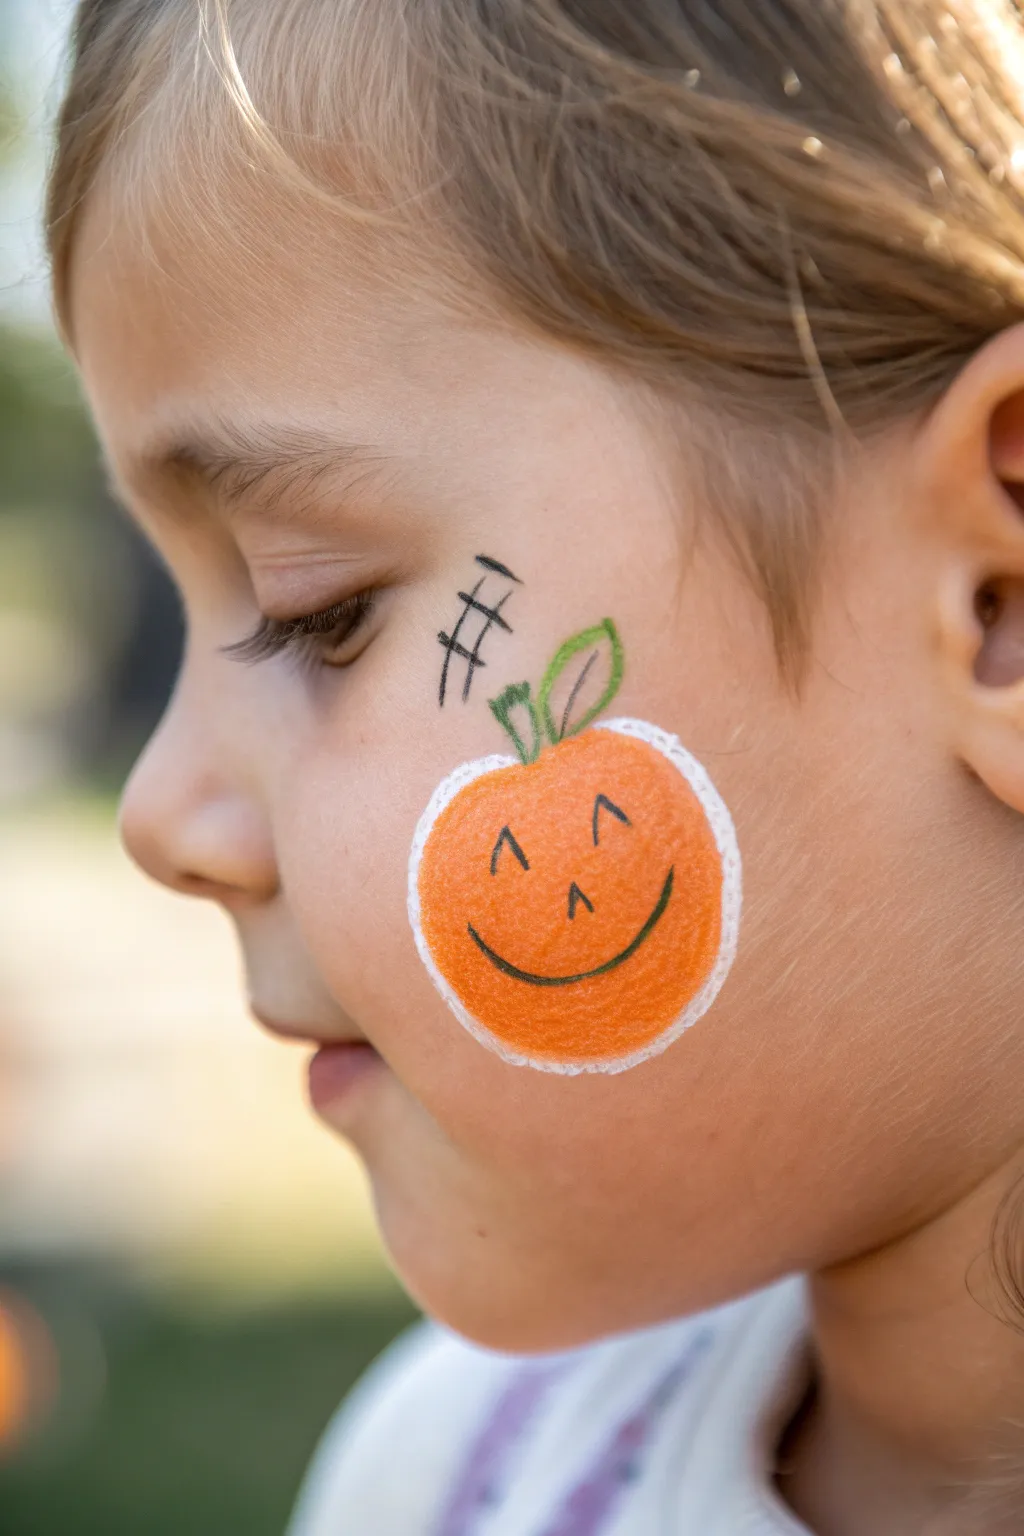
This adorable and minimalist design brings a touch of harvest festivity without covering the entire face. It features a cheerful orange pumpkin with a cute stitched-style outline, perfect for kids who might not want a full-face mask.
How-To Guide
Materials
- Orange face paint (creamy consistency)
- White face paint
- Green face paint
- Black face paint or black cosmetic eyeliner pen
- Face painting round sponge or dauber
- Small round brush (size 1 or 2)
- Fine liner brush (size 0 or 00)
- Cup of water
- Paper towels
Step 1: The Pumpkin Base
-
Clean and Dry:
Begin by gently wiping the cheek area with a damp cloth or baby wipe to ensure the skin is free of oils or food crumbs. Let it dry completely so the paint adheres smoothly. -
Load the Orange:
Dampen your round sponge or dauber slightly and swirl it into the orange face paint. You want a creamy, opaque load, not a watery one. -
Create the Circle:
Press the sponge onto the apple of the cheek. Gently rotate or dab to create a filled-in circle roughly the size of a tangerine. -
Refine the Shape:
If the edges look too ragged, you can use the edge of the sponge or a wider brush to round out the circle, but don’t worry about perfection; pumpkins are organic shapes. -
Texture Time:
While the orange is slightly tacky, you can dab a clean, dry sponge over it lightly to give it a skin-like texture rather than a glossy finish.
Fixing Smears
If the black line smudges onto the orange, wait for it to fully dry. Then, dab a tiny bit of fresh orange paint directly over the smudge to cover it up like an eraser.
Step 2: Adding the Details
-
Prep the White:
Clean your brush thoroughly or grab a clean small round brush. Load it with white face paint, mixing it to an ink-like consistency. -
The Halo Outline:
Paint a broken, slightly rough outline around the orange circle. Instead of a solid line, use short, curved strokes that embrace the pumpkin shape, leaving the very top open for the stem. -
Softening the White:
If the white line looks too harsh, lightly tap it with a finger to blend it slightly into the skin, giving it a soft, glowing effect. -
Green Stem Base:
Using a small round brush loaded with green paint, draw a short, thick line sprouting from the top center of the pumpkin. -
Adding the Leaf:
From the base of the stem, paint a simple loop shape to the right to form a leaf outline. You don’t need to fill this in; the outline style keeps it light and airy. -
Leaf Vein:
Add a quick, single stroke inside the leaf loop to suggest the center vein.
Step 3: The Face and Finishing Touches
-
Switch to Black:
Load your finest liner brush with black paint. Ensure the paint is thin enough to flow easily but pigmented enough to be dark. A cosmetic eyeliner pen works wonders here for stability if you prefer. -
Happy Eyes:
Paint two small inverted ‘V’ shapes or carets (^) high up on the orange circle for the smiling eyes. -
Tiny Nose:
Place a smaller inverted ‘V’ right in the center for the nose. -
The Smile:
Draw a simple u-curve for the mouth. Add tiny tick marks at the ends of the smile to make it look extra friendly. -
The Patch Lines:
Just above and to the left of the pumpkin, on the skin, paint two short parallel diagonal lines using the black paint. -
Stitching Effect:
Cross those parallel lines with two or three shorter perpendicular marks to create a playful ‘stitched’ or hashtag look. -
Final Check:
Step back and check for any smudges. Use a slightly damp Q-tip to clean up any stray marks around the design.
Add Some Sparkle
While the orange paint is still damp, lightly tap a cosmetic-grade glitter onto the center of the pumpkin. Gold or iridescent white adds a magical autumn shimmer.
This sweet little pumpkin patch is now ready for a festive photo
Simple Spider Web Corner
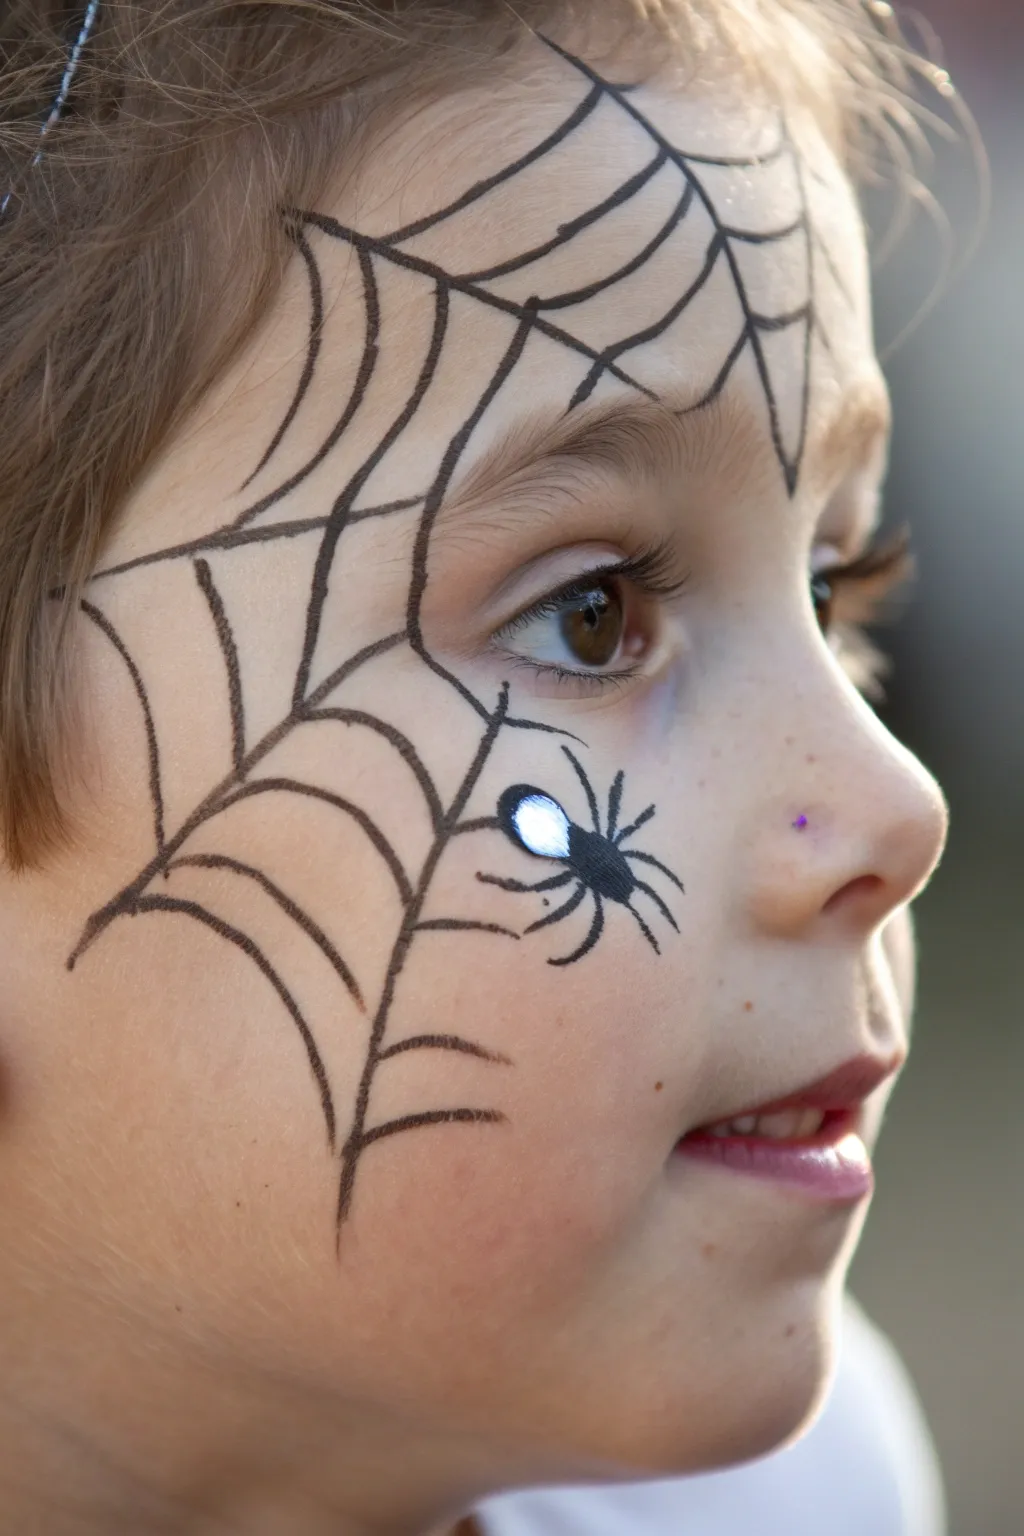
Transform one corner of the face into a spooky yet stylish spider’s lair with this crisp black web design. Featuring a crawling companion right on the cheek, this look is perfect for kids who want something festive but not a full-face mask.
Step-by-Step Guide
Materials
- High-quality black face paint (water-activated cake)
- White or silver face paint
- Small round brush (size 1 or 2)
- Medium round brush (size 3 or 4)
- Water cup
- Paper towels
- Cosmetic glitter gel (optional)
- Baby wipes (for cleanup)
Step 1: Laying the Framework
-
Anchor Point:
Visualize a central point near the top hairline, slightly off-center towards the temple. Imagine all your web lines will radiate from this imaginary spot. -
First Radial Line:
Load your small round brush with black paint. Ensure it’s an inky consistency, not too watery. -
Drawing the Spine:
Draw a long, slightly curved line starting from your imaginary point at the hairline, coming down past the outer corner of the eye and ending on the cheekbone. -
Adding Width:
Draw three to four more long lines fanning out from that same starting area. One should go across the forehead, one down the temple, and another towards the ear. -
Line Variance:
Don’t worry about making these lines perfectly straight; a little wobble adds to the natural, organic look of a spider web.
Fixing Shakey Lines
If lines get too thick or messy, don’t wipe! Wait for the black to dry completely, then use a damp Q-tip to clean up the edges or ‘erase’ mistakes precisely.
Step 2: Weaving the Web
-
Connecting the Spokes:
Starting near the center (hairline), draw small, curved lines connecting your main radial lines. Think of these as little ‘U’ shapes or scallops. -
Building Outward:
Move about an inch down the radial lines and add another row of connecting curved lines. -
Wait and Check:
I like to pause here to make sure the paint isn’t dripping; if your brush is too wet, dab it on a paper towel. -
Expanding the Pattern:
Continue adding rows of scallops until you reach the ends of your main radial lines on the cheek and forehead. -
Refining Ends:
At the very tips of the web on the cheek, extend the points slightly to make them look sharp and anchored to the skin.
Sparkle Upgrade
Add self-adhesive rhinestones at the intersection points of the web for a glamorous ‘dew drop’ effect that catches the light beautifully.
Step 3: The Crawler Detail
-
Spider Body:
Choose a spot on the cheek within one of the larger web sections. Use the medium brush and black paint to press down an oval shape for the spider’s body. -
Head Shape:
Add a smaller circle attached to the top of the oval for the head. -
Legs in Motion:
Switch back to the small liner brush. Paint four thin legs coming out of each side of the body. -
Leg Structure:
Make the front legs reach forward and the back legs reach back, giving the spider a crawling appearance. -
Highlight Pop:
Clean your small brush well. Pick up some white or bright silver paint. -
Adding Dimension:
Paint a small, curved highlight on the spider’s back (abdomen). This simple touch makes the spider look 3D and shiny. -
Glitter Touch:
If desired, dab a tiny bit of cosmetic glitter gel over the white highlight for extra sparkle.
Now you have a spooky, elegant design that leaves plenty of room for smiles and candy eating
Mermaid Scales on One Cheek
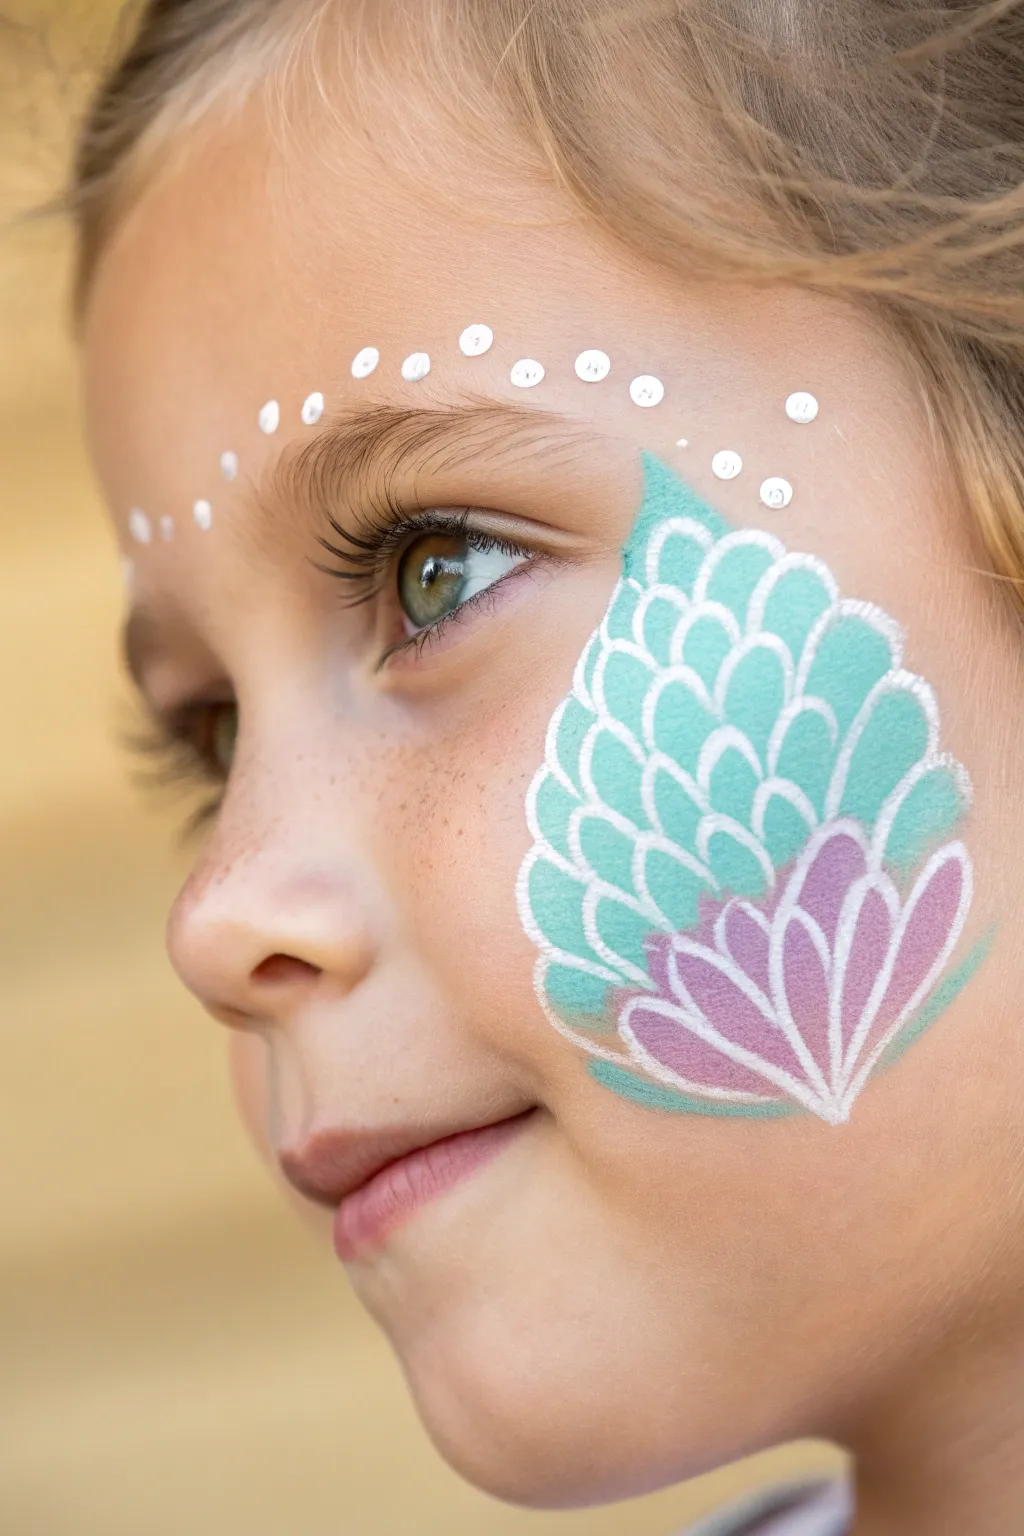
Transform your little one into an underwater princess with this delicate mermaid scale design. Featuring soft turquoise hues and crisp white linework, this one-cheek focal point is elegant yet surprisingly simple to achieve.
Step-by-Step
Materials
- Face paint (turquoise/teal)
- Face paint (lavender/purple)
- Face paint (white)
- Flat brush (medium width)
- Round brush (fine tip, size 1 or 2)
- Sponge or large brush for base (optional)
- Cup of water
- Paper towels
Step 1: Creating the Base Shape
-
Load your brush:
Start by moistening your turquoise or seafoam green face paint. Load a medium flat brush or a sponge until it has a creamy consistency, ensuring it’s not too watery to prevent drips. -
Map the outline:
Visualize a large teardrop shape on one cheek. The pointy end should aim up towards the temple, while the rounded bottom sits on the apple of the cheek. -
Fill the shape:
Gently fill in this teardrop shape with the turquoise paint. I like to use soft, patting motions if using a sponge for a textured look, or smooth strokes with a brush for a cleaner finish. -
Add the purple base:
While the turquoise is drying, clean your brush and load it with lavender or purple paint. Paint a small, rounded mound at the very bottom center of your turquoise teardrop to serve as the base for the shell or flower shape.
Step 2: Detailing the Scales
-
Prepare the liner brush:
Switch to your fine-tipped round brush (size 1 or 2). Load it thoroughly with white face paint. You want the consistency to be like ink—flowing smoothly but opaque. -
Start the bottom row:
Begin outlining the scales starting just above the purple section. Paint small, inverted ‘U’ shapes creates a row of scallops. Keep your hand steady and use just the tip of the brush. -
Build the scale pattern:
Work your way upwards, adding a second row of ‘U’ shapes. Position the middle of each new ‘U’ directly above the point where two bottom scales meet, creating a brick-pattern effect. -
Continue upward:
Continue stacking these rows of white scallops until you reach the top point of the turquoise shape. The scales should get slightly smaller as you near the tip to mimic the tapering of a tail. -
Outline the main shape:
Once the interior scales are done, use the white paint to outline the entire outer edge of the turquoise teardrop. This sharpens the design and cleans up any uneven edges.
Clean Lines?
If your white lines look transparent or mix with the base, wait for the turquoise to dry completely first. Ensure your white paint has a thick, creamy consistency.
Step 3: Flower Motif & Accents
-
Define the purple petals:
Return to the purple area at the bottom. Using your white liner brush, paint petal shapes over the purple base. Start from a central bottom point and paint outward-curving lines that fan out like a seashell or lotus flower. -
Add extra definition:
Thicken the white lines separating the purple petals slightly to make them pop against the darker color. Ensure the bottom point where all petals meet is crisp. -
Add side flourishes:
Paint two small, curved turquoise strokes extending out from the bottom of the flower shape, like little leaves floating in the water. -
Create the forehead tiara:
Move up to the forehead. Using the back end of your brush or a dotting tool dipped in white paint, gently press a row of dots across the forehead. -
Vary dot sizes:
Make the dots in the center slightly larger and decrease their size as the line curves down towards the temples for a delicate, jeweled headpiece effect. -
Final touches:
Inspect the design for any spots that need a second coat of white to ensure opacity. A tiny dot of cosmetic glitter on the center of the flower adds magical sparkle.
Extra Sparkle
While the paint is still slightly damp, gently puff cosmetic-grade iridescent glitter over the turquoise scales for a true shimmering mermaid effect.
Now step back and admire the sea-inspired artwork you have created
Space Stars and Tiny Planet
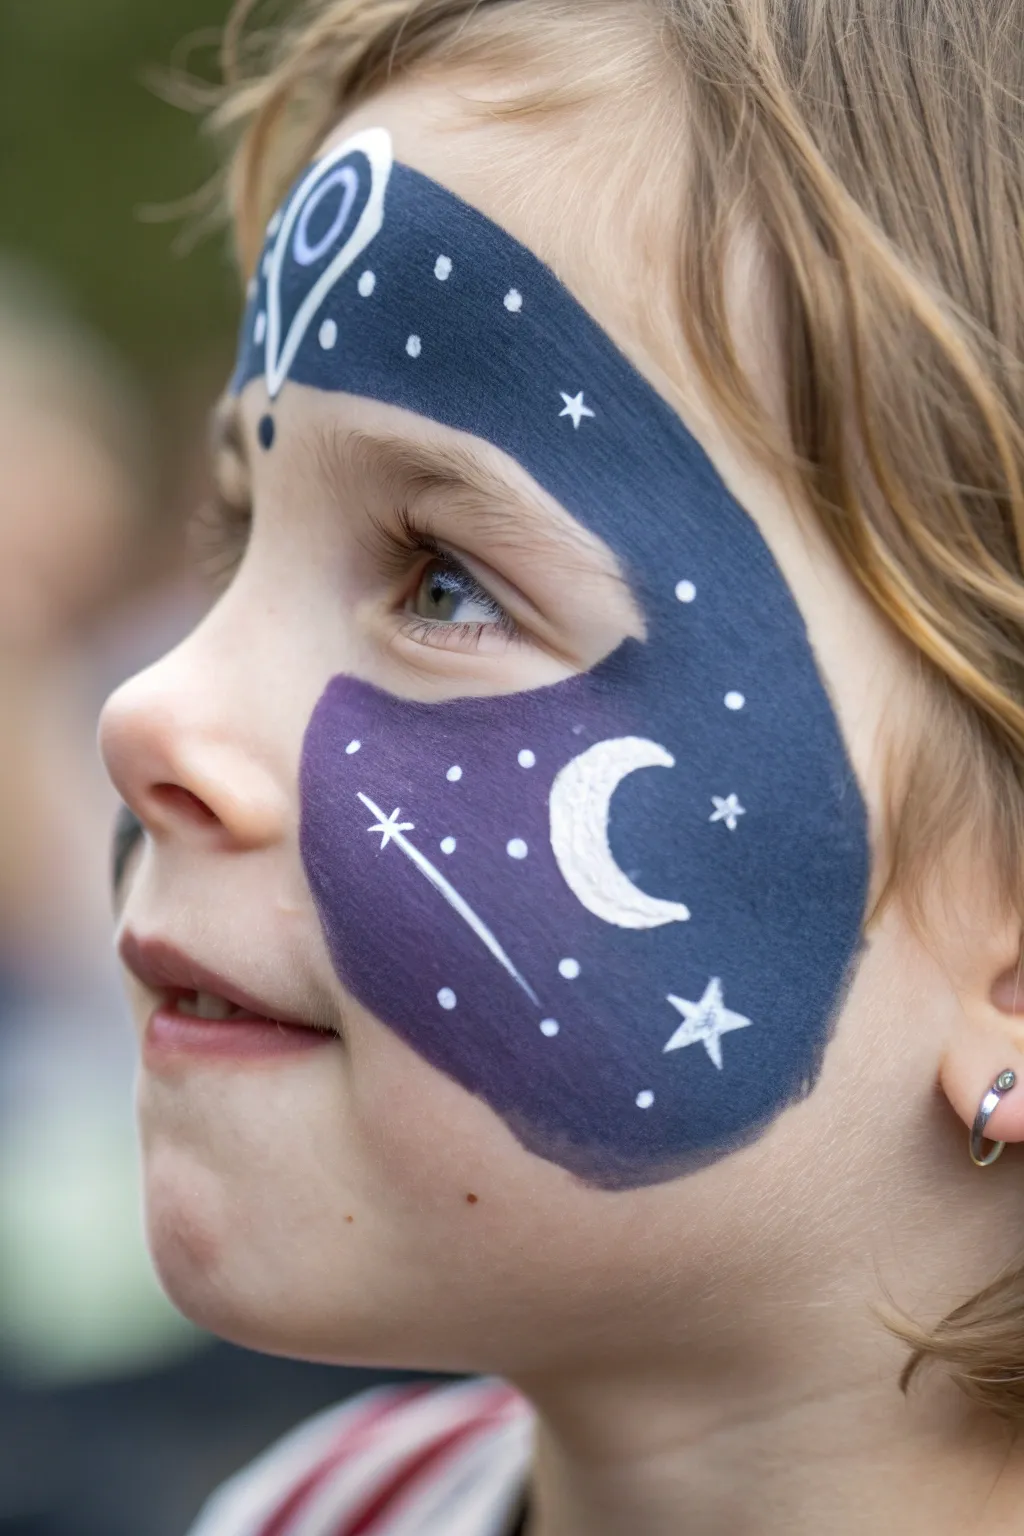
Transform half of a little face into a dreamy galaxy with this elegant, celestial design. Using deep blues and purples accented with bright white stars, this look captures the magic of a clear night sky in a way that is surprisingly simple to achieve.
Step-by-Step Tutorial
Materials
- Face paint (dark navy blue)
- Face paint (deep purple)
- Face paint (bright white)
- Medium flat brush (approx. 3/4 inch)
- Small round brush (size 2 or 3)
- Fine liner brush (size 0 or 1)
- Cup of water
- Spray bottle (optional, for wetting paints)
- Cosmetic sponge (optional, for blending)
Step 1: Creating the Galaxy Base
-
Load the blue:
Start by activating your dark navy blue face paint with a little water until it reaches a creamy consistency. Load your medium flat brush fully with the pigment. -
Outline the forehead shape:
Begin at the center of the forehead. Draw a curved line that swoops up and over the left eyebrow, extending out towards the hairline. -
Define the cheek area:
Continue that outer line down past the temple and curve it inward onto the cheek. It should swoop under the eye area, creating a large, organic teardrop or kidney bean shape that covers the left eye socket and cheekbone. -
Fill the forehead:
Using the flat side of your brush, fill in the forehead portion of your outline with the navy blue. Ensure the coverage is opaque and smooth. -
Introduce purple:
Rinse your brush and load it with deep purple paint. I like to blend this right while the blue is still slightly tacky. -
Fill the cheek:
Fill the lower section on the cheek with the purple paint. Where the purple meets the blue near the temple and outer eye corner, use gentle back-and-forth strokes to blend the two colors together for a soft gradient effect. -
Refine the edges:
Check the perimeter of your shape. If the edges are shaky, smooth them out with the edge of the flat brush to create crisp, clean lines.
Step 2: Adding Cellulose Details
-
Prepare the white:
Clean your brush thoroughly and switch to the bright white paint. You want ink-like consistency here for sharp details. -
Paint the forehead crest:
Using a small round brush, find the center top point of the blue shape on the forehead. Paint a stylized teardrop outline with a small dot inside, resembling a jewel or a peacock feather eye. -
Draw the moon:
On the purple section of the cheek, slightly below the outer corner of the eye, paint a bold white crescent moon shape. Fill it in completely so it stands out against the dark background. -
Add the shooting star:
Near the nose bridge on the purple section, paint a small asterisk shape. Drag a long, thin tail downwards and outwards across the cheek using a fine liner brush. -
Create large stars:
Scatter two or three larger, five-pointed stars across the design. A simple way to do this is to paint a small cross and add an ‘X’ through the middle. -
Add stardust dots:
Using the very tip of your round brush (or the back end of the brush handle), dot tiny white stars throughout the blue and purple areas. -
Vary dot sizes:
Make sure some dots are tiny pinpricks and others are slightly larger circles to create depth in your galaxy. -
Highlight the crest:
Add a small dot or teardrop hanging from the bottom of your forehead crest design to connect it visually to the rest of the piece. -
Final touches:
Inspect the white areas. If the dark paint has bled through, carefully add a second coat of white to the moon and largest stars to make them pop.
Patchy Paint?
If the dark blue or purple looks streaky, let the first layer dry completely before dabbing a second layer on top with a sponge rather than a brush.
Cosmic Shimmer
Before the paint dries, poof some cosmetic-grade iridescent glitter over the design. It will stick to the damp paint and make the galaxy sparkle.
Now step back and admire the little piece of the universe you just created


Have a question or want to share your own experience? I'd love to hear from you in the comments below!