There is something truly special about capturing the bond of your loved ones on canvas, even if you feel you haven’t mastered technical artistic skills yet. I quite often tell my students that the most powerful family portraits rely on emotional connection and simple shapes rather than painting perfect realistic faces.
The Classic Sunset Silhouette
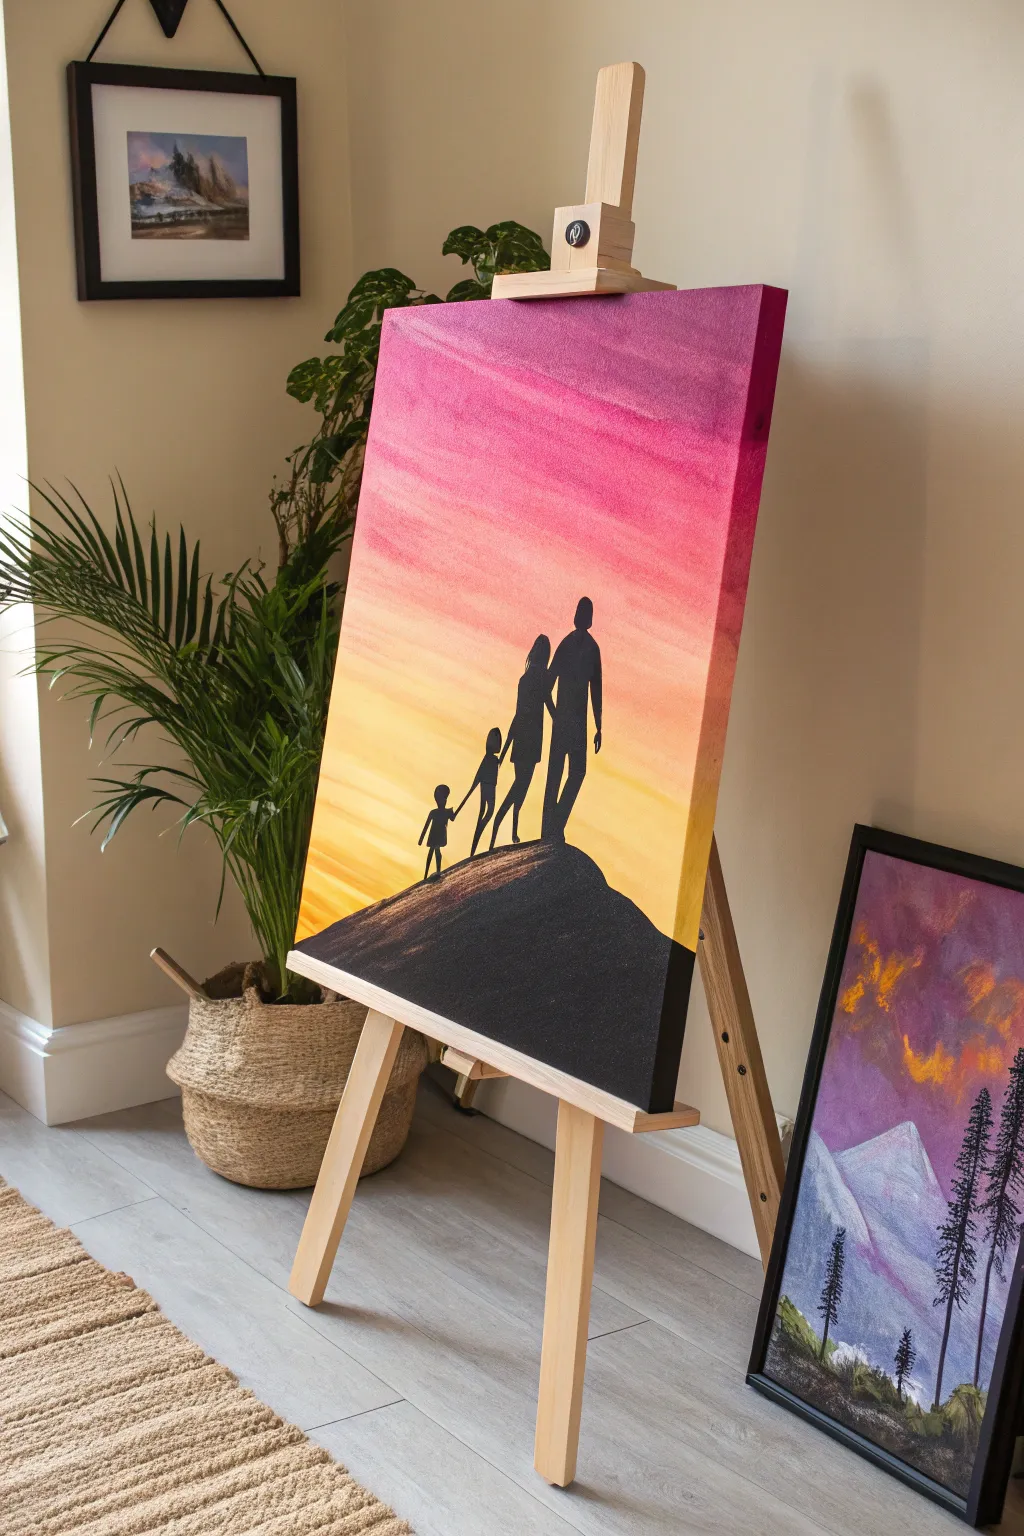
This stunning project captures total family unity against a breathtaking backdrop without worrying about facial features or intricate details. The vibrant ombre sky creates a professional look that pops against the stark black silhouettes.
Step-by-Step Guide
Materials
- Stretched canvas (16×20 inch recommended)
- Acrylic paints: Deep Violet, Magenta, Cadmium Orange, Lemon Yellow, Titanium White, Mars Black
- Large flat synthetic brush (2-inch)
- Medium flat brush
- Fine detail liner brush (size 0 or 1)
- Pencil
- Cup of water and paper towels
- Palette or paper plate
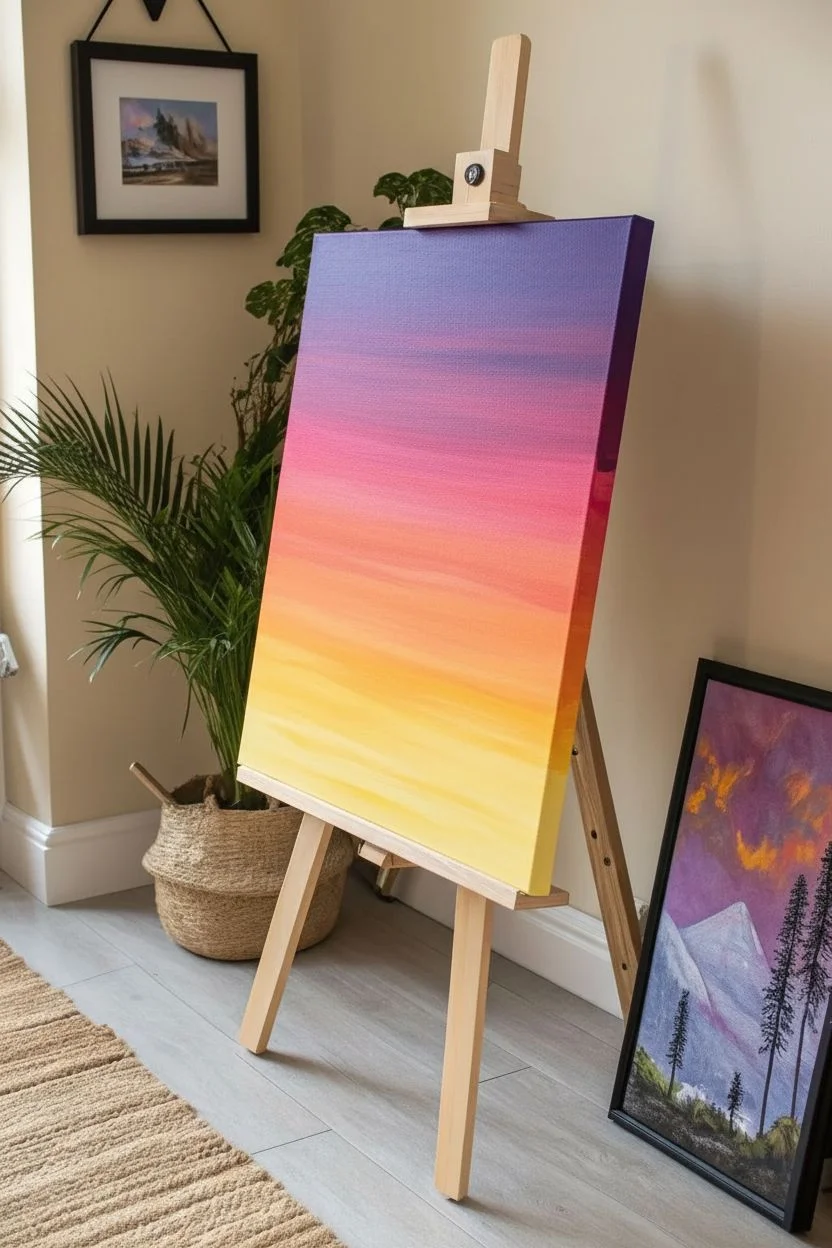
Step 1: Painting the Sunset Gradient
-
Prime the Surface:
Start by brushing a very thin, even coat of Titanium White over the entire canvas to help the subsequent colors blend smoothly. -
Apply the Violet:
Using your large flat brush, apply Deep Violet across the top 20% of the canvas using long, horizontal strokes from edge to edge. -
Add Magenta:
Without washing the brush entirely, pick up Magenta and paint the next section down, slightly overlapping the bottom edge of the violet band. -
Blend the Top Transition:
Wipe your brush on a paper towel, then use the damp bristles to gently brush back and forth over the line where violet meets magenta to create a soft blur. -
Introduce Orange:
Clean your brush thoroughly and load it with Cadmium Orange; paint a band below the pink section, roughly the same width as the previous stripes. -
Blend Downward:
Work the orange paint upward into the pink layer using light, sweeping horizontal motions to eliminate any harsh lines. -
Finish with Yellow:
Apply Lemon Yellow at the bottom, blending it upward into the orange; I find adding a tiny touch of white here adds extra luminosity to the horizon. -
Wrap the Edges:
Extend the corresponding sky colors onto the sides of the canvas so the gradient wraps perfectly for a finished, frameless look. -
Dry Completely:
Allow the background to dry fully, which usually takes about 20 to 30 minutes; the canvas must be dry to the touch before adding black.
Muddy Blending?
If colors start mixing into brown or getting sticky, stop immediately. Let the canvas dry fully, then apply a second thin layer of fresh paint to smooth out the transition rather than overworking it.
Step 2: Creating the Silhouettes
-
Sketch the Hill:
With a pencil, lightly sketch a curved, sloping hill starting from the lower left corner and rising towards the right side. -
Fill the Foreground:
Use the medium flat brush loaded with Mars Black to paint the entire hill area, ensuring the top curved edge is crisp and clean. -
Outline the Figures:
Lightly sketch your family figures on top of the hill using a pencil, or trace a printed stencil if you are less confident drawing freehand. -
Start the Silhouettes:
Switch to your fine liner brush and slightly thinned black paint to carefully outline the bodies of the figures. -
Fill in the Shapes:
Fill in the outlined bodies with solid black paint, checking that the opacity is consistent so no sunset colors show through. -
Detail the Limbs:
Define the arms and legs using the very tip of the liner brush to create sharp lines, depicting the figures holding hands. -
Refine Features:
Pay close attention to small details like the curve of the hair or the flair of a dress to make the silhouettes recognizable. -
Paint the Side Foreground:
Don’t forget to paint the sides of the canvas black where the hill meets the edge to continue the foreground wrap effect. -
Final Inspection:
Inspect the painting for any pinholes of light in the black areas and touch them up with a second coat to ensure a solid matte finish.
Add Some Magic
Once dry, use an old toothbrush to flick tiny droplets of watered-down white paint onto the purple section to create a beautiful starry night effect.
You now have a heartwarming masterpiece that immortalizes a moment of connection.


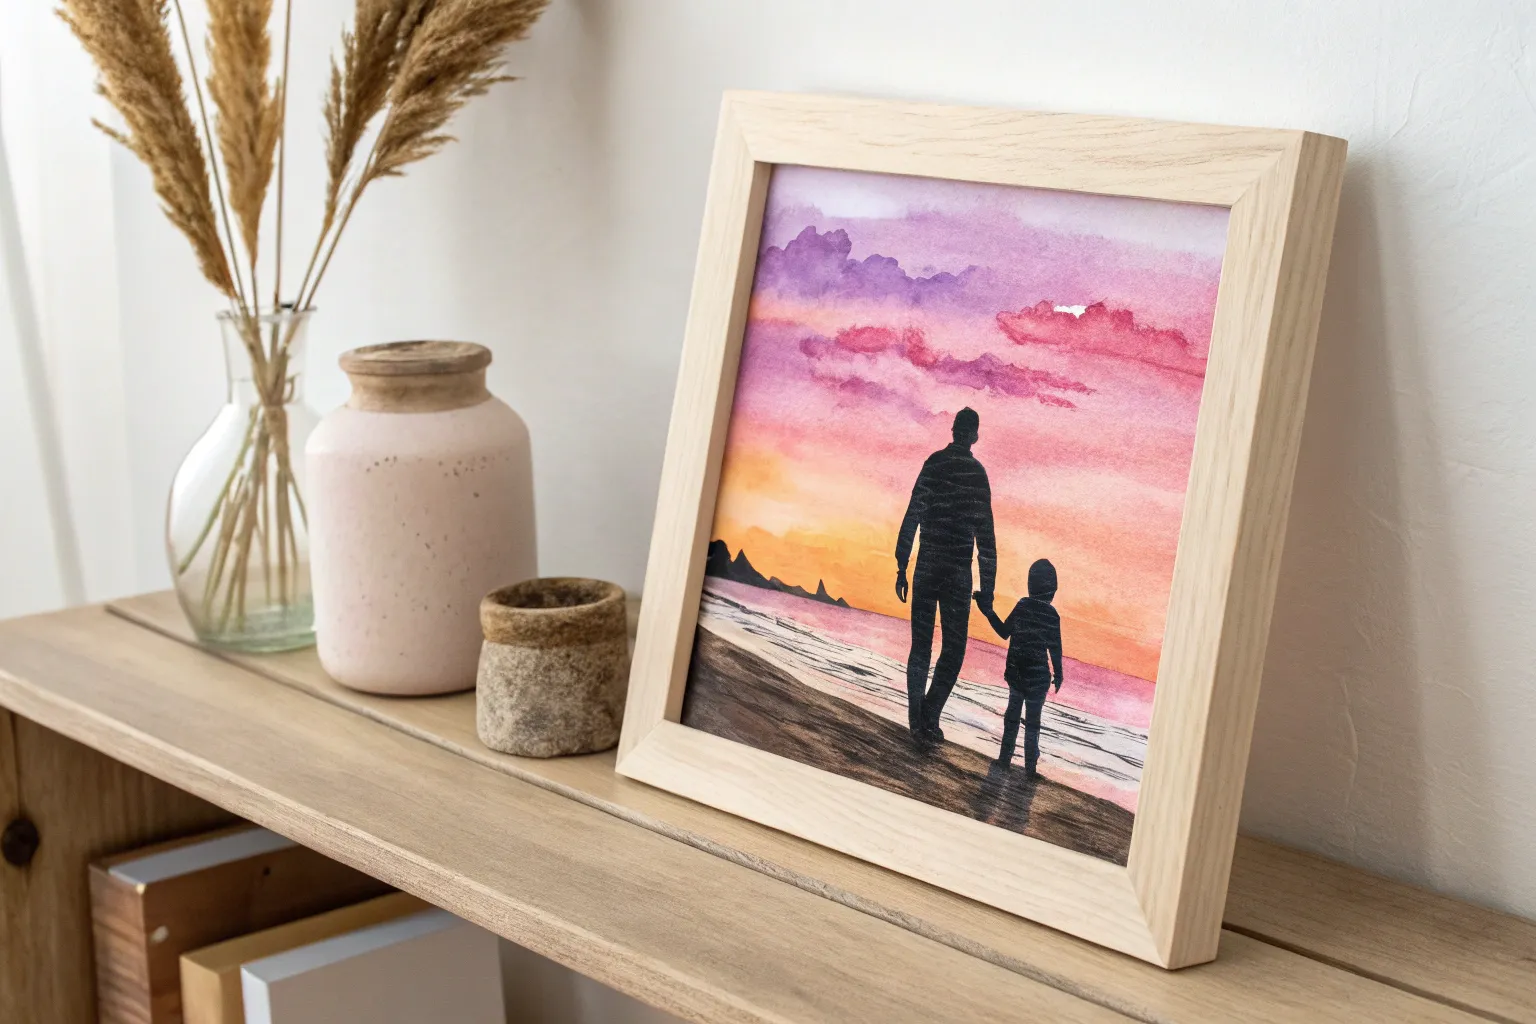
The Back-Facing Horizon View
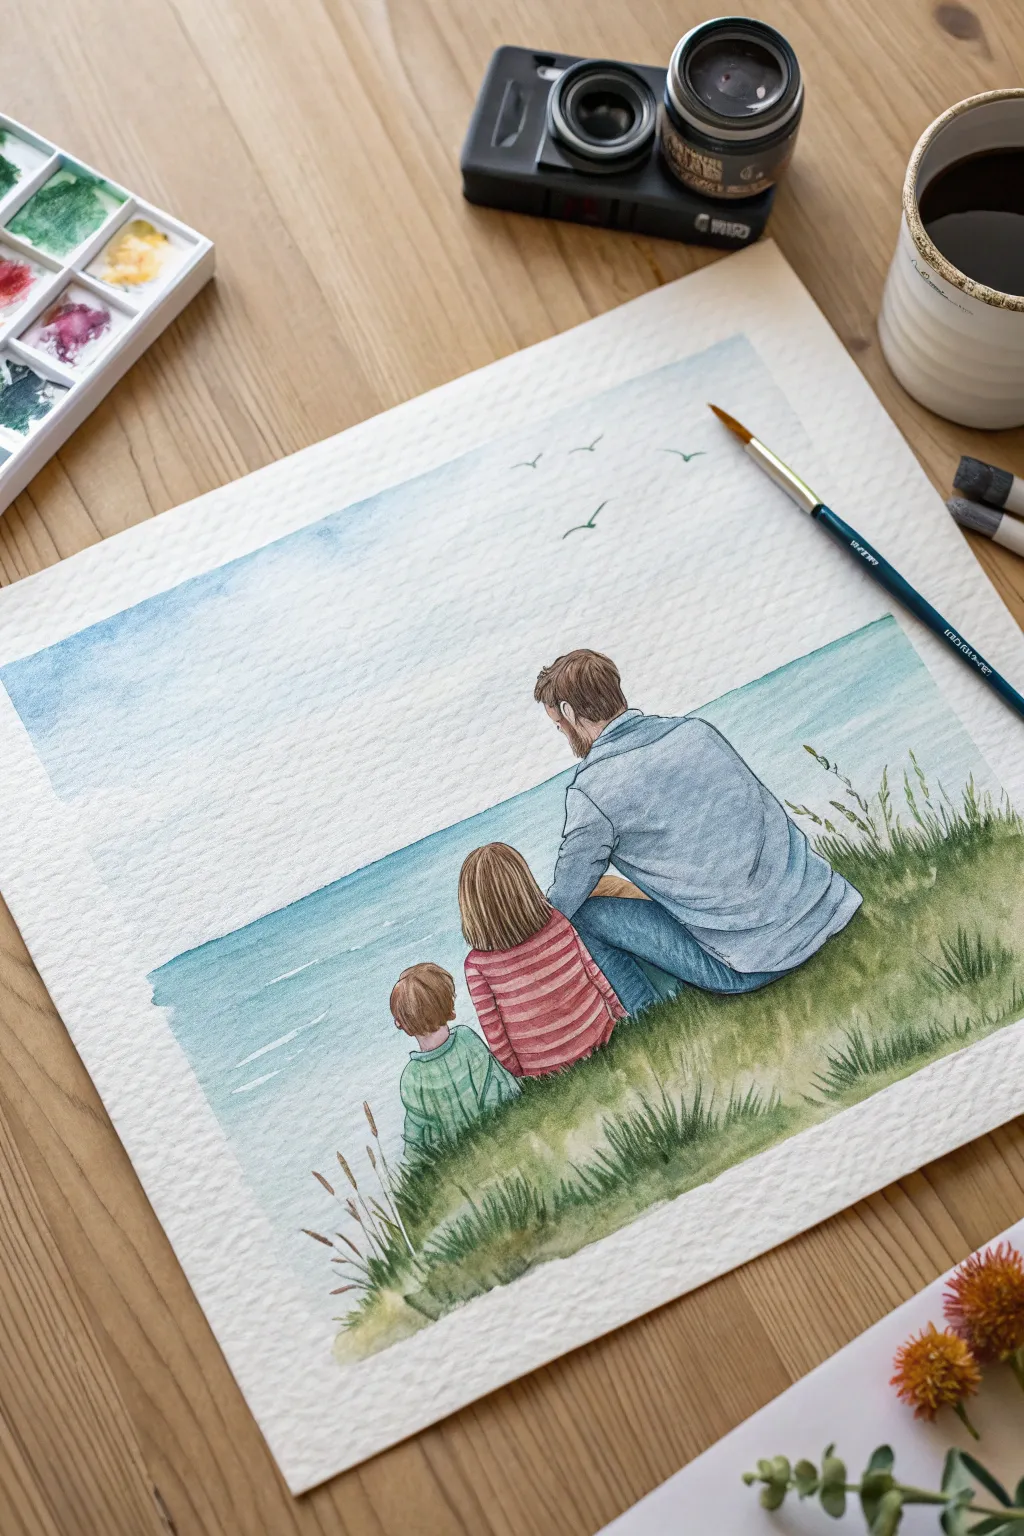
Capture a peaceful moment of togetherness with this back-facing portrait style, which is perfect for beginners since there are no tricky faces to paint. The soft watercolor textures of the ocean and grass create a calming, nostalgic atmosphere.
Step-by-Step
Materials
- Cold press watercolor paper (minimum 300gsm)
- Watercolor paints (pans or tubes)
- Round brushes (sizes 4, 8, and a fine detailer)
- HB Pencil and kneaded eraser
- Masking tape and rigid drawing board
- Jar of clean water and paper towels
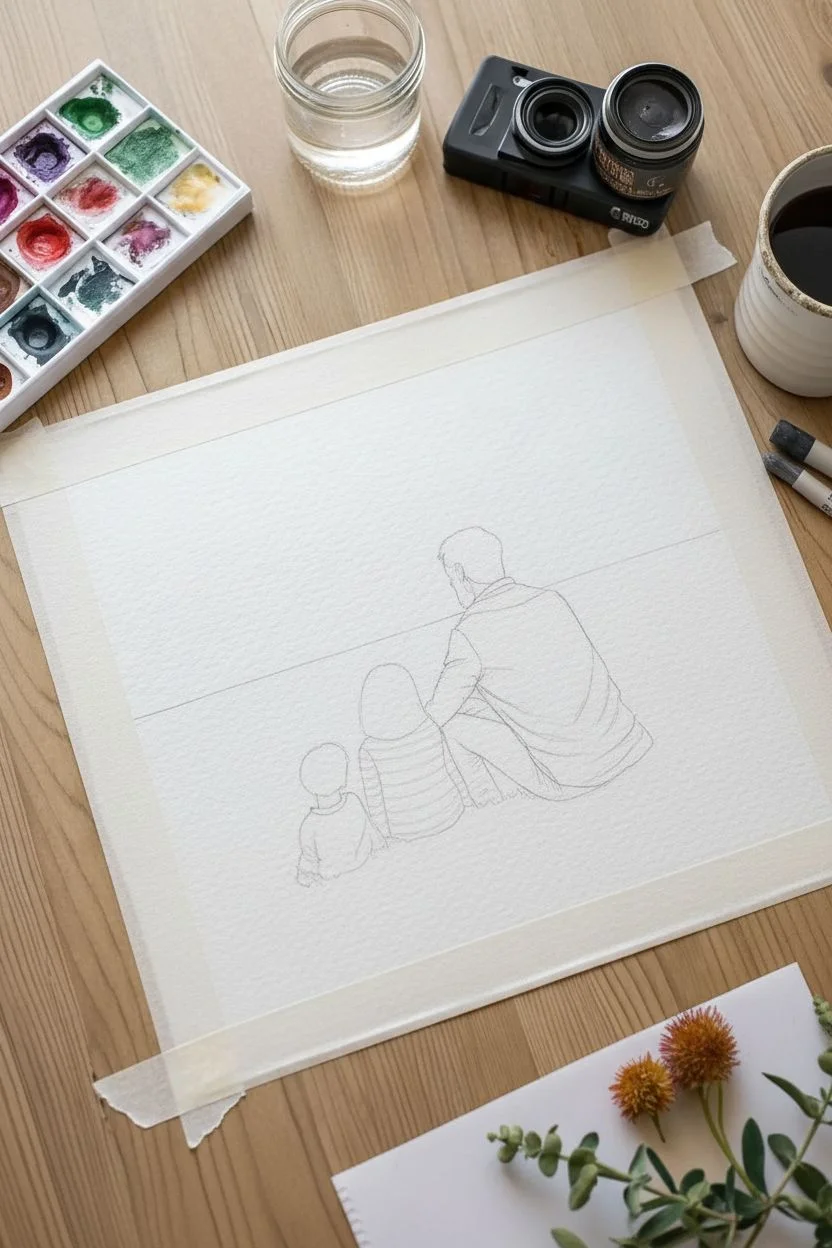
Step 1: Sketching the Composition
-
Secure the paper:
Begin by taping the edges of your watercolor paper to your board. This prevents the paper from buckling when wet and leaves a crisp white border around your finished piece. -
Establish the horizon:
Lightly sketch a horizontal line across the paper, positioning it about two-thirds of the way up the page to allow plenty of room for your subjects and the grassy foreground. -
Outline the figures:
Sketch the outline of the father figure first, sitting slightly to the right of center. Use simple geometric shapes to block out the torso and legs before refining the curves of the clothing. -
Add the children:
Draw the two children sitting to the left of the adult. Pay attention to relative sizes; their heads should sit lower than the adult’s shoulder. Don’t worry about facial features since they are facing away. -
Define the clothing:
Add details like the stripes on the middle child’s shirt and the folds in the father’s denim jacket. Keep pencil lines light so they won’t show through the transparent paint later.
Step 2: Painting the Backdrop
-
Wash the sky:
Mix a very watery, pale blue using cerulean or cobalt blue. Apply this to the sky area using your large brush, carefully painting around the heads of your figures. -
Add cloud suggestions:
While the sky is still damp, you can lift out a distinct cloud shape or two using a thirsty brush or a tissue, or simply let the wash dry unevenly for a natural look. -
Paint the ocean:
Mix a deeper teal or turquoise for the sea. Paint horizontally from the horizon line down to the grassy edge, ensuring the horizon line is perfectly straight. -
Create gentle waves:
Leave very thin, horizontal slivers of white paper unpainted within the blue ocean area to represent distant wave caps catching the light.
Uneven Horizon?
If your horizon line looks shaky, don’t try to freehand fix it with paint. Wait for it to dry completely, place a strip of masking tape along the line, and carefully repaint the edge.
Step 3: Bringing the Figures to Life
-
Style the father:
Paint the father’s jacket with a light blue-grey mix. Once dry, deepen the folds under the arms and back with a slightly darker shade to add dimension to the fabric. -
Paint denim textures:
Use a darker indigo or prussian blue for the pants. I like to blot this area slightly with a paper towel while wet to create a worn denim texture. -
Stripe the shirt:
For the child in the middle, carefully paint thin horizontal red stripes using your smallest brush. Let the red dry completely before painting the white spaces lightly if needed, or leave the paper bare. -
Detail the smallest child:
Paint the third shirt in a soft sage green. Adding a slight shadow on the side closest to the other sibling helps separate the forms. -
Hair and skin:
Mix browns, ochres, or yellows for the hair. Use distinct, fine strokes to mimic hair strands rather than filling it in as a solid block. Add a touch of peach or light brown for the visible ears and necks.
Make It Yours
Customize this piece by matching the hair colors, lengths, and clothing patterns to your actual family members. You can even add a family pet sitting in the grass beside the group.
Step 4: Foreground and Finishing Touches
-
Base layer for grass:
Mix a sap green with a little yellow ochre. Apply a loose wash over the bottom foreground area, painting right up to the jeans and shirts. -
Add grass texture:
Switch to a smaller round brush and mix a darker hooker’s green. Using quick, upward flicking motions, paint individual blades of grass over the dry base layer, especially around the sitting figures. -
Insert dried stalks:
On the bottom left, use a detail brush and light brown paint to flick up a few tall, dried wheat stalks or reeds to break up the greenery. -
Paint the birds:
Using a very fine liner brush and dark grey or diluted black paint, add three or four simple ‘V’ shapes in the sky to represent seagulls in the distance. -
Final assessment:
Check for any white gaps where the figures meet the grass or sea and fill them in carefully. Once completely dry, slowly peel off the masking tape to reveal the frame.
This lovely keepsake captures a quiet family moment that will look beautiful on your wall or as a heartfelt gift


Whimsical Birds on a Wire
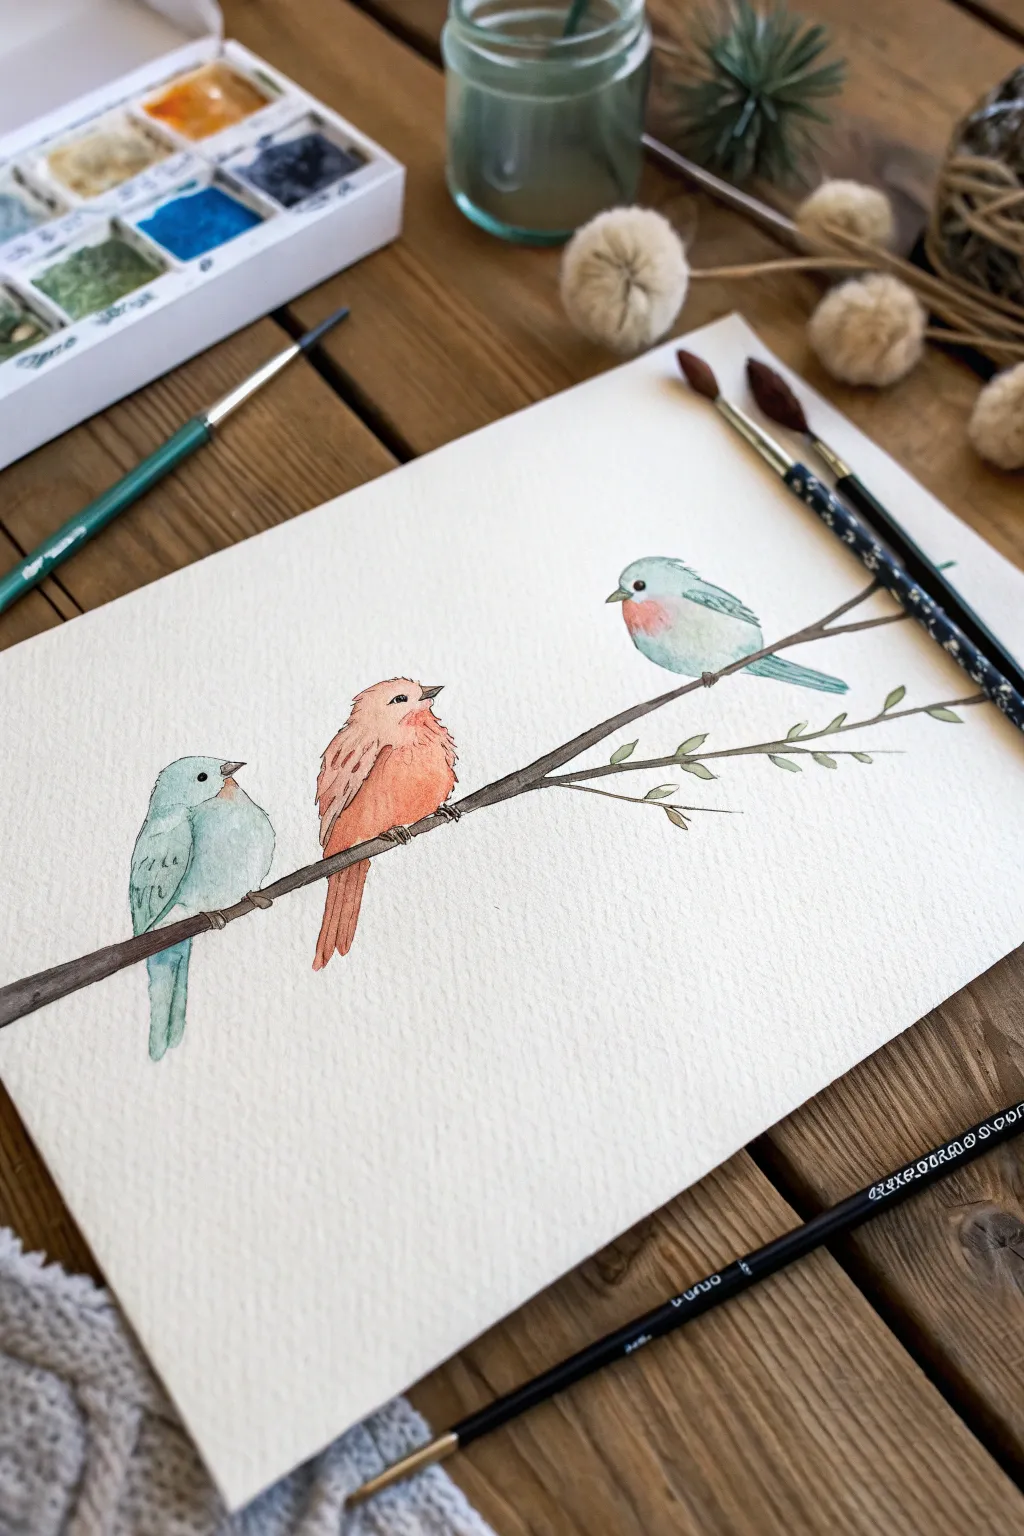
Capture the distinct personalities of three colorful birds perched on a rustic branch with this gentle watercolor tutorial. Using simple shapes and soft blending, you will create a charming piece of art perfect for a nursery or living room.
Step-by-Step Guide
Materials
- Cold-press watercolor paper (300gsm/140lb)
- Watercolor paints (teal, coral/rust, light blue, brown, sepia, sap green)
- Round watercolor brushes (size 6 for washes, size 2 for details)
- HB pencil and clean eraser
- Two jars of water
- Paper towels
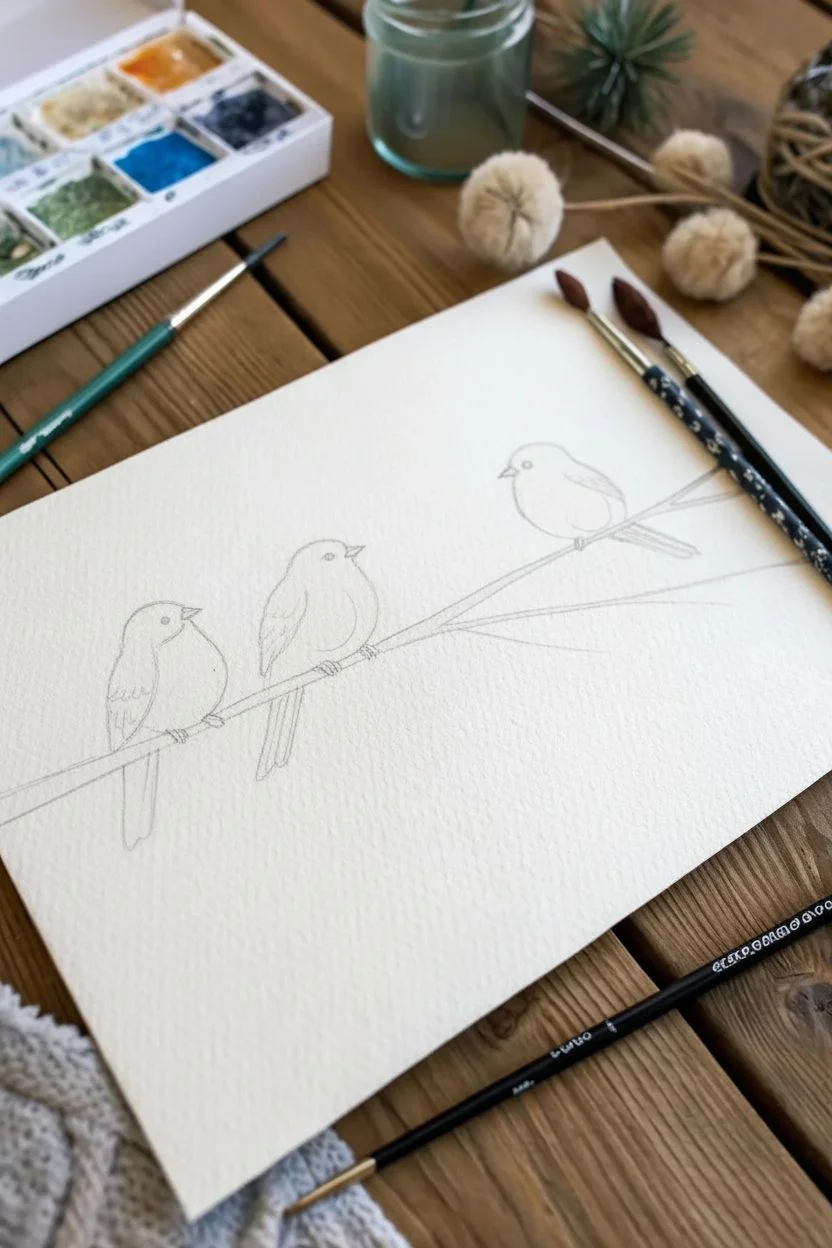
Step 1: Sketching the Composition
-
Draw the branch:
Start by lightly sketching a diagonal line stretching from the bottom left to the upper right of your paper to serve as the main branch. -
Outline the bodies:
Sketch three oval or egg-shaped outlines for the birds sitting on the branch. Make the middle bird slightly plumper and the right bird rounder. -
Add basic features:
Lightly draw small triangles for beaks and long, rectangular shapes dropping below the branch for the tails of the left and center birds. -
Refine the sketch:
Add curved lines for the wings and small leaf shapes at the very end of the right side of the branch. Erase any heavy pencil lines until they are barely visible.
Spark of Life
If you accidentally paint over the white highlight in the eye, wait for the black paint to dry and add a tiny dot of white gouache or gel pen.
Step 2: Painting the Branch
-
Mix the wood color:
Create a watery mix of dark brown with a touch of sepia or black to get a deep, woody tone. -
Paint the main line:
Using your smaller brush, carefully paint the branch, allowing the line to vary slightly in thickness to look like natural wood. -
Add thinner twigs:
Extend a few thinner lines off the right side of the main branch where the leaves will eventually go. -
Paint the leaves:
Dip your brush into sap green and press it gently onto the twig tips to create simple, teardrop-shaped leaves.
Step 3: Coloring the Birds
-
Left bird base:
Load your size 6 brush with a teal or turquoise mix. Paint the body of the left bird, keeping the color more concentrated on the back and fading to water on the belly. -
Center bird base:
Rinse your brush and switch to a warm coral or rust orange. Paint the middle bird, using short, distinct strokes near the chest to suggest texture. -
Right bird gradient:
For the round bird on the right, start with a pale blue wash on the head and back. While wet, drop a small amount of pink or red onto the chest area and let it bleed softly. -
Let it dry:
Pause here and wait for the paper to be completely bone-dry before adding details to prevent colors from running.
Make it yours
Try painting the birds in colors that match your own room’s decor, or add metallic gold ink to the wing tips for a magical finish.
Step 4: Fine Details
-
Define the wings:
Mix slightly darker versions of your body colors (darker teal, rust, and blue). Use the small brush to paint the wing shapes, adding small dashes for feathers. -
Add face details:
Use a very fine point brush with dark grey or black paint to add the small round eyes. I like to leave a tiny speck of white paper in the eye as a highlight. -
Beaks and feet:
Paint the small triangular beaks with grey or brown. Use the tip of your smallest brush to draw thin lines for the feet wrapping around the branch. -
Final textures:
Add a few dry-brush strokes of dark paint on the wings and tails to enhance the feathery look and give the birds dimension.
Frame your delightful flock of birds to bring a cheerful, artistic touch to your home.


Linked Hands Close-Up
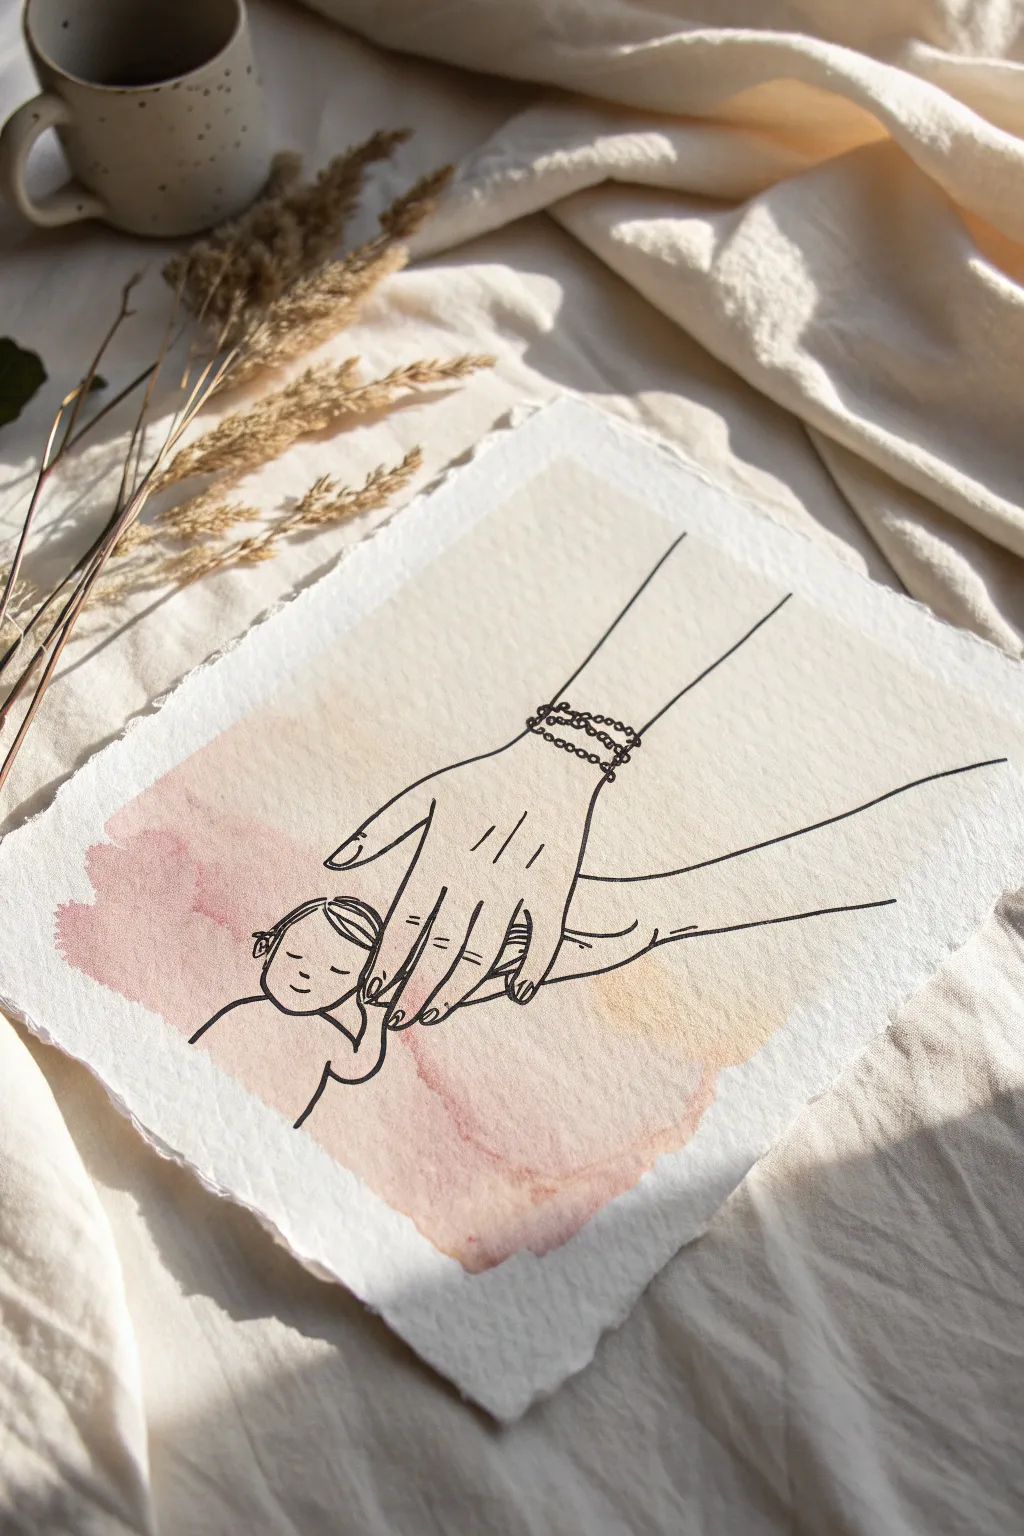
Capture the tender connection between parent and child with this elegant combination of loose watercolor and continuous line art. This project relies on a ‘less is more’ approach, using an abstract splash of color to frame a simple, emotive pen drawing.
Detailed Instructions
Materials
- Cold-press watercolor paper (300 gsm)
- Watercolor paints (Alizarin Crimson, Burnt Sienna, Yellow Ochre)
- Round watercolor brush (size 10 or 12)
- H or HB pencil
- Kneaded eraser
- Black waterproof archival styling pen (0.3mm or 0.5mm)
- Ruler (optional for tearing paper)
- Paper towel
Step 1: Preparing the Base
-
Create deckle edges:
If you want that vintage, torn-edge look shown in the photo, place a ruler against the edge of your paper and carefully tear the strip off. Repeat on all four sides to soften the borders. -
Mix the blush tone:
On your palette, mix a generous amount of water with a touch of Alizarin Crimson and a tiny speck of Burnt Sienna to create a dusty, muted rose color. -
Mix the golden tone:
In a separate spot, mix Yellow Ochre with plenty of water to create a soft, warm golden hue. -
Paint the abstract shape:
Load your brush with the blush mix and paint a loose, organic cloud shape in the lower-left center of the page. Do not try to paint a specific object; just make a fluid patch of color. -
Blend in the gold:
clean your brush slightly, pick up the golden ochre mix, and drop it into the upper right section of your wet shape, letting the two colors bleed naturally into one another. -
Soften the edges:
I like to wash the brush clean, leave it damp, and gently run it along the outer perimeter of the paint blob to feather the edges so they dry soft rather than harsh. -
Allow to dry:
This is the most critical step. Let the paint dry completely until the paper is room temperature and flat. If it is even slightly damp, your pen ink will bleed later.
Cheat the Sketch
Hands are notoriously hard to draw! If you are struggling, print a photo of hands in this pose at the desired size, tape it to a sunny window behind your watercolor paper, and trace the main contours.
Step 2: Sketching the Composition
-
Map out the adult arm:
Using your pencil very lightly, draw two diagonal lines descending from the top right corner toward the center of the painted patch to form the adult forearm. -
Sketch the hand gesture:
Continue the lines to form the wrist and the back of the hand. The hand should be open, gently reaching downwards. -
Draw the fingers:
Sketch elongated, elegant fingers. The middle ring finger should be the longest, dropping down to make the ‘connection’ point. -
Position the baby:
In the bottom left, nestled into the pinker part of the watercolor, sketch the curve of the baby’s head and a tiny shoulder. -
Connect the hands:
Draw the baby’s small hand reaching up or resting against the adult’s fingers. Focus on the touching point—this is the emotional center of the piece. -
Refine the lines:
Look at your sketch as a whole. Erase and adjust until the proportions feel right. Keep the details minimal; you want outlines, not shading.
Spiderwebbing Ink?
If your black lines start to feather or spread, the inner layers of the paper are still damp. Stop immediately and use a hair dryer on a low, cool setting before attempting to draw another line.
Step 3: Inking and Finishing
-
Test your pen:
Scribble on a scrap piece of watercolor paper first to ensure the ink flows smoothly and isn’t drying out. -
Ink the main arm:
Start at the top right. Draw the adult arm lines with a confident, steady speed. Slower lines tend to look shakier. -
Add the jewelry:
Pause at the wrist to draw the bracelets. Use small loops or tiny chains to create texture that contrasts with the smooth skin lines. -
Outline the fingers:
Carefully trace your pencil lines for the fingers. You can leave small gaps in the lines where the joints bend to keep the look airy and illustrative. -
Ink the baby’s profile:
Use a delicate touch for the baby’s face and hand. The line weight should feel slightly lighter here if possible. -
Add facial hints:
Draw simple curved lines for the closed eye, nose, and mouth. Minimal information conveys a peaceful sleep best. -
Let the ink set:
Wait at least 15 minutes to ensure the archival ink is fully bonded to the paper fibers. -
Erase pencil marks:
Gently rub your kneaded eraser over the entire drawing to lift the graphite, leaving only the crisp black ink and the soft watercolor background.
Frame this delicate piece in a simple wood frame to preserve that warm, sentimental moment forever


Have a question or want to share your own experience? I'd love to hear from you in the comments below!