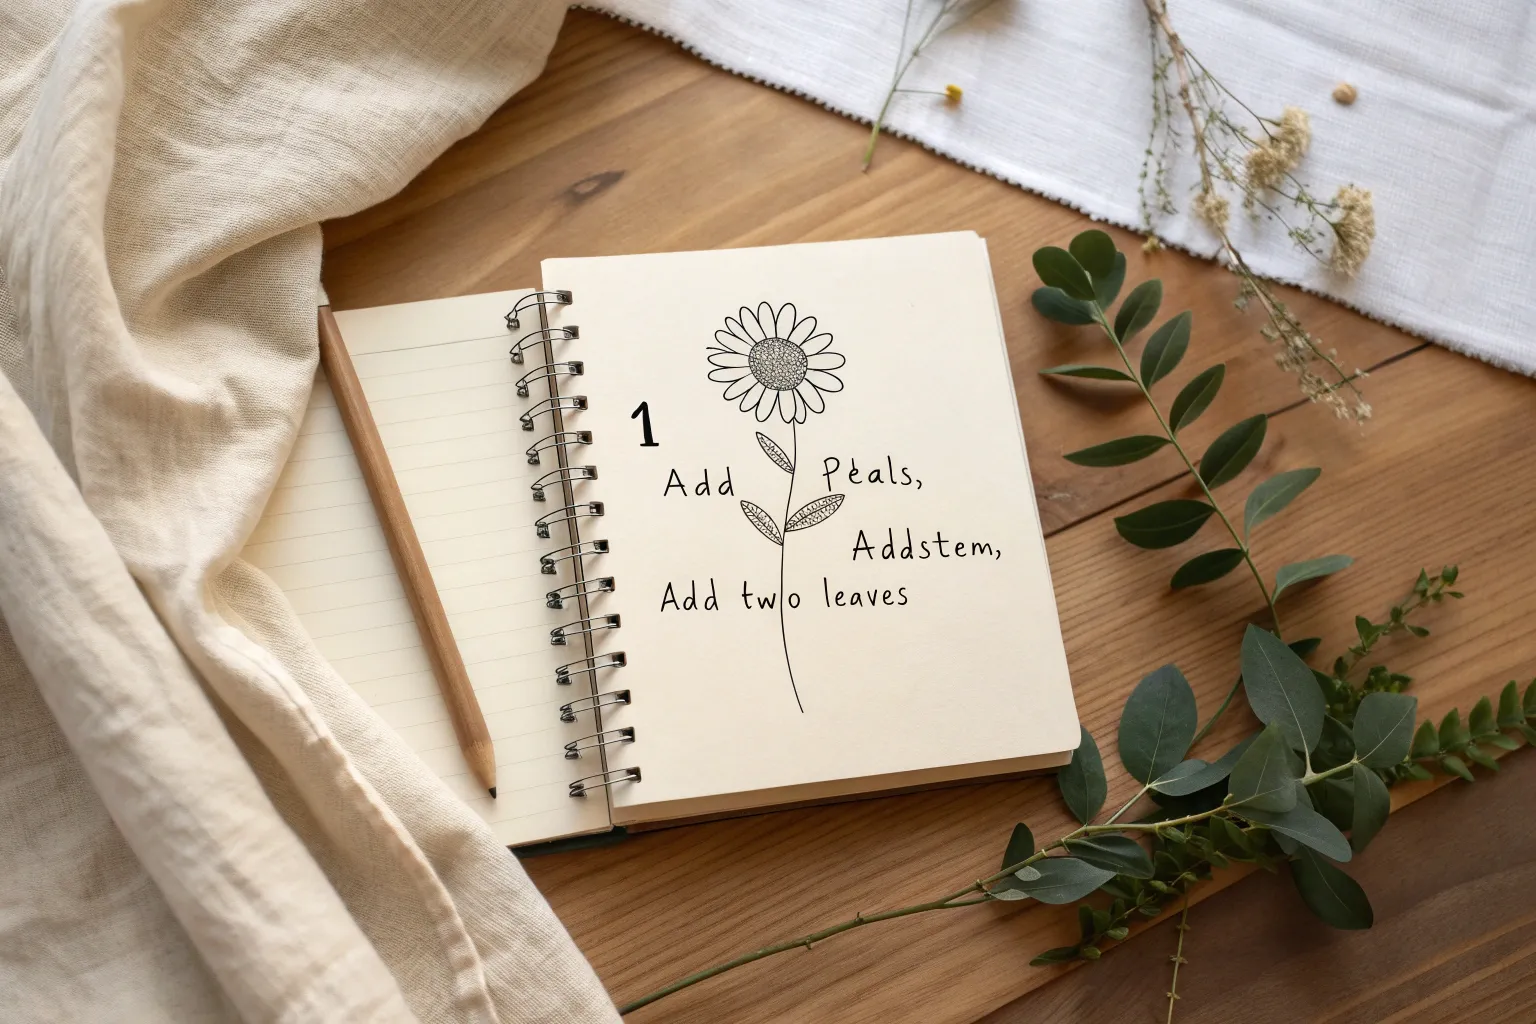
If you’ve been craving easy flower drawing ideas that actually look like flowers (without a ton of shading stress), you’re in the right place. I’m going to share a bunch of simple, beginner-friendly ways to sketch blooms that feel relaxing, quick, and surprisingly pretty.
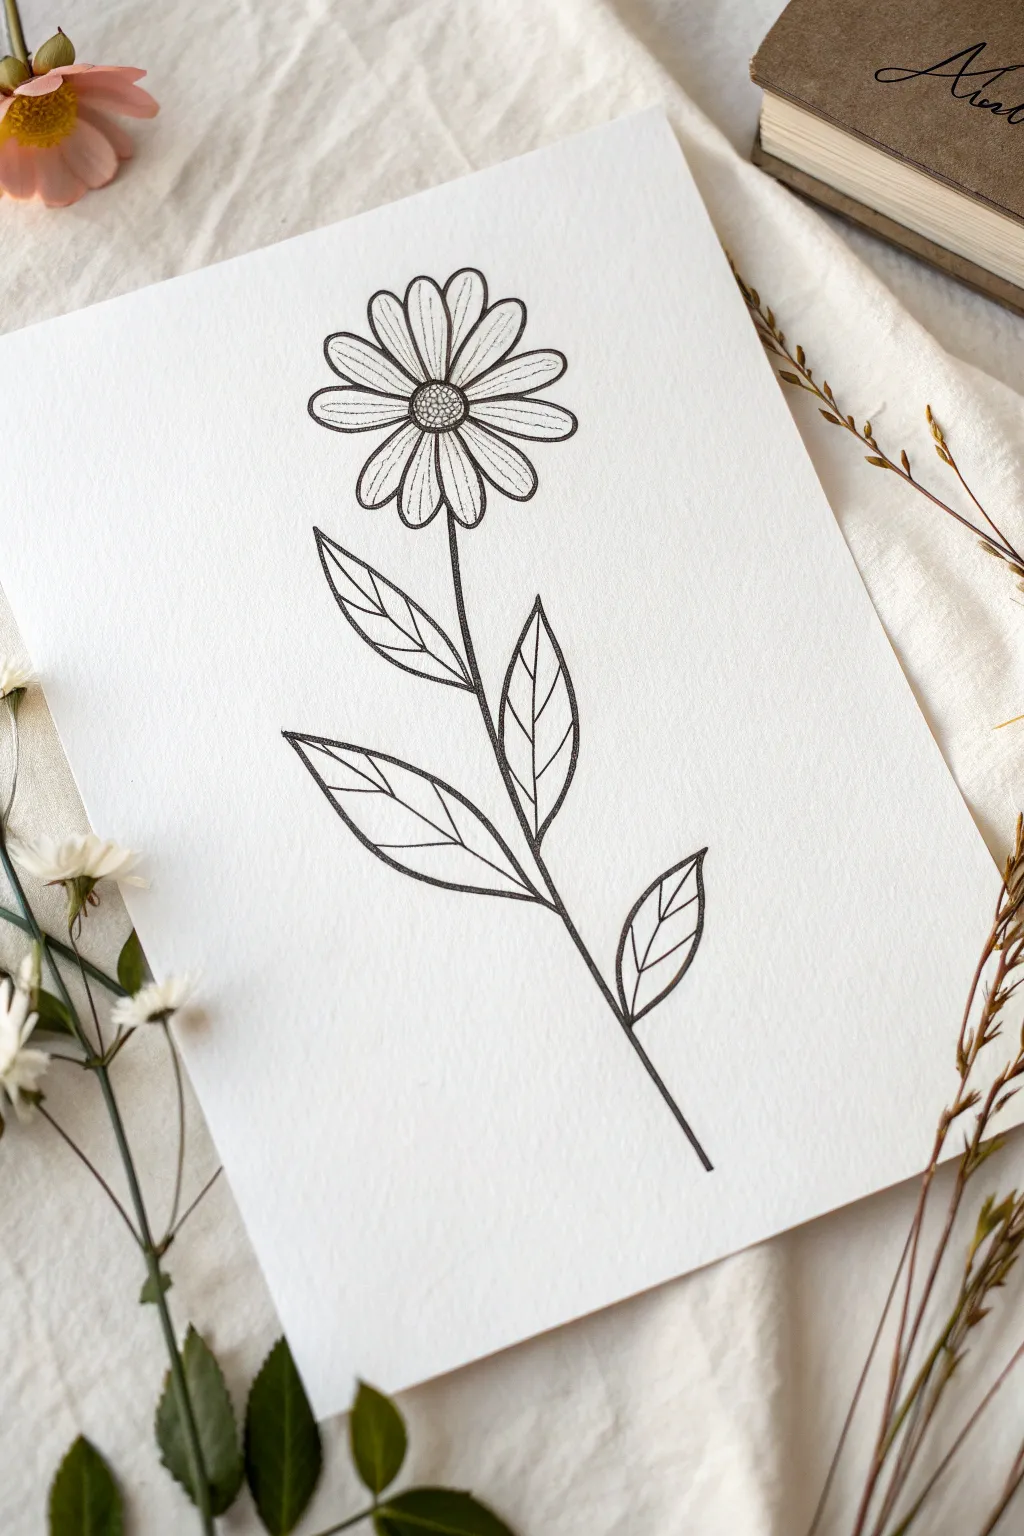
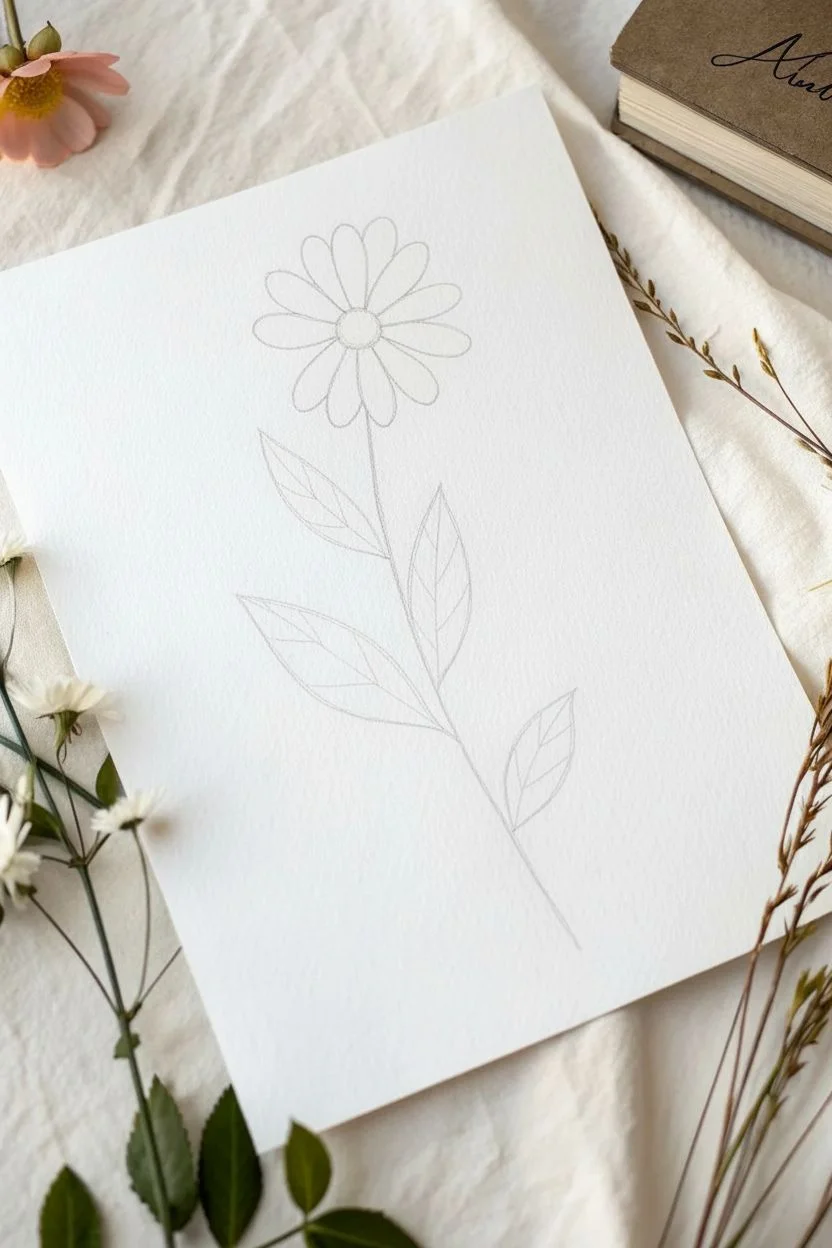
Classic Daisy With a Simple Center Circle
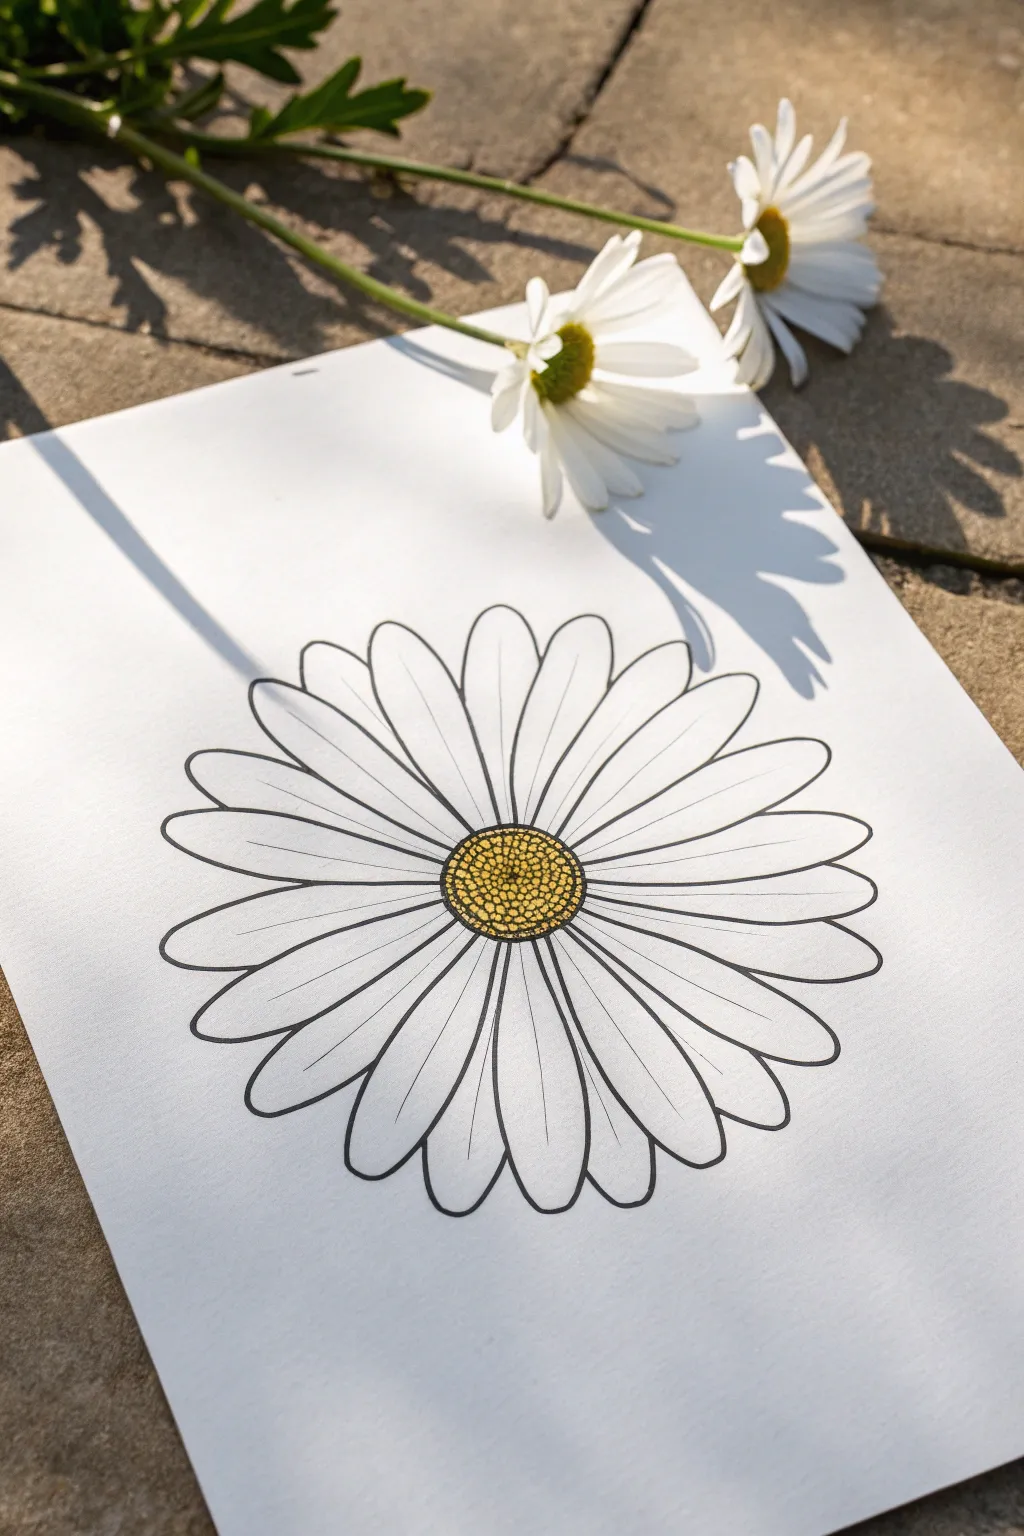
Capture the simple elegance of a summer garden with this clean, minimalist daisy illustration. The stark contrast between the crisp black linework and the textured golden center makes for a refreshing piece that pops off the page.
Step-by-Step Tutorial
Materials
- High-quality white drawing paper or cardstock (A4 or Letter size)
- Pencil (HB or H for light sketching)
- Fine liner pen (black, 0.5mm or 0.8mm)
- Clean eraser
- Yellow colored pencils (medium yellow and a darker ochre or mustard)
- Ruler (optional, but helpful for finding the center)
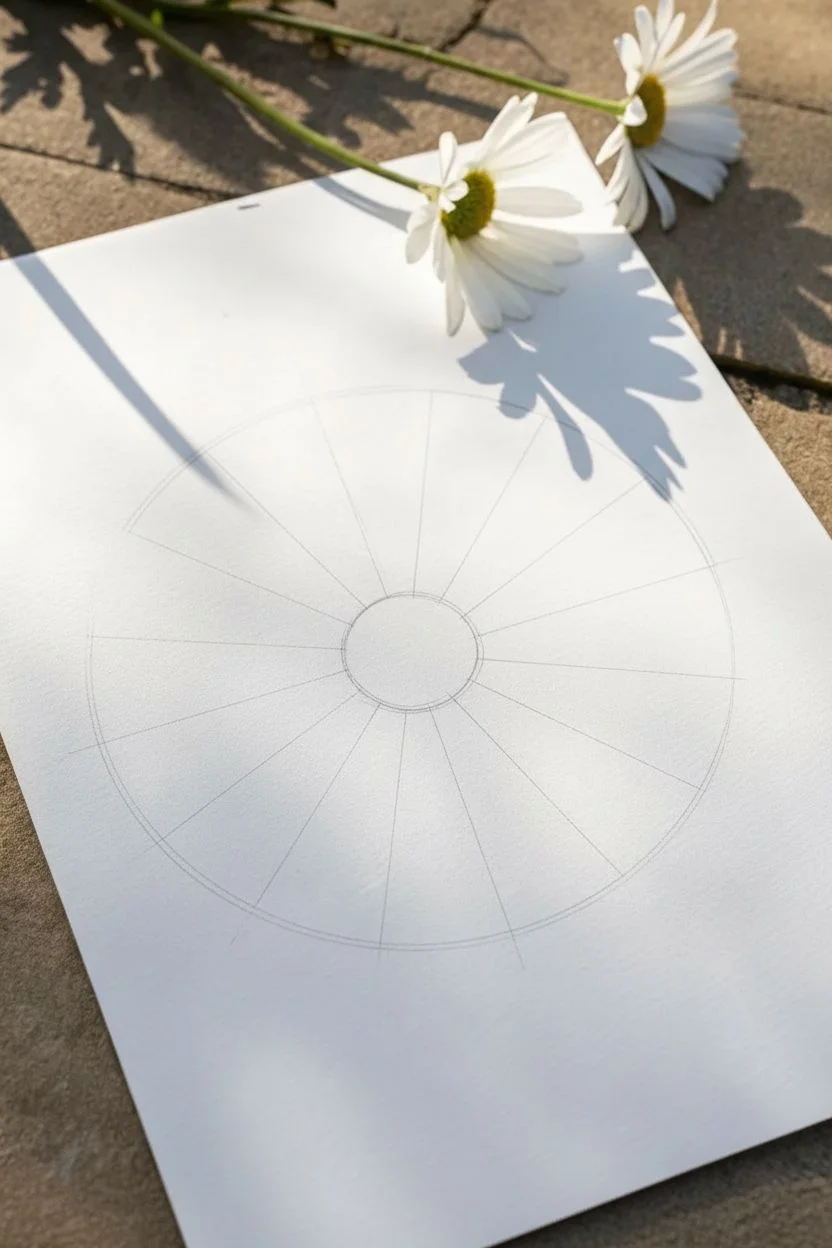
Step 1: Drafting the Structure
-
Find Your Center:
Begin by lightly marking the center of your paper with a pencil. You can eyeball this or use a ruler to measure a cross-hair if you prefer precise symmetry. -
Sketch the Core:
Around your center mark, lightly sketch a medium-sized circle. This will become the yellow disc of the daisy later. Don’t worry about making it a perfect geometric circle; a slightly organic shape looks more natural. -
Mark Pale Guidelines:
Draw faint radial lines extending from the center circle outward, like the spokes of a wheel. These will help you keep the petals evenly spaced and directed properly as you draw them. -
Determine Petal Length:
Lightly sketch a very large, faint circle around the entire drawing to establish the boundary for your petal tips. This ensures no petal is significantly longer or shorter than the others.
Uneven Petals?
If your petals look lopsided, rotate your paper frequently while sketching. Drawing ‘upside down’ helps your brain see shapes accurately rather than just symbols of petals.
Step 2: Drawing the Base Petals
-
Draft the Primary Layer:
Start sketching the first layer of petals. These are the ones closest to the viewer. Draw long, U-shaped loops that start at the center circle and extend to your outer boundary line. -
Vary the Shapes:
Keep the petals slightly varied in width. Some can be a bit chubby, while others might be slender. Notice how the tips aren’t sharp points but rounded curves. -
Leave Spacing:
Don’t make all the petals touch perfectly side-by-side just yet. Leave small gaps between some of these primary petals because we will fill them in with a second layer behind them. -
Add the Background Petals:
Now, sketch the second set of petals in the gaps you left. These should appear to be ‘tucked behind’ the first set, meaning you only draw the visible tips peaking out between the main petals. -
Refine the Flow:
Step back and look at the whole flower. Adjust any petals that look stiff or out of place. Erase and redraw as needed until the arrangement feels balanced.
Step 3: Inking and Coloring
-
Outline the Center:
Using your black fine liner, carefully trace the outline of the central circle. Use a slightly shaky or bumpy line here to suggest texture rather than a smooth geometric stroke. -
Ink the Petals:
Proceed to ink the petals. Start with the ‘front’ layer of petals so you don’t accidentally draw lines through them. Use smooth, confident strokes from the base to the tip. -
Add Center Defintion:
Within the petals, draw a single, thin line down the center of each one, starting from the middle and fading out about halfway up the petal. This adds dimension and that classic botanical illustration look. -
Erase Draft Lines:
Once the ink is completely dry—I usually give it a full five minutes just to be safe—gently erase all your pencil guidelines, leaving only the clean black ink. -
Base Color Application:
Take your medium yellow pencil and fill in the center circle. Use consistent, small circular motions to build up a solid layer of color without harsh directional streaks. -
Add Texture with Dots:
Using the fine liner again, add stippling (small dots) inside the yellow center. Cluster them densely around the edges of the circle and let them get sparser toward the middle. -
Deepen the Shadow:
Finally, take your darker ochre or mustard pencil and lightly shade the very edges of the yellow center. This emphasizes the round, dome-like shape of a daisy’s eye.
Level Up: Realism
Add tiny imperfections to the petals, like a small notch at the tip or a slight bend in the side line. These quirks make the flower feel organic and less like a stencil.
Place your finished drawing near a window for a lovely photo opportunity that captures the light and shadow play


Sunflower With Chunky Petals and a Textured Center
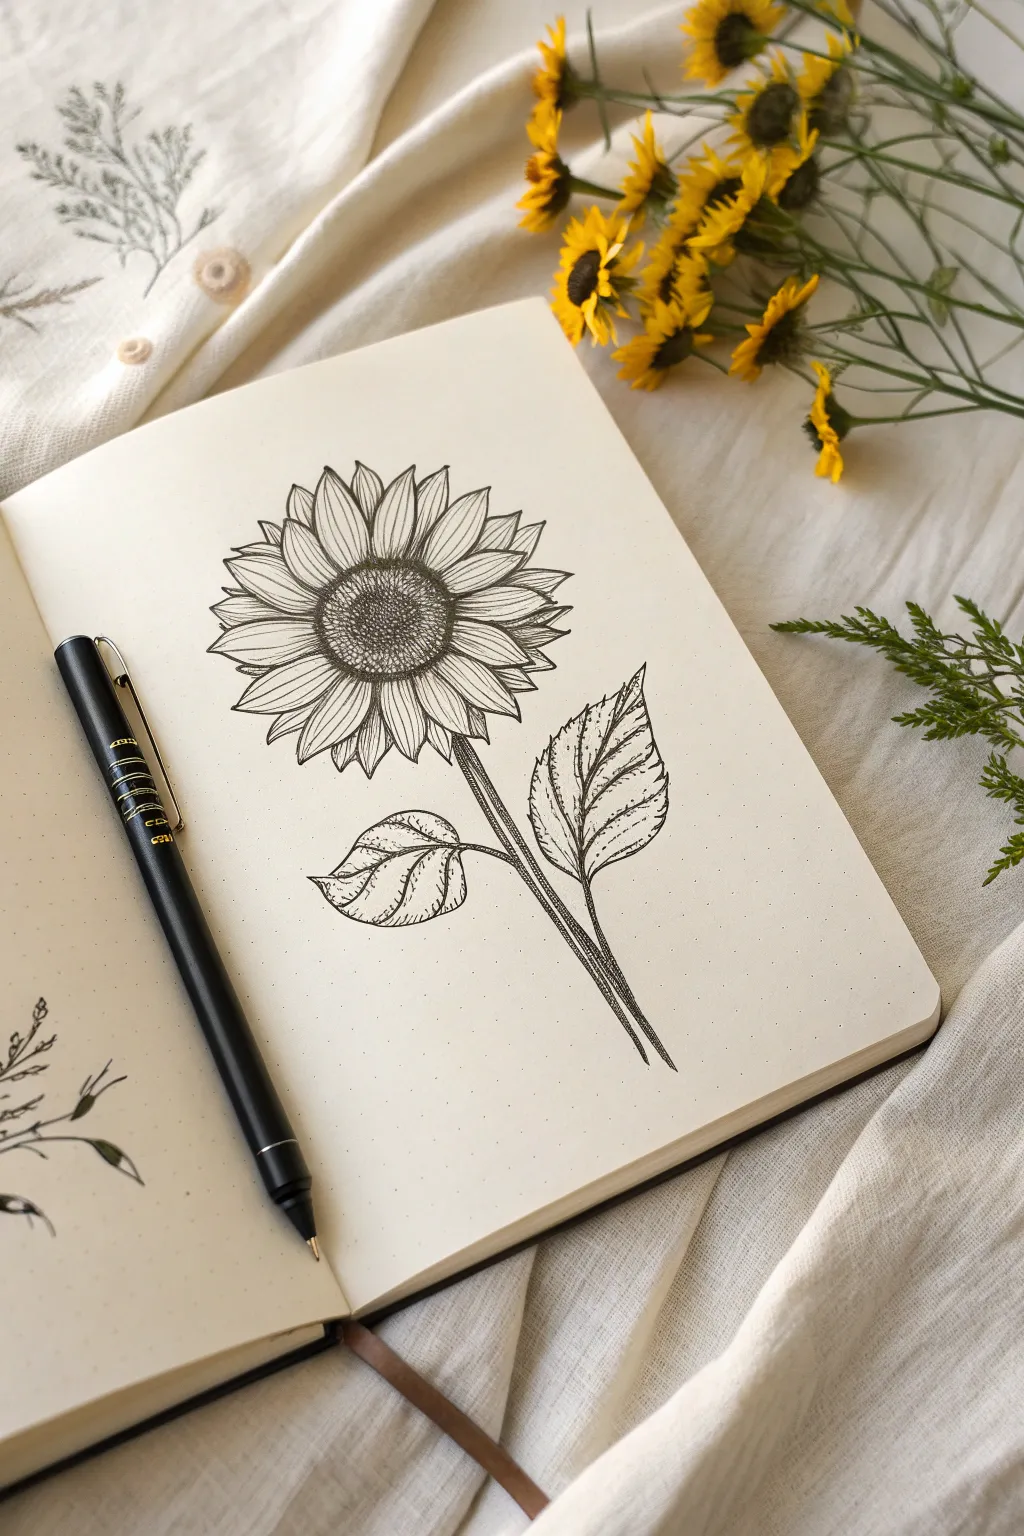
Create a detailed botanical study of a sunflower using simple pen strokes and stippling techniques. This project focuses on building texture through repetition, perfect for filling a page in your bullet journal or sketchbook with minimal supplies.
Detailed Instructions
Materials
- Dotted or plain journal/sketchbook
- Fine liner pen (black, size 0.3 or 0.5)
- Pencil (HB or H)
- Eraser
- Ruler (optional)
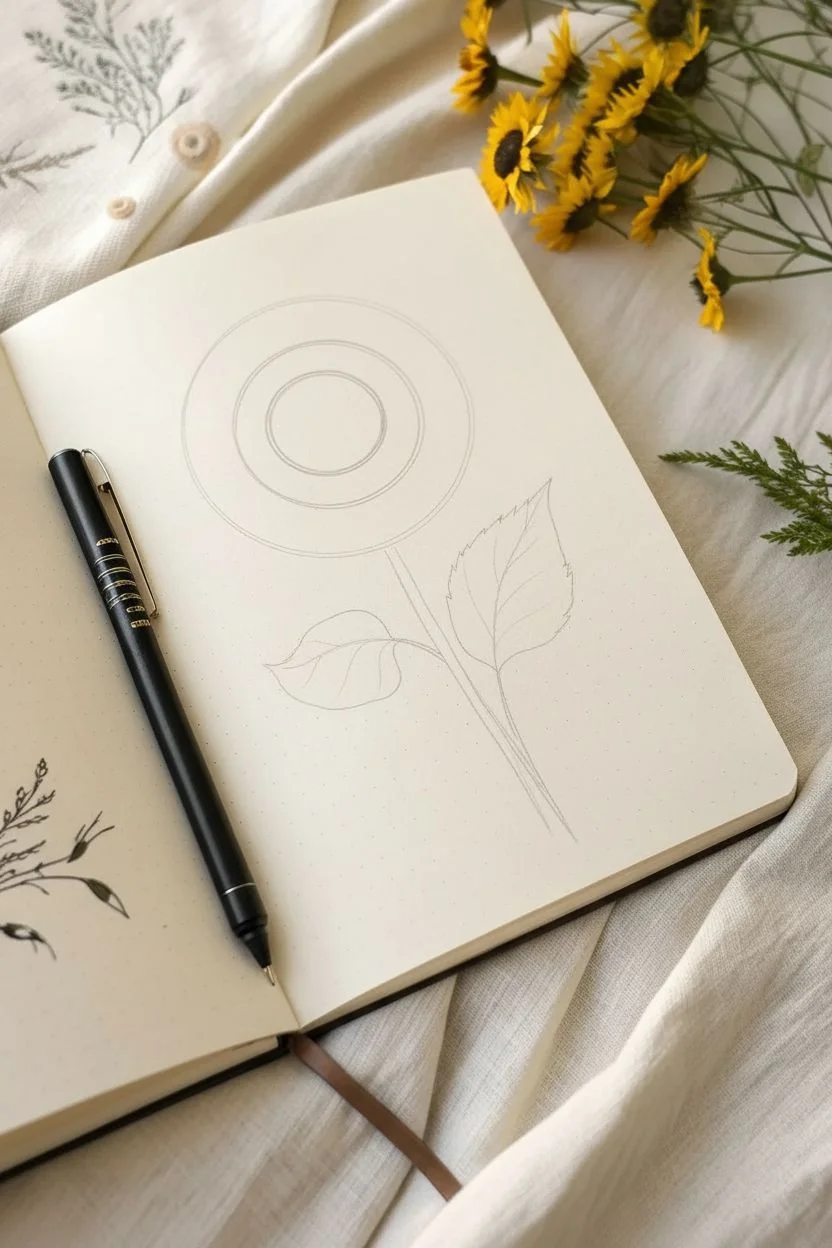
Step 1: Sketching the Skeleton
-
Establish the center:
Begin by lightly sketching a medium-sized circle in the upper-middle section of your page. This will be the sunflower’s seed head. -
Draw the petal boundary:
We don’t want the flower to get too uneven, so sketch a larger circle around the first one to act as a guideline for your maximum petal length. -
Map out the stem:
Draw a slightly curved line extending downward from the bottom of your center circle. Add a second parallel line very close to it to give the stem thickness. -
Place the leaves:
Sketch the rough outline of two large, teardrop-shaped leaves stemming from the stalk—one lower on the left and a larger one higher on the right.
Step 2: Inking the Flower Head
-
Outline the center:
Switch to your fine liner pen. Trace the inner circle with a slightly broken, wobbly line to suggest organic texture rather than a perfect geometric shape. -
Add the first layer of petals:
Draw the front-most petals first. Start at the center circle and draw U-shaped or slightly pointed petals radiating outward. Make sure they touch each other at the base. -
Fill the gaps:
Look for the V-shaped gaps between your primary petals. Draw the tips of secondary petals peeking out from behind these spaces to create fullness and depth. -
Texture the petals:
Add fine, swift lines inside each petal. Start from the base and flick your pen outward, then do two or three shorter flicks from the tip moving inward. This mimics the natural ridges of the flower. -
Stipple the center ring:
Inside the seed head, draw a smaller concentric circle made entirely of dots. Pack the dots densely near the very center. -
Create the seed texture:
Fill the rest of the seed head with tiny, C-shaped curves and dashes. Keep them tighter near the edges of the circle to create a shadowed, 3D dome effect.
Ink Confidence
Don’t worry about wobbles! A slightly shaky hand actually makes organic subjects like flowers look more realistic than perfectly straight computer-generated lines.
Step 3: Stem and Leaves
-
Define the stem:
Ink the stem lines, making them slightly thicker where the leaves attach. Add short vertical dashed lines along the length of the stem for a fibrous, woody look. -
Outline the leaves:
Trace your leaf sketches. Give the edges a serrated or ‘toothed’ look by using small zigzag lines instead of a single smooth curve. -
Draw the main veins:
Draw a central vein down the middle of each leaf, extending from the stem to the tip. It creates a nice flow if this line is slightly curved. -
Add side veins:
Branch smaller veins off the center line, angling them upwards toward the leaf tip. -
Shade the leaves:
Using very light pressure, add hatching (parallel lines) along one side of the central vein on each leaf. This simple shading adds instant dimension.
Add a Splash
Use watercolor paint or mildliner markers to add soft yellow to the petals, but leave some white space for highlights.
Step 4: Finishing Touches
-
Deepen the shadows:
Go back to the flower head and add a few darker ink lines right where the petals meet the center circle. This increases contrast. -
Erase pencil marks:
Wait at least five minutes to ensure the ink is completely dry. Gently erase all your initial pencil guidelines.
Now you have a timeless botanical illustration ready to brighten up your journal page


Tulip Cup Shape With Two Easy Leaves
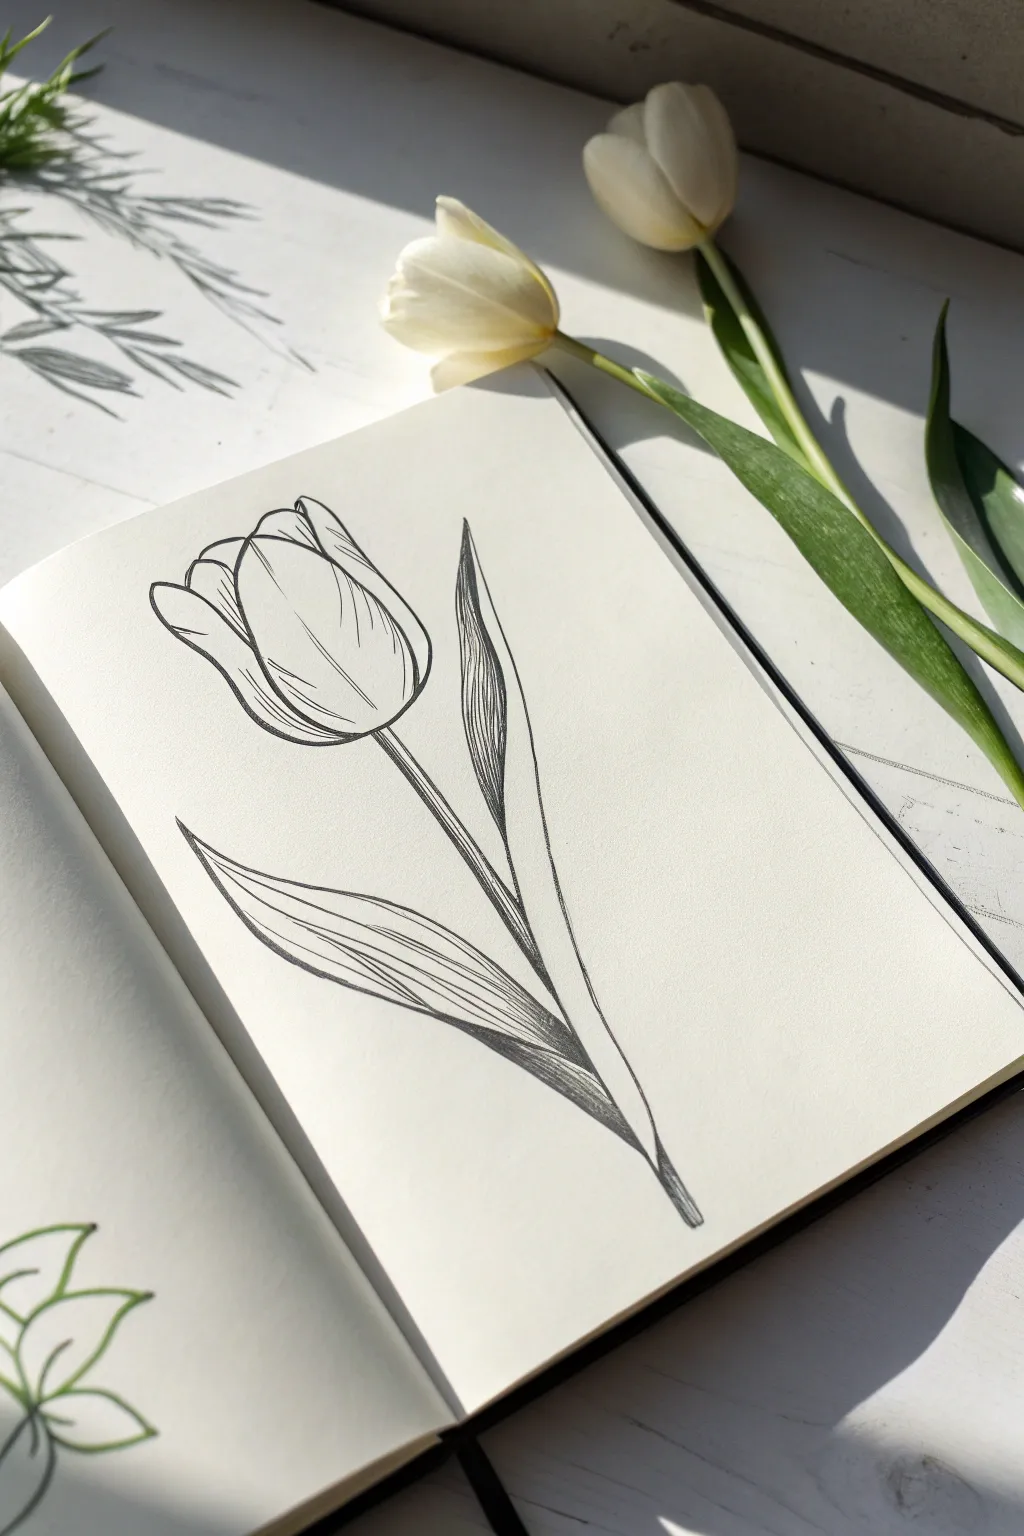
Capture the delicate beauty of spring with this refined tulip study. Using clean lines and subtle shading, you will create a timeless floral illustration that balances a bold cup-shaped blossom with sweeping, graceful leaves.
Step-by-Step
Materials
- Sketchbook or drawing paper (heavyweight preferred)
- HB or 2B graphite pencil (for initial sketch)
- Fine liner pen (0.3mm or 0.5mm, black ink)
- Soft eraser
- Reference photo or real tulip (optional)
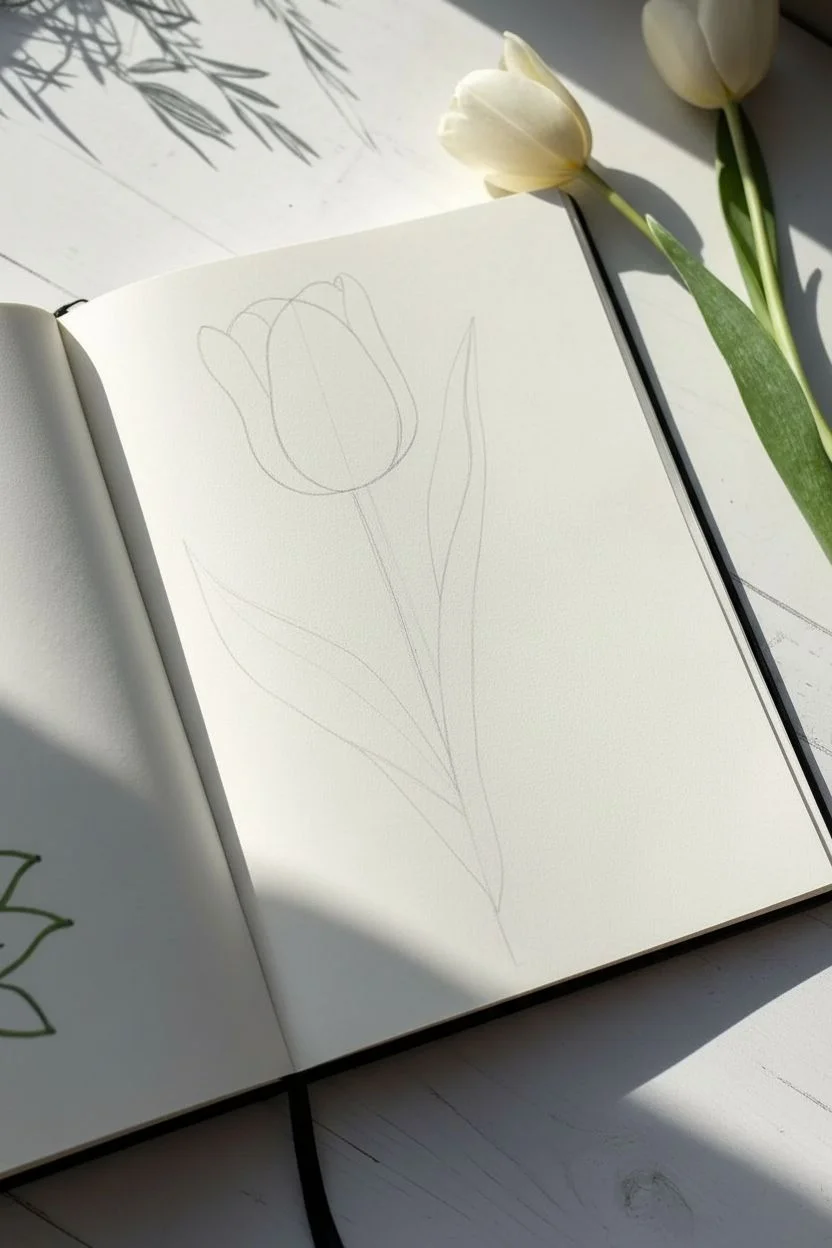
Step 1: Drafting the Basic Shape
-
Establish the stem line:
Start by drawing a faint, slightly curved line down the center of your page with your pencil. This will serve as the central axis for the stem and anchor the entire flower. -
Outline the flower head:
At the top of your stem line, lightly sketch a ‘U’ shape or a simple wine glass bowl shape. This forms the base of the tulip’s cup. -
Define the petals:
Within the bowl shape, draw an inverted teardrop shape in the center—this is the front-facing petal. Add curved lines on either side to represent the petals wrapping around it. -
Sketch the leaf placement:
From the lower third of the stem, sketch two long, sweeping curves extending upward. Make the left leaf droop slightly away, while the right leaf stands taller and closer to the stem.
Natural Lines
Avoid perfectly straight lines for the stem and leaves. A slight wobble or curve mimics organic growth and makes the drawing feel more realistic and less stiff.
Step 2: Defining the Flower
-
Ink the central petal:
Switch to your fine liner pen. Trace the central petal, giving the top edge a slight dip or wave to make it look distinct and organic rather than perfectly geometric. -
Add side petals:
Draw the side petals embracing the center one. Allow the lines to overlap slightly at the top, creating the illusion of tight layers. -
Draw the outer petals:
Add the slight curve of the back petals visible at the very top rim, closing the cup shape. Keep your hand loose to ensure the lines flow naturally. -
Texture the bloom:
Draw very fine, vertical hatching lines on the petals, following the curve of the flower’s form. Concentrate these lines at the base of the cup where shadows would naturally fall.
Add Color
Once the ink is dry, use watercolor or diluted colored markers to add a soft wash of pink or yellow over the petals, letting the ink lines serve as texture.
Step 3: Stems and Leaves
-
Ink the stem:
Draw over your stem guideline with a confident, single stroke if possible. Double the line closest to the flower head to give the stem proper thickness, tapering it slightly as it goes down. -
Outline the left leaf:
Trace the left leaf, emphasizing the pointed tip. Draw a central vein line that doesn’t quite touch the tip, splitting the leaf surface visually. -
Detail the right leaf:
Outline the tall right leaf. Since this leaf is more upright, make the lines straighter and stronger to suggest structure. -
Add leaf texture:
Using quick, flicking motions, add long shading lines inside the leaves. Follow the direction of growth—upward and outward—to show the fibrous texture of the plant.
Step 4: Refining and Shading
-
Deepen the shadows:
Return to the base of the leaves and the bottom of the flower cup. Add a second layer of hatching lines (cross-hatching) to darken these areas, which adds volume to the drawing. -
Refine the contour:
Thicken the outer perimeter lines of the tulip slightly. A bolder outline helps separate the flower from the background and gives it a sticker-like clarity. -
Clean up:
Wait at least five minutes for the ink to dry completely to prevent smudging. I usually hold the paper up to the light to check for wet sheen before erasing the pencil guidelines.
Now you have a permanent bloom to brighten up your sketchbook pages


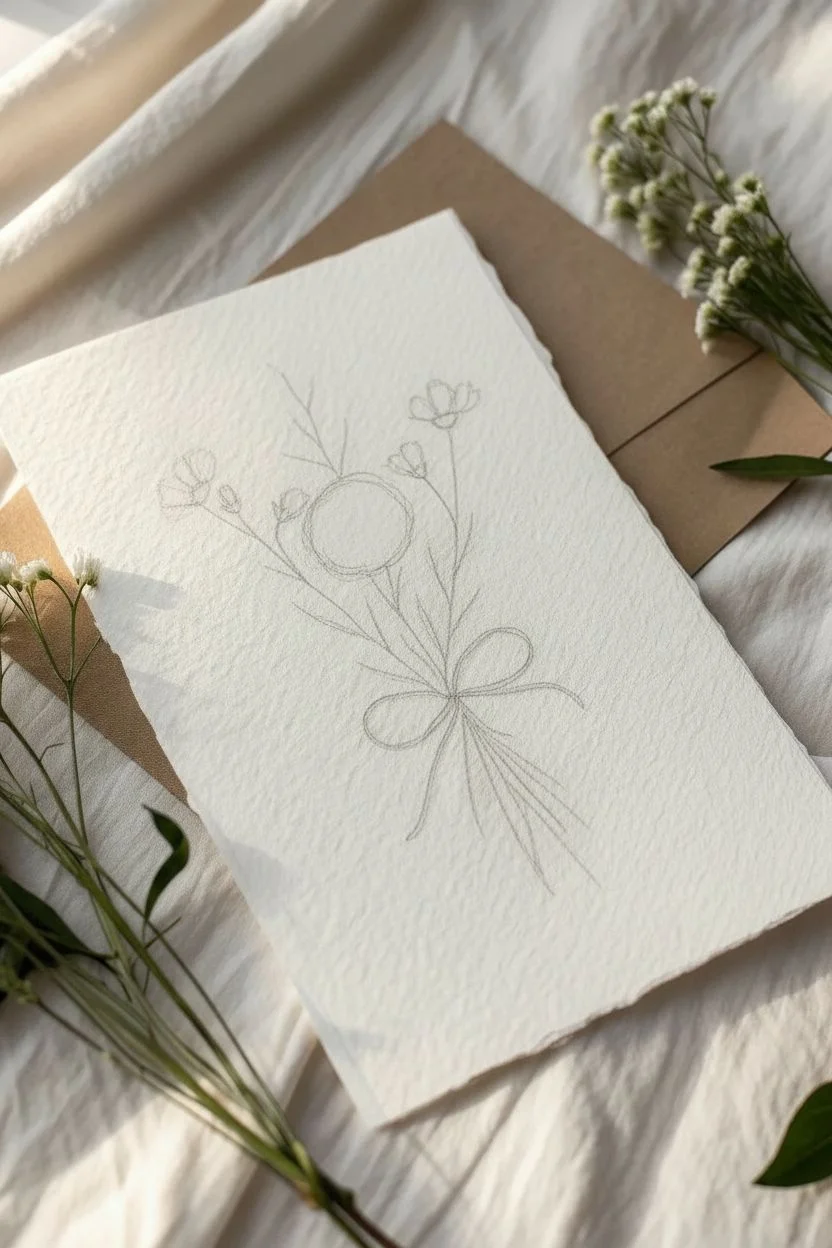
Simple Rose Spiral You Can Draw in Seconds
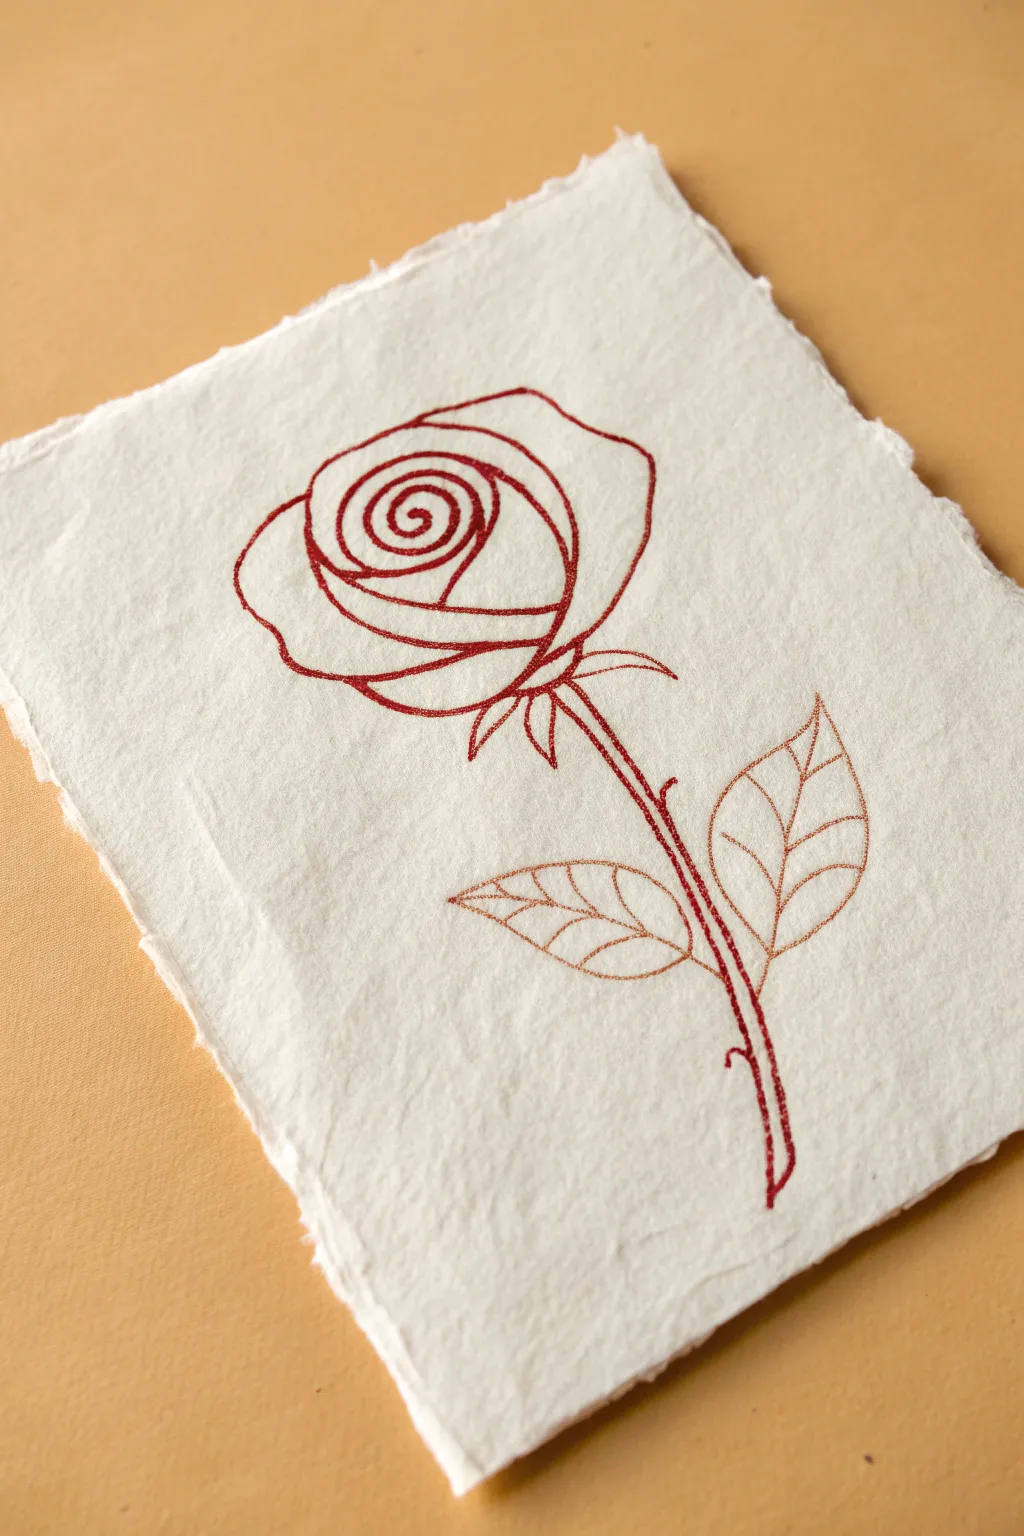
Capture the elegance of a classic rose with this minimalist line drawing that uses a clever spiral technique for the bloom. The combination of textured handmade paper and metallic copper ink creates a sophisticated finish perfect for greeting cards or framed mini-art.
How-To Guide
Materials
- Handmade cotton rag paper with deckled edges (approx. 5×7 inches)
- Metallic copper or rust-red gel pen (fine tip, approx. 0.5-0.7mm)
- Pencil (HB or 2H for light sketching)
- Kneaded eraser
- Ruler (optional)
- Scrap paper for testing ink flow
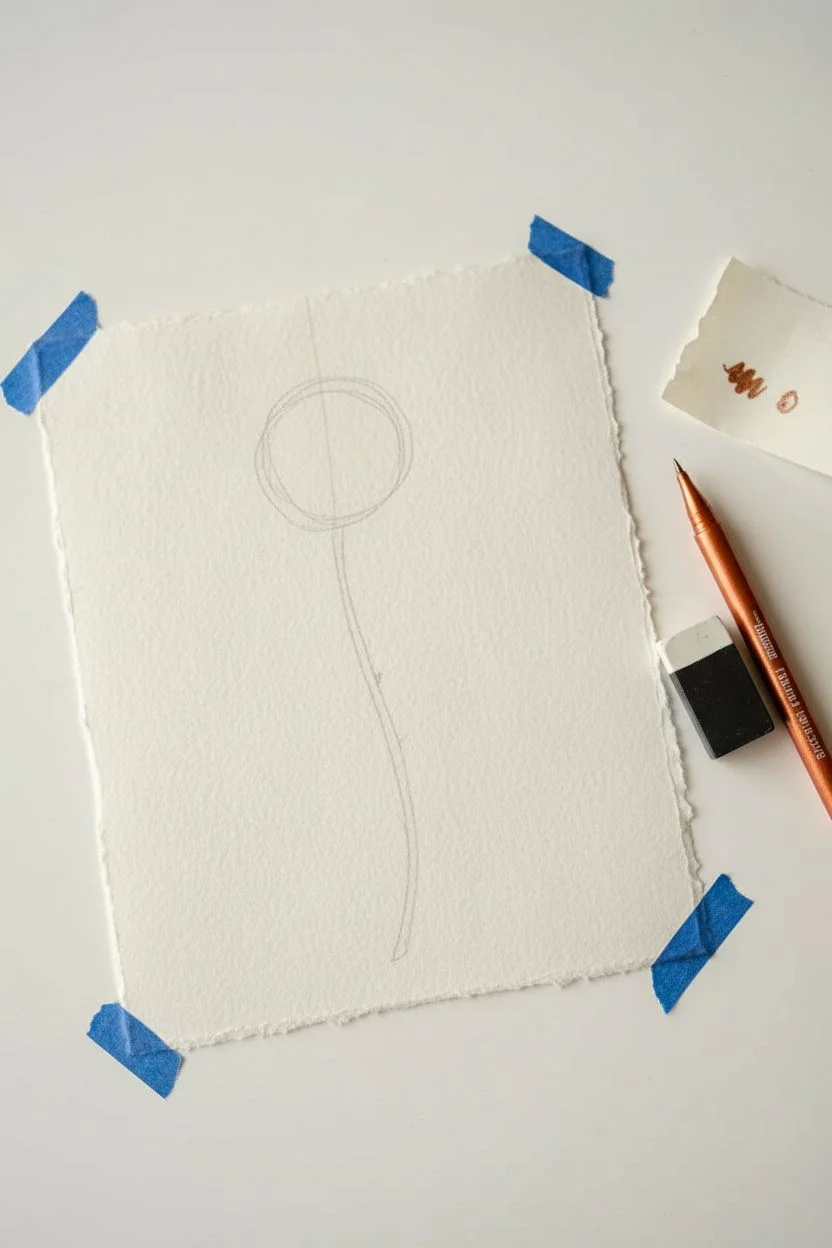
Step 1: Setting the Composition
-
Prepare your surface:
Place your deckled-edge paper on a flat, clean surface. Since handmade paper can be bumpy, I like to tape the corners down gently with painter’s tape to keep it from shifting while I draw. -
Test your pen:
Before touching the final paper, scribble on a scrap sheet to ensure your metallic gel pen is flowing smoothly. You want crisp lines without skipping, which can be tricky on textured surfaces. -
Map out the anchor points:
Using a very light touch with your pencil, sketch a faint vertical line where the stem will go, curving it slightly to the right at the bottom. Mark a rough circle at the top where the bloom will sit to ensure it’s centered.
Ink skipping on bumps?
Handmade paper has texture. If your pen skips, slow down your drawing speed significantly and go over the line a second time with very light pressure.
Step 2: Drawing the Bloom
-
Start the center spiral:
Take your metallic pen and begin in the absolute center of your bloom area. Draw a tight, small spiral, working outward like a snail shell. -
Expand the spiral:
Continue the spiral line, letting the spacing between the lines get slightly wider as you move outward. Create about 3-4 loops total. -
Close the bud:
At the end of your last spiral loop, bring the line down and across the bottom of the spiral shape, creating a shallow ‘U’ curve that connects one side of the spiral to the other. This forms the cup of the rose. -
Add first outer petal:
Start a line from the top left edge of your spiral. Curve it outwards and downwards, hugging the shape of the bud, and connect it back to the bottom center of the bloom. -
Add the opposing petal:
Mirror that action on the right side. Start near the top right of the central spiral, curve out and down, overlapping slightly with the lines you’ve already drawn, forming a cohesive bowl shape. -
Create the final contour:
Draw one larger, slightly wavy line that encompasses the bottom half of the flower head. This should look like the largest, fully opened petal supporting the bud.
Pro Tip: Metallic Pop
Once the first layer is dry, re-trace just the outer edges of the petals with your metallic pen. This builds up the ink texture, making it catch the light more intensely.
Step 3: Adding Stem and Sepals
-
Draw the sepals:
Directly under the flower head, draw three small, pointed leaf-like shapes (sepals) pointing downwards. Make the center one straight and the side ones curve slightly outward. -
Form the upper stem:
Draw two parallel lines extending down from the sepals. Keep them very close together to make a delicate stem. Stop about halfway down the paper. -
Add a small thorn:
About a third of the way down the stem, add a tiny triangular spike on the right side for a realistic thorn detail. -
Continue the stem:
Extend the double lines of the stem all the way to the bottom, adding a slight curve to the right for a natural look. Close the bottom of the stem with a tiny tapered point.
Step 4: Leaves and Final Details
-
Outline the right leaf:
Draw the outline of a leaf branching off the right side of the stem. Use a teardrop shape with a pointed tip. -
Add leaf veins:
Draw a central line through the leaf, then add 3-4 pairs of diagonal lines branching from the center to the edges for veins. -
Outline and detail the left leaf:
Draw a slightly smaller leaf on the left side, positioned a bit lower than the right one. Add the central vein and side veins just like the first one. -
Erase guidelines:
Wait at least 10-15 minutes for the metallic ink to fully dry. Gently dab—don’t rub—with your kneaded eraser to lift any visible pencil marks without smudging the ink.
Enjoy the simple beauty of your metallic rose drawing as you display it or gift it to a friend
BRUSH GUIDE
The Right Brush for Every Stroke
From clean lines to bold texture — master brush choice, stroke control, and essential techniques.
Explore the Full Guide
Five-Petal Blossom Using Rounded Heart Shapes
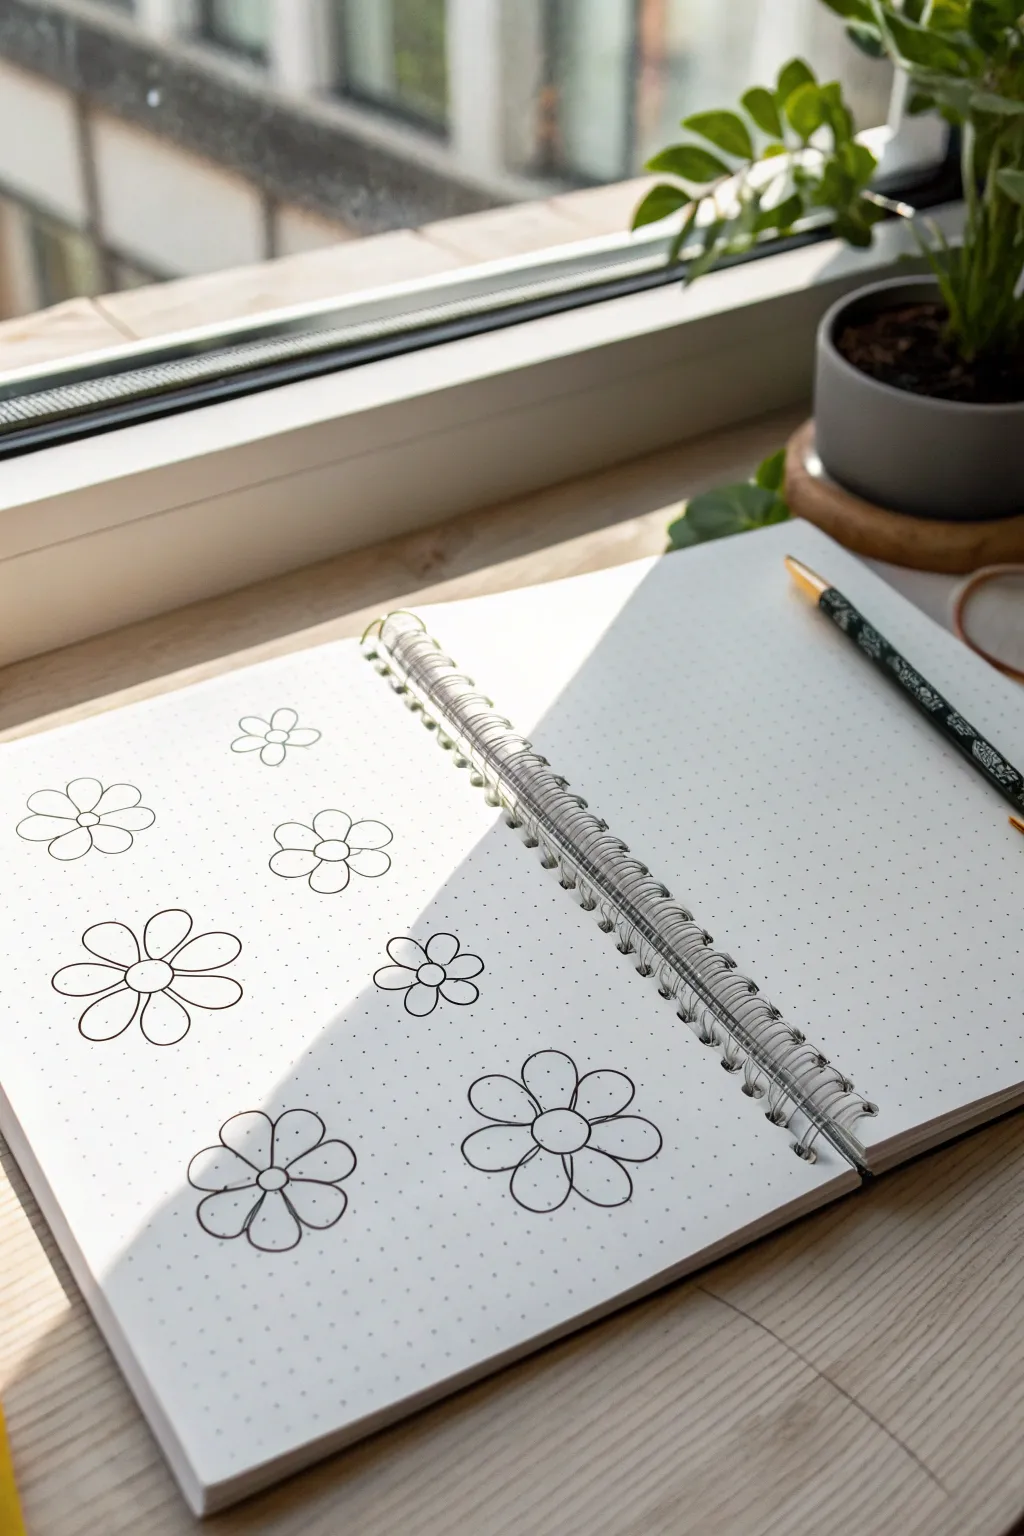
These charming five-petal flowers embrace simplicity with their rounded, heart-like petal shapes clustered around a central disc. The minimalist black-and-white style makes them perfect for beginner bullet journal spreads or quick doodle sessions.
Step-by-Step Guide
Materials
- Dot grid notebook or sketchbook
- Fine liner pen (black, size 03 or 05)
- Pencil (optional for sketching)
- Eraser
Step 1: Planning the Layout
-
Observe the grid:
Open your dot grid notebook to a fresh spread. The dots are your best friends here; they will help you space out your flowers evenly without needing a ruler. -
Visualize placement:
Decide where you want your flowers to sit. In the example, there’s a mix of sizes—some small, some medium, and some large—scattered across the page rather than in straight rows. -
Mark the centers:
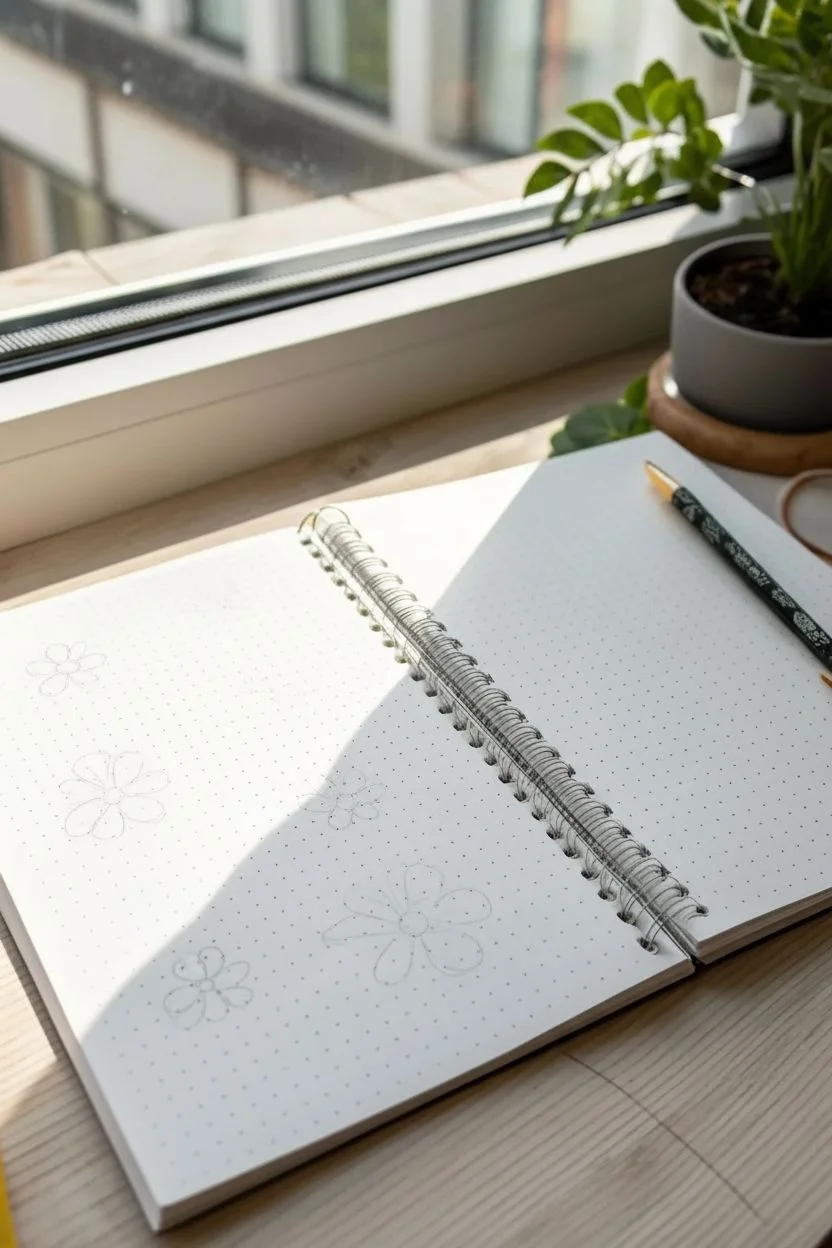
Using your pencil lightly, mark the center points for about 5-7 flowers on your page. Stagger them so they aren’t directly on top of one another to create a natural, drifting look.
Uneven Petals?
If you finish and realize one side has huge gaps, add a tiny sixth petal or simply draw a stray leaf to fill the awkward white space naturally.
Step 2: Drawing the Base Structure
-
Draw the center circle:
Choose one of your marked spots and draw a small circle with your fine liner. It doesn’t need to be geometrically perfect; a hand-drawn look adds character. -
Estimate petal positions:
Visualize five points equally spaced around that center circle. If you’re nervous about spacing, you can make tiny pencil dots as guides before committing to ink.
Grid Guide
Use the dot grid to count spaces! For a medium flower, try making your center circle 1×1 grid square, and extend petals out 2 squares in each direction.
Step 3: Creating the Petals
-
Start the first petal:
Pick a spot on the edge of the center circle. Draw a curve moving outward that loops around and comes back to the circle, creating a rounded, almost heart-like shape but without the sharp dip in the middle. -
Complete the first petal:
Make sure the petal is wider at the outer edge than at the base where it connects to the center. The line should be continuous and smooth. -
Draw the second petal:
Move to the next space on the circle. Start this petal right next to the base of the first one so they touch or nearly touch. -
Continue the pattern:
Repeat the shape for the third and fourth petals. Try to keep them roughly the same size, but slight variations are totally fine and look organic. -
Close the flower:
Fit the fifth and final petal into the remaining gap. If the gap is a bit tight, I usually just make this petal slightly narrower to fit it in snugly.
Step 4: Adding Variety and Depth
-
Vary the sizes:
Move to your next marked center point. For this one, try drawing a significantly larger or smaller center circle and adjust your petal size to match. -
Create a ‘floating’ feel:
Draw a few very small, simple flowers in the empty spaces between the larger ones. These can be quick sketches with just implied petals to fill the negative space. -
Check line weight:
Look over your drawing. If any lines look too thin or faint, trace over them carefully a second time to darken them, giving the doodle a bold, sticker-like appearance. -
Erase guidelines:
Once the ink is completely dry (give it a full minute just to be safe), gently erase any pencil marks you made for spacing or centers.
Now you have a page full of cheerful blooms ready to be colored in or left as striking line art
Cherry Blossom Branch With Tiny Clusters
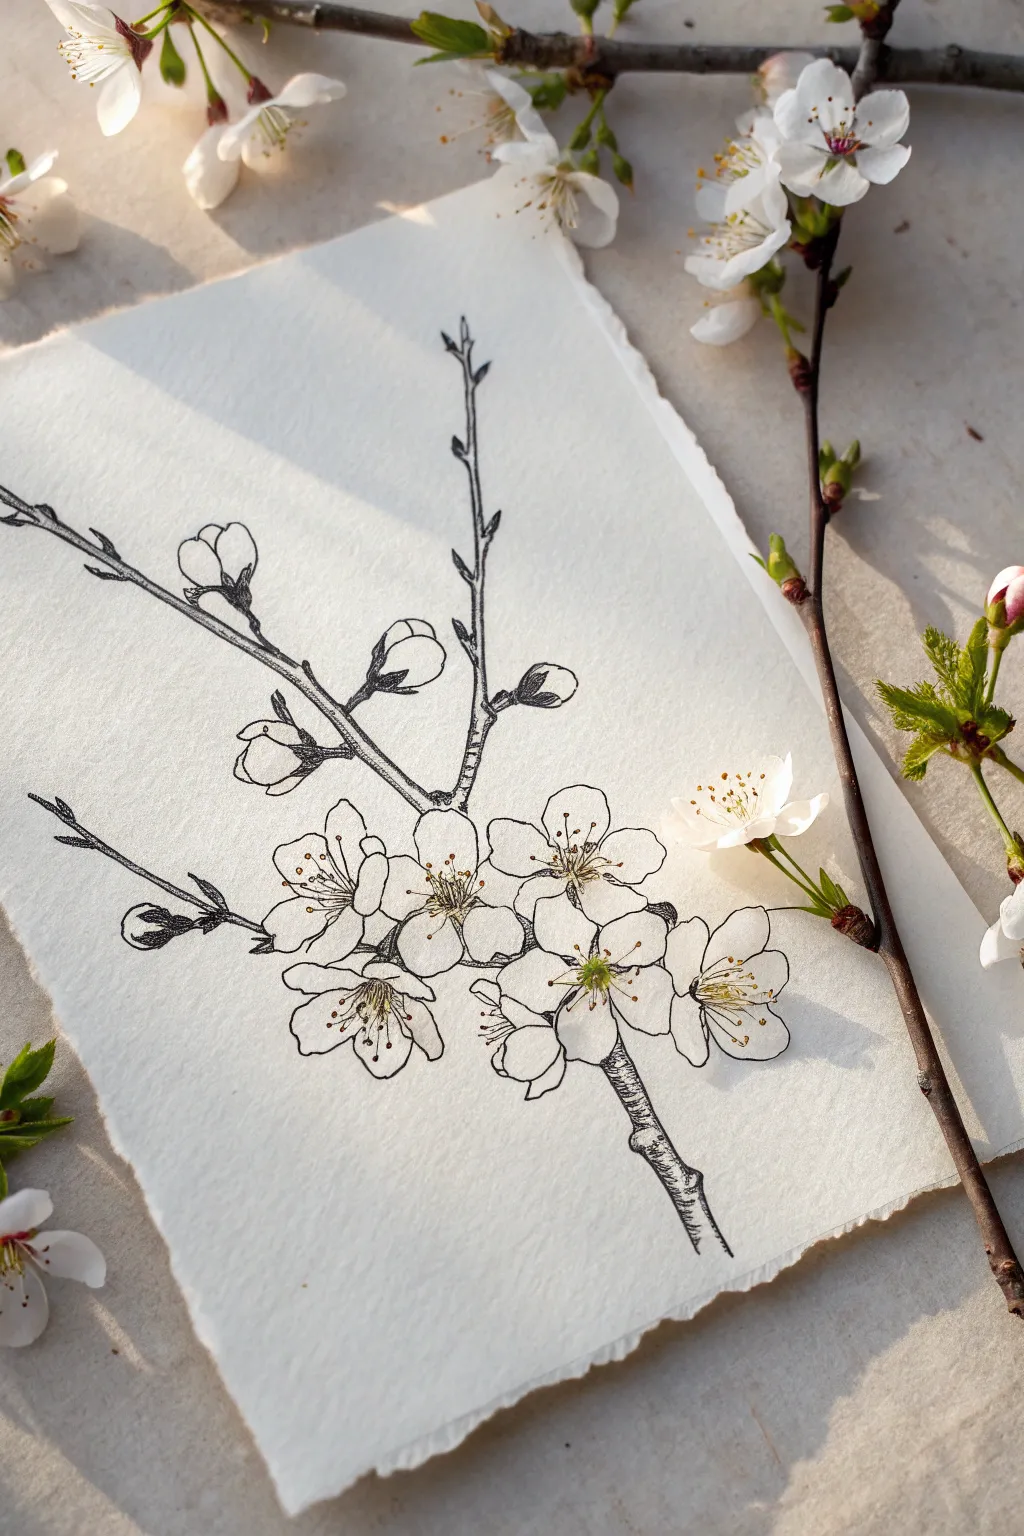

Capture the delicate beauty of spring with this fine liner sketch of a blossoming cherry branch. This project focuses on clean linework and botanical details, creating a timeless piece of art on beautiful deckle-edged paper.
How-To Guide
Materials
- Textured watercolor or mixed media paper (with deckle edge)
- Fine liner pens (sizes 005, 01, and 03)
- Pencil (HB or H)
- Kneaded eraser
- Real flower or reference photo (optional)
Step 1: Drafting the Structure
-
Establish the main branch:
Begin with a pencil and very light pressure. Draw a diagonal line starting from the bottom right, curving gently upward toward the left center. -
Add secondary branches:
From the main stem, sketch two thinner offshoots extending upwards. One should reach high towards the top right, while a shorter one angles off to the left. -
Mark flower placements:
Instead of drawing flowers immediately, simply draw rough circles or ovals where the main cluster of blooms will sit near the intersection of the branches. -
Position the buds:
Along the upper branches, sketch small tear-drop shapes. These will become the unopened flower buds later on.
Step 2: Inking the Blooms
-
Outline the petals:
Switch to your 01 fine liner. Start with the central open flowers. Draw five rounded petals for each bloom, keeping the edges slightly wavy for a natural look. -
Center detailing:
In the center of the open flowers, draw tiny circles for the stamen attachments. Radiate fine lines outward from these centers, topping each with a small dot. -
Ink the buds:
Move to the tear-drop shapes on the upper branches. Draw the enclosed petals tightly wrapped together. Add the small textured sepals at the base of each bud. -
Refine the bud stems:
Connect the buds to the main branch with short, slightly curved stems. I find that making these lines slightly thicker where they join the branch adds realism.
Shaky Lines?
Don’t worry about wobbles! Cherry branches are naturally knobby and irregular. A slightly shaky hand can actually add realistic organic texture to the bark.
Step 3: Defining the Wood
-
Outline the branches:
Using a slightly thicker 03 pen, trace over your pencil lines for the wooden parts. Don’t make the lines perfectly straight; add little bumps and knots. -
Add bark texture:
On the thickest part of the branch at the bottom, draw short horizontal curved lines. This suggests the classic cherry tree bark texture. -
Detail the nodes:
Where branches split or buds emerge, create darker patches or tiny rings to show the growth nodes. -
Extend the tips:
At the very top of the thin branches, taper your lines into delicate points, perhaps adding a tiny, undeveloped leaf bud.
Create a Vintage Look
Before drawing, tea-stain your paper to give it an antique, scientific field-journal appearance. Let it dry completely before inking.
Step 4: Finishing Touches
-
Add stippling shading:
Switch to your finest 005 pen. Add tiny dots (stippling) at the base of the petals near the center to create depth without solid shading. -
Shade the sepals:
Darken the base of the buds and the sepals using closely spaced hatching lines to make them look rounded and solid. -
Review contrast:
Look at the drawing as a whole. if the branch looks too flat, add a few more bark lines on the shadowed side (usually the bottom edge). -
Erase guidelines:
Once the ink is completely dry—give it a few minutes—gently use the kneaded eraser to lift away all initial pencil marks. -
Optional coloring:
If you wish, add a very faint touch of yellow-green pencil to the center of the flowers, but keeping it black and white preserves the classic botanical illustration style.
Now you have a delicate botanical study that captures the fleeting beauty of spring on paper

PENCIL GUIDE
Understanding Pencil Grades from H to B
From first sketch to finished drawing — learn pencil grades, line control, and shading techniques.
Explore the Full Guide
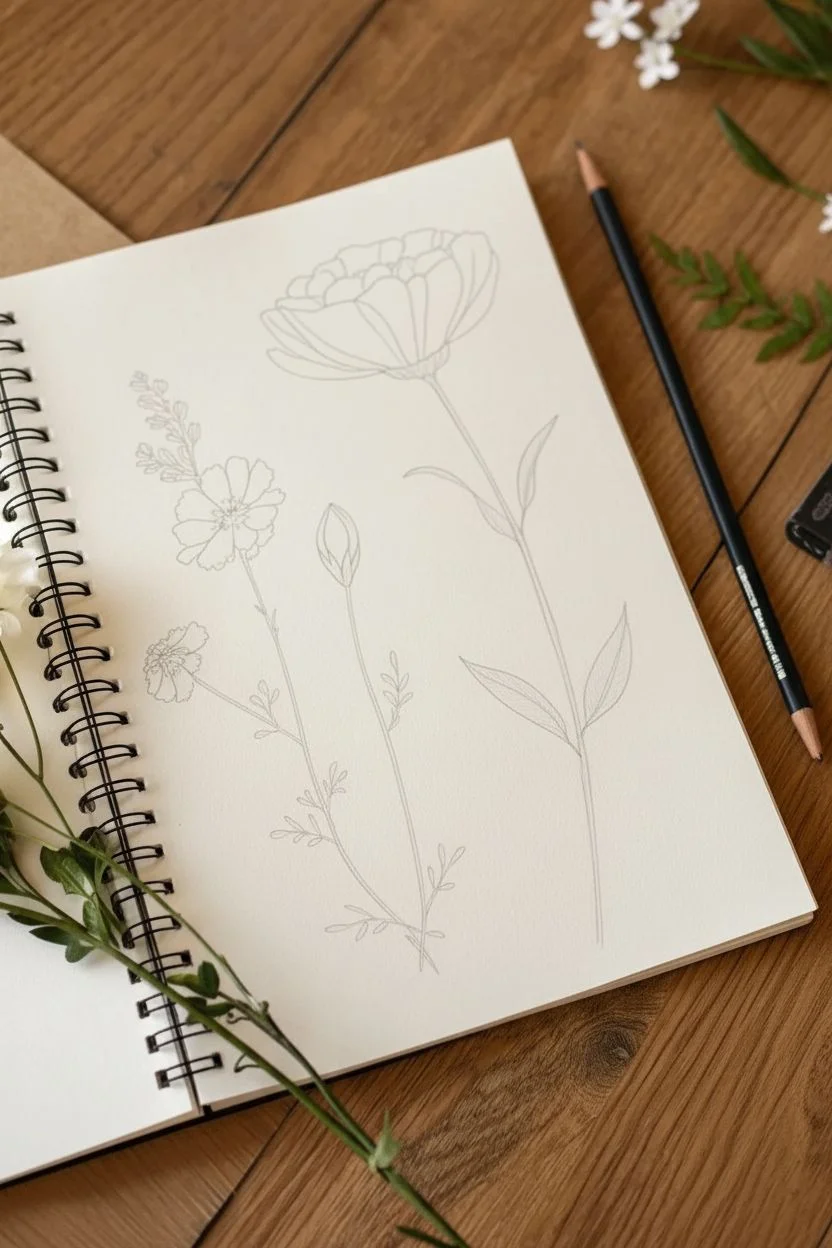
Wildflower Trio Using Only Ovals and Lines
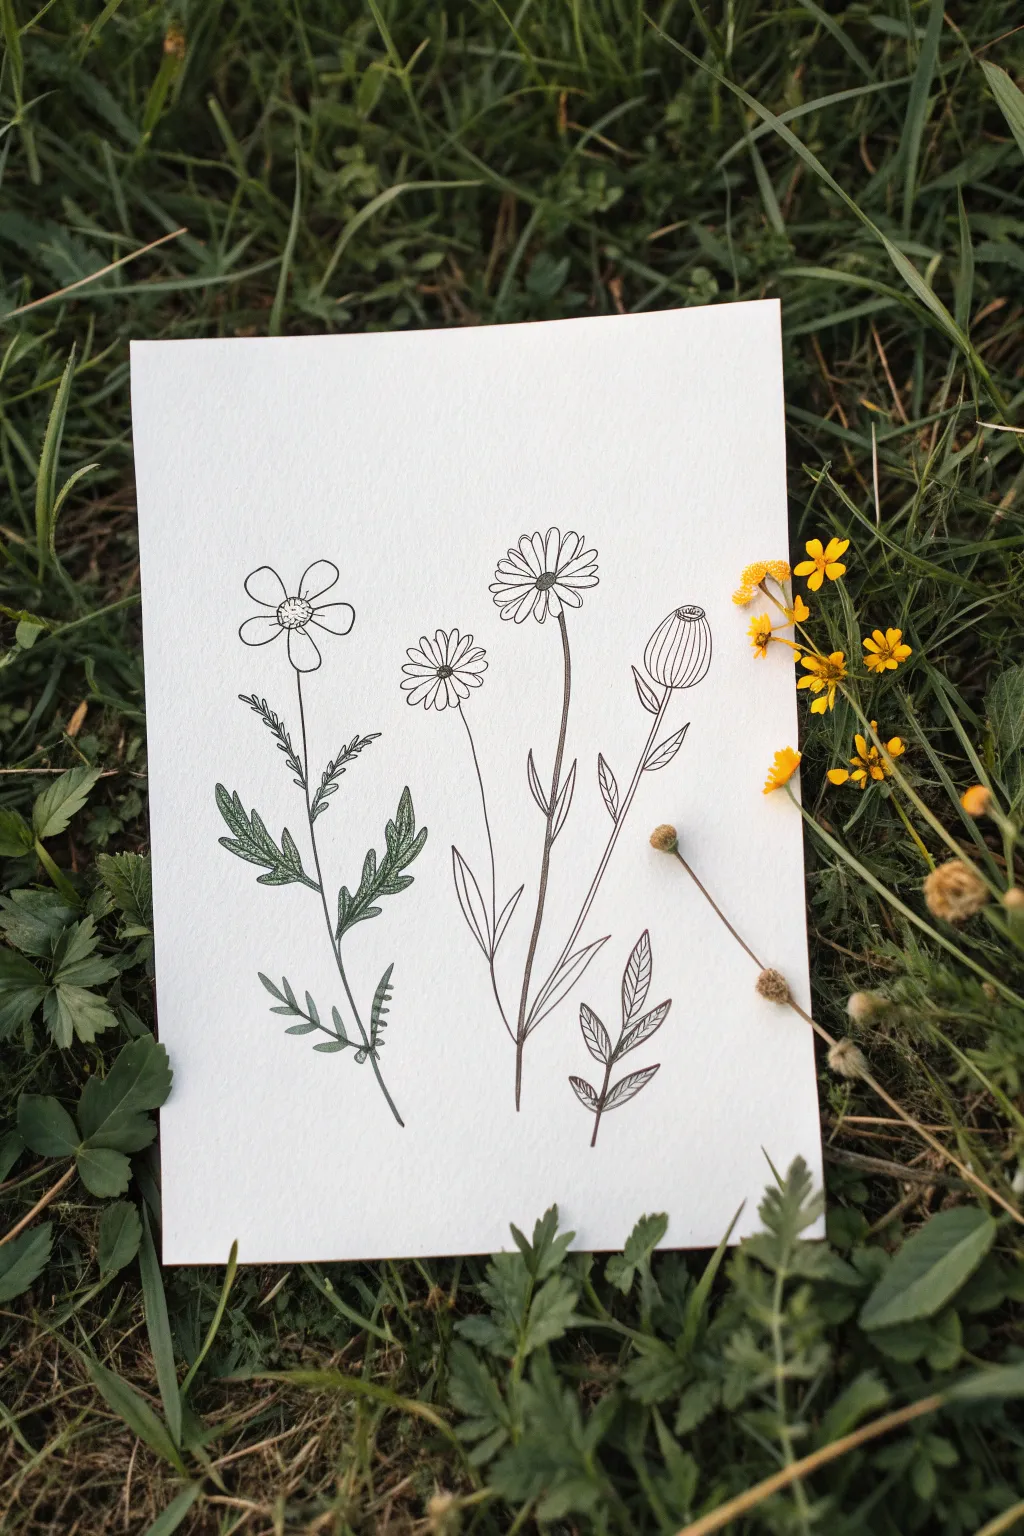
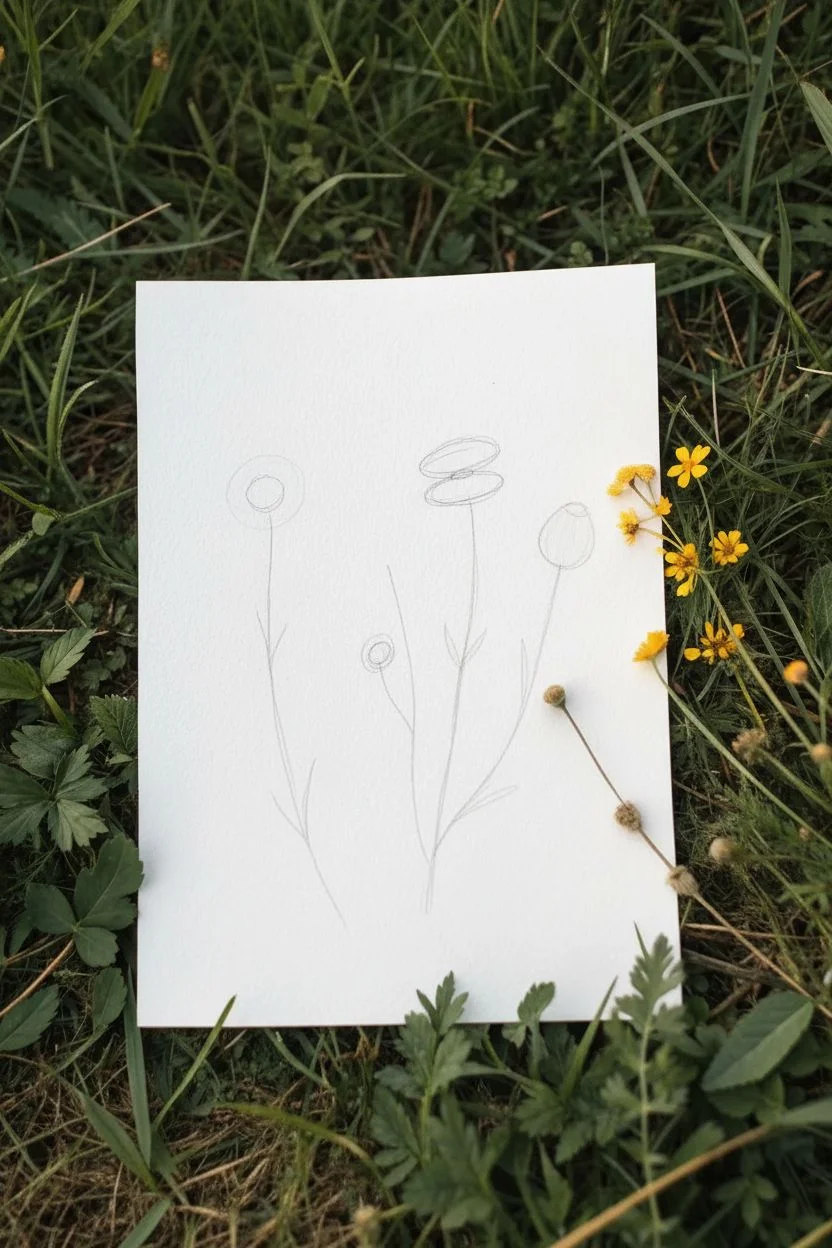
Capture the delicate beauty of a meadow with this simple line art project featuring three distinct wildflower silhouettes. Using basic geometric shapes as guides, you’ll create a clean, botanical illustration perfect for greeting cards or journal pages.
How-To Guide
Materials
- Heavyweight drawing paper or mixed media paper (approx. A5 size)
- HB pencil for sketching
- Soft eraser (kneaded eraser preferred)
- Black fine liner pen (0.3mm or 0.5mm)
- Ruler (optional)
Step 1: Drafting the Foundations
-
Set the guidelines:
Begin by lightly sketching three vertical lines for the stems. Curve the left one slightly to the left, make the center one the tallest and straightest, and angle the right one gently to the right to create a pleasing composition. -
Position the flower heads:
At the top of the left stem, draw a small circle for the flower center. For the middle stem, draw two concentric ovals (a smaller one inside a larger one) to mark the daisy-like head. On the right stem, sketch a teardrop shape pointing upward for the unbloomed bud. -
Add a secondary bloom:
About halfway down the middle stem, to its left, sketch a smaller circle to indicate a second, smaller daisy flower branching off.
Keep It steady
Rest the heel of your hand on a scrap piece of paper while drawing. This prevents hand oils from smudging your pencil sketch or smearing wet ink.
Step 2: Drawing the Flower Heads
-
Detail the left buttercup:
Using your fine liner, ink the center circle of the left flower. Draw five large, rounded petals radiating outward. Add a tiny line or two inside each petal near the center to suggest dimension. -
Define the center daisy:
For the tallest flower, ink the small center circle first. Then, draw many thin, long petals extending to the edge of your outer guide oval. Make the tips of these petals slightly rounded but narrow. -
Create the lower bloom:
Repeat the petal process for the smaller flower on the middle stem, but keep the petals shorter and slightly more compact. -
Structure the bud:
On the right stem, draw the bud shape. Fill the teardrop shape with vertical curved lines that follow the contour of the bud, making it look ribbed and closed.
Step 3: Stems and Foliage
-
Ink the main stems:
Trace over your pencil stem lines with confident, darker strokes. I find it helpful to pull the pen toward me for smoother lines. -
Leaf structure for the left flower:
The left flower has jagged, fern-like leaves. Draw stems branching out, then add deeply lobed leaves with pointed tips. The texture here should feel a bit spiked compared to the flowers. -
Simple leaves for the center:
For the middle daisy, keep the leaves minimal. Draw long, slush, lance-shaped leaves near the base of the stems, using simple pointed ovals. -
veined leaves for the right bud:
The right plant features small, stacked leaves. Draw ovate shapes along the lower stem and add a central vein line to each one with tiny diagonal veins branching off.
Add a wash
Once the ink is waterproof-dry, dilute watercolor paint heavily with water. Dab very pale yellow or green loosely over the blooms for a ‘lazy watercolor’ effect.
Step 4: Final Touches
-
add texture:
Go back to the flower centers. Add tiny dots or stippling to the center of the left flower and the main central daisy to give them a pollen-like texture. -
Erase guidelines:
Wait at least five minutes to ensure the ink is completely dry. Gently erase all underlying pencil marks to reveal a clean, crisp illustration.
Now you have a charming botanical trio ready to be framed or gifted to a nature lover
Daffodil With a Trumpet Center (Simplified)
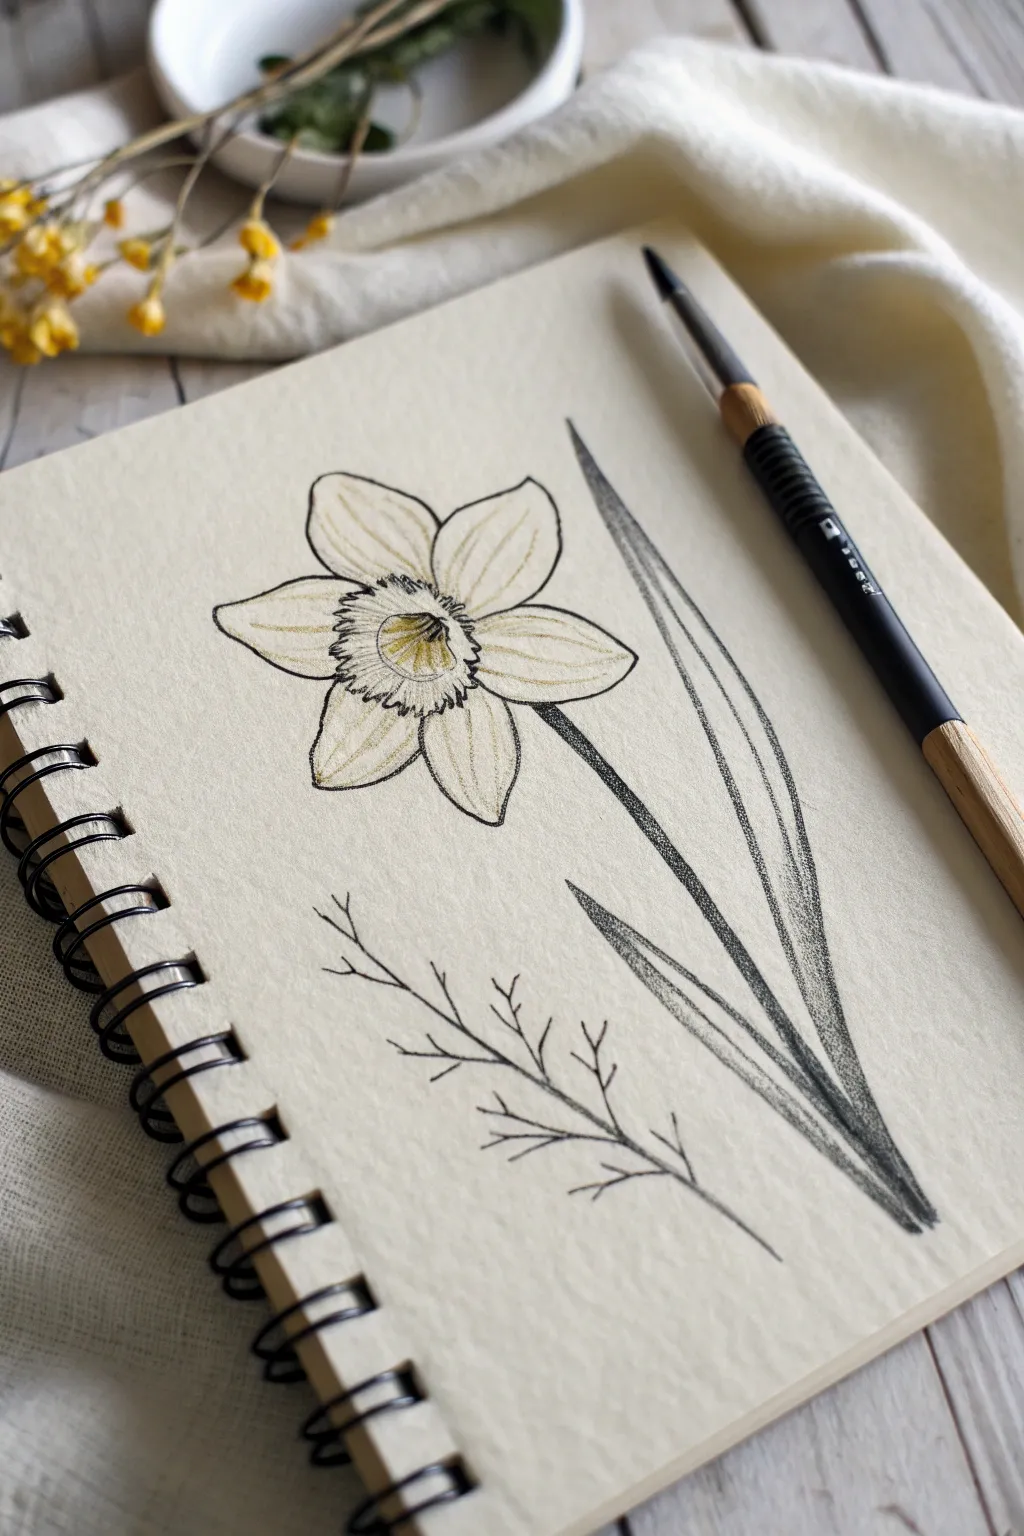
Capture the beauty of spring with this elegant pen and ink daffodil sketch. The style combines clean contour lines with delicate textural shading for a botanical illustration feel that looks great in any sketchbook.
Step-by-Step Guide
Materials
- Spiral-bound sketchbook (cream or off-white paper recommended)
- Fine liner pen (black, 0.3mm or 0.5mm)
- Brush pen or softer pencil for shading (black/grey)
- Light yellow colored pencil or watercolor wash (optional)
- Pencil for initial sketch
- Eraser
Step 1: Drawing the Flower Head
-
Outline the trumpet:
Start by drawing a small, slightly flattened circle for the opening of the trumpet in the center of your page. Make the line wavy or jagged to represent the ruffled edge. -
Add the trumpet body:
Draw a U-shape extending downwards from the ruffled circle to form the cup or ‘trumpet’ of the daffodil. Connect it to the center ruffle with short, curved lines. -
Sketch the inner details:
Inside the ruffled opening, draw a tiny circle for the stamen. Add very light, short strokes radiating outward from the center to suggest depth. -
Draw the first petals:
Sketch three large, slightly rounded petals behind the trumpet. Space them out roughly in a triangle shape—top, left, and right. -
Complete the petals:
Fill in the gaps between the first three petals with three additional petals. These should look like they are peeking out from behind the first set. -
Refine the petal shapes:
Go over your petal outlines with your fine liner. Give the edges a slightly organic, uneven wobble rather than making them perfect geometric curves. -
Add petal texture:
Draw faint, curved lines running from the base of the petals toward the tips. These veins help define the form and make the petals look delicate.
Wobbly Lines?
Don’t stress if your lines aren’t perfectly straight! A slight wobble actually makes botanical drawings look more organic and natural, mimicking real petals.
Step 2: Stem and Foliage
-
Draw the main stem:
From the base of the flower head, draw a long, slender stem curving gently downwards to the right. Use a slightly thicker line or double pass here for weight. -
Add the main leaf:
Draw a long, blade-like leaf extending upward alongside the stem. It should be taller than the stem itself, tapering to a sharp point. -
Sketch the secondary leaf:
Add a second, shorter leaf near the base of the stem, curving slightly outward. Keep the lines fluid and confident. -
Shade the stem:
Using your pen or a grey marker, add shading to one side of the stem and leaves. I like to use close, diagonal hatching lines to create a shadow effect. -
Add the sprig detail:
In the bottom left empty space, sketch a simple, bare twig or sprig. Use thin, jagged lines to create a branching pattern for visual balance.
Level Up: Texture
Try stippling (using tiny dots) inside the trumpet instead of lines. It creates a velvety texture that contrasts beautifully with the smooth petals.
Step 3: Finishing Touches
-
Darken the center:
Return to the trumpet center and darken the very middle recess to create depth. This high contrast draws the eye immediately to the focal point. -
Add color (optional):
If you wish, lightly shade the petals with a pale yellow colored pencil. Keep the color subtle, fading out toward the edges of the petals. -
Clean up:
Once the ink is completely dry, gently erase any visible pencil guidelines. Be careful not to smudge your shading.
You now have a lovely botanical sketch ready to brighten up your journal


Poppy Bowl Bloom With Crinkly Petal Edges
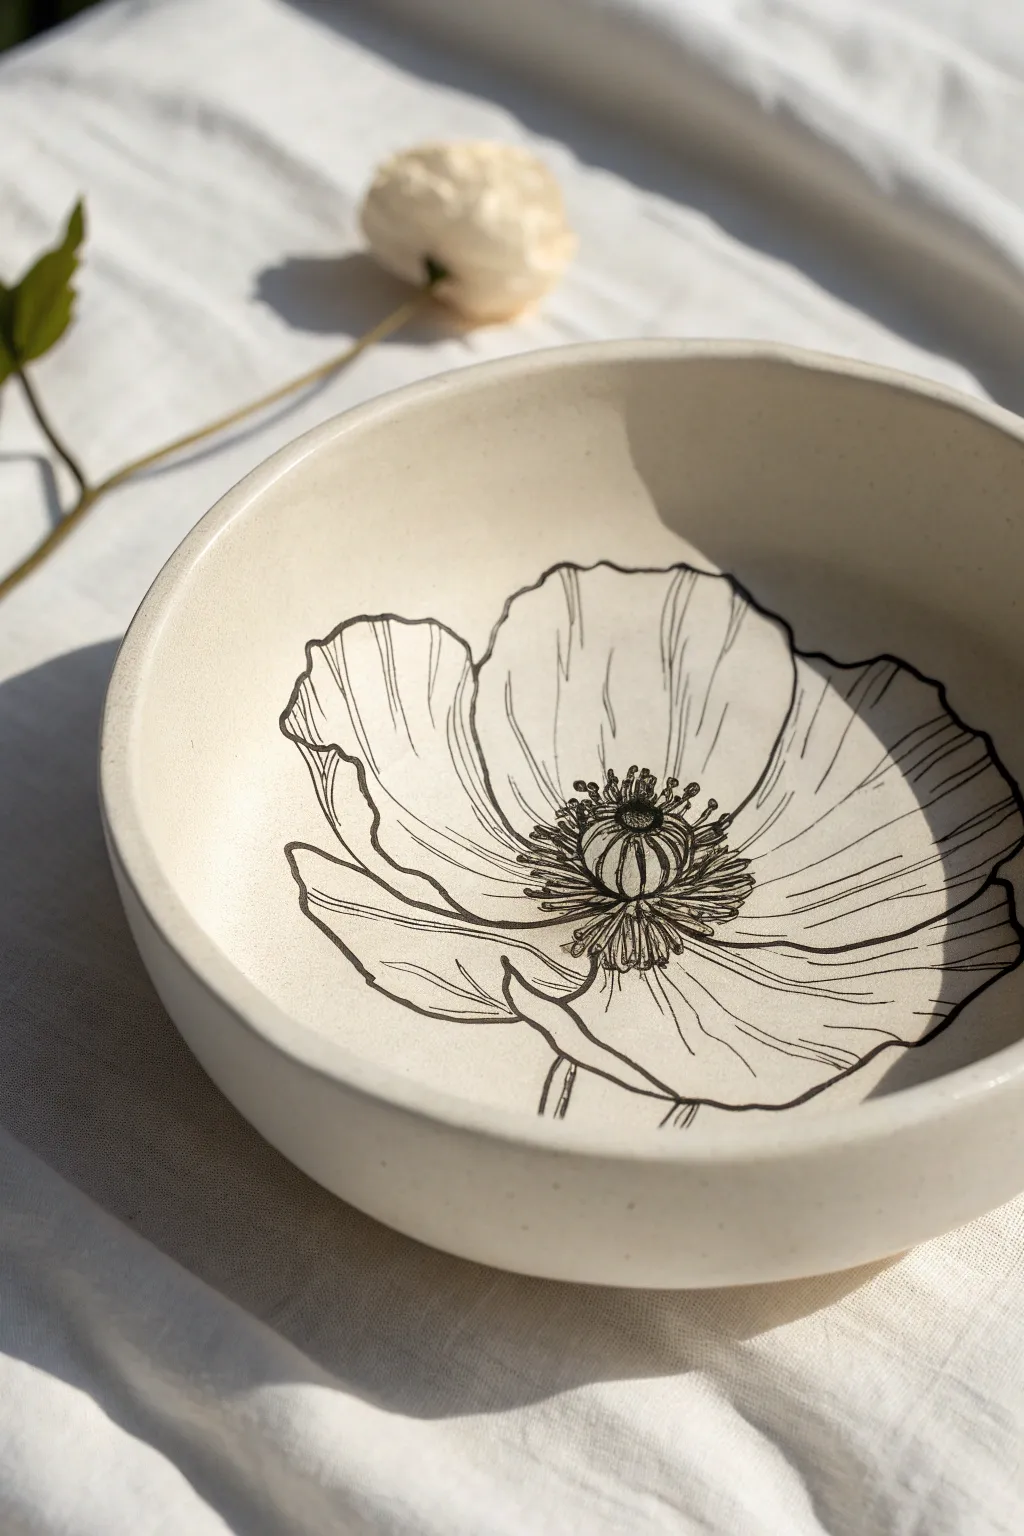
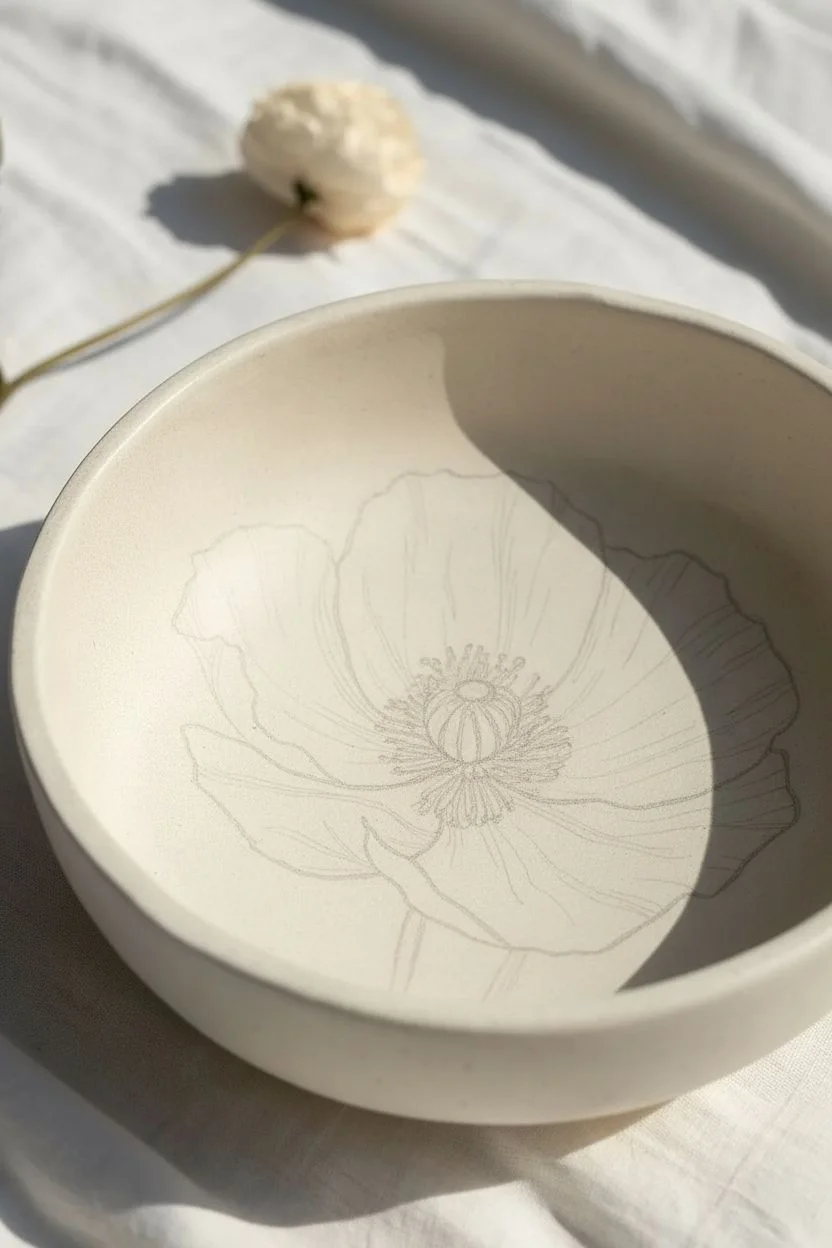
Transform a simple ceramic bowl into a piece of functional art with this delicate poppy illustration. The high-contrast black lines against the creamy ceramic surface create a modern, minimalist botanical look that highlights the crinkly texture of poppy petals.
Step-by-Step Tutorial
Materials
- Plain ceramic bowl (cream or off-white, matte finish preferred)
- Oil-based black paint marker (fine point) or ceramic porcelain pen
- Rubbing alcohol
- Cotton pads or paper towel
- Pencil (soft lead)
- Paper (for sketching)
- Oven (for curing)
Step 1: Preparation and Sketching
-
Clean the surface:
Before you begin, wipe the interior of the bowl thoroughly with rubbing alcohol on a cotton pad. This removes any oils or fingerprints that could prevent the ink from adhering properly. -
Practice your poppy:
Grab a piece of scrap paper and practice drawing the poppy first. Focus on the center pod and the large, wavy petals radiating outward. Don’t worry about perfect symmetry. -
Sketch the center:
Using a soft pencil very lightly, sketch the central seed pod—a small circle with a textured top—right in the middle of the bowl’s interior. This will anchor your entire design. -
Outline the petals:
Lightly sketch four to five large, overlapping petals around the center. Poppies have distinctive crinkled edges, so keep your pencil lines wavy and organic rather than stiff and straight.
Step 2: Inking the Design
-
Draw the seed pod:
Shake your black paint marker well to prime the ink. Carefully trace over your pencil sketch of the central pod, adding vertical lines to give it a ribbed texture. -
Add the stamen:
Draw tiny, fine lines radiating immediately from the base of the seed pod. Top each little line with a small dot or oval to create the dense ring of stamens characteristic of poppies. -
Outline the first petal:
Choose a front-facing petal and trace its outline. I like to let my hand wobble slightly here to replicate that fragile, tissue-paper texture of the flower. -
Detail the petal texture:
Draw fine, sweeping lines inside the petal, starting from the center and curving outward toward the edge. These lines shouldn’t touch the edge; they just suggest the curves and folds. -
Complete the petals:
Work your way around the flower, outlining the remaining petals. Make sure the petals behind appear to tuck underneath the front ones by stopping your lines where they intersect. -
Add petal folds:
Include a few ‘fold-over’ lines at the edges of the petals where the drawing meets the curve of the bowl, giving the flower a sense of three-dimensional depth. -
Draw the stem:
Extend two parallel lines down from the bottom petals towards the rim of the bowl to suggest a thick, hairy stem just peeking out.
Ink Bleeding?
If the marker ink bleeds or spiders, the ceramic glaze might be too porous. Try using a specifically formulated ‘porcelain marker’ or work on a glazed surface that is glossy rather than matte.
Step 3: Finishing Touches
-
Clean up:
Allow the ink to dry for at least 15-20 minutes. Once completely dry touch-safe, use a damp cotton swab or eraser to gently remove any visible pencil guidelines. -
Dry time:
Let the bowl sit undisturbed for 24 hours to ensure the pigment fully settles into the ceramic surface before baking. -
Bake to set:
Place the bowl in a cold oven. Turn the heat to 350°F (175°C). Once the oven reaches temperature, set a timer for 30 minutes. Turn the oven off and let the bowl cool completely inside to prevent cracking.
Longevity Tip
Even after baking, hand washing is best to preserve the fine lines of your drawing. Avoid abrasive scrubbers on the artwork area to keep the poppy looking crisp.
Display your new bowl on a shelf or use it for dry trinkets to show off your delicate floral line work
Side-View Buds and Blooms for Easy Variety
Capture the delicate beauty of meadow flora with this elegant pen-and-ink study featuring three distinct growth stages. The composition balances a large, open bloom with smaller wildflowers and a slender bud, perfect for practicing fine line work and varied textures.
Step-by-Step Guide
Materials
- Acid-free sketchbook (smooth or vellum finish)
- HB graphite pencil
- Kneaded eraser
- Fine liner pen (01 or 03 size, black)
- Fine liner pen (005 size for details, black)
Step 1: Sketching the Structural Shapes
-
Map the stems:
Begin by lightly drawing three vertical, slightly curved lines with your HB pencil to establish the stems. Place the tallest stem on the right, leaning slightly right, and the other two to the left, crossing near the bottom. -
Outline the large bloom:
At the top of the rightmost stem, sketch a wide, flattened oval shape for the flower head. Add a smaller circle near the base of this oval to mark where the petals meet the stem. -
Position the smaller flowers:
For the leftmost cluster, sketch small circles at different heights along the upper half of the stem to mark the flower heads. Add a small teardrop shape at the top of the middle stem for the bud. -
Block in foliage:
Lightly indicate leaf positions. Draw long, lance-shaped outlines for the large flower’s leaves and smaller, jagged shapes for the wildflower cluster’s foliage.
Step 2: Inking the Large Bloom
-
Define the petals:
Using your 01 pen, trace the large flower’s petals. Focus on overlapping shapes that fan out from the center, giving the edges a slight wobble for a natural, organic look. -
Detail the flower base:
Draw the sepal (the green cup at the base) with short, dark vertical strokes to suggest texture and shadow where the stem meets the petals. -
Add petal veins:
Switch to a 005 pen or use very light pressure. Draw fine lines radiating from the base of the petals outward, stopping about halfway up to keep the look airy. -
Ink the stem and leaves:
Go over the main stem line. For the leaves, draw the outer contour first, then fill the interior with closely spaced diagonal hatching lines to create a dark, textured contrast against the white petals.
Uneven Lines?
Shaky hands are actually great for flower drawings. Allow your pen to wiggle slightly on petal edges; nature rarely produces perfectly straight lines.
Step 3: Developing the Middle Bud
-
Outline the bud:
Trace the teardrop shape on the middle stem. Divide it vertically with a curved line to show the petals tightly wrapped together. -
Add shading:
Use vertical hatching lines at the base of the bud to give it volume and roundness. Keep the tip of the bud clear and white. -
Draw the lower leaves:
Ink the small, sprouting leaves near the bottom of this stem. Keep these simple—just outline the shapes and add a single central vein line for each.
Add Depth
Use stippling (tiny dots) near the center of the open wildflowers instead of lines. This adds a pollen-like texture that contrasts beautifully with the petals.
Step 4: Refining the Wildflower Cluster
-
Draw the open flowers:
On the leftmost stem, ink the small, daisy-like blooms. Give the petals slightly jagged tips and draw a small, textured circle in the center of each. -
Create the top buds:
At the very tip of this stem, draw a cluster of tiny, unopened buds using small oval shapes stacked in a raceme formation. -
Connect with stems:
Draw thin, branching lines connecting the individual flowers to the main stalk. I find that keeping these lines very thin makes the flowers look more delicate. -
Detail the lower foliage:
Ink the jagged leaves on the lower stem. Unlike the large leaves on the right, leave these leaves open (unfilled), adding only a simple central vein.
Step 5: Final Touches
-
Enhance contrast:
Look over your drawing. If the hatched leaves on the large flower look too light, add a second layer of cross-hatching to deepen the black tones. -
Clean up:
Wait at least 5-10 minutes for the ink to fully cure. Gently erase all underlying pencil sketch lines with your kneaded eraser. -
Check connections:
Inspect where stems meet leaves or flowers. If any lines have gaps, carefully connect them with the finest pen tip to ensure the plant looks structural and solid.
Your sketchbook page is now filled with a botanically inspired study that balances negative space with intricate detail
Mini Bouquet With Three Stems and Overlapping Blooms
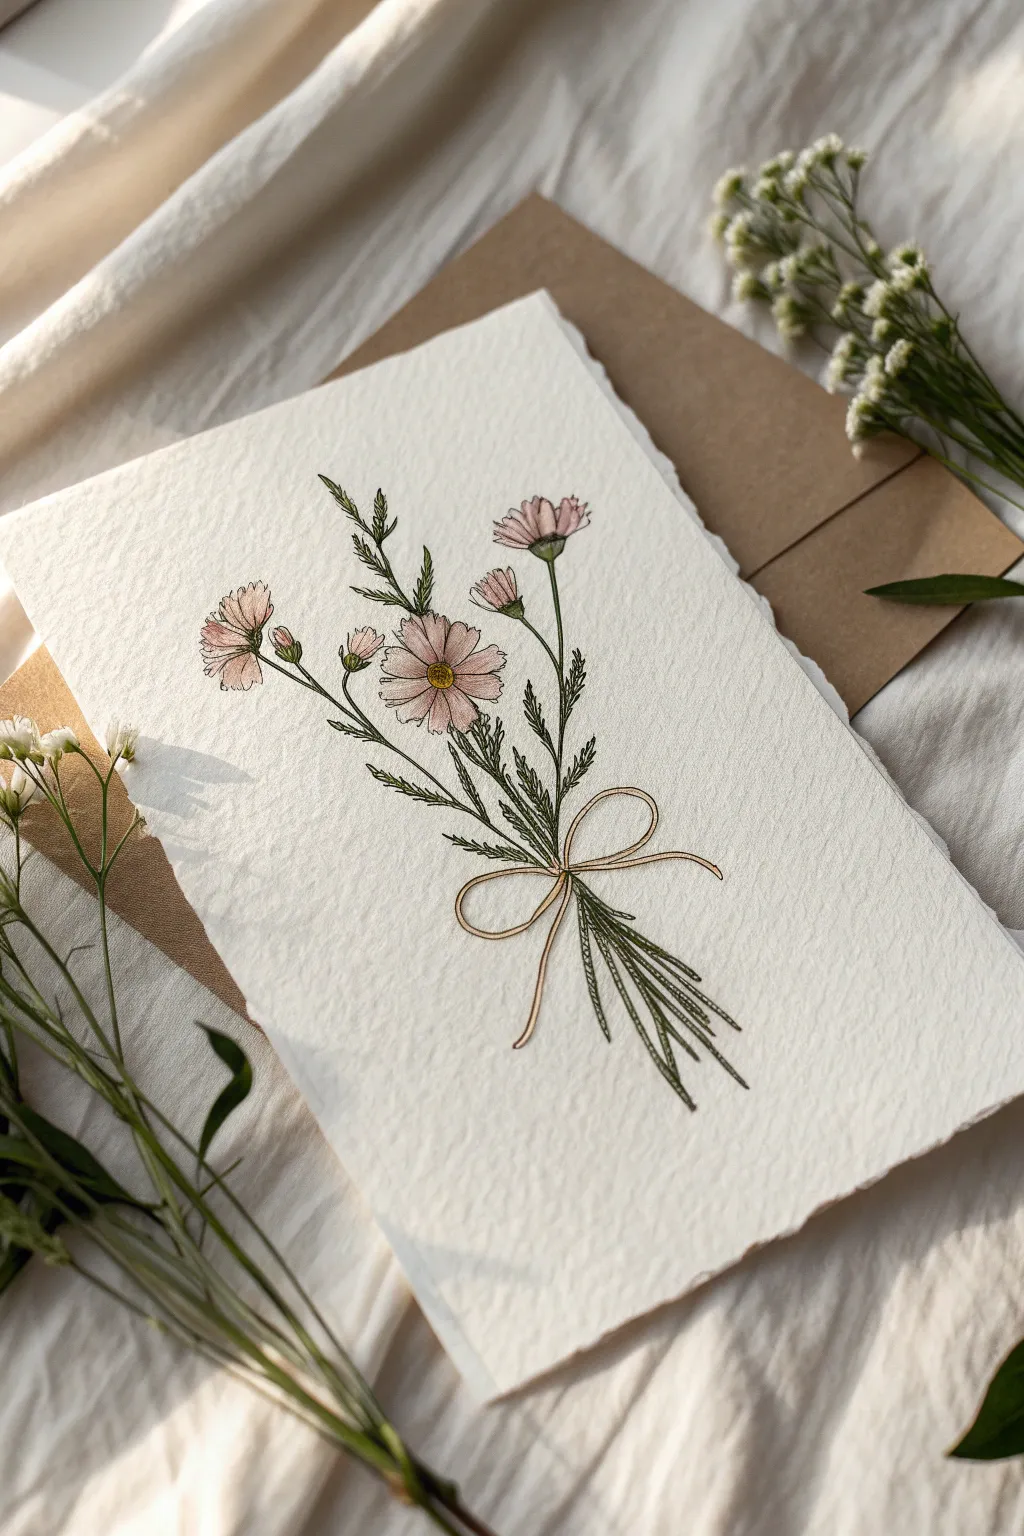
Capture the graceful simplicity of wildflowers with this charming line-and-wash illustration. Using fine liners and soft watercolors on textured paper creates a timeless, vintage botanical feel perfect for greeting cards or wall art.
Step-by-Step Guide
Materials
- Cold-pressed watercolor paper (heavy texture/deckled edge)
- Fine liner pens (sizes 0.1 and 0.3, black or dark sepia)
- Pencil (HB or H)
- Kneaded eraser
- Watercolor paints (Peach/Rose, Sap Green, Yellow Ochre)
- Small round watercolor brush (size 2 or 4)
- Paper towel
- Water cup
Step 1: Sketching the Composition
-
Map the stems:
Begin by lightly sketching three main intersecting lines for your stems. Start them near the bottom center and fan them out gently towards the top left, center, and top right to create a natural spread. -
Place the blooms:
Draw rough circles to mark flower placement. Place a large, open bloom on the center stem, slightly lower down. Add a sideways-facing bloom at the top right, and a smaller bud cluster on the left stem. -
Sketch the bow:
Where the three stems intersect, sketch a simple bow shape. Draw two looped ears and two trailing ribbon ends that drape down alongside the stems. -
Add foliage guides:
Lightly mark lines for leaves coming off the main stems. These cosmos-style leaves are feathery, so just indicate the main direction for now.
Ink Smearing?
If your fineliner smears when painting, switch to waterproof archival ink pens. Alternatively, paint the watercolor layer first, let it dry fully, and then draw your lines on top.
Step 2: Inking the Outlines
-
Outline the center flower:
Using your 0.1 fine liner, ink the petals of the main central flower. Keep the edges slightly jagged to mimicking the texture of cosmos petals. Draw a tight circle of dots for the center. -
Ink the side blooms:
Move to the side flowers. For the top right bloom, draw petals that cup upwards. For the left bud, keep the shape tight and closed. Add the small sepals (green leafy parts) at the base of each flower head. -
Draw the ribbon:
Carefully ink your bow sketch. Use a confident, continuous line for the loops to make the ribbon look fluid. Avoid making the knot too complex; a simple crossover works best. -
Add the stems:
Draw the main stems using the 0.3 pen for slightly more weight. Break the line occasionally where leaves or other stems cross over to keep the drawing airy. -
Create feathery leaves:
Switch back to the 0.1 pen. Draw short, flicking strokes branching off the stems to create the fern-like foliage. Don’t overthink this; random, quick strokes look more organic. -
Erase pencil lines:
Wait a few moments for the ink to fully dry, then gently roll your kneaded eraser over the entire drawing to lift the graphite guides.
Vintage Look
Tea-stain your paper before starting! Brew strong black tea, brush it over the paper, and let dry. This gives an antique parchment look that pairs beautifully with botanical art.
Step 3: Adding Soft Color
-
Prepare your palette:
Dilute your paints significantly. You want very pale washes—think ‘tint’ rather than ‘paint.’ I like to test the strength on a scrap piece of paper first. -
Tint the petals:
Dip your brush in the pale peach/rose mix. Touch the center of the petals and gently pull the color outward, leaving the tips of the petals white or very pale. This gives a delicate gradient effect. -
Color the centers:
Once the petals are damp-dry, drop a tiny dot of yellow ochre into the center of the main flower. -
Paint the greenery:
Using a very watery sap green, carefully paint along the thin stems and over the feathery leaves. It’s okay if the color bleeds outside the lines slightly; it adds to the looseness. -
Detail the ribbon:
Use a light brownish-gold or dilute ochre to fill in the ribbon loops. Keep the color sheer so the varied paper texture shows through. -
Add final contrast:
If needed, add a slightly darker touch of green to the base of the stems or where leaves overlap to create depth.
Allow your artwork to dry completely before framing or gifting this sweet floral sentiment.
One-Line Flower Drawing for Calm, Flowing Practice
This elegant drawing combines the simplicity of clean black linework with the classic charm of a field daisy. It features a straightforward petal arrangement and striking geometric leaves, making it a perfect project for practicing steady hand control and balanced composition.
Step-by-Step Tutorial
Materials
- High-quality white drawing paper (heavyweight sketch or mixed media paper recommended)
- Pencil (HB or 2B for sketching)
- Eraser (kneaded or soft vinyl)
- Fine liner pen (0.3mm or 0.5mm, black ink)
- Ruler (optional, for stem alignment)
Step 1: Sketching the Framework
-
Map the center:
Begin by lightly sketching a small circle near the top third of your paper to serve as the flower’s center. Keep your pencil pressure very light so these lines can be erased later. -
Draw the stem guideline:
Starting from the bottom of your center circle, drop a long, gently curving line downwards to the right corner. This establishes the posture of your flower. -
Draft the petal shapes:
Around the center circle, lightly sketch elongated oval shapes for the petals. Aim for about 10-12 petals, ensuring they radiate outwards evenly. -
Outline leaf positions:
Mark the locations for four leaves along the stem. Place one small leaf near the bottom right, and three larger ones ascending on alternating sides. -
Refine the leaf forms:
Shape the leaves into pointed ovals or lance-like shapes based on your marks. I find it helpful to make the upper leaves slightly larger than the lowest one for a balanced look.
Step 2: Inking the Flower Head
-
Ink the flower center:
Switch to your fine liner pen. Trace the center circle, keeping the line smooth and continuous. -
Add texture to the center:
Fill the center circle with tiny, tight stippling dots. Concentrate the dots slightly more on one side (like the bottom left) to create a subtle shadow effect. -
Outline the front petals:
Draw the full outlines of the petals that appear to be ‘in front’. These should have complete, unbroken contours. -
Fill in the back petals:
Draw the remaining petals that tuck behind the front ones. Stop your pen line when it hits a front petal, creating a sense of depth. -
Detail the petals:
Add a single, straight line down the center of each petal. Start from the center circle and extend about three-quarters of the way to the tip.
Choosing Pen Weight
Use a thicker pen (0.5mm) for the main outlines and a thinner one (0.1mm) for the delicate interior veins and petal details.
Step 3: Stem and Leaf Details
-
Ink the main stem:
Trace the long stem line you sketched earlier. You can make this line slightly thicker by going over it twice if you want more stability in the drawing. -
Outline the leaf perimeters:
Carefully ink the outer edges of your leaves, connecting them clearly to the main stem. -
Draw the leaf veins:
Draw a central vein line down the middle of the lowest leaf on the right. -
Add side veins to the first leaf:
Add simple V-shaped or diagonal lines branching off the center vein to the leaf edges. -
Detail the middle leaves:
Repeat the vein process for the two large middle leaves. Keep the lines crisp and geometric rather than overly organic. -
Complete the top leaf:
Finish by inking the veins on the highest leaf. Ensure the lines flow in the direction of the leaf tip.
Add a Splash of Color
This style looks amazing with watercolor. Try adding a very loose, pale yellow wash over the petals that intentionally goes outside the lines.
Step 4: Final Touches
-
Let the ink set:
Wait 2-3 minutes to ensure the ink is completely dry to prevent smudging. -
Erase pencil marks:
Gently erase all the underlying pencil sketches. Hold the paper taut with one hand to avoid crinkling it while erasing. -
Assess and refine:
Look over your drawing. If any lines look too thin or disconnected, carefully touch them up with your pen now.
Step back and admire the clean, minimal beauty of your botanical illustration
Mandala-Style Flower Using Easy Symmetry
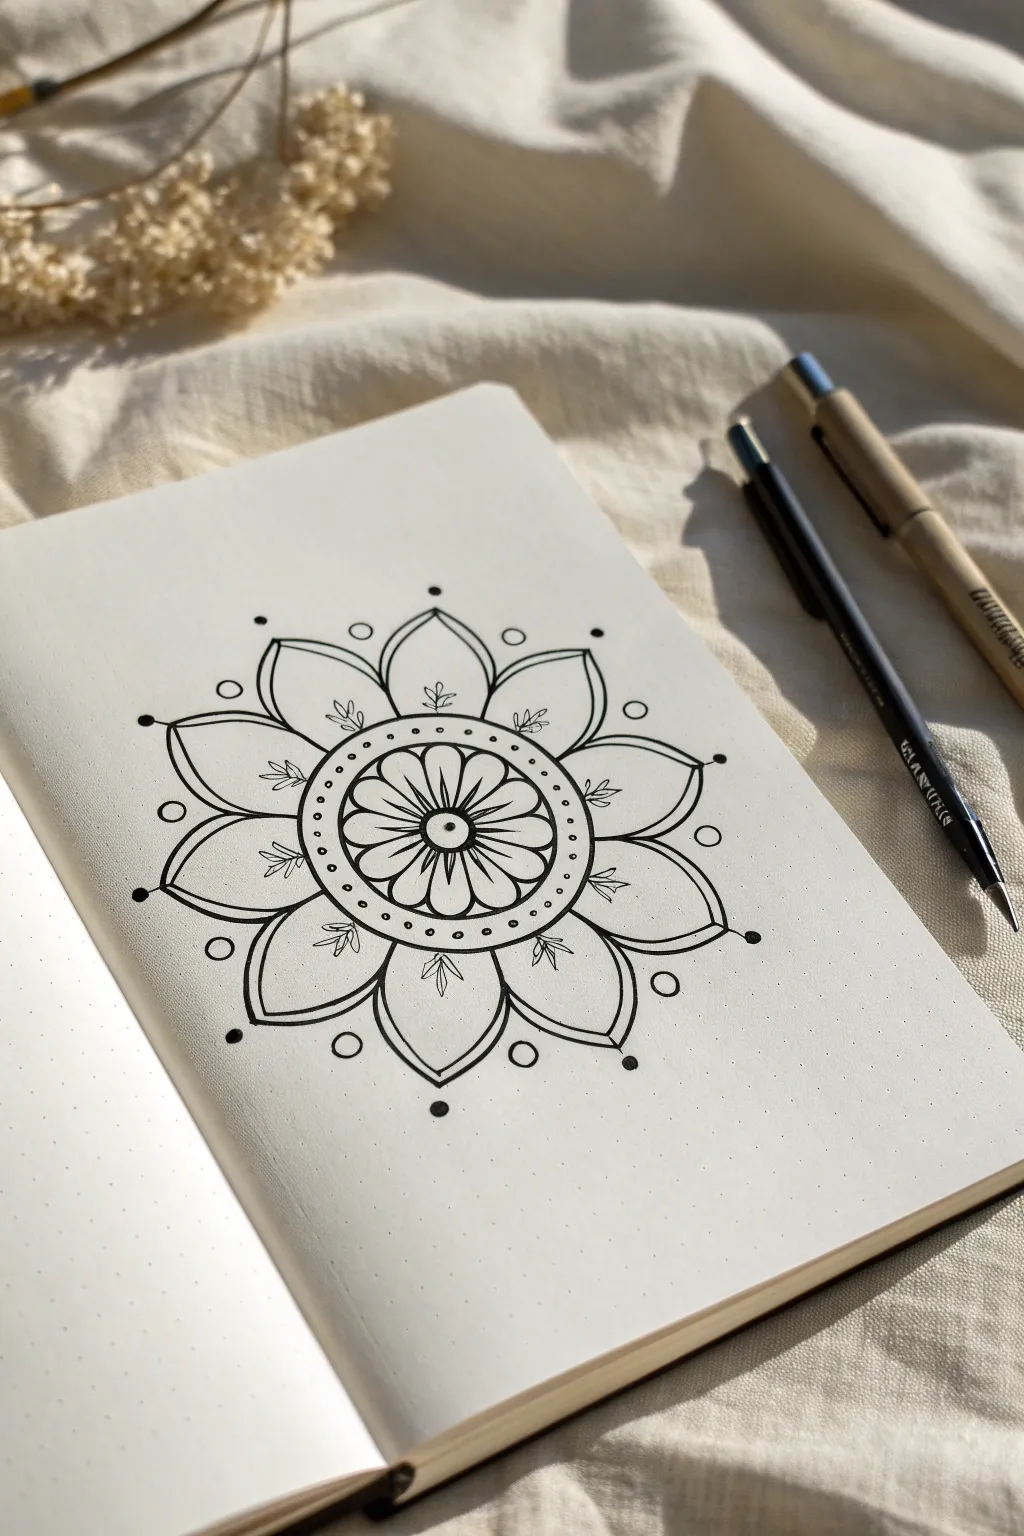
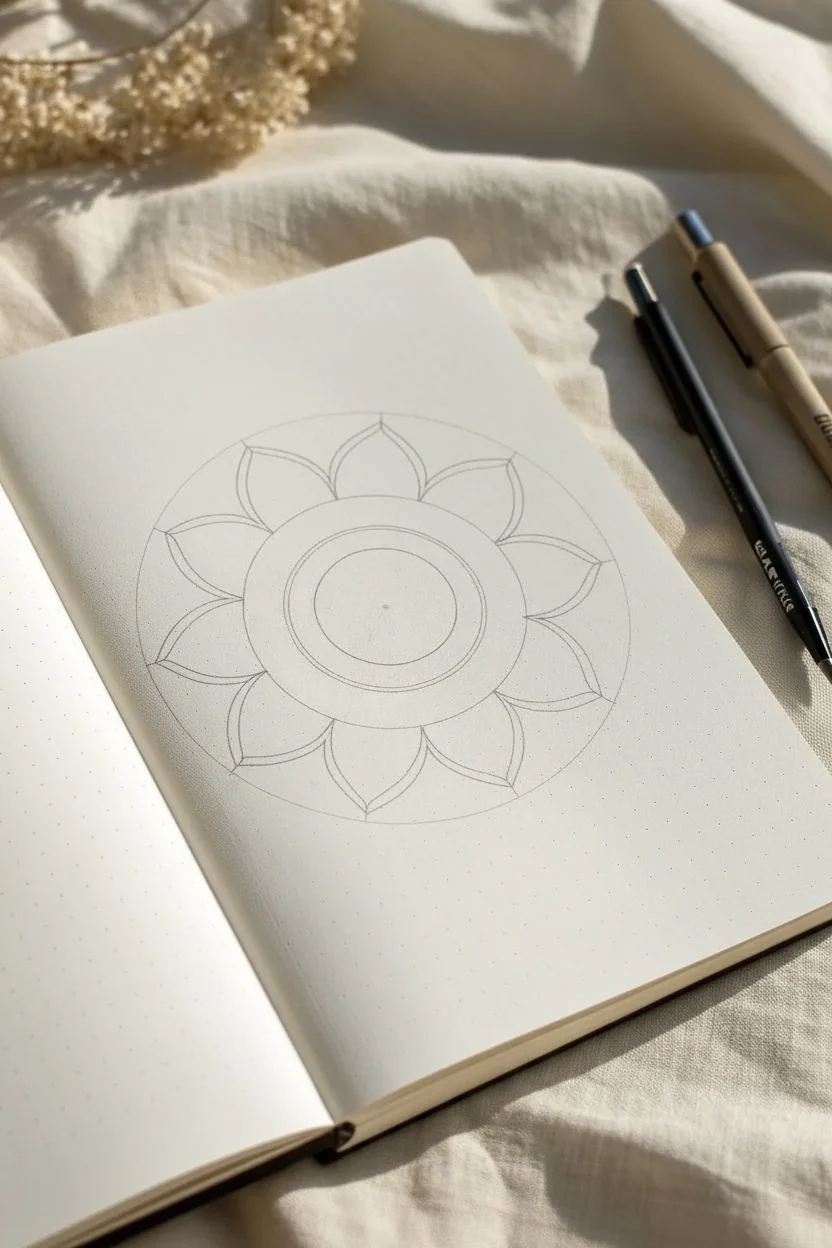
This elegant mandala-style flower combines geometric precision with organic floral shapes for a deeply relaxing drawing experience. The design radiates outward from a central bloom, using a dot grid journal to keep everything perfectly symmetrical without needing complex tools.
Step-by-Step Guide
Materials
- Dot grid notebook or journal
- Fine liner pen (black, size 03 or 05)
- Thinner fine liner pen (black, size 01 or 005 for details)
- Pencil (HB or H for light sketching)
- Eraser
- Compass (optional)
Step 1: Drawing the Central Structure
-
Find your center:
Locate the center of your page. If you are using a dot grid notebook, mark a specific dot as your anchor point. -
Sketch the core circle:
Using your pencil or a compass, lightly draw a small circle about 1 inch in diameter around your center point. This will house the innermost flower. -
Add the outer ring:
Sketch a second, larger circle around the first one, leaving a gap of about half an inch. This creates a band where we will later add decorative dots. -
Create the petal guide:
Visualize or lightly sketch a much larger third circle that defines the outer limit of your large petals. Dividing this circle into eight equal sections can help you space the large petals evenly.
Step 2: Inking the Inner Floral Design
-
Ink the center eye:
Switch to your standard fine liner. Draw a tiny circle at the very center point and fill it in solidly with black ink. Draw a small ring around it. -
Draw the first layer of petals:
Inside your smallest pencil circle, draw eight tear-drop shaped petals radiating from the center eye. They should touch the edge of your pencil guide. -
Ink the spacing rings:
Go over your pencil circles with ink. Draw one solid line enclosing the inner petals. Then, draw a second solid line for the outer edge of that band. -
Decorate the band:
In the space between these two inked rings, carefully place small dots. Try to space them evenly around the entire circumference for a neat look.
Grid Guide
Use the dot grid to count spaces! If your inner circle is 4 dots wide, make sure the outer petals extend 4 dots further for perfect proportions.
Step 3: Creating the Major Petals
-
Outline the large petals:
Draw eight large, pointed petals extending from the dotted band. The tip of each petal should align with the tip of an inner petal to maintain radial symmetry. -
Add inner details:
Inside each large petal, draw a slightly smaller version of the same shape. This ‘double outline’ effect adds depth and makes the design look more polished. -
Draw delicate sprigs:
At the base of each large petal, inside the inner shape, draw a tiny three-leaved sprig. It should point outward, filling the empty white space near the center.
Go Golden
Elevate the drawing by filling in the small ‘band’ between the circles with metallic gold ink instead of black dots for a luxurious finish.
Step 4: Final Accents and Finishing Touches
-
Place outer circles:
In the ‘V’ shaped gaps between the tips of the large petals, draw a small open circle. These should float just outside the main design. -
Add radiating lines:
From the very tip of each large petal, draw a short, straight line extending outward. -
Cap the lines:
At the end of each short line you just drew, place a solid black dot. This extends the visual footprint of the mandala. -
Erase pencil guides:
Wait at least 5-10 minutes to ensure the ink is completely dry. Gently erase all your underlying pencil circles and grid marks to reveal the crisp black lines.
Now you have a beautifully symmetrical geometric flower ready to grace the pages of your journal
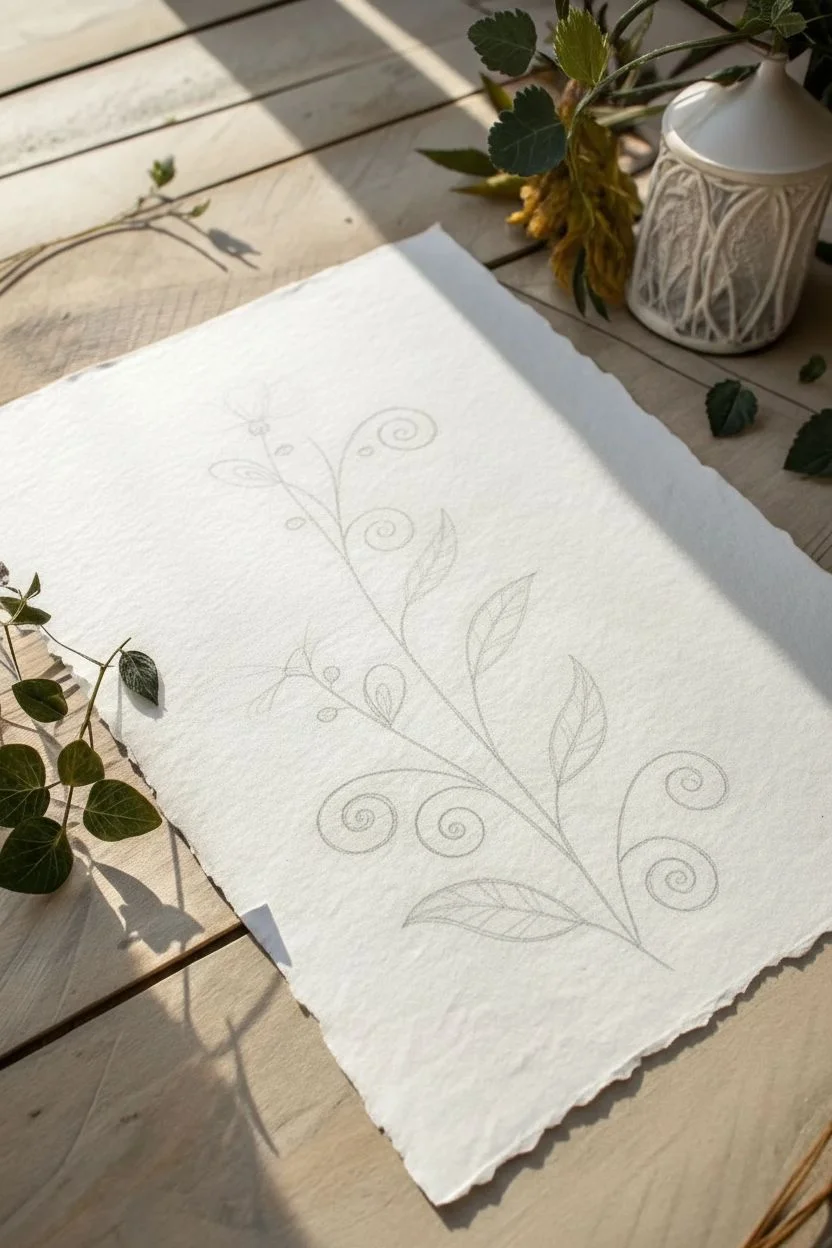
Decorative Vines and Swirls Around Simple Blooms
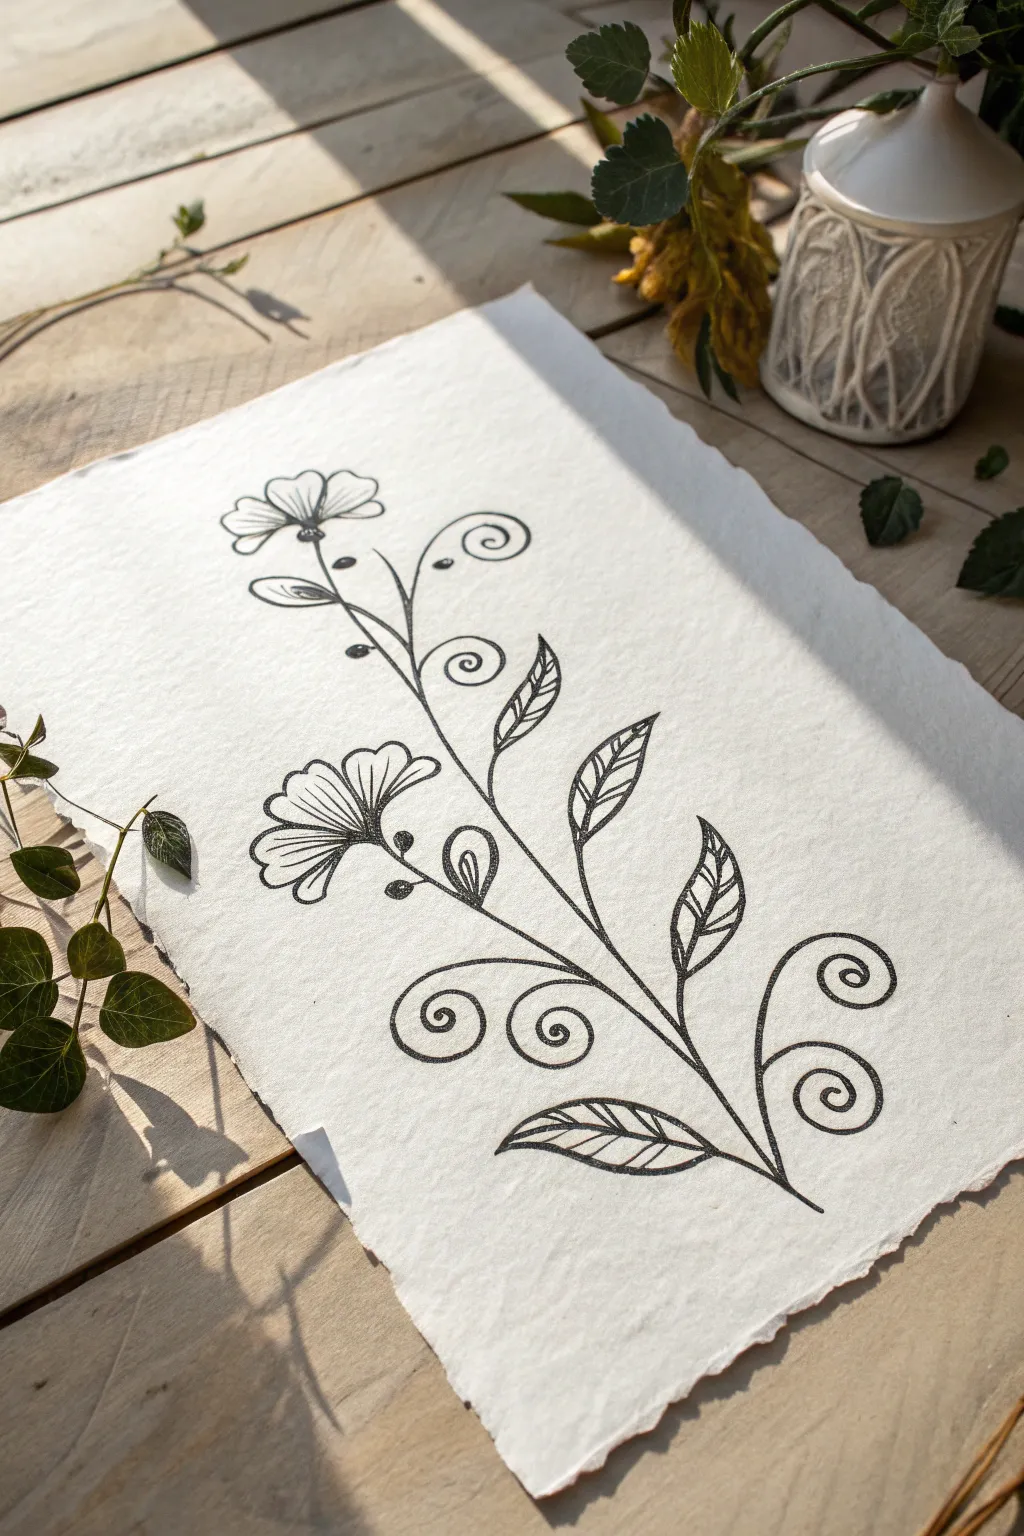
This charming illustration combines rustic folk-art vibes with clean linework, featuring a trailing vine adorned with playful swirls and stylized flowers. It sits beautifully on handmade paper, making it perfect for framing or a personalized greeting card.
Step-by-Step Tutorial
Materials
- Textured handmade paper (deckled edge)
- Pencil (HB or H for light sketching)
- Kneadable eraser
- Fine liner pen (Black, size 0.3 or 0.5)
- Thicker marker or brush pen (Black, for filling)
Step 1: Drafting the Skeleton
-
Establish the main curve:
Start by lightly sketching a single, long S-curve that flows from the bottom right corner up toward the top left. This serves as the spine for your entire botanical design. -
Mock up the branches:
Add small, branching lines coming off the main spine. Alternate sides as you go up—left, right, left—to keep the visual weight balanced. -
Place the spiral markers:
At the ends of some of the lower branches, sketch loose circles where your decorative spirals will eventually go. -
Outline the flower heads:
Draw simple U-shapes or semicircles at two key points along the vine to mark where the main blooms will sit. One near the top and one in the middle works well.
Step 2: Inking the Outlines
-
Draw the central stem:
Switch to your fine liner pen. Trace over your main S-curve, but start thickening the line slightly near the base to give the plant some stability. -
Create the bottom spirals:
Near the base of the stem, draw the large, decorative swirls. Start from the stem and curl outward, keeping the line smooth and confident. -
Add lower leaves:
Draw pointed, almond-shaped leaves on the lower section. Give them a central vein line, and then add angled hatching lines inside just one half of the leaf for texture. -
Inking the middle bloom:
For the lower flower, draw a fan of petals extending from a central point. The petals should be simple and rounded at the tips. -
Detail the middle bloom:
Add a central line to each petal and small stamens poking out from the center. I like to add a tiny black dot at the end of each stamen for contrast.
Shaky Lines?
Don’t stress over perfect curves. In folk art, slight wobbles add organic charm. If a line goes astray, thicken it slightly to hide the bump.
Step 3: Adding Flourishes & Details
-
Draw upper leaves:
Continue up the stem, adding smaller almond-shaped leaves. Maintain that same hatching pattern—veins on one side, clear on the other—to unify the style. -
Ink the top flower:
Draw the topmost flower. Make this one slightly smaller or tilting upward, using the same petal shape as the first bloom. -
Add tight spirals:
Fill in the gaps between leaves with smaller, tighter spirals that branch off the main stem like fern fiddleheads. -
Incorporate berries:
Draw tiny solid black circles attached to short stems. Place these randomly near the flower heads to add visual weight and darkness. -
Thicken key lines:
Go back over the main stem and the outlines of the leaves with your pen to create a bolder line weight compared to the delicate inner details. -
Erase pencil marks:
Wait for the ink to dry completely to avoid smudging. Gently roll the kneadable eraser over the entire drawing to lift the drafting sketch.
Add Vintage Patina
Steep a black tea bag in hot water, let it cool, and lightly brush the liquid over the paper before drawing for an aged, parchment look.
Now step back and admire the elegant flow of your botanical creation


Have a question or want to share your own experience? I'd love to hear from you in the comments below!