Glass painting is one of my favorite ways to turn an everyday jar or glass into something that looks totally custom with surprisingly little effort. If you can paint a dot, a line, or a simple petal, you’ve got more than enough skill to try these easy glass painting ideas.
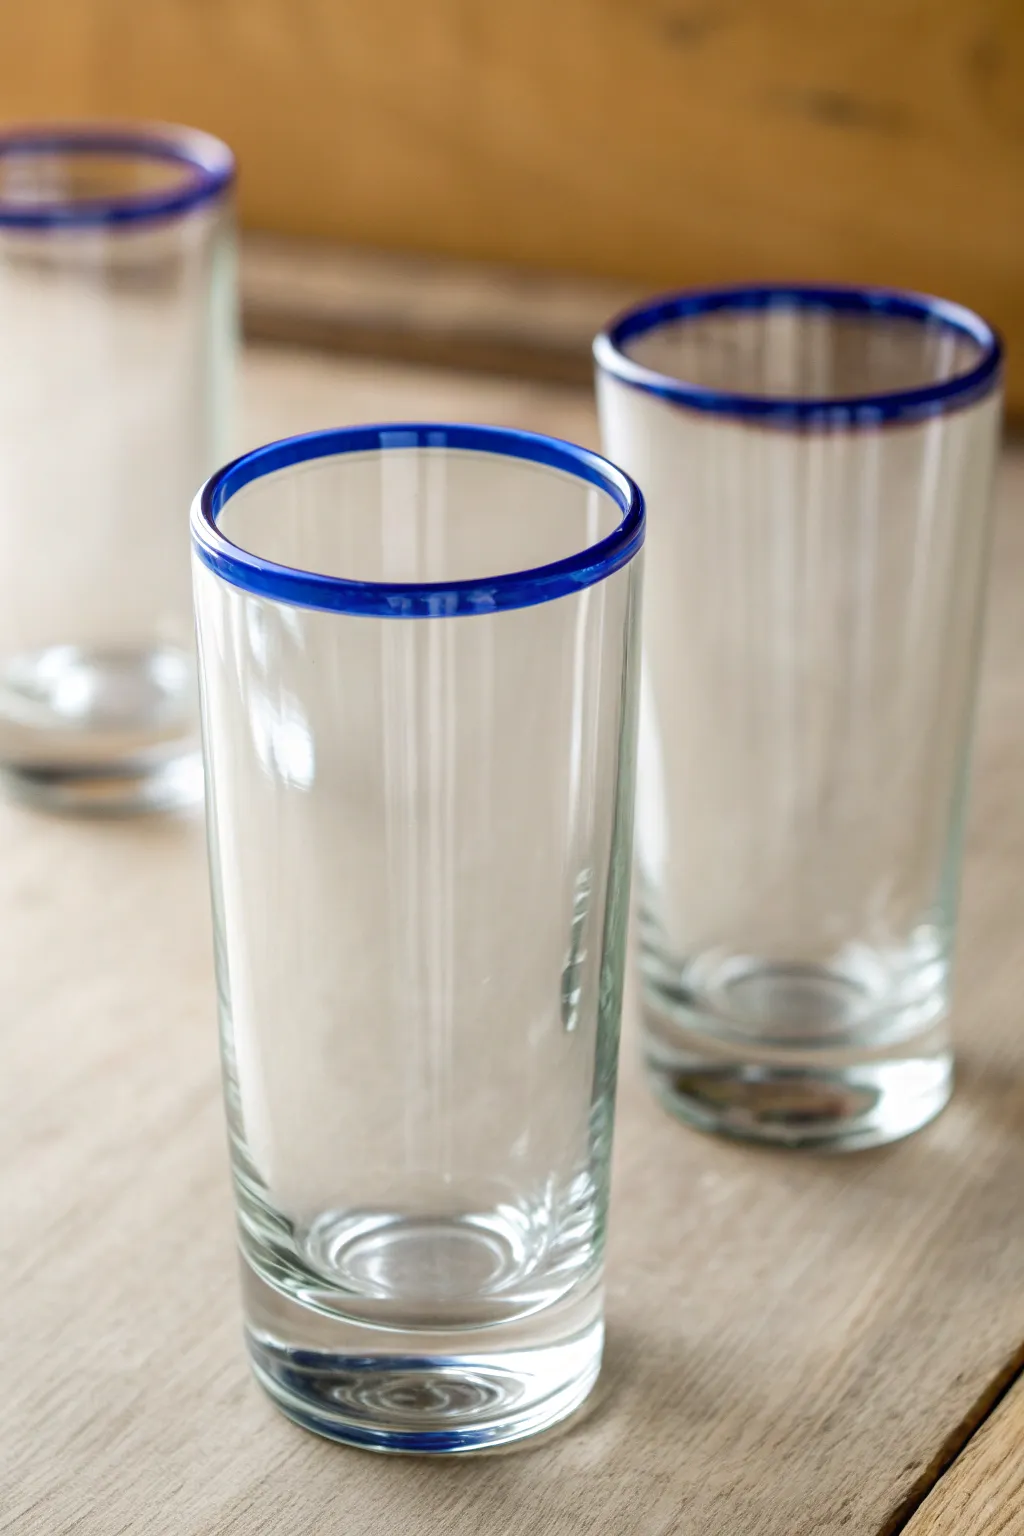
Simple Polka Dot Confetti Glasses
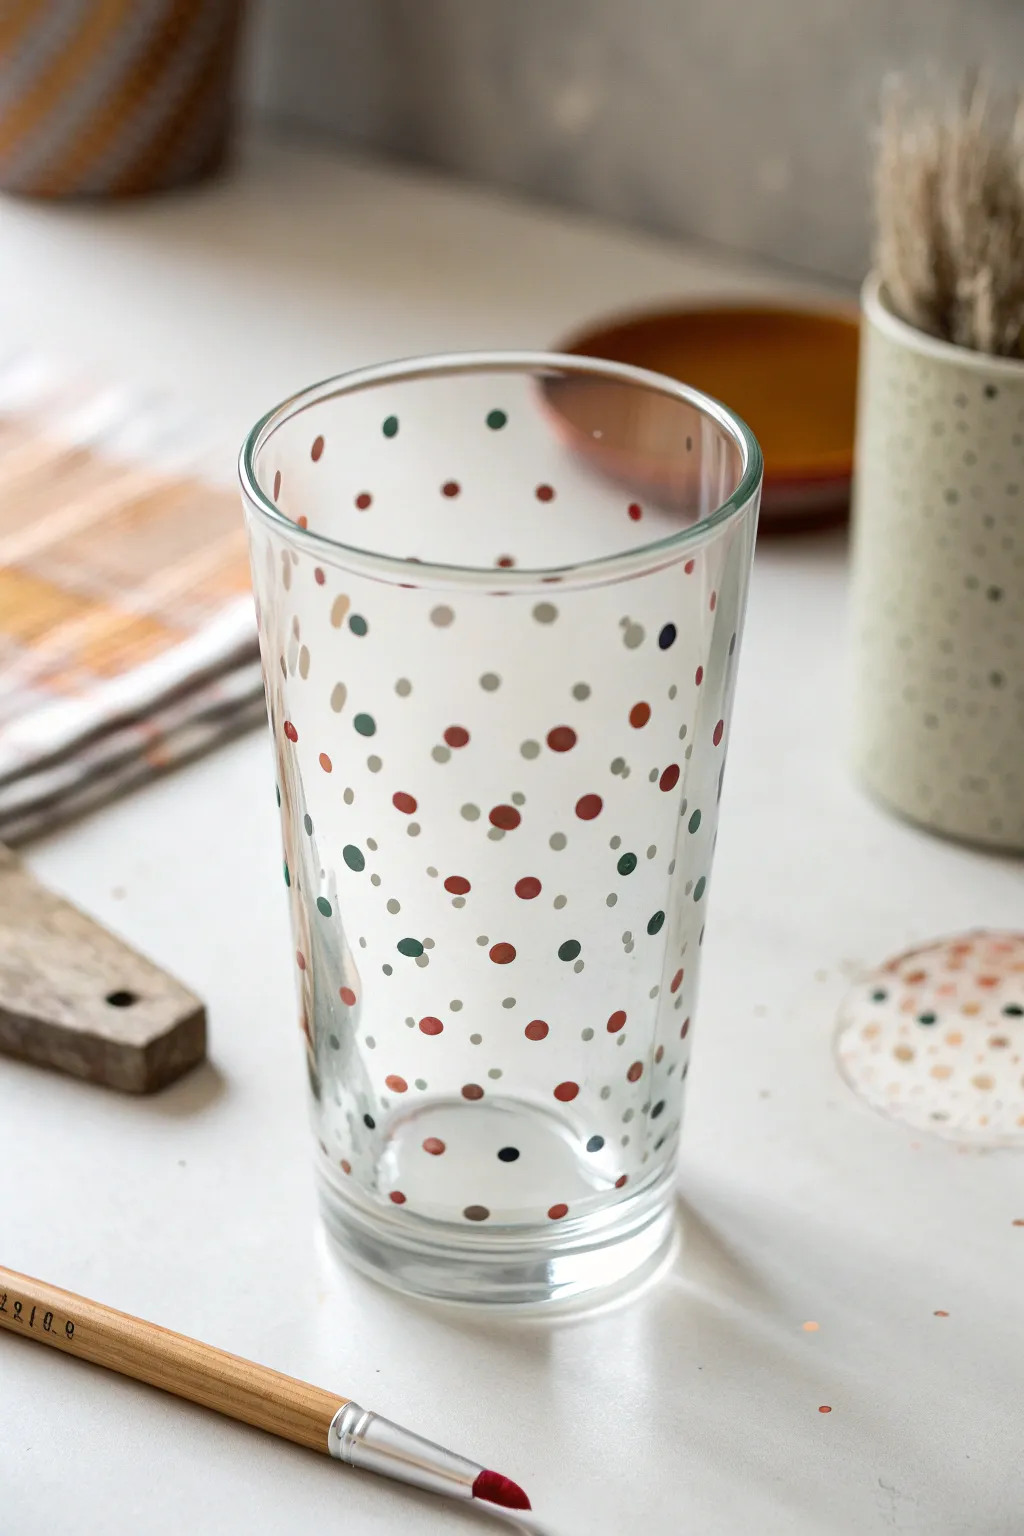
Transform a plain glass tumbler into a festive yet sophisticated piece of drinkware with this scattered polka dot design. Using a palette of muted, earthy tones creates a confetti effect that feels modern rather than childish.
How-To Guide
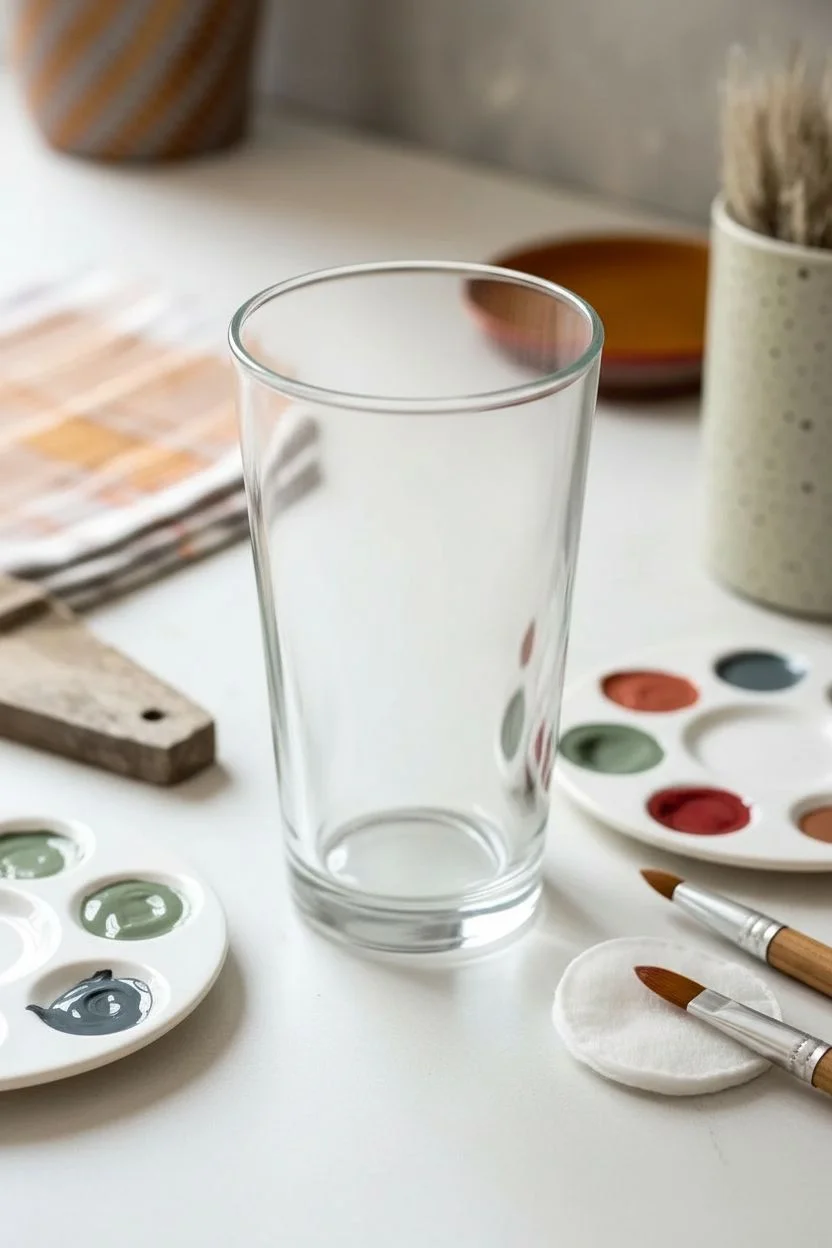
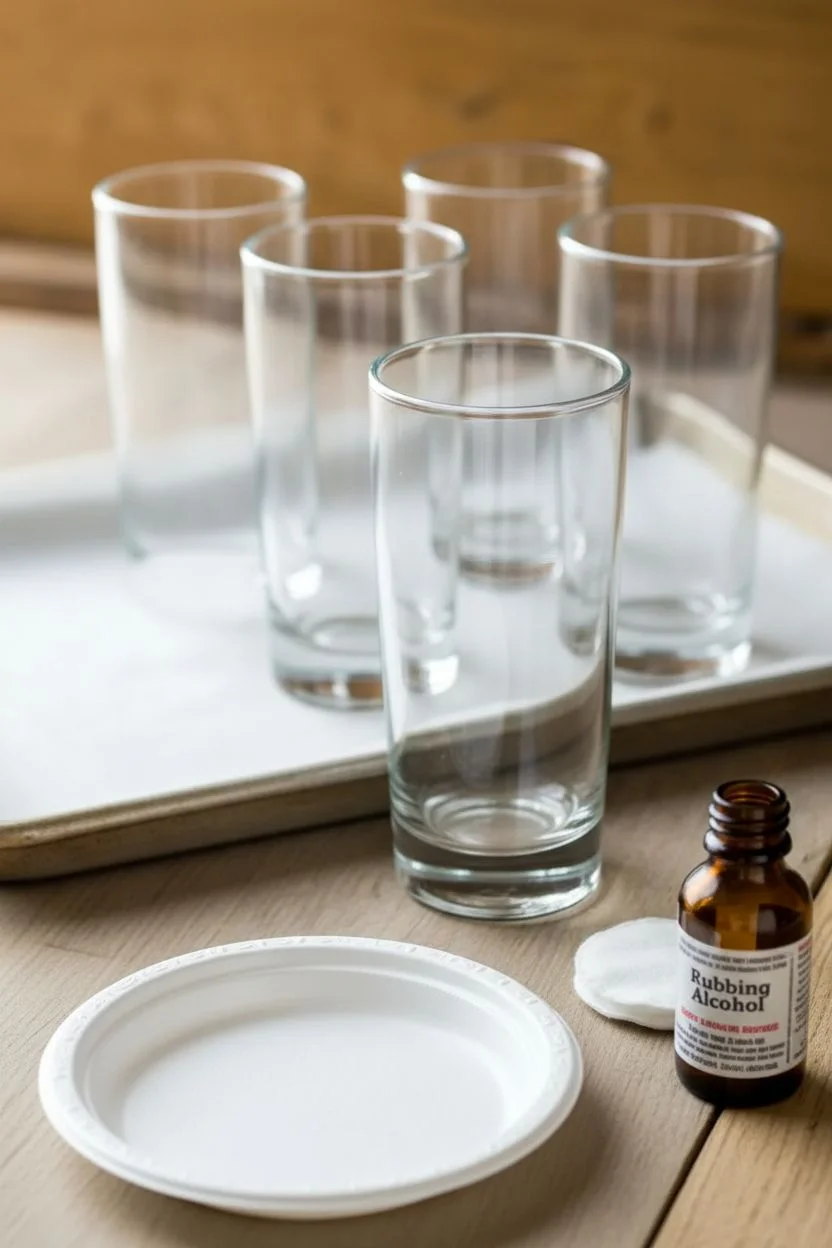
Materials
- Plain clear glass tumbler
- Rubbing alcohol
- Cotton pads or paper towel
- Multi-surface acrylic paint or glass enamel paint (Terracotta, Sage Green, Slate Gray, Burnt Sienna)
- Round paintbrushes (small size 2 or 4)
- Cotton swabs (optional for dot technique)
- A small mixing palette or paper plate
- Oven (for curing)
Step 1: Preparation
-
Clean the surface:
Before you apply a single drop of paint, ensure your glass is perfectly pristine. Wash the tumbler thoroughly with soap and warm water to remove dust and warehouse grime. -
Degrease with alcohol:
Once dry, soak a cotton pad with rubbing alcohol and wipe down the entire exterior surface of the glass. This removes subtle oils from your hands that prevent paint adhesion. -
Set up your palette:
Squeeze dime-sized amounts of your chosen colors onto your palette. I recommend sticking to 4-5 complementary colors like terracotta, sage green, cool gray, and a deep reddish-brown to capture that organic look.
Use A Guide
Roll a piece of polka-dot scrapbooking paper into a tube and insert it inside the glass. You can use the paper’s pattern as a template to trace perfect spacing.
Step 2: Painting the Confetti
-
Plan your spacing:
Visualize the pattern before painting. The goal is random ‘controlled chaos’ usually denser near the bottom and slightly sparser near the rim, though a consistent scatter works beautifully too. -
Dip the brush handle:
For perfectly round, varying dot sizes, try using the back end (the handle) of different paintbrushes. Dip the handle directly into the paint puddle. -
Apply the first color:
Start with your boldest color, perhaps the terracotta red. Touch the painted handle tip gently to the glass to deposit a dot. -
Reload frequently:
Reload your tool after every one or two dots. If you press multiple times without reloading, the dots will become successively smaller and fainter. -
Add larger dots:
Switch to a larger brush handle or a cotton swab to add bigger circles in the same color, keeping them spaced out randomly around the glass. -
Switch colors:
Wipe off your tool or switch to a clean brush handle. Now, come in with your second color, like the sage green, filling in empty spaces between the red dots. -
Vary the opacity:
Don’t worry if some dots are slightly more raised or opaque than others; this texture adds to the hand-painted charm. -
Add neutral tones:
Incorporate the gray and slate tones next. These act as visual spacers that make the brighter colors pop without overwhelming the design. -
Check the rim area:
Be mindful of the top 3/4 inch of the glass. It is often best to keep the paint slightly below where your lips will touch, just for comfort and longevity. -
Fill the gaps:
Rotate the glass and look for awkward empty patches. Use your smallest brush tip to add tiny ‘filler’ dots in open areas to balance the composition. -
Clean up smudges:
If you smudge a dot or don’t like its placement, quickly wipe it away with a damp cotton swab or a bit of rubbing alcohol while the paint is still wet.
Step 3: Curing
-
Air dry first:
Let the glass sit undisturbed for at least 1 hour, or up to 24 hours depending on your paint brand’s specific instructions, to ensure the outer shell of the paint is dry. -
Oven cure method:
Place the glass into a cool, non-preheated oven. Turn the heat to 350°F (176°C) and set a timer for 30 minutes. -
Cool down slowly:
Once the timer goes off, turn the oven off but do NOT open the door. Let the glass cool down completely inside the oven to prevent cracking from thermal shock. -
Final cure:
Even after baking, wait 72 hours before using or washing the glass to ensure maximum durability.
Make It Metallic
Swap one of your neutral gray colors for a Metallic Gold or Copper paint. The shimmering dots catch the light beautifully and add a touch of luxury.
Once fully cured, your new confetti glasses are ready to add a splash of color to your next dinner party


Classic Daisy Rings Around a Wine Glass
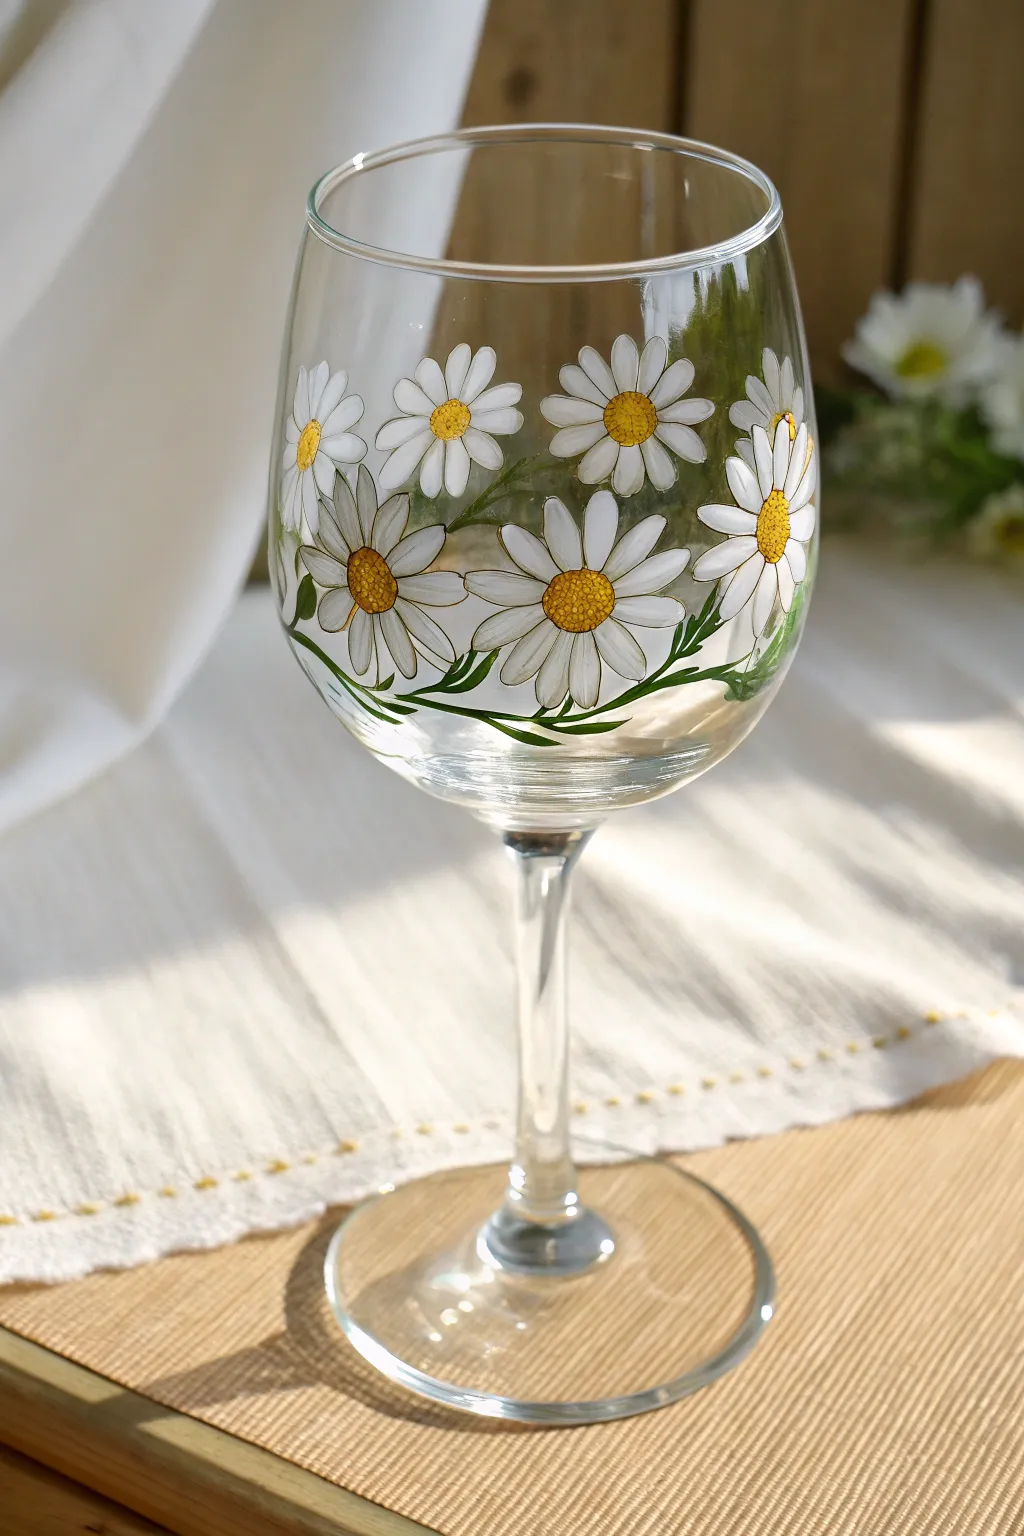

Transform plain glassware into a charming garden scene with this daisy chain design. The crisp white petals and sunny yellow centers wrap around the bowl, creating a perfect vessel for spring gatherings or a thoughtful handmade gift.
Detailed Instructions
Materials
- Clear wine glass
- Rubbing alcohol and cotton pads
- White enamel glass paint
- Yellow enamel glass paint
- Green enamel glass paint (leaf green)
- Small round paintbrush (size 2 or 3)
- Fine liner brush (size 0 or 00) or a toothpick
- Palette or small plate
- Paper towels
- Oven (for curing, if paint requires)
Step 1: Preparation
-
Clean the surface:
Before painting, wipe the entire outer surface of the wine glass with rubbing alcohol on a cotton pad. This removes oils and fingerprints that prevent paint adhesion. -
Plan the placement:
Visualize where your daisies will sit. Aim for a ring around the widest part of the bowl. You can use a washable marker to make tiny dots for the center of each flower to ensure even spacing.
Fixing Translucent Petals
If your white paint looks streaky, avoid thick globs. Instead, apply three very thin layers, letting each dry for 15 minutes in between application.
Step 2: Painting the Petals
-
Load the brush:
Load your small round brush with white enamel paint. You want enough paint for opacity but not so much that it drips. -
Create the first petal:
Start with one of your guide dots. Press the brush down near the dot and pull outward, lifting pressure as you go to create a tapered petal shape. -
Complete the flower shape:
Continue painting petals around the imaginary center in a clock face pattern—12, 6, 3, and 9 o’clock first—then fill in the gaps. Don’t worry if they aren’t identical; variety looks natural. -
Repeat around the glass:
Move to the next guide dot and paint the next flower. For a dynamic look, I like to angle some flowers slightly differently, perhaps tilting one up or down. -
Layer for opacity:
Glass paint can be translucent. Let the first layer dry for about 20 minutes, then apply a second coat of white to the petals to make them bright and solid.
Step 3: Adding Details
-
Paint the centers:
Once the white petals are dry to the touch, dip the handle end of a paintbrush or a large dotting tool into the yellow paint. Firmly dot the center of each flower. -
Texture the centers:
While the yellow paint is wet, use a toothpick to gently stipple (poke tiny dots) into the yellow blob. This mimics the textured pollen center of a real daisy. -
Connect with stems:
Switch to your fine liner brush and green paint. Paint thin, curved lines connecting the bottom of the flowers, creating a vine-like effect that wraps around the glass. -
Add leaves:
Using the same green paint, add small, slender leaves coming off the main stem. Use a light flicking motion to keep the leaf tips sharp. -
Optional outlining:
If you want more definition, use a very fine brush with a tiny amount of grey or thinned black paint to faintly outline the petals, though the freehand look is lovely on its own.
Level Up: Bee Happy
Add a tiny bumblebee near the rim! Use a yellow oval, add black stripes with a toothpick, and paint two tiny white tear-drops for wings.
Step 4: Finishing
-
Clean up edges:
Use a damp cotton swab or a toothpick to scrape away any stray paint splatters or to sharpen the edges of a messy petal while the paint is still tacky. -
Air dry:
Allow the glass to dry completely according to your paint manufacturer’s instructions, usually at least 24 hours. -
Cure the paint:
Most glass enamels need to be baked to become dishwasher safe. Place the glass in a cool oven, set the temperature (usually 350°F/175°C), bake for 30 minutes, then turn the oven off and let the glass cool inside completely.
Now pour a cool drink and enjoy seeing your floral handiwork bloom with every sip


Easy Horizontal Stripes With Clean Tape Lines
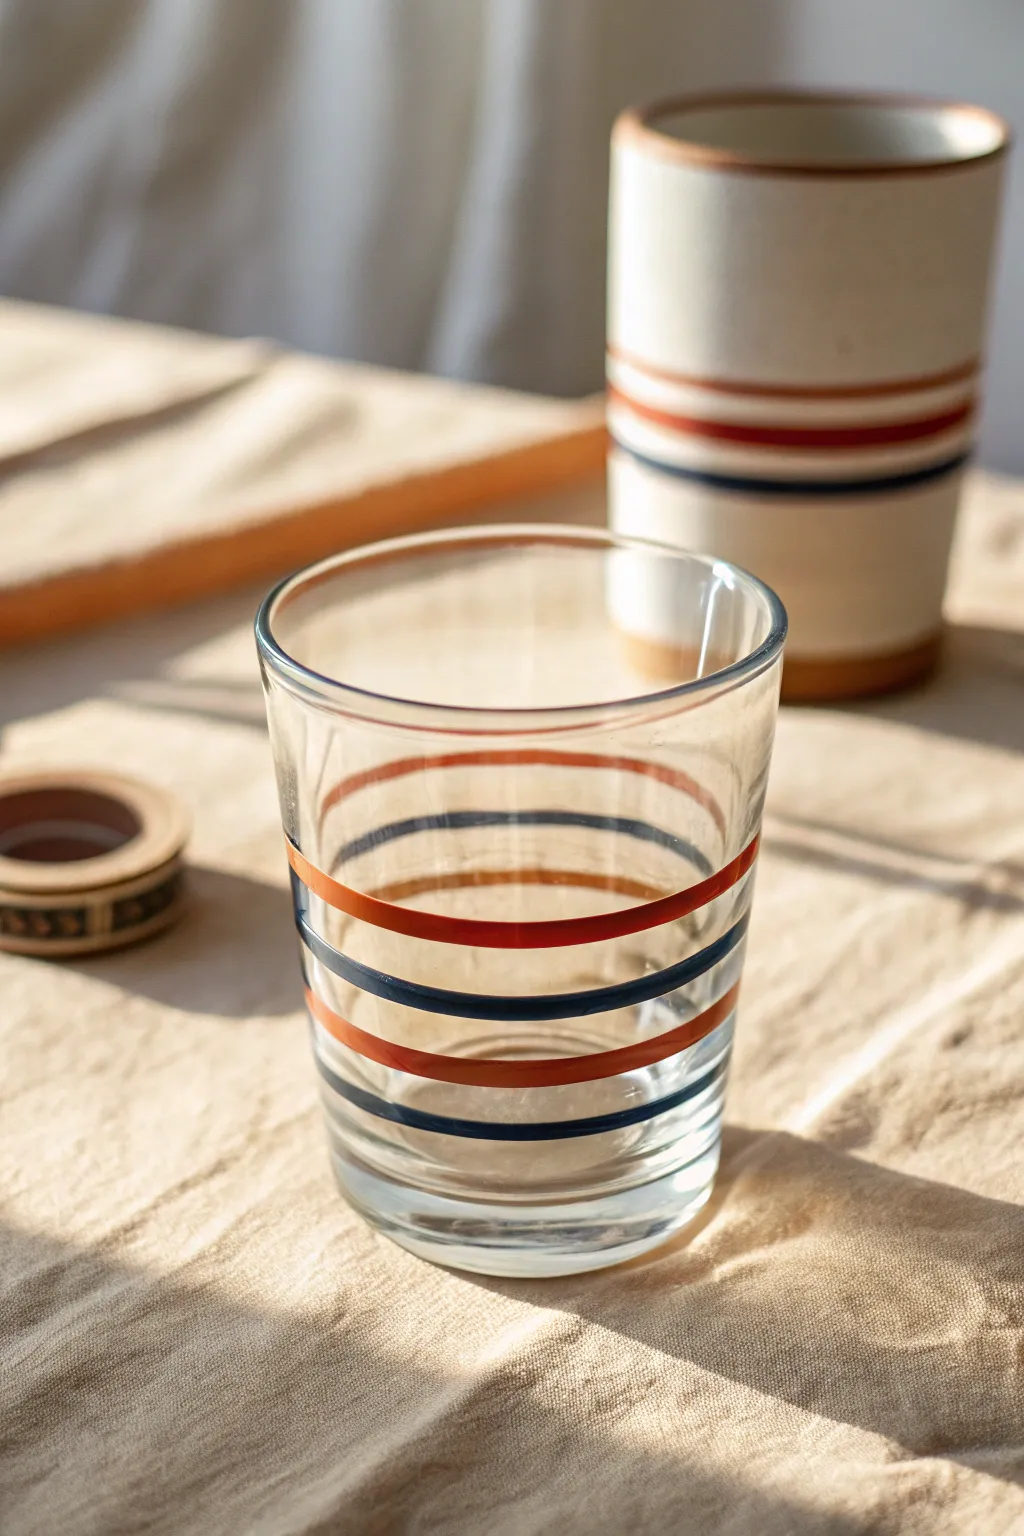
Transform plain glassware into a chic, retro-inspired set with nothing more than tape and paint. This project uses crisp, horizontal lines in alternating warm terra cotta and cool navy tones to create a clean, modern aesthetic perfect for everyday use.
How-To Guide
Materials
- Clear glass tumbler (straight-sided works best)
- Rubbing alcohol and paper towel
- Narrow masking tape or painter’s tape (approx. 1/4 inch width)
- Enamel glass paint (Opaque Gloss Red-Orange/Terra Cotta)
- Enamel glass paint (Opaque Gloss Navy Blue)
- Small flat paintbrush
- Craft knife (optional)
- Ruler or measuring tape
Step 1: Preparation & Masking
-
Clean the surface:
Before creating your design, thoroughly wipe the exterior of the glass with rubbing alcohol on a paper towel. This removes oils and fingerprints that could prevent the paint from adhering properly. -
Plan your spacing:
Decide on the placement of your stripes. For the look in the photo, you’ll need space for four distinct bands. You can make small tick marks with a washable marker if you want precise measurements. -
Apply the first tape line:
Start near the top third of the glass. Apply a strip of narrow masking tape horizontally around the circumference. Ensure the ends meet perfectly for a continuous line. -
Seal the edges:
Press the edges of the tape down firmly with your fingernail or a credit card. Good adhesion here is the secret to getting those crisp, professional-looking lines later. -
Create the first gap:
Leave a gap of clear glass below your first tape line—this gap will become your first painted stripe. The width of this gap determines the width of your painted line. -
Apply the second tape line:
Place a second strip of tape below that gap, running parallel to the first. I find it easiest to rotate the glass on a flat surface while holding the tape steady to keep it level. -
Repeat the masking process:
Continue placing tape strips down the glass, leaving equal gaps between them until you have four distinct empty bands ready for paint. -
Double-check the seal:
Run your finger over every piece of tape one last time to ensure there correspond no bubbles, especially right at the edges where the paint will go.
Clean Lines Secret
Peel the tape off immediately while the paint is wet! If you let it dry, the edge will crack and lift. Pull slowly away from the paint line.
Step 2: Painting & Finishing
-
Load the brush:
Dip your small flat brush into the terra cotta (red-orange) enamel paint. You want enough paint for coverage, but not so much that it globs up. -
Paint the first orange stripe:
Fill in the top open gap with the orange paint. Apply the paint somewhat generously but evenly, brushing horizontally with the direction of the tape. -
Paint the second orange stripe:
Skip the next gap (which will be blue) and paint the third gap down with the same terra cotta color. -
Switch colors:
Clean your brush thoroughly or switch to a fresh one. Load it with the navy blue enamel paint. -
Fill the blue stripes:
Paint the remaining two gaps (the second and fourth ones) with the navy blue. Be careful not to accidentally smudge the wet orange paint nearby. -
Touch up lightly:
Check for transparency. If the glass paint looks streaky, you can lightly dab a little more paint on while it’s still wet to level it out. -
Remove tape promptly:
This is crucial: peel off the tape while the paint is still wet. If you wait for it to dry, the paint might peel up with the tape. Pull the tape slowly at a 45-degree angle. -
Clean stray marks:
If any paint bled under the tape, use a craft knife or a toothpick to gently scrape away the excess once it has dried slightly but isn’t fully cured. -
Cure the paint:
Allow the glass to air dry according to the paint manufacturer’s instructions (usually 21 days for air cure) or bake it in the oven if the formula permits for disjoint dishwasher safety.
Mix It Up
Vary the width of your tape strips to create a fun, irregular ‘barcode’ pattern instead of uniform stripes for a quirky, artistic look.
Enjoy your new custom glassware with your morning coffee or evening drink


Heart Sprinkles for a Cute, Quick Gift
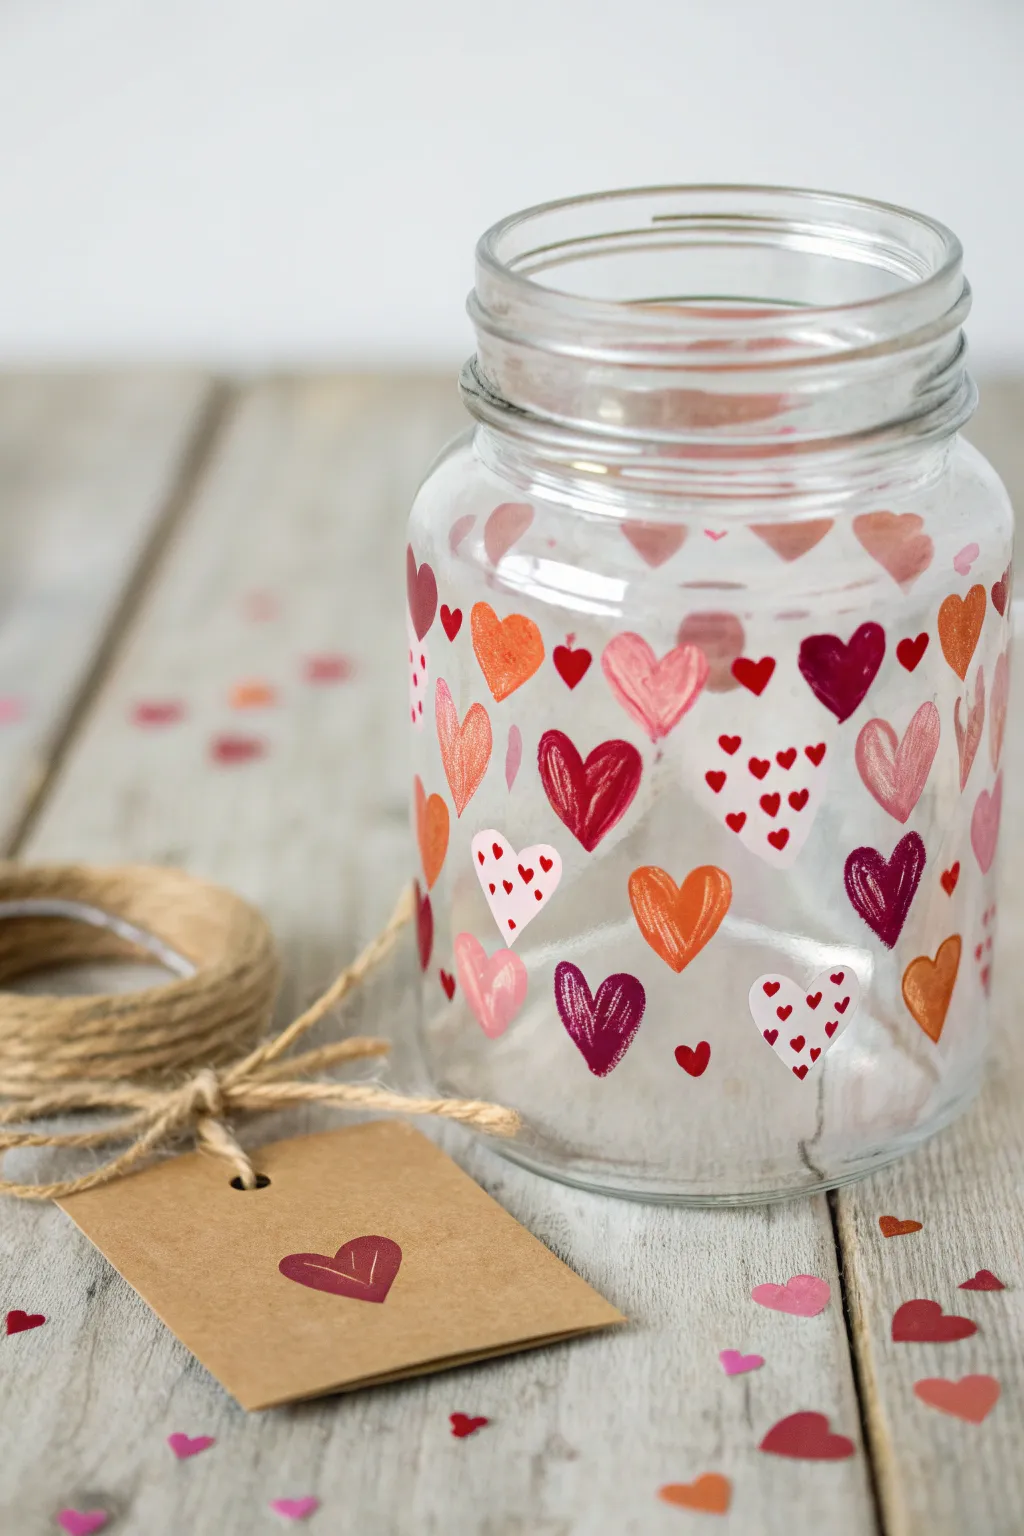
Transform a plain glass jar into a vessel of affection with this whimsical heart-scattered design. Using various shades of red, pink, and orange acrylics, you’ll create a layered, hand-painted look that feels both rustic and sweet, perfect for gifting treats or glowing with a candle inside.
Detailed Instructions
Materials
- Clean, empty glass jar (mason jar or recycled jam jar)
- Rubbing alcohol and cotton pad
- Multi-surface acrylic paints (bright red, burgundy, coral, pale pink, white)
- Small round paintbrush (size 2 or 4)
- Fine detail paintbrush (size 0 or 00)
- Small piece of sponge or foam pouncer (optional)
- Jute twine
- Kraft paper gift tag
- Hole punch
- Palette or small plate for mixing
- Clear sealant spray (optional)
Step 1: Preparing the Canvas
-
Clean the Glass:
Begin by thoroughly washing your glass jar with warm soapy water to remove any labels or glue residue. -
Degrease the Surface:
Moisten a cotton pad with rubbing alcohol and wipe down the entire exterior of the jar. This removes oils and ensures the paint adheres properly. -
Dry Completely:
Let the jar air dry for a few minutes before you start painting; do not touch the painting surface with your fingers once cleaned.
Step 2: Painting the Hearts
-
Prepare Your Palette:
Squeeze out small amounts of your red, burgundy, coral, and pink paints onto your palette. Leave space to mix a few custom shades if desired. -
Paint the Base Layer:
Using your small round brush, paint simple heart shapes randomly around the jar. Vary the sizes from dime-sized to quarter-sized. -
Rotate and Repeat:
Rotate the jar as you work, spacing the hearts out. Use different colors for variety—some deep red, some light pink, some vibrant coral. -
Vary the Shapes:
Keep the heart shapes slightly organic and imperfect for a hand-painted charm. Don’t worry about complete uniformity. -
First Drying Phase:
Allow this first layer of solid hearts to dry completely. This usually takes about 15-20 minutes depending on the paint thickness. -
Add Decorative Details:
Switch to your fine detail brush. Choose a contrasting color (like white on red, or red on pink) to add details. -
Paint Inner Hearts:
On some of the larger hearts, paint a smaller heart shape directly inside the first layer to create a framed effect. -
Add Polka Dots:
For other hearts, use the very tip of your detail brush to dab tiny dots inside the shape, mimicking sprinkles. -
Create Patterned Hearts:
If you are feeling adventurous, paint tiny smaller hearts inside a larger light-colored heart for a ‘confetti’ look. -
Fill the Gaps:
Look for large empty spaces on the jar. Use your finest brush to paint tiny, single-color hearts or small dots in these gaps to balance the composition. -
Final Cure:
Let the jar sit undisturbed for at least 24 hours to let the paint fully cure. If you plan to wash the jar later, follow the baking instructions on your specific paint bottle.
Oops! Smudged paint?
Work quickly! If the paint is wet, wipe it with a damp Q-tip. If dry, gently scrape the error off with a craft knife or toothpick.
Step 3: Adding the Final Touches
-
Prepare the Tag:
Take a small kraft paper tag and paint a single heart in the center using one of your main colors, like burgundy or deep red. -
Detail the Tag:
Once the tag’s heart is dry, use a fine brush or a white gel pen to add a simple outline or cross-hatch detail to match the jar’s style. -
Wrap the Twine:
Cut a length of jute twine (about 24 inches). Wrap it around the lower third of the jar several times to create a rustic band. -
Attach the Tag:
Thread the tag onto the twine and tie it off securely with a simple knot or bow, letting the ends hang slightly loose.
Pro Tip: Translucency
Mix a tiny drop of clear glazing medium into your acrylics. This makes the hearts slightly sheer, letting candlelight glow through beautifully.
Now fill your charming jar with sweet treats or a tea light and enjoy the warm, handmade glow
BRUSH GUIDE
The Right Brush for Every Stroke
From clean lines to bold texture — master brush choice, stroke control, and essential techniques.
Explore the Full Guide
Single-Line Vine Border for Instant Elegance
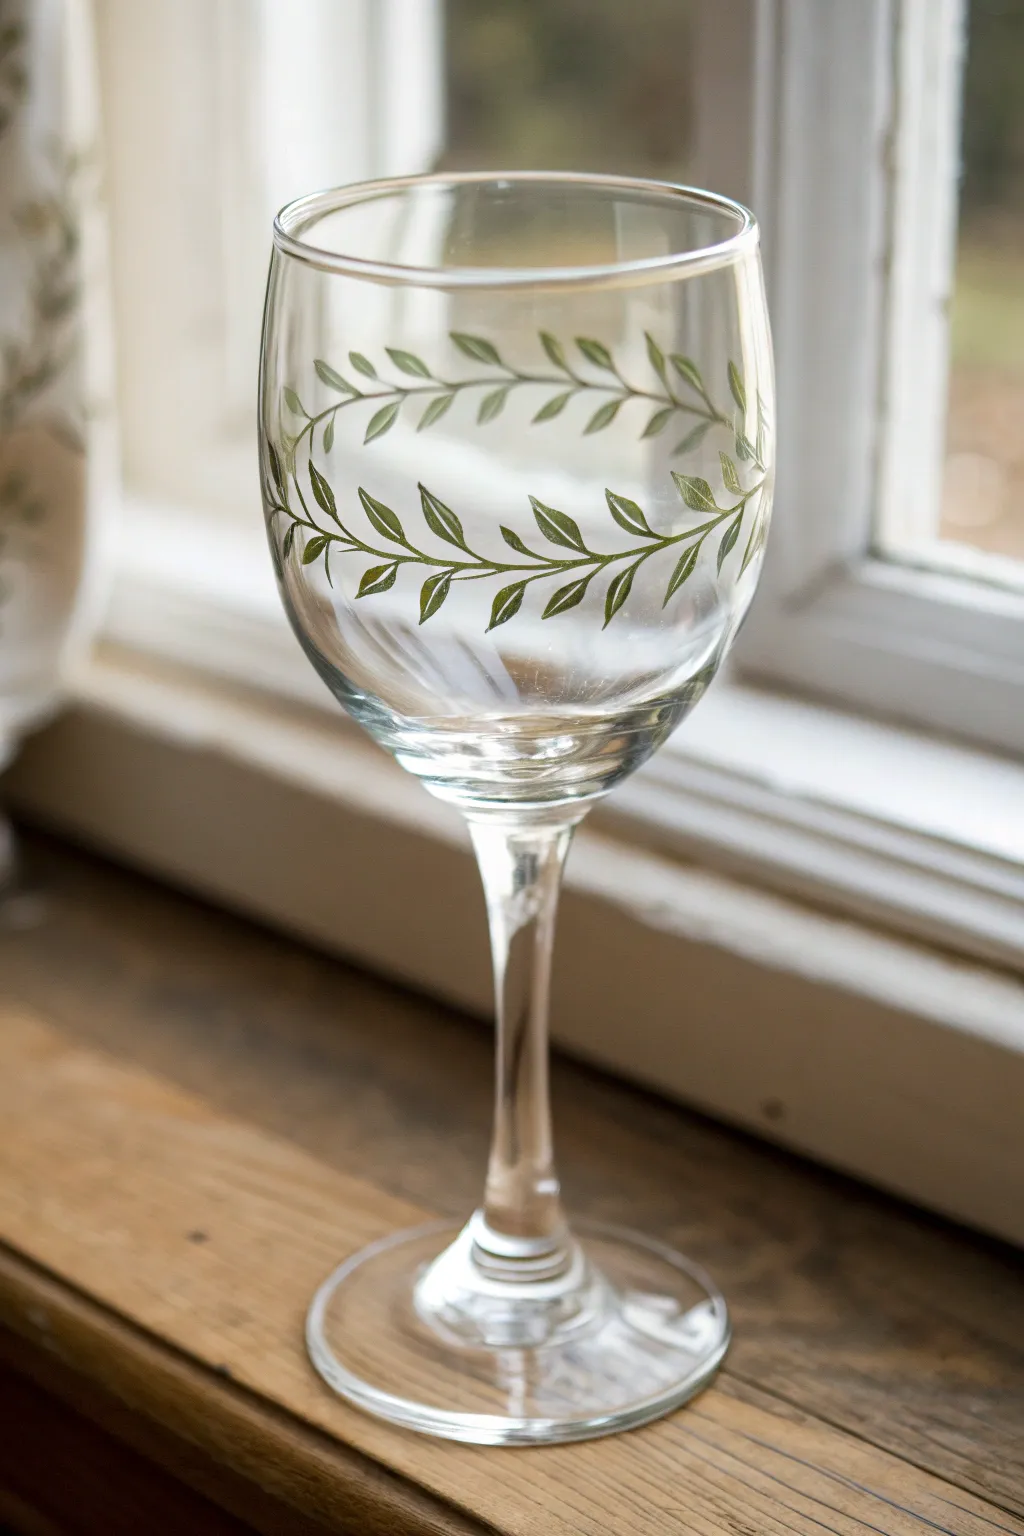
Transform plain stemware into a piece of rustic chic decor with this straightforward yet sophisticated leaf design. The delicate green vine wrapping around the glass adds a touch of nature-inspired elegance that looks beautiful on any table setting.
Step-by-Step Guide
Materials
- Clean wine glass (clear)
- Rubbing alcohol
- Cotton pads or paper towel
- Enamel glass paint (olive or sage green)
- Fine liner brush (size 0 or 00)
- Small flat brush (optional, for leaf filling)
- Painters tape (optional)
- Baking sheet
- Oven (for curing)
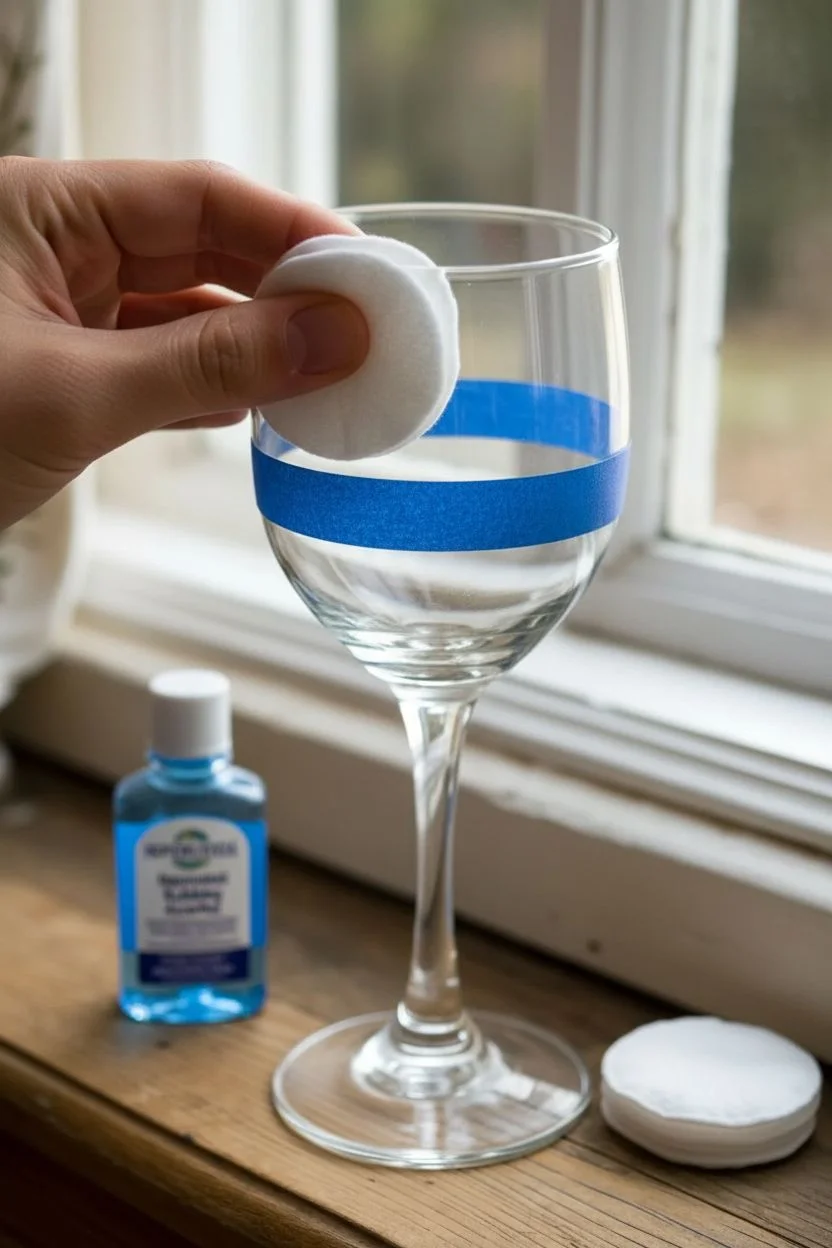
Step 1: Preparation
-
Clean surface:
Begin by thoroughly washing your wine glass with warm, soapy water to remove any dust or sticker residue. -
Degrease glass:
Wipe the outer surface of the glass bowl with rubbing alcohol on a cotton pad. This step is crucial because oils from your fingers can prevent the paint from adhering properly. -
Plan position:
Decide where you want the vine to sit. The ideal placement is usually around the widest part of the bowl or slightly above the midway point. -
Mark guide (optional):
If you are worried about keeping a straight line, you can place a strip of painters tape lightly around the glass as a visual guide, though freehanding yields a more organic look.
Paint Slipping?
If paint beads up or separates, the glass usually still has oil on it. Clean again with alcohol and let it dry completely before reapplying paint.
Step 2: Painting the Vine
-
Load brush:
Load your fine liner brush with olive green enamel paint. You want the paint to be fluid but not dripping. -
Draw stem:
Paint a continuous, thin horizontal line around the circumference of the glass. Don’t worry if it isn’t perfectly straight; slightly wavy lines look more natural for a vine. -
Connect ends:
Ensure the two ends of your line meet seamlessly. If there’s a gap or overlap, gently smooth it out with the tip of your brush. -
Start first leaf:
Starting at one point on the vine, paint a small, singular leaf shape angling upwards. Use a simple teardrop motion: press down slightly to widen the stroke and lift up to create a point. -
Paint opposing leaf:
Paint a second leaf directly below the first one, angling downwards. This creates a symmetrical pair. -
Continue pattern:
Move about half an inch to the right along the vine and paint another pair of leaves, one pointing up and one pointing down. -
Vary angle:
As you work your way around the glass, slightly vary the angle of the leaves. I like to make some curved inward and others straighter to mimic real movement in nature. -
Fill gaps:
Continue this pairing pattern until you encircle the entire glass. Check for any large empty spaces and adjust the leaf spacing if needed as you approach the start. -
Define details:
Go back over your leaves. If the paint looks too sheer, carefully add a second coat to the center of each leaf, leaving the edges sheer for a distinct, hand-painted look. -
Add highlights (optional):
If you want extra dimension, mix a tiny bit of white with your green and add a sheer highlight stroke to the top edge of a few leaves while the green is still wet.
Pro Tip: Stroke Technique
Use a specialized ‘dagger striper’ brush or a long liner brush. These hold more paint and allow you to create the tapered leaf point in a single, smooth motion.
Step 3: Curing and Finishing
-
Initial dry:
Let the glass sit undisturbed for at least one hour or until the paint is dry to the touch. -
Full cure time:
Follow the instructions on your specific bottle of enamel paint. Most require air drying for 21 days or oven baking for durability. -
Oven preparation:
For the oven method, place the glass on a baking sheet in a cold oven. -
Bake glass:
Set the oven temperature to 350°F (175°C) and bake for 30 minutes. The key is allowing the glass to heat up gradually with the oven to prevent cracking. -
Cool down:
After 30 minutes, turn the oven off and leave the glass inside until the oven is completely cool. Removing it too early can cause thermal shock.
Enjoy your beautiful new custom glassware at your next dinner party or give it as a handmade gift
Minimal Fruit Slices (Lemon, Orange, or Lime)
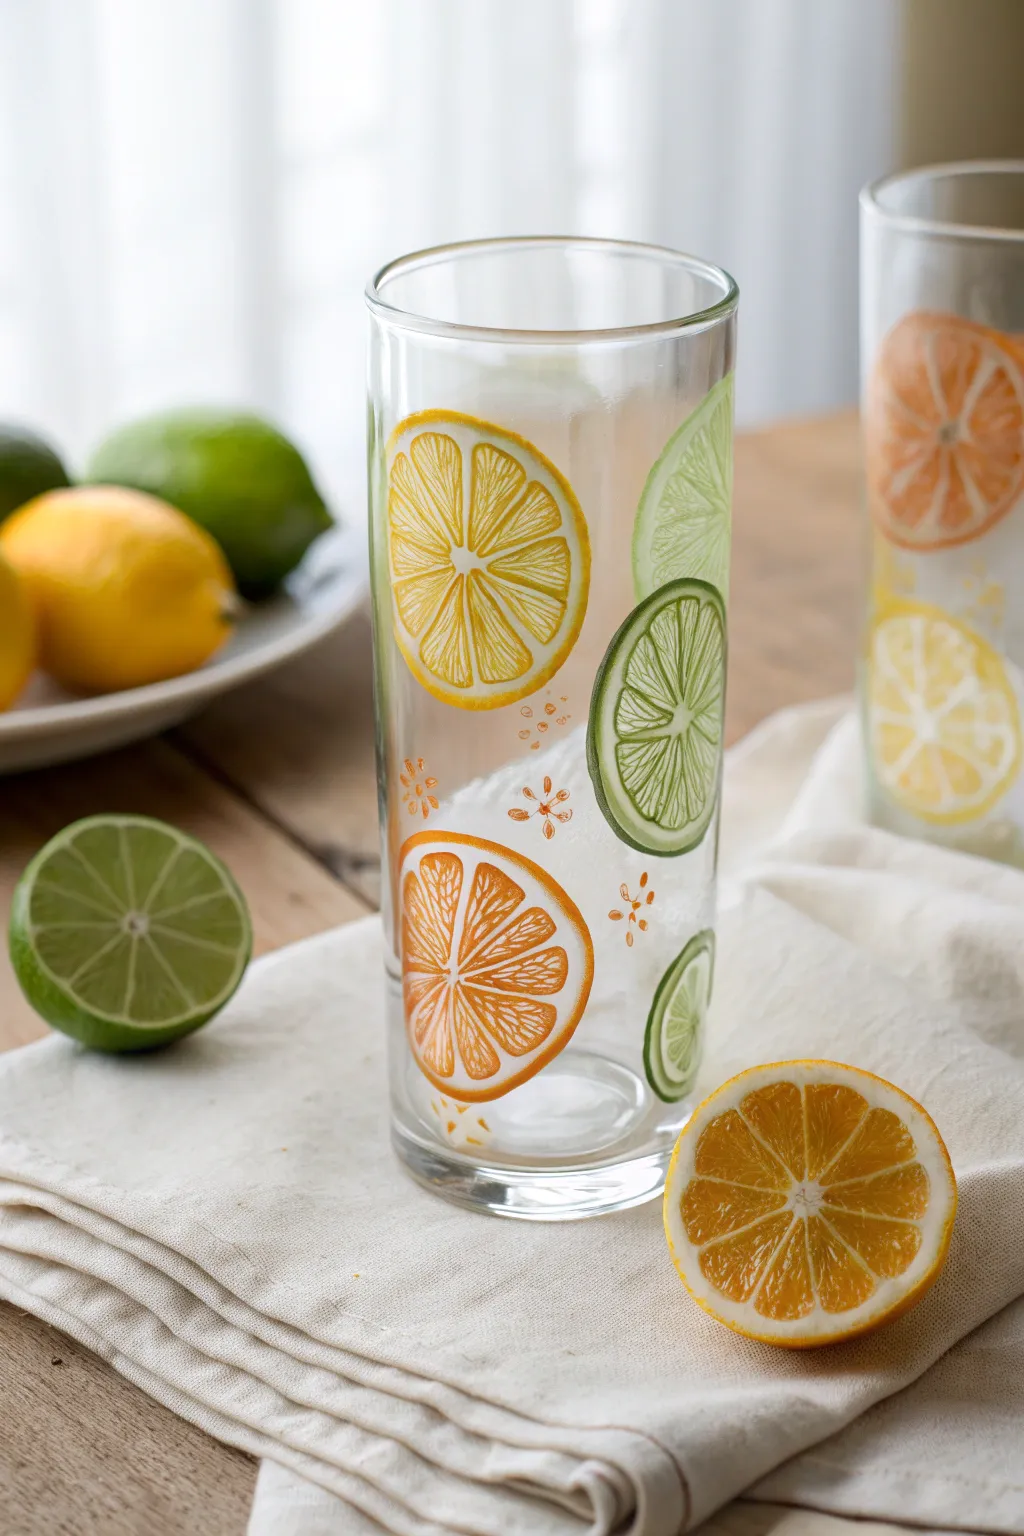
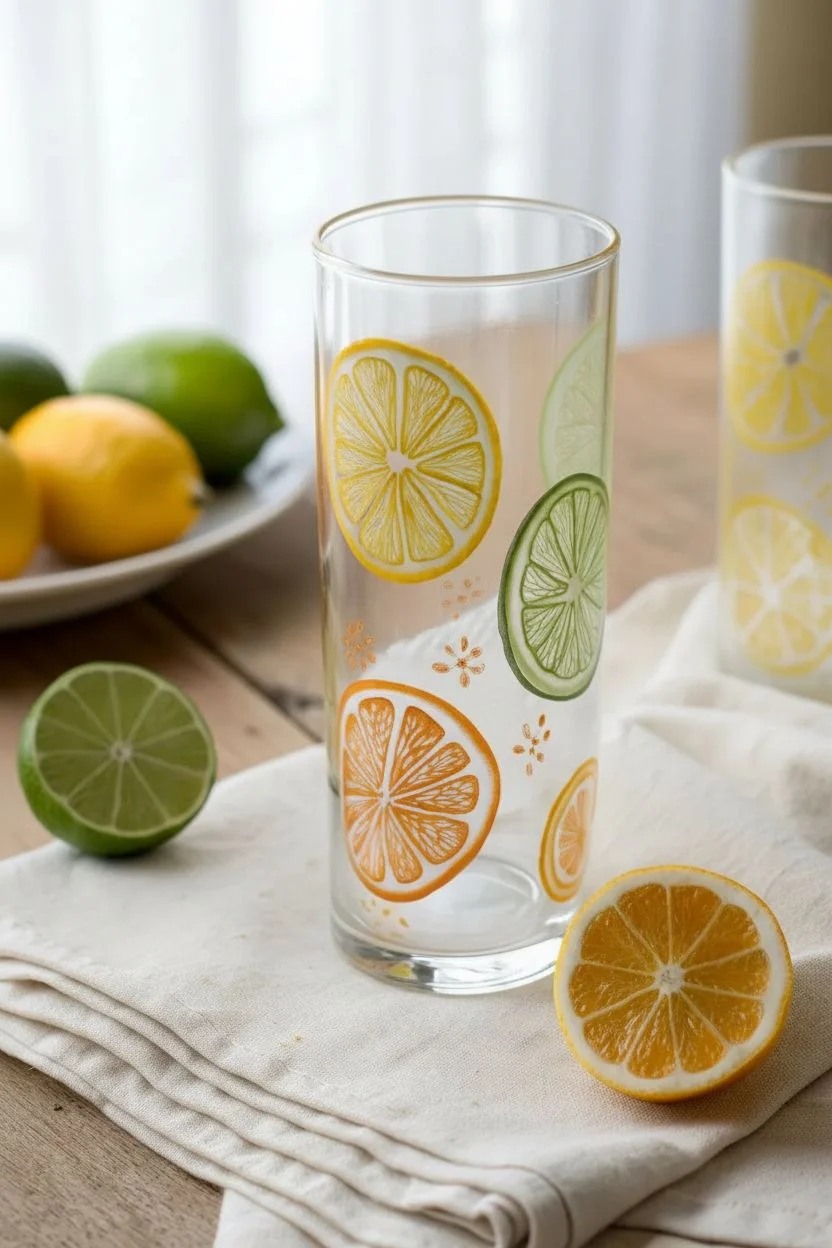
Brighten up plain glassware with these vibrant, translucent citrus slices that look almost juicy enough to squeeze. This beginner-friendly project uses glass paints to create semi-transparent lemons, limes, and oranges for a refreshing, summery look.
How-To Guide
Materials
- Tall clear glass tumbler (thoroughly cleaned)
- Glass outliner paint (gold or light copper)
- Transparent glass paints (yellow, orange, bright green)
- Fine round paintbrush (size 0 or 1)
- Rubbing alcohol and paper towels
- Cotton swabs for cleanup
- Oven for baking (if using heat-set paints)
Step 1: Preparation and Outlining leading
-
Clean surface:
Before starting, wipe the entire outer surface of the glass with rubbing alcohol on a paper towel. This removes any oils or fingerprints that could prevent the paint from adhering properly. -
Plan placement:
Visualize where you want your slices to go. For a balanced look, scatter them at different heights—some near the rim, some near the base, and overlapping slightly if you’re feeling adventurous. -
Outline the rind:
Using the gold or copper outliner tube, gently squeeze to draw varied circles on the glass. Make some larger for oranges/grapefruits and slightly smaller ones for lemons and limes. -
Draw the segments:
Inside each circle, draw a smaller inner circle about 1/4 inch from the edge to create the rind thickness. Find the center point and draw straight lines radiating outward like wheel spokes to create the fruit segments. -
Add detail lines:
To make the segments look realistic, round off the corners of each triangular wedge inside the outline so they don’t look too sharp. I like to add tiny, faint lines inside the wedges for texture. -
Add floating accents:
Fill the empty spaces between the large fruit slices with tiny flower-like clusters. Draw a small central dot surrounded by 5-6 tiny dots using the outliner to mimic seeds or blossoms. -
Dry the outlines:
Let the outliner paint dry completely according to the manufacturer’s instructions. This usually takes about an hour, but it acts as a crucial barrier for the liquid paint later.
Fixing Wobbly Lines
If your outliner hand shakes, don’t panic. Wait for the line to dry for 5 minutes, then use a wooden toothpick to gently nudge or scrape the line into a perfect curve before it fully hardens.
Step 2: Filling with Color
-
Prepare the yellow:
Load your fine brush with transparent yellow glass paint. You want enough paint to flood the area but not so much that it drips. -
Paint the lemons:
Fill in the segments of your lemon slices. Carefully drop the paint into the center of a segment and gently nudge it toward the gold outline, letting the fluid paint settle flat. -
Paint the oranges:
Clean your brush thoroughly and switch to orange paint. Fill in the interior segments of the larger circles. The translucency is key here, so don’t overwork the paint or it might get bubbly. -
Paint the limes:
Finally, use the bright green paint for the remaining outlines. For variety, you can mix a tiny drop of yellow into the green for a lighter, zestier lime shade. -
Adding rind color:
For the outer rind (the space between your two initial circles), apply a very thin, diluted wash of the matching color. It should be paler than the fruit segments to distinct the peel from the juice pulp. -
Paint the decorative dots:
Use the tip of your smallest brush to dab a tiny amount of orange paint onto the decorative flower accents you drew earlier, giving them a subtle pop of color. -
Check for drips:
Rotate the glass slowly to ensure gravity hasn’t caused any paint to pool unevenly. If you spot a mistake, wipe it quickly with a damp cotton swab before it sets.
Step 3: Finishing Touches
-
Initial dry:
Place the glass upright in a dust-free area and let it air dry for at least 24 hours. Don’t touch the paint even if it looks dry, as it may still be tacky underneath. -
Bake to set:
Place the glass in a cold oven. Turn the temperature to 325°F (or the temperature specified on your paint bottle) and bake for 30-40 minutes. -
Cool down:
Turn the oven off and leave the glass inside until the oven is completely cool. Removing it while hot can cause the glass to crack due to thermal shock.
Adding Texture
While the colored paint is still wet, use a clean toothpick to swirl the paint inside the segments slightly. This creates a natural, fibrous pulp texture when it dries translucent.
Your new citrus glassware is ready to serve up lemonades with an extra splash of artistic style

PENCIL GUIDE
Understanding Pencil Grades from H to B
From first sketch to finished drawing — learn pencil grades, line control, and shading techniques.
Explore the Full Guide
Watermelon Wedge Rim Design
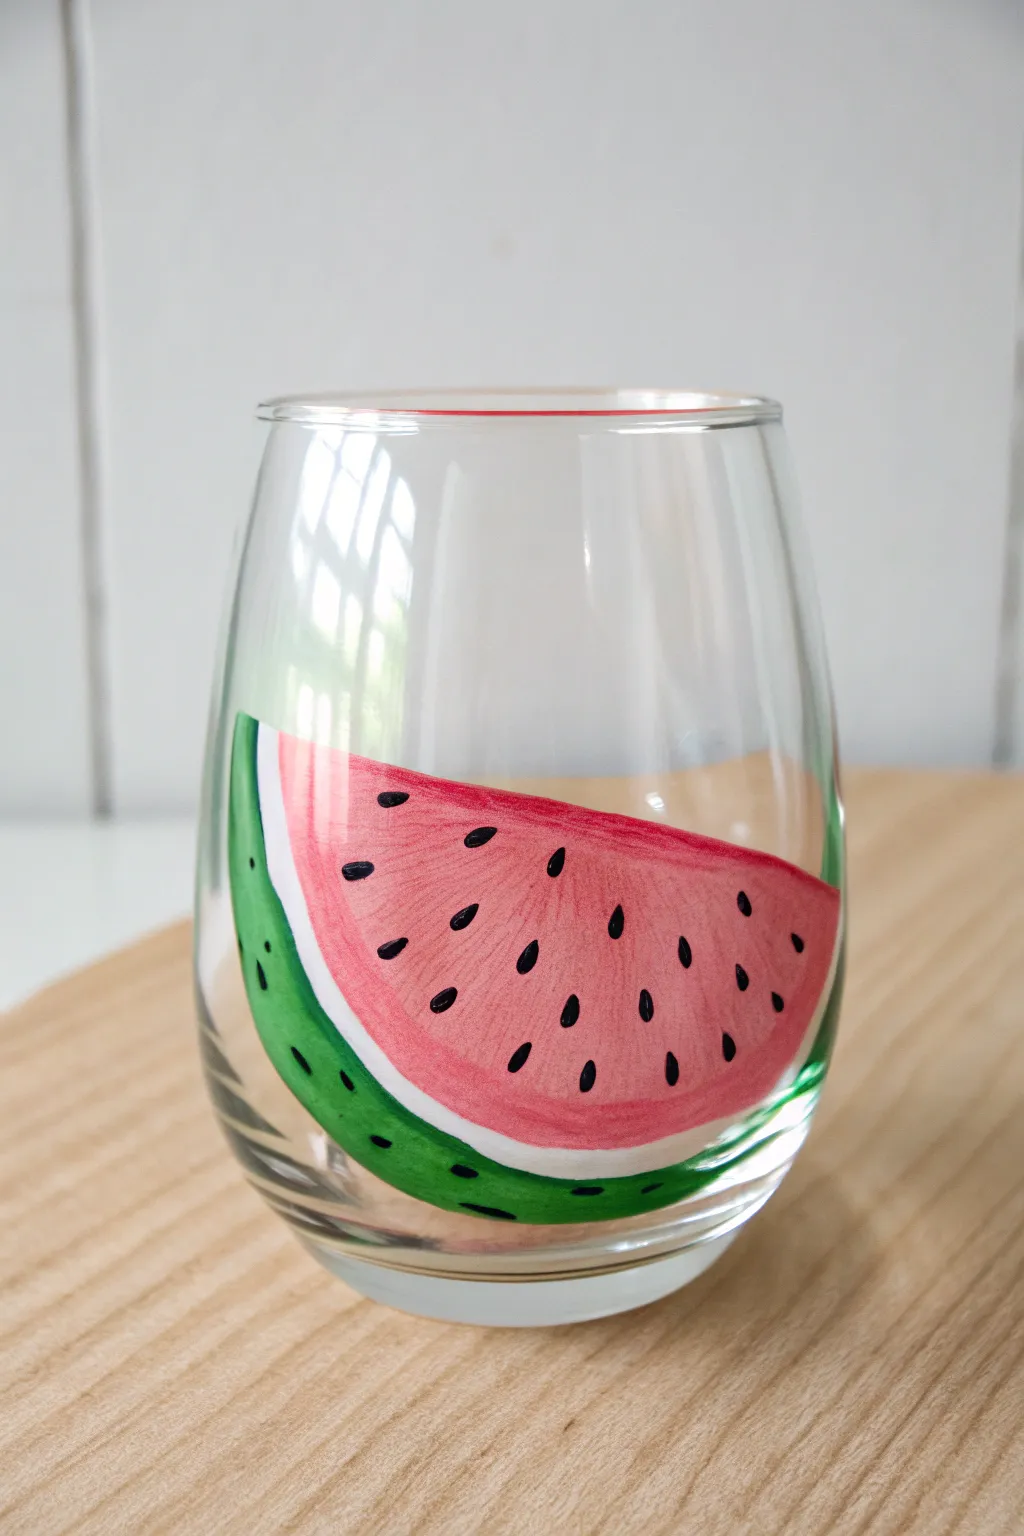
Transform a plain stemless wine glass into a summer standout with this bold watermelon wedge design. The slightly translucent paint gives it a lovely stained-glass effect that glows when it catches the light.
Step-by-Step Tutorial
Materials
- Stemless wine glass (washed and dried)
- Rubbing alcohol
- Cotton pad or paper towel
- Enamel glass craft paints (Dark Green, White, Pink/Red, Black)
- Medium flat shader brush
- Small round detail brush
- Fine liner brush
- Palette or small plate
- Palette knife (optional, for mixing)
- Oven (for curing, check paint instructions)
Step 1: Preparation and Outline
-
Clean the Surface:
Start by wiping down the exterior of your glass thoroughly with rubbing alcohol and a cotton pad. This removes invisible oils and fingerprints which are the main reason paint peels off later. -
Plan the Placement:
Visualize where your watermelon wedge will sit. In the reference image, it wraps around the lower curve, taking up about a third of the glass’s circumference. You want it low enough to look grounded but high enough to be seen. -
Apply the Base Shape:
Using your medium flat brush and the pink (or watermelon red) enamel paint, block out the main wedge shape. Picture a large pizza slice lying sideways. Don’t worry about the edges being perfect yet; we will refine them. -
Build Opacity:
Glass paint can be streaky. Allow the first pink layer to dry for about 20 minutes (or until tacky but set), then apply a second coat to smooth out brush strokes and deepen the color.
Step 2: Adding the Rind
-
Paint the White Pith:
Switch to a clean flat brush. Load it with white enamel paint. Carefully paint a curved band directly underneath the bottom edge of your pink wedge. This line should be fairly thick, acting as the transition between the fruit and the rind. -
Refine the Connection:
If there’s a gap between the pink and white, gently pull the wet white paint up to meet the dry pink edge. A clean, crisp line here makes the fruit look fresh. -
Paint the Green Skin:
Using the dark green paint, create the outermost curved band right below the white line. This is the rind. Make this stripe slightly wider than the white one to anchor the design visually. -
Clean Up Edges:
While the paint is wet, inspect the outer boundaries. If your curve is wobbly, you can use a damp cotton swab or a clean, stiff brush dipped in alcohol to erase mistakes and sharpen the silhouette. -
Add Rind Details:
If you want extra realism, mix a tiny bit of black into your green to create a darker shade, and dab small, elongated dashes along the bottom of the green rind for texture. This adds that organic melon look.
Pro Tip: Smooth Curves
Rest your painting hand’s pinky finger on the glass surface (not on the wet paint!) to stabilize your hand while painting the long curved rind lines.
Step 3: Shading and Seeds
-
Create Inner Texture:
To give the pink flesh some dimension, you can lightly dry-brush vertical strokes of a slightly darker red or pink. Start from the top edge of the wedge and pull downward. This mimics the fibrous texture of real watermelon. -
Prepare the Seeds:
Once the pink base is completely dry to the touch (this is crucial or you’ll smudge the background), switch to your fine liner brush and black paint. -
Painting Teardrops:
Paint small teardrop shapes scattered across the pink area. Point the narrow end of the teardrop toward the center of the hypothetical melon (roughly upward and inward). -
Spacing Matters:
Keep the seed placement somewhat random but balanced. Avoid placing them in straight rows. I find it helpful to start with a few central seeds and work outward. -
Add Seed Highlights:
For a ‘pop’ of dimension, dip the very tip of a toothpick or smallest brush into white paint. Add a microscopic white dot on the upper curve of each black seed to make them look shiny and wet.
Level Up: Bite Marks
For a playful twist, paint a jagged ‘bite’ missing from the top pink edge of the wedge. Just outline a small semicircle and leave that area clear glass.
Step 4: Finishing Touches
-
Final Cleanup:
Check the glass one last time for stray paint marks or smudges. Scrape them away gently with a craft knife or wipe with alcohol. -
Air Cure:
Let the glass sit undisturbed for at least 1 hour (though 24 hours is often recommended by manufacturers) before handling it heavily. -
Bake to Set:
To make your design dishwasher safe (top rack usually), place the glass in a cold oven. Set the temperature to 350°F (176°C) and bake for 30 minutes. Turn the oven off and let the glass cool down inside completely before removing.
Enjoy your refreshing new summer glassware at your next patio gathering
Easy Cactus With Stippled Texture
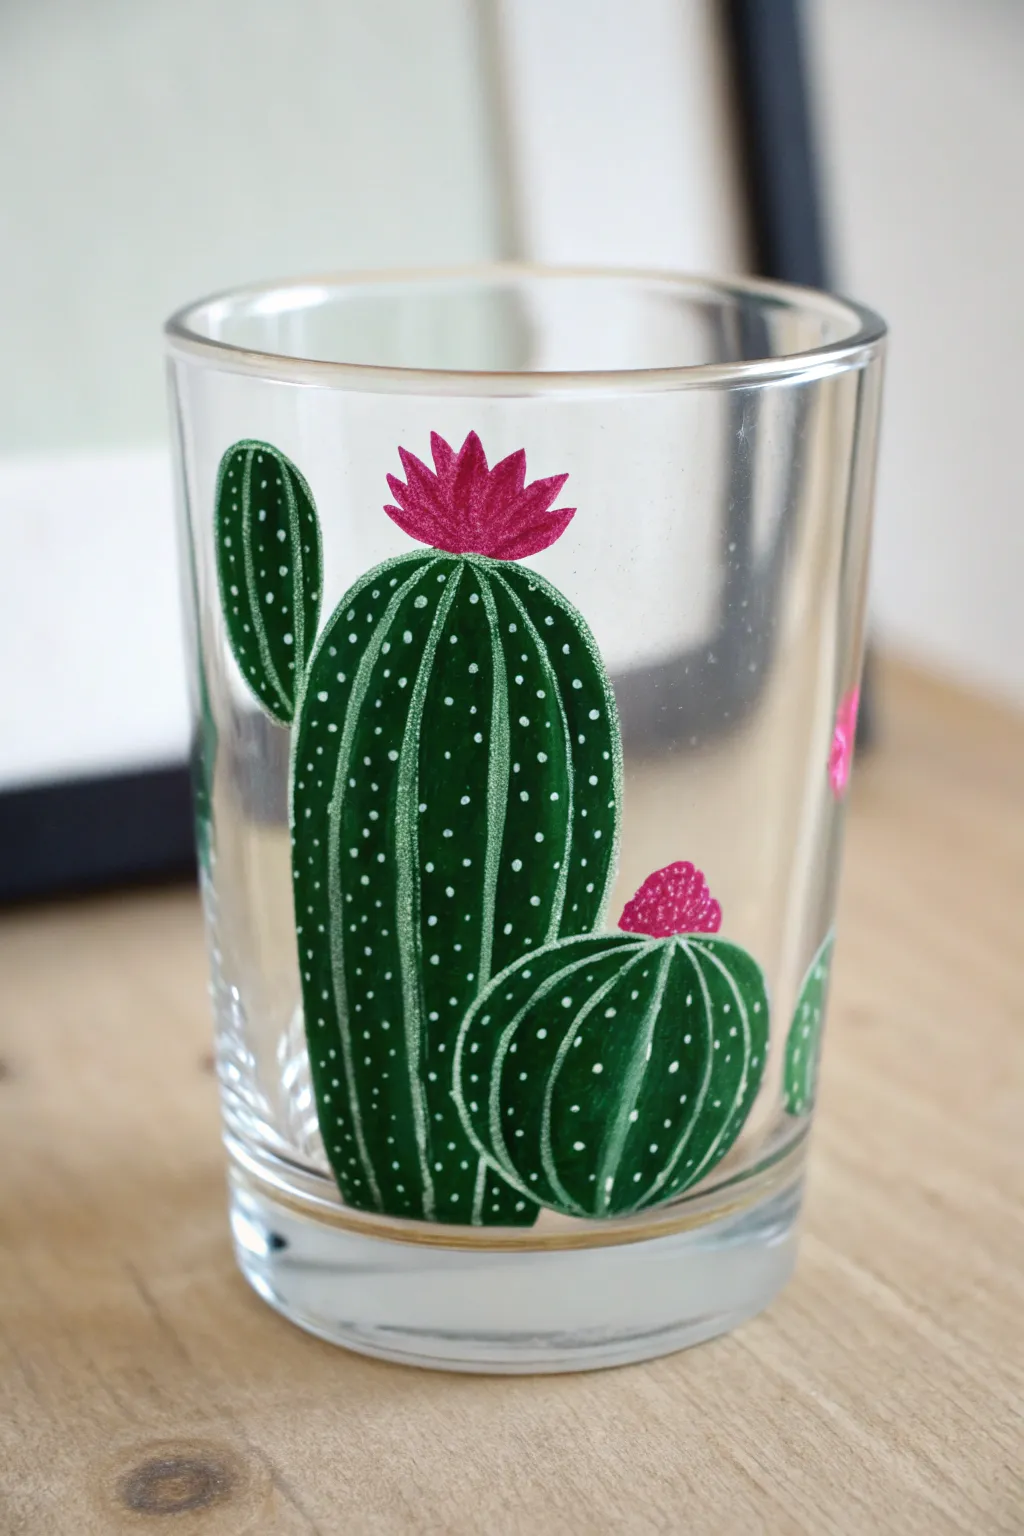
Transform a plain glass tumbler into a desert-inspired masterpiece with this simple painting technique. Using layered greens and delicate white stippling creates a charming, stylized cactus design that looks professional yet is easy to achieve.
Detailed Instructions
Materials
- Clear glass tumbler (clean and dry)
- Rubbing alcohol and cotton pads
- Gloss enamel paint for glass (dark forest green)
- Gloss enamel paint for glass (light leafy green)
- Gloss enamel paint for glass (bright pink or magenta)
- Gloss enamel paint for glass (opaque white)
- Flat shader brush (small size)
- Fine liner brush (size 0 or 00)
- Dotting tool or toothpick
- Paper plate or palette
- Paper towels
Step 1: Preparation & Base Shapes
-
Clean the Surface:
Before painting, wipe the outside of your glass thoroughly with rubbing alcohol on a cotton pad. This removes any finger oils or dust that could prevent the paint from adhering properly. -
Outline the Main Cactus:
Using your small flat brush and dark forest green paint, paint a tall, rounded oblong shape in the center of the glass. This will be the main body of the cactus. -
Add a Side Arm:
Paint a smaller, slightly curved oblong shape extending from the upper left side of the main body, resembling a classic cactus arm. -
Paint the Round Cactus:
Toward the bottom right of the main shape, paint a circular or slightly flattened round shape to represent a barrel cactus sitting in the foreground. -
Fill in the Color:
Go back over your shapes with the dark green creating a solid, opaque base. You may need two coats for full opacity; let the first coat dry for about 20 minutes before adding the second.
Step 2: Detailing the Texture
-
Mix a Lighter Green:
If you don’t have a pre-mixed light green, mix a little white into your dark green or use a separate lime green enamel. -
Paint the Ribs:
Using a fine liner brush and the lighter green, paint thin vertical curved lines following the contour of the cactus shapes. These lines create the ‘ribs’ of the plant. -
Curve for Dimension:
Make sure the lines on the sides curve outward to follow the roundness of the glass and the cactus, which gives the painting a 3D effect. -
Let the Lines Dry:
Allow these light green lines to dry completely to the touch so your next layer doesn’t smudge them. -
Begin Stippling:
Dip a fine dotting tool or the very tip of a toothpick into opaque white paint. -
Apply the Spines:
Gently tap tiny white dots directly along the light green lines you painted earlier. Space them evenly to mimic the look of cactus spines. -
Vary Dot Sizes:
I like to keep the dots fairly uniform, but slight variations in size can make the texture look more organic and hand-drawn.
Use a Foam Rest
To stop the glass from rolling while you paint, rest it on a folded towel or between two heavy books. This keeps your canvas steady for detailed line work.
Step 3: Flowering Finishes
-
Base for the Flowers:
Clean your small flat brush and pick up the bright pink paint. Establish the base of the flower on top of the main cactus and the small barrel cactus. -
Shape the Petals:
Use short, flicking brushstrokes upward to create spiky petal shapes. The flower on the tall cactus should fan out, while the one on the round cactus can be more like a rounded bud. -
Add Texture to Flowers:
Once the pink is tacky, you can gently stipple a slightly lighter pink or white into the center or tips for added depth. -
Cleanup Edges:
If any paint went outside the lines, use a damp Q-tip or a toothpick to scrape away the excess before curing. -
Curing Process:
Follow the instructions on your specific glass paint bottle. Most require air drying for 21 days or baking in a home oven to make the design dishwasher safe.
Fixing Smudged Dots
If a white dot smears, don’t wipe it immediately. Let it dry completely, then gently scrape it off with a craft knife or toothpick and re-apply a fresh dot.
Once baked and cured, your new custom glassware is ready to hold your favorite refreshing drinks


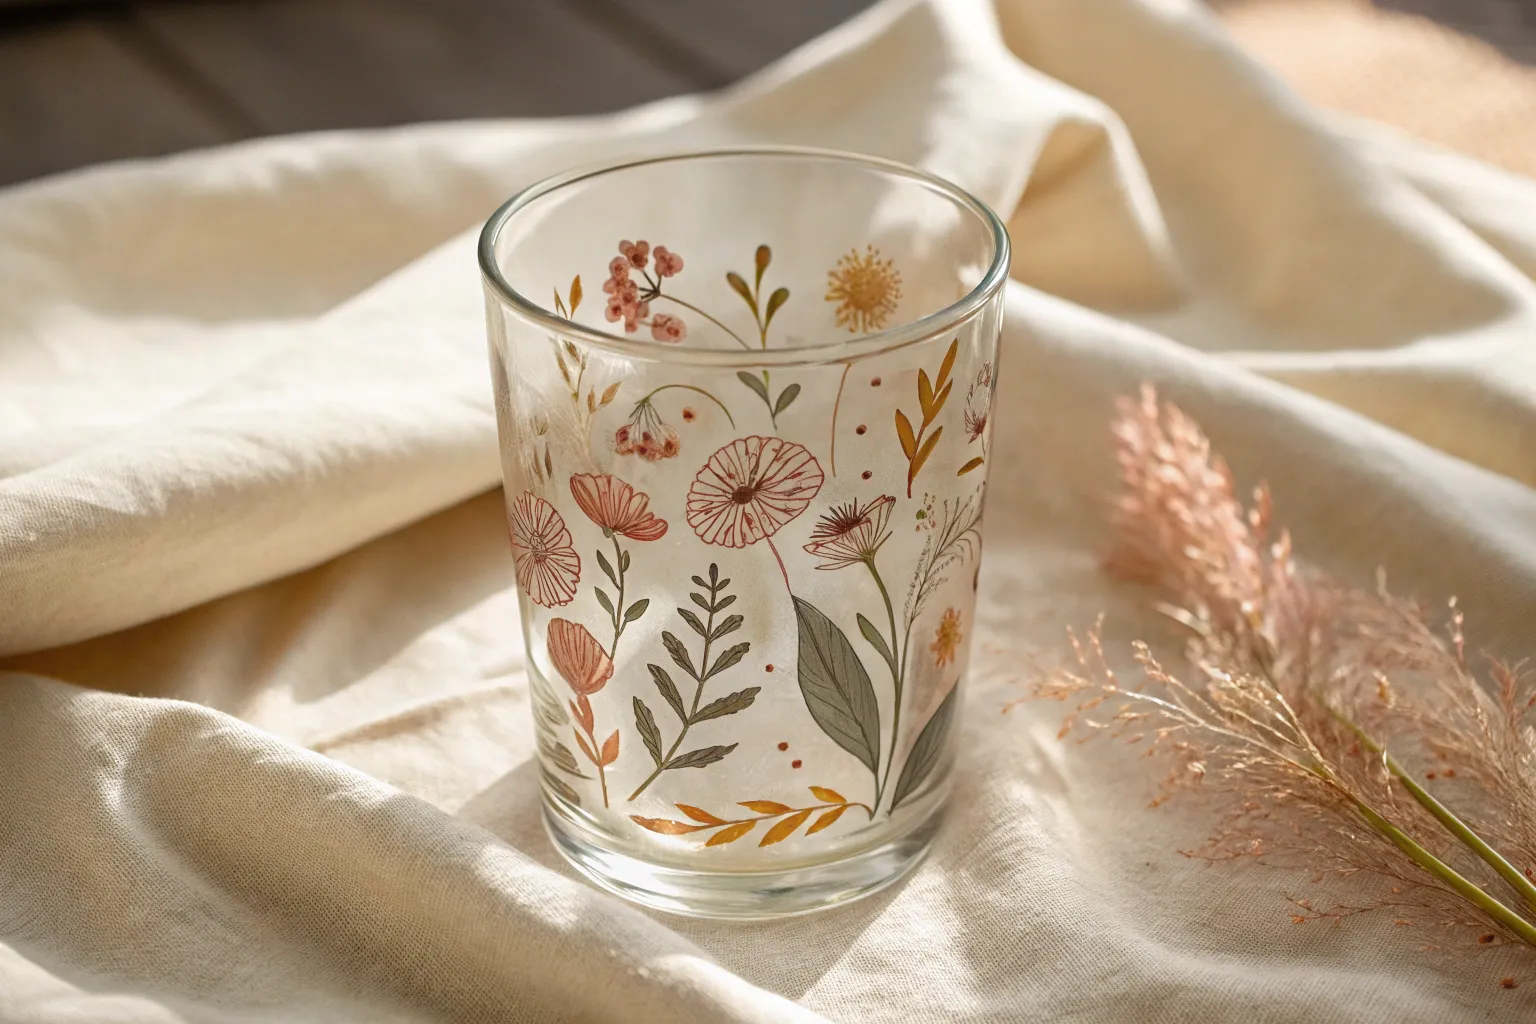
Quick Wildflower Meadow Strokes
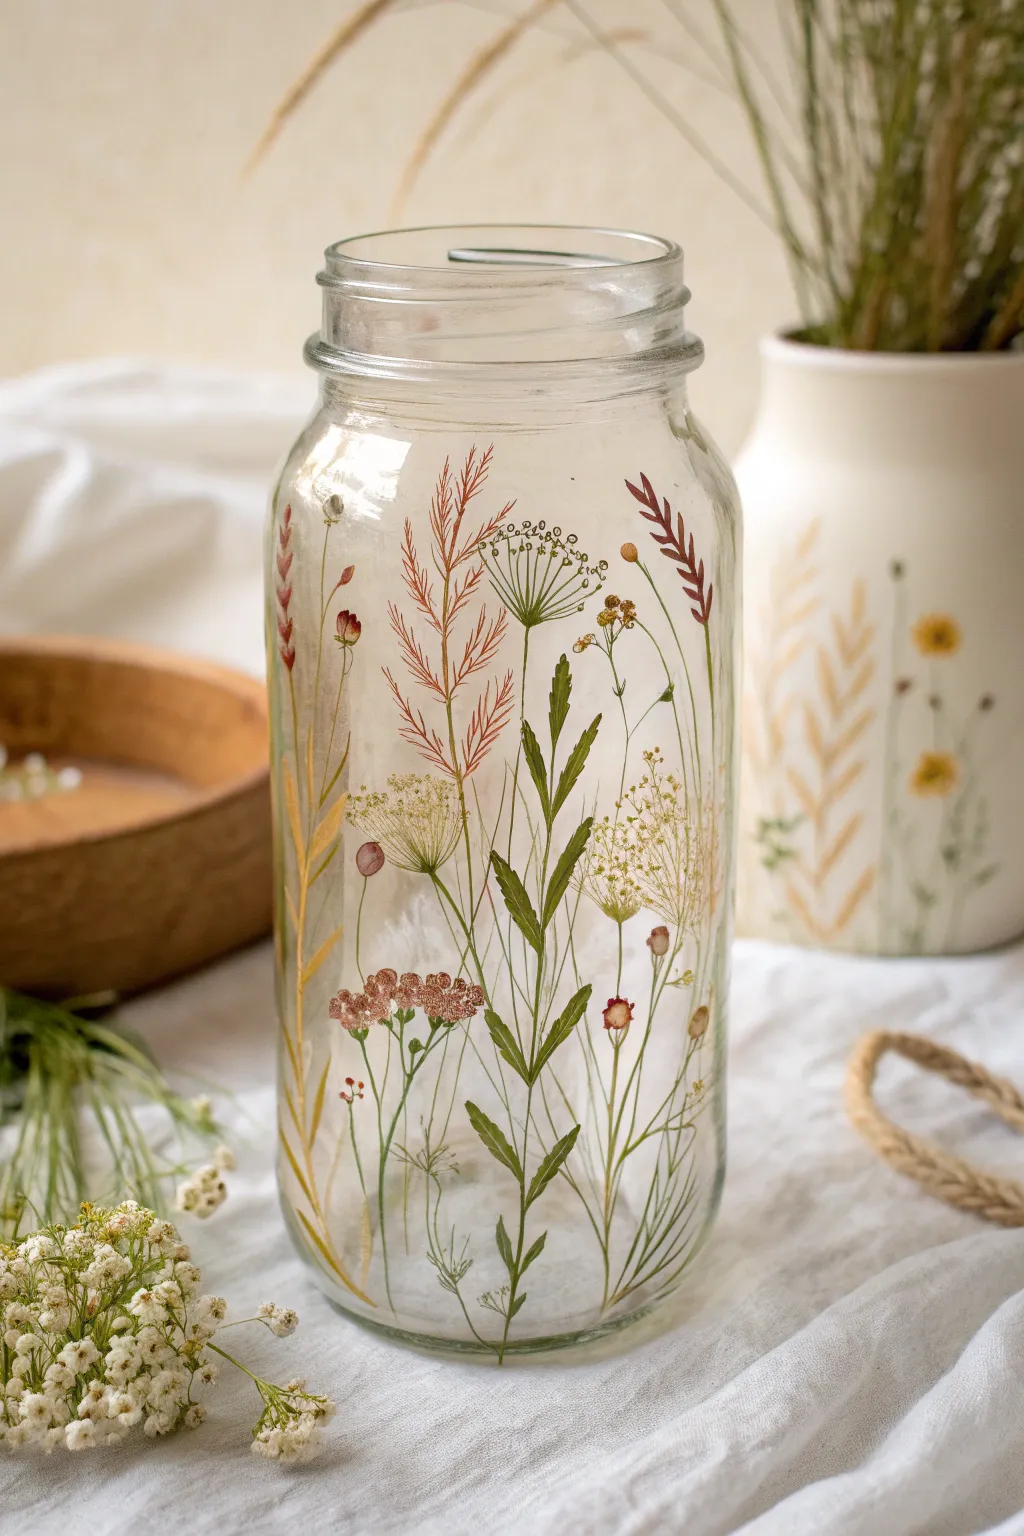
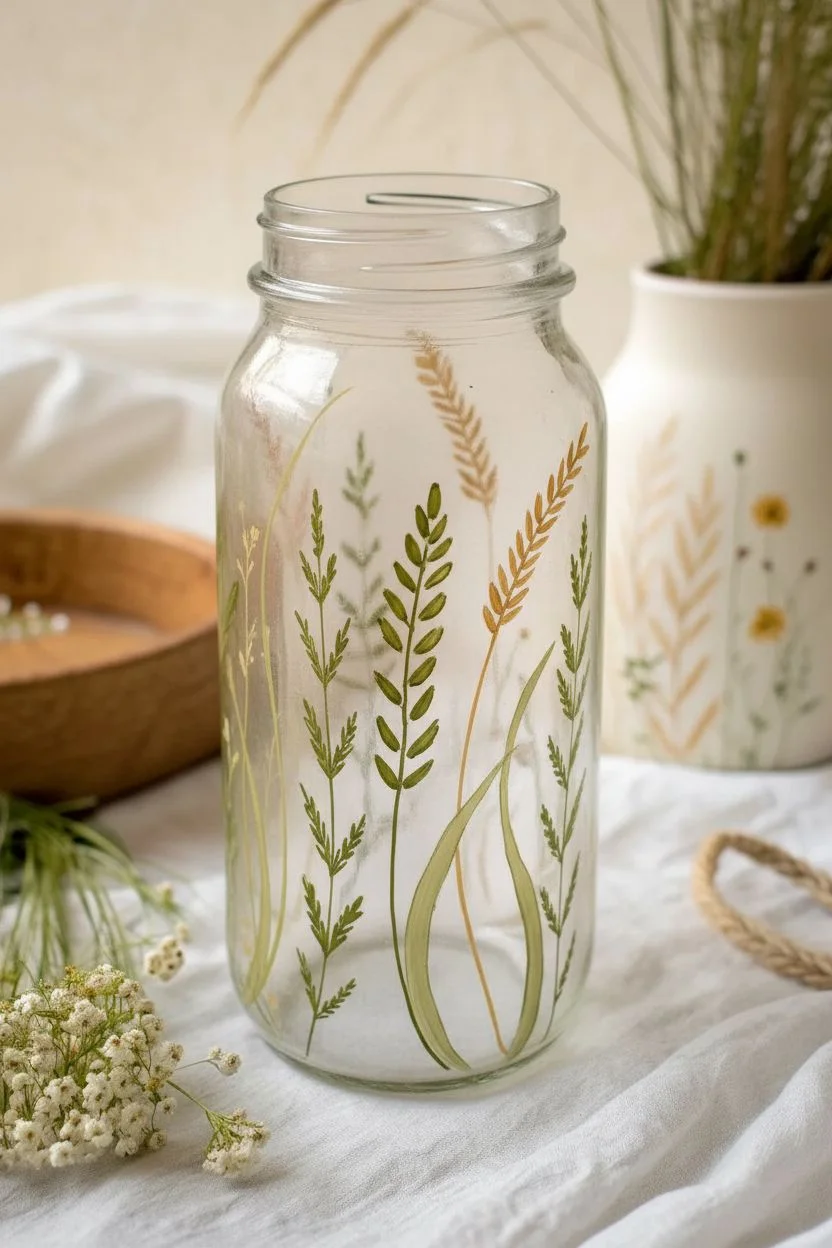
Transform a plain glass jar into a delicate botanical display using simple brushstrokes to mimic the look of pressed wildflowers. This airy, transparent design lets light filter through, creating a lovely sun-catcher effect perfect for holding dried grasses or fresh blooms.
Step-by-Step Tutorial
Materials
- Clean glass mason jar (smooth sides work best)
- Rubbing alcohol and cotton pads
- Enamel glass paints (acrylic enamel) in: sage green, olive green, ochre yellow, rust red, brownish-pink, and white
- Fine liner brush (size 0 or 00)
- Small round brush (size 1 or 2)
- Palette or ceramic plate
- Paper towels
- Jar of water
Step 1: Preparation and Planning
-
Prep the surface:
Begin by thoroughly cleaning the outside of your glass jar with soapy water. Once dry, wipe it down again with rubbing alcohol on a cotton pad to remove any lingering oils or fingerprints, which ensures the paint adheres properly. -
Plan your composition:
Visualize a meadow growing up from the bottom of the jar. You want varied heights—some tall grasses reaching near the rim, and shorter flowers filling the lower sections. It helps to keep the design somewhat sparse to maintain that delicate, airy aesthetic.
Transparency Trick
Mix a tiny drop of clear glazing medium or water with your acrylic enamel. This makes the petals semi-sheer, mimicking the delicate nature of real dried pressed flowers.
Step 2: Painting the Greenery
-
Mix your greens:
Create two shades of green on your palette: a darker olive green for the central fern-like leaves and a lighter, yellowish-sage for the grasses. Mixing in a tiny dot of yellow ochre can warm up standard green paint. -
Anchor the design:
Using your fine liner brush and the darker olive green, paint a few main vertical stems. Start from the bottom curve of the jar and pull the brush upward with a shaky, organic motion to avoid perfectly straight lines. -
Add fern leaves:
Along one of your main stems, use the small round brush to press and lift, creating leaf shapes. Start at the bottom of the stem with larger leaves and make them progressively smaller as you reach the top. -
Paint tall grasses:
Switch back to the fine liner brush and the lighter sage green. Paint long, sweeping lines that curve gently at the top. These should act as the background ‘whitespace’ breakers between your main flowers. -
Create wheat stalks:
Using an ochre or golden-yellow shade, paint a central stem. Then, use short, quick dashes angling upward from the top third of the stem to mimic the look of a dried wheat stalk or wild grain.
Step 3: Adding the Wildflowers
-
Paint the Queen Anne’s Lace:
For the umbrella-shaped flowers, start by painting a thin green stem that branches out into tiny spokes at the top. Think of it like an upside-down skeleton of an umbrella. -
Dabble the blooms:
Dip the very tip of your liner brush into white or pale cream paint. Gently dot the ends of those umbrella spokes to create the fluffy flower head. -
Add rust-colored accents:
Load your brush with a mixture of rust red and a touch of brown. Paint tall, feathery fronds that look almost like coral. I like to let the brush tip barely graze the glass here for a wispy texture. -
Paint the clover-like flowers:
Using a brownish-pink hue, create small clusters of dots at the end of shorter stems. Group these dots tightly together to form a rounded, clover-head shape. -
Insert small buds:
Scatter a few tiny, unbloomed buds throughout the design. These are just small ovals of reddish-brown or yellow attached to very thin, wispy stems. -
Vary the heights:
Step back and look at your jar. Ensure you don’t have all the flower heads at the exact same horizontal level. Add a few taller wisps of grass or a lower flower to break up any straight lines.
Level Up: Beaded Texture
While the paint on the flower heads is still wet, sprinkle a tiny pinch of clear micro-beads or glitter onto the sticky paint for a 3D texture that catches the light.
Step 4: Finishing Touches
-
Refine the details:
Once the first layer is touch-dry (about 15 minutes), go back in with your finest brush. Add tiny darker green veins to the larger leaves or a second layer of white dots to the Queen Anne’s Lace for dimension. -
Clean up edges:
If you made any mistakes or smudges, use a damp cotton swab or a toothpick to gently scrape away the wet paint before it cures. -
Curing the paint:
Follow the specific instructions on your enamel paint bottle for curing. Most require air drying for 21 days or baking in a home oven (usually placing the glass in a cool oven, heating to 350°F, baking for 30 minutes, and cooling inside the oven).
Place your finished jar on a windowsill where the sun can illuminate your painted garden from behind
Mandala Dot Art on the Base of a Glass

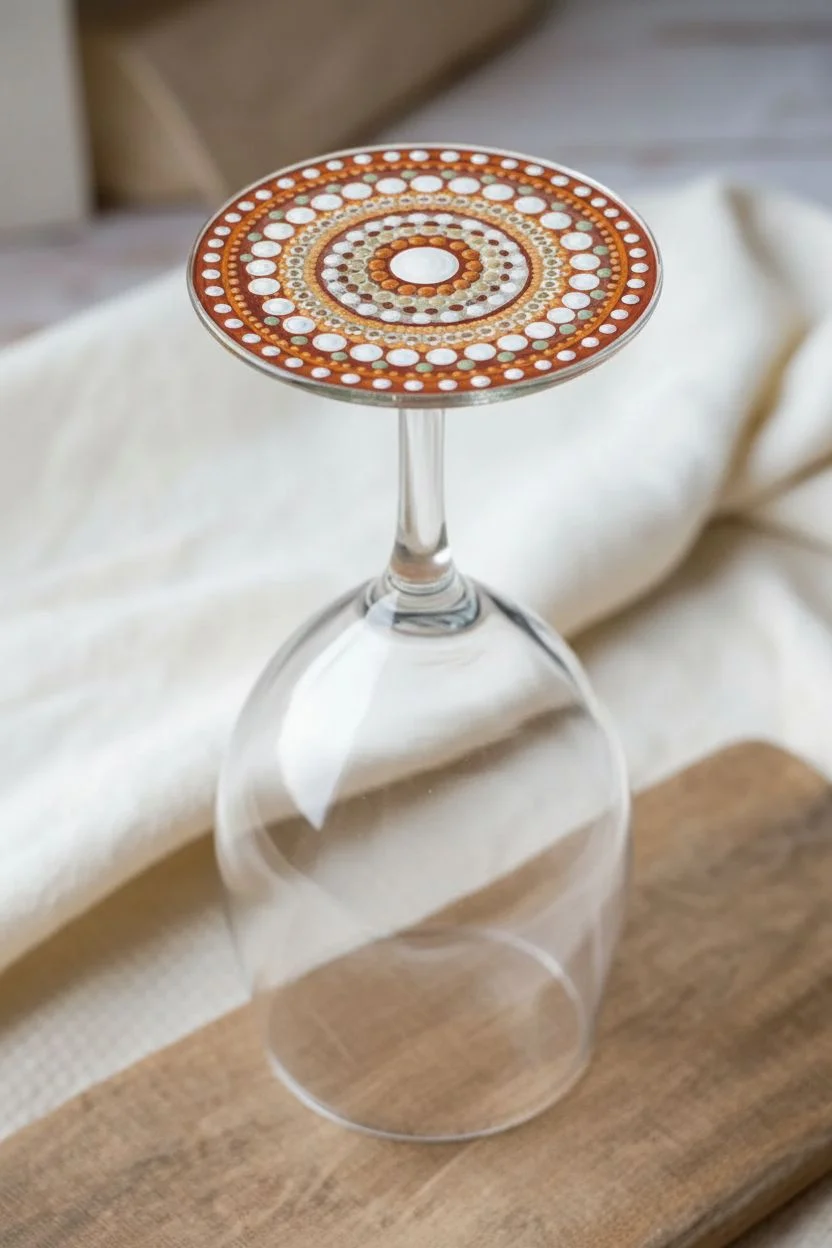
Transform a plain wine glass into a bohemian masterpiece with this intricate yet surprisingly simple dot art technique. Using a warm palette of earth tones like terra cotta, sage, and ochre, you’ll create mesmerizing mandala patterns on both the bowl and base that look professionally hand-painted.
How-To Guide
Materials
- Clear wine glass
- Rubbing alcohol
- Cotton pads
- Multi-surface acrylic enamel paint (rust red, ochre/gold, sage green, white)
- Dotting tools (various sizes)
- Small palette or ceramic tile
- Q-tips (for cleanup)
- Oven (for curing)
Step 1: Preparation & Base Design
-
Clean the surface:
Before you begin, wipe down the entire glass, especially the base and the area on the bowl you plan to paint, with rubbing alcohol and a cotton pad. This removes oils and ensures the paint adheres properly. -
Start the base center:
Flip the glass upside down so the base is facing up. Dip a medium-sized dotting tool into white paint and place a single dot directly in the center where the stem meets the base. -
First ring:
Using a slightly smaller tool, dip into the ochre or gold paint. Create a ring of small dots immediately surrounding the center white dot. -
Second ring:
Switch to your rust-colored paint. Using a medium tool, dot a second concentric circle around the first ring. Try to keep the spacing between dots consistent. -
Walking the dots:
For the next layer, create larger white dots spaced slightly further apart. Then, using a tiny tool and the same white paint, add progressively smaller dots curving around each large dot—a technique often called ‘walking the dots’ or ‘swooshes’. -
Outer rim detail:
Complete the base pattern by adding a final ring of rust-coloured dots near the edge of the glass base. Fill any remaining negative space with tiny sage green filler dots to add density to the design.
Oops! Uneven Dots?
If dots are merging, your paint is too fluid or you’re pressing too hard. Use a barely damp Q-tip to wipe the wet mistake instantly and retry with less paint.
Step 2: Bowl Mandala
-
Determine placement:
Turn the glass right side up or lay it on a soft towel on its side. Locate the area on the curve of the bowl where you want your main mandala to sit. -
Create the focal point:
Start with a large central dot in rust red. Around this, place a tight ring of tiny white dots to create a bright center. -
Layering colors:
Move to the ochre paint. Add a ring of medium-sized dots around the white ring. I find it helpful to place dots at the 12, 6, 3, and 9 o’clock positions first to keep the circle symmetrical. -
Adding texture:
On top of the larger ochre dots you just painted (once they are slightly tacky/dry), place a tiny dot of rust red in the center of each to create a ‘bullseye’ effect. -
Expanding the pattern:
Create the next ring using sage green dots. Keep these relatively small and tightly packed to define the border of the inner medallion. -
Large outer petals:
Switch to your largest dotting tool. load it with rust red paint and create a ring of large, prominent dots. Leave a tiny gap between the green ring and this new red ring. -
Top dotting detail:
Once the large red dots are dry to text, add a smaller white dot on top of each one, followed by a tiny ochre dot on top of the white one for a three-layered 3D look.
Step 3: Finishing Touches
-
Outer halo:
Switch to a very pale, diluted ochre or a translucent pearl paint. Create a wide, scattered halo of tiny dots radiating outward from the main mandala, fading out as they get further away. -
Clean up edges:
Inspect your work for any accidental smudges. Use a damp Q-tip to gently wipe away mistakes while the paint is still wet. -
Let it cure:
Allow the glass to air dry for at least 24 hours. Do not touch the paint during this time. -
Bake to set:
Place the glass in a cold oven. Set the temperature to 350°F (176°C) and bake for 30 minutes. Turn the oven off and let the glass cool completely inside before removing it to prevent cracking.
Pro Tip: Consistency
Reload your dotting tool after every single dot. This ensures that every dot in the ring is the exact same size and shape, preventing the ‘fading tail’ effect.
Now you have a stunning, custom piece of glassware ready for your next dinner party
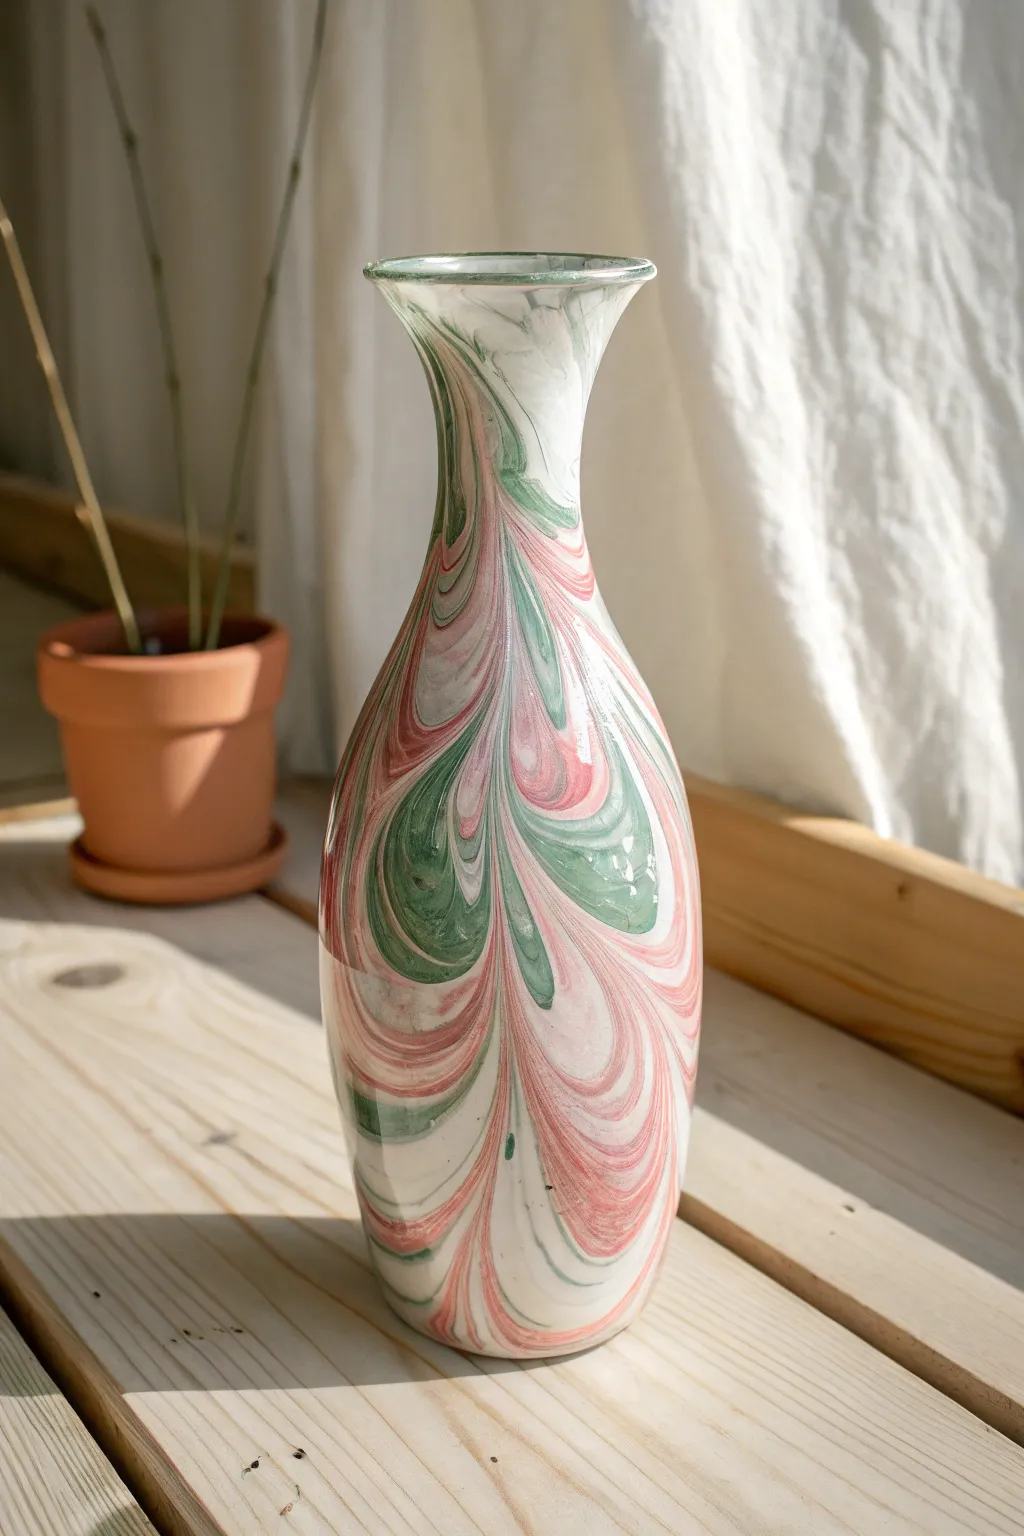
Color-Blocked Shapes for Modern Style

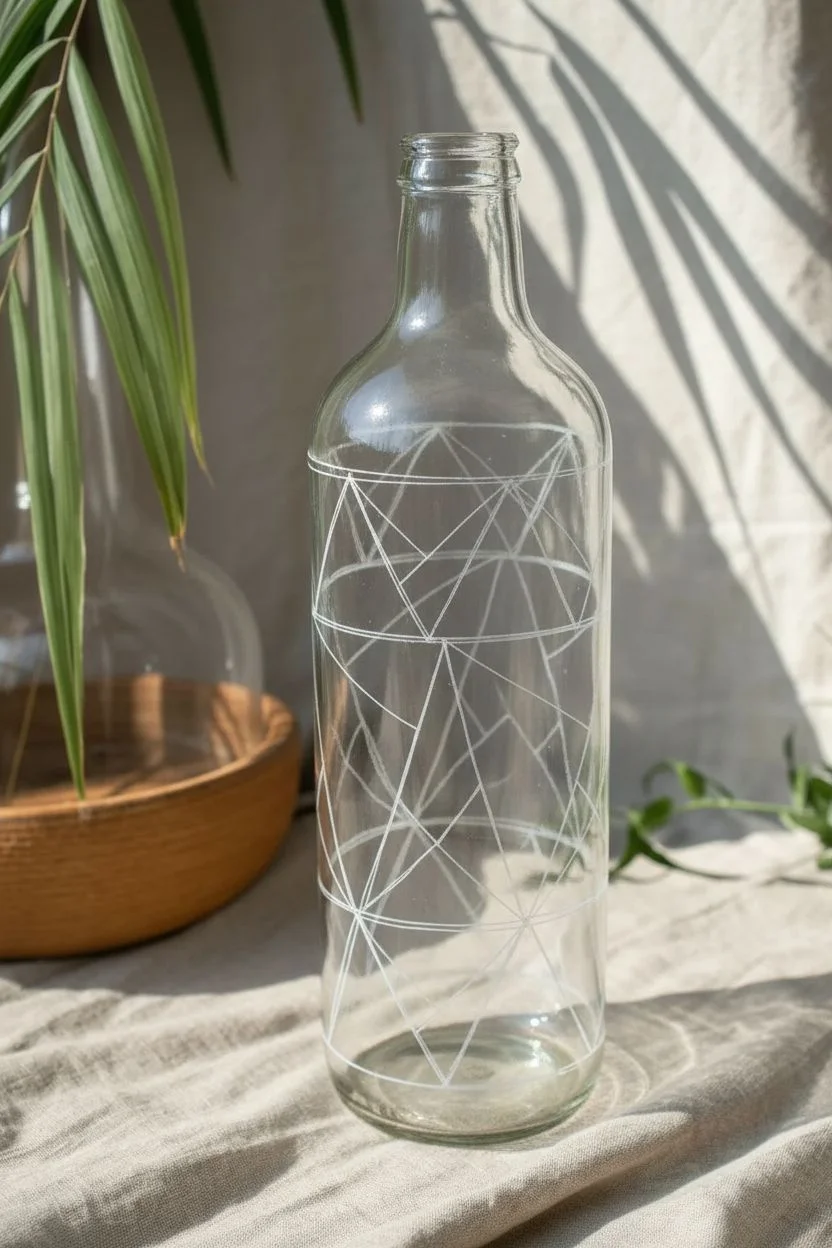
Transform a plain glass bottle into a striking piece of modern decor with this geometric color-blocked design. Using earthy warm tones and crisp triangular patterns, you’ll create a sophisticated vessel that looks like high-end ceramic.
Detailed Instructions
Materials
- Clean glass bottle or carafe
- Rubbing alcohol and cotton pads
- Multi-surface acrylic craft paints (terracotta, forest green, sand beige, black)
- White liquid leading or a white oil-based paint marker
- Flat shader brushes (small and medium sizes)
- Fine liner brush
- Ruler or straight edge
- Water-soluble marking pencil or chalk marker
- Palette or paper plate
- Matte spray sealant (optional)
Step 1: Preparation & Planning
-
Clean the Surface:
Begin by thoroughly cleaning your glass bottle with warm soapy water to remove any labels or glue residue. Once dry, wipe the entire exterior with rubbing alcohol on a cotton pad to remove oils and fingerprints, ensuring the paint adheres properly. -
Map the Grid:
Using a water-soluble marking pencil or chalk marker, lightly sketch a series of vertical and horizontal lines around the bottle to create a basic grid. This doesn’t need to be perfectly mechanically precise, as the hand-painted look adds charm. -
Draw the Triangles:
Within your grid, draw diagonal lines connecting opposite corners of your squares or rectangles. This will divide the space into the triangular shapes seen in the design. Vary the direction of the diagonals to create visual interest.
Tape Hack
If free-handing lines feels daunting, use thin automotive detailing tape (1/8 inch) to mask off the grid. Paint the shapes, let dry, then peel to reveal clear glass lines.
Step 2: Creating the Outlines
-
Apply the Lines:
Go over your sketched pattern with a white oil-based paint marker or a steady hand using white liquid leading. I prefer using a marker for a flatter, more modern finish, whereas leading adds texture. -
Refine the Intersections:
Pay close attention where the points of the triangles meet. Ensure the white lines connect cleanly without large globs of paint. Keep the lines relatively thin to maintain the delicate geometric aesthetic. -
Let it Cure:
Allow these outline lines to dry completely before moving on to adding color. If you used a paint marker, 30 minutes is usually sufficient; if you used liquid leading, wait at least 4-6 hours.
Texture Twist
Mix a teaspoon of baking soda into your acrylic paints before applying. This creates a gritty, ceramic-like texture that mimics the matte finish of pottery.
Step 3: Painting the Shapes
-
Prepare Your Palette:
Squeeze out your acrylic colors: terracotta, forest green, sand beige, and black. If the paints are heavy body, thin them slightly with a drop of water or glazing medium so they flow smoothly on the glass. -
Start with Earth Tones:
Begin filling in scattered triangles with the terracotta color. Use a small flat shader brush to get crisp edges right up to your white outlines without painting over them. -
Add Green Accents:
Next, paint selected triangles with the forest green. Try to space these out so they don’t all cluster in one area, balancing the darker tones across the bottle’s surface. -
Fill with Neutrals:
Use the sand beige color to fill in a significant portion of the remaining shapes. This lighter color acts as a negative space that makes the darker colors pop. -
Bold Contrast:
Finally, paint a few select triangles in black or very dark grey. These dark anchors add depth and modernization to the overall pattern. -
Leave Some White:
Notice how some triangles in the design are white or very pale grey. You can either leave the glass clear if it’s frosted, or paint these sections white to complete the opaque look.
Step 4: Finishing Touches
-
Apply Second Coats:
Glass can be slippery, and the first coat might look streaky. Once the first layer is dry to the touch, apply a second coat to each color section to ensure solid opacity. -
Clean Up Edges:
If you accidentally painted over any white outlines, wait for the color to dry, then carefully touch up the line with your white marker or liner brush. -
Seal the Work:
To protect your design against scratches, spray the bottle with a clear matte sealant. Use light, even mists rather than one heavy coat to prevent drips. -
Rim Detail:
For a polished look, carefully paint the very rim of the bottle opening with a small band of gold or matching beige paint.
Place your newly patterned vase near a window where the light can play off the geometric shapes and rich colors
Painted Rim Dip for a Subtle Pop of Color
Transform plain, inexpensive drinking glasses into custom drinkware with a sophisticated splash of color. This dipping technique creates a perfectly smooth, slightly raised rim that looks professionally manufactured but takes only minutes to achieve at home.
How-To Guide
Materials
- Clear highball or tumbler glasses (thoroughly cleaned)
- Pebeo Vitrea 160 glass paint (glossy turquoise or deep blue)
- Rubbing alcohol
- Cotton pads or paper towels
- Small shallow disposable plate or saucer (must be wider than the glass mouth)
- Parchment paper or wax paper
- Baking sheet
- Oven (for curing)
Step 1: Preparation & Cleaning
-
Wash the glass:
Start by washing your glasses with warm soapy water to remove any factory dust or oils. Dry them completely with a lint-free cloth. -
Degrease the rim:
Pour a small amount of rubbing alcohol onto a cotton pad. Wipe the rim of the glass vigorously, covering both the very edge and about half an inch down the inside and outside. -
Avoid fingerprints:
From this point forward, try to hold the glass mainly by the base or the middle section. Oils from your fingers can prevent the paint from adhering properly to the rim. -
Prepare the drying station:
Lay a sheet of parchment paper over a baking sheet or a flat work surface. Have this ready nearby so you can transfer the wet glass immediately.
Step 2: The Dipping Technique
-
Pour the paint:
Squeeze a generous amount of glass paint onto your shallow disposable plate. You need a pool of paint slightly wider than the rim of your glass. -
Level the paint:
Gently tap the plate against the table to help the paint settle into a flat, even pool. Avoid creating bubbles, but ensure the depth is consistent. -
Dip the rim:
Invert the glass and hold it perfectly vertical. Lower it straight down into the paint pool until the rim creates a seal with the liquid. -
Lift carefully:
Without twisting or tilting, lift the glass straight up. You should see a uniform bead of blue paint clinging to the rim. -
Check coverage:
Quickly inspect the rim. If there are gaps, you can do a second simultaneous dip, but be quick before the first layer starts to tack up. -
Handle drips:
Hold the glass upside down for a few seconds to let any excess paint drip off into the plate. A gentle shake can help dislodge a heavy bead. -
Flip the glass:
This is crucial: swiftly flip the glass right-side up. This allows gravity to pull the paint down slightly, settling it into a smooth, rounded edge rather than dripping down the sides.
Clean Edges Pro Tip
If you want a strictly defined line rather than a organic dipped look, use painters tape 1/4 inch below the rim before dipping. Remove immediately while wet.
Step 3: Cleaning & Curing
-
Clean the drip line:
When you flipped the glass, the paint might have naturally leveled out. If any paint ran too far down the side, use a damp cotton swab to immediately wipe it away for a clean edge. -
Initial dry time:
Place the glass upright on your prepared parchment paper. Let the paint air dry for at least 24 hours. The paint needs to be fully hardened before baking. -
Load the oven:
Place the dried glasses on a baking sheet and put them into a cold oven. Do not preheat the oven, as sudden temperature changes can shatter the glass. -
Bake to cure:
Turn the oven to 325°F (160°C). Once the oven reaches temperature, bake for 40 minutes to permanently set the paint. -
Cool down slowly:
After 40 minutes, turn off the oven but leave the door closed. Let the glasses cool down completely inside the oven for a few hours.
Mix It Up
Try marbling the paint in the saucer! Squeeze two complementary colors (like dark blue and teal) side-by-side and swirl slightly with a toothpick before dipping.
Once fully cured, your custom blue-rimmed glasses are dishwasher safe and ready for your next dinner party
Sea Glass-Inspired Bottle Painting
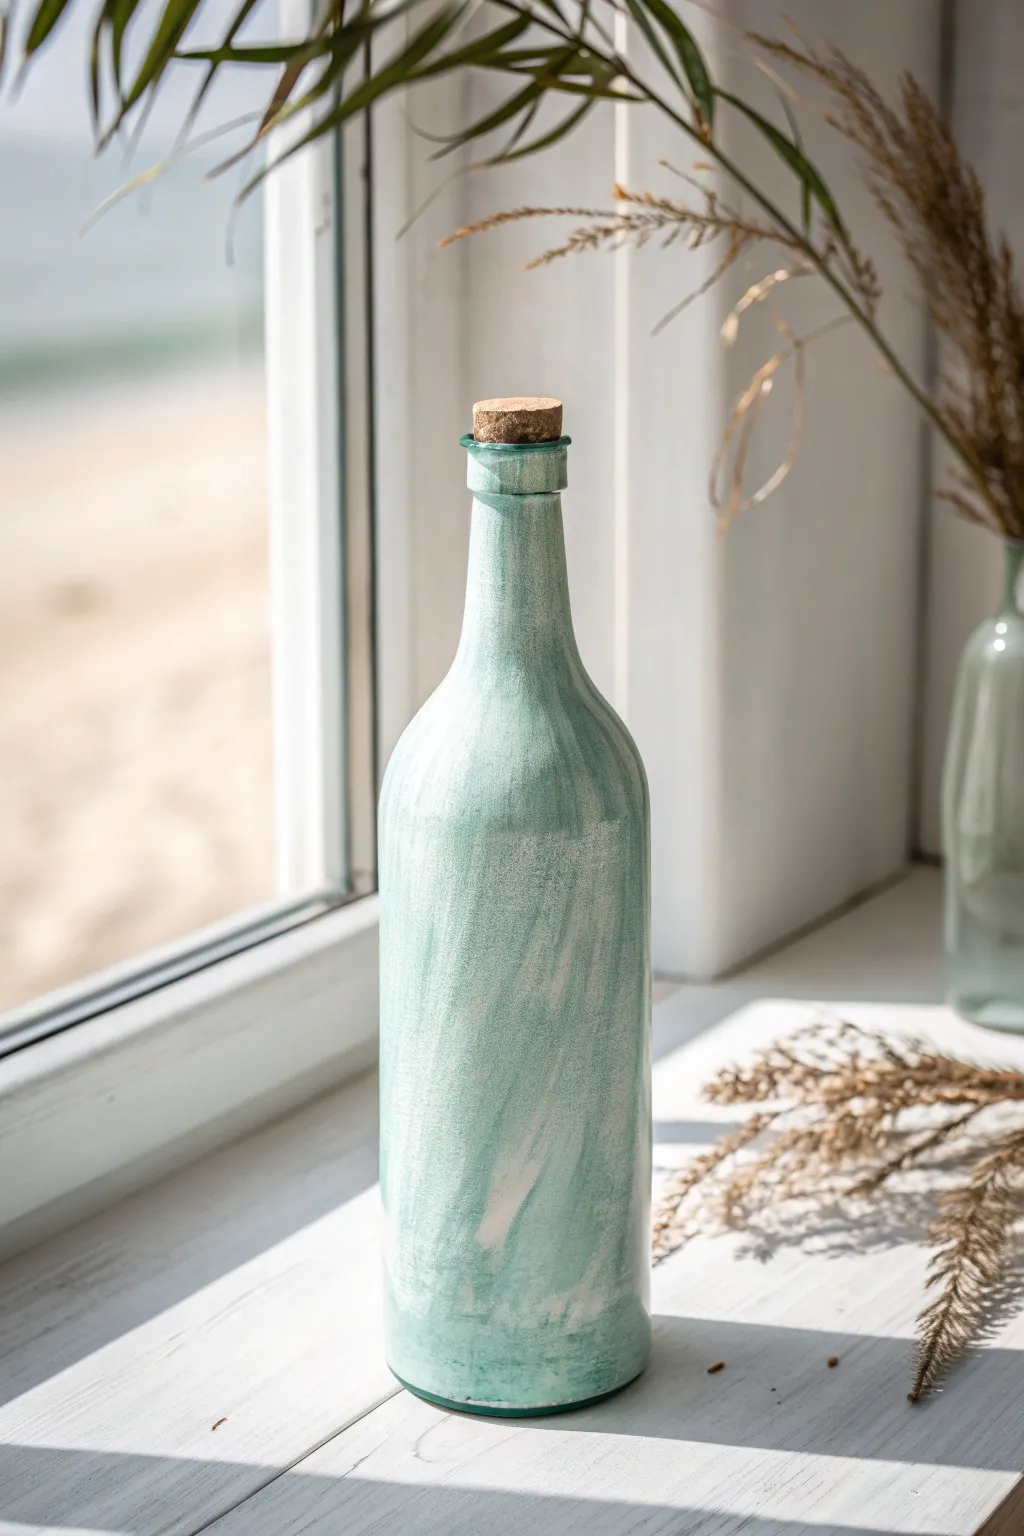
Transform an ordinary glass bottle into a piece of coastal decor that looks like it’s been tumbled by the ocean for years. This project creates a stunning, frosted turquoise finish with authentic-looking texture that perfectly mimics weathered sea glass.
Step-by-Step
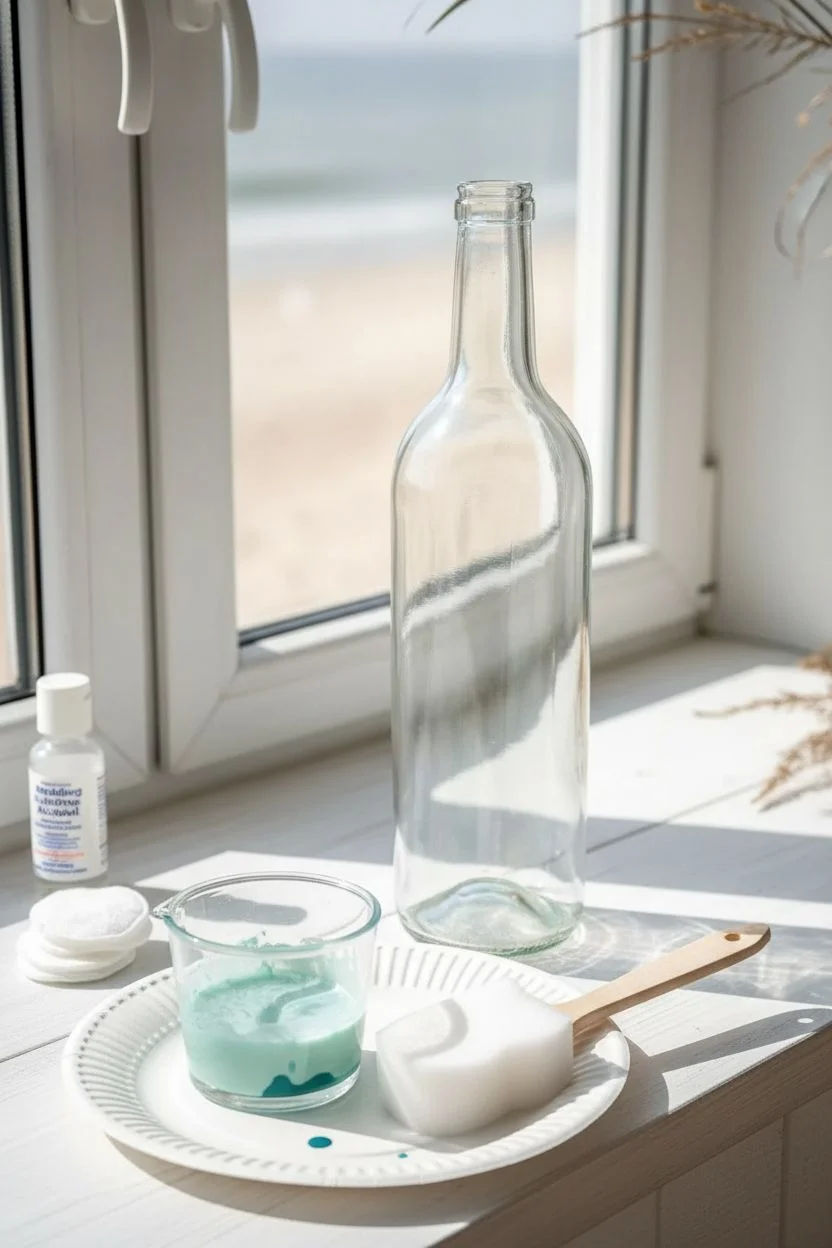
Materials
- Clean glass wine bottle (clear or light green)
- Rubbing alcohol
- Cotton pads
- Mod Podge (Matte finish)
- Acrylic paint (Teal, Aqua, or Seafoam Green)
- White acrylic paint
- Small mixing cup
- Foam sponge brush or dabber
- Paper plate or palette
- Cork stopper
Step 1: Preparation
-
Label removal:
Begin by removing all labels and adhesive residue from your glass bottle. soaking it in hot soapy water usually does the trick. -
Surface cleaning:
Once the bottle is dry, wipe down the entire exterior surface with rubbing alcohol on a cotton pad to remove any oils or fingerprints, ensuring the paint adheres properly. -
Initial mixing:
In your mixing cup, pour a generous amount of Matte Mod Podge. -
Add color:
Add a few drops of your teal or aqua acrylic paint into the Mod Podge. You want a translucent look, so keep the ratio high on glue and low on paint. -
Check consistency:
Stir the mixture gently. The color should look milky and pastel in the cup; remember that the Mod Podge will dry clear, leaving just the tint behind.
Use Matte Only
Using Glossy Mod Podge will ruin the effect. You must use Matte to get the frosted, salt-blasted look of real sea glass.
Step 2: Creating the Texture
-
First coat application:
Using your foam sponge brush, dab the tinted mixture onto the bottle. Do not brush it on with strokes; the up-and-down dabbing motion creates the necessary frosted texture. -
Neck details:
Work your way up to the very top rim of the bottle, being careful not to let the mixture drip excessively. -
First drying phase:
Allow this first layer to dry completely. It will take about 20-30 minutes. It will look streaky at first, but stick with the process. -
Second coat:
Apply a second layer using the same dabbing technique. This builds up opacity and enhances the rough, tumbled texture. -
Highlight mixing:
While the main bottle dries, mix a tiny amount of white paint with a fresh dollop of Mod Podge to create a very pale, almost white highlight color. -
Adding dimension:
Once the base is tacky but not fully wet, lightly sponge patches of the whitish mixture in random areas. I like to focus on the center where light would naturally hit.
Wrap It with Twine
Wrap natural jute twine around the neck of the bottle 5-6 times and secure with hot glue for extra nautical charm.
Step 3: Finishing Touches
-
Dry brushing:
Take a nearly dry sponge with a tiny bit of pure white paint (no glue) and very lightly whisk it vertically in a few spots to simulate scratches and heavy weathering. -
Full cure time:
Let the bottle sit undisturbed for at least 12 to 24 hours. The mixture needs to cure fully to achieve that hard, frosted feeling. -
Insert cork:
Once completely dry, press a natural cork stopper into the neck of the bottle to complete the rustic look.
Place your bottle on a sunny windowsill where the light can filter through the teal haze for the best effect
Two-Tone Bottles (Inside and Outside Color)
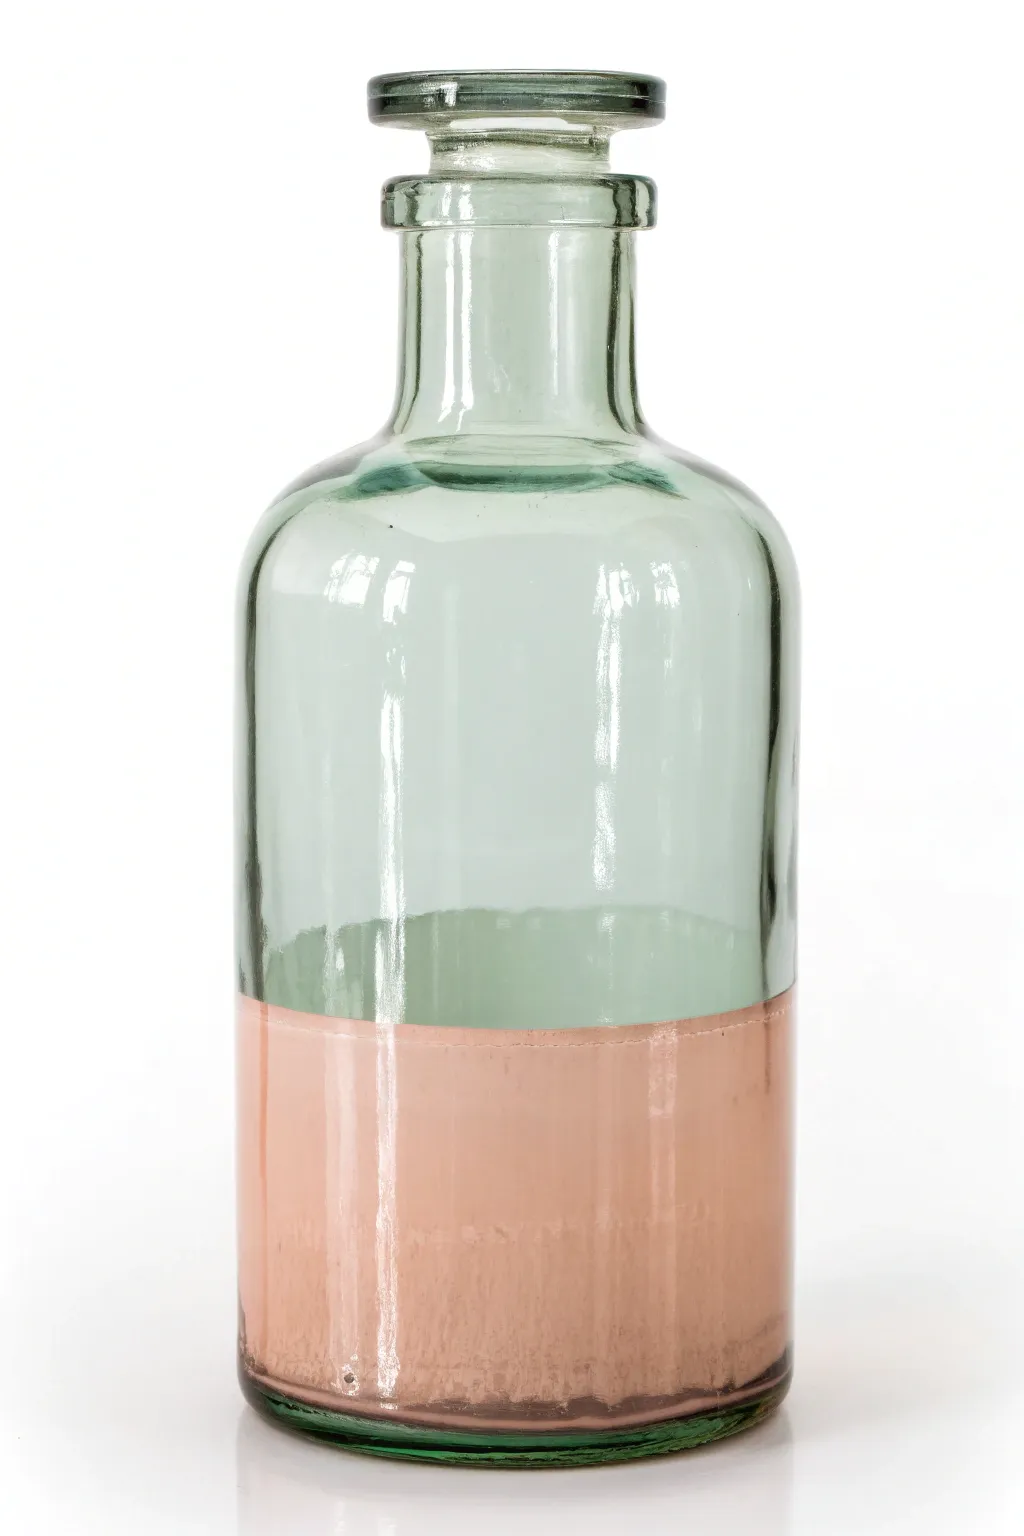
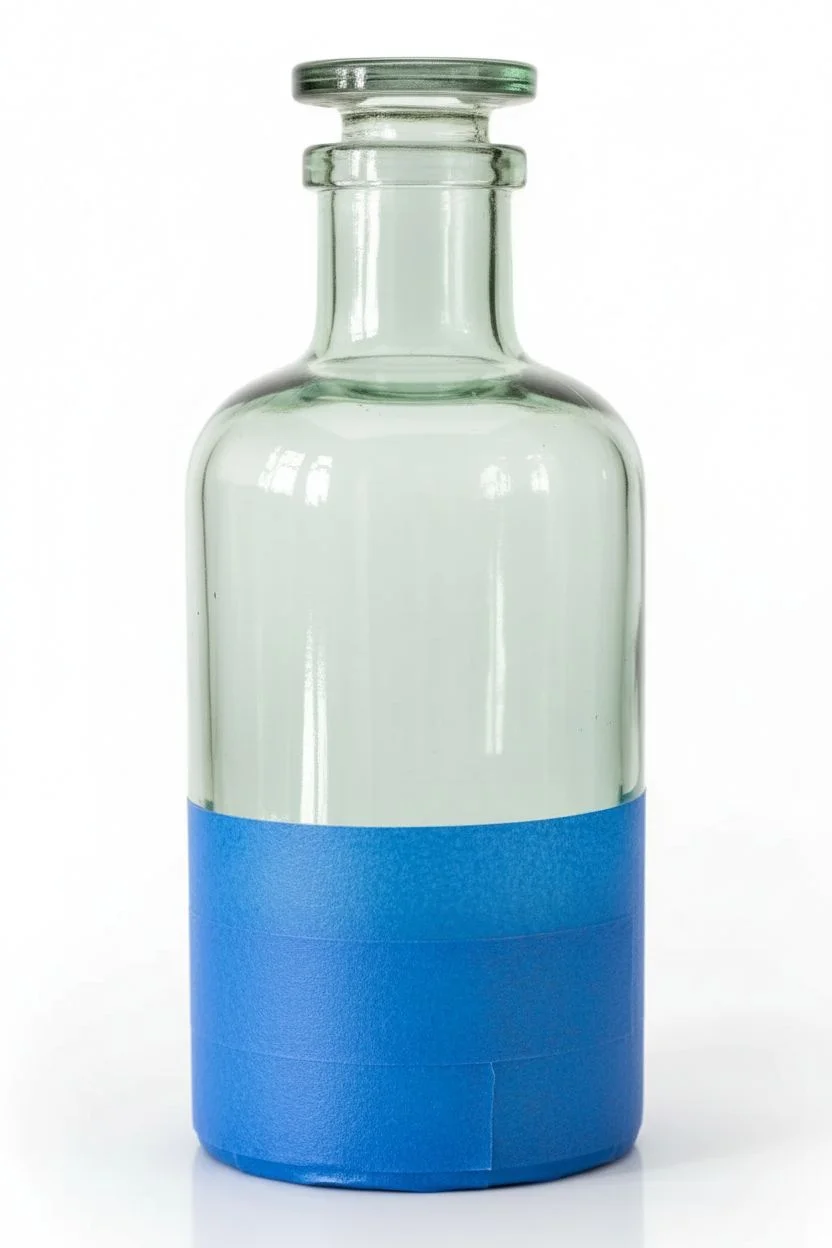
Transform a simple glass vessel into a modern decor piece with this surprisingly achievable two-tone technique. By combining the natural tint of the glass with a bold, metallic band, you create a sophisticated ”dipped” look that mimics expensive high-end pottery.
Step-by-Step Guide
Materials
- Green tinted glass bottle (apothecary style preferred)
- Metallic rose gold or copper acrylic craft paint (multi-surface)
- Rubbing alcohol
- Cotton pads or paper towel
- Painter’s tape or masking tape
- Ruler
- Soft flat paint brush (1-inch width)
- Gloss varnish or sealer (optional)
Step 1: Cleaning and Prepping
-
Clean the Surface:
Before putting any paint down, it is crucial to remove dust, fingerprints, and oils from the glass. Wipe the entire exterior surface thoroughly with rubbing alcohol and a cotton pad. -
Dry Completely:
Let the alcohol evaporate completely so the surface is bone dry. This ensures the best possible adhesion for your metallic layer. -
Measure the Height:
Decide how high you want your metallic band to go. For a balanced look, aiming for the bottom third of the bottle—approximately 3 to 4 inches up from the base—works beautifully. -
Mark the Line:
Use a ruler to make tiny tick marks with a washable marker or a piece of chalk at your desired height around the circumference of the bottle.
Uneven Coverage?
If you see brush strokes in the metallic paint, use a cosmetic sponge to dab the final layer on instead of brushing. This creates a textured, stippled finish that hides imperfections.
Step 2: Creating the Mask
-
Apply Tape:
Carefully run a line of painter’s tape around the bottle, aligning the bottom edge of the tape with your tick marks. This tape line will define the sharp transition between the glass and the paint. -
Seal the Edge:
Run your fingernail or a credit card firmly along the bottom edge of the tape. You need a tight seal here so no paint bleeds underneath, which keeps your line crisp. -
Tape the Base:
If you want the very bottom (the underside) of the bottle to remain unpainted, add a layer of tape there as well, though painting slightly onto the curve is usually fine.
Step 3: Painting the Metallic Band
-
Load the Brush:
Dip your soft flat brush into the rose gold metallic paint. You want a decent amount of paint, but not so much that it drips. -
Paint Away from the Tape:
When applying the first strokes near the tape line, brush downwards away from the tape edge. This technique helps prevent forcing paint under the tape barrier. -
Fill the Area:
Continue painting the rest of the bottom section using smooth, horizontal strokes to minimize visible brush marks. -
Let the First Coat Dry:
Allow this base coat to dry for about 20 to 30 minutes. It will likely look streaky and semi-transparent at this stage, which is completely normal. -
Apply Second Coat:
Apply a second layer of paint, moving in the same direction as the first. The metallic pigments should start building up a nice opacity now. -
Check for Opacity:
Hold the bottle up to a light source. If you can still see significant light coming through the painted section, apply a third thin coat after the second has dried. -
Dry to Touch:
Let the final coat dry until it is tacky but firm to the touch, usually about an hour.
Level Up: Faux Patina
After the rose gold dries, very lightly dry-brush a tiny bit of teal or mint green paint over the metallic texture to give it an aged, oxidized copper look.
Step 4: Finishing Touches
-
Remove the Tape:
Carefully peel back the painter’s tape while the paint is still slightly pliable (don’t wait for it to fully cure). Pull the tape away at a 45-degree angle to ensure a clean line. -
Clean Up Edges:
If any tiny seepages occurred, use a toothpick or a cotton swab dampened with alcohol to gently scrape or wipe away the excess paint while it’s fresh. -
Cure Time:
Allow the bottle to cure for at least 24 hours before handling it extensively. If you used enamel paint, follow the manufacturer’s instruction for baking to make it dishwasher safe. -
Seal (Optional):
For extra durability, you can brush a layer of clear gloss varnish over the painted section only, overlapping slightly onto the glass to seal the edge.
Now you have a stunning custom vase that looks perfect on a windowsill or mantle
Faux Stained Glass Suncatcher With Bold Outlines
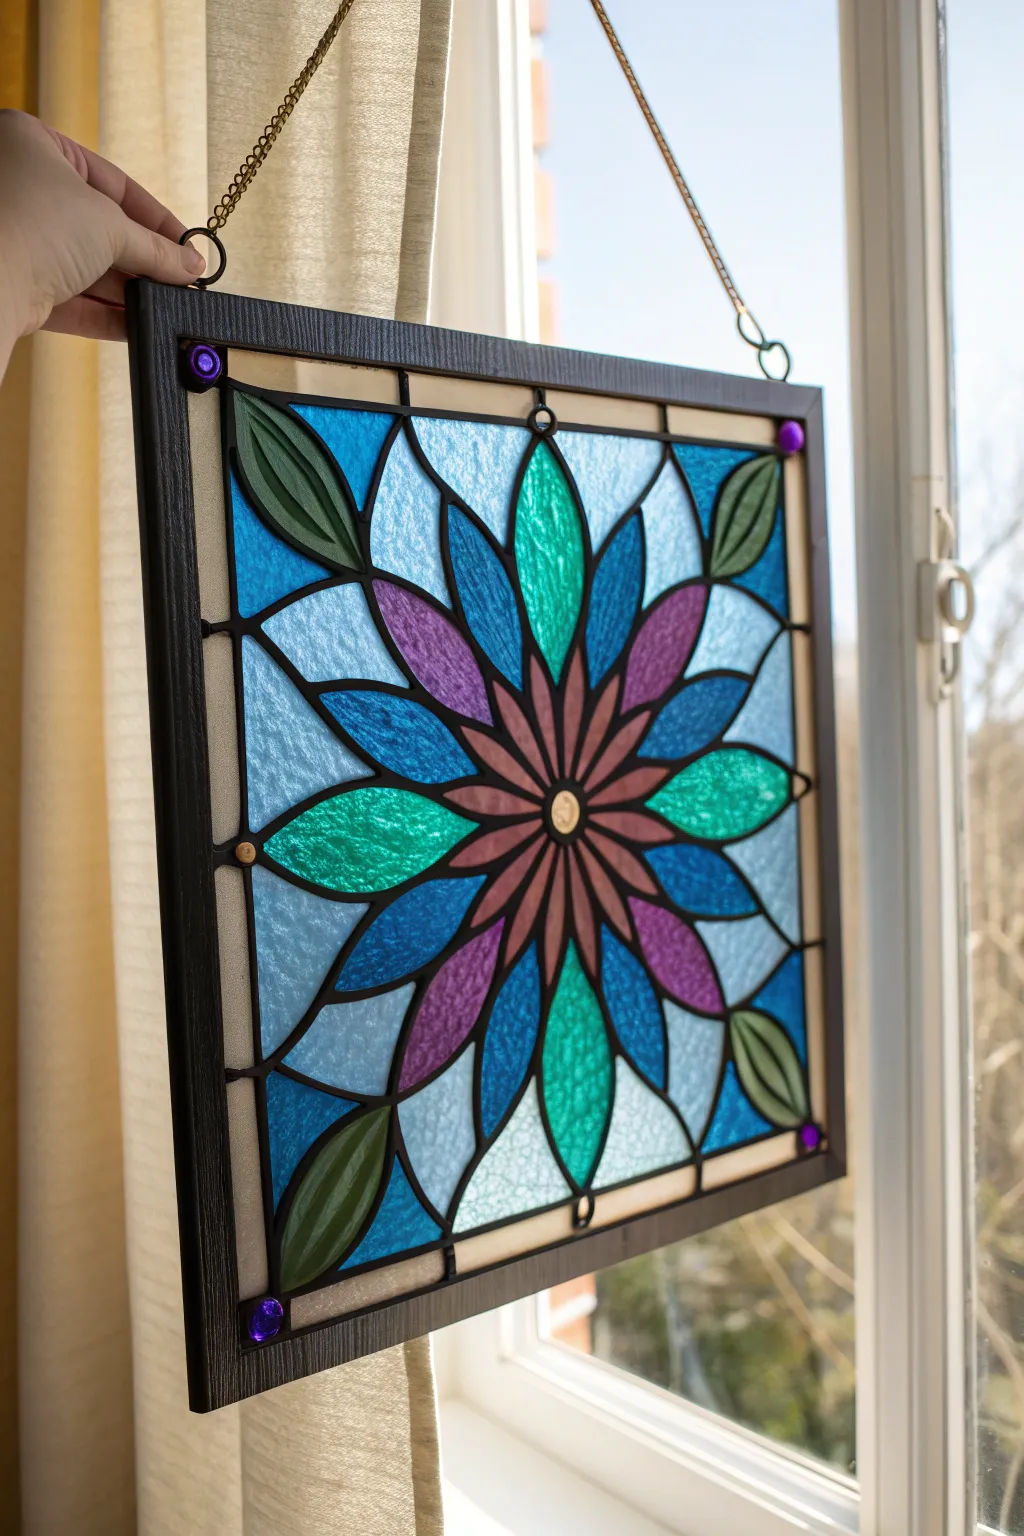
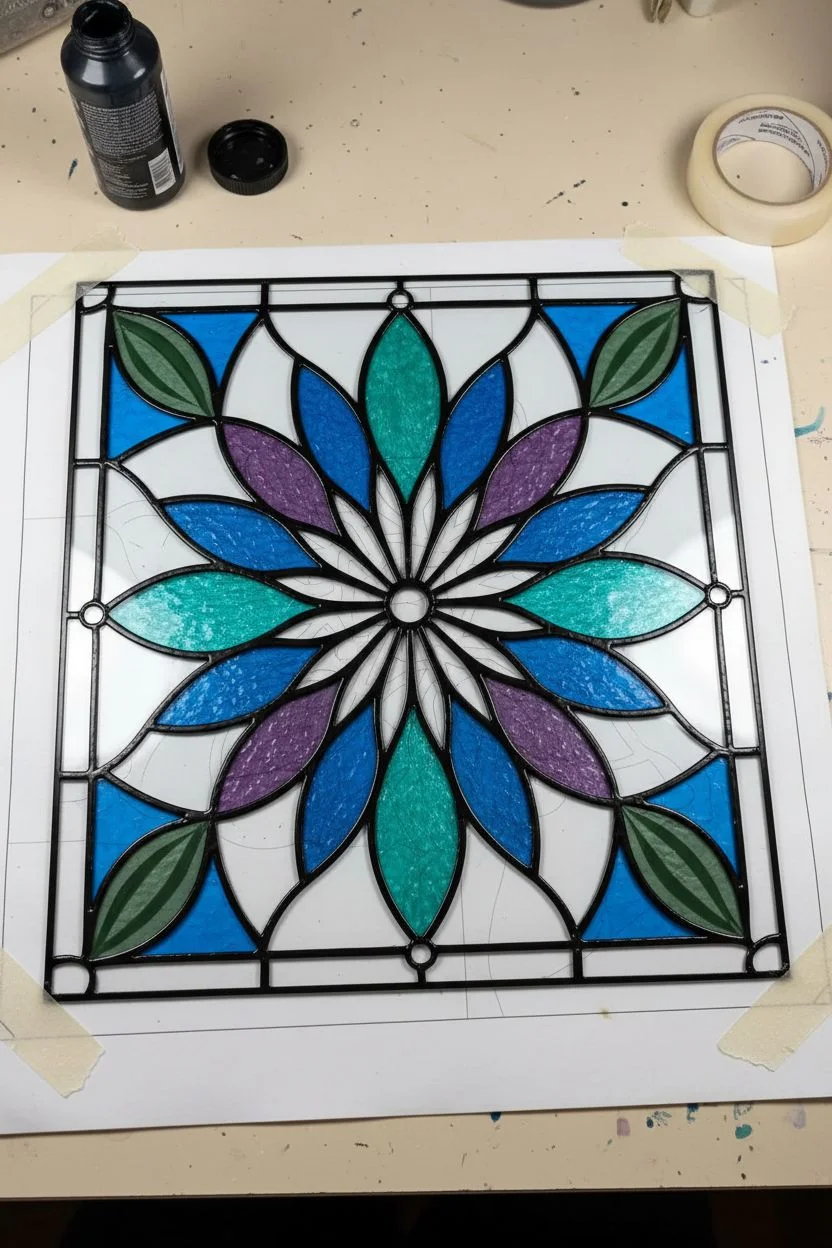
Transform a simple glass frame into a stunning piece of light-catching art with this geometric mandala design. Using dramatic black outliners and jewel-toned translucent paints, you’ll create the look of traditional leaded stained glass without the heavy tools.
Step-by-Step Tutorial
Materials
- Square picture frame with glass (approx. 8×8 or 10×10 inches)
- Black liquid leading or relief outliner paint
- Gallery glass paints (Crystal clear, Turquoise, Deep Blue, Amethyst, Emerald Green)
- Template of a geometric flower/mandala design
- Tape
- Rubbing alcohol and cotton pads
- Small round paintbrush or toothpick (for popping bubbles)
- Small craft jewels (purple for corners, gold/clear for center)
- Strong craft glue (E6000 or similar)
- Chain and screw eyes for hanging
Step 1: Preparation & Outlining
-
Prepare the glass:
Remove the glass pane from your frame carefully. Clean both sides thoroughly with rubbing alcohol to remove any fingerprints or oils, which can prevent the paint from adhering properly. -
Secure the template:
Place your mandala pattern on a flat work surface. Lay the clean glass directly over the pattern and secure it with tape at the corners so it doesn’t shift while you work. -
Begin the center lines:
Using your black liquid leading bottle, start tracing the lines from the center of the design outward. Hold the bottle nozzle slightly above the glass—don’t drag it—to let the line fall smoothly onto the surface. -
Complete the flower petals:
Trace the main petal shapes. Aim for a consistent, thick bead of paint that simulates lead caming. If a line gets shaky, wipe it away immediately with a Q-tip and try again. -
Add the border details:
Create the structural lines that connect the flower to the frame edges and the corner details. Ensure every line connects completely to another line or the edge; gaps will let the liquid color leak out later. -
Let the outline cure:
Allow the black outline to dry completely. This usually takes 8 to 12 hours depending on the brand. The lines must be hard to the touch before you add color.
Pro Tip: Texture Trick
To mimic expensive rippled glass, tap the bottom of the wet paint sections repeatedly with your finger (under the glass) or lightly swirl a toothpick on the surface before it dries.
Step 2: Painting & Decoration
-
Fill the center petals:
Start with the innermost ring. Squeeze Amethyst paint directly from the bottle nozzle into the petal shapes. Use a toothpick or small brush to nudge the paint right up against the black outline without going over it. -
Add teal accents:
Fill the alternating longer petals with Turquoise paint. To get that textured glass look, apply the paint generously so it self-levels but retains some depth. -
Create the blue ring:
Use your Deep Blue paint for the larger surrounding petals. I like to swirl the tip of the nozzle slightly in the paint as I apply it to create a subtle ripple effect as it dries. -
Paint the leaves and background:
Fill the corner leaf shapes with Emerald Green. For the large background sections between the flower and the frame, use the Crystal Clear or a very pale blue texture paint to simulate textured clear glass. -
Pop air bubbles:
Inspect your wet paint immediately for tiny air bubbles. Pop them gently with a sewing needle or toothpick to ensure a smooth finish once dry. -
Allow to dry:
Let the panel dry flat in a dust-free area for at least 24 hours. The colors will look milky at first but will clear up and become transparent as they dry.
Step 3: Assembly & Finishing
-
Reframe the glass:
Once fully cured, carefully place the glass back into the frame. You may need to secure it with glazier points or a bead of silicone if the original backing won’t fit over the raised paint. -
Add jewel accents:
Using a dab of strong craft glue, attach small purple gems to the four corners of the frame face and a gold or clear gem to the very center of the mandala flower. -
Attach hardware:
Screw two small eye hooks into the top edge of the wooden frame. Ensure they are spaced evenly for balance. -
Add the chain:
Attach your metal chain to the eye hooks using jump rings or pliers. Hold it up to check that it hangs level.
Troubleshooting: Leaks
If color leaks under a black line, let it dry completely. Then, use a craft knife to score along the line and peel up the mistake before patching it with fresh paint.
Hang your creation in a sunny window to enjoy the beautiful play of colored light throughout your room
Hydro-Dipped Swirls for a Wow Finish (Still Beginner-Friendly)

Transform a plain glass vessel into a high-end decor piece with this surprisingly simple hydro-dipping technique. The result is a stunning, organic swirl of sage green, blush pink, and creamy white that mimics natural stone.
Step-by-Step
Materials
- Tall glass vase (thoroughly cleaned)
- Spray paint (Matte White)
- Spray paint (Sage Green)
- Spray paint (Blush Pink)
- Large plastic bin or bucket (deep enough to submerge the vase)
- Rubber gloves
- Painter’s tape
- Bamboo skewer or toothpick
- Drop cloth or plastic sheeting
- Clear acrylic sealant (spray)
- Water
Step 1: Preparation
-
Clean the glass:
Start by washing your glass vase with warm, soapy water to remove any dust or oils. Dry it completely with a lint-free cloth. -
Tape the opening:
Use painter’s tape to seal off the top rim and inside of the vase. You want the paint to adhere only to the exterior, keeping the inside clean and food-safe for flowers. -
Prime the surface:
Take your vase outside or to a well-ventilated area. Apply a thin, even coat of matte white spray paint over the entire exterior. This acts as a primer and ensures your marbled colors pop. -
Let it dry completely:
Allow the white base coat to dry fully according to the can’s instructions. A dry base is crucial so the hydro-dip doesn’t slide off.
Water Temp Trick
Use lukewarm water (around 70-80°F) for the dip. Cold water makes spray paint clump instantly, while hot water makes it disperse too thin.
Step 2: Creating the Marble Effect
-
Prepare the water bath:
Fill your large plastic bin with lukewarm water. The temperature matters; if it’s too cold or too hot, the paint might clump or dry too fast. -
First color drop:
Shake your spray paint cans vigorously. Hold the sage green can about 8 inches from the water surface and spray a generous burst into the center of the water. -
Layering colors:
Immediately follow with a burst of blush pink spray paint, aiming for the center of the green patch. The colors will naturally push against each other. -
Add the white accent:
Spray a small amount of white paint into the mix. This adds depth and breaks up the darker pigments. -
Swirl the pattern:
Use a bamboo skewer to gently drag through the floating paint film. Create swirls and marble-like veins, but work quickly before the paint skin hardens.
Step 3: The Dip
-
The immersion angle:
Put on your rubber gloves. Hold the vase by the taped rim (or insert your hand inside if the opening allows) and angle it slightly. -
Submerge the vase:
Ideally, I like to push the vase slowly down into the water through the paint film. As you submerge it, the paint will wrap around the glass. -
Clear the surface:
Once the vase is fully submerged, keep it under the water. Use your free hand (or blow on the surface) to move the remaining floating paint away from the area where you will pull the vase out. -
Remove the vase:
Lift the vase out of the clearn water. This prevents a second layer of paint from ruining the pattern you just applied. -
Initial dry:
Hold the vase still for a moment to let excess water drip off, then set it upright on your drop cloth to dry.
Metallic Touch
Add a quick spritz of gold or copper spray paint into your water swirl to give the marble veins a luxurious, shimmering metallic finish.
Step 4: Finishing Touches
-
Remove water droplets:
If you see large water beads sitting on the paint, you can very gently dab them with a paper towel, but be careful not to smear the soft paint. -
Full cure time:
Let the vase dry undisturbed for at least 24 hours. The paint needs to fully harden onto the glass surface. -
Remove the tape:
Carefully peel away the painter’s tape from the rim. If paint has bridged over the tape, score the edge lightly with a craft knife first to prevent peeling. -
Seal the deal:
To protect your design from scratches and water damage when washing, apply a light coat of clear acrylic spray sealant over the painted exterior.
Place your newly marbled vase on a sunny sill and enjoy the sophisticated splash of color it brings to your room
Glow-From-Within Painted Bottle Lanterns

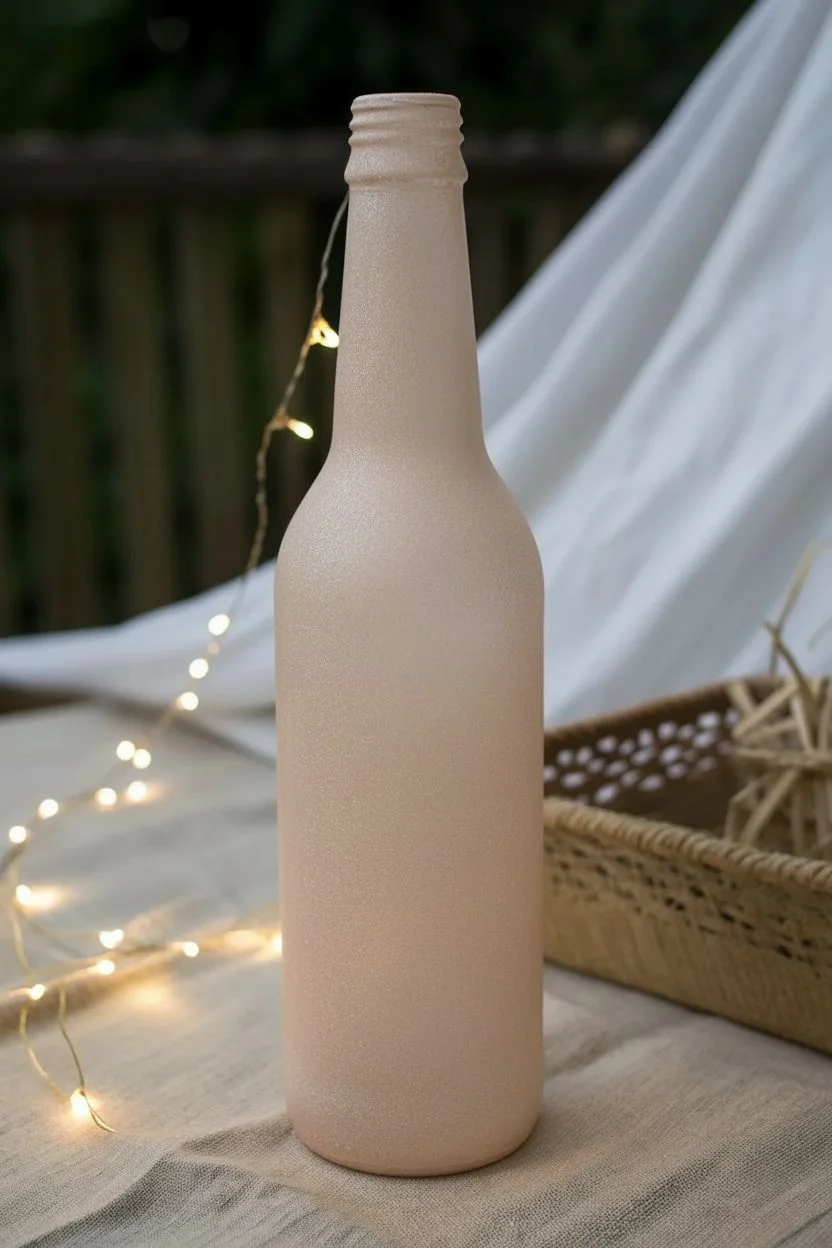
Transform a simple glass bottle into a glowing piece of decor using a frosted wash technique and delicate white detailing. The soft, semi-opaque background allows the fairy lights inside to cast a warm, diffused glow perfect for cozy evenings or outdoor gatherings.
Step-by-Step Tutorial
Materials
- Clean, clear glass bottle (label removed)
- Rubbing alcohol
- Beige or pale pink acrylic paint
- Matte finish Mod Podge or clear matte craft sealer
- Sponge dabber or small kitchen sponge piece
- White or off-white acrylic paint pens (fine and medium tip)
- Thin liner brush (optional, for filling shapes)
- Battery-operated cork fairy lights (warm white)
- Paper plate or palette
- Paper towels
Step 1: Preparing the Base
-
Clean the Glass:
Start by ensuring your bottle is perfectly clean. Remove any label residue with warm soapy water. Once dry, wipe the entire exterior with rubbing alcohol on a paper towel to remove oils and fingerprints, which ensures the paint adheres properly. -
Mix the Semi-Sheer Base:
To achieve that frosted, glowing look, we don’t want solid opaque paint. On your palette, mix roughly two parts matte Mod Podge (or matte medium) with one part beige or pale pink acrylic paint. You want a translucent, milky consistency. -
Apply the First Layer:
Dip your sponge dabber into the mixture. Pat off the excess on the paper plate—you want a thin application, not globs. Dab the sponge all over the bottle using an up-and-down pouncing motion to create a textured, frosted effect. -
Dry and Repeat:
Let this first coat dry completely; it will look clearer as it dries. If the coverage is too streaky or thin, apply a second layer using the same dabbing technique to build up that soft, sandy texture. I usually find two coats is the sweet spot for light diffusion. -
Let it Cure:
Allow the base coat to dry fully for at least an hour. The surface should feel dry to the touch and ready for intricate work.
Step 2: Painting the Design
-
Plan the Bands:
The design consists of distinct horizontal bands. Using your medium-tip white paint pen, draw two parallel lines around the top neck of the bottle, spacing them about an inch apart. -
Add Neck Details:
Inside this top band, draw a zigzag line. In the triangular spaces created by the zigzag, add small arches or semi-circles to mimic a lace-like pattern. -
Create the Central Flower:
Move down to the shoulder area of the bottle. Draw a simple, eight-petaled flower using the white paint pen. The petals should be elongated teardrop shapes. -
Outline the Main Arches:
Below the flower, draw large, sweeping arches that mimic cathedral windows. These should be the largest shapes on the bottle. Double the line work here—draw one arch, then a second one slightly inside it. -
Fill the Arches:
Inside these large arches, draw decorative elements. You can add a heart shape with dotted outlines, or a teardrop shape with cross-hatching inside. -
Connect the Patterns:
Between the large arches, draw vertical lines or small ladders to connect the design elements, ensuring the pattern wraps cohesively around the bottle. -
Create the Sunburst Medallion:
Near the bottom third of the bottle, draw a large circle. Inside this, draw a smaller circle. Fill the space between them with radiating lines to create a sunburst effect. -
Deatil the Center:
In the very center of your sunburst, paint a simple six-petaled flower or star shape. -
Bottom Border:
Create a final border at the very base of the bottle. Draw two parallel horizontal lines about an inch apart, similar to the neck design. -
Geometric Fill:
Fill this bottom border with a zigzag pattern. Underneath the zigzags, add a row of small, open circles or dots for a finished look. -
Refine the Lines:
Go back over your white lines. If any look faint against the beige background, carefully trace them a second time to make the white pop.
Paint Pen Struggles?
If the pen tip clogs on the textured base, scribble on a piece of scrap paper to get the ink flowing again. Don’t press too hard on the glass or you might scratch the base coat.
Step 3: Finishing Touches
-
Add Subtle Texture:
If you want extra sparkle (like the faint glitter shown in some areas), you can lightly brush a tiny amount of glitter glaze over just the empty spaces between the white lines, avoiding the white paint itself. -
Dry Completely:
Let the white paint detail dry for at least 30 minutes to ensure it won’t smear during handling. -
Insert Lights:
Uncoil your cork fairy lights. Carefully feed the wire strand into the bottle, distributing the LEDs evenly from bottom to top so the whole bottle glows. -
Seal (Optional):
For extra durability, you can spray a final light coat of matte sealer over the entire bottle, though this is often unnecessary if the bottle is just for indoor display.
Level Up: Color Contrast
Instead of white, try gold or copper metallic pens for the detailing. The warm metallic tones will reflect the inner light beautifully for a richer, more luxurious look.
Place your finished lantern on a mantle or tablescape and enjoy the warm, custom ambiance created by your handiwork


Have a question or want to share your own experience? I'd love to hear from you in the comments below!