
If you’re craving easy golf paintings that still look instantly recognizable, you’re in the right place. I’m sharing beginner-friendly ideas that lean on bold shapes, simple textures, and those classic golf icons—the ball, the club, the flag, and that satisfying swing silhouette.
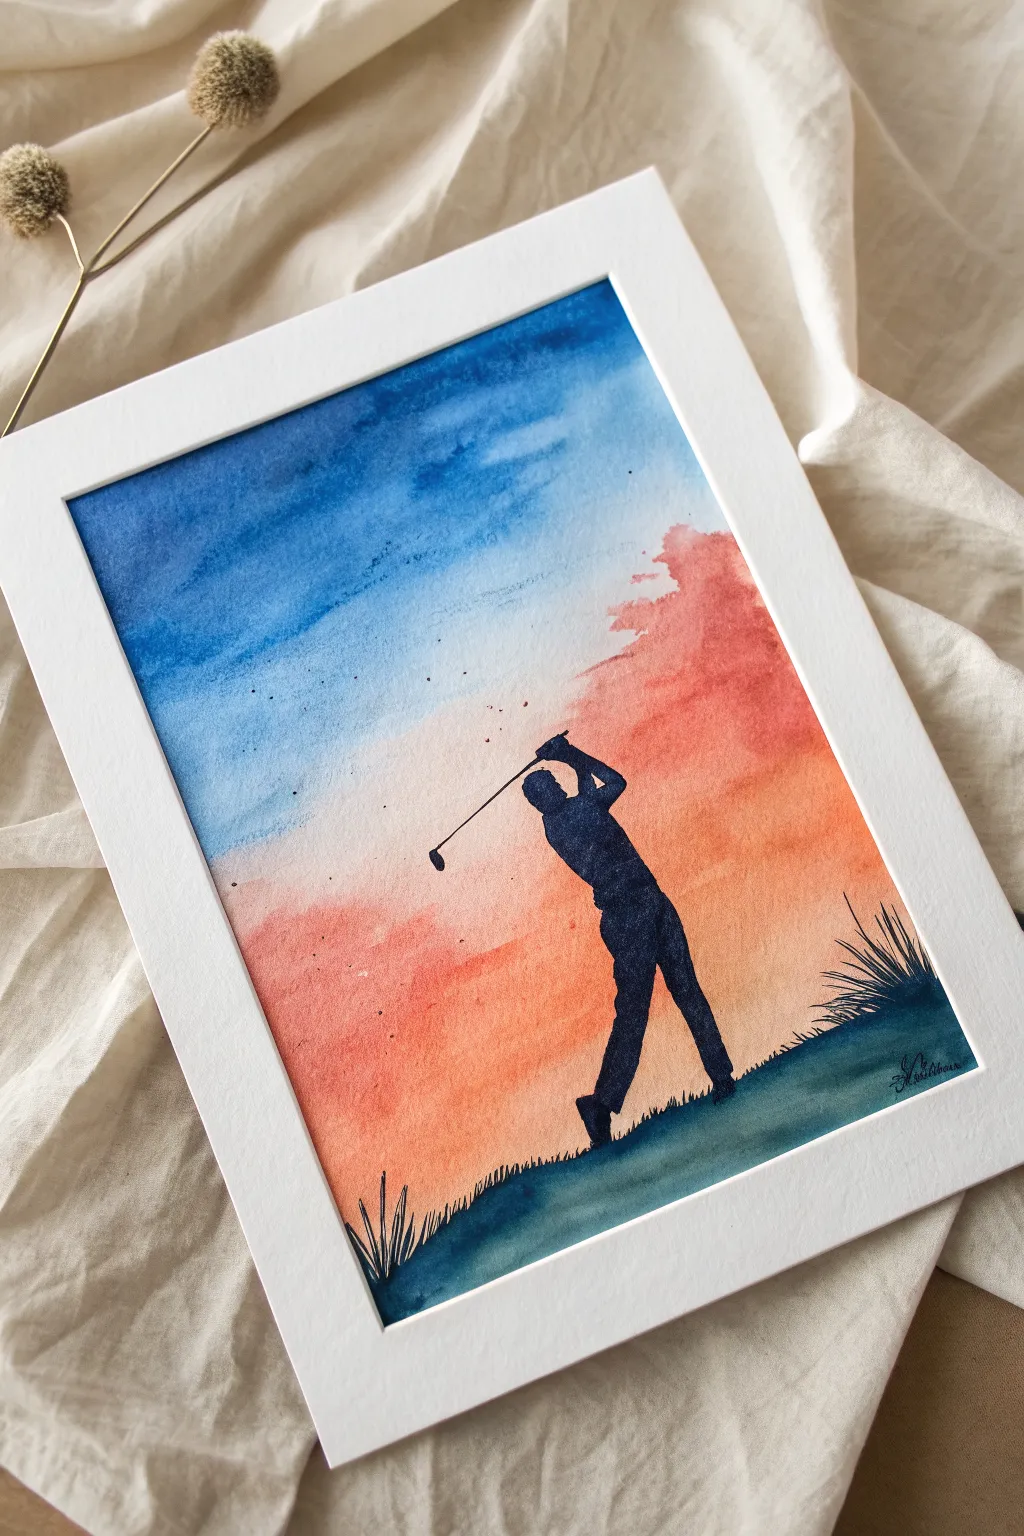
Sunset Golfer Silhouette Swing
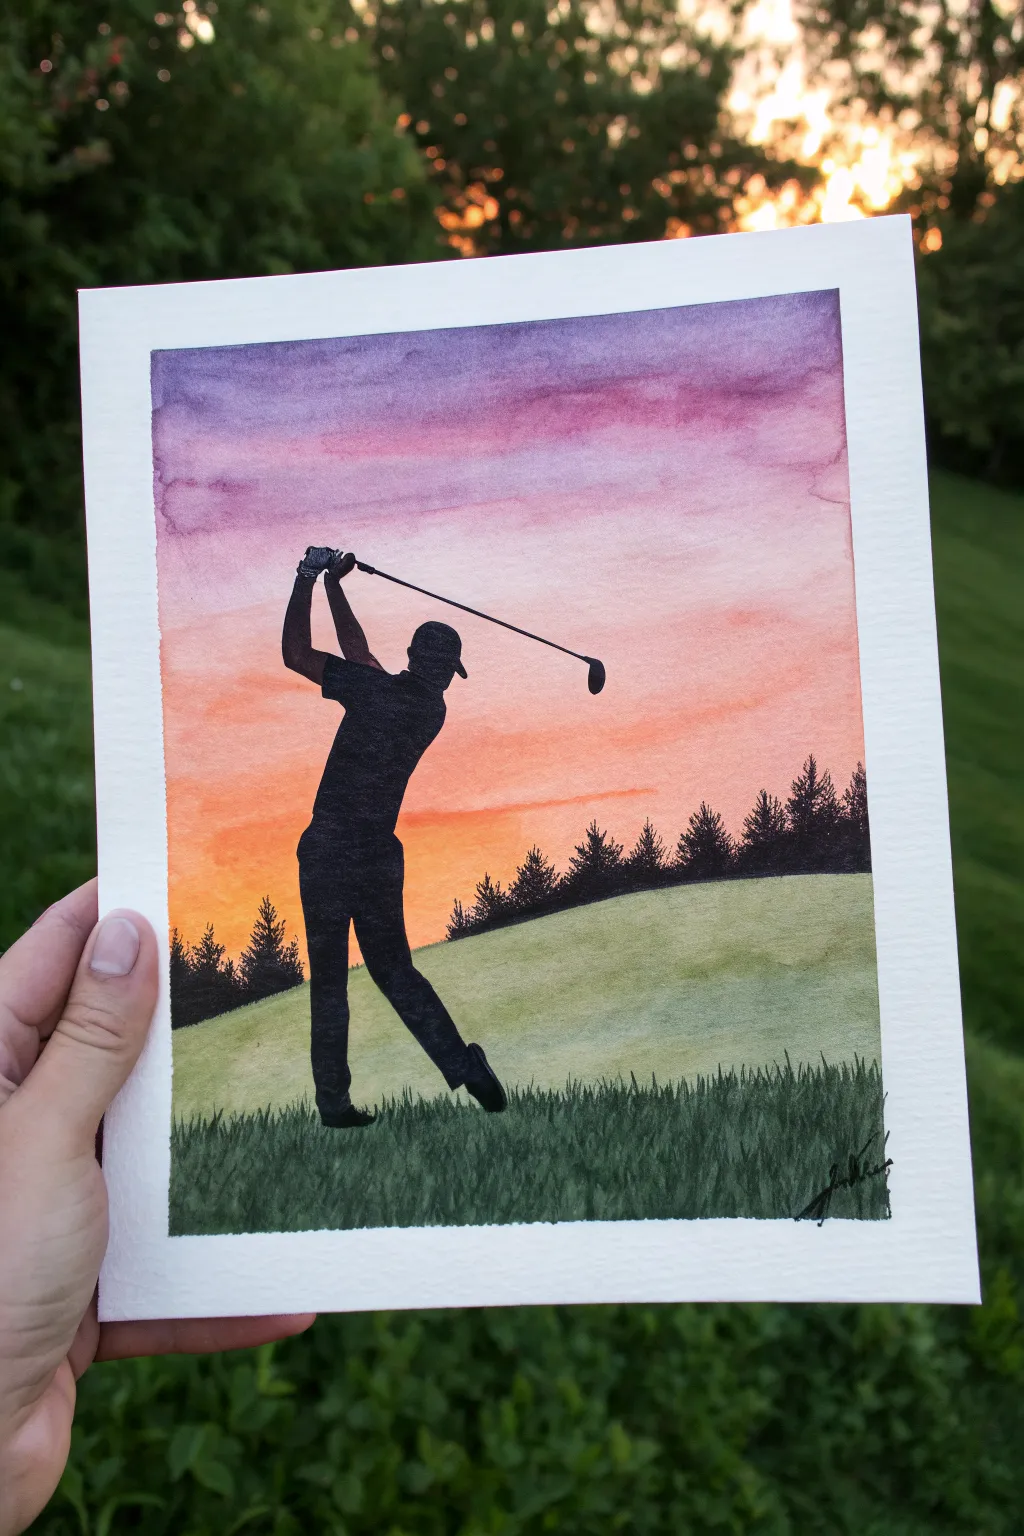
Capture the perfect follow-through against a stunning watercolor sky with this vibrant painting project. By combining a colorful wet-on-wet background with a stark black silhouette, you’ll create a dramatic and professional-looking piece of art.
Step-by-Step Tutorial
Materials
- Watercolor paper (cold press, 140lb/300gsm recommended)
- Watercolor paints (purple, pink, orange, yellow, sap green, black)
- Masking tape
- Flat wash brush (large)
- Round brush (size 6 or 8)
- Fine liner or detail brush (size 0 or 1)
- Pencil and eraser
- Clean water and paper towels
- Palette for mixing
Step 1: Preparation and Sketching
-
Secure the Paper:
Begin by taping down all four edges of your watercolor paper to a hard board or table. This creates a clean white border and prevents the paper from buckling when we add water. -
Sketch the Horizon:
Lightly draw a sloping line across the bottom third of the paper to mark where the grassy hill meets the tree line. -
Draft the Golfer:
Using a pencil, lightly sketch the outline of the golfer. Focus on the pose: legs spread, torso twisted, and arms high in the follow-through. Don’t worry about clothing details, as this will be filled in solid black.
Bleeding Lines?
If your black silhouette bleeds into the sky, the background was too damp. Wait for the paper to be bone dry. Use a hair dryer on cool setting to speed up the process if you’re impatient.
Step 2: Painting the Sunset Sky
-
Wet the Sky Area:
With a large flat brush, apply clean water to the entire sky area, stopping just above your pencil horizon line. The paper should be glisten, but not form puddles. -
Apply the Purple:
Load your brush with a deep purple/violet mix. Paint the very top strip of the sky using horizontal strokes, letting the pigment bleed partly down into the wet paper. -
Transition to Pink:
Rinse your brush slightly and pick up a vibrant pink or magenta. Apply this below the purple, allowing the colors to maintain a soft, blended edge where they meet. -
Add Orange Warmth:
Move to a bright orange hue. Paint the middle section of the sky, blending it gently upward into the pink layer. -
The Yellow Horizon:
Finish the sky by painting a yellow or light peach strip right above the tree line. This creates that glowing sunset effect. Let the entire sky dry completely before moving on.
Make It Personal
Customize the silhouette! If painting this for a friend, try to match their specific hat style (visor vs baseball cap) or adjust the swing pose to match a photo of them.
Step 3: Painting the Landscape
-
Base Green Layer:
Mix a light, watery sap green. Paint the hill area below the horizon line. I like to keep this wash uneven to suggest the texture of a fairway. -
Foreground Grass:
While the green layer is drying, mix a darker shade of green (add a touch of blue or black to your sap green). Paint the bottom inch of the paper with short, upward strokes to simulate blades of grass in the rough. -
Distant Trees:
Once the sky is bone dry, mix black watercolor with a tiny bit of green. Using a round brush, paint a jagged tree line along the horizon. Use the tip of the brush to create pointy pine tree tops.
Step 4: The Golfer Silhouette
-
Outline Art:
Switch to your fine detail brush and load it with concentrated black paint (gouache or indian ink works great here too for opacity). Carefully trace over your pencil outline of the golfer. -
Fill the Shape:
Using a slightly larger round brush, fill in the body of the golfer with solid black. Ensure the coverage is opaque; you may need a second coat after the first dries. -
Refine the Details:
Go back to the fine liner brush to crisp up the edges. Pay attention to the hands, the cap’s brim, and the shoes. -
Add the Club:
Paint the golf club shaft as a single, confident thin line extending from the hands. Add the club head at the very end of the line. -
Final Grass Texture:
To ground the figure, paint a few dark grass blades overlapping the golfer’s shoes so it looks like he is standing in the grass, not floating above it. -
Reveal:
Wait for everything to be completely dry to the touch. Slowly peel away the masking tape at a 45-degree angle to reveal your crisp white border.
Frame your finished piece to highlight those striking sunset colors and the sharp silhouette action

Golf Ball on Tee Close-Up

This classic composition captures the anticipation of a drive with a focus on texture and light. Using watercolors, you will build up realistic dimples on the ball and create a grassy foundation, resulting in a clean and peaceful piece of sports art.
Detailed Instructions
Materials
- Cold press watercolor paper (140lb/300gsm)
- Pencil (HB or H for light sketching)
- Kneaded eraser
- Watercolor paints (burnt sienna, yellow ochre, sap green, ultramarine blue, burnt umber, neutral tint)
- Round brushes (sizes 2, 4, and 6)
- Jar of clean water
- Paper towels
Step 1: Sketching the Subject
-
Establish the horizon:
Begin by lightly drawing a very faint horizontal line about one-third of the way up your paper to mark where the grass will grow. This doesn’t need to be perfectly straight, just a guide. -
Draw the tee:
Sketch the wooden tee first. Draw a thin, tapered triangle pointing downwards into your ground line. At the top of the tee, create a slightly curved, cup-like shape where the ball will sit. -
Outline the golf ball:
Draw a perfect circle resting in the cup of the tee. Using a compass or tracing a small circular object like a bottle cap can really help keep this shape accurate. -
Map the dimples:
Lightly sketch small circles or hexagons across the surface of the ball. Start larger in the center and make them narrower and closer together near the edges to create the illusion of a 3D sphere.
Dimple trouble?
If your dimples look like flat polka dots, make sure you are painting crescent shapes (moons) inside the circles, not filling the whole circle in. Leave white space for highlights.
Step 2: Painting the Wooden Tee
-
Base wash:
Mix a watery wash of yellow ochre and apply it to the entire wooden tee shape. Let this dry completely before moving to the next step to avoid muddy colors. -
Build wood grain shadows:
Mix burnt sienna with a touch of burnt umber. Using your size 2 brush, paint vertical stripes down the right side of the tee to indicate shadow and wood grain. -
Deepen the contrast:
Add a stronger mix of burnt umber right under the cup of the tee where the ball casts a shadow. Blend this slightly downward for a natural transition.
Make it sunny
To suggest a bright sunny day, add a very pale, watery wash of yellow to the top-left ‘highlight’ side of the ball while the paper is dry, before painting the grey shadows.
Step 3: Creating the Golf Ball
-
Initial shading:
The ball is white, so we are painting shadows, not the ball itself. Mix a very dilute grey using ultramarine blue and a tiny touch of burnt sienna or neutral tint. -
Form the sphere:
Apply a light wash of your grey mix to the bottom right side of the ball, curving upward. Soften the edge with a clean, damp brush so it fades into white toward the light source on the top left. -
Paint the dimples (shadow side):
I like to switch to my smallest brush here. Using a darker grey mix, paint crescent-shaped shadows inside the bottom-right of each drawn dimple on the shaded side of the ball. -
Paint the dimples (light side):
For the dimples on the top left, use an extremely faint grey wash. The shadows here should be barely visible, just enough to show texture. -
Refine the edges:
Go back over the dimples on the bottom edge of the ball with a slightly darker pigment to emphasize the roundness and depth.
Step 4: Painting the Grass & Finishing Touches
-
Lay the grassy foundation:
Mix sap green with a little yellow ochre. Paint a loose, horizontal wash along your ground line, letting the bottom edge fade out into the white paper. -
Add individual blades:
While the base is still slightly damp but not wet, use a size 4 brush to flick upward strokes. Start from the bottom and lift your brush quickly to create tapered grass tips. -
Vary the greens:
Mix sap green with ultramarine blue for a cooler, darker shadow green. Add more grass blades in this color, focusing on the area directly beneath the tee. -
Create depth in the grass:
Using your smallest brush and the darkest green mix, paint tiny, sharp blades of grass right at the base of the tee to anchor it to the ground. -
Add the club head (optional):
If you want to include the driver head peeking in from the right, mix a dark grey wash. Paint a curved shape at the bottom right corner, keeping the edges soft. -
Sign your work:
Once everything is bone dry, erase any visible pencil lines and sign your name near the bottom in a fine brush or pen.
Step back and admire the crisp details of your sporty still life


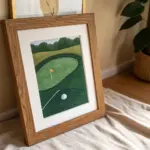
Minimal Green With Pin Flag
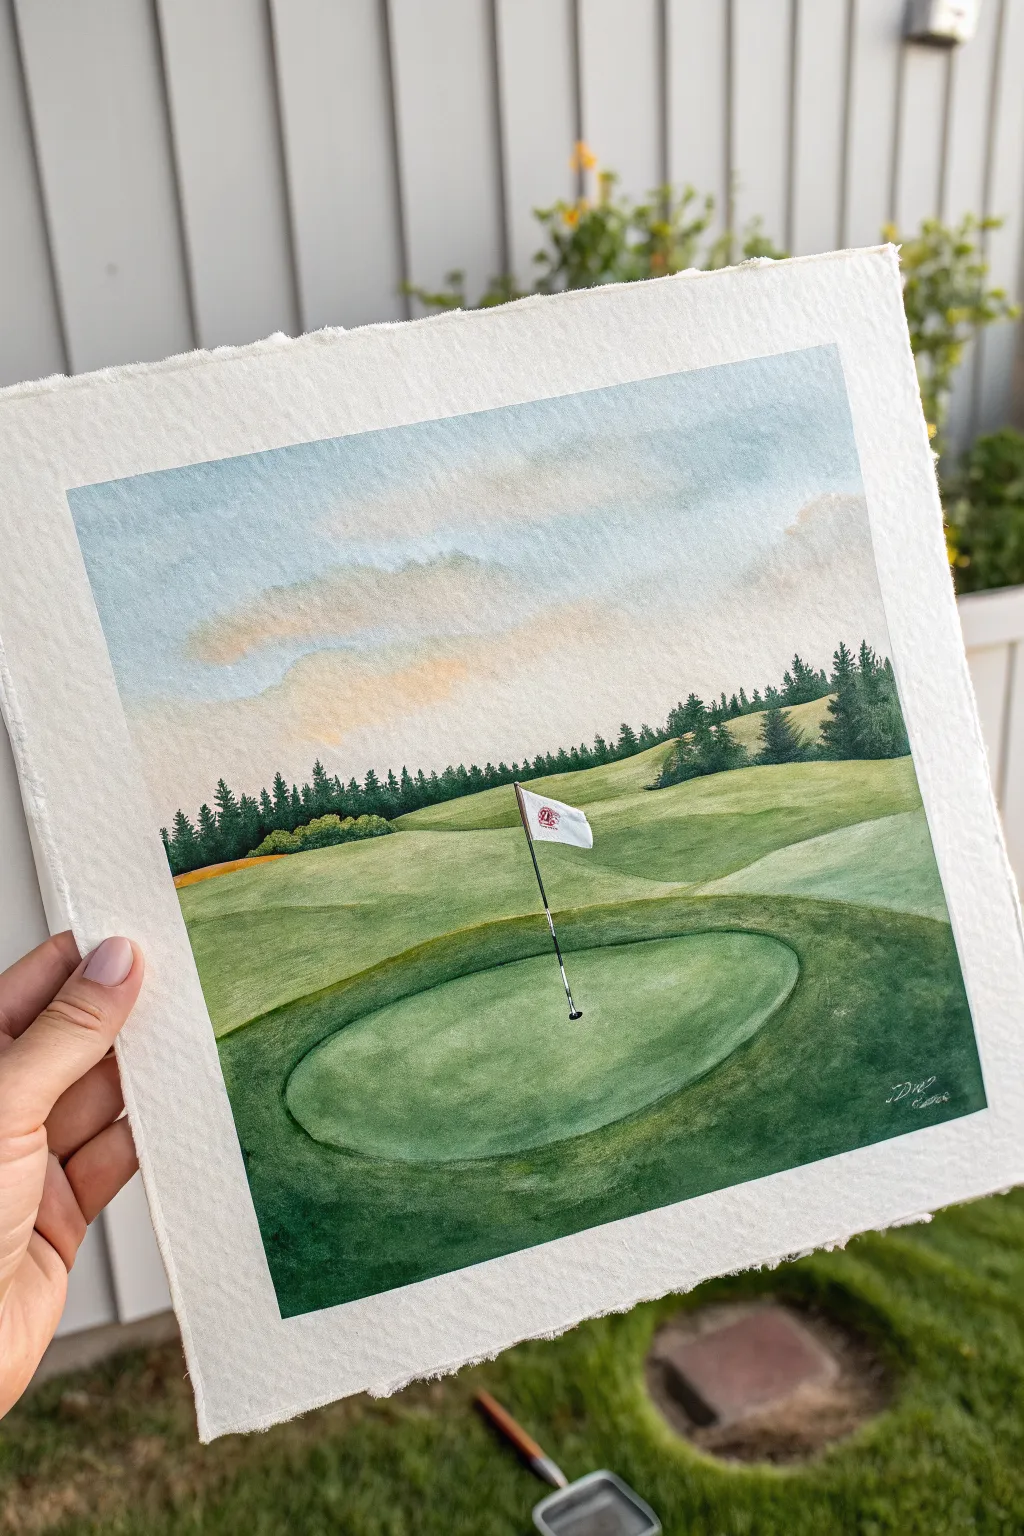
Capture the serenity of the fairway with this watercolor landscape featuring a crisp green, a solitary pin flag, and a soft, airy sky. The focus is on layering tranquil greens to create depth and distance.
Step-by-Step
Materials
- Cold press watercolor paper (deckled edge optional)
- Watercolor paints (Sap Green, Hooker’s Green, Indigo, Yellow Ochre, Burnt Sienna, Cerulean Blue, Alizarin Crimson)
- Round brushes (flats: size 8 or 10; rounds: size 2 and 6)
- Pencil (HB or H)
- Kneaded eraser
- Masking fluid (optional)
- Palette for mixing
- Two jars of water
- Paper towels
Step 1: Sketch & Sky
-
Plan the composition:
Lightly sketch the horizon line about two-thirds down the page. Draw rolling hills leading towards the foreground green. Mark the position of the oval-shaped putting green and the vertical line for the pin flag. -
Mask the details:
If you are worried about painting around the flag, apply a small amount of masking fluid to the flag and pole. Let it dry completely before painting. -
Wet the sky area:
Use a large clean brush to wet the paper above the tree line with clear water until it glistens. -
Paint the blue gradient:
Mix a watery wash of Cerulean Blue. Apply it to the top of the sky, letting it fade naturally as you pull the color downward. Leave some white spaces for clouds. -
Add sunrise warmth:
While the paper is still slightly damp near the horizon, drop in a very faint mix of Yellow Ochre and a touch of Alizarin Crimson to suggest morning light peeking through clouds. -
Soften the clouds:
Use a clean, damp brush (blotted on a towel) to lift out soft cloud shapes or blend the warm and cool tones gently. Let the sky dry completely.
Clean Edges
For the distinct boundary between the putting green and the rough, wait for the putting green wash to be 100% dry before painting the darker grass around it. This prevents bleeding.
Step 2: Mid-Ground & Trees
-
Block in distant hills:
Mix a light, hazy green using Sap Green and a touch of white or water to desaturate it. Paint the furthest hill shapes, keeping the edges soft. -
Paint the tree line base:
Mix a darker, cooler green (Sap Green + Indigo). Using the tip of a size 6 brush, dab in the dense forest line along the horizon. -
Refine tree details:
While the tree line is damp, drop in concentrated Indigo at the bottom for shadow. Use a dry brush technique at the top to suggest pointy evergreen tips. -
Create the fairways:
Mix a vibrant, warm green (Sap Green + Yellow Ochre). Paint the rolling hills in the middle ground, using horizontal strokes that follow the curve of the land. Vary the green slightly for different hills to show separation.
Sand Trap Addition
Want more challenge? Leave a kidney-bean shape unpainted in the rough (white paper). Later, fill it with a creamy beige wash and stipple in darker brown dots for a sand trap.
Step 3: Foreground & The Green
-
Define the putting green:
For the oval putting surface, mix a smooth, consistent wash of Hooker’s Green and a little white or water for brightness. Paint the oval shape carefully to keep it distinct from the rough. -
Paint the surrounding rough:
Mix a darker, more textured green using Hooker’s Green and Burnt Sienna. Paint the area surrounding the putting oval, using darker values near the bottom corners to frame the viewer’s eye. -
Establish the fringe:
Once the main greens are dry, use a small brush to deepen the color right at the edge where the putting green meets the rough, creating a ‘lip’ or fringe effect. -
Add texture and shadow:
Glaze a thin, dark shadow across the bottom right of the foreground to suggest undulation in the terrain. I like to use a fairly dry brush here to let the paper’s texture show through like grass.
Step 4: Final Details
-
Reveal the flag:
Rub away the masking fluid or ensure the paper is white where the flag is. Paint the pole with a thin line of black or dark grey, leaving segments white for stripes. -
Paint the flag:
Add a tiny red logo or detail to the white flag if desired, keeping it minimal. Add a very faint grey shadow on the white fabric to show folds. -
Cast the shadow:
Paint a small, dark shadow extending from the base of the flag hole across the green, consistent with your light source. -
Define the cup:
Use a dot of pure black or dark grey to paint the hole itself at the base of the pole.
Step back and admire your tranquil view of the links, ready for framing


Simple Fairway Stripes Landscape
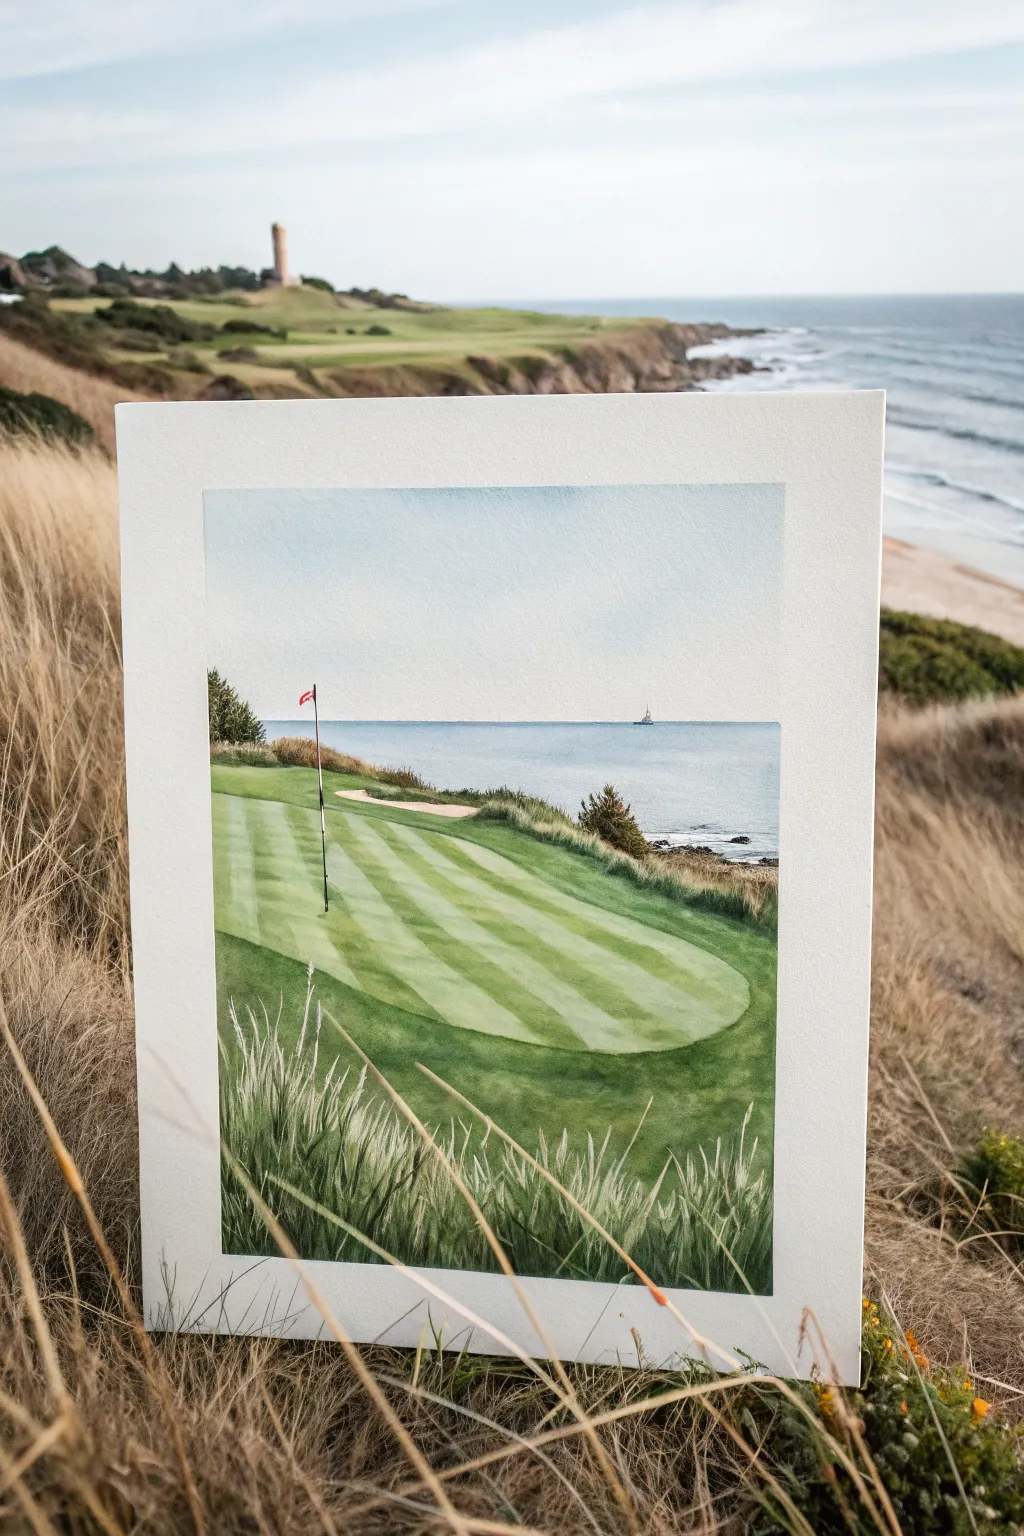
Capture the serene beauty of a seaside links course with this approachable watercolor landscape. Featuring distinct mowing stripes and soft ocean hues, this project perfectly balances structured patterns with organic coastal textures.
Step-by-Step Tutorial
Materials
- Cold press watercolor paper (block or taped down)
- Watercolor paints (Sap Green, Hooker’s Green, Ultramarine Blue, Burnt Sienna, Yellow Ochre, Alizarin Crimson)
- Masking fluid (optional)
- Flatwash brush (3/4 inch)
- Round brushes (size 4 and 8)
- Rigger or liner brush
- HB pencil and eraser
- Ruler
- Painter’s tape
- Paper towels and two water jars
Step 1: Planning and Sky
-
Prepare the paper:
Begin by taping the edges of your watercolor paper to a board to create a clean, crisp white border. This frame gives the finished piece a polished look. -
Sketch the layout:
Using an HB pencil, lightly sketch the horizon line about 2/3 of the way up the page. Draw the kidney-bean shape of the putting green in the foreground and outline the sand trap on the left edge. -
Mark the stripes:
Use a ruler to lightly draw diagonal lines across the green to represent the mowing pattern. Keep the pressure very light so the graphite doesn’t show through the paint later. -
Mask the flagstick:
If you have masking fluid, apply a thin line for the flagstick and the flag itself. If not, you will need to paint carefully around this area. Let the mask dry completely. -
Paint the sky:
Wet the sky area with clean water first. Drop in a very diluted wash of Ultramarine Blue, fading it out to almost clear water as you reach the horizon line for a realistic atmospheric gradient.
Bleeding Stripes?
If your green stripes are bleeding into each other, the first set wasn’t fully dry. Use a hairdryer between the first and second set of stripes to ensure crisp, manicured edges.
Step 2: Ocean and Horizon
-
Paint the water:
Mix a slightly deeper blue using Ultramarine and a touch of Green. Apply this horizontally below the horizon line. Leave the color lighter along the shoreline to suggest shallow water. -
Add coastal rocks:
While the water dries, mix Burnt Sienna with a dot of Blue to make a rocky grey-brown. Paint the small protruding landmass on the right edge and the rocks beneath the cliff line. -
Establish the rough:
Using a size 8 round brush, dab in textures for the far foliage and trees on the horizon line using a dark mix of Hooker’s Green and Burnt Sienna.
Step 3: The Green and Foreground
-
Base layer for stripes:
Mix a large puddle of bright, grassy green (Sap Green + Yellow Ochre). Paint every other diagonal stripe on the green. Keep the edges relatively crisp. -
Second stripe layer:
Once the first stripes are dry, paint the remaining stripes with a slightly darker version of the same green mix. This creates the ‘with the grain’ and ‘against the grain’ lawn effect. -
Paint the rough:
Around the manicured green, paint the taller ‘rough’ grass using a darker, less yellow green. Apply this loosely to contrast with the neat stripes. -
Fill the bunker:
For the sand trap, use a dilute wash of Yellow Ochre and Burnt Sienna. Keep it pale to look like white sand in shadow. -
Paint the foreground grasses:
At the very bottom of the paper, paint a dark green base layer. While wet, use a dry brush or a palette knife to scratch out lines, revealing the white paper to suggest blades of grass.
Pro Tip: Depth of Field
Make the foreground grass details sharper and more distinct than the trees on the horizon. This ‘soft focus’ background mimics how a camera captures a landscape and creates distance.
Step 4: Final Details
-
Refine the foreground:
Using your rigger or liner brush and opaque white gouache (or thick watercolor), paint distinct tall blades of grass in the immediate foreground to add depth. -
Add the flag:
Rub away the masking fluid. Paint the pole carefully with a dark grey and fill the flag with a bright pop of Alizarin Crimson. -
Shadows and highlights:
Add a thin shadow under the flagstick on the green. If needed, a tiny white dot can be added to the ocean for a distant boat. -
Reveal the border:
Ideally, wait several hours or use a hairdryer to ensure the paper is bone dry. Slowly peel away the painter’s tape at a 45-degree angle to reveal your clean edges.
Step back and admire your peaceful coastal scene before framing it for display
BRUSH GUIDE
The Right Brush for Every Stroke
From clean lines to bold texture — master brush choice, stroke control, and essential techniques.
Explore the Full Guide
One-Line Golfer Gesture Drawing
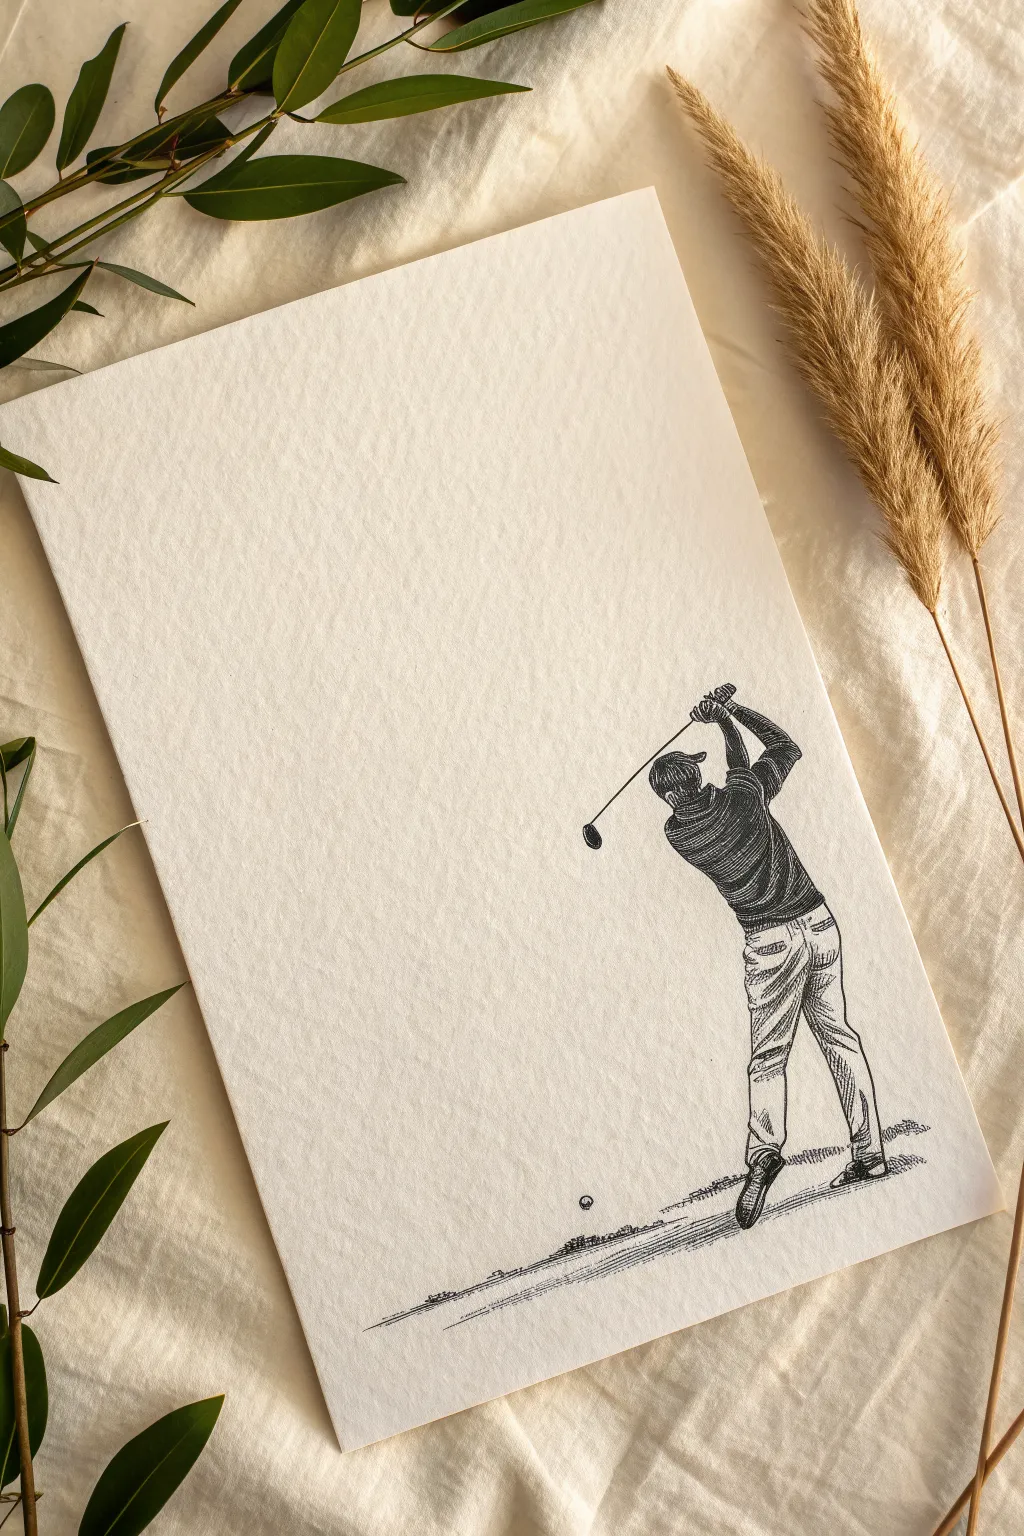
Capture the dynamic motion of a golf swing with this classic pen-and-ink illustration style. Using fine liners and textured paper, you will recreate the look of an antique sporting etching through careful cross-hatching and shading.
Step-by-Step Guide
Materials
- Cold press watercolor paper or textured sketch paper (cream/off-white)
- Pencil (HB or H)
- Eraser (kneaded preferred)
- Fine liner pens (sizes 005, 01, and 05)
- Ruler (optional, for ground alignment)
Step 1: Sketching the Posture
-
Establish the Action Line:
Start with a light pencil line to define the spine and leg angle. The figure is leaning slightly forward, shifting weight onto the front (left) leg, so draw a gentle C-curve to guide the body’s rotation. -
Block in Shapes:
Using simple geometric shapes, map out the torso, hips, and head. The torso is twisted, with the back facing the viewer, while the head remains focused down at the ball location. -
Position the Limbs:
Sketch the arms forming a triangle shape leading to the hands high above the right shoulder. Draw the legs, ensuring the back heel is lifted to show the follow-through motion. -
Add Cling and Club:
Refine the clothing outlines, adding natural folds where the fabric bunches at the waist and armpits. Draw a straight line for the club shaft extending from the hands, with the clubhead pointed downward.
Ink Smudging?
If your hand drags through wet ink, place a scrap piece of paper under your drawing hand as a guard sheet while you work on detailed hatching.
Step 2: Inking the Figure
-
Outline the Shirt:
Switch to your 01 pen. Carefully trace the outer edges of the polo shirt. Don’t make the line solid everywhere; break it slightly near wrinkles to keep it looking organic. -
Define the Pants:
Outline the trousers, paying attention to the creases behind the knees and near the shoes. The fabric should look slightly stiffer than the shirt. -
Inking the Head and Cap:
Draw the contour of the cap and the back of the golfer’s head. Use very short, scratchy strokes to suggest hair texture beneath the cap line. -
Drawing the Club:
Use a steady hand or ruler to ink the thin shaft of the golf club. Darken the clubhead, leaving a tiny sliver of white to suggest a metallic reflection.
Step 3: Shading and Texture
-
Hatching the Shirt:
Using the 005 pen, fill the back of the shirt with tight horizontal hatching lines. These lines should curve slightly with the body’s contour to emphasize the twist in the torso. -
Deepening Shadows:
Go back over the darkest areas of the shirt—under the arm and the side of the torso—with vertical cross-hatching to create a dense, dark value. -
Texturing the Trousers:
Keep the pants lighter than the shirt. Add simple diagonal hatching lines mostly on the right side of the legs and inside the intricate folds behind the knees to suggest shadow without making them black. -
Detailing the Shoes:
Darken the shoes significantly, especially the lifted heel. Use dense scribbles or cross-hatching to make them ground the figure.
Add Vintage Flair
Use a tea bag to lightly stain the paper before drawing. This creates an aged, parchment-like effect that complements the cross-hatch style perfectly.
Step 4: Ground and Atmosphere
-
Establish the Ground Plane:
Draw the faint horizon line or ground level using loose, broken horizontal strokes. This anchors the golfer so they aren’t floating in space. -
Add Grass Texture:
Use quick, short tick marks and scribbles near the feet and the ball location to simulate grass. Keep these marks sparse as you move away from the figure. -
Drawing the Ball:
Place a small circle on the ground in line with the club head sketch. Add a tiny shadow underneath it to give it weight. -
Create the Shadow:
Add horizontal hatching lines on the ground stretching to the right of the figure to cast a shadow, reinforcing the lighting direction. -
Final Clean Up:
Once the ink is completely dry, gently erase all underlying pencil marks. I find a kneaded eraser works best here to avoid damaging the paper texture.
Now you have a timeless piece of sporting art ready to be framed
Negative Space Golfer Against Sky
Capture the perfect swing frozen against a stunning twilight sky with this vibrant watercolor project. The high contrast between the colorful gradient background and the deep indigo silhouette creates a dramatic, professional-looking piece that is surprisingly simple to achieve.
Step-by-Step Tutorial
Materials
- Cold press watercolor paper (A4 or 8×10)
- Watercolor paints (Indigo, Prussian Blue, Crimson or Alizarin, Cadmium Orange)
- Masking tape or painter’s tape
- Flat wash brush (1/2 inch or 1 inch)
- Round detail brush (size 2 or 4)
- Pencil and eraser
- Paper towels
- Jar of clean water
Step 1: Preparation and Sketching
-
Secure the paper:
Tape your watercolor paper down to a flat board or table on all four sides. This prevents the paper from buckling when it gets wet and creates a crisp white border around your final painting. -
Outline the subject:
Lightly sketch the golfer’s silhouette in the center of the page. Focus on the main shapes: the legs apart, the torso twisted, and the arms extended high holding the club. Don’t worry about tiny details yet; just get the overall form right. -
Sketch the ground:
Draw a sloping hill at the bottom of the paper where the golfer stands. Add a few jagged lines on the right side to indicate tufts of grass.
Muddy Sky Fix
If blue and orange mix too much, they turn brown. To fix, let the first layer dry completely, then glaze a thin layer of pink or red over the transition area to bridge the colors.
Step 2: Painting the Sky Gradient
-
Wet the sky area:
Using your large flat brush and clean water, gently wet the entire sky area around your pencil sketch. Try to avoid wetting the inside of the golfer shape, but it’s okay if a little water crosses the line. -
Apply the blue:
Load your brush with Prussian Blue. Start at the very top of the paper and paint horizontal strokes, letting the color be strongest at the top edge. -
Fade the blue:
As you move down the page, dip your brush in water to dilute the blue paint, creating a fade effect. Stop the blue about halfway down the paper. -
Introduce the warmth:
Clean your brush thoroughly. Mix a watery Cadmium Orange and start painting from the bottom of the sky (just above the hill line), working your way up. -
Blend the transition:
Where the orange meets the fading blue, introduce a touch of Crimson or red. Let the colors bleed slightly into each other on the damp paper to create a soft purplish transition, rather than a muddy green. -
Add texture:
While the sky is still damp, you can dab a clean paper towel lightly in a few spots to lift color, or splatter tiny drops of water to create subtle atmospheric texture. -
Let it dry completely:
This is crucial—wait until the paper is bone dry. If you paint the silhouette while the sky is damp, the black ink will bleed into your beautiful sunset.
Enhance the Vibe
Make it a sunrise instead! Swap the orange/red at the bottom for a soft lemon yellow, and exchange the deep blue top for a lighter cerulean blue for a fresh morning feel.
Step 3: The Silhouette & Foreground
-
Mix the dark tone:
Create a very concentrated, thick mixture of Indigo. You want this to look nearly black, so use very little water. Paint the sloping ground first to test the darkness. -
Paint the golfer’s body:
Switch to your round detail brush. Carefully fill in the golfer’s legs and torso with the dark Indigo mix. Keep your edges sharp and clean against the colorful background. -
Define the arms and head:
Paint the head and arms. Pay attention to the angle of the elbows to show the momentum of the swing. -
Add the club:
For the golf club shaft, use the very tip of your smallest brush or even a fine-liner pen if you aren’t confident with a brush. Draw a straight thin line extending from the hands, topped with the club head. -
Create grass details:
Return to the ground area. Use quick, upward flicking motions with the tip of your brush to pull dark paint up from the hill, creating the look of wild grass blades. -
Splatter effect:
Load a small brush with watery Indigo paint. Tap it against a finger over the painting to create tiny dark speckles mostly around the golfer, mimicking dirt or turf kicked up by the swing. -
Remove tape:
Once the dark paint is fully dry, slowly peel off the masking tape at a 45-degree angle to reveal your clean white borders.
Frame your artwork in a simple white mat to make those sunset colors truly pop off the wall

PENCIL GUIDE
Understanding Pencil Grades from H to B
From first sketch to finished drawing — learn pencil grades, line control, and shading techniques.
Explore the Full Guide
Abstract Color-Block Course Map
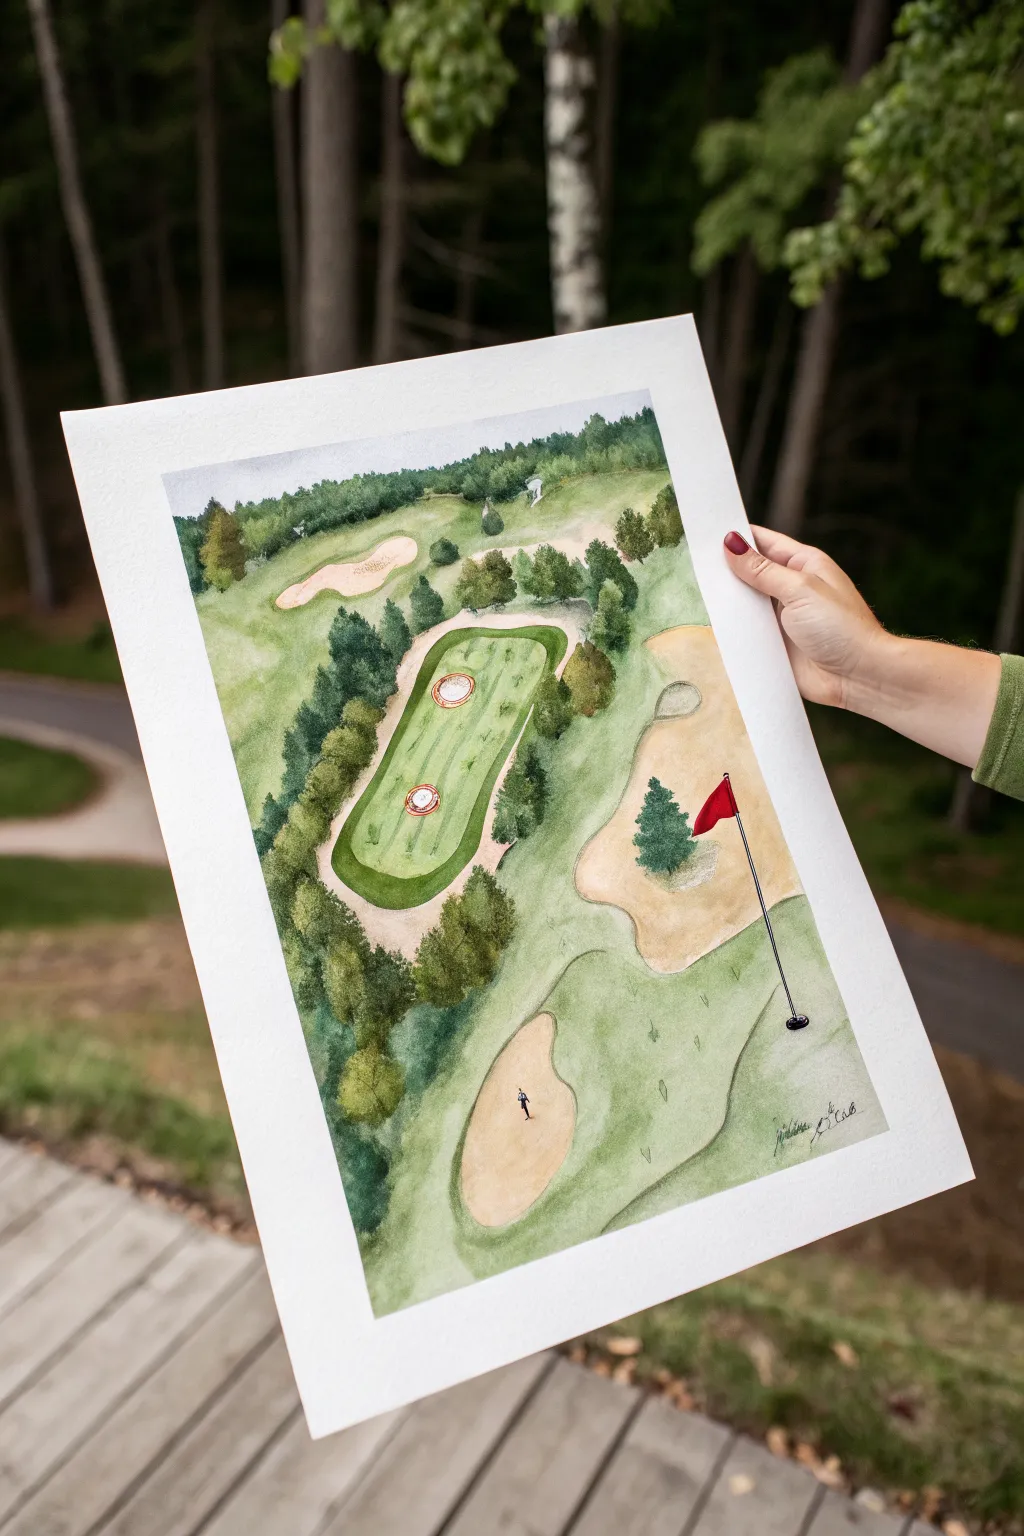
Capture the beauty of your favorite fairway with this illustrative watercolor map, blending precision with the fluid charm of water-based media. This project transforms a standard course layout into a piece of art, focusing on lush greens, sandy bunkers, and the distinctive shape of the hole.
Step-by-Step
Materials
- Heavyweight watercolor paper (300gsm/140lb, cold press recommended)
- Watercolor paint set (essential colors: sap green, hooker’s green, yellow ochre, burnt sienna, sepia, ultramarine blue)
- Pencils (HB for sketching, 2H for finer details)
- Fine liner pens (black, waterproof, 0.1mm and 0.3mm)
- Round watercolor brushes (sizes 2, 6, and 8)
- Masking fluid (optional, for preserving whites)
- Artist tape or painter’s tape
- Reference photo of a specific golf hole layout
- Paper towels and two water jars
Step 1: Planning and Sketching
-
Secure the paper:
Tape your watercolor paper down to a hard board using artist tape. This prevents the paper from buckling when it gets wet and creates a clean, professional white border around your final painting. -
Draft the layout:
Using a light hand and an HB pencil, sketch the overhead shape of the golf hole. Start with the main fairway strip, then locate the green and the teebox areas. Don’t worry about perfect straight lines; organic shapes look more natural. -
Define the hazards:
Lightly outline the sand bunkers. Notice in the example how they kidney-bean around the green and along the fairway. Add the rough outlines of where dense tree clusters will go, but don’t draw individual trees yet. -
Add focal details:
Sketch a small circle for the hole on the green and draw a straight line extending upwards for the flagstick. If you want to include the specific tee markers (like the red and white circles in the example), draw those lightly now.
Fixing Water Blooms
If water puddles create ‘cauliflower’ blooms in your grass, wait for it to dry completely. Then, gently scrub the edge with a damp stiff brush and blend it out with fresh paint.
Step 2: Painting the Greens and Fairways
-
Wash the fairway:
Mix a light, vibrant green using sap green and a touch of lemon yellow. Using your size 8 brush, apply a wet wash over the fairway and green areas. Keep this layer fairly translucent to establish the base grass color. -
Differentiate the rough:
While the first layer is drying, mix a slightly duller, darker green (sap green with a tiny bit of burnt sienna). Paint the areas surrounding the fairway to represent the ‘rough.’ Let these edges bleed slightly into the fairway for a soft transition, or paint them wet-on-dry for a distinct cut line. -
Paint the bunkers:
Dilute yellow ochre with plenty of water to get a sandy beige. Carefully fill in your bunker shapes. I like to drop in a tiny dot of light brown on one side of the wet bunker to suggest shadow and depth. -
Deepen the shadows:
Once the base greens are dry, mix a darker shadow green (hooker’s green and ultramarine). Paint the perimeter of the green and the fairway where the grass would be taller, creating a ‘halo’ effect that makes the manicured parts pop.
Level Up: Course Logo
Use a white gel pen to draw the specific course logo or hole number onto the corner of the painting or directly onto the green flag for a personalized touch.
Step 3: Adding Landscape Elements
-
Block in tree masses:
For the distant forests, use a dark, cool green. Instead of painting leaves, use a stippling motion with your size 6 brush to create irregular blobs that suggest tree canopies. Vary your color mix between deep greens and earthy browns to avoid a flat look. -
Detail individual trees:
Switch to a smaller size 2 brush. Near the foreground elements, paint more defined pine tree shapes by using jagged, downward strokes. Use a dark sepia or Payne’s gray to add thin trunks beneath the foliage. -
Add texture to the grass:
With a very dilute green and a dry-brush technique, sweep lightly across the fairway in the direction of the cut pattern. This subtle striping mimics the mowing lines seen on real courses. -
Enhance the perimeter:
If your background looks too white, you can add a very faint, watery wash of green-gray around the outer rough areas to fade the course into the paper, rather than having it end abruptly.
Step 4: Final Details and Finishing
-
Paint the flag:
Use a bold cadmium red for the flag itself. Make sure your green wash is totally dry first so the red doesn’t bleed. Use a fine liner or a very steady hand with dark grey paint for the thin flagstick. -
Add the golfer:
If you wish to include a player, paint a tiny silhouette or simplified figure in a bunker or on the fairway. Keep it abstract; just a few strokes for the legs, torso, and head are enough to give the map scale. -
Ink the accents:
Once the paint is bone dry, use your waterproof fine liner to add selective outlines. Don’t outline everything—just emphasize the bunkers, the flagstick, and perhaps the edge of the green. This gives it that illustrative map quality. -
Sign and peel:
Sign your name in pencil or pen near the bottom corner. Carefully peel away the masking tape at a 45-degree angle to reveal your crisp white border.
Frame your finished map to create a sophisticated tribute to the game that looks great on any office wall.
Night Course With Moonlit Flag
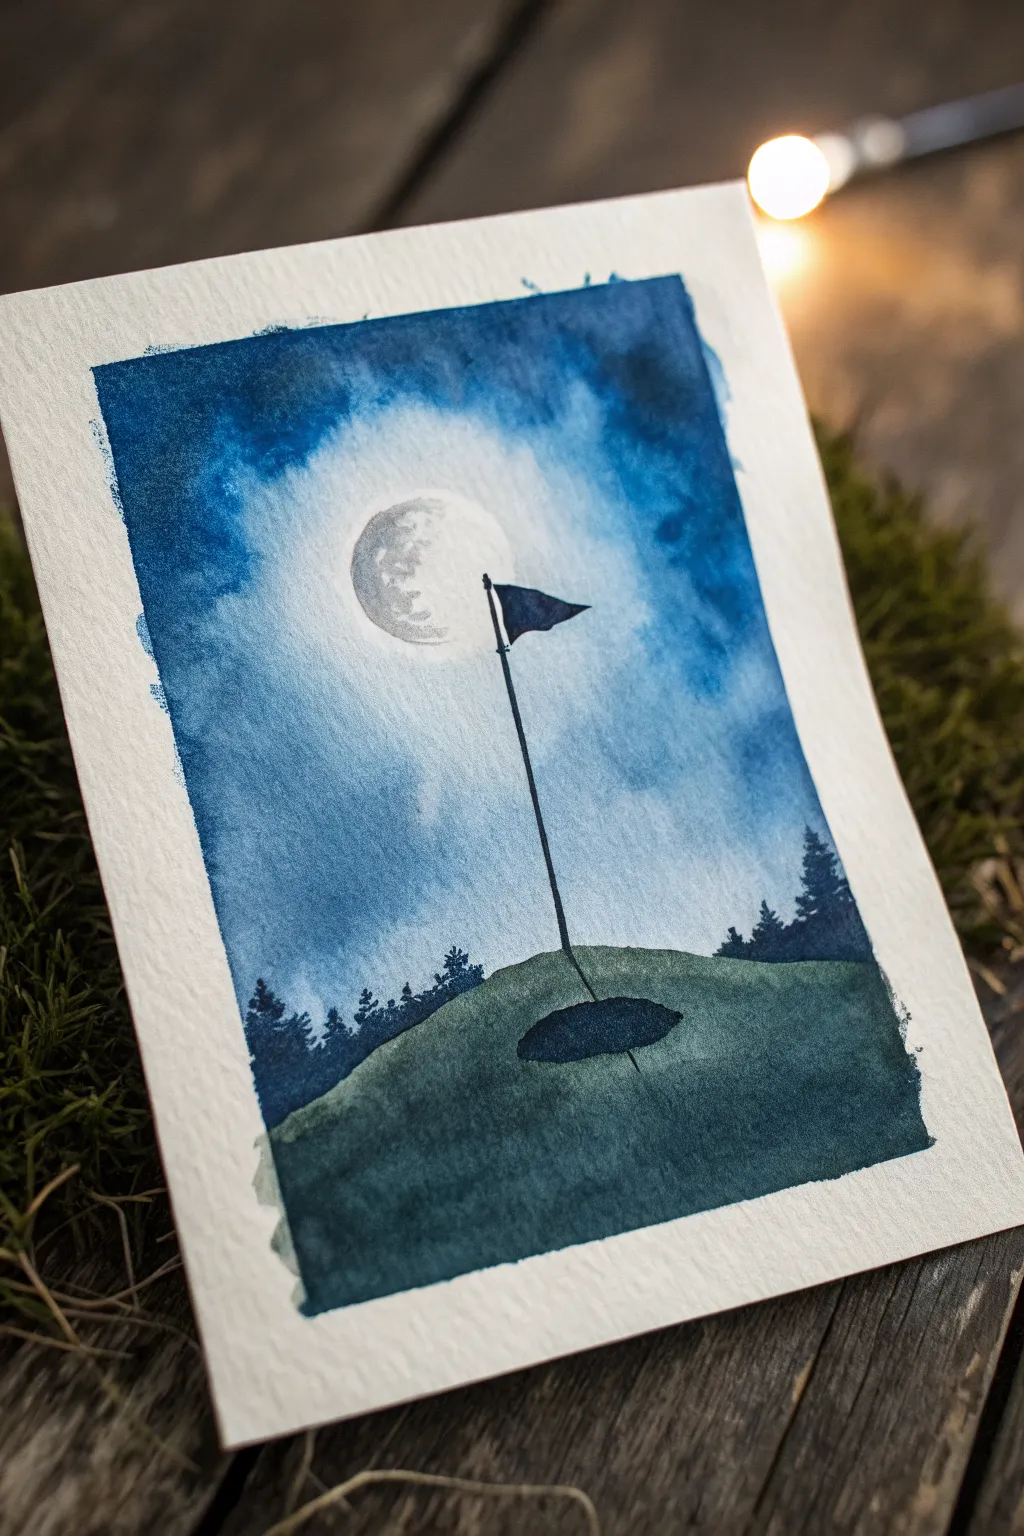
Capture the serene solitude of the putting green after dark with this moody watercolor project. The high contrast between the glowing moon and the deep indigo sky creates a dramatic atmosphere that is surprisingly simple to achieve.
Detailed Instructions
Materials
- Cold press watercolor paper (300 gsm)
- Painter’s tape or masking tape
- Watercolor paints (Indigo, Payne’s Grey, Sap Green, Burnt Umber)
- White gouache or white gel pen
- Round brushes (large size 10 or 12, medium size 6, small detail size 1 or 0)
- Mixing palette
- Two jars of water
- Paper towels
- Pencil and eraser
- Hairdryer (optional)
Step 1: Preparation and Sketching
-
Tape the border:
Begin by taping down all four edges of your watercolor paper to a hard surface. This creates the crisp white border seen in the example and prevents the paper from buckling under heavy washes. -
Lightly sketch key elements:
Using a pencil, lightly draw a circle for the moon in the upper center. Draw a sloping curved line about a third of the way up from the bottom to represent the hill of the green. -
Position the flag:
Sketch a vertical line for the flagstick intersecting the hill, placing the hole shadow just below it. Add the triangular flag shape blowing in the wind near the top.
Step 2: Painting the Sky
-
Wet the paper:
Dip your large brush in clean water and wet the entire sky area, being very careful to paint *around* the moon circle. The paper should be glisten, but not hold puddles. -
Apply the first wash:
Mix a light wash of Indigo blue. Drop this color into the wet sky, starting from the edges and working inward. Let the water carry the pigment toward the moon, but stop before touching the pencil line to keep a halo effect. -
Deepen the night sky:
While the paper is still wet, pick up more concentrated Indigo and Payne’s Grey. Dab this intense dark blue into the top corners and side edges to create a vignette effect. -
Softening the glow:
Clean your brush and stroke the area just outside the moon’s edge with slightly damp bristles. This softens the transition from the white paper to the blue sky, enhancing the glowing effect. -
Dry completely:
Let this layer dry fully. If the paper feels cold to the touch, it’s still damp. Using a hairdryer on a low setting can speed this up.
Moon Glow Trick
To make the moon really pop, re-wet just the area around the moon with clean water and drop in a tiny bit of Cyan. It creates an ethereal glow against the dark Indigo.
Step 3: The Moon and Trees
-
Texture the moon:
Mix a very watery, pale grey. Using a small brush, dab irregular blotches inside the moon circle to represent craters. Leave plenty of white paper showing for brightness. -
Paint the tree silhouettes:
Mix a dark, almost black color using Indigo and Payne’s Grey. With a medium brush, dab small, jagged vertical shapes along the horizon line of the hill to suggest distant pine trees. -
Vary tree heights:
Ensure the trees on the left and right edges are slightly taller to frame the composition, dipping lower towards the center.
Backruns (Blooms)
If you see cauliflower-like textures in the sky, you added water to drying paint. Don’t fight it! In a night sky, these “mistakes” look like cool, atmospheric clouds.
Step 4: The Green and Flag
-
Paint the green:
Mix Sap Green with a touch of Indigo and Burnt Umber to create a dark, night-time green. Paint the hill area below the horizon line with horizontal strokes. -
Add texture:
While the green wash is wet, drop slightly darker pigment into the bottom corners and the shadow of the hole to give the terrain volume. -
Detail the hole:
Once the green is dry, paint a dark oval for the hole using concentrated Payne’s Grey. It should look like a deep shadow on the grass. -
Draw the flagstick:
Switch to your smallest detail brush (size 0 or 1). With thick black or dark grey paint, draw the flagstick line starting from the center of the hole upward. -
Add the flag:
Paint the triangular flag shape at the top of the stick. You can make it solid black for a silhouette look, or add a tiny highlight if you want it to catch the moonlight. -
Cast a shadow:
Use a diluted greyish-green to paint a thin, long line extending from the base of the flagstick across the green, opposite the moon’s light source. -
Reveal the border:
Wait until the painting is absolutely bone-dry. Slowly peel off the tape at a 45-degree angle away from the painting to reveal your crisp edges.
Frame this moody piece in a simple black frame to let those deep blues really stand out on your wall


Have a question or want to share your own experience? I'd love to hear from you in the comments below!