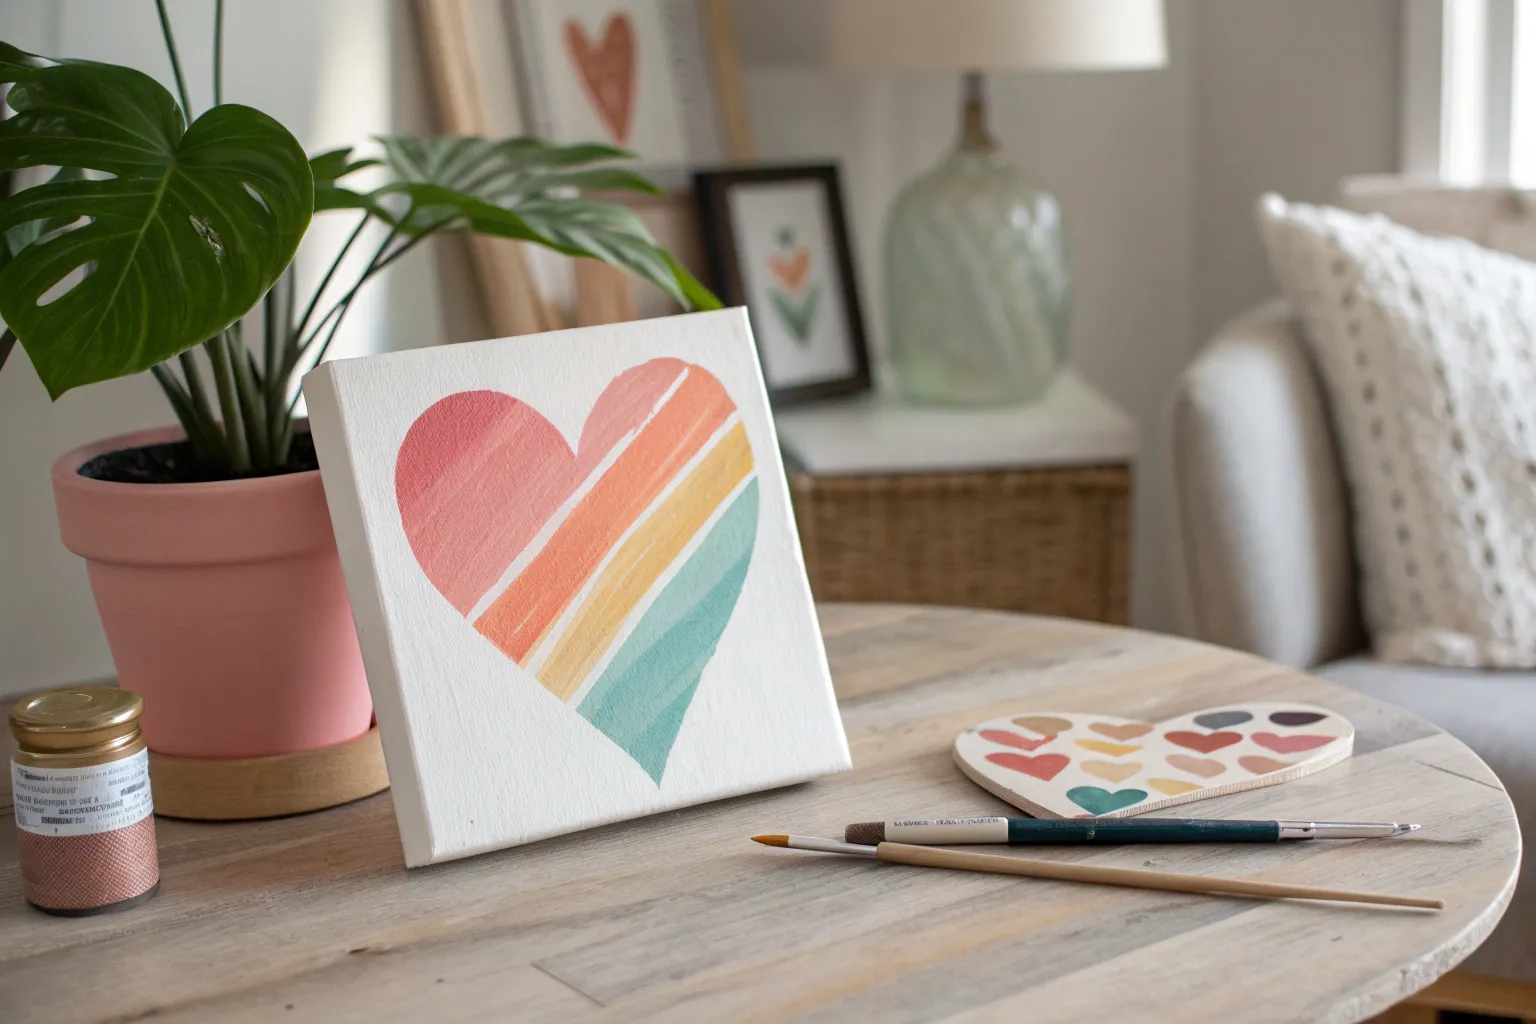
When you’re craving something cute, quick, and genuinely satisfying, a heart painting is my go-to because it’s basically impossible to mess up. Here are my favorite easy heart painting ideas—from classic and clean to playful and a little wild—so you can pick one that matches your mood.
Classic Solid Heart With a Soft Shadow
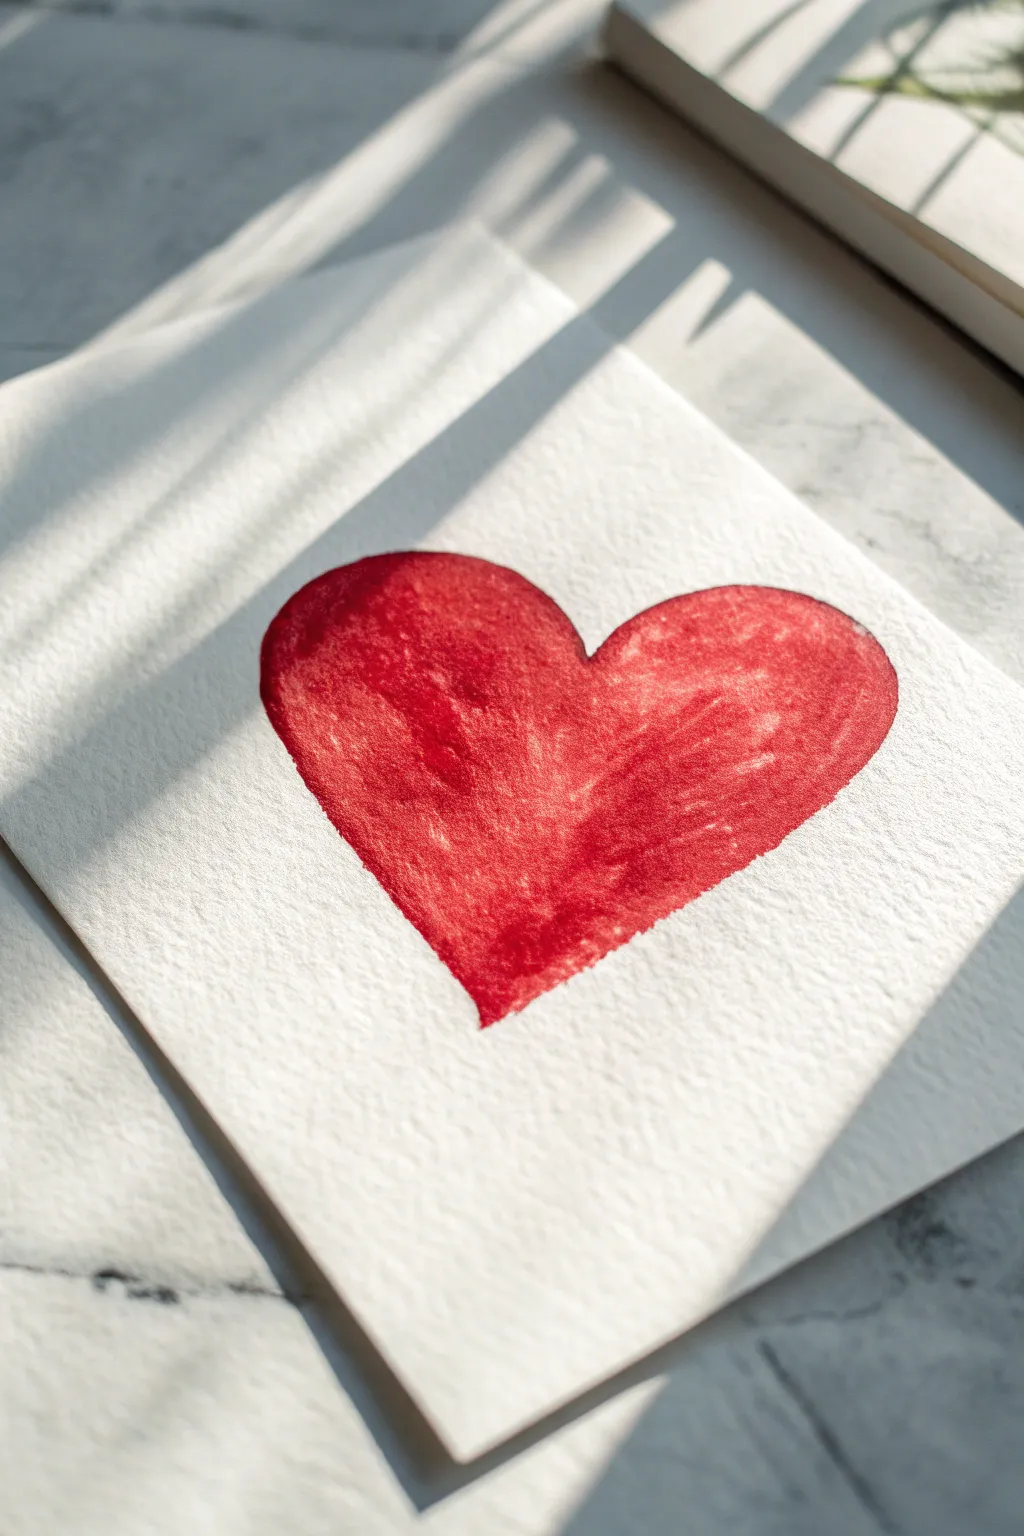
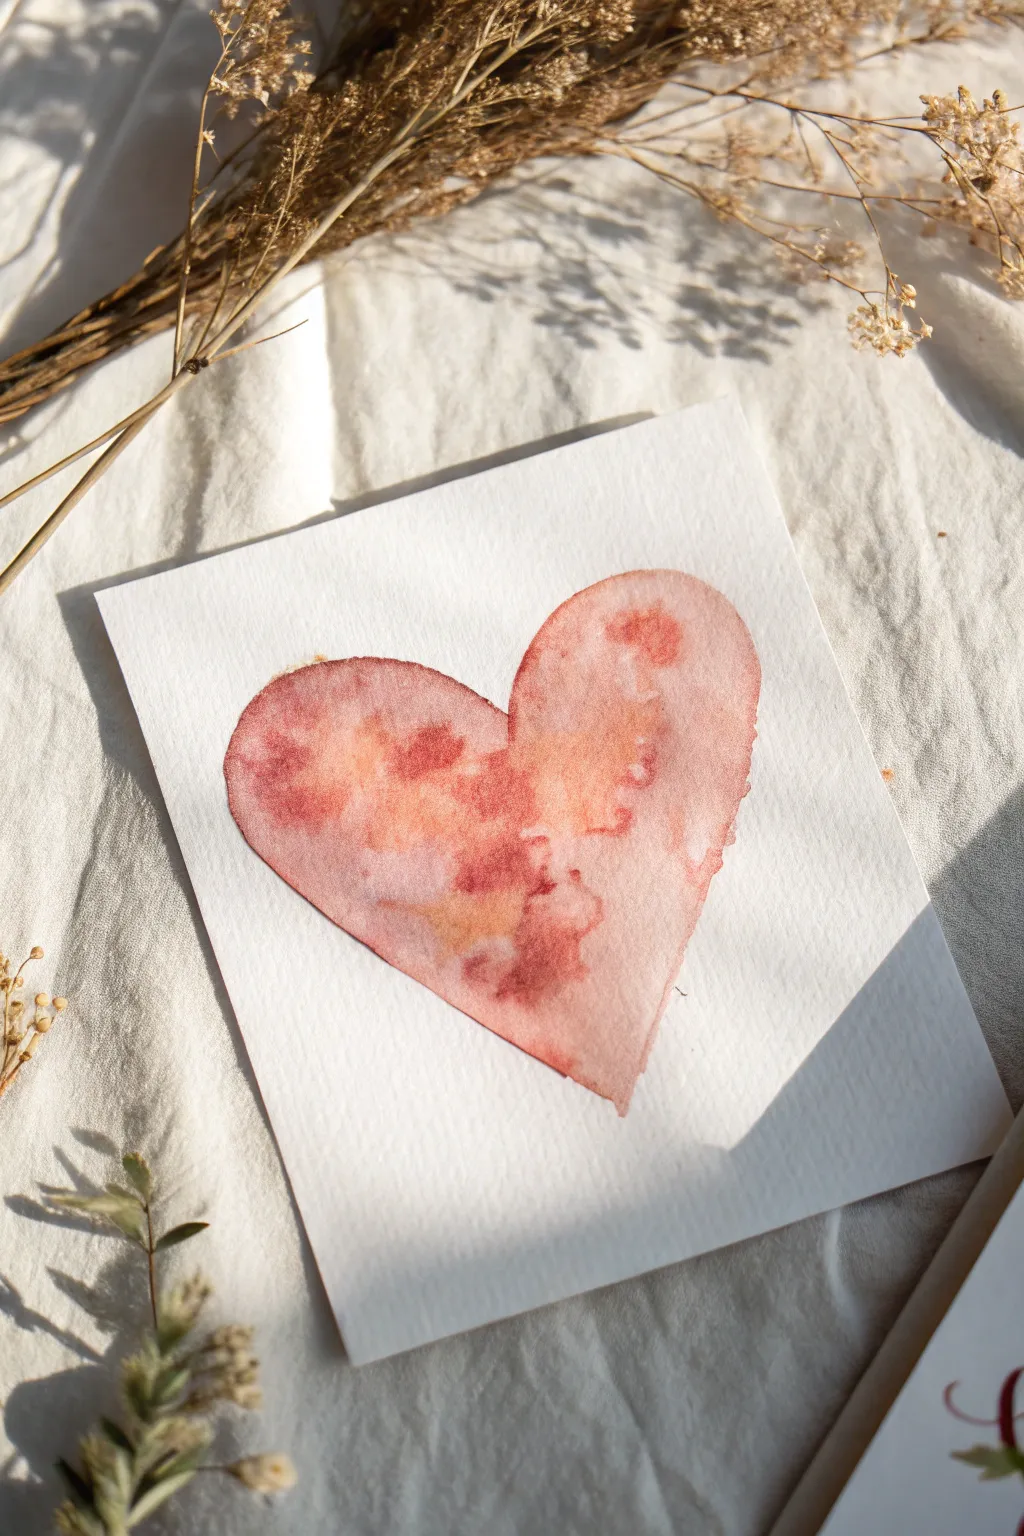
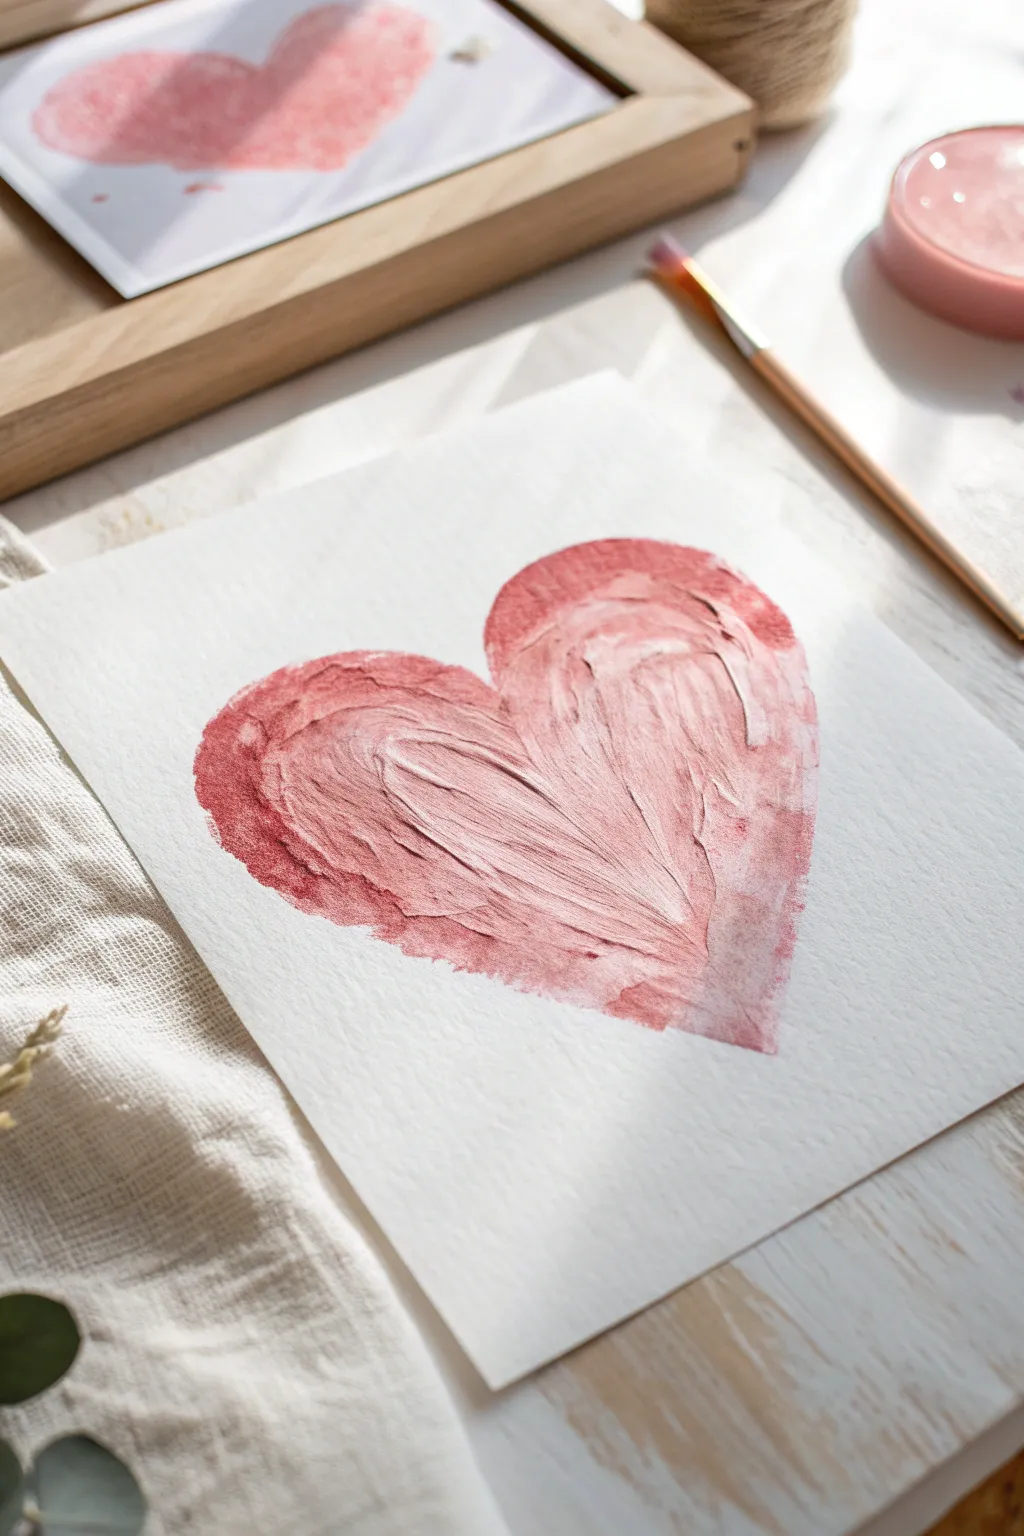
This classic project captures the simple beauty of a vibrant red heart on textured paper. The result is a bold but gentle piece that lets the natural granulation of the paint create depth and character.
Step-by-Step Guide
Materials
- Heavyweight cold-press watercolor paper (300gsm or higher)
- Red watercolor paint (e.g., Alizarin Crimson or Cadmium Red)
- Round watercolor brush (size 6 or 8)
- Pencil (HB or lighter)
- Eraser
- Jar of clean water
- Paper towel
- Palette or mixing plate
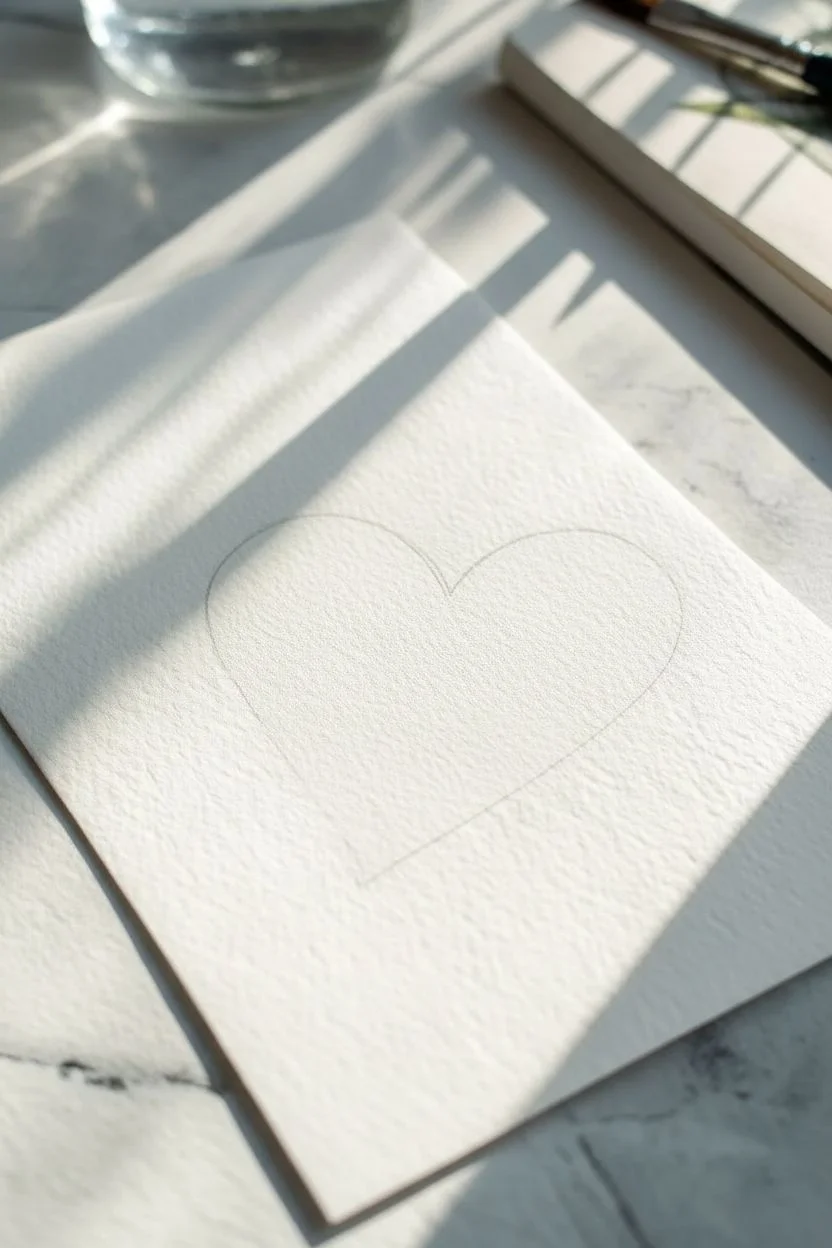
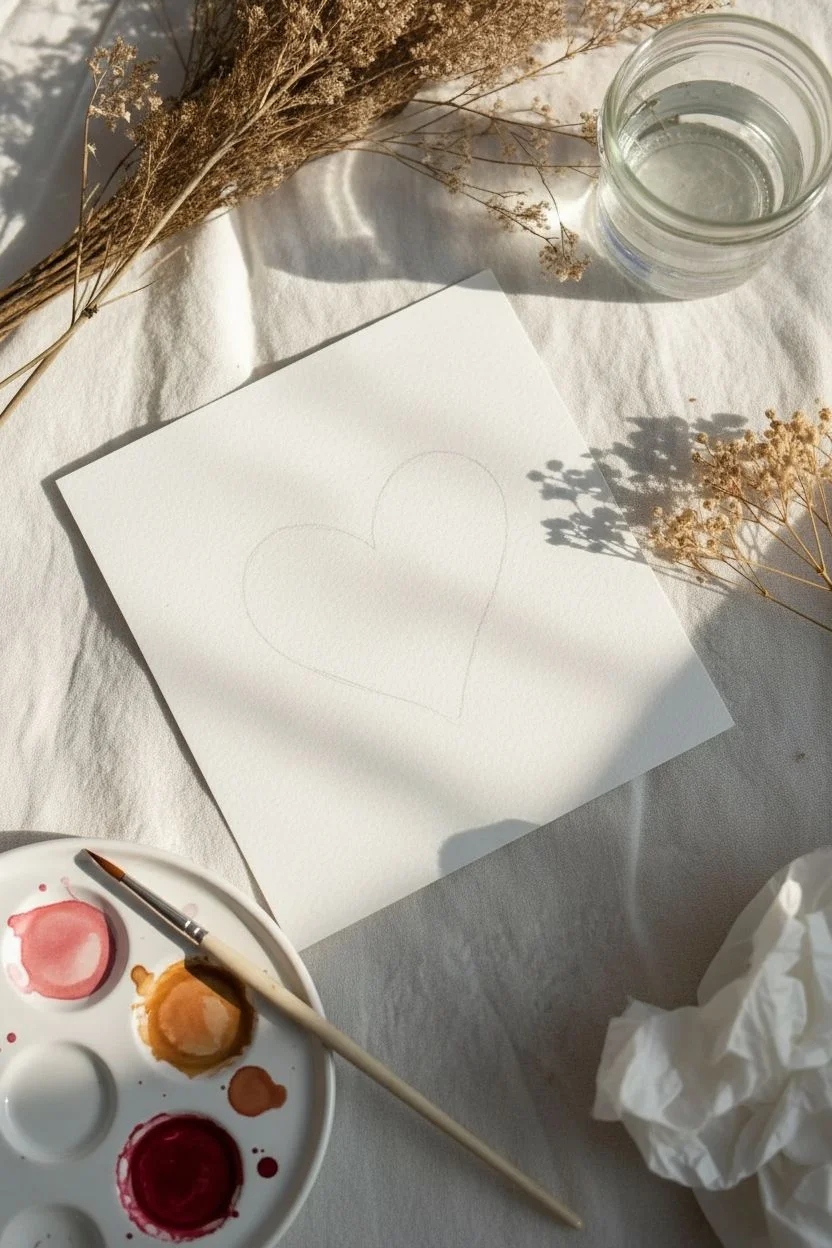
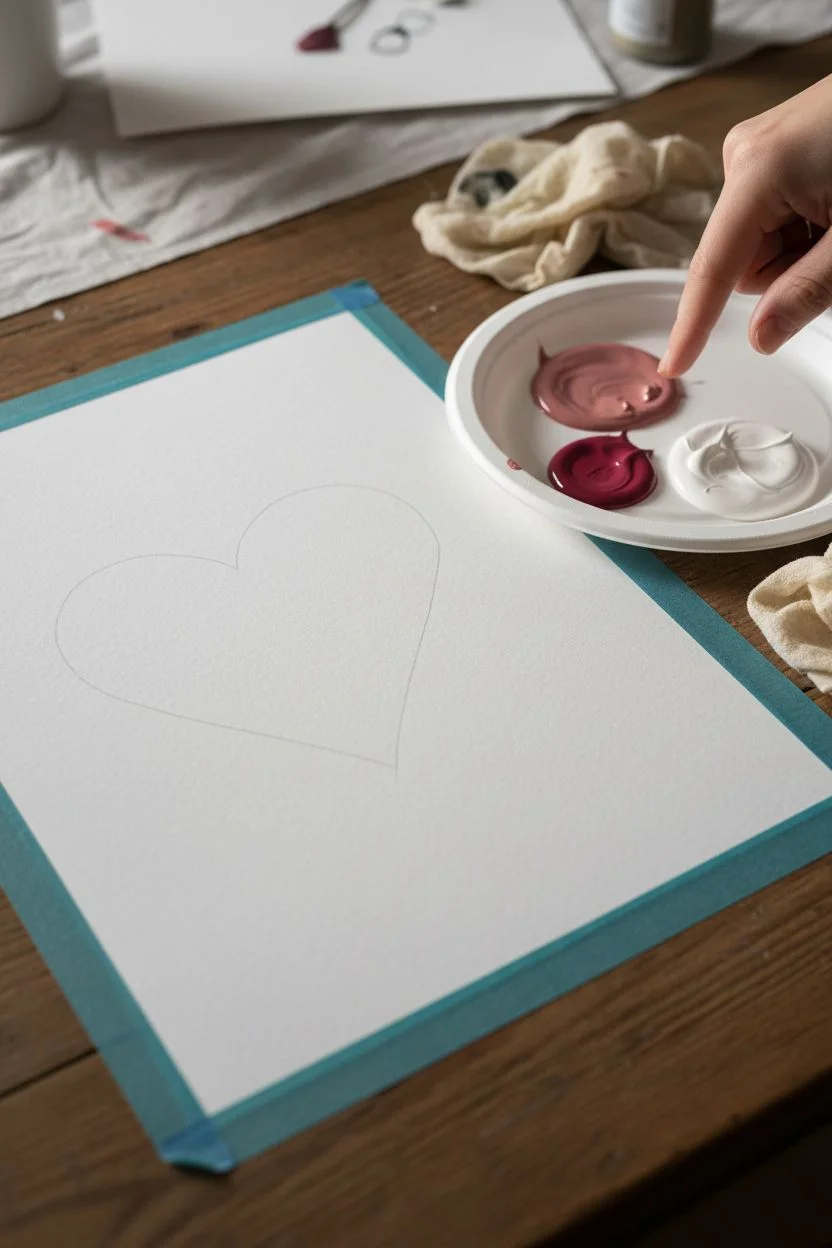
Step 1: Preparation & Sketching
-
Paper Selection:
Begin by selecting a piece of heavyweight cold-press watercolor paper. The texture is crucial here, as it grabs the pigment and creates that lovely, organic edge seen in the final piece. -
Light Sketching:
Using a very light touch with your HB pencil, draw a symmetrical heart shape in the center of your paper. Keep the lines faint so they won’t show through the translucent watercolor later. -
Refining the Shape:
Step back and look at your outline. If one side feels wider than the other, gently erase and correct it now. The symmetry makes the simple subject stand out. -
Cleaning the Lines:
Use a kneaded eraser to dab at your pencil lines until they are barely visible ghosts. This ensures clean edges for your painting.
Uneven Drying?
If you get ‘cauliflower’ blooms where water pushes pigment away, you added water to drying paint. Let it dry fully, then glaze over the whole shape with a very light wash to unify it.
Step 2: Applying the Wash
-
Mixing the Red:
Squeeze a generous amount of red watercolor paint onto your palette. I like to mix a drop of water into it to create a creamy consistency that is rich but flows easily. -
Loading the Brush:
Dip your round brush into the water and then swirl it into your red paint mixture. Ensure the bristles are fully saturated but not dripping uncontrollably. -
First Stroke:
Starting at the top left curve of the heart, lay down your brush and pull the paint downward toward the bottom point. Use the belly of the brush to cover more area smoothly. -
Filling the Left Side:
Continue filling in the left lobe of the heart. Work fairly quickly to keep the edge of the paint wet, which prevents harsh internal lines from forming. -
Painting the Right Side:
Reload your brush with fresh paint and repeat the process on the right lobe, starting at the top curve and sweeping down to meet the first section at the bottom point. -
Smoothing the Center:
Where the two sides meet in the middle, blend the wet paint together gently. Let the water encourage the pigments to mingle naturally.
Step 3: Refining & Drying
-
Creating Texture:
While the paint is still wet, you can dab a tiny bit more concentrated pigment into the upper lobes of the heart. This creates a subtle gradient and that beautiful mottled texture as it dries. -
Checking the Edges:
Look closely at the perimeter of your heart. Use just the very tip of your brush to smooth out any wobbly sections, ensuring a continuous, confident curve. -
Lifting Highlights (Optional):
If the color looks too flat, use a clean, slightly damp brush to gently lift a tiny bit of pigment from the center of the right lobe to suggest a highlight. -
Blotting Excess:
If a pool of water has formed at the bottom point of the heart, touch the corner of a paper towel to it very lightly to wick away the excess without removing the color. -
Initial Drying:
Allow the painting to sit flat and undisturbed for at least 10 minutes. Moving it too soon can cause the pigment to run and ruin the shape. -
Final Cure:
Let the paper dry completely for several hours. The red will soften slightly as it dries, revealing the beautiful grain of the paper underneath.
Pro Choice: Paint Quality
Use ‘granulating’ watercolor paints for this project. They naturally settle into the texture of the paper, creating that speckled, organic look automatically.
Once dry, your artwork is ready to be framed or turned into a lovely handmade card


Simple Outline Heart Filled With Loose Strokes

Capture the charm of imperfection with this lovely mixed-media heart project. The combination of loose watercolor washes and a freehand ink outline creates a rustic, heartfelt look that feels personal and warm.
How-To Guide
Materials
- Thick watercolor paper (cold press, roughly 140lb/300gsm)
- Watercolor paints (warm red, burnt orange, brown)
- Round watercolor brush (size 6 or 8)
- Black ink marker or fineliner (waterproof)
- Small flat brush or q-tip (for details)
- Jar of clean water
- Paper towel
Step 1: Painting the Base
-
Prepare your paper:
Start with a square piece of cold press watercolor paper. The texture of the paper is key here, as it adds character to the washes you are about to lay down. -
Mix a warm base color:
On your palette, mix a warm red with a touch of burnt orange watercolor. You want a color that feels earthy rather than a bright primary red. -
Paint the initial shape:
Using a wet round brush, paint a large, loose heart shape in the center of the paper. Don’t worry about perfect symmetry. -
Keep it wet:
Ensure the shape is fairly wet. If the paint is drying too fast, add a little more water to the surface of the paper. -
Add color variation:
While the first layer is still damp, drop in a slightly darker red or brown tone on the right side of the heart to suggest a bit of shadow and volume. -
Create the halo effect:
Dip your brush in clean water and blur the edges of the painted heart slightly outwards. This creates a soft, very pale wash or ‘halo’ around the main shape, which you can see in the example.
Step 2: Adding Details and Outlines
-
Let it dry completely:
This is crucial. Wait for the watercolor base to be bone dry before moving on, or your ink lines will bleed uncontrollably. -
Mix a darker red:
Create a concentrated mix of red paint with very little water, so it’s quite opaque. -
Add inner hearts:
Using the tip of a small brush or even a Q-tip, dab small, darker red heart shapes onto the left side of the main heart. They should look like subtle textures rather than crisp stickers. -
Dry the details:
Allow these small accents to dry completely. -
Start the outline:
Take your black marker. I like to start at the top dip of the heart. -
Sketch loosely:
Draw the outline of the heart, but purposely avoid following the paint edge perfectly. Let the line wander slightly inside or outside the painted area. -
Double the line:
Go around the shape a second time, crossing over your first line. Make this second pass quick and sketchy to enhance the artistic, hand-drawn feel. -
Add emphasis:
thicken the line slightly at the bottom point and the curves of the heart to add visual weight.
Loose is Best
Don’t lift your pen too often when outlining. A continuous, slightly shaky line adds more character than a stiff, slow one.
Add Some Sparkle
Once the painting is dry, use a metallic gold gel pen to trace a third, very thin outline for a subtle shimmer.
Now you have a charming piece of art ready to be framed or gifted to someone special


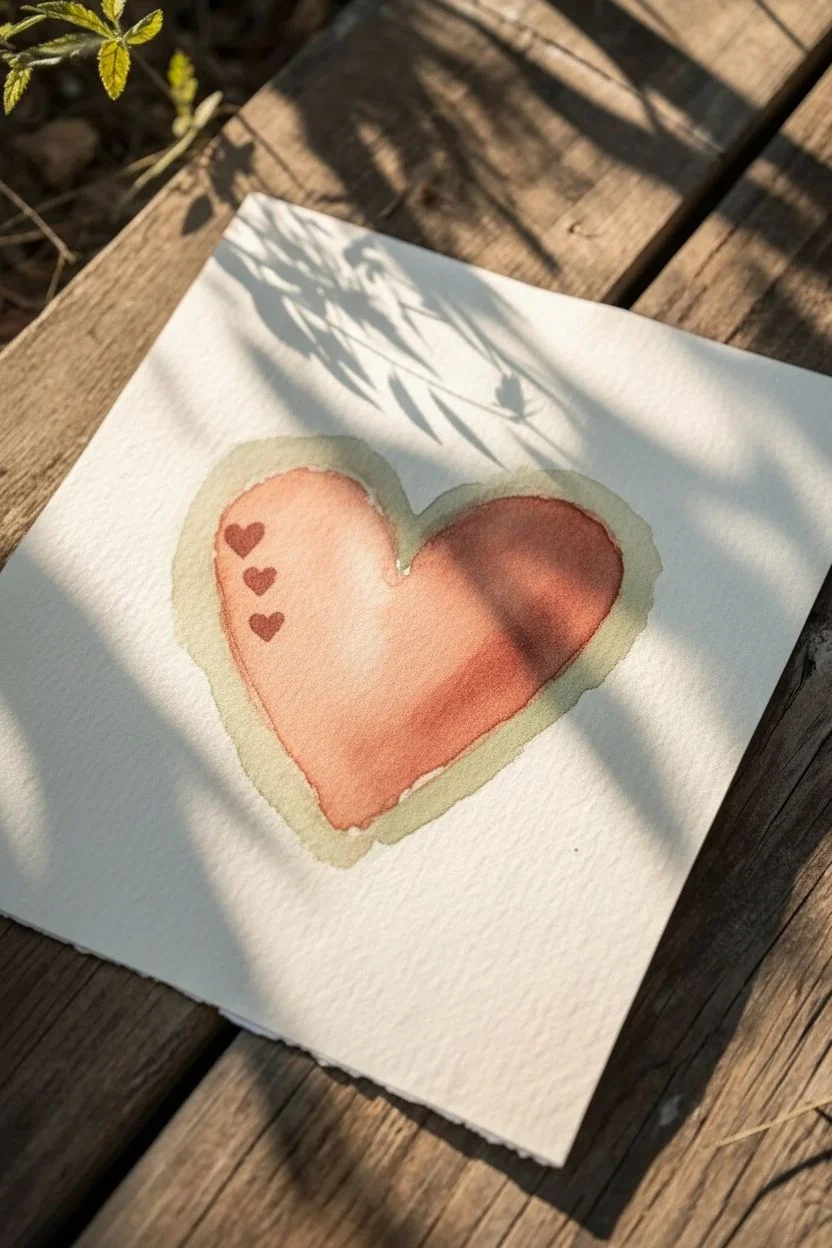
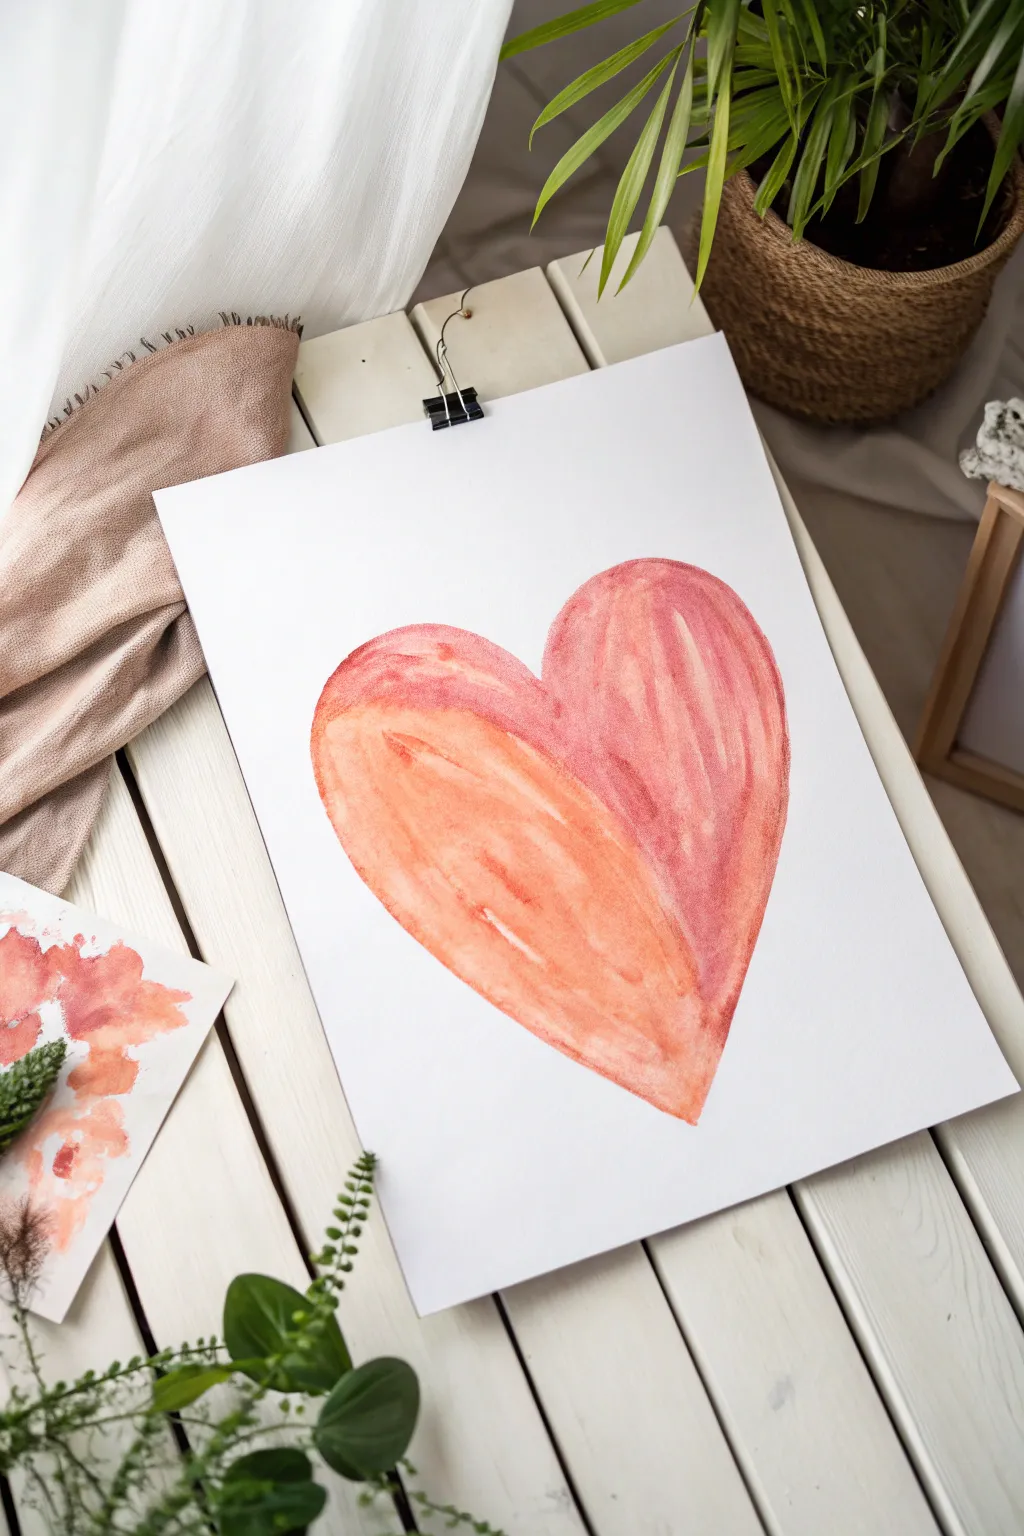
Easy Watercolor Wash Heart With Bleedy Edges
Capture the romantic unpredictability of watercolor with this textured heart painting that relies on the wet-on-wet technique. The resulting blend of soft pinks, rusty oranges, and deep reds creates a cloudy, organic look that feels warm and inviting.
Step-by-Step
Materials
- Cold-pressed watercolor paper (rectangular cut)
- Watercolor paints (Alizarin Crimson, Cadmium Red, Yellow Ochre)
- Round watercolor brush (size 6 or 8)
- Jar of clean water
- Pencil
- Palette or small white plate
- Paper towel
Step 1: Preparation & Sketching
-
Prepare your paper:
Start with a piece of cold-pressed watercolor paper. The texture is crucial here, as it allows the pigment to settle into the grooves for that beautiful granulated effect. -
Lightly sketch the shape:
Using a pencil, draw a simple heart shape in the center of your paper. Keep your lines very faint so they won’t be visible once the paint dries over them. -
Mix your palette:
On your palette, prepare three puddles of paint: a watery pink-red, a slightly more concentrated deep red, and a warm yellow-orange like ochre. You want them ready to go before you wet the paper.
Step 2: Painting the Base Layer
-
Wet the shape:
Dip your clean brush into the water jar and paint the inside of your heart outline with just water. This technique, called wet-on-wet, is the secret to soft blends. -
Check the sheen:
Tilt your paper against the light. The heart shape should glisten evenly but not have a large pool of water sitting on top. -
Drop in the first color:
Load your brush with the watery pink-red mix. Gently touch the tip of the brush to the wet paper, starting near the top left curve of the heart. -
Watch the bloom:
Let the paint spread naturally. Do not overwork it with brushstrokes; just tap the pigment in and let the water carry it to the edges. -
Fill the shape:
Continue dropping this base color until the heart is mostly filled, leaving a few tiny areas lighter or white for highlights.
Muddy colors?
If colors turn gray or muddy, you’re likely over-mixing on the paper. Trust the water! Drop the paint in and pull your brush away immediately to keep colors fresh.
Step 3: Adding Depth & Texture
-
Introduce the warmer tone:
While the paper is still wet, clean your brush and pick up the yellow-orange ochre paint. Drop this color into the center and upper right areas of the heart. -
Encourage blending:
Tilt the paper slightly if needed to help the orange merge softly into the pink, creating those peachy transitions seen in the example. -
Add deep contrast:
Pick up the concentrated deep red paint. Dab this into the bottom point of the heart and along the left edge. -
Create the ‘bleedy’ texture:
To get those specific blooms and cauliflowers, load your brush with a tiny bit of clean water and touch it to a drying area of concentrated pigment. -
Push the pigment:
Alternatively, you can drop a heavy load of pigment into a semi-dry area to force the existing paint away, creating hard, textured edges within the heart. -
Refine the edges:
If the paint has strayed outside your pencil line, use a clean, damp brush (blotted on a towel) to gently lift the excess paint or reshape the edge. -
Soften the transition:
Let the colors sit. As it dries, the different pigments will separate slightly on the textured paper, enhancing the vintage look. -
Let it dry completely:
Resist the urge to touch it! Let the paper dry flat naturally to keep those watermarks crisp. Using a hairdryer might blow the pigment around too much.
Add some sparkle
Once fully dry, splatter tiny flecks of metallic gold watercolor over the heart for a luxurious, modern finish that catches the light.
Give your beautiful heart painting a moment to dry completely before framing it or using it as a thoughtful card front


Abstract Acrylic Heart With Layered Color Blocks
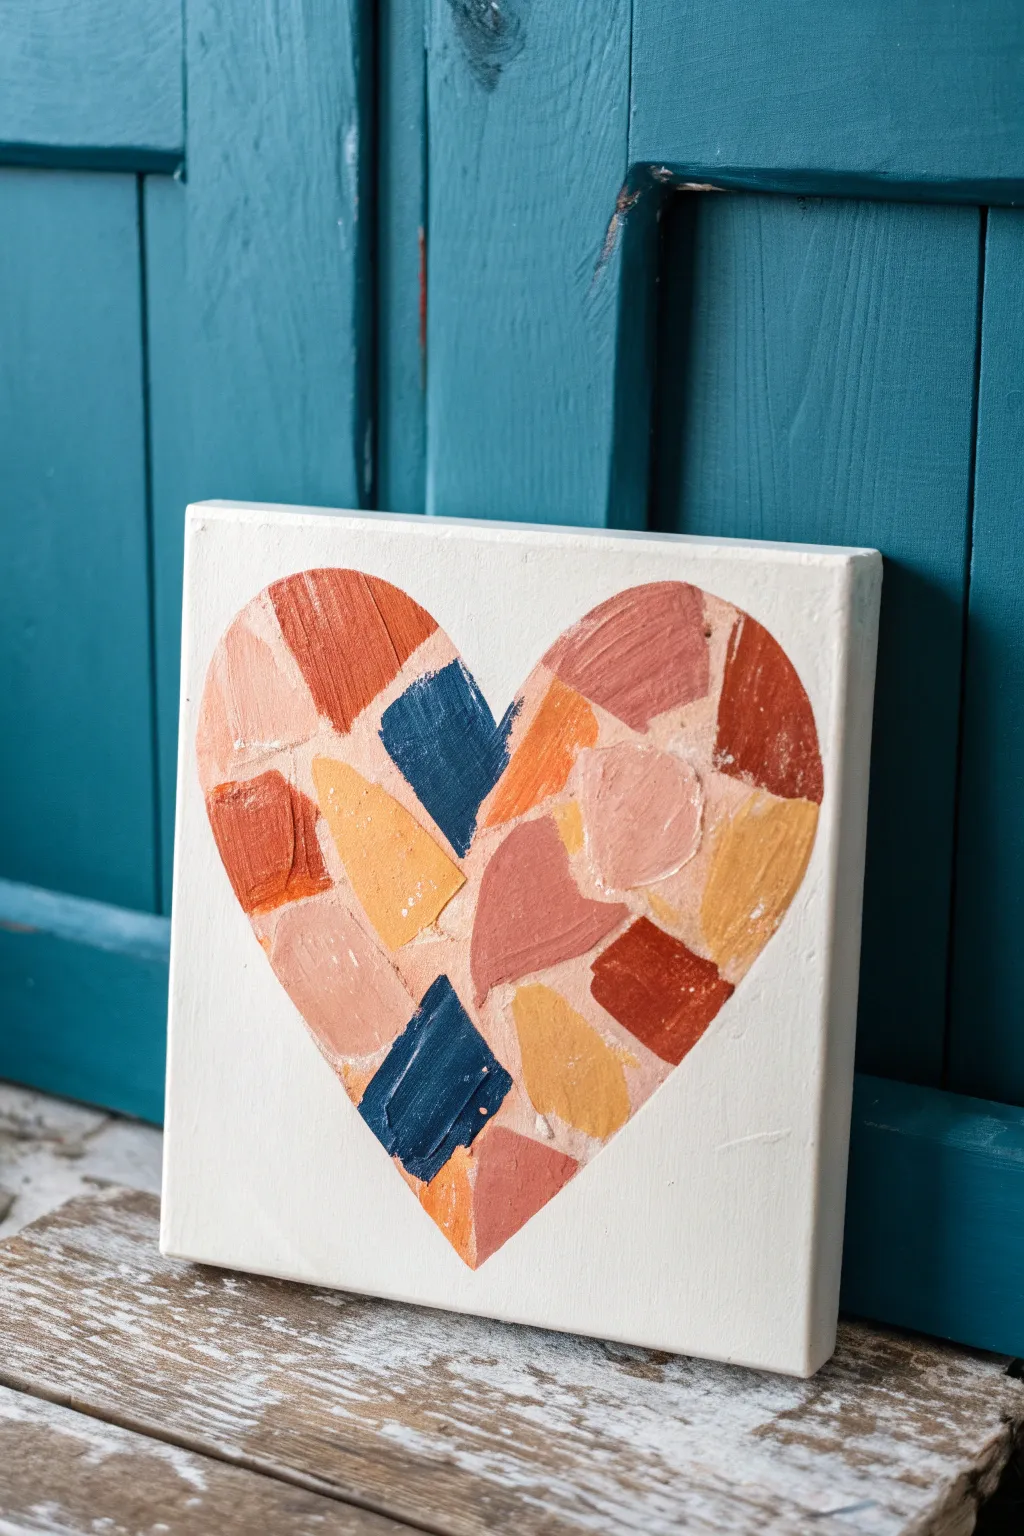
This charming project features a heart composed of fractured color blocks, creating a modern, mosaic-like aesthetic without the need for grout or tiles. Using warm, earthy tones accented with deep navy, the layered acrylic technique gives the piece wonderful texture and depth.
Step-by-Step Tutorial
Materials
- Small square canvas (approx. 6×6 or 8×8 inches)
- Acrylic paints (terracotta, burnt orange, blush pink, mustard yellow, navy blue, white)
- Flat shader synthetic brushes (sizes 6 and 8)
- Pencil for sketching
- Paper palette or mixing plate
- Paper towels
- Small palette knife (optional, for texture)
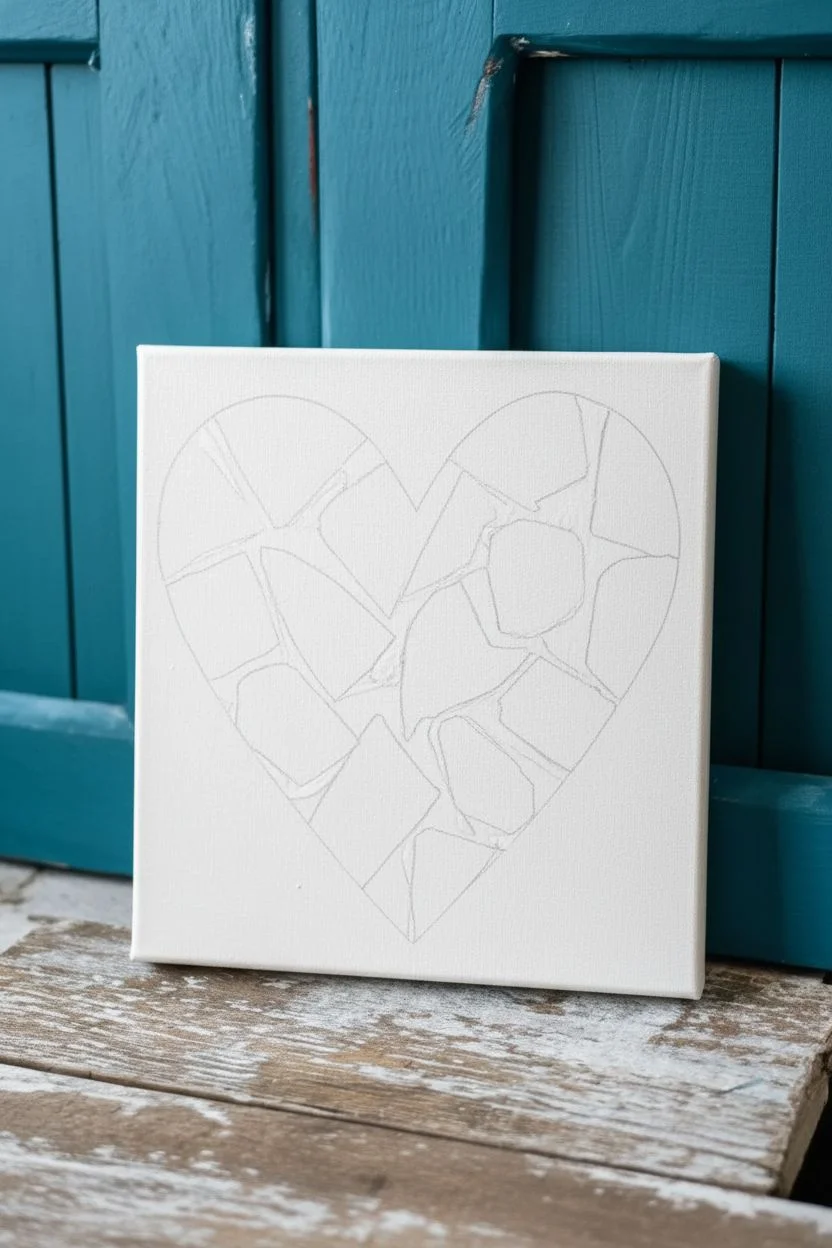
Step 1: Preparation & Sketching
-
Prepare the Background:
Start by giving your canvas a fresh coat of white acrylic paint if it isn’t already primed. This ensures your background is bright and clean. Allow this base layer to dry completely before pencil touches canvas. -
Sketch the Heart Outline:
Using a pencil, lightly draw a large, symmetrical heart shape in the center of the canvas. Keep your lines faint so they are easy to cover with paint later. Leave a generous white margin around the heart. -
Map Out the Segments:
Inside your heart outline, lightly sketch irregular geometric shapes. Think of them like broken pottery shards or crazy paving—varying sizes of triangles and quadrilaterals that fit puzzle-like together. -
Leave Visual Gaps:
As you sketch the internal shapes, be sure to leave small channels of negative space between them. These gaps will act as the ‘grout’ lines, letting the white background show through to define the mosaic look.
Clean Lines Hack
For ultra-crisp ‘grout’ lines between colors, you can use thin artist tape or masking fluid to cover the gaps before painting, then peel it away once dry.
Step 2: Painting the Color Blocks
-
Mix Your First Color:
Start with a warm terracotta shade. Squeeze out burnt orange and mix in a tiny touch of white to soften it slightly if needed. You want a creamy consistency that holds brush marks. -
Apply the First Blocks:
Select 3-4 random shapes within your heart sketch and fill them in with the terracotta mix. Use the flat edge of your brush to get crisp, straight edges against the white gaps. -
Create Texture:
Don’t smooth the paint out perfectly. Leave the brushstrokes visible and slightly thick to mimic the uneven surface of stone or tile. -
Introduce Blush Pink:
Clean your brush and switch to a soft blush pink color. Fill in another set of 3-4 scattered shapes. Try to place these next to empty spots rather than directly adjacent to the orange ones for now. -
Add Mustard Accents:
Mix a mustard yellow paint. Fill in smaller, distinctive shapes with this sunny hue. It adds a nice brightness that contrasts well with the upcoming darker tones. -
Incorporate the ‘Pop’ Color:
Now for the drama—mix a deep navy blue. Paint 2-3 specific blocks with this dark color. I find placing these near the center or bottom creates a great focal anchor. -
Fill Remaining Spaces:
Look at the remaining empty shapes. Fill them with variations of your existing palette—perhaps mix the pink with a little orange to create a coral tone, or darken the terracotta for a rust brick red.
Step 3: Isolating & Refining
-
Check the Gaps:
Examine the white lines between your colors. If any paint has bled over, wait for it to dry, then use a fine brush with white paint to touch up and re-establish crisp boundaries. -
Layer for Opacity:
Some lighter colors, like the yellow or pink, might look streaky. Apply a second coat to these specific blocks to ensure the color is solid and vibrant. -
Add Impasto Details:
To enhance the tactile feel, take a palette knife or a loaded brush and dab a little extra paint on the center of the larger blocks. This raised paint catches the light. -
Clean the Edges:
Paint the sides of the canvas white for a professional gallery-wrap finish, ensuring no stray color marks remain on the borders. -
Final Drying:
Let the painting sit flat in a dust-free area for at least 24 hours, especially given the thicker application of paint in certain areas.
Level Up: Metallic Touch
Mix gold leaf flakes or metallic gold paint into one or two of the color blocks to make the heart shimmer and look like high-end jewelry.
Hang your textured heart on a colored wall to really make those earthy tones pop
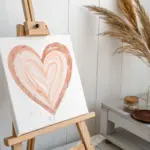
BRUSH GUIDE
The Right Brush for Every Stroke
From clean lines to bold texture — master brush choice, stroke control, and essential techniques.
Explore the Full Guide
Finger-Painted Blended Heart for a No-Brush Day
Sometimes the best paintbrush is your own finger, and this project proves just that with its tactile, swept texture. This finished piece features a soft, romantic heart shape created with sweeping motions that blend dusty rose and white paints directly on the paper for a beautifully imperfect, rustic look.
How-To Guide
Materials
- Heavyweight watercolor paper or mixed media paper (textured surface is best)
- Acrylic paints (Dusty Rose, Titanium White, and a Deep Pink or Burgundy)
- Paper palette or a disposable plate
- Paper towels or a rag
- Pencil (optional, for light sketching)
- Painter’s tape (optional, to secure the paper)
Step 1: Preparation and Setup
-
Prepare your workspace:
Before diving in, clear a flat surface and lay down a protective covering if you’re worried about mess. Lay your textured paper flat. If the paper tends to curl, you can use small pieces of painter’s tape on the corners to hold it steady. -
Dispense your paints:
Squeeze a generous dollop of dusty rose, a smaller amount of deep pink, and a good amount of titanium white onto your palette. You want these separated but close enough to access quickly. -
Lightly sketch the shape (optional):
If you are nervous about freehanding the heart shape, use a pencil to very faintly draw the outline of a heart in the center of your paper. Keep the lines incredibly light so they won’t show through the paint later.
Pro Tip: Heavy Body Paint
Use ‘Heavy Body’ acrylic paints if possible. They hold brush (or finger) strokes much better than craft paints, ensuring those beautiful ridges stay standing as they dry.
Step 2: Creating the Textured Heart
-
Load your finger:
Dip your index finger into the dusty rose paint. Don’t be shy; you want a thick amount of paint on your fingertip to create those raised ridges visible in the final piece. -
Start the left lobe:
Place your finger at the top curve of the left side of the heart. Press down and drag your finger downward and inward toward the center point of the heart in a sweeping motion. -
Add dimension with white:
Without wiping your finger clean, dip slightly into the white paint. Go back to the top of the left lobe and make another sweep right next to your first one, following the curve of the heart. -
Build the curve:
Continue this process on the left side, alternating between dipping into the rose and the white. The goal is to layer the strokes so they overlap slightly, building up a thick texture. -
Create the bottom point:
As you reach the bottom of the left side, drag your finger sharply toward the bottom center point to define the tip of the heart. Lift your finger abruptly at the end of the stroke to leave a nice ridge of paint. -
Start the right lobe:
Wipe your finger on a paper towel if the colors have become too muddy. Reload with fresh dusty rose and a tiny touch of the deep pink for contrast. -
Sweep the right side:
Starting from the top curve of the right lobe, mirror your previous motions. Press and sweep downward and inward, letting the paint track marks from your fingerprints show through. -
Blend the center:
Where the two lobes meet in the middle vertical line, gently pull the paint from the right side over to the left side just slightly. This ‘knits’ the two halves together without destroying the separate direction of the strokes. -
Enhance texturing:
Look at your heart. If some areas look too flat, dab a thick glob of white paint on your finger and drag it lightly over the existing wet paint. This highlights the ridges and adds that sculptural feel. -
Refine the edges:
The edges shouldn’t be perfect, but they should be shaped. Use a clean finger to gently push any stray paint back into the heart shape, or add small swipes to round out the top curves if they look too jagged.
Troubleshooting: Muddy Colors
If your pink and white start turning into a solid flat color, stop blending! Wipe your finger completely clean, pick up fresh white paint, and layer it on top without over-mixing.
Step 3: Finishing Touches
-
Check balance:
Step back and look at the color distribution. I like to ensure there is a good balance of the light white streaks on both sides so one side doesn’t look heavier than the other. -
Add contrast:
If the heart looks too pale, dip just the very tip of your finger into the deep pink. Add one or two quick, confident swipes following the curved grain of the heart to add depth. -
Let it dry completely:
The paint is quite thick in places, so this will take longer to dry than a standard painting. Leave it flat for several hours or overnight to ensure the peaks of the paint harden completely. -
Clean up:
Wash your hands immediately with warm soapy water before the acrylic paint dries on your skin. Peel off the tape gently once the paper is fully dry.
Once dry, this tactile piece of art is ready to be framed or gifted to someone special
Cotton Swab Dots Heart With a Simple Glow Effect
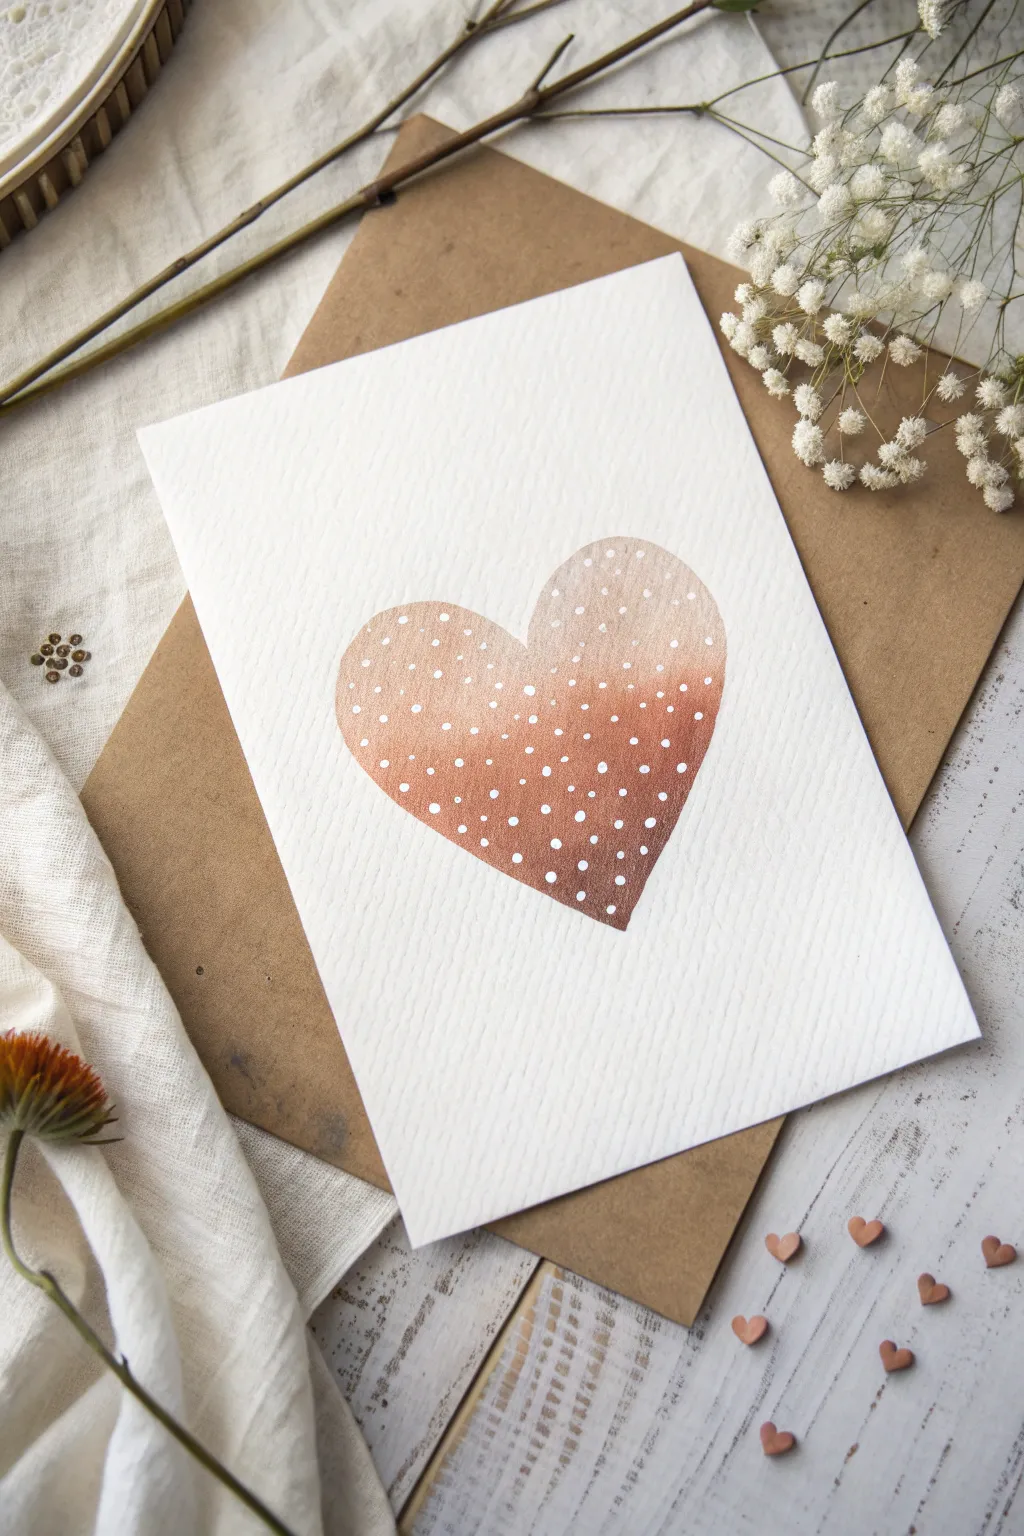
Create a warm, sophisticated focal point for your next greeting card using a simple masking technique and a gradient wash. This project features a lovely metallic copper heart that fades softly from dark to light, speckled with delicate white dots for a magical, starry effect.
Detailed Instructions
Materials
- Heavyweight watercolor paper or cardstock (textured)
- Metallic copper or bronze watercolor paint
- Pencil
- Heart stencil (or paper to make one)
- Painter’s tape or masking fluid (optional but helpful)
- Soft round watercolor brush (size 6 or 8)
- White gel pen or fine white acrylic paint/gouache
- Cotton swabs (optional for dotting paint)
- Water container and paper towel
Step 1: Preparation & Masking
-
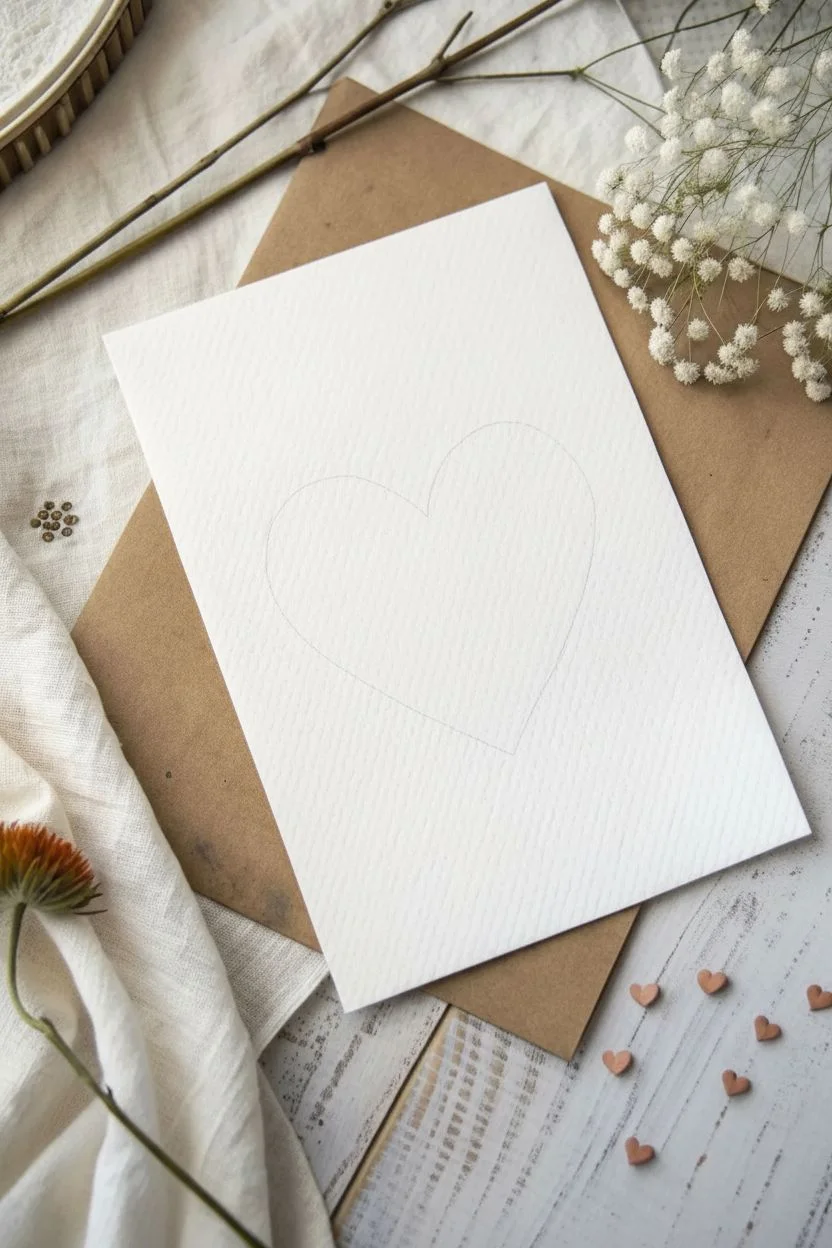
Trace the shape:
Begin by lightly tracing a heart shape onto the center of your watercolor paper using a pencil. Keep the lines very faint so they won’t show through the lighter parts of the paint later. -
Protect the edges (optional):
If you are worried about painting outside the lines, you can apply masking fluid around the exterior of the heart shape, or carefully place painter’s tape to block off the surrounding white space. However, freehand painting inside the pencil line works well for a closer, organic feel.
Step 2: Create the Gradient Wash
-
Mix your metallic paint:
Prepare your metallic copper paint. Create a small puddle of concentrated pigment for the darkest area and a separate, more watered-down puddle for the lighter gradient. -
Apply the dark base:
Start painting at the bottom point of the heart using the concentrated copper paint. Fill roughly the bottom third of the heart with this rich, opaque color. -
Start the transition:
Dip your brush into the water just slightly to dilute the pigment on your bristles. Continue painting upwards into the middle section of the heart, overlapping slightly with the wet bottom section to encourage blending. -
Fade to the top:
Clean your brush and pick up the very watery mix (or just clean water). Paint the top lobes of the heart, dragging the pigment up from the middle section. The goal is a smooth transition from the dark copper bottom to a very pale, translucent shimmer at the top. -
Let it dry completely:
This is crucial: allow the paint to dry 100%. If you touch the paper and it feels cool, it’s still damp. The white dots will bleed if applied too early.
Clean Lines Pro-Tip
For a razor-sharp heart edge without masking fluid, cut a heart shape out of post-it notes or sticker paper to use as a negative stencil. Paint right over the edge!
Step 3: Adding the Details
-
Test your dotting tool:
Whether using a white gel pen or a fine brush with white acrylic, make a few test dots on scrap paper to ensure the flow is consistent and opaque. -
Start dotting loosely:
Begin adding white dots freely across the heart. Unlike the reference image’s section title suggesting cotton swabs, a gel pen or fine brush tip gives the crispest result shown in the photo. Keep the spacing somewhat random but balanced. -
Vary dot distribution:
To enhance the ‘glow’ effect, consider clustering the dots slightly denser in the darker copper areas at the bottom and spacing them wider apart in the lighter areas at the top, though a uniform scatter looks beautiful too. -
Erase pencil lines:
Once the white ink is fully dry, gently erase any visible pencil marks around the perimeter of the heart for a clean finish. -
Mount the artwork:
If you painted this on a loose sheet, use double-sided tape or glue to mount your masterpiece onto a folded card base or slip it into a kraft envelope as a standalone print.
Level Up: Texture
Before the paint dries, sprinkle a tiny pinch of coarse salt onto the wettest copper area. Brush it off when dry for a subtle, starry texture beneath the dots.
Now you have a shimmering piece of heart art ready to share with someone special

PENCIL GUIDE
Understanding Pencil Grades from H to B
From first sketch to finished drawing — learn pencil grades, line control, and shading techniques.
Explore the Full Guide
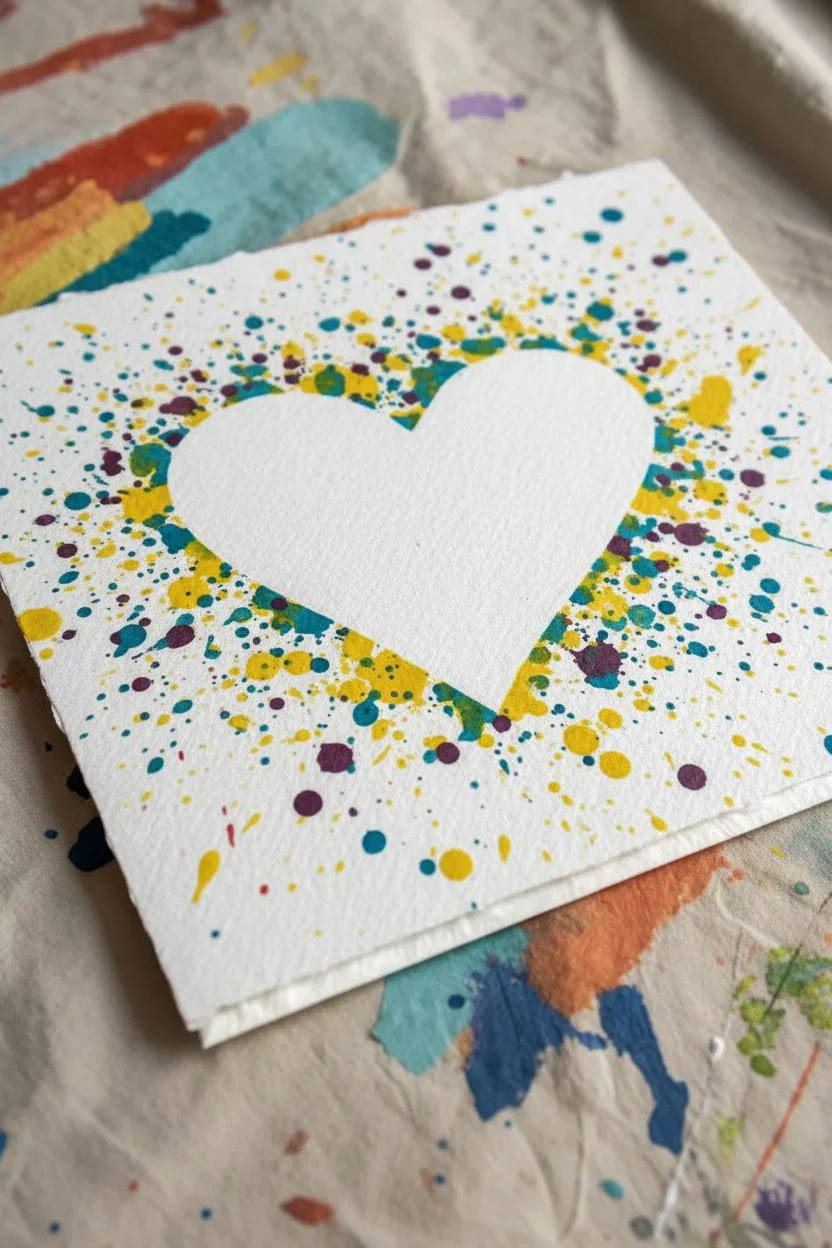
Negative Space Heart Made With Simple Masking
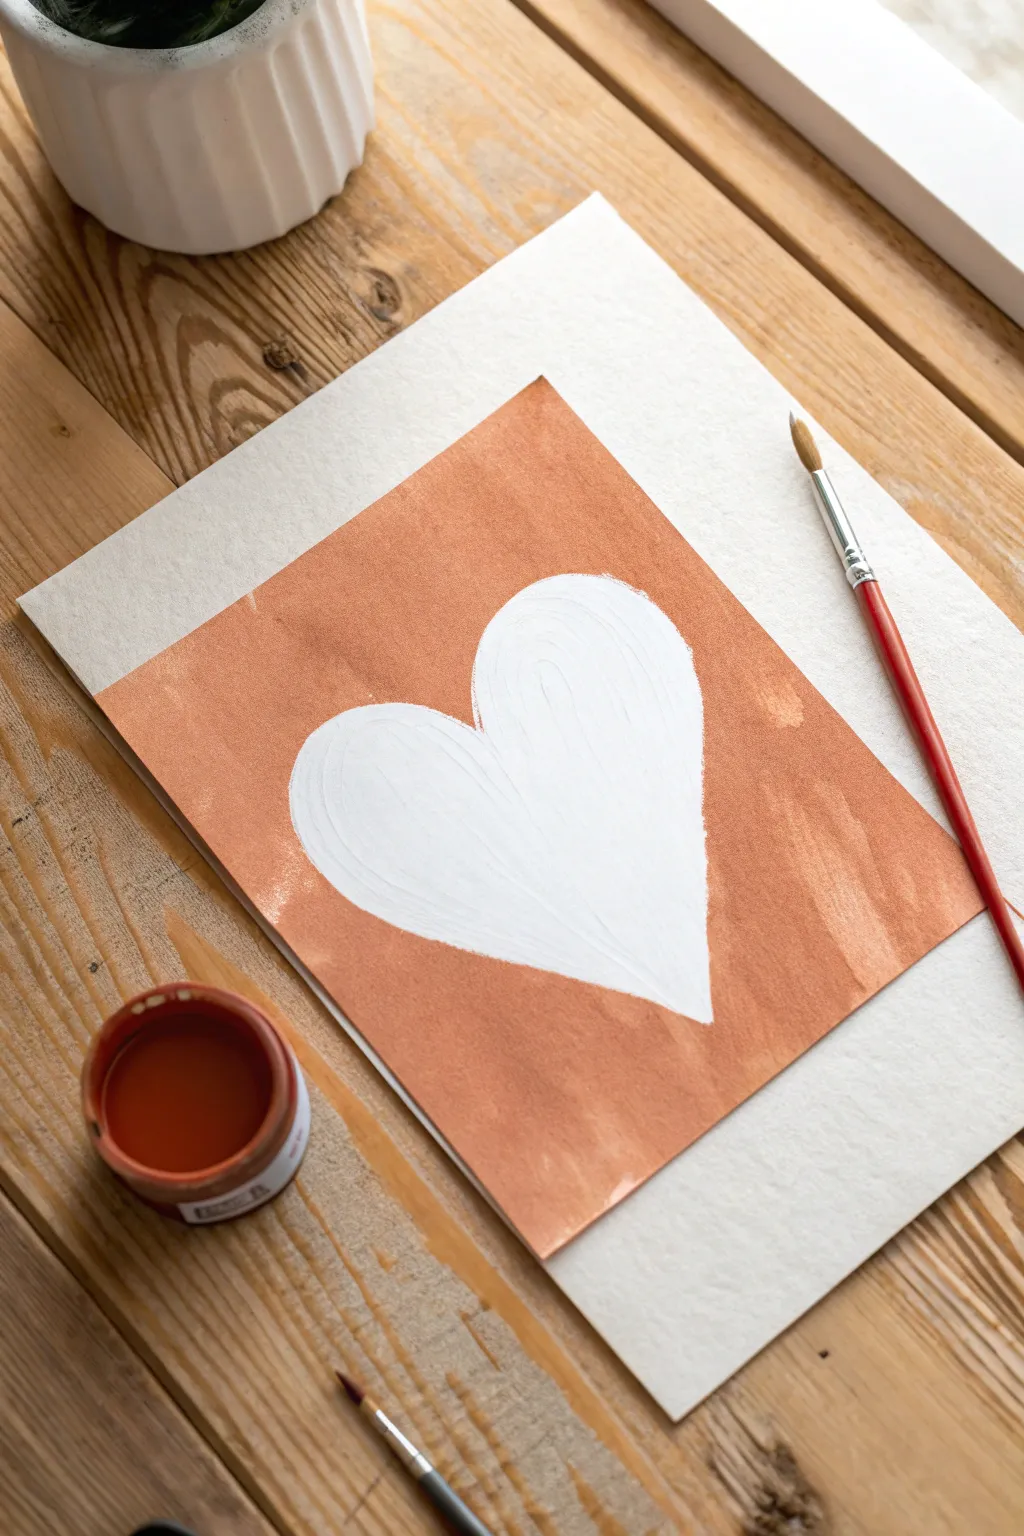
Embrace the beauty of negative space with this minimalist heart painting that frames a simple white shape with a warm, earthy terracotta background. The textured brushstrokes add a lovely, organic feel that makes this piece perfect for modern wall art or handmade cards.
Step-by-Step Guide
Materials
- Heavyweight watercolor paper or mixed media paper
- Terracotta or burnt orange acrylic paint (or gouache)
- Medium-sized flat paintbrush
- Small liner paintbrush (optional)
- Pencil
- Eraser
- Water cup
- Paper towel
Step 1: Preparation and Sketching
-
Prepare your workspace:
Lay down your heavyweight paper on a flat, clean surface like a wooden table. Ensure you have good lighting to see your pencil lines clearly. -
Find the center:
Visually locate the center of your paper to ensure your heart is balanced. -
Lightly sketch the heart:
Using a pencil, very lightly draw the outline of a large heart in the center of the page. Keep the pressure light so you can erase lines later if needed. -
Refine the shape:
Adjust the curves of your heart until you are happy with the symmetry. I like to make the top curves nice and full for a classic look. -
Prepare your paint:
Open your terracotta or burnt orange paint. If it’s too thick, mix in a tiny drop of water to improve flow, but keep it opaque.
Clean Lines Hack
For a perfectly crisp heart without steady hands, cut a heart shape from masking tape or adhesive paper, stick it down, paint over it, and peel it off when dry.
Step 2: Painting the Background
-
Start at the edge:
Dip your medium flat brush into the paint. Begin painting carefully along the *outside* of your pencil line. -
Define the boundary:
Create a crisp edge against the heart shape. This is the most crucial step, as this painted edge will define your white heart. -
Work outwards:
Once you have outlined a section of the heart, pull the paint outwards toward the edges of the paper. -
Maintain texture:
Don’t over-blend your strokes. Allow the brush marks to remain visible; vertical strokes work well to create that rustic, hand-painted texture seen in the example. -
Fill the corners:
Continue painting until you reach the corners and edges of your rectangular background area. -
Check opacity:
If the first layer looks streaky or too transparent, let it dry slightly and apply a second coat for a richer color.
Add Metallic Flair
Once the terracotta paint is completely dry, outline the white heart with a thin gold paint pen for a glamorous, shining border.
Step 3: Finishing Touches
-
Clean up edges:
If you missed any spots near the heart’s outline, use a smaller brush to carefully touch up the terracotta block. -
Let it dry completely:
Allow the paint to fully dry. This ensures that when you erase, you won’t smudge any pigment. -
Erase pencil marks:
Gently erase any visible pencil lines from the white interior of the heart or along the painted edge. -
Assess the white space:
If the white paper inside the heart got smudged, you can carefully paint over the smudge with white acrylic or gouache to clean it up. -
Flatten the paper:
If the paper buckled slightly from the moisture, place the dry artwork under a heavy book overnight to flatten it.
Now you have a stunning piece of modern art ready to frame or gift to someone special
Crayon or Oil Pastel Resist Heart With Watercolor Fill
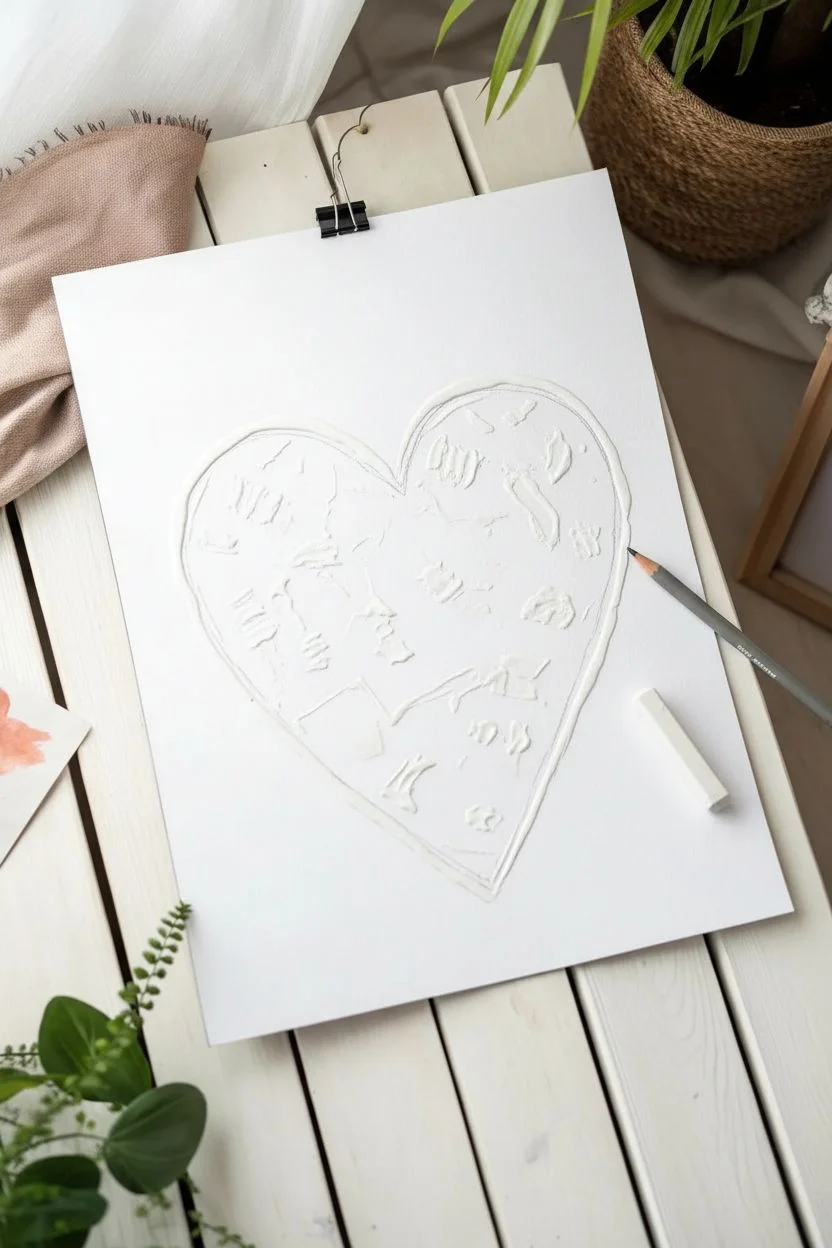
This project combines the creamy texture of oil pastels with the fluid beauty of watercolors to create a stunning, two-toned heart. The technique uses the wax in the pastels to resist the paint, creating a unique, textured finish that glows with warmth.
Step-by-Step Tutorial
Materials
- High-quality watercolor paper (white, cold press)
- Oil pastels or white wax crayon
- Watercolor paints (red, orange, and coral shades)
- Medium round watercolor brush
- Jar of water
- Paper towels
- Pencil (optional for sketching)
- Binder clip and board (optional for mounting)
Step 1: Preparation and Sketching
-
Prepare your workspace:
Set up a clean, flat surface with your watercolor paper taped down or clipped to a board. This prevents the paper from buckling when it gets wet during the painting process. -
Sketch the heart outline:
Using a pencil, lightly sketch a large heart shape in the center of your paper. Keep your lines very faint so they won’t show through the translucent watercolor later. -
Create the resist layer:
Take a white oil pastel or wax crayon and trace over your pencil outline. Press firmly to ensure a good amount of wax is deposited on the paper. -
Add inner texture:
Inside the heart shape, draw random scribbles, lines, or hatching patterns with the white pastel. These marks will remain white once you paint over them, creating the resist effect.
Step 2: Painting the Heart
-
Mix your colors:
Prepare two distinct puddles of watercolor paint on your palette. For the left side, mix a warm, peachy orange. For the right side, mix a deeper coral or soft red. -
Wet the paper slightly:
Dip your clean brush in water and lightly dampen the inside of the heart shape. Don’t soak it; just add a little moisture to help the paint flow. -
Paint the left side:
Load your brush with the orange mix and start painting the left lobe of the heart. Use long, sweeping strokes that follow the curve of the heart shape. -
Observe the resist:
Notice how the paint beads up or slides off the areas where you applied the white pastel. This reveals the white paper underneath and creates that lovely texture. -
Paint the right side:
Rinse your brush slightly and pick up the red-coral color. Paint the right lobe of the heart, bringing the color down to the bottom point. -
Blend the center:
Where the orange and red sections meet in the middle, gently brush the wet paints together. Let them bleed slightly to create a soft, natural gradient rather than a hard line. -
Add varying opacity:
I like to leave some areas slightly lighter by using more water, and others more saturated by dabbing in pure pigment while the paper is still wet. This adds dimension to the heart. -
Define the edges:
Carefully run the tip of your brush along the wax outline you drew earlier. The paint might pool slightly against the wax barrier, creating a defined edge.
Secret Weapon
Use a white crayon for a subtle resist, but try a pale pink or yellow pastel for colored texture lines instead of white.
Step 3: Finishing Touches
-
Check for gaps:
Look over the heart for any large white spots that you didn’t intend to be there. Fill them in with a light wash of color if needed. -
Let it dry completely:
Allow the painting to dry thoroughly. Avoid using a heat tool if possible, as it could melt the wax pastel and change the texture. -
Erase pencil lines:
Once the paper is bone dry, carefully erase any visible pencil marks from around the outside of the heart. -
Display your art:
Clip your finished piece to a decorative board or frame it. The raw, artistic vibe of this project looks great mounted on wood or a simple white background.
Customize It
Sprinkle coarse salt over the wet watercolor paint. Once dry, brush it off for a starry, speckled texture effect inside the heart.
Hang your beautiful watercolor heart in a spot where it catches the light to show off the texture


Splatter Background With a Bold Center Heart
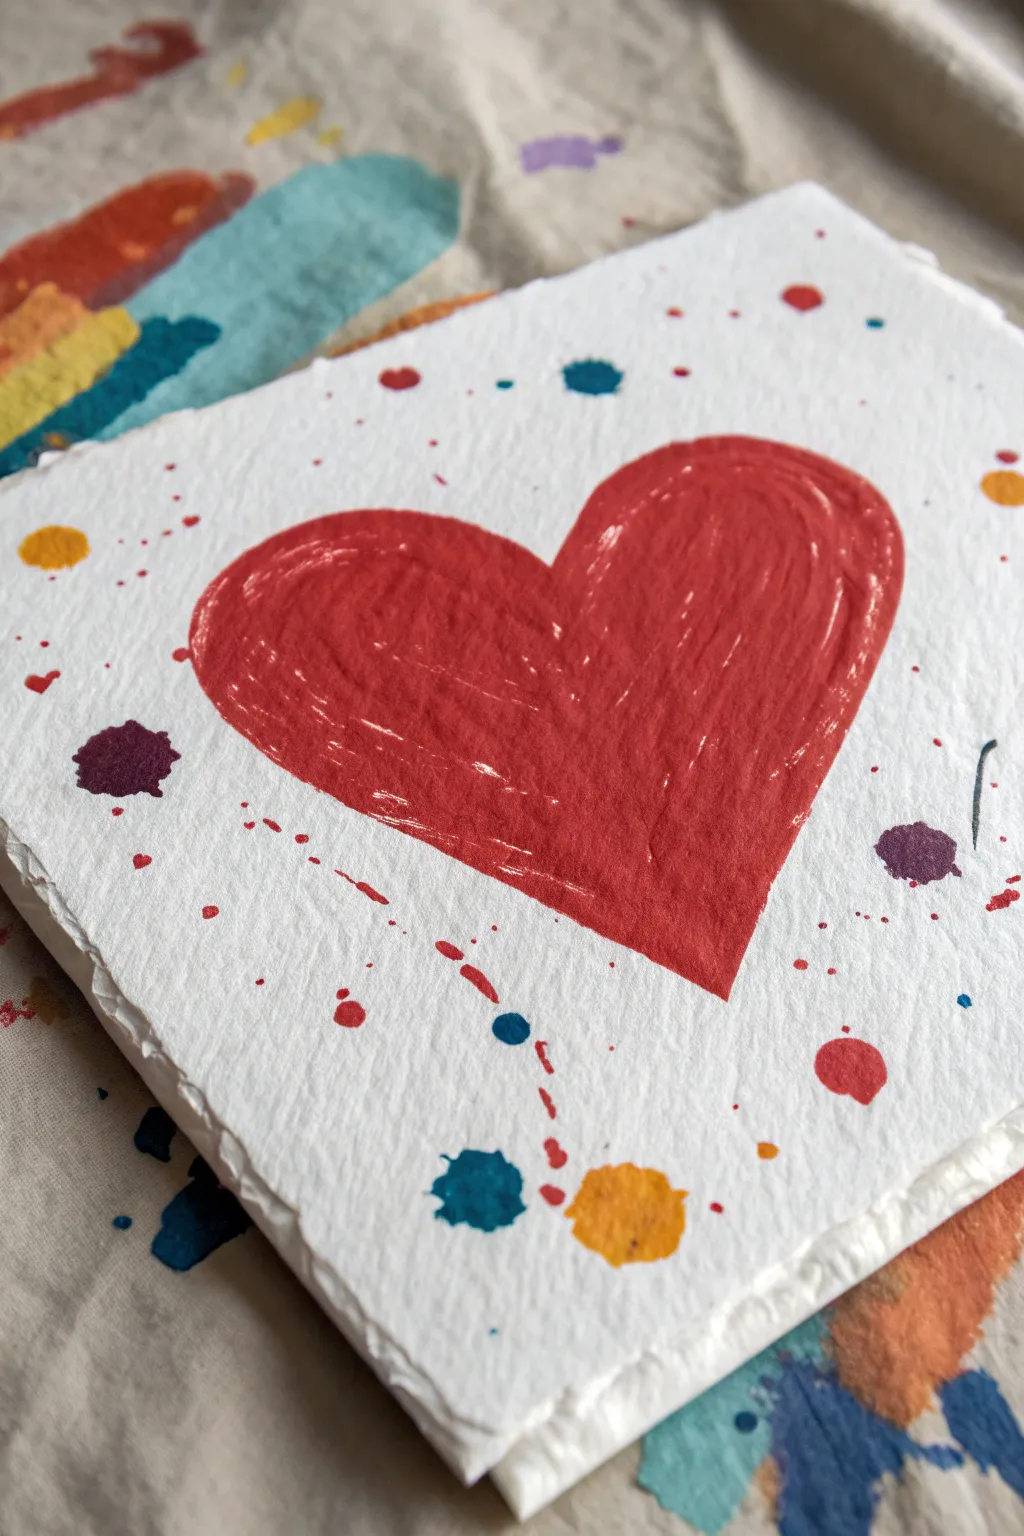
This project creates a striking contrast between a messy, playful splattered background and a solid, textured heart centerpiece. It’s a wonderful way to experiment with loose paint application while keeping a clean focal point.
Detailed Instructions
Materials
- Heavyweight textured watercolor paper or handmade paper (with deckled edges)
- Red acrylic paint
- Yellow acrylic paint
- Blue or Teal acrylic paint
- Purple acrylic paint
- Medium flat paintbrush
- Small round paintbrush
- Scrap paper or painter’s tape
- Water cup
- Paper towels
Step 1: Preparation & Splatter
-
Surface setup:
Place your textured paper on a protected surface. Because splattering can be messy, ensure you have plenty of newspaper or a drop cloth underneath your workspace. -
Mask the center:
To keep the future heart area relatively clean, you can lightly sketch a heart shape in the center with a pencil. Alternatively, cut a heart shape out of scrap paper and place it loosely in the middle as a shield. -
Mix splatter consistency:
Dilute small amounts of your yellow, teal, and purple paints with water. You want a consistency that is fluid enough to drip off a brush but not so watery that it loses its color intensity. -
First splatter layer:
Dip your small round brush into the yellow paint. hold it over the paper and tap the handle against a finger or another brush to send droplets flying onto the page. -
Add cool tones:
Repeat the tapping process with the teal paint. Focus these splatters around the edges of where your heart will be, allowing some to drift toward the corners. -
Create distinct spots:
For larger, bolder drips like the purple ones shown, load the brush heavily and let a single large drop fall directly onto the paper, rather than spraying fines mists. -
Dry completely:
Remove your paper mask if you used one. Let the background paint dry fully. If you rush this step, the red heart might bleed into the damp splatters.
Step 2: Painting the Heart
-
Outline the shape:
Using your red acrylic paint (undiluted for texture), carefully outline the heart shape in the center of the paper. This establishes your boundaries. -
Fill the left lobe:
Take the medium flat brush and fill in the left side of the heart. Use curved strokes that follow the roundness of the lobe to create visual volume. -
Fill the right lobe:
Paint the right side, mirroring those curved strokes. I like to confirm the symmetry here, making sure the bottom point aligns with the cleft at the top. -
Build texture:
Don’t smooth the paint out perfectly. Add a second coat while the first is tacky, leaving visible brushstrokes to mimic the texture seen in the reference image. -
Refine the edges:
Go back around the perimeter with a smaller brush to sharpen the edge of the heart, ensuring it stands out crisp against the messy background. -
Add final details:
If your background feels too empty near the heart, you can add a few tiny controlled dots of red paint near the outline to integrate the two elements. -
Final drying:
Acrylic dries quickly, but because the heart layer is thick, give it extra time to set completely before moving the artwork.
Uneven Splatters?
If your splatters are too fine or mist-like, your paint is too thick or your brush is too dry. Add more water to the mix and ensure the brush is fully loaded before tapping.
Level Up: Metallic Pop
Swap the yellow splatter paint for gold leaf paint or metallic ink. The shimmer adds an elegant dimension that pairs beautifully with the rustic paper texture.
Once dry, you can mount this textured piece on a card or frame it for a pop of heartfelt color
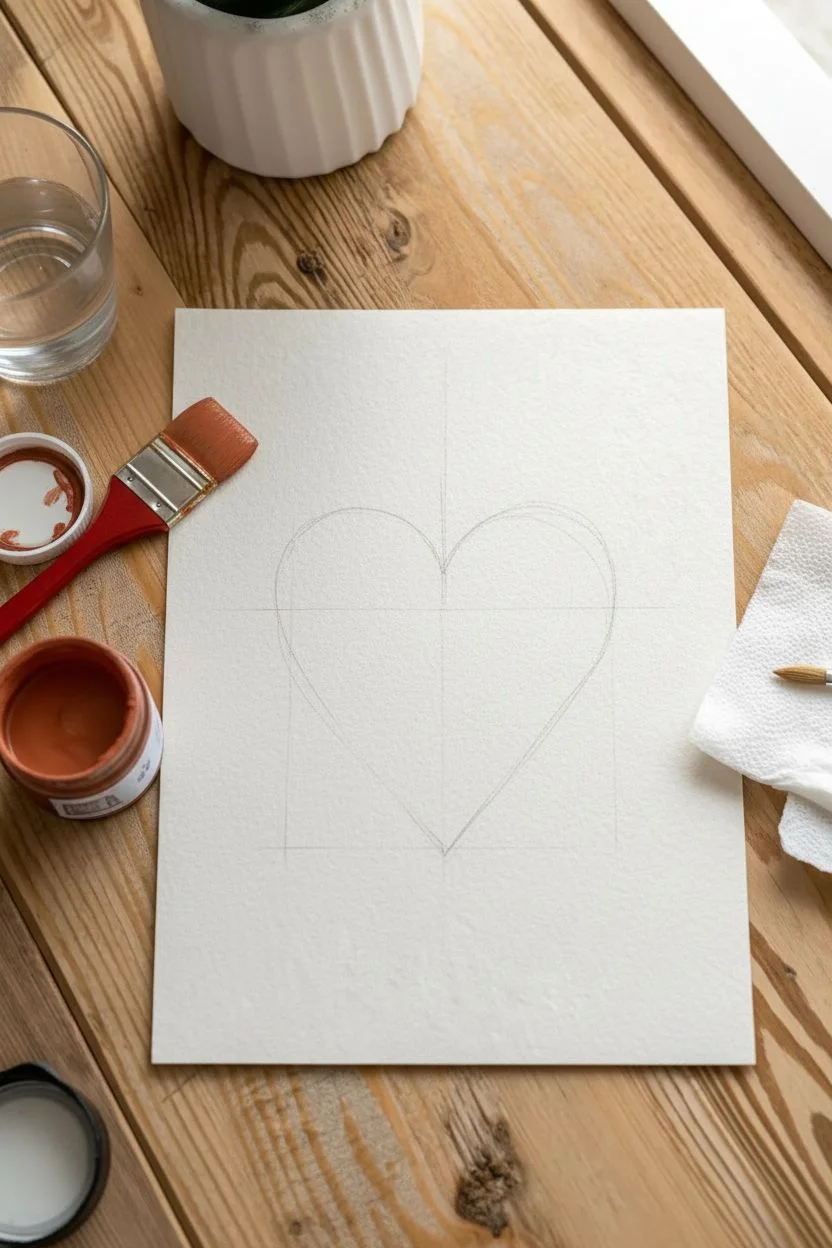
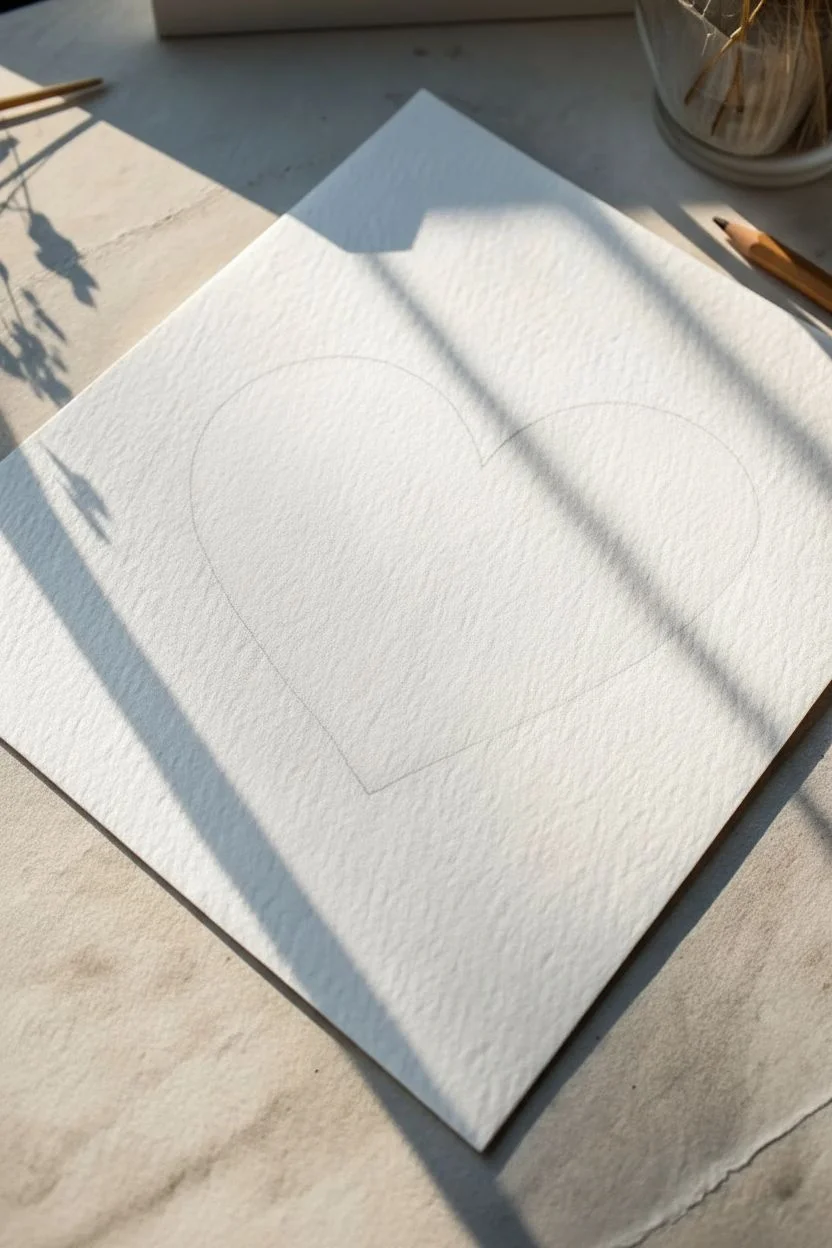
Ombre Gradient Heart From Dark to Light
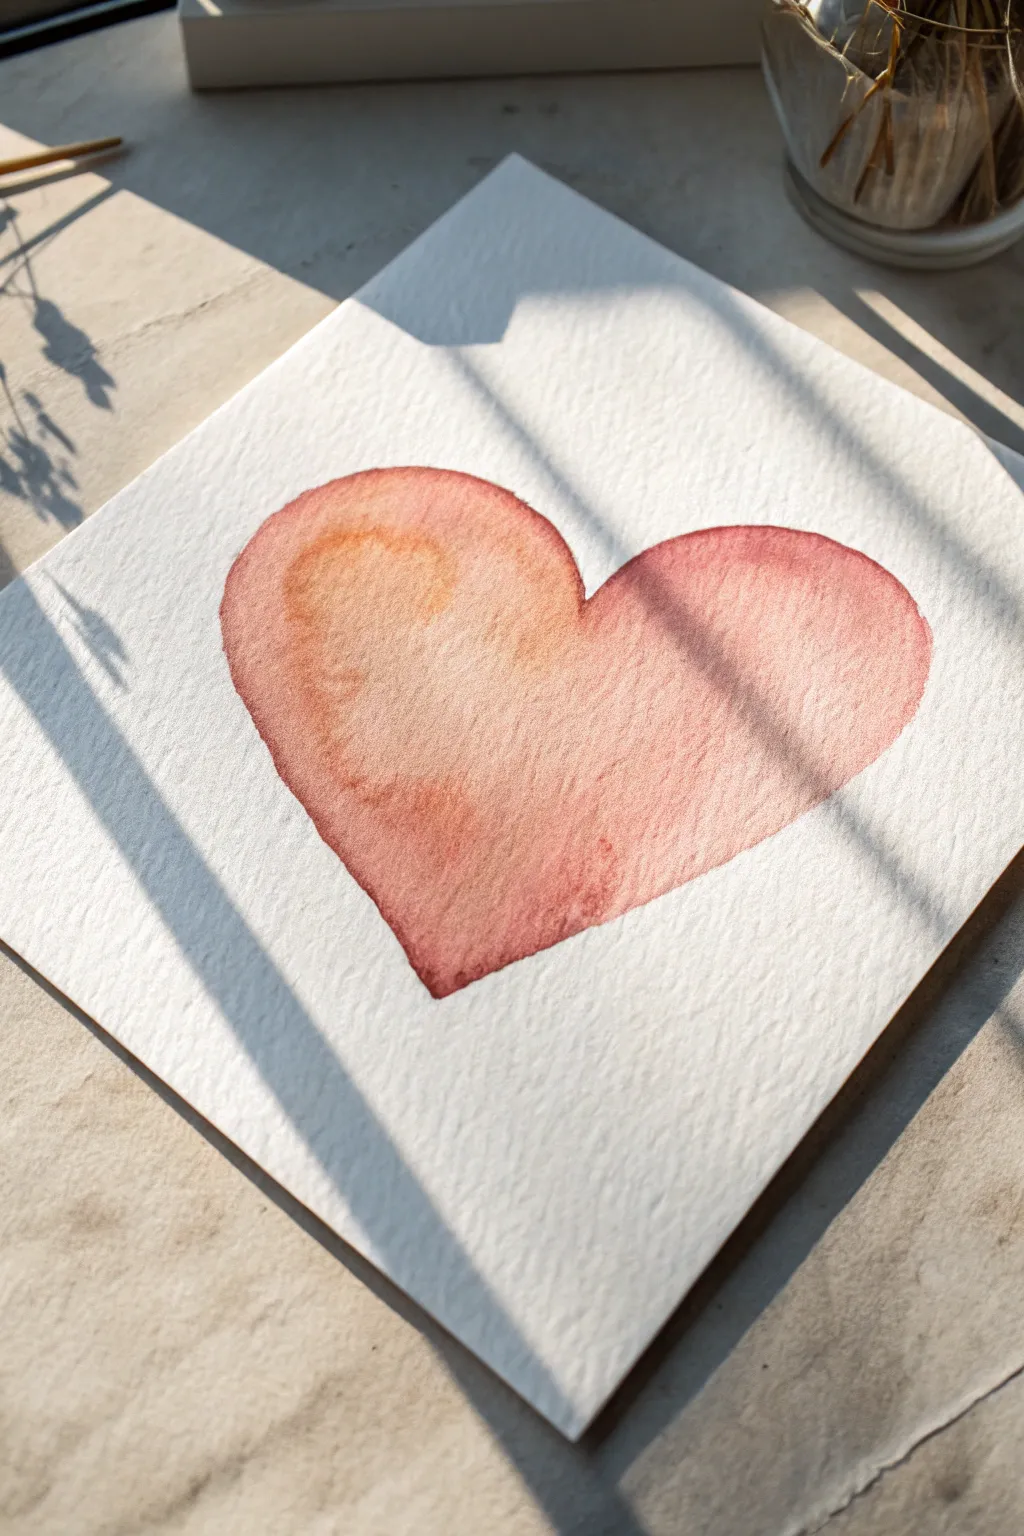
Capture the warmth of sunlight with this gentle watercolor heart that transitions from a deep, rosy red to a soft, peachy glow. Using the wet-on-wet technique allows the pigments to bloom and blend naturally, creating a lovely organic texture perfect for cards or framed art.
Step-by-Step
Materials
- Cold press watercolor paper (square format, approx. 6×6 inches)
- Watercolor paints (Alizarin Crimson or similar deep red)
- Watercolor paints (Yellow Ochre or light orange)
- Round watercolor brush (size 6 or 8)
- Jar of clean water
- Paper towel
- Pencil (HB or lighter)
- Kneaded eraser
Step 1: Preparation & Sketching
-
Prepare your paper:
Cut your cold press watercolor paper into a square. Tape the edges down to a hard board if you tend to use a lot of water, though for a single shape like this, you can often work directly on the block. -
Sketch the heart outline:
Lightly draw a large, symmetrical heart in the center of the paper using an HB pencil. Keep the lines very faint so they won’t show through the translucent paint later. -
Refine the shape:
Use a kneaded eraser to lift off any excess graphite, leaving just a ghost of the outline to guide your brush.
Fixing Cauliflowers
If ‘blooms’ or water marks appear as it dries, your brush was too wet when adding color. Embrace the texture, or soften it with a damp brush.
Step 2: Painting the Base Layer
-
Mix your colors:
Prepare two puddles of paint on your palette: a watery, diluted Yellow Ochre (or light peach) for the highlight area, and a more saturated Alizarin Crimson for the shadows. -
Wet the shape:
Dip your clean brush into water and carefully paint the entire inside of the heart shape with just clear water. This is the wet-on-wet technique. -
Check the sheen:
Tilt your paper slightly under a light source. The water should have a glossy sheen but shouldn’t be pooling. If there are puddles, dab them up with a thirsty brush. -
Apply the light tone:
Load your brush with the diluted Yellow Ochre mixture. Touching the wet paper, drop this color into the upper left lobe of the heart. -
Guide the flow:
Let the yellow paint spread naturally, or gently guide it towards the center, keeping it concentrated in that upper left highlight area.
Step 3: Creating the Ombre Effect
-
Introduce the darker red:
While the paper is still wet, clean your brush and pick up the saturated Alizarin Crimson. -
Paint the shadows:
Start applying the red at the bottom point of the heart and along the right-hand curve. The wet surface will pull the pigment, creating soft edges instantly. -
Blend the transition:
Working upward from the bottom, let the red paint meet the yellow ochre area. They will mix on the paper to create a warm, reddish-orange transition. -
Strengthen the edges:
Drop a bit more concentrated red pigment along the very bottom tip and the outer right edge to add depth and define the shape crisply. -
Soften the highlight:
If the yellow area looks too plain, faint touches of dirty water or very diluted red can be dabbed nearby to create that subtle texture seen in the reference. -
Tilt for movement:
I sometimes gently tilt the paper forward and back to encourage the red pigment to flow slightly into the yellow zone, creating a seamless gradient. -
Let it bloom:
Stop manipulating the paint now. Allow the natural granulating properties of the watercolor to do the work as it settles into the texture of the paper.
Shimmer Touches
Once dry, overlay a translucent gold watercolor wash on the highlight area (upper left) to make the heart truly glow in sunlight.
Step 4: Finishing Touches
-
Dry completely:
Let the painting sit flat until it is bone dry. Using a hairdryer is okay, but be careful not to blow the wet pigment across the boundaries of your shape. -
Final inspection:
Check the edges. If any pencil marks are still visible outside the paint, carefully erase them with the kneaded eraser once the paper is completely dry.
Place your finished piece on a windowsill to admire how the natural light interacts with the translucent layers of color
Tiny Flower-Dot Heart for a Sweet, Delicate Look
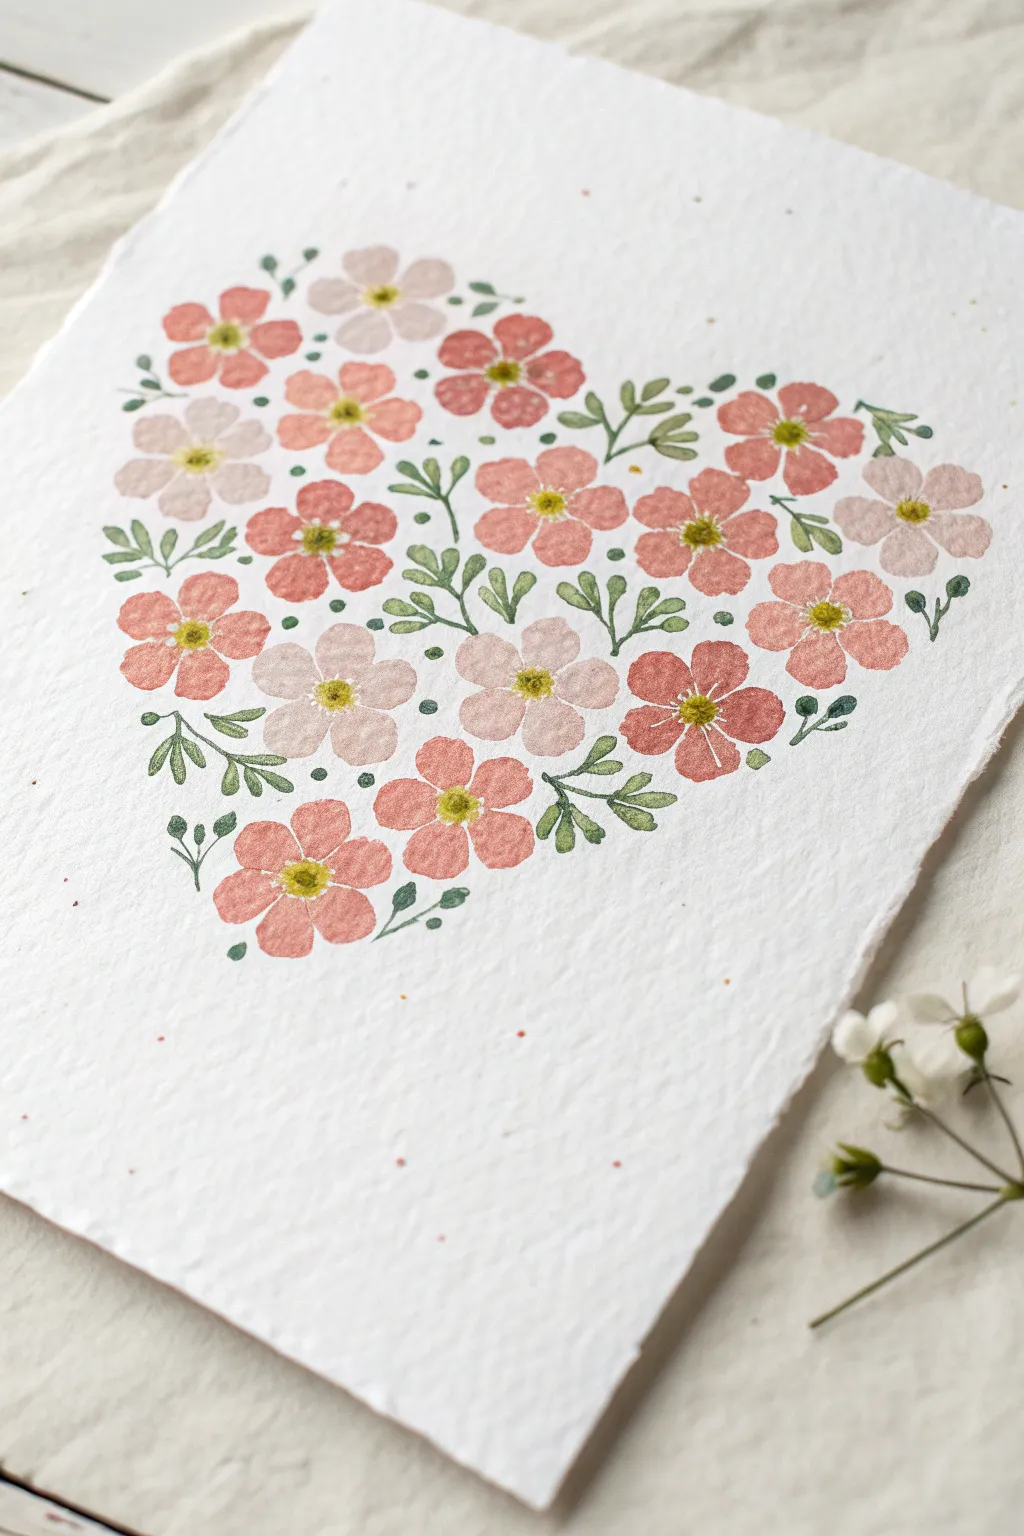
Capture the romance of a wildflower meadow in a simple heart shape with this delicate watercolor project. By combining soft pink blooms with tiny green sprigs, you’ll create a charming piece of art perfect for handmade cards or wall decor.
Detailed Instructions
Materials
- Cold press watercolor paper (textured)
- Pencil (HB or H for light lines)
- Eraser
- Watercolor paints (shades of pink, warm red, muted green, and yellow)
- Small round brushes (size 0, 2, and 4)
- Water jar
- Paper towel or rag
- Palette for mixing
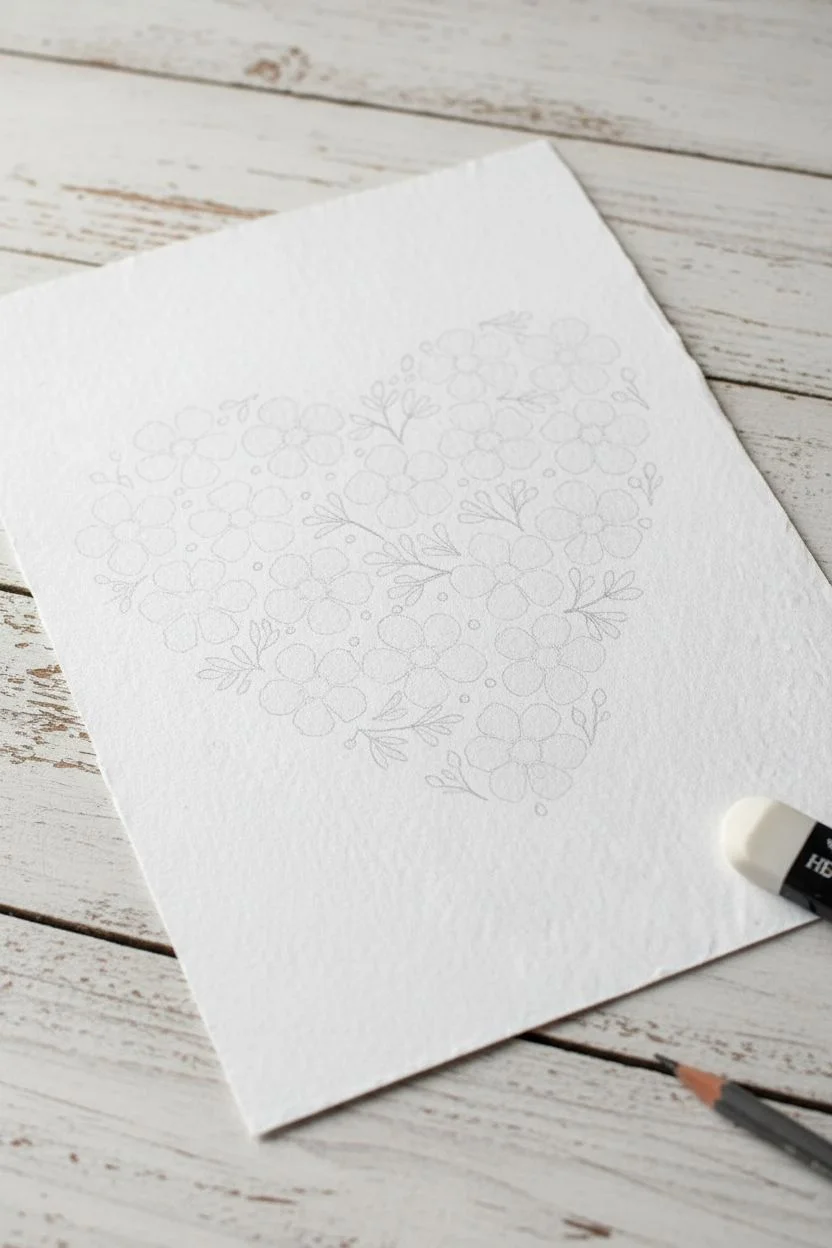
Step 1: Setting the Shape
-
Lightly Sketch the Heart:
Begin by drawing a faint heart shape on your watercolor paper using an H or HB pencil. Keep the pressure very light so the graphite doesn’t show through the translucent paint later. -
Plan Your Composition:
Visualize where your flowers will sit within the boundary. You don’t need to draw every flower, but marking a few key positions near the edges and center helps maintain the shape.
Muddy Centers?
If the yellow centers bleed into the pink petals, the first layer wasn’t dry enough. Wait longer or use a hair dryer on a low, cool setting to speed up drying between color layers.
Step 2: Painting the Blooms
-
Mix Your Pink Palette:
Prepare two or three variations of pink on your palette. I like to have a soft, watered-down blush and a slightly more saturated coral-pink ready to create natural variety. -
Start with Main Flowers:
Using a size 4 brush, paint simple five-petal flowers scattered throughout the heart shape. Create each petal with a single dab or short stroke of the brush, leaving a tiny white space in the very center. -
Vary the Sizes:
Paint some flowers slightly larger and others smaller. This variation makes the arrangement look more organic and less like a pattern. -
Introduce a Second Shade:
Switch to your lighter blush pink mix. Paint a few softer, paler flowers nestled between the coral ones to add depth and dimension. -
Check the Outline:
Ensure you place several flowers right along the pencil line edge. This defines the heart shape clearly so the viewer recognizes the form immediately. -
Let the Petals Dry:
Allow the pink petals to dry completely before adding centers or leaves. If the paint is still wet, colors will bleed into muddy messes.
Seed Paper Effect
Use textured handmade paper or ‘seed paper’ (paper embedded with wildflower seeds) for an authentic, rustic look that can actually be planted in the garden after gifting.
Step 3: Adding Details
-
Paint Yellow Centers:
Once the petals are dry, take a size 0 or 2 brush with yellow ochre or lemon yellow. Dot a small, textured center into the middle of each flower. -
Mix Leaf Green:
Create a muted green shade by mixing sap green with a touch of brown or red to desaturate it. This keeps the look vintage and soft rather than neon. -
Add Leaf Sprigs:
Using your smallest brush (size 0), paint delicate stems extending from the flowers or floating in the empty white spaces. -
Paint Tiny Leaves:
Add small, teardrop-shaped leaves to your stems. Group them in pairs or threes for a natural fern-like appearance. -
Fill the Gaps:
Look for large white gaps between the flowers. Fill these spaces with standalone leaf clusters or tiny green dots to balance the composition. -
Refine the Edges:
Add small leaves or buds poking just slightly outside the heart’s pencil line to soften the stiff outline while maintaining the overall shape.
Step 4: Finishing Touches
-
Erase Pencil Lines:
After ensuring every drop of paint is bone dry, gently erase the visible pencil outline. Be careful not to scrub too hard over the painted areas. -
Add Texture (Optional):
If you want more detail, use a slightly darker pink to add tiny lines or dots on the petals for texture, radiating from the yellow centers. -
Final Assessment:
Step back and look at the overall heart. If the shape feels lost, add a few tiny green leaves or pink buds to the edges to correct the silhouette.
Once dry, your floral heart is ready to frame or turn into a heartfelt greeting card.
Geometric Tape-Resist Heart With Faceted Color Shapes
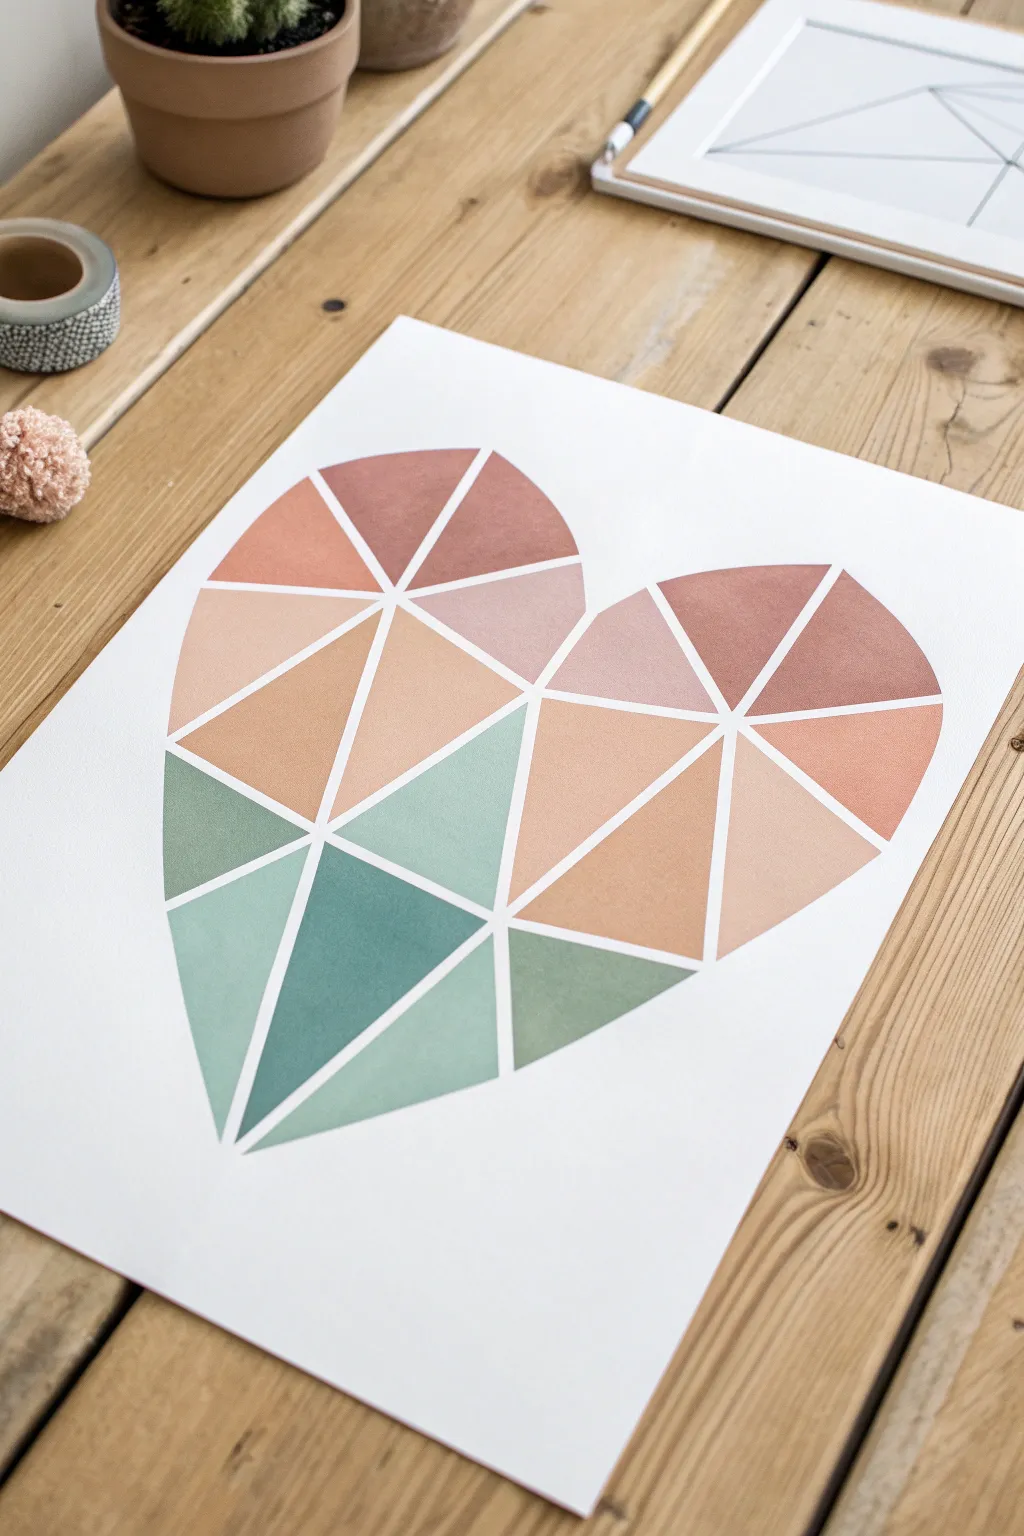
This trendy, faceted heart design brings a sophisticated touch to Valentine’s artwork with its muted palette of terracotta, blush, and sage. Using a simple tape-resist technique, you’ll create crisp white lines that define geometric shards of beautiful, coordinated color.
How-To Guide
Materials
- Heavyweight drawing paper or watercolor paper (A3 or A4)
- Washi tape or artist’s masking tape (thin width, approx. 0.5 cm)
- Acrylic paints or gouache (Terracotta, Blush Pink, Peach, Sage Green, Teal)
- Pencil and eraser
- Flat paintbrushes (small and medium sizes)
- Palette or mixing plate
- Paper towels
- Ruler (optional)
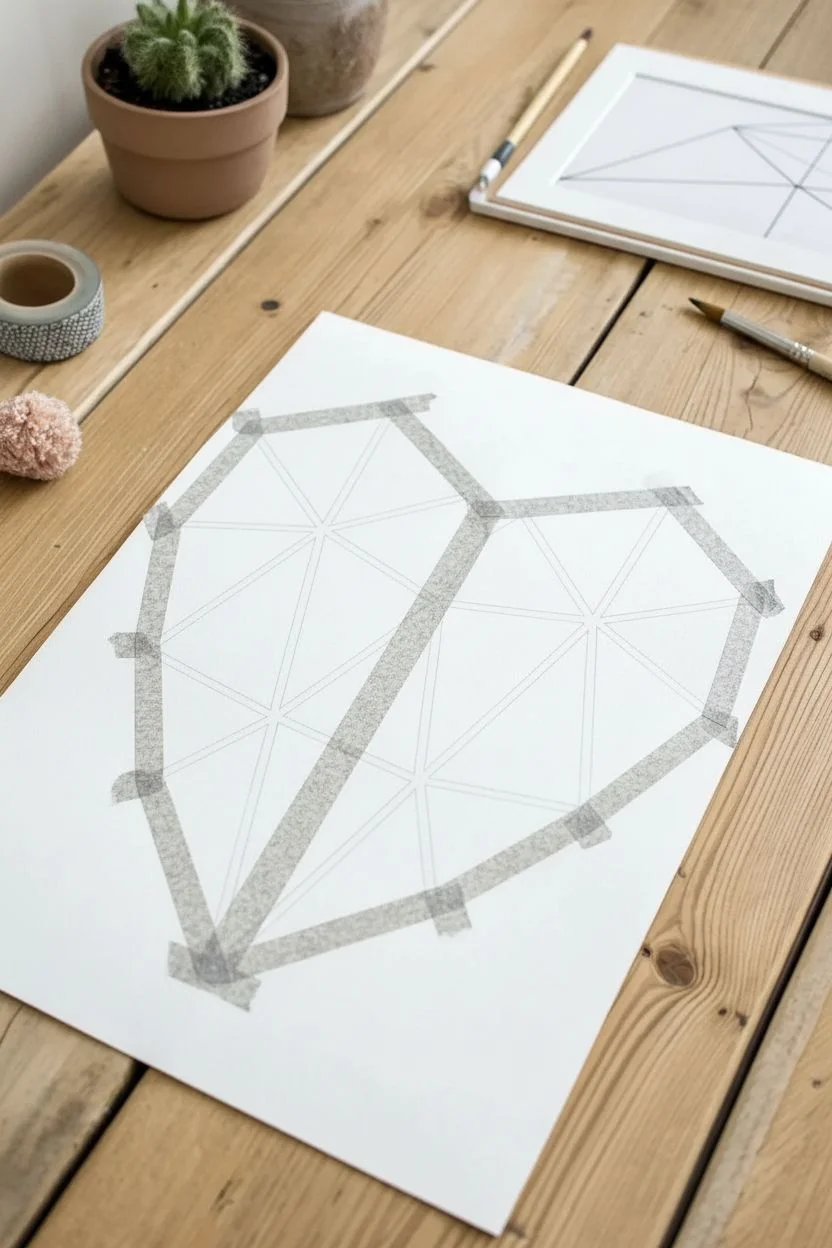
Step 1: Planning and Taping
-
Sketch the heart outline:
Begin by lightly sketching a large heart shape in the center of your paper. Keep your pencil lines very faint so they are easy to erase later. If you want perfect symmetry, you can fold a scrap piece of paper to make a stencil first. -
Apply the perimeter tape:
Carefully place strips of washi tape along the outside edges of your pencil outline. You will need to tear the tape into smaller, straight segments to navigate the curves of the heart, creating a slightly angular, geometric exterior. -
Create the central division:
Place a long strip of tape vertically down the center of the heart, or slightly off-center if you prefer an asymmetrical look. This anchors your geometric design. -
Add radiating lines:
Add strips of tape radiating outward from a central point or two distinct focal points within the heart lobes. These lines should extend all the way to the perimeter tape. -
Complete the geometric grid:
Fill in the remaining spaces with smaller connecting strips of tape to create triangles and irregular quadrilateral shapes. Ensure every piece of tape is firmly pressed down, especially at the intersections, to prevent paint bleeding.
Bleeding Lines?
If paint seeps under the tape, seal your tape edges with a thin layer of clear matte medium or white paint before applying your colors. This blocks gaps.
Step 2: Painting the Facets
-
Prepare your palette:
Squeeze out your acrylic or gouache colors. I like to mix a little white into my terracotta and teal to soften them into the pastel range seen in the example. -
Paint the top sections:
Start with the upper lobes of the heart. Use the terracotta and blush pink shades for the top facets. Paint carefully inside the tape boundaries, using a small flat brush for sharp corners. -
Transition to middle tones:
As you move downwards towards the middle of the heart, introduce the peach and lighter pink tones. Try to avoid placing two identical colors right next to each other. -
Paint the lower sections:
For the bottom point and lower sides of the heart, switch to your cool tones: sage green and teal. This creates a pleasing gradient effect from warm to cool. -
Fill remaining segments:
Fill in any final empty shapes. If your paint looks streaky, let the first coat dry for a few minutes and apply a second thin layer for solid, opaque coverage. -
Let it dry completely:
Allow the painting to dry fully. This is crucial—if the paint is wet when you remove the tape, it might smear or tear the paper.
Add Metallic Flair
For a glamorous twist, paint one or two random facets with gold leaf or metallic gold paint. It adds a beautiful shimmer against the matte pastels.
Step 3: The Reveal
-
Peel the tape slowly:
Once the paint is bone dry, begin peeling up the tape. Start from the center and pull slowly at a 45-degree angle away from the painted area. -
Remove perimeter tape:
Carefully remove the tape outlining the main heart shape. Be extra gentle here to avoid ripping the paper’s surface. -
Erase pencil marks:
Inspect the white lines for any visible pencil sketches from your initial outline. Gently erase them with a clean, soft eraser. -
Touch up edges:
If any paint bled under the tape (it happens to the best of us!), use a tiny brush with white paint or a white gel pen to tidy up the lines.
Now you have a stunning piece of modern art ready to frame or gift to someone special
Fold-and-Press Symmetry Heart for a Perfect Mirror Print
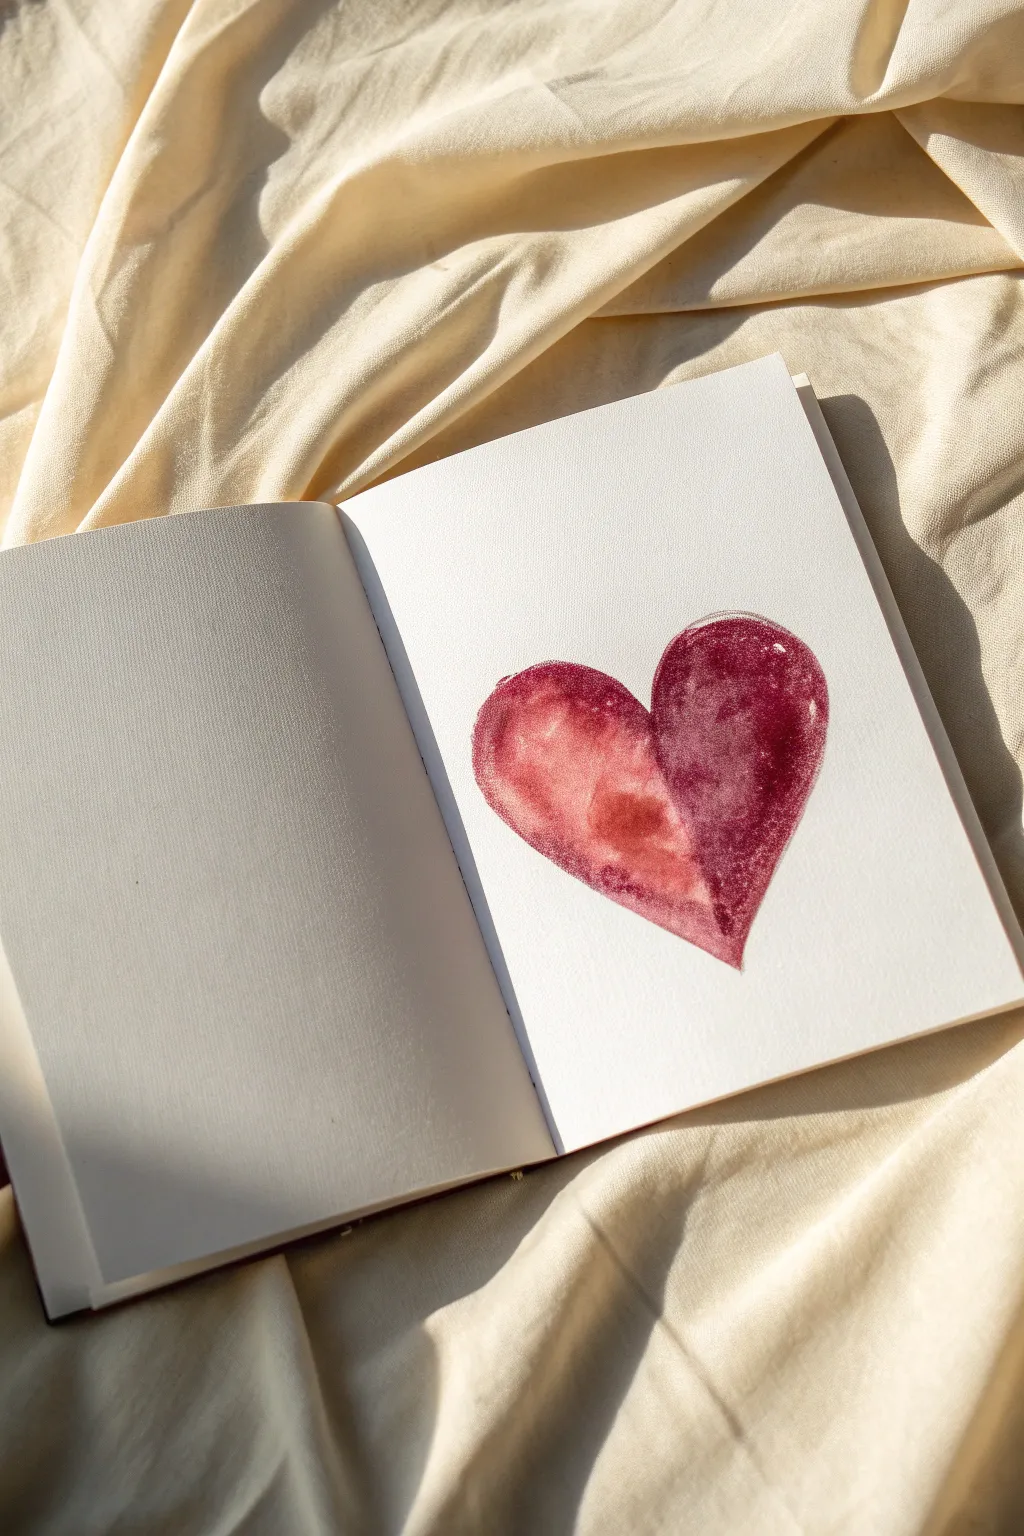
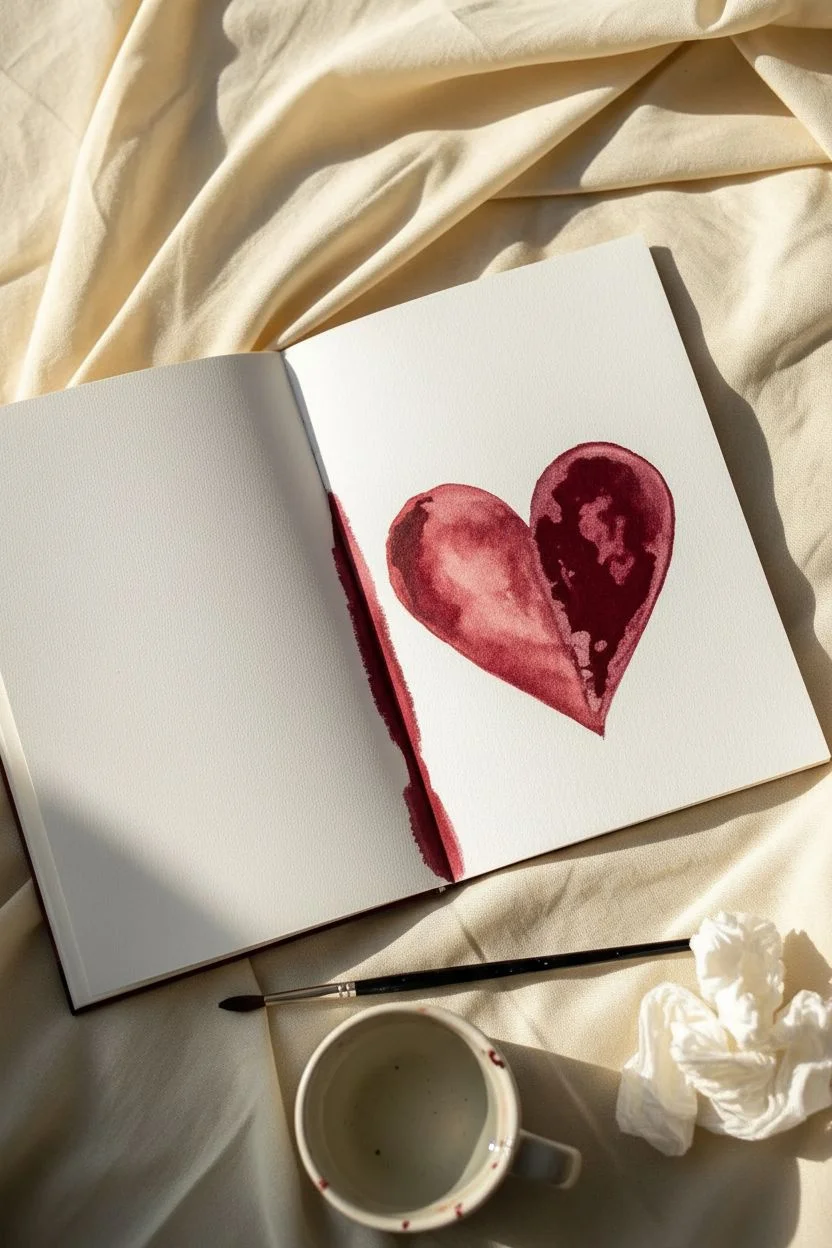
This clever technique uses the natural fold of your sketchbook to create a heart with perfect symmetry but beautifully varied textures. The result is an organic, watercolor-style heart where one side mirrors the other with soft, diffused edges.
Step-by-Step Tutorial
Materials
- Thick sketchbook paper or watercolor paper
- Water-based paints (watercolor or fluid gouache)
- Medium round paintbrush
- A small cup of water
- Paper towel
Step 1: Preparation and First Half
-
Prepare your workspace:
Since this technique relies on speed, have your paints mixed and ready. You’ll need a deep burgundy or crimson color diluted just enough to be fluid but still rich in pigment. -
Locate the crease:
Open your sketchbook to a fresh spread. Identify the center gutter or binding crease; this will act as the vertical axis of your heart. -
Paint the first curve:
On the right-hand page, starting near the top of the gutter, paint the right half of a heart shape. Use a generous amount of paint so it remains wet. -
Fill in the shape:
Quickly fill in the outline you just created. Ensure the paint is quite wet and pooled slightly—if it dries before you fold, the transfer won’t work. -
Check the center line:
Make sure your paint goes all the way into the gutter or crease of the book so the two halves will connect seamlessly.
Pro Tip: Moisture Control
Work fast! The success of the print depends entirely on the paint being wet. If your room is warm or dry, use a spray bottle to mist the paint before closing the book.
Step 2: The Transfer Technique
-
Fold the page:
While the paint is still glistening wet, swiftly close the sketchbook. Bring the left page over onto the right page. -
Apply pressure:
Press down firmly on the back of the closed page. Rub your hand in a circular motion over where the heart is located to ensure good contact between the paper surfaces. -
Peel open carefully:
Slowly lift the page back open. You should see a lighter, textured print of the heart transferred onto the left side, mirroring your original painting. -
Assess the transfer:
If the transfer is too faint on the left side, you can add a tiny bit more water to the right side and repeat the press, though the first impression is usually the most organic.
Level Up: Ghost Images
Try painting a small message or initials inside the heart with white gouache before pressing. It will appear reversed and ghostly on the transfer side.
Step 3: Refining the Shape
-
Clean up edges (optional):
The transfer side (left) will likely have irregular, bubbly edges. You can leave these for a rustic look or use a damp brush to gently smooth them out. -
Enhance the darkness:
I often like to go back into the original side (the right side) and add a second layer of deep red paint to create contrast between the dark original and the lighter print. -
Define the center:
Run a thin line of paint down the center crease if there is a white gap, connecting the two lobes of the heart. -
Let it dry completely:
Leave the book open flat to dry. Because you pressed wet pages together, the paper may buckle slightly; let it air dry fully before closing the book again.
Enjoy the simple beauty of your perfectly symmetrical, imperfectly textured heart art


Have a question or want to share your own experience? I'd love to hear from you in the comments below!