
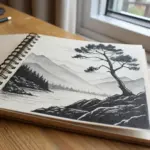
Lighthouses are one of my favorite things to paint because they’re instantly recognizable even with super simple shapes. These easy lighthouse painting ideas are all about bold silhouettes, relaxed coastal backgrounds, and little tricks that make your scene feel finished fast.
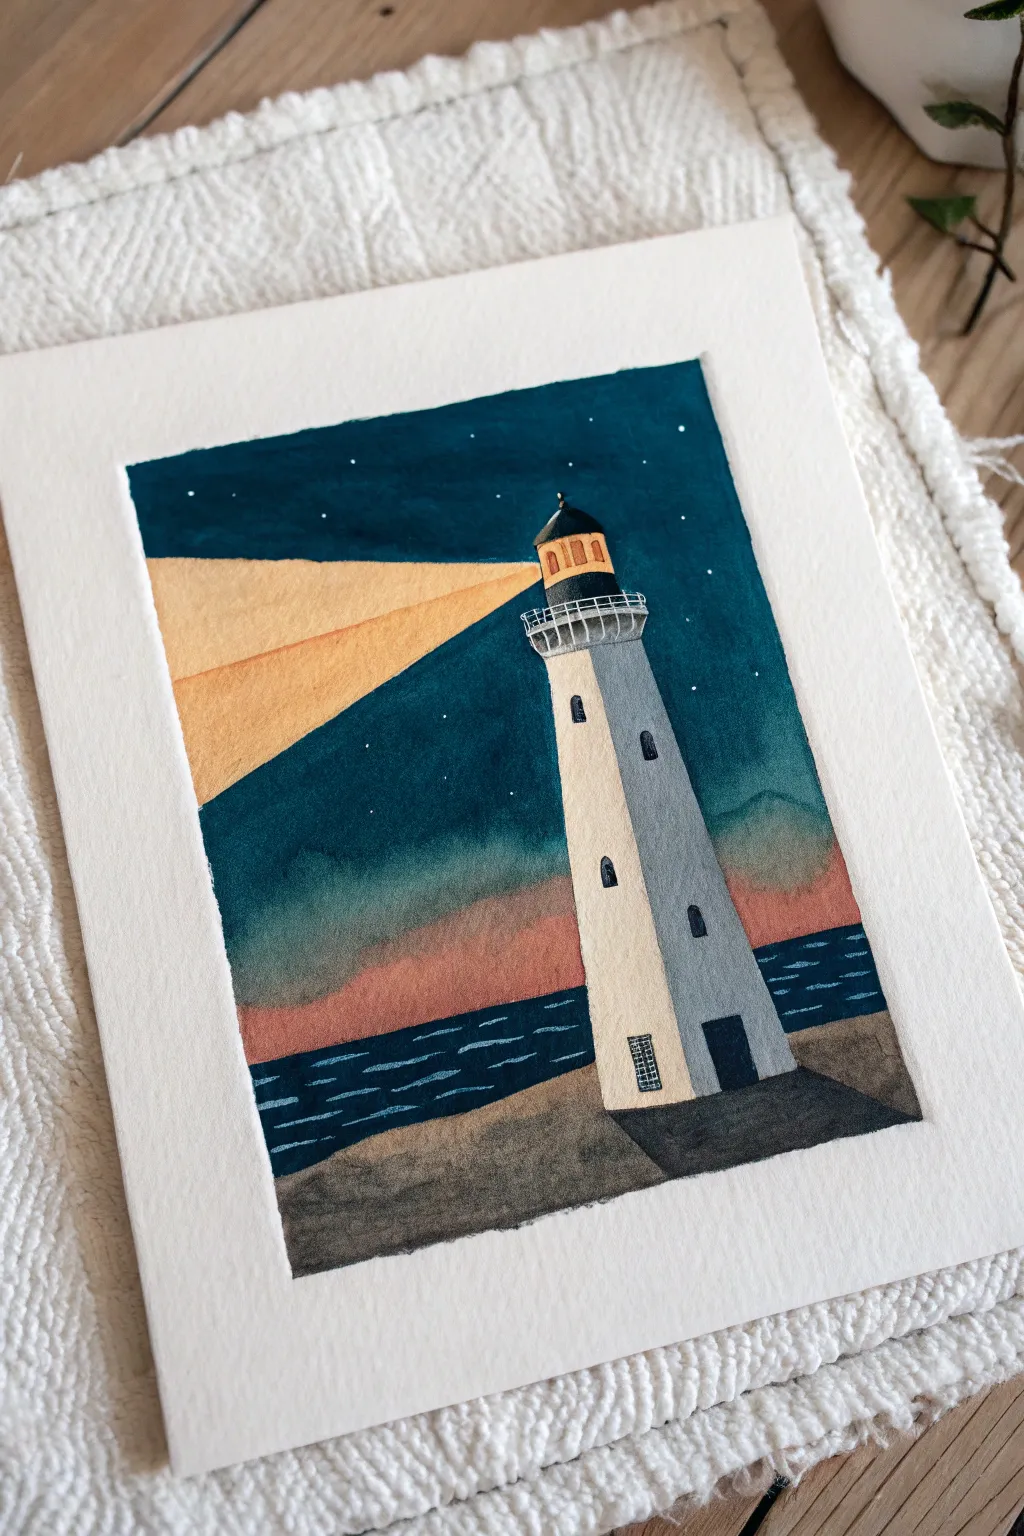
Sunset Lighthouse Silhouette
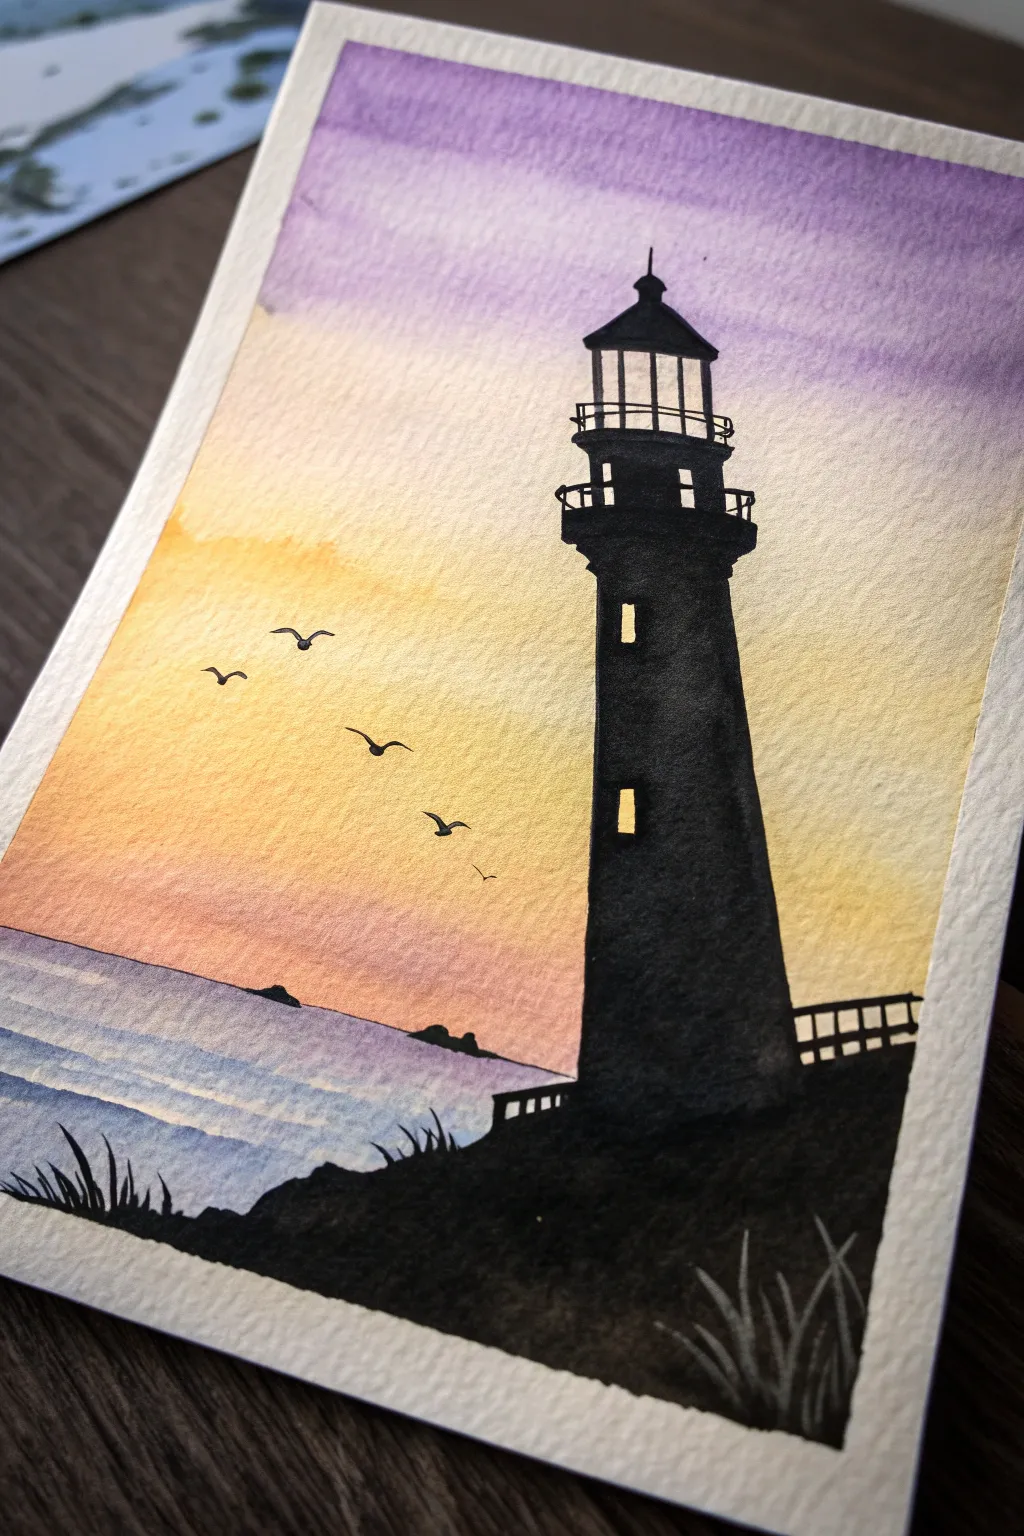
Capture the serene beauty of a coastal evening with this stunning watercolor project entirely focused on silhouettes. The vibrant wet-on-wet sky transitions from violet to gold, creating the perfect backdrop for a stark, dramatic lighthouse standing guard over the sea.
Step-by-Step
Materials
- Cold-press watercolor paper (300 gsm)
- Painter’s tape or masking tape
- Watercolor paints (Violet, Yellow Ochre, Orange, Rose/Pink, Payne’s Grey or Black, Indigo)
- Large flat brush or wash brush
- Medium round brush (size 6 or 8)
- Fine detail brush (size 0 or 1)
- Jars of water
- Paper towels
- Pencil and eraser
- White gel pen (optional for stars or highlights)
Step 1: Preparation and Sketching
-
Secure the paper:
Tape down all four edges of your watercolor paper to a board or table to prevent buckling and create a clean white border. -
Establish the horizon:
Lightly sketch a horizontal line about one-third of the way up from the bottom of the paper for your horizon. -
Outline the lighthouse:
Draw the lighthouse shape on the right side. Include the main tower, the lantern room at the top with its triangular roof, and the railing details. Keep pencil lines very light so they disappear under the paint.
Bleeding Lines?
If your black silhouette bleeds into the sky, the background wasn’t dry enough. Wait longer or use a hair dryer on a low, cool setting to ensure the paper is completely bone dry before adding details.
Step 2: Painting the Sky Gradient
-
Invert the board:
Turn your board upside down. This makes it easier to control the paint flow for the sky gradient, letting gravity help pull the wash ‘down’ towards the top of the painting. -
Wet the sky area:
With a clean wash brush, wet the entire sky area (from the horizon line to the top edge) with clean water until it glistens but isn’t pooling. -
Apply the yellow band:
Load your brush with a watered-down yellow ochre or warm yellow. Paint a wide band near the horizon line (which is currently at the top because the board is inverted). -
Blend in orange and pink:
While the yellow is still wet, introduce a soft orange or coral pink right next to it, blending the edges gently so they fuse without hard lines. -
Add the violet top:
Pick up a purple or violet mix. Apply this to the remaining area (the actual top of the sky), letting it bleed naturally into the orange/pink section. -
Let it dry completely:
Flip the board back to its correct orientation. Allow the paper to dry completely before moving on to avoid smudging the sky.
Step 3: Creating the Ocean
-
Paint the water base:
Mix a diluted wash of purple and indigo. Paint the water area below the horizon line using horizontal strokes to mimic waves. -
Add depth to the water:
While the water layer is damp, drop in slightly darker blue or purple pigment near the bottom edge and left corner to suggest depth and shadow. -
Define the horizon:
Just above the water line, paint distant land masses or rocks on the horizon using a muted purple-grey mix. Keep these shapes low and organic.
Pro Tip
For the window glow, don’t just leave white paper. Once the black is dry, dot a tiny amount of yellow gouache or opaque yellow watercolor into the window gaps for a realistic ‘lit lamp’ effect.
Step 4: The Lighthouse Silhouette
-
Mix a dense black:
Create a rich, opaque black. I prefer mixing Payne’s Grey with a bit of Burnt Umber for a more natural dark tone than straight tube black. -
Paint the lighthouse tower:
Using a medium round brush, carefully fill in the main body of the lighthouse. Ensure the edges are crisp against the colorful sky. -
Add the lantern room details:
Switch to your fine detail brush. Carefully paint the roof, the vertical bars of the lantern room, and the delicate railing around the walkway. -
Create the windows:
Leave small rectangular spaces unpainted for windows, or paint over them and lift the color later. If you want them ‘lit,’ you can paint them with a tiny bit of opaque yellow later. -
Anchor the lighthouse:
Extend the black paint downwards to create the rocky cliff or ground the lighthouse stands on. Make the top edge of this ground uneven to simulate grass and rocks.
Step 5: Final Details
-
Add the railing:
Extend a small railing silhouette to the right of the lighthouse base using your finest brush. -
Paint the foreground grasses:
With the tip of your detail brush, flick quick, upward strokes from the black ground area to create silhouettes of tall grass blades. -
Include flying birds:
Paint a few small ‘V’ or ‘M’ shapes in the sky to the left of the lighthouse to represent seagulls in flight. -
Dry and peel:
Wait until the painting is bone dry. Slowly peel off the masking tape at a 45-degree angle to reveal your crisp white border.
Now you have a striking coastal scene that perfectly balances vibrant color with bold contrast


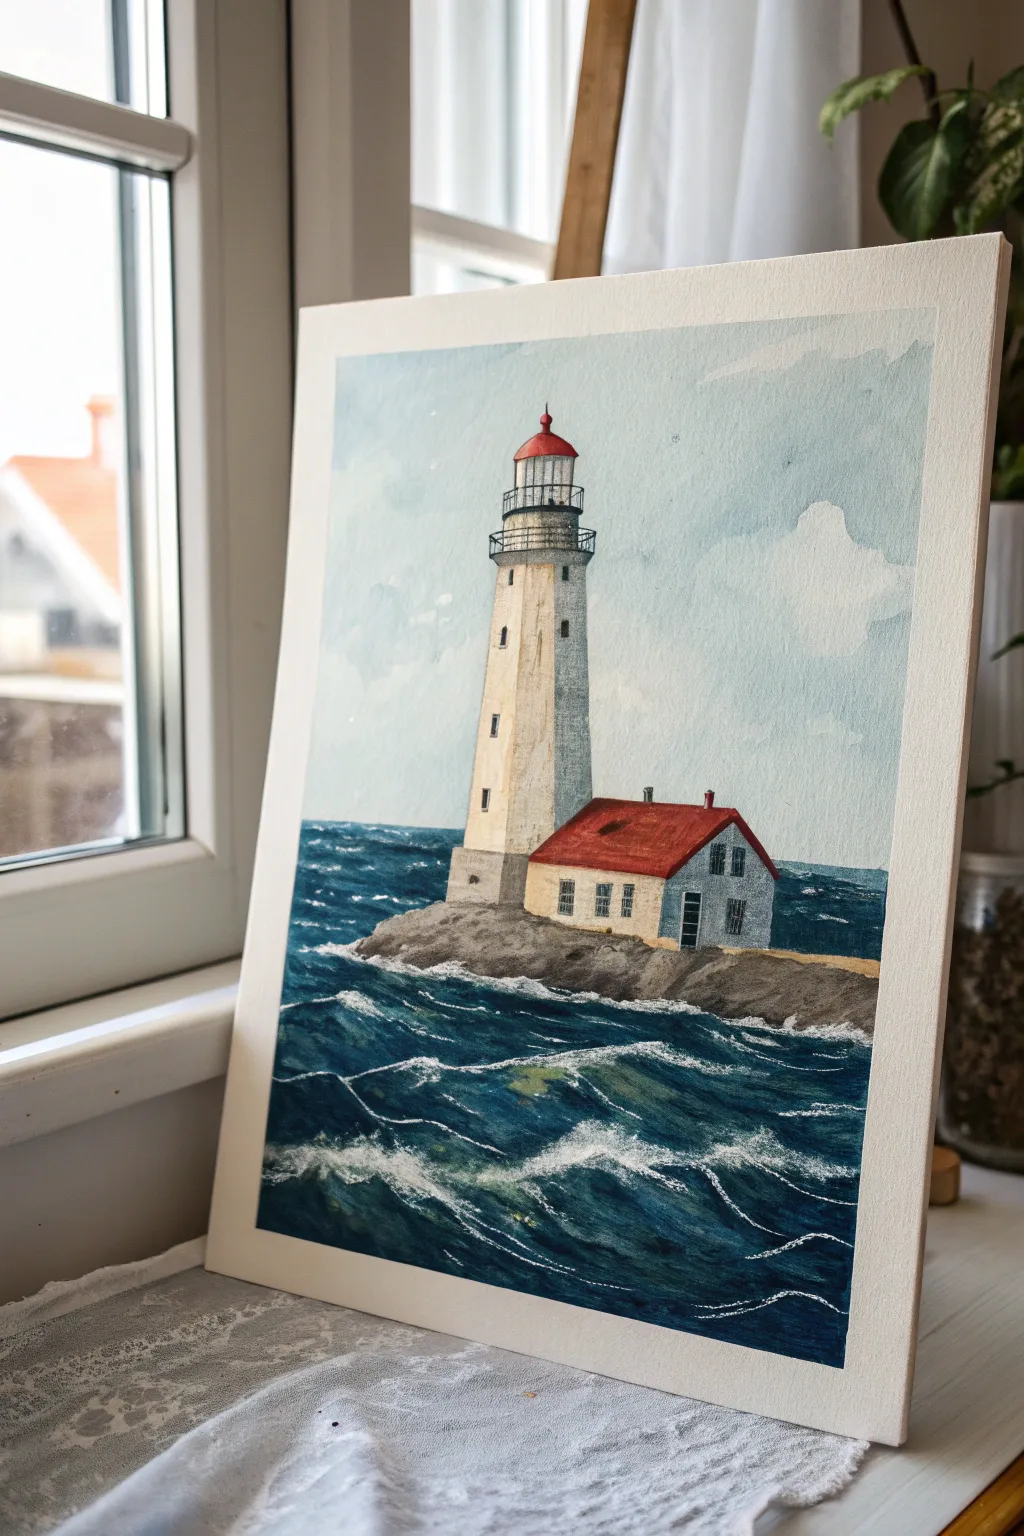
Classic White Lighthouse on Blue Sky
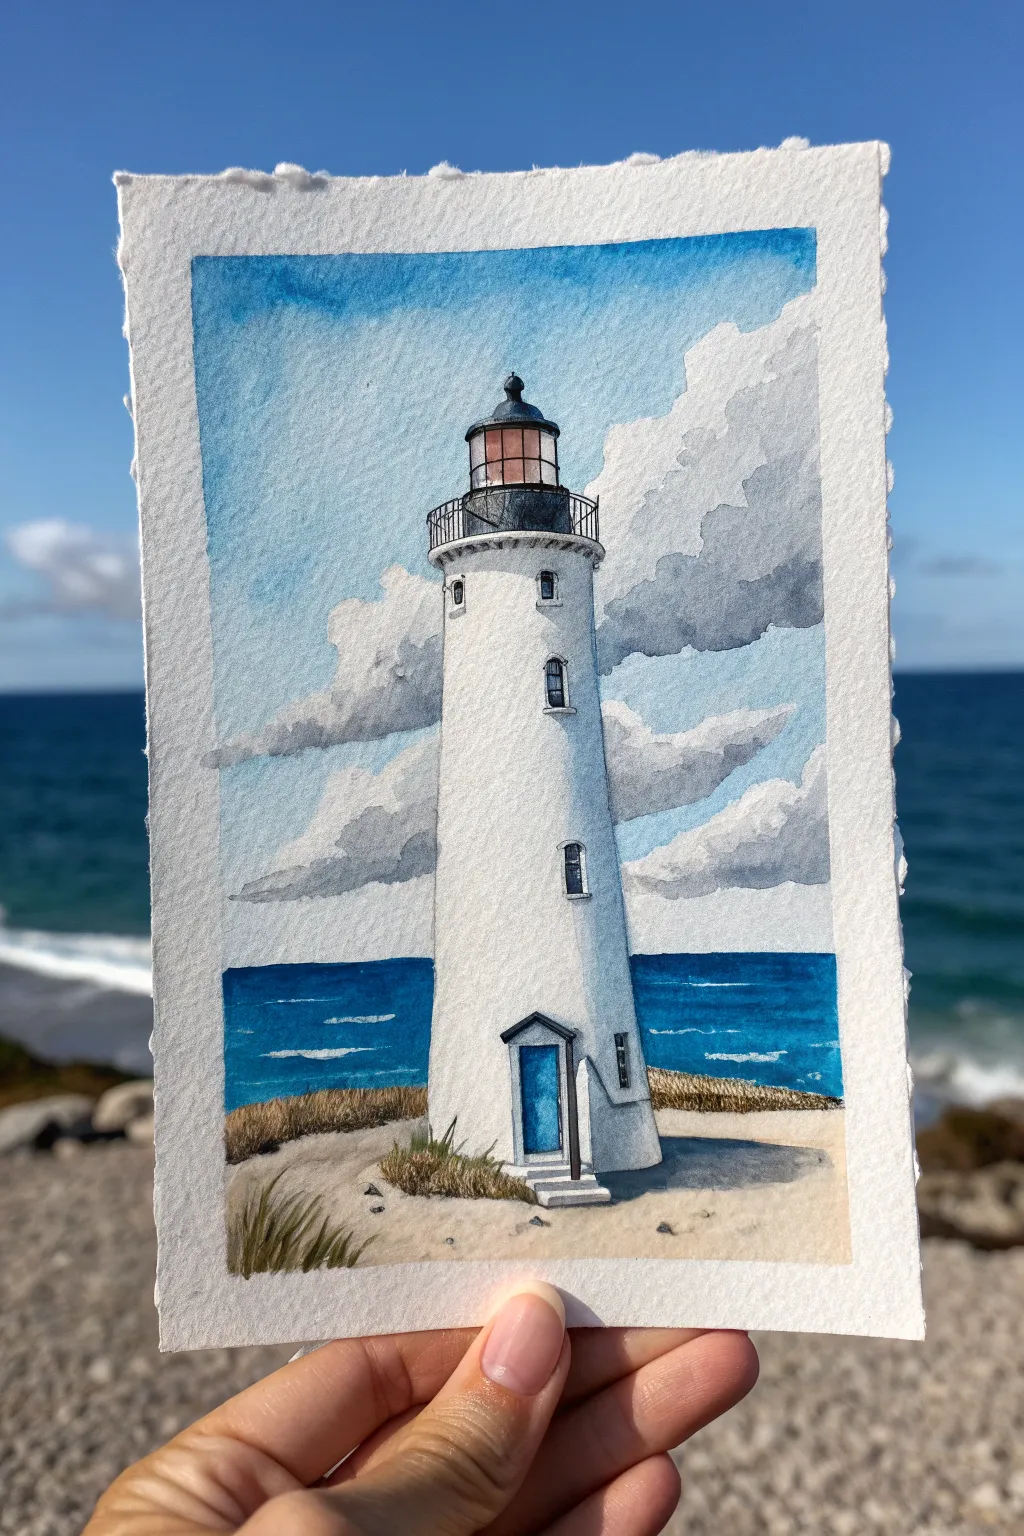
Capture the serene beauty of a classic seaside beacon with this detailed watercolor tutorial. The stark white lighthouse creates a stunning contrast against the moody, cloud-filled sky and deep blue ocean, making it a perfect subject for practicing values and crisp edges.
Step-by-Step Tutorial
Materials
- Cold press watercolor paper (approx. 5×7 inches)
- Pencil (HB or H)
- Kneaded eraser
- Watercolor paints (Cobalt Blue, Prussian Blue, Burnt Sienna, Payne’s Grey, Yellow Ochre)
- Round brushes (size 4 and 8)
- Detail brush (size 0 or 1)
- White gouache (optional)
- Masking tape
- Two water jars
Step 1: Preparation and Sketching
-
Tape the edges:
Begin by taping down all four sides of your watercolor paper to a board. This creates that crisp, professional white border seen in the photo and prevents buckling when the paper gets wet. -
Establish the horizon:
Lightly sketch a horizontal line across the lower third of the paper. This separates the sky from the ocean and land. -
Draft the lighthouse shape:
Draw the central lighthouse structure. Start with a tall, slightly tapered cylinder. Ensure the base is wider than the top, and add the small entryway structure at the bottom right. -
Detail the lantern room:
Sketch the top of the lighthouse carefully. Add the railing (gallery), the glass lantern room, and the domed roof. Keep these lines light, as you want them to disappear under the paint later. -
Mark windows and door:
Place the small rectangular windows going up the tower and the door at the base. I find it helpful to draw these slightly darker so they don’t get lost.
Step 2: Painting the Sky and Clouds
-
Wet the sky area:
With clean water, wet the entire sky area, carefully painting around the lighthouse shape. The paper should be glistening but not pooling with water. -
Drop in the blue:
Mix a light wash of Cobalt Blue. Apply it to the top corners and general sky area, leaving random organic shapes white to represent the brightest parts of the clouds. -
Add cloud shadows:
While the paper is still damp but losing its sheen, mix a soft grey using Cobalt Blue and a touch of Burnt Sienna or Payne’s Grey. Paint the undersides of the white cloud shapes to give them volume and fluffiness. -
Deepen the shadows:
Add a slightly darker grey mix to the bottom edges of the largest clouds for drama. Let the sky dry completely before moving on.
Keep it clean
To keep the lighthouse stark white, you can use liquid masking fluid on the tower before painting the sky. Rub it off only after the sky is totally dry.
Step 3: The Ocean and Land
-
Paint the horizon line:
Using a flat wash of Prussian Blue mixed with a little Cobalt Blue, paint the ocean strip. Make the color deepest right at the horizon line and slightly lighter as it comes toward the shore. -
Lift out waves:
While the ocean wash is still damp, use a clean, thirsty brush to lift out horizontal streaks of paint, creating the suggestion of whitecaps and waves. -
Create the sandy base:
Mix a very watery wash of Yellow Ochre and a tiny dot of Burnt Sienna. Paint the foreground sand, letting it be uneven and textured.
Muddy clouds?
If your grey clouds look muddy, you’re likely overworking the paint while it dries. Lay the stroke down once and let the water do the mixing work.
Step 4: Architecture and Details
-
Shadow the tower:
The lighthouse is white, but it needs form. Mix a very pale, cool grey. Paint the right side of the tower to suggest a shadow, blending it softly toward the center so the left side remains pure white paper. -
Paint the lantern room:
Use a mix of Burnt Sienna and a touch of red for the glass glass area of the lantern room. Paint the dome and the ironwork with a dark mix of Payne’s Grey. -
Define the windows:
Using your smallest detail brush and dark Payne’s Grey, fill in the small windows. Add a tiny L-shaped shadow around the frames to give them depth. -
Painting the door:
Fill the door with a vibrant blue (like Cobalt or Cerulean). Outline the door frame with dark grey to make it pop against the white walls. -
Add the railing:
With a steady hand and your finest brush (or a fine-liner pen if you prefer), draw the delicate railing around the top gallery.
Step 5: Finishing Touches
-
Paint the grass:
Using short, upward flicking motions with a small brush, add tufts of dune grass along the ridge where the sand meets the ocean. use a mix of Yellow Ochre and olive green or brown. -
Enhance foreground texture:
Splatter a tiny bit of brown paint or add small dots to the sand to represent pebbles and texture. -
Final highlights:
If you lost any crisp whites on the waves or the lighthouse highlights, use a touch of white gouache to reclaim them. -
Reveal the border:
Wait until the painting is bone dry—touch it with the back of your hand to check—then slowly peel off the tape at a 45-degree angle to reveal clear edges.
Now you have a charming coastal scene ready to frame or send as a postcard.


Lighthouse on a Simple Cliff
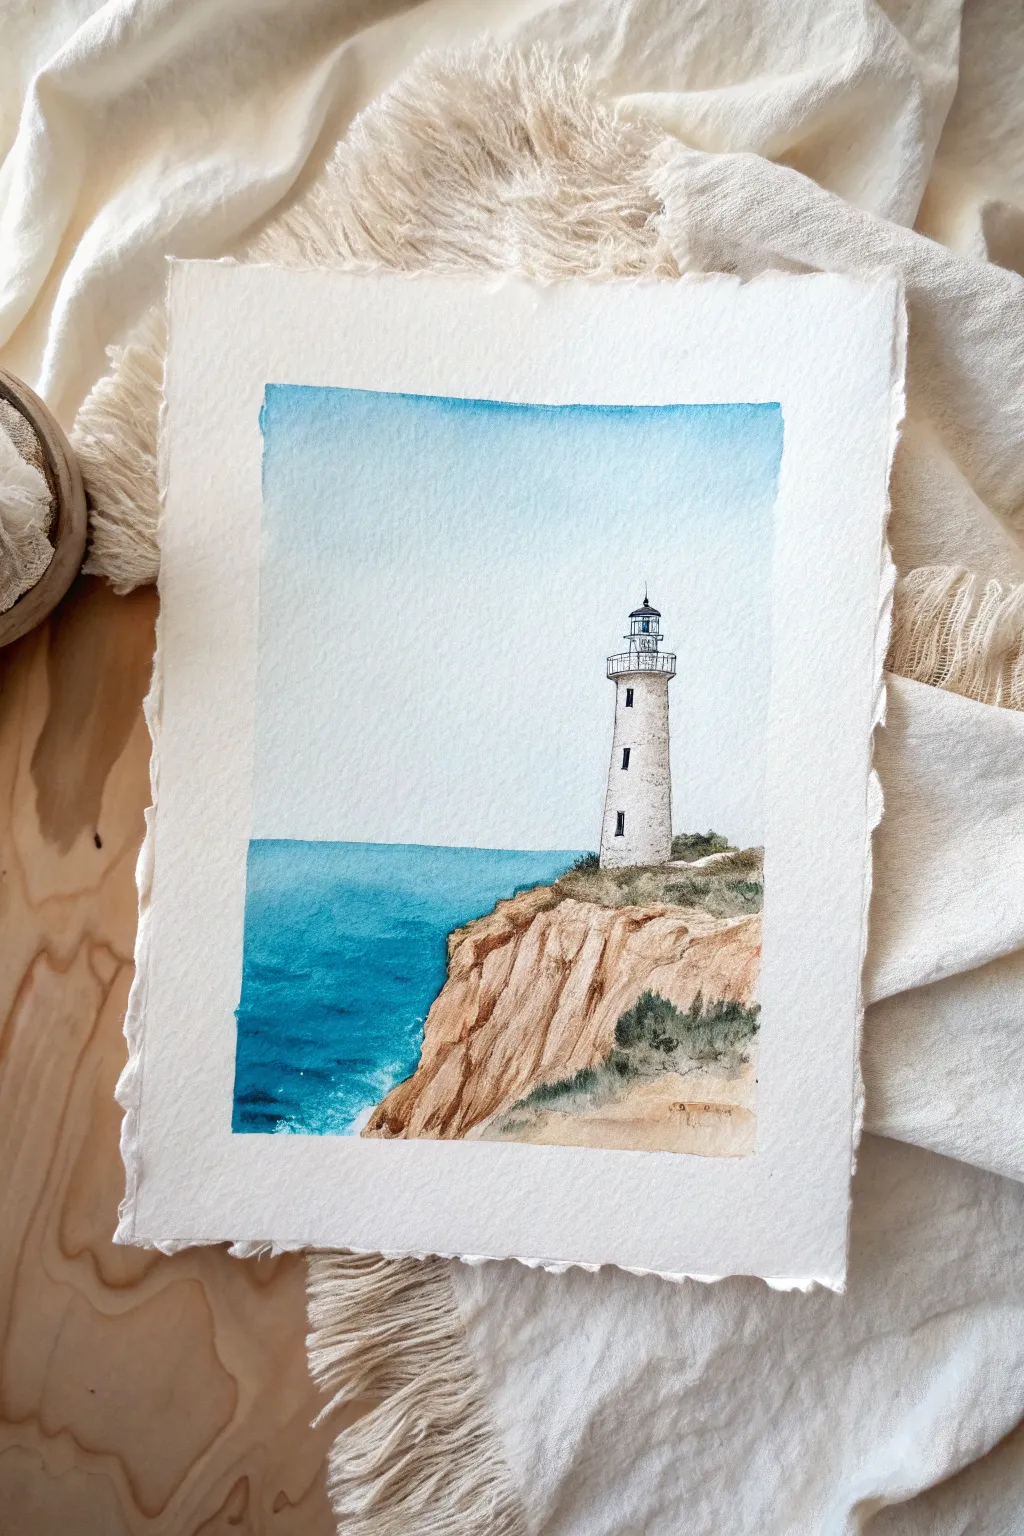
Capture the serene beauty of a classic white lighthouse perched atop rugged cliffs with this watercolor project. The composition balances the soft, airy sky with the textured earth tones of the rock face and the deep blue of the ocean.
Step-by-Step
Materials
- Cold press watercolor paper (deckled edge optional)
- Watercolor paints (Cerulean Blue, Burnt Sienna, Yellow Ochre, Paynes Grey, Sap Green)
- Round watercolor brushes (sizes 2, 6, and 10)
- Pencil (HB or H)
- Kneaded eraser
- Masking tape (for securing paper)
- Two jars of water
- Paper towels
Step 1: Sketching the Scene
-
Establish the Horizon:
Begin by lightly sketching a horizontal line about one-third of the way up from the bottom of your paper. This separates the sky from the ocean. -
Outline the Cliff:
Sketch the jagged profile of the cliff on the right side. Let it curve naturally from the bottom edge up towards the horizon line, creating a diagonal slope that leads the eye. -
Place the Lighthouse:
Draw the lighthouse structure standing firmly on the flat top of the cliff. Use simple vertical lines for the tower, slightly tapering inward as you go up, and top it with a simple lantern room and railing detail. -
Refine Details:
Add small rectangles for the windows on the lighthouse tower and sketch the rocky crevices on the cliff face lightly. Use your kneaded eraser to lift any heavy graphite marks until they are barely visible.
Natural Edges
To get the beautiful torn edge look shown in the photo, fold your paper back and forth several times and rip it slowly against a ruler, or buy pre-cut deckle-edge paper.
Step 2: Painting the Sky and Sea
-
Wet-on-Wet Sky:
Using your largest brush, apply clean water to the sky area. Pick up a light wash of Cerulean Blue and paint from the top down, letting the color fade to near-white as you approach the horizon. -
Define the Horizon:
While the sky is still slightly damp but not soaking, mix a slightly stronger blue for the very top edge to create depth. -
Ocean Gradient:
Once the sky is dry, wet the ocean area. Load your brush with a mix of Cerulean and a touch of Phthalo or darker blue. Paint the ocean, making it darker near the bottom left corner and lighter as it meets the cliff. -
Soft Waves:
While the sea wash is wet, lift out a little pigment near the base of the cliff with a thirsty brush or paper towel to suggest white foam hitting the rocks.
Atmospheric Depth
Make the ocean slightly darker at the horizon line than the sky directly above it. This contrast immediately pushes the horizon back and creates a sense of vast distance.
Step 3: The Cliff and Lighthouse
-
Base Tone for Rocks:
Mix a warm, sandy color using Yellow Ochre and a hint of Burnt Sienna. Apply a loose wash over the entire cliff face, leaving a few tiny white gaps for highlights. -
Adding Rock Texture:
While the base is drying, switch to a size 6 brush. Using a thicker mix of Burnt Sienna and Paynes Grey, paint vertical, jagged strokes to mimic the striations and cracks in the cliff face. -
Deep Shadows:
Add the darkest shadows in the crevices of the rocks and under the cliff overhangs to give the landmass weight and dimension. -
Greenery Accents:
Dab in some Sap Green mixed with a little brown along the top edge of the cliff and in patches on the slope to represent coastal scrub bushes. -
Lighthouse Shadow:
The lighthouse is white, but it needs form. Mix a very watery grey-blue and paint a vertical shadow along the right side of the tower to make it look cylindrical. -
Lighthouse Details:
Use your smallest brush (size 2) and a dark grey or black mix to carefully paint the lantern room, the railing, and the small windows. Keep your hand steady for these fine lines. -
Final Touches:
Add any final dark accents to the bushes or rocks to increase contrast. If needed, use opaque white gouache to bring back crisp highlights on the waves or the lighthouse railing.
Frame your cliffside scene in a floating frame to show off those lovely textured edges


Easy Lighthouse Beam of Light
Capture the solitary beauty of a lighthouse piercing the darkness with this striking watercolor project. By layering deep indigo skies against a warm, translucent beam of light, you’ll create a dramatic contrast that makes the artwork glow from within.
Detailed Instructions
Materials
- Watercolor paper (cold press, 300gsm)
- Masking tape or painter’s tape
- Pencil and eraser
- Ruler
- Watercolor paints (Indigo, Prussian Blue, Burnt Sienna, Yellow Ochre, Black, White Gouache or Acrylic)
- Round brushes (sizes 2, 6, and 10)
- Fine liner brush or white gel pen
- Palette for mixing
- Two jars of water
Step 1: Sketching and Preparation
-
Define the boundaries:
Start by taping down the edges of your paper to a flat surface with masking tape. This creates that crisp, clean white border seen in the image and prevents the paper from buckling when wet. -
Sketch the lighthouse structure:
Using a ruler, lightly draw the tapered vertical lines of the lighthouse tower slightly right of center. Add the lantern room at the top and the rectangular base at the bottom. -
Map the horizon and beam:
Draw a horizontal line about one-quarter of the way up the page for the horizon. From the lighthouse lantern, use your ruler to draw two lines extending outward to the left, creating a wide cone for the light beam.
Clean Beam Edges
For a perfectly straight beam of light, place a strip of masking tape along the beam’s edge before painting the dark sky. Peel it off when dry for a razor-sharp line.
Step 2: Painting the Beam and Sky
-
Wash the light beam:
Mix a watery wash of Yellow Ochre with a touch of orange. Paint the inside of the beam cone first. Keep this layer light and transparent so the paper’s white shines through. -
Paint the first sky layer:
While the beam dries, mix a deep teal using Prussian Blue and a little green. Paint the sky area around the beam and lighthouse, getting darker as you move away from the light source. -
Deepen the night sky:
Once the first layer is dry, mix a saturated Indigo or dark blue. Apply this over the teal areas, carefully cutting in around the yellow beam contour to keep that edge sharp. -
Add the sunset glow:
Near the horizon line, blend a soft wash of Burnt Sienna or muted red into the wet blue sky to suggest the fading light of dusk just above the water.
Step 3: The Lighthouse and Ocean
-
Paint the tower’s lit side:
For the left side of the lighthouse tower (facing the light), use a very diluted mix of cream or pale yellow. It should be barely off-white to show the reflection. -
Shadow the tower:
Paint the right side of the tower structure with a cool grey. I find mixing a tiny bit of blue into the grey helps it harmonize with the night sky. -
Fill the lantern room:
Use a saturated orange or yellow for the windows at the very top of the lighthouse, making them look like the source of glowing warmth. -
Paint the ocean:
Mix a dark navy blur for the water. Paint horizontal strokes, leaving small gaps towards the top to represent waves catching the last light. -
Ground the scene:
Paint the foreground land with a mix of brown and black. Ensure you paint a distinct, sharp shadow extending from the lighthouse base to the right.
Level Up: Texture
Sprinkle a tiny pinch of salt onto the wet sand/foreground paint. As it dries, the salt absorbs pigment, creating a distinctive stony texture for the ground.
Step 4: Details and Stars
-
Add architectural details:
Using a small size 2 brush and black paint, carefully add the windows on the tower, the railing around the top, and the roof of the lantern. -
Refine the door:
Paint the arched doorway at the base of the tower in dark grey or black. -
Create ocean texture:
Use a fine liner brush or a white gel pen to add thin, horizontal highlights on the dark water, emphasizing the movement of the waves. -
Paint the stars:
Load a small brush with white gouache or acrylic. Carefully dot tiny stars into the dark blue sky area, avoiding the yellow beam. -
The final reveal:
Wait until the painting is completely bone-dry. Slowly peel away the masking tape at a 45-degree angle to reveal your crisp, clean borders.
Now you have a serene coastal night scene perfect for framing or gifting
BRUSH GUIDE
The Right Brush for Every Stroke
From clean lines to bold texture — master brush choice, stroke control, and essential techniques.
Explore the Full Guide
Red-and-White Stripe Lighthouse
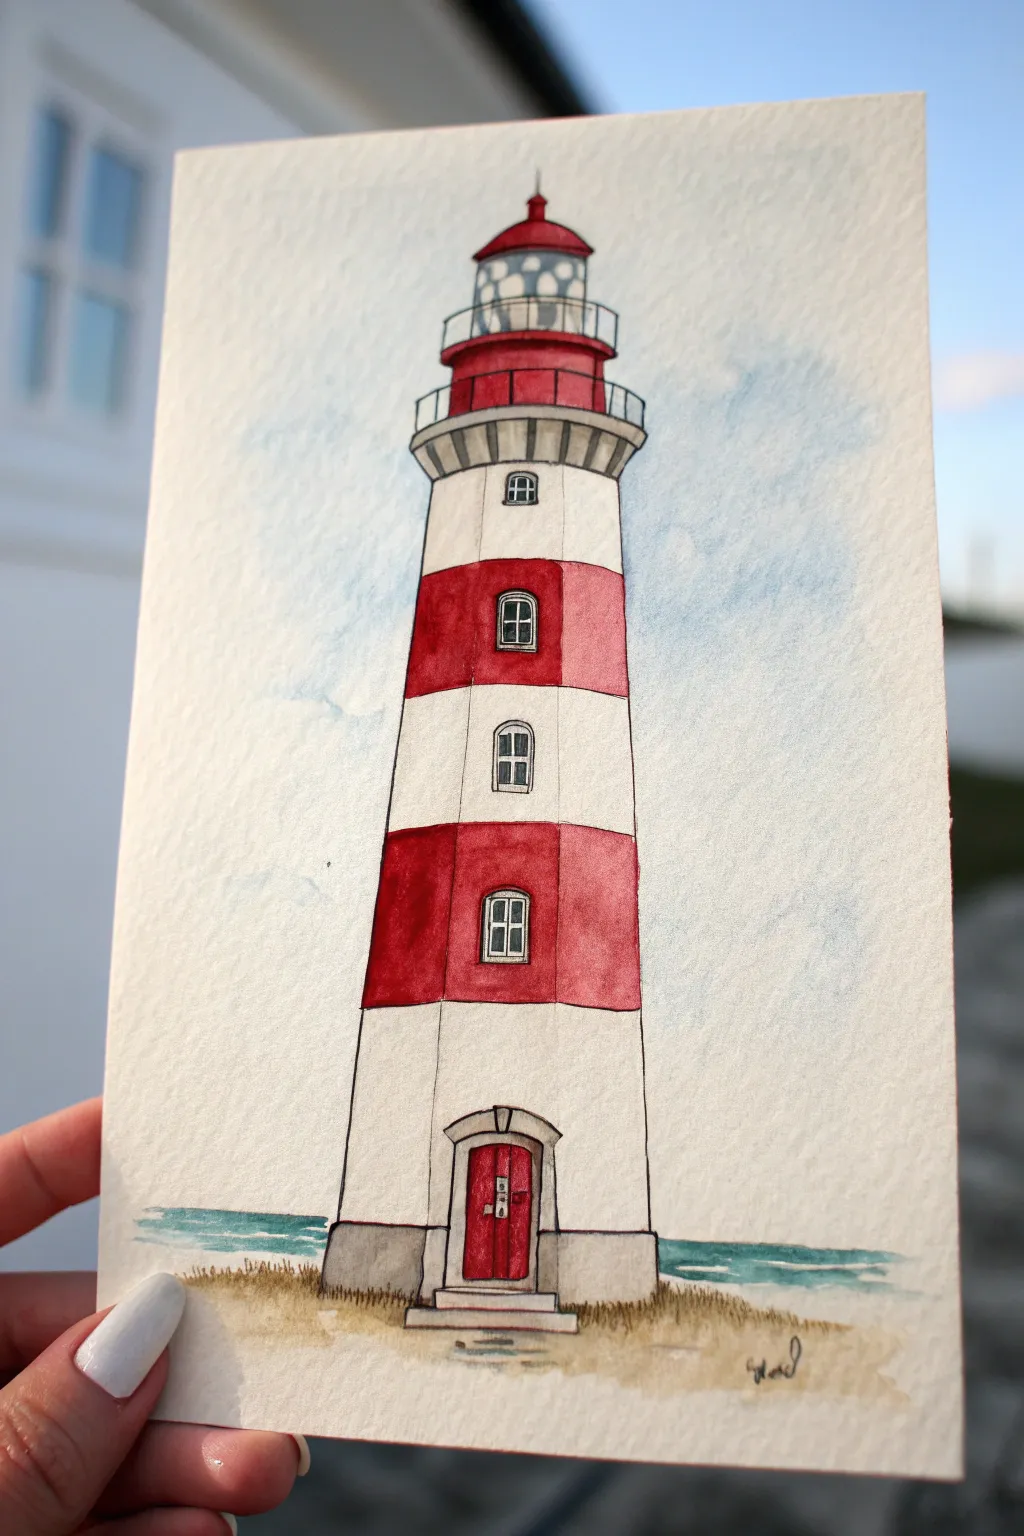
Capture the charm of a traditional seaside sentinel with this watercolor tutorial featuring bold red stripes and delicate architectural details. The textured paper adds a lovely rustic feel to the lighthouse’s sturdy masonry.
Step-by-Step Guide
Materials
- Cold press watercolor paper (300gsm)
- Pencil (HB or H)
- Fine liner pen (black, waterproof, 0.1mm and 0.3mm)
- Watercolor paints (Alizarin Crimson, Burnt Sienna, Payne’s Grey, Cobalt Blue, Yellow Ochre)
- Round watercolor brushes (size 2 and 6)
- Ruler
- Eraser
- Jar of clean water
- Paper towels
Step 1: Sketching the Structure
-
Establish the centerline:
Begin by using your ruler to draw a faint vertical line down the center of your paper. This guide will ensure your lighthouse stands straight and doesn’t lean to one side. -
Outline the tower shape:
Draw two long, slightly tapered vertical lines on either side of the center guide to form the main body of the lighthouse. Connect them at the bottom with a straight horizontal line for the base. -
Add the lantern room:
At the top of the tower, sketch a small rectangle for the gallery deck, followed by a slightly narrower section for the glass lantern room, and cap it with a triangular roof shape. -
Mark the stripes:
Lightly draw curved horizontal lines across the tower body to divide it into five distinct sections. Curve the lines slightly upward to give the illusion of a cylindrical form. -
Detail the door and windows:
Sketch a small arched doorway at the very bottom center. Add three small rectangular windows vertically aligned up the tower, placing one in every other colored section.
Step 2: Inking the Outline
-
Trace with fine liner:
Using your 0.3mm waterproof pen, carefully go over your pencil lines. Be precise with the straight edges of the tower, but feel free to keep the lines slightly organic. -
Add architectural details:
Switch to a 0.1mm pen to draw the finer details, such as the railing around the top gallery, the grid pattern on the lantern glass, and the panes within the small windows. -
Erase pencil marks:
Once the ink is completely dry—give it a minute or two to avoid smudging—gently erase all the visible pencil guides, including the center line.
Bleeding Stripes?
If your red paint bleeds into the white stripes, your paint was likely too wet. Wait for the red to dry completely, then gently lift the mistake with a damp, clean brush.
Step 3: Painting the Tower
-
Paint the red stripes:
Load your size 6 brush with Alizarin Crimson. Carefully fill in the top, middle, and bottom sections of the tower stripes. Paint right up to the ink lines but try not to go over them. -
Add stripe shading:
While the red paint is still damp, drop a tiny touch of more concentrated red or a hint of brown on the left side of each stripe to create a rounded shadow effect. -
Paint the grey foundation:
Mix a diluted wash of Payne’s Grey and fill in the stone foundation at the very bottom of the tower, keeping the application light. -
Color the door:
Use a concentrated red mix to paint the door, leaving the surrounding frame white for contrast. -
Detail the lantern room:
Paint the roof of the lantern room red to match the stripes. For the glass area, use a very watery pale blue wash, leaving tiny white spots to represent reflected light.
Pro Choice: Masking Fluid
Apply masking fluid to the tiny window frames and railing before painting. This keeps those delicate white areas pristine without needing perfect brush control.
Step 4: Background and Finishing Touches
-
Paint the sky:
Create a very watery wash of Cobalt Blue. Using a larger brush, paint loosely around the lighthouse to suggest the sky, letting the watercolor texture create natural cloud shapes. -
Add the horizon line:
Paint a thin horizontal strip of teal or blue-green just behind the base of the lighthouse to represent the distant ocean. -
Create the sandy base:
Mix Yellow Ochre with a touch of Burnt Sienna. Paint the ground area around the base, using rough horizontal strokes. -
Add grassy texture:
Once the sand layer is dry, use your smallest brush or the fine pen to flick quick, upward strokes of brown paint or ink to create dune grass tufts. -
Final shadow enhancements:
I like to mix a very faint grey wash and paint a thin vertical strip down the left side of the white sections of the tower to reinforce the cylindrical shape.
Sign your artwork at the bottom and enjoy your beautiful coastline creation
Lighthouse With Two-Tone Water Reflection
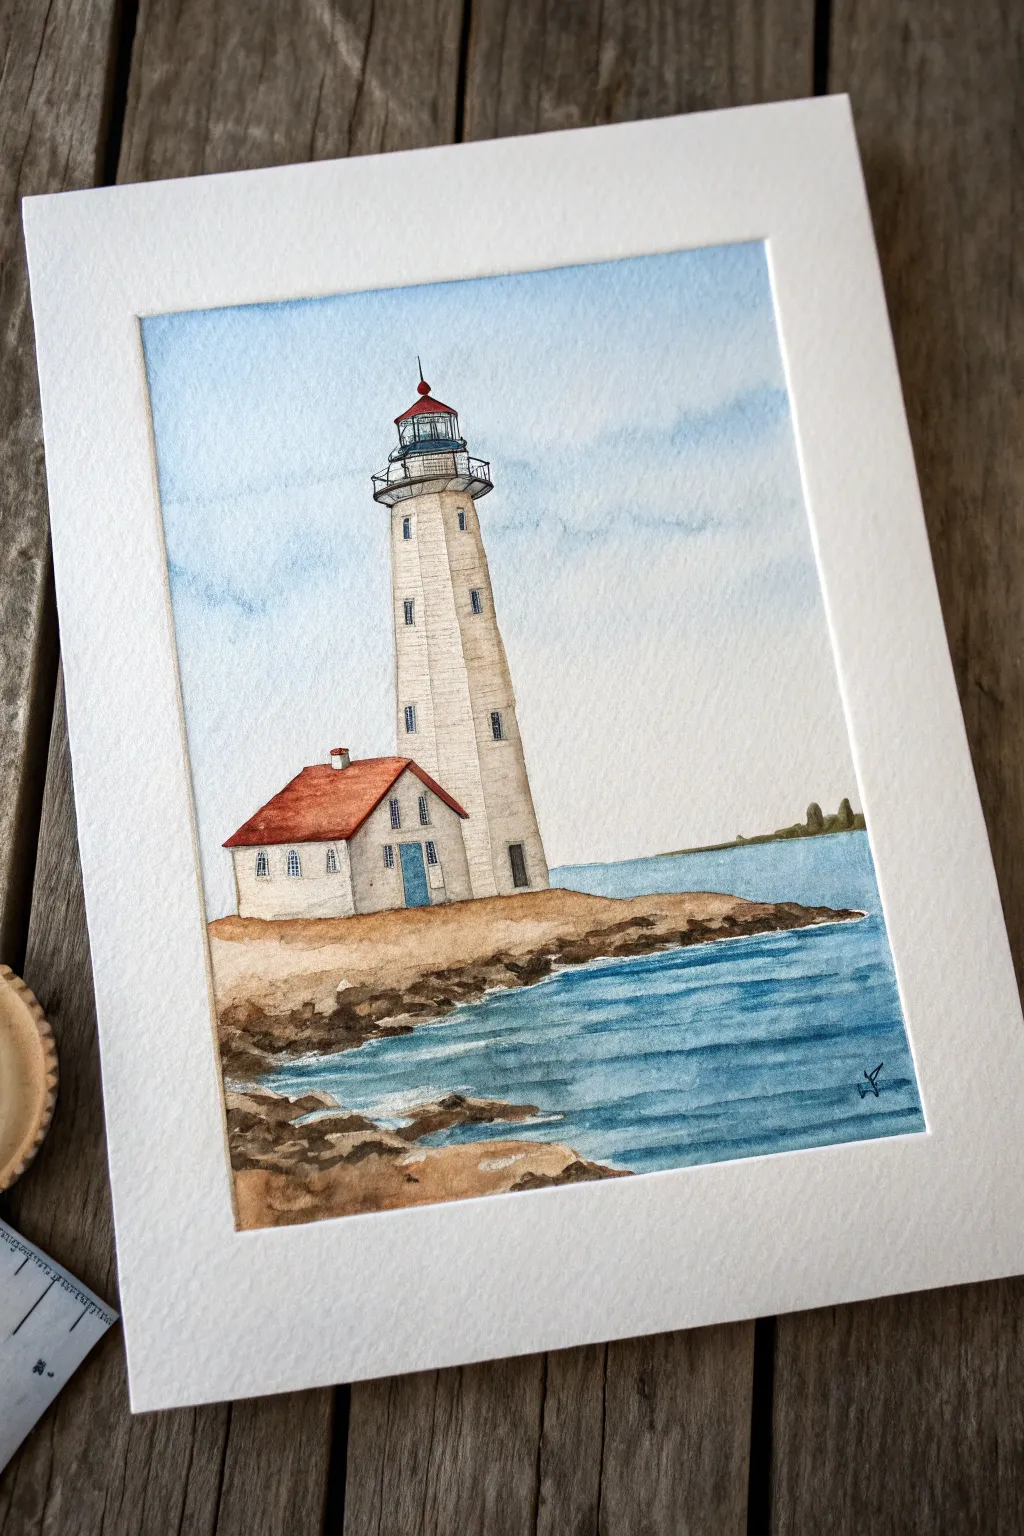
Capture the serene beauty of a classic lighthouse perched on a rugged shoreline with this layered watercolor tutorial. You will create soft atmospheric skies, textured rocks, and a detailed architectural focal point using simple washes and fine lines.
Step-by-Step Tutorial
Materials
- Cold press watercolor paper (140lb/300gsm)
- Watercolor paints (Ultramarine Blue, Cerulean Blue, Burnt Sienna, Yellow Ochre, Alizarin Crimson, Paynes Grey)
- Round brushes (size 8 for washes, size 4 for forms, size 0 or 00 for details)
- Pencil (HB or H) and kneaded eraser
- Two jars of water
- Paper towels
- Masking tape (for securing edges)
Step 1: Sketching and Sky
-
Establish the horizon:
Begin by lightly drawing a horizon line across the lower third of your paper. This will separate the sky from the distant water line. -
Sketch the structure:
Draw the lighthouse outline. Start with a tall, tapering vertical column. Use a ruler if you need help keeping the lines straight, but a hand-drawn line looks more organic. -
Add architectural details:
Sketch the lantern room at the top with a railing and a small triangular roof. At the base, draw the attached keeper’s house with a slanted roof and small windows. -
Outline the land:
Sketch the rocky shoreline extending from the lighthouse base into the water, keeping the shapes irregular and jagged to suggest natural rock formations. -
Wet the sky area:
Using your large round brush, wet the entire sky area with clean water, being careful to paint around the lighthouse shape. -
Paint the sky wash:
Drop in a dilute wash of Cerulean Blue while the paper is still wet. Let the pigment flow naturally, keeping the color more concentrated at the top and fading to near-white as it meets the horizon.
Step 2: Lighthouse and Land
-
Paint the roofs:
Mix Alizarin Crimson with a touch of Burnt Sienna to create a rusty red. Paint the roof of the keeper’s house and the lantern top, leaving a tiny highlight unpainted on the lantern roof if possible. -
Base coat the lighthouse:
Create a very watery mix of Yellow Ochre and a tiny dot of Paynes Grey to get a creamy off-white. Wash this over the lighthouse tower and house walls to give them an aged look, avoiding the bright white of the paper. -
Create the rocky base:
Mix Yellow Ochre and Burnt Sienna. Apply this as a base layer for the ground the lighthouse sits on, letting the color be uneven to suggest dirt and sand. -
Shadow the tower:
Once the cream layer is dry, mix a diluted Paynes Grey wash. Paint a vertical shadow down the right side of the lighthouse tower to give it cylindrical volume. -
Detail the rocks:
Using a smaller brush and a mix of Burnt Sienna and Paynes Grey, dab darker colors onto the shoreline, particularly along the water’s edge, to create rocky textures and jagged stones.
Clean Lines
For the railing and window mullions, use a fine-tip waterproof archival ink pen instead of a brush if you struggle with brush control.
Step 3: Water and Final Details
-
Paint the distant water:
For the water strip just below the horizon, use a flat wash of dilute Cerulean Blue. Keep this layer smooth and relatively light. -
Paint the foreground water:
Mix a stronger Ultramarine Blue with a touch of Paynes Grey. Paint the water nearest to the rocks, using horizontal strokes. -
Create ripples:
While the foreground blue is semi-dry, use a damp brush to lift out horizontal lines, or add darker blue lines to suggest gentle waves lapping against the shore. -
Define the windows and railing:
Switch to your smallest brush (size 0). Use a concentrated dark grey mix to carefully paint the lantern room grid, the railing, and the small windows on the tower and house. -
Add the door:
Paint the door of the keeper’s house with a solid blue color, perhaps matching the sky but more saturated. -
Enhance texture:
Use a dry brush technique with dark brown to scuff slightly over the lighthouse walls, suggesting weathering or brick texture. -
Add distant land:
With a mix of green and grey, paint a very small, thin strip of land on the distant horizon line to the right of the lighthouse.
Texture Boost
Before the rocky shore paint dries completely, sprinkle a tiny pinch of table salt on the pigment. Brush it off when dry for organic rock textures.
Remove the tape carefully to reveal your crisp border and enjoy your coastal masterpiece

PENCIL GUIDE
Understanding Pencil Grades from H to B
From first sketch to finished drawing — learn pencil grades, line control, and shading techniques.
Explore the Full Guide
Foggy Lighthouse With Soft Edges
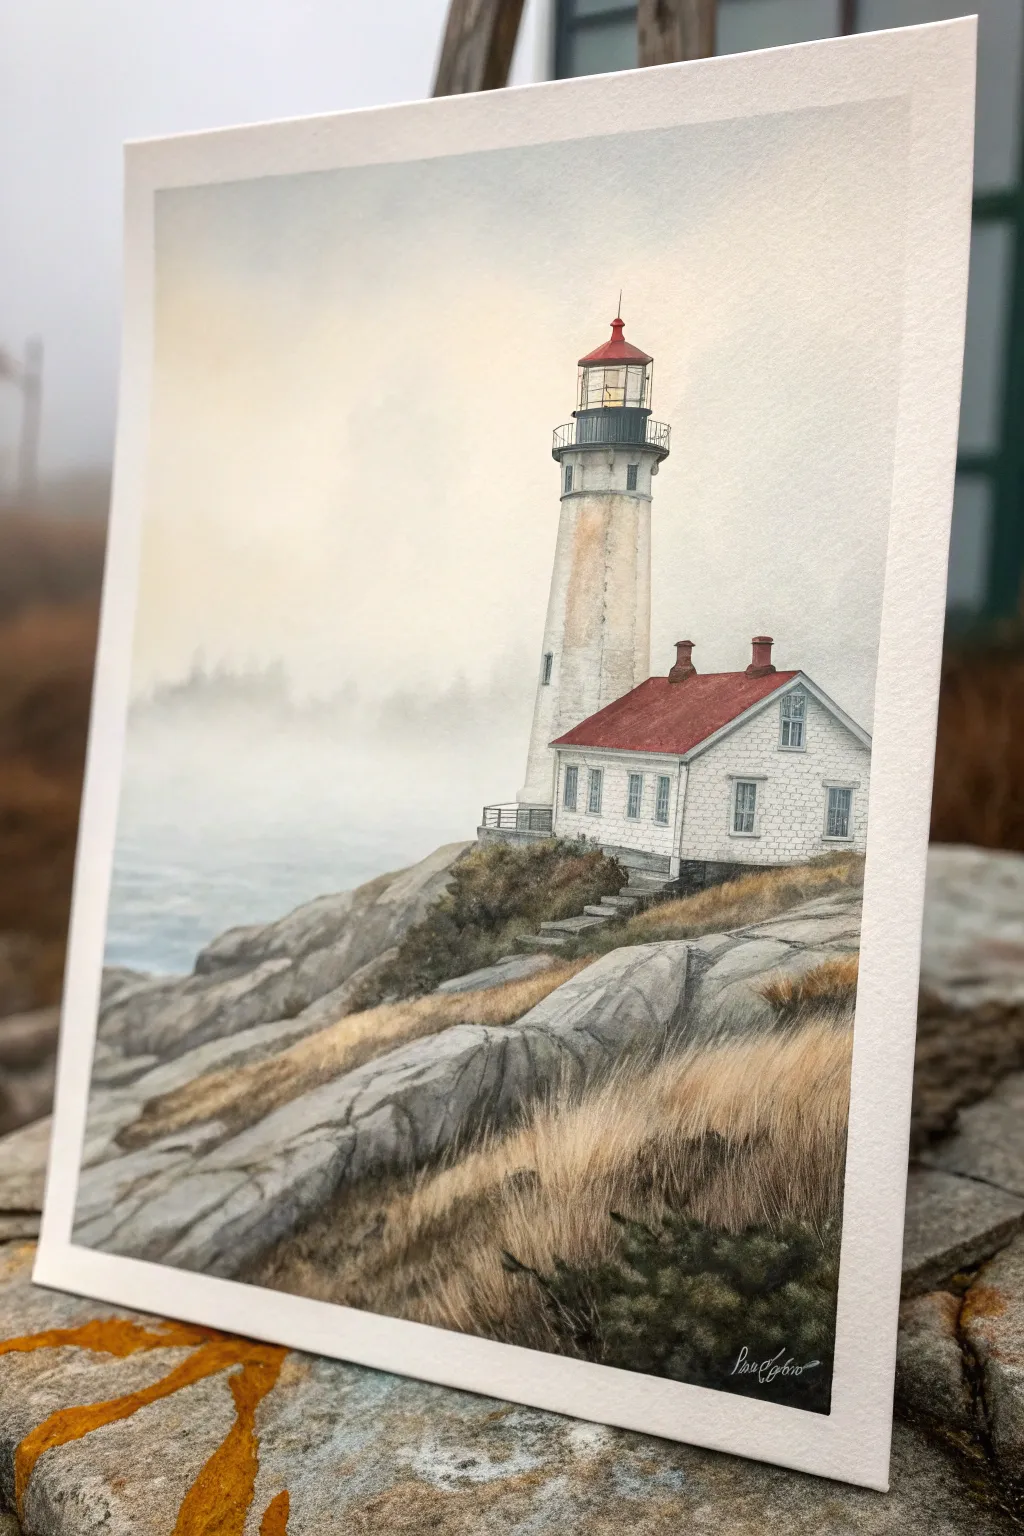
This atmospheric painting captures the serene beauty of a lighthouse standing guard on a fog-wrapped cliffside. By balancing soft, wet-into-wet techniques for the background with crisp details for the architecture, you’ll create a piece with incredible depth and mood.
Detailed Instructions
Materials
- Cold press watercolor paper (300 gsm or heavier)
- Watercolor paints (Payne’s Grey, Burnt Sienna, Yellow Ochre, Alizarin Crimson, Cerulean Blue, Sepia, White Gouache)
- Masking fluid and an old synthetic brush
- Large flat wash brush (1 inch)
- Round brushes (sizes 4, 8, and a 00 rigger for details)
- Masking tape
- Paper towels
- Two jars of water
Step 1: Setting the Scene
-
Sketch the Layout:
Begin with a very light pencil sketch. Place the lighthouse structure off-center to the right, ensuring the horizon line is low to emphasize the sky. Outline the jagged rocks in the foreground, but keep the distant tree line vague. -
Protect the Whites:
Apply masking fluid carefully to the lighthouse structure, the attached house, specifically the white walls and window frames, and the lantern room railing. Let this dry completely before touching any paint. -
Create the Hazy Sky:
Wet the entire sky area with clean water. While glistening, drop in a very dilute mix of Yellow Ochre near the horizon for a morning glow. As you move up, blend in a soft, watery grey made from Payne’s Grey and a touch of Cerulean Blue. -
Hint at Distant Trees:
While the paper is still damp (but not soaking), drop in a thicker, creamy mix of Payne’s Grey along the horizon line. Let the paint bloom upward slightly to create a soft, out-of-focus tree line effect that mimics fog. -
Paint the Ocean Fog:
Continue that soft grey wash down below the horizon line on the left. Keep it paler than the sky to represent the dense mist hanging over the water, letting it fade to white as it nears the rocky foreground.
Step 2: The Rocky Foundation
-
Base Layer for Rows:
Once the sky is bone dry, mix a watery wash of Sepia and Payne’s Grey. Paint the basic shapes of the foreground rocks, leaving some areas lighter to suggest sunlight hitting the stone surfaces. -
Adding Texture:
While the rock shapes are damp, dab in darker, more saturated grey into the crevices and shadows. Use a dry brush technique on the top ridges to create the rough texture of granite. -
Warm Grass Tones:
Mix Yellow Ochre and Burnt Sienna to create the dried grassy areas. Apply this in sweeping strokes across the foreground rocks, following the slant of the hill. -
Deepen the Shadows:
Mix a dark, cool grey using Sepia and Blue. Paint the deep crevices between the rock slabs and the shadowed side of the cliff face to give the landmass weight and dimension.
Muddy colors?
If your grey sky looks dull or brown, stop mixing all three primary colors together. Stick to just a blue and a brown (like Ultramarine and Burnt Umber) for cleaner, cooler greys.
Step 3: Building the Lighthouse
-
Initial Architecture:
Rub away the masking fluid to reveal the crisp white paper. Mix a very faint, watery grey and shadow the left side of the lighthouse tower and the house to indicate a light source coming from the right. -
The Red Roofs:
Paint the roofs with a mix of Alizarin Crimson and Burnt Sienna. Keep the color slightly uneven to suggest weathering, rather than a solid block of red. -
Lantern Details:
Using your smallest brush, paint the lantern room details carefully. Use pure Yellow Ochre for the light itself to make it glow, and dark grey for the cage and railing details. -
Weathering the Walls:
I like to take a nearly dry brush with a tiny amount of brownish-grey paint and vertically drag it down the white tower to simulate rust stains and age. -
Windows and Texture:
Paint the window panes with a slate blue-grey, leaving tiny slivers of white paper for reflections. Add the small brick or stone texture to the house walls using faint, broken grey lines.
Pro Tip: Lost Edges
Don’t outline the distant trees. Let the water carry the pigment into the wet sky area. These ‘lost edges’ are the secret to convincing atmospheric perspective.
Step 4: Final Atmosphere
-
Foreground Grasses:
Using a rigger brush or fine liner, flick delicate strands of grass over the rocky foreground using mixed ochres and browns. Vary the length and direction to look natural. -
Dark Accents:
Add the dark green-black shrubbery near the bottom right corner. Stipple this texture to contrast with the smooth long grasses. -
Integrating the Base:
Add small scribbles of dark grey around the base of the lighthouse where it meets the rock to ‘seat’ the building so it doesn’t look like it’s floating. -
Mist Recovery:
If the background mountains became too sharp, glaze a very thin layer of white gouache over them to push them back into the fog.
Step back and admire how the soft mist contrasts with the sturdy architecture of your coastal scene
Stormy Sky Lighthouse Contrast
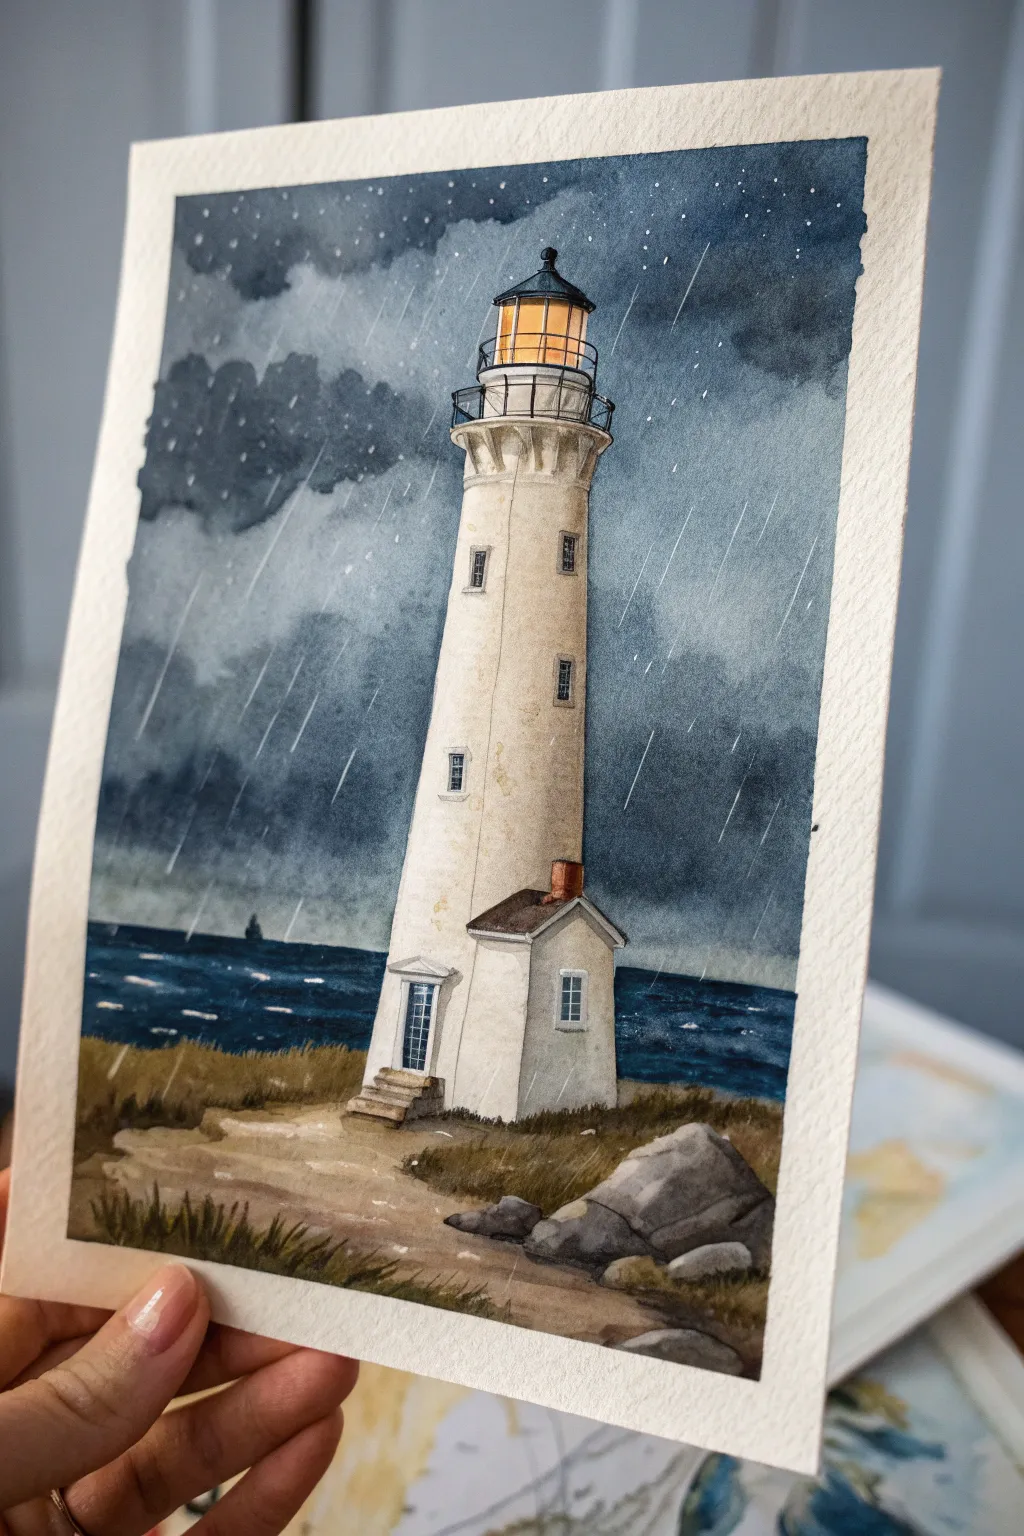
Capture the dramatic moody atmosphere of a storm-tossed coast with this high-contrast watercolor project. You’ll layer dark indigo skies against the pale stone of a lighthouse, finishing with striking white rain streaks that bring the scene to life.
Step-by-Step Guide
Materials
- Cold press watercolor paper (300 gsm)
- Watercolor paints (Indigo, Payne’s Gray, Burnt Sienna, Yellow Ochre, Cadmium Yellow, Sepia)
- White gouache or white gel pen
- Masking fluid (optional)
- Round brushes (sizes 4, 8, and 12)
- Fine detail brush (size 0 or 1)
- Pencil and eraser
- Painter’s tape
- Two jars of water and paper towels
Step 1: Sketching and Masking
-
Tape the edges:
Secure your paper to a board using painter’s tape to create a crisp white border and prevent buckling when the paper gets wet. -
Draft the outline:
Lightly sketch the lighthouse tower slightly off-center. Draw the cylindrical shape tapering upward, the lantern room at the top, and the small attached cottage at the base. Add a simple horizon line behind the tower and outline the rocky foreground. -
Mask the lighthouse:
To keep your whites pristine against the dark sky, carefully apply masking fluid to the main body of the lighthouse and the cottage. If you don’t have masking fluid, you will need to paint very carefully around these shapes in the next phase.
Muddy colors?
If your shadows look dirty, you likely over-blended. Place your shadow stroke once and let it settle. Don’t scrub the paper with the brush.
Step 2: The Stormy Atmosphere
-
Prepare the sky wash:
Mix a large puddle of dark, moody blue-grey using Indigo and Payne’s Gray. You want this mixture to be quite saturated. -
Paint the wet-in-wet sky:
Pre-wet the sky area with clean water until it glistens. Drop in your dark blue mix, starting from the top corners and letting it flow downward. Concentrate the darkest pigments at the top to suggest heavy storm clouds. -
Create cloud textures:
While the sky is still damp, lift out a few lighter areas with a thirsty, clean brush to suggest swirling clouds. You can drop in hints of slightly warmer grey near the horizon for depth. -
Paint the ocean:
Using a similar mix of Indigo but perhaps with a touch of Phthalo Green or Prussian Blue, paint the sea. Use horizontal strokes to mimic waves, leaving tiny slivers of dry white paper for sea foam caps. -
Let it dry completely:
This is crucial. The paper must be bone dry before you remove the masking fluid or paint the lighthouse features to prevent bleeding.
Level Up: Spatter Effect
For a wilder storm, load an old toothbrush with white gouache and flick tiny droplets over the bottom of the painting to mimic sea spray hitting the rocks.
Step 3: Lighthouse Structure and Glow
-
Reveal the white paper:
Gently rub away the masking fluid to reveal the crisp white shape of the lighthouse. Erase any harsh pencil lines that remain visible. -
Shadow the tower:
Mix a very dilute, pale grey-brown (watered down Sepia). Paint a vertical shadow along the left side of the tower to give it cylindrical volume, fading it out as you move toward the lit right side. -
Paint the lantern room glowing:
Use Cadmium Yellow and Yellow Ochre to fill the glass area of the lantern room at the top. Let it be bright and warm to contrast the cool storm. -
Detail the metalwork:
With your smallest brush and dark Sepia or Black, carefully paint the railing, the lantern cap, and the window frames. Keep your hand steady for the thin railing lines. -
Detail the cottage:
Paint the cottage roof with a mix of Burnt Sienna and curve the eaves slightly. Add the small window with light blue-grey tones.
Step 4: Foreground and Finishing Touches
-
Paint the path:
Use a wash of Yellow Ochre and lightly textured Beige for the path leading to the door. Keep the strokes loose. -
Add grass and rocks:
Paint the rocks with varying shades of grey. Use short, upward flicking strokes with an olive green mix (Green mixed with a touch of Sepia) to create the windswept dune grass in the foreground. -
Deepen the shadows:
Add deeper shadows under the rocks and at the base of the lighthouse to ground the structure. -
Create the rain:
Dilute white gouache slightly so it flows but remains opaque. Using a small round brush, paint thin, diagonal dashed lines across the sky and dark ocean areas to simulate driving rain. -
Whiten the waves:
Use the white gouache to add a few brighter highlights to the wave crests on the dark water. -
Final assessment:
Step back and check your contrast. If the sky dried too light, you can carefully glaze another layer of Indigo over the background, avoiding the rain streaks.
Peel off the tape carefully to reveal your dramatic coastal scene ready for display


Starry Night Lighthouse Scene
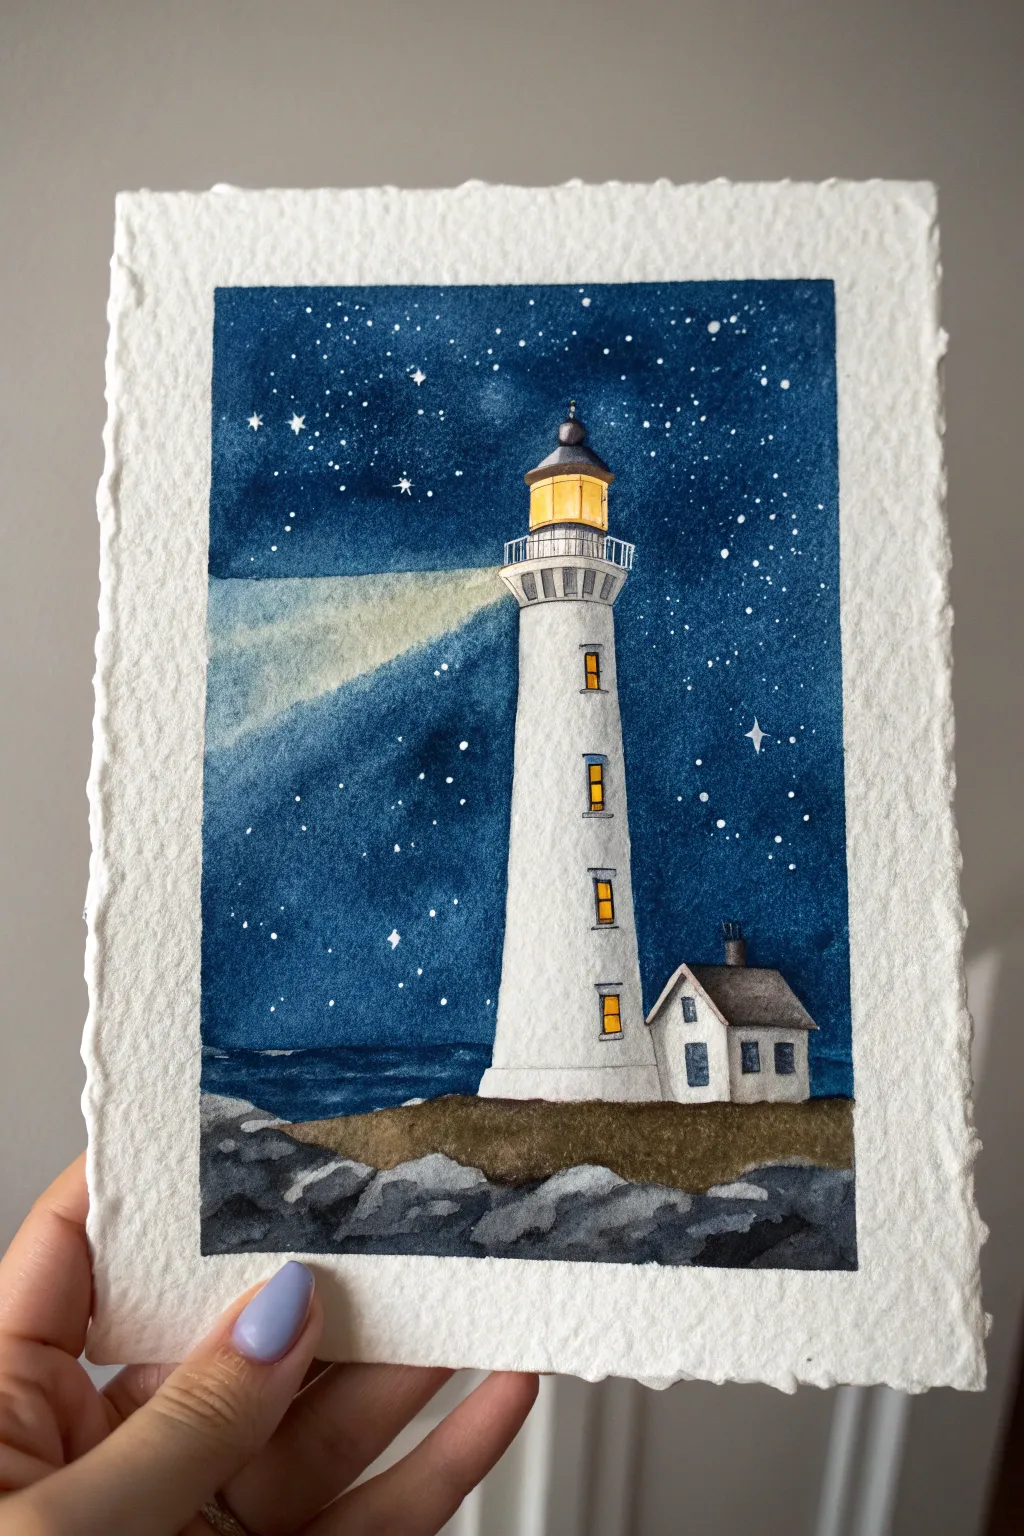
Capture the serene magic of a coastal night with this mesmerizing watercolor project. Featuring a deep indigo sky dotted with stars and a glowing white lighthouse, this painting balances striking contrast with soft, atmospheric light effects.
How-To Guide
Materials
- Cold press watercolor paper (deckle-edge preferred)
- Watercolor paints (Indigo, Payne’s Gray, Burnt Umber, Yellow Ochre, Cadmium Yellow)
- White gouache or white gel pen
- Pencil and eraser
- Masking fluid (optional)
- Round brushes (sizes 2, 6, and 10)
- Painter’s tape
- Clean water and paper towels
Step 1: Planning and Sketching
-
Prepare the paper:
If using a standard watercolor block, tape down the edges to create a clean border. However, for the look in the photo, use a sheet of cold-press paper with deckle edges and lightly mark a rectangular boundary with pencil where your painting will go, leaving a generous white border. -
Sketch the lighthouse:
Lightly draw the lighthouse slightly off-center to the right. Create a tall, tapered column shape for the tower and add a small house structure attached to the bottom right. Keep your pencil pressure very light so graphite doesn’t smudge later. -
Add details:
Sketch the lantern room at the top, the railing, and the small windows going down the tower. Draw the rocky foreground at the base of the lighthouse. -
Protect the whites:
Apply masking fluid to the lighthouse tower, the small house, and the windows if you have a steady hand. If you don’t have masking fluid, you will need to be very careful to paint around these shapes in the next steps.
Starry Sky Troubleshooting
If you spatter stars where you don’t want them (like on the ocean), quickly dab them up with a clean, damp tissue before the paint dries.
Step 2: Painting the Sky and Sea
-
Create the sky wash:
Mix a large puddle of Indigo and Payne’s Gray to get a deep, dark night blue. Using your largest brush, saturate the sky area with clean water first (wet-on-wet technique), stopping carefully at the horizon line. -
Drop in color:
While the paper is wet, drop in your dark blue mix. Let the color bloom and vary in intensity, making it darkest at the top corners and slightly lighter near the horizon. -
Create the beam of light:
While the sky is still damp, lift out a cone of pigment extending from the lighthouse lantern to the left using a clean, thirsty brush. This creates the soft beam of light cutting through the darkness. -
Paint the sea:
Once the sky is dry to the touch, mix a slightly darker version of your sky color. Paint the strip of ocean below the horizon line with horizontal strokes to suggest water texture, leaving the lighthouse base unpainted. -
Add the stars:
Load a small brush or toothbrush with white gouache diluted slightly with water. Flick the bristles to spatter tiny white stars across the dry sky area. You can hand-paint a few larger, glimmering stars with a fine detail brush.
Pro Tip: Glowing Light
To make the yellow lighthouse beam look brighter, paint a faint, translucent glaze of yellow over the sky area where you lifted the paint earlier.
Step 3: The Lighthouse and Foreground
-
Reveal the white:
If you used masking fluid, gently rub it away once the background is fully dry. You should now have a crisp white silhouette. -
Shadow the tower:
Mix a very watery pale gray. Paint the left side of the lighthouse tower and the house to give them form, blending the gray out to pure white on the right side where the light hits. -
Light the lantern:
Paint the lantern room glass and the small windows with a bright Cadmium Yellow. While the yellow is still wet, touch in a tiny bit of orange or darker yellow at the edges for a glowing effect. -
Define the structure:
Using a very fine brush (size 0 or 2) and a dark gray mix, outline the lantern room details, the railing, and the window frames. Keep these lines delicate. -
Paint the roof:
Color the roof of the small house with a wash of Burnt Umber mixed with a touch of purple or gray to Desaturate it slightly. -
Base layer for ground:
Paint the grassy area connecting the lighthouse to the rocks with a muddy mix of Yellow Ochre and Burnt Umber. -
Paint the rocks:
For the bottom rocks, use a mix of Payne’s Gray and Burnt Umber. Paint loose, irregular shapes, leaving small gaps of white paper or lighter washes to define the edges of individual stones. -
Final touches:
Add a few tiny white highlights to the top of the lantern room or the rocks with white gouache or a gel pen to bring everything into focus.
Peel off your tape if you used it, frame your moody seascape, and enjoy the peaceful glow of your lighthouse.
Moonlit Lighthouse With Ocean Glow
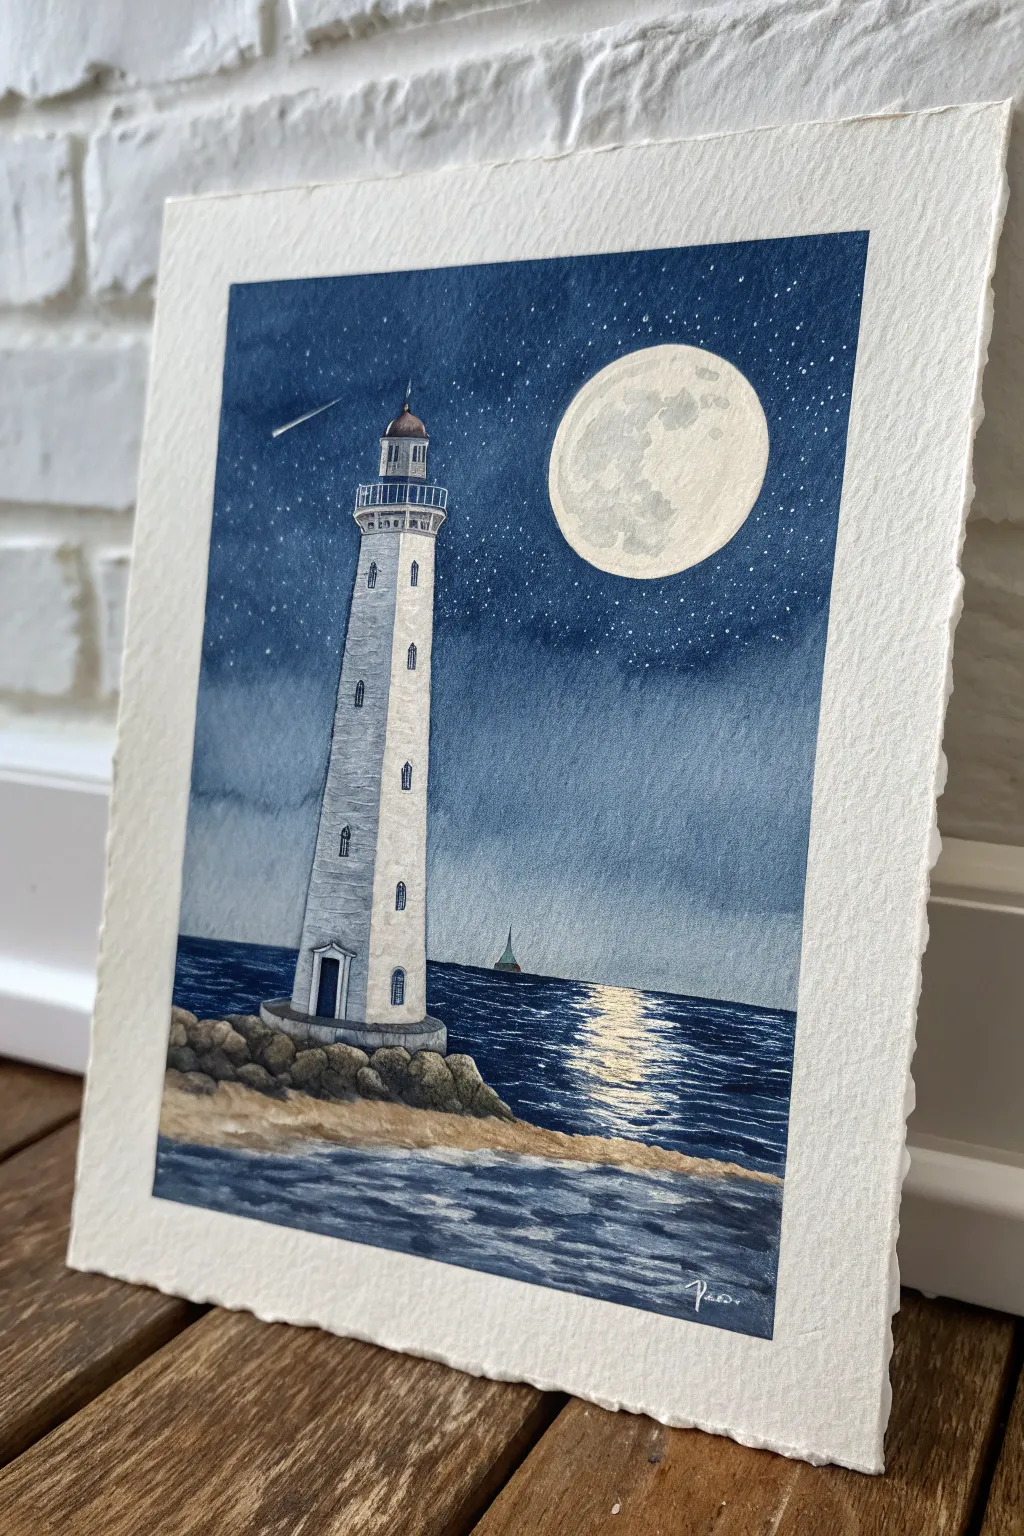
Capture the serene magic of a moonlit night at sea with this atmospheric watercolor project. You will learn to create a glowing moon texture, a starry gradient sky, and the shimmering reflection of light on dark waves.
Step-by-Step Guide
Materials
- Cold-press watercolor paper (300 gsm)
- Watercolor paints (Indigo, Payne’s Gray, Ultramarine Blue, Burnt Umber, Yellow Ochre, White Gouache)
- Masking fluid (drawing gum) and old brush
- Round brushes (sizes 2, 6, and 10)
- Pencil (HB) and eraser
- Painter’s tape or board for mounting
- Salt (optional for texture)
- White gel pen (optional)
Step 1: Sketching and Masking
-
Layout the composition:
Begin by lightly sketching the horizon line about one-third of the way up from the bottom. Outline the tall, slender shape of the lighthouse on the left side, ensuring it tapers slightly as it goes up. -
Define the celestial body:
Draw a large circle in the upper right quadrant for the full moon. You can trace a lid or a cup to get a perfect shape if drawing freehand feels tricky. -
Add structural details:
Sketch the lantern room at the top of the lighthouse, the small windows running down the shaft, and the rocky base it sits upon. Add a tiny triangle sail on the distant horizon. -
Protect the highlights:
Use a dedicated old brush to apply masking fluid over the moon, the entire lighthouse shape, the tiny sailboat, and the wavy path of the moon’s reflection on the water. Let this dry completely before painting.
Step 2: The Night Sky
-
Prepare the sky wash:
Mix a large puddle of deep night blue using Indigo and a touch of Payne’s Gray. Wet the entire sky area with clean water, being careful not to soak the paper too much. -
Paint the gradient:
Apply your dark blue mix starting from the top corners, making it most saturated there. As you move down toward the horizon, dilute the paint slightly with water or add a touch of Ultramarine to lighten the tone near the sea line. -
Create the stars:
While the sky is still damp, splatter clean water or tiny drops of white gouache to create diffused stars. For sharper stars, wait until the paint is dry and flick white gouache with a stiff brush. -
Add a shooting star:
Use a fine liner brush with white gouache to paint a thin, diagonal streak in the upper left corner to represent a shooting star.
Saving Your Brush
Never use your good watercolor brushes for masking fluid! The latex will ruin the bristles instantly. Use an old, cheap synthetic brush or a silicone applicator tool instead.
Step 3: The Ocean and Foreground
-
Paint the deep sea:
Mix a color slightly darker than your sky using Indigo and maybe a hint of Green. Paint horizontal strokes across the water area, leaving the masked reflection area alone for now. -
Refine the waves:
While the ocean wash is wet, drop in darker pigment near the horizon line to create depth. Use a dry brush technique near the bottom to suggest sea foam hitting the shore. -
Reveal the whites:
Once the entire painting is bone dry—I usually give it at least 20 minutes—gently rub away the masking fluid with your finger or a rubber cement pickup tool -
Texture the moon:
Dilute a very pale grey wash. Dab it onto the white moon circle loosely to create craters and shadows, leaving some areas pure white for brightness. -
Paint the reflection:
Using a mix of Yellow Ochre and white gouache, paint horizontal zig-zag strokes over the white area where the reflection was masked. Make the center of the reflection brightest and let it fade into the dark water.
Level Up: Celestial Glow
For an extra magical effect, lightly glaze a very watery ring of yellow ochre or iridescent medium around the moon after the sky is dry to create a soft atmospheric halo.
Step 4: Lighthouse and Details
-
Shade the tower:
Paint the shadowed side of the lighthouse (the left side) with a very pale blue-grey mix to give it cylindrical form, keeping the right side bright white where the moonlight hits. -
Detail the architecture:
Using a small size 2 brush and dark grey paint (not black), fill in the windows, the door, and the railing around the lantern room. Add the copper-colored dome with a bit of Burnt Sienna. -
Paint the rocks:
Block in the rocks at the base using varied tones of Burnt Umber and Grey. Keep the tops of the rocks lighter to show moonlight hitting them. -
Add rocky texture:
Once the base rock color dries, use a dry brush with darker brown to stipple texture onto the stones, defining the cracks and crevices. -
Final highlights:
Use white gouache or a white gel pen to add sharp highlights to the wave crests in the foreground, the edges of the rocks, and the very tip of the lighthouse. -
Finishing touch:
Tear the edges of the paper using a ruler to create that beautiful deckled edge look if you aren’t using pre-deckled paper.
Now your lighthouse stands as a brilliant guide against the deep blue night sky.
Lighthouse With Easy Sea Grass Foreground
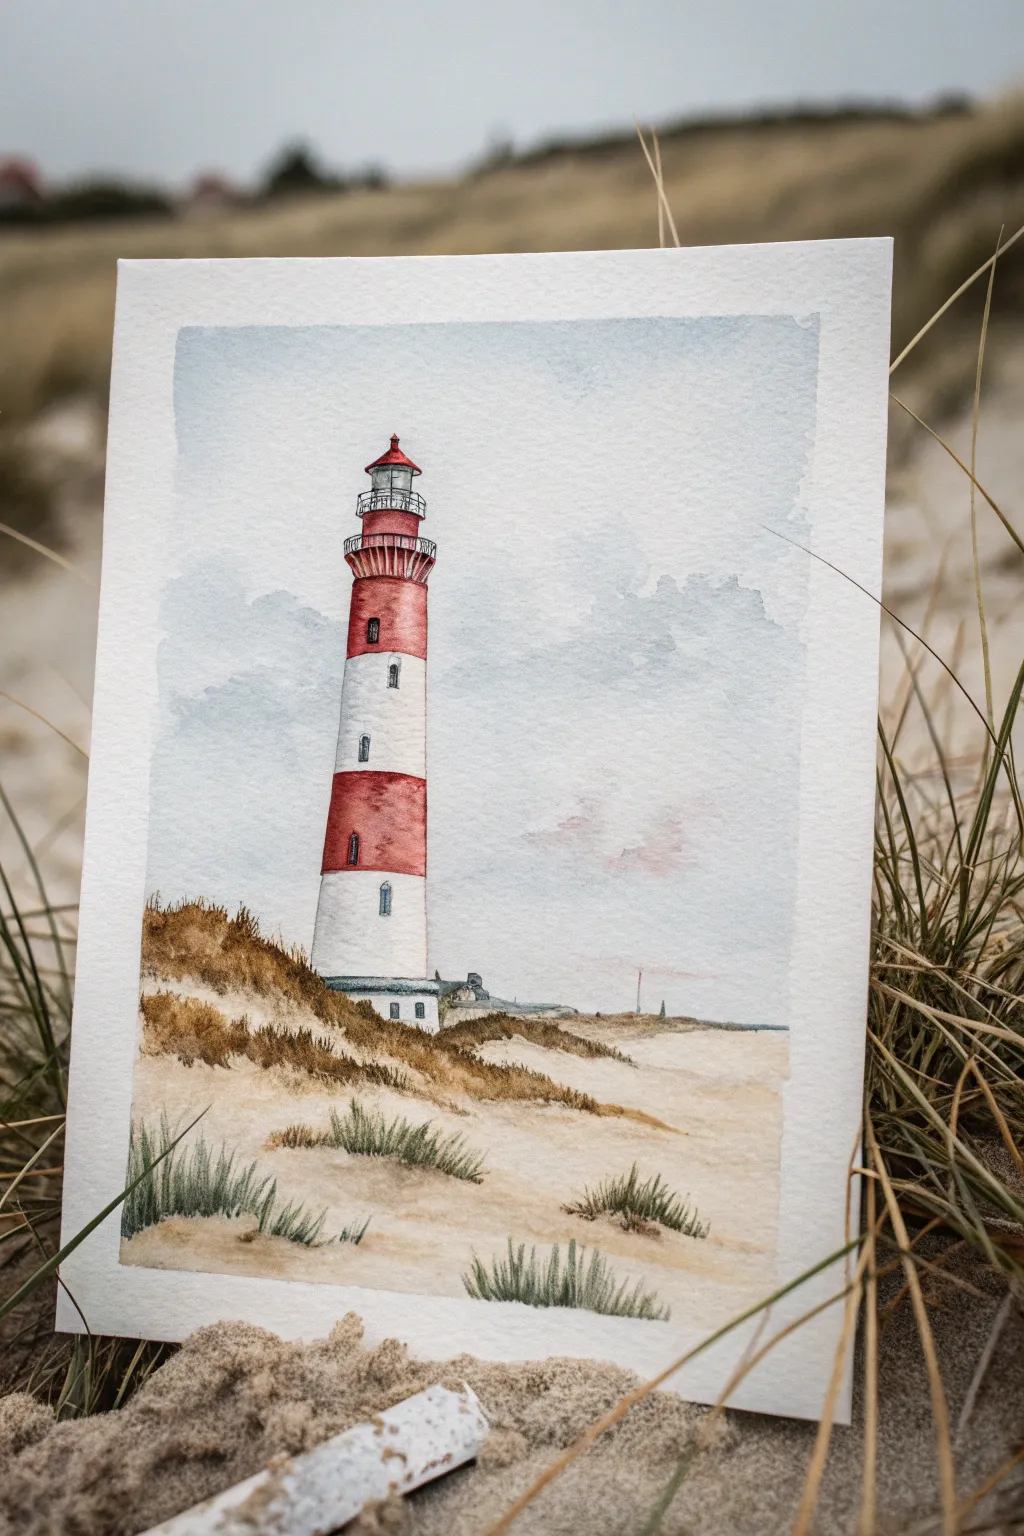
Capture the breezy charm of the coast with this watercolor illustration featuring a classic red-striped lighthouse rising from sandy dunes. The composition balances architectural details with loose, organic textures in the foreground for a refreshing seaside scene.
Step-by-Step Tutorial
Materials
- Cold press watercolor paper (300 gsm)
- HB pencil and kneaded eraser
- Waterproof fine liner pen (black, 0.1mm)
- Watercolor paints (Ultramarine Blue, Burnt Sienna, Yellow Ochre, Alizarin Crimson, Sap Green)
- Round brushes (size 2, 6, and 8)
- Rigger or liner brush
- Masking fluid (optional)
- Two jars of water
- Paper towels
Step 1: Sketching the Structure
-
Establish the horizon:
Begin by lightly penciling a low horizon line about one-third of the way up the paper. This line doesn’t need to be perfectly straight, as it represents the uneven tops of sand dunes. -
Draft the lighthouse cylinder:
Position the lighthouse slightly off-center to the left. Draw a tall, tapering cylinder. Ensure the base is wider than the top, giving it a solid foundation in the sand. -
Add architectural details:
Sketch the lantern room at the top with a small railing and a triangular roof. Divide the main tower into four equal sections to mark where the red and white stripes will go. -
Position the windows:
Draw small, rectangular windows on the tower, staggering them slightly as you move down. Add the small keeper’s cottage shapes jutting out from the base of the tower. -
Outline the dunes:
Draw rolling, organic shapes for the sand dunes in the foreground and middle ground, creating layers that lead the eye toward the lighthouse base.
Clean Edges
For the crispest red stripes on the lighthouse, I find it helpful to wait for one red stripe to dry completely before painting a neighboring section or shadow.
Step 2: Painting the Sky and Tower
-
Paint a soft sky:
Wet the sky area with clean water. Drop in a very dilute wash of Ultramarine Blue, leaving some white paper showing for fluffy clouds. Let the blue fade out near the horizon for an atmospheric look. -
Stripe the tower:
Once the sketch is dry, mix a bold Alizarin Crimson. Carefully paint the alternating red stripes on the lighthouse, following the curve of the cylinder to emphasize its roundness. -
Shade the white sections:
Use a very watery mix of Ultramarine and a touch of Burnt Sienna to create a pale grey shadow. Apply this to the right side of the white stripes to create cylindrical volume. -
Detail the lantern room:
Use a small size 2 brush to paint the roof red and the railing area with a dark grey mix. Keep these strokes precise.
Step 3: Developing the Dunes
-
Base layer for sand:
Mix Yellow Ochre with plenty of water. Apply a loose, uneven wash over the sand dune areas, leaving the tops of the dunes lighter or white to suggest sunlight hitting the ridges. -
Add texture to the dunes:
While the sand wash is still slightly damp, drop in touches of Burnt Sienna on the shadowed sides of the dunes (the right side) to create depth and softness. -
Darken the dune peaks:
Mix Burnt Sienna with a little Ultramarine for a darker brown. Using the side of your brush, scumble this texture along the tops of the dunes closest to the lighthouse to represent dry vegetation. -
Paint the background hills:
For the distant land visible on the horizon, use a faint, cool grey-blue mix. This pushes the horizon back and creates a sense of vast distance.
Level Up: Salt Texture
While the sand washes are still wet, sprinkle a pinch of table salt onto the paper. When dry, brush it off to reveal unique, speckled grains that look just like real sand.
Step 4: Foreground Details
-
Mix green for grass:
Create a muted green color by mixing Sap Green with a touch of Burnt Sienna or red to desaturate it. You don’t want a bright, artificial green here. -
Flick the grass blades:
Load a rigger brush or a sharp round brush with the green mix. Starting from the bottom of the paper, flick your wrist upward to create thin, tapering blades of marram grass. -
Group the tufts:
Don’t cover the whole foreground evenly. Paint the grass in small, random clumps—some dense, some sparse—to mimic how it naturally grows on windswept dunes. -
Add ink accents:
Once the painting is completely bone dry, use your fine liner pen to add very minimal definition to the lighthouse railings, windows, and the sharpest edges of the architecture.
Peel off any tape you used to secure the paper and enjoy your serene coastal landscape.
Lighthouse on a Tiny Island
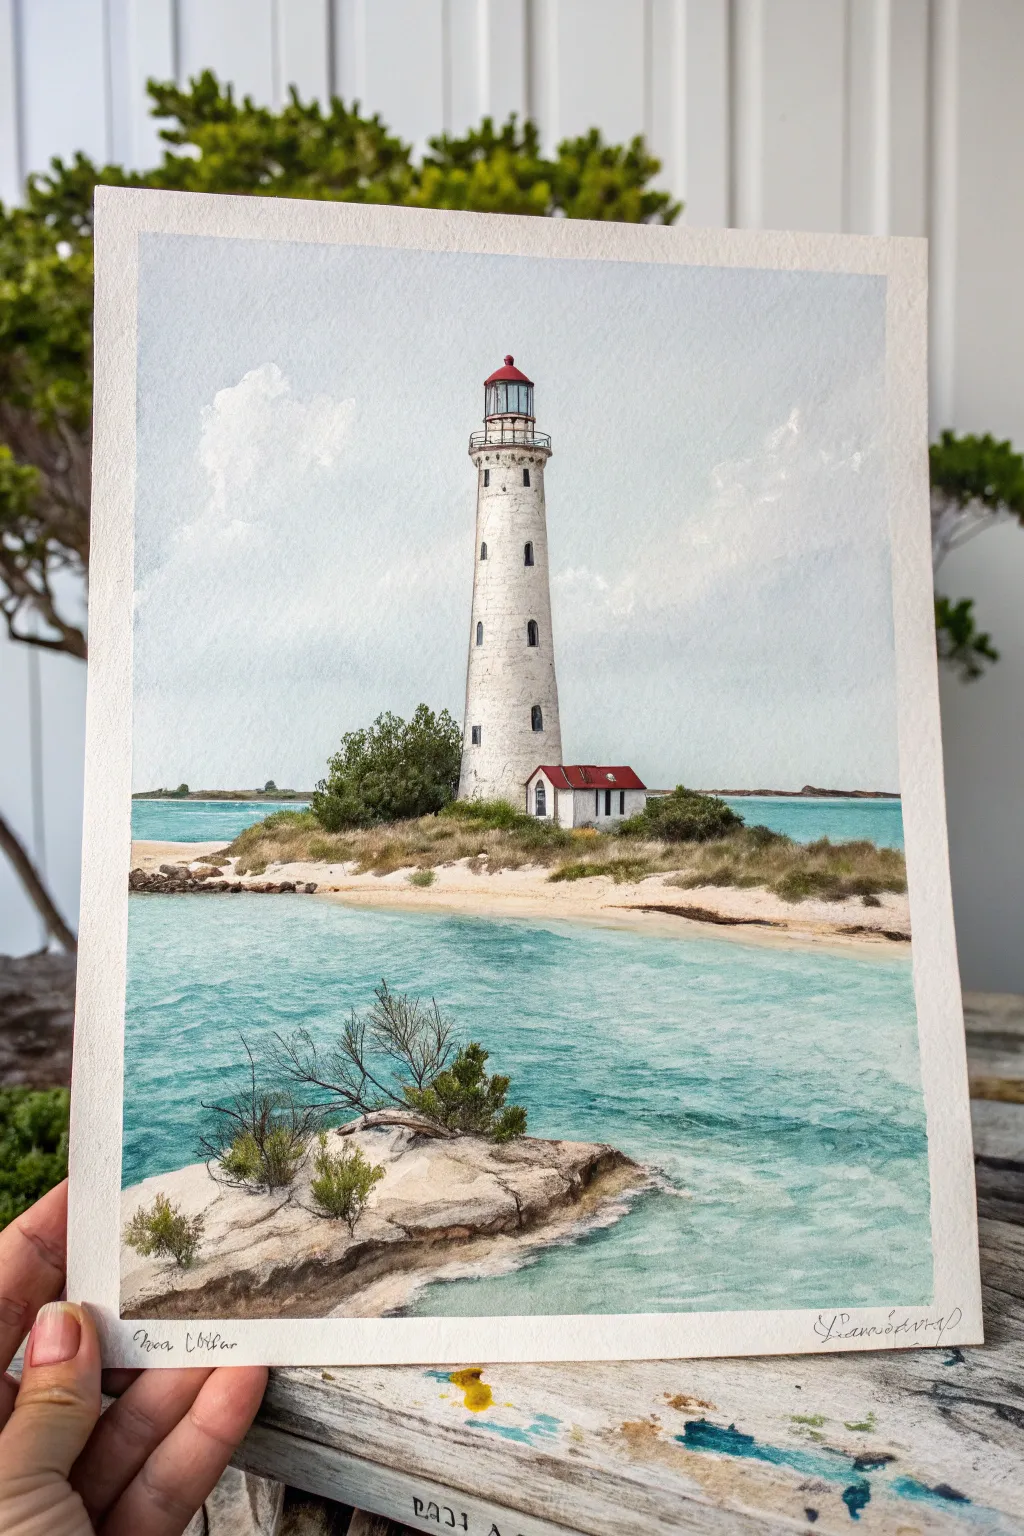
Capture the serene beauty of a classic white lighthouse standing watch over turquoise waters in this detailed watercolor project. You will learn to layer translucent washes to create realistic depth in the sea and sky while retaining the crisp architectural details of the tower.
Step-by-Step Tutorial
Materials
- Cold press watercolor paper (140lb/300gsm)
- Watercolor paints (Cerulean Blue, Cobalt Teal, Burnt Sienna, Yellow Ochre, Alizarin Crimson, Paynes Gray, Sap Green)
- Masking fluid
- Pencil (HB or H) and kneaded eraser
- Round brushes (sizes 2, 6, and 10)
- Rigger or liner brush
- Painter’s tape or masking tape
- Two jars of water and paper towels
Step 1: Preparation and Sky
-
Tape and Trace:
Secure your watercolor paper to a board using painter’s tape on all four sides to create a clean white border. Sketch the lighthouse, the horizon line, the main island shape, and the rocky foreground lightly with a pencil. -
Masking Details:
Using an old brush or a dedicated applicator, apply masking fluid carefully to the white lighthouse tower, the small white house attached to it, and strictly the brightest white caps or sand highlights. Let it dry completely. -
Sky Wash:
Wet the sky area with clean water using your size 10 brush. Drop in a very diluted wash of Cerulean Blue, leaving random patches of white paper untouched to suggest soft, cumulus clouds. -
Softening Clouds:
While the paper is still damp, lift out pigment with a clean, thirsty brush or dab gently with a paper towel to create softer edges on your clouds.
Step 2: Ocean and Island Base
-
Turquoise Waters:
Mix a vibrant Cobalt Teal with a touch of Cerulean. Apply this to the water area using horizontal strokes, letting the color fade slightly as it approaches the horizon line. -
Sand Foundation:
Once the water is dry, mix Yellow Ochre with a tiny amount of Burnt Sienna. Paint the sandy beach areas on the main island and the foreground rock, keeping the wash light and uneven. -
Island Vegetation:
Mix Sap Green with a little Burnt Sienna for a natural olive tone. Stipple this color along the top ridge of the sandy island to create the base for the bushes and dune grass. -
Water Texture:
With a size 6 brush and a slightly darker mix of your water color, add varied horizontal ripples and waves, saving white space for foam where the water meets the sand.
Clean Horizons
Use a piece of masking tape to preserve the horizon line while painting the sky. It keeps the ocean edge razor-sharp without needing a ruler.
Step 3: Lighthouse and Architecture
-
Remove Masking:
Gently rub away the dried masking fluid with your finger or a cement pickup eraser to reveal the crisp white paper underneath. -
Tower Shadow:
Mix a very pale grey using Cobalt Blue and a touch of Burnt Sienna. Paint a vertical shadow down the right side of the lighthouse to give it a cylindrical form. -
Lantern Room:
Use Alizarin Crimson for the roof of the lighthouse and the small house. Paint the glass section of the lantern room with cool grey, leaving tiny speckles of white for reflection. -
Windows and Details:
Using a size 2 brush and a dark Payne’s Gray, carefully paint the small rectangular windows, the railing around the top, and the door details. -
House Shadows:
Add shadows under the eaves of the small red-roofed house and define its corners to make it sit firmly on the ground.
Weathering Effects
Lightly splatter tiny dots of watered-down white gouache or acrylic onto the lighthouse base to simulate salt spray and weathering texture.
Step 4: Foreground and Finishing Touches
-
Deepening Greens:
For the bushes near the lighthouse, mix a dense dark green. Dapple this color over your initial green wash, focusing on the undersides of the foliage to create volume. -
Foreground Rocks:
Add texture to the foreground rocks using the dry brush technique with a mix of Burnt Sienna and Payne’s Gray, dragging the brush across the texture of the paper. -
Scrubby Bushes:
Switch to your rigger or liner brush. Paint the thin, spindly branches of the foreground shrubs, adding sparse clusters of green leaves. -
Defining the Shoreline:
Enhance the waterline where the sand meets the sea with a thin, dark line of wet sand color to add separation. -
Final Contrast:
Evaluate your values. If the lighthouse feels too bright, glaze a tiny bit more shadow on the dark side. Darken the water in the immediate foreground to push the perspective.
Peeling off the tape reveals a crisp border that frames your coastal scene beautifully
Lighthouse With Palette Knife Waves Look
Capture the solitary beauty of a lighthouse standing guard over a restless sea with this painting project that emphasizes texture and distinct brushwork. The finished piece features a crisp, structural lighthouse contrasted against a sea of choppy, deep blue waves created with energetic strokes.
Step-by-Step
Materials
- Canvas panel or sturdy watercolor paper (approx. 11×14 inches)
- Acrylic paints (Titanium White, Phthalo Blue, Ultramarine Blue, Burnt Umber, Yellow Ochre, Cadmium Red, Black)
- Flat brushes (various sizes: 1/2 inch, 1/4 inch)
- Small round detail brush (size 1 or 0)
- Palette knife (optional, for wave texture)
- Ruler
- Pencil for sketching
- Painter’s tape or masking tape (for horizon line)
- Cup of water and paper towels
Step 1: Sketching the Structure
-
Establish the horizon:
Begin by deciding where your sea meets the sky. Draw a light horizontal line across the lower third of your canvas. You can use painter’s tape here to ensure a sharp division later if you wish. -
Outline the lighthouse:
Using a ruler, lightly sketch the vertical tapering shape of the lighthouse tower centered a bit to the left. It should be wider at the base and narrow as it reaches the top. Draw the cylindrical lantern room and the triangular cap on top. -
Add the keeper’s house:
Sketch a small rectangular building attached to the right side of the tower base. Give it a simple pitched roof shape and rough in the placement of windows and the door. -
Define the rocky island:
Draw an irregular, jagged shape beneath the buildings to represent the rocky outcropping they sit on. Let this shape extend horizontally across the middle ground, dipping into where the water will be.
Straight Lines Made Easy
Struggling to paint the thin black railings or window frames? Wait for the paint to dry fully, then use a fine-tip black permanent marker or archival ink pen for crisp control.
Step 2: Painting the Sky and Tower
-
Wash in the sky:
Mix a very pale blue using a lot of White and a tiny touch of Phthalo Blue. Paint the entire sky area with broad, sweeping strokes. For a cloudy effect, leave some areas slightly lighter or add hints of barely-there grey for cloud shadows. -
Base coat the lighthouse:
Paint the lighthouse tower using a mix of White with a drop of Yellow Ochre to give it an aged, sun-warmed concrete look. Don’t make it pure stark white; the warmth adds realism. -
Shade the tower:
While the base is drying, mix a slightly darker version of your tower color using a touch of grey or brown. Apply this vertically along the right side of the tower to create a rounded, cylindrical form through shadowing. -
Paint the red accents:
Use Cadmium Red mixed with a speck of brown (to tone down the brightness) for the lantern room roof and the roof of the keeper’s house. I like to use two coats here for solid, opaque coverage.
Texture Boost
Mix a little modeling paste or heavy gel medium into your white paint for the wave foam. This will physically raise the whitecaps off the canvas for a 3D effect.
Step 3: Creating the Sea and Rocks
-
Paint the rocky base:
Mix Burnt Umber with grey and a little white. Paint the jagged island shape beneath the lighthouse. Use a dabbling motion with your brush to mimic the rough texture of stone. -
Block in the deep water:
For the ocean, mix a dark, rich color using Phthalo Blue, Ultramarine, and a touch of Black. Fill in the water area completely, brushing horizontally to suggest calmness in the distance. -
Add wave movement:
Once the dark blue is tacky but not fully dry, mix a medium blue-green tone. Using a flat brush or the edge of a palette knife, apply choppy, diagonal strokes in the foreground to create the swelling body of the waves. -
Highlight the whitecaps:
Load a small flat brush or palette knife with pure Titanium White. Create the crashing foam by dragging the paint loosely over the dark blue waves. Focus on creating jagged, peaked shapes where the water is most turbulent. -
Refine water transparency:
In the very front waves, glaze a tiny bit of transparent yellow-green over the dark blue before adding the white foam. This suggests light shining through the thinner water.
Step 4: Details and Final Touches
-
Window details:
Using your smallest detail brush and dark grey paint, carefully fill in the small windows on the lighthouse tower and the keeper’s house. Keep the lines straight and crisp. -
Ironwork railings:
With the same dark grey or black and a very steady hand (or a precise ink pen once dry), draw the railing around the lantern room at the top of the tower. -
Add shadows to the house:
Paint the side of the keeper’s house that faces away from the light source in a cool grey-blue tone to firmly ground the structure. -
Enhance the shore break:
Add extra white foam right where the water meets the dark rocks to show the collision of the sea against the land. -
Final assessment:
Step back and look for balance. If the sky looks too empty, you can dab a few soft white clouds near the horizon to mirror the white of the waves below.
Now stepping back, you can hear the crash of the waves and feel the solid presence of your painted tower
Abstract Color-Block Lighthouse
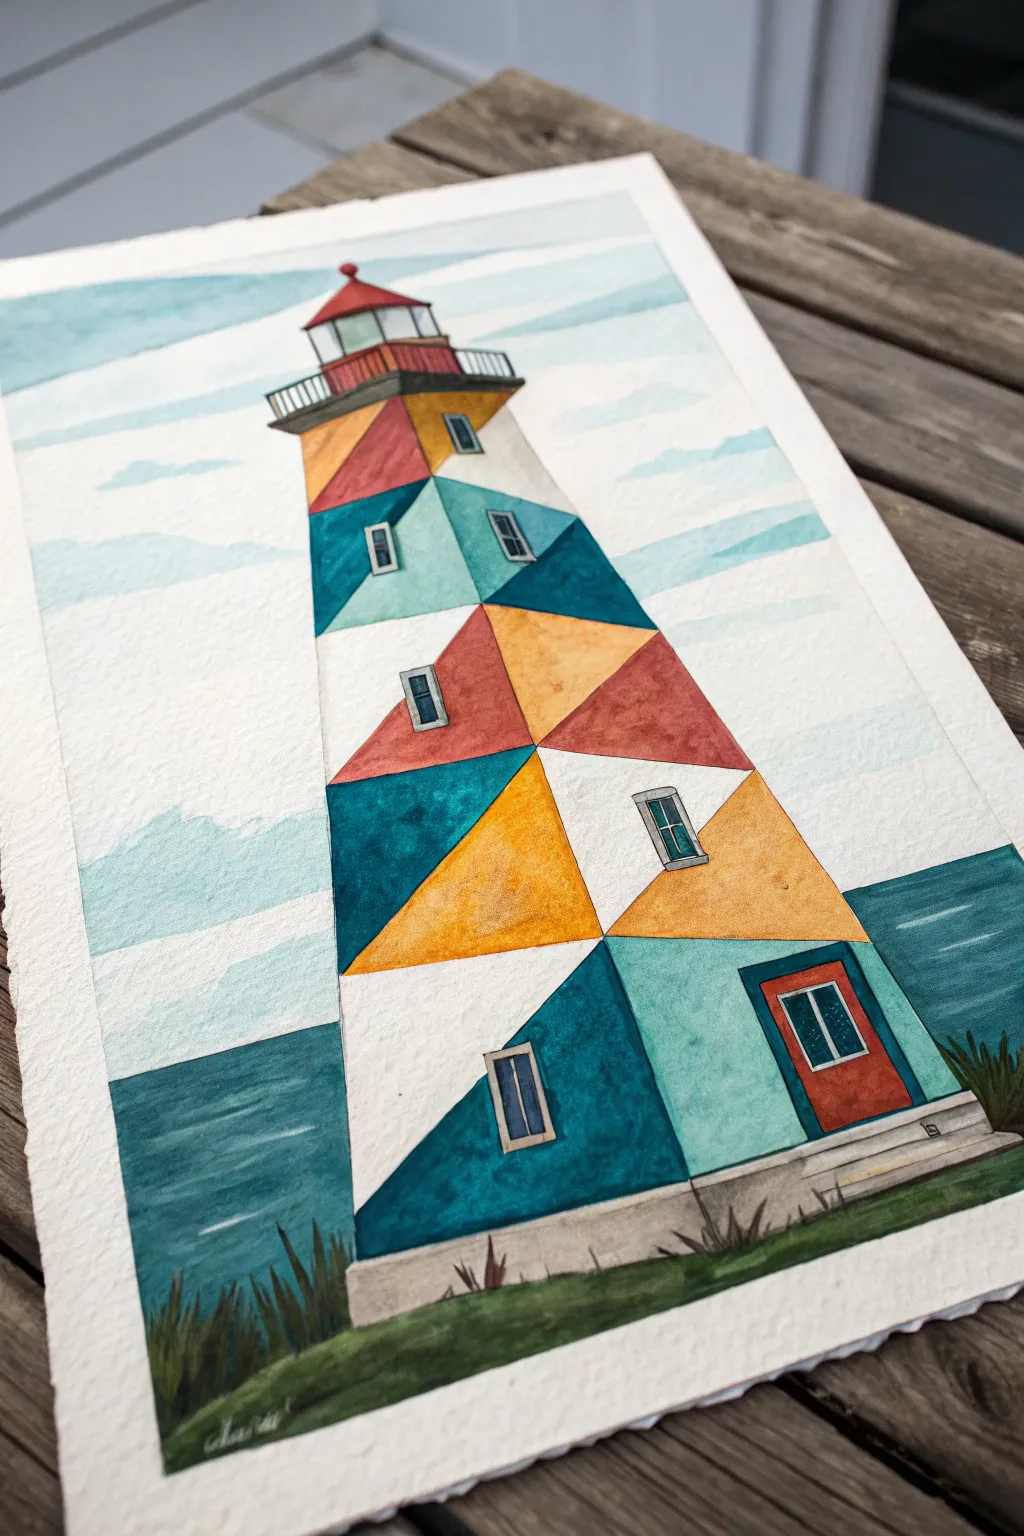
This project transforms a traditional coastal icon into a modern piece of art using sharp geometric shapes and vibrant color blocking. The faceted design gives the lighthouse a unique 3D appearance while keeping the actual painting process surprisingly simple and beginner-friendly.
Detailed Instructions
Materials
- Cold press watercolor paper (140lb/300gsm)
- Pencil (HB or H)
- Ruler
- Eraser
- Watercolor paints (teal, indigo, rust red, yellow ochre, warm grey)
- Round watercolor brushes (size 4 and 8)
- Fine liner brush or small detail brush (size 0 or 1)
- Painters tape or masking tape
- Palette for mixing
- Two jars of water
- Paper towels
Step 1: Drafting the Design
-
Tape the border:
Begin by taping down all four edges of your watercolor paper to a board or table. This creates that clean white border shown in the original image and keeps the paper flat while wet. -
Establish the horizon:
Using your ruler, lightly draw a horizontal line across the bottom third of the paper. This won’t be perfectly straight in the final painting, but it helps position the base. -
Outline the lighthouse shape:
Draw the main tapered vertical shape of the lighthouse. Start wide at the bottom (sitting on your horizon line) and taper it inward as you go up, capping it with a horizontal line for the observation deck. -
Create the geometric segments:
Here is where the magic happens: instead of drawing curved lighthouse stripes, use your ruler to draw diagonal zigzag lines across the lighthouse body. Imagine cutting the structure into irregular triangles and quadrilaterals. -
Add windows and door:
Sketch small rectangular windows within the geometric shapes. Try to angle the tops and bottoms of the windows to match the slope of the lighthouse walls, which helps distinct perspective. Draw a larger rectangle at the base for the door. -
Detail the top lantern:
Sketch the lantern room on top. This includes a small railing, the glass room itself (a simple cylinder shape), and a pointed triangular roof.
Colors Bleeding?
If colors run into each other, you’re painting adjacent shapes too quickly. Use a hairdryer on ‘cool’ setting for 30 seconds between painting neighboring geometric blocks.
Step 2: Applying Color
-
First wash – Sky:
Mix a very diluted, watery teal or light blue. Paint horizontal bands across the sky area, leaving random gaps of white paper to suggest cloud formations. Keep this layer very loose and light. -
Plan your palette:
Prepare four main puddles of paint on your palette: a deep teal, a rust/terracotta red, a sunny yellow-ochre, and a very light grey. -
Paint the lighthouse blocks:
Start filling in your geometric segments. The trick is to never paint two touching shapes at the same time to prevent bleeding. Paint a red triangle, then skip to a teal one on the other side. Let sections dry before painting their neighbors. -
Leave white segments:
Be sure to leave several geometric segments completely unpainted (white) to represent the white sections of the lighthouse. This high contrast makes the colors pop. -
Paint the sea on the sides:
While the lighthouse body dries, mix a deep blue-green (indigo mixed with teal). Paint the water sections on the left and right of the lighthouse, using horizontal strokes to mimic gentle waves. -
Paint the grassy base:
Mix a dark olive green. Paint the ground area below the lighthouse. While the paint is still wet, use a smaller brush to flick upward strokes at the edges to create wispy blades of grass.
Step 3: Refining Details
-
The lantern room:
Paint the roof usually a vibrant red. Use a dark grey or black for the lantern room glass details and the railing. I find a very fine liner brush is essential here to keep these lines crisp. -
Windows and frames:
Paint the interior of the window rectangles with a dark grey-blue to look like glass reflecting the sky. Carefully outline them with a thin grey border. -
The door details:
Fill the door with your rust red, outlining the frame in teal or grey. Add a tiny dot for the doorknob once dry. -
Adding texture to the white:
Mix an extremely pale grey wash. Add very faint shadows on one side of the white geometric shapes. This subtle step gives the white paper dimension so it doesn’t look flat. -
Final touches:
Once everything is bone dry, carefully peel off the masking tape at a 45-degree angle to reveal your crisp white border.
Level Up: Salt Texture
While the paint for the ocean or the rusty red blocks is still wet, sprinkle a tiny pinch of table salt on it. Brush it off when dry for a weathered, rocky texture.
Step back and admire how simple geometric shapes have come together to build a striking, architectural seascape.
Whimsical Pastel Lighthouse Dreamscape
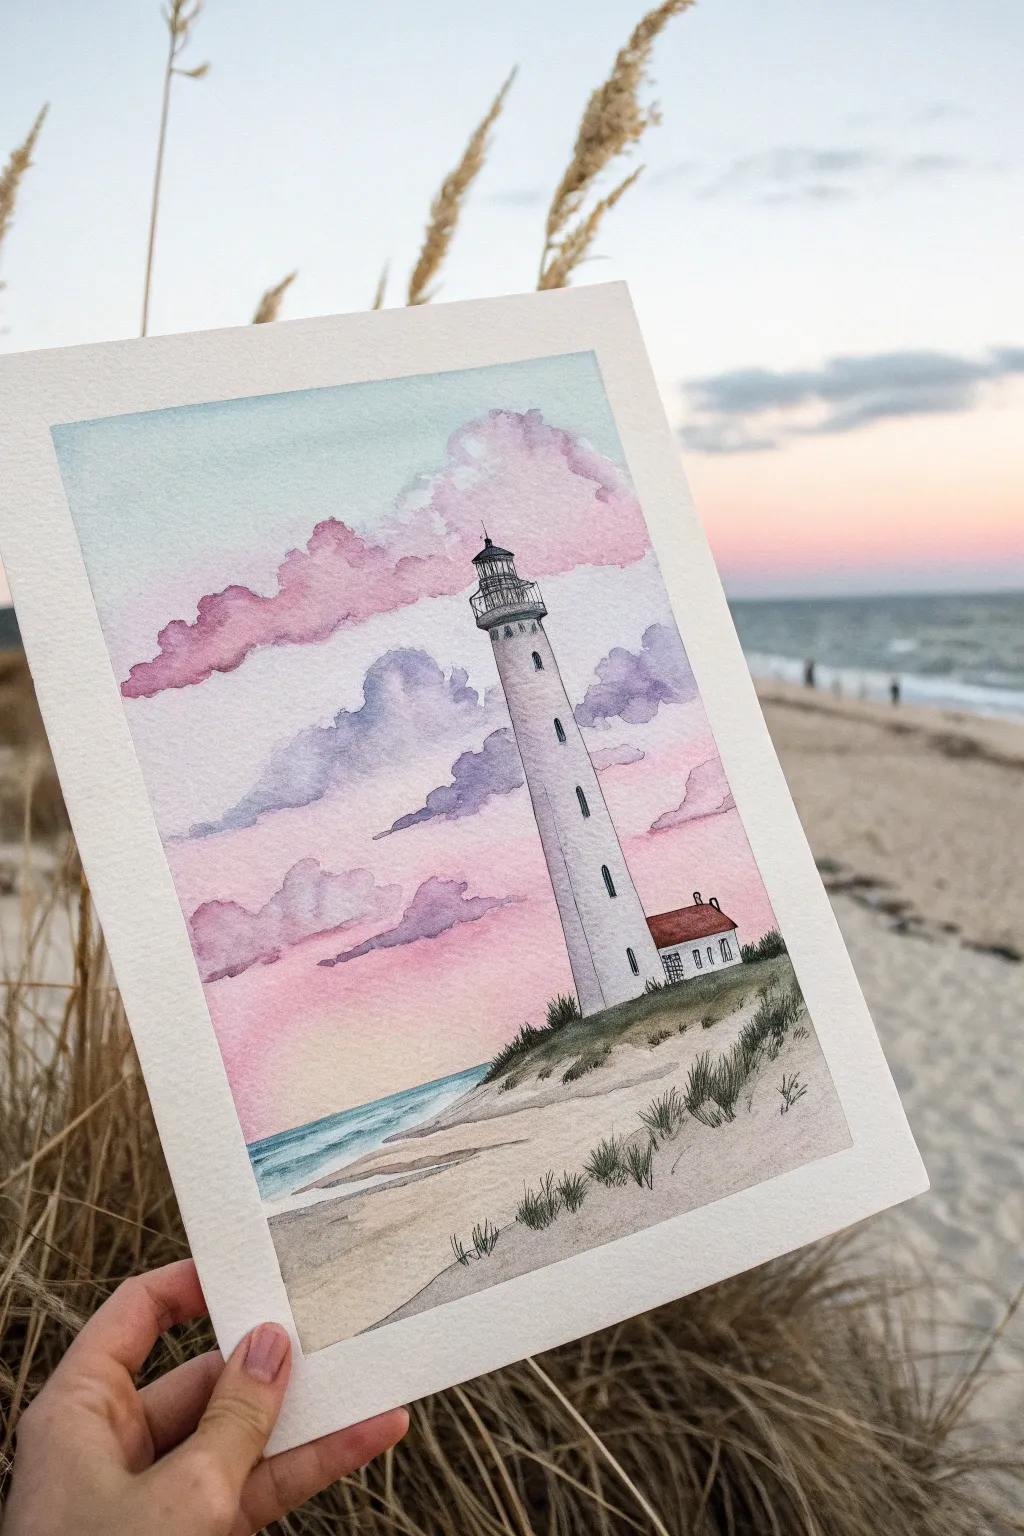
Capture the magic of twilight at the coast with this dreamy watercolor project. This painting combines soft, wet-on-wet cloud formations with delicate ink linework to create a serene moment suspended in time.
Step-by-Step Tutorial
Materials
- Cold press watercolor paper (300 gsm)
- Watercolor paints (Cotton Candy Pink, Lavender/Violet, Cyan Blue, Paynes Gray, Burnt Sienna, Sap Green)
- Round watercolor brushes (Size 4, Size 8)
- Fine liner pen (Black, waterproof, 0.1 or 0.3mm)
- Pencil (HB) and soft eraser
- Masking tape
- Jar of clean water
- Paper towels
Step 1: Sketching the Foundations
-
Establish the horizon:
Begin by taping down your paper to prevent warping. Lightly pencil in a horizon line roughly one-quarter of the way up from the bottom of the page. -
Draft the dune line:
Below the horizon, sketch a gently sloping dune line on the right side that dips down towards the left, leaving space for the water. -
Outline the lighthouse:
Draw the lighthouse structure on top of the dune. Make it tall and slender, slightly tapering as it goes up. -
Add architectural details:
Sketch the lantern room at the top, a small keeper’s house attached to the base, and indicate where the small windows will be.
Cloud Softness Secret
Work fast on the sky! If the paper starts drying, your clouds will get hard edges. Rewet slightly with a mist spray bottle if needed.
Step 2: Painting the Sky & Water
-
Prepare the sky:
Use your larger brush to wet the entire sky area with clean water, carefully painting around the white shape of the lighthouse. -
Apply the first blush:
While the paper is wet, drop in soft patches of pink near the horizon and slowly fade it upward. Keep the edges vague and soft. -
Create cloud separation:
Mix a watery light blue or turquoise. Paint the upper section of the sky, letting it touch the pink slightly but leaving some white paper gaps for cloud highlights. -
Depict purple clouds:
While the sky is still damp (but not soaking), dab in lavender or soft purple to form the distinct cloud shapes floating midway up the sky. -
Paint the ocean:
Once the sky is dry enough that colors won’t bleed, paint a strip of cyan blue for the ocean. Leave a tiny white gap at the shoreline for sea foam.
Step 3: Detailed Foreground & Structure
-
Base layer for sand:
Mix a very dilute wash of brown and gray. Paint the sand dunes, keeping the color uneven to mimic texture. -
Add dune shadows:
While the sand wash is wet, drop slightly darker brown pigment along the bottom edge of the dune crests to create depth. -
Roof details:
Once the paper is fully dry, careful paint the roof of the small cottage red or terracotta. -
Lighthouse shading:
Using a very watery gray-purple mix, paint a shadow down the left side of the lighthouse cylinder to give it form. -
First layer of vegetation:
Mix a muddy green and use the tip of your smaller brush to flick upward strokes along the dune ridge for grass.
Wobbly Lines?
Don’t stress straight lines. A slightly shaky hand actually adds character to the old lighthouse architecture and looks more organic.
Step 4: Ink Work & Refinement
-
Ink the lighthouse lantern:
Ensure the paper is bone dry. Use your fine liner pen to draw the intricate railing and glass panes of the lighthouse top. -
Outline the structure:
Lightly trace the sides of the lighthouse and the cottage. Keep the lines somewhat broken rather than rigid and solid. -
Define windows:
Draw the small arched windows going up the tower and the square windows on the cottage. -
Add grassy texture:
Use quick, confident pen strokes to draw tufts of dune grass over your painted green areas. -
Final enhancements:
Add tiny details like a weather vane or lightning rod at the very peak, and few scribbled birds in the distance if desired.
Peel off your tape to reveal a crisp border and enjoy your peaceful seaside creation


Have a question or want to share your own experience? I'd love to hear from you in the comments below!