When you want to draw nature but don’t want to overthink it, simple shapes and small scenes are your best friends. These ideas are the kind you can finish in one sitting and still feel proud enough to pin or share.
Pine Tree Silhouettes Against a Light Sky
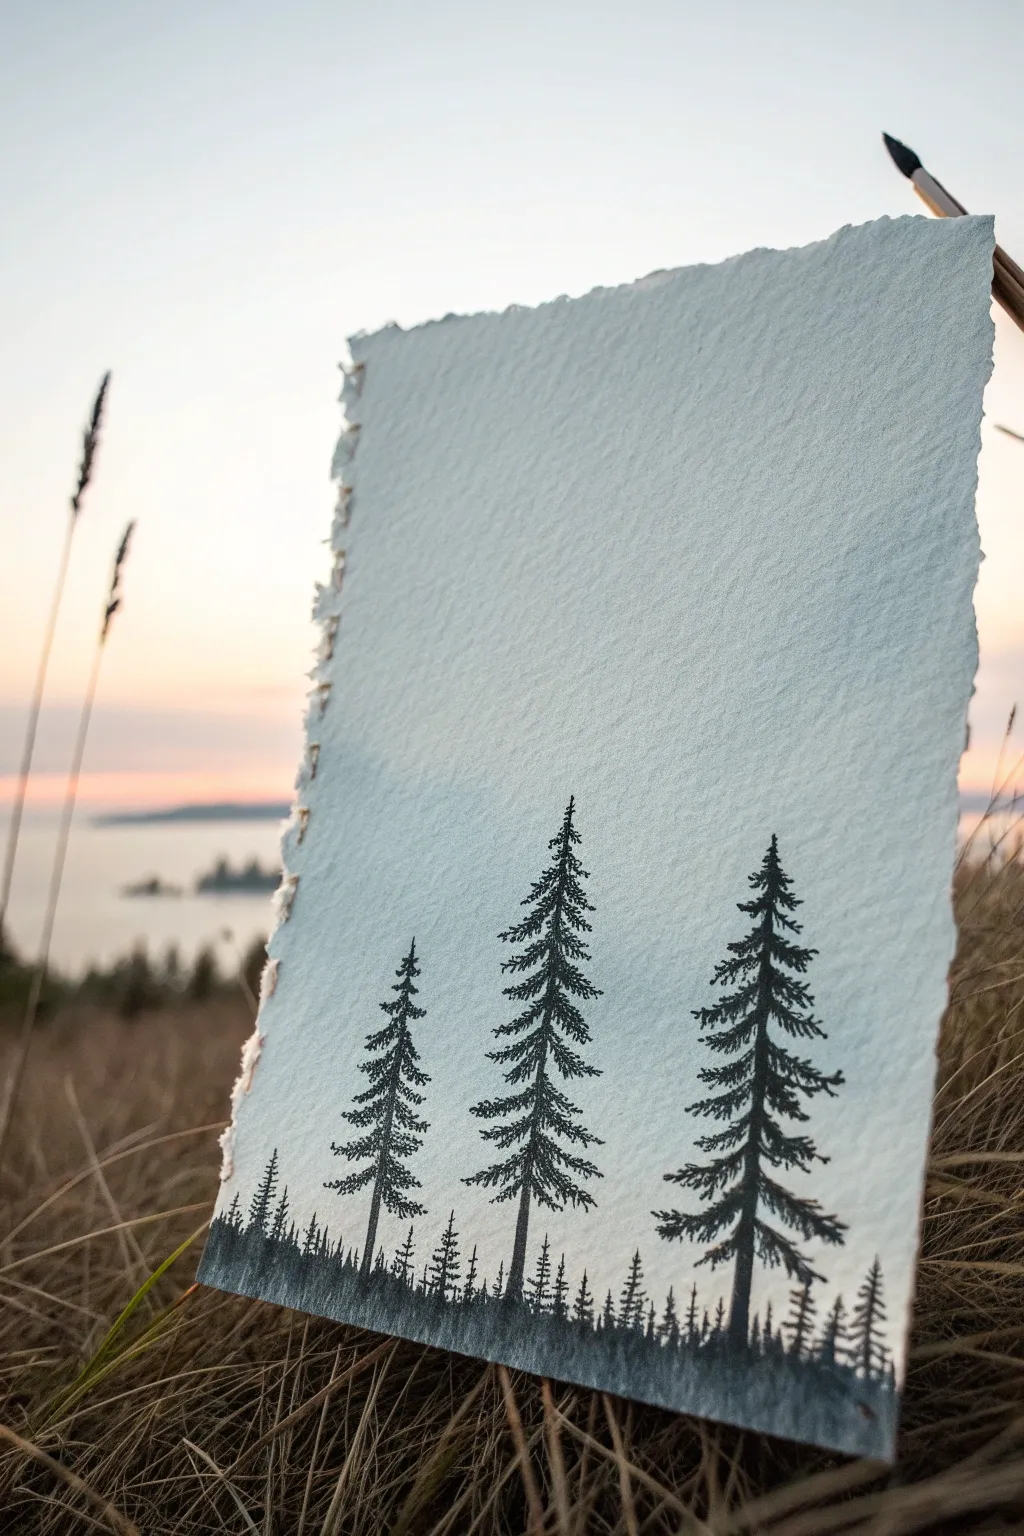
This project captures the stark beauty of evergreen trees against a soft, atmospheric background using a minimal monochromatic palette. Working on heavily textured paper adds an organic feel that perfectly complements the rugged nature of the subject matter.
Step-by-Step Tutorial
Materials
- Cold press watercolor paper (300 gsm or heavier)
- Black waterproof ink or archival fineliner pens (sizes 0.1, 0.3, and 0.5)
- Black watercolor paint or diluted ink (for the wash at the bottom)
- Round watercolor brush (size 2 or 4)
- Masking tape (optional, for securing the paper)
- Ruler (for tearing paper edges)
- Small cup of water
Step 1: Preparing the Canvas
-
Select the paper:
Choose a high-quality cold press watercolor paper. The rough texture, or “tooth,” is essential for achieving the specific look seen in the reference image. -
Create the deckled edge:
Instead of cutting your paper with scissors, place a ruler firmly along the edge where you want the border to simply tear against it. Pull the paper upward and toward the ruler to create a soft, ragged “deckled” edge on at least one side. -
Orient the page:
Position your paper vertically (portrait mode). This composition relies on height to give the trees a majestic presence.
Master the Texture
Utilize the paper’s roughness! When drawing branches, move your pen quickly. The pen will skip over the paper’s “valleys,” creating natural highlights.
Step 2: Establishing the Horizon
-
Mix a dark wash:
Dilute a small amount of black watercolor paint or ink with water. You want a dark grey consistency, not pitch black yet, to create the misty forest floor. -
Paint the uneven ground:
Using your round brush, paint a solid, uneven band along the very bottom of the paper. Let the top edge of this band be jagged to simulate distant treetops and uneven terrain. -
Add depth to the bottom:
While the first layer is still slightly damp, drop in concentrated black ink or pigment right at the bottom edge. Gravity will pull the pigment down, naturally creating a gradient from dark black at the base to dark grey at the horizon line. -
Let it dry completely:
This is crucial. Before drawing the sharp tree details, ensure the bottom wash is bone dry to prevent the ink from bleeding.
Step 3: Designing the Trees
-
Plan the composition:
Visualize three main focal trees. Place the tallest tree slightly off-center to the right, a medium tree in the center, and a smaller one to the left. Avoid perfect symmetry. -
Draw the main trunks:
Using a 0.3 or 0.5 fineliner (or a fine brush with pure ink), draw faint, straight vertical lines for the trunks. Make them slightly thicker at the base and tapering extremely thin at the top. -
Start the tops:
Switch to your finest pen (0.1). At the very tip of the trunk, make tiny, downward-angled dashes to represent the delicate new growth at the crown. -
Build the upper branches:
Working your way down the trunk, create small, jagged scribbles. Keep the branches short near the top, creating a narrow, arrowhead shape. I find erratic, quick strokes work better than careful lines here. -
Thicken the canopy:
As you move lower, widen the branches. Use a zig-zag motion, letting the pen skip slightly over the textured paper to leave tiny white gaps that look like highlighted pine needles. -
Vary the branch density:
Pine trees aren’t solid cones. Leave small gaps between some branch layers to show the trunk through the needles, making the tree look realistic and airy. -
Weigh down the lower branches:
For the bottom third of the trees, curve the branches slightly downward as if they are heavy with age. Use thicker strokes here.
Level Up: Morning Mist
Before drying the bottom layer, lift some pigment out with a dry tissue to create a foggy, separation layer between the foreground and background trees.
Step 4: Background Details
-
Add distant trees:
Between your three main trees, draw tiny, simplified vertical lines sprouting from the dark horizon wash. -
Detail the background layer:
Turn these tiny lines into miniature pine trees by adding quick, scribble-like foliage. Keep them significantly shorter and less detailed than the main three to create proper scale. -
Blend the bases:
Where the main tree trunks meet the dark wash at the bottom, gently stipple small dots or short grass-like marks to blend the sharp trunk lines into the shadowy forest floor. -
Final check:
Step back and look at the silhouette. If any tree looks too sparse, go back in with your stippling technique to darken the core of the foliage, keeping the outer edges delicate.
Once the ink is fully set, you have a serene miniature landscape ready to be gifted or displayed


Big Moon Over a Minimal Landscape

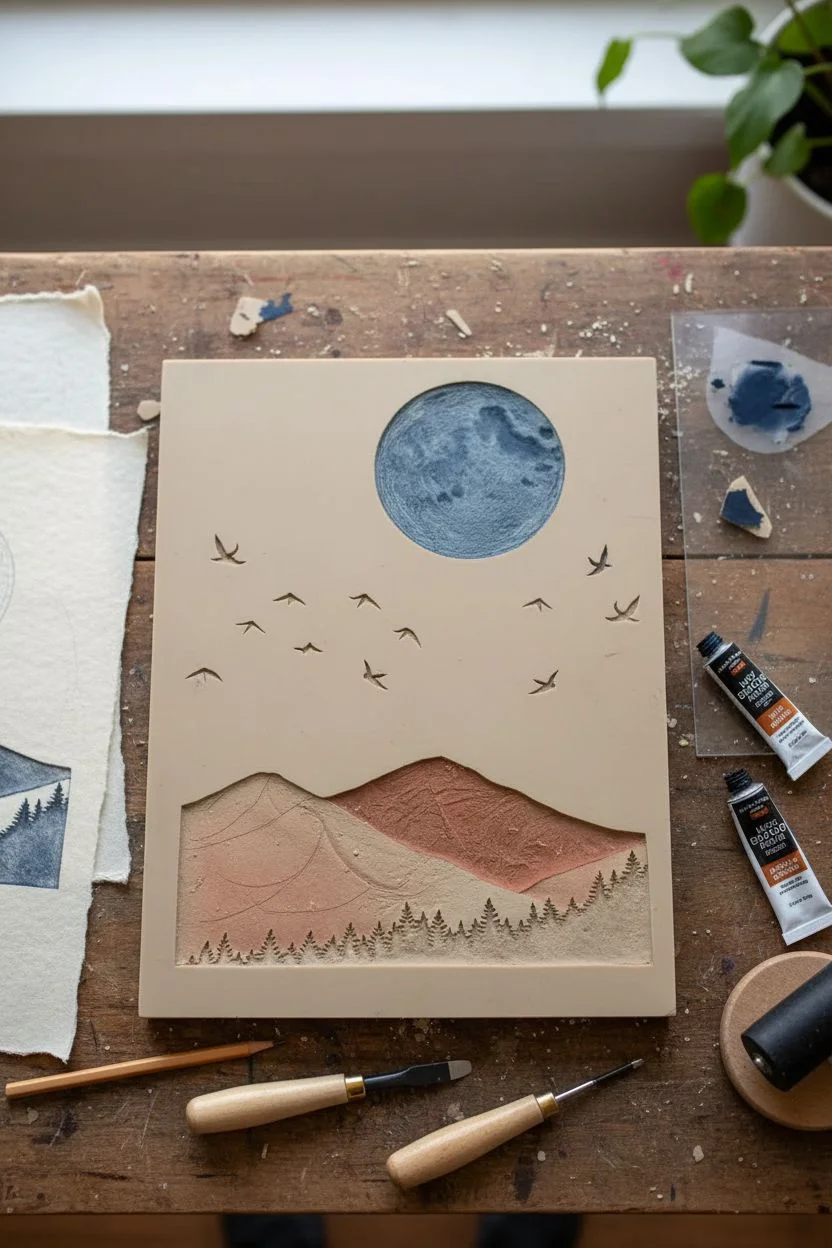
Capture the serene beauty of a twilight landscape with this block printing project on textured handmade paper. The combination of a bold moon and delicate pine silhouettes creates a stunning, earthy piece of wall art.
Detailed Instructions
Materials
- Handmade or textured watercolor paper (deckled edge preferred)
- Rubber carving block or soft linoleum
- Linoleum carving tools (V-gouge and U-gouge)
- Block printing ink (Navy Blue, Rust/Burnt Sienna, Black)
- Brayer (rubber roller)
- Glass or acrylic sheet for rolling ink
- Baren or wooden spoon for pressing
- Pencil and tracing paper
- Craft knife
Step 1: Designing & Carving
-
Sketch your design:
Start by lightly sketching the mountain range directly onto your paper to gauge the size. You want rolling hills that take up the bottom third of the page. -
Transfer to block:
Trace your mountain shapes onto the rubber carving block. You can create separate blocks for the hills and the tree line, or careful carve them on one large block if you are experienced. -
Carve the mountains:
Using a U-gouge, clear away the negative space around your mountain shapes. For the mountain texture itself, leave the surface mostly flat, perhaps carving very shallow scratches to create that weathered, grainy look seen in the reference. -
Carve the moon:
Trace a circle (use a cup or jar lid as a guide) onto a separate piece of rubber block. Carve around the outside. Inside the circle, use a small gouge to create craters and texture by removing small bits of rubber. -
Carve the trees:
For the treeline, you need a precise touch. Draw a long, jagged strip of pine trees. Use your finest V-gouge to carve away the sky around the tree spikes. This strip should be wide enough to span the bottom of your print. -
Carve the birds:
On a small scrap piece of rubber, crave 2-3 tiny bird silhouettes. Having them separate allows you to stamp them wherever you like.
Step 2: Printing the Landscape
-
Prepare the mountain ink:
Squeeze a small amount of Rust or Burnt Sienna ink onto your glass slab. Roll it out with the brayer until it sounds sticky, like velcro pulled apart. -
Print the foreground hill:
Ink up your first mountain block. Position it near the bottom of your textured paper and press firmly. Use a baren or the back of a spoon to rub the back of the block in circles to transfer the ink evenly. -
Print the background hill:
Re-ink the mountain block, perhaps mixing in a tiny touch of darker red or brown for depth. Stamp this slightly higher than the first hill, overlapping just a bit to create dimension. -
Ink the moon:
Clean your brayer or use a second one. Roll out a dusty Navy Blue ink. Apply it to your round moon stamp. -
Place the moon:
Position the moon high in the sky, slightly off-center for visual interest. Press down firmly to catch the texture of the paper.
Textured Paper Tip
Using rough, cold-press watercolor paper naturally creates ‘noise’ in the print. Don’t press too hard if you want those white speckles to show through.
Step 3: Adding Details
-
Prepare the treeline ink:
Mix a very dark Navy Blue or add a touch of Black to your blue ink. You want a deep, shadowy silhouette color. -
stamp the forest:
Ink up your tree strip block. Align it with the very bottom edge of your rust-colored mountains. Press firmly to lay the dark trees over the lighter mountains. -
Add the flock:
Using black or dark grey ink, stamp your varying bird shapes into the open space between the hills and the moon. -
Let it cure:
I always let block printing ink dry for at least 24 hours, as oil-based inks can take time to fully set on thick cotton paper.
Uneven Ink Coverage?
If your print looks too patchy, your ink might be too dry. Add a drop of printmaker’s plate oil or extender to loosen the ink before rolling.
Enjoy the calming process of peeling back the paper to reveal your handmade landscape


Easy Cloud Study Using Soft Shading
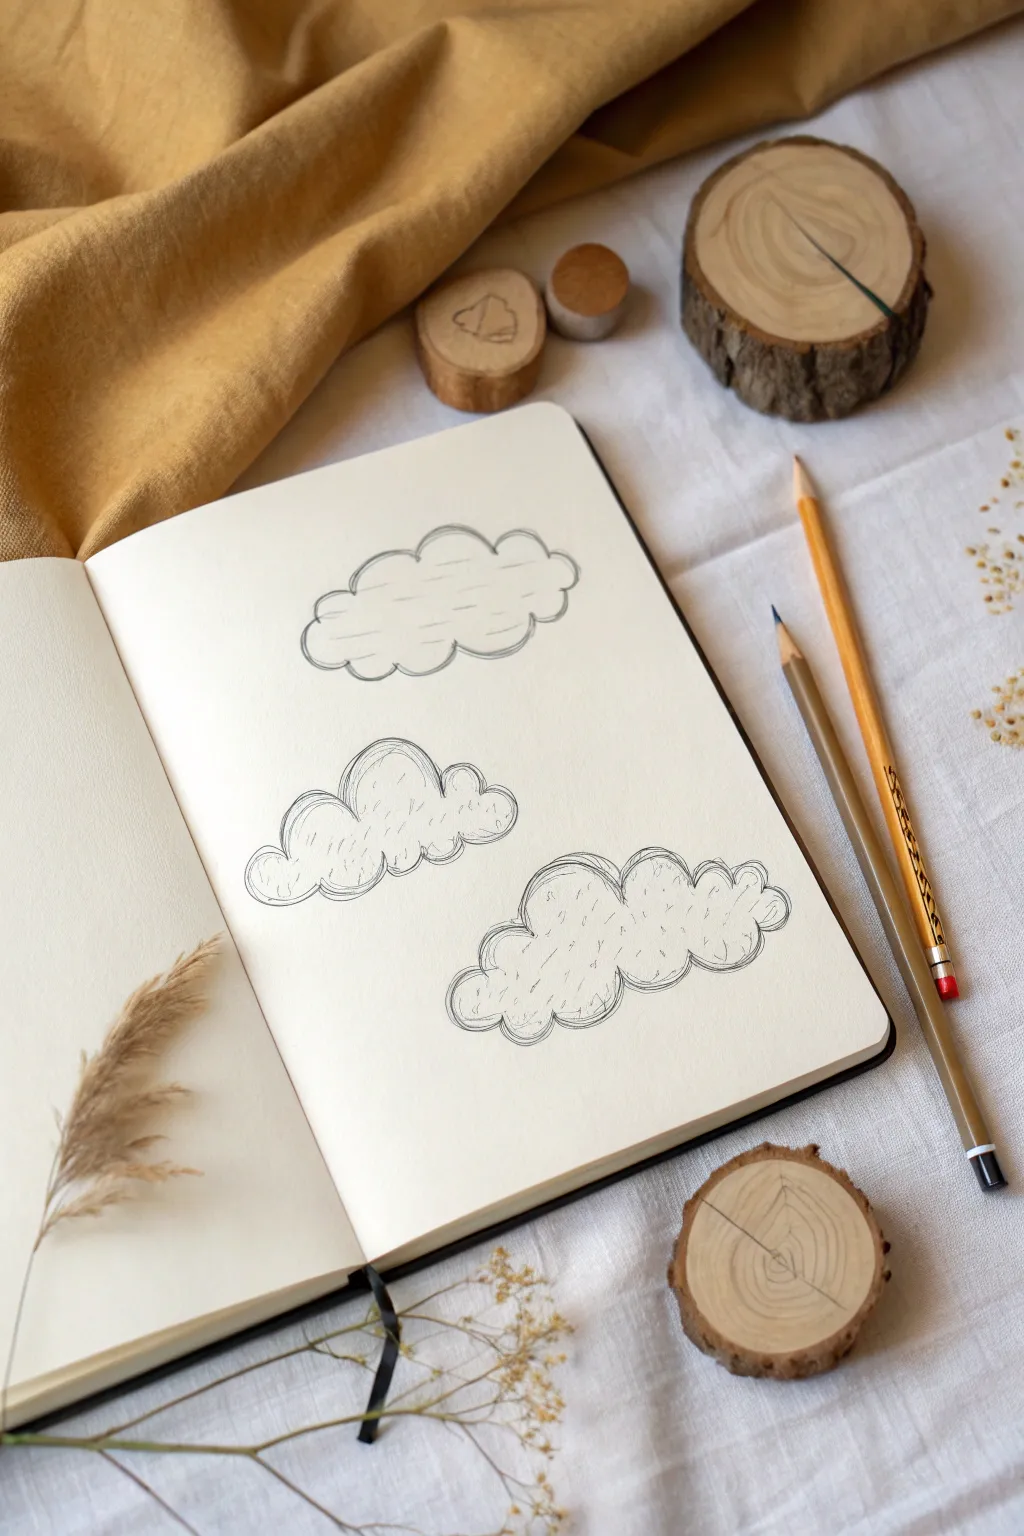

Master the art of simple, illustrative clouds with this charming sketchbook study that focuses on line weight and subtle texture. You will create three distinct cloud formations that progress in complexity, perfect for filling the margins of journals or starting a landscape piece.
Step-by-Step
Materials
- Sketchbook with cream or off-white paper
- HB graphite pencil (for initial outlines)
- 2B or 4B graphite pencil (for shading and emphasis)
- Fine-tip black drawing pen (optional, if ink look is desired)
- Kneaded eraser
- Blending stump or tissue
Step 1: The Floating Cumulus
-
Draft the perimeter:
Begin with the topmost cloud. Using your HB pencil, lightly sketch a wide, oblong oval shape as a guide. Then, draw a series of connected semi-circles along the top edge to form the fluffy peaks. -
Flatten the base:
Along the bottom edge, create a slightly flatter line with gentle undulations rather than distinct semi-circles. This gives the cloud a sense of weight and float. -
Add horizontal volume:
Inside the cloud shape, lightly sketch thin, horizontal lines. Do not connect them end-to-end; leave gaps to suggest airiness. -
Define the outline:
Go over your perimeter line with a slightly firmer pressure or a darker pencil, making the line continuous but varying the pressure slightly to keep it organic.
Step 2: The Building Storm
-
Create the heavy base:
For the middle cloud, start by drawing a stronger, more rippled bottom line. Think of drawing a wavy line that dips up and down more dramatically than the first cloud. -
Build vertical height:
Stack taller, dome-like semi-circles on top of the base. Creating a large central dome flanked by two smaller ones helps achieve a classic cloud silhouette. -
Double the outline:
Trace over your initial outline loosely. Instead of trying to match the first line perfectly, let the second line weave in and out slightly or sit right next to it. This ‘sketchy’ style adds movement. -
Vertical texture shading:
Instead of horizontal lines, use short, vertical hatching marks inside the cloud. Focus these marks near the bottom curves to suggest shadow and density.
Loose Lines Only
Don’t lift your pencil constantly. Keep the tip on the paper and re-trace the curves multiple times. This ‘messy’ outline creates that soft, airy aesthetic much better than a single stiff line.
Step 3: The Fluffy Billow
-
Outline the complex shape:
For the bottom cloud, draw a wide, irregular shape composed entirely of small, tight semi-circles. Avoid any straight lines here; keep every edge bubbling and round. -
Layer the interior:
Draw partial semi-circles inside the main outline, specifically near the bottom indentations. This trick makes the cloud look three-dimensional, like puffs of cotton balling up. -
Loose scribbling:
Go over the entire perimeter with a very loose hand. I find that holding the pencil further back on the barrel helps create these relaxed, uninhibited strokes. -
Add scattered texture:
Fill the interior with tiny, scattered ticks and dashes. Unlike the previous clouds, apply these marks randomly throughout the body to mimic a textured, dissipating mist. -
Final shade accents:
Take your softer 2B or 4B pencil and darken just the underside of the lowest billows on all three clouds to ground them on the page.
Looking Flat?
If your clouds look like stickers, ensure you aren’t closing every shape. Leave some lines open or broken on the top edge where the ‘sun’ would hit to suggest light dissolving the edge.
Now you have a trio of atmospheric clouds ready to float across your next landscape drawing


Single Tree on a Hill With Basic Value Shapes
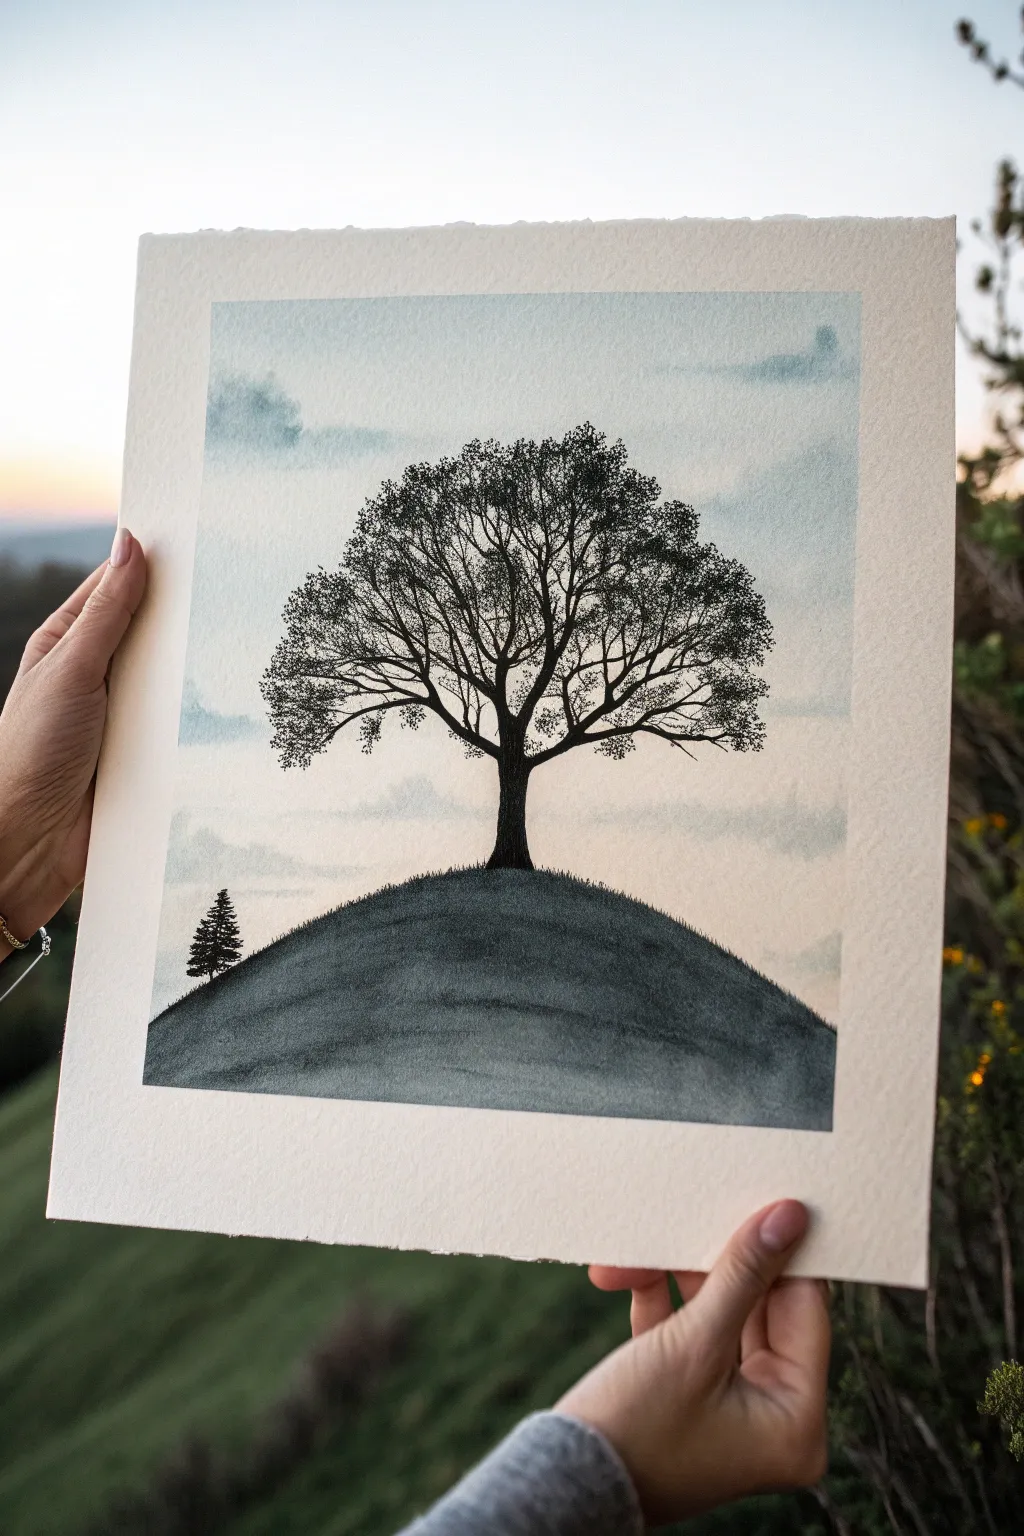
Capture the stark beauty of a lone tree against a soft, atmospheric sky with this mixed-media project. By combining the fluidity of watercolor with the precision of ink liners, you’ll create a striking artwork that focuses on basic shapes and contrasting values.
Step-by-Step Guide
Materials
- Cold press watercolor paper (approx. 300 gsm)
- Masking tape
- Watercolor paints (Payne’s Gray, light blue, soft pink)
- Large flat brush or wash brush
- Fine-liner pen (0.05 or 0.1 size, black)
- Medium-tip marker or pen (0.5 or 0.8 size, black)
- Graphite pencil (HB) and eraser
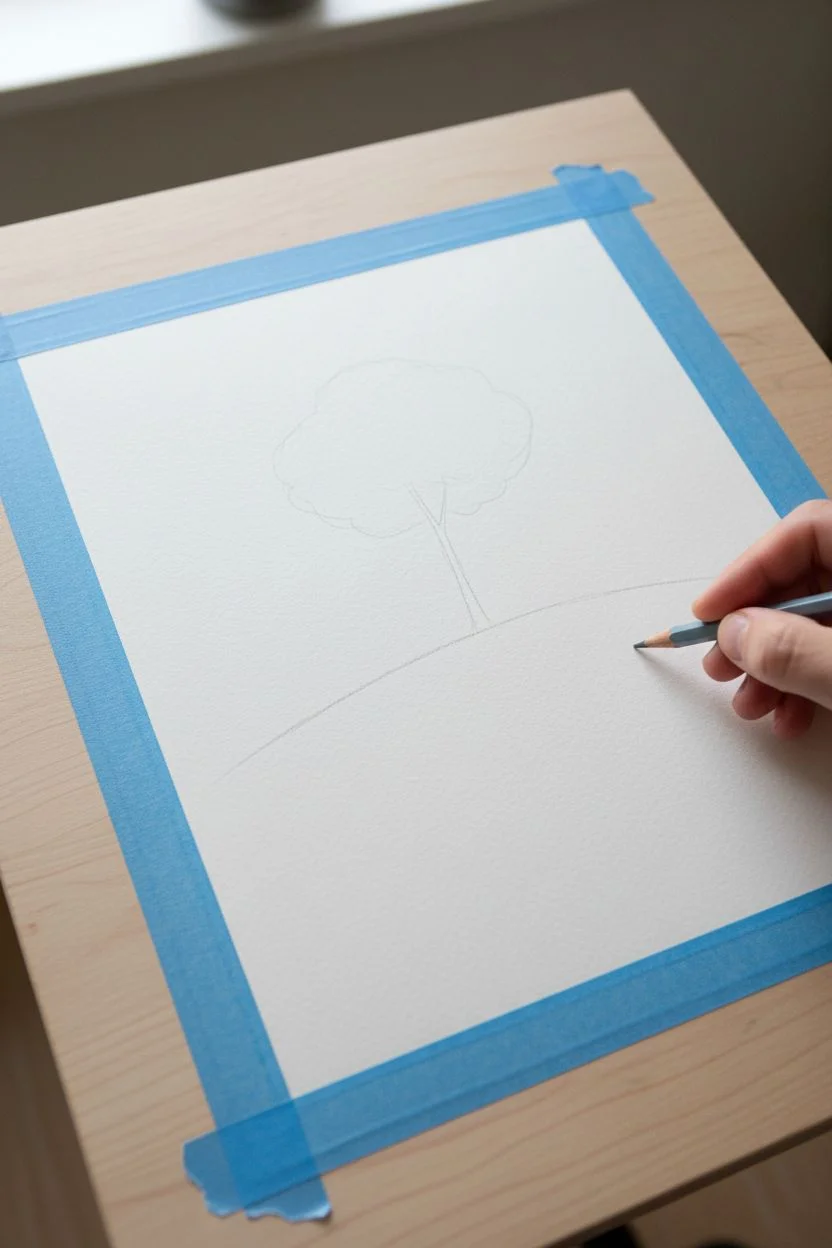
Step 1: Setting the Scene
-
Secure your canvas:
Tape your watercolor paper down to a board or table on all four sides. This creates that crisp, clean white border we want for the final presentation and prevents the paper from buckling when wet. -
Sketch the horizon:
Using your pencil very lightly, draw a curved hill shape in the lower third of the paper. This doesn’t need to be perfect, just a gentle mound to ground your composition. -
Outline the tree placement:
Lightly mark a vertical line from the center of the hill upwards to guide your tree trunk. Sketch a loose, rounded shape for the canopy area to ensure your tree fits nicely within the frame.
Step 2: Painting the Atmosphere
-
Prepare a sky wash:
Mix a very diluted, watery blue. You want this to look like distant atmosphere, not a bright sunny day, so keep the pigment load light. -
Apply the first sky layer:
Using your large wash brush, wet the sky area above your pencil line with clean water first, then drop in your pale blue. Let it bloom and spread naturally. -
Add cloud definition:
While the paper is still damp, dab in slightly stronger blue-grey mixtures in random patches to suggest clouds. I like to keep the area immediately behind where the tree usually will be quite light to create contrast. -
Create the hill gradient:
Once the sky is dry, mix a darker grey-blue wash. Paint the hill area, starting darker at the bottom and adding more water as you move up toward the horizon line to make the top edge appear softer and more distant. -
Let it dry completely:
This is crucial; if the paper is even slightly damp, your ink lines in the next phase will bleed and lose their crispness.
Ink Smearing?
If your hand rests on the paper while drawing, place a scrap piece of paper under your hand. This protects the drawing from natural skin oils and prevents smudging fresh ink.
Step 3: Inking the Silhouette
-
Draw the main trunk:
Switch to your thicker 0.5 or 0.8 pen. Draw the trunk, making it thickest at the base where it meets the hill and tapering as it moves upward. Don’t make the lines perfectly straight; nature is full of bumps and curves. -
Branch structure:
Create 3-4 main branches splitting from the trunk. Imagine the letter ‘Y’ splitting over and over again. -
Fine details:
Switch to your 0.05 fine-liner. Draw smaller twigs extending from the main branches. These should be delicate and spider-web like, reaching out toward the edges of your canopy circle. -
Create the leaves:
Using a stippling motion (rapid dots) or very tiny scribbles, fill in the canopy area. Focus the darkest, densest dots toward the bottom of the leaf clumps and leave the tops airier. -
Texture the hill:
To give the hill form, use the side of a graphite pencil or a very diluted grey wash to add shading. Add horizontal, sweeping strokes across the hill to show the curvature of the land. -
Add the tree shadow:
Darken the hill directly beneath the tree trunk to anchor it to the ground. -
Draw the secondary tree:
On the far left of the hill, use your fine pen to draw a tiny pine tree silhouette. This small detail adds a wonderful sense of scale to the main subject. -
Final grass details:
along the horizon line of the hill, use quick, short upward flicks with your finest pen to suggest grass blades breaking the smooth line.
Natural Looking Leaves
Don’t draw individual leaves. Instead, focus on creating ‘clouds’ of texture. Group your dots and squiggles into clusters, leaving empty ‘sky holes’ between them for realism.
Step 4: Finishing Touches
-
Erase pencil guides:
Once you are absolutely certain the ink is dry, gently erase any visible pencil marks from your initial sketch. -
Reveal the border:
Slowly peel away the masking tape. Pull the tape away from the center of the artwork at a 45-degree angle to prevent tearing the paper surface.
Step back and admire the peaceful solitude of your silhouette landscape
BRUSH GUIDE
The Right Brush for Every Stroke
From clean lines to bold texture — master brush choice, stroke control, and essential techniques.
Explore the Full Guide
River Path That Curves Into the Distance
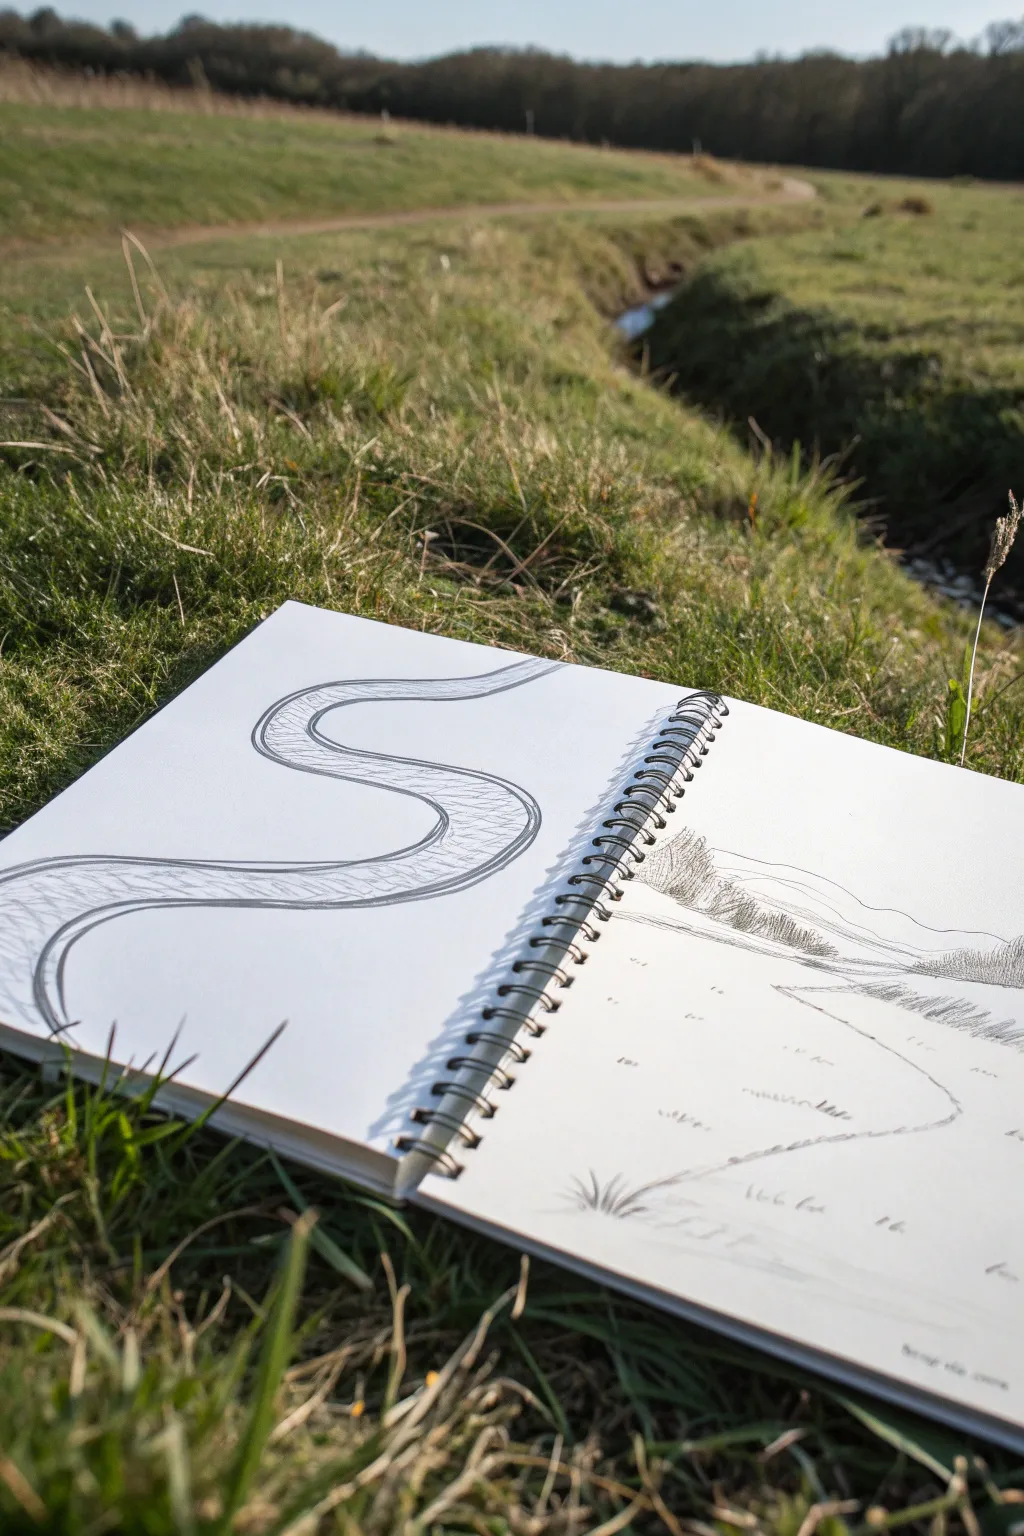
Capture the serene flow of a countryside stream with this dual-page sketchbook study. This project breaks down a complex landscape into manageable parts, focusing on the rhythmic curves of a river path on one side and a gentle, hilly horizon on the other.
How-To Guide
Materials
- Spiral-bound sketchbook (A4 or similar size)
- Graphite pencils (HB for sketching, 2B or 4B for shading)
- Eraser
- Pencil sharpener
- Optional: Real-life view or reference photo of a stream
Step 1: Drafting the River Curve
-
Establish the start point:
Begin on the left page of your open sketchbook. Place your pencil near the bottom left edge of the paper to mark where the river or path will enter the frame. -
Draw the first S-curve:
With a loose, confident stroke, draw a large ‘S’ shape that winds from the bottom left, curves towards the middle right, and then snakes back towards the top left. Keep your wrist relaxed to get a fluid line. -
Add the parallel bank:
Draw a second line parallel to your first one to define the width of the river. As the river moves further away towards the top of the page, let the lines get slightly closer together to create a sense of perspective. -
Refine the edges:
Go over your initial lines with slightly more pressure to define the banks. I like to keep these lines a bit sketchy rather than perfectly smooth, as nature rarely has straight edges. -
Add flow texture:
Inside the river boundaries, sketch very faint, curved hatching lines that follow the direction of the bend. This simple texture mimics the movement of water flowing downstream.
Smooth Curves
If your river lines look shaky, try drawing from your shoulder instead of your wrist. Lock your wrist and move your whole arm to get a smoother, more sweeping curve.
Step 2: Sketching the Landscape View
-
Set the horizon line:
Moving to the right page, lightly sketch a horizontal line about two-thirds up the page. This doesn’t need to be perfectly straight; a slight unevenness suggests rolling hills. -
Outline the distant hills:
Above your horizon line, draw gentle, rolling curves to represent distant hills or a tree line. Layer a second, lower curve in front of the first to create depth in the distance. -
Continue the path:
Now, draw the continuation of your river or a walking path on this page. Start from the bottom right and curve it gently towards the center horizon, letting it fade out as it reaches the hills. -
Suggest vegetation:
Along the horizon line and the base of the hills, use short, vertical strokes to suggest trees and dense bushes. Group these strokes together in clusters rather than drawing individual trees. -
Detail the foreground:
In the bottom foreground area, add a few small clumps of grass using quick, upward flicks of your pencil. This anchors the viewer in the scene. -
Add field texture:
Scatter groups of tiny dashes or dots across the open field area. These minimal marks are enough to suggest a grassy texture without needing to draw every blade. -
Shade the distant tree line:
Return to the trees on the horizon and shade them in darker with a 2B pencil. Press harder at the base of the trees and lighter at the tops to give them volume. -
Connect the pages:
Look at both pages together. Ensure the scale of the path on the right page feels connected to the abstract flow on the left, even though they are separate studies. -
Final touches:
Erase any stray construction lines that are too distracting, but leave some of the loose sketch marks to maintain that authentic ‘field study’ character.
Perspective Check
Remember that objects get smaller and lines converge as they move away. Ensure your river narrows significantly as it reaches the top of the page to show distance.
Step back and enjoy how simple lines can effectively capture the peaceful atmosphere of a meandering stream
Easy Waterfall With Straight Lines and Mist
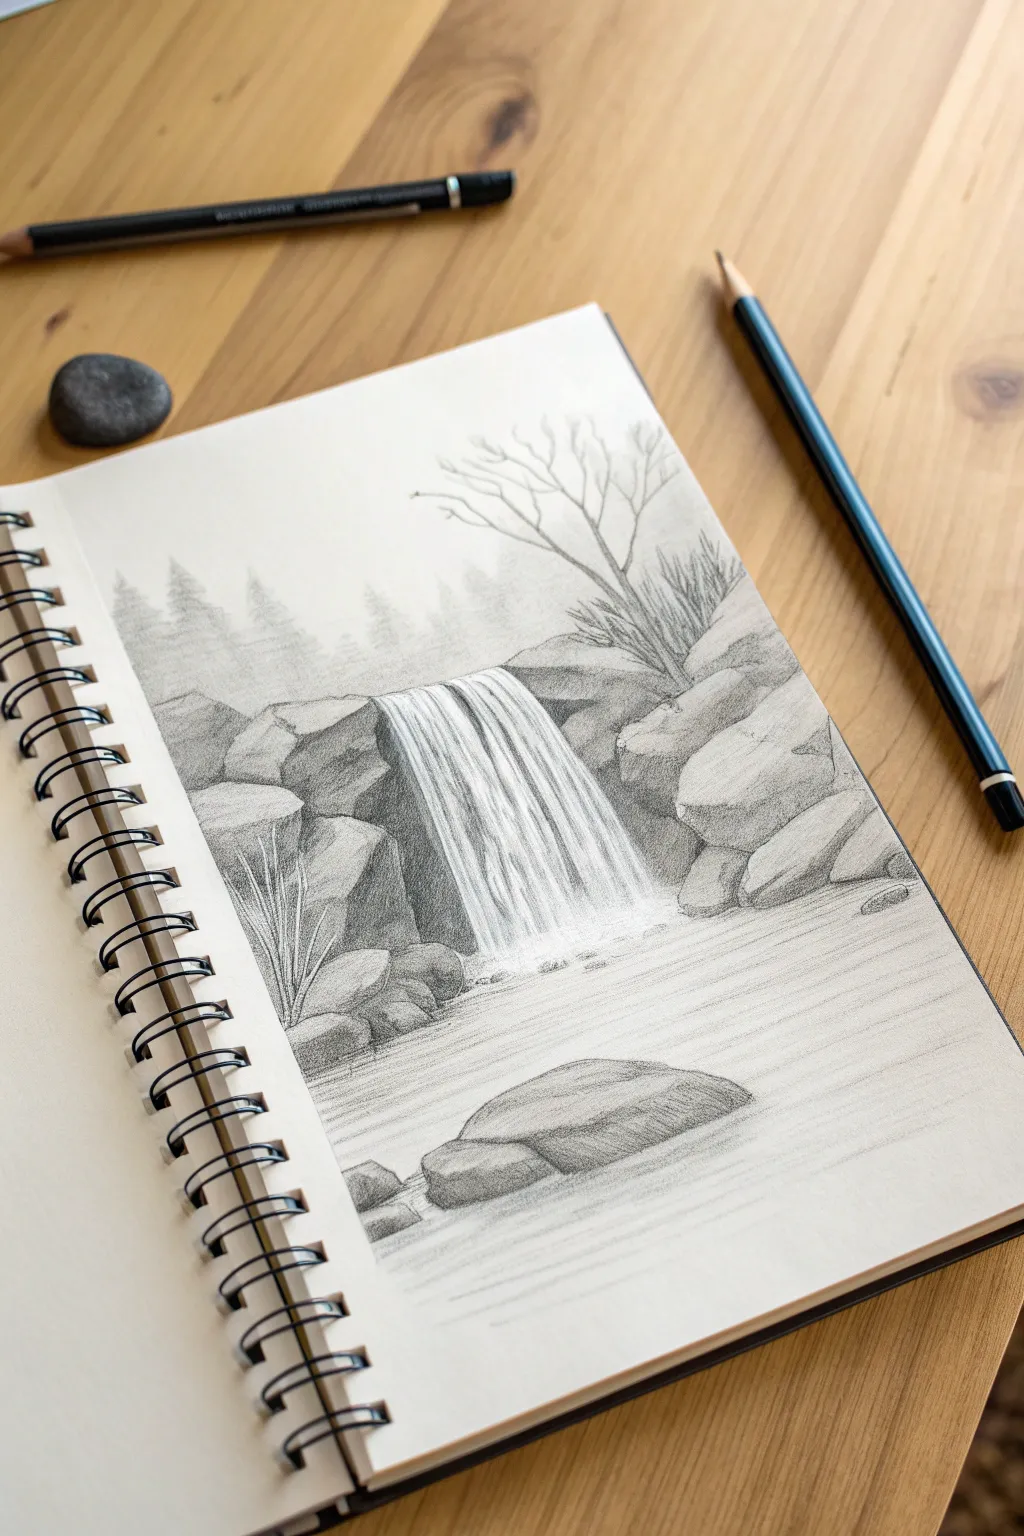
Capture the serene movement of water with this graphite pencil study, featuring a cascading waterfall framed by sturdy rocks and a misty forest backdrop. This project focuses on value control and simple linework to create depth and texture without needing advanced skills.
Step-by-Step
Materials
- Sketchbook or drawing paper (medium tooth)
- Graphite pencils (H or HB for sketching, 2B and 4B for shading, 6B for darkest shadows)
- Black pencil or charcoal pencil (optional for deepest contrasts)
- Kneaded eraser
- Precision eraser or eraser stick
- Paper blending stump or cotton swab
- Pencil sharpener
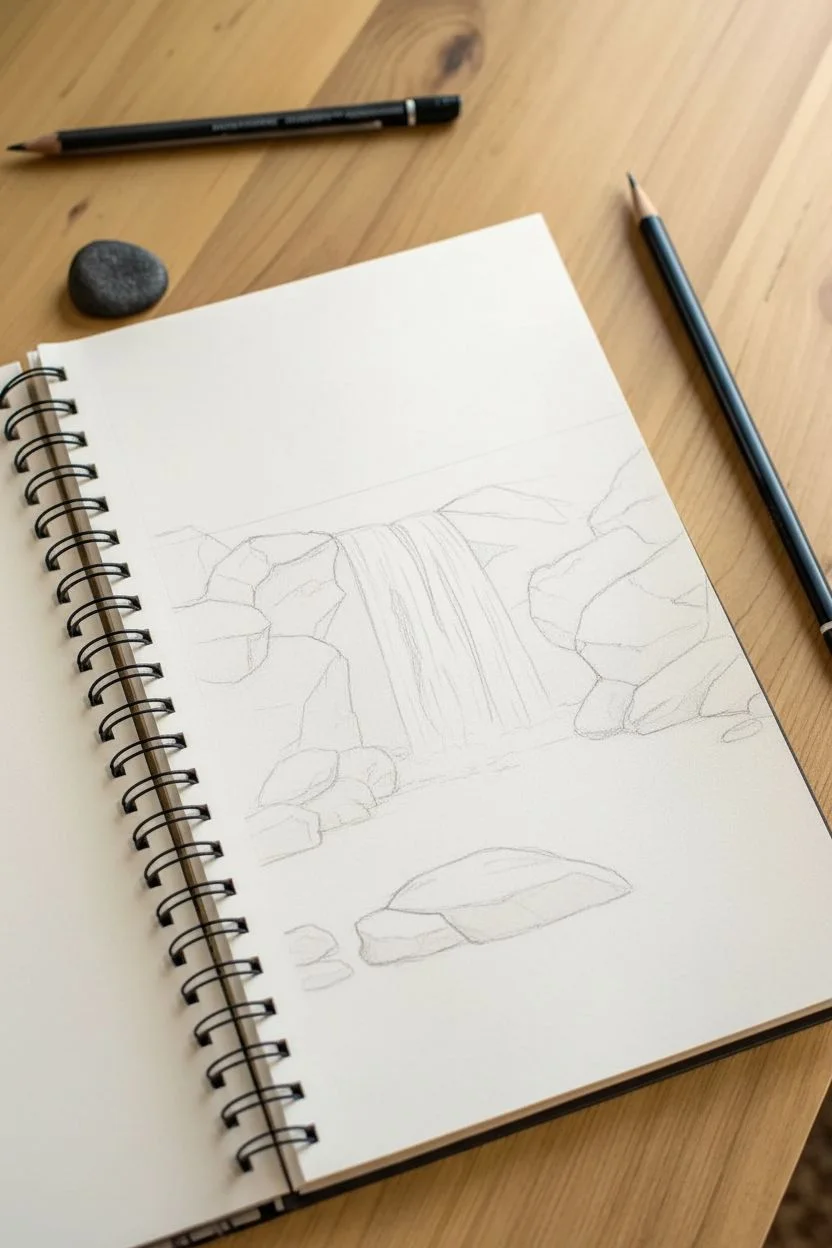
Step 1: Setting the Scene
-
Establish the horizon:
Begin lightly with an HB pencil. Draw a faint horizontal line about one-third of the way down the page to separate the foreground water from the background forest. -
Map the waterfall edge:
Sketch the top lip of the waterfall. Instead of a straight line, use uneven, jagged strokes to represent the rocky edge where the water begins to spill over. -
Outline the main rocks:
Draw the basic shapes of the large boulders flanking the waterfall on both the left and right sides. Keep these shapes blocky and angular rather than perfectly round. -
Sketch the foreground stones:
Place a large, flat rock in the center foreground of the pool and a smaller one to its left. These will act as anchors for the viewer’s eye later.
Water Looking Stiff?
If your waterfall looks like stripes, vary your line pressure. Start strokes dark at the top, lift pressure in the middle for a highlight, and darken again at the bottom.
Step 2: Creating the Water
-
Draw the falling water:
Using long, vertical strokes, draw the sheet of water falling. Curve the lines slightly outward at the top and inward at the bottom to suggest volume. Leave plenty of white space between lines to show the highlight and speed of the water. -
Add the splash zone:
At the base of the falls, lightly sketch some small, bubbly shapes and keep the paper mostly white to represent the mist and foam where the water hits the pool. -
Ripple the pool surface:
Draw horizontal, slightly wavy lines radiating out from the base of the waterfall. These lines represent the ripples moving across the calm pool.
Step 3: Shading and Texture
-
shade the rocks (Base layer):
Switch to a 2B pencil. Apply a light, even layer of shading to all the rock surfaces. Use a diagonal hatching motion for consistency. -
Define rock facets:
Identify the sides of the rocks facing away from the light source. Darken these areas significantly with a 4B pencil to create sharp, angular planes. -
Deepen the shadows:
Find the crevices between rocks and the underside of the rock ledges. Using a 6B or charcoal pencil, press firmly to create deep black shadows. This high contrast makes the white water pop. -
Add rock texture:
Use the tip of your 2B pencil to make small squiggles, dots, and cracks on the surface of the boulders to give them a rough, stony texture. -
Detail the foreground:
Shade the large foreground rock, keeping the top surface lighter than the sides. Add a cast shadow underneath it in the water to make it feel grounded.
Level Up: Reflections
Make the pool realistic by lightly drawing a mirror image of the large rocks upside down in the water. Keep these reflection lines horizontal and wavy, not solid.
Step 4: Background and Atmosphere
-
Sketch the distant trees:
Using the side of an HB pencil, lightly shade in the silhouette of a pine forest in the background. Keep this very faint and soft to simulate atmospheric perspective (mist). -
Draw the bare tree:
On the right bank, above the rocks, draw a small, leafless tree with branches reaching upward. Keep the lines thin and delicate. -
Insert grassy accents:
Add clusters of tall, thin grass blades growing out of the cracks in the rocks on the left side and near the bare tree base. -
Refine the water flow:
Go back to the waterfall with a clean eraser. Lift out thin vertical highlights in the falling water to ensure it looks bright and glistening. -
Soften the water:
I like to use a blending stump here to very gently smudge the bottom of the waterfall into the pool, creating a misty transition effect. -
Final touches:
Check your contrasts. If the foreground water looks too flat, add a few slightly darker horizontal ripple lines to emphasize the surface movement.
Take a moment to clean up any smudge marks around the border with your kneaded eraser to finish your landscape

PENCIL GUIDE
Understanding Pencil Grades from H to B
From first sketch to finished drawing — learn pencil grades, line control, and shading techniques.
Explore the Full Guide
Leaf Cluster Doodles With Simple Veins

This charming sketchbook page combines four distinct leaf varieties onto a single, imaginary branch for a whimsical botanical study. Using clean black ink lines and simple veining patterns creates a crisp, scientific illustration style that looks complicated but is surprisingly easy to construct.
Step-by-Step Guide
Materials
- Sketchbook or quality drawing paper (smooth bristol or mixed media paper works well)
- HB or 2H pencil for under-drawing
- Fine liner pen (0.3mm or 0.5mm, black)
- Thinner fine liner pen (0.1mm or 0.05mm) for details
- Kneaded eraser
Step 1: Planning the Structure
-
Draw the main stem:
Start by lightly sketching a central curved line in pencil. Let it gently arc from the bottom right towards the top left, giving it a natural, organic flow rather than a ruler-straight edge. -
Map out leaf positions:
Along this main stem, sketch four smaller offshoot lines where your leaf clusters will go. Place one near the top, two in the middle section on opposite sides, and one larger one near the base. -
Sketch the leaf shapes:
Using light, loose ovals or geometric shapes, block in the general footprint of each leaf group. This ensures you don’t run off the page before you start detailing.
Wobbly Lines?
If your long stem lines look shaky, try drawing from your shoulder rather than your wrist. Moving your whole arm creates smoother, more confident arcs.
Step 2: Drawing the Horse Chestnut Cluster
-
Outline the palmate leaves:
Focus on the top-left cluster. Draw five distinct leaflets radiating from a central point, like fingers on a hand. The center leaflet should be the largest, with the side ones gradually getting smaller. -
Inking the outlines:
Switch to your 0.3mm pen. Trace your pencil lines with confident strokes. For a more natural look, you can add tiny serrations or bumps along the edges, though a smooth line works perfectly for this stylized look. -
Add the veins:
Draw a central vein down the middle of each leaflet. Then, add simple parallel lines branching off this center vein. Keep them straight and evenly spaced for that graphic, tidy appearance seen in the photo.
Step 3: Drawing the Rose-Style Leaves
-
Create the top-right cluster:
Move to the top right branch. Draw a set of three to five small, teardrop-shaped leaves along a thin stem. -
Draw the middle-left cluster:
Directly below the first cluster, draw a slightly smaller version on the left side of the main stem. These leaves should be smaller and denser, perhaps overlapping slightly. -
Ink and detail:
Ink the outlines. For the veins here, use a very simple approach: just a central line that stops short of the tip, and one or two side veins if the leaf is large enough.
Add Some Color
Scan your drawing before adding color so you keep the original. Then, use watercolor washes in autumnal hues like ochre and burnt sienna to fill the leaves.
Step 4: Drawing the Maple Leaf
-
Outline the maple shape:
At the bottom of the stem, sketch a classic five-pointed maple leaf shape. Make the points sharp and the dips between them deep and curved. -
Refine the edges:
When inking this leaf, adding jagged, saw-tooth edges is crucial to character. Don’t worry about perfect symmetry; nature is rarely perfectly symmetrical. -
Vein structure:
Draw main veins radiating from the stem to each major point. I like to add secondary veins branching off these main highways, mirroring the sharp angles of the leaf edges.
Step 5: Finishing Touches
-
Detailed shading:
Select a few leaves, particularly the middle clusters, to add ‘shading’ via texture. Instead of gray, use dense diagonal hatching lines to fill a few specific leaves darker than others. This creates wonderful contrast. -
Thicken the main stem:
Go back to your main branch. Draw a second line parallel to the first to give it thickness, tapering it slightly as it reaches the top. -
Connect the branches:
Ensure all your leaf stems connect convincingly to the main branch. Add tiny little ‘collars’ or bumps where the smaller stems meet the big one. -
Erase and clean:
Wait at least five full minutes for the ink to dry completely. Then, gently rub your kneaded eraser over the entire drawing to lift the graphite guidelines.
Now you have a botanical study that captures the diversity of the forest on a single page
Pinecone or Acorn With Repeating Patterns
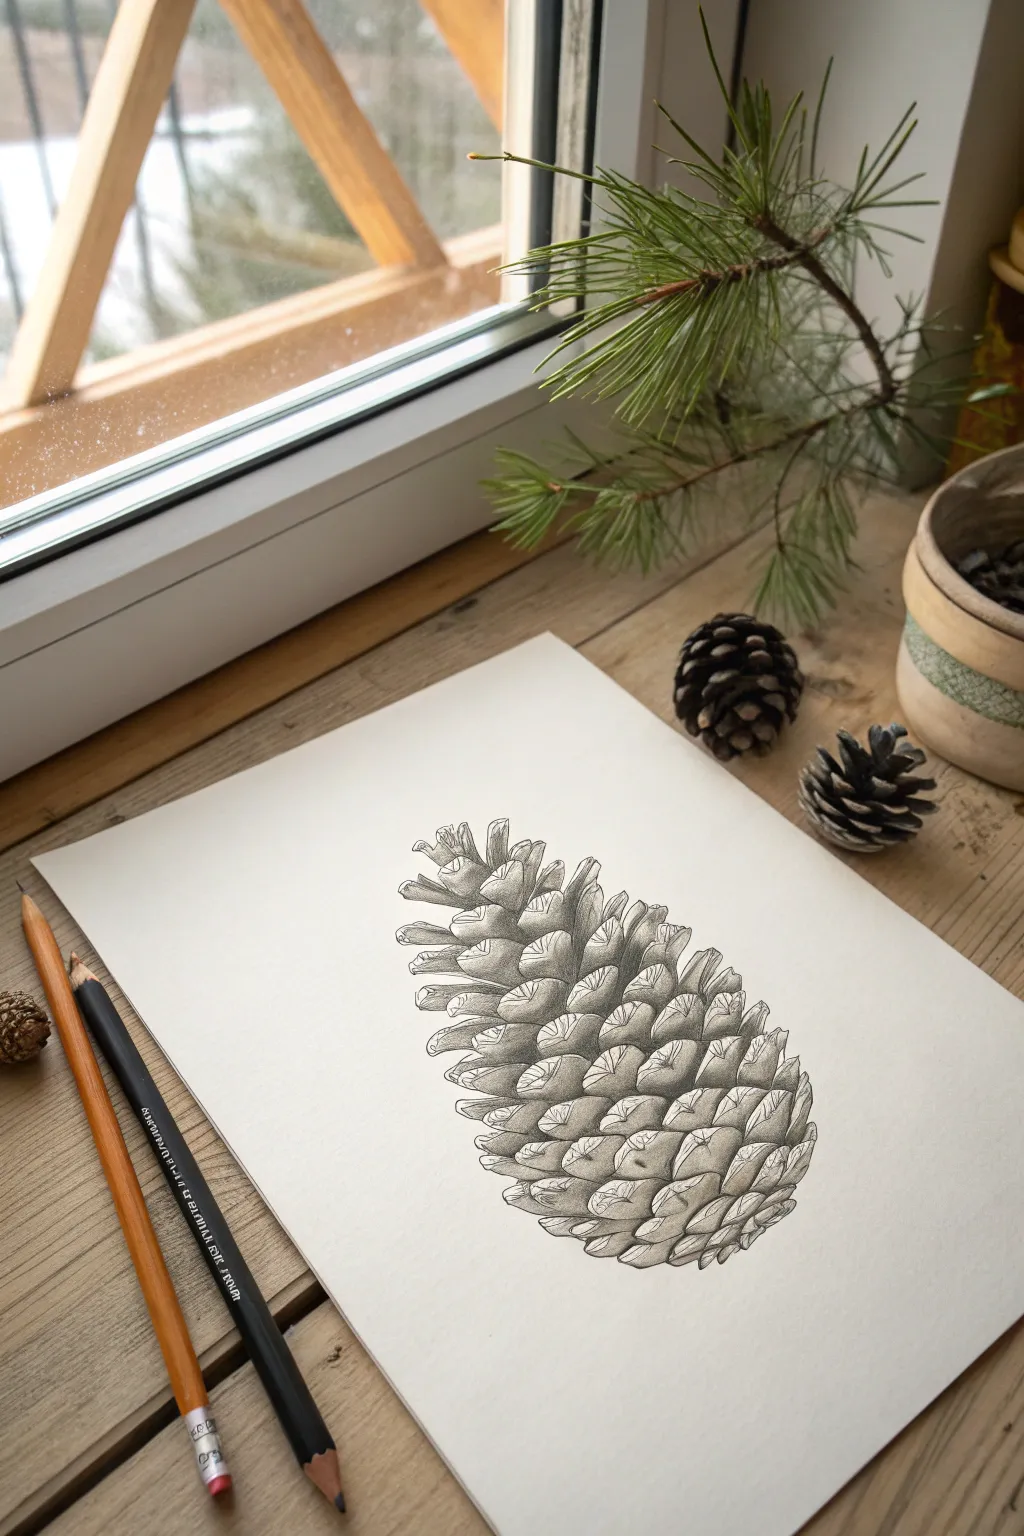
Capturing the intricate scales of a pinecone is a relaxing exercise in observation and repetitive patterning. This project creates a clean, botanical illustration using simple pencil shading to give volume to organic shapes.
Step-by-Step
Materials
- Smooth white drawing paper (heavyweight cardstock or Bristol board work best)
- HB graphite pencil for initial sketching
- Fine-point black ink pen or dark charcoal pencil (0.5mm)
- Dull orange/sepia colored pencil for background warmth (optional)
- Eraser
Step 1: Building the Skeleton
-
Establish the Core Shape:
Begin by lightly sketching a large, elongated teardrop shape on your paper. This will act as the boundary for your pinecone, wider at the bottom and tapering gently to a point at the top. -
Mark the Central Axis:
Draw a faint curved line down the center of your teardrop. This axis line helps ensure the scales wrap naturally around the cone’s form rather than looking flat. -
Map the Spirals:
Pinecones follow a geometric spiral pattern. Sketch very light diagonal grid lines creating a diamond pattern across the teardrop shape. These diamonds will determine the size and placement of each individual scale.
Drawing from Life
For the most realistic results, place a real pinecone on your desk. Rotating it physically helps you understand how the scales stack.
Step 2: Drafting the Scales
-
Shape the Bottom Scales:
Starting at the wide base, outline the first few scales. Draw them as rounded, semi-triangular shapes that overlap slightly, like roof shingles. -
Define the Scale Edges:
Unlike a perfect diamond, actual pinecone scales have a thick tip. Draw a smaller, rougher shape inside the upper tip of each diamond to represent the woody end of the scale. -
Work Your Way Up:
Continue drawing the outlines of the scales row by row, moving upward. As you approach the top, make the scales gradually smaller and tighter together. -
Refine the Outlines:
Once all scales are mapped, go over them with a slightly firmer graphite line to lock in their shapes before shading. Erase your initial teardrop and grid guidelines.
Lost the Pattern?
If the spiral pattern gets confusing near the top, stop thinking about the spiral. Just draw small, tight ‘roof tiles’ overlapping purely vertically.
Step 3: Inking and Shading
-
Inking the Silhouette:
Switch to your black ink pen or dark charcoal pencil. Carefully trace the outer edges of the scales. Use a broken, organic line rather than a perfect continuous stroke to mimic wood texture. -
Identify Light Source:
Decide where your light is coming from (usually top-left). The areas underneath each overlapping scale will be the darkest shadows. -
Add Core Shadows:
Shade the deepest crevices where one scale tucks under another. Press firmly here to create high contrast, which makes the scales pop forward. -
Texture the Tips:
On the ‘face’ of each scale, use tiny, flicking lines radiating from the center outward. This directional shading mimics the fibrous nature of the wood. -
Stippling for Detail:
Add tiny dots (stippling) on the rounded bottom parts of the scales. Concentrate the dots on the shadowed side to enhance the 3D rounded effect. -
Highlighting Edges:
Leave the very tips of the scales largely white or with minimal markings. This negative space allows the eye to interpret them as catching the light. -
Final Contrast Check:
Step back and look at the whole form. Darken the bottom-right side of the entire pinecone slightly more than the top-left to give the whole object weight and volume. -
Optional Warmth:
If you want a hint of color like in the reference, lightly graze the paper with an orange or sepia pencil around the edges, but keep the drawing predominantly monochromatic.
Now you have a detailed botanical study ready to be framed or added to a nature journal


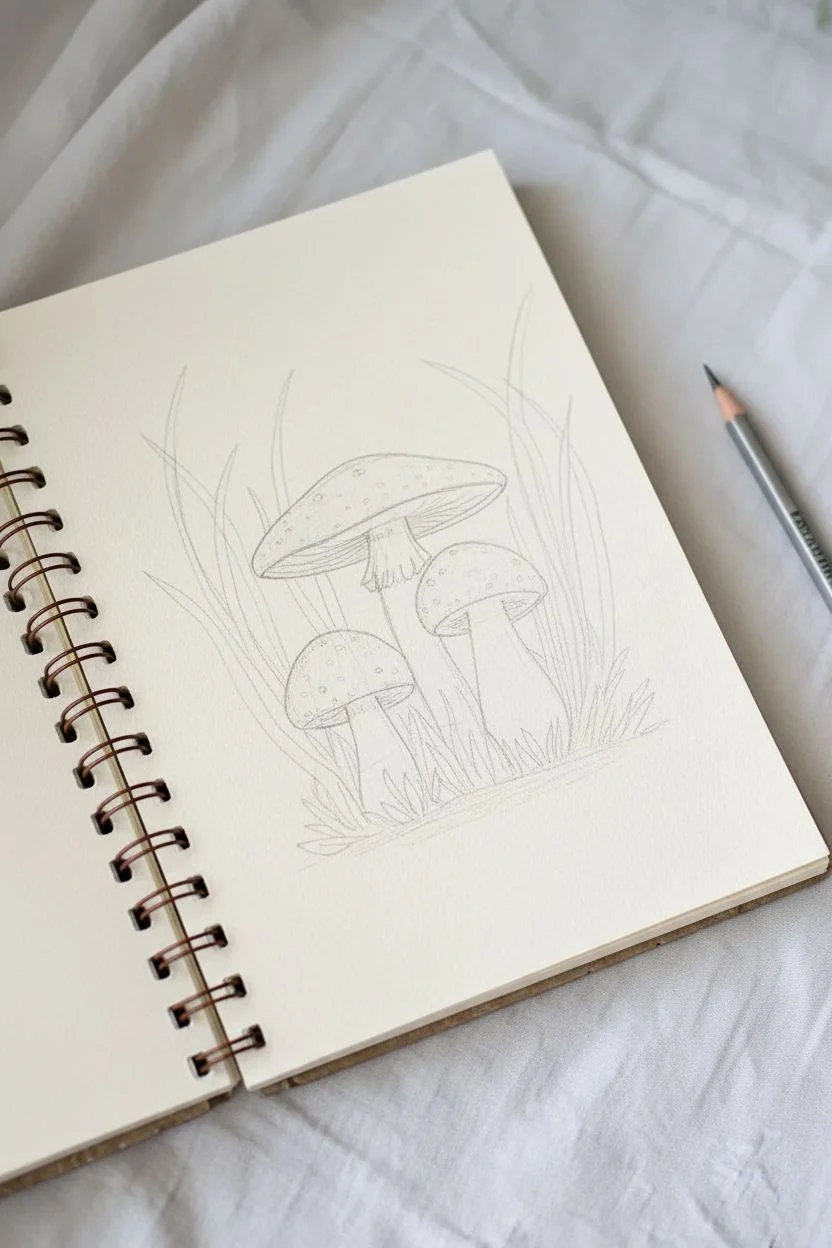
Mushrooms in a Little Forest Patch
Capture the charm of the forest floor with this delightful watercolour and ink illustration. Featuring three vibrant red-capped mushrooms nestled among tall grasses, this project combines soft washes with crisp line work for a lovely sketchbook aesthetic.
How-To Guide
Materials
- Sketchbook with mixed media or watercolour paper (creamy or off-white recommended)
- HB pencil and soft eraser
- Watercolour paints (Red, Burnt Sienna, Sap Green, Olive Green, Indigo)
- Small round brushes (size 2 and 4)
- Fine liner pens (Black 0.1, 0.3, and Brown 0.1)
- White gel pen or gouache for highlights
- Clean water and paper towel
Step 1: Pencil Sketching
-
Position the main mushroom:
Start by drawing the largest mushroom slightly off-center. Sketch a broad, flatter cap shape and a thick stem that curves slightly to the left. Don’t press too hard with your pencil; keep lines faint. -
Add the companions:
Draw a medium-sized mushroom to the right, slightly lower than the first, with a rounder cap. Then, add a small, button-like mushroom tucked low on the bottom left side. -
Define the stems:
Refine the stems. Give the largest one a skirt-like ring near the top. For the medium and small mushrooms, draw curved lines indicating the veil remnants on their stems. -
Draft the grass:
Sketch long, flowing blades of grass behind the mushrooms, radiating outward like a fan. Add smaller tufts of grass and a tiny fern-like leaf at the base to ground the composition.
Smudge Alert
Ink can bleed instantly if applied to damp paper. Touch the back of your hand to the painting; if it feels even slightly cool, it’s still wet. Waiting is key!
Step 2: Watercolour Application
-
Paint the caps:
Mix a vibrant red with a touch of burnt sienna. Paint the caps of all three mushrooms, leaving tiny unpainted specks if you can, or simply paint solid red to add white details later. -
Wash the stems:
Use a very watered-down mix of burnt sienna or warm grey to paint the stems. Keep the wash transparent so the paper texture shows through, giving an organic feel. -
Paint the foliage:
Blend sap green and olive green for the grass blades. Use long, confident strokes from the base upwards. Make some blades lighter and others darker to create depth. -
Ground the scene:
Mix a light wash of brown and gently paint a patch of soil beneath the mushrooms. Soften the edges with clean water so it fades naturally into the white page. -
Add simple dots:
Dip your smallest brush into a diluted indigo or grey-blue paint. Add scattered dots in the background space above the mushrooms to create a magical atmosphere.
Better Highlights
If your white gel pen isn’t showing up on the red caps, try tapping the pen tip on scrap paper first to get the ink flowing, or switch to white acrylic paint.
Step 3: Detailing and Ink
-
Outline the mushrooms:
Once the paint is completely bone dry, use a 0.3 black fine liner to outline the caps. Use a delicate, broken line for the stems to keep them looking soft. -
Texture the gills:
Under the large cap, draw fine, closely spaced lines radiating from the stem to the edge of the cap to represent gills. -
Detail the stems:
Use the 0.1 black pen to add small stippled dots on the stems, concentrating them near the base and under the caps for shading. -
Define the grass:
Outline the grass blades selectively. I find it looks best if you don’t outline every single blade fully—let the watercolour edge do some of the work. -
Add cap spots:
Use a white gel pen or a tiny dot of white gouache to add the characteristic white spots to the red mushroom caps. -
Final foliage touches:
Use a 0.1 brown pen to write the date or add tiny scribbles near the soil line to suggest fallen pine needles or debris.
Close your sketchbook and let the ink cure fully before admiring your little forest corner
Seashell Sketch With Gentle Contour Lines
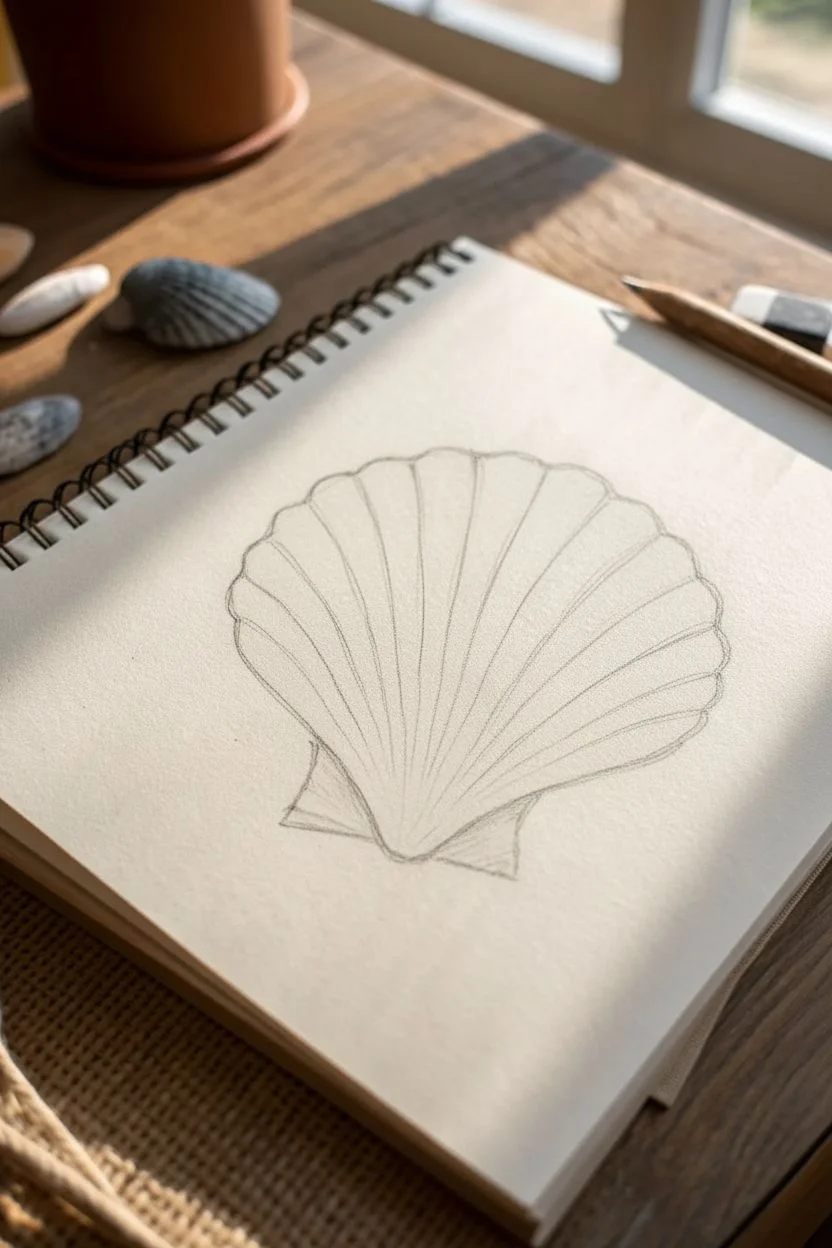
Capture the delicate ridges and gentle curves of a scallop shell in this relaxing monochrome study. Using simple pencil strokes, you’ll learn to build dimension through contour lines and subtle shading to create a classic, natural specimen.
Step-by-Step Tutorial
Materials
- HB or 2B graphite pencil
- Sketchbook with cream or off-white paper (medium tooth)
- Kneaded eraser
- Reference seashell (optional, but helpful)
- Pencil sharpener
Step 1: Laying the Foundation
-
Establish the base shape:
Begin by lightly sketching a wide fan shape on your page. Imagine an inverted triangle with a very curved top edge to guide your proportions. -
Mark the hinge:
At the bottom point of your fan, draw a small, flattened ‘U’ shape or a slight dip. This will become the umbo or hinge of the shell where all the ridges originate. -
Add the wing-like ears:
Extending from the bottom hinge area, sketch two small triangular shapes on either side. These ‘ears’ (auricles) give the scallop its distinctive silhouette. -
Define the outer edge:
Refine the large top curve of your fan. Instead of a smooth line, create a gentle scalloped edge with small, repetitive bumps that correspond to where the ribs will end.
Step 2: Drawing the Ribs
-
Draw the center rib:
Starting from the very center of the top edge, draw a single line curving gracefully down toward the bottom hinge point. This central line anchors the symmetry of the shell. -
Map the primary ribs:
Work outward from the center line to the left and right. Draw long, radiating lines that connect the dips in your scalloped top edge down to the central hinge point. -
Watch the spacing:
As you move toward the outer edges, let the lines curve more dramatically. I find it helpful to imagine these lines wrapping around a rounded form, rather than lying flat. -
Refine the lines:
Go over your radiating lines. They shouldn’t be perfectly straight; give them a slight wobble or organic irregularity to mimic natural growth patterns.
Drawing Looking Flattened?
Curvature is key. Ensure your radiating lines aren’t straight rulers; curve them progressively more as you reach the edges to mimic a convex 3D form.
Step 3: Shading and Contour
-
Add depth to the ribs:
Ideally, you want each rib to look raised. To do this, draw a second, fainter line right next to each main rib line, suggesting the thickness of the ridge. -
Shade the valleys:
Use the side of your pencil lead to gently shade the spaces *between* the ribs. Keep the top of the ridges lighter (the paper color) to make them pop forward. -
Darken the hinge area:
Apply slightly more pressure near the bottom point where all lines converge. This area is naturally recessed and shadowed, so deeper tones maximize the 3D effect. -
Define the outer rim:
Strengthen the scalloped line along the top edge. Add tiny, short shadow strokes just under the distinctive bumps to emphasize the shell’s fluted texture. -
Detail the ears:
Add subtle vertical hatching lines to the small triangular wings at the bottom. These shouldn’t be as prominent as the main ribs.
Pro Tip: Line Weight
Vary your pressure. Use darker, thicker lines for the shadowed side of the shell and lighter, broken lines for the side hit by the light source.
Step 4: Final Touches
-
Enhance contrast:
Look for areas that need more definition. Darken the very deepest crevices between the ribs, but lift your pencil pressure as you move up toward the wide top edge. -
Add growth rings:
Lightly sketch a few horizontal concentric arcs crossing over the ribs. These faint lines represent the growth stages of the shell and break up the vertical dominance. -
Clean up highlights:
Use your kneaded eraser to dab away any smudges on the highest points of the ribs or the background paper to ensure the drawing looks crisp.
Now you have a timeless nature study that captures the serene beauty of the coast
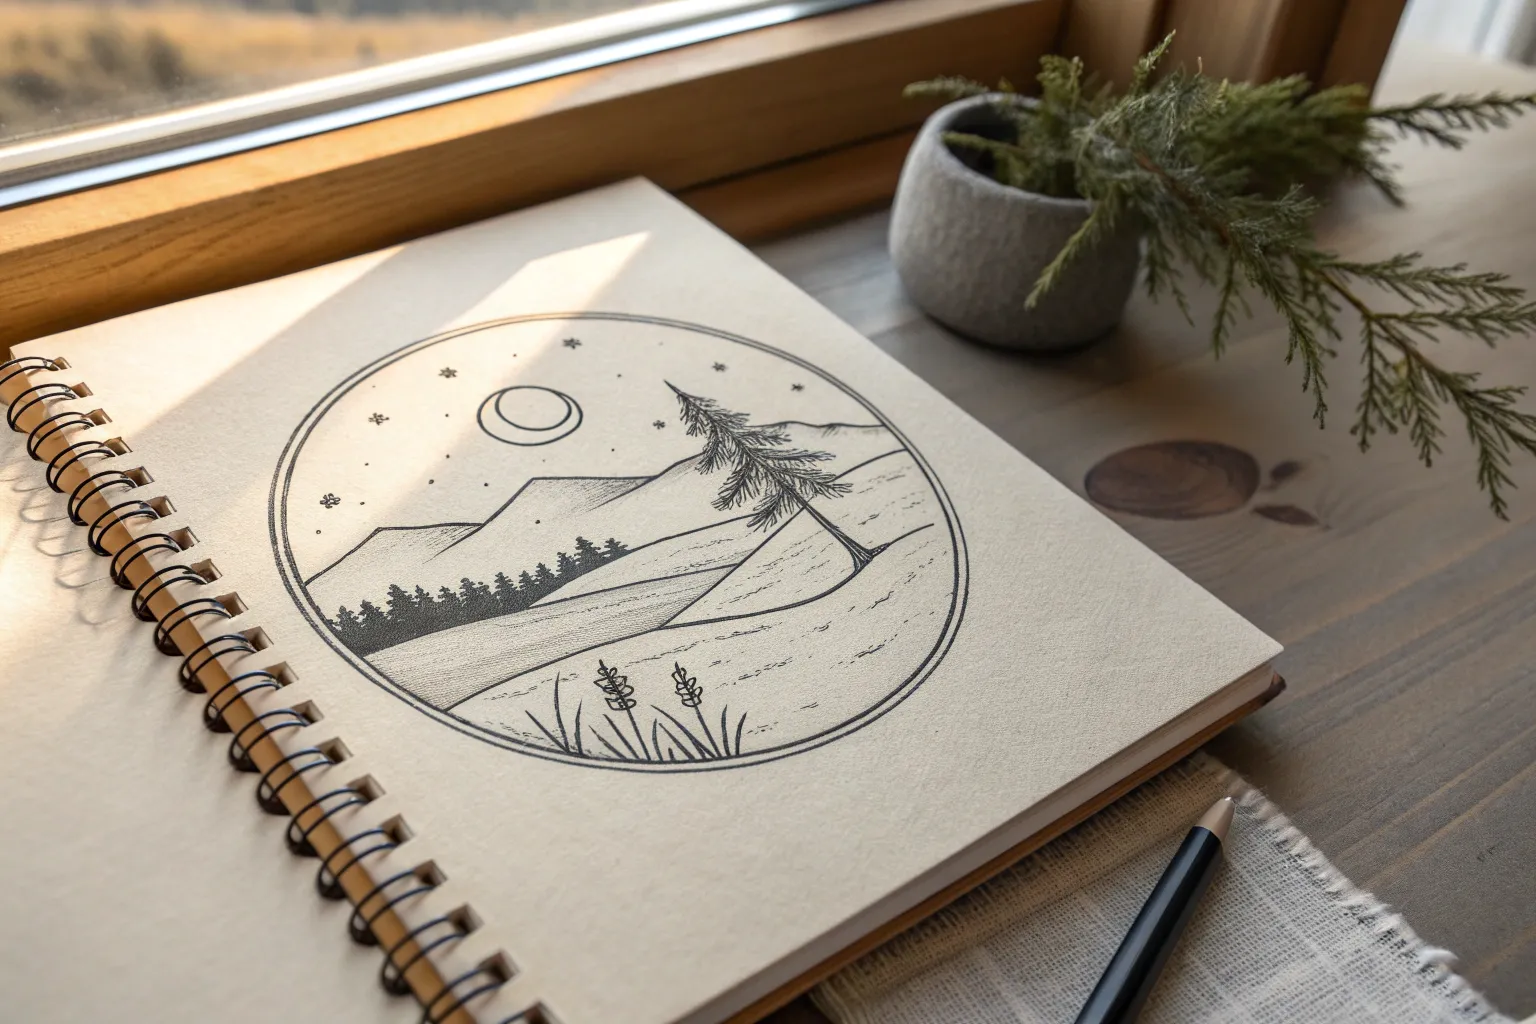
Circular Nature Vignette With Mountains and Trees
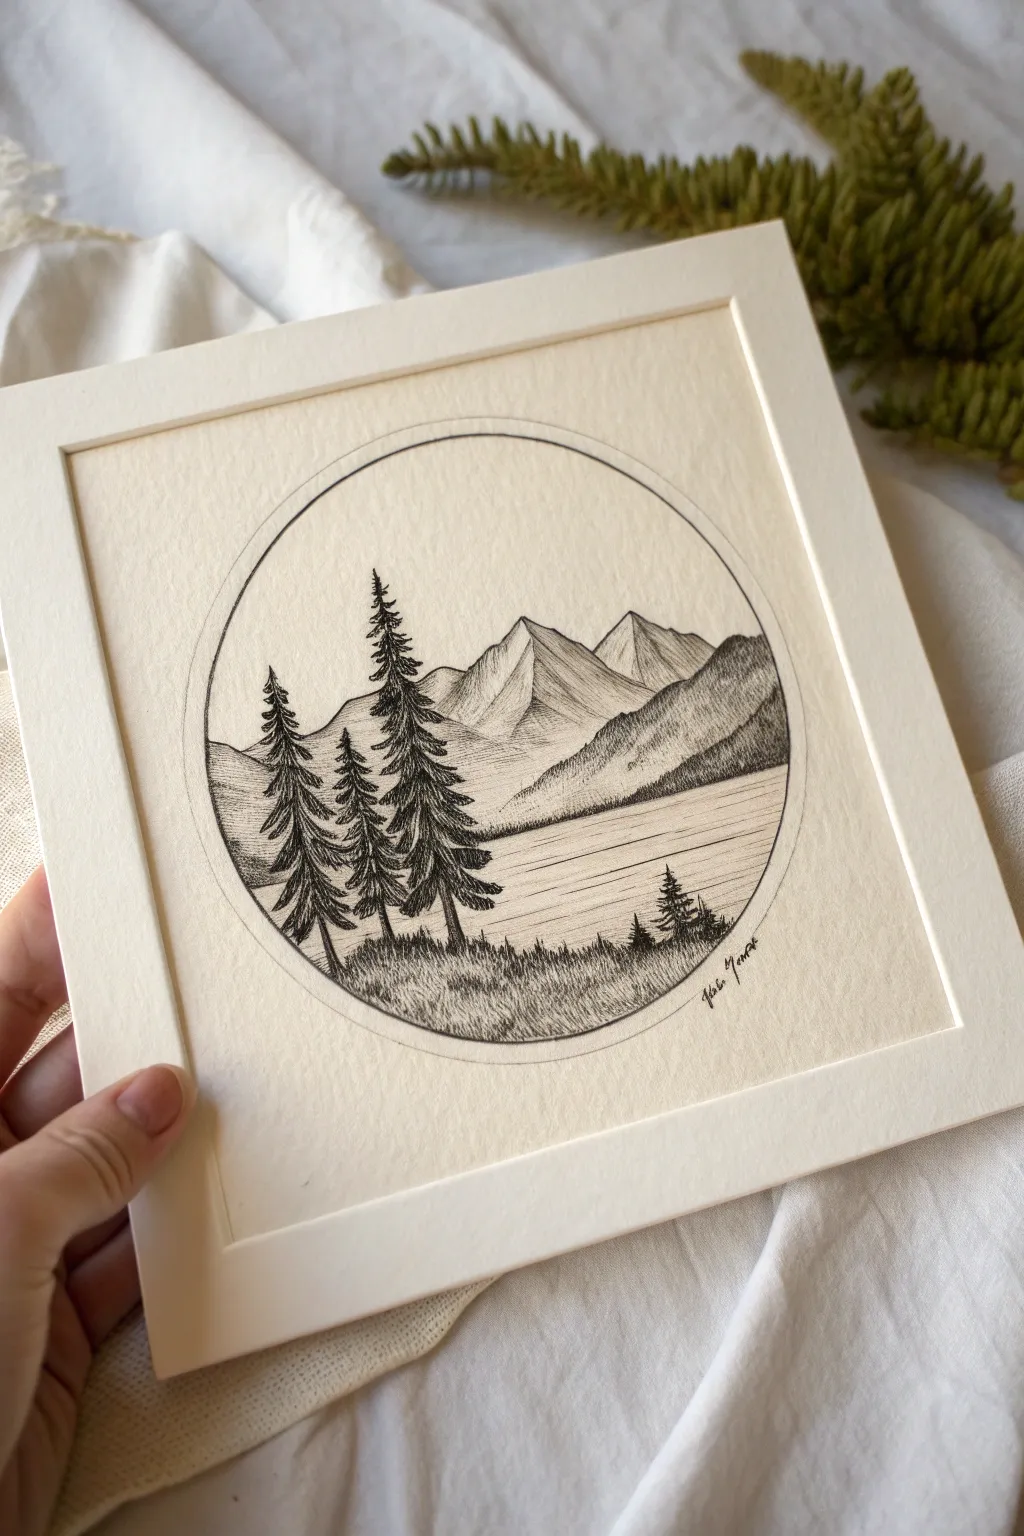
This project transforms a simple circle into a window overlooking a peaceful mountain landscape. Using fineliner pens, you’ll build depth through layers of stippling and hatching to create realistic textures for trees, water, and stone.
How-To Guide
Materials
- High-quality drawing paper or Bristol board (slightly textured)
- Black fineliner pens (sizes 0.1, 0.3, and 0.5)
- Pencil (HB or 2H)
- Compass or a round object to trace
- Eraser
- Ruler
- Square mat frame (optional, for display)
Step 1: Setting the Scene
-
Draw the boundary:
Begin by using a compass to draw a perfect circle in the center of your paper. If you don’t have a compass, trace a bowl or lid lightly with your pencil. -
Sketch the horizon:
Lightly sketch a horizontal line across the lower third of the circle to mark the far shore of the lake. This doesn’t need to be perfectly straight; a slight undulation looks more natural. -
Outline the mountains:
Above the lake line, sketch the jagged peaks of the mountains. Create three main peaks, with the central one slightly recessed to add depth. -
Place the foreground trees:
On the left side of the composition, pencil in the vertical guide lines for three distinct pine trees. The tallest should be in the middle, with a smaller companion on its left and another slightly behind it.
Step 2: Inking the Background
-
Define the mountain peaks:
Using a 0.3 pen, trace over your pencil outlines for the mountains. Keep your hand loose to capture the craggy, uneven nature of the rock. -
Shade the distant mountains:
Switch to your finest 0.1 pen. Use diagonal hatching lines on the shadowed sides of the peaks to create form. Vary the density of your lines—make them closer together in the valleys and further apart near the summits. -
Add texture to the nearer hills:
For the lower mountain slopes on the right, use a stippling technique (tiny dots) mixed with short, erratic scribbles to suggest dense vegetation or rough terrain. -
Create the water:
With the 0.1 pen, draw long, horizontal lines across the water surface. Keep these lines sparse and thin in the center to suggest light reflection, and slightly denser near the shoreline.
Clean Lines
Keep a piece of scrap paper under your drawing hand. This prevents skin oils from smudging the pencil sketch or transferring wet ink across your pristine paper.
Step 3: Detailing the Foreground
-
Ink the tree trunks:
Draw the main trunks of the three foreground trees using the 0.5 pen for a bolder look. Taper them slightly as they reach the top. -
Add pine foliage:
Starting from the top of each tree, use short, downward-angled strokes to create the branches. I find it helpful to make the branches wider and denser as I move down the trunk. -
Draw the grassy bank:
At the base of the trees, use short, upward flicks with the 0.3 pen to simulate tall grass. Let some of the grass overlap the bottom of the tree trunks to ground them in the scene. -
Add the distant tree line:
On the right side of the foreground bank, draw tiny, simplified pine tree shapes. These should be much smaller than the main trio to reinforce the perspective. -
Darken the foreground base:
Add more ink density to the grassy area at the very bottom of the circle. This dark base creates a strong visual anchor for the composition.
Add a Spot Color
Use a watercolor wash in a single tone—like a hazy blue for the sky or a deep green for the trees—before doing the final inking to create a moody, mixed-media piece.
Step 4: Final Touches
-
Outline the frame:
Carefully trace over your original pencil circle with a 0.3 pen. For a cleaner look, you might want to rotate the paper as you draw the curve. -
Erase pencil guides:
Wait at least 10 minutes to ensure the ink is completely dry. Then, gently erase all visible pencil marks, being careful not to buckle the paper. -
Inspect contrast:
Step back and look at your drawing. If the mountains fade too much into the sky, add a few more hatching lines to their shadowed sides to boost the contrast. -
Sign and mat:
Add a small, subtle signature curved along the bottom right edge of the circle. Place your finished artwork behind a square mat for a professional gallery look.
Now you have a captured a tiny world of wilderness ready to display or gift
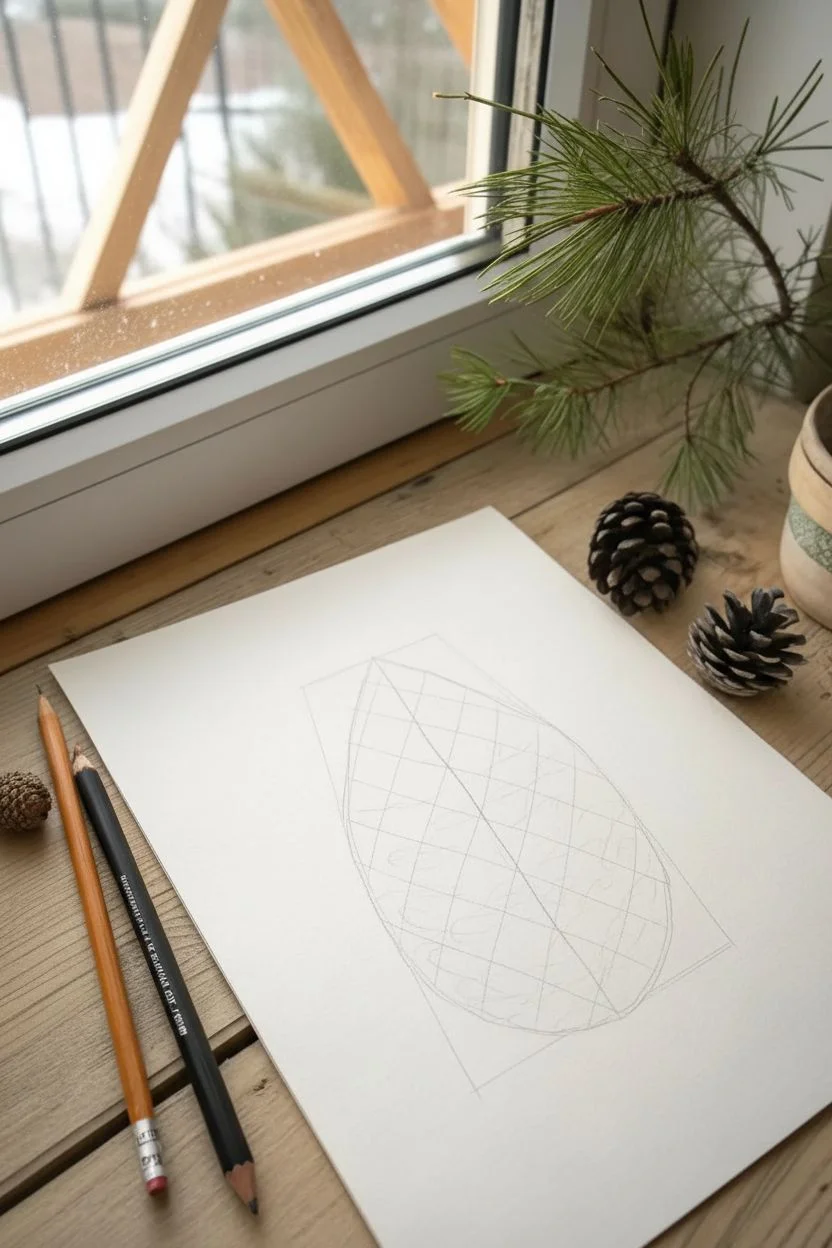
Sunset Gradient in a Circle Using One Pencil
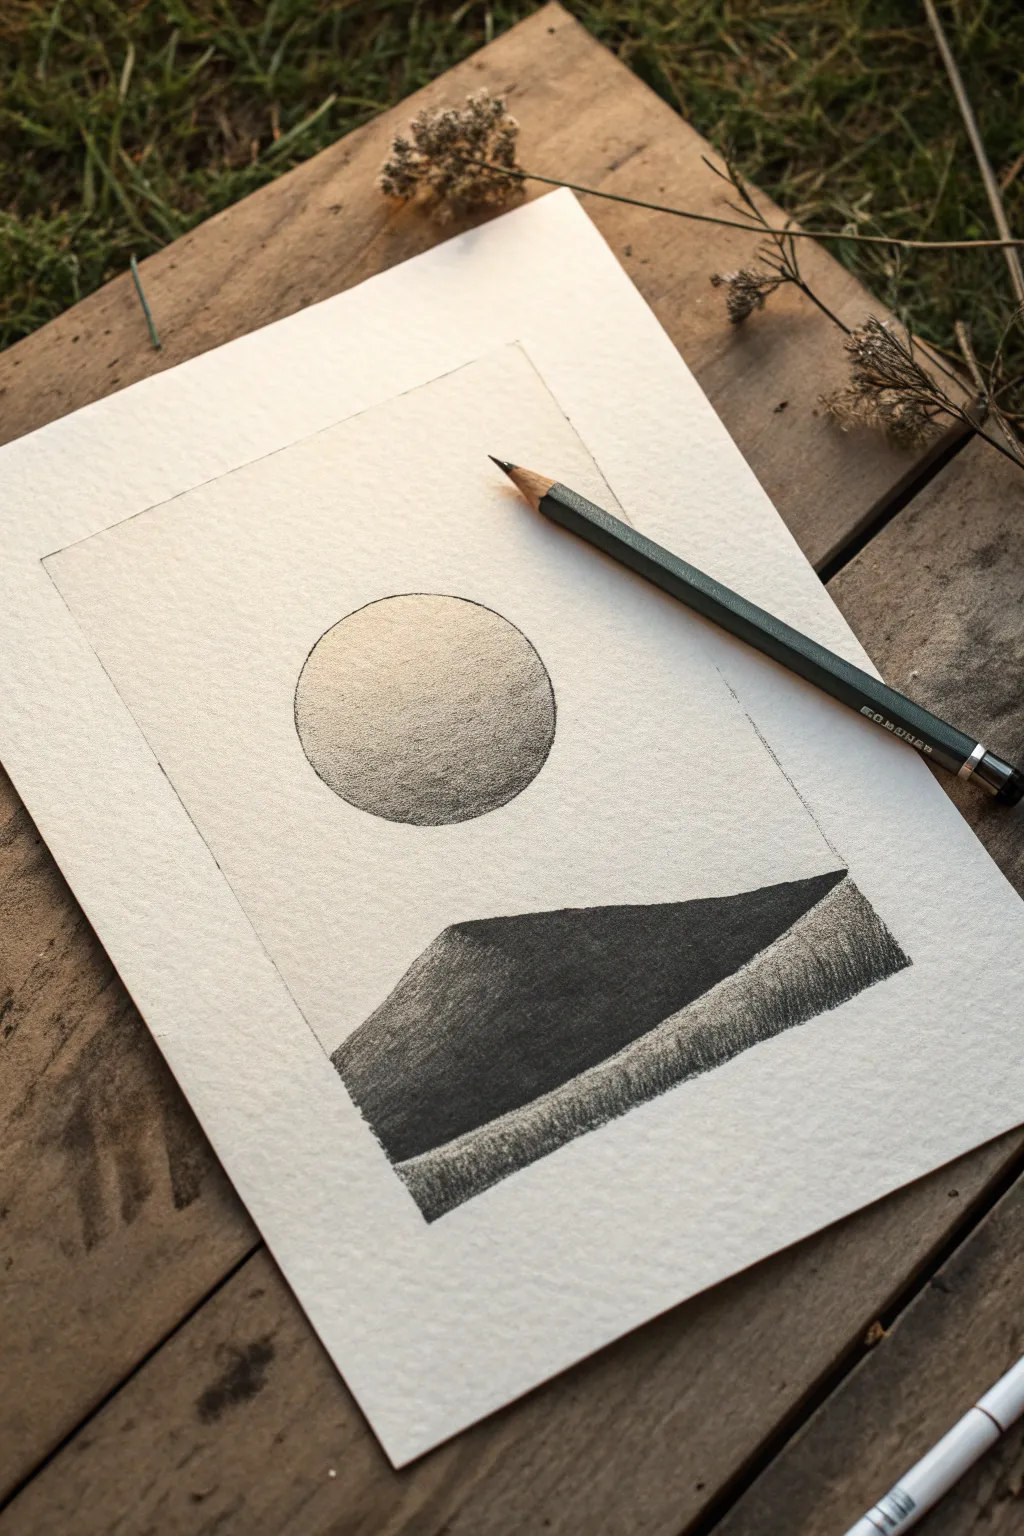
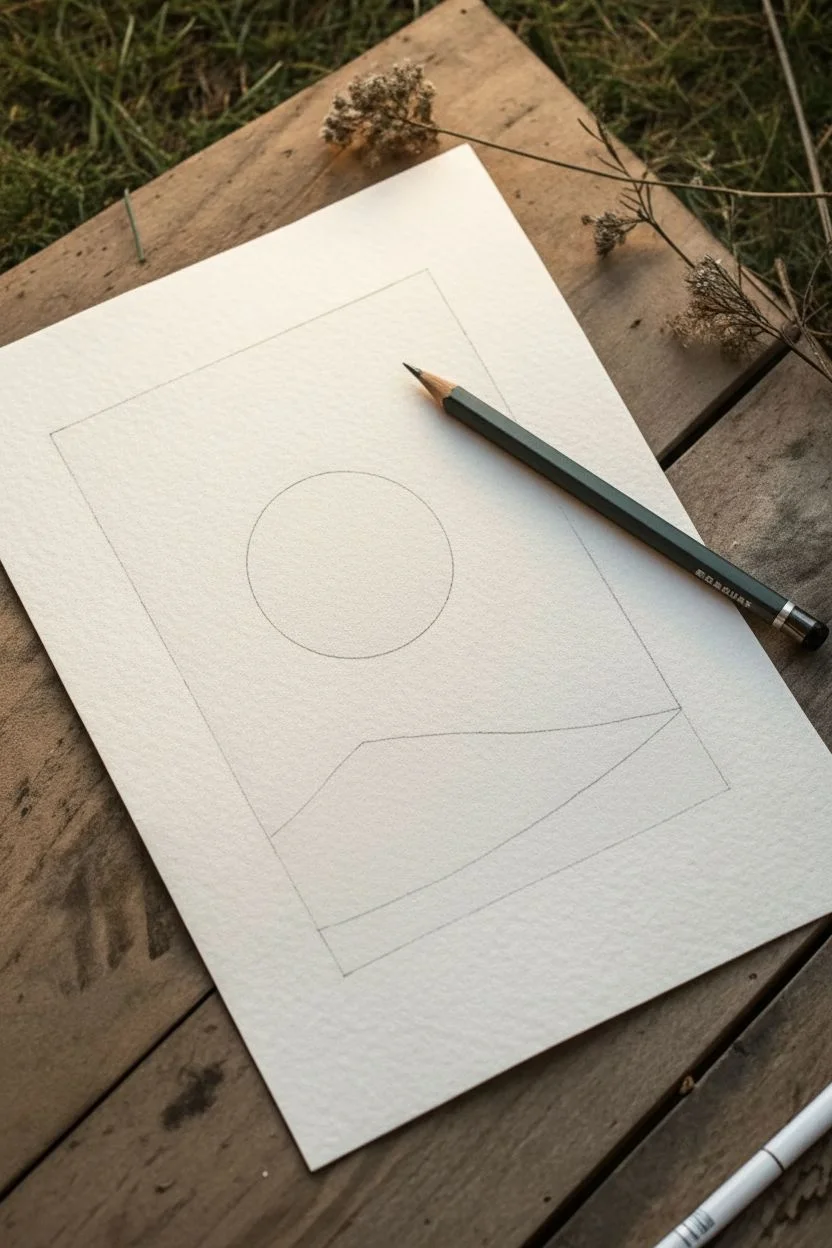
Master the art of minimalism with this striking geometric landscape that uses nothing more than a single pencil and clever shading. By playing with gradients and sharp lines, you’ll create a moody, surreal sunset scene that feels both modern and timeless.
Step-by-Step Guide
Materials
- High-quality drawing paper (textured or mixed media paper works best)
- Graphite pencil (HB or 2B recommended)
- Ruler
- Compass or a small circular object to trace
- Eraser (kneaded eraser preferred)
- Pencil sharpener
Step 1: Setting the Scene
-
Define the borders:
Begin by using your ruler to draw a crisp rectangular border in the center of your paper. Keep your lines very light at this stage so they don’t groove the paper, just in case you need to adjust them later. -
Position the sun:
Place the point of your compass slightly above the vertical center of the rectangle. Draw a perfect circle. You want it to be the focal point, floating serenely in the sky space. -
Establish the horizon:
For the landscape below, draw a single diagonal line starting from the bottom-left edge of the sun (though lower down) and angled upward toward the right edge of the frame. This will be the ridge of your dark hill.
Grainy Goodness
Use cold-press watercolor paper. Its ‘tooth’ (texture) naturally breaks up pencil strokes, creating that perfect stippled sunset look without extra effort.
Step 2: Shading the Sun
-
Start the gradient:
Begin shading the circle from the bottom up. Apply firm pressure at the very bottom edge of the circle to create a deep, dark crescent. -
Ease the pressure:
As you move upward, gradually reduce the pressure on your pencil. The texture of the paper will start to show through as ‘white noise,’ which adds a wonderful grainy effect. -
Fade to white:
Continue blending upward until the graphite naturally fades into the white of the paper near the top third of the circle. This creates that glowing, sun-bleached look. -
Refine the edge:
Go back over the outline of the circle with a sharpened tip to ensure the edge is crisp against the blank sky. A clean silhouette is crucial for this style.
Step 3: Creating the Landscape
-
Darken the main slope:
Now, tackle the large triangular hill shape. Fill this area in with solid, heavy shading. I like to use the side of the lead here to get a dense, uniform black without visible stroke lines. -
Build saturation:
Layer your pencil strokes on this hill. It needs to be the darkest part of the drawing to anchor the composition, creating a strong contrast against the lighter sky. -
Maintain the ridge line:
Be very careful along the top diagonal line of the hill. Use a ruler as a guard if you need to, keeping that edge razor-sharp. -
Add the foreground slope:
Draw a secondary, lower slope in the bottom right corner. This section should have a different texture. Instead of solid block shading, use short, directional strokes. -
Texture the grass:
Fill this bottom right section with tight, vertical vertical hatching lines that mimic tall grass or a rougher terrain. -
Blend the transition:
Where the dark hill meets the textured foreground, ensure there is a clear distinction. The dark hill should appear to sit behind the lighter, textured foreground slope.
Uneven Gradients?
If your shading looks streaky, use small circular motions rather than back-and-forth lines. This diffuses the graphite for a smoother transition.
Step 4: Final Touches
-
Clean the borders:
Take your eraser and clean up any graphite smudges outside the main rectangular border. -
Crisp up the frame:
Retrace the original rectangular frame lines with a ruler and firm pressure to give the artwork a finished, deliberate ‘window’ effect. -
Check values:
Step back and assess your contrast. If the sun looks too faint, darken the bottom curve slightly more to exaggerate the gradient.
Frame this minimal piece in a simple black mat to highlight the stunning contrast you have achieved
Night Sky Vignette With Stars and a Treeline
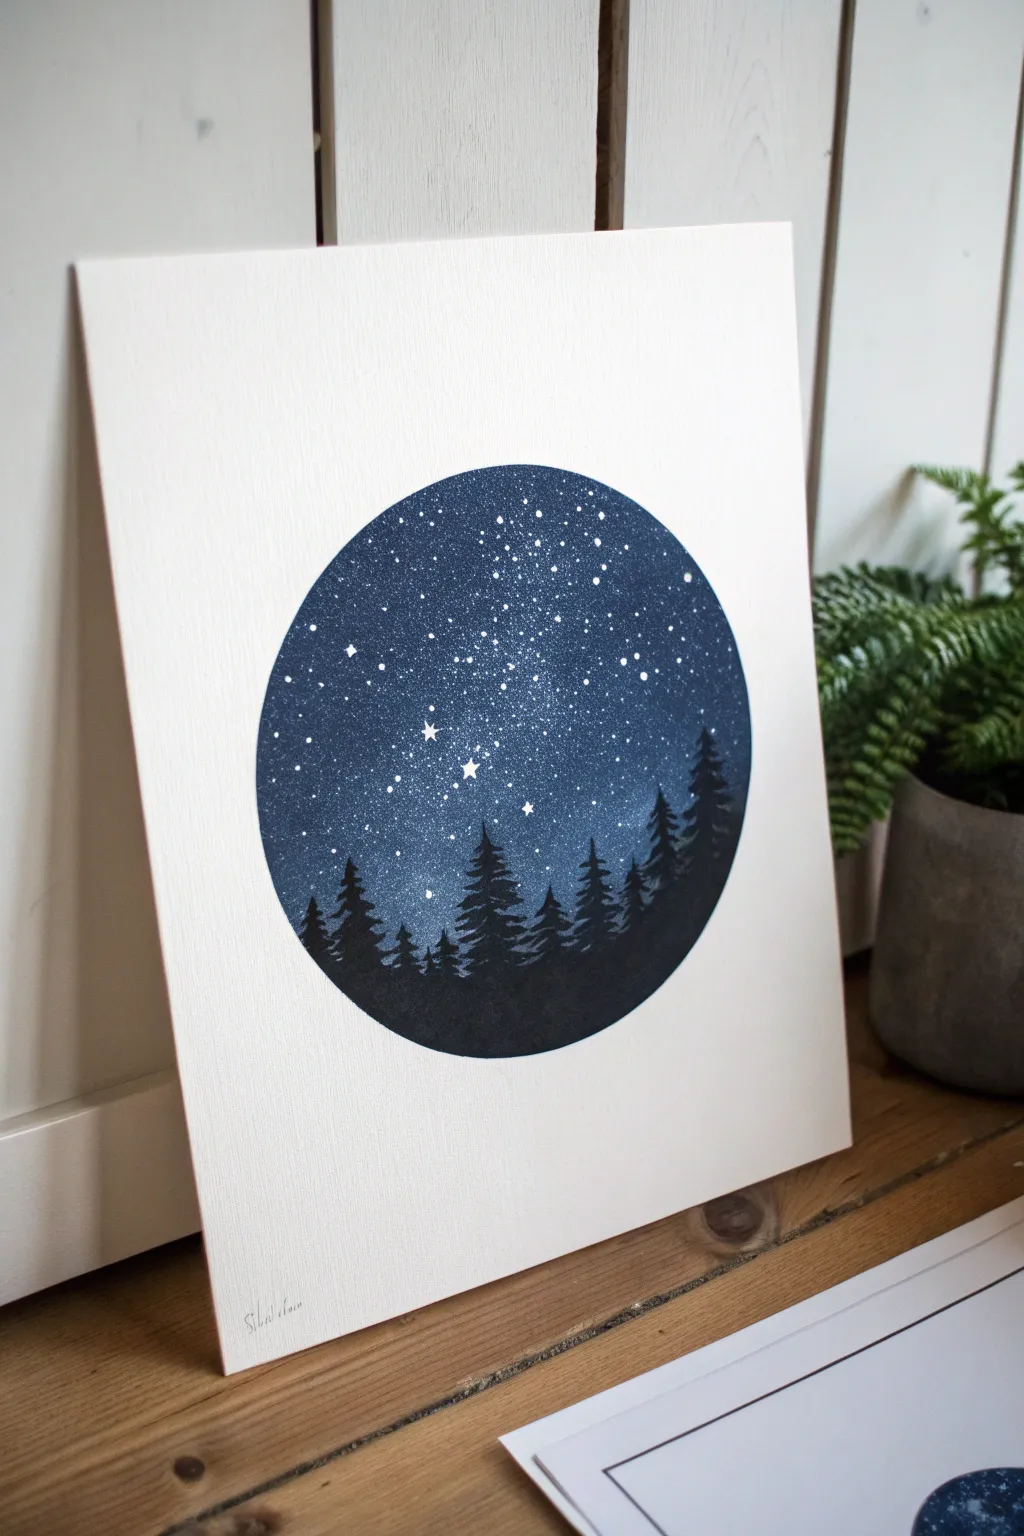

This striking project captures the magic of a clear night sky contained within a perfect circle. By combining blending techniques with crisp silhouettes, you’ll create a professional-looking art print that highlights the contrast between the luminous galaxy and the dark forest.
Step-by-Step Tutorial
Materials
- Heavyweight watercolor paper or cardstock (smooth finish)
- Blue painter’s tape or drafting tape
- Compass or a circular bowl for tracing
- Acrylic paints: Navy Blue, Phthalo Blue (or primary blue), Black, and White
- Sponges (makeup wedges or small kitchen sponge pieces)
- Small flat brush (size 4 or 6)
- Small round detail brush (size 0 or 00)
- Old toothbrush (for splatter)
- Palette for mixing
Step 1: Setting the Stage
-
Trace the boundary:
Begin by deciding where you want your vignette to sit on the paper. Place a circular bowl or use a compass to lightly trace a perfect circle in pencil. Keep the lines faint so they are easier to cover later. -
Mask the edges:
This is the most crucial step for that crisp edge. Carefully apply blue painter’s tape along the outside of your pencil line. You can tear small strips to curve them around the circle, or cut a circle out of a frisket film or a large piece of masking tape. Ensure the inner edge is pressed down firmly to prevent paint seepage.
Clean Edges Pro-Tip
Before painting, run a clear matte medium or white paint along the edge of your tape. This creates a seal that prevents the blue paint from bleeding under, guaranteeing a perfect circle.
Step 2: Creating the Galaxy
-
Base gradient layer:
Squeeze out your Navy Blue, Phthalo Blue, and a tiny dot of Black. Start at the top of the circle with the Navy Blue mixed with a bit of Black. Use a slightly damp sponge to dab the paint onto the paper. -
Blending down:
As you move toward the middle of the circle, switch to pure Navy Blue. While the paint is still wet, dab over the transition area to blend the colors seamless. -
Adding the lighter horizon:
Near the bottom third of the circle, introduce the Phthalo Blue. Blend it upwards into the navy. Finally, mix a tiny bit of White into the Phthalo Blue for the very bottom area where the trees will sit, creating an atmospheric glow. Let this base layer dry completely. -
Sponging texture:
Once dry, go back in with your sponge and a lighter blue-white mix. Lightly dab a diagonal band across the sky to suggest the Milky Way. Keep this texture subtle and cloudy. -
Creating the stars:
Thin down some white acrylic paint with a drop of water until it’s the consistency of ink or heavy cream. Dip an old toothbrush into this mixture. -
Splatter technique:
Hold the toothbrush over the painting and run your thumb along the bristles to flick tiny droplets onto the blue background. Test this on a scrap paper first to gauge the splatter size. -
Painting larger stars:
Use your smallest detail brush (size 0) to add specific, larger stars. Paint a few small cruciform shapes or slightly larger dots to represent major constellations like the Big Dipper seen in the example.
Step 3: The Forest Silhouette
-
Mixing the tree color:
You want a deep, rich dark tone, but plain black can look flat. Mix your Black paint with a small amount of Navy Blue to create a ‘midnight’ black. -
Establishing the ground:
Using a flat brush, paint a solid, undulating line across the bottom section of the circle. This forms the forest floor and covers the lightest part of your blue gradient. -
Starting the trees:
Switch to your detail brush. Paint vertical lines of varying heights rising from the ground layer. These will be the trunks of your pine trees. -
Adding branches:
Starting from the top of a trunk, use a stippling or dabbing motion to create branches. Use the very tip of the brush. Make the branches narrow at the top and gradually wider as you move down the trunk. -
Varying the forest:
Make sure your trees aren’t identical. Paint some distinct, tall pines on the right side, and create a dense, lower canopy on the left. Vary the spacing so some trees overlap. -
Refining the silhouette:
Fill in the bottom area completely with your dark mix, ensuring it is opaque. I like to do a second coat here just to be sure no blue shows through the dense forest floor.
Level-Up: Constellations
Look up a star chart for a specific date (like a birthday) and accurately place the dots with a white gel pen to make the piece a personalized gift.
Step 4: The Reveal
-
Dry time:
Wait until the paint is bone dry. If you peel the tape too soon, you risk difficult smudges. -
Removing the mask:
Slowly peel the tape away from the center of the artwork at a 45-degree angle. This reveals that satisfying, sharp circular edge. -
Final touches:
If any paint bled under the tape, you can touch it up carefully with a bit of white acrylic or white gouache to restore the crisp paper edge.
Sign your work in pencil at the bottom corner and find a simple frame to display your miniature galaxy
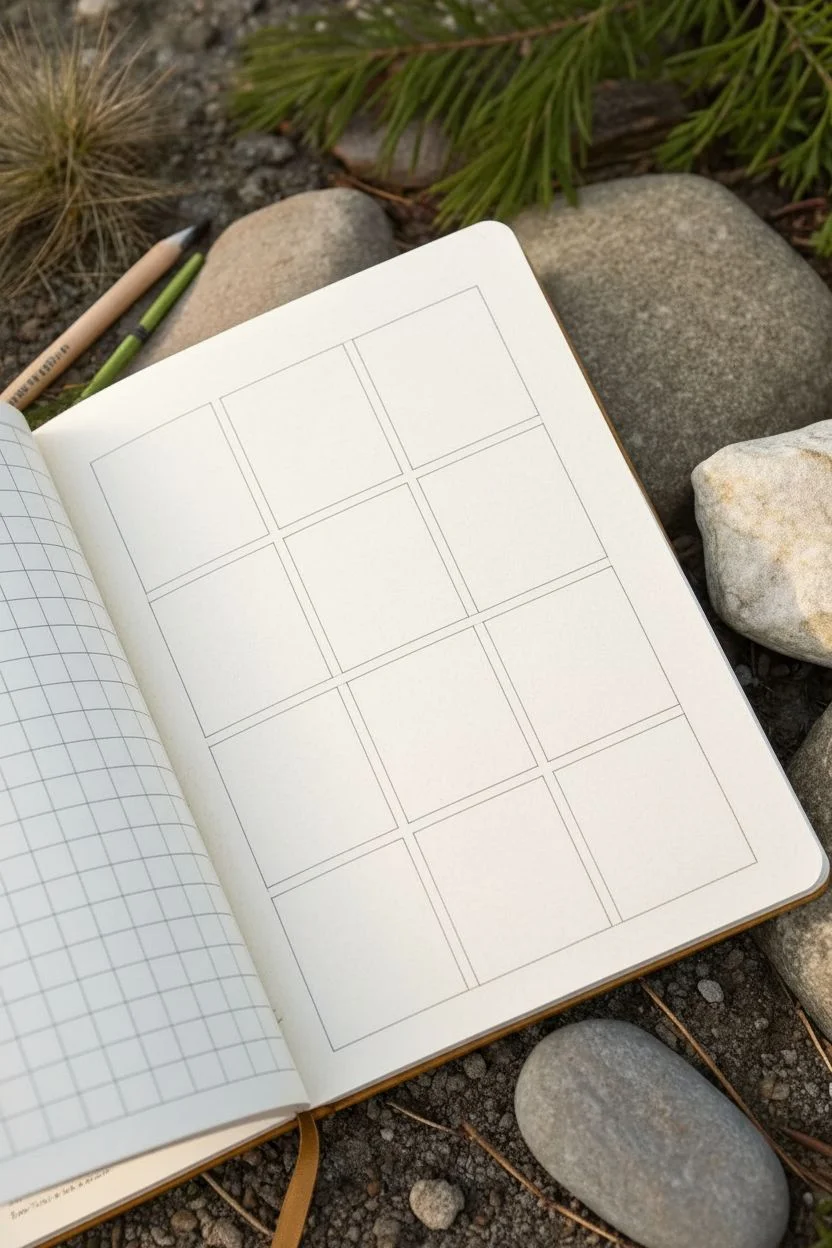
Mini Nature Sketch Grid of Tiny Scenes
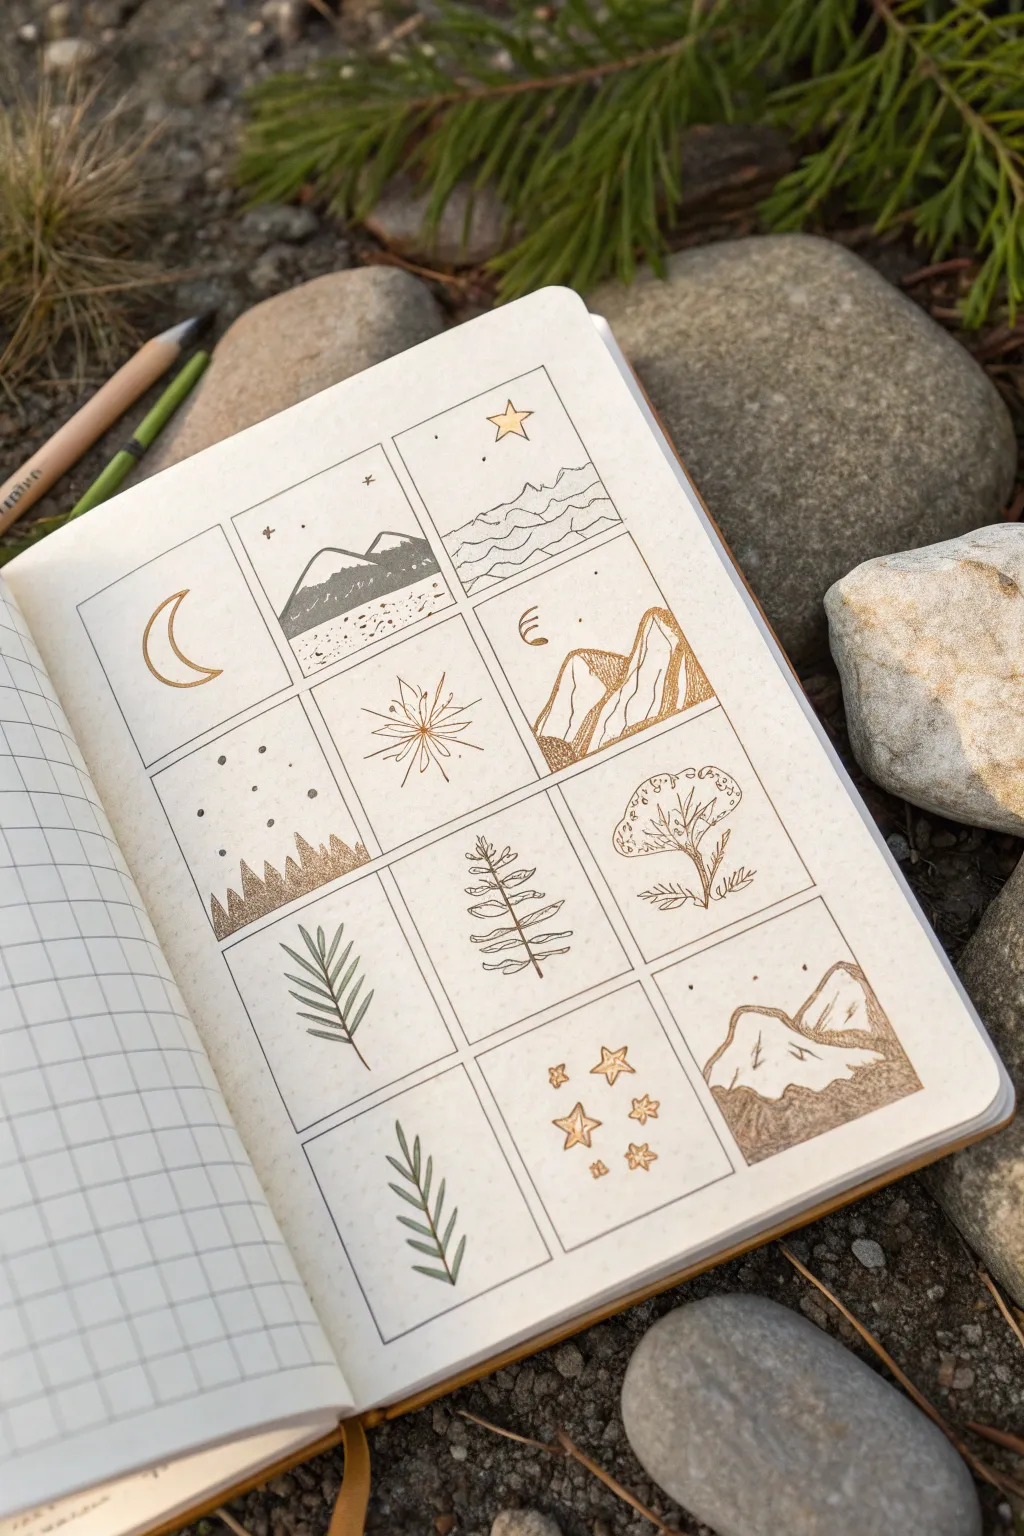
Capture the essence of the outdoors with this charming grid of miniature landscapes and botanical doodles. Using fine liners and metallic accents creates a delicate, exploratory feel perfect for filling a journal page without the pressure of a full composition.
Detailed Instructions
Materials
- Dotted or blank journal/sketchbook
- Ruler
- Pencil (HB or lighter)
- Eraser
- Fine liner pen (01 or 03 size, black or dark brown)
- Metallic gel pen or marker (gold or bronze)
- Sepia or brown drawing pen (optional for shading)
Step 1: Setting the Structure
-
Measure the page:
Begin by assessing the available space on your page. You need room for a grid of 12 squares (3 columns by 4 rows). Leave a comfortable margin around the edges of the paper so the artwork can breathe. -
Draft the grid lines:
Using your ruler and pencil, lightly draw the main rectangular outlines. Aim for squares that are approximately 1.5 to 2 inches in size. Keep your pencil pressure very light so these lines are easy to erase later. -
Ink the frames:
Trace over your pencil grid with a fine liner pen. Use a ruler if you want perfectly crisp edges, or freehand the lines slowly for a more organic, hand-drawn aesthetic that matches the natural theme.
Ink Confidence
Don’t worry if your lines aren’t perfectly straight. Slight wobbles in nature drawings actually add character and make mountains or trees look more organic and realistic.
Step 2: Row 1: Celestial & Horizons
-
Draw the crescent moon:
In the top-left square, draw a simple crescent moon shape using your metallic gold pen. Keep the lines clean and unfilled for a minimalist look. -
Sketch the mountain night:
For the second square, draw a simple mountain silhouette. Use stippling (tiny dots) with a dark pen to fill the mountains, creating texture. Add a few tiny stars in the sky above. -
Create line waves:
In the third square, draw a single floating star at the top using gold ink. Below it, fill the bottom half with wavy, horizontal lines to mimic a calm ocean or rolling desert dunes.
Add Color Washes
Once the waterproof ink is dry, lightly paint over specific squares with diluted watercolor. Try a soft blue for the sky squares or a sage green for the botanical ones.
Step 3: Row 2: Heights & Flora
-
Stipple the snowy peaks:
In the first square of the second row, draw tiny dots scattered across the upper half to represent snow or stars. At the bottom, draw a jagged treeline silhouette using dense stippling or solid shading with your metallic pen. -
Draw a metallic starburst:
Center a starburst design in the middle square. Use gold ink to draw thin lines radiating from a central point, alternating between long and short rays. -
Outline majestic peaks:
In the third square, sketch three tall, sharp mountain peaks. Use vertical hatching lines on one side of each peak to indicate shadows and dimension.
Step 4: Row 3: Botanical Details
-
Sketch the pine branch:
Draw a curved line starting from the bottom corner for a branch. Add short, thin needles emerging from the main stem, getting smaller as you reach the tip. -
Create a fern Frond:
In the center square, draw a vertical stem. Add symmetrical, horizontal leaves going up the stem, using a looped, continuous line style for a whimsical touch. -
Detail a mushroom:
Draw a large mushroom cap in the third square. Fill the cap with intricate texture, like tiny circles or veins, and ground it with a small tuft of grass at the base.
Step 5: Row 4: Final Elements
-
Draw a simple leaf:
In the bottom-left square, draw a basic fern or palm-like leaf. Use a single central stroke and add angled leaflets on either side. -
Scatter gold stars:
For the middle square, take your metallic pen and draw five or six small five-pointed stars. Vary their sizes and orientation to make them look like distinct constellations. -
Finish with textured hills:
In the final square, draw rolling hills or low mountains. Use a ‘scumbling’ technique (tiny scribbles) to shade the lower areas, giving them an earthy, rocky appearance. -
Final clean up:
Wait at least 10 minutes to ensure all ink—especially gel or metallic ink—is completely dry. Gently erase any remaining pencil grid lines to leave a crisp, clean finish.
Now you have a completed gallery of tiny scenes ready to inspire your next outdoor adventure


Have a question or want to share your own experience? I'd love to hear from you in the comments below!