If you’ve been staring at a blank mug or bowl and not sure where to start, I’ve got you. These easy pottery painting ideas lean on simple shapes, repeatable patterns, and clean color palettes that make your piece look polished fast.
Polka Dot Confetti
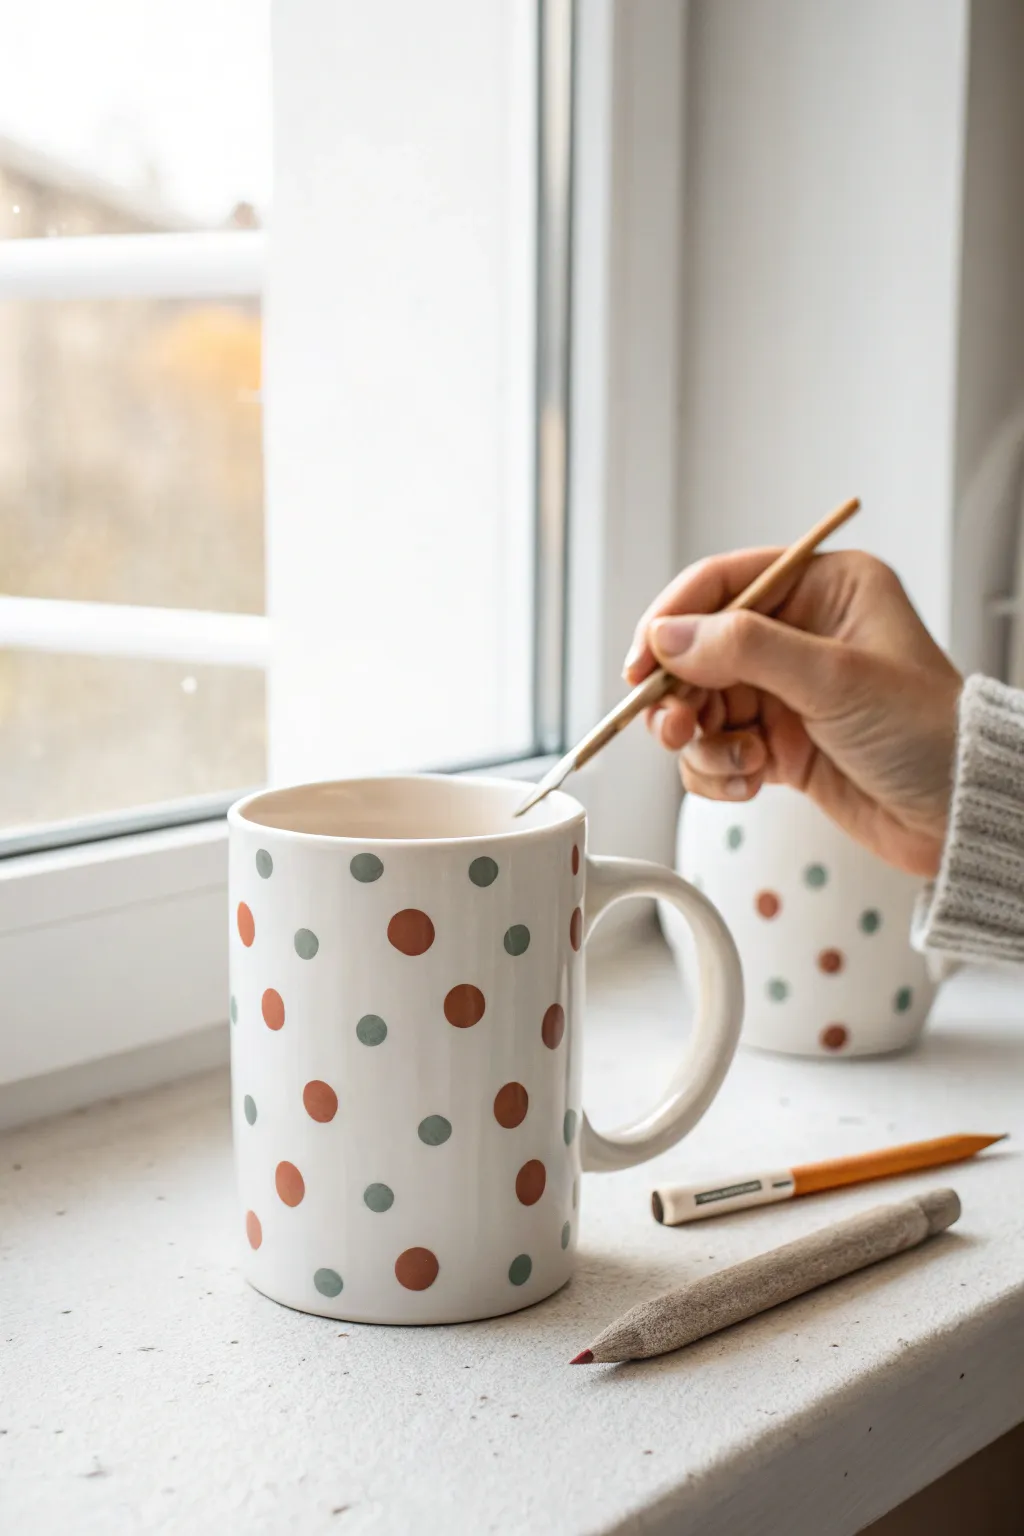
Transform a plain ceramic mug into a cheerful companion for your morning coffee with this simple yet stylish confetti design. Using alternating warm terracotta and cool sage green dots, creating a balanced and whimsical pattern is easier than you might think.
Detailed Instructions
Materials
- Bisque fired ceramic mug (white)
- Underglaze (Terracotta/Burnt Orange)
- Underglaze (Sage Green/Muted Teal)
- Clean sponge
- Pencil with a new eraser or round foam pouncer tool
- Fine liner brush (size 0 or 1)
- Round detail brush (size 4)
- Palette or small dish
- Water cup
- Clear dipping glaze
Step 1: Preparation & Planning
-
Clean the surface:
Begin by wiping down your bisque mug with a damp, clean sponge. This removes any dust that could prevent the glaze from adhering properly. -
Check for imperfections:
Inspect the handle and rim for any rough spots. If you find any, gently smooth them with a fine sanding pad or your fingers before you start painting.
Stamp Master Tip
Don’t have a round brush? Use the flat end of a drill bit or a specialized foam pouncer. These tools create perfectly uniform circles every time without brush strokes.
Step 2: Applying the Pattern
-
Prepare your palette:
Pour a coin-sized amount of the terracotta orange underglaze and the sage green underglaze onto your palette. -
Mix consistency:
If the underglaze feels too thick, add a singular drop of water. You want a creamy consistency that flows but doesn’t drip. -
Start with the orange:
Choose your dotting tool. For perfectly round circles, dipping the eraser end of a pencil into the paint works wonders. Dip the eraser into the terracotta paint. -
Place anchor dots:
Apply your first few orange dots randomly around the mug. Space them out generously, leaving plenty of room for the second color. -
Reload frequently:
Reload your tool with paint after every singe dot to ensure they stay the same size and opacity. -
Switch to green:
Wipe off your tool or grab a fresh one. Dip it into the sage green underglaze. -
Fill the gaps:
Place green dots in the spaces between the orange ones. Avoid creating distinct lines; aim for a scattered ‘confetti’ look. -
Review the spacing:
Step back and look at the mug from a distance. If you see large white gaps, add a smaller dot using the back end of a paintbrush handle for size variation.
Fixing Smudges
If you accidentally smear a dot, let it dry completely. Once dry, you can gently scratch the mistake off with a toothpick or a craft knife without ruining the white base.
Step 3: Refining & Finishing
-
Clean the edges:
If any dots look smudged or uneven, dip a fine liner brush in water and carefully tidy up the edges of the circles. -
Add a second coat:
Once the first layer is dry to the touch (it will look chalky), carefully dab a second coat of the corresponding color over each dot to ensure rich, opaque coverage. -
Check the interior:
Ensure no accidental splatters landed inside the mug. Wipe them away with a damp sponge if found. -
Interior glaze option:
I prefer to leave the inside white, but if you want color, pour a diluted wash of clear or white glaze inside and swirl it around now. -
Final drying:
Let the mug dry completely for at least 24 hours. The dots should feel powdery and dry. -
Glazing:
Dip the entire mug into a clear dipping glaze using glazing tongs. Shake off excess gently. -
Firing:
Fire the mug in a kiln according to the clay and glaze specifications (usually cone 06 for earthenware or cone 6 for stoneware).
Enjoy your morning coffee in your delightful new handmade confetti mug


Simple Stripes and Bands
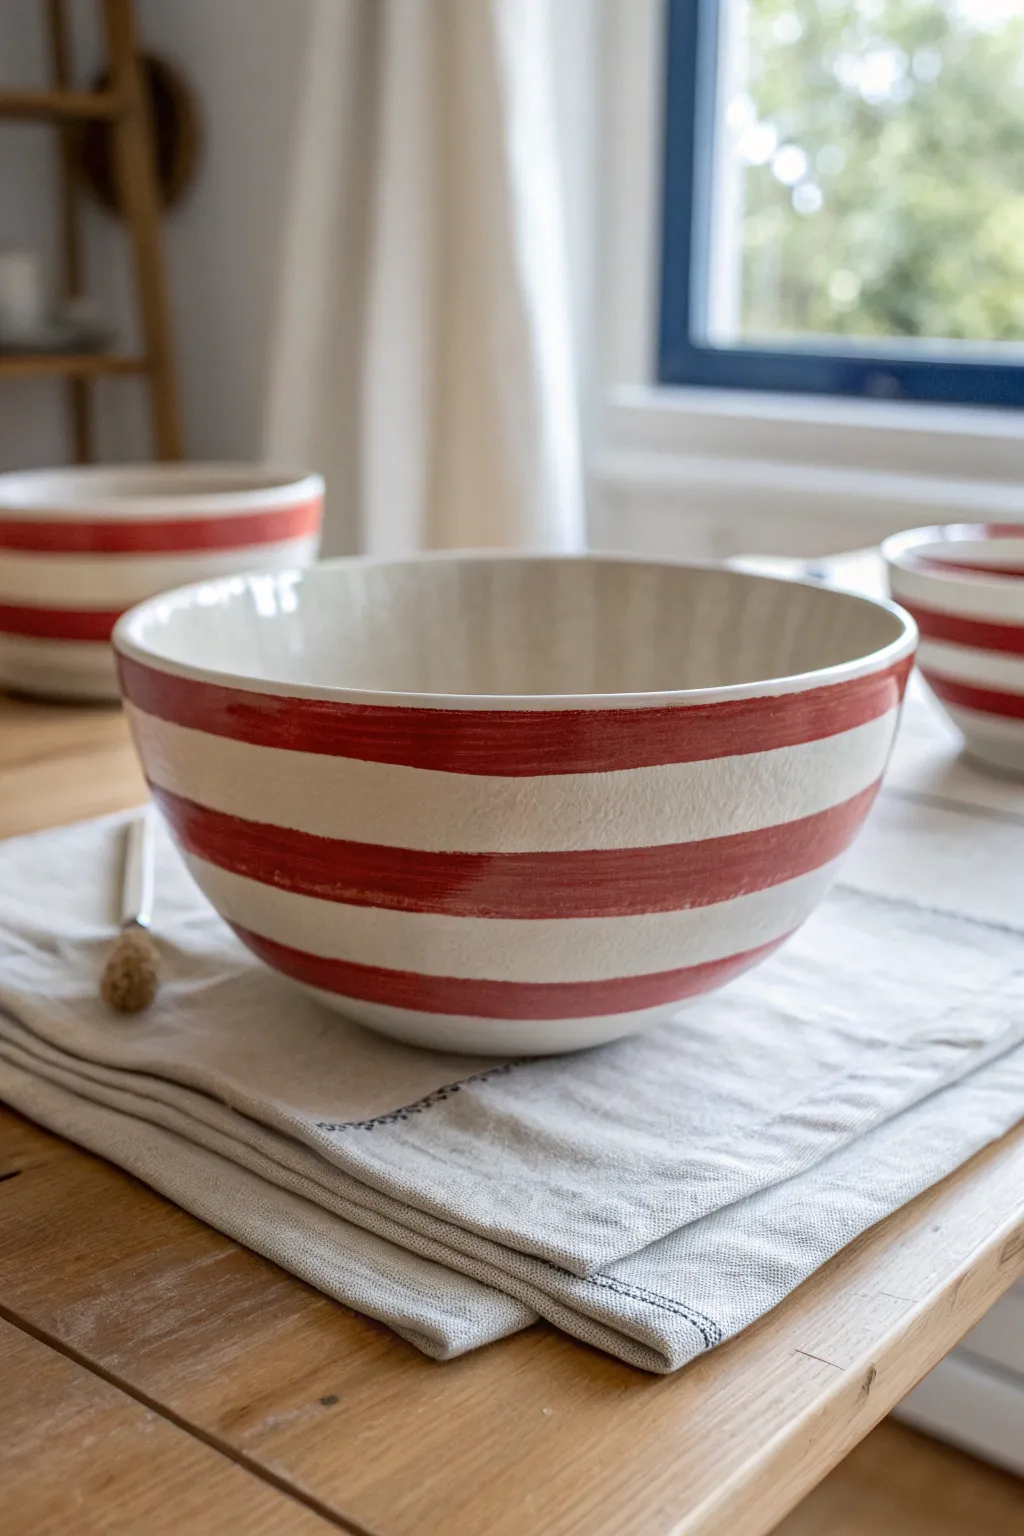
Embrace the charm of imperfection with this lovely, hand-painted ceramic bowl featuring bold red bands against a crisp white background. This beginner-friendly project celebrates the organic feel of handmade pottery, proving that steady hands aren’t required for beautiful results.
How-To Guide
Materials
- Bisque-fired white ceramic bowl
- Underglaze (bright cherry red)
- Flat shader brush (medium width, approx. 1/2 inch)
- Banding wheel (optional but helpful)
- Clear dipping glaze or brush-on clear glaze
- Sponge and water bowl
- Pencil (optional)
Step 1: Preparation
-
Clean the Bisque:
Start by wiping down your bisque bowl with a slightly damp sponge. This removes any ceramic dust that might prevent the glaze from adhering properly. -
Assess the Surface:
Check for any rough spots on the rim or interior. If you find any, you can gently sand them down, but be sure to wipe away the dust again afterward. -
Set Up Your Station:
If you have a banding wheel, center your bowl on it now. This tool allows the bowl to spin while your hand stays stationary, making bands much easier to apply.
Uneven Paint?
If your stripes look patchy, don’t overload the brush. Instead, apply multiple thin layers, letting each dry to the touch before adding the next.
Step 2: Painting the Bands
-
Load the Brush:
Dip your flat shader brush into the red underglaze. You want the brush fully loaded but not dripping. -
Position the First Band:
Decide where your top band will go. On this bowl, it sits just below the rim. Hold your brush horizontally against the bowl’s exterior surface. -
Paint the Top Stripe:
If using a banding wheel, spin the wheel slowly while keeping your hand steady to create the line. If painting manually, slowly rotate the bowl with one hand while dragging the brush with the other. -
Embrace the Wobble:
Don’t stress if the line isn’t perfectly straight or uniform. The beauty of this piece is its hand-painted, rustic look. Variations in thickness add character. -
Second Coat (Top Band):
Once the first layer loses its wet sheen, apply a second coat to the top band to ensure the red is opaque and vibrant. -
Spacing the Middle Band:
Leave a gap of white space roughly equal to the width of your red stripe. This negative space is just as important as the color. -
Painting the Middle Stripe:
Repeat the process for the second stripe. I find that resting my painting elbow on the table helps stabilize my hand while the bowl rotates. -
Check Coverage:
Apply your second or third coat to the middle band. Underglaze often requires three coats for full opacity, so check your specific bottle’s instructions. -
Painting the Bottom Stripe:
Add the final red band near the base of the bowl. Because the bowl curves inward here, you might need to adjust your brush angle slightly to maintain contact. -
Review the Edges:
Look closely at the edges of your stripes. You want a ‘dry brush’ look on the texture, which gives it that vintage feel, so don’t try to make the edges razor-sharp. -
Clean Up Strays:
If you made any accidental marks on the white sections, use a clean, damp brush or a scratch tool to gently remove the unwanted paint.
Step 3: Finishing
-
Let it Dry:
Allow the underglaze to dry completely. It should feel powdery and look matte. -
Apply Clear Glaze:
Once dry, apply a clear dipping glaze or two coats of brush-on clear glaze over the entire bowl to seal the design and make it food-safe. -
Sponge the Foot:
Wipe the very bottom ‘foot’ of the bowl clean of any glaze with a sponge to prevent it from sticking to the kiln shelf. -
Final Fire:
Fire the piece in the kiln according to the clay and glaze specifications (usually Cone 06 or Cone 6).
Mix It Up
Try varying the width of the stripes for a modern twist, or layer a translucent speckle glaze over the red for a stone-ware pottery finish.
Once fired, you will have a timeless serving vessel that brightens up any table setting


Modern Color Blocking
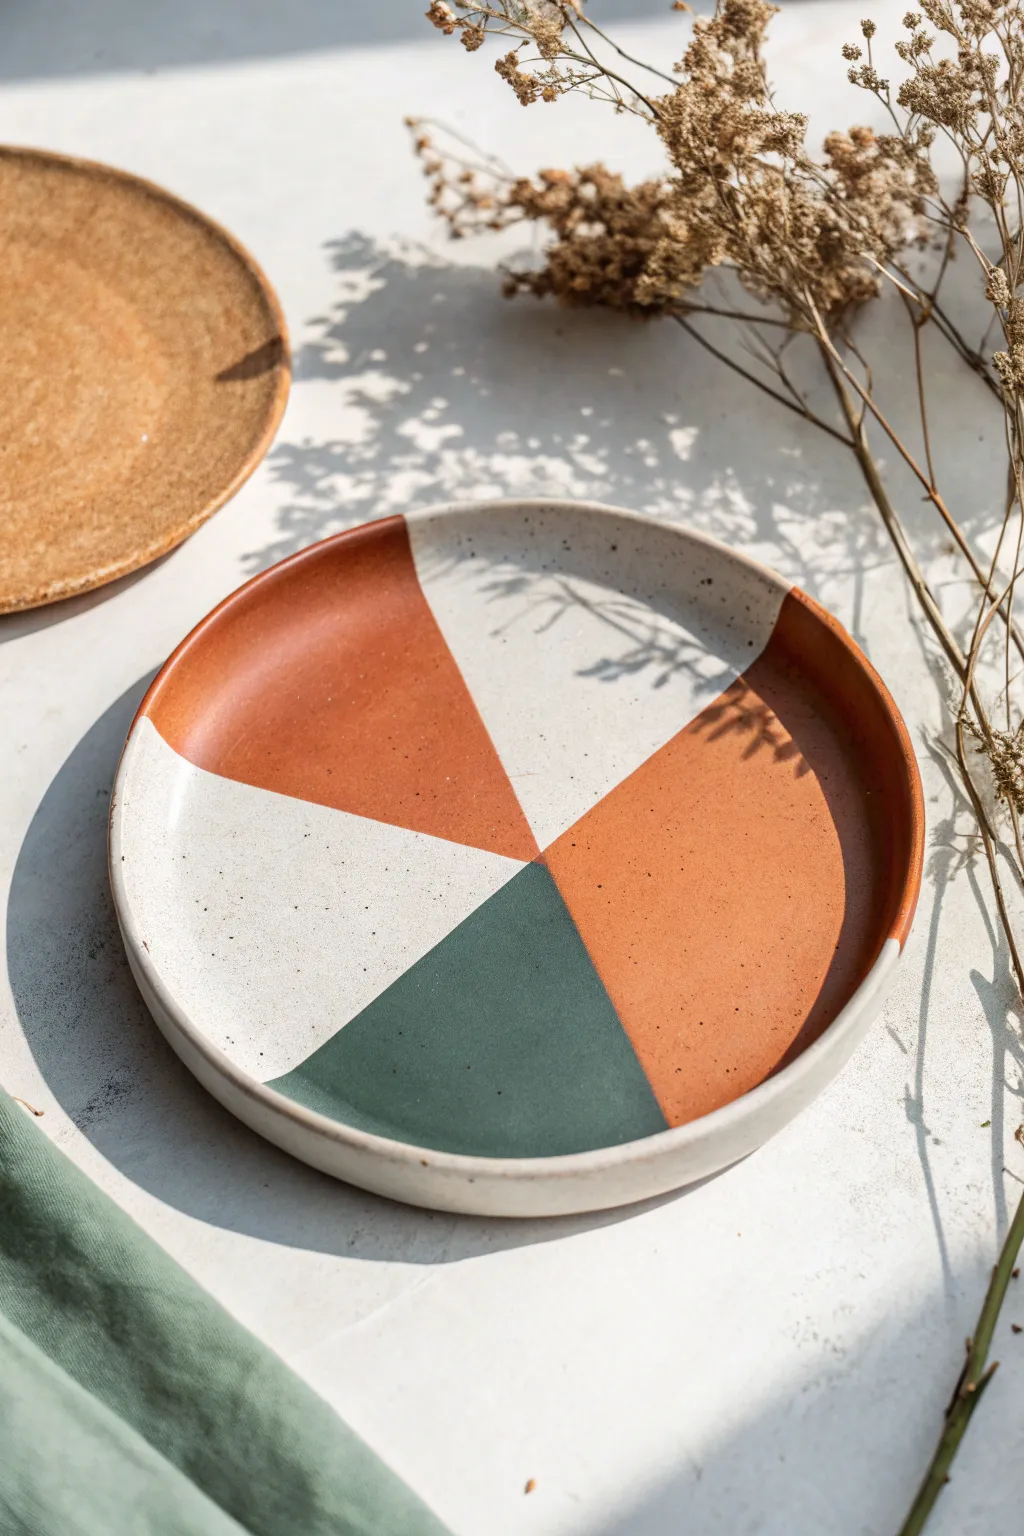
Bring a touch of mid-century modern flair to your table with this clean and striking geometric design. By sectioning off simple triangular shapes, you can create a bold interplay between warm terracotta, deep forest green, and a speckled creamy white.
Step-by-Step
Materials
- Bisque ceramic plate (dinner or salad size)
- Pencil (No. 2 or lighter)
- Ruler
- Protractor (optional but helpful)
- Masking tape or thin artist tape (1/4 inch width is ideal)
- Underglazes: Matte White/Cream, Rust/Terracotta, Forest Green
- Speckled underglaze medium (or black underglaze for manual speckling)
- Fan brush (medium)
- Small flat shader brush
- Clear transparent glaze
- Sponge
- Bowl of water
Step 1: Preparing the Canvas
-
Clean the bisque:
Start by wiping down your bisque plate with a damp sponge. This removes any ceramic dust that might resist the glaze and ensures a smooth application surface. -
Find the center:
Using your ruler, lightly measure and mark the exact center point of the plate with your pencil. Don’t press too hard; graphite burns off in the kiln, but deep grooves won’t. -
Map the quadrants:
Lightly draw a straight vertical line through the center, dividing the plate in half. Then, draw a horizontal line to create four equal quadrants. -
Create the diagonal:
Draw one diagonal line running from the top right to bottom left. This breaks two of your quadrants into triangles, creating the ‘spokes’ for your color blocking.
Fixing Bleeds
Glaze seeped under the tape? Wait for it to dry completely, then use a craft knife to gently scratch off the excess paint until the line is sharp again.
Step 2: Tape and Block
-
Tape the first section:
Select the large left-side section that will be white and the top-right section that will also be white. Apply masking tape firmly along the pencil lines that border these areas. -
Seal the edges:
Run your fingernail or a credit card edge along the tape line to ensure a tight seal. This prevents the colored glazes from bleeding underneath. -
Apply the white base:
Using a flat shader brush, apply three even coats of the Matte White or Cream underglaze to these masked sections. Allow each coat to dry until it loses its sheen before applying the next. -
Add speckling (method A):
If you are using a pre-mixed speckled glaze, the speckles are already included. If not, dip an old toothbrush into a small amount of watered-down black underglaze. -
Add speckling (method B):
Flick the bristles with your thumb to mist tiny black dots over the wet white glaze. Keep it subtle to mimic natural clay texture. -
Remove tape carefully:
Once the white sections are semi-dry (leather hard), gently peel back the tape. Pulling it away at a 45-degree angle usually gives the cleanest line.
Raw Clay Look
Skip the white underglaze! Leave those sections as bare bisque. Before the final clear glaze, wax resist the bare clay for a textured, matte finish.
Step 3: Applying Color
-
Retaping for color:
Wait until the white sections are fully dry to the touch. Now, carefully tape over the edge of the white glaze you just painted to protect it while you paint the neighboring colors. -
Paint the Terracotta sections:
Identify the two large sections that fan out towards the rim. Using your rust/terracotta underglaze, apply three solid coats. I find cross-hatching my brush strokes helps get the most even coverage here. -
Paint the Forest Green:
Move to the single triangular wedge at the bottom. Apply three coats of the Forest Green underglaze, ensuring you get right up to the taped edge for a sharp point. -
Check opacity:
Hold the plate up to the light. If you can see light shadows of brushstrokes in the colored sections, add a slightly thinned fourth coat for complete opacity. -
Final tape removal:
Gently remove the remaining tape. You should now have crisp boundaries between your white, rust, and green sections. -
Clean up lines:
If any glaze bled under the tape, use a slightly damp, stiff-bristled brush or a cleanup tool to gently scrape the excess away and sharpen the line.
Step 4: Glazing and Firing
-
Final dry:
Let the entire plate dry completely, ideally overnight, to ensure all moisture has evaporated from the underglaze layers. -
Clear glaze application:
Using a large fan brush, apply a coat of clear transparent glaze over the entire front and back of the plate (avoiding the foot ring on the bottom). Apply quickly to avoid smearing the design. -
Sponge the foot:
Wipe the bottom foot ring of the plate with a clean, wet sponge to ensure no glaze touches the kiln shelf. -
Fire:
Fire the piece according to your clay body and glaze specifications (usually Cone 06 or Cone 6).
Now you have a stunning, modern piece of dinnerware ready for your next gathering


Classic Checkerboard
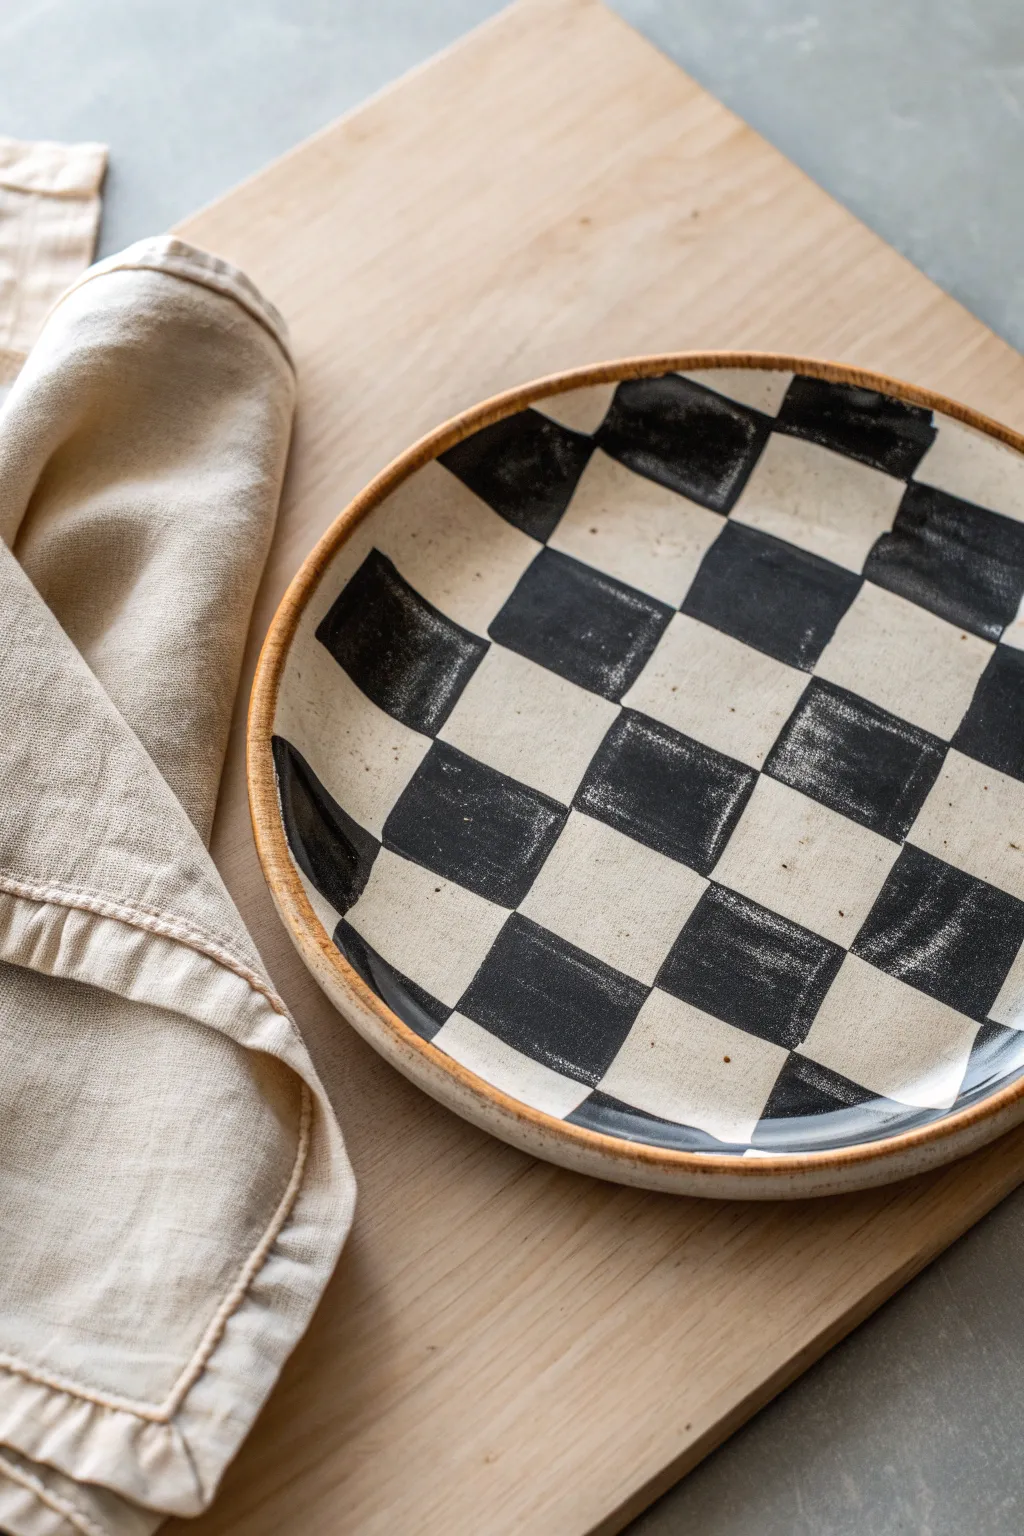
Embrace the imperfect charm of this classic checkerboard design, where wobbly lines and brushstrokes add character rather than detract from it. This project combines a stark black underglaze with the warm, natural tone of unpainted ceramic for a rustic yet modern aesthetic.
How-To Guide
Materials
- Bisque bowl or plate (stoneware or earthenware)
- Black underglaze
- Clear dipping or brushing glaze
- Flat shader brush (roughly 1/2 inch)
- Small round detail brush
- Pencil (standard #2)
- Flexible ruler or measuring tape
- Damp sponge
- Water cup
Step 1: Preparation & Mapping
-
Surface Prep:
Begin by wiping down your bisque plate with a clean, damp sponge. This removes any dust that could prevent the underglaze from adhering properly. -
Find the Center:
Using your flexible ruler, lightly mark the center point of the plate with your pencil. Don’t worry about marks; pencil lead burns off in the kiln. -
Draw the Grid:
Draw a large plus sign through the center point, extending the lines all the way to the rim. Try to keep the lines perpendicular to each other. -
Subdivide the Quarters:
Divide each quarter section in half with another line, creating eight pie-slice sections radiating from the center. -
Create Concentric Circles:
Sketch a series of concentric circles (or rounded squares, depending on your desired look) starting from the center and moving outward. Establish the rows of your checkerboard. -
Mark the ‘Black’ Checks:
To avoid confusion later, lightly scribble a small ‘X’ inside every square that needs to be painted black. It’s easy to get lost once the painting starts.
Don’t Erase Mistakes
Avoid using the eraser on your pencil if you mess up the grid. Erasers can leave a rubber residue that repels glaze. Just wipe with a damp sponge or ignore the stray lines.
Step 2: Painting the Checks
-
Load the Brush:
Shake your black underglaze well. Dip your flat shader brush, ensuring it’s fully loaded but not dripping. -
Outline First:
Choose your first marked square. Use the edge of the flat brush (or switch to the round detail brush if preferred) to carefully outline the shape of that specific check. -
Fill the Center:
Fill in the outlined square with the flat brush. Apply the strokes in one direction for a cleaner look. -
Work Systematically:
I find it helpful to work in a spiral from the center outward to avoid smudging wet paint with my hand. -
Build Opacity:
Once the first coat is matte and dry to the touch, apply a second coat to each black square. Solid black usually requires 2-3 coats for full opacity. -
Embrace Imperfection:
Don’t stress if the squares aren’t perfect geometrical shapes. The visible brush texture and slightly wavy edges are key to this specific rustic style.
Streaky Black Paint?
If your black looks transparent or streaky after the first coat, cross-hatch your second coat. Paint the strokes perpendicular to the first layer to ensure solid coverage.
Step 3: Finishing Touches
-
The Rim Detail:
Leave the very edge of the rim unpainted to show the raw clay color, which acts as a nice frame for the pattern. -
Clean Up:
If you accidentally smudged black onto a white square, let it dry completely, then gently scratch the mistake off with a toothpick or a stiff, damp brush. -
Final Drying:
Allow the underglaze to dry completely. It should look chalky and light gray. -
Glazing:
Apply a clear glaze over the entire piece. If brushing, use a large soft fan brush to avoid smearing the black design underneath. -
Firing:
Fire the piece according to the clay and glaze specifications (usually Cone 06 or Cone 6) to reveal the glossy, deep black finish.
Once fired, you will have a stunning, graphic statement piece ready for your table display
BRUSH GUIDE
The Right Brush for Every Stroke
From clean lines to bold texture — master brush choice, stroke control, and essential techniques.
Explore the Full Guide
Daisy Scatter Pattern
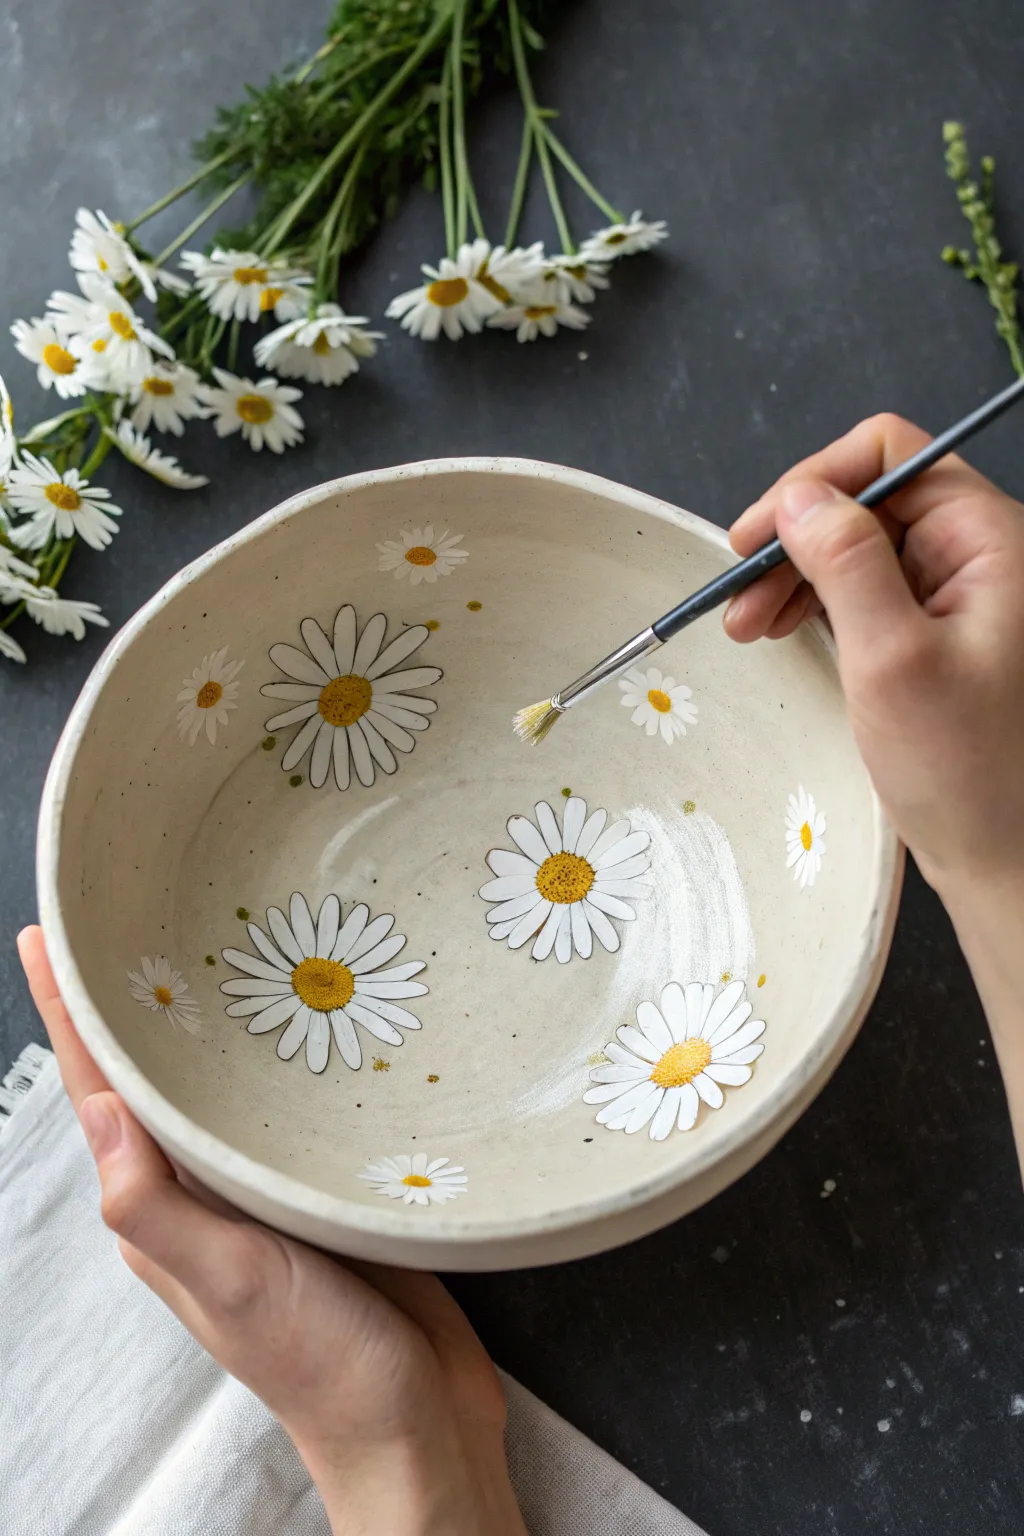
Bring the charm of a sunlit meadow to your table with this delightfully simple pottery project. Featuring crisp white petals and sunny yellow centers scattered across a speckled creamy background, this design is timeless, cheerful, and perfect for beginners.
Detailed Instructions
Materials
- Bisque ceramic bowl (wide shallow shape works best)
- Cream or off-white underglaze (speckled variety preferred)
- Opaque white underglaze
- Golden yellow underglaze
- Mustard or ochre underglaze (for shading)
- Black underglaze pencil or fine liner bottle
- Large fan brush or soft glaze brush
- Small round synthetic brush (size 2 or 4)
- Fine liner brush (size 0 or 00)
- Pencil for sketching
- Clear dipping glaze
- Sponge and water bucket
Step 1: Base Preparation
-
Clean the bisque:
Before you even touch a brush to the piece, wipe down the entire bowl with a damp sponge. This removes any kiln dust that might repel the glaze and ensures a smooth surface for painting. -
Choose your background:
For this look, you want a warm, organic feel. Select a creamy off-white underglaze. If you can find a ‘speckled’ glaze that reveals tiny flecks when fired, that adds lovely character, but a solid cream works too. -
Apply the first base coat:
Using a large soft fan brush, apply a smooth, even coat of the cream underglaze to the inside of the bowl. Long, sweeping strokes help minimize texture. -
Build opacity:
Allow the first coat to dry until it’s chalky and cool to the touch. Apply a second and third coat to ensure full coverage so the clay body doesn’t show through. I usually do three coats for a solid background. -
Dry completely:
Let the base coats dry thoroughly before moving on. The surface should be bone dry so your pencil sketches don’t gouge the paint layers.
Step 2: Painting the Daisies
-
Plan your placement:
Lightly sketch the centers of your flowers using a regular pencil. Scatter them randomly—place some near the rim (even falling off the edge), some deep in the well, and vary the spacing so it doesn’t look like a grid. -
Sketch the petals:
Draw the petals around your marked centers. Don’t worry about making them identical; daisies are organic. Make some large and fully open, and others smaller or slightly tilted. -
Paint the petals white:
Load a size 4 round brush with opaque white underglaze. Fill in the petal shapes. You’ll likely need 2-3 coats of white to make sure they pop against the cream background. -
Paint the centers:
Using the same round brush (cleaned thoroughly), fill the center circles with a golden yellow underglaze. Dab the paint on rather than stroking to build a little texture. -
Add dimension to centers:
While the yellow is still damp, take a tiny bit of mustard or ochre underglaze on the tip of your brush and tap it onto the bottom edge of each floral center to create a shadow effect. -
Paint the stray dots:
Dip the handle end of a small brush into your mustard or yellow paint. Dot tiny flecks of color randomly in the empty spaces between flowers to mimic pollen or seeds floating in the air.
Paint Consistency Tip
If your black outlining paint feels sticky or drags on the brush, thin it with a drop or two of water. It should flow like liquid ink for the smoothest lines.
Step 3: Defining the Details
-
Outline the petals:
This step brings the design into focus. Use a very fine liner brush with thinned black underglaze, or a black underglaze pencil. Carefully trace the perimeter of each white petal. -
Add petal definition:
Draw single, thin lines down the center of some petals to suggest the crease where the flower curves. Keep these lines wispy and light. -
Outline the centers:
Circle the yellow centers with your fine black line. Instead of a perfect circle, use small, jagged strokes to mimic the fuzzy texture of a daisy’s disk. -
Stipple the centers:
Add tiny black dots inside the yellow centers, concentrating slightly more on the shadowed side. This stippling technique makes the centers look three-dimensional. -
Final check:
Look over the bowl for any smudges or thick pencil marks. The graphite from the sketch will burn off in the kiln, but heavy gouges won’t, so smooth them gently with a finger if needed. -
Clear glaze application:
Once your design is completely dry, the bowl needs to be dipped in clear glaze. If you are doing this at a studio, the staff will usually handle this step for you. -
Fire the piece:
Your bowl is now ready for the kiln firing, which will make the glaze glossy and food-safe, sealing your beautiful floral pattern forever.
Fixing Smudges
Accidentally got black paint on a white petal? Don’t wipe it! Let it dry completely, then gently scratch the mistake off with a toothpick or crafting knife.
Once fired, you will have a durable, cheerful bowl that captures the wild beauty of a daisy field
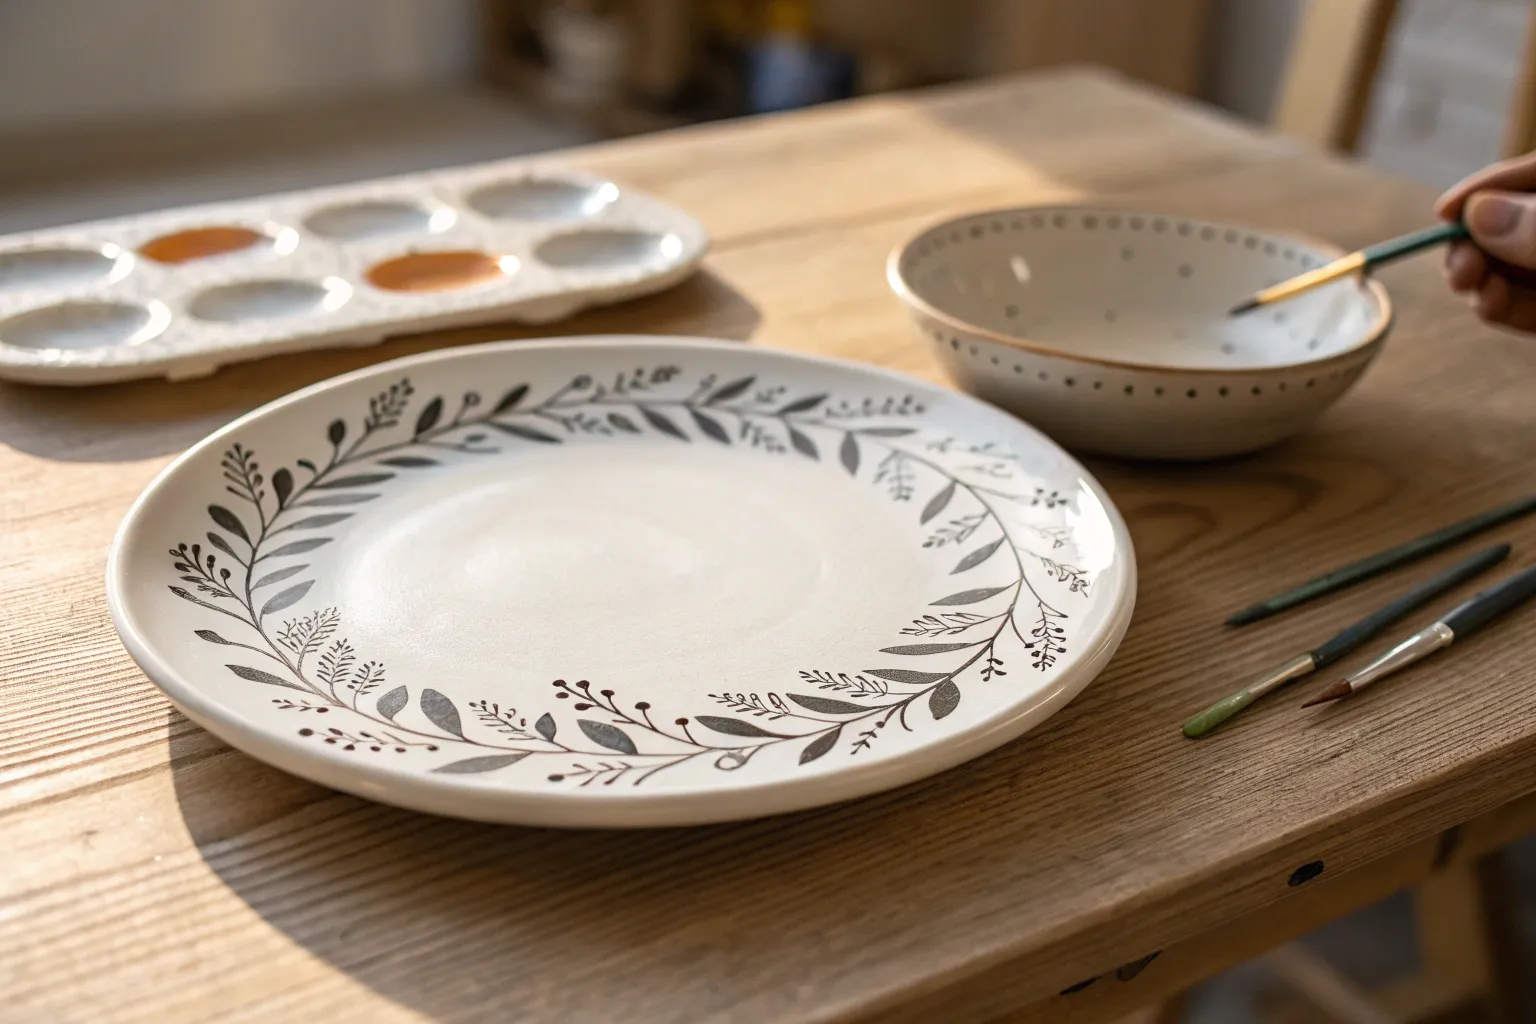
Leafy Sprig Border
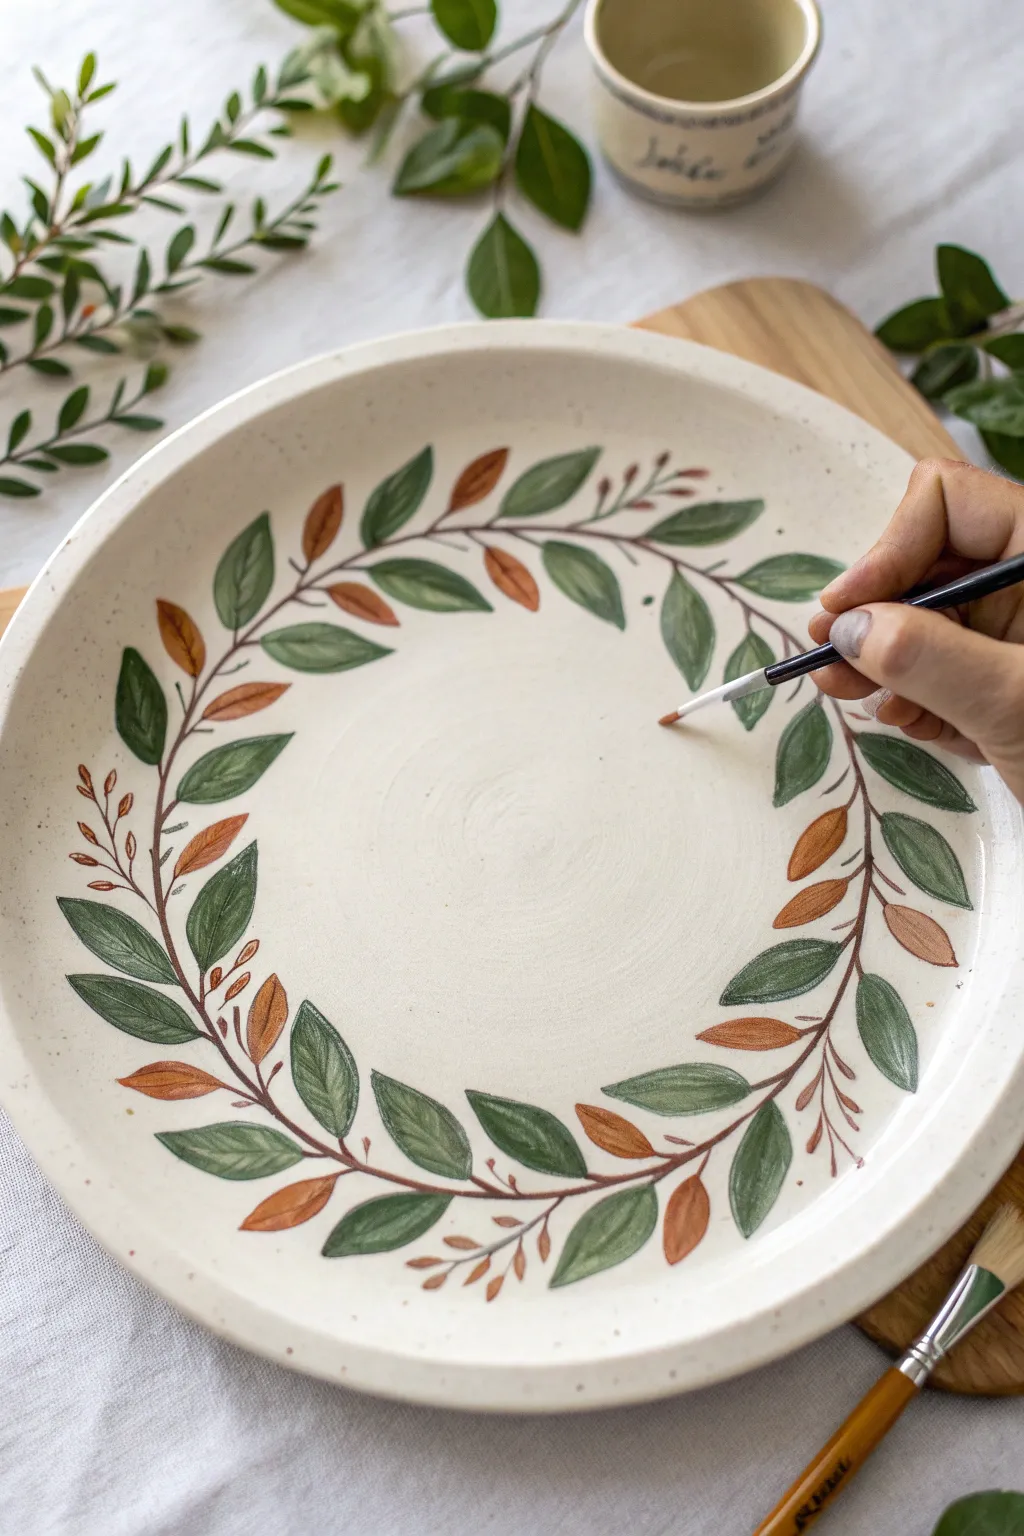
Transform a plain ceramic bisqueware plate into a charming botanical centerpiece with this simple leaf sprig border. The design features a continuous, flowing vine with earthy green and amber leaves, perfect for adding a touch of nature to your table setting.
Step-by-Step Tutorial
Materials
- Ceramic bisqueware plate (preferably with a speckled clay body for texture)
- Underglazes: Dark Hunter Green, Sage Green, Rust/Burnt Orange, Dark Brown
- Fine liner brush (size 0 or 00)
- Round brush (size 2 or 4)
- Pencil (optional)
- Water cup and palette
- Clear dipping glaze (for post-firing)
Step 1: Planning and Vine Structure
-
Prepare your surface:
Wipe down your bisqueware plate with a slightly damp sponge to remove any kiln dust or oils from your hands. This ensures the underglaze adheres properly. -
Sketch the vine:
Using a pencil, lightly sketch a circular, wavy line around the rim of the plate. Don’t worry about being perfect; the pencil lines will burn off in the kiln. Let the line overlap slightly at the ends to create a continuous loop. -
Paint the main stem:
Load your fine liner brush with Dark Brown underglaze. Carefully trace over your pencil line, varying the pressure slightly to make the vine look organic—thicker in some spots, thinner in others. -
Add branch offshoots:
While using the liner brush and brown paint, add small, short stems branching off the main vine. These will be the anchor points for your leaves. Alternate them on the inside and outside of the main circle.
Step 2: Adding the Foliage
-
Start the green leaves:
Switch to your round brush (size 2 or 4) and load it with Sage Green. Paint the larger leaves first. Use a ‘press and lift’ motion: touch the tip to the stem, press down to widen the belly of the brush, and lift up as you pull away to create a point. -
Vary the greens:
While the Sage Green is still wet or tacky, mix in a little Dark Hunter Green on your palette. Paint a few leaves with this darker shade to create depth and variety in the foliage. -
Create leaf details:
Go back to your fine liner brush. I find that picking up a tiny amount of the Dark Hunter Green and adding a central vein down the middle of the lighter Sage leaves makes them pop. -
Add accent leaves:
Clean your round brush thoroughly. Load it with the Rust/Burnt Orange underglaze. Fill in the remaining empty stems with smaller, accent leaves or bud shapes. These warm tones contrast beautifully with the cool greens. -
Refine the edges:
Look closely at your leaves. If any edges look too rough, use a slightly damp, clean brush to gently smooth them out. Be careful not to wipe away the paint entirely.
Brush Technique Tip
For pointed leaves, practice the ‘press and lift’ motion on paper first. The harder you press, the wider the leaf. Lift sharply for a crisp tip.
Step 3: Finishing Touches
-
Add tiny twigs:
Using the liner brush and Dark Brown again, add very fine, wispy twigs or ‘sprigs’ coming off the ends of the leaf clusters. This adds a delicate, wild feel to the wreath. -
Speckling (Optional):
If your bisqueware isn’t naturally speckled, you can flick a toothbrush loaded with watered-down brown paint over the design for a rustic, pottery-studio look. -
Check density:
Step back and look at the overall balance. If there are large gaps, add a free-floating orange leaf or a small green sprig to fill the space without attaching it to the main vine. -
Let it dry completely:
Allow the underglaze to dry until it is chalky and matte. This usually takes about 15-20 minutes depending on humidity. -
Glaze and fire:
Once dry, the piece is ready for clear glazing and firing according to your clay and glaze manufacturer’s instructions (usually Cone 06 or Cone 6).
Level Up: Layering
Wait for the green leaves to dry, then paint a thin, paler green vein on top. This reverse-value painting adds incredible dimension post-firing.
Now you have a timeless piece of dinnerware that brings the serenity of the forest to your daily meals

PENCIL GUIDE
Understanding Pencil Grades from H to B
From first sketch to finished drawing — learn pencil grades, line control, and shading techniques.
Explore the Full Guide
Lemon Slice Motifs
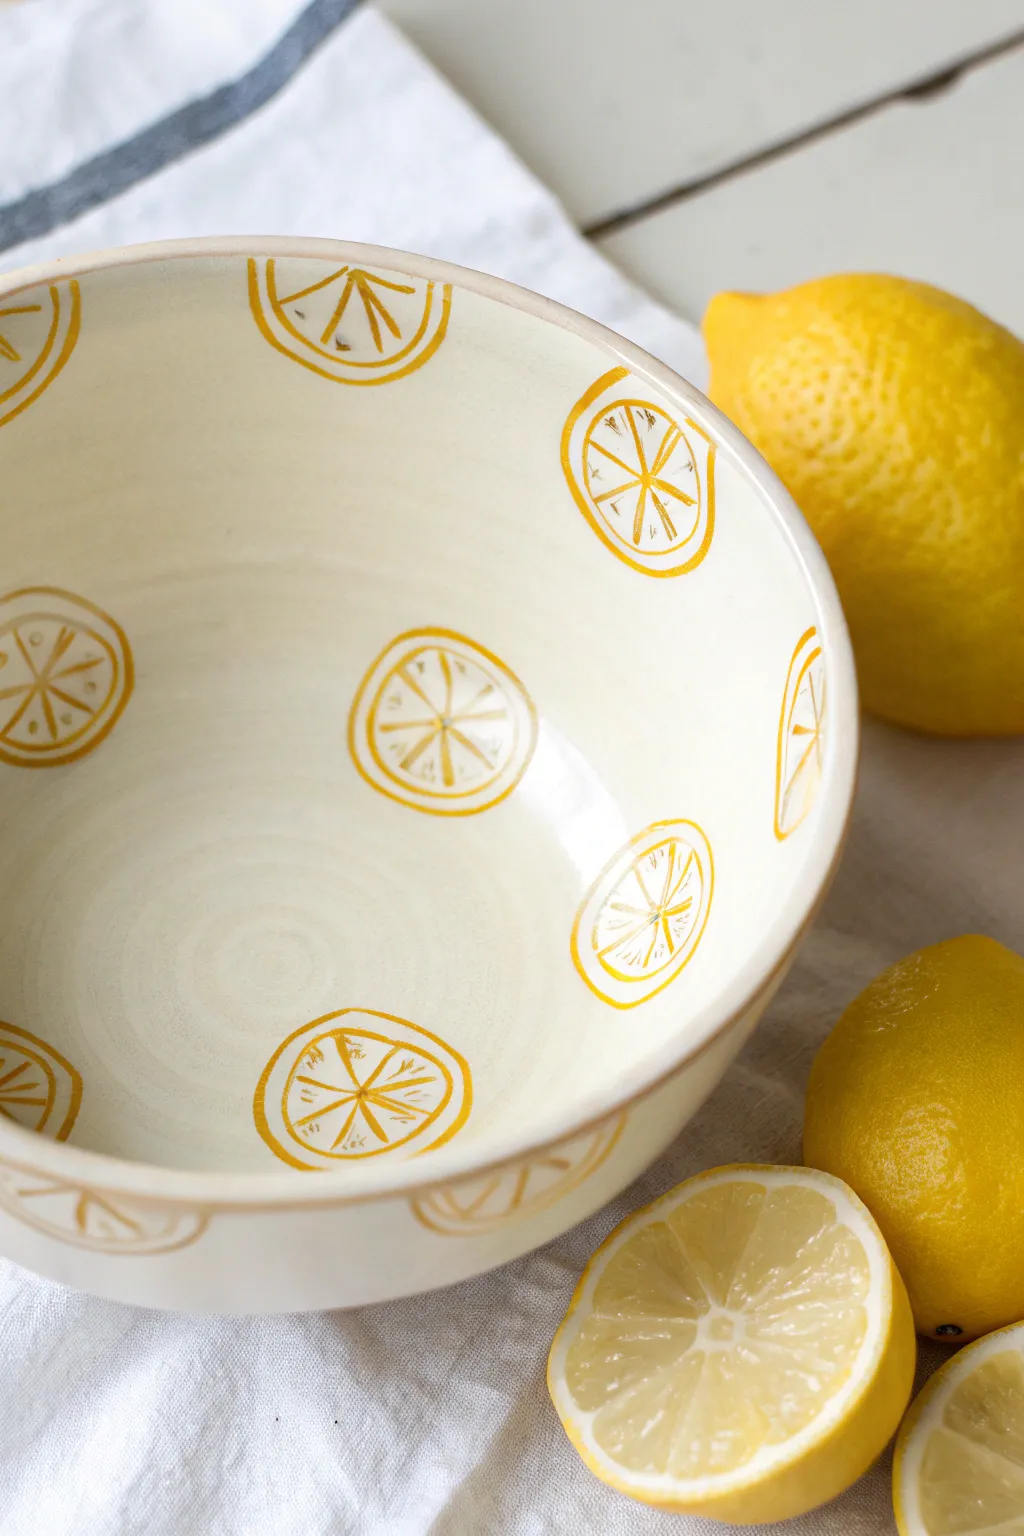
Bring a burst of citrus sunshine to your kitchen with this deceptively simple pottery project. Using basic brush strokes and a cheerful yellow hue, you can transform a plain bisque bowl into a lively summer centerpiece.
Step-by-Step Guide
Materials
- Bisque ceramic bowl (ready to glaze)
- Underglaze pencil (light color) or graphite pencil
- Yellow underglaze (sunshine or lemon yellow)
- Clear dipping glaze or brush-on clear glaze
- Small round brushes (size 2 and 4)
- Palette or small dish for paint
- Clean water
- Sponge
Step 1: Preparation & Planning
-
Wipe the bisque:
Before you begin, take a slightly damp sponge and wipe down the entire bowl to remove any kiln dust. This ensures the glaze adheres properly to the surface. -
Observe the pattern:
Note how the lemon slices are scattered randomly rather than in a grid. Some overlap the rim, others lean sideways. This organic placement is key to the relaxed look. -
Sketch the placement:
Using a pencil, lightly sketch loose circles where you want your lemons to go. Don’t worry about being perfect; these lines will burn off in the kiln.
Smudged lines?
If you accidentally smudge the yellow underglaze while handling the bowl, gently scrape the mistake away with a clean craft knife or a stiff, damp tools rather than wiping it, which spreads the pigment.
Step 2: Painting the Lemons
-
Load your brush:
Dip your size 4 round brush into the yellow underglaze. You want the consistency to be fluid but opaque, similar to heavy cream. -
Paint the outer rind:
Follow your sketched circles to paint the outer ring of the lemon. Keep the line thickness relatively consistent, about 1/8th of an inch wide. -
Add the pith gap:
I like to leave a small gap of unpainted white space inside the outer yellow ring. This represents the white pith of the lemon and adds realism. -
Paint the inner circle:
Paint a thinner yellow circle inside your ‘pith’ gap. This will be the boundary for your fruit segments. -
Create the segments:
Switch to a smaller size 2 brush for finer control. Paint a central dot in the middle of the lemon slice. -
Draw the spokes:
Paint straight lines radiating from the center dot to the inner circle, creating a wheel shape. Aim for 6 to 8 segments per lemon. -
Fill the segments:
Add small, dash-like strokes inside each triangular segment to give it texture, rather than filling it in solid yellow. This mimics the juicy pulp. -
Repeat the process:
Continue painting these motifs across the interior of the bowl. Don’t forget to paint a few slices creeping over the top rim for a continuous design. -
Decorate the exterior:
Turn the bowl over carefully and repeat the pattern on the outside walls to match the interior. -
Let it dry completely:
Allow the underglaze to dry until it is chalky and cool to the touch. This usually takes about 20 minutes.
Step 3: Finishing Touches
-
Check density:
If your yellow looks thin or streaky, apply a second coat over your existing lines to ensure a bright pop of color after firing. -
Sketchy details:
For a looser, artistic feel, you can add tiny, quick ticks of yellow drifting off the main shapes, implying movement or juice. -
Clear glaze application:
Once fully dry, dip the entire bowl into a clear glaze bucket using tongs, or apply 2-3 coats of brush-on clear glaze. -
The final fire:
Place your piece in the kiln for the final glaze firing according to your clay body instructions.
Add some zest
Mix a tiny drop of orange underglaze into your yellow for just a few of the segment lines. This subtle variation adds visual depth and makes the fruit look riper and more dimensional.
Once fired, you will have a cheerful, food-safe bowl perfect for serving summer salads or fresh fruit
Sweet Heart Repeats

Embrace a warm, minimalist aesthetic with this lovely heart-patterned mug project. Using a palette of muted terracotta, blush, and beige tones creates a cozy, hand-painted feel that looks effortlessly chic.
Step-by-Step Tutorial
Materials
- Bisque-fired mug (standard coffee size)
- Underglazes: Dark Rust Red, Terracotta/Burnt Orange, Blush Pink, Sand/Beige
- Glossy clear glaze (dipping or brushing)
- Small round brush (size 2 or 4)
- Fine liner brush (size 0 or 1)
- Sponge
- Water bucket
- Pencil (optional)
Step 1: Preparation and Planning
-
Clean the bisque:
Begin by wiping down your bisque mug with a damp sponge. This removes any dust from the shelf that could repel the glaze later. -
Plan your spacing:
Visualize a grid around your mug. You want rows of hearts that alternate positions (like a brick wall pattern). You can lightly mark the center point for each heart with a pencil if you’re nervous about freehanding, but slight imperfections add charm.
Stamp It Out
Make a simple stamp by carving a heart into a small chunk of cosmetic sponge or a wine cork. This guarantees uniform shapes if you struggle with painting consistent hearts freehand.
Step 2: Painting the Hearts
-
Mix your palette:
Pour out a small amount of each underglaze color onto your palette. It helps to keep them in a gradient order—darkest red to lightest beige—so you can easily grab the next shade. -
Start with the darkest shade:
Using your small round brush, dip into the Dark Rust Red. Paint your first heart. The shape should be simple and unstructured; think of two teardrops meeting in the middle. -
Establish the first row pattern:
Continue with the Dark Rust Red, skipping spaces where the other colors will go. I like to leave about two finger-widths between hearts. -
Add the medium tones:
Switch to your Terracotta or Burnt Orange shade. Fill in some of the gaps in your first row, and start a few hearts on the second row, offset from the first. -
Apply the blush tones:
Clean your brush thoroughly and pick up the Blush Pink. Paint hearts randomly throughout the grid. The goal is a scattered, organic distribution of colors rather than a strict alternating pattern. -
Finish with the lightest shade:
Fill in the remaining empty spots with the Sand/Beige color. Ensure every ‘row’ has a good mix of all four tones. -
Refine the shapes:
Look over your work. If any hearts look too thin, use the fine liner brush to round out the tops or extend the bottom point slightly. -
Second coat:
Once the first layer is dry to the touch, apply a second coat to every heart. This ensures the colors will be opaque and vibrant after firing. -
Third coat (optional):
For lighter colors like the Blush and Beige, a third coat is often necessary to prevent streakiness. Check your specific underglaze bottle for recommendation.
Fixing Smudges
If you smear a heart or drip paint where it shouldn’t be, wait for it to dry completely. Then, gently scratch the mistake off with a wooden skewer or stiff tool before reglazing.
Step 3: The Finishing Touches
-
Paint the rim:
Load your round brush with the Dark Rust Red (or a dedicated dark brown). Hold the brush steady against the rim and slowly rotate the mug on a banding wheel or in your hand to create a thin, slightly irregular border. -
Add speckles (optional):
If your bisque is plain white but you want the speckled look in the photo, dilute a tiny bit of brown underglaze with water. Flick the bristles of a toothbrush to splatter tiny dots over the whole mug. -
Let it dry completely:
Allow the underglaze to dry until it is chalky and room temperature. Any moisture trapped underneath can cause issues with the clear glaze. -
Apply clear glaze:
Dip the entire mug into a clear glossy glaze. Alternatively, brush on three even coats of brushing clear glaze, letting each coat dry in between. -
Check the foot:
Use a damp sponge to wipe any glaze off the very bottom (foot) of the mug so it doesn’t fuse to the kiln shelf. -
Final fire:
Fire the piece in the kiln according to the clay and glaze specifications (usually Cone 06 or Cone 6 depending on your studio).
Enjoy your morning coffee wrapped in this handmade pattern of love


Easy Animal Print Spots
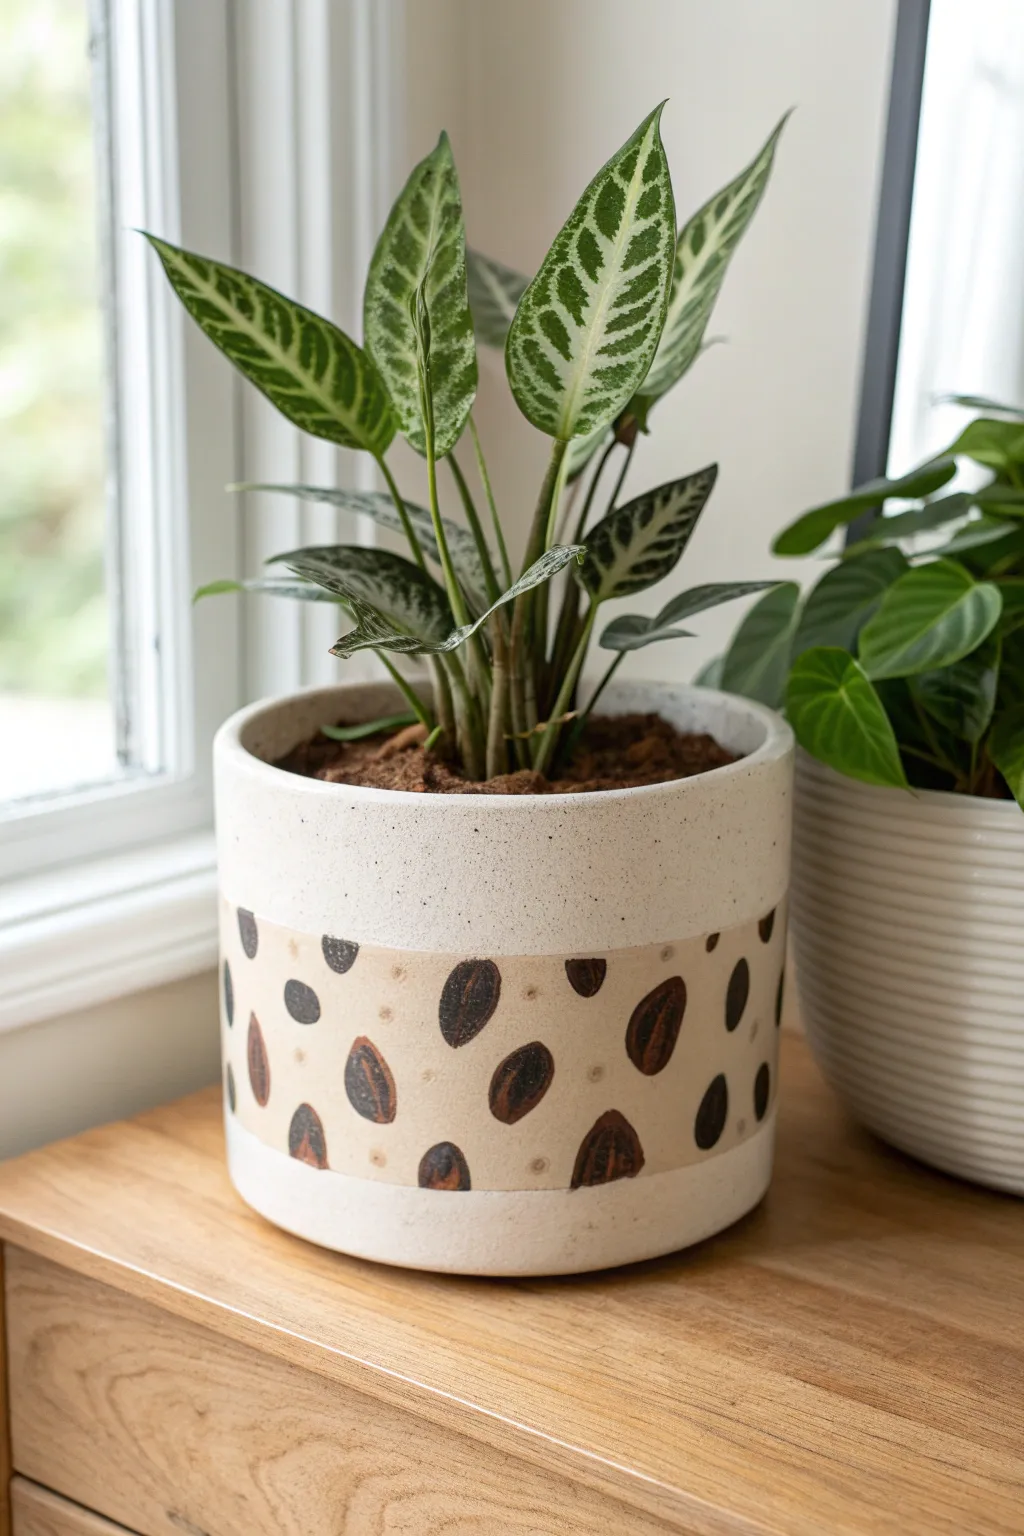
Transform a plain ceramic pot into a stylish home decor piece with this surprisingly simple animal print design. The combination of a soft tan band and bold, painterly spots creates a modern look that feels organic rather than cartoonish.
Detailed Instructions
Materials
- White or cream ceramic planter (unglazed bisque or matte glazed)
- Tan or beige acrylic paint (for the band)
- Dark brown or espresso acrylic paint
- Soft golden-brown or burnt sienna acrylic paint
- Painter’s tape or masking tape (1 inch width)
- Ruler or measuring tape
- Flat paintbrush (medium size)
- Small round detail brush
- Clear matte sealant spray (optional)
Step 1: Preparation & Base Band
-
Clean the surface:
Before starting, wipe your planter down with a damp cloth or rubbing alcohol to remove any dust or oils. Let it dry completely to ensure the paint adheres perfectly. -
Measure the band placement:
Decide where you want your decorative band to sit. On a standard pot, measuring about 2 inches up from the bottom and 2 inches down from the rim usually creates a balanced central area. -
Tape the top border:
Apply a strip of painter’s tape horizontally around the pot to define the upper edge of your band. Press the edge of the tape down firmly with your fingernail or a credit card to prevent paint bleed. -
Tape the bottom border:
Apply a second strip of tape parallel to the first one to define the lower edge. Make sure the space between the two tape lines is even all the way around the pot. -
Paint the background band:
Using your medium flat brush, fill in the space between the tape lines with the tan or beige paint. Use horizontal strokes for a smooth finish. -
Second coat application:
Allow the first layer to dry to the touch (about 15-20 minutes). If the ceramic color is showing through, apply a second coat of tan paint for opaque coverage. -
Remove tape:
Carefully peel off the painter’s tape while the paint is still slightly tacky, not bone dry. This helps achieve the crispest possible line. Let the band cure for at least an hour.
Step 2: Painting the Spots
-
Practice the shapes:
Before hitting the pot, practice your spot shapes on a scrap piece of paper. You’re aiming for oval or kidney-bean shapes, not perfect circles. -
Paint the dark outlines:
Load your small round brush with dark brown paint. Paint pairs of curved brackets () or ‘C’ shapes scattered across the tan band. -
Vary the arrangement:
Rotate your wrist as you work to ensure the spots face different directions. Some should be two separate curves, while others can be nearly closed loops. -
Add detail dots:
In the open spaces between the larger spots, dot a few tiny specks of the dark brown paint. This mimics natural leopard markings. -
Add inner dimension:
Once the dark brown is dry, use a tiny amount of the golden-brown or burnt sienna paint. Dab this color gently inside some of the larger open spots. -
Blend slightly:
I like to dampen the brush just slightly to soften the inner color, blending it almost imperceptibly into the tan background so it doesn’t look like a solid sticker. -
Check for balance:
Step back and look at the pattern from a distance. If any area looks too empty, add a small dark spot to fill the void.
Natural Imperfection
Don’t stress about making spots identical. In nature, irregular shapes look more authentic. Varying the pressure on your brush creates lovely thick-and-thin line variations.
Step 3: Finishing Up
-
Final drying:
Let the painted design dry completely, preferably overnight, to ensure the acrylic has hardened. -
Clean up edges:
If any paint bled under your tape earlier, you can gently scrape it off with a craft knife or touch it up with white paint. -
Seal the work:
To protect your design from water drips when watering the plant, spray the painted area with a clear matte sealant. Two light coats work better than one heavy coat.
Fixing Bleeds
If paint seeps under the tape, wait for it to dry fully. Then, dip a stiff detailed brush in rubbing alcohol to gently scrub away the excess paint without damaging the ceramic.
Pop your favorite houseplant inside and enjoy the wild touch added to your room
Tape-Resist Geometric Shapes
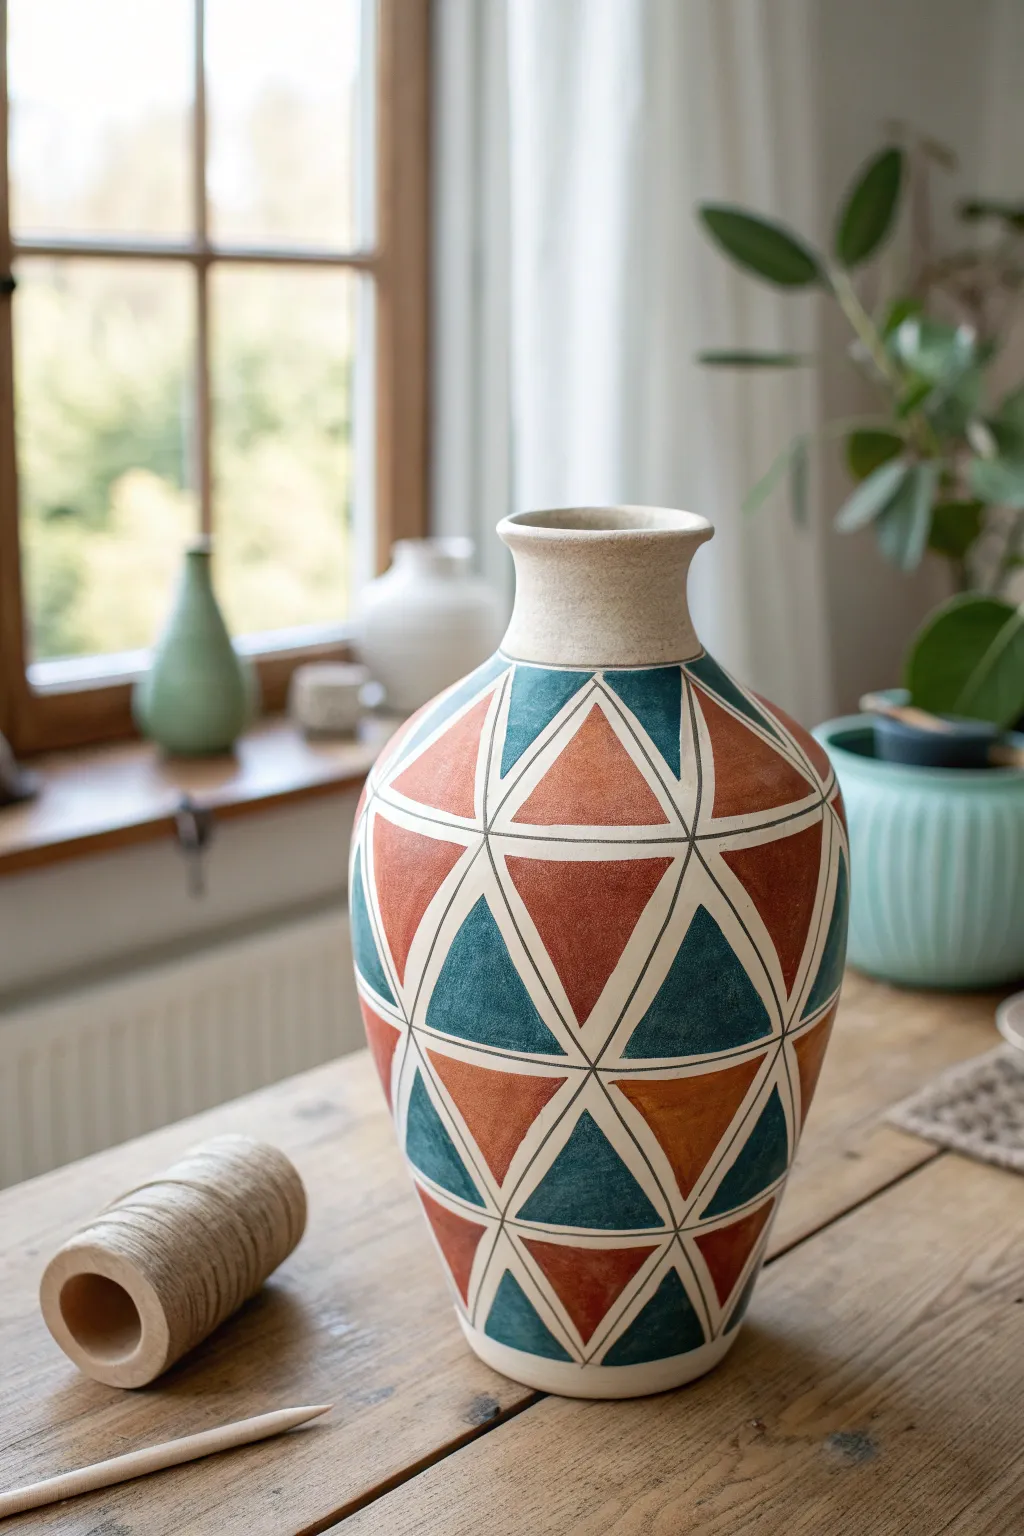
Bring a touch of modern Southwestern charm to your home with this striking geometric vase. Using a clever tape-resist method, you’ll create crisp, clean lines separating bold triangles of terracotta and deep teal for a professional-looking finish.
How-To Guide
Materials
- Bisque-fired ceramic vase (smooth curves work best)
- Thin painter’s tape or dedicated masking tape (1/8 inch or 3mm width)
- Underglaze in Terracotta or Rust Orange
- Underglaze in Deep Teal or Petrol Blue
- Speckled beige or sand-colored glaze (for the neck)
- Medium flat shader brush
- Small detail brush
- Pencil
- Clear transparent glaze (optional, for a glossy finish)
- Scissors
Step 1: Planning and Taping
-
Clean surface:
Begin by wiping down your bisque vase with a damp sponge to remove any dust or kiln residue that might prevent the glaze from adhering properly. -
Mark vertical guides:
Using a pencil, lightly mark vertical lines evenly spaced around the circumference of the vase. These will act as the vertical points for your triangles. -
Mark horizontal rings:
Lightly sketch horizontal rings around the vase to define the height of each row of triangles. You don’t need to be perfect, as the tape will crisp up the lines. -
Apply the grid:
Take your thin masking tape and create the main grid. Run strips of tape diagonally, connecting your pencil marks to form a continuous pattern of triangles. I find it easiest to work on one diagonal direction first, go all the way around, and then cross back with the opposing diagonal. -
Seal the edges:
Once your geometric web is taped out, run your fingernail or a burnishing tool firmly over every piece of tape. This is crucial to prevent paint from bleeding underneath.
Burnish for Success
The secret to crisp lines is pressing the tape down incredibly hard. Use a spoon or credit card edge to seal the tape before painting.
Step 2: Painting the Pattern
-
Identify colors:
Decide which triangles will be terracotta and which will be teal. To avoid mistakes, you can place a tiny dot of the correct color in each section before you start full painting. -
First coat: Terracotta:
Using your flat shader brush, fill in the terracotta triangles. Apply the glaze smoothly, brushing away from the tape edges toward the center of the shape to minimize bleed-through. -
First coat: Teal:
Switch to a clean brush and fill in the remaining triangles with the deep teal underglaze. -
Apply second coats:
Once the first layer is dry to the touch (it will lose its sheen), apply a second coat to all triangles to ensure opaque, solid color coverage. -
Add a third coat:
For the richest depth of color, I always recommend a third coat, especially with darker pigments like teal. -
Paint the neck:
Paint the neck and rim of the vase with the speckled beige glaze. Use a steady hand where the neck meets the geometric pattern, or add a ring of tape there for a sharp border.
Step 3: Finishing Touches
-
Remove the tape:
This is the most satisfying part. Once the paint is dry to the touch but not bone dry, carefully peel away the tape strips to reveal the raw bisque grid lines underneath. -
Clean up edges:
If any glaze seeped under the tape, use a stiff brush dampened with water or a specialized clean-up tool to gently scrape or wipe away the excess. -
Clear glaze application:
If you want a glossy finish and food-safe waterproofing, apply a layer of clear transparent glaze over the entire vase, including the unpainted lines. -
Final fire:
Place the vase in the kiln for its final firing according to the instructions on your glaze bottles.
Carve the Lines
Instead of leaving the lines flat, use a carving tool to gently scratch out the white lines (sgraffito style) for added texture and depth.
Enjoy styling your new handcrafted vase with some dried stems or fresh flowers
Scalloped Rim Detail
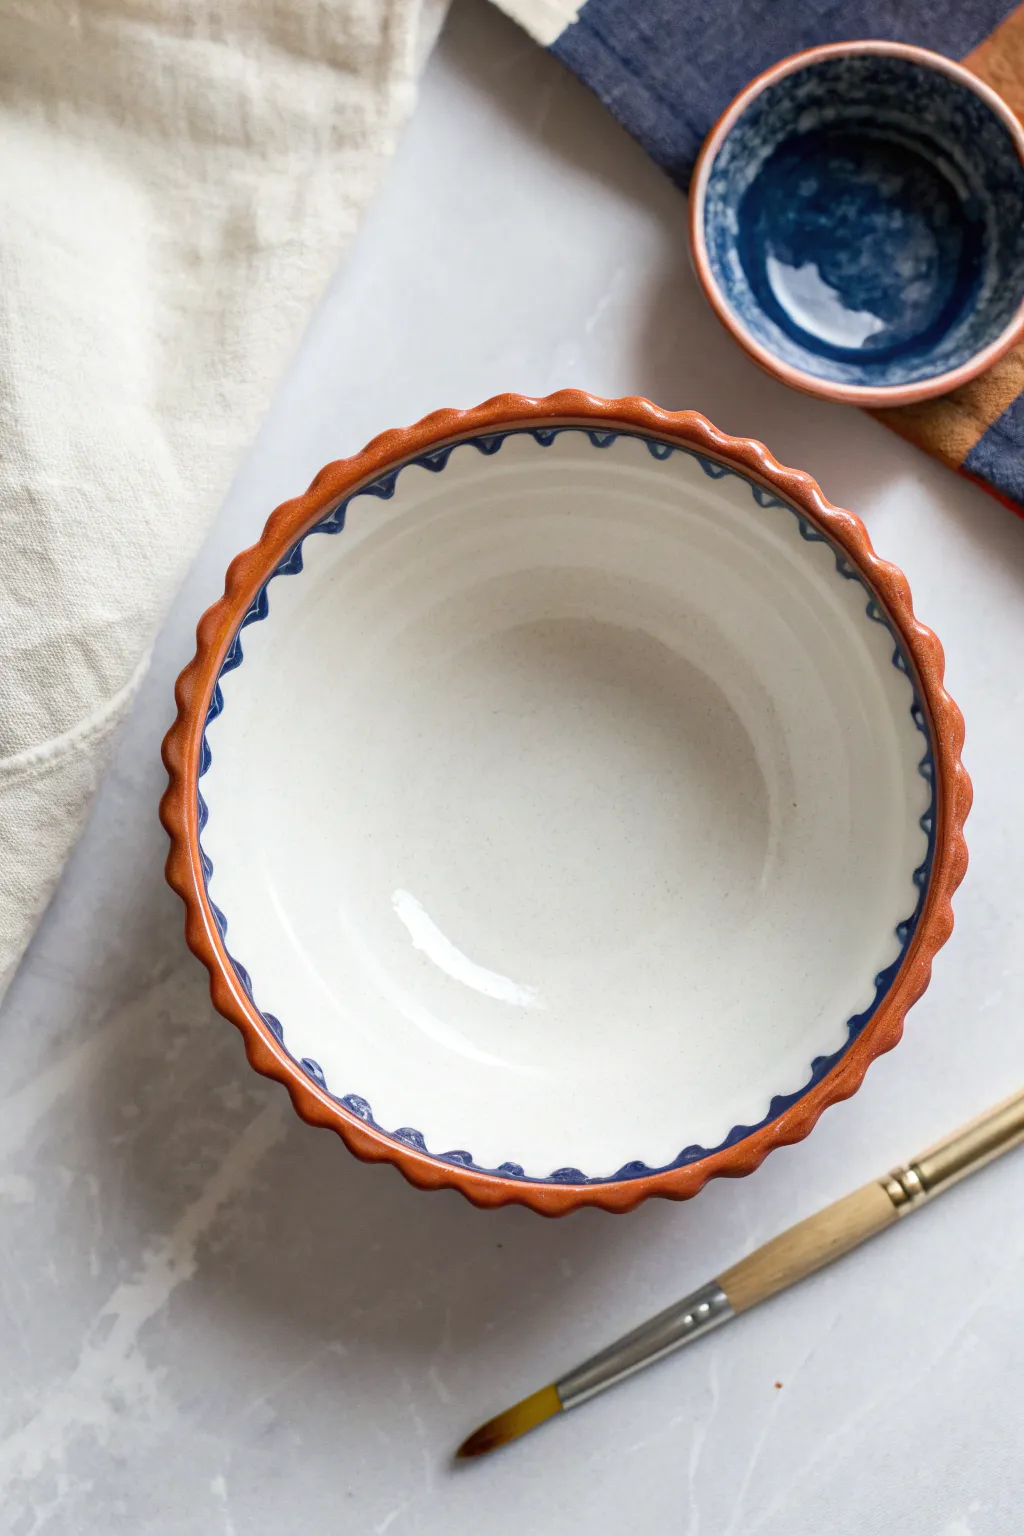
Elevate a simple white bowl with this classic color combination that mimics the warmth of traditional pottery. The scalloped rim detail adds a charming, handmade feel while the interior blue loops provide a delicate, refined finish.
Step-by-Step Guide
Materials
- Bisque fired ceramic bowl (with a scalloped rim shape)
- Underglaze (Terracotta/Burnt Orange)
- Underglaze (Deep Navy Blue)
- Clear dipping glaze or brushing glaze
- Soft fan brush
- Fine liner brush (size 0 or 1)
- Sponge
- Bowl of water
Step 1: Preparation
-
Clean the bisque:
Start by wiping down your entire white bisque bowl with a damp sponge. This removes any dust that might prevent the glaze from adhering properly. -
Dry check:
Ensure the bowl is completely dry from the wiping before you begin painting; cool to the touch is okay, but no visible wet spots.
Uneven Lines?
If your blue loops are shaky, use a toothpick to gently scratch away excess paint once dry. This sharpens edges without smudging.
Step 2: Painting the Rim
-
Load the brush:
Load your soft fan brush generously with the terracotta-colored underglaze. You want the brush full but not dripping. -
Apply the first coat:
Paint the very top edge of the scalloped rim. Hold the brush steady and follow the curves of the bowl’s edge. -
Extend the color:
Bring the terracotta color slightly down the outside of the rim and just barely over the lip onto the inside edge to create a solid border. -
Dry and repeat:
Let this first layer dry until it looks chalky and matte. Apply a second coat to ensure the color is rich and opaque. -
Add a third coat:
For the most vibrant finish, I always recommend a third coat on rims since they get high wear. Let this dry completely.
Level Up: Speckles
Flick a stiff toothbrush loaded with watered-down brown paint over the bowl before glazing for a rustic, stoneware pottery look.
Step 3: Detailing the Interior
-
Prepare the blue:
Shake your deep navy blue underglaze well over a palette. You need a smooth consistency for fine lines. -
Position your hand:
Place your hand inside the bowl or rest your pinky on the dry center to stabilize your painting hand. -
Start the loops:
Using your fine liner brush, paint small, U-shaped loops just underneath the terracotta rim on the white interior. -
Align the pattern:
Try to align the bottom of each blue ‘U’ with the lowest point of the physical scallop on the bowl’s rim. -
Connect the loops:
Ensure the top points of your blue loops connect seamlessly, creating a continuous scalloped chain around the inner circumference. -
Refine the lines:
If your lines look thin, carefully trace over them a second time. A slightly thicker line at the top of the loop adds nice visual weight. -
Check for consistency:
Spin the bowl slowly to check your spacing. If a loop is too small, you can gently widen it with a damp brush, though slight variations add character.
Step 4: Finishing Touches
-
Clean up:
Check the white center of the bowl. If any stray paint specs landed there, gently scratch them off with a toothpick or wipe with a cleanly damp sponge edge. -
Glazing:
Once all underglaze is bone dry, apply a coat of clear dipping glaze or three coats of clear brushing glaze over the entire piece. -
Fire:
Place the piece in the kiln for a cone 06 (or appropriate temperature) firing to seal the design and make it food safe.
Now you have a beautifully rimmed bowl ready for your morning cereal or soup
Simple Ombre Fade

Recreate the charm of a cozy farmhouse kitchen with this elegant yet approachable project. By layering a speckled cream glaze over a deep, iron-rich metallic base, you achieve a beautiful, subtle fade that makes every sip feel special.
How-To Guide
Materials
- Bisque-fired ceramic mug
- Cream or oatmeal speckled glaze (stoneware)
- Deep iron-blue or metallic black glaze (stoneware)
- Wide dipping tongs (optional but helpful)
- Clean sponge
- Soft fan brush
- Bucket of clear water
- Wax resist (for the foot)
Step 1: Preparation
-
Clean surface:
Begin by wiping down your bisque mug with a slightly damp sponge to remove any kiln dust or oils from handling. This ensures the glaze adheres perfectly to the clay body. -
Wax the foot:
Apply a coat of wax resist to the bottom foot of the mug and about 1/8th of an inch up the side. This prevents glaze from fusing your mug to the kiln shelf later. -
Mix glazes:
Stir your glazes thoroughly. Since we are using stoneware glazes that often have heavy particles settle at the bottom, ensure the consistency is like heavy cream before starting.
Glaze Crawling?
If the overlapping section separates or ‘crawls’ leaving bare spots, the bottom layer wasn’t dry enough before the second dip. Let the first coat dry longer next time.
Step 2: Applying the Base
-
The first dip:
Holding the mug by the rim (or using tongs), dip the bottom half into the dark metallic blue/black glaze. -
Watch the line:
Aim for the glaze to cover roughly the bottom 40% of the mug. Hold it submerged for about 3 seconds to get a solid coat. -
Handle coverage:
Don’t forget the handle! Carefully brush the same dark glaze onto the lower portion of the handle to match the body line. -
Initial dry:
Let this bottom layer dry until it loses its sheen and is dry to the touch. This usually takes about 10-15 minutes depending on humidity.
Soften the Transition
For a smoother gradient, lightly sponge the transition line while the top glaze is still damp. This physically blends them before the kiln does the chemical work.
Step 3: Creating the Ombre Top
-
Prepare the top glaze:
Stir your cream or oatmeal speckled glaze again to ensure the speckles are well-distributed. -
Pouring the interior:
Pour the cream glaze inside the mug, roll it around to coat the entire interior surface, and pour the excess back into your bucket. -
Wipe the rim:
If any drips formed on the outside rim while pouring the inside, wipe them away cleanly with a sponge before proceeding. -
The top dip:
Hold the mug by the foot this time. Dip the top of the mug into the cream glaze. -
Creating the overlap:
Dip deep enough so that the cream glaze overlaps the dark bottom glaze by about half an inch. This overlap is crucial for the chemical reaction that creates the fade. -
Handle part two:
Use your fan brush to apply the cream glaze to the rest of the handle, slightly overlapping the dark glaze just like you did on the body. -
Check the rim:
Inspect the rim to make sure the glaze isn’t too thick. If a droplet forms, gently dab it with your finger to smooth it out.
Step 4: Finishing Touches
-
Clean the foot:
Even with wax resist, I always do a final wipe of the foot ring with a damp sponge to remove any rouge beads of glaze. -
Drying time:
Allow the mug to dry completely, preferably overnight, before firing. The thick area where the glazes overlap needs to be bone dry. -
Firing:
Fire the mug to Cone 6 (or whatever temperature your specific stoneware clay and glaze combination requires) in an oxidation kiln. -
Cooling:
Let the kiln cool naturally before opening to prevent thermal shock to your new piece.
Enjoy your morning coffee in a custom mug that combines modern technique with rustic charm
Speckled Terrazzo Look
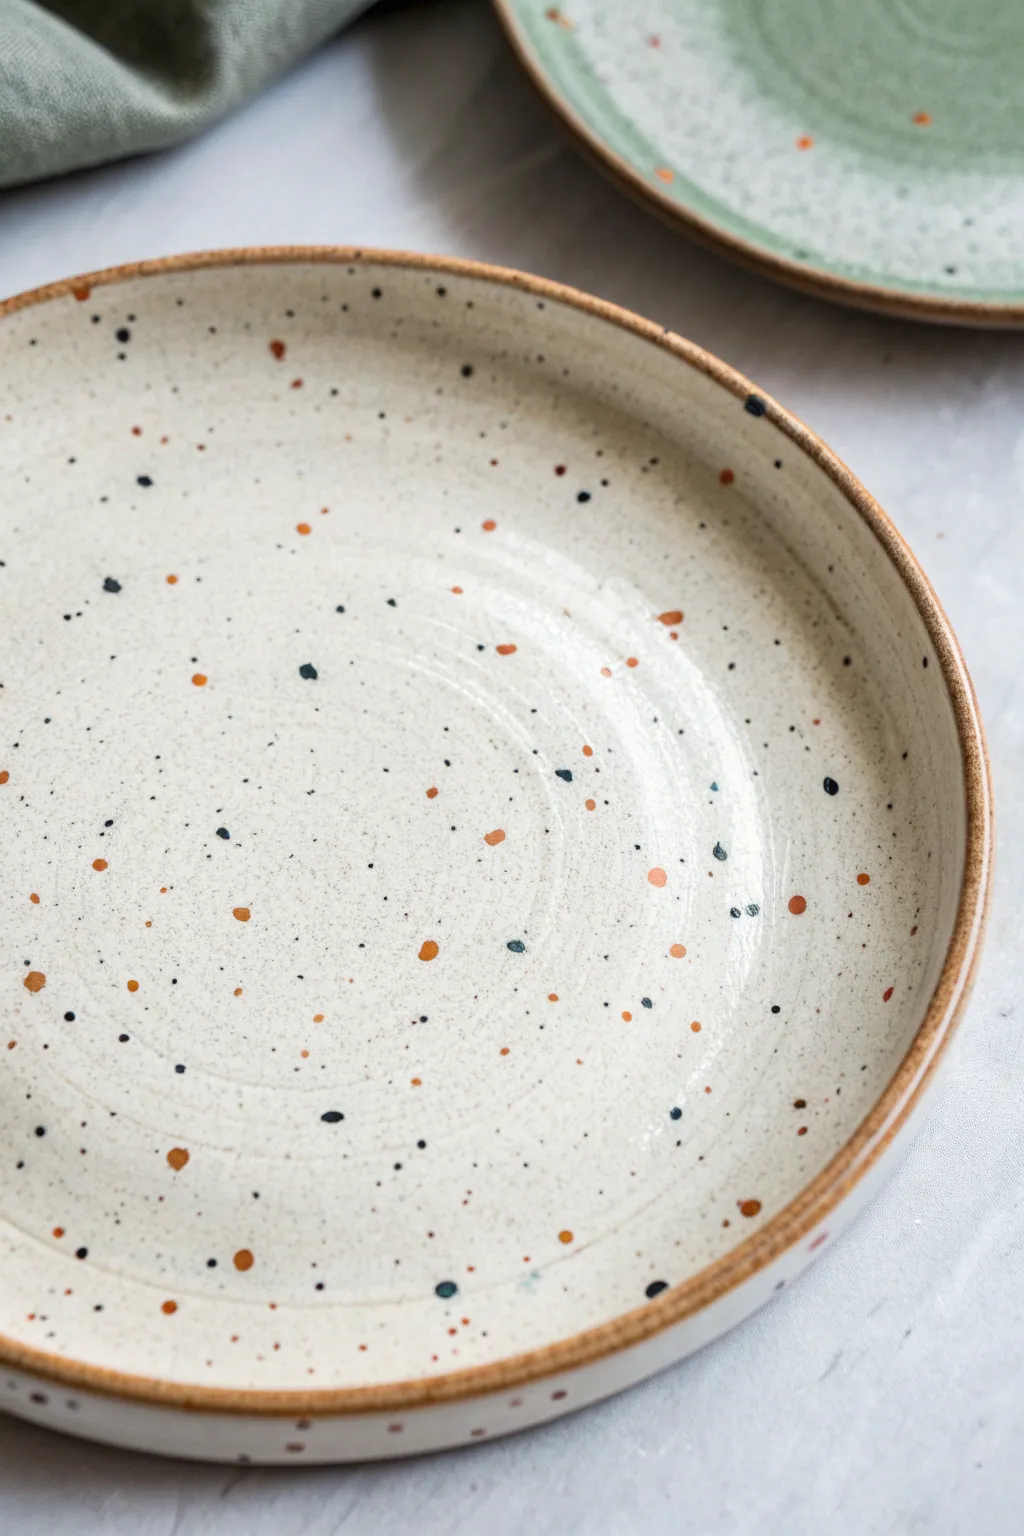
Achieve the trendy, high-end look of speckled stoneware without needing a pottery wheel or specific clay body. By using a splatter technique on plain bisque, you can create a sophisticated, organic pattern that mimics natural flecks in terrazzo.
Step-by-Step Guide
Materials
- Bisque plate (cleaning and fired)
- Cream or off-white underglaze
- Black underglaze
- Terracotta or rust-orange underglaze
- Deep teal or blue-grey underglaze (optional)
- Medium soft fan brush
- Old toothbrush or stiff bristle brush
- Small round detail brush
- Clear dipping glaze or brush-on clear glaze
- Sponge and water
- Popsicle stick or palette knife
Step 1: Base Preparation
-
Clean the bisque:
Begin by wiping down your ceramic bisque plate with a damp sponge to remove any dust or oils that might prevent the glaze from adhering properly. -
Mix base color:
Stir your cream or off-white underglaze thoroughly. You want a consistent, creamy texture without any lumps. -
Apply first coat:
Using a soft fan brush, apply a smooth, even layer of the cream underglaze all over the front of the plate. -
Dry and repeat:
Let the first coat dry until it loses its sheen. Apply a second coat in a cross-hatch direction (perpendicular to the first strokes) to ensure solid, opaque coverage. -
Final base layer:
Apply a third coat of the cream base color for richness. Ensure the rim is fully covered as well. Let this dry completely before moving to the speckling.
Step 2: Creating the Speckles
-
Prepare splatter mixture:
Put a small amount of black underglaze onto a palette. Add a tiny drop of water to thin it slightly; it needs to be fluid but not watery. -
Load the tool:
Dip your old toothbrush or a stiff-bristle brush into the thinned black underglaze. Tap off any excess drippy paint onto a paper towel. -
Fine speckling:
Hold the brush about 6-8 inches above the plate. Run your thumb across the bristles to flick tiny droplets onto the surface. Aim for a randomized, organic spread. -
Rotate the plate:
As you splatter, rotate the plate occasionally so the spray direction varies, preventing the pattern from looking directional or artificial. -
Add secondary color:
Clean your brush thoroughly. Repeat the splatter process using the rust-orange or terracotta color. I find using slightly less of this color creates a nice balance. -
Create larger spots:
While the fine mist looks great, true terrazzo has variety. Dip the handle of a small paintbrush or a toothpick into your rust color and gently dot a few larger, purposeful spots onto the plate. -
Add tertiary accents:
If using the teal/blue-grey, add very sparse flecks of this color using the splatter method. This adds depth without overwhelming the warm tones. -
Check density:
Step back and look at the plate. If some areas look too empty, add a few more manual dots or a quick spritz of splatter.
Splatter Control
Practice your thumb-flicking technique on a piece of paper first. Varying the distance or speed changes the dot size significantly.
Step 3: Finishing Touches
-
Paint the rim:
Using a small round detail brush and the rust-orange or a brown underglaze, carefully paint the very edge of the rim. This frames the design and mimics raw clay edges. -
Clean back:
Flip the plate carefully and sponge off any stray splatter marks from the bottom (unless you want the pattern there too). -
Dry completely:
Allow all underglaze layers to dry completely. The surface should feel room temperature and look chalky. -
Glazing:
Since this is food-ware, apply a clear glaze over the entire piece. Dip glazing often yields the smoothest finish, but brushing on two coats of clear glaze works well too. -
Fire:
Fire the piece in the kiln according to the specific glaze instructions (usually cone 06 or cone 6 depending on your materials).
Natural Variation
Mix two similar shades (like rust and dark brown) for the larger hand-painted dots. This subtle tone shift makes the faux stone look more realistic.
Once fired, you will have a durable, stylish plate perfect for serving meals with an artisan touch
Minimal Line Art Faces
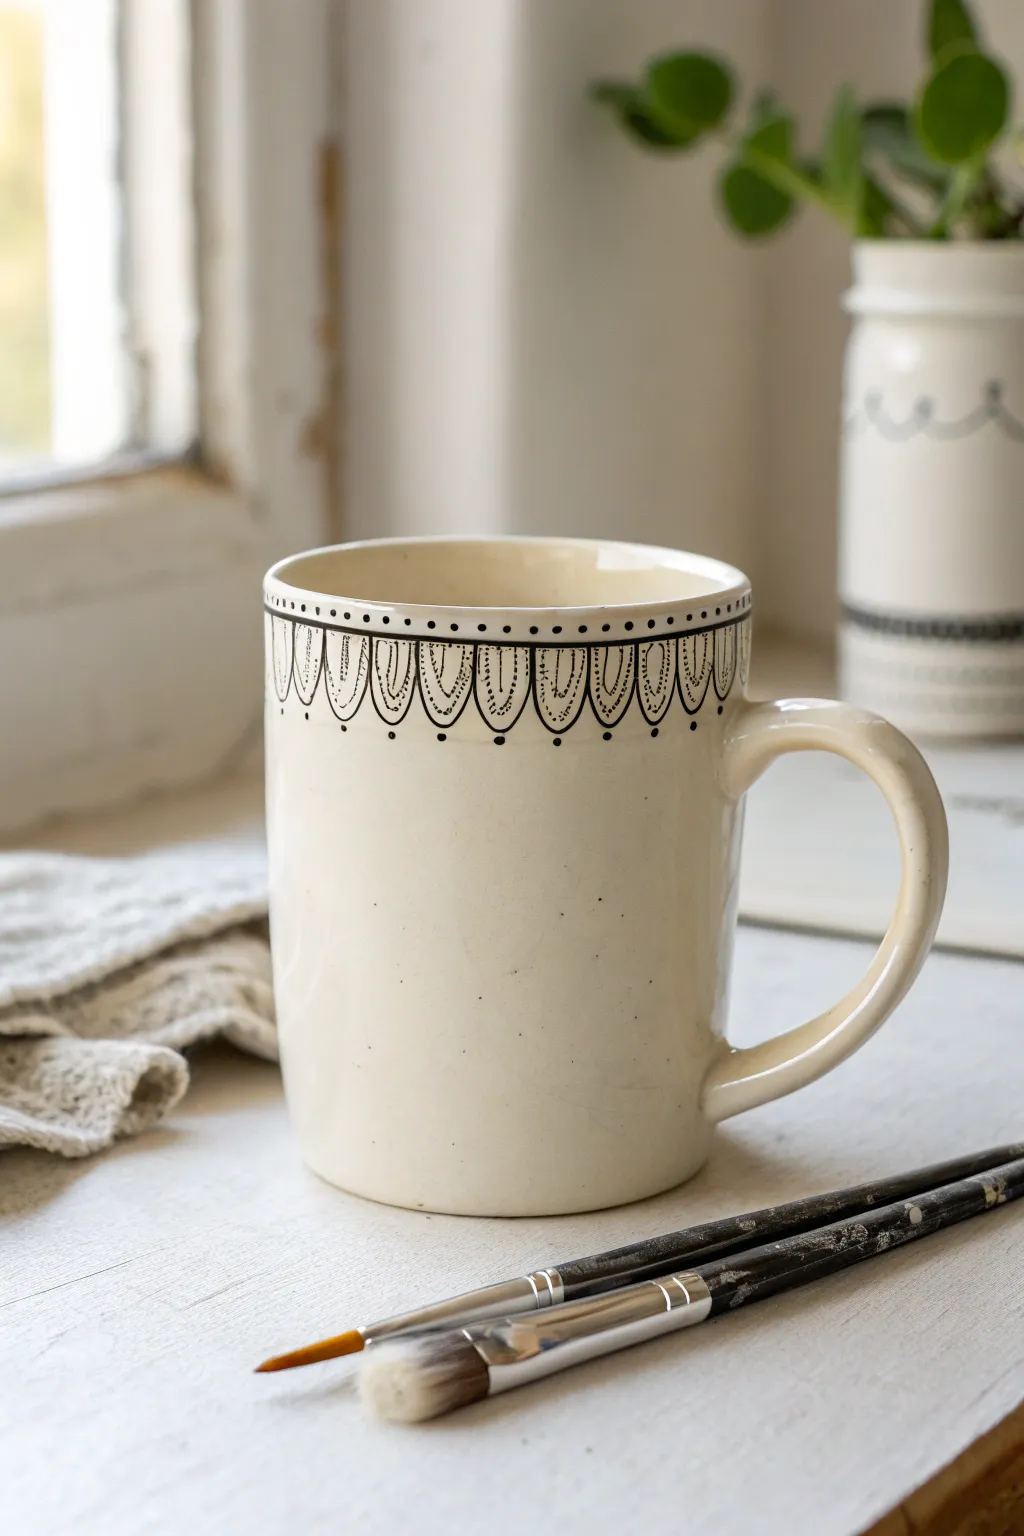
This project transforms a plain ceramic mug into a piece of delicate art using fine black lines and repetitive patterns. The resulting design features an elegant scalloped border that mimics intricate beadwork or lace, perfect for a cozy morning coffee.
How-To Guide
Materials
- Plain cream or white ceramic mug (bisque or glazed, depending on paint choice)
- Black underglaze (if firing) or black porcelain paint/marker (for oven-bake)
- Fine liner brush (size 00 or 000)
- Pencil for sketching
- Cotton swabs
- Water cup
- Paper towel
- Lazy Susan or banding wheel (optional but helpful)
Step 1: Drafting the Pattern
-
Clean surface:
Begin by thoroughly cleaning your mug with rubbing alcohol or soapy water to remove any oils from your fingers. Let it dry completely. -
Mark horizontal guides:
Using a pencil, lightly sketch a horizontal line about 1/4 inch below the rim of the mug. Try to keep this line as level as possible all the way around. -
Draw secondary guide:
Sketch a second horizontal line about 1/8 inch below your first line. These two lines will form the top border of your design. -
Sketch the scallops:
Below the second line, lightly draw a series of U-shaped scallops or petals. Aim for them to be roughly uniform in width, connecting corner-to-corner. -
Inner details:
Inside each primary scallop, sketch a smaller, nested U-shape to create a double outline effect.
Steady Hands Secret
Rest your painting hand on a heavy book or yoga block that is the same height as your workspace. This anchor point drastically reduces shakiness for fine lines.
Step 2: Painting the Lines
-
Prep your paint:
Place a small amount of black underglaze or porcelain paint onto a palette. Add a tiny drop of water if the paint feels too thick; you want an inky consistency for smooth lines. -
Load the brush:
Dip your fine liner brush into the paint, rolling it slightly to maintain a sharp point. Don’t overload it, or you might get drips. -
Trace the top band:
Carefully paint over your top two horizontal pencil lines. I find it easier to keep my hand steady by resting my pinky against the mug surface while I pull the brush. -
Fill the band dots:
Between those two horizontal lines, paint tiny, evenly spaced dots. A dotting tool or the back end of your brush handle works great here for uniformity. -
Outline scallops:
Paint the main outer curves of your scalloped U-shapes. Take your time here; slow, deliberate strokes yield the best curves. -
Paint inner scallops:
Trace the smaller, inner U-shapes you sketched earlier. Ensure there is clear separation between the inner and outer lines. -
Add vertical hatching:
In the space between the inner and outer scallop lines, paint tiny vertical hash marks. These mimic the look of stitching or beadwork.
Wobbly Lines?
If your lines look shaky, your paint might be too thick. Thin it slightly with water or flow medium so the brush glides rather than drags across the surface.
Step 3: Finishing Touches
-
Decorate the junctions:
Where two scallops meet at the top, paint a small vertical teardrop or line extending slightly downward into the V-shape. -
Add dangling dots:
Place a single, small dot directly underneath the lowest point of each scallop curve. This adds a lovely, jewelry-like finish. -
Clean up:
If you made any smudges, use a damp cotton swab to gently wipe away the mistake before the paint fully sets. -
Remove guide lines:
Once the paint is dry to the touch, you can lightly wipe away any visible pencil marks with a clean, dry finger or cloth. In the kiln, pencil lead usually burns off anyway. -
Top coat:
If using underglaze, apply a clear transparent glaze over the entire mug (dipping or brushing) to seal the design. -
Final cure:
Fire the mug in a kiln according to your clay and glaze specifications, or bake in a home oven if you used oven-cure porcelain paints.
Enjoy the rhythmic process of painting these patterns and the elegant vessel you’ll have created
Dot Mandala Rings
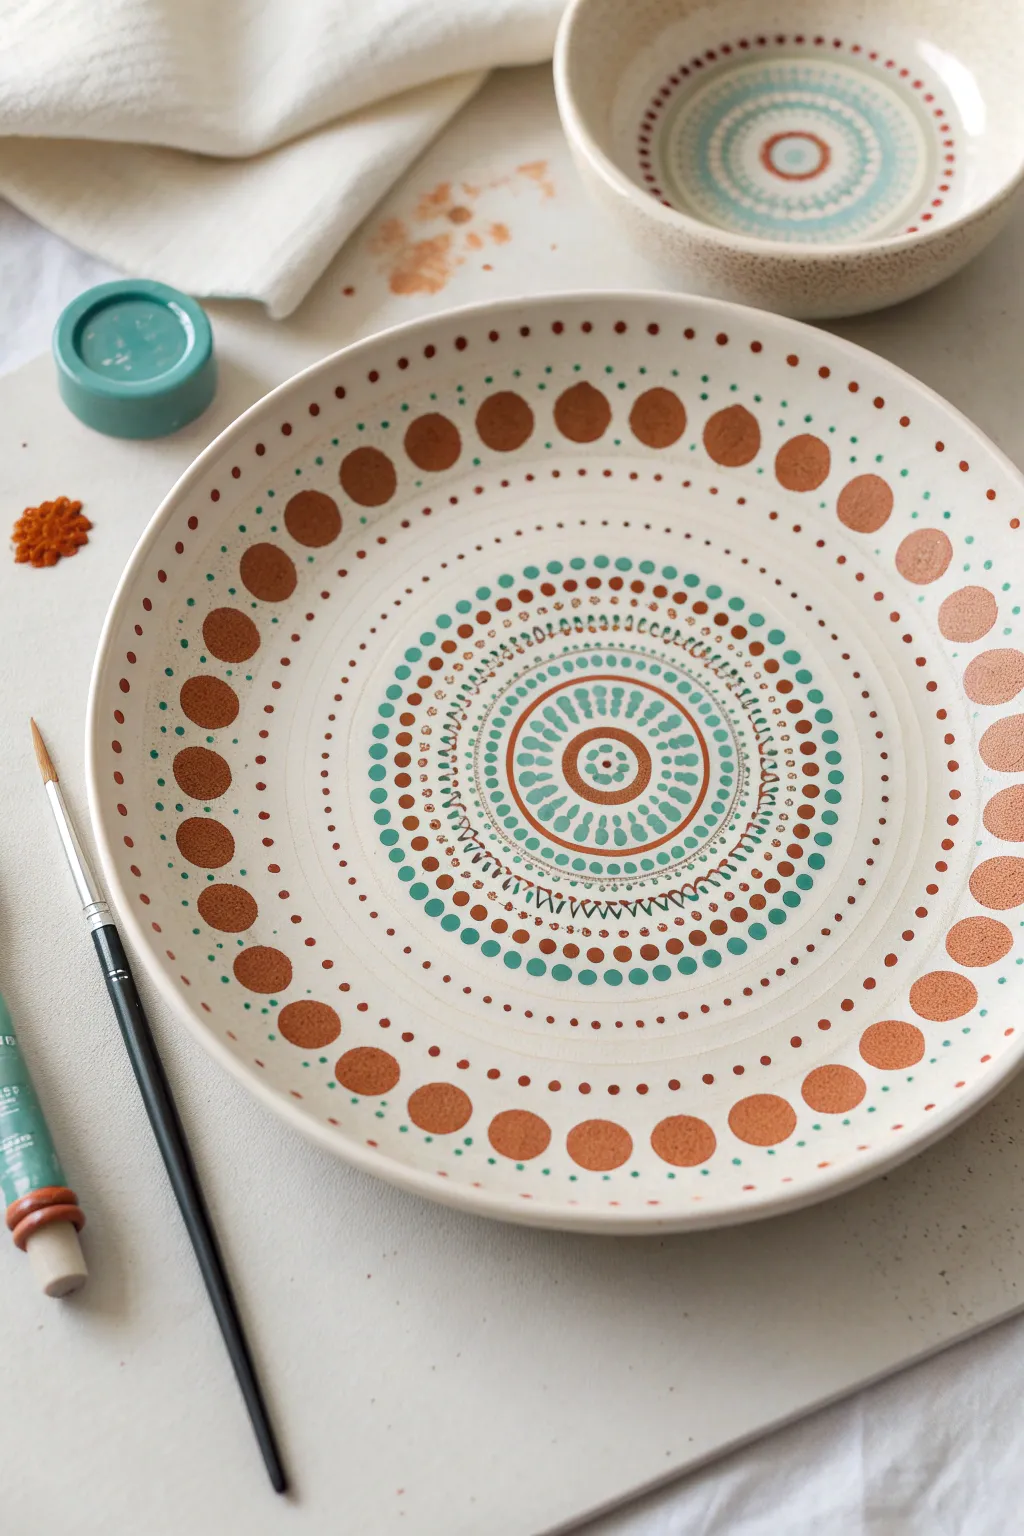
This soothing pottery project combines warmth and coolness through concentric rings of rhythmically placed dots. Perfect for beginners, this mandala design builds slowly from the center outward, resulting in a mesmerizing, harmonious piece.
Step-by-Step
Materials
- Bisque ceramic plate (dinner size)
- Underglaze paints: Rust/Terra Cotta
- Underglaze paints: Teal/Turquoise
- Underglaze paints: Deep Chocolate Brown
- Various paintbrushes (fine detail to small round)
- Dotting tools (or makeshift tools like pencil erasers, brush handles)
- Damp sponge
- Clear dipping glaze (for post-firing)
Step 1: Center Foundation
-
Prep the surface:
Begin by wiping down your bisque plate with a damp sponge. This removes any dust that could prevent the glaze from adhering properly. -
Paint the bullseye:
Identify the absolute center of your plate. Using a small round brush, paint a solid Rust-colored circle about the size of a dime. -
Add first teal ring:
Load a fine detail brush with Teal glaze. Paint a thin, steady ring encircling your center dot, leaving a small gap of white space between them. -
Create the sun rays:
Using the same Teal paint, make small, elongated teardrop shapes radiating outward from that ring. These should look like little petals or sun rays. -
Outer rust circle:
Enclose the teal sunburst with another solid ring of Rust paint. Keep your hand steady or use a banding wheel if you have one to help get a perfect circle.
Pro Tip: Measuring Hack
Don’t have a banding wheel? Place your plate on a lazy Susan or a folded towel so you can easily rotate the piece without touching the wet paint.
Step 2: Mid-Section Detail
-
Start the dotting pattern:
Switch to your dotting tool or the back of a brush handle. Dip it in Teal and create a ring of evenly spaced dots just outside the Rust circle. -
Layer tiny dots:
Using a very fine tool or toothpick, place a microscopic dot of Dark Brown between every two Teal dots you just made. -
Paint the zig-zag ring:
With a fine liner brush and Dark Brown glaze, paint a delicate zig-zag or chevron line encircling the dot rings. -
Expand with teal:
Create three concentric rings of Teal dots, increasing the dot size slightly with each new ring. The spacing should remain tight and consistent. -
Add brown accents:
Inside the outermost Teal dot ring, place tiny warm Rust or Brown dots in the gaps. This adds depth to the cool tones.
Troubleshooting: Uneven Dots
If dots look uneven, you likely ran out of paint. Reload your tool after every single dot to ensure the size and ‘puffiness’ of the glaze remains consistent.
Step 3: Border & Finishing
-
Mark the wide gap:
Leave a significant band of negative space (about an inch) empty. This ‘breathing room’ is crucial for the design’s balance. -
Paint the large anchor dots:
Load a larger round brush or sponge dauber with Rust paint. Stamp or paint large circles around the outer rim of the plate. I find spacing them like clock numbers first helps layout unevenness. -
Fill the intervals:
Ensure the large Rust dots are evenly spaced; fill in any gaps until you have a complete ring of boldness. -
Inner rim detail:
Just inside the ring of large Rust dots, use a small tool to dab a ring of tiny Dark Brown dots. -
Outer rim detail:
Repeat this tiny dot process on the *outside* of the large Rust dots, near the very edge of the plate, using Teal or Brown. -
Clean and dry:
Check for any smudges and wipe them gently. Let the underglaze dry completely before applying a clear dipping glaze and firing.
Your finished plate will be a stunning centerpiece for any table setting once fired
Ocean Wave Swirls
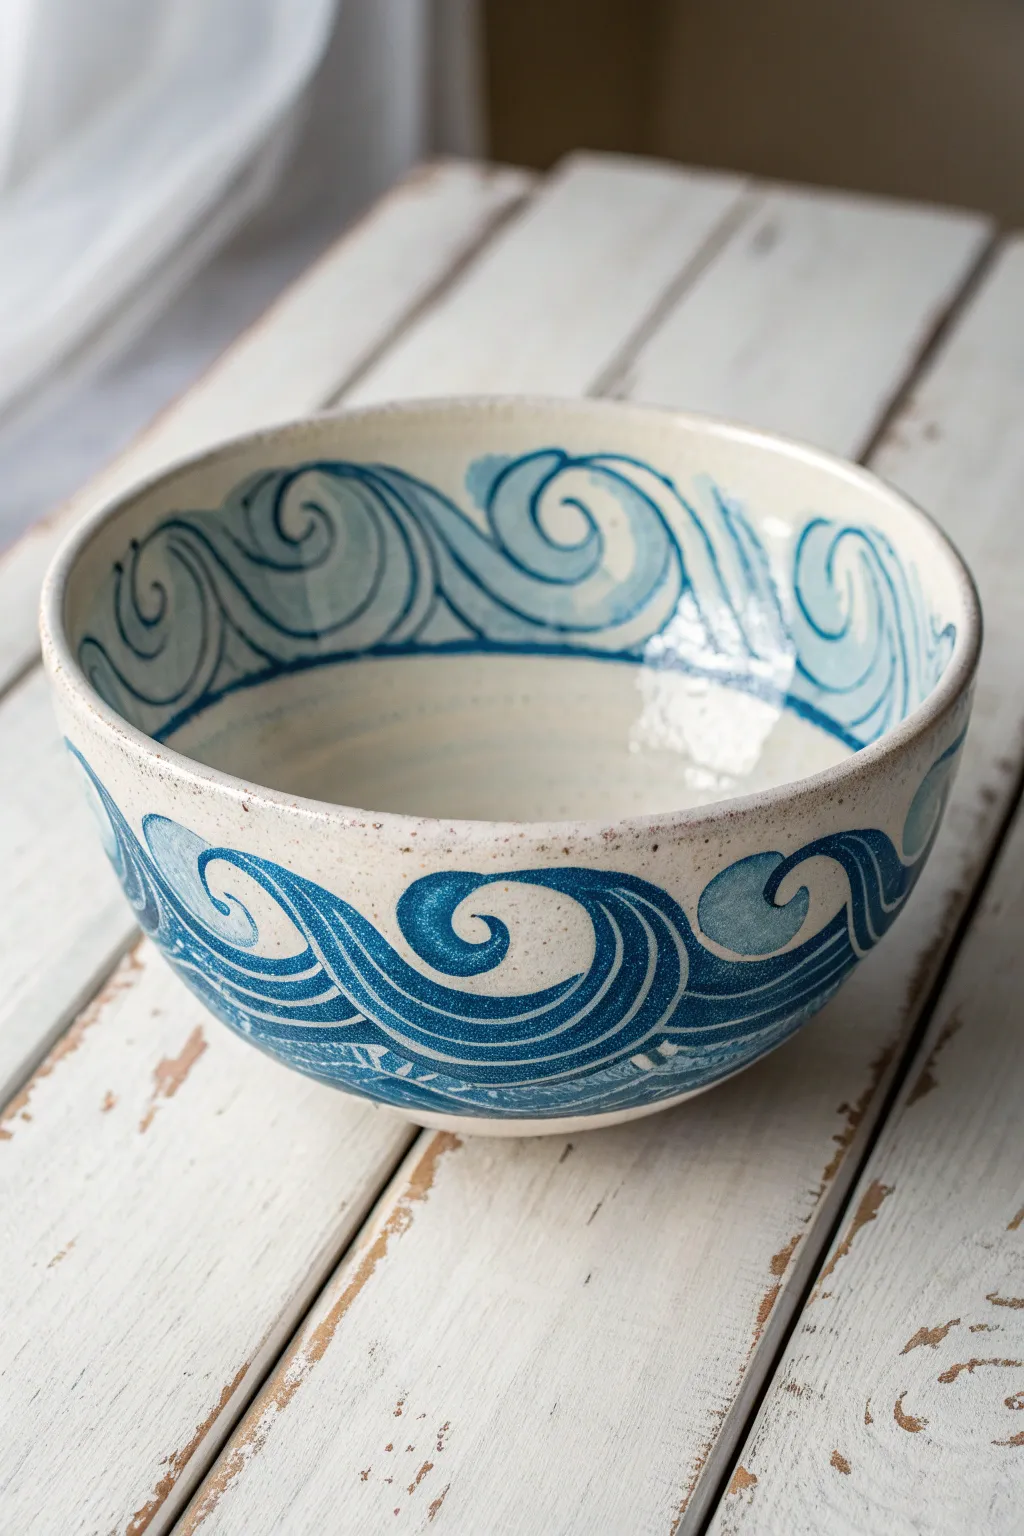
Capture the rhythmic beauty of the sea with this stunning wave-patterned bowl. Using a combination of deep blues and flowing brushstrokes, you’ll create a dynamic swirl design that wraps seamlessly around both the interior and exterior of your ceramic piece.
Detailed Instructions
Materials
- Bisque ceramic bowl (ready to paint)
- Pencil (standard No. 2)
- Underglaze (Dark Navy Blue)
- Underglaze (Medium Sky Blue)
- Underglaze (Light Blue or Teal)
- Clear dipping glaze or brushing glaze
- Round brushes (sizes 4 and 8)
- Fine liner brush (size 0 or 1)
- Sponge
- Water cup and palette
Step 1: Preparation & Sketching
-
Clean the surface:
Begin by wiping down your bisque bowl with a slightly damp sponge. This removes any dust that could prevent the glaze from adhering properly. -
Mark the horizon line:
Lightly sketch a horizontal line with a pencil around the inside rim, about 1.5 inches down from the top edge. Repeat this on the exterior, keeping the spacing consistent. -
Sketch the wave shapes:
Using your pencil, draw a series of connecting swirls along your guide line. Think of them as rounded hooks or letter ‘C’ shapes rolling forward. Make sure the exterior and interior waves flow in the same direction for continuity. -
Refine the swirls:
Add a second inner line to each swirl to give it thickness and dimension. Don’t worry about pencil marks; they burn off in the kiln.
Wobbly Lines?
If your lines feel shaky, rest your painting hand’s pinky finger on the bowl for stability while using the liner brush.
Step 2: Painting the Exterior Waves
-
Base layer for dark waves:
Load your size 8 round brush with Dark Navy Blue underglaze. Paint the main body of the exterior waves, filling in the bottom section of your sketched swirls. -
Create flow:
Use long, sweeping strokes that follow the curve of the wave. I find that reloading the brush frequently helps keep the edges crisp and opaque. -
Add the lighter crests:
Switch to the Medium Sky Blue. Paint the upper curl of the wave, blending slightly where it meets the dark navy to create a gradient effect. -
Detailing the swirls:
Using the fine liner brush and the Dark Navy Blue, outline the spiral at the center of each wave crest to sharpen the definition. -
Adding texture lines:
With the liner brush and a very small amount of Light Blue or white, add thin, curved lines inside the dark navy body of the wave to suggest movement and water current.
Make It Sparkle
Add ‘sea foam’ by dabbing tiny dots of thick white glaze on the tips of the waves before the final clear coat.
Step 3: Painting the Interior Rim
-
Replicate the pattern inside:
Move to the inside of the bowl. Using the size 4 brush, paint the interior wave band using the same technique: dark navy for the bottom heavy sections and sky blue for the top curls. -
Define the borders:
Carefully paint a solid line along the bottom edge of your interior wave design to give it a clean, finished border. -
Clean up edges:
If any paint smudged onto the plain white areas, use a clean, damp stiff brush or a specialized clean-up tool to gently scrape or wipe it away.
Step 4: Speckling & Glazing
-
Create a sandy texture:
To mimic sand or sea foam, dip an old toothbrush or stiff brush into a thinned brown or tan underglaze. Run your thumb over the bristles to flick tiny speckles over the unpainted clay areas. -
Let it dry completely:
Allow the underglaze to dry until it is chalky and cool to the touch. This usually takes about 20-30 minutes. -
Apply clear glaze:
Apply two to three coats of clear brushing glaze over the entire bowl, or dip it into a clear glaze bath if you have access to one. -
Check the foot:
Wipe the bottom foot ring of the bowl with a sponge to ensure no glaze remains there, which prevents it from sticking to the kiln shelf. -
Fire the piece:
Have the bowl fired in a kiln according to the clay and glaze specifications (usually cone 06 or cone 6).
Once fired, you will have a beautiful, durable bowl perfect for your morning cereal or a hot soup
Night Sky Splatter Stars
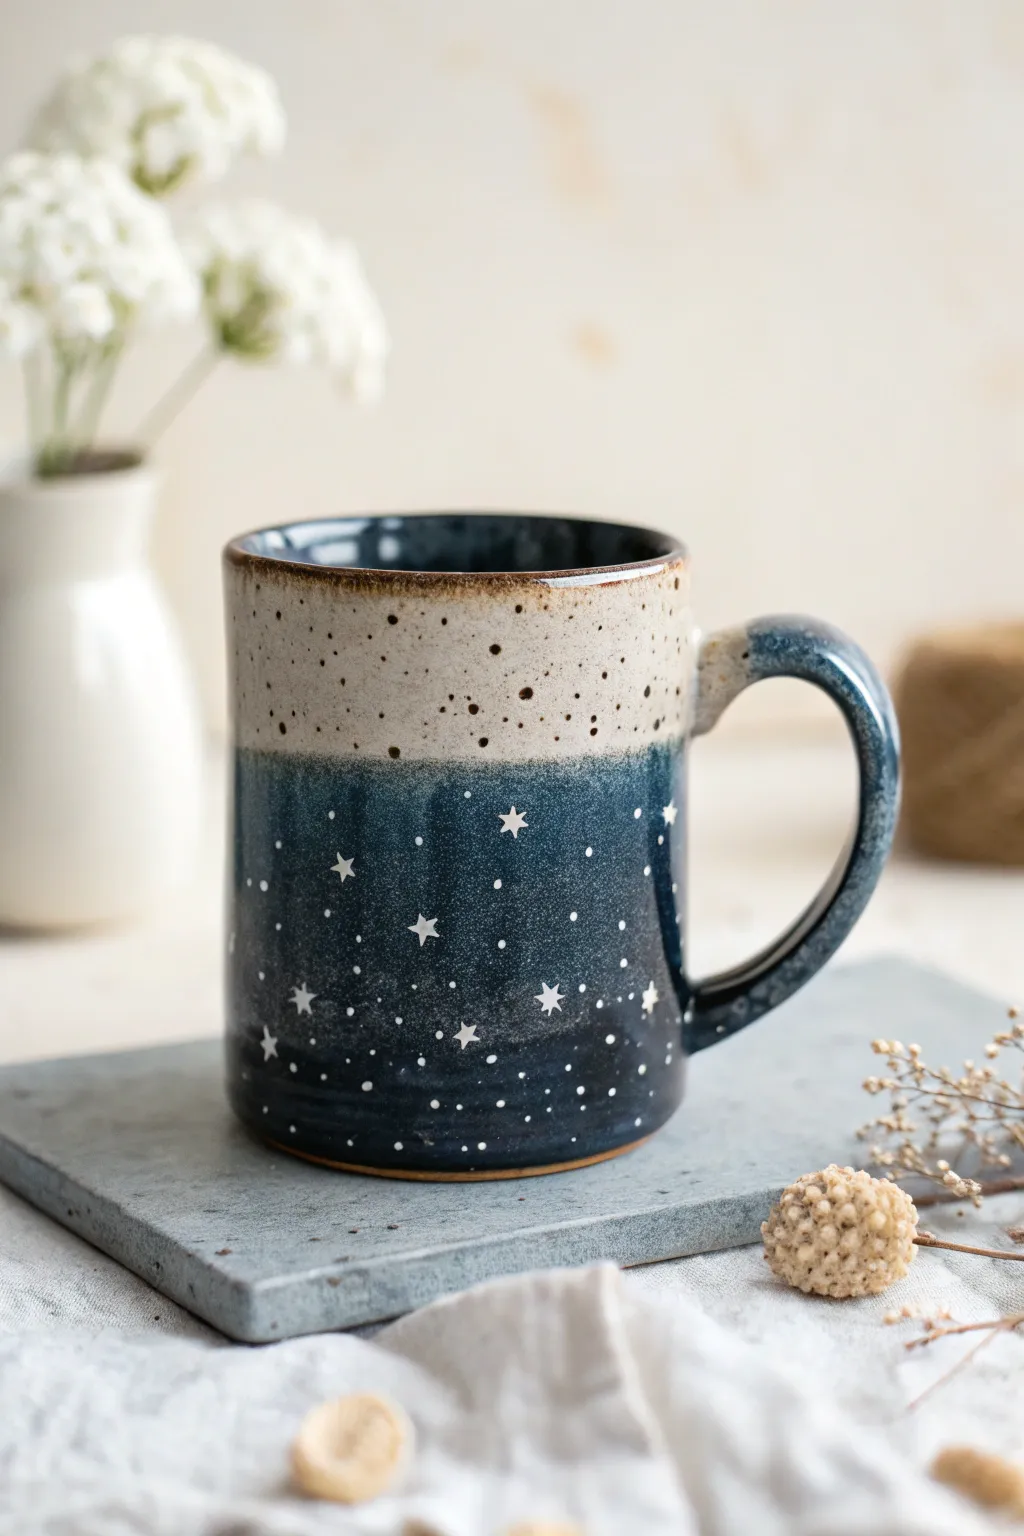
Capture the magic of a starry night with this dreamy two-tone design that blends creamy speckles with a deep galaxy blue. The hand-painted stars and delicate splatter technique create a whimsical finish that makes every sip feel a little more enchanting.
Step-by-Step
Materials
- Bisque fired ceramic mug
- Deep navy blue underglaze
- Cream or off-white speckled underglaze
- Bright white underglaze (opaque)
- Small round brush (size 2 or 4)
- Detail liner brush (size 0 or 00)
- Stiff bristle brush (e.g., old toothbrush)
- Clear dipping glaze
- Sponge
- Pencil
Step 1: Preparation and Base Coats
-
Clean the bisque:
Start by wiping down your bisque mug with a damp sponge. This removes any dust from the shelf that could prevent the glaze from adhering properly. -
Mark the horizon line:
Lightly sketch a line around the mug with a pencil about one-third of the way down from the rim. Don’t worry about being perfectly straight; a slightly organic line adds character. -
Apply the creamy top:
Using a soft round brush, apply the cream or off-white speckled underglaze to the top section, stopping right at your pencil line. This glaze usually needs three solid coats for full opacity. -
Paint the handle top:
Extend the cream color onto the top curve of the handle, blending it down just a bit to create a transition point similar to the mug body. -
Apply the night sky base:
Switch to your deep navy blue underglaze. Paint the bottom two-thirds of the mug, carefully meeting the cream edge. You want them to touch but not overlap heavily yet. -
Cover the rest of the handle:
Continue painting the navy blue onto the rest of the handle. I like to blend the meeting point on the handle slightly while the paint is still damp for a softer look. -
Layering the blue:
Apply two more coats of the navy blue to ensure a rich, dark background for your stars. Let the blue dry completely before moving to the next phase. -
Glaze the interior:
Paint the inside of the mug with three coats of the same navy blue, or pour the glaze inside, roll it around to coat, and pour out the excess.
Uneven Splatter?
If your splatter drops are too big, your brush is too wet. Blot the bristles on a paper towel first. Test the spray on scrap paper before aiming at your beautiful artwork.
Step 2: Creating the Galaxy
-
Paint main stars:
Using your finest detail liner brush and bright white underglaze, paint several large 5-point stars scattered randomly around the blue section. -
Add medium stars:
Use the tip of the brush to create slightly larger dots or 4-point diamonds to represent medium-sized distant stars. -
Prepare for splatter:
Cover the cream top section of the mug with a piece of paper or masking tape to protect it from stray paint. You want the stars only on the blue. -
Splatter technique:
Dip a stiff bristle brush or old toothbrush into water-thinned white underglaze. Hold it near the mug and flick the bristles to spray a fine mist of tiny white dots creates the ‘milky way’ effect. -
Remove masking:
Carefully peel away your paper or tape protection to reveal the clean line between the starry night and the quiet sky above. -
Add the rim detail:
Dip a sponge lightly in a toasted almond or brown iron-oxide wash. Gently dab it along the very rim of the mug and slightly over the transition line between blue and white for an earthy, rustic finish. -
Final dry:
Let the entire piece dry completely for at least 24 hours. The clay should feel room temperature, not cool to the touch. -
Clear glaze:
Dip the entire mug into a clear dipping glaze. Shake off excess gently and clean the foot of the mug with a sponge so it doesn’t stick to the kiln shelf. -
Fire:
Fire the mug in the kiln according to the specific directions of your glaze and clay body, usually to cone 06 or cone 6 depending on your materials.
Add a Moon
Make the sky specific by painting a thin crescent moon in the navy section. Use a pale yellow mixed with white for a soft, glowing moonlight effect.
Now you have a stunning piece of pottery that brings the wonder of the cosmos to your morning coffee routine
Scratch-Through Sgraffito Patterns
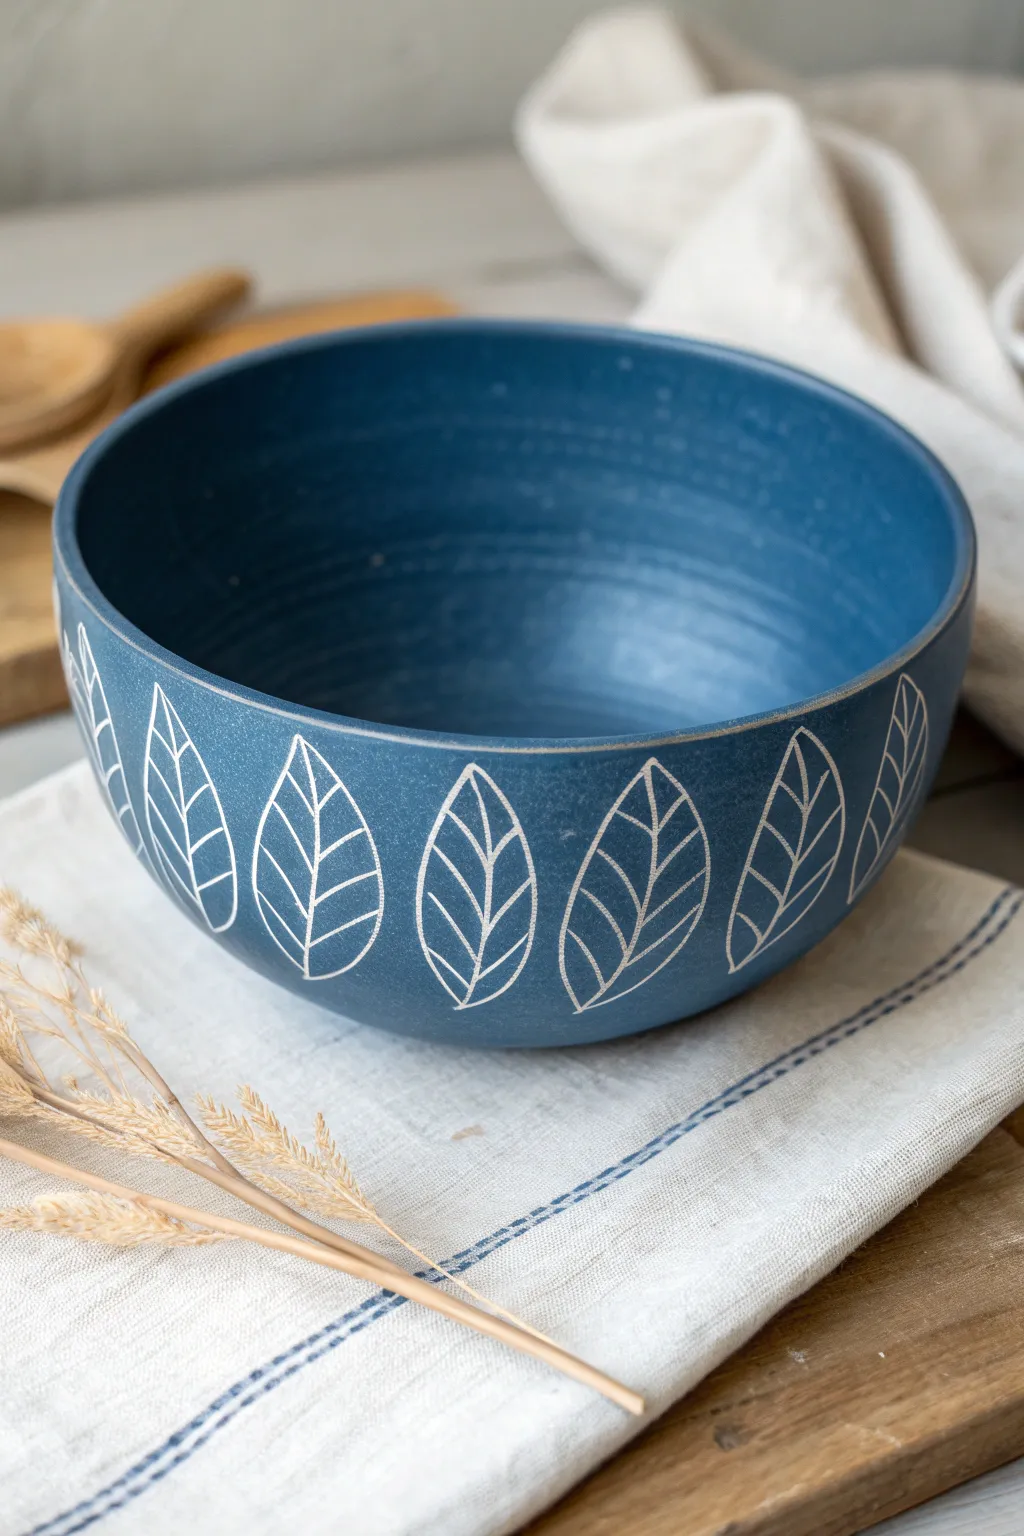
This elegant project transforms a simple clay bowl into a statement piece using the ancient technique of sgraffito. By scratching through a layer of deep denim-blue underglaze, you’ll reveal the crisp white clay beneath in a repeating organic leaf pattern.
Detailed Instructions
Materials
- Leather-hard clay bowl (white stoneware or porcelain)
- Deep blue underglaze
- Source image of simple leaf shapes
- Soft fan brush
- Pencil
- Sgraffito tool (loop tool or needle tool)
- Clean sponge
- Clear transparent glaze
Step 1: Preparation and Glazing
-
Check clay consistency:
Ensure your thrown or hand-built bowl is ‘leather hard’—stiff enough to hold its shape but soft enough to carve into without chipping. If it’s too dry, the carving will be jagged. -
Clean the surface:
Wipe the exterior of the bowl gently with a slightly damp sponge to remove any dust or grog that might interfere with the underglaze application. -
Apply first coat:
Using a soft fan brush, apply a generous, even layer of deep blue underglaze to the entire exterior and interior of the bowl. -
Wait for sheen to disappear:
Let the first coat dry just until the wet sheen vanishes. This usually takes just a few minutes. -
Apply additional coats:
Apply 2-3 more coats of blue underglaze, alternating the direction of your brushstrokes (horizontal then vertical) to ensure solid, opaque coverage without streaks. -
Dry to leather hard:
Allow the underglaze to dry until the surface is no longer tacky but the clay itself is still leather hard. I usually test this by touching a discreet spot near the foot. -
Sketch the spacing:
Lightly mark vertical tick marks around the rim with a pencil to plan where each leaf will go, ensuring even spacing around the circumference.
Fixing Smudges
If you smear blue dust onto the white carved lines, wait until the piece is bone dry. Then, carefully scrape the white line again with a needle tool.
Step 2: Carving the Design
-
Outline the leaf shape:
Using a pencil, lightly sketch the almond-shaped outline of the leaves onto the underglaze. The graphite will burn off in the kiln. -
Begin carving outlines:
Take your sgraffito tool (a small wire loop tool works best) and gently scratch through the blue layer along your pencil lines to reveal the white clay body. -
Maintain pressure:
Keep your pressure consistent. You only need to remove the skin of the color, not dig deep trenches into the clay. -
Carve the center vein:
Draw a central vein line straight down the middle of each leaf, starting from the tip and ending just before the base. -
Add detailing:
Carve diagonal lines branching from the center vein to create the leaf ribs. Try to mirror the angle on both sides for symmetry. -
Clean up burrs:
As you carve, little crumbs of clay (burrs) will accumulate. Do not brush them away with your hand, or you might smear the blue. Blow them off gently. -
Refine the edges:
Go back over your main outline lines if necessary to make them slightly thicker and bolder than the interior detail lines. -
Final wipe:
Once all carving is done, wait for the pot to be bone dry. Then, very gently brush a soft, dry brush over the design to remove any lingering clay dust.
Play with Texture
Instead of smooth lines, use a needle tool to create the leaf interior with tiny stippled dots for a totally different texture.
Step 3: Finishing
-
Bisque fire:
Fire the bowl to cone 04 (or your clay’s bisque temperature) to set the design permanently. -
Clear glaze:
Dip or brush a clear gloss glaze over the entire piece. This will make the deep blue pop and protect the white clay revealed by your carving. -
Final firing:
Glaze fire the piece to the maturity temperature of your specific clay body (e.g., Cone 6).
Once fired, the contrast between the dark blue and bright white clay creates a timeless look perfect for any table setting


Have a question or want to share your own experience? I'd love to hear from you in the comments below!