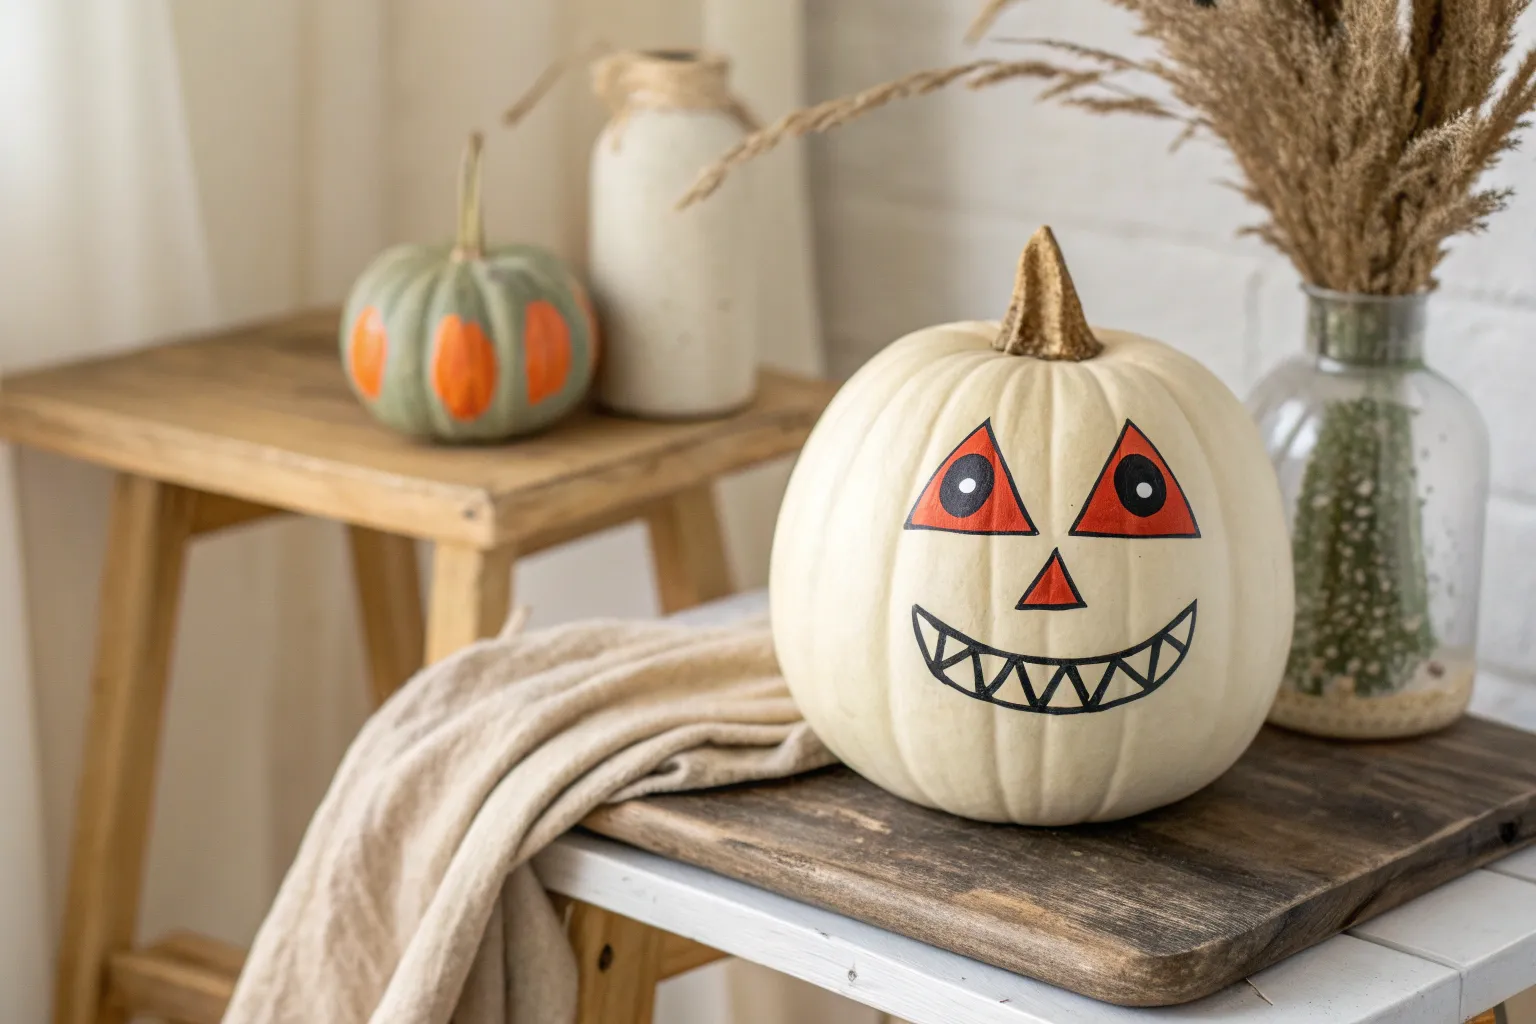
The crisp air has finally arrived, and in my studio, that means swapping out canvas for bright orange gourds and getting messy with high-coverage acrylics. Whether you want to create a spooky porch display or a chic centerpiece, these painting techniques will help you transform ordinary produce into lasting works of art without the mess of carving.
The Classic Friendly Ghost
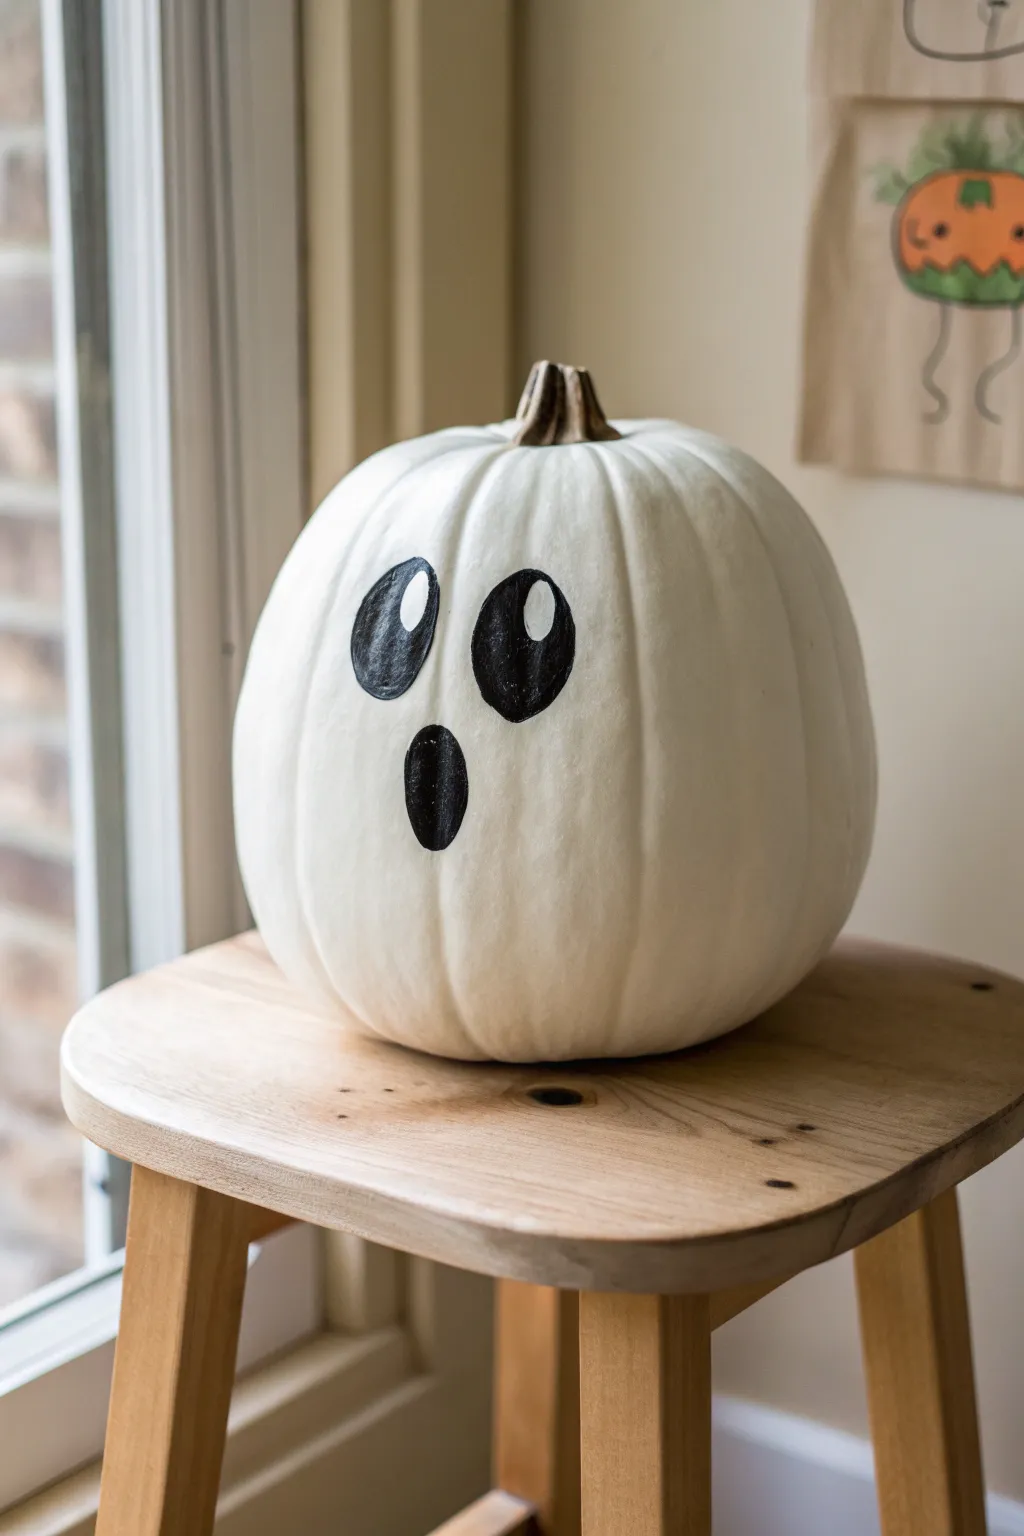
Transform an ordinary pumpkin into an adorable spectral friend using a minimalist high-contrast design. This project relies on simple geometric shapes and careful placement to create a classic character that is welcoming rather than spooky.
Step-by-Step Guide
Materials
- Real or faux pumpkin (medium size)
- Titanium White acrylic paint (matte)
- Mars Black acrylic paint
- Wide foam brush
- Medium round paintbrush
- Fine detail paintbrush
- Pencil
- Painter’s tape
- Damp cloth
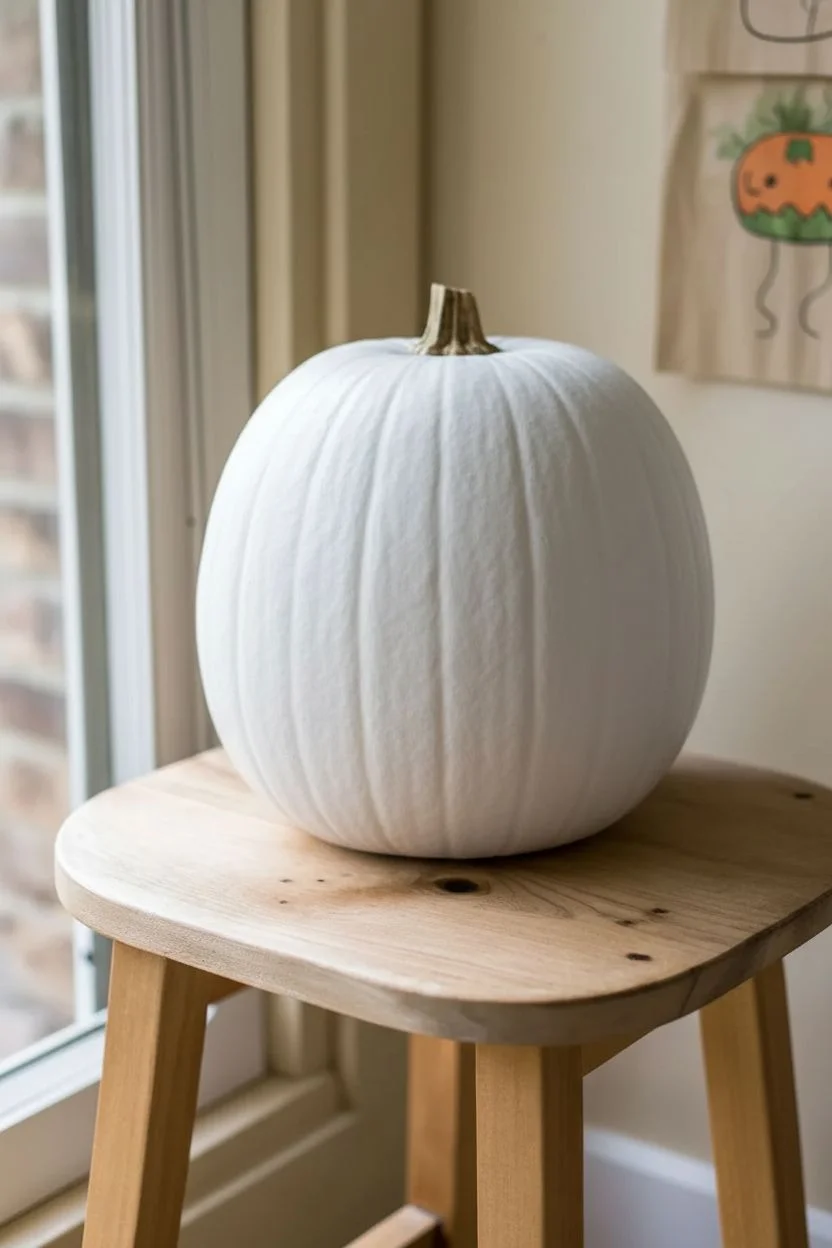
Step 1: Preparing the Base
-
Clean the surface:
Wipe down your pumpkin with a damp cloth to remove any dirt or oil, as this ensures the artificial surface or skin accepts the paint evenly. -
Protect the stem:
Wrap a strip of painter’s tape around the base of the stem to keep it natural and brown while you paint the body. -
Apply the first white coat:
Using a wide foam brush, apply a layer of titanium white paint over the entire pumpkin. -
Allow to dry:
Let this layer dry completely; I find that rushing this step often leads to dragging the paint and creating streaks. -
Apply the second coat:
Add a second or third coat of white until the orange skin is completely hidden and the finish looks solid and matte. -
Remove tape:
Gently peel off the painters tape from the stem once the final coat of white is dry to the touch.
Paint Opacity Fix
If the orange shows through your white base, don’t just pile on thick wet paint. Apply thin, even layers, allowing full drying time between each, to build up a solid porcelain-like finish.
Step 2: Sketching the Expression
-
Locate the center:
Identify the best ‘face’ of the pumpkin, looking for a relatively smooth area without deep vertical ribs. -
Mark the eye position:
Using a pencil, lightly sketch the tops of the eyes about two-thirds of the way up the pumpkin’s height. -
Draw the eye shapes:
Sketch two large vertical ovals for the eyes, tilting the tops slightly inward toward each other to create a sweet expression. -
Add the mouth:
Draw a smaller, vertical oval centered below the eyes to form the surprised ‘O’ shaped mouth. -
Check symmetry:
Step back and look at your pencil marks from a distance to ensure the ghost looks surprised, not lopsided.
Step 3: Painting Features
-
Outline the eyes:
Load your medium round brush with black paint and carefully trace the pencil outline of the left eye. -
Fill the left eye:
Fill in the oval with smooth black strokes, working from the outside edge toward the center. -
Paint the right eye:
Repeat the outlining and filling process for the right eye, turning the pumpkin if needed to get a better angle. -
Paint the mouth:
Use the same brush to outline and fill the smaller mouth oval, keeping the edges crisp and rounded. -
Refine the edges:
Switch to a fine detail brush to smooth out any bumps in your black ovals so they look like perfect shapes.
Pro Tip: Perfect Circles
For the eye catchlights, avoid using brush bristles. The flat end of a brush handle, a pencil eraser, or a cotton swab acts as a stamp, creating a perfectly round dot in one second.
Step 4: Finishing Touches
-
Dry the features:
Wait for the black paint to dry completely to prevent the white highlights from turning gray. -
Load a tool for dots:
Dip the handle end of a paintbrush into a small puddle of white paint. -
Stamp the highlights:
Press the painted handle tip gently onto the upper right section of each black eye to create a perfect white dot. -
Final cure:
Let the pumpkin sit undisturbed for at least an hour so the thick dots of paint harden fully.
Set your finished ghost pumpkin near a window or entryway to greet guests with a surprised smile


The Minimalist Frankenstein
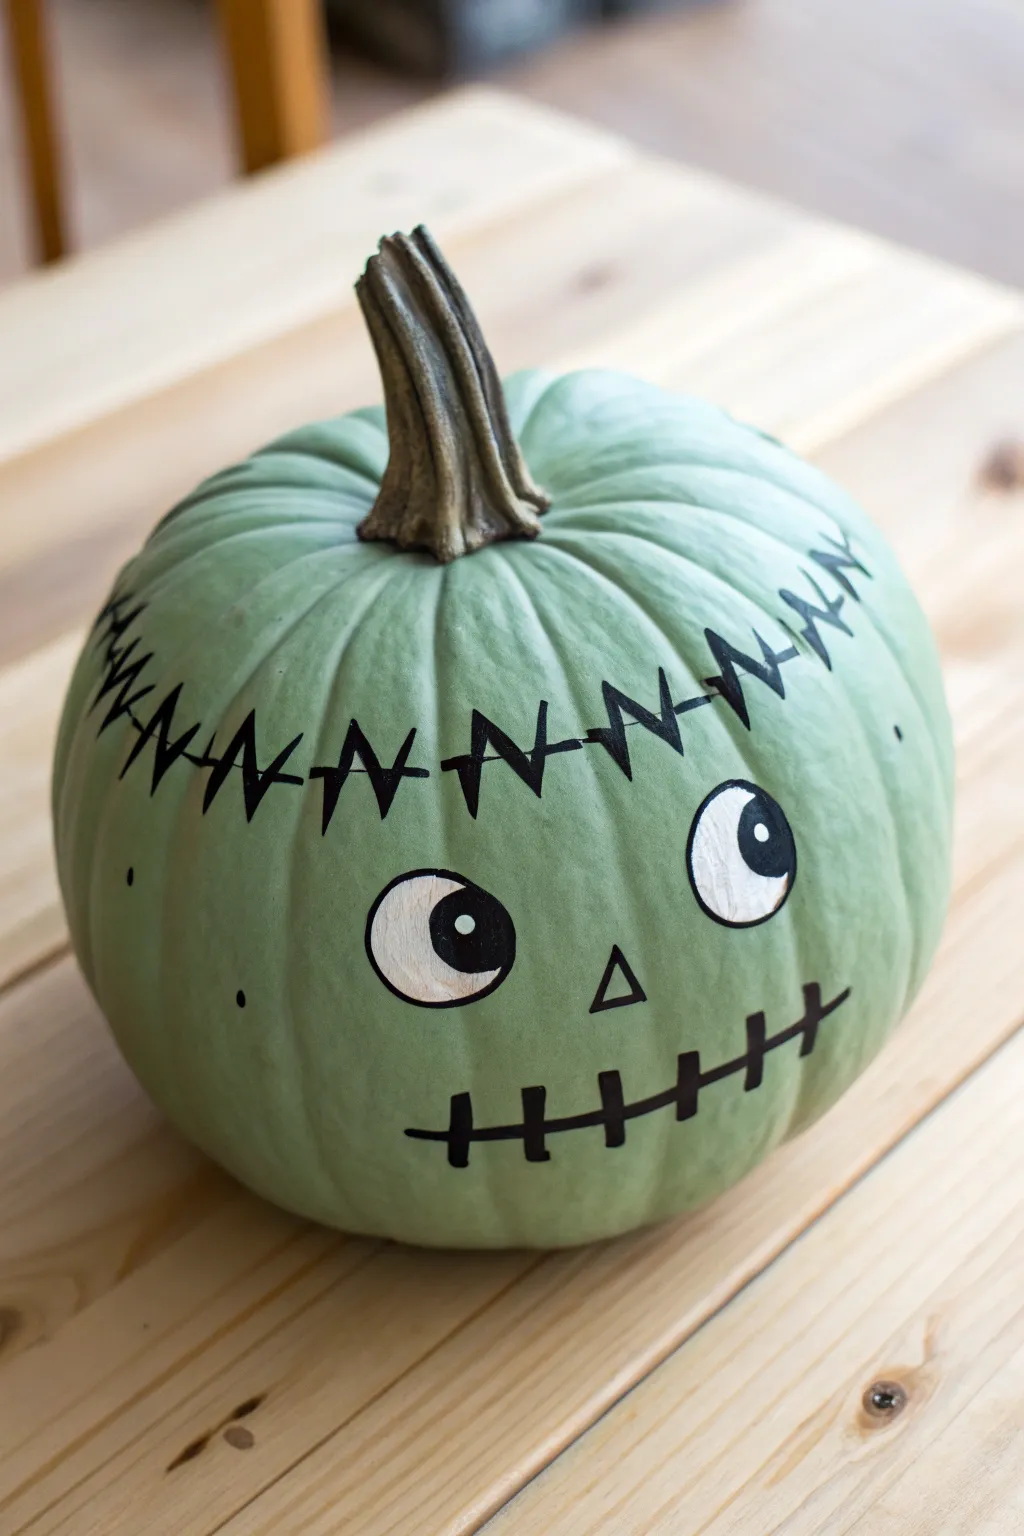
Skip the scary monsters this year and opt for this adorable, minimalist Frankenstein pumpkin. With its trendy sage green hue and simple stitched details, this character adds a touch of modern charm to your Halloween decor without the mess of carving.
Step-by-Step Tutorial
Materials
- Medium-sized pumpkin (real or artificial)
- Sage green matte acrylic paint
- White acrylic paint
- Black paint marker (medium tip)
- Flat paintbrush (1-inch width)
- Small round paintbrush
- Pencil
- Clear matte sealer spray (optional)
Step 1: Preparing the Base
-
Clean surface:
Wipe down your pumpkin with a damp cloth to remove any dirt or oils that might prevent the paint from adhering properly. -
First coat:
Apply a base coat of sage green acrylic paint over the entire pumpkin surface using your flat brush, carefully painting around the stem base rather than over it. -
Drying time:
Allow this first layer to dry completely until it is no longer tacky to the touch. -
Second coat:
Paint a second coat of green to ensure full, opaque coverage where the orange rind doesn’t peek through; I find two coats usually does the trick for a solid matte finish. -
Final cure:
Let the pumpkin dry thoroughly, preferably overnight, as painting details on a tacky base can cause the colors to muddy.
Streaky Base Coat?
If your green paint looks uneven, try dabbing the final coat with a makeup sponge instead of brushing. This creates a smooth, textured finish that hides brushstrokes perfectly.
Step 2: Painting the Features
-
Sketching:
Using a pencil, very lightly sketch two large circles for eyes about halfway down the pumpkin face, along with a small triangle nose. -
Eye whites:
Fill in the sketched circles with white acrylic paint using a small round brush. -
Layering white:
Don’t worry if the first layer looks sheer; let it dry and add a second layer to achieve a bright, pop-out white. -
Outlining:
Once the white paint is bone-dry, use your black paint marker to draw a smooth, bold outline around the edge of each eye. -
Pupils:
Draw large, round pupils inside the white circles, positioning them slightly to the right to give him a playful side-glance. -
Highlights:
Use the very tip of a small brush or a toothpick dipped in white paint to add a tiny ‘catchlight’ dot inside each black pupil. -
Nose detail:
Trace over your pencil triangle with the black marker to create a simple, open nose shape.
Steady Hand Secret
Rest your pinky finger on the dry surface of the pumpkin while drawing with the paint marker. It acts as an anchor to keep your lines crisp and prevents accidental smudging.
Step 3: Stitching & Finishing
-
Mouth line:
Draw a long, horizontal line for the mouth using the black paint marker, slightly curving it if you want a happier expression. -
Mouth stitches:
Add small perpendicular hash marks every half-inch along the mouth line to mimic the classic Frankenstein mouth stitches. -
Scar line:
For the forehead scar, draw a long uneven line across the upper curve of the pumpkin, incorporating sharp zigzag peaks here and there. -
Scar stitches:
Cross the straight sections of this forehead line with varying vertical stitch marks to emphasize the ‘patched together’ look. -
Texture dots:
Add a few random, small black dots on the cheeks and sides of the face to create balance and texture. -
Sealing:
If you plan to display this outdoors, spray the entire pumpkin with a clear matte sealer to protect your artwork from the elements.
Now you have a stylishly spooky masterpiece ready to greet your visitors!


The Pumpkin King Face
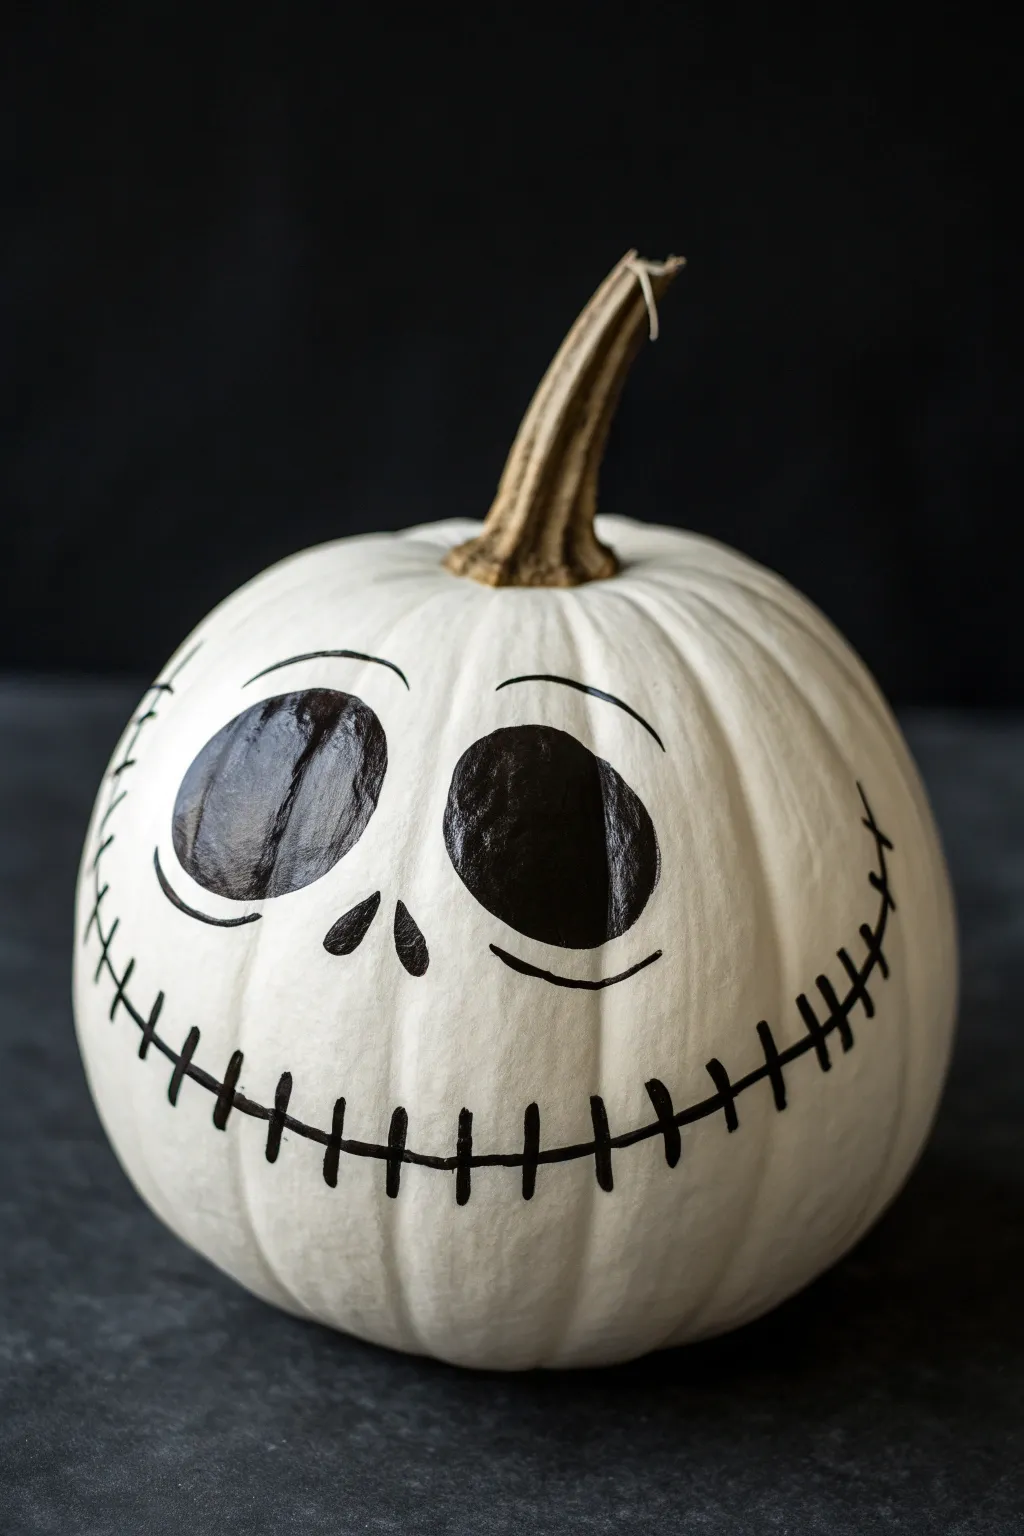
Capture the spooky charm of Halloween’s favorite skeleton with this high-contrast black and white design. This project relies on bold shapes and delicate line work to create an expressive face that looks great on a porch or mantle.
How-To Guide
Materials
- White pumpkin (real or faux)
- Black acrylic paint
- Medium round paintbrush (#6 or #8)
- Fine liner paintbrush (#0 or #1)
- Pencil or light gray watercolor pencil
- Eraser
- Palette or paper plate
- Cup of water
- Paper towels
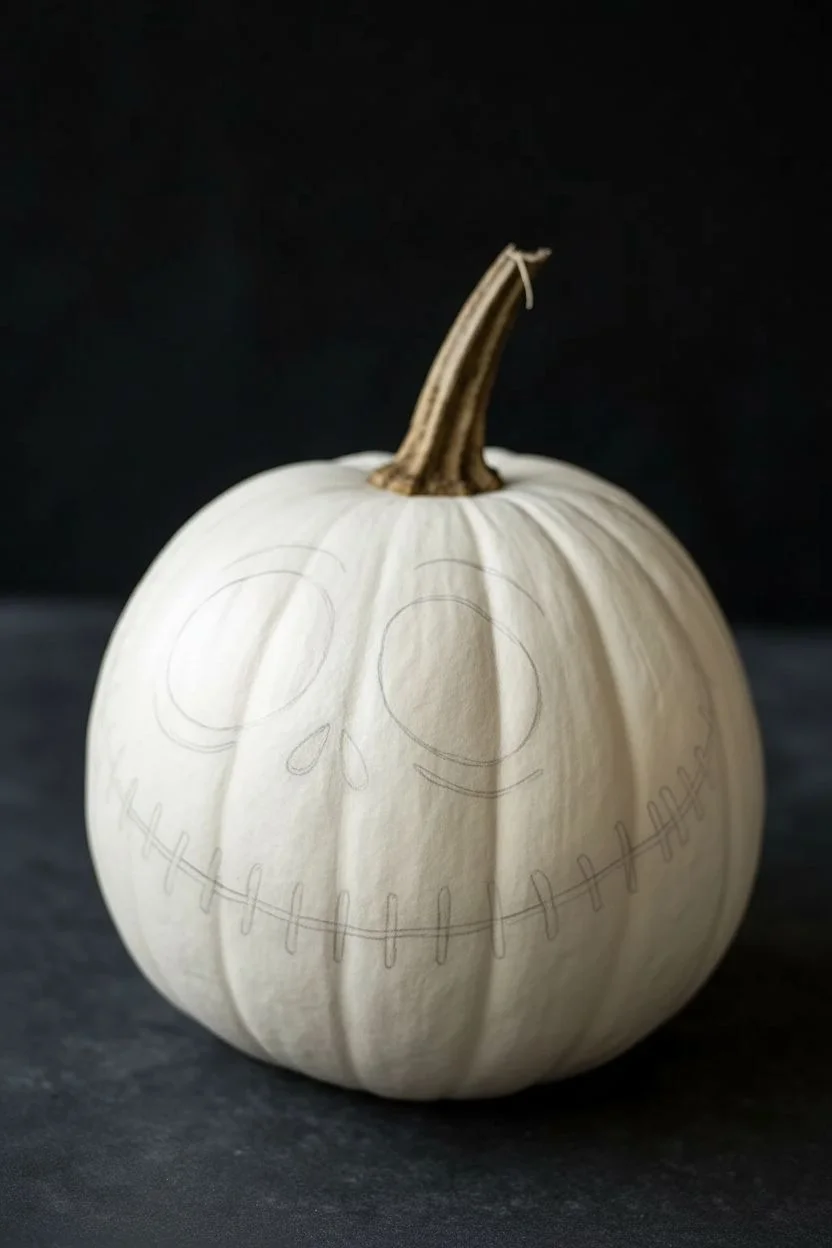
Step 1: Planning the Face
-
Clean surface:
Wipe down your white pumpkin with a damp cloth to remove any dust or oils and let it dry completely. -
Positioning:
Choose the smoothest side of the pumpkin to be the face, positioning the stem so it tilts slightly for character. -
Sketch left eye:
Using a pencil, lightly sketch a large, slanted oval for the left eye socket, keeping the top edge slightly flatter than the bottom. -
Sketch right eye:
Draw the matching right eye socket, ensuring there is a wide space between them for the nose area. -
Add nostrils:
Sketch two small, angled tear-drop shapes in the center to serve as the skeletal nostrils. -
Draw the smile:
Sketch a very wide, curved smile line that extends far up the sides of the pumpkin cheeks. -
Mark markings:
Add short arched lines above the eyes for eyebrows and small curved lines partially under the eyes for bags. -
Detail stitches:
Lightly mark vertical dashes across the mouth line where the stitches will eventually be painted.
Clean Lines Tip
Use a light gray watercolor pencil for your sketch. Unlike graphite, the lines will dissolve into the paint or wipe away easily with a damp Q-tip.
Step 2: Painting Features
-
Load paint:
Squeeze a generous amount of black acrylic paint onto your palette. -
Outline eyes:
Using the medium round brush, carefully trace the outline of the left eye socket. -
Fill left eye:
Fill in the entire shape with the black paint, smoothing out brushstrokes as you go for a solid finish. -
Fill right eye:
Repeat the outlining and filling process for the right eye socket. -
Paint nose:
Use the tip of the medium brush to carefully fill in the two small nostril slits. -
Check opacity:
If the black looks streaky, let it dry briefly and apply a second coat for a deep, opaque look.
Glossy & Matte
To mimic the photo perfectly, apply a coat of clear high-gloss varnish only over the black eyes once dry. This contrasts beautifully with the matte skin.
Step 3: Stitching & Details
-
Switch brushes:
Change to your fine liner brush for the delicate line work. -
Trace mouth:
Dip the liner brush in black paint (thin it slightly with a drop of water if needed) and trace the main smile line. -
Steady hand:
I find it helpful to rest my pinky finger against the dry part of the pumpkin to stabilize my hand while painting these thin lines. -
Make stitches:
Paint short vertical lines across the mouth opening, varying their length slightly for a hand-stitched look. -
Add eyebrows:
Paint the thin, arched eyebrow lines above both eye sockets using the liner brush. -
Under-eye details:
Carefully paint the curved lines beneath the eyes to give the face its signature tired expression. -
Final Cleanup:
Once the paint is completely dry, gently erase any visible pencil marks remaining around the painted areas.
Set your finished masterpiece on the doorstep to greet trick-or-treaters with a classic skeletal smile.


The One-Eyed Monster
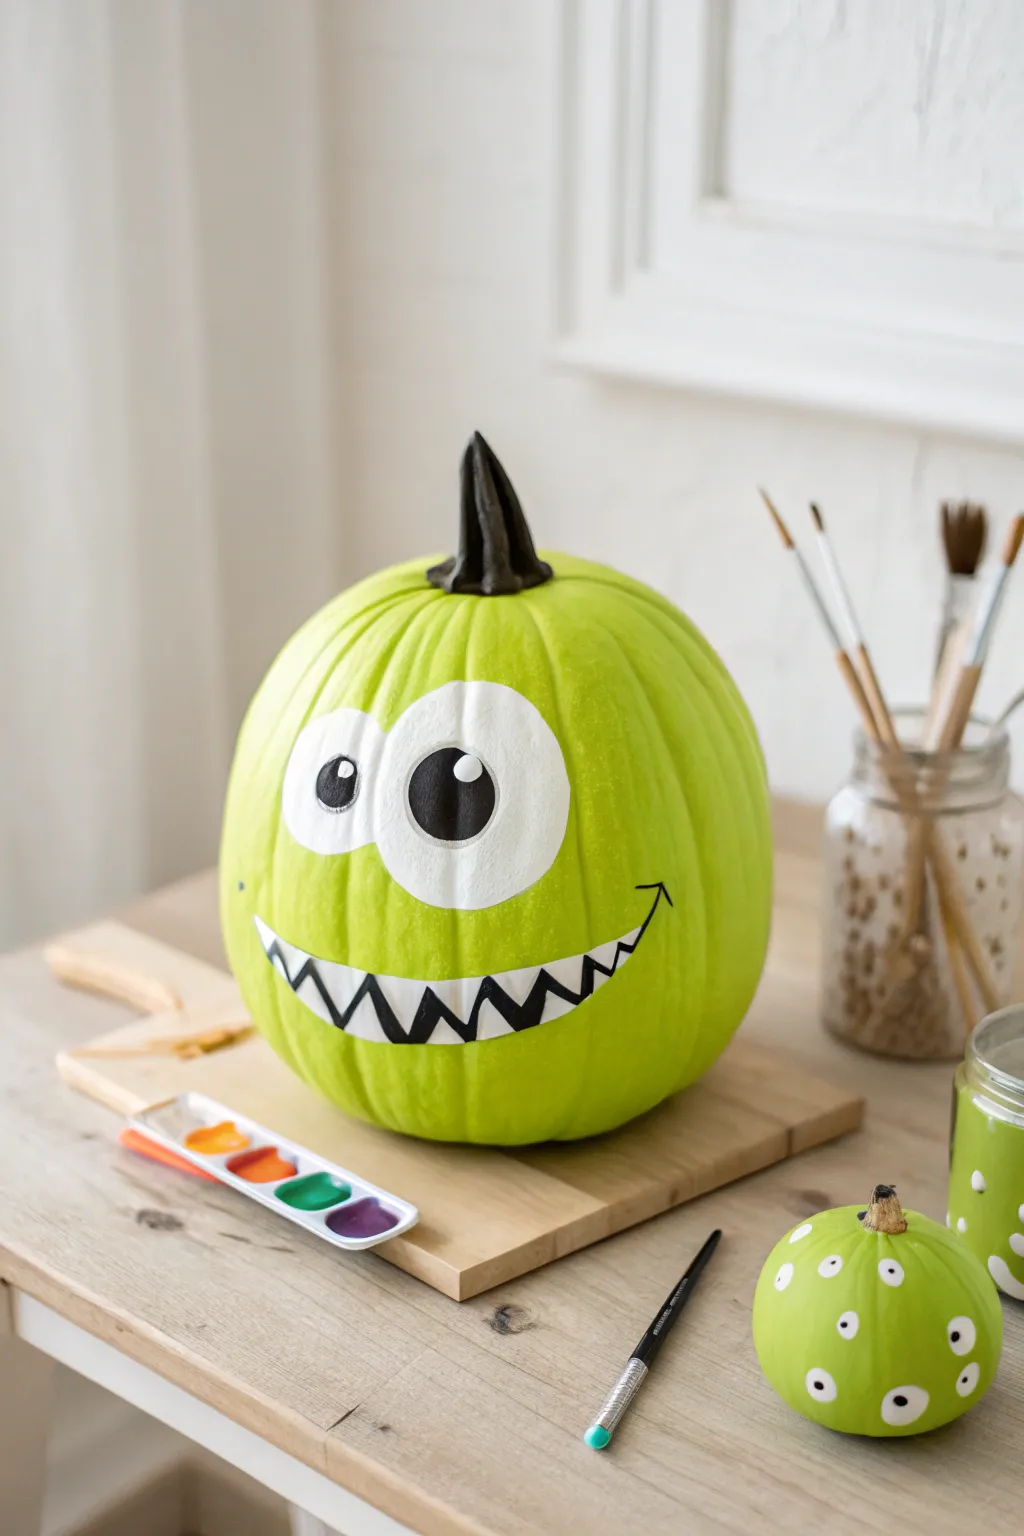

This bright, silly character brings a pop of neon color and humor to your autumn decor without any scary vibes. With its mismatched eyes and jagged grin, this painted pumpkin is a playful alternative to traditional spooky carvings.
Step-by-Step Tutorial
Materials
- Pumpkin (real or foam)
- Lime green acrylic paint
- Titanium white acrylic paint
- Carbon black acrylic paint
- Large flat paintbrush
- Medium round paintbrush
- Fine detail liner brush
- Pencil
- Water cup and paper towels
Step 1: Setting the Stage
-
Prep the surface:
Wipe down your pumpkin with a damp cloth to remove any dirt or oils, ensuring the paint adheres properly. -
Apply the base color:
Using your large flat brush, coat the entire pumpkin in lime green paint. Use long, vertical strokes following the pumpkin’s ribs. -
Let it cure:
Allow the first coat to dry completely. This usually takes about 15-20 minutes depending on paint thickness. -
Add a second coat:
Apply a second layer of lime green to ensure solid, opaque coverage where no orange shows through. -
Paint the stem:
While the body dries, carefully paint the stem solid black using a smaller brush to keep the edges neat.
Step 2: The Goofy Face
-
Sketch the features:
Lightly draw the face with a pencil. Draw two touching circles for eyes (one large, one small) and a wide curved line for the mouth. -
Paint the eye whites:
Fill in the eye circles with white paint using the medium round brush. I find dabbing the paint on creates better coverage than brushing. -
Create the teeth:
Paint a row of sharp white triangles along the bottom curve of your pencil mouth line, and a few pointing down from the top. -
Refine opacity:
Once the white areas are touch-dry, add a second coat to the eyes and teeth to make them bright and crisp against the green.
See-Through White?
If the green base shows through your white paint, don’t keep brushing wet paint. Let it dry fully, then apply a second layer. Opacity comes from layers, not pressure!
Step 3: Defining Details
-
Add pupils:
Paint two black circles inside the white eyes. Make them slightly different sizes or looking in different directions for a crazier look. -
Outline the smile:
Switch to your fine liner brush and black paint. Carefully trace the main curved line of the mouth. -
Outline the teeth:
Use the tip of the liner brush to outline each individual white tooth triangle, connecting them to the main mouth line. -
Add the highlights:
Dip the handle end of a brush into white paint and dot a small reflection mark onto each black pupil to bring the character to life. -
Clean up edges:
If you went outside the lines, use a little green paint to touch up the area around the mouth or eyes once the black is dry.
Glow Up
Swap the standard white paint for glow-in-the-dark acrylic on the eyes and teeth. Your monster will look cute by day and delightfully spooky when the porch lights go out.
Set your goofy green monster out on the doorstep to greet trick-or-treaters with a friendly smile.
BRUSH GUIDE
The Right Brush for Every Stroke
From clean lines to bold texture — master brush choice, stroke control, and essential techniques.
Explore the Full Guide
Spooky Thumbprint Spiders
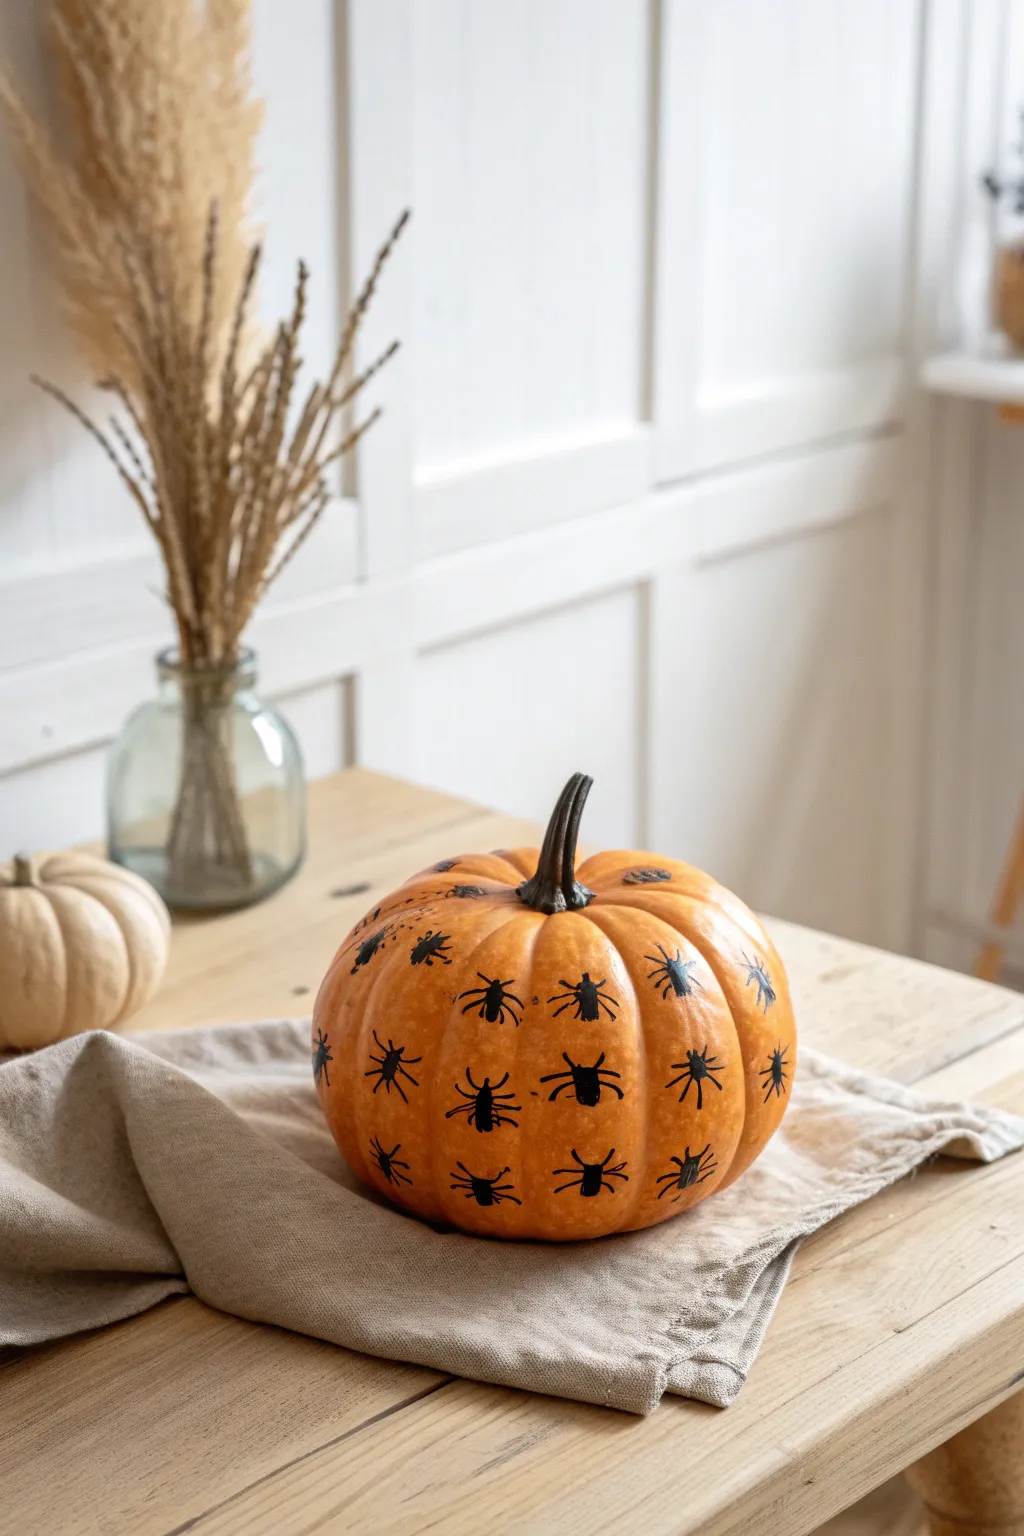
Transform a plain orange pumpkin into a festive centerpiece with a pattern of marching spiders. This project uses a simple printing technique to create a spooky yet charming look that perfect for display.
Step-by-Step
Materials
- Medium orange pumpkin (real or faux)
- Black acrylic paint
- Paper plate or palette
- Fine-tip black paint pen (or fine liner brush)
- Damp paper towels
- Rubbing alcohol
- Clear matte sealer spray (optional)
Step 1: Preparation
-
Clean surface:
Wipe down your pumpkin with a damp cloth to remove dust, and then wipe with rubbing alcohol to remove any waxy residue that might resist paint. -
Dry completely:
Ensure the pumpkin is totally dry before starting; moisture is the enemy of acrylic adhesion. -
Prepare paint:
Squeeze a coin-sized amount of black acrylic paint onto a paper plate or palette. -
Spread paint:
Use a brush or your finger to spread the paint into a thin, even layer so it isn’t too goopy for dipping.
Slippery Surface?
If the paint beads up or separates on a faux pumpkin, lightly buff the spot with fine-grit sandpaper to give the paint something to grip.
Step 2: Creating Bodies
-
Dip thumb:
Press your thumb into the black paint, ensuring the pad is evenly coated. -
Test print:
Stamp your thumb onto a scrap piece of paper first to check the opacity and shape, adjusting paint amount if needed. -
First impression:
Press your thumb firmly onto the pumpkin surface to create the first oval spider body. -
Clean lift:
Lift your thumb straight off the surface without sliding to keep the edges crisp. -
Create pattern:
Continue stamping thumbprints around the pumpkin, spacing them about two inches apart in a rough grid pattern. -
Re-ink often:
Re-dip your thumb into the paint every two or three stamps to maintain bold, solid color. -
Follow the form:
I find it helpful to align the vertical columns of spiders with the natural ribs or grooves of the pumpkin. -
Fix mistakes:
If a print smudges, quickly wipe it away with a damp paper towel before it sets and try again. -
Dry bodies:
Allow the thumbprints to dry completely for at least 30 minutes so you don’t smear them during the next phase.
Step 3: Adding Details
-
Start legs:
Using a black paint pen or a fine liner brush, draw four legs extending from the left side of a dry thumbprint. -
Shape legs:
Curve the legs slightly upward and then down to mimic a crawling spider stance. -
Finish legs:
Repeat the process on the right side with four corresponding legs to complete the arachnid. -
Repeat pattern:
Work your way around the pumpkin, adding legs to every thumbprint body. -
Watch your hand:
Be mindful of where you rest your hand so you don’t smudge the wet ink of the legs you just drew. -
Seal it:
Once all ink is fully dry, lightly mist the pumpkin with a clear matte sealer if you plan to keep it outside.
Family Variety
Mix up the sizes by using your pinky finger to create baby spiders and your thumb for the larger mama spiders for a dynamic pattern.
You’ll love seeing how a simple fingerprint can turn into such a charmingly creepy decoration for your porch or table.
Candy Corn Color Blocking
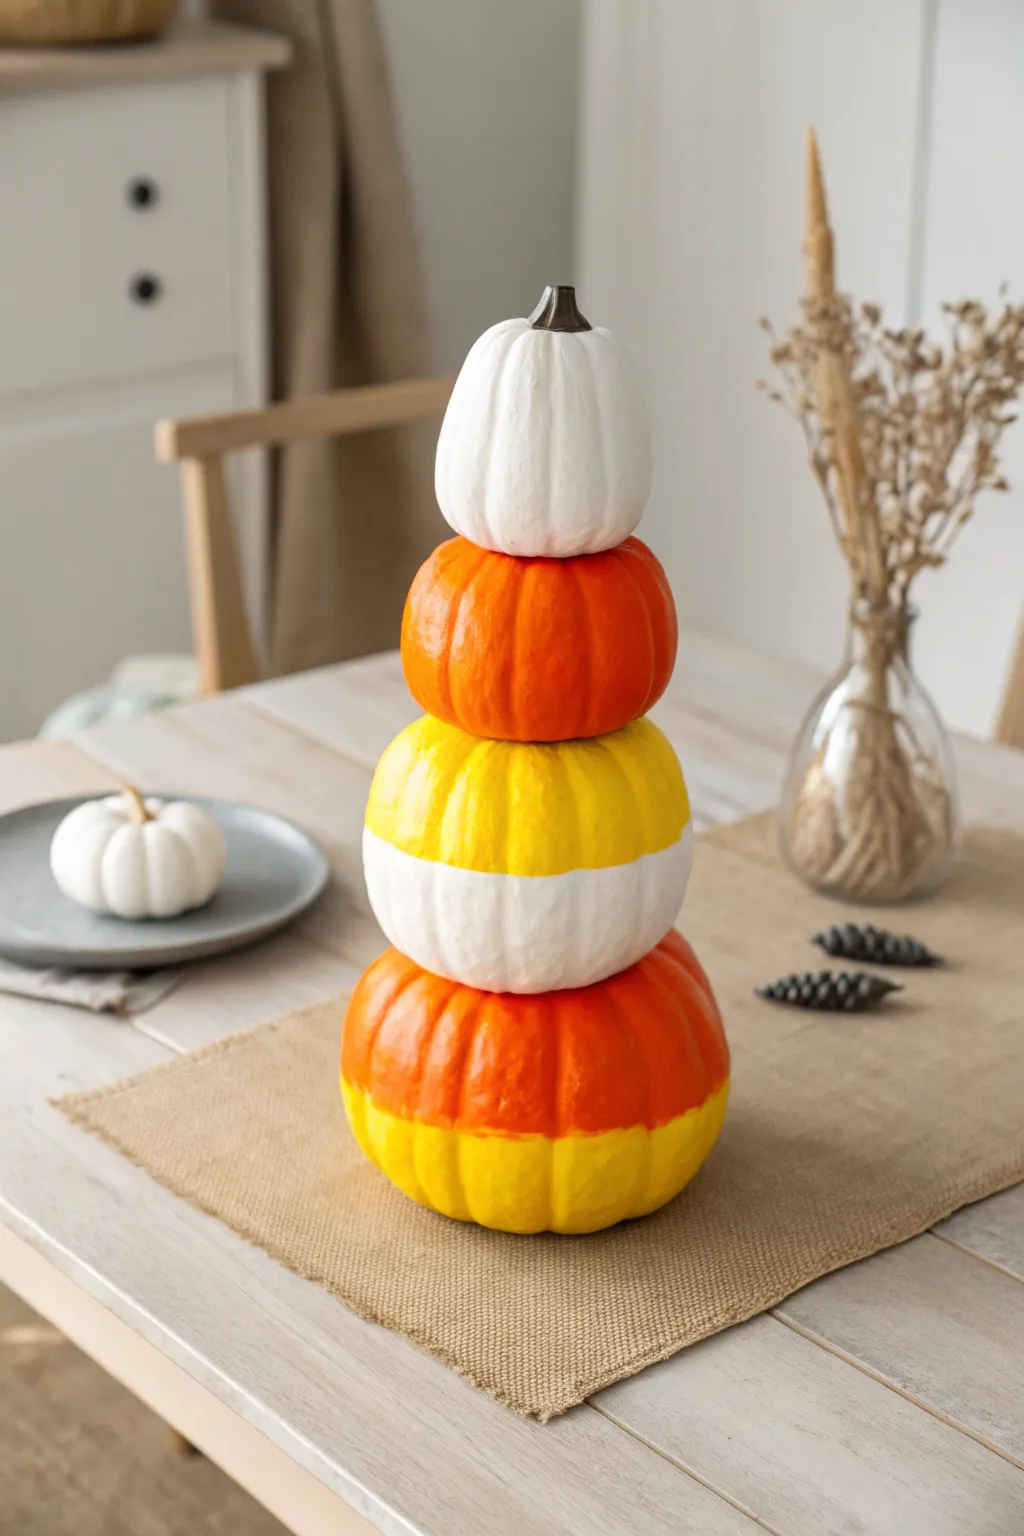
This cheerful centerpiece deconstructs the classic candy corn palette into a modern, color-blocked topiary. By painting four stacked pumpkins in specific segments of white, orange, and yellow, you create a cohesive visual gradient that feels both festive and chic.
How-To Guide
Materials
- 4 Faux pumpkins (graduated sizes)
- Acrylic craft paint (White, Bright Orange, Sunshine Yellow)
- Dark Brown or Black acrylic paint (for stem)
- Painter’s tape or masking tape
- Medium flat paintbrush
- Small detail brush
- Hot glue gun and glue sticks
- Paper plate or palette
Step 1: Preparation and Priming
-
Prepare the stack:
Before painting, test your stack stability. Remove the stems from the bottom three pumpkins by pulling them out or cutting them flush so they can sit steadily on top of one another. -
Surface cleaning:
Wipe down all four pumpkins with a damp cloth to remove any dust or manufacturing residue, ensuring the paint adheres properly. -
Prime with white:
Apply a base coat of white acrylic paint to all four pumpkins. This acts as a primer and ensures your yellow and orange colors will look bright and opaque later.
Step 2: Painting the Solids
-
The top tier:
Take the smallest pumpkin (the topper) and paint it purely white. Even if primed, a fresh coat of quality white paint gives it a finished look. -
Refine the stem:
Use a small detail brush to paint the stem of this top pumpkin a realistic dark brown or black, keeping the edge against the white pumpkin clean. -
The second tier:
Paint the second-smallest pumpkin entirely with bright orange paint. I find that orange pigment is often translucent, so plan on doing two coats here for solid coverage.
Crisp Line Pro Tip
Since pumpkins have ribs, paint can bleed under tape. Use your fingernail to burnish the tape deep into the grooves before painting your top color.
Step 3: Creating the Color Blocks
-
Base coat the third tier:
For the medium-large pumpkin, ensure the entire surface is painted solid white first. Let this dry completely—it must be dry to the touch so the tape doesn’t peel it off. -
Mask the third tier:
Apply a strip of painter’s tape horizontally around the “equator” or middle of the pumpkin to create a split design. -
Paint the yellow block:
Paint the top half of this pumpkin (above the tape line) with yellow paint. Allow a slight overlap onto the tape to ensure a crisp edge. -
Base coat the bottom tier:
For the largest pumpkin at the base, paint the entire surface yellow. Allow this to dry completely before moving to the next step. -
Mask the bottom tier:
Place your painter’s tape horizontally around the middle of this large yellow pumpkin. -
Paint the orange block:
Paint the top half of the base pumpkin (above the tape) with your orange paint. -
Reveal the lines:
Carefully peel away the painter’s tape from both split-color pumpkins while the paint is still slightly tacky to prevent chipping. Let all pieces cure fully.
Level Up
Once the paint is dry, spray the entire stack with a high-loss clear coat. This gives the pumpkins a ceramic look and makes the colors look like real candy.
Step 4: Assembly
-
Secure the base:
Apply a generous ring of hot glue around the center of the largest pumpkin’s top. -
Stack the layers:
Press the third pumpkin (yellow/white) onto the base. Repeat the gluing process with the orange pumpkin, and finally the white topper. -
Final hold:
Apply gentle downward pressure on the whole stack for about 30 seconds to ensure the glue sets the structure straight.
Display your candy corn tower on a burlap runner to complete that perfect harvest aesthetic

PENCIL GUIDE
Understanding Pencil Grades from H to B
From first sketch to finished drawing — learn pencil grades, line control, and shading techniques.
Explore the Full Guide
Pastel “Girl Gang” Ghosts
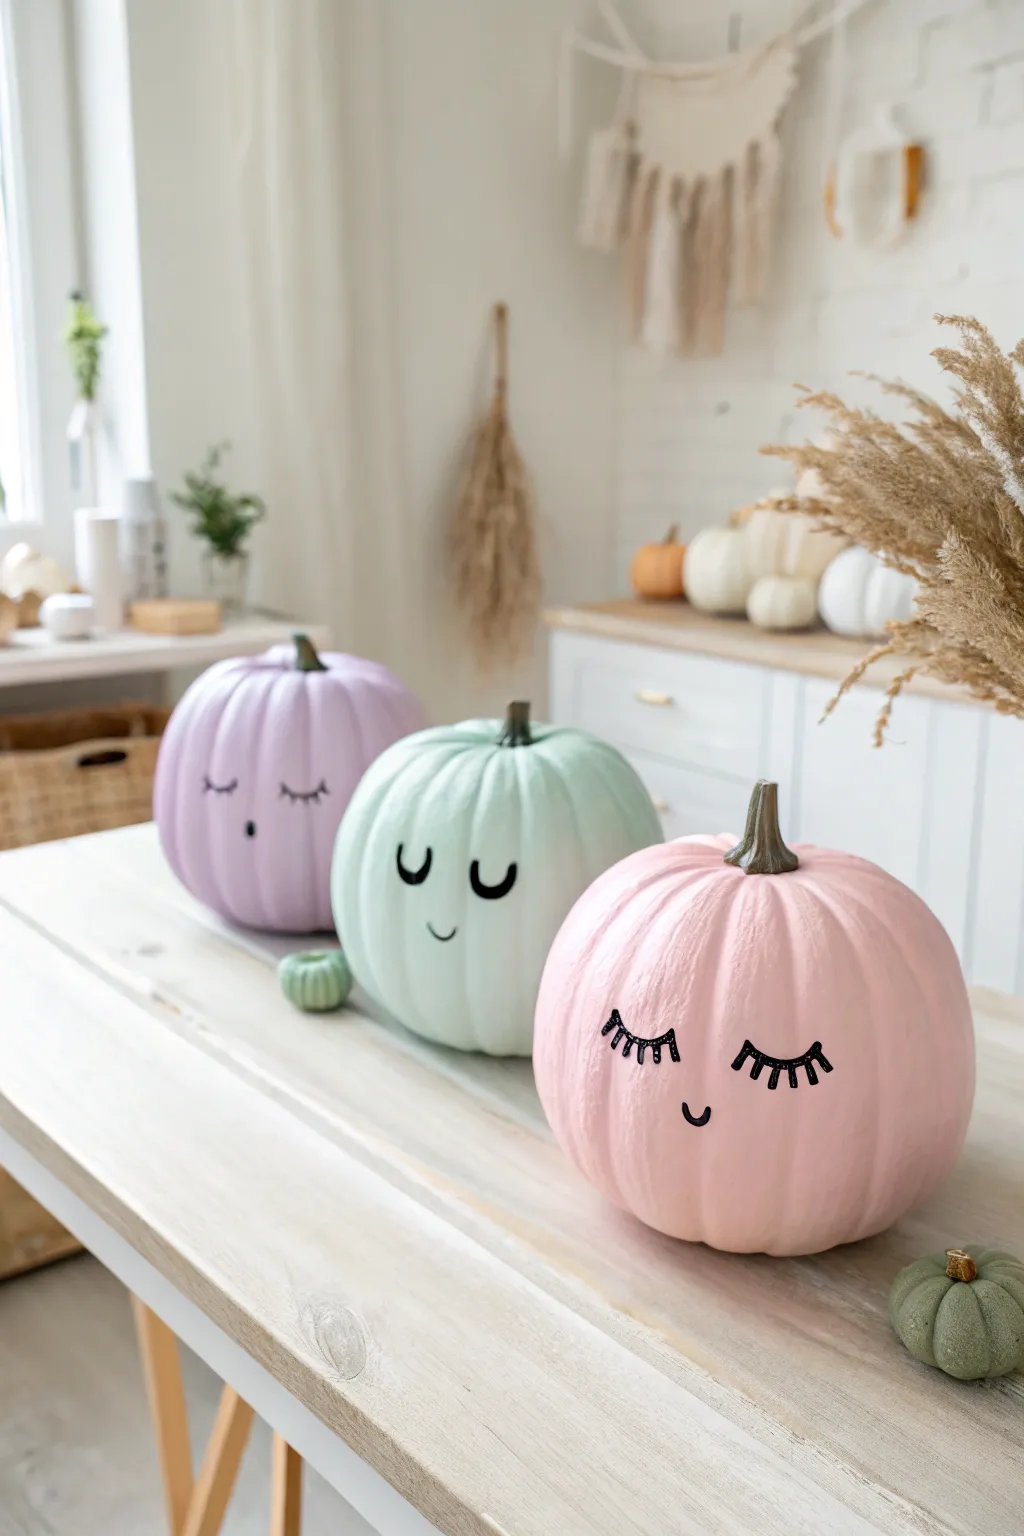
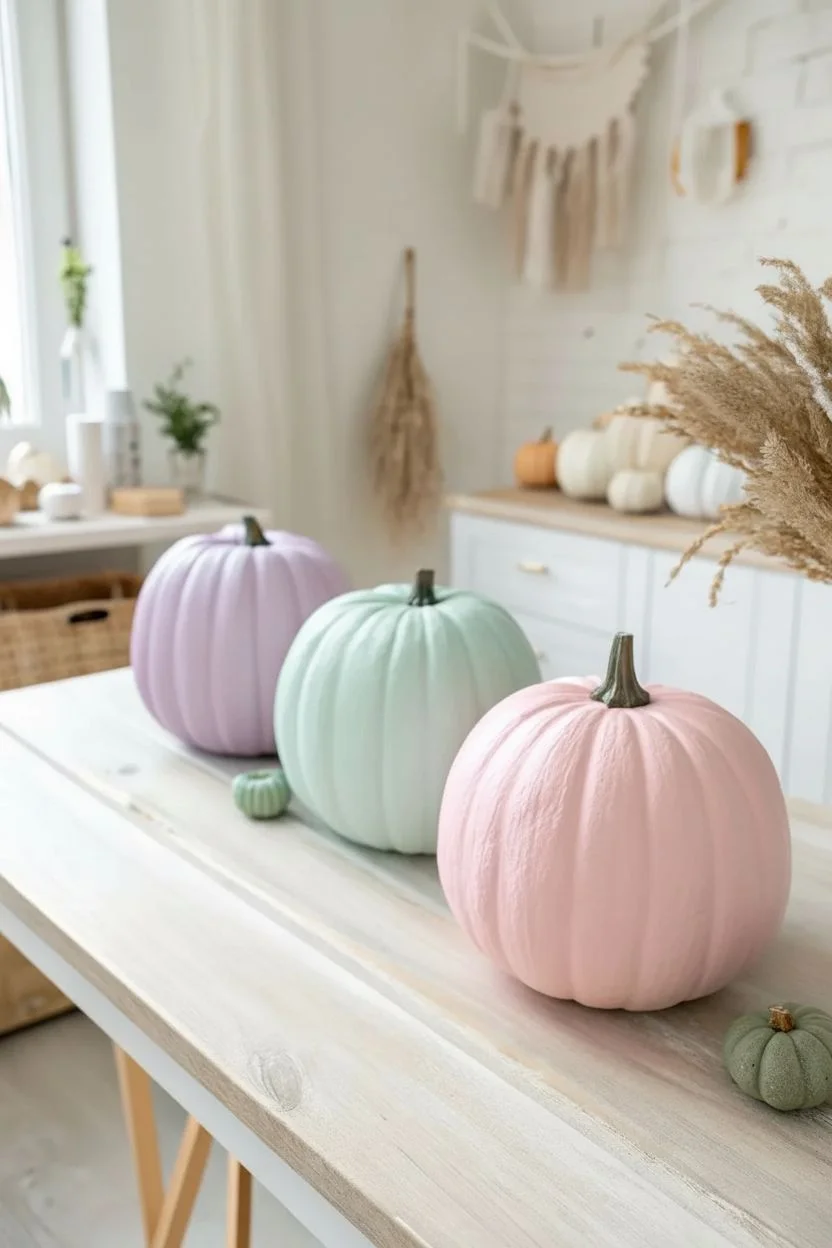
Swap out the traditional spooky orange for this adorable ‘girl gang’ consisting of soft pastels and sweet, sleepy expressions. This project uses a matte finish to give ordinary pumpkins a modern, dreamy aesthetic perfect for a chic Halloween display.
How-To Guide
Materials
- 3 medium pumpkins (real or faux)
- White acrylic primer or Gesso
- Matte acrylic paints: Lilac, Mint Green, Baby Pink
- Dark Brown or Bronze acrylic paint (for stems)
- Black paint pen (medium tip) or fine liner brush
- Wide flat synthetic brush
- Pencil and eraser
- Matte spray sealer (optional)
Step 1: Base Coat Application
-
Surface Prep:
Wipe down your pumpkins with a damp cloth to remove any dust or oils. If using real pumpkins, make sure they are completely dry before painting. -
Prime the Surface:
Apply a coat of white primer or Gesso to the entire surface of each pumpkin. This is crucial because pastel colors are naturally translucent and need a bright white base to pop. -
Lilac Base:
Paint the first pumpkin with your pastel lilac acrylic. Use long, vertical strokes following the natural ribs of the pumpkin. -
Mint Base:
Cover the second pumpkin in the mint green shade. I find a wide flat brush works best here to get into the crevices without pooling paint. -
Pink Base:
Apply the baby pink paint to the third pumpkin. Don’t worry if the coverage isn’t perfect on the first pass; pastels often need layering. -
Drying Time:
Allow the first coats to dry completely to the touch, which usually takes about 20-30 minutes depending on humidity. -
Second Coat:
Apply a second coat of colored paint to each pumpkin to ensure a solid, opaque finish with no streaks showing through. -
Painting Stems:
Once the bodies are dry, use a smaller brush to paint the stems in a dark brown or bronze shade to create a nice contrast against the pastels.
Streaky Paint Fix
If your pastel paint looks streaky after brushing, try applying the final coat with a cosmetic sponge using a dabbing motion for a flawless, airbrushed look.
Step 2: Designing the Faces
-
Sketch Layout:
Lightly sketch the facial features onto the dried paint using a pencil. Keep the designs centered on the ‘flattest’ side of the pumpkin. -
Mint Expressions:
For the mint pumpkin, draw two ‘U’ shapes for sleeping eyes and a small, simple smile curve underneath. -
Pink Lash Detail:
On the pink pumpkin, sketch downward curved lines for heavier eyelids, adding distinct vertical eyelashes spacing them evenly. -
Lilac Personality:
For the purple one, sketch downward curved eyes with smaller lashes and a small ‘o’ shape for a surprised or whistling mouth. -
Inking the Mint Face:
Using your black paint pen or a fine liner brush with black acrylic, trace over the ‘U’ shaped eyes on the mint pumpkin first. Keep the line weight consistent. -
Inking the Pink Face:
Carefully draw the lashed eyes on the pink pumpkin. Press slightly harder on the curve of the eyelid and lift up for whispy lash ends. -
Inking the Lilac Face:
Fill in the small ‘o’ mouth on the lilac pumpkin so it is solid black, then trace the delicate eye lines. -
Cleanup:
If you make any small smudges with the black ink, wait for it to dry completely and then touch it up with the original pastel base color. -
Final Seal:
To protect your work, lightly mist the pumpkins with a matte spray sealer. This keeps the finish velvety and prevents the paint from chipping.
Add Accessories
Give your girl gang more personality by hot-gluing small dried flowers near the stems or adding pink chalk dust to create rosy cheeks on the faces.
Group your new friends together on a table or entryway console for a display that is equal parts cozy and cute.
Expressive Yellow Emojis
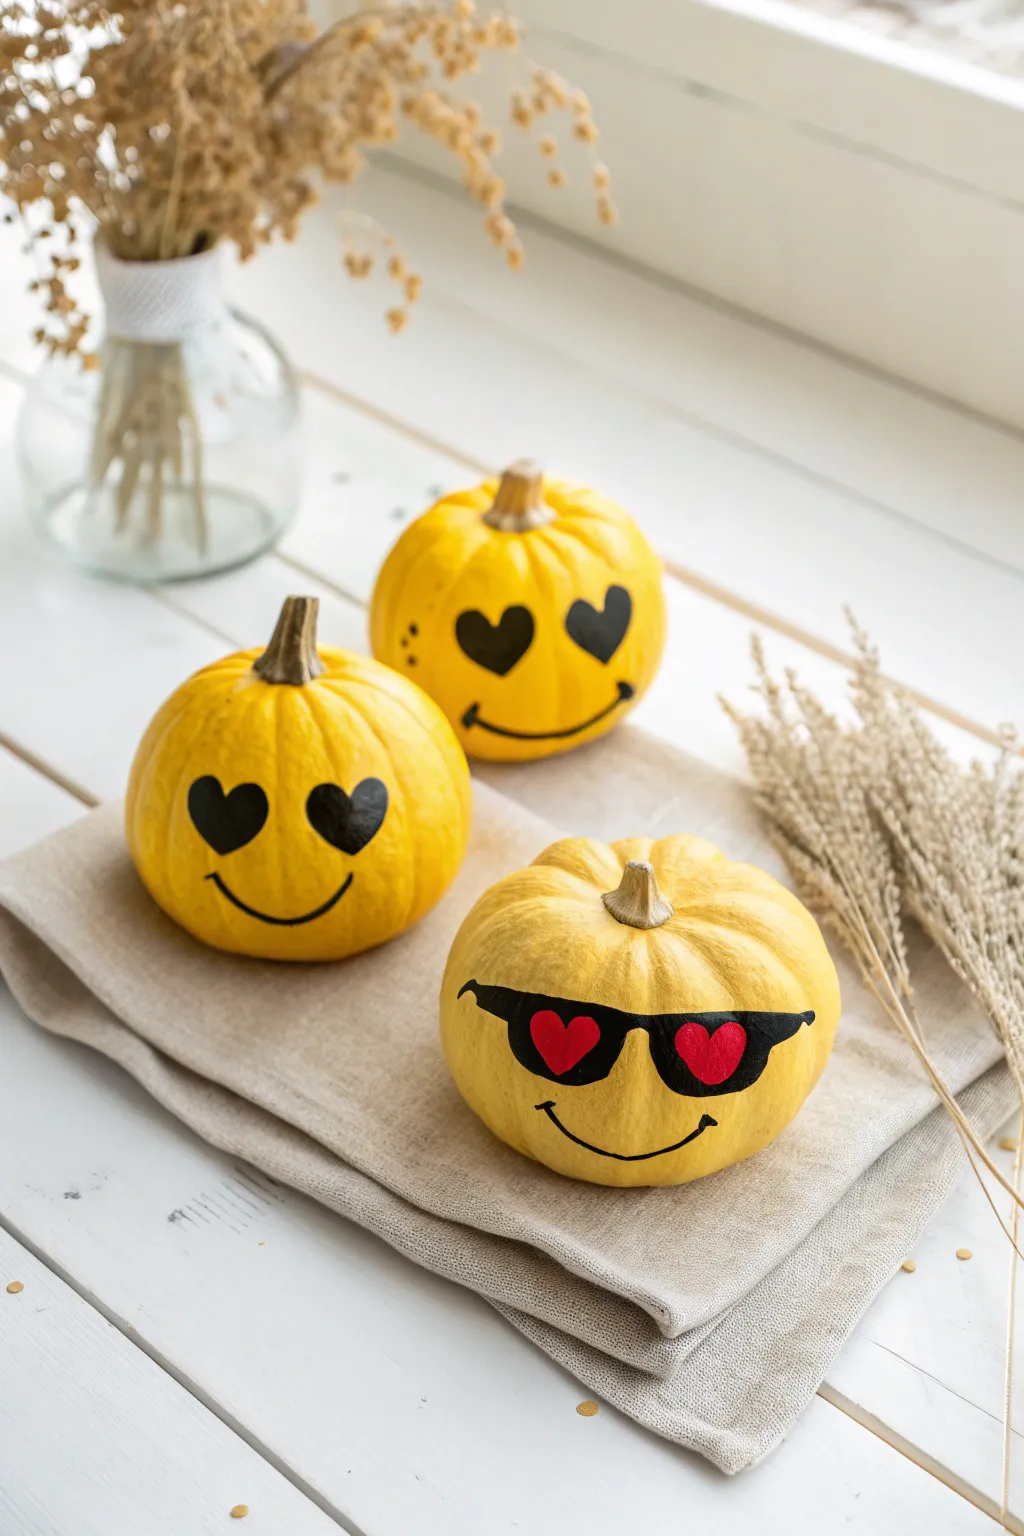
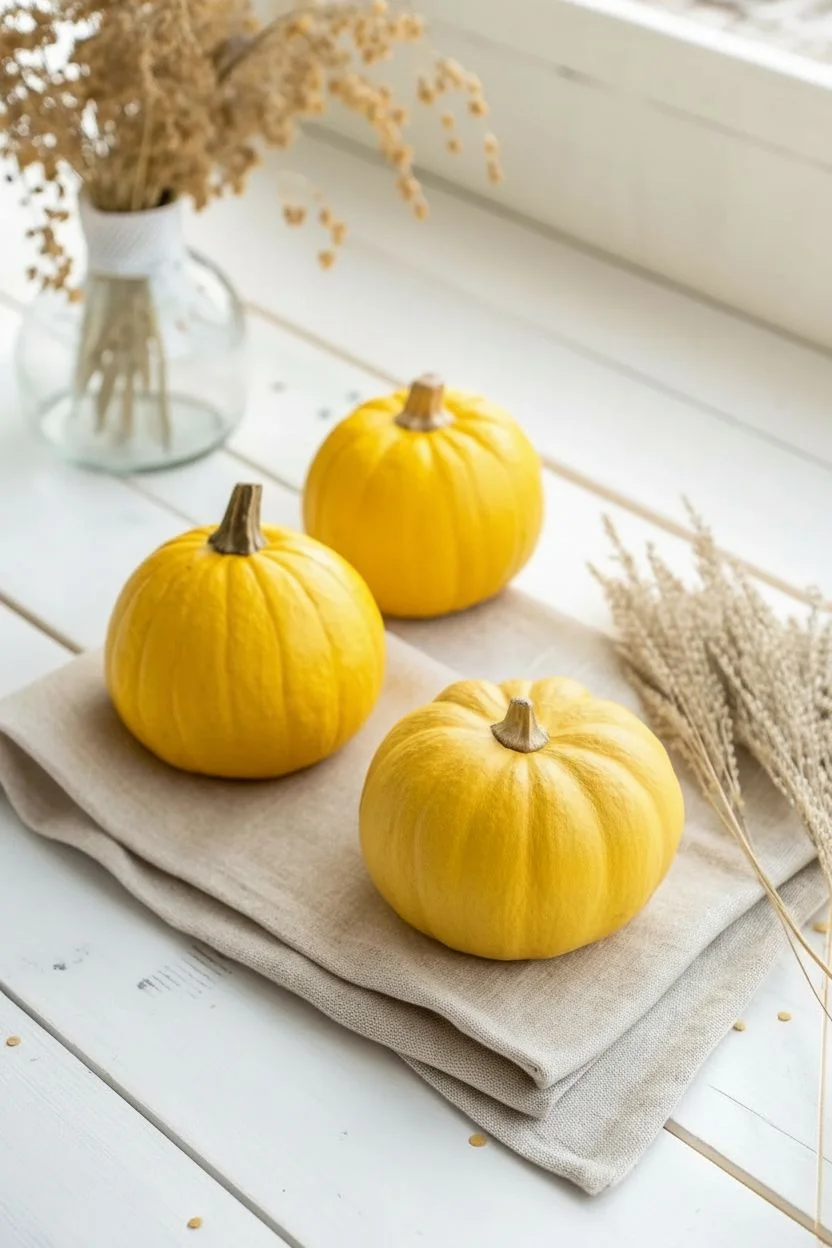
Bring your favorite text expressions to life with this bright and cheerful pumpkin set. Using vibrant yellow paint as a base, you will transform ordinary gourds into bold, graphic statements that add a playful modern twist to rustic autumn decor.
Step-by-Step Tutorial
Materials
- 3 mini pumpkins (sugar pie or munchkin variety)
- Bright yellow acrylic paint (heavy body recommended)
- Black acrylic paint or a black broad-tip paint pen
- Red acrylic paint
- Soft flat brush (1 inch)
- Fine liner brush (size 0 or 1)
- Pencil/eraser
- Palette or paper plate
- Water cup and paper towels
Step 1: Creating the Yellow Canvas
-
Clean the surface:
Wipe down your pumpkins with a damp cloth to remove any dirt or field dust, then dry them completely with a paper towel to ensure the paint adheres properly. -
Apply the first coat:
Using the soft flat brush, apply a thin, even layer of yellow acrylic paint over the entire surface of the pumpkin, carefully painting up to the base of the stem but leaving the stem natural. -
Allow to dry:
Let this first layer dry for about 20 to 30 minutes; yellow pigment is naturally translucent, so don’t worry if the orange skin shows through at this stage. -
Apply the second coat:
Apply a second, slightly thicker coat of yellow paint to build up opacity, brushing in vertical strokes from top to bottom to minimize texture marks. -
Check for coverage:
If I can still see the underlying pumpkin color, I usually add a third coat after the second one is fully dry to ensure that vivid, emoji-bright finish. -
Full cure:
Allow the pumpkins to dry completely for at least an hour before attempting to draw on them, as wet paint will snag your pencil or brush.
Stubborn Streaks?
Yellow paint can be notoriously sheer. If you are struggling to cover an orange pumpkin, mix a dime-sized drop of white paint into your first coat of yellow to create an opaque primer layer.
Step 2: Sketching the Expressions
-
Plan your faces:
Decide on your expressions; as seen in the project image, you will want one with heart eyes and one wearing sunglasses. -
Draft the features:
Lightly sketch the features onto the yellow paint using a pencil, drawing the heart shapes for eyes and the curve of the smiles. -
Refine the sunglasses:
For the cool emoji, map out the shape of the ‘wayfarer’ style sunglasses, drawing two large D-shapes connected by a bridge, and sketch small hearts in the center of each lens.
Step 3: Painting the Details
-
Paint the red details first:
On the sunglasses pumpkin, use your fine liner brush to paint the small hearts inside the lens area bright red; do this before the black to keep the red vibrant. -
Outline the black eyes:
For the heart-eyed pumpkin, use the fine brush or a black paint pen to carefully embrace the outline of your heart sketches. -
Fill in the hearts:
Fill the heart outlines with solid black paint, working slowly to keep the edges crisp and rounded. -
Paint the sunglasses frames:
Switch back to the sunglasses pumpkin and paint the black frames, carefully working around the red hearts you painted earlier so you don’t smudge them. -
Fill the lenses:
Fill in the rest of the lens area with black, leaving the red hearts popping out against the dark background. -
Add the temple arms:
Extend a thin black line from the outer corner of the sunglasses toward the side of the pumpkin to represent the arms of the glasses. -
Paint the smiles:
Using the very tip of your fine brush or the paint pen, trace the curved line of the mouth on all your pumpkins. -
Add the dimples:
Add a tiny perpendicular hash mark at the ends of the smile lines to give the emojis their characteristic grin. -
Clean up:
Once the black paint is fully dry, gently erase any visible pencil marks that weren’t covered by paint. -
Final touches:
Inspect your edges; if the yellow background needs a touch-up near the eyes, dab a little yellow paint over any mistakes to create a clean line.
Level Up: Glossy Finish
To mimic the shiny look of a digital screen or plastic icon, apply a coat of clear high-gloss varnish spray over the pumpkins once they are completely dried and cured.
Arrange your trio on a linen cloth or rustic table to enjoy your handcrafted autumnal expressions


Chic Leopard Print Patterns
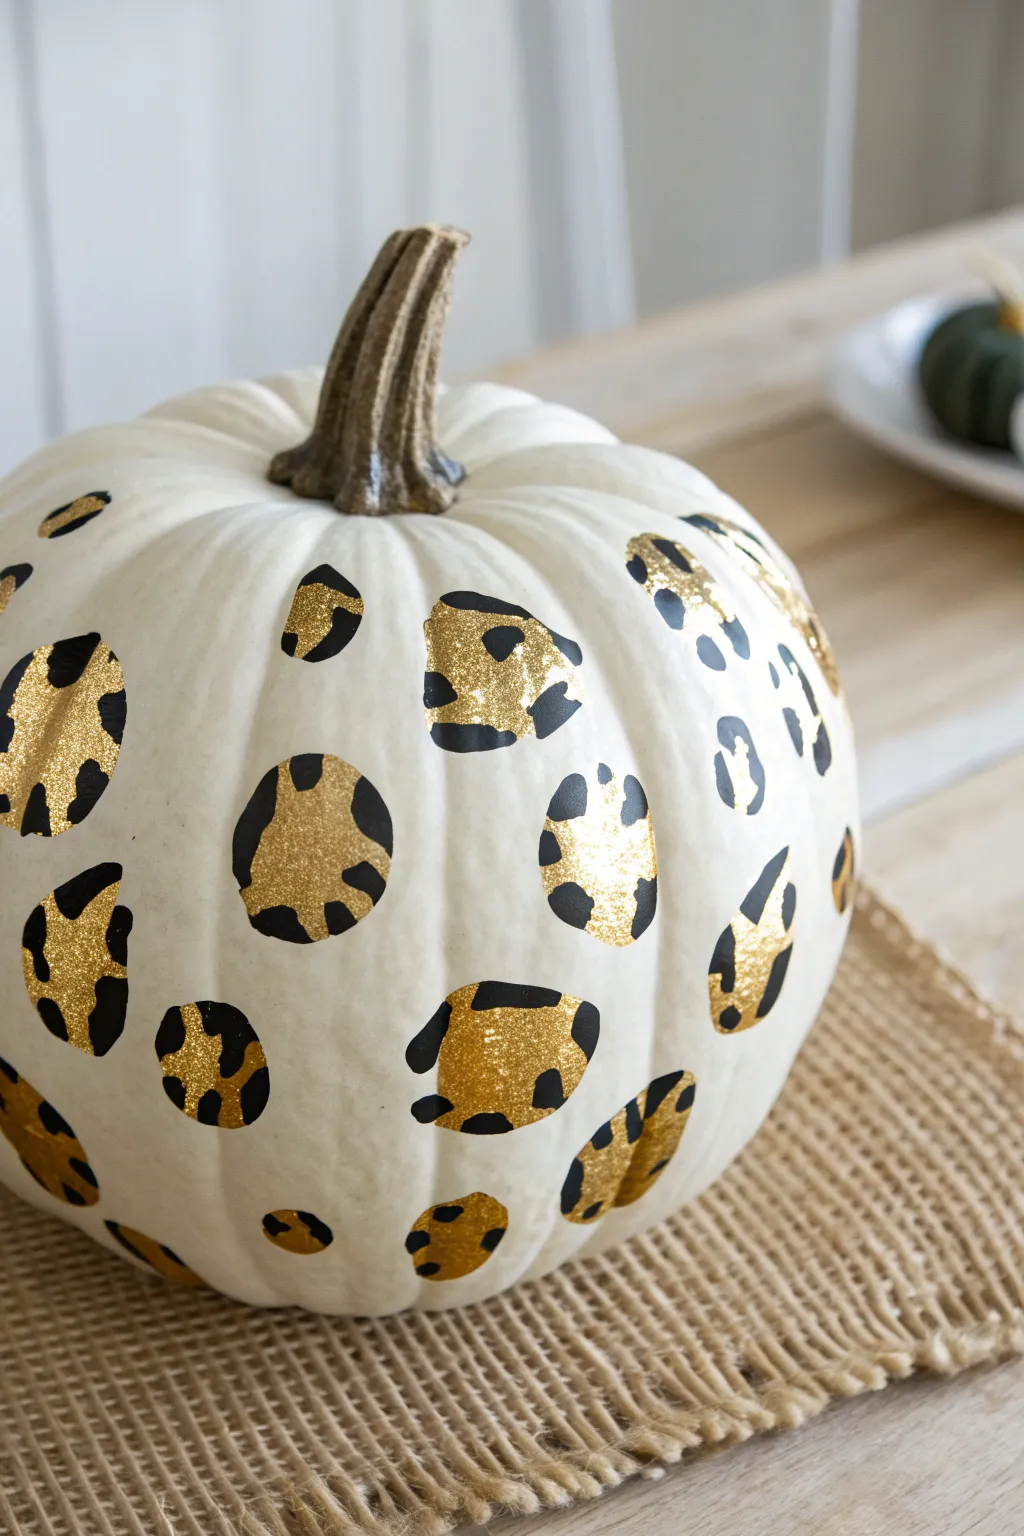
Transform a plain white pumpkin into a glamorous fall centerpiece with this chic animal print design. The combination of textured gold glitter and bold black brushstrokes creates a sophisticated look that pairs beautifully with neutral decor.
Detailed Instructions
Materials
- White pumpkin (faux or fresh)
- Metallic gold acrylic paint
- Fine gold glitter
- Black acrylic paint
- Small round paintbrush
- Fine liner paintbrush
- Paper plate or palette
- Soft dry brush (for cleanup)
- Newspaper or drop cloth
Step 1: Base Preparation
-
Clean surface:
Wipe down your pumpkin with a damp cloth to remove any dust or oils, ensuring the paint adheres properly to the skin. -
Dry completely:
Allow the surface to air dry fully before beginning any painting to prevent moisture from bubbling the paint.
Glitter Control
If glitter stubbornly sticks to the white unpainted areas, use a piece of masking tape to gently lift the stray sparkles without damaging the paint job.
Step 2: Gilded Centers
-
Prepare gold paint:
Squeeze a generous amount of metallic gold acrylic paint onto your paper plate palette. -
Paint organic shapes:
Using the small round brush, paint irregular, oval-like blobs scattered across the pumpkin surface. -
Apply glitter:
I like to work in small sections here; immediately sprinkle fine gold glitter over the wet gold paint before moving to the next area. -
Manage excess:
Gently tilt the pumpkin to let loose glitter fall onto a catch paper or tray to reuse later. -
Vary spot placement:
Continue painting gold blobs around the pumpkin, keeping them randomly spaced and varying the sizes between large and small. -
Dry interval:
Let the gilded spots sit undisturbed for about 20 minutes until the paint is set. -
Cleanup sparkle:
Take a clean, dry soft brush and gently sweep away any stray glitter specks clinging to the white background.
Step 3: Leopard Detailing
-
Load black paint:
Switch to your fine liner brush and dip it into the black acrylic paint. -
Paint brackets:
Create the leopard look by painting bold, curved lines around the edges of the gold spots. -
Leave gaps:
Avoid circling the gold completely; paint two or three disconnected segments around each spot rather than a full ring. -
Vary line width:
Press slightly harder in the middle of the stroke and lift at the ends to create tapered, natural-looking outlines. -
Fill empty spaces:
Identify any large white gaps between your main leopard spots. -
Add irregular dots:
Fill these voids with small, solid black markings or tiny ‘C’ shapes to balance the pattern density. -
Check consistency:
Rotate the pumpkin to ensure the pattern wraps seamlessly from top to bottom without awkward bald spots. -
Final cure:
Allow the black paint to dry completely for at least an hour before displaying.
Style Swap
Try a reverse color scheme using a matte black pumpkin with silver glitter spots and white outlines for a dramatic, high-contrast evening look.
Place your sparkling masterpiece on a woven mat or burlap runner to add a touch of elegance to your autumn table
Hand-Lettered “Boo” Typography
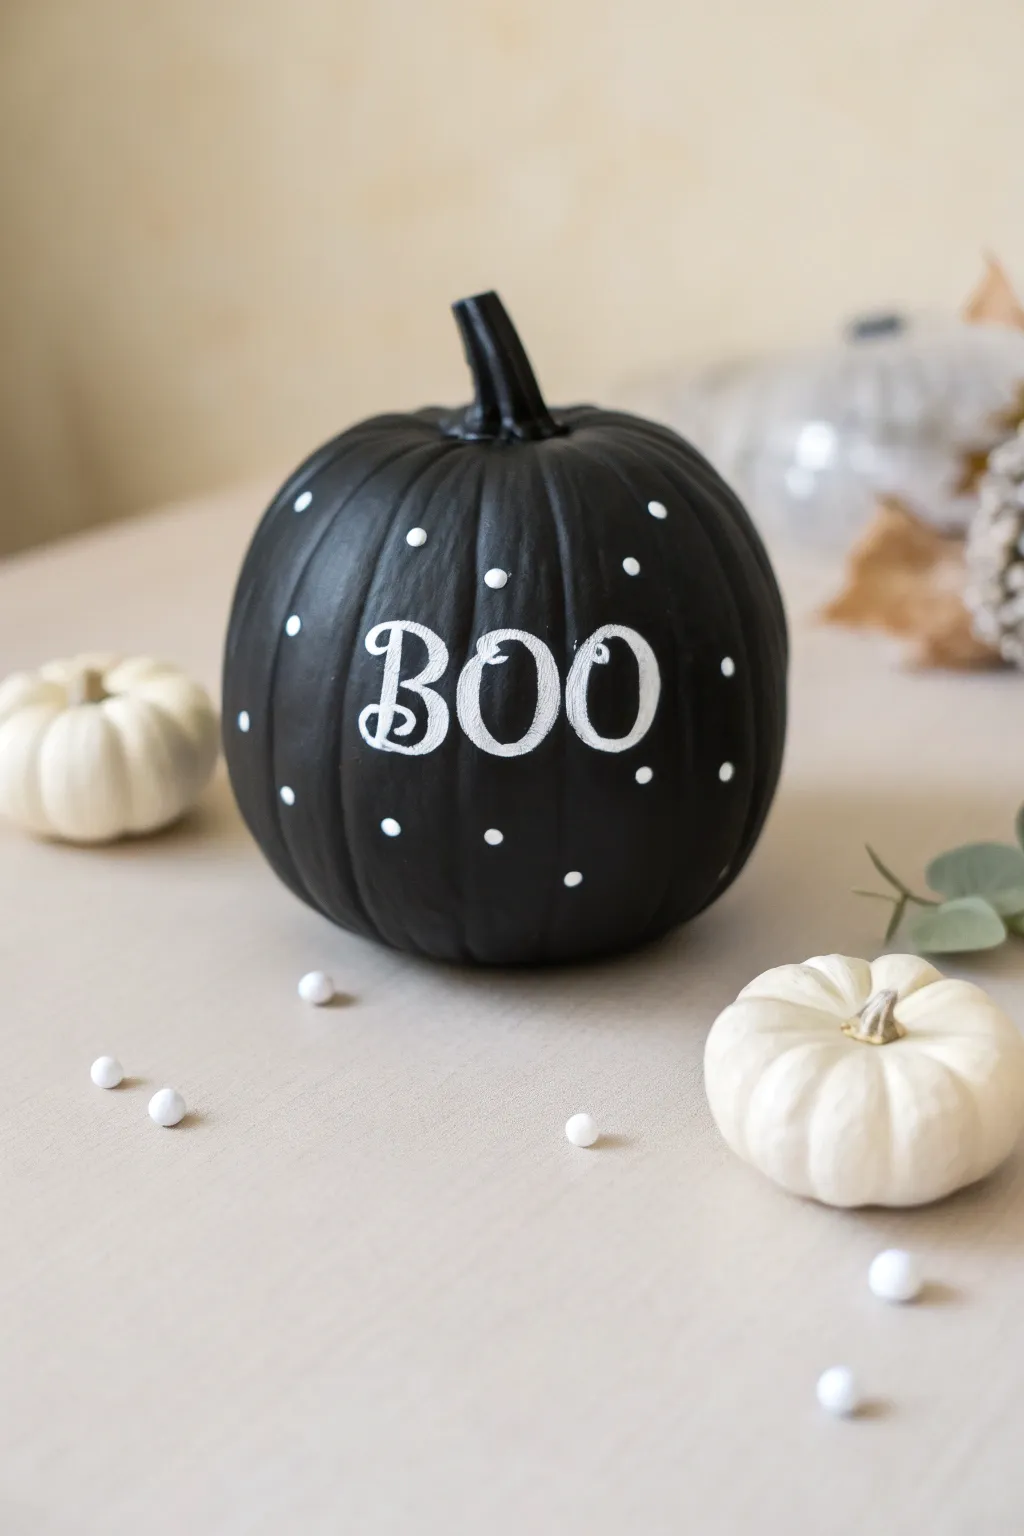
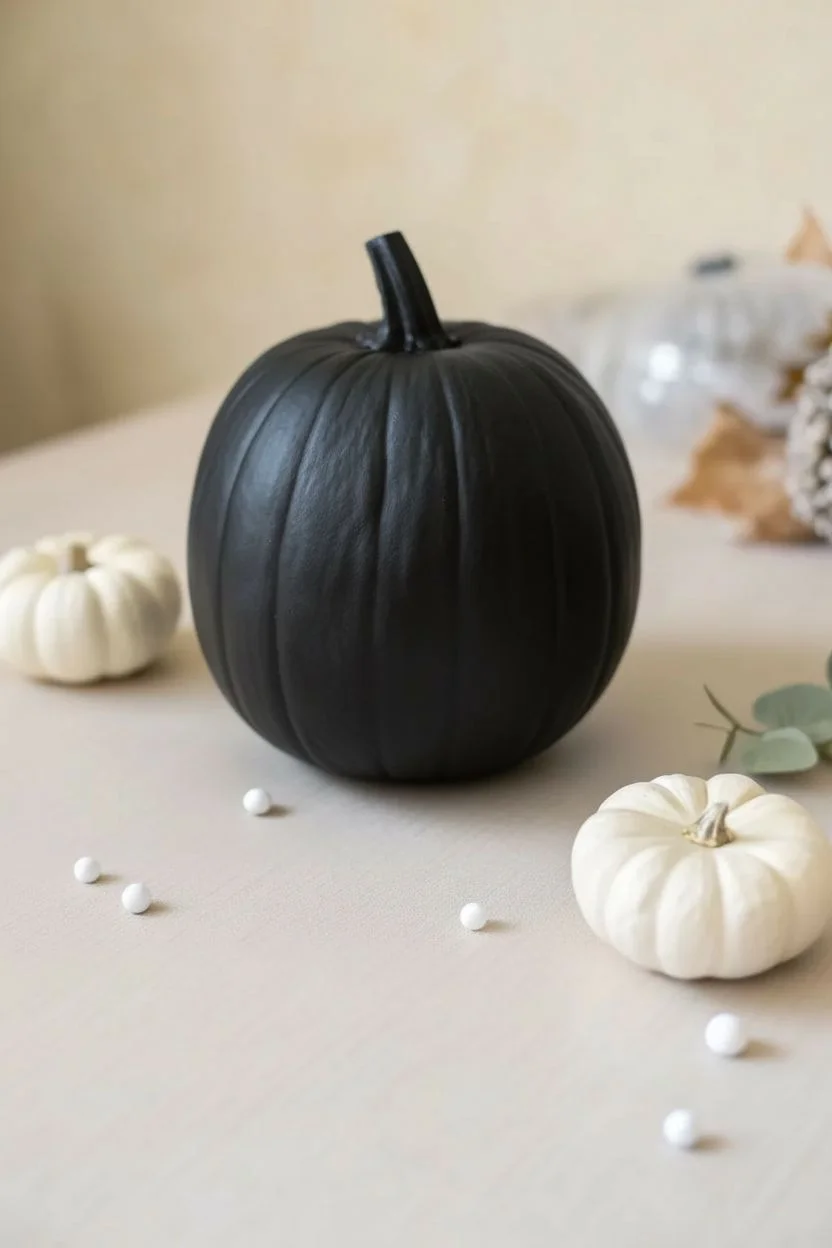
Transform a simple pumpkin into a modern Halloween masterpiece with this high-contrast black and white design. The clean typography and playful polka dots creating a sophisticated look that fits perfectly with any minimalist seasonal decor.
Step-by-Step
Materials
- Medium-sized pumpkin (real or faux)
- Black acrylic paint (satin or matte)
- Titanium white acrylic paint
- Wide flat paintbrush
- Fine liner detail brush
- White chalk or white charcoal pencil
- Palette or paper plate
- Paper towels
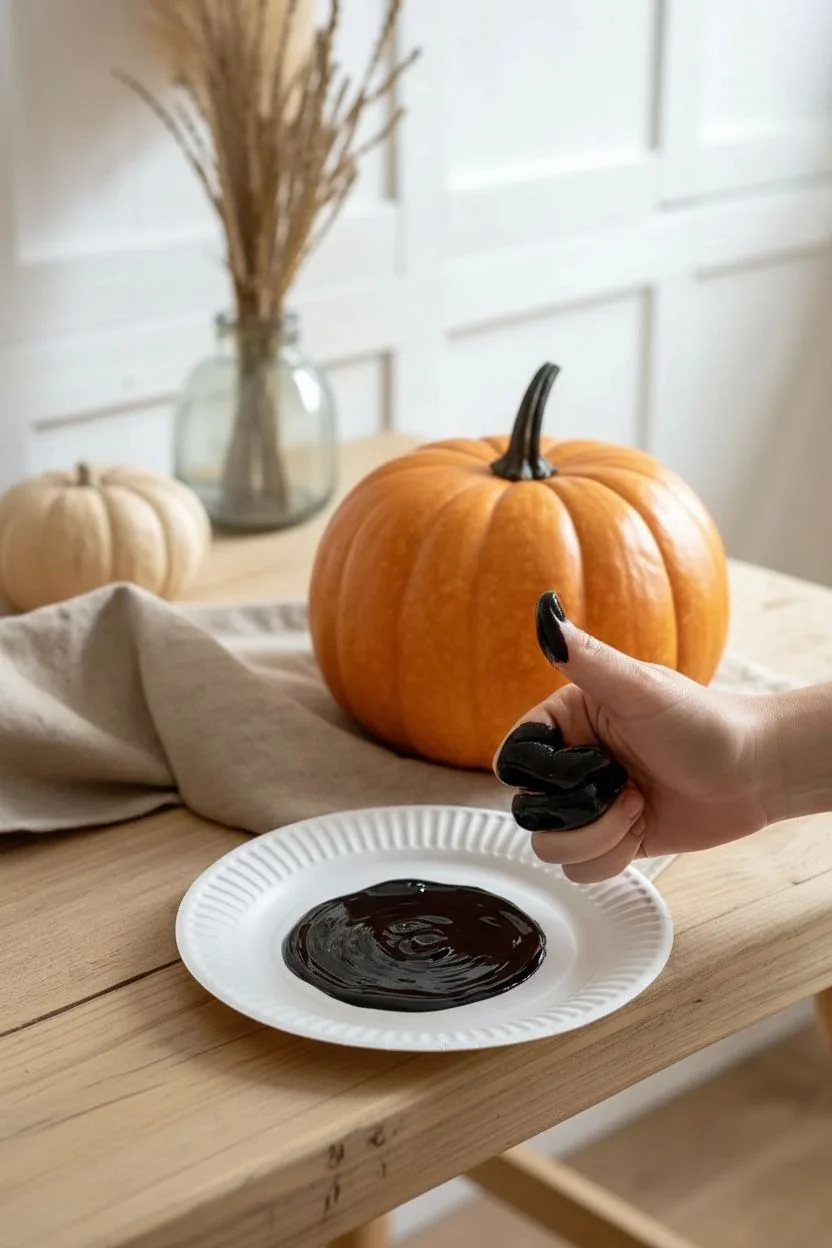
- Cup of water
Step 1: Setting the Stage
-
Prep the surface:
Wipe down your pumpkin with a damp cloth to remove any dust, dirt, or oils that might prevent the paint from sticking properly. -
First black coat:
Squeeze a generous amount of black acrylic paint onto your palette and use a wide flat brush to apply the first base layer over the entire pumpkin. -
Paint the stem:
Don’t forget to paint the stem jet black as well to match the monochromatic, dipped look shown in the example. -
Dry and assess:
Allow this first layer to dry completely; I personally use a hairdryer on a cool setting here to speed up the process if I’m impatient. -
Second black coat:
Apply a second coat of black paint to ensure a rich, opaque finish with absolutely no orange background showing through. -
Final drying:
Let the pumpkin sit undisturbed until it is completely dry to the touch, creating a stable, dark canvas for your lettering.
Step 2: Typography Time
-
Draft the text:
Lightly sketch the word “BOO” on the center front using a piece of white chalk, which is easy to wipe off later if you make a mistake. -
Check spacing:
Ensure the letters follow the curve of the pumpkin slightly and that the “B” is large enough to anchor the design. -
Load the liner brush:
Dip a fine liner brush into titanium white paint, possibly thinning it with a tiny drop of water to help the paint flow smoothly for crisp lines. -
Outline the B:
Carefully paint the outline of the “B,” adding the distinctive serif notch at the top left and the decorative curl at the bottom left. -
Fill the B:
Fill in the thick vertical strokes of the letter, keeping the lines sharp against the black background. -
Paint the O’s:
Paint the two “O”s next to the B, keeping them slightly narrower than perfect circles to mimic a serif font style. -
Add serifs:
Go back and gently add small horizontal lines (serifs) to the top and bottom of your strokes to give the font a classic bookish feel. -
Layer the white:
Since white over black can be translucent, let the first layer dry and paint a second coat over the letters to make them bright solid white.
Ghostly Letters?
If your white paint looks gray or streaky over the black base, resist the urge to pile on wet paint. Let it dry fully, then apply a fresh thin coat for true opacity.
Step 3: Dotted Details
-
Prepare the dotting tool:
Dip the handle end (the non-brush end) of a paintbrush into your white paint to use as a makeshift stamp for perfect circles. -
Apply dots:
Gently press the handle onto the pumpkin surface to create small white polka dots scattered around the text. -
Randomize pattern:
Space the dots randomly, placing some near the letters and others trailing off to the sides for a whimsical, floating effect. -
Clean up:
Once the paint is 100% dry, use a slightly damp Q-tip to gently wipe away any visible chalk guidelines left around the letters. -
Final touch:
Check for any uneven edges on your letters and tidy them up with a tiny bit of black paint if necessary.
Add a Little Sparkle
Before the white polka dots dry, lightly sprinkle ultra-fine clear or iridescent glitter onto them. They will catch the light and add a magical shimmer to your display.
Place your stylish creation on a mantle or tablescape to enjoy the spooky vibes all season long.
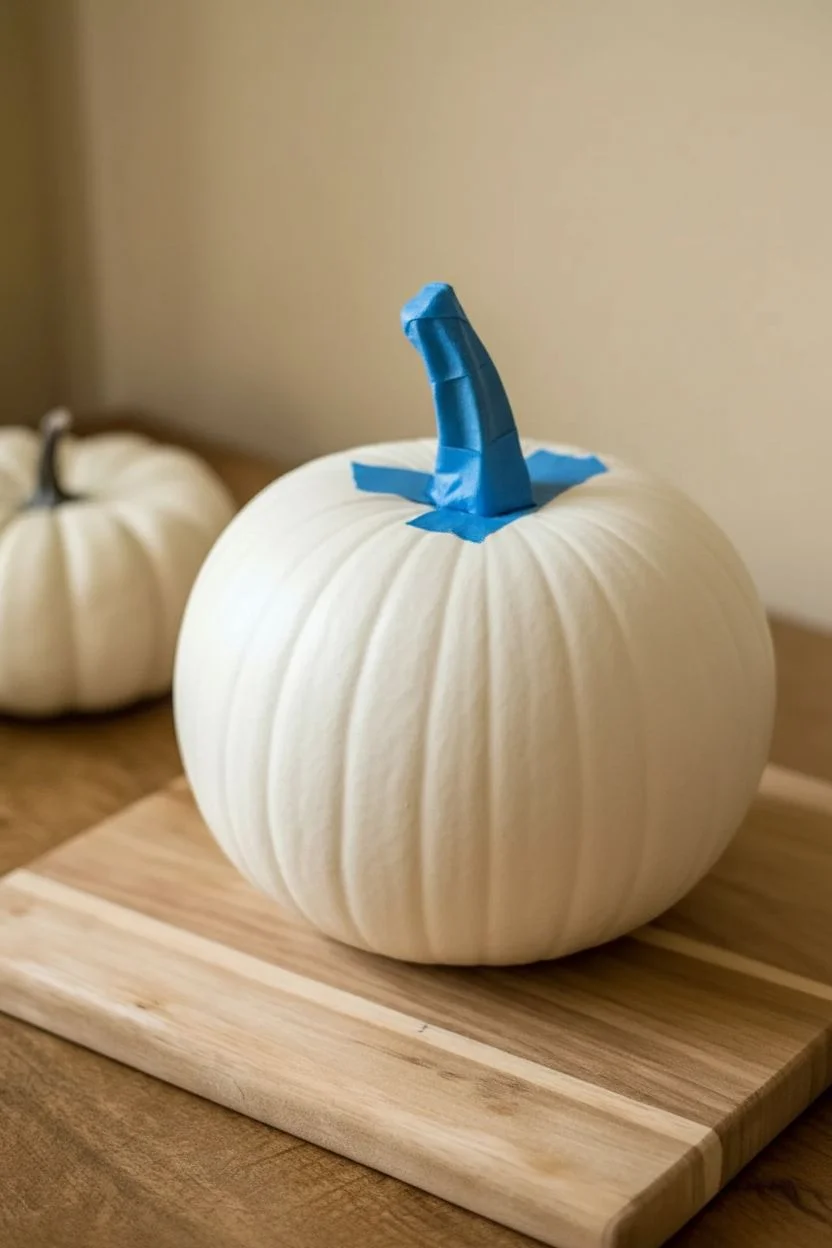
Abstract Splatter Paint Design
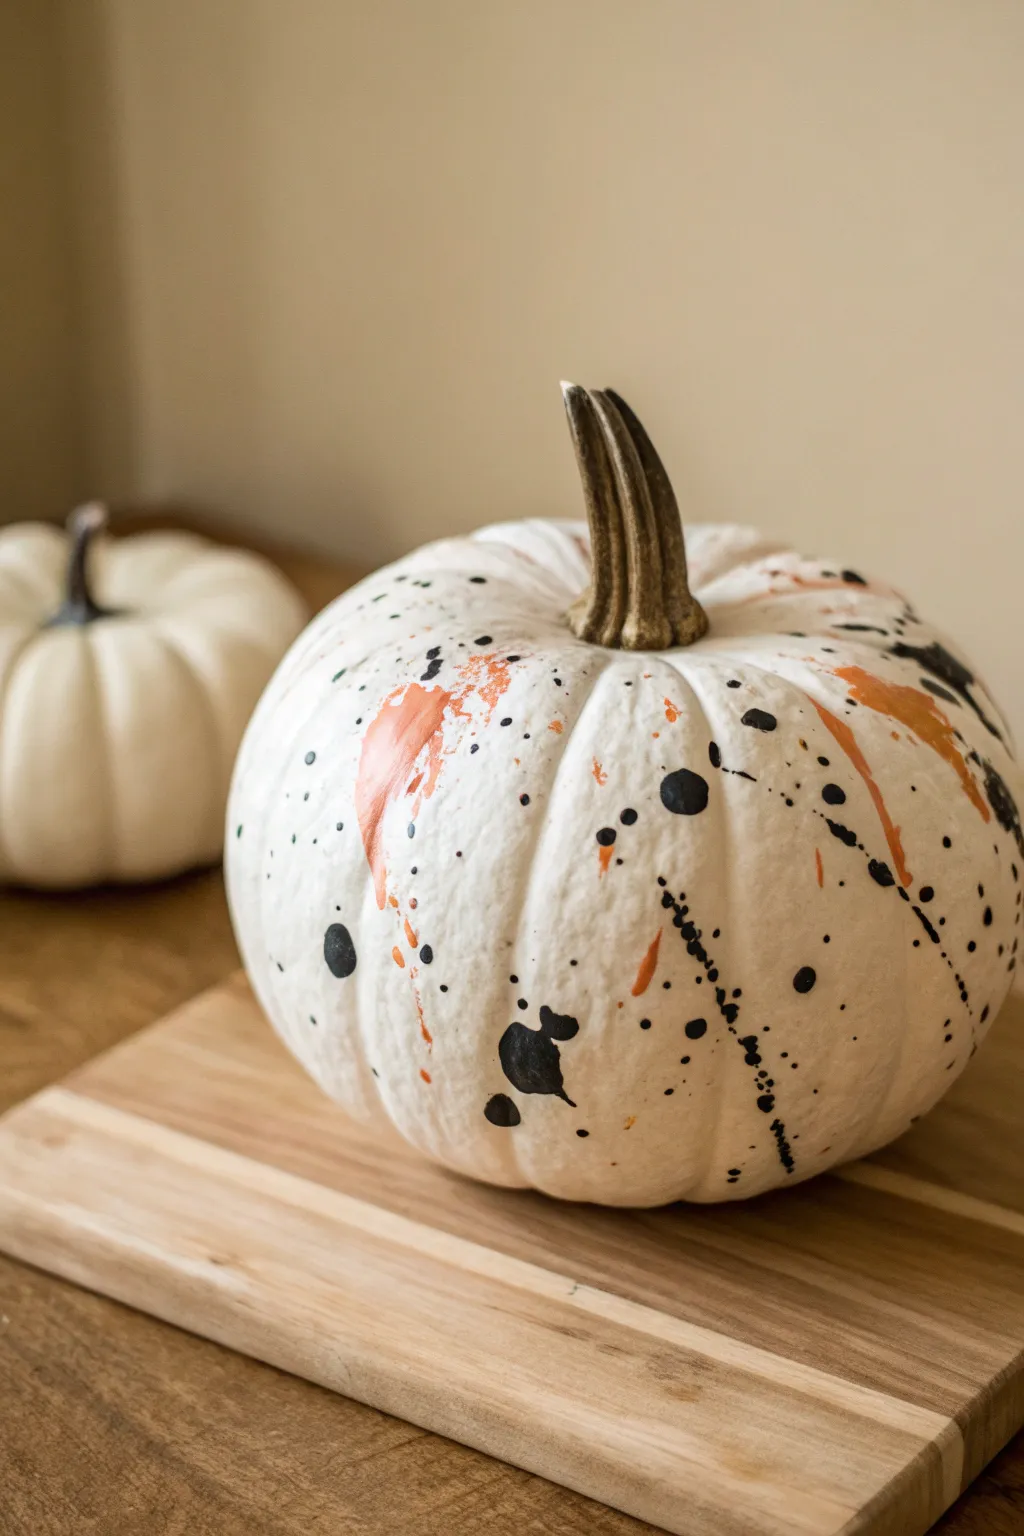
This modern, abstract design brings a sophisticated edge to traditional fall decor. By combining bold orange brushstrokes with chaotic black splatter on a pristine white base, you create a look that is both artistic and wonderfully messy.
Step-by-Step Guide
Materials
- White faux or real pumpkin
- Black acrylic paint
- Bright orange acrylic paint
- Flat paintbrush
- Small round paintbrush
- Old toothbrush
- Painter’s tape
- paper plate or palette
- Cup of water
- Newspaper or drop cloth
Step 1: Preparation
-
Clean the surface:
Wipe down your pumpkin with a damp cloth to remove any dust or oils, ensuring the paint adheres properly. -
Protect the stem:
Carefully wrap a piece of painter’s tape around the pumpkin stem to keep it natural and paint-free. -
Set the stage:
Spread out newspaper or a drop cloth over a large area. Splatter painting is incredibly fun but tends to travel further than you expect.
Practice Run
Before flicking paint at your final project, test your toothbrush splatter technique on a piece of cardboard to gauge the spray radius and paint consistency.
Step 2: Adding Color Accents
-
Prepare the orange:
Squeeze a coin-sized amount of bright orange acrylic paint onto your palette. Do not dilute this color; you want it opaque. -
Create the swipes:
Load a flat paintbrush with the orange paint and create two to three distinct, broad strokes down the side of the pumpkin. Follow the vertical curve of the ribs for a natural flow. -
Let it set:
I like to verify these base swipes are completely dry before moving on, so the colors don’t muddy together during the splatter phase.
Level Up
Add a touch of glamour by repeating the splatter steps with metallic gold paint once the black layer is dry, creating a multi-dimensional, high-end look.
Step 3: Creating the Abstract Splatter
-
Mix the black paint:
Put a dollop of black paint on your palette and mix in a few drops of water until it reaches the consistency of heavy cream or ink. -
Load the toothbrush:
Dip the bristles of an old toothbrush into the thinned black paint, ensuring it’s saturated but not dripping excessively. -
Flick the fine mist:
Hold the toothbrush about six inches from the pumpkin and run your thumb briskly across the bristles to spray a fine mist of black speckles over the white and orange areas. -
Add medium droplets:
Reload the toothbrush and flick it with a bit more force, or tap the handle against your other hand to shake loose slightly larger, organic spots. -
Paint larger distinct spots:
Switch to a small round paintbrush. Dip it in the black paint and gently press the tip against specific areas to create the boldest, largest black dots seen in the design. -
Create a linear trail:
To mimic the trailing effect shown in the image, use the round brush to dot paint in a loose vertical line, letting the dots get smaller as they go down. -
Connect with drips:
If you want a runny look, load your brush heavily with water-thinned paint and press it at the top of a rib, allowing distinct drips to run down naturally.
Step 4: Sealing and Finishing
-
Dry thoroughly:
Allow the pumpkin to sit undisturbed for at least an hour. Thick blobs of paint will take longer to cure than the fine mist. -
Reveal the stem:
Gently peel away the painter’s tape from the stem. -
Tidy up:
If any stray splatter landed on the stem despite the tape, use a damp paper towel or a craft knife to gently scrape it off. -
Seal the art:
Establish the longevity of your artwork by spraying a light coat of clear matte sealer over the entire pumpkin.
Place your masterpiece on a wooden board or entryway table to enjoy your modern art creation.
Faux Heirloom Porcelain Finish
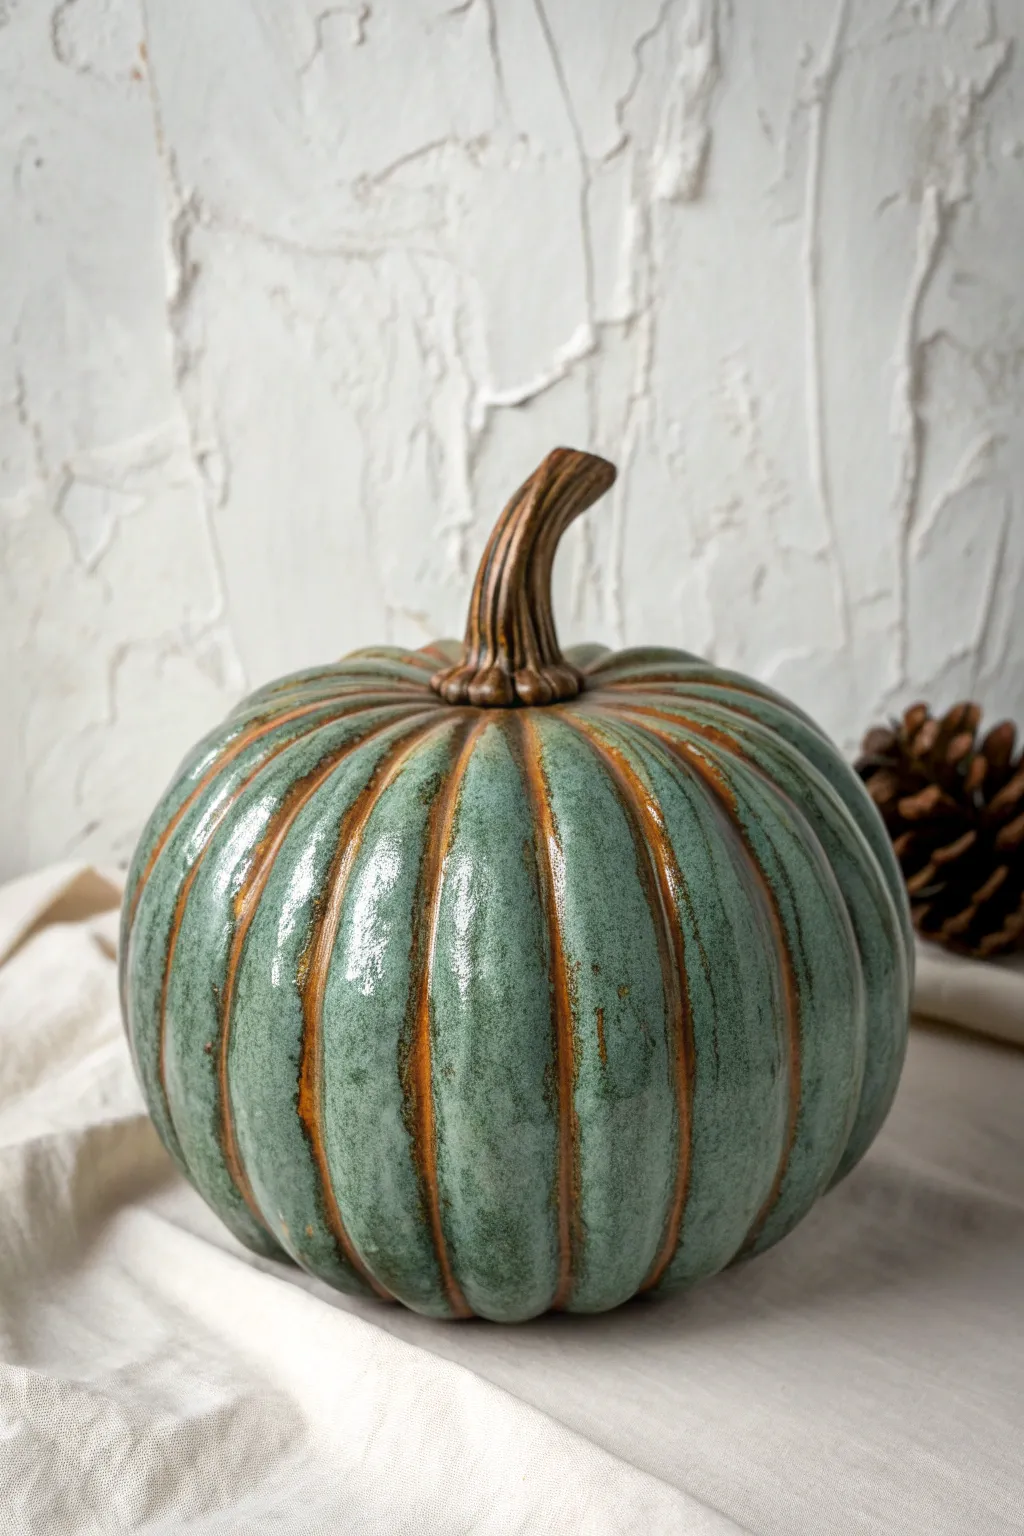

Transform a standard craft store pumpkin into a piece resembling high-end, kiln-fired pottery with this faux finishing technique. By layering earthy tones with a glossy celadon green, you’ll mimic the look of heavy glaze dripping over a clay body.
Step-by-Step Guide
Materials
- Faux pumpkin (smooth surface works best)
- Acrylic paint: Burnt Sienna or Terracotta
- Acrylic paint: Sage Green and Teal
- Acrylic paint: Deep Brown and Tan (for stem)
- Glazing medium or water
- High-gloss varnish (polyurethane or ‘Triple Thick’)
- Medium flat synthetic brush
- Small detail brush
- Natural sea sponge (optional)
Step 1: Preparation & Clay Base
-
Clean the surface:
Wipe down your artificial pumpkin with a damp cloth to remove any manufacturing dust or oils, ensuring the paint adheres properly. -
Remove or tape the stem:
If the stem is removable, pull it out to paint separately. If not, carefully wrap it in painter’s tape to protect it from the base colors. -
Mix the clay color:
Create a rich ‘fired clay’ tone by using Burnt Sienna straight from the tube, or mixing orange with a touch of brown for a rusted earth tone. -
Apply the base coat:
Paint the entire pumpkin with your clay color. Don’t worry about perfect smoothness here; a little texture adds to the ceramic feel. -
Fill the crevices:
Double-check that the paint has fully saturated the deep vertical grooves (ribs) of the pumpkin, as these areas will remain visible later. -
Dry completely:
Allow this base layer to dry fully. I usually give it about 30 minutes to an hour so the next colors don’t lift the underlayer.
Ceramic Secret
Mix a tiny drop of brown into your green ‘glaze’ paint just around the edges of the panels. This ‘dirty’ transition mimics how real glaze reacts with clay in a kiln.
Step 2: Applying the Faux Glaze
-
Create the glaze shade:
Mix Sage Green with a drop of Teal to get that classic celadon pottery look. Add a small amount of glazing medium or water to make the paint slightly translucent. -
Paint the panels:
Using a flat brush, paint the rounded ‘bulbs’ of the pumpkin with your green mixture, stopping just short of the deep grooves. -
Refine the edges:
Use a steady hand to create an organic, uneven line where the green meets the orange groove, mimicking how liquid glaze naturally settles before firing. -
Add surface dimension:
While the green is still wet, dip a damp sea sponge or crumpled paper towel into a slightly lighter green and dab the centers of the panels softly. -
Blend the highlights:
Lightly brush over the sponged area to soften the texture, giving the color a mottled, depth-filled appearance rather than a flat look. -
Detail the top and bottom:
Ensure the green paint tapers off near the stem and the base, allowing a bit more of that burnt sienna ‘clay’ to peek through, just like real pottery wear patterns.
Step 3: Finishing Touches
-
Paint the stem base:
Coat the stem in a deep chocolate brown. If you taped it earlier, remove the tape now and carefully touch up the seam. -
Highlight the wood grain:
Using a dry brush with a tiny amount of Tan or Ochre paint, lightly sweep over the raised ridges of the stem to reveal the wood texture. -
Cure the paint:
Let all paint layers dry completely, preferably overnight, to ensure no moisture is trapped under the varnish. -
Apply the first gloss coat:
Brush on a thick layer of high-gloss varnish over the pumpkin body (avoiding the stem if you want that matte). This is the magic step that turns ‘paint’ into ‘porcelain’. -
Check for drips:
Watch for varnish pooling at the bottom of the pumpkin and wipe away excess drips before they harden. -
Final coat for glass-like shine:
Once dry, apply a second heavy coat of gloss. The thicker the gloss, the more realistic the ceramic effect will be.
Level Up: Crackle Effect
Apply a clear crackle medium between your paint and the final varnish. This creates fine spiderweb fractures in the finish, making the pumpkin look like an antique heirloom.
Set your stunning faux-ceramic creation on a mantle or table and enjoy the sophisticated charm it brings to your autumn decor.
Gilded Metallic Accents
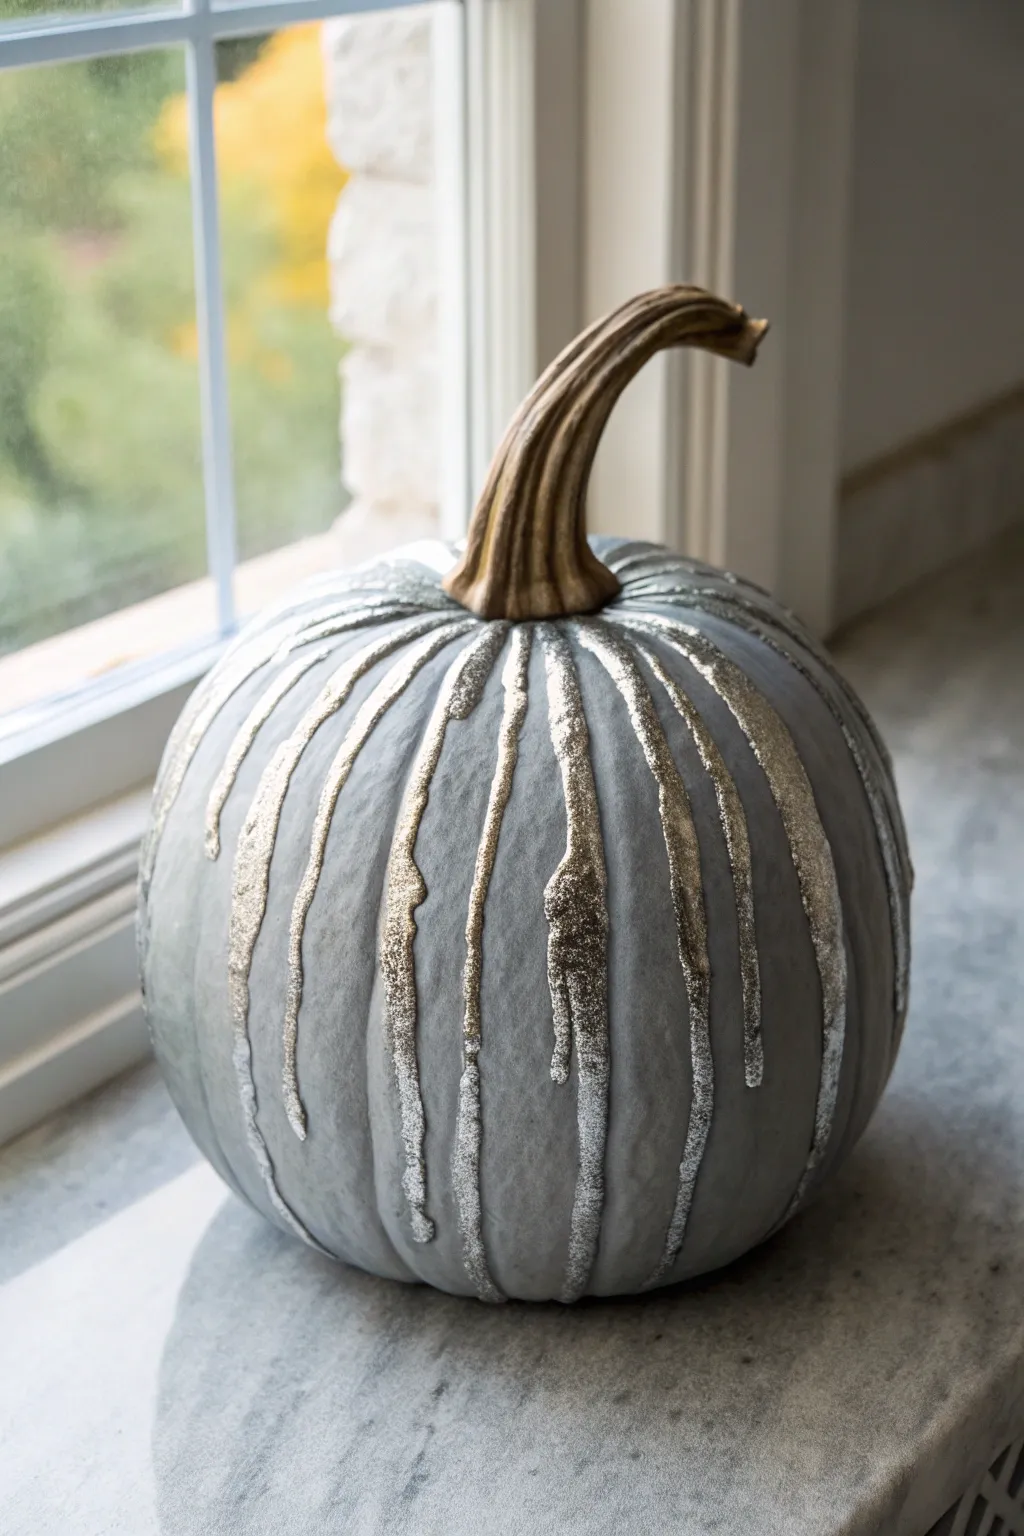
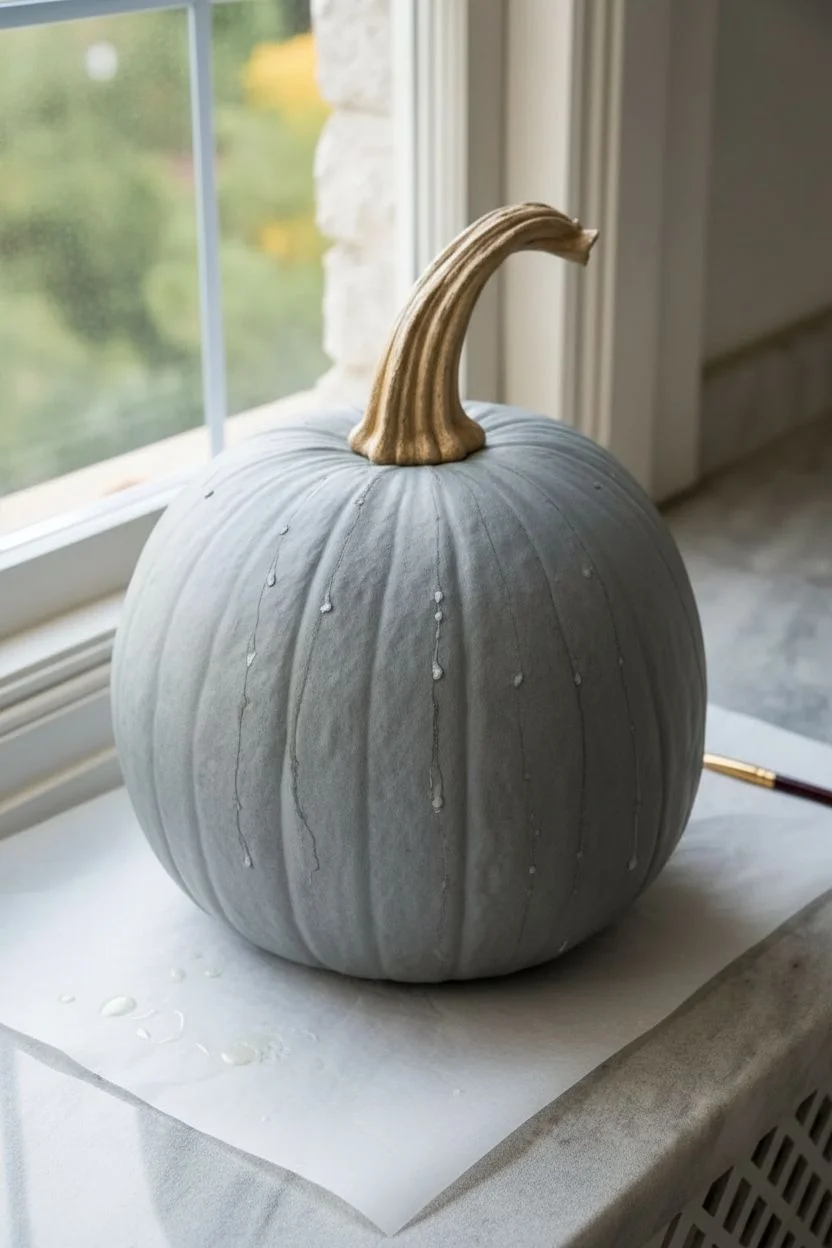
Transform a muted grey pumpkin into a piece of metallic art by adding cascading ‘drips’ of shimmering silver leaf. This project creates a striking contrast between matte organic textures and high-shine gilding for an elegant seasonal display.
Step-by-Step Tutorial
Materials
- Grey pumpkin (Jarrahdale variety or painted faux foam)
- Metal leaf adhesive (gilding size)
- Silver or champagne metallic leaf sheets
- Small round paintbrush
- Soft cosmetic or hake brush
- Wax paper
- Soft cloth
Step 1: Preparation & Design
-
Clean surface:
Begin by wiping down your pumpkin with a damp cloth to remove any dust or oils that might repel the adhesive. -
Dry completely:
Ensure the pumpkin is completely dry before beginning; moisture can prevent the gilding size from setting correctly. -
Protect workspace:
Lay down wax paper under your pumpkin, as metal leaf flakes can be messy and tend to stick to surfaces. -
Plan the flow:
Identify the natural ridges and valleys of the pumpkin; these grooves are the perfect path for your metallic drips to follow.
Sticky Situation?
If the leaf pulls away when you brush it, your adhesive likely wasn’t tacky enough yet. Wait a few extra minutes next time until the glue is completely clear before applying the foil.
Step 2: Applying Adhesive
-
Load the brush:
Dip your small round brush into the metal leaf adhesive, picking up a generous amount. -
Start at the stem:
Place your brush right at the base of the stem to create the starting pool of the drip. -
Paint the drip:
Drag the adhesive down the pumpkin’s groove, allowing the line to wiggle slightly for an organic, liquid look. -
Taper the end:
As you reach the end of your desired length, lift the brush gradually to create a naturally tapered point. -
Vary lengths:
I like to alternate between long drips and shorter ones to keep the design from looking too uniform or rigid. -
Repeat around:
Continue painting these adhesive paths down every ridge, or every other ridge, depending on how dense you want the silver to be. -
Wait for tack:
Allow the adhesive to sit until it turns from milky to clear and feels sticky to the touch (usually 15-30 minutes).
Step 3: Gilding Process
-
Apply leaf:
Gently lift a sheet of silver leaf and lay it directly over a section of the sticky adhesive. -
Press down:
Use your fingers or a dry, soft cloth to lightly press the leaf onto the adhesive trails so it adheres firmly. -
Continue coverage:
Repeat this process with more sheets until all the painted adhesive lines are fully covered with foil. -
Brush off excess:
Take your soft cosmetic brush and vigorously sweep over the surface to remove the unattached bits of leaf. -
Reveal the design:
As the excess flakes away, clean edges of your drip design will emerge from beneath the foil. -
Patch gaps:
If you missed any spots, dab a tiny bit more adhesive, wait for it to dry to tack, and press a scrap of leaf over it. -
Final burnish:
Give the metallic areas a final gentle buff with a soft cloth to maximize the shine and flatten any crinkles.
Antiqued Look
To tone down the bright silver brightness, apply a small amount of dark antique wax over the finished drips with a rag. This adds depth and gives the metal an aged, vintage pewter appearance.
Place your shimmering creation by a window to let natural light catch the metallic accents.


Have a question or want to share your own experience? I'd love to hear from you in the comments below!