When I want easy pumpkin painting that kids can actually finish (and feel proud of), I stick to no-carve ideas with big shapes, simple steps, and lots of room for personality. Grab a few pumpkins and let’s turn them into cheerful little decorations that are more giggles than stress.
Classic Smiley Jack-o’-Lantern Face
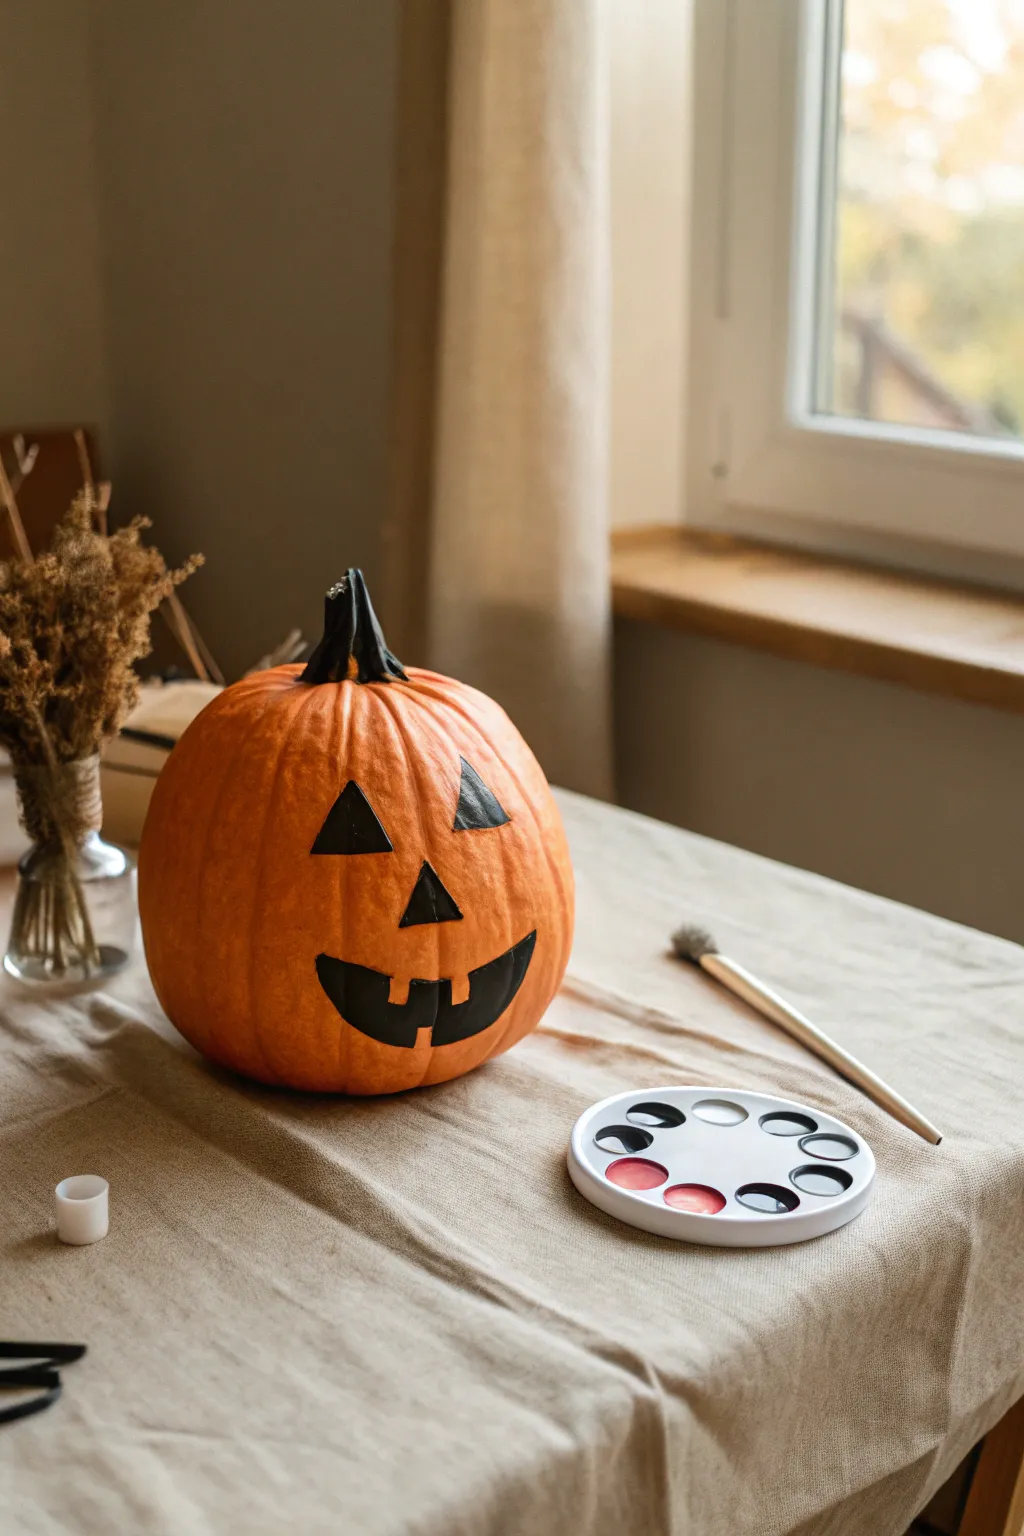
Skip the mess of carving and create a timeless Halloween decoration with this classic painted Jack-o’-Lantern. This project features sharp geometric shapes and a charming toothy grin painted in solid black against the pumpkin’s natural orange skin, perfect for a cozy afternoon craft.
How-To Guide
Materials
- One medium-sized orange pumpkin (clean and dry)
- Black acrylic paint
- Medium flat paintbrush (size 6 or 8)
- Small round paintbrush (size 2 or 3 for detailing)
- Pencil for sketching outlines
- Paper towel or cloth
- Cup of water
- Palette or small dish for paint
- Beige tablecloth or newspaper (to protect surface)
Step 1: Preparation & Planning
-
Select and clean:
Begin by wiping down your pumpkin with a damp cloth to remove any dirt or residue. Dry it thoroughly with a paper towel to ensure the paint adheres properly to the skin. -
Define the face area:
Choose the smoothest side of your pumpkin to be the ‘face.’ Look for a section without too many deep ridges or bumps so your geometric shapes remain crisp. -
Sketch the eyes:
Using a pencil, lightly sketch two equilateral triangles for the eyes about a third of the way down from the stem. Angle them slightly inward to create a classic expression. -
Add the nose:
Draw a smaller triangle directly below the gap between the eyes. This triangle should point upward, mirroring the shape of a traditional carved nose. -
Outline the mouth:
Sketch a wide, crescent-shaped smile starting below the nose. Don’t worry about the teeth just yet; focus on getting the curve of the smile symmetric and centered. -
Detail the teeth:
Draw square notches along the top and bottom of your smile outline. For this classic look, aim for two teeth on the top and one distinct tooth on the bottom.
Crisp Lines Secret
Use painter’s tape to outline the triangle eyes before painting. Press edges down firmly to stop bleed-through, paint, and peel away for perfect points.
Step 2: Painting the Features
-
Load the paint:
Squeeze a coin-sized amount of black acrylic paint onto your palette. Dip your medium flat brush into the paint, ensuring it’s coated but not dripping. -
Fill the eyes:
Start by filling in the triangle outlines of the eyes. Use the flat edge of your brush to create sharp, straight lines along the borders of the triangles. -
Fill the center:
Once the edges are defined, use broad strokes to fill in the center of the eye triangles. If the pumpkin skin shows through, let the first coat dry for five minutes before adding a second layer. -
Paint the nose:
Switch to your smaller round brush if the nose triangle is petite. Carefully fill in the nose shape, keeping the corners sharp and defined. -
Outline the smile:
Using the small round brush, carefully trace over your pencil lines for the mouth, including around the square teeth. This creates a barrier to help you stay inside the lines when filling it in. -
Fill the mouth shape:
Switch back to the medium brush to fill in the larger areas of the mouth. Work slowly around the teeth notches to keep them square and distinct.
Make It Glow
Add a coat of glow-in-the-dark paint specifically over the white or yellow teeth area (if you painted them) or outline the black eyes for a spooky night look.
Step 3: Finishing Touches
-
Check opacity:
Assess the black paint coverage. If any orange skin is peeking through the black features, I like to dab a little extra paint specifically in those lighter spots for a solid, matte finish. -
Clean up edges:
If any paint went outside your desired lines, quickly wipe it away with a damp cotton swab or wait for it to dry and gently scrape it off with a fingernail. -
Dry the paint:
Allow the face paint to dry completely for at least 30 minutes. Be careful not to touch the wet paint as you move the pumpkin. -
Paint the stem (optional):
For added contrast, use your medium brush to paint the pumpkin stem entirely black. This ties the whole look together and adds a finished quality to the top.
Place your newly painted pumpkin near a window or on the porch to greet visitors with its timeless smile


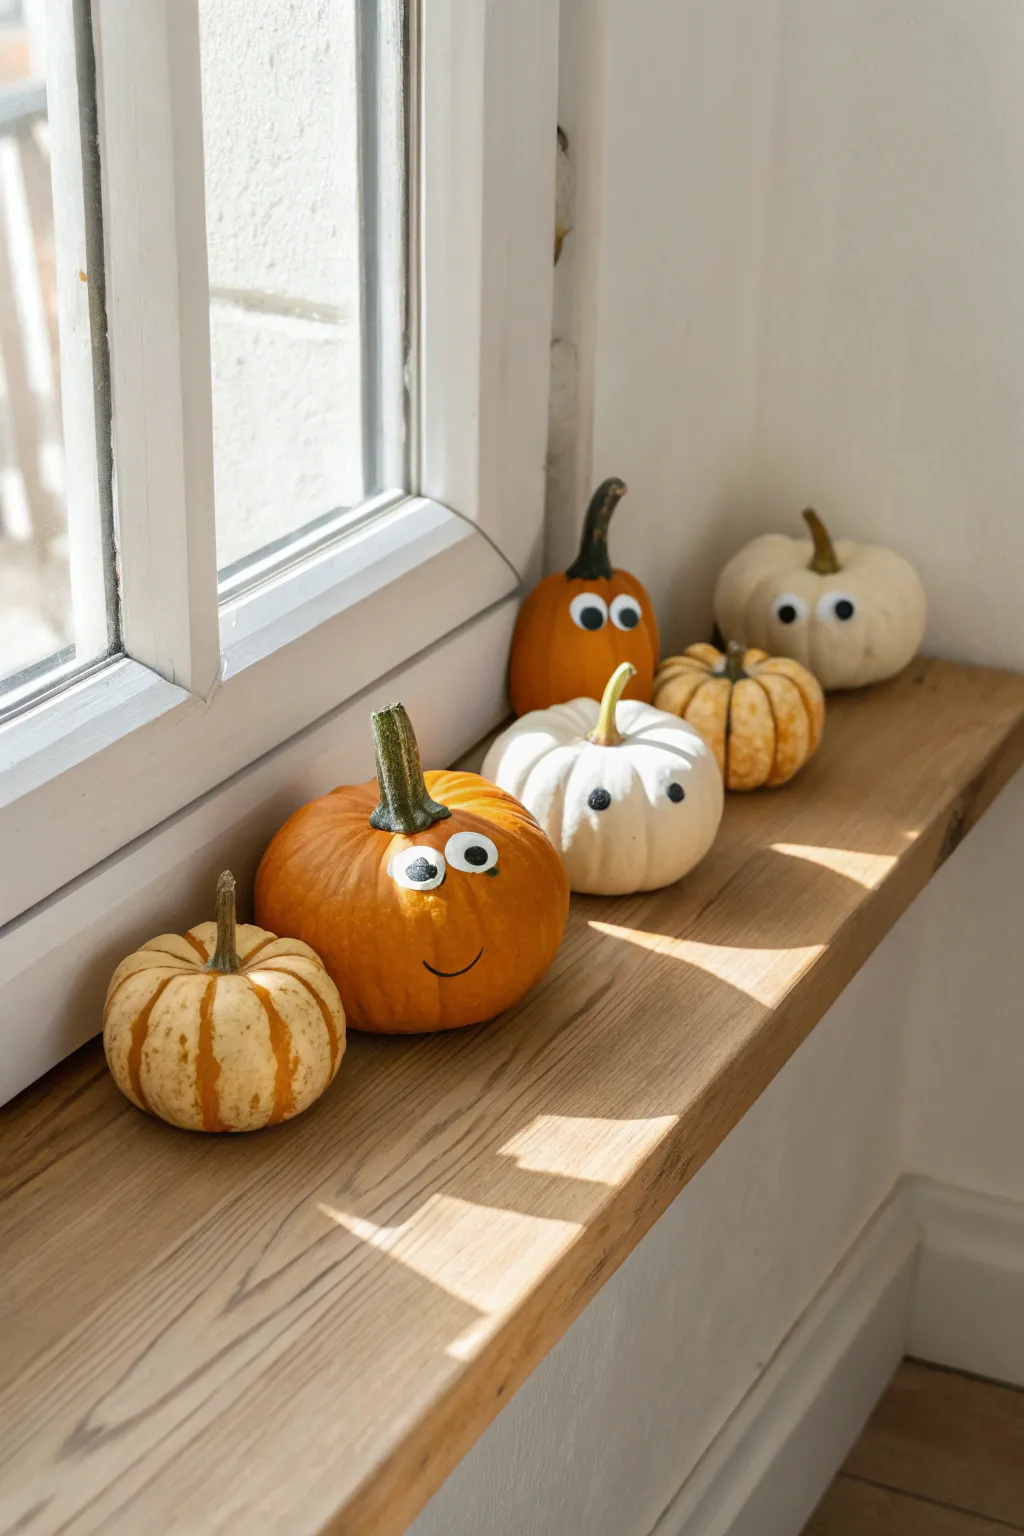
Silly Mixed-Up Pumpkin Faces
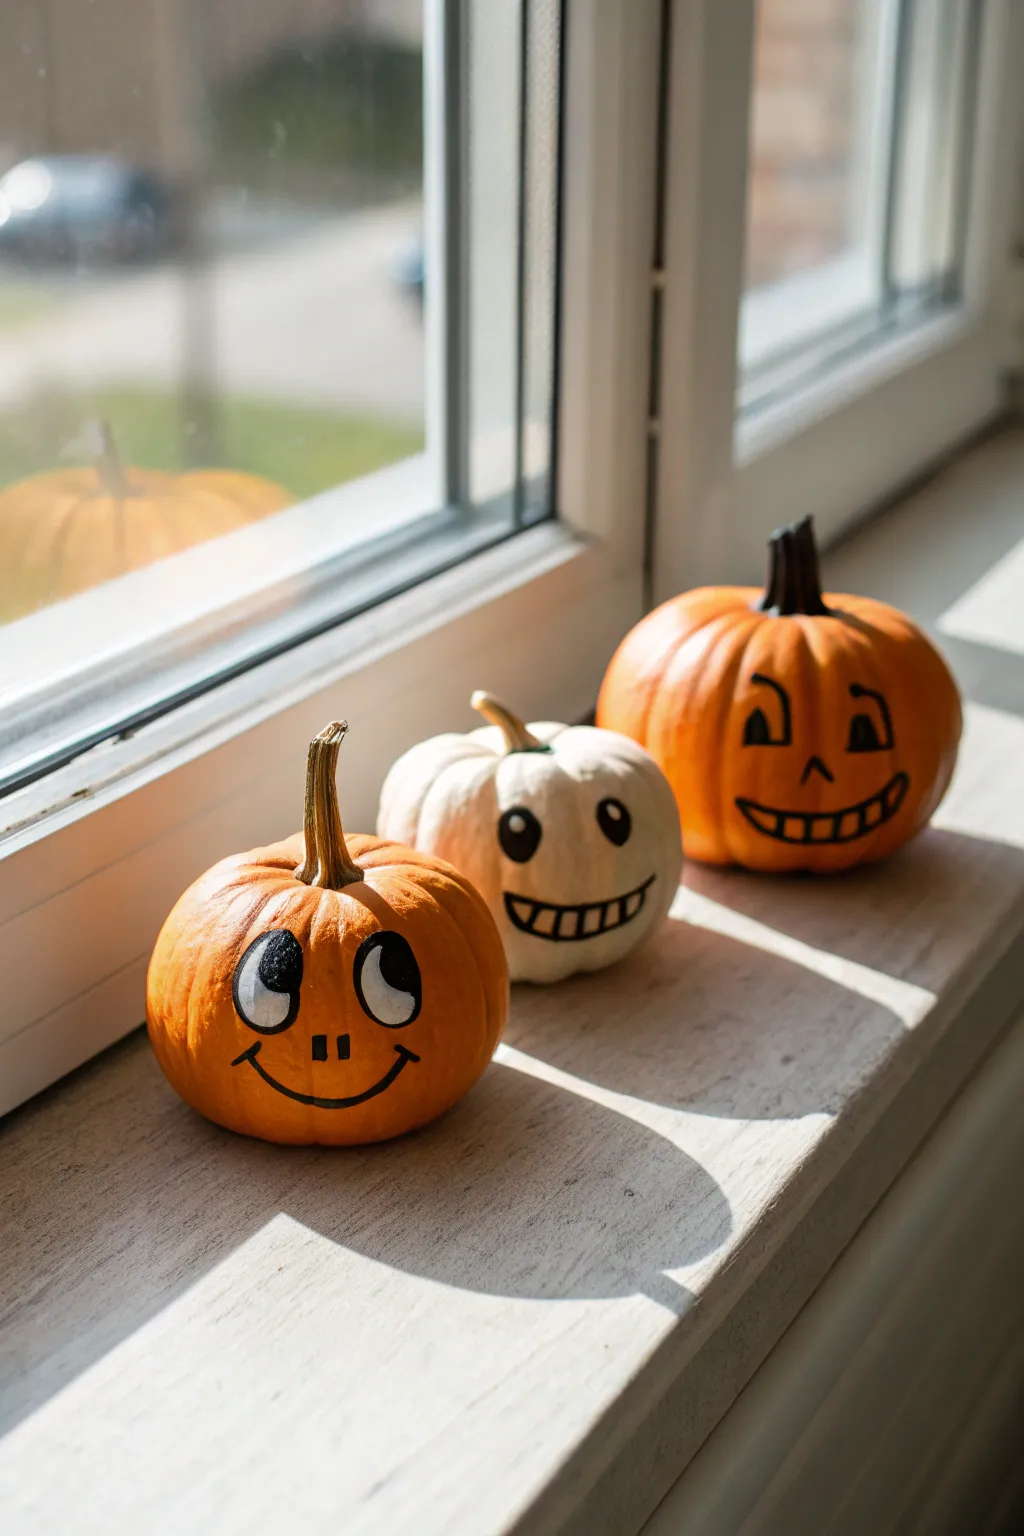
Bring your windowsill to life with this charming group of expressive, painted mini pumpkins. These simple designs use basic shapes to create distinct personalities, from a googly-eyed goofball to a mischievous grinner.
Detailed Instructions
Materials
- 2 small orange pumpkins
- 1 small white pumpkin (or painted faux pumpkin)
- Black acrylic paint or paint pen
- White acrylic paint
- Small round paintbrush (size 2 or 4)
- Medium round paintbrush (size 6)
- Fine detail brush or liner brush
- Cup of water and paper towels
- Pencil (optional for sketching)
Step 1: Preparation and Base Shapes
-
Clean the surfaces:
Before you start, wipe down each pumpkin with a damp cloth to remove any dirt or residue. A clean, dry surface ensures the paint adheres properly and lasts longer. -
Choose your pumpkins:
Arrange your three pumpkins in a row to decide which face goes on which shape. The taller orange one works well for the wide-eyed look, while the squat white one is perfect for a wide, toothy grin. -
Sketch lightly (optional):
If you are painting with younger kids, you might want to lightly sketch the facial features with a pencil first. This helps with placement before committing with paint.
Lasting Layers
Work in thin layers rather than thick globs. If the orange shows through the black paint, let the first layer dry for 10 minutes and apply a second coat for solid opacity.
Step 2: Painting the Wide-Eyed Orange Pumpkin
-
Outline the eyes:
Using a small round brush and black paint, draw two large ovals for the eyes. Position them midway down the pumpkin. -
Whiten the eyes:
Rinse your brush thoroughly or switch to a clean one. Fill inside the black ovals with white acrylic paint. You may need two coats here to make the white really pop against the orange skin. -
Add pupils:
Once the white paint is completely dry to the touch, use black paint to add large pupils. Place them looking upward and slightly to the left for that goofy expression. -
Draw the nose:
Paint two small, vertical rectangular dashes right between the eyes to create a simple nose. -
Create the smile:
Paint a simple, thin curved line for a smile. Add tiny perpendicular tick marks at the very ends of the smile line for cheeks.
Step 3: Painting the Tooth-Grinning White Pumpkin
-
Paint the eyes:
On the white pumpkin, use the medium round brush and black paint to create two solid black ovals. Leave a tiny speck of unpainted white space inside each oval near the top for a highlight, or add a dot of white paint later. -
Outline the mouth:
Below the eyes, paint a long, horizontal oval shape for the mouth using a liner brush or paint pen for control. -
Add the teeth:
Draw a horizontal line straight through the middle of the mouth oval. Then, paint several vertical lines crossing it to create the grid of teeth.
Make Them Shine
Once the faces are fully dry, brush a coat of Mod Podge or clear acrylic sealer over the painted areas. This adds a nice gloss and protects the paint from scratching.
Step 4: Painting the Classic Jack-o’-Lantern Face
-
Outline the eyes:
On the second orange pumpkin, paint two large triangles with a black outline. Curve the bottom line of the triangle slightly upward to soften the look. -
Detail the eyes:
Inside the bottom corner of each triangle eye, paint a smaller black triangle shape, leaving the rest of the eye the natural orange color. This creates a graphic, cartoonish pupil effect. -
Add the nose:
Paint a small, simple triangle for the nose in the center of the face. -
Shape the mouth:
Paint a wide crescent shape for the grin. Outline it first to get the curve right. -
Fill the teeth:
Inside the mouth outline, create a grid similar to the white pumpkin but curved. Draw a horizontal line following the curve of the smile, then add vertical lines for teeth. -
Final touches:
Check all your black lines. If any look thin or transparent, I find that going over them one last time with a detail brush makes the features stand out clearly. -
Let them dry:
Allow the pumpkins to dry completely for at least an hour before moving them to your windowsill display.
Enjoy your cheerful row of pumpkin personalities brightening up the room


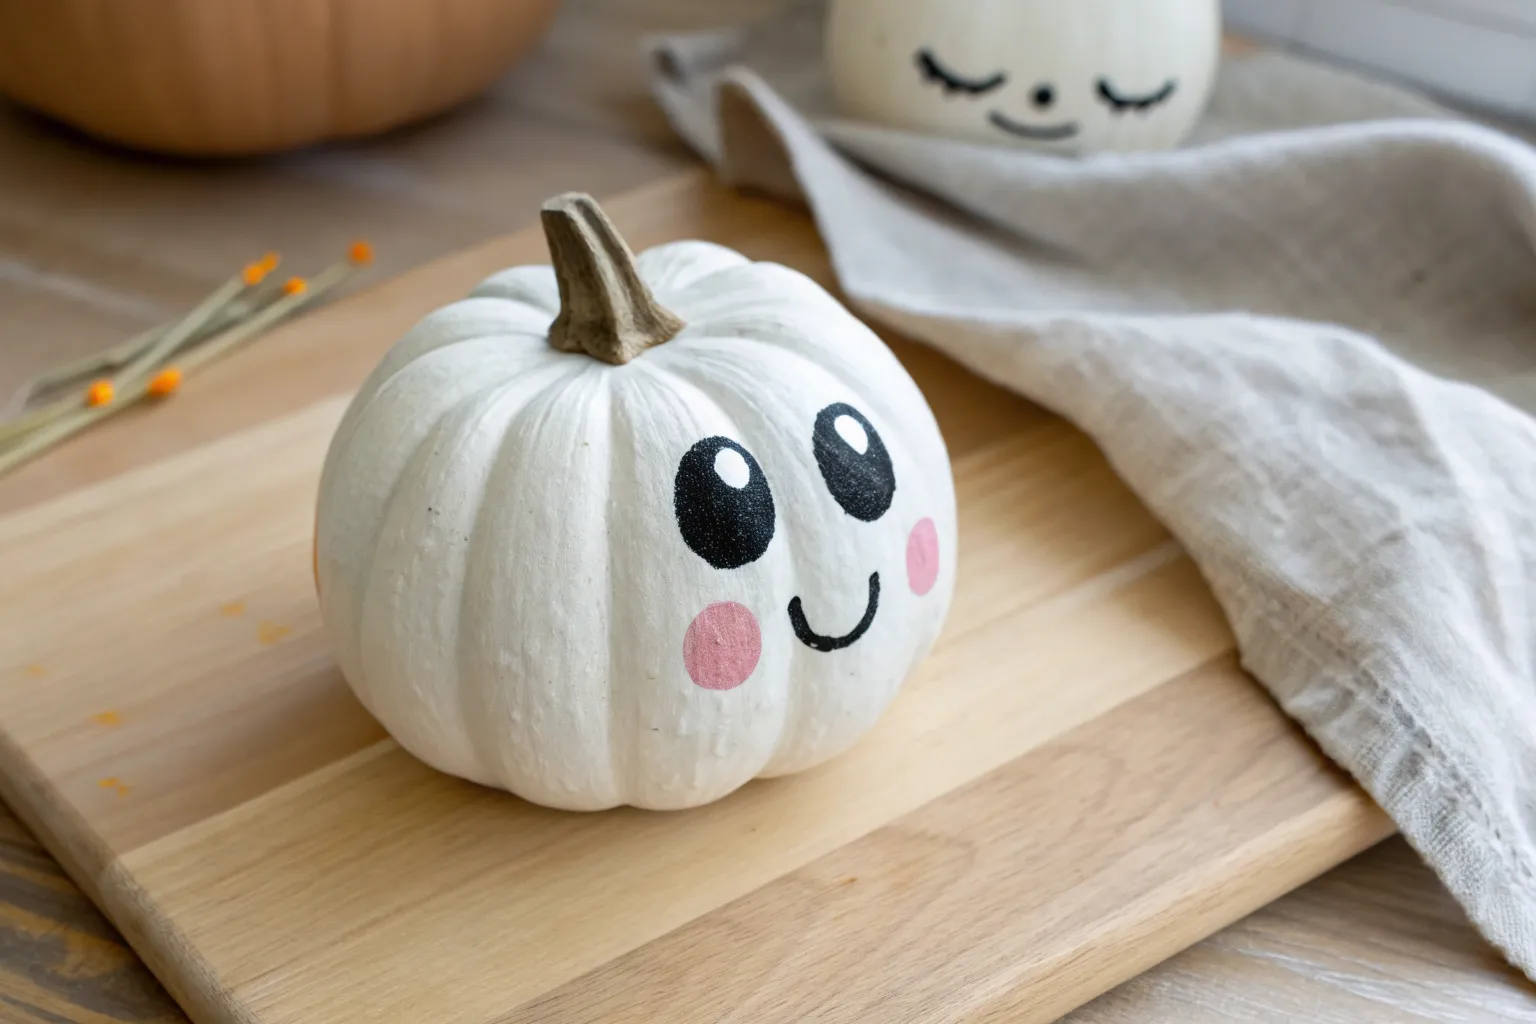
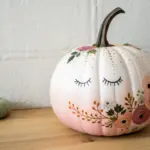
Cute Ghost Face on a White Pumpkin
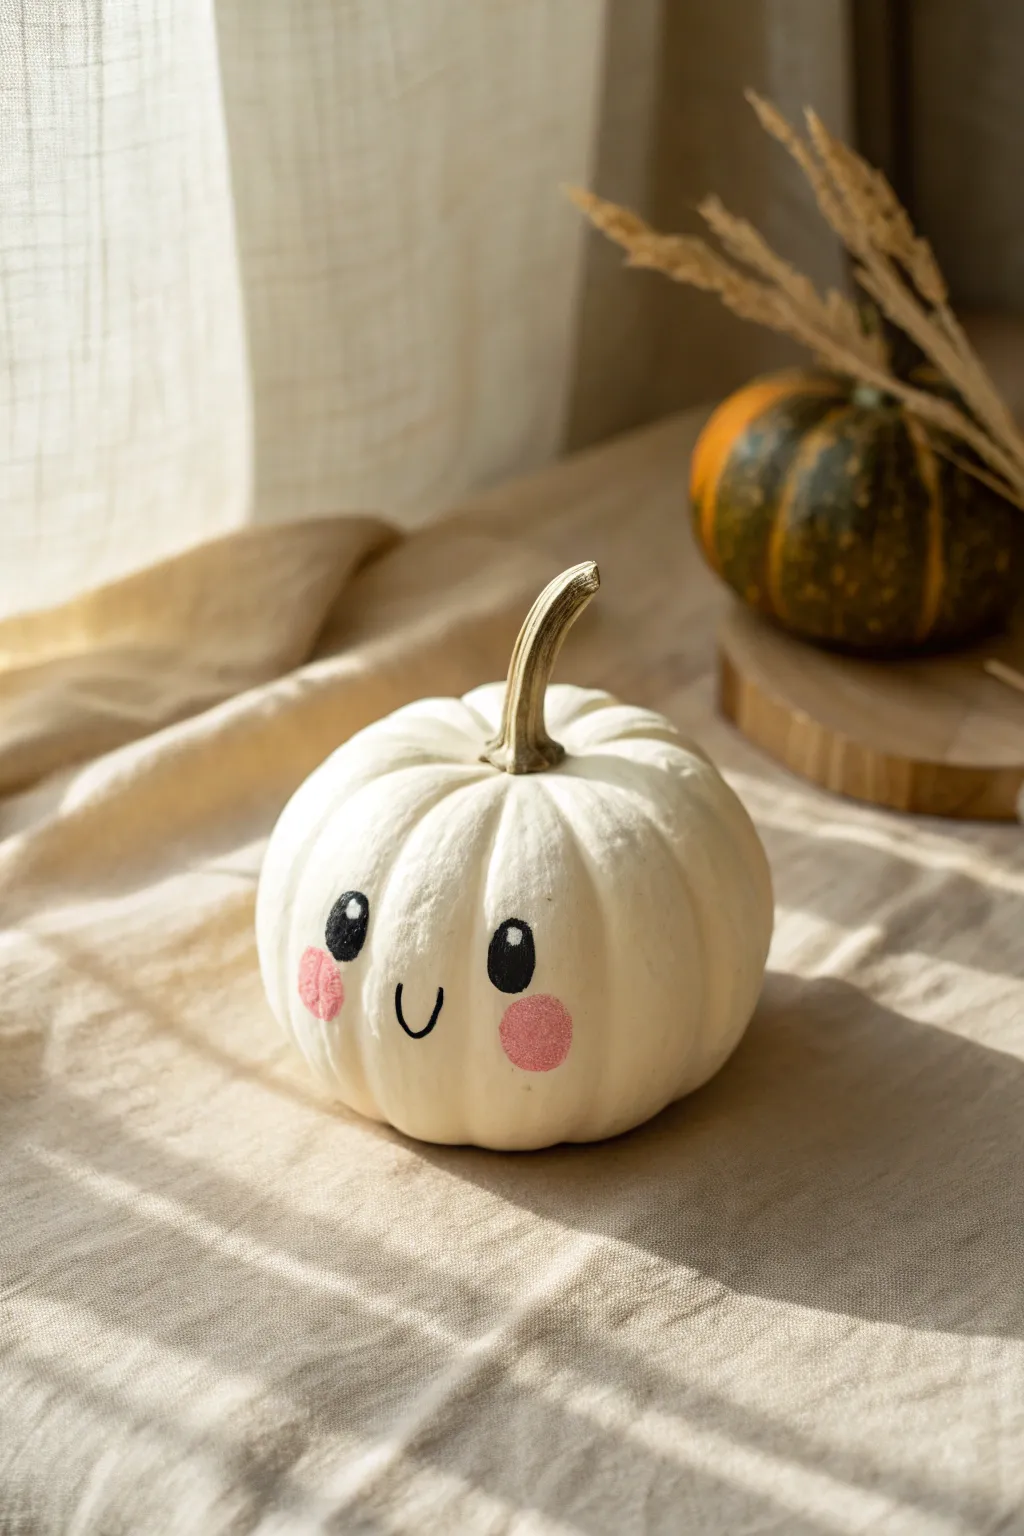
Transform a simple white pumpkin into an adorable, blushing character with just a few strokes of paint. This minimalist design relies on sweet, wide-set eyes and rosy cheeks to create a welcoming autumn decoration that isn’t spooky at all.
How-To Guide
Materials
- Small white pumpkin (real or faux)
- Black acrylic paint
- Pink acrylic paint (soft blush tone)
- Small round paintbrush (size 2 or 4)
- Fine detail brush or paint pen (black)
- Small sponge dabber or round foam pouncer
- Paper plate or palette
- Water cup and paper towels
- Pencil (optional)
Step 1: Preparation & Planning
-
Clean the surface:
Before starting, wipe down your pumpkin with a slightly damp paper towel to remove any dust or dirt. If you are using a real pumpkin, make sure it is completely dry before applying any paint. -
Choose the best side:
Rotate your pumpkin to find the smoothest ‘face.’ Look for a section that is relatively flat and free of deep blemishes so your painted features will sit nicely. -
Draft the features:
To ensure symmetry, lightly sketch the placement of the eyes and mouth with a pencil. You’ll want the eyes slightly wide-set for that cute, ‘kawaii’ look.
Stamp Perfectly Round Cheeks
No sponge? Cut a potato in half or use the flat end of a wine cork dipped in pink paint. Test on paper first to get the right paint amount.
Step 2: Painting the Face
-
Outline the eyes:
Using your small round brush and black acrylic paint, carefully paint two tall oval shapes for the eyes. They should look like upright coffee beans or jellybeans. -
Fill the eyes:
Fill in the oval outlines completely with solid black paint. Apply a second coat if the first one looks streaky or transparent. -
Create the smile:
Switch to your fine detail brush. Paint a small, simple ‘U’ shape right in the center between the eyes. Keep the line thin and delicate. -
Let the black dry:
Wait about 10-15 minutes for the black paint to dry completely. This is crucial because wet black paint will easily smudge into your pink cheeks or white highlights.
Make it Sparkle
While the pink cheek paint is still wet, sprinkle a tiny pinch of iridescent glitter over the blush spots for a magical, shimmering effect.
Step 3: Adding Charming Details
-
Prepare the blush color:
Pour a small amount of soft pink paint onto your palette. If your pink is too bright, mix in a tiny drop of white to soften it. -
Apply the cheeks:
Dip a round sponge dabber or pouncer into the pink paint. Dab off the excess on a paper towel so it isn’t gloppy. Gently press the sponge onto the pumpkin cheeks, just below and slightly outside the eyes. -
Alternative cheek method:
If you don’t have a sponge, you can paint a rough circle with a dry brush to get that textured, soft look. -
Paint the eye highlights:
Once the black eyes are fully dry, dip the handle end of a paintbrush into white paint. Dot a large highlight near the top of each black oval. -
Add secondary highlights:
Using a smaller tool, like a toothpick or a fine brush tip, add a tiny second dot diagonally below the first one for extra sparkle. -
Refine the edges:
Check your work. If the edges of the eyes look ragged, you can carefully neaten them up with your fine brush. -
Protect the stem:
I like to leave the natural stem as is for a rustic look, but if you got any paint on it, wipe it off quickly with a damp cloth.
Step 4: Finishing Touches
-
Final dry time:
Let the entire pumpkin sit undisturbed for at least an hour to ensure the thickest parts of the paint harden fully. -
Seal the paint (optional):
If this pumpkin will live outside, apply a clear acrylic sealer over the painted face to protect it from moisture.
Place your happy little pumpkin on a windowsill where the light can catch those bright eyes


Simple Black Cat Pumpkin
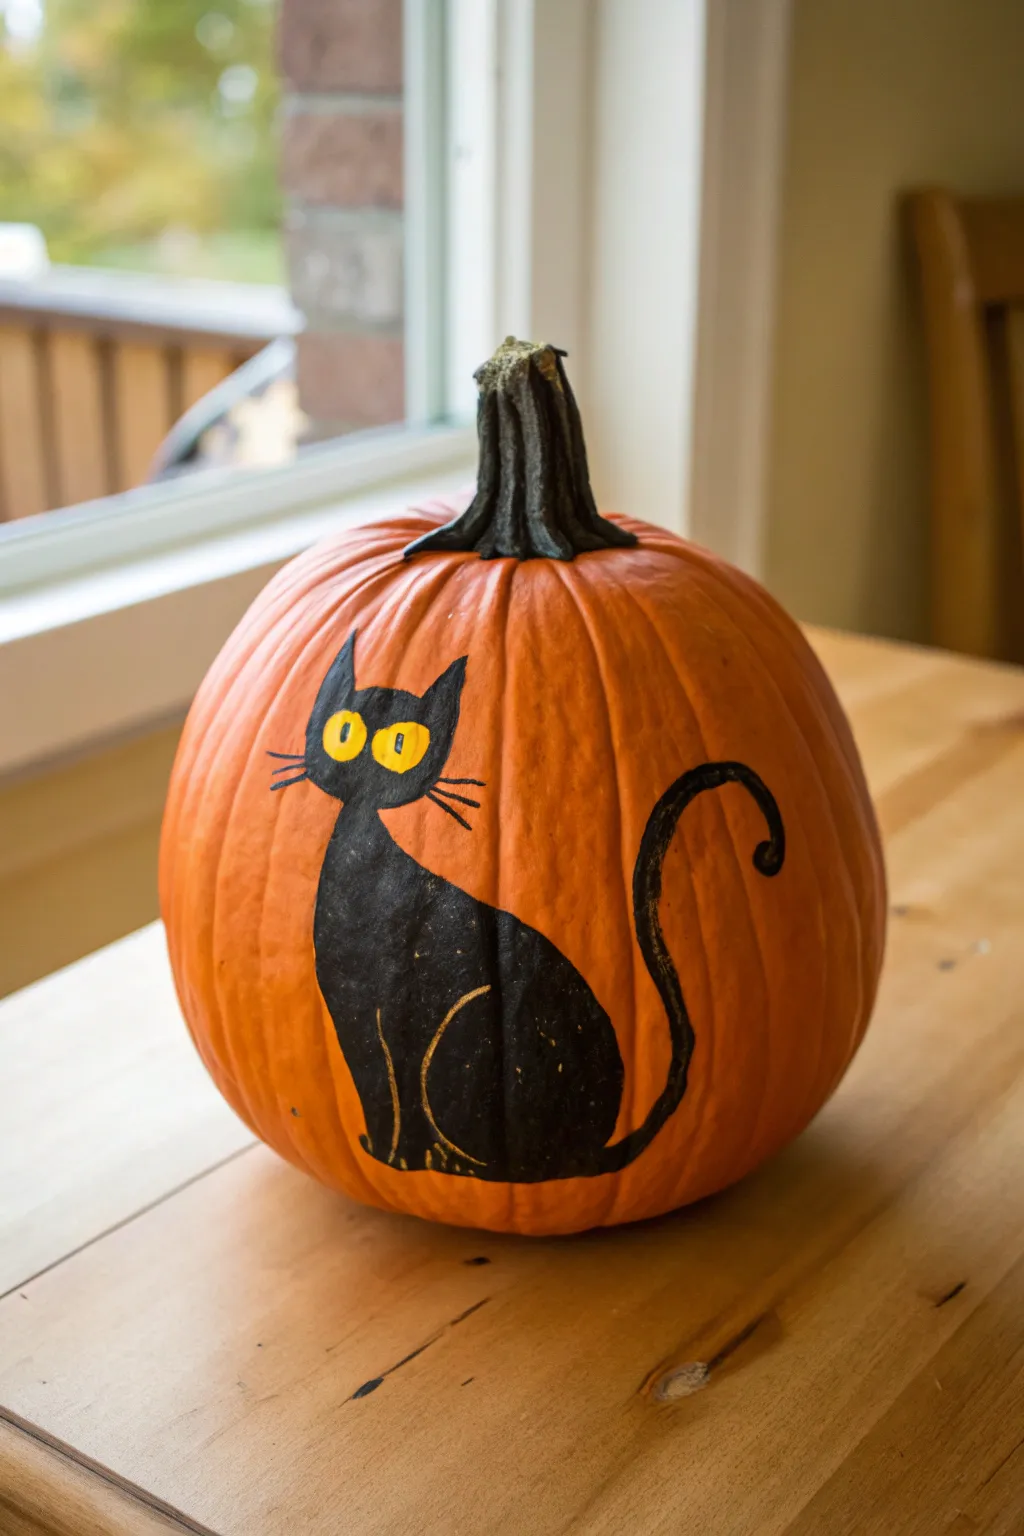
This charming project features a classic black cat silhouette painted directly onto a bright orange pumpkin for a timeless Halloween look. It’s a perfect no-carve option that combines simple shapes with expressive details like bright yellow eyes and subtle gold outlining.
Step-by-Step Tutorial
Materials
- Medium-sized orange pumpkin (cleaned and dried)
- Black acrylic paint
- Yellow acrylic paint
- Gold paint marker or fine gold paint pen
- Fine detail paintbrush
- Medium flat paintbrush
- Pencil or dry-erase marker
- Paper towel
- Water cup
Step 1: Planning and Outline
-
Clean surface:
Begin by wiping your pumpkin down with a damp cloth to remove any dirt or oils, then dry it completely. Paint adheres best to a clean, room-temperature surface. -
Sketch the body:
Using a pencil or a light dry-erase marker, lightly sketch a large, elongated teardrop shape for the cat’s body. The bottom should be wider than the top to give the cat a seated posture. -
Add the head:
Draw a circle slightly overlapping the top of your teardrop shape. This will be the cat’s head. Don’t worry if your sketch lines are messy; the paint will cover them later. -
Draw ears:
At the top of the circle, sketch two distinct triangles for the ears. Make them slightly tall and pointed for that alert, spooky cat look. -
Sketch the tail:
Starting from the bottom right side of the body, draw a long, curving line that loops upward and curls at the end like a question mark. Draw a parallel line to give the tail thickness.
Step 2: Painting the Silhouette
-
Outline in black:
Take your fine detail brush loaded with black acrylic paint and carefully trace over your pencil sketch. This establishes your boundaries. -
Fill the body:
Switch to the medium flat brush to fill in the large body area. Use smooth, vertical strokes following the curve of the pumpkin to get even coverage. I find two thin coats work better than one thick glob. -
Paint the head:
Carefully fill in the circle of the head. Be gentle around the edges to keep the round shape crisp. -
Fill the ears:
Using the detail brush again, fill in the triangular ears. Try to keep the points sharp. -
Paint the tail:
With a steady hand and the smaller brush, fill in the tail. Since the pumpkin surface is bumpy, you might need to dab paint into the crevices to get a solid black line. -
Let it dry:
Allow the black silhouette to dry completely. This is crucial before adding lighter colors or details on top.
Use a Pen Tip
For the crispest whiskers, don’t use a brush at all. Draw them on with a black permanent marker after the head paint is fully dry.
Step 3: Adding Personality
-
Create eye spots:
Once dry, paint two small ovals near the center of the head using yellow paint. You will likely need a second layer of yellow to make it pop against the black background. -
Add pupils:
dip the very tip of your detail brush or a toothpick into black paint. Put a tiny vertical slit or dot in the center of each yellow eye. -
Outline the legs:
Using your gold paint marker, draw a curved line on the lower left of the body to suggest a seated front leg. -
Define the hind leg:
Draw a larger curved line with the gold marker on the lower right side of the body, creating the appearance of a hunched back leg. -
Add whiskers:
With the finest point of your brush and black paint, paint three thin, horizontal lines extending from each cheek area. Keep them light and wispy. -
Final touches:
Check for any uneven edges or spots where orange shows through the black paint and touch them up with your small brush.
Paint Slipping?
If the acrylic paint beads up or slips on the pumpkin’s waxy skin, mix a tiny drop of dish soap into your paint puddle before applying.
Now you have a purr-fectly painted pumpkin ready to guard your porch for the season
BRUSH GUIDE
The Right Brush for Every Stroke
From clean lines to bold texture — master brush choice, stroke control, and essential techniques.
Explore the Full Guide
Candy Corn Color-Block Pumpkin
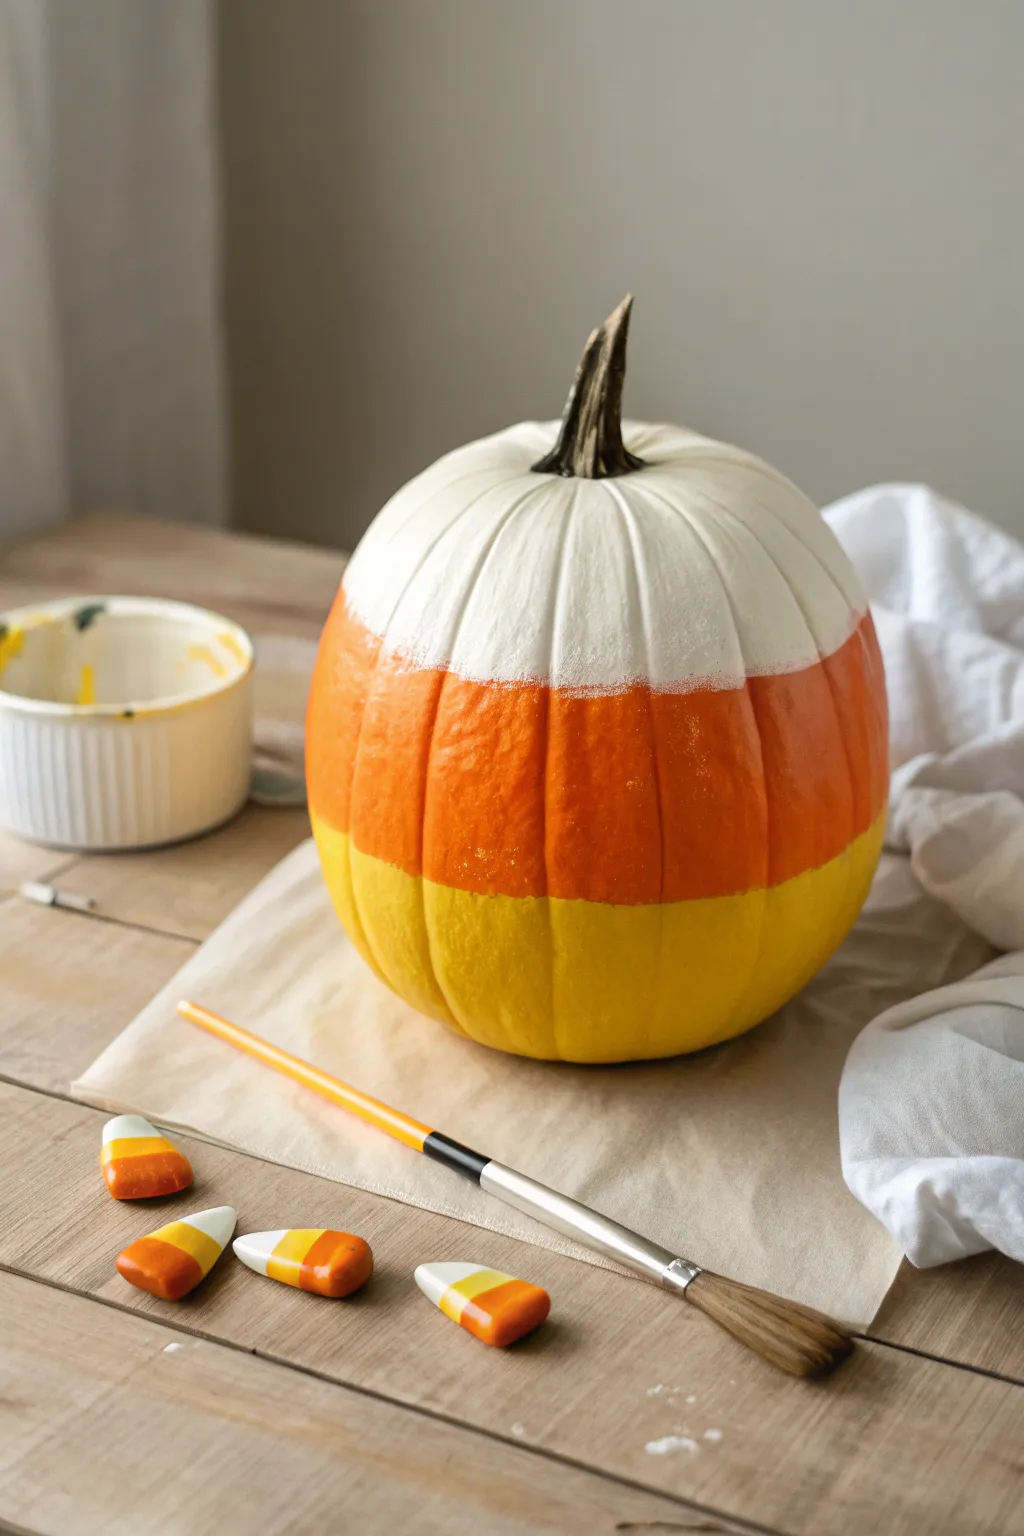
Transform a classic autumn gourd into everyone’s favorite polarizing treat with this sweet and simple painting project. The bold horizontal stripes of yellow, orange, and white create a striking color-blocked look that mimics giant candy corn.
Detailed Instructions
Materials
- Medium-sized pumpkin (real or artificial)
- White acrylic paint
- Orange acrylic paint
- Yellow acrylic paint
- Medium flat paintbrush
- Small detail paintbrush (optional)
- Painter’s tape or masking tape (optional)
- Paper plate or palette
- Cup of water
- Paper towels
Step 1: Preparation & Base Coat
-
Clean surface:
Begin by wiping down your pumpkin with a damp cloth to remove any dirt or dust from the pumpkin patch. A clean, dry surface ensures the paint adheres properly and doesn’t flake off later. -
Plan your zones:
Visualize your pumpkin divided into three horizontal sections. The top third will be white, the middle band will be orange, and the bottom third will be yellow, just like the real candy. -
Prime the top:
Squeeze a generous amount of white acrylic paint onto your palette. Using your medium flat brush, paint the top section of the pumpkin, starting right at the base of the stem. -
Extend the white:
Work the white paint down the ridges of the pumpkin until you cover approximately the top third. Don’t worry about a perfectly straight line yet; a slightly organic edge looks nice on the curved surface. -
Painting the stem:
Carefully paint around the base of the stem. You can choose to leave the stem natural for contrast, or paint it if you prefer a fully covered look. In the example, the natural stem acts as a nice earthy accent. -
Let it dry:
Allow this white layer to dry completely. Since orange and white can mix to make peach, you want the white section dry to the touch before moving on.
Tape Trick
For super crisp lines between colors, wrap painter’s tape horizontally around the pumpkin. Press it firmly into the ribs to prevent seepage underneath.
Step 2: Adding the Color Bands
-
Apply the middle band:
Rinse your brush thoroughly and load it with bright orange paint. Begin painting the middle horizontal section of the pumpkin, directly below the white area. -
Create the upper edge:
Carefully trace the line where the orange meets the white. I find it helpful to look at the pumpkin from the side to keep the horizon line relatively straight across the curved ribs. -
Fill the center:
Fill in the rest of the middle band with orange paint, ensuring you get paint deep into the vertical crevices (the ribs) of the pumpkin skin for solid coverage. -
Dry break:
Let the orange paint set for about 10-15 minutes. This prevents the upcoming yellow layer from turning muddy where the colors meet. -
Start the base:
Once the orange is tacky or dry, clean your brush again and pick up the yellow paint. Start painting the bottom third of the pumpkin. -
Join the colors:
Paint upwards to meet the bottom edge of the orange stripe. Keep your hand steady to create a clean transition line between the two bright colors. -
Cover the bottom:
Continue painting yellow all the way down to the base where the pumpkin sits on the table. You may need to tilt the pumpkin slightly to reach the very bottom curve.
Step 3: Finishing Touches
-
Check for gaps:
Inspect the deep grooves of the pumpkin. Often, the brush skips over these crevices, leaving bare spots. Use a smaller detail brush to dab extra paint into these valleys if needed. -
Apply second coats:
Acrylics can be translucent, especially yellow and orange. Once the first layer is dry, apply a second coat to any areas that look streaky or where the pumpkin’s original color shows through. -
Refine the lines:
If your horizontal lines look a little too messy, you can go back with the appropriate color and carefully touch up the borders to make them crisper. -
Final cure:
Allow the entire pumpkin to dry undisturbed for at least an hour before moving or displaying it.
Sparkle Upgrade
While the paint is still wet, sprinkle fine glitter onto the corresponding color sections (white on white, orange on orange) for a sugary, crystallized effect.
Place your bright new creation on the porch or a table for a festive pop of color that looks good enough to eat
Polka-Dot Party Pumpkin
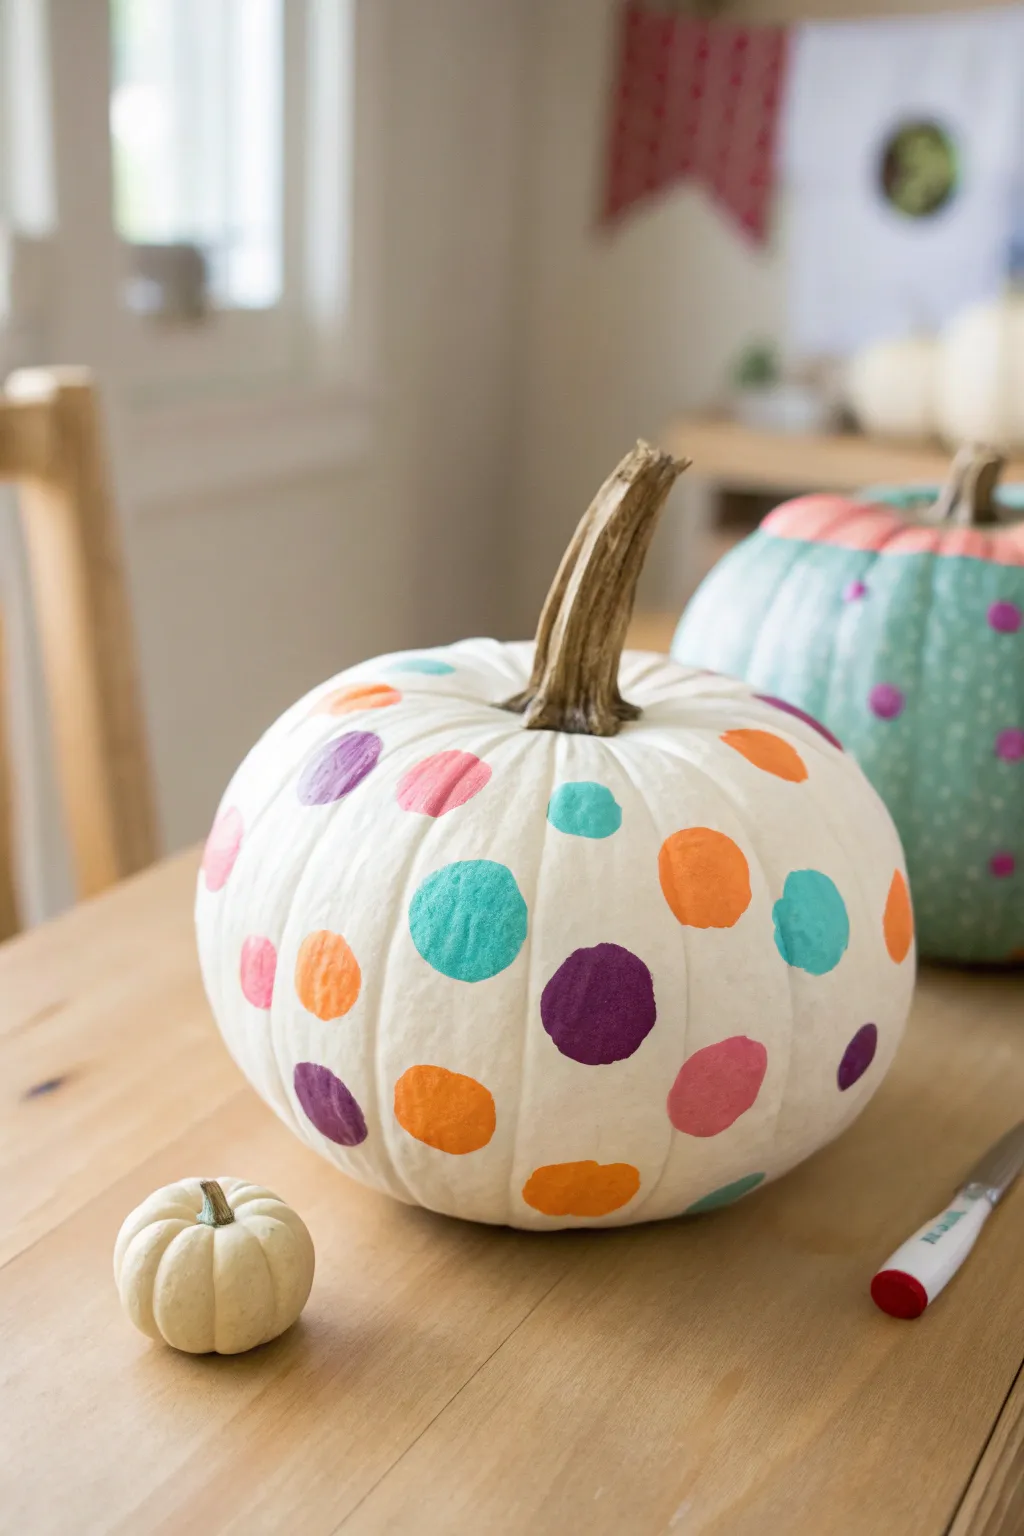
Transform a plain white pumpkin into a festive centerpiece with this beautifully simple polka-dot design. Using bright, cheerful acrylic colors on a clean white background creates a playful look that is perfect for celebrating the season.
Step-by-Step Tutorial
Materials
- Medium-sized white pumpkin (real or faux)
- White acrylic paint (matte finish)
- Wide flat paintbrush
- Medium round sponge plotter or foam pouncer (approx. 1 inch)
- Acrylic craft paints (orange, teal, purple, pink)
- Small detail brush
- Paper plate or palette
- Paper towels
- Cup of water
Step 1: Base Coat Preparation
-
Clean the surface:
Start by wiping down your pumpkin with a damp cloth to remove any dirt or oils. Let it dry completely. -
Apply the first white coat:
Even if your pumpkin is naturally white, apply a coat of matte white acrylic paint. This creates a uniform canvas and helps the colored dots pop. Use a wide flat brush for broad strokes. -
Let it dry:
Allow the first coat to dry for about 15-20 minutes. It should be dry to the touch before proceeding. -
Apply a second coat:
For full opacity, paint a second layer of white. Pay attention to the grooves of the pumpkin, ensuring paint gets into the crevices without pooling.
Step 2: Creating the Polka Dots
-
Prepare your palette:
Squeeze dime-sized amounts of your orange, teal, purple, and pink paints onto a paper plate. Space them out so the colors don’t mix accidentally. -
Test your pouncer:
Dip your foam pouncer into one color, blot it once on a paper towel to remove excess globs, and do a practice dot on a piece of paper to check the coverage. -
Start with the first color:
Choose your first color (like orange) and press the pouncer firmly onto the pumpkin surface. Twist slightly and lift straight up to create a clean circle. -
Space out the first color:
Apply 4-5 more dots of this same color randomly around the pumpkin. Leave plenty of white space between them for the other colors. -
Switch colors:
Clean your pouncer thoroughly in water and dry it well, or switch to a fresh pouncer. Load up your second color, perhaps the teal. -
Fill in gaps:
Place teal dots in the empty spaces, trying to avoid placing two dots of the same color right next to each other. -
Add darker accents:
Repeat the process with the purple paint. I find that darker colors anchor the design, so place these thoughtfully near the bottom and middle sections. -
Finish with pink:
Add your final pink dots to any remaining large open spaces. Step back occasionally to ensure the distribution looks balanced.
Uneven Circles?
If your sponge slips on the curved surface, don’t panic. Wait for the smudge to dry, paint over it with a bit of your white base coat, and restamp the dot once that patch is dry.
Step 3: Refining and Sealing
-
Touch up edges:
Because pumpkins are curved, your foam pouncer might miss some edges of the circles. Use a small detail brush to carefully fill in any rough edges or light spots on your dots. -
Check opacity:
Some colors, especially yellows or oranges, might need a second coat once the first dot is dry to look solid and bright. -
Clean the stem:
If you accidentally got any white or colored paint on the stem, use a damp paper towel to wipe it off immediately to keep that natural contrast. -
Let it cure:
Allow the pumpkin to sit undisturbed for at least an hour to ensure all the thick paint layers are completely dry.
Crisper Edges
Don’t overload your sponge. Too much paint causes slippery sliding and messy edges. A thinner, even layer of paint on the foam usually creates the crispest circle shape.
Place your colorful spotted pumpkin on a table or mantel for an instant pop of cheer

PENCIL GUIDE
Understanding Pencil Grades from H to B
From first sketch to finished drawing — learn pencil grades, line control, and shading techniques.
Explore the Full Guide
Stripes Made With Painter’s Tape
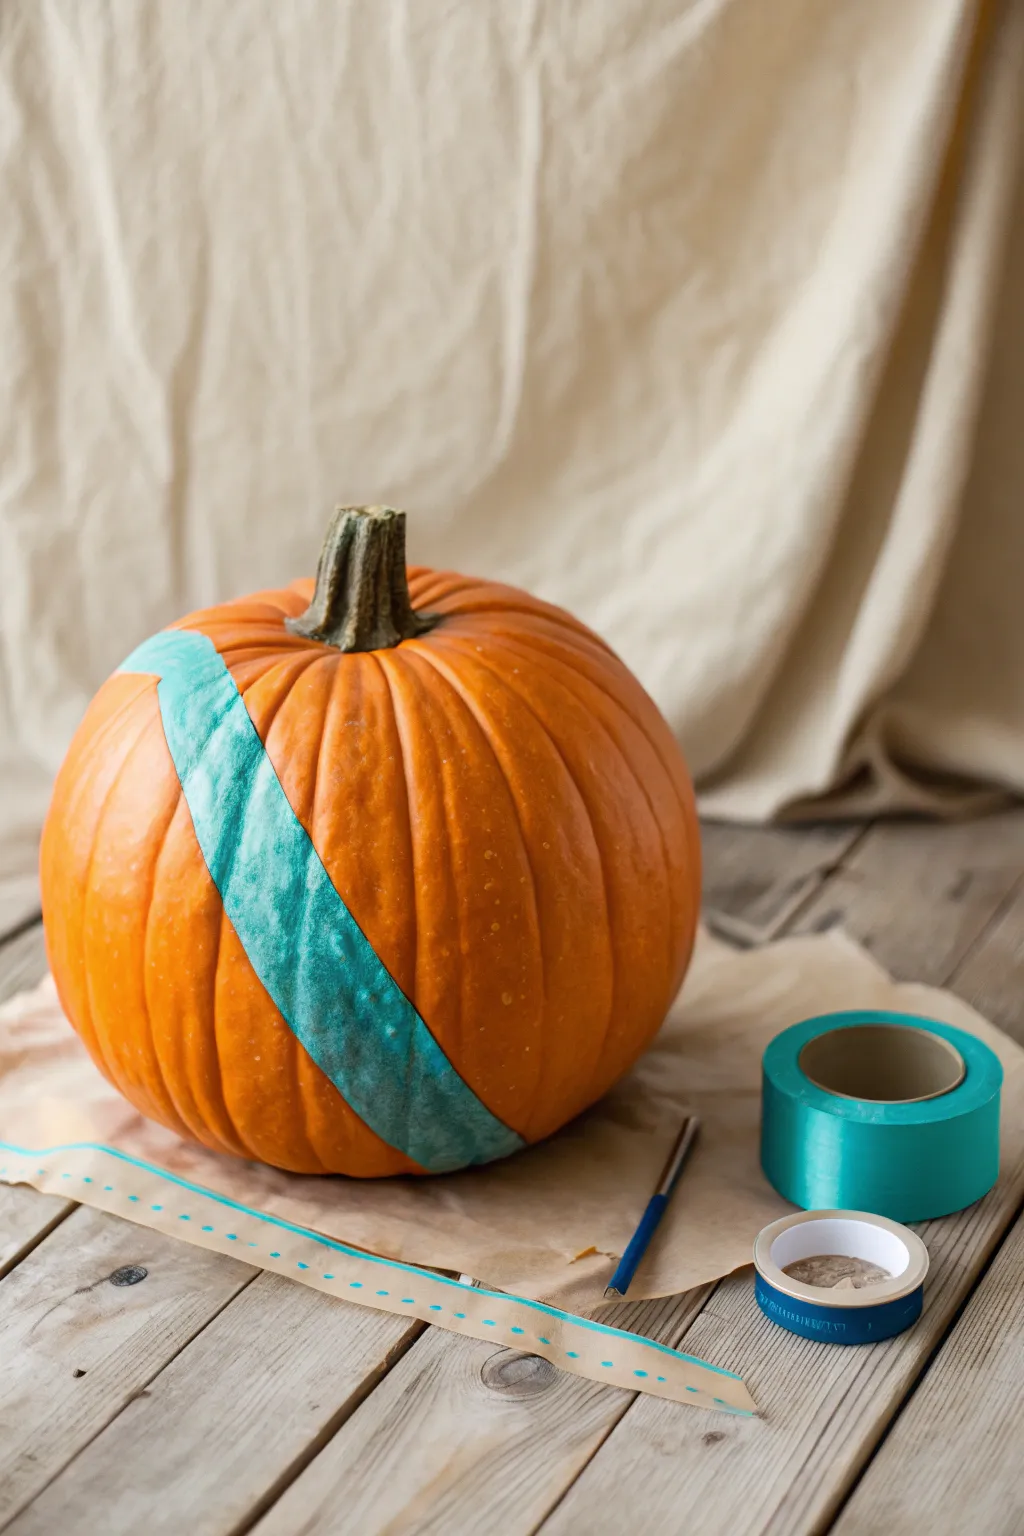
Achieve crisp, professional-looking lines on your pumpkin with this simple tape-resist technique. By masking off sections before painting, you create bold geometric patterns that stand out beautifully against the natural orange rind.
Detailed Instructions
Materials
- Medium-sized orange pumpkin
- Wide painters tape (1.5 to 2 inch width)
- Acrylic craft paint (desired colors)
- Foam brush or medium flat paintbrush
- Paper plate or palette
- Paper towels or craft paper (for work surface)
- Damp cloth
- Clear sealant spray (optional)
Step 1: Preparation
-
Clean surface:
Begin by wiping the entire surface of the pumpkin with a damp cloth to remove any dirt or field dust. This ensures the tape sticks properly. -
Dry thoroughly:
Use a dry paper towel to dry the pumpkin completely. Any residual moisture will prevent the tape from adhering well, leading to paint bleed later. -
Set up workspace:
Lay down craft paper or an old newspaper on your wooden table or work surface to catch any drips.
Step 2: Taping Design
-
Start the tape line:
Pull a long strip of wide painter’s tape from the roll. Place the starting end near the stem at the top of the pumpkin. -
Angle the stripe:
Guide the tape downwards at a diagonal angle across the front face of the pumpkin. Don’t press it down firmly just yet; simply position it to check the placement. -
Wrap around:
Continue the tape strip down to the bottom center of the pumpkin, following the natural curve. -
Secure the edges:
Once you are happy with the stripe’s position, press firmly along the entire length of the tape. Pay special attention to the edges. -
Seal the gaps:
Pumpkins are bumpy, so use your fingernail or the handle of a paintbrush to burnish the tape edges into the deep vertical grooves of the pumpkin skin. -
Add more stripes (optional):
If you want a multi-stripe design, add parallel strips of tape now, leaving gaps of orange pumpkin showing between them.
Seal the Edges
Brush a thin layer of Mod Podge over the tape edges before adding color. This creates a clear barrier so any bleeding is invisible.
Step 3: Painting & Revealing
-
Load the brush:
Squeeze a generous amount of acrylic paint onto your palette. Dip your foam brush or flat paintbrush into the paint. -
Apply first coat:
Paint over the entire exposed surface of the pumpkin, or just in specific sections if you are doing a multi-color design. You can paint right over the tape edges. -
Directional painting:
To minimize bleeding, I usually stroke the brush away from the tape edge rather than pushing paint underneath it. -
Let dry:
Allow the first coat to dry for about 15-20 minutes until it is tacky but not wet. -
Second coat:
Apply a second coat of paint for full opacity, ensuring the orange rind is completely covered. -
Wait briefly:
Let the paint dry until it is set but not perfectly rock-hard cured. This usually takes about 30 minutes depending on humidity. -
Remove tape:
Locate the end of your tape strip near the stem. Slowly and steadily peel the tape back at a 45-degree angle. Do this gently to reveal the clean orange stripe underneath. -
Touch ups:
If a tiny bit of paint bled under the tape, use a damp Q-tip or a toothpick to gently scrape it away while the paint is fresh. -
Final dry:
Allow the pumpkin to sit undisturbed for a few hours to fully cure the paint.
Reverse Pattern
Instead of leaving the stripe orange, paint the whole pumpkin white first. Apply tape, then paint a contrast color for a colorful hidden stripe.
Place your geometrically perfected pumpkin on the porch for a modern autumn look
Fingerprint Pumpkin Patch Pattern
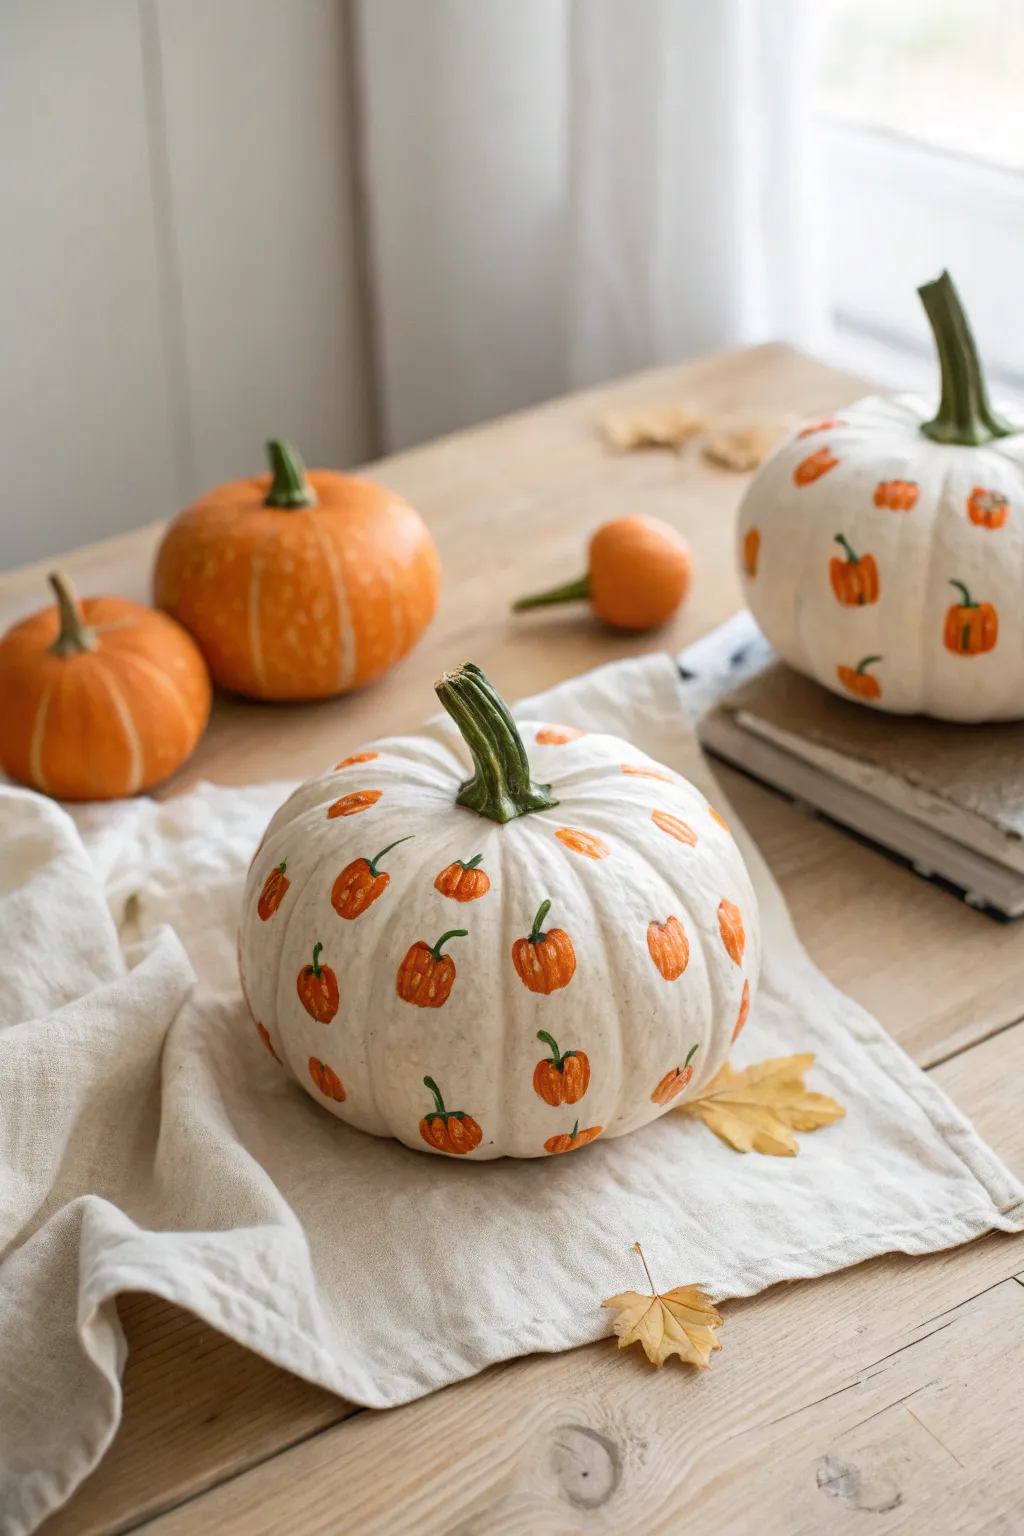
Transform a simple white pumpkin into a whimsical canvas with this adorable pattern-making project. By using fingertips to stamp the pumpkin shapes, kids can create a perfectly imperfect vintage-style design that looks surprisingly sophisticated.
Step-by-Step Guide
Materials
- White craft pumpkin (or real white pumpkin, washed and dried)
- Orange acrylic paint (matte finish works best)
- Dark green acrylic paint
- Small fine-point paintbrush
- Paper plate or palette
- Paper towels
- Clear matte sealant spray (optional)
Step 1: Preparing Your Canvas
-
Clean surface:
Begin by wiping down your pumpkin with a damp cloth to remove any dust or waxy residue. If you are using a real pumpkin, ensure it is completely dry before applying any paint. -
Set up paints:
Squeeze a generous dollop of orange acrylic paint onto your paper plate. We aren’t mixing colors here, just using the pure orange for a bright pop against the white skin. -
Test prints:
Have your child practice a few fingerprints on a scrap piece of paper first. This helps them learn how much paint to pick up and how hard to press to get a solid oval shape.
Smudged a print?
Don’t panic! Use a damp Q-tip to quickly wipe away the mistake before the acrylic dries. If it stains, let it dry and paint a new pumpkin slightly offset over the spot.
Step 2: Creating the Pumpkin Shapes
-
First dip:
Dip the pad of your index finger into the orange paint. You want a thin, even coat on the skin—too much paint will cause the print to slide and smear. -
Start at the top:
Press your painted finger firmly onto the pumpkin’s surface near the stem area. Rock your finger slightly side-to-side to ensure the edges transfer, then lift straight off. -
Create a pattern:
Continue stamping fingerprints all over the pumpkin. Try to space them out randomly but evenly, leaving about two inches of white space between each orange spot. -
Rotate and stamp:
Rotate the pumpkin carefully as you work. I usually like to finish mostly one side before turning, so I don’t accidentally smudge wet paint with my gripping hand. -
Fill the gaps:
Look for any large empty white spaces and add a fingerprint there. Don’t worry about lining them up in rows; a scattered confetti look is much more charming. -
Let it dry completely:
This is crucial: allow the orange fingerprints to dry fully. Acrylics usually take about 15-20 minutes, but since the pumpkin surface is slick, give it a bit extra time to be safe.
Step 3: Adding the Details
-
Load the fine brush:
While the orange dries, clean your finger and get the green paint ready. Dip your fine-point paintbrush into the dark green paint. -
Paint the stems:
Paint a tiny, curved line coming out of the top of each orange fingerprint. Vary the direction of the stems—some hooked left, some right—to make each mini-pumpkin look unique. -
Add ribs:
Using the very tip of your brush with just a tiny amount of orange paint (or a slightly darker orange if you have it), paint faint vertical curved lines inside the fingerprints to mimic pumpkin ribs. -
Refine the shapes:
If any fingerprints look too sheer or messy, you can dab a tiny bit more orange paint over them with a brush now to solidify the shape. -
Leaf details:
For extra flair, add a tiny green distinct dot or a microscopic swirl next to a few of the stems to suggest a vine or leaf, though keeping it simple is often best. -
Final dry:
Let the green stems dry completely. Be careful handling the pumpkin until everything is touch-dry. -
Seal the deal:
If you plan to display this outdoors or want to keep it for next year (if using a faux pumpkin), take it outside and spray a light coat of clear matte sealant over the entire surface.
Make it 3D
Once the paint is dry, use a tiny drop of craft glue to attach real dried pumpkin stems or tiny twists of green pipe cleaner to a few of the painted pumpkins for texture.
Now you have a charming, hand-printed centerpiece that celebrates the season without the mess of carving


Sponge-Stamped Pumpkin Textures
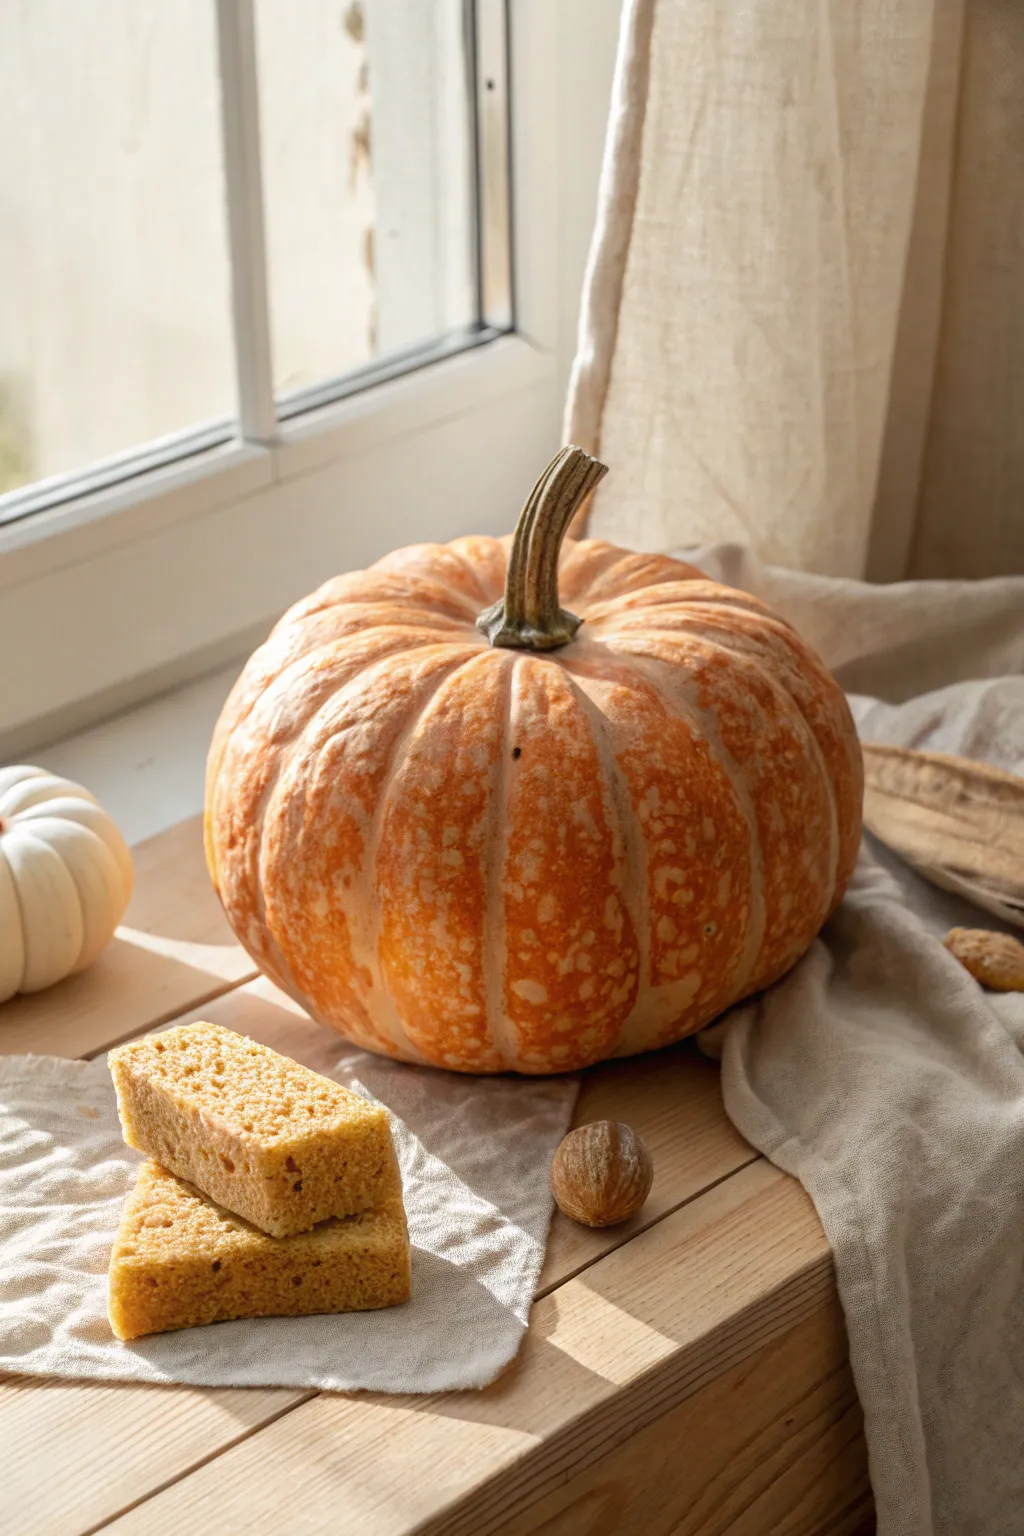
Move beyond plain orange paint by mimicking the natural, speckled skin of a real pumpkin using simple sponge techniques. This method creates a rich, mottled texture that looks surprisingly lifतीय on a flat surface or a 3D papier-mâché base.
Step-by-Step
Materials
- Large fake pumpkin (foam or craft store base) or heavy cardstock cut into a pumpkin shape
- Acrylic paints: Bright orange, burnt sienna (brown-orange), cream/pale yellow, and muted green
- Kitchen sponge (cut into small pieces)
- Medium round paintbrush
- Paper plate or palette
- Matte finish sealant spray (optional)
Step 1: Base Coat Application
-
Prepare the surface:
If you are using a smooth craft pumpkin, lightly sand the surface first to help the paint adhere better. Wipe away any dust with a damp cloth. -
Mix the base color:
Combine your bright orange acrylic paint with a tiny drop of cream to soften the tone. You want a warm, inviting base layer rather than a neon orange. -
Apply the first layer:
Paint the entire pumpkin surface with this base mixture using your paintbrush. Don’t worry about brushstrokes showing; we will cover most of this later. -
Let it dry completely:
Allow the base coat to dry fully. If the original color of the craft pumpkin is still showing through, apply a second coat for solid coverage.
Natural Texture Hack
Use a natural sea sponge instead of a synthetic kitchen sponge. The irregular holes create even more realistic, random organic patterns.
Step 2: Creating the Speckled Texture
-
Prepare your sponge:
Take a standard kitchen sponge and cut a 2-inch piece. I like to pluck small bits of foam off the painting surface of the sponge to create an uneven, organic texture. -
Load the sponge:
Dip your textured sponge into a mixture of burnt sienna and bright orange. Dab the excess paint off onto your paper plate until the print looks light and airy, not like a solid blob. -
Start stamping:
Gently stamp the sponge over the pumpkin. Focus on creating random clusters of texture rather than a perfect grid pattern. This darker orange mimics the natural variations in pumpkin skin. -
Add lighter highlights:
Flip your sponge to a clean side (or use a fresh piece). Dip it into a creamy pale yellow paint, off-load the excess, and lightly dab over the upper curves of the pumpkin. -
Blend the textures:
While the paint is still slightly tacky, use a dry, clean sponge piece to gently press over areas where the colors meet. This softens the transition between the dark orange speckles and the light highlights.
Add Imperfections
Real pumpkins aren’t perfect. Add a small brown ‘wart’ or a scratch using a fine brush to give your creation authentic character.
Step 3: Defining the Ribs
-
Mix a shadow color:
Create a translucent wash by mixing a small amount of burnt sienna with water. It should be runny, like watercolor. -
Paint the grooves:
Using a thin brush, paint lines vertically down the pumpkin to simulate the natural ribs. The watery paint will naturally settle into the recesses of a craft pumpkin, creating depth. -
Feather the lines:
Immediately use a damp brush or a clean piece of sponge to wipe the edges of these lines, blurring them so they look like soft shadows rather than harsh stripes.
Step 4: The Realistic Stem
-
Base coat the stem:
Paint the stem thoroughly with a muted green acrylic paint. Let this dry completely. -
Dry brush formatting:
Dip a stiff brush into a dark brown paint and wipe almost all of it off on a paper towel. Lightly drag the brush vertically along the ridges of the stem to catch the texture. -
Add the cut end:
Paint the very top flat circle of the stem with a lighter brownish-green to look like a fresh cut. -
Final seal:
Once your masterpiece is fully dry, you can spray it with a clear matte sealant to protect the paint and give it a unified, realistic finish.
Place your textured artwork near a window to let the natural light show off your realistic painting skills
Easy Shaded Ribs for 3D Pumpkins
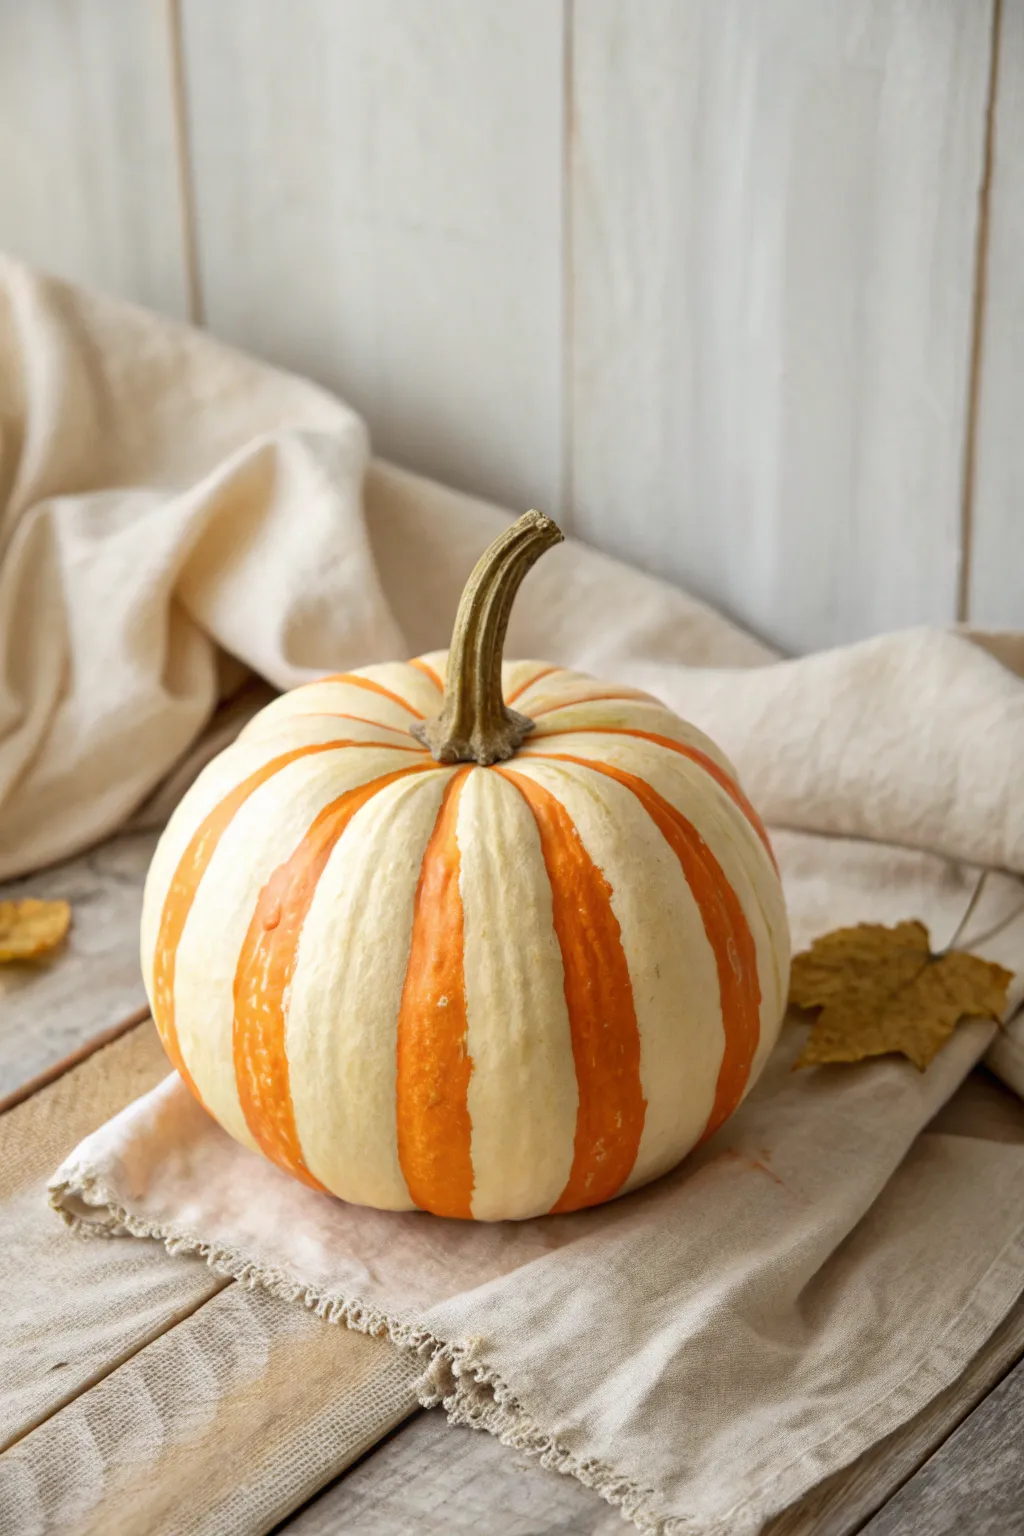
This simple yet effective painting technique transforms a basic white mini pumpkin into a vibrant, dual-toned centerpiece. By following the pumpkin’s natural shape, you achieve a clean, professional look that preserves a rustic charm.
Step-by-Step Guide
Materials
- Small white pumpkin (real or artificial)
- Orange acrylic paint (bright pumpkin orange)
- Flat shader brush (size 6 or 8)
- Small round brush (size 2 or 4)
- Palette or paper plate
- Paper towels for cleanup
- Dish of water
- Matte finish sealer (optional)
Step 1: Preparation and Planning
-
Prepare the Pumpkin:
Start by gently washing your pumpkin with a damp cloth to remove any dirt or waxy residue. Dry it completely with a paper towel, as moisture will prevent the acrylic paint from adhering properly. -
Inspect the Ribs:
Examine the natural grooves and ribs of your pumpkin. Identify which alternating sections you want to paint orange and which will remain the natural creamy white. -
Set Up Paints:
Squeeze a dollop of bright orange acrylic paint onto your palette. If the paint feels too thick, you can thin it with a tiny drop of water to help it flow more smoothly over the pumpkin’s skin.
Use Your Pinky
To steady your hand on a curved surface, rest your pinky finger gently on a dry part of the pumpkin while you paint. This creates an anchor for smoother lines.
Step 2: Painting the Stripes
-
Start at the Top:
Take your flat shader brush and load it with orange paint. Place the brush tip right at the base of the stem where a rib begins. -
The First Stroke:
Slowly pull the brush downward along the center of the rib. Don’t worry about filling the whole width of the rib yet; just establish a straight, confident line down the middle. -
Refine the Edges:
Using the same flat brush, gently widen your stroke to fill the rib. Be careful not to paint into the deep groove; you want the orange to sit on the raised part, leaving the recessed groove clean for contrast. -
Taper the Bottom:
As you reach the bottom of the pumpkin, allow the stroke to taper off naturally where the pumpkin sits on its base. This creates a soft, unfinished edge that looks organic. -
Skip a Section:
Leave the next rib completely unpainted to show the white skin. Move to the subsequent rib and repeat the painting process. -
Complete the Pattern:
continue working your way around the pumpkin, painting every other rib orange. This alternating pattern is key to the design’s striped effect. -
Clean Up Mistakes:
If I accidentally slip and get orange paint in a white groove, I quickly wipe it away with a damp paper towel or cotton swab before it dries.
Step 3: Finishing Details
-
Allow to Dry:
Let the first coat of paint dry deeply for about 15 to 20 minutes. Acrylics on pumpkin skin can be slippery, so patience here prevents smearing. -
Check Coverage:
Inspect your orange stripes. If the coverage looks streaky or transparent, apply a second thin coat of orange paint over the existing stripes for a bold, opaque color. -
Detail the Stem Base:
Switch to your small round brush. Carefully tidy up the area where the orange paint meets the stem, creating a clean, curved line that hugs the stem base without painting on it. -
Texture Work:
For a more rustic look like the example, use a mostly dry brush to feather the edges of the orange stripes slightly. This softens the transition between the orange paint and the white skin. -
Final Inspection:
Rotate the pumpkin and look for any missed spots or uneven edges. Touch up as necessary with your small brush. -
Seal (Optional):
If you plan to use this pumpkin outdoors or want it to last longer, brush a light coat of matte sealer over the entire surface once the paint is fully cured.
Slippery Paint?
If the acrylic paint beads up on the pumpkin skin, the surface is too waxy. Lightly buff the skin with a fine-grit sandpaper or a scouring pad to help the paint stick.
Your striped pumpkin is now ready to add a pop of cheerful color to your fall table display
Googly-Eye Surprise Pumpkins
Add instant personality to a collection of mini pumpkins with this delightfully simple craft. By mixing natural textures with playful oversized eyes and simple drawn expressions, you create a charming family of gourds perfect for a windowsill display.
Step-by-Step
Materials
- Assorted mini pumpkins and gourds (orange, white, and striped varieties)
- Adhesive googly eyes regarding various sizes (large and medium)
- Strong craft glue or clear-drying tacky glue
- Black permanent marker or black acrylic paint pen
- Damp cloth or paper towel
Step 1: Preparation & Selection
-
Clean surface:
Begin by gently wiping down each pumpkin with a damp cloth to remove any dirt or dust from the garden. A clean surface is crucial for the adhesive to stick properly. -
Dry thoroughly:
Use a dry paper towel to ensure every pumpkin is completely moisture-free before moving on to decoration. -
Group by height:
Arrange your pumpkins in a loose line to see how they look together. I like to alternate colors—placing a white one between two oranges—to create visual interest.
Sticky Situation
If you’re using real pumpkins, their waxy skin can be tricky. A tiny dab of hot glue works instantly but use the low-temp setting to avoid burning the gourd skin.
Step 2: Creating Characters
-
Choose your eyes:
Select pairs of googly eyes for each pumpkin. Try mixing sizes for a quirkier look, or use two large identical eyes for a surprised expression. -
Test placement:
Hold the eyes up to the pumpkin without glue first to find the ‘face.’ Look for the smoothest side of the pumpkin to serve as the front. -
Apply adhesive:
Put a small dot of craft glue on the back of a googly eye. You don’t need much, just enough to secure it to the uneven skin. -
Secure the first eye:
Press the eye firmly onto your chosen spot and hold it for about 10-15 seconds to let the glue tack up. -
Add the second eye:
Repeat the gluing process for the second eye. Position it close to the first one for a cute, huddled look, or slightly wider apart for a goofy appearance. -
Let dry flat:
If the pumpkin is round and rolls easily, prop it up or lay it on its back so the eyes don’t slide down while drying.
Step 3: Adding Expressions
-
Plan the mouth:
Identify which pumpkin will be the ‘happy’ one. The orange pumpkin in the foreground works best for a simple smile. -
Draw the smile:
Using a black permanent marker or paint pen, draw a simple, curved line beneath the eyes. Keep the stroke swift and confident to avoid bleeding ink. -
Add cheek details:
For extra charm, add tiny perpendicular ticks at the ends of the smile line to create dimples. -
Check stability:
Wait a moment for the marker to dry completely so it doesn’t smudge when you handle the pumpkin.
Accessory Upgrade
Give your pumpkin family even more character by gluing on pipe cleaner glasses, yarn hair, or tiny felt hats to match their new googly-eyed personalities.
Step 4: Final Arrangement
-
Mix plain and personalized:
Leave one or two striped gourds completely unadorned. This contrast makes the ones with faces pop even more. -
Set the scene:
Place your main character—the smiling orange pumpkin—slightly forward on the ledge. -
Layer the back:
Tuck larger or taller pumpkins, like the tall-stemmed orange one, behind smaller gourds to create depth. -
Final adjustments:
Rotate the pumpkins slightly so their ‘gaze’ is directed outward or toward each other, giving the group a sense of interaction.
Now your windowsill is populated by a cheerful crew of pumpkin friends ready to greet anyone who passes by
Donut-Style Frosted Pumpkin
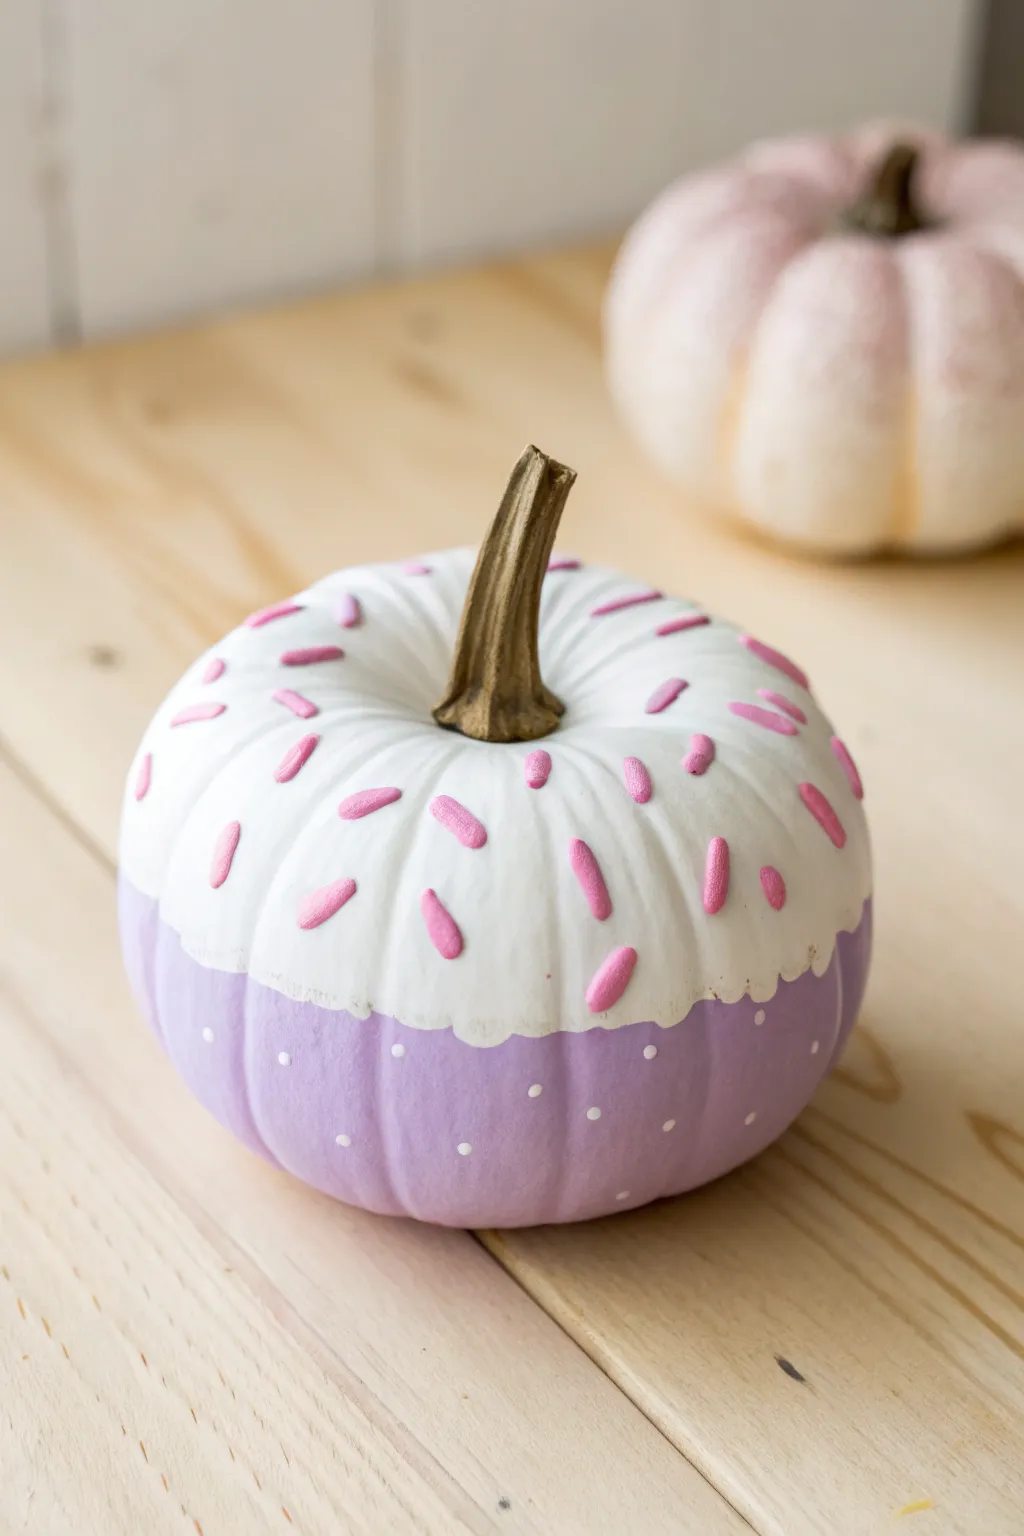
Transform a simple pumpkin into a delectable-looking treat with this clever donut-inspired design, complete with frosting, sprinkles, and a pastry base. This playful project combines soft pastels and bold icing details for a decoration that looks good enough to eat.
Detailed Instructions
Materials
- Small to medium craft pumpkin (real or faux)
- White acrylic craft paint
- Light lavender or lilac acrylic craft paint
- Pink acrylic craft paint
- Medium flat paintbrush
- Small round detail paintbrush
- Very fine point paintbrush or dotting tool
- pencil (optional)
- Palette or paper plate
- Water cup and paper towels
Step 1: Base Layers
-
Clean surface:
Begin by wiping down your pumpkin with a slightly damp cloth to remove any dust or dirt. Let it dry completely so the paint adheres properly. -
Mark the horizon line:
Visualize where your ‘frosting’ will end—usually about halfway down the pumpkin. If you’re nervous about freehanding, use a pencil to lightly sketch a wavy, scalloped line around the middle circumference. -
Paint the bottom half:
Using your medium flat brush and the lavender paint, fill in the bottom section of the pumpkin. Paint right up to your wavy line, ensuring good coverage. -
Second coat for opacity:
Acrylics can sometimes be translucent, especially pastels. Once the first lavender layer is dry to the touch, apply a second coat so the orange doesn’t show through. -
Paint the top frosting:
Switch to white paint. Using a clean flat brush, paint the top half of the pumpkin, including the area around the stem. Allow the white paint to overlap the top edge of the purple section slightly. -
Create the drip effect:
While painting the white section, carefully shape the bottom edge into rounded scallops. I find it easiest to push the paint downward in small curves to mimic thick, dripping icing. -
Let it dry completely:
Allow both sections to dry fully before moving on to details. This prevents the colors from smudging or lifting when you add the decorations next.
Pro Tip: 3D Sprinkles
For realistic texture, use ‘puffy paint’ or dimensional fabric paint for the sprinkles. They will stand up off the surface just like real candy treats.
Step 2: Adding the ‘Sprinkles’ and Details
-
Prepare the sprinkle color:
Load a small round detail brush with pink acrylic paint. Make sure the consistency isn’t too runny so the sprinkles hold their shape. -
Paint the first sprinkles:
Touch the brush to the dried white ‘frosting’ area and pull it slightly to create short, pill-shaped dashes. Paint these in random directions just like real sprinkles fall. -
Vary the placement:
Distribute the pink sprinkles evenly around the top, ensuring some land on the ridges and some in the grooves of the pumpkin for a natural look. -
Build opaque sprinkles:
If the pink looks a bit transparent over the white, let the first layer of sprinkles dry and dab a second layer of pink right on top to make them pop. -
Start the bottom dots:
For the bottom half, dip a very fine point brush or the tip of a dotting tool into your white paint. -
Apply the polka dot pattern:
Gently dot white spots onto the lavender section. Space them out regularly to create a clean, patterned look that contrasts with the random sprinkles above. -
Check spacing:
Rotate the pumpkin as you work to ensure your polka dots remain somewhat consistent in size and spacing all the way around. -
Clean up edges:
Inspect the boundary where the white frosting meets the purple base. If the line looks messy, use a small brush with the appropriate color to tidy up the curves. -
Final stem touch-up:
If you got any white paint on the stem, carefully wipe it off with a damp cloth or paint over it with a brown or metallic gold for a finished look.
Level Up: Glossy Finish
After the paint is fully cured, coat just the white ‘frosting’ section with a high-gloss varnish. It will look like fresh, wet glaze.
Enjoy displaying your adorable dessert-themed pumpkin this autumn season
Galaxy Swirl Pumpkin
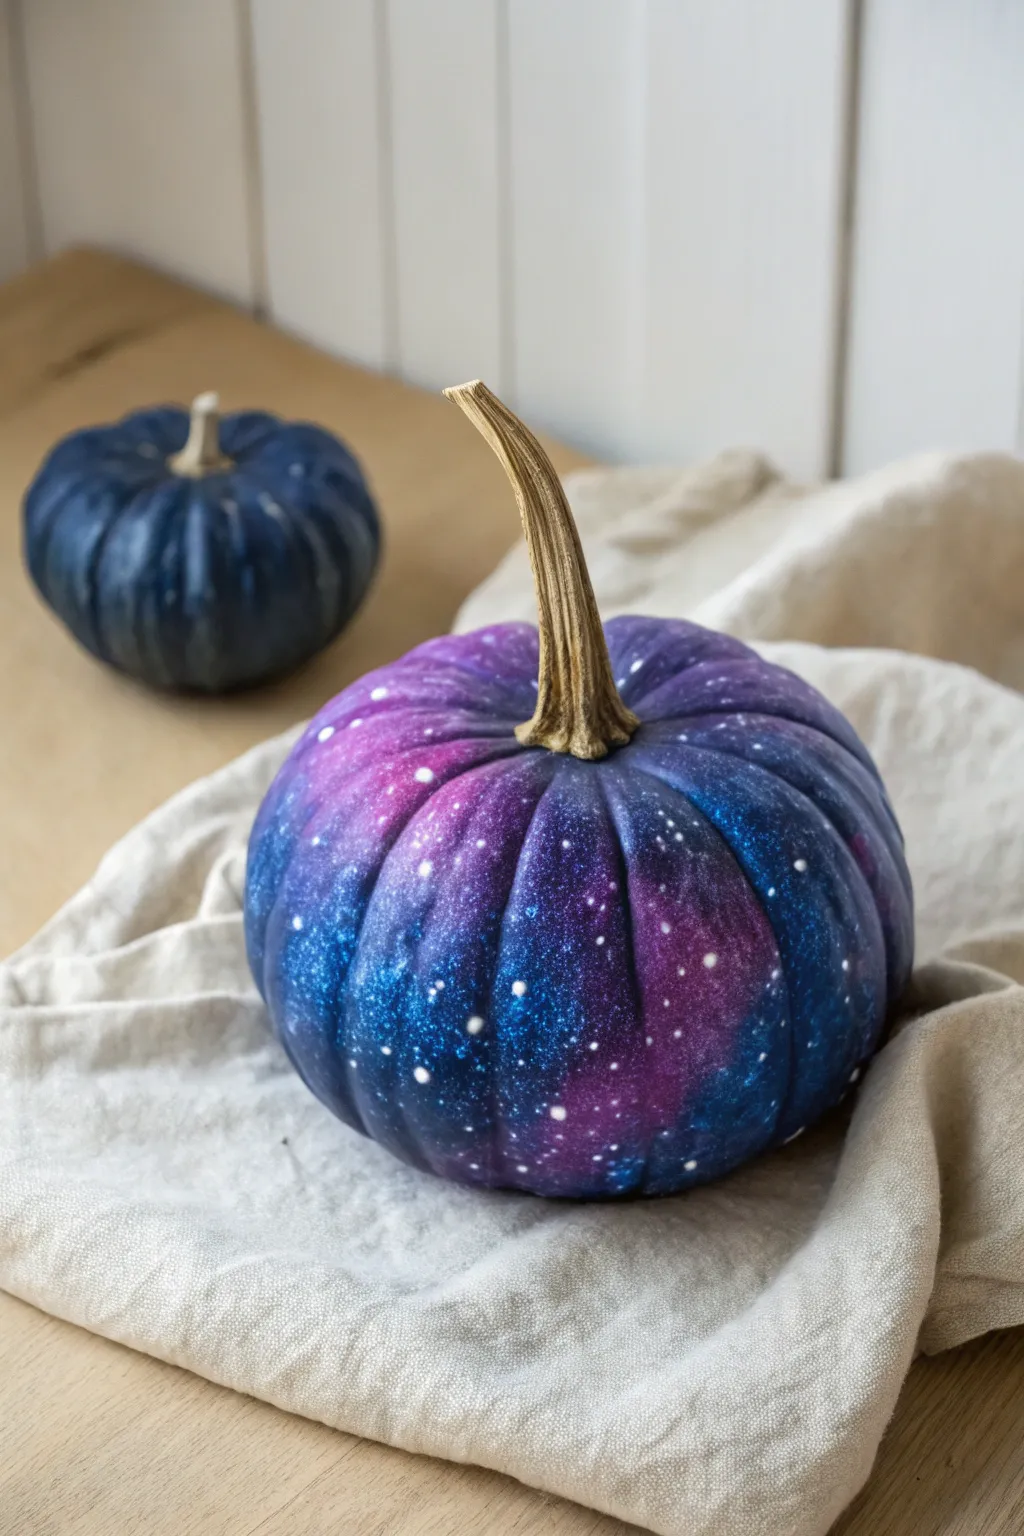
Transform an ordinary pumpkin into a piece of the cosmos with this stunning galaxy painting technique. By layering deep blues, purples, and touches of starry white, you’ll create a mesmerizing night sky effect that looks incredibly professional yet is simple enough for kids to master.
Step-by-Step
Materials
- Pumpkin (real or faux)
- Black acrylic paint
- Dark blue acrylic paint
- Purple or violet acrylic paint
- Teal or magenta acrylic paint (optional accents)
- White acrylic paint
- Sponge brushes or kitchen sponges
- Stiff-bristled toothbrush
- Small round paintbrush
- Cup of water and paper towels
- Clear sealant spray (optional)
Step 1: Setting the Stage
-
Clean the surface:
Before you begin, wipe down your pumpkin with a damp cloth to remove any dirt or dust. If using a real pumpkin, ensure it is completely dry before applying paint. -
Base coat application:
Using a sponge brush, cover the entire pumpkin with a solid coat of black acrylic paint. This creates the deep darkness of space needed for the colors to pop. -
Let it dry:
Allow the black base coat to dry completely. This usually takes about 15-20 minutes depending on the thickness of the paint.
Muddy Colors?
If your galaxy looks gray or muddy, ensure each layer is touch-dry before adding the next. Also, use a fresh sponge area for every new color you introduce.
Step 2: Creating the Galaxy
-
Prepare your sponges:
Cut a kitchen sponge into small, manageable wedges, or grab a few small sponge daubers. You will want separate sponges for your blue, purple, and accent colors to keep them from turning muddy. -
Start with dark blue:
Dip a sponge lightly into dark blue paint and dab off the excess on a paper towel. You want a dry-brush texture, not a wet globs. -
Sponge on the blue:
Gently dab the dark blue paint onto the pumpkin in random patches. Focus on creating cloudy shapes rather than solid blocks of color, leaving plenty of black space visible between the patches. -
Layering purple:
Using a fresh sponge wedge, pick up some purple paint. Dab this over parts of the blue sections and slightly onto the black areas to blend them together softly. -
Adding highlights:
I like to mix a tiny bit of white into the purple or blue to create a lighter variation. Sponge this lighter shade very sparingly into the center of your colored clouds to give them depth and a glowing effect. -
Optional accent colors:
If you want more vibrancy, dab small touches of teal or magenta near the edges of your purple clouds, blending them out until they fade into the background.
Step 3: The Starry Finish
-
Prepare the stars:
Thin down a small amount of white acrylic paint with a few drops of water. The consistency should be fluid, almost like heavy cream. -
The flicking technique:
Dip an old toothbrush into the thinned white paint. Hold the brush a few inches from the pumpkin and run your thumb across the bristles to flick a fine mist of specks onto the surface. -
Adding bigger stars:
Take a small round paintbrush or the handle end of a brush, dip it in un-thinned white paint, and dot a few larger stars manually. Place these randomly, perhaps focusing on the brighter colored areas. -
Creating a starburst:
For an extra touch, use a fine detail brush to paint a tiny cross shape over one or two of the larger white dots to create a twinkling starburst effect. -
Clean the stem:
If painting got messy near the top, carefully wipe paint off the stem with a damp cloth, or choose to paint the stem gold or silver for a metallic contrast. -
Final drying:
Let the galaxy layers dry completely. Since we used thin layers with sponges, this should happen quickly. -
Sealing the work:
To protect your galaxy from moisture and chipping, take the pumpkin outside and spray it with a clear acrylic sealer.
Level Up: Metallic Magic
Mix glitter into your clear sealant or use a metallic gold paint to sponge faint clouds alongside the purple for a shimmering interstellar dust effect.
Step back and admire your own slice of the universe right on your table
Drip and Splatter Pumpkin
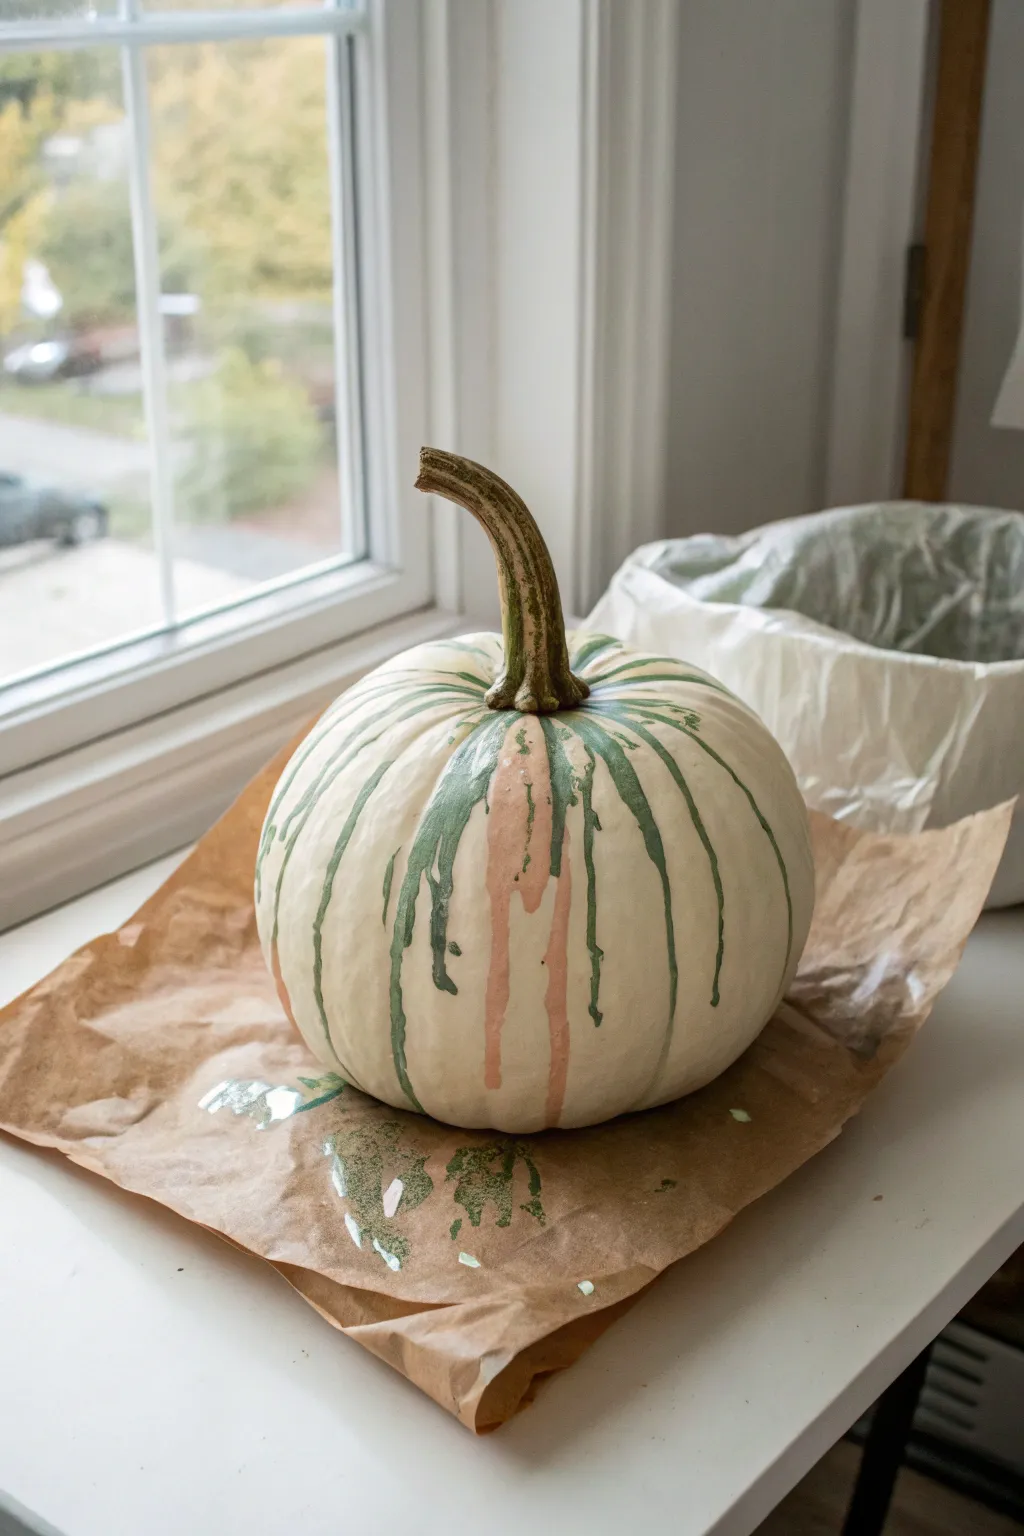
Embrace the beauty of imperfection with this elegantly simple drip technique that transforms a standard pumpkin into a modern art piece. The result is a striking design featuring cascading rivulets of muted greens and soft pinks against a clean white canvas.
Step-by-Step Guide
Materials
- Medium-sized pumpkin (white Lumina or standard orange)
- White matte acrylic paint (if using an orange pumpkin)
- Sage or olive green craft acrylic paint
- Soft blush or peach pink craft acrylic paint
- Small squeeze bottles or rinsing cups (for pouring)
- Water
- Mixing sticks or spoons
- Large sheet of butcher paper or newspaper to protect surfaces
- Painter’s tape or plastic wrap (optional, for stem protection)
Step 1: Preparation & Base Coat
-
Clean the surface:
Before starting, wipe down your pumpkin with a damp cloth or a mild soapy water solution to remove any dirt or field grime. Dry it thoroughly with a towel. -
Set up your workspace:
Lay down a large piece of brown butcher paper or thick newspaper on your table. This project gets messy by design, so ensure your protective layer is wider than the pumpkin. -
Protect the stem:
If you want to keep the natural look of the pumpkin stem, carefully wrap it in painter’s tape or a bit of plastic wrap to shield it from stray paint drips. -
Create a blank canvas:
If you are starting with a standard orange pumpkin, apply two coats of matte white acrylic paint to the entire surface, allowing full drying time between coats. If you have a naturally white pumpkin like the one pictured, you can skip this step.
Step 2: Mixing the Paint
-
Prepare the green mixture:
Squeeze a generous amount of sage or olive green acrylic paint into a rinsing cup or small bowl. -
Thin the paint:
Add water to the green paint very slowly—about half a teaspoon at a time—stirring constantly with a mixing stick. You want a consistency similar to heavy cream or melted ice cream, where it flows easily but isn’t watery. -
Prepare the pink mixture:
Repeat the previous step with your blush pink paint in a separate container. I find that testing the consistency on a piece of scrap paper helps ensure the drip isn’t too fast. -
Load the applicators:
If using squeeze bottles, carefully pour your thinned paints into them. If you don’t have bottles, you can simply use a spoon or the cup itself for pouring in the next phase.
Gravity Guide
Work slowly with your pours. You can always add more paint to make a drip longer, but you can’t erase a drip once it hits the bottom.
Step 3: Creating the Drips
-
Start at the top:
Position your applicator or spoon right at the base of the stem, near the top ridge of the pumpkin. -
First pour: Green:
Gently squeeze or pour a small puddle of the green paint mixture and let gravity do the work. Watch as it naturally finds the grooves of the pumpkin and travels down the sides. -
Vary the lengths:
Move around the stem, applying more paint in some sections and less in others. This variation creates different drip lengths, adding visual interest. -
Add the accent color:
While the green is still tacky or wet, introduce the pink paint. Pour it sparingly in the gaps between the green drips to create a soft contrast. -
Overlay the colors:
Don’t be afraid to let a little pink drip directly over a green section. Since the green is arguably the dominant color here, the pink acts as a lovely highlight. -
Check the flow:
If a drip stops too high up, you can gently tilt the pumpkin slightly to encourage it to run further down, or simply add a tiny drop more paint to the top of that specific stream. -
Manage the base:
As paint reaches the bottom, it might pool on the paper. This is fine and adds to the messy-chic aesthetic, but you can wipe excess pooling away with a paper towel if you want a cleaner bottom edge.
Metallic Magic
Once the matte colors are dry, add a few thin drips of metallic gold or liquid chrome paint for a glamorous, high-contrast finish.
Step 4: Finishing Touches
-
Remove stem protection:
If you taped the stem, carefully peel it away while the paint is still wet to avoid pulling up any dried acrylic skin later. -
Let it cure:
Allow the pumpkin to sit undisturbed for several hours or overnight. Because the paint is applied thickly in drips, the drying time is longer than a standard coat.
Place your masterpiece on a windowsill or porch to show off its lovely cascading colors
Sticker-Resist Name Pumpkin
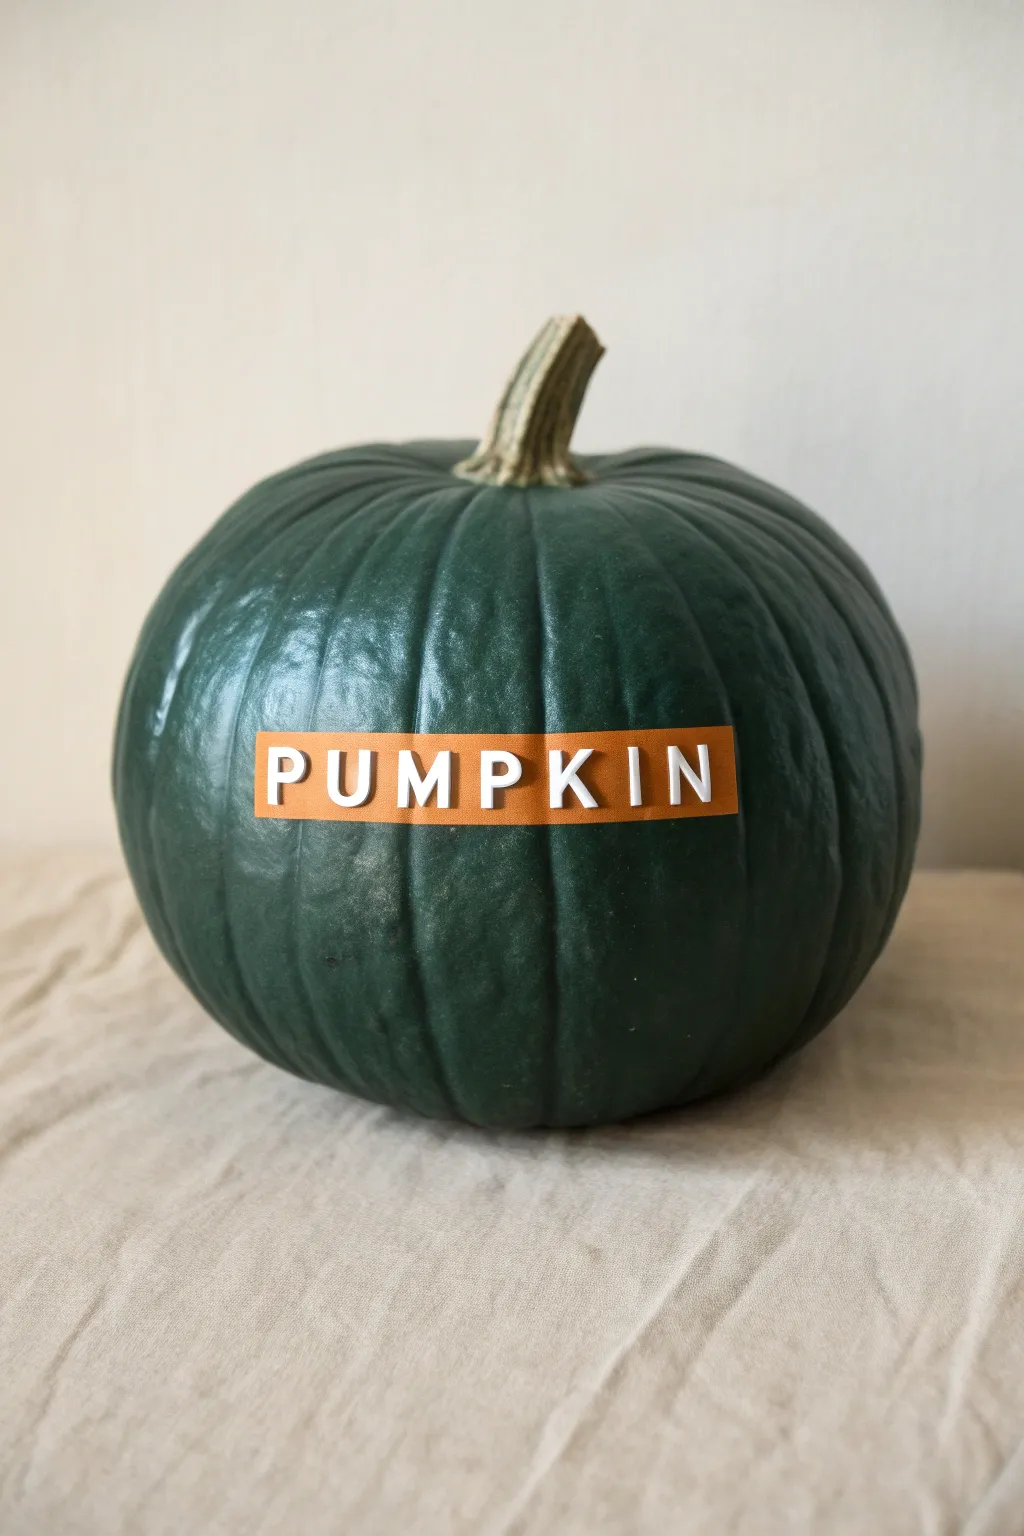
This chic and simple pumpkin design uses a bold color blocking technique to create a striking customizable label. It’s a clean, modern way to display a name or message using contrasting paint and simple adhesive letters.
Step-by-Step
Materials
- A medium-sized pumpkin (real or faux)
- Dark green acrylic paint (matte finish recommended)
- Orange acrylic paint
- Adhesive foam letter stickers (white)
- Painter’s tape or masking tape
- Medium flat paintbrush
- Small flat paintbrush
- Damp cloth or paper towel
- Palette or paper plate
Step 1: Preparation & Base Coat
-
Clean the Surface:
Begin by wiping down your pumpkin with a damp cloth to remove any dirt or dust. A clean surface ensures the paint adheres smoothly and evenly. -
Dry Completely:
Let the pumpkin air dry fully before applying any materials. Trapped moisture can cause the paint to bubble or peel later on. -
Tape the Label Area:
Decide where you want your name label to sit. Apply a strip of painter’s tape horizontally across the widest part of the pumpkin to mask off the area that will eventually be orange. -
Press Edges Firmly:
Run your finger along the edges of the tape, pressing down firmly into the pumpkin’s vertical grooves. This seal is crucial to prevent green paint from seeping underneath. -
Paint the Top Half:
Using your medium flat brush and dark green acrylic paint, cover the upper portion of the pumpkin, painting right over the top edge of the tape. -
Paint the Bottom Half:
Continue painting the bottom section of the pumpkin dark green, covering the bottom edge of the tape. Ensure the entire pumpkin surface, except specifically under the tape, is covered. -
Second Coat Application:
I usually find that one coat is a bit streaky, so let the first layer dry to the touch and apply a second coat of green for a rich, opaque finish. -
Dry Thoroughly:
Allow the green paint to dry completely. This step requires patience, as peeling the tape too early can lift the paint.
Seal the Tape
Before painting green, brush a thin layer of clear matte medium over the tape edges. This locks the seal and ensures absolutely perfect, crisp lines when you peel it off.
Step 2: Creating the Label
-
Remove the Tape:
Carefully peel away the painter’s tape to reveal the unpainted natural strip underneath. Pull the tape slowly at a 45-degree angle to keep the green edges crisp. -
Fill the Strip:
Switch to your smaller flat brush and fill in the unpainted horizontal strip with bright orange acrylic paint. -
Mind the Edges:
Paint carefully along the green borders. You want a solid block of orange, but try not to overlap onto the green sections you’ve already perfected. -
Build Opacity:
Orange pigment is often translucent, so apply two or three thin layers until the color is solid and vibrant, letting it dry briefly between coats. -
Dry the Orange Strip:
Wait until the orange section is fully dry. If it’s tacky, the letter stickers won’t adhere properly.
Letters Keep Popping Off?
Pumpkin skins can be oily or uneven. If self-adhesive stickers won’t stay put, add a tiny dot of craft glue or hot glue to the back of each letter for a permanent hold.
Step 3: Applying Letters
-
Select Your Letters:
Pick out the white foam letters needed to spell ‘PUMPKIN’ or your child’s name. Lay them out on a table first to check spacing. -
Center the Middle Letter:
To center the word perfectly, identify the middle letter (in ‘PUMPKIN’, it’s the ‘P’) and place it in the exact center of the orange strip. -
Work Outward:
Place the remaining letters on either side of the center letter. This ensures the word remains balanced and doesn’t run off one side. -
Press Into Grooves:
Since pumpkins have a ribbed texture, press firmly on each sticker, bending them slightly if needed to conform to the curves of the fruit. -
Final Touch-Ups:
Inspect the edges where the orange and green meet. If any lines look wobbly, use a tiny detailed brush with green paint to tidy them up.
Now you have a sophisticated, personalized decoration that looks great on a porch or mantle


Have a question or want to share your own experience? I'd love to hear from you in the comments below!