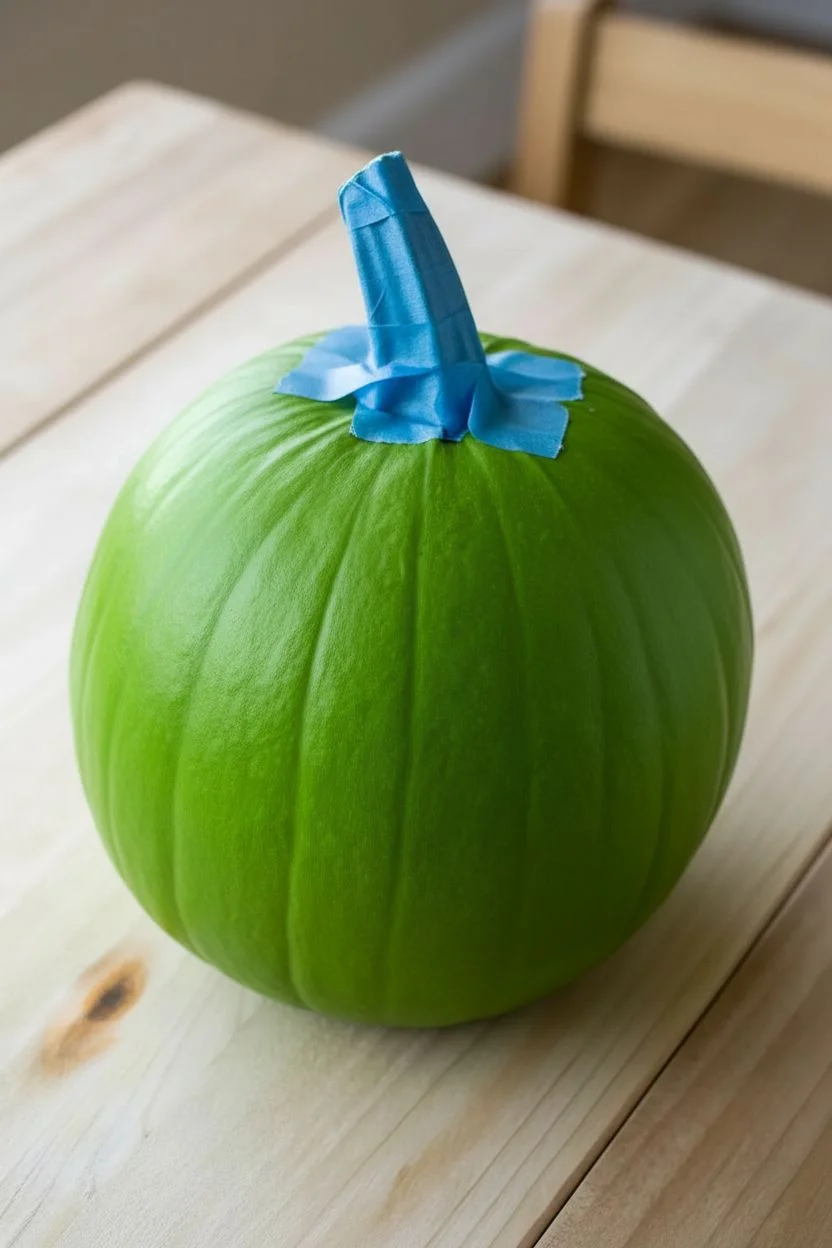
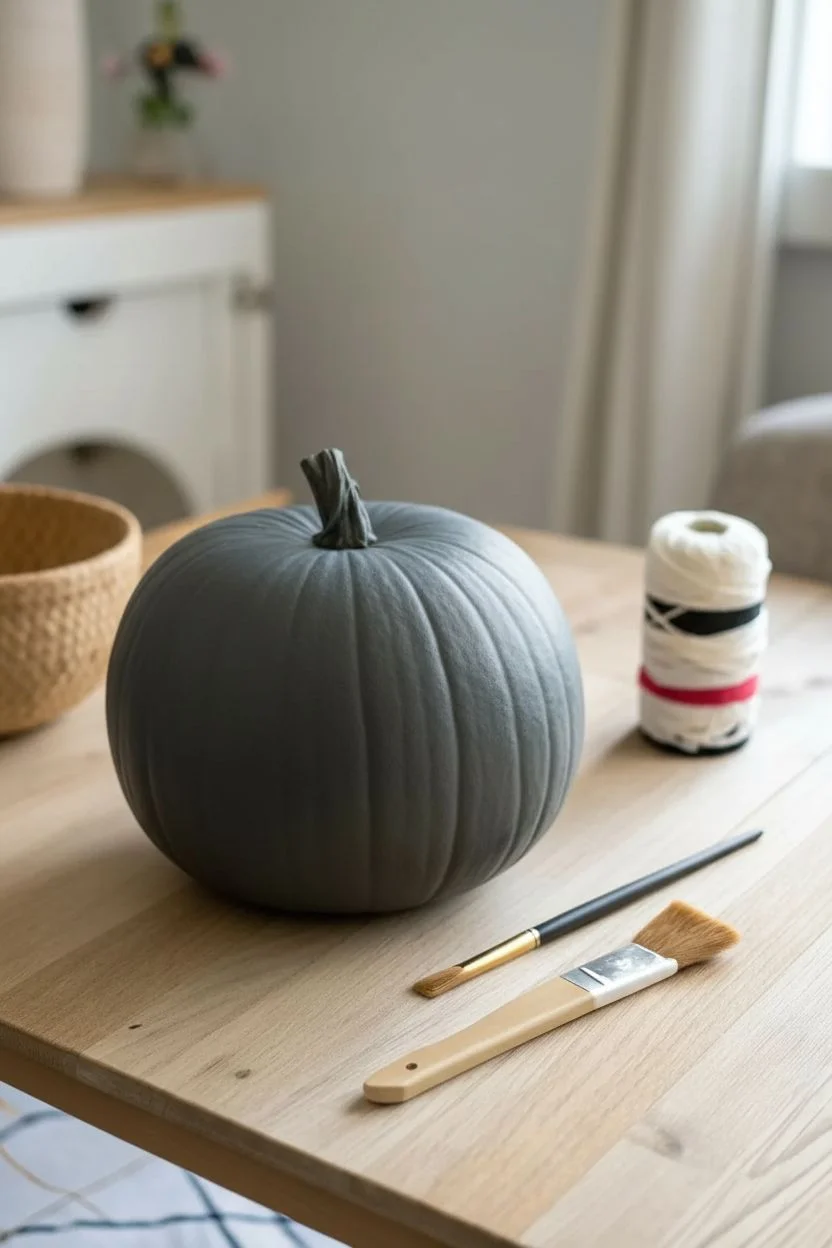
Let’s skip the messy guts and sticky seeds this year by grabbing our paintbrushes for some hauntingly beautiful decor. These spooky designs are all about achieving a chilling effect with simple strokes, perfect for anyone wanting to add a touch of fright to their porch without the carving tools.
The Classic Sheet Ghost Face
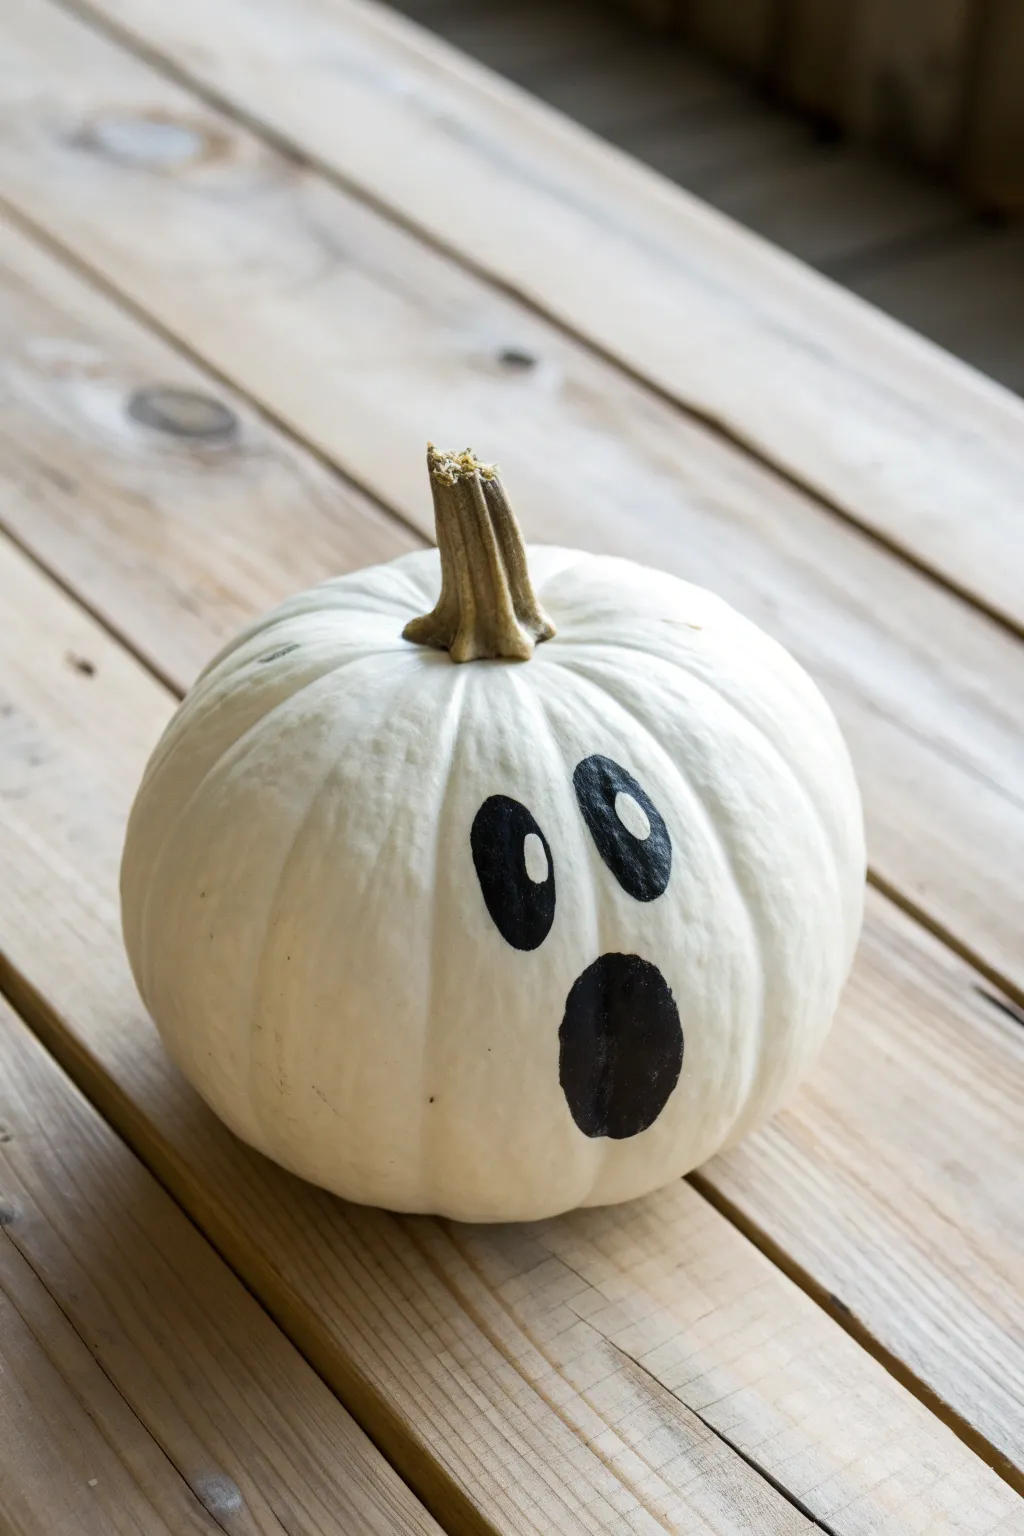
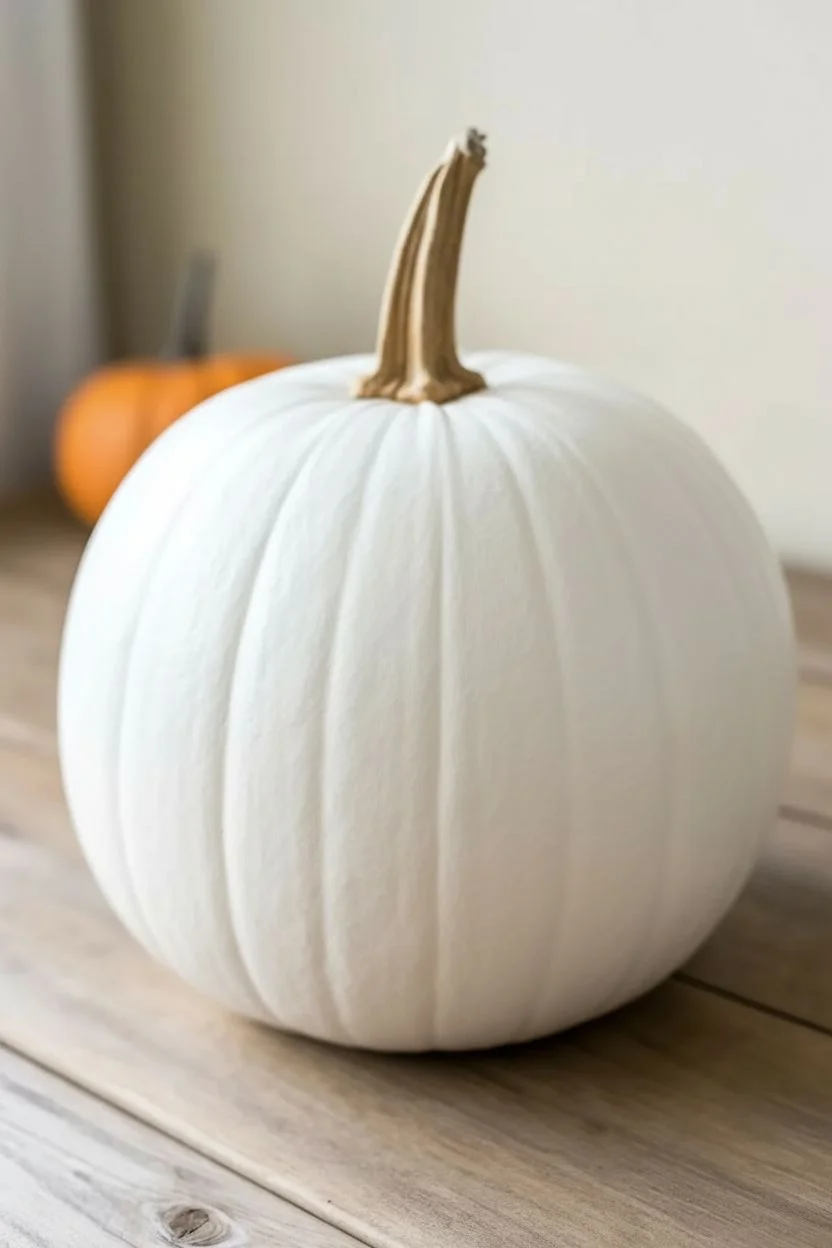
Transform a simple white pumpkin into a spooky yet adorable character reminiscent of a classic bedsheet ghost. This minimalist design uses bold black shapes and simple highlights to create an expressive face perfectly suited for Halloween.
Step-by-Step Guide
Materials
- Small white pumpkin (naturally white or painted)
- Black acrylic craft paint
- White acrylic craft paint
- Medium round paintbrush
- Pencil
- Damp cloth
- Paper plate or palette
- Water cup
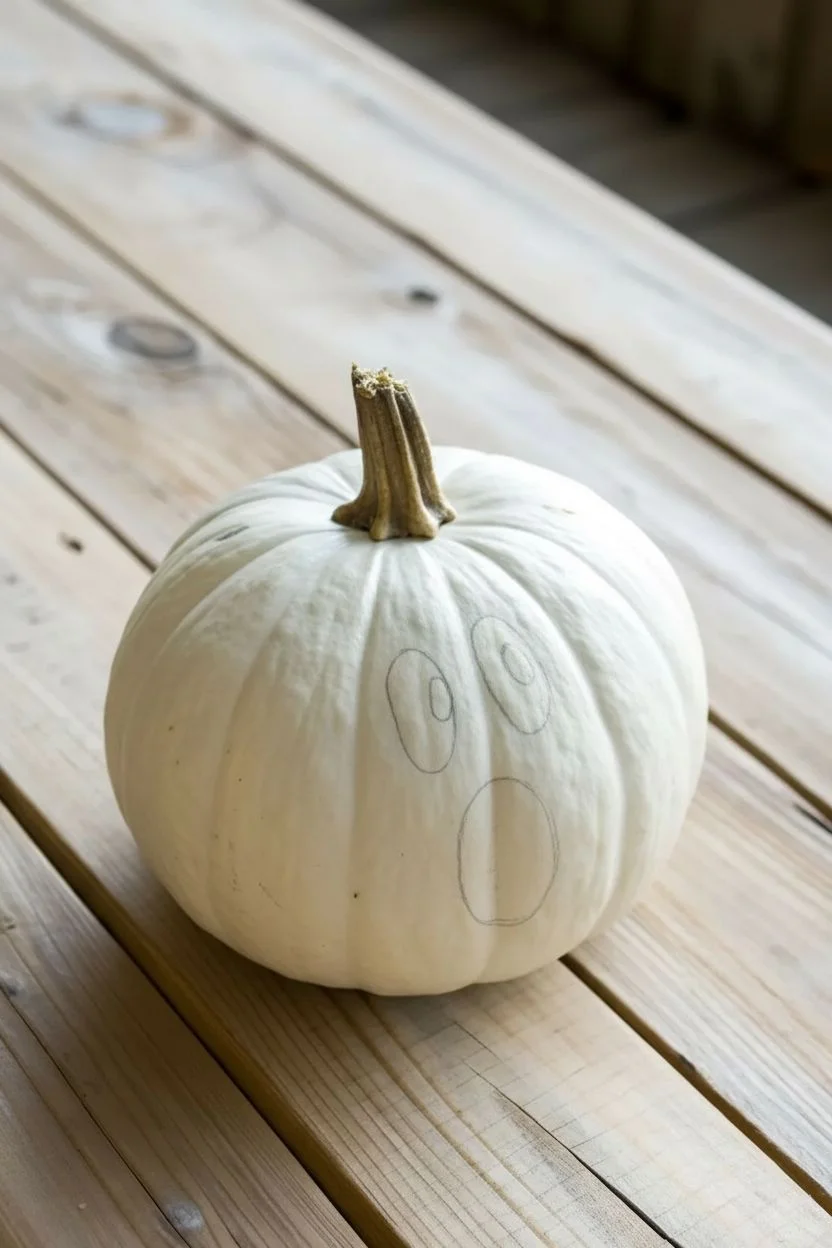
Step 1: Preparation & Sketching
-
Clean the surface:
Wipe down the pumpkin skin gently with a damp cloth to remove any garden dirt or dust. -
Dry thoroughly:
Ensure the pumpkin is completely dry before starting; paint won’t stick well to a damp rind. -
Base coat option:
If you are using an orange pumpkin, apply two coats of matte white acrylic paint to the entire surface, letting it dry fully between layers. -
Sketch the mouth:
Using a pencil, lightly draw a tall, vertical oval near the bottom center of the pumpkin face to serve as the open mouth. -
Position the eyes:
Sketch two oval shapes above the mouth for the eyes, spacing them evenly apart. -
Add expression:
Angle the tops of the eye ovals slightly toward each other to give the ghost a surprised or wailing look. -
Check symmetry:
Step back and view the pumpkin from a few feet away to make sure the face feels balanced.
Fixing Smudges
If you paint outside the lines, quickly wipe the error away with a damp cotton swab or wait for it to dry and touch it up with white paint.
Step 2: Painting the Features
-
Prepare black paint:
Squeeze a coin-sized amount of black acrylic paint onto your paper plate or palette. -
Outline the mouth:
Load your round brush with black paint and carefully trace the pencil line of the mouth oval. -
Fill the shape:
Fill in the center of the mouth with smooth, even vertical strokes to create a solid black void. -
Paint the left eye:
Outline and then fill in the left eye oval, being careful to keep the edges crisp and rounded. -
Paint the right eye:
Repeat the process for the right eye, trying to match the size and saturation of the first one. -
Let it dry:
Allow the black paint to dry completely to the touch—this usually takes about 15 to 20 minutes depending on humidity.
Glow Up
Use glow-in-the-dark paint for the white eye highlights so your pumpkin’s gaze eerily appears when the lights go out.
Step 3: Highlights & Finish
-
Prepare highlight tool:
I prefer using the handle end of a paintbrush for this step, as it creates perfectly round dots without effort. -
Dip in white:
Dip the handle tip straight into a small blob of white acrylic paint. -
Dot the left eye:
Press the painted tip gently onto the upper section of the black left eye to create a ‘sparkle’ highlight. -
Dot the right eye:
Repeat on the right eye, placing the dot in the same relative position (e.g., top-right) so the gaze looks focused. -
Final dry:
Let the white highlights dry undisturbed before moving your new spooky friend.
Now you have a charmingly spooky addition to your Halloween decor that captures the classic spirit of the season


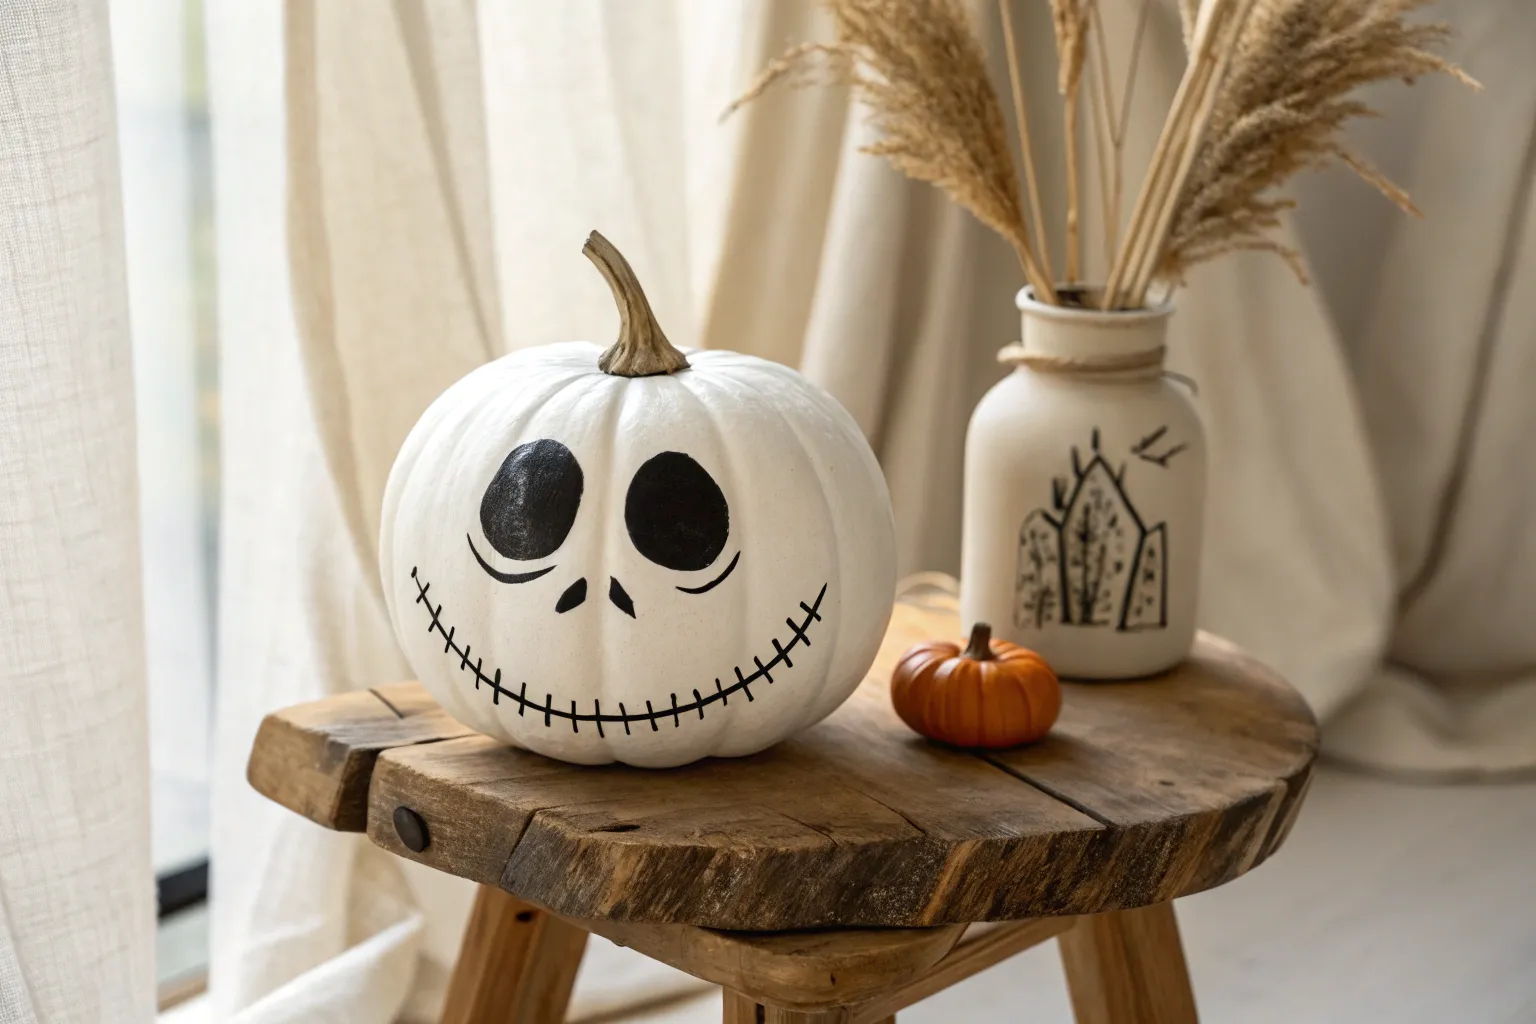
Faux-Carved Jack-O-Lantern
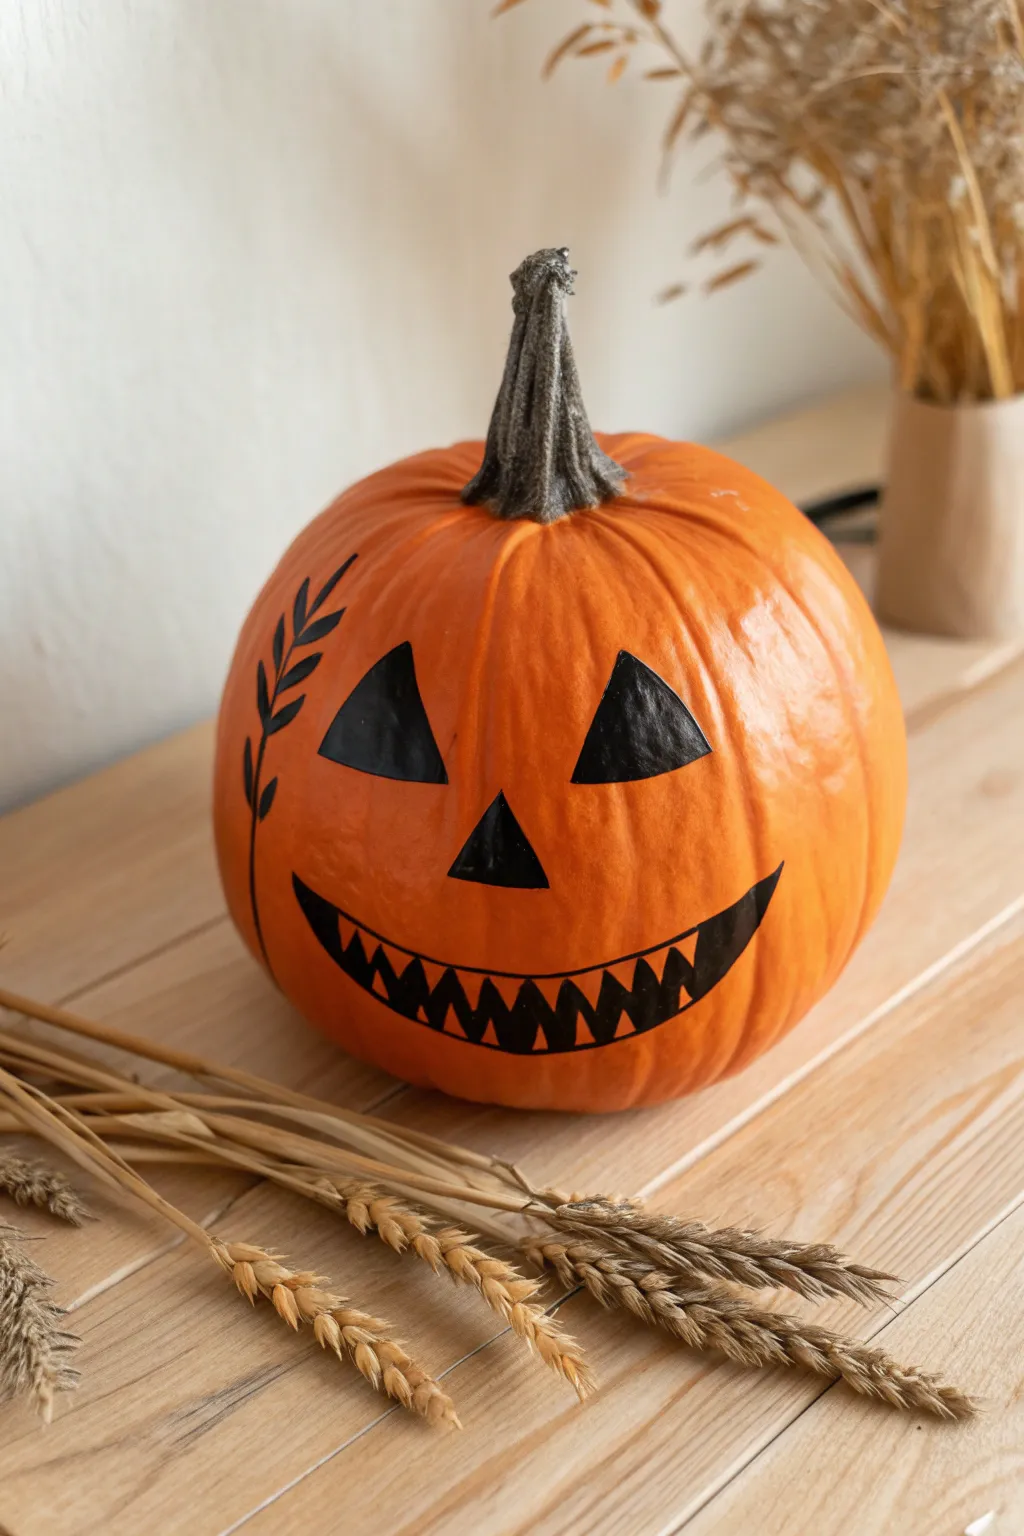
Achieve the iconic look of a carved Jack-O-Lantern without the mess of gutting a pumpkin. This project uses matte black paint to create a deep, hollow illusion, accented by a delicate botanical design for a modern touch.
Detailed Instructions
Materials
- Medium orange pumpkin (real or faux)
- Matte black acrylic paint
- Dark grey or graphite acrylic paint
- Pencil or white chalk pencil
- Black paint pen (medium tip)
- Small flat paintbrush
- Fine liner paintbrush
- Paper towels and water cup
Step 1: Preparation & Stem
-
Clean surface:
Wipe down your pumpkin with a damp cloth to remove any dirt or oily residue, ensuring the paint adheres properly. -
Dry completely:
Allow the surface to air dry fully before applying any materials. -
Base coat the stem:
Using the dark grey or graphite paint, cover the entire stem to replace the natural green-brown with a moody, oxidized look. -
Stem texture:
I like to dab a second layer of black paint near the base of the stem while it’s still wet to add dimension. -
Let it cure:
Wait for the stem to dry completely so you don’t smudge it while working on the face.
Paint Pen Precision
If you struggle with brush control, use a black acrylic paint marker for the entire project. It acts just like a marker but dries opaque like paint.
Step 2: Sketching the Design
-
Position the face:
Identify the smoothest side of your pumpkin to serve as the ‘face’ canvas. -
Sketch the eyes:
Using a pencil, lightly draw two equilateral triangles for the eyes, spaced evenly apart. -
Add the nose:
Draw a smaller triangle directly between and slightly below the eyes for the nose. -
Map the smile:
Sketch a wide, crescent-shaped curve for the bottom of the mouth to establish the grin’s width. -
Add teeth:
Draw sharp zigzag lines across the top of the smile curve to create the classic toothy grin. -
Design the vine:
On the left cheek area, sketch a simple curved line rising upward with small offshoot leaves.
Level Up: Depth Effect
Mix a tiny drop of dark blue into your black paint. This subtle cool tone mimics the shadows inside a real pumpkin better than flat black alone.
Step 3: Painting the Details
-
Outline the features:
Use a black paint pen or a fine liner brush with black acrylic to trace over your pencil lines for the eyes, nose, and mouth. -
Block in the eyes:
Fill the eye triangles with matte black paint using a small flat brush for smooth coverage. -
Fill the nose:
Carefully paint inside the nose triangle, keeping the corners sharp. -
Paint the mouth:
Fill in the mouth area, taking extra care around the sharp points of the teeth to maintain the jagged look. -
Trace the vine:
Using your fine liner brush or paint pen, trace the main stem of the botanical design on the cheek. -
Add leaves:
Press down gently with the brush to create small, almond-shaped leaves along the vine stem. -
Clean up:
Once the paint is fully dry, gently erase any visible pencil marks with a standard eraser.
Now step back and admire your clean, perfectly spooky creation


Minimalist Spiderweb Crawler
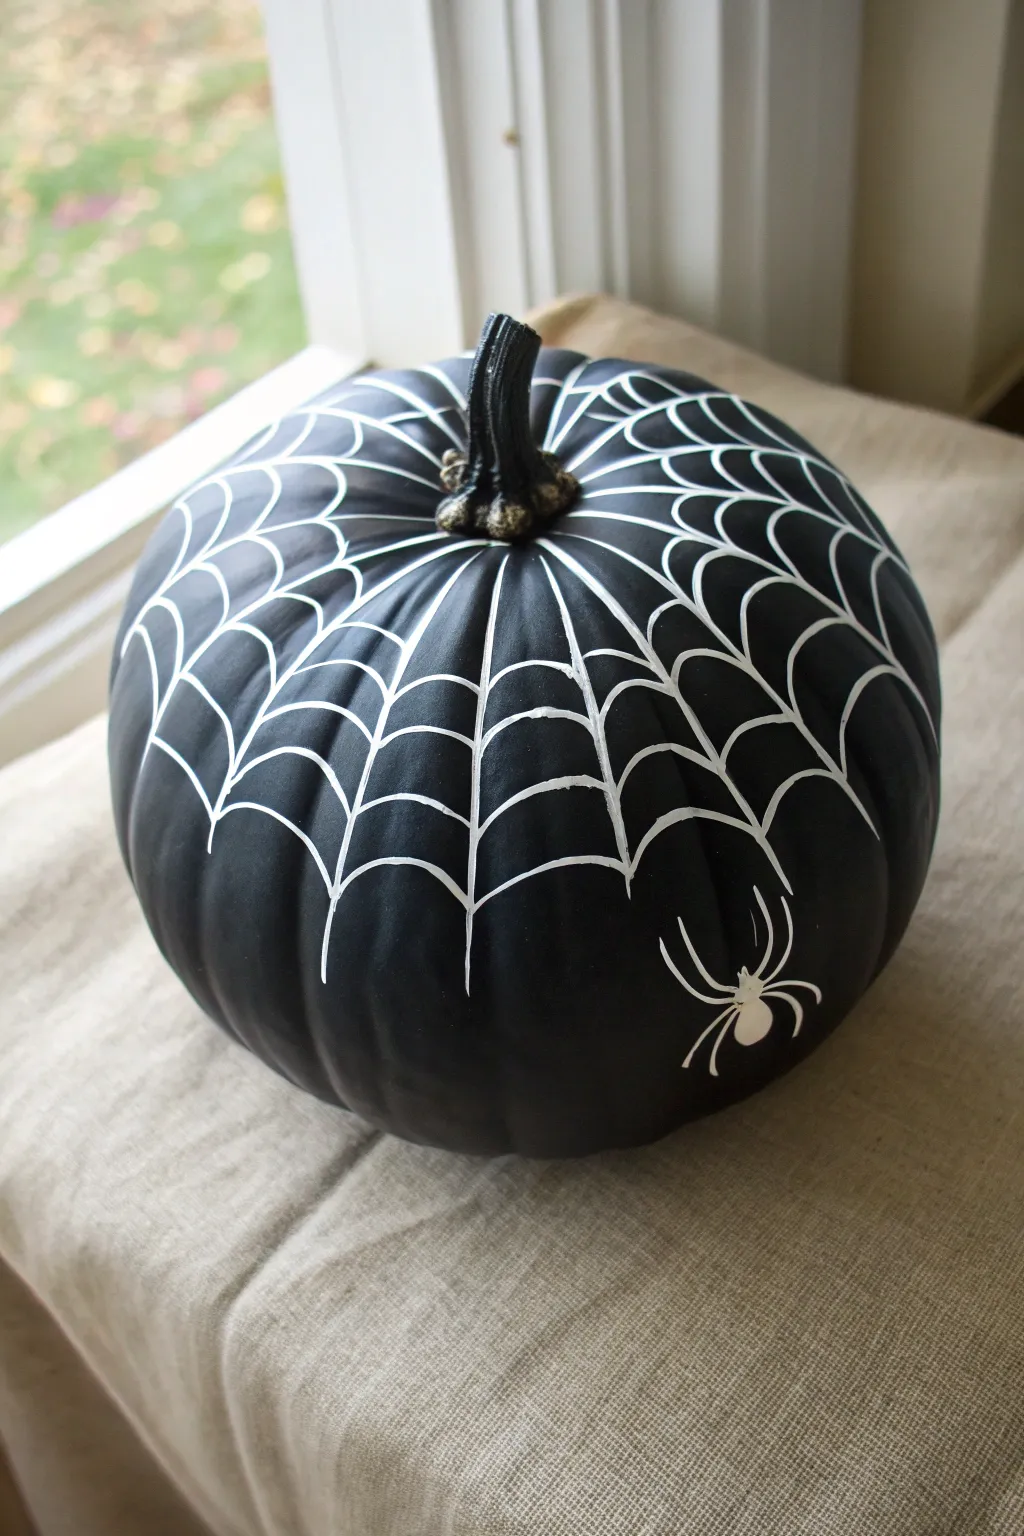
Transform a standard pumpkin into a chic Halloween centerpiece with this high-contrast design. The combination of a matte black base and delicate white linework creates a spooky yet sophisticated look that mimics a spider spinning its home in the moonlight.
Step-by-Step Guide
Materials
- Medium-sized pumpkin (real or faux)
- Matte black acrylic paint
- Titanium white acrylic paint
- Wide flat brush (for base coat)
- Fine liner brush (size 0 or 1)
- Water cup and paper towels
- Palette or paper plate
- Clear matte sealer spray (optional)
Step 1: Setting the Dark Canvas
-
Clean surface:
Wipe your pumpkin down with a damp cloth to remove any dirt or oils, ensuring the paint adheres properly to the skin. -
Protect the stem:
You can wrap the stem in painter’s tape if you want to keep it natural, though I usually just paint carefully around the base of it. -
Apply first black coat:
Using the wide flat brush, apply a layer of matte black acrylic paint over the entire body of the pumpkin. -
Let it dry:
Allow the first coat to dry completely. Acrylics dry fast, but giving it 15-20 minutes ensures you don’t lift the first layer. -
Apply second coat:
Add a second layer of black paint to achieve that deep, opaque finish where no orange shows through. -
Inspect coverage:
Check for any bald spots, particularly in the deep grooves of the pumpkin, and touch them up before moving on.
Step 2: Weaving the Web
-
Prepare white paint:
Squeeze a dime-sized amount of titanium white paint onto your palette. -
Paint the spokes:
Switch to your fine liner brush. Identify the natural vertical ribs of the pumpkin to use as guides. -
Draw vertical lines:
Starting from the base of the stem, paint thin white lines flowing down along the ridges of the pumpkin ribs. -
Vary the lengths:
Bring these lines about halfway to two-thirds down the pumpkin, varying the lengths slightly so the web doesn’t look too uniform. -
Load the brush specifically:
Reload your liner brush frequently to keep the bristles sharp and pointy for the connecting lines. -
Start the top webbing:
Beginning near the stem, paint small scalloped curves (u-shapes) connecting the vertical spoke lines. -
Work downward:
Move down about an inch and paint a second row of scalloped lines connecting the spokes, making these slightly wider than the first row. -
Complete the web pattern:
Continue adding rows of scallops until you reach the ends of your vertical lines. I like to leave some ends ‘open’ at the bottom to look like an unfinished web.
Fixing Wobbly Lines
Made a mistake? Don’t stress. Let the white mishap dry completely, then take a small brush with black paint and ‘erase’ it by painting over the error.
Step 3: The Crawler Detail
-
Place the spider thread:
Choose a spot near the bottom right of your web design. Paint a single straight line dropping down from the last decorative web curve. -
Paint the body:
At the end of the thread, paint a small solid white oval for the spider’s abdomen and a tiny dot for the head. -
Add the legs:
Using the very tip of your liner brush, flick four thin, angular legs extending out from each side of the spider’s body. -
Final touches:
Look over the design. If any black paint shows through your white lines, gently retrace them for bright, crisp contrast.
Pro Tip: Better Flow
Mix a tiny drop of water into your white paint. An ink-like consistency helps the liner brush glide over the bumpy texture without skipping.
Now you have a strikingly spooky pumpkin that looks gorgeous on a stoop or a mantle


Block-Color Frankenstein Square
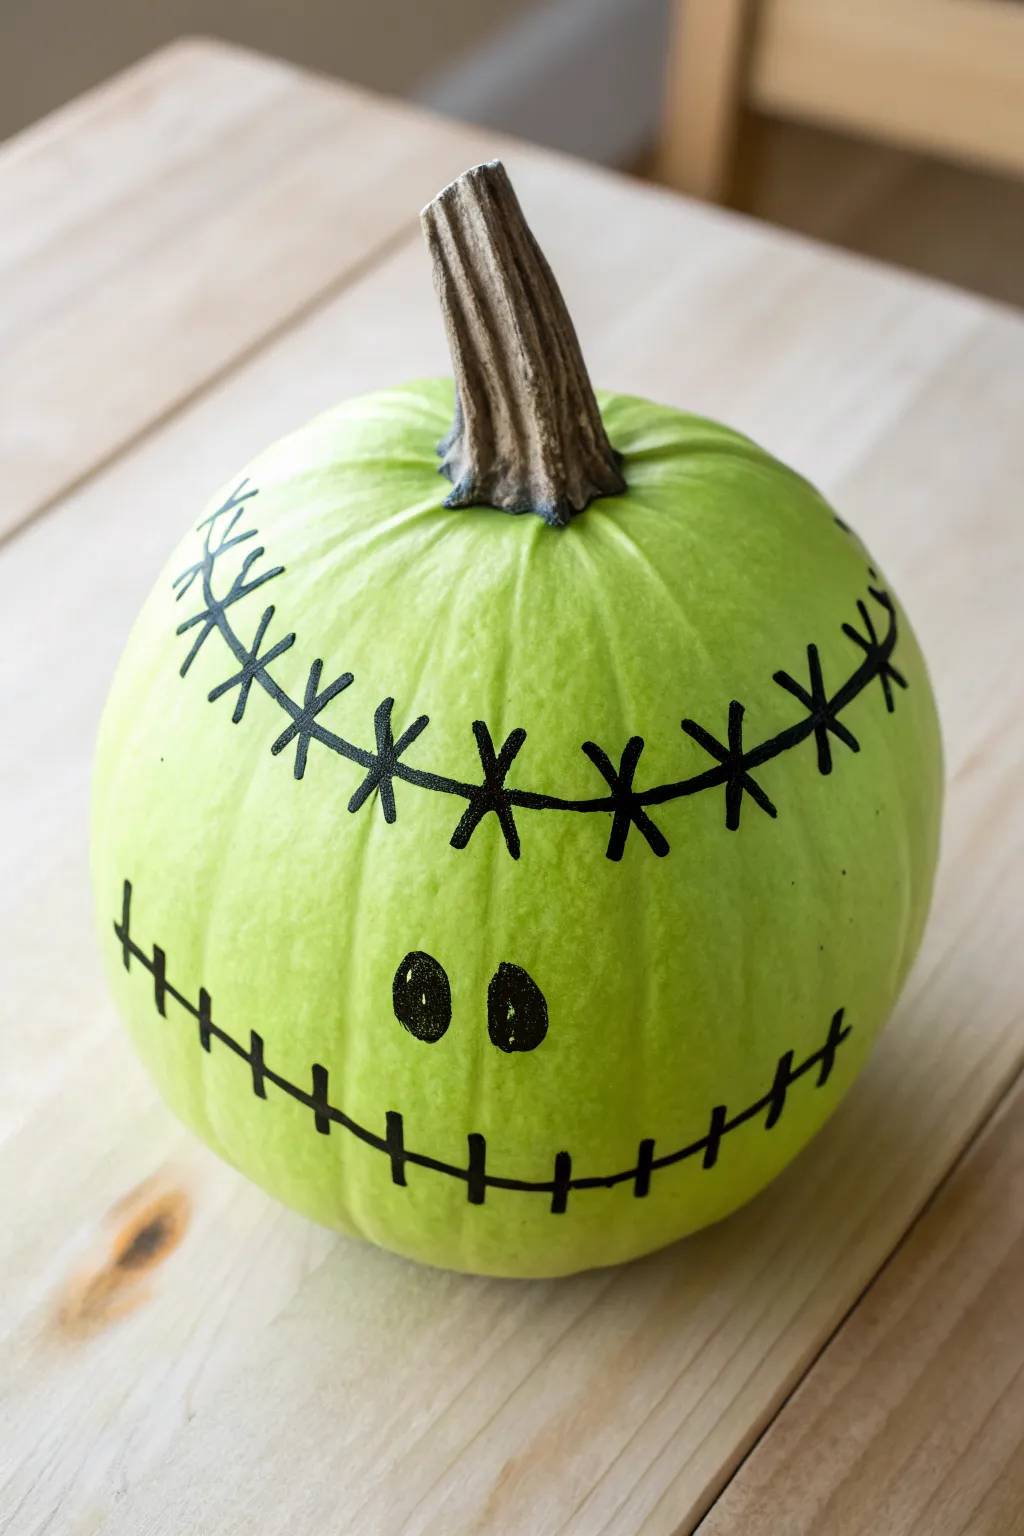
Transform a standard pumpkin into a vibrant, minimalist monster with this high-contrast painting project. Using a bright lime green base and simple black stitch work, this design captures a fun Frankenstein-inspired look without the mess of carving.
Detailed Instructions
Materials
- Medium-sized pumpkin (real or faux)
- Lime green acrylic paint (matte or satin)
- Wide flat paintbrush
- Foam sponge brush
- Black oil-based paint pen (medium tip)
- Pencil
- Painter’s tape
- Paper towel or rag
- Drop cloth or newspaper
Step 1: Preparing the Base
-
Clean surface:
Wipe down your pumpkin with a damp cloth to remove any dirt, dust, or oils from the pumpkin patch, which ensures the paint sticks properly. -
Dry completely:
Use a dry towel to remove all moisture from the surface before you open your paint. -
Protect the stem:
Wrap pieces of painter’s tape carefully around the base of the stem to keep it natural and brown while you paint the body. -
First coat:
Squeeze a generous amount of lime green acrylic paint onto a palette or paper plate. -
Apply base layer:
Using the wide flat brush, apply the first layer of green paint using long, vertical strokes from the top near the stem down to the base. -
Let it dry:
Allow this first coat to dry completely; depending on your paint brand, this usually takes about 15 to 20 minutes. -
Apply second coat:
Apply a second coat of green paint to ensure full opacity, covering any orange streaks that are showing through. -
Smooth the texture:
I like to use a foam sponge brush for this final wet layer, lightly dabbing or smoothing over the surface to minimize visible bristle strokes. -
Final cure:
Let the painted pumpkin sit undisturbed for at least an hour until it is dry to the touch and the paint feels hard.
Paint Beading Up?
If paint beads on a real pumpkin’s waxy skin, wipe it with rubbing alcohol first. For faux pumpkins, a light sanding with fine-grit sandpaper helps the acrylic adhere.
Step 2: Drawing the Monster Features
-
Sketch the design:
Lightly sketch the face placement using a pencil, marking the forehead scar, the eyes, and the mouth curve to guide your permanent marker. -
Draw the forehead scar:
Using the black paint pen, draw a long, slightly curved horizontal line across the upper third of the pumpkin. -
Add forehead stitches:
Draw X-shapes and straight vertical hash marks across the forehead line to simulate messy stitches. -
Create the eyes:
Draw two small vertical ovals in the center of the pumpkin face, spacing them about two inches apart. -
Fill the eyes:
Color in the oval outlines completely with the black paint pen so they are solid dark shapes. -
Draw the mouth:
Create a wide, U-curved line near the bottom third of the pumpkin for the smiling mouth. -
Stitch the mouth:
Add vertical hash marks along the mouth line, spacing them evenly to resemble sewn lips. -
Touch ups:
Go over any of your black lines a second time if the green paint is showing through, making the black as deep as possible. -
Remove tape:
Carefully peel away the painter’s tape from the stem. -
Final clean up:
If you made any stray marks, use a tiny bit of green paint on a small brush to cover them up once the black ink is dry.
Glow Up
Make it spooky at night by swapping the standard lime paint for glow-in-the-dark acrylic, or glue silver-painted wine corks to the sides for monster neck bolts.
Set your bright green creation on the doorstep to greet trick-or-treaters with a friendly scare.
BRUSH GUIDE
The Right Brush for Every Stroke
From clean lines to bold texture — master brush choice, stroke control, and essential techniques.
Explore the Full Guide
The Blood Splatter Effect
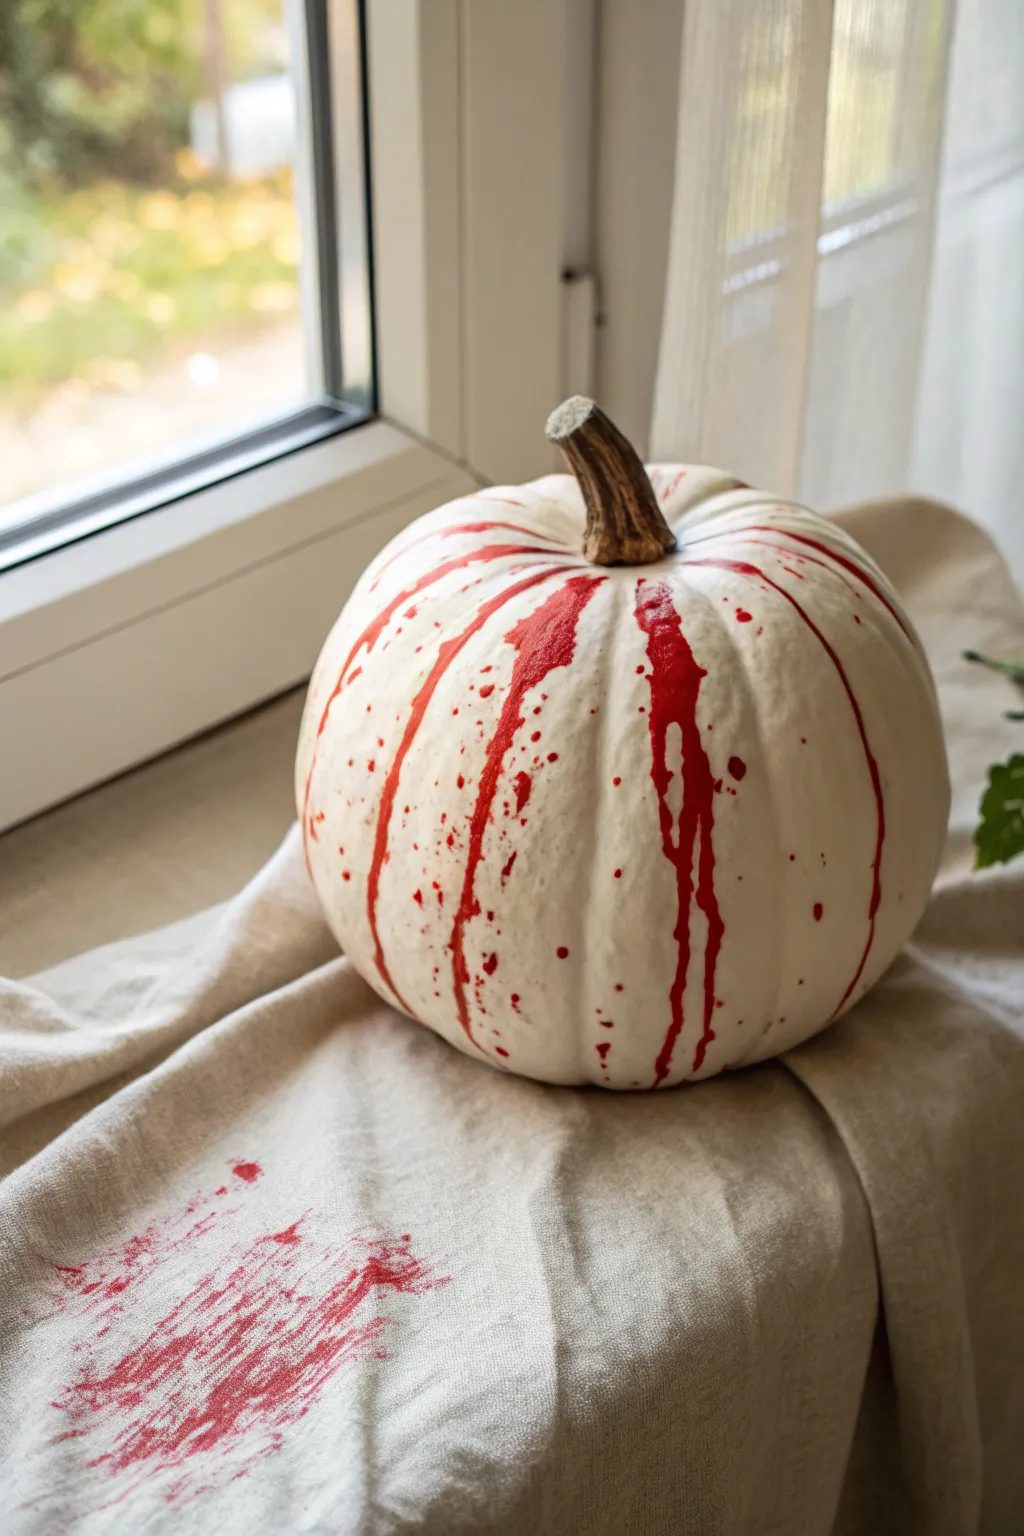
A minimalist yet chilling design, this project contrasts a pristine white pumpkin with visceral red drips for a classic horror effect. It is incredibly simple to execute but delivers a high-impact scary aesthetic perfect for window displays.
How-To Guide
Materials
- Faux or real pumpkin
- Matte white acrylic paint
- Crimson or blood red acrylic paint
- Dark brown acrylic paint (for stem)
- Water
- Medium flat paintbrush
- Round paintbrush
- Stiff bristle brush or toothbrush
- Paper plate or palette
- Beige linen cloth (for display)
- Matte spray sealer (optional)
Step 1: Preparing the Canvas
-
Surface cleaning:
Wipe down your pumpkin with a damp cloth to remove any dust or dirt that might interfere with paint adhesion. -
Base coat application:
Squeeze out a generous amount of matte white acrylic paint onto your palette. -
Painting the pumpkin:
Apply a thin, even layer of white paint over the entire pumpkin body using a medium flat brush. -
Second layer:
Allow the first coat to dry to the touch; if the original color shows through, apply a second coat for a solid, opaque look. -
Stem detailing:
While the body dries, use a smaller brush to paint the stem a realistic dark brown if it isn’t already naturally colored. -
Full cure:
Wait for the white base to cure completely before moving to the messy part to prevent the red from turning into pink.
Step 2: Creating the Drips
-
Mixing the blood:
In a small cup or on your palette, mix your crimson red acrylic paint with a small amount of water. -
Consistency check:
Aim for the consistency of heavy cream—runny enough to travel down the surface but thick enough to hold an opaque color. -
Loading the brush:
Load a round paintbrush heavily with the thinned red paint mixture. -
Starting the flow:
Place the tip of the brush right at the crease where the stem meets the top of the pumpkin body. -
Releasing paint:
Press down gently to release a pool of paint, allowing gravity to naturally pull it down the vertical ridges of the pumpkin. -
Varying the effect:
I like to rotate the pumpkin slowly as I work, adding varying amounts of paint to different sections to ensure random, uneven line lengths. -
Thickening streams:
Create a few thicker streams by reloading the brush and reapplying paint to the same starting point to intensify the color. -
Thin drips:
For thinner, faster drips, add a drop more water to your mixture and apply these between the thicker lines.
Deepening the Color
Mix a tiny drop of blue or brown into your bright red paint to deepen the hue. This makes it look like realistic oxygenated blood rather than cartoonish ketchup.
Step 3: Splatter and Finish
-
Preparing splatter tool:
Dip an old stiff-bristled brush or a toothbrush into the undiluted red paint. -
Flicking technique:
Use your thumb to flick the bristles near the pumpkin surface to create tiny, scattered blood spatter dots for texture. -
Impact zones:
Focus some splatters near the bottom of the drips to simulate impact splashes. -
Cloth detailing:
Take a dry paper towel or cloth, dip it slightly in red paint, and lightly smudge the beige linen fabric to match the reference style. -
Drying time:
Allow the red paint to dry undisturbed for several hours, as the thick drips take much longer to set than thin coats. -
Sealing:
Once fully dry, lightly mist with a matte clear spray sealer to protect your spooky artwork.
Drips Stopping Short?
If your drips stop halfway down, mix a little pouring medium into the acrylics. It improves flow much better than water without diluting the pigment’s opacity.
Display your spooky creation near a window or on a mantle to give guests a frightfully fun welcome
Skeletal Grin and Hollow Eyes
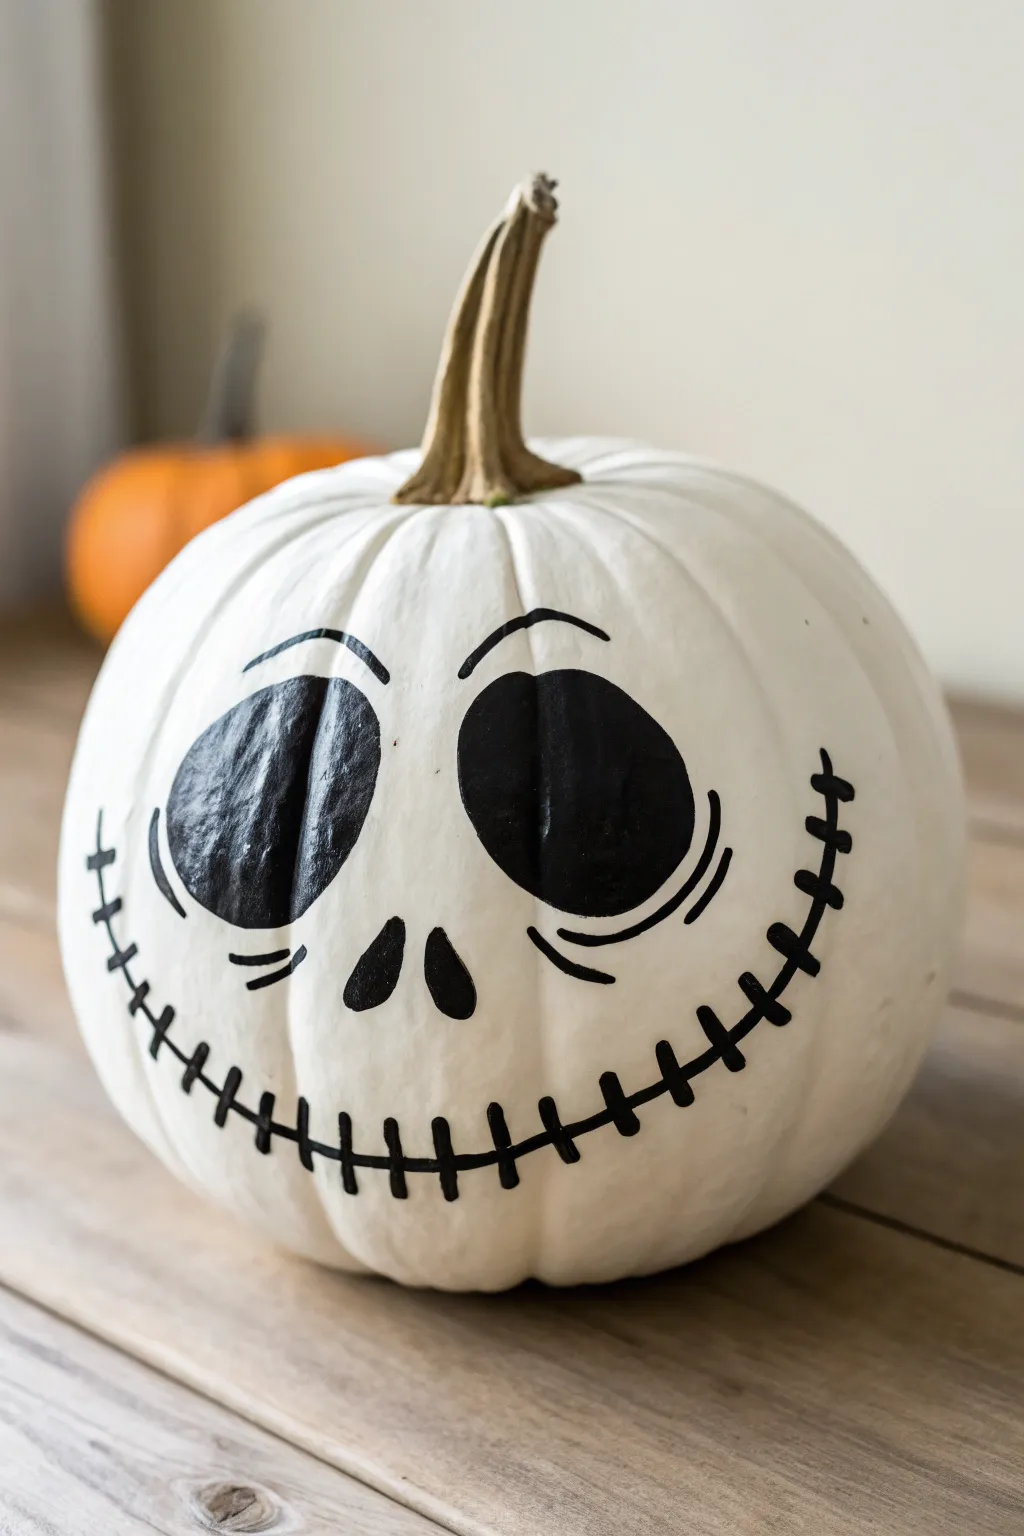
Capture the essence of a classic animated nightmare with this high-contrast black and white design. This project transforms a simple gourd into a recognizable, spooky character using bold shapes and delicate stitch details.
How-To Guide
Materials
- White oval-shaped pumpkin (real or faux)
- Black acrylic paint (heavy body is best)
- Matte white acrylic paint (optional for base)
- Soft drawing pencil
- Medium round paintbrush
- Fine detail liner brush or black paint pen
- Eraser
- Water cup and paper towels
- Clear matte sealer spray
Step 1: Preparing the Canvas
-
Clean the surface:
Wipe down your pumpkin with a damp cloth to remove any dirt or oils that might repel the paint. -
Dry thoroughly:
Ensure the pumpkin is completely dry before beginning your sketch. -
Assess the color:
If you are using a real white pumpkin that has blemishes, apply a thin coat of matte white acrylic paint to create a uniform canvas. -
Let the base cure:
Allow the white base coat to dry for at least 30 minutes if you applied one. -
Select the face side:
Rotate the pumpkin to find the smoothest side with the most pleasing shape for a face.
Step 2: Sketching the Features
-
Outline the eyes:
Using your pencil lightly, draw two large, slightly mismatched ovals that slant downward toward the center. -
Add nose details:
Sketch two small, tear-drop shaped nostrils right between the bottom inner corners of the eyes. -
Draft the smile:
Draw a long, sweeping line across the bottom third of the face, curving slightly upward at the cheeks towards the eyes. -
Mark the cheeks:
Add small, curved ‘C’ shapes at the very ends of the smile to create dimples. -
Indicate stitches:
Lightly mark vertical dashes along the entire length of the mouth line where the stitches will go. -
Add expressive lines:
Sketch small eyebrow arches floating above the eyes and subtle curved lines just beneath the eyes for tired-looking bags.
Quick Fix
If your hand slips while painting the thin black lines, immediately wipe the mistake away with a damp Q-tip before the paint sets to avoid staining the white skin.
Step 3: Painting the Design
-
Paint the eye sockets:
Using the medium round brush and black paint, carefully fill in the large eye outlines. -
Refine the edges:
Smooth out the edges of the eyes to ensure they are crisp ovals. -
Fill the nostrils:
Use the tip of your medium brush to dab in the two nostril shapes. -
Trace the mouth line:
Switch to your fine liner brush (or paint pen) and trace the main horizontal smile line with a steady hand. -
Create the stitches:
Paint short, vertical hatch marks across the mouth line, spaced roughly half an inch apart. -
Detail the expression:
Use the liner brush to paint the thin floating eyebrows and the small creases under the eyes. -
Add a second coat:
I prefer to go back over the large black eye areas with a second layer of paint to ensure they are pitch black and opaque. -
Cleanup:
Once the paint is fully dry, gently erase any visible pencil marks that weren’t covered by paint. -
Preserve the work:
Spray the entire pumpkin with a light mist of clear matte sealer to prevent chipping.
Crisp Lines Secret
For the mouth stitches, a black oil-based paint marker often gives cleaner results than a brush. It prevents the bristles from splaying and creating messy edges.
Set this skeletal masterpiece on your porch or mantel to add a touch of playful fright to your decor

PENCIL GUIDE
Understanding Pencil Grades from H to B
From first sketch to finished drawing — learn pencil grades, line control, and shading techniques.
Explore the Full Guide
The Widow’s Peak Vampire
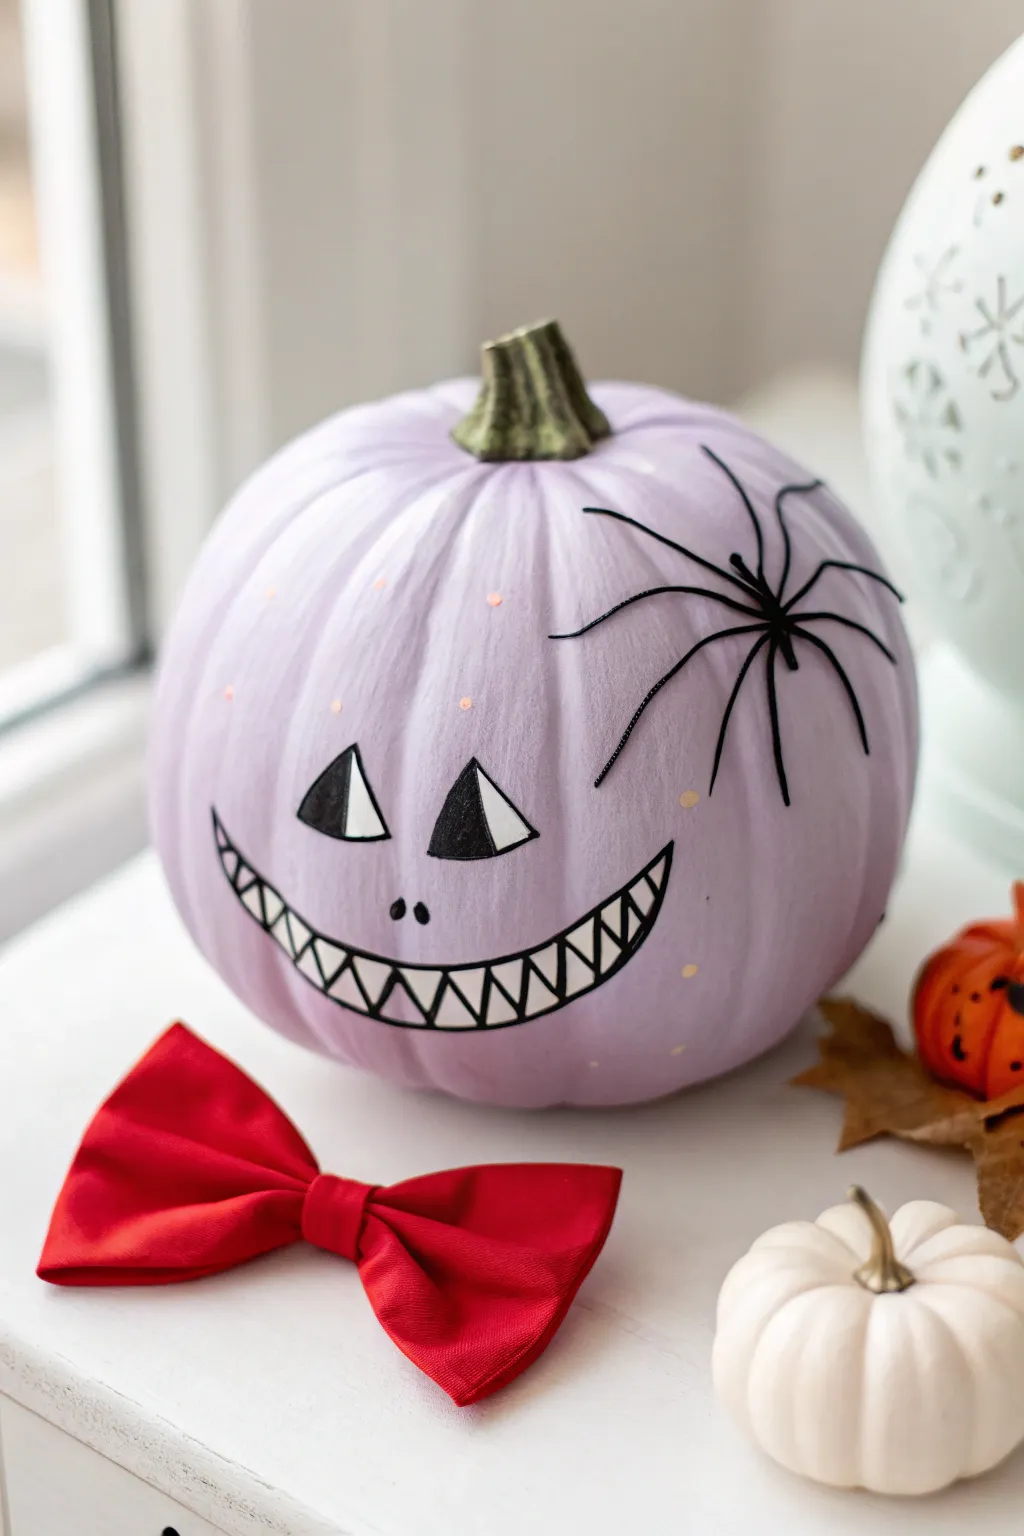
Give your Halloween decor a sophisticated yet spooky twist with this pastel pumpkin featuring a mischievous grin and a creepy-crawly companion. This project combines smooth matte painting with sharp, graphic details for a look that is equal parts playful and eerie.
Step-by-Step
Materials
- Medium-sized pumpkin (real or faux)
- Matte acrylic craft paint (Pastel Lilac or Lavender)
- Titanium White acrylic paint
- Carbon Black acrylic paint
- Soft Peach or pale orange acrylic paint
- Wide flat brush
- Fine liner brush or size 0 round brush
- Black oil-based paint pen (fine tip)
- Pencil
- Red fabric bow tie
Step 1: Setting the Scene
-
Prepare the surface:
Wipe down your pumpkin with a damp cloth to remove any dust or oils, ensuring the paint adheres smoothly to the skin. -
Apply the base color:
Using the wide flat brush, coat the entire pumpkin with the pastel lilac paint. Long, vertical strokes following the pumpkin’s ribs work best here. -
Layer for opacity:
Allow the first coat to dry completely. Apply a second or even third coat until the orange of the pumpkin is no longer visible and the finish is opaque. -
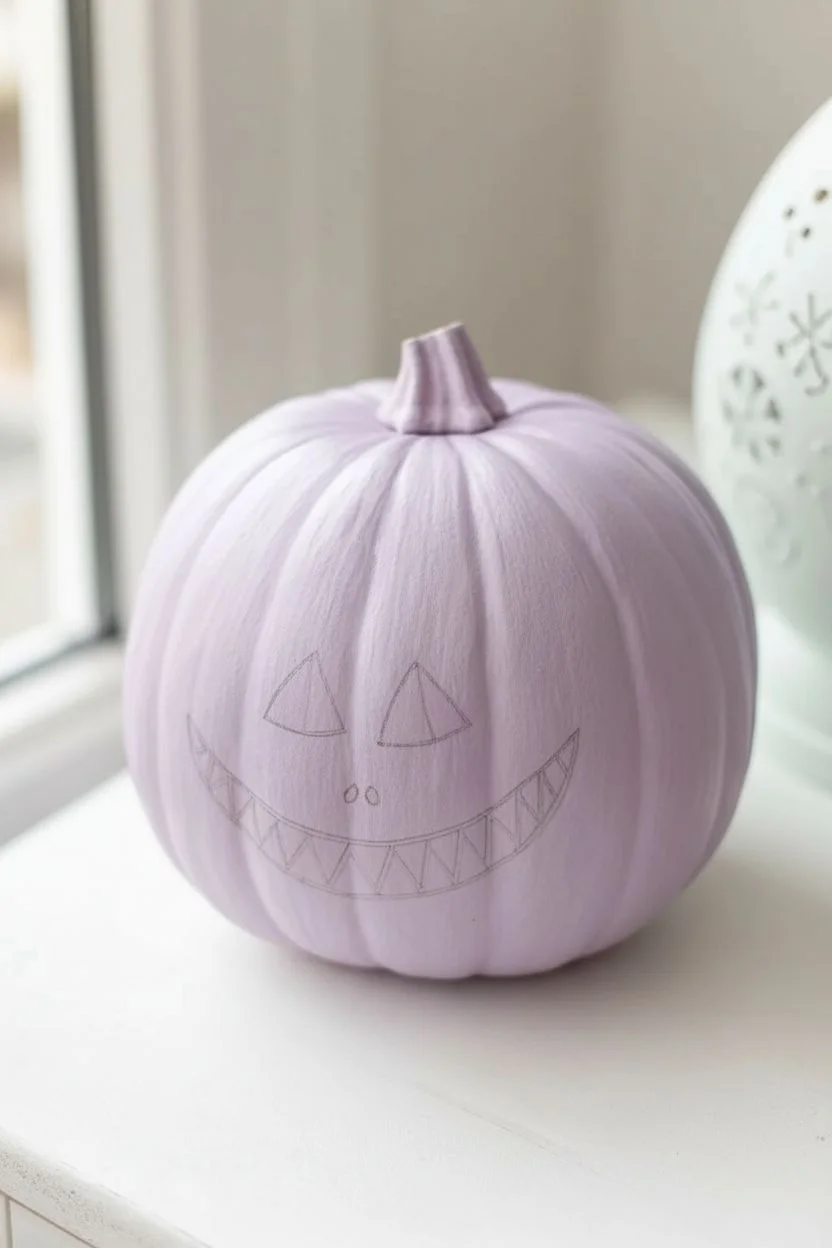
Sketch the visage:
Once the purple base is bone-dry, lightly sketch the triangular eyes and the wide, crescent smile using a pencil.
Step 2: The Sinister Smile
-
Block in the eyes:
Fill the sketched triangles of the eyes with Titanium White paint. You may need two thin layers to get a bright, solid white against the purple. -
Outline the shapes:
I prefer to use a black paint pen for this step to get crisp edges. Carefully trace the outline of the white eye triangles. -
Add the pupils:
Draw black semi-circles inside the white triangles, positioning them against the inner vertical edge to create a cross-eyed, manic look. -
Draw the nostrils:
Place two small, teardrop-shaped dots near the center of the face for the nose, keeping them relatively close together. -
Define the mouth:
Use your paint pen or liner brush to trace the large, U-shaped upward curve of the mouth. -
Create the teeth:
Draw a parallel line just above the bottom lip line, tapering it at the corners. Fill the space between these lines with sharp zig-zag patterns to create the teeth.
Paint Pen Precision
For the sharpest teeth and spider legs, swap the brush for a black oil-based paint pen. It offers control like a marker but dries permanent like paint.
Step 3: Creepy Details
-
Start the spider:
Using black paint, create a small oval body on the upper right shoulder of the pumpkin. -
Extend the legs:
With the fine liner brush, paint long, spindly legs radiating from the spider’s body. Make the knees sharp and let the tips trail down over the pumpkin’s ridges. -
Add texture spots:
Dip the non-brush end of a paintbrush handle into the peach or pale orange paint. -
Dot the face:
Gently gently press the paint-dipped handle onto the pumpkin face to create tiny, perfect polka dots scattered randomly around the eyes and forehead. -
Final cure:
Let all the detail work dry for at least an hour to prevent smudging. -
Accessorize:
Place the red bow tie at the base of the pumpkin, or attach it with a dab of hot glue if you want it permanently fixed for a dapper finish.
Make it 3D
Give the spider some creepy dimension by using black puffy fabric paint for the body and legs. It will dry raised and tactile!
Display your dapper creation near a window or on a mantle to show off that charmingly wicked grin.
Dry-Brushed Mummy Wraps
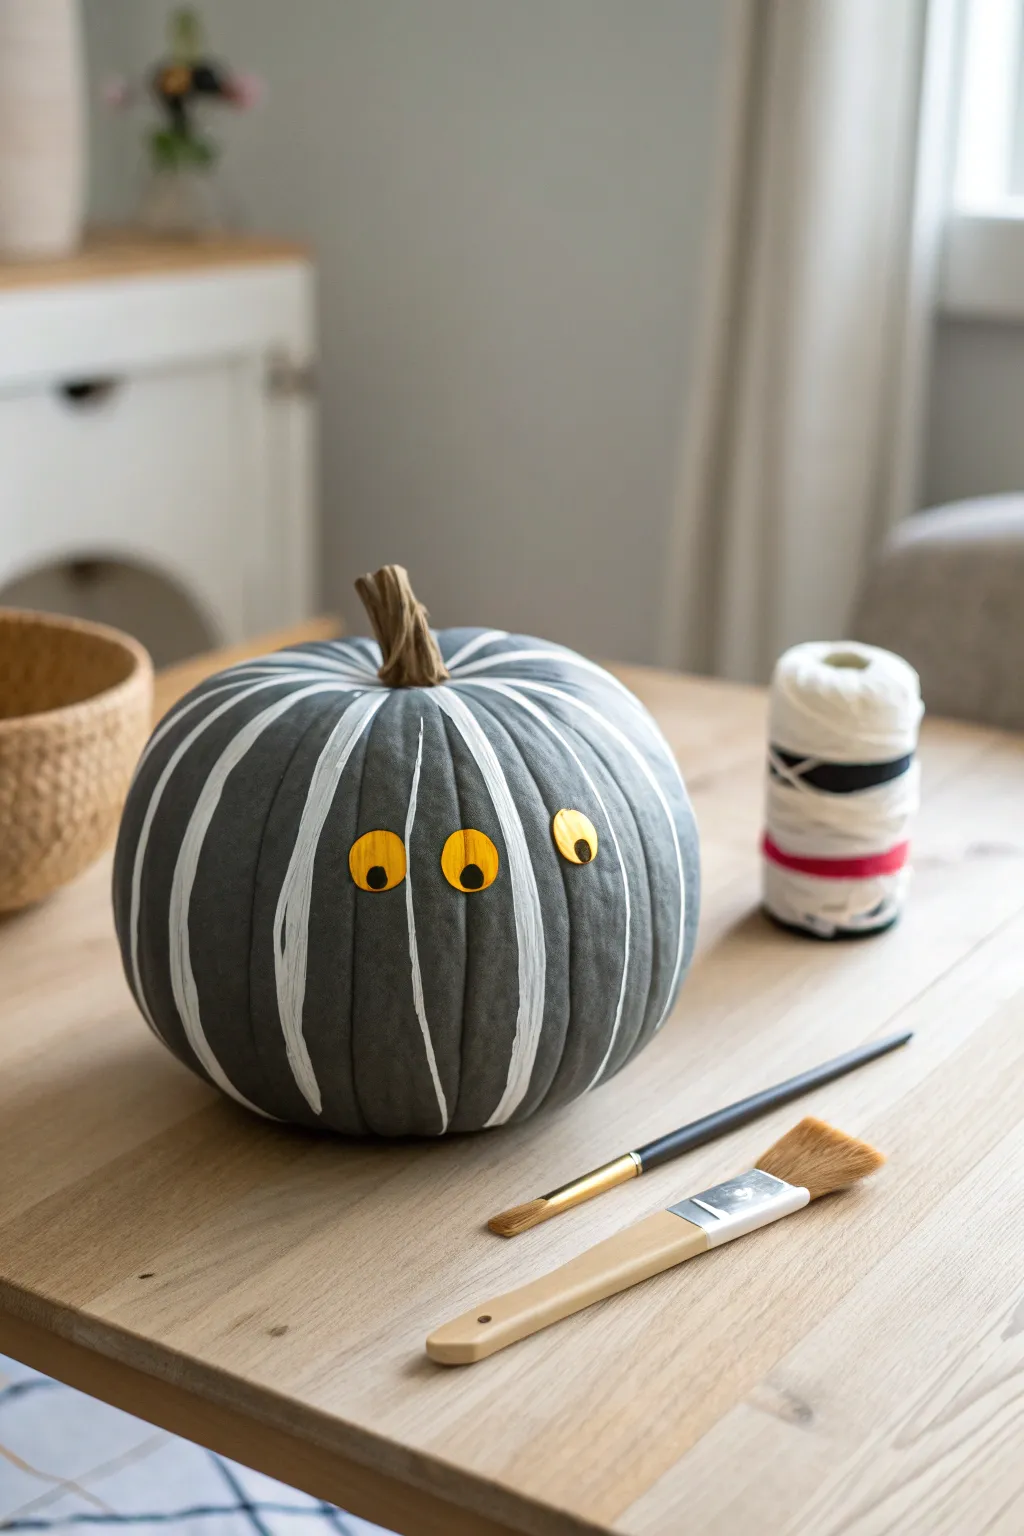
Turn a standard gourd into a shadowy, whimsical character with a matte charcoal finish and striking bone-white stripes. This quick project uses a playful arrangement of eyes to give your pumpkin a confused but spooky personality.
Step-by-Step Tutorial
Materials
- Medium-sized pumpkin (real or faux)
- Matte charcoal or dark slate acrylic paint
- Titanium white acrylic paint
- Yellow acrylic paint
- Black acrylic paint or permanent marker
- 3 small wooden craft discs or buttons (approx. 1 inch)
- Wide flat paintbrush
- Small stiff-bristle brush or chip brush
- Hot glue gun and glue sticks
- Palette or paper plate
Step 1: Setting the Mood
-
Clean the surface:
Wipe down your pumpkin with a damp cloth to remove any dirt or oils, ensuring the paint adheres properly. -
Apply the base color:
Using your wide flat brush, cover the entire pumpkin in the matte charcoal paint. Don’t worry about the bottom yet. -
Let it set:
Allow the first coat to dry completely for about 15 to 20 minutes. -
Add a second coat:
Apply a second layer of grey if the orange is still peeking through. I find this creates a much richer, chalkier look resembling stone. -
Dry completely:
Ensure the pumpkin is fully dry to the touch before moving on to the stripes to prevent colors from muddying.
Too Streaky?
If your white stripes look too messy, don’t worry! Uneven textures actually make the ‘mummy wrap’ effect look more realistic and aged.
Step 2: Painting the Wraps
-
Load the brush:
Dip your stiff-bristle brush into the white paint, but wipe most of it off on a paper towel. You want a ‘dry’ brush. -
Follow the ridges:
Starting from the stem and pulling downward, paint a vertical stripe along one of the pumpkin’s natural ribs. -
Create texture:
Press lightly so the bristles leave scratchy, streaky edges rather than a solid line. This mimics the texture of old fabric or mummy wrappings. -
Repeat around the pumpkin:
Continue painting these vertical stripes on every rib around the gourd. -
Check consistency:
Some lines can be thicker or brighter than others; the variation adds to the organic, spooky feel. -
Fill the gaps:
If the spaces between ribs look too wide, add a thinner, floaty white line in the valleys between the ridges.
Step 3: Creating the Eyes
-
Base coat the eyes:
Take your three wooden discs and paint the flat surfaces solid yellow. -
Add pupils:
Once the yellow is dry, use a small dab of black paint or a permanent marker to draw a pupil in the center of each disc. -
Vary the gaze:
For a quirky look, make the pupils slightly different sizes or place them slightly off-center. -
Test placement:
Hold the eyes against the pumpkin to determine the funniest arrangement before gluing. -
Attach the eyes:
Apply a dot of hot glue to the back of each wooden eye and press them firmly onto the pumpkin within one of the widest dark grey sections. -
Final clean up:
If any white paint accidentally got on the stem, gently wipe it off or touch it up with a little brown paint.
Pro Tip: Eye Depth
Use thick wooden buttons or even slices of cork for the eyes. The added thickness casts small shadows, giving the face 3D dimension.
Set your newly decorated pumpkin on a porch or table for a spooky staring contest with your guests


The All-Seeing Eyeballs
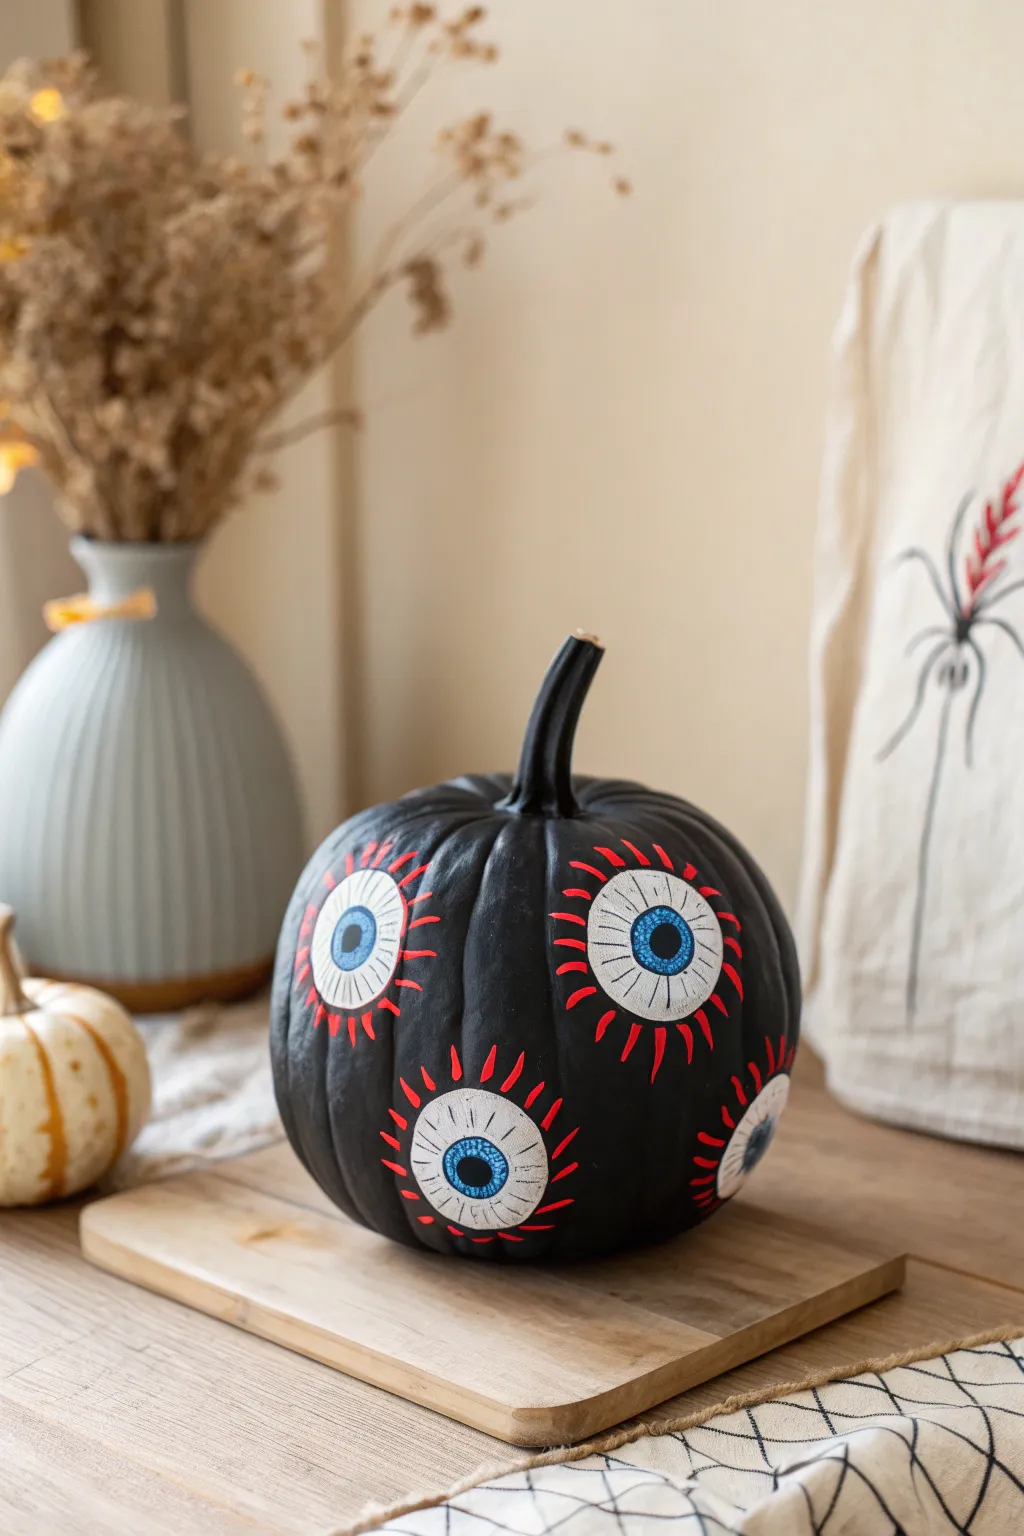
Transform a standard pumpkin into a mysterious, watchful centerpiece with this high-contrast painting project. By using a matte black background, the graphic eyeball designs pop with an intense, spooky vibrancy that is sure to catch everyone’s attention.
Step-by-Step Tutorial
Materials
- Medium-sized pumpkin (real or faux)
- Matte black acrylic paint
- Titanium white acrylic paint
- Bright red acrylic paint
- Light blue acrylic paint
- Dark blue acrylic paint
- wide flat brush
- Medium round brush
- Fine liner or detail brush
- White chalk or pastel pencil
- Paint palette
- Water cup and paper towels
Step 1: Setting the Stage
-
Surface Prep:
Wipe down your pumpkin with a slightly damp cloth to remove any dirt or dust, ensuring a smooth canvas for the paint. -
Base Coat Application:
Using the wide flat brush, cover the entire pumpkin in matte black paint. Don’t forget to paint the stem black as well for a seamless look. -
Opacity Check:
Allow the first coat to dry completely for about 20 minutes. If the orange skin is still peeking through, apply a second coat of black. -
Complete Drying:
Let the black base cure fully before moving on to the design to prevent muddying your colors.
Step 2: The Sclera Shapes
-
Sketching:
Use a piece of white chalk to lightly sketch circles of varying sizes all around the pumpkin. I like to space them irregularly to make it feel more organic and creepy. -
Filling the Whites:
With a medium round brush, fill in your sketched circles with titanium white paint. -
Smoothing:
You will likely need two or three thin layers of white to get a solid, opaque coverage over the black background. -
Clean Edges:
Use the tip of your brush to carefully refine the edges of the white circles so they are crisp and round.
Chalk Marks?
If you can still see faint white chalk lines from your initial sketch after painting, simply wipe them away with a slightly damp Q-tip once the paint is fully dry.
Step 3: Iris and Pupil Details
-
Painting the Iris:
Once the white is dry, paint a smaller circle in the center of each eye using light blue paint. -
Adding Texture:
Dab a tiny amount of dark blue paint onto your small brush and stipple small dots or lines inside the blue iris to create depth and texture. -
The Pupil:
Paint a solid black circle in the direct center of the blue iris. -
The Spark of Life:
Dip the handle end of a small brush into white paint and dot a tiny reflection highlight onto the upper right side of the black pupil.
Glow Up
Swap the standard white paint for glow-in-the-dark acrylics for the eyeballs. Charged by daylight, they will stare back at trick-or-treaters after the sun goes down.
Step 4: The Fiery Aura
-
Starting the Rays:
Switch to your fine liner brush and load it with bright red paint. -
Painting North, South, East, West:
Paint four small triangular spikes coming off the white circle at the top, bottom, left, and right to establish your spacing. -
Filling the Gaps:
Paint additional red spikes between your main four points, keeping them roughly the same length but varying slightly for a hand-drawn feel. -
Final Touch-ups:
If any red paint overlapped onto the black background too much, use a small brush with black paint to clean up the outer edges.
Place your pumpkin in a well-lit spot to show off those intense colors and enjoy the spooky stares
Witch Silhouette Moon
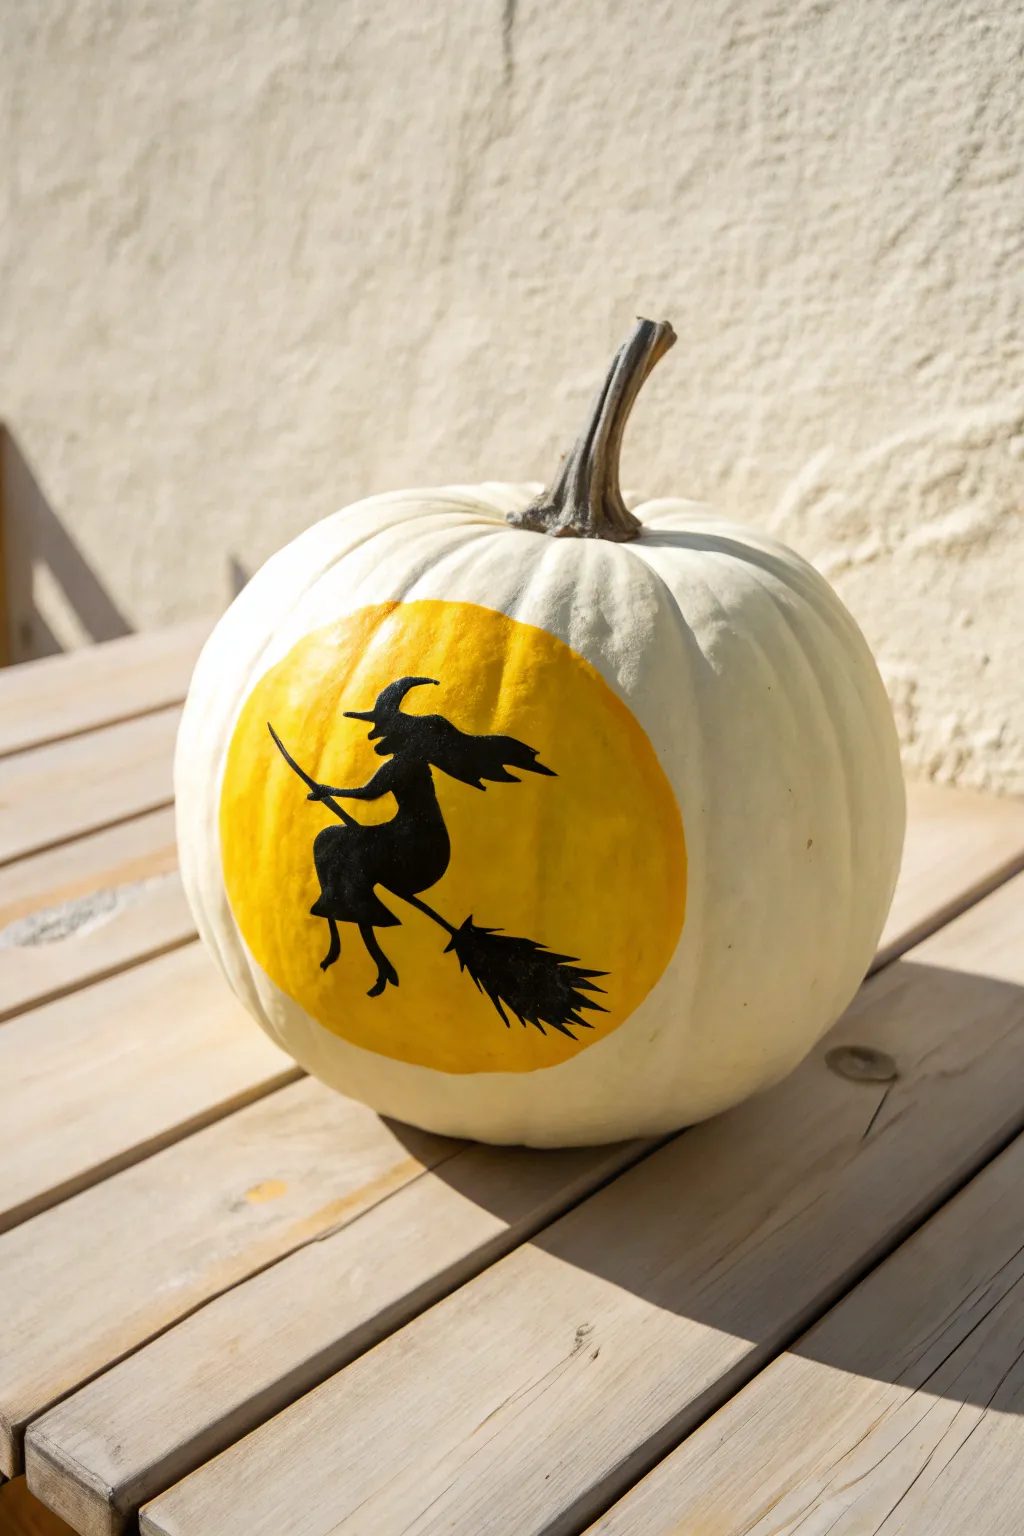
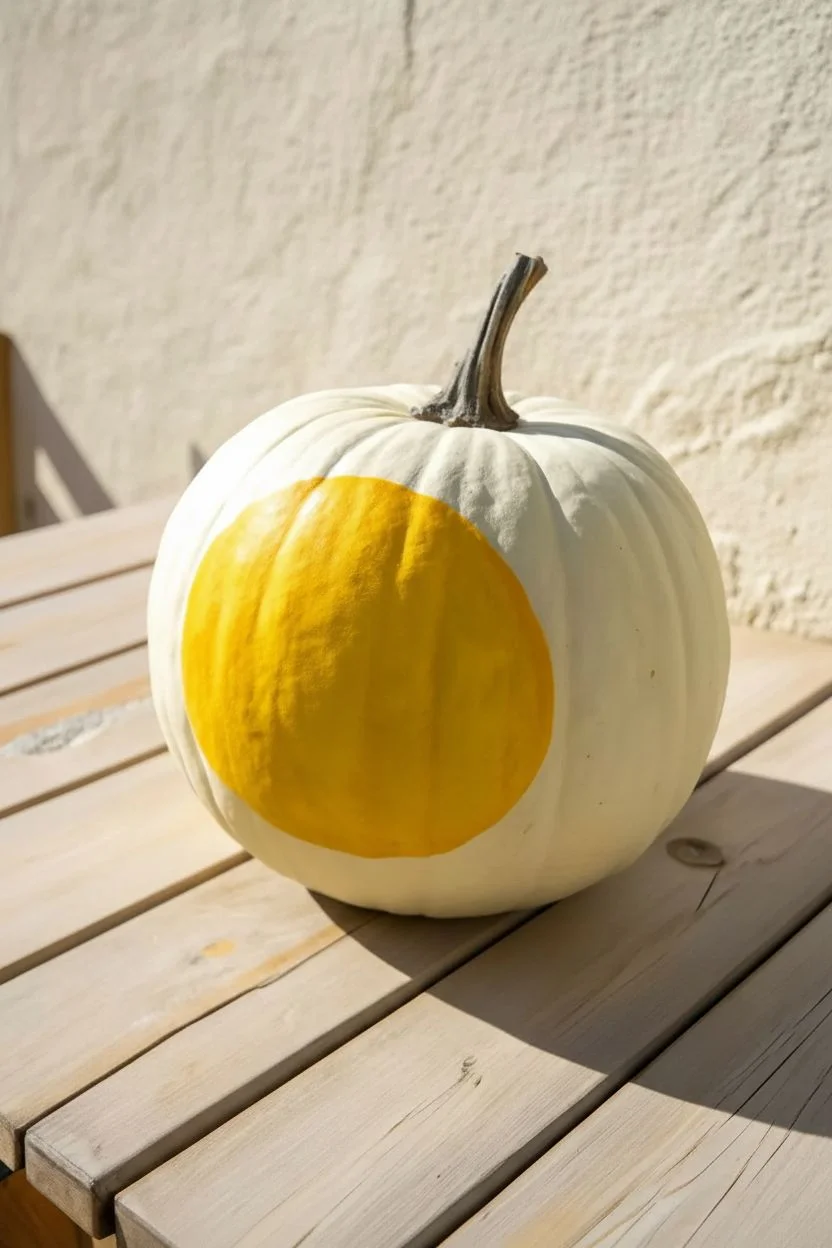
Transform a simple white pumpkin into a spooky classic with this high-contrast painted design. The bright yellow moon provides a vibrant backdrop for the witch silhouette, creating a decoration that pops beautifully against the pale skin.
Step-by-Step Guide
Materials
- White pumpkin (real or faux)
- Yellow acrylic craft paint
- Black acrylic craft paint
- Pencil
- Small round bowl or lid (approx. 4-5 inches)
- Medium flat paint brush
- Fine liner or detail paint brush
- Paper palette or plate
- Water cup
- Paper towels
Step 1: Setting the Scene
-
Clean surface:
Wipe down the white pumpkin with a damp cloth to remove any dust or oils that might prevent the paint from sticking. -
Dry thoroughly:
Ensure the surface is completely dry with a paper towel before starting. -
Trace the moon:
Hold your small bowl or round lid against the side of the pumpkin where you want the design to sit. -
Outline circle:
Lightly trace around the object with a pencil to create a perfect circle guide. -
Paint edges:
Load the medium flat brush with yellow acrylic paint and carefully trace along the inside edge of your pencil line. -
Fill center:
Fill in the rest of the circle with smooth, even strokes. -
Dry first coat:
Allow this initial layer to dry to the touch; yellow pigment is often quite transparent. -
Build opacity:
Apply a second or even third coat of yellow until the moon looks solid and opaque. I prefer to let each layer dry fully to prevent streaking.
Streaky Moon?
Yellow paint can be finicky. If it looks sheer, resist the urge to glob it on thick. Multiple thin layers that are allowed to dry in between will yield a much smoother result than one heavy coat.
Step 2: The Silhouette
-
Sketch the figure:
Once the moon is 100% dry, use your pencil to lightly sketch the witch’s shape directly onto the yellow paint. -
Establish the angle:
Draw a diagonal line first for the broomstick to guide the posture of the witch. -
Draft shapes:
Sketch a small triangle for the hat and a curvy, flowing shape for the cape and dress. -
Outline hat:
Switch to your fine liner brush and black paint, starting by outlining the pointed hat and keeping the tip sharp. -
Paint profile:
Carefully paint the silhouette of the face and the arm reaching forward to the broom handle. -
Fill body:
Fill in the main body shape with solid black, creating jagged edges at the bottom of the cape to suggest wind movement. -
Define broom handle:
Paint the thin black line of the broomstick handle extending out from the hands. -
Add bristles:
For the back of the broom, use quick, short flickering strokes to create the texture of bushy bristles. -
Final details:
Add the dangling boots and the flowing hair trailing behind the hat. -
Touch ups:
Check the edges of your silhouette and smooth out any bumps with the fine brush for a crisp finish.
Glow Up
Swap the standard yellow acrylic for glow-in-the-dark paint. By day it looks like a normal design, but at night the moon will illuminate the witch silhouette for a spooky surprise.
Place your pumpkin on the porch to welcome trick-or-treaters with this delightfully simple piece of art
The Red-Lined Clown Face
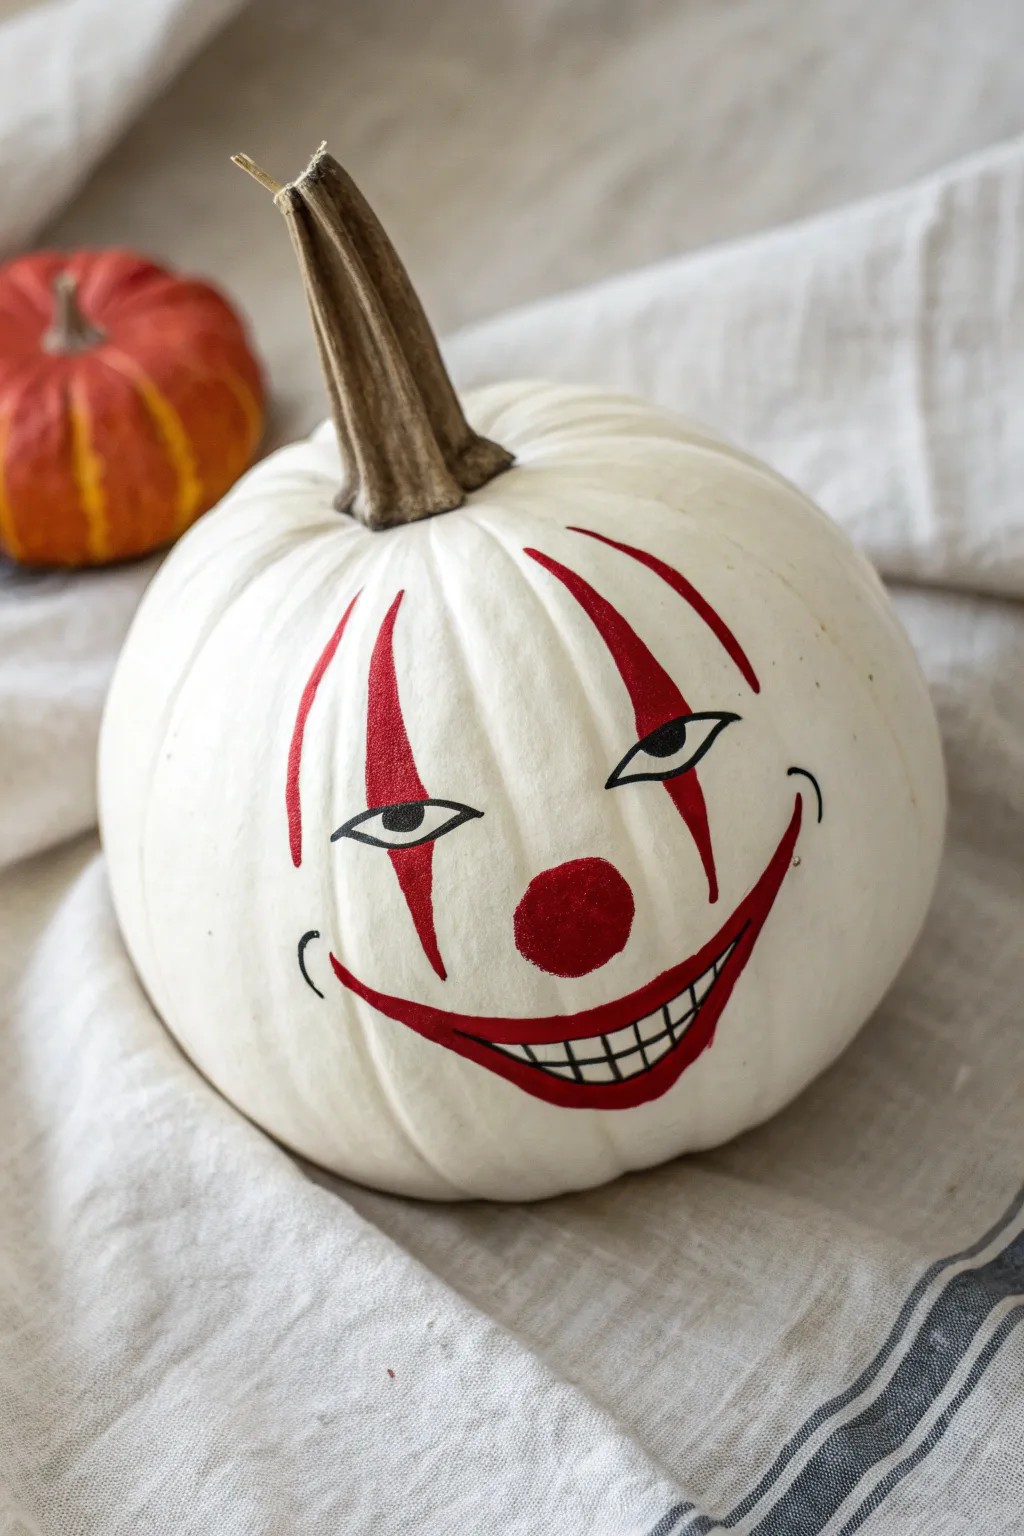
Capture the eerie essence of a classic horror clown with this minimal yet striking painted pumpkin. Using a natural white gourd as your canvas, you’ll create sharp red markings and a sinister smile that stands out beautifully.
Step-by-Step Guide
Materials
- Medium-sized white pumpkin (real or faux)
- Bright red acrylic paint
- Black acrylic paint
- Black paint pen (fine tip)
- Pencil and eraser
- Fine detail brush (size 0 or 00)
- Small round brush (size 2 or 4)
- Water cup and paper towels
Step 1: Sketching the Features
-
Clean the surface:
Wipe down your pumpkin with a slightly damp cloth to remove any dirt or oils so the paint adheres properly. -
Map the nose:
Using a pencil, lightly sketch a circular shape in the center of the pumpkin’s face for the nose. -
Outline the eyes:
Draw two almond shapes slightly above and to the sides of the nose, angling the inner corners downwards. -
Sketch the forehead lines:
Draw the signature vertical lines extending from the top of the eyes up toward the pumpkin stem, tapering to points. -
Draw cheek lines:
Continue the vertical lines from the bottom of the eyes down the cheeks, curving them outward to meet where the mouth corners will be. -
Draft the smile:
Sketch a wide, sweeping smile connecting the bottom of the cheek lines, leaving space inside for the teeth. -
Grid the teeth:
Lightly draw horizontal and vertical lines inside the mouth area to map out the teeth grid.
Clean Lines Hack
If you make a mistake or a line gets wobbly, quickly wipe it away with a damp Q-tip before the paint sets.
Step 2: Applying the Red
-
Paint the nose:
Load your small round brush with bright red acrylic paint and fill in the nose circle. -
Fill the forehead fissures:
Carefully paint the red lines above the eyes, keeping the tips sharp and the color opaque. -
Paint the cheek stripes:
Follow your pencil lines down past the eyes, painting a smooth red stripe that ends at the mouth corners. -
Create the lips:
Paint a thick red border around the smile shape, being careful not to get paint in the teeth area. -
Dry time:
Allow the red paint to dry completely; I usually give it about 15 minutes so my hand doesn’t smudge it later.
Step 3: detailing the Expression
-
Check the tools:
For the sharpest black details in this phase, I prefer using a black paint pen over a brush for better control. -
Outline the eyes:
Trace the almond shape of the eyes with your black marker or liner brush. -
Add the gaze:
Draw semi-circles for pupils in the corners of the eyes so the clown appears to be looking sideways. -
Draw eyebrows:
Add thin, angular eyebrows just above the eyes to enhance the menacing expression. -
Define the mouth:
Outline the outer and inner edges of the red lips with a thin black line. -
Draw the teeth:
Trace the grid lines inside the mouth to create the separated teeth, keeping lines straight and clean. -
Add dimples:
Finish by drawing small, curved accent lines at the very tips of the smile for extra depth.
Level Up
Apply a coat of high-gloss varnish only over the red nose and lips to make them look wet and freshly painted.
Place this menacing masterpiece on your doorstep to give visitors a frightful welcome.
Shadowy Grim Reaper Hood
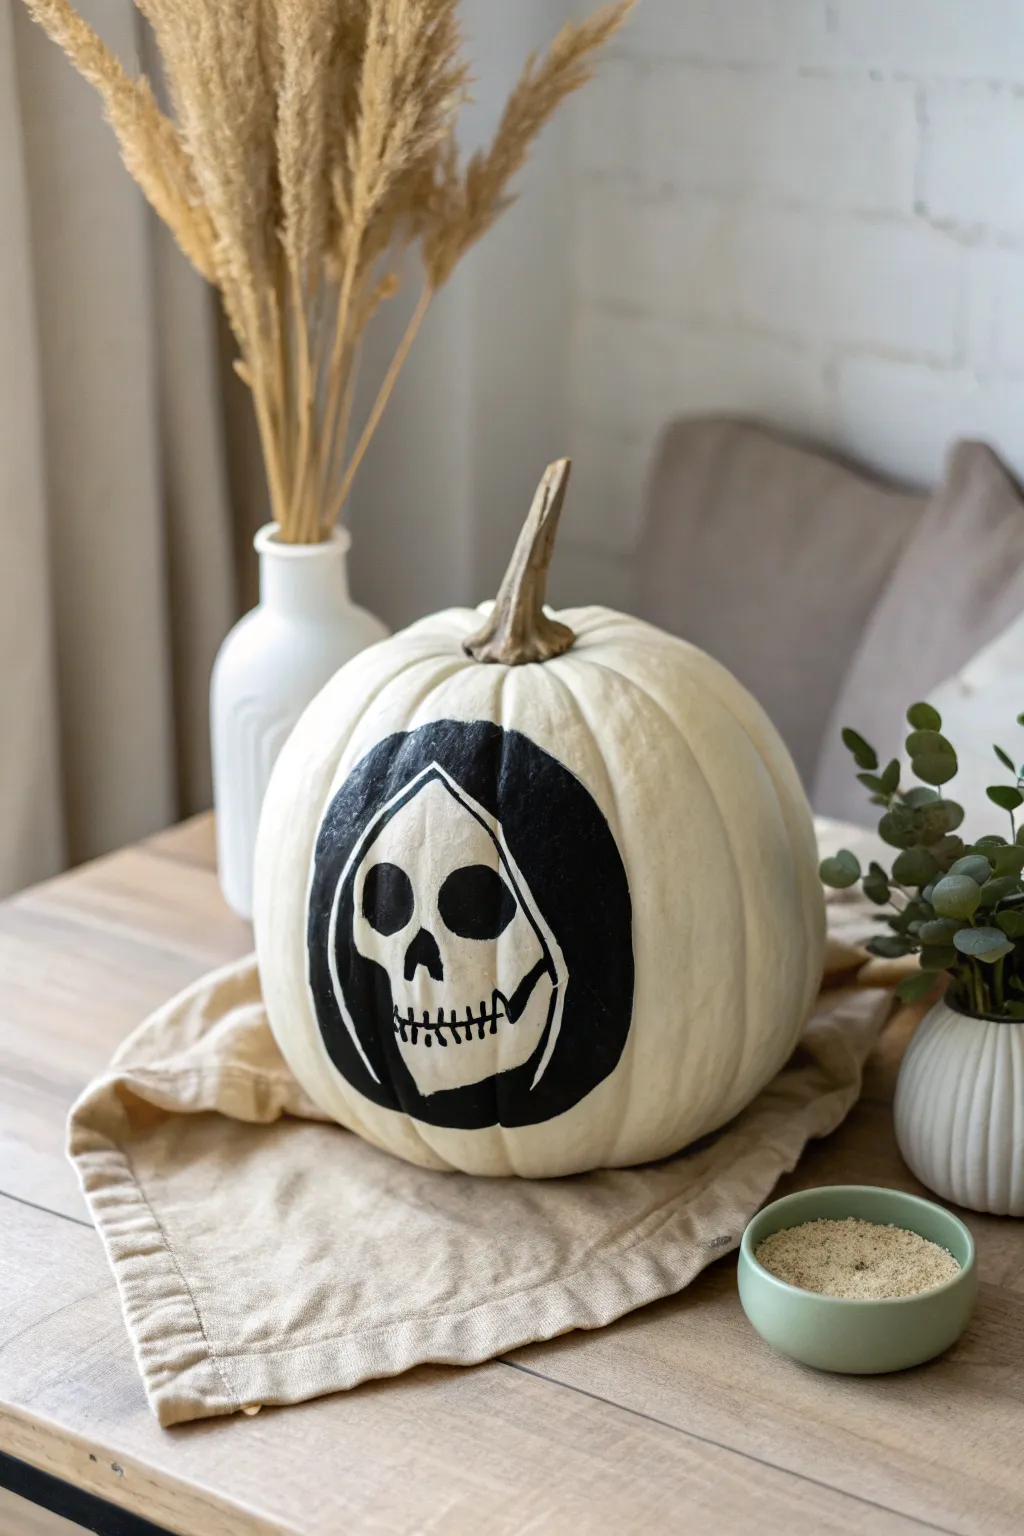
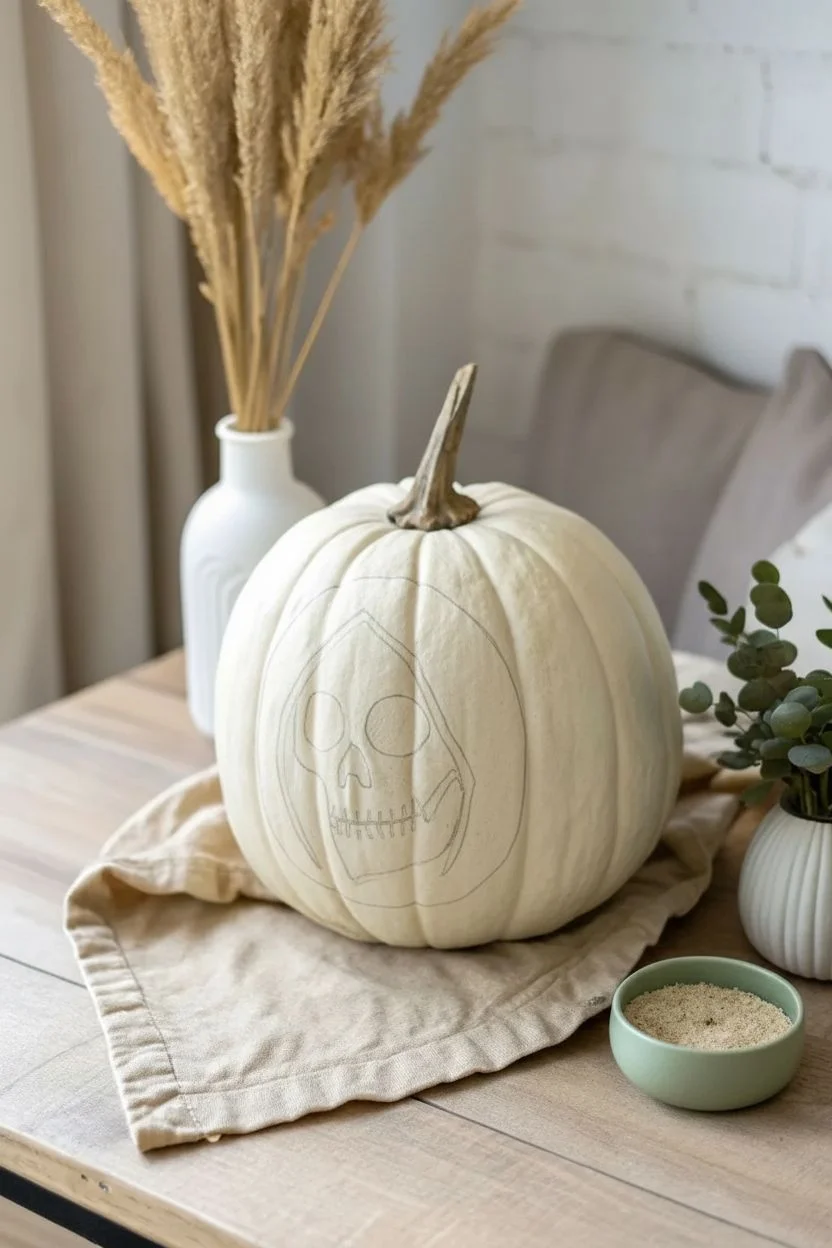
Get spooky with this high-contrast design that uses the pumpkin’s natural white color to create a bone-chilling skull. It is an easy-to-master project that relies on bold shapes rather than intricate shading for a striking effect.
Step-by-Step Tutorial
Materials
- White pumpkin (real or craft foam)
- Black acrylic craft paint
- Pencil (light lead like HB)
- White eraser
- Medium flat paintbrush
- Small round paintbrush
- Fine liner brush (for details)
- Palette or paper plate
- Water cup and paper towels
Step 1: Planning the Phantom
-
Prepare the surface:
Wipe down your white pumpkin with a damp paper towel to remove any dirt or dust. -
Dry completely:
Ensure the surface is totally dry so the acrylic paint adheres smoothly without bubbling. -
Sketch the hood outline:
Using your pencil, lightly draw a large oval shape on the flattest side of the pumpkin to define the outer edge of the reaper’s hood. -
Define the face opening:
Draw a smaller, slightly pear-shaped outline inside the first oval; this space will remain unpainted to become the skull. -
Outline the features:
Lightly sketch two large teardrop shapes for eyes and an inverted heart or triangle for the nose cavity inside the face area. -
Draft the mouth:
Sketch a horizontal line for the mouth, adding short vertical ticks for the teeth along the jawline.
Wobbly Lines?
Painting over pumpkin bumps can cause shaky lines. If you make a mistake, let it dry completely, then use a white paint pen or small brush with white paint to clean up the edges.
Step 2: Painting the Void
-
Outline the hood:
Load your small round brush with black paint and carefully trace the large outer oval of the hood. -
Trace the skull shape:
Switching to a steady hand, trace the inner outline that defines the edge of the skull face. -
Fill the hood:
Use the medium flat brush to fill in the large space between your two outlines with black paint. -
Smooth the ridges:
I usually dab the brush slightly into the pumpkin’s natural vertical grooves to ensure no white spots peek through the black hood. -
Let it verify:
Allow this large black area to dry to the touch so you don’t accidentally smudge it while working on the face. -
Apply a second coat:
If the black looks streaky or gray in spots, apply a second layer of paint for a solid, opaque look.
Step 3: Bone-Chilling Details
-
Paint the eyes:
Using the small round brush, fill in the two eye sockets with solid black paint. -
Paint the nose:
Carefully fill in the triangular nose cavity, keeping the edges sharp. -
Define the jaw:
Switch to your fine liner brush to paint the thin black line that separates the skull’s cheekbone from the jaw area. -
detail the mouth:
With the liner brush, paint the main horizontal line for the mouth. -
Add the teeth:
Paint the small vertical hatch marks across the mouth line to create the skeletal teeth look. -
Clean up:
Once strictly dry, gently erase any visible pencil lines left on the white parts of the skull.
Pro Tip: Matte Finish
To get that deep, shadowy fabric look for the hood, use a matte black acrylic paint rather than glossy. Glossy paint reflects light and ruins the ‘void’ illusion of the reaper’s hood.
Now you have a hauntingly simple centerpiece ready to stare down your Halloween guests
Surreal Melting Face
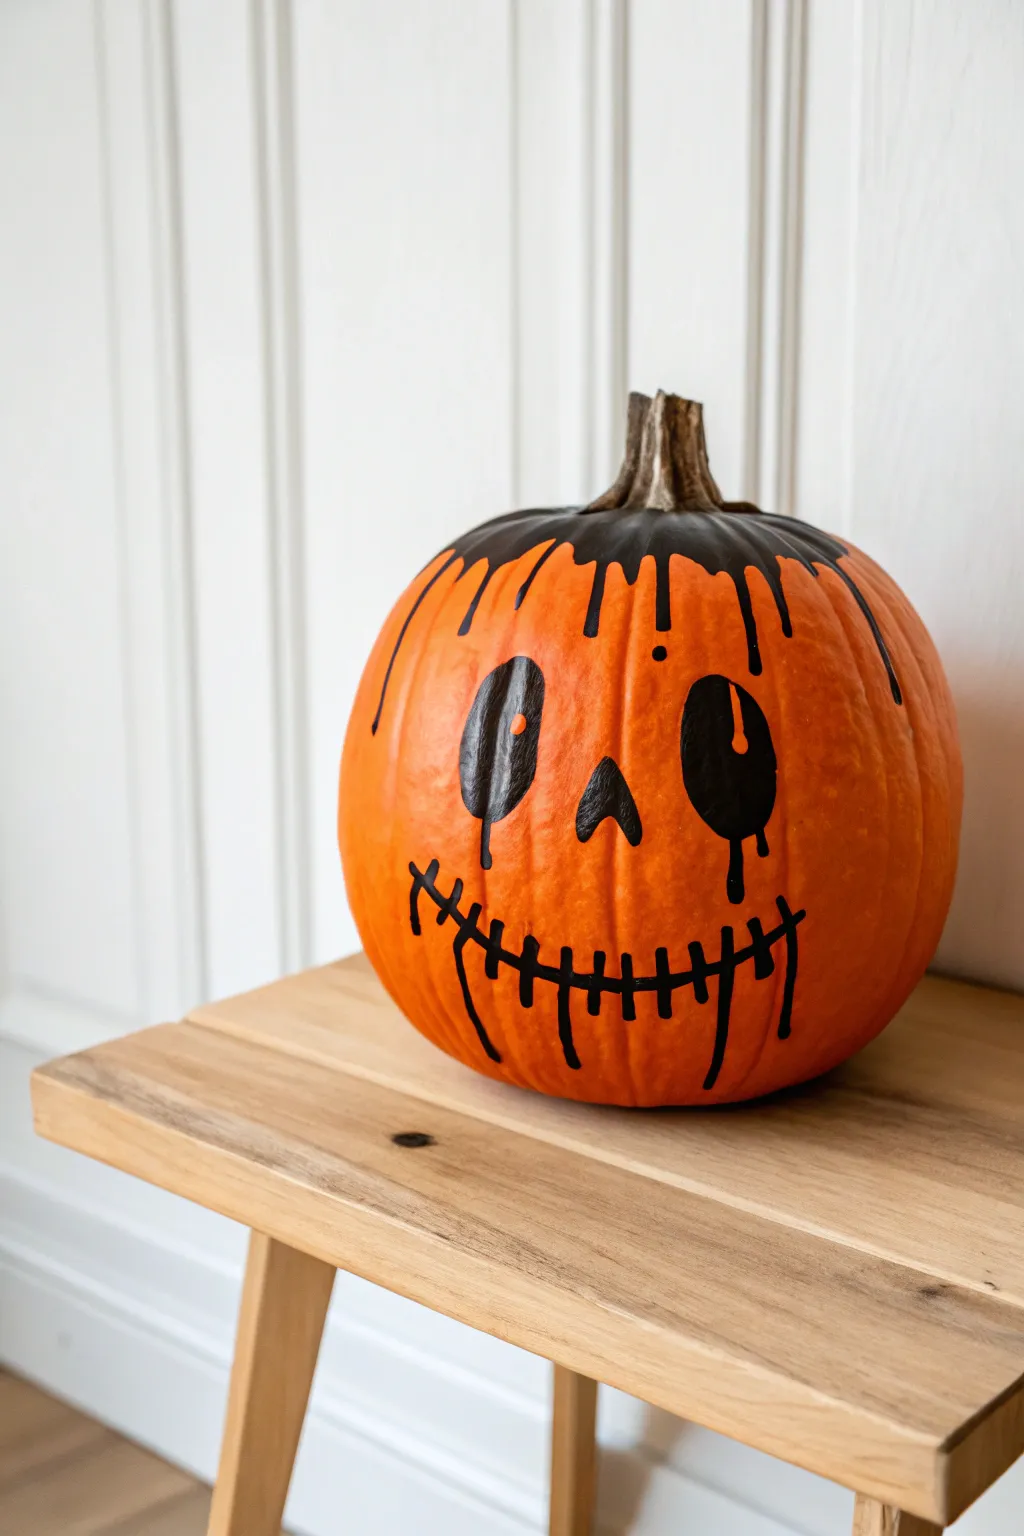
Give your Halloween decor a surreal edge with this dripping, high-contrast pumpkin design. The combination of a classic stitched smile with melting black paint creates a wonderfully spooky effect that is surprisingly simple to achieve.
How-To Guide
Materials
- Medium-sized orange pumpkin
- Black acrylic paint
- Medium round paintbrush
- Fine liner or detail brush
- Pencil or white chalk marker
- Paper towels
- Water cup
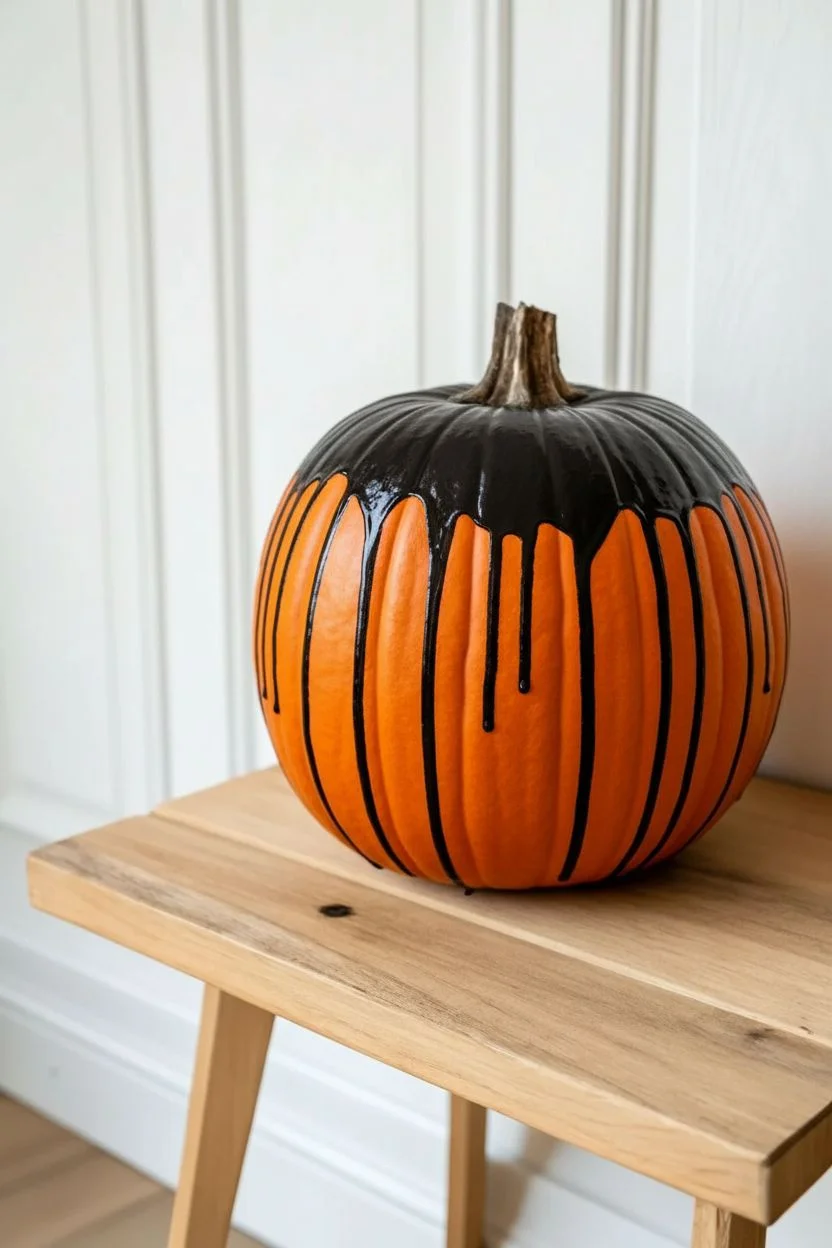
Step 1: The Dripping Crown
-
Prep the surface:
Wipe your pumpkin down with a damp cloth to remove any dust or natural oils, then dry it completely so the paint adheres well. -
Paint the stem base:
Using your medium round brush, paint a thick, irregular ring of black acrylic paint surrounding the pumpkin stem. -
Create the flow:
Drag the paint downwards from the stem area along the natural vertical ridges of the pumpkin to start your drips. -
Vary the lengths:
Extend these lines to different lengths—some short and some reaching halfway down—to simulate a random, organic melt. -
Round the ends:
Use the tip of your brush to round off the bottom of each vertical line, making them look like heavy droplets pooling before they fall. -
Fill the gaps:
Go back to the top and fill in the spaces between the drips near the stem so you have a solid black cap that transitions into the oozing lines.
Streaky Paint?
If the black looks translucent, don’t keep brushing wet paint. Let it dry completely, then dab (rather than drag) a second coat on top for solid coverage.
Step 2: The Surreal Face
-
Sketch the features:
Lightly sketch two large, slightly misshapen oval eyes and a small triangle nose using a pencil or chalk marker. -
Mark the highlights:
Draw a small circle inside each eye near the upper corner; preserving this unpainted spot is crucial for giving the face a glossy look. -
Paint the eyes:
Use the fine liner brush to outline and then fill in the eyes with black paint, carefully working around your marked highlight circles. -
Add the tear:
On the right eye (viewer’s right), paint a small line dripping from the bottom edge, finishing it with a rounded tear shape. -
Define the nose:
Paint the small triangle nose in solid black, keeping the corners sharp and distinct.
Step 3: The Mouth & Finish
-
Draw the smile:
Paint a long, thin horizontal curve across the lower section of the face for the mouth, adding small upward ticks at the corners. -
Stitch it up:
Paint vertical hatch marks across the smile line, spacing them out like rugged stitches. -
melt the stitches:
Select three or four specific stitches and extend them downward into wavy lines to continue the melting theme. -
Add corner drips:
Paint a longer drip extending down from the far left corner of the mouth to balance out the tear on the right eye. -
Check opacity:
Allow the first layer of paint to dry for about 15 minutes. I find that orange pumpkins often soak up the first coat, so apply a second layer on the black areas for a truly opaque finish. -
Clean up:
Once fully dry, gently wipe away any remaining visible sketch marks with a damp cloth.
Level Up: Texture
Use black 3D puff paint instead of standard acrylics. This will create a raised, tactile surface that makes the ‘melting tar’ effect look incredibly realistic.
Set your creation on the porch to greet trick-or-treaters with its delightfully drippy grin
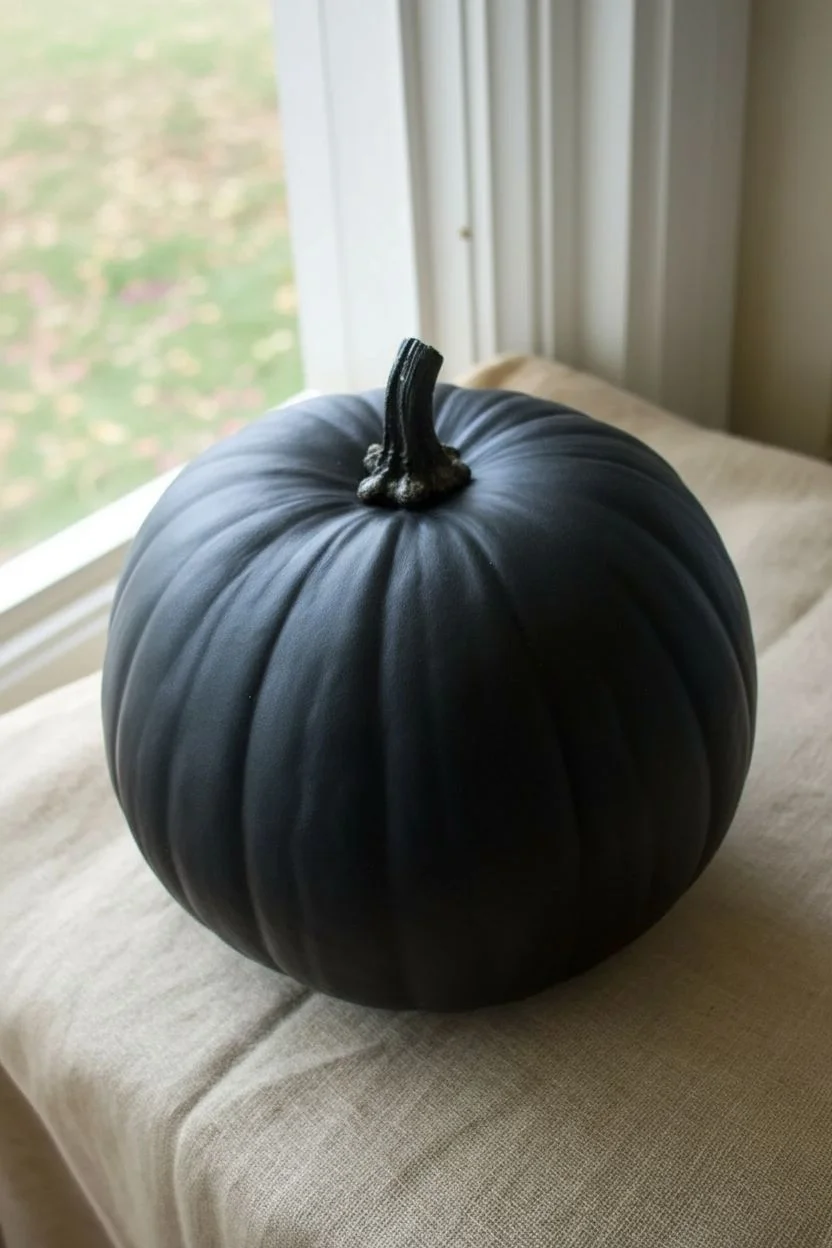
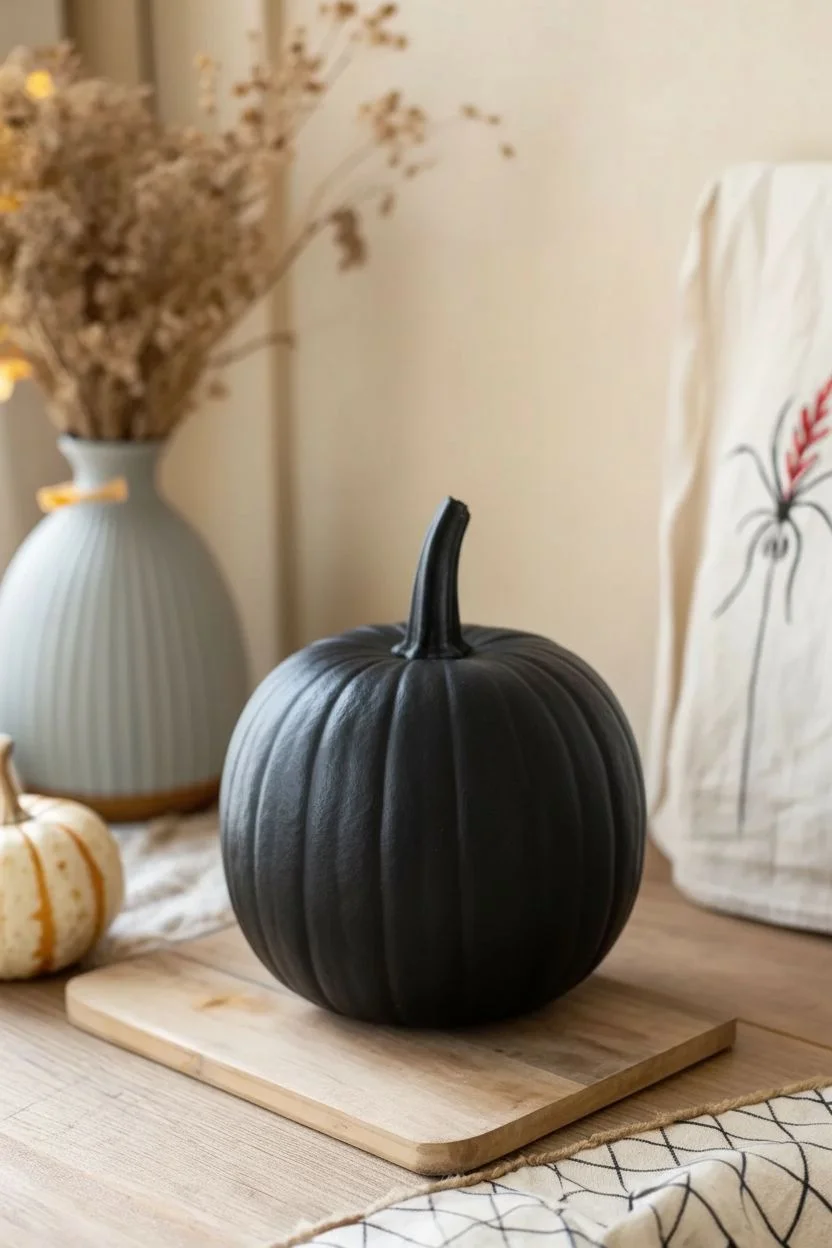
Matte Black on Glossy Black
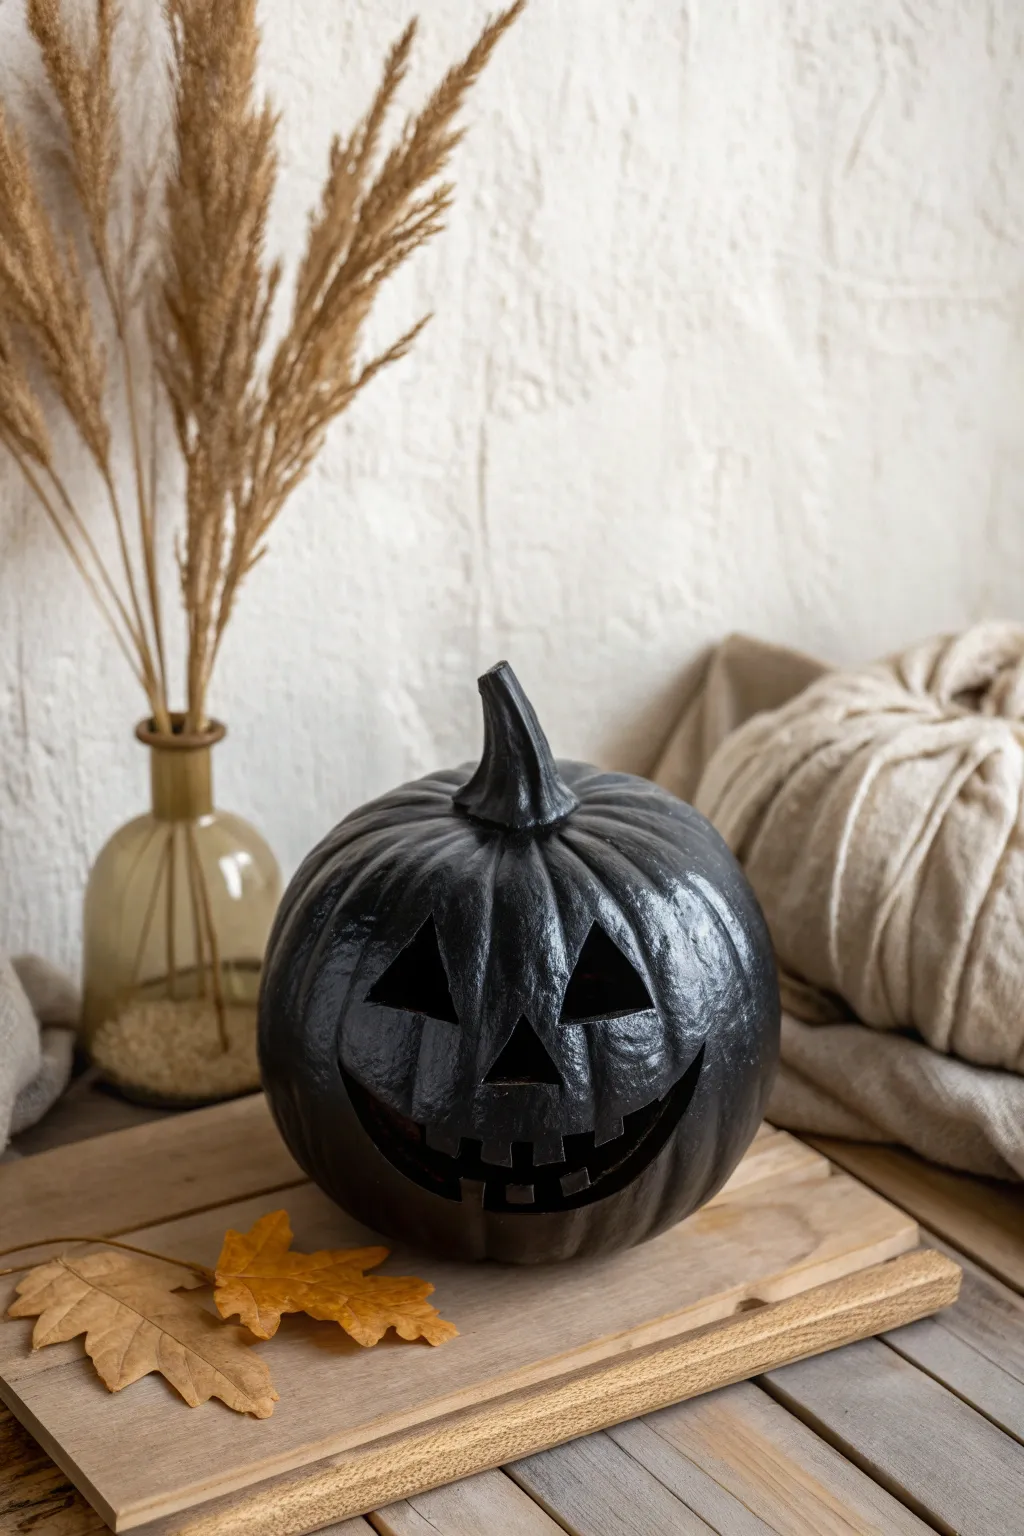
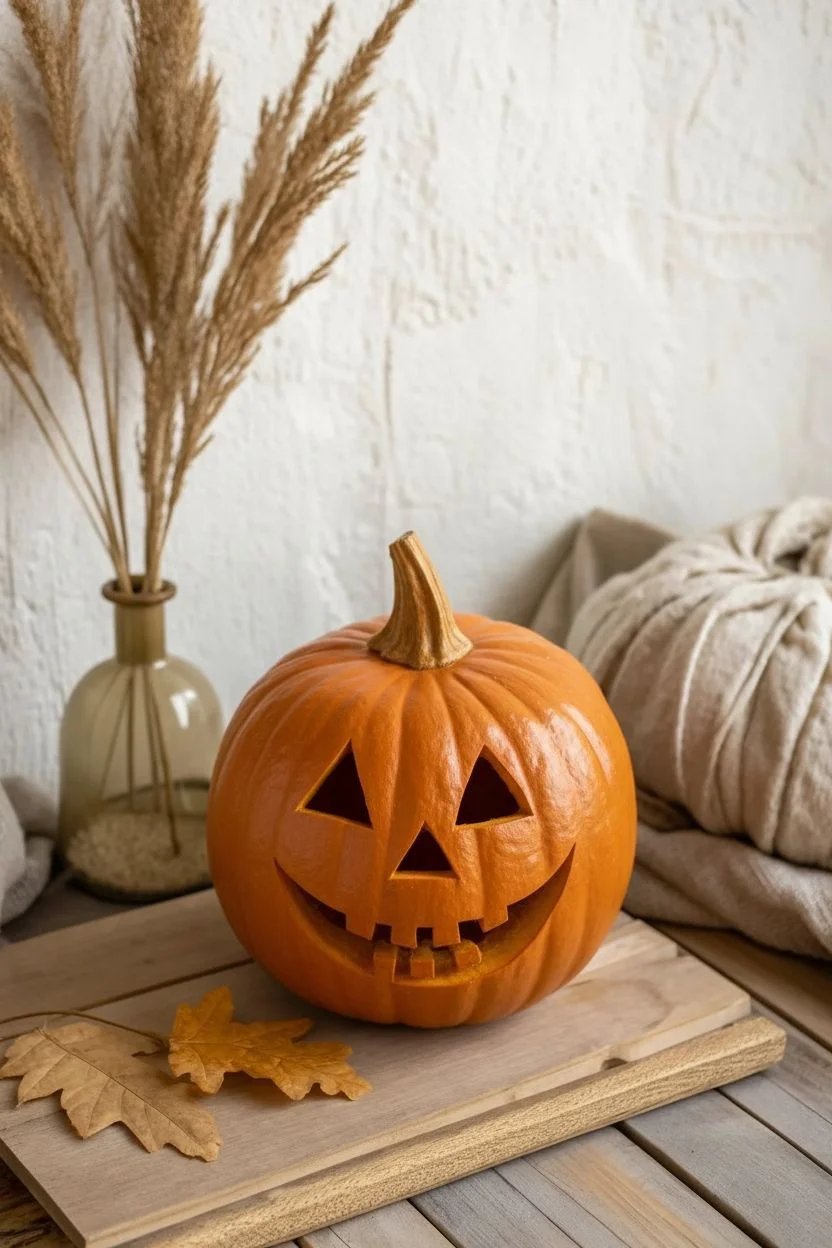
Transform a traditional jack-o’-lantern into a spooky, monochromatic shadow with this striking total-blackout technique. This project relies on a matte finish and deep carving to create a silhouette that looks like it was pulled straight from a noir film.
Detailed Instructions
Materials
- Medium-sized pumpkin (real or carvable foam)
- Serrated carving knife
- Scooping spoon
- Matte black acrylic paint
- Wide flat brush
- Small angled detail brush
- Black spray primer (optional)
- Newspaper or drop cloth
- Dry erase marker (for sketching)
Step 1: Carving the Face
-
Prepare the workspace:
Lay down your newspaper or drop cloth to protect your table, as black paint can be tricky to clean up later. -
Clean the surface:
Wipe the pumpkin exterior with a damp cloth to remove any dirt or oily residue, creating a clean base for the paint to adhere to. -
Sketch the expression:
Use a dry erase marker to draw a classic scary face directly onto the pumpkin skin; look for triangular eyes, a small nose, and a wide, jagged grin. -
Open the pumpkin:
Cut a circle around the stem (or a hole in the bottom) with your serrated knife and remove the lid piece. -
Scoop the insides:
Thoroughly scrape out all seeds and stringy pulp until the inner walls are clean and relatively dry. -
Carve the eyes:
Carefully saw along your marker lines to remove the eye triangles, pushing the cut pieces gently into the pumpkin. -
Carve the nose:
Cut out the small triangle for the nose, keeping your knife perpendicular to the pumpkin surface for clean edges. -
Carve the mouth:
Take your time sawing through the jagged teeth of the grin, removing the cutout sections as you go to prevent them from getting stuck. -
Tidy the edges:
Go back over your cut lines with the knife or a small paring tool to trim away any dangling bits of pumpkin flesh for a sharp silhouette.
Depth Perception
Paint the ‘flesh’ edges of your cutouts black. If you leave them orange, the illusion breaks. Black edges make the pumpkin look hollow.
Step 2: The Blackout Paint Job
-
Dry surfaces:
Ensure the exterior of the pumpkin is completely dry before introducing any paint. -
Apply base coat:
Using the wide flat brush, apply a generous layer of matte black acrylic paint over the entire exterior surface. -
Paint the stem:
Extend the black paint all the way up and over the stem; I find dabbing the brush into the stem’s grooves helps cover the deep textures. -
Coat the cut edges:
Switch to your small angled brush and carefully paint the exposed rim of the flesh inside the eyes, nose, and mouth cuts. -
Darken the interior:
Reach inside with your brush and paint the inner back wall of the pumpkin black so no orange shows through the face holes. -
Let it cure:
Allow this first heavy coat to dry for about 20 to 30 minutes, or until it is dry to the touch. -
Apply second coat:
Add a second layer of matte black paint to eliminate any streaky areas and ensure a solid, opaque finish. -
Stipple for texture:
While the second coat is wet, use a dabbing or stippling motion with your brush to create a slight texture that mimics cast iron or charcoal. -
Final touch-ups:
Inspect the pumpkin from different angles and dab a little extra paint into any stubborn orange crevices near the stem or base.
Paint Slipping?
If acrylic paint slides off the pumpkin skin, lightly buff the surface with fine-grit sandpaper first to give the paint some grip.
Place your creation on a rustic board with some dried leaves to complete this hauntingly sophisticated display.


Have a question or want to share your own experience? I'd love to hear from you in the comments below!