If you’ve been craving easy scenery painting ideas that still look like “wow, I made that,” you’re in the right creative headspace. I’m sharing my go-to scene setups that rely on simple shapes, smooth blends, and bold contrasts—so you can focus on mood, not perfection.
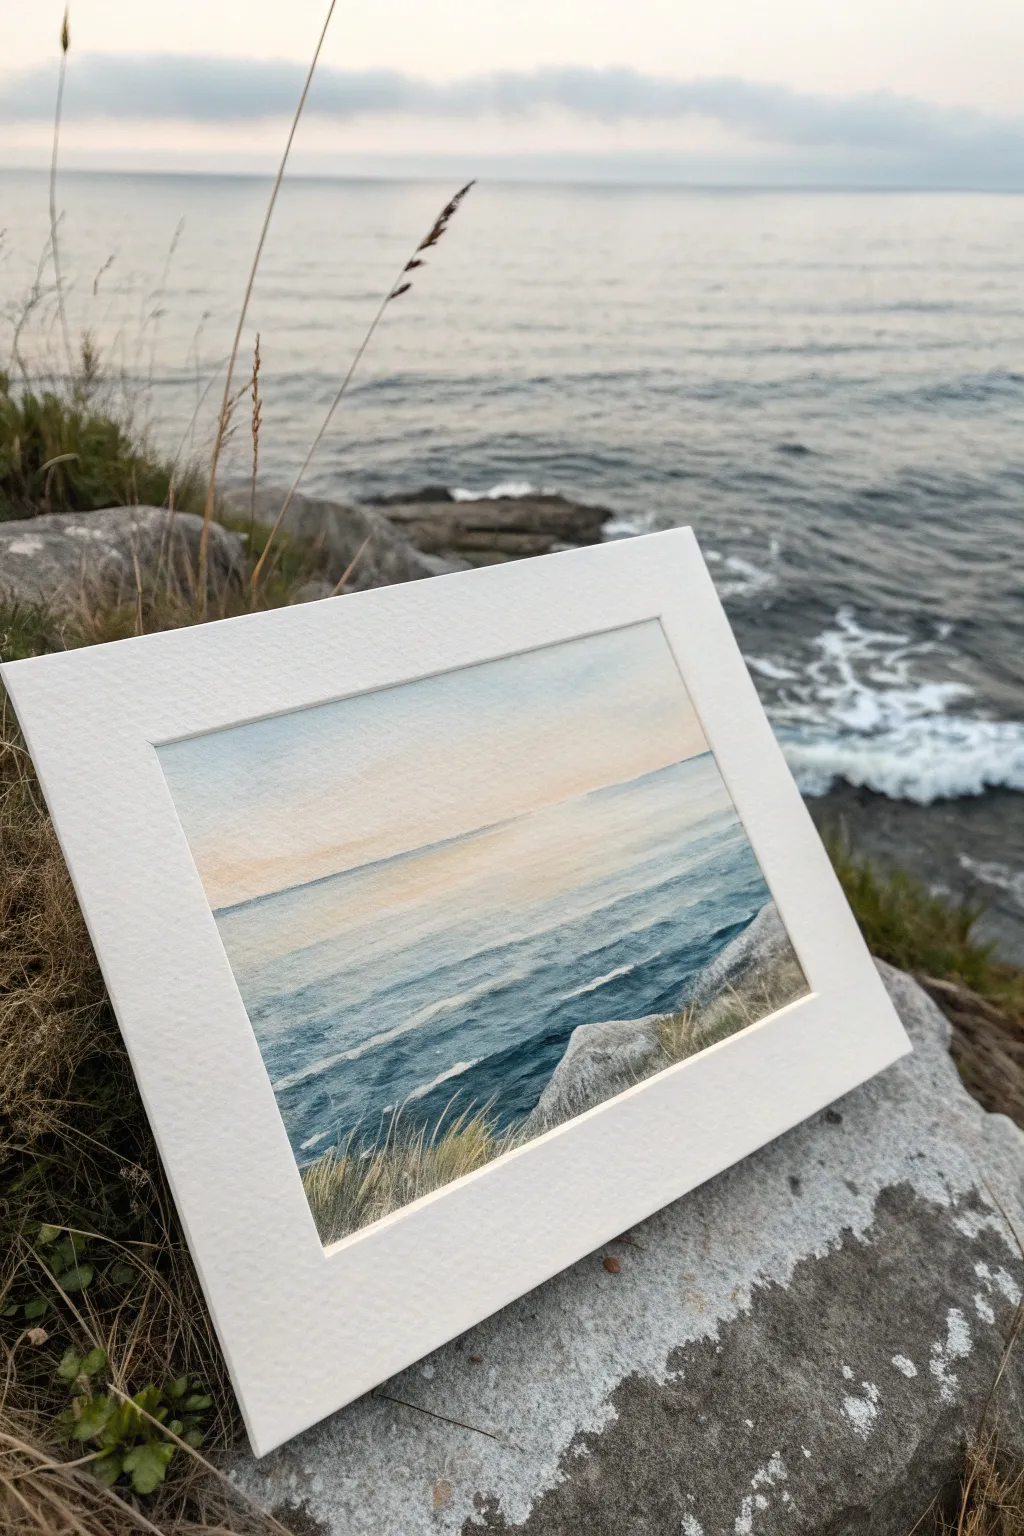
Sunset Gradient Over a Calm Ocean
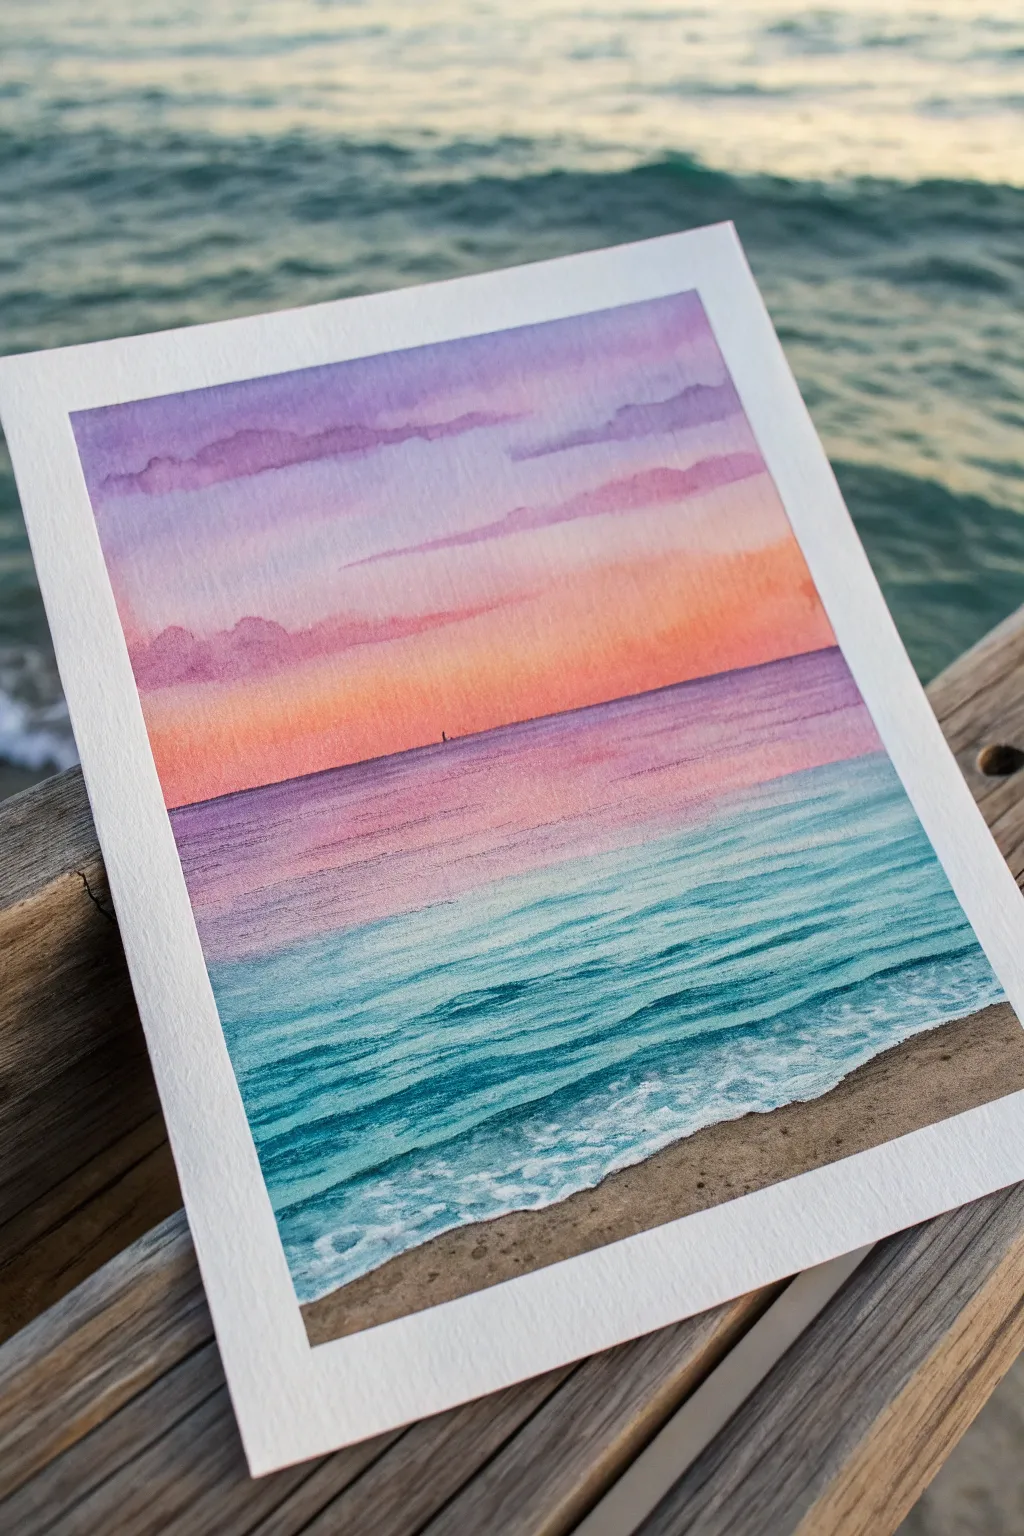
Capture the serene beauty of twilight colliding with the sea in this vibrant watercolor piece. By mastering wet-on-wet blending for the sky and dry-brush techniques for the waves, you will create a stunning gradient that transitions from warm corals to cool teals.
Step-by-Step Guide
Materials
- Cold press watercolor paper (300 gsm recommended)
- Masking tape
- Watercolor paints (Violet, Rose/Magenta, Orange, Teal/Turquoise, Burnt Umber, White Gouache or Acrylic)
- Flat wash brush (3/4 inch or similar)
- Round brushes (sizes 4 and 8)
- Clean water jar
- Paper towels
- Mixing palette
Step 1: Setting the Scene
-
Tape the borders:
Begin by taping down all four edges of your watercolor paper to a board. Press the tape firmly to ensure clean, crisp white borders later. -
Define the horizon:
Using a pencil, very lightly draw a straight horizontal line just below the halfway point of your paper. This separates your sky from the ocean.
Fixing Back-Runs
If cauliflower-like blooms appear in your sky, you likely added water to a drying section. Blend it out with a damp brush immediately or embrace it as a cloud texture.
Step 2: Painting the Sky Gradient
-
Wet the sky area:
With your flat brush, apply a layer of clean water to the entire sky section above the horizon line. The paper should glisten but not have puddles. -
Apply the top violet layer:
Load your brush with a soft violet or purple. Starting at the very top edge, paint horizontal strokes, letting the color naturally diffuse downwards into the wet paper. -
Transition to warm tones:
Rinse your brush slightly and pick up a rose or magenta hue. Blend this into the bottom edge of the wet violet, moving downward toward the middle of the sky. -
Finish with orange:
Load a bright, warm orange. Paint the area just above the horizon line, blending it upwards into the pink. Ensure the orange meets the horizon line clearly. -
Add soft clouds:
While the sky is still damp (not soaking), mix a slightly more concentrated purple-grey. Use a round brush to gently dab in horizontal cloud shapes near the top, letting them bloom slightly for softness. -
Dry completely:
Let the sky layer dry fully before moving on. I usually wait until the paper feels room temperature to the touch rather than cool.
Add Sparkle
Make the water glisten by using a white gel pen to add tiny dots of reflected light on the top of the wave ripples closest to the viewer.
Step 3: Painting the Ocean
-
Establish the horizon color:
Use a medium round brush with a mix of violet and rose—mirroring the sky colors—to paint a thin, straight strip of water directly below the horizon line. -
Transition to teal:
Quickly clean your brush and switch to a turquoise or teal. Blend this into the wet purple strip, pulling the color downwards to create the main body of water. -
Deepen the foreground:
As you move closer to the bottom of the page, add more pigment to your teal mix to make the water appear deeper and richer in the foreground. -
Create wave texture:
Once the base ocean layer is dry, use a slightly darker teal mixture. With a fine round brush, paint thin, horizontal lines to suggest ripples and wave crests, getting wider as they come forward.
Step 4: The Shoreline and Foam
-
Paint the sand:
Mix burnt umber with a tiny bit of violet to dull it down. Paint the bottom corner section for the wet sand, keeping the edge visible against the blue water. -
Prepare the white paint:
Squeeze out a small amount of white gouache or opaque white acrylic. It needs to be thick enough to cover the underlying blue. -
Add rushing foam:
Using a small, stiff brush or an old toothbrush, gently stipple white paint along the line where the water meets the sand to create sea foam. -
Detail the waves:
Add thin white highlights on the crests of the teal waves in the foreground to define the movement of the water. -
Final touch: The Sailboat:
Using a very fine brush and dark grey or black paint, draw a tiny silhouette of a distant sailboat on the horizon line for scale. -
The reveal:
Once absolutely everything is bone dry, slowly peel off the masking tape at a 45-degree angle to reveal your crisp white frame.
Frame your beautiful sunset painting or turn it into a thoughtful handmade greeting card


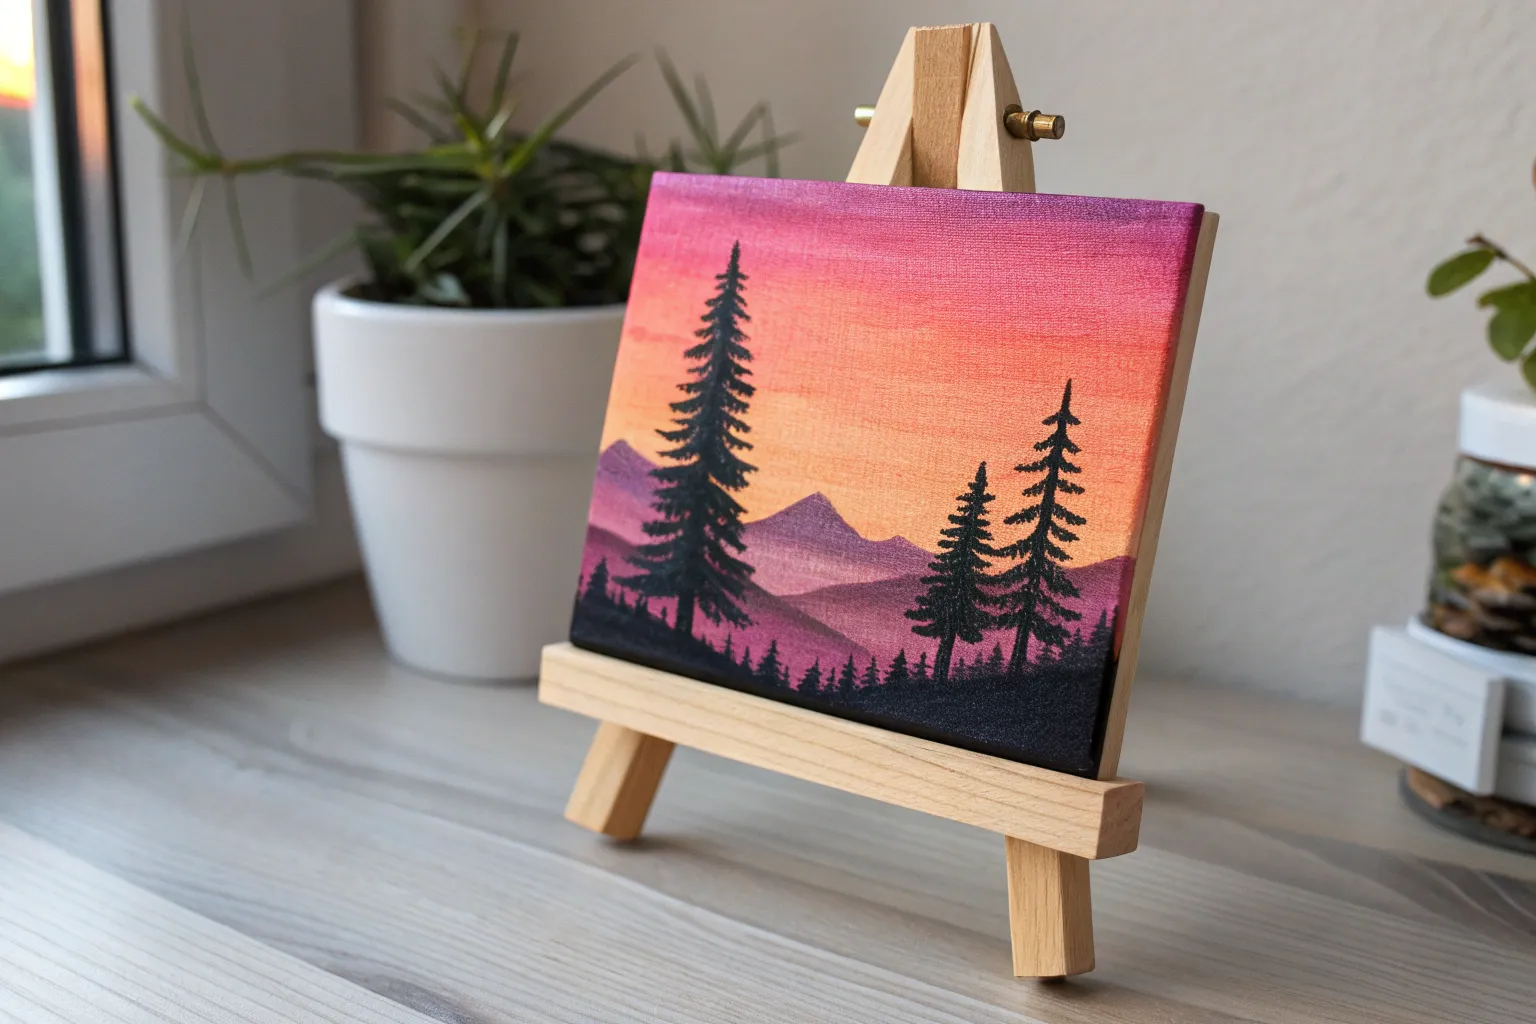
Mountain Layers at Sunrise
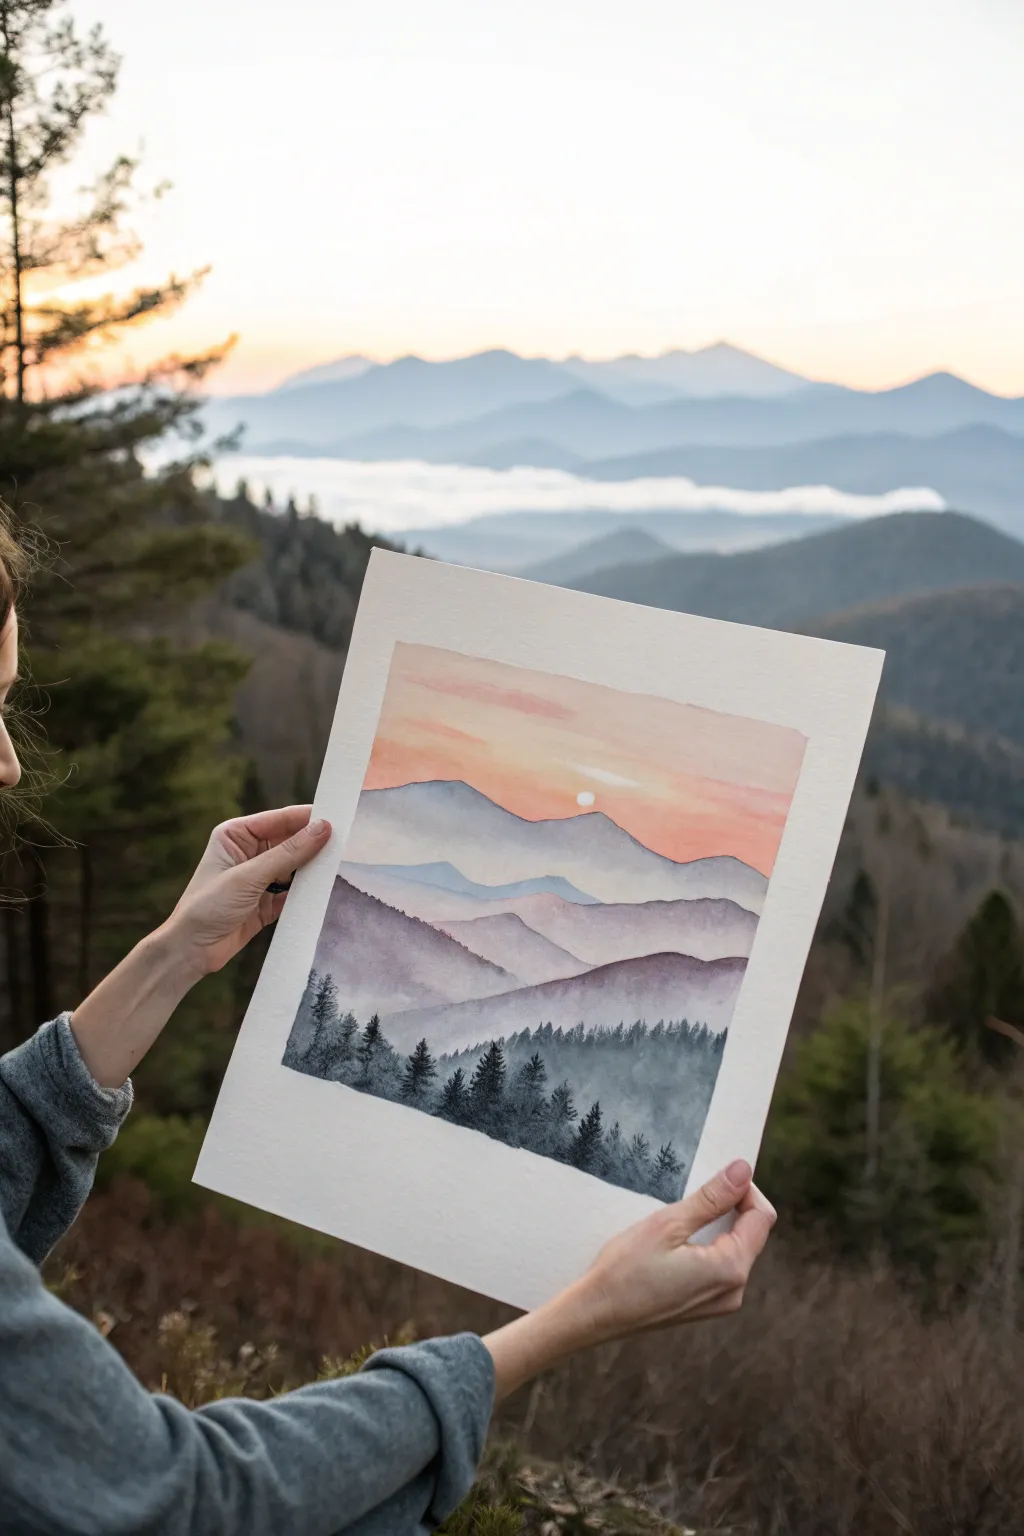
Capture the serene beauty of the Blue Ridge Mountains with this atmospheric watercolor study. You’ll layer soft washes to create depth, moving from a glowing pastel sky to deep, shadowed evergreens in the foreground.
Step-by-Step
Materials
- Cold press watercolor paper (140 lb/300 gsm)
- Painter’s tape or washi tape
- Watercolor paints (Indigo, Payne’s Gray, Alizarin Crimson, Yellow Ochre, Burnt Sienna)
- Large flat wash brush (3/4 inch)
- Medium round brush (size 6 or 8)
- Small detail brush (size 0 or 2)
- Jar of clean water
- Paper towels
- Pencil for sketching
- White gouache or masking fluid (optional for sun)
Step 1: Setting the Scene
-
Prepare your paper:
Tape down all four edges of your watercolor paper to a hard board using painter’s tape. This creates that crisp, clean white border seen in the photo and prevents the paper from buckling when wet. -
Sketch the horizon lines:
Using a light pencil touch, draw four or five wavy, horizontal lines across the paper. These represent the different mountain ridges. Keep the lines faint so they disappear under the paint later. -
Mask the sun:
If you want a crisp white sun, apply a small dot of masking fluid in the sky area. Alternatively, you can carefully paint around a small circle, or add it later with white gouache.
Water Control
Work top to bottom! Always let the layer above dry completely before painting the one below it. If it’s wet, the colors will bleed and ruin the distinct mountain ridges.
Step 2: The Glowing Sky
-
Wet the sky area:
With your large flat brush, apply clean water to the entire sky section, stopping just at the first mountain ridge line. The paper should be glistening but not forming puddles. -
Add warmth:
Load your brush with a watery mix of Yellow Ochre. Drop this color just above the first mountain line and around where the sun will sit, letting it diffuse upward. -
Introduce pink hues:
While the paper is still wet, mix a soft pink using Alizarin Crimson and a touch of water. Paint this into the upper part of the sky, blending it gently down into the yellow to create a soft peach transition. -
Soften the edges:
Clean your brush and use barely damp bristles to smooth out any harsh lines in the sky. Let this layer dry completely before moving on.
Atmospheric Depth
Objects get lighter and bluer as they get further away. Ensure your top mountain layer is the palest and bluest, and your bottom layer is the darkest and warmest.
Step 3: Layering the Mountains
-
First ridge: Distant haze:
Mix a very pale wash of Indigo and water. Fill in the shape of the furthest mountain range. The color should be very transparent to indicate atmospheric distance. -
Second ridge: Slight deepening:
Once the previous layer is dry, mix slightly more pigment into your Indigo wash, perhaps adding a touch of Alizarin Crimson for a purplish tint. Paint the second ridge, overlapping the bottom of the first. -
Third ridge: Adding definition:
Increase the pigment concentration again. For this middle layer, use a mix of Indigo and a tiny bit of Burnt Sienna to gray it down slightly. Paint the third mountain shape, ensuring the top edge is crisp against the lighter layer behind it. -
Creating the mist effect:
I find it helpful to soften the bottom edge of these middle ridges with a clean, damp brush. This creates the illusion of mist settling in the valleys between the peaks. -
Fourth ridge: Darker tones:
Mix a strong, dark purple-gray using Indigo and Alizarin Crimson. Paint the next ridge down. We are getting closer to the viewer, so the value should be significantly darker than the previous layers.
Step 4: Foreground Details
-
Closest ridge base:
Mix your darkest value yet—Payne’s Gray with a thick consistency (like heavy cream). Paint the base shape of the closest hill at the very bottom of the page. -
Detailing the trees:
Switch to your small detail brush. Using that same dark Payne’s Gray mix, paint tiny vertical lines rising from the closest ridge to mimic tree trunks. -
Adding pine foliage:
Use the tip of the brush to dab small, horizontal strokes on either side of the ‘trunks’ to create pine tree silhouettes. Keep the tops pointy and let the bottoms blend into the dark hill mass. -
Varying tree heights:
Make sure some trees are taller and some shorter to create a natural, organic jagged line across the foreground. -
Final reveal:
Wait until the painting is 100% bone dry. Carefully peel off the masking tape at a 45-degree angle to reveal your clean borders. If you used masking fluid for the sun, rub it off gently now.
Step back and admire your misty landscape, remembering that watercolor dries lighter than it looks when wet


Lake Reflection With a Simple Treeline
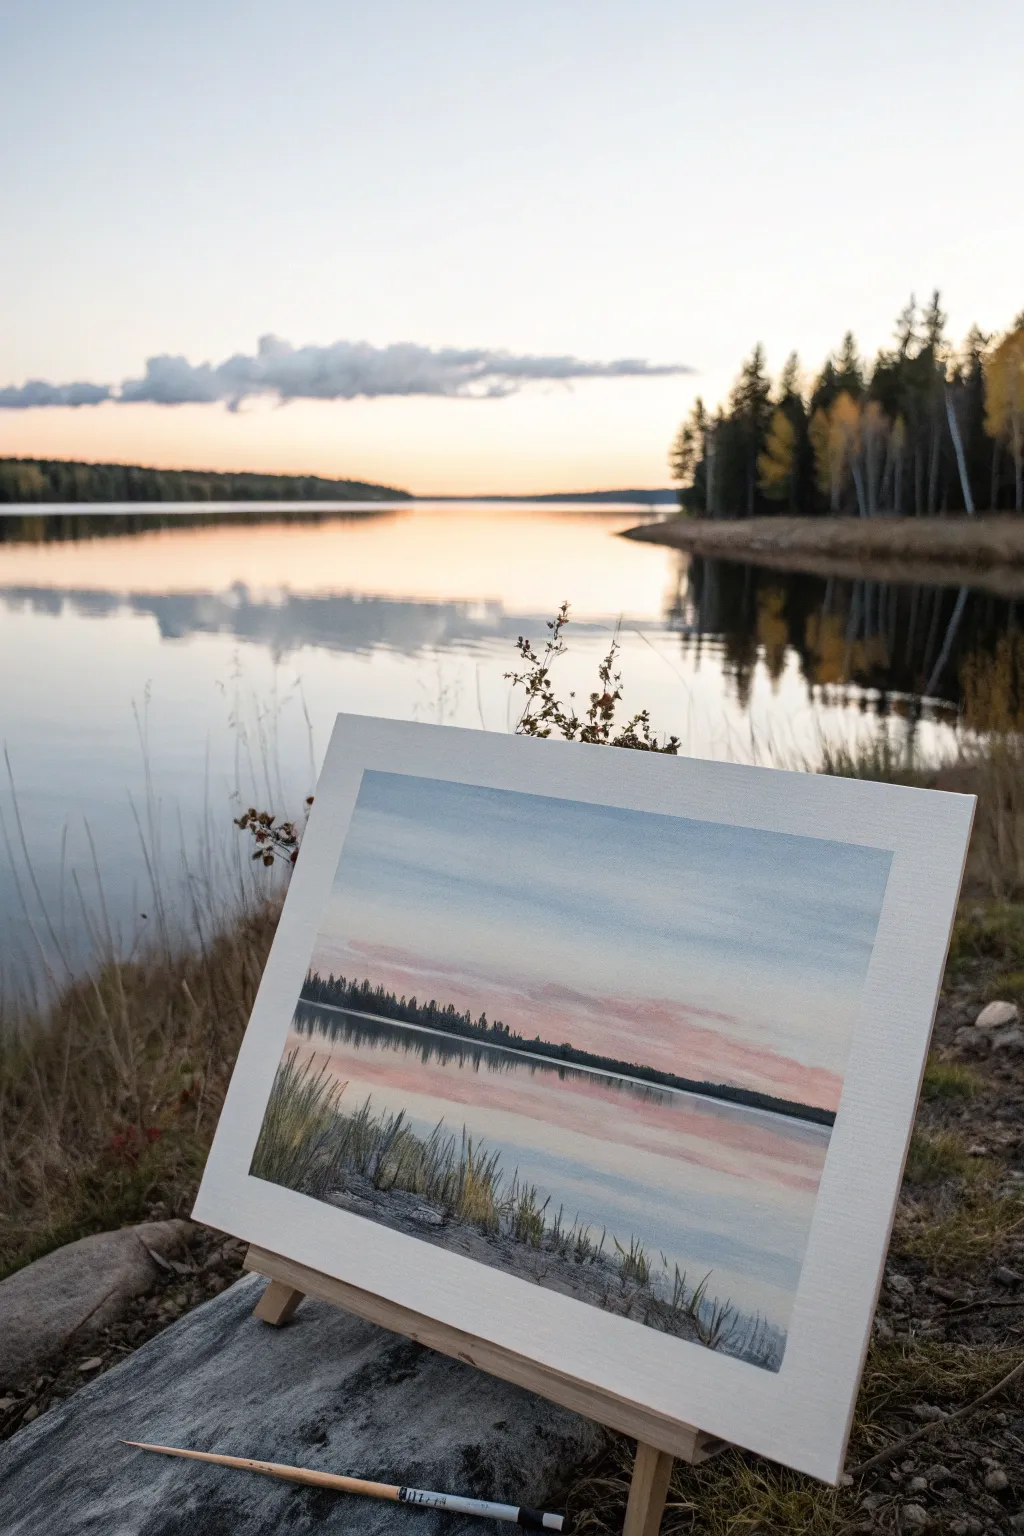
Capture the stillness of twilight with this gentle watercolor landscape featuring a soft, gradient sky and its perfect mirror image. This project focuses on mastering wet-on-wet blending for the sky and water, contrasted by crisp, dry-brush details for the silhouette treeline.
Step-by-Step Tutorial
Materials
- Watercolor paper (cold press, roughly 9×12 inches)
- Watercolor paints (Cerulean Blue, Alizarin Crimson, Burnt Umber, Sap Green, Payne’s Grey)
- Flat wash brush (1 inch)
- Round brush (size 6 or 8)
- Rigger or liner brush (size 1)
- Masking tape
- Drawing board or thick cardboard
- Two jars of water
- Paper towels
- Pencil (HB)
Step 1: Preparation and Sketching
-
Secure the paper:
Tape your watercolor paper down firmly to your drawing board on all four sides. This creates that clean white border shown in the photo and prevents the paper from buckling when wet. -
Establish the horizon:
Using a ruler and a light pencil touch, draw a straight horizontal line just below the visual center of the paper. This will be the base of your distant treeline. -
Plan the foreground:
Lightly sketch a curved, uneven line at the bottom left where the sandy bank and grasses will eventually go. Keep these pencil marks extremely faint so they don’t show through the transparent paint later.
Horizon Check
Ensure your horizon line is perfectly straight. If it tilts even slightly, the water will look like it’s sliding off the paper. Use a ruler!
Step 2: Painting the Sky and Water
-
Pre-wet the sky:
Dip your large flat brush in clean water and evenly coat the paper from the top edge down to the horizon line until the surface has a uniform sheen. -
Apply the blue gradient:
Load the flat brush with a watery mix of Cerulean Blue. Start at the very top and sweep across, gradually adding more water as you move down to fade the blue into white before you reach the horizon. -
Add sunset hues:
While the paper is still damp, mix a dilute Alizarin Crimson. Gently sweep this soft pink horizontally near the horizon line, letting it bleed slightly up into the fading blue without overworking it. -
Mirror the water:
Repeat this process for the lake surface below the horizon. Paint the water area with clean water first, then apply the pink near the horizon and the blue near the bottom, effectively upside-down compared to the sky. -
Strengthen the ripples:
While the water area is still slightly damp but not soaking, use a round brush with a slightly stronger mix of pink and grey-blue to add horizontal streaks. This suggests the gentle movement of water distorting the reflection. -
Let it dry completely:
Before moving on to the sharp details of the trees, you must wait for the paper to be bone dry. If it’s cool to the touch, it’s still wet.
Adding Life
Use the tip of a craft knife to gently scratch out a few tiny white lines in the dark foreground rocks. This reveals the paper and looks like highlights.
Step 3: The Treeline and Reflection
-
Mix the tree color:
Combine Payne’s Grey with a touch of Sap Green and Burnt Umber to create a deep, near-black forest green. It needs to be fairly thick, distinctly less watery than your sky mix. -
Paint the distant trees:
Using the tip of your round brush, dab vertical uneven shapes along the top of the horizon line. Vary the heights to simulate pine trees, keeping the bottom edge of the trees perfectly flat against the horizon line. -
Establish the reflected trees:
Immediately paint the reflection of the trees below the horizon line using the same dark mix. Pull the paint downwards slightly to mimic the length of the trees above. -
Blur the reflection:
I like to take a clean, slightly damp brush and gently run it horizontally through the reflected trees while they are wet. This softens their edges and makes them look like they are sitting on water rather than solid ground.
Step 4: Foreground Details
-
Paint the bank:
Mix Burnt Umber with a little blue to make a grey-brown. Paint the foreground land mass in the bottom left corner, using rough brushstrokes to suggest dirt and rocks. -
Add tall grasses:
Switch to your rigger or liner brush. Mix a dark green (Sap Green + Payne’s Grey). Start from the bottom of the bank and flick the brush quickly upward to create tapering, grass-like lines. -
Create texture:
Mix a lighter ochre or yellow-green and add a few highlights to the grass clumps. add a few horizontal dark lines at the base of the grasses to ground them. -
Final touches:
Evaluate your painting. If the water looks too plain, you can add extremely faint, horizontal lines of white gouache or very pale blue to suggest surface shimmer. -
Reveal the border:
Once everything is absolutely dry, slowly peel off the masking tape at a 45-degree angle away from the painting to reveal your crisp, professional edge.
Now step back and admire how the stillness of the water brings a sense of calm to your space
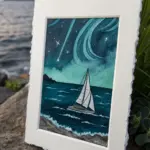

Night Sky With a Big Moon
Capture the serene beauty of a crisp evening with this striking watercolor composition featuring a luminous full moon. The painting uses a gradient wash to create depth and contrast, capped with delicate pine tree silhouettes.
Step-by-Step Guide
Materials
- Cold Press watercolor paper (approx. 5×7 inches)
- Painter’s tape or masking tape
- Pencil and a circular object (for tracing)
- Masking fluid
- Watercolor paints: Indigo, Prussian Blue, Black
- Pro-White gouache or white gel pen
- Round watercolor brushes (Size 8 and Size 2)
- Water cups and paper towels
Step 1: Setting the Scene
-
Tape the Edges:
Secure your watercolor paper to a board or table with painter’s tape on all four sides. This creates that crisp, clean white border synonymous with finished watercolor pieces. -
Trace the Moon:
Place your circular object (like a jar lid or tape roll) slightly above the center of the paper. Lightly trace a circle with your pencil to define the moon’s shape. -
Mask the Moon:
Carefully fill in the entire moon circle with masking fluid. This protects the white paper underneath so you can paint the dark sky freely without worrying about the edges. -
Let it Dry:
Allow the masking fluid to dry completely until it feels rubbery and tacky to the touch. Painting over wet fluid will ruin your brushes.
Clean Edges Pro-Tip
To prevent paint bleeding under the tape, run a bone folder or the back of your fingernail firmly along the inner edge of the tape before you start painting.
Step 2: Painting the Sky Gradient
-
Prepare Your Colors:
Mix a generous amount of Indigo and Prussian Blue on your palette. You want a very saturated, dark mixture for the top of the sky. -
Start at the Top:
Using your larger round brush, apply the darkest blue mixture to the top third of the paper. Paint right over the masked moon area. -
Create the Gradient:
As you work your way down the paper, dip your brush into clean water to dilute the paint slightly. This should make the blue gradually lighter as you approach the horizon line. -
Fade to Mist:
When you reach the bottom quarter of the paper where the trees will go, use mostly water to create a very pale, misty blue wash. I find this creates a lovely atmospheric glow behind the forest. -
Dry Time:
Let this background layer dry completely. The paper should be flat and room temperature before you proceed.
Add a Halo Effect
Before the dark sky dries, lift a little paint around the moon’s edge with a clean, damp brush. This creates a soft, glowing halo around the moon.
Step 3: Detailing the Moon
-
Remove the Masking:
Gently rub the masking fluid off with your finger or a rubber cement pickup tool to reveal the stark white circle underneath. -
Soften the Glow:
Mix a very watery, pale grey wash. Dab this lightly onto parts of the moon to create craters and shadows, leaving some areas bright white for brilliance. -
Add Texture:
While the moon is still slightly damp, drop in tiny touches of slightly darker grey to mimic the lunar surface’s texture.
Step 4: Applying Final Details
-
Paint the Treeline:
Mix a deep black with a touch of indigo. Using your smallest size 2 brush, paint a jagged, sloping hill at the very bottom of the paper. -
Add Pine Trees:
Using the tip of the small brush, paint tiny vertical lines rising from the hill. Add small, downward-sloping dabs on either side of these lines to create pine branches. -
Vary Height:
Make sure your trees are different heights—some tall and majestic, others short—to keep the forest looking natural. -
Flick the Stars:
Cover the bottom trees with a scrap piece of paper. Dip a stiff brush or toothbrush into white gouache and flick tiny specks across the upper blue sky. -
Paint Larger Stars:
Use a white gel pen or a fine brush with gouache to manually paint a few distinct four-point stars for extra sparkle. -
The Reveal:
Once everything is bone dry, slowly peel away the painter’s tape at a 45-degree angle to reveal your clean edges.
Now you have a tranquil night scene ready to frame or gift to a friend
BRUSH GUIDE
The Right Brush for Every Stroke
From clean lines to bold texture — master brush choice, stroke control, and essential techniques.
Explore the Full Guide
Pine Tree Silhouettes Against a Colorful Sky
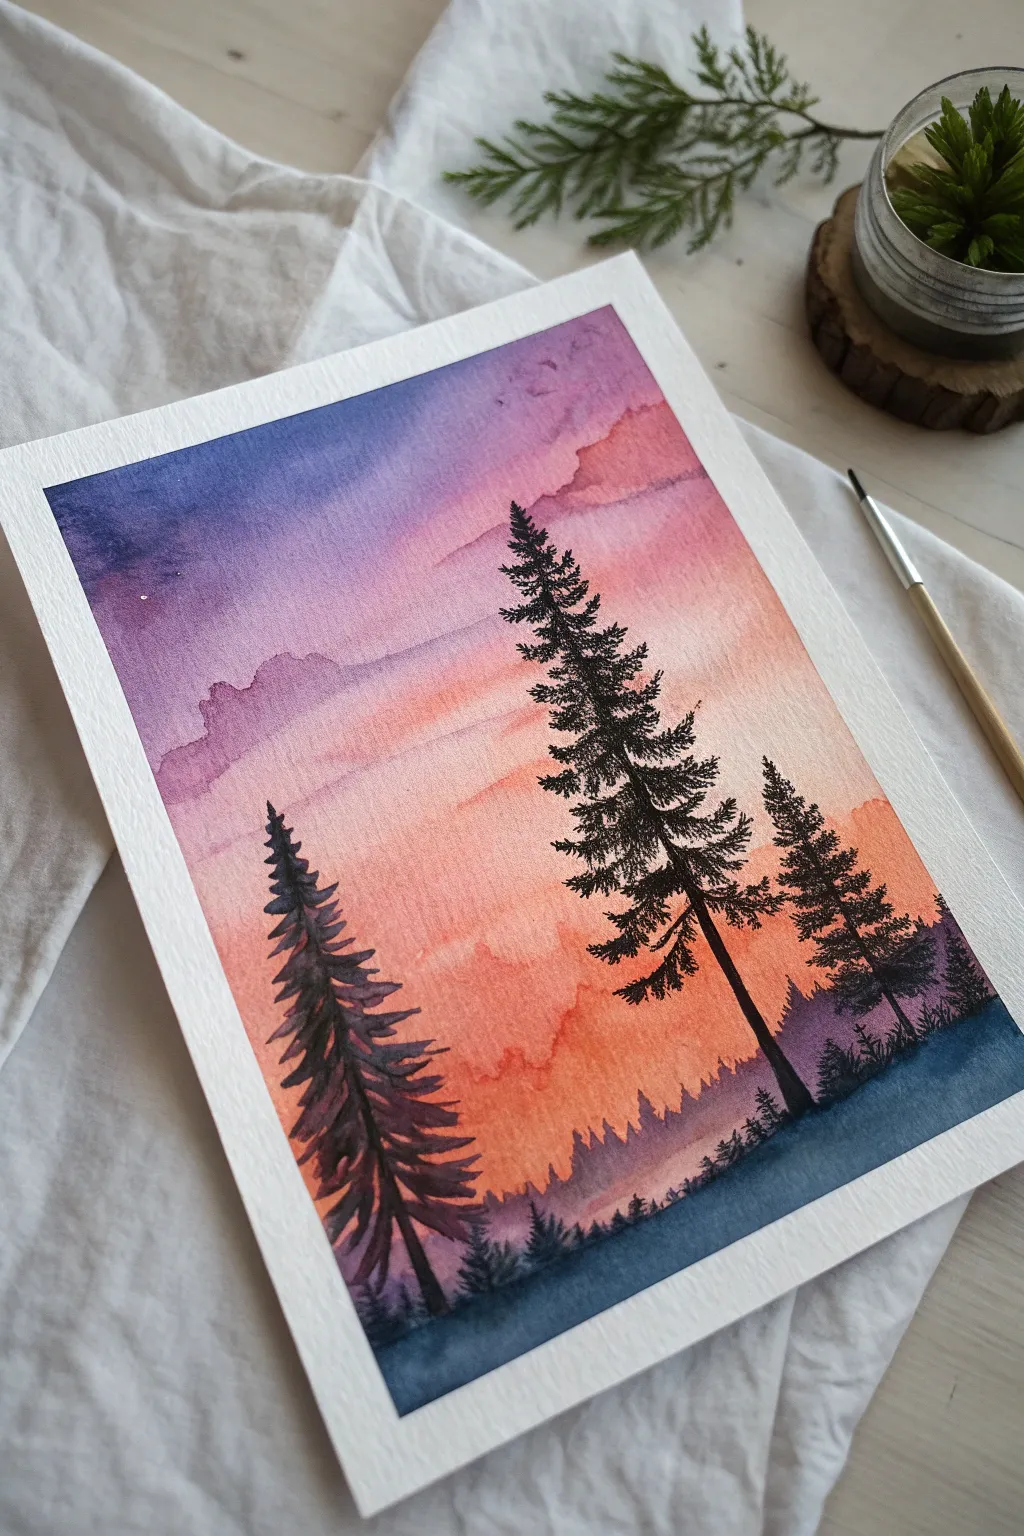
Capture the serene beauty of twilight with this vibrant watercolor landscape featuring striking pine silhouettes. The seamless gradient from deep violet to warm orange creates a glowing backdrop that makes the dark trees pop beautifully.
Step-by-Step
Materials
- Cold press watercolor paper (300 gsm)
- Watercolor paints (Indigo, Purple/Violet, Rose Madder/Pink, Orange, Cadmium Yellow, Payne’s Gray or Black)
- Masking tape
- Flat wash brush (large)
- Round brush (size 6 or 8)
- Fine detail brush (size 0 or 1)
- Clean water jar
- Paper towels
- Palette for mixing
Step 1: Preparing the Sky Gradient
-
Secure the Paper:
Begin by taping down all four edges of your watercolor paper to a board or table surface using masking tape. This creates a clean white border and prevents the paper from buckling when wet. -
Pre-wet the Paper:
Using your large flat wash brush, apply a generous coat of clean water across the entire paper surface. The paper should glisten evenly but not have standing puddles. -
Mix Your Sunset Colors:
While the paper soaks, quickly prepare puddles of Indigo, Purple, Pink, Orange, and a touch of Yellow on your palette. You want them to be fluid but vibrant. -
Apply the Night Sky:
Start at the very top of the paper with the Indigo mix. Paint a horizontal band across the top quarter, letting the wet-on-wet technique soften the edges naturally. -
Transition to Purple:
Immediately below the Indigo, introduce the Purple hue. Clean your brush slightly and blend the bottom of the blue into the top of the purple to create a smooth transition. -
Add While-Wet Clouds:
While the purple section is still wet, drop in a slightly more saturated purple pigment in irregular, fluffy shapes on the left side to hint at distant cloud formations. -
Introduce the Warmth:
Rinse your brush thoroughly. Below the purple, paint a band of Pink/Rose, allowing it to touch and bleed slightly into the purple above it. -
Finish the Gradient:
Complete the sky by painting Orange and finally a hint of Yellow at the horizon line. Ensure the transition from pink to orange is seamless by using horizontal strokes. -
Lift Out Clouds:
If you want softer clouds, take a designated thirsty brush (a clean, damp brush) or a crumpled tissue and gently lift a little pigment from the pink and purple areas to create highlight streaks. -
Complete Drying:
This is crucial: allow the background to dry completely. It must be bone dry before you paint on top, or the trees will fuzz out. You can use a hairdryer on a low setting to speed this up.
Muddy Colors?
If your orange and purple mix into brown, let the first color dry slightly before adding the next, or rinse your brush more thoroughly between color changes.
Step 2: Painting the Silhouettes
-
Mix the Dark Tone:
Create a very dark, saturated mix for the trees. Using pure black can look flat, so I prefer mixing Indigo with Paynes Gray or deeply concentrated Purple to get a lively dark tone. -
Paint the Horizon Line:
Using a size 6 round brush, paint a jagged, uneven horizon line near the bottom. This represents distant trees or hills; vary the height to make it look organic. -
Start the Main Tree:
Switch to a smaller round brush. Determine the placement of your largest pine tree (right of center). Draw a thin vertical line for the trunk, tapering it as it goes up. -
Stipple the Branches:
Starting from the top of the trunk, use the tip of your brush to tap small, irregular downward-facing marks. As you move down the trunk, make the branches wider and heavier. -
Add the Second Tree:
Paint the second tree on the left side. Make this one slightly shorter or thicker than the first to create visual interest suitable for the composition. -
Create Depth:
Paint a third, smaller tree behind the main one on the right. Using a slightly more watered-down dark mix for this one will make it recede into the distance. -
Refine the Foreground:
Darken the bottom section (the ground) with your darkest mix. Add small vertical flicks with a fine detail brush along the horizon to suggest grassy textures or tiny saplings. -
Texture the Foliage:
Go back over the main trees. If the center of the tree looks too solid, leave gaps. If it looks too sparse, tap in more pigment to densify the pine needles. -
Final White Details:
Once everything is dry, you can flick a tiny bit of white gouache or use a white gel pen to add a few stars in the dark indigo section at the top.
Sharp Tree Lines
Use a ‘rigger’ brush or a very fine liner for the pine needles. Hold the brush loosely at the end of the handle to create more natural, random organic shapes.
Peel off the tape carefully to reveal those crisp white edges and enjoy your vibrant sunset scene
Rolling Hills in Two Colors
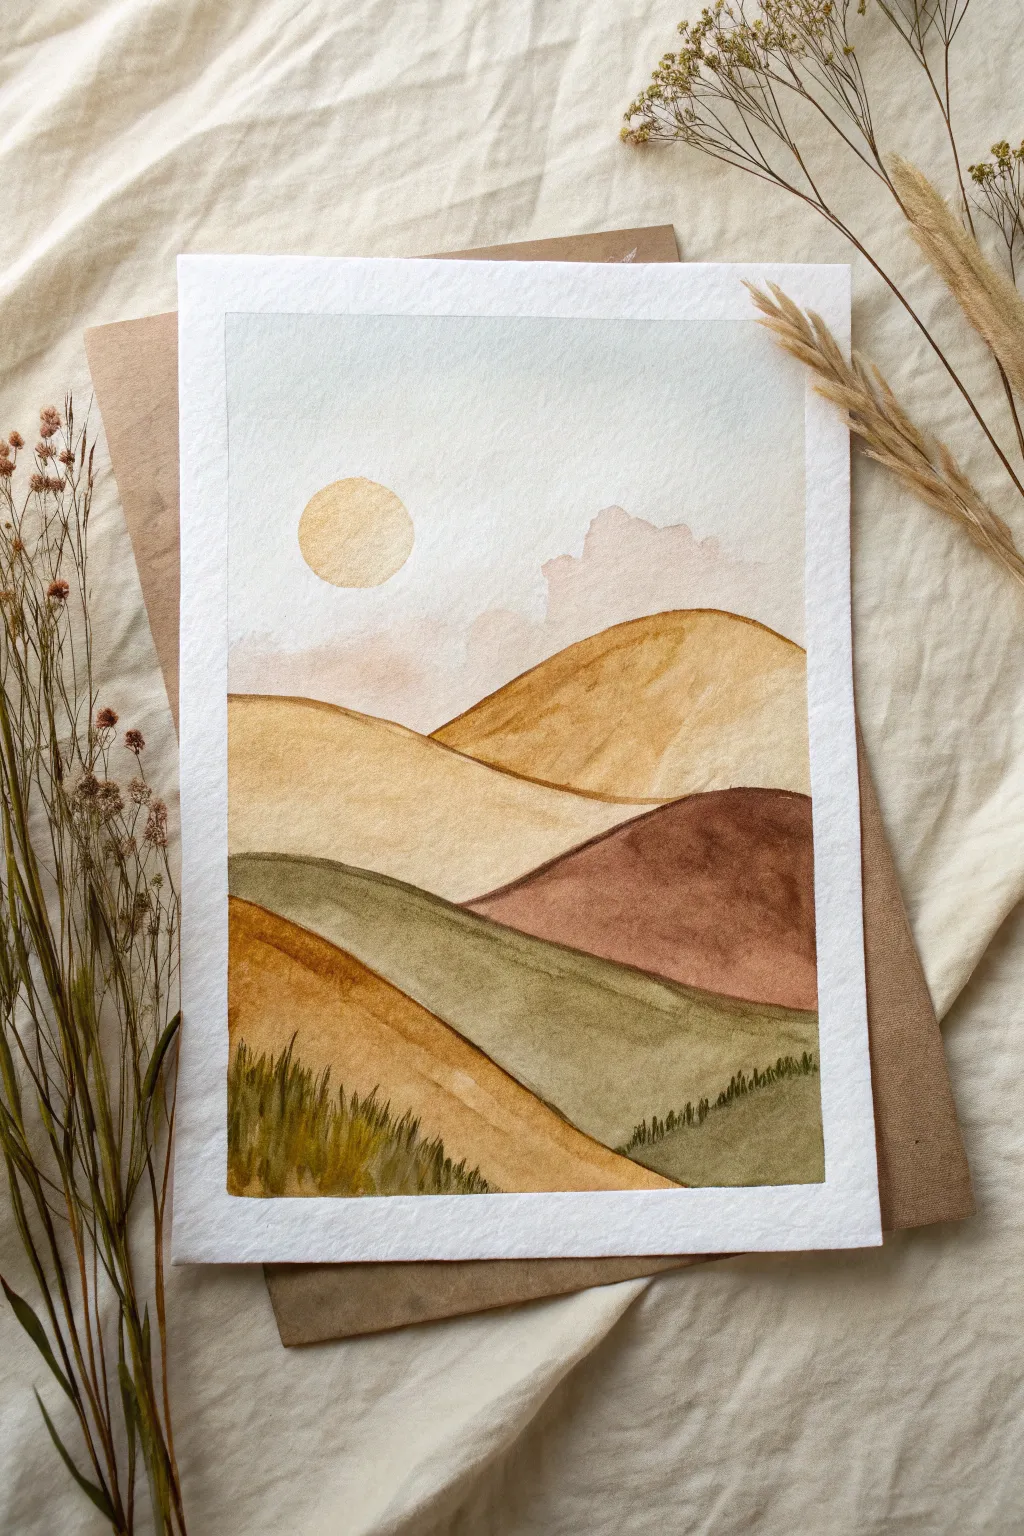
Capture the warmth of a golden hour landscape with this minimalist watercolor project featuring rolling hills and a gentle sun. using earthy ochres and muted greens, you’ll create soothing, overlapping layers that mimic the tranquility of nature.
Step-by-Step Tutorial
Materials
- Cold press watercolor paper (A5 or 5×7 inches)
- Watercolor paints (Yellow Ochre, Burnt Sienna, Olive Green, Sepia, White/Gouache)
- Round watercolor brushes (size 6 and size 2)
- Painter’s tape or masking tape
- Pencil and eraser
- Clean water jar
- Paper towel
- Circle stencil or compass
Step 1: Preparation & Sketching
-
Tape the edges:
Begin by taping down all four edges of your watercolor paper to a board or table. This creates that crisp white border seen in the final piece and keeps the paper flat while wet. -
Sketch the sun:
Use a circle stencil or a compass to lightly draw a perfect circle in the upper left quadrant of the paper for the sun. Keep the pencil lines barely visible. -
Outline the hills:
Sketch three simple, curvy lines to define the hills. The first line should be high and swoop down from right to left. The second hugs the middle, and the third creates the foreground hill on the bottom left. -
Add background mountains:
Very faintly sketch a jagged, uneven line in the distance, just below the sun, to represent distant mountains or clouds.
Step 2: Painting the Sky & Sun
-
Paint the sun:
Mix a watery wash of Yellow Ochre. Carefully fill in the circle. While it’s still wet, drop a tiny hint of darker orange on one side for subtle dimension, then let it dry completely. -
Wash the sky:
Prepare a very diluted mix of blue-grey or just dirty water from your brush jar for a barely-there sky tint. Wash this over the sky area, being extremely careful to paint *around* the sun, not over it. -
Paint the distant mountains:
Mix a very pale, watery pinkish-brown. Paint the distant mountain shapes with soft edges. You can soften the bottom edge with clear water so it fades into the horizon.
Water Control Tip
To get those hard edges between hills without outlining, let each section dry completely before painting the neighbor. If the paper is cool to the touch, it’s still wet.
Step 3: Layering the Hills
-
First hill layer:
Mix a warm golden-tan color using Yellow Ochre and a touch of brown. Paint the highest hill on the right. Let the paint pool slightly at the bottom edge for a natural gradient. -
Create separation:
Wait for that first hill to be bone dry. This is crucial to prevent colors bleeding into each other. -
Second hill layer:
Paint the middle hill on the left using a lighter, creamier beige mix. Ensure your brush strokes follow the curve of the land. -
Third hill layer:
For the lower middle hill section, mix a reddish-brown or Burnt Sienna wash. Paint this shape, creating a bold contrast against the lighter hills above it. -
The green valley:
Mix an earthy Olive Green. Paint the sweeping section that cuts across the bottom right. While wet, you can lift a little pigment with a dry brush to create texture. -
Foreground hill:
Paint the final hill in the bottom left corner with a rich golden-orange mix, similar to the first hill but slightly more saturated.
Enhance the Mood
Mix a tiny amount of metallic gold watercolor into the sun or the golden hill layers for a subtle shimmer that catches the light when viewed from an angle.
Step 4: Details & Final Touches
-
Dry check:
Ensure the entire painting is completely dry. Touch the paper gently with the back of your hand to check for cold spots. -
Paint grass details:
Using your smallest size 2 brush and a concentrated dark green mixture (mix Olive Green with Sepia), flick tiny upward strokes along the bottom edge of the foreground hill. -
Vary the grass:
Make some grass blades taller and others shorter. I like to curve them slightly to mimic the wind blowing. -
Add distant texture:
Add a few very tiny, faint grass marks on the green valley hill to suggest texture without overwhelming the minimal look. -
The reveal:
Once you are certain all detail work is dry, slowly peel away the painter’s tape at a 45-degree angle to reveal your clean white border.
Frame your serene landscape or gift it to a friend who needs a little calm in their day

PENCIL GUIDE
Understanding Pencil Grades from H to B
From first sketch to finished drawing — learn pencil grades, line control, and shading techniques.
Explore the Full Guide
Simple River Bend Through a Meadow
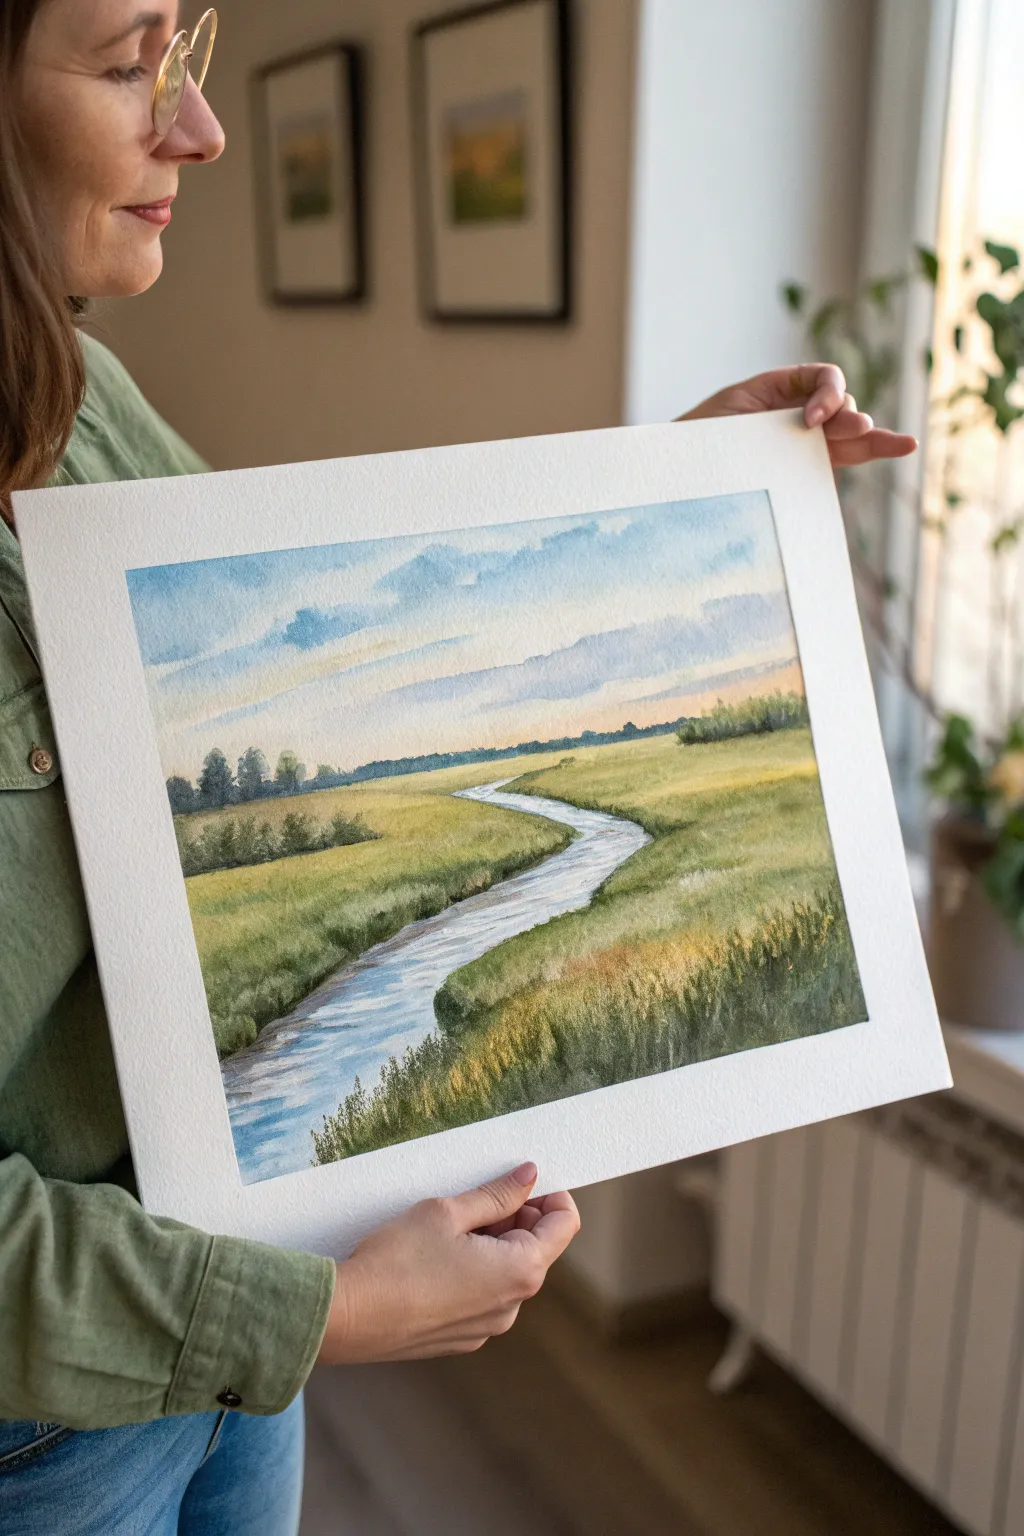
Capture the peaceful essence of a winding river cutting through tall grass under a soft, expansive sky. This watercolor project focuses on mastering wet-on-wet gradients and creating depth through an inviting S-curve composition.
Detailed Instructions
Materials
- Cold press watercolor paper (140lb/300gsm), approx. 11×14 inches
- Watercolor paints (Cobalt Blue, Burnt Sienna, Yellow Ochre, Sap Green, Payne’s Grey, Alizarin Crimson)
- Painter’s tape or masking tape
- Drawing board or hard surface
- Large round brush (size 10 or 12)
- Medium round brush (size 6 or 8)
- Detail brush (size 2 or rigger brush)
- Pencil (HB) and kneadable eraser
- Two jars of water
- Paper towels
Step 1: Preparation and Sketching
-
Secure the paper:
Tape your watercolor paper down firmly to your board on all four sides. This creates a clean white border (as seen in the photo) and prevents the paper from buckling too much when wet. -
Establish the horizon:
Using your HB pencil, lightly draw a horizon line about one-third of the way down from the top of the paper. Keep this line very faint so it doesn’t show through the sky later. -
Sketch the river bend:
Draw the river starting wide at the bottom left-center and narrowing significantly as it curves toward the horizon line in an ‘S’ shape. The perspective is key here; the river should become a thin sliver in the distance to create depth. -
Outline major shapes:
Lightly indicate the treeline on the horizon and mark out the general separation between the taller foreground grasses and the smoother mid-ground meadow.
Step 2: Painting the Sky and Distance
-
Wet the sky area:
Using your large brush and clean water, thoroughly wet the paper above the horizon line. Avoid getting water into the land area. -
Apply the blue gradient:
Load your brush with dilute Cobalt Blue. Start at the very top edge and paint downwards, letting the color fade and become lighter as it approaches the horizon. Leave some irregular white spaces for fluffy clouds. -
Add warmth near the horizon:
While the sky is still damp, mix a very pale wash of Yellow Ochre with a tiny touch of Alizarin Crimson. Gently blend this into the lower sky just above the treeline to suggest a sunset glow, being careful not to make green by mixing heavily with the blue. -
Paint the distant treeline:
Mix Sap Green with a little Payne’s Grey and Cobalt Blue to create a cool, muted green. Using the medium brush, dab this along the horizon line for the distant trees. Keep the edges slightly soft to push them into the background.
Keep the Glow
To keep the meadow looking sunlit, leave the yellow underpainting visible in patches. Don’t cover everything with dark green; let the ‘light’ shine through from underneath.
Step 3: The Meadow and River
-
Underpainting the grass:
Once the sky is dry, wash a light, watery layer of Yellow Ochre over the entire grassy area (avoiding the river). This provides that underlying warm, sunlit glow. -
Block in green fields:
While the underlayer is still slightly damp, drop in Sap Green mixed with a little water. Focus this color on the mid-ground, leaving the tops of the foreground grass lighter to catch the light. -
Paint the river surface:
Mix a very watery pale blue using Cobalt Blue. Carefully paint the river, using horizontal strokes. Leave a few thin strips of white paper, especially near the bends, to represent reflections or movement in the water. -
Add riverbank shadows:
Mix a darker green using Sap Green and Burnt Sienna. With the medium brush, paint along the edges where the grass meets the water to define the riverbank. I like to make the shadow slightly thicker on one side to indicate light direction.
Muddy Colors?
If your greens look dull or muddy, you likely overmixed them on the palette. Try mixing colors directly on the paper by dropping wet paint into wet paint for a fresher look.
Step 4: Details and Texture
-
Create distant texture:
Using a slightly drier brush with the mid-green mix, tap in some small bushes or texture in the middle distance near the river bend. -
Build foreground density:
Mix a rich, dark green using Sap Green, Payne’s Grey, and a touch of Burnt Sienna. Start adding vertical, flicking strokes at the bottom of the paper to suggest tall grasses. -
Define the grass blades:
Switch to your detail or rigger brush. Paint distinct, fine blades of grass in the foreground, varying their direction and height. Overlap some of these over the edge of the river to integrate the elements. -
Enhance the light:
If viewing the painting from a distance reveals it looks flat, glaze a transparent layer of pure Yellow Ochre over the sunlit parts of the meadow to boost the golden hour effect. -
Final adjustments:
Add the darkest accents (Payne’s Grey mixed with Green) at the very base of the foreground clumps and sharpest river bends to maximize contrast. -
Reveal the border:
Wait until the painting is 100% bone dry. Slowly peel away the painter’s tape at a 45-degree angle away from the artwork to reveal your crisp, clean edge.
Step back and admire your tranquil landscape, ready to be framed and displayed.
Sunset With a Single Island Silhouette
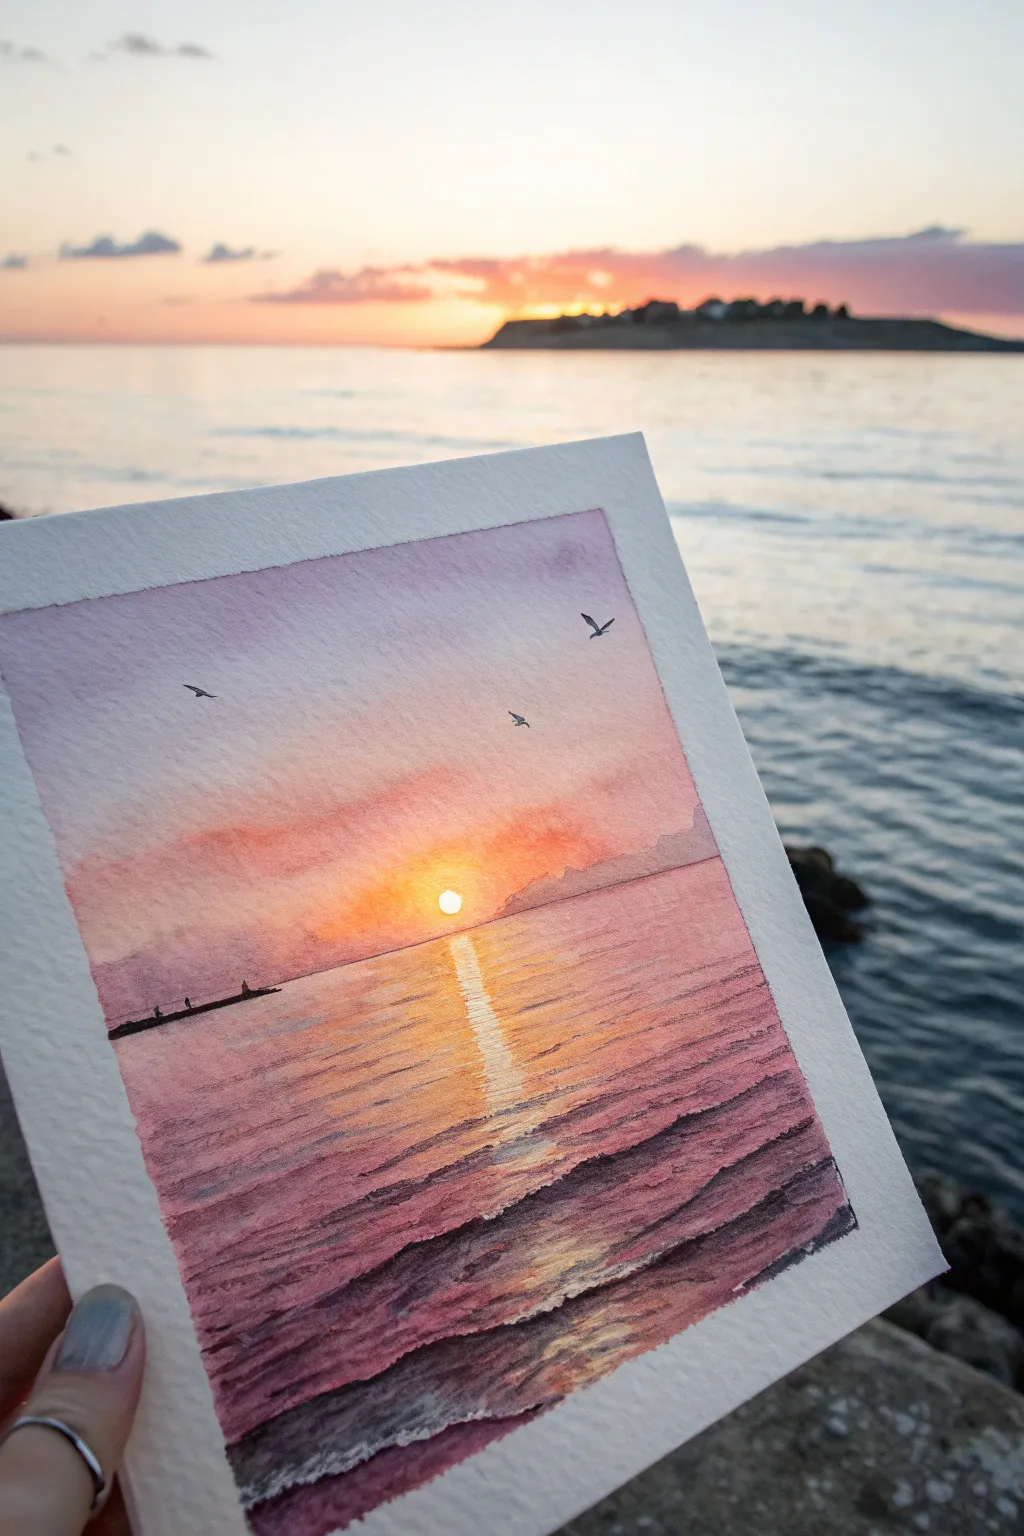
Capture the magic of a coastal sunset with this serene watercolor project, featuring soft pink skies and gentle, rippled waves. The warm, glowing sun reflects beautifully on the water, creating a peaceful scene that looks impressive but relies on simple wet-on-wet techniques.
Step-by-Step Guide
Materials
- Cold press watercolor paper (300 gsm)
- Masking tape
- Watercolor paints (Alizarin Crimson, Cadmium Yellow, Ultramarine Blue, Burnt Umber, Lamp Black)
- Round brushes (size 8 for washes, size 2 for details)
- Clean water jar
- Paper towels
- Pencil (optional for horizon line)
Step 1: Sky and Base Wash
-
Prepare the paper:
Begin by taping down all four edges of your watercolor paper to a board. This creates a crisp white border and prevents the paper from buckling when wet. -
Lightly sketch:
Using a pencil, very lightly draw the horizon line across the middle of the paper. Keep it faint so it disappears under the paint later. -
Wet the sky area:
With your larger rush and clean water, wet the entire sky area above the horizon line. The paper should be glisten but not have puddles. -
Apply the sun glow:
Drop a small amount of pure Cadmium Yellow just above the center of the horizon line to mark the position of the setting sun. -
Paint the sky gradient:
Mix a soft pinkish-purple using Alizarin Crimson and a tiny touch of Ultramarine Blue. Start painting from the top of the paper, pulling the color down. -
Blend the sunset colors:
As you approach the yellow sun area, introduce a mix of orange (Crimson + Yellow) to transition smoothly from the cool purple top to the warm horizon. Leave the white paper brilliant white right where the sun is.
Keep the sun bright
To ensure the sun stays perfectly round and white, you can apply a small dot of masking fluid before painting. Rub it off only at the very end.
Step 2: Water and Reflections
-
Initial water layer:
While the sky is drying, dampen the water area below the horizon. Use the same pink-purple mix from the sky, but keep it lighter in the center. -
Create the sun path:
Leave the vertical column directly under the sun mostly unpainted or extremely pale yellow to represent the strong reflection on the water. -
Add gentle ripples:
Switch to a slightly smaller brush. Mix a darker purple-grey. While the paper is still damp, paint horizontal streaks on the sides of the water to suggest calm waves. -
Reinforce the foreground:
At the very bottom of the painting, use a more concentrated mix of Alizarin Crimson and Ultramarine Blue to deepen the color, anchoring the foreground. -
Let it dry completely:
Wait until the paper is bone dry. This is crucial before adding distinct silhouettes, or the sharp lines will bleed.
Fixing a bleeding horizon
If the sky bleeds into the sea, don’t panic. Let it dry completely, then re-wet just the bleed area and lift the excess color with a clean, damp brush.
Step 3: Silhouettes and Details
-
Paint the distant island:
Mix a light grey-purple color. Paint a low, uneven shape on the right side of the horizon. Keep the edges soft to suggest atmospheric distance. -
Add the pier silhouette:
Using a dark, almost black mixture (Burnt Umber + Ultramarine Blue), paint a thin horizontal line extending from the left edge into the water. -
Paint tiny figures:
With the very tip of your smallest brush, dot tiny vertical shapes on top of the pier to represent people watching the sunset. -
Detail the waves:
I like to use a dry-brush technique here. Load your brush with dark purple paint, wipe most of it off on a towel, and lightly skim the paper surface in the foreground to catch the texture. -
Define the sun reflection:
Use diluted yellow paint to add faint horizontal lines across the white reflection path, connecting the left and right sides of the water naturally. -
Add birds:
Using your smallest brush and dark grey paint, add three small ‘V’ shapes in the sky for seagulls, varying their sizes to show depth. -
Reveal the painting:
Once everything is perfectly dry, slowly peel off the masking tape at an angle to reveal the clean, professional edges.
Now you have a tranquil sunset scene that brings the calm of the ocean right to your desk


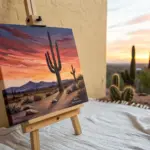
Desert Sunset With Cactus Shapes
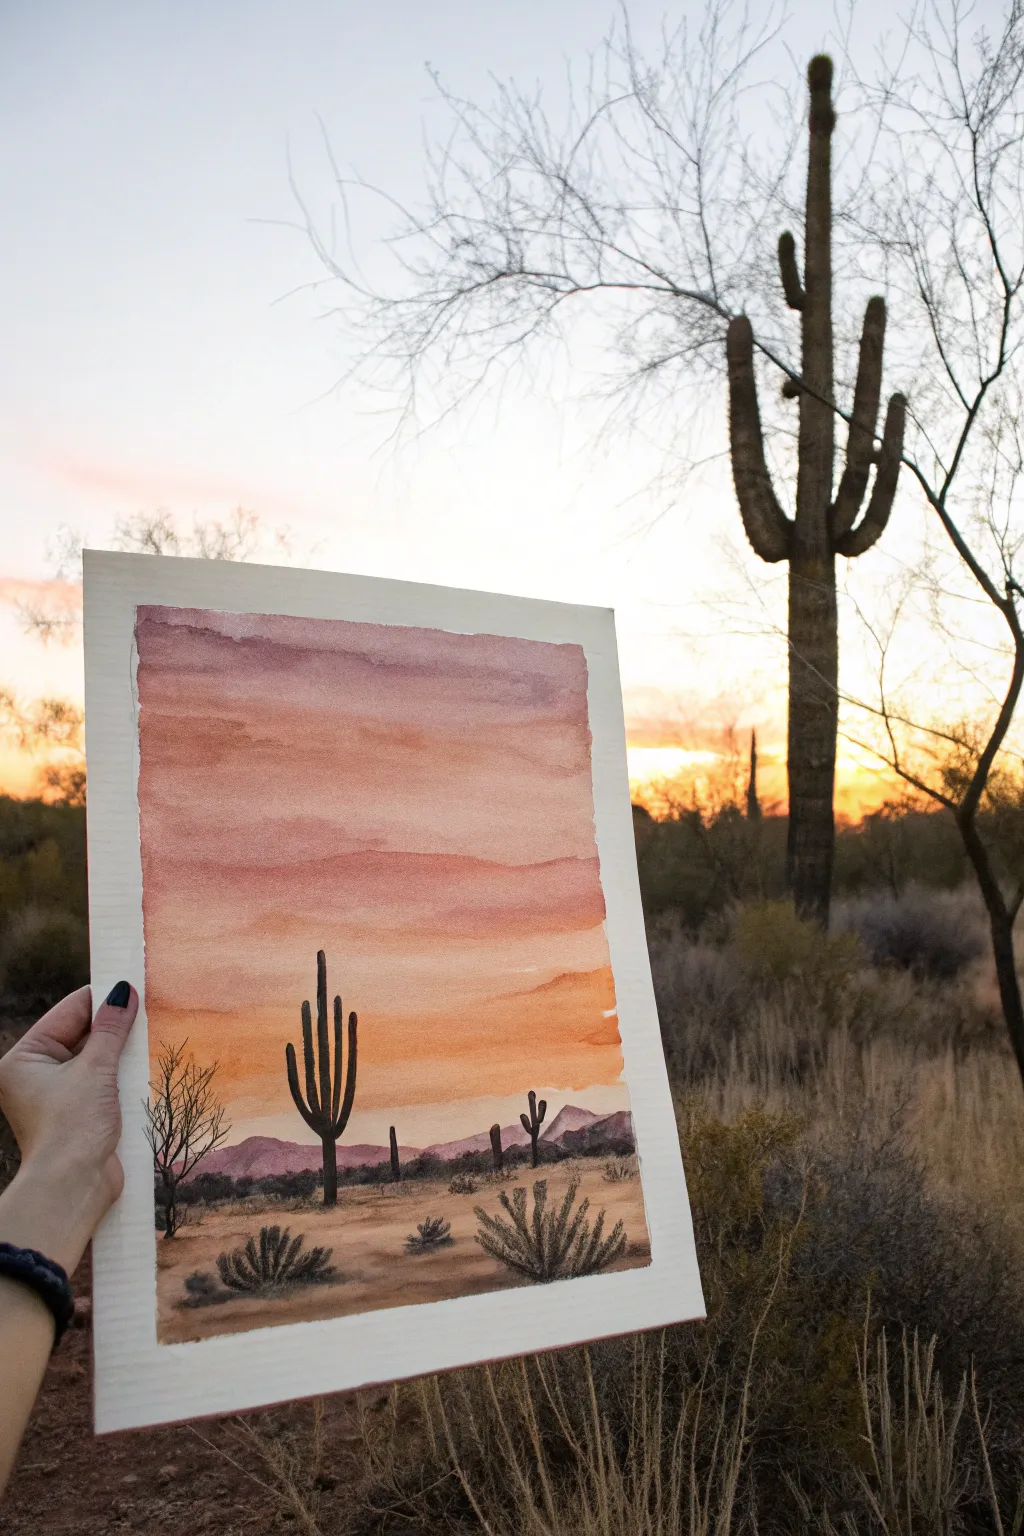
Capture the serene beauty of the desert at dusk with this vibrant watercolor project. By layering warm sunset gradients behind striking cactus silhouettes, you’ll create a scene that feels both vast and intimate.
Step-by-Step
Materials
- Cold press watercolor paper
- Watercolor paints (Alizarin Crimson, Burnt Sienna, Yellow Ochre, Ultramarine Blue, Burnt Umber)
- Masking tape
- Flat wash brush (large)
- Round brushes (size 6 and size 2)
- Jar of clean water
- Paper towels
- Pencil and eraser
Step 1: Setting the Scene
-
Tape the edges:
Begin by securing your watercolor paper to a flat board or table using masking tape. This creates that crisp, professional white border shown in the photo and helps prevent the paper from buckling when wet. -
Sketch the horizon:
Lightly draw a horizon line about a third of the way up from the bottom of the paper. This will separate your sky from the desert floor. -
Outline main shapes:
Very faintly sketch the placement of the main saguaro cactus and distant mountain ranges. Don’t worry about tiny details yet; just establish where your focal point stands.
Fixing Water Blooms
If water drops create “cauliflower” blooms in your sky, wait for it to dry, then gently scrub the edge with a damp stiff brush to soften it, or paint birds over the mistake.
Step 2: Painting the Sky
-
Wet the sky area:
Using your large flat brush, apply a clean coat of water to the entire sky area above the mountain line. The paper should be glistening but not forming puddles. -
Apply the top layer:
Load your brush with a mix of Alizarin Crimson and a touch of Ultramarine Blue to create a dusty mauve. Paint horizontal strokes across the very top of the sky, letting the pigment flow into the wet paper. -
Blend in warm tones:
Rinse your brush and pick up a peachy mix using Alizarin Crimson and Yellow Ochre. Apply this directly below the mauve, slightly overlapping so the colors bleed together naturally. -
Finish the horizon glow:
Transition into pure Yellow Ochre or a light orange near the mountains. Keep your strokes horizontal and loose to mimic cloud bands. Leave this layer to dry completely before moving on.
Add Dimension
Use a white gel pen to add tiny highlights on the cactus spines or edges of the bushes where the setting sun would catch them.
Step 3: Mountains and Ground
-
Paint distance mountains:
Mix a watery purple-grey for the distant mountains. Paint their silhouette right over the bottom edge of your dry sky. The color should be transparent enough to look far away. -
Base layer for the ground:
For the desert floor, use a wash of Burnt Sienna and Yellow Ochre. Paint loosely around the base of where your cacti will go, leaving some areas lighter to suggest sand dunes or light hitting the dirt. -
Add ground texture:
While the ground layer is still damp, drop in slightly darker spots of Burnt Umber to create uneven texture and shadows on the sand.
Step 4: Silhouettes and Details
-
Mix a dark silhouette color:
Create a rich, dark color for the cacti and foreground plants. I find mixing Burnt Umber with Ultramarine Blue creates a deep, natural-looking almost-black that isn’t as flat as tube black. -
Paint the main cactus:
Using a size 6 round brush, paint the main saguaro cactus. Start with the central trunk, pulling the brush upward, then add the curved arms. Ensure the edges are relatively sharp against the sky. -
Add secondary cacti:
Paint the smaller, distant cacti using the same dark mixture but perhaps slightly more watered down to push them into the background. -
Create foreground bushes:
Switch to a smaller size 2 brush. Use quick, flicking upward strokes to paint spiky bushes and shrubs in the foreground corners. These darker elements help frame the scene. -
Detail the scrub:
Add tiny dotting and scratching motions near the horizon line to suggest distant scrub brush without painting every single leaf. -
Final touches:
Once everything is dry, you can add a bare, spindly tree on the left side using the very tip of your smallest brush for fine branches. -
The reveal:
Wait until the paper is bone dry, then carefully peel away the masking tape at a 45-degree angle to reveal your clean white edges.
Step back and admire the warm desert glow you’ve brought to life on paper
Foggy Forest With Faded Tree Trunks
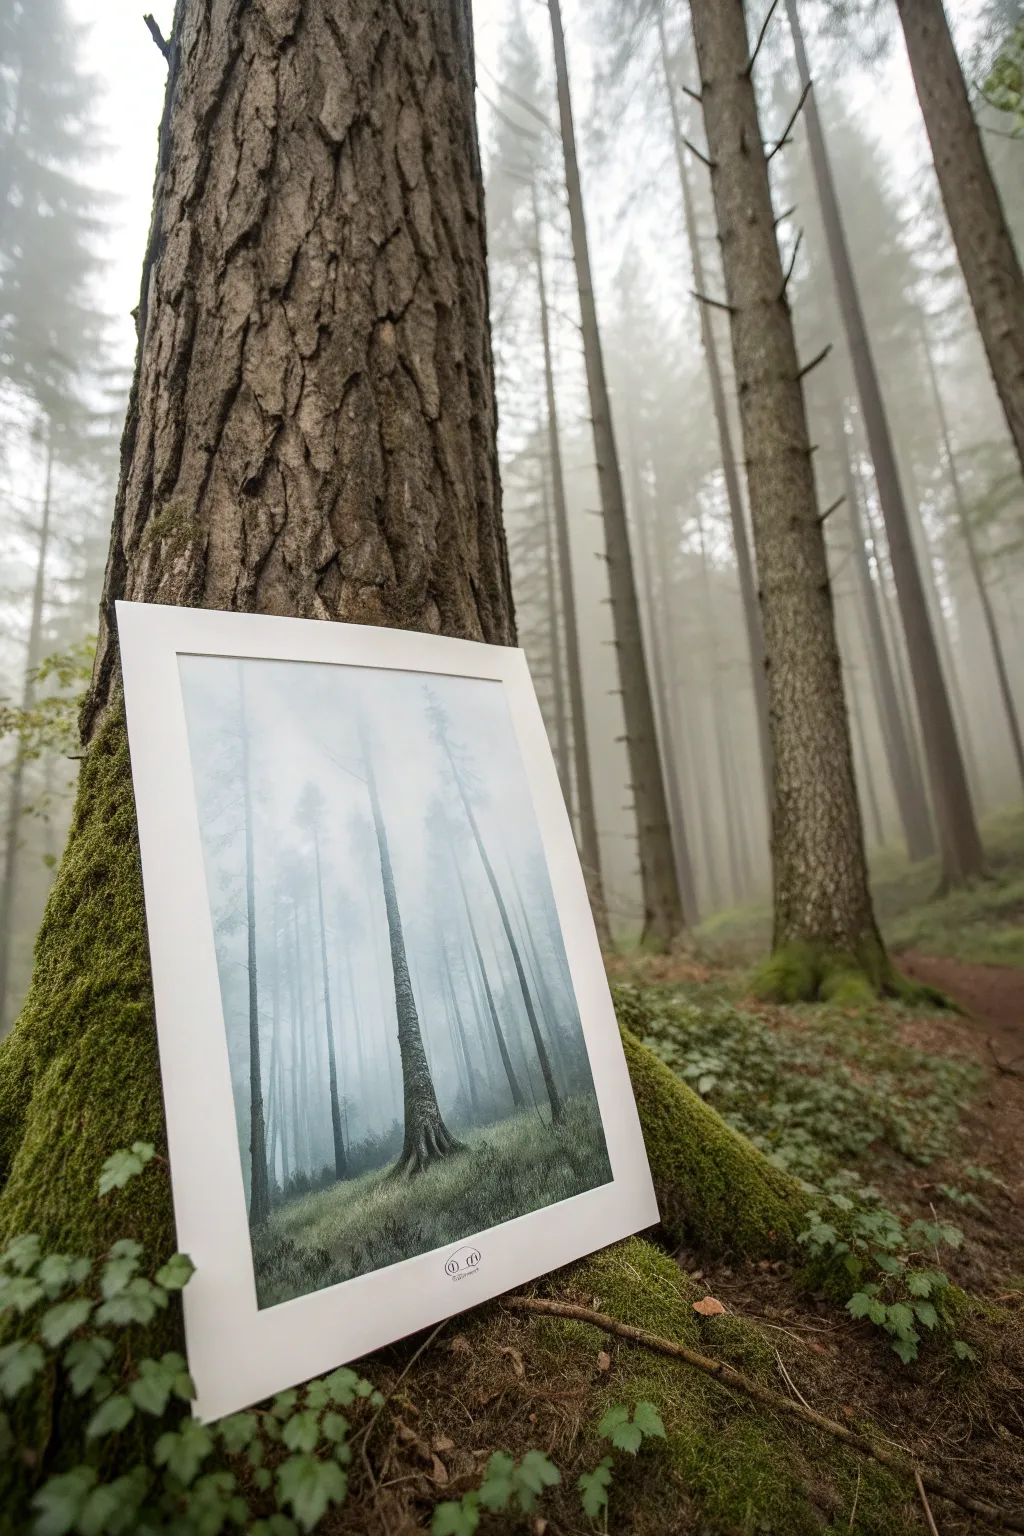
Capture the serene silence of a fog-laden woodland with this atmospheric watercolor project. Using wet-on-wet techniques and careful layering, you’ll create depth that makes the trees appear to fade into the misty distance.
Step-by-Step Guide
Materials
- Cold Press Watercolor Paper (140lb/300gsm)
- Watercolor Paints (Indigo, Payne’s Gray, Burnt Umber, Sap Green)
- Flat Wash Brush (1-inch)
- Round Brushes (Size 4 and 8)
- Rigger or Liner Brush
- Painter’s Tape
- Drawing Board
- Two Jars of Water
- Paper Towels
- White Gouache (optional)
Step 1: Setting the Atmosphere
-
Prepare the Surface:
Begin by taping your watercolor paper securely to a board on all four sides. This prevents buckling and creates that crisp, clean border you see in the reference image. -
Pre-wet the Paper:
Using your large flat brush and clean water, dampen the entire paper surface evenly. You want a consistent sheen, but avoid creating puddles. -
Mix the Mist Color:
Create a very diluted wash of Indigo and a touch of Payne’s Gray. The mixture should be watery and pale, like skim milk, to represent the densest fog. -
Apply the Background Wash:
While the paper is still wet, gently sweep this pale gray-blue mix across the top two-thirds of the paper, letting it fade naturally as it reaches the bottom area.
Wetness Control
If the paper is too wet, trees will dissolve into blobs. If too dry, they look hard-edged. Test your stroke on a corner first to check the spread.
Step 2: Painting the Ghost Trees
-
Mix a Faint Tree Tone:
Slightly darken your mist mixture by adding a tiny bit more pigment. It should still be extremely transparent. -
Paint Distant Shapes:
Using a Size 8 round brush on the damp paper, paint simple vertical lines for the furthest trees. Because the paper is wet, these lines will blur and fuzzy out, creating that perfect ‘distant’ effect. -
Vary the Spacing:
Place these faint lines irregularly across the background. Nature isn’t perfectly orderly, so avoid picket-fence spacing. -
Let it Dry (Partially):
Wait until the paper loses its glossy shine and becomes damp-matte. This is the critical stage for the mid-ground layer.
Add Subtle Color
Try dropping tiny hints of purple or deeply diluted teal into the wet background mist to give the fog a magical, early-morning atmosphere.
Step 3: Adding the Mid-Ground
-
Darken the Mix:
Add more Indigo and a hint of Burnt Umber to your palette. You want a meaningful jump in value—darker than the first layer significantly. -
Create Closer Trees:
Paint a second set of vertical trunks. Since the paper is drier, these edges will be softer than dry-brush strokes but more defined than your background ghosts. -
Add Height Variation:
Ensure some of these trees extend off the top of the page, while others fade out near the bottom third where the ground fog will be. -
Dry Completely:
Allow the cleaning paper to dry completely. The paper should feel room temperature to the touch, not cool.
Step 4: The Hero Tree and Foreground
-
Mix the Darkest Tone:
Prepare a rich, saturated mix of Payne’s Gray and Burnt Umber. This creates a near-black silhouette color for the main foreground tree. -
Paint the Main Trunk:
Using the Size 4 brush, paint a prominent tree slightly off-center. I like to make the base wider and add root suggestions gripping the earth. -
Add Texture:
While the main trunk is wet, lift out tiny specks of paint with a thirst brush or tissue to suggest bark texture, or drop in pure water to create blooms. -
Paint Fine Branches:
Switch to your rigger brush to pull very thin, delicate branches from the main trunk and the darker mid-ground trees. -
Create the Grass Floor:
Mix Sap Green with your gray tone for a desaturated earthy green. Using quick, upward flicking motions, paint the grassy foreground at the base of your trees. -
Add Depth to Grass:
Layer darker green flicks over the initial grassy wash while it’s still damp to create volume and shadow near the tree roots. -
Final Mist Highlights:
If you need more separation, carefully glaze a very thin white gouache wash between tree layers to push the background further back.
Peel off the tape to reveal your crisp edges and enjoy your silent, misty forest scene
Cherry Blossom Branch Over a Sky Wash
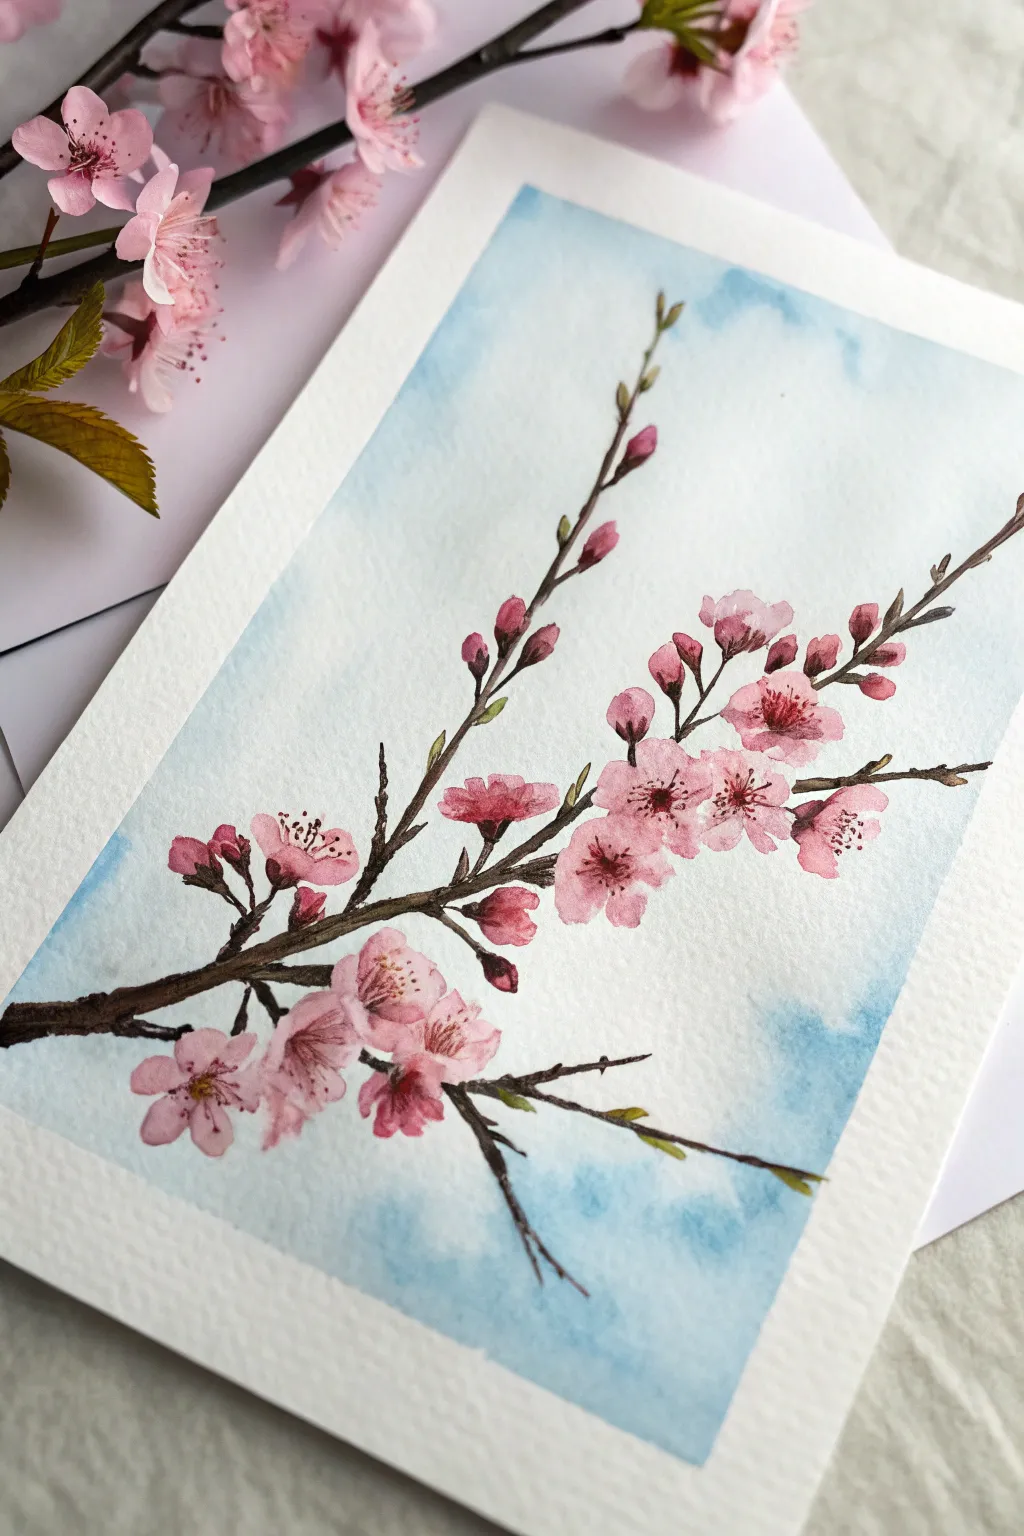
Capture the fleeting beauty of spring with this graceful watercolor study. By combining loose, wet-on-wet washes for the sky with precise, layered botanical details, you’ll create a piece that feels both airy and grounded.
Step-by-Step
Materials
- Cold press watercolor paper (300 gsm)
- Watercolor paints: Cerulean Blue, Alizarin Crimson (or Rose Madder), Burnt Umber, Sap Green
- Round brushes: Size 8 (for washes) and Size 2 or 0 (for details)
- Masking tape
- Pencil (HB or lighter)
- Clean water jar
- Paper towels
Step 1: Preparing the Canvas
-
Secure the paper:
Tape down all four edges of your watercolor paper to a board or table. This prevents buckling when we add the water for the sky. -
Sketch the branch:
Using an HB pencil, very lightly sketch the main diagonal branch structure. Draw the smaller offshoots and faint circles to mark where the major flower clusters will sit. Keep lines faint so they disappear under the paint.
Natural Imperfection
Don’t make your branches straight lines. Adding slight kinks, knots, and jagged turns where the twigs split makes the wood look much more organic.
Step 2: The Sky Wash
-
Pre-wet the paper:
With your large round brush and clean water, dampen the area of the sky. Avoid the specific areas where you sketched flowers, but don’t worry about being perfect; overlap is fine. -
Drop in color:
While the paper is wet, load the brush with a watery mix of Cerulean Blue. Dab it unevenly onto the wet sections to create a cloudy texture. -
Feather the edges:
Use clean water to soften the edges of the blue paint so it fades into white, leaving negative space around where the branch will be. Let this layer dry completely.
Sparkle Effect
For a magical spring touch, splatter tiny droplets of clean water or white gouache onto the background after it’s dry to mimic pollen or floating petals.
Step 3: Painting the Blooms
-
Mix pink tones:
Prepare a puddle of very watered-down Alizarin Crimson for a pale pink base. Prepare a second, more concentrated puddle for darker petals. -
Base petals:
Using the small brush, paint the five-petal shapes for the open flowers with the pale pink mix. Leave tiny slivers of white paper between petals to separate them. -
Paint buds:
For the unopened buds near the tips of the branches, use a slightly darker pink mix. Paint small tear-drop shapes. -
Add depth:
While the base petals are still slightly damp, drop a tiny dot of concentrated crimson into the center of each flower. Let it bleed outward naturally to create a gradient. -
Define petals:
once dry, use a slightly darker glaze of pink to paint folded edges or shadows on the petals that are facing away from the light.
Step 4: Structure and Details
-
Mix branch color:
Create a dark brown by mixing Burnt Umber with a tiny touch of Blue or Black. The consistency should be like milk. -
Paint main branch:
Using the fine tip of your brush, paint the main branch segments between the flower clusters. Vary the pressure: press down for thick sections and lift up for thin tips. -
Connect the buds:
Draw very thin, delicate lines connecting the floating pink buds to the main stem. -
Add sepals:
Mix a small amount of Sap Green with some brown. Paint the tiny green base (sepals) at the bottom of the buds and under the main flowers. -
Tiny leaves:
Add just a few emerging leaf shoots along the branch using the green mix. Keep them small and scarce, as cherry blossoms usually bloom before leaves fully emerge.
Step 5: Final Touches
-
Stamen centers:
Load your smallest brush with a concentrated dark red or brown mixture. Paint very fine lines radiating from the center of the open flowers. -
Pollen dots:
At the end of those fine lines, dot tiny specks of yellow or dark orange to represent the pollen anthers. -
Review contrast:
Step back and assess your work. If the branch looks too flat, add a second layer of dark brown to the underside of the wood for shadow.
Peel off the tape carefully to reveal your crisp white border and enjoy your serene spring scene
Cloud Study With Two-Brush Blending
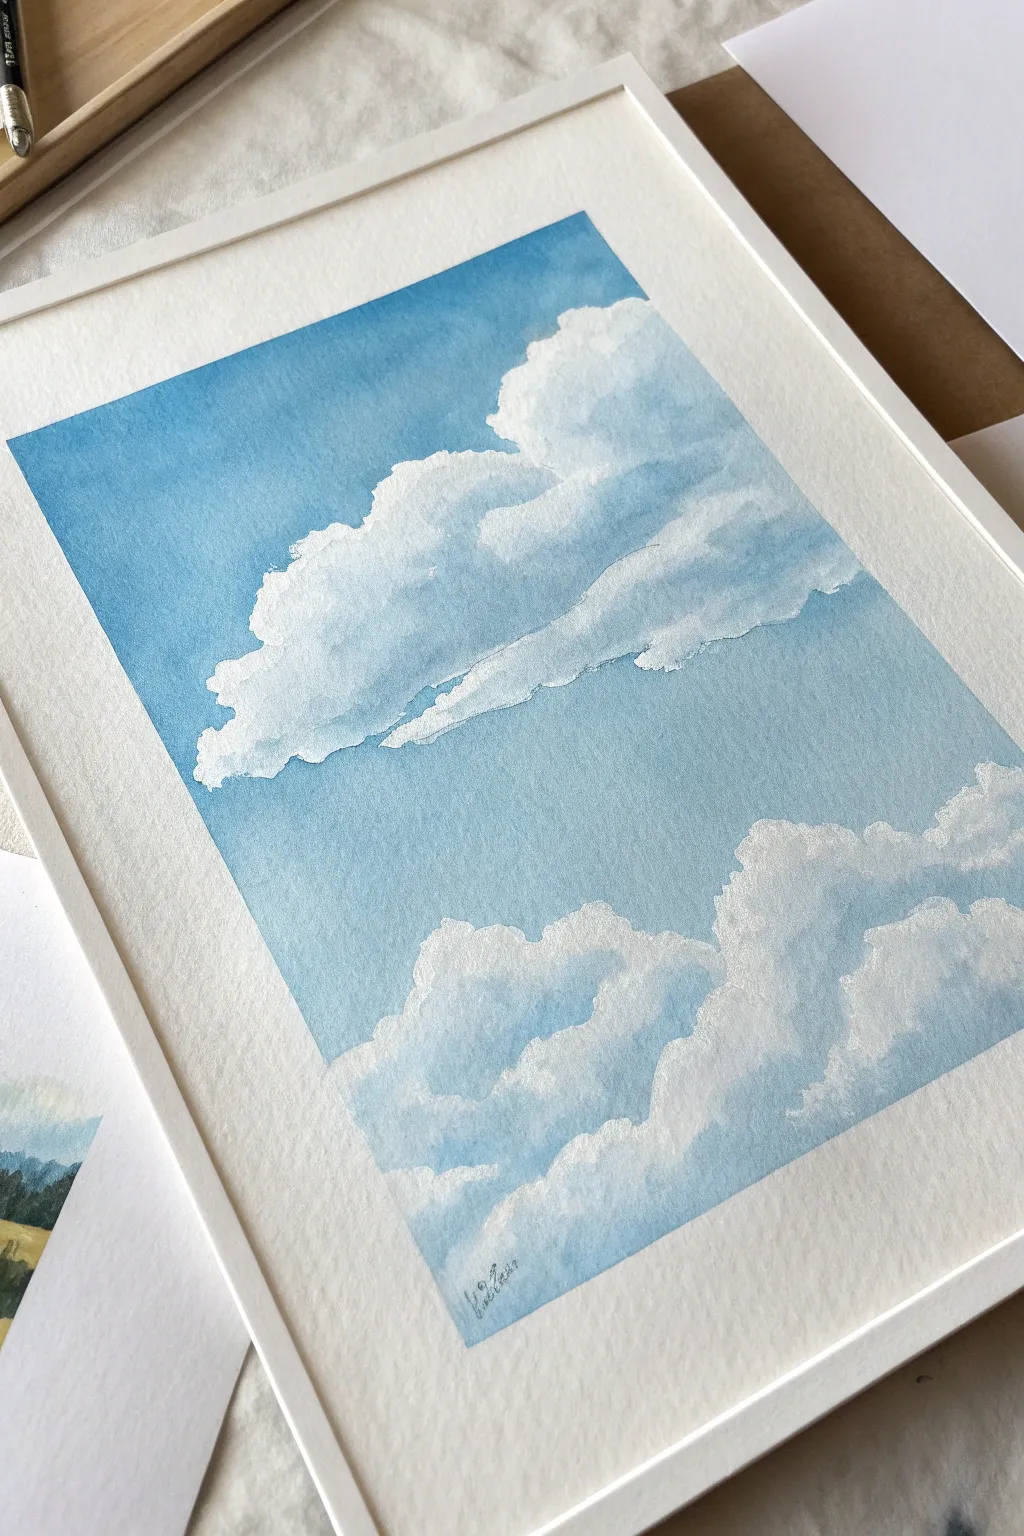
Capture the serenity of a quiet afternoon with this gentle watercolor cloud study. By focusing on soft edges and negative space, you’ll learn to create fluffy, voluminous clouds drifting across a vibrant blue sky.
How-To Guide
Materials
- Cold-press watercolor paper (300 gsm)
- Masking tape
- Watercolor paints (Cerulean Blue, Cobalt Blue, Paynes Gray)
- Large round brush (size 10 or 12)
- Medium round brush (size 6 or 8)
- Two jars of water
- Paper towels
- Pencil (HB or 2H)
- White gouache (optional, for corrections)
Step 1: Preparation and Sketching
-
Secure the paper:
Tape down all four edges of your watercolor paper to a board or table. This creates a crisp white border and prevents the paper from buckling significantly when wet. -
Outline the shapes:
Using a light hand, sketch the rough outlines of your cloud formations. Focus on the large cloud bank in the upper third and the rolling cumulus clouds at the bottom. -
Keep lines faint:
Ensure your pencil lines are barely visible so they won’t show through the transparent watercolor layers later.
Hard Lines?
If your cloud shadows dry with harsh edges, re-wet the area slightly with clear water and gently scrub with a soft brush to reactivate and smooth the paint.
Step 2: Painting the Sky
-
Mix your sky blue:
Prepare a generous puddle of blue on your palette. I like to mix Cerulean Blue with a touch of Cobalt Blue to get that bright, midday hue. -
Start at the top:
Load your large brush with the blue mix and begin painting the very top edge of the sky, applying a solid, even wash. -
Carve out the top cloud:
As you move down, carefully paint *around* the top edge of the upper cloud shape. Leave the paper completely white for the cloud itself. -
Soften the edges:
While the blue paint is still wet, use a clean, slightly damp brush to gently touch some of the edges where the blue meets the white paper. This creates a soft, misty transition rather than a hard cutout look. -
Fill the middle gap:
Continue painting the blue sky in the large gap between the upper and lower cloud banks. Keep the wash consistent, perhaps diluting it slightly with water as you move lower to simulate atmospheric perspective.
Step 3: Creating Cloud Volume
-
Mix a shadow color:
Create a very pale grey-blue wash. Use a tiny amount of Paynes Gray mixed with your original sky blue and plenty of water. -
Define the cloud bottoms:
On the white ‘cloud’ areas, paint the undersides and shadowed pockets using this pale mix. This gives the clouds three-dimensionality. -
Use two-brush blending:
Apply the shadow color with one brush, and immediately use a second clean, damp brush to soften the upper edge of that shadow into the white of the cloud. -
Layer the shadows:
Once the first shadow layer is dry, add a slightly darker grey-blue to the deepest crevices of the clouds for added drama and weight. -
Connect the layers:
Ensure the shadows follow the rounded, billowing forms of the cumulus clouds. Think of them as cotton balls where the light hits the top and shadows gather underneath.
Soft Edges Secret
Always keep a ‘thirsty’ brush ready—a clean, damp brush you can use solely for smoothing edges before the paint sets into the paper.
Step 4: Final Touches
-
Assess the contrast:
Step back and look at your painting. If the sky looks too pale around the bright white clouds, add a second glaze of blue to deepen the contrast. -
Dry completely:
Let the painting sit until the paper is cool to the touch and completely dry. -
Reveal the border:
Slowly peel away the masking tape at a 45-degree angle, pulling away from the center of the painting to avoid tearing the paper.
Now you have a breezy, ethereal piece of sky art ready to frame
Minimal Seascape in Three Horizontal Bands
Capture the peaceful transition of sea meeting sky with this soft, three-band watercolor landscape. The composition relies on gentle gradients and dry-brush textures to mimic calm waves and coastal grasses.
Step-by-Step
Materials
- Cold press watercolor paper (300 gsm)
- Watercolor paints (Cerulean Blue, Indigo, Yellow Ochre, Burnt Sienna, Payne’s Grey, Soft Peach)
- Flat wash brush (3/4 inch)
- Round brushes (size 4 and 8)
- Painter’s tape or masking tape
- Paper towels
- Two jars of water
- White gel pen or white gouache (optional)
- White mat board for framing
Step 1: Setting the Horizon
-
Preparation:
Tape down all four edges of your watercolor paper to a board. This prevents buckling and creates a crisp white border later. -
Define the horizon:
Using a pencil, very lightly draw a horizontal line about one-third of the way down the paper. This separates your sky from the sea. Draw a second curved line in the bottom right corner to block out the rocky foreground. -
Wet-on-wet sky:
With your flat brush, wet the sky area with clean water. The paper should be glistening but not forming puddles. -
Painting the sunset glow:
Load a diluted mix of Soft Peach or very pale Yellow Ochre. Gently sweep this across the bottom of the sky section, right above the horizon line. -
Blending the upper sky:
While the paper is still damp, mix a very faint wash of Cerulean Blue. Apply this to the top edge of the paper, blending it downwards until it meets and softly merges with the peach tone.
Fixing “Blooms”
If water back-runs into drying paint creating cauliflower shapes (blooms), disguise them by blending with a damp brush or turning them into clouds or whitecaps.
Step 2: The Ocean Layers
-
First ocean wash:
Wait for the sky to dry completely. Mix a watery wash of Cerulean Blue with a touch of Indigo. Paint a horizontal stroke right along the horizon line for a sharp edge. -
Creating the gradient:
Continue painting downwards, gradually adding more water to your brush to lighten the blue as you move toward the shore. -
Adding depth:
Before the wash dries, drop slightly darker blue pigment into the distant water area to create the illusion of deep ocean. -
Suggesting waves:
Switch to a round brush (size 8). While the bottom half of the water is still damp, lift out some pigment using a clean, thirsty brush to create soft, white horizontal streaks suggesting rolling waves. -
Darkening the foreground water:
Mix a stronger Indigo and Payne’s Grey. Paint the bottom-left corner of the water area, using choppy, horizontal strokes to mimic restless movement near the rocks. -
Adding whitecaps:
Once the water layer is dry, I find dry-brushing a little white gouache or very thick white watercolor along the wave crests adds a nice sparkle.
Step 3: The Rocky Foreground
-
Painting the rocks:
Mix Payne’s Grey with a little Burnt Sienna for a stony grey-brown. Paint the rock shape in the bottom right corner, varying the color intensity to show shadows. -
Adding rock texture:
While the rock shape is damp, sprinkle a tiny pinch of salt or dab with a tissue to create a weathered stone texture. -
Painting grass blades:
Using your smallest round brush (size 4) or a rigger brush, mix a thick Green Gold or sap green. Flick quick, upward strokes from the base of the rock to create grasses. -
Highligting the grass:
Add some dry, yellow-ocher colored grass strokes amongst the green ones to suggest sun-bleached coastal vegetation. -
Final touches:
Use a white gel pen or gouache to add fine highlights to the tips of the grass and the very edge of the rock where it meets the water. -
The reveal:
Wait for everything to be bone dry. Carefully peel away the masking tape at a 45-degree angle to reveal your clean edges, then mount the piece in the white mat.
Pro Tip: Masking Fluid
Use liquid masking fluid on the white wave lines before painting the blue ocean wash to keep those areas perfectly sparkling white without lifting paint.
Now you have a tranquil coastal view ready to frame and display
Aurora Borealis Over Dark Mountains
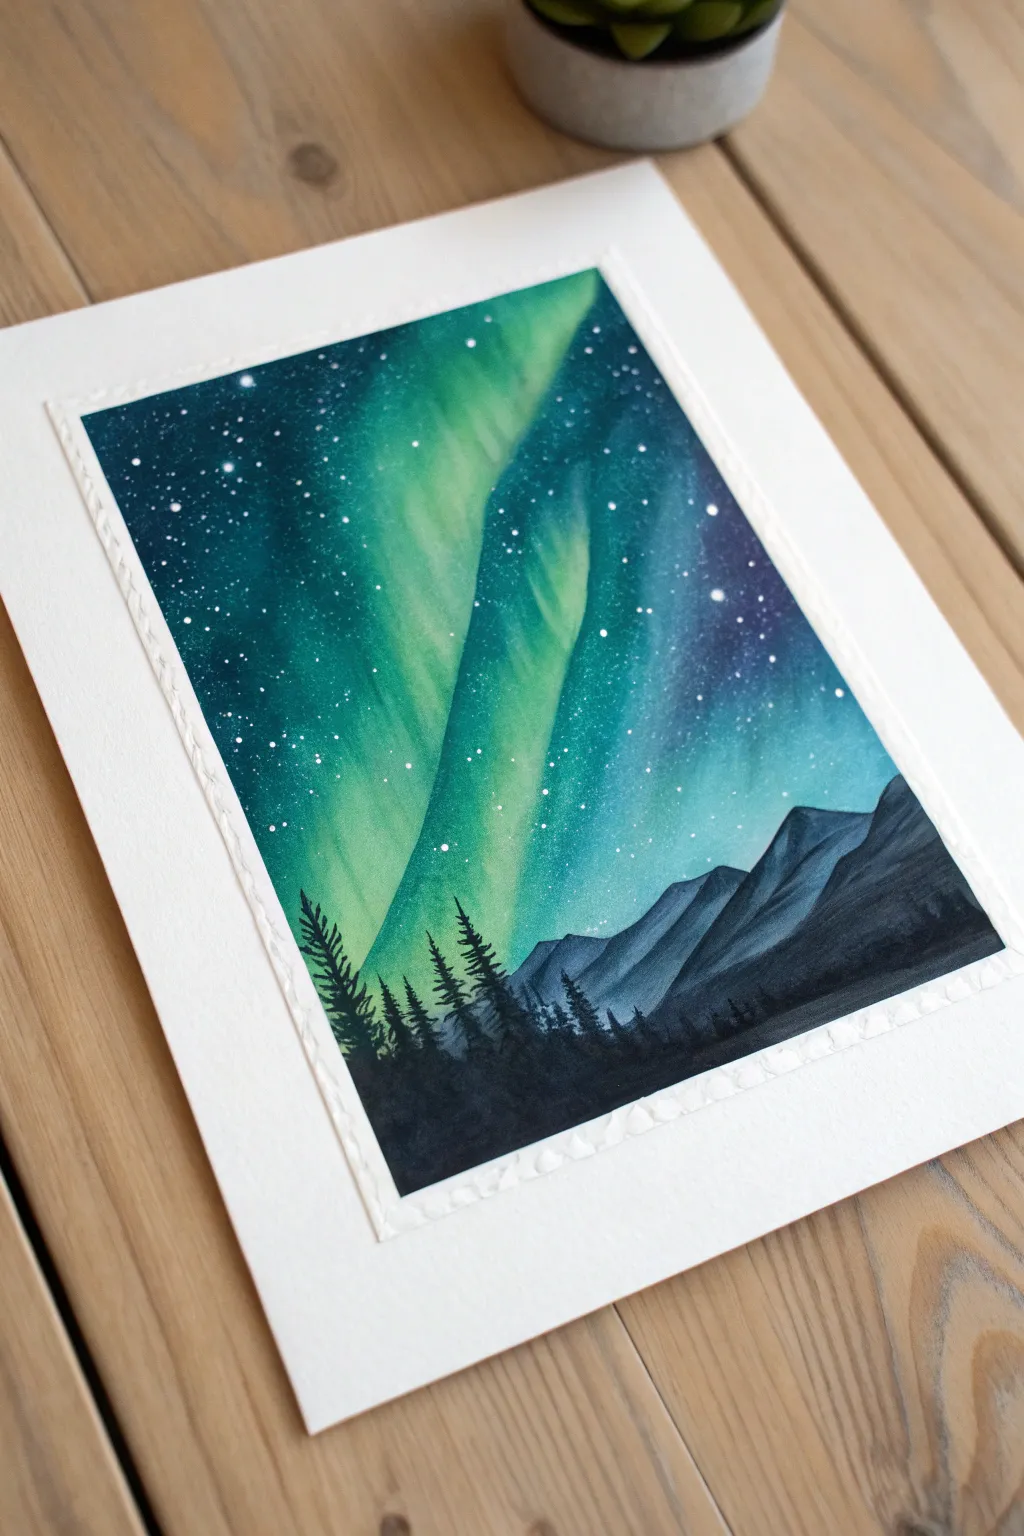
Capture the magic of an arctic night with this vibrant painting featuring sweeping green auroras dancing over a silhouette of jagged mountains. The contrast between the luminous sky and the deep black foreground makes for a striking, yet approachable piece.
How-To Guide
Materials
- Watercolor paper (cold press, at least 140lb/300gsm)
- Painter’s tape or washi tape
- Watercolor paints (Emerald Green, Phthalo Blue, Prussian Blue, Indigo, Black)
- White opacity medium (white gouache or white acrylic)
- Flat wash brush (large)
- Round brush (size 6 or 8)
- Detail liner brush (size 0 or 1)
- Old toothbrush or stiff bristle brush
- Jars of clean water
- Paper towels
Step 1: Preparing the Sky
-
Tape the edges:
Secure your watercolor paper to a flat surface using painter’s tape on all four sides. This creates that crisp, professional white border shown in the image and prevents the paper from buckling too much. -
Wet the paper:
Using your large flat wash brush, apply clean water to the entire sky area (the top 3/4 of the paper). The paper should be glistening wet but not forming puddles. -
Establish the light path:
Load your brush with a watery mix of Emerald Green. Paint two wide, sweeping, curved strokes moving diagonally from the bottom-left of the sky section toward the top-right. These will be the brightest parts of your aurora. -
Deepen the greens:
While the first layer is still wet, add a slightly more saturated Emerald Green to the edges of your original strokes, leaving the centers pale and bright.
Step 2: Layering the Night Sky
-
Introduce the blue:
Mix Phthalo Blue with a touch of Prussian Blue. Carefully paint into the negative spaces around your green aurora ribbons. Allow the blue to touch the wet green paint so they bleed together softly, but don’t overwork the blending. -
Darken the corners:
Mix a deep indigo or payne’s gray. Apply this dark hue to the very top corners and the far edges of the sky to create a vignette effect, making the center lights appear brighter by contrast. -
Softening edges:
If you have hard lines between the blue and green, rinse your brush, dry it slightly on a towel, and gently run the damp bristles along the seam to soften the transition. -
Let it dry completely:
This is crucial—wait until the paper is bone dry. If it feels cool to the touch, it’s still damp. Painting stars on damp paper will result in fuzzy blobs.
Fixing “Blooms”
If water pushes into drying paint creating cauliflower-like blooms, wait for it to dry, then gently scrub the area with a damp stiff brush to soften the texture before layering over it.
Step 3: Stars and Mountains
-
Splatter stars:
Dilute a small amount of white gouache or acrylic with water until it’s the consistency of milk. Load an old toothbrush or stiff brush, and flick the bristles to spray tiny white specks across the dried sky. -
Add larger stars:
Using your smallest detail brush and the white paint, manually dot a few larger, brighter stars in the darker blue areas for variety. -
Sketch the mountain range:
Using a pencil very lightly, or going straight in with a medium blue-grey wash, outline the jagged peaks of the mountains in the lower third of the paper. Keep the shapes irregular and triangle-like. -
Fill the mountains:
Paint the mountains with a dark blue-grey (mix Indigo with a little Black). I like to make the mountains slightly lighter than the trees that will go in front to create atmospheric depth. -
Add mountain texture:
While the mountains dry, you can add faint streaks of slightly darker paint on one side of the peaks to suggest shadows and dimension.
Level Up: Metallic Pop
Mix a tiny amount of iridescent or pearlescent medium into your white gouache for the stars. When the light hits the artwork, the starry sky will actually shimmer.
Step 4: Foreground Silhouettes
-
Base of the forest:
Once the mountains are dry, load your round brush with pure Black paint. Paint a solid, undulating line across the very bottom of the paper for the ground. -
Paint pine tree lines:
Switch to your detail liner brush or the very tip of your round brush. Paint vertical lines of varying heights sticking up from the black ground. These are the trunks of your trees. -
Foliage technique:
Starting at the top of a trunk, use a zig-zag motion to paint the branches, getting wider as you move down toward the base. Keep the texture rough and organic. -
Vary the density:
Group some trees closely together so they merge into a solid mass, while letting others stand alone with distinct branches against the aurora background. -
The Reveal:
Wait for the black paint to be totally dry. Carefully peel away the painter’s tape at a 45-degree angle to reveal your crisp white frame.
Step back and admire how the dark trees make those green lights truly glow
Snowy Peaks With Cool Shadow Shapes
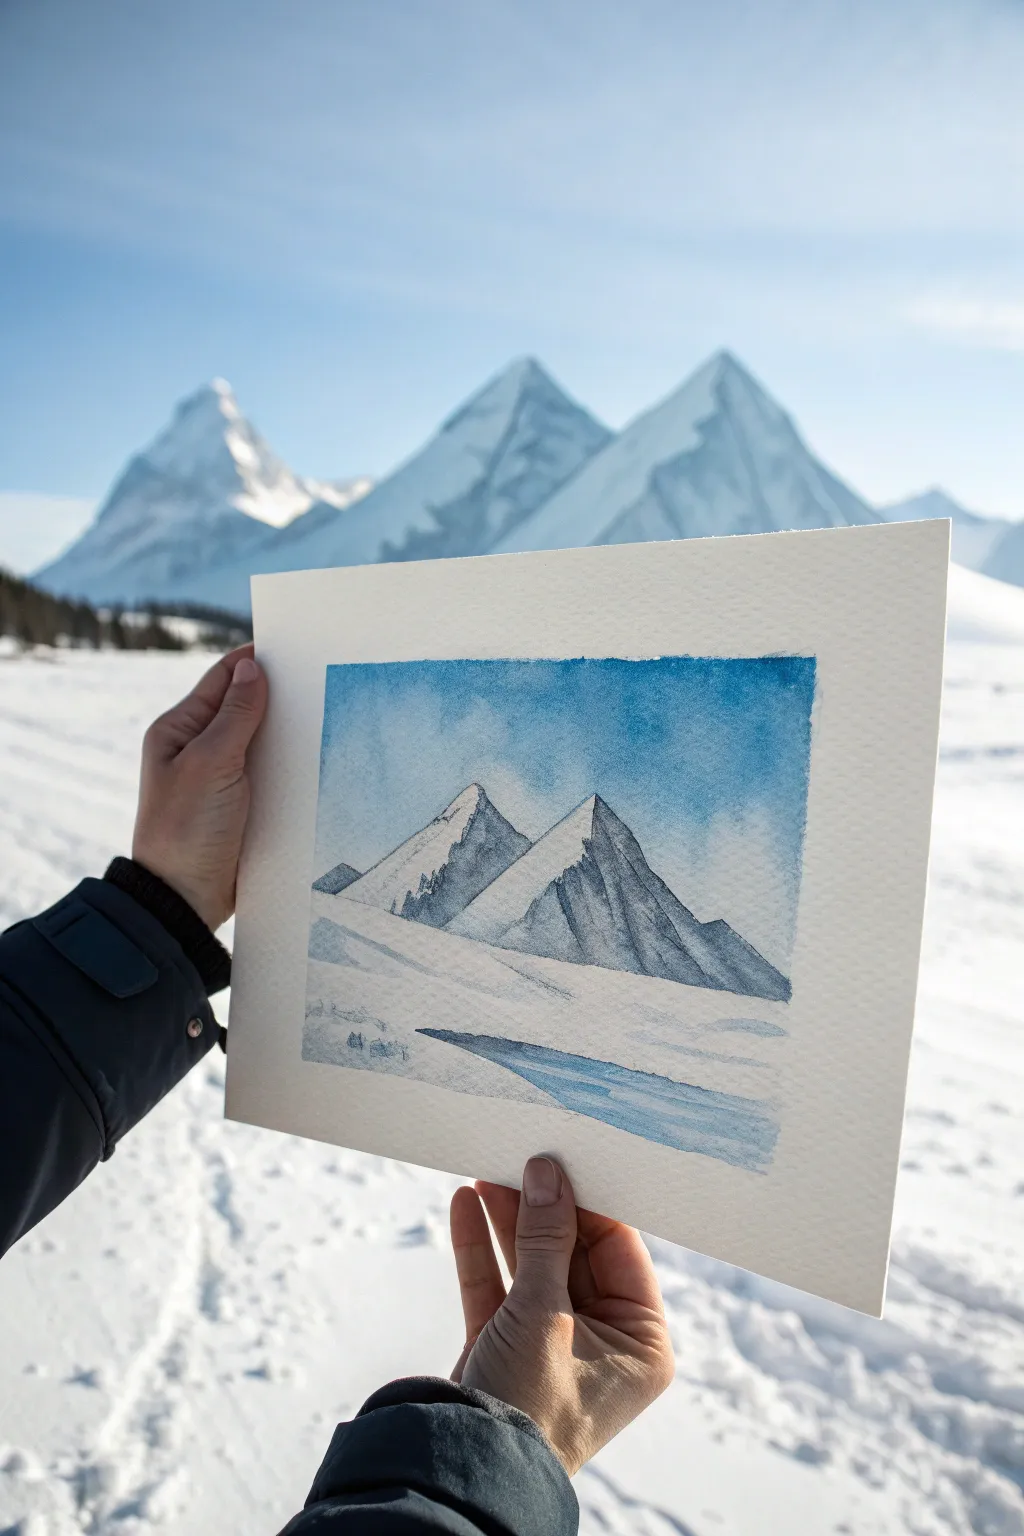
Capture the stark beauty of alpine summits with this refreshing watercolor project that emphasizes sharp edges and distinct shadow shapes. Using a limited palette of cool blues and greys, you will build volume through simple geometric forms and negative painting techniques.
Step-by-Step
Materials
- Cold press watercolor paper (300 gsm/140 lb or heavier)
- Masking tape
- Watercolor paints (Indigo, Cobalt Blue, Paynes Grey)
- Round watercolor brushes (size 8 for washes, size 4 for details)
- Flat brush (1 inch)
- Two jars of water
- Paper towels
- HB or 2H Pencil
- Kneaded eraser
Step 1: Planning and Sky
-
Tape the borders:
Begin by taping down all four edges of your watercolor paper to a board. Ensure the tape is pressed down firmly to create that crisp white border seen in the reference photo. -
Sketch the peaks:
Lightly sketch two main triangular peaks. Place the front peak slightly to the left and overlapping the secondary peak on the right. Add a horizon line that slopes gently downward from left to right. -
Define shadow lines:
Within the triangles, draw a jagged, vertical line down the center of each peak to separate the light side from the shadow side. Keep these lines angular to mimic rock formations. -
Prepare the sky wash:
Mix a watery puddle of Cobalt Blue. You want a clear, bright blue that isn’t too dark. -
Paint the sky:
Using your flat brush or large round brush, paint the entire sky area above the mountain outlines. Bring the blue wash right down to the pencil line of the peaks, carefully cutting around the white paper of the mountains. A slightly uneven, mottled texture in the blue adds atmospheric interest. -
Soften the horizon:
While the sky is drying, use clean water to dampen the area just above the snowy foreground, but avoid touching the mountain peaks yet.
Clean Edges
For the crispest line between the blue sky and white mountain, paint the sky while the paper is dry (wet-on-dry) rather than pre-wetting the paper.
Step 2: Mountain Structure
-
Mix shadow color:
Create a cool shadow mix using Indigo and a touch of Paynes Grey. Dilute this with water until you have a mid-tone value—dark enough to contrast with the white paper, but transparent enough to see texture. -
Base shadow layer:
On the right side of the main peak (the shadow side), paint a flat wash of your shadow color. Let the edge be jagged where it meets the light side. -
Background peak shadow:
Repeat this process for the secondary peak in the background. You can make this mixture slightly paler or bluer to suggest atmospheric perspective, pushing it further back. -
Dry brush texture:
Once the initial shadow wash is dry, mix a slightly thicker, darker version of the same color. Wipe excess paint off your brush onto a paper towel, then drag the brush lightly over the shadow areas to create rocky textures. -
Detailing the light side:
On the sunlit left sides of the mountains, add just a few tiny, fragmented strokes of pale blue-grey to suggest exposed rock faces, leaving the majority of the paper pure white.
Sparkle Effect
Before the paint fully dries on the frozen stream area, sprinkle a tiny pinch of salt. Brush it off when dry to create crystalline ice textures.
Step 3: Foreground and Finish
-
Foreground shadows:
The snow in the foreground isn’t perfectly flat. Mix a very watery, pale version of your sky color (Cobalt Blue). Add broad, horizontal strokes across the bottom third of the paper to indicate gentle slopes and dips in the snow. -
The frozen stream:
Paint a diagonal shape starting from the bottom right, narrowing as it moves toward the mountains. Use a mix of Cobalt Blue and Indigo to create the look of a shadowed, frozen creek bed or deep depression in the snow. -
Add distant texture:
On the far left horizon, dab in small, irregular spots of grey-blue to hint at distant trees or rocks barely poking through the snow. -
Final assessment:
Check your values. If the shadow sides of the mountains have dried too light, glaze another transparent layer of Indigo over them to deepen the contrast against the white snow. -
Reveal the border:
Ensure the paper is bone dry. Slowly peel away the masking tape at a 45-degree angle to reveal the clean, sharp edges that frame your snowy scene.
You now have a serene winter landscape that perfectly balances negative space with bold, chilly shadows.
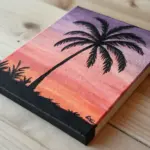
Palm Tree Silhouette at Dusk
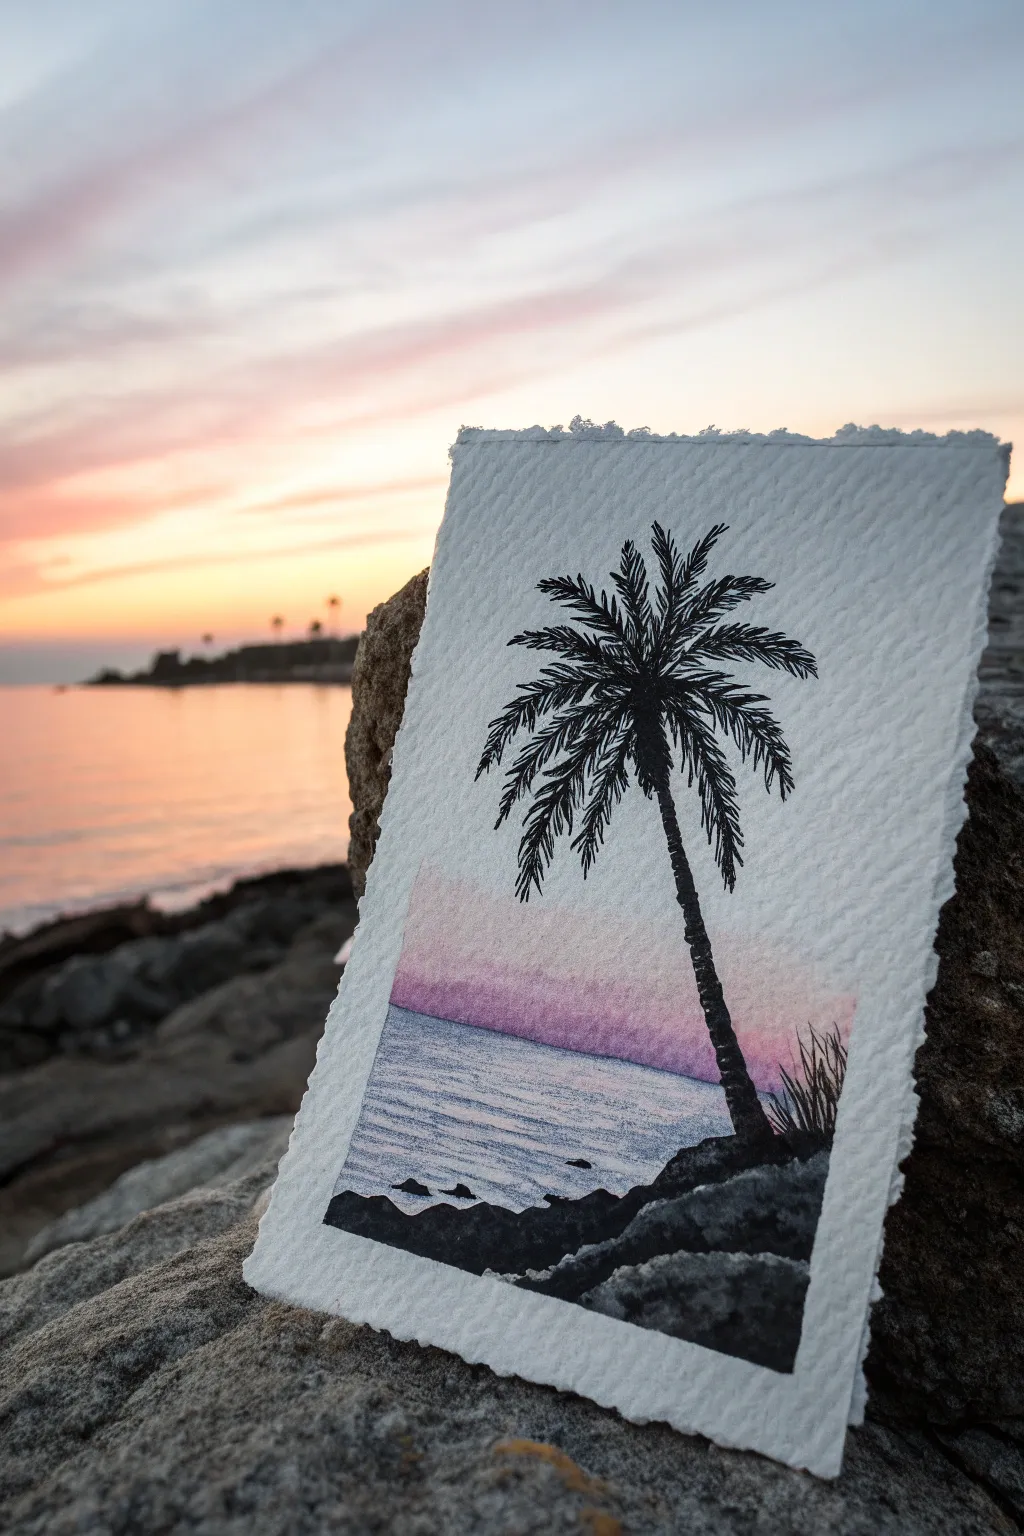
Capture the serene beauty of a seaside sunset with this mixed-media watercolor project. By combining soft watercolor washes with crisp ink details on textured paper, you’ll create a miniature escape that fits in the palm of your hand.
Step-by-Step Guide
Materials
- Cold-press watercolor paper (300 gsm or heavier)
- Watercolor paints (Pink, Purple, Blue, Black)
- Round watercolor brushes (Size 6 for wash, Size 0 or 00 for details)
- Black archival ink fine liner pen (0.3mm or 0.5mm)
- Black waterproof ink or gouache (optional, for the darkest blacks)
- Masking tape
- Jar of clean water
- Paper towels
- Pencil and eraser
Step 1: Preparing the Sky and Sea
-
Paper Selection:
Start by tearing your watercolor paper to size rather than cutting it. Gently folding and tearing creates that beautiful, rustic deckled edge seen in the example. -
Establish the Horizon:
Lightly sketch a horizontal line about one-third of the way up from the bottom of your paper to separate the sea from the sky. -
Wet-on-Wet Sky:
Using your larger round brush, brush clean water over the sky area until it glistens but isn’t dripping. This primes the paper for a smooth gradient. -
Applying the Pink Glow:
Load your brush with a watery, pale pink watercolor. Touch it to the paper just above the horizon line and let it bloom upward, fading as it goes higher. -
Adding Twilight Hues:
While the paper is still damp, introduce a soft lavender or purple near the horizon, blending it gently into the pink. Keep the top of the sky nearly white or very pale blue. -
Painting the Water:
Clean your brush and mix a diluted blue-purple shade for the water. Apply horizontal strokes below the horizon line, leaving tiny slivers of white paper showing through to represent glimmering waves. -
Dry Completely:
Allow the background washes to dry fully. If the paper feels cool to the touch, it’s still damp—wait a bit longer to prevent the black ink from bleeding.
Bleeding Lines?
If your ink spiders into the sky, the paper was too wet. Let it dry completely, or use a hairdryer on low heat before resuming ink work.
Step 2: Inking the Silhouette
-
Sketching the Trunk:
With a pencil, very faintly draw the curve of the palm tree trunk. Notice how it leans slightly to the right for a natural look, starting from the lower right foreground. -
Inking the Trunk:
Using a fine liner pen or a small brush with black ink, fill in the trunk. Make the texture uneven and slightly bumpy to mimic the rough bark of a palm tree. -
Foreground Rocks:
Paint jagged, irregular shapes at the very bottom edge of the paper using solid black. These silhouette rocks anchor the composition and give the tree a place to stand. -
Drawing the Fronds spine:
From the top point of the trunk, draw curved lines radiating outward like the spokes of a wheel. These will be the central spines of your palm fronds. -
Adding the Leaves:
I like to use quick, flicking motions with a fine pen to add the leaflets. Draw them hanging downwards from each spine, varying the length to create a ragged, windswept appearance. -
Layering the Crown:
Go back over the center of the palm crown where the branches meet, adding more ink density. This creates depth and makes the tree look lush and full. -
Detailing the Water:
Switch back to a diluted black watercolor or a very light gray marker. Add subtle horizontal lines across the blue water area to emphasize ripples, getting smaller as they approach the horizon. -
Adding Grasses:
Near the base of the tree on the right, use quick upward flicks of the pen to draw silhouetted blades of grass peeking up from the rocks. -
Final Contrast Check:
Inspect your silhouette. If the black looks faded or gray against the sunset, add a second layer of ink to ensure it pops as a true silhouette.
Pro Tip: Texture Trick
For the rocky foreground, dab the wet black paint with a crumpled tissue to lift pigment. This creates instant stone-like texture.
Place your finished piece against a window or light source to see the translucent colors shine through
Swing Silhouette Under a Sunset Tree
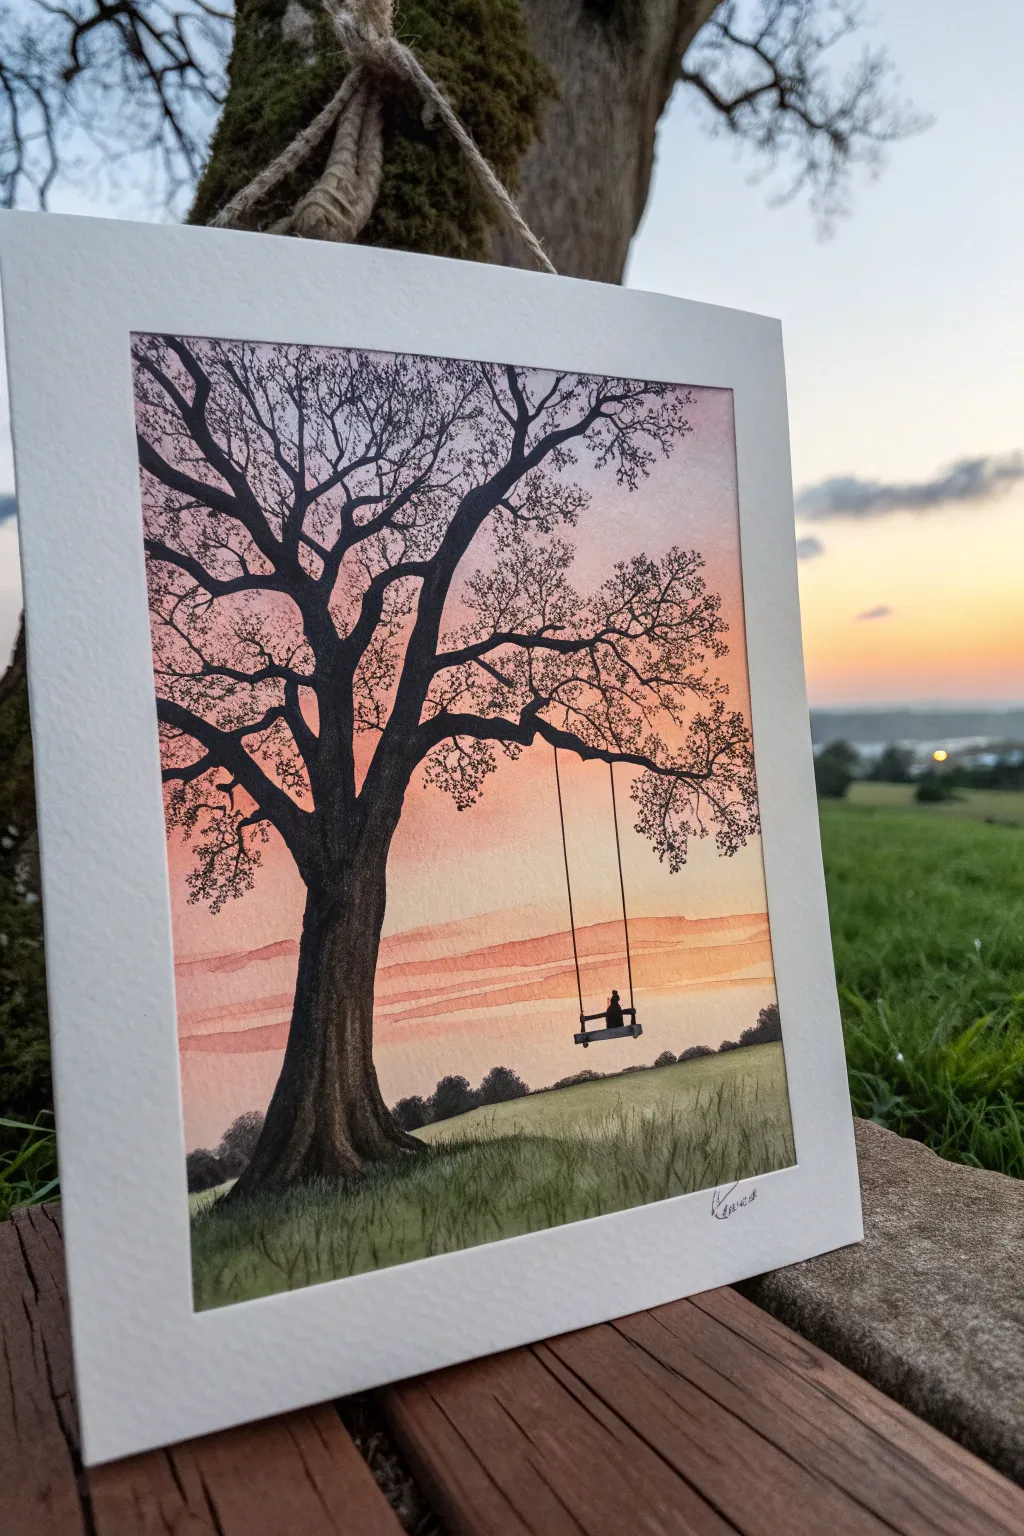
Capture the quiet nostalgia of a countryside evening with this watercolor and ink silhouette painting. The contrast between the vibrant, warm sunset sky and the stark black ink tree creates an emotionally resonant scene that looks far more complex than it actually is.
How-To Guide
Materials
- Cold press watercolor paper (A4 or slightly smaller)
- Watercolor paints (Pink, Orange, Yellow, Light Blue, Sap Green, Burnt Umber)
- Fine liner pens (Black, sizes 0.1, 0.3, and 0.5)
- Black waterproof ink or gouache
- Flat wash brush (large)
- Round brushes (sizes 4 and 0)
- Masking tape
- Pencil and eraser
- Palette
Step 1: Setting the Scene
-
Prepare the workspace:
Begin by taping down all four edges of your watercolor paper to a hard board or table. This prevents buckling when we add the water for the sky. -
Sketch the layout:
Lightly sketch the horizon line about one-quarter of the way up the page. Draw the basic shape of the large tree trunk on the left side, letting the branches reach out towards the right, but keep the lines faint. -
Wet the sky:
Using your large flat brush, apply clean water to the sky area above the horizon line. You want the paper to be damp and glistening, but not swimming in puddles.
Branch Naturally
Avoid the ‘ladder effect.’ Don’t draw one branch directly opposite another on the trunk. Offset them (left, up a bit, then right) for a more realistic organic structure.
Step 2: Painting the Sunset Sky
-
Apply the warm tones:
While the paper is wet, horizontally brush a soft mix of orange and yellow near the horizon line. Let the colors bleed slightly upwards. -
Transition to cool tones:
Moving upward, introduce a soft pink or rose color, blending it gently into the orange. At the very top corners, add a faint wash of light blue or violet to suggest the encroaching evening. -
Build the clouds:
While the sky is still damp, paint horizontal streaks of darker orange or diluted red across the lower sky to mimic cloud layers. Let these soften naturally. -
Dry completely:
This is crucial: allow the sky to dry completely before touching it again. Use a hairdryer on a low setting if you are impatient, as the paper must be bone dry for the ink layer.
Golden Hour Glow
After the black ink dries, glaze a tiny amount of your yellow watercolor over the edges of the tree trunk that face the sun to create a subtle backlit rim-lighting effect.
Step 3: Creating the Foreground
-
Paint the distant hills:
Mix a very pale grey-purple watercolor wash. Paint a low, rolling hill line just above your main horizon line to create depth, and let it dry. -
Base layer for grass:
For the main grassy area, apply a wash of Sap Green mixed with a touch of Burnt Umber. While wet, drop in slightly darker green patches to create uneven texture. -
Add grassy texture:
Once the green wash is dry, use a small round brush with a darker green mix to flick tiny vertical lines upwards, simulating blades of grass.
Step 4: Inking the Silhouette
-
Outline the trunk:
Using a 0.5 fine liner or black ink with a small brush, carefully outline the main trunk of the tree. Make the base wider and gnarled, tapering as it goes up. -
Fill the trunk:
Fill in the trunk with solid black. If using watercolor or gouache, ensure it’s opaque. I find adding vertical texture lines in the bark adds realism even in silhouette. -
Extend the branches:
Switch to a thinner 0.3 pen. Draw the main branches extending outward. Remember that trees are fractals: thick branches split into thinner ones, which split into twigs. -
Add fine twigs:
Use your finest 0.1 pen for the delicate outer tips of the branches. Let your hand shake slightly to give the twigs a natural, organic look rather than perfectly straight lines. -
Stipple the leaves:
To suggest sparse foliage, use the tip of your pen to stipple clusters of tiny dots around the ends of the twiggy branches.
Step 5: The Final Details
-
Draw the swing:
Identify a sturdy-looking horizontal branch. Draw two straight parallel lines hanging down using a ruler if necessary, and connect them with a small rectangle for the seat. -
Add the figures:
Carefully draw the silhouette of the figures sitting on the swing. Keep the shapes simple—focus on the posture rather than details. -
Deepen the shadows:
Paint a few small, dark bush silhouettes along the horizon line using opaque black paint to ground the scene. -
Remove tape:
Once absolutely everything is dry, slowly peel away the masking tape at a 45-degree angle to reveal your crisp white border.
Now hang your masterpiece and enjoy the eternal sunset view.
Abstract Landscape With Color-Block Mountains
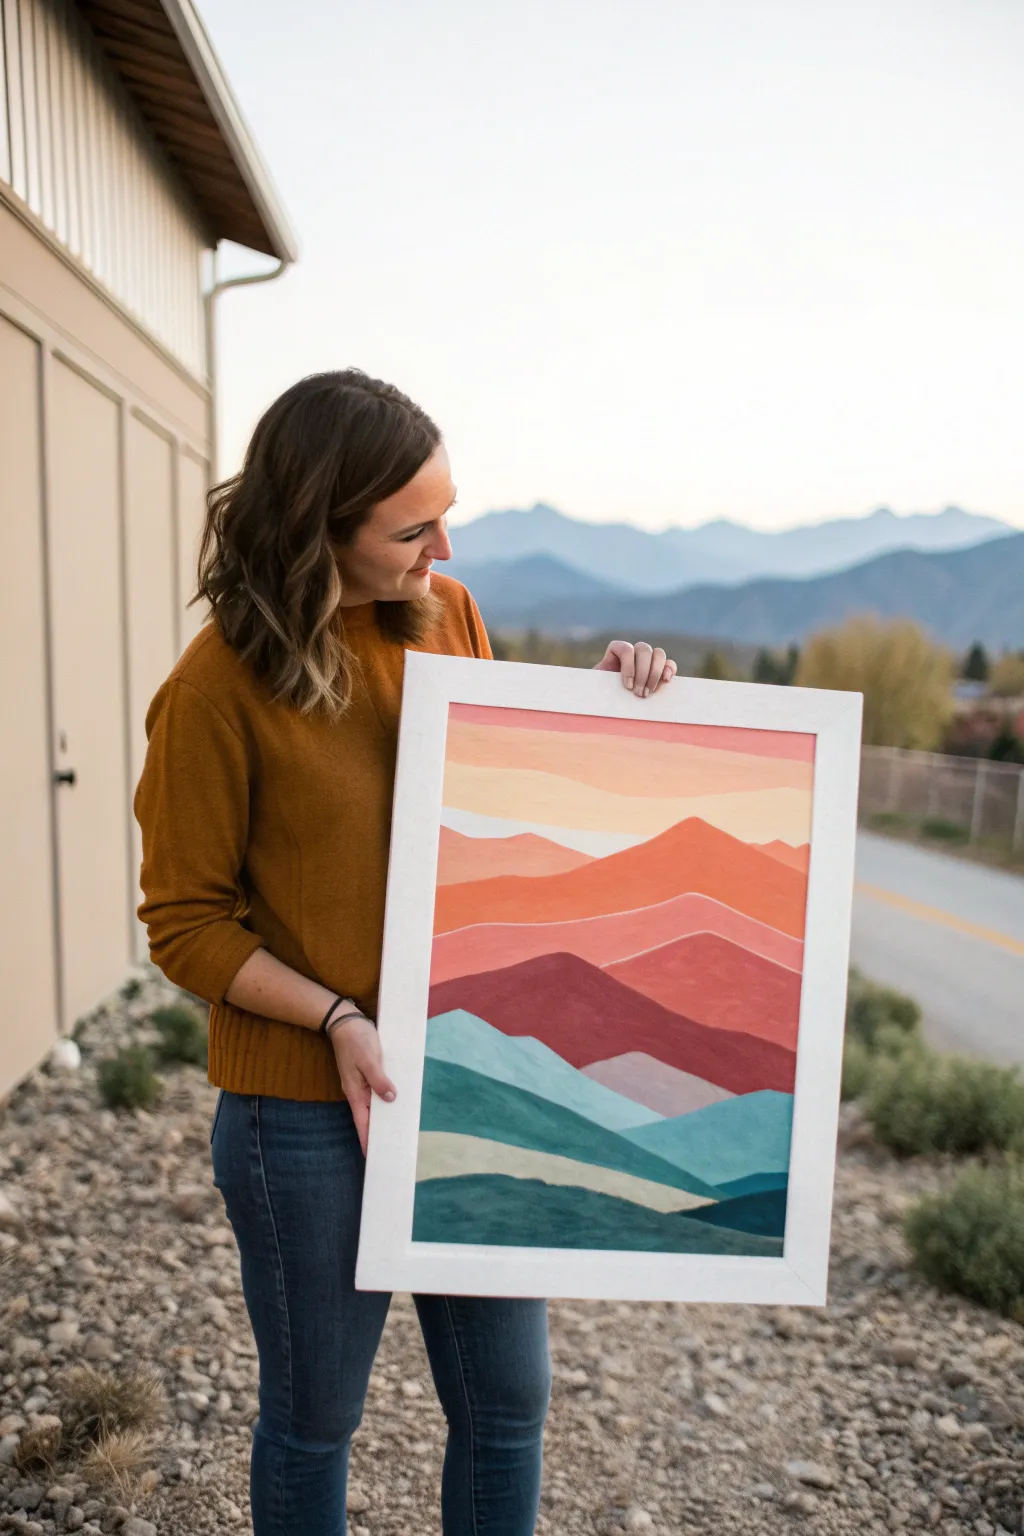
Capture the serenity of a mountain range at dusk with this clean, graphic landscape painting. By using crisp lines and a harmonized warm-to-cool palette, you’ll create a modern piece of art that looks professionally designed but is surprisingly simple to execute.
Step-by-Step
Materials
- Canvas or canvas board (18×24 inches recommended)
- Acrylic paints (Titanium White, Cadmium Orange, Crimson Red, Burnt Sienna, Phthalo Blue, Hookers Green, Yellow Ochre)
- Painter’s tape or masking tape (optional, for edges)
- Flat shader brushes (medium 3/4 inch and small 1/4 inch)
- Small round brush (for detailed edges)
- Palette or paper plate
- Pencil
- Ruler (optional)
- Cup of water and paper towels
Step 1: Planning and Sketching
-
Prepare your canvas:
Start with a clean canvas. If you want a crisp white border like the inspiration photo, you can tape off the edges with painter’s tape, or plan to frame it later with a mat. -
Sketch the horizon lines:
Lightly sketch wavy, horizontal lines across the canvas to define your mountain ranges. Start near the top third for the sky, then create 6-8 distinct layers moving downward. -
Vary the peaks:
Ensure your lines aren’t uniform. Make some peaks higher and sharper, while others should be rolling and gentle. The layers need to overlap to create depth. -
Number your sections:
To stay organized, visually divide your sketch into three zones: the top sky (warmest), the middle mountains (reds/purples), and the foreground (blues/greens).
Wobbly Lines?
Improve crisp lines by using an angled brush. Load paint only on the tip and pull the brush steadily towards you, rather than pushing it away.
Step 2: Painting the Warm Sky
-
Mix the lightest sky color:
On your palette, mix a large amount of Titanium White with a tiny dot of Yellow Ochre and a hint of Cadmium Orange. This creates a pale, creamy sunset yellow. -
Paint the top strip:
Fill in the very top section of the canvas with this pale mixture. Use a large flat brush for smooth, even strokes. -
Mix the peach tone:
Add a bit more Orange and a touch of Red to your previous mixture to create a soft peach color. -
Paint the second layer:
Apply this peach tone to the band directly below the top strip. Painting wet-on-dry makes sharp lines easier, so let layers dry briefly if you’re worried about smudging.
Make it Metallic
For a glamorous twist, paint one specific layer—perhaps the sun-kissed peak or a river—using metallic gold leaf or gold paint.
Step 3: The Middle Ranges
-
Create a vibrant orange:
Mix pure Cadmium Orange with a little Red. Paint the first distinct mountain peak shape below the sky with this bold, warm color. -
Transition to terracotta:
Mix Burnt Sienna into your red-orange blend. This creates an earthy, clay-like tone. Fill in the next mountain layer down. -
Deepen to burgundy:
Add a tiny touch of Blue or more Burnt Sienna to your red mix to create a deep wine or burgundy shade. Paint the darkest warm layer, usually situated right in the middle of the composition. -
Refine the edges:
Use your small round brush or the edge of a flat brush to clean up the ridge lines where the colors meet. A sharp, clean edge is crucial for this style.
Step 4: The Cool Foreground
-
Mix a muted teal:
Clean your brush thoroughly. Mix White, Phthalo Blue, and a little Hookers Green. Add a speck of Orange or Red to desaturate the color so it isn’t too neon. -
Paint the first cool layer:
Apply this light, dusty teal to the first mountain range in the lower half. It should contrast sharply with the burgundy above it. -
Darken the green:
Add more Green and less White to your teal mix. Paint the next overlapping hill shape. -
Create a deep forest color:
For the bottom-most layers, use mostly Green and Blue with very little White. You want these to be the darkest values in the painting to anchor the scene. -
Final touch-ups:
Once the paint is fully dry, inspect your edges. If any underlying canvas shows through or lines look shaky, do a second coat or careful touch-up with the appropriate color. -
Seal or Frame:
If you taped the edges, peel the tape off slowly. Frame the piece in a white frame to really make those colors pop.
Hang your new landscape proudly and enjoy the modern splash of color it adds to your room
Mini Series: Four Tiny Skies, Four Moods
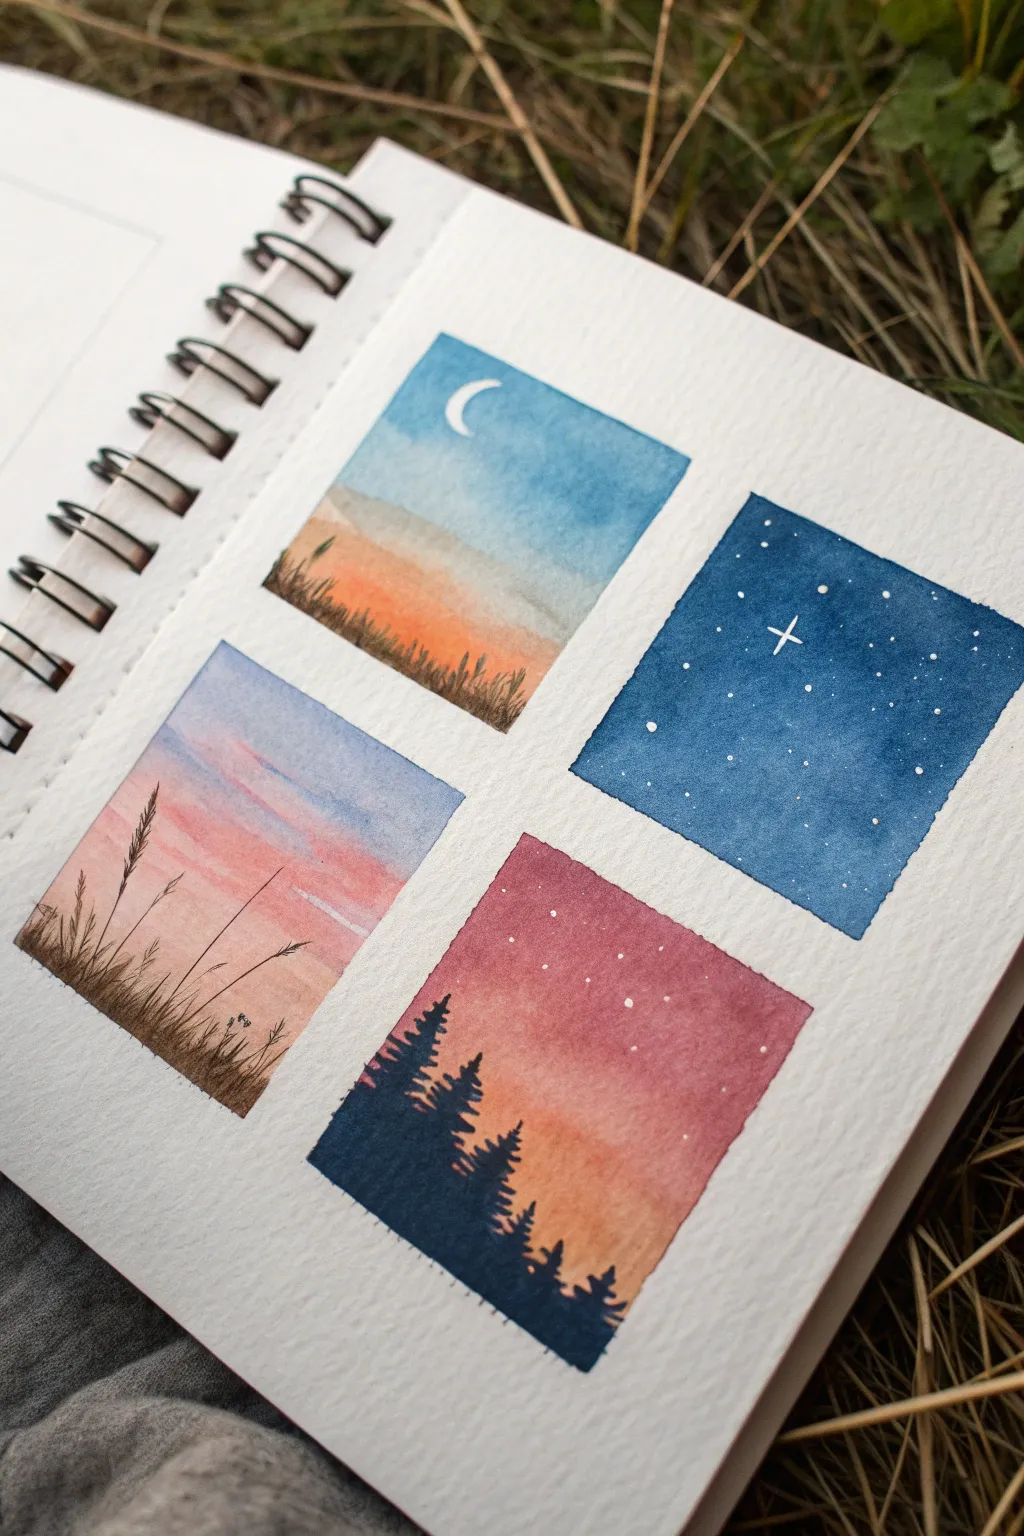
This charming project features four distinct square landscapes painted on a single sketchbook page, capturing the changing atmosphere of the sky. From a crisp crescent moonrise to a serene starry night, these miniature watercolors are perfect for practicing gradients and silhouette work without the pressure of a large canvas.
Step-by-Step Tutorial
Materials
- Watercolor sketchbook (cold press paper recommended)
- Watercolor paints (Cerulean Blue, Ultramarine, Indigo, Payne’s Gray, Alizarin Crimson, Burnt Sienna, Yellow Ochre)
- Masking tape or painter’s tape
- Small round brush (size 2 or 4)
- Fine liner brush (size 0 or 00)
- White gel pen or white gouache
- Jar of clean water
- Paper towels
Step 1: Preparation
-
Tape the borders:
Begin by dividing your sketchbook page into four equal squares using masking tape. Press the edges of the tape down firmly with your thumbnail or a spoon handle to ensure crisp, clean lines and prevent paint seeping underneath. -
Pre-wet the paper:
Lightly wet the paper inside the first square (top-left) with clean water. The paper should have a slight sheen but no puddles, preparing it for the wet-on-wet technique.
Step 2: Square 1: Golden Hour Crescent
-
Paint the gradient:
Start at the top with a diluted Cerulean Blue, pulling the color downwards. As you reach the middle, rinse your brush and introduce a soft Yellow Ochre mixed with a touch of Burnt Sienna for the horizon, letting the blue and gold merge naturally. -
Add distant hills:
While the sky is still slightly damp but not soaking, mix a very pale, watery gray-blue. Paint a faint, rolling mountain shape across the horizon line to create atmospheric perspective. -
Paint the foreground:
Switch to a mixture of Burnt Sienna and a tiny bit of brown. Paint the bottom third of the square with upward vertical strokes to suggest tall, dried grass. -
Add the moon:
Once the blue sky is completely dry, use white gouache or a gel pen to draw a crisp, thin crescent moon in the upper left corner.
Clean Lines Hack
To stop paint bleeding under the tape, apply a very thin layer of clear water or white gouache over the tape edges first. This seals the gap before you apply color.
Step 3: Square 2: Deep Starry Night
-
Build the base layer:
Moving to the top-right square, apply a solid wash of water. Drop in rich Ultramarine Blue, darkening it with Indigo or Payne’s Gray towards the edges to create a vignette effect. -
Deepen the color:
While wet, drop in more concentrated pigment to get a deep, saturated night sky color. Let this dry completely before moving to the stars. -
Create the stars:
Using your white gel pen, dot random stars across the sky. Vary the pressure to create different sizes, and choose one spot to draw a larger, four-pointed star for focus.
Metallic Magic
Swap the white gel pen for metallic gold or silver paint for the moon and stars. It adds a lovely shimmer when the sketchbook catches the light.
Step 4: Square 3: Pink Sunset Meadow
-
Create the sunset gradient:
Wet the bottom-left square. Start at the top with a very pale blue, then quickly transition into a soft pink (Alizarin Crimson diluted) and finish with a warm peach tone near the bottom. -
Lay in clouds:
While the wash is still wet, take a slightly thicker mixture of pink and purple. Gently drag horizontal streaks across the sky to form soft, diffuse clouds. -
Detail the grass:
Once the background is bone dry, mix a dark brown. Use your finest liner brush to flick quick, upward strokes from the bottom edge, creating delicate silhouettes of tall grass stems and seek heads.
Step 5: Square 4: Silhouetted Pines
-
Paint the twilight sky:
For the bottom-right square, create a vibrant gradient starting with a dusky purple at the top, fading into a bright pink/orange near the horizon line. -
Draft the trees:
Wait for complete dryness. Mix a strong, opaque Indigo or black paint. Start painting pine trees on the left side, making the ones on the far left the tallest. -
Flesh out the forest:
Continue adding smaller pine trees descending toward the right. Use a stippling motion with the tip of your brush to mimic the texture of pine needles on the branches. -
Add final stars:
I like to finish this one with just a few subtle white dots in the purple section of the sky for early evening stars.
Step 6: Finishing Touches
-
Reveal the borders:
Wait until all four paintings are completely dry to the touch. Slowly peel the tape away at a 45-degree angle, away from the painted area, to reveal your crisp white borders.
Now you have a captured a full day’s worth of beautiful skies on a single page.


Have a question or want to share your own experience? I'd love to hear from you in the comments below!