If you’re craving that paradise feeling without a complicated painting plan, you’re in the right place. These easy tropical painting ideas are all about big, satisfying color, simple shapes, and a few little “cheat” techniques that make your art look lush fast.
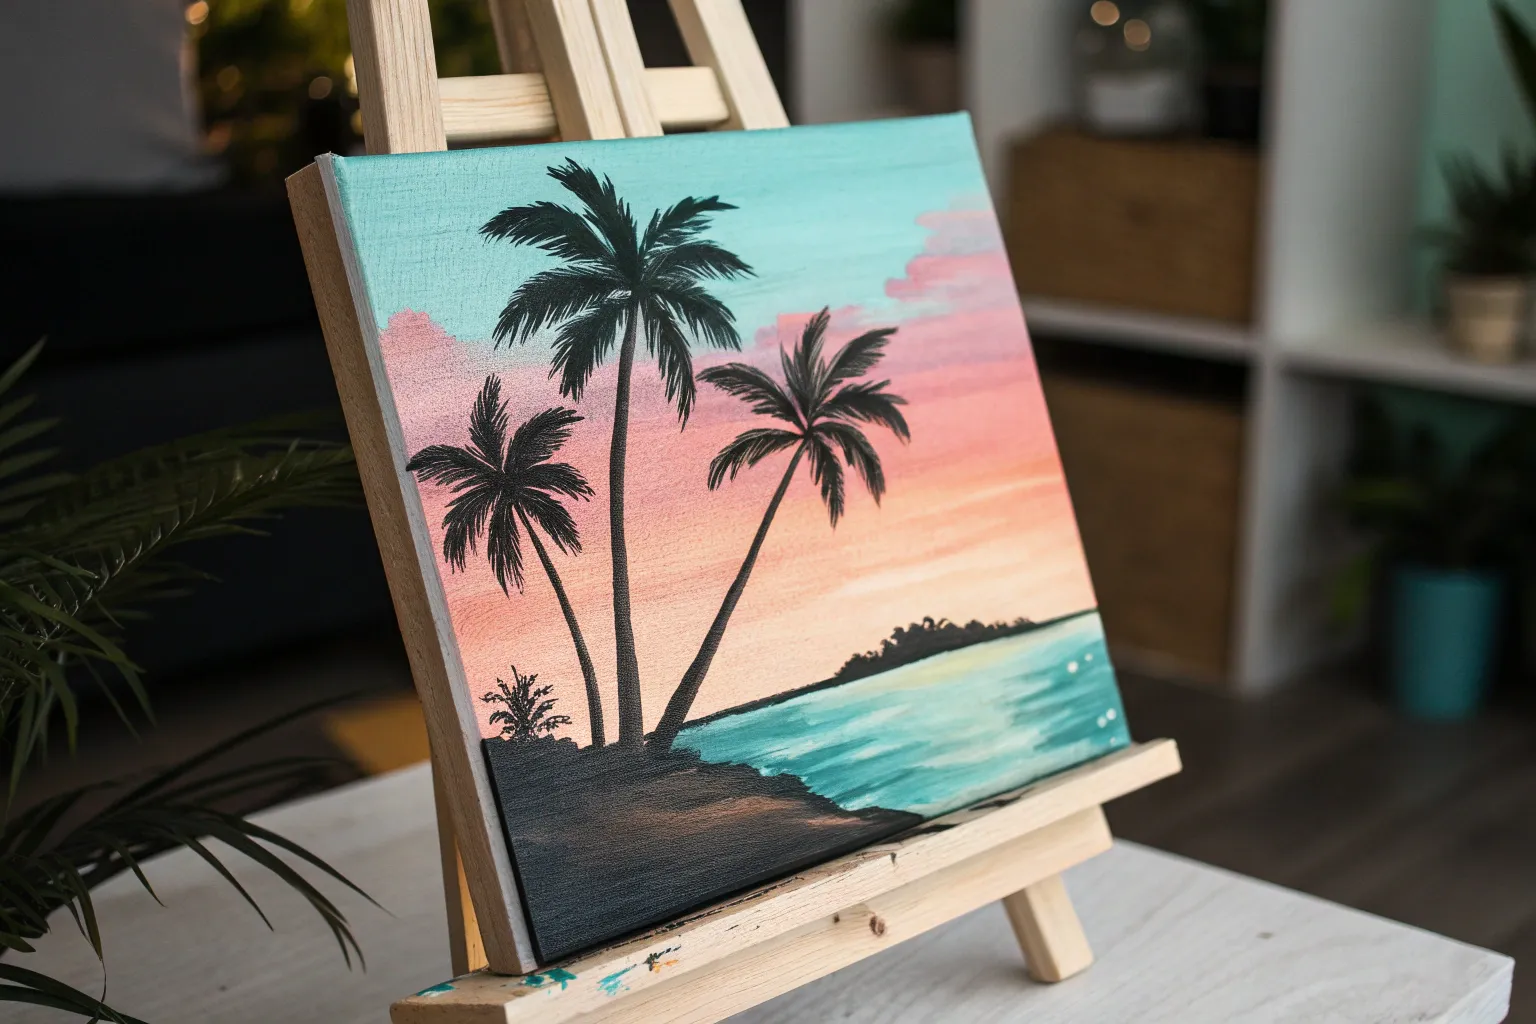
Palm Tree Silhouette Sunset
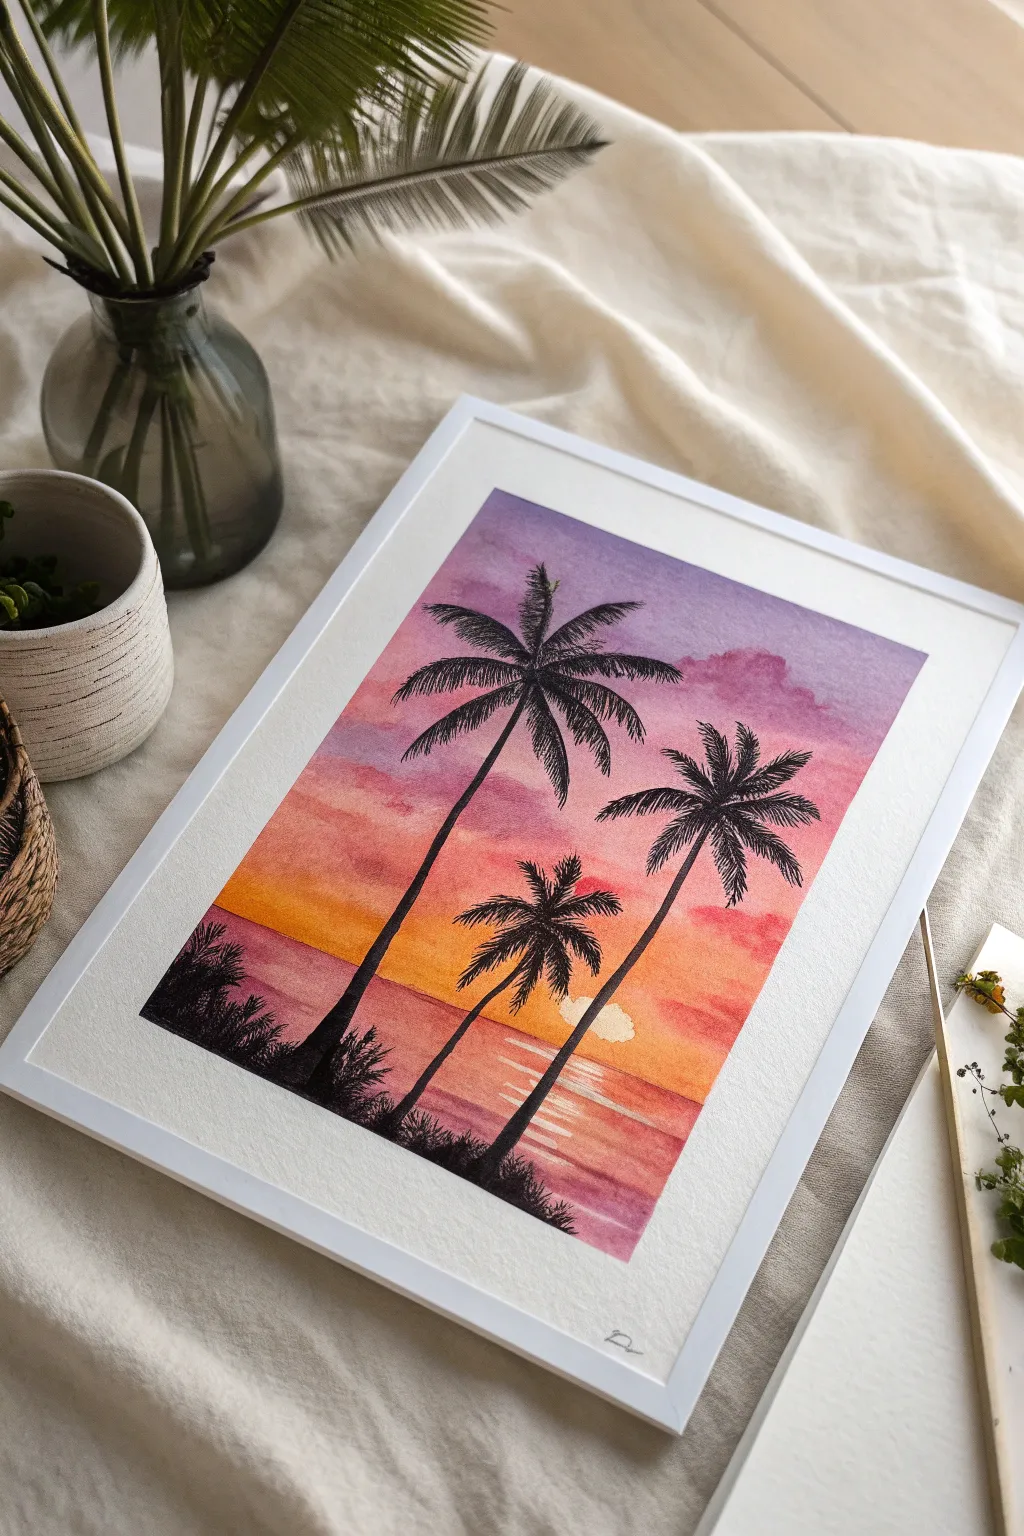
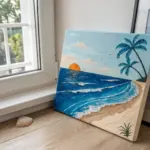
Capture the magic of a tropical evening with this vibrant watercolor project featuring stark black palm silhouettes against a blended sunset sky. This beginner-friendly painting uses a wet-on-wet technique to create a seamless gradient from violet to gold.
How-To Guide
Materials
- Cold press watercolor paper (approx. A4 or 9×12 inches)
- Watercolor paints (Purple, Magenta/Rose, Orange, Yellow)
- Black acrylic paint or black gouache (for opaque silhouettes)
- Masking tape
- Flat wash brush (large)
- Round brush (size 6 or 8)
- Fine liner brush or rigger brush (size 0 or 1)
- Two jars of water
- Paper towels
- White gel pen (optional, for highlights)
Step 1: Setting the Scene
-
Prepare the canvas:
Secure your watercolor paper to a board or table using masking tape along all four edges. This creates a clean white border and prevents buckling when the paper gets wet. -
Sketch the horizon:
Using a pencil, very lightly draw a straight horizontal line about one-third of the way up from the bottom of the paper. This separates the sky from the ocean. -
Wet the sky area:
With your large flat brush and clean water, apply a generous even coat of water to the entire sky area above the horizon line. The paper should glisten but not have puddles.
Muddy Colors?
If your purple and yellow turn brown where they meet, add a buffer zone of clear orange or red between them. Always wash your brush thoroughly before switching from cool to warm colors.
Step 2: Painting the Sunset Gradient
-
Add the top violet layer:
Load your brush with purple watercolor. Apply it horizontally across the very top of the wet paper, letting the color naturally diffuse downwards. -
Introduce magenta:
Clean your brush slightly and pick up a vibrant magenta or rose color. Paint this directly below the purple, allowing the edges to bleed together softly. -
Blend in the warmth:
Switch to orange paint and apply it below the magenta. Finally, use a bright yellow right above the horizon line, blending it upwards into the orange. Be careful not to let the purple and yellow mix too much, or it will turn muddy. -
Create soft clouds:
While the sky is still damp, dab in a few concentrated spots of purple or magenta into the upper sections to suggest soft, fluffy clouds. Let the wet paper do the work of softening the edges. -
Let the sky dry:
Allow the sky section to dry completely. It must be bone dry before you start the water or the colors will bleed uncontrollably.
Step 3: Painting the Water
-
Establish the water base:
Wet the paper below the horizon line. Mirror the sky colors in reverse order: start with yellow just under the horizon line, blending into orange, then pinks and purples at the very bottom. -
Create the sun reflection:
While the paint is wet, lift out a small vertical column of color in the center using a clean, damp brush, or leave a small patch of paper white to represent the sun’s reflection on the water. -
Add water ripples:
Once the base wash is semi-dry, use a slightly stronger mix of purple or magenta on a round brush to paint thin horizontal lines across the water, mimicking gentle waves. Leave the center reflection area bright. -
Second drying phase:
Let the entire painting dry completely. Use a hairdryer on a low setting if you are impatient, but air drying often yields smoother blends.
Level Up: Sun Glints
Once everything is dry, use a white gel pen to add tiny, sharp highlights on the water ripples right down the center to make the reflection sparkle intensely.
Step 4: Adding the Silhouettes
-
Mix the silhouette color:
For the crispest silhouettes, I prefer using black acrylic or gouache instead of watercolor, as it provides solid, opaque coverage. Dilute it slightly so it flows smoothly. -
Paint the trunks:
Using a size 6 round brush, paint three curved palm tree trunks. Make the base of the trunks slightly wider and taper them as they reach upwards into the sky. -
Draw the frond spines:
Switch to your fine liner brush. From the top center of each trunk, paint 5 to 7 curved lines arching outwards like a firework explosion. These are the spines of the palm leaves. -
Add the leaves:
With the fine brush, paint quick, short strokes hanging down from each spine line. Vary the length of these strokes—shorter near the tip and center, longer in the middle of the frond. -
Paint the land:
Fill in the bottom corners with solid black paint to create a shoreline. Use lighter tapping motions along the top edge of this black area to suggest grass or small bushes. -
Adding texture:
Add a few tiny grass spikes sticking up from the black shoreline to give the foreground more organic detail. -
The final reveal:
Once the black paint is fully dry, carefully peel off the masking tape at a 45-degree angle to reveal your crisp white border.
Frame your new tropical masterpiece or gift it to bring a bit of warmth to a friend’s home


Simple Beach Horizon With Sun Reflection
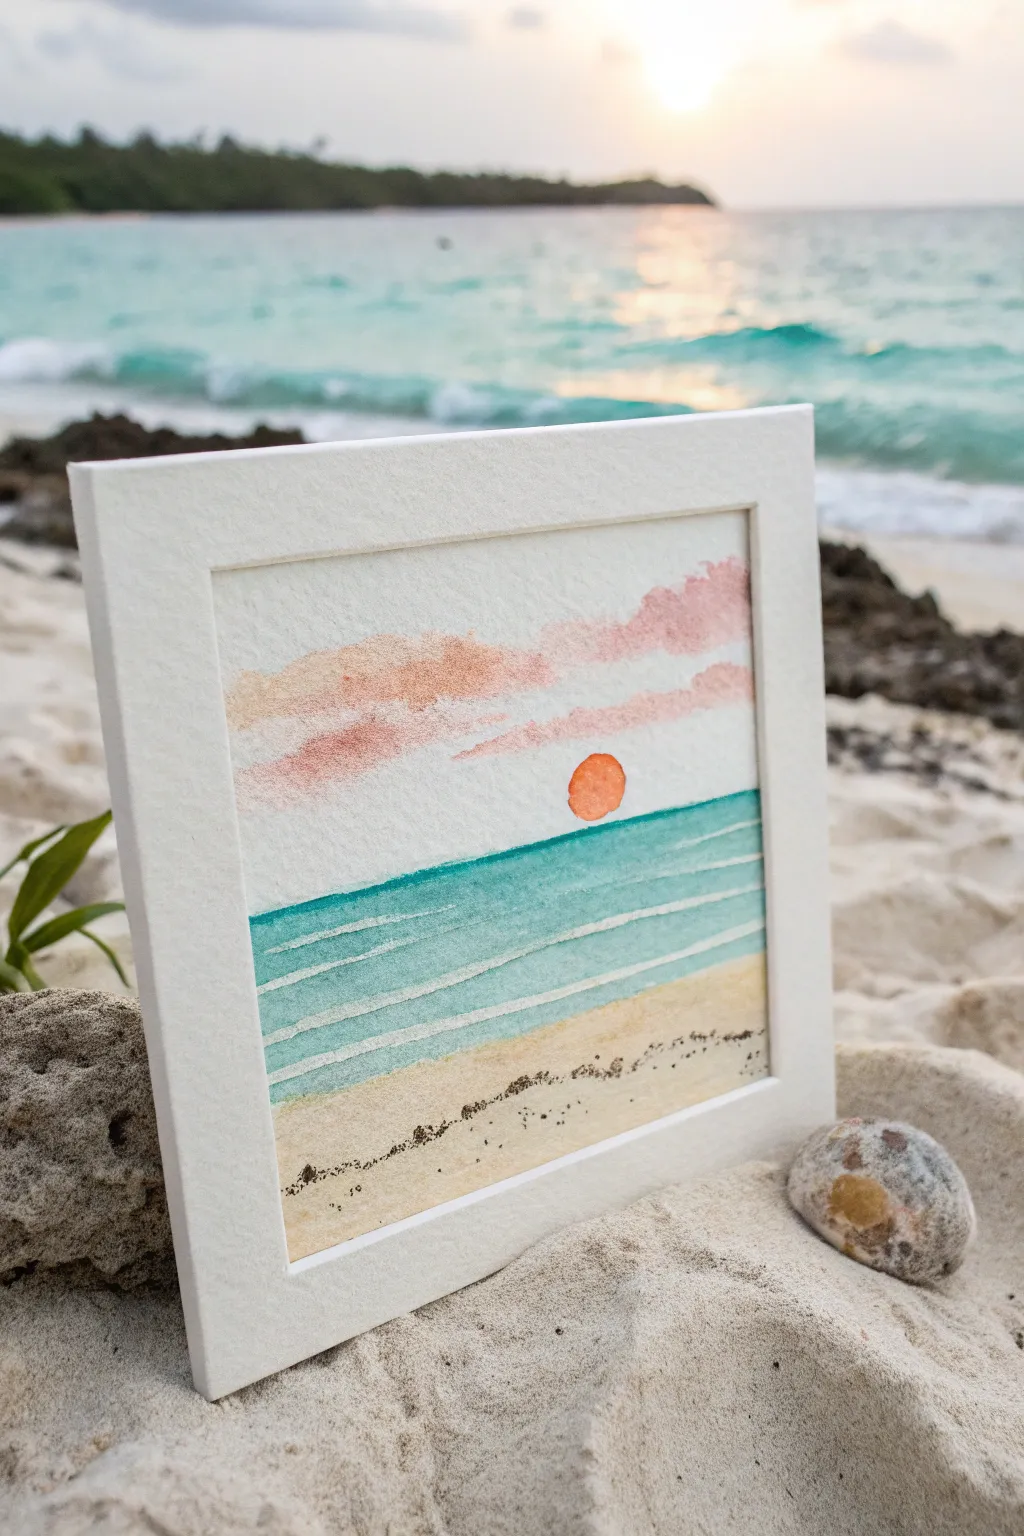
Capture the serenity of golden hour with this clean, minimalist watercolor study. Its charm lies in the small square format and the delicate balance between the soft clouds and the crisp horizon line.
Step-by-Step
Materials
- Cold press watercolor paper (cut to a small square, approx. 4×4 inches)
- White cardstock mat frame (square opening)
- Watercolor paints (Turquoise/Teal, Yellow Ochre, Cadmium Orange, Burnt Umber, Soft Pink)
- Small round brushes (size 2 and size 4)
- Masking fluid or white gouache (for the wave lines)
- Washi tape or masking tape
- Clean water and mixing palette
- Salt (optional for texture)
Step 1: Setting the Scene
-
Prepare your canvas:
Begin by taping down your small square of watercolor paper to a board. Use washi tape for a clean border, ensuring the tape is pressed flat to prevent paint bleeding underneath. -
Establish the horizon:
Sketch a very faint pencil line horizontally across the paper, about one-third of the way up from the bottom. This will separate your sea from the sky. -
Define the wave lines:
This step makes the painting pop. Using a fine brush or a ruling pen, apply three or four thin, horizontal lines of masking fluid across the area that will become the ocean. These will preserve the white paper to look like gentle wave crests later. -
Let it cure:
Allow the masking fluid to dry completely. It must be dry to the touch before you introduce any water, or it might become impossible to remove later.
Step 2: Painting the Sky and Sun
-
Paint the sun:
With a clean, damp brush, pick up rich Cadmium Orange paint. Paint a small, perfect circle sitting just above the horizon line in the right half of the sky. -
Soften the edges:
While the sun is still wet, you can carefully soften the very outer edge with a clean damp brush if you prefer a hazy look, or leave it sharp for a graphic style. -
Create the clouds:
Mix a watery wash of soft pink with a tiny touch of orange. Using a lifting motion or a dabbing technique with your size 4 brush, paint loose, fluffy cloud shapes in the upper sky. -
Add dimension:
While the pink clouds are still damp, drop in a slightly more concentrated orange pigment at the bottom edges of the clouds to simulate the sunset glow hitting them. -
Dry sky completely:
Wait for the entire sky section to dry. Because the ocean horizon meets the sky, everything must be bone dry to keep that horizon line crisp and straight.
Uneven Horizon?
If your horizon line wobbled, use a ruler and a white gel pen to re-draw the line after the paint dries. Or, lay a piece of masking tape across the sky area before painting the sea for a razor-sharp edge.
Step 3: Ocean and Shore
-
Paint the water:
Load your brush with a beautiful turquoise or teal mix. Paint firmly right up to the horizon line, creating a clean edge against the sky. -
Gradient wash:
As you move down from the horizon, add a tiny bit more water to your brush to make the turquoise slightly more transparent as it nears the shore. -
Paint over the mask:
Wash your turquoise paint directly over the dried masking fluid lines you created earlier. Don’t worry, the rubber resists the paint perfectly. -
Create the sand:
Rinse your brush and pick up a diluted Yellow Ochre. Paint the bottom section of the paper, letting it meet the wet turquoise edge just slightly for a soft transition where the water hits the sand. -
Add beach texture:
To mimic the look of speckled sand or seaweed, mix a splattering of Burnt Umber. Gently tap your brush against your finger to flick tiny specks of brown paint onto the lower sandy area. -
Define the shoreline debris:
For the darker line of debris common on beaches, take a mostly dry brush with Burnt Umber and stipple a loose, broken line across the middle of the sand area.
Sparkle Effect
Before the turquoise ocean paint dries, sprinkle a tiny pinch of table salt on the wet pigment. Brush it off when dry to create a unique, sparkly texture that looks like sunlight hitting the water.
Step 4: Finishing Touches
-
Remove masking fluid:
Once the ocean paint is 100% dry, gently rub off the masking fluid lines with your finger or a rubber cement pickup tool to reveal the crisp white paper underneath. -
Initial reveal:
Peel away the washi tape borders carefully. Pull the tape away from the paper at a 45-degree angle to avoid tearing the surface. -
Mount the artwork:
Position your dry painting behind the square cut window of your white cardstock mat frame. Center it so the horizon line feels balanced. -
Secure the frame:
Tape the painting to the back of the mat to hold it securely in place, completing your window into paradise.
Now you have a tiny piece of summer vacation ready to display on your desk or shelf


Tropical Night Sky With a Moonlit Ocean
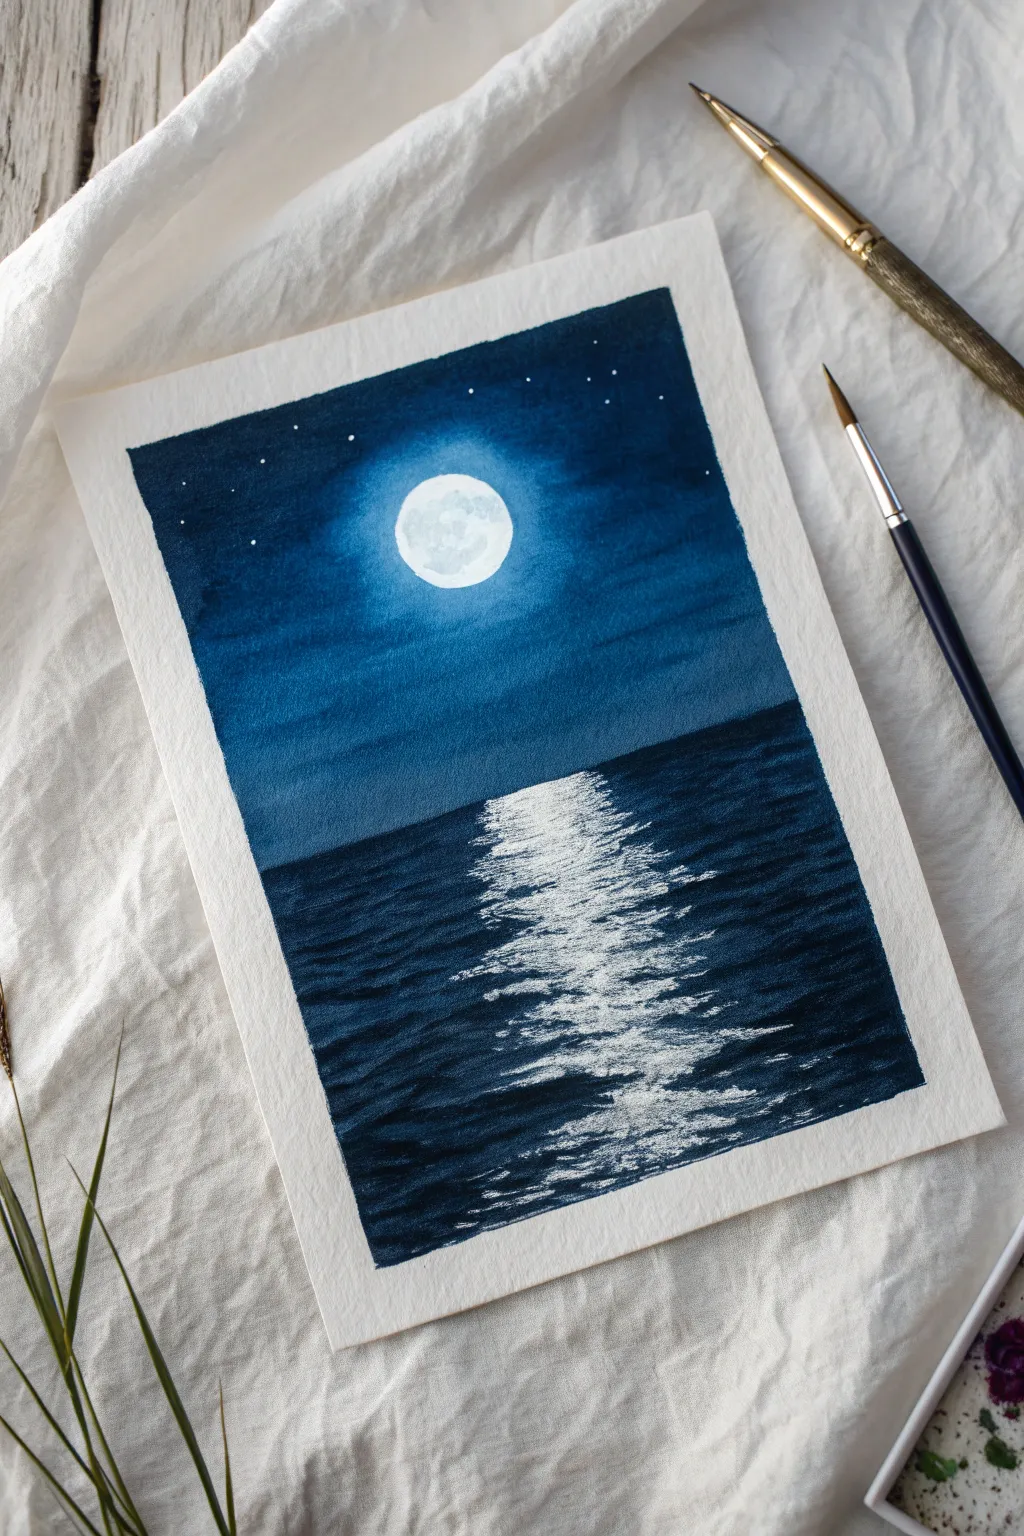
Capture the serenity of a calm tropical night with this striking moonlit seascape. Using deep blues and stark whites, you’ll create a powerful contrast between the velvety sky and the shimmering reflection on the water.
Step-by-Step Tutorial
Materials
- Cold Press watercolor paper (300 gsm)
- Masking tape
- Pencil and masking fluid (optional)
- Dark blue watercolor or gouache (e.g., Prussian Blue or Indigo)
- Black watercolor or gouache
- White gouache paint
- Flat shader brush (medium size)
- Round brush (size 4 or 6)
- Fine detail brush (size 0 or 00)
- Palette for mixing
- Jar of water and paper towels
Step 1: Setting the Scene
-
Prepare your canvas:
Begin by taping down all four edges of your watercolor paper to a hard board. This creates the crisp white border seen in the example and prevents the paper from buckling under heavy washes. -
Sketch the horizon:
Lightly draw a straight horizontal line across the paper, positioned slightly below the halfway point. This separates your sky from your ocean. -
Place the moon:
In the upper center of the sky area, lightly sketch a circle for the moon. If you have masking fluid, apply it carefully to cover the moon shape now to keep it perfectly white; otherwise, just paint carefully around it later.
Uneven Horizon?
If your horizon line feels wobbly, place a strip of masking tape across the dry sky area before painting the ocean. This guarantees a perfectly straight separation line.
Step 2: Painting the Midnight Sky
-
Mix your sky color:
Create a rich, dark blue mix using Indigo or Prussian Blue. You want this to be quite saturated. -
Paint the upper sky:
Start applying the dark blue at the very top of the paper. As you move down, keep the color deep and opaque to represent the vastness of space. -
Create the glow:
As you approach the moon area, dilute your paint slightly with water or mix in a touch of white gouache to create a lighter halo effect around the moon. -
Blend the transition:
Work wet-on-wet to ensure a smooth gradient from the dark corners of the sky into the lighter blue surrounding the moon. -
Finish the horizon line:
Continuing past the moon, darken the blue again as you reach the horizon line. Ensure the bottom edge of the sky is straight and sharp. -
Add stars:
Once the sky is fully dry, take a clean, slightly damp brush or your white gouache and splatter tiny dots for stars. You can also manually place a few specific stars with a fine tip brush for control.
Step 3: Creating the Ocean Depth
-
Mix the ocean base:
For the water, mix your dark blue with a small amount of black. The ocean should generally be darker than the sky to give it weight. -
Paint the water sides:
Using your flat brush, paint the ocean area, starting from the left and right edges and working inward. Leave the center column of the water unpainted or very light for now—this is where the reflection will go. -
Mark the ripple texture:
While painting the dark ocean sides, use horizontal strokes. Let the brush skipping create a natural, uneven texture that mimics waves.
Add a Silhouette
To give the scene scale, use black gouache to paint a tiny silhouette of a boat on the horizon or palm tree leaves hanging in from a top corner.
Step 4: The Shimmering Reflection
-
Prepare white gouache:
Squeeze out fresh white gouache. You want a creamy consistency—not too watery, so it sits on top of the paper, but fluid enough to flow. -
Shape the moon:
If you used masking fluid, rub it off now. Paint the moon with white gouache, adding tiny amounts of grey to create craters and texture rather than leaving it a flat white circle. -
Start the reflection path:
Using a small round brush, begin painting horizontal white dashes directly under the moon, starting at the horizon line. -
Widen the path:
As you move down the paper towards the foreground, make your horizontal strokes slightly wider and more spaced out. This helps with perspective. -
Dry brush technique:
For the most realistic water effect, wipe most of the paint off your brush and drag it lightly across the paper’s tooth. I find this creates those jagged, sparkly edges that look just like light hitting ripples. -
Layer the highlights:
Go back over the center of the reflection path with pure, thick white to make the brightest highlights pop, ensuring the strokes remain horizontal. -
Final touches:
Carefully remove the tape at a 45-degree angle to reveal your clean edges.
Now you have a tranquil night scene perfect for framing or gifting


Monstera Leaf Close-Up
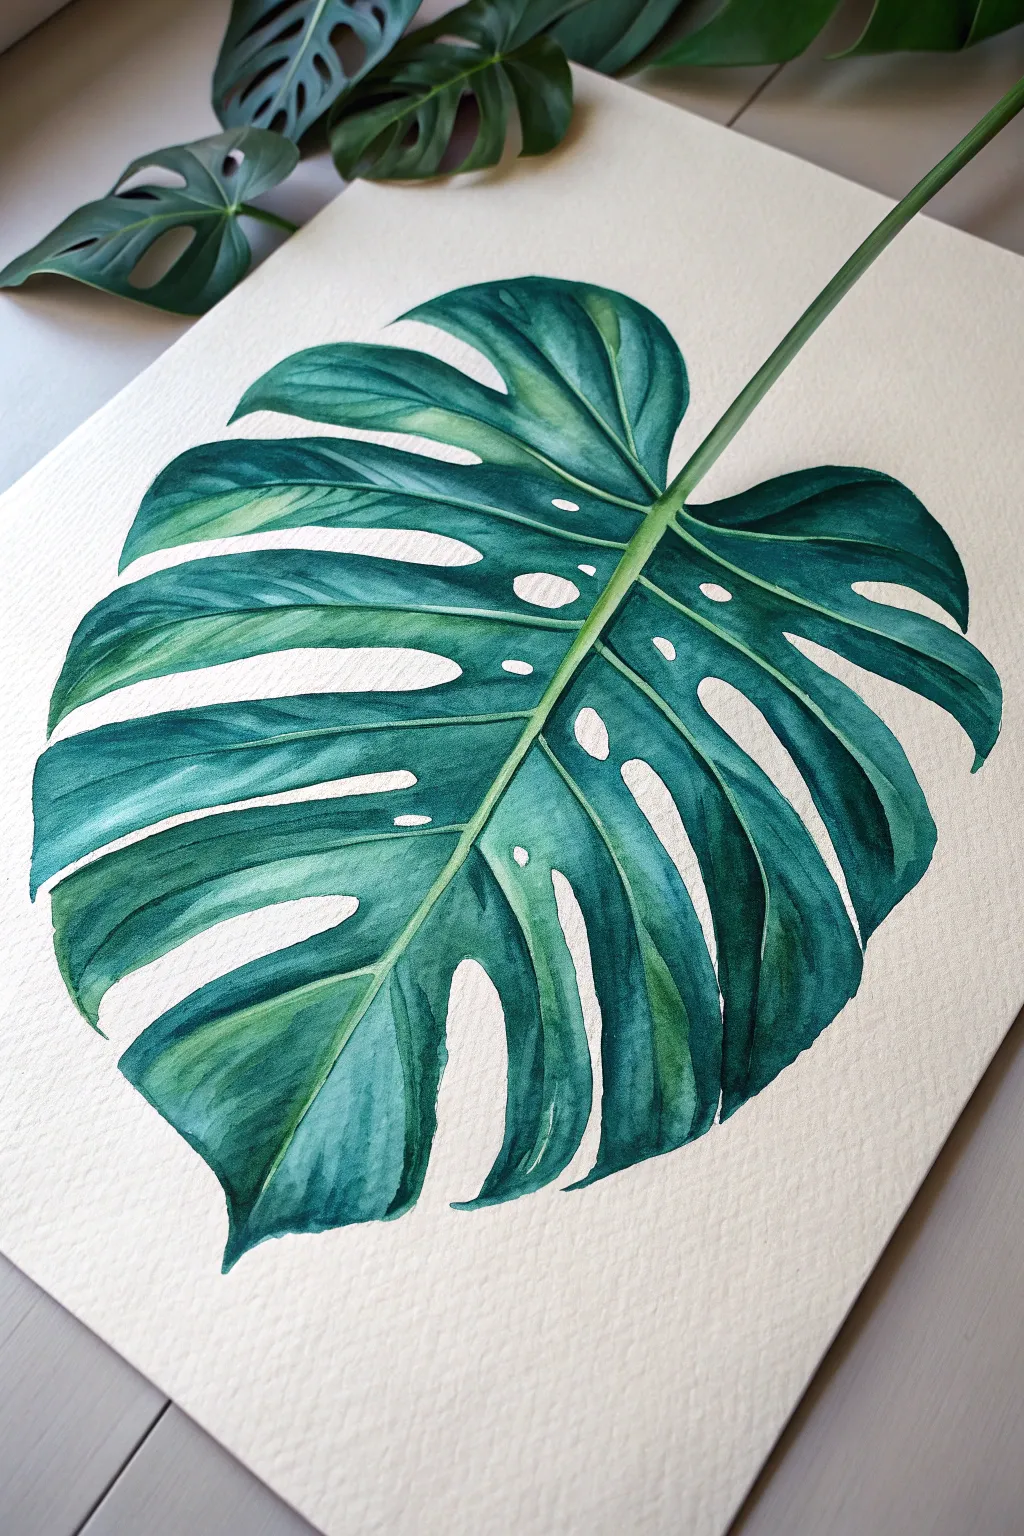
Capture the lush beauty of the tropics with this detailed watercolor study of a classic Monstera leaf. By layering rich greens and preserving the paper’s white for those iconic fenestrations, you’ll create a vibrant botanical piece full of depth and texture.
Detailed Instructions
Materials
- Cold press watercolor paper (300 gsm)
- Watercolor paints (Sap Green, Hooker’s Green, Prussian Blue, Lemon Yellow, Burnt Umber)
- Round brushes (size 4 for details, size 8 or 10 for washes)
- HB pencil
- Kneaded eraser
- Two jars of water
- Paper towels
- Masking fluid (optional)
Step 1: Sketching the Structure
-
Map the central vein:
Start by lightly drawing the central midrib of the leaf. It should curve gently from the top right corner down towards the bottom left, anchoring the leaf’s position on the page. -
Outline the leaf shape:
Draw the outer contour of the large heart-shaped leaf around the midrib. Keep your pencil lines very faint so they don’t show through the final paint. -
Add the segments:
Sketch the deep splits extending from the edge toward the center. Monstera leaves are rarely perfect, so vary the width and curviness of these segments for a natural look. -
Mark the fenestrations:
Draw the characteristic oval holes (fenestrations) near the midrib. Place them mainly along the upper half of the leaf where the surface area is wider. -
Clean up the sketch:
Use a kneaded eraser to gently lift any excess graphite, leaving only a ghost image to guide your painting.
Step 2: Base Layers and Washes
-
Mix your base greens:
Prepare a large puddle of a medium green mix on your palette, using Sap Green and a touch of Lemon Yellow for a fresh, leafy tone. -
First wash technique:
Working one leaf segment at a time, wet the paper slightly with clean water. This helps the paint flow smoothly and avoids hard edges within the shape. -
Apply the first color:
Drop your yellowish-green mix onto the wet segment. Let the color fade out slightly near the midrib to create a highlighted effect. -
Preserve the light:
Be incredibly careful to paint around the holes and splits. The white of the paper is the only white you have, so precision here is key. -
Work across the leaf:
Continue painting each segment individually. This segmentation helps you manage the drying time and prevents the paint from drying unevenly across the large surface.
Fixing “Cauliflower” Blooms
If water blossoms appear in your smooth wash, wait for the area to dry completely. Then, use a stiff damp brush to gently scrub the edge and glaze over it with a fresh layer of paint.
Step 3: Building Depth and Detail
-
Mix shadow colors:
Create a deeper, cooler green by mixing Hooker’s Green with a bit of Prussian Blue. You want a strong contrast against the first light layer. -
Establish the veins:
Using a smaller size 4 brush, paint thin lines radiating from the midrib into each segment to suggest secondary veins. Keep these lines fluid and organic. -
Deepen the edges:
Apply the dark green mix along the edges of the segments and near the midrib. Soften the edge of this dark paint with a damp clean brush so it blends into the lighter center of each segment. -
Define the stem:
Paint the stem using a gradient. Start with the light yellow-green at the top and blend into a darker green as it meets the leaf base to show roundness. -
Enhance the contrast:
Look for areas where segments overlap or curve. Glaze a very dark green (mixed with a tiny bit of Burnt Umber) in the deepest crevices to make the leaf pop. -
Final dry brush details:
I like to take a nearly dry brush with medium green paint and gently drag it across the widest parts of the leaf to suggest subtle texture without covering the highlights.
Level Up: Dew Drops
To make it tropical, lift a tiny circle of paint with a clean, wet brush. Add a dark crescent shadow at the top and a bright white gouache dot at the bottom for a realistic water droplet.
Step back and admire the vibrant, organic flow of your new botanical masterpiece
BRUSH GUIDE
The Right Brush for Every Stroke
From clean lines to bold texture — master brush choice, stroke control, and essential techniques.
Explore the Full Guide
Palm Fronds From the Bottom View
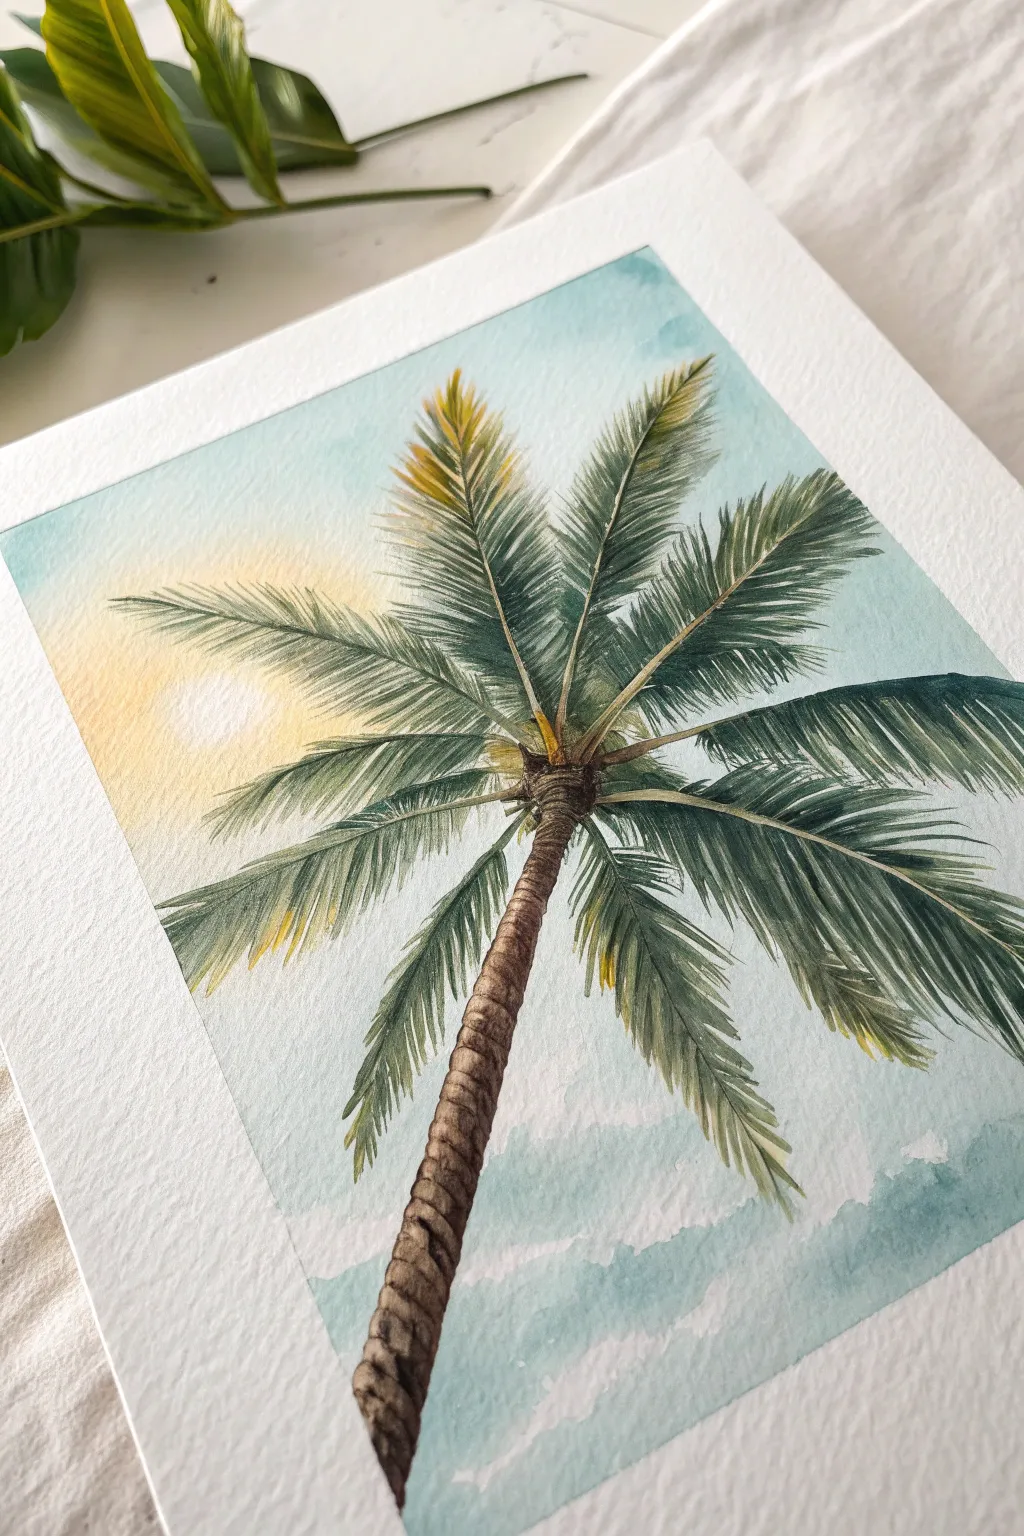
Capture the breezy feeling of looking up at a towering palm tree with this watercolor tutorial. The perspective draws the eye upward along the textured trunk to an explosion of green fronds backlit by a soft, glowing sun.
How-To Guide
Materials
- Cold press watercolor paper (300gsm)
- Watercolor paints (Sap Green, Hooker’s Green, Burnt Umber, Yellow Ochre, Cerulean Blue, Lemon Yellow)
- Round brushes (size 2, 6, and 10)
- Pencil (HB or 2B) for sketching
- Kneaded eraser
- Clean water
Step 1: Sketching the Perspective
-
Plot the viewpoint:
Start by drawing a diagonal line representing the trunk, starting from the bottom left corner and angling towards the center of the page. This creates that ‘looking up’ perspective. -
Mark the center point:
At the top of your trunk line, mark a small dot. This is the central hub where all your palm fronds will explode outward from. -
Sketch the frond spines:
Lightly draw curved lines radiating from that central dot. Make sure they vary in length and curve; some should reach high up, while others droop lower down. -
Add leave details:
Gently sketch the jagged shapes of the palm leaves along the spines. Keep your pencil marks very faint so they don’t show through the final paint.
Step 2: Painting the Sky & Sun
-
Wet the paper:
Use your largest brush to apply clean water to the sky area, carefully working around the sketch of the palm tree. -
Drop in the sun:
While the paper is wet, drop a dilute wash of Lemon Yellow into the upper left area to create a soft, glowing sun. Let the edges bleed naturally. -
Paint the sky gradient:
Mix a watery Cerulean Blue. Apply it to the rest of the wet sky area, letting it touch the yellow sun zone gently so they blend slightly without turning bright green. -
Create cloud textures:
While the blue is still damp, lift out a few pigment spots with a thirsty brush or paper towel to suggest wispy clouds near the horizon line. -
Let it dry completely:
This is crucial; the sky must be bone dry before you start painting the green fronds to avoid muddy edges.
Brush Flicks Matter
When painting palm leaves, always flick the brush from the spine OUTWARD. Lift your brush at the end of the stroke to create the tapered, pointy tips naturally.
Step 3: Painting the Palm Fronds
-
Mix your greens:
Prepare three puddles of green: a light yellow-green (Sap Green + Lemon Yellow), a mid-tone green (Sap Green), and a deep shadow green (Hooker’s Green + tiny touch of Burnt Umber). -
Establish the spines:
Using a size 2 brush and a mix of Yellow Ochre and Burnt Umber, paint the thin central spines of the fronds first. -
Paint the sunlit leaves:
Start with the fronds closest to the sun (upper left). Use the light yellow-green mix and flick your brush outward from the spine to create the individual leaflets. -
Add mid-tones:
Move to the fronds on the right side. Use your mid-tone green, using quick, confident flicks. The texture of the cold press paper will help give the illusion of leafy detail. -
Deepen the shadows:
For the fronds closest to the viewer and underneath the canopy, use the deep shadow green. Overlap some of the lighter fronds to create depth and density. -
Refine the edges:
Go back with your smallest brush and add very fine, dark lines near the center hub to separate individual leaves where they cluster together.
Sunset Variation
Swap the blue sky for a gradient of pinks, oranges, and purples. Paint the palm tree almost entirely in dark Payne’s gray or black for a dramatic silhouette look.
Step 4: Texture the Trunk
-
Base layer for the trunk:
Paint the trunk shape with a wash of Burnt Umber mixed with a little Yellow Ochre. Keep the left side (facing the sun) lighter. -
Add bark segments:
While the base is damp but not soaking, use a thicker mix of Burnt Umber to paint horizontal, slightly curved lines up the trunk to indicate the bark segments. -
Deepen the shadows:
Once the trunk is dry, glaze a dark brown (Burnt Umber + Blue) along the entire right edge of the trunk to enhance the cylindrical form. -
Final highlights:
As a finishing touch, if you lost your sunlight highlights on the trunk, use a tiny bit of white gouache or lift paint with a damp brush on the left edge.
Step back and admire your breezy, sun-soaked view that brings a piece of the tropics right into your room
Tropical Ocean Ombré Wash
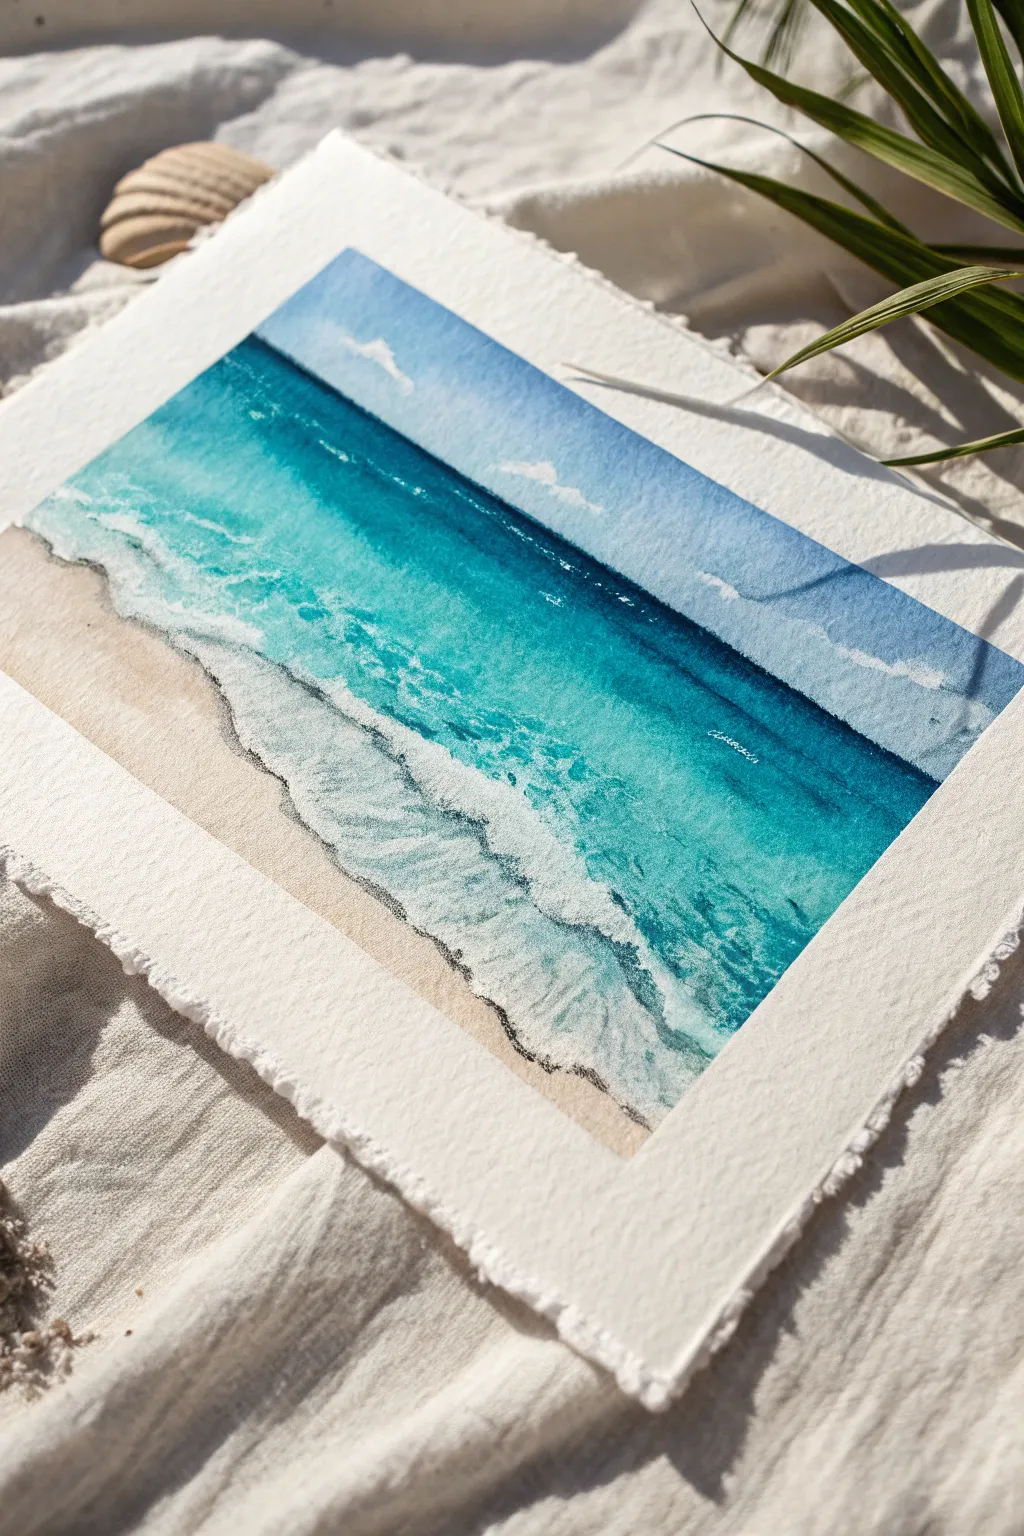
Capture the tranquil beauty of a tropical shoreline with this layered watercolor tutorial. By mastering wet-on-wet gradients and masking fluid techniques, you’ll recreate the gentle rhythm of rolling turquoise waves crashing onto soft sand.
Step-by-Step Guide
Materials
- Heavyweight cold-press watercolor paper (300gsm/140lb or higher) with deckle edges
- Watercolor paints (Phthalo Blue, Turquoise, Indigo, Burnt Sienna, Yellow Ochre)
- Masking fluid (drawing gum)
- Old paintbrush or silicone applicator for masking fluid
- Large flat wash brush (3/4 or 1 inch)
- Medium round brush (size 6 or 8)
- Small detail brush (size 2)
- Two jars of water
- Paper towels
- Painter’s tape or masking tape
- White gouache (optional, for highlights)
Step 1: Preparation & Sand
-
Secure the paper:
Tape your watercolor paper down onto a hard board. Since this project involves heavy water usage, ensuring your paper is taut is crucial to prevent buckling. -
Plan the horizon:
Lightly sketch a straight horizon line about one-third down from the top. Then, draw a gentle, wavy diagonal line near the bottom left to mark where the water meets the sand. -
Mix the sand color:
Create a warm, sandy beige by mixing a generous amount of water with Yellow Ochre and a tiny touch of Burnt Sienna. It should be very pale and transparent. -
Paint the beach:
Apply the sand wash to the bottom left corner of the paper. Use clean water to soften the edge where it will meet the ocean, letting it fade out white. Allow this layer to dry completely.
Fixing “Cauliflowers”
Did water bloom on the paper creating weird edges? This happens if you add wet paint to drying damp paper. Embrace the texture for foam, or gently scrub it out with a damp stiff brush once dry.
Step 2: Creating the Sea Foam
-
Apply masking fluid:
Shake your masking fluid well. Using an old brush or silicone tool, stipple irregular, bubbly shapes along the shoreline where the water meets the sand. This preserves the white of the paper. -
Add texture:
Continue adding smaller dots and thin lines of masking fluid slightly further out into the ‘water’ area to represent foam trails and crashing wave crests. -
Let it cure:
Wait until the masking fluid is entirely dry and rubbery to the touch. Painting over wet masking fluid will ruin your brushes and the paper surface.
Step 3: The Ocean Gradient
-
Wet the ocean area:
With a large clean flat brush, apply a coat of clean water to the entire area between the horizon line and the masked shoreline. The paper should be glistering but not swimming in puddles. -
Start with the deep blue:
Load your brush with a rich mix of Indigo and Phthalo Blue. Paint a horizontal stroke right along the horizon line. Because the paper is wet, the color will begin to bleed downward softly. -
Transition to turquoise:
Quickly rinse your brush slightly and pick up your bright Turquoise paint. Apply this below the deep blue, blending the edges gently where the colors meet. -
Fade to shore:
Dilute the Turquoise with more water as you move closer to the shore. By the time you reach the masking fluid, the color should be a very pale, transparent aquamarine. -
Create wave depth:
While the wash is still damp, drop in slightly darker teal pigment just beneath the white foam lines (the masked areas). This creates the shadow cast by the wave, giving it volume. -
Add detail to the deep sea:
Use a smaller round brush with concentrated Indigo to add thin, horizontal streaks in the distance. This mimics the texture of ripples on the open ocean. -
Dry partially:
Let the painting sit until it loses its glossy sheen but is cool to the touch. This semi-dry state is perfect for adding softer textures if needed.
Level Up: Sparkles
Mix a tiny amount of iridescent medium or pearlescent watercolor into your turquoise paint for the shallow water. It makes the ocean shimmer beautifully when the light hits it.
Step 4: The Sky & Finish
-
Paint the sky:
Wet the sky area above the horizon line. Apply a very diluted wash of Phthalo Blue at the top, fading to clear water as it touches the horizon line for an atmospheric effect. -
Lift out clouds:
While the sky is wet, crunch up a paper towel and dab it gently onto the paper to lift paint, creating soft, fluffy cumulus clouds. -
Dry completely:
Let the entire painting dry bone-dry. If you touch the paper and it feels cold, it’s still wet inside. Patience here prevents tearing. -
Remove masking:
Gently rub your finger or a rubber cement pick over the dried masking fluid to peel it away, revealing the crisp white paper underneath. -
Soften the foam:
If the white edges look too sharp, take a damp clean brush and gently scrub the edges of the foam to soften them slightly. -
Final highlights:
For extra sparkle, use white gouache on a small brush to add the brightest highlights on the wave crests or to fix any gaps in the foam.
Peel off your tape to reveal the clean edges and enjoy your slice of tropical paradise

PENCIL GUIDE
Understanding Pencil Grades from H to B
From first sketch to finished drawing — learn pencil grades, line control, and shading techniques.
Explore the Full Guide
Tiny Island With Two Palms
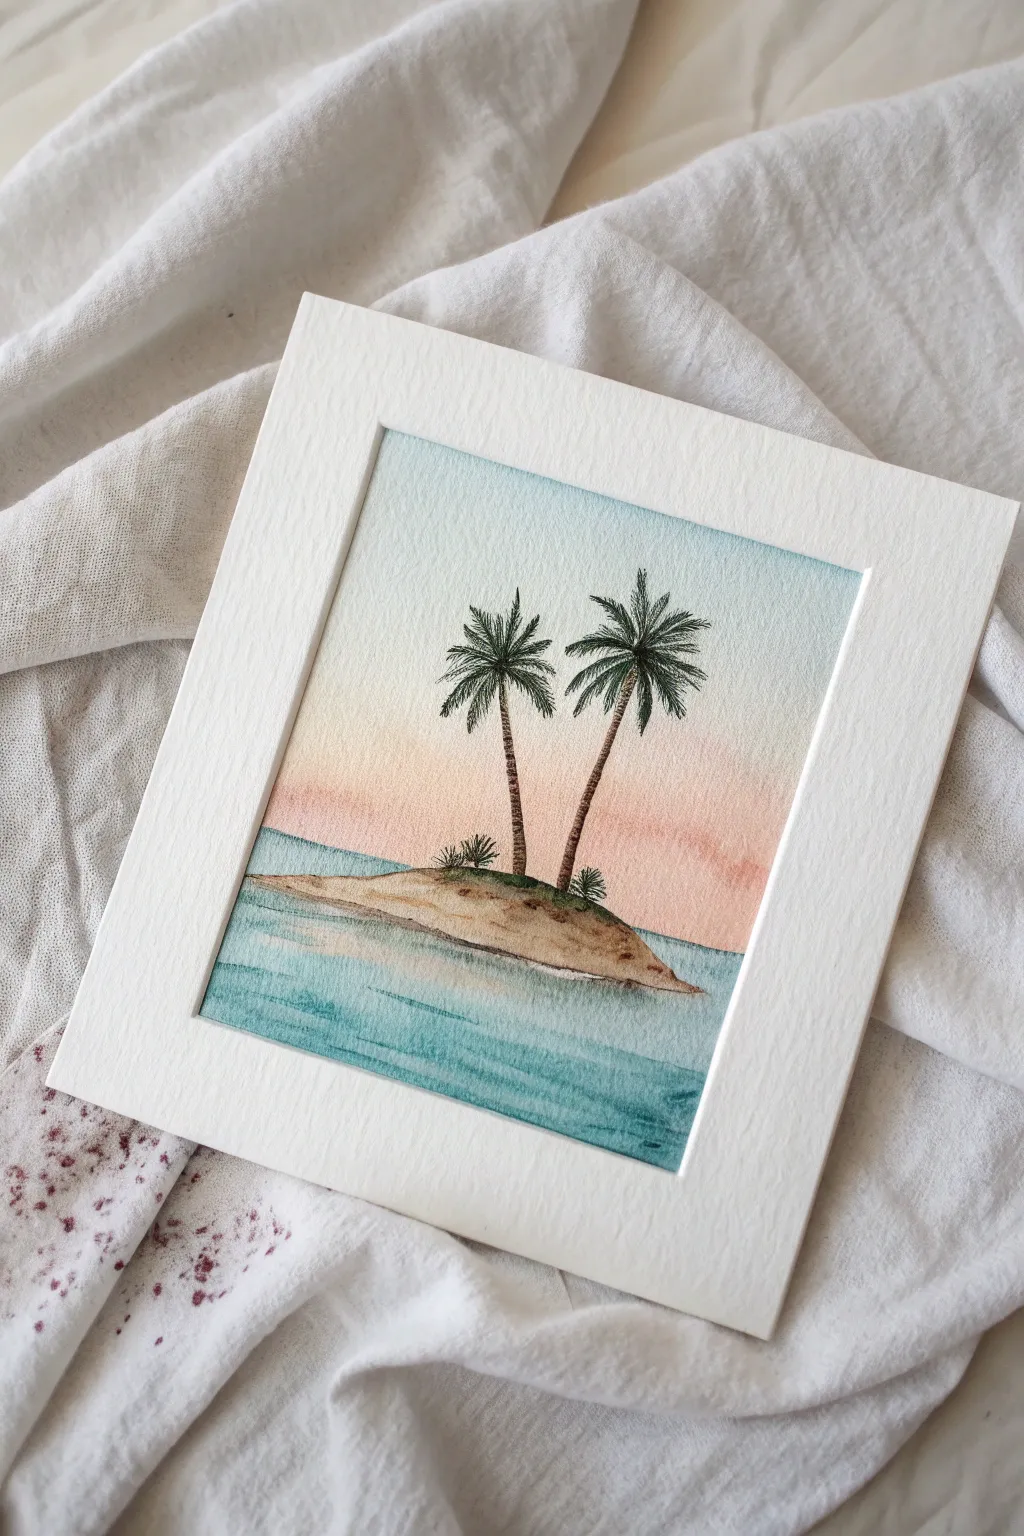
Transport yourself to a peaceful tropical paradise with this simple yet stunning watercolor painting featuring a tiny sandbar and swaying palms. The soft gradient sky and gentle water reflections create a calming atmosphere perfect for beginners.
How-To Guide
Materials
- Cold press watercolor paper (cut to 5×5″ or similar square)
- Watercolor paints (Cyan, Teal, Burnt Sienna, Yellow Ochre, Coral/Pink, Dark Green)
- Round watercolor brushes (Size 6 for washes, Size 0 or 00 for details)
- Pencil (HB) and eraser
- Masking tape
- Jar of clean water
- Paper towels
- White mat frame (optional, for display)
Step 1: Setting the Scene
-
Prep your paper:
Begin by cutting your watercolor paper into a small square. Tape down the edges to your work surface to prevent buckling and create a clean white border when you’re finished. -
Sketch the outline:
Lightly sketch a small, low mound in the lower third of the paper for the island. Draw two curved lines rising from the center for the palm trunks—make one slightly taller and leaning right, the other leaning left. -
Mark the horizon:
Draw a faint straight line horizontally across the paper, positioned just behind the island mound, to separate the sky from the sea.
Step 2: Painting the Sky & Sea
-
Review the gradient:
For the sky, we want a ‘wet-on-wet’ technique. Use your larger clean brush to wet the entire sky area with clear water until it glistens but isn’t pooling. -
Apply the blue sky:
Load your brush with a diluted Cyan blue. touching the top edge of the paper and letting the color bleed downward, fading out as it reaches the middle. -
Add warm sunset tones:
While the paper is still damp, pick up a soft Coral or diluted Pink. Apply this near the horizon line, gently blending it upward to meet the fading blue, creating a soft transition. -
Paint the ocean base:
Once the sky is dry, mix a Teal or Turquoise color. Paint the water area below the horizon line using horizontal strokes, leaving the island shape unpainted. -
Add water ripples:
While the teal wash is still slightly wet, load your brush with a slightly darker, more concentrated teal. Add definitive horizontal lines to suggest gentle waves and depth.
Clean Edges Trick
Before painting, run your fingernail or a bone folder firmly along the inside edge of your masking tape. This seals it tightly so paint won’t seep underneath.
Step 3: Creating the Island
-
Paint the sand:
Mix Yellow Ochre with a tiny touch of Burnt Sienna to get a sandy beige. Fill in the island mound. -
Shadow the shoreline:
Drop a darker mix of Burnt Sienna along the bottom edge of the sand where it meets the water to show wet sand and shadow. -
Paint the tree trunks:
Switch to your fine detail brush (size 0). Mix dark brown using Burnt Sienna and a touch of blue or black. Carefully paint the curved trunks over your pencil lines. -
Add trunk texture:
Once the trunks are dry, I like to use the very tip of the brush to add tiny horizontal dashes up the trunk to mimic the texture of palm bark.
Muddy Gradient?
If your blue sky and pink sunset turn purple or grey where they meet, let the blue wash dry completely first. Then glaze the pink over it lightly rather than mixing wet.
Step 4: Details & Fronds
-
Start the palm fronds:
Mix a deep green using Dark Green and a bit of Burnt Sienna to make it look natural, not neon. Paint the central spine of each palm leaf radiating from the top of the trunk. -
Flick the leaves:
Using quick, flicking motions, paint the individual leaflets coming off each spine. Ensure they hang downward slightly to look heavy and realistic. -
Add tiny bushes:
At the base of the trees on the island, dab small clusters of the same dark green to create low-lying scrub bushes. -
Final reflections:
Using a very diluted version of your trunk color, paint faint, wavy vertical lines in the water directly beneath the island to suggest a reflection. -
Remove tape:
Wait for the painting to be 100% bone dry. Slowly peel away your masking tape at a 45-degree angle to reveal the crisp border.
Pop your finished piece into a square mat and enjoy your personal slice of tropical paradise.
Tropical Wave With White Foam Marks
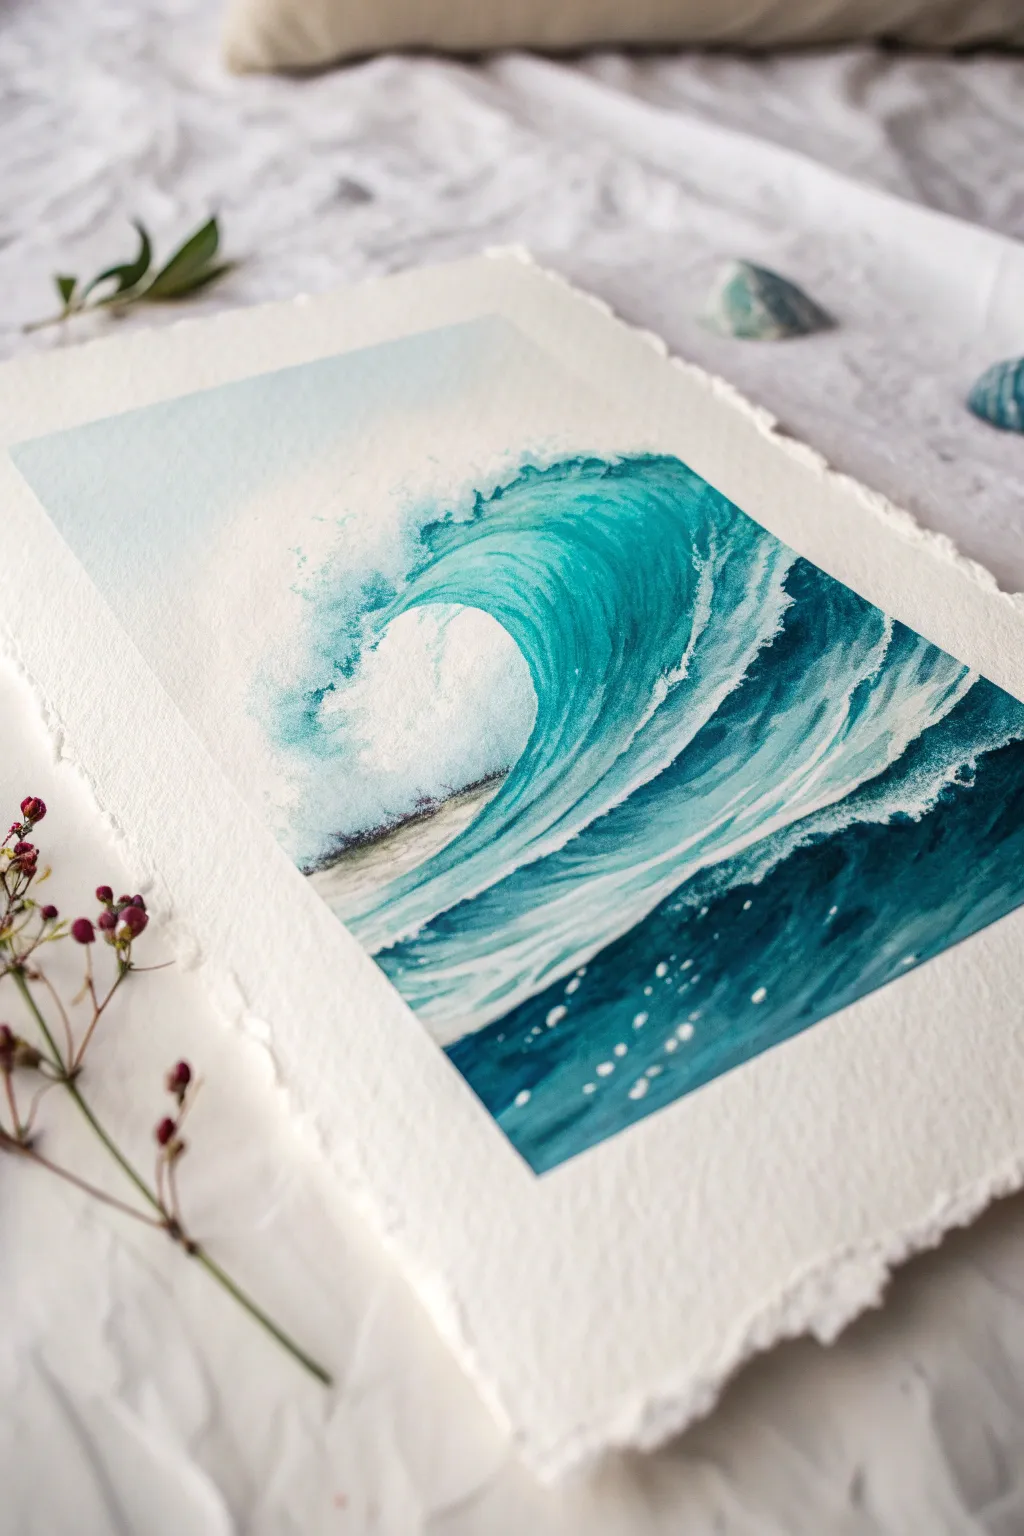
Capture the powerful energy of the ocean with this dynamic watercolor study of a curling wave. The piece features striking contrasts between deep teal depths and crisp white foam, all set on beautiful deckle-edged paper.
Step-by-Step Tutorial
Materials
- Cold press watercolor paper (deckle edge preferred, 300gsm)
- Watercolor paints: Phthalo Turquoise, Prussian Blue, Titanium White (gouache or white watercolor)
- Round brushes (sizes 4, 8, and 12)
- Fine liner brush or rigger brush
- Pencil (HB)
- Kneadable eraser
- Masking fluid (optional, but recommended)
- Clean water jars
- Paper towels
Step 1: Sketching and Preparation
-
Lightly sketch the outline:
Begin by softly penciling the primary curve of the wave. Start from the bottom right and sweep upwards and to the left, creating a ‘C’ shape that indicates the crest about to crash. -
Mark the foam lines:
Sketch the prominent veins of foam trailing behind the wave’s crest. These lines should curve downward from the top right, following the momentum of the water. -
Protect the highlights:
If you are using masking fluid, apply it carefully to the brightest white areas: the splashing foam at the lip of the wave and the thin, separating lines of foam on the wave’s face. Let this dry completely.
Muddy colors?
If your white foam looks grey or muddy, ensure the blue layer underneath is 100% dry before applying white. Use opaque gouache for the brightest white.
Step 2: First Wash: The Sky and Light Water
-
Wet the sky area:
Using your large round brush comfortably loaded with clean water, wet the area above and behind the wave outline, fading it out toward the top edges of the paper. -
Paint a faint sky:
Dilute a tiny amount of Phthalo Turquoise with plenty of water. Wash in a barely-there blue sky, keeping it lightest near the wave’s spray to imply mist. -
Base layer for the wave face:
While the sky dries, mix a light wash of Phthalo Turquoise. Apply this to the inner curve of the wave (the ‘tube’), leaving the bottom area slightly lighter where the foam hits the water. -
Soften the edges:
Use a damp, clean brush to feather out the edges of this light turquoise wash on the wave face so there are no harsh lines yet.
Step 3: Building Depth and Form
-
Deepen the upper wave:
Mix a stronger concentration of Phthalo Turquoise. Paint the upper section of the wave’s face, using brush strokes that follow the curve of the water to suggest movement. -
Define the wave back:
Behind the crashing lip, paint the back of the wave using a mix of Phthalo Turquoise and a touch of Prussian Blue. Leave gaps for the white foam trails we sketched earlier. -
Darken the foreground:
Mix your darkest value using Prussian Blue and Turquoise. Apply this to the bottom right corner of the painting, which represents the deep, shadowed water in front of the wave. -
Create water texture:
While painting the dark foreground, use rough, horizontal strokes. Leave tiny flecks of dry white paper showing through to represent sparkles on the water surface.
Add sparkle
For a magical sun-kissed look, mix a tiny amount of iridescent or pearl medium into your white paint for the final highlights on the wave crest.
Step 4: Detaling the Splash and Foam
-
Remove masking fluid:
Once the paper is bone dry, gently rub away the masking fluid. If you didn’t use masking fluid, you will focus on adding white paint in the next steps. -
Enhance the crash:
Using Titanium White gouache or concentrated white watercolor on a size 4 brush, stipple paint heavily at the lip of the wave where it curls over. Create a cloud-like shape for the mist. -
Add dry brush mist:
Load a brush with thick white paint, blot it on a paper towel until it’s ‘dry’, and scumble it lightly over the transition between the blue wave and the white crash to create a misty spray effect. -
Paint foam trails:
Using a fine liner brush and white paint, refine the long, sweeping lines of foam trailing down the back of the wave. I like to make these lines break and vary in thickness so they look organic. -
Add foreground droplets:
Dip a stiff brush or toothbrush in white paint and flick it carefully over the dark blue foreground to create sea spray and foam bubbles. -
Final contrast check:
Look for areas that need more definition. If the shadow under the curl isn’t dark enough, glaze a thin layer of Prussian Blue over it to make the white foam pop.
Step back and admire your refreshing seascape, perfect for bringing a cool coastal breeze into your home


Sunset Clouds in Cotton-Candy Colors
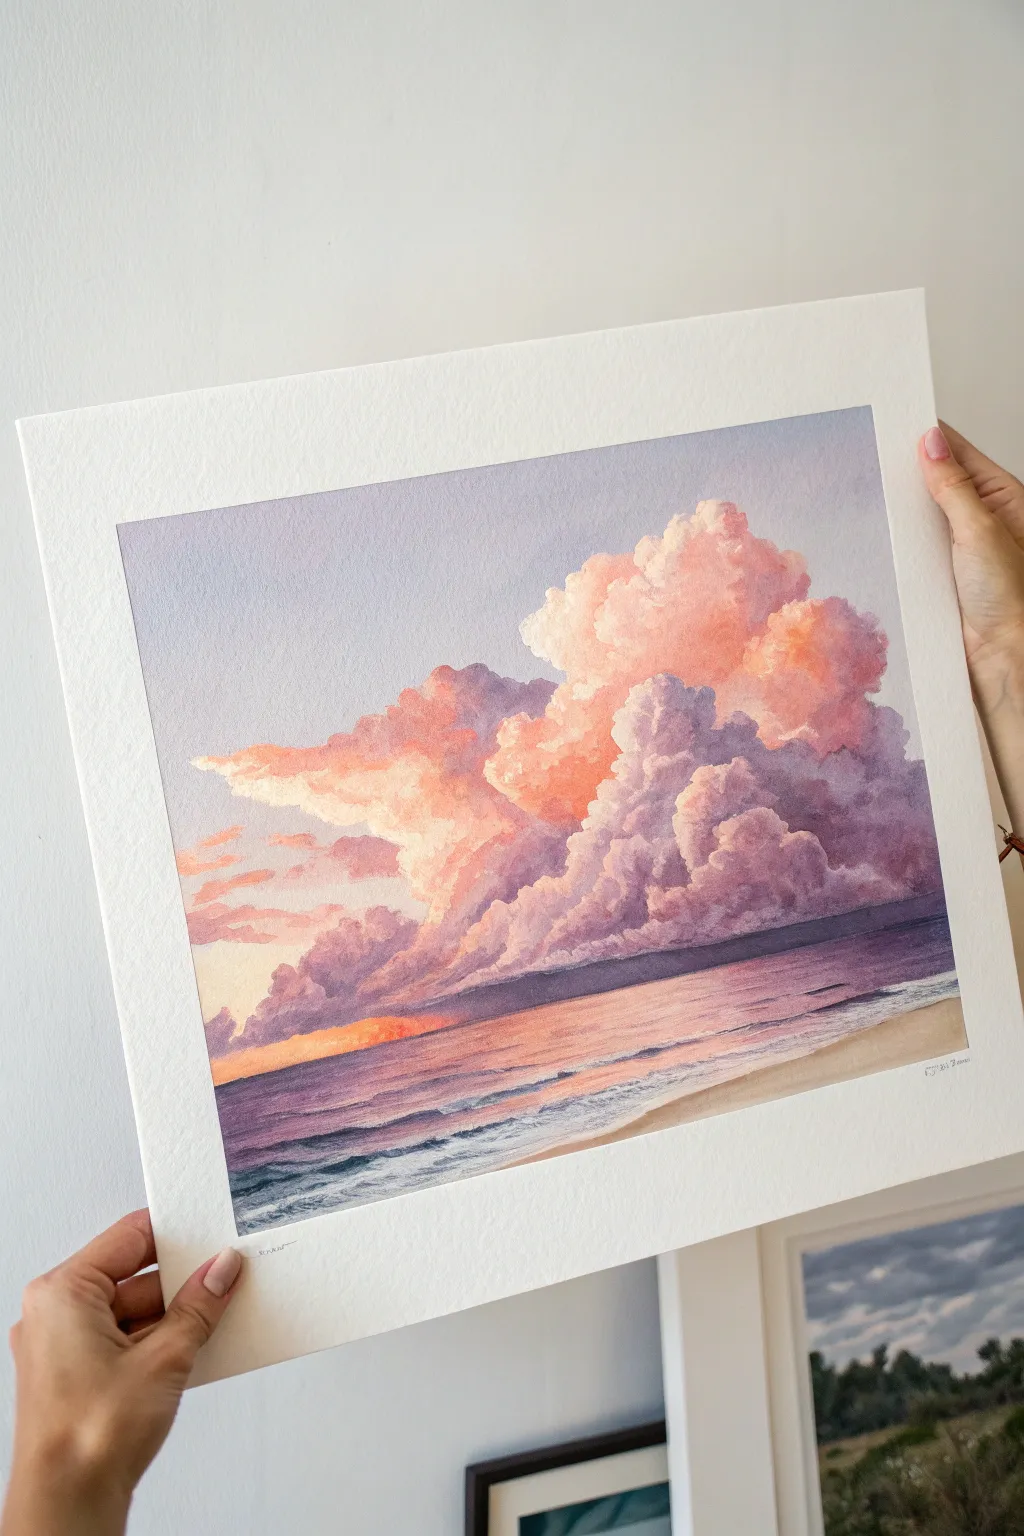
Capture the fleeting beauty of twilight with this watercolor painting featuring voluminous, billowy clouds bathed in pink, peach, and purple light. The soft gradients and defined edges create a dreamy atmosphere where the sky meets a tranquil sea, perfect for practicing wet-on-wet and lifting techniques.
Step-by-Step
Materials
- Cold-press watercolor paper (300gsm/140lb or heavier)
- Painter’s tape or masking tape
- Watercolor paints (Alizarin Crimson, Cadmium Orange, Ultramarine Blue, Burnt Sienna, Payne’s Grey, Lemon Yellow)
- Round watercolor brushes (sizes 4, 8, and 12)
- Clean water jars (two)
- Paper towels or cotton rag
- Pencil (HB) and kneaded eraser
- Mixing palette
Step 1: Preparation and Sketching
-
Secure the Paper:
Begin by taping down all four edges of your watercolor paper to a rigid board. This creates the crisp white border seen in the original image and prevents heavy buckling during the wet stages. -
Sketch the Horizon:
Using a light hand and an HB pencil, draw a straight horizon line across the lower third of the paper. Keep it level, as this grounds the entire scene. -
Outline the Cloud Forms:
Lightly sketch the large, billowing cloud formation. Focus on the organic, cauliflower-like shapes. The main mass should dominate the center-right, reaching up high, with smaller trailing clouds on the left. Don’t worry about tiny details, just the major masses.
Clean Edges, Fluffy Centers
For realistic cumulus clouds, keep the top outer edges crisp against the blue sky, but keep the internal transitions (between pink and purple) soft and blended.
Step 2: Painting the Sky Gradient
-
Pre-wet the Sky Area:
With a large clean brush, apply clean water to the sky area *around* your cloud sketch. Be careful not to wet the inside of the clouds just yet, as we want to keep those edges distinct. -
Apply the Initial Sky Wash:
Mix a very dilute wash of Ultramarine Blue with a touch of purple. Drop this into the wet sky area, letting it fade to white near the horizon and around the cloud edges to create a soft glow. -
Soften the Edges:
While the sky is still damp, rinse your brush and gently soften some of the hard edges around the top of the clouds if you want a hazier look, but ensure the main cloud shape remains defined.
Add a Focal Point
To give the scene scale, paint a tiny silhouette of a distant sailboat on the horizon line or add a few scattered seagulls using white gouache dots.
Step 3: Building the Clouds
-
Mix Warm Highlights:
Prepare a mix of Cadmium Orange and a tiny bit of Alizarin Crimson for that warm, peach-colored sunlight. This will be the base color for the illuminated parts of the clouds. -
Paint the Lightest Areas:
Using the ‘wet-on-wet’ technique inside the cloud shape, wet the cloud area slightly. Drop in your peach mix on the upper left protruding shapes and the top domes of the cloud structure where the sun hits directly. -
Introduce Soft Pinks:
While the peach is still wet, introduce a gentle pink (Alizarin Crimson heavily diluted) into the middle sections of the clouds. Let the colors bleed naturally into one another. -
Create Shadow Tones:
Mix a soft violet using Ultramarine Blue and Alizarin Crimson. While the paper is still damp but not swimmming, paint the undersides and shadowed crevices of the clouds. This establishes the volume. -
Deepen the Cloud Base:
Mix a stronger purple-grey (Ultramarine Blue + Burnt Sienna or Payne’s Grey). Apply this to the flat bottom of the cloud formation and the deeply shadowed recesses. This stark contrast makes the peach tops pop. -
Refine Cloud Edges:
Use a damp, clean brush to lift out pigment or soften internal edges within the cloud mass to create that fluffy, cotton-like texture. Keep the outer contour relatively crisp against the blue sky.
Step 4: The Ocean and Horizon
-
Paint the Horizon Line:
Once the sky is dry, mix a dark, cool purple. Use a size 4 brush to paint a straight, sharp line just below the cloud base for the distant ocean horizon. Add a hint of orange right at the horizon line to suggest the sun’s reflection. -
Wash in the Water:
For the main body of water, use horizontal strokes of varied purples and pinks. Mirror the colors of the sky above—purple under the dark clouds, pinker towards the left where the light is. -
Add Wave Texture:
With a slightly drier brush and darker purple paint, add thin, broken horizontal lines to suggest gentle waves rolling in. Concentrate these darker lines closer to the foreground. -
Create Foam and Shoreline:
Leave thin strips of white paper unpainted near the bottom to represent white foam. Paint the sandy beach in the bottom right corner with a pale wash of Burnt Sienna or Yellow Ochre. -
Final Adjustments:
Evaluate the contrast. If the cloud shadows dried too light, glaze another layer of purple over them once the paper is bone dry. Remove the tape carefully at an angle.
Enjoy the calming process of watching these gentle colors blend together on the page
Banana Leaf Shapes as a Bold Border

Capture the warmth of a tropical dusk with this layered painting featuring bold banana leaves silhouetted against a soft, gradient sky. Using handmade paper adds a rustic texture that complements the organic shapes perfectly.
How-To Guide
Materials
- Heavyweight handmade cotton paper (deckled edge)
- Watercolor or gouache paints
- Synthetic round brushes (size 4 and 8)
- Fine liner brush (size 0 or 1)
- Pencil (HB or H)
- Masking fluid (optional)
- Painter’s tape palette or mixing tray
- Two jars of water
- Paper towels
Step 1: Preparing the Sky Gradient
-
Outline the Composition:
Begin by lightly sketching the outline of five to six large banana leaves rising from the bottom edge. Keep the lines very faint so they don’t show through the sky later. Draw a small semi-circle near the horizon line for the setting sun. -
Mix Sky Colors:
Prepare three washes on your palette: a pale cyan or turquoise for the upper sky, a soft peach or salmon pink for the middle and lower sky, and a bright yellow for the sun. -
Paint the Upper Sky:
Using your larger round brush, wet the upper right area of the paper with clean water, avoiding the leaf shapes if you can manage precise control—otherwise, paint right over where the lighter leaves will be if you are using opaque gouache. Drop in the pale cyan wash. -
Blend the Transition:
While the cyan is still damp, introduce the peach color starting from the left and bottom section. Allow the colors to meet and mingle naturally in the middle to create a soft, cloud-like transition. -
Add the Clouds:
While the peach wash is wet, dab in a slightly more saturated coral or pink tone to suggest fluffy clouds floating in the background, especially on the upper left side. -
Paint the Sun:
Rinse your brush thoroughly and fill in the sun shape with the bright yellow. Let the edges touch the damp peach sky slightly for a glowing effect. Allow the entire background layer to dry completely before proceeding.
Step 2: Layering the Leaves
-
Base Color for Light Leaves:
Mix a vibrant lime green or sap green. Identify the two leaves in the center background that appear lighter and more translucent. -
Fill the Lighter Leaves:
Paint these background leaves with the lime green mixture. Don’t worry about detailing the veins yet; just establish a flat, even shape. Let this layer dry. -
Mix Darker Greens:
For the foreground leaves, mix a deep viridian or Hooker’s green. Add a touch of indigo or Prussian blue to create a shadow green for the darkest leaves. -
Paint Mid-Tone Leaves:
Using the viridian mix, paint the large leaf curving in from the left side. Ensure your brushstrokes follow the direction of the leaf’s growth. -
Paint Darkest Leaves:
Use the darkest blue-green mixture for the bottom-most leaves and the one on the far right. These dark values act as a frame, creating depth against the lighter sky. -
Refine Edges:
If the handmade paper texture caused rough edges, go back with a smaller brush and smooth out the contours of the leaves to give them a sharp, crisp silhouette.
Uneven Texture?
Handmade paper is thistly! Use a drier brush (less water, more pigment) to get crisp lines, or the paint will bleed into the paper fibers.
Step 3: Detailing and Textures
-
Add Leaf Veins:
Switch to your fine liner brush. Taking a slightly darker version of each leaf’s base color, paint the central midrib line running up the spine of each leaf. -
Create Ribbing Texture:
Paint thin, closely spaced lines radiating from the midrib to the leaf edges. Curve them slightly to mimic the natural bowing of the leaf surface. -
Separate the Leaves:
If any leaves overlap, darken the section of the leaf that sits behind the other to cast a subtle shadow, helping visually separate the layers. -
Highlight the Edges:
Mix a tiny amount of white gouache with your pale green. Add very fine highlights along the top ridges of the lighter leaves where the sun might catch them. -
Final Splits:
Banana leaves often tear in the wind. Use the background sky color (peach or blue) to paint small, wedge-shaped ‘cuts’ into the sides of the leaves to simulate these natural tears.
Level Up: Gold accents
Once fully dry, trace the very edge of the sun or the central vein of the darkest leaf with metallic gold paint for a luxury tropical feel.
Now you have a vibrant slice of paradise ready to brighten up any wall.
Easy Tropical Waterfall in a Jungle Clearing
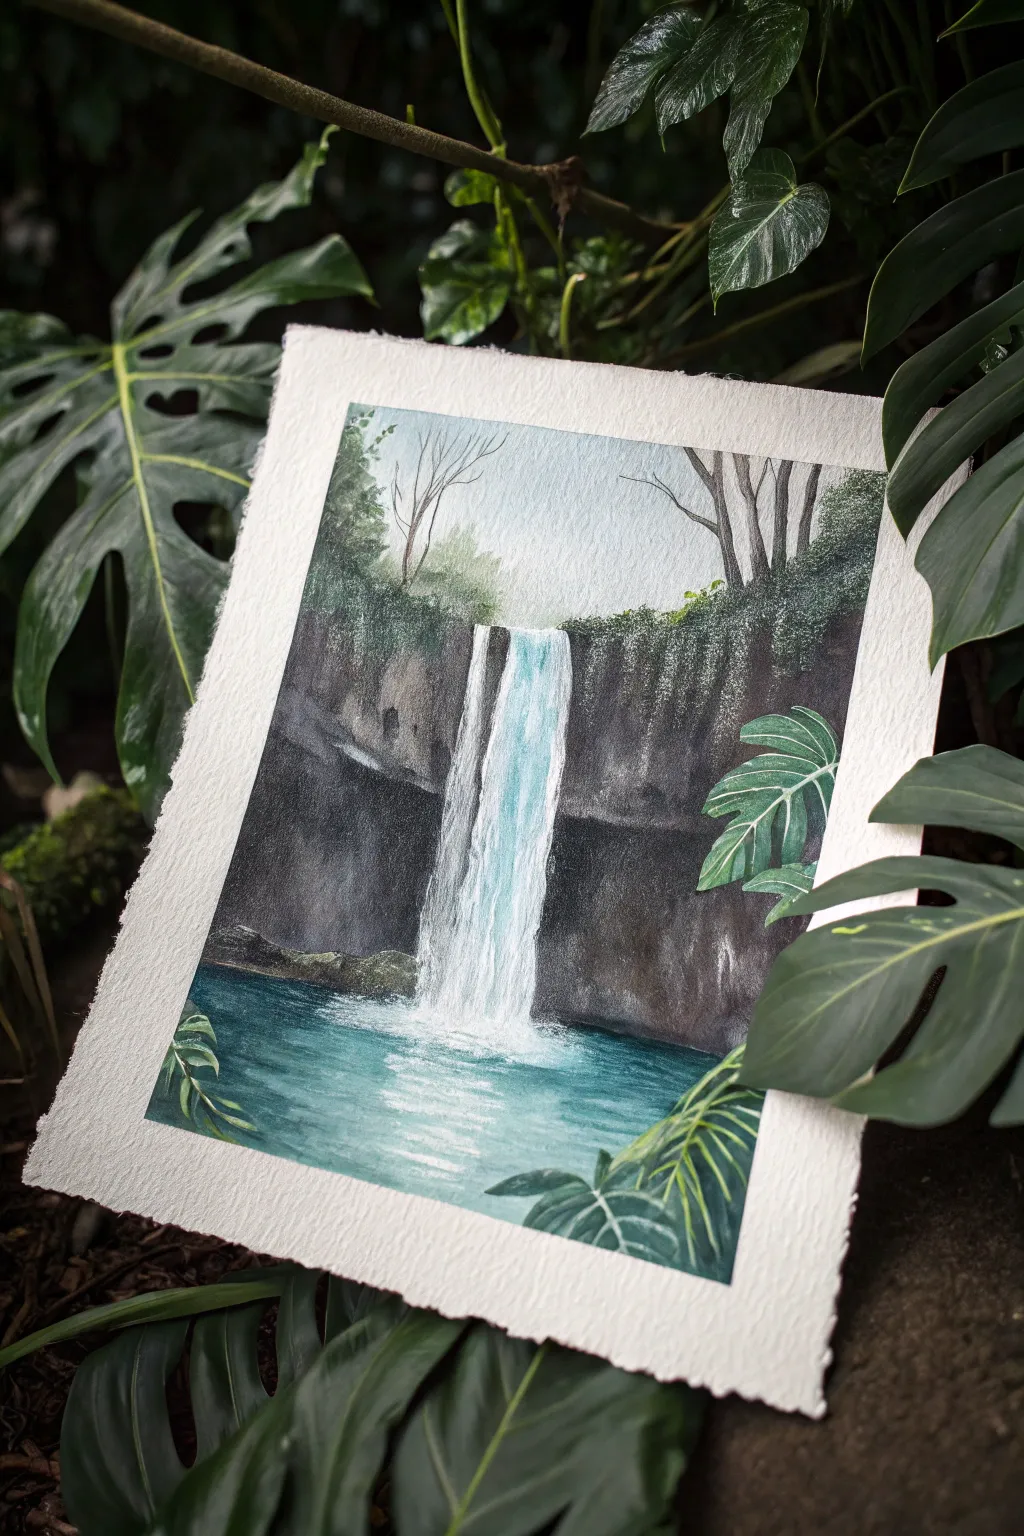
Capture the serenity of a hidden tropical oasis with this refreshing watercolor and gouache painting. The contrast between the dark, moody rock face and the bright, rushing water creates a striking focal point surrounded by lush greenery.
Step-by-Step Guide
Materials
- Cold press watercolor paper (300 gsm)
- Masking tape
- Watercolor paints (phthalo blue, turquoise, indigo, burnt umber, sap green, payne’s gray)
- White gouache paint
- Round brushes (sizes 2, 6, and 10)
- Small flat brush
- Palette for mixing
- Two jars of water
- Paper towels
Step 1: Planning and Foundation
-
Tape and Sketch:
Begin by taping down the edges of your watercolor paper to a board to create a crisp white border. Lightly sketch the horizon line for the pool, the U-shape of the cliff edge, and the vertical column where the waterfall will be. -
Sky Wash:
Wet the sky area above the cliff with clean water. Drop in a very faint wash of watered-down turquoise or light blue, letting it fade almost to white near the treeline. -
Distant Trees:
While the sky is still slightly damp but not soaking, paint the distant tree shapes atop the cliff using a mix of sap green and a touch of indigo for desaturation. Use a dabbing motion to simulate leafy textures. -
Bare Branches:
Once the sky layer is fully dry, use your smallest round brush (size 0 or 2) with a mix of burnt umber and gray to paint fine, bare tree branches reaching up from the greenery.
Gouache Magic
Use white gouache instead of watercolor for the waterfall streams. Its opacity sits on top of the dark rocks, creating a bright, crisp contrast that transparent watercolor can’t achieve.
Step 2: Painting the Rock Face
-
Cliff Base Layer:
Mix a dark, muddy tone using burnt umber and indigo or payne’s gray. Apply this to the rock walls on either side of the waterfall area. Keep the edges nearest the water slightly lighter to suggest mist. -
Adding Texture:
While the rock wash is damp, drop in darker pigment (pure indigo or black) into the crevices and under the overhangs to create depth and shadow. -
Cliff Vegetation:
Using a relatively dry brush with thick sap green paint, stipple along the top edge of the cliff to create hanging vines and overgrowth that spills down the rock face.
Make It Moody
Try painting the sky a moody grey instead of blue and deepening the greens to olive tones. This changes the vibe from a sunny afternoon to a humid, misty morning deep in the rainforest.
Step 3: The Water Elements
-
Waterfall Base:
For the waterfall itself, use a mix of white gouache and a tiny drop of turquoise. Paint vertical strokes downward from the cliff edge, letting the brush bristles separate slightly to create the look of falling water strands. -
Pool Gradient:
Paint the pool at the bottom, starting with deep teal (phthalo blue + sap green) near the rocks and transitioning to a lighter turquoise near the bottom of the page. -
Water Interactions:
Blend the bottom of the waterfall into the pool using horizontal strokes. Add a splash of white gouache at the impact zone to simulate foam and mist. -
Reflections:
While the pool water is drying, use a slightly lifting motion or add horizontal lines of white gouache to create shimmering reflections on the water’s surface.
Step 4: Foreground Details
-
Foreground Foliage:
Mix a vibrant green using sap green and yellow. Paint large monstera-style leaves in the bottom corners, framing the scene. Use a confident hand to create the distinct split-leaf shapes. -
Mid-ground Leaves:
Add smaller, slightly darker leaves peeking out from the right side of the cliff wall to push the rock formation back into space. -
Highlighting Leaves:
Once the green leaves are dry, mix a lighter mint green (green + white gouache) and paint thin veins on the leaves for realistic detail. -
Final Mist:
I like to take a clean, slightly damp brush and soften the edges where the waterfall meets the pool one last time to enhance the misty atmosphere. -
Deepen Shadows:
Assess the contrast. If the cave area behind the waterfall looks too flat, glaze over it with another layer of transparent dark gray to make the white water pop. -
The Reveal:
Wait until the painting is completely bone-dry, then carefully peel away the masking tape at a 45-degree angle to reveal your clean edges.
Frame your new jungle escape in a simple wood frame to complement the natural tones
Tropical Fruit Mini Paintings
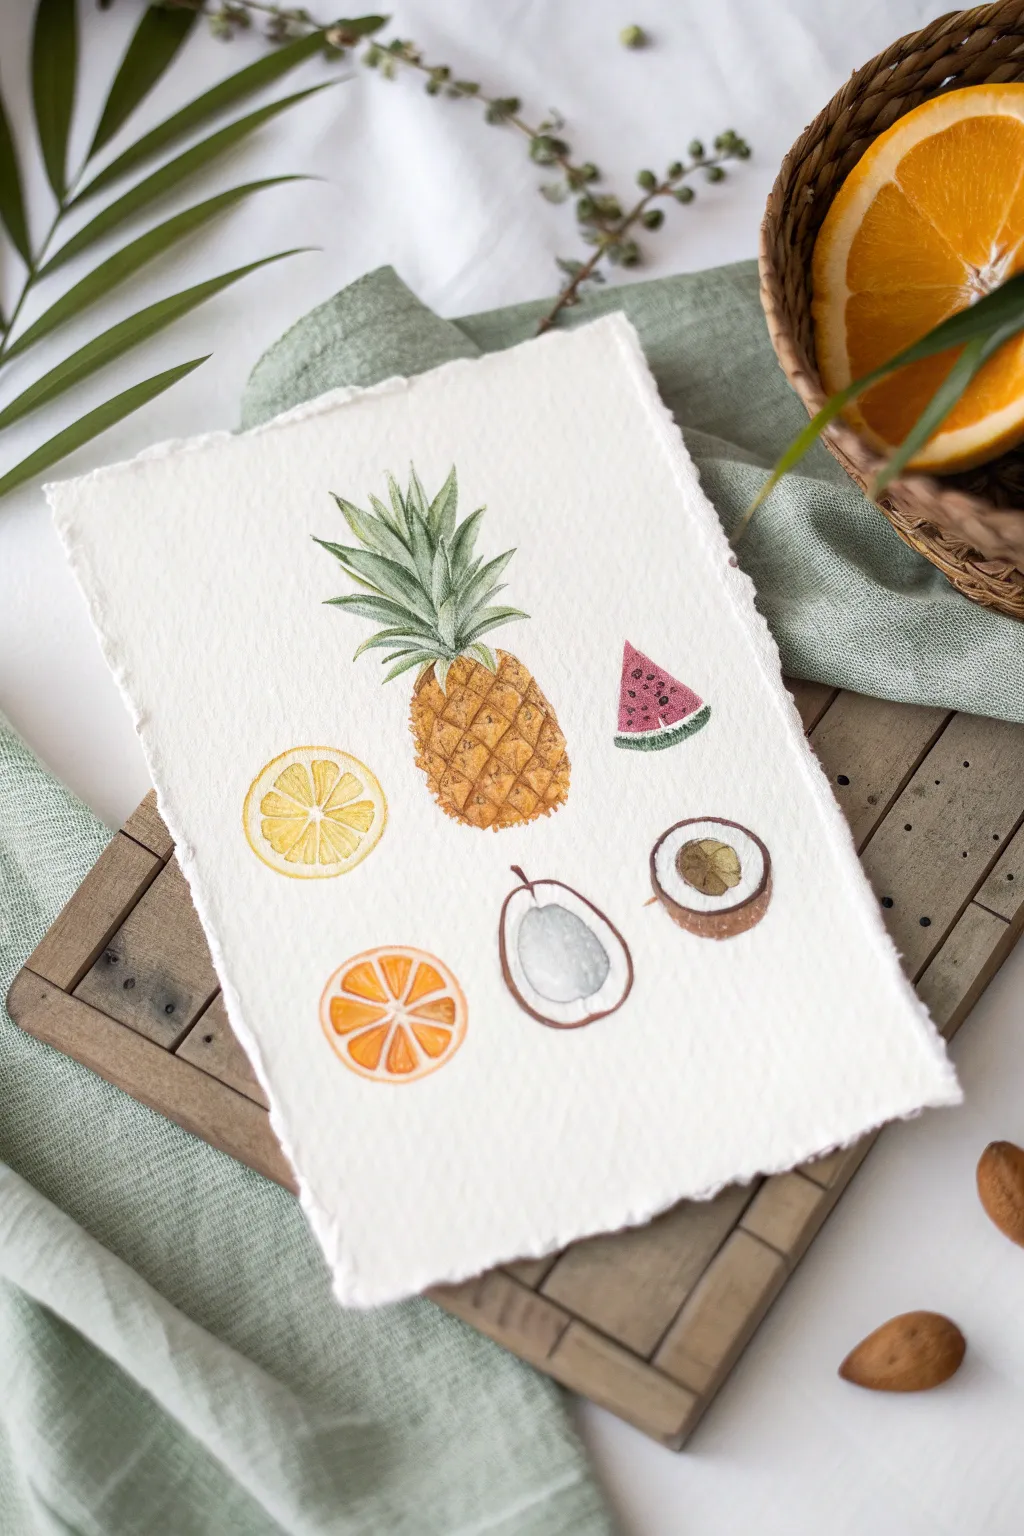
Capture the fresh, vibrant essence of summer with this delightful study of tropical fruits. Using delicate watercolor layers on textured paper, you’ll create a charming composition featuring a pineapple centerpiece surrounded by citrus and coconut slices.
How-To Guide
Materials
- Cold-pressed watercolor paper (300 gsm)
- Ruler for tearing edges
- Watercolor paints (Yellow Ochre, Sap Green, Alizarin Crimson, Cadmium Orange, Burnt Umber, Lemon Yellow)
- Small round brushes (sizes 0, 2, and 4)
- HB pencil and kneaded eraser
- Jar of clean water
- Paper towel
Step 1: Preparation & Sketching
-
Prepare the paper:
To achieve that beautiful deckle-edge look shown in the photo, place a ruler firmly against your watercolor paper and tear the paper upward against the edge. Do this on all four sides to create a soft, fibrous border. -
Outline the pineapple:
Lightly sketch the central pineapple first. Draw an oval shape for the body and a wild, spiky crown of leaves extending upwards. Keep your pencil pressure very light so the graphite doesn’t show through the paint later. -
Add the surrounding fruits:
Sketch a small triangle for the watermelon on the right. Below the pineapple to the left, draw a circle for the lemon slice. Add another circle for the orange slice near the bottom left, and an oval for the coconut half near the center bottom.
Step 2: Painting the Pineapple
-
Base layer for the body:
Mix a warm Yellow Ochre with a touch of Cadmium Orange. Using a size 4 brush, paint the oval body of the pineapple. Use a ‘wet-on-dry’ technique to keep the edges crisp, but allow the color to vary slightly in intensity across the shape. -
Leafy crown:
Switch to Sap Green. Paint the spiky leaves starting from the top of the fruit body and flicking the brush upward to create sharp tips. Layer different shades of green, adding a tiny bit of blue for the shadowed leaves in the background. -
Pineapple texture:
Once the body is dry, use a size 0 or 2 brush with Burnt Umber to paint the diagonal cross-hatching pattern. Add small ‘V’ shapes or dots within each diamond section to mimic the prickly skin texture.
Natural Edges
To get a softer deckle edge, paint a line of water where you want to tear the paper. Let it soak for a minute before tearing against the ruler.
Step 3: Painting the Accents
-
Watermelon slice:
Paint the triangle shape with a watery Alizarin Crimson, leaving a small gap of white paper before painting the green rind at the bottom. Once the red is dry, dot in seeds with concentrated black or dark brown paint. -
Citrus slices:
For the lemon (left) and orange (bottom left), paint the outer rim first. Then, paint the triangular segments inside, leaving thin untouched white lines between them to represent the pith. Use Lemon Yellow for the first and Cadmium Orange for the second. -
Coconut shell:
Paint the outer shell of the coconut with a dark Burnt Umber. Keep the line seemingly rough and fibrous. I find that dabbing the brush rather than stroking helps create that hairy texture. -
Coconut interior:
For the white coconut meat, use a very watery grey-blue wash just along the inner edge to create a shadow, leaving the center paper-white to suggest depth. -
Coconut variation:
If you sketched the second opened coconut (the brown-ish interior one shown on the right), paint the center with a very pale, watery brown wash and add a darker, textured center circle.
Change the Scale
Instead of one sheet, paint each fruit on its own tiny scrap of torn paper to create a set of miniature gift tags or bookmarks.
Step 4: Final Details
-
Erase pencil lines:
Wait until the painting is completely bone-dry. Gently roll a kneaded eraser over the artwork to lift any visible graphite lines without damaging the paint. -
Enhance contrast:
Go back in with your smallest brush and deepen the darkest areas—like the shadows between the pineapple leaves and the rind of the watermelon—to make the colors pop.
This charming fruit study looks beautiful framed in wood or clipped onto a mood board for inspiration

Have a question or want to share your own experience? I'd love to hear from you in the comments below!