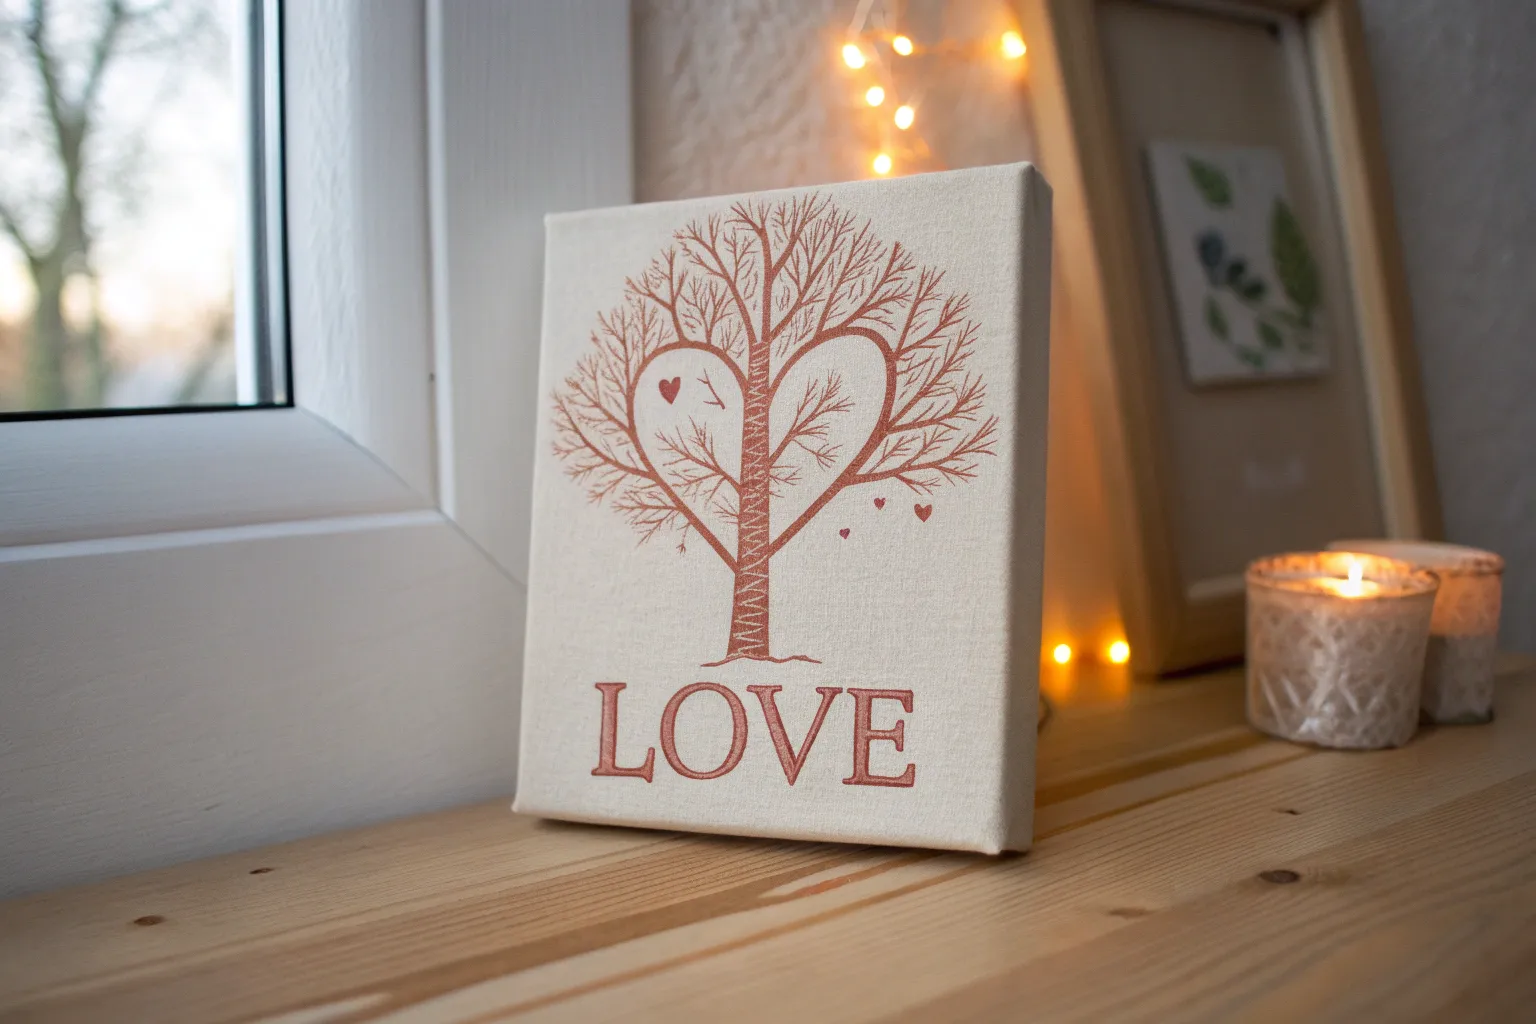
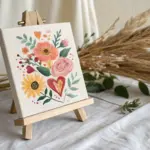
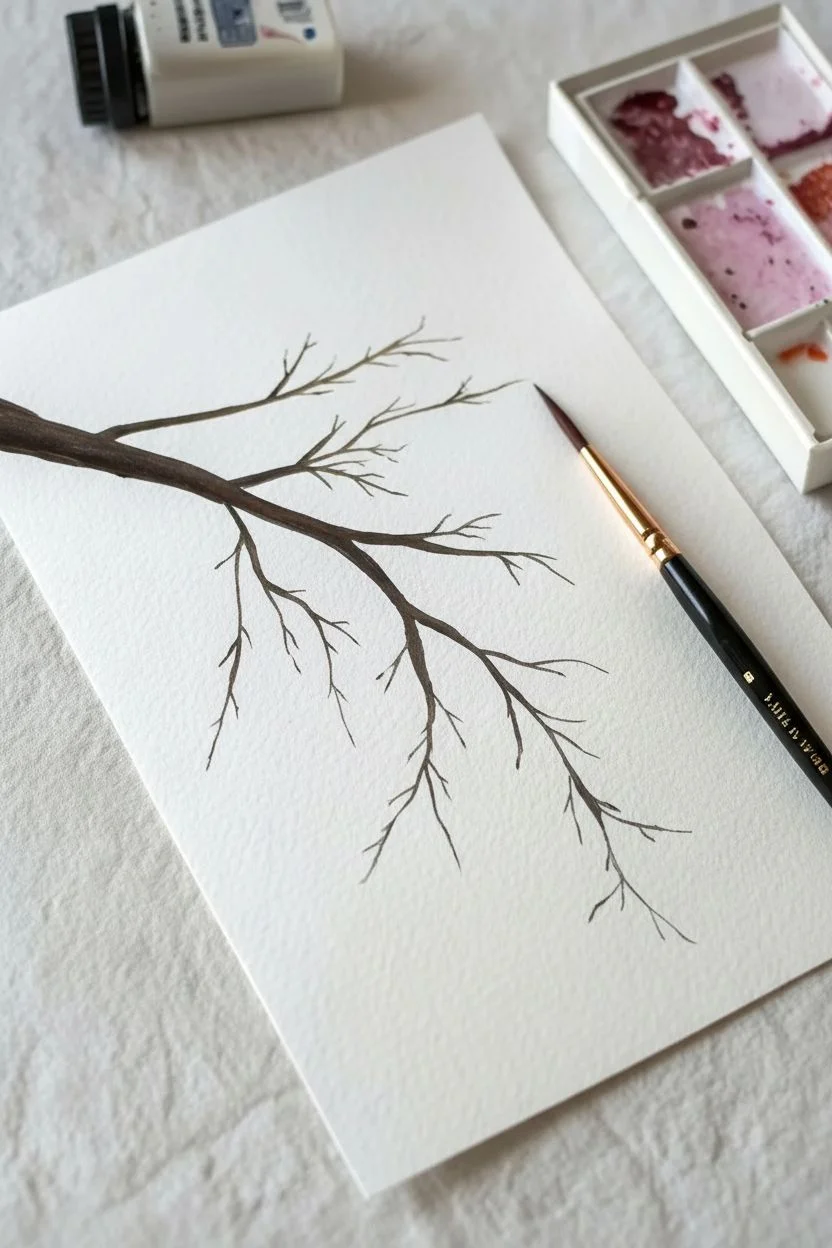
If you’re craving something sweet and creative, easy Valentine’s painting ideas are the perfect way to make art that feels personal without getting complicated. I pulled together beginner-friendly projects packed with hearts, cozy romance, and simple color palettes you can actually finish in one sitting.
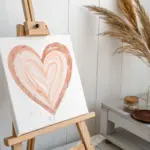
Classic Ombre Heart Background
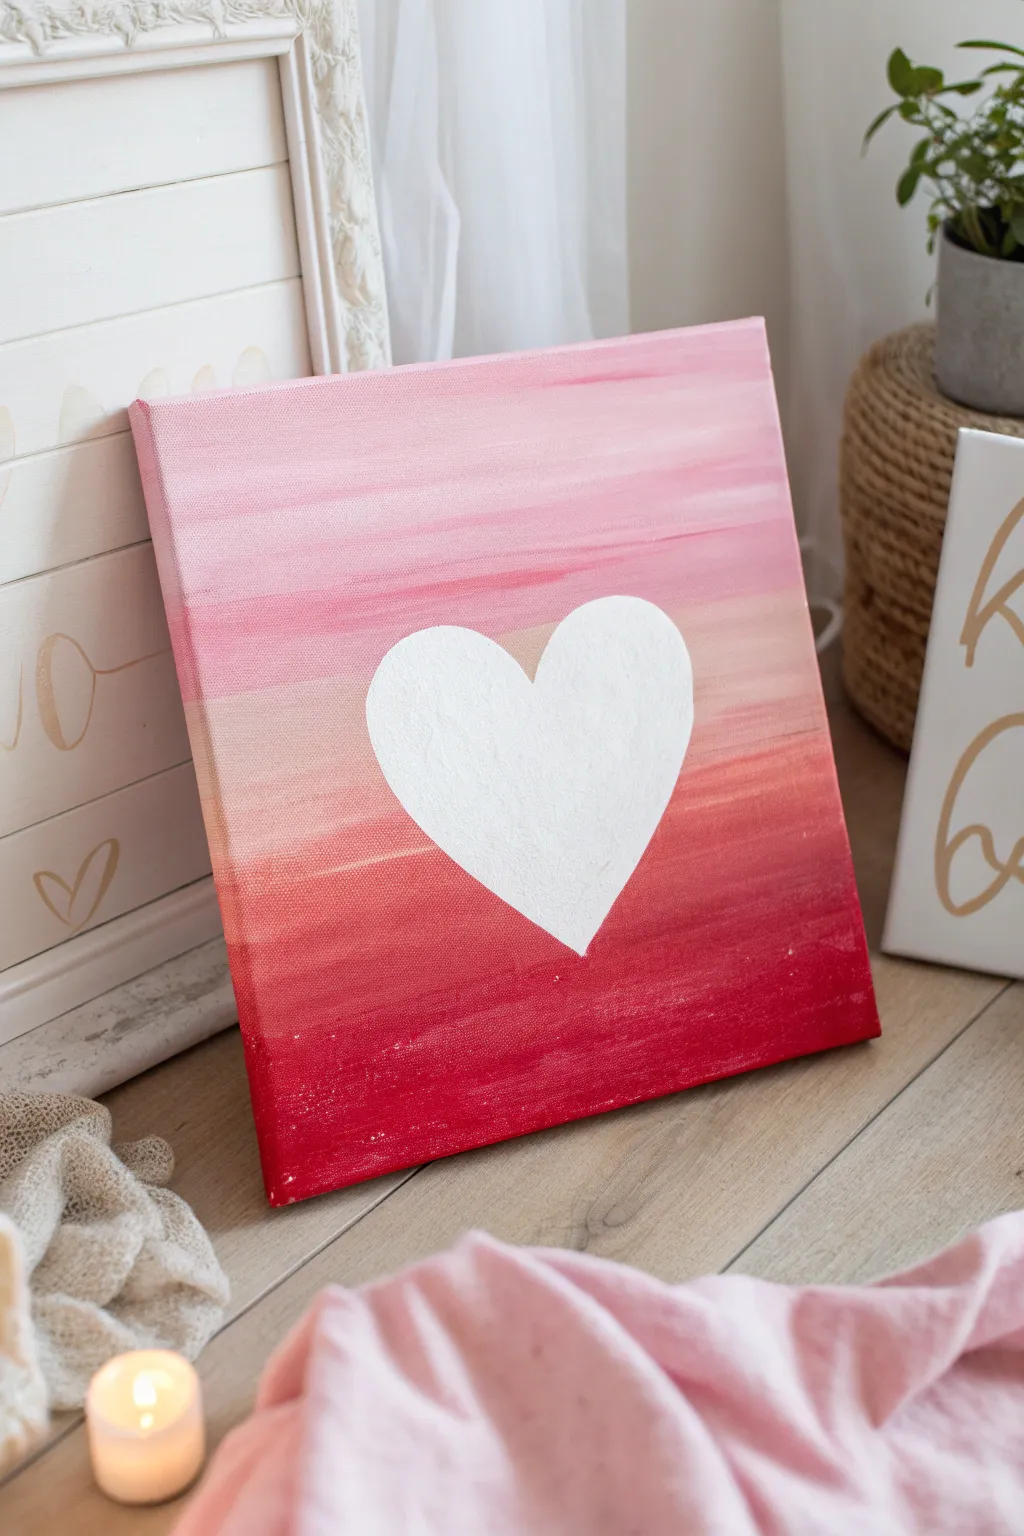

This beginner-friendly project creates a stunning statement piece using a simple gradient technique. Starting with deep red and fading into soft blush pink, the background perfectly highlights a crisp, white heart silhouette.
How-To Guide
Materials
- Square stretched canvas (e.g., 10×10 or 12×12 inch)
- Acrylic paint: Crimson red, Titanium white, Pale pink
- Flat brush (1 inch wide) for background
- Medium round brush for the heart
- Pencil
- Heart template (paper cutout) or stencil
- Palette or paper plate
- Cup of water and paper towels
Step 1: Creating the Ombre Background
-
Prepare your palette:
Squeeze out generous amounts of crimson red, pale pink, and white paint onto your palette. You will need to work somewhat quickly to blend them, so having the paint ready is key. -
Start with the base:
Load your large flat brush with the crimson red paint. Apply a solid band of red across the bottom quarter of the canvas using horizontal strokes. -
Begin the transition:
Pick up a little bit of the pale pink on your brush without washing out the red fully. Paint the next section up, overlapping slightly with the red band to encourage blending. -
Blend the red zone:
Using long, continuous horizontal strokes, brush back and forth over the line where the pure red meets the reddish-pink mix until the harsh line disappears. -
Move to medium pink:
Wipe your brush on a paper towel to remove most of the heavy red. Load it with pure pale pink and paint the middle section of the canvas. -
Soften the middle:
Blend this pink section downward into the darker section below it. If the brush feels too dry, dip just the tip in water to help the acrylics move and merge. -
Plan the upper section:
Clean your brush thoroughly. Mix a little white into your pale pink to create a very light blush shade. -
Apply the lightest top:
Paint the top quarter of the canvas with this light blush mix, ensuring you cover the top edge of the canvas as well. -
Final background blending:
With a clean, slightly damp brush, gently stroke back and forth across the entire canvas from top to bottom to smooth out any distinct ridges. -
Paint the edges:
Don’t forget to extend your colors around the sides of the canvas so it looks finished from every angle. Match the color on the side to the gradient on the front. -
Let it dry completely:
Allow the background to dry fully. This is crucial—if the background is wet, the white heart will turn pink. Wait at least 30-45 minutes.
Smooth Blends
Work quickly while the acrylics are wet. If the paint starts to drag, mist the canvas lightly with water to keep the gradient workable.
Step 2: Adding the Heart
-
Position the template:
Once the canvas is bone dry, place your heart cutout in the center. You can measure to ensure it’s centered, or just eyeball it for a relaxed look. -
Trace the shape:
Lightly trace around the heart template with a pencil. Press gently so you don’t dent the canvas or leave dark graphite marks that are hard to cover. -
Fill the outline:
Using your medium round brush and titanium white paint, carefully paint along the inside edge of your pencil line first to establish a crisp border. -
Fill the center:
Fill in the rest of the heart with white paint. Don’t worry if the background color shows through slightly on this first pass. -
Apply a second coat:
Let the first layer of white dry for about 10 minutes. Apply a second coat of white to make the heart opaque and bright against the colorful background. -
Clean up edges:
Inspect your heart’s edges. If any spots look wobbly, use a small detail brush with a little bit of white to sharpen the silhouette. -
Final drying:
Allow the entire painting to cure for several hours before displaying or wrapping it as a gift.
Modern Twist
Instead of a solid white heart, use gold leaf size and foil for the heart shape to add a metallic, shimmering texture.
Now you have a beautifully blended piece of art ready to add warmth to any room


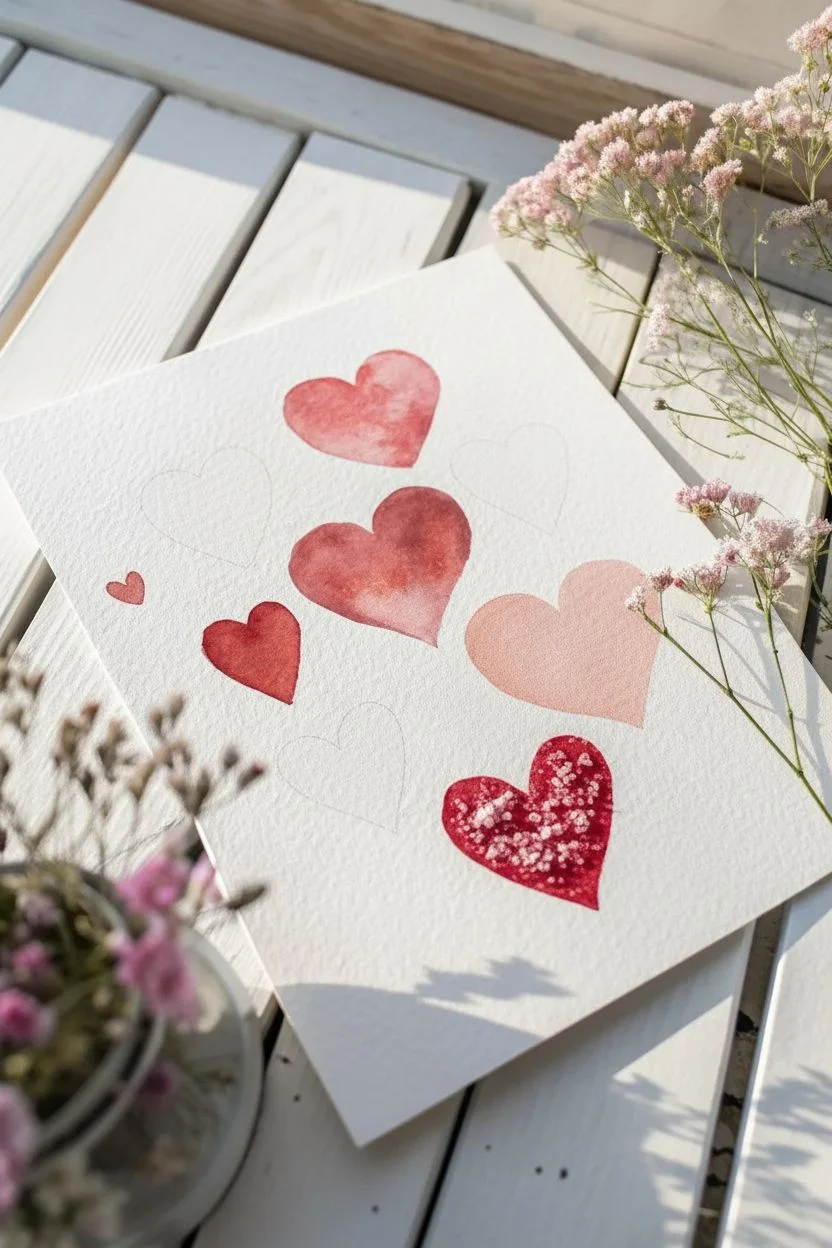
Negative Space Heart With Tape Resist

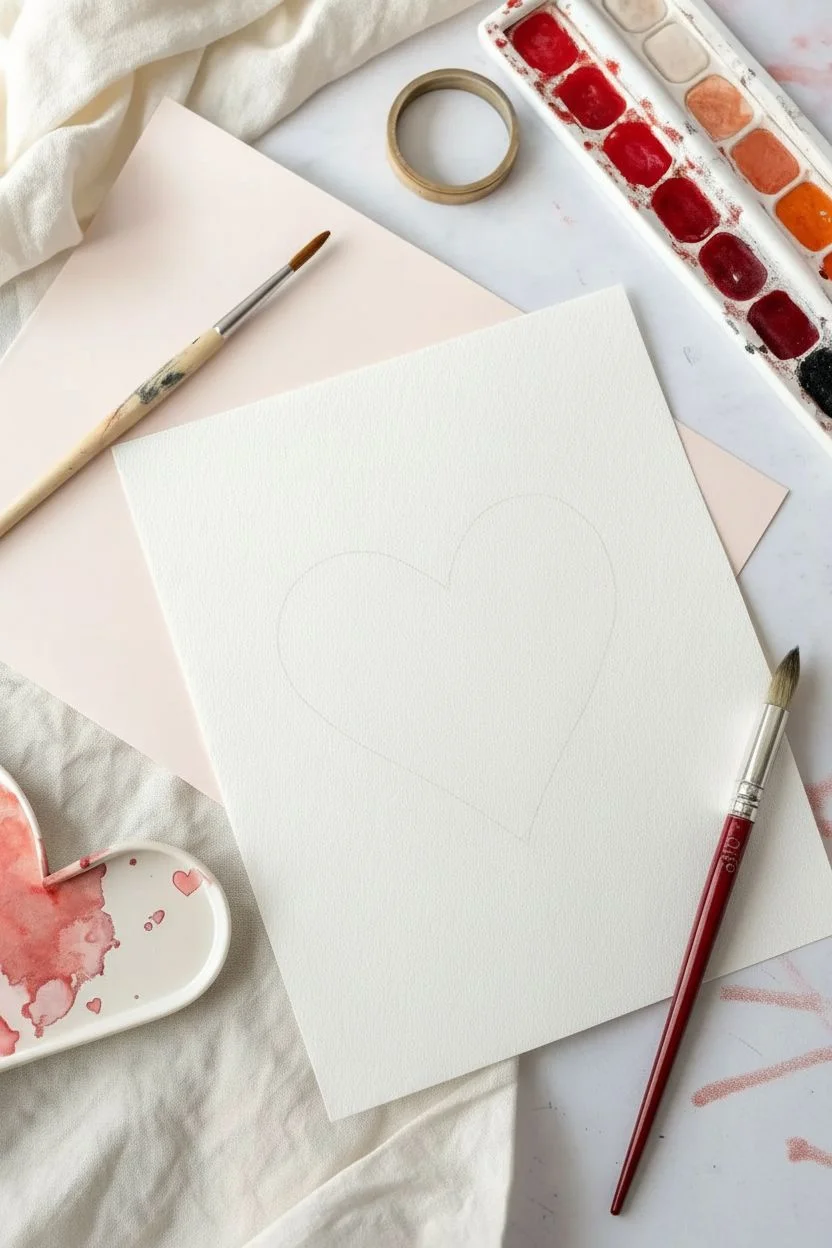
Create a delicate, romantic mood with this watercolor technique that focuses on soft edges and subtle gradients. By painting the outline with water first and letting pigment bloom naturally, you achieve a dreamy, ethereal heart perfect for a heartfelt note.
Step-by-Step Tutorial
Materials
- Cold press watercolor paper (heavyweight, 300gsm ideally)
- Watercolor paints (Alizarin Crimson, Sap Green, and Burnt Umber mix, or a pre-mixed deep red)
- Round watercolor brush (size 6 or 8)
- Clean water jar
- Paper towel or rag
- Ceramic or plastic mixing palette
- Pencil (optional, hard lead like 2H)
Step 1: Preparation and Sketching
-
Paper selection:
Begin with a sheet of high-quality, cold-press watercolor paper. The texture helps hold the water and pigment, creating those lovely granulated edges. -
Sketch lightly:
If you aren’t confident painting a heart freehand, use a hard pencil (like a 2H) to sketch a very faint outline of a heart. Keep the lines barely visible so they won’t show through the translucent paint later. -
Prepare your palette:
Mix a watery puddle of your chosen red or pink hue. You want a high water-to-paint ratio to start, creating a ‘tea’ consistency rather than a thick cream.
Hard Water Lines?
If you get unwanted hard edges (blooms) inside the heart, your brush was too wet. Lift the excess puddle with a dry brush corner.
Step 2: Painting the Heart Outline
-
Load the brush:
Dip your round brush into clean water first, then pick up a small amount of your prepared paint mix. The brush should be wet but not dripping. -
Paint the first curve:
Starting at the top center dip of the heart, drag your brush along the left curve. Don’t worry about making a perfectly crisp line; a little wobble adds organic charm. -
Soften the edge:
Immediately rinse your brush in clean water and blot it slightly. Run the clean, damp brush along the *inner* edge of the line you just painted to pull the pigment inward slightly, softening that boundary. -
Continue the outline:
Reload with pigment and continue painting the outline down to the bottom point of the heart. -
Complete the shape:
Repeat the process on the right side, starting from the top center again and meeting at the bottom point. Aim for symmetry, but embrace imperfections.
Add Some text
Use a fine-liner pen to write a romantic quote or a name in calligraphy right in the pale center of the heart once dry.
Step 3: Enhancing the Edge
-
Deepen the color:
While the first layer is still damp (but not shiny wet), pick up a slightly more concentrated amount of pigment on the tip of your brush. -
Drop in color:
Gently touch the tip of the brush to the outer rim of your heart shape. Watch as the color bleeds softly into the damp paper, creating a darker ‘rim’ effect seen in the photo. -
Keep the center pale:
Be careful not to drag this darker pigment too far inward. The beauty of this piece relies on the center of the heart remaining largely white or extremely pale pink. -
Add variance:
I like to vary the intensity of the line. Make the top arches a bit darker and let the color fade out more towards the bottom point for visual interest.
Step 4: Finishing Touches
-
Assess the shape:
Stand back and look at your heart. If one side looks too distinct, use a clean, damp brush to gently scrub the edge and diffuse it. -
Let it dry completely:
Allow the paper to dry flat naturally. Using a heat gun can sometimes push the pigment around too much and ruin the soft gradient you’ve built. -
Flatten the paper:
Once fully dry, if the paper has buckled slightly from the water, place it under a heavy book overnight to flatten it out.
You now have a clean, minimalist watercolor heart ready to frame or gift to someone special


Scattered Mini Hearts Pattern Painting
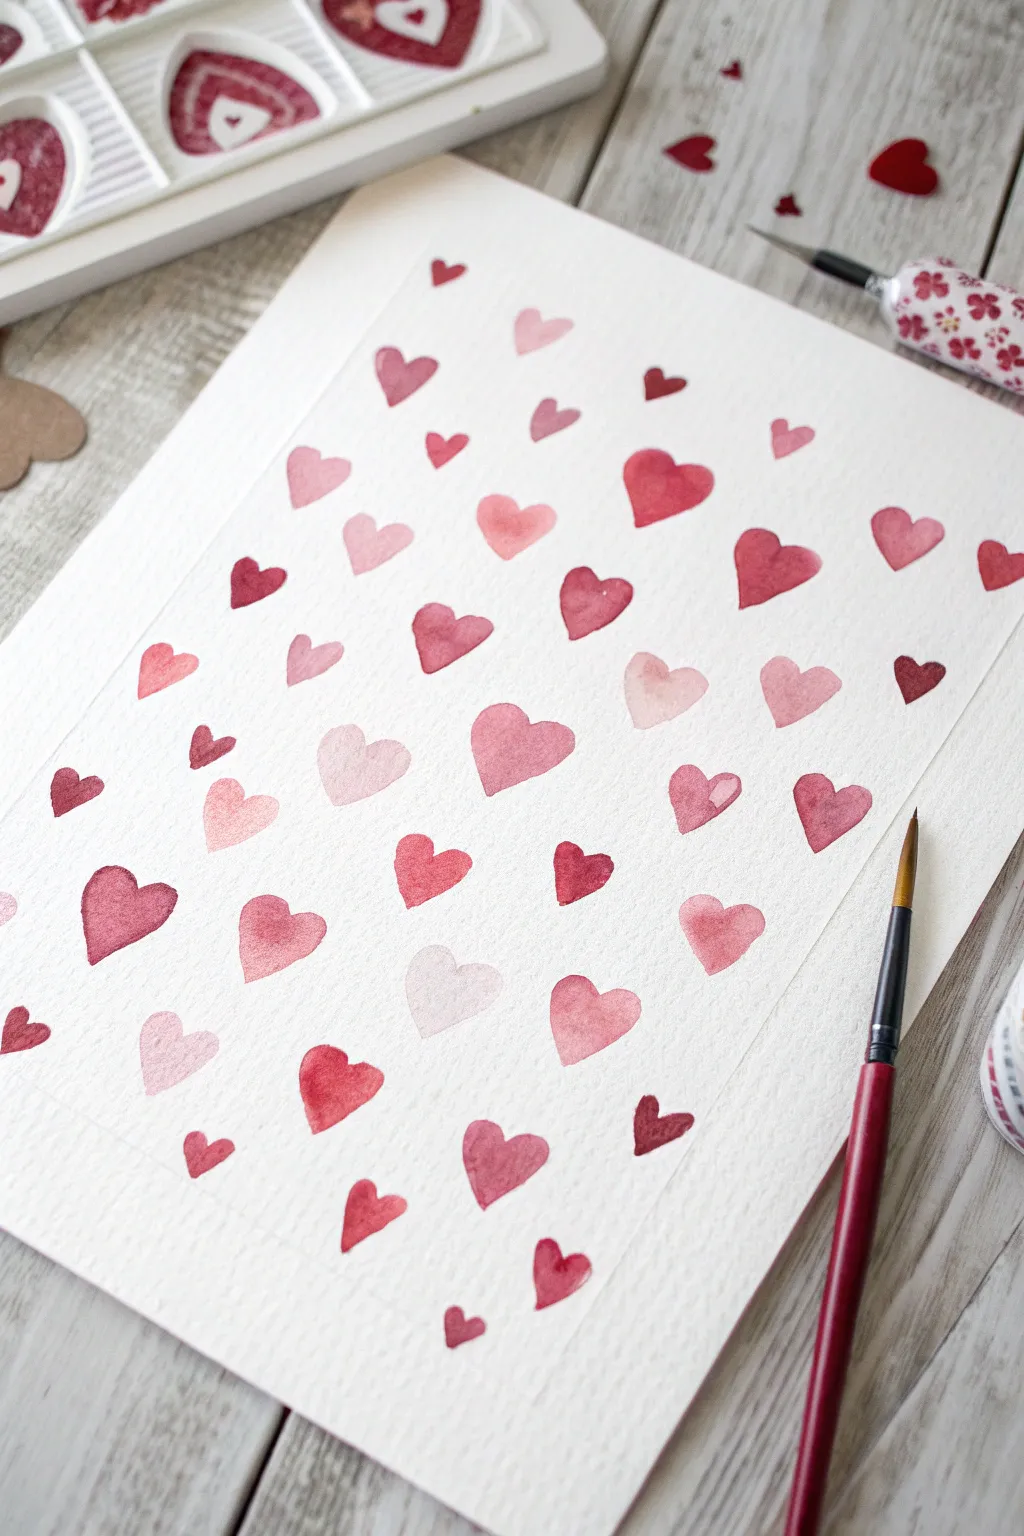
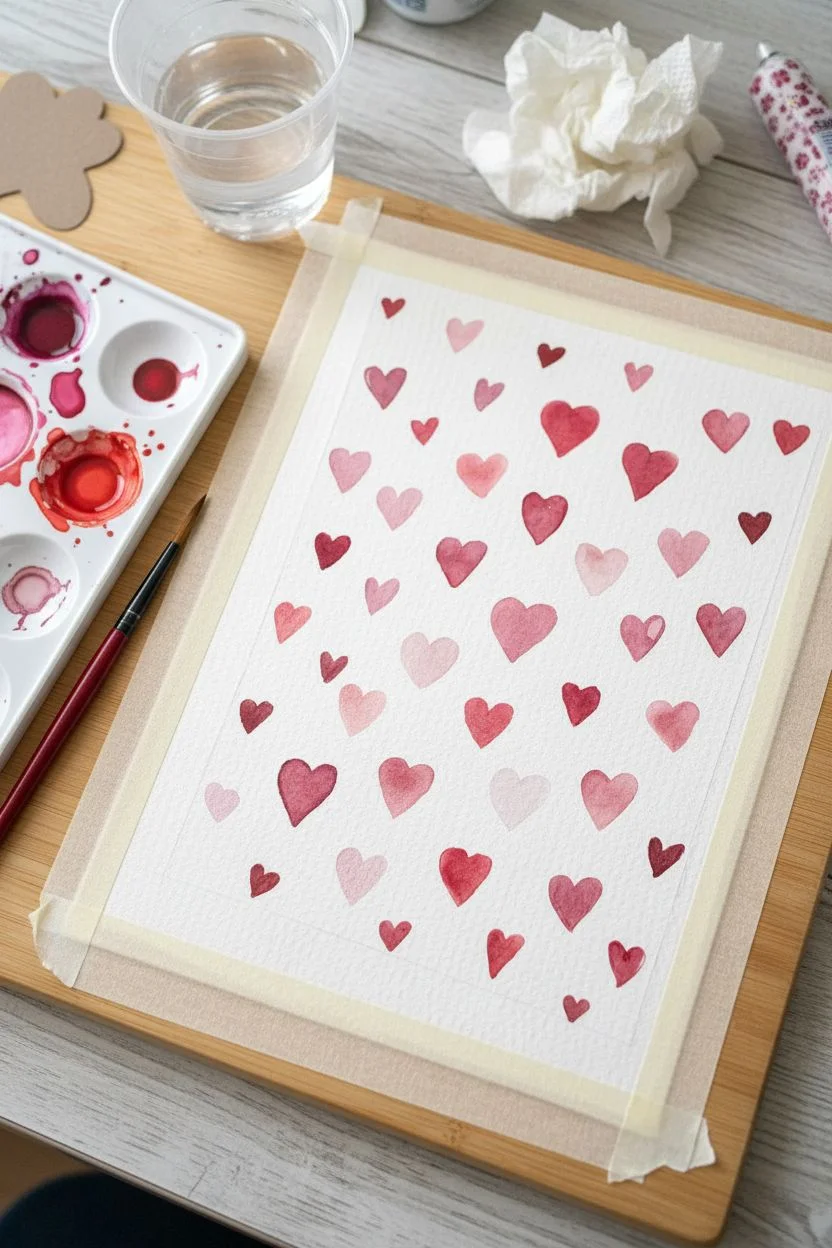
Embrace the imperfect charm of watercolor with this lovely scattered heart painting. By varying the size, orientation, and color intensity of each heart, you create a flowing, confetti-like pattern that feels organic and full of love.
How-To Guide
Materials
- Cold press watercolor paper (block or taped down)
- Watercolor paints (red, crimson, and pink shades)
- Round watercolor brush (size 4 or 6)
- Pencil and ruler
- Water cups (one for rinsing, one for clean water)
- Paper towel
Step 1: Preparation & Setup
-
Prepare your paper:
Start by securing your watercolor paper. If you aren’t using a block, tape the edges down to a board with artist’s tape to prevent buckling. -
Mark the boundaries:
Using a pencil and ruler, very lightly draw a rectangular border inside your paper. Leave about a 1-inch in margin all around. This guide helps contain your pattern and gives the final piece a professional, framed look. -
Mix your palette:
On your palette, prepare several puddles of red and pink paint. You want a variety: a deep crimson, a bright scarlet, and perhaps a softer shell pink. -
Dilution check:
Create different values by adding varying amounts of water to your puddles. Having a range—from concentrated pigment to watery washes—is the secret to the depth in this piece.
Blooms & Cauliflowers?
If you see water marks drying unevenly inside the hearts, you likely used too much water. Dab your brush on a paper towel before painting to control the moisture.
Step 2: Painting the Hearts
-
Start with the ‘V’:
Load your round brush with a medium-strength red. To form a heart, start by gently pressing the tip down to make one side of a ‘V’ shape, lifting as you pull down. -
Complete the shape:
Mirror that stroke on the other side to close the heart. Allow the two strokes to bleed together naturally. -
Vary the sizes:
Paint your first few hearts randomly across the paper, keeping them within your pencil border. Make some larger and some smaller to establish a balanced composition. -
Switch colors:
Rinse your brush and pick up a different shade, perhaps a lighter pink or a watered-down red. Paint new hearts nearby the existing ones, but don’t let them touch wet-on-wet unless you want them to bleed. -
Play with transparency:
For the palest hearts, use very dirty water or highly diluted paint. These ‘ghost’ hearts add beautiful background depth. -
Rotate the brush:
Slightly tilt the angle of some hearts. They shouldn’t all stand perfectly straight; a little tilt to the left or right makes the pattern look like falling confetti. -
Fill the gaps:
Step back and look for empty white spaces. Fill these gaps with tiny, micro-hearts using just the very tip of your brush. -
Add darker accents:
Mix a very saturated, deep red or burgundy. Add a few small, bold hearts scattered sparingly to act as anchor points for the eye.
Wet-on-Dry Texture
Let one layer of pale hearts dry completely before painting darker ones that overlap them. This creates a lovely layered, translucent effect without muddying colors.
Step 3: Finishing Touches
-
Review edges:
Check the pencil border you drew earlier. Paint a few hearts that come right up to—or just barely kiss—this line to define the rectangle shape clearly. -
Dry completely:
Let the painting sit until the paper is cool to the touch and fully dry. This ensures no smudging during the final step. -
Erase guidelines:
Gently erase the visible pencil border lines. Be careful not to rub over the painted areas too vigorously.
Now you have a charming, hand-painted pattern ready to be framed or scanned for custom Valentine cards


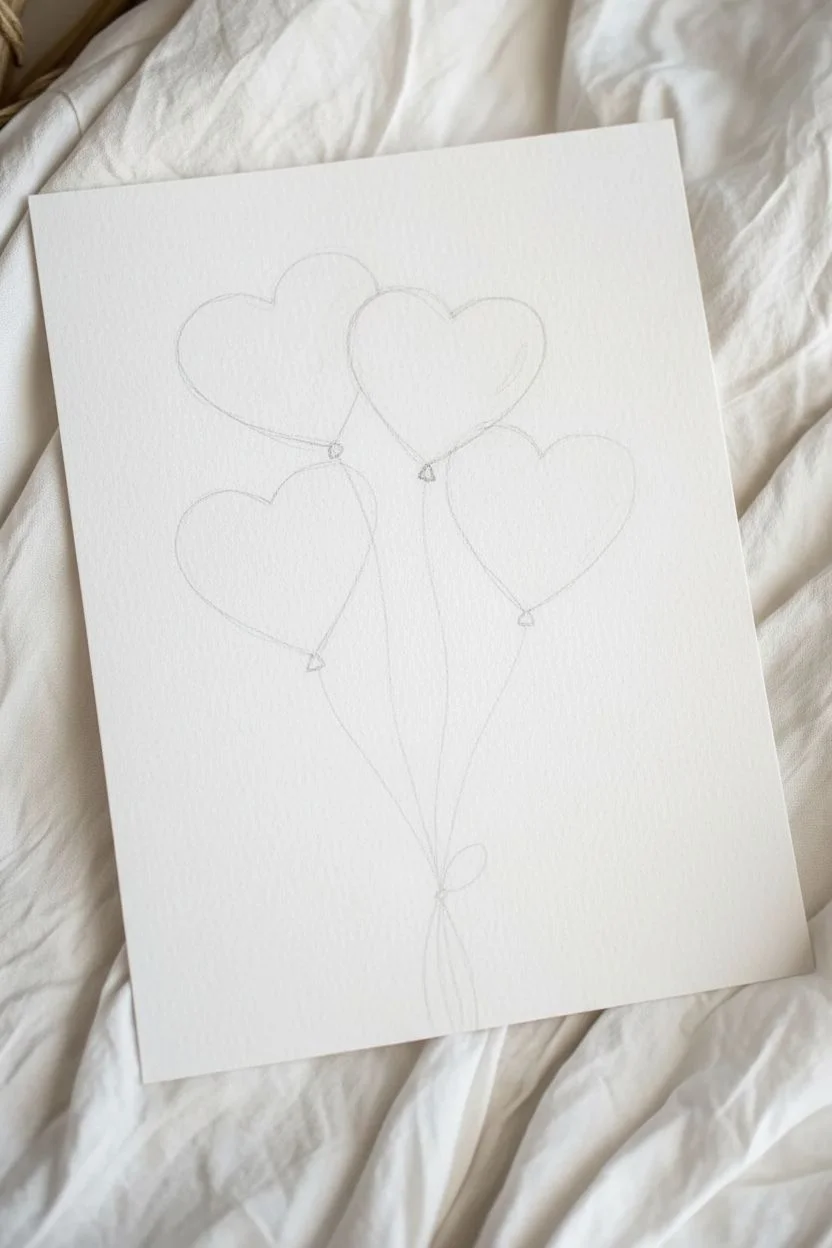
Easy Heart Balloon Bunch
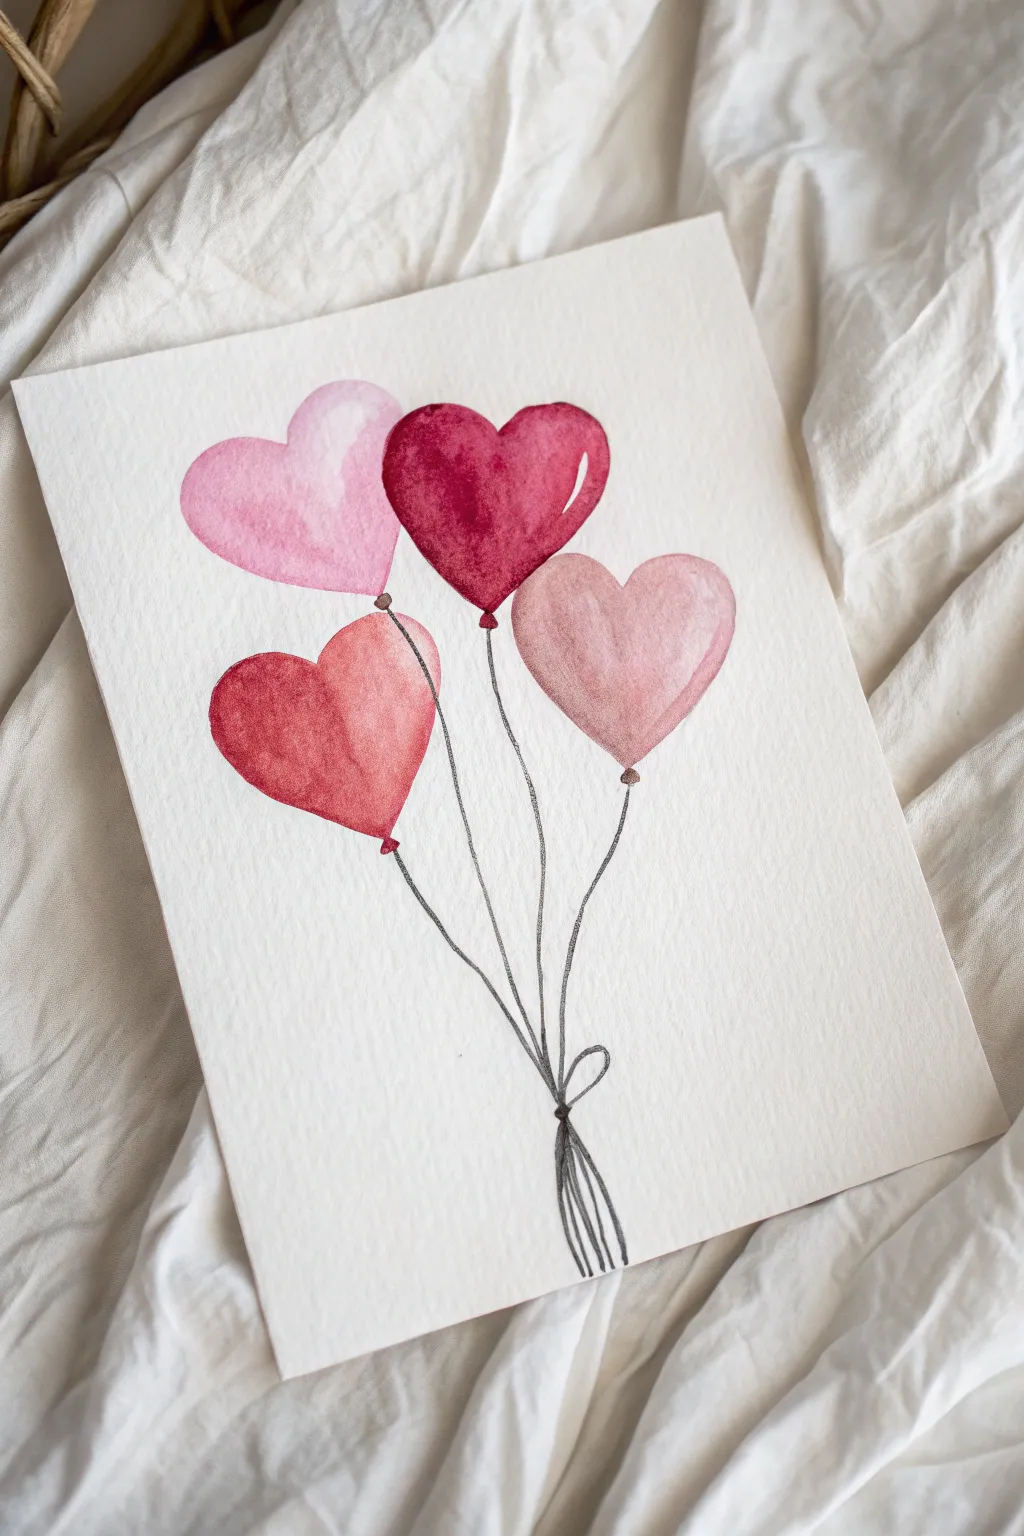
Capture the lightness of love with this airy cluster of floating heart balloons. Using soft watercolor washes and simple line work, you’ll create a sweet and romantic piece perfect for a Valentine’s card or framed gift.
Step-by-Step Tutorial
Materials
- Cold press watercolor paper (approx. 140lb/300gsm)
- Watercolor paints (Alizarin Crimson, Cadmium Red, Rose Madder, Burnt Sienna)
- Round watercolor brushes (sizes 4 and 6)
- Pencil (HB or 2H)
- Kneaded eraser
- Clean water jar
- Paper towels
- Fine liner pen (black or dark grey, waterproof)
Step 1: Sketching the Layout
-
Plan positions:
Visualize where your four balloons will float on the paper. You want a cluster near the top center, leaving plenty of vertical space below for the strings. -
Draw the heart shapes:
With a very light hand, sketch four heart shapes using your pencil. Vary their angles slightly so they look like they are naturally bumping into each other. -
Add balloon knots:
At the bottom point of each heart, sketch a tiny triangle or circle to represent the tied knot of the balloon. -
Lighten the lines:
Roll your kneaded eraser gently over the sketch. You want the graphite to be barely visible so it doesn’t show through the translucent watercolor later.
Highlight Hack
If you forget to lift paint for highlights while wet, use a white gel pen or a tiny dot of white gouache after the paint is completely dry to add that shine.
Step 2: Painting the Balloons
-
Mix the deepest red:
Start with the topmost central balloon. Mix a rich, saturated red like Alizarin Crimson with just a touch of water on your palette. -
Paint the first layer:
Fill in the top center heart. While the paint is still wet, lift a small sliver of color on the upper right curve with a clean, damp brush to create a highlight. -
Mix a soft pink:
Dilute your red paint significantly with water, or switch to a Rose Madder, to create a very pale, transparent pink for the top-left balloon. -
Apply the pink wash:
Paint the top-left heart. Allow the color to be uneven—let more pigment pool at the bottom for a natural gradient. -
Create a dusty rose:
For the right-side balloon, mix a bit of Burnt Sienna into your pink to desaturate it, creating a warm, dusty rose tone. -
Paint the third balloon:
Carefully paint this heart, ensuring it doesn’t bleed into the wet red balloon next to it. If the red is still wet, leave a tiny hairline gap between them. -
Mix a coral red:
For the final bottom-left balloon, mix Cadmium Red with a touch of the pink to get a vibrant coral shade. -
Paint the final heart:
Fill in the last shape. I like to drop a tiny bit of darker red into the wet paint on the left side to give it a shadowed, rounder appearance. -
Let it dry completely:
Wait until the paper is bone dry. If the paper feels cool to the touch, it is still wet.
Bleeding Hearts?
If adjacent wet colors bleed into each other, stop immediately. Use a dry paper towel corner to dab up the bleed, let it dry fully, then sharpen the edge.
Step 3: Adding Details & Strings
-
Paint the knots:
Using a small brush (size 4), dab a tiny spot of brown or dark red paint onto the pencil sketches of the knots at the base of each balloon. -
Draw the strings:
Once everything is dry, take your fine liner pen. Draw shaky, organic lines extending from each knot downwards. -
Converge the lines:
Ideally, bring all four lines together at a single point near the bottom center of the page, as if they are being held or tied together. -
Add a bow:
Where the strings meet, draw a simple, loose loop to suggest a string tied around the bunch. -
Finish the tails:
Extend short, slightly curved lines below the gathered point to show the ends of the strings hanging down loose.
Now you have a charming, hand-painted bouquet that floats off the page.
BRUSH GUIDE
The Right Brush for Every Stroke
From clean lines to bold texture — master brush choice, stroke control, and essential techniques.
Explore the Full Guide
Lovebirds Silhouette on a Branch With Heart Accent
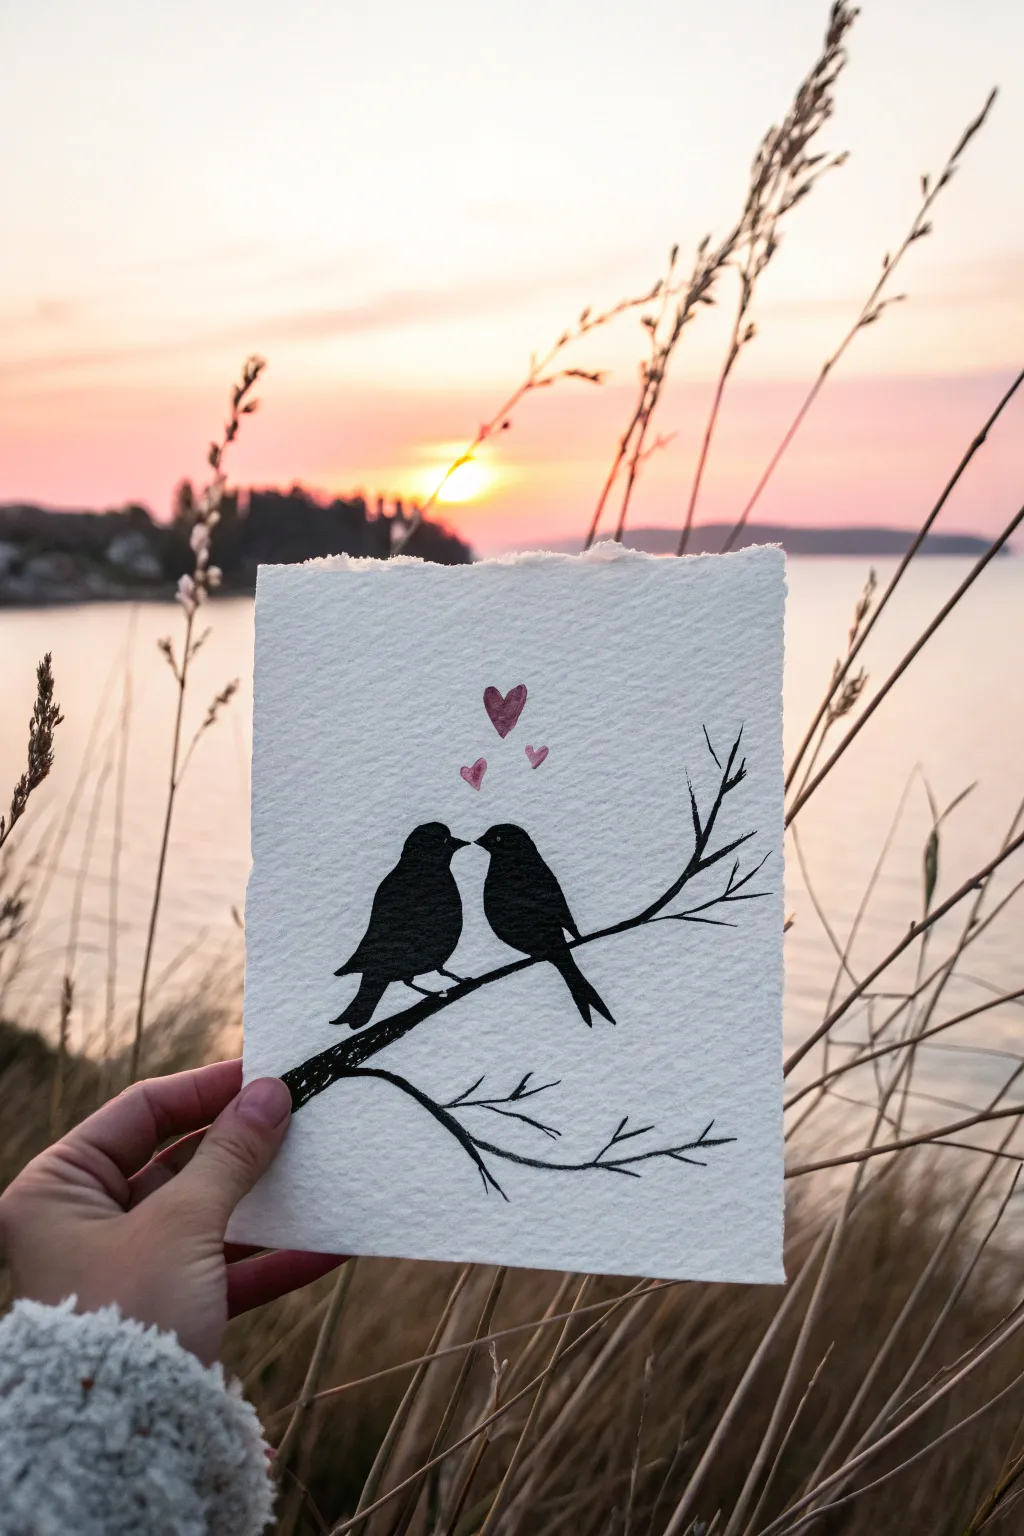
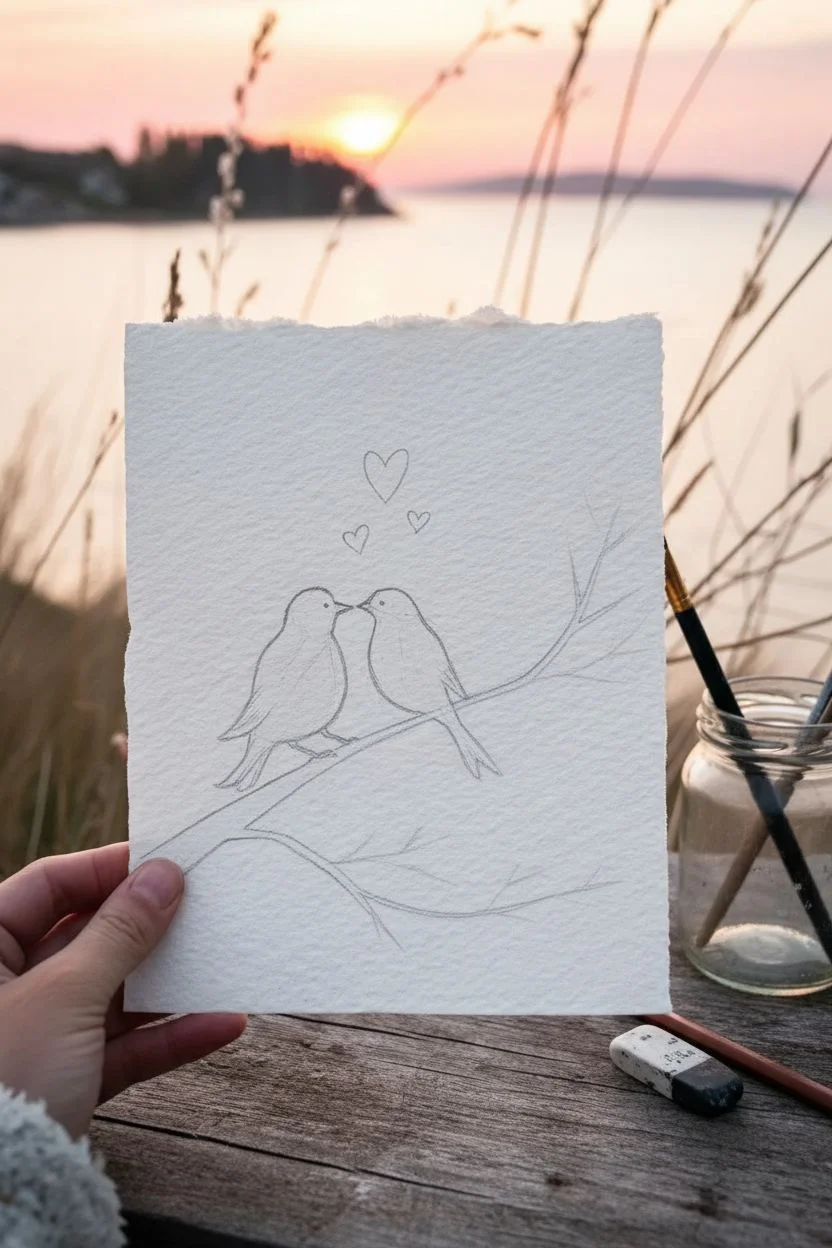
This simple yet romantic little painting captures the essence of connection with just a few strokes of black and a touch of red. Using the high contrast of silhouettes against textured paper, you’ll create a charming piece perfect for a handmade Valentine’s card.
Detailed Instructions
Materials
- Cold press watercolor paper (approx. 4×6 or 5×7 inches)
- Black ink, black watercolor, or a fine-tip black brush pen
- Small round paintbrush (size 0 or 1) if using liquid paint
- Red or metallic pink watercolor/ink
- Pencil for sketching
- Eraser
- Masking tape (optional)
Step 1: Preparation & Sketching
-
Prepare the paper:
Start with a piece of cold press watercolor paper. For this specific look, you can tear the edges carefully against a ruler or thick card to create a soft, deckled edge effect, rather than cutting it straight with scissors. -
Establish the branch line:
Using a pencil very lightly, sketch the main branch line starting from the lower right side and curving gently upward toward the left center. Keep the line slightly uneven to mimic organic wood texture. -
Sketch the lower branch:
Add a secondary, thinner branch stemming from the main one, curving downwards and to the left. This balances the composition. -
Outline the first bird:
Draw the outline of the left bird sitting on the main branch. Start with a round head, a short beak pointing right, and a plump body that tapers down into a tail extending below the branch line. -
Outline the companion:
Sketch the second bird on the right, facing the first one. Their beaks should be very close, almost touching. I find it helpful to make this bird slightly more slender or tilted to give them distinct personalities. -
Add placement for hearts:
Lightly mark three small spots floating above the birds’ heads where the hearts will go. Arrange them in a loose, vertical arc.
Clean Lines Tip
If you struggle with shaky hands on small details like the beak, use a fine-tip archival ink pen instead of a brush for the outlines, then fill in with paint.
Step 2: Painting the Silhouettes
-
Fill the branches:
Load your small brush with black ink or concentrated black watercolor. Carefully trace your pencil line for the main branch. -
Add branch texture:
Thicken the branch slightly in uneven intervals. Add tiny, protruding twigs or thorns sticking out from the main stems to make the silhouette look like a realistic bramble or tree limb. -
Outline the birds:
Switch to your finest brush tip. Carefully trace the outer perimeter of both birds. Proceed slowly around the beaks to keep them sharp and defined. -
Fill in the bodies:
Once the outline is secure, fill in the bodies with solid black. Ensure the coverage is opaque; you may need a second coat if your paint looks streaky after the first pass. -
Detail the feet and tails:
Pay attention to where the birds meet the branch. Add a tiny stroke for feet gripping the wood, and ensure the tail feathers taper to a sharp, elegant point. -
Refine the twigs:
Extend the smaller twigs at the ends of the branches. Make these lines very thin, almost wispy, fading out at the tips. -
Let the black dry completely:
Wait for the black ink or paint to form a dry crust. If you paint the red hearts too soon and they touch wet black ink, the colors will bleed into a muddy mess.
Level Up: Dawn Sky
Before painting the black silhouettes, apply a very pale wash of pink and orange watercolor to the background and let it dry. This mimics a sunset behind the birds.
Step 3: Adding the Accents
-
Paint the main heart:
Using a clean brush and red or metallic pink paint, fill in the largest heart directly above the space between their beaks. A slightly watery application gives it a nice, soft texture. -
Add the floating hearts:
Paint the two smaller hearts, one slightly to the left and one to the right, creating a rising motion. These can be fainter or smaller than the main heart. -
Clean up sketch lines:
Once the paint is 100% dry (touch it gently to be sure), use a quality eraser to remove any visible pencil marks around the birds or lighter areas. -
Final touches:
Check the silhouette edges. If any look ragged, smooth them out with one final, careful pass of black ink.
This charming silhouette makes a wonderful gift tag or framed miniature for someone special
Heart Tree With Fingerprint Leaves
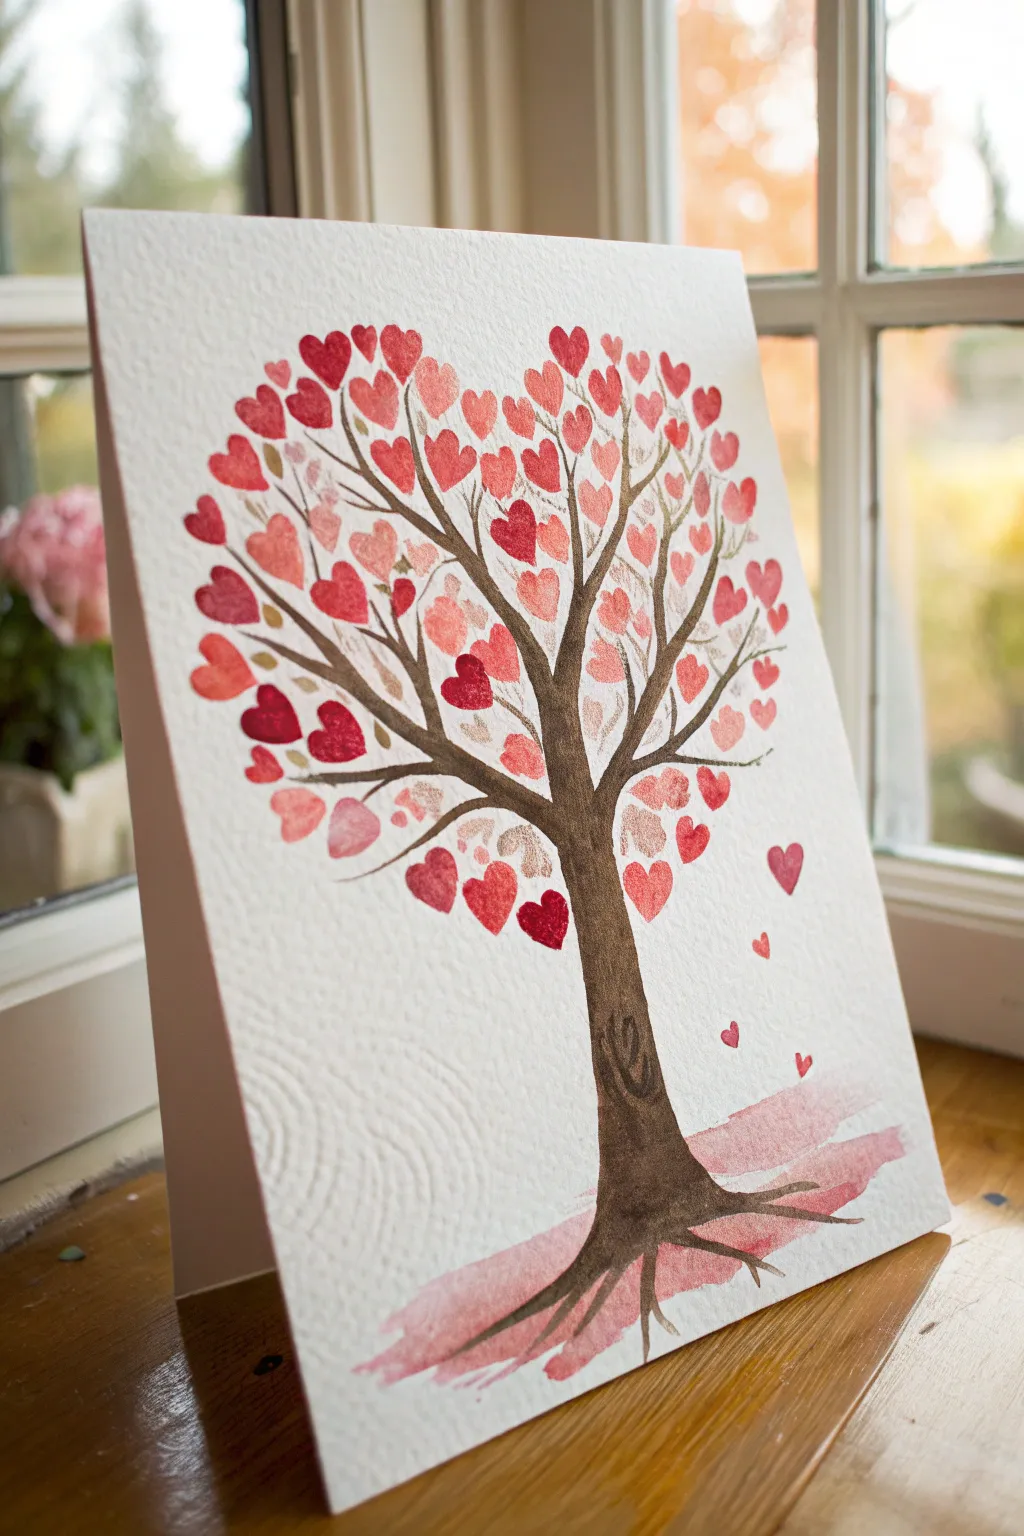
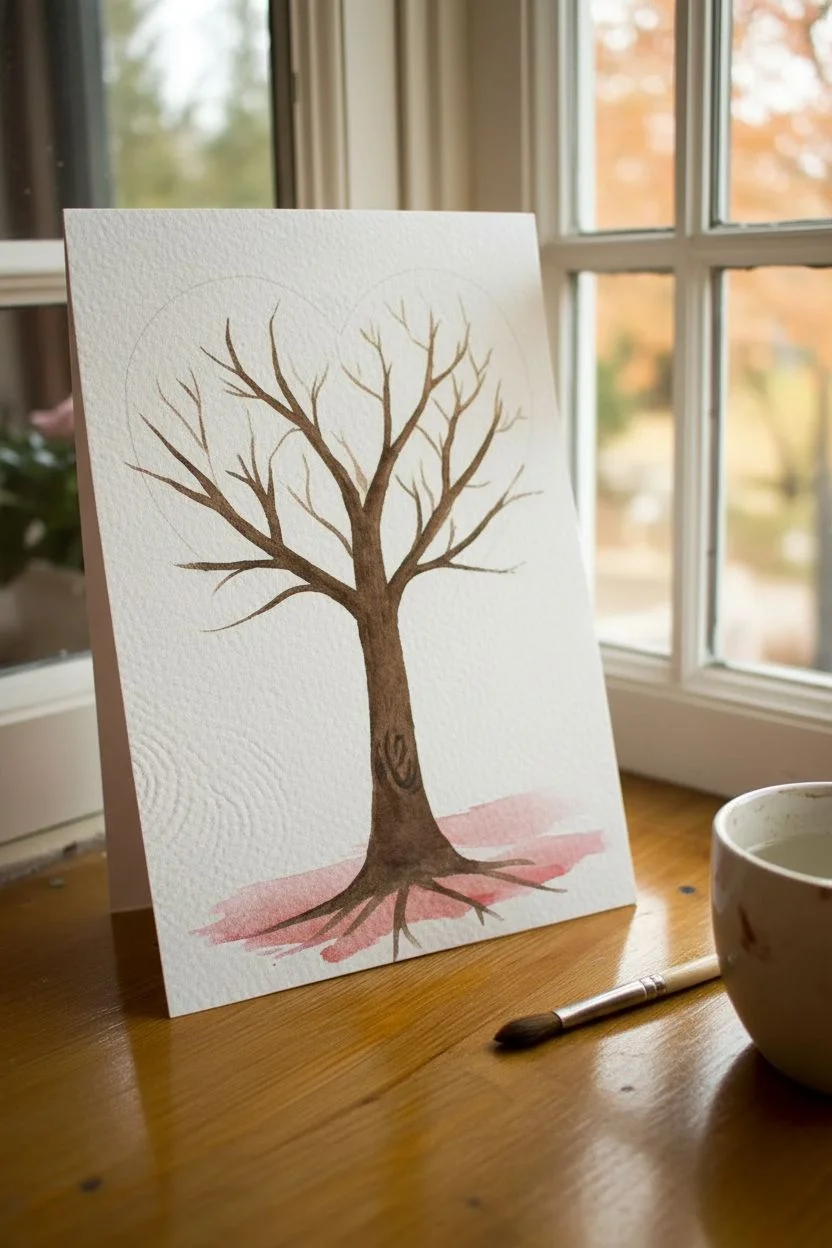
This charming painting features a sturdy tree trunk crowned with a canopy of heart-shaped leaves in varying shades of pink and red. The textured paper adds depth to the watercolor washes, creating a heartfelt piece perfect for Valentine’s Day or an anniversary.
Step-by-Step Tutorial
Materials
- Cold press watercolor paper (textured)
- Brown watercolor paint (burnt umber or sepia)
- Red and pink watercolor paints (various shades)
- Round watercolor brush (size 4 or 6)
- Smaller detail brush (size 0 or 2)
- Water cup and paper towels
- Pencil and eraser
- Palette for mixing
Step 1: Painting the Trunk
-
Sketch the outline:
Lightly sketch the tree structure with a pencil. Draw a trunk that widens at the bottom into roots and splits into several main branches at the top. Outline a large heart shape around the branches to guide where your leaves will go. -
Mix your brown:
Prepare a rich brown color on your palette. Add a touch of black or dark blue to deepen the brown for the shadowed areas of the bark. -
Paint the base trunk:
Using your medium round brush, fill in the trunk with the lighter brown shade. Start from the bottom and pull the paint upwards into the main branches. -
Add texture and shadow:
While the base layer is still slightly damp, drop darker brown pigment along the right side of the trunk and near the roots to create a rounded, 3D effect. Suggest bark texture with small, vertical strokes. -
Extend the branches:
Switch to your smaller detail brush. extending the main branches into thinner, delicate twigs that reach out towards the edges of your penciled heart outline. -
Ground the tree:
Create a soft wash of diluted pinkish-red paint at the base of the roots. Use horizontal strokes to suggest the ground, letting it fade out naturally at the edges.
Fixing Blotchy Hearts
If a heart has too much water and blooms, touch the corner of a dry paper towel to the wet puddle to lift the excess, then repaint with thicker pigment
Step 2: Creating the Canopy
-
Prepare red palette:
Mix three or four distinct shades for the leaves: a deep crimson, a bright scarlet, a soft rose pink, and a very pale blush. Variety is key here. -
Start the heart shapes:
Begin painting small hearts at the very tips of your painted branches. You can use the tip of your round brush: press down, lift, and repeat at an angle to easily form a heart shape. -
Vary sizes and colors directly:
Alternate between your red and pink shades constantly. Paint some hearts large and others tiny to create a natural, organic look within the canopy. -
Fill the canopy:
Continue filling in the large heart outline you sketched earlier. Cluster the hearts densely near the heavy branches and space them out as you move toward the outer edge of the canopy. -
Add falling leaves:
Paint three or four small hearts floating down on the right side of the tree, suspended in the air. Add smaller ones near the ground wash to suggest they have landed. -
Layer for depth:
Once the first layer of hearts is dry, I sometimes like to add a translucent second layer of lighter hearts overlapping the darker ones to make the tree look fuller. -
Erase guidelines:
Wait until the painting is completely bone dry. Gently erase any visible pencil marks from your initial heart outline. -
Final details:
If you want to add a personalized touch, use the dark brown paint and the detail brush to paint carved initials inside a small heart shape on the trunk.
Use Fingerprints
Instead of a brush, use your thumb dipped in paint for the larger hearts and pinky finger for small ones to make this a true keepsake craft
Once dry, you can fold your paper to create a unique card that speaks straight from the heart

PENCIL GUIDE
Understanding Pencil Grades from H to B
From first sketch to finished drawing — learn pencil grades, line control, and shading techniques.
Explore the Full Guide
Tic-Tac-Toe Hearts and X’s Painting
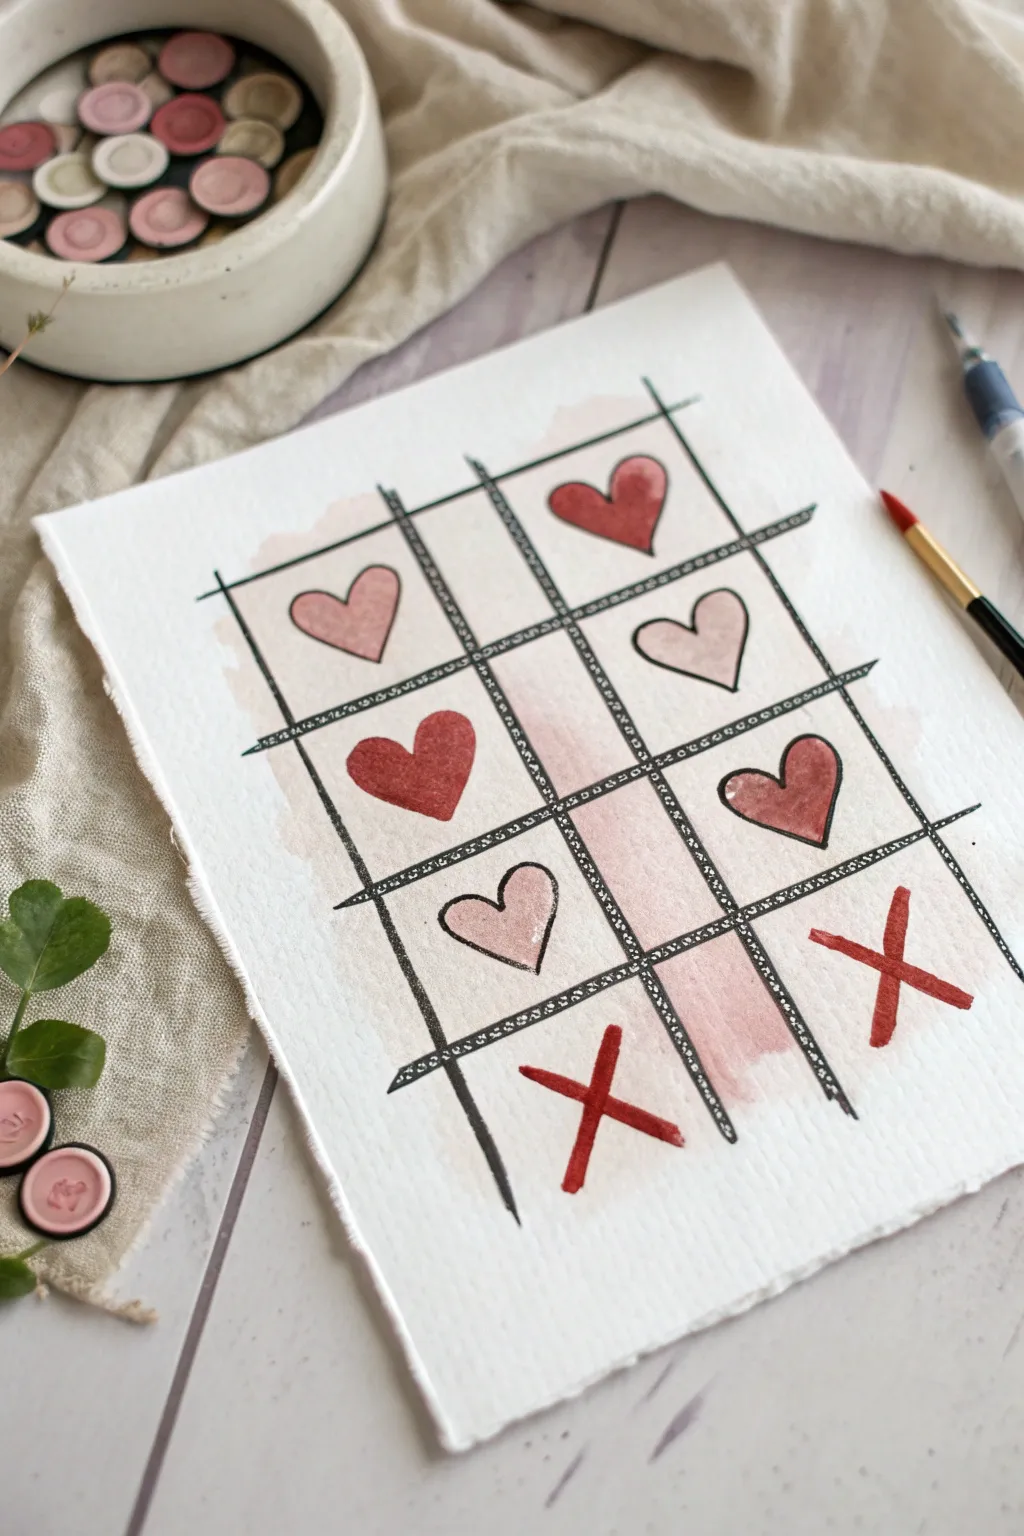
Transform a classic game into a romantic piece of art with this charming watercolor project. Featuring soft pink washes, hand-drawn hearts, and bold X’s, this painting is perfect for a handmade Valentine’s card or framed decor.
Detailed Instructions
Materials
- Cold press watercolor paper (approx. 5×7 or 8×10)
- Watercolor paints (shades of red, pink, and burgundy)
- Black fine-liner pen (waterproof) or thin black marker
- Flat shader brush (size 6 or 8)
- Round pointed brush (size 4 or 6)
- Ruler
- Pencil and eraser
- Two jars of water
- Paper towels
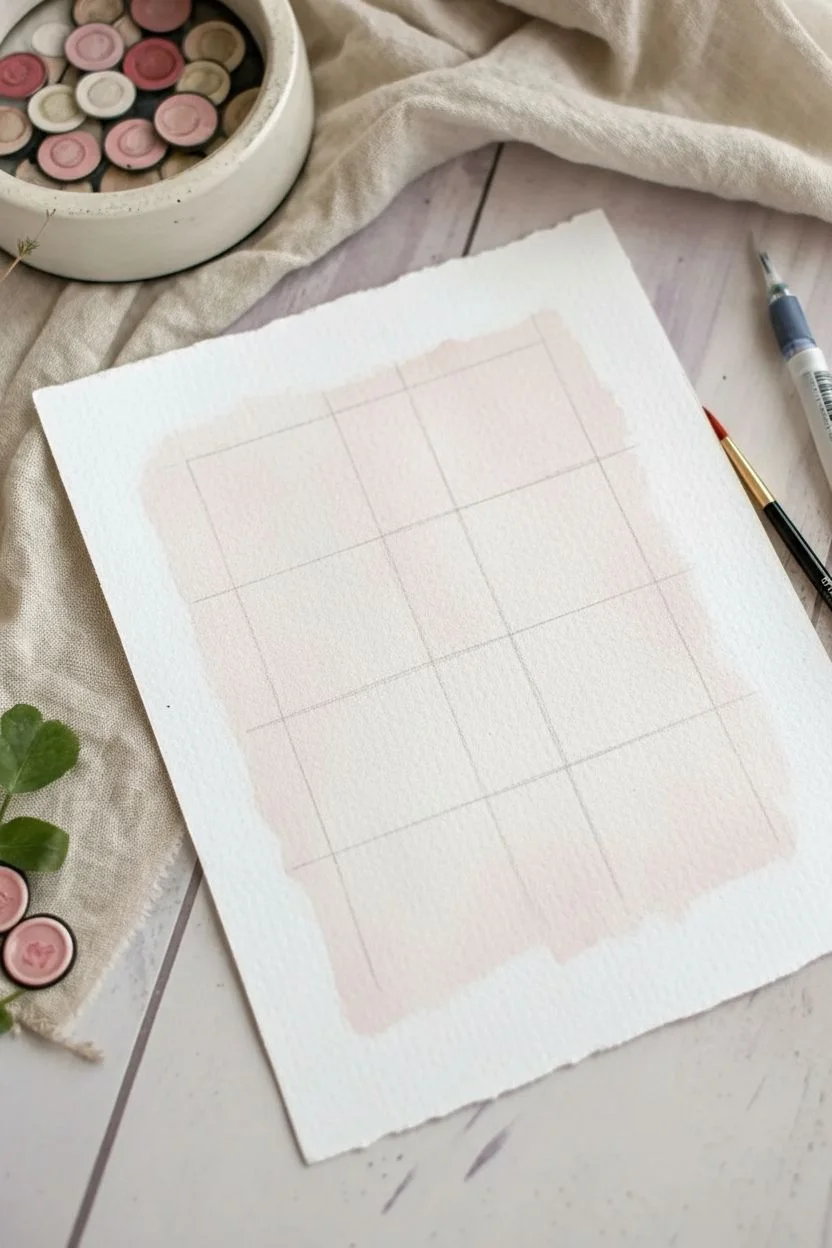
Step 1: Setting the Background
-
Paper preparation:
Start by trimming your watercolor paper to your desired size. If you want that lovely deckled edge look shown in the photo, you can carefully tear the paper against a ruler instead of cutting it with scissors. -
Drafting the grid:
Using a pencil and a ruler, lightly sketch a simple tic-tac-toe grid in the center of your paper. Make the lines long enough so they extend slightly beyond where the outer box would be, giving it an open feel. -
Adding the background wash:
Mix a very watery, pale pink wash on your palette. Take your flat shader brush and paint a loose, rectangular background shape behind your grid lines. -
Keeping it loose:
Don’t try to stay perfectly within the lines for this wash; let the edges be uneven and organic for a soft, artistic effect. Let this layer dry completely before moving on.
Step 2: Drawing the Grid Details
-
Inking the main lines:
Once the pink wash is dry, use your ruler and a waterproof black fine-liner pen to trace over your pencil grid lines. -
Adding texture:
To mimic the textured look in the reference, draw a second line right next to each main grid line. It doesn’t need to be perfectly parallel; slight wiggles add character. -
Creating the scribble effect:
Between those double lines, add tiny scribbles, dots, or diagonal hatch marks. This fills the gap and gives the grid a playful, sketched appearance rather than a rigid geometric look.
Smudge Alert
Make sure your pink background wash is 100% dry before drawing the black grid. Ink will bleed instantly into damp paper, ruining crisp lines.
Step 3: Painting the Hearts and X’s
-
Planning the moves:
Decide where your winning moves will be. In this example, the X’s are at the bottom, and hearts fill the upper squares. Lightly sketch the heart shapes with a pencil to ensure they are centered in their boxes. -
Painting the first hearts:
Load your round brush with a soft rose or light pink watercolor. Paint the hearts in three of the squares (like the top left, middle right, and bottom center-left). -
Adding outlines:
While the paint is wet, you can drop in slightly darker pigment at the edges, or wait for it to dry and outline these lighter hearts with your black fine-liner for definition. -
Painting the bold hearts:
Switch to a deeper red or burgundy paint. Fill in the remaining hearts (like the center square, top right, and middle right) with this stronger color to create contrast against the lighter pinks. -
Adding the X’s:
Using a saturated red paint and your round brush, paint two large ‘X’ marks in the bottom right corner squares. Make the strokes fairly thick to match the visual weight of the hearts. -
Final ink touches:
Once all paint is bone dry, go back in with your fine-liner. Add loose outlines around the hearts if you haven’t already. I like to keep the pen line slightly separate from the paint edge sometimes to keep it looking spontaneous. -
Erasing guides:
Gently erase any visible pencil marks that weren’t covered by paint or ink, being careful not to smudge the artwork.
Add Some sparkle
Once dry, use a metallic gold gel pen to add tiny dots or accents inside the dark red hearts for a subtle, festive shimmer.
Now you have a sweet, handmade piece of art ready to frame or give to someone special
Sweet “LOVE” Block Letters With Simple Shadows
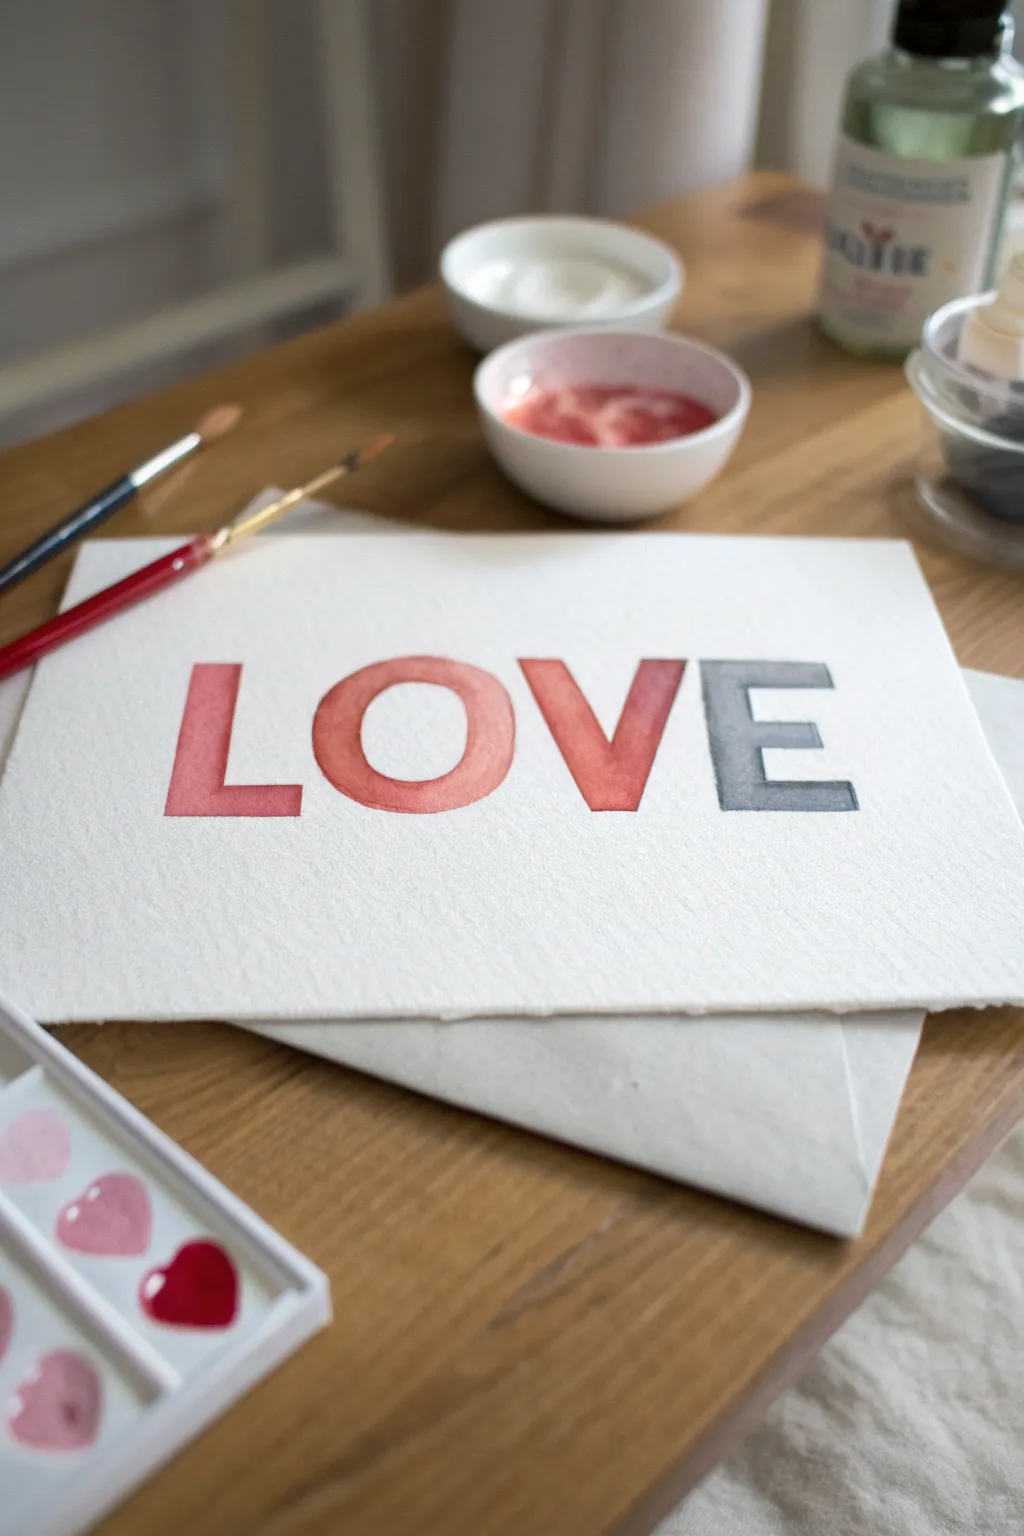
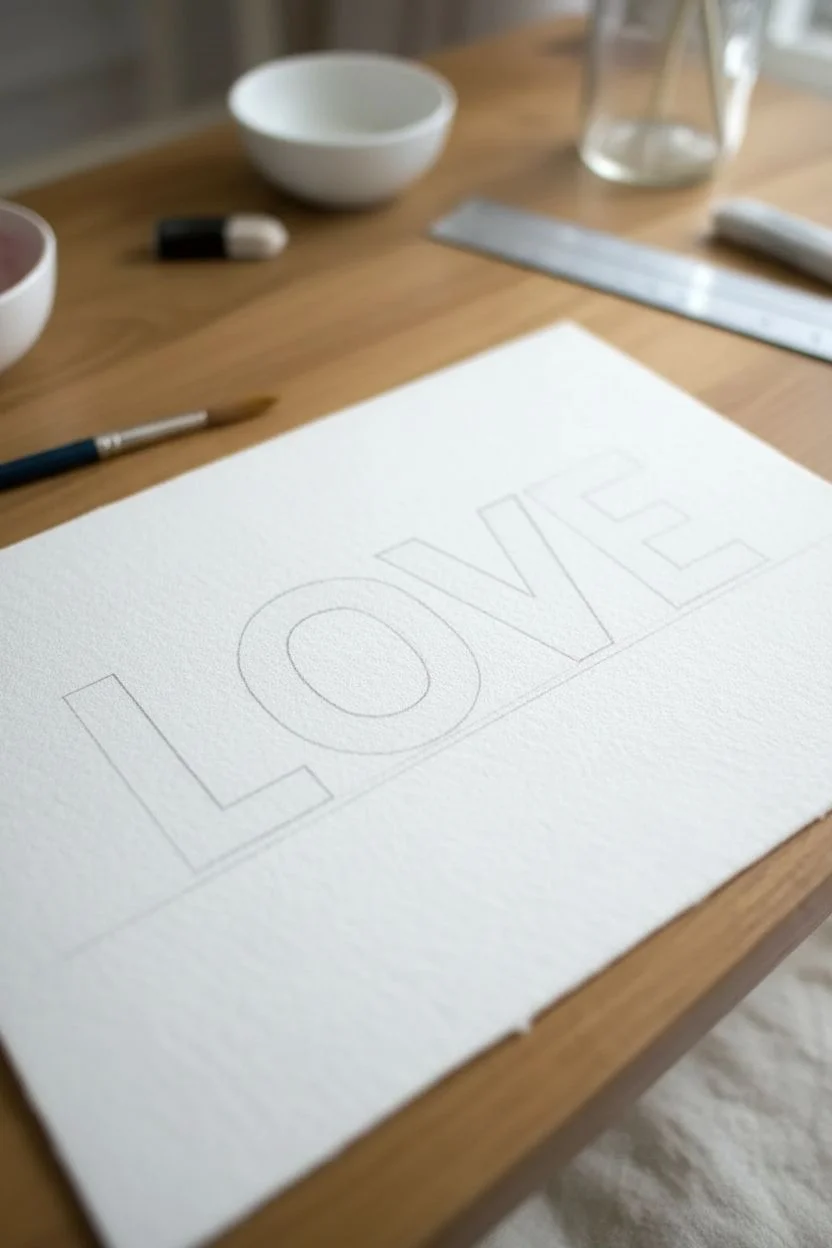
Create a modern, typographic statement piece with this simple watercolor project featuring the word LOVE. The design relies on clean block letters and a subtle color transition from warm rose to cool grey, perfect for a minimalist Valentine’s gift.
Step-by-Step
Materials
- Cold press watercolor paper (heavyweight, textured)
- Pencil and eraser
- Ruler
- Watercolor paints (red, pink, Paynes grey)
- Round watercolor brush (size 6 or 8)
- Clean water jar
- Paper towels
- Masking tape (optional)
Step 1: Planning and Sketching
-
Prepare your paper:
Start with a clean sheet of cold press watercolor paper. The texture is important here as it adds character to the simple letters. -
Measure the baseline:
Use a ruler to lightly draw a straight horizontal line across the lower middle section of your paper. This will serve as the baseline for your letters. -
Outline the blocks:
Sketch the letters L, O, V, and E using your ruler for the straight edges. Aim for thick, bold block letters, keeping the spacing between them even. Press very lightly with your pencil so the graphite doesn’t show through the translucent paint later. -
Clean up sketch lines:
Gently erase any stray marks or double lines. You want the faintest possible guide that you can still see to paint within.
Fixing Bleeds
If paint bleeds outside the line, quickly dab it with a clean, dry paper towel, then use a damp brush to ‘scrub’ the error away gently.
Step 2: Painting the Gradient
-
Mix your first color:
Load your brush with a watery mix of rose pink or light red. You want the pigment to be fluid but not dripping. -
Paint the letter L:
Carefully fill in the ‘L’ with your pink mixture. Use the tip of the brush to create crisp edges along your pencil lines, then fill the center. -
Transition to the O:
For the ‘O’, mix a tiny amount of orange or a warmer red into your original pink puddle. Paint the ‘O’, keeping the paint wet so it settles evenly into the paper’s texture. -
Create the V:
Now, begin the shift toward the cooler tones. Add a very small drop of grey or a tiny touch of blue to your red mix. The ‘V’ should look slightly moodier and darker than the ‘O’. -
Finish with the E:
Clean your brush thoroughly. Mix a watery Paynes grey or a blue-black shade. Paint the ‘E’ in this contrasting cool tone to complete the gradient effect across the word.
Step 3: Adding Depth
-
Let the base dry:
Wait until the letters are completely dry to the touch. If the paper feels cool, it’s still wet. -
Mix a shadow tone:
Create a slightly more concentrated version of your red mix and your grey mix. You want these to be just a shade darker than the dried letters. -
Apply subtle shading:
I like to add just a hint of dimension here. On the ‘L’ and ‘O’, add a transparent glaze of the darker pink on the lower half of the letters. -
Shade the cool letters:
Repeat this process for the ‘V’ and ‘E’, adding a slightly darker grey wash to the bottom or right side of the strokes to suggest weight. -
Final touches:
Once everything is fully dry, gently erase any visible pencil lines that weren’t covered by paint.
Level Up: Edges
For ultra-crisp lines, apply masking tape or drawing gum over the letters before painting, but ensure the paper is sturdy enough to handle removal.
Allow the painting to dry flat completely before framing or gifting to someone special


Heart Garland With String and Clothespins

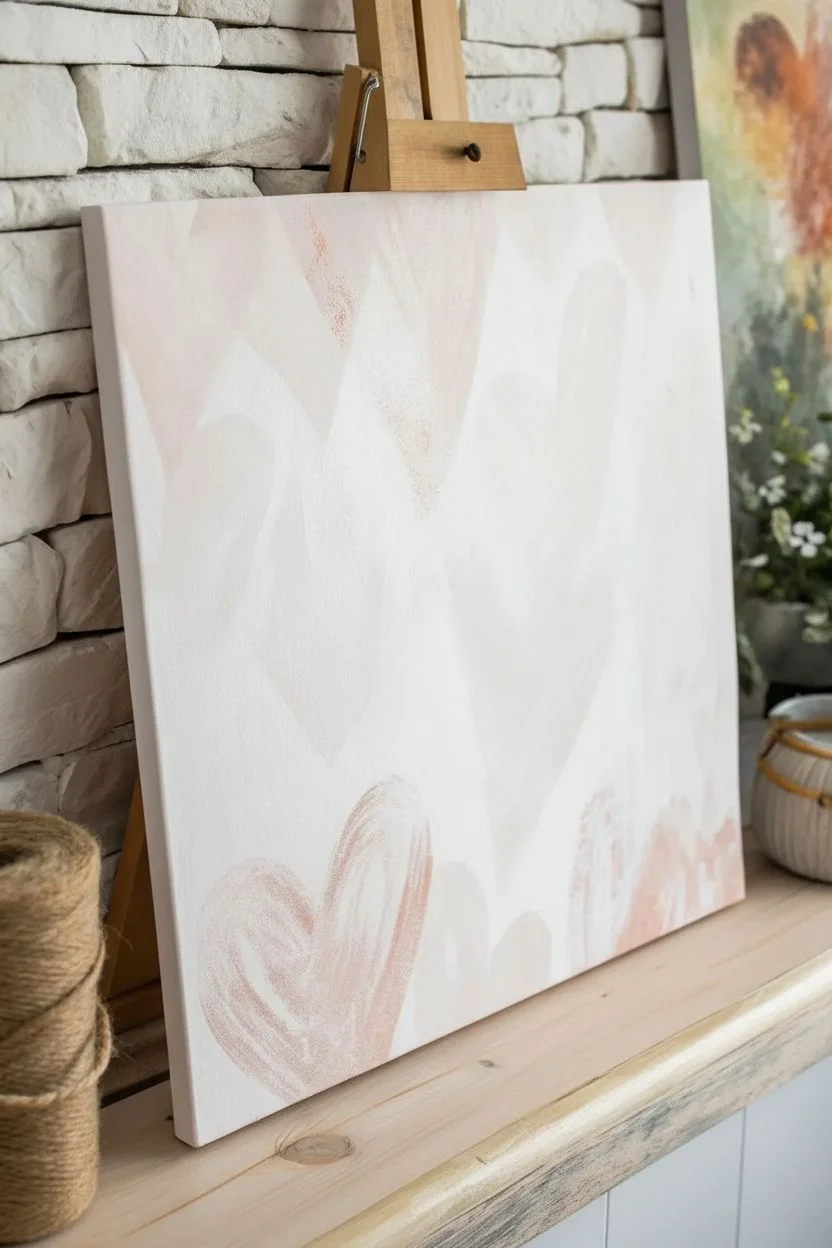
This charming mixed-media project combines soft, abstract painting with tridimensional elements to create a piece full of texture and warmth. The delicate string of wooden hearts adds a lovely farmhouse touch to the gentle pink backdrop.
Detailed Instructions
Materials
- Stretched canvas (rectangular)
- Acrylic paints (white, blush pink, terracota/rust)
- Wide flat paintbrush
- Jute twine
- Mini wooden clothespins (natural finish)
- Small wooden heart cutouts (approx. 1-2 inches wide)
- Hot glue gun and glue sticks
- Scissors
Step 1: Painting the Background
-
Prepare the canvas:
Start with a clean, blank stretched canvas. If your canvas isn’t pre-gessoed, give it a quick coat of white acrylic paint to ensure a smooth base, though the raw texture works well here too. -
Mix your base pinks:
On your palette, mix a small amount of blush pink with plenty of white to create a very pale, soft rose color. You want this layer to be subtle. -
Paint large abstract hearts:
Using a wide flat brush, paint large, loose heart shapes onto the canvas. Don’t worry about perfect symmetry—the charm lies in the visible brushstrokes and faded edges. -
Add texture:
While the paint is still slightly tacky, I like to dry-brush a bit of pure white over the hearts to soften them further and create a distressed, vintage look. -
Let it dry completely:
Allow the background to dry fully before moving on. This prevents the next steps from smudging your soft design.
Natural Wood Look
Dilute your acrylic paint with water (1:1 ratio) to create a ‘stain’ rather than a solid coat. This lets the natural wood grain show clearly through the color.
Step 2: Preparing the Wooden Hearts
-
Sort your hearts:
Select about 7-9 small wooden heart cutouts. Lay them out to plan your color gradient or pattern. -
Paint the first shade:
Paint a few hearts in a solid blush pink color. Apply thin coats so the wood grain still peeks through slightly if you like a rustic feel. -
Paint the accent hearts:
Paint the remaining hearts in a deeper terracotta or rust shade. This provides a nice contrast against the paler background. -
Add decorative details (optional):
For extra whimsy, use a fine-tip brush or a pin to add tiny dots or patterns to one or two of the pink hearts once they are dry. -
Drying time:
Set all the painted wooden hearts aside until they are completely dry to the touch.
Step 3: Assembling the Garland
-
Measure the twine:
Cut a length of jute twine that is slightly wider than your canvas. You want it to drape nicely across the middle with enough slack to wrap around the edges. -
Position the twine:
Hold the twine across the canvas to determine the perfect height for your garland—usually right across the center or slightly above looks best. -
Secure the twine ends:
Using a dab of hot glue, attach one end of the twine to the back or side edge of the canvas. Pull it across securely—but not too tight—and glue the other end. -
Arrange the clips:
Take your mini wooden clothespins and space them out evenly along the twine. Don’t attach the hearts yet; just get the spacing right. -
Attach the hearts:
Clip each painted wooden heart onto the twine using the clothespins. You can gently adjust their positions if needed. -
Secure with glue (optional):
If you want the arrangement to be permanent, place a tiny dot of hot glue behind each knot or clip to keep the hearts from sliding or tilting. -
Trim excess:
Snip off any extra twine hanging off the back of the canvas for a clean finish.
Add Dimension
For a 3D pop, glue a smaller unpainted wooden heart on top of one of your larger painted hearts to create a layered embellishment.
Display your new artwork on a mantel or shelf to add a sweet, handcrafted rustic vibe to your room
Cupid Arrow Through a Big Heart (Super Simple Shapes)
Capture the classic symbol of romance with this minimalist watercolor project featuring a bold red heart pierced by a graphic arrow. The contrast between the soft watercolor wash and the sharp black lines creates a striking modern look perfect for a handmade card or framed gift.
Step-by-Step Tutorial
Materials
- Cold-press watercolor paper (300 gsm)
- Red watercolor paint (pan or tube)
- Black ink or black gouache
- Medium round watercolor brush (size 6 or 8)
- Fine liner watercolor brush (size 0 or 1)
- Pencil and eraser
- Ruler (optional)
- Clean water jar
- Paper towel
Step 1: Painting the Heart
-
Sketch the outline:
Begin by lightly sketching a large heart shape in the center of your paper with a pencil. Keep your lines very faint so they won’t show through the translucent paint later. -
Prepare your red:
Load your medium round brush with plenty of water and mix a vibrant pool of red paint. Test the color on a scrap piece of paper to ensure it’s the right saturation—you want a nice balance between pigment and water. -
Paint the left curve:
Starting at the top left curve of the heart, drag your brush downwards, following your pencil guide. Let the belly of the brush do the work to create a smooth, rounded edge. -
Complete the shape:
Repeat the process on the right side, joining the two halves at the bottom point. Don’t worry if the watercolor has some natural variation in tone; that texture adds character. -
Fill the center:
Quickly fill in the middle of the heart while the edges are still wet. This ‘wet-on-wet’ technique helps blend the strokes together seamlessly. -
Soften the edges:
If you have any harsh lines or puddles, dry your brush on a paper towel and gently lift the excess paint or smooth out the area. -
Let it dry completely:
This is crucial: allow the red heart to dry completely before touching it again. If it’s even slightly damp, the black ink in the next step will bleed into the red.
Step 2: Adding the Arrow
-
Map out the arrow line:
Once the paper is bone-dry, use a ruler to lightly sketch the path of the arrow going diagonally through the lower third of the heart. Visualize the line passing behind the heart. -
Sketch the arrow head:
Draw a small triangle at the upper right end of your line. Give it slightly curved back edges to make it look like a classic arrowhead. -
Sketch the fletching:
At the bottom left end of the line, sketch the feathers (fletching). Draw a chevron shape, followed by a second chevron slightly behind it, connected by small lines. -
Load the fine brush:
Switch to your fine liner brush (size 0 or 1). Load it with black ink or very opaque black gouache. I find ink gives the crispest line for this part. -
Line the shaft:
Carefully trace over your pencil line for the arrow shaft. Remember to stop when you hit the red heart and pick up the line on the other side. -
Fill in the arrowhead:
Outline the triangle shape of the arrowhead and fill it in completely with solid black. -
Detail the feathers:
Trace the outline of your fletching design. Use confident, straight strokes to define the sharp angles of the feather vanes. -
Add stripe details:
Inside the feather outline, draw a few diagonal lines parallel to the V-shape to suggest the individual barbs of the feather. -
Erase guide lines:
Wait for the black ink to dry fully—give it at least 10 minutes. Then, very gently erase any visible pencil marks remaining around the arrow.
Use Tape for Crisp Lines
For the arrow shaft, place two pieces of washi tape very close together to create a stencil. Paint between them for a perfectly straight line.
Fixing a Bleed
If black ink bleeds into the red, stop immediately. Use a clean, damp brush to lift the bleeding ink, blot with tissue, and let it dry before trying again.
Now you have a charming piece of art ready to frame or give to someone special
Rainy Night Couple Silhouette With Heart Umbrella
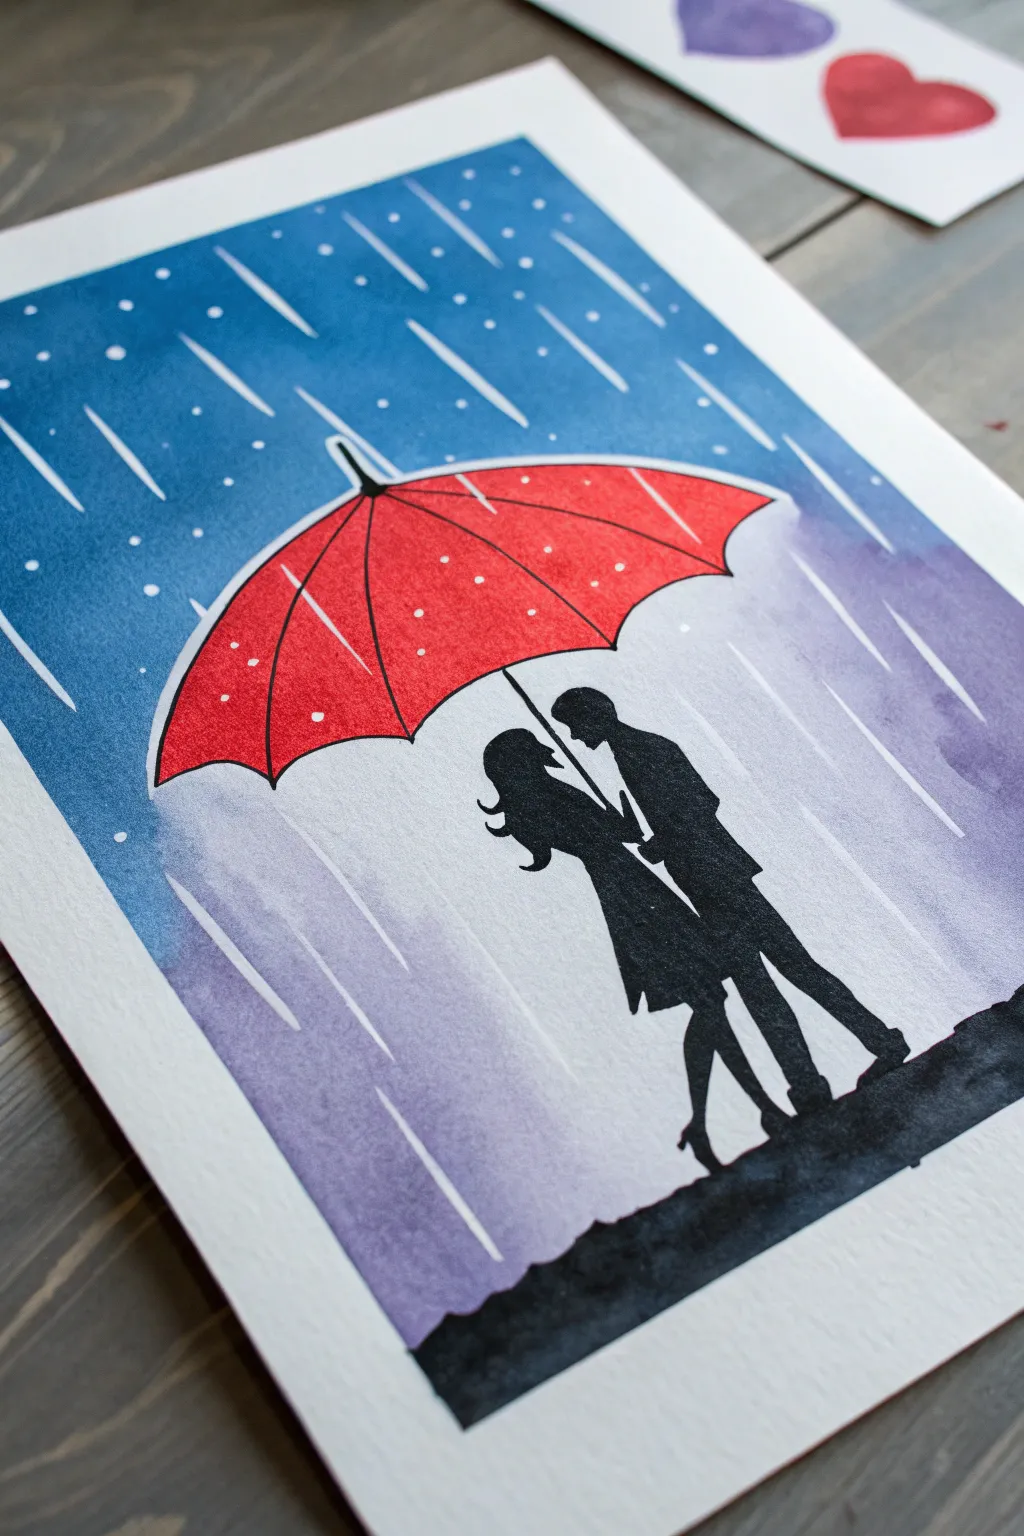

Capture a moment of quiet connection with this moody yet vibrant watercolor painting. The contrasting bright red umbrella against a stormy blue-violet sky creates an instantly classic romantic scene perfect for a DIY Valentine’s gift.
Step-by-Step Tutorial
Materials
- Watercolor paper (cold press, 300gsm)
- Watercolor paints (Indigo/Prussian Blue, Purple/Violet, bright Red)
- Black acrylic paint or waterproof black ink
- Pencil and eraser
- Painter’s tape or masking tape
- White gel pen or white gouache with a fine liner brush
- Round brushes (sizes 4 and 8)
- Fine detail brush (size 0 or 00)
- Masking fluid (optional but recommended)
Step 1: Drafting the Design
-
Tape your borders:
Begin by taping down all four edges of your watercolor paper to a board or table. This creates that crisp white border seen in the final piece and prevents the paper from buckling when wet. -
Sketch the umbrella:
Lightly sketch a large, curved dome shape in the upper center of the paper for the red umbrella. Make sure the arc is smooth and symmetrical. -
Outline the couple:
Beneath the umbrella, sketch the silhouette of the couple. Start with the heads close together, almost touching, and draw their bodies leaning slightly inward. Don’t worry about facial features; the outline is all that matters. -
Add the ground:
Draw a wavy, uneven line at the bottom to represent the ground or a puddle reflection where they are standing.
Bleeding Lines?
If your black silhouette bleeds into the background, the background wasn’t dry enough. Wait longer, or fix mistakes by painting over the bleed with opaque white gouache, then re-painting the background color.
Step 2: Creating the Rainy Atmosphere
-
Mask the subjects:
If you have masking fluid, carefully paint it over the entire umbrella shape and the couple’s silhouette. This protects these areas so you can paint the background freely. Let it dry completely. -
Wet-on-wet background:
Brush clean water over the entire background area (everything except the umbrella, couple, and ground). The paper should be glisten, but not hold puddles. -
Apply the blue tones:
Load your brush with a deep blue like Indigo or Prussian Blue. Drop the color into the upper left and right corners, letting it flow downwards. -
Blend in purple:
While the paper is still wet, introduce a soft purple or violet hue into the lower middle section of the background. Let the blue and purple merge naturally on the paper to create a stormy sky gradient. -
Lift or mask rain:
If you didn’t use masking fluid for rain streaks beforehand, wait for the paint to lose its shine but remain damp. Use a stiff, clean brush to lift out diagonal streaks of paint to suggest rain. -
Dry the background:
Allow the background wash to dry completely. If you used masking fluid for the figures, gently rub it off with your finger or an eraser once the paper is bone dry.
Step 3: Painting the Subjects
-
Fill the umbrella red:
Using a bright, opaque red watercolor (or gouache for better coverage), fill in the umbrella completely. I prefer to do two thin layers rather than one thick one to keep it even. -
Detail the umbrella ribs:
Once the red base is dry, use a very fine brush with a slightly darker red or black to paint thin curved lines radiating from the center top point down to the edges, creating the umbrella’s segments. -
Highlight the umbrella:
With a white gel pen or white gouache, add dashed lines or dots along the ribs of the umbrella to show reflection and wetness. -
Paint the silhouette:
Switch to black acrylic paint or ink for the couple. Carefully fill in the sketched outline. Use your smallest brush for the delicate areas like the hair, noses, and the umbrella handle mechanism. -
Ground the figures:
Fill in the bumpy ground area at the bottom with solid black, merging it seamlessly with the couple’s feet.
Sharper Rain
For the crispest rain lines, use a ruler and a white gel pen instead of a brush. Vary the pressure to create tapered lines that look like falling water rather than solid sticks.
Step 4: Final Rain Details
-
Add bold rain streaks:
Using white gouache or a bold white gel pen, draw distinct diagonal lines over the background. Make some lines longer and some shorter. -
Vary the line thickness:
Press harder on some strokes to make ‘closer’ raindrops and lighter for distant ones. Ensure the angle matches any rain streaks you lifted earlier. -
Detailing splashes:
Add tiny white dots or small splashes near the top of the umbrella where the rain would be hitting and bouncing off. -
Peel the tape:
Once you are absolutely certain everything is dry, slowly peel off the painter’s tape at a 45-degree angle to reveal your clean white border.
Frame this charming rainy scene to give as a heartfelt gift or keep as reminder of cozy days
Cherry Blossom Branch Made of Heart Petals
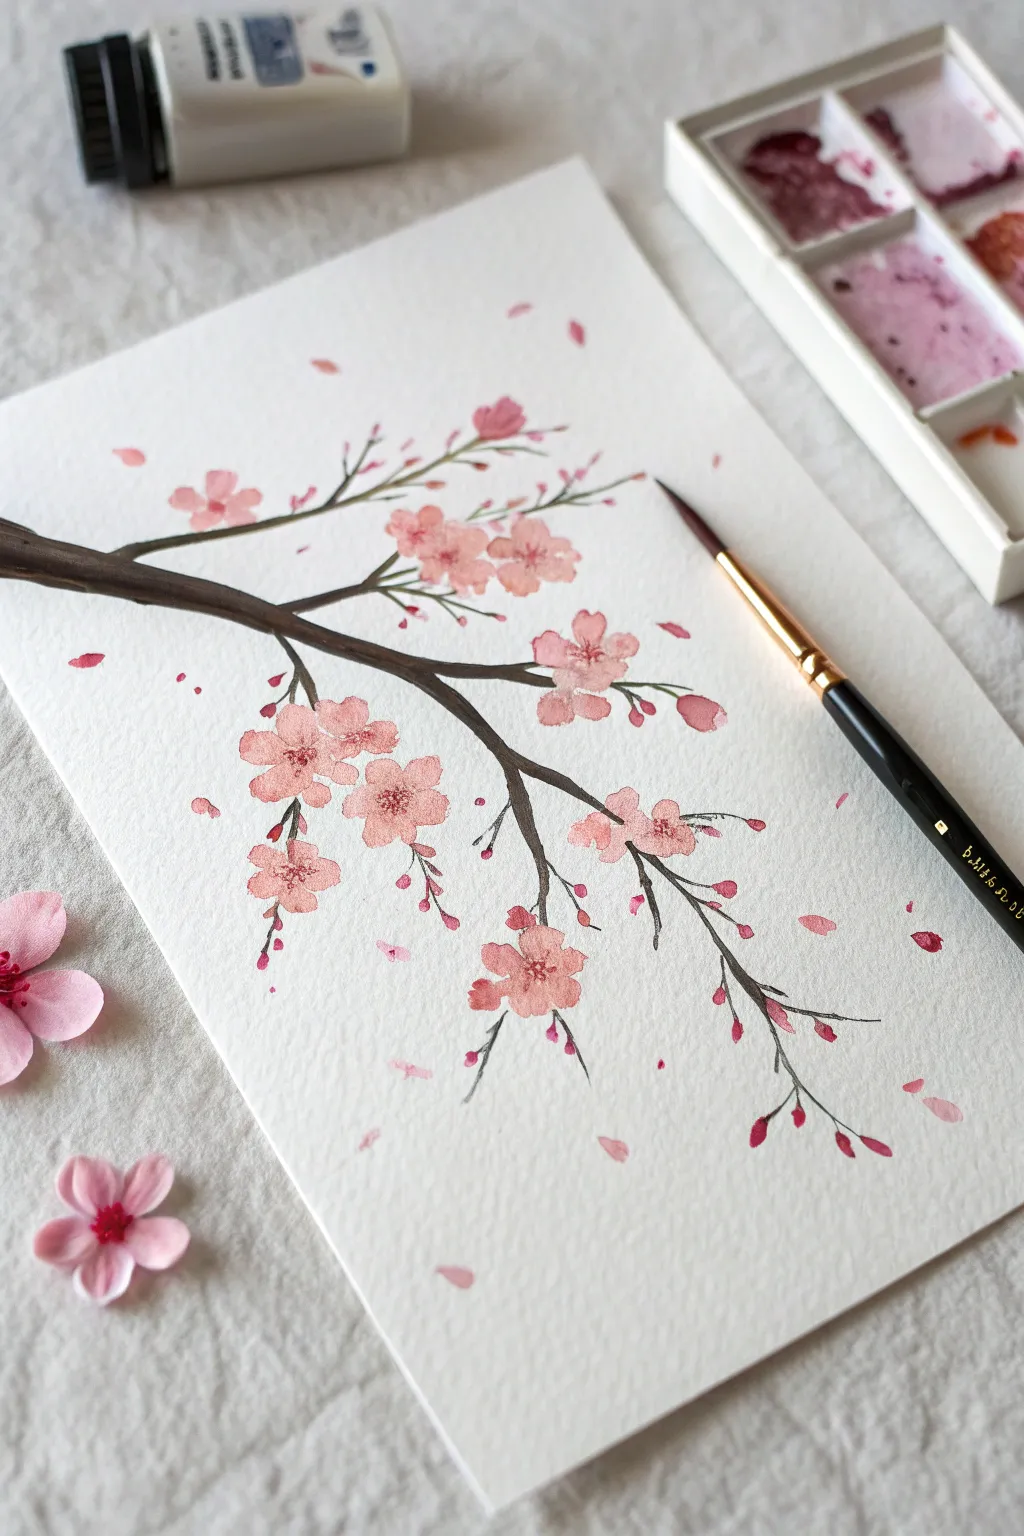
Capture the fleeting beauty of spring with this delicate watercolor cherry blossom branch. The soft pink petals and scattered drifting blooms create a romantic and airy composition perfect for a Valentine’s art piece.
Step-by-Step
Materials
- Cold press watercolor paper (A5 or A4 size)
- Watercolor paints (shades of pink, brown, and black)
- Round watercolor brush (size 4 or 6)
- Fine detail brush (size 0 or 1)
- Jar of clean water
- Paper towels
- Pencil (optional for sketching)
- White gouache or white gel pen (optional for highlights)
Step 1: Painting the Branch Structure
-
Mix your brown:
Start by mixing a dark, earthy brown. Combine burnt umber with a tiny touch of black to get a deep, woody tone. The consistency should be inky but not too watery. -
Anchor the main branch:
Using your medium round brush, start from the left edge of the paper about one-third of the way down. Paint the thickest part of the branch entering the frame, pressing down firmly to create width. -
Extend and taper:
Drag your brush towards the center-right, gradually lifting pressure so the branch becomes thinner as it reaches outward. Let the line have a natural curve rather than being perfectly straight. -
Add secondary branches:
Switch to a slightly smaller brush or use the very tip of your round brush. Paint smaller offshoots growing from the main branch, alternating directions—some pointing up, some angling down. -
Create fine twigs:
At the very ends of your branches, add tiny, jagged twigs. These should be very thin lines, almost like hairline cracks, where the future buds and flowers will attach. -
Let it dry:
Allow the branch structure to dry completely. If the brown is still wet when you add flowers, the pink will bleed into the mud, losing that delicate blossom look.
Petal Pro Tip
Keep the center of your flowers slightly white! When painting the 5 petals, don’t let them fully touch in the middle. Leaving a tiny speck of white paper adds instant sparkle and light.
Step 2: Blooming the Flowers
-
Prepare your pinks:
Mix two shades of pink on your palette: one very watery, pale wash for the petals, and a slightly more saturated, darker pink for the centers and buds. -
Paint the first flower shape:
Choose a spot on a twig. Using the pale pink, dab five small petal shapes in a circle. Keep them loose and not perfectly round—think of them almost like small distorted hearts meeting in the middle. -
Add clusters:
Continue adding full five-petal flowers along the branches. Group them in clusters of two or three for a natural look, rather than spacing them out evenly like polka dots. -
Create side-view blossoms:
For variety, paint some flowers that look like they are facing sideways. Do this by painting just three petals fan-shaped, attached directly to the wood. -
Add the buds:
Using a slightly darker pink mix, paint small, single teardrop shapes at the very tips of the thinnest twigs. These represent unopened buds ready to bloom. -
Paint falling petals:
To create movement, paint single petals floating in the empty white space around the branch. Use a very light hand so they look like they are drifting in the breeze. -
Let the petals settle:
Allow the pink layer to dry until it is damp but no longer soaking wet. This is crucial for the next step where we add details.
Step 3: Refining Details
-
Darken the centers:
Take your darker pink concentration. While the flower centers are still ever-so-slightly damp (or fully dry for a crisp look), drop a tiny dot of pigment right in the middle of each open flower. -
Draw the stamens:
Once the flowers are fully dry, switch to your finest detail brush. Mix a dark reddish-brown or deep pink. Paint tiny, hair-like lines radiance out from the center of the main flowers. -
Add pollen dots:
At the end of those tiny stamen lines, dab the smallest possible dot of dark pink or red to represent the pollen tips. -
Connect the floating petals:
Check your composition. If any buds look like they are floating disconnected from the branch, use your finest brush and the brown paint to draw a hairline stem connecting them back to the wood. -
Final check:
Step back and look at the whitespace. If it feels too empty, add one or two more drifting petals in the corners to balance the image.
Level Up: Metallic Pop
Once your painting is 100% dry, use a gold metallic watercolor paint or a gold gel pen to add tiny dots to the center of the flowers. It adds a luxurious finish perfect for a gift.
You now have a lovely, breezy branch that captures the serene feeling of the season
Scraped Paint Texture With a Hidden Heart Reveal
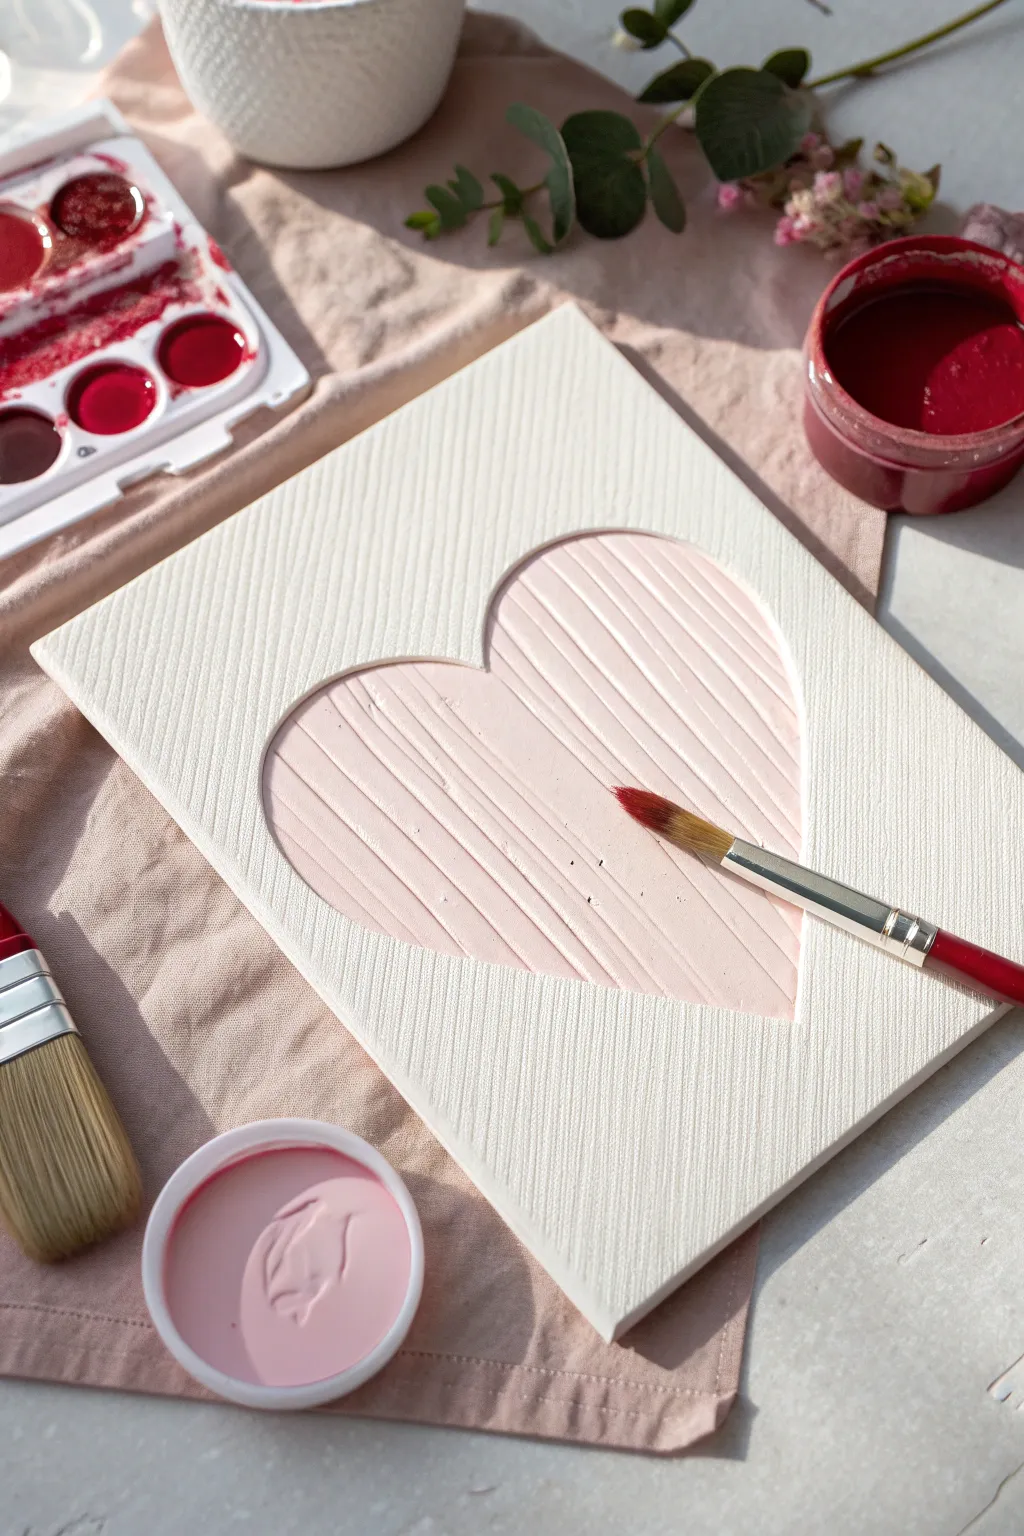
Create a stunning tactile art piece by combining heavy body textures with a negative space technique. This project uses modeling paste to sculpt a ribbed heart center surrounded by clean white canvas, revealing a soft pink interior.
Step-by-Step Guide
Materials
- Stretched canvas (8×10 or similar size)
- Masking tape or painter’s tape
- Heart template (paper or cardstock)
- Pencil
- X-Acto knife or craft knife
- Modeling paste or heavy structure gel
- Toothed spreaders or texture combs
- Acrylic paint (Soft Pink)
- Palette knife
- Small flat paintbrush
- Medium red acrylic paint (optional for accents)
Step 1: Preparation & Masking
-
Prepare the canvas:
Ensure your stretched canvas is clean and free of dust. Place it on a flat, protected work surface. -
Create the heart stencil:
Cut a piece of paper or cardstock that perfectly covers the entire face of your canvas. -
Draw the heart:
Draw a large, symmetrical heart in the center of your paper sheet. Make sure it is centered vertically and horizontally. -
Cut the negative space:
Using an X-Acto knife, carefully cut *out* the heart shape from your paper. You want to keep the outer frame, not the heart itself. -
Secure the mask:
Place the paper frame (with the heart hole) onto the canvas. Secure it tightly with masking tape around the edges so it doesn’t shift.
Step 2: Building Texture
-
Mix the color:
Mix a small amount of Soft Pink acrylic paint directly into your modeling paste on a palette. Aim for a pale, pastel marshmallow hue. -
Apply the paste:
Scoop a generous amount of the pink-tinted paste onto the canvas, specifically inside the open heart area of your stencil. -
Spread it thick:
Use a palette knife to spread the paste evenly within the heart, ensuring it’s about 1/8 to 1/4 inch thick. Don’t worry about smoothness yet. -
Create ridges:
Take a texture comb or a piece of cardboard with notches cut into it. Drag it diagonally through the wet paste to create deep, parallel linear grooves. -
Check the edges:
Ensure the paste fully meets the edges of your paper stencil so distinct heart outline forms.
Tape Trick
Apply a thin layer of matte medium over your stencil edges before adding paste. This seals the paper and prevents paste from bleeding underneath.
Step 3: Refining & Revealing
-
Initial drying:
Let the textured paste set for about 10-15 minutes. It should be firm but not rock hard. -
Remove the mask:
Carefully peel away the paper stencil. Lift straight up to avoid smudging the textured heart edges. -
Clean the lines:
If any paste seeped under the stencil, quickly wipe it away with a damp cotton swab or clean up the edge with a palette knife while it’s still pliable. -
Full cure:
Allow the modeling paste to dry completely. This is crucial; heavy texture can take 24 hours to fully harden. -
Enhance the texture (Optional):
Once dry, use a small flat brush to dry-brush a tiny amount of darker pink or red paint just on the ridges to make the texture pop. -
Final touches:
If I notice the surrounding white canvas got dirty, I like to do a quick coat of fresh white acrylic around the heart for a crisp finish.
Mixed Media Magic
Before the paste dries, press small beads or dried flowers into the grooves for added dimension.
Display your textured masterpiece on a shelf where the light can catch the ridges and cast subtle shadows
Salt-and-Wash Watercolor Hearts
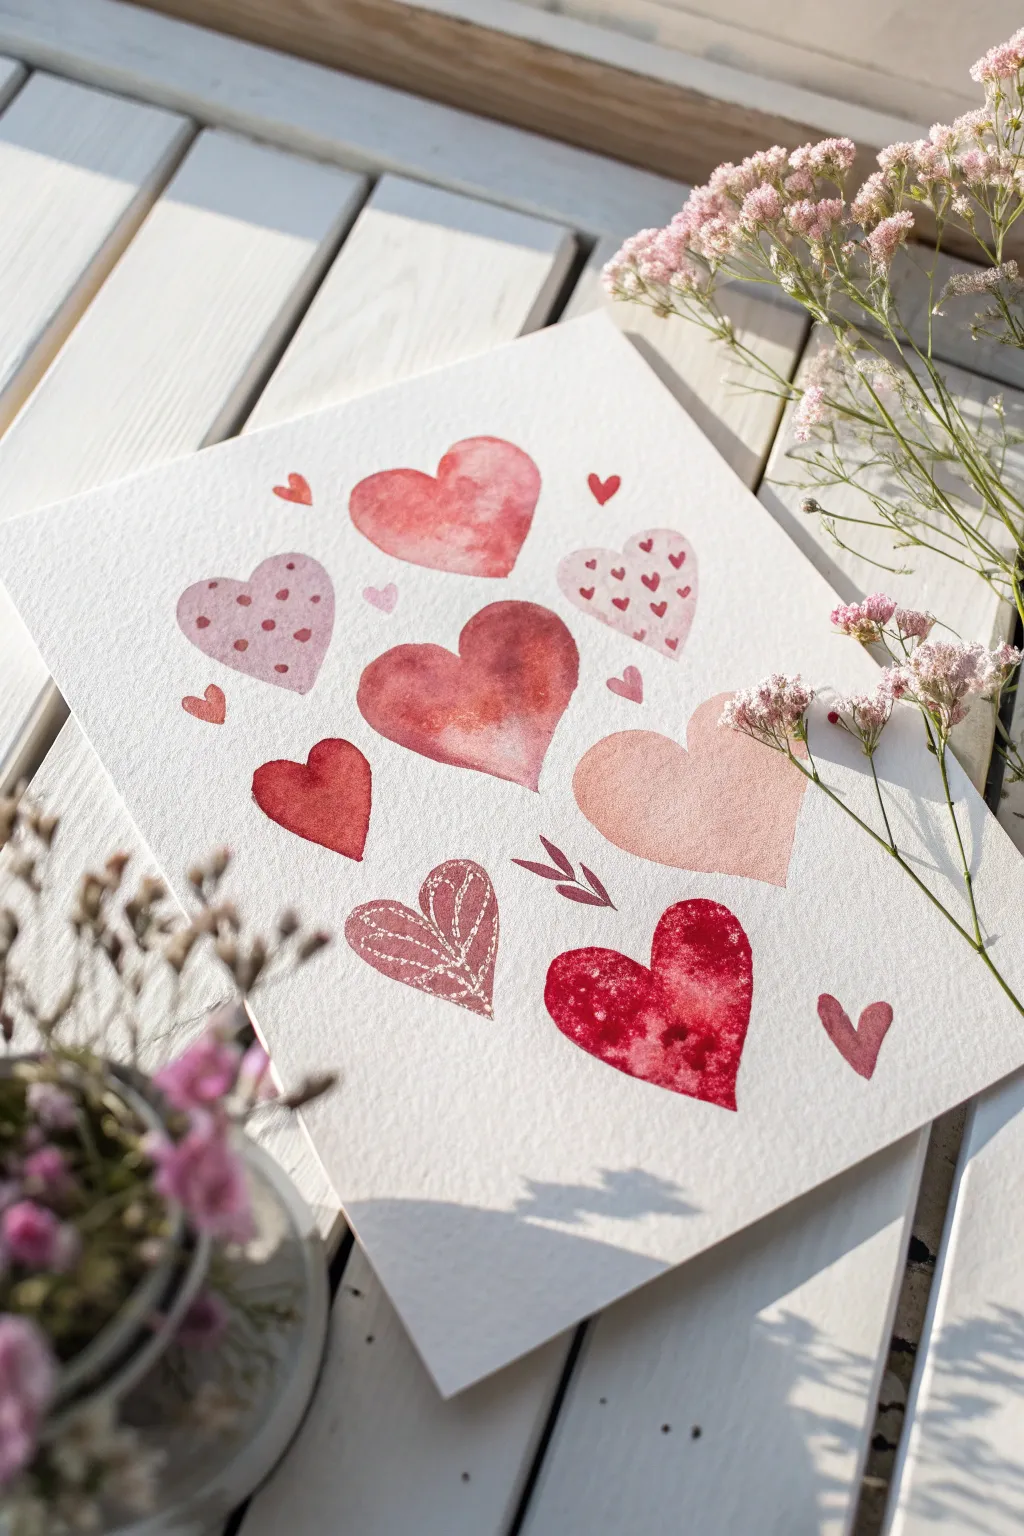
This delightful watercolor project explores various textures and techniques through a simple motif of scattered hearts. By playing with salt, wet-on-wet blending, and delicate patterns, you’ll create a charming piece perfect for Valentine’s Day or everyday decor.
How-To Guide
Materials
- Cold press watercolor paper (300gsm/140lb)
- Watercolor paints (Alizarin Crimson, Opera Pink, Burnt Sienna, Yellow Ochre)
- Round watercolor brushes (Size 4 and 8)
- Table salt
- Clean water jar
- Paper towels
- White gel pen or white gouache (optional)
Step 1: Creating Texture with Salt & Washes
-
Sketch placement:
Begin by lightly sketching roughly ten hearts of various sizes scattered across your paper. Keep the lines incredibly faint so they disappear under the paint later. -
Paint the central heart:
Mix a warm, rusty red using crimson and a touch of brown. Paint the large central heart, keeping the wash quite wet and slightly uneven to encourage natural blooming as it dries. -
Salt texture heart:
For the bottom right heart, load your brush with a deep, saturated red. Paint the shape quickly so it stays wet, then immediately sprinkle a pinch of table salt into the wet paint. Leave it completely undisturbed to dry. -
Soft peach gradient:
Create the large heart on the right side using a watery mix of pink and yellow ochre. Paint the shape with a very dilute wash, letting the color pool slightly at the bottom for a subtle gradient effect. -
Wet-on-wet blend:
For the top center heart, wet the paper inside the heart shape first with clean water. Drop in concentrated pink at the top and red at the bottom, tilting the paper slightly to let them merge naturally without over-mixing.
Step 2: Adding Patterns & Details
-
Dotted heart base layer:
Mix a dusty rose color and paint a medium-sized heart on the left side. Let this layer dry completely before moving to the next step. -
Adding the dots:
Once the dusty rose heart is bone dry, mix a slightly darker, thicker consistency of the same red. Use the tip of your size 4 brush to dab small polka dots across the surface. -
Miniature heart pattern:
Paint a very pale pink heart near the top right. Let it dry, then use a tiny detail brush and saturated red paint to draw miniature hearts floating inside the larger shape. -
Solid accent hearts:
Fill in the remaining small gaps with solid hearts in varying shades of red and coral. Paint a small, tilted red heart on the left and a few tiny floating hearts near the top edges to balance the composition. -
White ink detailing:
Locate the textured heart on the bottom left. Paint it with a muddy pink wash, let it dry, and then use a white gel pen or fine brush with white gouache to draw delicate vein-like lines or stitching across it. -
Leaf flourishes:
Mix a dark, reddish-brown hue. Use your smallest brush to paint two simple, stylized leaves or arrow fletching floating between the central and bottom hearts. -
Removing the salt:
Check that the salt-textured heart from the first phase is 100% dry. Gently rub the salt crystals off with your finger or a dry cloth to reveal the speckled starburst pattern underneath. -
Final assessment:
Step back and look at your composition. If any areas feel too empty, add tiny, single-stroke hearts or small dots of color to fill the negative space without overcrowding.
Make The Salt Work
Timing is everything with salt. If the paint is too wet, the salt dissolves; too dry, and nothing happens. The paper should have a glistening sheen when you sprinkle.
Level Up: Metallic Touch
Once your painting is fully dry, tracing the outline of just one or two hearts with gold metallic watercolor or a gold paint pen adds an elegant, modern finish.
Allow your beautiful watercolor collection to dry completely before framing or turning it into a heartfelt card
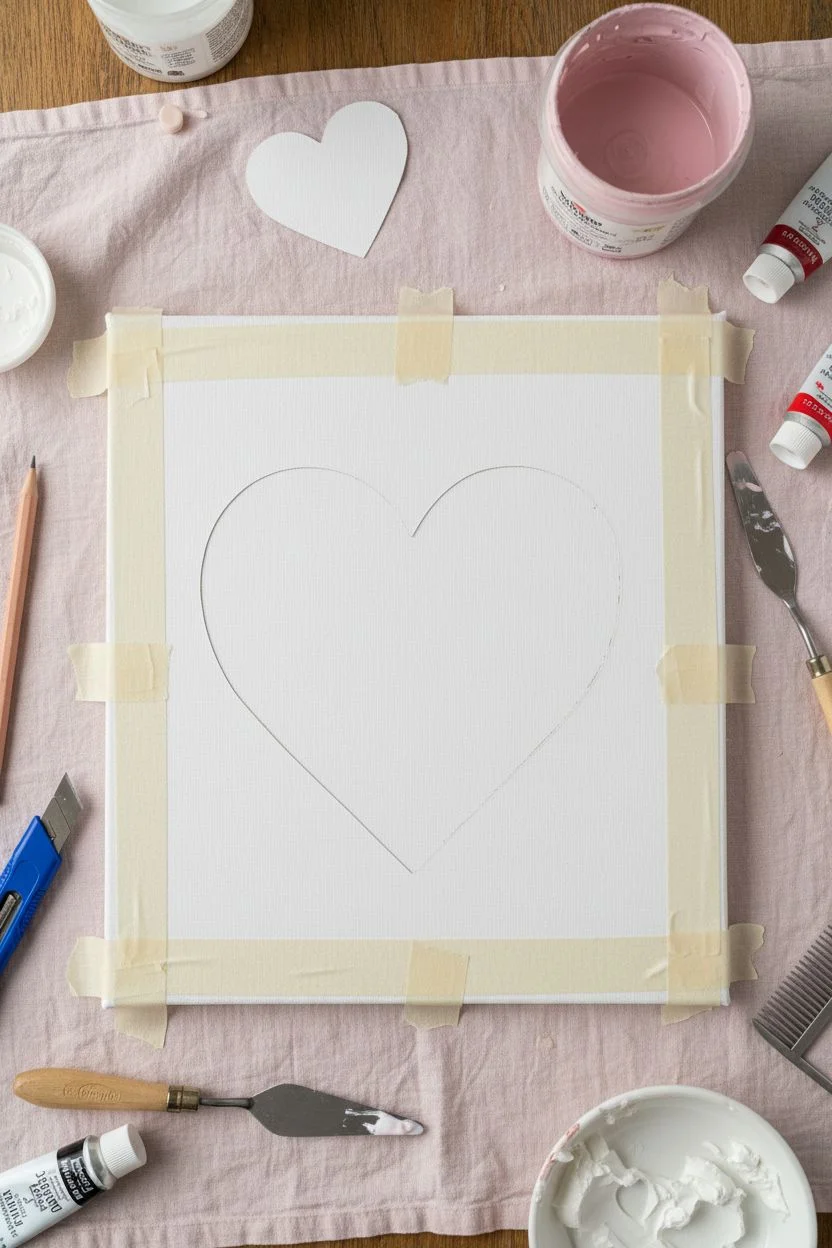
Two-Canvas Split Heart Diptych for Couples or Friends
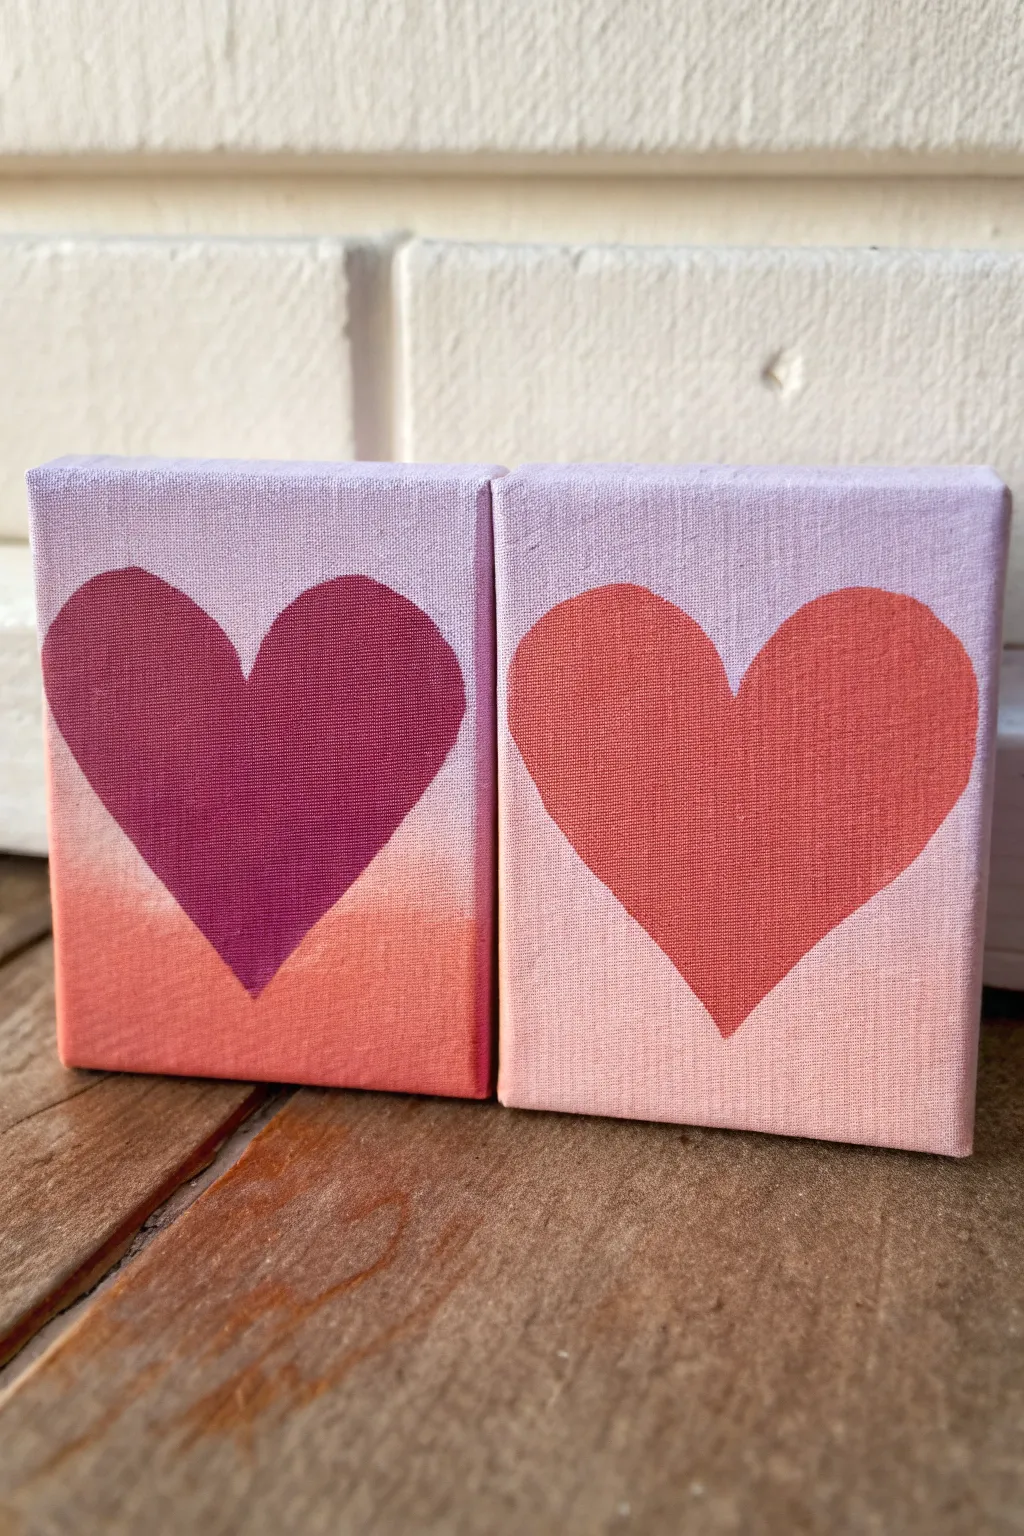
Create a stunning pair of matching canvases featuring bold hearts set against soft, gradient backgrounds. This project uses a subtle ombre effect to make the solid hearts pop, perfect for splitting between two friends or displaying side-by-side as a unified piece.
Step-by-Step Tutorial
Materials
- Two small square canvases (e.g., 4×4 or 6×6 inches)
- Acrylic paints (lavender, warm pink/coral, deep magenta, dark orange)
- Flat shader brushes (medium and large)
- Detail brush
- Heart stencil or thick cardstock to make one
- Pencil
- Painter’s tape or stencil adhesive (optional)
- Palette for mixing
- Cup of water and paper towels
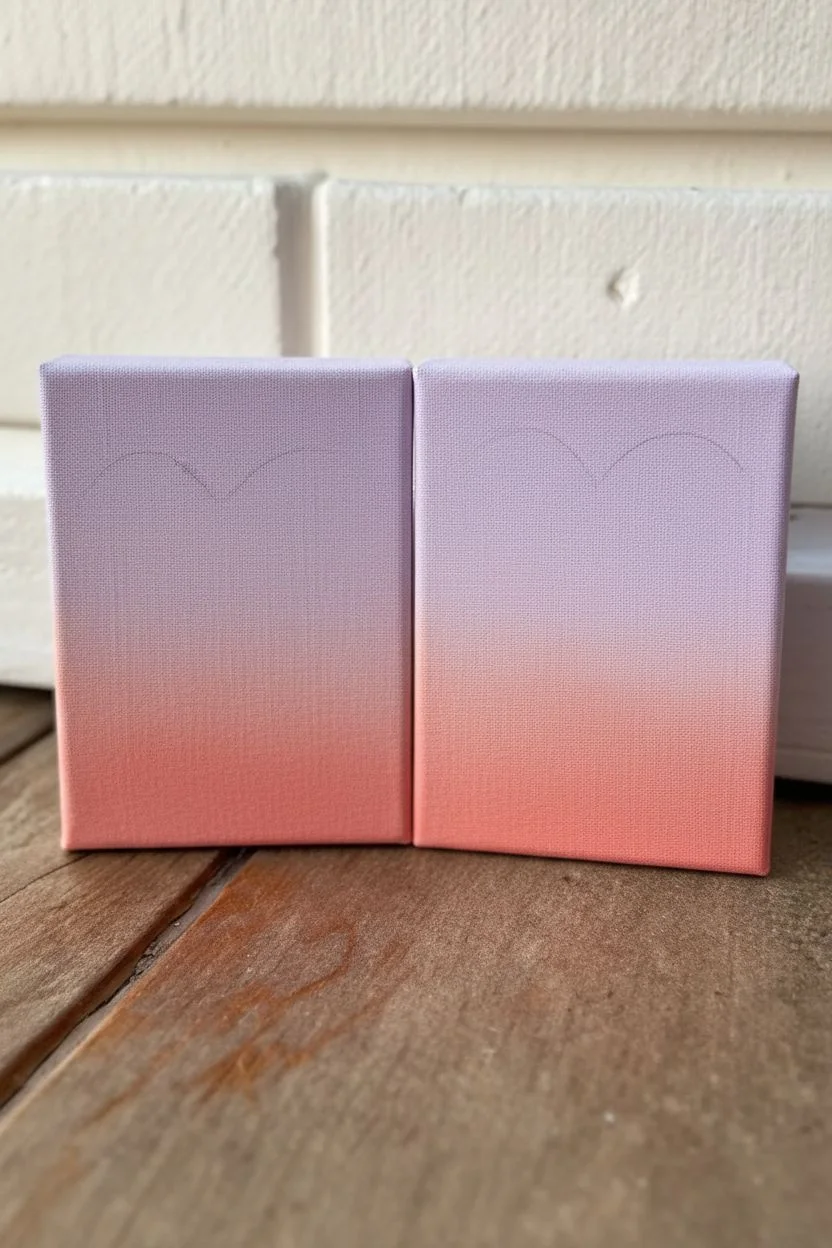
Step 1: Preparing the Background Gradient
-
Mix your base colors:
Begin by preparing your background palette. You will need a soft lavender for the top section and a warm, coral-pink for the bottom section. If you don’t have premixed tubes, blending white with purple and a touch of orange creates a lovely custom lavender. -
Apply the top color:
On the first canvas, paint the top two-thirds with your lavender mixture. Use a large flat brush and long, horizontal strokes to ensure smooth coverage. -
Apply the bottom color:
While the top is still slightly wet, paint the bottom third of the canvas with your coral-pink shade. Don’t worry about a perfect line where they meet just yet. -
Blend the transition:
Using a clean, slightly damp brush, gently work back and forth horizontally where the two colors meet. Allow the lavender to pull slightly down into the pink and vice versa to create a soft, ombre fade. -
Paint the edges:
Don’t forget to wrap your colors around the sides of the canvas. This gives the finished piece a polished, professional look without needing a frame. -
Repeat for the second canvas:
Recreate the exact same gradient process on your second canvas. I like to place them side-by-side while blending to ensure the horizon line of the fade matches perfectly across both pieces. -
Let it dry completely:
Set both canvases aside to dry fully. The background must be completely dry before you attempt to trace or paint the hearts, or the graphite will smudge and the paint will lift.
Step 2: Painting the Hearts
-
Create a template:
Cut a heart shape out of cardstock that fits nicely within the center of your canvas. A simple symmetrical heart works best for this modern look. -
Trace the shape:
Center your stencil on the first dry canvas and lightly trace the outline with a pencil. Repeat for the second canvas. Keep your pencil lines faint so they are easier to cover later. -
Select your heart colors:
Choose two distinct colors for the hearts that contrast well with your background. The example uses a deep magenta for one and a vibrant terracotta-orange for the other. -
Outline the first heart:
Using a detail brush and your deep magenta paint, carefully trace over your pencil line on the first canvas to establish a crisp edge. -
Fill in the center:
Switch to a medium flat brush to fill in the rest of the magenta heart. Apply the paint smoothly to avoid heavy texture ridges. -
Outline the second heart:
Repeat the outlining process on the second canvas using your terracotta-orange paint. Take your time with the curves to keep them looking organic. -
Fill the second heart:
Fill in the second heart completely. If the background gradient shows through, let the first coat dry and apply a second coat for full opacity. -
Refine the edges:
Once filled, inspect your edges. Use your detail brush to sharpen the point at the bottom of the heart or smooth out the curves at the top if needed. -
Clean up details:
If you made any small mistakes on the background, you can touch them up with your original gradient colors using a tiny brush, but usually, the bold heart covers most imperfections.
Smooth Blending Trick
If your acrylics are drying too fast to blend the gradient, mix in a drop of acrylic retarder or slow-drying medium to keep the paint workable longer.
Metallic Pop
For a glamorous twist, paint the hearts using metallic gold or copper paint. The shimmer will look incredible against the matte pastel gradient background.
Now you have a charming duo of paintings ready to brighten up a small shelf or desk


Have a question or want to share your own experience? I'd love to hear from you in the comments below!