Whenever you want that western vibe without getting stuck in tiny details, lean on bold shapes, big skies, and a little high-contrast silhouette magic. In this list of easy western painting ideas, I’m keeping it super doable with simple horizons, punchy sunset gradients, and iconic desert-and-ranch symbols you can paint in one satisfying session.
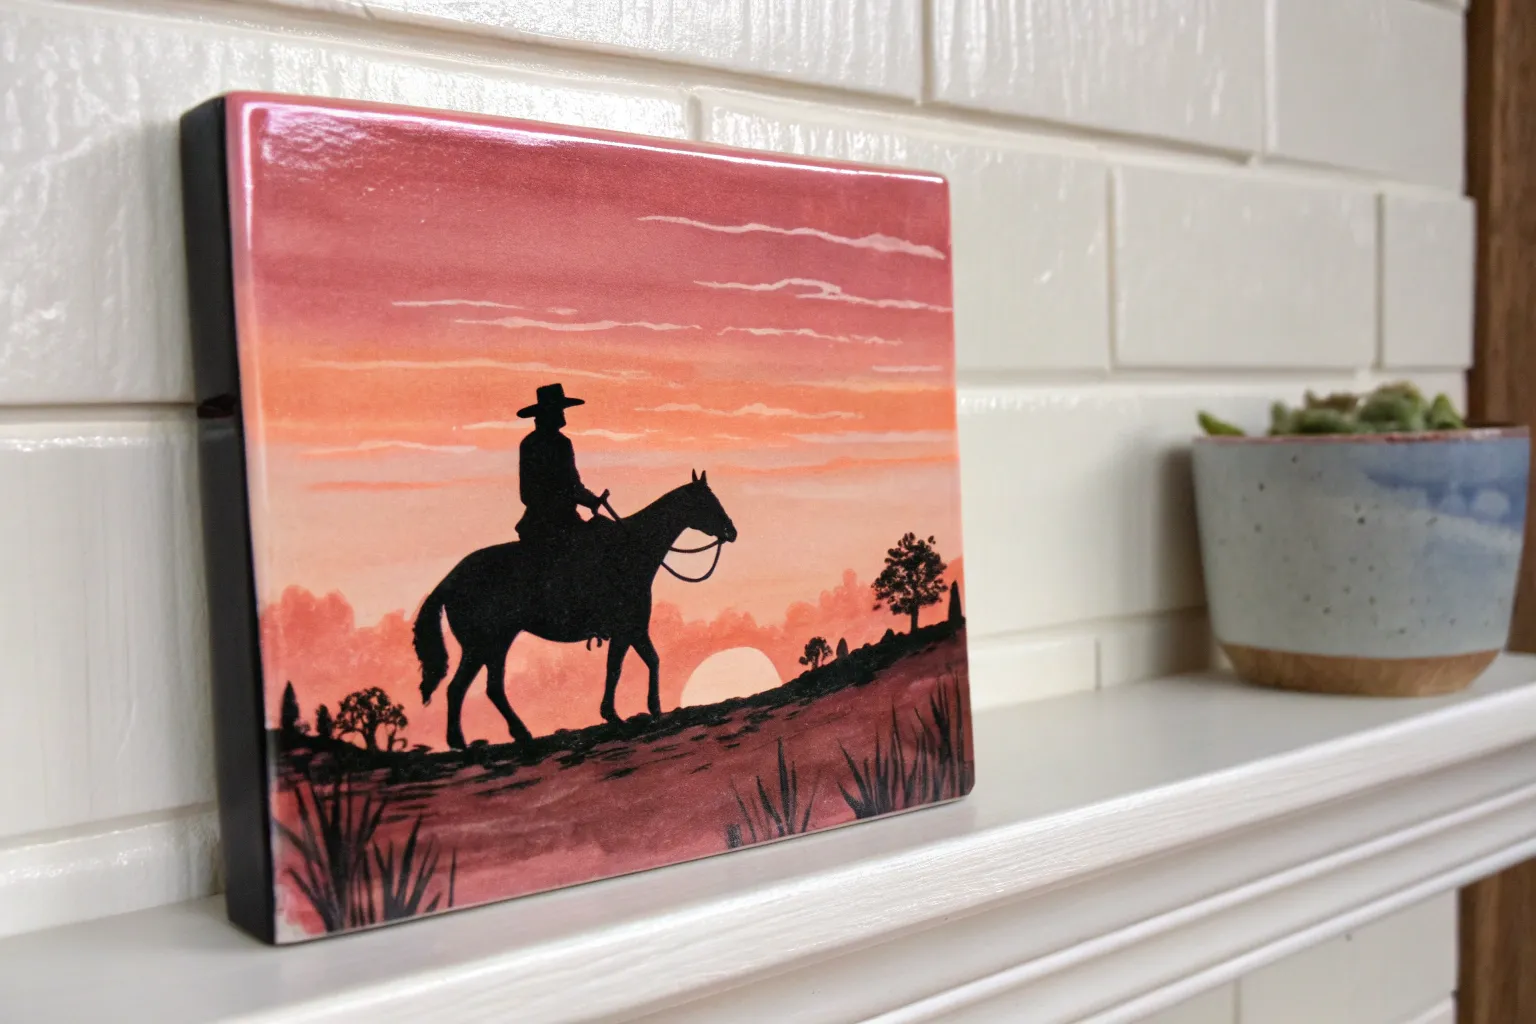
Lone Cowboy on Horseback on a Ridge
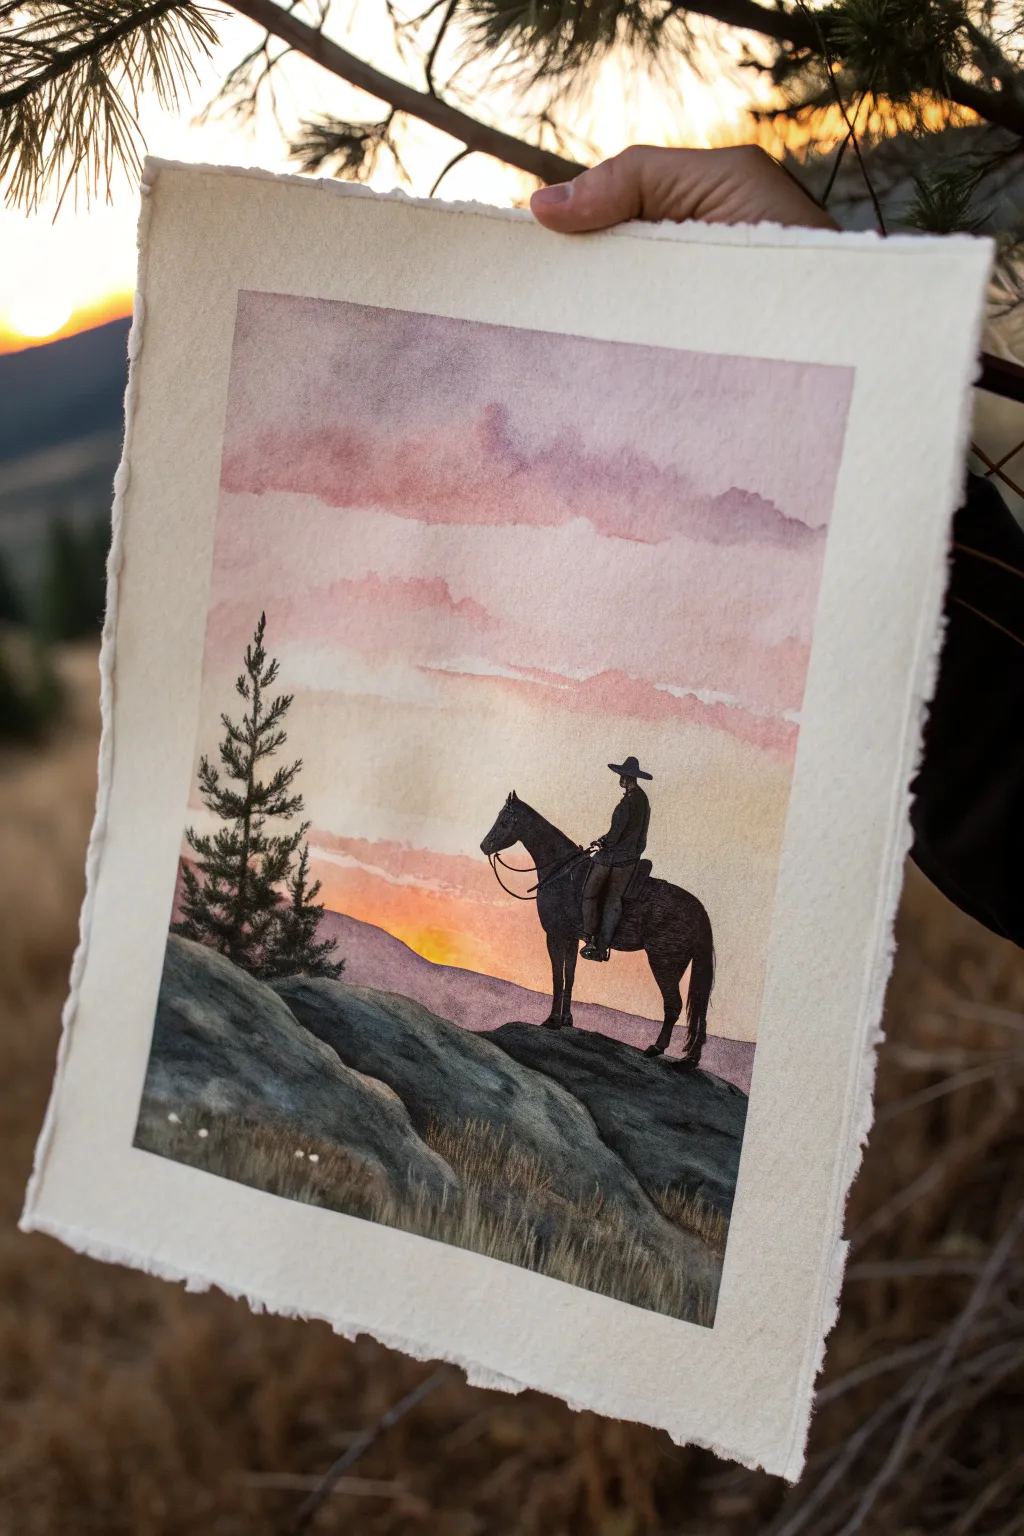
Capture the quiet solitude of the American West with this atmospheric watercolor painting featuring a cowboy silhouette against a soft, cotton-candy sunset. Using wet-on-wet techniques for the sky and precise dry-brushing for the details creates a stunning contrast that brings the scene to life on deckled paper.
Step-by-Step
Materials
- Cold press watercolor paper (deckled edge preferred)
- Watercolor paints (Indigo, Burnt Sienna, Alizarin Crimson, Yellow Ochre, Lamp Black)
- Round watercolor brushes (Size 8 for washes, Size 0 or 1 for details)
- Masking tape
- Drawing board
- Pencil (HB or H)
- Paper towels
- Jar of clean water
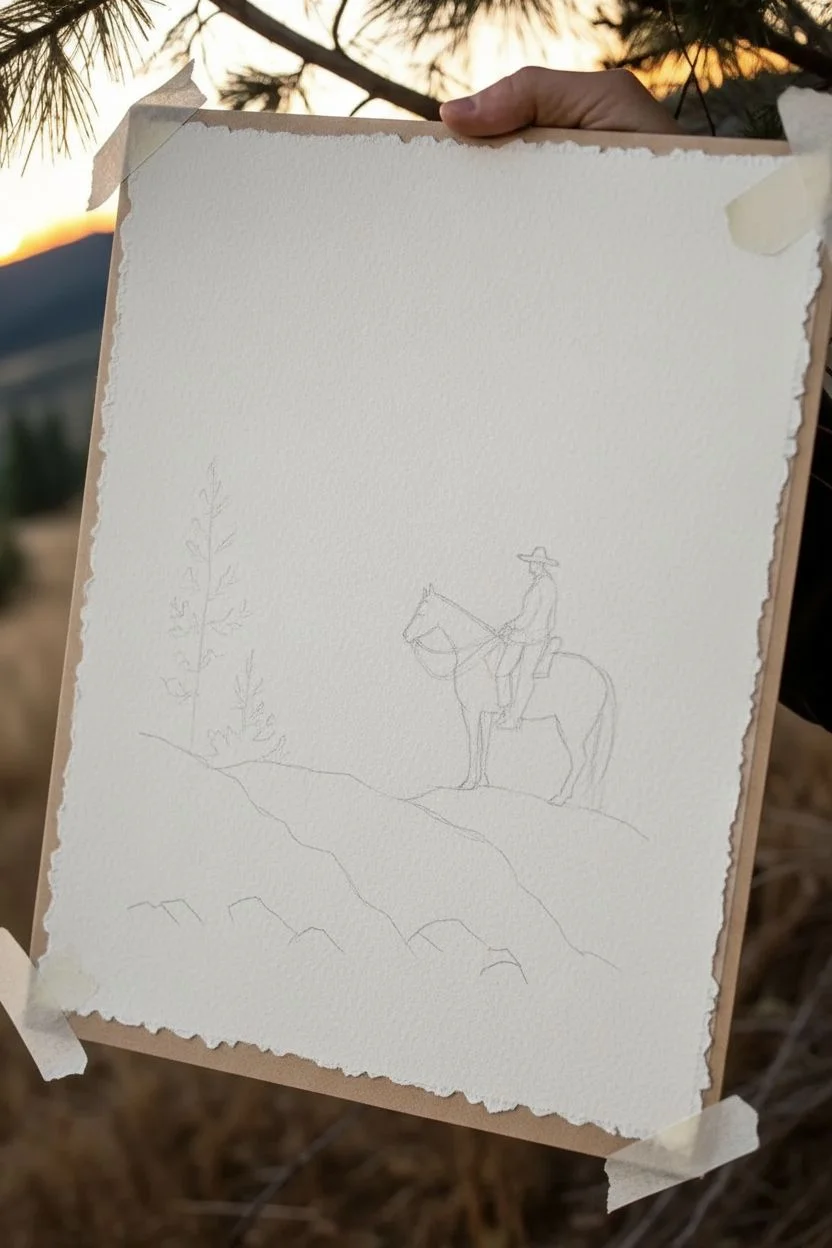
Step 1: Planning and Sketching
-
Prepare your paper:
Since this project looks best on deckled paper, tape your sheet down to a board using just a few small loops of tape on the back, or tape only the corners if you want the rough edges to remain visible throughout the process. -
Sketch the horizon:
Lightly draw a sloping line about one-third of the way up from the bottom to establish your rocky ridge. Keep this line organic and uneven. -
Outline the silhouette:
Draw the outline of the horse and rider on top of the ridge. Focus on the overall shape rather than internal details—get the hat brim, the rider’s posture, and the horse’s legs proportioned correctly. -
Place the scenery:
Sketch a rough, triangular shape on the left side to mark where your pine tree will stand, and add a few simplified jagged shapes for the foreground rocks.
Step 2: Painting the Sky
-
Wet the sky area:
Using your largest round brush, apply clean water to the entire sky area, stopping carefully at the edge of your pencil sketch for the ridge and the rider. -
Apply the glow:
Drop a wash of dilute Yellow Ochre near the horizon line behind the rider to create the setting sun’s glow. Let it bleed upwards slightly. -
Layer the clouds:
While the paper is still damp, mix Alizarin Crimson with a touch of Burnt Sienna. Paint horizontal, irregular strokes across the upper sky to form soft, pinkish clouds. -
Deepen the atmosphere:
Towards the very top of the paper, blend in a very watery mix of Indigo or muted purple to suggest the coming twilight, letting it merge softly with the pinks below. -
Let it dry completely:
Wait until the paper is bone dry and flat before moving on. This is crucial to prevent the silhouette from bleeding into the sky.
Uneven Wash?
If your sky dries with hard water lines (blooms), simply soften them with a slightly damp scrub brush, or paint over the line with semi-opaque cloud layers.
Step 3: Painting the Foreground
-
Base layer for rocks:
Mix a cool grey using Indigo and a tiny bit of Burnt Sienna. Paint the large rocky shapes in the foreground with a watery wash, leaving the very tops lighter to catch the light. -
Add rocky texture:
While the rock wash is still slightly damp, drop in concentrated Indigo into the crevices and shadows of the rocks to create weight and dimension. -
Paint the distant hills:
Behind the main ridge, paint a faint, purplish mountain range using a very diluted mix of your sky colors. This adds depth without stealing focus. -
Dry brush the grass:
Using a semi-dry brush with a mix of Yellow Ochre and Burnt Sienna, flick upward strokes at the bottom of the painting to create dry, yellow prairie grass.
Golden Hour Glow
For a warmer sunset, swap the Alizarin Crimson for a vibrant Cadmium Orange in the sky, and gently glaze a thin layer of orange over the rocks once dry.
Step 4: The Details
-
Fill the silhouette:
Switch to your smallest detail brush. Mix a dense, opaque Lamp Black or very dark Indigo. Carefully fill in the rider and horse shape. -
Refine edges:
Ensure the edges of the hat, the reins, and the horses hooves are crisp. Any fuzziness here will ruin the illusion of the silhouette. -
Paint the pine tree:
Use a dark green-black mix for the tree. Start at the top point and dab downwards with the tip of your brush, getting wider as you go, to create jagged pine branches. -
Cast shadows:
Add a thin, dark shadow underneath the horse’s hooves to anchor the figure to the rock so he doesn’t look like he is floating. -
Add final highlights:
If you have white gouache or a gel pen, add tiny dots in the foreground grass to suggest small wildflowers catching the last light.
Now you have a serene western scene that captures the quiet end of a long day


Two Horses in Profile With a Shared Sunset
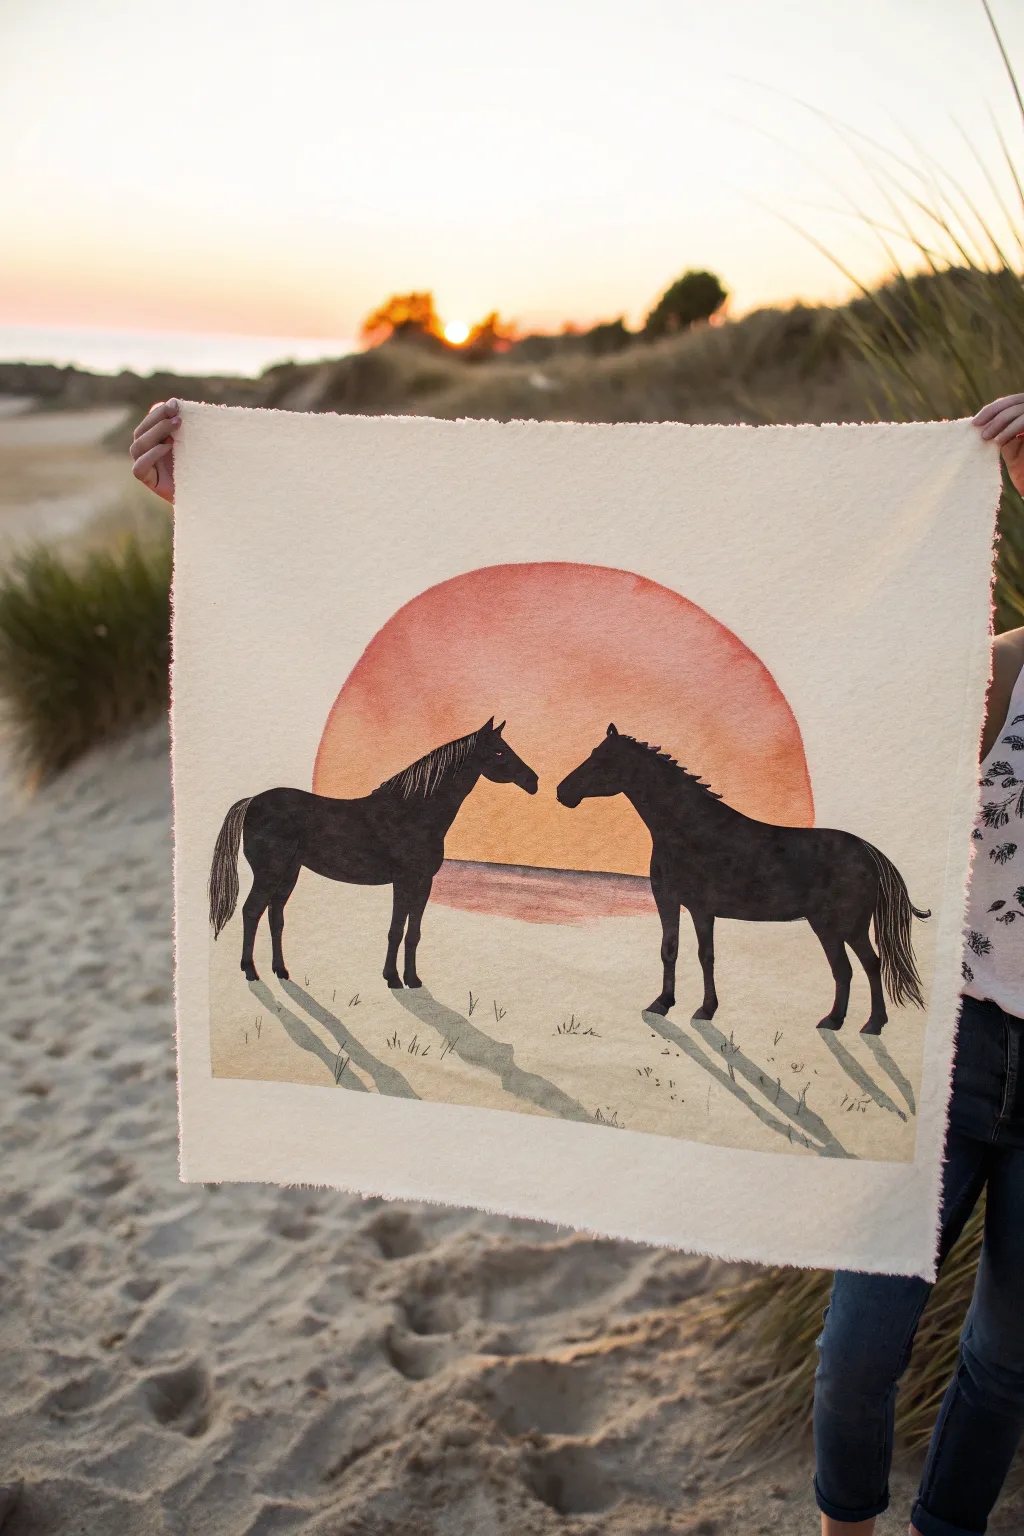
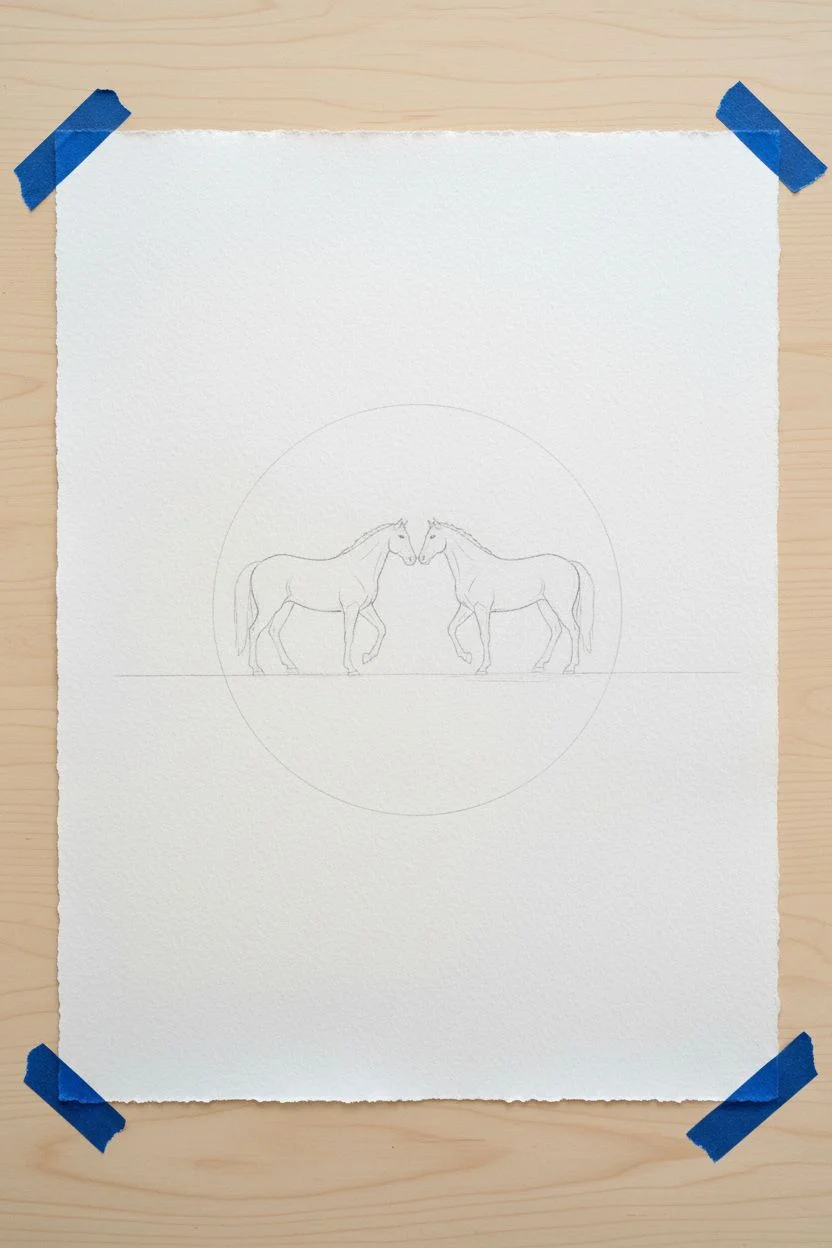
Capture the quiet beauty of the wild west with this striking composition of two horses silhouetted against a vibrant sunset. Whether painted on heavy watercolor paper or fray-edged fabric, the contrast between the dark figures and the warm sun creates a dramatic, timeless piece.
Step-by-Step Guide
Materials
- Heavyweight cold-press watercolor paper or untreated canvas sheet (approx. 18×24 inches)
- Watercolor paints (Cadmium Red, Alizarin Crimson, Yellow Ochre, Burnt Umber)
- Black acrylic paint or India ink
- Large round watercolor brush (size 10 or 12)
- Small liner brush (size 1 or 2)
- Pencil and eraser
- Large circular object for tracing (like a mixing bowl or plate)
- Painter’s tape
- Water cups and paper towels
- Ruler or straight edge
Step 1: Setting the Scene
-
Prepare your surface:
If using paper, tape down all four edges to a board to prevent warping. If using a canvas sheet with frayed edges like the example, lay it flat on a protected surface. I prefer taping the corners just slightly to keep it steady. -
Draw the horizon lines:
Lightly sketch a horizontal line about one-third of the way up from the bottom of your sheet. This will be where the water meets the sand. -
Trace the sun:
Place your large circular object centered horizontally on the page. Position it so the bottom third of the circle dips below your horizon line. Trace lightly with a pencil. -
Sketch the horses:
Using a reference photo or stencil, lightly sketch the outlines of two horses in profile, facing each other. Their noses should almost touch the center of the sun, and their hooves should stand on a ground line below the horizon.
Step 2: Painting the Backdrop
-
Wet the sun area:
With clean water, dampen the inside of the circle area only. Do not wet the area where the horses will be standing. -
Create the sun gradient:
Load your large brush with a watery Cadmium Red. Start at the top arc of the sun and paint downwards. As you move lower, mix in a touch of Yellow Ochre to soften the color. -
Add depth to the sun:
While the sun is still damp, drop in touches of Alizarin Crimson near the edges to create a glowing effect. Let the colors bleed naturally but keep the edges crisp. -
Paint the water reflection:
For the water section inside the sun (below the horizon line), use horizontal strokes with a diluted red-brown mix. Leave small gaps of white paper to suggest ripples. -
Paint the sand:
Mix a very dilute wash of Yellow Ochre and a tiny bit of Burnt Umber. Paint the foreground loosely, allowing the wash to be uneven to mimic sand texture. -
Dry thoroughly:
Wait until the background layers are completely bonedry before moving to the acrylics. This prevents the black paint from bleeding into the wet paper.
Clean Lines Tip
If you struggle painting perfect circles freehand, use liquid masking fluid around the sun’s edge before painting. Peel it off after the paint dries.
Step 3: The Silhouettes
-
Outline the horses:
Switch to black acrylic paint and your smaller brush. Carefully trace over your pencil lines for the horses, ensuring smooth curves along the back and neck. -
Fill in the bodies:
Fill the interior of the horse shapes with solid black. If the paint looks streaky, apply a second coat after the first one dries for a truly opaque silhouette. -
Detail the manes:
Using your finest liner brush, paint the manes with quick, flicking strokes. I like to start at the neck and flick outward to create a windswept, natural hair texture. -
Add legs and hooves:
Paint the legs carefully, noting that the back legs should have a slight bend at the hock. Ensure the hooves look firmly planted on the ground. -
Paint the tails:
Use long, fluid strokes for the tails. Vary the pressure on the brush—press down for thickness and lift up for wispy ends.
Rustic Texture Idea
To get the rough texture shown in the photo, gently tear the edges of your heavy paper against a ruler instead of cutting it with scissors.
Step 4: Finishing Touches
-
Create the shadows:
Mix a transparent grey wash (black heavily diluted with water). Paint long diagonal shadows stretching from the hooves towards the bottom corners of the paper. -
Add grass tufts:
With your fine liner brush and the grey wash, flick tiny, upward strokes around the hooves and randomly in the foreground to represent sparse dune grass. -
Final eye detail:
If you want a hint of life, use a tiny dot of white paint or simply leave a pinprick of unpainted paper for the horse’s eye.
Now you have a serene western scene ready to hang or frame for a warm, rustic touch


Layered Desert Mesas With Two-Tone Shadows
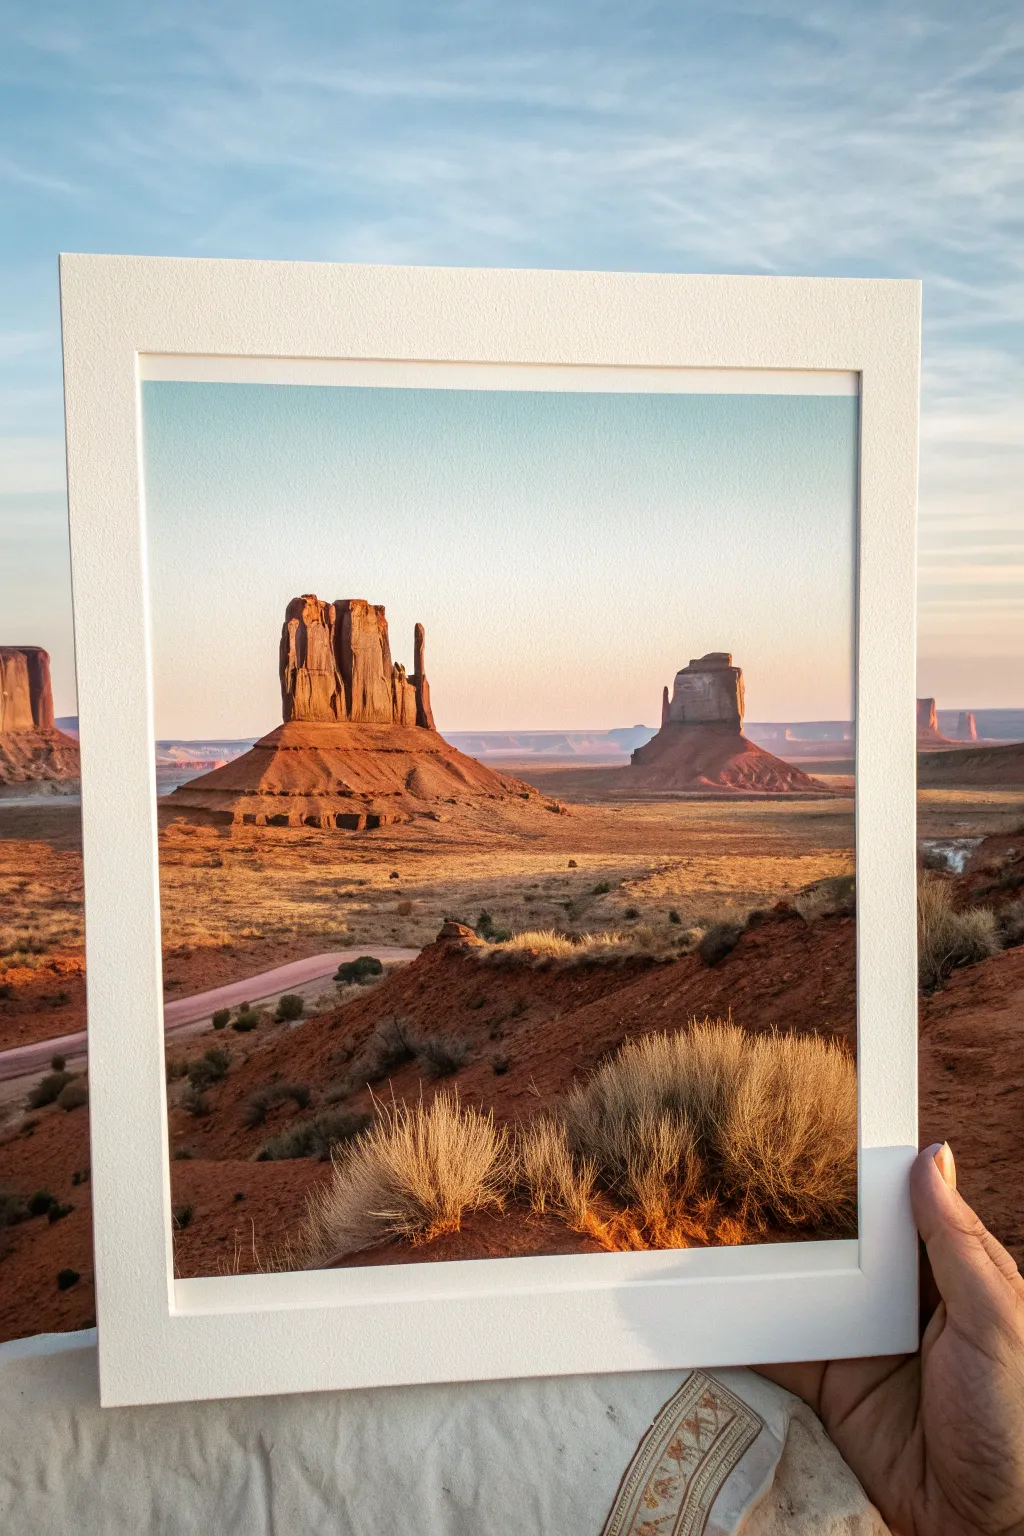
Capture the majestic stillness of the American Southwest with this desert landscape painting featuring iconic buttes and deeply shadowed mesas. This project focuses on atmospheric perspective and capturing the glowing warmth of the setting sun on red rock formations.
Step-by-Step
Materials
- Canvas board or heavy watercolor paper (8×10 or similar)
- Acrylic paints (Titanium White, Burnt Sienna, Yellow Ochre, Cadmium Red, Ultramarine Blue, Burnt Umber)
- Flat brushes (1-inch for sky, 1/2-inch for land)
- Small round detail brush
- Palette knife (optional for texture)
- Cup of water and paper towels
- Pencil for sketching
- White mat board frame (optional for display)
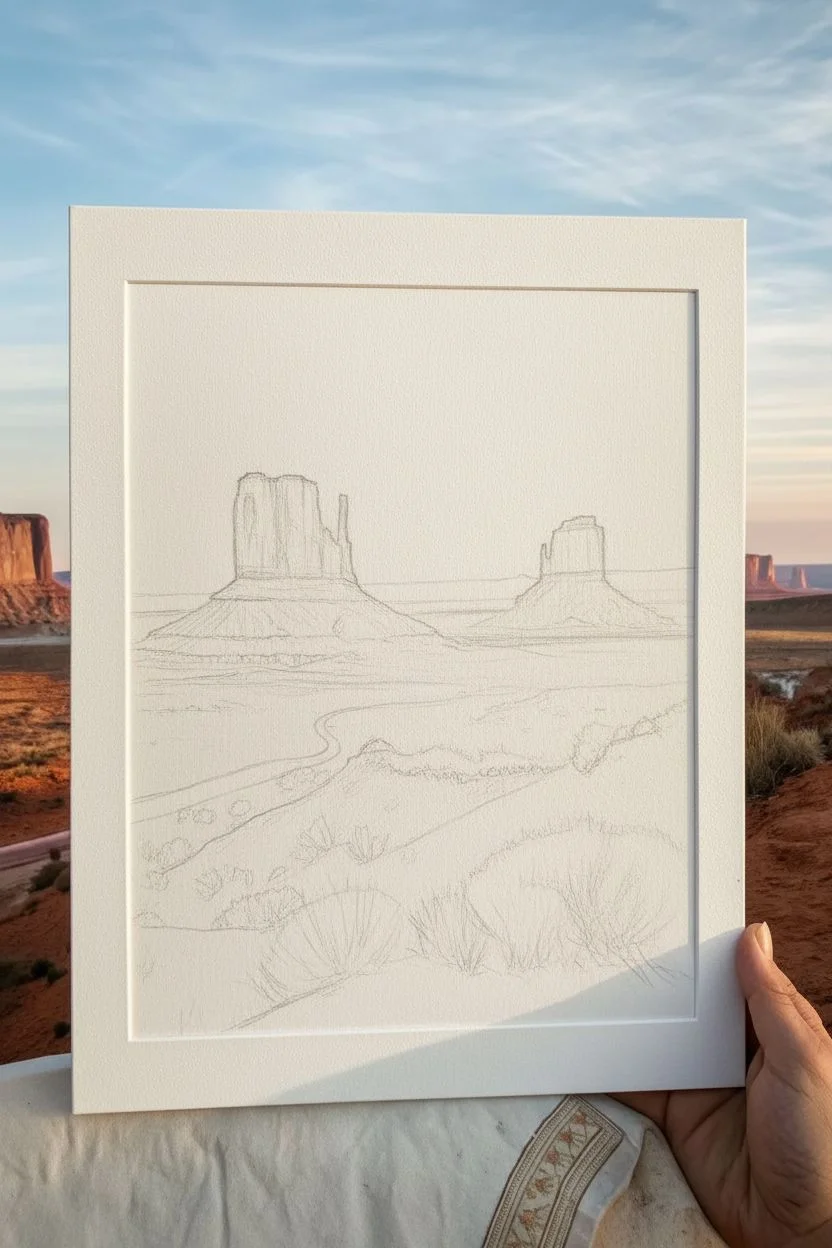
Step 1: Setting the Scene
-
Sketch the Horizon:
Begin by lightly sketching a horizon line about one-third of the way up from the bottom of your canvas. -
Outline the Buttes:
Draw the basic shapes of the two main buttes. The left one (West Mitten Butte) should be larger and centered slightly left, resembling a mitten with a thumb. The right one (East Mitten Butte) sits further back and is smaller. -
Map the Foreground:
Lightly sketch a winding path leading from the foreground towards the left butte and indicate rough shapes for the foreground hills and shrubs.
Muddy Shadows?
If your shadow colors look grey or muddy, avoid using black paint. Instead, darken your orange/red tones by adding a complementary blue like Ultramarine.
Step 2: Painting the Atmosphere
-
Mix the Sky Gradient:
Prepare a gradient palette: a pale cyan blue (White + tiny touch of Ultramarine) for the top and a warm, creamy peach (White + tiny touch of Yellow Ochre + Cadmium Red) for the horizon. -
Apply the Sky:
Using your large flat brush, paint the top of the sky blue, blending downwards into the peach color near the horizon. Ensure a smooth transition while the paint is still wet. -
Paint Distant Mesas:
Mix a hazy purple-grey using Ultramarine Blue, a little Cadmium Red, and plenty of White. Paint the distant, low mesas on the horizon line so they appear faded and far away.
Framing Trick
To mimic the ‘photo-in-landscape’ look, cut a white mat board frame slightly larger than your painting and tape it over the edges for a clean, professional border.
Step 3: The Majestic Monuments
-
Base Color for Buttes:
Mix a rusty orange using Burnt Sienna and a touch of Cadmium Red. Fill in the silhouettes of the main buttes solidly. -
Adding Form and Light:
Once the base is dry, use a lighter orange-gold (add Yellow Ochre and White to the base mix) to highlight the left-facing sides of the cliffs where the sun hits. -
Creating Deep Shadows:
Mix Burnt Sienna with a dot of Ultramarine Blue to create a deep, cool shadow tone. Paint the right-hand sides of the buttes to create a strong three-dimensional effect. -
Detailing the Rock Strata:
Use a small round brush or the edge of your flat brush to add horizontal lines across the buttes, suggesting the layered geological strata distinctive to Monument Valley.
Step 4: Foreground and Finishing
-
Painting the Desert Floor:
Cover the flat ground with a wash of Yellow Ochre mixed with White. While wet, streak in horizontal hints of Burnt Sienna to suggest dry grass texture. -
The Winding Road:
Paint the small winding road on the left using a pale, dusty pink mix. It should get narrower as it moves toward the horizon to enhance depth. -
Foreground Hills:
Paint the immediate foreground hill in the bottom right corner with a dark reddish-brown (Burnt Sienna + Burnt Umber). This dark value pushes the background further away. -
Adding Vegetation:
Switch to your detail brush. Dab small clusters of dark green-brown dots across the mid-ground to represent sagebrush. -
High-Contrast Grasses:
I find that adding crisp details right at the front pulls the whole image together. Use a thin liner brush with light yellow-white paint to flick delicate, individual blades of dry grass onto the dark foreground hill. -
Final Adjustments:
Step back and check your values. If the distant haze looks too dark, glaze over it with a very watered-down white to push it back.
Once dry, frame your piece to bring a permanent slice of the warm, wild West into your home


Longhorn Skull on a Fence Post

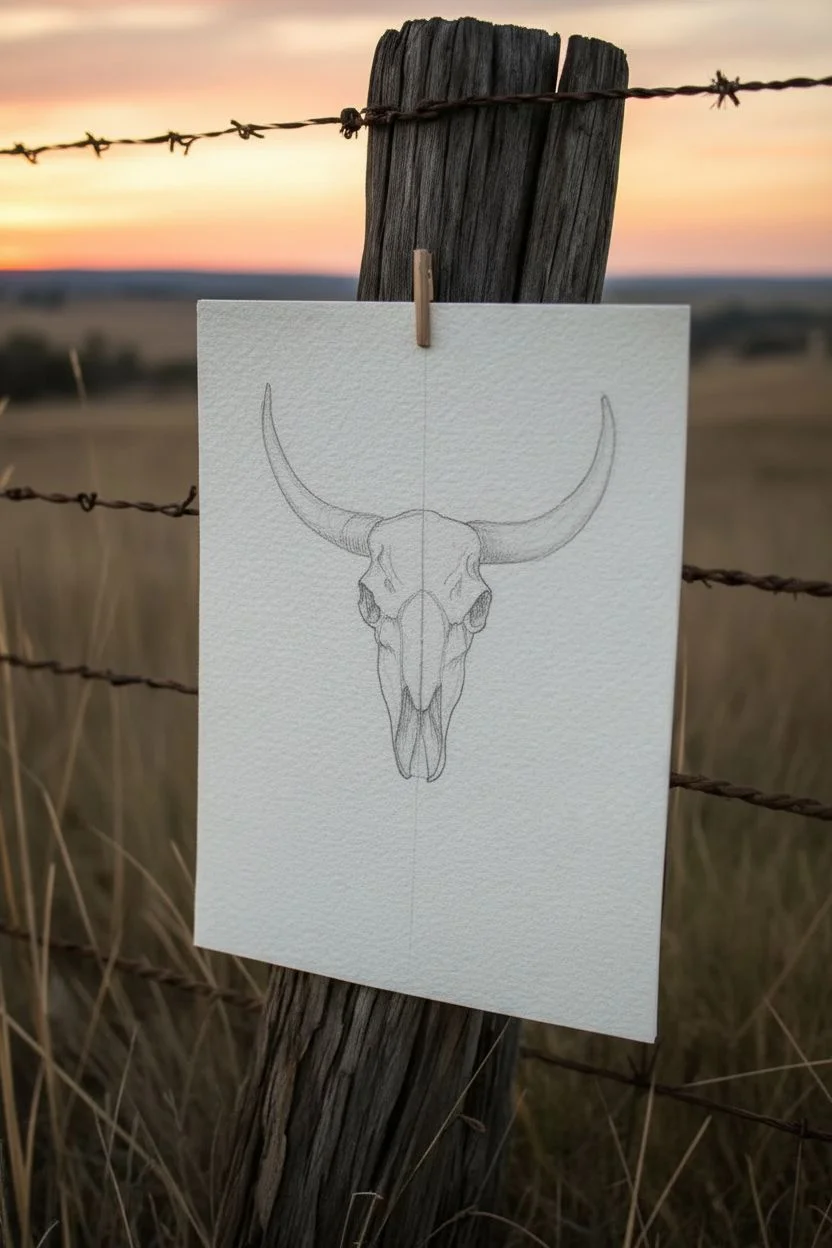
Capture the rustic spirit of the West with this mixed-media piece that combines delicate pen illustration with bold watercolor washes. The finished artwork features a detailed longhorn skull hovering above a minimalist, abstract landscape in warm sunset hues.
How-To Guide
Materials
- Heavyweight cold-press watercolor paper (300gsm)
- Fine liner pens (0.1, 0.3, and 0.5mm sizes, waterproof ink)
- Pencil (HB or 2B)
- Kneaded eraser
- Watercolor paints (Burnt Sienna, Yellow Ochre, Alizarin Crimson, Burnt Umber)
- Round watercolor brushes (Size 4 and Size 8)
- Jar of clean water
- Paper towels
Step 1: Sketching the Bones
-
Outline the skull shape:
Begin by lightly sketching the central vertical axis of the skull with your pencil to ensure symmetry. Draw the elongated triangular shape for the nose and the broad forehead area. -
Map out the horns:
Add the iconic curved horns, extending them outwards and upwards from the sides of the forehead. Pay close attention to the thickness at the base where they attach to the skull. -
Refine the details:
Lightly draw the eye sockets, nasal cavity, and the cracks or seams in the bone structure. Don’t press too hard, as you want these graphite lines to be easily erasable later.
Ink Confidence
Don’t fret if your ink lines wobble. ‘Perfect’ lines look unnatural on organic subjects like bone. A shaky hand actually adds realistic texture to the skull’s surface.
Step 2: Inking the Skull
-
Trace the main outlines:
Using a 0.5mm waterproof fine liner, carefully trace over your pencil outlines for the skull and horns. The line should be confident but can have a slightly organic, shaky quality to mimic bone texture. -
Add texture to the horns:
Switch to a 0.3mm pen. Draw curved lines following the contour of the horns to suggest the ridges and growth rings, concentrating them near the base and tips. -
Detail the cracks and seams:
Use your finest 0.1mm pen to draw the jagged suture lines on the forehead and the small fissures around the nose. These delicate lines make the bone look aged and weathered. -
Shading with stippling:
Create depth by adding tiny dots (stippling) inside the eye sockets, nasal cavities, and under the ridge of the brow. Build up density where the shadows would be deepest. -
Erase pencil marks:
Wait until the ink is completely dry to prevent smudging. Gently run your kneaded eraser over the entire drawing to lift the initial graphite sketch.
Step 3: Painting the Sunset Landscape
-
Mix your base wash:
Prepare a watery mix of Burnt Sienna on your palette. You want a warm, earthy orange tone that isn’t too thick. -
Apply the first horizon layer:
Using a Size 8 brush, paint a broad, rough horizontal stroke below the skull to form the sky. Leave the edges irregular and textured; dry brushing works well here to create a rugged look. -
Drop in warm accents:
While the orange wash is still slightly damp, touch in small amounts of Alizarin Crimson or reddish-brown to suggest clouds catching the last light of the day. -
Paint the dark terrain:
Mix a strong concentration of Burnt Umber with a touch of Burnt Sienna. Paint a jagged, silhouette-like landscape strip at the very bottom, overlapping the base of your orange sky wash. -
Suggest distant mountains:
Use the tip of the brush to create small peaks and valleys in the dark brown layer, giving the impression of a distant, rocky horizon line.
Coffee Stain Effect
For an even more vintage Western feel, lightly splatter diluted coffee or tea across the paper before starting. It creates an authentic, weathered parchment look.
Step 4: Final Touches
-
Tint the horns:
Dilute a tiny amount of Burnt Sienna with lots of water. Carefully glaze this very pale wash over the horns to give them a natural bone color without obscuring the ink lines. -
Add subtle shadows:
If the skull looks too stark white, mix a very faint grey wash and paint strictly on the shadowed side of the skull (usually the right side) to give it three-dimensional form. -
Let it dry completely:
Allow the paper to dry flat. The watercolor paper might buckle slightly, which adds to the rustic charm, but you can press it under a heavy book once dry if you prefer it flat.
Once dry, display your western masterpiece in a simple wood frame or clip it up for a casual, rustic vibe
BRUSH GUIDE
The Right Brush for Every Stroke
From clean lines to bold texture — master brush choice, stroke control, and essential techniques.
Explore the Full Guide
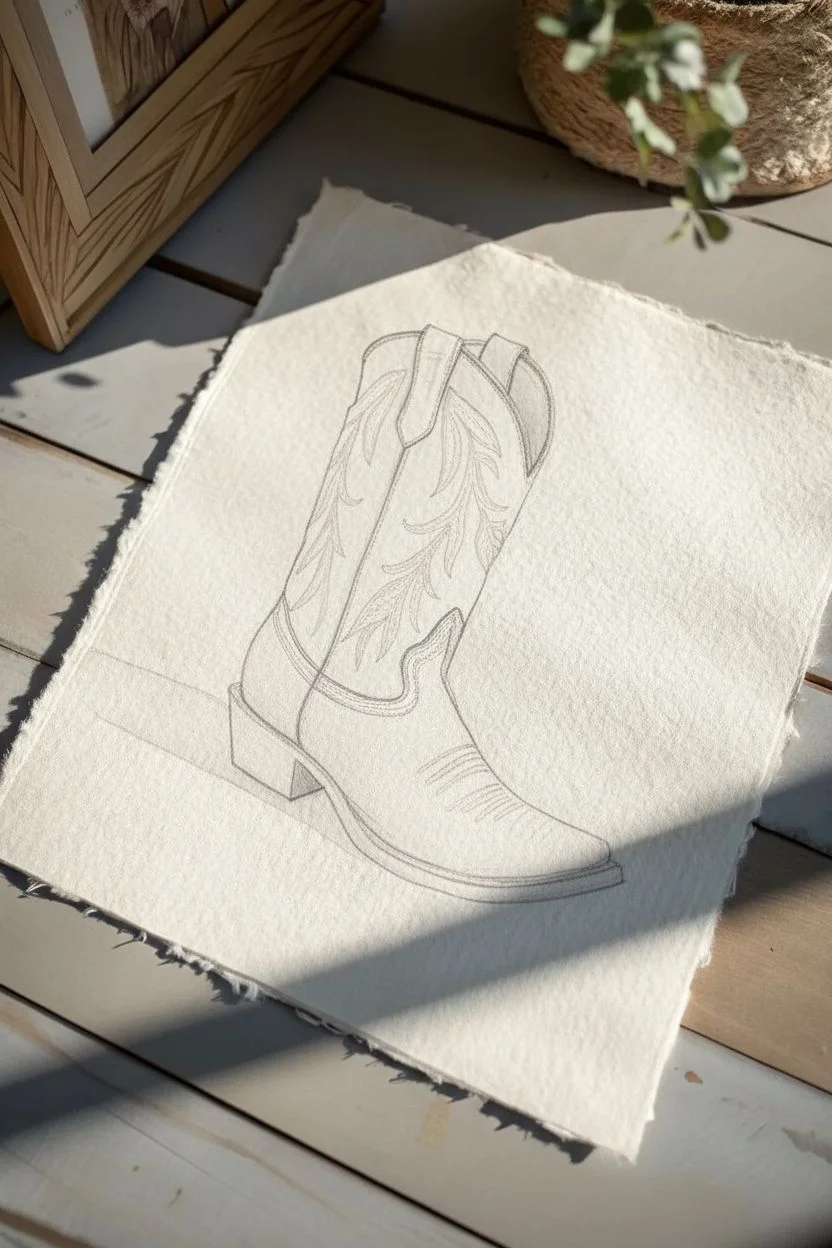
Western Boots With Easy Stitch Marks
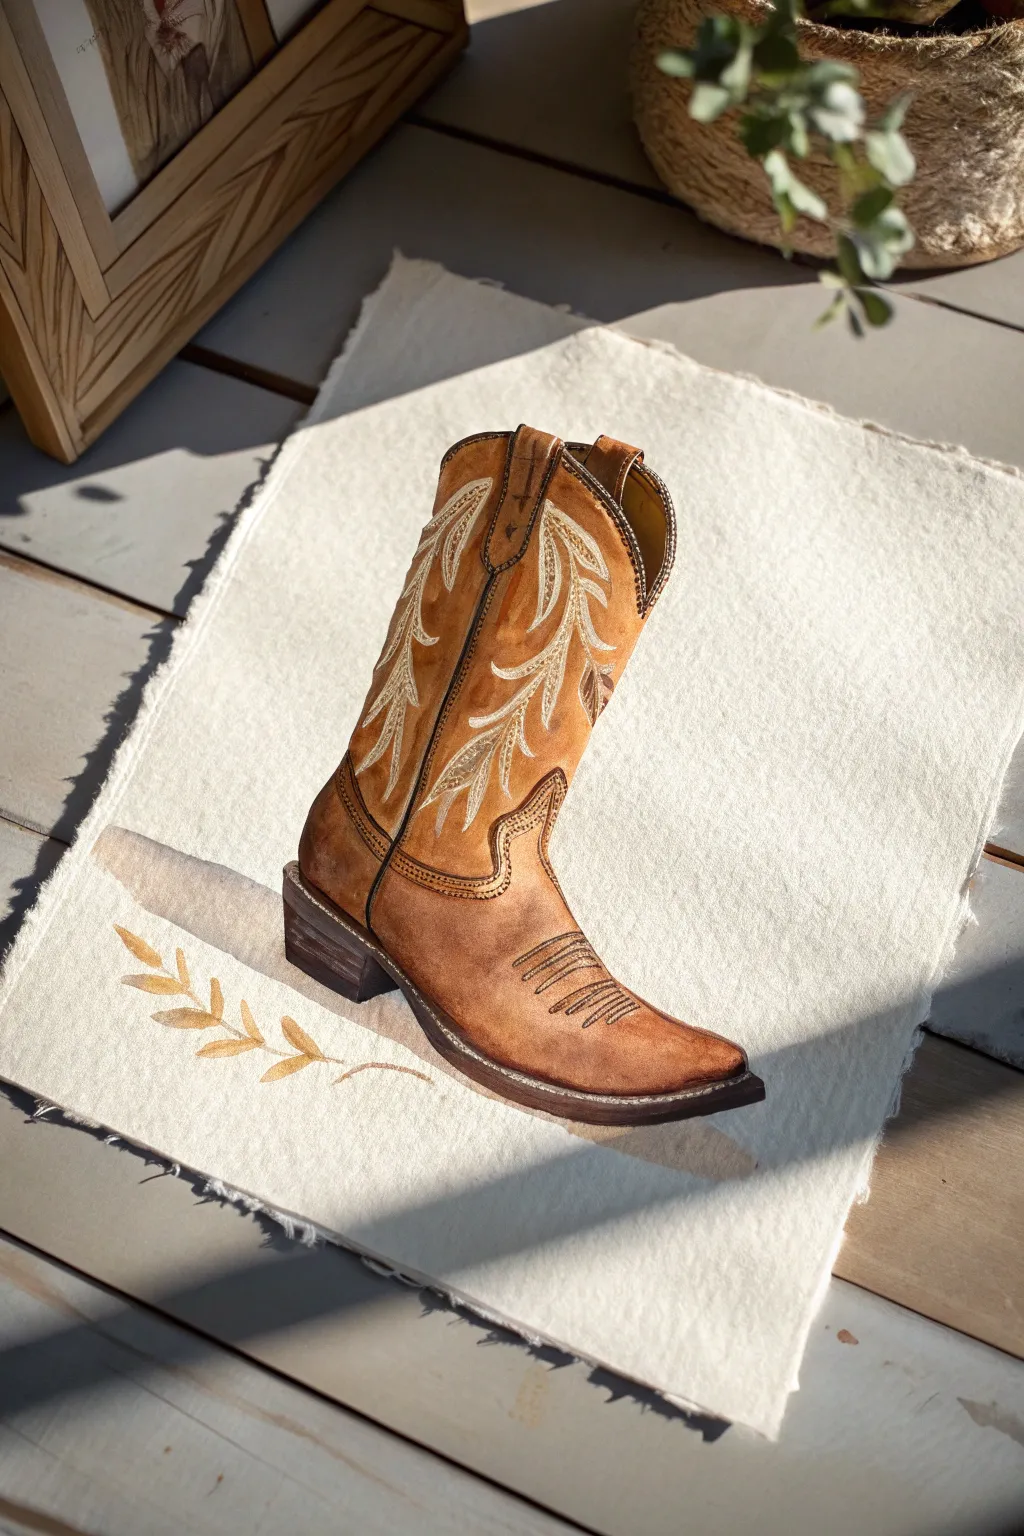
Capture the rugged charm of the Wild West with this detailed watercolor painting of a classic leather cowboy boot. This project focuses on building rich leather tones and adding delicate stitch work on textured, deckled-edge paper for a rustic finish.
Step-by-Step Tutorial
Materials
- Cold press watercolor paper (deckled edge preferred)
- Watercolor paints (Burnt Sienna, Yellow Ochre, Burnt Umber, Sepia, Titanium White)
- Synthetic sable brushes (Sizes 4 round, 2 round, and 00 liner)
- Pencil (HB or H)
- Kneaded eraser
- Masking fluid (optional)
- Mixing palette
- Water cups and paper towels
- White gouache or white gel pen
Step 1: Sketching and Preparation
-
Outline the shape:
Begin by lightly sketching the outline of the boot on your textured paper. Pay attention to the heel angle and the curve of the toe. The shaft should have a slight slouch to look worn and comfortable. -
Detail the seams:
Draw the interior lines where the leather panels meet. Mark the swooping decorative patterns on the shaft and the vamp (the part over the foot) lightly so you know where the embroidery will go. -
Refine the edges:
If your paper doesn’t already have one, carefully tear the edges against a ruler to create a soft, deckled look that enhances the rustic aesthetic.
Wet-in-Wet for Leather
To get that smooth gradient of worn leather, apply your darker brown to the toe while the underlying lighter wash is still wet. The colors will bleed naturally.
Step 2: Painting the Base Leather
-
First wash:
Mix a diluted wash of Yellow Ochre and a touch of Burnt Sienna. Apply this over the entire boot area, avoiding only the sole and the patterned embroidery areas if you can. -
Building warmth:
While the first layer is still slightly damp, drop in stronger Burnt Sienna on the toe and the shadowed side of the shaft to start creating volume. -
Let it dry completely:
Allow the paper to dry fully. This is crucial so your next layers don’t muddify the nice glow you’ve established. -
Deepening the shadows:
Mix Burnt Umber with a tiny bit of Sepia. Glaze this darker color over the shadowed areas: the back of the heel, under the vamp, and the lower toe box. This creates the ‘worn leather’ patina. -
Painting the sole:
Use a concentrated Sepia or dark brown to paint the heel and the thick sole. Leave a tiny sliver of light paper between the sole and the boot body to represent the welt stitching.
Stitching Looks Flat?
If your white embroidery looks like a sticker, pain a tiny, thin line of dark brown right underneath each white stitch to create a mini shadow.
Step 3: Stitching and Details
-
The decorative stitching:
Using your smallest liner brush (size 00) and opaque Titanium White watercolor (or thinned gouache), paint the leaf-like embroidery pattern on the boot shaft. -
Refining the embroidery:
I like to go back over the white stitching with a very faint wash of dirty yellow once it’s dry, so the thread looks aged rather than bright white. -
Toe details:
Add the distinct decorative stitching lines across the top of the foot using a mix of Burnt Umber and black. These should be short, confident dashes. -
Enhancing the seams:
Use your dark brown mix to paint fine lines along the structural seams of the boot (where the side panels meet the foot). This delineates the different pieces of leather.
Step 4: Shadows and Finishing Touches
-
Cast shadow:
Mix a watery grey-purple (a mix of blue and brown works well). Paint a diagonal shadow extending from the heel and sole to ground the boot on the surface. -
Adding texture:
With a nearly dry brush and some dark brown paint, lightly scumble over the darker areas of the leather to mimic scratches and grain texture. -
Leaf motif (optional):
Paint a simple, single-color leaf sprig in the bottom left corner using the same Ochre/Sienna palette to balance the composition. -
Final highlights:
Use a touch of pure white gouache or a white gel pen to add tiny highlights on the shiniest part of the leather (usually the toe and the curve of the ankle) to make it look polished.
Step back and admire the rugged textures you’ve created in this timeless western piece
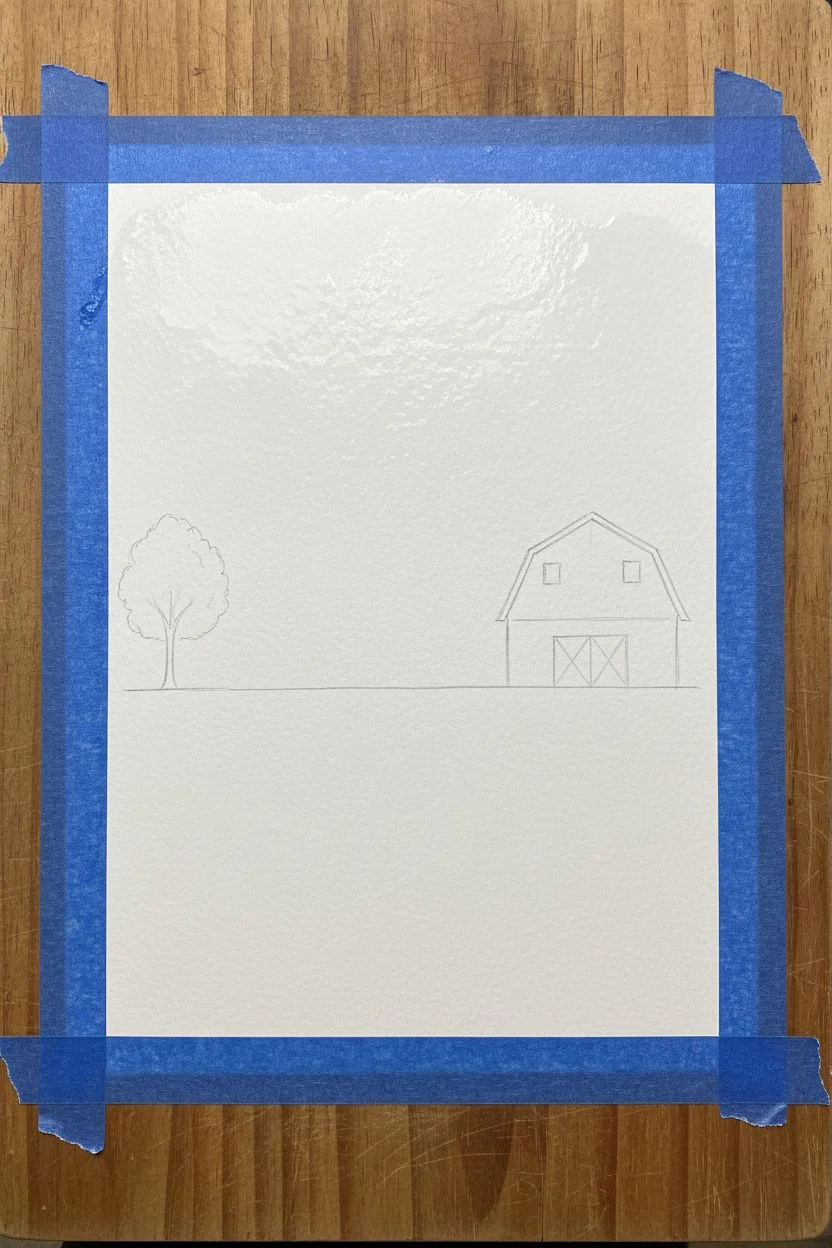
Barn and Corral Shapes in a Sunset Wash
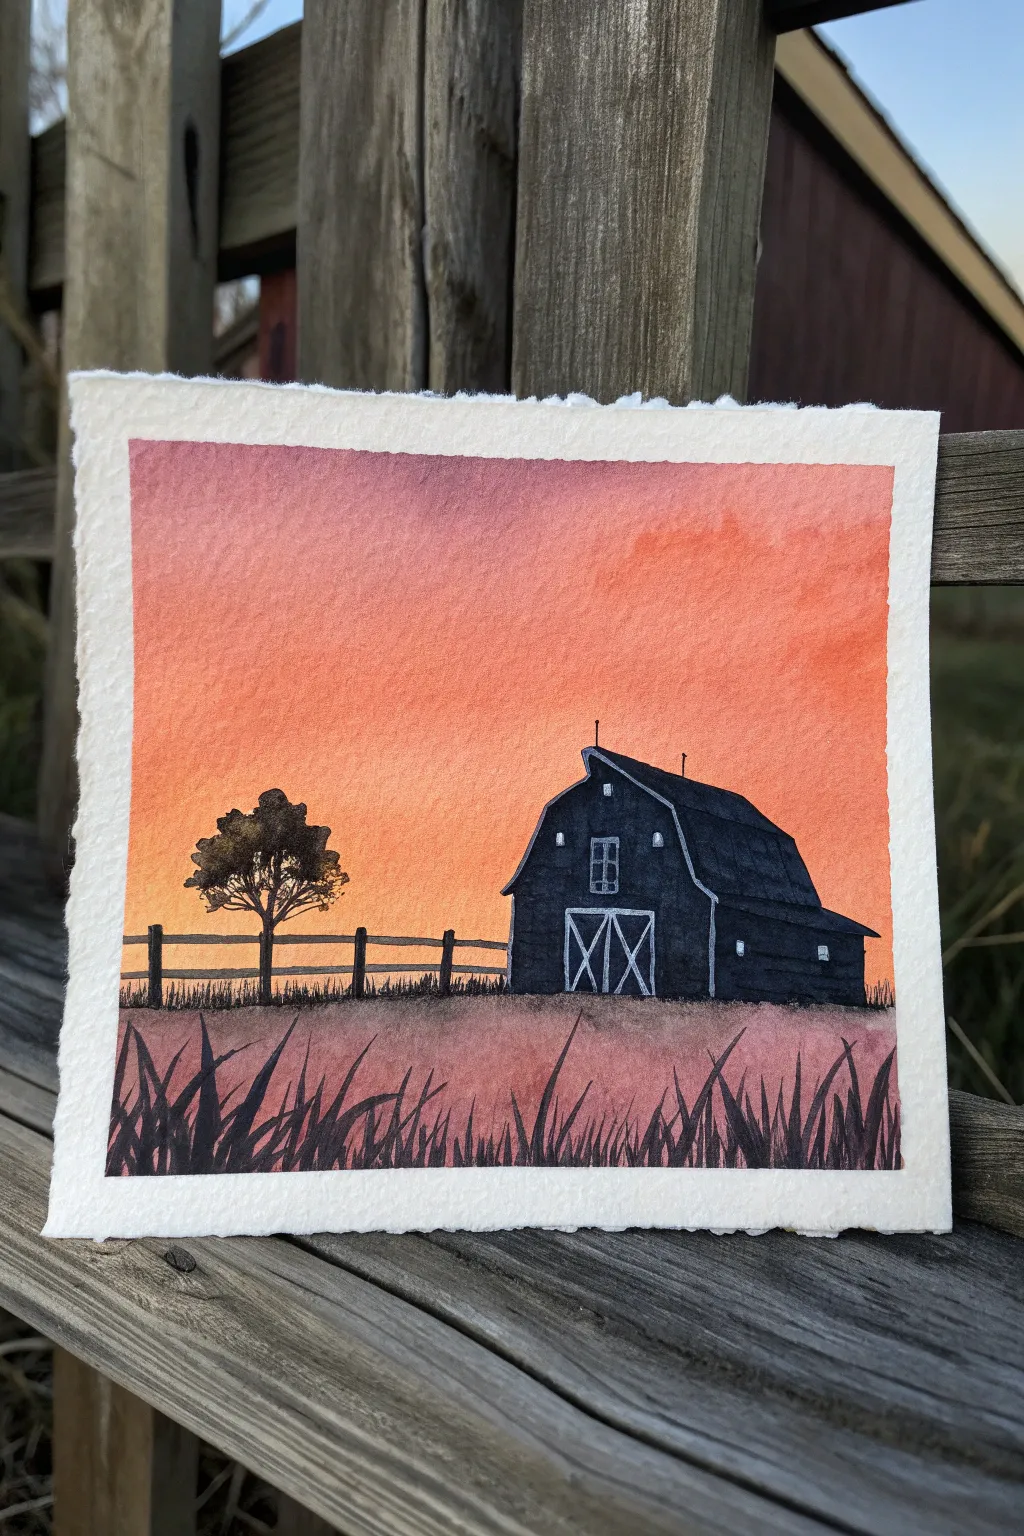
Capture the serene beauty of a rural evening with this striking watercolor project. By combining a vibrant wet-in-wet sunset wash with bold, black silhouettes, you can create a high-contrast western scene that pops off the page.
How-To Guide
Materials
- Cold press watercolor paper (roughly 6×6 inches)
- Masking tape
- Watercolor paints (Orange, Red, Purple/Violet, Black)
- Flat wash brush (3/4 inch or 1 inch)
- Round brush (size 4 or 6)
- Fine liner brush (size 0 or 1)
- White gel pen (e.g., Gelly Roll or Posca)
- Pencil and eraser
- Paper towels
- Clean water
Step 1: Setting the Scene
-
Tape Borders:
Begin by taping down all four edges of your watercolor paper to a board or table. This creates that crisp, professional white border seen in the example and keeps the paper flat while wet. -
Light Sketching:
Using a pencil, very lightly sketch the horizon line about a third of the way up from the bottom. Outline the basic shape of the barn on the right and the position of the tree on the left. -
Pre-wet the Sky:
Dip your clean flat wash brush into water and coat the entire sky area above your horizon line. You want the paper glistening but not forming puddles.
Step 2: The Sunset Wash
-
Orange Glow:
Load your flat brush with a vibrant orange paint. Start applying it just above the horizon line, brushing horizontally across the paper. -
Adding Red:
While the orange is still wet, introduce a reddish tone above it. Gently blend the edges where the colors meet so there are no harsh lines. -
Purple Transformation:
At the very top of the sky, paint a band of purple or violet. Allow this to bleed slightly down into the reddish-orange section to create a natural gradient. -
Ground Wash:
Clean your brush and mix a very diluted, pale red-purple wash for the foreground grass area. Paint this quickly below the horizon line and let the entire paper dry completely.
Bleeding Lines?
If your black silhouette bleeds into the sky, the background wasn’t dry enough. Let the paper dry until it feels room temperature to the touch before adding darker layers
Step 3: Building Silhouettes
-
Barn Outline:
Switch to your round brush and load it with concentrated black watercolor (or black gouache for opacity). Carefully fill in the barn shape you sketched earlier. -
Roof Details:
Be mindful of the roof angles; the gambrel roof shape is classic western. Ensure the edges are sharp against the colorful sky. -
The Tree:
On the left side, paint the trunk of the tree. Use the tip of the brush to dab irregular clusters of leaves, leaving small gaps so the sunset peeks through the foliage. -
Fence Posts:
Paint vertical black posts evenly spaced between the tree and the barn. Connect them with two horizontal rails using a steady hand. -
Immediate Foreground:
Mix a slightly lighter black (add a tiny bit of water) and paint loose, organic grass shapes along the very bottom edge of the paper to ground the scene.
Make it Western
Add a silhouette of a horse near the fence or a windmill in the distance to enhance the ranch theme. A few tiny ‘v’ shapes in the sky make great distant birds
Step 4: Final Details
-
Tall Grasses:
Use your fine liner brush with deep black paint to flick quick, upward strokes in the foreground. Make them vary in height and direction to look like wild prairie grass. -
White Highlights:
Once the black paint is 100% dry, shake your white gel pen. Draw the large ‘X’ doors on the barn front and add a simple window above them. -
Roof Accents:
Add subtle white lines along the roofline and eaves to suggest dimension and catch the light. -
The Reveal:
Wait until everything is bone dry, then slowly peel away the masking tape at a 45-degree angle to reveal your clean edges.
Now you have a stunning, high-contrast landscape ready to frame or give as a gift

PENCIL GUIDE
Understanding Pencil Grades from H to B
From first sketch to finished drawing — learn pencil grades, line control, and shading techniques.
Explore the Full Guide
Prickly Pear Cactus With Desert Wildflowers
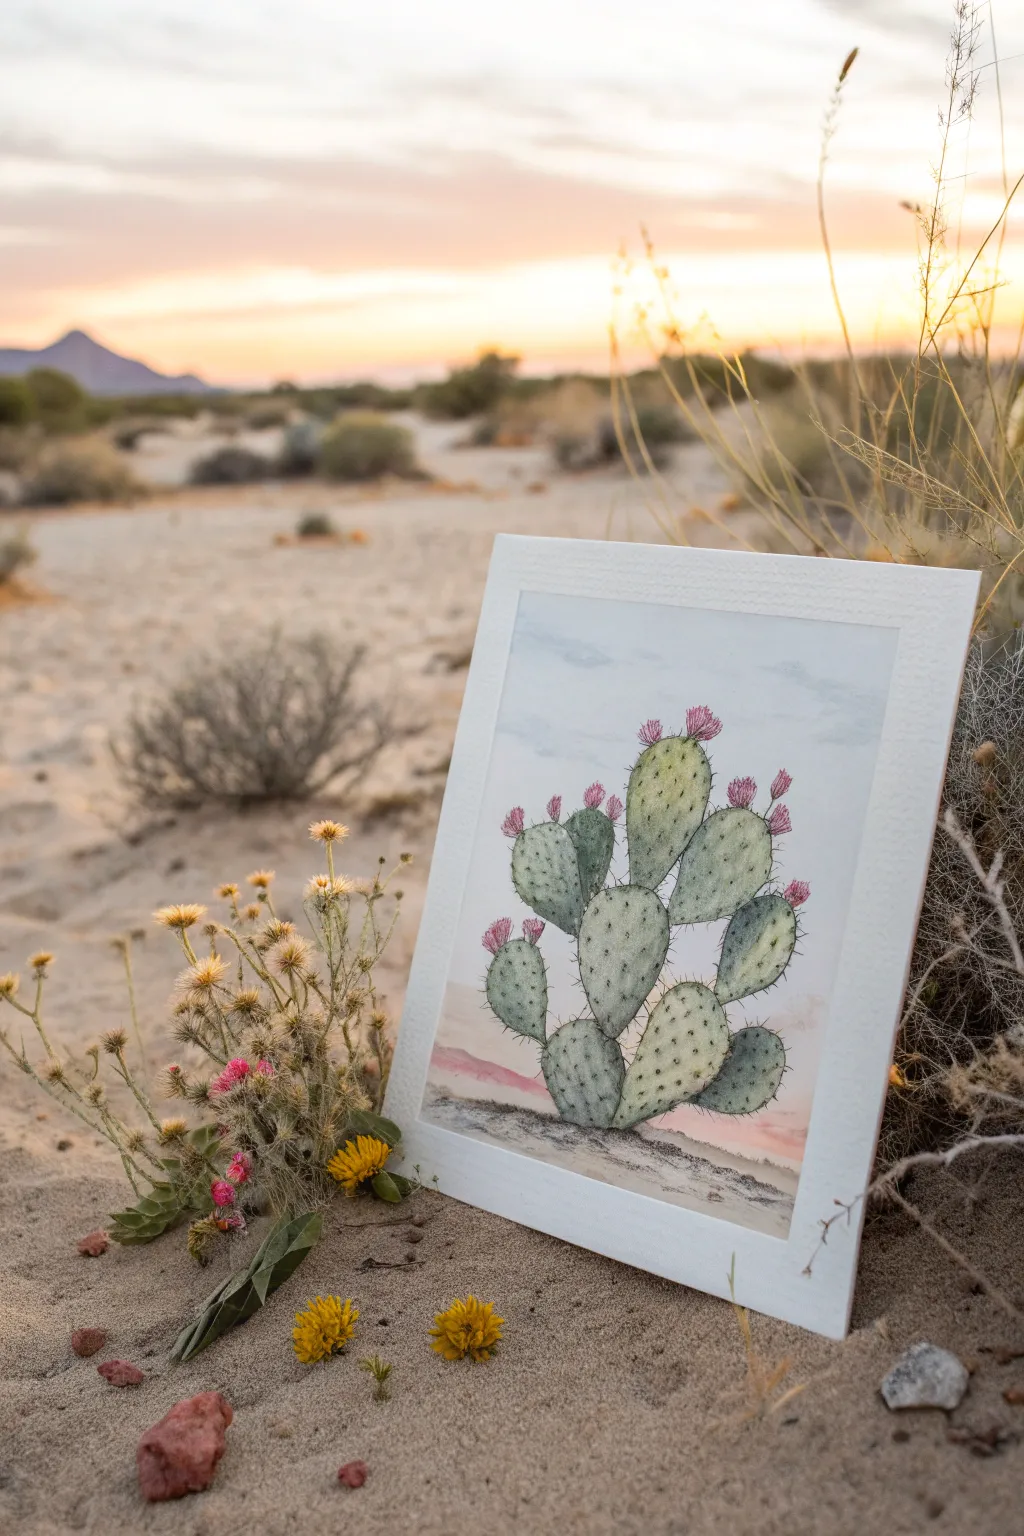
Capture the serene beauty of the arid southwest with this watercolor study of a blooming prickly pear cactus. The soft, layered greens and delicate pink flowers create a peaceful composition perfect for framing.
Step-by-Step Tutorial
Materials
- Cold-press watercolor paper (140lb/300gsm)
- Watercolor paints (Sap Green, Olive Green, Alizarin Crimson, Burnt Sienna, Payne’s Gray, Cerulean Blue)
- Round brushes (sizes 2, 6, and 8)
- Fine liner brush or 0.1mm waterproof ink pen
- Pencil (HB or H)
- Kneaded eraser
- Two jars of water
- Paper towels
- Masking tape
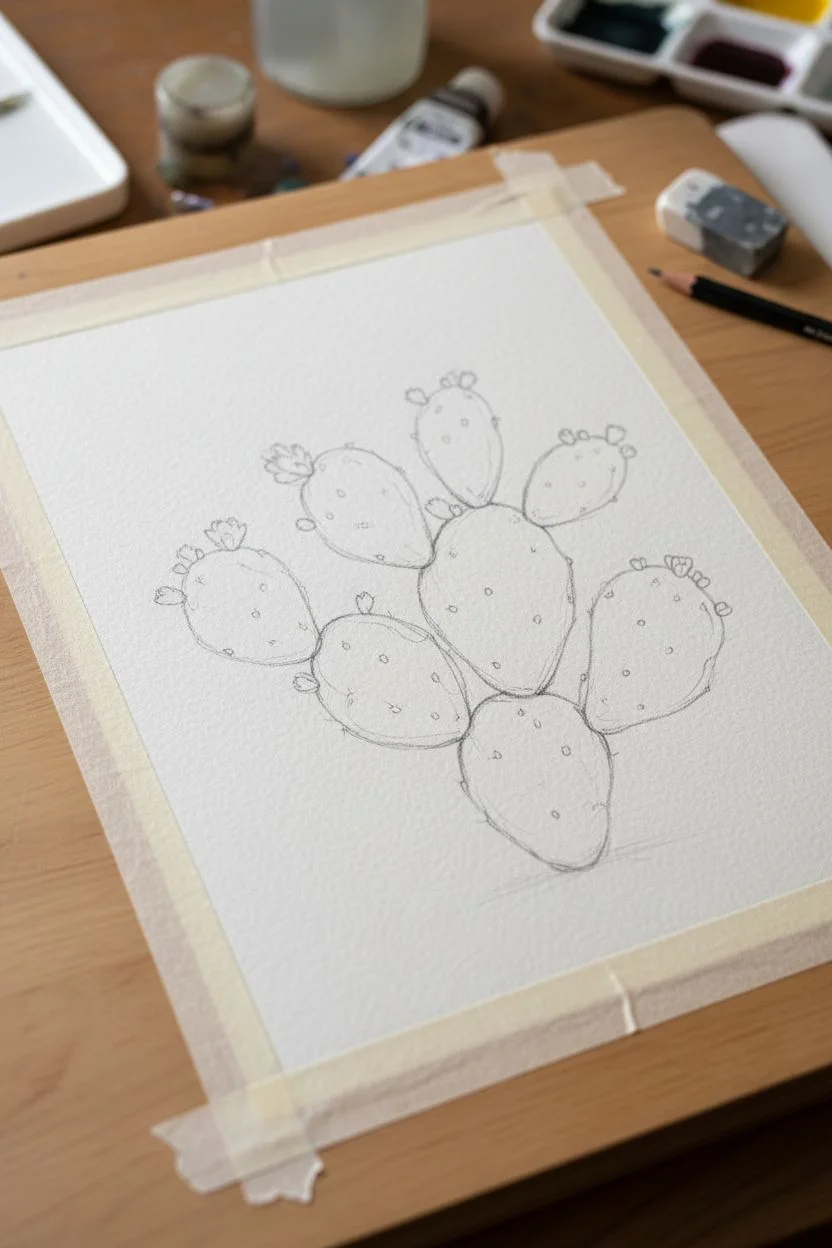
Step 1: Sketching the Structure
-
Tape the edges:
Begin by taping down all four edges of your watercolor paper to a board. This creates the crisp white border seen in the example. -
Outline the pads:
Using an HB pencil, lightly sketch the oval shapes of the cactus pads. Start with a central base pad and stack others on top, creating a balanced, slightly asymmetrical arrangement like a candelabra. -
Add detail markers:
Lightly mark small dots or ‘V’ shapes where the blooms will sit on the upper edges of the pads. Also, faint indications of where the needle clusters (areoles) will be placed can be helpful. -
Lighten the lines:
Roll your kneaded eraser gently over the entire sketch. You want the graphite lines to be barely visible so they don’t show through the final transparent watercolor layers.
Needle Precision
For ultra-fine spines, try dipping the edge of a credit card in paint and stamping lines, or use a rigger brush for long, controlled strokes.
Step 2: Base Washes
-
Paint the sky:
Mix a very dilute wash of Cerulean Blue. Using a large round brush, wet the sky area with clean water first, then drop in the pigment loosely to create soft, faint clouds. Keep it very pale. -
Create the horizon:
While the bottom of the sky is still damp, introduce a faint wash of Alizarin Crimson mixed with a touch of Burnt Sienna near the horizon line to mimic a sunset glow. -
Mix green tones:
Prepare two puddles of green: one lighter (Sap Green with plenty of water) and one slightly cooler/darker (Olive Green mixed with a tiny dot of Payne’s Gray). -
First cactus layer:
Paint the cactus pads with the lighter green mixture. Use the wet-on-dry technique, filling each oval shape carefully but leaving tiny white highlights unpainted for dimension.
Level Up: Salt Tech
While the green pad wash is still wet, sprinkle table salt on it. Let it dry fully, then brush it off for a stunning organic, speckled cactus texture.
Step 3: Building Depth and Texture
-
Shadows on pads:
While the first green layer is still slightly damp, drop the darker Olive Green mix onto the bottom and left sides of each pad to suggest volume and shadow. -
Adding texture:
I like to sprinkle a tiny bit of salt or dab with a thirst brush on the wet pads occasionally to create that mottled, imperfect texture characteristic of cactus skin. -
Let it dry completely:
Wait until the paper is bone dry. This is crucial before adding the fine details. -
Painting the blooms:
Load a size 2 brush with concentrated Alizarin Crimson. Paint the small flower buds at the tops of the pads using short, upward flicking strokes to mimic petals. -
Grounding the subject:
Mix Burnt Sienna with Payne’s Gray for a rocky ground color. Paint the ground beneath the cactus, fading it out into the white of the paper at the edges.
Step 4: Final Details
-
Drawing the spines:
Using either a very fine liner brush with dark green paint or a waterproof ink pen, draw the needle clusters. Make small dots with 2-3 tiny lines radiating out from them. -
Defining edges:
Use the same fine tool to carefully outline the pads where needed to separate them from the background, but keep the line broken and organic, not a solid cartoon outline. -
Darkening shadows:
Add a final glaze of Payne’s Gray to the very bottom junction where pads meet to deepen the contrast. -
Reveal the border:
Once the painting is completely dry, slowly peel away the masking tape at a 45-degree angle to reveal your crisp, clean edges.
Now your desert scene is ready to bring a touch of the wild west to your wall
Horseshoe and Rope Minimal Line Painting
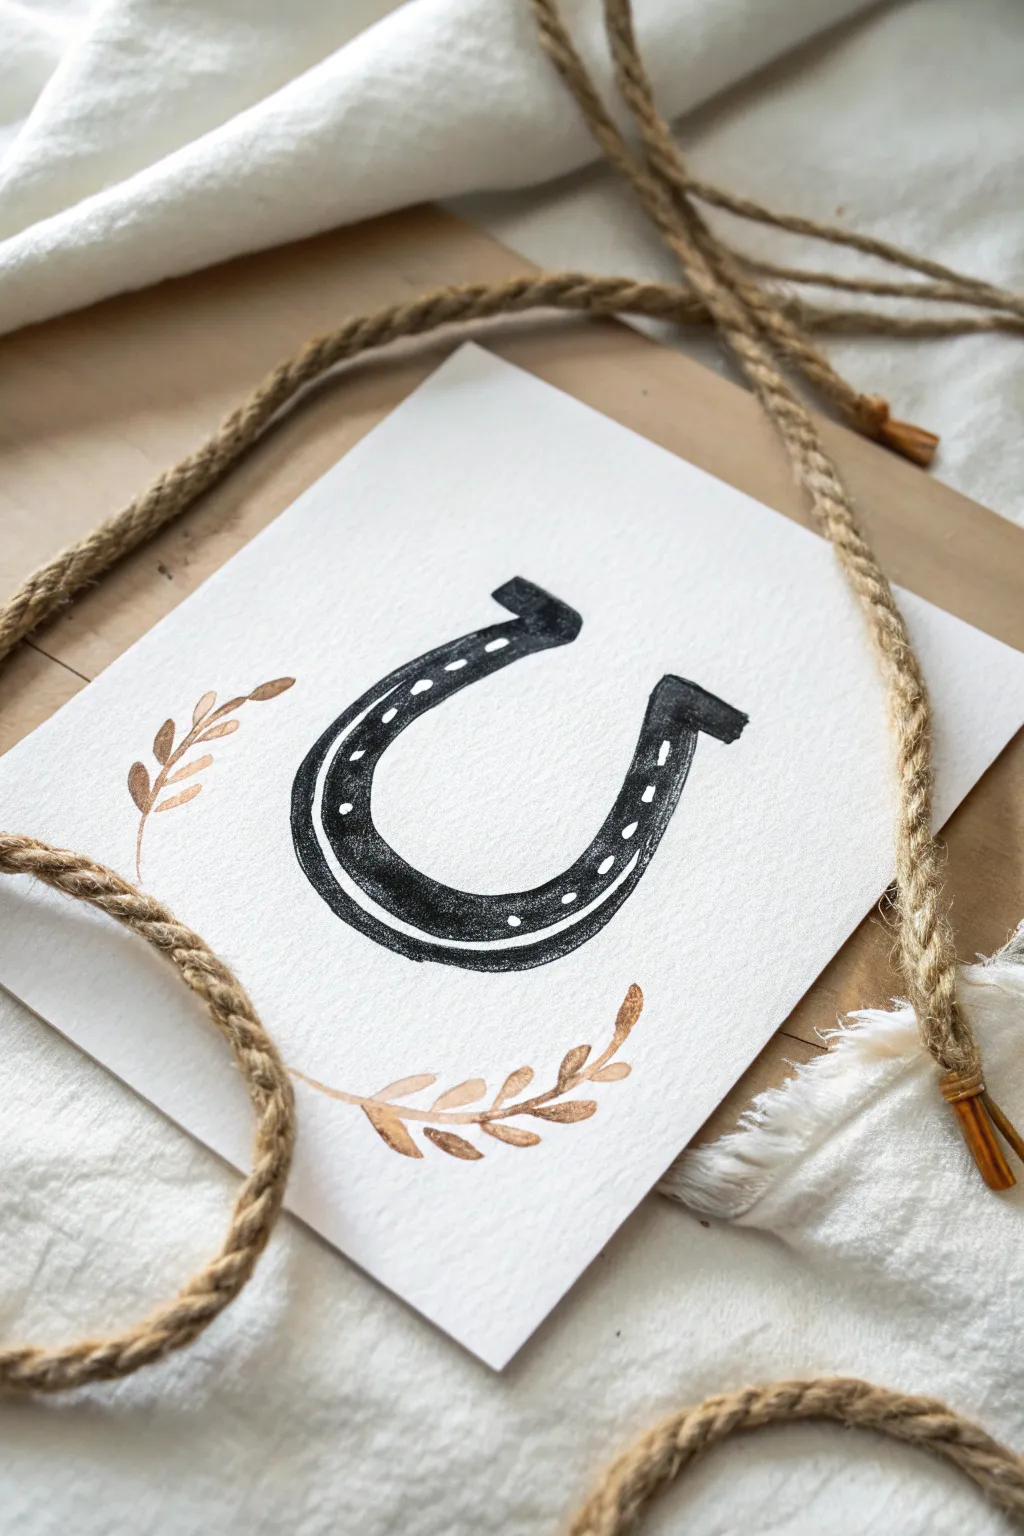
Capture the spirit of the Wild West with this minimalist watercolor illustration featuring a classic horseshoe and delicate grain stalks. The contrast between the bold black ink and shimmering metallic accents creates a sophisticated yet homey piece perfect for modern farmhouse decor.
How-To Guide
Materials
- Cold press watercolor paper (140lb/300gsm)
- Black watercolor paint or black India ink
- Metallic copper or bronze watercolor paint
- Small round brush (size 2 or 4)
- Fine liner brush (size 0 or 00)
- Ornate gold gel pen or white gouache (for details)
- Pencil (HB or lighter)
- Kneaded eraser
- Clean water and paper towels
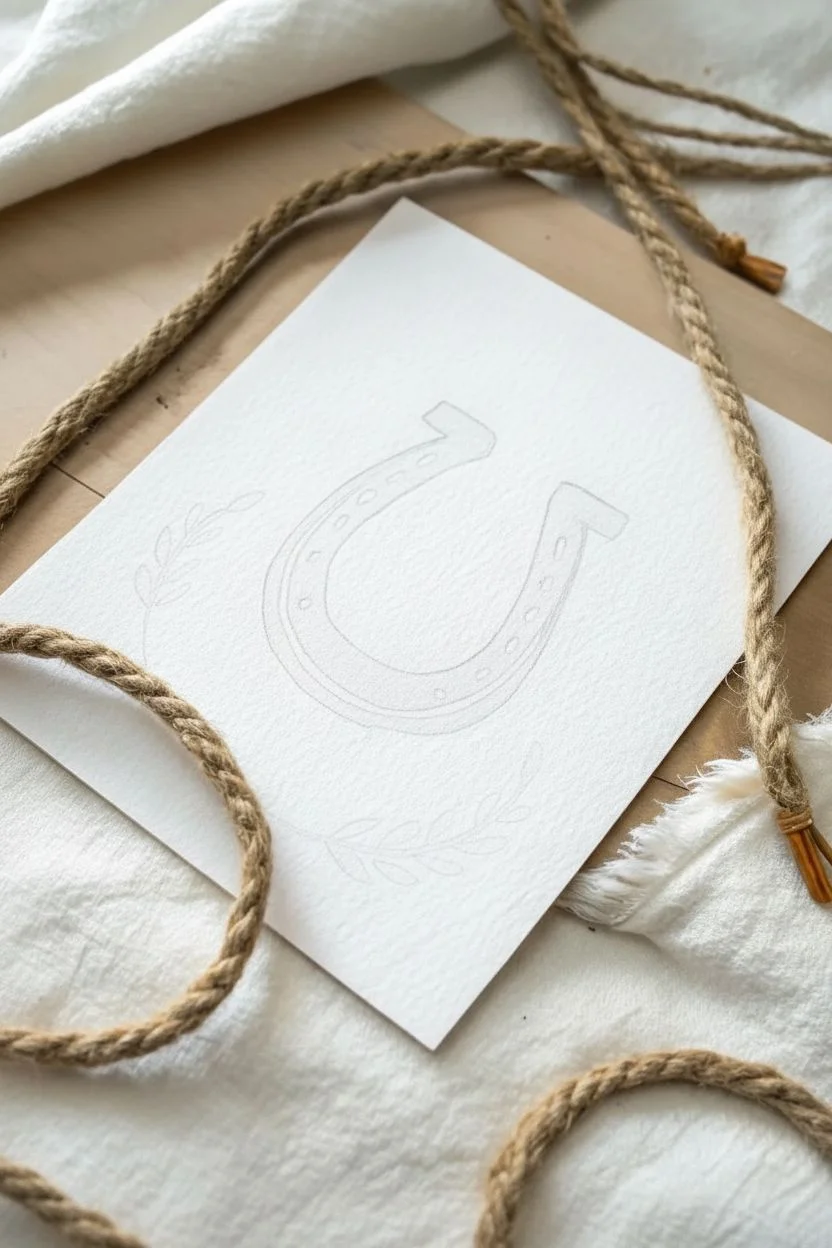
Step 1: Sketching the Outline
-
Center Your Horseshoe:
Begin by lightly sketching a ‘U’ shape in the center of your watercolor paper. Horseshoes are generally wider than a perfect half-circle, so gently flare the sides out before bringing them back in at the top tips. -
Add Dimension:
Draw an inner ‘U’ shape parallel to your first line to create the thickness of the shoe. At the top of each prong, create the rectangular ends, known as the heels or caulks, which stick out slightly. -
Placement of the Grain:
Lightly sketch two curved stems near the bottom of the horseshoe. One should curve up from the bottom left, and the other should sweep up towards the right side, creating a loose laurel effect. -
Refine the Sketch:
Use your kneaded eraser to lift most of the graphite off the paper until the lines are barely visible. This ensures your final painting looks clean and professional without heavy pencil marks showing through.
Step 2: Painting the Iron
-
Prepare Black Paint:
Mix a rich, saturated black watercolor or pour a small amount of India ink. I prefer using ink for this step because it gives that deep, wrought-iron look that watercolor sometimes lacks. -
First Coat:
Using your size 2 or 4 round brush, carefully fill in the horseshoe shape. Work relatively quickly to maintain a wet edge, which prevents unwanted drying lines in the middle of your shape. -
Leaving Texture:
Don’t worry about making the fill perfectly solid black. Allowing the natural texture of the cold press paper to show through gives the metal a weathered, rustic appearance. -
Defining Edges:
Switch to your fine liner brush to crisp up the outer and inner edges of the horseshoe. The blocky ends at the top should be distinct and sharp. -
Dry completely:
Let this layer dry fully before adding details. If the paper feels cool to the touch, it is still wet; wait until it is room temperature.
Pro Tip: Texture Trick
For a rusty iron look, blot the wet black paint with a crumpled tissue immediately after applying. This lifts pigment and leaves organic texture behind.
Step 3: Metallic Accents
-
Mixing Copper:
Activate your metallic copper or bronze paint with a few drops of water. You want a creamy consistency that is opaque enough to shine but fluid enough to flow off the brush. -
Painting Stems:
With the size 2 brush, paint the main stems for the grain stalks following your faint pencil guides. Use a light hand to keep the stems delicate. -
Adding Leaves:
Paint small, tear-drop shaped leaves or grain kernels along the stems. Press the belly of the brush down to widen the leaf, then lift up as you drag to create a pointed tip. -
Varying the Foliage:
Paint the leaves on the left stem pointing upwards and slightly outwards. Repeat on the right side, ensuring the composition feels balanced but not perfectly symmetrical. -
Second Layer (Optional):
Once the first metallic layer is dry, you can go back over just the darker areas of the leaves to add depth and make the shimmer pop.
Level Up: Rope Frame
Glue a piece of actual twine or thin hemp rope around the border of your paper to physically mimic the rope seen in the inspiration photo.
Step 4: Final Details
-
Nail Holes:
Once the black horseshoe isbone dry, use white gouache or a white gel pen to add the nail holes. Draw small, rectangular or oval dashes along the center curve of the shoe. -
Highlight Line:
Add a very thin, broken white line along the inner curve of the horseshoe. This suggests a highlight on the metal edge and adds three-dimensionality to the flat black shape. -
Clean Up:
Check for any stray pencil marks once the entire painting is completely dry and gently erase them. Sign your work small in the corner with a fine pen.
Hang this charming study in a simple wood frame to bring a touch of the stable into your home.


Sepia “Old Photo” Western Silhouette Scene
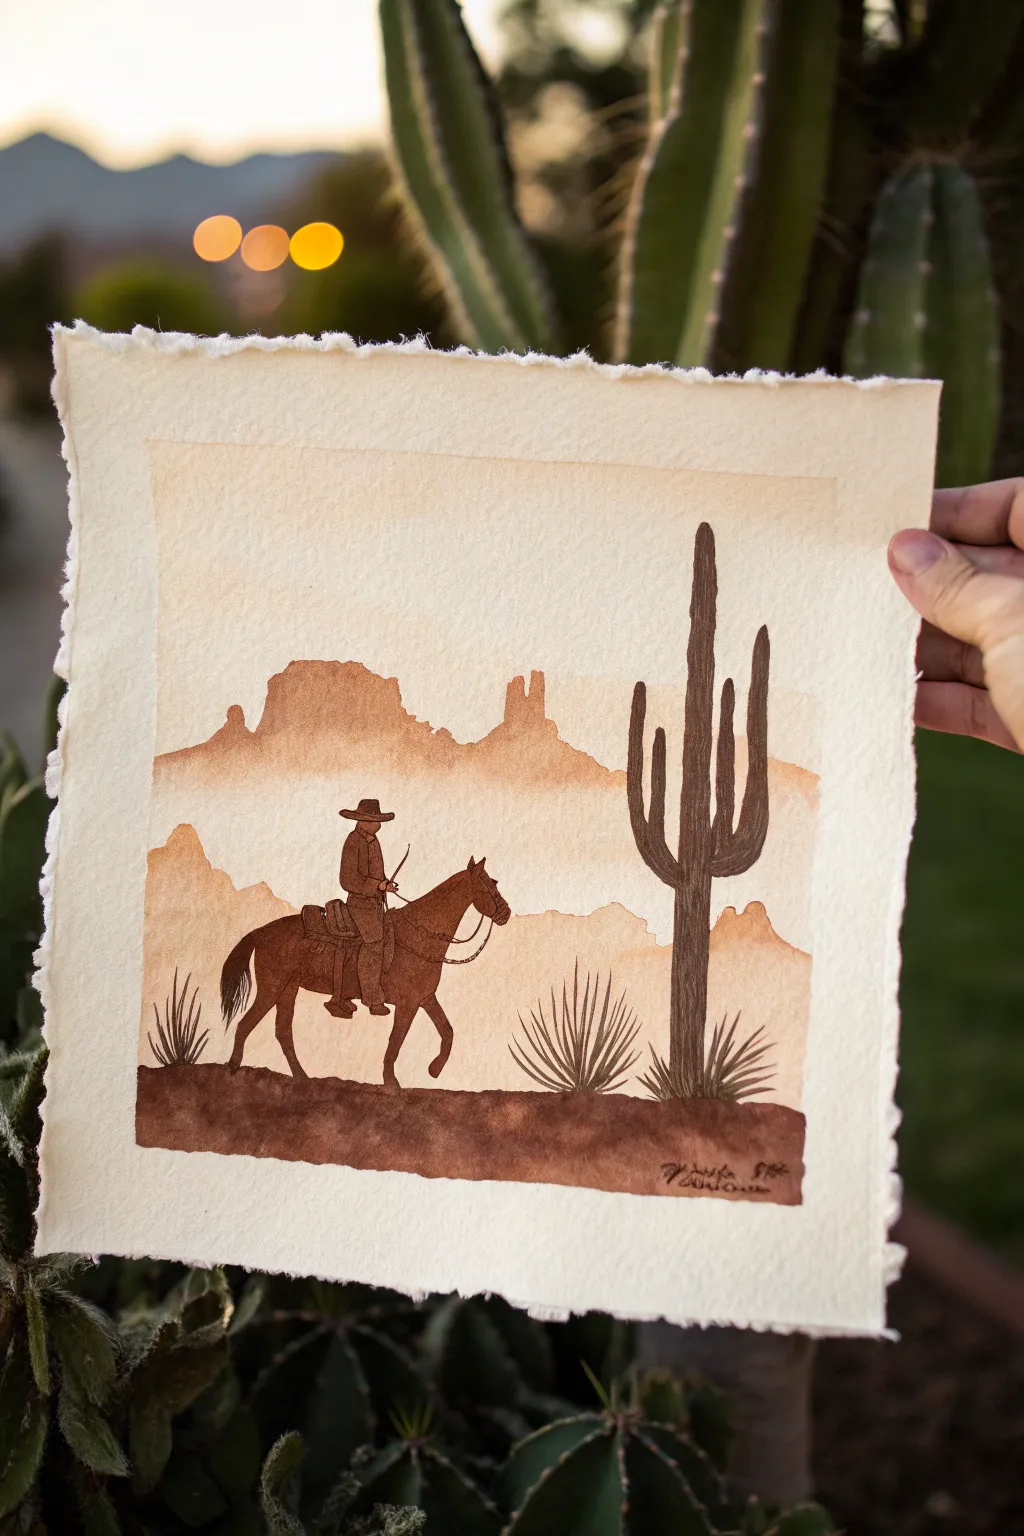
Capture the nostalgic feel of an old tintype photograph with this monochromatic watercolor landscape. Using layers of a single warm brown hue, you’ll build depth from faint distant mountains to a striking dark foreground silhouette.
Detailed Instructions
Materials
- Cold press watercolor paper (deckled edge optional)
- Sepia or Burnt Umber watercolor paint
- Flat wash brush (3/4 inch)
- Round brushes (sizes 2 and 6)
- Pencil for sketching
- Masking tape
- Clean water and mixing palette
- Paper towels
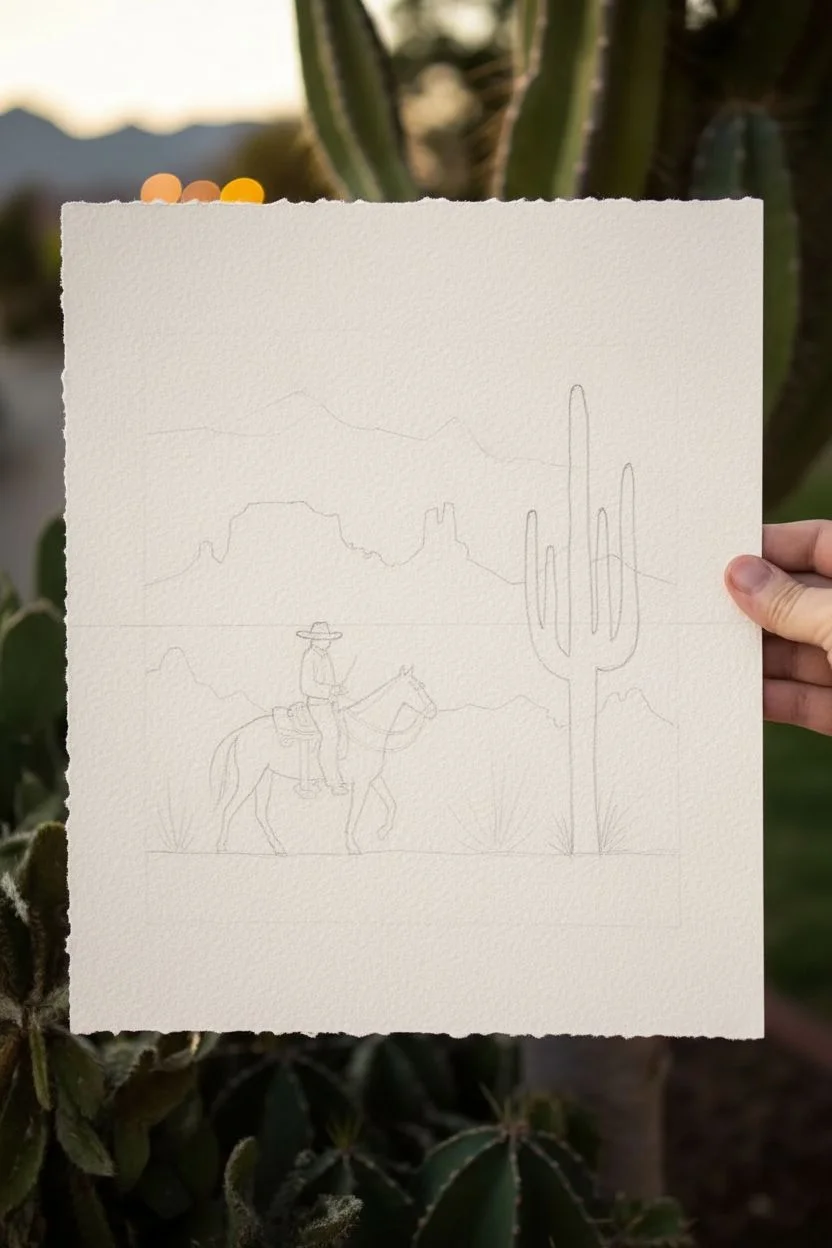
Step 1: Planning and Sketching
-
Composition Sketch:
Begin by lightly sketching your horizon line about one-third of the way up from the bottom. This will be your ground level. -
Map Out Layers:
Draw faint, jagged outlines for the distant mountain ranges. Place the furthest range high up and another, closer range slightly lower to create depth. -
Subject Placement:
Sketch the outline of the horse and rider on the left side of the foreground. Keep the details simple since this will be filled in as a solid silhouette later. -
Add Cactus details:
Draw the large saguaro cactus on the right side to balance the composition, sketching its arms reaching upward.
Step 2: Painting the Background
-
Mix Your Wash:
Create a very watery, pale mix of your Sepia or Burnt Umber paint. Test it on scrap paper; it should be a faint tea color. -
First Sky Layer:
Using the flat wash brush, paint the entire sky area above the furthest mountains. You can use a wet-on-wet technique here for a soft, hazy look, or distinct strokes for a more graphical style. -
Distant Mountains:
While the sky is drying, mix a slightly darker value of sepia. Paint the furthest mountain range, letting the bottom edge of this shape fade out with a little clean water to suggest atmospheric distance. -
Middle Ground Mesas:
Allow the first mountain layer to dry completely. Mix a medium-tone wash—think coffee with a little milk—and paint the second layer of mountains or mesas that sit slightly lower. -
Create Depth:
As you paint these middle layers, ensure the top edges are crisp against the pale background behind them.
Pro Tip: Deckled Edges
To get the rough paper edge shown in the photo, tear your watercolor paper against a ruler instead of cutting with scissors.
Step 3: Painting the Foreground
-
Darkest Mix:
Prepare your most concentrated paint mixture. It should be thick, almost creamy, to achieve a deep, dark brown. -
Ground Line:
With the dark mix and a size 6 round brush, paint the solid ground strip at the bottom. Use uneven strokes to mimic rough desert terrain. -
Cactus Silhouette:
Switching to the same dark mix, paint the saguaro cactus. Use the tip of the brush to keep the edges sharp. Add vertical texture lines while the paint is wet if you want subtle detail. -
Desert Scrub:
Using a smaller size 2 brush, add the spiky agave or yucca plants near the cactus and horse. Use quick, flicking motions upward to create sharp, tapered leaves.
Level Up: Coffee Painting
Swap the watercolor paint for real instant coffee! Mix different concentrations of water and coffee granules to achieve the various sepia tones.
Step 4: The Main Subject
-
Horse Outline:
With your dark mix and the small brush, carefully outline the horse and rider. I find it helps to start with the tricky shapes like the hooves and the hat. -
Filling the Shape:
Fill in the silhouette with solid dark paint. Be careful not to let the paint pool too much, or it might bloom as it dries. -
Refining Details:
Add tiny details like the horse’s reins and the cowboy’s spur using the very tip of your smallest brush. -
Grounding Shadows:
Paint small, horizontal shadow lines connecting the horse’s hooves to the ground to ensure the figure looks planted and not floating. -
Final Touches:
Once everything is fully dry, erase any visible pencil lines and add your signature in the bottom corner with a fine liner or brush.
Now step back and admire how a single color can create such a rich western atmosphere
Abstract Southwestern Geometric Desert Landscape
Capture the warmth of a setting desert sun with this modern, abstract landscape painting. By breaking down the scene into simple geometric shapes and soothing earth tones, you’ll create a striking piece of wall art that feels both structured and organic.
Step-by-Step
Materials
- Heavyweight watercolor paper (300gsm)
- White or light wood frame (8×10 or 11×14)
- Watercolor paints (Rust, Ochre, Teal, Sage Green, Deep Green, Brown)
- Painter’s tape or masking tape (low tack)
- Pencil and eraser
- Ruler
- Flat shader brushes (medium and small)
- Round detail brush (size 2 or 4)
- Palette for mixing
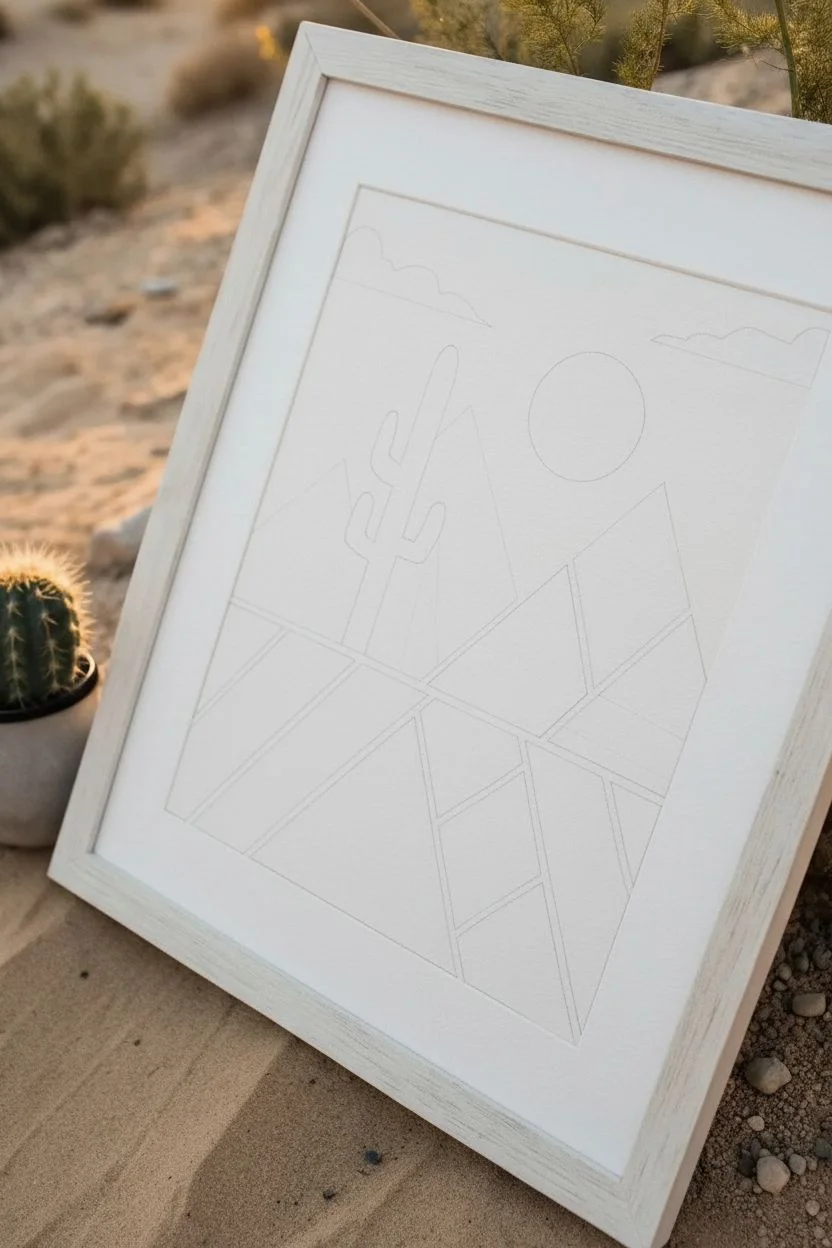
Step 1: Planning and Sketching
-
Map out the horizon:
Begin by lightly drawing a horizontal line about one-third of the way down from the top of your paper. This will separate your sky from the landscape. Don’t worry about it being perfectly straight; a little natural variation is fine. -
Divide the landscape:
Using your ruler, divide the lower two-thirds of the paper into various geometric triangles and trapezoids. Start with two large mountain peaks rising above the horizon line, then break the foreground down into smaller, angular facets. -
Add the sun and clouds:
Use a small circular object, like a spice jar lid, to trace a circle in the sky area between the two mountain peaks. Above this, sketch two simple, flat-bottomed cloud shapes near the top edge. -
Sketch the cactus:
On the left mountain slope, draw a classic saguaro cactus silhouette. Keep the lines clean and simple—a main vertical stem with two upward-curving arms is perfect. -
Refine the lines:
Go over your geometric divisions with a ruler one last time to ensure crisp edges, erasing any stray sketch marks. Leave a thin channel of white space (about 1-2mm) between each shape if you want a true mosaic look, or plan to paint right up to the lines.
Bleeding Lines?
If colors bleed into each other, ensure adjacent shapes are 100% dry before painting the neighbor. You can also use masking fluid or thin tape to mask off sections for razor-sharp edges.
Step 2: Painting the Landscape
-
Start with the sun:
Mix a warm rust-orange color with a fair amount of water. Paint the sun circle entirely, allowing the pigment to pool slightly in some areas for texture. Let this dry completely before moving nearby. -
Paint the background mountains:
For the two large peaks in the background, mix a very pale peach or dusty pink wash. We want these to look distant, so keep the color light and watered down. Paint these shapes carefully, avoiding the cactus outline you sketched. -
Fill the middle ground:
Moving downward, select the triangles that represent the middle layer of dunes. Use a terracotta or burnt sienna shade here. I like to paint these sections with horizontal brush strokes to mimic the sedimentary layers of rock. -
Add the foreground details:
Mix a deep mustard yellow or ochre. Paint the angular strips on the bottom left. For visual interest, leave some faint streaks in your brushwork to suggest the texture of sand or sandstone. -
Paint the cool tones:
Contrast the warm earth tones by painting the remaining lower geometric shapes in cool greens. Use a deep forest green for the bottom-most triangles and a lighter sage or mint green for the adjacent shapes. -
The cactus silhouette:
Mix a teal-blue color that is darker than your mountain background. Using your small flat brush or round brush, carefully fill in the cactus shape. It should stand out boldly against the pale pink mountain behind it.
Step 3: Final Details
-
Add the clouds:
Paint the cloud shapes at the very top with a very light, watered-down teal or grey-blue wash. Keep the edges soft or geometric depending on your preference, but ensure they don’t overpower the sun. -
Clean up the gaps:
If you intended to leave white channels between shapes (the ‘grout’ lines), use a clean, damp brush or a white gel pen to tidy up any paint that bled over the edges. Sharp, distinct boundaries are key to this geometric style. -
Add texture (optional):
Once the paint is dry, you can add subtle vertical lines or cross-hatching to the green sections using a slightly darker shade of paint and a detail brush to simulate plant fibers or shadows. -
Frame your work:
Allow the painting to dry flat for at least an hour to prevent buckling. Place it into your light wood frame without the glass initially if you want to photograph it without glare, then secure it properly for display.
Color Harmony
Stick to a limited palette of 5-6 colors. Mixing a tiny dot of brown into every color you use will harmonize the whole piece, giving it that cohesive, earthy desert vibe.
Hang your desert mosaic in a sunny spot to let those warm earth tones truly glow.


Have a question or want to share your own experience? I'd love to hear from you in the comments below!