
When I’m trying to paint a feeling I can’t quite put into words, I lean on color, symbols, and a little bit of mess. These ideas are like studio prompts you can grab anytime you want your painting to hold real emotion—quiet, loud, tangled, tender, all of it.
Make a Weeping Eye the Whole Story

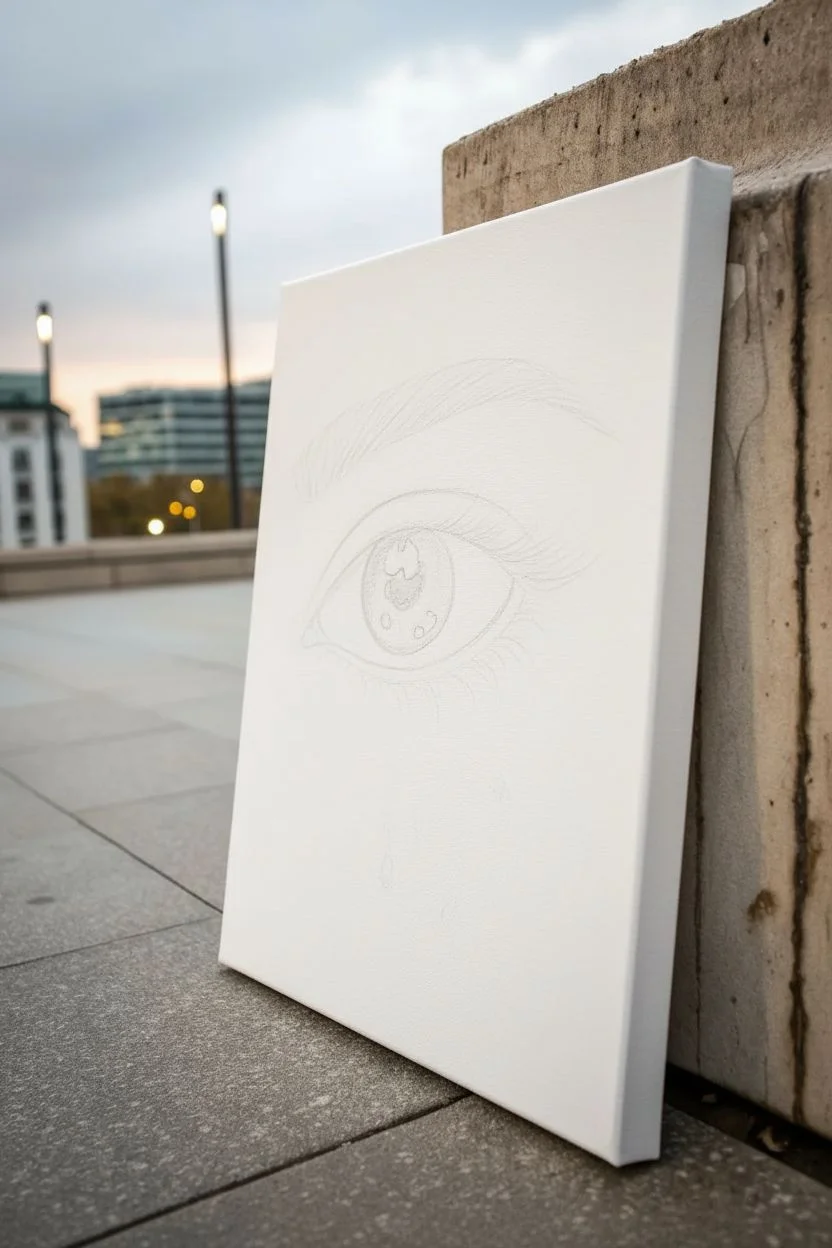
Capture raw emotion with this stunning portrayal of a single weeping eye, blending precise sketched details with loose, flowing watercolor drips. The contrast between the sharp lashes and the chaotic, colorful tears creates a deeply expressive piece that turns a simple subject into a powerful story.
Step-by-Step Guide
Materials
- Stretched canvas (approx. 16×20 inches recommended)
- Watercolor paints (tube or high-pigment pan)
- Black archival ink fine liner pens (various thicknesses, e.g., 0.1, 0.3, 0.5)
- Pencil (HB or H) and eraser
- Synthetic sable brushes (Round sizes 2, 6, and 10)
- Water spray bottle
- Paper towels
- Palette for mixing
- Jar of clean water
Step 1: Sketching the Foundations
-
Position the eye:
Begin with a very faint pencil sketch. Locate the eye centrally on your canvas, ensuring it’s large enough to capture detail—the iris alone should be significant in size. Sketch the almond shape of the eye, drooping slightly at the outer corner. -
Map the details:
Lightly outline the circle of the iris and the smaller pupil in the center. Mark the waterline (the small ledge of skin between the eye and the lower lashes) and the crease of the eyelid above the main almond shape. -
Draft the eyebrow and highlights:
Sketch the eyebrow shape well above the eye, indicating the direction of hair growth. Crucially, draw small organic shapes inside the iris and pupil to reserve as white highlights; these reflections make the eye look wet and alive.
Step 2: Watercolor Washes
-
Base skin tones:
Mix a very watery wash of pale peach or beige. Apply this loosely around the eye shape, letting the edges remain rough and undefined. Don’t worry about perfect coverage; the white canvas showing through adds to the look. -
Add warmth:
While the first layer is still damp, drop in touches of muted pink and soft orange near the tear duct and the outer corner to simulate irritation or emotion. -
Paint the iris:
Using a size 6 brush, paint the iris with shades of golden brown and ochre. Keep the area around the pupil darker and the bottom curve of the iris lighter and more golden. Avoid painting over your sketched highlight shapes. -
Depict the eyebrow:
Mix a brown shade and use the size 2 brush to flick hair-like strokes for the eyebrow. Start lightly at the inner edge and thicken the strokes as you move outward, layering to build density.
Drips stopping too soon?
If your paint trails stop midway, the paint is too thick. Mist the trail lightly with water and tilt the canvas again, or gently guide the bead of paint downward with a clean, wet brush.
Step 3: Creating the Drips
-
Prepare the ‘tear’ colors:
Prepare puddles of fluid paint on your palette in pink, orange, violet, and a hint of cool blue. These should be quite watery. -
Apply the paint pools:
Load a large round brush with the pinkish-violet mix and press it against the lower lash line area. Allow a significant amount of water to pool there. -
Let gravity work:
Tilt your canvas upright vertically. If the paint doesn’t run immediately, gently touch the bottom of the wet pool with a water-loaded brush or mist it lightly with your spray bottle to encourage the drip. -
Vary the streams:
Repeat this process with orange and blue tones, spacing them out along the bottom of the eye. Let some drips run all the way to the canvas edge, while others can stop shorter. I find that letting the colors bleed slightly into one another at the source creates a beautiful transition. -
Add splatter:
Load a brush with watery red or pink paint and tap the handle against a finger to flick tiny specks of color around the top right and bottom corners for texture.
Pro Tip: Masking Fluid
Use liquid masking fluid or white crayon on the highlights in the pupil before you start painting to ensure those critical white spots stay perfectly clean and bright.
Step 4: Inking and Definition
-
Pupil darkness:
Once the paint is completely dry, use a thick black ink pen or black paint to fill in the pupil, making it devoid of light except for the preserved white reflection. -
Outline the iris:
Trace the outer edge of the iris with a finer pen. Draw tiny lines radiating from the pupil outward to create the texture of the iris muscle. -
Draw upper lashes:
With a steady hand and a medium-thickness pen, draw the upper eyelashes. Start at the lash line and flick your wrist upward and outward in a quick, curving motion. These should be thickest at the base and taper to a point. -
Draw lower lashes:
Draw the lower lashes using shorter, slightly more spaced-out strokes. Ensure they originate from below the waterline ridge, not directly from the eyeball. -
Deepen the crease:
Add some ink hatching or dark watercolor shading into the eyelid crease to give the eye dimension and make it recede into the socket.
Step back and admire how the colorful chaos balances with the sharp details of the eye


Use Body Language in a Simple Figure
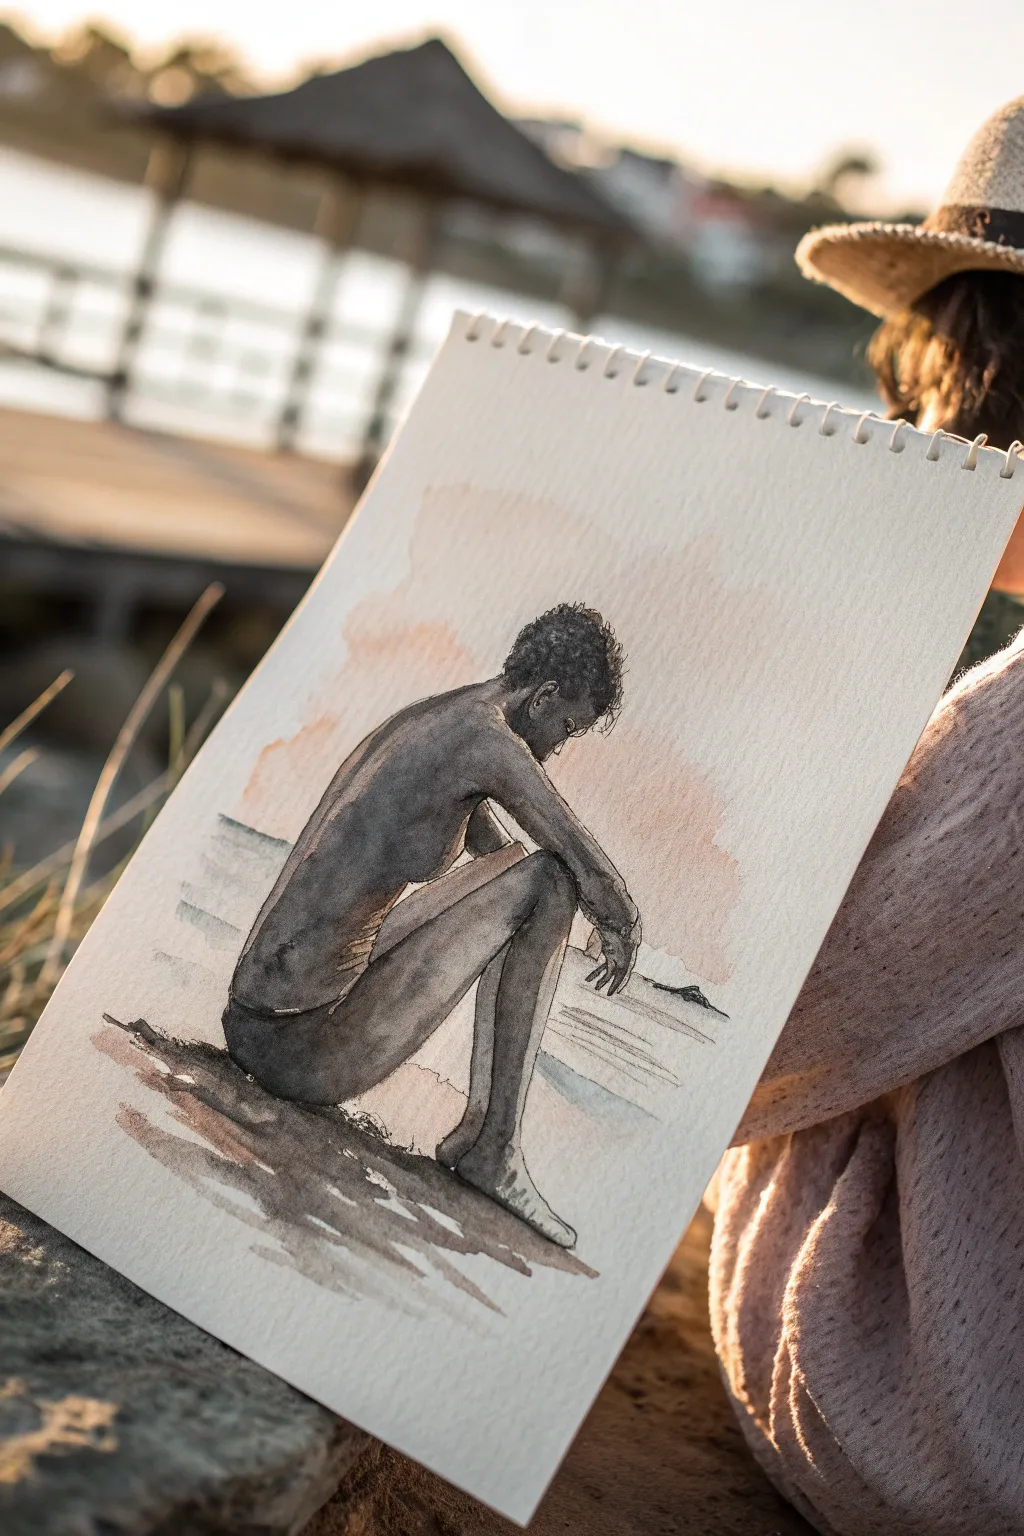
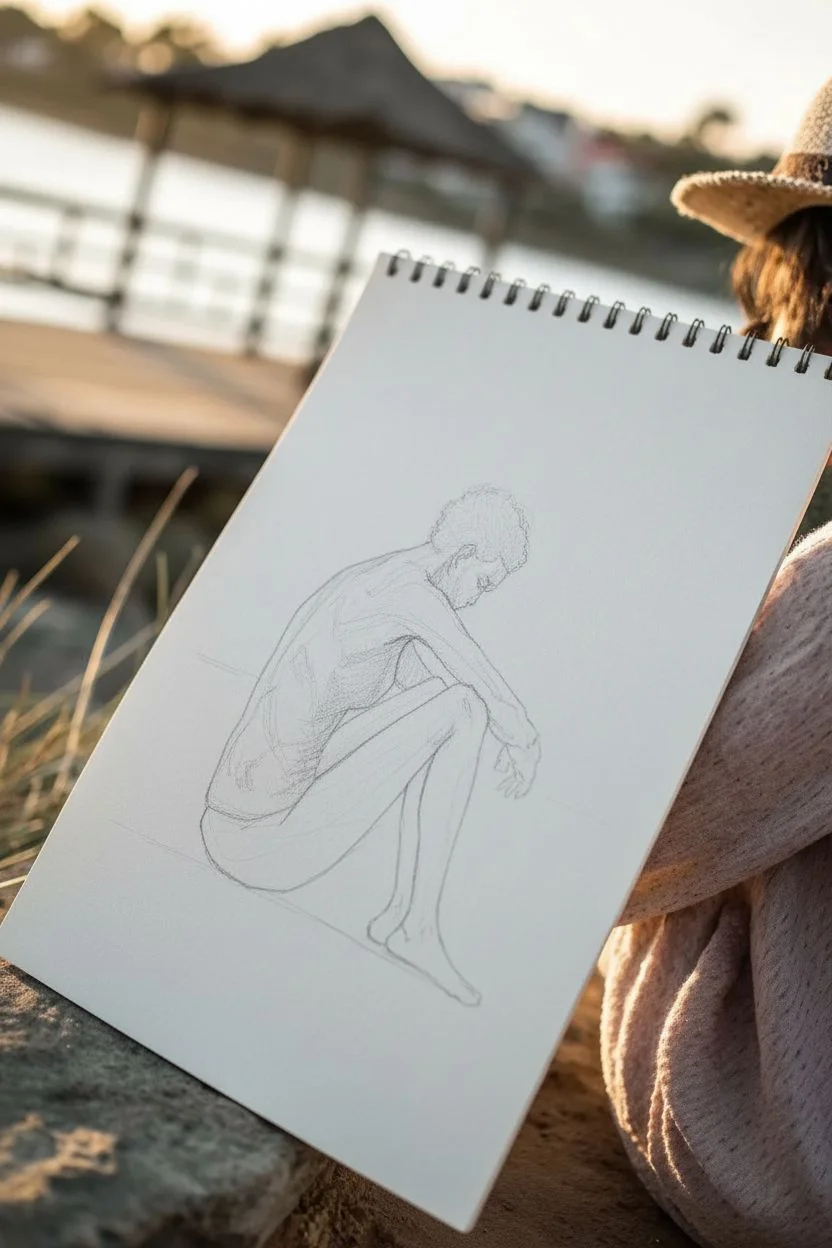
Capture quiet introspection with this emotive watercolor study, focusing on the expressive power of body language. Using a limited palette of warm grays and soft peach tones, you will learn to build a figure that conveys deep emotion through posture alone.
Detailed Instructions
Materials
- Cold press watercolor paper (spiral bound sketchbook)
- Watercolor paints: Payne’s Grey, Burnt Umber, Yellow Ochre, Cadmium Red (or a peach mix)
- Round watercolor brushes (size 4 and 8)
- Waterproof fine liner pen (black or sepia, 0.1mm)
- Graphite pencil (HB or 2H)
- Kneaded eraser
- Clean water jar
- Paper towels
Step 1: Planning the Posture
-
Initial sketch:
Begin with a very light graphite sketch. Focus on the curve of the spine; draw a long C-curve to represent the back, showing the figure hunched over. -
Positioning limbs:
Sketch the legs pulled close to the chest. The knees should be the highest point of the lower body, creating a triangular composition that feels closed off and private. -
Resting arms:
Draw the arms draped loosely over the knees. The hands should hang relaxed, not clenched, suggesting weariness rather than tension. -
Refining the head:
Angle the head downward, tucking the chin slightly toward the chest to emphasize the contemplative mood. -
Lighten lines:
Roll your kneaded eraser gently over the entire sketch. You want the pencil marks to be barely visible guides before applying paint.
Muddy colors?
If your grey skin tones look dirty, you likely over-mixed on the paper. Let the layers dry fully before glazing a new color on top to keep the transparency.
Step 2: Applying the Washes
-
Mixing the skin shadow:
Create a watery mix of Payne’s Grey with a tiny touch of Burnt Umber. You want a cool, shadowy tone rather than a realistic skin color. -
First figure wash:
Using the size 8 brush, wet the figure area slightly with clean water, then drop in your grey mix. Let the wet-on-wet technique soften the edges naturally. -
Building contrast:
While the first layer is still damp, drop clearer, darker pigment into the shadowed areas: under the thigh, the stomach crease, and the nape of the neck. -
Painting the hair:
Switch to a smaller brush and use a concentrated, formidable mix of Payne’s Grey for the hair. Use a stippling motion to suggest tight curls or texture. -
The ground shadow:
Mix a darker, warmer grey using more Burnt Umber. Paint loose, horizontal strokes underneath the figure to ground them, letting the paint fade out unevenly to the left.
Emotional Impact
Change the mood by altering the background wash. A cool blue feels lonely and cold, while this warm peach suggests a moment of peaceful sunset reflection.
Step 3: Atmospheric Background
-
Mixing the sky tone:
Dilute a mix of Cadmium Red and Yellow Ochre (or a pre-mixed peach) with plenty of water. It needs to be extremely transparent. -
sunset wash:
Apply this peach wash loosely behind the back of the figure. Use broad, uneven strokes and let the edges bloom and fade into the white of the paper; don’t paint the whole page. -
Horizon hint:
With a very dilute blue-grey, paint a few horizontal lines to the right of the figure to suggest water ripples or a distant shoreline. -
Drying time:
Allow the painting to dry completely. If the paper feels cool to the touch, it is still wet deep down.
Step 4: Defining Details
-
Texture with pen:
Using your fine liner, add very subtle scribbles to the hair area to deepen the texture and define the shape of the head. -
selective outlining:
Do not outline the whole figure. Use the pen to add broken lines only where shadows are deepest: under the arm, the crook of the knee, and the curve of the spine. -
Final darkening:
If the watercolor dried too light in the deepest shadows (like under the buttocks), add a final heavy glaze of dark grey paint to anchor the figure to the ground.
Now you have a touching study of human emotion captured through simple posture and light


Push the Mood With Light and Shadow
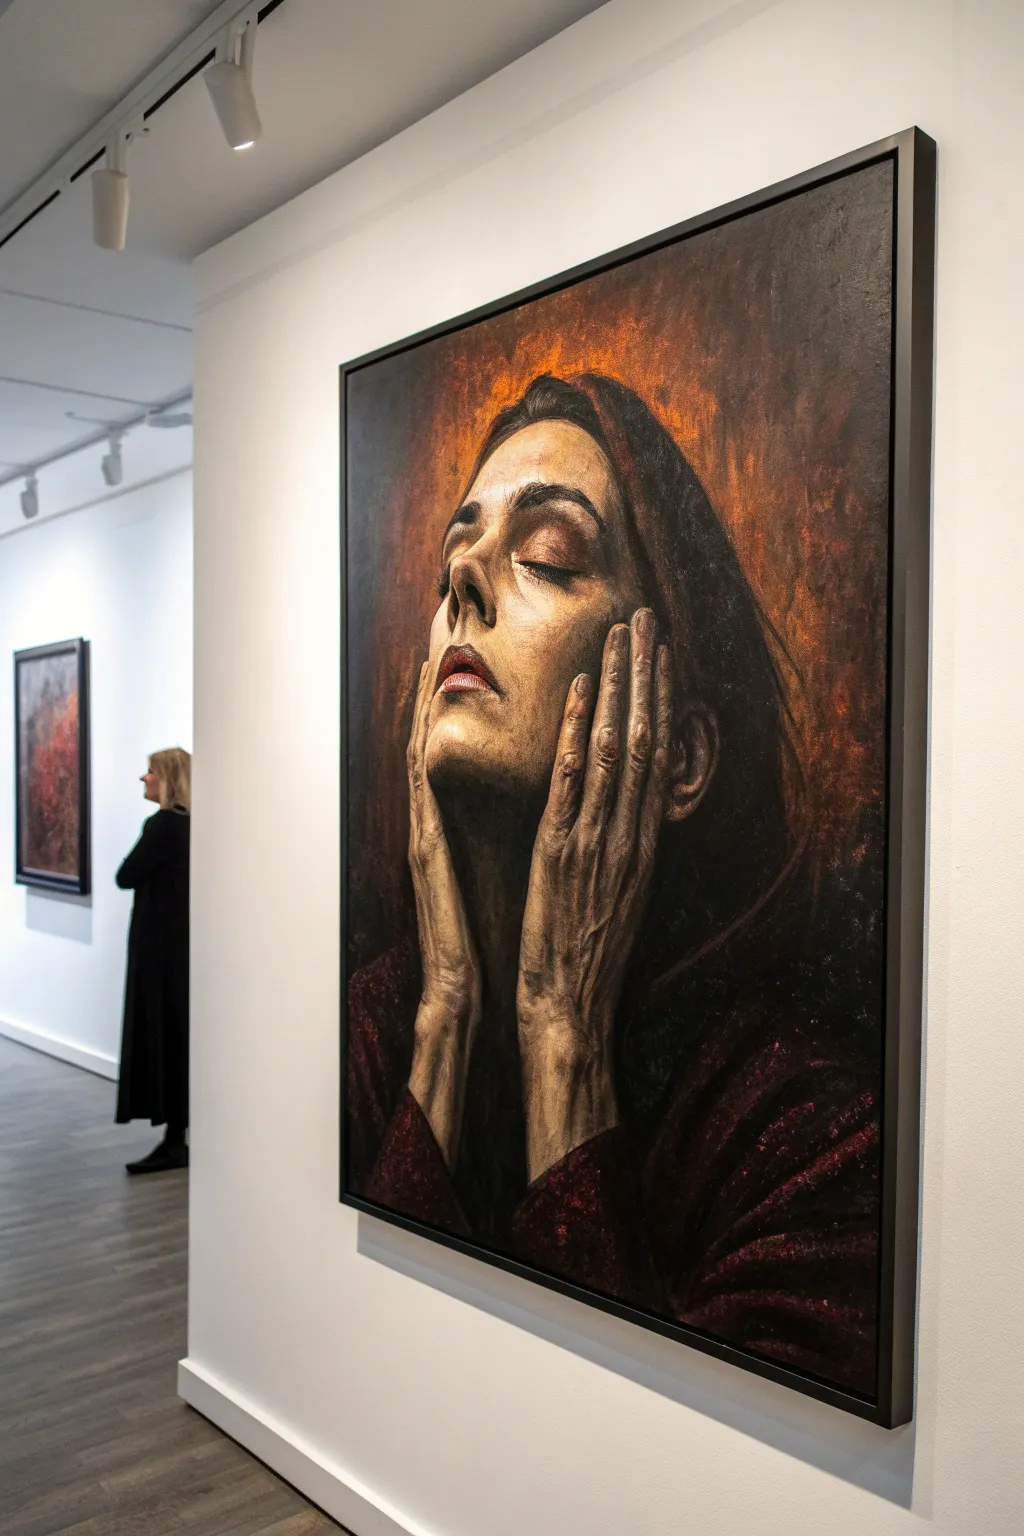
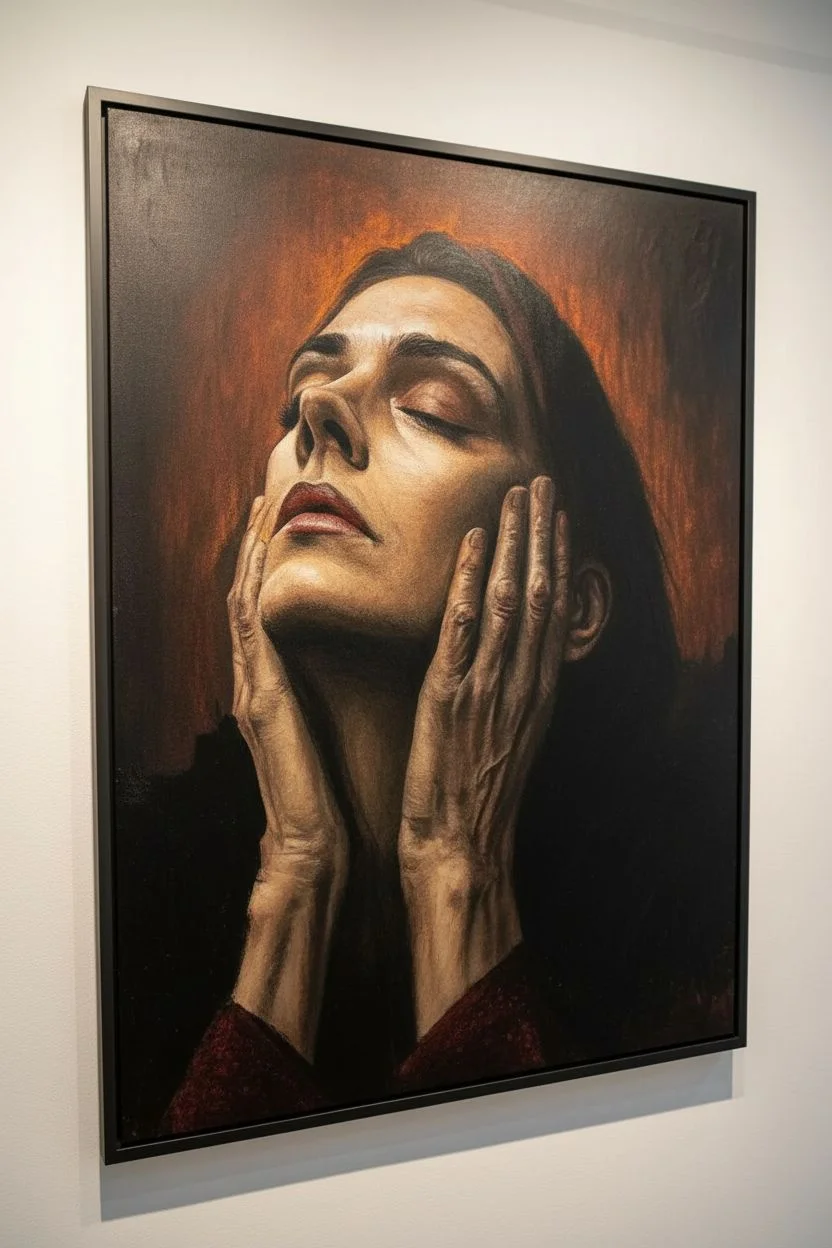
Capture raw emotion with this striking portrait that uses extreme light and shadow to sculpt the face and hands. By focusing on deep, warm darks and selective highlights, you will create a mood of intense longing or introspection.
How-To Guide
Materials
- Canvas (stretched, 18×24 inches or similar)
- Oil or heavy-body acrylic paints
- Colors: Burnt Umber, Alizarin Crimson, Yellow Ochre, Cadmium Red, Titanium White, Ivory Black, Ultramarine Blue
- Assorted flat and filbert brushes (sizes 2, 6, 10)
- Palette knife
- Slow-drying medium (if using acrylics) or Linseed oil (if using oils)
- Charcoal stick for sketching
Step 1: The Foundation
-
Tone the Canvas:
Begin by covering the entire white canvas with a wash of Burnt Umber mixed with a touch of Alizarin Crimson. This creates a warm, unifying undercurrent that will peek through the final layers. -
Map the Composition:
Using a charcoal stick or a thin brush with diluted dark paint, sketch the basic structure of the head tilted back. Pay close attention to the placement of the hands framing the jawline. -
Establish the Shadows:
Mix a deep, rich black using Alizarin Crimson and Ivory Black. Block in the background and the darkest areas of the figure—specifically the hair on the right side and the collar area. -
Create the First Flesh Tone:
Mix a mid-tone skin color using White, Yellow Ochre, and a small amount of Burnt Umber. Apply this loosely to the face and hands, avoiding the areas you just marked as deep shadow. -
Blend the Transitions:
While the paint is still wet, use a clean, dry filbert brush to soften the edges between your dark shadow blocks and the mid-tone skin. This establishes the initial form without getting too detailed.
Don’t Over-blend
Resist smoothing everything out. Leaving visible brushstrokes on the skin, especially on the forehead and hands, adds raw energy and emotional tension to the piece.
Step 2: Building Form and Emotion
-
Deepen the Eye Sockets:
The closed eyes are crucial for the mood. Use a mix of Burnt Umber and Alizarin Crimson to paint the deep shadows of the eye sockets, keeping the eyelids distinctive but shadowed. -
Sculpt the Nose:
Add a strong shadow under the nose and along the left nostril. The light source is coming from above and slightly to the left, so the shadow cast by the nose is vital for dimension. -
Define the Hands:
The hands are tense and expressive. Paint the fingers using a mix of your mid-tone with a little more Burnt Umber to show the tendons and knuckles. Keep the shadows between fingers distinct. -
Veining and Texture:
To make the hands look realistic and strained, mix a translucent glaze of Ultramarine Blue and Alizarin Crimson. Lightly suggest veins on the backs of the hands and wrists. -
Add Warms to the Shadows:
Pure black can look flat. Glaze a thin layer of Burnt Sienna or pure Cadmium Red over the transition areas where the face meets the shadow. This ‘subsurface scattering’ effect makes the skin look alive.
Step 3: Refining Light and Detail
-
Highlight the Cheeks and forehead:
Mix Titanium White with a tiny bit of Yellow Ochre. Apply this highlight boldly to the forehead, the bridge of the nose, and the upper cheekbones. This is where the light hits hardest. -
Detail the Lips:
Paint the lips using Alizarin Crimson and Cadmium Red. Keep the upper lip darker and add a small, sharp highlight to the bottom lip to show moisture. -
Refine the Eyebrows and Lashes:
Using a small number 2 liner brush, carefully paint individual hairs for the eyebrows and long lashes. Keep these dark but not solid black. -
Texture the Hair:
Don’t paint every strand. Use a flat brush with a mix of Brown and Black to drag long, confident strokes downwards, suggesting the flow of hair losing itself in the background shadow. -
Paint the Garment:
For the clothing, use a deep crimson mixed with black. Use a palette knife or rough brushstrokes to create a velvet-like texture that absorbs light rather than reflecting it. -
Final Light Pops:
Add the brightest highlights last: the tip of the nose, the highest point of the knuckles, and the sheen on the fingernails. I prefer to apply these with a heavier load of paint for impasto texture. -
The Background Warmth:
To create that “halo” effect, scumble a dry brush of Burnt Sienna and Orange around the top of the head, letting it fade into the black background.
Color Temperature
Play w/ temperature contrast! Use cool blues in the deepest shadows of the veins and warm oranges in the illuminated skin to make the form pop.
Step back and admire how the intense contrast brings a soulful presence to your canvas


Paint Your Inner Weather as a Stormy Sky
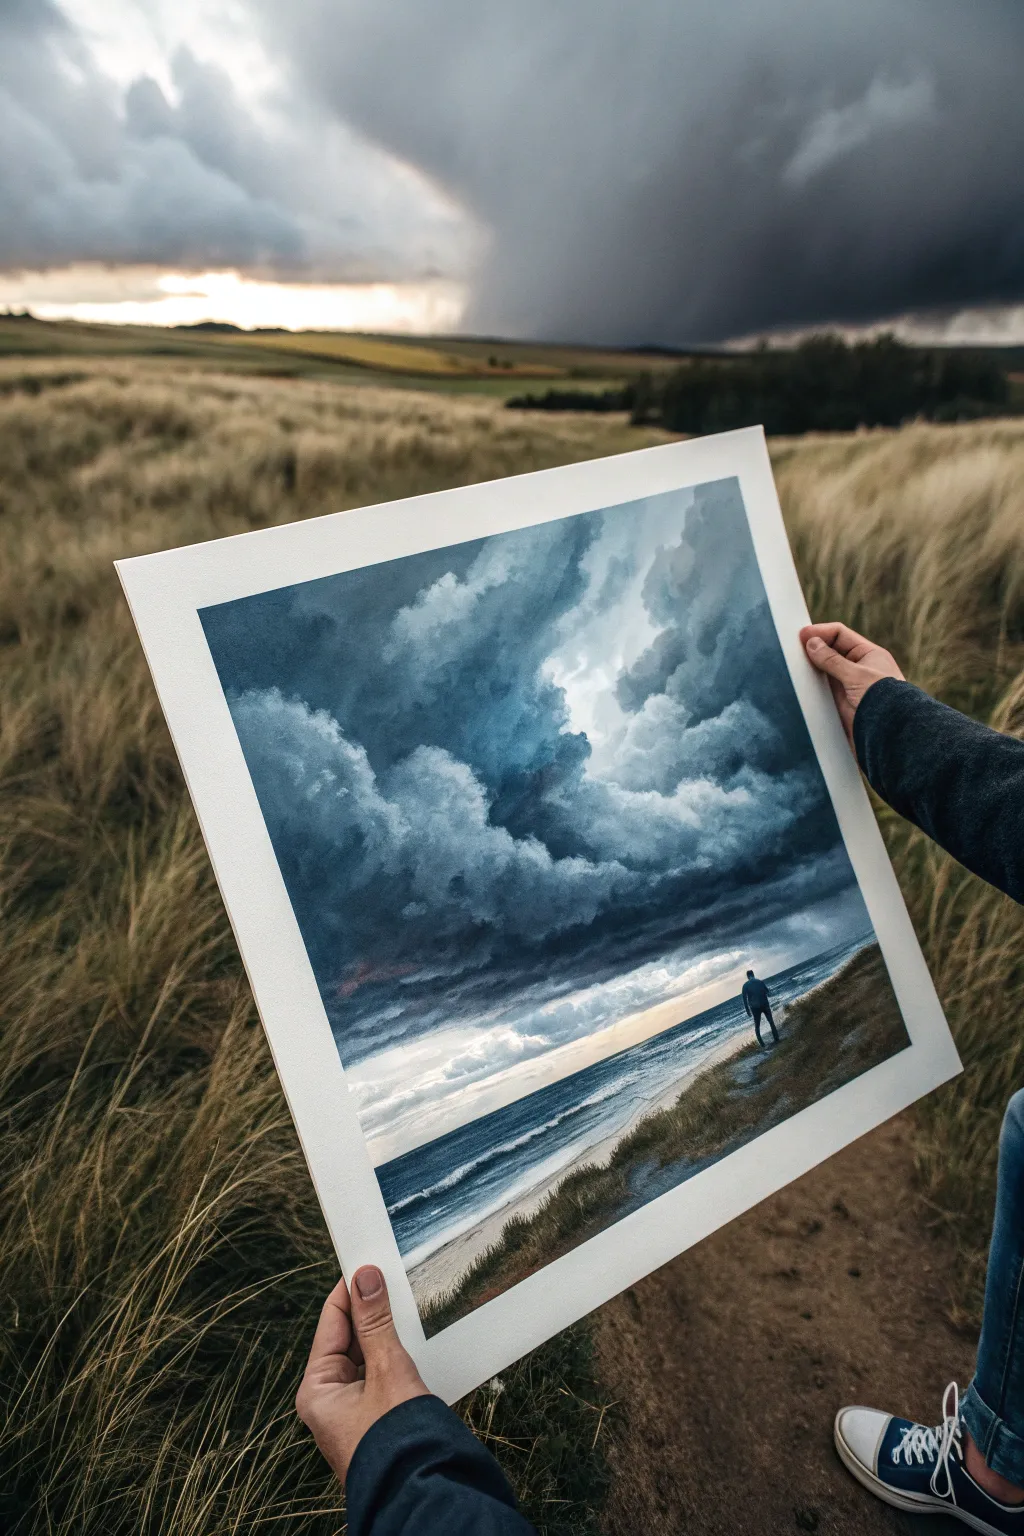

Channel intense emotions into a dramatic seascape featuring roiling storm clouds and a solitary figure on the shore. This project uses deep, moody blues and greys to capture the feeling of an inner storm clearing over the horizon.
Step-by-Step
Materials
- Cold-pressed watercolor paper (heavyweight, 300gsm or higher)
- Watercolor paints (Indigo, Payne’s Grey, Cerulean Blue, Burnt Umber, Titanium White gouache for highlights)
- Large flat brush (1 inch)
- Medium round brush (size 8)
- Small detail brush (size 0 or 1)
- Masking tape
- Spray bottle with water
- Paper towels
- Palette for mixing
Step 1: Setting the Atmosphere
-
Secure your canvas:
Tape down all four edges of your watercolor paper to a sturdy board. This creates that crisp white border seen in the photo and prevents buckling when we add water. -
Sketch the horizon:
Lightly draw a horizon line about one-third of the way up from the bottom of the paper. Keep it straight, but feel free to slope the dunes on the right side slightly upwards. -
Pre-wet the sky:
Use your large flat brush to apply a generously clean wash of water to the entire sky area, stopping just at the horizon line. We want the paper glistening but not swimming in puddles.
Step 2: Building the Storm
-
Base cloud layer:
While the paper is wet, drop in a diluted wash of Cerulean Blue mixed with a touch of Payne’s Grey. Let this color bloom softly to create the lighter, background clouds. -
Deepening the shadows:
Mix a strong, dark concentration of Indigo and Payne’s Grey. While the first layer is still damp, charge this dark pigment into the upper sections of the sky to form threatening heavy clouds. -
Creating volume:
Use a crumpled paper towel to gently lift out pigment in circular motions where you want the brightest white parts of the clouds to be. This subtractive method creates fluffy, realistic edges. -
Adding drama:
With a semi-dry medium brush, scumble darker grey paint along the bottom edges of your clouds to give them weight and density. Soften any harsh edges with a slightly damp brush. -
The light breaks through:
Leave the area just above the horizon line significantly lighter, perhaps almost white paper, to suggest the sun breaking through the storm or reflecting off the distant water.
Cloud Control
Work fast on the wet sky. If the paper dries while you’re blending, stop—adding water to semi-dry paint causes ‘cauliflowers’ or unwanted blooming textures.
Step 3: The Sea and Shore
-
Painting the ocean:
Once the sky is dry, mix a deep teal using Indigo and a tiny bit of Green. Paint horizontal strokes for the water, getting darker towards the horizon and lighter as you approach the beach. -
Adding waves:
While the ocean layer is drying, use Titanium White gouache or a white gel pen to add thin, horizontal lines for crashing waves and foam near the shoreline. -
Sandy dunes:
Mix Burnt Umber with a lot of water for a sandy beige. Wash this over the bottom right corner, sloping up towards the right edge to create the dune structure. -
Texture on the beach:
Splatter tiny specks of darker brown or grey onto the sand area while it’s dry to create the texture of pebbles and rough terrain. -
Grassy details:
Using your smallest detail brush and a mix of Green and Burnt Umber, flick quick, upward strokes along the dune ridge to paint windswept dune grass.
Emotional Colour
Change the mood by swapping the blue-greys for purples and crimson to create a sunset storm, or use warm sepias for a nostalgic, vintage memory feels.
Step 4: The Solitary Figure
-
Drafting the silhouette:
Wait until the beach area is bone dry. With a pencil, lightly outline a small, solitary figure standing near the water’s edge, facing the ocean. -
Filling the figure:
Use pure Indigo or thick Black paint to fill in the silhouette. Be careful to keep the edges sharp so the figure stands out against the lighter surf. -
Grounding shadow:
Add a faint, elongated shadow stretching from the figure’s feet towards the bottom right, anchoring them to the ground so they don’t look like they are floating. -
Final highlights:
If I feel the clouds need more punch, I sometimes add tiny touches of white gouache to the very tops of the darkest clouds to maximize contrast. -
The reveal:
Once absolutely everything is dry, carefully peel away the masking tape at a 45-degree angle to reveal your clean, professional border.
Step back and admire how the dark storm clouds contrast with the peaceful solitary figure, telling a story of resilience
BRUSH GUIDE
The Right Brush for Every Stroke
From clean lines to bold texture — master brush choice, stroke control, and essential techniques.
Explore the Full Guide
Let the Paint Run Like Tears
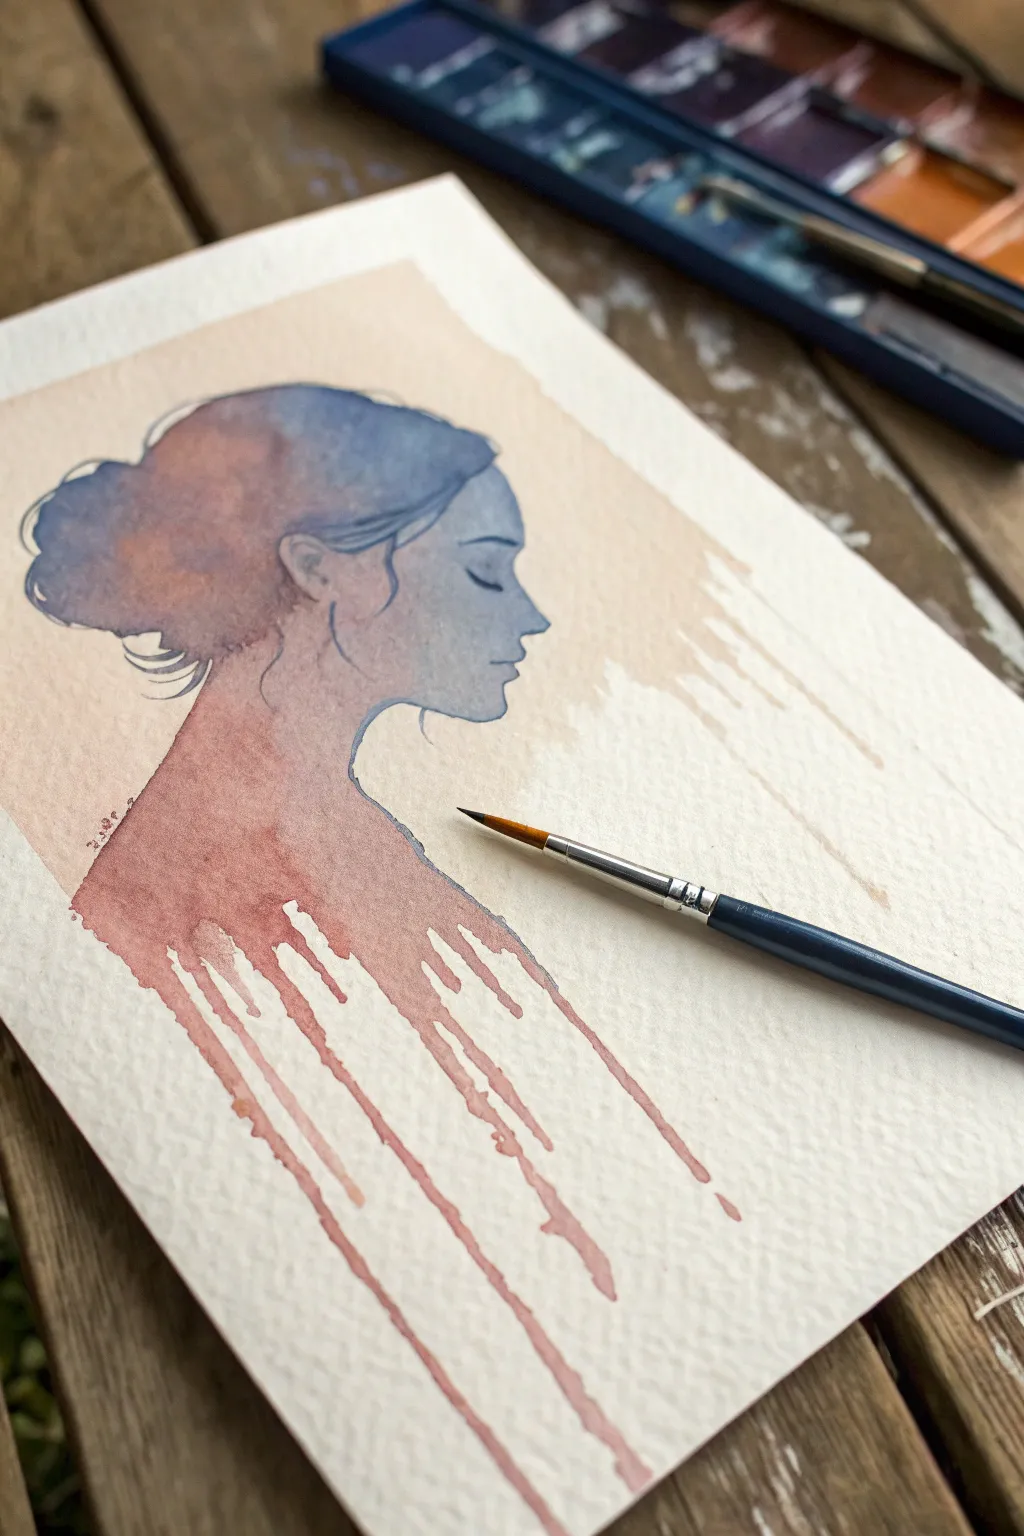
Capture quiet melancholy with this evocative watercolor portrait that embraces the unpredictable nature of the medium. By letting pigment bleed and drip down the page, you’ll create a powerful visual metaphor for releasing emotion.
Step-by-Step Guide
Materials
- Cold press watercolor paper (300 gsm)
- Watercolor paints (Indigo, Burnt Sienna, Payne’s Gray, Alizarin Crimson)
- Round watercolor brushes (Size 4 and Size 8)
- Pencil (HB or H)
- Kneaded eraser
- Clean water jar
- Paper towel
- Palette for mixing
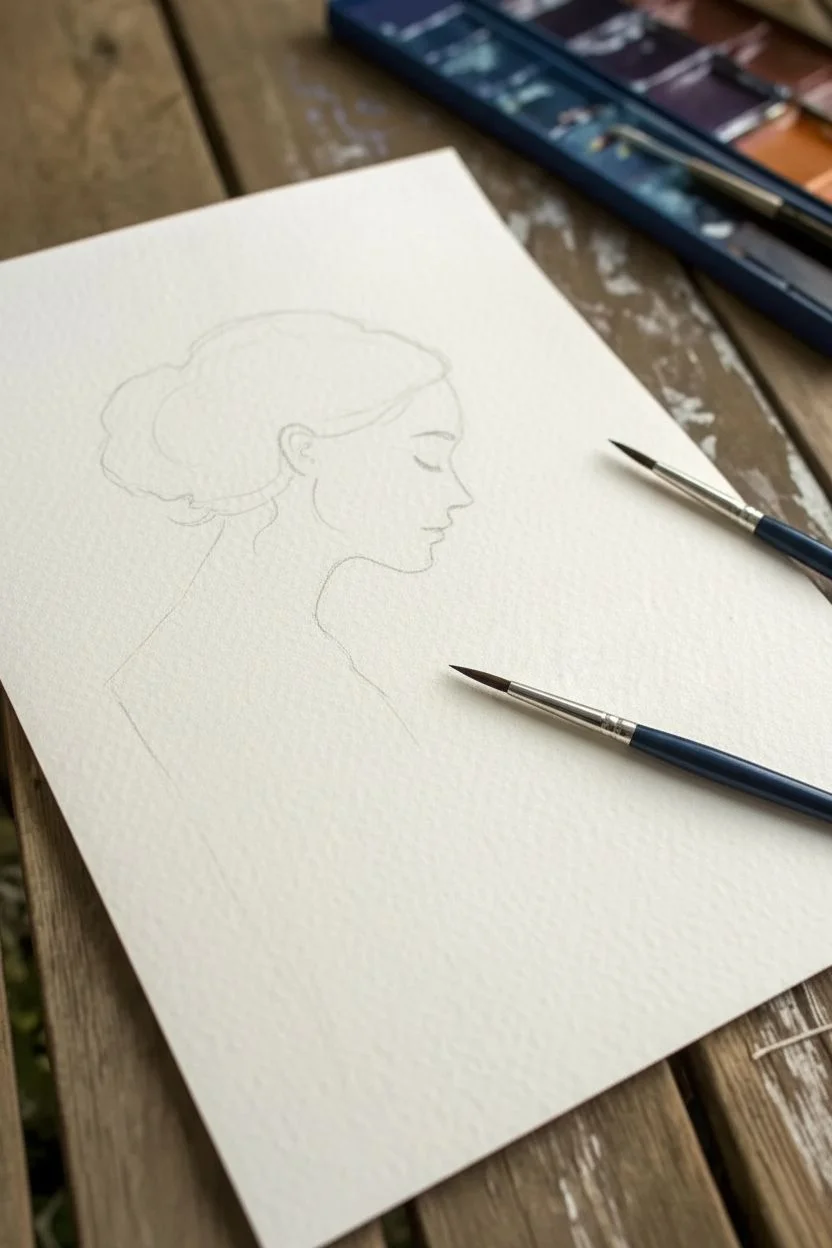
Step 1: Sketching the Silhouette
-
Outline the profile:
Begin with a very light pencil sketch of a woman’s profile. Focus on the gentle curve of the nose and the relaxed closed eye. Keep your lines faint so they won’t show through the translucent watercolor later. -
Define the hair:
Sketch the bun loosely at the back of the head. Avoid drawing individual strands; instead, outline the general shape of the mass of hair. -
Map the paint flow:
Lightly mark where the neck ends and the shoulder begins, but leave the bottom edge open. This is where your paint will eventually drip down.
Gravity is Your Friend
Don’t lay your paper flat for the drip phase. Tape your paper to a board and prop it up at a 45-degree angle. This forces the paint to run naturally rather than puddle.
Step 2: Applying the Initial Wash
-
Mix your skin tone:
Create a watery mix of Burnt Sienna with a tiny touch of Alizarin Crimson for warmth. For the shadowy areas, I like to cool it down slightly with a speck of Indigo. -
Paint the face:
Using your size 4 brush, carefully paint the face area. Start with the lighter tone near the forehead and nose. While the paint is still wet, drop in your cooler shadow mix near the hairline and under the jaw. -
Transition to the hair:
While the face wash is still damp (but not puddling), mix a stronger Indigo or Payne’s Gray. Touch this color to the hair area, allowing it to gently bleed into the skin tone at the hairline for a soft, dreamy edge. -
Fill the hair shape:
fill in the rest of the hair bun with varying concentrations of blue-gray. Leave small gaps or lift pigment with a dry brush to suggest highlights.
Make it Sparkle
Once the painting is totally dry, use a metallic gold watercolor pan or pen to outline just the profile of the face or trace one single drip for a ‘kintsugi’ repair effect.
Step 3: Creating the Emotional Drips
-
Prepare the shoulder wash:
Mix a generous amount of a rusty red-brown color (Burnt Sienna plus a little Alizarin). You need plenty of fluid paint for the next steps. -
Paint the neck and back:
Apply this rusty mix to the neck and upper back area, blending it seamlessly into the blue of the hair and the pale skin tone of the jaw. -
Start the drips:
Load your size 8 brush with very watery pigment. Touch the bottom edge of your painted shoulder area. Let gravity do the heavy lifting by tilting your paper upright. -
Encourage the flow:
If the drips are stubborn, lightly guide them downward with the tip of your brush, but try not to over-control them. The beauty lies in their irregularity. -
Vary the lengths:
Add more water to some drips and more pigment to others. Let some run all the way to the bottom of the page while others stop short. -
Soften the transition:
While the paint is moving, drop clear water into the top of the drip area to create ‘blooms’ or textured cauliflower effects as it dries.
Step 4: Refining the Details
-
Deepen the facial features:
Once the face is completely dry, mix a concentrated dark grey-blue. Use the very tip of your small brush to paint the eyelash line and the eyebrow. -
Add subtle definition:
Glaze a very pale shadow under the nose and the bottom lip to give the face dimension without darkening it too much. -
Enhance the ear:
Add a few delicate strokes to define the curves of the ear. Keep it loose; it shouldn’t be the focal point. -
Paint wispy strands:
Using a nearly dry brush with dark pigment, add a few loose, flying hair strands escaping from the bun and at the nape of the neck for movement. -
Final assessment:
Step back and look at the balance. If the drips look too uniform, splatter a tiny bit of clean water or pigment near the bottom to break them up.
Let your artwork dry completely before removing any tape, and admire how the uncontrolled drips add a layer of raw emotion to the piece
Paint Release as Something Leaving the Body
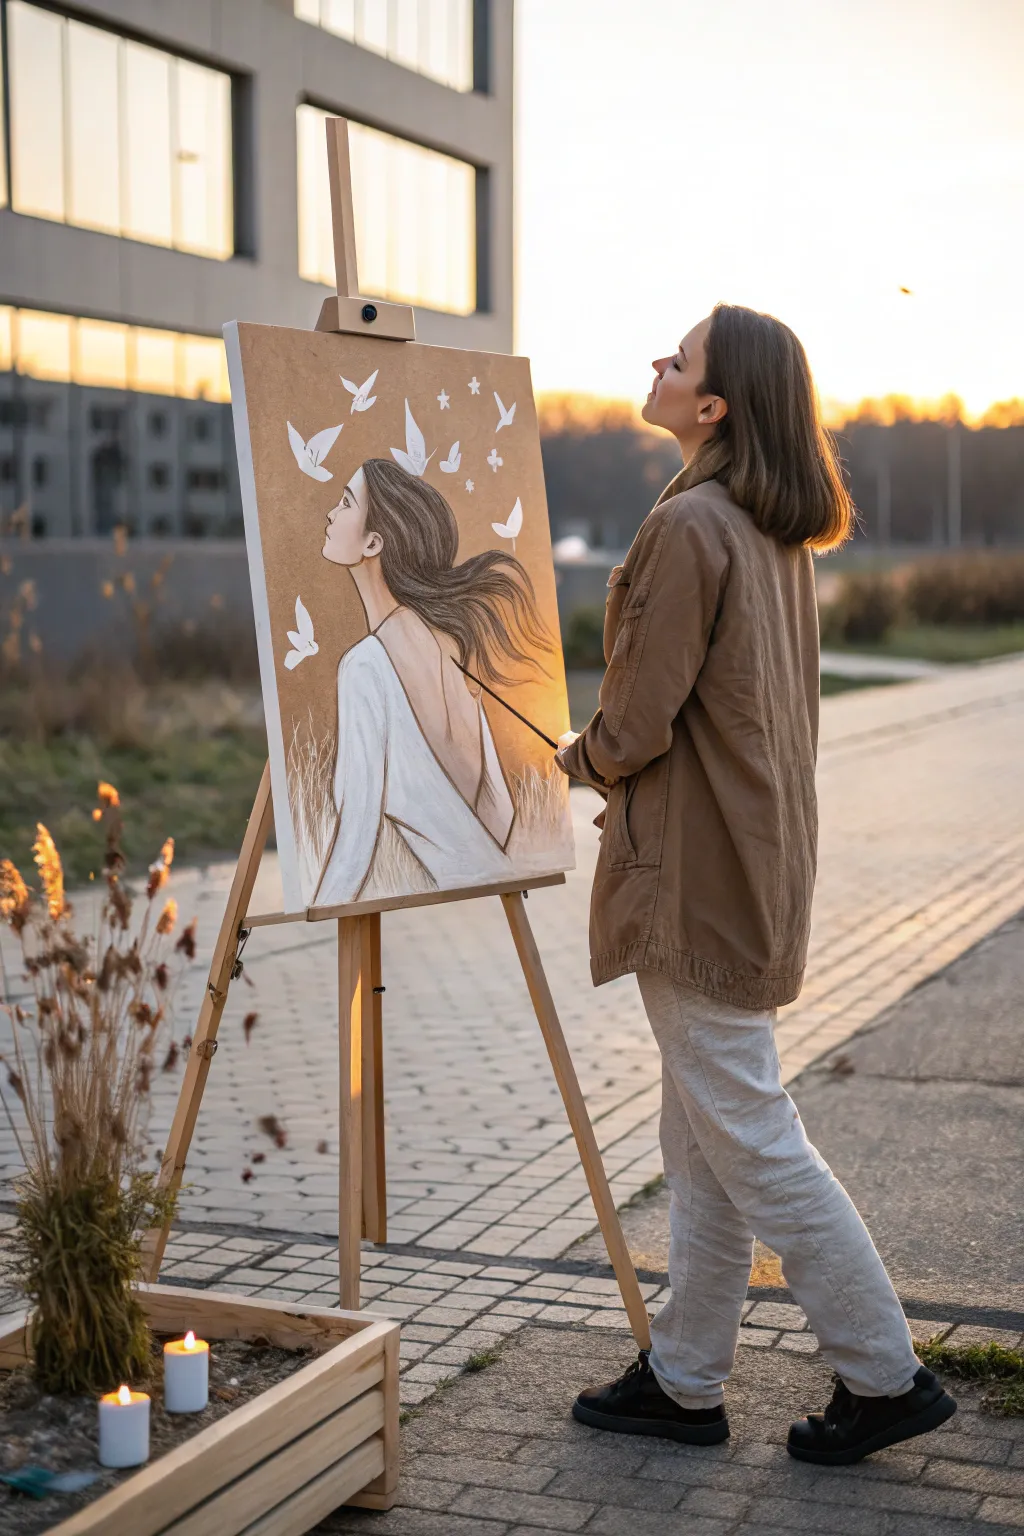
Capture the ethereal feeling of letting go with this evocative acrylic painting featuring a figure releasing birds into a warm sky. Using a soft, limited palette on a toned background creates a serene and deeply emotional piece perfect for reflective spaces.
Step-by-Step Tutorial
Materials
- Stretched canvas or canvas board (approx. 18×24 inches)
- Acrylic paints: Titanium White, Burnt Umber, Raw Sienna, Yellow Ochre, Black
- Gesso (optional, if canvas isn’t pre-primed)
- Large flat brush (for background)
- Medium filbert brush (for figure and hair)
- Small round detail brush (sizes 0 or 1)
- Pencil for sketching
- Palette and container for water
- Rag or paper towels
Step 1: Preparing the Background
-
Mix the base tone:
Start by mixing a generous amount of warm, earthy tan color. Combine White with Raw Sienna and a small touch of Burnt Umber until you achieve a soft, latte-like hue. -
Apply the wash:
Using your large flat brush, cover the entire canvas with this mixture. You can add a little water to the paint to make it slightly translucent, allowing the canvas texture to show through, or apply it thick for an opaque look. -
Create a gradient:
While the paint is still wet, blend in slightly lighter shades (more White/Yellow Ochre) near the top right creating a subtle light source effect, and slightly darker tones at the bottom left. Let this base layer dry completely before sketching.
Birds look stiff?
Avoid perfect symmetry. Paint wings at different angles—some fully open, some banking to the side. Varying the size drastically helps create the illusion of depth.
Step 2: Sketching the Subject
-
Outline the profile:
Lightly sketch the profile of the woman on the left side of the canvas. Her face should be tilted upward, chin lifted, with her gaze directed toward the upper right corner. -
Sketch the hair and dress:
Draw the hair flowing back horizontally as if caught in a breeze. Sketch the outline of a simple, backless dress that dips low on her back, keeping the lines fluid and graceful. -
Position the birds:
Map out the placement of the white birds. Start with larger ones near her head and make them progressively smaller as they ascend toward the top right, simulating distance and movement.
Soft hair tip
For flowing hair, dilute your paint slightly with water to an ink-like consistency. This helps the brush glide smoothly for long, uninterrupted strands.
Step 3: Painting the Figure
-
Block in the skin tone:
Mix a pale skin tone using White, a tiny dot of Burnt Umber, and a hint of Yellow Ochre. Fill in the face, neck, and back area. Keep the paint application smooth. -
Add facial shadows:
Mix a slightly darker version of your skin tone. Brush this gently under the jawline, around the eye socket, and along the spine to create dimension. I find blending while the paint is still tacky works best for soft skin transitions. -
Paint the dress:
Use Titanium White to fill in the dress. Don’t make it a solid block of color; add subtle streaks of light grey (White + tiny dot of Black) to suggest folds in the fabric and movement. -
Detail the features:
Switch to your small detail brush. Use a mix of Burnt Umber and Black to carefully paint the eyebrow, the closed eyelid/lashes, and the nostril. keep the lines delicate.
Step 4: Hair and Atmosphere
-
Base layer for hair:
Using the medium filbert brush, apply a base coat of dark brown (Burnt Umber + Black) for the hair, following the direction of the wind. -
Add hair strands:
Once the dark base is dry, mix a lighter brown. Use the fine liner brush to paint individual strands sweeping back. Add a few highlights near the crown of the head where the light hits. -
Create wispy ends:
Feather out the ends of the hair so they don’t look like a solid block. Allow some strands to separate and flow freely into the background space. -
Paint the grass:
At the very bottom of the canvas, use quick, upward strokes with a mix of White and Raw Sienna to create abstract dry grass or wheat stalks obscuring the bottom of the dress.
Step 5: The Elements of Release
-
Paint the first birds:
Using pure Titanium White, paint the silhouettes of the birds. Keep the shapes simple—essentially stylized ‘V’ or crescent shapes to represent wings. -
Add distant birds:
Paint the smaller birds further up the canvas. These can be less detailed, just simple white impressions against the tan background. -
Add stars and sparkles:
In the space surrounding the birds and hair, dot small white stars or four-point sparkles. This adds a magical, dreamlike quality to the composition. -
Final highlights:
Add a final bright white highlight to the shoulder blade and the tip of the nose to make the figure pop. -
Review and refine:
Step back from the easel. Check if the flow of birds leads the eye naturally from the figure to the upper corner. Strengthen any white areas that may have dried too transparent.
Enjoy the peaceful feeling this completed artwork brings to your space

PENCIL GUIDE
Understanding Pencil Grades from H to B
From first sketch to finished drawing — learn pencil grades, line control, and shading techniques.
Explore the Full Guide
Show Weight vs. Floatation in One Scene
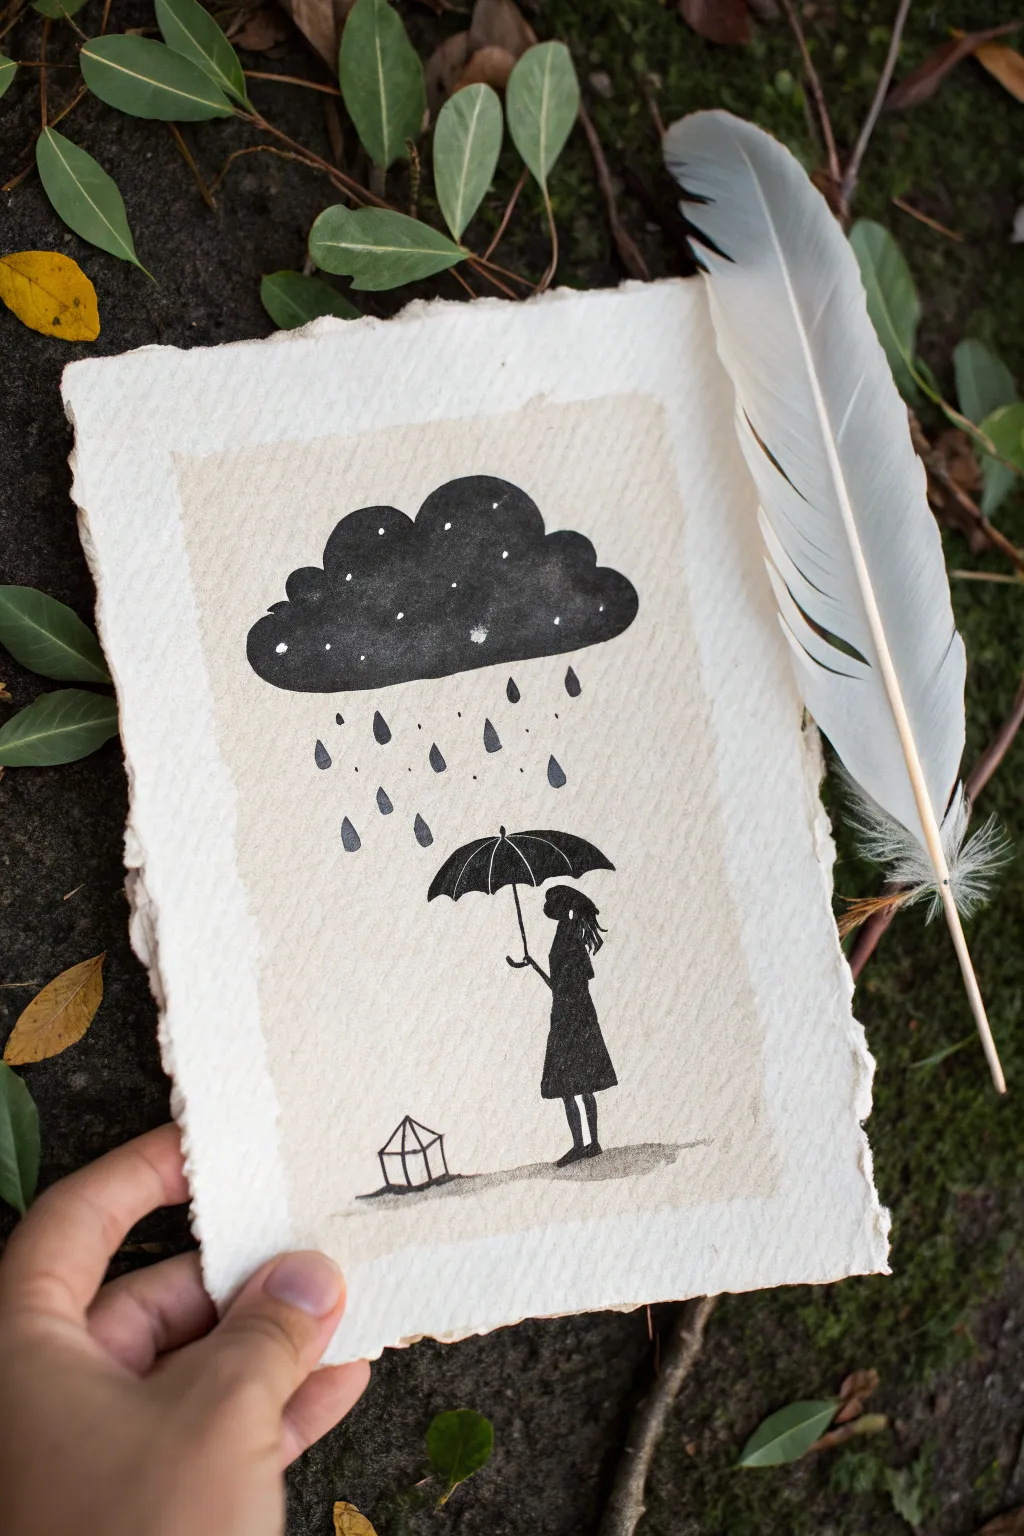
Capture the contrast between a heavy, storm-filled cloud and the delicate silhouette of a figure beneath an umbrella in this evocative ink illustration. Using handmade paper and bold black ink, you’ll create a striking visual metaphor for protection and resilience.
How-To Guide
Materials
- Heavyweight handmade cotton rag paper (with deckled edges)
- Black India ink or waterproof acrylic ink
- Fine liner pen (0.1 or 0.3mm)
- Small round watercolor brush (size 2 or 4)
- Beige or tan watercolor paint (tea wash works too)
- Pencil and eraser
- White gel pen or white gouache
- Paper towels
- Jar of water
Step 1: Preparing the Ground
-
Select your paper:
Choose a piece of thick, handmade paper with a rough texture. The deckled edges frame the artwork beautifully, giving it an artifact-like quality. -
Create the background wash:
Mix a very dilute wash of beige watercolor or even strong tea. Gently paint a rectangle in the center of the paper, leaving a wide, unpainted border around the edges to highlight the paper’s texture. -
Let it dry completely:
Allow the painted rectangle to dry fully. If the paper buckles, you can gently press it under a heavy book once dry, but textured paper usually handles moisture well.
Ink Bleeding?
Handmade paper is thirsty! If lines blur, switch to a pigment liner instead of liquid ink, or seal the paper area first with a clear matte medium.
Step 2: Drafting the Composition
-
Sketch the cloud:
Lightly pencil a large, fluffy cloud shape near the top of your painted rectangle. Keep the bottom edge relatively flat to suggest weight. -
Position the figure:
Below the cloud, sketch a simple silhouette of a girl in a dress, facing left. Place her slightly off-center to the right. -
Add the umbrella:
Draw an open umbrella held by the figure. Ensure the curve of the umbrella mirrors the curves of the cloud above. -
Include the small house:
Near the bottom left corner, adjacent to the figure’s feet, sketch a tiny, structural shape resembling a lantern or a small glass house.
Make it Shine
Use metallic gold watercolor for the rain or the tiny house frame. This adds a magical element and contrasts beautifully with the matte black cloud.
Step 3: Inking the Heavy Elements
-
Fill the cloud:
Using your small round brush and black India ink, carefully fill in the cloud shape. I prefer to start at the outline and work inward to keep the edges crisp. -
Review saturation:
If the black looks patchy once it soaks into the fiber, apply a second coat of ink to ensure it is a solid, opaque void. -
Paint the figure:
Switch to your fine liner pen for the delicate outline of the figure and umbrella handle, then fill the dress and hair with solid black ink using the brush for broader coverage. -
Detail the umbrella:
Use the fine liner to draw the ribs of the umbrella first, then fill the canopy with black. Leave tiny hairline gaps if you want to suggest structure, or make it solid silhouette.
Step 4: Adding Atmosphere and Detail
-
Draw the rain:
With the fine liner or tip of a detail brush, paint teardrop shapes falling from the cloud. Vary their sizes—some large and heavy, some small dots. -
Create interaction:
Ensure the rain stops just above the umbrella, leaving negative space to show the umbrella is doing its job. -
Ground shadow:
Dilute a tiny drop of ink with water to make a grey wash. Paint a soft, horizontal shadow beneath the figure and the small house to ground them. -
Ink the house:
Use your finest pen to trace the geometric lines of the small house on the ground. Leave the inside unpainted so it feels light and empty compared to the dark figure. -
Add stars to the cloud:
Once the black cloud is 100% dry, use a white gel pen or a dot of white gouache to add tiny speckles and stars inside the dark mass. This transforms the storm into a night sky. -
Final touches:
Erase any visible pencil lines gently. Check the edges of your ink work and sharpen any fuzzy lines with your pen.
Display your finished piece in a floating frame to show off those beautiful rough edges
Turn a Window Scene Into Loneliness
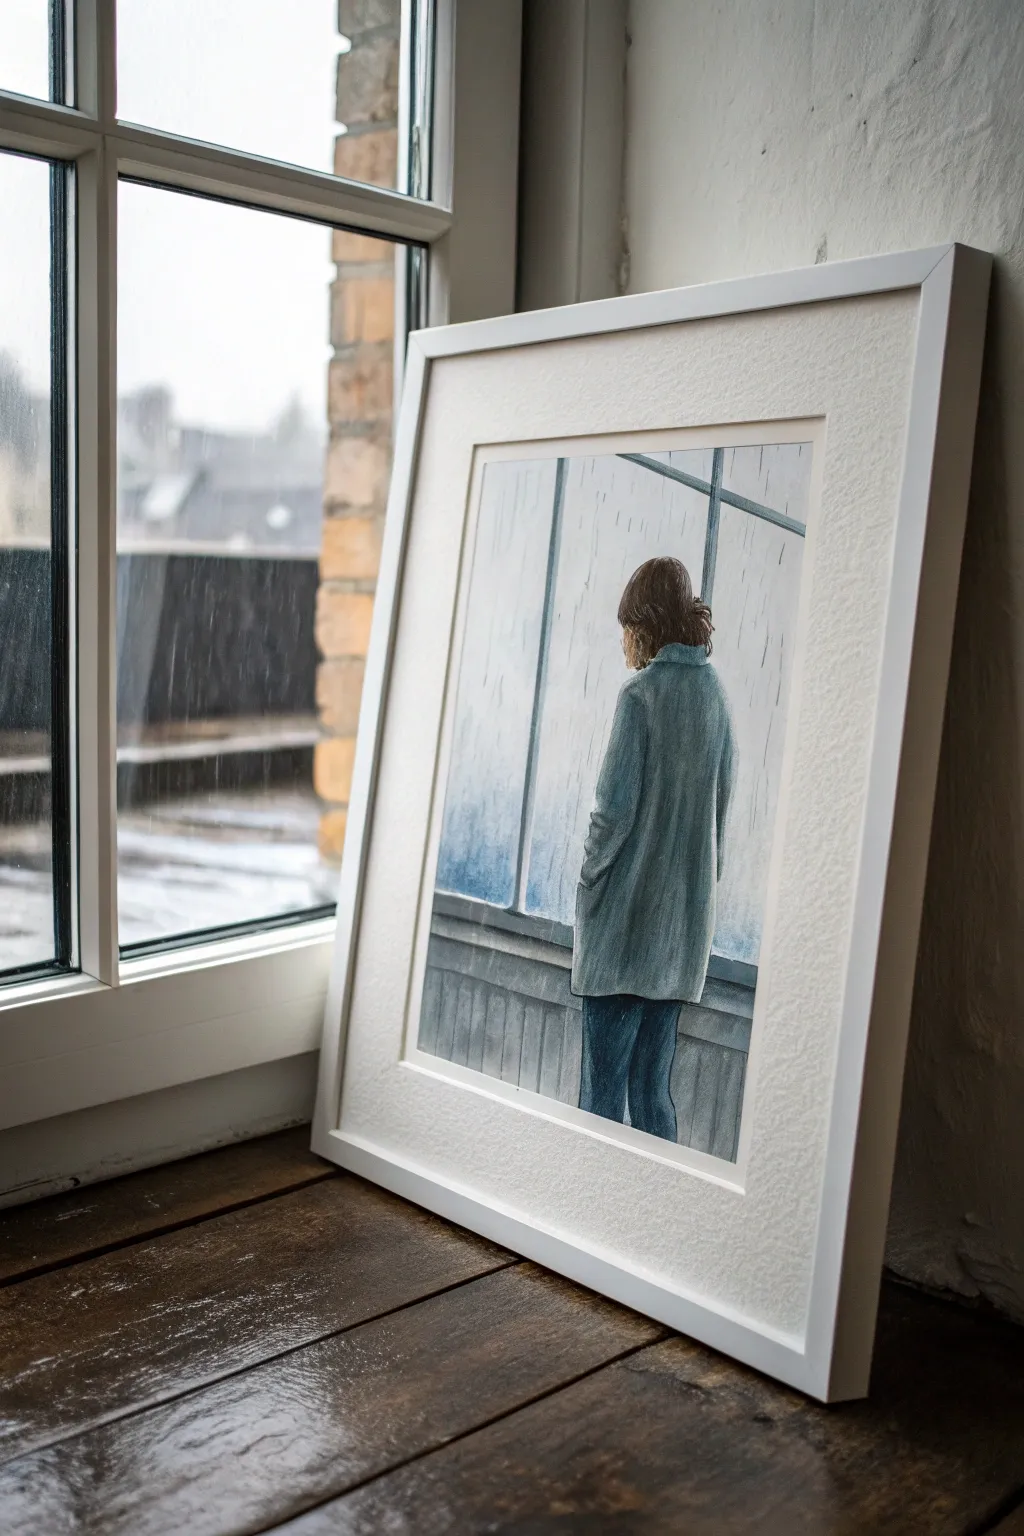
Capture the quiet introspective mood of a rainy day with this evocative watercolor piece. By balancing cool blue tones and soft vertical lines, you will create a scene that perfectly embodies the feeling of peaceful loneliness.
How-To Guide
Materials
- Cold Press Watercolor Paper (140lb/300gsm)
- Watercolor paints (Payne’s Grey, Indigo, Prussian Blue, Burnt Umber, Teal/Turquoise)
- H or HB pencil for sketching
- Soft synthetic watercolor brushes (Round sizes 4, 8, and a Flat wash brush)
- Masking fluid or white gouache (optional for rain)
- Palette for mixing
- Two jars of water
- Paper towels
- Ruler
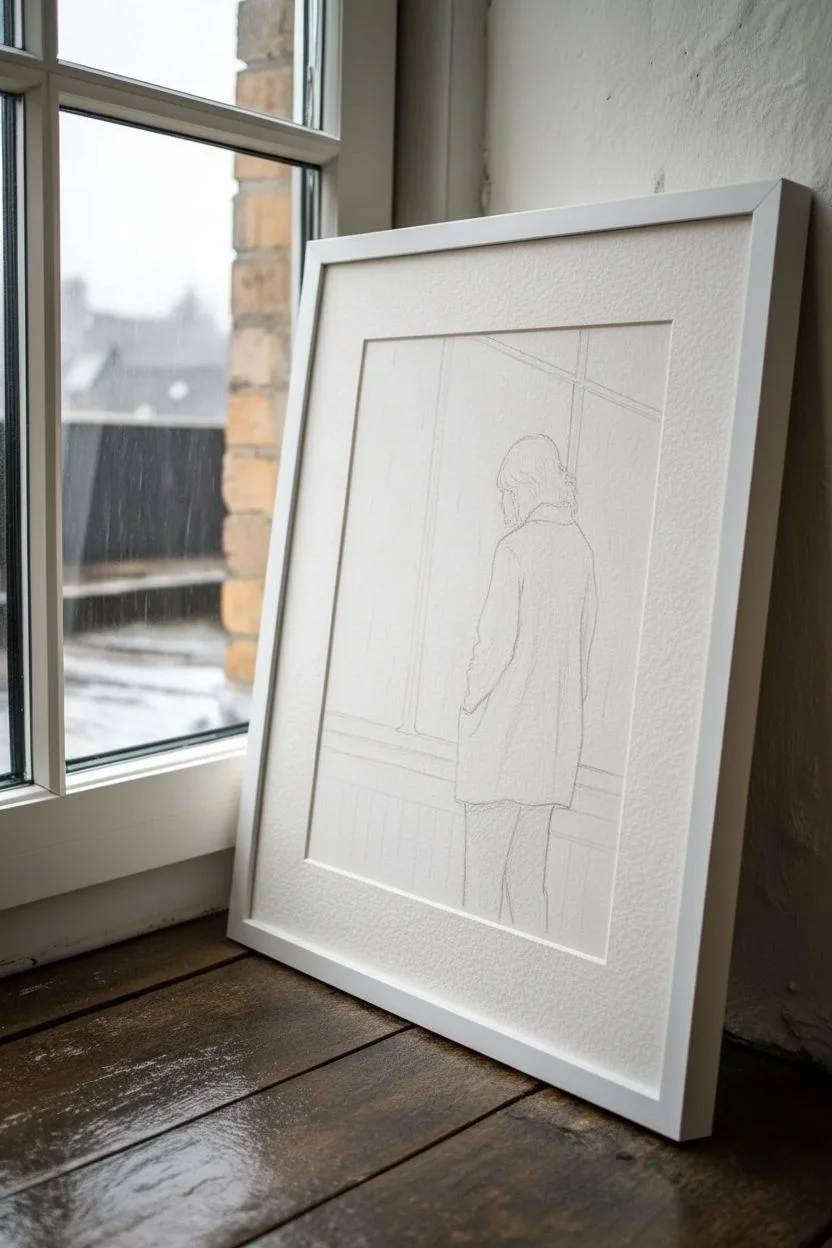
Step 1: Sketching the Composition
-
Establish the Frame:
Begin by lightly penciling the large window frame structure. Draw a vertical line roughly one-third of the way from the left edge to divide the panes, and a horizontal ledge at the bottom third of the paper. -
Outline the Figure:
Sketch the silhouette of the woman standing slightly right of center. Focus on the shape of her coat—it should drape loosely, hiding the body’s form to emphasize stillness. Keep the head slightly tilted down. -
Add Perspective Lines:
Use your ruler to draw the window pane dividers. Angle the top horizontal mullion slightly upward as it goes right, creating a subtle perspective that places the viewer slightly below the figure. -
Refine the Coat Details:
Add faint lines to indicate the texture of the coat, marking where the fabric folds near the elbows and the back vent. Keep these pencil marks very light so they don’t show through the paint later.
Creating Distance
Make the background colors significantly paler and cooler than the figure. Atmospheric perspective makes distant objects fade, enhancing the feeling that the woman is isolated from the world outside.
Step 2: Painting the Atmosphere
-
Wet-on-Wet Background:
Pre-wet the window glass area with clean water, avoiding the figure and the window frames. You want the paper glistening but not pooling. -
Washing in the Rain:
Load a large flat brush with a very diluted mix of Indigo and Payne’s Grey. Apply vertical strokes from top to bottom while the paper is wet, allowing the pigment to bleed and create a blurry, rainy effect. -
Deepening the Blues:
While the background is still damp, drop slightly concentrated Prussian Blue into the lower left corner of the window pane to suggest distant buildings or shadows outside. -
Suggesting Rain Streaks:
Before the wash dries completely, use a thirsty (slightly dry) brush to lift out thin vertical lines, or wait until dry and use a fine rigger brush with clean water to stroke downwards, mimicking rain trailing down glass. -
Allow to Dry:
Let this background layer dry completely. If the paper feels cool to the touch, it is still wet; be patient to prevent the figure’s colors from bleeding into the window.
Step 3: The Figure and Foreground
-
Base Coat Color:
Mix a muted teal using Turquoise and a touch of Payne’s Grey to desaturate it. Paint the entire coat area with a medium-strength wash, leaving the hair and legs white for now. -
Building Coat Form:
Once the base teal is damp-dry, mix a darker version of the same color. Apply this to the right side of the figure and under the arms to create shadow and rounded form. -
Painting the Hair:
Using Burnt Umber mixed with a little Indigo, paint the hair. Use the tip of a #4 round brush to flick short strokes at the ends, suggesting messy, loose strands resting on the collar. -
Defining the Jeans:
Paint the legs with a strong Indigo mix. I like to keep the edges slightly soft here so the figure feels grounded but not cut-out. Darken the inner thighs to separate the legs. -
Window Frames:
Paint the window frames with a pale grey wash. Once dry, add a thin, dark grey shadow line along the right side of the dividers to give them three-dimensional depth. -
The Ledge:
Paint the bottom ledge and wall paneling in muted greys and blues. Use vertical strokes for the paneling below the window to mirror the rain outside.
Add a Narrative Touch
Paint a faint reflection of the woman’s face or hand in the window glass using a very watery, pale wash. This ghostly double image adds a layer of deep introspection.
Step 4: Final Textures
-
Coat Texturing:
Using a nearly dry brush with dark teal paint, lightly drag it over the shadowed side of the coat (scumbling) to give the fabric a heavy, wool-like texture. -
Enhancing the Rain:
If the rain effect looks too subtle, use a very fine brush with diluted white gouache to add a few sharp, distinct rain streaks on the glass. -
Final Shadows:
Add the deepest shadows now: just under the hair, beneath the coat hem, and in the deep folds of the jeans. -
Evaluation:
Step back and look at your contrast. The figure should stand out against the lighter, washed-out background. If the background feels too heavy, scrub it gently with a damp sponge to lighten.
Frame your finished piece in white or light wood to maintain the clean, contemplative aesthetic of the scene


Have a question or want to share your own experience? I'd love to hear from you in the comments below!