
Engagements are such a sweet in-between season—still full of surprises, but already soaking in the promise. Here are my favorite engagement painting ideas you can make as a keepsake, a party activity, or a heartfelt gift for the couple.
Engagement Photo Portrait
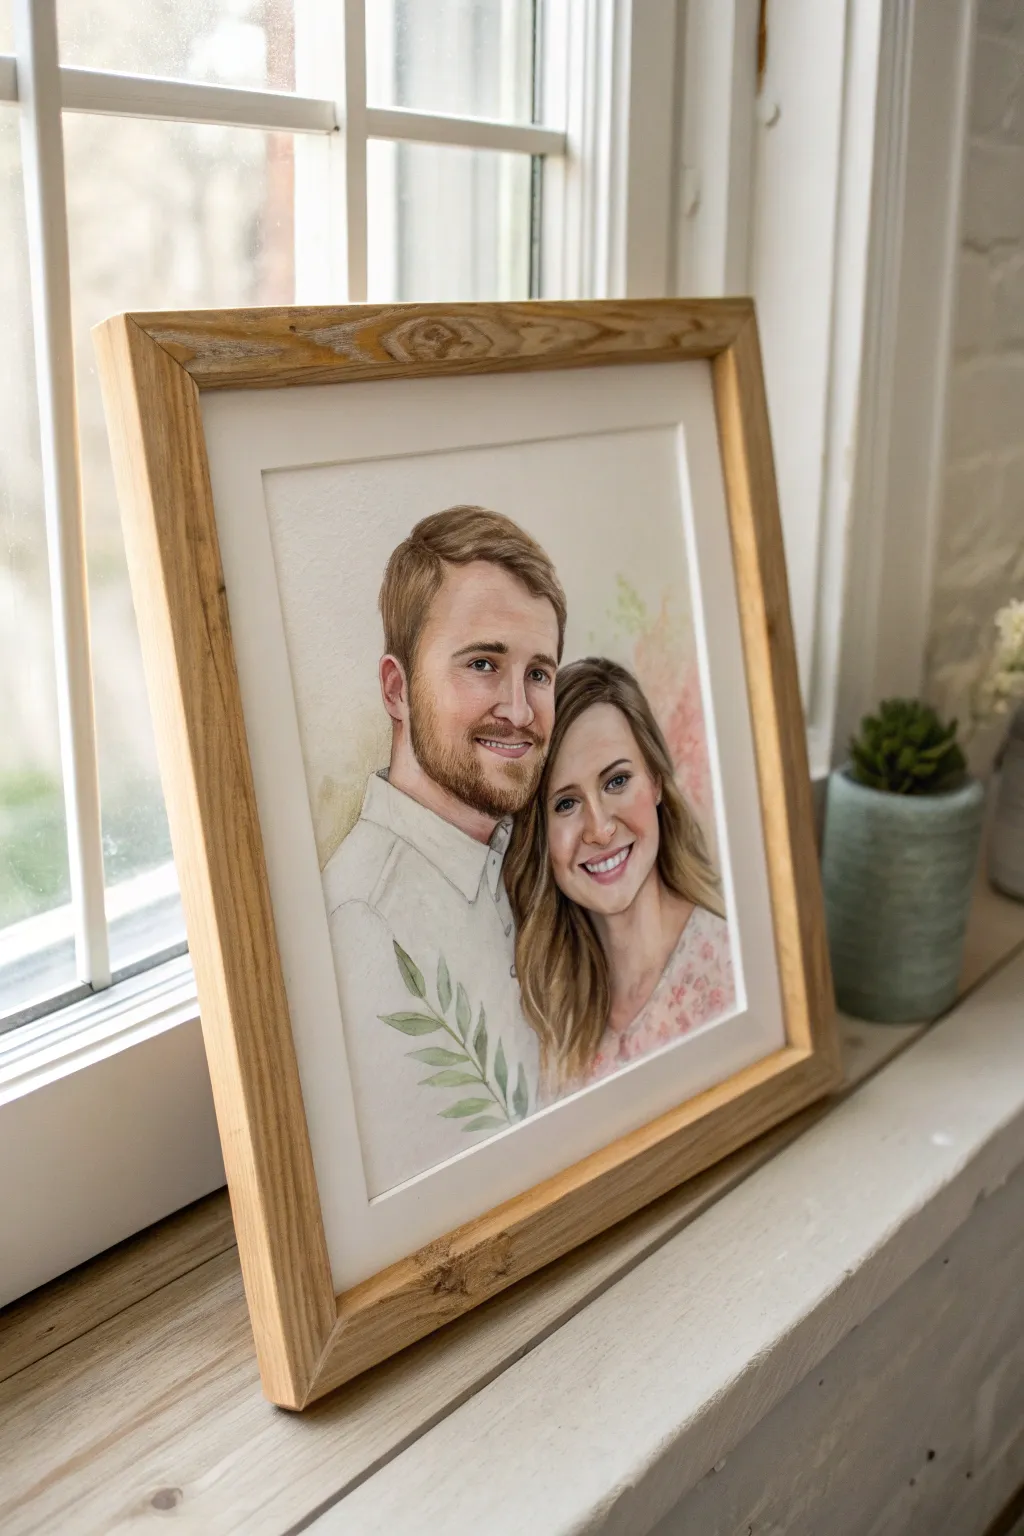
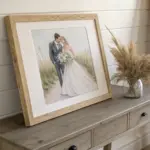
Capture the warmth and connection of an engagement with this soft, realistic watercolor portrait. The piece combines delicate skin tones with illustrative floral touches, all presented in a warm wood frame for a classic, heartfelt gift.
Step-by-Step
Materials
- High-quality watercolor paper (cold press, 140lb/300gsm)
- Pencil (HB for sketching)
- Kneaded eraser
- Watercolor paints (pans or tubes: Cadmium Red, Yellow Ochre, Burnt Sienna, Ultramarine Blue, Sap Green, Alizarin Crimson)
- Round watercolor brushes (Size 2, 6, and 10)
- Masking fluid (optional)
- Two jars of water
- Paper towels
- Reference photo of the couple
- Light wooden frame with white mat board
Step 1: Preparation and Sketching
-
Select your reference:
Choose a clear, high-resolution photo of the couple. Look for good lighting where facial features are defined but not washed out by harsh shadows. -
Outline the composition:
Lightly sketch the contours of the figures onto your watercolor paper using an HB pencil. Focus on key landmarks: eyes, nose, mouth corners, and jawlines. Keep lines faint so they disappear under the paint. -
Refine the details:
Add indications for hair direction and clothing folds. At the bottom, lightly sketch a sprig of leaves or floral element to anchor the composition near the man’s chest. -
Protect highlights:
If you want crisp white highlights in the eyes or teeth, apply a tiny dot of masking fluid now and let it dry completely.
Muddy colors?
If skin tones look dirty, you likely overmixed the paint or layered colors while they were still wet. Let layers dry completely between glazes to keep them fresh.
Step 2: Painting Skin Tones
-
Mix base skin tones:
Create a pale wash using Yellow Ochre and a touch of Cadmium Red. For cooler shadows, add a tiny bit of Ultramarine Blue or Alizarin Crimson to a separate puddle. -
Apply the first wash:
Using a size 10 brush, apply a very watery, pale tea-colored wash over the faces, avoiding the eyes and teeth. Work wet-on-dry for control, but keep edges soft. -
Build facial structure:
While the first layer is barely damp, drop in slightly darker pigment around the eyes, nose bridge, and hairline to begin sculpting the form without harsh lines. -
Deepen the shadows:
Once dry, mix a darker shadow tone (Burnt Sienna mixed with a touch of blue). Use a size 6 brush to define the jawline, neck shadows, and the side of the nose. -
Add warmth:
Glaze a very dilute Alizarin Crimson over the cheeks, the tip of the nose, and lips to bring life and blood flow to the complexion.
Step 3: Hair and Features
-
Paint facial features:
Switch to a size 2 brush. Carefully paint the irises, nostrils, and the line between the lips using a concentrated mix of Burnt Sienna and Ultramarine. Keep the touch light. -
Base layer for hair:
Mix the appropriate hair colors (Yellow Ochre/Burnt Sienna for him, Raw Umber/Ochre for her). Apply a mid-tone wash over the hair shapes, following the direction of growth. -
Definition and texture:
When the hair base is dry, use the size 6 brush to paint individual strands and darker masses where the hair tucks behind ears or overlaps. Leave some areas of the base layer showing for highlights. -
Paint the beard:
For the man’s beard, use short, stippling strokes or tiny lines to suggest texture rather than painting a solid block of color. Let the skin tone show through slightly.
Digital Hybrid
Scan your finished painting and add the floral elements digitally in Procreate or Photoshop for crisper lines and easier color adjustments before printing.
Step 4: Clothing and Florals
-
Suggest the clothing:
Keep the clothing simple to focus attention on faces. Use a very pale grey or blue wash for the shirt, defining the collar and placket with loose, confident strokes. -
Paint the dress pattern:
If the woman is wearing a patterned top, dab in soft suggestions of the print using a wet-on-wet technique so it doesn’t distract from her face. -
Add the botanical element:
Paint the leaves at the bottom using Sap Green muted with a little red. Make the leaves slightly transparent and overlapping to add an artistic, illustrative feel. -
Background wash:
To separate the couple from the white page, add a very faint, watery background wash behind them—perhaps a soft pink or creamy yellow—fading out to white at the edges.
Step 5: Finishing Touches
-
Final details:
Remove any masking fluid. Soften any edges that look too hard with a damp clean brush. Darken the pupils or lash lines one last time if needed for contrast. -
Frame the artwork:
Once fully dry (give it a few hours), mount the painting behind a clean white mat and secure it in a light wood frame to complement the natural tones of the watercolor.
Now you have a touching, personalized heirloom that celebrates a special love story


Sunset Proposal Silhouette
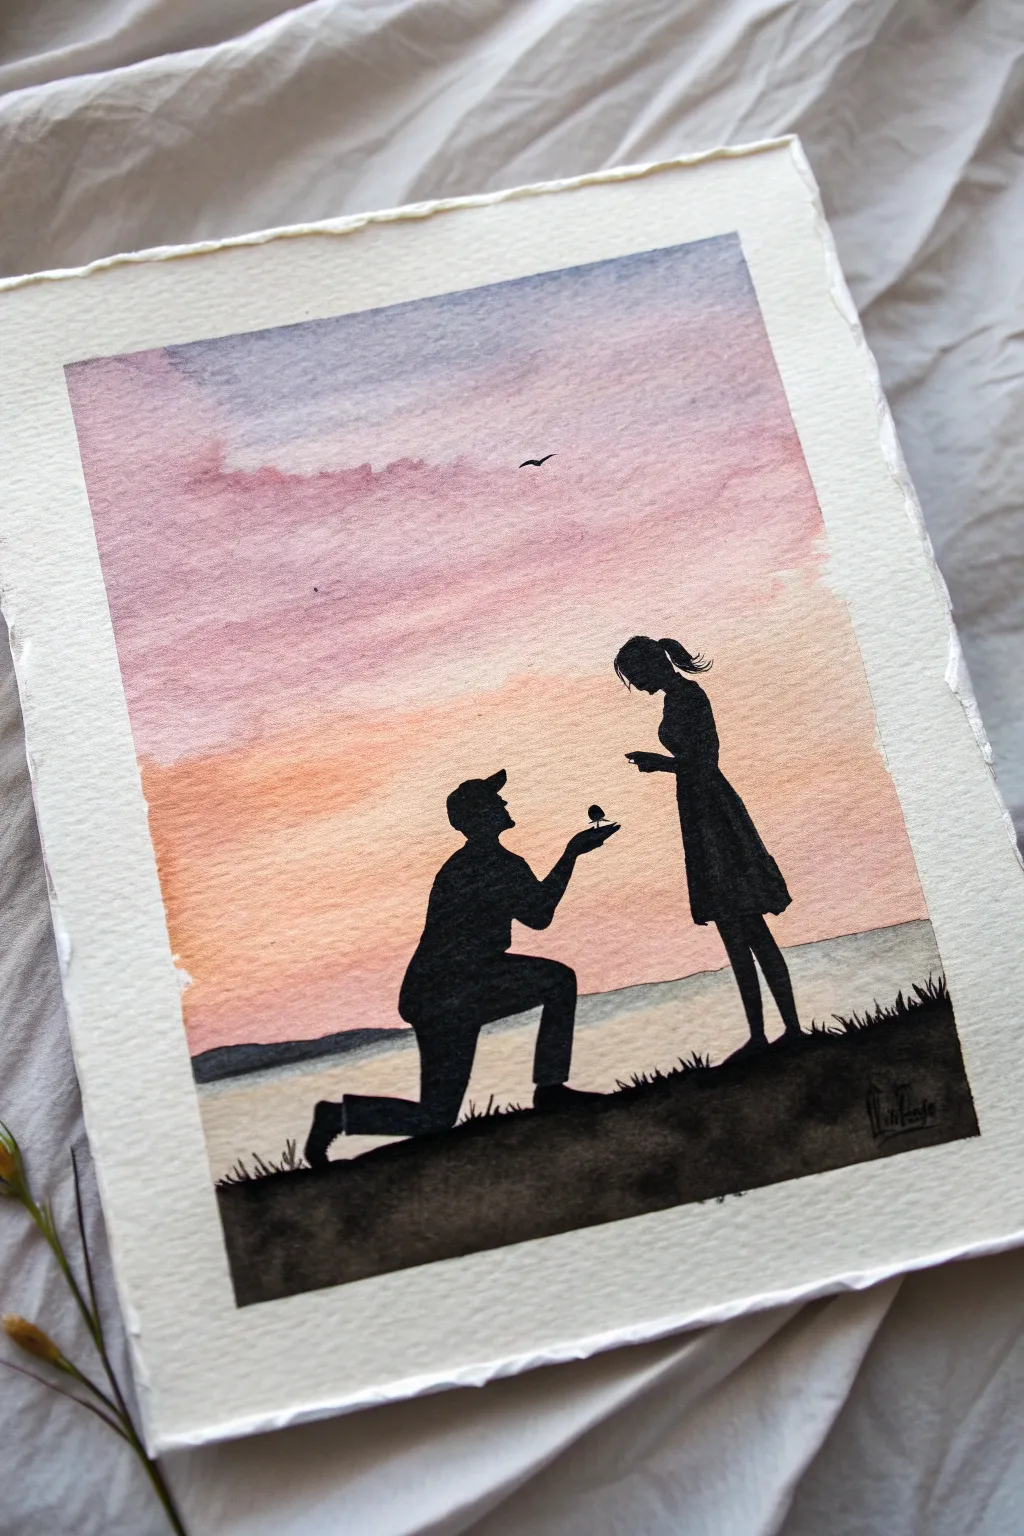
Capture the magic of a proposal with this stunning watercolor silhouette painting. Using a warm, blended gradient sky as the backdrop, you’ll learn to contrast delicate details against vibrant light to create a deeply romantic scene.
Step-by-Step
Materials
- Cold press watercolor paper (300 gsm recommended)
- Watercolor paints (Indigo, Alizarin Crimson, Orange Lake, Yellow Ochre)
- Black ink or gouache for silhouettes
- Masking tape
- Flat wash brush (3/4 inch)
- Round brush (size 6)
- Fine detail brush (size 0 or 1)
- Pencil and eraser
- Jar of clean water
- Paper towels
Step 1: Setting the Scene
-
Prepare your paper:
Cut your watercolor paper to your desired size (A5 or A4 works well). If you want that beautiful deckle edge shown in the reference, tear the paper against a ruler rather than cutting it with scissors. -
Create borders:
Tape down the edges of your paper onto a board with masking tape. This creates a crisp clean frame around the final painting and keeps the paper flat while you work with water. -
Sketch the horizon:
Lightly sketch a low horizon line about one-quarter of the way up from the bottom. It doesn’t need to be perfectly straight; a slight unevenness mimics natural terrain. -
Outline the figures:
Very lightly sketch the silhouettes of the couple. Draw the kneeling figure on the left and the standing figure on the right. Focus only on the outer shape; don’t worry about internal details like facial features or clothing folds.
Clean Edges Tip
When painting the silhouette over the sunset, use waterproof black ink instead of paint. It’s opaque and won’t reactivate the watercolor layers underneath.
Step 2: Painting the Sky
-
Wet the sky area:
Using your large flat brush, apply a generous wash of clean water to the entire sky area, stopping just at the horizon line. The paper should be glistening but not forming puddles. -
Apply the top layers:
Load your brush with a diluted Indigo or purple-grey mix. Paint horizontal strokes at the very top, letting the pigment flow into the wet paper. -
Blend in the pinks:
While the top is still wet, introduce a band of Alizarin Crimson mixed with a touch of purple. Let this bleed slightly upward into the dark sky to create that soft, cloud-like transition. -
Add warmth:
Rinse your brush and pick up a vibrant Orange Lake. Paint the middle section of the sky, allowing it to touch the pink edge above so they soften into each other. -
Finish the sunset glow:
Near the horizon line, blend a wash of Yellow Ochre or pale orange. This should be the lightest part of the painting, representing the fading sun. -
Paint the water reflection:
Once the sky is damp (not soaking), drag a very light, dry-brush horizontal stroke of the sky colors just below the horizon line to suggest water reflecting the sunset.
Make It Personal
Customize the silhouette to match the real couple! Add a specific hairstyle, a baseball cap, or even a tiny silhouette of their dog sitting nearby.
Step 3: Creating the Silhouettes
-
Wait for dryness:
This is crucial: allow the background wash to dry completely. If the paper is cool to the touch, it’s still wet. Use a hair dryer on a low setting if you’re impatient. -
Block in the ground:
Using black ink or heavily saturated black watercolor, paint the foreground ground area. Use a rough, tapping motion with your brush to create the texture of grass and earth. -
Paint the kneeling figure:
Switch to your medium round brush. Carefully fill in the shape of the kneeling man. Ensure his front knee and back foot are clearly defined to show the posture. -
Paint the standing figure:
Fill in the standing woman’s silhouette. Pay close attention to the shape of her dress and hair, as these details define her character. -
Refine the connection:
Use your smallest detail brush to paint the arms reaching out. I find it helpful to hold my breath for a second here to keep my hand steady while painting the hand holding the ring box.
Step 4: Final Details
-
Add environmental details:
With the detail brush and black paint, add tiny spikes of grass emerging from the ground line, overlapping the feet slightly to ground the figures. -
Paint the bird:
Place a tiny, V-shaped bird silhouette high in the sky, slightly off-center, to balance the composition. -
Remove the tape:
Once absolutely everything is dry, carefully peel away the masking tape at a 45-degree angle to reveal your crisp white border.
Frame this romantic artwork in a simple floating frame to show off those beautiful edges.


“Where It Happened” Location Scene
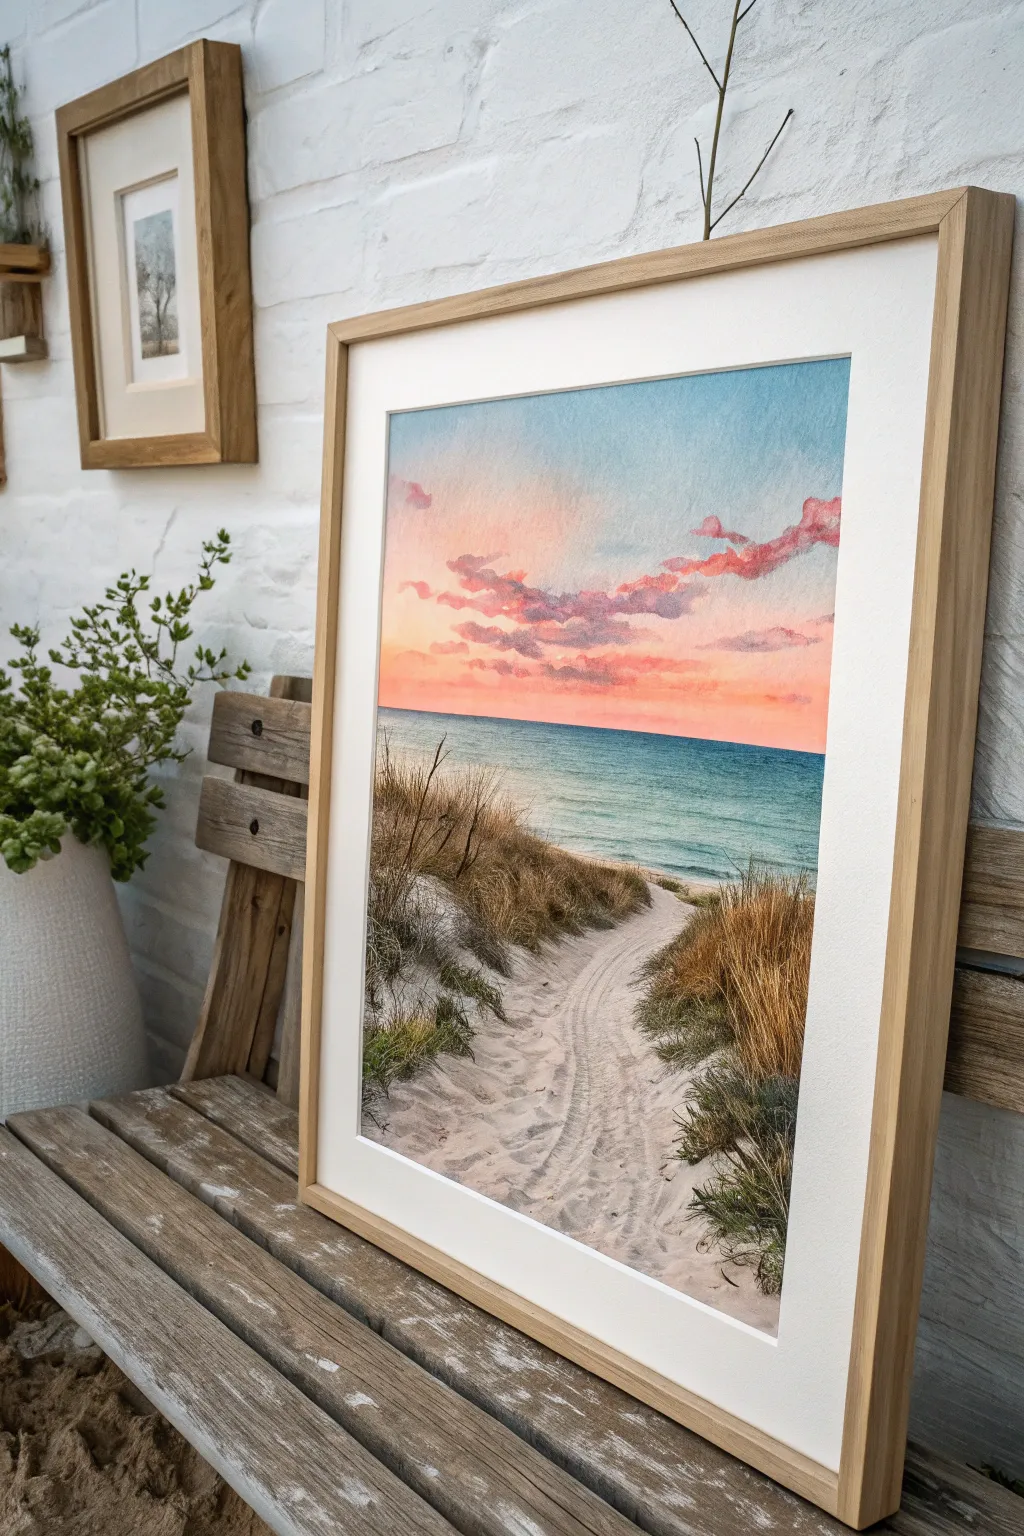
Capture the romantic memory of a beach proposal with this serene watercolor landscape, featuring soft dunes and a vibrant sunset sky. The blend of warm pinks and cool aquamarines creates a dreamy, nostalgic atmosphere perfect for commemorating a special location.
Step-by-Step Tutorial
Materials
- Cold press watercolor paper (300 gsm)
- Watercolor paints (Alizarin Crimson, Cadmium Orange, Cerulean Blue, Ultramarine, Burnt Sienna, Yellow Ochre, Sap Green)
- Large flat wash brush (1 inch)
- Round brushes (size 4 and 8)
- Detail brush (size 0 or 1)
- Masking fluid (optional)
- Painters tape
- Pencil and eraser
- Two jars of water
- Paper towels
Step 1: Preparation and Sketching
-
Secure the paper:
Tape your watercolor paper down to a board on all four sides. This prevents buckling when the paper gets wet and creates a crisp white border for framing later. -
Sketch the horizon:
Using a light hand, draw a straight horizon line about one-third of the way up from the bottom. Keep it perfectly level to ensure the ocean looks realistic. -
Outline the path:
Sketch a winding path starting wide at the bottom center and narrowing as it leads up and slightly to the right toward the water. Add rough shapes for the dunes on either side of the path.
Muddy Clouds?
If your pinks and blues mixed to make grey or green, let the layer dry completely. Then, gently lift the muddy paint with a damp sponge and re-apply fresh color.
Step 2: Painting the Sky and Ocean
-
Wet-on-wet sky base:
Generously wet the sky area with clean water using your large flat brush. Drop in a pale wash of Cerulean Blue at the very top, fading it out into clear water as you reach the middle. -
Add warmth:
While the paper is still damp, introduce a mix of Cadmium Orange and Alizarin Crimson just above the horizon line. Let these warm colors bleed slightly upward, but try not to let them mix too much with the blue to avoid creating green. -
Cloud formation:
Mix a slightly more saturated purple-grey using Alizarin Crimson and a touch of Ultramarine. While the sky is still damp but not soaking, dab in loose, horizontal cloud shapes, letting the bottom edges soften into the sunset glow. -
Ocean gradient:
Once the sky is dry, paint the ocean. Start with a deep teal (Cerulean mixed with a tiny drop of Sap Green) right at the horizon line for depth. Dilute the paint with water as you pull the color down toward the shore to make the shallows look transparent.
Add Texture
Splatter clean water droplets or a tiny bit of white gouache onto the sand area while it’s drying to create natural grainy textures in the dunes.
Step 3: Dunes and Sand
-
Sand base layer:
Mix a very watery wash of Yellow Ochre and a touch of Burnt Sienna. Apply this loosely over the path and dune areas, leaving patches of white paper showing for high-contrast sunlit sand. -
Shadowing the path:
Mix a cool violet-grey shadow tone. Use the side of your brush to drag this color across the sand, mimicking the texture of footprints and tire tracks. I find dragging the brush quickly creates that dry-brush texture that looks just like loose sand. -
Building the dunes:
Deepen the color of the dunes using a stronger mix of Burnt Sienna and Ochre. Paint the slopes of the sand mounds, keeping the tops lighter to indicate sunlight hitting the peaks.
Step 4: Grasses and Details
-
Base grass texture:
Load a size 8 round brush with a mix of Sap Green and Burnt Sienna. Flick the brush upward rapidly to create clumps of dune grass base layers on the mounds. -
Adding dry grass:
Mix Yellow Ochre with a bit of Orange. Add lighter, dried grass stalks amongst the green ones, focusing on the areas catching the most light. -
Detailing foreground grass:
Switch to your smallest detail brush. Use a dark mix of Green and Ultramarine to paint individual, sharp blades of grass in the immediate foreground on the bottom left and right. -
Refining the horizon:
Use a steady hand with blue paint to neaten the horizon line if the ocean wash settled unevenly. A crisp line here is crucial for perspective. -
Paths and tracks:
Strengthen the shadows in the tire tracks on the path with a slightly darker grey-purple wash to guide the viewer’s eye toward the water. -
Final assessment:
Step back and check your values. If the foreground needs more punch, add a few more dark grass strokes to anchor the painting.
Peeling off the tape reveals a crisp border, leaving you with a romantic memento of your special place

Abstract Love Color Wash
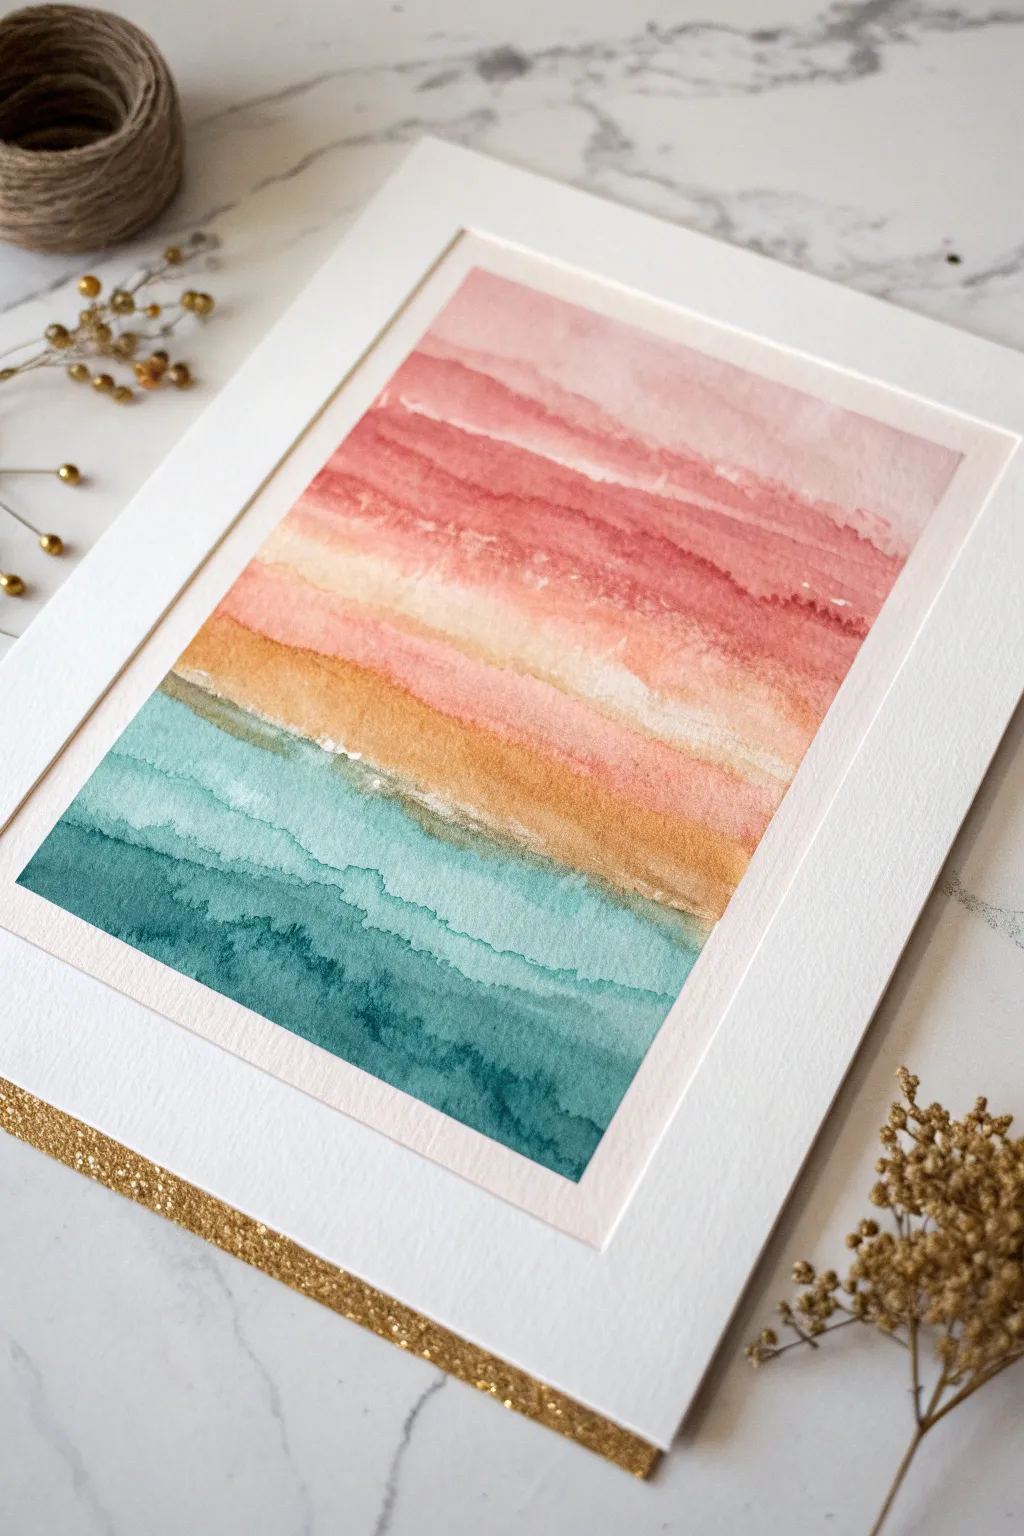
Capture the soft, bleeding transition of colors reminiscent of a sunset over the ocean with this serene watercolor project. This abstract wash technique creates dreamy horizontal bands of coral, blush, ochre, and teal that feel romantic and timeless.
How-To Guide
Materials
- Cold press watercolor paper (300 gsm or heavier)
- Watercolor paints (Coral, Alizarin Crimson, Yellow Ochre, Turquoise, Payne’s Grey)
- Large flat wash brush (3/4 inch or 1 inch)
- Medium round brush (size 8 or 10)
- Masking tape
- Jar of clean water
- Paper towels
- White or cream picture mat for framing
Step 1: Preparation and Palette
-
Secure the paper:
Tape your watercolor paper down firmly to a hard board or table on all four sides. This prevents the paper from buckling when we add water and ensures you have a crisp white border at the end. -
Mix your top colors:
Prepare a very dilute wash of blush pink by mixing a tiny amount of Alizarin Crimson with plenty of water. In a separate well, mix a stronger, more saturated coral tone. -
Mix your transition colors:
Get a warm, earthy yellow ready by diluting Yellow Ochre. You want this to be fluid but pigmented enough to stand out against the pinks. -
Mix your ocean tones:
Create a vibrant turquoise mix. Then, prepare a deeper shadow version of this color by adding a touch of Payne’s Grey or deep blue to your turquoise.
Step 2: Painting the Sky
-
Wet the sky area:
Using your large flat brush and clean water, dampen the top third of the paper. You want a sheen, not puddles. -
Apply the first blush wash:
Load your brush with the pale blush mix and sweep it across the very top of the wet paper, letting it bleed naturally downwards. -
Introduce the coral:
While the paper is still damp, pick up the deeply saturated coral paint. Paint a horizontal band just below the blush, allowing the edges to fuzz and merge. -
Create texture:
With a slightly drier brush, drag some of that coral pigment sideways to create irregular, organic ‘cloud’ lines. Using a bloom technique here—dropping clear water into damp paint—adds lovely texture. -
Dry layer one:
Let this top sky section dry completely. I prefer to be patient here to ensure the next layer doesn’t bleed upwards uncontrollably.
Wet-on-Wet Magic
For softest clouds, tilt your board slightly. Gravity pulls the wet pigment down, creating natural gradients without harsh brushstrokes.
Step 3: Transition and Ocean
-
Add the golden horizon:
Paint a band of the Yellow Ochre directly below the dried pink section. Soften the bottom edge of this stripe with clean water so it fades out. -
Begin the waterline:
Switch to your turquoise mix. Start painting horizontally, leaving a tiny sliver of white paper between the yellow and blue in some spots to represent sea foam. -
Deepen the color:
As you move down the paper, pick up more pigment. The goal is a gradient where the blue gets stronger toward the bottom. -
Add wave layers:
While the blue wash is wet, charge your brush with the darker turquoise/grey mix. Paint wiggly, horizontal lines into the wet wash to suggest depth and waves. -
Lift pigment for highlights:
Clean and dry your brush, then run it horizontally across damp sections of the blue to lift slight lines of color, mimicing cresting waves.
Metallic Touch
Once fully dry, paint a thin, delicate line of gold leaf or metallic watercolor right along the horizon line for a luxurious shimmer.
Step 4: Finishing Details
-
Dry completely:
Allow the entire painting to dry thoroughly. The paper should feel cool to the touch if it is still damp. -
Hard edge details:
Using a small round brush with very little water (dry brush technique), add faint, scratchy lines of dark turquoise at the very bottom for distinct wave texture. -
Glazing adjustments:
If the transition between pink and yellow looks too stark, you can gently glaze a very watery orange wash over the dried seam to unify them. -
Remove tape:
Ideally, peel the masking tape away at a 45-degree angle purely away from the artwork to reveal your crisp, clean edges. -
Mat and frame:
Place your finished piece inside a white picture mat. The wide white border really makes the soft colors pop.
Step back and admire calmness of your personal abstract seascape
BRUSH GUIDE
The Right Brush for Every Stroke
From clean lines to bold texture — master brush choice, stroke control, and essential techniques.
Explore the Full Guide
Star Map of the Proposal Night
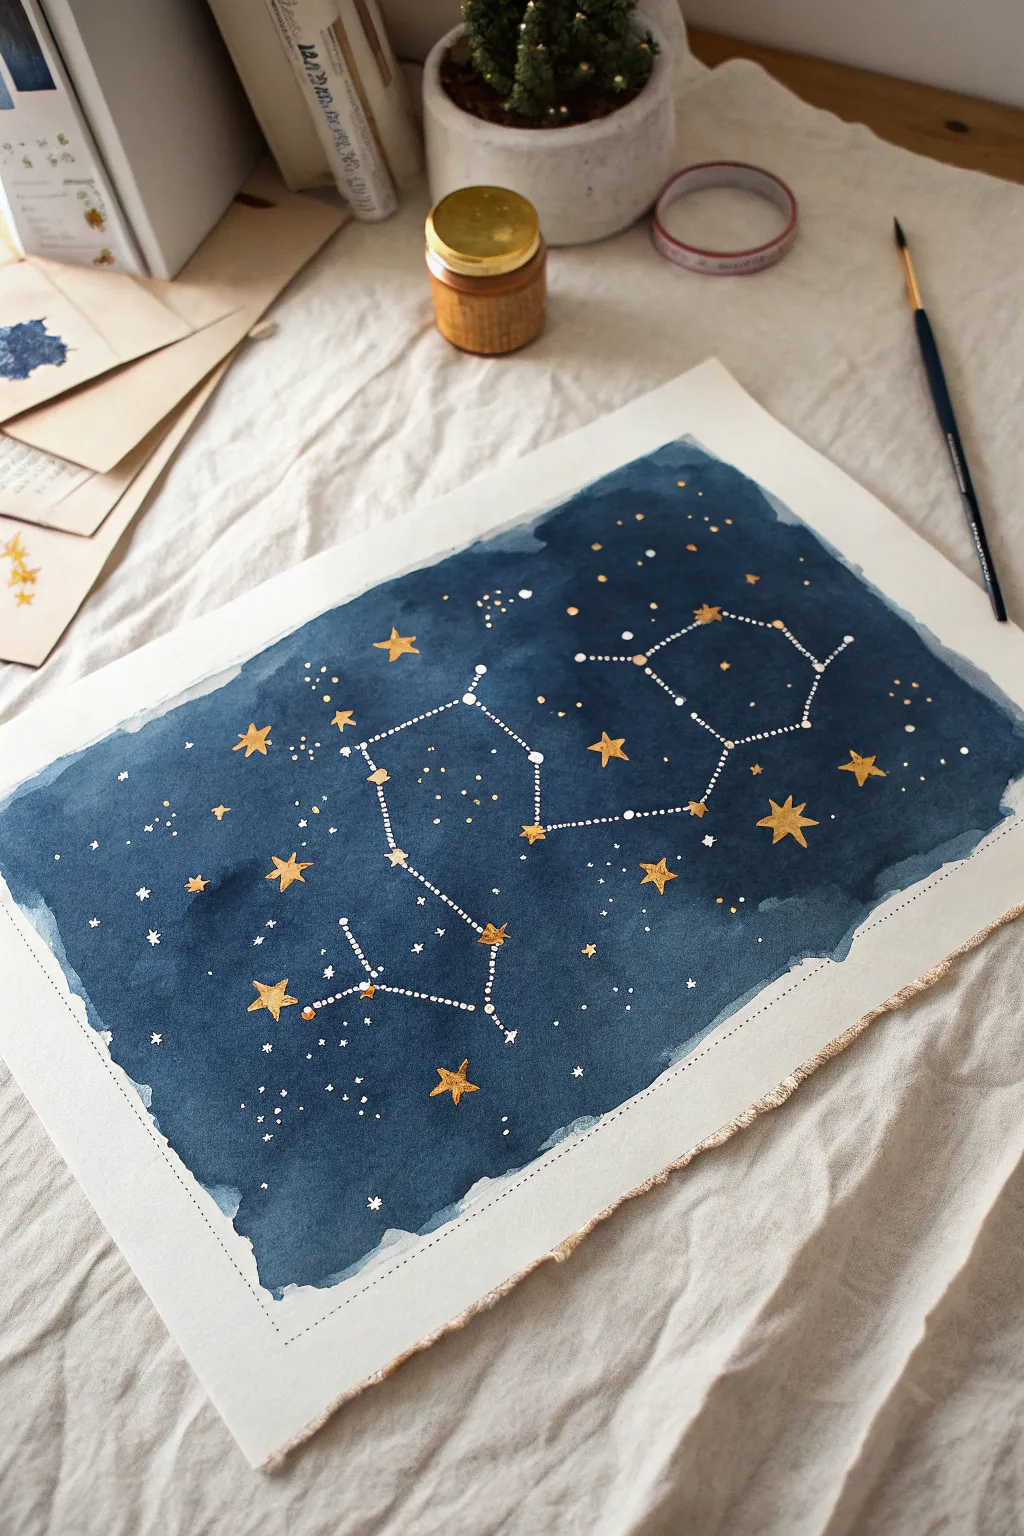
Capture the magic of a special night with this elegant watercolor star map featuring deep indigo washes and shimmering gold details. This piece combines the fluidity of watercolor with precise metallic accents to create a timeless keepsake of the night sky.
Detailed Instructions
Materials
- High-quality watercolor paper (300 gsm, cold press)
- Indigo watercolor paint (tube or pan)
- Payne’s Grey watercolor paint
- Gold metallic gouache or gold watercolor
- White gouache or white ink
- Large round watercolor brush (size 10 or 12)
- Small detail brush (size 0 or 00)
- White gel pen (optional)
- Painter’s tape or masking fluid (optional)
- Paper towels
- Jar of clean water
- Pencil and eraser
- Deckle edge ruler (optional for paper prep)
Step 1: Preparing the Foundation
-
Paper Preparation:
Start by preparing your paper size. If you want the rustic look shown in the example, gently tear the edges of your watercolor paper against a ruler to create a soft, deckled edge. Tape the paper down to your work surface to prevent buckling. -
Sketching the Map:
Lightly sketch the constellations relevant to your specific date. You can find reference maps online for the specific orientation of the stars on your special night. Keep these pencil lines extremely faint so they don’t show through the dark paint later. -
Mixing the Night Sky:
Create a rich, dark mixture on your palette. I like to combine Indigo with a touch of Payne’s Grey to get that deep, midnight blue that isn’t too saturated. Make a generous puddle of this paint; you’ll need enough to cover the whole area without stopping to rematch the color.
Bleeding Stars?
If your white dots are turning blue or spreading, your base layer wasn’t 100% dry. Let it sit for another 30 minutes, or use a hairdryer to bone-dry the paper before continuing.
Step 2: Painting the Sky
-
Laying the Wash:
Using your large round brush, load it fully with the dark blue mixture. Start painting the rectangular shape of the sky, letting the edges be slightly organic and wavy rather than perfectly straight. -
Creating Depth:
While the wash is still wet (wet-on-wet technique), drop in slightly more concentrated pigment in random areas to create cloud-like variations in the night sky. This prevents the background from looking flat. -
Refining Edges:
Use the tip of your brush to carefully shape the perimeter. The goal is a controlled erratic edge that looks like a vintage map or parchment. Don’t worry about perfection here; the irregularity adds charm. -
Drying Time:
Allow this base layer to dry completely. This is crucial—if the paper is damp, your stars will bleed into fuzzy blobs. Use a hairdryer on a low setting if you’re impatient, but air drying is safest.
Add Personal Data
Use a calligraphy pen to write the coordinates of the location, the specific date, and the time of the proposal in a neat serif font at the bottom of the paper.
Step 3: Mapping the Constellations
-
Drafting Connection Lines:
Once dry, look for your faint pencil marks. Using a fine detail brush dipped in white gouache (consistency of heavy cream) or a white gel pen, begin creating the dotted lines that connect your constellation stars. -
Ensuring Opacity:
If using gouache, you may need to reload your brush frequently to keep the dots bright white against the dark background. The dots should be small and relatively uniform in spacing. -
Adding Major Stars:
Identify the ‘anchor’ stars of your constellations—the points where the lines meet. At these intersections, paint larger white circles to represent the primary stars.
Step 4: Gilding the Stars
-
Gold Accents:
Switch to your gold metallic gouache or watercolor. Paint five-pointed stars over the largest white dots you just created. The gold pops thoroughly against the indigo. -
Varying Star Sizes:
Scatter a few medium-sized gold stars randomly around the constellations to balance the composition. Don’t overthink their placement; randomness feels more natural. -
Adding Tiny Sparkles:
Using the very tip of your smallest brush, add tiny gold dots interspersed among the larger stars. These subtle glimmer points add a magical depth to the piece.
Step 5: Final Details
-
Background Stars:
Return to your white gouache. Dilute it slightly and splatter tiny droplets over the painting by tapping the brush handle against another brush. Cover the main constellations with a paper towel if you want to keep them clean. -
Manual Touch-ups:
If the splatter feels too chaotic, manually paint tiny white pinpricks to fill empty voids in the deep blue galaxy. -
Frame Border:
Referencing the image, use a fine black pen or pencil to draw a very delicate, dashed border box just outside the painted edge giving it a technical map aesthetic. -
Final Inspection:
Check for any pencil lines that are still visible and gently erase them, being careful not to smudge the gold paint.
Once framed, this celestial map serves as a sophisticated reminder of the moment your lives changed together
Before-and-After Diptych
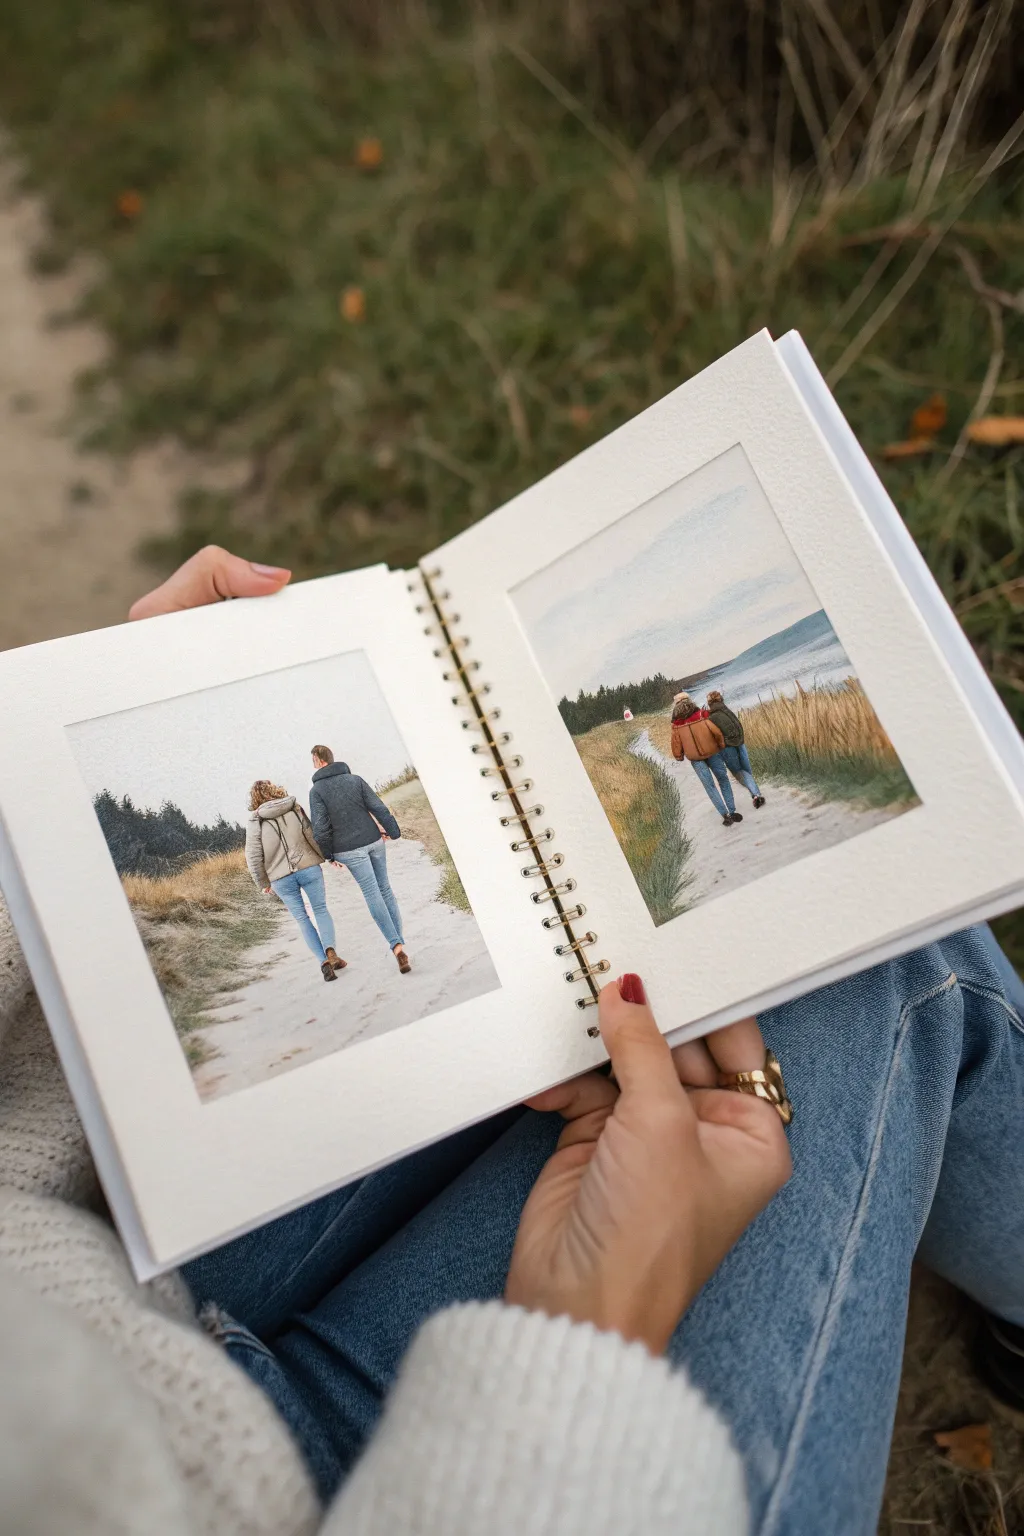
Capture the fleeing moments of an engagement with a unique sketchbook diptych that tells a story of movement and progression. This project uses soft mixed media to create two sequential scenes of a couple walking along a coastal path, beautifully framed within a spiral-bound book.
How-To Guide
Materials
- High-quality spiral-bound watercolor sketchbook (heavyweight paper)
- Watercolor paint set
- Watercolor pencils or soft pastel pencils
- Small round brushes (sizes 2 and 4)
- Flat shader brush (size 6)
- Masking tape (low tack)
- Reference photos of the couple walking away
- HB pencil for sketching
- Paper towels
- Water jar
Step 1: Preparation & Sketching
-
Select your canvas:
Choose a spread in your sketchbook where the paper lies flat. High-quality paper with a bit of tooth is essential here to grab onto the pigment of both the paint and pencils. -
Mask the borders:
Use your low-tack masking tape to create clean, rectangular borders on both the left and right pages. Leave a generous white margin around the edges to mimic the look of a mounted photograph. -
Sketch the left scene:
This serves as the ‘Before’ image. Lightly sketch the couple walking away from the viewer on the sandy path. Keep them relatively large in the frame to establish intimacy. -
Sketch the right scene:
On the opposite page, sketch the same setting but place the couple significantly further down the path. This creates the ‘After’ perspective, suggesting time and distance traveled.
Tape Technique
To prevent the tape from ripping your sketchbook paper, stick the tape to your jeans or shirt once or twice before applying it. This reduces the stickiness.
Step 2: Painting the Foundation
-
Wash the sky:
Mix a very dilute wash of cerulean blue and grey. Apply this to the sky area on both pages using your flat brush, keeping it lighter near the horizon. -
Block in the path:
Using a sandy beige mixed with a touch of white, paint the main walkway. Use horizontal strokes for the immediate foreground and switch to vertical strokes as the path recedes to enhance depth. -
Lay the grassy base:
While the path dries, use a sap green and yellow ochre mix to block in the grassy dunes on either side. Keep this loose; we will add texture later. -
Initial clothing layers:
Paint the base colors of the coats and jeans. For denim, I usually start with a flat mid-tone blue, saving the darker indigos for shadows later.
Step 3: Adding Texture & Detail
-
Deepen the shadows:
Once the base layers are completely dry, use a smaller round brush to paint the darker values—the folds in the jackets, the shadows under the shoes, and the darker patches of vegetation. -
Texturizing the grass:
Switch to your watercolor pencils or pastels. Use short, upward flicking motions in ochre, burnt sienna, and olive green to create the look of tall, dry dune grass. -
Defining the path:
Lightly scribble over the painted path with a light grey or brown pencil to mimic the grainy texture of sand and dirt. -
Refining the figures:
Sharpen your pencils for this step. Outline the figures gently and add distinct highlights to the hair and shoulders. The pencil texture over watercolor gives a lovely, soft ‘illustration’ feel. -
Atmospheric fade:
For the right-hand image (the distant view), keep the details slightly blurrier and colors less saturated. You can achieve this by gently smuggling the pencil lines with a damp brush.
Fixing Buckled Paper
If your paper warps from the water washes, close the book with a heavy weight on top overnight once the painting is fully dry to flatten it out.
Step 4: Final Touches
-
Consistent horizon:
Double-check that the horizon line on the right page aligns logically with the left page, ensuring the two images feel like one continuous world. -
Hair details:
Add tiny strokes for hair strands using a fine-point pencil. This detail is crucial for the closer image on the left. -
Highlight recovery:
If you’ve lost any bright whites (like shoe soles or jacket zippers), use a touch of opaque white gouache or a gel pen to bring them back. -
Reveal the border:
Wait until the paper is bone dry. Slowly and carefully peel away the masking tape at a 45-degree angle to reveal those crisp, clean edges that frame your work.
You now have a beautiful narrative keepsake that captures the journey of love step by step

PENCIL GUIDE
Understanding Pencil Grades from H to B
From first sketch to finished drawing — learn pencil grades, line control, and shading techniques.
Explore the Full Guide
Engagement Party Signature Sky
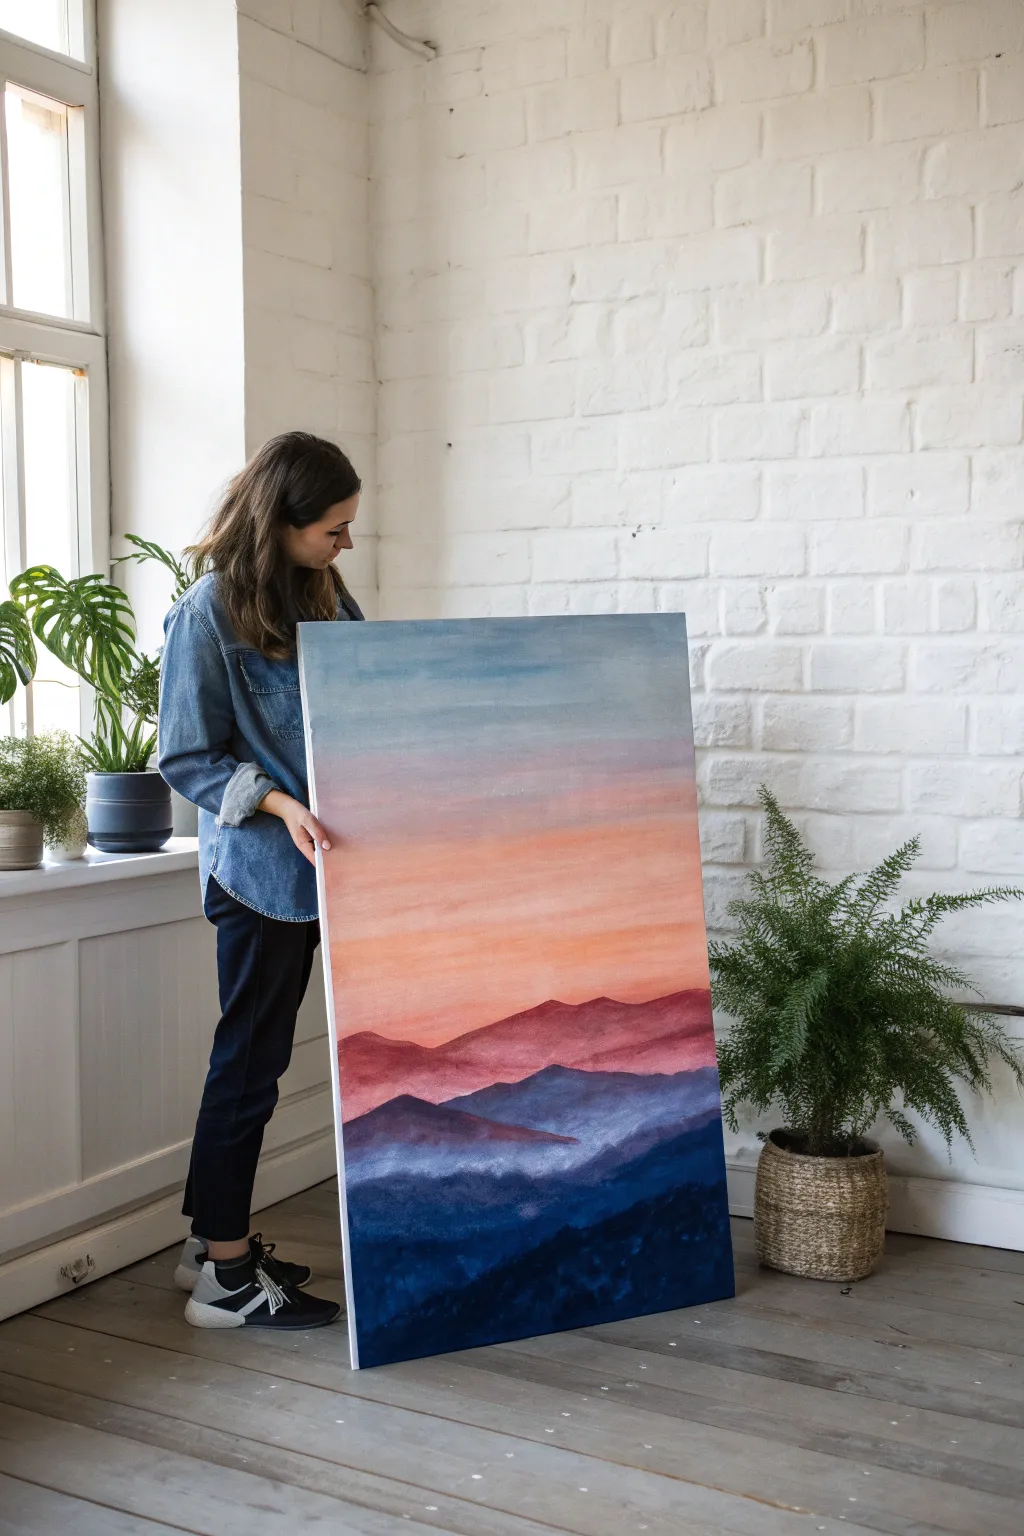
Create a breathtaking mountain gradient landscape that serves as a stunning backdrop for engagement signatures or well-wishes. This large-scale acrylic painting uses simple blending techniques to capture the serene transition from a twilight sky to deep, shadowed valleys.
Step-by-Step Tutorial
Materials
- Large stretched canvas (at least 24×36 or larger)
- Acrylic paints: Titanium White, Ultramarine Blue, Phthalo Blue, Alizarin Crimson, Cadmium Orange, Burnt Umber
- Large flat brush (2-3 inch) for background
- Medium flat brush (1 inch) for mountains
- Small round brush for details
- Mixing palette or paper plates
- Water cup and paper towels
- Easel or drop cloth for floor working
Step 1: Painting the Sky Gradient
-
Prepare the canvas:
Set up your canvas vertically. If the surface feels rough, apply a quick coat of gesso and sand it lightly once dry for a smoother blending surface. -
Mix the sky blue:
Start by mixing a large amount of Titanium White with just a touch of Ultramarine Blue to create a very pale, airy blue. Apply this to the top 1/5th of the canvas using your large flat brush. -
Transition to white:
As you move down the canvas, gradually add more white to your mix until you are painting with pure white near the upper-middle section. -
Introduce pink tones:
Mix Titanium White with a tiny dot of Alizarin Crimson. While the white layer above is still slightly wet, blend this pale pink starting just below the white section, working in long horizontal strokes. -
Deepen the sunset:
Add a small amount of Cadmium Orange to your pink mixture to create a warm peach tone. Blend this into the pink layer, occupying the middle band of the canvas where the sky meets the horizon. -
Final sky blending:
Clean your large brush and use it slightly damp (but not wet) to lightly feather the transitions between the blue, white, pink, and peach bands, ensuring no harsh lines remain.
Step 2: Layering the Mountains
-
Mix the distant mountain color:
Create a hazy purple by mixing Ultramarine Blue, Alizarin Crimson, and a significant amount of White. You want a color that is just slightly darker than your peach sky. -
Paint the first range:
Using the medium flat brush, paint a wavy, organic line across the canvas, overlapping the peach sky section. Fill in the area below this line with your light purple mix. -
Add the second ridge:
Mix a slightly darker version of the previous purple by adding more blue and less white. Paint a second mountain ridge below the first one, varying the peaks’ heights to keep it interesting. -
Create atmospheric perspective:
For the middle mountain layers, start introducing Phthalo Blue into your purple mix. This cooler tone helps push these mountains visually forward. Paint the next range with this new hue. -
Add texture:
While the paint is wet on this middle layer, add a tiny touch of white to your brush and lightly sweep it across the tops of the ridges to suggest mist or light hitting the peaks. -
Darken the mix:
As you move to the bottom third, mix Phthalo Blue with a touch of Burnt Umber and very little white. This should be a deep, rich navy color. -
Paint the foreground mountains:
Paint the lowest mountain ranges with this dark navy mix. Make the slopes steeper and more dramatic here to suggest proximity. -
Final depth adjustments:
I like to take a step back here to check the values. If the bottom doesn’t feel grounded enough, add a final layer of almost pure Phthalo Blue and Burnt Umber at the very bottom edge. -
Soften the valleys:
Use a dry, clean brush to gently tap the areas between mountain layers if the harsh lines look too unnatural; a little fuzziness mimics distant fog.
Paint Stripping?
If acrylics are drying too fast while blending the sky, mist the canvas lightly with water or mix a drop of slow-drying medium into your paint.
Metallic Touch
Mix a little gold or silver metallic paint into the peach sunset band for a subtle shimmer that catches the light during the evening engagement party.
Allow the painting to cure for at least 24 hours before setting it out for guests to sign with permanent markers
Mini Love-Story Storyboard

Capture the sweetest chapters of your relationship with this charming six-panel storyboard illustration. Using delicate ink lines and soft watercolor washes, this piece creates a whimsical visual timeline of your journey together.
How-To Guide
Materials
- Cold press watercolor paper (A4 or slightly larger)
- Pencil and eraser
- Ruler
- Fine liner waterproof pigment pens (0.1mm and 0.3mm)
- Watercolor paint set
- Small round brushes (size 2 and 4)
- Masking tape
- Water jar and paper towels
Step 1: Planning and Layout
-
Plan your narrative:
Before touching the paper, sketch out six key moments or symbols of your relationship on scratch paper. This could be where you met, a favorite trip, or a shared hobby. -
Prepare the paper:
Tape your watercolor paper down to a flat surface with masking tape to prevent buckling during the painting process. -
Grid the panels:
Using a ruler and a light pencil touch, measure and draw two columns of three rectangles each. Leave ample white space margins between them to create a clean, storybook feel. -
Sketch the scenes:
Lightly sketch your chosen scenes into the boxes. Keep the drawings simple and stylized—focus on shapes rather than intricate realism.
Bleeding ink lines?
Make absolutely sure your pen is waterproof before painting. Test it on a scrap piece of paper with water first. If it bleeds, switch to a pigment liner.
Step 2: Inking the Outlines
-
Define the borders:
Use your 0.3mm pen to carefully trace over the rectangular panel borders. You can use a ruler for precision or freehand it for a more organic look. -
Ink the subjects:
Switch to the finer 0.1mm pen to trace your illustrations inside the boxes. Keep your lines delicate, especially for elements like mountain peaks or flower petals. -
Add textural details:
Use small stippling dots for sand, tiny dashes for grass, or jagged lines for rock faces to add interest before painting. -
Clean up:
Wait at least 15 minutes for the ink to fully cure, then gently erase all visible pencil lines to keep the final art crisp.
Make it personal
Write a tiny date or location name in the bottom corner of each panel in a delicate script to turn this art piece into a documented timeline.
Step 3: Watercolor Washes
-
Mix your palette:
Prepare watery, desaturated mixes of your colors. You’ll want a soft aesthetic, so dilute the paint heavily. Earth tones like ochre, burnt sienna, and sage green work beautifully. -
Paint the backgrounds:
Start with the skies and large background areas using the size 4 brush. Apply a pale pink or light blue wash, letting the white of the paper shine through for clouds. -
Layering landscapes:
Move on to the middle ground elements like mountains or sand dunes. I like to drop a slightly darker pigment into the wet wash while it’s still damp to create natural gradients. -
Subject details:
Using the size 2 brush, carefully paint the smaller focal points like the couple’s clothing, the vintage suitcase, or the tent. Use more saturated color here to make them pop. -
Floral touches:
If you have a flower panel, paint the petals loosely. Don’t worry about staying perfectly inside the lines; a little bleed adds artistic charm. -
Adding depth:
Once the initial layers are bone dry, add shadows. Mix a diluted purple or grey wash and apply it to one side of objects (like the suitcase or mountains) to create dimension. -
Final check:
Review all panels for consistency. If one looks too pale, add a second light glaze of color to balance the visual weight across the storyboard.
Step 4: Finishing Touches
-
Re-inking if needed:
If painting has obscured any fine details, carefully go back over them with the 0.1mm pen to bring back definition. -
Remove tape:
Peel the masking tape away slowly at a 45-degree angle to reveal your clean, crisp edges.
Frame your mini storyboard in a floating glass frame to showcase the lovely paper texture and your unique love story


Have a question or want to share your own experience? I'd love to hear from you in the comments below!