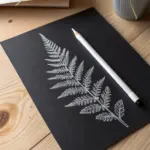
The evil eye is one of those symbols that’s instantly recognizable, super satisfying to draw, and endlessly customizable. If you’re in the mood for something that feels both decorative and meaningful, these evil eye drawing ideas will keep your sketchbook busy in the best way.
Classic Nazar Concentric Circles
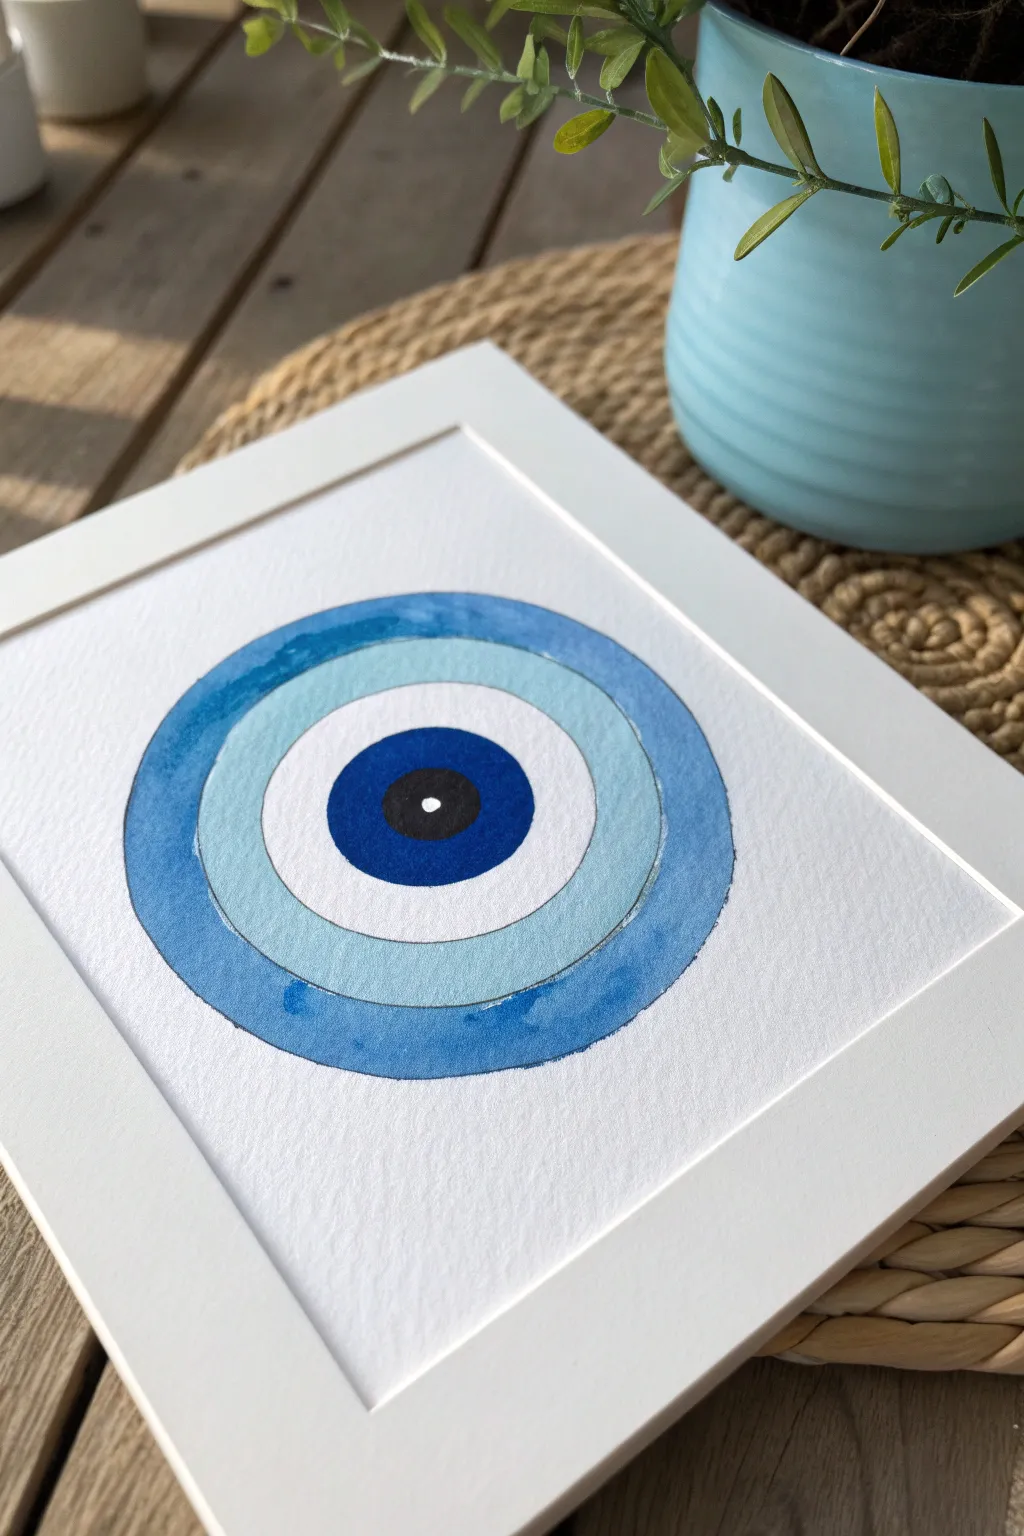
This project captures the protective essence of the classic Turkish Nazar in a clean, modern watercolor format. The beauty lies in the transparency of the paint layers, which give the concentric circles a vibrant, handmade depth.
Step-by-Step
Materials
- Cold press watercolor paper (300 gsm)
- Watercolor paints (Ultramarine Blue, Cerulean Blue/Turquoise, Black)
- Round watercolor brushes (Size 4 and Size 8)
- Compass or circular objects for tracing
- HB Pencil
- Palette for mixing
- Two jars of water
- Paper towels
- Square white mat and frame
Step 1: Drafting the Design
-
Find the center:
Begin by lightly marking the exact center of your watercolor paper with a tiny dot. Since the final piece is square, measure carefully to ensure your eye sits perfectly in the middle. -
Draw the outer circle:
Using a compass set to your largest desired radius, draw the outermost circle. If you don’t have a compass, trace a small bowl or large jar lid lightly with your pencil. -
Create the inner rings:
Draw three smaller concentric circles inside the first one. You want four distinct zones: the outer dark blue ring, the light blue ring, the white ring, and the dark pupil center. Keep your pencil lines very faint so they fade under the paint.
Clean Lines Pro Tip
For perfectly round outer edges without needing a steady hand, apply masking fluid over your pencil lines before painting. Rub it off only after the paint is 100% dry.
Step 2: Painting the Blues
-
Prepare the outer wash:
Mix a generous amount of Ultramarine Blue with water on your palette. You want a saturated but fluid consistency, roughly like whole milk. -
Paint the outer ring:
Load your Size 8 brush and carefully fill in the outermost ring. Use the ‘wet-on-dry’ technique here for crisp edges. Rotate the paper as you work to keep your hand position creating a smooth curve. -
Control the puddle:
As you paint the ring, push the bead of wet paint along the circle. Don’t let it dry midway, or you’ll get a hard line. If you make a mistake, quickly dab it with a paper towel. -
Let it dry completely:
This is crucial. Wait until the outer ring is bone dry before moving on. If the paper is cool to the touch, it’s still damp. I often use a hairdryer on a low setting to speed this up. -
Mix the turquoise tone:
For the second ring, dilute Cerulean Blue or Turquoise with plenty of water. You want this layer to be significantly lighter and more transparent than the outer ring. -
Fill the second ring:
Paint the second ring carefully. It is okay if it barely touches the dry edge of the outer ring, but try to keep a tiny hair-width of white paper between them if you want extremely crisp definition.
Step 3: The Center Details
-
Skip the white ring:
Leave the third ring completely unpainted. This negative space represents the white of the eye and uses the natural brightness of the watercolor paper. -
Paint the pupil:
Switch to your smaller Size 4 brush. Mix a deep, dark blue using Ultramarine and a touch of Black (or just pure Black if you prefer high contrast). -
Fill the center circle:
Carefully fill in the innermost circle. Go slowly here, as this dark shape draws the most attention. -
Add the highlight:
While the center pupil is still wet, you can lift out a tiny dot of paint with a dry brush, or simply leave a tiny speck of white paper unpainted. Alternatively, wait for it to dry and add a dot of white gouache or gel pen.
Metallic Level Up
Mix a tiny amount of iridescent medium into your blue paint or trace the boundaries of the circles with a fine-tip gold paint pen for a touch of mystical shimmer.
Step 4: Final Assembly
-
Erase guidelines:
Once the entire painting is completely dry (give it at least an hour), very gently erase any visible pencil marks remaining around the edges. -
Flatten the paper:
If your paper has buckled slightly from the water, place it under a heavy book overnight to flatten it out. -
Frame the artwork:
Place your finished piece behind a square white mat to give it that professional gallery look, and secure it in the frame.
Hang your new Nazar painting near a doorway to welcome good vibes and ward off negativity


Minimal Evil Eye Icon Grid
This project is all about exploring variations on a single theme by filling a sketchbook page with diverse, minimalist eye designs. Utilizing clean black ink on warm-toned paper creates a striking, mystical aesthetic that serves as both practice and a finished piece of art.
Step-by-Step Tutorial
Materials
- Spiral-bound sketchbook (cream or tan paper recommended)
- Fine liner pen (0.3mm or 0.5mm, black)
- Pencil (HB or 2B)
- Eraser
- Ruler (optional for spacing)
Step 1: Planning the Layout
-
Visualize the grid:
Start by looking at your blank page. Imagine a loose grid structure. You don’t need perfect squares, but having a general sense of columns and rows will keep the page looking organized rather than chaotic. -
Mark faint guides:
Using your pencil, lightly tap small dots or draw very faint lines to mark where the center of each eye will go. Aim for roughly three columns and six to seven rows to match the reference density. -
Draft the basic shapes:
Still using your pencil, lightly sketch the almond shapes for the eye outlines. Vary the width and height slightly—some can be wide and open, others narrow and sleek.
Steadier Circles
Draw circles by locking your wrist and moving your whole arm in a rotary motion. Hover the pen first to practice the movement before lowering the tip.
Step 2: Inking Simple Designs
-
Start top-left:
Begin inking with your fine liner at the top left corner. Draw a classic almond eye shape, but instead of a realistic iris, draw a small circle with a dot in the center. -
Add lashes:
On the first eye, add small, straight vertical lines above the upper lid to represent lashes. Keep them sparse and graphic. -
Create the ‘circled’ eye:
Move down to the next row. Draw a standard eye outline, but inside, draw a perfect circle that touches both the top and bottom lid, housing a small pupil dot. -
Draw the ‘double-lid’ variation:
For the third design down, draw a larger almond shape, then draw a slightly smaller almond shape inside it. Place a solid black dot in the very center. -
Inking the patterned iris:
Next, try a more detailed iris. Draw the eye outline, then a large circle for the iris. Inside that circle, draw concentric rings or radiating lines before placing the pupil.
Step 3: Adding Stylized & Geometric Variants
-
The dot-work eye:
Moving to the center column, create an eye where the details are made of dots. Draw a solid pupil, surround it with a circle, and then add a ring of small dots around the outside of the iris. -
Geometric teardrop:
Draw an eye but sharpen the corners dramatically. Instead of a round iris, try drawing a diamond shape or a triangle for the pupil to give it a geometric feel. -
The sun-burst eye:
Towards the bottom, draw a very simplified eye shape. Around the outside of the lids, draw short, radiating dashes like rays of light. -
Heavy contrast eye:
Draw a thick, bold outline for one eye. Make the pupil large and solid black, leaving a tiny sliver of white as a highlight to create depth. -
The mystical symbol:
For a unique variant seen near the bottom, draw a circle with a dot. Surround it with a larger circle, and then add small dots at the four cardinal points (North, South, East, West) outside the ring.
Add Metallic Flair
Use a gold or silver gel pen to add accents to specific details, like the pupils or rays of light, making the page shimmer when turned.
Step 4: Right Page Accents
-
Shift to the right side:
If you are working across the spiral binding, mirror the layout on the right page. Start introducing celestial elements like crescents or small stars next to the eyes. -
Draw the crescent moon icon:
In an empty space on the right page, draw a solid black crescent moon shape accompanied by a few tiny dots. -
Create the sun icon:
Near the top right, draw a small solid circle and add long, thin lines radiating outward to represent a sun.
Step 5: Finishing Touches
-
Review line weight:
Look over the whole page. If some lines look too thin or shaky, go over them a second time to thicken them up and smooth out the curves. -
Erase pencil marks:
Wait at least five minutes to ensure the ink is completely dry. Gently erase all your initial pencil guides and dots to reveal the clean, crisp ink work. -
Add final details:
Adding tiny dots or ‘stardust’ in the empty white spaces between the eyes can help balance the composition and tie the grid together.
Now you have a beautifully curated page of mystic symbols ready to inspire future projects


Bold Blackline Evil Eye Tattoo Style
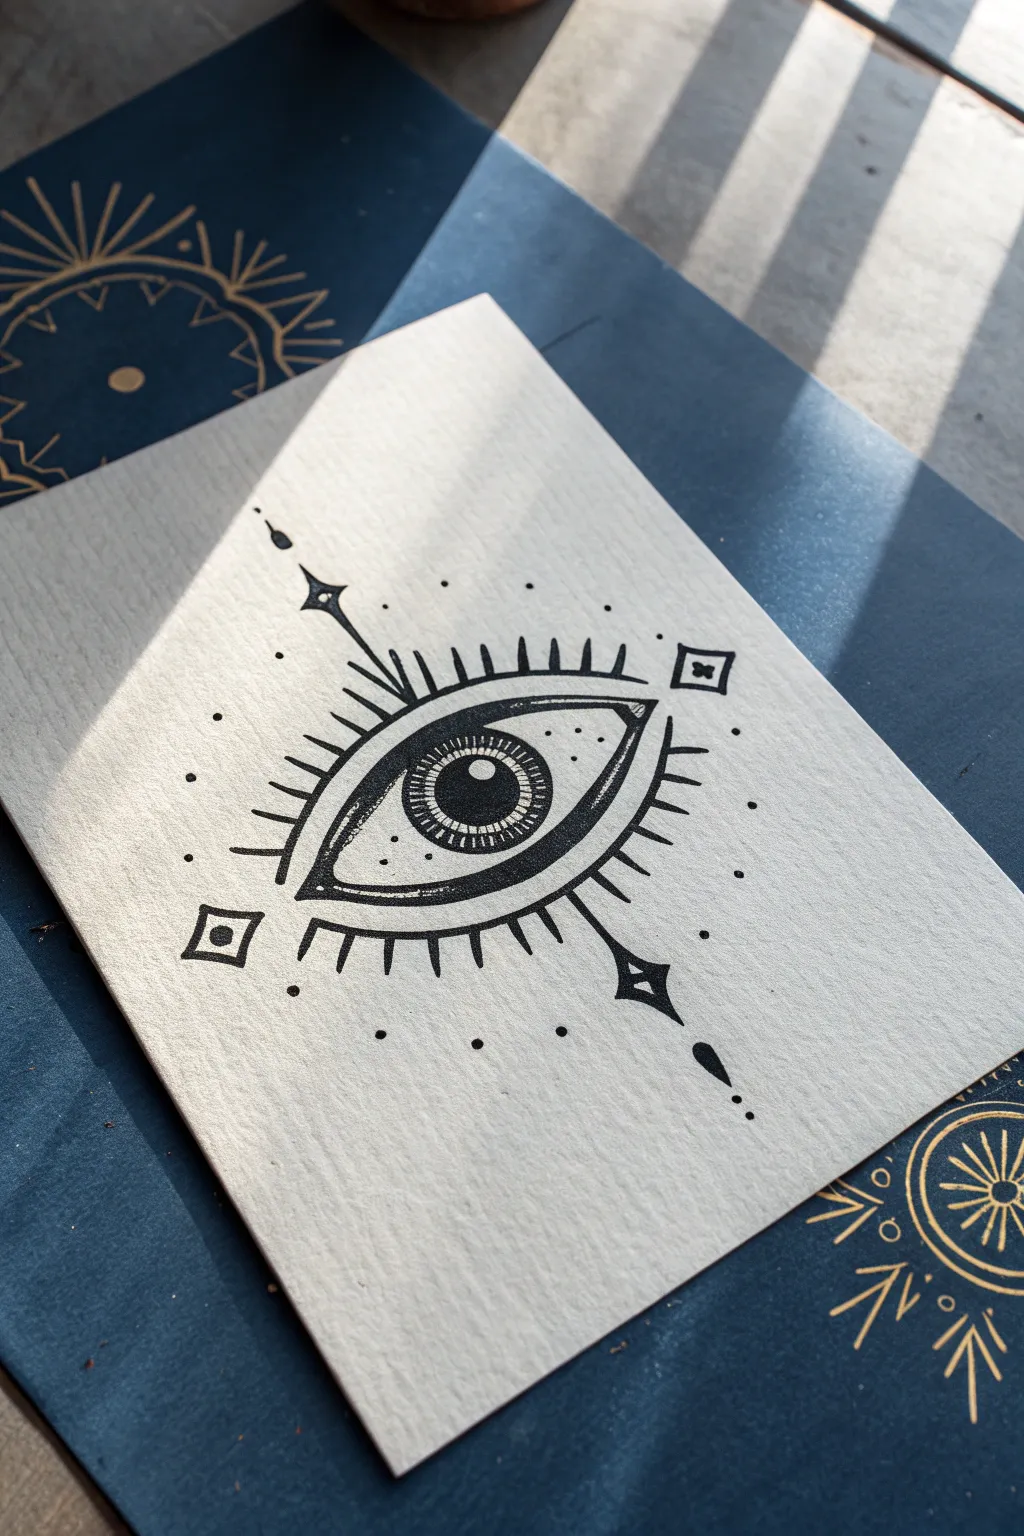
Channel tattoo-style artistry with this striking monochromatic Evil Eye illustration. Using bold black ink on textured paper creates a timeless, occult-inspired piece perfect for framing or scanning for digital use.
Step-by-Step
Materials
- Cold press watercolor paper or heavyweight mixed media paper (textured surface is key)
- Pencil (HB or 2H)
- Kneaded eraser
- Fine liner pens (sizes 005, 01, 05, and 08)
- Black brush pen or broad marker for heavy fills
- Ruler or straight edge
- Compass or circular template (optional)
Step 1: Sketching the Framework
-
Center Basics:
Begin by lightly marking the center point of your paper with a pencil. Draw a small circle for the pupil and a larger circle surrounding it for the iris. You can use a compass here or freehand it for a more organic feel. -
The Eye Shape:
Sketch the almond shape of the eye around the iris. Ensure the upper curve is slightly more arched than the lower curve. Extend the corners of the eye outwards to create sharp tear duct points. -
Adding Lid Details:
Draw delicate creases above and below the main eye shape. The top crease should be more prominent, mimicking the fold of an eyelid, while the bottom line can be shorter and subtler. -
Planning Radiating Elements:
Lightly sketch the radiating ‘lashes’ or rays extending outward. Aim for symmetry, placing the longest rays at the direct top and bottom, shortening them as they fan out to the sides. -
Geometric Accents:
Mark the positions for the two main diamond shapes at the far ends of the vertical axis. Add the smaller diamond accents on the horizontal axis and lightly plot where your stippling dots will go.
Uneven Ink Flow?
Textured paper can snag fine pens. If lines skip, slow down your stroke speed significantly. This allows ink to soak into the paper valleys for a solid black line.
Step 2: Inking the Details
-
Outline the Iris:
Switch to an 05 pen. Carefully trace the inner pupil circle and the outer iris circle. Keep your hand steady to ensure smooth curves. -
Iris Texture:
Using your finest 005 pen, draw tiny, dense radial lines inside the iris band. These should look like tick marks connecting the pupil to the outer iris edge, creating depth without solid black. -
Filling the Pupil:
Use a brush pen or thicker marker to fill in the pupil completely black. I always leave a small, crisp white circle uncolored to represent a highlight or reflection. -
The Main Outline:
Trace the main almond shape of the eye with an 08 pen for a bold, tattoo-like weight. Vary the pressure slightly to taper line ends at the sharp corners. -
Adding Heavy Shadows:
Thicken the upper lash line significantly and add a heavy black shadow to the inner corner of the eye. This high contrast creates the dramatic ‘blackline’ aesthetic.
Pro Tip: Highlight Hack
If you accidentally fill in the pupil highlight, don’t panic. Use a white gel pen or a dot of white acrylic paint to add the reflection back in on top of the dry black ink.
Step 3: Finishing Flourishes
-
Inking the Rays:
Go over your pencil sketches for the radiating lashes. Use an 05 pen. Instead of simple lines, give them a slight taper—thicker at the base near the eye and sharp at the tip. -
Geometric Terminals:
Ink the diamond shapes at the top and bottom. Fill the elongated diamond points with solid black, but leave the small square centers open or outlined for visual interest. -
Mid-Rays:
Draw the elongated spikes extending from the top and bottom centers. These should pierce through the lash line and connect to your outer diamond shapes. -
Side Accents:
Ink the small floating squares or diamonds on the left and right sides. Keep lines crisp and geometric to contrast the organic eye shape. -
Stippling:
Take your 01 pen and maintain a vertical position to dot the paper. Place dots intentionally around the rays and inside the eyelid crease to add texture. -
Clean Up:
Wait at least 15 minutes to ensure the ink is bone dry. Gently erase all underlying pencil sketch lines with a kneaded eraser to reveal the high-contrast artwork.
Step back and admire the stark contrast of your mystical design


Evil Eye Inside a Hamsa Hand
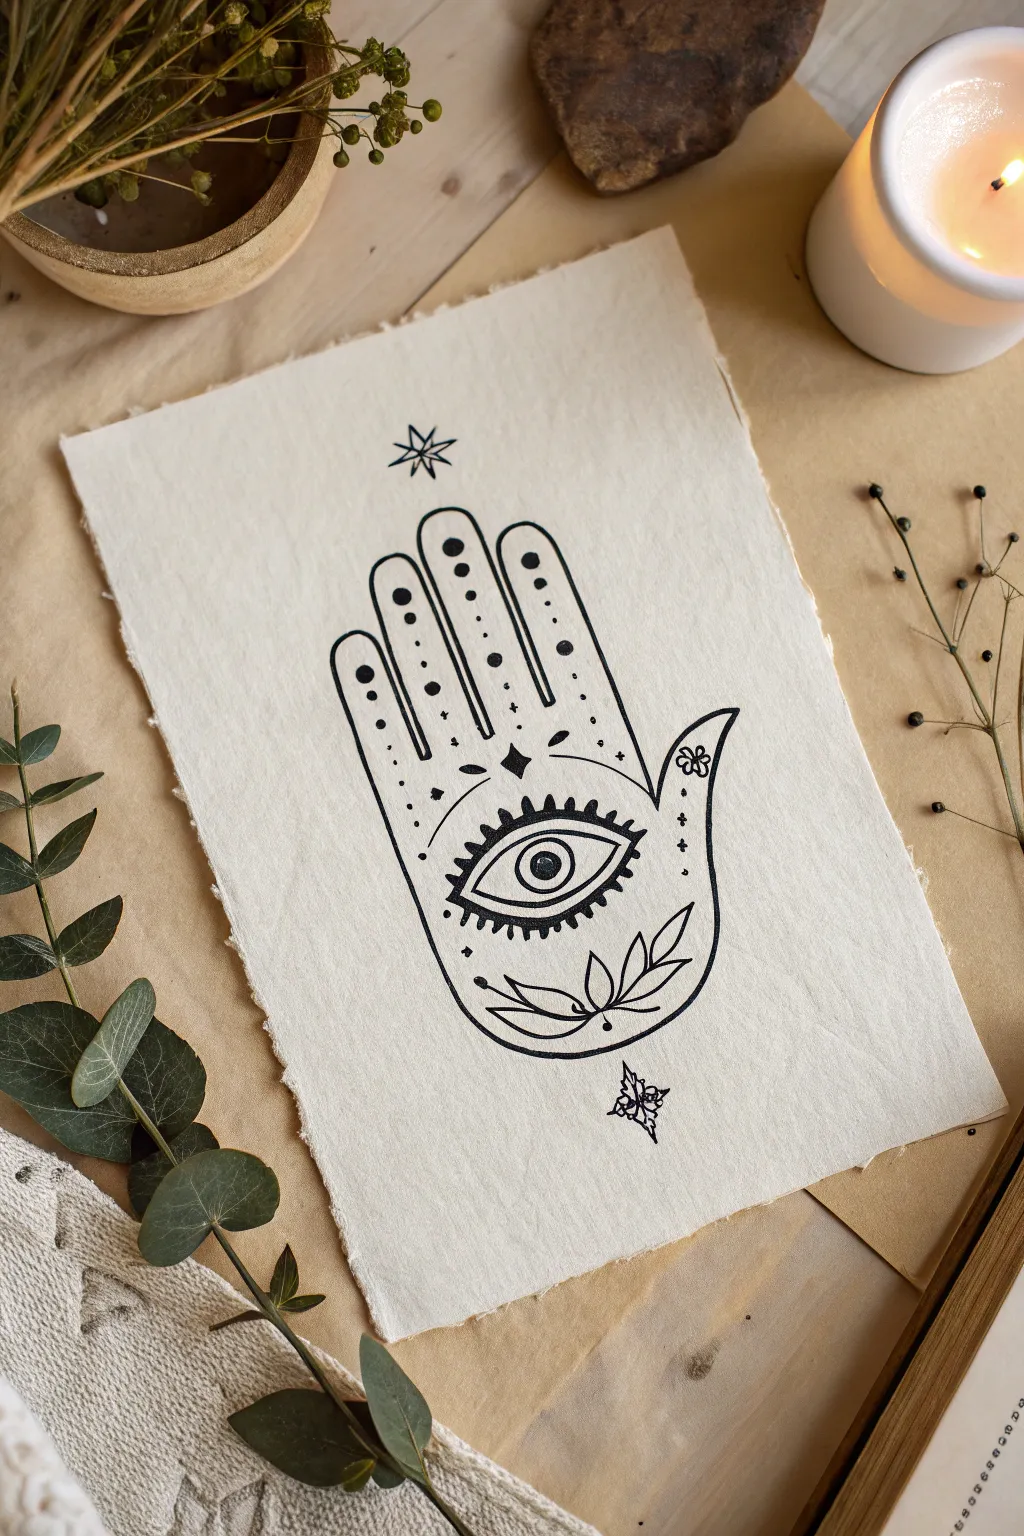
Capture the mystic beauty of this ancient talisman with a simple yet striking ink illustration on handmade paper. The clean black lines against the warm, textured background create an aesthetic that is both modern and spiritually grounding.
Step-by-Step Guide
Materials
- Handmade cotton rag paper (deckle edge)
- Pencil (HB or H)
- Kneaded eraser
- Fine liner pen (01 or 03 size, black)
- Brush pen or thick marker (black, for filling)
- Ruler
Step 1: Drafting the Outline
-
Establish the Center:
Begin by lightly marking a vertical centerline on your paper with a pencil. This helps ensure symmetry, which is crucial for the Hamsa shape. -
Sketch the Eye:
In the lower centerpiece of the hand, draw the almond shape of the eye first. Place the circular iris and pupil dead center within this shape. -
Form the Palm:
Draft a ‘U’ shape around the eye to form the base of the palm. The sides should curve gently inward before flaring out slightly where the fingers will begin. -
Add the Thumb and Pinky:
Sketch the thumb pointing outward on the right and the corresponding finger on the left. In this specific design, the thumb (right) curves out more distinctly, while the left finger mirrors the height but stays straighter. -
Draw the Middle Fingers:
Sketch the three central tall fingers. The middle finger should be the tallest, with the index and ring fingers purely symmetrical flanking it. Keep the tips rounded. -
Refine the Lotus:
At the very bottom of the palm, sketch a stylized lotus flower. Draw a central teardrop petal pointing up towards the eye, flanked by two curving leaves on each side.
Smudge Control
Handmade paper has texture that can trap wet ink. Place a scrap piece of paper under your drawing hand to prevent smearing while you work.
Step 2: Inking the Details
-
Trace main lines:
Switch to your fine liner pen. Carefully trace the external outline of the hand and the main shape of the eye. Keep your hand steady and confident. -
Detail the Iris:
Ink the pupil and iris. Use a thicker pen or brush pen to fill the pupil completely black, leaving a tiny white highlight if you want extra depth. -
Add the Eyelashes:
Draw thick, triangular lashes radiating from the top and bottom of the eye. I like to fill these in solid black for a bold, graphic look. -
Ink the Fingers:
Go over the finger outlines. Notice the gap between the fingers doesn’t go all the way to the palm; stop the lines where the knuckles would be. -
Create the Dots:
Inside the three middle fingers, add a vertical row of decorative elements. Start with a large black dot near the tip, followed by a smaller dot, and then tinier stippling dots descending. -
Decorative Elements:
Add the small four-point star (or diamond) just above the eye. Then, draw small ‘plus’ signs and dots scattered symmetrically within the palm area. -
Drawing the Star:
Above the middle finger, draw an eight-pointed star. Start with a standard cross, then add a diagonal cross (X) through the center. -
The Bottom Motif:
Below the hand, near the bottom edge of the paper, draw a small, geometric moth or butterfly shape to balance the composition.
Step 3: Finishing Touches
-
Thicken the Outline:
Go back over the main perimeter line of the hand with a slightly thicker pen stroke to make the shape pop against the paper. -
Fill the Lotus:
Ink the lotus at the bottom of the palm. Keep the lines crisp and ensure they connect cleanly to the bottom curve of the hand. -
Erase Sketches:
Wait at least 10-15 minutes for the ink to dry completely. Gently use your kneaded eraser to lift away all visible pencil marks.
Gold Leaf Accent
Apply a tiny dab of gold leaf to the iris of the eye or the star above the hand for a mystical, shimmering focal point.
Display your new talisman in a frame or on a small easel to bring a sense of protection to your space

PENCIL GUIDE
Understanding Pencil Grades from H to B
From first sketch to finished drawing — learn pencil grades, line control, and shading techniques.
Explore the Full Guide
Evil Eye Mandala Centerpiece
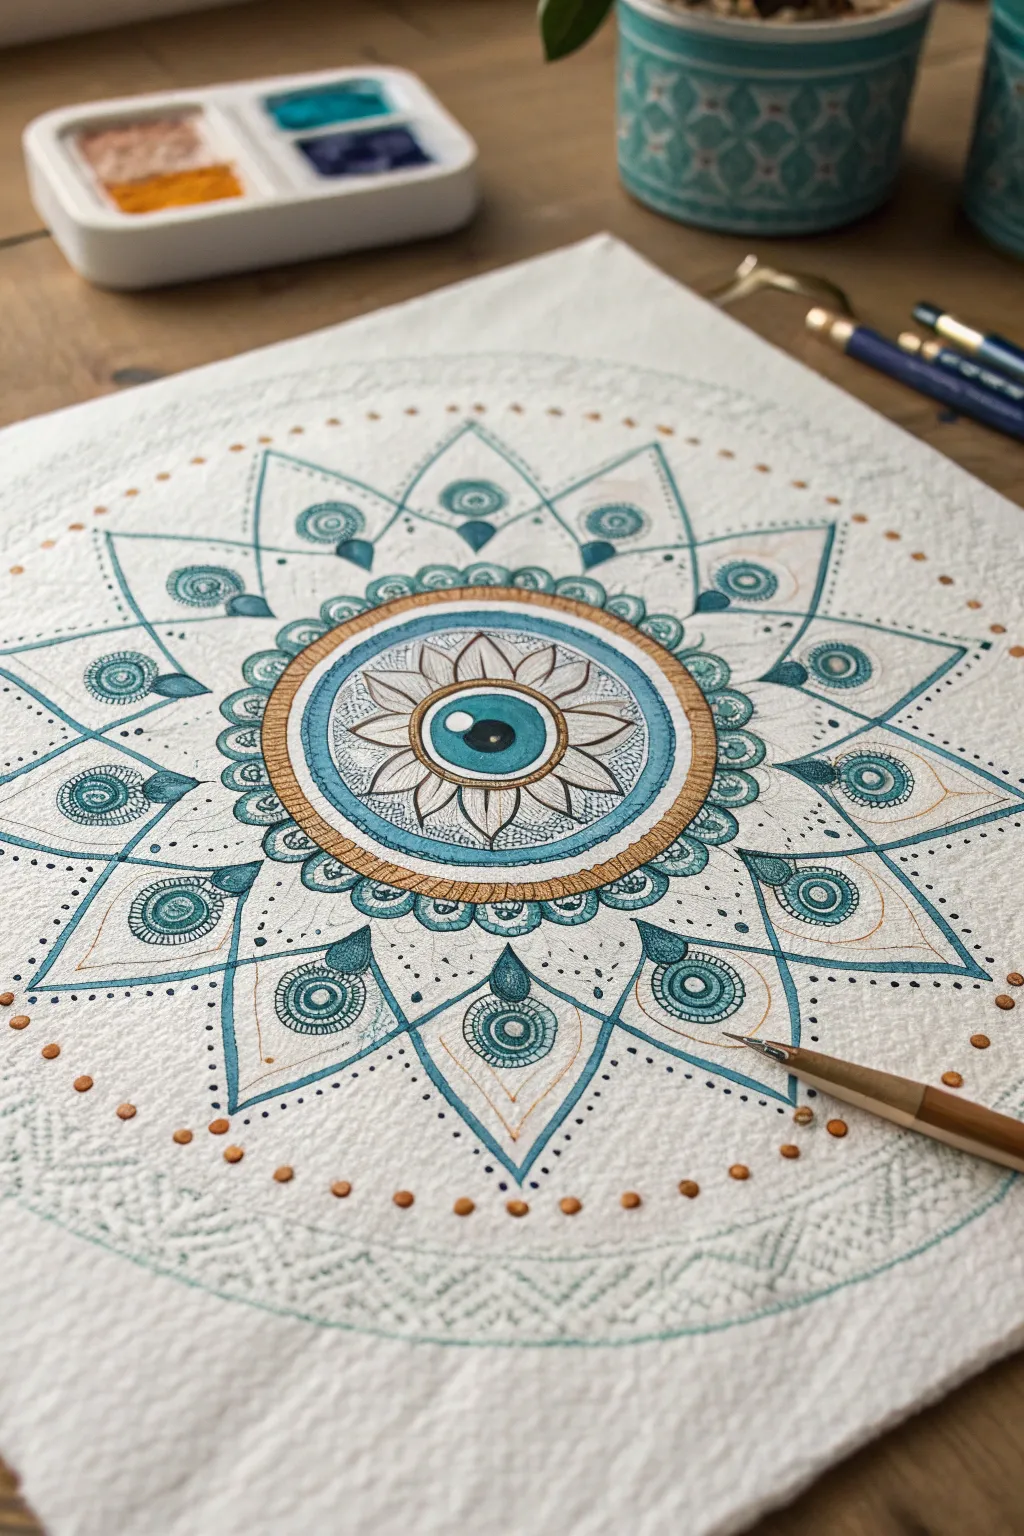
This intricate centerpiece blends the protective symbolism of the evil eye with the meditative symmetry of a mandala. Created on textured paper with fine liners and metallic accents, the design features radiating geometric petals in soothing teal and gold tones.
Step-by-Step Guide
Materials
- High-quality cold press watercolor paper (textured)
- Pencil (HB) and eraser
- Compass and ruler
- Fine liner pens (Black, 0.1mm and 0.5mm)
- Teal and turquoise markers or watercolor pens
- Gold metallic paint pen or gel pen
- White gel pen for highlights
- Small round brush (if using watercolor)
Step 1: Setting the Foundation
-
Mark the center:
Begin by finding the exact center of your paper. Make a tiny dot with your pencil; this anchor point is crucial for keeping your symmetry tight as the mandala expands. -
Draw the guide circles:
Using your compass, draw a series of concentric circles radiating from the center. You’ll need a small one for the pupil, a medium one for the iris, and several larger rings to define the petal layers. Keep these lines faint so they can be erased later. -
Divide the space:
Use a protractor and ruler to divide your circles into equal sections. For this design, twelve sections work beautifully to create the twelve main radiating points. Draw straight lines through the center to mark these segments.
Step 2: Drawing the Central Eye
-
Sketch the iris and pupil:
In the innermost circles, outline the central eye. Draw a perfect circle for the pupil and a larger ring for the iris. Add a small highlight circle within the pupil now so you don’t accidentally color it in later. -
Create the flower center:
Around the iris, sketch a row of small, pointed petals. These should look like a sunflower shape, nesting the eye in the center of the design. -
Add the gold ring:
Define a thick band around the flower center. This will become the prominent gold texture later. Inside this band, sketch faint concentric lines to guide your texture work.
Pro Tip: Paper Texture
Use cold press watercolor paper. The rough ‘tooth’ of the paper creates natural breaks in the ink lines, giving the drawing an authentic, vintage textile look.
Step 3: Drafting the Petals
-
Outline the main star:
Using your guide lines, draw twelve large, pointed petals extending outward. The tips of these petals should touch one of your outer pencil circles to ensure they are all the same length. -
Add inner details:
Inside each large petal, draw a smaller, similar shape. At the base of these inner shapes, sketch a small circle and a teardrop shape pointing outward—this is a signature motif of this specific design. -
Connect the layers:
Draw scalloped edges or small connecting arches between the bases of the large petals. This creates a cohesive web effect rather than just floating shapes.
Troubleshooting: Smuding Ink
If you are right-handed, work from the center out to the left, or rotate the paper constantly so your hand rests on the blank areas, never on fresh ink.
Step 4: Inking and Coloring
-
Ink the outlines:
Switch to your 0.1mm black fine liner. Carefully trace over your pencil sketches. Be deliberate with your lines; for the main structural lines, you might want to go over them twice or use a slightly thicker 0.5mm pen for emphasis. -
Color the central eye:
Fill in the pupil with black ink, leaving the highlight white. Use a bright turquoise or teal marker for the iris, blending from dark on the outside to lighter near the pupil if possible. -
Apply gold texture:
For the thick ring around the center, use your gold pen. Instead of coloring it solid, draw tiny, tight vertical lines or cross-hatching to mimic the texture of woven thread or metalwork. -
Detail the petal interiors:
Use your teal marker to outline the inner shapes of the large petals. Fill in the small circles and teardrops at the base of the petals with a deeper teal or turquoise to add depth. -
Add stippling effects:
I find that adding texture brings the piece to life, so use your finest black pen to add stippling (tiny dots). Concentrate the dots at the base of the petals and fade them out toward the tips for a shading effect. -
Color accents:
add touches of gold to the tips of the small inner flower petals. Use a very light hand to add faint blue shading to the white areas of the large petals, keeping the paper mostly white for contrast.
Step 5: Final Touches
-
Add the outer rim:
Using a pencil first, sketch the faint geometric pattern on the very outer edge of the paper. This looks like a subtle zigzag or chevron pattern. Trace it lightly with a pale teal color. -
Place gold dots:
create a ring of small gold dots floating just outside the main mandala star. Try to place one dot between each petal point for perfect rhythm. -
Erase guidelines:
Wait until the ink is completely dry—give it a good 20 minutes to be safe. Gently erase all remaining pencil marks to reveal a clean, crisp design.
Step back and admire the hypnotic symmetry you have created with this protective emblem
Geometric Evil Eye With Triangles and Lines
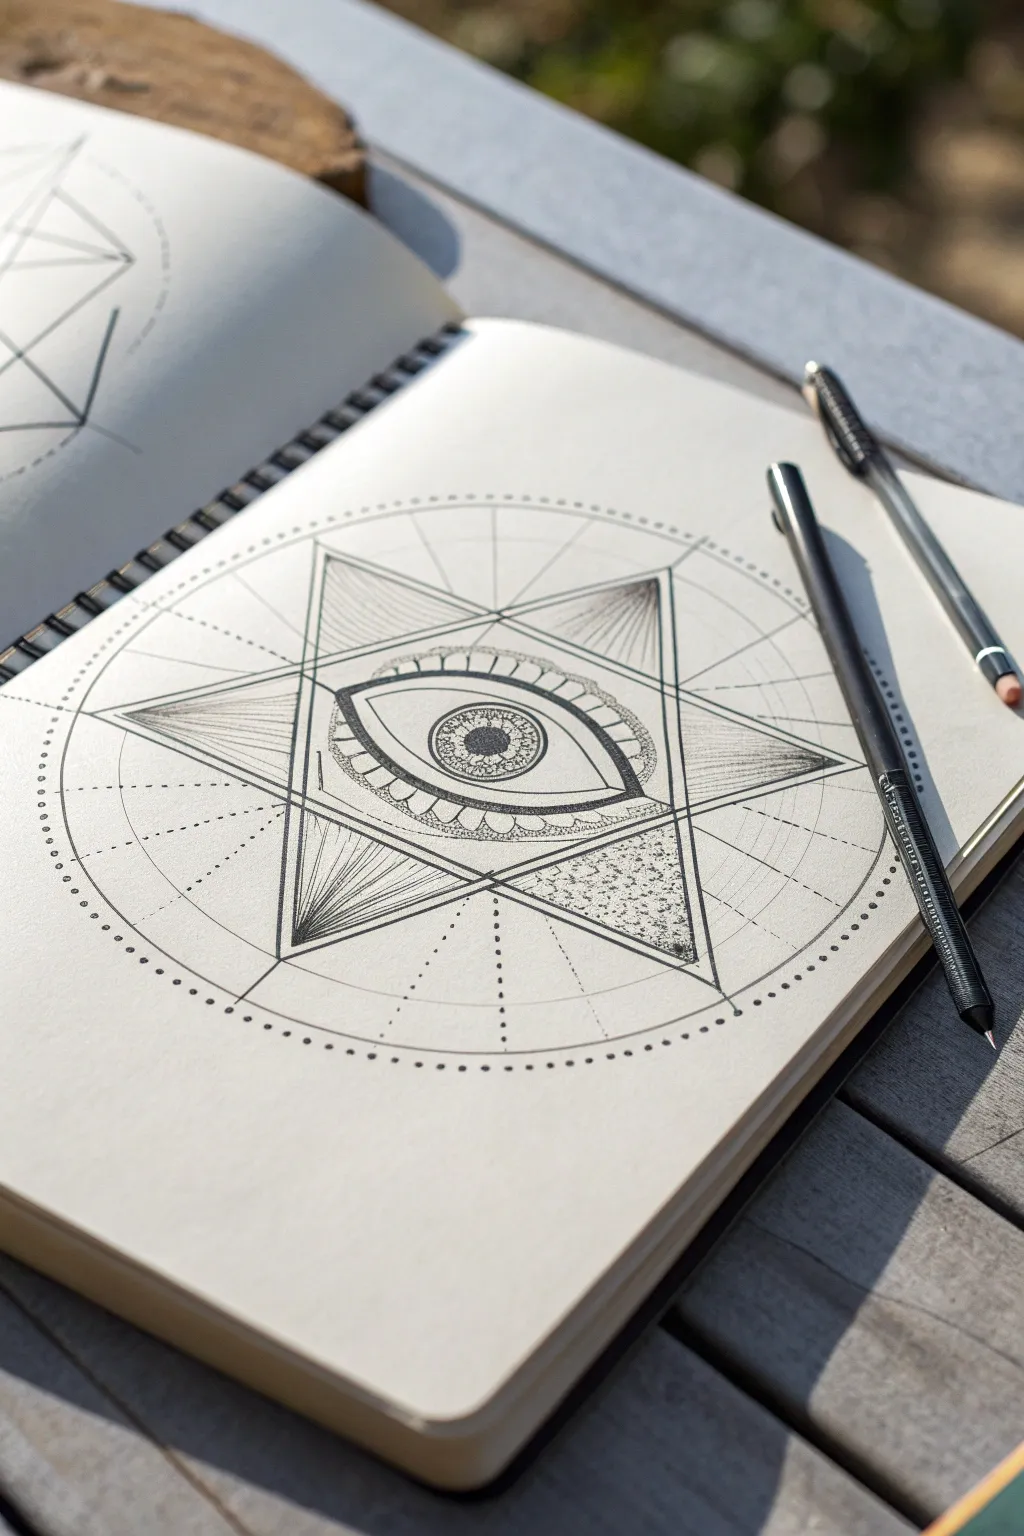
This intricate design fuses the protective symbolism of the evil eye with the precise beauty of sacred geometry. Using a combination of fine-liners and careful measurement, you’ll create a mesmerizing six-pointed star that frames a stunningly detailed, stippled eye.
Step-by-Step Tutorial
Materials
- Sketchbook or drawing paper (heavyweight preferred)
- Compass
- Ruler
- Pencil (HB or 2H)
- Eraser
- Protractor (optional but helpful)
- Fine-liner pens (0.1mm, 0.3mm, and 0.5mm)
- Pencil sharpener
Step 1: Constructing the Framework
-
Establish the center:
Begin by finding the exact center of your page. Mark this point lightly with your pencil; this will be the anchor for all your concentric circles. -
Draw the main circles:
Using your compass, draw a large circle that fills most of the page. Then, draw a slightly smaller inner circle about 1.5 cm inside the first one. This creates the outer ring for your dotted border later. -
Create the hexagram guidelines:
Keep your compass set to the radius of the inner circle. Place the needle on the circle’s edge (start at the top) and make a mark on the circumference. Move the needle to that mark and repeat until you have six evenly spaced points around the circle. -
Form the star:
Connect every other point using a ruler to form two overlapping equilateral triangles. One should point up, and the other down, creating a classic six-pointed star shape.
Clean Lines Pro-Tip
When inking along a ruler, wipe the ruler’s edge with a tissue after every few lines. This prevents ink buildup on the edge that could smudge across your paper.
Step 2: Drawing the Central Eye
-
Outline the eye shape:
In the central hexagon formed by the star, sketch an almond-shaped eye. The corners of the eye should align horizontally with the star’s intersection points, but keep the shape organic and curved. -
Add the iris and pupil:
Draw a perfect circle for the iris using a small compass setting or a circle template if you have one. Inside that, draw a smaller black pupil. -
Detail the eyelids:
Sketch a crease line above the eye to suggest the upper eyelid. Add a thinner line along the bottom lid to give it dimension. -
Refine pencil work:
Lightly draw guidelines radiating from the center of the pupil out to the edge of the large circle, passing through the star’s points. Add a secondary, faint circle halfway between the star’s tips and the center to help guide future shading.
Step 3: Inking and Stippling
-
Outline the geometry:
Switch to a 0.5mm fine-liner. carefully trace over the main lines of the six-pointed star. Use a ruler to ensure these lines stay crisp and straight. -
Texture the triangles:
For the triangle points extending outward, use different shading techniques. On the left and right points, draw fine lines radiating from the tip inward. For the bottom right point, use stippling (tiny dots) to fill the space. -
Detail the iris:
With a 0.1mm pen, create the texture of the iris. Start with a dark ring around the pupil, then use squiggly, radiating lines outward. Leave a small white highlight for reflection. -
Stipple the sclera:
Using the 0.1mm pen again, apply dots (stippling) to the corners of the eyeball (the sclera). Concentrate the dots near the edges to create a rounded, 3D effect, fading to white as you move toward the iris. -
Ink the eyelashes:
Draw small, curved segments along the upper and lower lash lines. Instead of individual hairs, group them into small, stylized petal-shapes for a decorative look. -
Create the dotted halo:
Go to the outermost ring you drew in pencil. Using a 0.3mm pen, carefully place dots along this path. Try to keep the spacing consistent between each dot. -
Add radial dotted lines:
Along the straight guidelines radiating from the center, add rows of dots that extend from the star’s edge to the outer circle. -
Final Cleanup:
Wait at least 15 minutes for the ink to dry completely. Once safe, gently erase all remaining pencil guidelines to reveal the clean, stark contrast of the ink.
Level Up: Cosmic Touch
Add a touch of gold leaf or metallic gold ink to the iris or the outer halo dots. This introduces a mystical, glowing element that catches the light.
Take a moment to admire the satisfying balance between the fluid organic eye and the rigid geometric frame you have created
BRUSH GUIDE
The Right Brush for Every Stroke
From clean lines to bold texture — master brush choice, stroke control, and essential techniques.
Explore the Full Guide
Zentangle-Style Evil Eye Textures
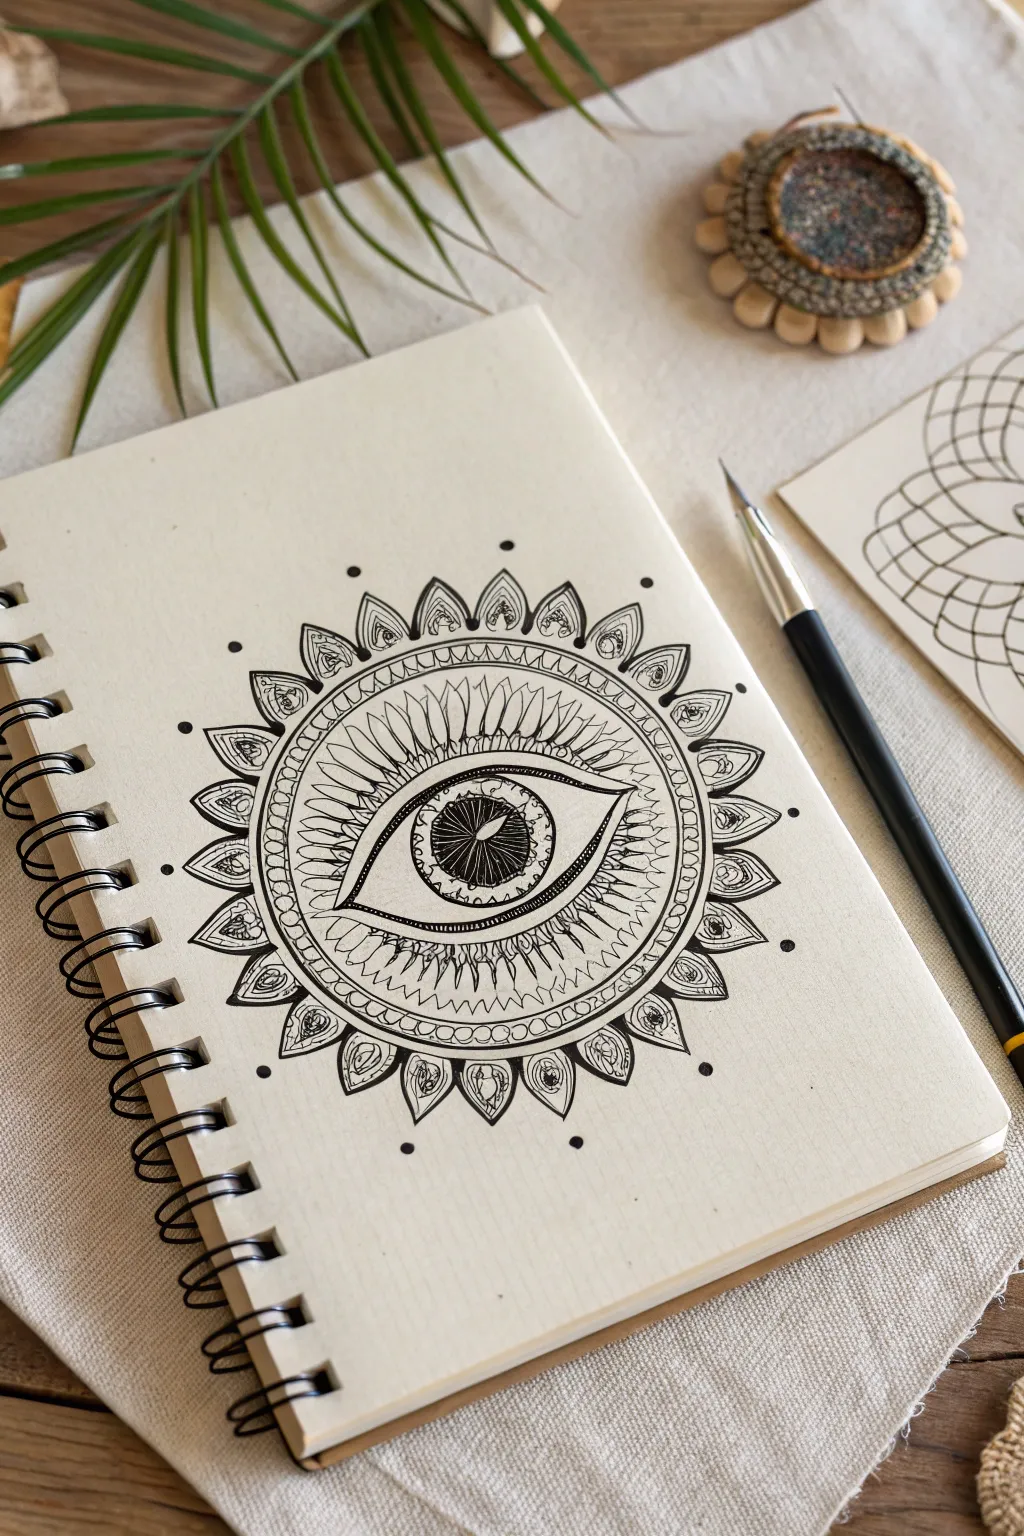
This striking black-and-white ink drawing combines the mystical symbolism of an evil eye with the meditative repetition of mandala patterns. The design radiates outward from a central gaze, using distinct ink textures to create depth and focus without the need for color.
How-To Guide
Materials
- Spiral-bound sketchbook with smooth, heavyweight paper
- Fine liner pens (sizes 0.1, 0.3, and 0.5)
- Pencil (HB or 2H)
- Compass
- Eraser
- Ruler
Step 1: Setting the Structure
-
Mark the center:
Begin by finding the approximate center of your page. Just make a very light dot with your pencil to anchor the entire drawing. -
Map the eye shape:
Lightly sketch the central almond shape of the eye. It should be relatively wide to accommodate the iris detail later. -
Draw the guide circles:
Using your compass, draw four concentric circles radiating from the center point. The first circle should touch the corners of the eye, and the subsequent circles should expand outward with about 1/2 inch to 3/4 inch spacing between them.
Keep it Steady
Rest the heel of your hand on a scrap piece of paper while drawing. This prevents skin oils from smudging your pencil lines or smearing wet ink.
Step 2: Inking the Central Eye
-
Outline the eye:
Switch to a 0.5 pen to boldly trace the almond outline of the eye. Add a secondary, thinner line just inside the top lid to suggest a crease or eyelid thickness. -
Create the iris and pupil:
Draw the circular iris in the center. Inside that, draw the smaller pupil circle. Leave a tiny white geometric shape (like a triangle or diamond) inside the pupil for a highlight. -
Detail the iris:
With an 01 pen, fill the iris with dense lines radiating from the pupil to the edge. Darken the pupil completely black, carefully avoiding your highlight shape.
Step 3: Building the Inner Rings
-
Add first petal layer:
In the band immediately surrounding the eye shape, draw a series of long, thin petal shapes. These should radiate outward like sun rays, filling the space between the eye outline and the next circle boundary. -
Texture the petals:
Add a single thin line down the center of each of these petals using your finest 005 or 01 pen. -
Create the heavy border:
Use your 0.5 pen to trace over the next compass circle line, making it distinct and bold. Add a second line very close to it to create a double border. -
Fill the narrow band:
In the narrow space between the petal layer and the next ring, draw tiny, repetitive ‘U’ shapes or scallops all the way around.
Go Metallic
Use a gold or silver gel pen to fill in the pupil’s highlight or to trace one of the concentric circle bands for a mystical, reflective quality.
Step 4: The Outer Florals
-
Sketch the outer leaves:
Along the outermost circle guide, lightly pencil in poinsettia-shaped leaves or pointed arches. Space them evenly so they create a crown around the entire mandala. -
Ink the leaf outlines:
Trace these pointed shapes with your medium-weight pen (03 is good here). Inside each leaf, draw a smaller, identical shape to create a border effect. -
Fill the leaf details:
Inside the inner shape of each leaf, draw a small teardrop or seed shape at the base. I like to add tiny stippling dots inside this seed for texture. -
Connect the leaves:
Between the base of each large leaf, add a small, inverted ‘V’ or tiny triangle to visually connect the ring.
Step 5: Final Touches
-
Add floating dots:
Place a single, bold black dot above the tip of every outer leaf. This expands the design’s footprint and adds a celestial feel. -
Enhance contrast:
Look over the drawing for areas that need more depth. Thicken the lines on the main eye lid and the major circle dividers to make the delicate patterns pop. -
Clean up:
Once you are absolutely certain the ink is dry, gently erase all pencil guidelines, including the initial compass circles.
Step back and admire the hypnotic depth your precise linework has created
Botanical Evil Eye Wreath

This delicate illustration combines the mystical symbolism of the evil eye with the grounded beauty of a botanical wreath. The fine linework and soft, earthy colors create a serene protective charm perfect for framing or an art journal.
Step-by-Step Tutorial
Materials
- Cold-pressed watercolor paper or heavy textured drawing paper
- Fine liner pens (sizes 005, 01, and 05; black ink)
- Colored pencils (muted sage green, olive green, dusty rose, burnt orange)
- Pencil (HB or 2H for sketching)
- Kneadable eraser
- Compass or circle template (optional)
Step 1: Drafting the Layout
-
Setting the Composition:
Begin by lightly sketching a large circle in the center of your paper to define the wreath’s boundary. I find that a 5-6 inch diameter works best for this level of detail. Mark the exact center point for the eye. -
Sketching the Central Eye:
At the center mark, lightly sketch an almond or football shape for the eye outline. Inside this, draw a perfect circle for the iris and a smaller circle for the pupil. Add a small ‘glint’ circle near the top left of the pupil to indicate light. -
Placing the Botanical Elements:
Along your large circle guide, sketch the main stems of the wreath. Instead of a single continuous line, draw two main branches that curve upward and meet at the top, leaving a small gap. Add a large open flower shape (like a daisy or sunflower) near the bottom right.
Uneven Wreath Shape?
If your wreath looks lopsided, don’t erase! Add extra ‘rogue’ sprigs or berries extending outward in the sparser areas to balance the visual weight naturally.
Step 2: Inking the Centerpiece
-
Refining the Eye Shape:
Switch to your 05 fine liner to ink the main outline of the eye. Make the upper lid line slightly thicker than the bottom to create depth. -
Detailing the Iris:
Ink the pupil with solid black, carefully preserving the tiny white glint. Use a 01 pen to stipple (dot) the iris, making it denser near the pupil and fading out toward the edge. -
Adding the Radiating Lines:
Using a 005 or 01 pen, draw small, straight lines radiating outward from the eye’s perimeter. Top each line with a tiny open circle, giving it a celestial or lash-like appearance.
Step 3: Developing the Wreath
-
Drawing the Leaves:
Using your 01 pen, draw the leaves along the stems. Use a mixture of simple pointed oval leaves and some with serrated edges for variety. Draw a central vein in each leaf, keeping the lines delicate. -
Inking the Blooms:
Outline the large flower at the bottom right. Focus on distinct, separate petals radiating from a textured center. Add a few smaller buds or berries scattered along the upper branches of the wreath. -
Erasing Guidelines:
Once the ink is completely dry—give it a few minutes to be safe—gently roll your kneadable eraser over the entire drawing to lift the pencil sketches.
Add Metallic Magic
Use a gold gel pen for the radiating lines around the eye or the center of the flower. It catches the light beautifully and emphasizes the mystical theme.
Step 4: Adding Subtle Color
-
Base Greenery:
Take a muted sage green pencil and color the leaves lightly. Use small circular strokes to get an even texture on the rough paper. Leave the very tips of the leaves slightly lighter. -
Deepening Shadows:
With an olive green pencil, add shading to the base of each leaf where it meets the stem. This small step adds significant dimension to the flat drawing. -
Coloring the Floral Elements:
Use a dusty rose or light brown for the flower petals, shading from the center outward. Color the small berries in burnt orange to create a warm contrast against the cool greens. -
Final Touches:
Go back in with your finest pen (005) to add tiny texture lines to the flower center and re-darken any main lines that might have been dulled by the colored pencil wax.
Now you have a beautifully balanced piece of botanical art that feels both ancient and modern.


Celestial Evil Eye With Stars and Moons
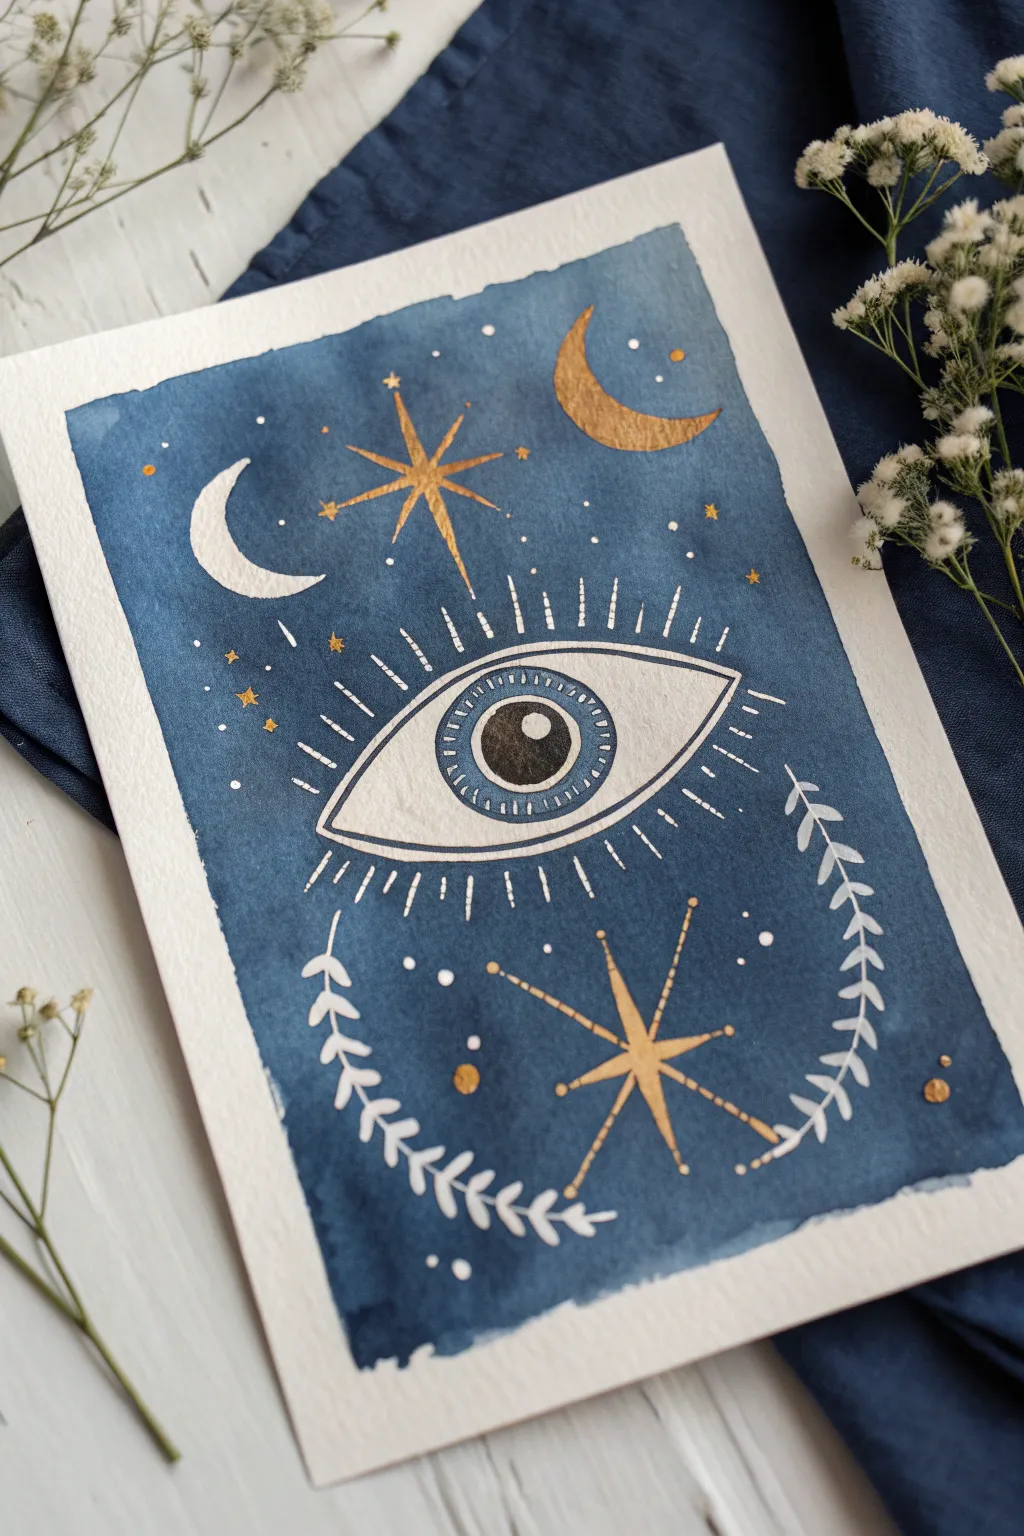
This ethereal watercolor piece combines a deep, moody indigo sky with gleaming gold accents, creating a mystical take on the traditional evil eye talisman. The interplay of matte white details against shimmering metallic gold stars makes this artwork feel both ancient and modern.
How-To Guide
Materials
- Cold-pressed watercolor paper (300 gsm recommended)
- Indigo or Payne’s Gray watercolor paint
- Metallic gold watercolor paint or gold ink
- Opaque white gouache or white gel pen
- Soft round watercolor brushes (sizes 6 and 2)
- Fine detail brush (size 0 or 00)
- Pencil and eraser
- Painter’s tape or masking tape
Step 1: Preparation and Sketching
-
Paper Setup:
Begin by taping down all four edges of your watercolor paper to a board or table. This prevents buckling when we apply the wet wash later and creates a crisp white border. -
Layout the Eye:
Lightly sketch a large almond shape in the center of the paper. Inside this, draw a perfect circle for the iris and a smaller circle for the pupil. Keep your pencil lines very faint so they don’t show through the paint. -
Celestial Elements:
Sketch the surrounding elements: a large crescent moon in the top right, a smaller one on the left, and two large starbursts—one above the eye and one below. Add curved vines framing the bottom section.
Fixing Wobbly Borders
If your blue background bled into your shapes, don’t panic. Use opaque white gouache to ‘cut back’ into the blue and clean up the edges of your moons and eye.
Step 2: Painting the Background
-
Mix the Midnight Blue:
Create a rich, dark blue wash using Indigo or mixing Payne’s Gray with a touch of blue. You want a high pigment-to-water ratio for a deep color. -
Apply the Base Wash:
Using your larger round brush, carefully paint around your sketched elements (the eye, moons, and stars). It’s crucial to leave the paper white in these areas. Don’t worry if the edges aren’t perfect; we can refine them later. -
Create Texture:
While the blue paint is still wet, you can drop in slightly more concentrated pigment or water in random spots to create that beautiful, cloudy watercolor texture seen in the reference. -
Dry Thoroughly:
Let this layer dry completely. The paper must be bone-dry before adding sharp details on top.
Add Cosmic Depth
Splatter tiny droplets of white gouache over the finished piece using an old toothbrush to create a distant galaxy effect over the dark blue.
Step 3: Detailing the Eye
-
Fill the Sclera:
Use white gouache (diluted slightly to a creamy consistency) to fill in the white part of the eye, smoothing out the negative space you left earlier. This ensures a bright, opaque base. -
Paint the Iris:
Paint the iris circle with a medium blue shade. For the pupil, use solid black paint or ink. -
Add Iris Details:
Once dry, use a fine detail brush or white gel pen to draw tiny radial lines inside the blue iris, giving it texture and depth. Add a small white highlight dot overlapping the pupil and iris for life.
Step 4: Gold and White Accents
-
Gold Moons:
Load your brush with metallic gold paint. Fill in the top-right crescent moon. I like to let it pool slightly for a richer shine. -
Golden Stars:
Paint the large starbursts in gold—one above and one below the eye. Use a fine brush to pull the paint outward into sharp points. -
White Moon and Vines:
Using your white gouache or gel pen, fill in the top-left crescent moon. Then, carefully paint the leafy vines curving upwards from the bottom, painting small teardrop shapes along a central stem. -
Radiating Lashes:
With white ink or gouache, draw short, straight lines radiating outward from the entire perimeter of the eye. Alternate lengths slightly for an organic feel. -
Final Sparkles:
Scatter small details around the background: tiny white dots for stars, small gold circles, and miniature four-pointed stars to fill any empty space and balance the composition.
Peel off the tape slowly to reveal those crisp edges and enjoy your mystical creation
Kraft Paper Evil Eye With White Highlights
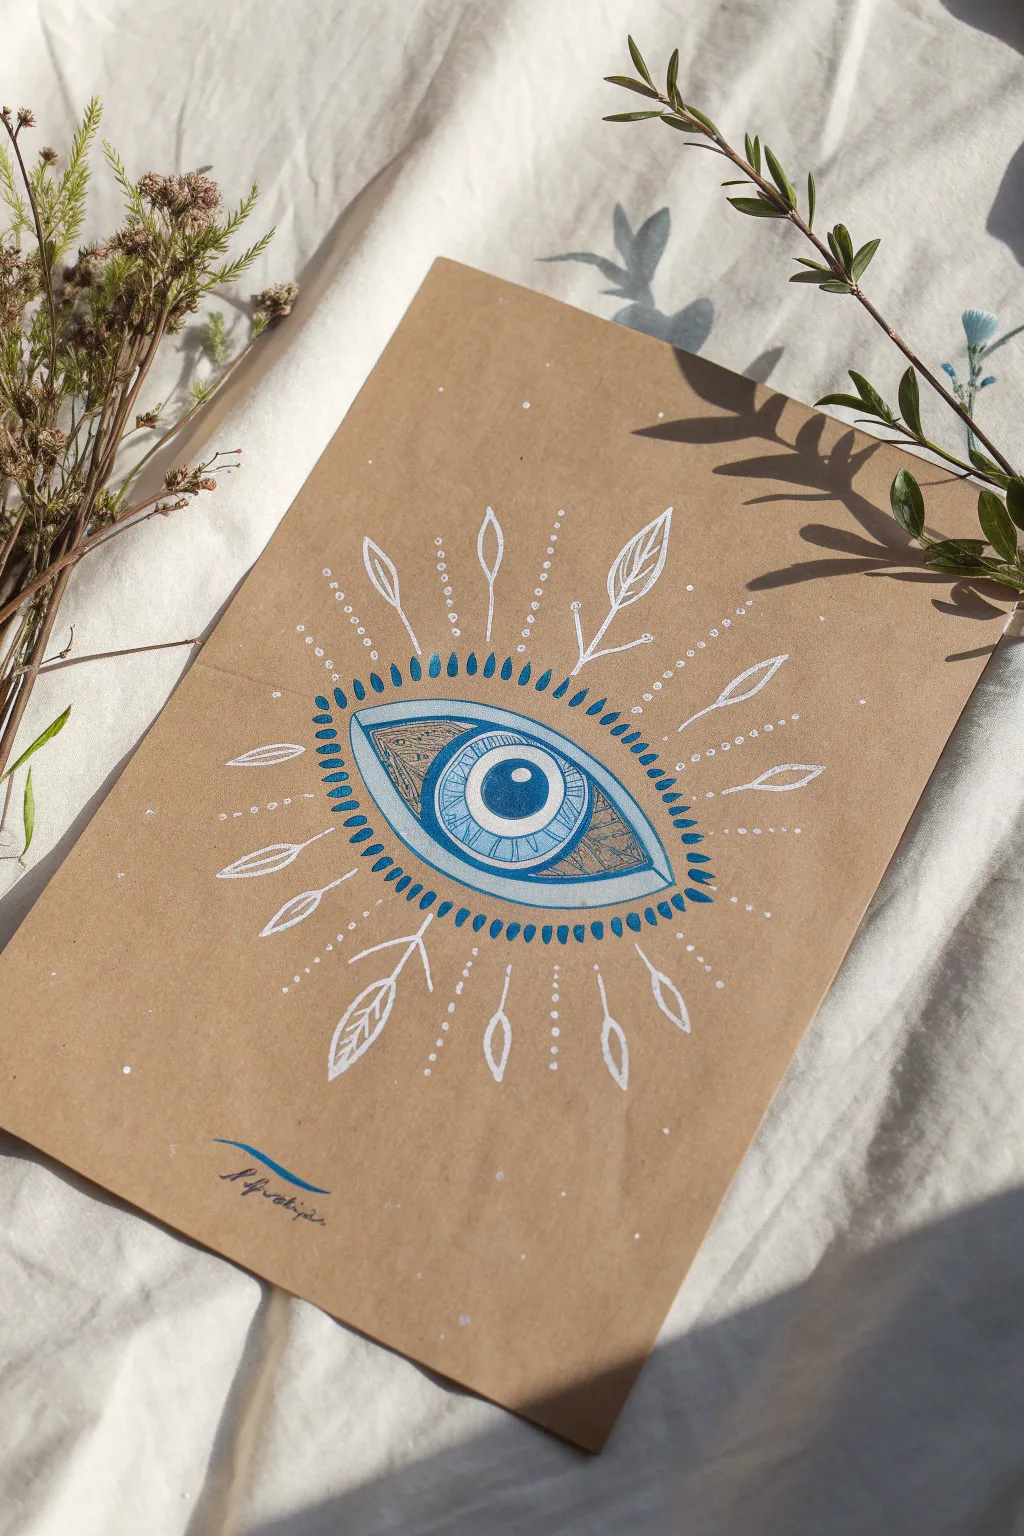
This striking illustration combines the earthy texture of brown kraft paper with bold blue ink and delicate white highlights to create a mystical evil eye design. The contrast between the matte paper and the vibrant eye creates a piece that feels both modern and talismanic.
Step-by-Step Tutorial
Materials
- Brown kraft paper (heavyweight cardstock preferred)
- Pencil and eraser
- Compass or circle stencil (optional)
- Black fine liner pen (0.1mm or 0.3mm)
- Blue brush marker or pigment liner (medium tip)
- White gel pen (Signo Broad or Gelly Roll) or white gouache with fine brush
- Light blue marker or colored pencil (optional for shading)
Step 1: Sketching the Foundation
-
Establish the center:
Begin by marking the center of your kraft paper. Lightly sketch a perfect circle for the iris using a compass or a small round object like a bottle cap as a guide. -
Draw the pupil:
Inside the first circle, draw a smaller concentric circle for the pupil. Ensure it sits dead center. -
Form the eye shape:
Sketch the almond-shaped outline of the eye around the iris. The curves should be gentle, tapering to points on the left and right sides. Leave enough space around the iris so it doesn’t look cramped. -
Add the upper lid crease:
Draw an arched line above the main eye shape to indicate the eyelid crease. This adds depth and dimension to the anatomy. -
Plan the outer rays:
Lightly pencil in the radiating lines and decorative leaf shapes extending outward from the eye. Don’t worry about perfect symmetry; an organic flow looks better here.
Ink Troubleshooting
Is the white gel pen absorbing into the paper? Kraft paper is porous. Let the first layer dry completely, then apply a second layer of white for maximum opacity.
Step 2: Inking and Coloring
-
Fill the pupil:
Using your blue brush marker or a dark blue pen, fill in the center pupil circle. Leave a tiny white circular spot uncolored for a highlight reflection, or add it later with white ink. -
Outline the iris:
Draw a thick blue ring around the pupil to define the iris. If you have a lighter blue marker, you can fill the space between the pupil and the ring, or use fine black stippling later. -
Create the lash line:
Trace the main almond shape of the eye with your blue marker. Make this line intentionally bold and thick, almost like heavy eyeliner. -
Add the teardrop fringe:
Along the bottom and top edges of the thick blue outline, draw small, solid blue teardrop shapes pointing outwards. These act as stylized eyelashes. -
Detail the sclera:
Switch to your black fine liner. Inside the white of the eye (the sclera), draw intricate geometric patterns or fine lines. In the example, notice the delicate shading lines near the corners. -
Texture the eyelid:
Use the fine liner to fill the space between the eye and the eyelid crease with a dense pattern—tiny triangles or cross-hatching works beautifully here to suggest shadow.
Step 3: Adding the magic
-
White ink accents:
Take your white gel pen. Carefully trace inside the blue iris ring to brighten it. Add white lines to the patterned sections inside the eye for contrast against the kraft paper. -
Draw the radiating stems:
Using the white pen, trace over your pencil sketches for the rays extending from the eye. Draw single lines ending in leaf shapes or arrowheads. -
Decorate the rays:
Add small leaves to these white stems. I like to keep the leaf interiors open (unfilled) so the brown paper shows through, creating a nice outlined effect. -
Dotted details:
Between the main white rays, add lines of small white dots. Graduating the size of the dots from large to small as they move away from the eye adds a sense of movement. -
Final highlights:
Add a crisp white dot to the center of the pupil if you didn’t leave one blank earlier. This ‘spark’ brings the eye to life. -
Clean up:
Once you are absolutely certain all ink is dry (white gel pens can smudge easily), gently erase any remaining pencil guidelines. -
Sign your work:
Add your signature or a small blue swoosh at the bottom to balance the composition.
Level Up: Gold Leaf
Apply tiny touches of gold leaf or metallic gold paint to the iris or the tips of the radiating leaves for a luxurious, shimmering finish.
Frame this piece in a simple wooden frame to let the natural textures shine
Surreal Evil Eye Melting Into Fluid Shapes
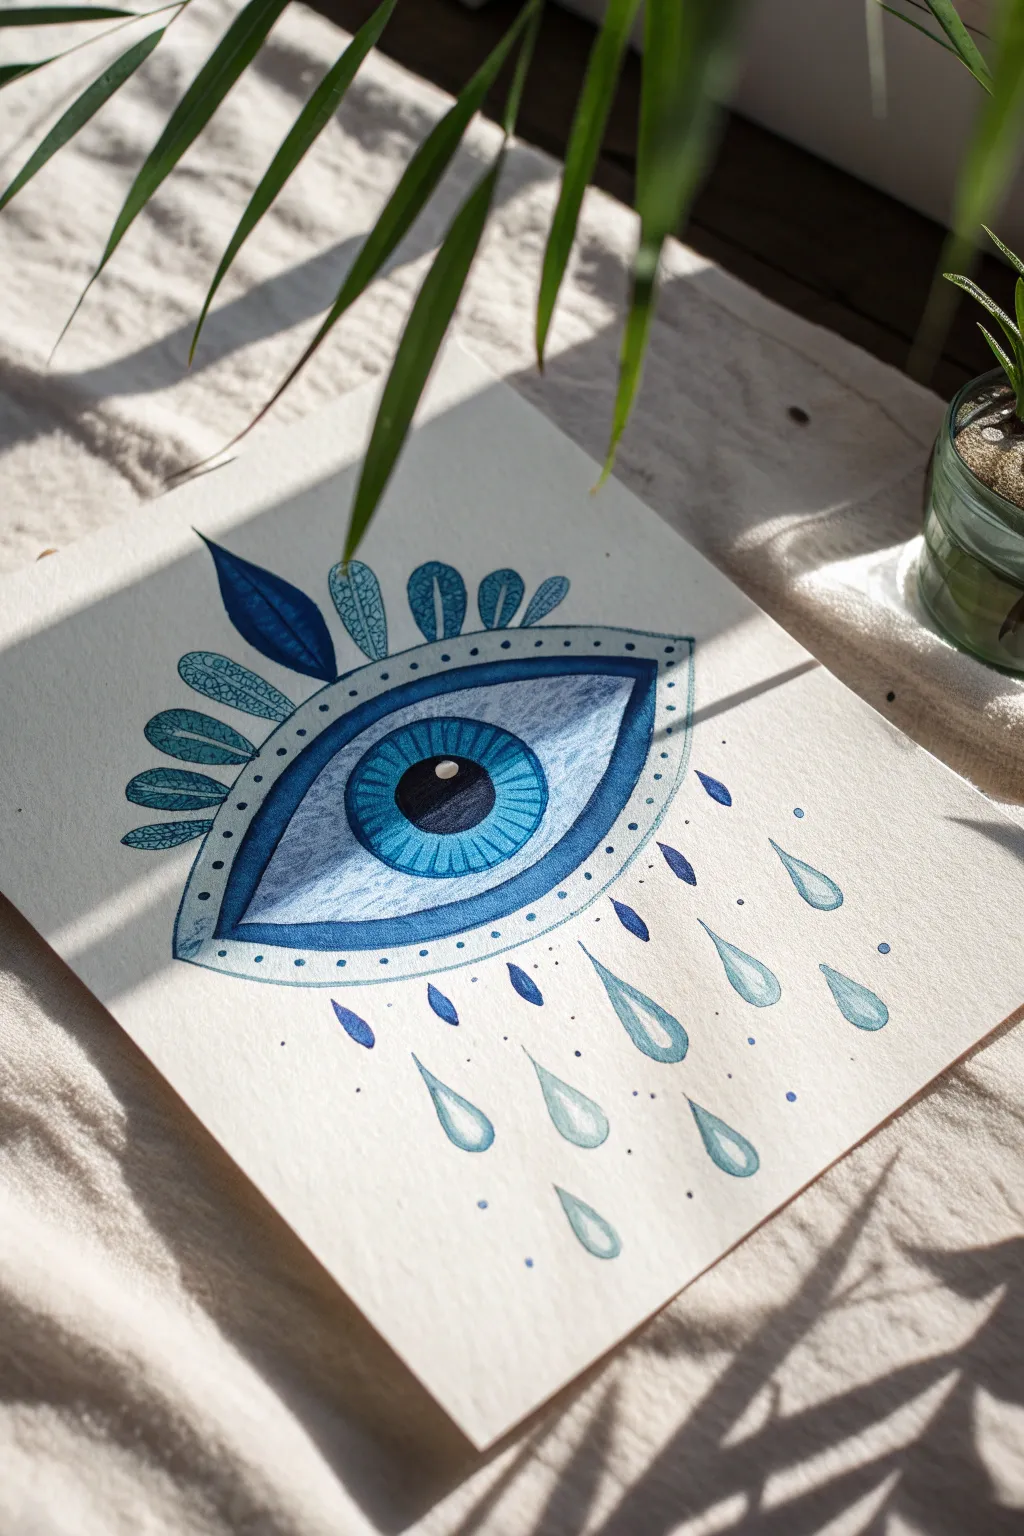
This ethereal artwork combines the protective symbolism of the evil eye with surreal, fluid elements resembling rain or tears. Using a monochromatic blue palette, you’ll create a striking piece that balances geometric precision with soft, watery flows.
How-To Guide
Materials
- Cold press watercolor paper (300 gsm)
- Watercolor paints (Indigo, Phthalo Blue, Cerulean Blue, Turquoise)
- Round watercolor brushes (sizes 2, 4, and 6)
- Fine liner pen (Black, waterproof)
- Pencil (HB)
- Eraser
- Ruler
- Compass (optional but recommended)
- White gel pen (for highlights)
Step 1: Sketching the Framework
-
Center the iris:
Begin by lightly marking the center of your paper. Using a compass or by carefully tracing circular objects, draw two concentric circles in the middle. The smaller inner circle will be the pupil, and the larger one the iris. -
Shape the eye:
Sketch a large almond shape around the circles to form the eyelids. Make the corners sharp and elegant, extending slightly beyond the natural curve. -
Add upper details:
Above the upper eyelid, lightly draw a series of radiating shapes. The central one should look like a pointed leaf, flanked by smaller, rounded petal-like forms on either side. -
Draft the tears:
Sketch teardrop shapes falling from the lower eyelid. Vary their sizes, placing larger drops near the center and smaller droplets towards the edges and further down the page.
Step 2: Painting the Eye
-
Pupil base:
Load your smallest brush with highly concentrated Indigo or black watercolor. Fill in the innermost circle (the pupil), but leave a small, crisp white circle near the top left for the reflection highlight. -
Iris gradient:
Wet the iris area (the ring around the pupil) with clean water. Drop in Phthalo Blue near the outer edge and Turquoise near the pupil, letting them bleed together. Leave a very faint ring of lighter blue right around the pupil for depth. -
Iris detailing:
Once the iris is dry, take a size 2 brush with a darker blue mix. Paint fine, radial lines extending from the pupil outward to mimic the texture of an iris. -
Sclera shading:
Paint the ‘white’ of the eye. Instead of leaving it stark white, add a very watery wash of pale blue to the corners to create a spherical shadow, leaving the center bright white. -
Eyelid outlines:
With a steady hand and a size 4 brush, paint the thick borders of the almond eye shape using a deep, saturated blue. Ensure the lines taper elegantly at the corners.
Bleeding Lines?
If your blue eyelid outlines are bleeding into the white of the eye, your paper was likely still damp. Wait for the paper to be cool and dry to the touch before painting adjacent sections.
Step 3: Adding Surreal Elements
-
Upper lashes:
Fill in the central leaf shape above the eye with a solid deep blue. For the surrounding petal shapes, use a lighter blue wash and add intricate web-like vein patterns inside them once dry. -
Dotted border:
Paint a thin, framing line around the entire eye shape, leaving a small gap between it and the main eyelid. Inside this gap, carefully place small blue dots spaced evenly apart. -
Painting large tears:
For the larger teardrops, use a ‘grading’ technique. Paint the bottom curve of the drop with saturated blue, then rinse your brush and drag that color upward to fade it into white at the pointed tip. -
Tiny droplets:
Use the tip of your smallest brush to paint the tiny, solid blue droplets scattered among the larger tears. I like to vary the saturation here—some dark, some watery light. -
Smaller floating accents:
Add a few small, darker blue almond shapes directly beneath the lower lash line to bridge the gap between the eye and the falling tears.
Pro Tip: Glossy Finish
For a ‘wet’ look on the tears, mix a tiny amount of Gum Arabic into your watercolor paint. It adds a subtle shine and thickness that makes the droplets pop.
Step 4: Final Definition
-
Clean up outlines:
Once the paint is completely bone-dry, use your waterproof fine liner to very gently outline the iris and pupil if the paint edges look too soft. -
Enhance highlights:
Use a white gel pen to crisp up the highlight in the pupil. You can also add a tiny white specular highlight to the bottom curve of the wettest-looking teardrops to make them look glossy. -
Check balance:
Step back and check the distribution of the blue shades. If the upper details feel too light, add a second glaze of blue to deepen the contrast. -
Erase guidelines:
Gently erase any visible pencil marks that weren’t covered by paint, being careful not to rub the paper surface too hard.
frame your mystic creation or gift it as a stylized token of protection.
Pattern-Filled Evil Eye Wallpaper Repeat
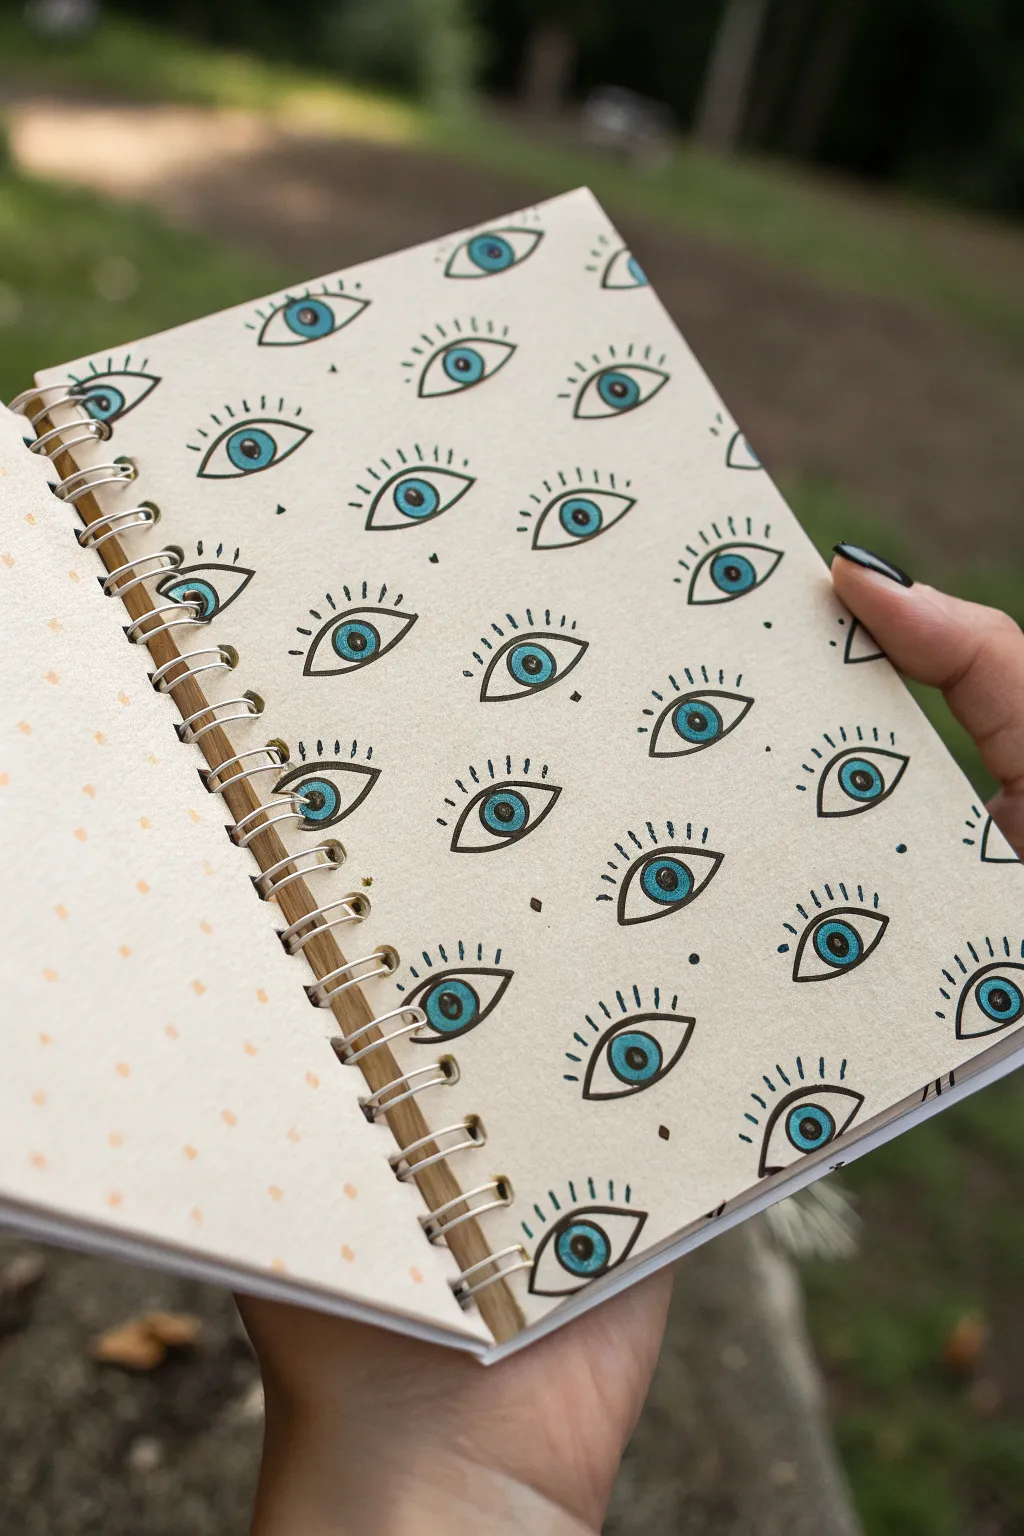
Turn a plain sketchbook page into a mesmerizing piece of art with this rhythmic repeating eye pattern. The simple combination of bold black ink and bright teal creates a modern, mystical look that feels both structured and organic.
Step-by-Step Tutorial
Materials
- Spiral-bound sketchbook (cream or white paper)
- Black fine liner pen (0.3mm or 0.5mm)
- Teal or cyan colored pencil
- Pencil (HB or 2B)
- Eraser
- Ruler (optional)
Step 1: Planning the Layout
-
Set up your grid:
To keep the pattern consistent, start by lightly sketching a series of horizontal guidelines across your page with a pencil. Space them about 1.5 inches apart, or adjust based on how large you want your eyes to be. -
Mark the centers:
Along each horizontal line, make small tick marks where the center of each eye will sit. Stagger the marks on alternating lines (like a brick wall pattern) so the eyes fit together comfortably without looking too rigid. -
Sketch the eye shape:
Using your pencil, draw a simple almond shape at each tick mark. Aim for a smooth curve on the bottom and a slightly flatter arch on top. Keep your strokes light so they are easy to erase later. -
Add the iris and pupil:
Inside each almond shape, lightly sketch a perfect circle for the iris. It should touch the top and bottom eyelids. Then, draw a smaller circle in the absolute center for the pupil.
Ink Confidence
Don’t worry if every eye isn’t identical. Slight variations in shape or lash length give the pattern a charming, hand-drawn character rather than looking like a machine print.
Step 2: Inking the Details
-
Outline the eyelids:
Switch to your black fine liner. Carefully trace over your pencil almond shapes. I find it helps to rotate the notebook slightly to get the natural curve of your hand working with the drawing. -
Thicken the upper lid:
Go over the top line of the eye a second time to make it slightly thicker and bolder than the bottom line. This adds visual weight and makes the eyes look more defined. -
Ink the pupil:
Outline the small inner circle and fill it in completely with black ink. Leave the larger iris circle empty for now. -
Draw the iris outline:
Carefully trace the larger circle of the iris. Ensure the line is clean and connects smoothly with the upper and lower eyelids. -
Add the lashes:
Draw small, straight lines radiating outward from the top eyelid only. Use quick, confident flicks of the wrist. Aim for about 5-7 lashes per eye, keeping the center ones slightly longer. -
Erase pencil guides:
Wait at least 5-10 minutes for the ink to dry completely to avoid smudging. Once dry, gently erase all your initial pencil guidelines and tick marks.
Metallic Magic
Swap the teal colored pencil for a gold or silver gel pen to fill the irises. The metallic shimmer adds a mystical quality that catches the light beautifully when you turn the page.
Step 3: Adding Color
-
Select your blue:
Take your teal or cyan colored pencil. Ensure it is freshly sharpened to get into the small details without going outside the lines. -
Fill the iris:
Color in the ring between the black pupil and the iris outline. Apply medium pressure for a solid, vibrant pop of color. -
Add subtle shading:
To give the eye a little dimension, press slightly harder with the colored pencil right near the top eyelid, fading slightly as you move down toward the pupil. -
Repeat across the page:
Continue coloring each eye until the entire page is filled. Take breaks if your hand gets tired to ensure your coloring stays neat and consistent. -
Fill empty spaces:
If you notice any large gaps between the eyes that feel empty, add a tiny black dot or a very small diamond shape with your pen to balance the negative space.
Enjoy using your new custom-patterned notebook for journaling or sketching.
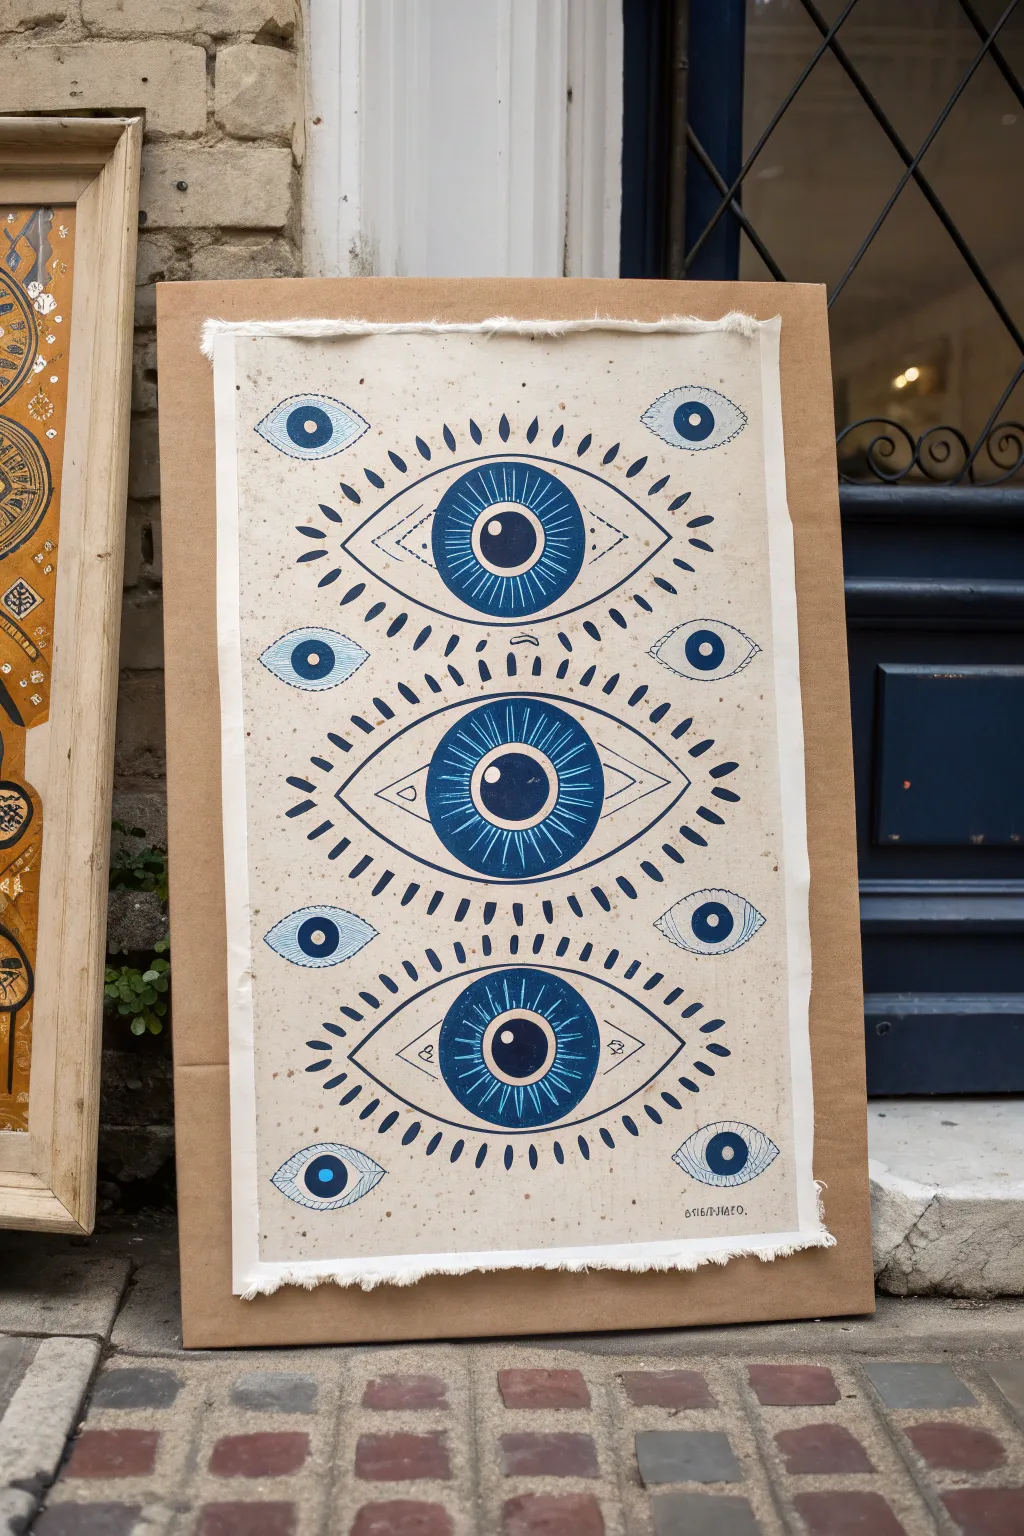
Layered Collage-Style Evil Eye Poster

Channel ancient symbolism with this striking block-print style poster featuring a trio of mesmerizing evil eyes. The textured, handmade paper and deep indigo ink give the piece an authentic, talismanic feel that looks perfect mounted on simple kraft board.
Step-by-Step Tutorial
Materials
- Soft-cut carving block (linoleum or rubber)
- Linocut carving tools (V-gouge and U-gouge)
- Block printing ink (Navy Blue or Indigo)
- Brayer (roller)
- Glass pane or acrylic sheet for rolling ink
- Handmade paper with deckled edges (cream or oatmeal)
- Large sheet of thick kraft board or cardboard
- Pencil and tracing paper
- Barren or wooden spoon
- Double-sided archival tape or glue dots
Step 1: Designing the Motif
-
Draft your master eye:
Begin by sketching your main eye design on paper. Draw a wide almond shape for the sclera, a large perfect circle for the iris, and a smaller circle for the pupil. Add a small highlight circle within the pupil to give it life. -
Add the radiating details:
Around the iris, draw fine lines radiating outward to create texture. Then, sketch a repeating pattern of teardrop shapes or dashes floating around the almond shape to represent eyelashes or energy rays. -
Create the secondary mini-eye:
Sketch a smaller, simper version of the eye (just the almond shape and a solid circle iris/pupil) to fill the negative space later. You will need two separate stamps: one large main eye and one small filler eye. -
Transfer to the block:
Trace your designs onto tracing paper with a soft graphite pencil. Flip the tracing paper onto your carving block (graphite side down) and rub firmly to transfer the image. Remember, the image will print in reverse, which is crucial if your design is asymmetrical.
Uneven Ink Transfer?
If your print looks patchy, your paper might be too textured. Lightly mist the paper with water before printing to soften the fibers, helping them grab the ink better.
Step 2: Carving the block
-
Outline the main shapes:
Using a fine V-gouge tool, carefully carve along the outline of your pencil lines. Go slowly, carving away from your body to prevent slips. This initial cut defines your boundaries. -
Clear the negative space:
Switch to a wider U-gouge to clear away the large areas of rubber that you don’t want to print. For the iris, you want the ring to be solid, so carve out the white of the eye carefully. -
Detail the iris and lashes:
Use your finest tool to carve the radiating lines inside the iris. These need to be shallow but clean. Carve around each individual eyelash/ray shape, ensuring they stand out as raised islands of rubber. -
Refine the edges:
Trim the excess rubber block around your design close to the image edge. This prevents ‘background noise’ or stray ink marks when you press down later.
Pro Tip: Custom Colors
Mix a tiny dot of black into your blue ink to get that deep, mystical indigo shade. Pure blue can sometimes look too bright or primary for this antique style.
Step 3: Printing the Poster
-
Prepare the workspace:
Tape your handmade paper to your table so it doesn’t shift. Place your backing board nearby to visualize the final layout. -
Ink the brayer:
Squeeze a small line of indigo ink onto your glass pane. Roll the brayer back and forth and lift it occasionally to create a tacky, velvety texture. Listen for a specific ‘hissing’ sound—that means your ink consistency is perfect. -
Ink the main block:
Roll a thin, even layer of ink onto your large eye stamp. Inspect it closely to make sure ink hasn’t flooded into the fine carved lines of the iris. -
The first impression:
Position the large stamp in the absolute center of your paper. Press down firmly. Use a barren or the back of a wooden spoon to rub the back of the stamp in circular motions to ensure even transfer. -
Complete the central trio:
Re-ink the block and stamp two more large eyes: one directly above and one directly below the center eye, keeping the spacing consistent. -
Add the smaller eyes:
Using your smaller stamp, fill the corners and the spaces between the large eyes. I find a slightly random, floating placement looks more mystical than a rigid grid. -
Dry and mount:
Allow the ink to dry fully (oil-based inks may take a day or two). Once dry, center the handmade paper onto the large kraft board and secure it using double-sided tape or glue dots.
Hang your new protective talisman in an entryway or studio space to keep the good vibes flowing


Have a question or want to share your own experience? I'd love to hear from you in the comments below!