When my sketchbook starts feeling a little too full of mugs and apples, I reach for exotic drawing ideas—the ones with wild silhouettes, surprising textures, and that “I’ve never drawn this before” spark. These prompts are meant to nudge you into bolder choices while still feeling totally doable, one sketch at a time.
Parrot Profile With Patterned Feathers
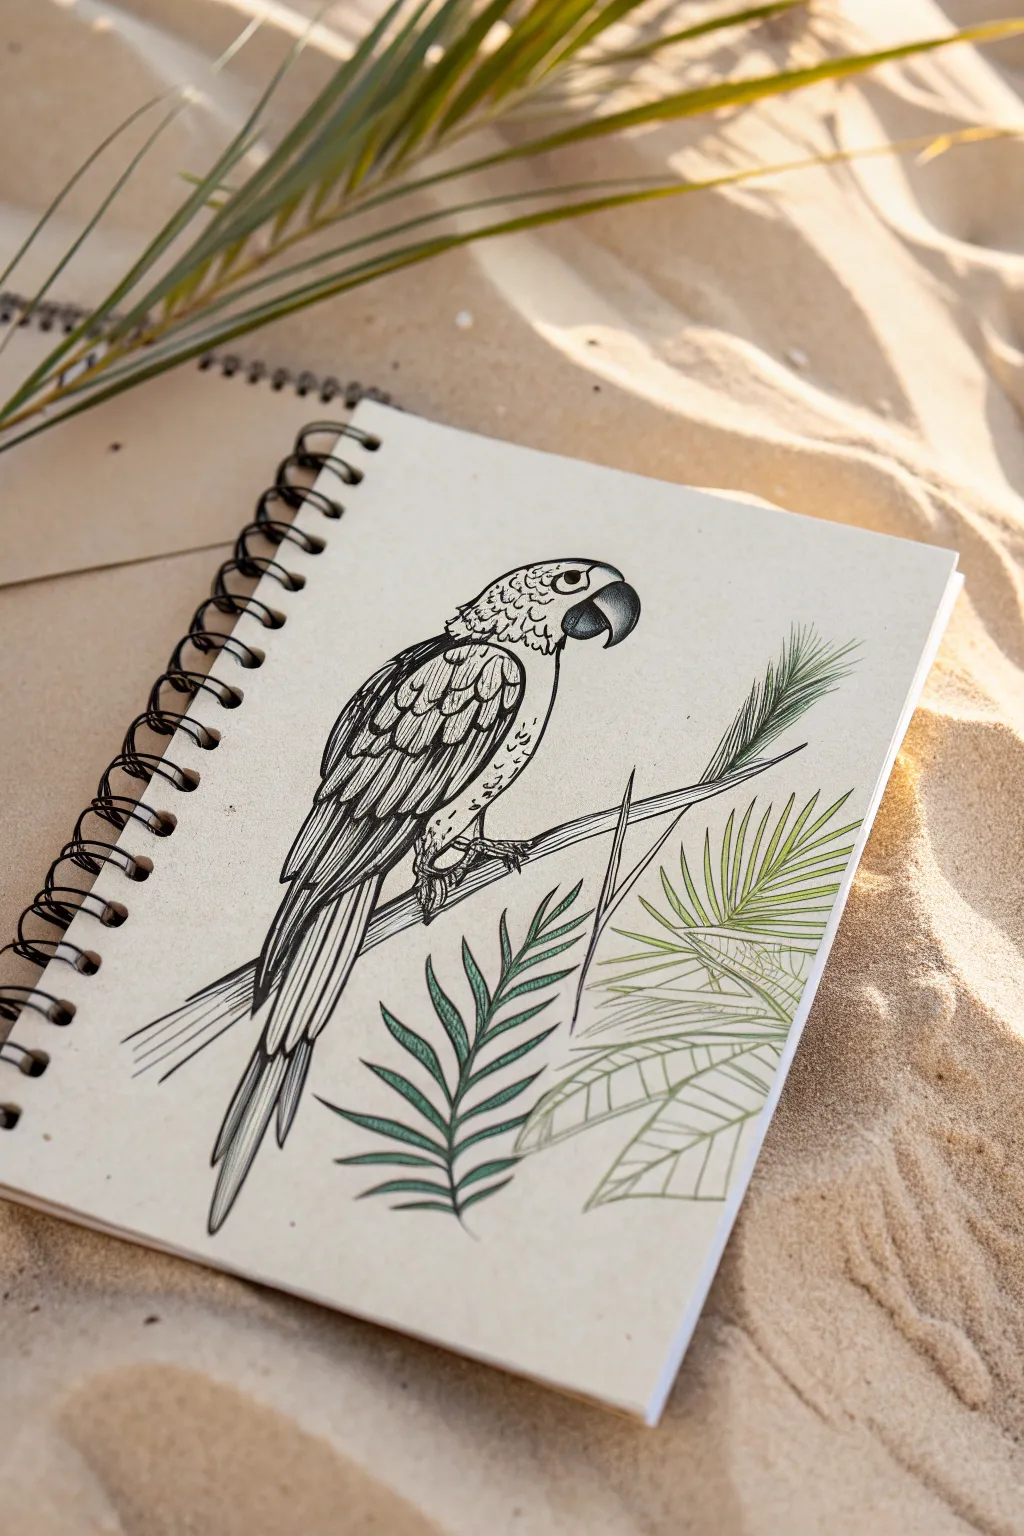
Capture the island vibes with this detailed pen-and-ink illustration of a parrot perched among tropical leaves. The contrast between the intricate black linework of the bird and the softer green accents creates a beautiful, rustic aesthetic perfect for a nature journal.
How-To Guide
Materials
- Spiral-bound sketchbook with off-white or cream paper
- Fine liner pens (sizes 0.1, 0.3, and 0.5)
- Pencil (HB or 2B)
- Kneaded eraser
- Green colored pencils (olive and sage tones)
- Reference photo of a macaw or parrot profile
Step 1: Sketching the Framework
-
Drawing the head and beak:
Start with a light pencil sketch. Draw a rounded curve for the top of the head, flowing into a strong, curved beak. The beak should have a distinct upper mandible that overlaps the smaller lower one. -
Drafting the body shape:
Extend a line down from the head to form the back and wings. Keep the chest relatively flat, leading down to where the legs will grasp the branch. The overall shape should feel sleek and perched. -
Adding the tail:
Sketch long, tapering feathers extending downward. These should be longer than the body itself to give the parrot its classic silhouette. Don’t worry about individual feathers yet; just get the main shape. -
Placing the branch:
Draw a diagonal line representing the branch underneath the bird’s feet. Angle it slightly upward from left to right to create a dynamic composition.
Feather Flow
When hatching the feathers, don’t just draw straight lines. Curve your strokes slightly to match the rounded shape of each feather. This makes the bird look round and 3D rather than flat.
Step 2: Inking the Parrot
-
Outlining the beak and eye:
Switch to your 0.3 fine liner. Carefully outline the beak, adding a small nostril and the eye. Use stippling (tiny dots) near the base of the beak to create texture and shading. -
Detailing the face:
Draw the scalloped, scale-like pattern around the face and cheeks. These are small, U-shaped marks that mimic the unique skin texture of macaws. -
Inking the wing feathers:
Move to the wing. Start at the shoulder with smaller, rounded feathers (coverts). As you move down the wing, elongate the shapes into larger flight feathers. Use the 0.5 pen here for bolder outer lines. -
Texturing the feathers:
Inside each wing feather, add fine hatching lines with your 0.1 pen. These lines should follow the curve of the feather to suggest volume and softness. -
Drawing the feet:
Ink the claws grasping the branch. Make them look textured and knobby, ensuring they wrap convincingly around the wood. -
Finishing the tail:
Outline the long tail feathers. Add a central spine (rachis) to each one, but keep the lines somewhat loose to suggest movement.
Smudge Prevention
If you are right-handed, work from the left side of the drawing to the right (and vice-versa for lefties) to avoid dragging your hand through wet ink while drawing the intricate feathers.
Step 3: The Botanical Surroundings
-
Inking the branch:
Go over the pencil line of the branch with a shaky, organic line. Add small knots or splits in the wood to make it look natural. -
Adding background foliage:
Behind and below the branch, sketch large, palm-like fronds. Draw a central stem and extend long, thin leaves outward. Keep these shapes simpler than the bird. -
Applying color to leaves:
Using your sage green colored pencil, gently fill in the lower palm leaves. Don’t press too hard; you want the texture of the paper to show through for a vintage look. -
Layering green tones:
Take the olive green pencil and define the veins of the leaves or add shadows where the leaves overlap. This adds depth without overpowering the black ink. -
Adding subtle background detail:
With a very light touch, draw faint outlines of more leaves or pine needles behind the main branch using just the colored pencil or a very thin pen, creating a sense of depth.
Step 4: Final Touches
-
Erasing sketches:
Wait for the ink to comprise fully dry. I usually give it an extra few minutes just to be safe. Then, gently erase all visible pencil lines with your kneaded eraser. -
Reinforcing darks:
Look at the drawing as a whole. Use your thickest pen to darken the underside of the wing and the pupil of the eye to increase contrast and make the bird pop.
Close your sketchbook knowing you’ve captured a little piece of the tropics on paper
Big Cat in Jungle Light
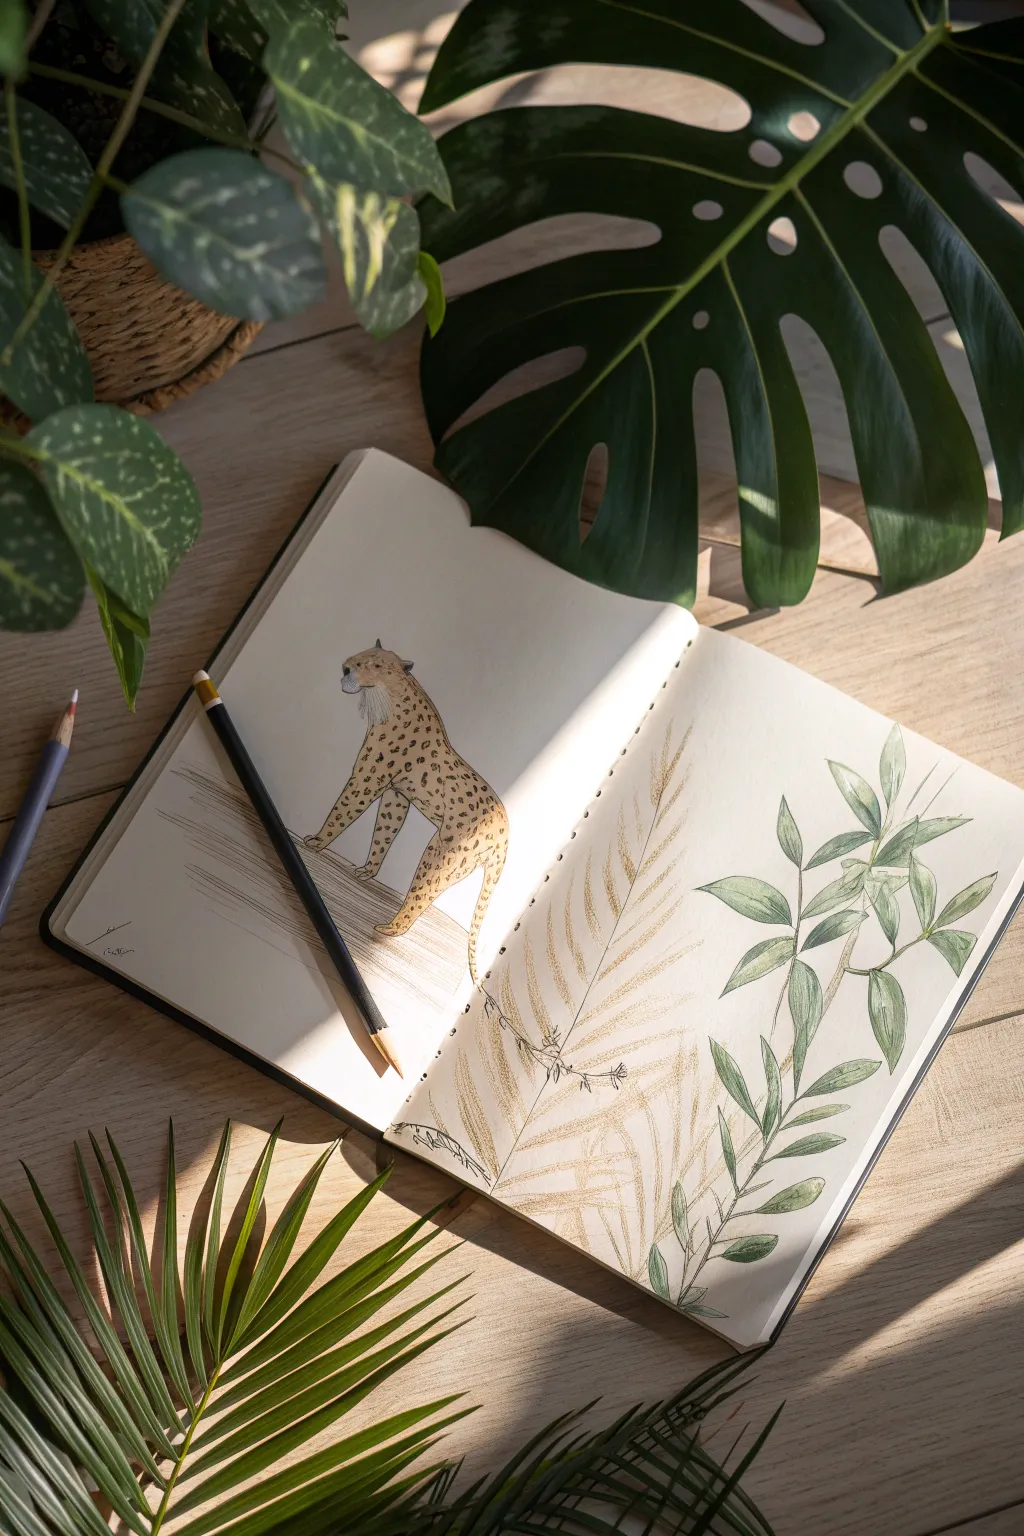
Capture the quiet elegance of a big cat strolling through sunlit grass in this two-page sketchbook spread. This project blends precise animal illustration with loose, botanical line work for a balanced and organic composition.
Step-by-Step
Materials
- Sketchbook with smooth heavyweight paper
- HB graphite pencil
- Kneaded eraser
- Base color colored pencil (mustard or ochre yellow)
- Detail colored pencil (dark brown or black)
- Foliage green colored pencil (olive or sage)
- Gold or bronze metallic gel pen/marker
- Ruler (optional)
Step 1: Drafting the Layout
-
Set the scene:
Open your sketchbook to a fresh spread. Lightly mark a horizon line about one-third up from the bottom of the left page, sloping gently downward toward the spine. This will be the branch your cheetah walks on. -
Basic shapes:
Using an HB pencil with a very light hand, construct the cheetah’s body. Start with an oval for the chest, a smaller circle for the hindquarters, and a small circle for the head. Connect these with sweeping lines for the neck and back. -
Refining the anatomy:
Add the legs, paying attention to the joints. The front legs should be straight and elegant, while the back legs show the powerful bend of the thigh. Sketch the tail trailing off the page or curving down. -
Botanical placement:
On the right page, lightly sketch the main stems for your foliage. Draw one large, sweeping curve mimicking a palm frond in the background, and a more defined branch structure in the foreground.
Step 2: Bringing the Cheetah to Life
-
Base coloring:
Take your mustard or ochre pencil. Create a soft, even layer of color over the cheetah’s body, leaving the chest, underbelly, and muzzle white. I like to keep my strokes directional, following the flow of the fur. -
Defining the outline:
Use a sharpened dark brown or black pencil to crisp up the outline of the cat. Give the contours some variation—thicker on the underside for shadow, thinner on top where the light hits. -
Facial features:
Carefully draw the eye, nose, and mouth. The eye should be small and almond-shaped. Add tiny dots for whisker pads on the muzzle. -
The spots:
This is the meditative part. Using the dark pencil, add small, irregular spots across the body. Keep them smaller on the head and neck, getting slightly larger and more spaced out on the flank. -
Grounding the subject:
Under the cheetah’s feet, sketch the texture of the wood or rock. Use horizontal, broken lines to suggest striations in the wood, extending them slightly onto the right page to bridge the gap.
Smudge Alert
Work left-to-right (if right-handed) to avoid smearing the metallic ink or soft pencil. Place a clean sheet of scrap paper under your drawing hand for extra protection.
Step 3: Botanical Details
-
Golden fronds:
Switch to your metallic gold or bronze pen. Trace over the large background frond shape on the right page. Draw long, feathery lines radiating from the central spine to create a palm-like texture. -
Ghost leaves:
Use the same metallic pen to add subtle stem details near the bottom of the page, interacting with the cheetah’s tail area. The metallic ink adds a lovely shimmer that catches the light. -
Green foliage structure:
Using your olive or sage green pencil, draw the main stem for the foreground plant on the right. Make the line confident and slightly curved. -
Adding leaves:
Draw lance-shaped leaves extending from the green stem. Vary the angles—some pointing up, some drooping slightly. -
Shading the green:
Color in the green leaves delicately. Press harder at the base of each leaf and along the center vein, fading out toward the edges to create volume and light.
Jungle Vibes
Overlay part of the cheetah with a translucent green leaf drawing to make it look like the cat is hiding deep within the thick jungle foliage.
Step 4: Final Touches
-
Shadow work:
Return to the cheetah one last time. Add a tiny bit of shading under the chin and on the back leg to give the figure weight. -
Cleanup:
Once you are sure the metallic ink is completely dry, gently erase any remaining graphite construction lines that are distracting.
Close your sketchbook and enjoy the satisfaction of capturing a wild moment on paper

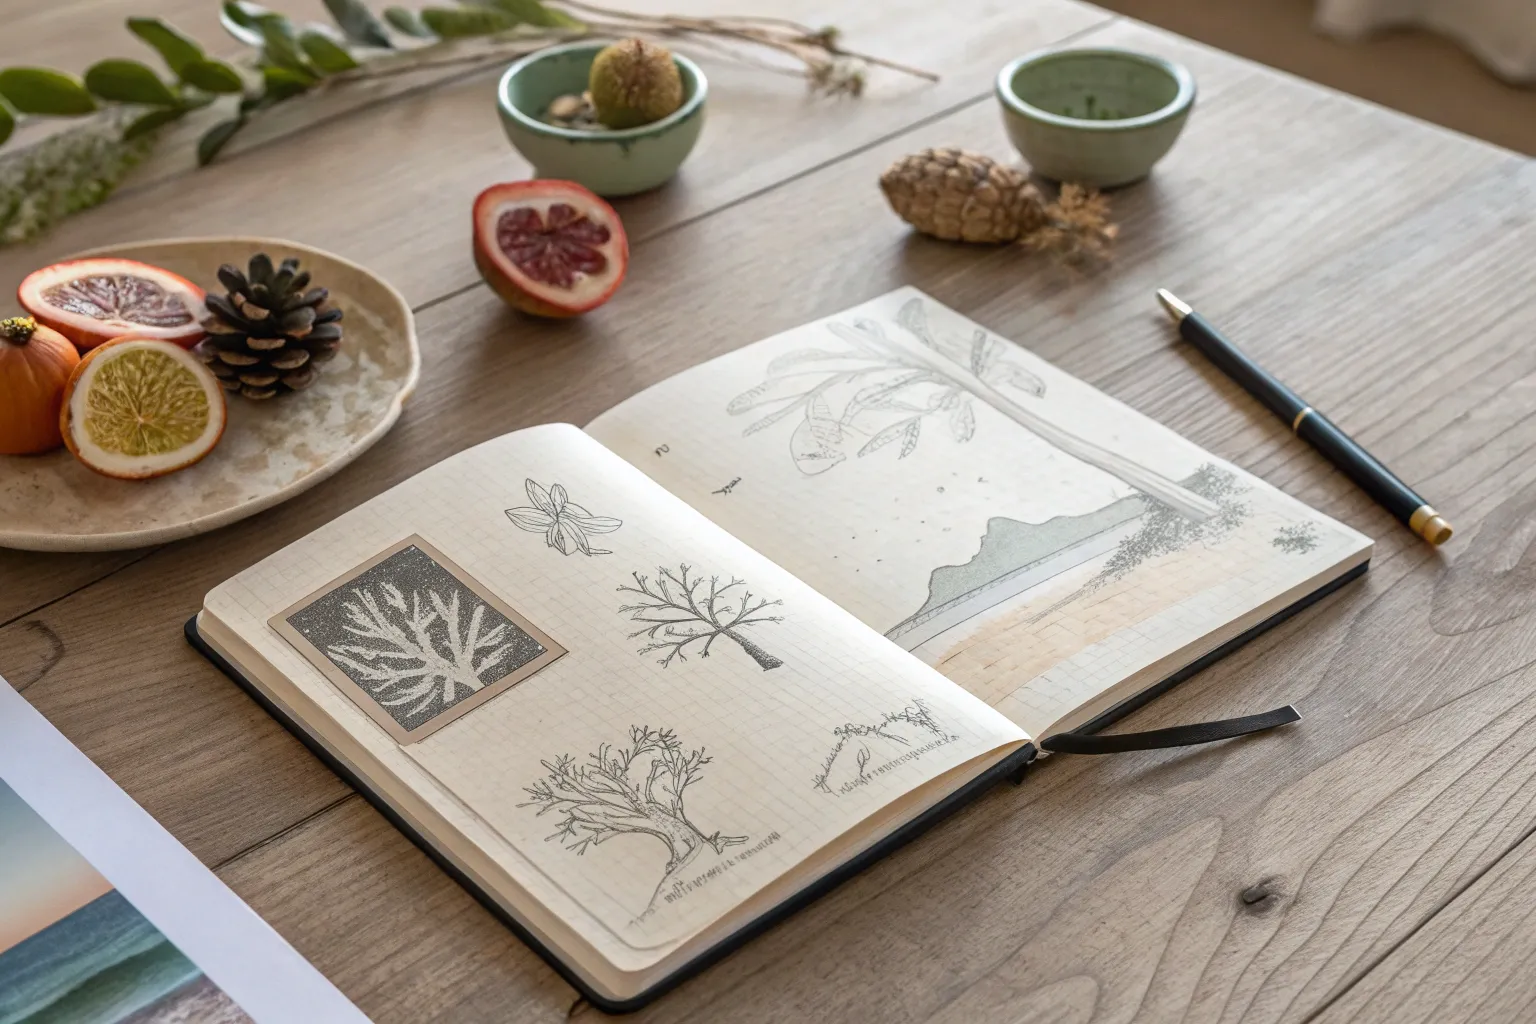
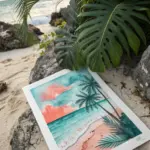
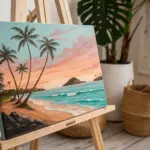
Rainforest Canopy From Below
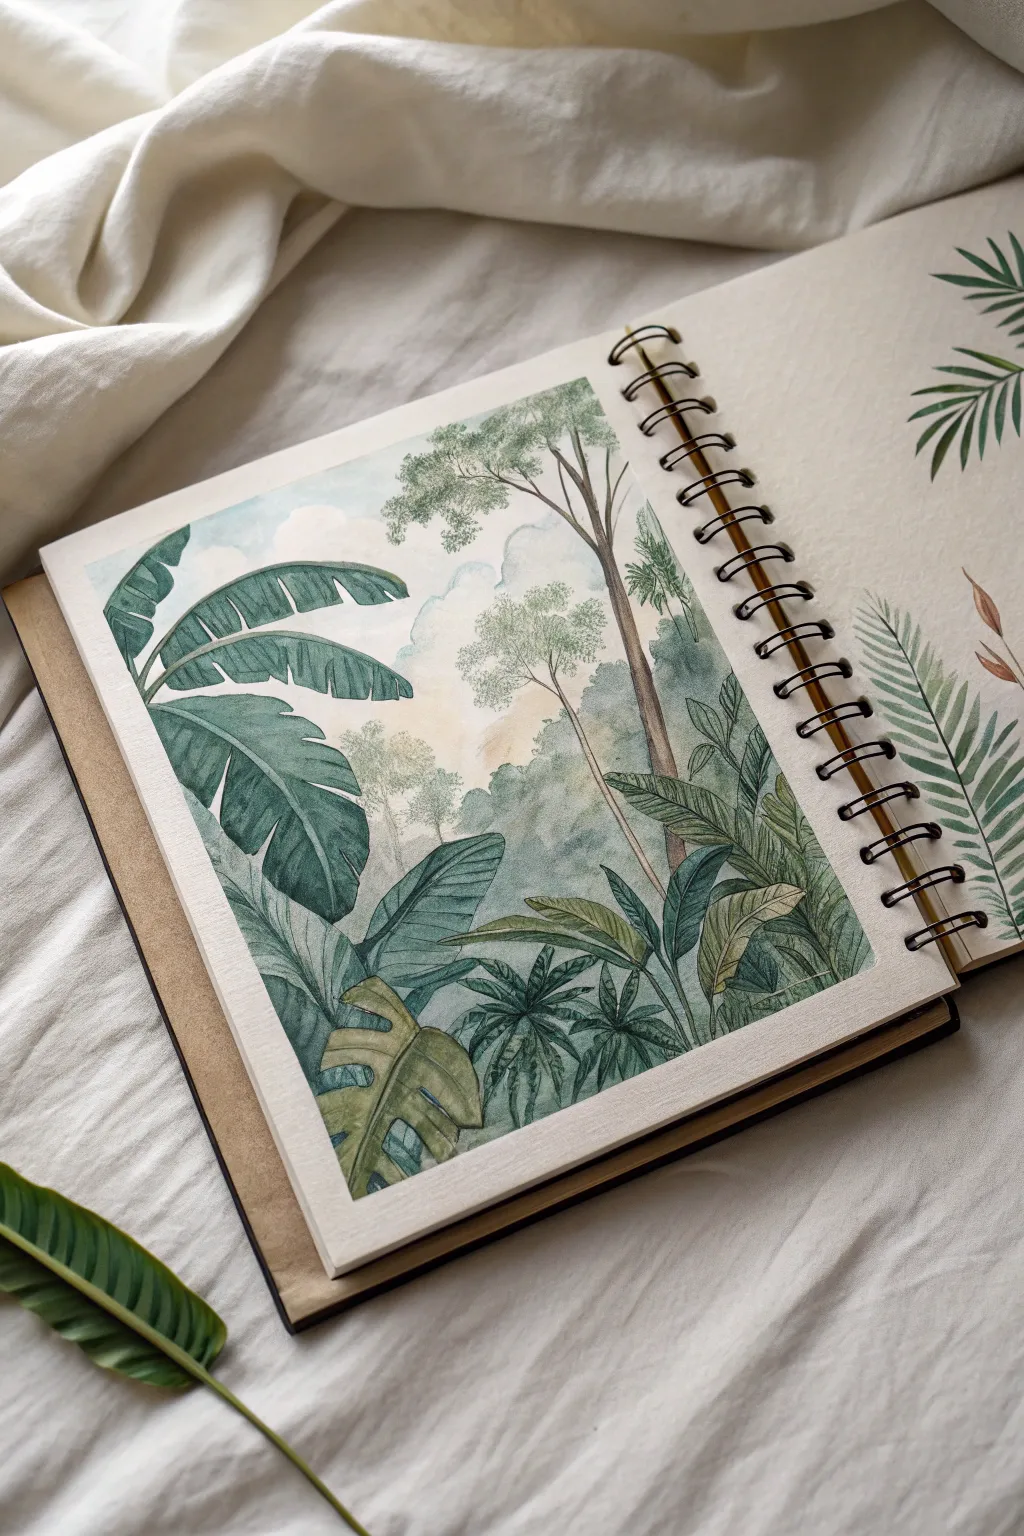
Capture the towering majesty of a jungle with this watercolor illustration that draws the viewer’s eye upwards. By focusing on varied leaf shapes and atmospheric depth, you’ll create a lush, immersive scene right in your sketchbook.
Detailed Instructions
Materials
- Spiral-bound sketchbook (heavyweight mixed media or watercolor paper)
- Watercolor paints (shades of sap green, viridian, earthy browns, indigo, and pale ochre)
- Fine liner pens (optional, for detailing)
- Round watercolor brushes (sizes 2, 4, and 6)
- Pencil (HB or 2H)
- Kneaded eraser
- Painter’s tape or masking tape
- Clean water and paper towels
Step 1: Planning and Sketching
-
Tape the borders:
Begin by applying painter’s tape to the four edges of your sketchbook page. This creates the crisp, clean white border seen in the reference image, which frames the organic scene beautifully. -
Establish the composition:
Lightly sketch the main elements using your HB pencil. Start with the large banana-style leaves on the left side, curving inwards. -
Add vertical elements:
Draw two or three tall, slender tree trunks reaching from the lower middle towards the top right. Make them slightly crooked to feel natural. -
Fill the mid-ground:
Sketch the outlines of the fan palms and smaller foliage at the bottom center and right. Keep these pencil lines very faint so they don’t show through the paint later. -
Suggest the canopy:
Lightly mark out the cloud-like clusters of leaves at the very top of the trees. You don’t need individual leaves here, just general shapes.
Atmospheric Perspective
Make background trees paler and bluer than foreground leaves. This color shift mimics how air density fades distant objects, adding massive scale to your jungle.
Step 2: Painting the Atmosphere
-
Wet-on-wet sky:
Pre-wet the sky area with clean water, carefully painting around your pencil sketches of the leaves and trees. -
Drop in color:
While the paper is damp, drop in very diluted indigo or grayish-blue for the sky. Add hints of pale ochre near the center horizon line to suggest distant sunlight filtering through. -
Create distant trees:
While the background is still slightly damp, mix a watery, desaturated gray-green. Paint the distant tree shapes in the background, letting the edges blur slightly to create a misty, atmospheric effect. -
Let it dry completely:
Wait until the paper is bone dry before moving to the foreground layers to prevent muddying the crisp edges.
Paper Buckling?
If your sketchbook page warps from the water, let it dry completely, then close the book with a heavy weight on top overnight to flatten it back out.
Step 3: Painting the Foliage
-
Base layer for large leaves:
Mix a cool, medium green. Paint the large banana leaves on the left. Use long, sweeping strokes that follow the curve of the leaf. -
Add leaf details:
Once the green is semi-dry, use a slightly darker, more concentrated green to paint the veins and the split edges of the leaves. -
Paint the trunks:
Mix a watery brown with a touch of purple. Paint the tall tree trunks, keeping the color uneven to suggest rough bark texture. -
Develop the mid-ground:
Using a size 4 brush, paint the smaller fan palms and leafy bushes at the bottom. Vary your greens here—add a little yellow to some and a little blue to others for variety. -
Detail the canopy top:
Stipple or dab small clusters of green at the top of your tall trees to simulate distant clusters of leaves high in the canopy. -
Deepen the shadows:
Mix your darkest green (viridian mixed with a touch of red or brown). Apply this to the areas where leaves overlap at the bottom, creating depth and separating the layers.
Step 4: Finishing Touches
-
Refine edges:
If you want sharper details, use a very fine brush or even a fine liner pen to reinforce the edges of the foreground leaves. -
Add highlights:
I like to lift a tiny bit of color with a damp brush or use a white gel pen sparingly to add highlights on the glossiest parts of the banana leaves. -
Remove the tape:
Once you are absolutely certain the paint is dry, slowly peel the tape away at a 45-degree angle to reveal your crisp border.
Now you have a refreshing window into a tropical world right in your sketchbook


Sea Turtle Over a Coral Garden
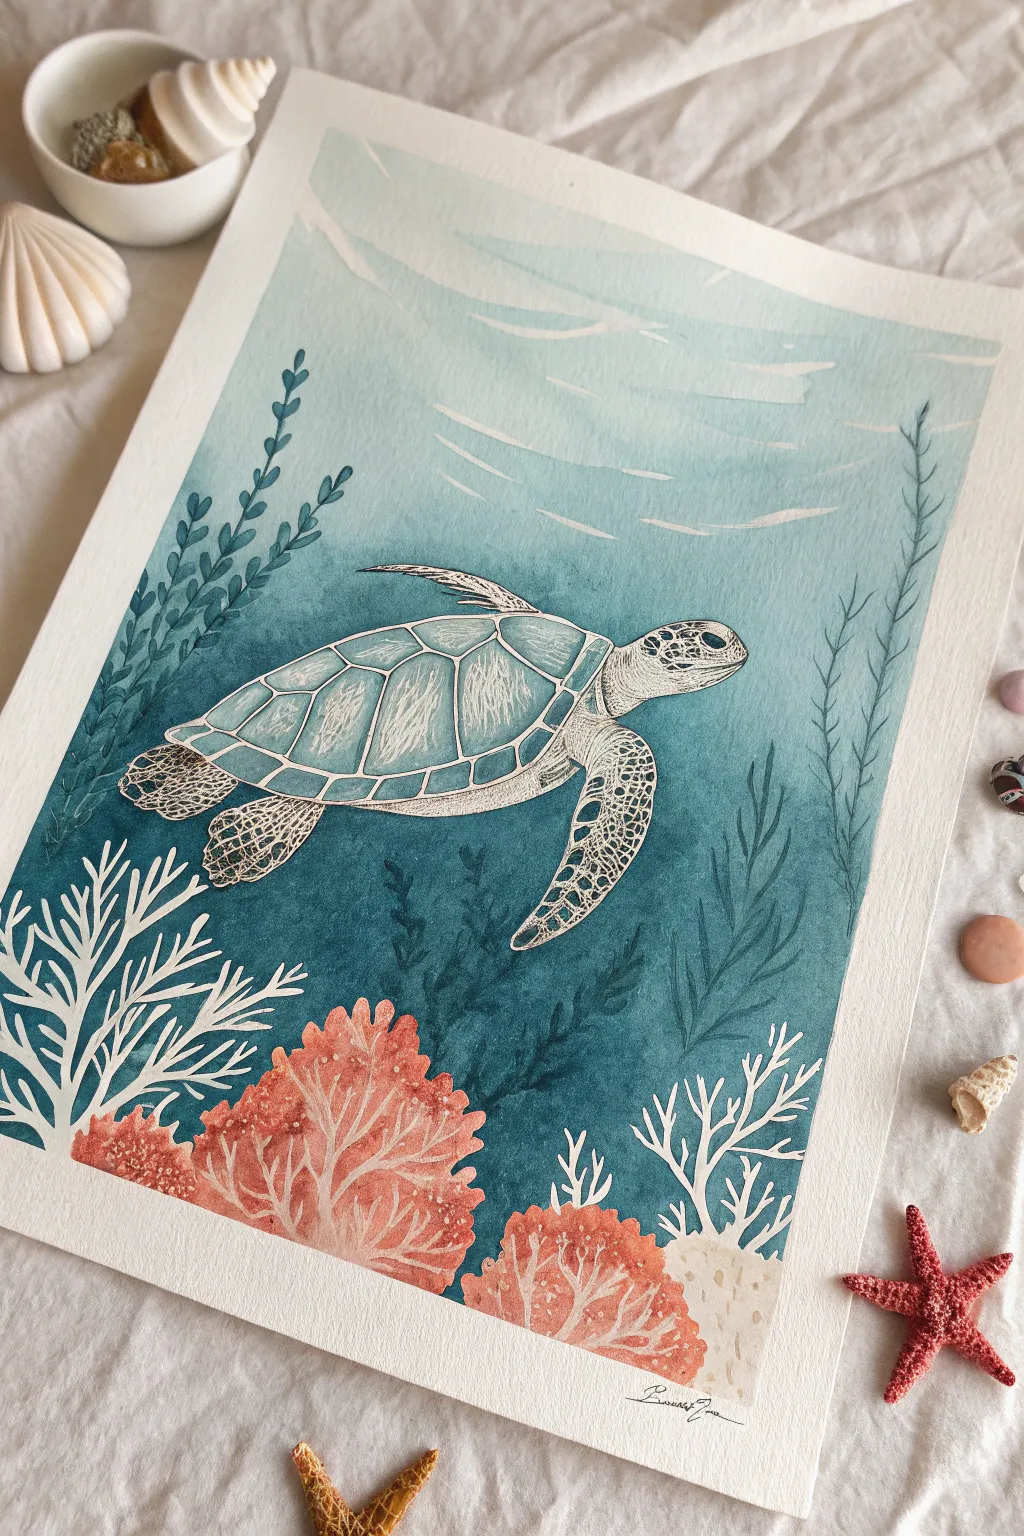
Capture the serene beauty of marine life with this mixed-media piece featuring a detailed sea turtle gliding over a vibrant coral reef. This project combines the fluid transparency of watercolor with the crisp precision of white ink for a striking, illustrative look.
Step-by-Step
Materials
- Cold press watercolor paper (A4 or similar size)
- Watercolor paints (Turquoise, Indigo, Prussian Blue, Burnt Sienna, Coral/Pink)
- White gel pen or Posca marker (fine tip)
- Black fineliner pen (0.1mm and 0.3mm)
- Masking fluid (optional)
- Round watercolor brushes (sizes 4, 8, and a fine detail brush)
- Pencil (HB) and eraser
- Palette for mixing
Step 1: Sketching & Preparation
-
Establish the composition:
Lightly sketch the outline of the sea turtle in the center of your page, angling it slightly upwards as if swimming toward the surface. -
Outline the environment:
Draw the basic shapes of the coral structures at the bottom and the waving kelp strands on the sides. Keep these lines faint, as you want them to disappear later. -
Detail the turtle shell:
Map out the hexagonal scutes on the turtle’s shell and the texture on the flippers. Precision here will help when we add ink later. -
Masking (Optional):
If you are comfortable using masking fluid, apply it over the white coral branches and the sea turtle. This preserves the pure white of the paper, though you can also just paint around these areas carefully.
Pro Tip: Line Consistency
When using white gel pens over watercolor, ensure the paint is 100% dry. If the artistic pen tip clogs, scribble on your thumb or a rubber sole to get the ink flowing again.
Step 2: The Watercolor Wash
-
Mix your ocean gradient:
Prepare a large wash of turquoise and Prussian blue. You want a gradient that is lighter at the top (surface) and gets deeper and darker towards the bottom. -
Paint the background:
Apply the blue wash across the entire background, working wet-on-wet for a smooth transition. Be careful to paint *around* the turtle and the coral shapes if you didn’t use masking fluid. -
Deepen the depths:
While the paper is still damp, drop concentrated indigo or dark teal into the bottom third of the painting to create shadows behind the coral and kelp. -
Streaks of light:
Lift out some pigment horizontally near the top using a clean, thirsty brush to mimic sunlight filtering through the water surface.
Level Up: Metallic Accent
Use gold watercolor or a metallic gold pen to trace just the outer rim of the turtle’s shell or the centers of the coral. The subtle shimmer mimics sunlight hitting the reef.
Step 3: Painting the Elements
-
Base layer for coral:
Mix a soft coral or salmon pink shade. Paint the rounded coral structures at the bottom, varying the intensity to show volume. -
Adding kelp shadows:
Use a dark teal or green-blue mix to paint the silhouette-style kelp strands rising on the left and right sides. These should look slightly translucent. -
Turtle base coat:
Paint the turtle using a very pale, watered-down wash of blue-green for the skin and shell. Let the paint pool slightly in the shadowed areas of the flippers. -
Dry completely:
Wait for the entire piece to be bone dry. If you used masking fluid, gently rub it off now to reveal the pristine white paper.
Step 4: Inking & DETAILS
-
White coral details:
Using your white gel pen or Posca marker, draw the intricate branching coral structures on the left and right. Make sure the lines are opaque and crisp against the blue background. -
Texturing the pink coral:
Add white veining and small dots to the pink coral mounds to simulate their porous texture. -
Defining the turtle:
Use the white pen to outline the turtle’s shell segments (scutes) and add the scaly texture to the head and flippers. I like to hatch lines inside the shell scutes for a worn, realistic texture. -
Adding depth with black ink:
Take your black fineliner and very selectively add shadows to the turtle’s eye, the underside of the flippers, and the deepest crevices of the shell to make the figure pop. -
Surface ripples:
Add a few faint, horizontal white lines near the top of the water to suggest current and movement. -
Final touches:
Review the balance of the piece. If the background feels too flat, use colored pencils to gently shade around the white coral branches to help them stand out.
Step back and admire your tranquil underwater scene, perfect for framing or gifting to an ocean lover
BRUSH GUIDE
The Right Brush for Every Stroke
From clean lines to bold texture — master brush choice, stroke control, and essential techniques.
Explore the Full Guide
Octopus With Flowing Tentacles
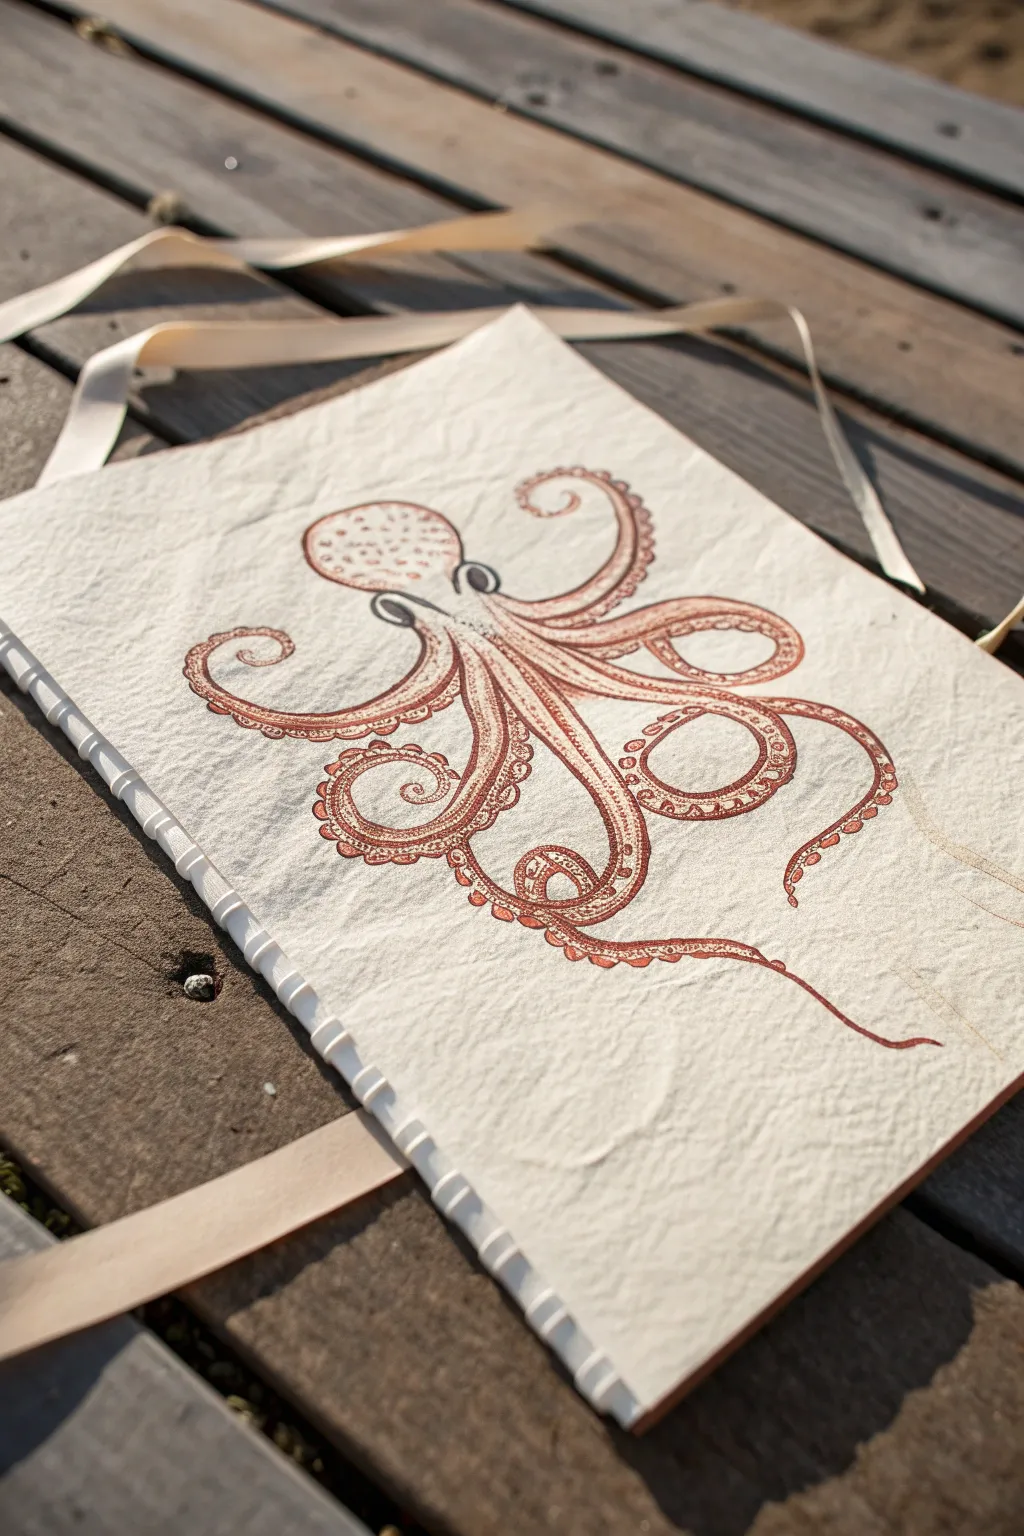
Capture the fluid elegance of the deep sea with this vintage-style octopus illustration on textured handmade paper. The combination of rusted red tones and crinkled paper creates an artifact-like quality that feels timeless and organic.
Detailed Instructions
Materials
- Handmade cotton rag paper (deckled edge)
- Sepia or terracotta waterproof fine-liner pen (0.1mm and 0.3mm)
- Watercolor paint (Burnt Sienna or Red Iron Oxide)
- Small round watercolor brush (size 2 or 4)
- Pencil (HB)
- Kneadable eraser
- Paper towels
- Water cup
Step 1: Drafting the Form
-
Center the head:
Begin by lightly sketching the mantle (the head) of the octopus in the upper-left center of your paper. Draw an oval shape slightly tilted to the left, like a deflated balloon. -
Map the eyes:
Just below the mantle, sketch two small circles for the eyes. The eye on the left should be slightly more prominent to suggest a three-quarter perspective. -
Establish the central flowing point:
Mark a central point below the eyes where all arms will converge. This doesn’t need to be perfect, just a guide for where the limbs originate. -
Sketch the first sweeping arms:
Draw the two top-most tentacles first. Curve the right one upwards in a gentle ‘S’ shape, and the left one curling back slightly towards the body. -
Fill in the lower tentacles:
Sketch the remaining arms radiating downwards. Ensure they twist and curl rather than hanging straight. Create varied loops—some tight, some loose—to mimic underwater movement. -
Refine the suction cups:
Lightly trace parallel lines along the underside of each tentacle to designate where the suckers will go. I find it helpful to draw small circles along these paths now to plan their spacing, making them smaller as they reach the tips.
Bleeding Lines?
Handmade paper is very thirsty. If your ink bleeds, switch to a pigment liner specifically marked ‘waterproof’ and let the ink cure for at least 30 minutes before painting.
Step 2: Inking the Outline
-
Outline the mantle:
Using your 0.3mm sepia pen, carefully trace the outline of the head. Use broken, organic lines rather than a solid stroke to complement the paper’s texture. -
Ink the arm contours:
Go over your pencil lines for the top edge of each tentacle. Keep your hand loose; a little wobble adds character to an organic subject like this. -
Detail the suckers:
Switch to the finer 0.1mm pen. Outline each individual suction cup. Draw a tiny ‘c’ shape or dot inside each circle to give them depth and a cup-like appearance. -
Add skin texture:
On the mantle and the upper parts of the arms, add tiny stippled dots and small irregular circles. This mimics the rough, bumpy texture of octopus skin. -
Erase pencil guides:
Once the ink is completely dry (give it a few extra minutes on this absorbent paper), gently roll a kneadable eraser over the drawing to lift the graphite.
Step 3: Adding the Wash
-
Mix your wash:
Dilute your Burnt Sienna watercolor with plenty of water. You want a very pale, transparent tea-like consistency for the first layer. -
Base layer color:
Gently paint over the entire octopus, staying roughly within the lines. The textured paper will grab the pigment unevenly, creating a lovely natural mottling effect. -
Deepen the shadows:
While the first layer is still slightly damp, drop a more concentrated mix of paint into the shadowed areas: under the mantle, beneath the arm curls, and between the tentacles. -
Accentuate the suckers:
Dip your fine brush into concentrated paint (less water) and carefully touch the center of the larger suction cups. This creates a high-contrast focal point on the limbs. -
Final texture splatter:
Load your brush with watery paint and tap it against your finger to flick tiny speckles over the drawing. This integrates the artwork with the rustic paper texture.
Antique Finish
Brew a cup of strong black tea and brush it over the empty background areas of the paper. This ages the page instantly, making your drawing look like a 19th-century specimen chart.
Allow your artwork to dry flat completely before framing or binding it into a journal to preserve the paper’s unique wave.
Seahorse in a Kelp Forest
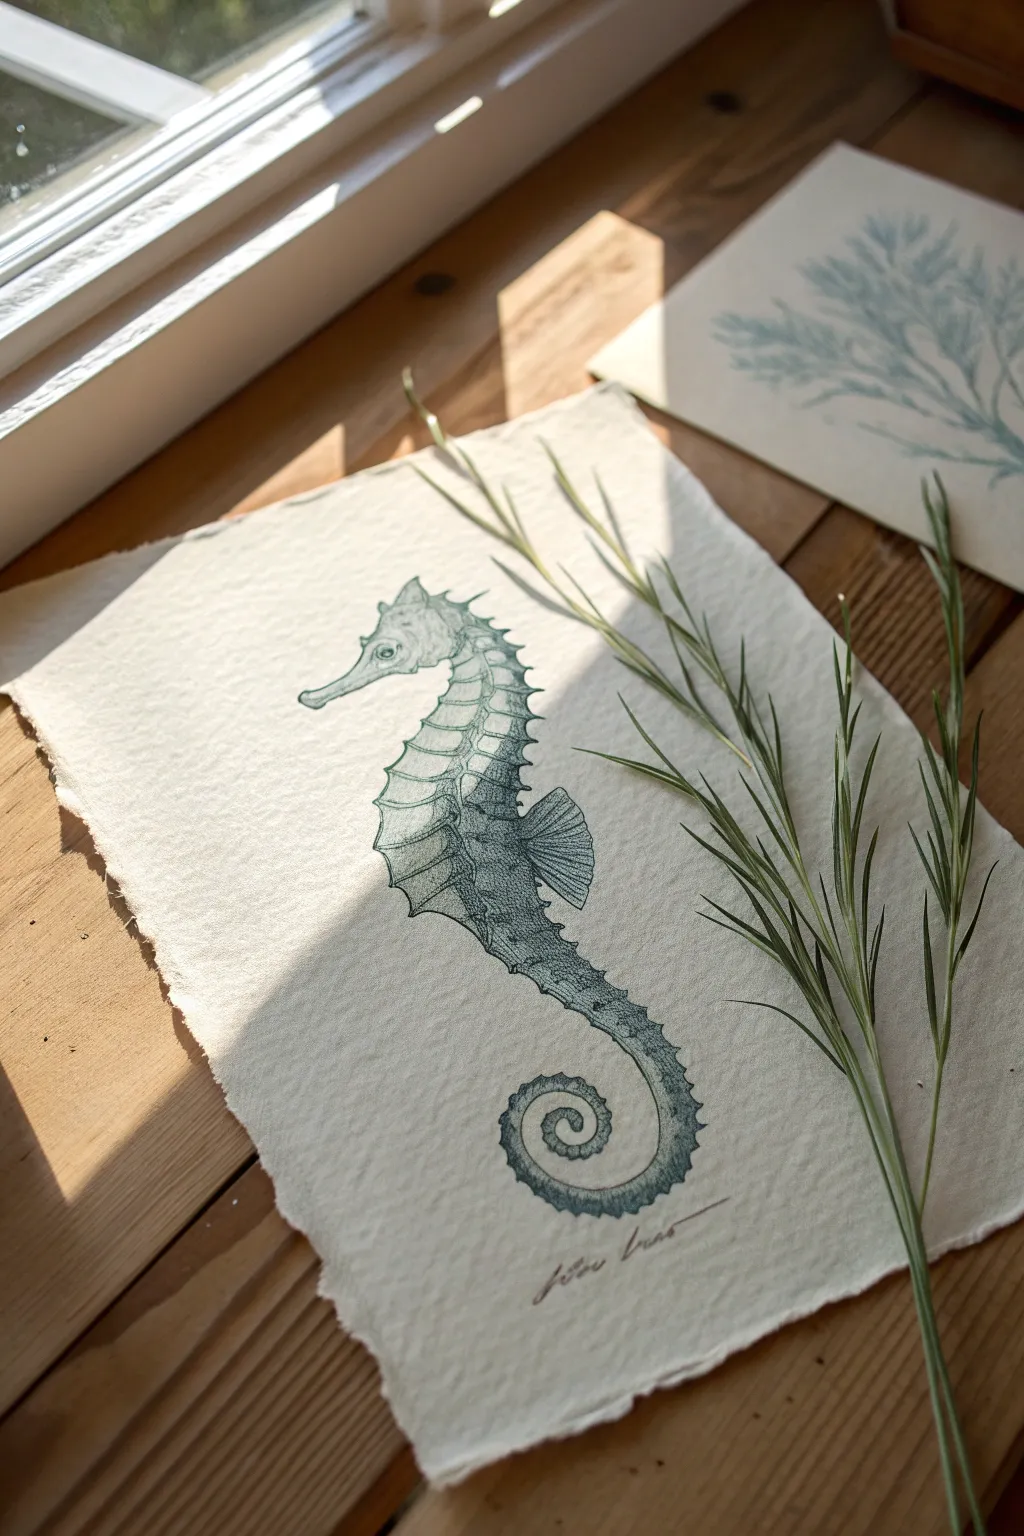
Capture the elegance of marine life with this intricate seahorse study, reminiscent of 19th-century scientific etchings. Using fine liner pens on textured handmade paper creates a timeless, organic piece perfect for coastal decor.
Step-by-Step
Materials
- Heavyweight handmade cotton rag paper (deckled edge)
- Fine liner pens (0.05, 0.1, and 0.3 sizes) in teal or slate grey
- HB Graphite pencil
- Kneaded eraser
- Reference image of a seahorse
- Smooth work surface
Step 1: Planning and Sketching
-
Prepare your paper:
Begin by selecting a high-quality sheet of handmade cotton rag paper. The texture is crucial for this look, so choose a piece with a visible grain and deckled edges. Tape the corners down lightly if the paper wants to curl. -
Map the S-curve:
Using your H pencil very lightly, draw a sweeping ‘S’ shape down the center of the paper. This gesture line will serve as the spine of the seahorse and determine the flow of the composition. -
Block in basic shapes:
Sketch a small oval at the top of the S-curve for the head, a wider oval for the chest, and a tapering line that curls into a spiral at the bottom for the tail. Keep these lines faint. -
Refine the outline:
Connect your shapes to form the continuous contour of the seahorse body. Add the snout, the small coronet on top of the head, and the dorsal fin on the back. Pay attention to the segmented, armor-like ridges along the body.
Step 2: Inking the Contours
-
Start the primary outline:
Switch to your 0.1 fine liner pen. I prefer to start at the snout and work downwards so I don’t smudge the ink. Trace your pencil lines with a steady hand, but allow the texture of the paper to break the line slightly for an antique feel. -
Define the segments:
Draw the horizontal ridges that run down the seahorse’s body. These should curve slightly around the form to demonstrate volume—curving upward on the chest and downward on the tail. -
Add facial details:
Carefully ink the eye, leaving a tiny white highlight to bring it to life. Define the mouth and the bony structure of the cheek. -
Erase pencil guides:
Once the basic outline ink is completely dry—give it a full five minutes—gently roll your kneaded eraser over the drawing to lift the graphite sketches without damaging the paper surface.
Paper Choice Matters
Using cold-press watercolor paper or handmade cotton rag is essential. The ‘tooth’ of the paper breaks up ink lines naturally, creating that instant vintage aesthetic without extra effort.
Step 3: Shading and Texture
-
Establish the light source:
Decide where your light is coming from (usually top-left). This means shadows will fall on the right side of the body and underneath the ridges. -
Begin stippling:
Using your finest 0.05 pen, start adding tiny dots (stippling) inside the body segments. Concentrate the dots on the shadowed side (the right side) to create a gradient from dark to light. -
Add hatching to the ridges:
For the bony plates, use short, parallel diagonal lines (hatching). Keep the lines closer together in shadow areas and further apart in highlighted areas. -
Detail the dorsal fin:
Draw fine, radiating lines on the fin using the 0.05 pen. These lines should fan out like sunbeams. Add a second layer of shorter lines at the base of the fin to show shadow. -
Darken the shadows:
Switch to the 0.3 pen to deepen the darkest areas, particularly under the chin, beneath the dorsal fin, and on the inner curve of the tail spiral. This contrast makes the drawing pop. -
Enhance texturing:
Go back over the mid-tones with cross-hatching (diagonal lines in the opposite direction) to build up richness. The texture of the handmade paper will naturally help create a distressed look. -
Final touches:
Sign your name at the bottom in a cursive, vintage style using a sharp pencil or the 0.1 pen. Check the drawing from a distance and darken any areas that look too flat.
Old World Aging
To simulate an antique specimen preservation page, lightly stain the paper edges with a damp tea bag before drawing. Let it dry completely flat under a heavy book.
Now you have a stunning piece of marine art that looks like it came straight from a naturalist’s field journal.

PENCIL GUIDE
Understanding Pencil Grades from H to B
From first sketch to finished drawing — learn pencil grades, line control, and shading techniques.
Explore the Full Guide
Deep-Sea Angler Mystery
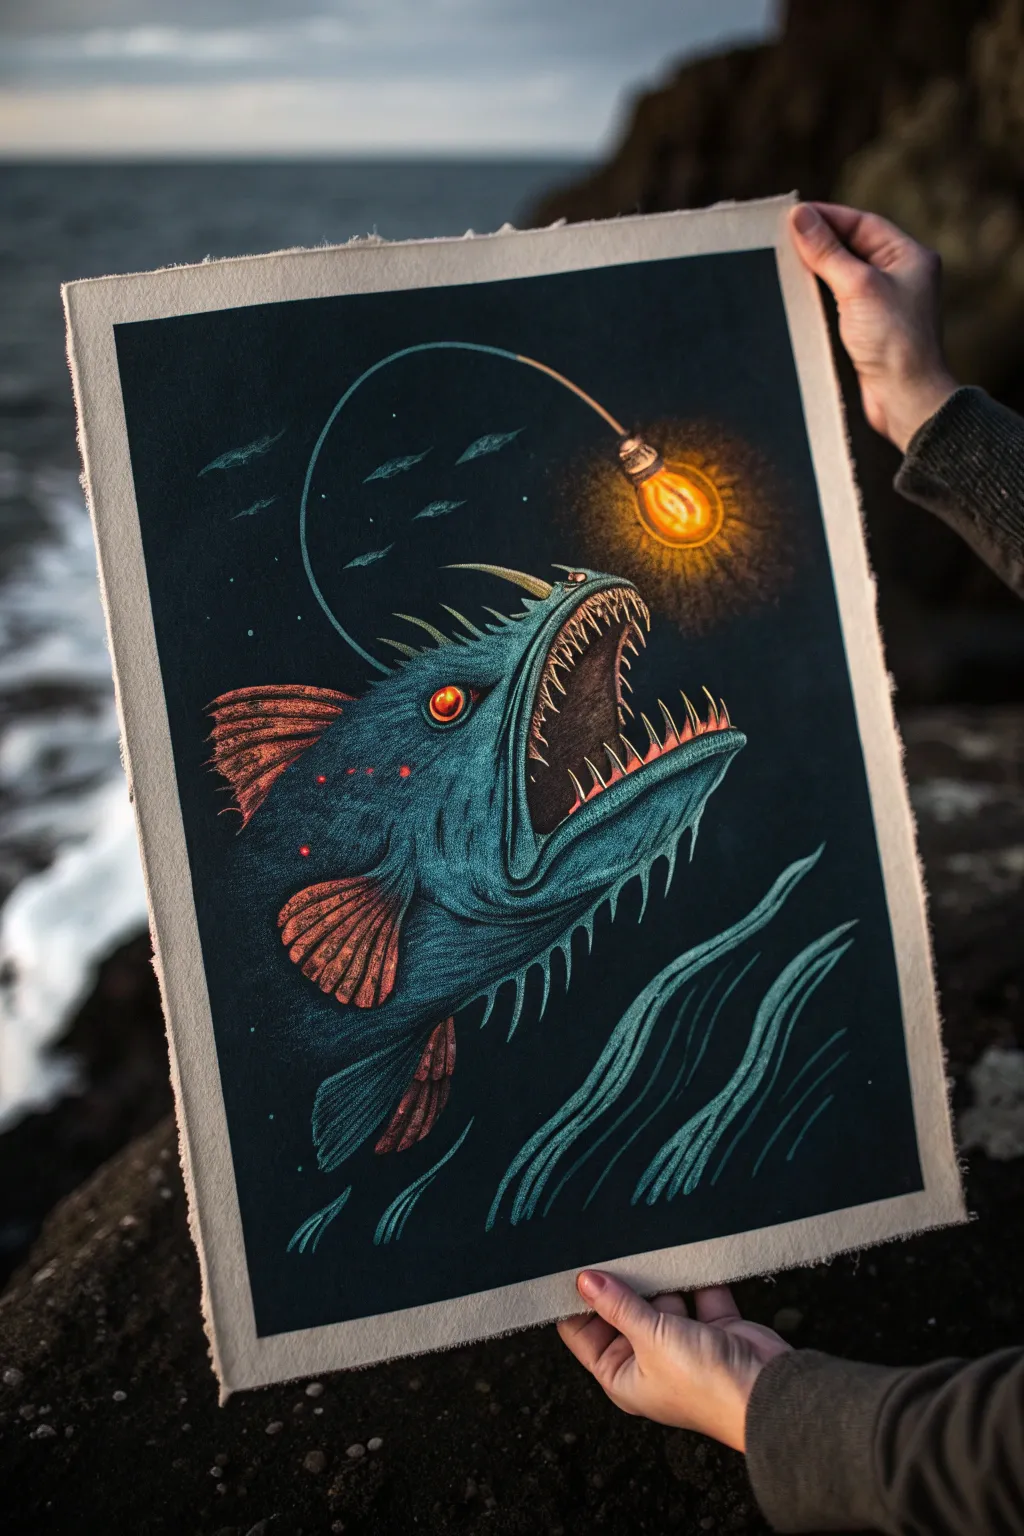
Dive into the abyss with this strikingly stylized deep-sea anglerfish illustration. Using opaque media on dark paper creates an eerie, glowing effect that brings the creature’s bioluminescent lure and menacing teeth to life against the midnight blue depths.
Step-by-Step Guide
Materials
- Heavyweight dark blue or black mixed-media paper (A3 size)
- White gel pen or fine-point white paint marker
- Gouache paints (Cyan, Magenta, Yellow, White, Black)
- Colored pencils (Prismacolor or similar soft core: bright orange, red, teal, yellow)
- Synthetic brushes (Round 2, Flat 6)
- Graphite pencil (HB) and eraser
- Spray fixative (matte)
Step 1: Planning the Predator
-
Lay the foundation:
Begin by sketching the basic oval shape of the anglerfish’s body diagonally across the paper with your graphite pencil. Keep the lines incredibly faint so they don’t show through later. -
Define the jaw:
Carve out the massive, gaping mouth. The jaw should take up nearly a third of the head space, angled upwards to suggest aggressive movement. -
Add key features:
Sketch the prominent, jagged teeth, the small angry eye just behind the jaw hinge, and the swaying dorsal fins. -
The lure structure:
Draw the long, curved illicium (the fishing rod part) arching from the forehead. Instead of a biological bulb, sketch a classic hanging lightbulb shape at the end for a surreal twist.
Gouache Consistency
Keep your gouache the consistency of heavy cream. Too watery and it will soak into the dark paper; too thick and it might crack when you draw pencil over it.
Step 2: Base Colors & Texture
-
Block in the body:
Using gouache, mix a dark teal color (cyan + touch of black + touch of yellow). Paint the main body, avoiding the fins, teeth, and eye. -
Add fin base:
Mix a muted coral red using magenta and yellow with a tiny dot of white. Apply this as a flat base coat to the dorsal and pectoral fins. -
Deepen the shadows:
While the paint is dry, use a black or very dark blue colored pencil to shade the bottom belly of the fish and the interior of the mouth abyss. -
Create scale texture:
Take a teal colored pencil lighter than your paint base. Start drawing short, curved hatching lines all over the skin to mimic rough, shark-like skin texture.
Step 3: The Glow & Details
-
Paint the teeth:
Use white gouache or a paint pen to fill in the teeth. They don’t need to be perfectly opaque; a little translucency makes them look bony. -
Highlight the eye:
Color the iris with a bright orange pencil, leaving a pure black pupil. Add a tiny dot of white for the reflection. -
Fin details:
Layer bright orange and red colored pencils over the dried fin paint. Draw stark, linear striations to give the fins a ribbed, skeletal appearance. -
The lightbulb filament:
Paint the glass bulb shape with a translucent yellow wash. Once dry, use a fine brush with intense orange paint to draw the glowing filament inside. -
Creating the halo:
Using a soft yellow pastel or dry-brushed gouache, gently stipple a circle of light around the bulb. Fade this out into the dark paper. -
Illuminating the rod:
Trace the curved rod with a light blue or white pencil. Make the line stronger near the bulb where the light hits it.
Level Up: Metallic Pop
Use metallic gold watercolor or ink for the filament inside the lightbulb. It will catch the light in the room and make the drawing literally shine.
Step 4: Atmosphere & Final Touches
-
Add skin highlights:
I find that adding small spots of bright cyan pencil along the upper ridge of the back helps separate the fish from the dark background. -
Red bioluminescence:
dotted small red spots along the fish’s lateral line using a gel pen or paint marker for extra sci-fi detail. -
Background currents:
Draw flowing, ribbon-like seaweed shapes at the bottom right using teal and light blue pencils to suggest deep currents. -
Distant shoals:
Sketch very faint, small fish silhouettes in the background using a dark grey pencil. They should barely be visible. -
Final rim light:
Add a crisp, thin line of white or pale yellow along the top edge of the fish’s head and the teeth nearest the lightbulb to show the cast light.
Seal your deep-sea creature with a light mist of fixative to protect the pencil work from smudging
Oddball Deep-Sea Creature Sketch
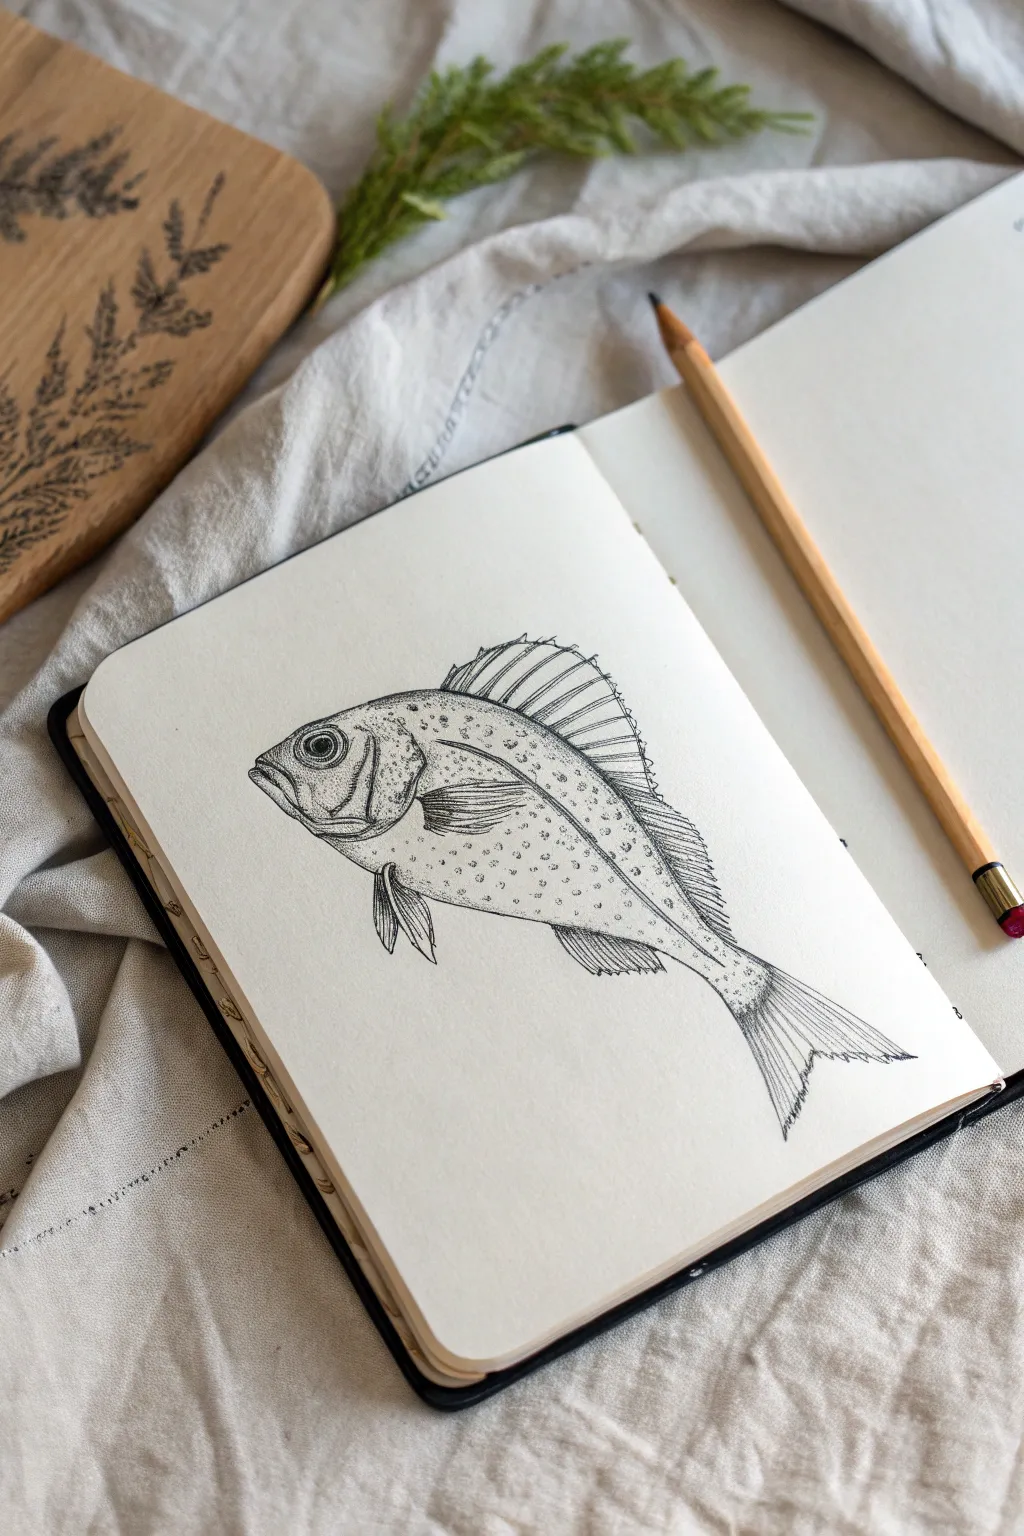
Capture the intricate details of a deep-sea specimen using fine liners and patience. This project combines crisp outlines with delicate stippling to create a textured, scientifically-inspired illustration of a rockfish or perch.
How-To Guide
Materials
- Sketchbook with smooth heavyweight paper (hot press watercolor or bristol)
- HB graphite pencil
- Kneaded eraser
- Fine liner pens (sizes 0.05mm, 0.1mm, and 0.3mm)
- Reference photo of a rockfish or ocean perch
Step 1: Pencil Under-drawing
-
Basic Shapes:
Start with your HB pencil, drawing a large oval for the main body. Add a triangle shape at the back for the tail section and a smaller, rounded shape at the front for the head. -
Define the Contour:
Refine the outline by connecting your shapes. Slope the forehead down steeply to the mouth and create a distinct curve for the belly. Keep your pencil pressure very light so these lines can be erased later. -
Placing Features:
Draw a large circle for the eye, placing it relatively high on the head. Sketch the curved line of the gill cover (operculum) behind the eye, ensuring it creates a ‘cheek’ area. -
Fin Framework:
Map out the dorsal fin on top using a spiky, undulating line. Sketch the pectoral fin on the side, the pelvic fin underneath, and the fantail at the back. Don’t worry about the spines yet, just get the overall shapes.
Ink Smudging?
If you are left-handed or working quickly, place a piece of scrap paper under your drawing hand. This acts as a shield to prevent oils and friction from smearing fresh ink.
Step 2: Inking the Outline
-
Main Lines:
Switch to a 0.3mm fine liner. Carefully trace the main outer contour of the fish. Use confident, single strokes rather than feathery lines to get a clean scientific look. -
Eye Detail:
Using a 0.1mm pen, outline the eye. Draw the pupil in the center and leave a small, white highlight un-inked to give the fish life. Fill the pupil black. -
Fin Spines:
With the 0.1mm pen, draw the structural spines inside the dorsal and tail fins. These should radiate outward. Keep the lines slightly imperfect to mimic organic texture. -
The Mouth and Gills:
Ink the frown of the mouth and the overlapping plates of the gill cover. Use broken lines slightly here to suggest where skin folds over bone. -
Clean Up:
Once the ink is completely dry (wait at least five minutes to avoid smudges), gently erase all your pencil guides with the kneaded eraser.
Step 3: Texture and Shading
-
Initial Stippling:
Switch to your finest pen, the 0.05mm. Begin adding tiny dots (stippling) along the top ridge of the back. I like to cluster them denser near the outline and spread them out as they move toward the center. -
Texturing the Body:
Instead of drawing individual scales, use groups of dots to suggest distinct patches on the skin. This fish has a speckled appearance, so create small, loose clusters of dots across the flank. -
Shading the Fins:
Add linear hatching lines to the fins. Draw thin lines parallel to the spines you drew earlier, starting from the base of the fin and fading out halfway up. -
Darkening the Underside:
Add density to the belly area. Use the 0.1mm pen to add heavier dots along the bottom curve of the fish. This shadow weight helps ground the drawing. -
Operculum Details:
Detail the gill cover and cheek with very fine dots. This area is bony and textured, so the stippling helps distinguish it from the softer body. -
Defining the Lateral Line:
Create a subtle lateral line running from the gills to the tail by leaving a thin strip of negative space free of dots, or by arranging dots in a faint row. -
Final Contrast Check:
Step back and squint at your drawing. If the eye or the gill shadow needs more depth, go back in with the 0.3mm pen and add a few strategic dark accents.
Go Antique
To mimic an old textbook illustration, lightly stain your paper with tea before drawing. Once dry, the ivory tone combined with the fine liner creates a vintage specimen look.
Close your sketchbook knowing you’ve preserved a small piece of the ocean depths on paper


Skull Wrapped in Tropical Vines
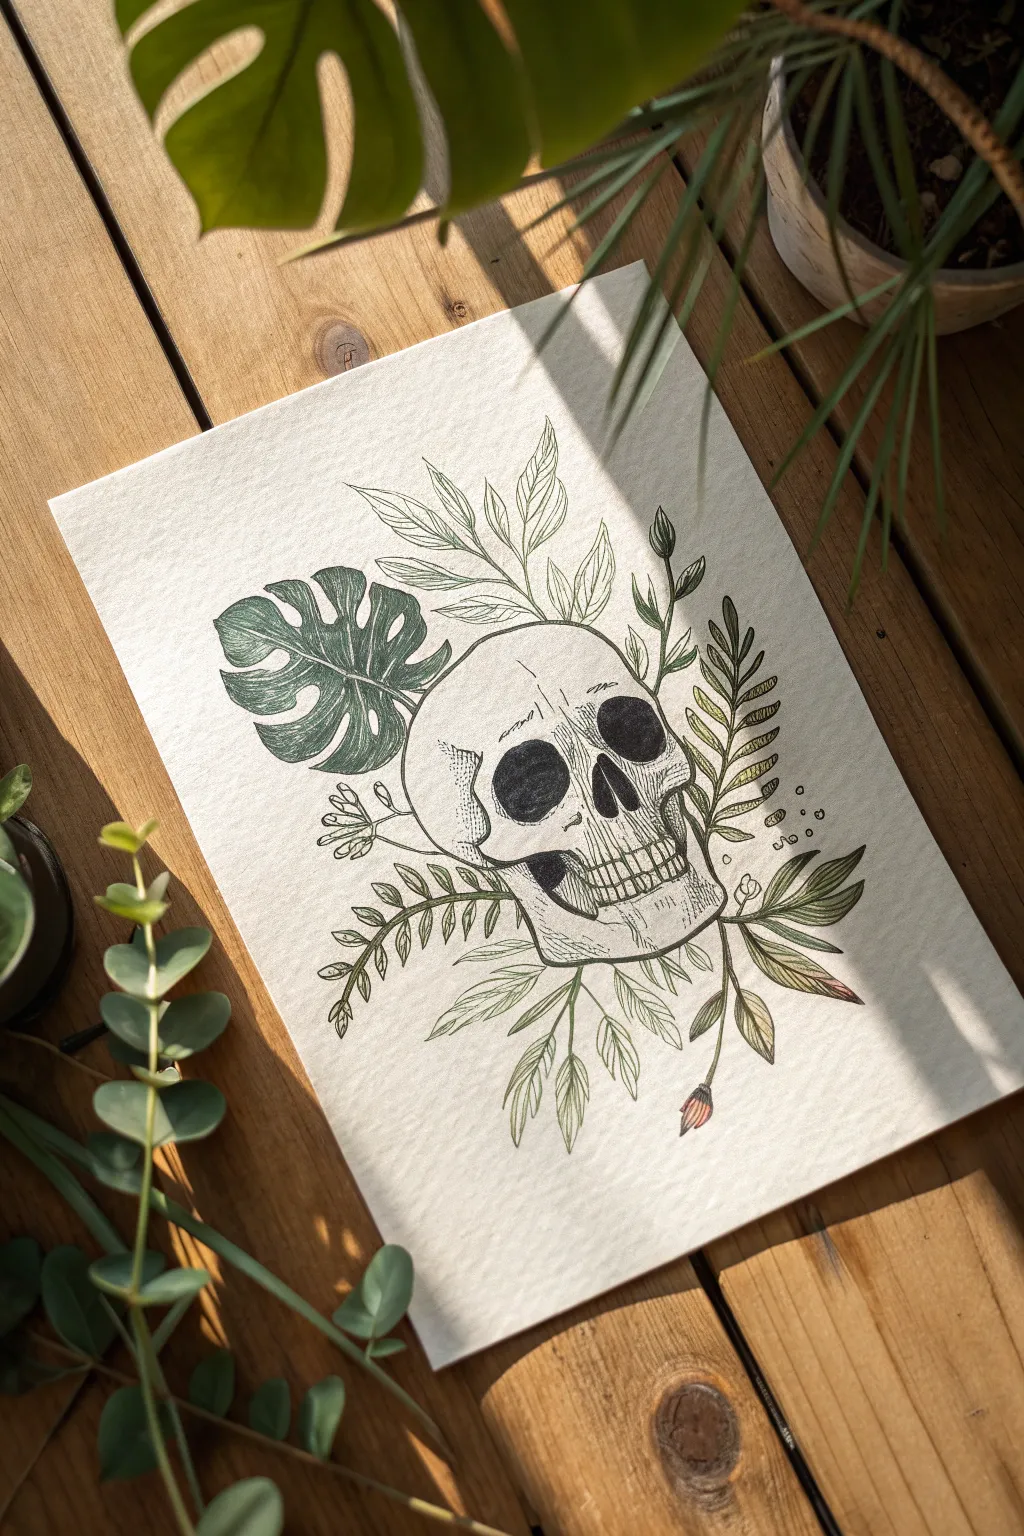
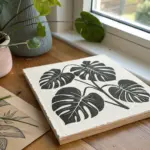
Marrying the macabre with lush botanical elements, this fine-line illustration features a detailed human skull nestled among monstera leaves and ferns. Using stippling and hatching techniques creates beautiful texture, while subtle green accents bring the foliage to life.
Step-by-Step Tutorial
Materials
- Heavyweight drawing paper (smooth bristol or hot press watercolor paper)
- H or HB pencil for sketching
- Kneaded eraser
- Fine liner pens (sizes 005, 01, and 03)
- Colored pencils or alcohol markers (in sage green, forest green, and muted pink)
- Ruler (optional for centering)
Step 1: Structural Sketching
-
Basic Skull Shape:
Begin by lightly sketching the cranium as a rounded dome shape in the center of your paper. Add a U-shaped jawline below it, leaving room for the cheekbones. -
Facial Features:
Map out large, darkened eye sockets that are slightly asymmetrical. Draw the triangular nasal cavity and outline the teeth row, keeping lines faint so they can be adjusted. -
Adding Foliage:
Draw the main monstera leaf emerging from the top left of the skull. Add fern-like fronds growing upward on the right side and draping downward from the jaw. -
Refining Lines:
Go over your sketch to define the edges of the vines and leaves, ensuring they appear to tuck behind and wrap around the bone structure naturally.
Don’t Connect Every Line
When inking the cracks in the skull or the edges of teeth, break your lines slightly. Continuous solid lines can make the object look cartoonish rather than organic and weathered.
Step 2: Inking the Outlines
-
Initial Outline:
Using an 01 fine liner, carefully trace the main contours of the skull. Don’t make the line perfectly smooth; small imperfections add character to the bone. -
Leaf Detailing:
Outline the leaves, paying attention to the unique splits in the monstera leaf. Use swift, confident strokes for the fern stems to keep them looking organic. -
Blackout Areas:
Switch to an 03 pen to fill in the eye sockets and nasal cavity. Fill these completely solid, but leave tiny white gaps or stippling near the edges for depth. -
Teeth Definition:
Switch to your smallest pen (005) to detail the teeth. Instead of drawing individual squares, focus on the curves of the gum line and the separation between top and bottom rows.
Smudged Ink?
If you accidentally smudge wet ink, turn it into a shadow or a dark crack in the bone. You can also add extra stippling over the mistake to blend it into the texture of the skull.
Step 3: Shading and Texture
-
Stippling the Bone:
Using the 005 pen, apply stippling (tiny dots) around the edges of the skull, under the cheekbones, and near where the leaves touch the bone to create shadow. -
Hatching Technique:
Add fine hatching lines on the side of the cranium and jaw. Keep these lines parallel and close together to suggest the curvature of the spherical shape. -
Leaf Veins:
Draw central veins in your leaves. For the ferns, add delicate lines radiating from the center; for the broad leaves, add subtle texture lines following the leaf shape. -
Deepening Shadows:
Go back with your 01 pen and thicken the outlines where shadows would naturally fall, such as beneath the jaw and under the main vine overlaps.
Step 4: Adding Color
-
Base Greenery:
Take a muted sage green pencil or marker and lightly color the monstera leaf. Leave some areas white for highlights to simulate a glossy texture. -
Fern Application:
Color the fern fronds with a slightly lighter olive tone. I like to keep the coloring somewhat loose and scratchy to match the vintage botanical illustration style. -
Tiny Accents:
Find the small flower bud at the bottom right. Add a touch of muted pink to the tip and a dark green to its base. -
Final Cleanup:
Once the ink is completely dry, use your kneaded eraser to gently lift any remaining graphite guidelines, leaving a crisp, clean illustration.
Now your illustration has that perfect balance of structure and organic flow, ready to be framed or gifted
Falling Figure Through a Starry Portal
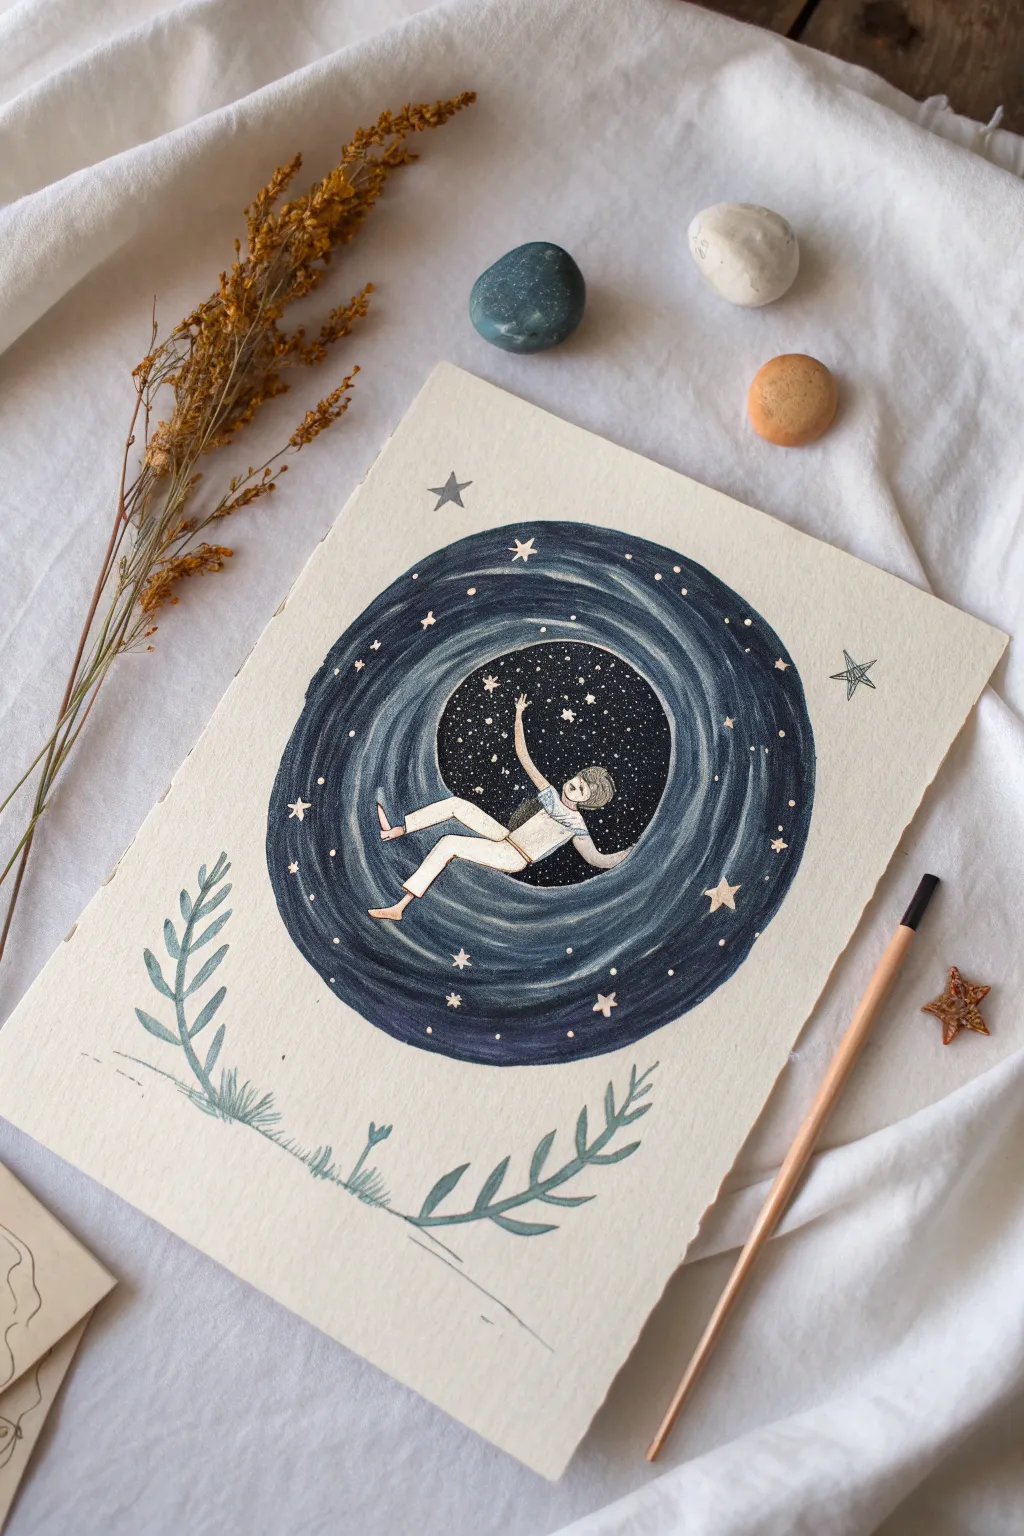
Capture the dreamlike sensation of weightlessness with this enchanting illustration featuring a figure tumbling through a swirling cosmic portal. The artwork combines deep, moody blues with delicate line work to create a sense of movement and celestial wonder.
Step-by-Step
Materials
- Heavyweight cold-press watercolor paper (300 gsm)
- Pencil (HB or similar for sketching)
- Kneaded eraser
- Navy blue and black watercolor or gouache paints
- Fine liner or dip pen with black ink
- White gel pen or opaque white gouache
- Small round brushes (Size 0 and 2)
- Circular stencil or compass
- Painters tape (optional for edges)
Step 1: Sketching the Composition
-
Outline the portal:
Begin by lightly tracing a large circle in the center of your paper using a compass or by tracing a bowl. This will be the outer boundary of your cosmic swirl. -
Create the inner void:
Draw a smaller, slightly off-center circle inside the first one. This creates the ‘opening’ or the deepest part of the portal where the figure will be placed. -
Sketch the falling figure:
Inside the smaller circle, lightly sketch a figure in a relaxed, falling pose. Orient their body diagonally, with one arm reaching up as if trying to catch a star. -
Add nature elements:
At the bottom left and right corners of the page, sketch simple, curved leafy branches. These frame the portal and ground the composition. -
Refine the lines:
Once you are happy with the positioning, gently erase excess graphite with your kneaded eraser until only ghost lines remain.
Uneven Swirls?
If your brushstrokes look choppy, re-wet the area slightly and drag a clean, damp flat brush in a continuous circle to smooth out the paint transitions.
Step 2: Painting the Cosmic Swirl
-
Mix your deep galaxy blue:
Combine navy blue with a touch of black to create a very dark, rich midnight hue. I find testing the color on a scrap piece helps ensure it’s dark enough. -
Block in the outer ring:
Paint the area between your inner and outer circle boundaries. Use long, curved brushstrokes that follow the circular shape to mimic a swirling motion. -
Create texture:
While the paint is still damp, lift a little pigment in spiral patterns using a thirsty (clean, damp) brush to suggest motion streaks within the vortex. -
Paint the inner void:
Fill the inner circle with your darkest possible black-blue mixture. Paint carefully around your sketched figure, leaving the body entirely white for now. -
Paint the foliage:
Using a diluted, lighter wash of your blue mix or a muted sage green, paint the leafy branches at the bottom. Keep these translucent and less saturated than the portal.
Make It Glossy
Once fully dry, apply a thin layer of iridescent medium or clear glitter glaze over the dark blue portal to make the galaxy truly shimmer in the light.
Step 3: Adding Detail and Stars
-
Outline the figure:
Once the background is completely bone-dry, use a fine detail brush or a black fine liner to ink the outline of the falling figure. -
Add character details:
Draw the hair, face, and simple clothing folds. Keep the style minimal and illustrative. -
Color the figure:
Use very diluted washes of color for the skin and clothing, or leave the paper bare for a high-contrast look. -
Create the stars:
Using opaque white gouache or a gel pen, dot thousands of tiny stars into the central black circle. Concentrate them heavily in the center for depth. -
Add movement lines:
Paint thin, curved white streaks in the outer blue ring, following the swirl direction. This emphasizes the spinning vortex effect. -
Place feature stars:
Draw a few larger, five-pointed stars scattered near the figure’s hand and outside the main circle to break the boundary. -
Final touches:
Add a few loose stars outside the main circle in grey or silver, and ensure your bottom foliage has definition with a few darker accent strokes.
Now you have a serene piece of art that captures the magic of falling into a dream


Have a question or want to share your own experience? I'd love to hear from you in the comments below!