If you can paint a circle, you can paint an eyeball pumpkin—and I mean that in the most encouraging, studio-chat kind of way. Let’s turn those pumpkins into creepy-cute eyes with simple shapes, juicy iris details, and just the right amount of bloodshot veins.
Classic Full-Sphere Eyeball Pumpkin
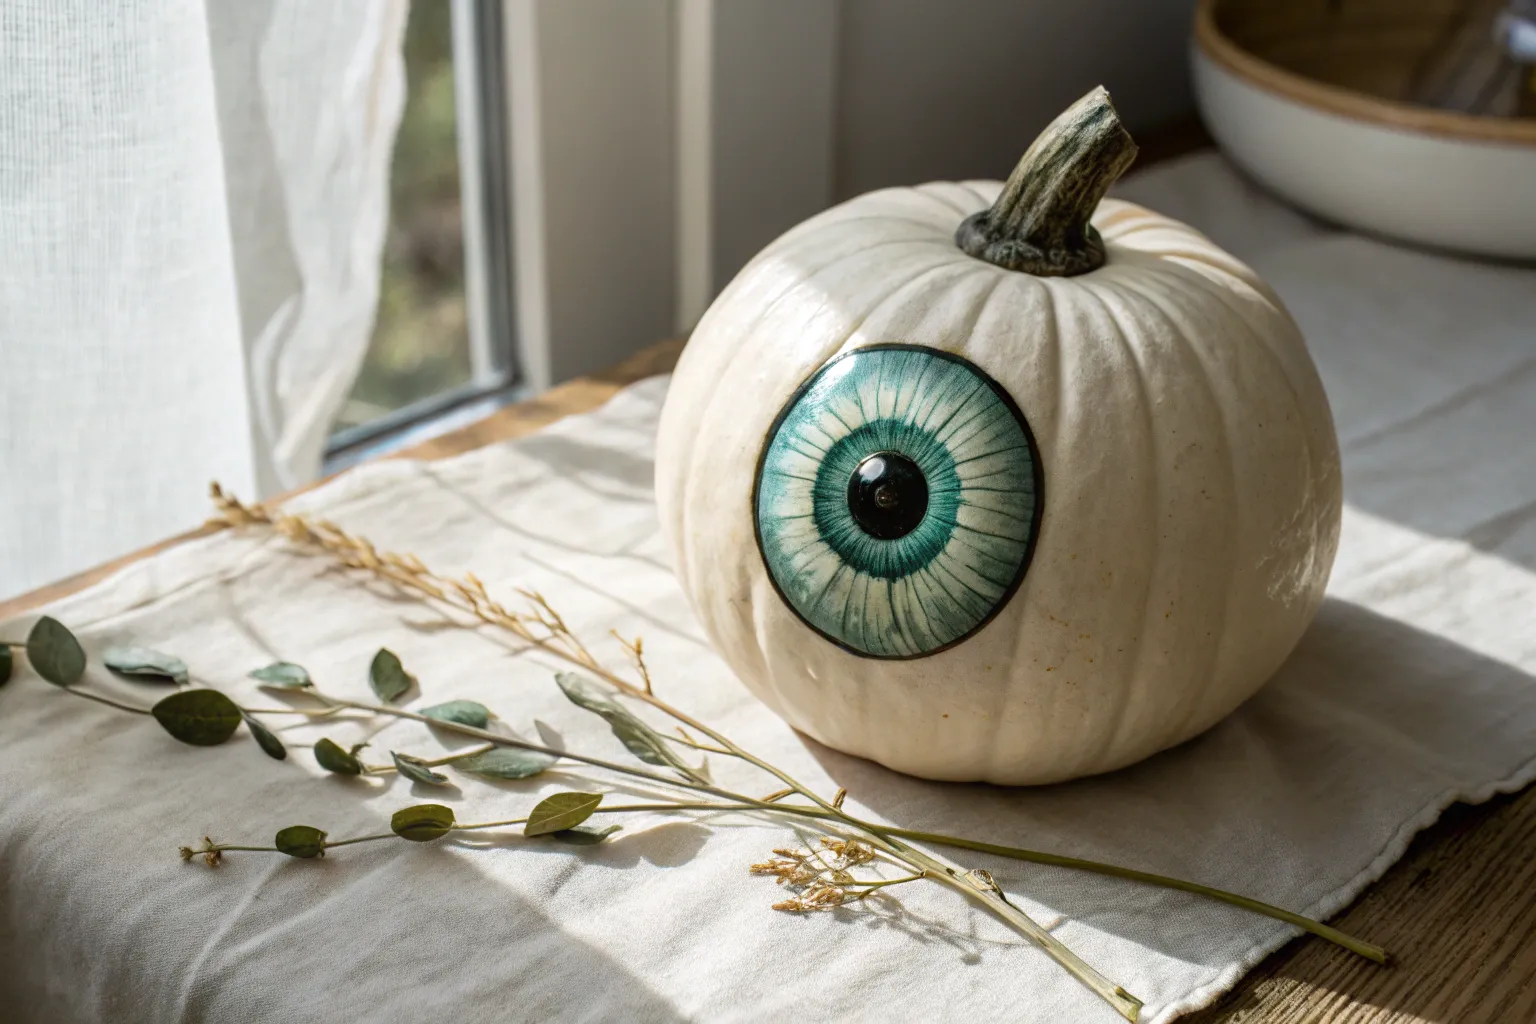
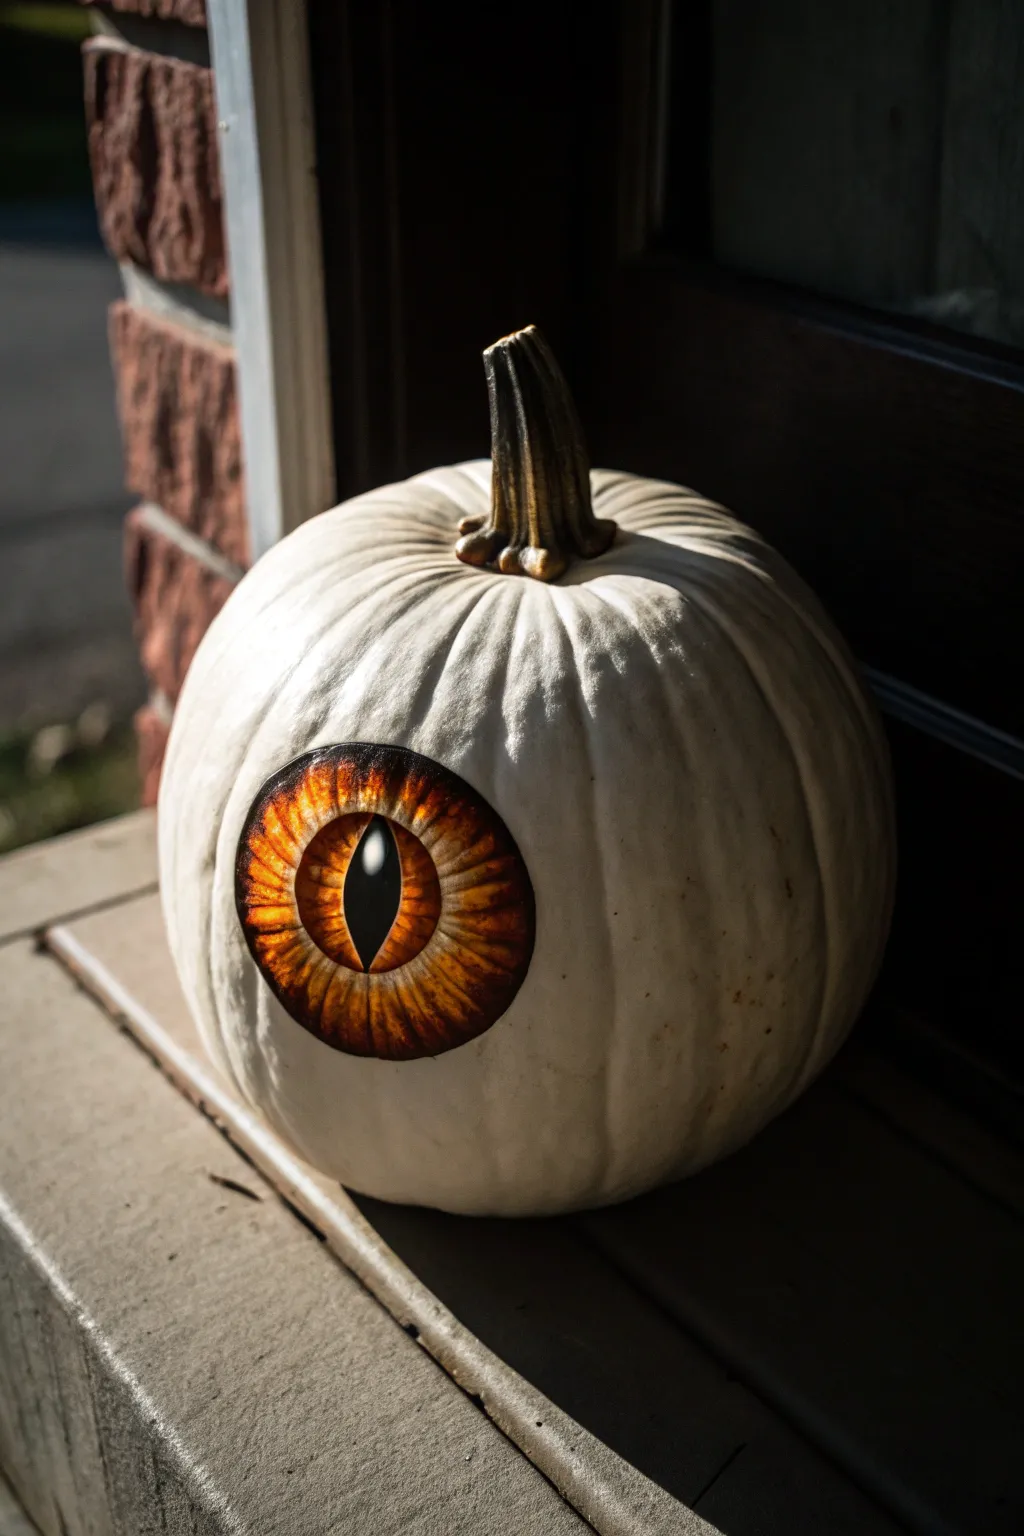
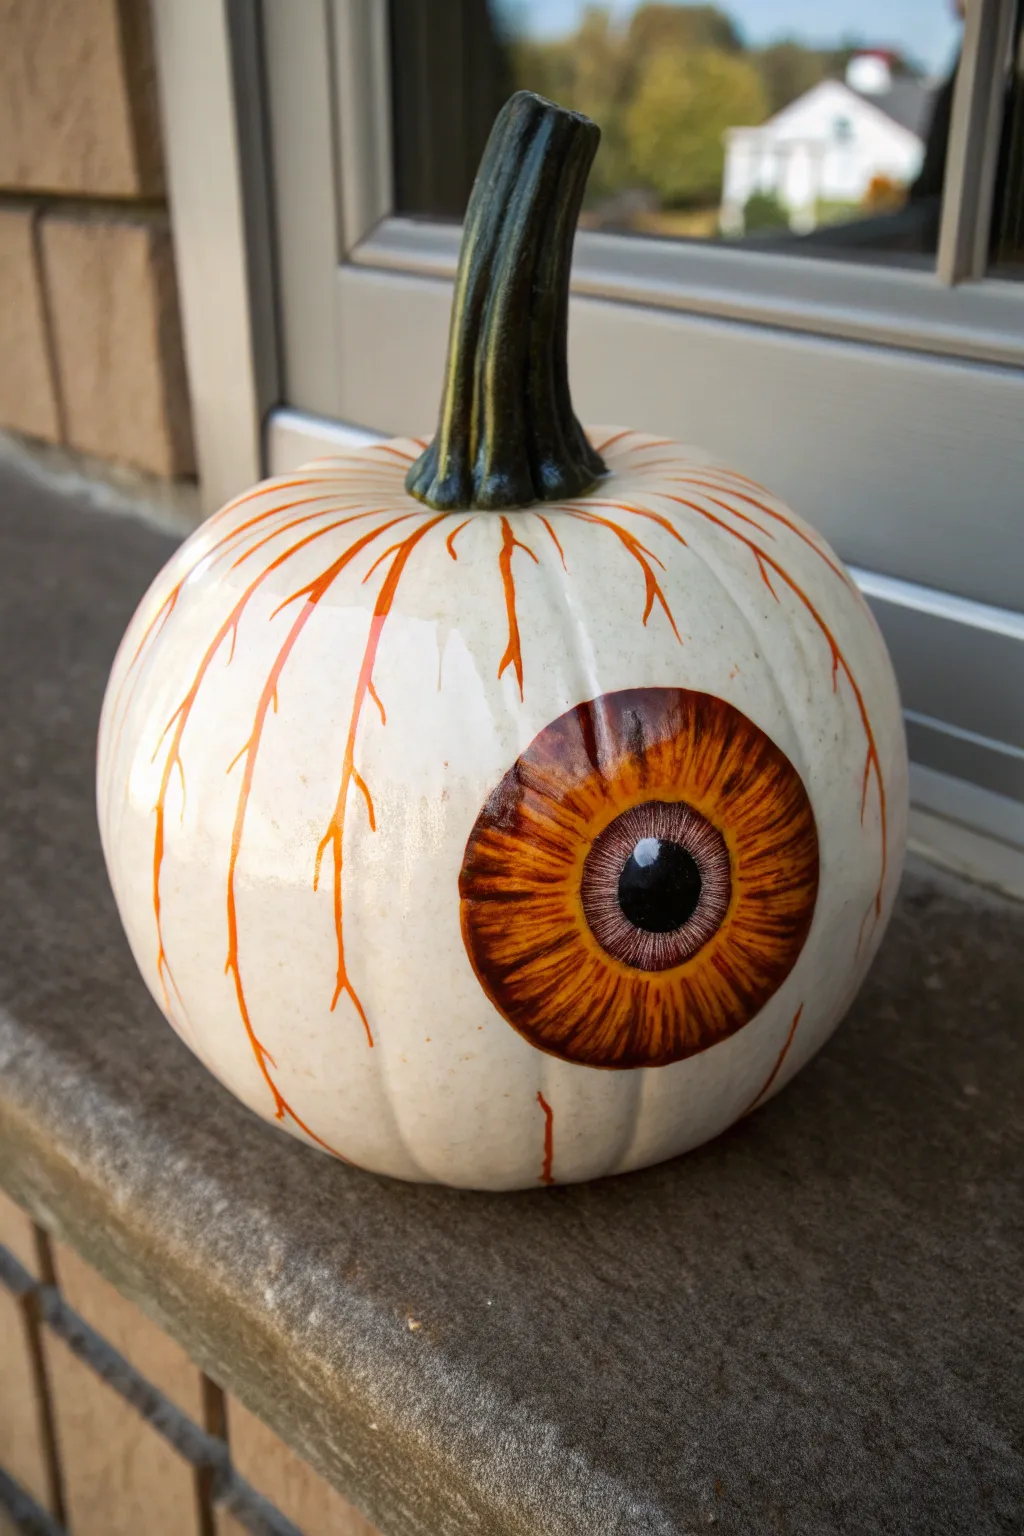
Transform a simple white pumpkin into an unnervingly realistic giant eyeball with just a few shades of acrylic paint. This project relies on a bright white base and careful layering of iris colors to create depth that seems to stare right back at you, perfect for a spooky porch display.
Step-by-Step Tutorial
Materials
- Medium-sized white pumpkin (real or faux)
- Acrylic craft paints: teal, emerald green, ultramarine blue, black, white, and burnt orange
- Pencil
- Flat shader brush (medium)
- Fine liner brush
- Small round brush
- Gloss varnish or clear sealant spray
- Paper plate or palette
- Water cup and paper towels
Step 1: Preparation and Base Outline
-
Clean surface:
Begin by wiping down your pumpkin with a damp cloth to remove any dirt or dust. If you are using a real pumpkin, ensure the skin is completely dry before applying any paint. -
Position the iris:
Choose the flattest, smoothest side of your pumpkin to be the front. This will make painting the circle much easier than working over deep ridges. -
Sketch the circle:
Using a pencil, lightly sketch a large circle for the iris. Aim for a size that dominates the face of the pumpkin but leaves plenty of white space around the edges. -
Add the pupil:
Draw a smaller circle perfectly in the center of your iris outline for the pupil. Don’t worry if your lines are faint; they are just guides.
Step 2: Painting the Iris
-
Base coat the iris:
Mix a bright teal with a tiny bit of white to create a base eye color. Use your flat shader brush to fill in the large iris circle, carefully painting around the inner pupil circle. -
Apply first layer:
Apply the paint fairly thickly to cover the pumpkin’s texture. You may need a second coat if the white rind shows through too much. -
Darken the edges:
While the base is tacky but not fully wet, take a darker blue or emerald green on a small round brush. Paint the outer perimeter of the iris to create a shadowed ring. -
Blend inward:
Use a damp brush to pull that dark edge color slightly inward toward the pupil, creating a soft gradient rather than a hard line. -
Add radial lines:
Switch to your fine liner brush. Load it with dark blue mixed with a little black. Paint thin, spoke-like lines radiating from the pupil outward, and from the outer edge inward. -
Highlight the fibers:
Clean your liner brush and pick up some light mint green or white. Paint tiny strokes in between the dark lines you just made to simulate the fibrous texture of an iris.
Natural Texture
Don’t fight the pumpkin’s ridges! Let the paint settle naturally into the vertical grooves. This distorts the iris slightly, making it look organic and fleshy rather than like a perfect sticker.
Step 3: Defining the Pupil and Details
-
Fill the pupil:
Using pure black paint and a steady hand, fill in the center circle. Use the round brush to carefully smooth out the edges so the pupil looks perfectly round. -
Add the reflection:
This is the magic step. I always wait until the black is dry, then dip the handle end of a brush into pure white paint to dot a ‘reflection’ highlight on the upper left or right side of the pupil. -
Outline the iris:
Mix a diluted burnt orange paint. Using the fine liner brush, trace a very thin, somewhat jagged line around the outer edge of the colored iris. -
Create veins:
Drag that burnt orange paint outward from the iris edge into the white of the pumpkin. Make the lines wavy and irregular, letting them fade out as they move away from the eye. -
Soften the veins:
If the veins look too harsh, tap them lightly with a fingertip while wet to blur them into the pumpkin skin slightly.
Shaky Hands?
If you struggle to paint a perfect circle for the pupil, trace a bottle cap or a coin with a pencil first. It’s much easier to paint inside a rigid guide line than to freehand a perfect circle.
Step 4: Sealing and Finishing
-
Create the wet look:
Eyes are naturally wet and glossy. Once all your paint is completely dry, apply a coat of high-gloss varnish specifically over the iris and pupil area. -
Seal the pumpkin:
You can leave the white part matte for contrast, or spray the entire pumpkin with a clear sealant to protect it from the elements if display outdoors.
Place your finished eyeball pumpkin in a dark corner or nested in some bushes for a watchful effect


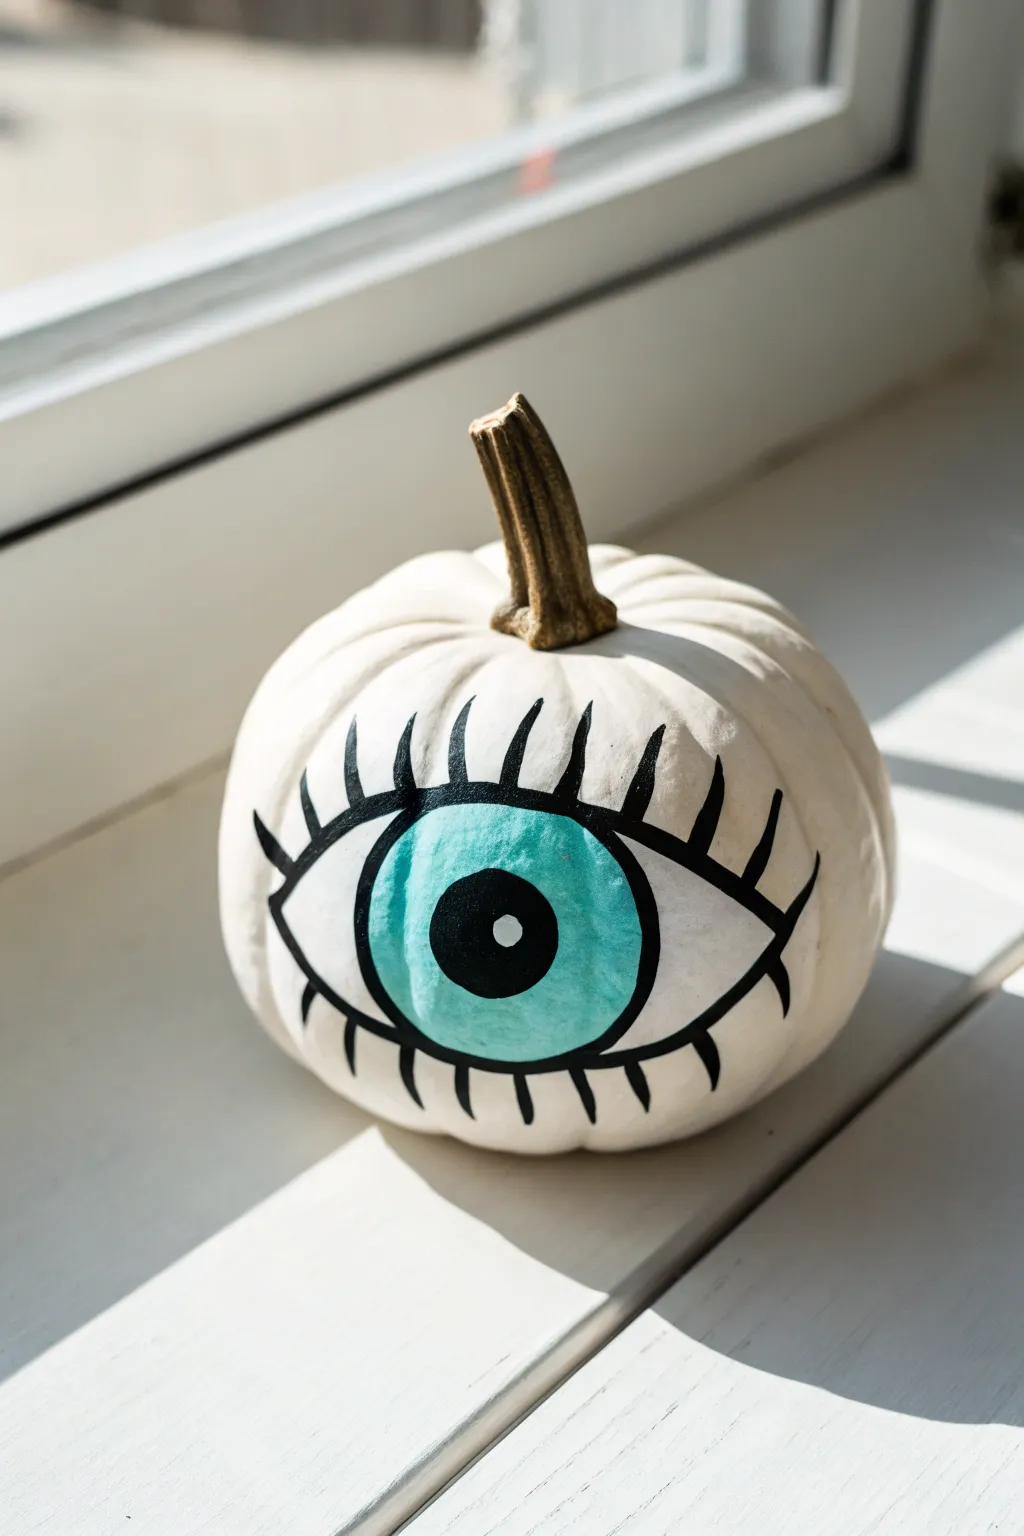
Bright Blue Iris With Radiating Strokes
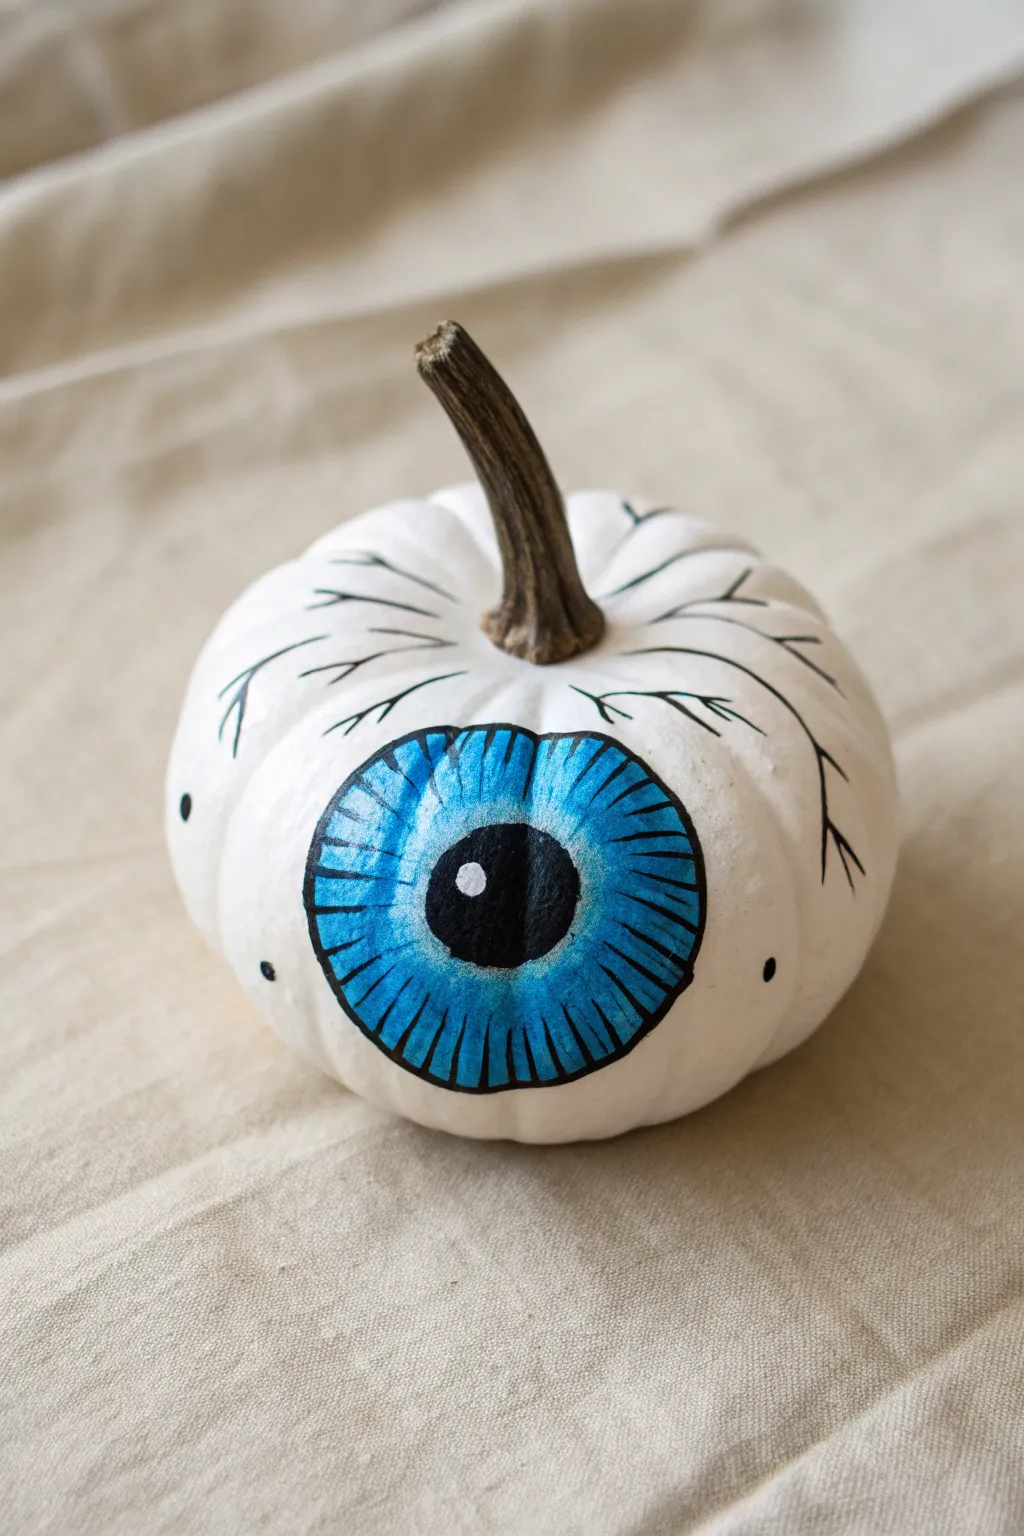
Transform a simple white pumpkin into an unblinking watcher with this striking eyeball design. The bright blue iris features crisp, radiating strokes that create a graphic, almost comic-book style effect perfect for a spooky display.
Step-by-Step Tutorial
Materials
- Small white pumpkin (real or faux)
- Acrylic paint: Bright blue, Black, White
- Medium round brush
- Fine liner brush or black paint marker
- Pencil
- Cup for water
- Paper plate or palette
Step 1: Base Preparation
-
Clean the surface:
Wipe down your pumpkin with a damp cloth to remove any dirt or oils. If you are using a real pumpkin that isn’t naturally white, apply two coats of white acrylic paint to the entire surface, letting it dry completely between layers. -
Sketch the outline:
Using a pencil, draw a large circle on the flattest side of the pumpkin. This will face ‘forward’ as the eye. Don’t worry if it’s not perfectly round; organic shapes often look creepier. -
Mark the pupil:
Lightly sketch a smaller circle in the absolute center of your large circle for the pupil. Getting this centered now helps avoid a lopsided look later.
Pro Tip: Marker Magic
For the crispest black lines, swap the brush for a black Posca paint pen. It offers way more control over the radiating iris lines.
Step 2: Painting the Iris
-
Fill the iris color:
Load your medium round brush with bright blue acrylic paint. Fill in the large circle, carefully painting around the inner pupil circle you sketched. -
Refine the edges:
Use the tip of your brush to smooth out the outer edge of the blue circle. You want a relatively clean line where the blue meets the white skin. -
Apply a second coat:
Once the first blue layer is touch-dry, apply a second coat to ensure the color is vibrant and opaque. I find this creates a much bolder look. -
Wait for drying:
Let the blue paint dry completely before moving on to the black details. Wet paint will cause the colors to bleed and muddy your crisp lines.
Troubleshooting: Shaky Lines?
If your circle outline is wobbly, thicken the black outer rim slightly to hide uneven edges. Nobody will notice the correction.
Step 3: Adding Details
-
Fill the pupil:
Use black paint and a smaller brush to fill in the center pupil circle. Make it solid and dark. -
Outline the iris:
With a fine liner brush or a black paint marker, carefully trace the outer circumference of the blue iris to define the shape. -
Draw radiating lines:
Using your liner brush or paint marker, draw straight lines starting from the outer black rim and pulling inward toward the pupil. Vary the lengths slightly. -
Add inner details:
Now draw shorter lines radiating outward from the black pupil into the blue. Leave a band of pure blue in the middle where the two sets of lines don’t touch. -
Create the catchlight:
Dip the handle end of a paintbrush into white paint. Dot it once inside the black pupil, slightly off-center. This ‘spark of life’ instantly makes the eye look wet and real.
Step 4: Veins and Finishing
-
Start the veins:
Using your fine liner brush with slightly watered-down black paint (or a marker), originate a few lines from the outer edge of the iris going backward across the pumpkin. -
Branch out:
Create little ‘Y’ splits in your vein lines as they extend further back. Keep the lines wiggly and jagged rather than straight. -
Add floating spots:
Place a few random small black dots around the white areas of the pumpkin for added texture and grit. -
Final check:
Look over your design and touch up any blue areas or black lines that need sharpening.
Set your new creation on the porch to keep a watchful eye on visitors


Green Hazel Iris With Golden Flecks
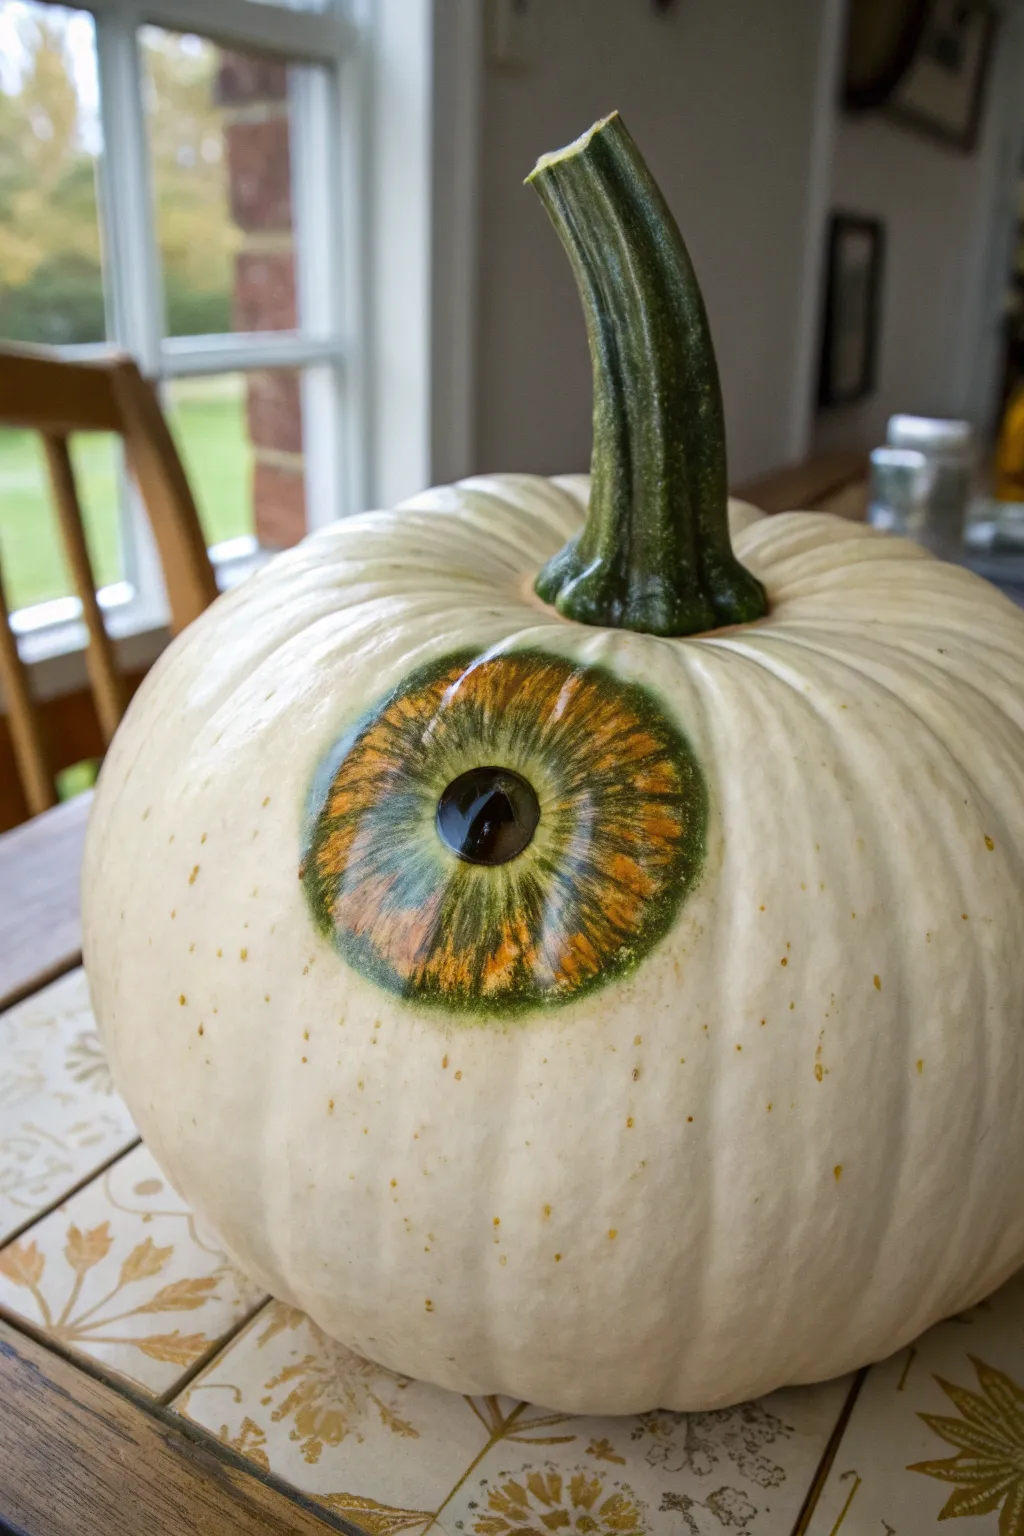
Transform a simple white pumpkin into an eerie, watchful decoration with this detailed eyeball painting tutorial. The blend of mossy greens and amber golds creates a stunningly realistic hazel iris that seems to stare right back at you.
Step-by-Step Guide
Materials
- Medium white pumpkin (real or faux)
- Acrylic paints: black, white, moss green, burnt sienna (or amber), yellow ochre
- Clear gloss varnish or high-gloss medium
- Pencil (H or HB)
- Large flat brush
- Medium round brush
- Fine liner brush
- Water cup and paper towels
- Palette
Step 1: Preparation and Outline
-
Clean surface:
Begin by wiping the pumpkin clean with a damp cloth to remove any dirt or oils, ensuring the paint adheres properly. -
Sketch the circle:
Using a light pencil, draw a large circle on the center of the pumpkin’s face. This will define the outer edge of the iris. -
Define the pupil:
Draw a much smaller circle directly in the center of your first circle to mark out the pupil. -
Outline the highlight:
Sketch a tiny, irregular shape overlapping the edge of the pupil slightly towards the top left. This will be the reflection highlight later.
Step 2: Painting the Base Layers
-
Fill the pupil:
With a medium round brush and jet black acrylic paint, fill in the center circle completely, carefully avoiding the small highlight area you sketched. -
Paint the limbal ring:
Mix a dark moss green with a tiny touch of black. Use your round brush to paint a thick band along the outer edge of the large circle, creating the limbal ring. -
Feather the edges:
While the green is still wet, use a clean, slightly damp brush to gently pull the inner edge of the green ring towards the center, softening the harsh line. -
Apply the iris base:
Fill the remaining space between the pupil and the outer green ring with a mix of burnt sienna and yellow ochre. -
Blend the transition:
Where the amber base meets the green ring, lightly blend the colors together so there is no stark separation.
Paint Slipping?
If acrylics slide off a fresh pumpkin skin, try lightly sanding the area with fine-grit sandpaper first to give the surface some ‘tooth’ for the paint to grip.
Step 3: Adding Detail and Texture
-
Start the radiating lines:
Switch to a fine liner brush. Using pure burnt sienna, paint thin lines radiating outward from the pupil like spokes on a wheel. -
Layer lighter tones:
Mix yellow ochre with a very small amount of white. Paint shorter, finer lines layered over the burnt sienna strokes, concentrating them near the center of the iris. -
Add depth strokes:
Using your dark moss green mixture again, paint very fine lines starting from the outer ring and flicking inward toward the pupil. -
Create the fibrous look:
I like to add a few sporadic touches of pure black near the pupil edge, flicking outward to create depth in the iris fibers. -
Enhance the green overtone:
Create a watery wash of moss green (lots of water, little paint). Lightly glaze over the bottom half of the iris to give it that varied hazel appearance.
Pro Tip: Depth
Add a tiny drop of blue to your white highlight paint. This subtle cool tone mimics daylight reflection better than plain white and makes the eye look wetter.
Step 4: Final Touches and Glazing
-
Paint the highlight:
Fill the small highlight shape you saved earlier with pure titanium white. Make the edges crisp for a wet look. -
Add secondary reflections:
Adding a tiny, faint dot of white or light grey on the opposite side of the pupil can enhance the spherical illusion. -
Dry completely:
Allow the entire painting to dry for at least one hour. Acrylics dry darker, so wait to see the final color balance. -
Apply gloss varnish:
Using a large flat brush, apply a thick coat of high-gloss varnish or medium only over the painted eye area. -
Second coat:
Once the first gloss layer is tacky but not wet, apply a second coat to achieve a true glass-like, wet eyeball finish.
Place your finished pumpkin on a porch or table where that glossy sheen can catch the light and startle passersby


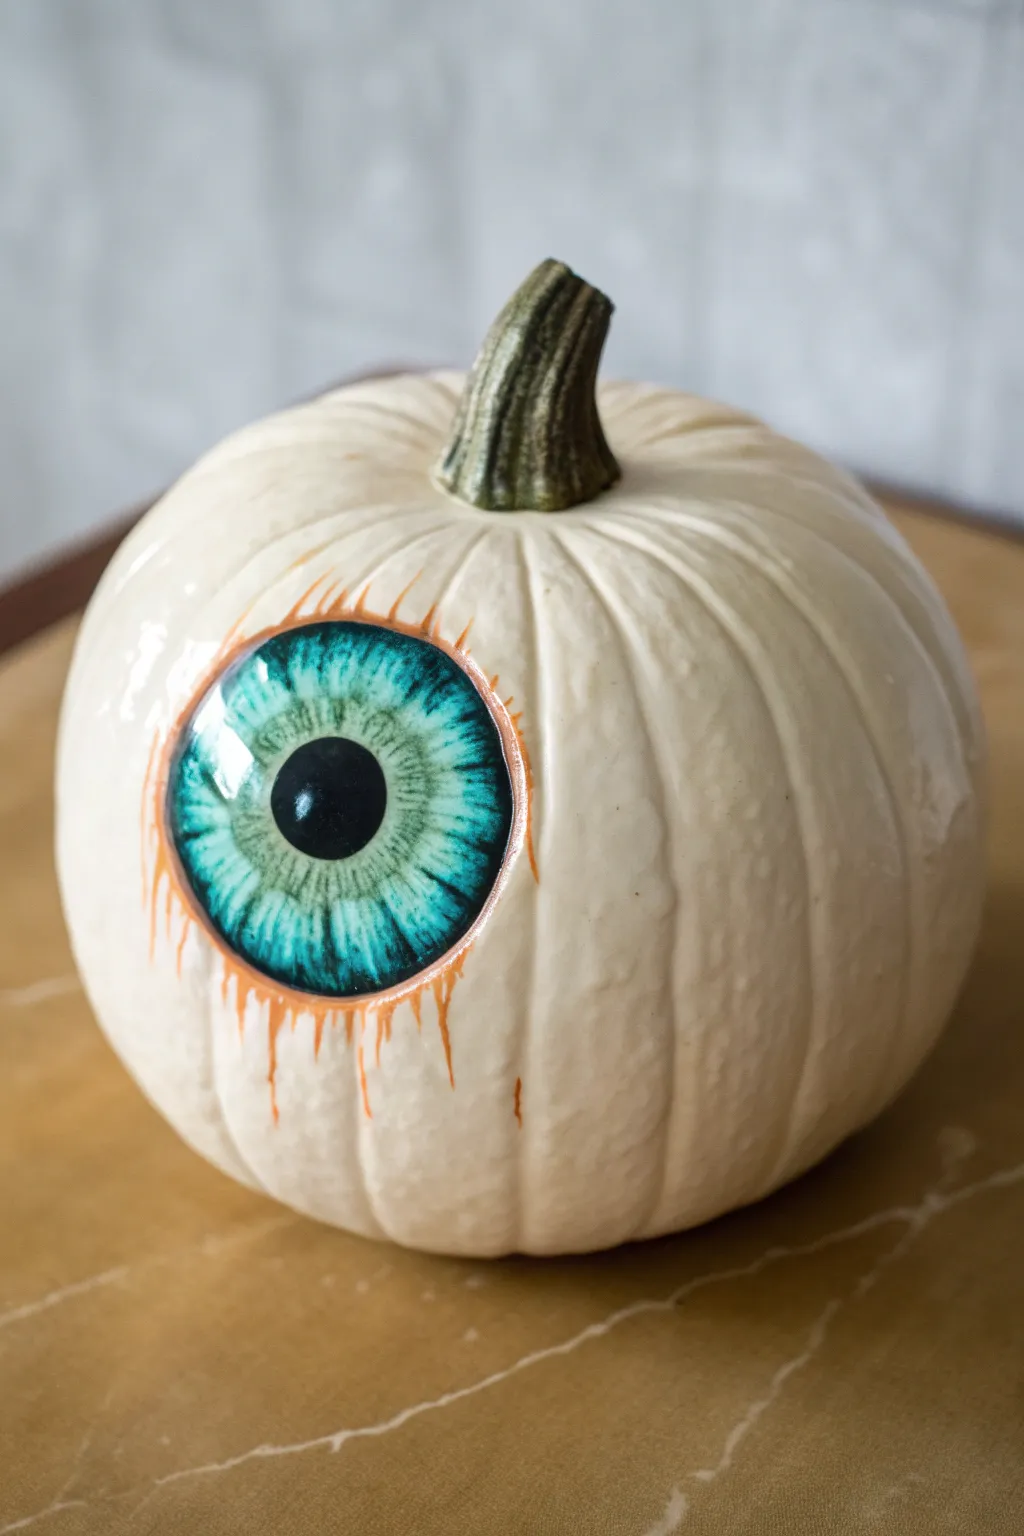
Cat-Slit Pupil Eyeball Pumpkin
Transform a simple white pumpkin into an unnerving observer with this striking cat-eye design. The radiant amber iris and sharp vertical pupil create a piercing look that feels both realistic and wonderfully spooky.
How-To Guide
Materials
- medium white pumpkin
- pencil
- round object for tracing (like a jar lid)
- acrylic paints: black, white, bright yellow, burnt orange, dark brown
- small flat brush
- fine detail liner brush
- clear high-gloss varnish or spray sealant
- palette or paper plate
- cup of water
- paper towels
Step 1: Drafting the Eye
-
Position the gaze:
Choose a smooth side of your white pumpkin. This natural white skin acts as the sclera (the white of the eye), so pick a spot relatively free of deep ridges or blemishes for the best canvas. -
Outline the iris:
Place your jar lid (or similar circular object) against the pumpkin surface. Lightly trace a perfect circle with a pencil to define the outer edge of the iris. -
Sketch the pupil:
In the center of your circle, sketch a vertical diamond or ‘slit’ shape for the pupil. Keep the points sharp at the top and bottom to mimic a feline or reptilian look.
Uneven Coverage?
Pumpkin skin is waxy and can resist paint. If your first layer is streaky or transparent, let it dry fully and apply a second coat rather than overworking wet paint.
Step 2: Painting the Base Layers
-
Fill the pupil:
Using your small flat brush and black acrylic paint, fill in the slit pupil completely. Ensure the edges are crisp and sharp against the pencil lines. -
Base coat the iris:
Mix a small amount of bright yellow with burnt orange to create a glowing amber base. I prefer to apply this unevenly around the iris area, avoiding the wet black pupil. -
Darken the outer edge:
While the yellow-orange is still tacky, take burnt orange (or a mix of orange and brown) and paint the outer ring of the circle, blending slightly inward. -
Create the limbal ring:
Use a very thin line of dark brown or black to trace the absolute outer perimeter of the circle. This defines the separation between the iris and the white pumpkin skin.
Pro Tip: 3D Effect
Add a tiny drop of clear UV resin or dimensional glaze (like Mod Podge Dimensional Magic) over the eye to create a physical glass-like dome effect.
Step 3: Adding Texture and Detail
-
Paint radial lines:
Switch to your fine detail liner brush. Load it with dark brown paint thinned slightly with water. Paint fine strokes radiating from the pupil outward toward the edge of the iris. -
Layer lighter strokes:
Clean your brush and pick up pure yellow or a light gold. Add similar radiating strokes in between the darker brown lines, concentrating them near the center to make the eye look like it’s glowing. -
Blend the gradients:
If the lines look too harsh, use a barely damp brush to gently soften the transition between the dark outer ring and the brighter inner iris. -
Add depth near the pupil:
Darken the area immediately surrounding the black slit with a mix of burnt orange and brown. This helps the pupil look like a hole rather than a sticker.
Step 4: Highlights and Finishing
-
The crucial reflection:
This is the most important step for realism: Using pure white paint, add a small, sharp highlight dot or crescent near the top edge of the pupil. It mimics light hitting a wet surface. -
Allow to dry:
Let the paint dry completely. Acrylics on pumpkin skin can be slippery, so give it at least 20-30 minutes to set firmly. -
Seal for shine:
Apply a coat of high-gloss varnish over just the painted eye area. The contrast between the shiny eye and the matte pumpkin skin makes the effect pop.
Set your piercing pumpkin on the porch to keep a watchful eye on trick-or-treaters
BRUSH GUIDE
The Right Brush for Every Stroke
From clean lines to bold texture — master brush choice, stroke control, and essential techniques.
Explore the Full Guide
Big Cartoon Eye With Bold Outline
Turn a simple white gourd into a mystical, staring centerpiece with this bold graphic eye design. The high-contrast black outline against the bright teal iris creates a striking cartoon-style look that pops beautifully on a windowsill.
Step-by-Step Guide
Materials
- Small white pumpkin (real or faux)
- Acrylic craft paint (bright teal/turquoise)
- Acrylic craft paint (black)
- Acrylic craft paint (white)
- Medium flat brush
- Small round detail brush
- Pencil for sketching
- Sealer (optional matte or satin spray)
- Paper plate or palette
- Cup of water and paper towels
Step 1: Drafting the Design
-
Clean surface:
Begin by wiping down your pumpkin with a damp cloth to remove any dirt or oils. If using a real pumpkin, ensure it is completely dry before starting. -
Position the eye:
Find the best ‘face’ of the pumpkin—a relatively smooth area without deep ridges is ideal for this design. -
Sketch the outline:
Using a pencil, lightly sketch a large, wide almond shape across the center. Don’t worry if it spans across the pumpkin’s ribs; the design looks great when it follows the natural curves. -
Draw the iris:
Sketch a large circle in the very center of the eye shape. This will become the colorful part of the eye. -
Mark the pupil:
Inside your circle, draw a smaller circle for the pupil, leaving a tiny spot unmarked for the highlight reflection.
Brush Tip
For the sharpest eyelashes, press down firmly at the start of the stroke against the eye outline, then lift your brush pressure gradually as you flick outward to create a tapered point.
Step 2: Painting the Eye Color
-
Fill the iris:
Load your medium flat brush with the bright teal paint. Fill in the large circle carefully, painting right up to your pencil lines. -
Add a second coat:
Let the first layer of teal dry completely. I find that a second coat is usually necessary to get that vibrant, opaque coverage that really stands out against the white skin. -
Paint the pupil:
Switch to black paint and fill in the center pupil circle. Be very careful to keep the edges crisp and round. -
Add the catchlight:
Once the black pupil is mostly dry, take your smallest brush or the back end of a paintbrush handle. Dip it in white paint and add a single, sharp dot in the upper right quadrant of the pupil for life-like shine.
Step 3: Defining the Shape
-
Outline the eye shape:
Using a small round brush with black paint, trace over your initial almond-shaped pencil sketches. Make this line thick and confident; varying the thickness slightly creates a nice organic feel. -
Outline the iris:
Carefully paint a thin black ring around the teal iris circle to separate it from the white of the eye. -
Start the lashes:
For the eyelashes, start at the top outline. Paint curved lines extending upward and slightly outward. Make the middle lashes the longest and let them get shorter as you move toward the corners. -
Bottom lashes:
Repeat the process for the bottom lashes, creating shorter, slightly curved strokes pointing downward. -
Refine the lines:
Go back over your black outlines one last time to ensure they are opaque and solid. Clean up any jagged edges where the black meets the pumpkin surface. -
Clean up smudges:
If you accidentally got paint where it shouldn’t be, use a clean, slightly damp brush to wipe it away quickly before it sets. -
Final dry:
Allow the entire pumpkin to dry undisturbed for at least an hour.
Wobbly Lines?
If painting straight lines over the pumpkin bumps is tricky, try using a black paint marker or permanent marker for the outlining and eyelashes instead of a brush. It gives great control.
Place your watchful pumpkin on a prominent shelf to keep an eye on all the festivities
Sleepy Eyelids Painted on Orange Pumpkin
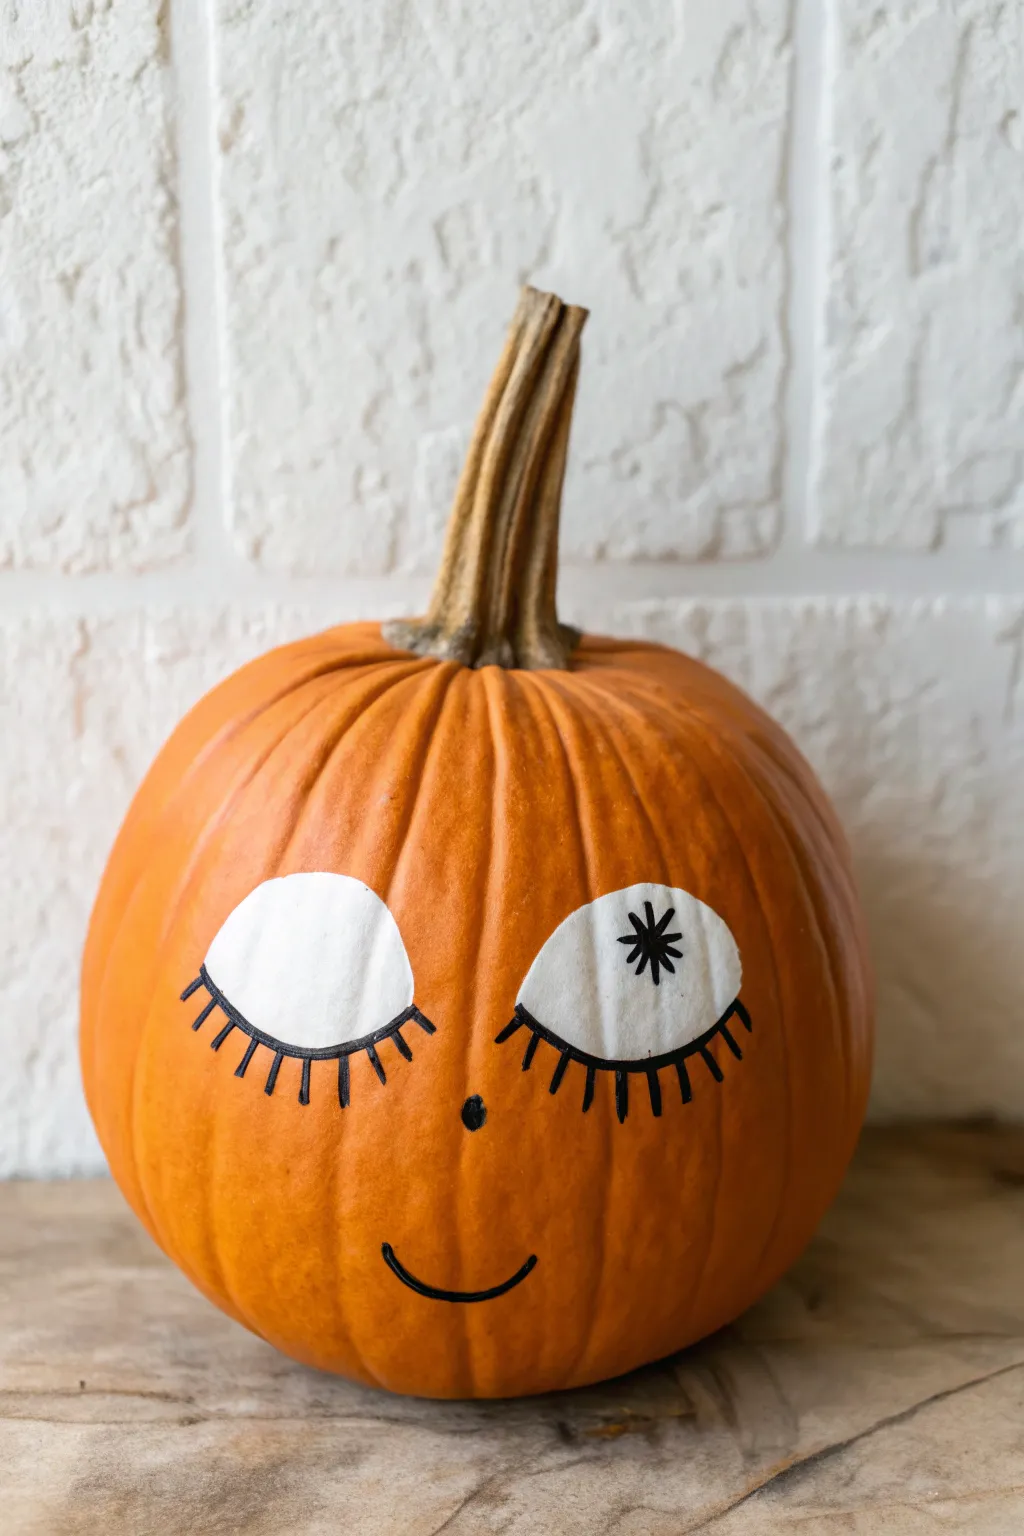
Give your Halloween decor a playful touch with this charming winking pumpkin design. Featuring oversized white eyelids and whimsical lashes, this simple painted project transforms a standard orange gourd into a sweet, expressive character.
How-To Guide
Materials
- Medium-sized orange pumpkin (real or faux)
- White acrylic craft paint
- Black acrylic craft paint or black paint marker (medium tip)
- Small flat paintbrush (for the white areas)
- Fine liner paintbrush or black permanent marker
- Pencil or chalk (for sketching)
- Paper towel
- Cup of water
Step 1: Planning the Face
-
Clean the surface:
Wipe down your pumpkin with a damp cloth to remove any dirt or oils that might prevent the paint from sticking, then dry it completely. -
Sketch the eye shapes:
Using a pencil or a piece of chalk, lightly sketch two large half-circles on the upper half of the pumpkin. Keep them relatively symmetrical, curving upward like rising moons. -
Mark the nose:
Place a small dot directly in the center of the face, slightly below the level of the eyes, to mark where the nose will go. -
ड्राw the smile:
Sketch a simple, gentle upward curve near the bottom third of the pumpkin face to create a sweet smile.
Fixing Shaky Lines
If your black outlines get wavy, wait for them to dry fully. Then, use a small brush with your background orange color (or white) to tidy up edges.
Step 2: Painting the Base Features
-
Fill in the whites:
Dip your flat paintbrush into white acrylic paint. Carefully fill in both half-circle eye shapes you sketched earlier. -
Apply a second coat:
Orange skin tends to show through white paint, so let the first layer dry for about 15 minutes. Apply a second coat to ensure the white looks solid and opaque. -
Paint the nose:
Using the handle end of a paintbrush dipped in black paint, or a black paint marker, stamp a solid round dot for the nose. -
Trace the mouth:
Go over your pencil line for the mouth with black paint. I find using a paint marker gives me a steadier line here than a brush, but a fine liner brush works well too.
Pro Tip: Long-Lasting Finish
Using a matte clear acrylic spray sealer after the paint is 100% dry will prevent chipping and keep the white paint crisp outdoors.
Step 3: Adding the Details
-
Outline the eyelids:
Once the white paint is fully dry, carefully outline the curved bottom edge of both white shapes with black paint or a marker. -
Add first eye lashes:
On the left eye (the winking one), draw straight black lines radiating downward from the bottom curve. These serve as the closed eyelashes. -
Add second eye lashes:
Repeat the process on the right eye, drawing lengthy lashes extending downward from the bottom rim of the white shape. -
Draw the pupil:
On the right eye (the open one), paint a black circle floating in the upper right portion of the white area. -
Create the starburst:
Instead of filling the pupil in solid, draw lines radiating outward from the center of the black pupil circle, creating a star or spark shape. -
Thicken the lash lines:
Go back over the lashes you drew earlier, making them slightly thicker at the base where they connect to the eye and tapering them at the ends. -
Clean up sketch lines:
If any pencil or chalk marks are still visible, gently wipe them away with a slightly damp cloth or cotton swab, being careful not to smudge your fresh paint.
Place your adorable pumpkin on the porch or a mantel to greet guests with a friendly wink

PENCIL GUIDE
Understanding Pencil Grades from H to B
From first sketch to finished drawing — learn pencil grades, line control, and shading techniques.
Explore the Full Guide
Wide-Open Eye Inside the Pumpkin Illusion
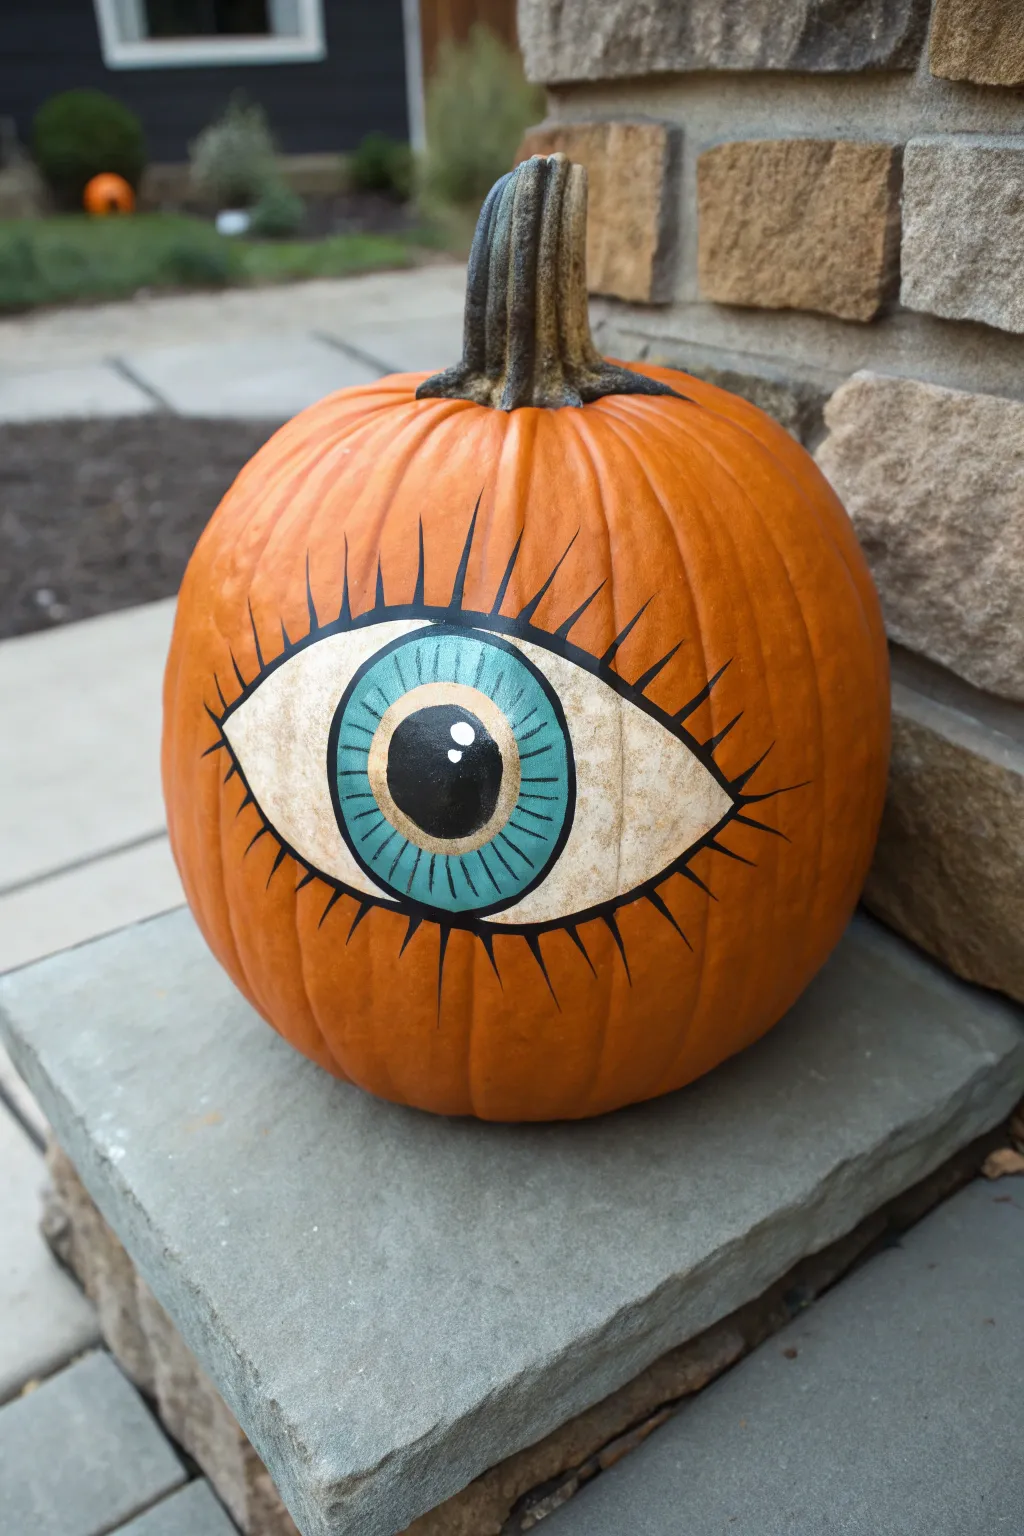
Transform a classic orange gourd into a striking, mystical eye that seems to watch visitors from your porch. This graphic, illustrative painting style uses sharp black lines and vibrant teals to create an unblinking gaze that is more intriguing than spooky.
Step-by-Step Guide
Materials
- Medium-sized orange pumpkin (clean and dry)
- Pencil or chalk marking tool
- Acrylic paints: Cream/Off-white, Teal/Turquoise, Black, White, Gold (optional)
- Medium flat paintbrush
- Small round detail brush
- Fine liner brush
- Water cup and paper towels
- Clear matte spray sealer (optional)
Step 1: Sketching the Outline
-
Clean surface:
Begin by wiping down your pumpkin with a damp cloth to remove any dirt or oils, ensuring a smooth surface for the paint to adhere to. -
Outline the shape:
Using a pencil or a piece of white chalk, lightly sketch a large almond shape on the flattest side of the pumpkin. Make it large enough to be the dominant feature. -
Mark the center:
Inside the almond shape, draw a perfect circle for the iris. It should touch the top and bottom eyelids of the almond shape you just drew. -
Add the pupil:
Sketch a smaller circle directly in the center of the iris for the pupil.
Uneven Coverage?
If the pumpkin’s ribs make painting straight lines difficult, embrace the texture. Using smaller brush strokes can help navigate the peaks and valleys easier.
Step 2: Blocking in Color
-
Paint the sclera:
Using your medium flat brush, fill in the whites of the eye with cream or off-white paint. I like to use an off-white rather than pure white to give it a vintage, parchment-like feel. -
Layering cover:
Let the first coat dry completely, then apply a second coat of the cream paint to ensure the orange pumpkin skin doesn’t show through. -
Fill the iris:
Switch to a clean brush and paint the large iris circle with a solid coat of teal or turquoise paint. -
Paint the pupil:
Fill the center pupil circle with solid black paint. Be careful to keep the edges round and crisp. -
Drying time:
Allow all the base colors to dry thoroughly before moving on to the detailed line work to prevent smudging.
Step 3: Detailed Line Work
-
Outline the eye:
Using a fine liner brush and black paint, carefully trace the outer edge of the almond shape. Make this line fairly thick and bold. -
Outline the iris:
Outline the teal iris circle with black paint. You can add a very thin ring of gold detailing just inside this black line for extra dimension. -
Add iris details:
With the fine liner brush, paint thin, radial lines emerging from the black pupil toward the edge of the iris, stopping just short of the border. -
Create the lashes:
Paint long, sharp spikes radiating outward from the top and bottom of the eye. Press down at the base of the lash and flick upward to create a tapered point. -
Add secondary lashes:
Between the longer lashes, add slightly shorter spikes to create fullness and a stylized, graphic look. -
The reflection:
Dip the handle end of a paintbrush into pure white paint and dot it onto the upper right side of the black pupil to create a ‘catchlight’ reflection.
Make it Glow
For a cooler effect, use glow-in-the-dark paint for the ‘whites’ of the eye or the iris color. It will look standard by day but ominous at night.
Step 4: Finishing Touches
-
Clean up edges:
Examine your work for any wobbly lines or smudges. Use a tiny bit of orange paint (mixed to match your pumpkin) to conceal mistakes outside the eye boundaries. -
Seal (Optional):
If your pumpkin will be sitting outside in the elements, give it a light coat of clear matte spray sealer once the paint is fully cured.
Now put your creation on display and enjoy the feeling that someone is always watching over your autumn decor
Carved Eyelid Edge Plus Painted Eyeball
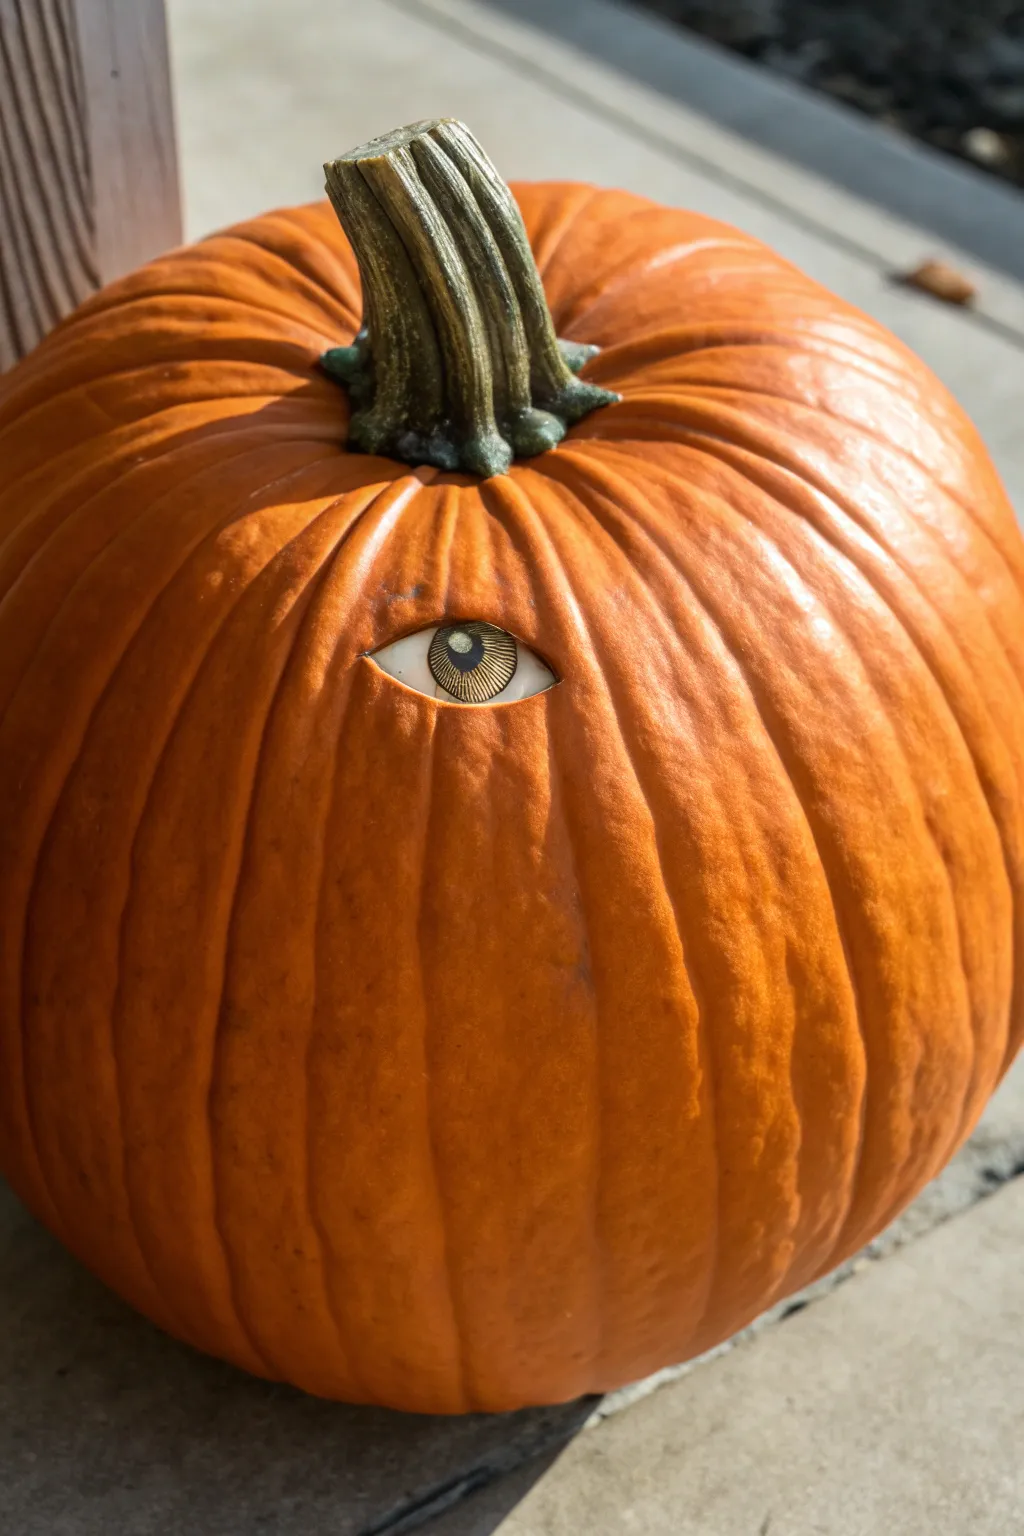
This clever pumpkin project combines simple carving with detailed painting to create the illusion of a realistic eye peering out from beneath the distinctive orange skin. By cutting a precise window rather than carving the whole eye, you get natural-looking eyelids that add uncanny depth to your decor.
Step-by-Step
Materials
- Medium round pumpkin
- Carving knife or X-Acto blade
- White ping pong ball or smooth styrofoam ball
- Fine-point black permanent marker
- Gold or metallic bronze acrylic paint
- Fine detail paintbrush (size 0 or 00)
- Pencil
- Hot glue gun and glue sticks
- Glossy varnish or clear nail polish
Step 1: Preparing the Eye
-
Draw the iris outline:
Take your ping pong ball and find the center point. Using a pencil, lightly draw a circle about greatest circumference of a dime; this will be your iris. -
Define the pupil:
In the exact center of your iris circle, draw a smaller circle for the pupil. Fill this in solid with your black permanent marker. -
Add radial details:
Using the fine-point marker, draw very thin lines radiating outward from the pupil to the edge of the iris circle like spokes on a wheel. Keep them close together for a detailed texture. -
Apply metallic accents:
Dip your fine brush into the gold or bronze paint. Carefully paint over the iris area, letting some of the black radial lines show through to create depth. -
Paint the catchlight:
Once the metallic paint is tacky or dry, add a tiny white dot (or just leave a small unpainted spot if your ball is white) near the top right of the pupil to simulate a light reflection. -
Seal for shine:
I prefer to coat the entire painted iris area with a layer of glossy varnish or clear nail polish. This mimics the wet look of a real eyeball.
Step 2: Carving the Pumpkin
-
Plan placement:
Choose a smooth side of your pumpkin between two vertical ribs. Hold the finished eyeball up to the surface to estimate the height. -
Sketch the eye shape:
Lightly draw an almond shape on the pumpkin skin. This should be slightly smaller than the diameter of your ping pong ball to ensure the ball sits behind the skin, not through it. -
Make the initial incision:
Using your X-Acto knife or sharp carving tool, carefully trace your drawn line, cutting just through the tough outer skin. -
Deepen the cut:
Go over your cut again, slicing deeper into the flesh. Angle your blade slightly inward toward the center of the eye shape. -
Remove the plug:
Gently pry out the almond-shaped piece of pumpkin flesh. Clean up the edges of the hole so they are smooth and sharp. -
Create a cavity:
You don’t need to hollow out the whole pumpkin. Instead, scoop out just enough flesh behind the almond opening to create a snug pocket for the ball.
Loose Eyeball?
If the eyeball falls back into the pumpkin, wedge a small piece of scrap foam or cardboard behind the ball inside the cavity before gluing to create focused pressure forward.
Step 3: Assembly
-
Test the fit:
Insert the painted eyeball into the cavity from the inside (if hollowed) or push it gently into your carved pocket from the front if the pumpkin is solid, though inserting from the back is cleaner. -
Adjust the angle:
Rotate the ball until the pupil is centered and staring straight forward. The eyelids (pumpkin skin) should slightly cover the top and bottom of the iris. -
Secure the eye:
Apply a ring of hot glue around the back perimeter of the eyeball where it meets the interior pumpkin flesh to lock it in place. -
Final cleanup:
Wipe away any pencil marks on the orange skin. If the cut edge of the pumpkin looks too dry, you can rub a tiny bit of petroleum jelly on the raw rim to keep it fresh.
Realistic Pupil
For a creepy ‘dilated’ look, paint the black pupil larger than normal. Start the metallic iris painting further out, leaving less color and more black void.
Place your creation in a well-lit spot to catch the glimmer in that unblinking eye


Matching Pair of Eyeball Pumpkins

Transform two simple white pumpkins into a gazing pair with these striking, stylized eyeball designs. The bold black outlines and vivid orange irises create a modern, slightly surreal look perfect for a mantle or windowsill display.
Detailed Instructions
Materials
- Two small white pumpkins (real or faux)
- Pencil with eraser
- Orange acrylic paint
- Sage green or grey-green acrylic paint
- Black acrylic paint
- White acrylic paint (for highlights)
- Fine liner paintbrush (size 0 or 1)
- Small flat shader paintbrush (size 4 or 6)
- Palette or paper plate
- Water cup and paper towels
Step 1: Planning and Sketching
-
Clean surface:
Begin by wiping down your pumpkins with a damp cloth to remove any dirt or oils that might prevent the paint from sticking. -
Outline the eye shape:
Using a pencil, lightly sketch a large almond or football shape onto the flattest face of each pumpkin. Aim to center it vertically. -
Sketch the iris:
Draw a large circle in the center of your almond shape. It should be big enough that the top and bottom edges are slightly cut off by the eyelids. -
Detail the center:
Inside the iris circle, draw a slightly smaller circle for the pupil area. Then draw an even smaller circle inside that for the black pupil itself. -
Mark the highlight:
Sketch a small oval or circle near the top left of the pupil area to reserve space for the white reflection highlight.
Wobbly Lines?
If brush painting fine lines is difficult, use a black oil-based paint marker for the outlining and eyelashes instead. It gives great control.
Step 2: Painting the Eye
-
Base coat the iris:
Using your flat shader brush, fill in the large outer ring of the iris with bright orange acrylic paint. Apply two coats if needed for full opacity. -
Paint the inner iris:
Switch to your sage green or grey-green paint. Fill in the circle just inside the orange ring, being careful not to paint over the center pupil area yet. -
Fill the pupil:
Paint the innermost circle with black acrylic paint. While you’re at it, carefully paint around the reserved highlight spot. -
Add the reflection:
Once the black pupil is dry, use a small brush to fill in the reflection spot with pure white paint. This immediately brings the eye to life. -
Dry time:
Allow all the colored sections to dry completely before moving on to outlining. This prevents colors from smudging into the black lines.
Make It Glow
Mix glow-in-the-dark medium into your white highlight or the green iris paint so the eyes watch you even after the lights go out.
Step 3: Outlining and Lashes
-
Outline the iris:
Load your fine liner brush with slightly thinned black paint. Carefully trace the circle separating the orange iris from the white of the pumpkin. -
Define the pupil:
Trace the line separating the orange iris section from the green section, and outline the black pupil for a crisp edge. -
Create the main outline:
Using bold strokes, paint the black outline of the almond eye shape. I find it helps to anchor my pinky finger on the pumpkin for stability. -
Paint the lashes:
Paint short, straight lines radiating outward from the upper and lower eyelids. Space them relatively evenly, but small variations add character. -
Final touch-ups:
Inspect your lines. If any orange or green paint looks patchy, carefully dab on a second layer, avoiding your fresh black outlines.
Set your decorated pumpkins together to create a staring contest that no one can win
Pile of Mixed-Size Eyeball Pumpkins
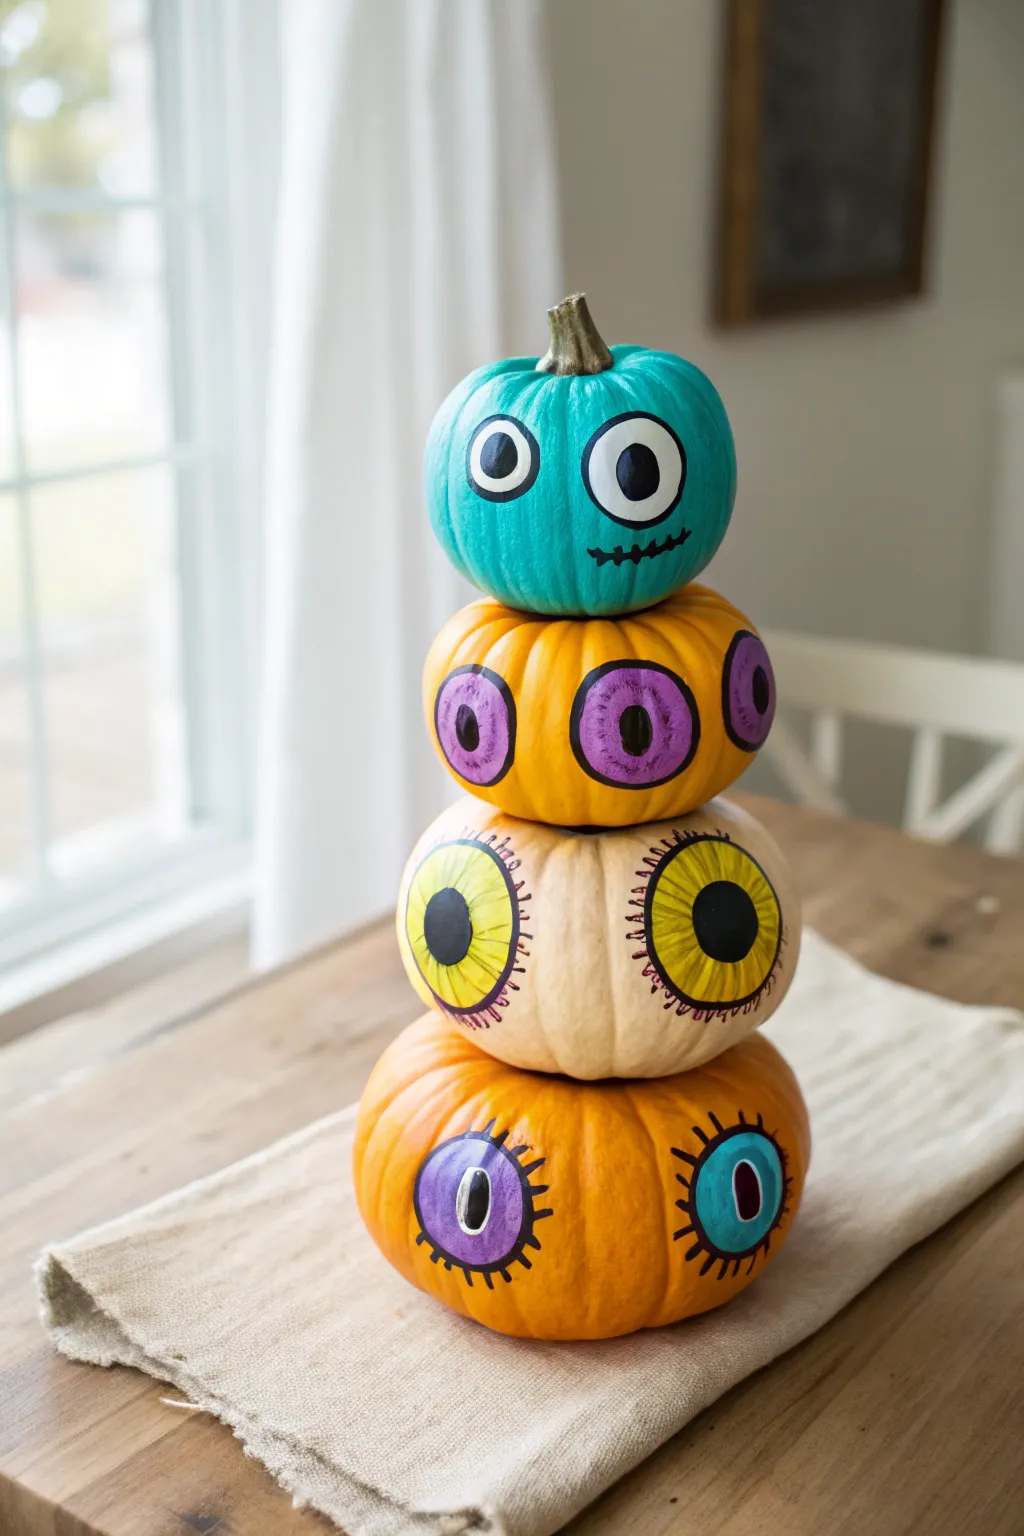
This whimsical centerpiece features a teetering stack of pumpkins transformed into a multi-eyed monster clan. By mixing different pumpkin sizes and painting styles, you can create a playful tower that looks like it’s watching your every move.
Step-by-Step
Materials
- 4 Faux or Real Pumpkins (graduated sizes from large to mini)
- Acrylic craft paints (Teal, Orange, Cream, Purple, Yellow, White, Black)
- Medium flat paintbrush
- Fine detail paintbrush or black paint pen
- Pencil
- Hot glue gun and glue sticks
- Matte finish sealer spray (optional)
Step 1: Base Painting
-
Prep the pumpkins:
Wipe down all four pumpkins to remove any dust or waxy residue. If you are using faux pumpkins, remove the stems from the bottom three pumpkins so they will stack flat against each other later. -
Paint the top pumpkin:
Select the smallest pumpkin for the top and paint the entire surface a bright teal blue. You may need two coats for full opacity, letting the first coat dry completely before adding the second. -
Paint the middle pumpkin:
Take the second smallest pumpkin and paint it a vibrant orange. While painting, try to get into the grooves of the pumpkin for a uniform look. -
Paint the large middle pumpkin:
Paint the third pumpkin (second from the bottom) a creamy off-white or beige color. This neutral base will make the yellow eyes really pop later on. -
Paint the base pumpkin:
Paint the largest bottom pumpkin a standard pumpkin orange. It creates a nice visual anchor and balances the color of the smaller orange pumpkin above it.
Pro Tip
For perfectly round eyes, trace household objects like bottle caps, coins, or small jar lids directly onto the pumpkin surface before painting.
Step 2: Painting the Eyes
-
Sketch the eyes:
Once the base coats are fully dry, use a pencil to lightly sketch circular eye shapes. Vary the number of eyes: give the top teal pumpkin two large eyes, the orange one three medium eyes around the side, the cream pumpkin two large eyes, and the bottom pumpkin three spread-out eyes. -
Fill in the top pumpkin eyes:
For the teal pumpkin, paint the penciled circles completely white. These will be classic cartoon-style eyes. -
Create the multi-colored irises:
On the second pumpkin (orange), paint the circles purple. On the third (cream), paint them yellow. On the bottom pumpkin, mix it up by painting the outer circles teal and purple. -
Add pupils:
Once the colorful circles are dry, paint smaller black circles in the center of every eye. For the top teal pumpkin, place the pupils slightly off-center to give it a goofy, looking-around expression. -
Paint the inner irises:
For the pumpkins below the top one, add a second, smaller circle inside the main color if you want extra detail—like the purple centers on the teal eyes of the bottom pumpkin. -
Add reflection highlights:
Dip the handle of your paintbrush into white paint and dot a small highlight onto each black pupil. This ‘catchlight’ brings the eyes to life immediately.
Step 3: Details & Assembly
-
Outline the top eyes:
Using a thin brush and black paint, or a paint pen, carefully outline the white eyes on the top teal pumpkin. -
Draw the mouth:
On the teal pumpkin, draw a thin, crooked smile line with little perpendicular hatch marks to look like stitches. -
Add texture to the irises:
On the middle pumpkins, use your fine liner brush to add small tick marks or rings around the pupils to simulate the texture of an iris. -
Add eyelashes:
Give the bottom pumpkin’s eyes distinctive eyelashes by painting thick, short lines radiating outward from the painted circles. -
Outline the cream pumpkin’s eyes:
Draw a jagged, spiky outline around the yellow eyes on the cream pumpkin for a slightly more energetic or ‘shocked’ look. -
Stack and secure:
Starting with the largest pumpkin, apply a ring of hot glue around the stem area (or where the stem was). Place the next pumpkin on top, pressing firmly. Repeat until your tower is complete.
Troubleshooting
If your paint streaks on the slick pumpkin surface, dab the paint on with a sponge brush instead of dragging a bristle brush. This builds texture and coverage.
Set your finished pumpkin tower on a porch or entryway table to greet guests with its many unblinking stares
Cracked Sclera Texture Effect
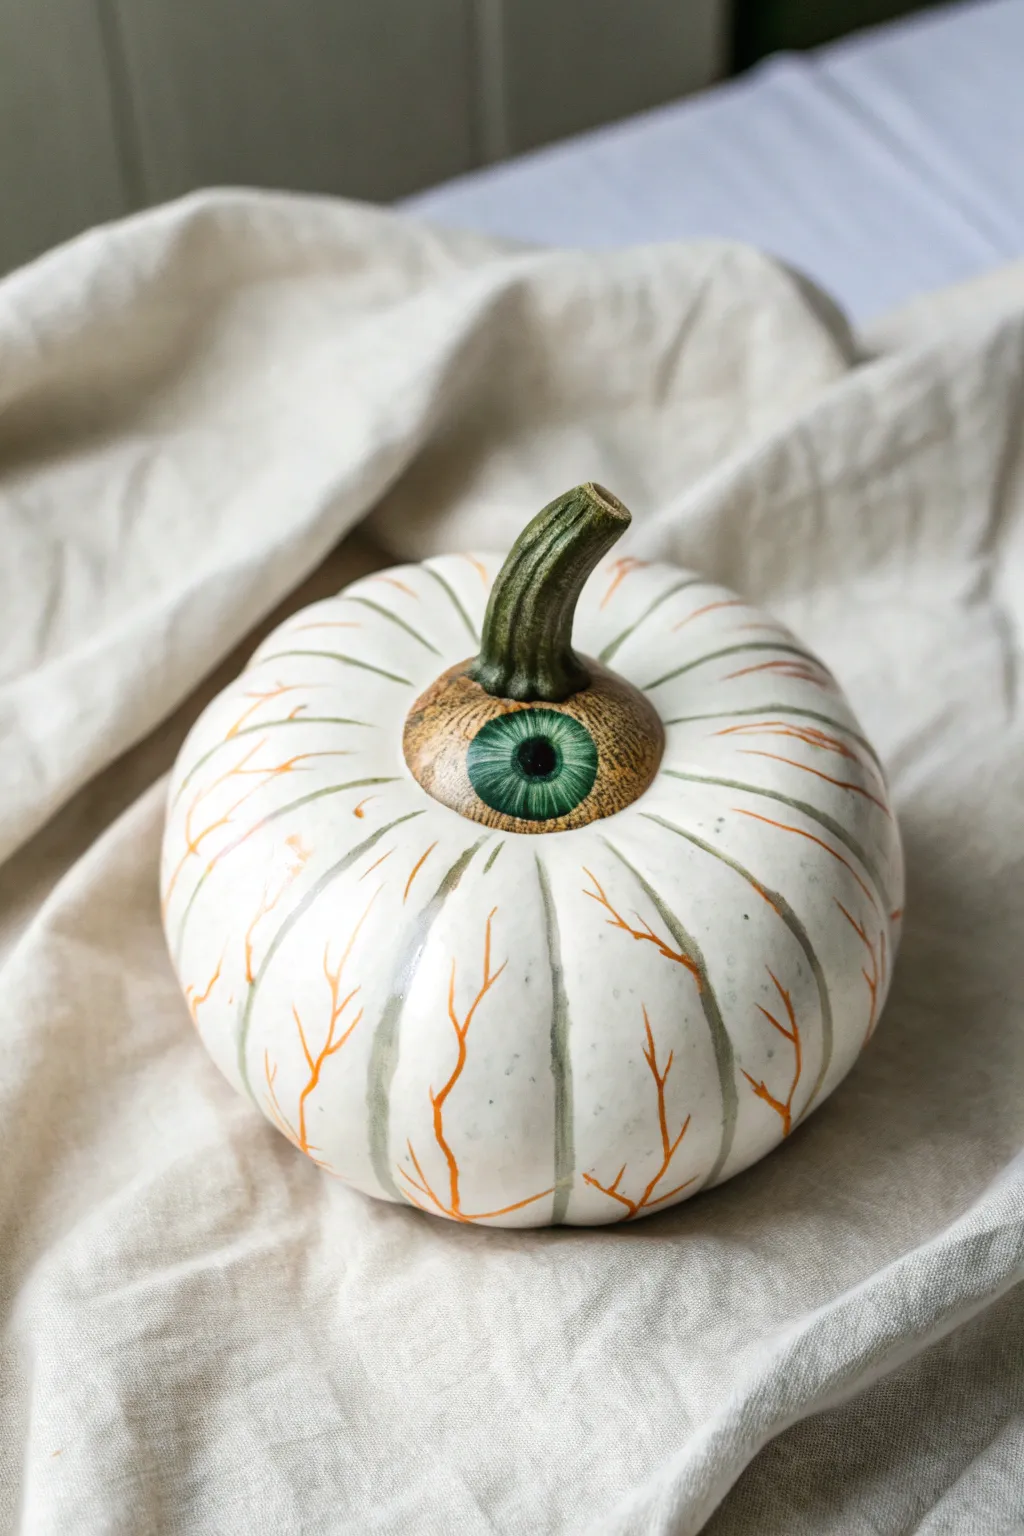
Transform an ordinary white pumpkin into a startlingly realistic cyclops eye with minimal specialized tools. This project focuses on subtle layering and fine brushwork to achieve that unsettlingly lifelike ‘cracked sclera’ look.
Detailed Instructions
Materials
- Small to medium white pumpkin (real or high-quality foam)
- Acrylic paints: Titanium White, Burnt Umber, Hooker’s Green (or Emerald), Black, Red, Orange
- Matte finish acrylic sealer (spray or brush-on)
- High-gloss varnish or clear nail polish
- Fine liner brush (size 00 or 000)
- Small flat shader brush
- Medium round brush
- Water cup and palette
- Pencil (optional)
Step 1: Base Preparation & Iris Mapping
-
Clean the surface:
Begin by wiping down your pumpkin with a slightly damp cloth to remove any dust or oils. If you are using a real pumpkin, ensure it is completely dry before painting. -
Prime the stem area:
The iris will sit right at the top where the stem connects. Paint a circular area around the base of the stem with a mix of Titanium White and a tiny drop of Burnt Umber to create an off-white, bone-colored base. Let this dry completely. -
Define the iris edge:
Using your medium round brush and a distinct brown shade (Burnt Umber), paint a defined ring around the base of the stem. This ring should be about 1-1.5 inches wide, creating the outer boundary of the colored part of the eye.
Step 2: Painting the Iris & Pupil
-
Create the iris texture:
Mix a dark green using your Hooker’s Green and a touch of Black. Apply this inside the brown ring you just painted. While the paint is still wet, use a clean, slightly damp brush to lift some paint in radial strokes moving outward from the stem, revealing hints of the brown underneath. -
Add radial details:
With your fine liner brush and a lighter green (mix Green with White), paint tiny, hair-thin lines radiating from the center toward the outer brown edge. These striations give the eye depth and realism. -
Paint the pupil:
The stem itself acts as the pupil in this design. Paint the bottom half of the stem—where it meets the pumpkin—stark Black. Gradually blend this black upward into the natural green/brown of the stem, so it looks like a dilated pupil fading into the optic nerve. -
Refine the iris border:
Take your Burnt Umber again and carefully stipple (dab) around the outer edge of the green iris. This softens the transition between the colored eye and the white pumpkin skin, mimicking the limbal ring found in real eyes.
Veins look too thick?
If your red lines look like stripes, thin your paint with water until it’s ink-like. Use a ‘000’ liner brush and roll the tip to a sharp point before painting.
Step 3: Creating the Veins & Sclera
-
Shadow the ridges:
To enhance the pumpkin’s shape, mix a very watery wash of grey or diluted green. Run this wash gently inside the vertical grooves (ribs) of the pumpkin. This adds dimension without looking like a solid stripe. -
Mix the vein color:
Create a watery orange-red mixture. You want this to be thin enough to flow easily off your brush but pigmented enough to show up against the white. -
Start the main veins:
Using your finest liner brush, paint ‘Y’ shapes starting from the bottom of the pumpkin and creeping upward. Keep your hand loose and shaky; erratic, wiggly lines look more organic than straight ones. -
Branch out:
From the tips of your initial ‘Y’ shapes, paint smaller, finer forks spreading out horizontally across the ribs. I usually lighten the pressure on the brush as I move toward the top to make the veins taper off. -
Connect to the grooves:
Allow some of the red veins to follow the natural vertical depressions of the pumpkin for a short distance before branching out again. This integrates the painting with the pumpkin’s physical form. -
Add micro-capillaries:
Mix an ultra-diluted red wash. Paint barely-there wisps branching off your main veins. These should be extremely subtle, creating a ‘bloodshot’ haze rather than distinct lines.
Level Up: Gross Factor
Mix clear gloss gel medium with a tiny drop of red ink. Dab this mixture over the vein endings to create 3D texture, making the blood vessels look raised and inflamed.
Step 4: Highlights & Finishing Touches
-
Highlight the iris:
Add a tiny dot of pure Titanium White on the iris (the green part), specifically at the 10 o’clock or 2 o’clock position. This reflection dot instantly makes the eye look wet and alive. -
Seal the pumpkin:
Once all paint is perfectly dry, coat the entire pumpkin with a matte acrylic sealer to protect the paint job. -
Gloss the eye:
Finally, apply a coat of high-gloss varnish or clear nail polish ONLY to the iris, pupil, and stem area. This contrast between the shiny ‘wet’ eye and the matte ‘skin’ of the sclera creates the convincing textural effect shown in the image.
Place your finished eye on a soft cloth or nestled in dried leaves to really sell the illusion
Drippy “Ooze” Around the Eyeball
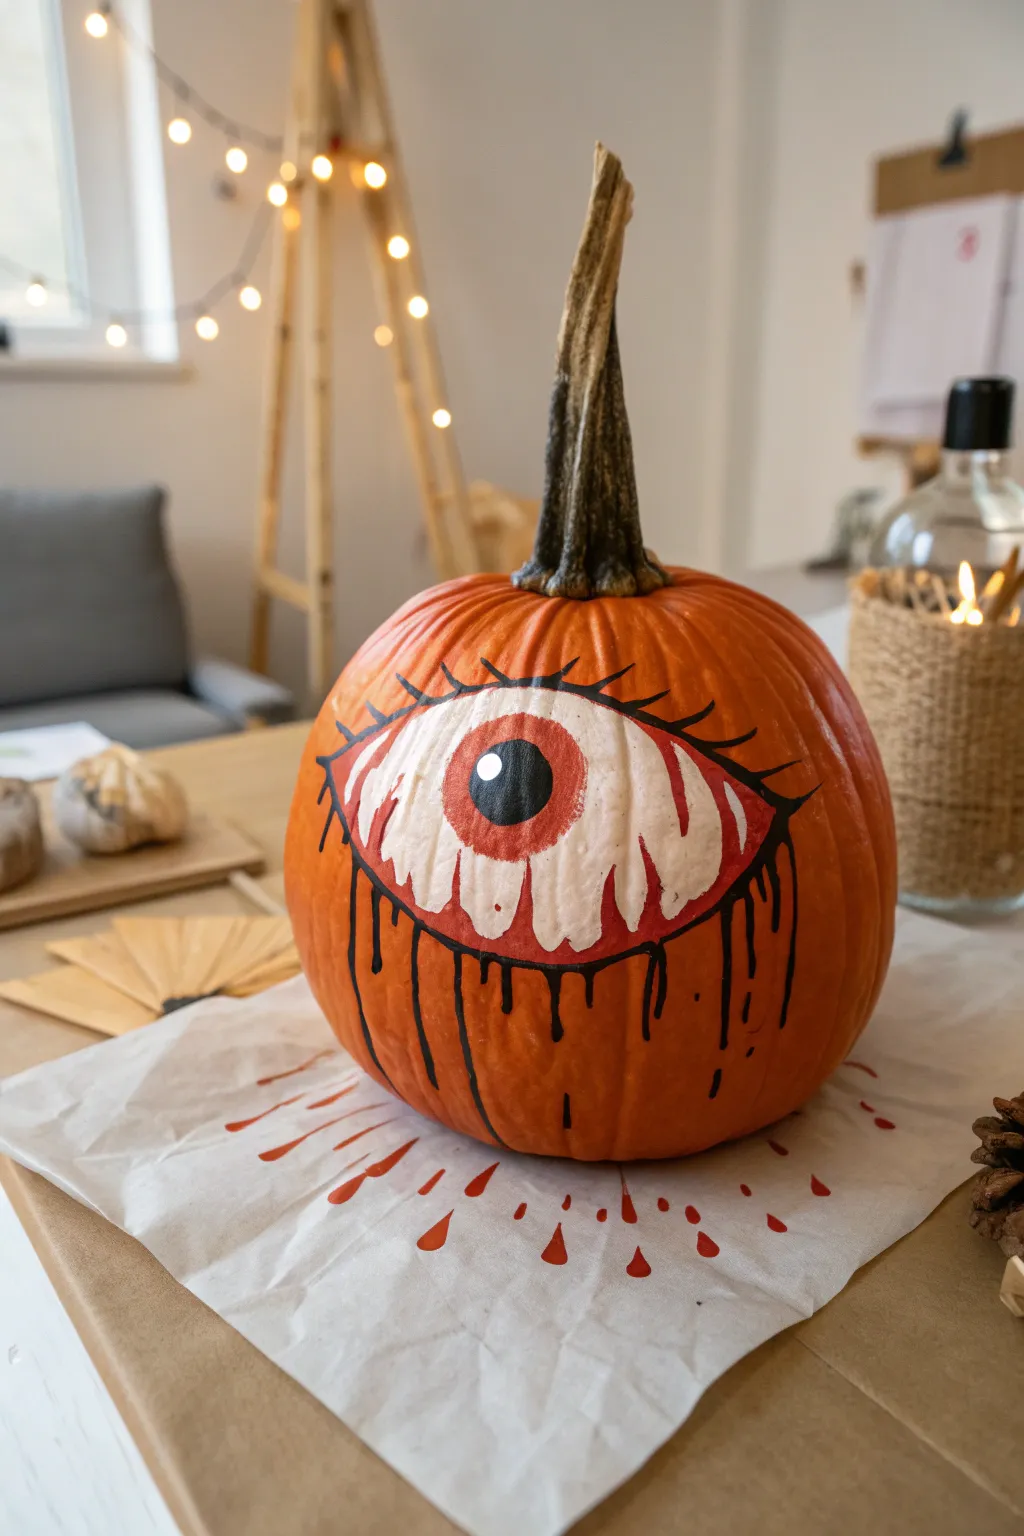
Transform a classic orange pumpkin into a spooky surrealist centerpiece with this stylized weeping eye design. The stark contrast of the melting black liner against the bright orange skin creates a haunting effect that looks great from across the room.
Step-by-Step Guide
Materials
- Medium-sized orange pumpkin
- White acrylic paint
- Red acrylic paint
- Black acrylic paint
- Flat paintbrush (medium width)
- Fine liner brush
- Pencil or marker for sketching
- White tissue paper or butcher paper (for underneath)
- Cup of water
- Paper towels
Step 1: Planning and Base Layers
-
Prepare the surface:
Before starting, wipe down your pumpkin with a damp cloth to remove any dirt or oils. Let it dry completely so the paint adheres properly. -
Sketch the eye shape:
Using a pencil or a light marker, draw a large almond shape horizontally across the middle of the pumpkin. Make it prominent, covering nearly the full width of the face. -
Outline the iris:
Draw a large circle in the center of your almond shape for the iris. Keep it centered but leave plenty of white space on either side. -
Paint the sclera:
Fill in the white part of the eye (the sclera) using your flat brush and white acrylic paint. You may need two to three coats to make it opaque against the orange rind. -
Paint the red iris:
Once the white is mostly dry, paint the large circle in the center with bright red acrylic paint. Ensure the edges are clean where the red meets the white. -
Add the pupil:
Paint a smaller, solid black circle directly in the center of the red iris. This creates the piercing gaze of the eye.
Fixing Translucent Whites
If your white paint looks streaky or thin over the orange skin, let it dry fully and apply a second coat. Painting a thin layer of grey first can also help enhance opacity.
Step 2: Adding Details and Drips
-
Create the highlight:
Dip the handle of your brush or a small dotting tool into white paint and place a small dot on the upper left side of the black pupil to create a ‘gleam’ or reflection. -
Add red shading:
Mix a tiny bit of water with your red paint to create a wash, or use a dry-brush technique. Lightly streak red from the corners of the eye inward over the white paint to make the eye look bloodshot or irritated. -
Outline the eye shape:
Using your fine liner brush and black paint, carefully trace the outer almond shape of the eye. Vary the line thickness slightly to give it an organic feel. -
Paint the upper lashes:
Extend long, curved lines upward from the top black outline. Make them wispy and dramatic, curving away from the center of the eye. -
Paint the lower outline:
Thicken the black line on the bottom edge of the eye slightly. This will serve as the reservoir for your drips. -
Create the black tears:
Paint vertical drips extending down from the bottom lash line. Vary the lengths—some stopping short, others running far down the pumpkin’s ribs. Add small rounded droplets at the ends of the lines. -
Refine the edges:
Go back over your black outlines one last time to ensure they are crisp and opaque, covering any transparent spots.
Step 3: The Splatter Base
-
Prepare the base paper:
Spread a sheet of white tissue paper or butcher paper on your display surface and place the painted pumpkin in the center. -
Paint the radiated drops:
Using red paint, specific teardrop shapes on the paper radiating outward from the base of the pumpkin. The pointed ends should face the pumpkin, with the rounded ends facing out. -
Vary drop sizes:
Paint some red drops large and others essentially just small dots to create a splattered, energetic look, as if the eye is weeping onto the table.
Add 3D Dimension
For a grosser texture, mix clear school glue or Mod Podge with your black paint for the drips. It will dry with a raised, glossy finish that makes the ooze look perpetually wet.
Now your pumpkin looks like it is weeping surreal tears onto your table
High-Gloss Highlights for Wet Look
Transform a simple white pumpkin into a startlingly realistic giant eyeball with this detail-oriented painting project. The key to its eerie effectiveness lies in the layered iris shading and that crucial high-gloss finish that gives it a permanently wet, organic appearance.
Step-by-Step Tutorial
Materials
- Small to medium white pumpkin (real or faux)
- Acrylic paints (Titanium White, Burnt Sienna, Raw Umber, Cadmium Orange, Black, Bright Red)
- High-gloss polyurethane varnish or spray sealer
- Pencil
- Large round object (jar lid or masking tape roll) for tracing
- Small round object (bottle cap) for tracing
- Assorted brushes: 1-inch flat, medium filbert, fine liner
- Palette or paper plate
- Paper towels and water cup
Step 1: Base Preparation and Iris Mapping
-
Clean the surface:
Wipe down your pumpkin thoroughly to remove any dirt or oils. If using a real pumpkin, ensure it is completely dry. If using a faux pumpkin with a prominent seam, turn that side to the back. -
Prime the surface (optional):
If your pumpkin isn’t a bright, clean white, apply a coat of Titanium White acrylic over the entire surface, avoiding the stem. Let this base coat dry completely. -
Trace the outer iris:
Position your large circular object (like a jar lid) on the most prominent, smoothest side of the pumpkin. Lightly trace around it with a pencil to define the outer edge of the colored iris. -
Trace the pupil:
Place your smaller circular object (like a bottle cap) perfectly in the center of the large circle. Trace this to create the pupil. -
Base coat the iris:
Mix a warm, medium brown using Burnt Sienna and a touch of Cadmium Orange. Fill in the large circle, carefully painting around the inner pupil circle. Don’t worry about texture yet; just get solid coverage.
Step 2: Detailing the Eye
-
Paint the pupil:
Fill the center circle with pure Black acrylic. Use a steady hand or a smaller brush to keep the edges crisp against the brown iris. -
Add radial texture:
Using a fine liner brush and Raw Umber (dark brown), paint thin lines radiating from the pupil outward toward the edge of the iris, like spokes on a wheel. Stop just short of the outer edge. -
Highlight the iris:
Mix a lighter shade using Cadmium Orange and a little White. Paint shorter, flickering strokes radiating from the pupil, layering them over the dark brown lines to create depth and dimension. -
Darken the outer rim:
Take your darkest brown or a mix of brown and a tiny dot of black. Carefully outline the outer edge of the iris and feather it slightly inward to soften the transition. -
Add tye catchlight:
Dip the handle end of a paintbrush into Titanium White. Place a single, confident dot overlapping the edge of the black pupil and the iris. This reflection instantly brings the eye to life.
Natural Texture
Don’t paint the veins perfectly straight. A slight wiggle or tremor in your hand actually creates more realistic, organic-looking blood vessels.
Step 3: Veins and Gloss Finish
-
Prepare the vein color:
Dilute Bright Red paint with a small amount of water to improve its flow. It should be the consistency of heavy cream. -
Paint the main veins:
Using your finest liner brush, start painting wavy lines originating from the stem area. Drag them down toward the center of the pumpkin, varying their length. -
Create branching capillaries:
From your main red lines, paint smaller ‘Y’ shaped branches that fork outward. Make these lines thinner as they move away from the main vein. I find twisting the pumpkin while painting helps create natural angles. -
Extend veins from the bottom:
Add a few smaller red veins creeping up from the bottom of the pumpkin to balance the look. -
Let it cure:
Allow all paint layers to dry completely. This is critical before sealing to prevent smearing your fine lines. -
Apply the first gloss coat:
Apply a thick, even layer of high-gloss varnish or spray sealer over the entire pumpkin. If brushing, use soft, long strokes to minimize brush marks. -
Final wet look:
Once the first coat is tacky or dry (check your product instructions), apply a second or even third coat. The goal is a glass-like finish that makes the eyeball look perpetually moist.
Level Up: Color Shift
Mix a tiny drop of metallic gold paint into your iris color. Under the thick gloss coat, it will give the eye a subtle, eerie shimmer in low light.
Set your shiny creation on the porch and watch the neighbors do a double-take at this unsettlingly realistic decoration
Metallic Iris Ring for Drama
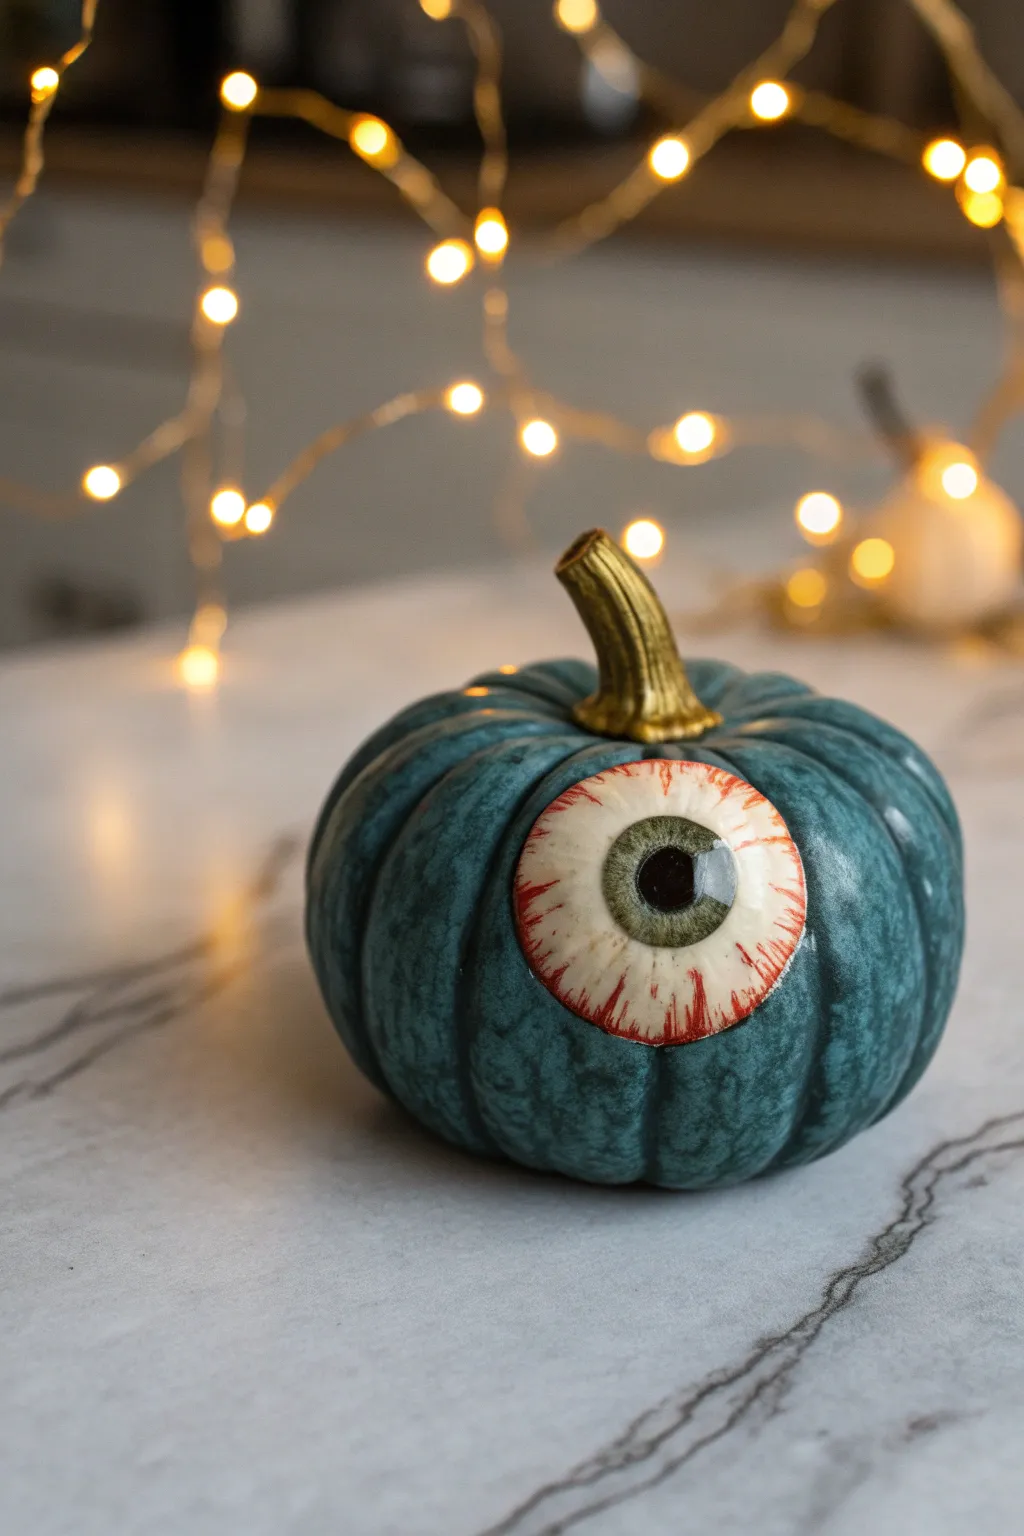
This elegant yet eerie project transforms a simple faux pumpkin into a sophisticated Halloween decoration featuring a teal base and a strikingly realistic eye. The metallic gold accents on the stem and iris add a touch of drama that catches the light beautifully.
Step-by-Step Guide
Materials
- Small faux pumpkin (foam or ceramic)
- Teal blue acrylic paint
- Titanium white acrylic paint
- Black acrylic paint
- Metallic gold acrylic paint
- Olive green acrylic paint
- Red fine-point paint pen or liner brush
- Medium flat paintbrush
- Small round detail brush
- Fine liner brush
- Gloss varnish or clear topcoat spray
- Pencil
- Palette for mixing
Step 1: Base Preparation
-
Clean the surface:
Wipe down your faux pumpkin with a damp cloth to remove any dust or manufacturing residue. Let it dry completely. -
Apply the base coat:
Using a medium flat brush, paint the entire pumpkin with the teal blue acrylic paint. You may need two coats to get full, opaque coverage, especially if the original pumpkin was orange. -
Paint the stem:
While the body dries, carefully paint the stem with metallic gold paint. Use a smaller flilbert or round brush to get into the crevices of the stem texture. -
Dry completely:
Allow the teal base and gold stem to dry fully before moving on to the detail work. This prevents the colors from muddying.
Step 2: Creating the Eye
-
Draft the outline:
Lightly sketch a large circle in the center of the pumpkin using a pencil. This will be the eyeball. -
Fill the sclera:
Paint inside your pencil circle with titanium white. Don’t worry about perfectly smooth edges yet; jagged edges can actually add to the creepy effect. Apply a second coat if the teal shows through. -
Add the iris base:
Mix a small amount of olive green with a drop of gold. Paint a smaller circle in the center of the white area for the iris. -
Detail the iris:
Using a fine liner brush, add tiny streaks of pure metallic gold radiating from the center of the iris outward. This gives the eye depth and that crucial metallic drama. -
Paint the pupil:
Paint a solid black circle directly in the center of your iris. Make sure it is centered to avoid a cross-eyed look. -
Add shadow depth:
Mix a tiny amount of black into your green mix (or use a dark grey wash) and paint a very thin, translucent ring around the outer edge of the iris where it meets the white. This creates a dimensional, spherical look.
Pro Tip: Realistic Veining
When painting veins, don’t just draw straight lines. Make them branch like lightning bolts or tree roots. Vary the pressure on your brush to create thick and thin sections for a more organic look.
Step 3: Veins and Finishing Touches
-
Draw the veins:
Using a red fine-point paint pen or a liner brush with thinned red paint, draw wiggly, branch-like lines coming from the outer edge of the white inward toward the iris. -
Feather the edges:
I like to flick the brush lightly at the ends of the veins so they taper off naturally rather than stopping abruptly. -
Brighten the sclera:
Mix a tiny drop of red into white to make a very pale pink wash. Glaze this lightly over the outer edges of the eyeball to make it look irritated and fleshy. -
Create the reflection:
Dip the handle end of a paintbrush into pure white paint and place a single dot on the upper right/left side of the pupil, overlapping slightly onto the iris. This ‘catchlight’ brings the eye to life. -
Seal the pumpkin:
Once everything is bone dry, spray the entire pumpkin with a gloss varnish. This gives the eyeball a wet, realistic sheen and protects that beautiful gold finish.
Troubleshooting: Shaky Hands
Struggling with the perfect circle for the pupil? Use a round sponge dauber or the end of a varying-sized dowel dipped in black paint to stamp a perfect circle instead of freehand painting it.
Place your sophisticated monster pumpkin near a light source to let that metallic iris truly shine
Galaxy Iris Eyeball Pumpkin
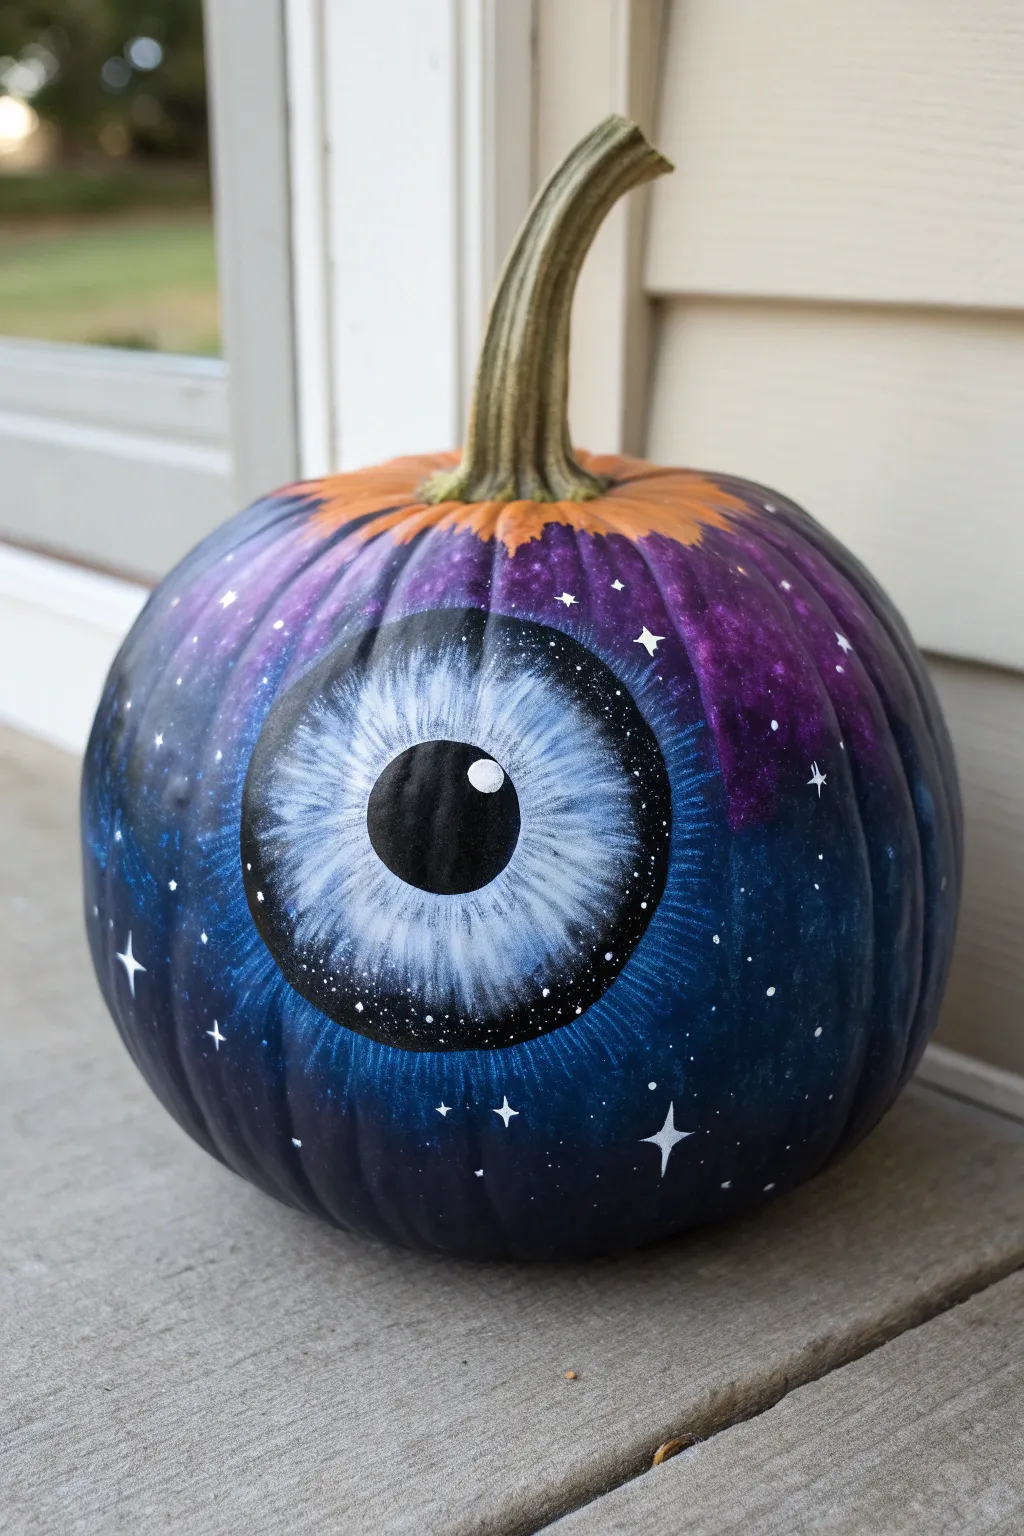
Transform a simple gourd into a celestial observer with this mesmerizing galaxy eyeball design. This project combines deep, space-themed blending with a striking, realistic iris that seems to stare right through you.
Detailed Instructions
Materials
- Medium-sized orange pumpkin (real or faux)
- Acrylic paints (black, white, phthalocyanine blue, violet/purple, turquoise)
- Wide flat brush or sponge brush
- Medium round brush
- Small detail liner brush
- Palette or paper plate
- Cup of water and paper towels
- Pencil or chalk
- Matte or satin acrylic sealer (spray or brush-on)
Step 1: Planning and Base Coating
-
Map out the design:
Start by cleaning your pumpkin surface to remove any dirt or oils. Use a pencil or a piece of white chalk to lightly sketch a large circle in the center of the flattest side of the pumpkin. This will be the eyeball. -
Mark the horizon:
Lightly mark a ragged edge near the top of the pumpkin around the stem. You want to leave the top inch or two natural orange to create a contrasting ‘lid’ effect. -
Apply the dark base:
Using your wide flat brush, paint the entire pumpkin surface outside of your sketched circle with black acrylic paint. Stop at the ragged line you marked near the top. Let this base coat dry completely.
Wet-on-Wet Blending
For the smoothest galaxy clouds, blend your purple and blue paints while they are still wet on the pumpkin surface.
Step 2: Creating the Galaxy
-
Sponge on deep blues:
Mix a small amount of black into your blue paint to deepen it. Using a slightly damp sponge or a dry brush, dab this midnight blue color randomly over the black background, focusing on the lower areas. -
Add violet nebula clouds:
While the blue is still tacky, take your violet paint and stipple it onto the upper sections of the black background, blending the edges softly where it meets the blue or black. -
Highlights and depth:
Mix a tiny bit of white into the turquoise paint. Lightly sponge this brighter color in small clusters within the blue areas to create the look of distant gas clouds. Keep the application sheer.
Step 3: Painting the Eye
-
Fill the sclera:
Paint the large center circle solid black. It might seem counterintuitive, but this dark base will make the blue iris pop. Allow it to dry fully. -
Outline the iris:
Using a medium round brush and dark blue paint, paint a large circle in the center of the black area, leaving a thick black ring around the outside edge. -
Create the pupil:
In the direct center of your blue circle, paint a smaller solid black circle for the pupil. -
Layering the iris texture:
Mix white with your blue to make a medium sky blue. Using a small brush, paint thin, radiating lines from the pupil outward toward the edge of the iris, like spokes on a wheel. -
Brightening the details:
Switch to an even lighter blue (almost white). Paint shorter, finer lines layered on top of the previous ones, concentrating them near the pupil and the middle of the iris band to create dimension. -
Adding the catchlight:
Dip the handle end of a brush into pure white paint and dot a single, crisp highlight onto the upper right side of the pupil, slightly overlapping into the iris. This brings the eye to life.
Glow in the Dark
Mix glow-in-the-dark medium into your white paint for the stars and iris highlights for a spooky night effect.
Step 4: Celestial Details
-
Starry background:
Dilute a small mount of white paint with water until it’s fluid. Load your brush and flick the bristles to splatter tiny stars across the purple and blue galaxy background. -
Hand-painted stars:
Use your finest detail brush to paint a few larger, four-pointed ‘cross’ stars manually. Place one or two near the edge of the eye to integrate the design. -
Feathering the edge:
Where the natural orange meets the galaxy paint at the top, use a mostly dry brush with a little purple or black to feather the paint upwards, making the transition look organic rather than a harsh line. -
Final clear coat:
Once everything is completely dry—give it a few hours—apply a coat of matte or satin acrylic sealer to protect your painting from moisture and scratches.
Place your creation on the porch and watch as it silently observes the neighborhood trick-or-treaters
Pointillism Iris With Tiny Dots
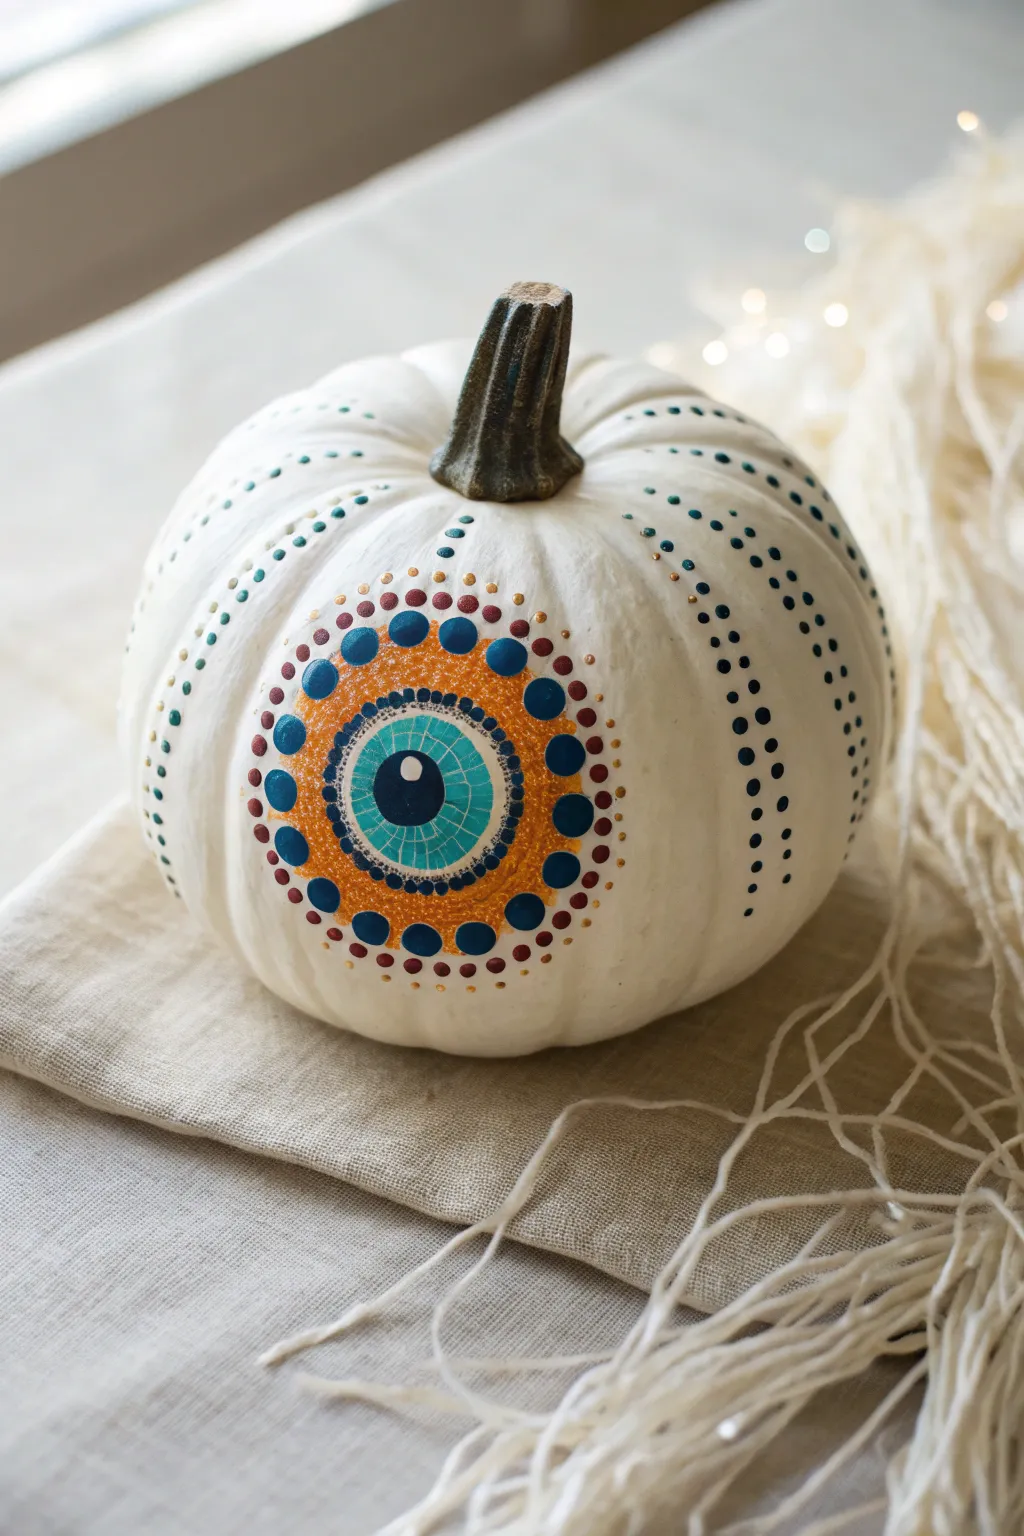
Transform a simple white pumpkin into a mystical piece of decor using the relaxing art of pointillism. This design features a stylized evil eye motif surrounded by intricate dot patterns, blending spooky vibes with sophisticated bohemian elegance.
Step-by-Step Guide
Materials
- Small to medium white pumpkin (real or faux)
- Acrylic paints (turquoise, teal, dark blue, burnt orange, gold, dark red/burgundy, white, black)
- Dotting tools (various sizes) or ends of paintbrushes/skewers
- Fine detail paintbrush
- Palette or paper plate
- Damp cloth or paper towel
- Clear matte sealer spray (optional)
Step 1: Painting the Central Eye
-
Prime the center:
Locate the smoothest, most prominent side of your pumpkin. Using turquoise paint mixed with the tiniest bit of white, paint a solid circle about 1.5 inches in diameter. This will be the base of your pupil. -
Add the pupil:
Once the turquoise base is dry to the touch, paint a smaller, dark blue circle right in the center. It shouldn’t be perfectly round; a slight oval shape gives it a more natural look. -
Create the highlight:
Dip a small dotting tool or the back of a thin brush into white paint. Place a single, crisp dot on the upper left side of the dark blue pupil to create that classic ‘gleam’ in the eye. -
Detail the iris:
Around the dark blue pupil, use a very fine brush or a toothpick to scratch purely decorative, faint lines or add tiny lighter teal specks onto the turquoise circle to mimic the texture of an iris.
Keep it clean
Keep a damp paper towel nearby to wipe your dotting tool frequently. Dried paint buildup on the tool will distort the shape of your dots and make them lumpy.
Step 2: Creating the Dotted Rings
-
First ring: Orange base:
Mix a vibrant burnt orange color. Using a medium-sized dotting tool, create a tight ring of dots immediately surrounding your central turquoise circle. Keep the spacing consistent. -
Second ring: Large blue dots:
Switch to a larger dotting tool and your dark blue paint. Place these larger dots in the gaps between the orange dots of the previous ring, effectively framing the eye. -
Third ring: Gold accents:
Using a small tool and metallic gold paint, place tiny dots in the negative space between the large blue dots. This adds a subtle shimmer that catches the light beautifully. -
Fourth ring: Textured orange:
Create another ring using the burnt orange paint, but this time, try double-loading your tool with a tiny bit of yellow or white to create a marbled effect within each dot. -
Fifth ring: Burgundy border:
Define the outer edge of the eye design with dark red or burgundy dots. I find that spacing these slightly further apart makes the design look less crowded. -
Final eye accents:
Intersperse tiny gold or teal micro-dots between the larger outer burgundy dots to soften the transition from the painted eye to the white pumpkin skin.
Step 3: Decorating the Ribs
-
Identify the natural lines:
Look at the natural vertical grooves (ribs) of your pumpkin. You will follow these lines to create trailing patterns. -
Start the rib pattern:
Dip a medium tool into teal or dark green paint. Starting from the top stem area, place dots running down the valley of a rib. -
Graduate the size:
As you move down the pumpkin, gradually decrease the size of your dots. You can do this by not re-dipping your tool for several dots, letting the paint run out naturally. -
Add secondary colors:
Next to your main line of teal dots, add a parallel line of smaller dots in a contrasting color like gold or dark blue. Use the adjacent ridge for this line. -
Repeat around the pumpkin:
Continue this vertical striping pattern on every other rib of the pumpkin, leaving some white space so the design breathes. -
Refine the stem:
If your stem looks dull, give it a quick dry-brush with dark brown or bronze paint to match the sophisticated look of your dot work. -
Let it cure:
Allow the pumpkin to dry completely for at least 24 hours. Because the dots are thick, they may skin over but stay wet underneath for a while.
Oops! Runny paint?
If a dot spreads too much or drips, wait for it to DRY completely. Then, simply paint over the mistake with white paint (or the pumpkin color) and re-dot.
Now you have a stunning, intricate centerpiece that looks as if it’s watching over your autumn festivities
Geometric Eyeball Pumpkin Pattern

Transform a simple white pumpkin into a chic, mystical centerpiece with this geometric eye design. Featuring bold black lines and shimmering gold accents, this no-carve project adds a modern bohemian touch to your autumn decor.
Detailed Instructions
Materials
- White pumpkin (real or faux)
- Black paint pen (medium tip)
- Black paint pen (fine tip)
- Gold paint pen or metallic gold acrylic paint with a small brush
- Pencil
- Eraser
- Paper towel or rag
- Clear matte sealer spray (optional)
Step 1: Planning and Sketching
-
Clean the surface:
Begin by wiping down your pumpkin with a damp cloth to remove any dirt or oils. If using a real pumpkin, dry it thoroughly before starting. -
Map out the central eye:
Using a pencil, lightly sketch the main eye shape in the center of the pumpkin, using the pumpkin’s vertical ribs as a guide to center it nicely. -
Add eye details:
Sketch the iris (circle) and pupil inside the eye shape, then draw the upper and lower eyelid creases parallel to the main eye outline. -
Draft the top triangle ring:
Around the top shoulder of the pumpkin, closest to the stem, lightly pencil in a ring of small triangles pointing upwards. -
Sketch the side hourglass shapes:
To the left and right of your central eye, draw large hourglass shapes made of two triangles meeting at their points. This balances the design horizontally. -
Outline filled triangles:
In the spaces between your main motifs, sketch solid triangles. Notice how the reference photo has small, solid black triangles scattered near the larger geometric shapes. -
Sketch the bottom border:
Create a bottom row of inverted triangles near the base of the pumpkin to mirror the top ring.
Smudge Control
Work from top to bottom and rotate the pumpkin carefully. If you’re right-handed, move left to right to avoid dragging your hand through wet ink.
Step 2: Inking the Design
-
Outline the eye:
Take your medium-tip black paint pen and trace over your pencil lines for the main eye shape. A steady hand works best here, but don’t worry if lines aren’t perfectly machine-straight; the handmade look adds charm. -
Create the iris lashes:
Switch to a fine-tip pen if needed. Draw the pupil solid black, leave a small white highlight circle, and then draw small radial lines (‘lashes’) extending from the pupil to the iris edge. -
Thicken main lines:
Go back over the upper and lower eyelid curves to thicken them slightly, giving the eye more definition and visual weight. -
Ink the geometric borders:
Trace the top ring of triangles and the bottom inverted triangles with the medium black pen. Keep the lines crisp. -
Fill solid black shapes:
Identify the triangles that should be fully black (like the scattered small ones) and fill them in completely with the paint pen. -
Detail the side hourglasses:
Ink the outline of the large hourglass shapes on the sides. Do not fill these in with black; they will receive gold texture later.
Step 3: Adding Gold and Finishing
-
Apply gold base:
Using your gold paint pen or brush, fill in the bottom half of the hourglass shapes and select triangles in the bottom border. You might need two coats for opacity. -
Add texture to gold:
Once the gold paint is fully dry, I like to take the fine-tip black pen and add tiny horizontal dashes or stippling over the gold areas for that tribal, textured look seen in the photo. -
Erase guidelines:
Wait at least 30 minutes to ensure all ink is bone dry. Gently erase any visible pencil marks that weren’t covered by paint. -
Final touch-ups:
Inspect your lines. If the black looks patchy over the textured pumpkin skin, do a second pass to make the black ultra-opaque. -
Seal the deal:
If you plan to keep this pumpkin outside or for future years (if it’s faux), spray a light coat of matte clear sealer to protect the design.
Level Up: 3D Effect
Use gold puffy paint for the gold sections instead of a flat pen. This adds tactile texture and makes the metallic elements catch the light even more.
Place your mystical creation near a window or entry table to catch the light and intrigue your guests


Have a question or want to share your own experience? I'd love to hear from you in the comments below!