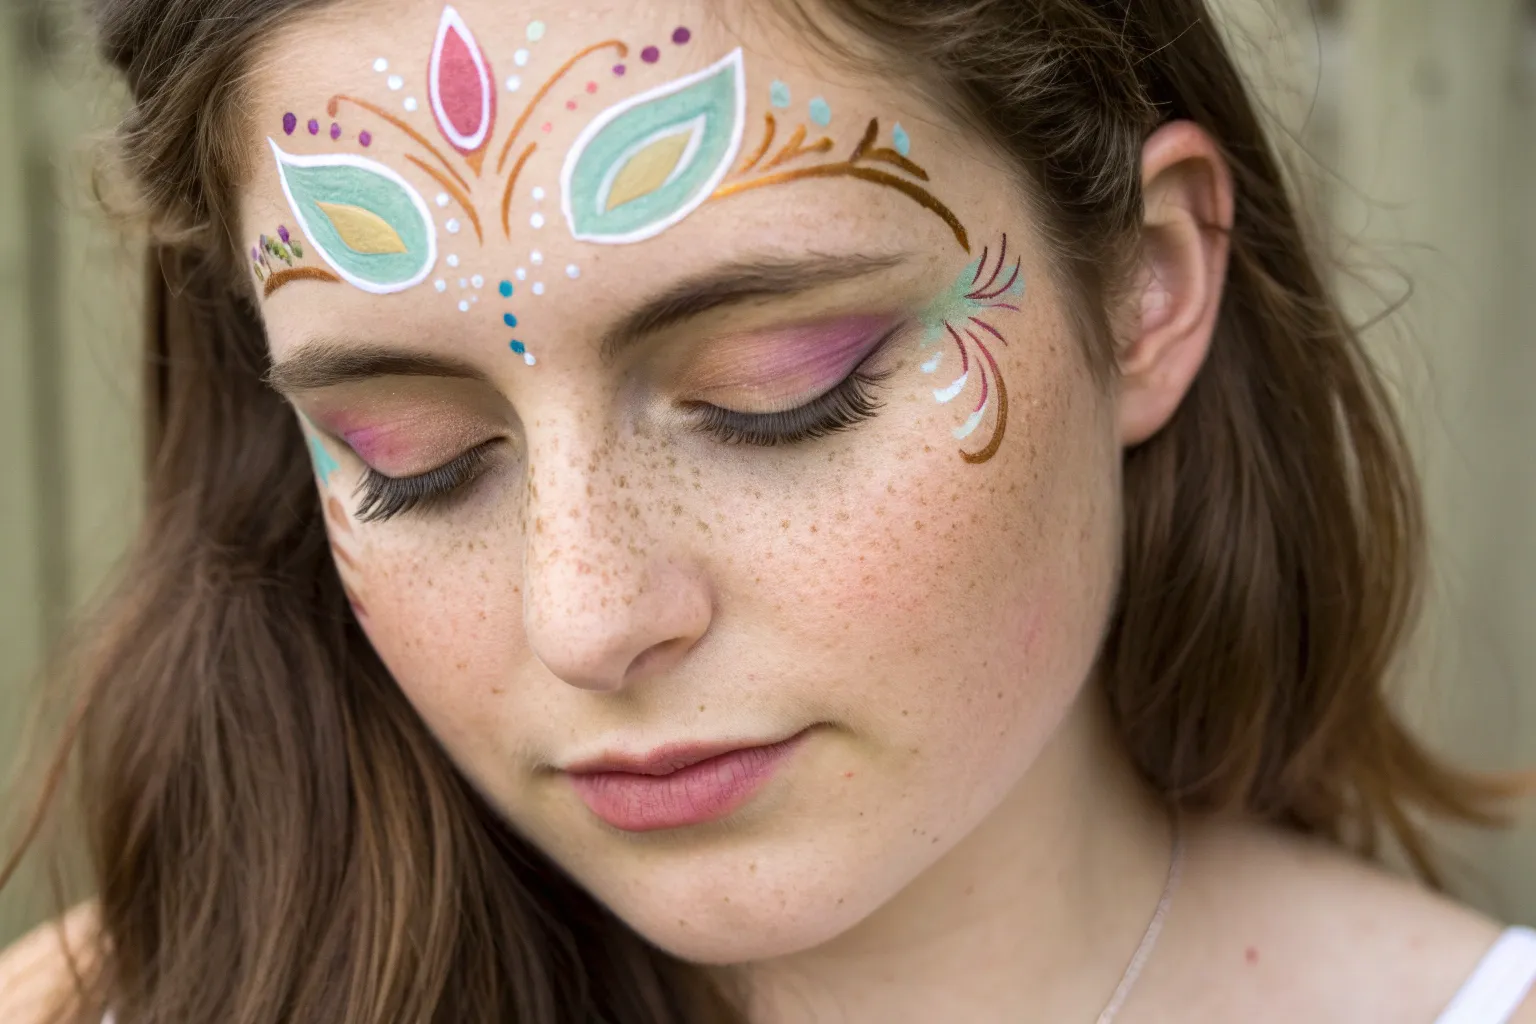
If you want a face paint design that instantly reads “fairy,” it’s all about soft color blends, wing-like shapes, and a little touch of sparkle. Here are my favorite fairy face paint ideas—from classic party-perfect looks to a few unexpected, artsy twists.
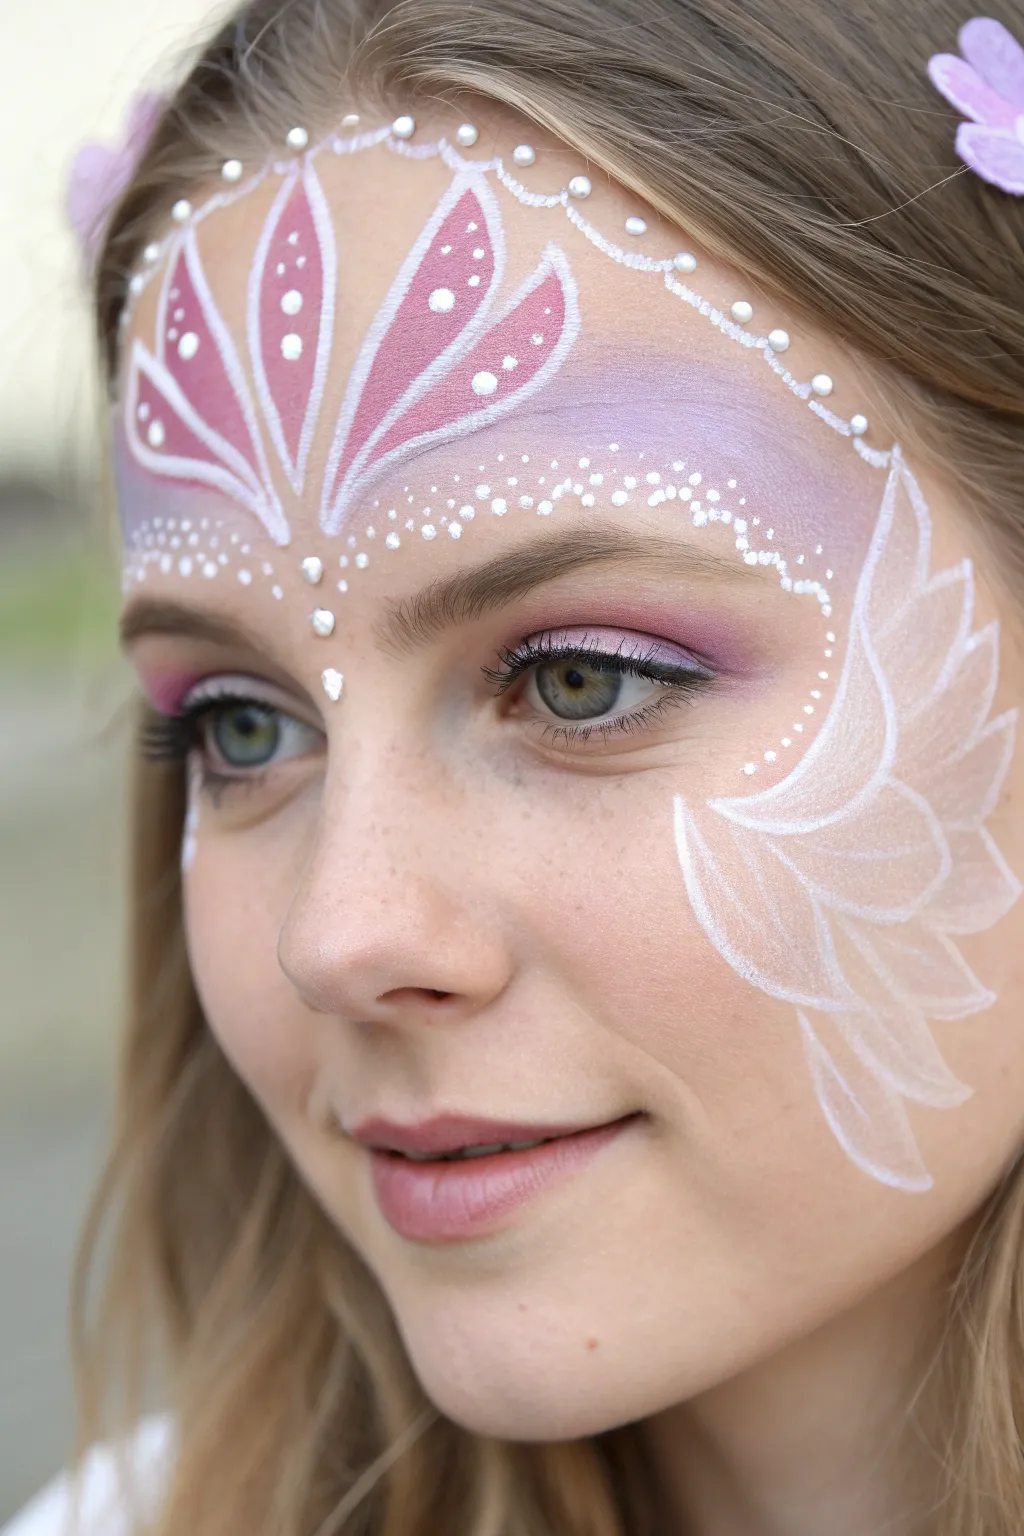
Classic Winged Fairy Mask
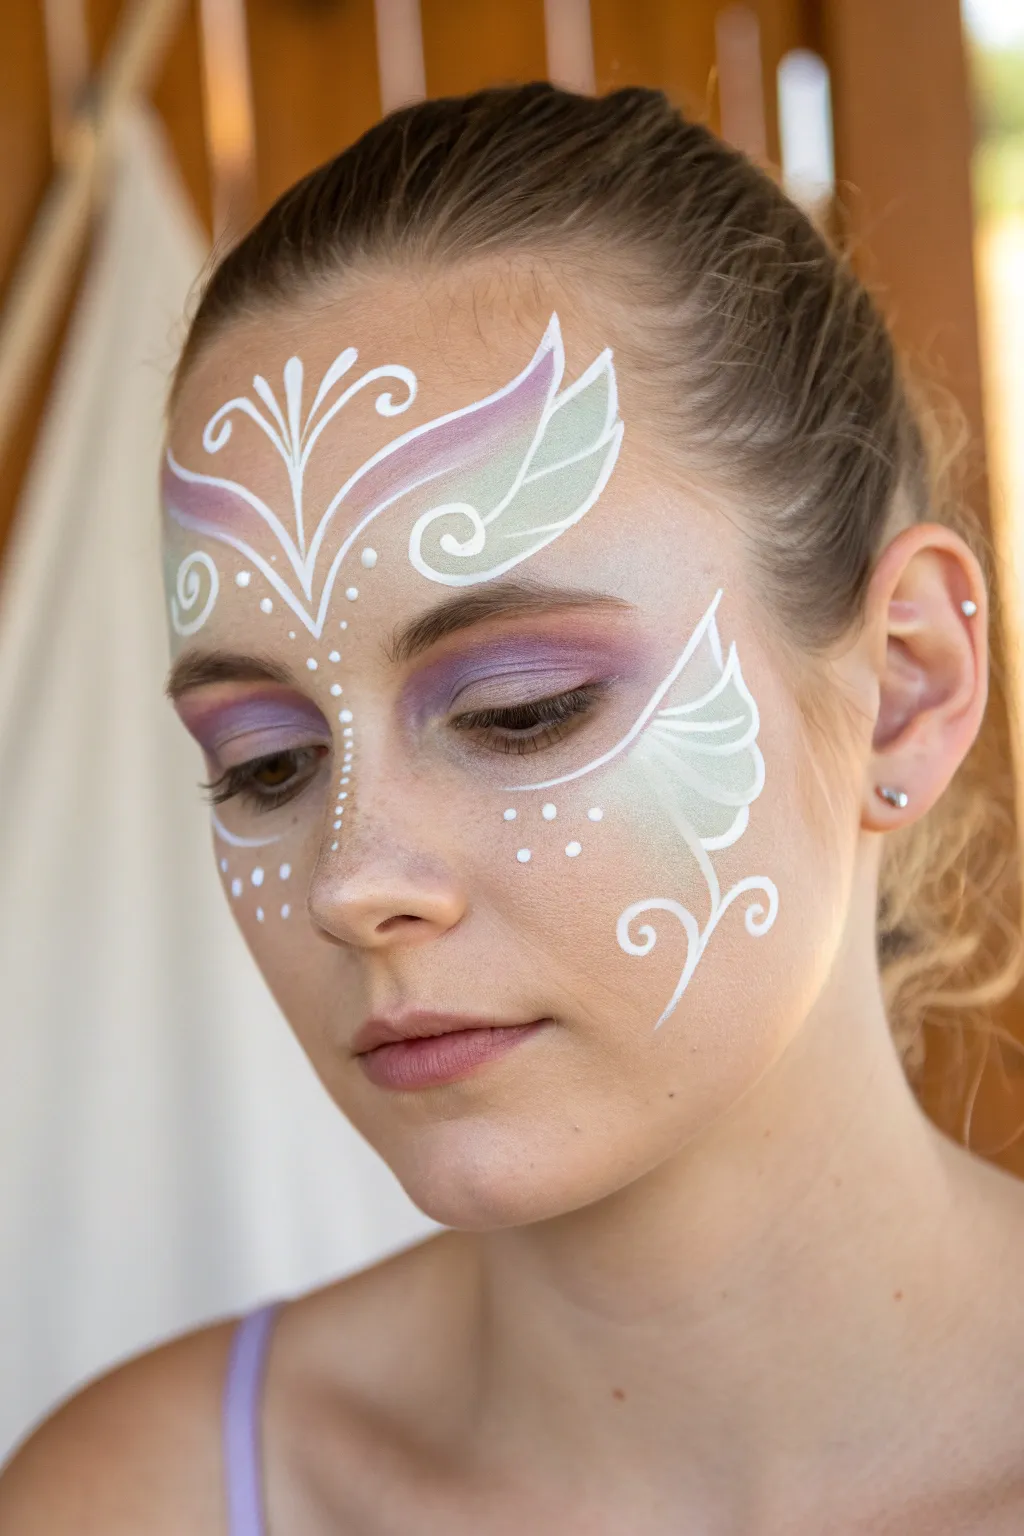
This delicate and whimsical design combines soft lilac and mint hues with crisp white linework for a classic fairy aesthetic. The look centers around an elegant winged mask shape on the forehead and cheeks, accented with dainty dots for a magical finish.
How-To Guide
Materials
- Face paint palette (lilac/purple, mint green/pale teal, white)
- High-density face painting sponge (petal shape or round)
- Small round brush (size 1 or 2 for details)
- Medium round brush (size 3 or 4 for blending)
- Spray bottle with water
- Silver face glitter or cosmetic adhesive gems (optional)
- Baby wipes or makeup remover
- Mirror
Step 1: Base Colors & Eyeshadow
-
Prep the sponge:
Start by dampening your sponge slightly with a spray bottle. You want it moist enough to pick up pigment but not dripping wet, as this helps keep the colors creamy rather than runny. -
Apply the purple base:
Load the sponge with a soft lilac or orchid purple. Gently pat this color over the eyelids, extending it just slightly above the crease and outward towards the temples to create a soft, diffused wing shape. -
Add the wing structure:
Reload your sponge with a split cake containing white and lilac, or manually blend the two on the sponge. Press this onto the forehead in a ‘V’ shape, starting from the center and curving upwards like bird wings. -
Introduce mint accents:
Using a clean edge of the sponge or a fresh one, pick up a pale mint green or teal. Dab this color gently below the purple wing tips on the forehead and sweeping down onto the upper cheekbones to create a gradient effect.
Linework Confidence
For smoother swirls, move your whole arm rather than just your wrist. This prevents shaky lines and creates elegant, fluid curves.
Step 2: White Linework Design
-
Load the liner brush:
Wet a size 1 or 2 round brush and load it thoroughly with white face paint. Roll the brush tip on the paint cake to create a sharp point and ensure the consistency is like ink-smooth and flowing. -
Create the center motif:
Begin right between the eyebrows. Paint a small, stylized ‘V’ shape that acts as the anchor. From this center point, draw a vertical line straight up, branching out into two small curled tendrils at the top. -
Outline the top wings:
From that central anchor, sweep a long, confident line upwards and outwards to outline the top edge of your purple forehead shape. At the very end of the line, curl it back slightly. -
Define the inner curves:
Inside the forehead wing area, paint tear-drop shapes or curved lines that follow the contour of the color. I find that varying the pressure on the brush helps—press down for thick lines and lift up for thin tails. -
Draw the lower wing swirls:
Move to the cheekbone area where you placed the mint green. Paint a large swirl starting near the outer corner of the eye, curving down the cheek and flicking outward towards the ear. -
Add cheek details:
Connect a second, smaller swirl to the bottom of the previous line, creating a filigree effect on the cheek. -
Frame the eyes:
Add a small, curved line extending from the outer corner of the eye, integrating with the larger cheek design to define the mask shape.
Step 3: Magical Details
-
Dot the nose bridge:
Reload your fine brush with white. Starting between the eyebrows, paint a line of graduating dots down the bridge of the nose. Start with larger dots at the top and make them tiny as you reach the tip. -
Embellish the cheeks:
Add a cluster of three to four small white dots on the apple of the cheek, just below the mint green shading, to balance the design. -
Highlight the forehead:
Place a few strategic dots inside the purple loops on the forehead design to fill the negative space. -
Optional glitter:
While the paint is still slightly tacky, use a finger or dry brush to tap a small amount of cosmetic glitter onto the eyelids or the center of the forehead design. -
Final jewelry accents:
If you have small adhesive gems, place one directly in the center of the forehead design (the ‘third eye’ area) for an extra sparkle.
Fixing Smudges
If a line goes astray, wait for it to dry completely. Then, use a damp cotton swab to gently erase the mistake before repainting.
Now you have a beautifully enchanted look ready for any magical gathering or festival


Rainbow Wing Sweep Fairy
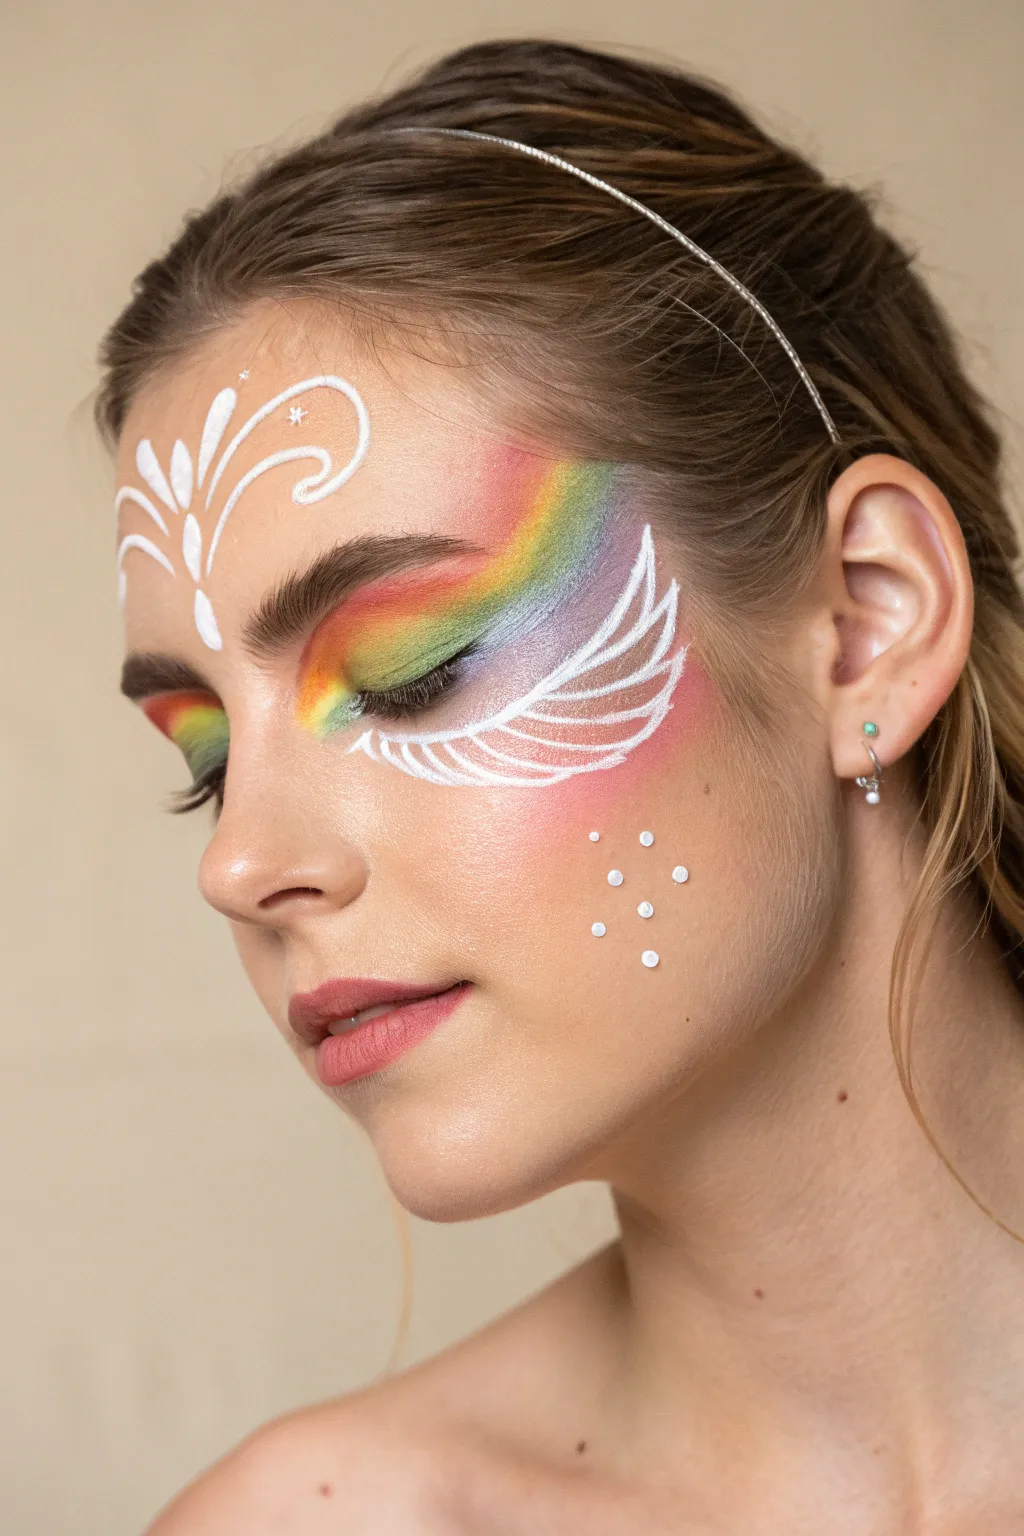
Transform into an ethereal creature with this vibrant design that combines a bold rainbow gradient with delicate white linework. This look centers on a sweeping wing shape that mimics the magical flight of a fairy, perfectly accented by sparkling gems and swirls.
How-To Guide
Materials
- Face painting rainbow split cake (red, orange, yellow, green, blue, purple)
- White face paint (high opacity)
- Wide flat brush (3/4 inch or 1 inch)
- Round brush (size 2 or 3 for linework)
- Small round brush (size 0 or 1 for details)
- Water container
- Paper towels
- Makeup setting spray (optional)
- Silver headband (optional accessory)
Step 1: Creating the Rainbow Base
-
Load the brush:
Dip your wide flat brush into water, wiping off excess drips on the edge of the cup. Rub the damp brush back and forth across the rainbow split cake until the bristles are creamy and fully loaded with pigment. -
Position the stroke:
Start at the inner corner of the eyelid. Position the brush so the darker colors (blue/purple) are on the bottom and the warmer colors (red/orange) are on top. -
Sweep across the lid:
In one smooth motion, sweep the brush across the eyelid, following the natural curve of the brow bone and extending outwards toward the temple. -
Create the wing shape:
As you reach the temple, curve the stroke slightly upward to create a sweeping wing shape. Lift the brush gently at the end to taper the color. -
Mirror the inner eye (Optional):
For added depth, use the corner of the brush to dab a small amount of the red/orange/yellow section just under the inner corner of the lower lash line to balance the look.
Muddy Rainbows?
If your rainbow colors are blending into brown, your brush is too wet. Dry it off, reload the split cake until the paint is tacky, and try one confident stroke.
Step 2: Painting the Wings
-
Prepare white paint:
Clean your brush or switch to a size 2 or 3 round brush. Load it with creamy white face paint. The consistency should be like melted ice cream for smooth lines. -
Outline the upper wing:
Starting near the outer corner of the eye, draw a curved white line that follows the top edge of your rainbow gradient, flicking it upward at the end. -
Add wing segments:
Beneath that first line, paint a series of curved, swooping lines that connect back toward the outer corner of the eye. Think of these as individual long feathers. -
Refine the shape:
Continue stacking these curved strokes downwards until you cover the lower part of the rainbow gradient. Make sure the lines are thickest at the curve and taper to sharp points.
Step 3: Forehead Details
-
Center teardrop:
Using the same round brush and white paint, place a central teardrop shape in the middle of the forehead, just above the eyebrows. Press down for the heavy part and lift up for the point. -
Create the sprays:
From the base of that central teardrop, paint two long, swirling S-curves that reach up and out toward the hairline on each side. -
Add floral accents:
Nestle smaller teardrop shapes or petal strokes inside the curves of your main swirls to create a floral crown effect. -
Tiny details:
Use your smallest round brush (size 0 or 1) to add tiny dots or starbursts at the ends of the swirls and in empty spaces on the forehead design.
Make It Sparkle
While the white paint on the wing tips is still slightly damp, gently press cosmetic-grade glitter onto the wet paint for a truly magical, shimmering finish.
Step 4: Final Touches
-
Cheek accents:
On the apple of the cheek, below the rainbow wing, use the back of a paintbrush handle dipped in white paint to stamp a cluster of perfect circles. -
Vary dot sizes:
Add a few smaller dots around the larger ones using a small brush tip to create a magical ‘fairy dust’ scattering effect. -
Highlight the eye:
Add a tiny dot of white in the inner corner of the eye to make the eyes pop. -
Lip color:
Finish the look with a soft pink or rose lipstick that complements the vibrancy of the rainbow eyes without overpowering them. -
Accessorize:
Gently place a thin silver headband into the hair, ensuring it sits just behind the painted forehead design to frame the artwork.
Step back and admire your colorful, winged masterpiece before heading out to spread some magic


Woodland Leaf And Vine Fairy
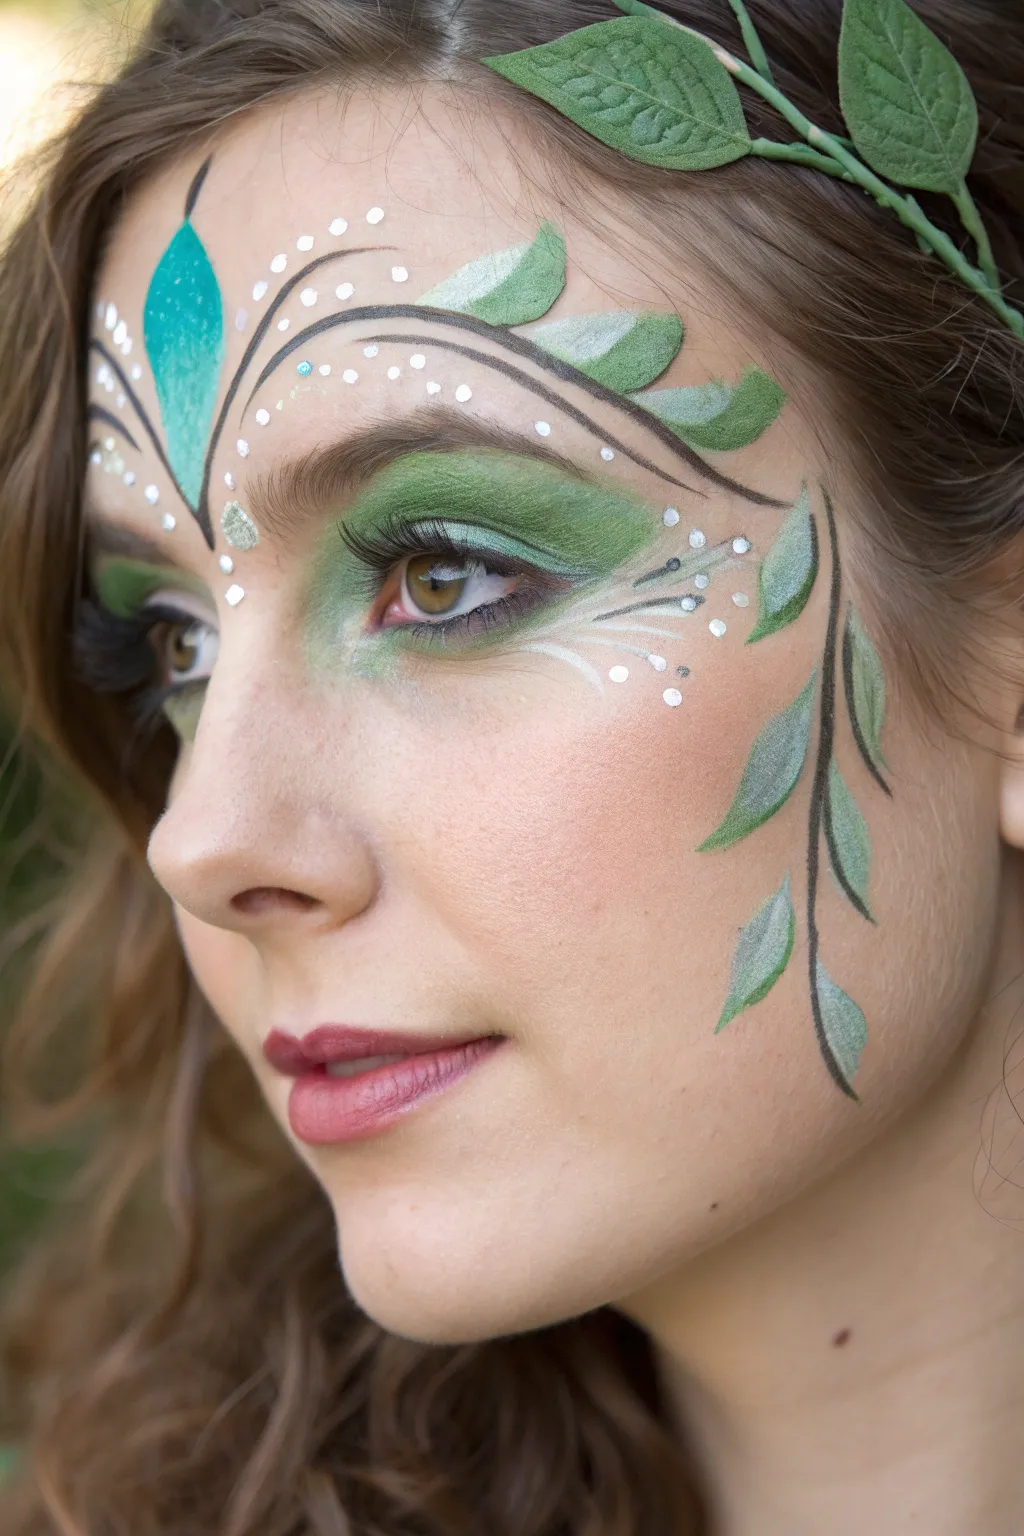
Transform into an ethereal woodland spirit with this delicate leaf and vine face paint design. This look combines soft, blended eyeshadows with crisp painted details to create an organic, magical appearance perfect for festivals or costumes.
Step-by-Step
Materials
- Face paint palette (dark green, light sage green, white, black/dark brown)
- Green eyeshadow palette (forest green, moss green, shimmer green)
- Fine liner brush (size 0 or 00)
- Round brush (size 2 or 4)
- Fluffy blending eyeshadow brush
- Small tapered eyeshadow brush
- Lipstick (rose or mauve shade)
- Fabric leaf headband or individual fake leaves
- Setting spray (optional)
- Makeup sponge
Step 1: Base and Eyes
-
Prep the skin:
Start with a clean, dry face. Apply your usual foundation or base makeup if desired, ensuring it’s matte so the face paint adheres well. -
Apply base eyelid color:
Using a fluffy blending brush, sweep a medium moss green eyeshadow across the entire eyelid, extending it slightly above the crease and outward toward the temple. -
Deepen the crease:
Take a smaller tapered brush and a darker forest green shadow. Work this into the crease and the outer corner of the eye to add depth and dimension. -
Highlight under the brow:
Apply a shimmering pale green or white shadow just under the eyebrow arch to lift the eye area. -
Line the lower lashes:
Softly smudge the medium green shadow along the lower lash line, connecting it to the outer corner color for a seamless look. -
Add inner corner pop:
Dab a tiny amount of shimmery light green or gold shadow in the inner tear duct area to brighten the eyes.
Clean Lines
If your vine lines look shaky, try resting your pinky finger on the cheek as an anchor while you paint. It stabilizes your hand significantly.
Step 2: Painting the Vines
-
Draft the main vine:
Load a fine liner brush with black or very dark brown face paint. Starting from above the eyebrow, draw a thin, curving line that sweeps down past the temple and onto the cheekbone. -
Add secondary tendrils:
Paint a few shorter, curved lines branching off the main vine, allowing them to taper off naturally into thin points. -
Create main leaves:
Switch to a round brush loaded with sage green paint. Press down and lift while dragging the brush to create teardrop or leaf shapes attached to your vines. -
Layering leaf colors:
While the green is still slightly damp, streak a little white or lighter green into the center of the larger leaves to create a mesmerizing 3D highlight. -
Outline the leaves:
I prefer to go back in with the fine liner brush and black paint to very lightly outline one side of the larger leaves, giving them crisp definition. -
Forehead focal point:
Paint a large, stylized teal or bright green leaf shape in the center of the forehead, bridging the space between the brows like a diadem.
Glitter Glaze
Before the paint fully dries, tap cosmetic-grade iridescent glitter over the white highlight dots. It catches the light beautifully outdoors.
Step 3: Magical Details
-
Add white accents:
Using the very tip of your fine brush and white face paint, add delicate feathery strokes fanning out from the corner of the eye toward the temple. -
Create magical dots:
Dot white paint in varying sizes along the curve of the eyebrow and around the vine tips. Varying the pressure creates a beautiful ‘fairy dust’ effect. -
Apply mascara:
Coat top and bottom lashes generously with black mascara, or apply fluttery false lashes for extra drama. -
Color the lips:
Finish the makeup with a swipe of mauve or soft rose lipstick to complement the green tones without overpowering them. -
Attach the headpiece:
Place your leafy headband or bobby-pin individual fabric leaves into your hair, positioning them to flow visually with your painted vines.
Step back and admire your transformation into a mystical creature of the woods


Golden Sunbeam Fairy
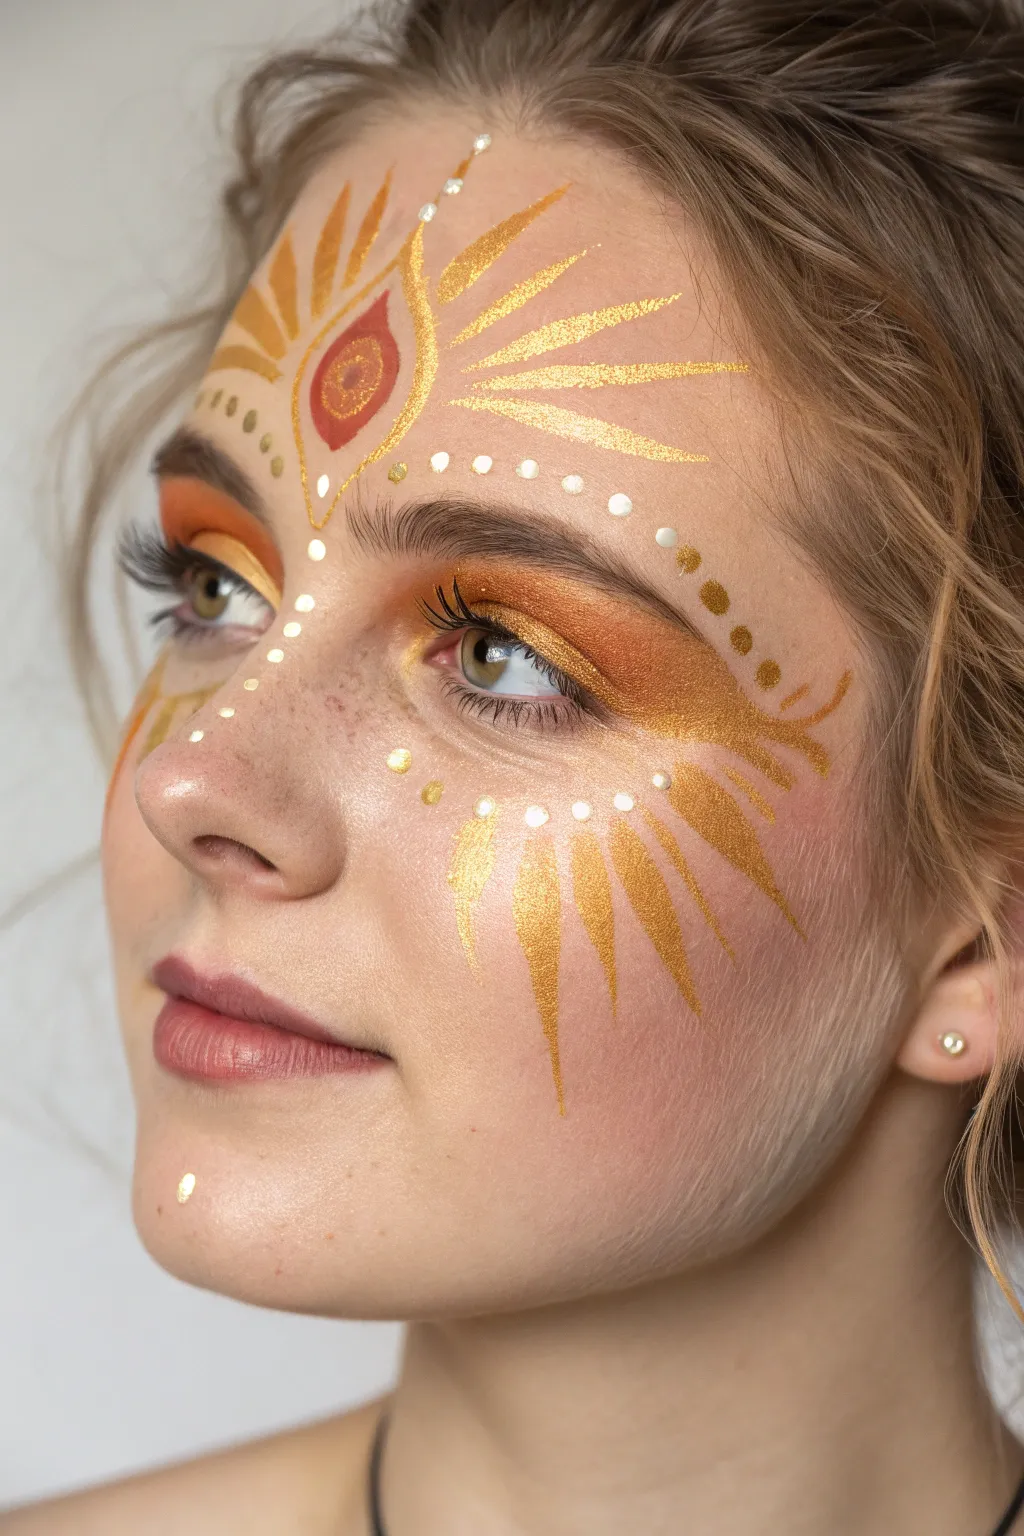
Transform into an ethereal being of light with this stunning golden sunburst design. Combining shimmering gold paints, warm sunset eyeshadows, and delicate dot work, this look captures the warmth and radiance of a summer deity.
Step-by-Step Tutorial
Materials
- Gold metallic face paint (liquid or water-activated cake)
- White face paint
- Rust-red or terracotta face paint
- Gold shimmer eyeshadow
- Burnt orange eyeshadow
- Fine round brush (size 1 or 2)
- Detail brush (size 0 or 00)
- Fluffy blending eyeshadow brush
- Small dotting tool or brush handle end
- Setting spray
Step 1: Golden Gaze Base
-
Prep the canvas:
Begin with a clean, moisturized face. Apply a light foundation or tinted moisturizer if desired to even out the skin tone, but keep it natural so your freckles can peek through if you have them. -
Apply crease color:
Load a fluffy brush with burnt orange eyeshadow. Sweep this generously through the crease of the eyelid, blending upwards toward the brow bone and outwards towards the temple to create a warm, elongated shape. -
Add golden shimmer:
Pack a dense gold shimmer eyeshadow onto the center of the eyelid. Wet your brush slightly with setting spray before picking up the pigment to make the metallic finish pop intensely. -
Define the lower lash line:
Run a small smudge brush with the burnt orange shadow along the lower lash line, connecting it to the outer corner color for a seamless, hazy effect.
Step 2: Forehead Sun Crest
-
Outline the teardrop:
Using a fine round brush loaded with gold face paint, paint a large, inverted teardrop shape in the center of the forehead. The point should extend upward toward the hairline. -
Fill the center:
Clean your brush or switch to a new one, and fill the center of this teardrop with a rust-red or terracotta face paint, leaving a clear golden border around the outside. -
Add the inner detail:
Once the red paint is dry to the touch, use your smallest detail brush with gold paint to create a swirled circle or ‘eye’ pupil right in the center of the red shape. -
Paint upper rays:
Starting from the top of your central teardrop, paint confident strokes flicking upwards and outwards. Imagine these as sun rays reaching into the hairline. Vary the lengths—some short, some long. -
Add side flares:
Add smaller, curved strokes extending horizontally from the sides of the possibly teardrop base, framing the top of the eyebrows.
Metallic Pop Pro-Tip
For the gold face paint, use a ‘mixing liquid’ instead of plain water. This turns the metallic powder into a liquid metal foil that is far more reflective and opaque.
Step 3: Cheek Radiance & Details
-
Create the cheek sunburst:
Load your fine round brush with gold paint again. Starting from the high point of the cheekbone (near the outer eye corner), paint rays extending downward across the cheek. -
Vary the stroke pressure:
Press down firmer at the start of the stroke (near the eye) and lift off quickly as you drag down to create sharp, tapered points. I find practicing this motion on my hand first helps clarify the shape. -
Add outer wing details:
Extension strokes should flow backwards towards the ear, mimicking the natural curve of the cheekbone. Add a few small, curved flicks at the end of the eye makeup wing to integrate the paint with the shadow. -
White dot accents:
Dip a dotting tool or the back of a thin brush into white face paint. Place a row of graduating dots underneath the eyebrow arch. -
Bridge of nose details:
Continue your white dot pattern down the bridge of the nose and curving slightly under the inner eye corner to brighten the face center. -
Golden chin accent:
Place a single golden dot or diamond shape on the center of the chin to balance the forehead design. -
Mascara finish:
Apply a coat of dark brown or black mascara to define the lashes without overpowering the delicate paintwork. -
Set the look:
Close your eyes and mist the face lightly with setting spray to lock the powders and water-based paints in place for long-lasting wear.
Level Up: Goddess Glow
Apply a liquid highlighter to the tops of your shoulders and collarbones, then dust gold biodegradable glitter over the wet paint rays while they are still tacky.
Enjoy your radiant transformation into a sun spirit, perfect for festivals or fantasy photoshoots
BRUSH GUIDE
The Right Brush for Every Stroke
From clean lines to bold texture — master brush choice, stroke control, and essential techniques.
Explore the Full Guide
Moonlit Lavender Fairy
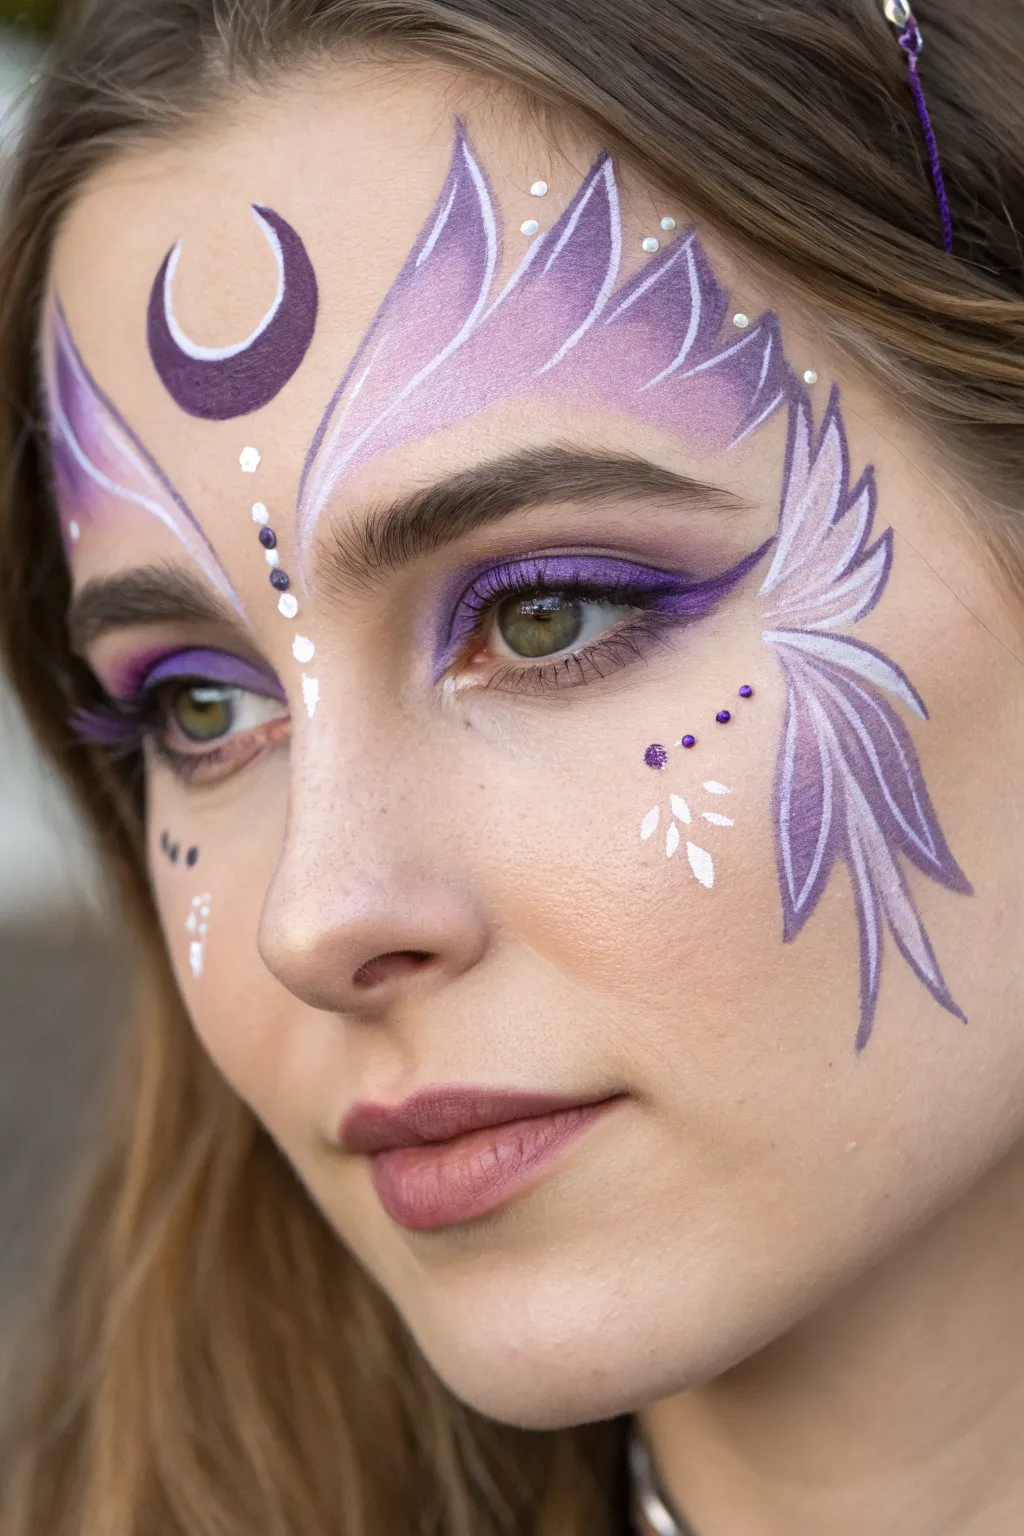
Transform into an ethereal night sprite with this delicate purple and white design featuring celestial motifs and feathery wing details. The blend of soft lavender hues, crisp white accents, and sparkling gems creates a magical look perfect for festivals or fantasy events.
Step-by-Step Guide
Materials
- Face paint pallet (purple, lavender, white, black)
- High-density face painting sponges
- Flat brush (medium)
- Fine liner brush (size 1 or 0)
- Purple eyeshadow palette (shimmer and matte)
- Fluffy eyeshadow blending brush
- Flat shader brush
- Self-adhesive face gems (purple and iridescent)
- Cosmetic adhesive (optional, for longer wear)
- Mascara
- Setting spray
Step 1: Eyes
-
Prime the lids:
Start with clean, dry eyelids. Apply an eyeshadow primer to ensure the purple pigment pops and stays vibrant throughout the day. -
Apply base color:
Pack a vibrant matte purple eyeshadow onto the entire eyelid using a flat shader brush, extending slightly past the outer corner. -
Define the crease:
Use a darker plum or deep purple shade in the crease to add depth, blending it outwards into a winged shape for a dramatic effect. -
Lower lash line:
With a smaller detail brush, smudge the lighter purple shadow underneath the lower lash line to balance the eye makeup. -
Liner and lashes:
Line the upper lash line with a deep purple or black liner, flicking it out. Finish the eyes with two coats of black mascara on the upper lashes.
Fixing Smudges
If your white lines look messy, wait for them to fully dry. Then, use a damp Q-tip to gently erase the error before repainting the line.
Step 2: Forehead Design
-
Create the moon:
Using a medium round brush loaded with dark purple face paint, carefully draw a crescent moon shape in the center of the forehead, between the eyebrows. -
Start the wings:
Load a flat brush or a split-cake brush with lavender paint. Start from just above the inner eyebrow and sweep upwards and outwards towards the hairline to create the top edge of the wing. -
Fill the wing shape:
Continue painting curved, teardrop-like strokes that mimic feathers, fanning them out towards the temples. Keep the color sheer at the edges for a soft, airy look. -
Outline in white:
Once the purple base is dry, take a fine liner brush with white paint. Outline the top edges of the purple wing shapes with thin, sweeping lines to define the feathers. -
Add detail dots:
Using the tip of your brush handle or a dotting tool, place small white dots above the wing tips near the hairline for a sprinkling of stardust.
Step 3: Cheek Details
-
Paint the cheek wing:
On the left cheekbone (or both, if you prefer symmetry), paint a smaller version of the winged design. Use the lavender paint to create three distinct feather shapes pointing downwards and backwards. -
Define feathers:
Use your fine liner brush and white paint to outline the interior and edges of these cheek feathers, giving them a crisp, graphic look. -
Create leaf accents:
Below the eye on the cheek without the large wing, paint delicate white teardrop or leaf shapes clustering together. -
Center detailing:
Paint a line of white dots descending from the crescent moon, down the bridge of the nose. Start with larger dots at the top and get progressively smaller.
Boost the Glow
Mix a tiny bit of iridescent loose glitter into your white face paint before lining to make the detailed feathery strokes shimmer in the light.
Step 4: Final Touches
-
Apply rhinestones:
Using cosmetic glue or the self-adhesive backing, place purple gems along the center dot detail on the nose and adjacent to the cheek designs for sparkle. -
Lip color:
Finish the look with a mauve or soft purple lipstick, keeping the edges soft rather than harshly lined. -
Highlights:
Add tiny white starbursts or dots on the inner corner of the eyes and the tip of the nose to bring light to the face. -
Set the paint:
Lightly mist the entire face with a setting spray to lock the powders and paints in place for long wear.
Now you are ready to flutter away into the moonlight with your enchanting new look
Daisy Cheek Fairy
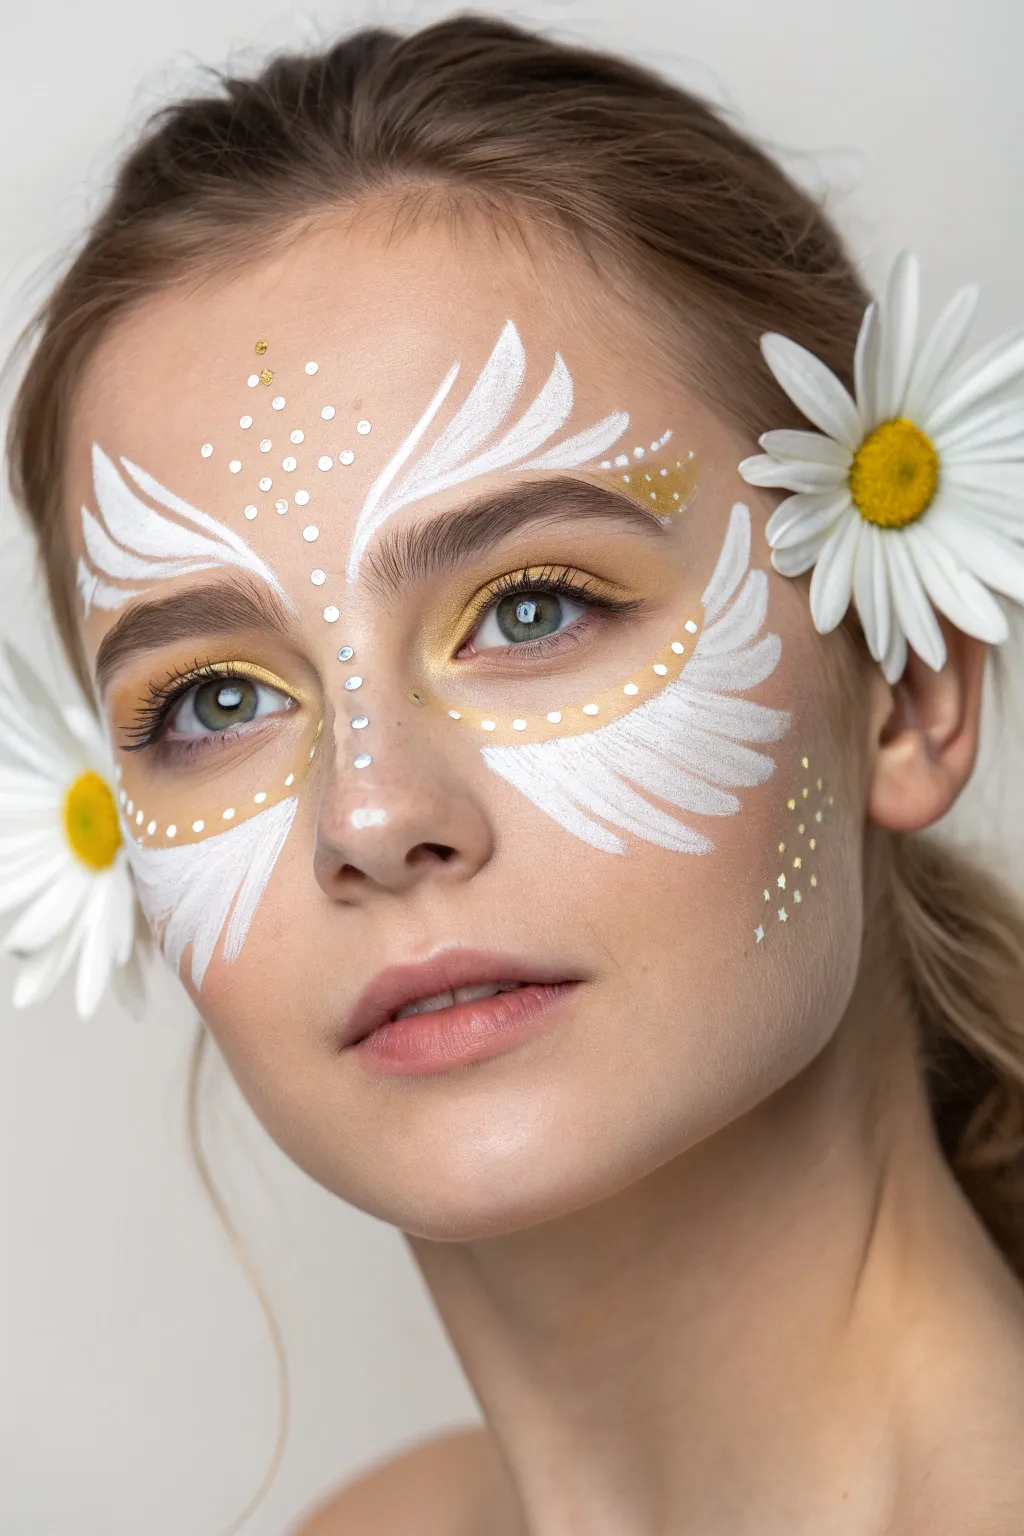
Transform into an ethereal woodland creature with this soft and elegant daisy-inspired face paint. Featuring delicate white feather strokes, golden accents, and fresh daisy embellishments, this design creates a light, magical aesthetic perfect for festivals or costume parties.
Step-by-Step Tutorial
Materials
- White face paint (water-activated for crisp lines)
- Gold metallic face paint (liquid or cake)
- Gold loose glitter or cosmetic adhesive gems
- Small round shimmer gems (iridescent/white)
- Small rhinestones (silver/clear)
- Fine round brush (size 1 or 2)
- Medium round brush (size 4)
- Small filbert brush or eyeshadow brush
- Gold eyeshadow (shimmer)
- Mascara
- Two fresh or artificial white daisies
Step 1: Base and Eyes
-
Prep the skin:
Start with a clean, moisturized face. Apply a light layer of foundation or BB cream to even out the skin tone if desired, keeping the look fresh and natural. -
Apply gold eyeshadow:
Using a soft eyeshadow brush, sweep a shimmering gold shadow across the entire eyelid, extending it slightly above the crease and into the inner corner for brightness. -
Define the lower lash line:
Gently drag the same gold shadow along the lower lash line to create a warm, glowing under-eye effect. -
Add mascara:
Apply a coat of black mascara to both top and bottom lashes to open up the eyes against the bright paint.
Clean Lines Secret
To get those sharp, tapered ends on your feathers, ensure your paint isn’t too watery. Press firmly at the start of the stroke and flick your wrist quickly as you lift off the skin.
Step 2: Painting the Wings
-
Load the white paint:
Wet your medium round brush and load it thoroughly with white face paint until it has a creamy consistency. -
Start the lower wing:
I like to start on the cheekbone. Press the brush down near the outer corner of the eye and sweep outward and slightly downward, lifting pressure at the end to create a tapered feather tip. -
Layer the cheek feathers:
Repeat this stroke directly below the first one, stacking 3-4 distinct feather shapes that curve gently toward the ear. -
Create the upper wing:
Move to the forehead above the eyebrow. Create similar sweeping strokes that curve upward and inward toward the center of the forehead, forming the top fairy wing shape. -
Add inner details:
Switch to a fine round brush. Add smaller, delicate white flicks near the tear duct area, extending down the side of the nose bridge. -
Create the chin feathers:
Paint two or three soft, downward-curving feather strokes on the jawline, just below the main cheek design. -
Repeat on the other side:
Mirror the design on the left side of the face, trying to keep the symmetry as close as possible.
Step 3: Golden Accents & Gems
-
Apply gold dots:
Use the back of a brush handle or a dotting tool dipped in gold paint to create a line of dots following the curve under the eye, bridging the gap between the white feather sections. -
Highlight the temple:
Paint a small cluster of gold strokes or dots at the outer edge of the upper wing design near the temple. -
Add forehead stippling:
Create a pattern of tiny white dots rising from the center of the forehead upwards, adding a magical dust effect. -
Place center gems:
Using cosmetic glue, place a line of small iridescent gems down the very center of the nose bridge for a structured, regal look. -
Add scattered sparkles:
Adhere a few tiny star-shaped glitters or gold speckles on the cheek near the hairline for extra dimension. -
Attach the daisies:
Tuck a large white daisy behind one ear. Place a second daisy on the opposite side, slightly lower near the jawline, securing them with bobby pins or using stems tucked into hair.
Smudge Control
If the white paint looks streaky or transparent, let the first layer dry completely for 60 seconds before applying a second coat. Wet paint on wet paint just moves the pigment around.
Now you are ready to flutter away with a delicate and sophisticated fairy style that brings the garden to life

PENCIL GUIDE
Understanding Pencil Grades from H to B
From first sketch to finished drawing — learn pencil grades, line control, and shading techniques.
Explore the Full Guide
Lace Petal Stencil Fairy
Transform into an enchanting woodland spirit with this delicate and feminine fairy face paint design. Featuring soft pink gradients, crisp white stenciling, and sweeping floral wings, this look captures the magic of a garden fairy perfectly.
Detailed Instructions
Materials
- White face paint
- Metallic pink or rose shimmer face paint
- Lilac or soft violet eyeshadow or face powder
- High-density sponge
- Soft blending sponge or kabuki brush
- Fine liner brush (size 0 or 1)
- Medium round brush (size 3 or 4)
- Round petal or scallop stencil
- Cosmetic glitter gel (optional)
- Small rhinestones or face gems
Step 1: Setting the Background
-
Prep the canvas:
Begin with clean, dry skin. Tie back any loose hair to prevent it from sticking to the paint. If the skin is oily, a very light dusting of translucent powder can help the paint grip better. -
Apply the violet haze:
Load a soft blending sponge or a fluffy brush with lilac or soft violet powder. Gently sweep this color across the upper eyelids, blending it upwards slightly past the eyebrows and out towards the temples to create a subtle, magical glow. -
Add pink accents:
Using a smaller eyeshadow brush, apply a deeper rose or pink shade into the crease of the eyelid to add depth. Blend this softly into the violet base so there are no harsh lines.
Step 2: The Central Crown
-
Outline the center petal:
Load your medium round brush with metallic pink face paint. Starting right at the center of the forehead, just above the brow line, paint an elongated teardrop shape pointing upwards. -
Create the side petals:
Paint a curved petal shape on either side of your center teardrop, flaring outwards like a blooming flower. These should be slightly wider at the base and taper to a point. -
Fill and gradient:
Fill these shapes with the pink paint. While the paint is still damp, I like to take a slightly lighter pink or white on the tip of the brush and blend it into the center of each petal to create a soft, dimensional highlight. -
Outline in white:
Switch to your fine liner brush loaded with creamy white paint. Carefully outline the pink petals with thin, crisp lines. Ensure your paint consistency is inky so the lines flow smoothly. -
Add inner details:
Inside each pink petal, use the white liner brush to add small dots or tiny teardrops for a decorative, lace-like effect.
Smudge Control
If your stencil work smears, your sponge is too wet. Squeeze it out thoroughly in a paper towel until it feels almost dry before tapping.
Step 3: Detailed Stenciling and Wings
-
Stipple the forehead lace:
Take a stencil with small dots or a mesh pattern. Hold it firmly against the skin above the eyebrows but below the pink crown. Load a dry-ish sponge with white paint and gently tap (don’t drag!) over the stencil to create a delicate dotted veil. -
Extend the dotted chain:
Using your fine liner brush and white paint, create a draped ‘chain’ of dots connecting the top of the outer pink petals down towards the temples. Vary the pressure to make some dots larger and others tiny. -
Map the cheek wing:
On the left cheek, visualize a wing shape sweeping from the outer corner of the eye down towards the jawline. Use your white paint to sketch the main spine of the wing essentially following the cheekbone. -
Paint the translucent feathers:
With a medium brush that has been loaded with white paint (and perhaps wiped slightly so it’s semi-transparent), paint broad, leafy strokes fanning out from the eye. Press the brush down to create width and lift as you pull away to create sharp tips. -
Define the wing structure:
Go back over the edges of these feather shapes with your fine liner brush and fully opaque white paint to give the wing a crisp, defined outline. -
Add connecting dots:
bridge the gap between the forehead design and the cheek wing with another series of delicate white dots, following the curve of the temple.
Add Magical Shimmer
While the white paint is still slightly tacky, tap a sheer iridescent glitter over the cheek wing to make it sparkle like morning dew.
Step 4: Final Flourishes
-
Highlight the center:
Place three prominent white dots descending between the eyebrows, acting as a focal point or ‘bindi’ for the design. -
Apply intricate dots:
Add tiny clusters of white dots at the tips of the cheek feathers and along the upper hairline to complete the lacy aesthetic. -
Attach gems:
Using cosmetic glue or skin-safe adhesive, place a few rhinestones. A teardrop gem looks beautiful in the center of the forehead, and smaller round gems can accent the highest points of the white dotted chains. -
Mascara finish:
Finish the look with a coat of black mascara on the upper lashes to define the eyes against the soft pastel colors.
Now you are ready to flutter into the garden with a look that is both elegant and magical
Ombre Wing Tips Fairy
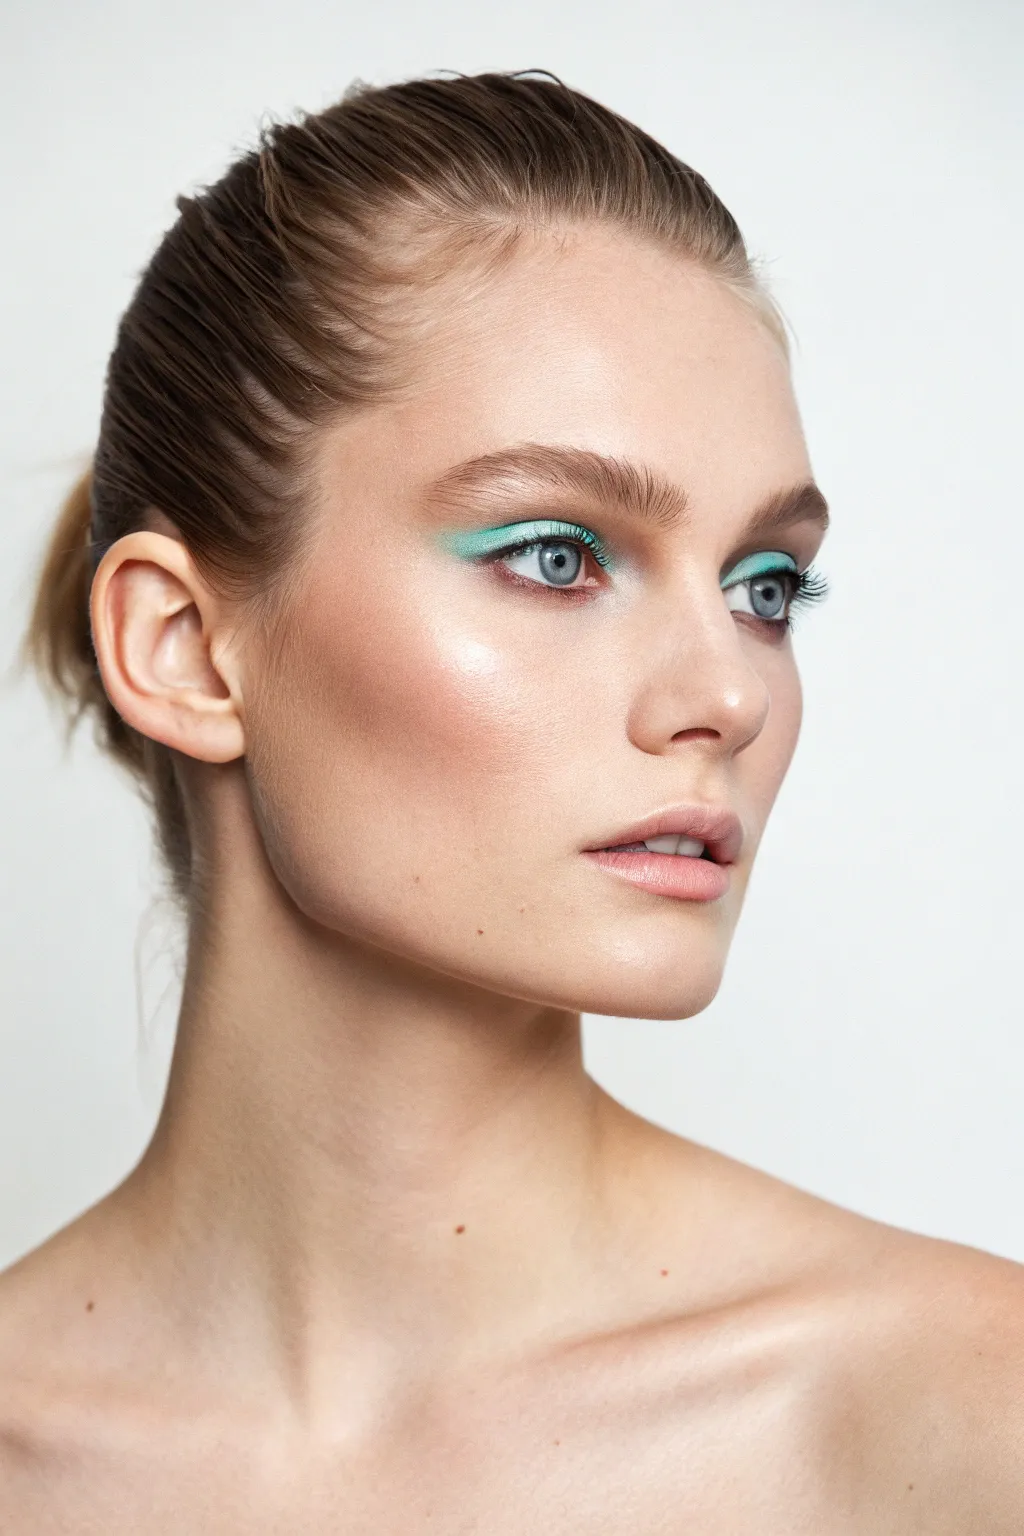
Achieve an ethereal, woodland-inspired look with this striking teal winged liner that mimics the delicate flutter of fairy wings. The dewy, natural skin keeps the focus on the eyes, making this a modern and wearable take on fantasy face paint.
Step-by-Step
Materials
- Dewy finish foundation or tinted moisturizer
- Liquid highlighter
- Cream contour stick
- Mint green or teal cream eyeshadow pot
- Matches-tone teal eyeshadow powder
- Angled eyeliner brush
- Small fluffy blending brush
- Volume mascara (black)
- Brow gel (clear)
- Nude pink lip gloss or balm
- Setting spray (dewy finish)
Step 1: Prepping the Canvas
-
Hydrate and prime:
Start with a freshly moisturized face. Apply a hydrating primer to ensure that glowing, fairy-skin base. -
Create a dewy base:
Apply a light-to-medium coverage foundation or even a tinted moisturizer. Use a damp beauty sponge to press it into the skin for a seamless, skin-like finish. -
Sculpt gently:
Using a cream contour stick, lightly define the cheekbones. Focus the product under the cheekbone and blend upwards towards the temples to lift the face structure without creating harsh lines. -
Add high-points glow:
Dab liquid highlighter onto the tops of the cheekbones, down the bridge of the nose, and slightly on the cupid’s bow. Blend with your fingers to melt it into the foundation.
Step 2: The Fairy Wing Eye
-
Lay the color base:
Dip an angled eyeliner brush into your mint green cream eyeshadow. Start at the inner corner of the eyelid and trace a line along the upper lashes. -
Thicken the line:
As you move towards the outer corner, gradually thicken the line. The shape should be boldest at the outer third of the eye. -
Draw the wing tip:
Extend the line past the outer corner, flicking it upwards towards the end of the eyebrow. Keep this tail sharp and precise. -
Fill the shape:
Connect the tip of the wing back to the lash line, filling in any gaps with the cream shadow to ensure opacity. -
Dust with powder:
To lock the cream in place and boost vibrancy, gently press a matching teal powder eyeshadow over the cream base using a flat shader brush. -
Soften the edges:
Take a clean, small fluffy blending brush and very lightly run it along the top edge of the eyeshadow (the crease area). You want to diffuse the harsh line slightly for that soft ‘ombre’ fade into the skin. -
Lower lash line:
Using the residue on your angled brush, lightly sweep the color along the outer third of the lower lash line to connect the wing seamlessly.
Sharpen That Wing
Cleanup is key! Dip a small cotton swab in micellar water and drag it under your wing to create a razor-sharp lower edge.
Step 3: Finishing Touches
-
Mascaras:
Apply two coats of black volumizing mascara to the top lashes. Focus on the roots to define the eye shape without overpowering the green wing. -
Brush the brows:
Comb through your eyebrows with a clear brow gel. Aim for a feathery, upward direction to maintain the wild, fairy-like aesthetic. -
Lip color:
Swipe on a sheer nude-pink lip gloss or balm. The lips should look hydrated and natural to balance the bold eye look. -
Set the look:
Mist the entire face with a dewy setting spray. This melts all the powders and creams together for that effortless glow.
Patchy Color?
If the teal looks uneven, switch to a white cream base first. Since pastels can be sheer, white underneath makes the mint pop.
Step back and admire your ethereal new look that captures magic in a glance


Mushroom Ring Forest Fairy
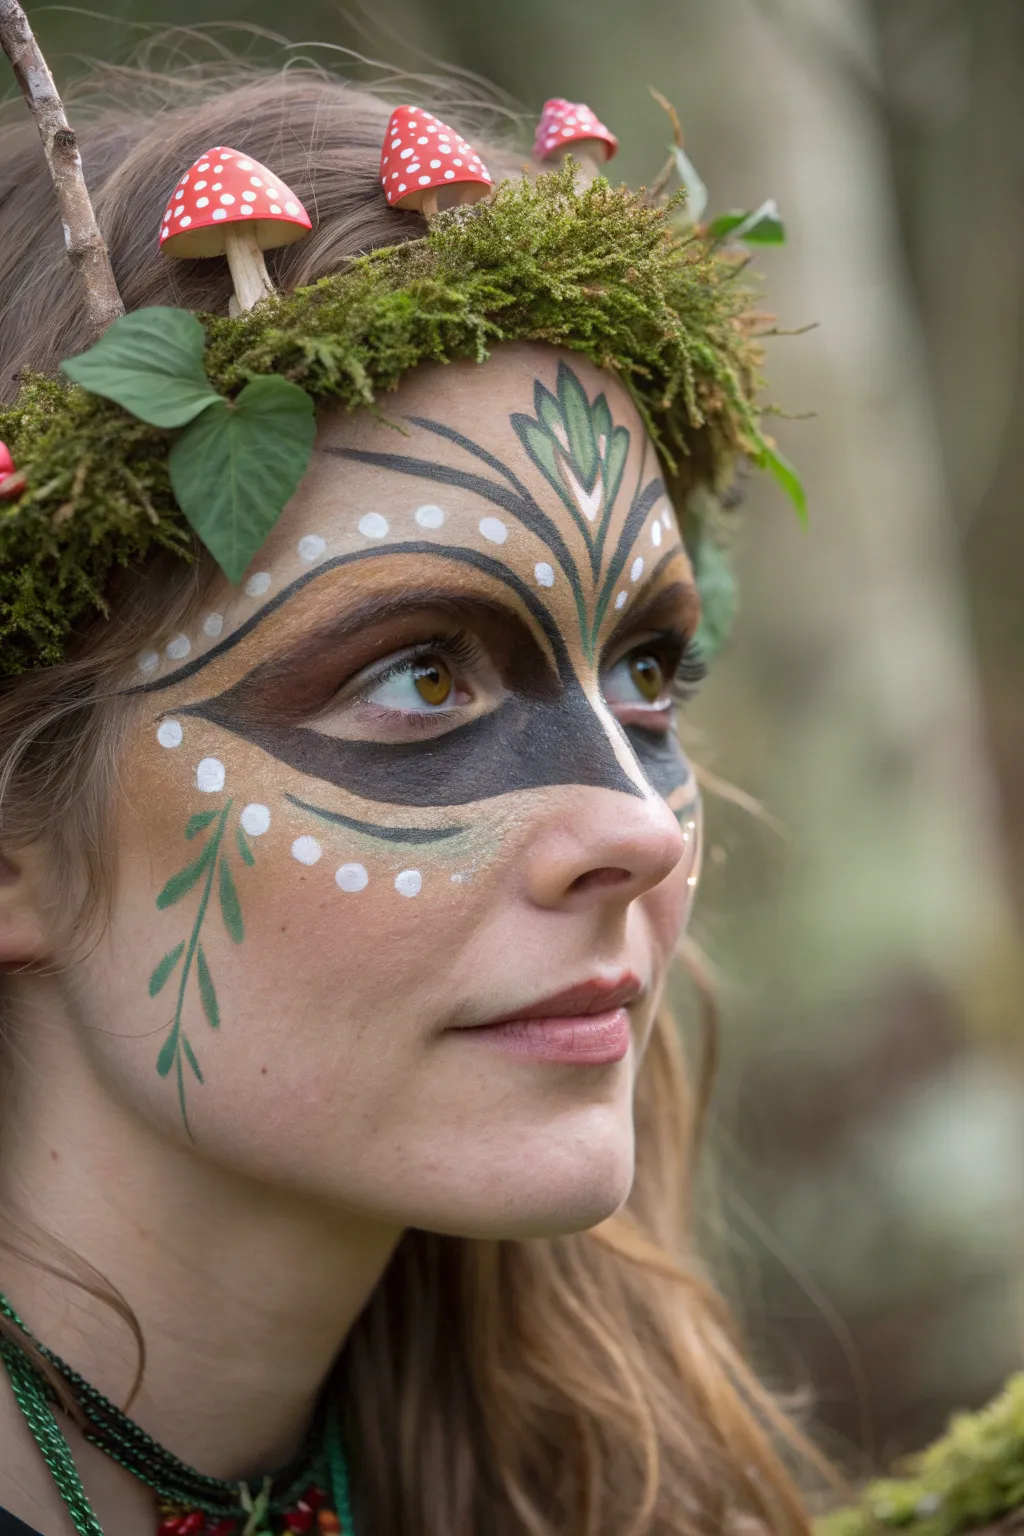
Embody the spirit of the woodland floor with this enchanting makeup look that pairs earthy tones with whimsical details. The combination of structural mossy greens, delicate white freckles, and a handmade mushroom crown creates a truly magical transformation.
Detailed Instructions
Materials
- Headband or heavy gauge wire (for crown base)
- Preserved sheet moss
- Artificial red mushrooms (small)
- Small twigs and artificial ivy leaves
- Hot glue gun and glue sticks
- Face paint palette (black, white, dark brown, medium brown, forest green, olive green)
- Makeup sponges (high-density)
- Round brushes (sizes 2 and 4)
- Fine liner brush (size 0 or 00)
- Setting spray
Step 1: Crafting the Mushroom Crown
-
Prepare the base:
Start by selecting a sturdy headband that matches your recipient’s hair color, or form a loop of heavy gauge wire that fits comfortably around the head. Ensure it sits securely before adding weight. -
Establish the moss layer:
Using a hot glue gun, carefully attach clumps of preserved sheet moss to the entire top surface of the headband. Layer it thickly to create a lush, risen forest floor effect. -
Add structural twigs:
Glue 2-3 small, real twigs onto one side of the band, positioning them so they rise up like miniature trees. I like to keep them slightly angled for a natural, organic look. -
Attach the mushrooms:
Cluster three small artificial red mushrooms near the center top of the crown. Vary their heights slightly by gluing some directly to the moss and propping others up on small hidden twig supports. -
Incorporate greenery:
Tuck artificial ivy leaves around the base of the mushrooms and twigs to hide any visible glue and add color variation. Let the glue cool completely.
Glue Gun Safety
When gluing moss, use a low-temp glue gun if possible. The porous moss allows hot glue to seep through quickly, which can burn your fingers as you press it down.
Step 2: Applying the Earthy Base
-
Sponge on the mask shape:
Load a sponge with a warm, nutty brown face paint. Dab a soft mask shape across the eyes, spanning from temple to temple and dipping down over the nose bridge. -
Deepen the eye sockets:
Using a smaller sponge or a brush, blend a darker espresso brown into the crease of the eyelids and the inner corners of the eyes to add depth and drama. -
Highlight the brow bone:
Brighten the look by blending a creamy beige or white paint just under the brow arch and onto the center of the forehead, creating a transition zone for the next details.
Step 3: Painting the Forest Details
-
Draw the central leaf:
With a #2 round brush and olive green paint, create a three-pronged leaf shape in the center of the forehead, rising from the bridge of the nose upwards. -
Outline the leaf:
Take your fine liner brush with black paint and carefully outline the green leaf, adding a central vein to define the shape clearly. -
Create the heavy liner:
Using black paint and a steady hand, draw a bold winged liner. Extend the inner corner into a sharp point downwards (cat-eye style) and sweep the outer corner up towards the temples. -
Add the under-eye swoops:
Paint a curved black line underneath the eye area, following the cheekbone contour. Fill the space between the lower lash line and this new line with black or dark brown for a smoky effect. -
Paint temple vines:
Switch back to the fine brush and green paint. Paint a delicate trailing vine dripping down the cheek from the outer corner of the eye, adding small teardrop-shaped leaves. -
Add white accents:
Dip the handle end of a brush into white paint to create perfect dots. Stamp a row of dots following the upper curve of the brown mask and a scattered cluster on the cheeks like magical freckles. -
Define the lips:
Apply a natural rose or berry lip color. For extra definition, lightly outline the cupid’s bow with a touch of the white paint to highlight. -
Final touches:
Mist the face lightly with setting spray to lock the design in place, then carefully place the finished mushroom crown on the head.
Level Up: Glitter
While the black eyeliner is still slightly wet, dab on a tiny amount of loose gold cosmetic glitter. It adds a magical shimmer that catches the sunlight beautifully.
Now you are ready to wander into the woods and blend perfectly with the magical flora


Have a question or want to share your own experience? I'd love to hear from you in the comments below!