
Fairy paintings are the perfect mix of simple shapes and pure magic—especially when you lean into bold silhouettes and glowing backgrounds. Here are my favorite fairy painting ideas you can make your own, whether you’re keeping it beginner-friendly or going full whimsical.
Fairy Dust Trail From a Wand
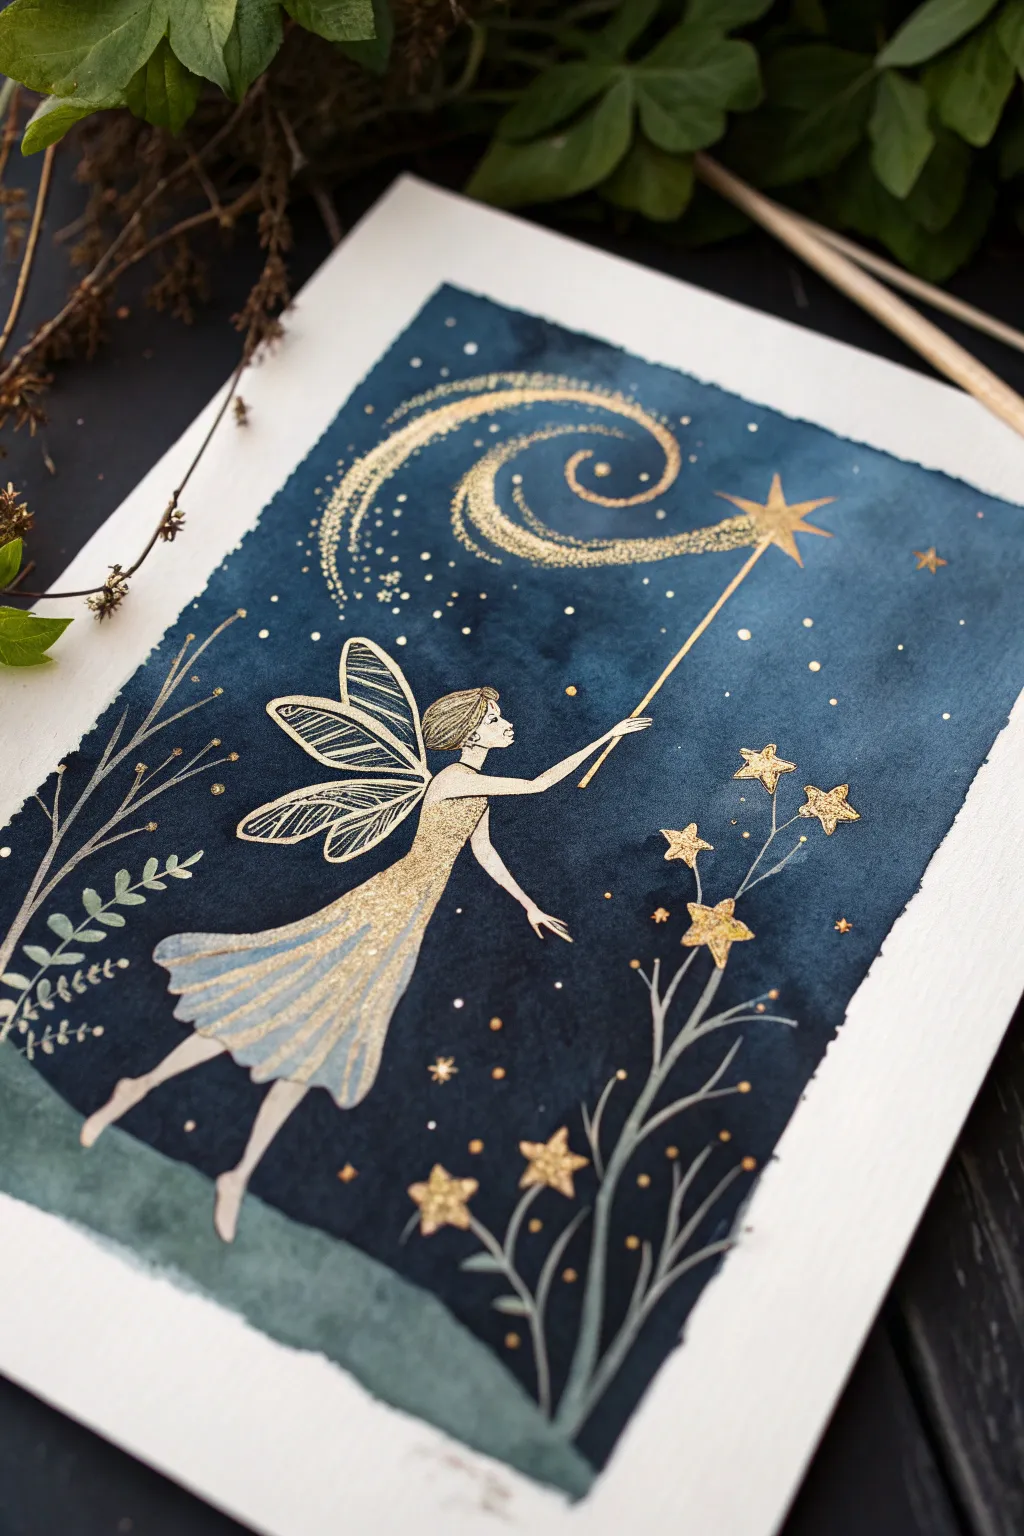
Capture the magic of a night sky with this enchanting mixed-media painting featuring a delicate fairy and a swirling trail of stardust. Using a combination of deep indigo watercolors and shimmering metallic gold ink creates a stunning contrast that makes the artwork truly glow.
Step-by-Step
Materials
- Cold press watercolor paper (300 gsm)
- Indigo watercolor paint
- Payne’s Grey watercolor paint
- Teal or Deep Green watercolor paint
- Metallic gold ink or gold gouache
- Round watercolor brushes (size 6 and 2)
- Fine liner brush (size 0 or 00)
- Masking fluid (optional)
- Pencil and eraser
- Paper towel
- Jar of water
Step 1: Sketching and Masking
-
Lightly sketch the composition:
Begin by lightly drawing the outline of the fairy, her wings, the wand, and the curve of the hill at the bottom. Mark the position of the large star at the end of the wand and the main trajectory of the swirl. -
Outline the flowing dress:
Sketch the fairy’s dress, allowing the hem to flutter backwards to suggest movement. Keep your pencil lines faint so they don’t show through the lighter paint later. -
Protect the fairy (optional):
If you are worried about painting around the fairy shape, use a small brush to apply masking fluid over her skin and dress area. Let this dry completely before moving to the next step, or simply proceed carefully with a steady hand.
Step 2: Creating the Night Sky
-
Mix your night colors:
Prepare a rich, dark wash using Indigo and a touch of Payne’s Grey. You want the background to be deep and moody to make the gold pop later. -
Paint the background wash:
Using your size 6 round brush, paint the entire sky area around the fairy and the hill. I find it helpful to keep the edges slightly uneven and rough for a dreamy, organic vignette look. -
Vary the saturation:
While the paint is still wet, drop in more concentrated Indigo near the edges and corners to create depth. Leave the area immediately around the wand swirl slightly lighter if possible, but it’s not strictly necessary. -
Paint the grassy hill:
Switch to a mix of Teal and Payne’s Grey to paint the rolling hill at the bottom. Keep this section distinct from the sky but dark enough to blend into the night theme. -
Let it dry completely:
This is crucial—wait until the background is bone dry. If the paper is cool to the touch, it’s still damp. Using a hairdryer on a low setting can speed this up.
Gold Ink Blobs
If your gold ink pools or drops a blob, don’t wipe it! Let it dry completely, then paint over it with the dark indigo background color to hide the mistake.
Step 3: Painting the Fairy
-
Base layer for the dress:
Once dry (and after removing masking fluid if used), paint the fairy’s dress with a very diluted, watery wash of blue-grey. Keep it translucent to look ethereal. -
Skin tone:
Paint the fairy’s skin with a very pale, neutral wash. Since she is silhouetted against the night, you don’t need heavy detail here, just a suggestion of form. -
Detail the hair:
Use a fine brush with a slightly darker grey-brown mix to paint the hair, adding tiny strokes to suggest strands pulled back in a bun.
Sparkle Effect
For the finest ‘dust’ in the wand trail, dip an old toothbrush in gold ink and gently flick the bristles with your thumb to spray microscopic speckles onto the paper.
Step 4: The Golden Magic
-
Shake the gold:
Ensure your metallic gold ink or gouache is fully mixed. The pigment often settles at the bottom, so give it a good shake or stir to get maximum opacity. -
Paint the wand trail:
Load your fine liner brush with gold. Start at the tip of the wand and paint the large swirl. Use a stippling motion (lots of tiny dots) rather than a solid line to create a sparkling, dusty effect. -
Add the main star:
Paint a sharp, five-pointed star at the very tip of the wand. Extend the points outward with quick flicking motions to make it look radiant. -
Detail the wings:
Carefully outline the fairy’s wings with gold. Draw the internal veins of the wings with very fine lines to make them look like delicate stained glass. -
Embellish the dress:
Add sheer glazes of gold over the dry blue dress, highlighting the folds and the hem. This ties the fairy to the magic she is casting. -
Create the star flowers:
At the bottom right, paint fine stems rising from the hill using a light grey-blue. Top these stems with gold stars instead of flowers. -
Scatter the stars:
Dip your smallest brush or a toothpick into the gold and dot tiny stars and specks throughout the dark blue sky, concentrating them near the wand’s swirl.
Frame your magical creation in a simple white mat to let the deep blues and shimmering golds take center stage


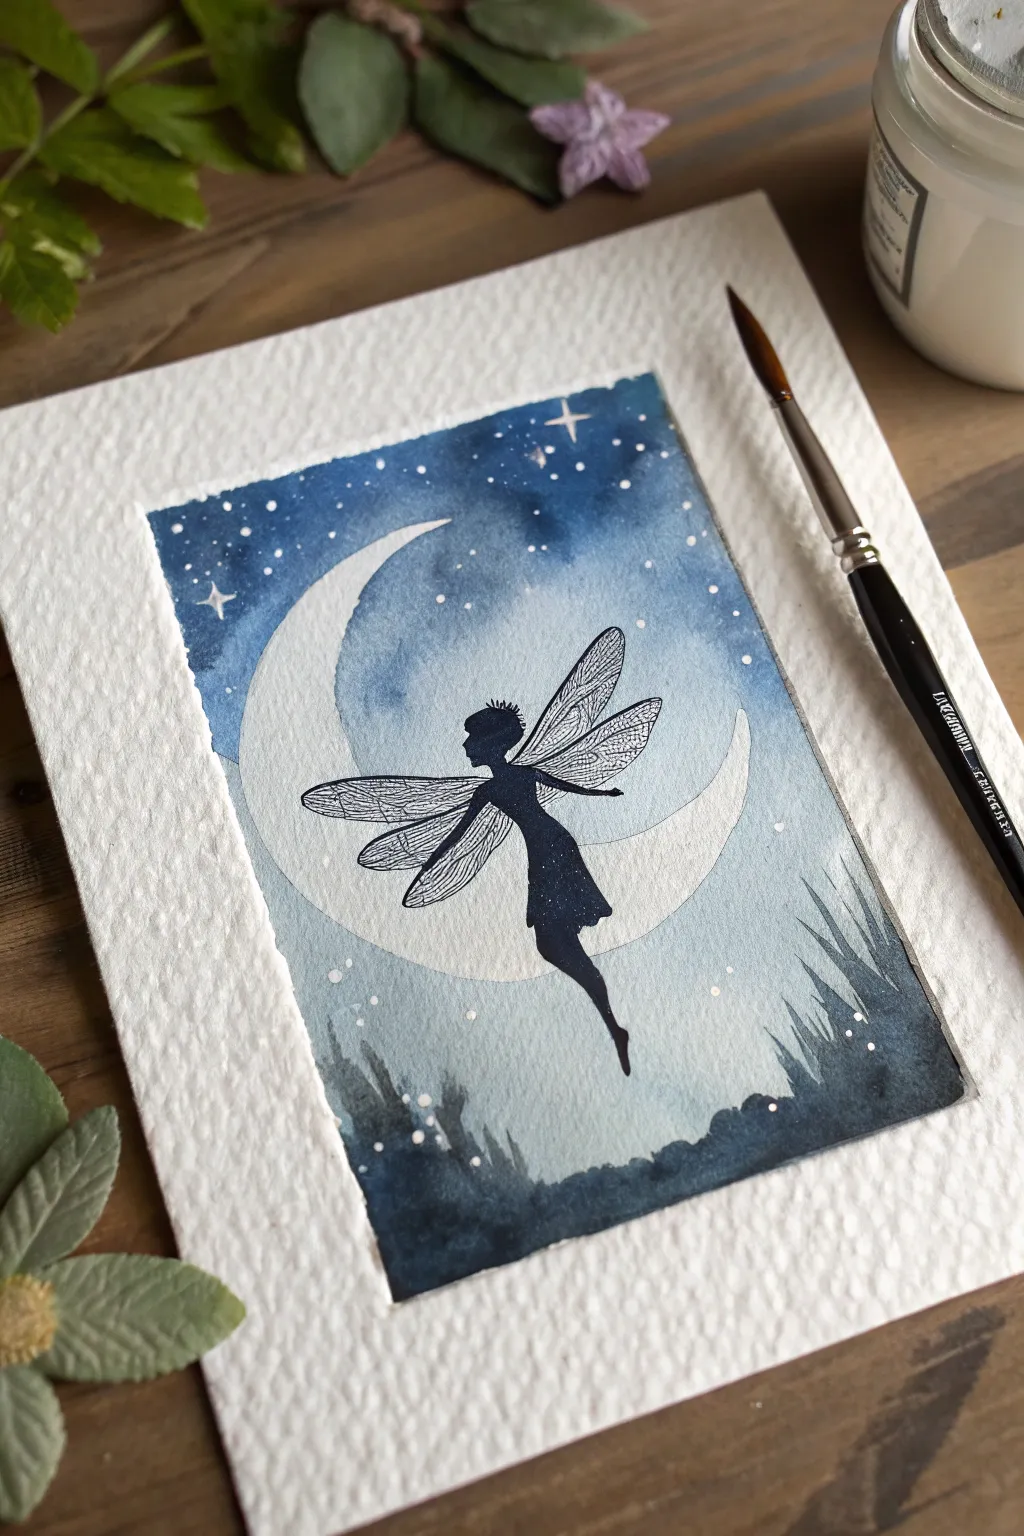
Fireflies Around a Flying Fairy
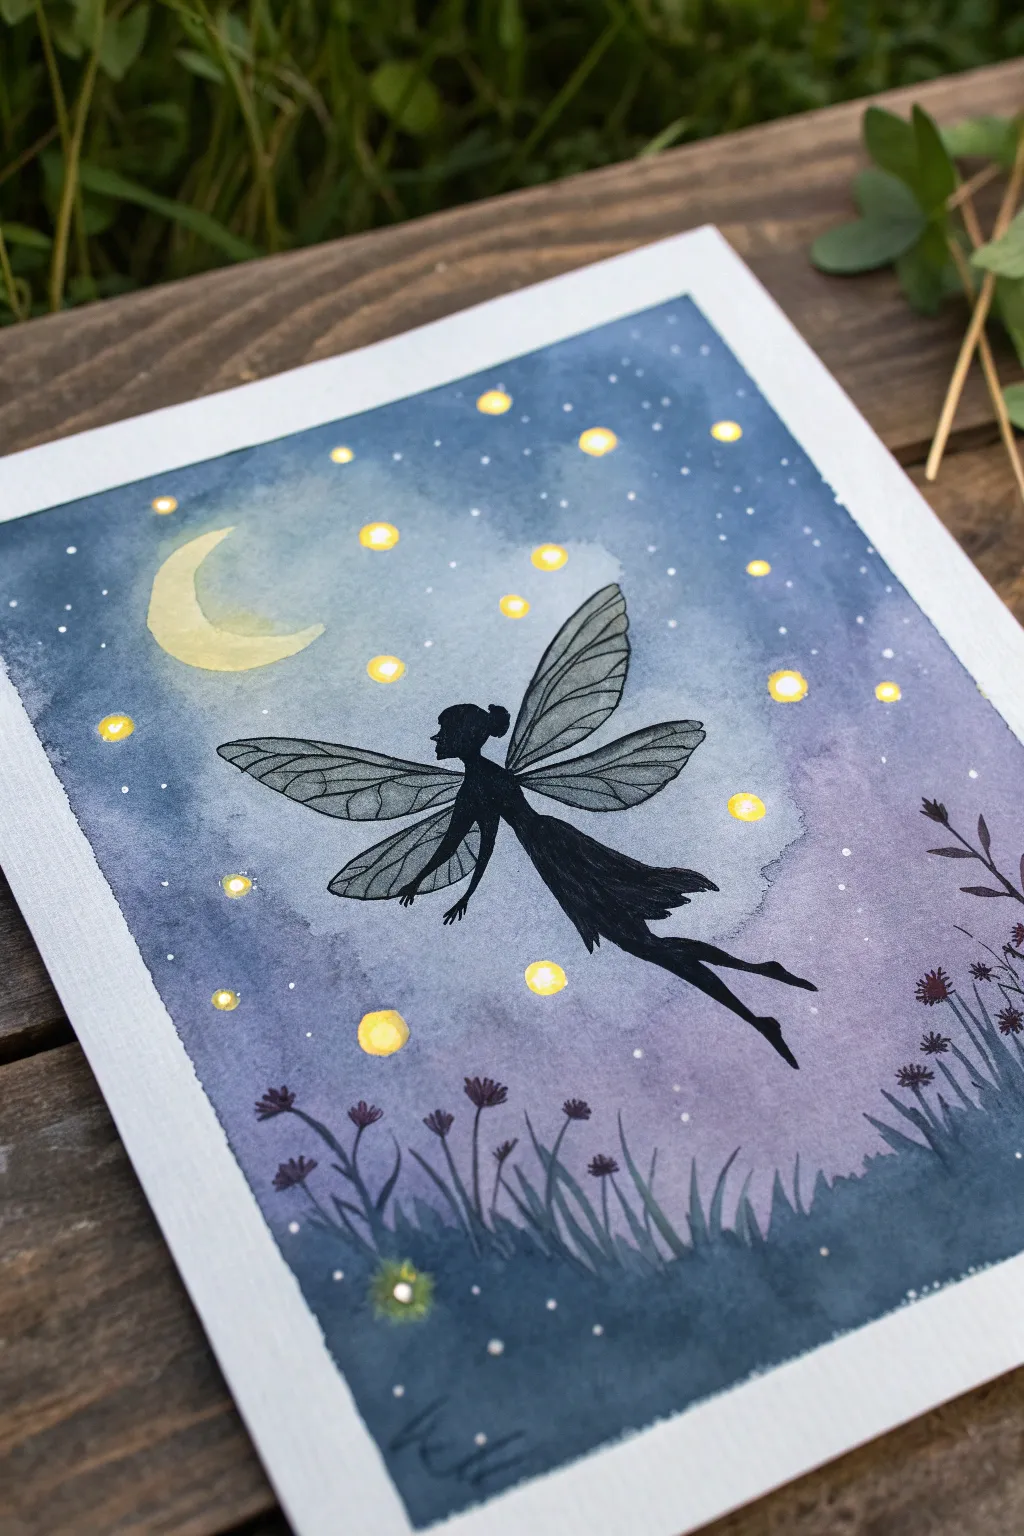
Capture the magic of a midsummer night with this enchanting watercolor silhouette painting. By combining a soft, blended night sky wash with stark black details, you’ll create a glowing scene where a delicate fairy dances among fireflies.
Step-by-Step Guide
Materials
- Cold press watercolor paper (300 gsm)
- Watercolor paints (Indigo, Prussian Blue, Purple, Yellow Ochre, Lemon Yellow)
- Black gouache or waterproof black ink
- Fine liner brushes (sizes 0 and 00)
- Medium round brush (size 6 or 8) for washes
- Masking tape
- White gel pen or white gouache
- Pencil and eraser
- Mixing palette and water jars
Step 1: Setting the Scene
-
Preparation:
Tape down all four edges of your watercolor paper to a board or table using masking tape. This creates that crisp white border and prevents the paper from buckling when wet. -
Initial Sketch:
Lightly sketch the position of the fairy in the center, the crescent moon in the upper left, and the general placement of the grass at the bottom. Keep your pencil lines very faint so they don’t show through the final paint. -
Masking the Light:
For the brightest stars and the intense glow of the fireflies, you can apply small dots of masking fluid if you have it. If not, simply carefully paint around these tiny circular areas in the next steps.
Step 2: Painting the Sky
-
Wet-on-Wet Sky:
Pre-wet the entire sky area with clean water using your large round brush, avoiding the moon and the distinct yellow firefly circles. -
Applying Blue Tones:
Drop in Prussian Blue near the top edges and corners, letting it bloom into the wet paper. Work quickly while the paper is damp to ensure smooth transitions. -
Adding Depth:
While the first layer is still wet, introduce some Indigo around the very edges to deepen the night sky effect. Towards the center and horizon, blend in a touch of Purple to soften the gradient. -
Creating the Glow:
Rinse your brush and gently lift a little pigment around where the moon and fireflies will be, creating a soft, hazy halo effect in the blue paint. -
Painting the Moon:
Once the blue sky is damp (not soaking), paint the crescent moon with a pale wash of Lemon Yellow. Add a tiny touch of Yellow Ochre to the inner curve for texture. -
Firefly Lights:
Fill in the reserved circular spots for the fireflies with bright Lemon Yellow. Soften the edges slightly with a damp brush so they look like glowing orbs rather than hard stickers. -
Bottom Grass Wash:
Paint the bottom section where the grass will be with a diluted mix of Indigo and Purple. This doesn’t need to be detailed yet, just a base color for the silhouette ground. -
Complete Drying:
Let this entire background layer dry completely. This is crucial—if the paper is cool to the touch, it’s still wet.
Bleeding Lines?
If your black silhouette bleeds into the blue sky, your background wasn’t fully dry. Let it dry completely, then tidy up the edges with opaque black gouache, which covers mistakes well.
Step 3: The Silhouette & Details
-
Fairy Silhouette Body:
Using black gouache or ink and a fine round brush, carefully fill in the solid black shape of the fairy’s body. Start with the head and torso, ensuring the edges are sharp. -
Flowing Dress:
Paint the dress/skirt flowing backwards. Use flicking motions at the hem to create a ragged, airy texture that suggests movement. -
Delicate Limbs:
Switch to your smallest brush (size 00) to paint the arms and legs. Pay close attention to the pointed feet and the graceful curve of the extended arm. -
Wing Outlines:
For the wings, do not fill them in solid black. Instead, paint the thin outlines of the upper and lower wings using a very steady hand and the tip of your fine brush. -
Wing Veins:
Dilute your black paint slightly with water to make a translucent grey. Use this wash to fill inside the wings, then go back with the black liner brush to add the delicate vein patterns on top. -
Grass Blades:
Using your black gouache, paint the silhouette grass at the bottom. Use quick, upward strokes to create thin, tapering blades. Vary the height and direction for a natural look. -
Wildflowers:
Add small silhouette flowers on some of the grass stems. Tiny V-shapes or small clusters of dots work perfectly to represent wildflowers in shadow. -
Distant Stars:
Once the black paint is dry, use a white gel pen or a small brush with white gouache to dot tiny stars into the upper blue sky area. -
Final Sparkles:
Add tiny white dots in the center of the largest yellow firefly orbs to make them look intensely bright.
Translucent Wings
To make the wings look gossamer-thin, simply mix much more water into your black paint for the ‘fill’ color. Use pure black only for the outer rim and the structural veins.
Peel off the tape slowly to reveal your crisp edges and enjoy your magical night scene


Fairy on a Lily Pad at Night
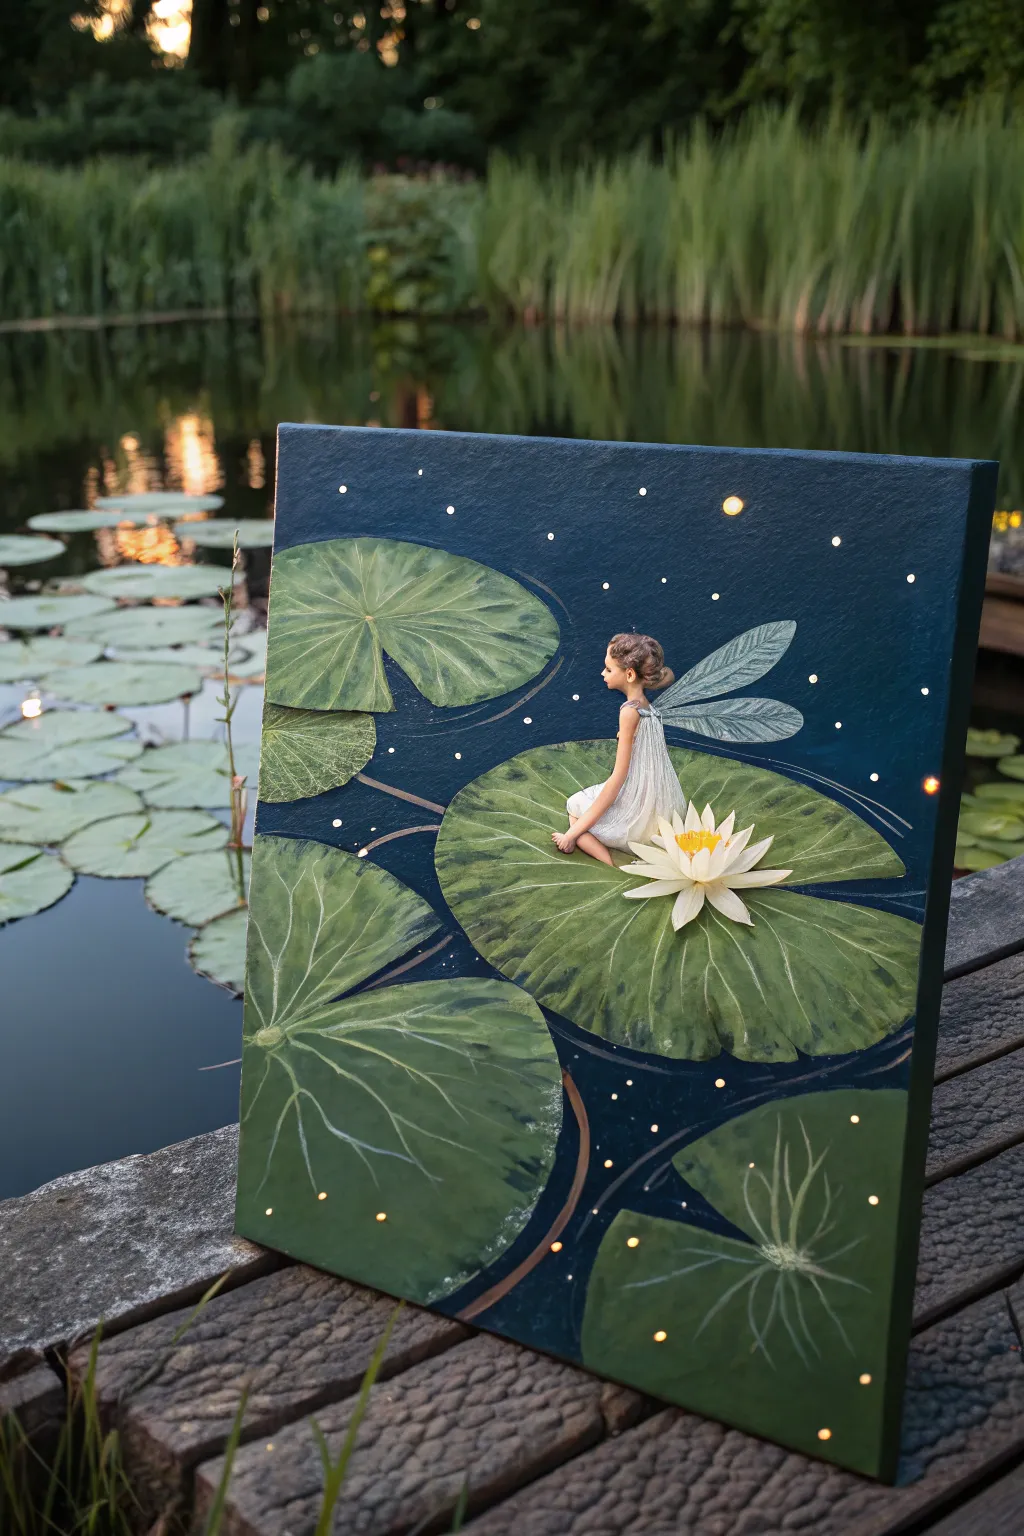
Create a magical, three-dimensional scene where a tiny fairy rests upon a giant lily pad under a starry sky. This mixed-media canvas project combines acrylic painting with textured elements to bring a peaceful night pond to life right on your wall.
How-To Guide
Materials
- Square stretched canvas (approx. 12×12 or 16×16 inches)
- Acrylic paints: Phthalo Blue, Prussian Blue, Titanium White, Hooker’s Green, Sap Green, Yellow Ochre
- Modeling paste or heavy structure gel
- Palette knives (medium size)
- Paintbrushes: Large flat brush, medium shader, and fine liner brush
- Pencil and eraser
- Cardstock or thick watercolor paper (for 3D elements)
- Craft glue or strong gel medium
- Small fairy figurine or fairy cutout (optional, can be hand-painted)
- Battery-operated LED string lights (optional for real glow)
- Awl or push pin (if using lights)
Step 1: Setting the Scene
-
Prime the background:
Begin by painting your entire canvas with a deep, dark blue base. Mix Phthalo Blue with a touch of Prussian Blue to create a rich midnight water tone. Don’t worry about making it perfectly smooth; slight brush texture adds to the rippling water effect. -
Add depth to the water:
While the base is still slightly tacky or just dry, mix a slightly lighter blue using Titanium White and your base color. Use a dry brush technique to gently sweep horizontal strokes across the canvas, suggesting calm ripples on a pond surface. -
Sketch the layout:
Once the background is completely dry, use a pencil to lightly sketch large oval shapes where your lily pads will go. Place the hero pad—the largest one—off-center in the lower middle area.
Glow Like a Pro
For painted lights that truly pop, paint a tiny dot of pure white first, let it dry, then glaze over it with fluorescent yellow or neon orange acrylic paint.
Step 2: Creating the Lily Pads
-
Prepare the textured pads:
To give the artwork dimension, trace your lily pad shapes onto cardstock or thick watercolor paper. Cut them out, remembering to cut a small ‘V’ notch in each one to create the classic lily pad shape. -
Build up texture:
Spread a thin layer of modeling paste or structure gel over your paper cutouts using a palette knife. Use the edge of the knife to drag lines radiating from the notched center to the outer edges, mimicking the veins of the leaf. -
Prime the pads:
Allow the texture paste to dry completely until hard. Paint a base coat of Sap Green over each cutout, ensuring you get into the little grooves created by the texture. -
Highlight the veins:
Dry brush a lighter green (mix Hooker’s Green with Yellow Ochre and White) over the raised ridges of the pads. This highlights the texture and makes the veins pop against the darker base. -
Attach the pads:
Glue your finished lily pads onto the canvas using strong craft glue or gel medium, following your original pencil layout. I like to overlap them slightly to create a sense of depth.
Texture Trick
Don’t have modeling paste? Mix white acrylic paint with a little bit of talcum powder or baking soda to create a thick, spreadable texture for your lily pads.
Step 3: Painting the Fairy and Flower
-
Position the focal point:
On the largest lily pad, decide where your fairy will sit. If you aren’t confident painting a figure from scratch, you can use a high-quality printout or collage element here. Otherwise, sketch a small seated posture with a fine pencil. -
Paint the fairy figure:
Using a fine liner brush, block in the fairy’s skin tone. For her dress, use thinned Titanium White to create a diaphanous, sheer fabric look. Let the blue background show through slightly at the edges of the dress. -
Add the wings:
Paint two elongated oval shapes for wings sticking out from her back. Use a very watery white or silver paint. Once dry, use your finest brush to add delicate vein lines in a pale grey. -
Create the water lily:
Paint a water lily next to the fairy. Start with the outer petals using pure white, radiating outward like a star. As you move toward the center, mix in a tiny dot of yellow for the inner petals and stamens.
Step 4: Illumination Effects
-
Paint the stars:
Using the tip of a paintbrush handle or a dotting tool, dip into thick white paint and dot stars randomly across the dark water background. -
Add a glowing halo:
To make the stars glow, mix a transparent glaze of white and water. Paint a faint, hazy circle around the larger stars and light sources to creates a diffusion effect. -
Prepare for LED lights (Optional):
If you want real light, poke small holes through the center of your largest painted stars using an awl. Be careful not to tear the canvas. -
Install the lights (Optional):
Flip the canvas over. Push the tiny bulbs of a battery-operated LED string light set through the holes from the back. Secure the battery pack to the wood frame with strong tape. -
Final touches:
Add tiny dots of yellow or orange paint to simulate fireflies hovering near the lily pads. A quick dot of white in the center of these ‘fireflies’ will make them look bright and active.
Hang your luminous creation in a quiet corner to add a touch of evening magic to your room
Fairy in a Star-Splatter Sky
Capture the magic of a starlit night with this enchanting watercolor and ink project. This piece features a delicate fairy silhouette soaring against a dreamy, textured blue sky and a glowing crescent moon.
Step-by-Step
Materials
- Cold press watercolor paper (textured)
- Masking tape
- Watercolor paints (Indigo, Payne’s Gray, Prussian Blue)
- White gouache or white ink
- Fine liner black pen or black India ink
- Round watercolor brushes (sizes 2 and 6)
- Pencil and eraser
- Jar of clean water
- Paper towels
Step 1: Preparation & Sketching
-
Secure the paper:
Begin by taping down all four edges of your watercolor paper to a board or table. This creates that crisp white border seen in the final piece and prevents the paper from buckling when wet. -
Sketch the moon:
Lightly draw a large crescent moon in the center-left of the page. Keep your pencil lines very faint so they don’t show through later. -
Outline the fairy:
Gently sketch the outline of the fairy silhouette flying across the moon. Focus on the pose—arms out and legs trailing—but don’t worry about filling it in yet.
Splatter Control
Cover the moon area with a scrap piece of paper before splattering stars. This keeps the moon’s surface clean and ensures the stars only appear in the deep blue sky.
Step 2: Painting the Sky
-
Wet the sky area:
Using your larger brush and clean water, carefuly wet the area *outside* the moon shape. Avoid the moon itself to keep it pristine white for now. -
Drop in color:
While the paper is still glistening, load your brush with Prussian Blue and drop it into the wet areas, starting from the top corners. -
Deepen the night:
While the first layer is damp, add Indigo concentrated at the very top edge and bottom corners to create a vignette effect. -
Create the horizon:
Paint the bottom section with your darkest blue mix, creating an uneven, grassy texture along the bottom edge where the ground meets the sky. -
Soften the moon edge:
With a slightly damp, clean brush, gently touch the inner curve of the moon to pull a tiny bit of blue paint into the white space, creating a soft shadow. -
Let it dry:
Allow the background wash to dry completely. If the paper feels cool to the touch, it is still wet inside.
Glitter Upgrade
Mix a tiny pinch of iridescent mica powder into your wing ink, or use metallic silver paint for the star accents to make the piece shimmer in real light.
Step 3: Adding the Stars
-
Prepare the splatter:
Mix a small amount of white gouache with water until it has a milky consistency. I like to test this on a scrap piece of paper first. -
Splatter stars:
Tap your brush handle against another brush or your finger over the painting to create fine white specks across the blue sky. -
Paint larger stars:
Use a small detail brush dipped in white gouache or a gel pen to hand-paint a few larger, four-point stars for extra sparkle.
Step 4: The Fairy Silhouette
-
Fill the body:
Using black India ink or a waterproof fine liner, carefully fill in the body of the fairy. Ensure the edges are sharp, especially the profile of the face. -
Draw the wings:
Instead of filling the wings solid black, outline the wing shapes first with a very fine nib. -
Detail the veins:
Fill the inside of the wings with delicate, distinctive veining patterns. Keep these lines extremely thin to make the wings look transparent. -
Add grass details:
With the same black ink or concentrated dark watercolor, paint distinct blades of grass rising from the dark bottom section.
Step 5: Final Touches
-
Highlight the grass:
Add a few tiny dots of white gouache to the tips of the grass blades to look like fireflies or dew. -
Peel the tape:
Once absolutely everything is dry, slowly peel off the masking tape at a 45-degree angle to reveal your clean edges.
Now you have a whimsical piece of art ready to frame or gift to a fantasy lover
BRUSH GUIDE
The Right Brush for Every Stroke
From clean lines to bold texture — master brush choice, stroke control, and essential techniques.
Explore the Full Guide
Fairy and Floating Light Orbs
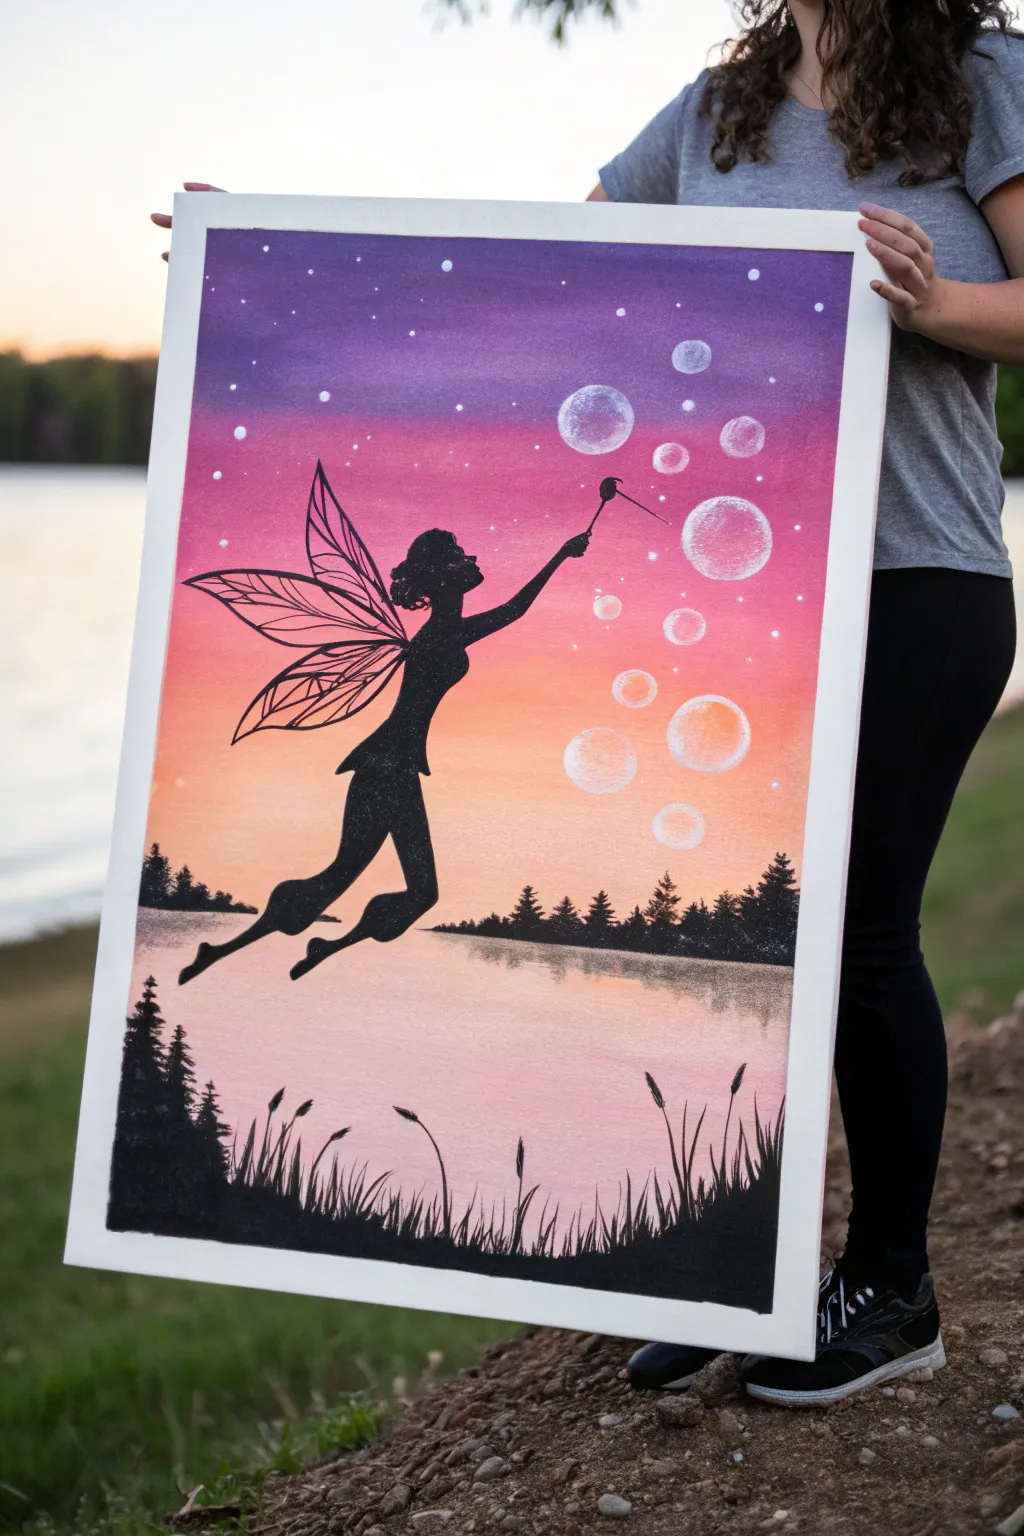
Capture the magic of twilight with this enchanting acrylic painting featuring a delicate fairy silhouette blowing glowing bubbles into a sunset sky. The vibrant gradient background contrasts beautifully with the stark black foreground, making for a striking piece of wall art.
How-To Guide
Materials
- Large stretched canvas (e.g., 18×24 inches or similar)
- Acrylic paints: Purple, magenta/pink, orange, peach, white, and black
- Large flat brush (for blending background)
- Medium flat brush
- Small round detail brush (size 0 or 1)
- Fan brush (optional, for trees)
- Cup of water and paper towels
- Pencil for sketching
- White paint pen or small sponge dabber (optional for bubbles)
- Painter’s tape (optional, for horizon line)
Step 1: Creating the Sunset Gradient
-
Prepare the Sky Colors:
Squeeze out your sky colors on the palette: deep purple, magenta, orange, bright peach, and white. Keep them separate for now but ready to mix. -
Start with Purple:
Using a large flat brush, apply the deep purple paint in horizontal strokes across the top quarter of the canvas. Ensure generous coverage but keep the layers thin enough to blend later. -
Blend in Pink:
Without cleaning your brush thoroughly (just wipe off excess), pick up the magenta paint. Apply this below the purple, brushing back and forth where the colors meet to create a seamless transition. -
Add the Sunset Glow:
Continue moving down the canvas, blending orange into the pink section, and finally fading into a light peach mixed with a little white near the center horizon line. -
Paint the Water Reflection:
Mirror your sky colors for the bottom half of the canvas to create the lake. Start with the peach/white mix just below the horizon, moving downwards into orange and pink, but keep the tones slightly more muted or horizontal strokes looser to suggest water. -
Let it Dry:
Allow the entire background layer to dry completely. This is crucial so your silhouette doesn’t muddy the beautiful gradient you just created.
Step 2: Painting the Foreground & Silhouette
-
Sketch the Fairy:
Lightly sketch the outline of the fairy using a pencil. Focus on the posture—leaning forward slightly as if blowing bubbles—and the delicate shape of the wings. -
Fill the Fairy Silhouette:
Using black acrylic paint and a medium brush (switching to a small round brush for details), fill in the fairy’s body. Ensure the edges are crisp and opaque. -
Detail the Wings:
For the wings, use your smallest detail brush. Instead of filling them in solid black, paint delicate veins and outlines, leaving the colorful sky visible through the wing sections. -
Add the Distant Treeline:
Along the horizon line where the sky meets the water, paint a strip of distant trees. Use a tapping motion with a small brush to create uneven, tree-like textures. Reflection Tip: Add faint, downward blurry strokes in the water directly below these trees to create a reflection. -
Create the Foreground Grass:
At the very bottom of the canvas, paint a solid black undulating ground line. Using a liner brush or the edge of a flat brush, flick upward quickly to create tall, thin blades of grass and reeds. -
Paint Foreground Pine Trees:
Add larger silhouette pine trees on the left side and smaller ones on the right. Start with a vertical line for the trunk, then tap your brush side-to-side, getting wider as you go down, to form the branches.
Sticky gradient?
If your acrylics dry too fast while blending the sunset, spray a fine mist of water over the canvas or mix a retarder medium into your paints to keep them workable longer.
Step 3: Adding the Sparkle
-
Create the Bubbles:
Mix a very watery white paint or use glazing medium. I like to use a small round sponge or freehand a circle, keeping the center transparent so the background shows through. -
Highlight the Orbs:
Add a crisp white crescent shape to one side of each bubble and a smaller dot on the opposite side to make them look spherical and shiny. -
Add Stardust:
Dip a stiff brush or toothbrush into watered-down white paint. Flix the bristles with your thumb to splatter tiny stars across the purple section of the sky. -
Final Touches:
Paint the bubble wand in the fairy’s hand using a thin black line, ensuring it connects visually to the stream of floating bubbles.
Add some sparkle
Once the painting is fully dry, cover the fairy’s wings or the bubbles with a layer of clear glitter glue or iridescent medium for a magical shimmering effect.
Step back and admire the peaceful, magical scene you have brought to life on your canvas
Fairy in Pink Dream Clouds
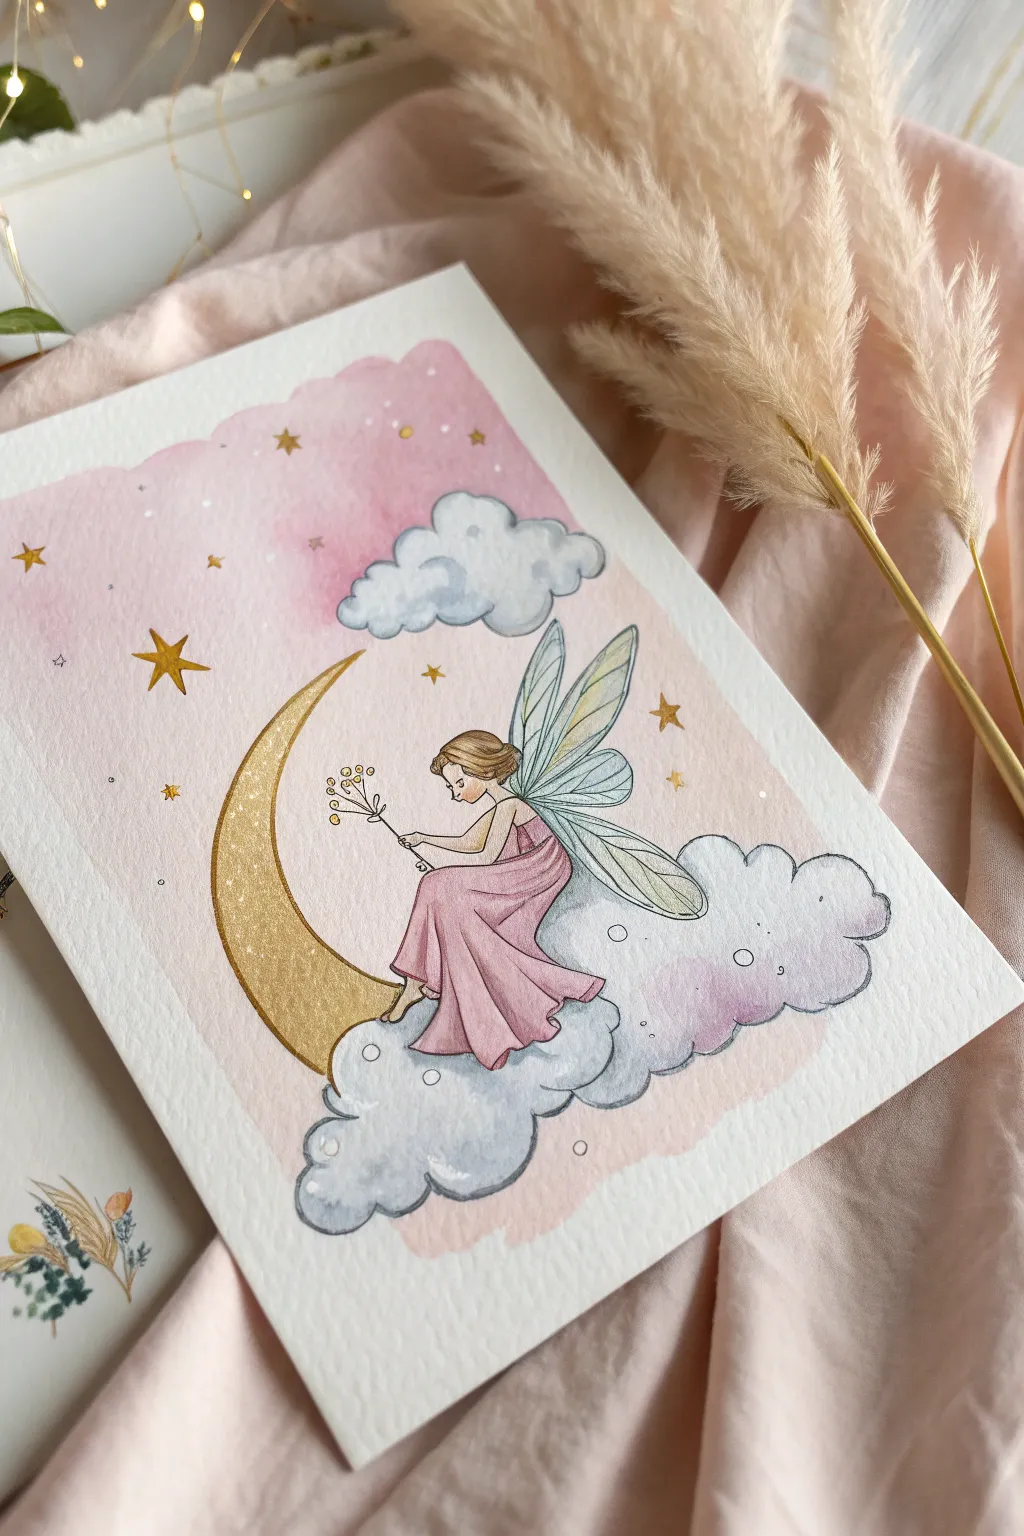
Capture the magic of a twilight dream with this gentle watercolor illustration. Featuring a delicate fairy resting on a golden crescent moon amidst fluffy clouds and a soft pink sky, this project is perfect for adding a touch of enchantment to any nursery or journal.
Detailed Instructions
Materials
- Cold press watercolor paper (300 gsm)
- Watercolor paints (Pink, Paynes Grey, Gold/Yellow Ochre, Skin tones)
- Metallic gold watercolor paint or gouache
- Fine liner pens (Black, 0.1mm and 0.05mm)
- White gel pen
- Pencil (HB) and eraser
- Round watercolor brushes (sizes 2, 4, and 6)
- Jar of clean water
- Paper towel
Step 1: Sketching the Scene
-
Outline the basics:
Begin by lightly sketching the large crescent moon shape in the lower left-center of your paper. Don’t worry about perfect symmetry; a hand-drawn look adds charm. -
Add the clouds:
Draw billowy cloud shapes clustering at the bottom tip of the moon and a smaller, floating cloud near the top right. Use soft, scalloped lines. -
Position the fairy:
Sketch the fairy sitting on the curve of the moon. Start with a simple oval for the head, a curved line for the back, and flowing lines for her long dress draped over the cloud. -
Refine the details:
Add her delicate wings extending behind her back, her facial profile looking down, and the flower stem she is holding. Keep your pencil pressure very light so lines can be erased later.
Step 2: Painting the Background
-
Prepare the wash:
Mix a very watery, pale pink wash on your palette. You want this to be subtle and dreamy. -
Apply the background:
Paint a loose, rectangular wash behind your main sketch, leaving the moon, clouds, and fairy unpainted. Let the edges be rough and organic rather than taping them off. -
Add texture:
While the pink wash is still wet, you can drop in slightly darker pink spots or sprinkle a tiny bit of salt for texture, though a smooth wash works beautifully too. Let this dry completely.
Soft Cloud Tip
To keep clouds fluffy, outline them with a very light grey watercolor pencil instead of graphite. The lines will dissolve slightly when you paint.
Step 3: Bringing the Elements to Life
-
Paint the moon:
Fill in the crescent moon with a yellow ochre or gold base. Allow it to have some variation in tone to suggest roundness. -
Color the dress:
Paint the fairy’s dress with a dusty rose or mauve shade. Use darker values in the folds of the skirt to create depth and dimension. -
Skin and hair:
Carefully paint the face, arms, and feet with a light skin tone. Use a small round brush (size 2) for this precision work. Paint her hair in a soft brown. -
Shadow the clouds:
Mix a very diluted grey-blue or Paynes Grey. Paint the bottom/shadow side of the clouds, blending the color upwards into white with a clean, damp brush for a soft gradient. -
Wing transparency:
I like to use a very pale, watery blue-green for the wings. Glaze it gently so they look transparent and ethereal.
Muddy Colors?
Ensure each section (like the dress next to the moon) is completely dry before painting the neighbor to prevent colors from bleeding into a muddy mess.
Step 4: Ink and Sparkle
-
Outline with ink:
Once the paint is bone dry, use a 0.1mm fine liner to outline the pencil sketch. Use broken or lighter lines on the clouds to keep them looking soft. -
Add wing sensation:
Draw delicate veins inside the fairy wings using your thinnest 0.05mm pen. -
Metallic magic:
Using metallic gold paint, add a second layer to the moon for shimmer. Paint small stars scattered in the pink sky and add gold dots to the flower she holds. -
Small star details:
Draw varying sizes of stars—some five-pointed, some diamond-shaped, and tiny dots—around the sky area using both gold paint and fine liner. -
Final highlights:
Use a white gel pen to add tiny highlights to the moon, the fairy’s hair, and small dots on the clouds for a magical finish.
Now step back and admire the peaceful dreamscape you have created

PENCIL GUIDE
Understanding Pencil Grades from H to B
From first sketch to finished drawing — learn pencil grades, line control, and shading techniques.
Explore the Full Guide
Fairy Silhouette With Sunset Gradient
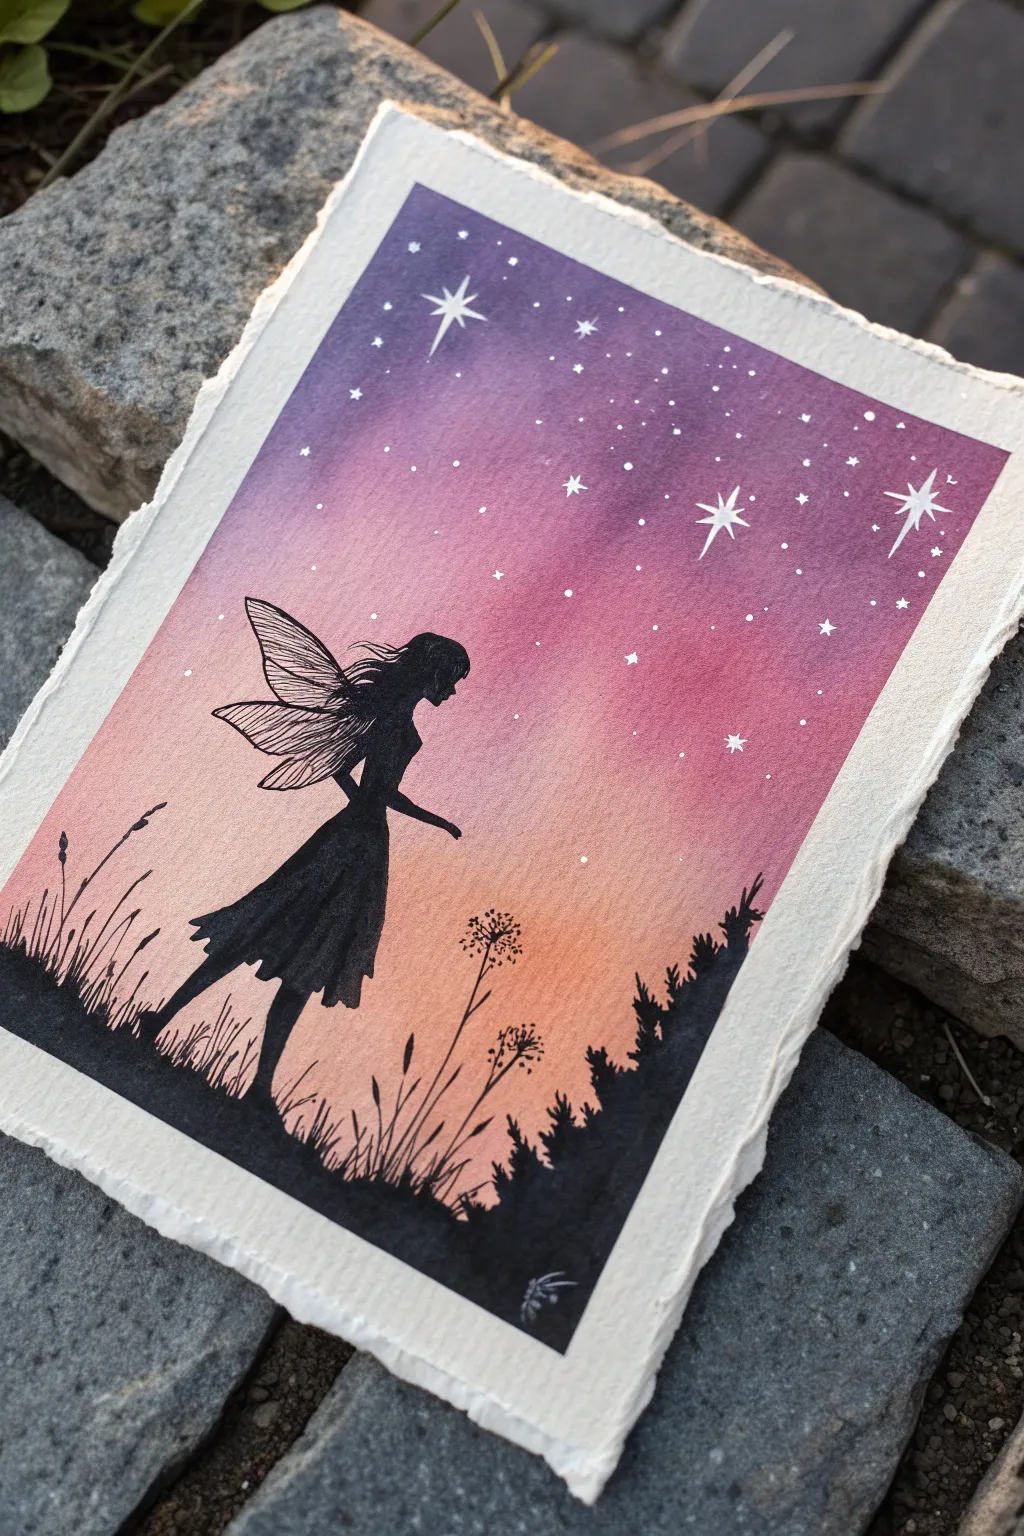
Capture the magic of twilight with this enchanting tutorial featuring a delicate fairy silhouette against a vibrant gradient sky. The seamless blend of purples, pinks, and peaches creates a dreamy backdrop for the crisp, black ink details.
Step-by-Step Tutorial
Materials
- Cold press watercolor paper (deckled edge optional)
- Watercolor paints (Purple, Magenta, Peach/Orange)
- Clean water and two jars
- Large flat wash brush
- Medium round brush
- Black waterproof fine liner pen (0.1 and 0.5 sizes)
- Black gouache or india ink
- White gel pen or gouache for stars
- Masking tape
- Pencil and eraser
Step 1: Setting the Sky
-
Paper preparation:
Begin by taping your watercolor paper to a solid board. If your paper has a beautiful deckled edge like the one shown, tape it from the back or leave a border of tape that you’ll trim later to preserve that texture. -
Wet-on-wet base:
Using a clean, wide brush, apply a generous layer of clear water across the entire paper surface. The paper should be glisten with moisture but not have puddles. -
Deep purple sky:
Load your brush with a rich, deep purple watercolor. Start applying it horizontally at the very top of the page, letting the wet paper help diffuse the edges downward. -
Adding magenta:
While the purple is still wet, clean your brush and pick up a vibrant magenta. Apply this directly below the purple, slightly overlapping the two colors so they bleed together softly. -
Transition to peach:
Finish the gradient by adding a soft peach or light orange at the bottom third of the paper. Blend it upwards into the magenta to create a smooth, sunset-like transition. -
Drying time:
This step is crucial: let the painting dry completely. The paper must be bone dry before adding any ink, or the lines will feather and ruin the silhouette effect.
Gradient Secrets
Tilt your drawing board slightly while painting the sky. Gravity will pull the wet paint downward, doing half the blending work for you.
Step 2: Drafting the Silhouette
-
Sketching the horizon:
Using a light hand and a pencil, draw a gentle slope near the bottom for the ground. Add a few vertical lines to indicate where tall grasses or flowers will go. -
Positioning the fairy:
Determine the placement of your fairy. Sketch a simple outline of her dress, torso, and head. She should be walking along the slope you just drew. -
Refining the pose:
Add details to your pencil sketch, such as her arm reaching out and the flow of her hair blowing back in the breeze. -
Wing placement:
Lightly sketch the shape of the wings extending from her back. Keep them delicate; you don’t need to draw every vein yet, just the overall shape.
Sparkle Upgrade
Mix a tiny pinch of mica powder or iridescent medium into your star paint. It’ll make the constellations shimmer when the light hits the paper.
Step 3: Inking the Details
-
Blocking in the black:
Using black gouache or a thick marker, fill in the solid black shape of the ground first. This anchors your composition. -
Painting the figure:
Carefully fill in the fairy’s body and dress with the solid black. I like to use a small round brush with black gouache for the larger areas of the dress to get a truly opaque matte finish. -
Detailing the wings:
Switch to a 0.1 fine liner pen. Outline the wings and draw delicate interior lines to mimic insect wings. These lines should be very thin to contrast with the solid body. -
Adding movement:
Use the fine pen to add stray strands of hair blowing in the wind. Quick, confident strokes work best here to keep it looking natural. -
Adding flora:
Draw the silhouette grasses and plants. Use the pen to create the seed heads (like dandelions or alliums) and small leaves along the stems. -
Foreground texture:
Add uneven grassy textures along the horizon line using short, upward strokes to break up the solid line of the hill.
Step 4: Final Magic
-
Creating stars:
Once the black ink is dry, take a white gel pen or a small brush with white gouache. Dot tiny points of light throughout the purple and magenta sections of the sky. -
Drawing the north stars:
Select three or four spots to create larger, glimmering stars. Draw a cross shape with elongated vertical and horizontal lines, then add smaller diagonal lines in the center. -
Finishing touches:
Review your silhouette edges. If any look rough, smooth them out with your fine liner for a crisp finish.
Now you have a stunning piece of twilight art ready to be framed or gifted
Fairy and Wildflower Meadow Glow
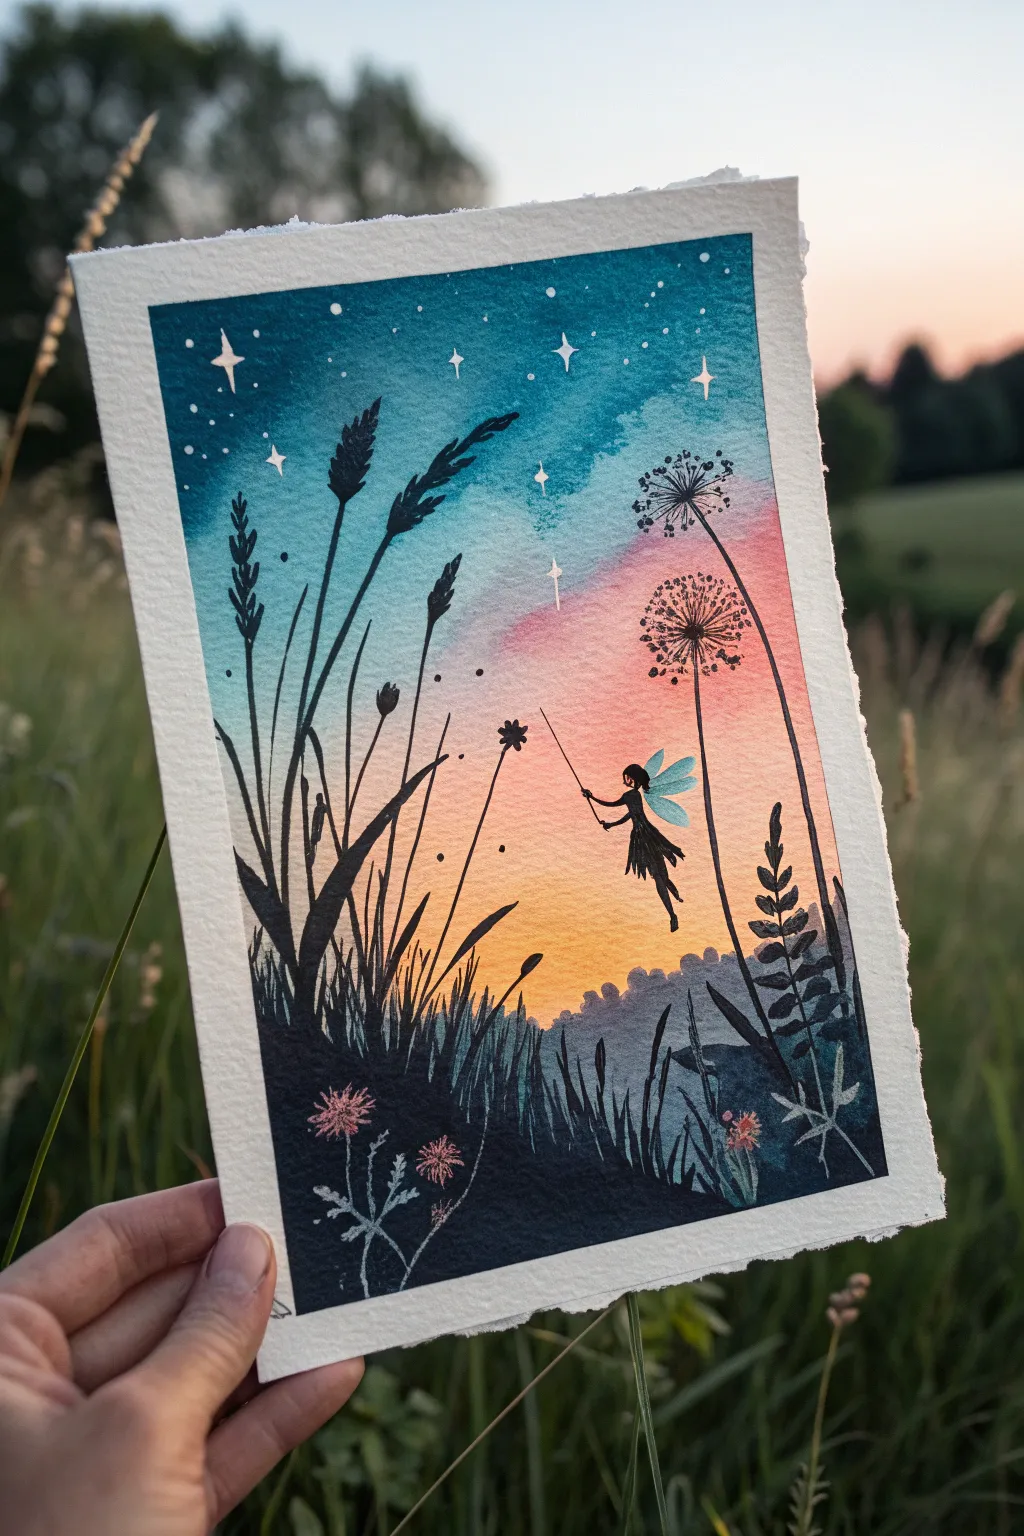
Capture the magic of a summer evening with this enchanting watercolor scene featuring a tiny fairy silhouette swinging amongst wildflowers. The blend of a vibrant sunset gradient with stark black silhouettes creates a whimsical world that fits perfectly on a greeting card or small frame.
Step-by-Step Tutorial
Materials
- Cold press watercolor paper (approx. 5×7 inches)
- Painter’s tape or masking tape
- Watercolor paints: Indigo, Turquoise/Teal, Magenta, Warm Yelow/Orange
- Black gouache or waterproof black ink
- White gel pen or white gouache
- Flat wash brush (3/4 inch)
- Round brushes (size 4 and size 0/liner)
- Pencil and eraser
- Clean water and mixing palette
- Paper towels
Step 1: Painting the Sunset Sky
-
Tape the Edges:
Secure your watercolor paper to a hard board using painter’s tape. Create a clean border of about 1/4 inch all around the edges to give that professional framed look when finished. -
Prepare the Gradient:
Pre-mix your sky colors on the palette. You will need a deep indigo blue, a bright teal, a soft magenta, and a warm sunset yellow. Having them ready is crucial for a smooth wet-on-wet blend. -
Wet the Paper:
Using your flat wash brush, apply a layer of clean water over the entire paper surface. It should be glistening wet but not forming puddles. -
Apply the Night Sky:
Start at the very top with your indigo mix, painting horizontal strokes. While the paint is still wet, blend in the teal color immediately below it. -
Create the Sunset:
Rinse your brush quickly and pick up the magenta. Blend this into the bottom edge of the teal. Finally, add the warm yellow at the bottom third of the paper, letting it meet the pink for a soft orange transition. -
Add Cloud Textures:
While the blue section is still damper than the rest, dab in a slightly more concentrated mixture of indigo and teal loosely to create soft, cloud-like textures in the upper sky. -
Let it Dry:
Allow the background to dry completely. The paper must be bone-dry before adding silhouettes, or the black ink will bleed into the sky.
Pro Tip: Wing Translucency
For wings that look truly magical, dilute white gouache significantly with water. This semi-sheer layer lets the sunset colors peek through, mimicking insect wings.
Step 2: Adding the Meadow Silhouettes
-
Sketch the Composition:
Lightly sketch the main elements with a pencil: the tall grasses on the left, the dandelion seed heads on the right, and the position of the fairy. -
Paint the Foreground Hills:
Using black gouache or ink and a size 4 round brush, paint a solid undulating hill shape at the very bottom. Keep the top edge slightly jagged to suggest grass blades. -
Establish Tall Grasses:
Switch to a liner brush or size 0. Paint long, sweeping strokes upward from the hill on the left side to create tall reeds and wheat-like grasses. -
Create Dandelions:
On the right side, draw two thin vertical stems lines reaching into the pink/blue sky area. At the top of each, paint a small central dot and radiate fine lines outward to form the dandelion puffs. -
Detail the Meadow:
Fill in the bottom area with shorter grass blades, leaves, and small fern-like shapes. Vary the height and thickness of your strokes to make the meadow look natural and wild.
Step 3: The Fairy and Finishing Touches
-
Paint the Swing Rope:
Using your finest brush and black gouache, paint two very thin, straight lines hanging down from the ‘unseen’ tree branch above. Connect them near the bottom with a small seat line. -
Silhouette the Fairy:
Carefully paint the fairy sitting on the swing. Focus on the profile: a small round head, slender torso, and pointed feet dangling down. Her dress should have a ragged, leaf-like hem. -
Add Wings:
Mix a tiny amount of water into your teal or white paint to make it semi-transparent. Paint delicate wing shapes emerging from the fairy’s back. They should look gossamer and light compared to the solid body. -
Paint the Stars:
Using a white gel pen or opaque white gouache, dot small stars throughout the blue section of the sky. Add a few larger four-pointed stars for variety. -
Foreground Details:
For extra depth, mix opacity-white with a touch of pink or blue and paint a few small wildflowers directly over the black hill at the bottom left. -
Reveal the Border:
Once the black ink is fully dry, slowly peel away the painter’s tape at a 45-degree angle to reveal the crisp white border.
Troubleshooting: Bleeding Sky
If your black silhouettes are blooming into the background, the paper wasn’t dry enough. Wait longer or use a hairdryer on the cool setting before painting details.
Now you have a whimsical twilight scene ready to bring a touch of magic to any room


Fairy With Stained-Glass Wing Pattern
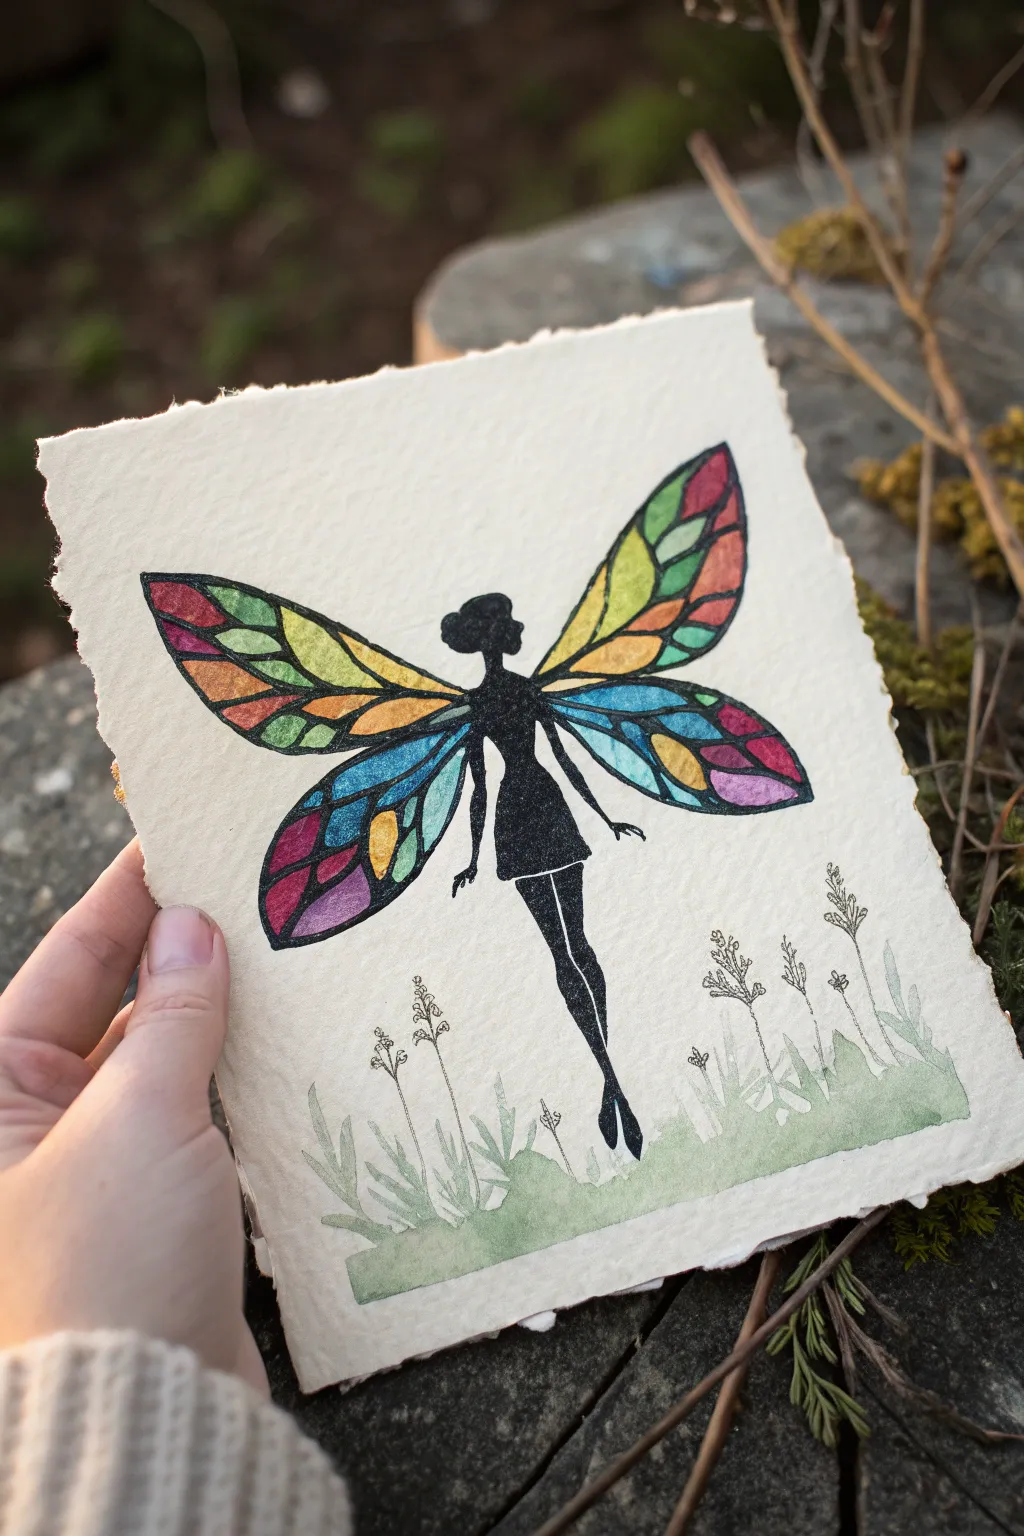
Capture the delicate beauty of a fairy using a striking contrast between solid black ink and vibrant, translucent colors. This mixed-media piece mimics the look of stained glass on textured paper, resulting in a whimsical and magical illustration.
Step-by-Step Tutorial
Materials
- Heavyweight textured paper (deckle edge watercolor paper recommended)
- Black waterproof fine liner pens (0.3mm and 0.5mm)
- Black brush pen or India ink
- Watercolor paints (various bright colors for wings, muted green for grass)
- Small round paintbrush (size 0 or 2)
- Pencil and eraser
- Ruler (optional)
- Paper towel
Step 1: Sketching the Outline
-
Paper preparation:
Select a piece of thick, textured paper. If your paper doesn’t have a deckle edge naturally, you can gently tear the edges against a ruler to create that rustic, handmade look. -
Draft the silhouette:
Lightly sketch the fairy’s body in the center of the page using a pencil. Draw a simple elongated pose with a head, torso, flowing skirt, and long legs tapering to pointed toes. Keep the limbs slender. -
Add the wing shape:
Draw four large wing shapes extending from the upper back. The top wings should be larger and point upwards, while the bottom wings are slightly smaller and curve downwards. -
Create the segments:
Inside the wing outlines, sketch curved intersecting lines to create a mosaic or stained-glass pattern. Vary the sizes of these segments; larger ones near the body and smaller ones toward the tips often look best. -
Sketch the foreground:
Lightly pencil in some vertical lines at the bottom of the page to indicate tall grass and wildflower stems, ensuring they don’t overlap the fairy’s feet.
Pro Tip: Glowing Wings
To make the wings look translucent, use more water in your paint mix. Paint the center of each segment lighter and let pigment pool slightly at the edges.
Step 2: Inking the Design
-
Outline the wings:
Using a 0.3mm waterproof fine liner, trace over your pencil lines for the wing segments. Go slowly to ensure clean, continuous lines. -
Thicken wing veins:
Go back over the main structural lines of the wings to make them slightly thicker than the inner segment lines, enhancing the leaded glass effect. -
Fill the silhouette:
Switch to a black brush pen or a larger marker to fill in the fairy’s body, head, hair bun, and legs. Ensure the black is solid and opaque. -
Refince the edges:
Use your finer pen to tidy up the edges of the silhouette, sharpening the fingers and the points of the feet. -
Ink the flora:
delicately trace the grass and flower stems at the bottom. Use dotwork or tiny dashing motions for the flower heads to make them look airy and light. -
Erase guidelines:
Wait until the ink is completely dry to the touch, then gently erase all remaining pencil marks.
Troubleshooting: Bleeding Ink
If your black lines smudge when you add watercolor, your pen isn’t waterproof. Let it dry for 24 hours or switch to a permanent pigment liner.
Step 3: Adding Color
-
Select your palette:
Choose a variety of bright watercolor paints. For a classic stained glass look, use reds, oranges, yellows, greens, and blues. -
Paint the first segments:
Dip your small brush into your first color and fill in random segments across all four wings. Try not to put the same color in adjacent segments. -
Continue filling:
Clean your brush and switch to the next color. I like to work from warm colors (reds, oranges) to cool colors (blues, greens) to keep the palette balanced. -
Leave some highlights:
As you paint the segments, you can leave tiny slivers of white paper near the black lines to suggest light reflecting off glass. -
Paint the grass:
Dilute a sap green or olive green paint with plenty of water. Brush a loose, wash-like layer over the bottom ‘ground’ area. -
Add grass details:
While the green wash is still slightly damp, drop in a tiny bit of darker green near the bottom edge to create depth. -
Final touches:
Allow the paint to dry completely. If the watercolors have faded too much upon drying, you can stick strictly to the dried areas and add a second layer for vibrancy.
Framing this piece in a simple floating glass frame will really make the colors pop against the textured paper


Have a question or want to share your own experience? I'd love to hear from you in the comments below!