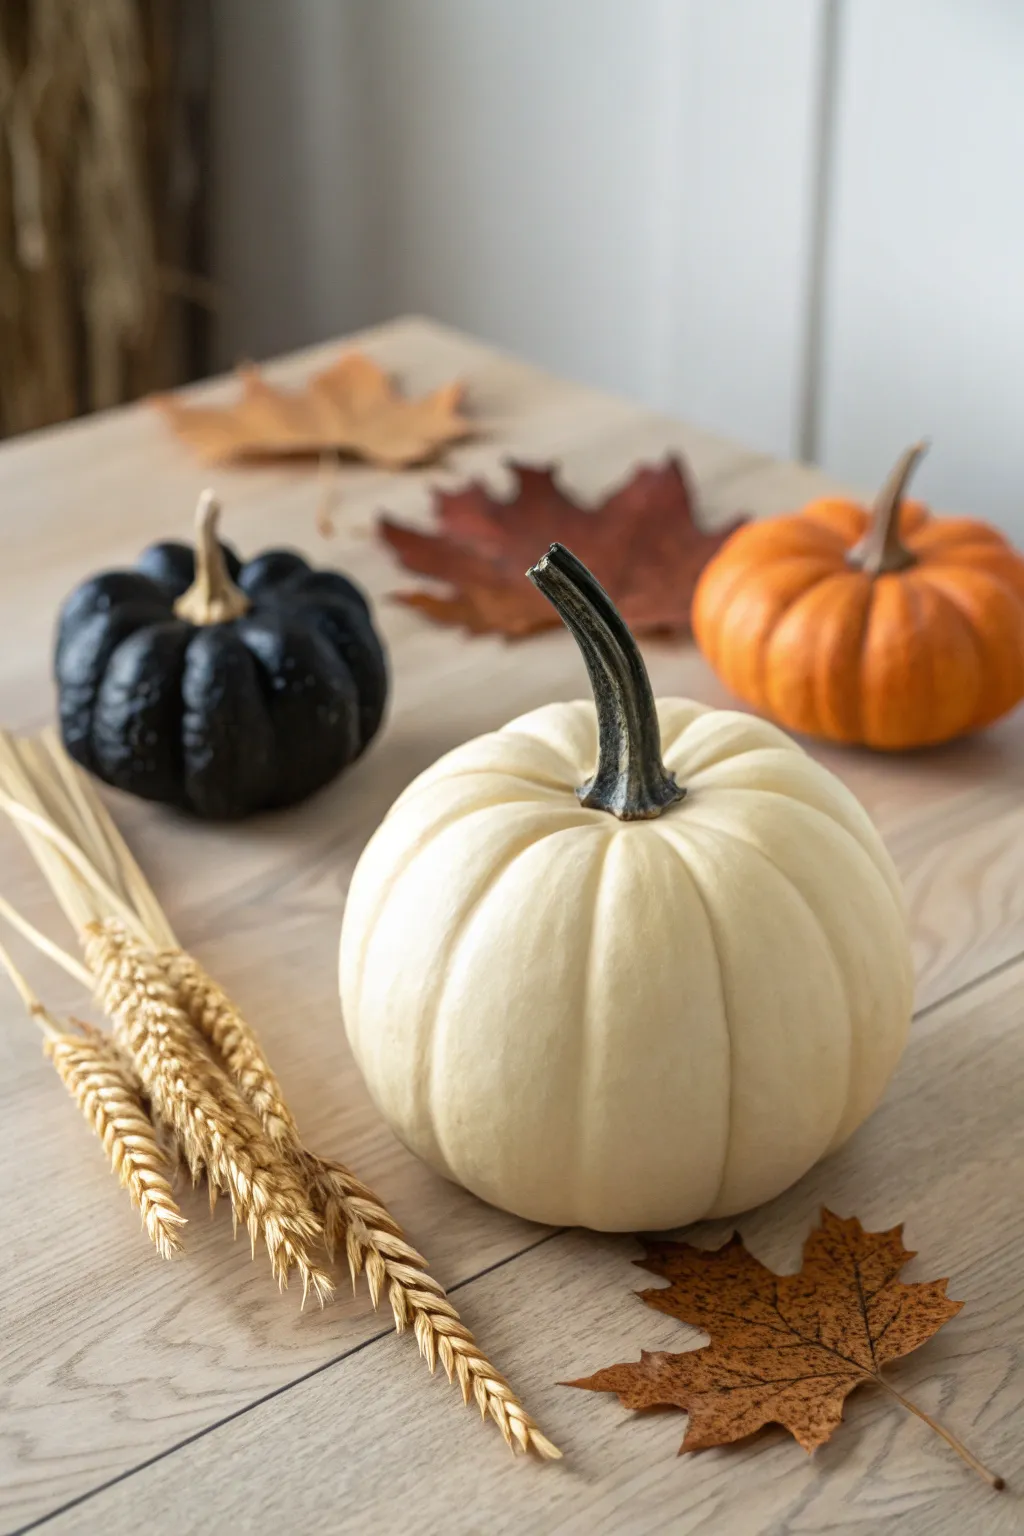
If you love fall decorating but hate the rush of a real pumpkin’s short lifespan, fake pumpkins are the perfect little blank canvases. I’m sharing my favorite no-carve ways to turn them into art you’ll actually want to reuse year after year.
Classic Matte Painted Pumpkins
Transform inexpensive craft pumpkins into a sophisticated autumn display with a trendy, ultra-matte finish. This project balances the richness of jet black with creamy white and classic orange for a modern twist on fall decor.
Step-by-Step Tutorial
Materials
- One medium-sized foam craft pumpkin (for white)
- One small foam craft pumpkin (for black)
- One small foam craft pumpkin (orange)
- Matte chalkboard paint or matte acrylic paint (Cream/Ivory)
- Matte chalkboard paint or matte acrylic paint (Black)
- Dark brown acrylic paint (for stems)
- Fine-grit sandpaper (220 grit)
- Wide flat synthetic paintbrush
- Small round detail brush
- Matte spray sealer (optional)
- Paper towels or cloth
- Dried wheat stalks (for styling)
- Preserved autumn leaves (for styling)
Step 1: Preparation & Base Coat
-
Clean and sand:
Begin by wiping down your foam pumpkins with a slightly damp cloth to remove any dust or manufacturing residue. If the pumpkins have prominent seams from the mold, gently sand them down with fine-grit sandpaper until smooth. -
Remove stems:
If your artificial pumpkins have removable stems, carefully pull them out and set them aside. If they are permanently attached, wrap them tightly in painter’s tape to keep them clean during the painting process. -
Prime the surface:
Apply a thin layer of primer or a base coat of white acrylic paint to the pumpkins intended for color change. This is especially helpful for the black pumpkin to ensure deep coverage later. -
Mix the cream color:
For the large center pumpkin, pour out your matte cream or ivory paint. I like to add a tiny drop of brown to warm it up slightly if the white is too stark. -
Paint the first cream layer:
Using the wide flat brush, apply the cream paint to the medium pumpkin. Use long, vertical strokes that follow the natural curve of the pumpkin segments to minimize visible brushstrokes. -
Paint the black pumpkin:
Switch to a clean brush and apply the matte black paint to one of the smaller pumpkins. Be sure to get the paint deep into the crevices between the ribs. -
Dry completely:
Allow the first coats to dry fully. This usually takes about 20-30 minutes for acrylics, but check the bottle for specific drying times.
Step 2: Refining & Detailing
-
Apply second coats:
Apply a second coat to both the cream and black pumpkins. The second coat provides that velvety, opaque finish that makes the faux material look high-end. -
Touch up the orange:
If your third pumpkin is already orange, inspect it. If the finish is too shiny or plastic-looking, give it a coat of matte clear medium or a light wash of matte orange paint to unify the sheen with the others. -
Paint the stems:
While the bodies dry, paint the removed stems with dark brown acrylic paint. For a realistic look, dry-brush a little bit of the cream color onto the raised ridges of the stem to highlight the texture. -
Reattach stems:
Once everything is dry, remove the tape or glue the stems back into the pumpkins. A dab of hot glue will secure them firmly. -
Seal the finish:
To protect the paint and enhance the non-reflective quality, lightly mist all three pumpkins with a matte spray sealer. Do this in a well-ventilated area.
Pro Tip: Baking Soda Hack
Mix a teaspoon of baking soda into your acrylic paint before applying. This creates a grainy, ceramic-like texture that hides the plastic sheen of cheap pumpkins.
Step 3: Composition & Styling
-
Arrange the main elements:
Place the large cream pumpkin in the center as your focal point. Position the black pumpkin to the left side and slightly forward. -
Add the orange accent:
Place the small orange pumpkin to the right, balancing the visual weight of the black one. -
Incorporate wheat:
Lay a bundle of dried wheat stalks along the left side, allowing the textured heads to rest near the black and cream pumpkins. -
Scatter leaves:
Tuck a few preserved autumn leaves under and around the pumpkins. Use darker brown leaves near the cream pumpkin for contrast, and allow a few to overlap loosely.
Level Up: Realistic Stems
Replace the plastic stems entirely by hot gluing dried real pumpkin stems or twisted driftwood pieces onto your faux pumpkins for an authentic touch.
Now you have a chic, modern centerpiece ready to grace your table throughout the autumn season


Whitewashed Farmhouse Finish
Transform a generic, bright orange foam pumpkin into a sophisticated piece of farmhouse decor with this subtle whitewashing technique. The result is a soft, matte finish that mimics the look of a natural Lumina pumpkin straight from the patch.
Step-by-Step
Materials
- Orange foam craft pumpkin
- Chalk-style paint (warm white/cream)
- Acrylic paint (tan/taupe for stem)
- Acrylic paint (dark brown for stem detail)
- Baking soda or plaster of paris (for texture)
- Medium flat paintbrush
- Small detail brush
- Paper towels or lint-free rag
- Matte clear sealer spray (optional)
- Mixing bowl or palette
Step 1: Preparation & Base Coat
-
Clean surface:
Begin by wiping down your fake pumpkin with a slightly damp cloth to remove any manufacturing dust or oils that might repel the paint. -
Remove stem:
If your pumpkin has a removable stem, gently pull it out now to make painting the body easier; if it’s glued on, simply mask it off with painter’s tape. -
Mix texture:
In your mixing bowl, combine your cream chalk paint with a tablespoon of baking soda (or plaster of paris). This creates a thicker, grittier consistency that helps hide the plastic look. -
Apply base layer:
Using the medium flat brush, apply a generous coat of the textured paint mixture all over the pumpkin, brushing vertically from top to bottom. -
Stipple method:
While the paint is still wet, use the tip of your brush to stipple (tap repeatedly) into the deep grooves to ensure the orange doesn’t peek through. -
Initial dry time:
Let this first heavy coat dry completely for at least one hour; the baking soda mixture may take slightly longer than plain paint.
Too Much Texture?
If the baking soda creates clumps that look too rough, lightly sand the pumpkin with fine-grit sandpaper after the first coat dries to smooth it out.
Step 2: Building Depth & Realism
-
Second coat:
Apply a second, slightly thinner layer of chalk paint (without extra baking soda this time) to smooth out any overly rough patches while maintaining the matte texture. -
Feather edges:
Pay special attention to the area around the stem hole and the very bottom, feathering the paint so there are no hard ridges. -
Create wash:
Mix a very small drop of tan acrylic paint with water to create a watery glaze. -
Apply glaze:
Brush this transparent glaze loosely into the vertical crevices of the pumpkin to simulate natural shadows and dirt accumulation. -
Wipe back:
Immediately use a dry paper towel to gently wipe the high points of the pumpkin ribs, leaving the darker glaze only in the deep grooves.
Pro Tip: Hidden Orange
Check the pumpkin from below eye level and touch up the bottom ‘underside’ curve; skipping this spot is a common mistake that reveals the fake orange base.
Step 3: Stem Detailing
-
Base stem color:
Paint the plastic stem with a solid coat of tan or taupe acrylic paint to cover any fake green or black plastic coloring. -
Add dimension:
Once the tan is dry, dry-brush a dark brown paint over the ridges of the stem to highlight its texture. -
Realistic transition:
Paint the very base of the stem where it connects to the pumpkin with a mix of the stem color and the pumpkin color to make it look like it grew there. -
Reattach stem:
Once everything is dry, pop the stem back into the hole (or remove your masking tape). -
Final seal:
Mist the entire pumpkin with a matte clear spray sealer to protect the chalk finish and prevent the baking soda texture from flaking off over time.
Now place your beautifully textured pumpkin near a window to let the natural light highlight those realistic matte details


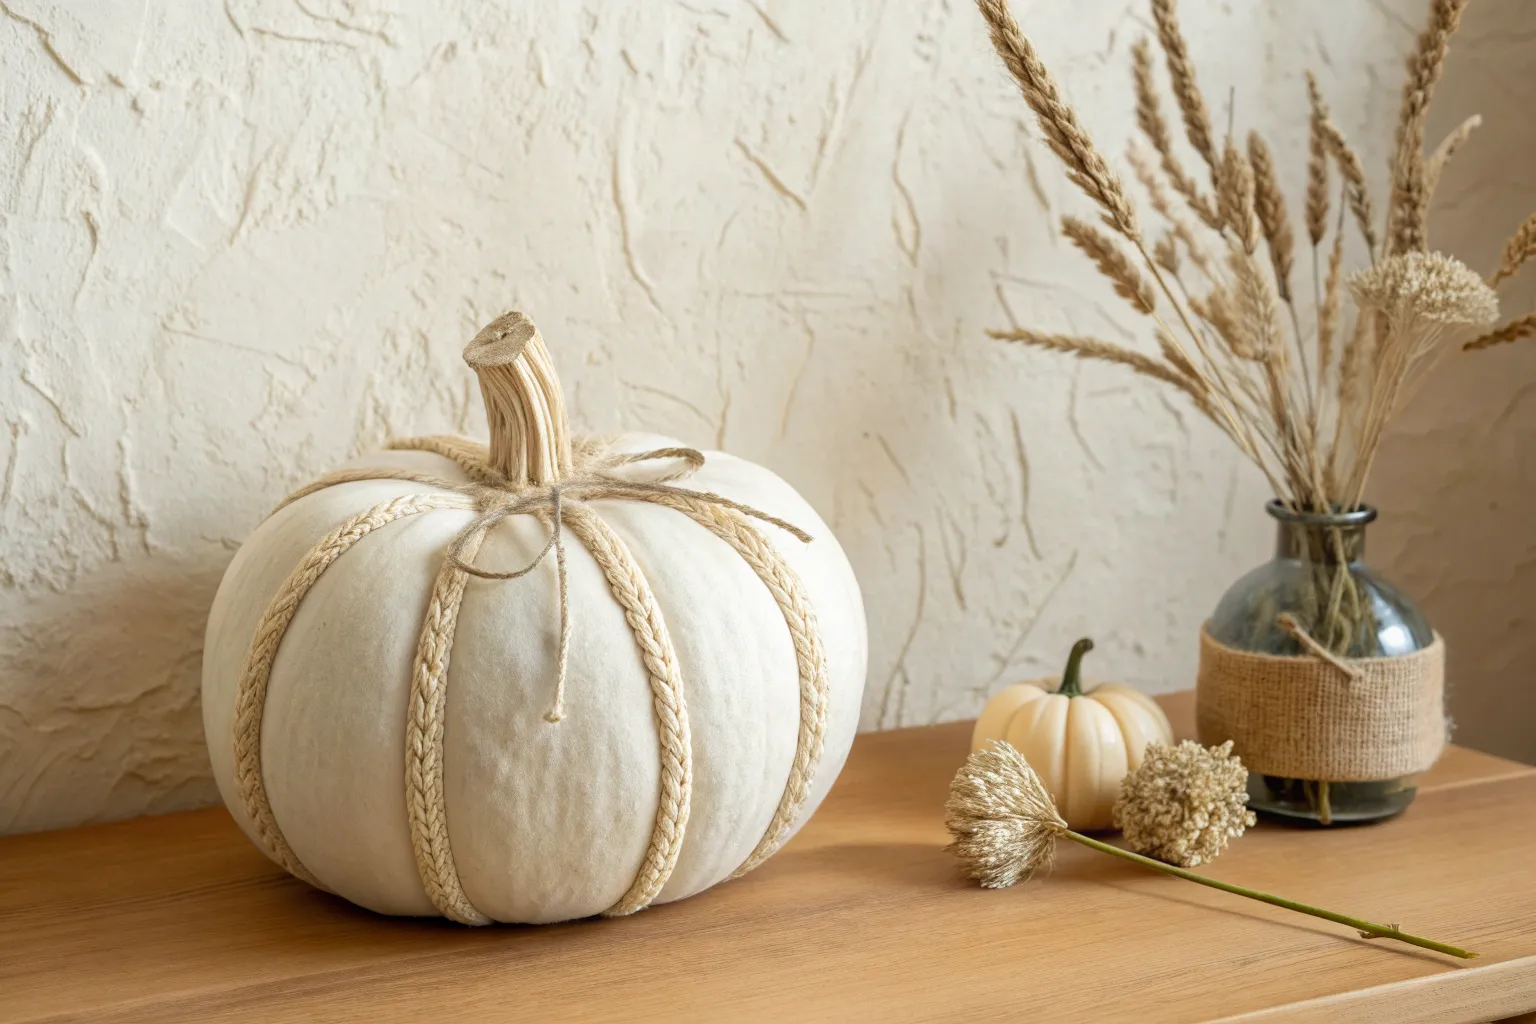
Metallic Gilded Highlights
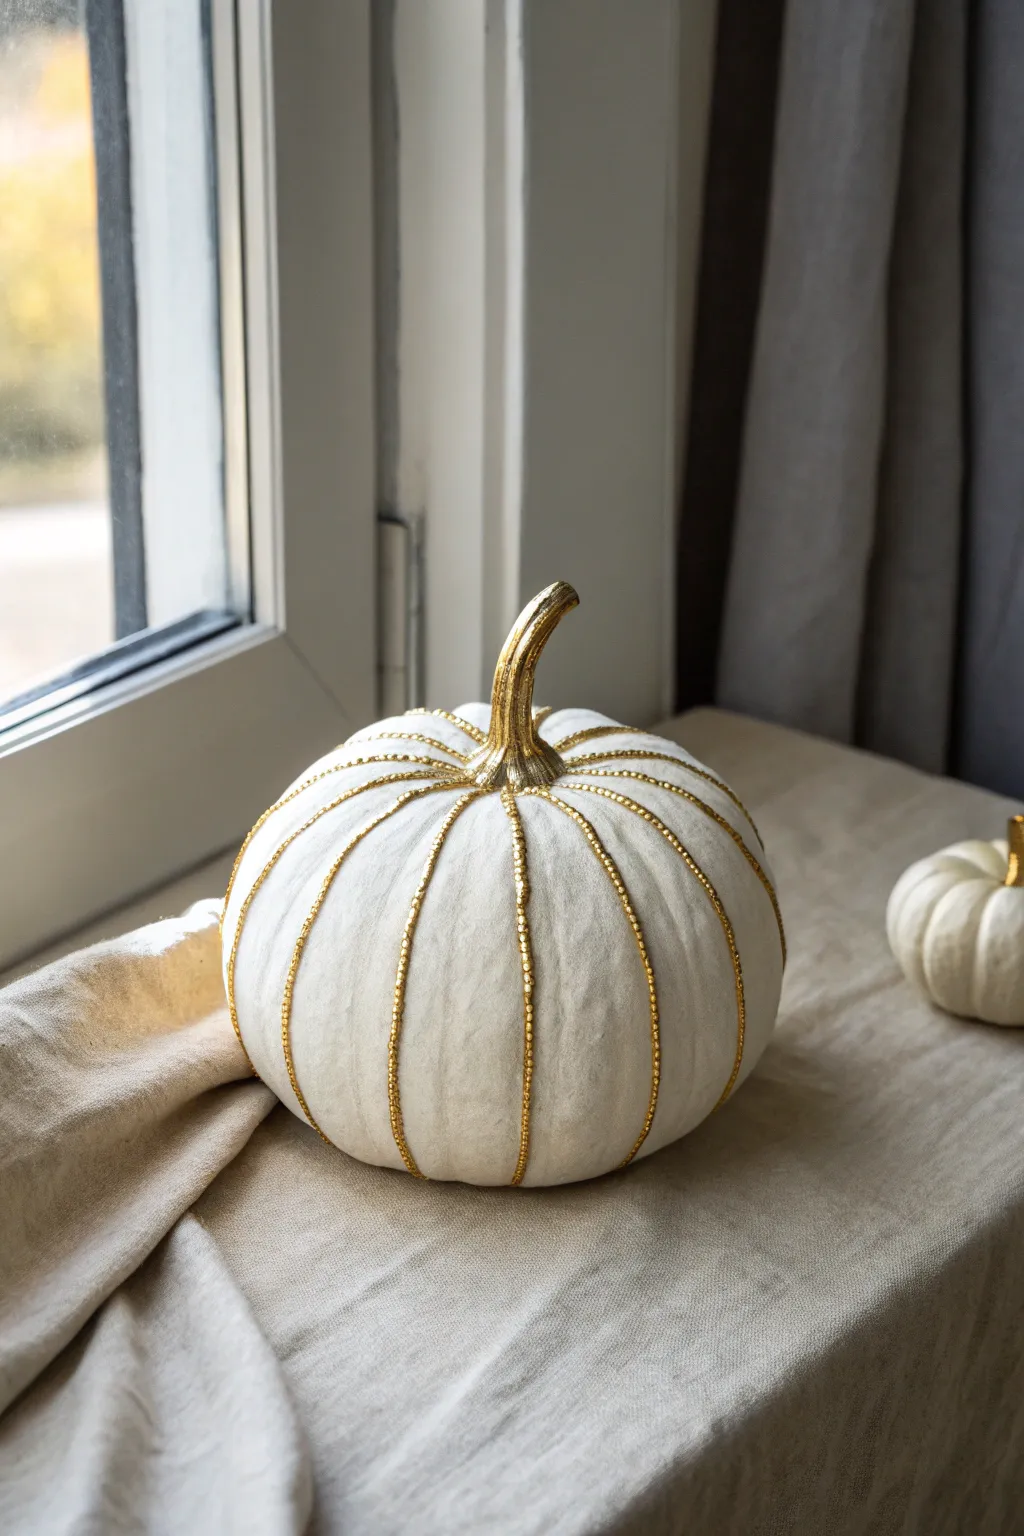
Transform a plain white faux pumpkin into a sophisticated piece of autumn decor with delicate metallic detailing. By highlighting the natural ribs with gold bead chains and painting the stem to match, you’ll create an elegant accent that catches the light beautifully.
Detailed Instructions
Materials
- medium sized white faux pumpkin
- gold ball chain ribbon (small bead size)
- gold metallic craft paint or gilding wax
- small paintbrush
- hot glue gun with clear glue sticks
- scissors
- clean cloth
- tweezers (optional but helpful)
Step 1: Preparation and Stem
-
Clean surface:
Begin by wiping down your faux pumpkin with a clean, slightly damp cloth to remove any dust or manufacturing residue. This ensures the glue and paint adhere properly. -
Dry completely:
Allow the surface to dry fully before moving on to any painting or gluing steps. -
Paint the stem base:
Dip your small paintbrush into the gold metallic paint. Start at the very base of the stem where it meets the pumpkin body, carefully cutting in a clean line. -
Cover the stem:
Continue painting upward, covering the entire stem with an even coat of gold. Work the paint into all the grooves and texture of the realistic stem. -
Check for coverage:
inspect the stem from different angles. If the underlying color is showing through, let the first coat dry for about 20 minutes and apply a second coat for a rich, solid gold finish. -
Dry paint:
Let the painted stem dry completely to the touch before you start handling the pumpkin for the next steps.
Clean Lines
Use a toothpick to guide the hot glue into the deep grooves. This prevents glue from smearing onto the white puffy parts of the pumpkin.
Step 2: Adding the Gold Ribs
-
Measure the first rib:
Select one of the natural vertical grooves (ribs) on the pumpkin. Take your spool of gold ball chain and hold it against the groove to measure the length needed from the very top (base of the stem) to the bottom center. -
Cut the chain:
Cut the chain to length using your scissors. It’s better to cut it slightly too long than too short, as you can trim the excess later. -
Apply glue at top:
Working with the first rib, apply a very small dot of hot glue right at the top of the groove, tucking it close to the painted stem base. -
Secure top end:
While the glue is still hot, press the start of your gold chain into the glue dot. I find tweezers helpful here to keep my fingers away from the heat. -
Glue the middle section:
Move about two inches down the rib. Apply a thin line of hot glue directly into the groove. -
Press chain into place:
Gently pull the chain taut and press it into the glue line, ensuring it sits deep within the groove rather than floating on top. -
Finish the first rib:
Continue gluing in small sections until you reach the bottom center of the pumpkin. Secure the end with a final dot of glue. -
Trim excess:
Snip off any excess chain at the bottom so it sits flush and tidy underneath the pumpkin.
Step 3: Finishing Up
-
Repeat the process:
Move to the next rib and repeat the measuring, cutting, and gluing process. Continue working your way around the entire pumpkin until every vertical groove is filled. -
Clean up glue strings:
Once all chains are attached and the glue has set, inspect the pumpkin for any wayward hot glue strings. Gently pull these off or use a hairdryer on a low setting to melt them away. -
Final inspection:
Check the connection points near the stem. If any gaps are visible between the gold paint and the start of the chain, touch them up with a tiny bit of gold paint for a seamless look.
Texture Twist
Instead of ball chain, try using thin twisted gold cord or even a line of gold dimensional puff paint for a different texture.
Now you have a stunning, high-end looking decoration ready to grace your windowsill or centerpiece


Polka Dot and Confetti Patterns
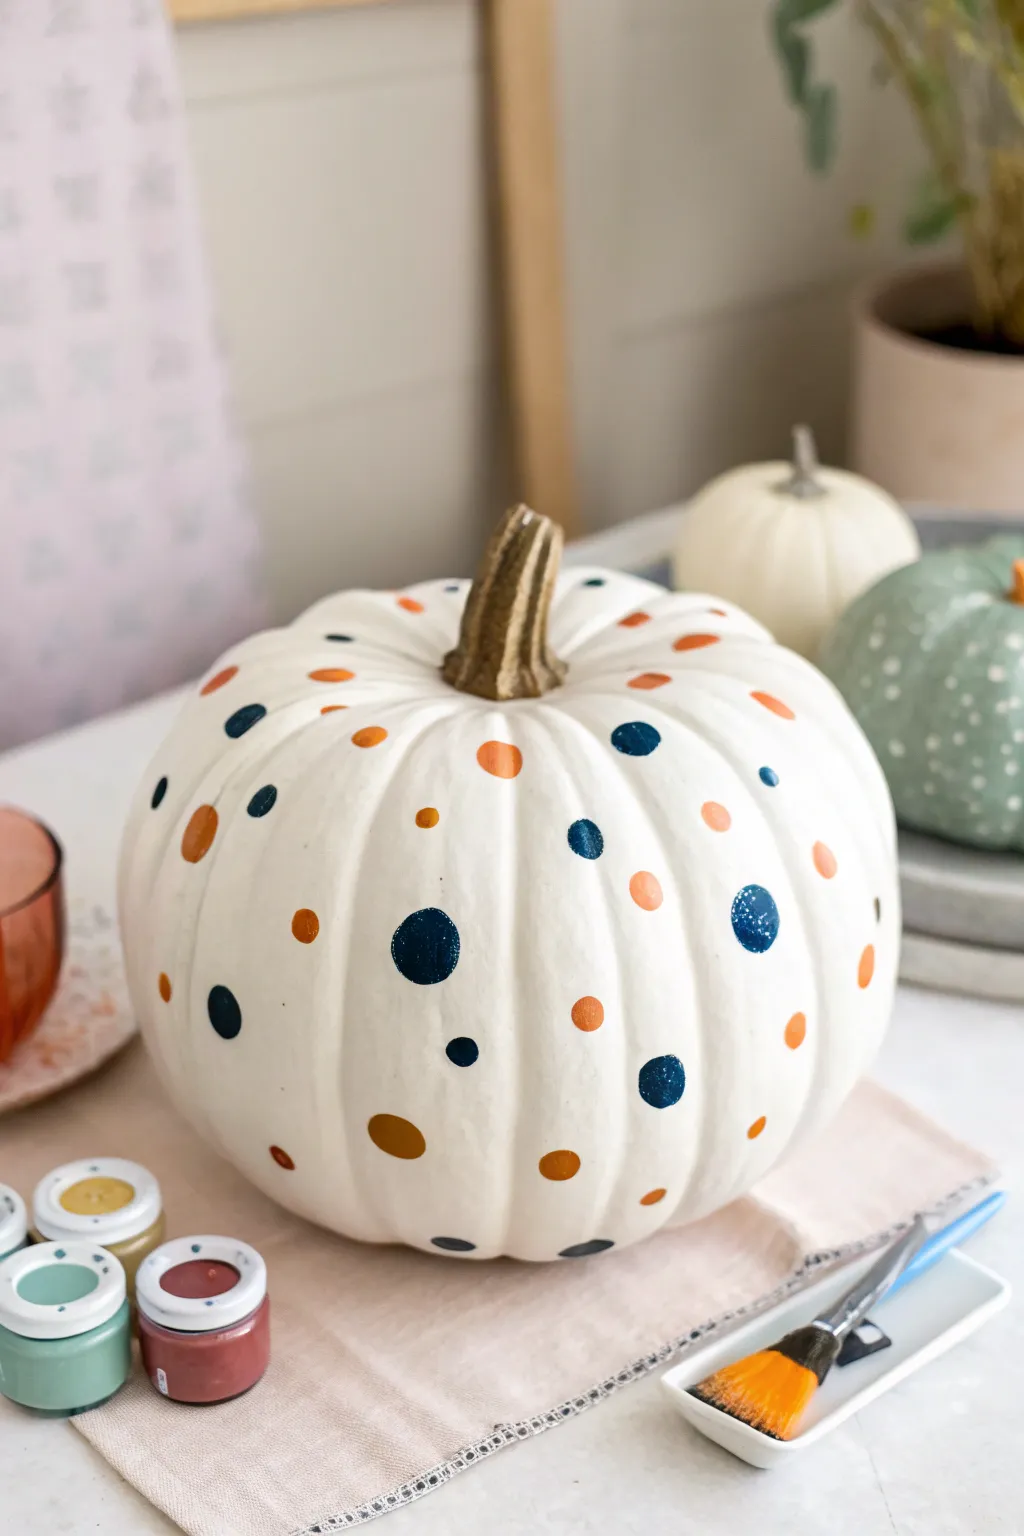
Transform a plain white craft pumpkin into a chic fall centerpiece with this simple polka dot design. Using a modern palette of navy, burnt orange, and terracotta, this project adds a playful yet sophisticated touch to your seasonal decor.
How-To Guide
Materials
- Medium-sized white foam craft pumpkin
- Acrylic craft paint (Navy Blue)
- Acrylic craft paint (Burnt Orange)
- Acrylic craft paint (Terracotta/Rust)
- Round foam pouncers (assorted sizes: small, medium, large)
- Small flat paintbrush (for touch-ups)
- Paper plate or paint palette
- Paper towels
- Cup of water
- Clear matte acrylic sealer spray (optional)
Step 1: Preparation and Planning
-
Clean surface:
Begin by wiping down your faux pumpkin with a slightly damp paper towel to remove any dust or manufacturing residue. Let it dry completely. -
Prepare paints:
Squeeze dime-sized amounts of your navy blue, burnt orange, and terracotta paints onto your paper plate. Keep the colors separated. -
Mix custom shades:
If your terracotta looks too bright, I like to mix a tiny dot of navy into it to deepen the tone for a earthier look. -
Test pouncers:
Tap your foam pouncers onto a scrap piece of paper first to see how much pressure creates a perfect circle.
Perfect Circle Pro Tip
Don’t press too hard! Smashing the foam pouncer flat causes paint to seep out the sides, creating messy rings. Use firm, even pressure and lift straight up.
Step 2: Painting the Large Dots
-
Load the large pouncer:
Dip your largest foam pouncer into the navy blue paint. Dab off excess paint on the palette to prevent globs. -
Apply first navy dots:
Press the pouncer firmly onto the pumpkin surface. Twist slightly and lift straight up to get a crisp edge. -
Space them out:
Scatter about 5-7 large navy dots randomly around the pumpkin, making sure to leave plenty of white space between them. -
Dry the first layer:
Allow these large dots to dry to the touch for about 10 minutes to avoid accidental smudging while you work.
Step 3: Adding Variety with Medium Dots
-
Select medium pouncer:
Switch to a medium-sized pouncer and load it with the burnt orange paint. -
Apply orange accents:
Place medium orange dots in the empty spaces, keeping them somewhat distant from the navy ones. -
Vary the height:
Ensure you place some dots near the stem and some near the base so the pattern looks organic and full. -
Add navy variety:
Clean the medium pouncer (or use a fresh one) and add a few medium-sized navy dots to balance the scale.
Level Up: Texture
Sprinkle ultra-fine glitter onto the wet paint of just one color (like the navy dots) before they dry to add a subtle sparkle that catches the light.
Step 4: Filling in with Small Details
-
Load small pouncer:
Dip your smallest pouncer into the terracotta or rust-colored paint. -
Fill the gaps:
Look for larger open white spaces and fill them with these small terracotta dots. They act like confetti in the design. -
Add small orange accents:
rinse the small tool and add tiny burnt orange dots near the larger navy circles for contrast. -
Add small navy accents:
Finish the pattern by adding small navy dots in any remaining awkward gaps.
Step 5: Finishing Touches
-
Check for imperfections:
Inspect your dots. If center coverage is thin, use a small flat brush to carefully dab in more paint. -
Sharpen edges:
If any circles have rough edges, use the small brush with a tiny amount of paint to round them out manually. -
Final dry:
Let the pumpkin sit undisturbed for at least an hour to ensure the thickest parts of the paint are fully cured. -
Seal (optional):
For longevity, especially if storing for next year, spray a light coat of matte acrylic sealer over the entire pumpkin.
Place your stylish new pumpkin on a mantel or dining table to enjoy those cozy autumn vibes
BRUSH GUIDE
The Right Brush for Every Stroke
From clean lines to bold texture — master brush choice, stroke control, and essential techniques.
Explore the Full Guide
Bold Stripes and Color Blocking
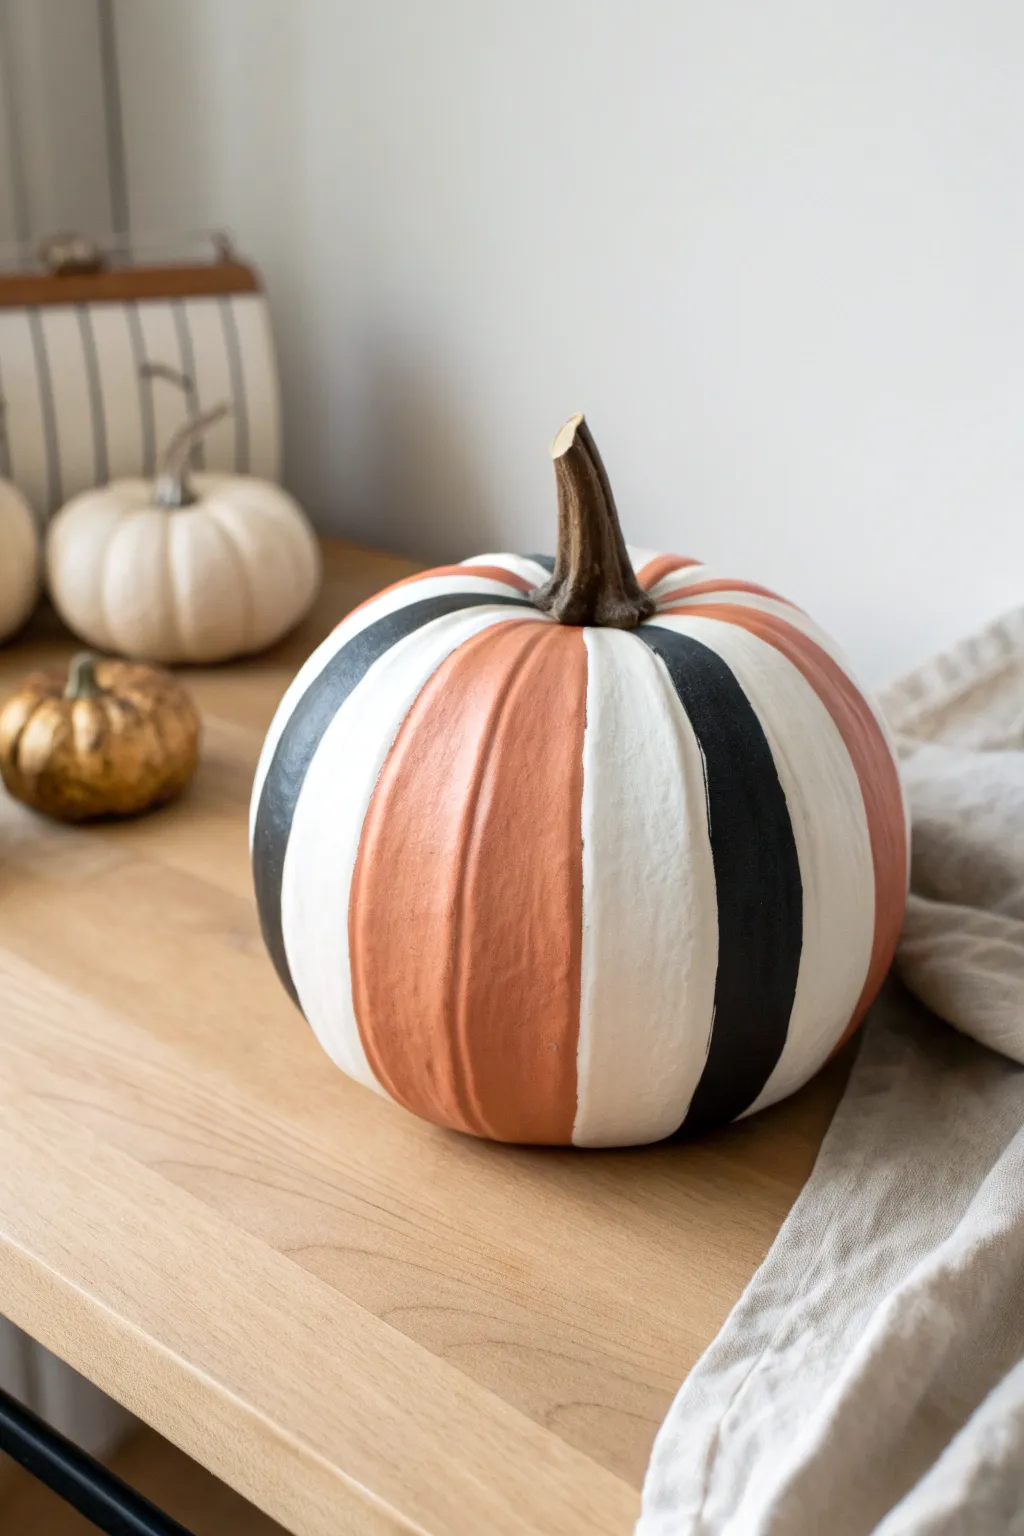
Transform a simple faux pumpkin into a chic, modern fall centerpiece with just a few stripes of paint. This project uses high-contrast black and warm terracotta tones against a crisp white base to create a bold, graphic look that fits perfectly in contemporary decor.
Step-by-Step
Materials
- White faux pumpkin (medium to large size)
- Black acrylic craft paint (matte finish)
- Terracotta or burnt orange acrylic craft paint (chalky finish preferred)
- White acrylic craft paint (for touch-ups)
- Flat shader brush (approx. 1/2 inch to 1 inch wide)
- Small round detail brush
- Pencil
- Clean cloth or rag
- Paper plate or palette
- Cup of water
Step 1: Preparation & Planning
-
Clean surface:
Begin by wiping down your faux pumpkin with a damp cloth to remove any dust or manufacturing residue. Let it dry completely to ensure the paint adheres smoothly. -
Map the segments:
Observe the natural ribs and indentations of your pumpkin. The grooves naturally divide the surface into segments, which makes planning your stripes much easier. -
Mark the pattern:
Using a pencil, lightly mark inside the grooves to designate which color goes where. A good pattern to follow is White (plain), Terracotta, White (plain), Black, and repeat. Writing a tiny ‘B’, ‘T’, or ‘W’ near the stem helps you keep track.
Uneven Lines?
If you struggle with shaky hands while painting the grooves, try resting your pinky finger on a dry section of the pumpkin to stabilize your brush hand as you pull the stroke down.
Step 2: Applying the Terracotta
-
Outline the segment:
Dip your flat shader brush into the terracotta paint. Carefully paint along the left and right grooves of one designated ‘Terracotta’ segment first to establish clean boundaries. -
Fill the center:
Once the edges are defined, fill in the rest of that segment with smooth vertical strokes, moving from the stem down to the base. Try to use long strokes to minimize brush marks. -
Check opacity:
Since terracotta can be semi-transparent, let this first coat dry for about 10-15 minutes. If you can see the white pumpkin underneath, apply a second coat for that rich, earthy saturation. -
Protect the stem:
As you paint near the top, use the corner of your brush or switch to the small detail brush to get crisp lines right up against the stem without getting paint on it. -
Repeat around the pumpkin:
Continue painting all designated terracotta segments around the pumpkin, keeping your pattern consistent.
Step 3: Adding the Black Contrast
-
Switch colors:
Thoroughly rinse your brush or grab a fresh one for the black paint. It is crucial there is no orange residue left, or your black will look muddy. -
Paint black stripes:
Just like before, outline the edges of the segments marked for black paint. The grooves act as a natural barrier, but a steady hand helps keep lines straight. -
Fill and smooth:
Fill in the black segments. Matte black paint usually covers well in one coat, but inspect it closely under good light to ensure no white shows through. -
Mind the base:
Don’t forget to paint all the way to the bottom curve of the pumpkin so the design looks complete when sitting on a table.
Texture Pro Tip
To mimic the look of real ceramic or pottery, mix a small teaspoon of baking soda into your acrylic paint before applying. It dries with a lovely, stone-like matte finish.
Step 4: Refinement
-
Evaluate the white spaces:
Look at the segments you left unpainted. If the original white finish of the faux pumpkin looks dull or plastic-shiny compared to your matte paint, painting them with white acrylic paint can unify the texture. -
Clean up edges:
If any paint slipped over the groove line into a neighboring stripe, wait for it to dry fully. Then, take your small detail brush and the correct color to crisp up the line. -
Final dry:
Allow the entire pumpkin to dry undisturbed for at least an hour before handling or styling it.
Now you have a striking graphic accent piece ready to anchor your seasonal vignette
Hand-Lettered Words and Monograms
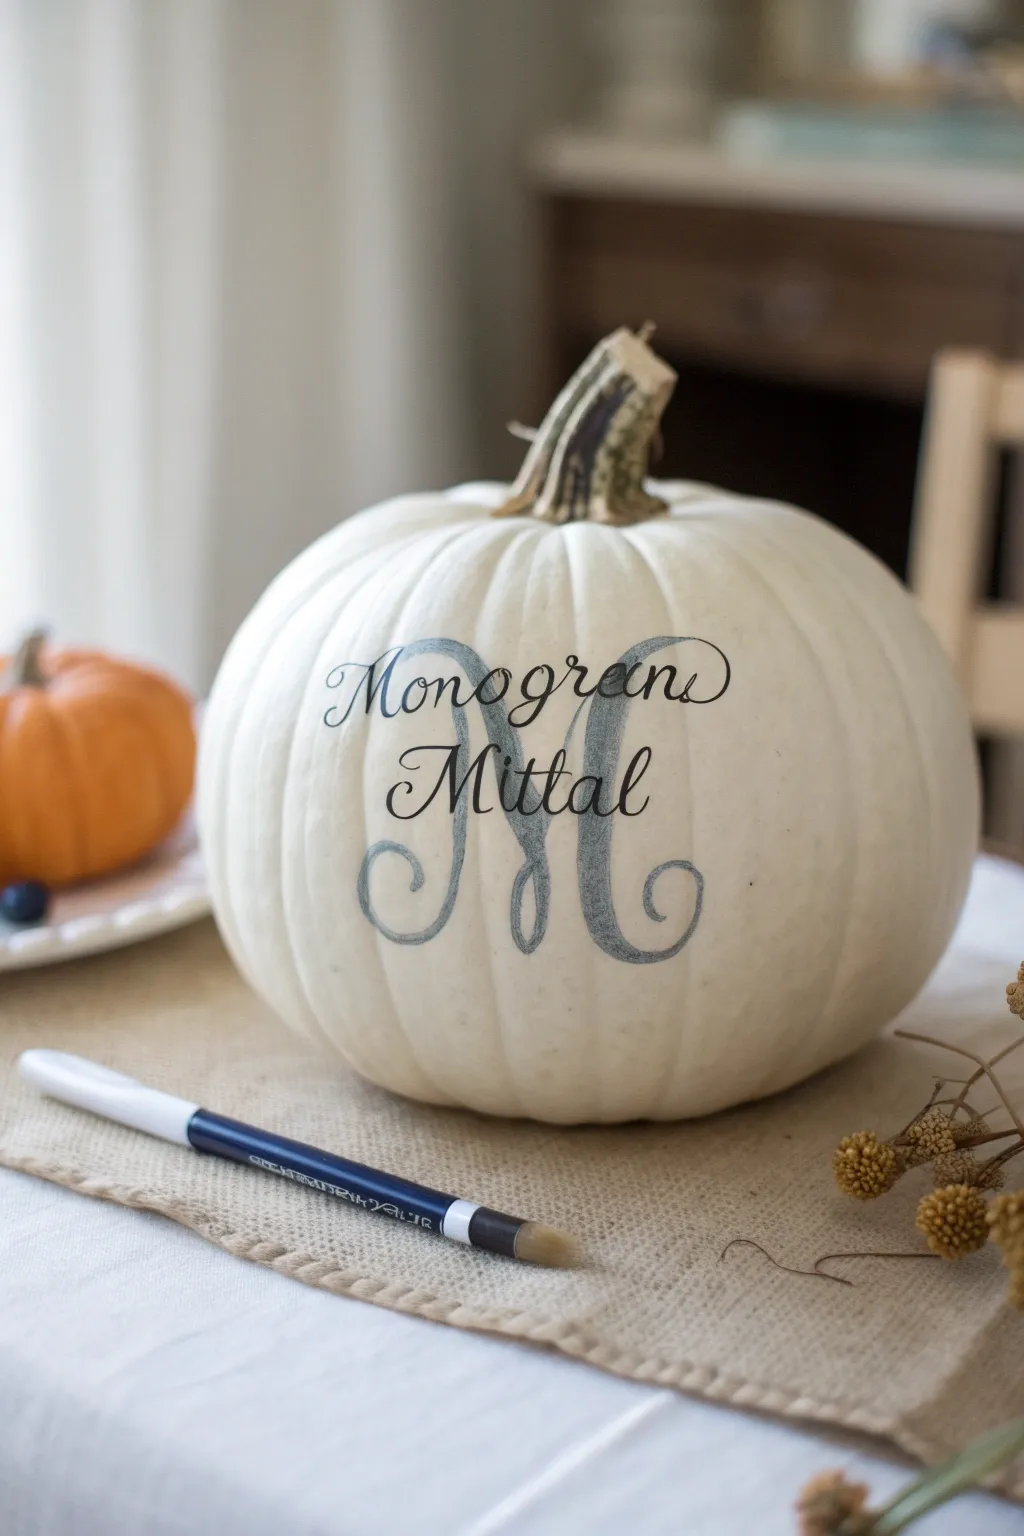
Elevate your autumn decor with this sophisticated hand-lettered pumpkin featuring a personalized monogram. The crisp white background perfectly highlights the fluid black script, creating a timeless centerpiece that looks far more expensive than it is.
Detailed Instructions
Materials
- Medium or large white faux pumpkin
- Pencil (HB or H)
- Soft white eraser
- Black brush pen or calligraphy marker
- Fine-point black permanent marker
- Tracing paper (optional)
- Ruler or measuring tape
Step 1: Planning and Sketching
-
Clean surface:
Begin by wiping down your faux pumpkin with a slightly damp cloth to remove any dust or oils, ensuring a completely smooth surface for lettering. -
Determine placement:
Identify the ‘face’ of the pumpkin—the flattest, most even side is usually best. Visualize where the center point lies. -
Draft the large initial:
Using your pencil, lightly sketch the large central initial letter first. Focus on creating flowing, curved serifs at the bottom and top of the letter stems. -
Refine the shape:
Go back over your large initial sketch and thicken the downstrokes to give the letter weight and dimension, simulating a calligraphy style. -
Plan the name overlay:
Sketch the full name (e.g., ‘Monogram’ or a family name) directly over the center of the large initial. The text should curve slightly to match the contour of the pumpkin. -
Check balance:
Step back and look at your pencil marks from a distance. Ensure the overlay text is centered and readable against the background letter. -
Lighten sketches:
Gently dab—don’t rub—your sketch with a kneadable or soft eraser to lift excess graphite, leaving just a faint guide for your ink.
Ink Control Pro-Tip
Rest your pinky finger on the pumpkin surface while drawing to stabilize your hand. This acts as an anchor and helps achieve smoother curves on the rounded surface.
Step 2: Inking the Design
-
Outline the large letter:
Take your black brush pen or calligraphy marker. Carefully trace the outer edges of your large background initial. -
Fill the large letter:
Use a shading technique to fill in the large letter. Instead of solid black, use light, directional strokes to create a textured, almost charcoal-like appearance. -
Create overlaps:
As you ink the large letter, be mindful of where the smaller text will cross. You might want to leave tiny gaps or ink lighter in those areas to help the overlay text pop. -
Letter the script name:
Using the fine-point marker, carefully letter the overlaid name. Use steady pressure to get crisp, clean lines that contrast with the shaded background letter. -
Thicken downstrokes:
On the script name, go back and thicken the downstrokes (any line where your pen moved downward) to create a faux-calligraphy effect. -
Add flourishes:
Extend the entry and exit strokes of the name slightly, adding small curls or flourishes if they fit the space well. -
Dry completely:
Let the ink sit for at least 15-20 minutes. Faux pumpkin surfaces can be slick, and ink takes longer to cure than on paper. -
Erase guidelines:
Once you are absolutely certain the ink is dry, very gently erase any remaining visible pencil marks.
Level Up: Gold Accents
Use a metallic gold paint pen to outline the large initial letter or add small dots around the flourishes for a glamorous finish.
Place your custom monogrammed pumpkin on an entryway table or mantle to welcome guests with handmade charm

PENCIL GUIDE
Understanding Pencil Grades from H to B
From first sketch to finished drawing — learn pencil grades, line control, and shading techniques.
Explore the Full Guide
Vintage Botanical Decoupage
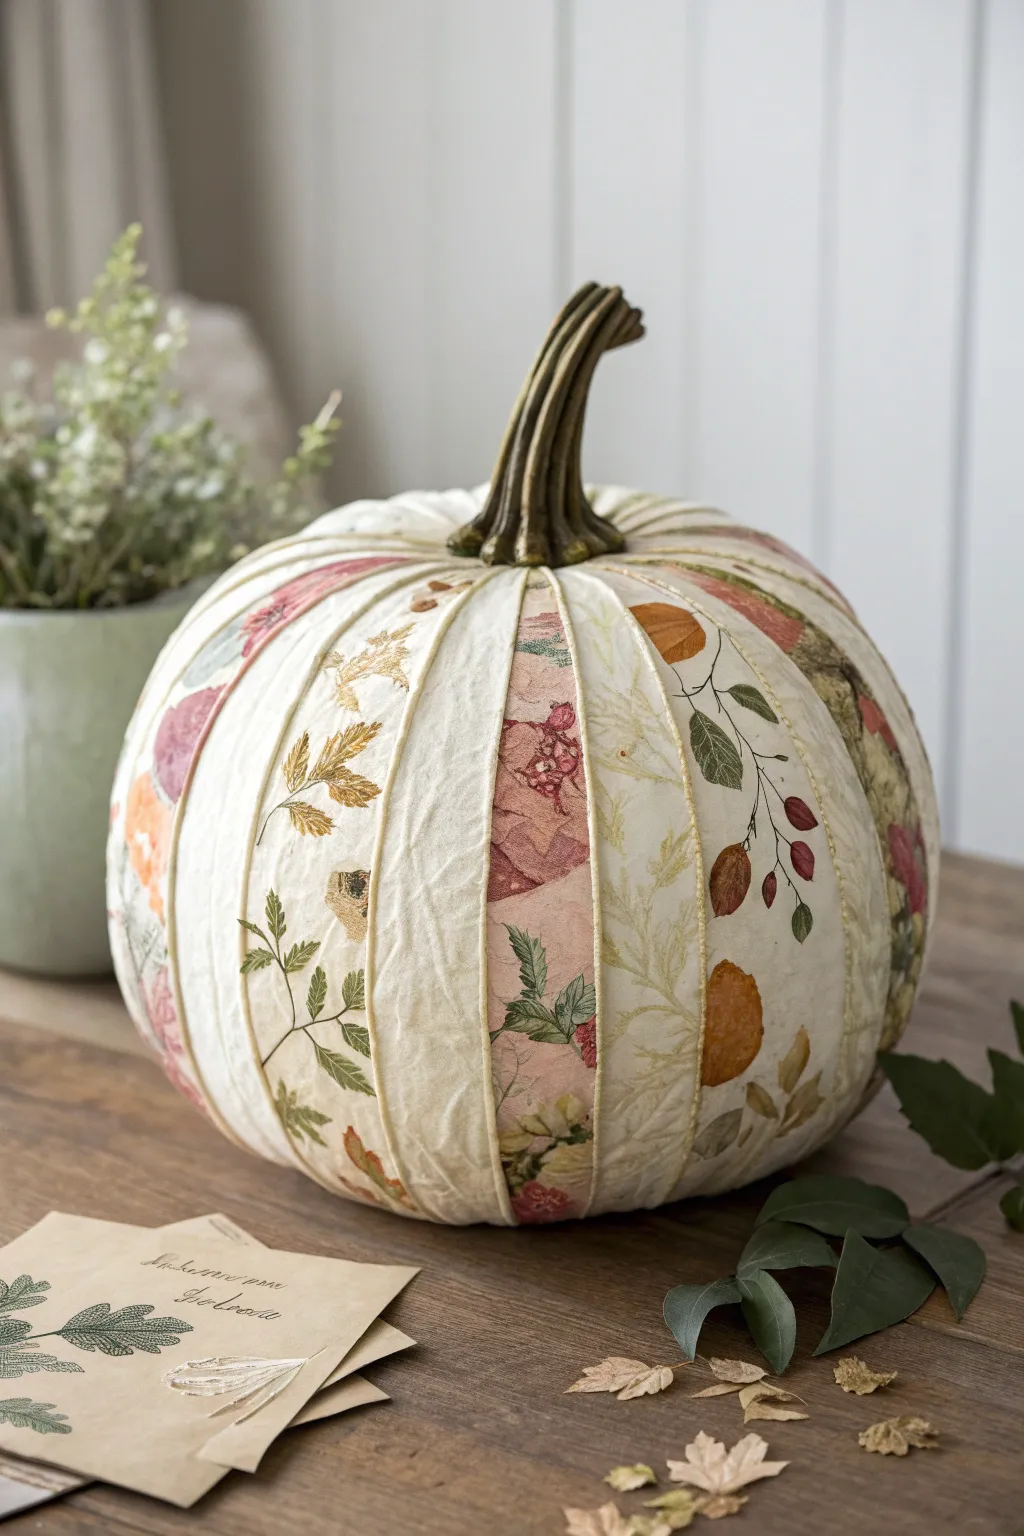
Bring the romance of a Victorian herbarium to your autumn decor with this sophisticated decoupage pumpkin. By combining faux floral textures with soft, fabric-like paper, you can transform a plain foam pumpkin into an heirloom-quality centerpiece that looks like it stepped out of a vintage field guide.
How-To Guide
Materials
- Large white faux pumpkin (smooth surface works best)
- Vintage botanical prints (thin paper, rice paper, or printed tissue paper)
- Mod Podge or heavy-duty decoupage medium (matte finish)
- Gold or cream embroidery floss or thin twine
- Soft flat specialized decoupage brushes
- Sharp detail scissors
- Pencil
- Measuring tape
- Antique gold craft paint (for the stem)
- Damp cloth
- Bone folder (optional)
Step 1: Preparation and Planning
-
Clean and Prep:
Begin by wiping down your faux pumpkin with a damp cloth to remove any dust or manufacturing oils. If the surface is very glossy, lightly scuff it with fine-grit sandpaper to help the adhesive grip better. -
Measure the Sections:
Using a measuring tape, measure the vertical length of the pumpkin’s natural ridges or lobes, from the base of the stem to the bottom center. Note the width of the widest part of each lobe. -
Select Your Imagery:
Choose botanical prints that feature different textures—ferns, floral blooms, and seed pods work beautifully together. Scan and print vintage images onto tissue paper or thin rice paper if you don’t have suitable premade decoupage sheets.
Wrinkle Rescue
If stubborn bubbles appear under the paper after drying, prick them with a fine needle and press them down. Tiny wrinkles actually enhance the antique parchment look, so don’t stress over perfection.
Step 2: Creating the Panels
-
Trace Templates:
Create a rough paper template that matches the shape of one pumpkin lobe. Use this to trace the shape onto your botanical papers, ensuring the main subject of the botanical print sits nicely in the center of the shape. -
Cut the Strips:
Carefully cut out your paper strips. I prefer to cut them slightly narrower than the actual pumpkin lobe so the natural white of the pumpkin creates a border, or slightly wider if you want full coverage—the choice defines the final style. -
Plan the Layout:
Lay your cut strips out on a table to balance the colors. Alternating between greener fern-heavy strips and warmer floral strips creates a pleasing rhythm around the pumpkin.
Aged Patina
Mix a tiny drop of brown paint into your topcoat of decoupage sealer. This creates an instant ‘tea-stained’ glaze that makes the white pumpkin look like aged ceramic or ivory.
Step 3: Application
-
Apply First Layer of Medium:
Working one section at a time, brush a thin, even layer of decoupage medium directly onto the pumpkin surface within a single lobe. -
Position the Paper:
Gently lay the botanical strip onto the wet medium, starting from the top near the stem and guiding it down to the base. Since the pumpkin is curved, the paper might want to buckle. -
Smooth the Surface:
Use your fingers or a bone folder to smooth the paper from the center outward. If wrinkles appear, gently lift the edge and re-smooth, or embrace them for an aged, parchment-like texture. -
Seal the Strip:
Immediately apply another coat of decoupage medium over the top of the paper to seal it, brushing gently to avoid tearing the delicate wet fibers. -
Repeat Around the Pumpkin:
Continue this process for every lobe of the pumpkin. Allow the entire piece to dry completely, usually for at least 2-3 hours.
Step 4: Detailing and Finishing
-
Define the Ridges:
To accentuate the segmented look, take your gold embroidery floss or thin twine. Apply a thin line of tacky glue into the deep grooves between the pumpkin lobes. -
Inlay the Trim:
Press the floss or twine into the glued groove, holding it taut from top to bottom. This creates that distinct, tailored piping effect seen in the image. -
Paint the Stem:
While the trim dries, paint the pumpkin stem with antique gold acrylic paint. Use dry-brushing techniques to let some of the dark undertones show through for a realistic, weathered metal look. -
Final Sealant:
Once all trim is secure and the stem is dry, coat the entire pumpkin (excluding the stem) with a final layer of matte varnish or Mod Podge to unify the gloss level and protect your work. -
Adding Texture:
For an extra vintage touch, you can lightly dab a bit of diluted brown paint or antiquing wax on random spots of the paper to simulate foxing or age spots.
Place your finished masterpiece on a wooden table or mantelpiece to enjoy the timeless autumn charm you have created
Washi Tape Geometric Designs
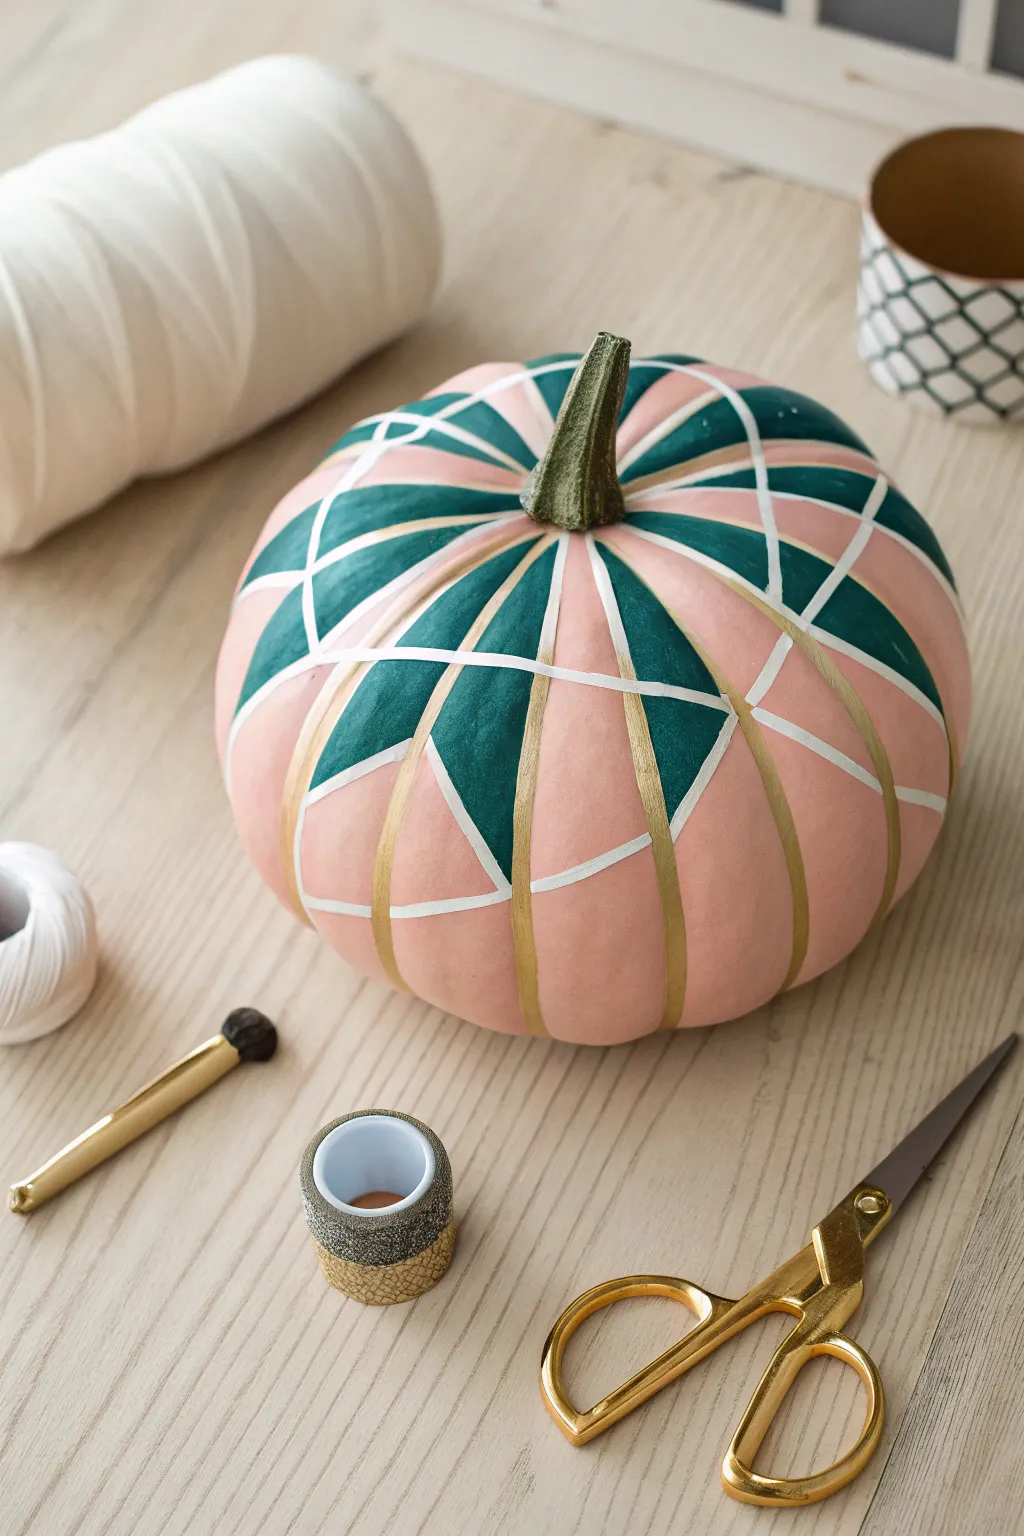
Transform a plain faux pumpkin into a chic, modern centerpiece using block colors and metallic accents. The interplay of soft blush pink, deep emerald green, and crisp gold lines creates a sophisticated geometric look perfect for elegant fall decor.
Step-by-Step Tutorial
Materials
- Medium-sized faux white pumpkin
- Blush pink matte craft paint
- Emerald green matte craft paint
- Narrow gold washi tape (approx. 3mm-5mm width)
- White pinstripe tape or very thin white washi tape
- Medium flat paintbrush
- Small angled paintbrush
- Scissors
- Ruler
- Pencil
Step 1: Base Preparation
-
Clean surface:
Wipe down your faux pumpkin with a slightly damp cloth to remove any manufacturing dust or oils, ensuring the tape and paint adhere perfectly. -
Remove stem:
If your pumpkin’s stem is removable, gently take it off to make painting easier; if not, wrap the stem carefully with painter’s tape to protect it. -
Base coat:
Paint the entire surface of the pumpkin with the blush pink matte craft paint. -
Dry and repeat:
Allow the first coat to dry completely for about 30 minutes. Apply a second coat to ensure opaque, even coverage without streaks.
Step 2: Creating the Grid
-
Map vertical lines:
Identify the natural vertical grooves of the pumpkin. Take your gold washi tape and run long strips vertically directly down these grooves, starting from the stem base to the bottom center. -
Secure ends:
Press the ends of the tape firmly underneath the pumpkin so they don’t lift up later. -
Horizontal guides:
Apply horizontal strips of gold washi tape around the circumference of the pumpkin to create intersecting points with the vertical lines. -
Form diamonds:
Using the vertical and horizontal lines as a guide, add diagonal strips of gold tape to form diamond/rhombus shapes, varying the angles slightly for a dynamic geometric feel. -
Burnish tape:
Run your fingernail or the back of a spoon over all applied gold tape edges to seal them tight against the pumpkin surface.
Tape Peeling Up?
If the washi tape lifts on the curved surface, dab a tiny dot of craft glue or decoupage medium under the loose end and press until set.
Step 3: Blocking Color
-
Select sections:
Decide which of the resulting geometric shapes you want to fill with darker color. The example uses deep emerald green in alternating triangular or diamond sections. -
Paint green blocks:
Using the small angled brush, carefully paint inside the chosen sections with emerald green paint, letting the gold tape act as your boundary line. -
Refine edges:
I like to work slowly near the tape edges to avoid seeping. If the paint is thin, apply a second coat of green after the first dries. -
Dry thoroughly:
Let the green paint cure fully for at least an hour. This prevents smudging during the final detailing steps.
Add Some sparkle
Before the green paint dries completely, sprinkle a pinch of gold glitter onto the wet paint for a textured, festive shimmer.
Step 4: Final Details
-
Add white accents:
Take your thin white pinstripe tape or string. Apply it creatively over the painted sections, creating a secondary layer of geometry that crosses over both pink and green areas. -
Paint stem:
If you removed the stem, paint it a dark, natural green to complement the emerald sections. Reattach it once dry. -
Clean up:
Inspect your lines. If any paint bled under the gold tape, you can carefully scrape it away with a craft knife or touch it up with a tiny bit of pink paint. -
Seal (optional):
For longevity, especially if storing for next year, apply a thin layer of matte spray sealer over the entire pumpkin.
Place your stylish geometric pumpkin on a mantle or tablescape to enjoy the modern flair it brings to your seasonal home


Glitter Ombre for Extra Sparkle
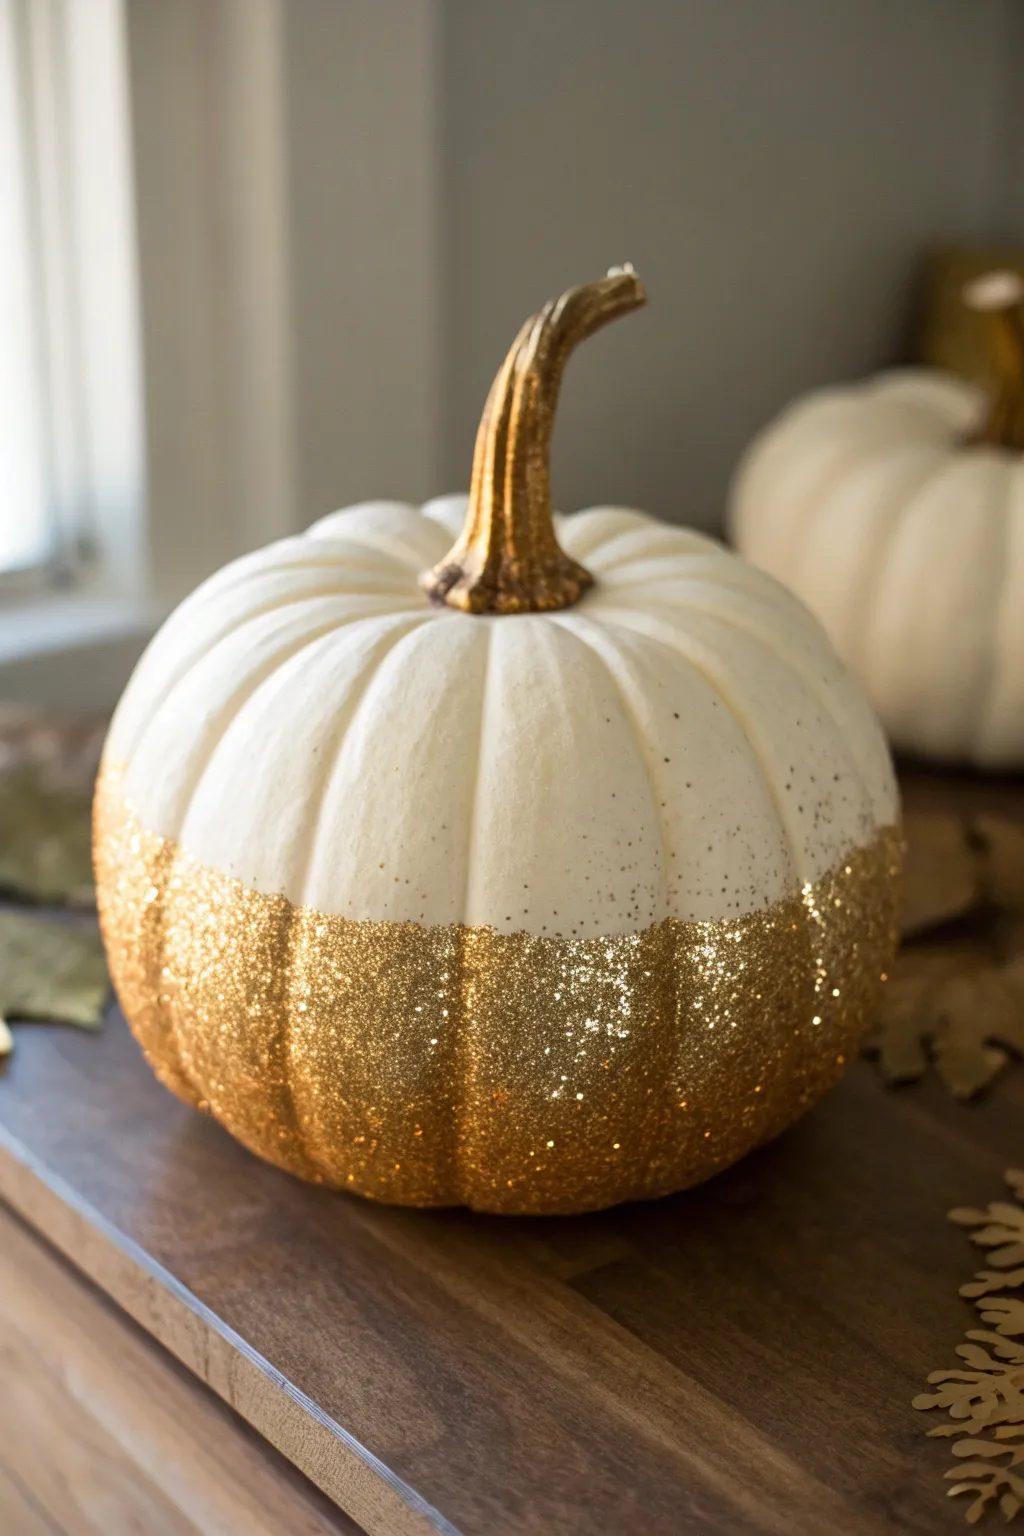
Transform a plain white faux pumpkin into a chic centerpiece with this easy but stunning glitter ombre technique. The gradual transition from creamy white to dazzling gold glitter adds a touch of glamour perfect for sophisticated autumn decor.
Step-by-Step
Materials
- White faux foam pumpkin (medium size)
- Gold glitter (extra fine)
- Gold glitter (chunky/hexagonal mix)
- Mod Podge (gloss or matte finish)
- Foam brush or soft paintbrush
- Gold metallic acrylic paint
- Small detail brush
- Painter’s tape or loose paper (optional)
- Spray sealant (clear gloss)
- Two paper plates or bowls
Step 1: Preparation and Stem
-
Clean and prep:
Start by wiping down your faux pumpkin with a slightly damp cloth to remove any dust or manufacturing residue. Let it dry completely to ensure the adhesive sticks well. -
Protect your workspace:
Lay down newspaper or a plastic drop cloth. I always recommend working over a large sheet of paper that you can fold later to funnel excess glitter back into its container. -
Base coat the stem:
Using a small detail brush, paint the entire stem with gold metallic acrylic paint. This creates a solid base color so no plastic shows through the glitter later. -
Second stem coat:
Allow the first coat on the stem to dry for about 15 minutes, then apply a second coat for full, rich opacity. Let this dry completely before moving on.
Clean Lines vs. Fade
Work quickly when feathering glue for the fade. If the glue starts to dry, simply dip your brush in a tiny bit of water to reactivate it and smooth out the transition line.
Step 2: Creating the Glitter Base
-
Apply adhesive to the bottom:
Dip your foam brush into Mod Podge and coat the very bottom of the pumpkin. Bring the glue up the sides about one-third of the way. -
Create an uneven edge:
As you brush the glue upward, feather the strokes slightly so the line isn’t perfectly straight. This helps create a more organic ombre effect later. -
Apply chunky glitter:
Holding the pumpkin by the stem or top half, generously pour the chunky gold glitter over the wet glue at the bottom third. Press it gently with your hand to secure it. -
Shake off excess:
Tap the pumpkin gently to dislodge any loose chunky glitter pieces. Make sure the very bottom is heavily coated for a dipped look. -
Dry briefly:
Let this bottom layer set for about 20 minutes so the heavy glitter doesn’t slide around during the next steps.
Double the shine
Mix two different shades of gold glitter, perhaps a champagne gold and a yellow gold, to give the finish more depth and dimension under warm lighting.
Step 3: Refining the Ombre Fade
-
Apply second glue layer:
Apply a fresh, thinner layer of Mod Podge starting from the top edge of your chunky glitter and extend it upward another inch or two. -
Feather the glue:
Use dry, light upward strokes with the brush to fade the glue out into the white space. You want the glue to be spotty near the top, not a solid sheet. -
Add fine glitter:
Sprinkle the extra fine gold glitter over this new section. Focus the heaviest application near the chunky glitter and let it sprinkle lightly as you go higher. -
Blend the transition:
To merge the two sections, dash a little bit of fine glitter over the top edge of the chunky section. This hides the seam between the two glitter types. -
Spot check:
Inspect the pumpkin for any large bald spots in the gold section. Dab a tiny bit of glue and add more glitter if needed.
Step 4: Finishing Touches
-
Glitter the stem:
Brush a light coat of Mod Podge onto the gold-painted stem. Sprinkle fine gold glitter over it, turning the pumpkin to coat every crevice. -
Tap and set:
Give the pumpkin a final firm tap to remove loose particles. Let the entire project dry for at least one hour. -
Seal the deal:
Take the pumpkin outside or to a well-ventilated area. Spray a light, even coat of clear gloss sealant over the glittered areas. -
Final dry:
Allow the sealant to cure according to the can’s instructions—usually 24 hours—to prevent glitter from shedding all over your table.
Place your sparkling creation on a mantel or dining table to add instant glamour to your seasonal display
Faux Flower Pumpkin Topper
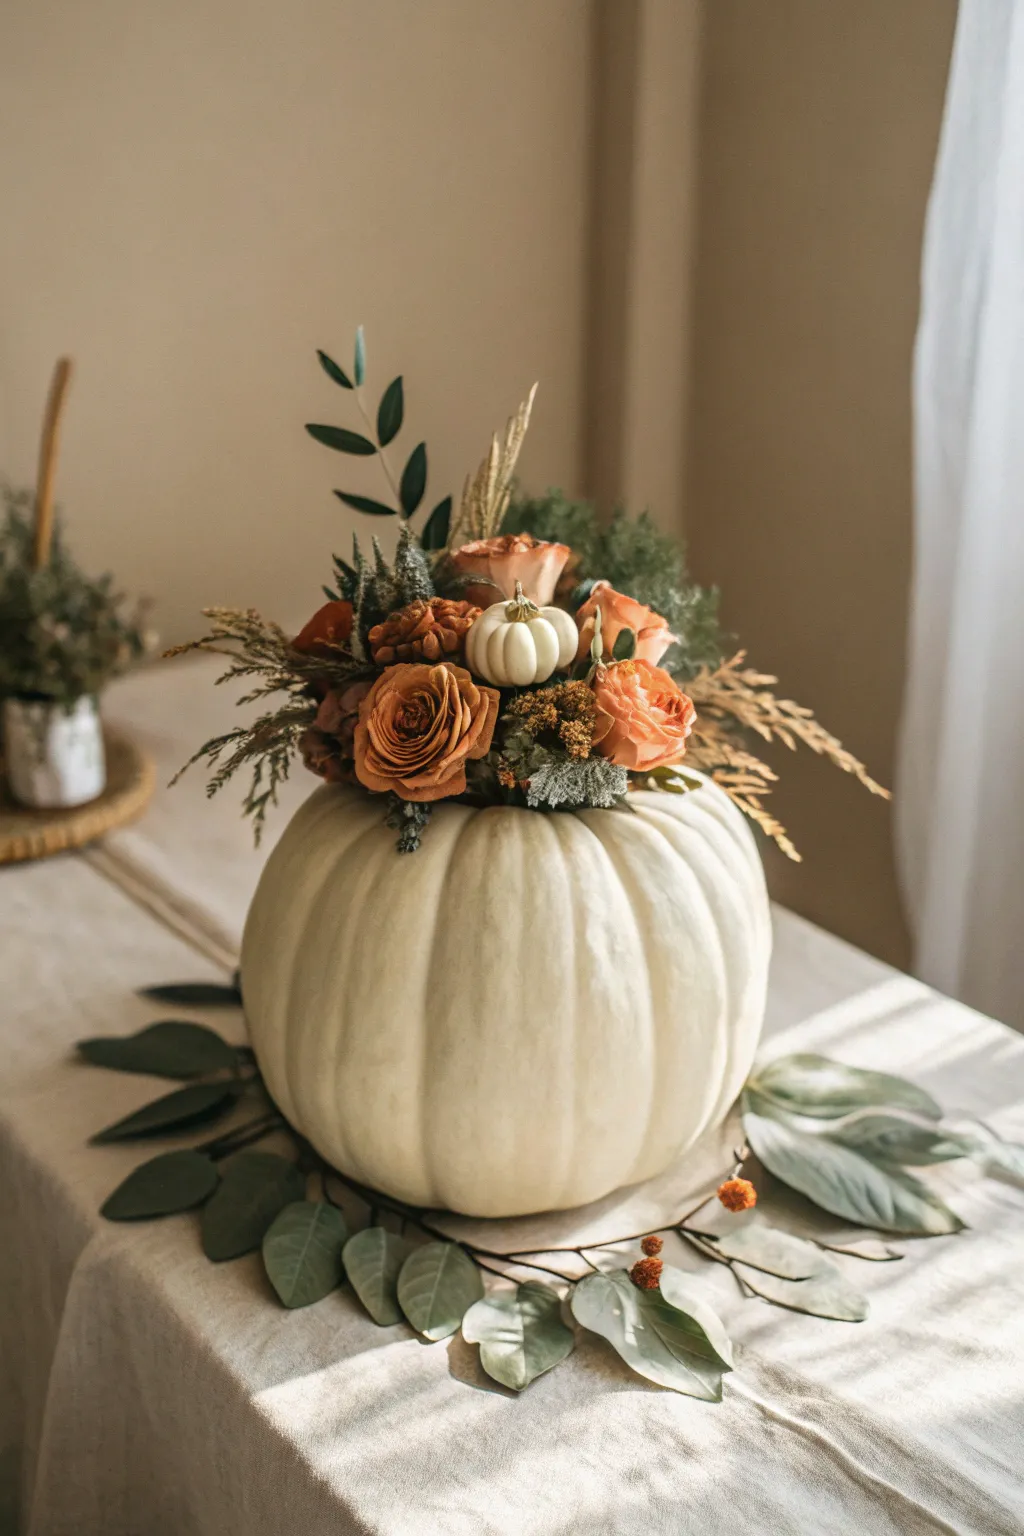
Transform a simple white faux pumpkin into a stunning autumn centerpiece brimming with warmth and texture. This project combines rustic dried elements with soft floral tones for a sophisticated look that lasts all season.
Step-by-Step Tutorial
Materials
- Large white faux pumpkin (heirloom shape or standard)
- Floral foam block or dry foam brick
- Carving knife or utility knife
- Hot glue gun and glue sticks
- Wire cutters
- Faux rust-colored roses (2-3 blooms)
- Faux cream/peach roses (2-3 blooms)
- Dried ruscus or eucalyptus stems
- Small white mini pumpkin pickup or pick
- Dried pampas grass or wheat stems
- Assorted greenery sprigs (sage green)
- Small textured filler flowers (brown or tan)
- Loose faux eucalyptus leaves (for the table base)
Step 1: Preparing the Base
-
Mark the cut line:
Using a pencil, lightly trace a circle around the stem of your large faux pumpkin. Make the circle roughly 4-5 inches in diameter, ensuring it’s large enough to fit your floral foam but keeps the structural integrity of the pumpkin. -
Remove the top:
Carefully cut along your traced line using a sharp utility knife or craft knife. Faux pumpkins are usually hollow, so once you pierce the shell, it should slice relatively easily. Discard the stem top or save it for another craft. -
Fit the foam:
Cut your floral foam block to fit snugly inside the opening. You want the foam to protrude slightly above the rim of the pumpkin—about an inch or so—to give the flowers some lift and dimension. -
Secure the foam:
Apply a generous amount of hot glue to the bottom and lower sides of the floral foam before pressing it firmly into the pumpkin cavity. Hold it in place for thirty seconds until the glue sets completely.
Foam Stability
If your pumpkin opening is too wide, stuff crumpled newspaper or moss around the floral foam block to keep it wedged tight before gluing.
Step 2: Building the Arrangement
-
Establish the height:
Start with your tallest greenery, specifically the darker ruscus or eucalyptus stems. Insert these into the back and slightly off-center of the foam to create an asymmetrical vertical line. -
Add grassy textures:
Introduce the dried pampas grass or wheat stems next to your tall greenery. These should be slightly shorter than the first stems to create a layered effect, adding distinct texture and softness. -
Position the focal point:
I like to place the mini white pumpkin pick right in the center, nestled somewhat low. If your mini pumpkin doesn’t differ in height, trim the pick stem shorter so it sits flush with where the flowers will go. -
Place the main blooms:
Trim the stems of your rust-colored roses to about 3-4 inches. Insert a large bloom to the left of the mini pumpkin, angling it slightly forward so looking at it feels welcoming. -
Add supporting colors:
Cut the stems of the peach or cream roses. Position one to the right of the mini pumpkin and another tucked slightly behind the main rust rose to create depth and color variation.
Scent Upgrade
Tuck two or three cinnamon sticks into the arrangement near the roses. It adds a hidden visual detail and a wonderful autumn scent.
Step 3: Filling and Styling
-
Fill the gaps:
Take your sage green sprigs and insert them around the base of the flowers, ensuring you cover the mechanics of the floral foam. Angle the lower pieces downward so they drape slightly over the white pumpkin’s shoulder. -
Insert textured filler:
Use the small brown or tan filler flowers to bridge the gap between the large blooms and the greenery. These tiny textures make the arrangement look professional and cohesive. -
Check from all angles:
Rotate the pumpkin slowly. Identify any visible foam spots or empty areas and tuck in small bits of leftover greenery or wheat to complete the rounded shape. -
Create the table garland:
Arrange the loose faux eucalyptus leaves in a circular wreath pattern on the table where the pumpkin will sit. This grounds the centerpiece and connects it visually to the table surface. -
Final placement:
Place your finished pumpkin centerpiece directly in the center of the leaf wreath, adjusting the loose leaves so they peek out naturally from underneath the base.
Your elegant pumpkin centerpiece is now ready to bring a refined harvest charm to your dining table.
Soft Ombre Gradient Painting
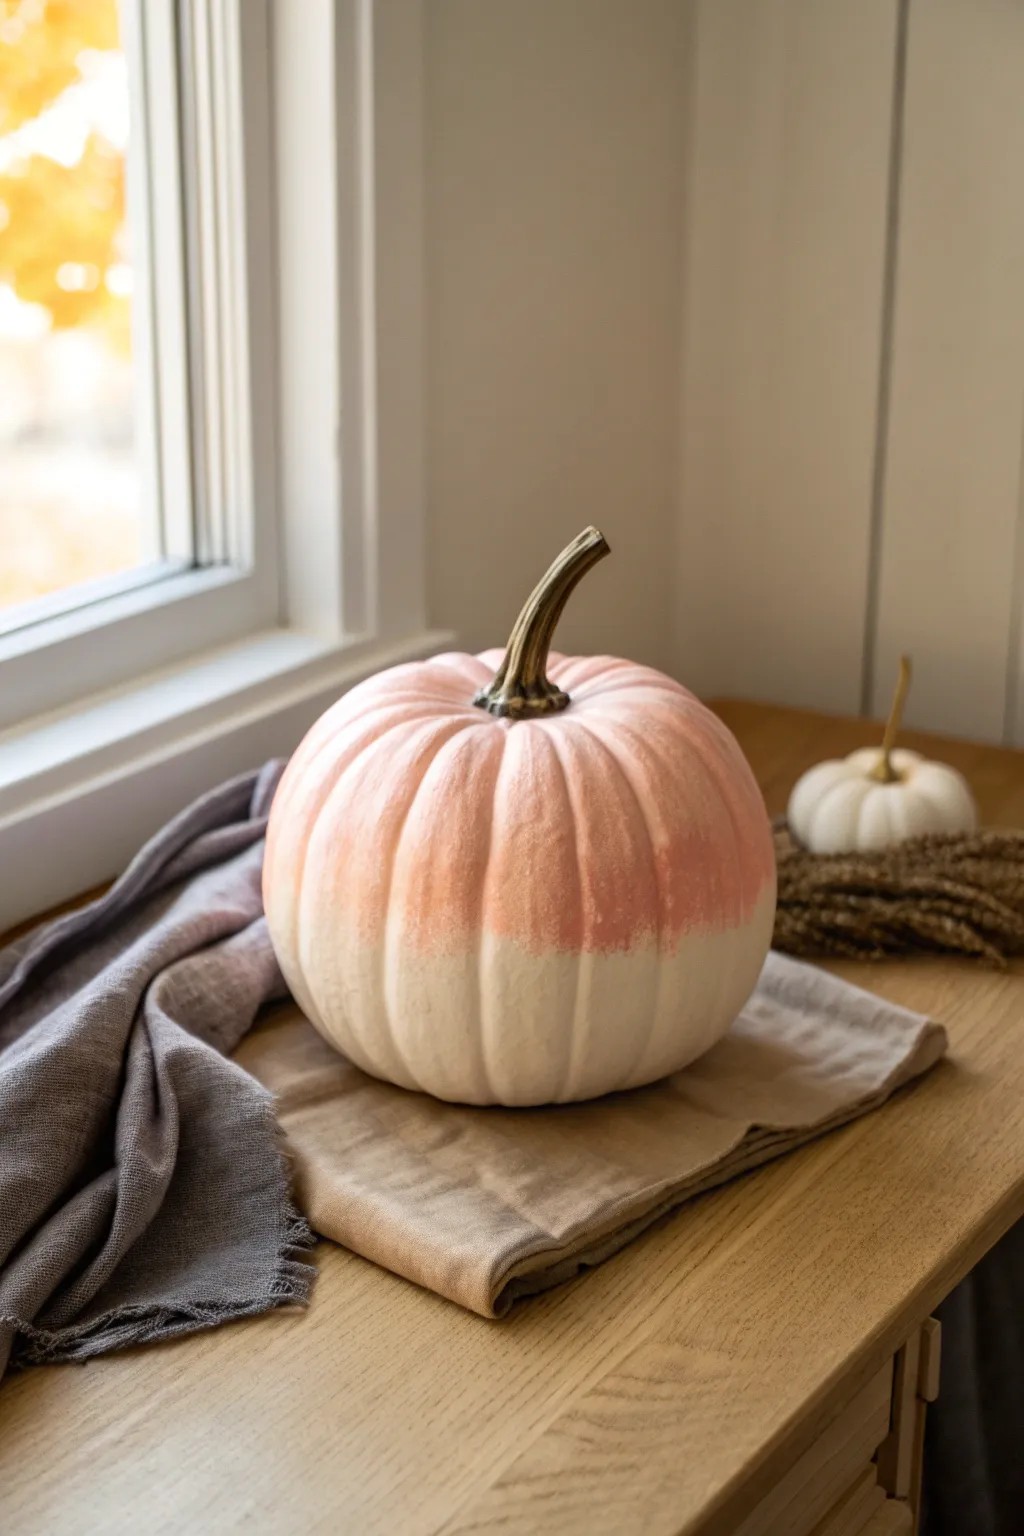
Bring a soft, sophisticated touch to your autumn decor with this dreamy two-tone painted pumpkin. By blending a warm matte white with a gentle pink blush, you create an elegant gradient that looks lovely by a window or as a centerpiece.
Step-by-Step Guide
Materials
- Medium-sized faux pumpkin (white or cream base is easiest)
- Matte chalk paint (Ivory or Warm White)
- Matte chalk paint (Dusty Pink or Blush)
- Clean cotton rags or paper towels
- Medium soft-bristle paintbrush
- Small foam pouncer or sponge
- Natural looking faux pumpkin stem (optional replacement)
- Painter’s tape (for stem protection)
Step 1: Base Preparation
-
Prepare your workspace:
Set up in a well-ventilated area and lay down drop cloths or old newspapers to protect your table surface from paint splatters. -
Clean the pumpkin surface:
Wipe the faux pumpkin down thoroughly with a damp cloth to remove any dust, oils, or manufacturing residue that might prevent the paint from adhering properly. -
Protect the stem:
If your pumpkin has a realistic stem you want to preserve, wrap it carefully with painter’s tape. Alternatively, you can remove the stem if it detachable and reattach it later. -
Apply the base coat:
Paint the entire bottom half of the pumpkin with your Ivory or Warm White chalk paint. -
Extend the base color:
Bring the white paint up just past the halfway point of the pumpkin. Don’t worry about a perfect line; an uneven edge actually helps with blending later. -
First drying phase:
Allow this white base layer to dry until it is tacky but not fully hardened, usually about 15 to 20 minutes.
Step 2: Creating the Gradient
-
Apply the top color:
Using a clean brush, apply the Dusty Pink paint to the top section of the pumpkin, starting near the stem and working your way down. -
Meet the middle:
Bring the pink paint down until it meets and slightly overlaps the white section you painted earlier. -
Initial blending:
While both paints are still somewhat wet, use a dry, soft brush to feather the pink paint downwards into the white area. -
Stippling technique:
I find using a foam pouncer or a crumpled dry rag works best here—gently stipple (tap up and down) right over the line where the colors meet to blur the transition. -
Refine the fade:
Continue lightly dabbing along the horizon line. If the pink becomes too strong, add a tiny dot of white to your sponge; if it’s too pale, add a whisper of pink. -
Check the vertical grooves:
Ensure the gradient effect goes deep into the vertical crevices of the pumpkin, dabbing your sponge or brush tip into the grooves so no original pumpkin color shows through. -
Smooth the texture:
Once you are happy with the blend, verify there are no harsh brush strokes. A very light sweep with a clean, dry brush across the surface can smooth out any heavy paint ridges. -
Full dry:
Let the pumpkin sit undisturbed for at least an hour or two until the Chalk paint is completely dry and has achieved its signature matte finish.
Paint drying too fast?
If the acrylics dry before you can blend them, keep a spray bottle of water nearby. A faint mist over the transition area re-activates the paint for smoother blending
Step 3: Final Touches
-
Remove protection:
Carefully peel away the painter’s tape from the stem. -
Stem maintenance:
If painting the pumpkin resulted in getting any color on the stem, wipe it off quickly with a damp cloth or touch it up with a bit of brown acrylic paint. -
Sealing (Optional):
For longevity, you can apply a clear matte spray sealer, though chalk paint is generally durable enough for indoor seasonal decor without it.
Add some sparkle
While the paint at the gradient line is still wet, lightly sprinkle ultra-fine iridescent glitter on the transition for a magical, frosted morning effect
Place your beautiful creation near a source of natural light to really show off that soft, velvety transition
Splatter Paint Studio Pumpkins

Embrace the messy joy of an art studio with this modern, abstract pumpkin design. By controlling your paint splatters to create vertical drips, you’ll achieve a striking high-contrast look that pops beautifully against a creamy white background.
Step-by-Step Tutorial
Materials
- Medium-sized faux white pumpkin
- Acrylic craft paint (bright red)
- Acrylic craft paint (cobalt blue)
- Small mixing bowls or pinch pots
- Water for thinning paint
- Assorted paintbrushes (flat and round)
- Large sheet of brown kraft paper or cardboard
- Paper towels
- Spoon or palette knife (optional)
Step 1: Preparation & Paint Mixing
-
Set up your workspace:
Lay down a generous amount of brown kraft paper or cardboard to protect your table. This project involves splattering, so ensure you have a wide catchment area. -
Prepare the pumpkin surface:
Wipe down your faux pumpkin with a slightly damp paper towel to remove any dust or manufacturing residue, then dry it completely so the paint adheres properly. -
Clean the stem:
If your pumpkin has a removable stem, take it off now to keep it paint-free. If it’s fixed, you can mask it with painter’s tape, though this design looks great with a natural stem. -
Pour the paints:
Squeeze a generous amount of bright red acrylic paint into one small bowl and cobalt blue into another. -
Thin the consistency:
Slowly add water to your paints, drop by drop, mixing constantly. You are aiming for a consistency similar to heavy cream or melted ice cream—fluid enough to drip but thick enough to hold color. -
Test the drip:
Dip a brush into the thinned paint and hold it over a scrap piece of paper vertical to the table. If it runs down slowly without breaking immediately, the consistency is perfect.
Step 2: Creating the Drips
-
Load the brush for drips:
Load a medium round brush heavily with the red paint mixture. You want the bristles to be fully saturated and almost dripping. -
Apply the first drip color:
Position your brush at the very top shoulder of the pumpkin, near the stem depression. Press the brush down gently to release a pool of paint, allowing gravity to pull a stream of color down the side. -
Guide the flow:
If a drip gets stuck in a ridge, I sometimes gently tap the pumpkin on the table or tilt it slightly to encourage the paint to travel further down the natural grooves. -
Repeat with the first color:
Continue creating red drips around the pumpkin, spacing them out unevenly. Leave plenty of white space between them for the second color. -
Allow a partial dry:
Let the red drips set for about 10-15 minutes. They don’t need to be fully cured, but surface dry enough that the colors won’t turn purple if they touch. -
Apply the second color:
Repeat the dripping process with your blue paint mixture, aiming for the white spaces between the red lines.
Drips stopping too soon?
If the paint stops midway, it’s too thick. Add a few more drops of water. If it runs too fast and looks watery, mix in more acrylic paint.
Step 3: Adding the Splatter
-
Prepare the splatter brush:
Switch to a stiffer brush or an old toothbrush for the splatter effect. Dip it into the red paint, wiping off just a little execution excess. -
Flick the paint:
Hold the brush near the pumpkin and tap the handle firmly with your other hand or a finger. This will send fine speckles of paint onto the pumpkin’s surface. -
Focus the splatter:
Concentrate your splatters near the existing drips of the same color to make the design feel cohesive rather than chaotic. -
Repeat with blue:
Clean your brush or grab a fresh one, and repeat the flicking process with the blue paint. -
Make adjustments:
If a splatter is too large or lands where you don’t want it, quickly dab it up with a corner of a paper towel, or let it be—imperfection is part of the charm. -
Dry completely:
Leave the pumpkin undisturbed for several hours or overnight. Because the paint drips are thick, they will take much longer to dry than a standard coat of paint.
Make it Metallic
Add a third layer of drips using metallic gold or silver paint. The shimmer adds an elegant, high-end twist to the playful splatter look.
Now you have a vibrant, gallery-worthy pumpkin that brings a splash of artistic flair to your seasonal decor
Drip Paint “Melted” Effect
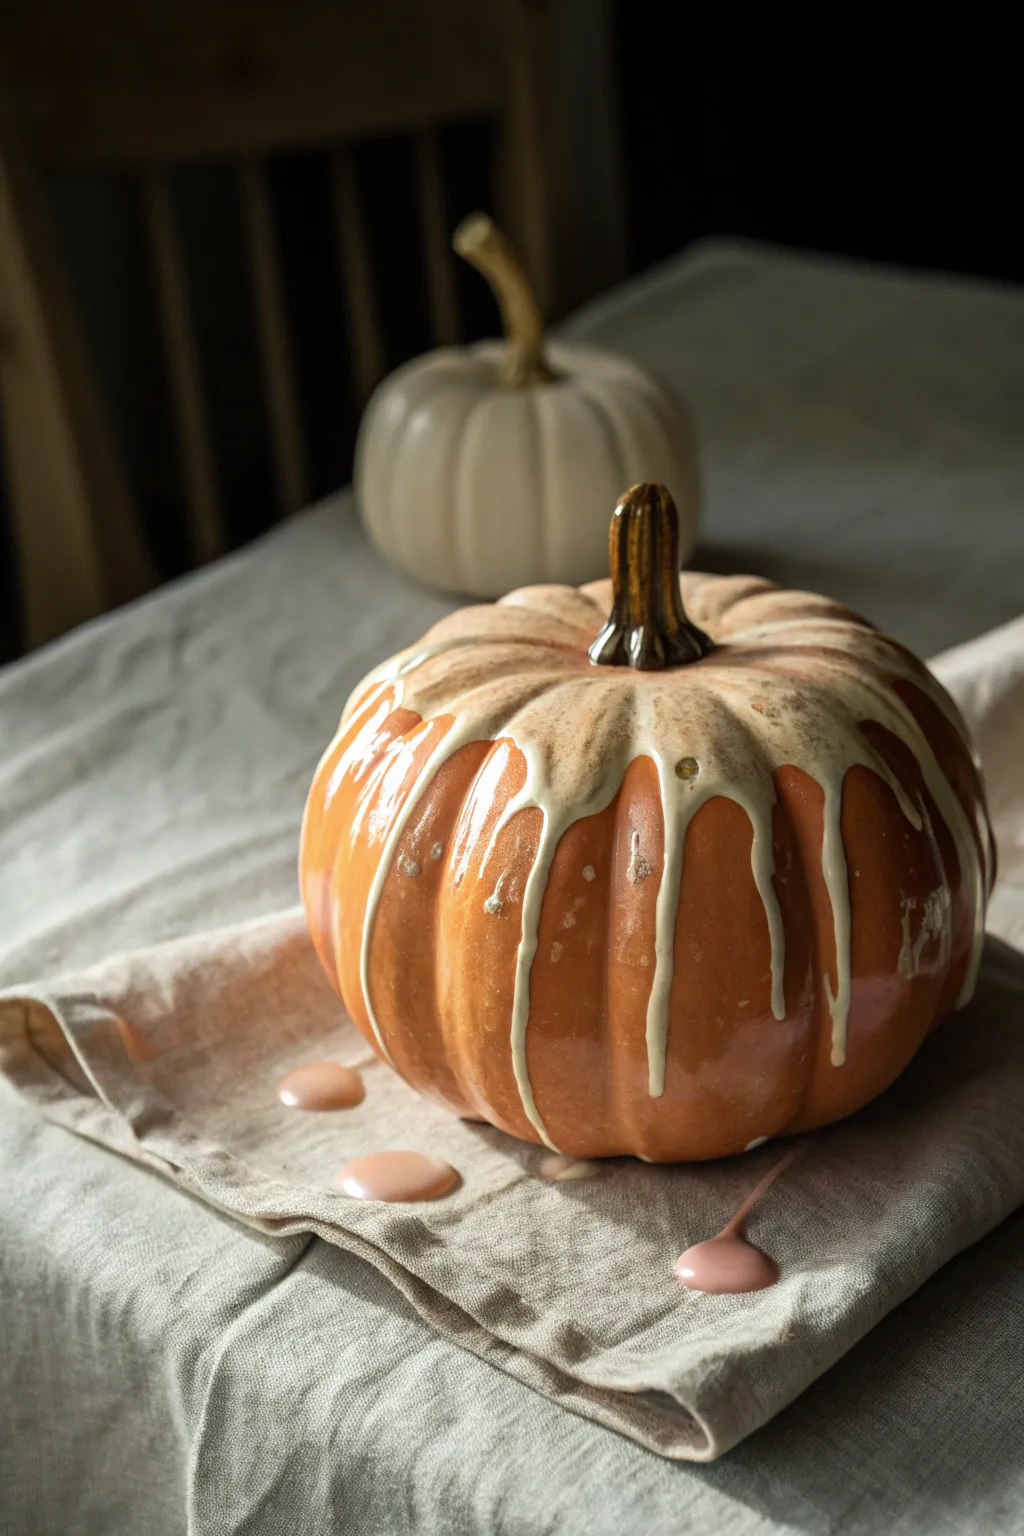
Achieve a sophisticated, spooky-chic look with this dripping paint technique that creates the illusion of melting wax or frosting. The contrast between the vibrant orange base and the creamy drips adds elegant texture perfect for an upscale Halloween centerpiece.
Step-by-Step
Materials
- Faux orange pumpkin (medium size)
- Cream or off-white acrylic craft paint (fluid body)
- Squeeze bottle or small pouring cup
- Paintbrush (small detail)
- Drop cloth or baking sheet (to catch drips)
- Damp paper towels
Step 1: Preparation
-
Clean surface:
Begin by wiping down your faux pumpkin with a slightly damp paper towel to remove any dust or manufacturing oils. A clean surface ensures the paint adheres properly without peeling later. -
Set up workspace:
Place your drop cloth or a baking sheet on a flat surface. Position the pumpkin in the center. Since we are creating intentional drips, you need a surface that can catch the excess paint. -
Prepare paint:
Pour your cream-colored acrylic paint into a squeeze bottle or a small cup with a pouring spout. If the paint is too thick (like heavy body acrylics), mix in a few drops of water or pouring medium until it has the consistency of warm honey.
Paint Running Too Fast?
If your paint is too runny and reaches the bottom instantly, let it sit in the cup for 10-15 minutes to thicken slightly before pouring again.
Step 2: Creating the Drips
-
Initial pour:
Start right at the base of the stem. Gently squeeze or pour a small puddle of paint around the stem capability, letting it naturally pool in the depressions. -
Guiding the flow:
Using more paint, target the ‘valleys’ or grooves of the pumpkin’s ridges. Squeeze a generous amount at the top of a groove and let gravity pull it down. -
Varying lengths:
To make the effect look organic, vary the amount of paint you use for each drip. Use less paint for short drips that stop midway, and more paint for long drips that reach the bottom. -
Top coverage:
Go back to the top area around the stem. Ensure there is solid coverage connecting all your drips, creating a ‘cap’ of paint that looks like it’s melting downward. -
Adding dimension:
I like to wait about five minutes for the first layer to tackle up slightly, then add a second, smaller pour in select spots. This creates a thicker, more 3D ‘wax’ effect.
Step 3: Refining Details
-
Touch-ups:
Inspect the drips. If any look too uniform or thin, use your small detail brush to add a little extra paint to the bottom of the drip, creating a bulbous ‘teardrop’ shape. -
Cleaning the stem:
If paint accidentally got onto the brown stem, carefully wipe it away with a damp cloth or a clean brush before it dries completely. -
Creating puddles:
To recreate the look in the photo, allow some paint to pool at the base of the pumpkin on your display cloth, or manually add a few drops of paint on the surface next to the pumpkin for a messy, artistic finish. -
Distressing (Optional):
For a vintage look, once the paint is tacky but not fully dry, you can lightly dab it with a dry sponge to add texture, though leaving it smooth mimics melted wax best. -
Final drying:
Let the pumpkin sit undisturbed for at least 24 hours. Because the paint is applied thickly to create the drip effect, the outer layer will dry faster than the paint underneath.
Add a Glossy Finish
Mix gloss medium into your acrylic paint or seal the dried drips with a high-gloss spray to make them look permanently wet and fresh.
Once fully dry, your melted-effect pumpkin is ready to add a touch of artistic flair to your seasonal display
Water Marbled Swirls

Transform a plain craft pumpkin into a stunning stoneware-inspired art piece using the magic of water marbling. This technique creates mesmerizing, organic swirls of turquoise, black, and white that look impressively high-end yet require surprisingly little artistic skill.
Step-by-Step Guide
Materials
- White faux pumpkin (smooth surface works best)
- Spray paint (Turquoise/Teal)
- Spray paint (Matte Black)
- Spray paint (White)
- Large plastic bucket or bin (deep enough to submerge pumpkin)
- Clean water (room temperature)
- Painter’s tape
- Stirring stick or skewer
- Cardboard or drop cloth
- Gloves
- Clear matte sealer spray
Step 1: Preparation
-
Clean surface:
Begin by wiping down your faux pumpkin with a damp cloth to remove any dust or oils that might repel the paint. Let it dry completely. -
Mask the stem:
Carefully wrap the stem of the pumpkin with painter’s tape. Since we want to preserve that natural, rustic brown look of the stem shown in the photo, ensure the seal is tight right at the base. -
Base coat application:
In a well-ventilated area, spray the entire pumpkin with a coat of white spray paint if yours isn’t already a bright, clean white. This ensures the marbled colors pop vividly. -
Setup the dipping station:
Fill your large plastic bin with room temperature water. It needs to be filled high enough to submerge the pumpkin, but leave enough room at the top so the water doesn’t displace and overflow when you dip.
Water Temperature Matters
Use lukewarm water. If the water is too cold, the spray paint will seize up and clump instantly. If it’s too hot, the paint may disperse too thinly.
Step 2: Creating the Marble Effect
-
Spray the first color:
Shake your spray paint cans vigorously. Hold the turquoise can about 8-10 inches from the water’s surface and spray directly into the center of the water for 2-3 seconds. -
Layer the second color:
Immediately spray the black paint into the center of the turquoise ring you just created. You’ll see the paint start to push the previous color outward. -
Add the final color:
Spray the white paint into the center of the black ring. Repeat this alternating process (Teal, Black, White) a few times to create concentric rings of color floating on the surface. -
Swirl the pattern:
Using a stirring stick or skewer, gently drag through the floating paint rings. I like to move slowly to create large, organic swirls rather than mixing it into a muddy mess. -
Identify the sweet spot:
Look for the area on the water’s surface with the most pleasing pattern density—this is where you will aim your pumpkin.
Add Metallic Flair
For a glamorous twist, swap the white spray paint for metallic gold or copper. The metallic ribbons will catch the light and add elegance.
Step 3: Dipping and Curing
-
The dip:
Wearing gloves, hold the pumpkin by the stem (or base if easier) and slowly push it straight down into the water through the paint pattern. -
Clearing the surface:
While the pumpkin is fully submerged, use your free hand (or have a helper) verify that the excess paint on the water surface is pushed aside or scooped away with a piece of cardboard so it doesn’t double-coat the pumpkin as you pull it out. -
Remove and inspect:
Lift the pumpkin out of the water quickly. Shake off any excess water droplets gently. -
Touch-ups:
If there are any large bubbles where the paint didn’t adhere, you can carefully tap them down with a gloved finger while wet, or wait for the next step. -
Dry time:
Set the pumpkin on a drying rack or piece of cardboard. Let it dry completely, ideally for at least 2-4 hours, or until the paint feels hard to the touch. -
Reveal the stem:
Once the paint is fully dry, carefully peel off the painter’s tape to reveal the clean, brown stem. -
Sealing the art:
To protect the design and give it that unified stoneware look, spray the entire pumpkin with a clear matte sealer. This knocks back any uneven glossiness from the different paint colors.
Place your newly marbled pumpkin on a console table or shelf to enjoy the sophisticated, modern autumn vibe you created
Galaxy Night-Sky Pumpkins
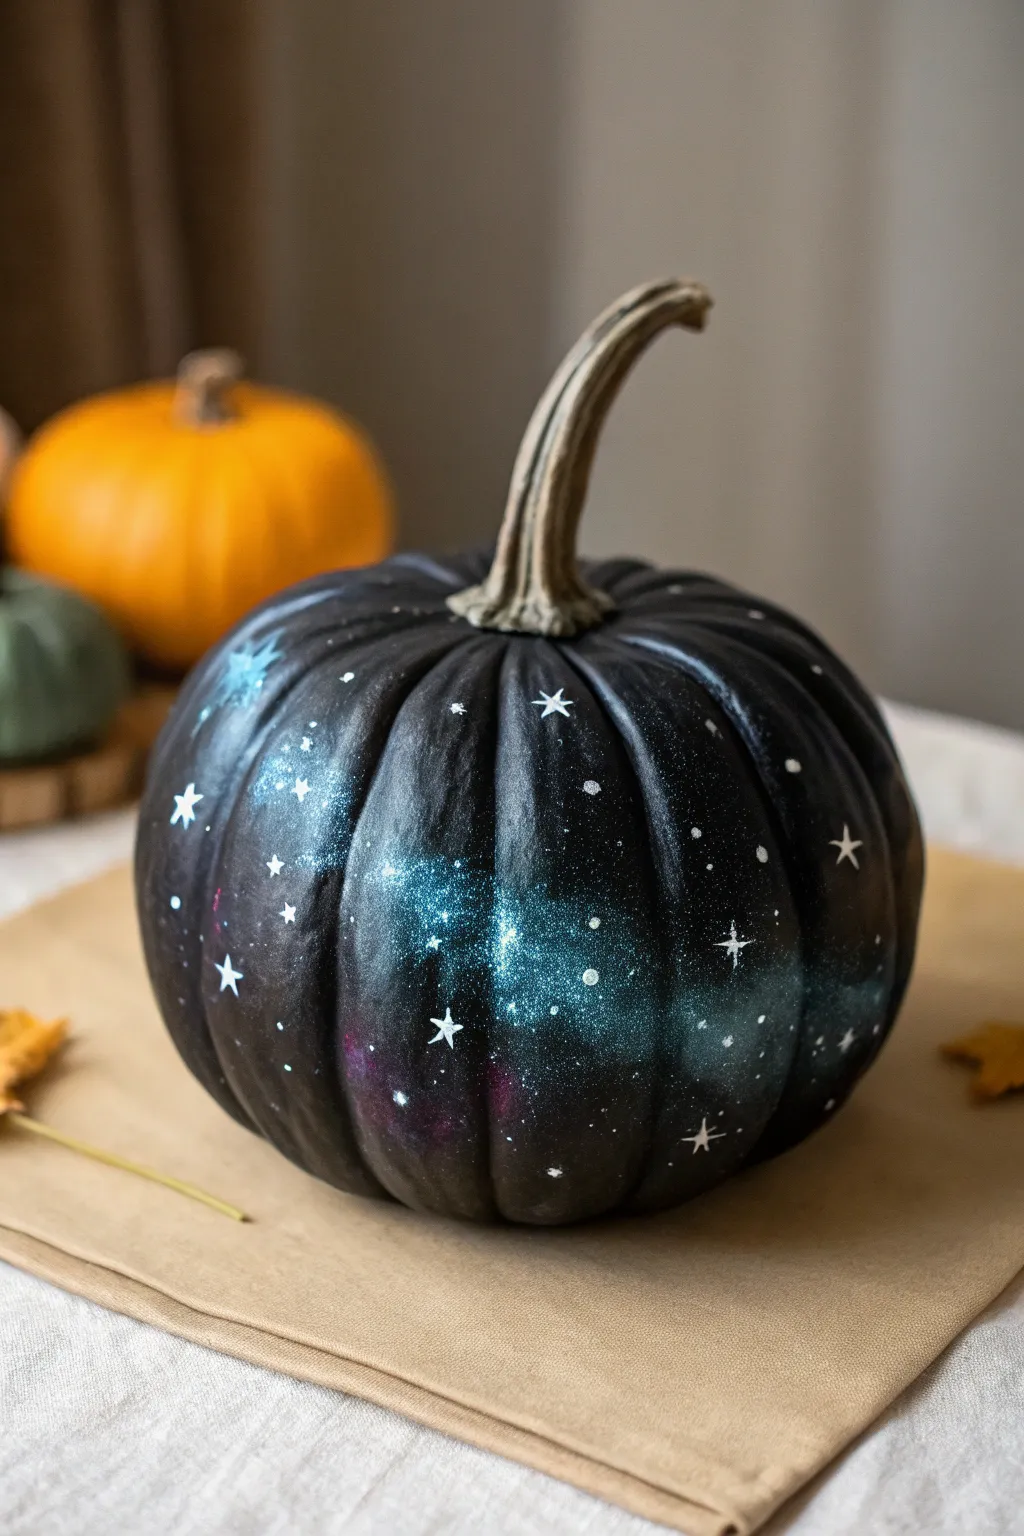
Transform a plain craft pumpkin into a cosmic masterpiece featuring a deep, velvety black background illuminated by shimmering nebulas and stark white stars. This celestial design brings a touch of magic and mystery to your Halloween decor without the mess of carving.
Step-by-Step
Materials
- Artificial craft pumpkin (any size)
- Black acrylic paint (matte finish recommended)
- Teal, purple, and blue metallic or glitter acrylic paints
- Deep blue acrylic paint
- White acrylic paint
- Wide flat paintbrush
- Makeup sponge wedges or small sponge daubers
- Small round paintbrush (fine tip)
- Old toothbrush (optional for spatter)
- Paper plate or palette
- Water cup and paper towels
- Clear spray sealer (matte or satin)
Step 1: Setting the Darkness
-
Prep the Surface:
Wipe down your artificial pumpkin with a damp cloth to remove any dust or manufacturing residue. Let it dry completely. -
Protect the Stem:
Carefully wrap painter’s tape around the stem to keep it clean, or just paint carefully around it. -
Apply the Base Coat:
Using the wide flat brush, paint the entire pumpkin with black acrylic paint. Work the paint into the deep grooves. -
Check Coverage:
Allow the first coat to dry for about 15-20 minutes. If the underlying orange or white color shows through, apply a second coat for a solid, opaque black finish.
Muddy colors?
If your galaxy colors look gray or muddy, you likely blended too much wet paint into the black base. Let the black fully dry, then layer your colors gently on top using a dry sponge.
Step 2: Creating the Nebula
-
Start the Glow:
Squeeze a small amount of deep blue paint onto your palette. Dampen a makeup sponge slightly and dip it into the paint, dabbing off the excess. -
Sponge Application:
Lightly dab the blue paint in diagonal clusters across the pumpkin. Keep the edges soft and uneven; you don’t want hard lines. -
Add Metallic Teal:
While the blue is still slightly tacky or just dry, switch to a fresh sponge edge and pick up the metallic teal paint. I like to focus this color in the center of the blue patches to create depth. -
Introduce Purple Accents:
Use a small amount of metallic purple paint on your sponge and dab it near the edges of your teal clusters, blending it gently into the black background. -
Intensify the Highlight:
Mix a tiny drop of white into your teal paint. Dab this very sparingly in the absolute center of your nebula clouds to make them look like they are glowing from within. -
Let the Nebula Dry:
Allow these sponge layers to dry completely before moving on to the stars so you don’t smear the galaxy effect.
Pro Tip: Glitter finish
For extra sparkle, mix a pinch of fine silver or holographic glitter into your sealing coat or sprinkle it onto the wet nebula paint before it dries.
Step 3: Starry Details
-
Prepare White Paint:
Thin a small amount of white acrylic paint with a drop or two of water. It should be the consistency of heavy cream. -
Paint Major Stars:
Using your finest detail brush, paint small four or five-pointed stars. Place these primarily within or near the nebula clouds for high contrast. -
Add Distant Stars:
Dip the back end (the handle) of a paintbrush into the white paint. Dot it onto the pumpkin to create perfect, round circles of varying sizes. -
Create Star Clusters:
Group some tiny dots closer together to mimic constellations or dense star fields. -
Optional Spatter Technique:
For a fine mist of stars, dip an old toothbrush into diluted white paint. Run your thumb across the bristles to flick tiny specks onto the pumpkin. Practice on paper first to control the spray. -
Final Touches:
Look over your galaxy. If any stars look too stark, you can lightly glaze over them with a transparent wash of blue to push them into the background. -
Seal the Art:
Once all paint is perfectly dry, take the pumpkin to a ventilated area and apply a light coat of clear spray sealer to protect your work.
Place your galactic creation near a light source to let those metallic hues truly shine
Glow-in-the-Dark Line Art
Transform a plain faux pumpkin into a sophisticated centerpiece that surprises when the lights go down. This project mimics the delicate texture of a classic ribbed gourd but adds a hidden layer of magic with subtle glow-in-the-dark detailing along its natural ridges.
Step-by-Step Guide
Materials
- High-quality foam craft pumpkin (unpainted or pre-primed)
- Terra cotta or soft orange acrylic craft paint
- Cream or beige acrylic paint (for dry brushing)
- Glow-in-the-dark acrylic medium or paint (neutral drying)
- Dark brown acrylic paint (for the stem)
- Matte spray sealer
- Medium flat shader brush
- Small round detail brush (size 1 or 2)
- Dry brush (stiff bristles)
- Paper plate or palette
- Paper towels
Step 1: Base Coloring
-
Prepare the surface:
Wipe down your faux pumpkin with a damp cloth to remove any dust or manufacturing oils. If the surface is very slick, give it a quick pass with fine-grit sandpaper to help the paint adhere. -
Apply the base coat:
Using the medium flat brush, cover the entire pumpkin in your Terra Cotta or soft orange paint. Don’t worry about perfect opacity yet; a little streakiness adds to the organic look. -
Deepen the grooves:
While the base coat is still slightly tacky, mix a tiny drop of brown into your orange paint. Use this slightly darker shade specifically in the deep crevices between the ribs to create artificial depth. -
Let it dry completely:
Allow the base layer to dry fully, which usually takes about 30-45 minutes depending on the thickness of your paint.
Charging Your Glow
For the brightest result, charge the pumpkin under a UV flashlight or strong LED bulb for 10 minutes before turning off the lights. Indirect sunlight works, but direct light is best.
Step 2: Adding Texture and Realism
-
Mix the highlight color:
Squeeze a dime-sized amount of cream or beige paint onto your palette. Dab your stiff dry brush into it, then wipe almost all the paint off onto a paper towel until the brush feels dry. -
Dry brush the surface:
Lightly sweep the dry brush vertically over the raised ridges of the pumpkin. This highlights the highest points and gives the faux skin a textured, matte appearance. -
Refine the texture:
I find it helpful to focus the dry brushing heavily on the top ‘shoulders’ of the pumpkin where the light naturally hits. -
Paint the stem:
Switch to the dark brown paint for the stem. Apply a solid coat, then use any leftover beige on your dry brush to whisk across the stem’s ridges, making it look woody and aged. -
Seal the color:
Give the pumpkin a light coat of matte spray sealer. This protects your realistic paint job and provides a consistent surface for the final step.
Step 3: The Glow-in-the-Dark Detail
-
Test the medium:
Check your glow medium on a scrap piece of paper first. You want one that dries relatively clear or milky-white so it remains invisible during the day. -
Trace the ribs:
Using your small round detail brush, load up the glow medium. Carefully paint thin lines following the vertical ribs of the pumpkin, starting from the stem and trailing down. -
Feather the lines:
Instead of a solid straight line, use short, feathery strokes that mimic the natural grain of the pumpkin skin. This makes the glow look like it’s emitting from the texture itself. -
Layer up:
Glow paint often requires volume to shine brightly. Once the first pass is dry to the touch, apply a second layer directly over your previous strokes. -
Add random accents:
Dab a few tiny specks of glow medium on the flat areas between ridges to create a starry, scattered light effect. -
Final inspection:
Take the pumpkin into a dark closet or turn off the lights to check for even coverage. If certain spots look dim, add another thin layer of medium.
Invisible by Day
If the glow paint looks too white or chalky when dry, mix a tiny drop of your original orange base coat into the glow medium. It will tint the paint to match the pumpkin while still glowing.
Now you have a rustic decoration for the daytime that reveals a secret, spectral outline when the sun goes down
Mini Haunted Diorama Pumpkin
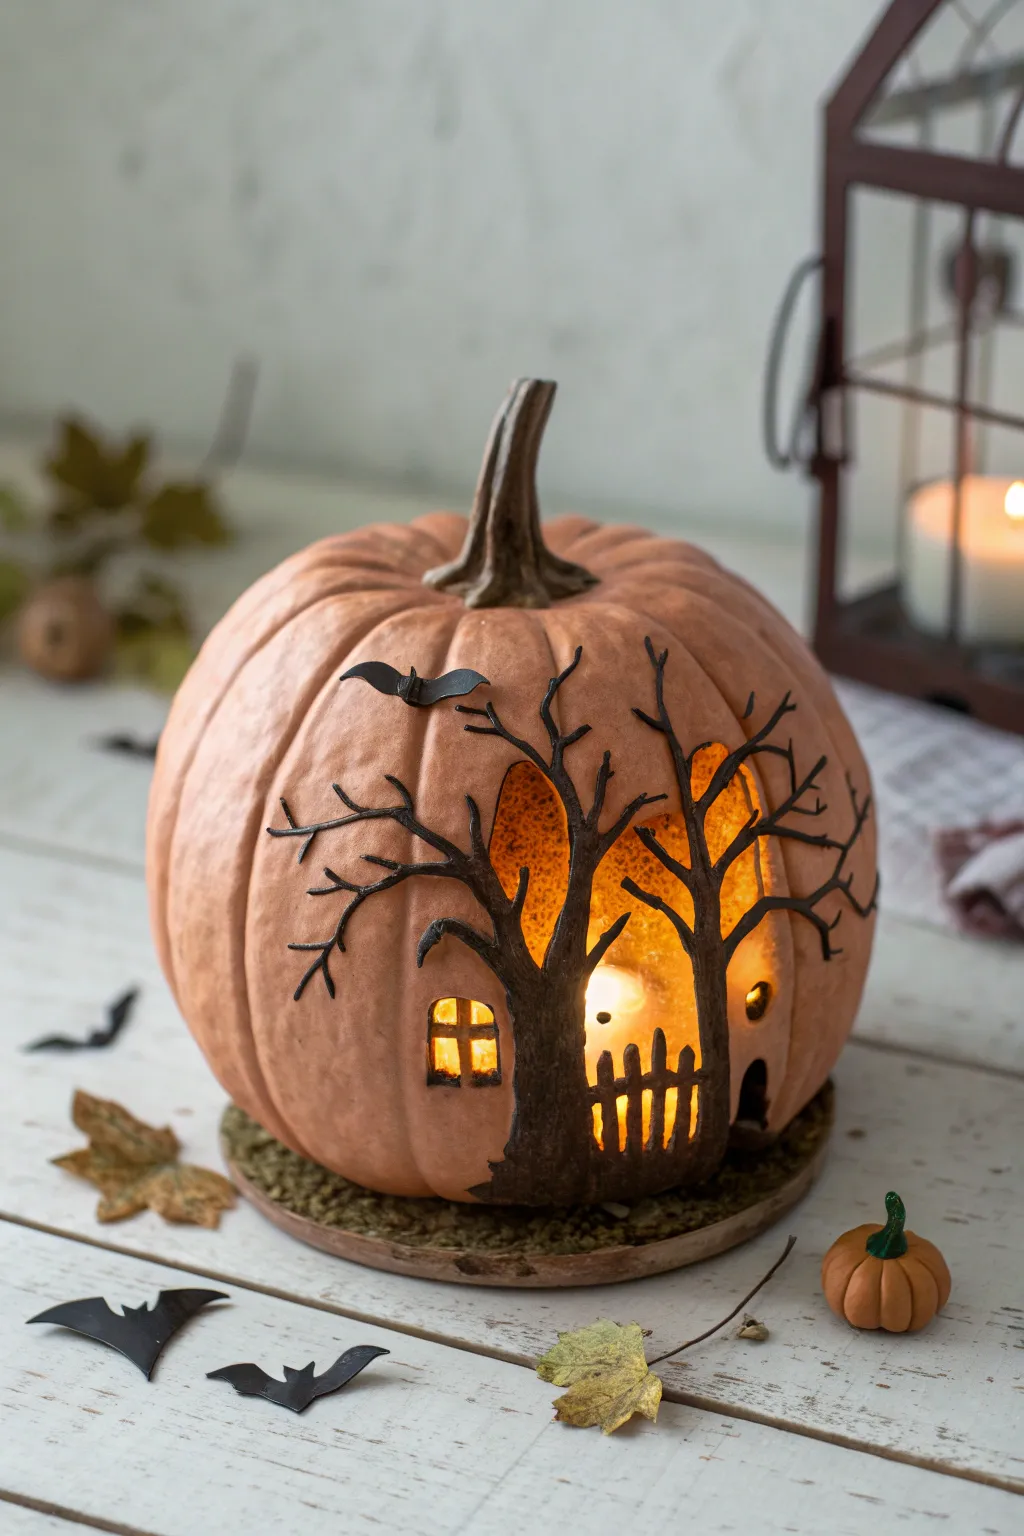
Transform a plain faux pumpkin into a glowing, mysterious scene with this clever diorama technique. By combining warm carving with intricate black silhouettes, you’ll create a layered, haunted forest effect that looks stunning when illuminated.
Detailed Instructions
Materials
- Medium-sized faux foam pumpkin (pale orange or peach)
- Black polymer clay or air-dry clay
- Carving knife or X-Acto blade
- Sculpting tools (needle tool, small spatula)
- Black acrylic paint (matte)
- Small detail paintbrush
- Black cardstock or stiff black paper
- Scissors
- Hot glue gun and glue sticks
- Battery-operated LED tealight or mini string lights
- Decorative moss base or faux moss sheet
- Fine-grit sandpaper
Step 1: Carving the Cavern
-
Map the Opening:
Begin by sketching a large, rough opening on the best side of your pumpkin using a pencil. Aim for an organic shape that looks like a clearing in the woods or a cave entrance, rather than a perfect circle. -
Carve the Void:
Carefully cut along your pencil line with a sharp carving knife. Remove the chunk of foam. Don’t worry if the edges look a bit rough; the clay overlay will cover most of the rim later. -
Smooth the Interior:
Use fine-grit sandpaper to smooth down the cut edges of the foam. If the inside of your faux pumpkin is white, give the interior back wall a wash of darker orange or yellow paint to create a warm glow when lit.
Step 2: Sculpting the Trees
-
Prepare the Clay:
Knead your black clay until it is soft and pliable. Roll out several ‘snakes’ of varying thickness to serve as the trunks and branches. -
Form the Main Trunks:
Press the thickest clay rolls vertically across the opening of the pumpkin. Position them so they bridge the gap from the bottom rim to the top rim, creating the foreground structure. -
Texture the Bark:
Using a needle tool or the tip of a toothpick, scratch long, uneven vertical lines into the wet clay trunks to mimic the texture of rough tree bark. -
Branch Out:
Attach thinner rolls of clay to the main trunks, fanning them out like spooky spindly branches. Extend some onto the pumpkin’s outer skin so the tree looks like it’s growing *over* the pumpkin. -
Secure the Edges:
Gently smear the edges of the clay where it meets the pumpkin skin to ensure a strong bond. I like to use a tiny bit of water on my finger to blend air-dry clay seamlessly.
Clay Anchoring Trick
To ensure heavy clay branches stick to a smooth faux pumpkin, rough up the contact area with sandpaper first or insert small wire pins for grip.
Step 3: Adding Architectural Details
-
Create the Windows:
Roll out a small, flat slab of black clay. Cut out tiny square frames with crossbars to mimic window panes. Press these onto the side of the carving opening or directly onto the pumpkin surface near the tree roots. -
Build the Fence:
Fashion tiny pickets from excess clay. Arrange them at the base of the opening, slightly crooked, to create a dilapidated fence line guarding the scene. -
Install the Bat:
Sculpt a small bat silhouette from clay, or cut one from black cardstock for a lighter look. Attach it near the top of the pumpkin, as if it’s swooping over the trees. -
Paint Corrections:
If using air-dry clay, let it dry completely (usually overnight). Once hard, touch up any graying areas or fingerprints with matte black acrylic paint to ensure a deep, shadowy finish.
Cracking Clay?
If your air-dry clay cracks while drying, mix a tiny bit of fresh clay with water to make a paste and fill the cracks, then paint over it.
Step 4: Final Assembly
-
Prepare the Base:
Cut a circle of sturdy cardboard or wood slightly larger than your pumpkin’s base. Glue a layer of faux moss or textured green fabric onto it. -
Mount the Pumpkin:
Apply hot glue to the bottom of your pumpkin and press it firmly onto the prepared mossy base. This grounds the scene and adds stability. -
Scatter Accessories:
Place a few loose faux autumn leaves or tiny pumpkins made of clay around the base of the scene for added dimension. -
Light It Up:
Insert a battery-operated LED tealight or a small bundle of string lights inside slightly behind the clay trees. This backlighting is crucial to make the silhouettes pop.
Now dim the lights and enjoy the eerie, glowing depth of your new miniature haunted forest
Woodland Creature Character Pumpkins
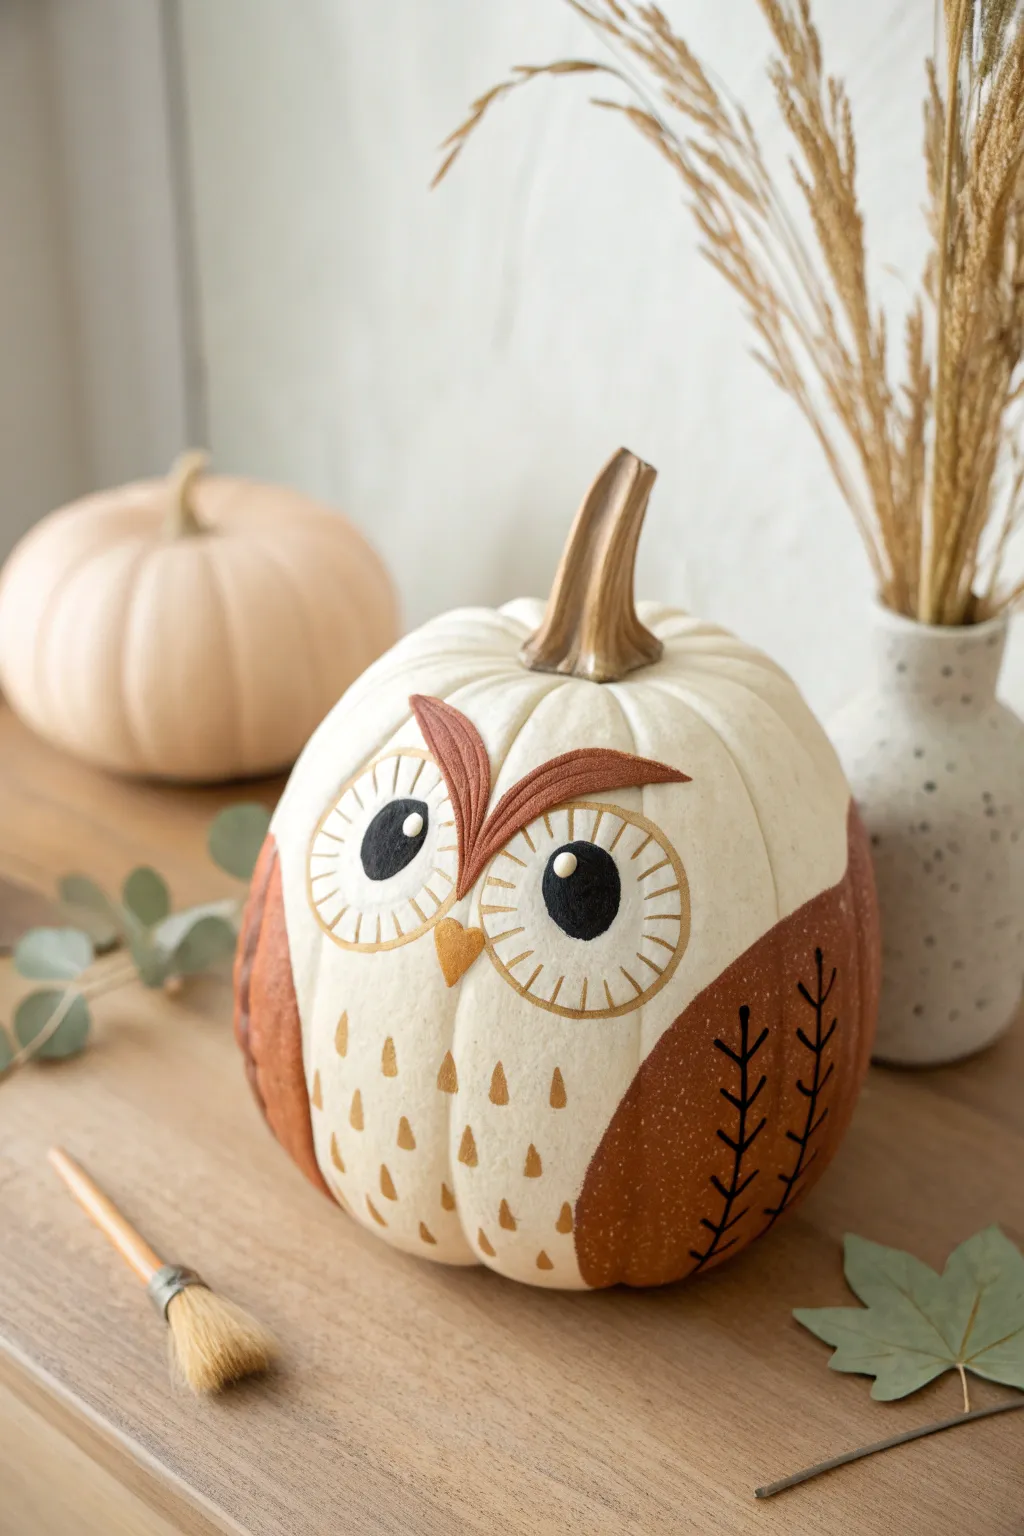
Transform a simple faux pumpkin into an adorable woodland companion with this charming owl design. Using a white pumpkin base and warm, autumnal paint tones, you’ll create a character that feels both rustic and modern.
Step-by-Step Guide
Materials
- Medium-sized faux pumpkin (white or cream)
- Acrylic craft paint (burnt sienna/rust brown, mustard yellow, dark brown, black, metallic gold)
- Medium and small flat paintbrushes
- Fine liner or detail brush
- Pencil
- Gold paint pen (optional but helpful for details)
- Paper towels and water cup
Step 1: Painting the Wings
-
Map out the wings:
Start by lightly sketching the outline of the wings on opposite sides of the pumpkin with a pencil. Aim for a curved ‘D’ shape that tapers down towards the bottom, occupying about one-third of the pumpkin’s side surface area. -
Base coat the wings:
Fill in the sketched wing areas with your burnt sienna or rust-brown acrylic paint. Use a medium flat brush for smooth, even coverage. -
Apply a second coat:
Depending on your paint’s opacity, you might need a second coat once the first is dry to ensure the white pumpkin doesn’t show through the brown. -
Add wing details:
Once the brown paint is completely dry, take a fine detail brush dipped in black or dark brown paint. Paint small stems or branch-like lines with little ‘v’ shapes coming off them along the back curve of the wing to mimic stylized feathers.
Clean Lines Pro-Tip
For the circular eyes, trace the rim of a small glass or jar lightly with pencil first. This guarantees your circles are perfectly round before you commit to painting them.
Step 2: Creating the Face
-
Sketch the eye placement:
Lightly draw two large circles on the front face of the pumpkin. They should be close together but not touching, positioned slightly above the vertical center. -
Paint the eye rings:
Since the pumpkin is already white, you don’t need to fill the circles. Instead, use gold paint (or a gold paint pen) to carefully outline these large circles. -
Add radial lines:
Paint small tick marks or radial lines extending inward from the gold circle outline toward the center, creating a sunburst effect. -
Paint the pupils:
In the center of each eye circle, paint a solid black circle. Make them fairly large to give the owl a cute, wide-eyed look. -
Add the catchlights:
This is the secret to bringing it to life: dip the handle end of a paintbrush into white paint and dot a small highlight near the top edge of each black pupil. -
Create the eyebrows:
Using the rust-brown paint and a small tapered brush, paint two large, sweeping leaf shapes above the eyes. Start from the center and sweep outward and upward like feathery brows. -
Paint the beak:
Right between the eyes, where they are closest, paint a small, inverted triangle using mustard yellow or gold paint for the beak.
Level Up: Texture
Mix a tiny bit of baking soda into your rust-brown wing paint before applying it. This creates a slightly raised, matte texture that feels more organic and less like plastic.
Step 3: Adding Chest Details
-
Plan the feather pattern:
Look at the open white space on the pumpkin’s ‘chest’ beneath the face. Visualise a staggered pattern of small triangles. -
Paint the chest feathers:
Using your gold paint or the mustard yellow, dab small triangular shapes in rows. I find it easiest to work from the top row down to keep the spacing even. -
Paint the stem:
For a cohesive finish, paint the pumpkin’s stem in a metallic gold or bronze to match the accents on the face and chest. -
Final touches:
Check over your linework. If any gold or black lines look faint, carefully go over them one last time for a crisp, finished appearance.
Set your finished owl on the mantel or entryway table to greet guests with its wise, wide-eyed stare


Have a question or want to share your own experience? I'd love to hear from you in the comments below!